Power Idea Technology LM121B MOBILE PHONE User Manual

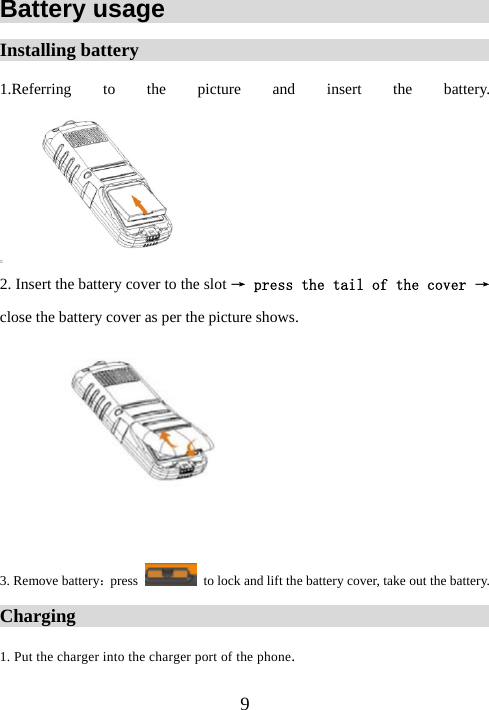
Power Idea Technology Limited. MOBILE PHONE Users Manual

Contents

Users Manual

    LM121B User Manual     GSM, Digital and Bar  mobile phone                        Basically brief introduction Thank you for choosing the GSM digital mobile phone designed
 2and produced by our company, this mobile phone has passed 1.6 meter drop test, reached the waterproof and dustproof grade IP57, also it supports FM radio, 5 groups of call filter list etc, it provides satisfying service for you and your family by its safe and reliable features. The mobile phone not only supports the functions of basic voice call, short message, etc., but also has the fallowing features and functions: Hands free, Automatic re-call, speed dial setting by 8 digitals, numbers’ home display, calculator, timer, wallpaper, memo, calendar and alarm,   Privacy lock (message, phone book, call record), phone lock, keypad lock, Automatic power on/off          In order to use the mobile phone correctly, please read the following statement of the user manual carefully before using the mobile phone.
 3Right statement Any content in the user manual is strictly prohibited from being copied, transferred, distributed and saved in any condition of no beforehand written permission of the company. The company keeps the right for amending and improving any product described in the manual in the condition of no notice in advance by the principles of continual perfection and sustainable development. The company is not responsible for any data or other loss and direct or indirect damage caused by any special event and accident under all circumstances. The contents of the manual are provided as original. The company does not provide definite or acquiescent guarantee of any type for accuracy, reliability or the contents unless the applicable law having other rules, and including the practical guarantee include but not limit to marketability and concrete application. The company keeps the right for revising or retracting the user’s manual at any time in the condition of no prior announcement.
 4  (1) Phone Appearance     Specification                       Frequency: GSM 900/1800/1900 MHZ Size: 111*49*20mm
 5Talk time: 180min Standby time: 130h Screen: 1.44 inch CSTN Screen Phonebook capacity: 500 records Message capacity: 100 Battery: 650mAh Speaker: Single Temperature: -20℃ to 55℃ Antenna: Inside  IP57: It will protect the mobile phone from the harmful dust and the liquid with all direction and there will no destructive effect to the functions of the phone itself.  Remark: The waterproof and dustproof only on the condition that the battery cover, screw, Screw hole stopper, earphone and USB rubber port in a well-sealed condition. No special statement on this point will be mentioned again in next texts.
 6Menu Content  Time Manager Alarm Clock Memo Calendar Set Clock Auto on / off Profiles Standard Conference Outdoor Silence Tools Calculator Timer Unit Conversion Electric Torch
 7 Phone book SIM Phonebook My Phonebook Browse all Create Copy All Delete All SDN Phonebook Speed Dials Group Memory Status         Short Message Inbox Create message Outbox Draft box Voice Mail
 8Settings Memory Status Broadcast Message Call records All calls Dialed calls Missed calls Received calls Delete all Call duration FM radio                                    .Entertainment  Games STK service Setting Phone settings Network settings Call settings Shortcut setting Call filter list
 9Battery usage                               Installing battery                                            1.Referring to the picture and insert the battery.  2. Insert the battery cover to the slot → press the tail of the cover → close the battery cover as per the picture shows.   3. Remove battery:press    to lock and lift the battery cover, take out the battery. Charging                                                   1. Put the charger into the charger port of the phone.
 10 2. Put another side of the charger to electrical outlet then start charging.  3. When charging is complete, disconnect the connector from the phone and unplug the charger from electrical outlet. Battery maintenance:                                      1. Make sure charge the battery fully for first time usage.  Remove the charger after charging 2. It’s strongly recommended to use original charger and cable from the phone manufacture. Third party products may reduce the use of the product performance or threaten your health and safety. 3. Talking and standby time will depend on different conditions when using the unit.  Signal intensity, working profiles, environment temperature etc, will affect the talking and standby time.   4. Do not throw the battery into fire or any severe environment such as in high temperature.
 11Inserting/Removing the SIM card         1. Power off the unit and remove the batter cover and battery. 2. Insert the SIM card into the card slot as per the picture shows.  3.Install the battery and the cover. 4.Remove SIM card by sliding out the card from reverse side. (2) Common Functions            Power on/off                                1. With enough quantity of electricity, press   for 2-3seconds to power on or off. 2. If unlock code is required, enter the digits of 0000.
 12Making a call                                A:You need to power on the phone and make sure you are in the network service area.  1. Enter the phone number you want to call with country or region code if needed, press to make a call。And press   for call ending and back to the standby interface.   2. You can dial a phone number in the phone book or call record list. Please refer to the phone book and call record menu.   B:Making a international call.  Press * twice, and the“+”symptom appears, enter country or area code and phone number, press  for dialing Remark: international dialing code in some networks is not symptom “+”. Answering a call                             When a call is incoming, press   to answer. Volume regulating During a call, press left/right navigation key to adjust volume.
 13Hands free Press right key→choose “hands free” to switch between earphone receiver or loudspeaker/   Reject a call                               when there’s a incoming call, press    or left key to choose “ reject” to reject a call.   Call option                                 During a call, press left soft key to call option menu to select mute, accept or reject etc.   Missed call checking                            Press    to check the call list   Make an emergency call   This phone supports emergency call.  Enter 112(International emergency call number)then press . Note: the maximum digit capacity is forty digits, more than forty digits, the digits you entered before will be covered.   (3) Basic Functions 1) Time Management 1.1 Alarm Clock
 14Press left button or Confirm button=>Alarm Clock=>Edit Alarm Clock (3 alarm clock at most), one-time alarm clock or cycle alarm clock=>directly input numbers or use up / down button to choose the alarm time=>choose alarm ring tones=>setting completed. Users can clear single alarm clock and clear all the alarm clock settings. 1.2 Memo Book Choose Memo, press left button or confirm button to create memo, including date and memory contents, the alarm will ring when it gets to the set time. According to option, users can do the clear operation to the memo. 1.3 Calendar Directly use navigation key to move and browse, the calendar information will be changed accordingly. Press confirm button and go to option to check that day’s memo and all the memo, and can do edit and clear operation.      1.4 Set Clock It is used to adjust the time and the time format, switch on the time and date display, it will show the time and date on the screen.
 151.5 Power on / off Setting Press left button or confirm key=>set the power on / off time=>directly press numeric key or up down button to choose the time=>finish setting; Select ”clear” to clear all the current setting. 2) Profiles You can use the profile settings(like ring tones, volume and vibration etc.) for different situation, including standard mode, meeting mode, outdoor mode and silence mode. Factory default mode is standard mode. Choose the mode: Under this menu, choose the mode through up / down button, press left button for confirmation. Edit the mode: Under current mode, press left button to edit the menu and do the personalize setting. Remark: Under different modes or different ring tone volume, different logos will be shown on the screen when standby.   3) Tools 3.1 Calculator: Press left button or confirm button => Calculator=>Input the numbers=>Navigation key to choose the calculation of plus, minus, multiply
 16and division. Under Calculator menu, press right button to change the positive or negative sign, square root, square => confirm to calculate the result, right button is used to delete numbers or return. 3.2 Timer: this function is used as the stopwatch, press left button to start or pause the stopwatch, confirm key/down button is used to save current time(it can save 4 different time). Right button is for returning, “*” key is for clearing the saved time and re-start to count the time. 3.3 Unit conversion Convert the volume, currency, area, energy, length, weight, power, pressure, temperature, time, speed with input exchange rate. 3.4 Electric Torch: Press confirm key to switch on / off electric torch. Note: Long press up button to switch on / off the electric torch.      4) Phonebook 4.1 SIM Card phonebook List all the records which are stored in the SIM card, type the first letter for
 17quick search, press left or confirm key => Option, to open options. Call: directly call the selected number Sending SMS: Type the SMS message and send to the selected number Edit: Modify the related information Create: Create the new contact to the phonebook Delete: Delete the information of the selected contact number Copy to my phonebook: Copy the contact information from SIM card to phone. Memory status: check the total capacity of the SIM card/used and phone total capacity / used space. 4.2 My Phonebook Press left button or confirm key=>Option to open option menu, after finding out the records, check the instruction of above SIM card phonebook. Phonebook records can be separated into groups, select the records by navigation key, press “Option”=>”Add member to group”=>choose the group(Family, Friends, Colleagues, others)=> Confirm OK.   4.3 Browse In this menu, users can browse all the records in the phonebook, input the first letter to start quick search, refer to Above SIM card phonebook after finding
 18out the records. 4.4 Create New Contact It is used to create contact numbers to the SIM card or Phone phonebook. 4.5 Copy All 1) From SIM card to phone: copy the phonebook of SIM card to Phone,   2) From phone to SIM card: before the SIM card is full, copy the phonebook of phone to SIM card. 4.6 Delete all the records 1. Delete phone records: delete all the contact records of the phone. 2. Delete SIM card records: delete all the contact records of the SIM card. 4.7 SDN phonebook: Need network support, check with local SIM car operator about this function. 4.8 Speed dialing Press Left button and go to speed dialing list, number 2-9 indicate different 8 phone contact numbers or names; If no setting, speed dialing will be blank.    Press the left button and go to set the speed dialing numbers or revise, after setting, different numeric button will indicate different set contact numbers. Remark: Numeric key 1=Voice Mail number, you can set this in SMS=>
 19Voicemail(Check local operator about this function). 4.9 Groups Left button=>choose group name=>group list=>create new contact=>added to phone’s phonebook, or right button=>Phonebook, create contact=>add a new group, then you can check the group member list in “Group Member”. “Re-set Names” is used to re-name the current group, “ring tone” menu is used to set the ring tone for the group. 4.10 Memory Status List the capacity of SIM card and phone’s phonebook, separately listed the total and used capacity of SIM card and phone.         5)Massages 5.1 Inbox You can view the received massages and choose delete, reply, transmit, call
 20back, and extract, if no message, the inbox is “blank”  5.2 Create Message       You can edit new massage ( input methods, please refer to after description_ After completing the new massage, you can choose send, save, send and save, and send to multi-recipients (five numbers you can choose at most)  5.3 Outbox  In the outbox, it saved the send and save massages and failed sending massages, you can choose to delete, transmit, call back and extract . 5.4 Draft box  It saved the massages, you can choose to delete and edit etc.  5.5 Voice Mail It provided by operator, it is like an answering machine, under standby mode, you can long press number 1 to enter into voice mail box, it need the network support. 5.6 Settings 1. Mode settings  Press left key to choose different mode, each mode can be edit,
 21press upper and down navigation key to choose the item, press the left and right navigation to set the data. Press right soft key to save the settings.   2. Status report and answer path It is used to set the message status report returning and replying path. 3. Storage space Set the space for storing the SMS, users can set storing in the phone or SIM card preferable. 5.7 Memory status The total storage capacity of inbox and outbox is decided by phone storage capacity, this function will show the using status of storage. 5.8 Broadcast Message This is the service that the SIM card service center provide the short information to the users, like weather report or traffic service, etc. Users can brow and read the received message. Please enquiry about the related information with the Operator.   5.9 Delete All Delete all the message, inbox message, outbox message, draft box message after press the confirm key.
 226) Call Records 6.1 All the calls This function is to keep records automatically on latest dialed, received or missed call numbers, and can check the details of these numbers(Name, Numbers, Date, Time), dial out, send SMS, Delete, Save the numbers, Modify the numbers, Delete all, list the numbers, add to firewall, etc. 6.2 Dialed Calls     This function is used for recording the recently dialed calls automatically, and support some related operation on these record numbers, specific operation please refer to “All Calls” . 6.3 Missed Calls This function is used for recording the recently missed calls and refused calls automatically, and support some related operation on these record numbers, specific operation please refer to “All Calls”.    6.4 Received Calls   This function is used for recording the recently received calls automatically, and support some related operation on these record numbers, specific operation please refer to “All Calls”.
 236.5 Delete All This function is used for deleting missed calls, received calls and dialed calls records.   6.6 Call Duration       It used for recording the duration of recently dialed call, received call, and last call, press left key and clear all the records.   7)、Settings 7.1 Phone settings 7.1.1 Display Settings 1) LCD Contrast      Press the left key to enter into contrast adjustment, adjust the contrast number through left and right navigation key.   2) Backlight   Press left soft key to enter into backlight setting, through the upper and down navigation key to set the keeping time and backlight level. 3) Wallpaper   Press left soft key to enter into wallpaper setting, through up and down navigation key to choose the different standby wallpaper.   4) Power on Greetings
 24You can set power on greetings not more than 10 characters. 5) Language   You can set the language through upper and down navigation key to choose.  6)Number’s home display.    Press left soft key to enter in this function, through the up or down navigation key to choose “open” that means when you received a call, it will reveal incoming telephone place, or choose “Close” that means it won’t reveal the incoming telephone place.   7.1.2 Input language Setting       Press left key to enter into settings, through the up and down navigation key to choose “English, 123, Abc, abc, ABC”.   7.1.3 Security Settings It means you can make some encrypt settings for the phone. It helps to prevent the mobile phone and SIM card from stealing.     7.1.3.1) PIN1 Checking PIN1 is used to protect your SIM card, it can prevent your SIM card from usurpation, you can configure your phone with related settings. Remark: If the PIN1 code is input wrongly for 3 times, SIM card will be locked, then you
 25are required to input PUK code to unlock. If the PUK code is lost, please contact your Telecom Operator. The default PIN1 code is “1234”. 7.1.3.2 Change PIN2 Input correct old PIN2 code, then re-set PIN2 code. 7.1.3.3 Phone Lock By virtue of this function, you can lock/unlock the mobile phone by inputting phone password. The default password is “0000”, users can re-set the password. 7.1.3.4 Privacy Lock Turning on this function, it can prevent others checking the call logs, SMS and phonebook records. Default Privacy Lock password is “0000”, users can re-set the password. 7.1.4 Owner Number It is editable, and support to save 2 phone numbers, SIM card phone number will be saved as the Phone Number automatically after being edited. Select the numbers if you want to edit, delete or save, etc.   7.1.5 Automatic Keyguard By virtue of this function, you can lock/unlock the keypad. Default settings is that the Keypad is locked. Notice: The keypad will be auto-locked after the setting time of unlock, when the screen light is turned off, press left function button to turn it on, and do the
 26steps shown to unlock; Otherwise, all the other keys do not work. 7.1.8 Factory Default Restore the phone settings to factory default settings, default password is “0000”. 7.2 Network Setting 7.2.1 Calling Waiting After activating this function, the calling number will be shown on the screen and give voice reply(Need network support); If turning off this function, the phone will not give voice reply, and the caller will hear the line is busy 7.2.2 Call Divert This function will transfer the calls to the designated telephone number(need network support) as per following modes: Unconditional Transfer, Busy Transfer, No Answer Transfer, No Contact Transfer, etc.    7.2.3 Call Barring This is to restrict picking up the calls or dialing out. If you want to use this service, please consult your network provider on activating this service and getting the network restriction password. Under Call Restriction menu,
 27following functions can be set on, off and searching: All outgoing calls: All the number being dialed out will be restricted. All International Calls: International calls will be restricted. Int’l calls except for home: Forbid dialing any numbers beyond of SIM card provider’s country. All incoming calls: No call will be received if activating this function. Incoming calls while Roaming: same steps as above “Forbid calling”.  7.2.4 Network Selection Network selection: Set finding the network by Auto-Searching or Manual selection(Suggest use Auto-Searching). 7.3 Call Settings 7.3.1 Call Volume Under the talking display, use left or right button to adjust the volume. 7.3.2 Hide number This can select turning on / off to set if hiding the calling numbers.   7.3.3 Automatic redial Use up or down button to turn on / off this function to set if re-dial the missed call number or rejected number.
 287.3.4  Any key answer Use up or down button to turn on / off this function to set if you can pick up the calls by pressing any key. 7.5 Select Line This function is to set the network line switch of SIM 1, it can select “Line 1” or “Line 2”(need the local network support, suggest to choose “Line 1”). 7.4 Shortcuts This can set the function of up/down/left/right navigation keys. After setting, users just need to press these buttons and have the shortcut function. 7.5 Call filter list Users can select the numbers from phonebook or inputting the numbers and set calling firewall to auto-reject the calls from those numbers, max. 5 numbers can be set in the firewall list. 8) FM Radio Press left button and go to FM Radio interface, left and right button is used to search the radio channel, up and down button is to adjust the radio volume. Remark: Please put in the earphone if you want to use FM Radio, as the earphone is the antenna of FM Radio. 9) Entertainment 9.1 Games In this phone, it has games. Under the game mode interface, users can
 29choose the game options, like “New Game”, “Continue”, “Select Game Level”, etc. Game Setting is used to set the game volume. <Four> Inputting Method Keypad Definition Confirm Key: used to confirm sending, saving, etc under message inputting interface. Left Key: Confirm the content input. Right Key: Cancel or clear, long press right key to clear the content input. * Key: Press this key to go to symbol selection interface. # Key: Press this key to switch inputting method For the words and functions that other keys represent, please refer to the printed words on each key button. Inputting Method Instruction 1. English Inputting Method Switch the inputting method to abc inputting, there are two way to input the English words: Direct Input and Associate Input.  1) Direct Input: Use the keypad to input the whole words 2) Associate Input: When inputting the letters, it will list the related words which begins with the letters, use up or down button to select the words.
 30When inputting the words,    press * button to change the words to be capital or small caps. Press once to make the first letter to capital, press twice to make the whole word to be capital, press thrice to make the whole word to be small caps. 4. Intelligent English Inputting Method When input the words under Intelligent English Inputting Method, it will show related words beginning with the letter input, Use up or down button to select the combination of the words. 5. Number Inputting Use Numeric Key 0-9 to input the numbers.
 FCC RF Exposure Information and Statement  The SAR limit of USA (FCC) is 1.6 W/kg averaged over one gram of tissue. Device types LM121B (FCC ID: ZLELM121B) has also been tested against this SAR limit. The highest SAR value reported under this standard during product certification for use at the ear is 0.885W/kg and when properly worn on the body is 1.03W/kg. This device was tested for typical body-worn operations with the back of the handset kept 1.5cm from the body. To maintain compliance with FCC RF exposure requirements, use accessories that maintain a 1.5cm separation distance between the user's body and the back of the handset. The use of belt clips, holsters and similar accessories should not contain metallic components in its assembly. The use of accessories that do not satisfy these requirements may not comply with FCC RF exposure requirements, and should be avoided.  FCC WARNING  This device complies with Part 15 of the FCC Rules. Operation is subject to the following two conditions: (1) this device may not cause harmful interference, and (2) this device must accept any interference received, including interference that may cause undesired operation.  NOTE 1: This equipment has been tested and found to comply with the limits for a Class B digital device, pursuant to part 15 of the FCC Rules. These limits are designed to provide reasonable protection against harmful interference in a residential installation. This equipment generates, uses and can radiate radio frequency energy and, if not installed and used in accordance with the instructions, may cause harmful interference to radio communications. However, there is no guarantee that interference will not occur in a particular installation. If this equipment does cause harmful interference to radio or television reception, which can be determined by turning the equipment off and on, the user is encouraged to try to correct the interference by one or more of the following measures: - Reorient or relocate the receiving antenna. - Increase the separation between the equipment and receiver. -Connect the equipment into an outlet on a circuit different from that to which the receiver is connected. -Consult the dealer or an experienced radio/TV technician for help.  NOTE 2: Any changes or modifications not expressly approved by the manufacturer could void the user’s authority to operate the equipment.  NOTE 3: The manufacturer is not responsible for any radio or TV interference caused by unauthorized modifications to this equipment. Such modifications could void the user’s authority to operate the equipment.

Navigation menu