Powerkiss WCT12W Wire-free charging solutions User Manual setup guide
Powerkiss Oy Wire-free charging solutions setup guide
Contents
- 1. setup guide
- 2. positioning guide
- 3. user guide
setup guide

PowerKiss
Heart
2
PowerKiss Heart Setup Guide
Version 3.1 (ZM1002)
© PowerKiss 2011

3
With PowerKiss, you represent
state-of-the-art technology and
design. Imagine getting rid of low
batteries and the annoying, tangled
wires from tabletops at the same
time! Step into the future with us.
PowerKiss Heart
Setup Guide
Thank you for choosing PowerKiss.
PowerKiss technology provides a
simple, efficient and user-friendly
way to keep your dear devices
charged.
Maija Itkonen, CEO of PowerKiss
Yours,
4
Contents
PowerKiss wire-free charging 5
Ring 5
Heart 5
Contents of the box 6
Single Heart 6
Double Heart 7
Tools for the installation 8
The milling for the Heart under the furniture surface 9
Introducing the Powerkiss Heart 10
Setup instructions for Powerkiss Heart 11
STEP I - Placing the Heart 11
STEP II - Attaching the Heart 12
STEP III - Inserting crystal 13
STEP IV - Marking the Hotspot 14
STEP V - Setting the power cables for single Heart 15
STEP VI - Setting the power cables for double Heart 17
STEP VII - Checklist 19
Technical specifications 20
The Heart 20
The Ring 20
Official power supplies 20
Regulatory Compliance Information 21
FCC Compliance Statement (United States) 21
EU declaration of conformity 21
European Union - Disposal information 22
Limited manufacturer's warranty for PowerKiss devices 22
5
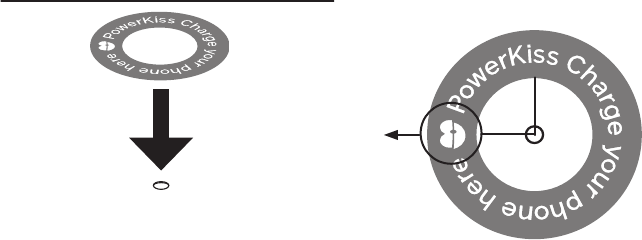
Heart
To turn a surface into a wire-free
charging platform it first needs to
be given a Heart. Like most, this
Heart is also hidden except for a
small LED light to indicate that it is
ready to charge a mobile device
wearing a Ring. The LED is also
the center point of the charging
area, called PowerKiss Hotspot.
Whenever the device with Ring
is on this Hotspot, the wire-free
charging begins.
PowerKiss wire-free charging
The essence of wire-free charging
is the pairing of Heart and Ring. The
Heart is the transmitter and the Ring
is the receiver and together they
enable wire-free charging on almost
any surface.
Ring
The Ring is a small accessory that
is plugged into handheld devices,
such as mobile phones or mp3-
players. As soon as the Ring is
plugged in, the device is ready to
be a part of a wire-free energy
transaction.
6
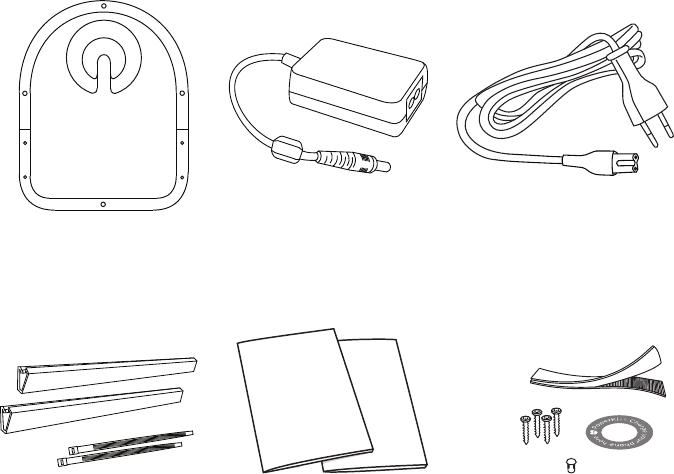
Contents of the box
Single Heart
PowerKiss
Heart
Setup &
User Guide
Power supply:
RS or PhiHong
AC power
cord
Installation kit
(crystal, 4x screw,
Hotspot sticker &
Velcro fastener)
Power cable
holders & ties
7
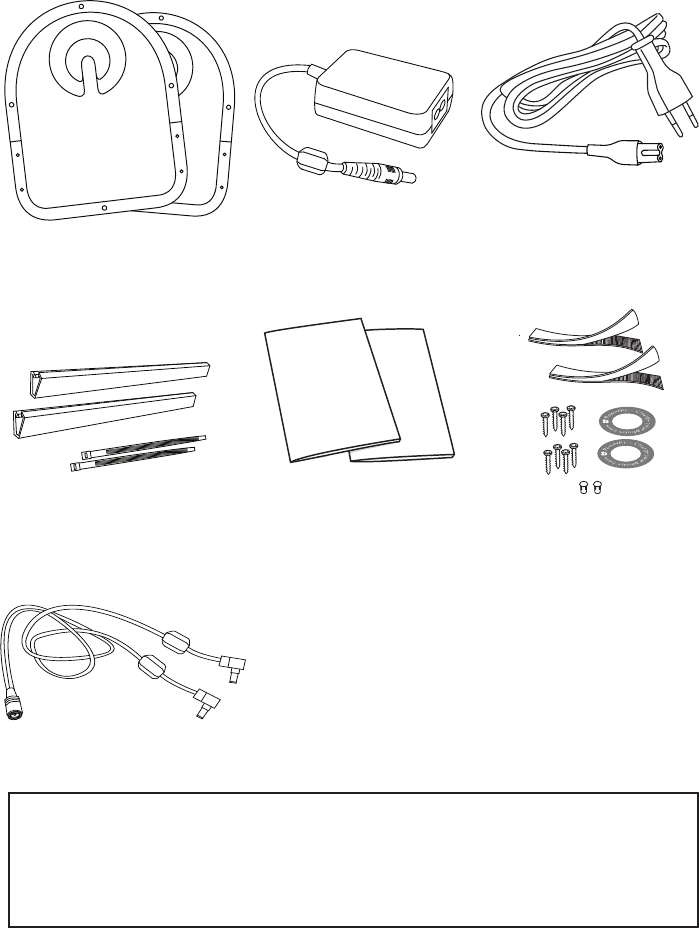
Contents of the box
Double Heart
2x PowerKiss
Heart
Setup &
User Guide
AC power
cord
Power cable
holders & ties
Power split cable
Installation kit
(2x crystal, 8x screw,
2x Hotspot sticker &
2x Velcro fastener)
Power supply:
Mascot or PhiHong
The items supplied with your device and available accessories may be
different depending on your region or service provider
8
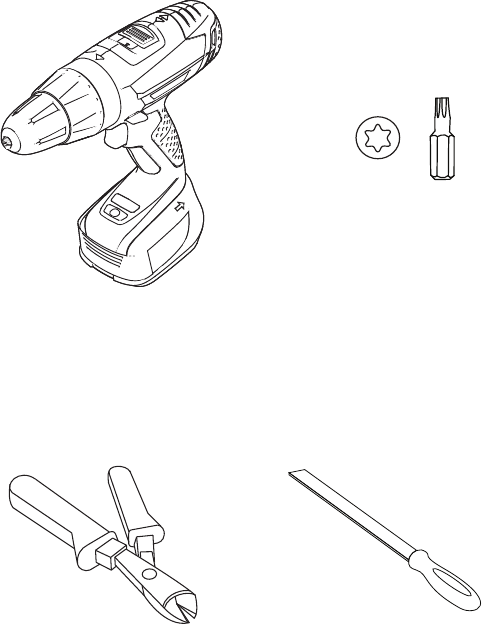
Tools for the installation
Power or cordless
drill
Torx 20 drill bit
Wire cutters File
9
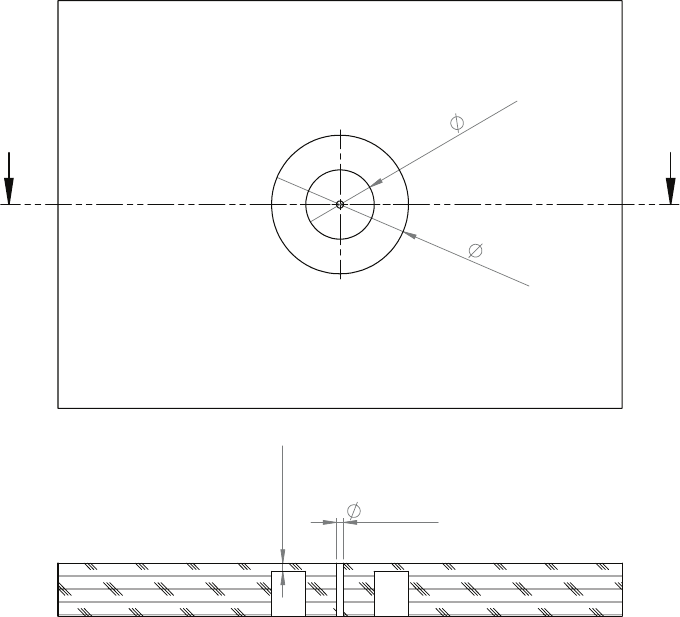
The milling for the Heart
under the furniture surface
34
±1
68
±1
A A
4
±0,5
3,5
+
0,1
SECTION A-A
Rout out dimensions
table_sample
PowerKiss Oy
12.1.2011
tal
WEIGHT:
A4
SHEET 1 OF 1
SCALE:1:2
FILE NAME:
PART NUMBER/DESCRIPTION:
REVISION
DO NOT SCALE DRAWING
MATERIAL:
DATE
SIGNATURE
NAME
DEBUR AND
BREAK SHARP
EDGES
FINISH:
UNLESS OTHERWISE SPECIFIED:
DIMENSIONS ARE IN MILLIMETERS
SURFACE FINISH:
TOLERANCES:
LINEAR:
ANGULAR:
Q.A
MFG
APPV'D
CHK'D
DRAWN
10
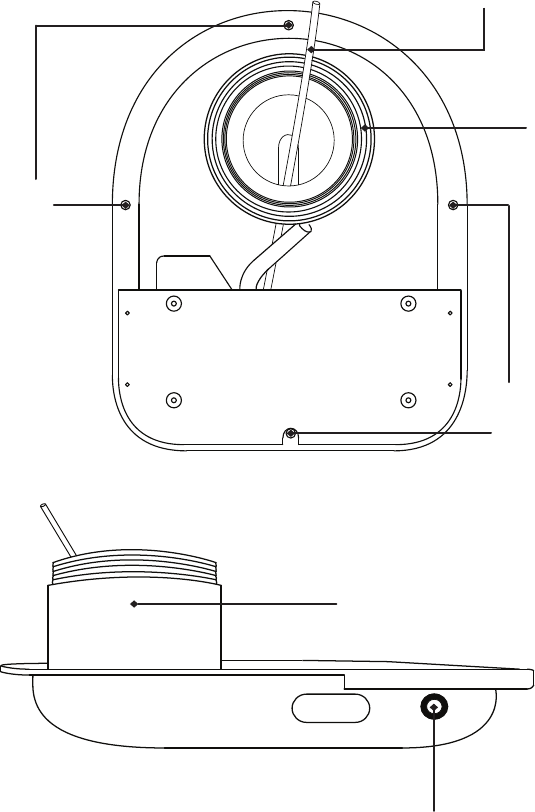
Introducing the Powerkiss
Heart
Screw holes
Lightguide
Coil
Screw holes
Power supply port
Coil support
11
Setup instructions for
Powerkiss Heart
STEP I - Placing the Heart
Place Heart in the milled out area
of the funiture surface. Push the
Heart against the surface so that the
lightguide goes through the hole
in the middle and comes out the
other side. Make sure that the coil
goes firmly into the round grooved
out area and is evenly against the
surface.
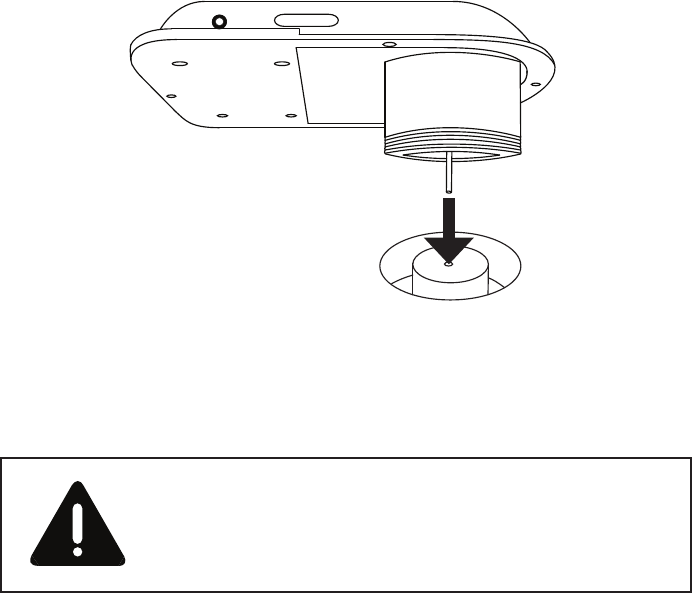
When the Heart is connected to a power source, do not
touch the coil or electrical components
12
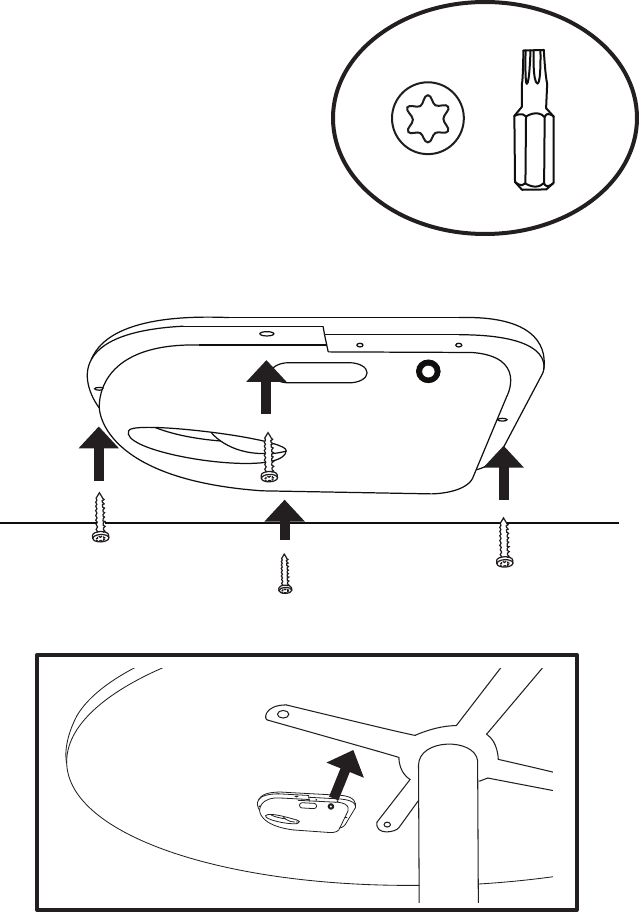
STEP II - Attaching the
Heart
Use the screws found in the
installation kit to fasten the Heart
firmly to the surface so that the
power supply port is facing away
from the closest edge.
Power
supply port
facing away
the edge
13
STEP III - Inserting crystal
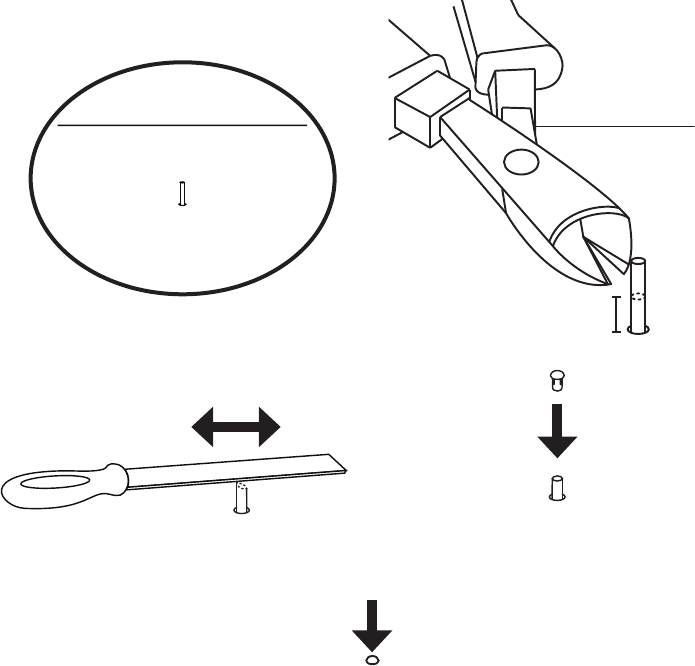
Measure the length of the
lightguide that stands out from the
furniture surface and cut the excess
leaving 10mm. Polish the end of the
cut lightguide.
Put the crystal (provided in the
installation kit) on top of the
lightguide and press it into the hole.
Make sure that the lightguide goes
all the way into the crystal.
length max
10 mm
14
STEP IV - Marking the
Hotspot
Attach PowerKiss Hotspot sticker
(provided in the Installation
package) to mark the charging area.
Place it so that it is symmetrically
around the center point, PowerKiss
logo on the left side.
left
For completing the installation with
single Heart, continue to page 15.
For completing the installation with
double Heart turn to page 17.
90°
15
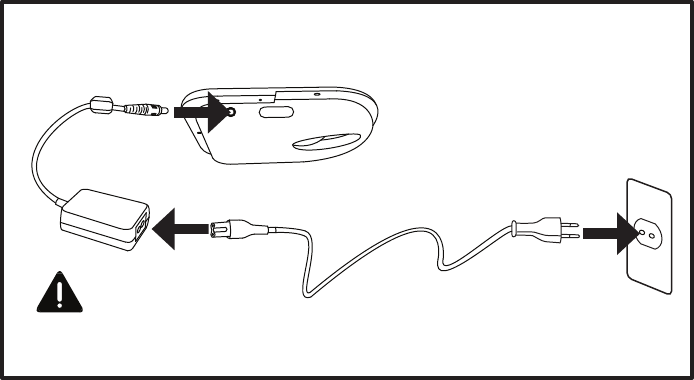
STEP V - Setting the power
cables for single Heart
Installing only one Heart, attach the
AC power cord to a power supply
and the power supply to the Heart’s
power supply port. Use only RS or
PhiHong power supplies with single
Heart.
RS or
PhiHong
16
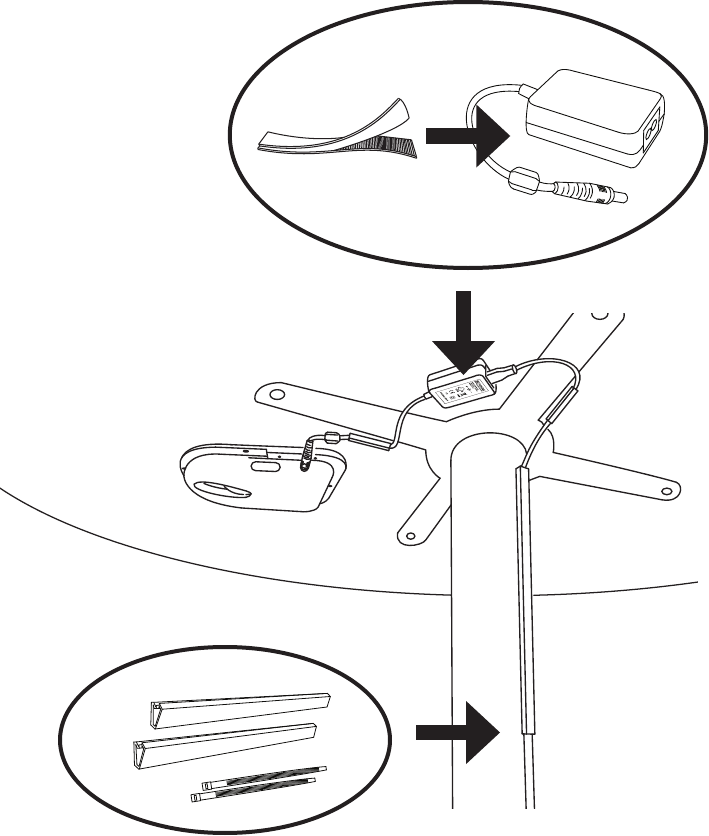
Attach the power cables using
the cable holders and ties when
needed. The power supply (RS or
PhiHong) should be attached with
velcro fastener to the piece of
furniture so that the label of the
power is visible.
17
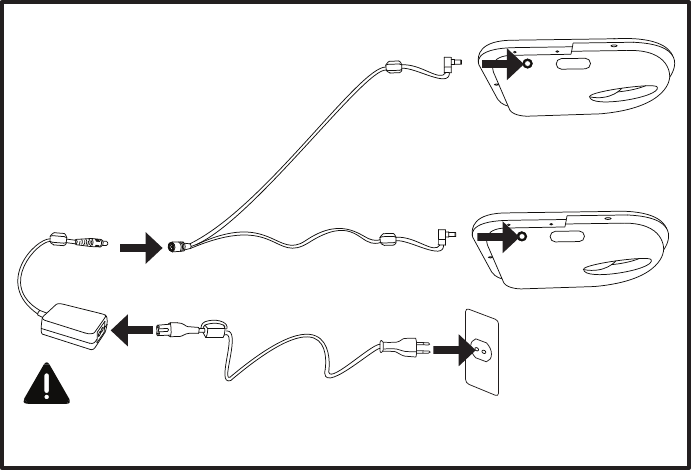
STEP VI - Setting the power
cables for double Heart
In the case of setting up two or
more Hearts into the same piece of
furniture, the underlying procedure
is almost the same as with installing
one Heart. The difference comes
from sharing a power supply
(Mascot or PhiHong) and using a
split cable for distributing power.
Mascot
or PhiHong
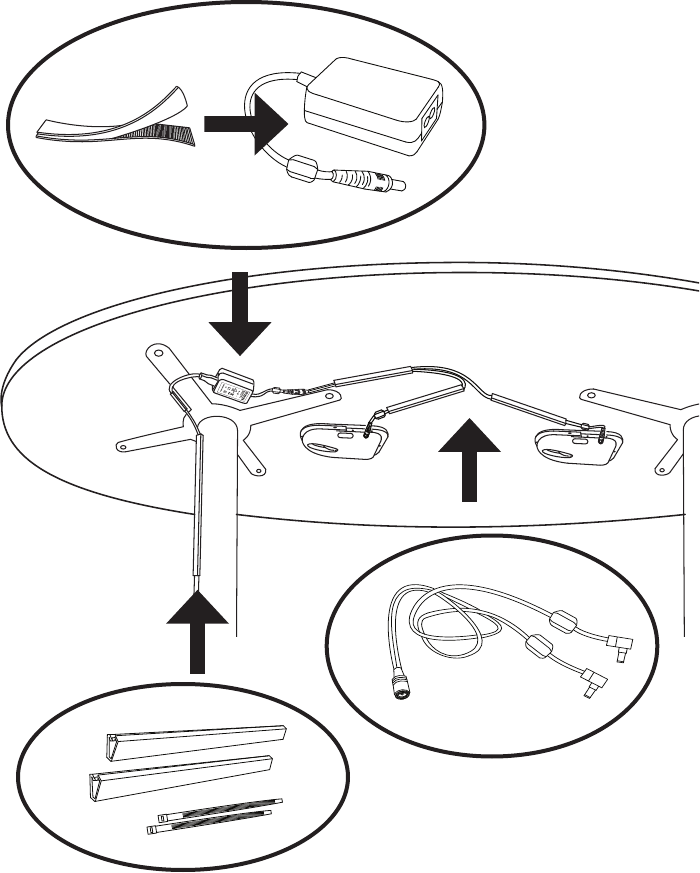
18
Attach the power cables using the
cable holders and ties. The power
supply (Mascot or PhiHong) should
be attached with velcro fastener to
the piece of furniture so that the
label of the power is visible.
19
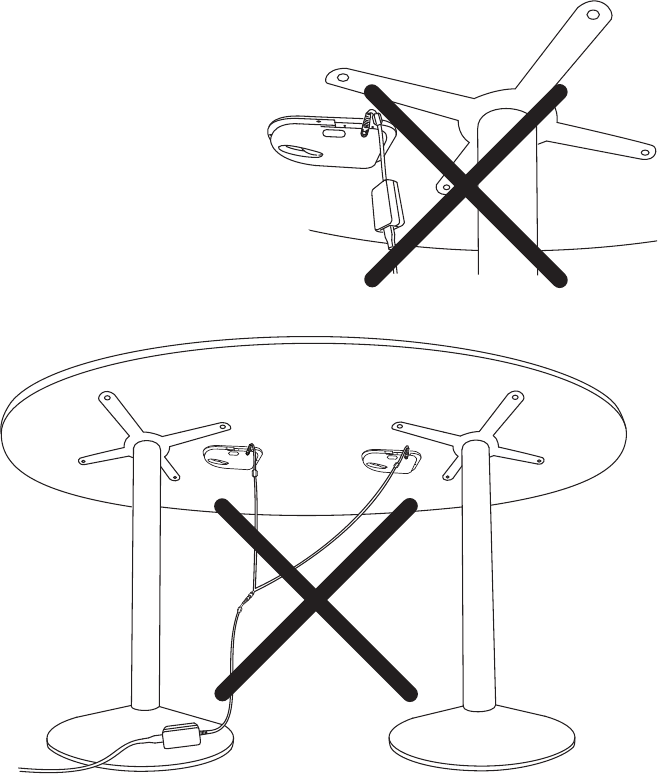
STEP VII - Checklist
Power
• Do not attach the power supply to
places where it can be interfered
with (e.g. let hang, bottom parts
of the furniture or clearly visible
places)
Wires
• Always install the cables so that
they are firmly and aesthetically
attached to the piece of furniture
and/or the surroundings and out of
the sight when possible
20
Technical specifications
The Heart
Dimensions (LxWxH):
• 163mm x 132mm x 24mm
Power consumption:
• Charging 12W (max)
• Standby 240mW
Charging area/Hotspot size:
• Width 60mm
• Height 15mm
The Ring
Dimensions (LxWxH):
• 43-46mm x 34mm x 7.5mm
Power output:
• 5W (max)
Compatibility:
• Nokia 2mm
• Apple
• MicroUSB
Official power supplies
Use only power supplies listed here with the PowerKiss system.
With one Heart (single):
• RS SAW18-12.0-1500 (only within CE or FCC certified areas)
or
• PhiHong PSM36W-120TW (only within areas where CB or FCC certification is
required)
With two Hearts (double, power divided):
• Mascot 2720 0000 40 (only within CE certified area)
or
• PhiHong PSM36W-120TW (only within areas where CB or FCC certification is
required)

21
Regulatory Compliance Information
FCC Compliance Statement (United States) - FCC Class B Part 15
This device complies with Part 15 of the Federal Communications Commission (FCC) Rules.
Operation is subject to the following two conditions:
• This device may not cause harmful interference
• This device must accept any interference received, including interference that may cause
undesired operation. See instructions below if radio or television interference is suspected.
FCC Compliance Notice
This equipment has been tested and found to comply with the limits for a Class B
digital device, pursuant to Part 15 of the FCC Rules. These limits are designed to
provide reasonable protection against harmful interference in a residential installation.
This equipment generates, uses and can radiate radio frequency energy and, if not
installed and used in accordance with the manufacturer’s instructions, may cause
interference harmful to radio or television reception or radio communication.
There is no guarantee, however, that interference will not occur in a particular
installation. If this equipment does cause harmful interference to radio or television
reception or radio communication, which can be determined by turning the
equipment off and on, the user is encouraged to try to correct the interference by
one or more of the following measures:
• Reorient or relocate the receiving antenna until the interference stops.
• Increase the separation between the equipment and the receiver.
• Connect the equipment an outlet that is on a different circuit from the receiver.
• Consult the dealer or an experienced radio or TV technician for help.
CAUTION: Changes or modifications not expressly approved by the party responsible for
compliance could void the user’s authority to operate the equipment.
EU declaration of conformity
Powerkiss Ltd hereby declares that the products PowerKiss Ring (model 11RXX) and
PowerKiss Heart (model 2.1) have been designed and manufactured in accordance with the
following standards: EN 61000-6-3 (incl. EN 55022), EN 61000-3-2, EN 61000-6-1(incl. EN
61000-4-2, EN 61000-4-3, EN 61000-4-4, EN 61000-4-5), IEC 61000-4-6, EN 61000-4-11,
EN 62233 and EN 60950, and conforms to: EMC Directive 2004/108/EC, Health and safety
Directive 2004/40/EC, Low Voltage Directive “LVD” 2006/95/EC, Hazardous substances
“RoHS” Directive 2002/95/EC, Waste Electrical and Electronic Equipment Directive 2002/96/
EC, CE marking Directive 93/68/EEC, Eco-design Directive 2005/32/EC
Betonimiehenkuja 5
FIN-02150 ESPOO
Finland
23.07.2010 Maija Itkonen, CEO

22
European Union - Disposal information
Waste Electrical & Electronic Equipment, applicable in the European Union
and other European countries with separate collection systems.
This marking on the product, accessories or literature indicates that the
product and its electronic accessories (e.g. power cables and adapters)
should not be disposed of with other household waste at the end of their working
life. To prevent possible harm to the environment or human health from uncontrolled
waste disposal, please separate these items from other types of waste and recycle
them responsibly to promote the sustainable reuse of material resources.
Household users should contact either the retailer where they purchased this
product, or their local government office, for details of where and how they can take
these items for environmentally safe recycling. Business users should contact their
supplier and check the terms and conditions of the purchase contract. This product
and its electronic accessories should not be mixed with other commercial wastes for
disposal.
This EEE is compliant with RoHS.
The package is recyclable.
Limited manufacturer's warranty for PowerKiss devices
This Limited Manufacturer's Warranty for PowerKiss devices sold in the European Union, Iceland, Norway,
Switzerland, and Turkey is valid as of October, 2011
MANUFACTURER'S LIMITED WARRANTY
NOTE! This Limited Warranty does not affect your legal (statutory) rights under your applicable national laws
relating to the sale of consumer products.
PowerKiss Ltd provides this Limited Warranty to you who have purchased the PowerKiss product(s)
included in the sales package ("Product").
PowerKiss Ltd sells its products with the intent that they are free of defects in manufacture and
workmanship for twelve (12) months from the date of original purchase by the first end-user.
PowerKiss warrants that its products will be free of defects in material and workmanship under normal
use and service defined in user guide. This warranty extends only to consumers and does not extend to
Retailers.
23
This warranty does not cover normal tear and wear, damage caused by misuse or abuse; accident; indirect
accident; the attachment of any unauthorized accessory; usage otherwise than intended to be used;
alteration to the product; improper installation; unauthorized service, repairs or modifications; improper use
of electrical/power supply; loss of power; dropped product; malfunction or damage of an operating part
from failure to provide manufacturer’s recommended maintenance; transportation damage; theft; neglect;
vandalism; or environmental out of specs conditions ; loss of use during the period the product is at a repair
facility or otherwise awaiting parts or repair; or any other conditions whatsoever that are beyond the control
of PowerKiss Ltd
This Limited Warranty is only valid and enforceable in the country where you have purchased the Product
provided that PowerKiss has intended the Product for sale in that country. However, if you have purchased
the Product in a member state of the European Union, Iceland, Norway, Switzerland or Turkey and
PowerKiss originally intended the Product for sale in one of these countries, this Limited Warranty is valid
and enforceable in all of these above listed countries.
How to get warranty service
If you wish to make a claim under this Limited Warranty, please return your Product to PowerKiss Ltd
When making a claim under this Limited Warranty you will be required to provide:
a) the Product
b) the original proof of purchase, which clearly indicates the name and address of the seller, the date and
place of purchase, the product type and serial number, when applicable.
Other important notices
All parts of the Product or other equipment that PowerKiss has replaced shall become the property of
PowerKiss. If the Product is found not to be covered by the terms and conditions of this Limited Warranty,
PowerKiss reserve the right to charge a handling fee
Limitation of PowerKiss's liability
This Limited Warranty is your sole and exclusive remedy against PowerKiss and PowerKiss's sole and
exclusive liability in respect of defects in your Product. This Limited Warranty replaces all other PowerKiss
warranties and liabilities, whether oral, written, (non-mandatory) statutory, contractual, in tort or otherwise,
including, without limitation, and where permitted by applicable law, any implied conditions, warranties or
other terms as to satisfactory quality or fitness for purpose. However, this Limited Warranty shall neither
exclude nor limit
i) any of your legal (statutory) rights under the applicable national laws or ii) any of your rights against the
seller of the Product.
To the extent permitted by applicable law(s) PowerKiss does not assume any liability for loss of or damage
to or , for any loss of profit, loss of use of Products or functionality, loss of business, loss of contracts, loss
of revenues or loss of anticipated savings, increased costs or expenses or for any indirect loss or damage,
consequential loss or damage or special loss or damage.
To the extent permitted by applicable law, PowerKiss´s liability shall be limited to the purchase value of
the Product. The above limitations shall not apply in case of gross negligence or intentional misconduct of
PowerKiss or in case of death or personal injury resulting from PowerKiss´s proven negligence.

www.powerkiss.com
info@powerkiss.com © PowerKiss 2011