Powertech Co R9P014 Green Power Surge Protector User Manual Green Powerlink V1
Powertech Industrial Co Ltd Green Power Surge Protector Green Powerlink V1
UserManual.wiki
>
Powertech Co
>
R9P014 User Manual
User Manual
Navigation menu
Upload a User Manual
Namespaces
Wiki Guide
HTML
PDF
Info
Views
User Manual
Discussion / Help
Navigation
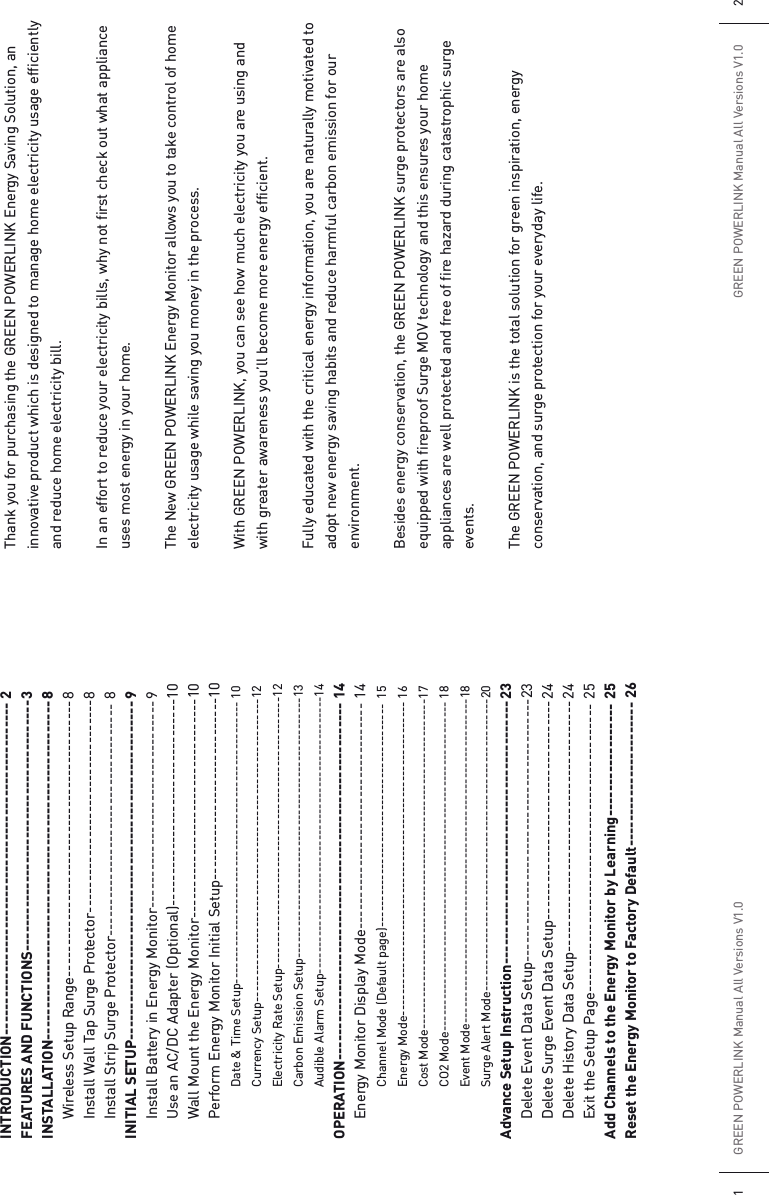
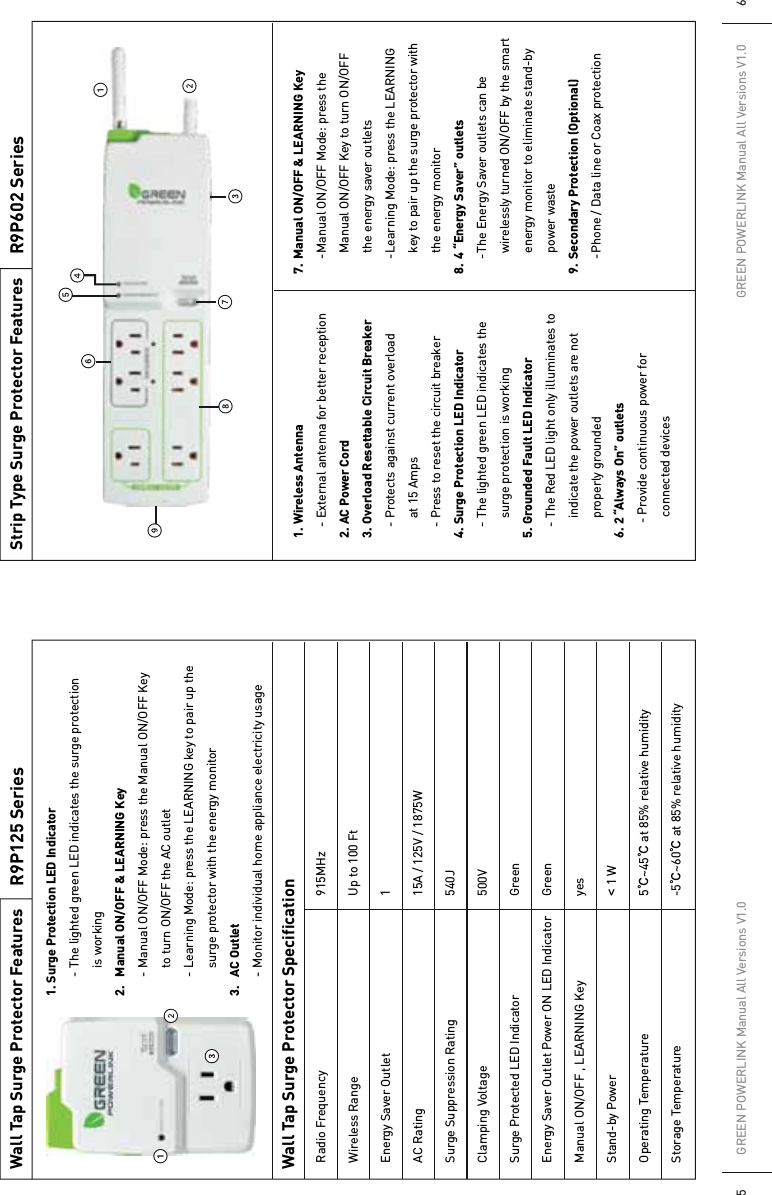
![GREEN POWERLINK Manual All Versions V1.013GREEN POWERLINK Manual All Versions V1.0141. In Electricity Rate setup page, “KWHƖRATE” in looping display represents cost of KWH of your electricity rate.2. The rate value blinks. Use the arrow key to change the rate value.3. Press the SET button to proceed to Carbon Emission setup page.Carbon Emission SetupCarbon dioxide is emitted in the process of producing electricity by burning coal & fossil fuel. This is usually referred to CO2 footprint or carbon emission, which in turn has contributed global warming and caused abnormal weather. The average carbon emission rate is 0.43Kg (0.95lbs) of carbon emission for every 1 KWH of electricity produced. This can be changed depending upon your local electric utility. Please contact your local utility for carbon emission rate.1. In Carbon Emission Setup page, “CO2ƖSETƖUP” displays in looping. 2. The Kg symbol blinks first. Use the arrow key to select the weight symbol in Kg or LB. Then press the SET button to proceed to carbon emission rate setup.3. The carbon emission rate blinks. Use the arrow key to change the value. Press the SET button to proceed to Audible Alarm setup pageAudible Alarm Setup1. In Audible Alarm setup page, “ALRMƖON” displays in looping. 2. The YES [YS]option blinks first. Use the arrow key to select Yes or NO to enable or disable audible alarm for surge and event alert. 3. Press the SET button finish the initial setup and the page will proceed to default Channel mode automatically.Energy Monitor Display ModeThe energy monitor provides 6 types of display modes. Press the MODE button to scroll thru different display modes.Channel Mode!Energy Mode!Cost ModeSurge Alert Mode!!!!!!!!!!Event Mode!!!!!!!!!!CO2 Mode](https://usermanual.wiki/Powertech-Co/R9P014/User-Guide-1379971-Page-8.png)
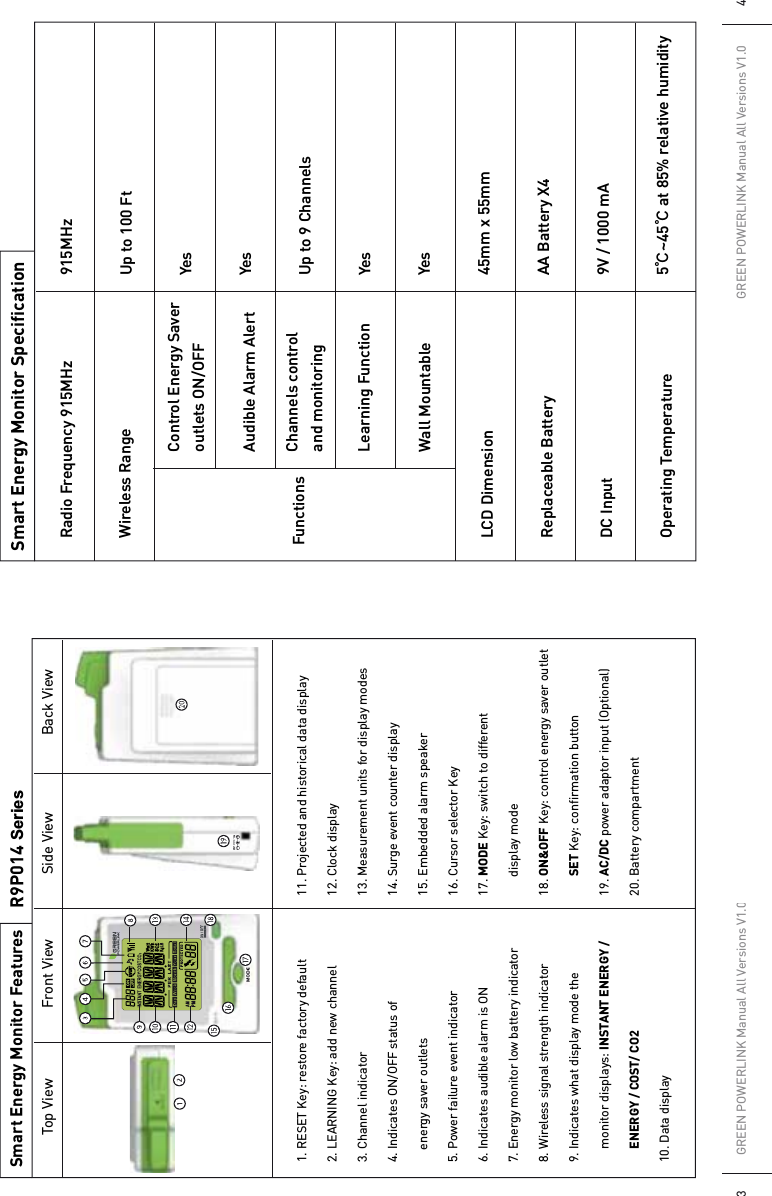
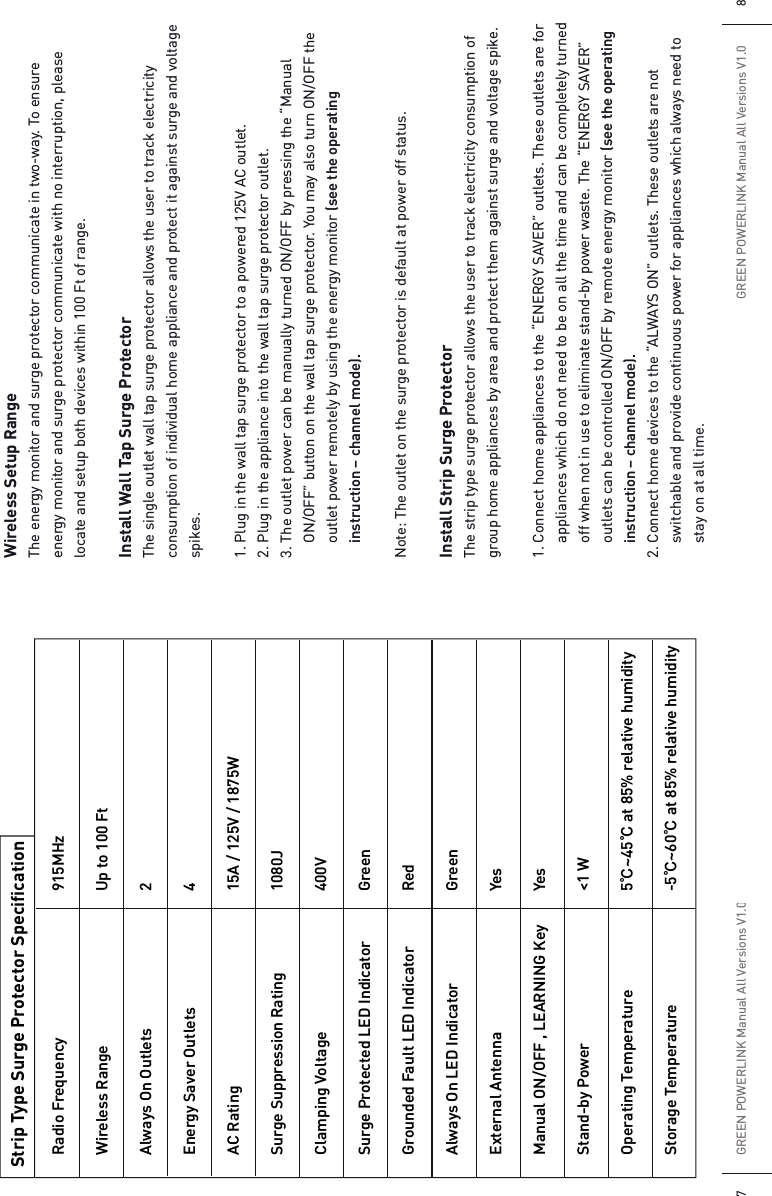
![Advance Setup InstructionIn set-up menu, the user can perform the following setup procedures for the energy monitor.Press and hold the SET button for 3 seconds to access in the set-up menu. For the first 5 advance setup options, please refer to Initial Setup Instruction in the manual.1. Date & Time Setup2. Currency Setup3. Electricity Rate Setup4. Carbon Emission Setup5. Audible Alarm Setup6. Delete Event Data Setup7. Delete Surge Event Data Setup8. Delete History Energy Data SetupDelete Event Data Setup1. In Delete Event Data setup page, “DELƖEVNTƖDATA” displays in looping. User may choose to delete all the previous event data.2. The NO option blinks first. Use the arrow key to select Yes [YS]or NO for event data delete decision. 3. Press the SET button to proceed to Delete Surge Event Data Setup page.Delete Surge Event Data Setup1. In Delete Surge Event Data setup page, “DELƖSURGƖDATA” displays in looping. User may choose to delete all the previous surge event data.2. The NO option blinks first. Use the arrow key to select Yes [YS]or NO for surge event data delete decision. 3. Press the SET button to proceed to Delete History Data Setup page.Delete History Data SetupGREEN POWERLINK Manual All Versions V1.023GREEN POWERLINK Manual All Versions V1.024](https://usermanual.wiki/Powertech-Co/R9P014/User-Guide-1379971-Page-13.png)
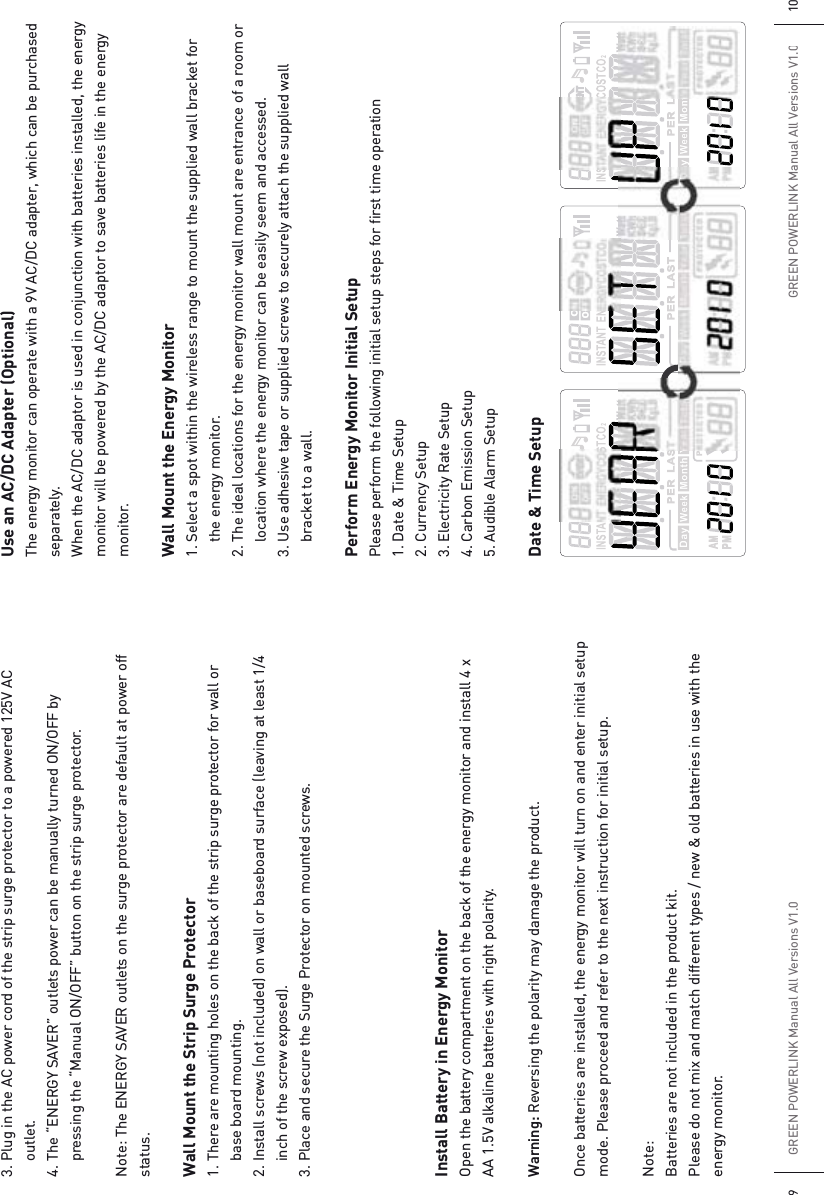
![1. In Delete History Data setup page, “DELƖHISTƖDATA” displays in looping. User may choose to delete all the previously saved KWH / COST / CO2 historic database.2. The NO option blinks first. Use the arrow key to select Yes [YS]or NO for history data delete decision. 3. Press the SET button to proceed to Exit page. Exit the Setup Page1. In Exit page, the NO option blinks first. Use the arrow key to select Yes [YS]then press the SET button to exit the setup menu.2. Select NO then press SET button will allow the user to re-do setup steps.Add Channels to the Energy Monitor by LearningThe energy monitor and the energy tracking surge protector in the kit are pre-paired and ready to use. You can purchase more compatible energy tracking surge protectors and expand up to 9 CH by adding to the exiting energy monitor. 1. Hold the energy monitor close to the energy tracking surge protector.2. In the energy monitor channel mode, use the arrow key to select which channel you wish to add the energy tracking surge protector. 3. On the energy tracking surge protector, press and hold the LEARNING button for 3 seconds until the green LED indicator light flashes and goes into learning mode.Note : you can release the button once the indicator light goes flashing4. Within 10 seconds, press the LEARNING button on the energy monitor to add energy tracking surge protector to the selected channel.5. The Surge Protector will beep once to confirm that it has been successfully added to the channel on the energy monitor.6. Redo step 3~5 if learning is not successful.7. Repeat step 2~5 to add more energy tracking surge protectors to different channels on the energy monitor.Reset the Energy Monitor to Factory DefaultPlease follow the instruction below to reset the energy monitor to its factory default setting.Note:By performing resetting energy monitor to factory default, all saved data, setup & channel settings will be erased. 1. Locate the reset point on top of the energy monitor.2. Push a stylus or pen into the reset point for 5 seconds.3. The energy monitor will be hard reset to factory default setting. Please perform all the necessary setup and channel setting. GREEN POWERLINK Manual All Versions V1.025 GREEN POWERLINK Manual All Versions V1.026](https://usermanual.wiki/Powertech-Co/R9P014/User-Guide-1379971-Page-14.png)