Precise Biometrics MS010013 USB Fingerprint Reader Security System User Manual Users Guide
Precise Biometrics AB USB Fingerprint Reader Security System Users Guide
Contents
- 1. Quick Setup Manual
- 2. Users Guide
Users Guide

User’s Guide
for Precise 100 SC
Fingerprint Identification System
for Windows NT/2000
Precise 100 SC

Notice
Electromagnetic Compatibility (EMC) Notices
For Europe:
This digital equipment fulfils the requirements for radiated emission according to limit B
of EN55022: 1994 and the requirements for immunity according to EN55024:
1998 residential, commercial and light industry.
For the U.S.A.: FCC
This device complies with part 15, subpart B, class B of the FCC Rules demonstrated
by compliance with EN55022: 1994, class B. Operation is subject to the following
two conditions: (1) This device may not cause harmful interference, and (2) this device
must accept any interference received, including interference that may cause undesi-
red operation.
The information in this user’s manual is protected by copyright and may not be repro-
duced in any form without written consent from Precise Biometrics. The information in
this user’s manual is subject to change without notice.
Precise Biometrics shall not be liable for any technical or editorial errors herein, nor for
incidental or consequential damages resulting from the use of this book.
This user’s manual is published by Precise Biometrics, without any warranty.
The Precise 100 Client software is protected by copyright of Precise Biometrics.
© Precise Biometrics AB, 2000
info@precisebiometrics.com
www.precisebiometrics.com
Phone +46 (0)46 31 11 00
Fax +46 (0)46 31 11 01
Address: Dag Hammarskjölds v 2
SE-224 64 Lund
Sweden
All rights reserved. Second Edition October 2000
P/N: AM010001 R2A

3
Content
Chapter 1
Introduction 5
Precise 100 SC – the Fingerprint Reader 6
Why Use Fingerprint 7
About Precise 100 Family 8
Possible configuration 9
Icons and Conventions 10
Chapter 2
Installation 11
Minimum System Requirements 12
Preparing Installation 13
Setting the Parallel Port 13
Connecting the Fingerprint Reader to the Computer 14
Installing the Fingerprint Identification Software 15
Installing the Precise 100 Client Software 16
Precise Demo 17
Port Configuration 18
Attaching the Fingerprint Reader 19
Replacing the Adhesive Tape 19
Chapter 3
Using the Fingerprint Reader 20
Placing Your Finger Correctly on the Fingerprint Reader 21
How to Place Your Finger 21
Fingerprint Reader Maintenance 26

4
Chapter 4
NOTE: Chapter 4 is for administrators. Users without administrator rights do not have access to the
BioManager.
The BioManager 27
Introduction to the BioManager 28
Accessing the BioManager 28
About Primary Logon Fingers 29
About Passwords 29
About the Security Level 30
Setting the Security Level 31
Passwords and Security Level 32
Fingerprint Registration 32
Beginning Fingerprint Registration of a New User 32
Beginning Fingerprint Registration of an Existing User 33
Continue Fingerprint Registration 34
Checking and Changing a User’s Properties 37
Deleting a User 38
Chapter 5
Logging on 39
Logging on with fingerprint stored on smart card 40
Logging on with a Fingerprint 42
Logging on with a Password 44
Chapter 6
Locking and Unlocking 45
Locking a Workstation 46
Unlocking a Workstation 47
Unlocking with fingerprint stored on smart card 47
Unlocking with a Fingerprint 48
Unlocking with a Password 49
Chapter 7
Troubleshooting 50
Fingerprint Troubleshooting 50
Smart Card Troubleshooting 51
Password Troubleshooting 51
Chapter 8
Uninstalling 52
Uninstalling the Precise 100 Client Software on Windows NT 49
Uninstalling the Precise 100 Client Software on Windows 2000 53
Uninstalling the Precise 100 Parallel Drivers 53
Glossary 54

5
Chapter 1
Congratulations on selecting Precise Biometrics’ Fingerprint Identification System! Using
your fingerprint for identification is an easy and secure way to prove your identity. Please
read this chapter before you install and use the system.
This chapter includes the following information:
• Precise 100 SC – the fingerprint reader
• Why use fingerprint technology?
• The Precise 100 Family
• Icons and conventions
Introduction
Chapter 1 Introduction

6
Precise 100 SC
– the Fingerprint Reader
Congratulations – you are about to use the Precise 100 SC for secure, cost-effective and
convenient logon!
The Precise 100 SC fingerprint reader
The fingerprint reader includes a sensor for reading fingerprints and a smart card reader
for reading and writing information on smart cards. When you place your finger on the
fingerprint reader, the part of the finger that touches the sensor is read. The sensor meas-
ures the capacitance in the finger pad, which reveals the pattern of the fingerprint. Thus,
a paper copy with a picture of a fingerprint can not grant access to the system.
When logging into a system, the read fingerprint is compared to a fingerprint template,
i.e. a data file containing information about the fingerprint, stored on a hard disk or on a
smart card. If the read fingerprint matches the fingerprint template, the system will grant
you access. If the match is not successful, the system will deny access. It takes less than
one second for the system to compare a read fingerprint with the information in the data-
base. All information sent between the fingerprint reader and computer is encrypted for
maximum security.
If the information is stored on a smart card, you must insert the smart card into the smart
card slot on the fingerprint reader before placing your finger on the sensor. If you do not
have a smart card, your fingerprints are stored on the hard disk, and you will simply enter
your username and place your finger on the fingerprint reader to log into the system.
Chapter 1 Introduction
diode
fingerprint sensor
smart card slot

7
Why Use Fingerprint
Technology?
In modern society, there is a vast need for secure identification at for instance logon to a
computer network. An unauthorised person who obtains access to computer files consti-
tutes a major risk to many companies. In order to prevent unauthorised access, network
users have previously identified themselves with a password entered together with the
username when logging into a network.
The disadvantages of passwords are:
• Unreliable identification. An unauthorised person who knows your password
can easily access your user account.
• A complicated system. In order to increase security, users are regularly asked to
change their passwords. This makes it difficult to remember a password.
• Users forget their passwords, this increase the administration workload.
• Users write down their passwords on notes and store them close to their
applications. This can be a serious security hazard.
The advantages of fingerprint identification are:
• Secure identification. By identifying yourself with your fingerprint, you use a
unique “key” to access your user account. All your fingerprints are unique –
no person has identical fingerprints.
• Simplicity. It is simple to use fingerprints for identification. You do not have
to worry about changing or memorising passwords anymore
– your fingerprint provides secure identification, year after year.
Simply put, with Precise 100 SC, you are identified by who you are,
not by what you know!
Chapter 1 Introduction

8
About Precise 100 Family
Precise 100 SC Server – Biometric logon for the NT network, Precise 100 SC Server
provides security and convenience. Precise 100 SC Server supports biometric network
logon to the domain server from NT clients using the Precise 100 A and/or Precise 100
SC systems. Precise 100 SC Server includes administrator support tools.
Precise 100 A Client – For Windows 98/NT/2000, local or in an NT domain.
Fingerprint data is stored on the local hard drive, or server hard drive when used in com-
bination with Precise 100 SC Server. For logon to local accounts and/or domain server
accounts.
Precise 100 SC Client – For Windows 95/98/NT/2000, local or in an NT domain.
For maximum security, fingerprint data can be stored on smart cards, as well as the local
hard drive or server hard drive when used in combination with Precise 100 SC Server.
For logon to local accounts and/or domain server accounts.
Precise 100 SC SDK – Precise Biometrics’ Software Development Kit, for OEM-customers
and system integrators who want to integrate Precise Biometrics’ software and hardware
into their own system. It contains documentation, tools, API, and examples.
Chapter 1 Introduction

9
Possible configuration
Chapter 1 Introduction
Domain server,
with Precise 100
SC Server installed
With Precise 100
SC installed, users
can log on to
local accounts
and/or domain
server accounts.
For maximum
security, fingerprint
data can be saved
on smart cards.
With Precise 100
A installed, users
can log on to local
accounts and/or
domain server
accounts, depen-
ding on where the
fingerprints are
registered.
Local workstation,
with Precise 100 SC
installed
Local workstation,
with Precise 100 A
installed
With the Precise
Biometrics server sof-
tware an administrator
can administrate all
users. To enable bio-
metric logon to domain
server acconts, user´s
fingerprints must be
registered here.

10
Icons and Conventions
• Key names on the keyboard appear in italics, for example
Caps Lock, Ctrl, Enter.
• Names of fields, text boxes and buttons appear in bold type, for example
Username, User, OK.
• Keys that you should press and hold down together appear as the key
names and the plus (+) sign, for example Ctrl + Alt + Delete.
• An arrow is used to separate icons or menu options that should be selected
in succession, for example Start > Settings > Control Panel.
Chapter 1 Introduction

11
Chapter 2
The installation consists of two parts. Start by following the instructions in the Preparing
Installation section. Then continue with the Installing the Fingerprint Identification Software
section.
NOTE: If you are using a Precise 100 SC with parallel port connector, it is very important
that the parallel port is set to ECP mode before using the fingerprint reader. Otherwise, the
fingerprint reader will not function properly. See Setting the Parallel Port in this chapter.
This chapter includes the following information:
• Minimum system requirements
• Preparing Installation
• Setting the parallel port
• Connecting the fingerprint reader
• Installing the fingerprint identification software
• Attaching the fingerprint reader
NOTE: In order to log into your domain server account using your fingerprint:
• the Precise 100 SC must be installed on your workstation
• the Precise 100 SC Server must be installed on the domain server
• your fingerprints must be registered by a domain server administrator on the
domain server
Installation
Chapter 2 Installation

12
Minimum System Requirements
In order to install the software included on the enclosed CD-ROM, your computer must
meet the following system requirements:
• PC with 200 MHz Pentium processor or equivalent
• 10 MB hard disk space available
• USB port or Parallel port with ECP support and PS/2 keyboard/mouse port
• Windows NT Workstation 4.0 operating system, with Service Pack 3 or higher,
or Windows 2000.
• Mouse or compatible pointing device
• CD-ROM drive (unless you are installing the software from a network)
• VGA resolution graphics card or higher
Chapter 2 Installation

13
Preparing Installation
The Precise 100 SC fingerprint reader comes in two versions: Precise 100 SC PAR and
Precise 100 SC USB. The Precise 100 SC PAR communicates with the computer through
the computer’s parallel port and the keyboard port or mouse port is used to power the fin-
gerprint reader. The Precise 100 SC USB communicates with the computer through the
computer’s USB port.
In the following a picture of a parallel connector indicates a section
relevant only to Precise 100 SC PAR readers while a picture of a
USB connector indicates a section relevant only to Precise 100 SC
USB readers.
If you are a using a Precise 100 SC USB reader you should skip the following two sec-
tions and continue with the Installing the Fingerprint Identification Software section. How-
ever, if you are using a Precise 100 SC PAR reader, follow the instruction below prior to
starting the installation.
Setting the Parallel Port
Before connecting the fingerprint reader, ensure that the parallel port is set to ECP mode.
It is very important that the parallel port is set to ECP mode before using the fingerprint
reader. Otherwise, the fingerprint reader will not function properly. If you do not know
whether your computer is in ECP mode (most new computers are), please see the
computer manual for additional information, or follow the instructions below.
1. Access the system setup utility. On most computers, this is done by pressing the
F1, F10, Delete or Esc key during system booting – i.e. immediately after the
power switch on your computer has been turned on. Keep pressing the key until
the system setup, sometimes called the BIOS, appears.
2. Find the parallel port mode. Set the port mode to ECP (sometimes called
Flexible mode). If you are unable to find the port mode, your computer is
probably already in ECP mode.
3. Save your changes and exit the system setup utility. If you have problems with
the ECP settings, please contact your computer retailer.
Chapter 2 Installation
Parallel USB
Chapter 2 Installation
14
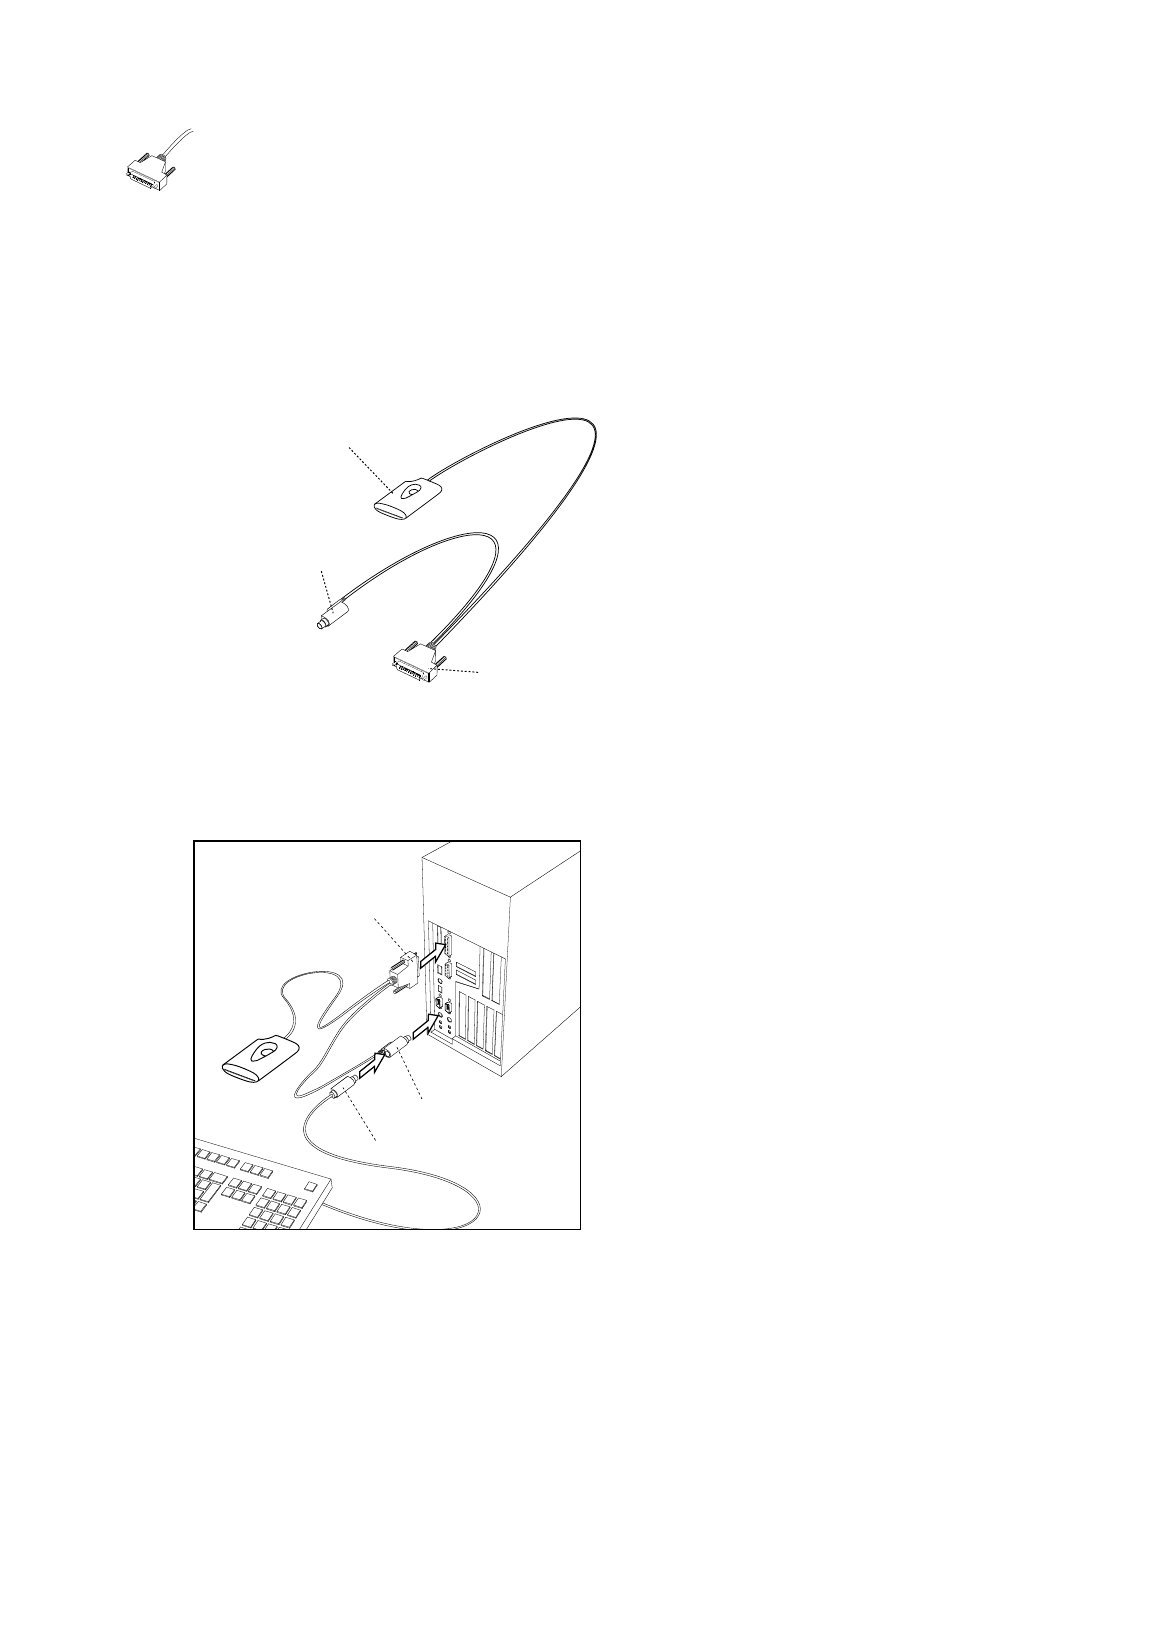
Connecting the Fingerprint Reader to the
Computer
1. Turn off the computer.
2. Make sure that the parallel port is set to ECP mode.
3. Connect the fingerprint reader to the parallel port at the back of the computer
by using the connector. Make sure that the connector is secured, so that it can
not be disconnected by mistake.
4. Unplug the keyboard/mouse PS/2 connector from the keyboard or mouse
port at the back of the computer. Plug the pass-through PS/2 connector from the
fingerprint reader into the keyboard/mouse port instead.
parallel port connector
pass-through
PS/2 connector
keyboard
PS/2 connector
Chapter 2 Installation
fingerprint reader
Precise 100 SC
pass through
PS/2 connector
parallel port connector

15
5. Connect the keyboard/mouse PS/2 connector to the pass-through PS/2
connector.
6. Power on the computer.
Continue with next step – Installing the Fingerprint Identification Software.
Installing the Fingerprint
Identification Software
NOTE: Only users with administrator rights can install the software.
The fingerprint identification software, Precise 100 Client, is needed to read your finger-
prints and to save and retrieve information about your fingerprints, accessible domains,
etc.
During installation you may be instructed to restart your computer before continuing to the
next step in the installation procedure. If the Master Setup screen does not appear auto-
matically after restart, start the CD from your desktop by double-clicking My Computer >
CD > MasterSetup.exe icon.
NOTE: Once the software is installed, you will be able to register fingerprints using the
BioManager (see The BioManager chapter for details) and store them locally if you log
on as administrator on your local workstation. However, that will not grant access to
domain server accounts. To be able to log into a domain server account using your fin-
gerprint, your fingerprint will have to be registered and stored on the domain server.
When the fingerprint identification software is installed on your local computer, see a
domain administrator to register your fingerprints on the domain server.
Chapter 2 InstallationChapter 2 Installation

16
Installing the Precise 100 Client Software
NOTE: After installation, the computer has to be restarted before you can use the software.
1. Log into your local computer as administrator. It is strongly recommended that all
Windows programs are closed and no disk is in the disk driver.
2. Insert the enclosed Precise 100 Client software CD into your computer’s
CD-ROM drive. The Master Setup screen appears.
Master Setup screen
NOTE: If the CD does not start automatically, start the CD by clicking Start > Run. Enter
D:\MasterSetup.exe, where “D” is the name of your CD drive. Click OK.
3a. If you have a Precise 100 SC USB reader, connect the fingerprint reader to
your computer. Windows 2000 will no detect the new hardware and install
the necessary drivers from the CD.
3b. If you have Precise 100 SC PAR reader, click the Parallel Driver button to
install the necessary parallel port drivers.
4. If you are using Windows NT you must install the updated Microsoft Smart
Card Base Components, if not previously installed. If you are using Windows
2000 do not install the Smart Card Base Components, the system may crash.
To install the Smart Card Base Components
a) Click the SC Base Components button, a submenu appears.
b) Click the Base Components button in the submenu. You don’t need to
reboot your computer after this step if you continue directly with the
next step.
c) Click the Update button in the submenu and follow the instructions.
Chapter 2 Installation

17
5. To install the Precise 100 Client software, click the Precise 100 Client button
and follow the instructions.
The software will guide you through the installation. Use the Back and Next buttons to
navigate through the screens.
4. Click Finish to complete the installation. The computer has to be restarted
after the installation is completed. Remove the software CD from the CD-ROM
drive before restarting the computer.
The software is now saved on your hard drive.
5. See a domain administrator to register your fingerprints, if you want to be able
to log into a domain server. If you only want to log into your local system, you
can register your own fingerprints. You must have administrator rights to register
fingerprints. See Fingerprint Registration in chapter 4 for details.
Precise Demo
It is recommended that you practice registering and verifying fingerprints for a few
minutes using the Precise Demo. This will help you to practice finger positioning which
will make it easier to log on using the fingerprint reader. When you are using the Demo,
none of your operations will affect your system.
Start the Precise Demo by clicking Start > Programs > Precise Biometrics > Demo.
Chapter 2 Installation
18
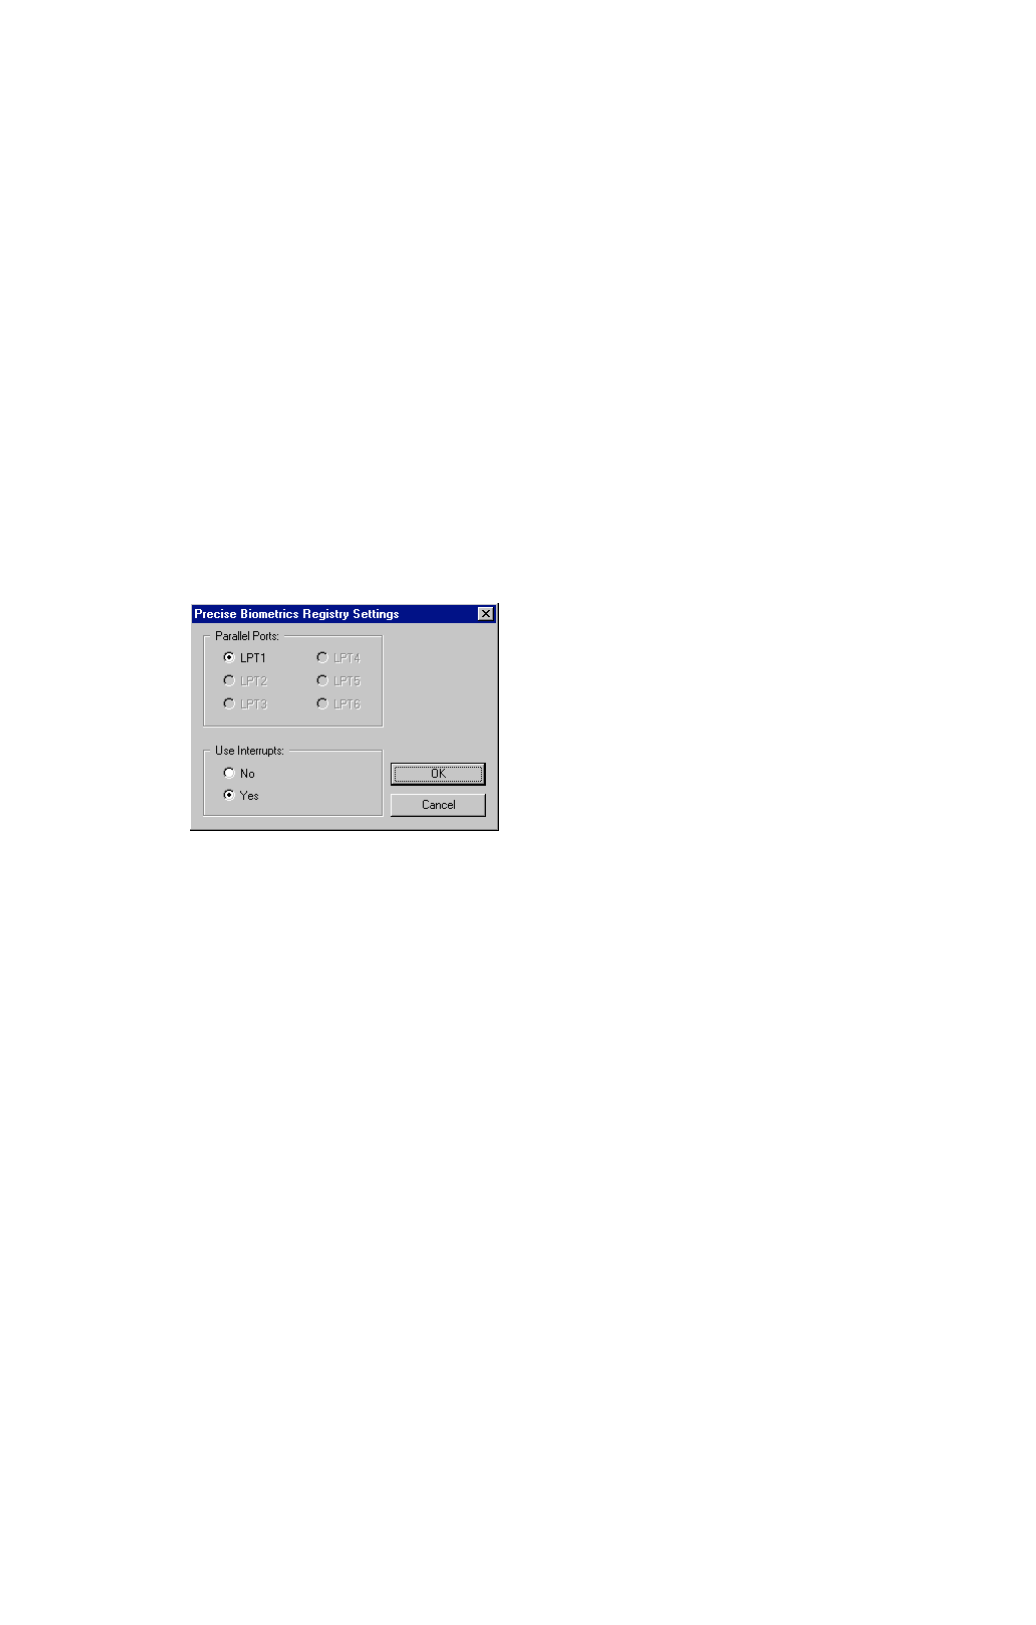
Port Configuration
If you are using Windows NT (only) and your system is equipped with multiple parallel
ports, you can specify which parallel port the fingerprint reader is connected to. This is
done in Precise Biometrics Registry Settings. In the rare case you should experience com-
patibility problems with other software, you may also need to turn interupts on or off.
1. Click Start > Settings > Control Panel. The Control Panel screen appears.
2. Double-click on the Precise Biometrics logo. The Precise Biometrics Registry
Settings screen appears.
3. Make the desired changes and click OK.
Chapter 2 Installation

19
Attaching the Fingerprint Reader
If preferable, the fingerprint reader can be attached to, for example the side of your mon-
itor. Simply use the adhesive tape at the back of the fingerprint reader. The adhesive tape
is very durable and will keep the fingerprint reader attached for many years. The finger-
print reader can be removed and attached again. If the adhesive tape loses its stickiness,
replace it with one of the enclosed adhesive tapes.
Before attaching the fingerprint reader, make sure that it will be comfortable for you to
use the fingerprint reader in its new place. Try some different positions to find out which is
the best before removing the adhesive tape cover strip. If you are right-handed, the right
side of your monitor will probably work best, and vice versa.
NOTE: If you attach the fingerprint reader to a monitor and want to use it with a smart
card, place the fingerprint reader close to the monitor’s front. In this way, you can easily
insert and remove the smart card.
1. Make sure the surface on which you want to attach the fingerprint reader is
perfectly clean.
2. Remove the cover strip from the adhesive tape at the back of the fingerprint
reader.
3. Attach the fingerprint reader by pressing it to the surface.
Replacing the Adhesive Tape
If the adhesive tape has lost its stickiness, use the enclosed adhesive tapes. The enclosed
adhesive tapes have a cover strip on both sides.
1. Remove the old tape from the fingerprint reader before attaching the new
adhesive tape.
2. Remove one cover strip from the new tape and press the sticky side to the
fingerprint reader.
3. Finally remove the remaining cover strip and attach the fingerprint reader to the
desired surface.
Chapter 2 Installation

20
Chapter 3
As with most new technology, it might take some training to feel at home logging on
using your fingerprint. When you log on and verify your fingerprint, it is important that
you place your finger on the fingerprint reader in a proper way. The following chapter
contains some examples of good and bad ways of placing your finger on the fingerprint
reader.
It is highly recommended that you practice by using the Precise Demo for a few minutes
(see Precise Demo in the previous chapter for details).
This chapter includes the following information:
• Placing your finger correctly on the fingerprint reader
• Fingerprint reader maintenance
Using the
Fingerprint
Reader
Chapter 3 Using the Fingerprint Reader
21
Placing Your Finger Correctly
on the Fingerprint Reader
When you place your finger on the fingerprint reader sensor to identify yourself, please
remember two things:
1. It is important that you use the correct finger. For example, if you place your left
index finger on the sensor, you will not be granted access if the system expects
you to use your left middle finger. When logging on, a screen shows you which
finger you are expected to use – it is marked with a dot.
2. Your finger should be properly positioned on the sensor. Poor positioning and
too much or too little pressure could result in an erroneous reading – which may
prevent you from gaining access to the system.
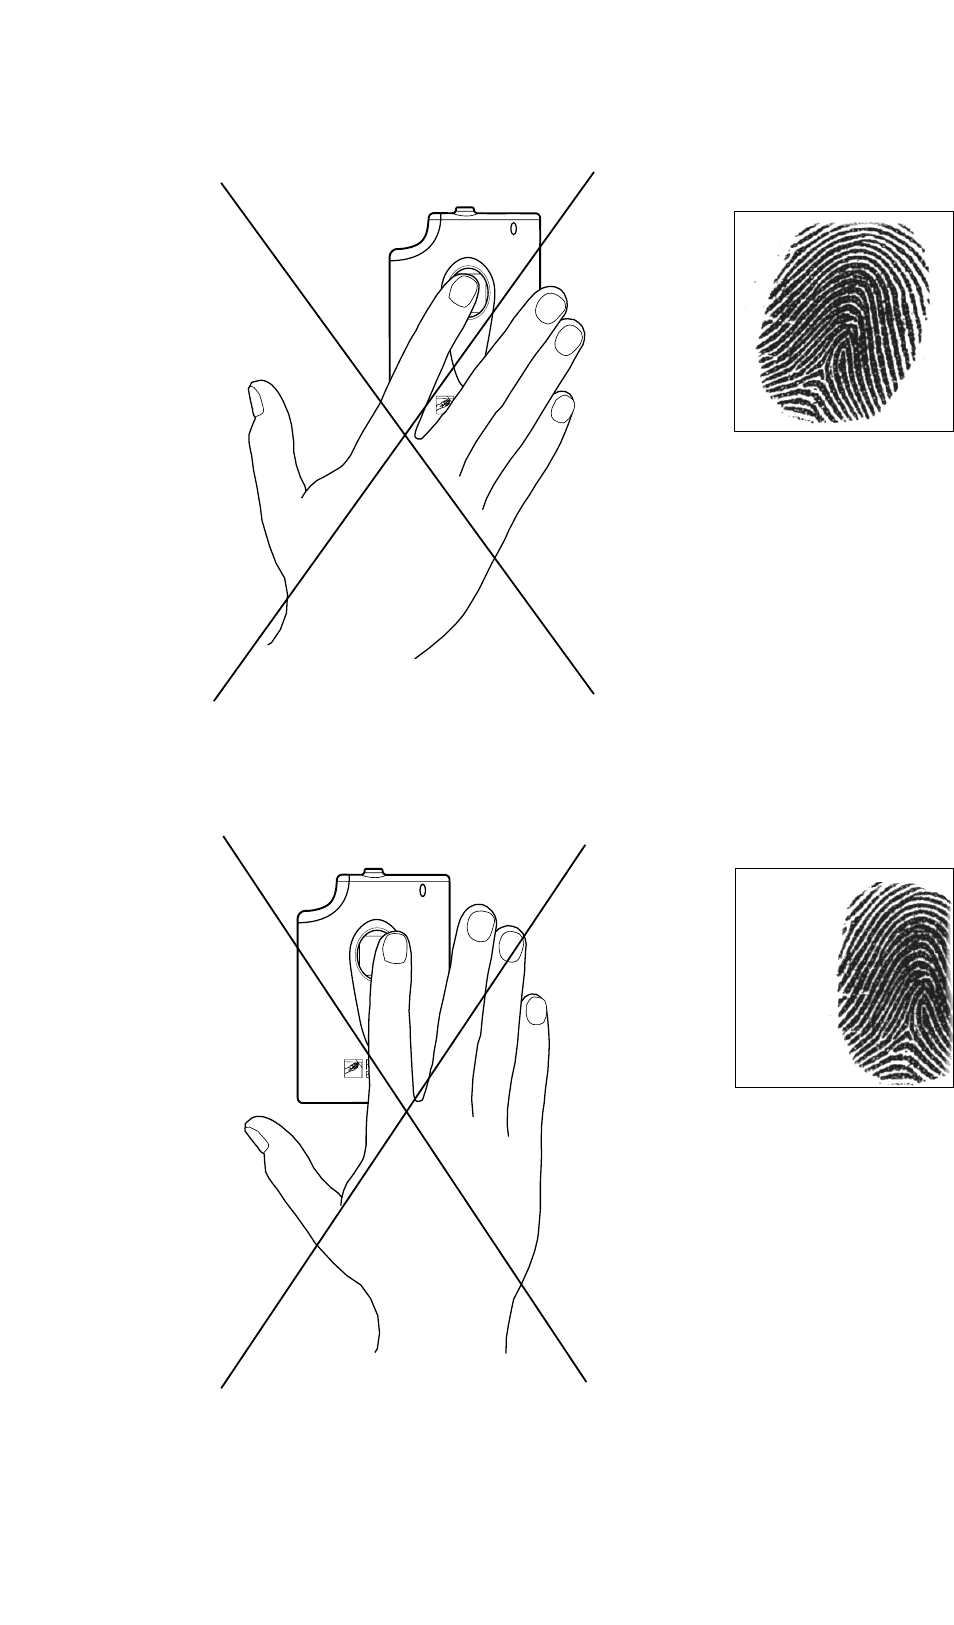
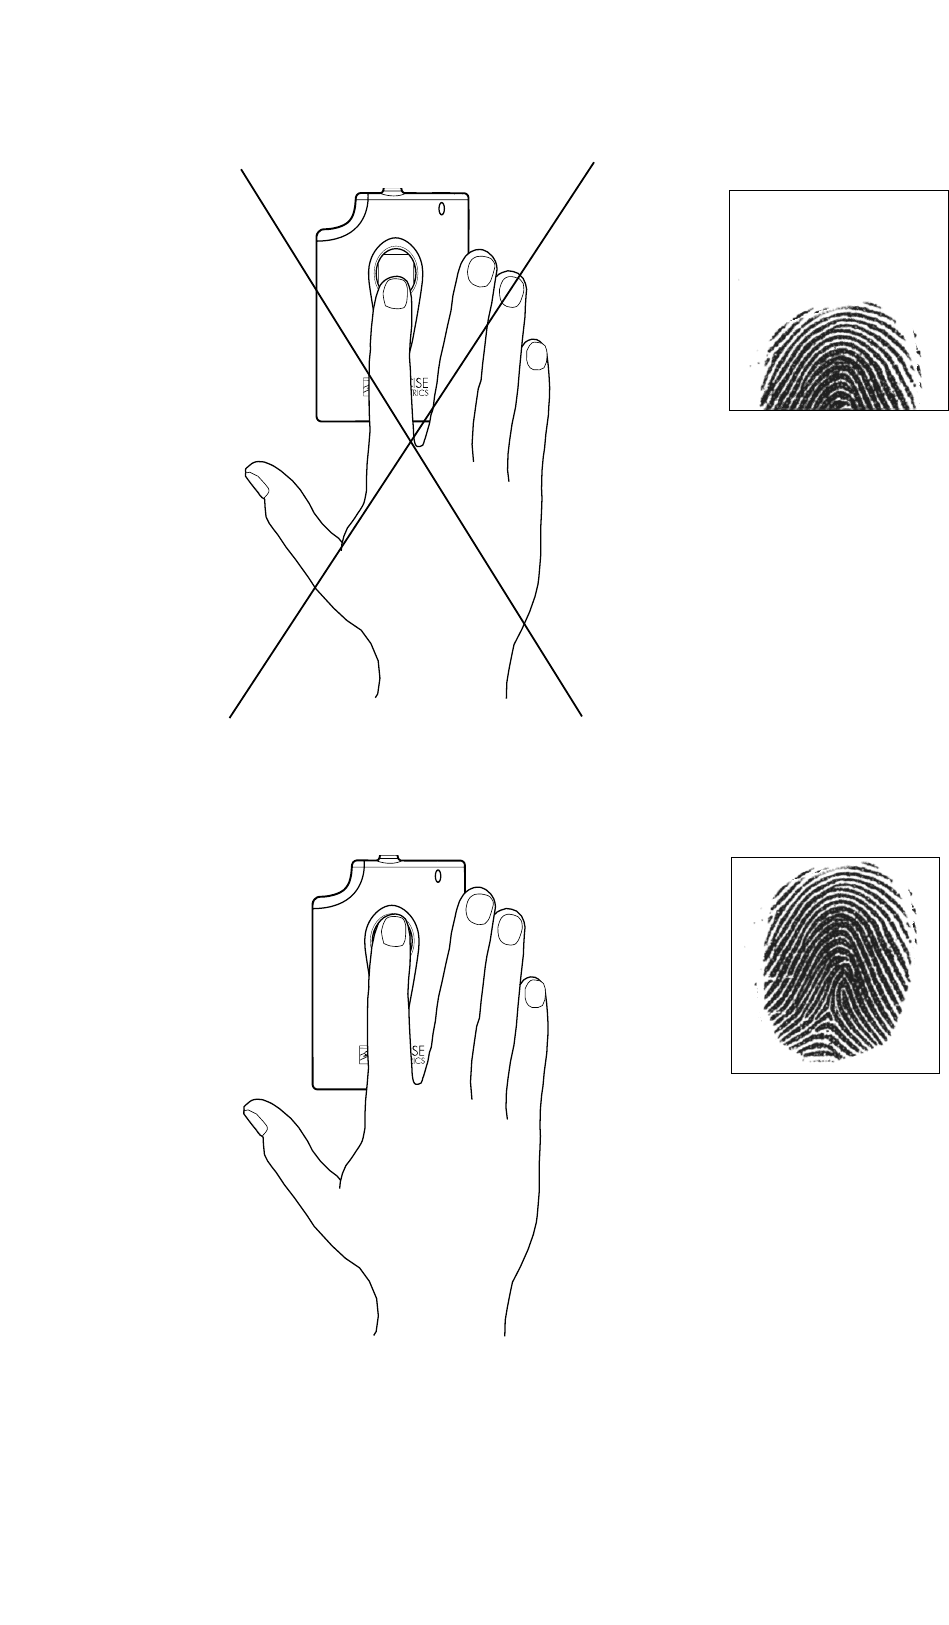
How to Place Your Finger
• Do not “roll” your finger pad. Slide it on to the sensor so that the centre of your
finger pad is placed in the sensor centre.
• Let the top of your finger pad touch the two dots on top of the fingerprint reader
while pressing the finger pad to the sensor.
• Use medium pressure and avoid rotating your finger. Keep it still when on sensor.
The following graphics show some examples of different fingerprint images:
Chapter 3 Using the Fingerprint Reader
22
Rotated finger
Poor image:
rotated fingerprint.
Skew finger
– too far to the right.
Poor image:
off-centre fingerprint.
Chapter 3 Using the Fingerprint Reader
23
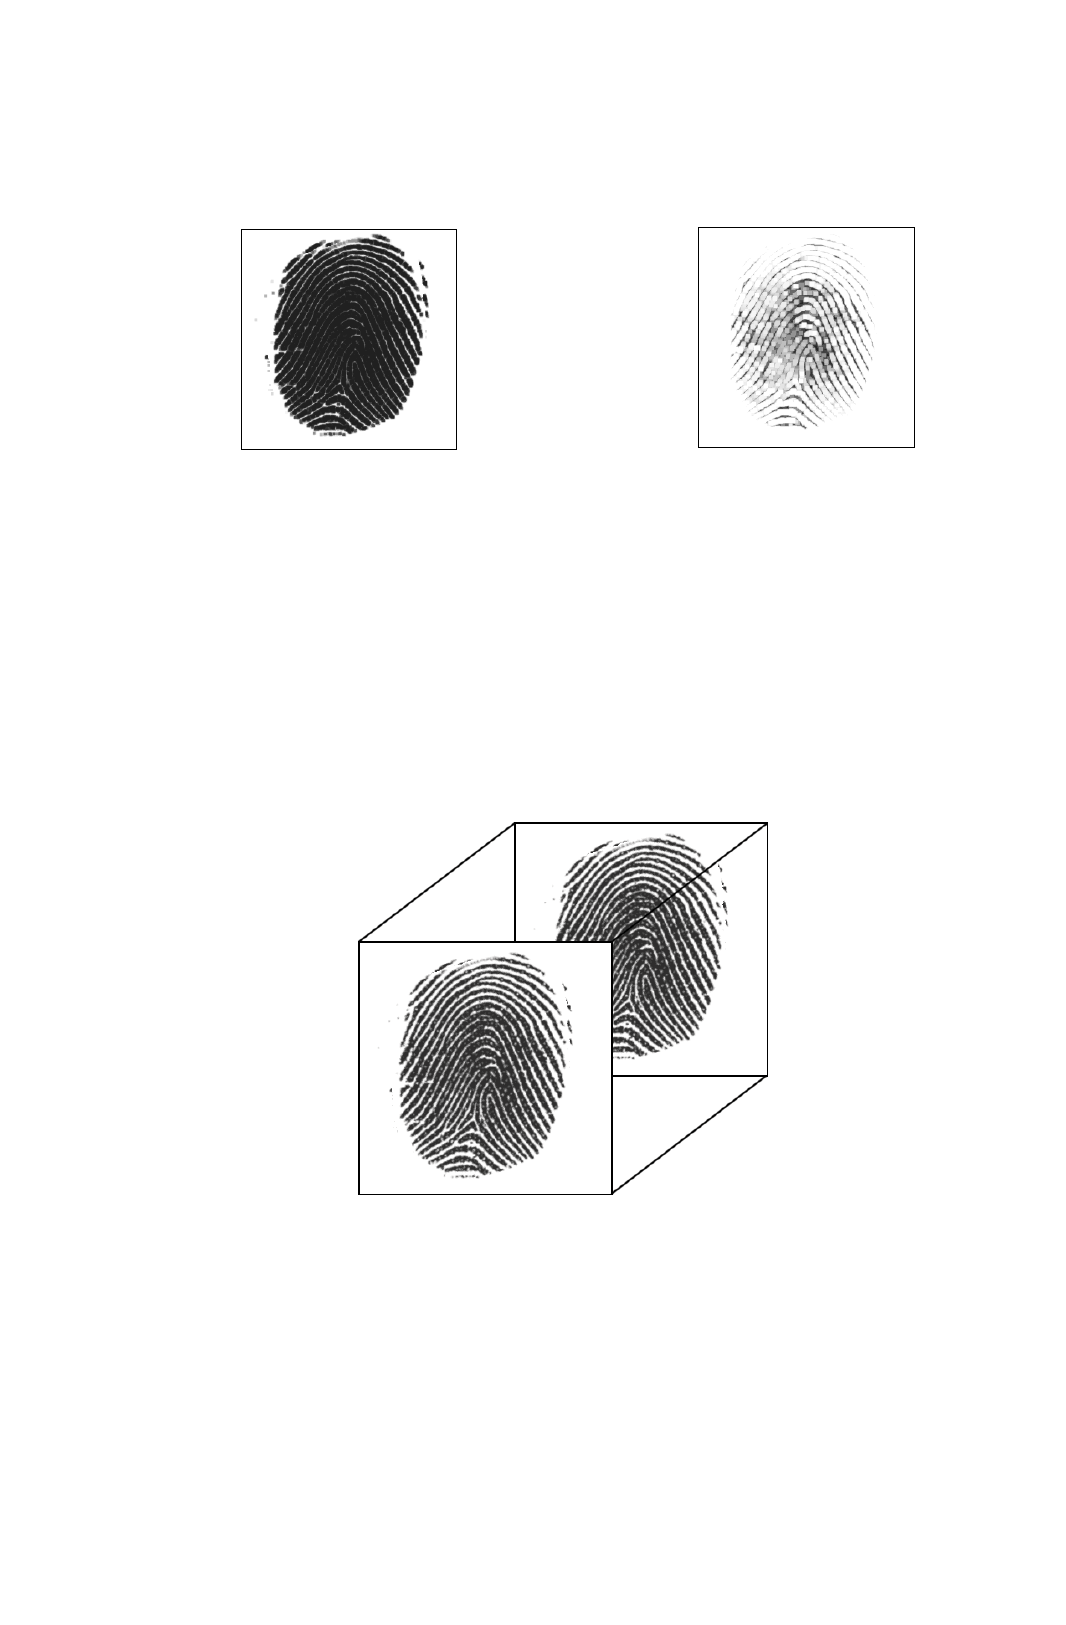
Finger placed too far down on the sensor
Poor image:
off-centre fingerprint.
Perfectly placed finger
Good image:
fingerprint in the middle,
medium pressure to the sensor.
Chapter 3 Using the Fingerprint Reader
24
When you are placing your finger on the fingerprint reader sensor, it is important that you
use the finger marked in the Verify Fingerprint window.
Above is a good fingerprint, which will result in a perfect match and system access.
If the placement is correct, but too much or too little pressure is used, the images will look
like this:
Poor image:
too dark fingerprint caused by exces-
sive pressure. The finger may also be
wet.
Good image from
the sensor
Poor image:
faint fingerprint caused by insufficient
pressure. The finger may also be very
dry.
Chapter 3 Using the Fingerprint ReaderChapter 3 Using the Fingerprint Reader
25
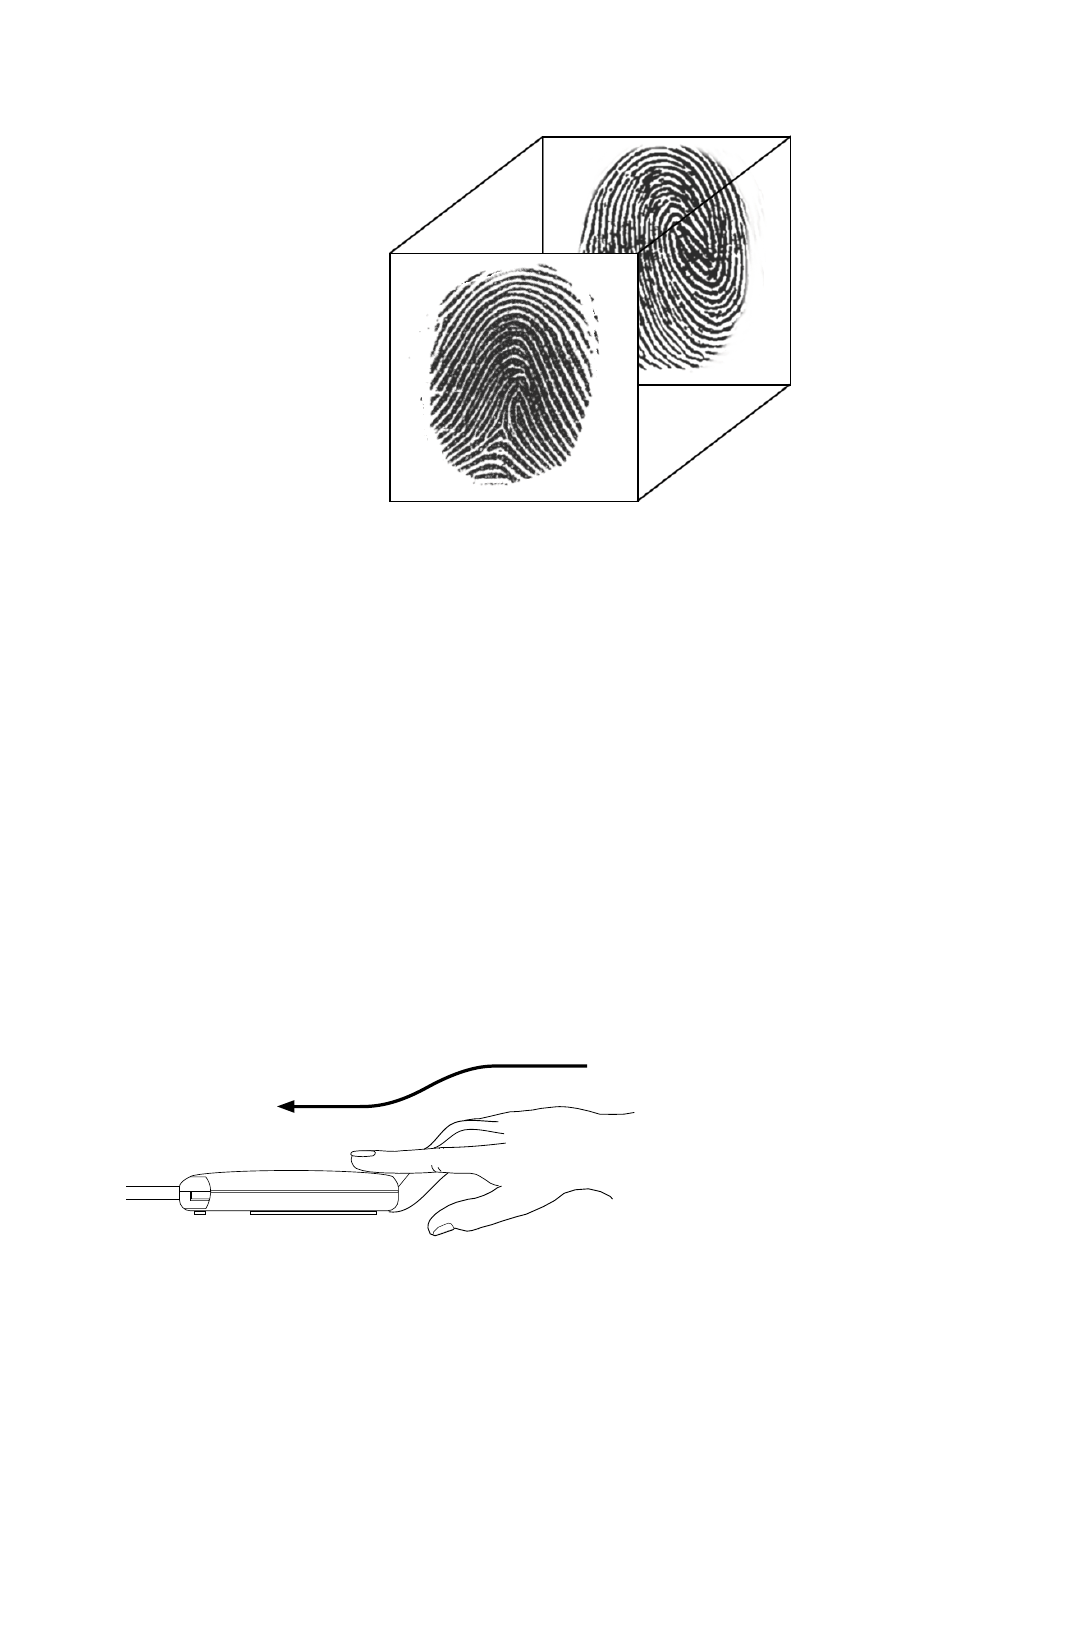
Above is a good fingerprint, which will not result in a match since the fingerprint is not
matched with its corresponding template. You may have placed the wrong finger on the
sensor, or it could be an unauthorised person trying to log into your account. The system
will deny access.
To learn more about how to position your finger on the fingerprint reader, use the Precise
Demo. To start the Precise Demo, click Start > Programs > Precise Biometrics > Demo.
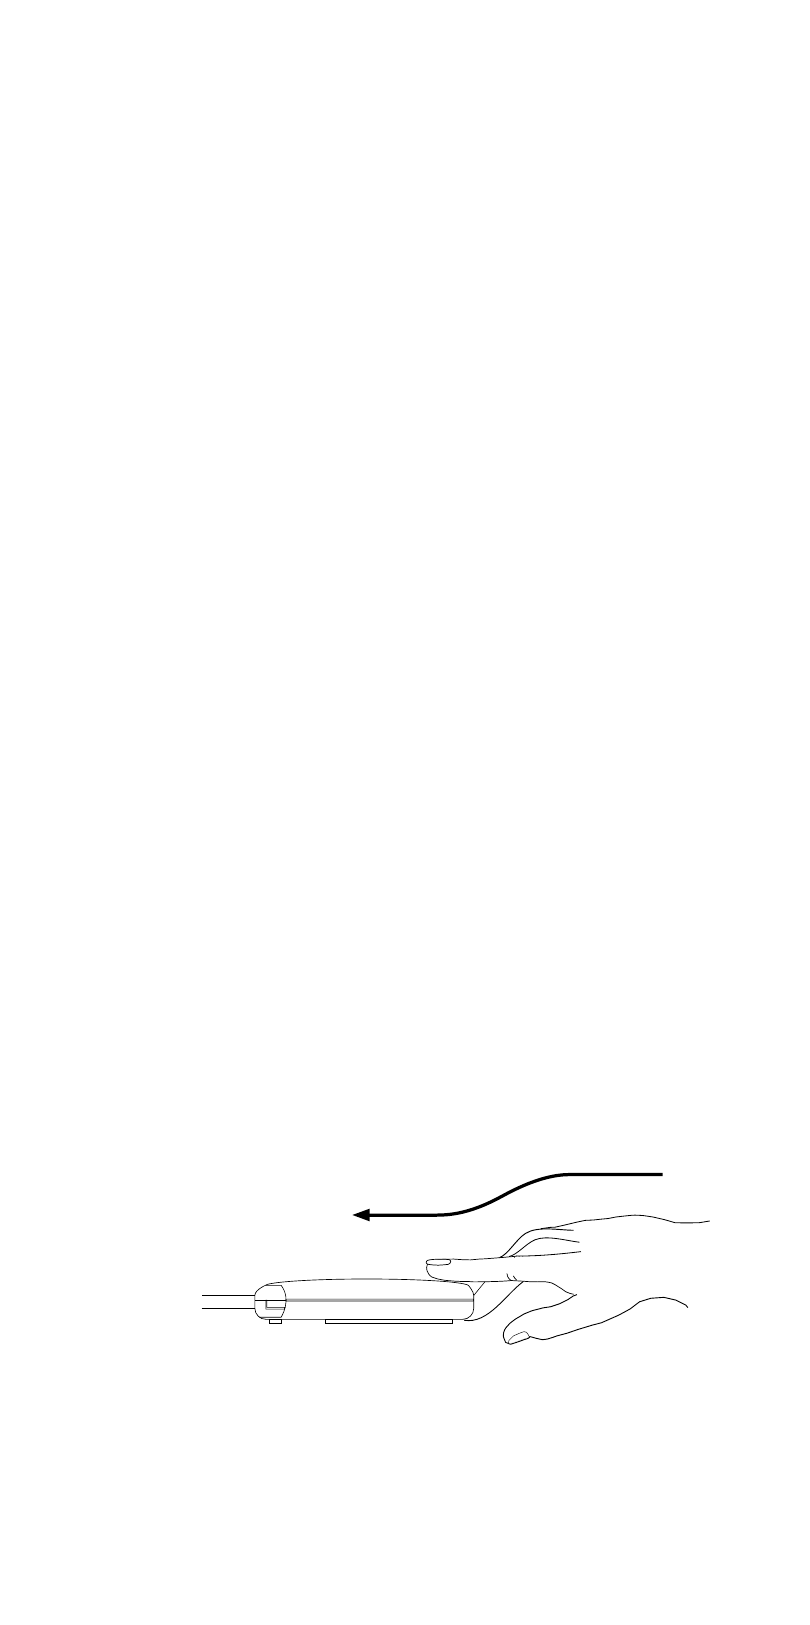
High electrostatic discharges might damage the fingerprint sensor. If your Precise 100
Reader is used in an environment where there is a high risk of electrostatic discharges
when putting the finger on the sensor, it is important to follow the instructions below. We
recommended to always use the Precise 100 Reader as described here. When putting
the finger on the sensor, let your finger slide via the finger guide towards the sensor (see
picture).
When putting the finger on the sensor multiple times in a short time period, e.g. during
enrolment, you only have to slide via the finger guide the first time you put your finger on
the sensor.
Good image from
the sensor
Template stored
in database
Chapter 3 Using the Fingerprint Reader

26
Fingerprint Reader Maintenance
It is very important that the sensor surface is kept clean. If the sensor is dirty
or scratched, there is an increased risk that a fingerprint can not be successfully matched
with its corresponding template stored in the database.
• Protect the fingerprint reader from any kind of physical damage.
• If necessary, clean the surface with a clean cotton cloth. You can dampen the
cloth slightly with a cleaner.
• Do not use paper tissue for cleaning purposes, since it may scratch the surface.
• Do not spray cleaner directly onto the fingerprint reader.
Chapter 3 Using the Fingerprint ReaderChapter 3 Using the Fingerprint Reader

27
Chapter 4
The BioManager is the heart of the fingerprint identification system. This chapter address-
es the process of enrolling a user into the fingerprint database system and registering a
user’s fingerprint data.
NOTE: Chapter 4 is for administrators. Users without administrator rights do not have
access to the BioManager.
This chapter includes the following information:
• The BioManager
• Primary logon fingers
• Passwords
• Security level
• Registering fingerprints
• Adding a new user
• Enrolling an existing user
• Checking and changing a user’s properties
• Deleting a user
The
BioManager
Chapter 4 The BioManager

28
Introduction to the
BioManager
In the BioManager, information about users, fingerprints, preferences and accessible
domains is stored.
Administrators can:
• Add and delete users
• Register fingerprints
• Turn password users into biometric users
• Decide whether a biometric user is allowed to use a password as backup
• Change properties for users
• Set the security level for the system
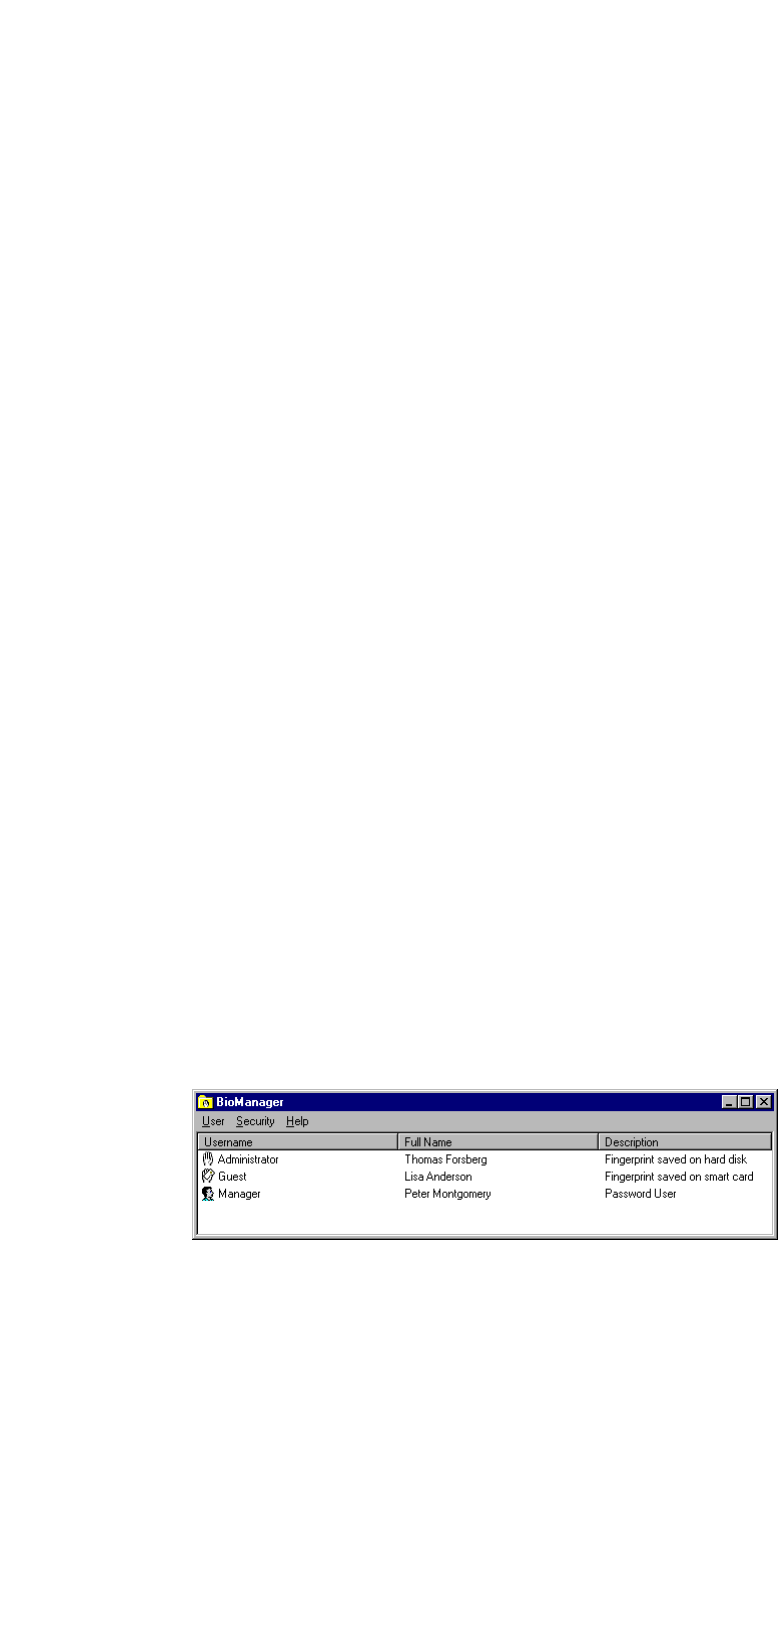
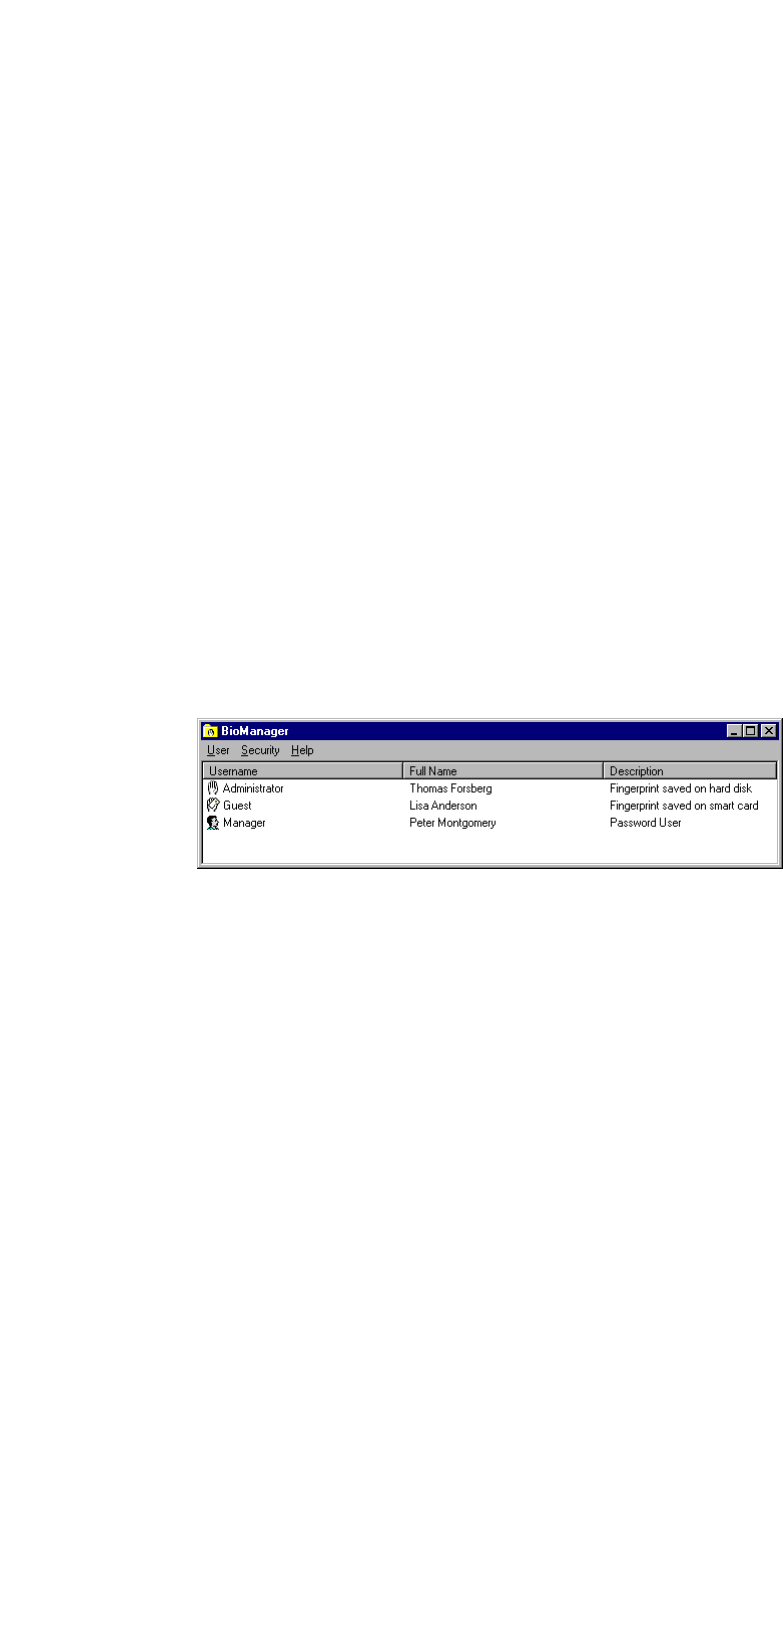
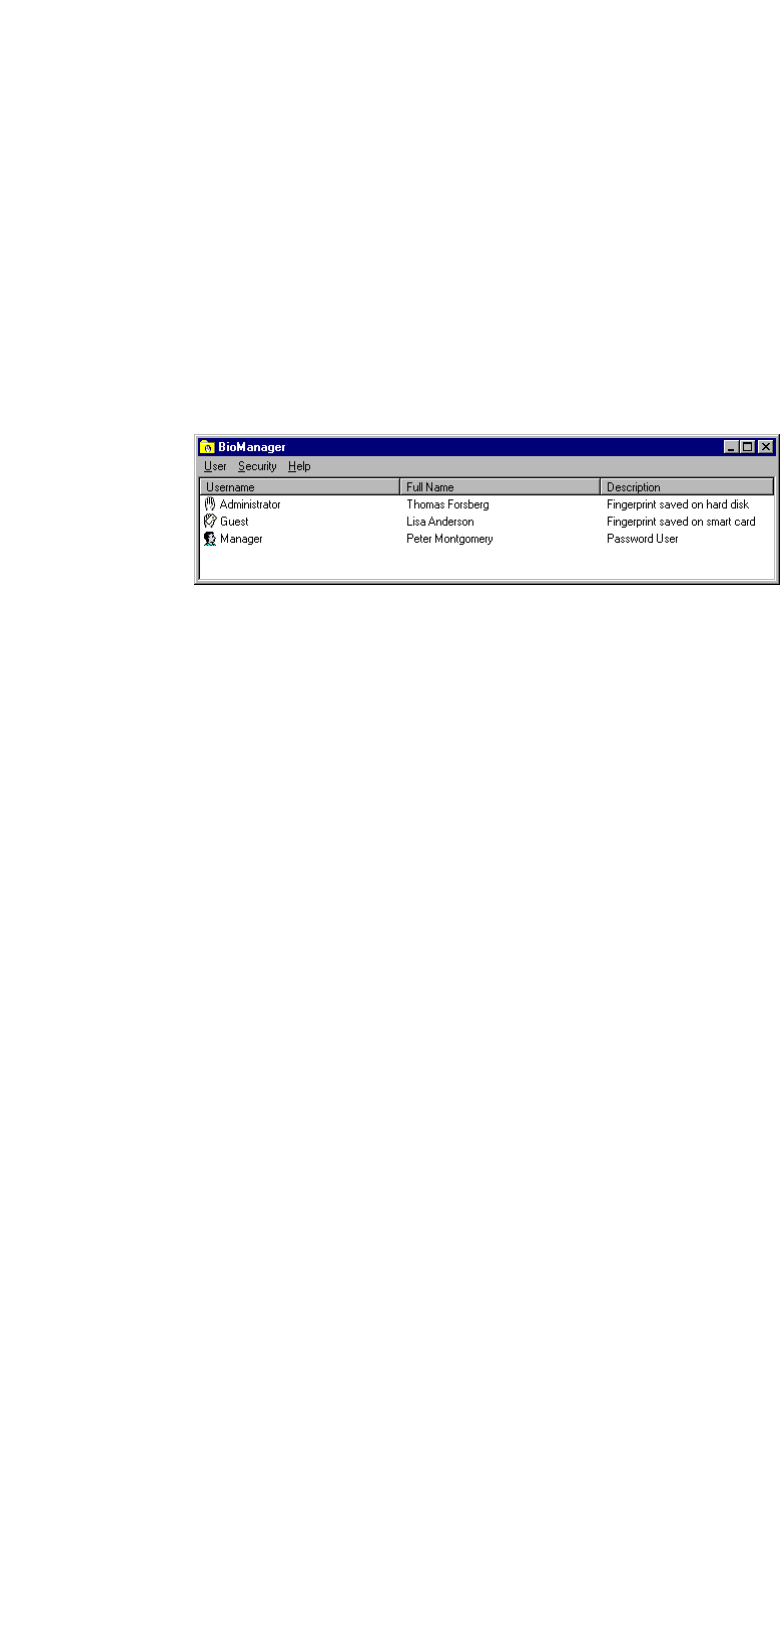
Users are listed in the BioManager with a symbol next to each username. The
following symbols are used to define a user’s current status:
Fingerprint user, with fingerprint information stored on the hard drive.
Smart card user. User with fingerprint information stored on smart card.
Password user. Can not log on using a fingerprint yet, must use a password
NOTE: If a password user is enrolled into the fingerprint database system, the current
password will no longer be valid.
Accessing the BioManager
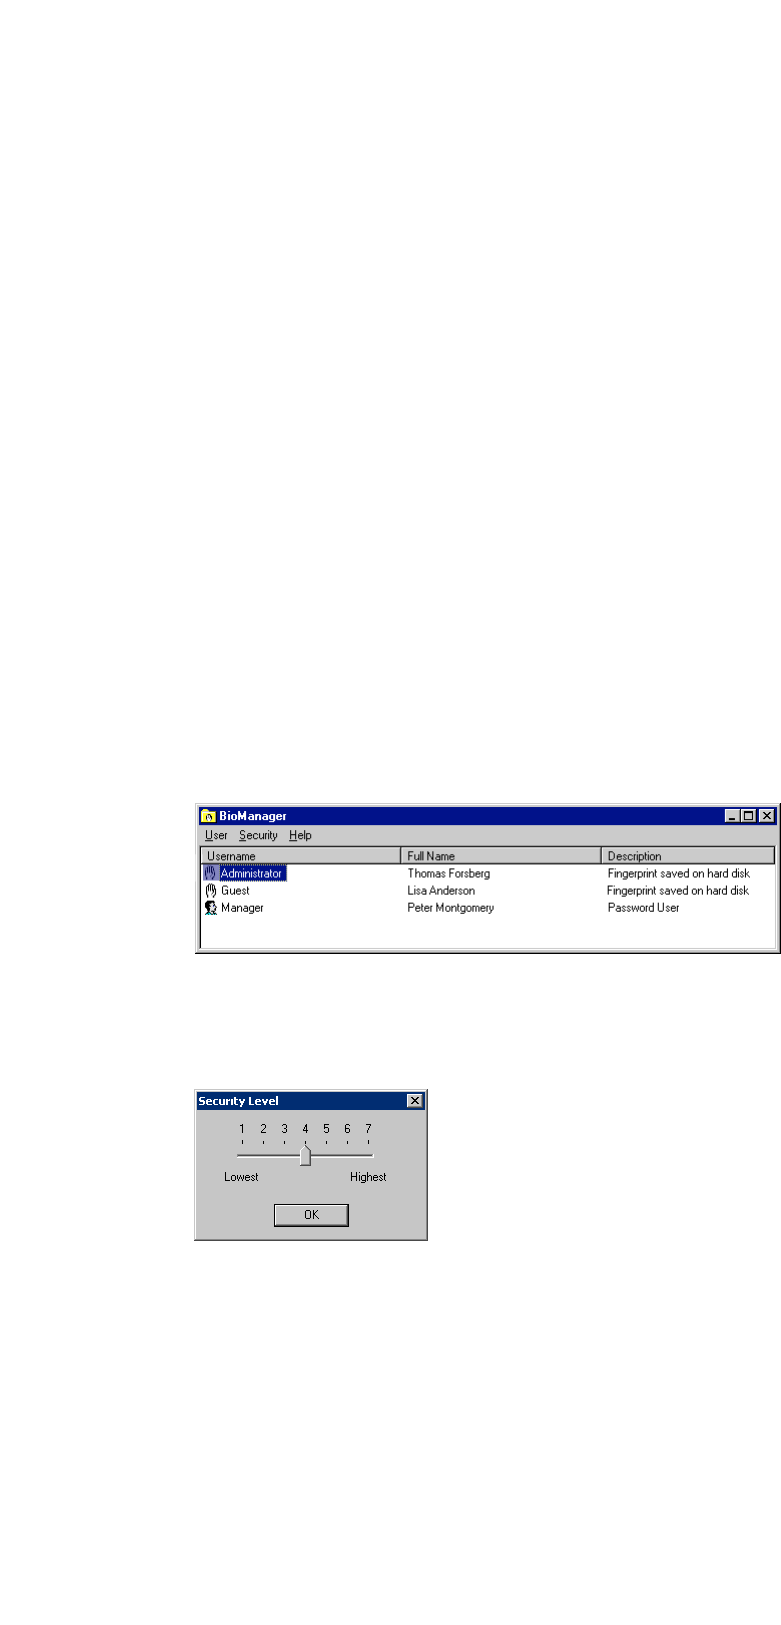
Click Start > Programs > Precise Biometrics > BioManager. The BioManager screen
appears.
Chapter 4 The BioManager

29
About Primary Logon Fingers
The primary logon finger is the finger normally used to log on. The system assumes that
the selected primary logon finger is placed on the fingerprint reader when a user logs
into or unlocks a workstation. The fingerprint on the sensor is then compared to the
primary logon fingerprint template in the database. The user can not change primary
logon finger, but he or she can easily choose to verify another registered finger when
logging on.
The primary logon finger is chosen during enrolment, in the Fingerprint registration
wizard. The wizard is accessed by clicking User > New User or User > Properties at the
BioManager screen. Any registered finger can be chosen as primary logon finger. To
change Primary Logon Finger, see Checking and Changing a User’s Properties at the end
of this chapter.
When the fingerprint registration has been completed, please notify the enrolled user
about the primary logon finger.
About Passwords
It is possible to let a fingerprint user log on with a backup password, if this option is cho-
sen during enrolment. It is not recommended, however, as passwords make it easier for
an unauthorised person to log into the user’s account.
NOTE: Only use the password option if the user really needs an alternative to fingerprints
for logon.
If the user uses a laptop computer at work and uses the same laptop at home or when
travelling, a password could be very useful. At logon, the user can choose to log on
using a fingerprint reader or by writing a password.
NOTE: If the password logon possibility is not chosen, the user can only log on using a
fingerprint. If a current password user is enrolled into the fingerprint database system, the
current password will no longer be valid.
Chapter 4 The BioManager

30
About the Security Level
The security level is an important part of the identification system. A higher security level
reduces the risk of an unauthorised person logging into an account. An administrator can
set the security level for biometric users. The security level is set globally; i.e. the set secu-
rity level affects all biometric users in the domain.
The False Acceptance Rate, FAR, is a parameter used to indicate the probability that an
unauthorised user is given access to an account. The False Rejection Rate, FRR, indicates
the probability that an authorised user is denied access to an account.
A secure system, i.e. a system with a high security level, means a low false
acceptance rate.
• Higher security levels = an excellent match between the fingerprint on the
sensor and the fingerprint template in the database is required. The FAR is
very low; the FRR is comparatively high.
• Lower security levels = a less perfect match between the fingerprint on the
sensor and the equivalent fingerprint template in the database is required.
The FAR is comparatively high; the FRR is low.
Higher security levels (level 6 or 7) result in:
• A very secure system. It will be virtually impossible for an unauthorised
person to log into a user account.
• A system, which sometimes rejects an authorised user trying to log into an
account. A small scratch, a distorted fingerprint or poor finger positioning
on the fingerprint reader may produce a fingerprint that the system does not
accept as a satisfactory match to the fingerprint template stored in the database.
Lower security levels (level 1or 2) result in:
• A less secure system. At lower security levels, the risk of an unauthorised
user logging into an account increases.
• A system, which very rarely rejects an authorised user who wants to log into
an account.
Chapter 4 The BioManager
31
Security level 4 is recommended to guarantee a reliable system that grants easy access
to authorised users while barring unauthorised users.
When should the higher and lower levels be selected? A lower security level is selected
when there is little risk of an unauthorised user attempting to log on, and
a very fast verification process is desirable. A higher security level is selected when secu-
rity is the main concern. In this case, the verification process may take a little longer.
NOTE: An experienced biometric user is less likely to be falsely rejected than a novice
biometric user. The FRR decreases as a user gets more used to biometric logon and learns
a proper finger placement.
Setting the Security Level
The security level is accessed from the BioManager.
1. Click Start > Programs > Precise Biometrics > BioManager.
The BioManager screen appears.
2. Click Security > Security Level.
The Security Level screen appears.
Set the security level and click OK. Security level 4 is recommended for
most purposes.
Chapter 4 The BioManager
32
Passwords and Security Level
If an administrator allows users to log on with a password, a high security level loses part
of its function. Even if the system is very restrictive when fingerprints are verified, the security
might suffer from users who write down passwords on notepads or choose a very simple
password, which can easily be cracked.
Fingerprint Registration
In order for a user to use a fingerprint to log on, the fingerprint must be read and stored in
a database – i.e. it has to be registered. The fingerprint data will be stored on a hard
drive.
Only an administrator can register fingerprints using the BioManager. To enrol a user,
whose username is not on the username list, see Beginning Fingerprint Registration of a
New User in this chapter. To enrol a user listed in the BioManager, see Beginning Finger-
print Registration of an Existing User in this chapter.
Beginning Fingerprint Registration of a New User
Log on as administrator.
1. Click Start > Programs > Precise Biometrics > BioManager.
The BioManager screen appears.
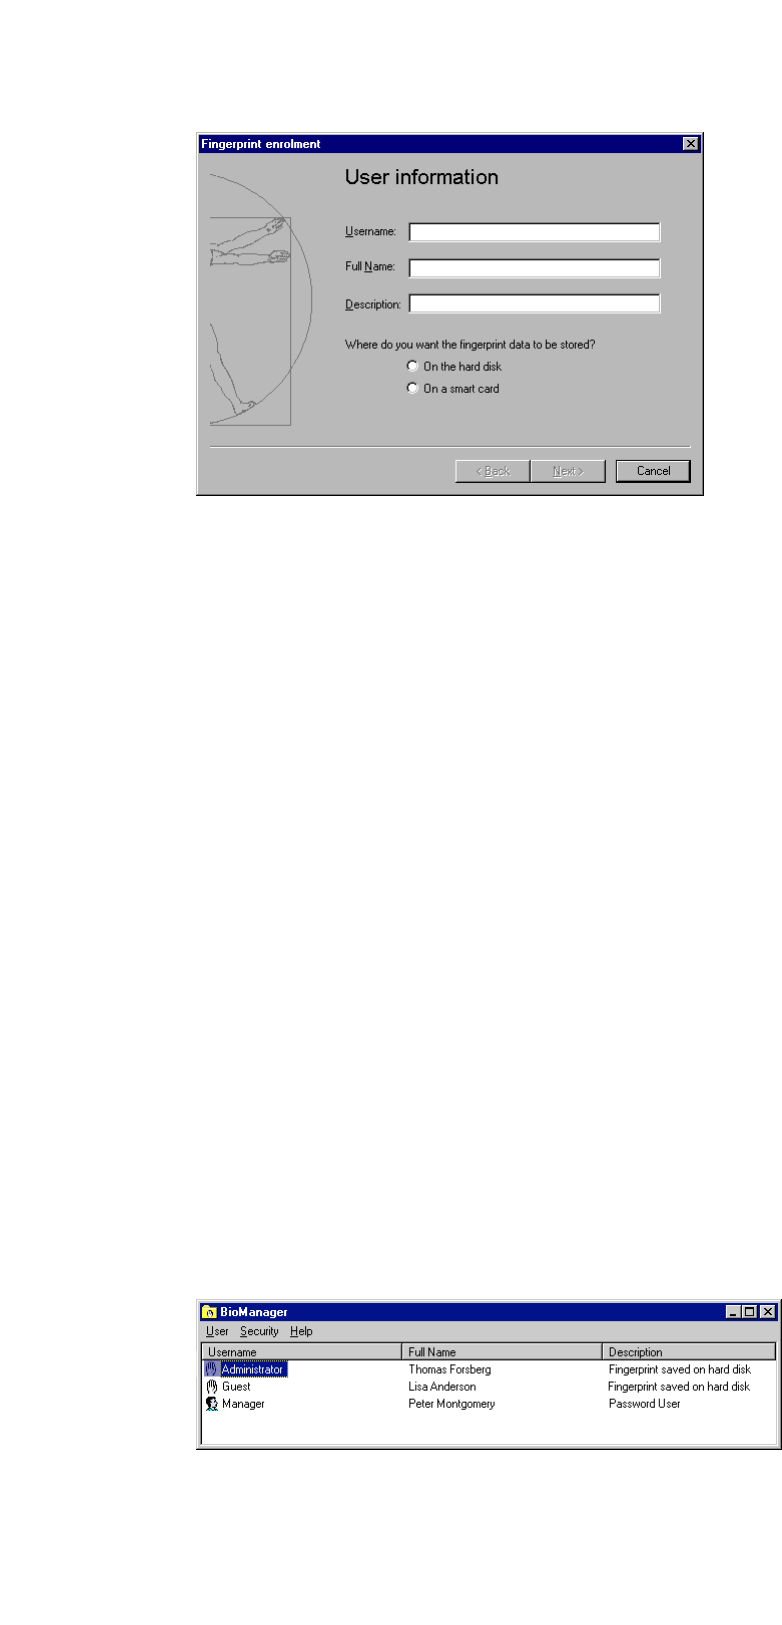
2. Click User > New User. The introduction screen of the Fingerprint registration
wizard appears.
Chapter 4 The BioManager
33
3. Type the user’s name in the Username field.
4. Type the user’s complete name in the Full Name field.
5. Type the user description in the Description field.
6. Choose where to save the fingerprint data.
7. Click Next.
See Continue Fingerprint Registration in is this chapter for information on how to continue.
Beginning Fingerprint Registration of an
Existing User
If a user has an account registered, his or her username is listed in the BioManager. An
administrator can register, or re-register, the fingerprints of both password users and
current biometric users.
1. Log on as administrator.
2. Click Start > Programs > Precise Biometrics > BioManager.
The BioManager screen appears.
3. Double-click on a username. You can also click on a username and then click
User > Properties. The introduction screen of the Fingerprint registration wizard
appears.
Chapter 4 The BioManager
34
4. Type the full name in the Full Name field.
5. Type the description in the Description field.
6. Choose where to save the fingerprint data.
7. Click Next.
See Continue Fingerprint Registration in this chapter for information on how to continue.
Chapter 4 The BioManager
35
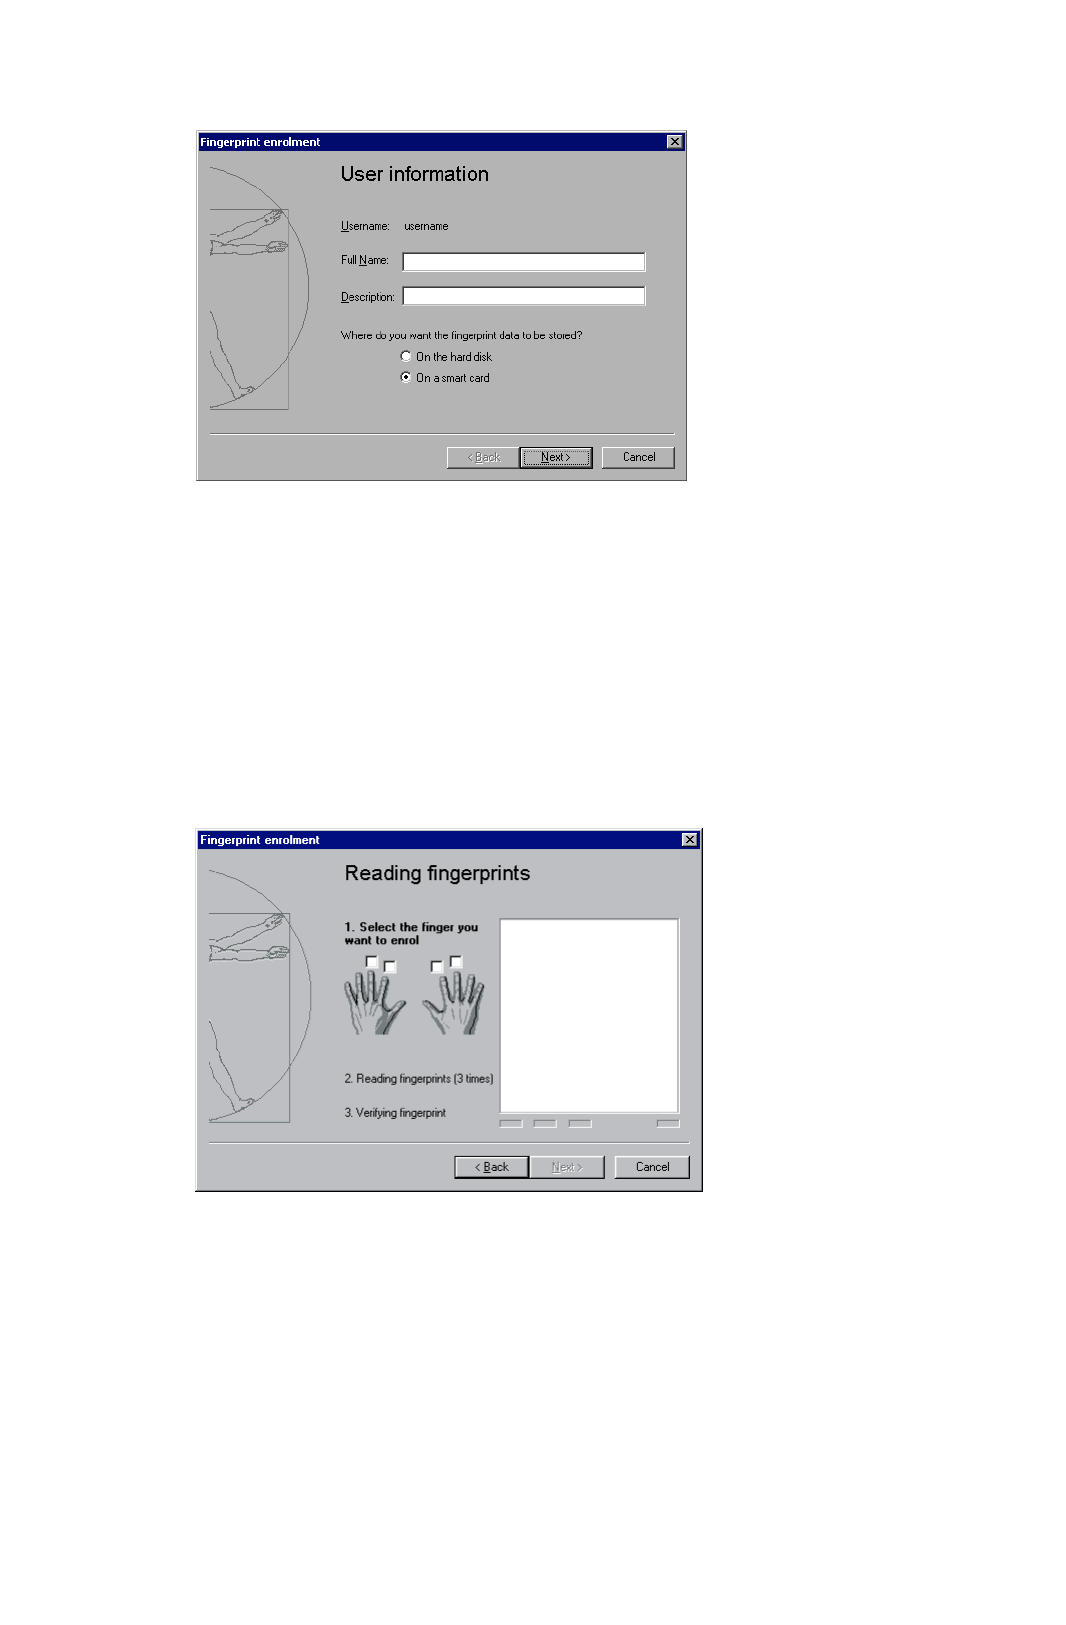
Continue Fingerprint Registration
When you click Next in the introduction screen of the Fingerprint registration wizard, the
fingerprint collection screen appears:
1. Select the finger to register by clicking in one of the checkboxes. Let the user
follow the instructions on the screen. Make sure the selected finger is placed on
the fingerprint reader sensor.
NOTE: Instruct the user to place the middle of the finger pad on the sensor, to ensure an
image rich in fingerprint information.
2. After collecting three images of the fingerprint, the best image is automatically
selected and verified against a fourth image. This is done to ensure that the best
image is of sufficient quality. Registered fingers will be marked with grey check
boxes containing a checkmark.
NOTE: It is recommended that more than one fingerprint is registered, in case a finger
gets scratched, etc. To register additional fingerprints, just click in a new checkbox.
3. Click Next when as many fingers as desired have been registered.
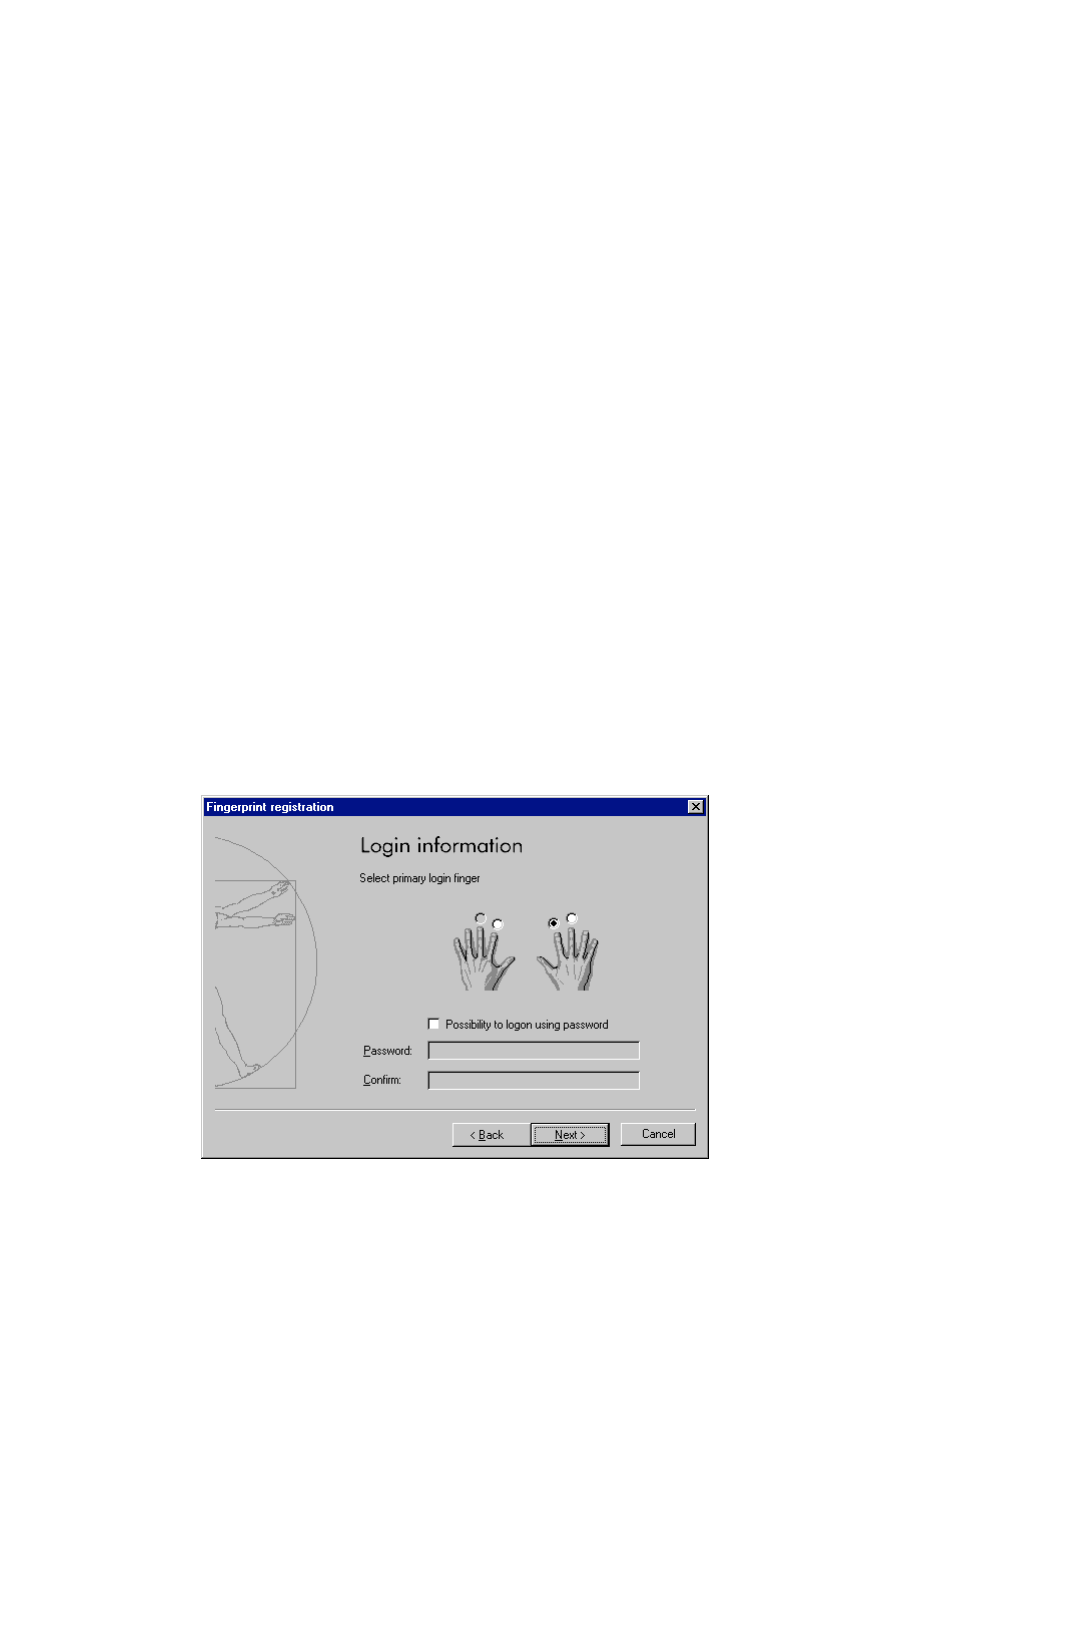
The logon information screen appears.
4. Select primary logon finger. The primary logon finger is the finger that usually
will be used to log on or unlock a workstation.
Chapter 4 The BioManager
36
5. If desired, select the Possibility to log on using password checkbox. This enables
the user to log on using either a password or a fingerprint. Type the password
in the Password field. Confirm the chosen password in the Confirm field.
NOTE: If a current password user is enrolled, the current password is no longer valid. A
new password must be typed, in order for the user to log on with a password as a
backup.
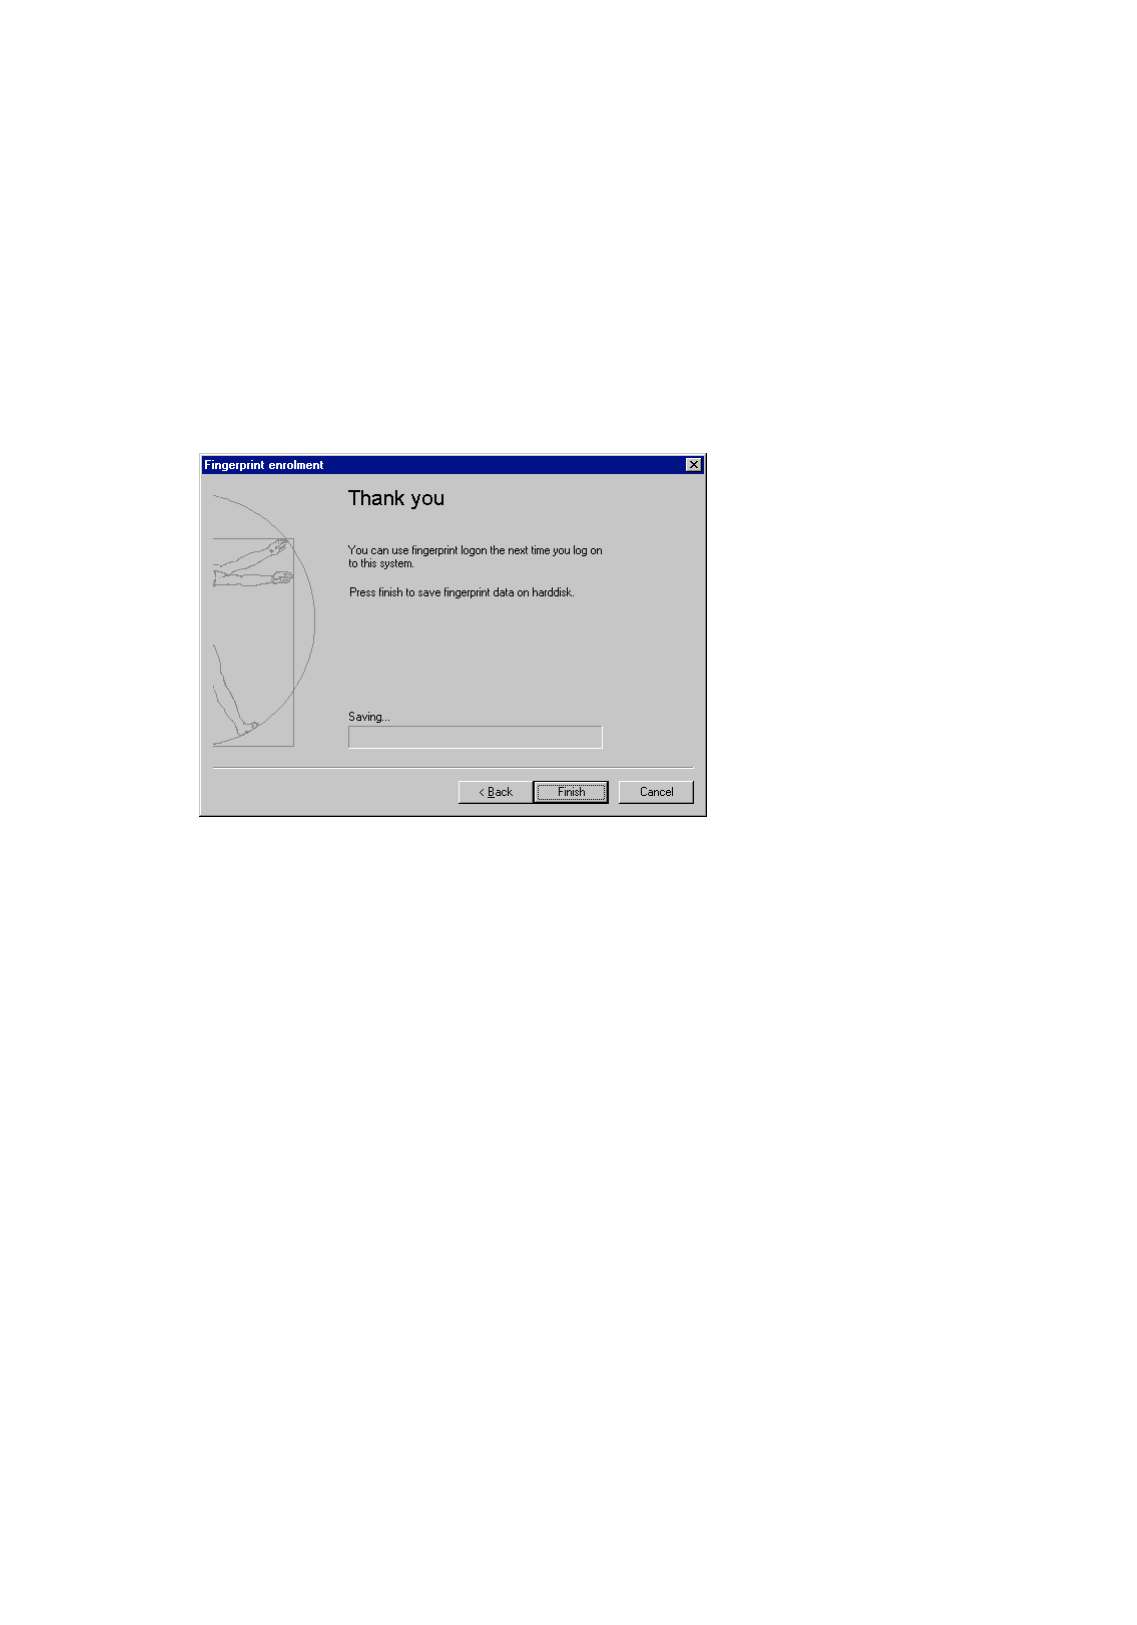
6. Click Next. The saving screen appears.
7. Click Finish.
The information is encrypted and saved on the hard drive or on a smart card.
Chapter 4 The BioManager
37
Checking and Changing a
User’s Properties
An administrator can check and change the set properties for an enrolled user:
• Full name
• Description
• Register fingerprints
• Primary logon finger
• Possibility to log on using a password
1. Log on as administrator.
2. Click Start > Programs > Precise Biometrics > BioManager.
The BioManager screen appears.
3. Double-click on a username. You can also click on a username and then click
User > Properties. The Fingerprint registration wizard appears.
4. Navigate through the screens using the Back and Next buttons.
5. Make the desired changes and save the data by clicking Finish on the last
screen.
See Continue Fingerprint Registration in this chapter for information on how to register
fingerprints.
Chapter 4 The BioManager
38
Deleting a User
When a user is removed from the username list, he or she cannot log into the associated
account anymore.
1. Click Start > Programs > Precise Biometrics > BioManager.
The BioManager screen appears.
2. Click on the username that you want to delete from the list.
3. Click User > Delete.
4. Click OK to delete the user.
5. Click OK to confirm operation.
The user is now deleted and can no longer log into the system.
Chapter 4 The BioManager

39
Chapter 5
When an administrator has registered your fingerprints, you can log into the system using
the fingerprint reader. Fingerprint logon is a very secure and simple way to log on. If you
want detailed information on how to place a finger on the fingerprint reader, please see
Placing Your Finger Correctly on the Fingerprint Reader in the Using the Fingerprint
Reader chapter.
NOTE: In order to log into your domain server account using your fingerprint:
• the Precise 100 SC must be installed on your workstation
• the Precise 100 SC Server must be installed on the domain server
• your fingerprints must be registered by a domain server administrator on the
domain server
This chapter includes the following information:
• Logging on with fingerprint stored on smart card
• Logging on with fingerprint stored on hard disk
• Logging on with a password
Logging on
Chapter 5 Logging onChapter 5 Logging on
40
Logging on with fingerprint
stored on smart card
NOTE: You can only log into a domain account using the fingerprint reader once an
administrator has enrolled your fingerprints on the domain server. You can only log on
with a fingerprint that has been enrolled and stored on the hard disk or on a smart card.
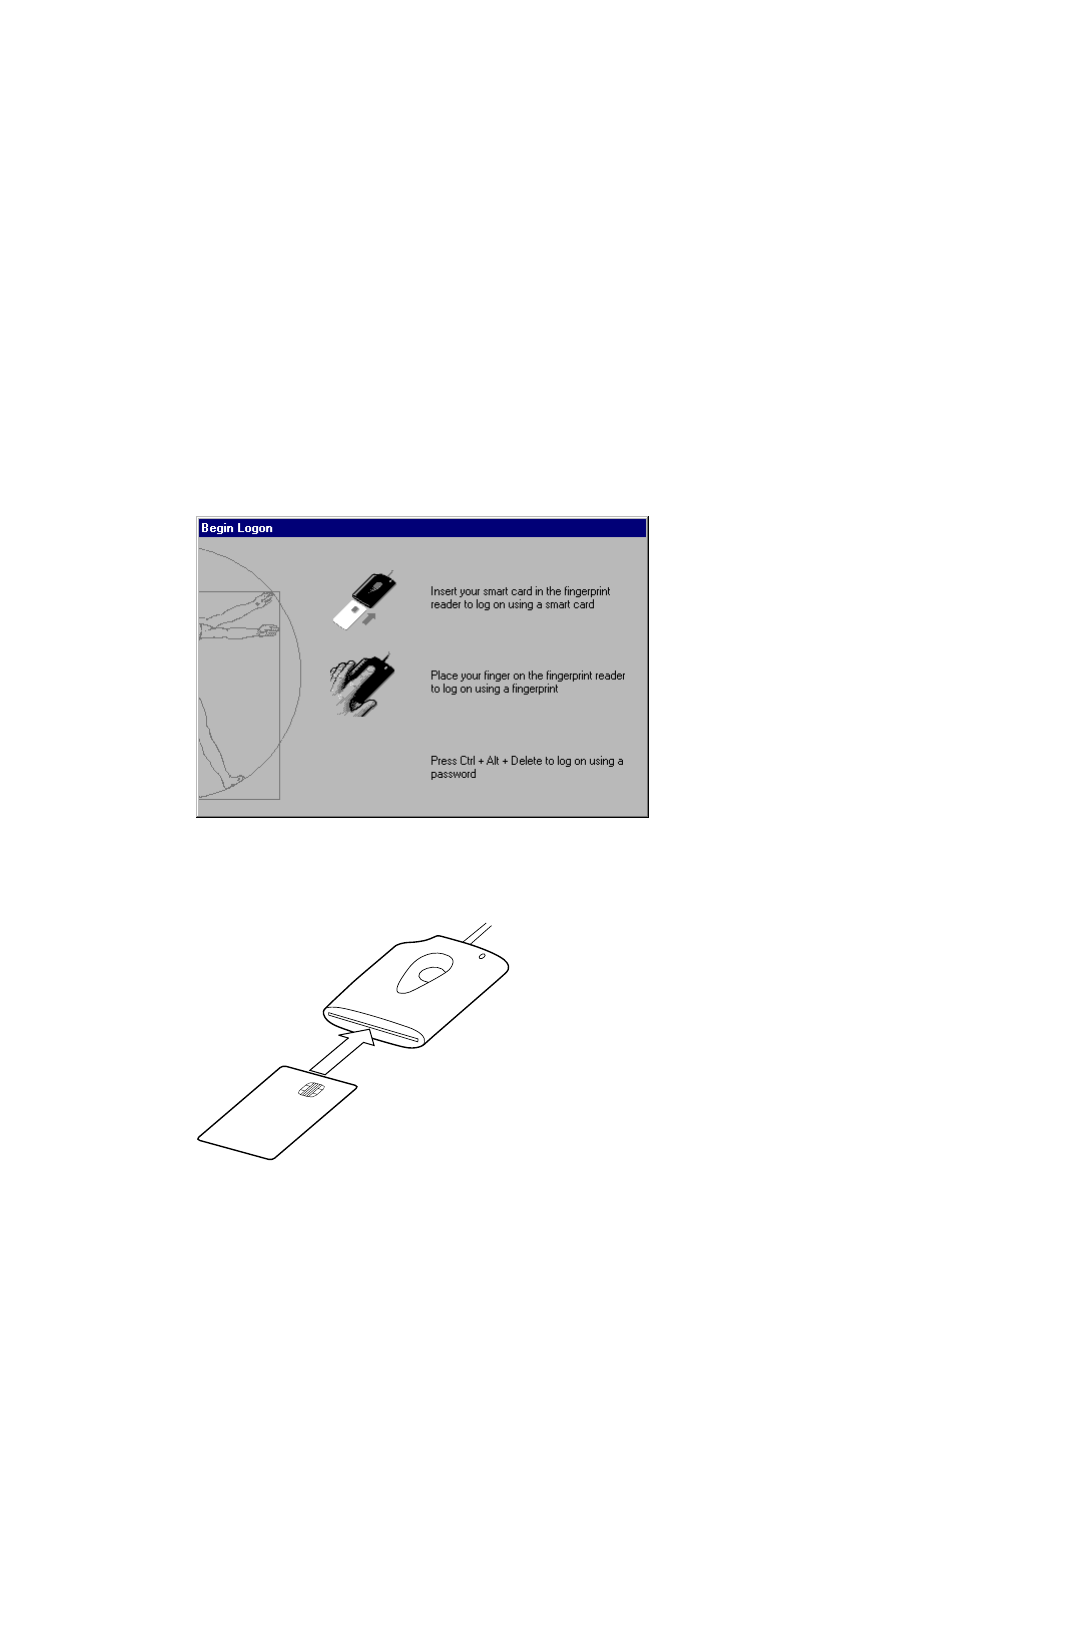
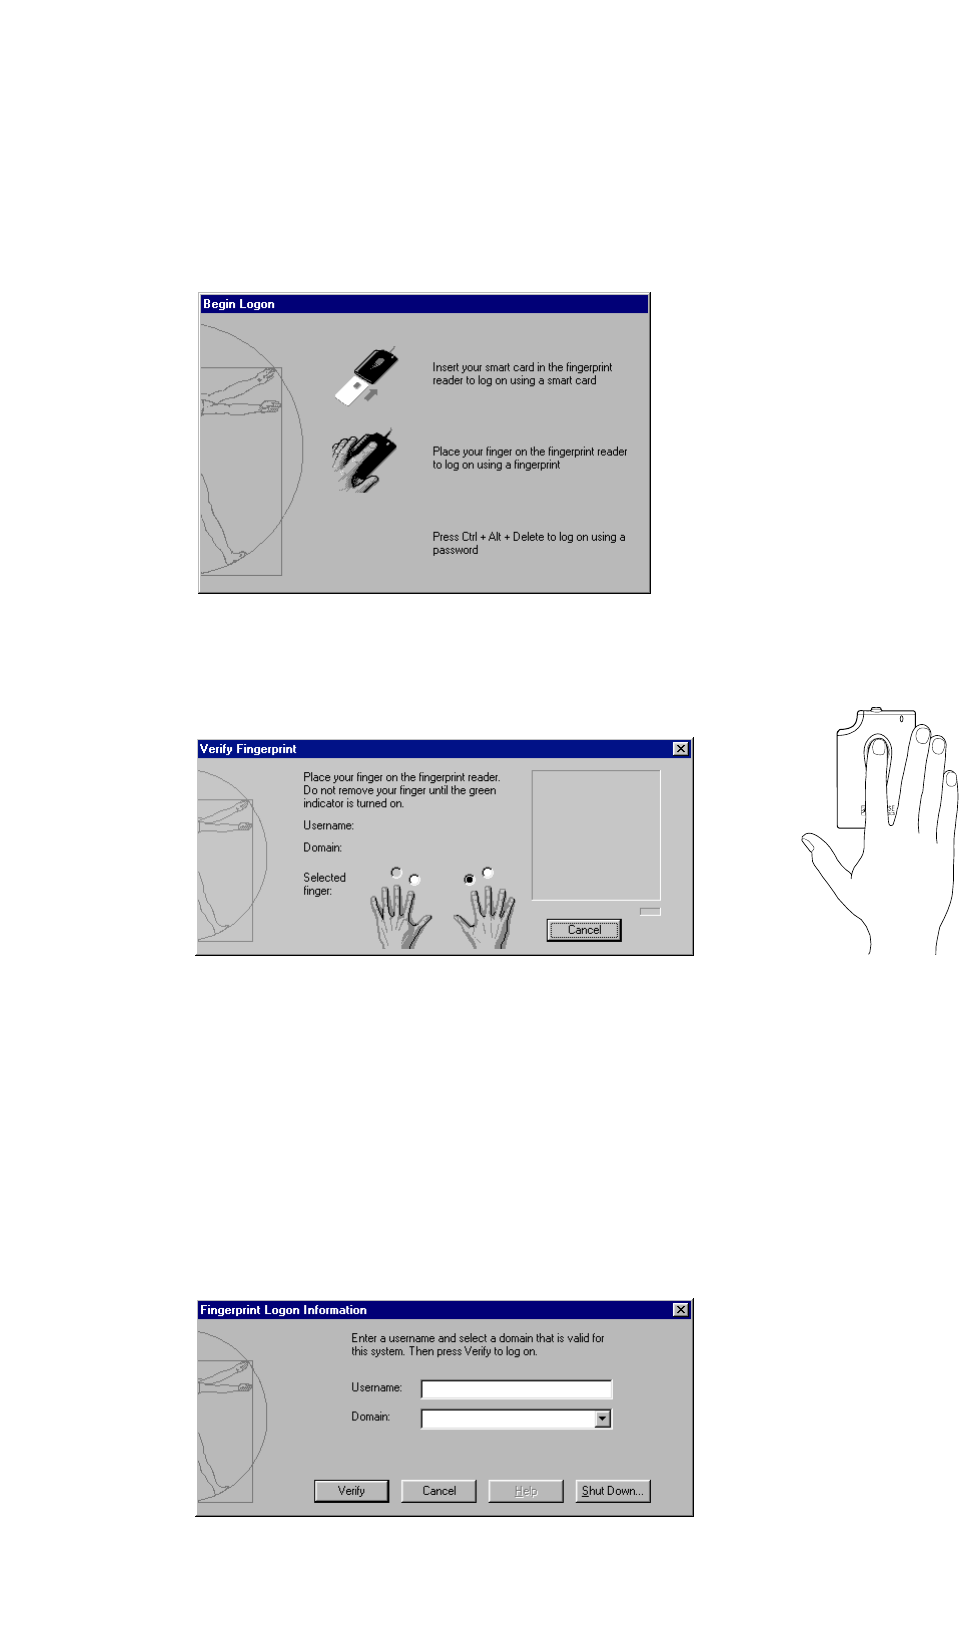
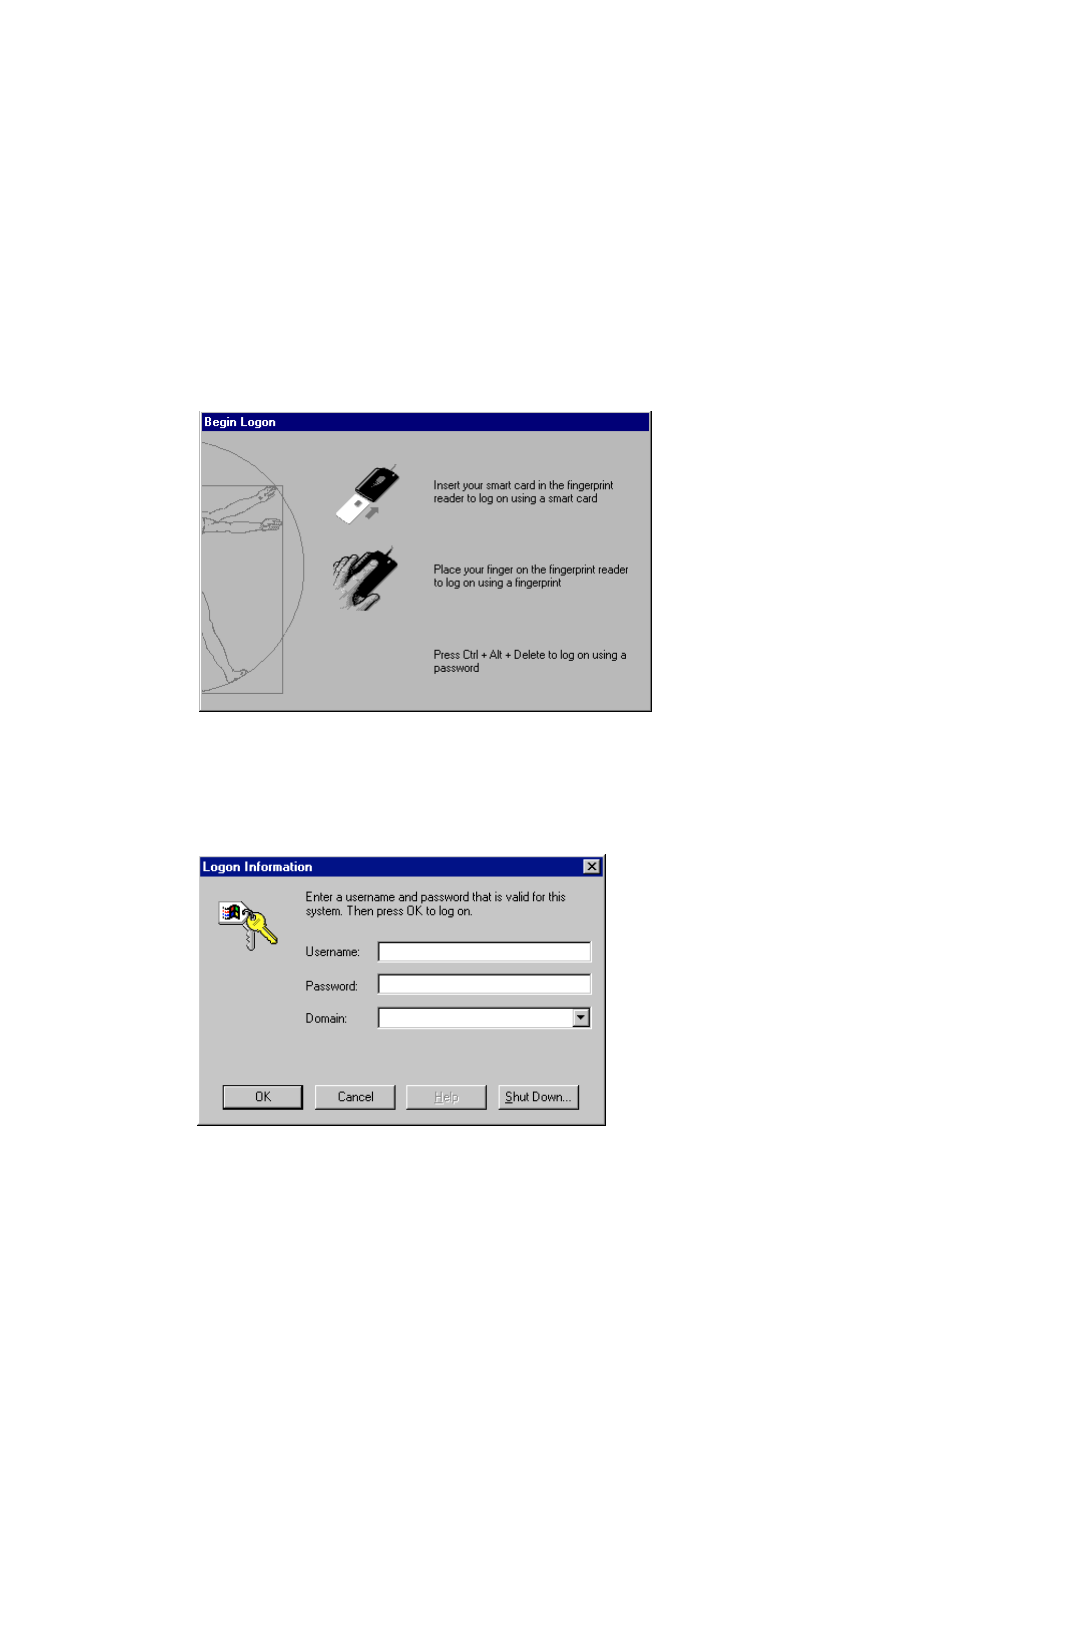
To begin logon from the Begin Logon screen
1. Insert your smart card as shown on the screen.
NOTE: The smart card must be fully inserted – make sure that you can see the tip of it in
the upper left corner of the fingerprint reader.
Chapter 5 Logging onChapter 5 Logging on
41
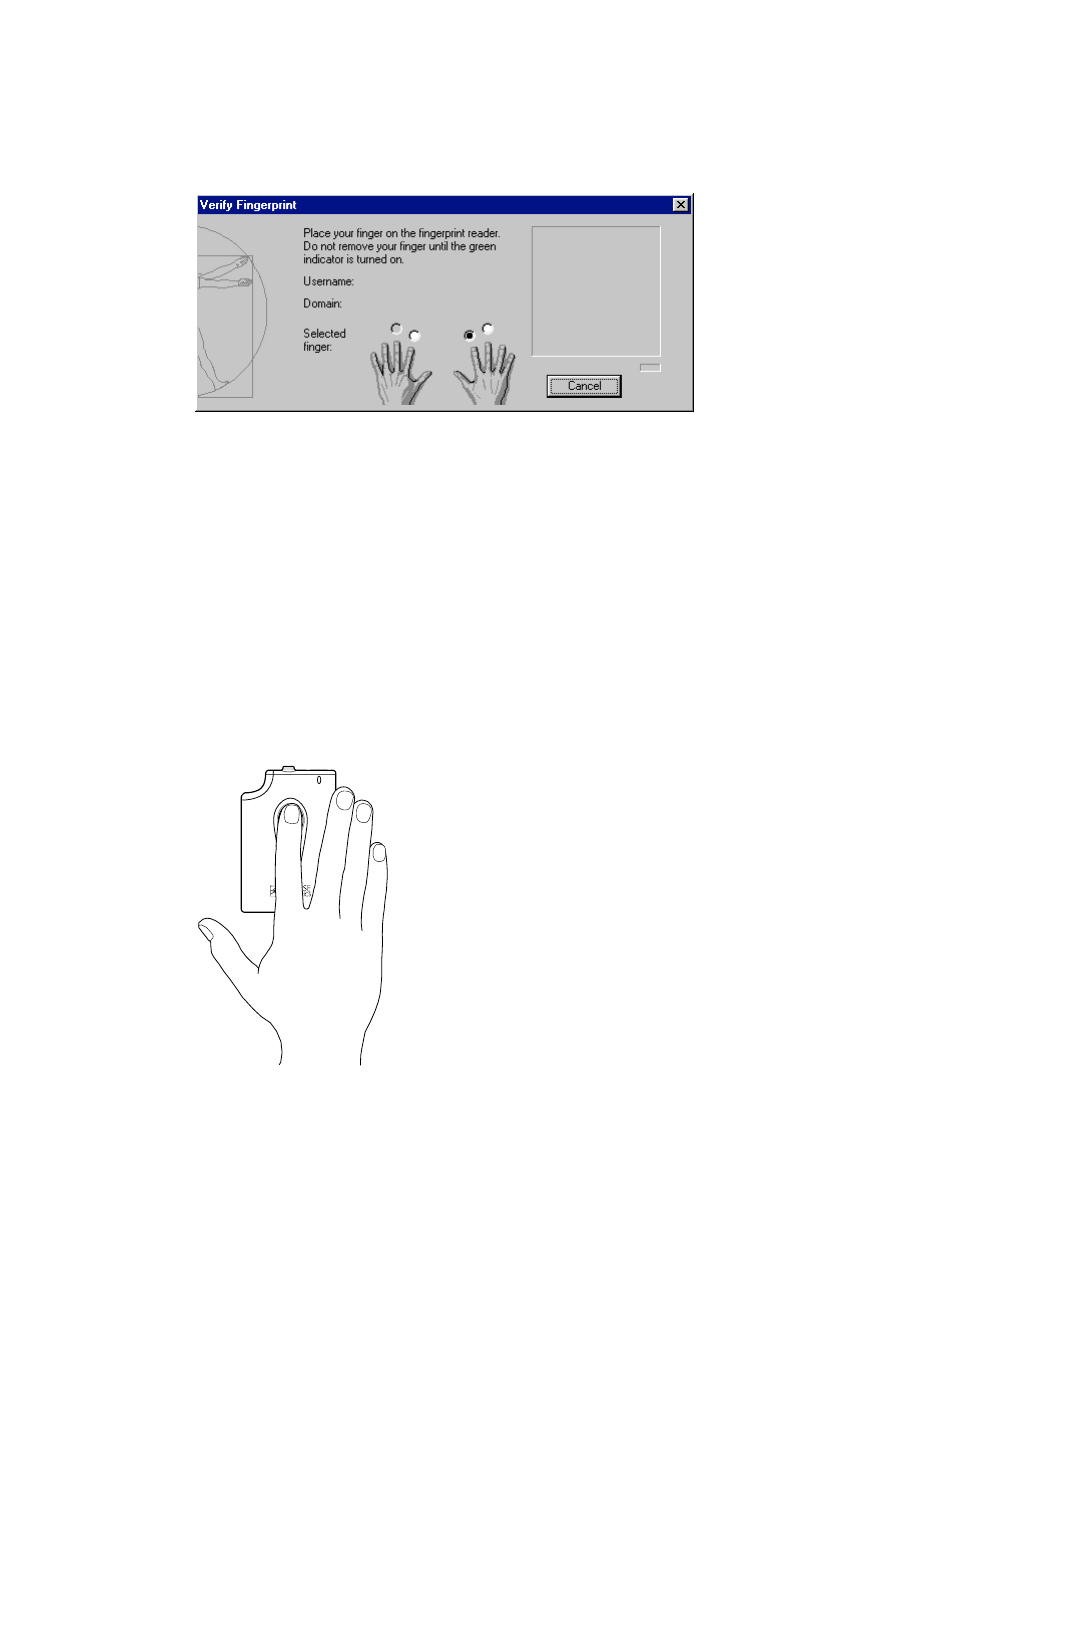
The Verify Fingerprint screen appears. Your primary logon finger will be selected.
2. Make sure the Username and Domain are correct, in other words, that it is your
card.
3. Place your finger pad (the area of your finger containing the fingerprint) on the
fingerprint reader sensor. The yellow light starts flashing.
NOTE: To place another finger on the sensor, select that finger on the Verify Fingerprint
screen – you must of course have more than one of your fingerprints stored on the smart
card.
4. Keep the finger placed on the sensor until the yellow light ceases to flash
The system verifies your fingerprint and access rights for the selected domain and displays
the Windows desktop.
If the logon fails, try lifting your finger and putting it back on the sensor again. Try adjust-
ing the position of your finger. If you still can not log on, see Fingerprint and Smart Card
Troubleshooting in the Troubleshooting chapter.
Chapter 5 Logging on
42
Logging on with a Fingerprint
To log on from the Begin Logon screen:
1. Place your primary logon finger on the fingerprint reader sensor.
The Verify Fingerprint screen appears.
2. Keep your finger placed on the sensor as long as the yellow light is flashing.
The system verifies your fingerprint and access rights for the selected domain
and displays the Windows desktop.
NOTE: The system will try to identify you as the most recent user. If you are not the most
recent user, follow the instructions below:
1. Click Cancel on the Verify Fingerprint screen.
The Fingerprint Logon Information screen will appear.
Chapter 5 Logging on
43
2. Type your username in the Username field.
3. Select your domain from the Domain pull-down list.
4. Click Verify. The Verify Fingerprint screen appears.
5. Place your primary logon finger on the sensor. The yellow light starts flashing.
NOTE: To use another finger on the sensor, select that finger on the Verify Fingerprint
screen – assuming that the fingerprint is previously registered.
6. Keep the finger placed on the sensor until the yellow light ceases to flash.
The system verifies your fingerprint and access rights for the selected domain and displays
the Windows desktop.
If logon fails, try lifting your finger and putting it back on the sensor again. Try adjusting
the position of your finger. If you still can not log on, see Fingerprint Troubleshooting in
the Troubleshooting chapter.
Chapter 5 Logging on
44
Logging on with a Password
NOTE: You can only log on using a password if the administrator asked you to type a
password when you were enrolled and registered your fingerprints. Once your finger-
prints have been registered, any previous password is no longer valid for logon.
To begin logon from the Begin Logon screen:
1. Press Ctrl + Alt + Delete.
The Logon Information screen appears.
2. Type your username in the Username field.
3. Type your password in the Password field.
4. Select your domain from the Domain pull-down list.
5. Click OK.
The system verifies your password and access rights for the selected domain and displays
the Windows desktop.
If logon failed, please check the spelling of your username and password.
Chapter 5 Logging on

45
Chapter 6
When you leave your workstation temporarily, it is recommended that you lock it to pre-
vent others from using it and accessing your files. The screen saver function can be used
to automatically lock the computer.
This chapter includes the following information:
• Locking your workstation
• Unlocking your workstation using your fingerprint without a smart card,
in combination with a smart card, or by typing a password
Locking
and
Unlocking
Chapter 6 Locking and Unlocking

46
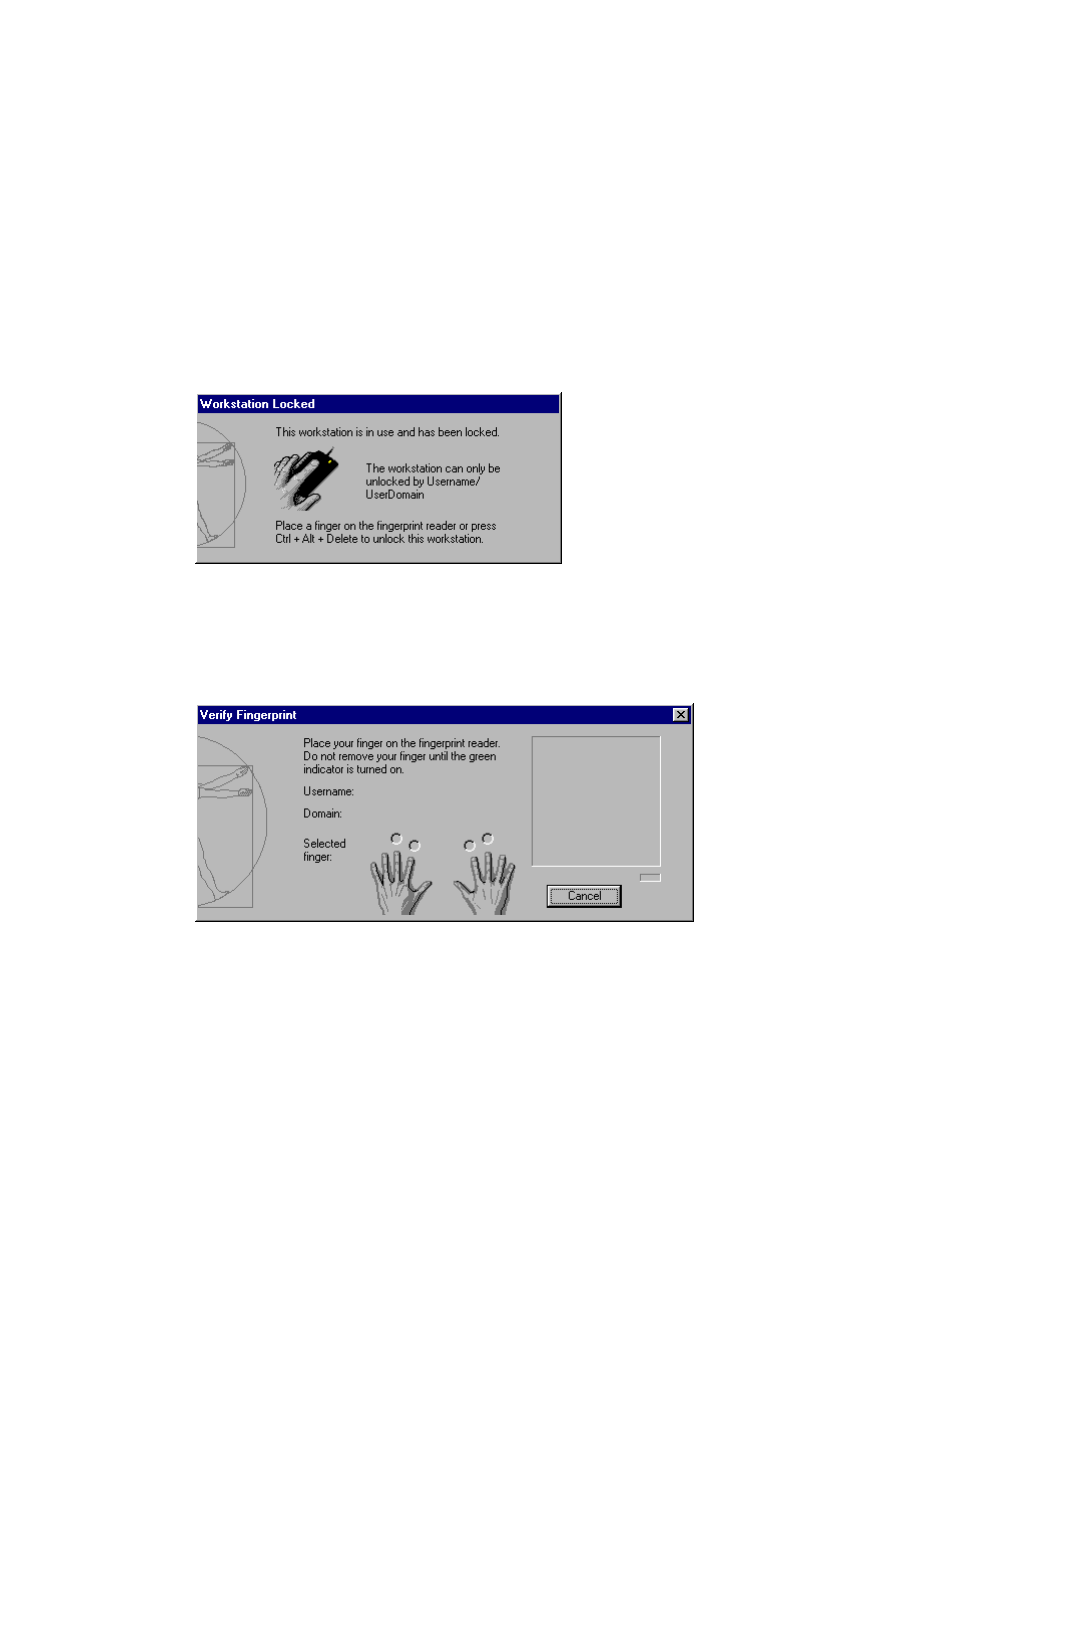
Locking a Workstation
To lock the workstation you are working on:
1. Press Ctrl + Alt + Delete.
The Windows Security screen appears.
2. Click Lock Workstation.
The system locks the workstation. You are the only one who can unlock your workstation.
An administrator can log you off.
Chapter 6 Locking and Unlocking
47
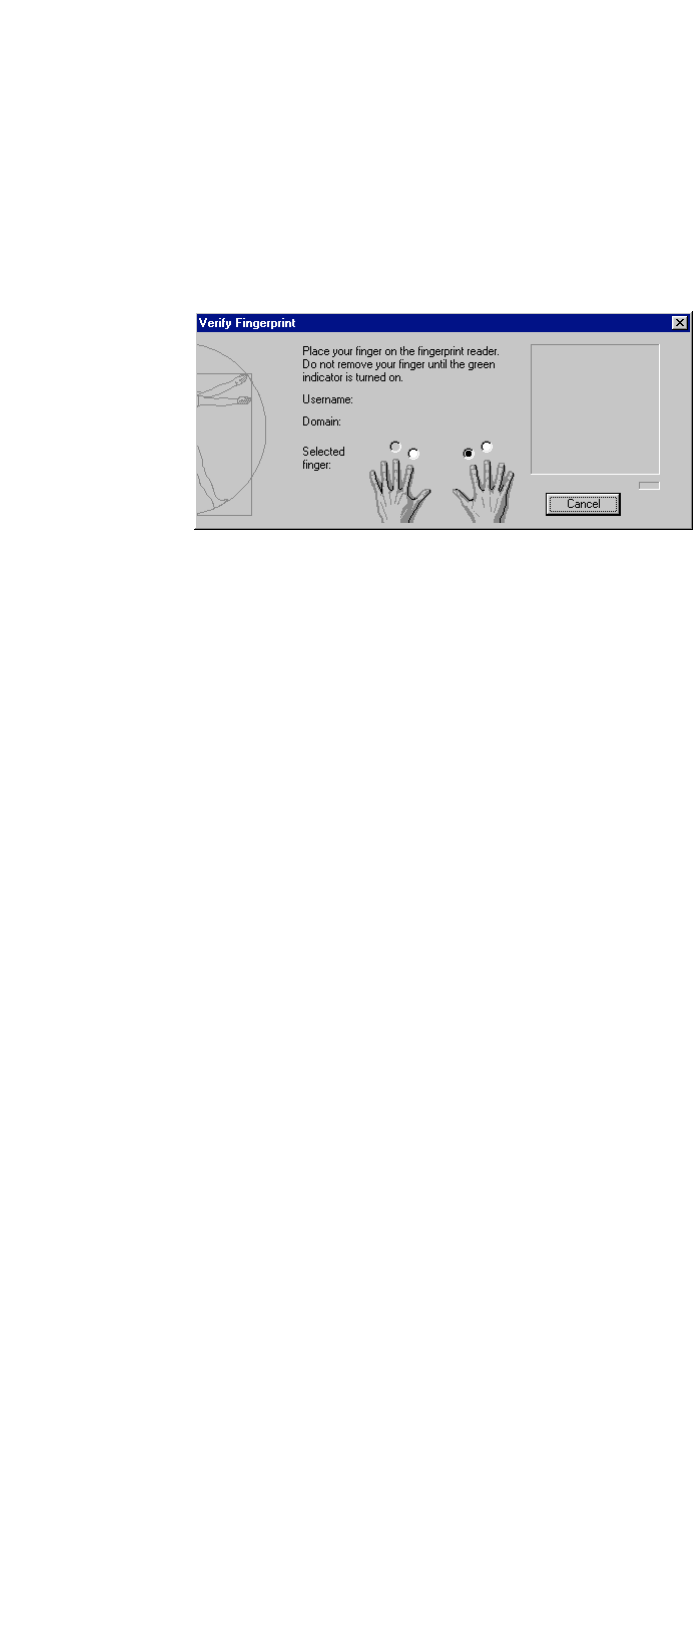
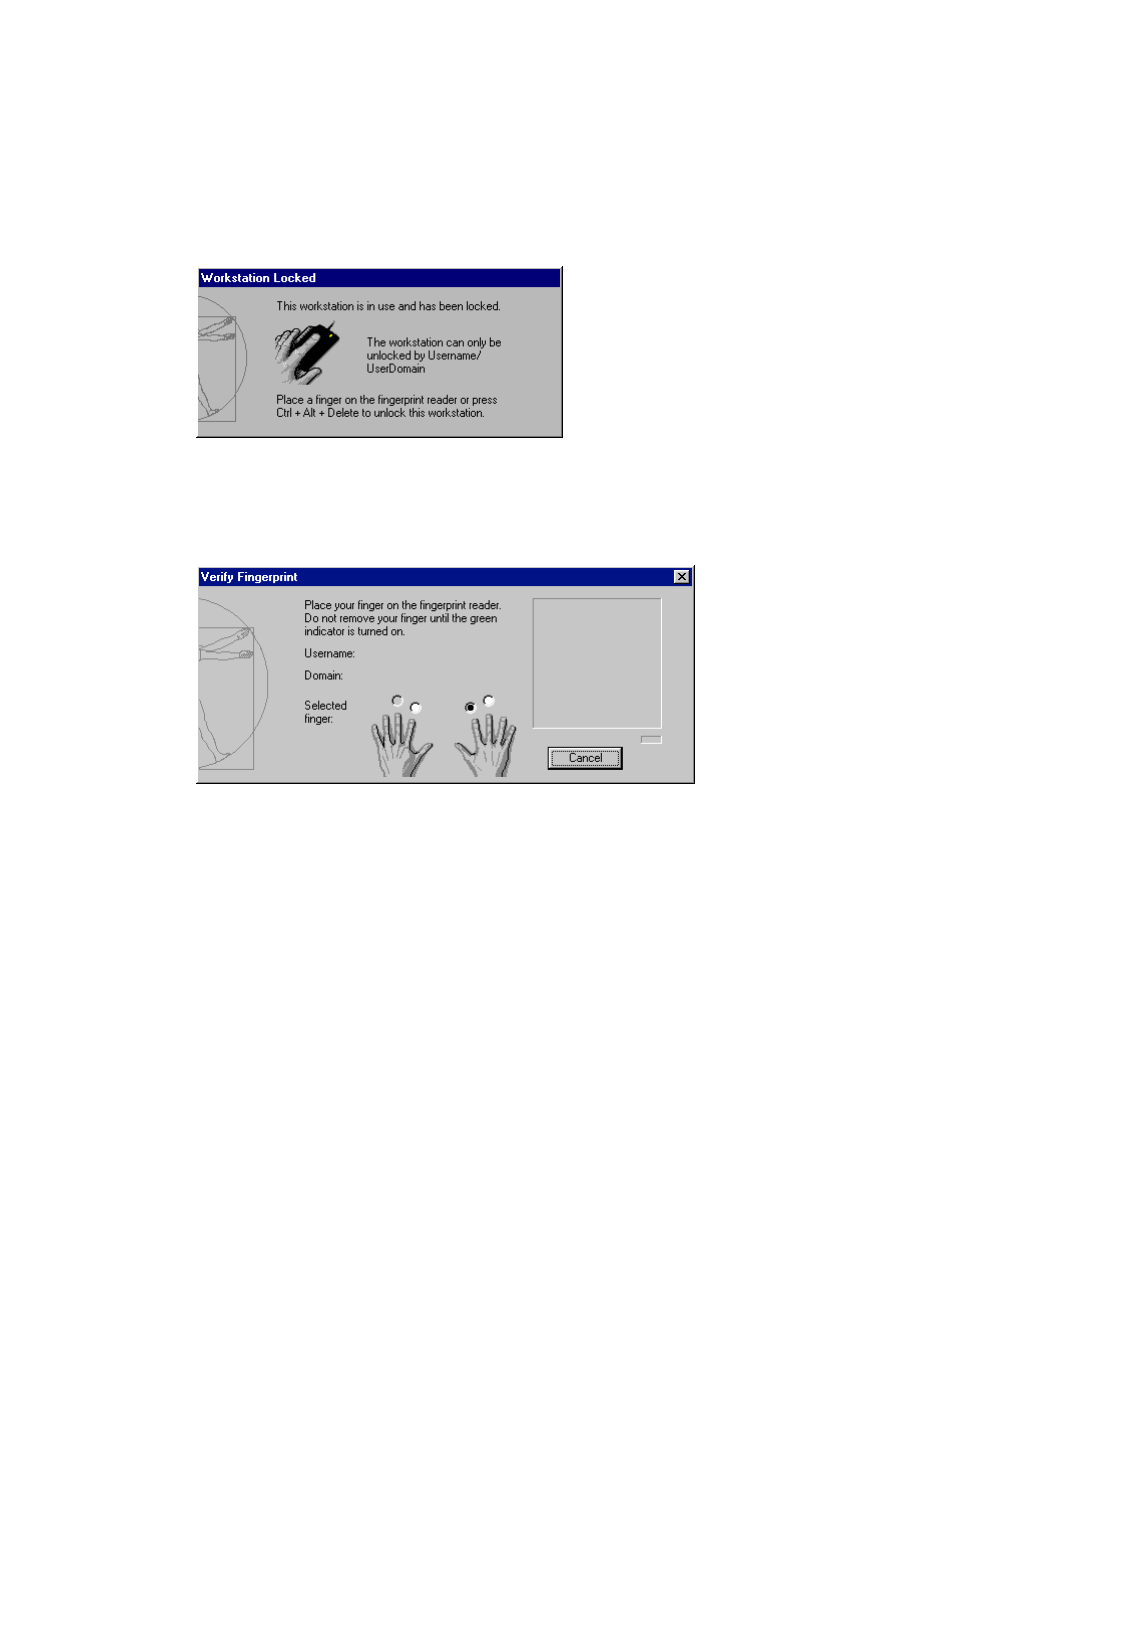
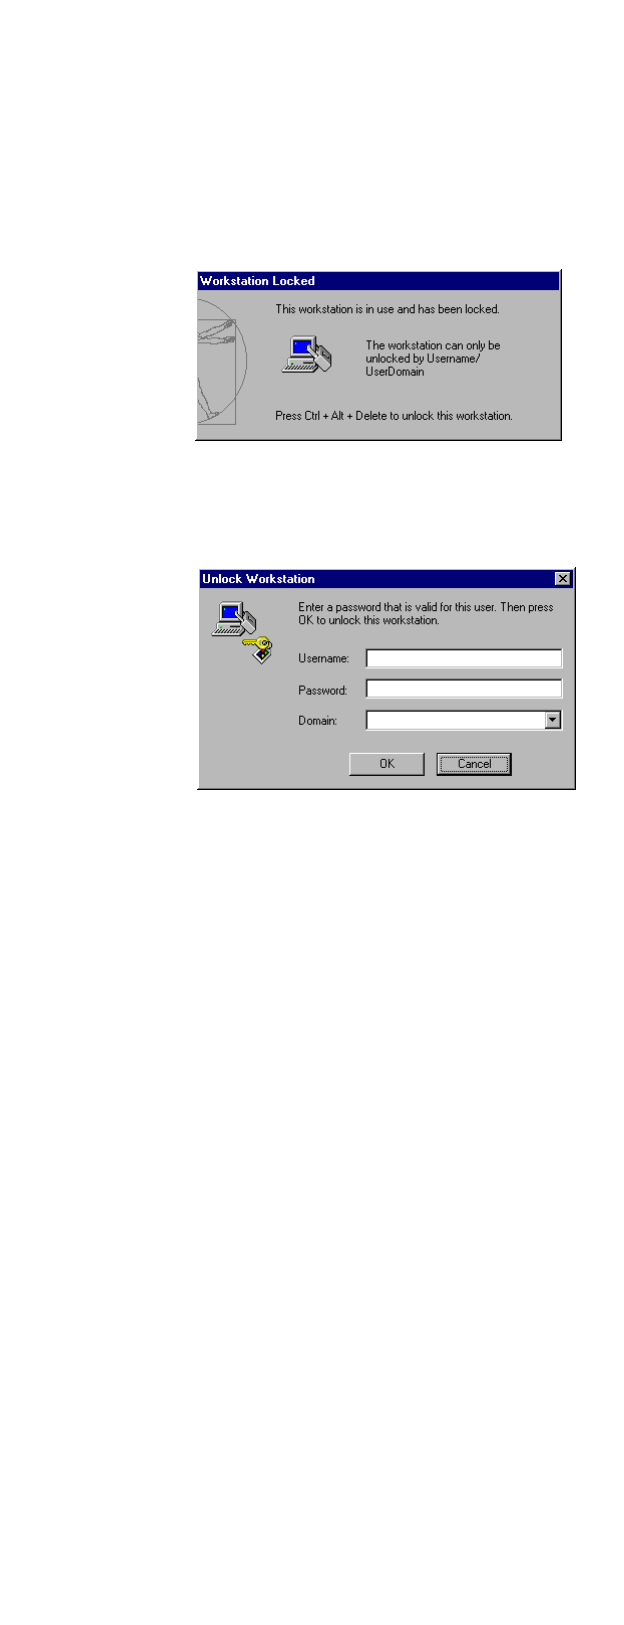
Unlocking a Workstation
Unlocking with fingerprint stored on smart card
To unlock a workstation from the Workstation Locked screen:
1. Insert your smart card into the smart card slot on the fingerprint reader as shown
on the screen. The Verify Fingerprint screen appears.
2. Place the selected finger on the sensor.
3. Keep your finger placed on the sensor as long as the yellow light is flashing.
The system verifies your fingerprint and displays the Windows desktop.
NOTE: To place another finger on the sensor, select that finger on the Verify Fingerprint
screen – you must of course have more than one of your fingerprints enrolled.
If the unlocking fails, try lifting your finger and putting it back on the sensor again. Try
adjusting the position of your finger. If you still can not unlock, see Fingerprint and Smart
Card Troubleshooting in the Troubleshooting chapter.
If you have been given a password from an administrator, you can press
Ctrl +Alt + Delete at the Workstation Locked screen, to log on using a password.
48
Unlocking with a Fingerprint
To unlock a workstation from the Workstation Locked screen:
1. Place your primary logon finger on the fingerprint reader sensor. The Verify
Fingerprint screen appears. Your primary logon finger will be selected.
2. Keep your finger placed on the sensor as long as the yellow light is flashing.
The system verifies your fingerprint and displays the Windows desktop.
NOTE: To logon with another finger on the sensor, select that finger on the Verify
Fingerprint screen – assuming that the fingerprint is previously registered.
If the unlocking fails, try lifting your finger and putting it back on the sensor again. Try
adjusting the position of your finger. If you still can not unlock, see Fingerprint Trouble-
shooting in the Troubleshooting chapter.
If you have registered a backup password from an administrator, you can press
Ctrl + Alt + Delete at the Workstation Locked screen, to log on using a password.
Chapter 6 Locking and Unlocking
49
Unlocking with a Password
To unlock a workstation from the Workstation Locked screen:
1. Press Ctrl + Alt + Delete.
The Unlock Workstation screen appears.
2. Type your password in the Password field. Click OK and your Windows
desktop will be displayed.
If the unlocking fails, please check the spelling of the password.
Chapter 6 Locking and Unlocking

50
Chapter 7
Fingerprint Troubleshooting
If the fingerprint verification fails, the red light on the fingerprint reader is turned on.
• Lift your finger and put it back on the sensor. Try to slightly adjust the positioning
of your finger.
• Make sure you placed the right finger on the sensor, i.e. the finger marked
with a dot on the Verify Fingerprint screen.
• Try to log on using another registered fingerprint.
• Place your finger flat on the sensor – not rotated in any direction. See Placing
Your Finger Correctly on the Fingerprint Reader in the Using the Fingerprint
Reader chapter for more information.
• Place the centre of your finger pad in the sensor centre.
• Apply enough pressure – the fingerprint reader must be able to detect the
fingerprint contours.
• Your finger must not be wet.
• If your finger pad is too dry try breathing on your finger before verification.
• The sensor must be clean. If necessary, gently wipe the sensor with a soft cotton
cloth dampened with a mild ammonia-based cleaner.
• If using the parallel port, the parallel port must be set to ECP mode. See Setting
the Parallel Port in the Installation chapter for more information.
• Check that the computer and fingerprint readers are properly connected.
See Connecting the Fingerprint Reader in the Installation chapter for more
information.
If you are still unable to log on, please contact an administrator:
• You might need to register your troublesome fingerprint one more time, or
register a new fingerprint.
• Your user account might be deleted.
Troubleshooting
Chapter 7 Troubleshooting

51
Smart Card Troubleshooting
If your smart card can not be read, remove it from the fingerprint reader.
• Insert the smart card with the chip end first and the chip facing upwards.
• Make sure the chip is not dirty. You can clean it by gently rubbing a softcotton
cloth over the chip surface.
• If you are using the parallel port, it must be set for ECP mode. See Setting the
Parallel Port in the Installation chapter for more information.
• Check that the computer and fingerprint reader are properly connected. See
Connecting the Fingerprint Reader in the Installation chapter for more
information.
If you are still unable to log on, please contact an administrator.
The chip may be broken.
Password Troubleshooting
You must have been given a password by an administrator during the enrolment to be
able to log on using a password.
1. Make sure the username, domain and password are valid.
2. Make sure the spelling is correct and that Caps Lock is not active. Windows
is case sensitive.
If you are still unable to log on, please contact an administrator. Your user account might
be deleted.
Chapter 7 Troubleshooting

52
Chapter 8
Only users with administrator rights can uninstall the Precise Biometrics software.
The consequences of uninstalling are:
1. No user accounts will be affected in any way.
2. Users without backup password will have to get a password to access their user
account. The password used before biometric conversion is no longer valid.
3. Backup passwords registered in the BioManager can be used as standard
Windows password.
4. If the precise 100 SC is reinstalled, the biometric user accounts can be
accessed as before.
NOTE: The installed Precise 100 Client software is good for use with both Precise 100 A
and Precise 100 SC fingerprint readers. If the system is changed from Precise 100 SC to
Precise 100 A, the existing software should not be uninstalled.
Uninstalling the Precise 100 Client Software
on Windows NT
1. Click Start > Settings > Control Panel.
The Control Panel screen appears.
2. Double-click Add/Remove Programs.
The Add/Remove Programs Properties screen appears.
3. Click Precise 100 Client.
4. Click Add/Remove…
5. Follow the instructions in the wizard, selecting Remove on the
Program Maintenance page.
6. Click Yes to restart the computer
The Precise 100 Client software is uninstalled.
Uninstalling
Chapter 8 UninstallingChapter 8 Uninstalling

53
Uninstalling the Precise 100 Client Software
on Windows 2000
1. Click Start > Settings > Control Panel.
The Control Panel screen appears.
2. Double-click Add/Remove Programs.
The Add/Remove Programs screen appears.
3. Click Precise 100 Client.
4. Click Remove.
5. Confirm by clicking Yes.
6. Click Yes to restart the computer.
The Precise 100 Client software is uninstalled.
Uninstalling the Precise 100 Parallel Drivers
1. Double-click uninstall.exe. This program can be found in the directory
../Program Files/Precise Biometrics/Parallel Drivers.
2. Restart the computer.
The Parallel drivers are uninstalled.
Chapter 8 UninstallingChapter 8 Uninstalling

54
Glossary
Biometric
A biometric is a measurable, unique, physical characteristic. For example, the pattern on
your retinas and your fingerprints are biometrics.
ECP/Enhanced Capabilities Port
The Precise 100 A PAR and Precise 100 SC PAR readers communicates with the comput-
er via the computer’s parallel port. To make the fingerprint reader and computer communi-
cate properly via the parallel port, the parallel port must be set to a mode called ECP –
Enhanced Capabilities Port. Most new computers are set to ECP by default, but not all.
See the Installation chapter for details. This does apply for USB readers.
Enrolment
The process of registering your fingerprints is sometimes referred to as enrolment, as you
are enrolled into the system as a biometric user. See Registration for more details.
Finger Pad
The finger pad is the part of your finger containing the fingerprint. If you take a closer
look on your finger pad, you will find that most of the information in the fingerprint comes
from the middle of the finger pad. That is the part, which should be placed in the middle
of the sensor when you register or log on.
Fingerprint Reader
The fingerprint reader is used for two things: to read a finger placed on the sensor, and to
read and store information on a smart card. The sensor measures the capacitance of the
finger pad, which reveals the pattern of the fingerprint. Thus, a paper copy with a picture
of a fingerprint can not grant access to the system.
The fingerprint reader is used both to enrol a fingerprint to store it in a database, and to
verify a fingerprint during logon. If you have a personal smart card, insert it into the slot
before placing your finger pad on the sensor.
Guiding bumps
Diode
smart card slot
55
Fingerprint registration
See Registration
Fingerprints
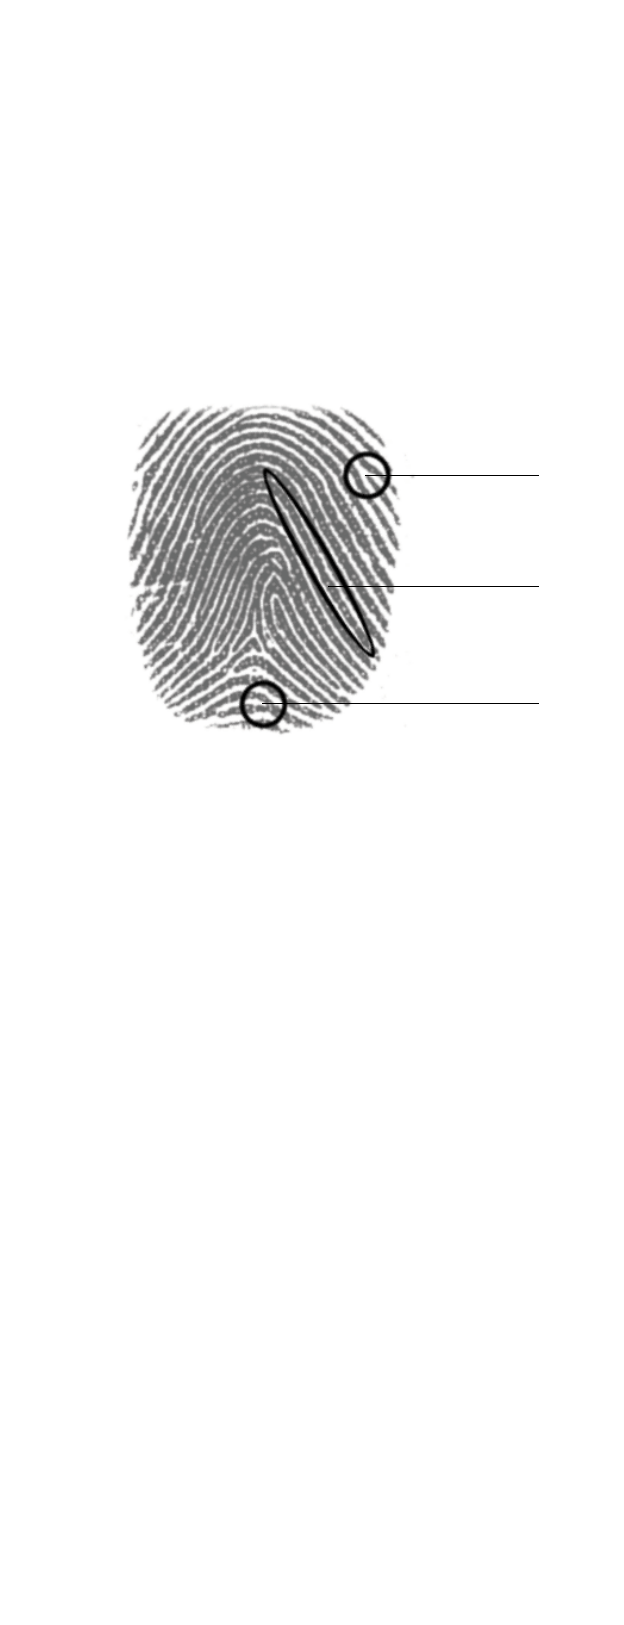
Your fingerprint can be described as a pattern of lines or ridges with valleys in between.
The lines form specific patterns that are observable to the naked eye. Loops, arches and
whirls are examples of patterns found in a fingerprint.
Some finger print structures
The fingerprints also include so-called minutiae points. Minutiae points are the points,
where a ridge begins, ends or splits. Precise Biometrics’ system identifies a person by
looking at loops, arches, whirls and minutiae points, and by measuring global features
such as line thickness and curve. These features make every fingerprint unique.
Plug-n-play
Plug and Play is a technology that supports automatic configuration of PC hardware and
external devices. A user can just attach a new device such as sound card or peripheral
devices (”plug it in”) and start working (”begin playing”) without having to configure the
device manually. Plug and Play technology is implemented in hardware, in operating sys-
tems, and in supporting software such as drivers and BIOS.
Primary logon finger
The primary logon finger is the finger normally used when logging into the system. The
system assumes that you place your selected primary logon finger on the fingerprint
reader when you log on or unlock a workstation. The fingerprint on the sensor is then
compared to the primary logon fingerprint template in the database. For example, if your
right index finger has been selected as the primary logon finger, the right index finger is
marked on the Verify Fingerprint screen, which appears when you log on or unlock a
workstation.
Reader
See Fingerprint Reader
Ending ridge
Ridge
Bifurcation or fork

56
Registration
When an administrator enrols you into the fingerprint database system, your fingerprints
will be registered. You will have to place each finger pad on the fingerprint reader sensor
four times. The best image will be saved in a database. Registered fingerprints are used
when you log into the system. For example, if your right index finger has been registered,
you can place your right finger on the fingerprint reader sensor to verify your identity
when you log on. The fingerprint on the sensor will be compared to the registered finger-
print. If your fingerprint on the sensor matches the fingerprint in the database, you are
granted access to the system.
NOTE: Once the software is installed, you will be able to register fingerprints using the
BioManager (see The BioManager chapter for details) and store them locally if you log
on as administrator on your local workstation. However, that will not grant access to
domain server accounts. To be able to log into a domain server account using your fin-
gerprint, your fingerprint will have to be registered and stored on the domain server.
Sensor
The sensor is the black window on the fingerprint reader. The sensor is used to read your
fingerprint. Do not “roll” your finger pad when you log on or register a fingerprint. Just
press it flat to the sensor.
Smart Card
A smart card is a card with information stored in a small chip. The smart card can be
described as some kind of miniature computer – it has a small processor and memory.
The difference is that the smart card is passive, i.e. it has no internal
power supply, and must hence rely on power from some kind of equip-
ment. When the smart card is inserted into the fingerprint reader, it “awak-
ens”. The fingerprint reader supplies the necessary power, and the com-
puter reads information from the chip. It is thus important to keep the chip
clean. If the chip looks dirty, you can clean it carefully with a soft cotton
cloth.
Smart Card Base Components
Smart Card Base Components provide the necessary files needed to enable applications
to communicate with a smart card through a reader attached to a PC.
Verification
When you register a fingerprint, log on or unlock a system, your fingerprint is verified.
During verification, the finger on the sensor is compared to a template of a registered fin-
gerprint from the fingerprint database. In other words, you verify that you indeed are who
you claim you are and that the fingerprint on the sensor matches the fingerprint template
in the database.