Primatronix SH100 Navigation and Information Reference Point System User Manual S H IM May 09
Primatronix Ltd Navigation and Information Reference Point System S H IM May 09
Users Manual
Instruction Manual
Model: STEP-HEAR™
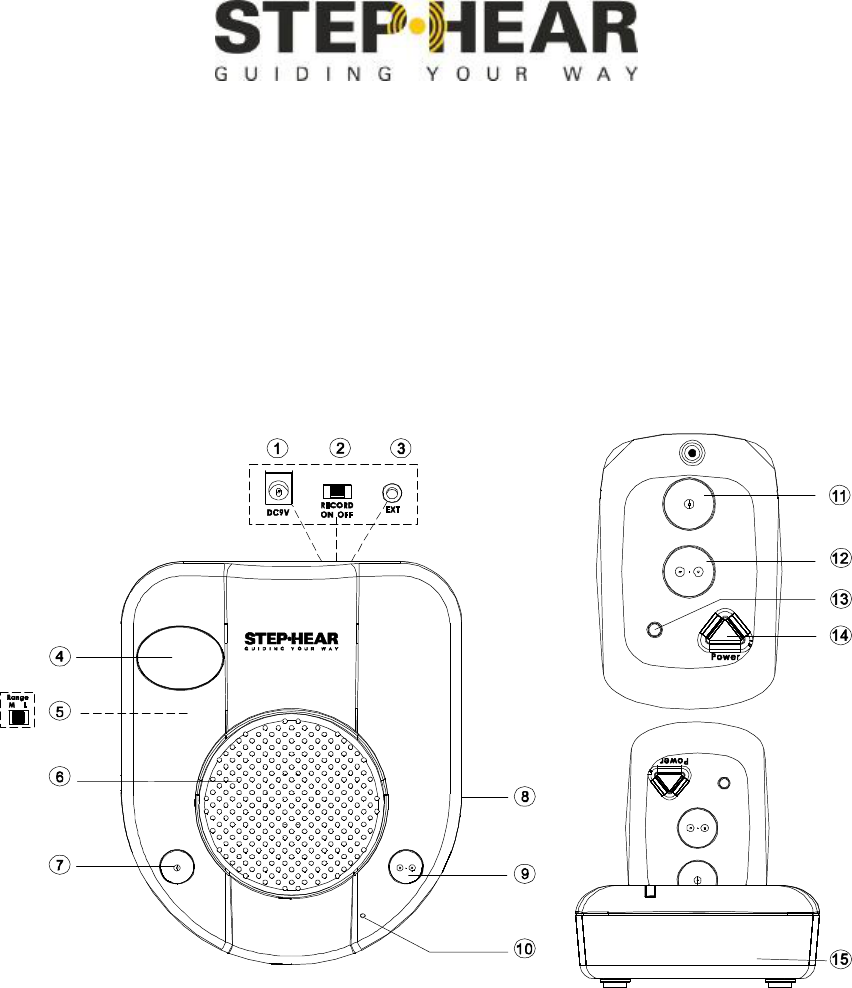
Location of controls
BASE UNIT ACTIVATOR & CHARGER
1. Socket for power jack
2. Record ON/OFF switch
3. Spare Socket for external
Flashing LED light
4. Flashing light/ battery low
indicator
5. Range Normal/Long switch
6. Speaker
7. Press and hold to record
message 1
8. Volume control switch
9. Press and hold to record
message 2
10. Microphone
11. Press to check message 1
12. Press to check message 2
13. LED indicator
14. Power ON/OFF button
15. Charger

2
Base Unit
Connecting the AC Adaptor of the Base Unit
1. Plug the power cord of the AC adaptor into the jack labeled DC 9V on the back of the
Unit (1).
2. Plug the other end of the power cord into an electric outlet.
Fitting the batteries
1. The battery compartment is to be found on the underside of base unit.
2. Open the battery compartment with a small screwdriver or a pointed object.
3. Insert 4 AAA 1.5V batteries. In doing so, ensure that the polarity is correct.
4. Close the battery compartment.
The battery can be lasted up to 8 hours while mains power failure. Batteries should be
used only for backup. The batteries should be changed when the red LED lights (4). All
four batteries must then be replaced.
Wall mounting
Your unit is suitable for wall mounting. Use two screws for fixing. Drill two holes vertically
one above the other, 72mm apart, and leave the screws protruding from the wall by 5mm.
Now place the unit over the screws and push it slightly downwards.
Recording message
1. Set the Record ON/OFF switch (2) on the base unit to ON, press and hold ANN1 (7) or
ANN2 (9).
2. Speak clearly when you hear a beep tone, the message can be up to 1 minute long.
3. Release the ANN1 or ANN2 button, the base unit will play the recorded message
automatically. You can press ANN1 or ANN2 button at any time to listen the message.

3
Please Note: Please set Record ON/OFF switch to OFF after recorded your message.
Please Note:
Operators need to understand that the quality of the recordings, the contents of the
information provided and the locations of installation of the base units are critical to the
successful use of the STEP-HEAR™ system.
1. Record messages in a quiet environment with no background noise or sound.
2. Carefully decide on number of strategic installation points of the base units at chosen
areas.
3. The provided recording messages need to be relevant and suitable to the area
regardless of which direction one may approach, especially if directionality is
provided. Make sure that when offering direction message, there is no alternative
for it to avoid direction confusion if one travels in opposite side. Do not use: “left”,
“right” but announce the name of the location: “elevator”, restrooms” etc.
Please Note: Base units should be installed at least 10 meters apart from each other.
Volume control
Adjust the volume to a more comfortable listening level by sliding the VOLUME switch (8)
on the side of base unit.
Setting the remote range (5)
The operating range can be set by the Range Medium/Long switch. When you set the
switch to Medium position, the operating range is about 3 to 8 meters. When you set the
switch to Long position, the remote range is about 3 to 10 meters. The activator will
vibrate and beep automatically once in the range of the base unit.
Please note: The ranges quoted are for indication only and will vary according to local
conditions and environment.
Activator
Turn the activator On/Off
To turn the activator ON, press and hold the POWER key (14) on the activator for 2-4
seconds until a beep tone is heard. To turn the activator OFF, press and hold the POWER
key again, 2-4 seconds until two beep tones are heard. The red LED indicator (13) will
flash.
Activator default set is beep & vibrate on.
Turn the beep tone OFF

4
1. Press and hold the POWER key (14) to turn on the activator.
2. Press and hold the activator 1 (11) and 2 (12) buttons together for 5 seconds until a
beep tone is heard. The activator will only vibrate.
3. To turn the beep ON, press and hold the 1 and 2 buttons together again until you hear a
beep tone. The activator will vibrate and beep.
The activator keeps the latest settings until a new setting is received.
Pause mode
1. Press the POWER key once to pause the vibrating and beeping. Only the vibrator will
work every 60 seconds. If the activator is out of range for 15 seconds, it will revert to
normal operation mode automatically.
2. Press the POWER key once again at any time to resume normal activator operation.
Checking the message with the Activator
1. Press 1 (11) or 2 (12) key once on the activator.
2. The corresponding message stored in ANN1 and ANN2 will be heard.
Charging your activator
1. Plug the supplied AC adaptor cord into the jack on the back of the charger, and the
other end into an electrical outlet.
2. Place your activator into the charger, the green LED lights and the activator vibrates
and beeps once. The green LED will turn off when the activator is fully charged.
Please note: When the green LED on the activator (13) flashes and a tone beeps every 60
seconds, you need to charge the activator. The approximate charging time for the activator
is about 2 hours.
For more information please visit: www.step-hear.com
Or contact: info@step-hear.com
Warning:
This device complies with part 15 of the FCC Rules. Operation is subject to the following two conditions: (1) This
device may not cause harmful interference, and (2) this device must accept any interference received, including
interference that may cause undesired operation. Changes or modifications not expressly approved by the party
responsible for compliance could void the user's authority to operate the equipment.