Primax Electronics BPHS-9 PHS-9 Bluetooth headset User Manual front ai
Primax Electronics Ltd PHS-9 Bluetooth headset front ai
manual
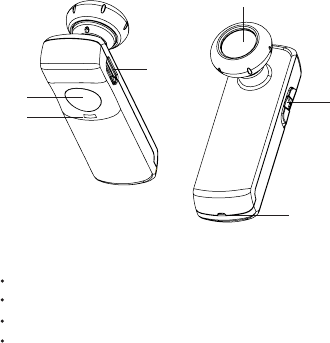
1. Multifunction key
For battery charging.
Relays the caller's voice.
Picks up your voice input.
3. Charger connector
4. Earpiece
5. Microphone
Getting started
Charging the battery
Pairing the Bluetooth headset to a
Bluetooth mobile phone
Switches the headset on and off
Answer incoming calls
End active calls
Reject incoming calls
6. Volume up / down buttons
2. Indicator light
Introduction
Thanks for purchasing PHS-9 Bluetooth Headset. Your Bluetooth Headset is
a stylish headset that enables comfortable handsfree communication with
compatible phone that supports Bluetooth technology.
Functions & Controls
Remove all components from the package...
Bluetooth Headset (with 15 mm diameter earbud)
AC Battery Charger
User Guide
Before using the Bluetooth Headset, you need to charge the built-in
rechargeable battery for approximately 2 hours. The indicator light is
red while charging. When the battery is fully charged, it provides up to 6
hours talking time and up to 150 hours standby time.
1. Connect the AC battery charger cable’s Micro USB connector to PHS-9
Headset’s Micro USB socket.
2. Plug the charger’s AC plug to AC outlet. When charging, the Bluetooth
Headset’s status indicator lights in solid red.
3. When the battery is fully charged, the status indicator turns to green.
Unplug the charger cable from AC outlet and Bluetooth Headset.
To enter pairing mode manually...
1. The headset must be in off mode.
2. Press the multifunction button for at least 5 seconds. Green LED light
flashing rapidly, and 4 ascending tones can be heard. Your mobile
phone can now "look for" the headset.
3. Activate the Bluetooth connection with the mobile phone according to
the mobile phone’s user’s guide.
4. Set the mobile phone to search for the Bluetooth devices according to
the mobile phone’s user’s guide.
5. Select the Bluetooth Headset from the phone menu.
6. Enter the pin code 0000 to connect (or “pair”) Bluetooth Headset to the
phone. You will hear two high tones when pairing completed.
7. Select ‘PHS-9’ from the device list on your phone. The LED will light
blink once every 5 seconds with the headset connected to your phone.
If the headset is turned on within 10 meters from several paired phones,
the headset will try to connect to the last connected device. If the headset
does not connect to the last connected phone, green LED will be flashing
every 2.5 seconds indicating it is in power on however not engaged status.
If the headset is turned on but not connected established, or dropped off
from previous connection, it will stay in connectable status for 30 minutes
before automatically turn off.
Phone list can be erased by holding the multifunction button and volume +
key simultaneously for more than 5 seconds
Pairing is the process for linking the headset with your Bluetooth enabled
mobile phone. After this process is completed, you can use the Bluetooth
Headset with the paired mobile phone. The Bluetooth Headset can be
paired with up to 8 compatible phones but connected to only one phone
at a time. If the headset is turned on with no existing pairing information
stored (e.g., first time use or pairing information been erased), it will enter
pairing mode automatically.
5
4
3
1
26

Clear settings or reset
To clear all the pairing settings from the headset, press and hold the
multifunction key, and press Volume + key simultaneously for more
than 5 seconds. The indicator light alternates red and green five times.
After the settings are cleared, the headset enters the pairing mode for
about 5 minutes (the indicator light flashes green quickly).
To reset the headset if it stops functioning, simply plug the charger into
the headset. The reset does not clear the headset settings.
Operation
To turn on the headset
To switch on, press and hold the multifunction key until the headset
beeps and the green indicator light turns on.
To turn off the headset
To switch off, press and hold the multifunction key for at least 5
seconds until the indicator light turns red.
Making a Phone Call
When the headset is connected to the phone, make a call using the
phone in the normal way.
Note: the call functions depending on the phone type you use. Please
refer to the manual of your phone for the related function.
The green indicator light flashes during the call.
Other status
Answering and Ending a Phone Call
When a call comes in, the indicator light flashes quickly, and ringing tones
can be heard through the headset until the call is answered.
You can short press the multifunction key to answer and end the call.
You can also answer and end the call through the mobile phone.
Note: Some phones offer Auto Answer function and may be used with the
headset or speakerphone, but this is a phone dependent feature. Please
refer to the manual of your phone for that function.
Rejecting a Call
Double press multifunction key to reject a incoming call.
Voice dialing (phone dependent)
Press the multifunction key for about 2 to 3 seconds when there is no
call in active to initial voice dialing, and one high tone can be heard.
To terminate voice dialing, press the multifunction key briefly again.
Voice dialing cannot be used during a call
Switching the Call between Phone and Headset
To switch the call from the headset to a connected device, press and hold
the multifunction key for about 3 seconds, a tone can be heard. Alternatively,
use the keys of your device.
To switch the call back to the headset, please use the related function key
on the phone (please refer to phone instruction), or press and hold the
multifunction key on the headset for about 3 seconds.
Redialing the Last Dialed Number
(Phone dependent)
if your device supports last number redialing with the headset, press the
multifunction key twice when no call is in progress
Reconnecting the Paired Bluetooth Headset to a
Compatible Phone
To reconnect the Bluetooth Headset to the last connected phone, proceed
as follows:
1. Press and hold the multifunction key for 3 seconds to turn on the
Bluetooth Headset.
2. Make sure your phone is on and Bluetooth function is enabled.
Please refer to the phone’s user guide and make the connection in
the Bluetooth menu of your phone.
3. The phone should connect to the headset automatically. If not,
please refer to ‘Pairing the Bluetooth Headset with a Compatible
Phone’ section and performance pairing again,
Status Indicator light Sound
Idle* (power on but
not connected)
Battery low
Charging
Call in active
Red solid light
Two low tones
every 5 mins
n/a
n/a
n/a
Green flashing once every
2.5 seconds
Red flashing once every 2.5 secs
in connectable mode, or every
5 secs in connected mode.
Green flashing once every
5 seconds
* The headset will switch off automatically if in idle mode for 30 minutes.
FCC statement
This equipment has been tested and found to comply with the limits for a
Class B digital device, pursuant to Part 15 of the FCC Rules. These limits
are designed to provide reasonable protection against harmful interference
in a residential installation. This equipment generates, uses and can radiate
radio frequency energy and if not installed and used in accordance with the
instructions, may cause harmful interference to radio communications.
However, there is no guarantee that interference will not occur in a particular This device complies with FCC RF radiation exposure limits.
installation. If this equipment does cause harmful interference to radio or
television reception, which can be determined by turning the equipment off
and on. The user is encouraged to try to correct the interference by one of the
following measures:
Reorient or relocate the receiving antenna.
Increase the separation between the equipment and receiver.
Connect the equipment into an outlet on a circuit different from that to
which the receiver is connected.
Consult the dealer or an experienced radio/TV technician for help.
To assure continued compliance, any changes or modifications not expressly
approved by the party responsible for compliance could void the user’s authority
to operate this equipment. (Example- use only shielded interface cables when
connecting to computer or peripheral devices).
FCC Radiation Exposure Statement
This equipment complies with Part 15 of the FCC Rules.Operation is subject
to the following two conditions:
(1) This device may not cause harmful interference, and
(2) This device must accept any interference received, including interference
that may cause undesired operation.