Primax Electronics DMORFE3UL Rocketfish 2.4Ghz Nano dongle User Manual
Primax Electronics Ltd Rocketfish 2.4Ghz Nano dongle
Users Manual

2.4Ghz Ergo Laser Mouse
RF-MSE14
User Guide
RF-MSE14_09-0482_MAN_V1_English.fm Page 1 Wednesday, June 17, 2009 4:39 PM
v1
R3

2
2.4Ghz Ergo Laser Mouse
Contents
Introduction ................................................................. 4
Features ......................................................................... 4
Package contents................................................ 4
System requirements......................................... 4
Top............................................................................ 5
Bottom .................................................................... 7
Setting up the mouse ............................................... 8
Installing the battery.......................................... 8
Setting up the mouse ......................................11
Installing the mouse driver and software 12
Configuring the Mouse ...................................18
Uninstalling the mouse driver and software25
Maintaining ................................................................26
Troubleshooting .......................................................27
RF-MSE14_09-0482_MAN_V1_English.fm Page 2 Wednesday, June 17, 2009 4:39 PM

3
RF-MSE14
Specifications ............................................................ 27
Legal notices.............................................................. 28
One-year limited warranty ................................... 31
Important safety instructions
1Read these instructions.
2Keep these instructions.
3Heed all warnings.
4Follow all instructions.
5Do not use this apparatus near water.
6Clean only with a dry cloth.
7Batteries should not be exposed to excessive heat such
as sunshine, fire, or the like.
8Caution: Danger of explosion if battery is incorrectly
replaced. Replace only with the same or equivalent type.
RF-MSE14_09-0482_MAN_V1_English.fm Page 3 Wednesday, June 17, 2009 4:39 PM

4
Introduction
Congratulations on your purchase of the 2.4Ghz Ergo Laser
Mouse. This mouse represents the state of the art in wireless
mouse design and is designed for reliable and trouble-free
performance.
Features
•Nano dongle
• 2.4 GHz wireless connection
•Tilt/scroll wheel
• Six mouse buttons
• Excellent performance working range of more than 32.8
feet (10 meters) (with no interference)
• Four LED indicators
Package contents
•Mouse
•Nano dongle
• Installation CD (includes software and User Guide)
•AA battery
• Quick Setup Guide
System requirements
• USB port (USB 2.0 OR 1.1)
•CD drive
• Operating system: Windows® XP with Service Pack 3 or
higher, Windows Vista®, or Windows® 7
RF-MSE14_09-0482_MAN_V1_English.fm Page 4 Wednesday, June 17, 2009 4:39 PM
5
RF-MSE14
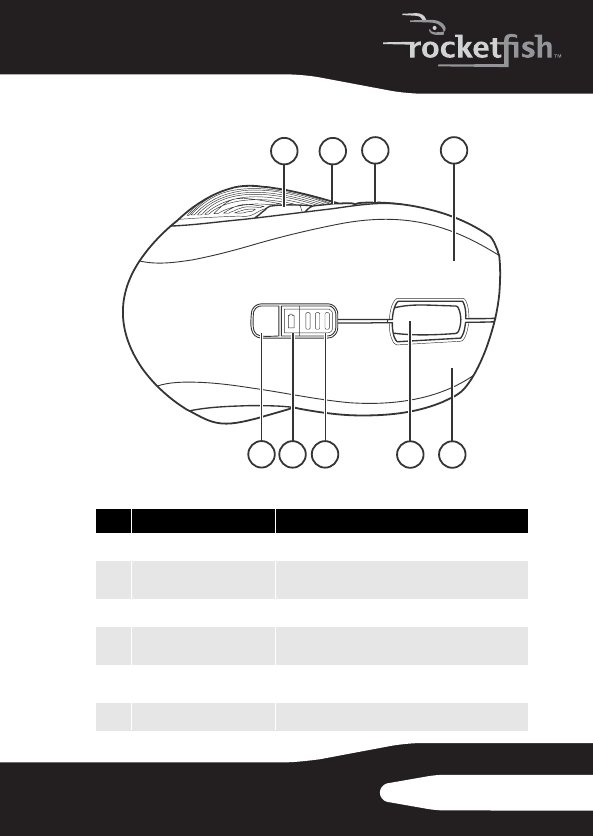
Top
#Item Description
1C button Press to go to the previous page in a Web browser.
2B button Press to activate dynamic search. You must install
the mouse driver to use this feature.
3A button Press to go to the next page in a Web browser.
4Left button Press to perform standard left-mouse actions such
as selecting items and opening programs.
5DPI button Press to select the screen resolution. You can
select 800 dpi, 1200 dpi, or 1600 dpi.
6Battery LED Lights red when the battery is low.
123 4
567 8 9
RF-MSE14_09-0482_MAN_V1_English.fm Page 5 Wednesday, June 17, 2009 4:39 PM

6
7
DPI LED Indicates the current DPI
setting.
One LED lit— DPI is set to 800.
Two LEDs lit— DPI is set to 1200.
Three LEDs lit— DPI is set to 1600.
8
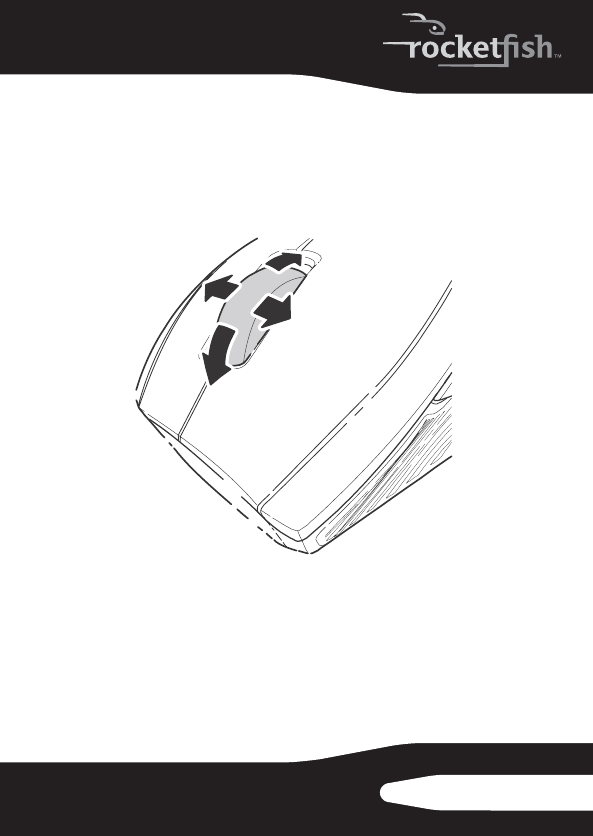
Scroll wheel Roll to move the screen image up or down or tilt to
move the screen left or right. If you press down on
the scroll wheel, a four- way icon appears on the
screen. Move the mouse up, down, left, or right to
scroll.
9
Right button Press to perform standard right mouse actions
such as opening popup menus or viewing help
information.
#Item Description
RF-MSE14_09-0482_MAN_V1_English.fm Page 6 Wednesday, June 17, 2009 4:39 PM
7
RF-MSE14
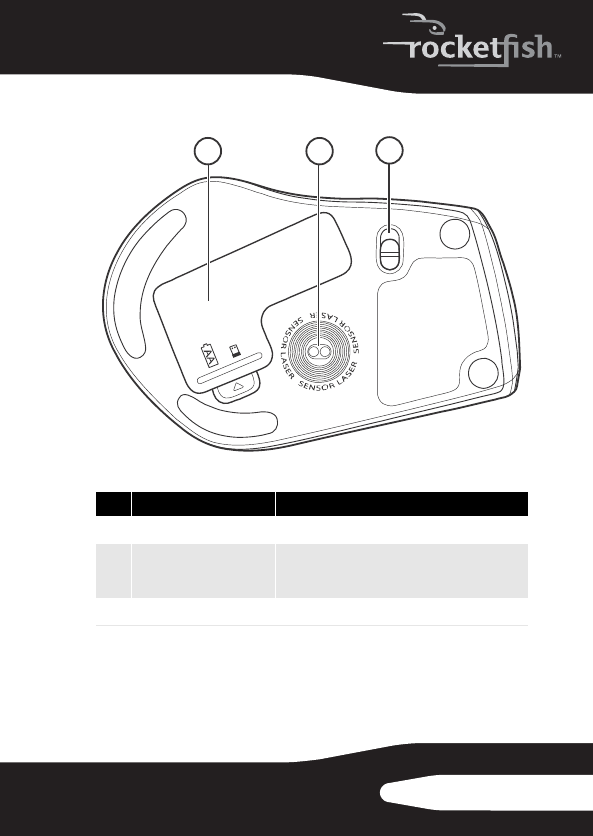
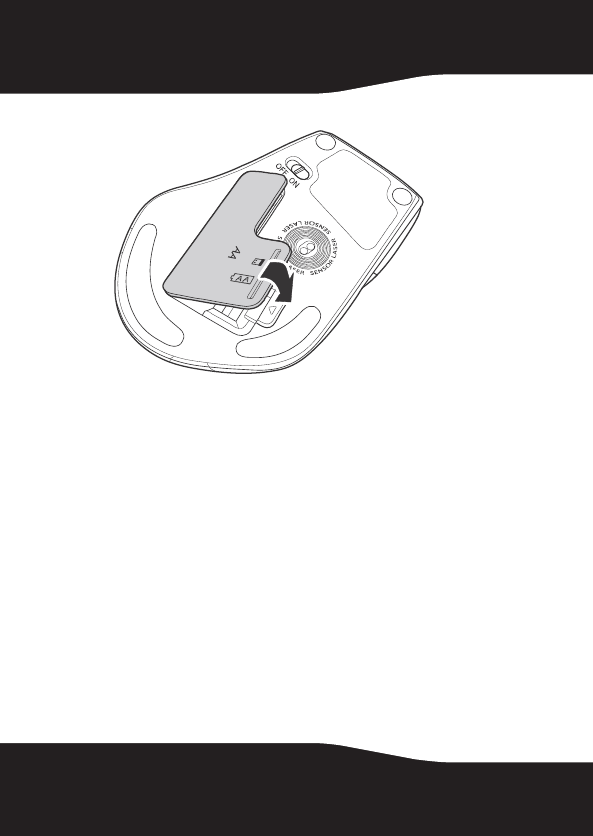
Bottom
#Item Description
1Battery comparntment Provides storage for the battery and dongle.
2
Laser sensor Detects the mouse movements and sends signals
to the computer to move the mouse pointer on the
screen.
3Power button Slide to turn the mouse on or off.
OFF
123
RF-MSE14_09-0482_MAN_V1_English.fm Page 7 Wednesday, June 17, 2009 4:39 PM
8
Setting up the mouse
Installing the battery
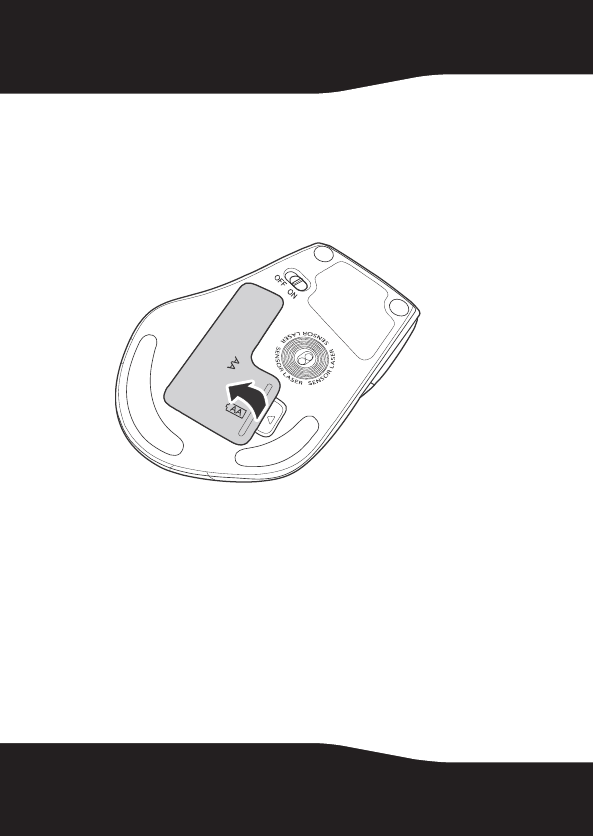
To install the battery:
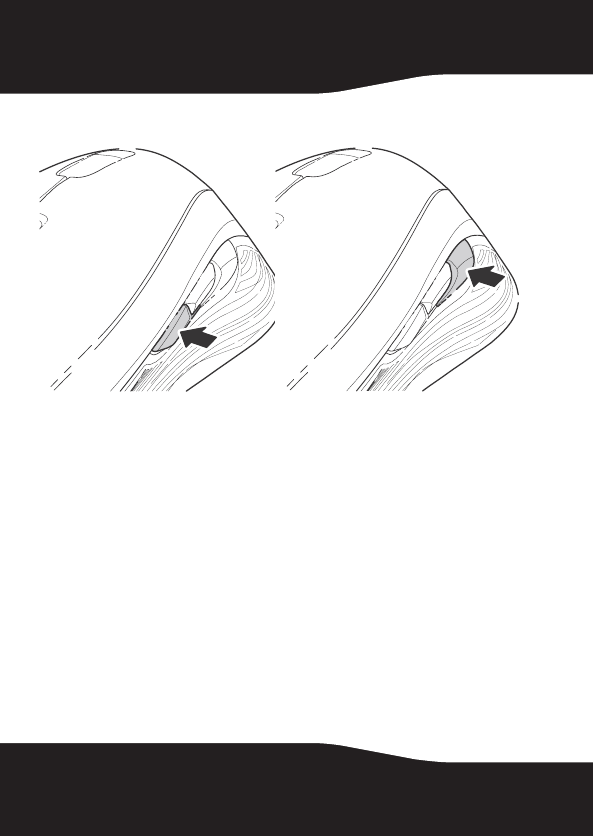
1Press the tab on the battery compartment cover, then lift
the cover away from the mouse.
RF-MSE14_09-0482_MAN_V1_English.fm Page 8 Wednesday, June 17, 2009 4:39 PM
9
RF-MSE14
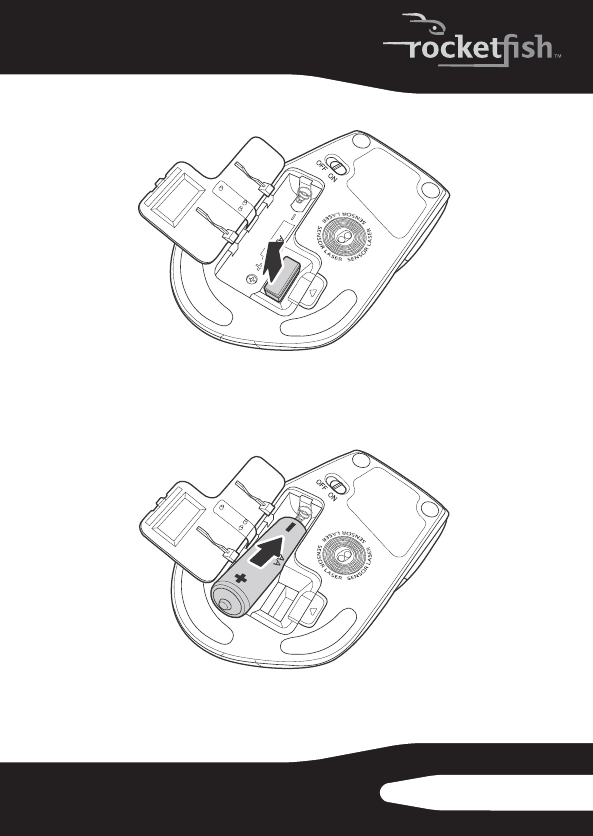
2Pull the dongle out of the battery compartment.
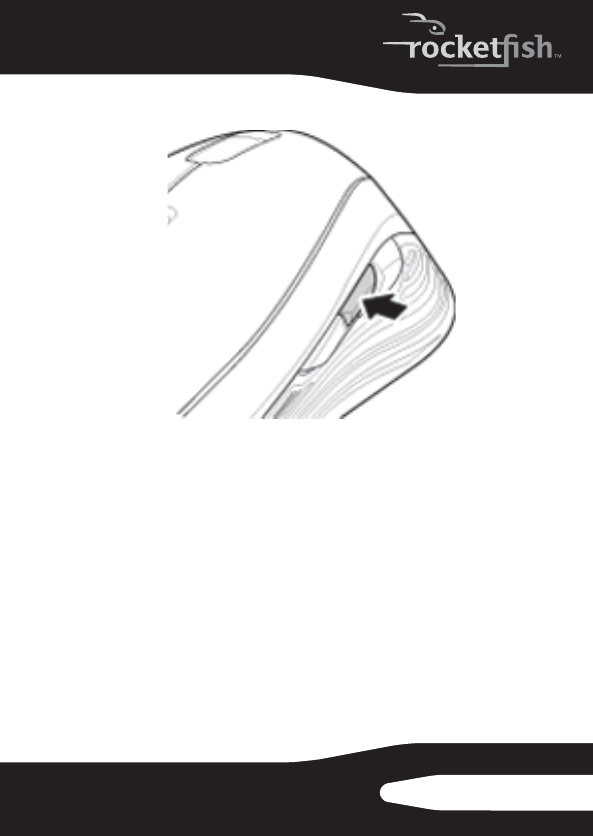
3Insert one AA battery into the battery compartment.
Make sure that the + and – symbols on the battery match
the + and – symbols in the battery compartment.
p
RF-MSE14_09-0482_MAN_V1_English.fm Page 9 Wednesday, June 17, 2009 4:39 PM
10
4Replace the battery compartment cover.
p
RF-MSE14_09-0482_MAN_V1_English.fm Page 10 Wednesday, June 17, 2009 4:39 PM
11
RF-MSE14
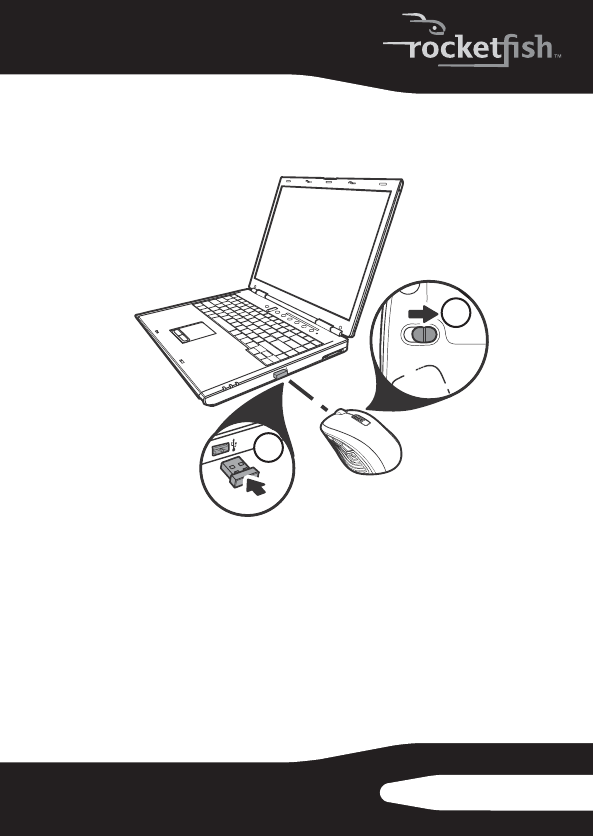
Setting up the mouse
To set up the mouse:
1Plug the USB dongle into a USB port on the computer.
2Slide the power button on the bottom of the mouse to
the right to turn on the mouse. The computer detects the
mouse.
OFF
ON
1
2
RF-MSE14_09-0482_MAN_V1_English.fm Page 11 Wednesday, June 17, 2009 4:39 PM

12
Installing the mouse driver and software
To use advanced functions, such as dynamic search and
magnifier, you need to install the mouse driver and software.
Note: The following instructions are based on the Windows®
XP operating system.
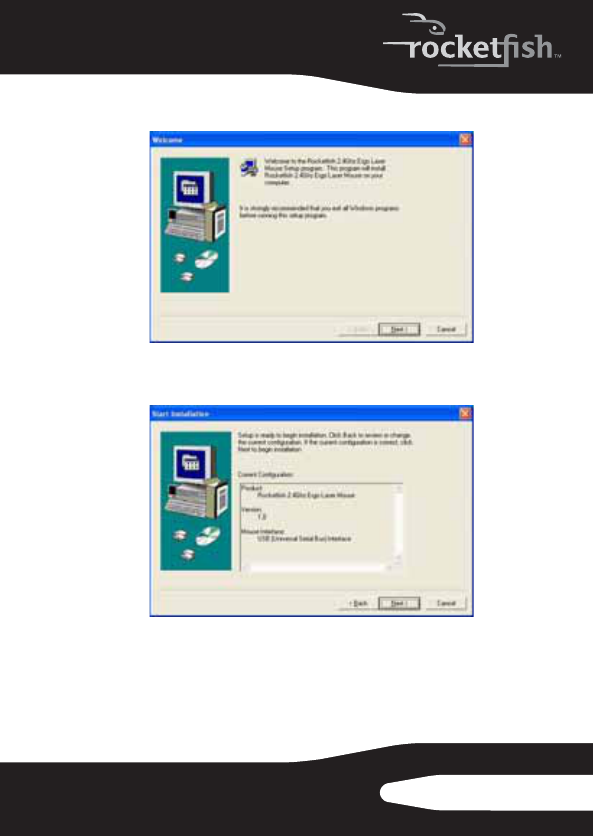
To install the mouse driver and software:
1Make sure that you have installed the battery, connected
the dongle, and turned on the mouse.
2Insert the provided installation CD in the CD drive on the
computer. The installation program should start
automatically. If it does not start automatically, open
Windows Explorer, browse the CD, then double-click
setup.exe. The mouse installation screen opens.
RF-MSE14_09-0482_MAN_V1_English.fm Page 12 Wednesday, June 17, 2009 4:39 PM
13
RF-MSE14
3Click Install Mouse Driver. The Welcome screen opens.
4Click Next. The Start Installation screen opens.
RF-MSE14_09-0482_MAN_V1_English.fm Page 13 Wednesday, June 17, 2009 4:39 PM
14
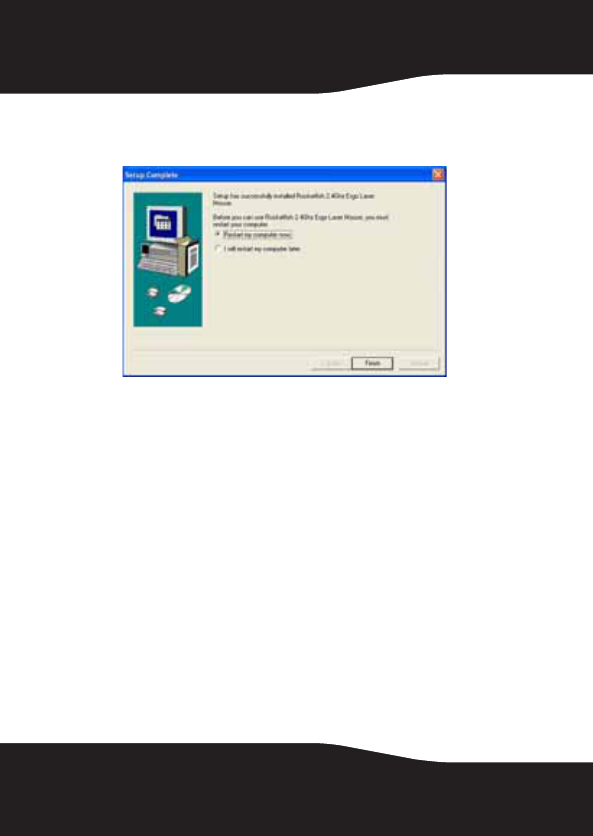
5Click Next. An installation progress bar appears. When the
installation is complete, the Setup Complete screen
opens.
6Click Finish.
RF-MSE14_09-0482_MAN_V1_English.fm Page 14 Wednesday, June 17, 2009 4:39 PM
15
RF-MSE14
Using the mouse
To use the mouse:
• Press the left or right mouse buttons to perform standard
left and right mouse clicks.
• Move the scroll wheel to move the screen image up,
down, left, or right.
Tip: You can also scroll the screen by sliding your mouse
instead of using the scroll wheel. To do this, press down on
the scroll wheel. A four-way icon appears on the screen.
Move your mouse up, down, left, or right to scroll.
RF-MSE14_09-0482_MAN_V1_English.fm Page 15 Wednesday, June 17, 2009 4:39 PM
16
•Press button A to go to the next page in a Web browser or
press button C to go the previous page in a Web browser.
A button C button
RF-MSE14_09-0482_MAN_V1_English.fm Page 16 Wednesday, June 17, 2009 4:39 PM
17
RF-MSE14
• Press button B to use the dynamic search function.
Note: To use dynamic search, press the left mouse button
and drag the mouse to highlight a word. Press the dynamic
search button. The Google™ Web site opens and displays
information about the word.
B button
RF-MSE14_09-0482_MAN_V1_English.fm Page 17 Wednesday, June 17, 2009 4:39 PM

18
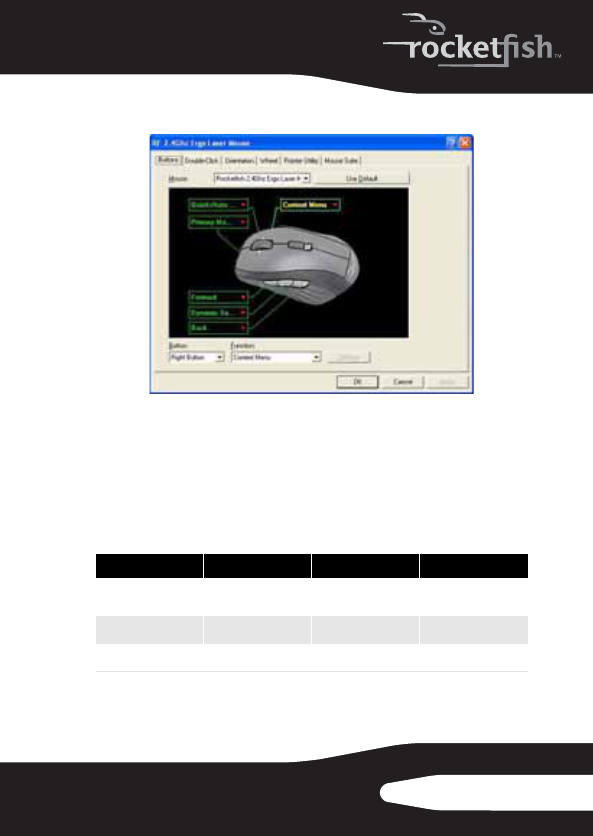
Configuring the Mouse
To configure the mouse:
• Double-click the mouse icon on the system tray to open
the mouse program, then click a tab to adjust a mouse
function. If the mouse icon is not in your system tray,
click Start, Settings, Control Panel, then click RF 2.46Ghz Ergo
Laser Mouse. You can select any of the following tabs:
•Buttons—See “Configuring mouse buttons” on
page 19.
•Double-Click—See “Adjusting the double-click speed”
on page 20.
•Orientation—See “Adjusting the orientation” on
page 21.
•Wheel—See “Adjusting the wheel settings” on
page 22.
•Pointer Utility—See “Adjusting the pointer behavior”
on page 23.
•Mouse Suite—See “Hiding the system tray’s mouse
icon” on page 24.
RF-MSE14_09-0482_MAN_V1_English.fm Page 18 Wednesday, June 17, 2009 4:39 PM
19
RF-MSE14
Configuring mouse buttons
To configure the buttons:
1Click the Button list arrow to open the list of buttons, then
click the button you want to configure.
2Click the Function list arrow to open the list of functions,
then click the function you want to assign to the button.
The default settings for the mouse buttons are:
Button Function Button Function
Left Primary mouse
button AForward
Right Context menu BDynamic search
Wheel Quick/Auto scroll CBack
RF-MSE14_09-0482_MAN_V1_English.fm Page 19 Wednesday, June 17, 2009 4:39 PM
20
3Click other tabs to make more adjustments, or click OK to
save your selections and close the program.
Note: To restore default button functions, click Use Default.
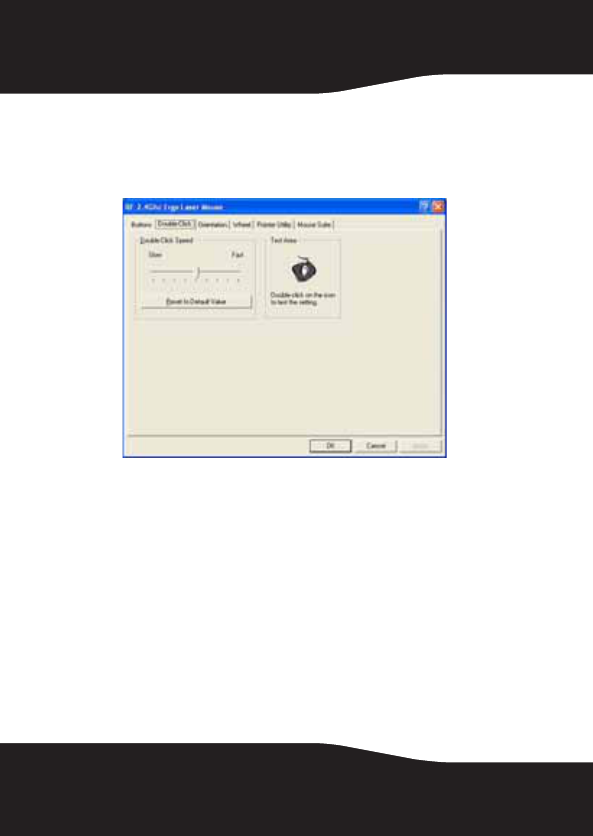
Adjusting the double-click speed
To adjust the double-click speed:
1To adjust double-click speed, drag the slider.
2To test the click speed, double-click the Test Area icon.
3Click other tabs to make more adjustments, or click OK to
save your selections and close the program.
Note: To restore to default settings, click Reset to Default Value.
RF-MSE14_09-0482_MAN_V1_English.fm Page 20 Wednesday, June 17, 2009 4:39 PM
21
RF-MSE14
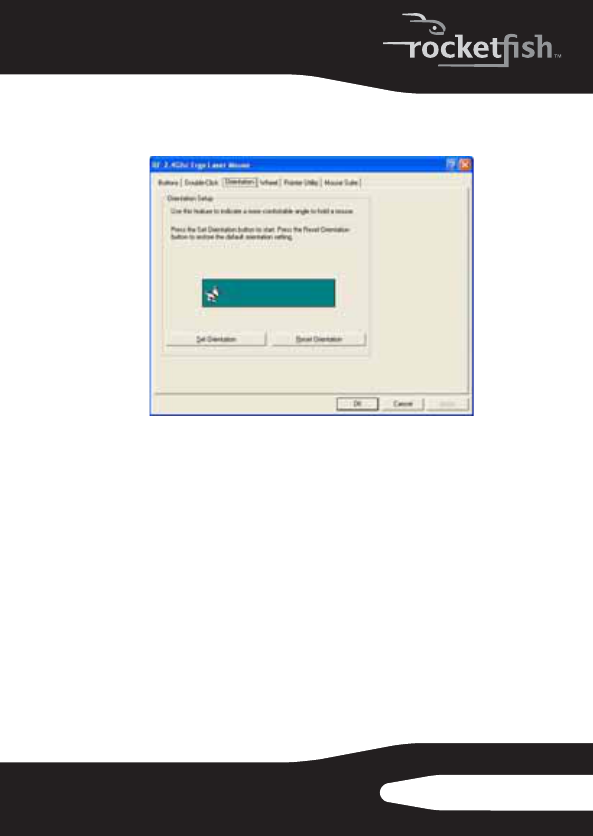
Adjusting the orientation
Use this tab to adjust the angle at which you use the mouse.
To adjust the orientation:
1Click Set Orientation to activate orientation setup, then use
the on-screen pointer to follow the dog as it moves
around.
2Click other tabs to make more adjustments, or click OK to
save your selections and close the program.
Note: To restore the default orientation settings, click Reset
Orientation.
RF-MSE14_09-0482_MAN_V1_English.fm Page 21 Wednesday, June 17, 2009 4:39 PM
22
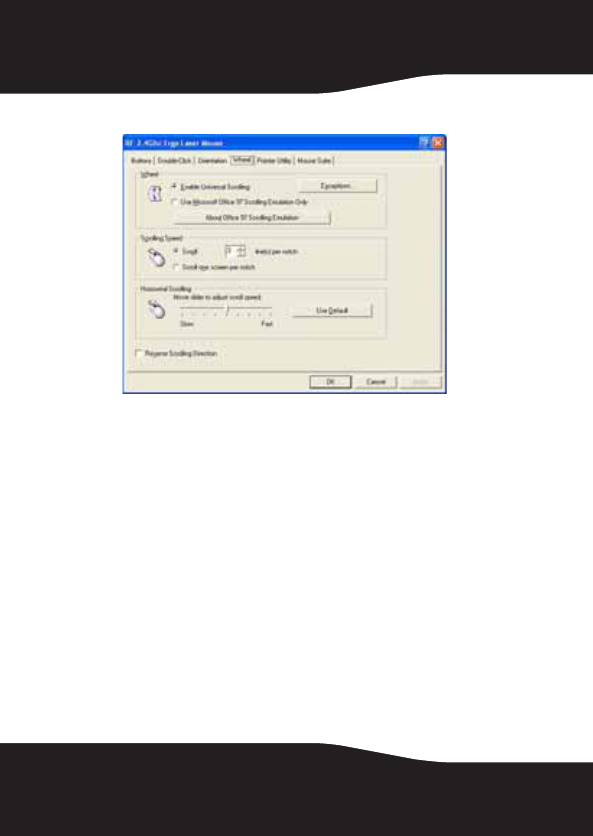
Adjusting the wheel settings
To adjust the wheel settings:
1To select the wheel scrolling method, click:
•Enable Universal Scrolling—Uses common scrolling
functions.
•Use Microsoft Office 97 Scrolling Emulation Only—Uses
Microsoft Office 97 scrolling emulation.
2To specify scrolling exceptions, click Exceptions.
3To adjust vertical scrolling speed, click:
•Scroll X line(s) per notch—Selects the number of lines to
scroll when the scroll wheel is moved one notch.
Click the up or down arrow keys to specify the
number of lines.
•Scroll one screen per notch—Scrolls an entire screen
when the scroll wheel is moved one notch.
4To adjust the horizontal scrolling speed, drag the slider.
RF-MSE14_09-0482_MAN_V1_English.fm Page 22 Wednesday, June 17, 2009 4:39 PM
23
RF-MSE14
5To reverse scrolling direction, click Reverse Scrolling
Direction.
6Click other tabs to make more adjustments, or click OK to
save your selections and close the program.
Note: To restore to default scrolling speed, click Use Default.
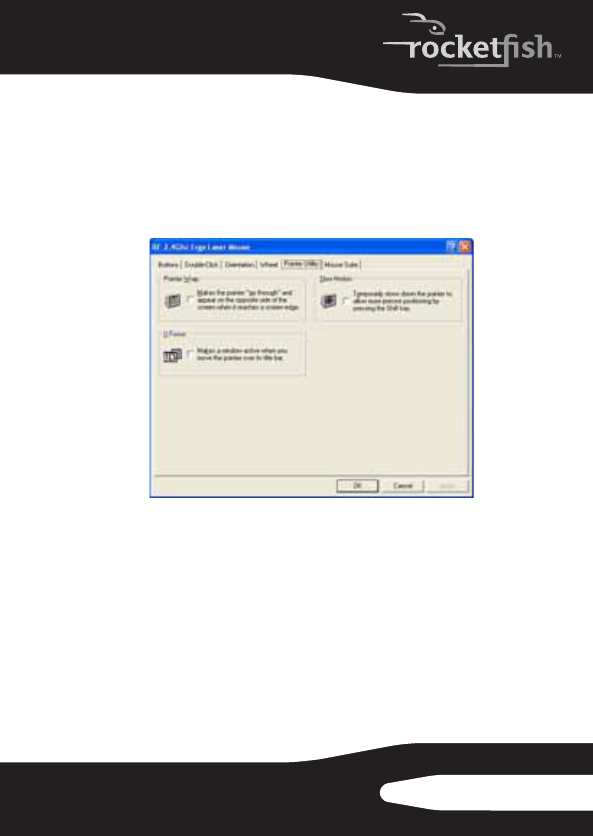
Adjusting the pointer behavior
To adjust the pointer behavior:
1Click a pointer option. You can select:
•Pointer Wrap—The pointer goes to the opposite side of
the screen when it reaches the screen edge.
•X Focus—Activates a window when the pointer moves
over the title bar.
•Slow Motion—Slows down the pointer when the Shift
key is pressed for a more precise positioning.
2Click other tabs to make more adjustments, or click OK to
save your selections and close the program.
RF-MSE14_09-0482_MAN_V1_English.fm Page 23 Wednesday, June 17, 2009 4:39 PM
24
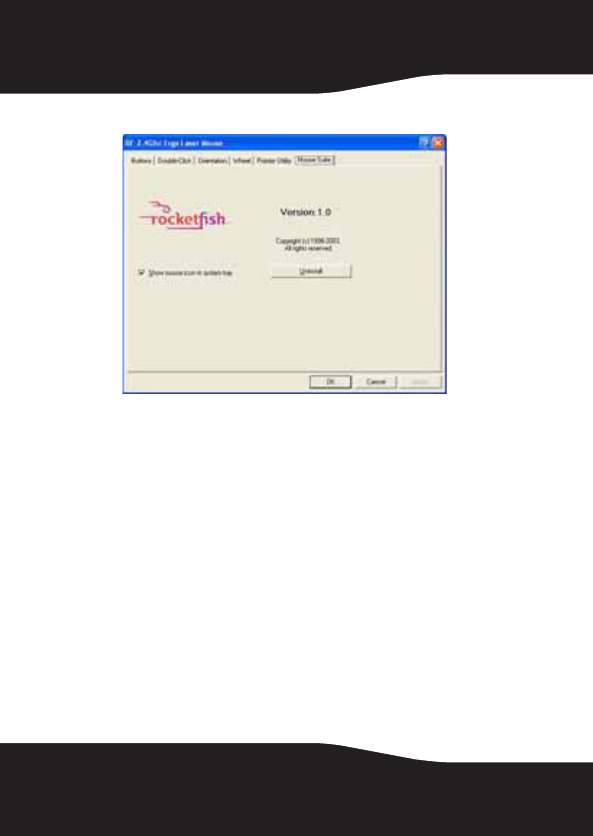
Hiding the system tray’s mouse icon
To hide the system tray’s mouse icon:
• Uncheck Show mouse icon in systray, then click OK to save
changes and close the application.
RF-MSE14_09-0482_MAN_V1_English.fm Page 24 Wednesday, June 17, 2009 4:39 PM
25
RF-MSE14
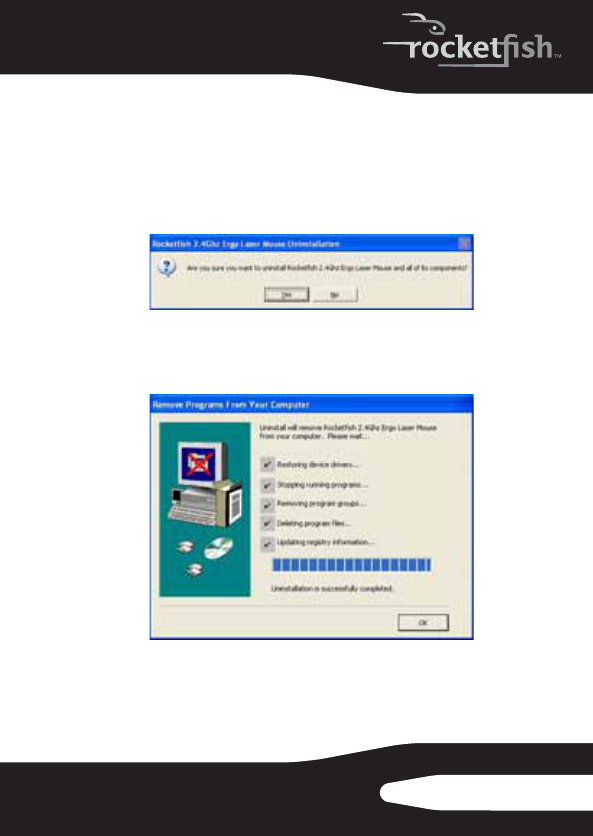
Uninstalling the mouse driver and software
To uninstall the mouse driver and software:
1Unplug the dongle.
2Click Start, Programs, RF 2.4Ghz Ergo Laser Mouse, then click
Uninstall RF 2.4Ghz Ergo Laser Mouse Driver. A message asks if
you are sure you want to uninstall the driver.
3Click Yes to continue. The Remove Programs From Your
Computer screen opens and displays the progress.
RF-MSE14_09-0482_MAN_V1_English.fm Page 25 Wednesday, June 17, 2009 4:39 PM
26
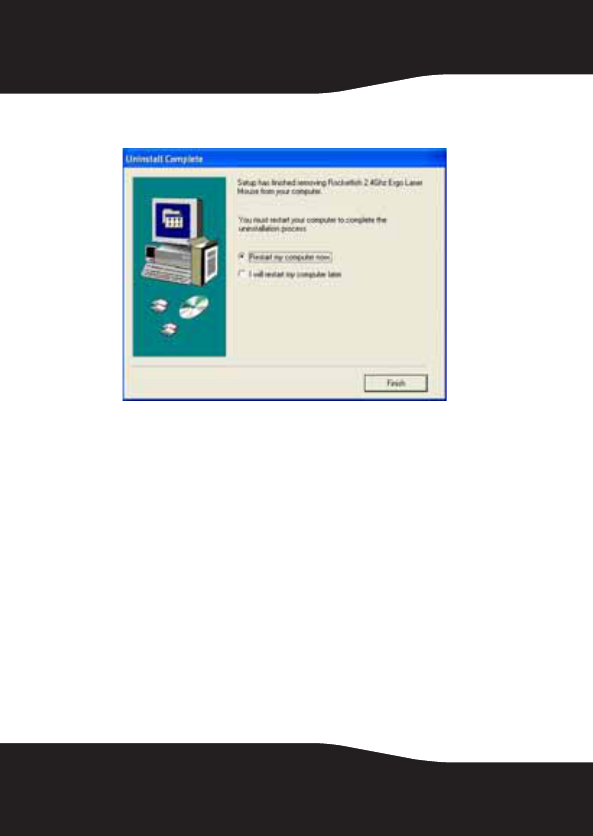
4When the uninstallation is complete, click OK to continue.
The Uninstall Complete screen opens.
5Click Finish. Your computer restarts and the uninstallation
is complete.
Maintaining
To clean the mouse:
• Wipe the surface and the optical sensor with a soft,
lint-free cloth slightly moistened with water.
RF-MSE14_09-0482_MAN_V1_English.fm Page 26 Wednesday, June 17, 2009 4:39 PM

27
RF-MSE14
Troubleshooting
If you experience any problems with the mouse, check the
following:
• Make sure that your computer meets the system
requirements.
• Make sure that the battery in the laser mouse is installed
correctly. Make sure the polarity of the battery
corresponds with the polarity symbols inside the battery
compartment.
• When the mouse LED lights red, the battery power is low.
Replace the battery with a new one.
• If the laser mouse fails to work, check the USB port to see
if the dongle is correctly connected.
• Only use the mouse on a clean, flat, non-slippery surface
to ensure smooth and accurate cursor action.
Specifications
Specifications are subject to change without notice.
Dimensions
H×L ×W
Mouse:
1.54 × 4.84 × 2.92 inches (39 × 113.9 × 74.1 mm)
Dongle:
0.26 × 0.74 × 0.59 inches (6.6 × 18.8 × 15.0 mm)
Resolution 800, 1200, 1600 dpi
Tracking speed Maximum 30 inch/sec (76.2 cm/sec)
Weight Mouse (without battery): 2.82 oz. (80 g)
Dongle :0.11 oz. (3 g)
Buttons 5 buttons with tilt scroll wheel
Compatibility Windows XP Service Pack 3
Windows Vista 32-bit or 64-bit
Windows 7 32-bit or 64-bit
Operating temperature 32° to 104°F (0° to 40°C)
RF-MSE14_09-0482_MAN_V1_English.fm Page 27 Wednesday, June 17, 2009 4:39 PM

28
Legal notices
FCC Part 15
This device complies with Part 15 of the FCC Rules. Operation of this
product is subject to the following two conditions: (1) this device
may not cause harmful interference, and (2) this device must accept
any interference received, including interference that may cause
undesired operation.
This equipment has been tested and found to comply within the
limits for a class B digital device, pursuant to Part 15 of the FCC Rules.
These limits are designed to provide reasonable protection against
harmful interference in a residential installation. This equipment
generates, uses, and can radiate radio frequency energy and, if not
installed and used in accordance with the instructions, may cause
harmful interference to radio communications. However, there is no
guarantee that interference will not occur in a particular installation.
If this equipment does cause harmful interference to radio or
television reception, which can be determined by turning the
equipment off and on, the user is encouraged to try to correct the
interference by one or more of the following measures:
• Reorient or relocate the receiving antenna.
• Increase the separation between the equipment and receiver.
• Connect the equipment into an outlet on a circuit different from
that to which the receiver is connected.
• Consult the dealer or an experienced radio/TV technician for
help.
Storage temperature -40° to 140°F (-40° to 60°C)
Operating humidity 90% RH or less
Storage humidity 95% RH or less
Battery AA (1)
Regulations and
certifications
EMI, ESD, RS, EFT, FCC, EC, IC, IEC-003
RF-MSE14_09-0482_MAN_V1_English.fm Page 28 Wednesday, June 17, 2009 4:39 PM

29
RF-MSE14
FCC warning
Changes or modifications not expressly approved by the party
responsible for compliance with the FCC Rules could void the user’s
authority to operate this equipment.
DHHS and FDA safety certification
This product is made and tested to meet safety standards of the FCC,
requirements and compliance with safety performance of the
U.S. Department of Health and Human Services, and also with FDA
Radiation Performance Standards 21 CFR Subchapter J.
Canada ICES-003 statement
This Class B digital apparatus complies with Canadian ICES-003.
Important notice
FCC Radiation Exposure Statement: This equipment complies with
FCC radiation exposure limits set forth for an uncontrolled
environment. End users must follow the specific operating
instructions for satisfying RF exposure compliance. This transmitter
must not be co-located or operating in conjunction with any other
antenna or transmitter. IC Statement Operation is subject to the
following two conditions:
1This device may not cause harmful interference and
2This device must accept any interference, including interference
that may cause undesired operation of the device.
RF-MSE14_09-0482_MAN_V1_English.fm Page 29 Wednesday, June 17, 2009 4:39 PM
Cet appareil numérique de la classe B est conforme à la norme
NMB-003 du Canada.

31
RF-MSE14
One-year limited warranty
Rocketfish Products (“Rocketfish”) warrants to you, the original
purchaser of this new RF-MSE14 (“Product”), that the Product shall
be free of defects in the original manufacture of the material or
workmanship for one (1) year from the purchase of the Product
(“Warranty Period”). This Product must be purchased from an
authorized dealer of Rocketfish brand products and packaged with
this warranty statement. This warranty does not cover refurbished
Product. If you notify Rocketfish during the Warranty Period of a
defect covered by this warranty that requires service, terms of this
warranty apply.
How long does the coverage last?
The Warranty Period lasts for one year (365 days), beginning on the
date you purchased the Product. The purchase date is printed on the
receipt you received with the product.
What does this warranty cover?
During the Warranty Period, if the original manufacture of the
material or workmanship of the Product is determined to be
defective by an authorized Rocketfish repair center or store
personnel, Rocketfish will (at its sole option): (1) repair the Product
with new or rebuilt parts; or (2) replace the Product at no charge
with new or rebuilt comparable products or parts. Products and
parts replaced under this warranty become the property of
Rocketfish and are not returned to you. If service of Products and
parts are required after the Warranty Period expires, you must pay all
labor and parts charges. This warranty lasts as long as you own your
Rocketfish Product during the Warranty Period. Warranty coverage
terminates if you sell or otherwise transfer the Product.
RF-MSE14_09-0482_MAN_V1_English.fm Page 31 Wednesday, June 17, 2009 4:39 PM

32
How to obtain warranty service?
If you purchased the Product at a retail store location, take your
original receipt and the Product to the store you purchased it from.
Make sure that you place the Product in its original packaging or
packaging that provides the same amount of protection as the
original packaging. If you purchased the Product from an online web
site, mail your original receipt and the Product to the address listed
on the web site. Make sure that you put the Product in its original
packaging or packaging that provides the same amount of
protection as the original packaging.
Where is the warranty valid?
This warranty is valid only to the original purchaser of the Product in
the United States, Canada, and Mexico.
What does the warranty not cover?
This warranty does not cover:
• Customer instruction
•Installation
•Set up adjustments
• Cosmetic damage
• Damage due to acts of God, such as lightning strikes
•Accident
•Misuse
•Abuse
•Negligence
•Commercial use
• Modification of any part of the Product, including the antenna
RF-MSE14_09-0482_MAN_V1_English.fm Page 32 Wednesday, June 17, 2009 4:39 PM

33
RF-MSE14
This warranty also does not cover:
• Damage due to incorrect operation or maintenance
• Connection to an incorrect voltage supply
• Attempted repair by anyone other than a facility authorized by
Rocketfish to service the Product
• Products sold as is or with all faults
• Consumables, such as fuses or batteries
• Products where the factory applied serial number has been
altered or removed
REPAIR REPLACEMENT AS PROVIDED UNDER THIS WARRANTY IS
YOUR EXCLUSIVE REMEDY. ROCKETFISH SHALL NOT BE LIABLE FOR
ANY INCIDENTAL OR CONSEQUENTIAL DAMAGES FOR THE BREACH
OF ANY EXPRESS OR IMPLIED WARRANTY ON THIS PRODUCT,
INCLUDING, BUT NOT LIMITED TO, LOST DATA, LOSS OF USE OF
YOUR PRODUCT, LOST BUSINESS OR LOST PROFITS. ROCKETFISH
PRODUCTS MAKES NO OTHER EXPRESS WARRANTIES WITH RESPECT
TO THE PRODUCT, ALL EXPRESS AND IMPLIED WARRANTIES FOR THE
PRODUCT, INCLUDING, BUT NOT LIMITED TO, ANY IMPLIED
WARRANTIES OF AND CONDITIONS OF MERCHANTABILITY AND
FITNESS FOR A PARTICULAR PURPOSE, ARE LIMITED IN DURATION TO
THE WARRANTY PERIOD SET FORTH ABOVE AND NO WARRANTIES,
WHETHER EXPRESS OR IMPLIED, WILL APPLY AFTER THE WARRANTY
PERIOD. SOME STATES, PROVINCES AND JURISDICTIONS DO NOT
ALLOW LIMITATIONS ON HOW LONG AN IMPLIED WARRANTY LASTS,
SO THE ABOVE LIMITATION MAY NOT APPLY TO YOU. THIS
WARRANTY GIVES YOU SPECIFIC LEGAL RIGHTS, AND YOU MAY
ALSO HAVE OTHER RIGHTS, WHICH VARY FROM STATE TO STATE OR
PROVINCE TO PROVINCE.
Contact Rocketfish:
For customer service please call 1-800-620-2790
www.rocketfishproducts.com
Distributed by Best Buy Purchasing, LLC
7601 Penn Avenue South, Richfield, Minnesota, U.S.A. 55423-3645
© 2009 Best Buy Enterprise Services, Inc.
All rights reserved. ROCKETFISH is a trademark of Best Buy Enterprise
Services, Inc. Registered in some countries. All other products and
brand names are trademarks of their respective owners.
RF-MSE14_09-0482_MAN_V1_English.fm Page 33 Wednesday, June 17, 2009 4:39 PM

www.rocketfishproducts.com (800) 620-2790
Distributed by Best Buy Purchasing, LLC
7601 Penn Avenue South, Richfield, MN 55423-3645 USA
© 2009 Best Buy Enterprise Services, Inc.
All rights reserved. ROCKETFISH is a trademark of Best Buy Enterprise Services, Inc.
All other products and brand names are trademarks of their respective owners.
09-0482
ENGLISH
RF-MSE14_09-0482_MAN_V1_English.fm Page 34 Wednesday, June 17, 2009 4:39 PM