Primax Electronics DN10 Nano Dongle for Lenovo Mini Laser Wireless Mouse User Manual manual
Primax Electronics Ltd Nano Dongle for Lenovo Mini Laser Wireless Mouse manual
User manual
2.4G Nano Laser Mouse
User’s Quick Guide
2
Notice:
Federal Communications Commission (FCC) requirements,
Part 15
This equipment has been tested and found to comply with the
limits for a class B digital device, pursuant to part 15 of the
FCC Rules. These limits are designed to provide reasonable
protection against harmful interference in a residential
installation.
This equipment generates, uses and can radiate radio
frequency energy and, if not installed and used in accordance
with the instructions, may cause harmful interference to radio
communications. However, there is no guarantee that
interference will not occur in a particular installation. If this
equipment does cause harmful interference to radio or
3
television reception, which can be determined by turning the
equipment off and on, the user is encouraged to try to correct
the interference by one or more of the following measures:
--Reorient or relocate the receiving antenna.
--Increase the separation between the equipment and
receiver.
--Connect the equipment into an outlet on a circuit different
from that to which the receiver is connected.
--Consult the dealer or an experienced radio/TV technician for
help.
CAUTION: Any changes of modifications not expressly
approved by the grantee of this device could void the user’s
authority to operate the equipment.
4
This device complies with Part 15 of the FCC Rules.
Operation is subject to the following two conditions: (1) this
device may not cause harmful interference, and (2) this device
must accept any interference received, including interference
that may cause undesired operation.
IMPORTANT NOTE:
FCC Radiation Exposure Statement:
This equipment complies with FCC radiation exposure limits set
forth for an uncontrolled environment. End users must follow the
specific operating instructions for satisfying RF exposure compliance.
This transmitter must not be co-located or operating in conjunction
with any other antenna or transmitter.
NOTE: THE MANUFACTURER IS NOT RESPONSIBLE FOR ANY RADIO OR TV INTERFERENCE
CAUSED BY UNAUTHORIZED MODIFICATIONS TO THIS EQUIPMENT. SUCH MODIFICATIONS
COULD VOID THE USER'S AUTHORITY TO OPERATE THE EQUIPMENT.
5
CE Declaration Of Conformity
Hereby, the manufacturer, declares that this s Mouse
Wireless Presenter in compliance with the essential
requirements and other relevant provisions of Directive
1999/5/EC.
Essential requirements - Article 3
Protection requirements for health and safety - Article
3.1a
--Testing for electric safety according to EN 60950 has
been conducted. These are considered relevant and
sufficient.
Protection requirements for electromagnetic compatibility
-Article 3.1b
--Testing for electromagnetic compatibility according to
6
EN 301 489-1 and EN 301 489-3 has been conducted.
These are considered relevant and sufficient
Effective use of the radio spectrum -Article 3.2
--Testing for radio test suites according to EN 300 440-2
has been conducted. These are considered relevant and
sufficient.
Congratulations on your purchase of this 2.4G Nano
Laser Mouse. Please carefully read the User’s
Quick Guide to learn about the installation and the
powerful functions of your new Laser Mouse.
7
Contents of the Package
2.4G Laser Mouse
Nano Dongle
One AA Battery
Mouse Driver CD
User’s Quick Guide
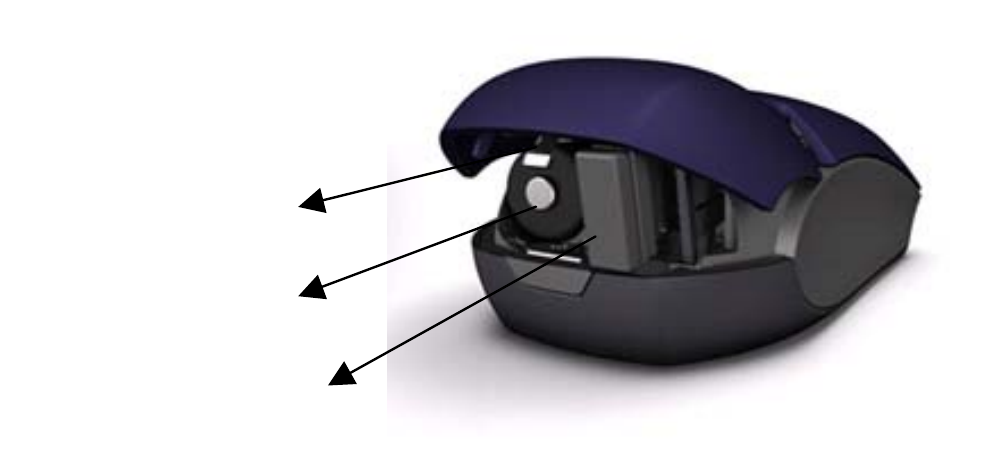
Nano Dongle
Battery
Release Button
Release Button
Release Button
8
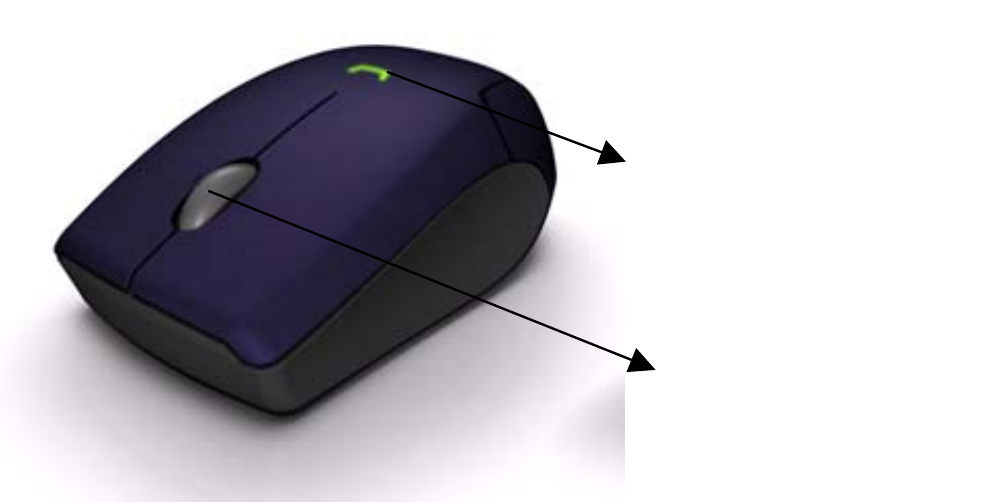
Scrolling Wheel with
Tilt Functionality
Battery Indication
9
Install Hardware
Push the release button to open the
battery door
Take off the Nano Dongle from battery
compartment
Close the battery door
Connect the Nano Dongle to the computer.
Switch on the power switch on the back
10
Install Driver
Notice:The driver supports Windows XP and
Vista
1. The Set-up of driver in Driver CD could be
automatically once plugged in. In case it
doesn’t work, please go to Step 2
2. Insert the driver CD to your computer
Double click “Setup.exe” and follow the setup
instructions to complete the driver installation.
3. A Mouse Setting icon will appear on the task
bar of Windows.
11
Battery Notice
The LED indicator on the mouse will turn
on as solid green ever since your power on
whenever the mouse is in battery ok status
The LED indicator on the mouse will
become blinking red with the frequency of 1
time at 1 second while the mouse is low
battery. Please change the batteries
immediately.
Press any button to wake up the mouse
while the mouse is in the standby mode.