Primax Electronics M2AC01 Wireless Presentation Mouse User Manual
Primax Electronics Ltd Wireless Presentation Mouse Users Manual
Users Manual
VGP-WMS50 2-684-362-11(1)
VGP-WMS50 2-684-362-11(1)
English
WARNING
To prevent fire or shock hazard, do not expose the unit
to rain or moisture.
Owner’s Record
The model number and the serial number are located on the bottom of the
mouse. Record the serial number in the space provided below. Refer to this
number whenever you call your Sony dealer regarding this product.
Model No. VGP-WMS50
Serial No.____________________
For customers in the U.S.A.
This equipment has been tested and found to comply with the limits for a Class B
digital device, pursuant to Part 15 of the FCC Rules. These limits are designed to
provide reasonable protection against harmful interference in a residential
installation. This equipment generates, uses, and can radiate radio frequency
energy and, if not installed and used in accordance with the instructions, may
cause harmful interference to radio communications. However, there is no
guarantee that interference will not occur in a particular installation. If this
equipment does cause harmful interference to radio or television reception, which
can be determined by turning the equipment off and on, the user is encouraged to
try to correct the interference by one or more of the following measures:
–Reorient or relocate the receiving antenna.
–Increase the separation between the equipment and receiver.
–Connect the equipment into an outlet on a circuit different from that to which
the receiver is connected.
–Consult the dealer or an experienced radio/TV technician for help.
The shielded interface cable recommended in this manual must be used with this
equipment in order to comply with the limits for a digital device pursuant to
subpart B of Part 15 of the FCC Rules.
You are cautioned that any changes or modifications not expressly approved in
this manual could void your authority to operate this equipment.
For questions regarding your product or for the Sony Service Center nearest you,
call 1-888-476-6972 in the United States or 1-800-961-7669 in Canada.
The number below is for FCC related matters only.
Declaration of Conformity
Trade Name: SONY
Model No.: VGP-WMS50
Responsible Party: Sony Electronics Inc.
Address: 16450 W. Bernardo Dr., San Diego, CA 92127 U.S.A.
Telephone No.: 858-942-2230
This device complies with Part 15 of the FCC Rules. Operation is subject to
the following two conditions: (1) This device may not cause harmful
interference, and (2) this device must accept any interference received,
including interference that may cause undesired operation.
FCC Radiation Exposure Statement:
These products comply with FCC radiation exposure limits set forth for
uncontrolled equipment and meet the FCC radio frequency (RF)
Exposure Guidelines in Supplement C to OET65. These products have
very low levels of RF energy that it is deemed to comply without
testing of specific absorption ratio (SAR).
For customers in Canada
This Class B digital apparatus complies with Canadian ICES-003.
The term “IC:” before the radio certification number only signifies that
the Industry Canada technical specifications were met.
Operation is subject to the following two conditions: (1) This device
may not cause harmful interference, and (2) this device must accept
any interference received,
including interference that may cause undesired operation of the
device.
To prevent radio interference to the licensed service, this device is
intended to be operated indoors and away from windows to provide
maximum shielding. Equipment (or its transmit antenna) that is
installed outdoors is subject to licensing.
IC Exposure of Humans to RF Fields
The installer of this radio equipment must ensure that the antenna is
located or pointed such that it does not emit RF field in excess of
Health Canada limits for the general population; consult Safety Code 6,
obtainable from Health Canada’s website:
www.hc-sc.gc.ca/rpb.
•VAIO and are trademarks of Sony Corporation.
•Microsoft, Windows and PowerPoint® are registered trademarks of Microsoft
Corporation in the United States and/or other countries.
•All other names of systems, products, and services are trademarks of their
respective owners. In this manual, the ™ or ® marks are not specified.
In this manual, Microsoft® Windows® 2000 Professional is referred to as
Windows 2000.
In this manual, Microsoft® Windows® Millennium Edition is referred to as
Windows Me.
In this manual, Microsoft® Windows® XP Home Edition, Microsoft® Windows®
XP Professional and Microsoft® Windows® XP Media Center Edition are referred
to as Windows XP.
Before Use
The Wireless Presentation Mouse is a USB mouse specifically designed
for Sony VIAO® computers* and IBM PC/AT compatible computers
with USB ports and pre-installed with Windows XP.
*This includes Windows XP Ready PCs upgraded with the Windows
XP Upgrade Program distributed by Sony Corporation.
This product features a presentation mode, enabling use not only as a
wireless mouse but also as a presentation remote, allowing for pointer
movement and slideshow direction from a distance.
Mouse mode: Use as a wireless mouse.
Presentation mode: Use as a pointing device, ideal for presentations.
Notes
• Inserting the wireless receiver into the computer’s USB port may disable
neighboring USB ports.
•Operation is not guaranteed for every computer that meets the above
conditions.
•Operation is not guaranteed for home-built computers, white box PCs, and
computers with OS upgrades and multi-boot systems.
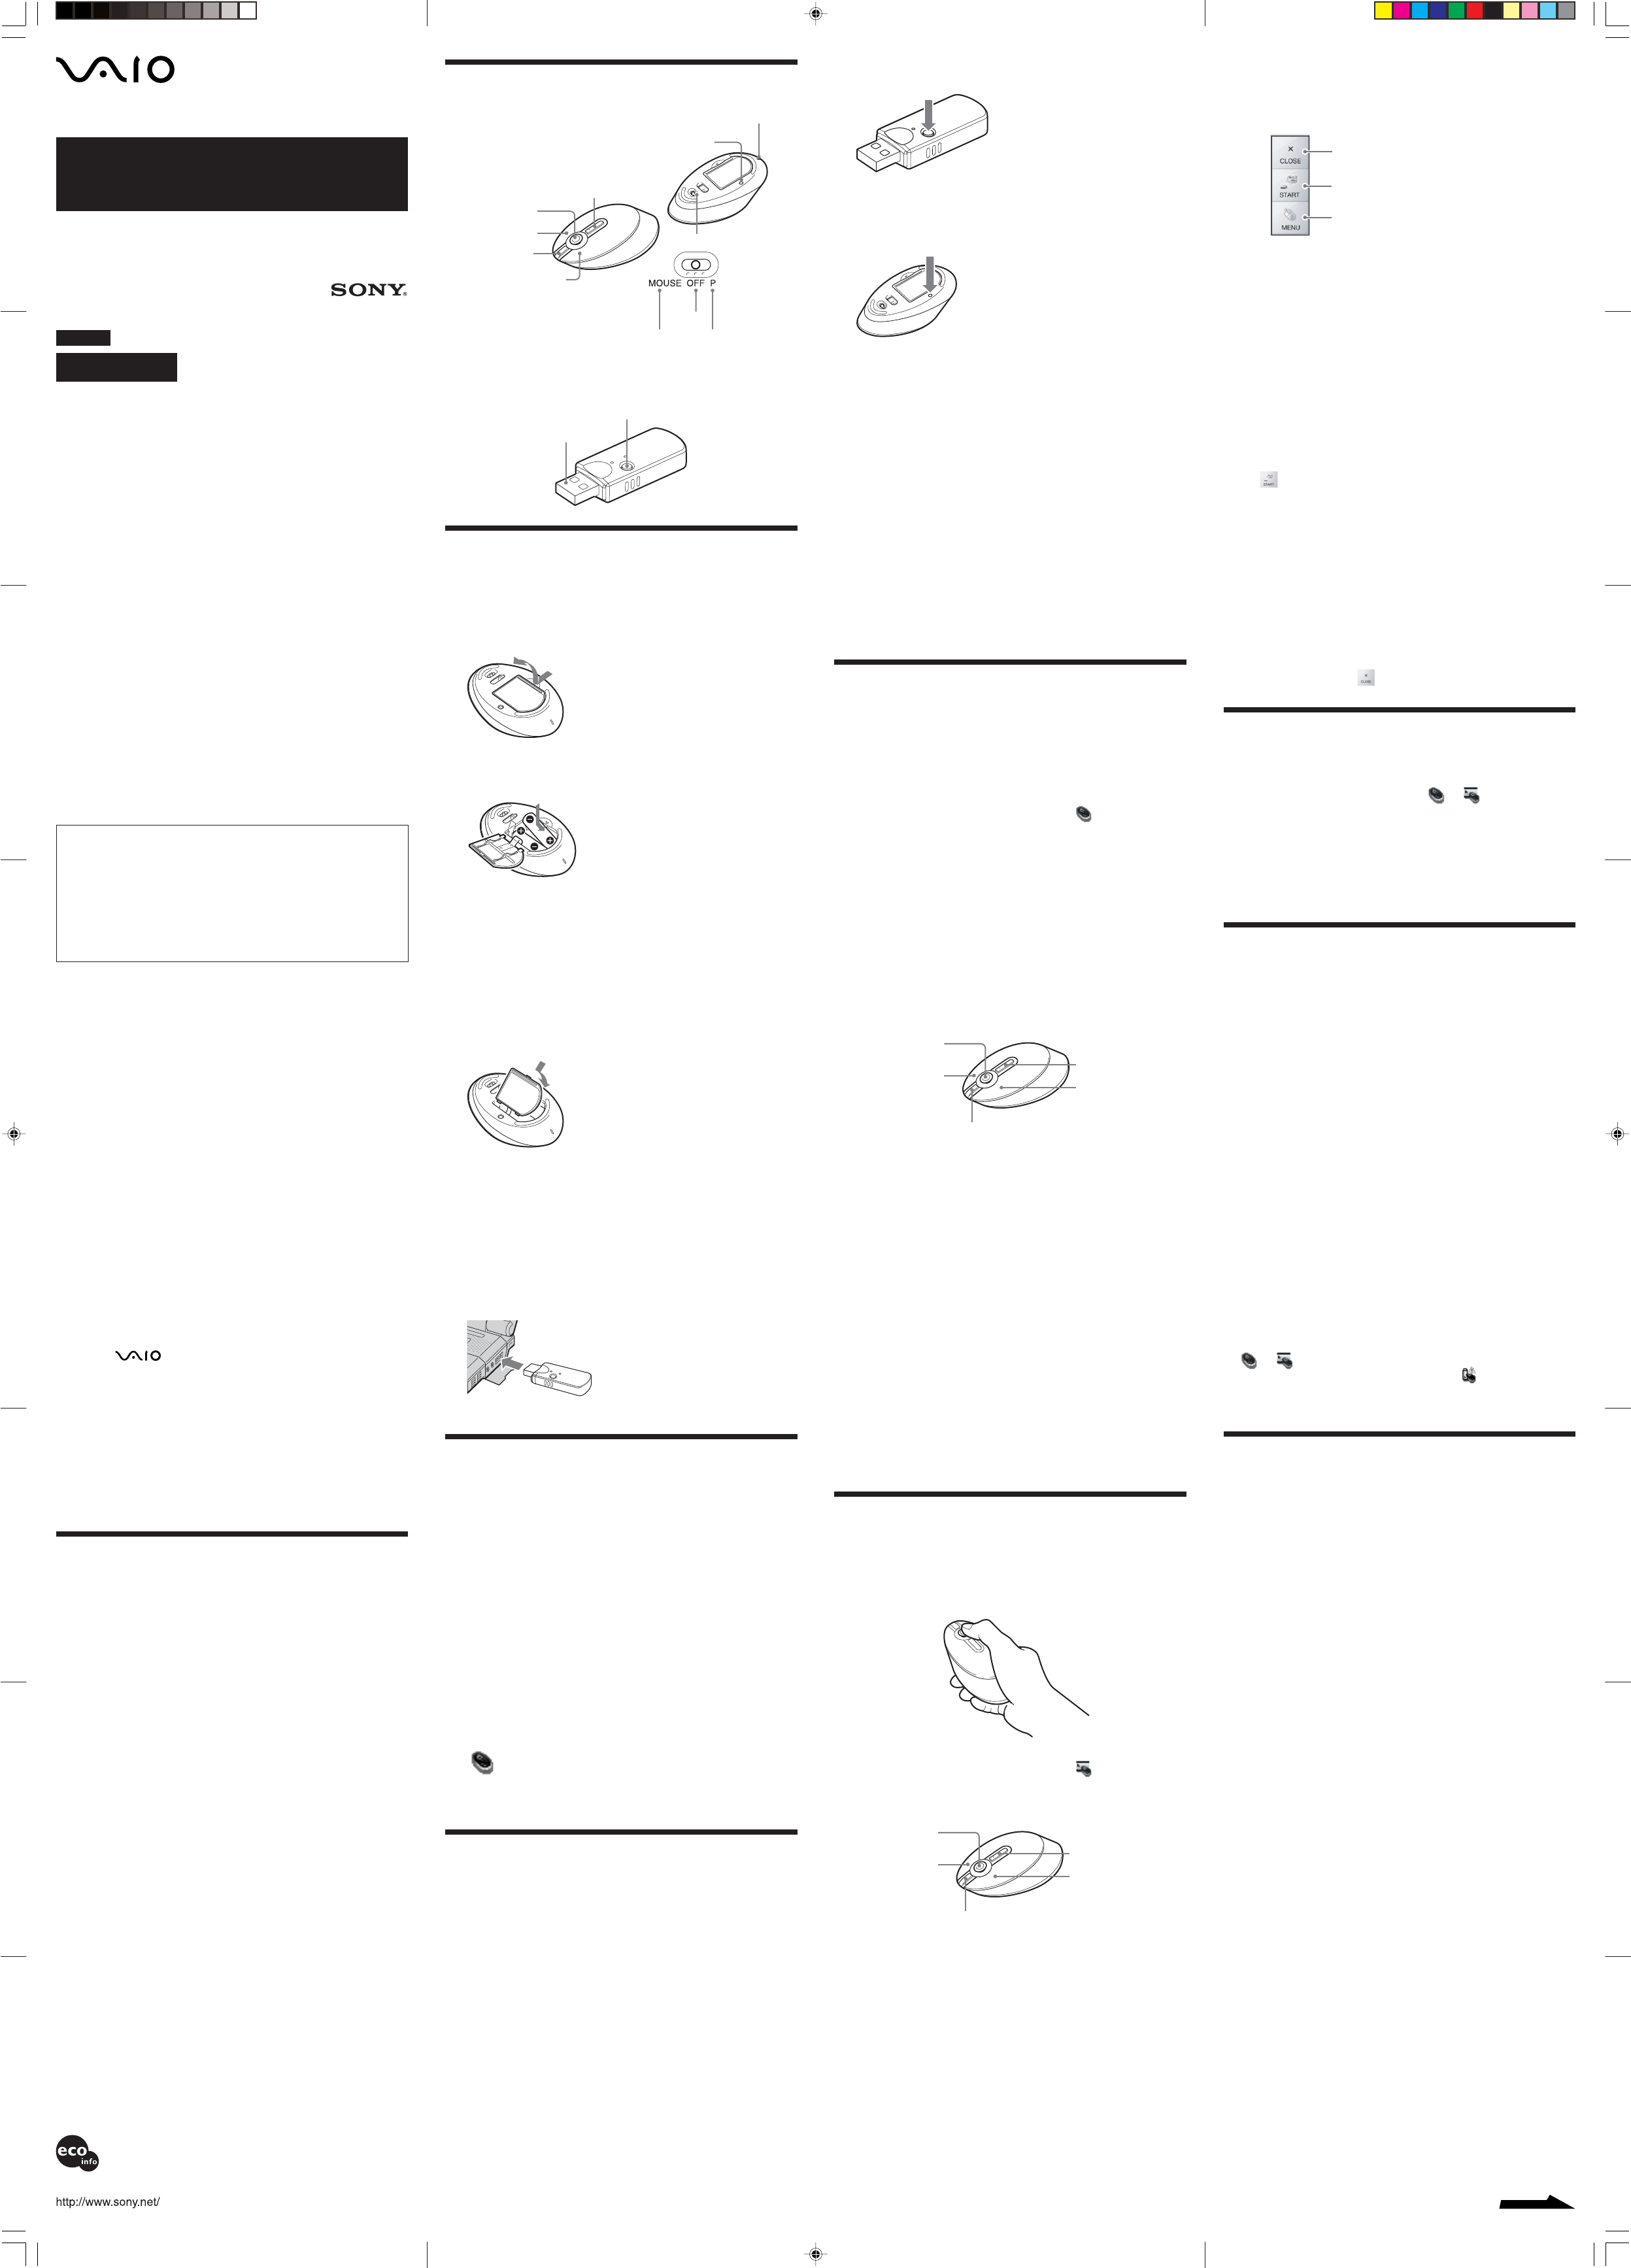
Names of Parts
Wireless mouse
*Hereafter referred to as ??Scroll Pointer??.
Wireless receiver
Preparations
Inserting batteries into the mouse
1Set the power/mode switch located on the bottom of
the mouse to OFF.
2Open the battery compartment cover.
3Insert the two supplied IEC R6 (size AA) batteries
with the correct + - orientation.
Note
To prevent battery fluid leaks and damage, observe the following
precautions.
•Insert the batteries with the correct + - orientation.
•Do not charge dry cell batteries.
•Do not mix old and new batteries, or batteries of a different type.
•If the mouse has not been used for a long time, remove the batteries.
•If a battery fluid leak occurs, carefully wipe the battery compartment,
and insert new batteries.
•To prevent accidental operation, be careful not to press any buttons or
move the ??Scroll Pointer?? when replacing the batteries.
4Close the battery compartment cover.
z
Under normal operating conditions, a set of alkaline batteries lasts about
three months. When the
cursor movement becomes sluggish and the communication distance
between the mouse and
receiver decreases, replace the batteries.
When not using the mouse, set the power/mode switch to OFF. This will
make the batteries last longer.
Connecting the receiver to the computer
Insert the receiver into the computer’s USB port.
Installing drivers and
utilities
Notes
• Depending on the computer or the software installed, some functions may not
be available.
•Make sure your CD-ROM drive is ready to use. For details on how to connect
and use your CD-ROM drive, refer to the operating instructions supplied with
the drive.
•Optical disc drives such as CD drives will be referred to as a CD-ROM drive in
this manual.
1Turn your computer on. Once Windows has finished
starting up, insert the supplied installation disc into
the CD-ROM drive.
Installation should start automatically. If it does not, click
“setup.exe” on the CD-ROM.
2Complete the installation according to the
instructions shown on the display.
When the installation is complete, the following icon will be
displayed in the Windows notification area.
z If the icon does not appear
Restart your computer and make sure the icon is displayed.
Enabling communication
between the mouse and
receiver
1Turn the mouse on.
Set the power/mode switch located on the bottom of the mouse to
one of the following positions.
When using as a wireless mouse (mouse mode) : MOUSE
When using in presentations (presentation mode) : P
Note
Whenever you operate the power/mode switch, be careful not to stare
directly into the red light emitted from the base of the mouse.
z When using the mouse for the first time
We recommend that you set the power/mode switch to MOUSE.
2Press the Connect button on the receiver.
Note
If you find it difficult to press the Connect button, use a ballpoint pen or
similar pointed objects to gently press the button.
The receiver LED lights up green, and the mouse can be
recognized for a period of about 30 seconds.
3Press the CONNECT button on the mouse.
Note
If you find it difficult to press the CONNECT button, use a ballpoint pen or
similar pointed objects to gently press the button.
Communication is established between the mouse and receiver.
4Wait until the receiver LED turns off before moving
the mouse (or moving the ??Scroll Pointer?? in
presentation mode).
If the pointer on the computer screen moves, you can use the
mouse.
To stop using the mouse
Disconnect the receiver from the USB port of the computer.
You can disconnect and connect the receiver without turning the
computer off. By setting the mouse power/mode switch to OFF, you
can conserve battery power.
Operating distance of the mouse
The mouse can normally be operated within about a 32 ft. (10 m) radius
around the receiver. Depending on the usage environment, sometimes
the usable distance may be notably shorter, preventing normal
operation.
In such a case, take the following measures:
• Use the mouse as far away from other wireless devices as possible.
•Use the mouse closer to the receiver.
•Use a mouse pad.
Using as a Wireless Mouse
(Mouse Mode)
To use the unit as a wireless mouse, set the power/mode switch
located on the bottom of the mouse to MOUSE. When you move the
mouse, the pointer displayed on your computer screen moves in the
same direction.
z When using as a wireless mouse
The following icon is displayed in the notification area:
Notes
•The optical mouse distinguishes movement by reflecting the red light from its
base off surfaces and detecting shadows with an optical sensor.
The optical mouse may not operate correctly on the following surfaces:
-Transparent surfaces (such as glass)
-Surfaces that reflect light (such as glossy plastics or mirrors)
- Surfaces with a repetitive pattern, such as screening (like those used for
printing photos in magazines and newspapers)
-Surfaces that are striped or have another distinct, high-contrast pattern
If the mouse pointer does not move smoothly across the screen, make sure
you are not using the mouse on one of the surfaces listed above.
•The soles on the base of the mouse are made with a low-friction fluoroplastic,
PTFE (polytetrafluoroethylene), but depending on the type of desk or mouse
pad, the smoothness of movement may vary.
Basic operations
2
1
3
5
4
1??Scroll Pointer??
Tilt the ??Scroll Pointer?? up, down, left, or right to scroll vertically
and horizontally. You can adjust scroll speed and sensitivity in the
“Mouse Properties” dialog box. For details, see “Adjusting Mouse
Properties”.
2Right button*
Press to open the shortcut menu and perform specific functions,
such as copying text/image files
and viewing file information.
3First button*
Press to go back to previous pages when browsing the Web or to
view previous screens.
4Second Button*
Press to go forward to the next page when browsing the Web
(when Button 1 has been used to go back).
5Left button
Press to perform specific mouse functions, such as opening files
and selecting programs. The left
button is used most often when using the mouse.
*You can configure the right button, left button, First button, and
Second button functions in the “Mouse Properties” dialog box. For
details, see “Adjusting Mouse Properties” .
Using the Presentation
Function (Presentation Mode)
Set the power/mode switch located on the bottom of the mouse to P to
turn off the red light and enter presentation mode. In presentation
mode, you can move the pointer from a distance and button functions
are set to make presenting easier.
z When using presentation mode
The following icon is displayed in the notification area:
Basic operations in presentation mode
Button functions will change to the following in presentation mode:
2
1
3
5
4
1??Scroll Pointer??
When you move the ??Scroll Pointer??, the pointer displayed on your
screen moves in the same direction.
2Right button
•Clicking: When using PowerPoint2003 or later, begins slide show from
selected sheet.
•Holding the button for more than 1 second: Opens the menu box and lets
you select specific functions. For details, see “Opening the menu box.”
3First button
Displays the previous slide.
4Second button
Displays the next slide.
5Left button
Same function as in mouse mode.
z
• You can configure the right button, left button, Button 1, and Button 2
functions. For details, see “Adjusting Mouse Properties.”
Scroller and Pointer
Wireless Presentation Mouse
VGP-WMS50
Operating Instructions
Mode d’emploi
© 2005 Sony Corporation Printed in Japan
2-684-362-11(1)
Opening the menu box
1Press and hold the right button for more than 1
second.
The menu box opens.
2Use the ??Scroll Pointer?? to move the pointer to an
icon, and click the right button.
The menu box closes and the selected function takes effect.
Closing the menu box
When the menu box is open, you cannot move the pointer outside of the menu
box’s frame. To close the menu box, select an icon or click the left button.
Giving presentations (steps and hints)
The following are steps and hints on giving presentations using
PowerPoint software.
1Open the presentation file.
2Start the slideshow.
•For PowerPoint2003 or later: Click the right button.
• For any other software: Press and hold the right button for more than 1
second to open the menu box, move the pointer to the icon in the center
(), and click the right button.
z Having the mouse pointer displayed during the slideshow
Under the default settings, the pointer is hidden when the mouse is not
moved for more than 3 seconds. To have the mouse pointer displayed at all
times, change the settings as follows:
Click the right button during a slideshow, under "??Pointer options??"
select “??Arrow options??,” and then click ”??Display??.”
Moving back and forward during the slideshow
Click First button or Second button.
Moving the pointer
Move the ??Scroll Pointer??.
3End the slideshow.
Press and hold the right button for more than 1 second to open the menu
box, move the pointer to ( ), and click the right button.
Adjusting Mouse Properties
You can change specific properties of the mouse, such as the pointer
speed and button functions.
1Double-click the mouse icon ( or ) in the
notification area.
The “Mouse Properties” dialog box appears.
2Click the tab for the mouse property you want to
change, and adjust the specific category.
Note
If you cannot change the pointer speed, consult your nearest Sony dealer.
Precautions
Safety
If any solid object or liquid falls onto the mouse, disconnect it and have
it checked by qualified personnel before continuing its use.
Location
Do not place the mouse in a location where it is:
•On an unstable surface
•In very humid areas or where there is no ventilation
•Subject to excessive dust
•Subject to direct sunlight or extreme heat
•Extremely cold
Operation
If the mouse is brought directly from a cold to a warm location or is
placed in a very damp room, moisture may condense on the inside of
the mouse. If this occurs, the mouse may not work properly.
In this case, wait about 30 minutes for the moisture to evaporate. If the
mouse does not work properly after one hour, consult your nearest
Sony dealer.
Cleaning the outside of the mouse
Clean the mouse with a soft, dry cloth or a soft cloth lightly moistened
with a mild detergent solution. Do not use any type of abrasive pad,
scouring powder, or solvent such as alcohol or benzine.
Replacing the batteries
The following indicate low battery charge. Replace the batteries in such
cases.
•The low battery lamp on the mouse flashes red.
•The low battery message pops up on your screen and the mouse icon
(or ) in the notification area located on the bottom right
corner of the screen changes to the following:
When the batteries are replaced, the low battery lamp will stop flashing
and the mouse icon will return to normal.
Specifications
Wireless mouse
Interface
Digital wireless transmission
Position tracking principle
Optical sensor
Sensor resolution
800 counts per inch
Wireless principle/frequency band
RF 2.4 GHz
Power requirements
3 V DC (two manganese IEC R6 [size AA] batteries)
Transmission distance
32 ft. (10 m) max. line of sight
Dimensions
Approx. 2.8 × 1.5 × 4.6 in. (71 × 38 × 115 mm) (w × h × d)
Mass
Approx. 4.3 oz. (120 g) (including batteries)
Wireless receiver
Interface
USB
Frequency band
2.4 GHz
Transmission distance
32 ft. (10 m) max. line of sight
Dimensions
Approx. 1.0 × 3.4 × 1.8 in. (23 × 84 × 44 mm) (w × h × d)
Mass
Approx. 1.5 oz. (40 g)
Miscellaneous
Supported models
Sony VAIO computers with the Windows XP operating system.
Operating temperature
41°F to 95°F (5°C to 35°C)
(temperature gradient less than 18°F (10°C)/hour)
Operating humidity
20% to 80% (not condensed), provided that humidity is less than 65% at
95°F (35°C) (hygrometer reading of less than 84°F (29°C))
Storage temperature
–4°F to 140°F (–20°C to 60°C)
(temperature gradient less than 18°F (10°C)/hour)
Printed on 100% recycled paper using VOC (Volatile Organic
Compound)-free vegetable oil based ink.
Imprimé sur papier 100 % recyclé avec de l’encre à base
d’huile végétale sans COV (composés organiques volatils).
suite
Right button
First button
Left button
Second button
CONNECT button
Low battery lamp
Power/mode switch
Mouse mode
Power OFF
Presentation mode
Connect button
USB connector
• For details on how to use during presentations, see “Giving presentations
(steps and hints).”
Closes the selected screen.
Starts the slideshow from the beginning.
Displays the menu list that appears when
the mouse or touch pad is right-clicked.
This device comply with Industry Canada RSS 210.

VGP-WMS50 2-684-362-11(1)
VGP-WMS50 2-684-362-11(1)
Storage humidity
10% to 90% (not condensed), provided that humidity is less than 20% at
140°F (60°C) (hygrometer reading of less than 95°F (35°C)
Accessories
Wireless receiver (PCGA-WMSR1) (1)
Manganese IEC R6 (size AA) batteries* (2)
Operating Instructions (this document) (1)
Warranty Card (1)
*The supplied batteries are for testing purposes only. You can use the
mouse longer by using alkaline batteries.
Design and specifications are subject to change without notice.
Troubleshooting
If you experience any of the following difficulties while using the
mouse, use this troubleshooting guide to solve the problem. If a
problem persists, consult your nearest Sony dealer.
Nothing happens when I press a mouse button.
❒The receiver is not connected properly to the USB port.
cClose all programs, and then reconnect the receiver to your
computer.
❒The operating system is not compatible.
cUse a supported operating system.
❒The USB port is not available.
cCheck the “System Properties” of your computer.
❒The mouse batteries are drained.
c If the power does not come on when the power/mode switch is set
to either MOUSE (mouse mode) or P (presentation mode), replace
the batteries. For details, see “Preparations”.
❒The mouse and receiver are not communicating.
c Perform steps 1 and 2 of “Enabling communication between the
mouse and receiver” to ensure that proper communication is
possible.
c In some operating environments, the usable distance may be notably
shorter, preventing normal operation. Ensure that the receiver is not
closer than 8 in. (20 cm) to the computer, the display, and other
electronic devices.
cIf the mouse is too far from the receiver, communication is not
possible. Bring the mouse and receiver closer together.
❒The mouse is being used on an unsuitable surface.
cWhen used on a mirror, glass, or other shiny surface, or on a
transparent or strongly patterned surface, the sensor on the bottom
of the mouse may not be able to correctly detect the mouse
movements. On such surfaces, use a mouse pad.
❒The mouse may have difficulty communicating in a 2.4 GHz wireless
LAN environment.
cIt is best to use the mouse in a location with low interference from
wireless devices.
Pressing the Connect button does not establish a connection.
cCheck whether batteries are inserted in the mouse. For details, see
“Preparations”.
cIf the power/mode switch on the mouse is set to OFF,
communication with the receiver is not possible. Check the power/
mode switch setting on the bottom of the mouse.
cIf the power does not come on when the power/mode switch is set to
either mouse mode or presentation mode, the batteries may be
drained. Under normal operating conditions, a set of alkaline
batteries lasts about three months. Replace the batteries. For details,
see “Preparations”.
cCommunication between the mouse and receiver may not have been
properly established. If the CONNECT button on the mouse is not
pressed within 30 seconds of pressing the Connect button on the
receiver, the receiver cancels communication. In such a case perform
the procedure again to enable communication. For details, see
“Enabling communication between the mouse and receiver”.
cIf the mouse and receiver are too far apart, communication is not
possible. The maximum communication distance between the mouse
and receiver is about 32 ft. (10 m). If used on a metal table or if
obstacles lie between the mouse and receiver, the usable distance
may be less.
The scrolling features do not work.
❒The operating system is not compatible.
cUse a supported operating system.
❒The program you are using is not compatible with the scrolling
features.
cThe scrolling features only work with programs that use a scroll
function.
cSome programs do not support the scrolling features.
❒After the receiver was installed, the computer was returned to normal
mode from power-saving mode.
cDisconnect the receiver from the USB port, wait a few seconds, and
then reconnect it.
The pointer does not move when I move the mouse.
cProcessing performed by Windows or other software may
temporarily disable the mouse. Wait a few moments for the
processing to finish before using the mouse.
cYou may find some useful solutions in your computer’s operating
instructions. Refer to the manuals provided with your computer.
❒The mouse batteries are exhausted.
c If the power does not come on when the power/mode switch is set
to either mouse mode or presentation mode, replace the batteries.
For details, see “Preparations”.
❒The mouse is not set to mouse mode.
c Set the power/mode switch on the bottom of the mouse to MOUSE
(mouse mode).
❒The mouse and receiver are not communicating.
c Perform steps 1 and 2 of “Enabling communication between the
mouse and receiver” to ensure that proper communication is
possible.
c To reduce interference from other radio waves, keep the mouse away
from other wireless devices.
cIf the mouse is too far from the receiver, communication is not
possible. Bring the mouse and receiver closer together.
❒The mouse is being used on an unsuitable surface.
cWhen used on a mirror, glass, or other shiny surface, or on a
transparent or strongly patterned surface, the sensor on the bottom
of the mouse may not be able to correctly detect the mouse
movements. On such surfaces, use a mouse pad.
Pressing First button or Second button does not switch the screen.
❒The program you are using is not compatible with First button and
Second button.
cFirst button and Second button only work with compatible
programs.
cThe mouse settings may have been changed. Check the settings on
the “Mouse Properties” screen. For instructions on displaying the
“Mouse Properties” screen, see “Adjusting Mouse Properties”.
When I am using the mouse, the display goes dark or the computer
enters power-saving mode.
❒The computer enters power-saving mode even while a USB device is in
use.
cChange the power management settings for the computer to prevent
it from entering power-saving mode. For details, refer to the manuals
provided with your computer.
cTouch the touchpad or press any key on the keyboard to exit power-
saving mode.
The computer does not return from Standby mode.
cTouch the touchpad or press any key on the keyboard to exit this
mode.
The mouse pointer does not move smoothly across the screen.
cThe optical mouse distinguishes movement by reflecting the red light
from its base off surfaces and detecting shadows with an optical
sensor.
The optical mouse may not operate correctly on the following
surfaces:
-Transparent surfaces (such as glass)
-Surfaces that reflect light (such as glossy plastics or mirrors)
- Surfaces with a repetitive pattern, such as screening (like those used
for printing photos in magazines and newspapers)
- Surfaces that are striped or have another distinct, high-contrast
pattern
If the mouse pointer does not move smoothly across the screen, make
sure you are not using the mouse on one of the surfaces listed above.
Exiting power-saving mode with the mouse takes a long time or is not
possible.
cPress any key or the power button on the keyboard.
When I start the computer an error message appears, saying that the
mouse is not connected.
cSelect the check box that offers not to display this message again, and
then click “OK”.
The mouse does not move smoothly after returning from the power-
saving mode.
cDisconnect the receiver from the USB port, wait a few seconds, and
then reconnect it.
After connecting the receiver, it takes a while before the mouse can be
used.
cIf the receiver is connected while the computer is processing
commands from Windows, other software, or another USB device, it
may take a while for the computer to detect the receiver.
The buttons and ??Scroll Pointer?? do not work as I expected.
❒The mouse is set to the wrong operating mode.
cCheck the power/mode switch setting on the bottom of the mouse
and the mouse icon in the computer's notification area, and set the
power/mode switch to the desired position.
❒The operation setting value is incorrect.
cOpen the “Mouse Properties” screen, and adjust the setting to the
desired value.
For details, see “Adjusting Mouse Properties”.
I do not know what mode the mouse is set to.
cCheck the power/mode switch setting on the bottom of the mouse
and the mouse icon in the computer's notification area.
: Mouse mode
: Presentation mode
The receiver is connected but the mouse icon does not appear in the
notification area.
cDisconnect the receiver from the USB port, wait a few seconds, and
then reconnect it.
•Dans des zones très humides ou mal ventilées
•Particulièrement poussiéreux
•Exposés à la lumière directe du soleil ou très chauds
•Extrêmement froids
Fonctionnement
Si vous déplacez la souris USB d’un endroit froid à un endroit chaud,
ou lorsqu’elle est placée dans une pièce très humide, il est possible que
de la condensation se forme à l’intérieur de la souris. Si cela se produit,
la souris risque de ne pas fonctionner correctement.