Primax Electronics M6000 Wireless Mouse User Manual BPwm
Primax Electronics Ltd Wireless Mouse BPwm
Contents
- 1. Manual
- 2. Manual Part 2
Manual
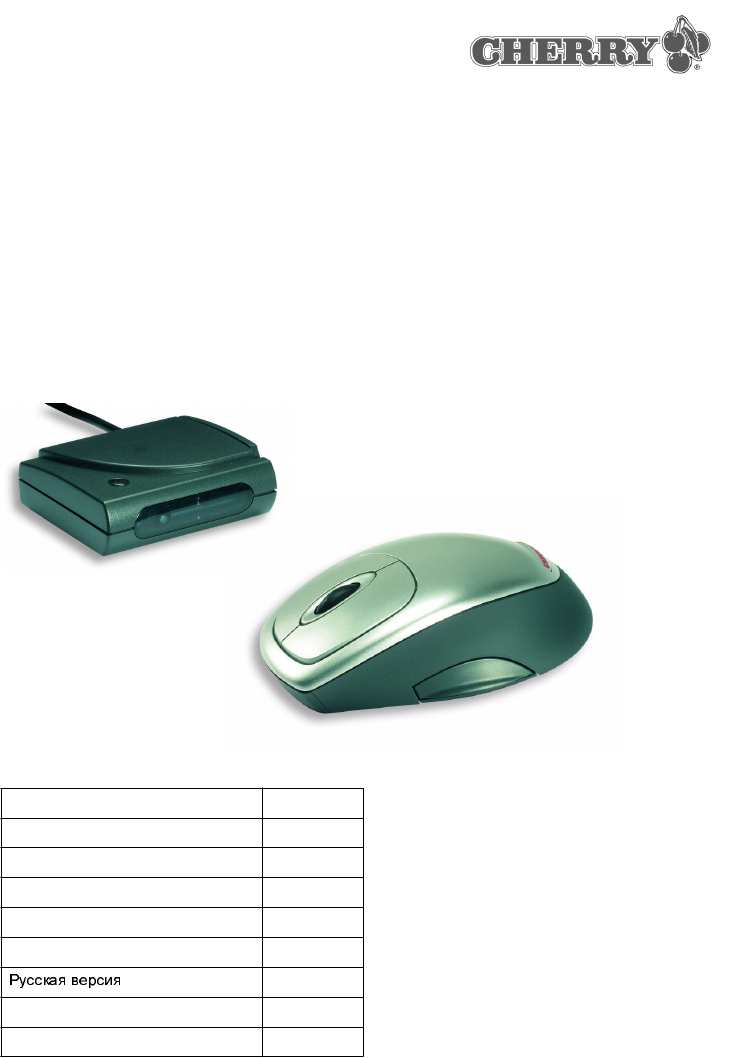
Cherry Power WheelMouse
wireless optical
Instructions
644-0272.00 March 2002
Deutsche Version 1-3
English Version 4-6
Version française 7-19
Versione italiana 10-12
Versión en español 13-15
Nederlandse versie 16-18
19-21
Technical data 22
Certification 23

1
1 Allgemeiner Anwenderhinweis
Cherry optimiert seine Produkte ständig im Zuge
der Entwicklung von neuen Technologien. Techni-
sche Änderungen behalten wir uns deshalb vor.
Die Ermittlung der Zuverlässigkeit sowie die Defini-
tion von technischen Angaben erfolgt gemäß
Cherry-interner Prüfung, um international aner-
kannte Vorschriften bzw. Normen zu erfüllen.
Davon abweichende Anforderungen können durch
gegenseitige Zusammenarbeit erfüllt werden.
Unsachgemäße Behandlung, Lagerung und
äußere Einflüsse können zu Störungen und Schä-
den im Einsatz führen. Wir übernehmen keinerlei
Gewährleistung, falls unser Produkt anwendersei-
tig verändert wird und haften nicht im Falle unbe-
fugter Veränderungen. Alle Reparaturen müssen
durch Cherry oder eine offiziell berechtigte Person
oder Organisation durchgeführt werden. Bei
unsachgemäßem Austausch der optional einge-
setzten Lithiumbatterie besteht Explosionsgefahr!
Etwaige Schadensersatzansprüche gegen Cherry
oder seine eingesetzten Vertreter – gleich aus wel-
chem Rechtsgrund (einschließlich streßbedingte
körperliche Schäden) sind ausgeschlossen, soweit
uns nicht Vorsatz oder Nichtbeachtung gültiger
Produkthaftungsbestimmungen trifft. Die vorlie-
gende Bedienungsanleitung ist nur gültig für das
mitgelieferte Produkt.
Weitere Informationen darüber sind bei den jeweili-
gen Cherry Distributoren oder direkt über die
Cherry GmbH erhältlich.
2 Informationen auf Papier und
online
Informationen zur Inbetriebnahme, Bedienung und
Konfiguration der Cherry Power WheelMouse
wireless optical erhalten Sie zum Teil in der vor-
liegenden Kurzanleitung, zum Teil in einer Online-
Version (als kontextsensitive Hilfe und als eine
elektronische Bedienungsanleitung). Bitte beach-
ten Sie dort auch die Lizenzvereinbarungen und
die allgemeinen Anwenderhinweise zu unserem
Produkt.
Die Aufteilung der Informationen erfolgt nach fol-
genden Kriterien:
• Die kontextsensitive Hilfe bietet Ihnen Informa-
tionen an den Stellen, an denen Sie diese
benötigen; wenn Sie die Dokumentation den-
noch auf Papier lesen möchten, können Sie die
elektronische Bedienungsanleitung (CD-ROM |
Manual) aufrufen und die gewünschten Inhalte
ausdrucken.
• Dadurch, dass wir Ihnen nur die wichtigsten
Informationen auf Papier präsentieren, verrin-
gern wir den Papierverbrauch und leisten somit
einen Beitrag zum Umweltschutz.
3 Vorteile der Cherry Power
WheelMouse wireless optical
Sie können die Cherry Power WheelMouse wire-
less optical leicht installieren und konfigurieren.
Folgende Merkmale und Funktionen machen die
Arbeit mit der Maus effizient und bequem:
• Die Auflösung von bis zu 800 dpi erlaubt Ihnen
präziseres Arbeiten.
• Ein optischer Sensor ersetzt die Kugel und
macht das aufwendige Reinigen der Maus
überflüssig.
• Mit dem Power Wheel können Sie bequem
scrollen.
• Die Soft Touch-Oberfläche sorgt für ein ange-
nehmes Betätigungsgefühl.
• Die Software bietet Ihnen die Möglichkeit, die
vier Tasten der Maus individuell mit Funktionen
zu belegen.
• Die kabellose Variante bietet mehr Bewegungs-
freiheit bei der Bedienung der Maus.
• Durch die ergonomische Form liegt die Maus
gut in der Hand.
Voraussetzung für eine optimale Nutzung
Sie können die Leistung der Maus nur dann opti-
mal nutzen, wenn Sie die Maus auf nicht spiegeln-
den Flächen benutzen.
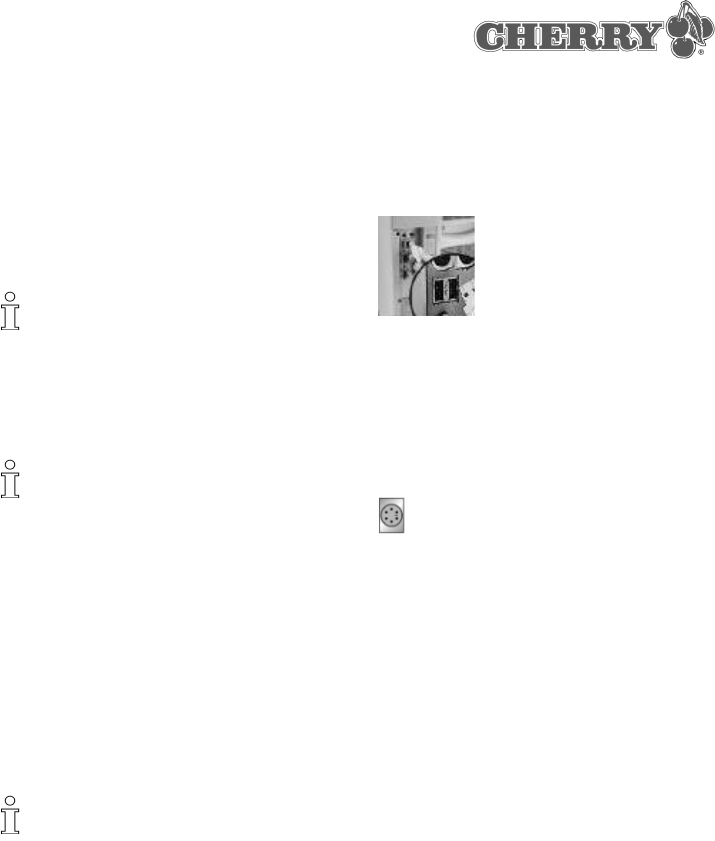
4 Anschließen und Inbetriebnahme
der Geräte
DerEmpfängerderCherry Power WheelMouse
wireless optical wird mit einen USB-Stecker aus-
geliefert. Mit dem USB-PS/2-Adapter können Sie
Deutsche Version
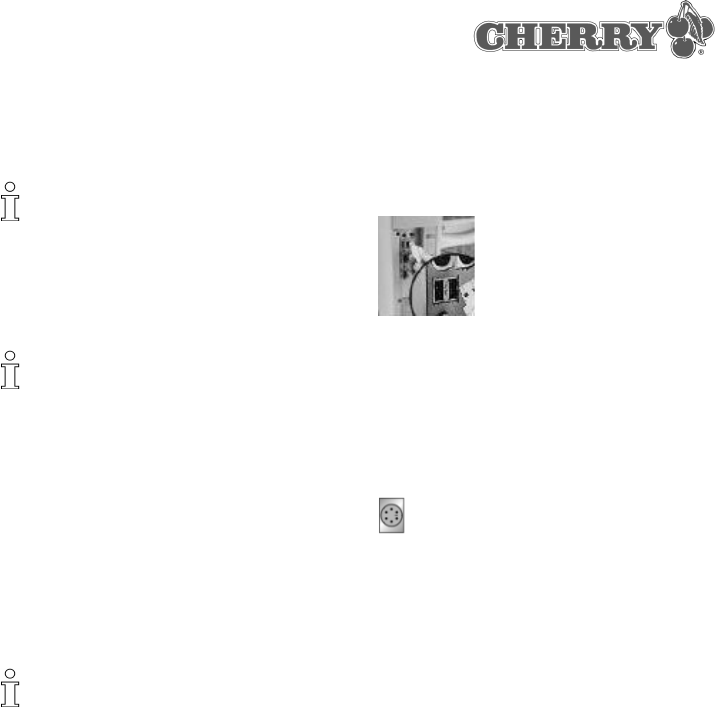
2
ihn auch an der PS/2-Buchse des PCs anschlie-
ßen.
Wenn Sie den Empfänger mit Hilfe des Adapters
an die PS/2-Buchse des PCs anschließen, müs-
sen Sie den PC zuvor ausschalten.
An die USB-Buchse können Sie den Empfänger im
laufenden Betrieb des PCs anschließen.
Unter Windows 95 und Windows NT können Sie
die Cherry Power WheelMouse wireless optical
nur mit Hilfe des USB-PS/2-Adapters nutzen, da
Windows 95 und Windows NT USB nicht unter-
stützen.
So legen Sie die Batterien in die Cherry Power
WheelMouse wireless optical ein
1 Öffnen Sie das Batteriefach an der Unterseite
der Maus.
2 Legen Sie die beiden mitgelieferten Batterien
vom Typ AA in das Gehäuse ein.
3 Schließen Sie die Abdeckung.
Plazieren des Empfängers auf dem Schreib-
tisch
WennIhrSchreibtischeineOberflächeausHolz
hat, erreichen Sie optimale Empfangsbedingun-
gen, indem Sie den Empfänger horizontal plazie-
ren.
WennIhrSchreibtischeineOberflächeausMetall
hat, erreichen Sie optimale Empfangsbedingun-
gen, indem Sie den Empfänger vertikal plazieren.
Dazu können Sie den Standfuß des Empfängers
benutzen.
So schließen Sie den Empfänger an Ihren PC
an der USB-Buchse an
1 Ermitteln Sie einen USB-Anschluss an der
Rückseite Ihres PCs.
2 Entfernen Sie den USB-PS/2-Adapter vom USB-
Stecker des Empfängerkabels.
3 Verbinden Sie den Stecker des Empfängers mit
dem USB-Anschluss.
So schließen Sie den Empfänger an Ihren PC
an der PS/2-Buchse an
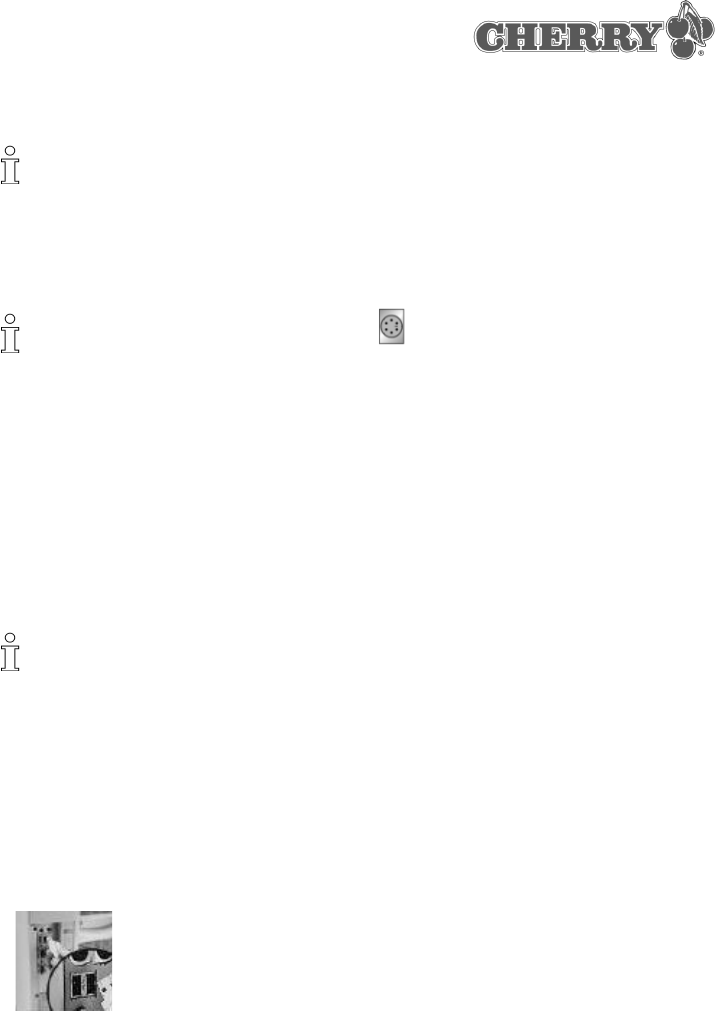
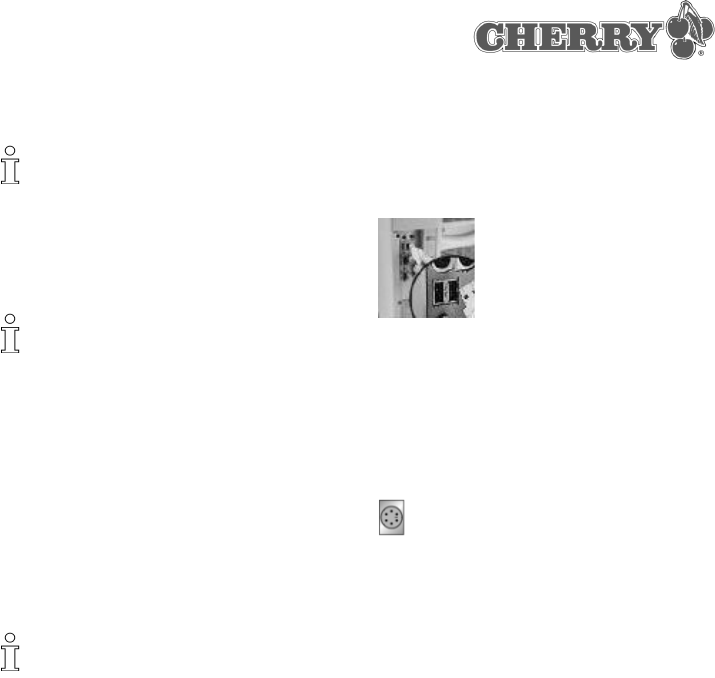
1 Ermitteln Sie den runden 6-poligen PS/2-Maus-
anschluss an der Rückseite des PCs.
2 Verbinden Sie den PS/2-Stecker des USB-PS/2-
Adapters mit der PS/2-Buchse des PCs.
So aktivieren Sie die Signalübertragung
zwischen dem Empfänger und der Maus
1 Ermitteln Sie den Aktivierungs-Knopf auf dem
Empfänger.
2 Drücken Sie den Knopf einige Sekunden lang.
Die LED des Empfängers schaltet sich ein und
leuchtet ca. eine Minute.
3 Ermitteln Sie den Aktivierungs-Knopf an der
Unterseite der Maus.
4 Drücken Sie den Aktivierungs-Knopf mit Hilfe
eines spitzen Gegenstandes, z. B. eines Kugel-
schreibers, einige Sekunden lang.
Die LED des Empfängers schaltet sich aus. Die
Maus ist betriebsbereit.

3
5 Installieren der Maus unter
Windows 95/98/ME/NT4/2000
So installieren Sie die Software unter
Windows 98/ME/2000
1 LegenSiediemitgelieferteCD-ROMinIhr
CD-ROM-Laufwerk.
Die CD-ROM wird automatisch gestartet. Das
Fenster Cherry Power WheelMouse optical
wird geöffnet.
-ODER-
Wenn die CD-ROM nicht automatisch gestartet
wird, wählen Sie im Windows Explorer
CD-ROM-Laufwerk | Software und
doppelklicken Sie mit der linken Maus-Taste auf
die Datei Setup.exe.
Die Installation beginnt.
2 Bei automatischem Start der CD-ROM klicken
Sie auf den Eintrag Softwareinstallation star-
ten.
Abhängig von den Einstellungen Ihres Internet-
Browsers haben Sie die Möglichkeit, die Datei zu
speichern oder zu öffnen.
• Wählen Sie nach Möglichkeit die Option Öff-
nen und klicken Sie auf die Schaltfläche OK.
Die Installation beginnt.
• Besteht nur die Option, die Datei zu speichern,
dann brechen Sie den Dialog ab, wählen Sie im
Windows Explorer CD-ROM-Laufwerk | Soft-
ware und doppelklicken Sie mit der linken
Maus-Taste auf die Datei Setup.exe.
Die Installation beginnt.
3 Folgen Sie den Installationsanweisungen auf
dem Bildschirm.
6 Bedienen der Maus
Informationen zur Bedienung und Konfigu-
ration der Maus
Detaillierte Informationen zur Bedienung und Konfi-
guration der Maus entnehmen Sie der elektroni-
schen Bedienungsanleitung (CD-ROM | Manual).
7 Support
Bei Problemen mit der Installation von Maus oder
Software bieten wir Ihnen einen kostenlosen Sup-
port an.
Unter http://support.cherry.de erreichen Sie das
CHERRY INTERNET SUPPORT SYSTEM (CISS).
Dort können Sie Ihre Anfragen rund um die Uhr,
sieben Tage in der Woche, direkt an uns übermit-
teln.
Sollten Sie über keinen Internet-Zugang verfügen,
kontaktieren Sie uns bitte unter folgender Adresse
oder Telefon- bzw. Faxnummer:
CHERRY GmbH
Cherrystrasse
91275 Auerbach
Hotline:
Tel. +49(0)9643-18-206
Fax: +49(0)9643-18-545
Wir stehen Ihnen Mo-Do von 07:15 bis 16:00 Uhr
und Fr von 07:15 bis 13:30 Uhr zur Verfügung.

4
1 General User Information
Cherry optimizes its products constantly to keep up
with new developments in technology. This is why
we reserve the right to make technical changes.
The determination of reliability and the definition of
technical data is carried out in accordance with
internal Cherry testing, in order to fulfil
internationally recognized regulations and
standards. Additional requirements can be met in
collaboration with customers. Improper handling,
storage and external influences can lead to faults
and damage during use. We assume no liability if
our product is modified by the user and are not
liable in the case of unauthorized modifications. All
repairs are to be made through Cherry or an
officially authorized person or organization. Danger
of explosion is present if the optional lithium battery
is replaced in an improper manner! Claims for
compensation against Cherry or its authorized
representatives – on whatever legal grounds
(including physical injuries due to stress) – are
excluded insofar as deliberate negligence on our
part or improper observation of valid product
liability regulations is not pertinent. These
operating instructions are only valid for the product
enclosed.
Additional information can be obtained from your
respective Cherry distributor or directly from Cherry
GmbH.
2 Printed and online information
Information on the setup, operation and
configuration of the Cherry Power WheelMouse
wireless optical is contained partially in these
quick-start instructions and partially in an online
version (as a context-sensitive help function and as
electronic operating instructions). Please also
observe the license agreement and general user
information on our product included therein.
The information is presented according to the
following criteria:
• The context-sensitive help provides you with
information where you need it; however, should
you wish to read the documentation in printed
form, you can call up the electronic operating
instructions (CD-ROM | Manual) and print out
the contents.
• By presenting only the most essential
informationonpaper,wearereducingthe
unnecessary use of paper and thus making our
contribution towards environmental protection.
3 Advantages of the Cherry Power
WheelMouse wireless optical
You can install and configure the Cherry Power
WheelMouse wireless optical easily. The
following features and functions make working with
the mouse efficient and comfortable.
• The resolution of up to 800 dpi allows precise
working.
• An optical sensor replaces the ball and makes
troublesome cleaning of the mouse
superfluous.
• The Power Wheel allows you to scroll
comfortably.
• The Soft Touch interface ensures a pleasant
operating feeling.
• The software allows you to assign functions
individually to the four mouse buttons.
• The wireless variant offers more freedom of
movement when handling the mouse.
• The ergonomic form ensures that the mouse
lies well in your hand.
Prerequisite for optimal use
You can only use the mouse functionality optimally,
if you do not use the mouse on reflecting surfaces.
4 Connecting and starting-up the
devices
The receiver of the Cherry Power WheelMouse
wireless optical is supplied with a USB
connector. You can also connect it to the PS/2 port
of the PC by means of the USB-PS/2 adapter.
English Version
5
You must first switch off the PC if you connect the
receiver to the PS/2 port of the PC by means of the
adapter.
You can connect the receiver to the USB port of
the PC while the PC is running.
Under Windows 95 and Windows NT you can
only use the Cherry Power WheelMouse
wireless optical by means of the USB-PS/2
adapter, since Windows 95 and Windows NT do
not support USB.
To insert the batteries into the Cherry Power
WheelMouse wireless optical
1 Open the battery compartment on the underside
of the mouse.
2 Insert the two included batteries, type AA, into
the housing.
3Closethecover.
Positioning the receiver on the desk
If your desk has a wooden surface, you can
achieve optimal receipt conditions by positioning
the receiver horizontally.
If your desk has a metal surface, you can achieve
optimal receipt conditions by positioning the
receiver vertically. You can use the base of the
receiver to this purpose.
To connect the receiver to your PC via
the USB port
1 Locate a USB port on the rear of your PC.
2 Remove the USB-PS/2 adapter from the USB
connector of the receiver cable.
3 Connect the receiver connector with the USB
port.
To connect the receiver to your PC via
thePS/2port
1 Locate the round 6-pin PS/2 mouse port on the
rear of your PC.
2 Connect the PS/2 connector of the USB-PS/2
adapter with the PS/2 port of the PC.
To activate the signal transfer between the
receiver and the mouse
1 Locate the activation button on the receiver.
2 Press the button for a few seconds.
The LED of the receiver is activated and lights up
for approx. one minute.
3 Locate the activation button on the underside of
the mouse.
4 Use a pointed object, e.g. a ballpoint pen, to
press the activation button for a few seconds.
The LED of the receiver extinguishes. The
mouse is ready to operate.
5 Installing the mouse under
Windows 95/98/ME/NT4/2000
To install the software under
Windows 98/ME/2000
1 Place the enclosed CD-ROM in your CD-ROM
drive.
The CD-ROM starts automatically. The Cherry
Power WheelMouse optical window is opened.
-OR-
If the CD-ROM does not start automatically,
select CD-ROM drive | Software in the
Explorer and double-click with the left mouse
button on the file Setup.exe.
Installation begins.

6
2 If the CD-ROM starts automatically, click on the
entry Start software installation.
Depending on the settings of your Internet
Browser you can save or open the file.
• If possible, select the option Open and click on
the OK command button.
Installation begins.
• If only the option to save the file exists, cancel
the dialog box, select CD-ROM drive |
Software in the Windows Explorer and double-
click with the left mouse button on the file
Setup.exe.
Installation begins.
3 Follow the installation instructions on the screen.
6 Operating the mouse
Information on the operation and
configuration of the mouse
Detailed information on operating and configuring
the mouse is contained in the electronic operating
instructions (CD-ROM | Manual).
7 Support
We offer a free support service in order to help you
with any problems you may encounter in the
installation of the mouse or the software.
Under http://support.cherry.de, you can contact
the CHERRY INTERNET SUPPORT SYSTEM
(CISS). There you can submit your questions to us
directly around the clock and seven days a week.
If you do not have an Internet connection, please
contact us at the following address or under the
following telephone or fax numbers:
CHERRY GmbH
Cherrystrasse
D-91275 Auerbach
Hotline:
Tel.: +49(0)9643-18-206
Fax: +49(0)9643-18-545
We are available to help you Monday to Thursday
from 07:15:00 AM to 16:00 and Friday from
07:15:00 AM to 13:30.

7
1 Indication générale pour
l'utilisateur
Cherry optimise ses produits en permanence dans
le cadre de l'évolution de nouvelles technologies.
Nous nous réservons pour cette raison le droit de
procéder à des modifications techniques. La
détermination de la fiabilité ainsi que la définition
d'indications techniques se font suivant contrôle
interne de Cherry, afin de répondre aux
prescriptions et normes internationalement
reconnues. Les exigences qui s'en écartent
peuvent être réalisées par collaboration mutuelle.
La manipulation ou le stockage inappropriés ainsi
que des influences extérieures peuvent conduire à
des dérangements et dommages lors de
l'utilisation. Nous déclinons toutes prestations de
garantie si notre produit est modifié par l'utilisateur
et nous déclinons toute responsabilité dans le cas
de modifications non autorisées. Toutes les
réparations doivent être effectuées par Cherry ou
une personne ou organisation officiellement
habilitée. Danger d'explosion en cas de
remplacement incorrect des piles au lithium
utilisées en option! Toutes revendications de
dédommagement vis-à-vis de Cherry ou de ses
représentants – quelle qu'en soit la raison (y
compris dommages corporels dus au stress) sont
exclues, sauf en cas d'intention délictueuse ou de
non-respect de clauses valables de responsabilité
de produit. Le présent mode d'emploi est
uniquement valable pour le produit fourni.
Desinformationsplusdétailléesàcesujetsont
disponibles auprès des distributeurs Cherry
respectifs ou directement auprès de Cherry GmbH.
2 Informations sur papier et en
version électronique
Vous recevez les informations concernant la mise
en service, la manipulation et la configuration de la
souris Cherry Power WheelMouse wireless
optical en partie sur la feuille en annexe et en
partie dans une version électronique (sous forme
d'une aide contextuelle et d'un mode d'emploi
électronique). Veuillez également tenir compte des
licences ainsi que des informations générales
destinées à l'utilisateur.
Les informations sont présentées selon les critères
suivants:
• L'aide contextuelle vous offre des informations
auxendroitsauxquelsvousenavezbesoin;si
vous désirez malgré tout lire la documentation
sur papier, vous pouvez appeler le mode
d'emploi électronique (CD-ROM/Manuels) et
imprimer les parties qui vous intéressent.
• En vous donnant seulement les informations
essentielles sur papier, nous réduisons ainsi la
consommation de feuilles et contribuons à la
protection de l'environnement.
3 Avantages de la souris Cherry
Power WheelMouse wireless
optical
La souris Cherry Power WheelMouse wireless
optical se laisse facilement installer et configurer.
Les caractéristiques et fonctions suivantes rendent
le travail avec la souris efficient et confortable:
• La résolution de jusqu'à 800 ppp vous permet
un travail précis.
• Un capteur optique remplace la boule et
supprime la nécessité de nettoyer la souris.
• La roulette Power Wheel vous permet de faire
défiler confortablement.
• La surface Soft Touch donne une sensation
agréable au contact.
• Le logiciel vous offre la possibilité d'attribuer
individuellement des fonctions aux quatre
boutons de la souris.
• La version sans fil offre une liberté de
mouvement accrue pour la manipulation de la
souris.
• Grâce à sa forme ergonomique, la souris tombe
bien dans la main.
Conditions pour une utilisation optimale
Vous ne pouvez utiliser la souris de manière
optimale que si vous utilisez la souris sur des
surfaces non réfléchissantes.
Version française
8
4 Raccordement et mise en service
des appareils
Le récepteur de la souris Cherry Power
WheelMouse wireless optical est livré avec un
connecteur USB. Avec l'adaptateur USB-PS/2,
vous pouvez également le raccorder à la douille
PS/2 du PC.
Si vous raccordez le récepteur à l'aide de
l'adaptateur à la douille PS/2 du PC, vous devez
d'abord mettre le PC hors service.
Vous pouvez raccorder le récepteur à la douille
USB pendant le fonctionnement du PC.
Sous Windows 95 et Windows NT,vousne
pouvez utiliser la souris Cherry Power
WheelMouse wireless optical qu'à l'aide de
l'adaptateur USB- PS/2, vu que Windows 95 et
Windows NT ne supportent pas l'USB.
Pour mettre les piles en place dans la souris
Cherry Power WheelMouse wireless optical,
procédez comme suit
1 Ouvrez le compartiment à piles situé à la face
inférieure de la souris.
2 Placez les deux piles fournies de type AA dans
le boîtier.
3 Fermez le couvercle.
Placez le récepteur sur le bureau
Si votre bureau a une surface en bois,vous
obtiendrez des conditions de réception optimales
en plaçant le récepteur à l'horizontale.
Si votre bureau a une surface métallique,vous
obtiendrez des conditions de réception optimales
en plaçant le récepteur à la verticale. A et effet,
vous pouvez utiliser le socle du récepteur.
Procédez comme suit pour raccorder le
récepteur à votre PC via le connecteur USB
1 Trouvez un connecteur USB à l'arrière de votre
PC.
2 Enlevez l'adaptateur USB-PS/2 de la fiche USB
du câble du récepteur.
3 Connectez la fiche du récepteur au connecteur
USB.
Procédez comme suit pour raccorder le
récepteur à votre PC via le raccord PS/2
1 Trouvez le raccord rond PS/2 à 6 pôles pour
souris à l'arrière de votre PC.
2 Connectez la fiche PS/2 de l'adaptateur USB-
PS/2àladouillePS/2duPC.
Procédez comme suit pour activer la
transmission du signal entre le récepteur et la
souris
1 Repérez le bouton d'activation sur le récepteur.
2 Appuyez sur le bouton pendant quelques
secondes.
La LED du récepteur s'allume et reste allumée
pendant env. une minute.
3 Repérez le bouton d'activation à la face
inférieure de la souris.
4 Appuyez sur le bouton d'activation à l'aide d'un
objet pointu, p. ex. un stylo à bille, pendant
quelques secondes.
La LED du récepteur s'éteint. La souris est prête
à fonctionner.

9
5 Installation de la souris sous
Windows 95/98/ME/NT4/2000
Procédez comme suit pour installer le logiciel
sous Windows 98/ME/2000
1 Introduisez le CD Cherry d'accompagnement
dans votre lecteur de CD-ROM.
Le CD-ROM démarre automatiquement. La
fenêtre Cherry Power WheelMouse optical
s'ouvre.
-OU-
Si le CD-ROM ne démarre pas
automatiquement, sélectionnez le dossier
lecteur de CD-ROM | Software dans
l'Explorateur Windows et faites un double clic
avec la touche de gauche de la souris sur le
fichier Setup.exe.
L'installation commence.
2 Si le CD-ROM démarre automatiquement,
cliquez sur l'entrée Lancer l'installation du
logiciel.
En fonction des réglages de votre navigateur
Internet, vous avez la possibilité d'enregistrer le
fichieroudel'ouvrir.
• Sélectionnez si possible l'option Ouvrir et
cliquez sur le bouton de commande OK.
L'installation commence.
• Si seule l'option Enregistrer le fichier est
disponible, coupez le dialogue et sélectionnez
le dossier lecteur de CD-ROM | Software dans
l'Explorateur Windows et faites un double clic
avec la touche de gauche de la souris sur le
fichier Setup.exe.
L'installation commence.
3 Suivez les instructions d'installation à l'écran.
6 Commande de la souris
Informations de commande et de
configuration de la souris
Vous trouverez des informations détaillées
concernant la commande et la configuration de la
souris dans le mode d'emploi électronique
(CD-ROM | Manuels).
7 Assistance
En cas de problèmes lors de l'installation de la
souris ou du logiciel, nous vous offrons une
assistance gratuite.
Vous pouvez contacter le "Cherry Internet Support
System" (CISS) à l'adresse Internet suivante:
http://support.cherry.de. Vous pourrez ainsi nous
transmettre directement vos questions 7 jours sur
7et24hsur24.
Si vous ne disposez pas d'un accès Internet,
veuillez nous contacter à l'adresse suivante ou au
numéro de téléphone ou de fax suivant:
CHERRY GmbH
Cherrystrasse
91275 Auerbach
Ligne d'assistance:
Tel. +49(0)9643-18-206
Fax: +49(0)9643-18-545
Nous sommes à votre disposition Lu-Je de 07:15 à
16:00 heures et le Ve de 07:15 à 13:30 heures.

10
1 Avvertenze generali per l'utente
Cherry ottimizza costantemente i suoi prodotti nel
corso dello sviluppo di nuove tecnologie. Ci
riserviamo pertanto di apportare modifiche
tecniche. L'analisi dell'affidabilità e la definizione di
specifiche tecniche avvengono conformemente al
controllo interno Cherry al fine di soddisfare
prescrizioni e norme internazionalmente
riconosciute. I requisiti che si differenziano da esse
possono essere presi in considerazione per mezzo
di una collaborazione reciproca. Il trattamento
scorretto, l'immagazzinamento inadeguato ed
influenze esterne possono causare anomalie
durante l'uso. Escludiamo qualsiasi garanzia
qualora il nostro prodotto venga modificato
dall'utente e non rispondiamo in caso di modifiche
arbitrarie e non autorizzate. Ogni riparazione deve
essere eseguita dalla Cherry o da una persona o
organizzazione ufficialmente autorizzata. La
sostituzione scorretta della batteria al litio
opzionale comporta il pericolo di esplosione! È
esclusa qualsiasi rivendicazione di risarcimento
danni nei confronti della Cherry o dei suoi
rappresentanti per qualsiasi ragione giuridica
(comprese le lesioni corporee dovute allo stress),
qualora la nostra responsabilità non sia dovuta a
premeditazione o ad inosservanza della legge sulla
responsabilità sul prodotto. Le presenti istruzioni di
servizio sono valide solo per il prodotto fornito
insiemeadesse.
Ulteriori informazioni possono essere richieste ai
distributori Cherry o direttamente alla Cherry
GmbH.
2 Informazioni stampate ed online
Informazioni sulla messa in servizio e sulla
configurazione del Cherry Power WheelMouse
wireless optical sono contenute in parte nella
presente guida rapida ed in parte in una versione
online (sotto forma di aiuto sensitivo del contesto e
di istruzioni per l'uso elettroniche). Si prega di
osservare anche le condizioni di licenza e le
avvertenze generali per l'utente sul nostro prodotto
lì contenute.
Le informazioni sono state strutturate sulla base
dei seguenti criteri:
• L'aiuto sensitivo del contesto offre informazioni
sui punti in cui vengono richieste; se tuttavia si
desidera leggere la documentazione stampata,
si possono richiamare le istruzioni per l'uso
elettroniche (CD-ROM | Manual) e stampare le
pagine necessarie.
• Ilpresentaresottoformastampatasolole
informazioni più importanti riduce il consumo di
carta e consente di dare un contributo alla
salvaguardia dell'ambiente.
3 Vantaggi offerti dal Cherry Power
WheelMouse wireless optical
Il Cherry Power WheelMouse wireless optical
può essere installato e configurato facilmente.
L'uso del mouse viene reso efficiente e comodo
dalle seguenti caratteristiche e funzioni:
• la risoluzione massima di 800 dpi consente
operazioni precise;
• un sensore ottico sostituisce la sferetta e rende
superflua la complicata pulizia del mouse;
• lo scorrimento di documenti è semplificato dalla
Power Wheel;
• la superficie Soft Touch assicura una piacevole
sensazione;
• il software offre la possibilità di assegnare
funzioni personalizzate ai quattro tasti del
mouse.
• lavariantesenzacavooffrepiùlibertàdi
movimenti nell'uso del mouse;
• la forma ergonomica del mouse si adatta bene
alla mano.
Presupposti per l'uso ottimale
Le sue funzioni possono essere utilizzate in
maniera ottimale se il mouse viene poggiato su
una superficie non riflettente.
4 Collegamento e messa in servizio
delle periferiche
Il ricevitore del Cherry Power WheelMouse
wireless optical viene fornito con un connettore
USB. Con l'adattatore USB-PS/2 si può collegare il
ricevitore anche alla porta PS/2 del PC.
Versione italiana
11
Prima di collegare il ricevitore alla porta PS/2 del
PC mediante l'adattatore è necessario spegnere il
PC.
Il ricevitore può essere collegato alla porta USB
anche se il PC è acceso.
In ambiente Windows 95 eWindows NT,il
Cherry Power WheelMouse wireless optical può
essere usato solo mediante l'adattatore
USB - PS/2, in quanto Windows 95 eWindows
NT non supportano USB.
Applicazione delle batterie nel Cherry Power
WheelMouse wireless optical.
1 Aprire il vano delle batterie sul lato inferiore del
mouse.
2 Introdurre le due batterie di tipo AA fornite in
dotazione nel vano.
3 Richiudere la copertura del vano.
Posizionamento del ricevitore sulla
scrivania
Se il piano della scrivania è di legno,laricezione
ottimale si ottiene posizionando il ricevitore
orizzontalmente.
Seilpianodellascrivaniaèdimetallo,laricezione
ottimale si ottiene posizionando il ricevitore
verticalmente. Per farlo si può usare l'appoggio del
ricevitore.
Collegamento del ricevitore alla porta USB del
PC
1 Individuare una porta USB sul lato posteriore del
PC.
2 Togliere l'adattatore USB-PS/2 dal connettore
USB del cavo del ricevitore.
3 Collegare il connettore del ricevitore alla porta
USB.
Collegamento del ricevitore alla porta PS/2 del
PC
1 Individuare l'attacco rotondo a 6 poli del mouse
della porta PS/2 sul lato posteriore del PC.
2 Collegare il connettore PS/2 dell'adattatore
USB - PS/2 alla porta PS/2 del PC.
Attivazione della trasmissione di segnali tra il
ricevitore ed il mouse
1 Localizzare il bottone di attivazione sul
ricevitore.
2 Premere il bottone per qualche secondo.
Il LED del ricevitore si accende e resta acceso
per circa un minuto.
3 Localizzare il bottone di attivazione sul lato
inferiore del mouse.
4 Per mezzo di un oggetto appuntito, ad esempio
una penna a sfera, premere il bottone di
attivazione per qualche secondo.
Il LED del ricevitore si spegne. Ora il mouse è
pronto all'uso.