Primex Wireless SNSA Synchronous Network Analog Clocks User Manual SNS Analog Clocks
Primex Wireless, Inc. Synchronous Network Analog Clocks SNS Analog Clocks
User manual

SNS Analog Clocks User Manual

Page ii SNS Analog Clocks User Manual
Notices
Notices
© Copyright 2008, Primex Wireless; all rights reserved.
Trademarks
Contact Primex Wireless
Web: http://www.primexwireless.com/
Email: support@primexwireless.com
United States Canada United Kingdom
Telephone (800) 537-0464 (800) 330-1459 0800-3896996
Hours 7:00am - 5:00pm Central 7:00am - 5:00pm Central 8:30am – 5:00pm GMT
Fax (262) 248-0061 (905) 952-0134 01422-349462
Mailing address Primex Wireless
965 Wells Street
Lake Geneva, Wisconsin
53147
Primex Wireless
1310 Kerrisdale Blvd.
Unit #4
Newmarket, ON L3Y 8V6
Primex Wireless Limited
Dean Clough
Halifax
West Yorkshire HX3 5AX

SNS Analog Clocks User Manual Page iii
Contents
Contents
Introduction.............................................................................................................................................1
Precautions and regulatory compliance statements....................................................................................2
Equipment precautions ..............................................................................................................................................2
Safety precautions......................................................................................................................................................2
FCC compliance .........................................................................................................................................................2
FCC radio frequency interference ............................................................................................................................2
FCC radiation exposure limits...................................................................................................................................2
Power specifications for AC-powered devices .......................................................................................................2
SNS analog clocks..................................................................................................................................3
Configure an SNS analog clock................................................................................................................................5
Install an SNS analog clock ....................................................................................................................................12
Install batteries in an SNS analog clock ................................................................................................................15
Remove an Clock Lock-mounted SNS analog clock...........................................................................................16
Configuration tool procedures ............................................................................................................17
Set the password for a clock...................................................................................................................................18
Disconnect an SNS analog clock ...........................................................................................................................19
Upgrade the firmware for an SNS analog clock ...................................................................................................20
Configuration Templates..........................................................................................................................................21
Ping a clock ...............................................................................................................................................................22
Display network information ....................................................................................................................................23
Communication log procedures..............................................................................................................................24
Time zone information..............................................................................................................................................25
Set preferences.........................................................................................................................................................26
Troubleshoot..............................................................................................................................................................28
Appendix – Install/remove Configuration tool software ...................................................................29
Minimum system requirements .....................................................................................................................30
Install Configuration Tool software ...............................................................................................................31
Uninstall Configuration Tool software ..........................................................................................................33
Index ......................................................................................................................................................34

Introduction
Primex Wireless’s SNS analog clocks are equipped with both an 802.11 b/g and Ethernet port interface. The
clocks are able to connect in an existing wireless LAN (WLAN), supporting a wide variety of security protocols.
Once the SNS clocks are configured using the Primex Wireless Configuration Tool, settings can be altered using
Primex’s Applications Management Platform (AMP). SNS analog clocks will connect to the WLAN or Ethernet
only at the times configured with AMP or the Configuration Tool. Any changes in configuration of an SNS
analog clock via AMP are transmitted to the SNS analog clock the next time it connects to the WLAN or
Ethernet. For detailed instructions on the use of AMP, please see the Primex AMP User Manual.
SNS analog clocks can be installed anywhere indoors within range of an 802.11 b/g access point. The initial setup
procedure can be performed in a convenient central location such as a maintenance area or at the final location of
the system clock. AMP has features to determine the signal strength of the SNS analog clock’s reception.
Page 2 SNS Analog Clocks User Manual
Introduction Precautions and regulatory compliance statements
Precautions and regulatory compliance statements
Equipment precautions
• To avoid possible electric shock and damage to an SNS analog clock, make sure that it is unplugged when
working on it.
• SNS analog clocks are cleanable with a cloth moistened with water or a common disinfectant.
Caution Be sure to test any cleaning solutions on a small area of the clock before using it on the entire clock.
Safety precautions
SNS analog clocks are designed for indoor use only and are not weather protected. Operating the clock outdoors,
or in wet areas is an electrical hazard and may damage the clock while nullifying the warranty.
FCC compliance
Any changes or modifications not expressly approved by the party responsible for compliance could void the
user's authority to operate the equipment.
FCC radio frequency interference
This equipment has been tested and found to comply with the limits for a Class B analog device, pursuant to Part
15 of the FCC Rules. These limits are designed to provide reasonable protection against harmful interference in a
residential installation. This equipment generates, uses and can radiate radio frequency energy and, if not installed
and used in accordance with the instructions, may cause harmful interference to radio communications. However,
there is no guarantee that interference will not occur in a particular installation. If this equipment does cause
harmful interference to radio or television reception, which can be determined by turning the equipment off and
on, the user is encouraged to try to correct the interference by one or more of the following measures:
• Reorient or relocate the receiving antenna.
• Increase the distance between the equipment and the receiver.
• Connect the equipment to an outlet on a circuit different from that to which the receiver is connected.
• Consult the dealer or an experienced radio/TV technician for help.
FCC radiation exposure limits
To comply with FCC RF exposure requirements in section 1.1307, a minimum separation distance of 20 cm is
required between the antenna and all persons.
Power specifications for AC-powered devices
The socket-outlet shall be installed near the equipment and shall be easily accessible
Clock model Input power Current draw
SNS7A306 100 - 240V~, 47-63Hz 67mA@120V~, 47mA@240V~
SNS7A330 100 - 240V~, 47-63Hz 134mA@120V~, 94mA@240V~
SNS Analog Clocks User Manual Page 3
Precautions and regulatory compliance statements SNS analog clocks
SNS analog clocks
Primex Wireless’s SNS analog clocks are equipped with both an 802.11 b/g and Ethernet port interface. The
clocks are able to connect in an existing wireless LAN (WLAN), supporting a wide variety of security protocols.
Once the SNS clocks are configured using the Primex Configuration Tool, settings can be altered using Primex’s
Applications Management Platform (AMP). SNS analog clocks connect to the WLAN only at the times
configured with the Primex AMP or Configuration Tool. Any changes in configuration of an SNS analog clock
via the Primex AMP will be transmitted to the clock the next time it connects to the WLAN. For detailed
instructions on the use of the Primex AMP, please see the Primex AMP User Manual.
Primex Wireless SNS analog clocks can be installed anywhere indoors within range of an 802.11 b/g Access
Point. The initial setup procedure detailed below can be performed in a convenient central location such as a
maintenance area or at the final location of the system clock. Primex’s Applications Management Platform has
features to determine the signal strength of the clock’s reception.
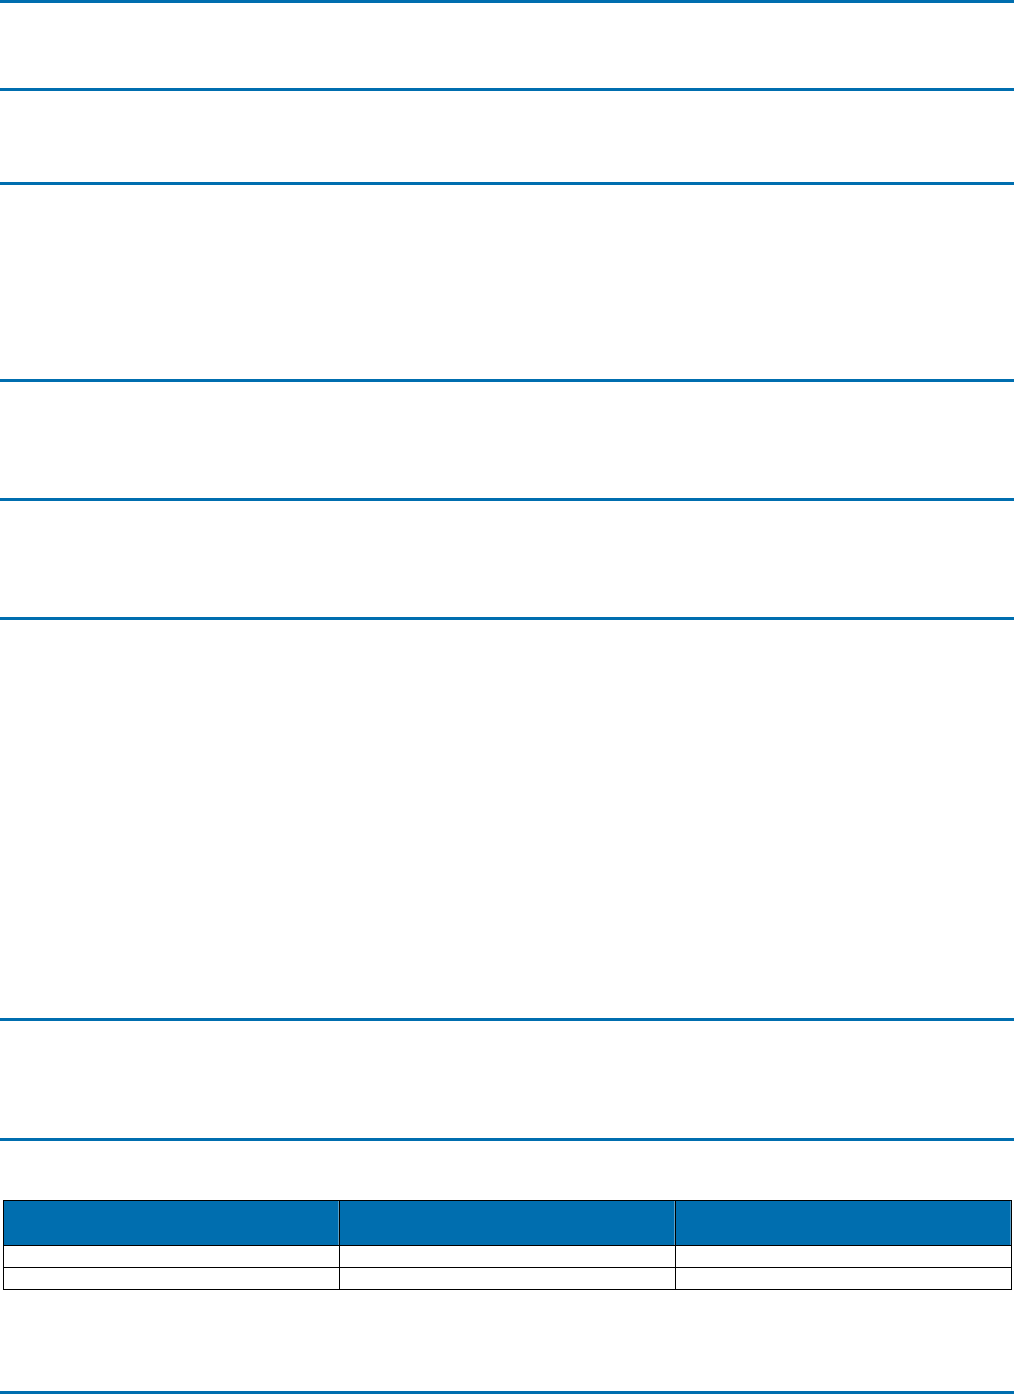
Primex Wireless SNS analog clocks are available in a variety of sizes and finishes to complement the décor of
your facility. All SNS analog clocks feature:
• The battery life of SNS analog clocks is up to seven years with Primex Wireless #SNS887 lithium DD-cell
batteries (up to four years with high-quality alkaline D-cell batteries). AC-powered models are also available
• Operating range: 32° - 158°F (0° - 70°C)
• A school mascot. A company logo. A city's colors. Now, you can show your pride with custom logo clocks.
Available on all Primex Wireless clocks for an additional fee.
Model number Description Color Power source Weight Mounting
SNS4Z155 12.5" Traditional series Black Batteries 1.7lb Clock Lock (2)
SNS4Z157 12.5" Traditional series Toupe Batteries 1.7lb Clock Lock (2)
SNS4Z159 12.5" Traditional series White Batteries 1.7lb Clock Lock (2)
SNS7A306 12.5" AC Black 100-240v~ 2.0lb
Clock Lock (2)
SNS4Z164 12.5" Dual sided wall Black Batteries 6.0lb Twist Lock
SNS7A330 12.5" Dual sided AC wall Black 100-240v~ 6.6lb Twist Lock
SNS4Z163 16" Traditional series Black Batteries 2.4lb Clock Lock (2)
SNS4Z176 16" Wood Oak Batteries
3.4lb Clock Lock (1)
SNS4Z177 16" Wood Cherry Batteries 4.9lb Clock Lock (1)
SNS4Z512 13.75" Platinum series Silver Batteries 1.6lb Clock Lock (2)
SNS4Z180 12.5" Brushed aluminum Aluminum Batteries 2.4lb Clock Lock (2)
SNS4Z227 15" Dual brushed aluminum Aluminum Batteries 5.2lb Fixed mount
Page 4 SNS Analog Clocks User Manual
SNS analog clocks Precautions and regulatory compliance statements
Traditional series
With simple dials and durable polycarbonate frames and lenses, these clocks are
designed for easy viewing. The patent-pending Clock Lock™ feature prevents
employees from removing clocks from walls, and high-impact polycarbonate frame
and shatterproof lens provide added safety. Dual-sided clocks are well-suited for
hallway use. A variety of styles, colors and sizes lets you coordinate with your
facility’s décor.
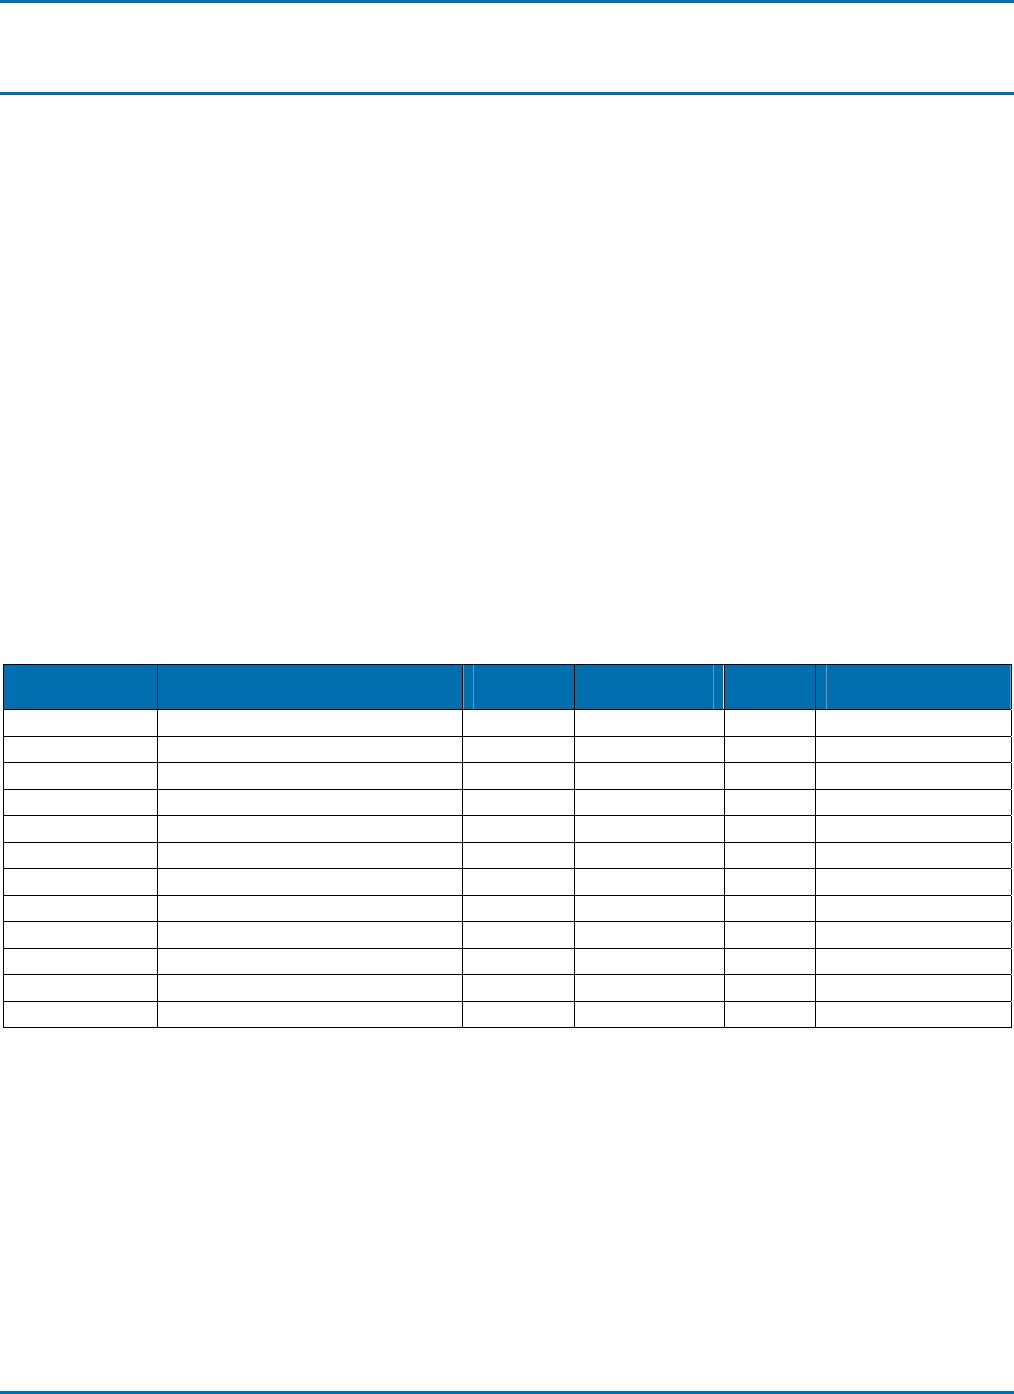
Metal series
Contemporary brushed aluminum frames offer an upscale, executive look to our high-
performance clocks, a smart choice for offices and reception areas. These high-tech,
synchronized clocks are easy to install, immediately keeping time with the rest of the
Primex Wireless Clock System.
Platinum series
The Platinum Series is the first and only analog clock series available with a high impact
frame with chemical resistant coating and Xylex lens to protect against commonly used
cleaners and dust collection. The smart design provides a clean look that can easily be
incorporated into a variety of settings ranging from the science lab, to food preparation areas,
or even individual classrooms.
Wood series
Solid 16” hardwood frames of cherry or oak with glass crystal lens are handsome timekeepers
for school offices, libraries and entryways.
SNS Analog Clocks User Manual Page 5
Configure an SNS analog clock SNS analog clocks
Configure an SNS analog clock
Follow these steps to configure an SNS analog clock.
1. In order to configure an SNS analog clock, you must connect directly the SNS clock to the computer with a
network cable. If you’re using a laptop computer or a desktop computer with a wireless network card, you
must disable the wireless network card in order to facilitate communication with the SNS analog clock.
Follow these steps to prepare your computer to communicate with SNS analog clocks.
A. Choose StartSettingsControl
PanelNetwork Connections.
Windows displays a Network
Connections window containing
LAN or High-Speed Internet
information similar to that shown
here.
B. If your computer has a wireless
network card, right-click the
Wireless Network Connection
item and choose Disable on the
context menu displayed.
C. Right-click the Local Area
Connection item and choose
Properties on the context menu
displayed. Windows displays a Local
Area Connection Properties
dialog box similar to the one shown
below.
D. On the General tab, select the Internet Protocol
(TCP/IP) item in the This connection uses the
following items list then click the Properties
button. Windows displays an Internet Protocol
(TCP/IP) Properties dialog box similar to the one
shown below.
Page 6 SNS Analog Clocks User Manual
SNS analog clocks Configure an SNS analog clock
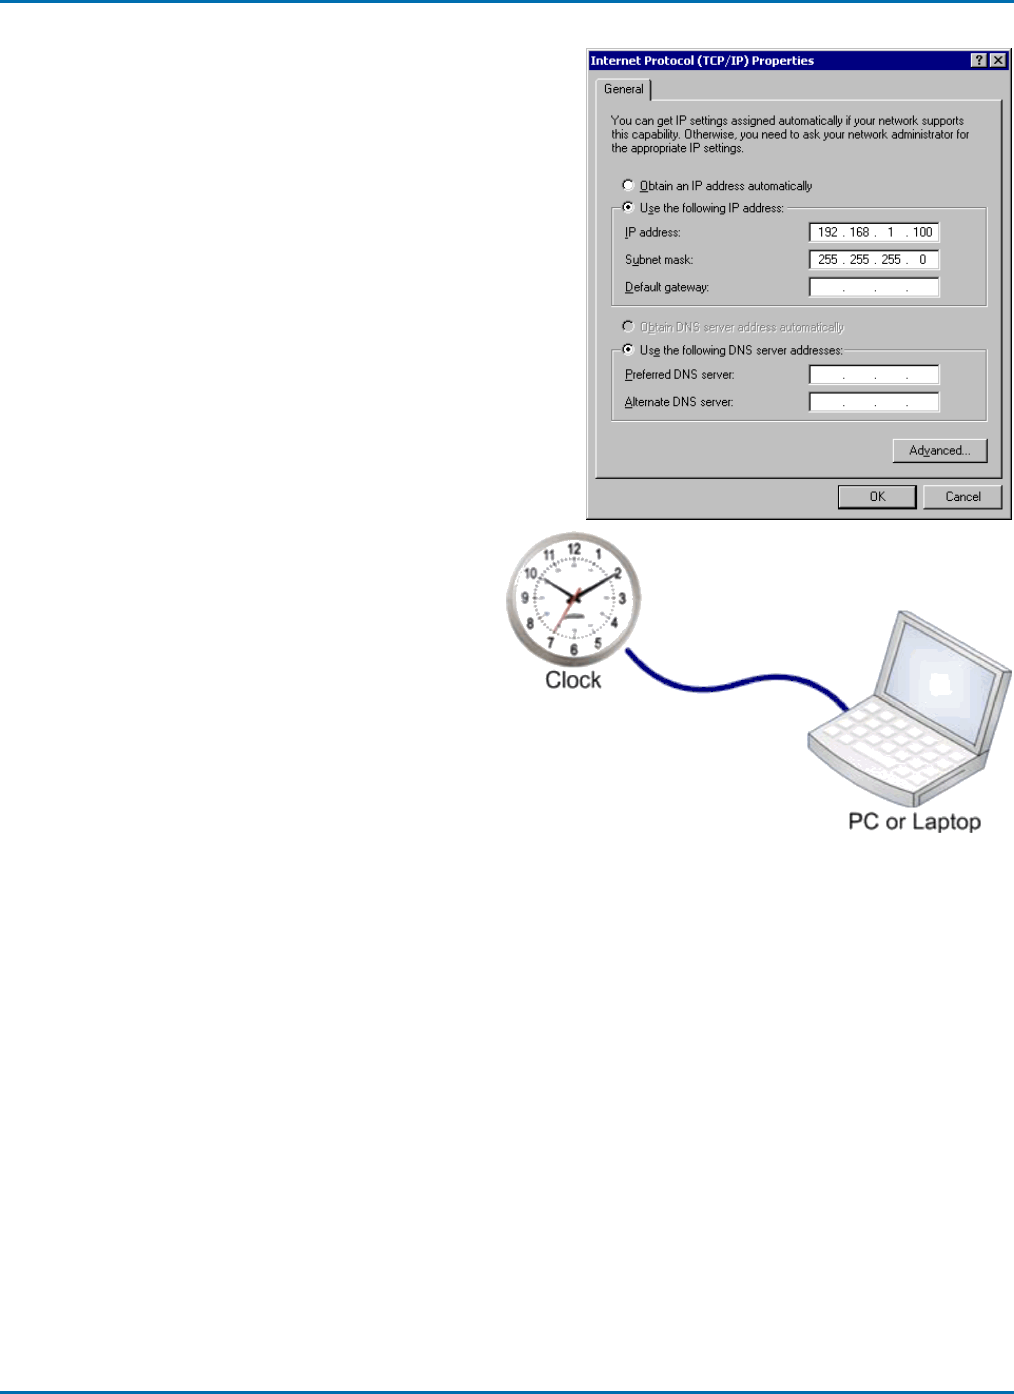
E. Choose the Use the following IP address option
button.
F. Enter 192.168.1.100 in the IP address field.
G. Enter 255.255.255.0 in the Subnet Mask field.
H. Click the OK button to accept the changes you’ve
made, close the Internet Protocol (TCP/IP)
Properties dialog box and return to the Local Area
Connection Properties dialog box.
I. Click the OK button to accept the changes you’ve
made, close the Local Area Connection
Properties dialog box and return to the Network
Connections window.
J. Close the Network Connections window.
2. If the clock is mounted on a wall, dismount the
clock from the wall so that you can access the
back of the clock.
3. Physically connect the SNS analog clock directly
to the PC or laptop using a standard network
cable. The SNS analog clock has an RJ-45
network cable jack on its back.

SNS Analog Clocks User Manual Page 7
Configure an SNS analog clock SNS analog clocks
4. If the clock you’re configuring is battery powered,
remove the batteries. If the clock you’re
configuring is AC-powered, unplug the clock.
5. If the clock you’re configuring is battery powered,
insert the batteries in the clock while holding
down the button on the back of the clock. Release
the button after completing battery installation.
After approximately two seconds, the clock beeps
once to indicate that it’s ready to configure.
6. If the clock you’re configuring is AC-powered,
plug the clock into the AC power outlet while
holding down the button on the back of the clock.
Release the button after plugging the clock in.
After approximately two seconds, the clock beeps
once to indicate that it’s ready to configure.
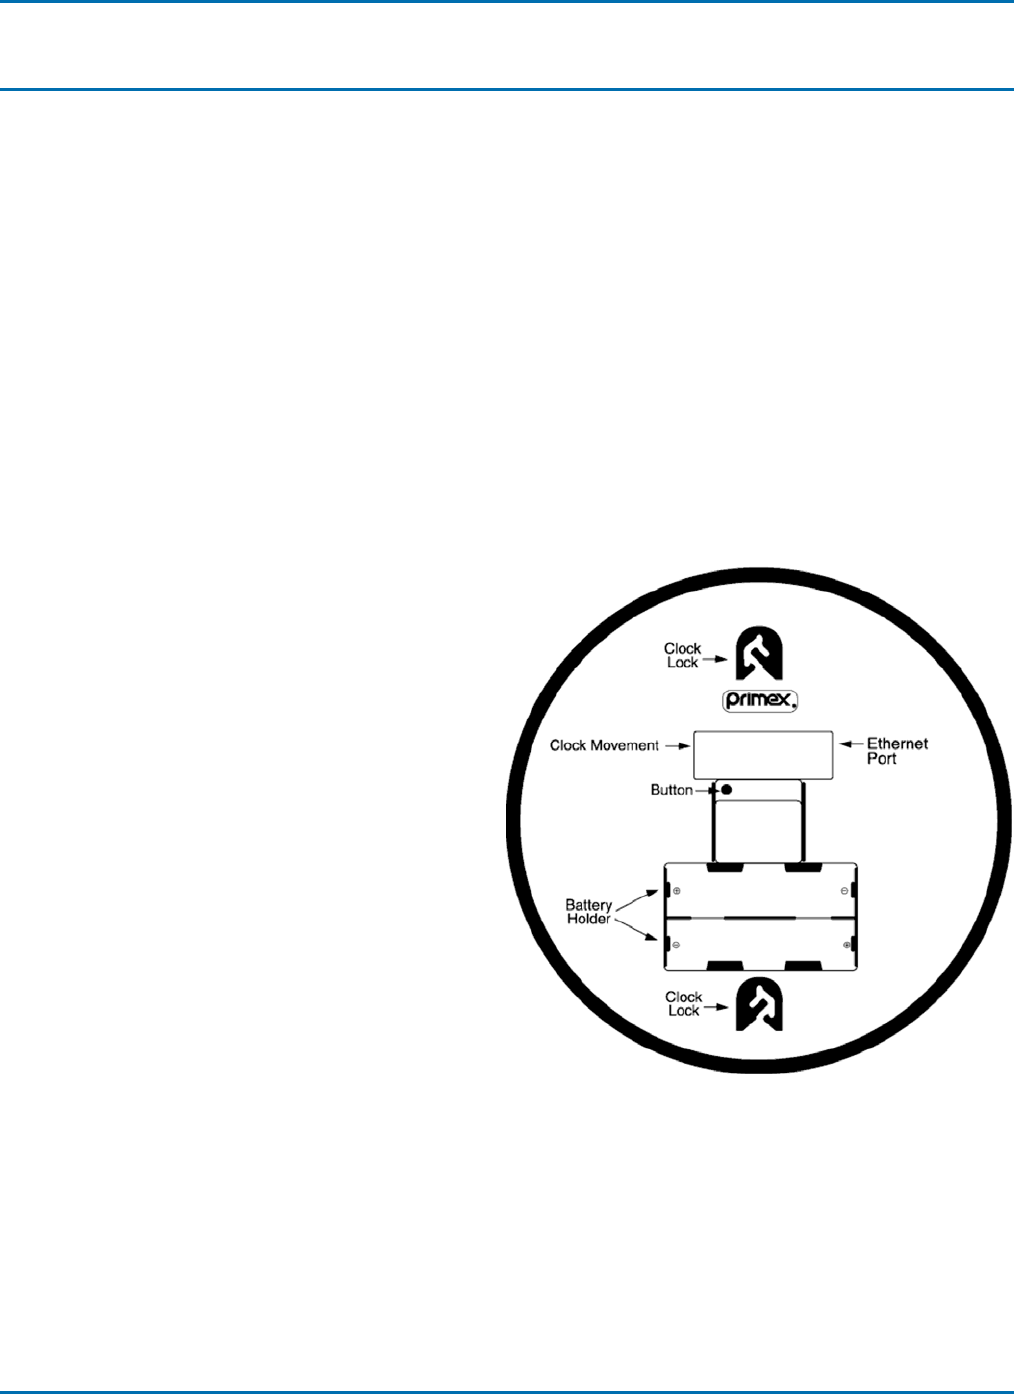
Clock Lock
Clock Lock
AC Power Cable
Strain Relief
AC Power Plug
A
C Power Supply
Button
Clock Movement
Ethernet Port
7. Choose StartProgramsPrimex WirelessPrimex Wireless Configuration
tool or double-click the Primex Wireless Configuration Tool icon on your computer’s
desktop.
Page 8 SNS Analog Clocks User Manual
SNS analog clocks Configure an SNS analog clock
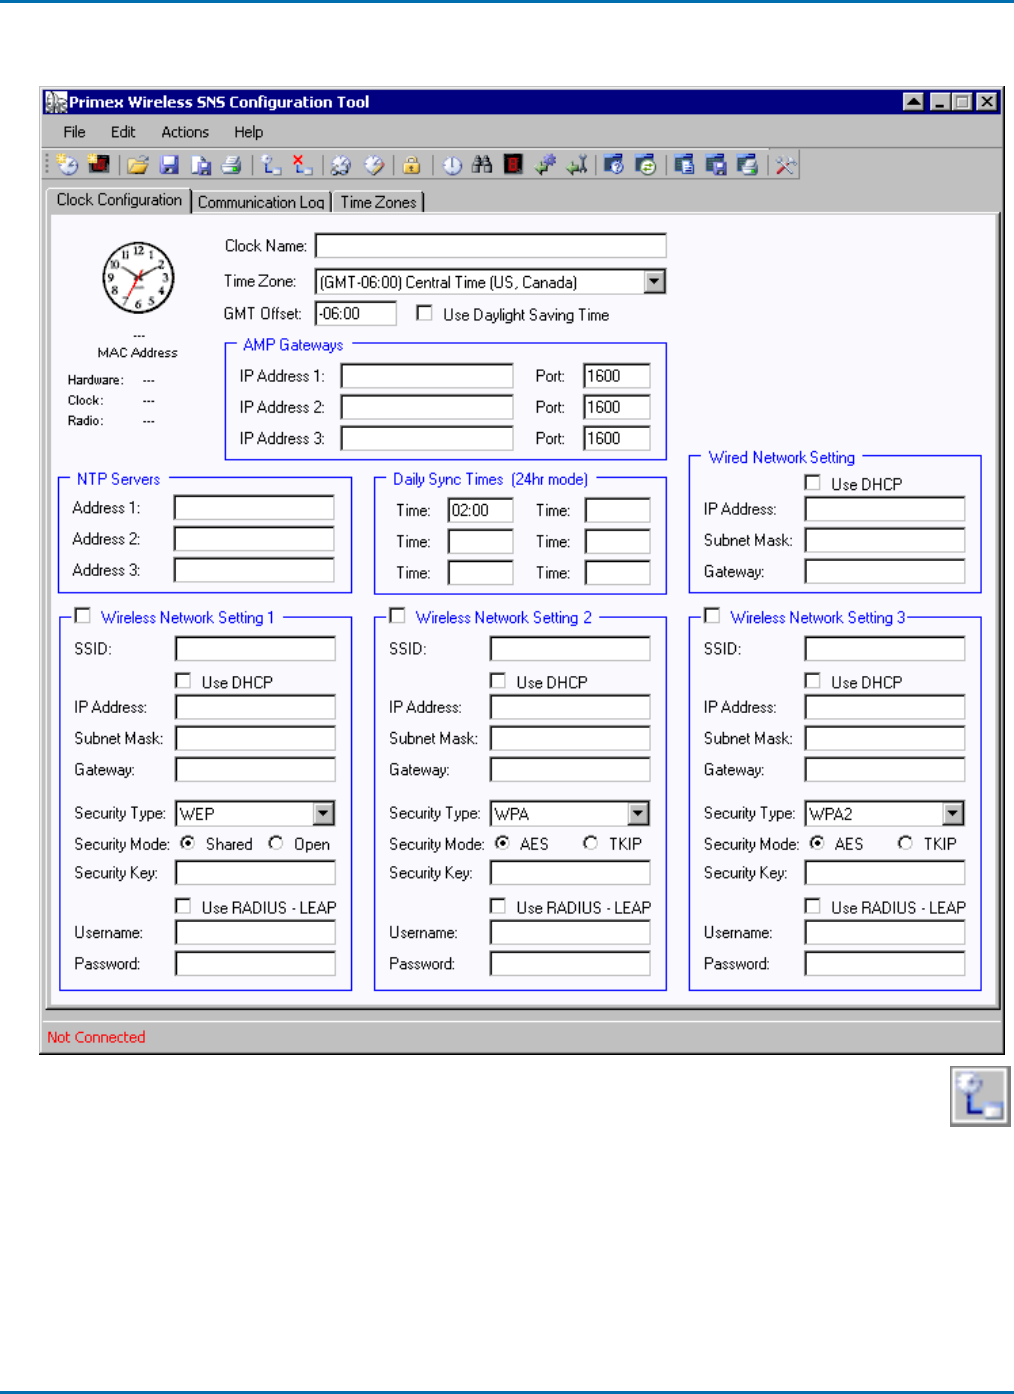
8. Windows displays a Primex Wireless Configuration Tool window similar to the one shown here.
9. Click the Connect button on the toolbar or choose the ActionsConnect menu item to establish
a connection to the clock. The clock should report its Media Access Control (MAC) Address and
hardware/clock/radio version numbers and those settings will be displayed in the upper left corner
of the Configuration tab. The status bar at the bottom of the window displays either a Connected! or
Connection Failed! message depending on whether a connection to the clock succeeded or failed.
Note Once a connection with the clock has been established, the other Action menu commands and toolbar
buttons are enabled and no longer grayed out.

SNS Analog Clocks User Manual Page 9
Configure an SNS analog clock SNS analog clocks
10. Click the Read Configuration from Clock toolbar button or choose the ActionsRead
Configuration menu item. The status bar at the bottom of the window displays a Configuration
read from device! message and the fields on the Configuration tab are updated with the
configuration values read from the clock.
Note SNS analog clocks have a password that prevents their configuration settings from being read unless the
clock is first logged into. If the clock is configured with a different password than the password currently
stored in the Configuration Tool the login will fail and you will receive the alert message and the status
bar displays the message Read Failed! The password is stored in the Configuration Tool’s
Preferences settings and can be changed by using the Edit Preferences command.
11. Fill in the fields with the desired configuration settings. The following fields are available for you to fill in to
configure the clock:
Note Invalid values are indicated with red text in the field. When you exit a field in which an invalid value has
been entered, you may also hear a beep from the system if your laptop or PC supports it.
Setting
name
Required Valid values
Clock
Name
Y 1 to 40 characters. A recommended practice is to name a clock to reflect where the
clock is (or will be) physically located.
Time Zone N Select from the list of available time zones. If a selection is made, the GMT Offset
field will be set based on the time zone selected. This selection also determines the
DST Transition Dates downloaded to the clock if the clock is configured to use DST.
GMT Offset Y -14:00 to +14:00, the offset from Greenwich Mean Time (GMT) that the clock should
display. The format is hh:mm and the field text will turn red if it contains an invalid
value.
Use
Daylight
Saving
Time
Y Yes/No checkbox set to indicate whether the clock should adjust its time for Daylight
Saving Time.
MAC
Address
N/A The read-only MAC Address field is populated with the MAC address of the clock
currently connected to the configuration tool.
Hardware N/A The read-only Hardware field is populated with the hardware version of the clock
currently connected to the configuration tool.
Clock N/A The read-only Clock field is populated with the clock firmware version of the clock
currently connected to the configuration tool.
Radio N/A The read-only Radio field is populated with the radio firmware version of the clock
currently connected to the configuration tool.
AMP Gateway You may enter the IP address and port for up to three AMP Gateways. The clock
will attempt to connect to them in the order listed when trying to report its current
condition at each time synchronization. You must enter settings for at least one
AMP Gateway.
IP address
(1-3)
Y, for each AMP
Gateway
The IP address must be a valid IPv4 address. The value will be converted to
standard notation if an abbreviated form is entered. The field text will turn red if it
contains an invalid value.
Port (1-3) Y, for each AMP
Gateway
The port to connect to on the AMP Gateway must be a valid port number from 0 to
65535. The field text will turn red if it contains an invalid value. The default port is
usually 1600.

Page 10 SNS Analog Clocks User Manual
SNS analog clocks Configure an SNS analog clock
Setting
name
Required Valid values
NTP Servers You may enter the IP Address for up to three NTP servers. The clock attempts to
connect to all configured NTP servers when synchronizing time and uses the first
NTP server to respond.
Note If no NTP Server IP addresses are entered, the clock will not be able to
synchronize time.
IP address
(1-3)
Y, for each NTP
Server
The IP Address field may accept a valid IPv4 address or may DNS Names for NTP
servers. Some examples are:
• time.microsoft.com
• time.nist.gov
• 0.us.pool.ntp.org
Daily Sync Times You are required to specify at least one and up to six times during the day that the
clock should attempt to synchronize with the configured NTP Servers.
Daily Sync
Times (1-6)
At least 1 The time of day that the clock should synchronize must be entered in 24 hour mode,
using a format of hh:mm. The field text will turn red if it contains an invalid value. If
the same value is entered more than once, the repeated entry is ignored. You do
not have to enter the colon (:) character, and/or may use a decimal (.) character to
separate the hour and minute values.
Wired Network Setting You have the option to enter information for a wired network configurations.
Use DHCP Y Yes/No checkbox set to indicate whether the clock should request a dynamically
assigned IP Address network each time it connects to the wired network.
IP Address Y The static IP address for the clock to use when connecting to the network. The IP
address must be a valid IPv4 address. The field text will turn red if it contains an
invalid value.
Subnet
Mask
Y The subnet mask must be a valid IPv4 address mask. The field text will turn red if it
contains an invalid value.
Gateway Y The network gateway IP address must be a valid IPv4 address. The field text will
turn red if it contains an invalid value.
SNS Analog Clocks User Manual Page 11
Configure an SNS analog clock SNS analog clocks
Setting
name
Required Valid values
Wireless Network Settings You have the option to enter information for up to three wireless network settings.
The clock attempts to connect to all configured network settings when synchronizing
time and uses the first network setting to respond.
Note If no network settings are entered, the clock will not be able to connect to
the network to synchronize time or report its condition.
SSID Y, for each
wireless network
setting
Service Set Identifier (SSID) 0 to 40 characters. The SSID for the wireless network.
Use DHCP Y, for each
wireless network.
setting
Yes/No checkbox set to indicate whether the clock should request a dynamically
assigned IP address network each time it connects to the wireless network.
IP Address Y, for each
wireless network
setting
The static IP address for the clock to use when connecting to the network. The IP
address must be a valid IPv4 address. The field text will turn red if it contains an
invalid value.
Subnet
Mask
Y, for each
wireless network
setting
The subnet mask must be a valid IPv4 address mask. The field text will turn red if it
contains an invalid value.
Gateway Y, for each
wireless network
setting
The network gateway IP address must be a valid IPv4 address. The field text will
turn red if it contains an invalid value.
Security
Type
Y, for each
wireless network
setting
Select from the available security types; you may choose from:
• None
• WEP
• WPA
• WPA2
Security
Mode
Y, for each
wireless network
setting
Not required if Security Type is set to None. If Security Type is set to WEP, select
from the available security modes; you may choose from:
• Shared
• Open
If Security Type is set to WPA or WPA2, select from the available security modes;
you may choose from:
• AES
• TKIP
Security
Key
N if security
mode is set to
None
0 to 64 alphanumeric characters.
Use
RADIUS –
LEAP
N Enable (check) the Use RADIUS – LEAP checkbox if your network administrator
requires the RADIUS – LEAP authentication protocol on your network.
Username Required if the Use RADIUS – LEAP checkbox is checked; 0 to 10 alphanumeric
characters.
Password Required if the Use RADIUS – LEAP checkbox is checked; 0 to 64
alphanumeric characters.
12. Click the Write Configuration to Clock toolbar button or choose the ActionsWrite
Configuration menu item.
Page 12 SNS Analog Clocks User Manual
SNS analog clocks Install an SNS analog clock
Install an SNS analog clock
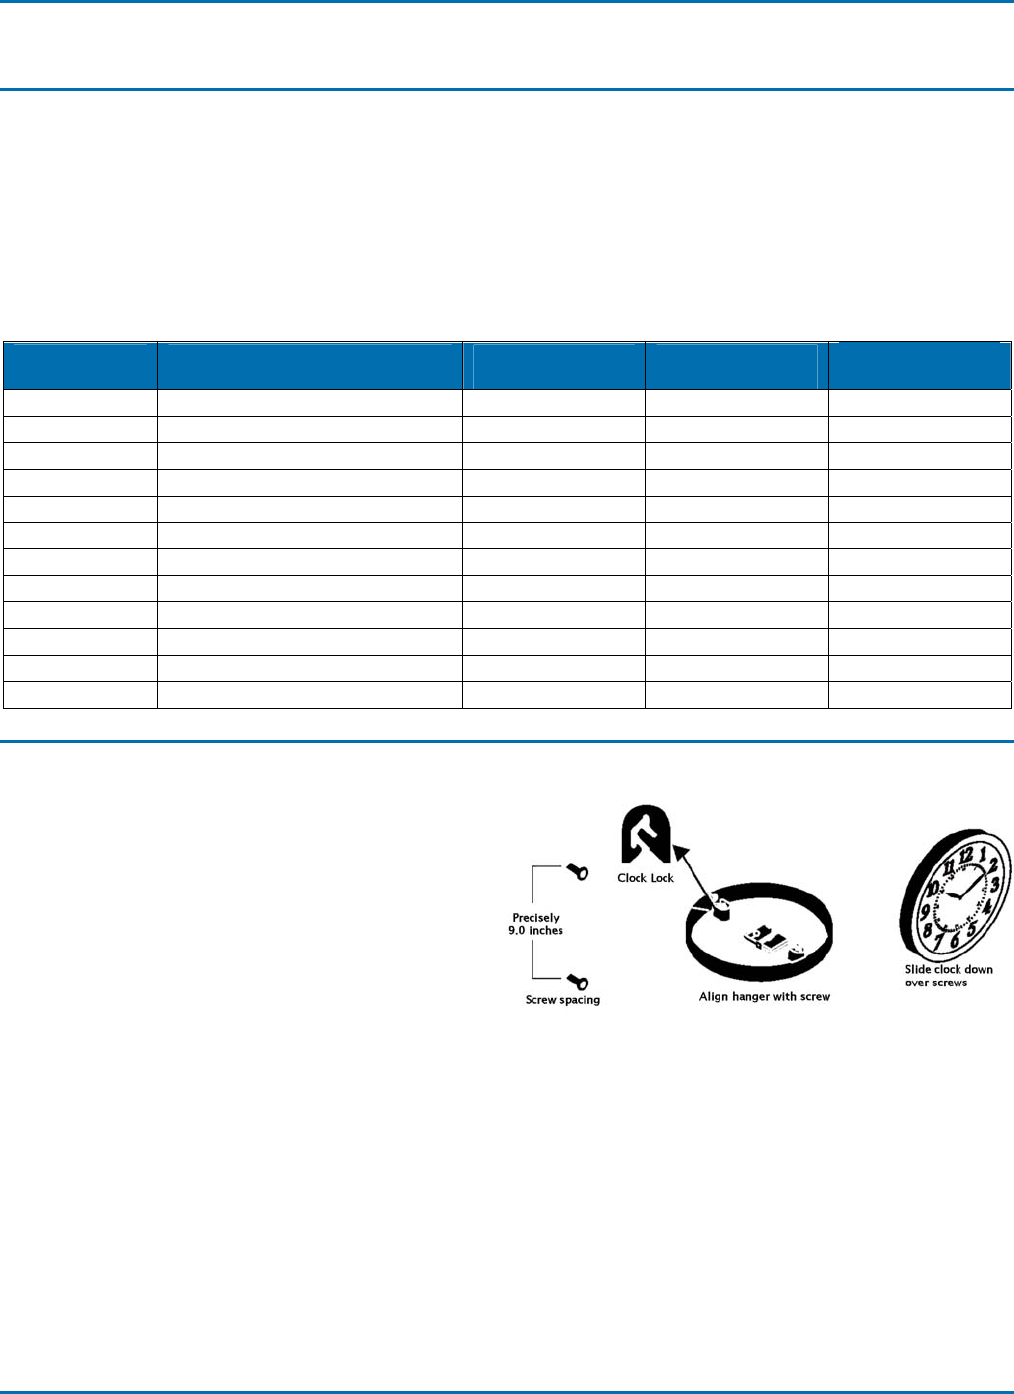
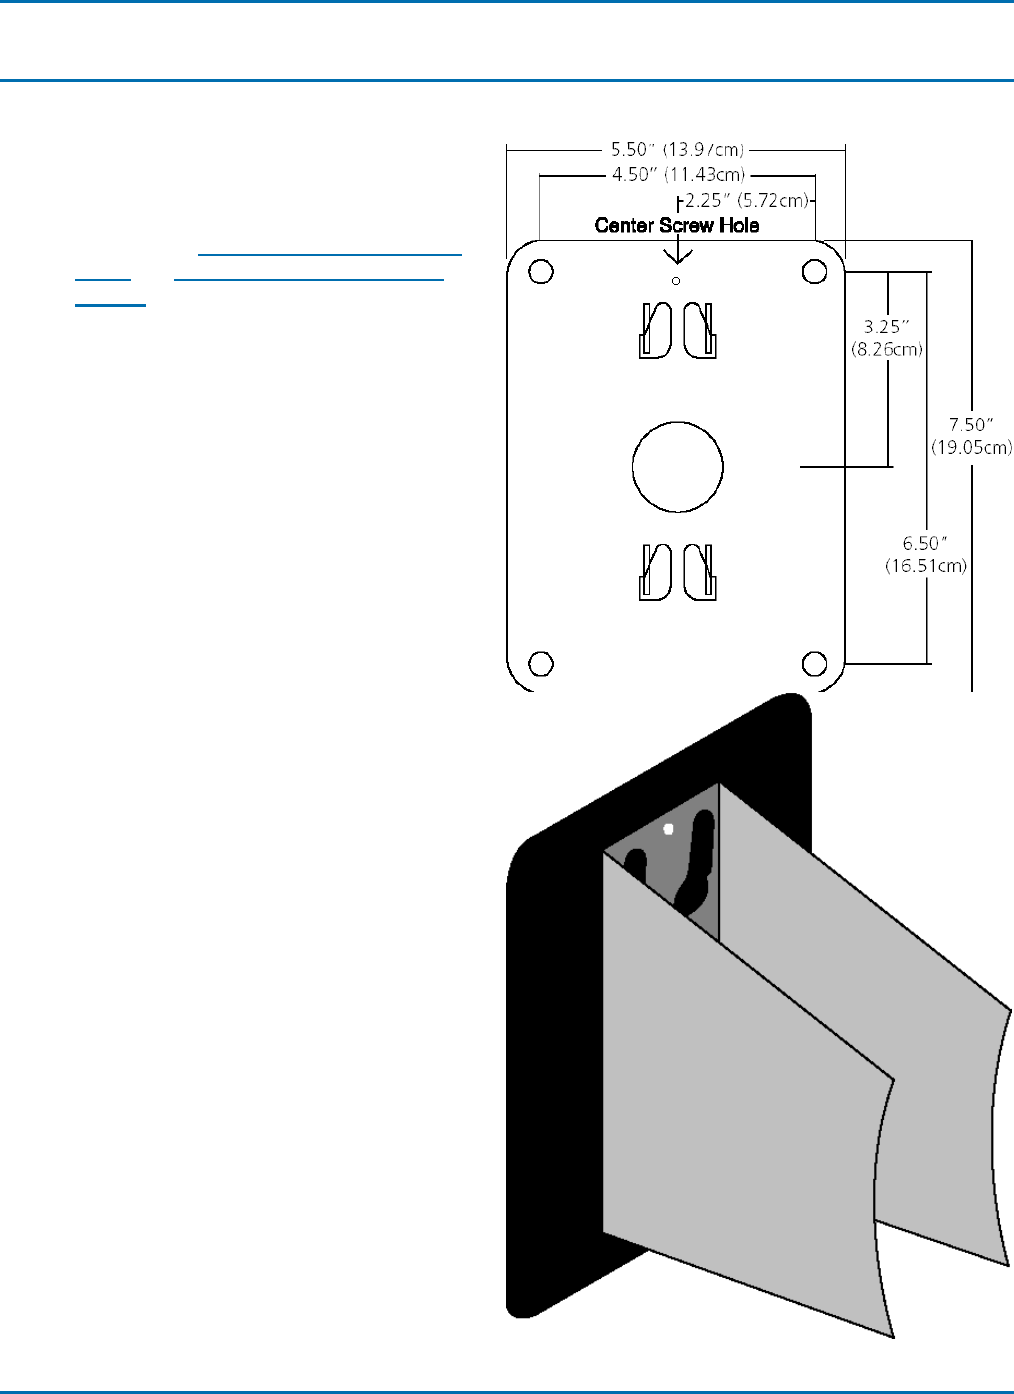
The backs of most SNS analog clocks feature two specially designed Clock-Lock hangers spaced at precise
distances, one on the top, and the other on the bottom. The Clock-Lock feature prevents accidental removal if
the clock is bumped and it may reduce theft by requiring a particular combination of moves to remove the clock.
All SNS analog clocks come with two #6 x 1-1/4” mounting screws and wall anchors. When hanging the clock,
be sure that if two screws are being used to secure the clock to the wall, that the distance between the screws be
precisely the same as that in the table below.
Note To avoid the Clock-Lock feature, use finishing nails with no heads angled at 45 degrees into the wall in
place of headed screws or nails. The clock may then be mounted and removed like a standard clock.
Model number Description Hole spacing Weight Mounting type
SNS4Z155 12.5" Traditional series 9” 1.7lb Clock Lock (2)
SNS4Z157 12.5" Traditional series 9” 1.7lb Clock Lock (2)
SNS4Z159 12.5" Traditional series 9” 1.7lb Clock Lock (2)
SNS7A306 12.5" AC-powered 9” 2.0lb Clock Lock (2)
SNS4Z164 12.5" Dual-sided See instructions 6.0lb Twist Lock
SNS7A330 12.5" Dual-sided AC-powered See instructions 6.6lb Twist Lock
SNS4Z163 16" Traditional series 9” 2.4lb Clock Lock (2)
SNS4Z176 16" Wood 9” 3.4lb Clock Lock (1)
SNS4Z177 16" Wood 9” 4.9lb Clock Lock (1)
SNS4Z512 13.75" Platinum series 9” 1.6lb Clock Lock (2)
SNS4Z180 12.5" Brushed aluminum 9” 2.4lb Clock Lock (2)
SNS4Z227 15" Dual-sided brushed aluminum See instructions 5.2lb Fixed mount
Install a single-sided analog clock
Follow these steps to install a single-sided clock:
1. Drill holes for the screw anchors at the spacing
listed in the table above.
2. Use a screwdriver to insert and tighten the screw,
leaving the top of the screw head 3/8” out from
the wall.
3. Hold the clock with the face down and align the
Clock Lock hanger with the bottom screw.
4. Tilt the clock face to vertical and position the clock with the screw heads in the opening of the Clock Lock
hanger.
5. Slide the clock down over the screw heads to latch it into place.
SNS Analog Clocks User Manual Page 13
Install an SNS analog clock SNS analog clocks
Install a SNS4Z164 or SNS7A330 dual-sided clock
Follow these steps to install a SNS4Z164 or SNS7A330 dual-sided clock:
Notes SNS4Z164 or SNS7A330 dual-sided clocks
come with self-tapping screw anchors (for
drywall installation) and mounting screws.
Complete the Configure an SNS analog
clock and Install batteries in an SNS
analog clock procedures before mounting an
SNS4Z164 or SNS7A330 dual-sided clock.
1. If you’re installing the clock on a drywall surface,
install the screw anchors at the spacing shown
here.
2. Install the mounting plate with the screws
provided.
3. Slide the bracket attached to the assembled dual
sided clock over the mounting tabs onto the
mounting plate as shown here. A gentle tap with a
rubber mallet may be needed for this step, as it is
a tight fit.
4. Install the provided short screw through the top
center hole on the bracket. This will increase the
security of the clock assembly.

Page 14 SNS Analog Clocks User Manual
SNS analog clocks Install an SNS analog clock
Install a SNS4Z227dual-sided clock
Follow these steps to install a SNS4Z227 dual-sided clock:
Note SNS4Z227 dual-sided clocks come with self-tapping screw anchors (for drywall installation) and
mounting screws.
1. The supplied hardware pack contains a mounting plate, four long screws, and four wall anchors. Secure the
mounting plate to the wall or ceiling with the four long screws, paying attention to the “up” arrow, at the
location you will be hanging the clock.
2. Remove one clock from the bracket by removing two of the four factory-installed screws. With the dual clock
flat on a soft surface to protect the lens and bezel, remove the two top screws and lift the top clock off of the
dual mounting bracket. (Note: It may require some force to remove the top clock because, in addition to the
screws, the clocks are also held in place by magnets.)
3. Set each clock using method detailed on the setup instruction sticker on the back of each clock.
4. Once the clocks are set (with batteries inserted), orient the clock face so that the 12 is in the correct position
for your mounting option. (Note: clocks are shipped in correct position for wall mounting. If ceiling mount is
required, both clocks must be removed and rotated within the bracket.)
5. Align one of the posts on the back of the clock with the appropriate post in the bracket, next to a clip. Make
sure that the raised portion of the clip next to the post is inside the bracket.
6. Lower clock down on bracket, keeping all clips inside ring. Press down to seat clock in bracket. Secure with
the two screws removed previously, in same holes in bracket (over screws holding other clock in place).
7. Four additional screws are included in package to cosmetically plug holes in bracket, if desired.
8. Check to make sure that the 12 o’clock position is oriented to read correctly from both sides of the clock.
9. Taking the fully assembled dual clock, line up the base (stem) of the clock with the plate that is mounted on
the wall. Slip the keyhole slots on the back of the base over the posts on the plate and push the clock down to
secure.
SNS Analog Clocks User Manual Page 15
Install batteries in an SNS analog clock SNS analog clocks
Install batteries in an SNS analog clock
Note The battery life of SNS analog clocks is up to seven years with Primex Wireless #SNS887 lithium DD-
cell batteries or up to four years with high-quality alkaline D-cell batteries. Therefore, it is important that
fresh, superior-quality batteries, with an expiration date that exceeds five years past the installation date,
be used for the clock.
The SNS analog clock notifies the user when the batteries need to be changed by moving the second hand in five-
second increments instead of one second at a time. Battery condition is also reported via AMP. The clock will
retain its configuration after the batteries are replaced.
• Use only new high-quality name brand alkaline batteries
• Batteries should be the same type and date code
• The use of heavy duty and zinc carbon batteries is not recommended, as they will not last as long as high-
quality name brand alkaline batteries
• Do not use rechargeable NiCad batteries, as their output voltage is too low to assure proper operation
• Do not use standard lithium batteries
Follow these steps to replace the batteries in an SNS analog clock:
1. Dismount the clock from the wall so that you can
access the back of the clock.
2. Remove the old batteries, wait 10 seconds.
3. Insert two new Primex Wireless #SNS887 DD-
cell batteries or four new alkaline D-cell batteries.
4. When the batteries are in place, the SNS analog
clock will execute the initialization process and
set the hands to the correct time.
Page 16 SNS Analog Clocks User Manual
SNS analog clocks Remove an Clock Lock-mounted SNS analog clock
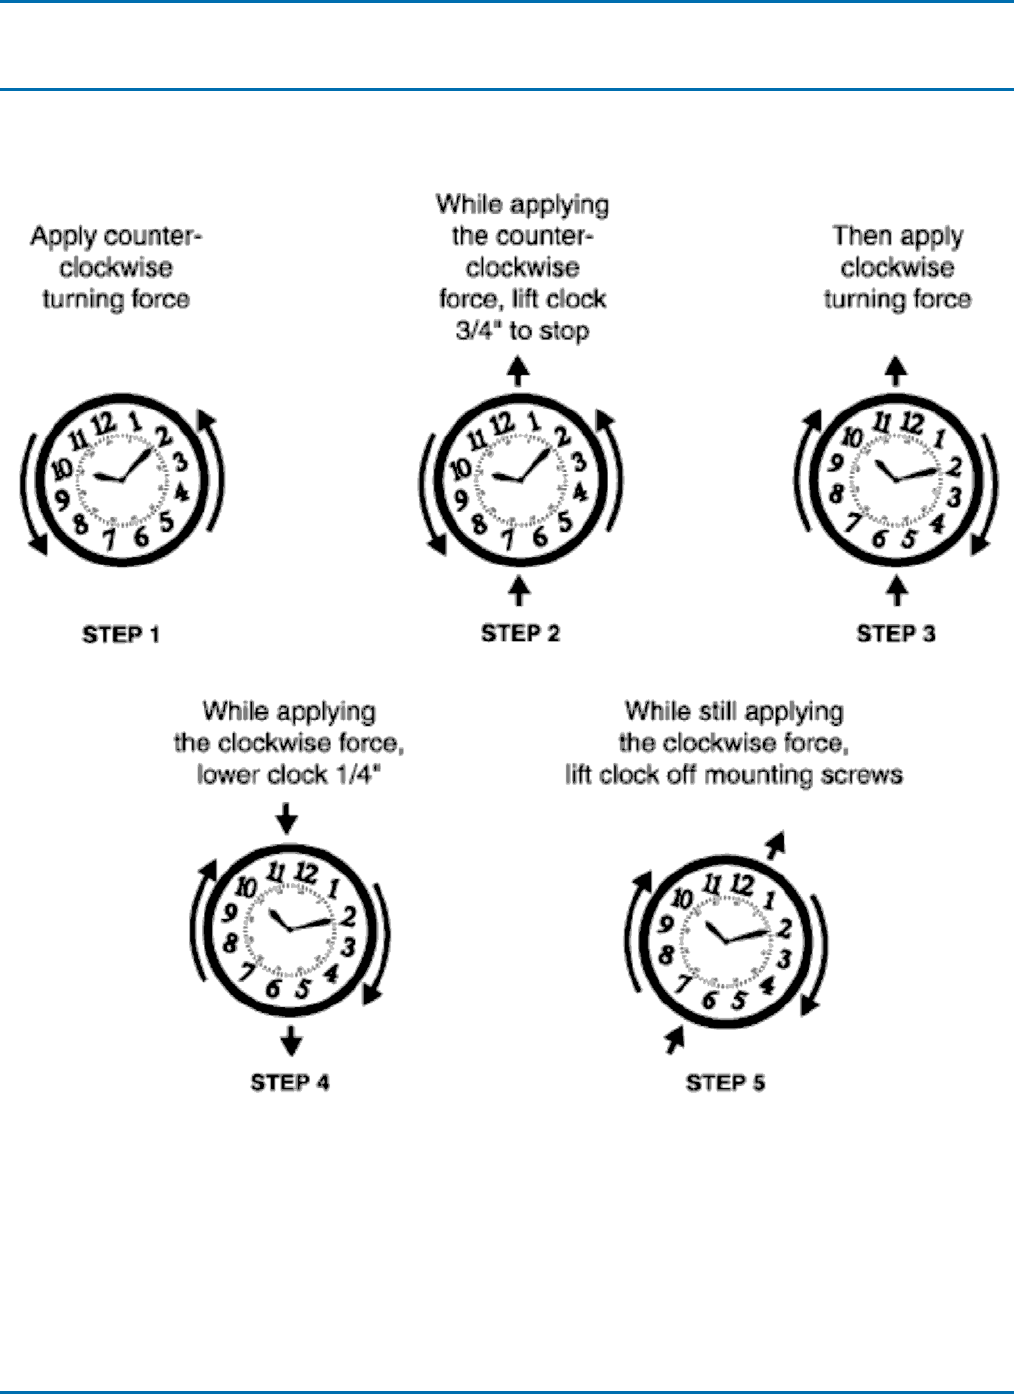
Remove an Clock Lock-mounted SNS analog clock
Follow these illustrated steps to remove an SNS analog clock

SNS Analog Clocks User Manual Page 17
Remove an Clock Lock-mounted SNS analog clock Configuration tool procedures
Configuration tool procedures

Page 18 SNS Analog Clocks User Manual
Configuration tool procedures Set the password for a clock
Set the password for a clock
Each clock contains a password which must be used to login to the clock before any of the configuration settings
can be read from the clock. The password used by the Configuration Tool is stored in the tool’s Preferences
settings and can be changed by using the Edit Preferences command (see the Preferences section of this manual).
To write the Primex Wireless Configuration Tool ‘s current password to a clock the tool has established a
connection with, you can use the Set Device Password toolbar button or the Actions > Set Device Password menu
command.
1. Click on either the Set Device Password toolbar button or the Actions > Set Device Password menu command,
both of which should be enabled once a connection to the clock has been established.
2. The status bar at the bottom of the window should display a “Device Password Set!” message.

SNS Analog Clocks User Manual Page 19
Disconnect an SNS analog clock Configuration tool procedures
Disconnect an SNS analog clock
To disconnect a clock from the Primex Wireless Configuration Tool, the following steps should be performed:
1. Click on either the Disconnect toolbar button or the Actions > Disconnect menu command, both of which
should be enabled once a connection to the clock has been established.
2. The status bar at the bottom of the window should display a “Disconnected” message.
3. Physically disconnect the clock from the PC or laptop by disconnecting the network cable that was used to
connect the devices.
4. The clock should restart and attempt to connect to the network using any configuration settings that were
written to it and perform a time synchronization.
Note You can physically disconnect the clock from the PC or laptop, without first using the Disconnect
command, however if you do so, note that the Primex Wireless Configuration Tool may not realize the clock has
been disconnected until you try to issue another command to the clock.

Page 20 SNS Analog Clocks User Manual
Configuration tool procedures Upgrade the firmware for an SNS analog clock
Upgrade the firmware for an SNS analog clock
The Primex Wireless Configuration Tool can be used to download new firmware to an SNS analog clock if the
proper firmware files are available. SNS Firmware files typically have a .rom extension, and you should only
attempt to upgrade an SNS analog clock with an authorized Primex Wireless firmware file or you risk rendering
your clock completely inoperable. Once a connection has been established from the Primex Wireless
Configuration Tool to the SNS Clock (see Connecting the Clock) you can initiate a firmware upgrade of the clock
by performing the following steps:
1. Click on either the Upgrade Firmware toolbar button or the Actions > Upgrade Firmware… menu command,
both of which should be enabled once a connection to the clock has been established.
2. An Open dialog window will be displayed to allow you to specify the Primex Wireless Firmware file that
should be used to upgrade the clock. By default, the Open dialog is set to look for files with a .rom file extension.
3. Double-click the desired Firmware file or select the file and click the Open button.
4. The status bar will display a “Waiting for device to download Firmware Upgrade file!” message while the
clock begins pulling down the file.
Note Do not disconnect or power down the clock during the download process, which may take up to six (6)
minutes.
5. Once the SNS Clock has completed pulling down the Firmware Upgrade file, the status bar will display a
“Firmware download complete!” message and the clock should go through a restart cycle and may be
disconnected from the laptop or PC.

SNS Analog Clocks User Manual Page 21
Configuration Templates Configuration tool procedures
Configuration Templates
Save a configuration template file
A significant portion of the information you configure your SNS Clocks with will be they same for all or a
significant number of your clocks since they will be accessing your same network or Virtual LAN. To facilitate
this, once you have entered the information for one of your clocks in the Primex Wireless Configuration Tool you
can save that information in a template file for reuse at a later time. All the information entered is stored in the file
with the exception of the Clock Name, which you would typically want to be unique for each clock. To save the
clock information in a template file, all the information fields must contain valid values, and then the following
steps should be performed:
1. Click on either the Save File or Save File As toolbar button or the File > Save… or File > Save File As.. menu
commands.
2. You will not be able to save the configuration settings to a template file if any of the fields contain invalid
values (indicated with red text). Attempting to do so will generate the following error dialog: Correct the invalid
value and try again.
3. If you selected the Save File command on a set of configuration settings you previously read from a file, the
data will be saved back to that file. If the data was entered into a “New” form, or the Save File As command was
selected, a Save As dialog window will be displayed to allow you to select where the file should be saved. By
default, Primex Wireless SNS Configuration files are saved with a .pwc file extension, but you
can use whatever name and extension you prefer.
Open a configuration template file
To open a previously saved Primex Wireless SNS Configuration file the following steps should be performed:
1. Click on either the Open File toolbar button or the File > Open… menu command.
2. If you have changed any data in the current configuration setting values displayed on the configuration tab you
will be prompted if you want to save those configuration values before opening the new set of configuration
values. If you select Yes, and those configuration settings were previously read from a file, the data will be saved
back to that file. If the data was entered into a “New” forma Save As dialog window will be displayed to allow
you to select where the file should be saved.
3. An Open dialog window will be displayed to allow you to specify the Primex Wireless SNS Configuration file
that should be opened.
By default, Primex Wireless SNS Configuration files are saved with a .pwc file extension, but you can change the
Files of type setting in the window to display files with other extensions, if you elected to save your configuration
files with a different extension.
4. You can either double-click the file once you have found it, or select the file and click the Open button. The
configuration information stored in the file will be loaded into the Configuration tab.
5. If the file you selected is not a valid Primex Wireless SNS Configuration file, one of the following error
messages will be displayed and the fields of the Configuration Tab will not be updated:

Page 22 SNS Analog Clocks User Manual
Configuration tool procedures Ping a clock
Ping a clock
The Primex Wireless Configuration Tool provides the ability to ‘ping’ the clocks it is connected to. To do so,
select the Ping Device command from the toolbar or the Communications Log context menu.

SNS Analog Clocks User Manual Page 23
Display network information Configuration tool procedures
Display network information
You can also display the network settings in use by your laptop or PC while connected to the clock by selecting
the Show Network Info command from the toolbar or the Communications Log context menu. This can be helpful
in making sure the clock is allocating your machine a valid IP Address when it is connected directly to the device.

Page 24 SNS Analog Clocks User Manual
Configuration tool procedures Communication log procedures
Communication log procedures
While active, the Configuration Tool keeps a log of all the communication sent and received between itself and
the devices it establishes a connection with. The log is cleared each time you exit the application and a fresh log is
started each time the application is started. You can view the current log at any time by clicking the
Communication Log tab.
If an error occurred, it is displayed in the Communications Log to help determine exactly what happened.
Clear the communication log
You can clear the Communications Log at any time by right-clicking in the display of the Communications Log
and selecting the Clear Log command from the context menu.
After selecting the Clear Log command, you will be prompted if you are sure you want to clear all the data from
the Communications Log before the log is actually cleared.
Copy the communication log
You can select and copy portions of the Communication Log by selecting the text and using the standard copy
command. You can also easily copy the entire contents of the Communication Log to the clipboard so it can be
pasted into a document or email message by selecting the Copy Entire Log command from the toolbar or the
Communication Log context menu. The contents will be copied as rich text, so if you paste it into a Microsoft
Word document it will retain any color coding.
Save the communication log
You can easily save the entire contents of the Communication Log to a file, as rich text, by selecting the Save Log
command from the toolbar or the Communication Log context menu. This will open a Save As dialog window
allowing you to specify where to save the file and the filename to use. By default, a filename of
“PrimexWirelessConfigLog.rtf” will be used, but you can change this.
Print the communication log
You can Print the entire contents of the Communication Log by selecting the Print Log command from the toolbar
or the Communication Log context menu. This will open the standard Print dialog window allowing you to select
the printer and options to use. You can also use the File > Page Setup… and File > Print Preview… menu
commands while displaying the Communication Log tab to configure and preview what the printout will look like
before sending it to the printer.

SNS Analog Clocks User Manual Page 25
Time zone information Configuration tool procedures
Time zone information
Time Zone options and the Daylight Saving Time (DST) transition dates for each time zone are kept in a data file
which is part of the installation of the Primex Wireless Configuration Tool. The Time Zone tab can be used view
what time zones are available and what DST transition dates stored for each time zone, if any. Each Time Zone
entry in the display can be expanded or contracted by clicking on the plus (+) or minus (-) character displayed
before the entry.
Page 26 SNS Analog Clocks User Manual
Configuration tool procedures Set preferences
Set preferences
The Configuration Tool allows you to adjust several
settings which affect how the application behaves
for your installation of the application. These
settings can be altered and the changes written to
disk so your preferred behavior for the application
will be remembered the next time you use the
Configuration Tool.
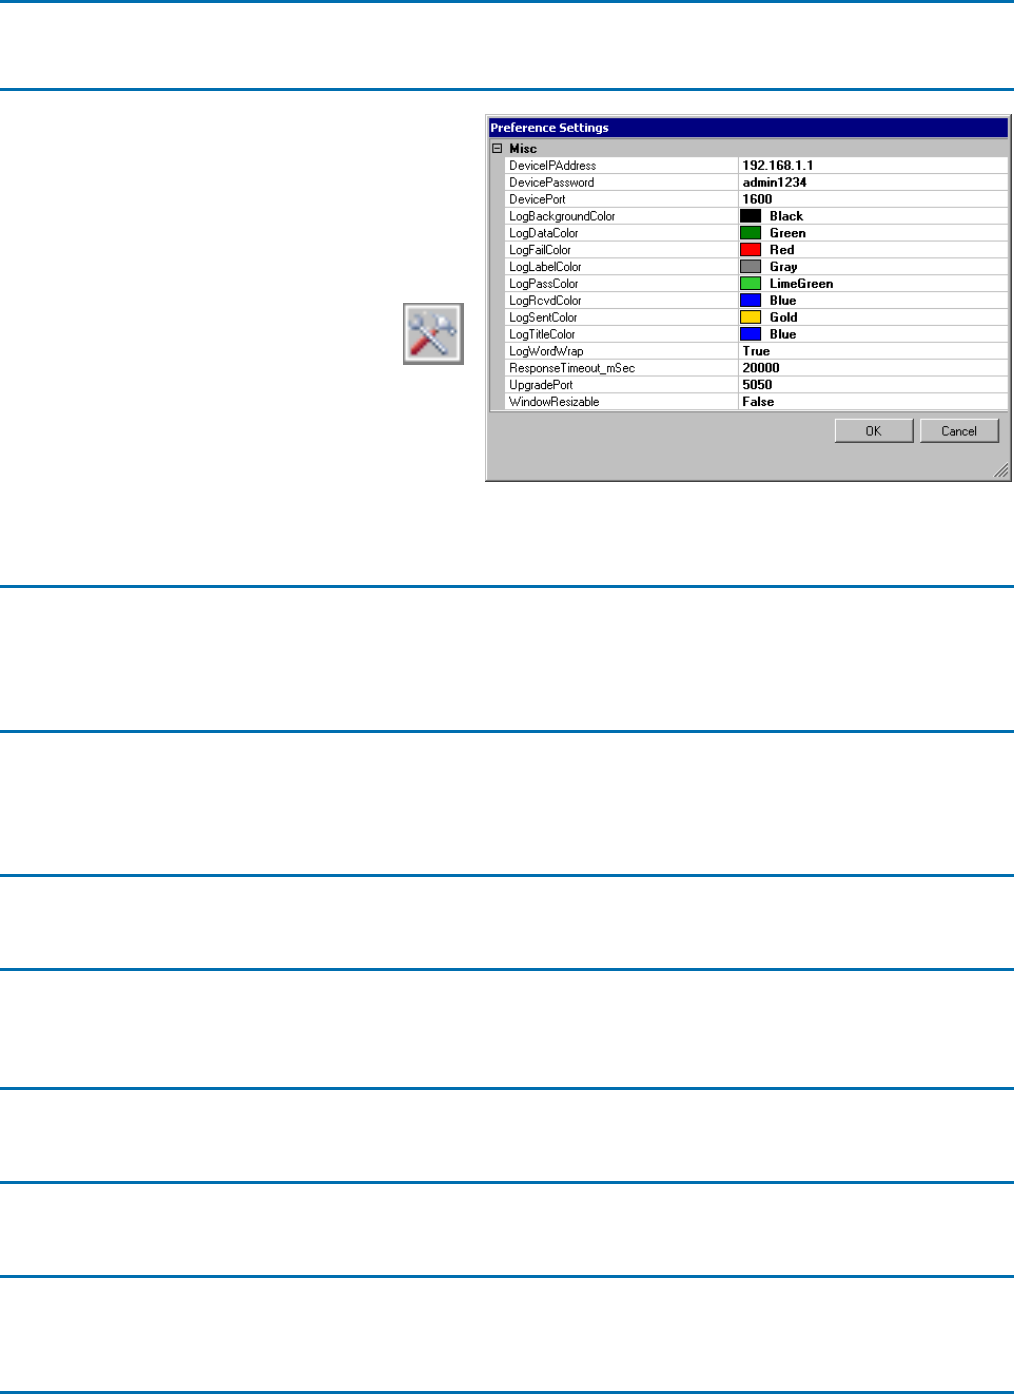
To view and edit the Preference Settings
for the Primex Wireless Configuration
Tool, click the Edit Preferences toolbar
button or choose the EditPreferences… menu
item. The Configuration Tool displays a
Preference Settings dialog box similar to the
one shown here.
Clicking on a color setting will display a drop-down which allows you to select a color value. Clicking on a
True/False setting will display a drop-down allowing you to pick either a True or False value.
Device address
By default, clocks in configuration mode act as DHCP servers to allocate IP Addresses to devices connected to
them and the devices use an IP Address of 192.168.1.1. The Primex Wireless Configuration Tool is configured to
attempt to connect to IP address 192.168.1.1 on port 1600 when attempting to connect to a clock.
Device password
The device password is used by the Primex Wireless Configuration Tool to log in to clocks in order to read their
current settings. You can change this password from the default and set it in all of your devices using the Set
Device Password command if you wish to use a custom password in all of your clocks.
Device port
Communication log settings
The Primex Wireless Configuration Tool uses color coding when displaying messages in the Communication
Log. These settings allow you to adjust those color settings to your own personal tastes.
Log background color
Log data color
Log fail color

SNS Analog Clocks User Manual Page 27
Set preferences Configuration tool procedures
Log label color
Log pass color
Log rcvd color
Log sent color
Log title color
Log word wrap
Response timeout mSec
Upgrade port
When performing a firmware update on a clock, the device pulls the information from the Configuration Tool.
This setting specifies what port the device should attempt to connect to the Configuration Tool application on in
order to pull the firmware upgrade file down. The default value of 5050 for this port should work fine in most
cases, but can be changed to another port if your laptop or PC already has an application using port 5050.
Window resizable
By default, the Configuration Tool runs in a fixed size window. You can change this setting to allow the window
to be resizable. This can be advantageous when viewing the Communication Log tab, but the forms displayed by
the Configuration Tool will not resize and will simply be displayed in the upper left of the tab. Note that there is a
fixed minimum size set to make sure the entire form remains visible when being displayed.

Page 28 SNS Analog Clocks User Manual
Configuration tool procedures Troubleshoot
Troubleshoot
Problem:
You receive a File not Found error on startup.
Solution:
The Time Zone and Daylight Saving Time Transition Date data is kept in an XML data file which must be located
in the same directory as the Configuration Tool executable. This is done at installation time, but if you copy just
the ‘.exe’ file to another folder and try to run the file from there you may get this error message. To prevent this,
run the executable from the directory it was originally installed in, or make sure you copy the TimeZones.xml
file with the PW Config Tool.exe file.

SNS Analog Clocks User Manual Page 29
Troubleshoot Appendix – Install/remove Configuration tool software
Appendix – Install/remove Configuration tool software
This appendix describes the minimum system requirements for the Primex Wireless Configuration Tool software
and how to install it.
• Minimum system requirements
• Install Configuration Tool software

Page 30 SNS Analog Clocks User Manual
Appendix – Install/remove Configuration tool software Minimum system requirements
Minimum system requirements
• Operating System Windows XP, Windows 2000, Windows 2003, Windows Vista
• Supporting Software Microsoft .NET Framework version 2.0 or later
• Disk Space Required 10 MB
• Network Network Interface Card with RJ-45 jack
• Network Cable 1 Cat 5 wired straight through with RJ- 45 connectors
• Minimum Screen Resolution 1024 x 768
SNS Analog Clocks User Manual Page 31
Install Configuration Tool software Appendix – Install/remove Configuration tool software
Install Configuration Tool software
Follow these steps to install the Primex Wireless
Configuration Tool software:
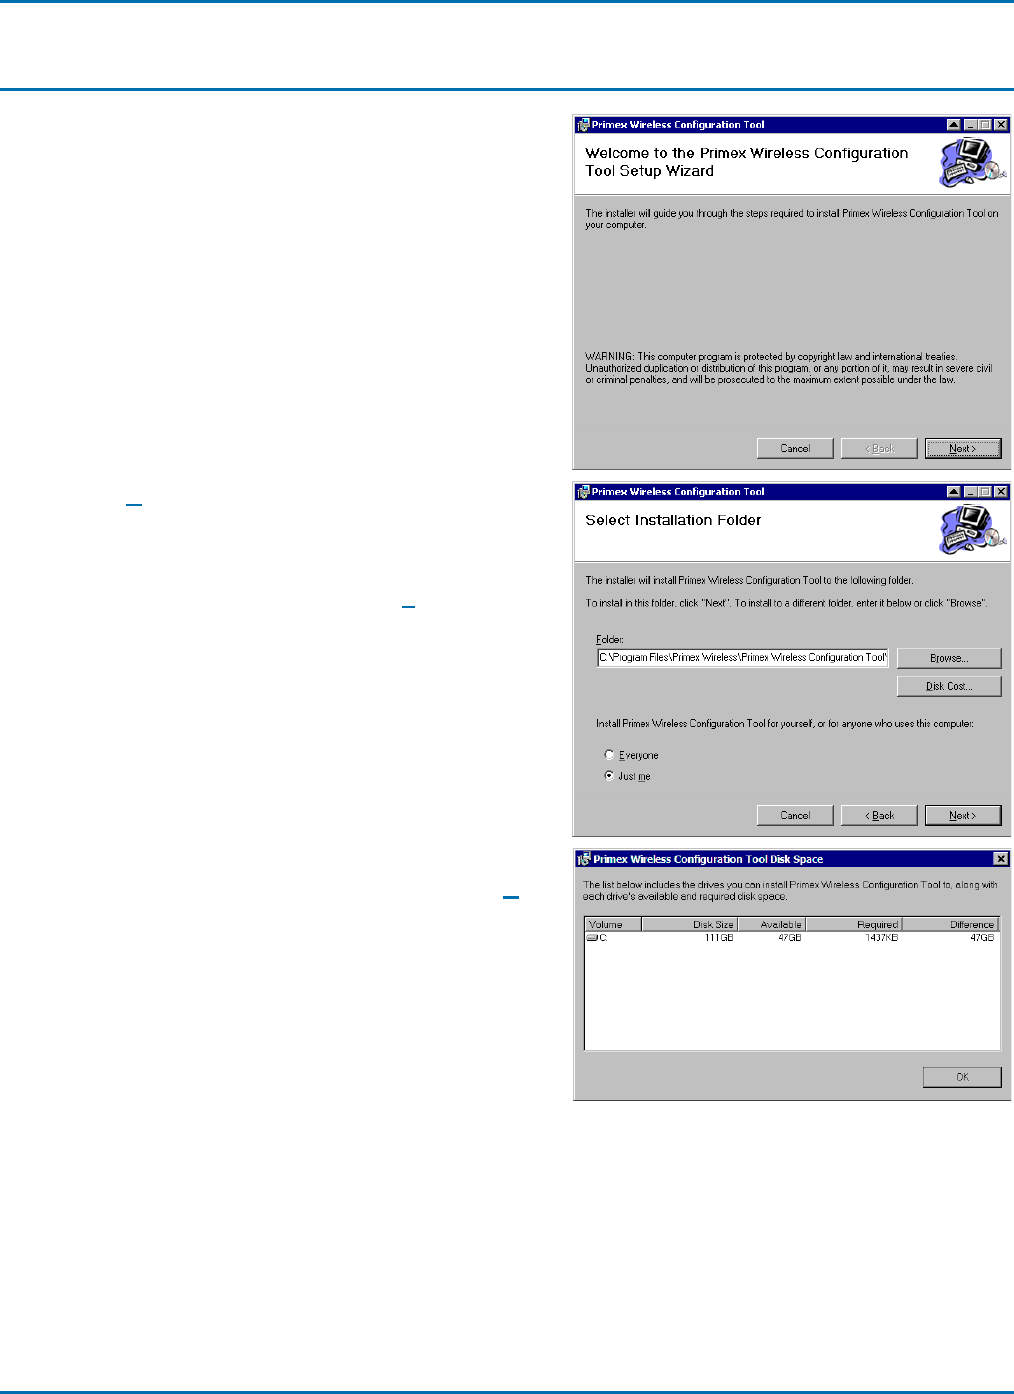
1. Insert the Primex Wireless Configuration Tool software
CD. Windows automatically launches the setup wizard
and displays a Welcome to the Primex Wireless
Configuration Tool Setup Wizard dialog box similar
to the one shown here.
Note If Windows does not automatically launch the setup
wizard, browse to your CD drive and double-click
setup.exe to launch the setup wizard.
2. Click the Next> button. The wizard displays a Select
Installation Folder dialog box similar to the one
shown here. The wizard shows the default installation
path (C:\Program Files\Primex Wireless\Primex
Wireless Configuration Tool) in the Folder field.
3. You may determine the impact of installing the
configuration tool on your computer by clicking the Disk
Cost button. The wizard displays a Primex Wireless
Configuration Tool Disk Space dialog box similar to
the one shown here. The Primex Wireless
Configuration Tool Disk Space dialog box shows all
available drives on your computer with their disk size,
free space available, amount of space required to install
the configuration tool and amount of space remaining
after installation of the configuration tool.
Page 32 SNS Analog Clocks User Manual
Appendix – Install/remove Configuration tool software Install Configuration Tool software
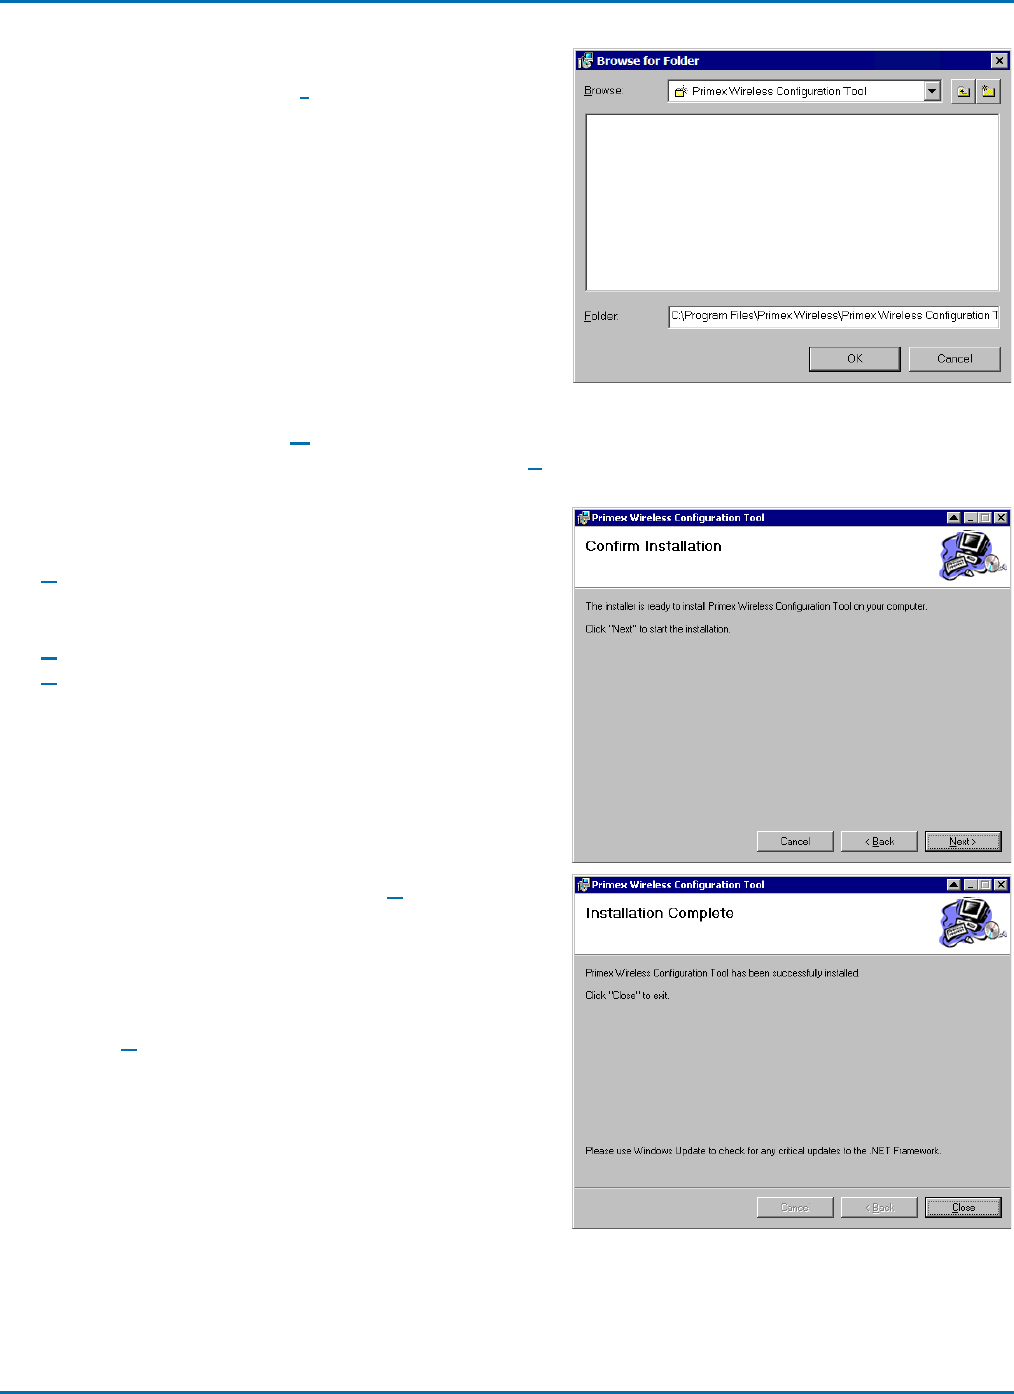
4. If you’d prefer to install the configuration tool to a
different location, click the Browse button. The wizard
displays a Browse for Folder dialog box similar to the
one shown here. Use the Browse for Folder dialog box
to choose a new location in which to install the
configuration tool. Click the OK button when you’ve
chosen your preferred location to accept your changes
and return to the Select Installation Folder dialog
box.
5. You may choose to make the configuration tool available to just yourself or to anyone who uses your
computer. Choose the Just me option button to only allow the configuration tool to be used when you’re
signed into your computer (recommended); choose the Everyone option button to allow anyone signed into
your computer to use the configuration tool.
6. When you’ve completed selecting your preferences with
the Select Installation Folder dialog box, click the
Next> button. The wizard displays a Confirm
Installation dialog box similar to the one shown here.
This is the final step before installation begins. Click the
Next> button to proceed with installation; click the
Back button to return to the Select Installation
Folder dialog box or click the Cancel button to end the
installation process without making any changes to your
computer.
7. When you click the he wizard displays Next> button, the
wizard displays a progress meter that shows the
installer’s progress and when installation is complete, the
wizard displays an Installation Complete dialog box
similar to the one shown here. At this point, the
configuration tool has been installed on your computer;
click the Close button to close the wizard.
SNS Analog Clocks User Manual Page 33
Uninstall Configuration Tool software Appendix – Install/remove Configuration tool software
Uninstall Configuration Tool software
Follow these steps to uninstall the
Configuration Tool software:
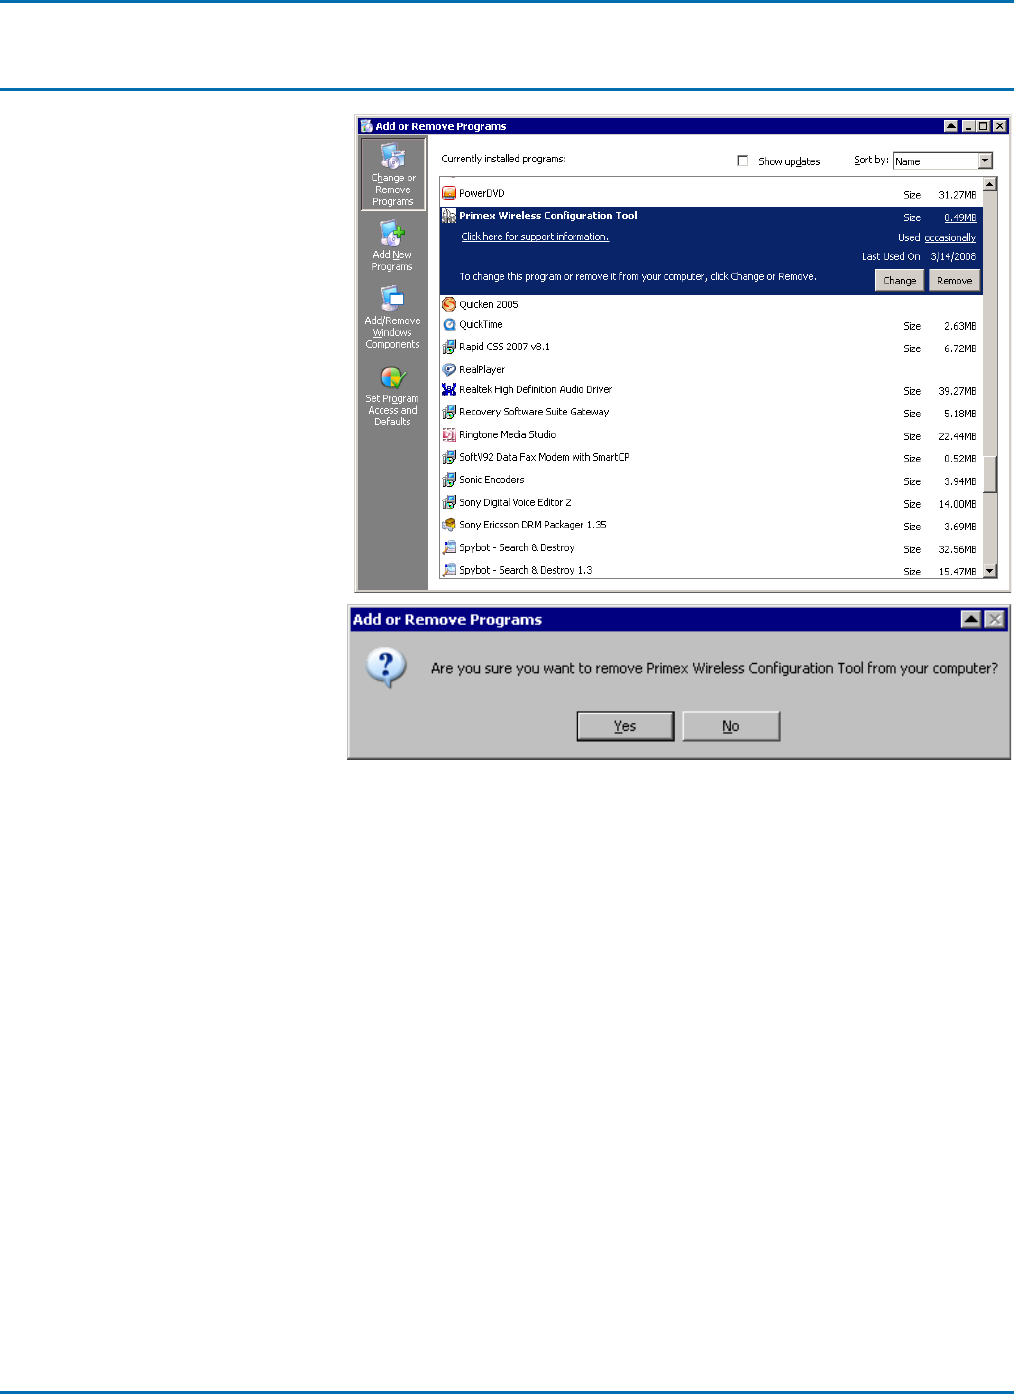
8. Choose
StartSettingsControl
PanelAdd or Remove
Programs. Windows displays
an Add or Remove
Programs dialog box similar
to the one shown here. Scroll
down the Currently installed
programs list and select
Primex Wireless
Configuration Tool. Click
the Remove button.
9. Windows displays an Add or
Remove Programs
confirmation message box
similar to the one shown here.
Click the Yes button to confirm
that you want to remove the
Configuration Tool software
from your computer.

Page 34 SNS Analog Clocks User Manual
Index Uninstall Configuration Tool software
Index
