Pro Nets Technology WP72RL1 Wireless PCI Card User Manual
Pro-Nets Technology Corporation Wireless PCI Card
Contents
- 1. User manual 1 of 2
- 2. User manual 2 of 2
User manual 1 of 2

IEEE 802.11n
Wireless PCI Card
User’s Manual
WP72RL1

1
FCCWarning
FCC Caution:
ThisdevicecomplieswithPart15oftheFCCRules.Operationissubjecttothefollowingtwo
conditions:(1)Thisdevicemaynotcauseharmfulinterference,and(2)thisdevicemustacceptany
interferencereceived,includinginterferencethatmaycauseundesiredoperation.
IMPORTANTNOTE:
FCCRadiationExposureStatement:
ThisequipmentcomplieswithFCCradiationexposurelimitssetforthforanuncontrolled
environment.Thisequipmentshouldbeinstalledandoperatedwithaminimumdistanceofabout
eightinches(20cm)betweentheradiatorandyourbody.
ThistransmittermustnotbecoͲlocatedoroperatedinconjunctionwithanyotherantennaor
transmitter.
This equipment has been tested and found to comply with the limits for a Class B digital device, pursuant to part
15 of the FCC rules. These limits are designed to provide reasonable protection against harmful interference in a
residential installation. This equipment generates, uses and can radiate radio frequency energy and, if not
installed and used in accordance with the instructions, may cause harmful interference to radio communications.
However, there is no guarantee that interference will not occur in a particular installation. If this equipment does
cause harmful interference to radio or television reception, which can be determined by turning the equipment off
and on, the user is encouraged to try to correct the interference by one or more of the following measures:
-Reorient or relocate the receiving antenna.
-Increase the separation between the equipment and receiver.
-Connect the equipment into an outlet on a circuit different from that to which the receiver is connected.
-Consult the dealer or an experienced radio/TV technician for help.
You are cautioned that changes or modifications not expressly approved by the party responsible for compliance
could void your authority to operate the equipment.

2
RevisionHistory
RevisionHistory
V1.1strelease
Allbrandandproductnamesmentionedinthismanualaretrademarksand/orregisteredtrademarks
oftheirrespectiveholders.

!
Is herewith confirmed to comply with the requirements set out in the Council Directive
on the Approximation of the Laws of the Member States relating to Electromagnetic
Compatibility (2004/108/EC), Low-voltage Directive (2006/95/EC),
the procedures given in European Council Directive 99/5/EC and 2004/104/EC.
The equipment was passed. The test was performed according to the following
European standards:
z EN 300 328 V.1.7.1
z EN 301 489-1 V.1.8.1 / EN 301 489-17 V.2.1.1
z EN 62311
z EN 60950-1
Regulatory statement (R&TTE)
zEuropean standards dictate maximum radiated transmit power of 100mW EIRP
and frequency range 2.400-2.4835GHz;
zIn France, the equipment must be restricted to the 2.4465-2.4835GHz frequency
range and must be restricted to indoor use.
Operation of this device is subjected to the following National regulations and may be
prohibited to use if certain restriction should be applied.
D=0.030m is the minimum safety distance between the EUT and human body when the
E-Field strength is 61V/m.
D=0.020m
098
4
E=9.67977 V/m is the maximum E-Field strength when safety distance between the EUT and
human body is maintained at least 20cm, which is below 61V/m as required in Annex III table
2 of EC Council Recommendation (1999/519/EC). This proves that the unit complies with the
EN 62311 for RF exposure requirement.

4
Contents
1. Introduction......................................................5
1.1 Features ....................................................................... 5
1.2 Familiar with your new wireless network card ............. 5
1.3 Package Contents......................................................... 6
1.4 Before you start............................................................ 7
1.5 Hardware Installation................................................... 7
2. Installation Procedure..........................................8
3. Wireless Network Configuration Utility...................15
3.1 RaUI Wireless Utility & Windows Zero Configuration (WZC)
15
3.2 Start RaUI Utility......................................................... 21
3.3 Profile ........................................................................ 28
3.3.1 Add/Edit Profile ................................................ 29
3.3.2 Example to Add Profile in Profile....................... 30
3.4 Network..................................................................... 32
3.5 Advanced................................................................... 34
3.6 Statistics..................................................................... 36
3.7 WMM ......................................................................... 37
3.8 WPS........................................................................... 43
3.9 SSO............................................................................ 47
3.10 CCX.......................................................................... 48
3.11 About....................................................................... 48
3.12 Link Status................................................................ 49
4. Soft-AP Function...............................................50
4.1 Switch to AP mode and Basic Configuration ................ 50
4.2 Security Settings ......................................................... 53
4.3 Access Control ............................................................ 54
4.4 MAC Table.................................................................. 55
4.5 Event Log.................................................................... 55
4.6 Statistics..................................................................... 56
4.7 About......................................................................... 57

5
1. Introduction
Thank you for purchasing this high-speed wireless network card! Excepting common
wireless standards 802.11b/g, this wireless network card is also able to access
802.11n wireless networks - data transfer rate is 150Mbps, and that’s three times faster
than 802.11g wireless network! With easy-to-install PCI interface - a very common
expansion port of computers - plug this wireless network card into any empty PCI slot of
your computer, just that simple!
This product is made in ISO9001 approved factory and complies with FCC part 15
regulations and CE approval.
1.1 Features
‧ High-efficiency antenna expands the scope of your wireless network.
‧ High-speed data transfer rate - Up to 150Mbps.
‧ WMM function: control the bandwidth required for different applications.
‧ Work with IEEE 802.11b/g/n wireless devices.
‧ Supports major encryption methods like WEP, WPA, and WPA2 encryption.
‧ WPS configuration - You don’t need an experienced computer technician to
help you to get connected. Utilizing the software program of the card, you can
get your computer connected by pushing a button or entering an 8-digit code.
Pressing the button on the network card, the WPS connection can be activated
as well.
‧ PCI interface - you can get it installed on your computer in just few seconds!
1.2 Familiar with your new wireless network card
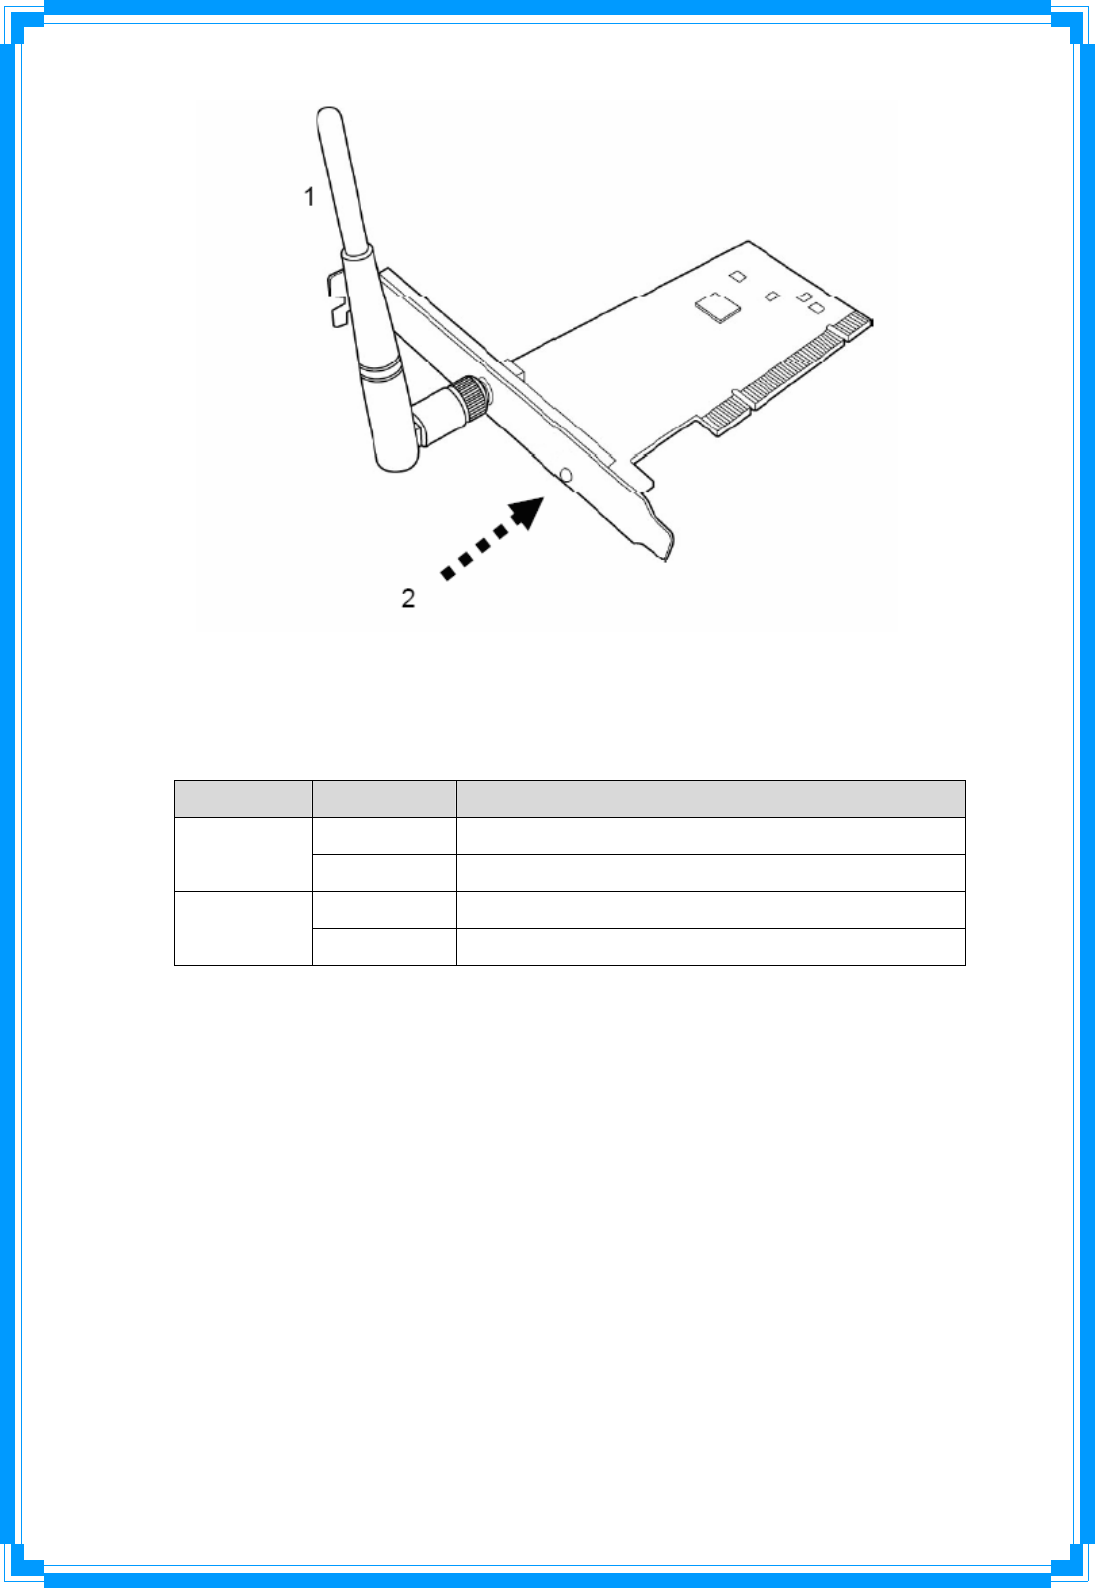
6
1. Antennas
One 2dBi dipole antenna is enclosed with the PCI card. Please secure the
antenna to Reverse SMA connector of the card.
2. Link & Active LED Definitions
LED Light Status
Description
On Link to a wireless access point
Link Off Radio is switched to off
Blinking Transferring / receiving data
Active Off No wireless activity
1.3 Package Contents
Before you starting to use this wireless network card, please check if there’s anything
missing in the package, and contact your dealer of purchase to claim for missing items:
‧ One PCI Wireless Network Card
‧ One 2dBi Dipole Antennas
‧ One CD-ROM (Drivers / Utility/User Manual)

7
1.4 Before you start
You must have the requirements as follow,
‧ A computer with an available PCI slot
‧ At least a 300MHz processor and 32MB memory
‧ Windows 2000/XP/Vista or Windows 7 operation system
‧ A CD-ROM drive
‧ At least 100MB of available disk space.
‧ Wireless PCI Adapter properly installed
1.5 Hardware Installation
STEP1: Turn off your computer and remove its cover
STEP2: Insert the PCI wireless network card into an available PCI slot firmly. Please refer
to the illustration below:
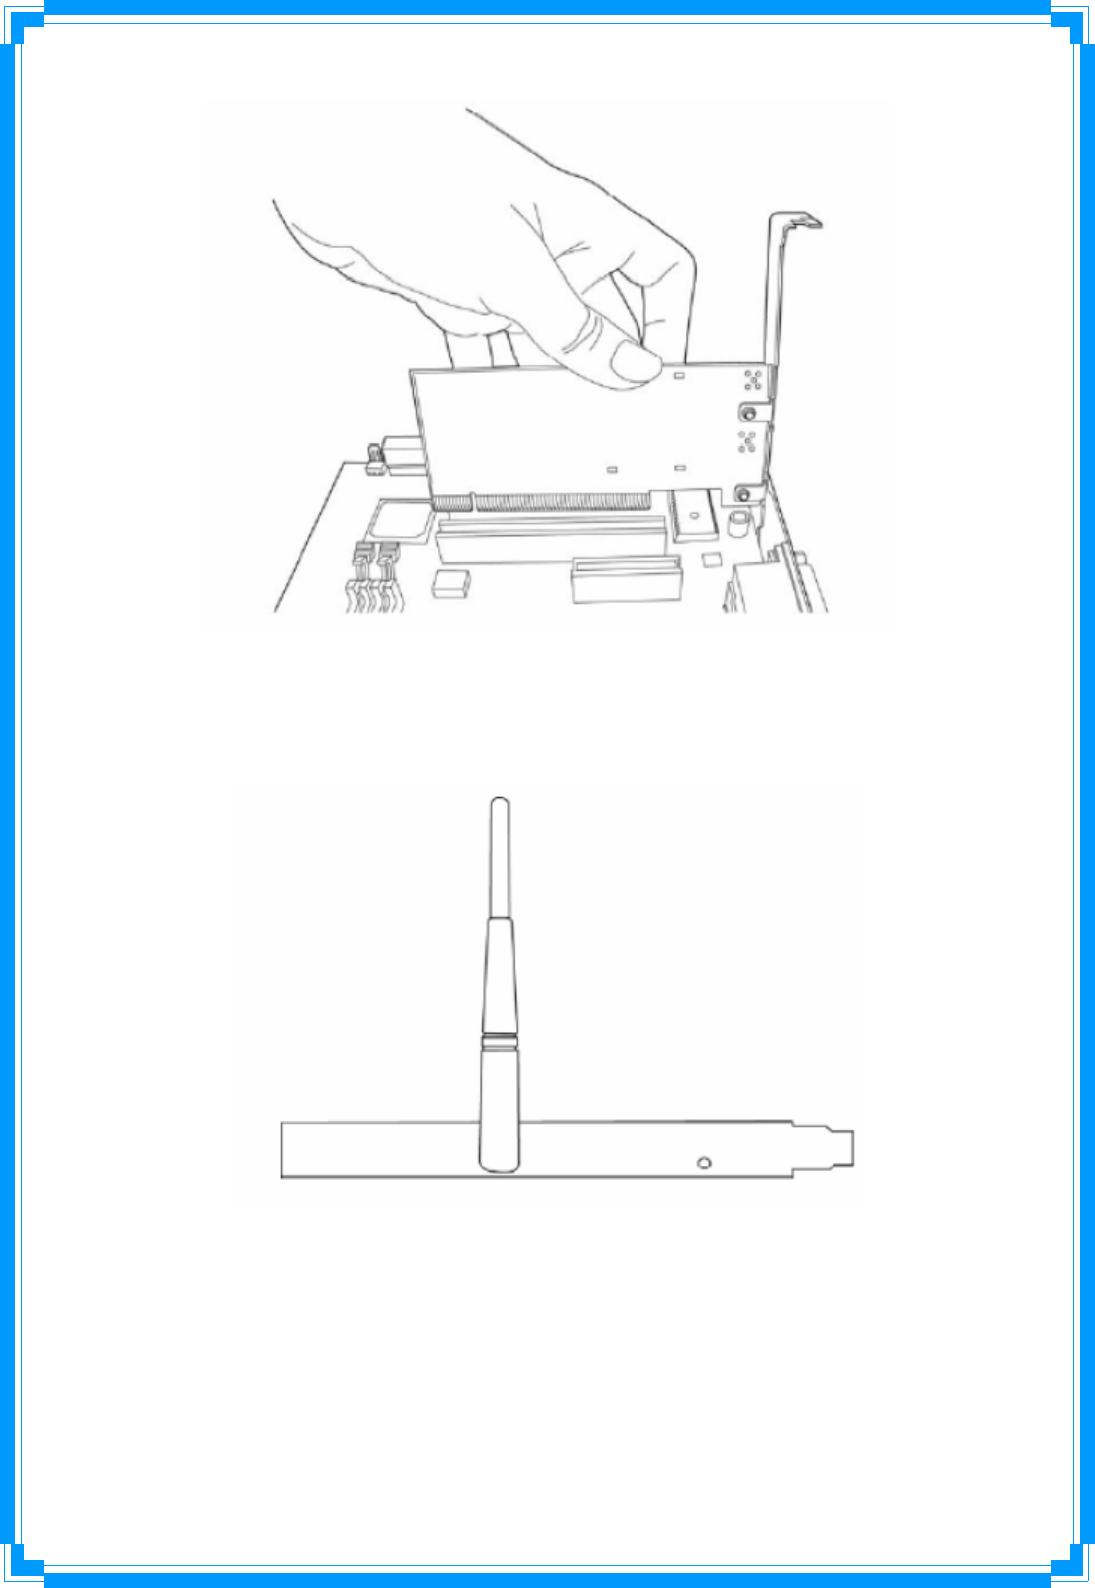
8
STEP3: Secure this card to the rear of the computer chassis and replace the cover.
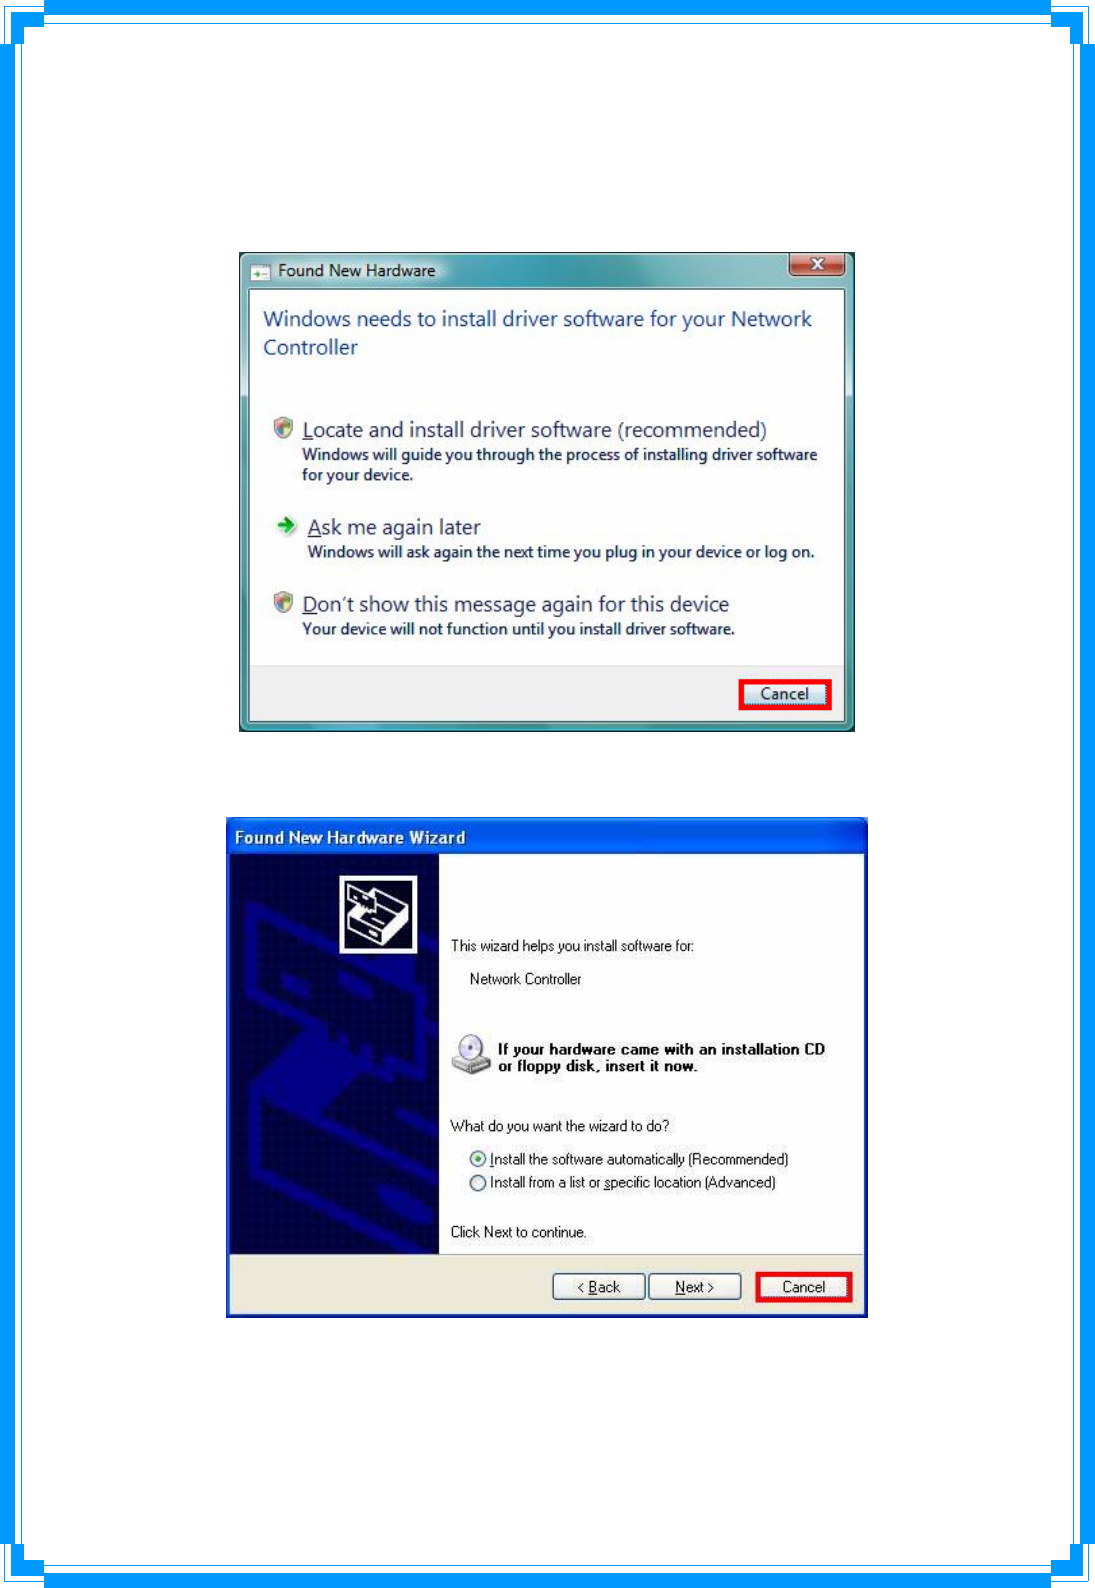
STEP4: Install the antenna on the wireless network card, and make sure the antenna is
securely installed. To improve radio reception, please adjust antenna to the proper
position.
STEP5: Turn on the computer.
2. Installation Procedure
Note: If you have installed the Wireless Adapter driver & utility before,
9
please uninstall the old version first.
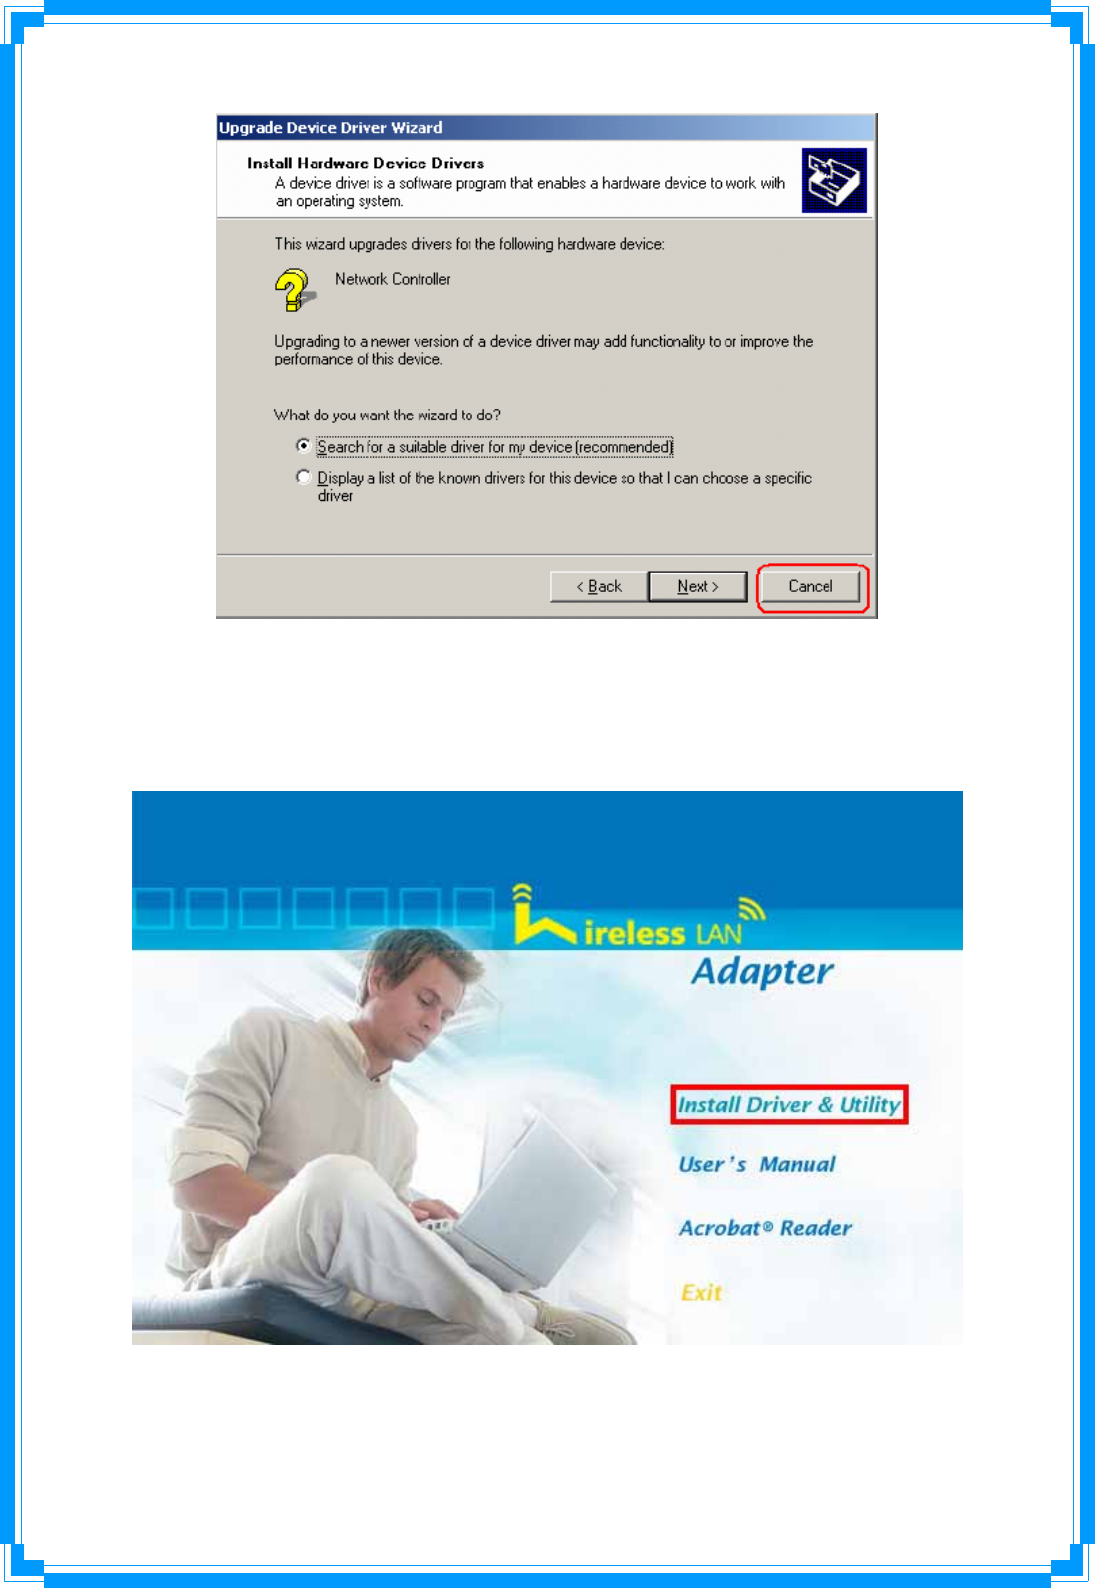
STEP1: The Found New Hardware Wizard below will appear after the WLAN
adapter is installed. Please click Cancel to continue.
(For Windows Vista)
(For Windows XP)
10
(For Windows 2000)
STEP2: Insert Installation CD into CD-ROM drive, windows below will appear. Click
Install Driver & Utility to begin device driver installation.
11
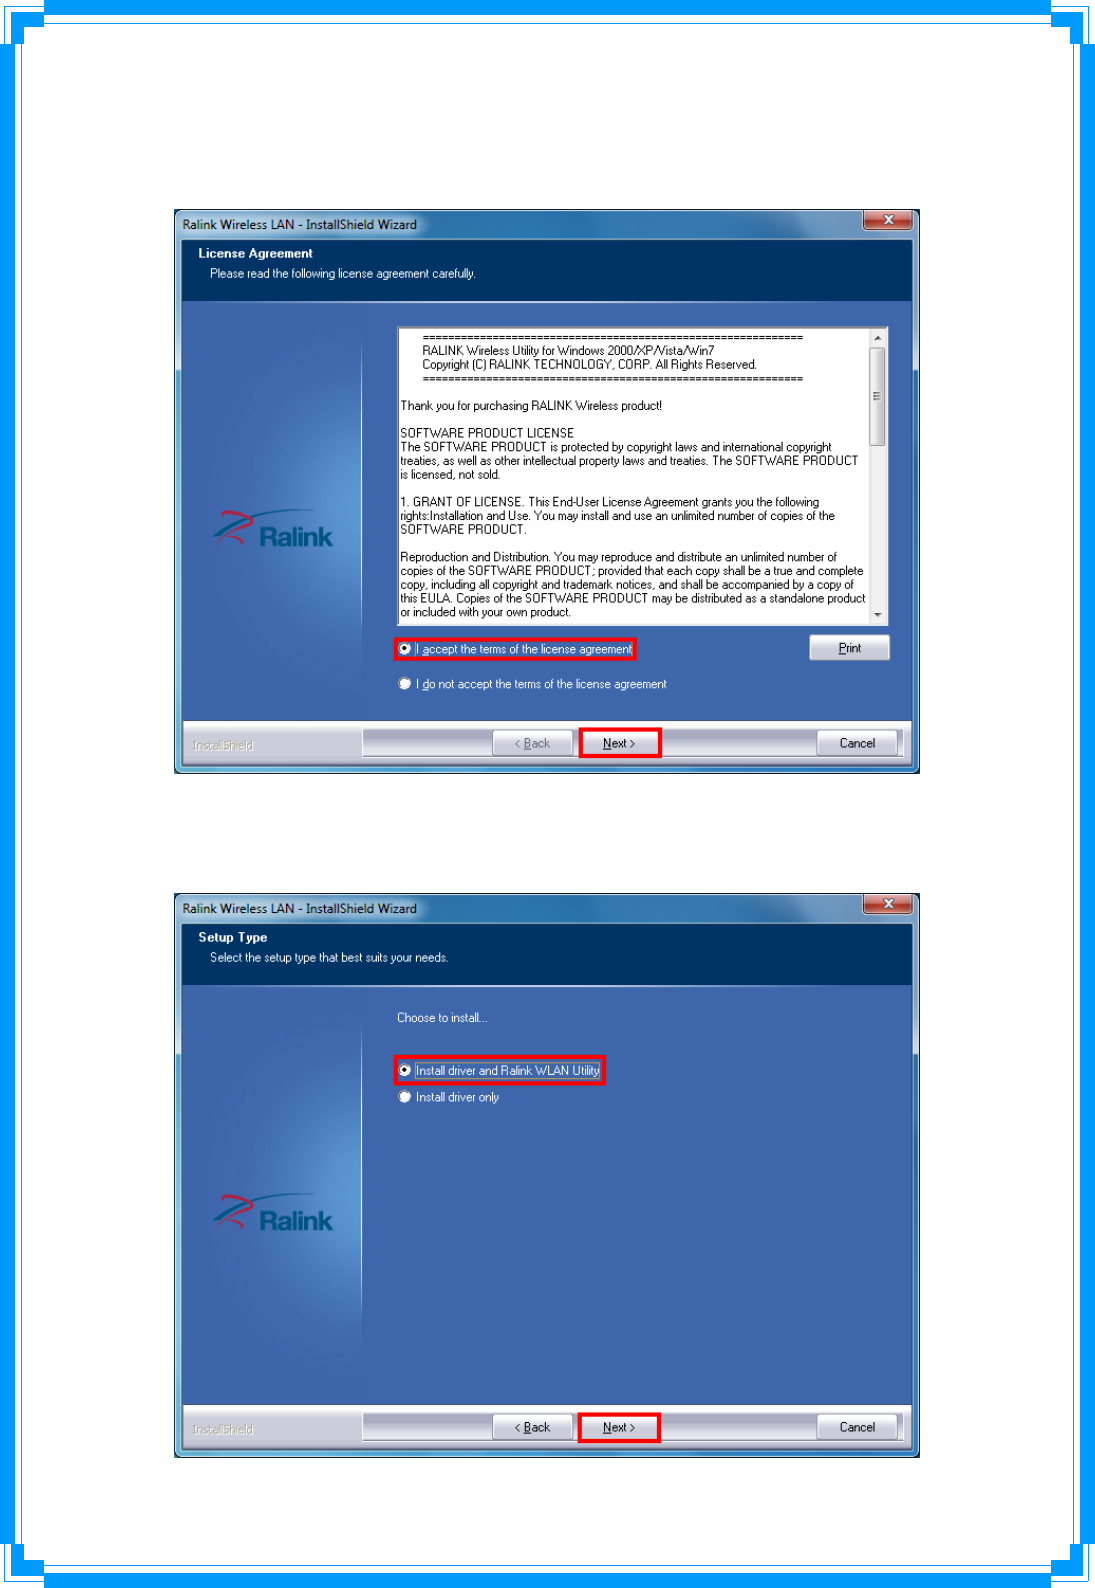
STEP3: Please read the following license agreement. Use the scroll bar to view the rest
of this agreement. Select I accept the terms of the license agreement and click
Next to continue.
STEP4: Choose Install driver and Ralink WLAN Utility and click Next to
continue.
12
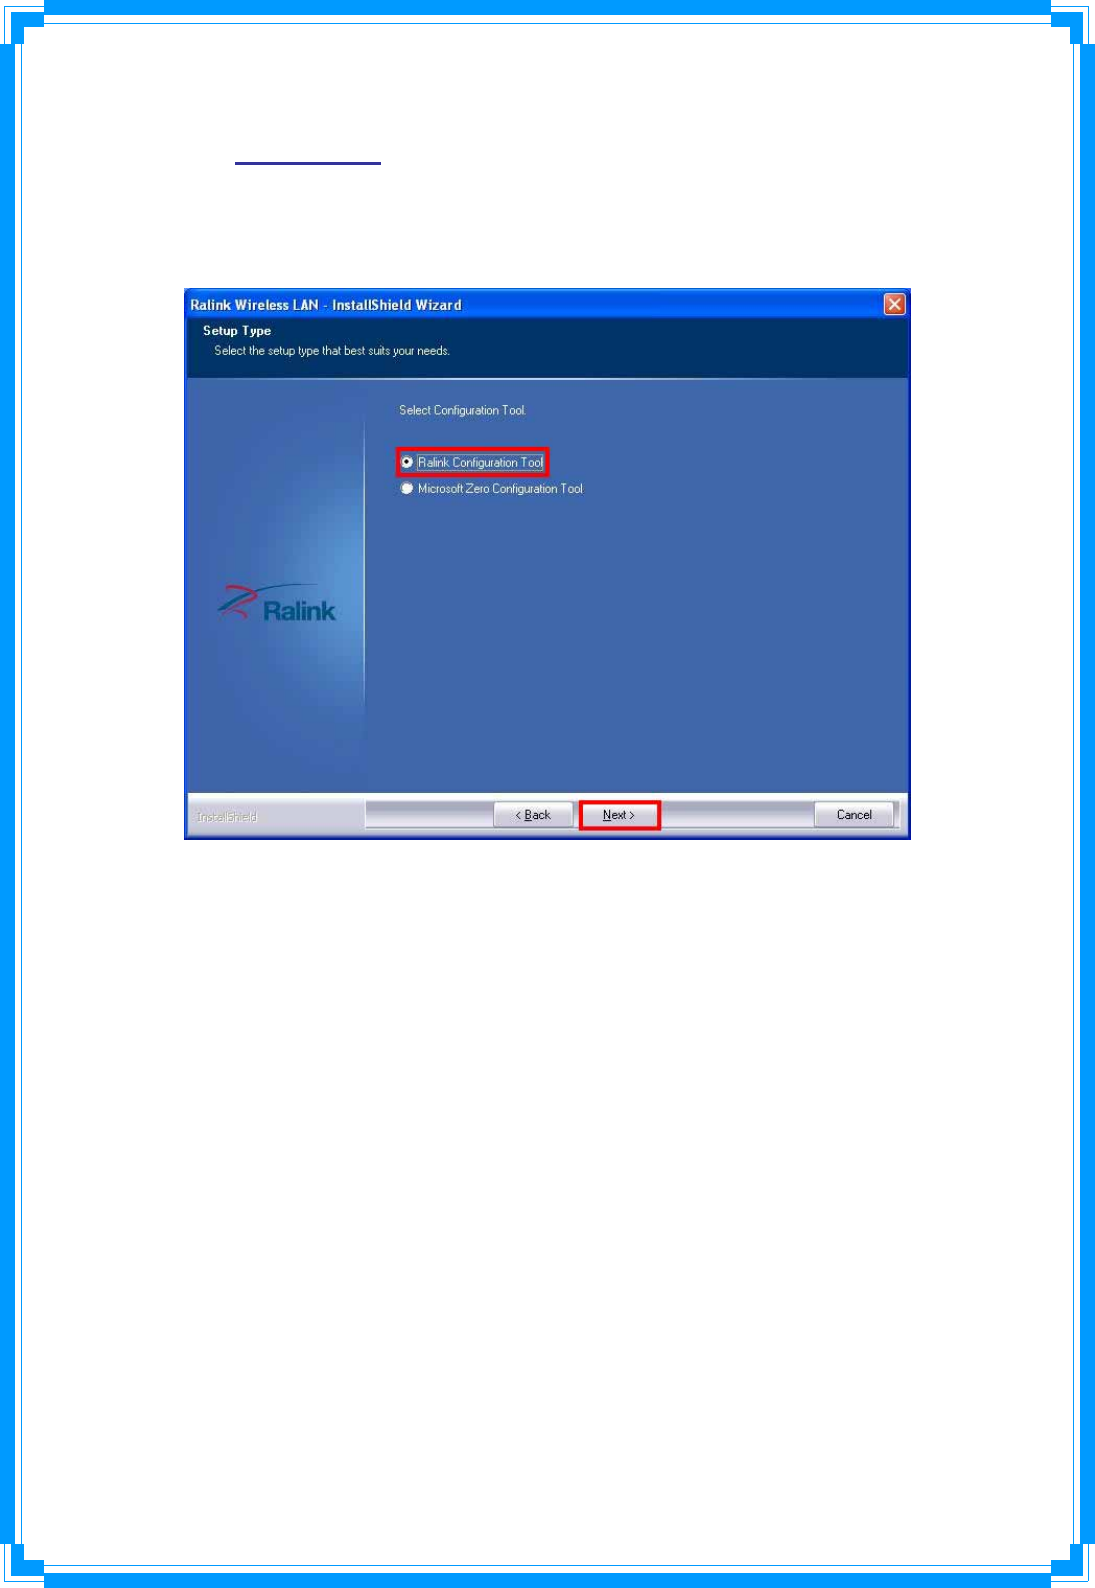
STEP5: In Windows XP, there is a Windows Zero Configuration Tool for you to
setup wireless adapter. You can choose to configure the adapter through the Microsoft
Zero Configuration Tool or the Ralink Configuration Tool. It is recommended to
choose the Ralink Configuration Tool for the adapter. Click Next to continue.
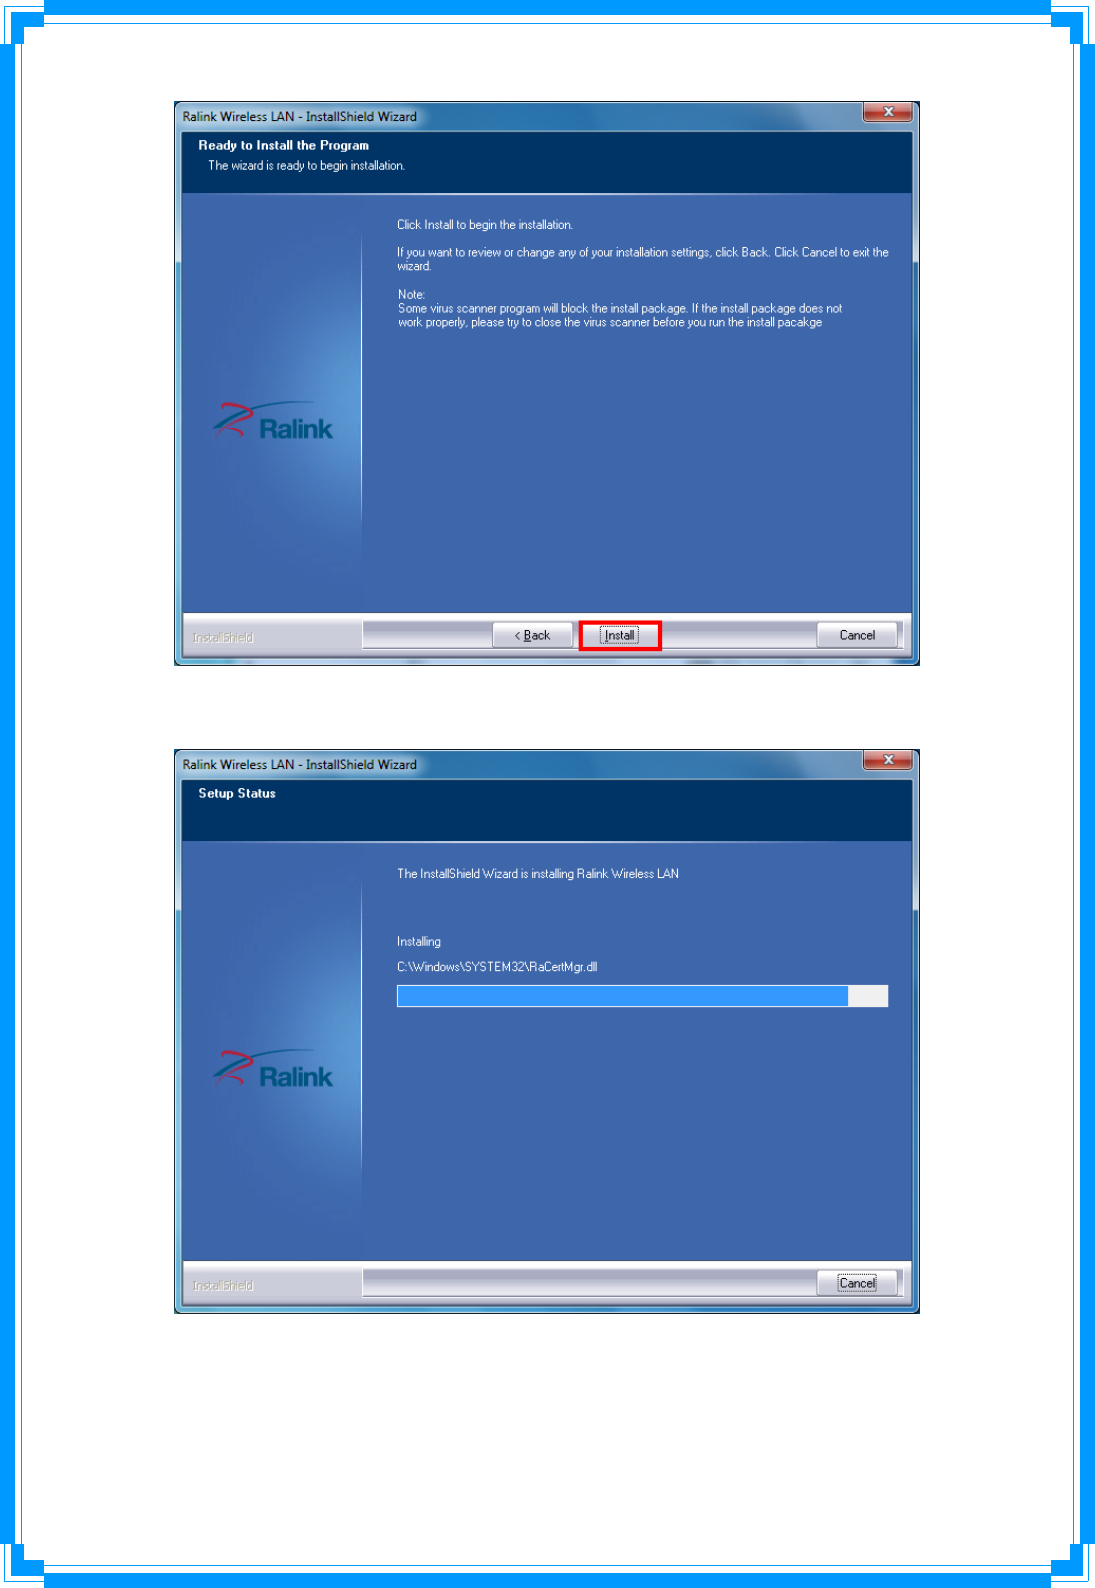
STEP6: Click Install to begin the installation.
13
STEP7: Please wait for a while during the Wireless LAN adapter is configuring your
new software installation.
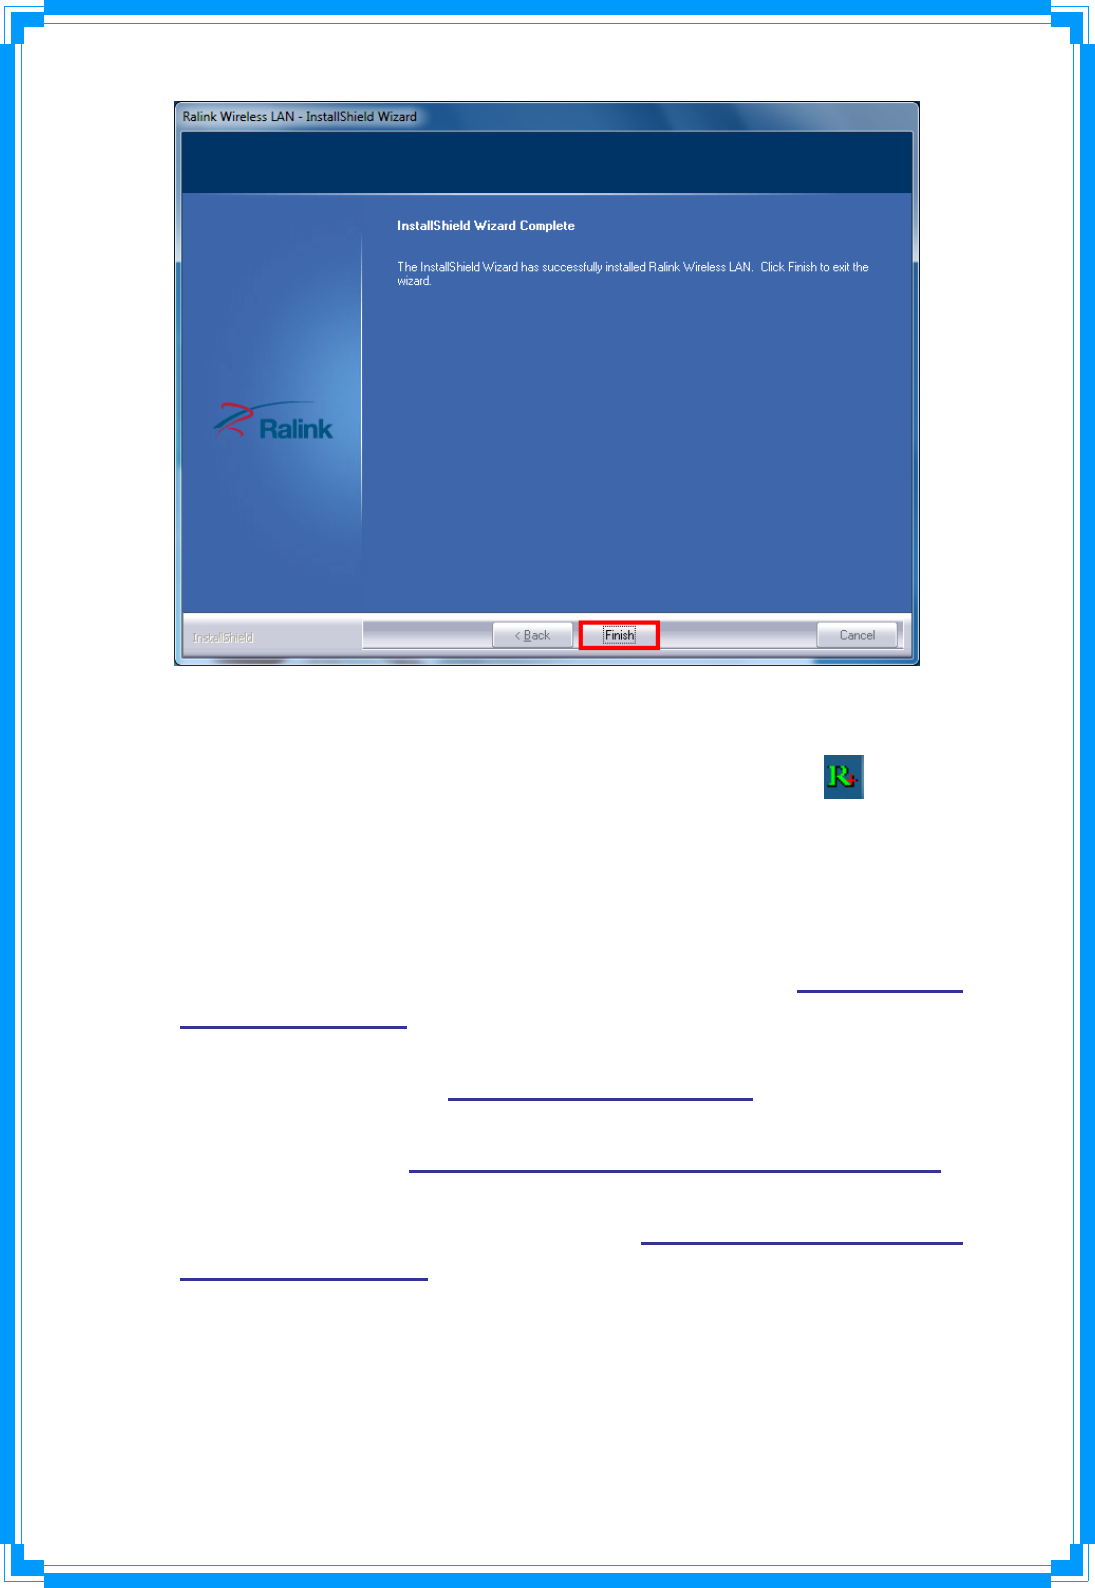
STEP8: After the setup wizard has successfully installed wireless LAN, click Finish to
exit the wizard.
14
The Configuration Utility appears as an icon on the system tray of Windows while the
adapter is running. You can open the utility by double-click on the icon.
Right-click the icon, there are some items for you to operate the configuration utility,
z Launch Config Utilities Æ Select this option to open the Configuration Utility
tool.
z Use Zero Configuration as Configuration utility (Available on
Windows XP only) Æ Select this option to use Windows XP built-in wireless
configuration utility (Windows Zero Configuration) to configure to card.
z Switch to STA+AP Mode (Available on Windows 7) Æ Select this option to
change to AP mode.
z Switch to AP Mode (Available on Windows Vista/XP/2000 only) Æ
Select this option to change to AP mode.
z Open Diagnostic Testing Mode (Available on Windows
Vista/XP/2000 only) Æ To check network connection status.
z Exit Æ Select Exit to close the Configuration Utility tool.

15
3. Wireless Network Configuration Utility
3.1 RaUI Wireless Utility & Windows Zero Configuration (WZC)
The Configuration Utility is a powerful application that helps you to configure the
Wireless LAN adapter and monitor the link status and statistics during the
communication process.
When the adapter is installed, the configuration utility will be displayed automatically.
This adapter will auto connect to wireless device which has better signal strength and no
wireless security setting.
In Windows XP, it provides wireless configuration utility named “Windows Zero
configuration” which provides basic configuration function for Ralink Wireless NIC,
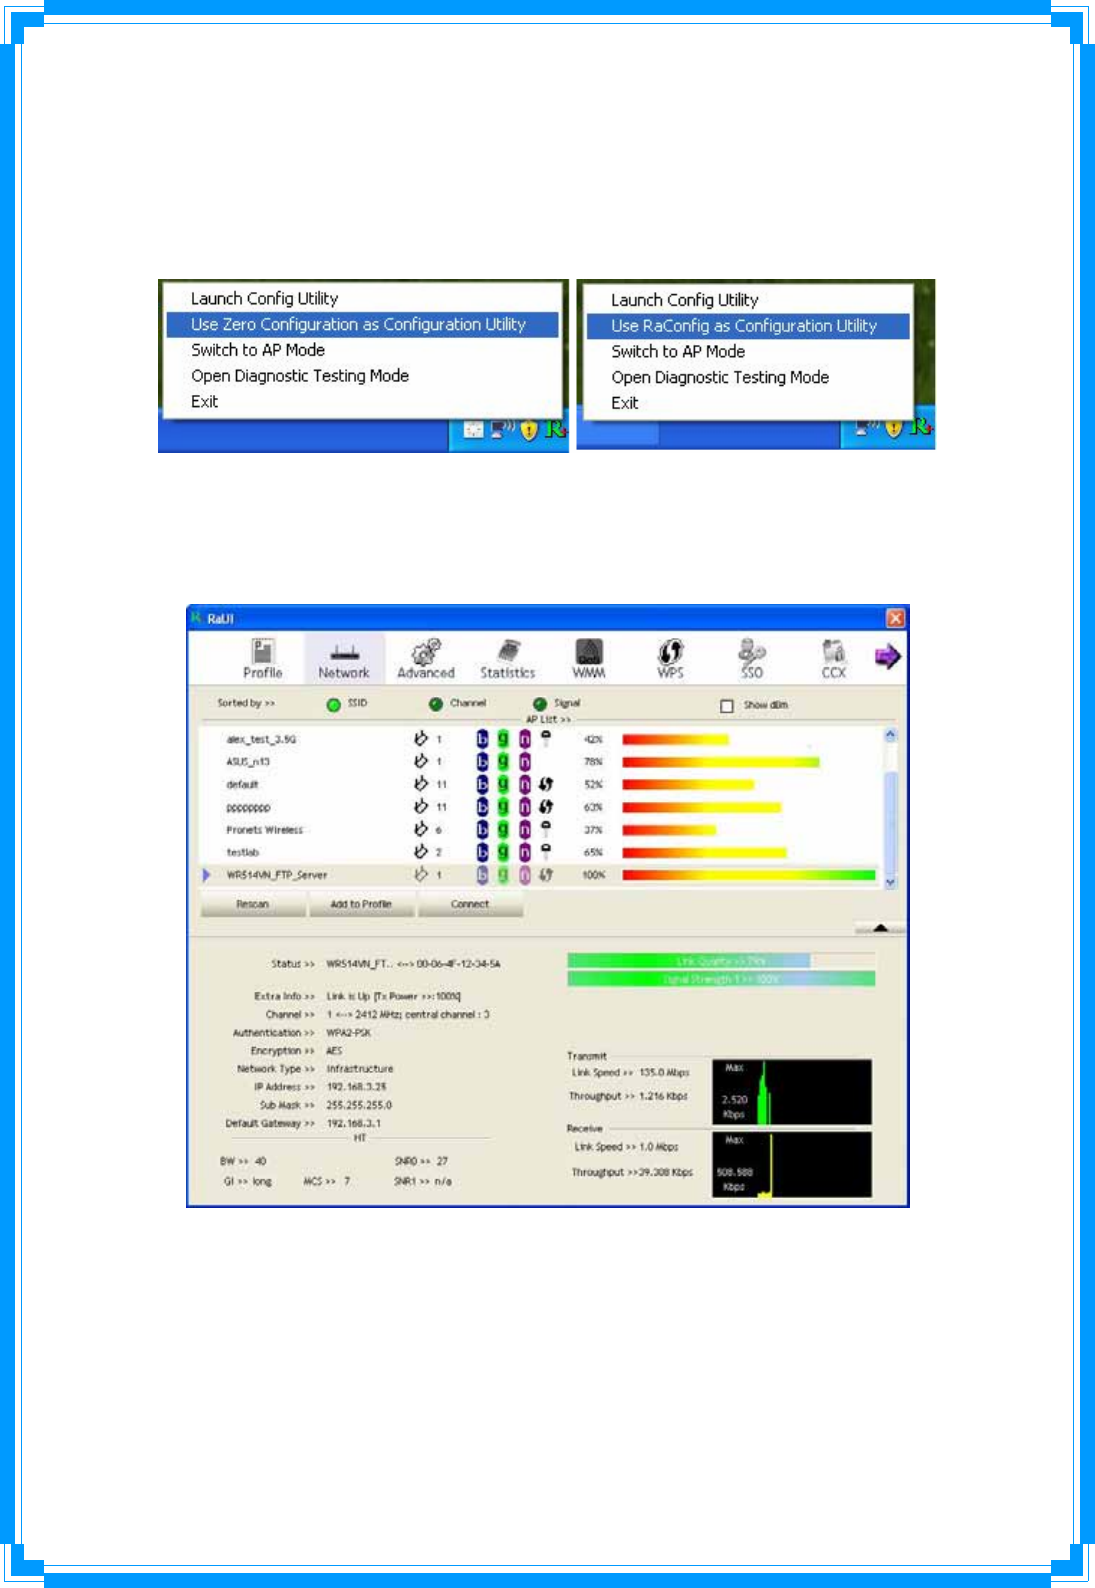
Ralink’s Utility (RaUI) provides WPA supplicant functionality. To make it easier for user to
select the correct utility, RaUI will let user make the selection when it first runs after
windows XP boots.
16
RaUI can co-exist with WZC (Windows Zero Configuration). When coexisting with
WZC, RaUI only provides monitoring function, such as link status, network status,
statistic counters, advance feature status, WMM status and WPS status. It won’t interfere
with WZC’s configuration or profile functions. Please see below picture: To select WZC
or RaUI
If “Use Zero Configurations as Configuration utility” is selected, please
continue on the section. Below picture shows that the RaUI status when WZC is active as
main control utility.
When activating WZC, there are couple different on RaUI status compare to the without
WZC running:
(1) Profile button will be gray, profile function is removed since the NIC is controlled
by WZC.
(2) The connect and add profile function will be gray. The reason is same as the first
difference.
17
[Use WZC to configure wireless NIC]
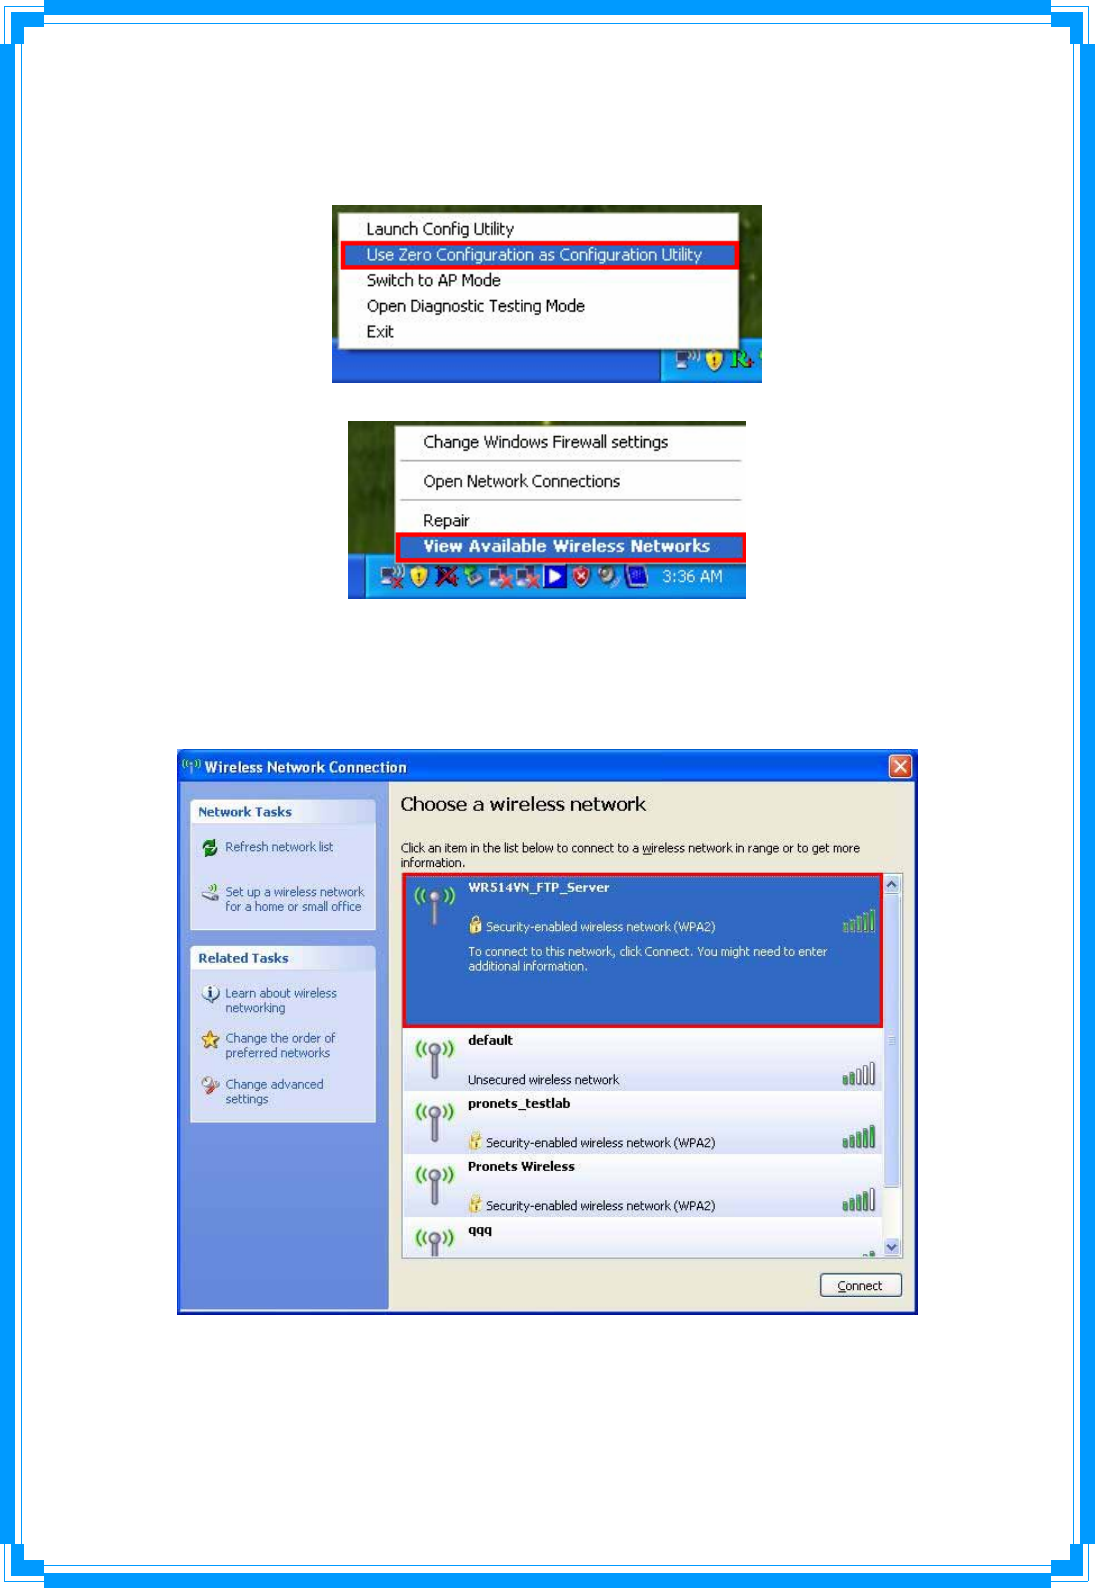
STEP1: Right-click Ralink configuration utility icon and select “Use Zero Configuration
as Configuration Utility”.
STEP2: Right-click the network connection icon in the task bar.
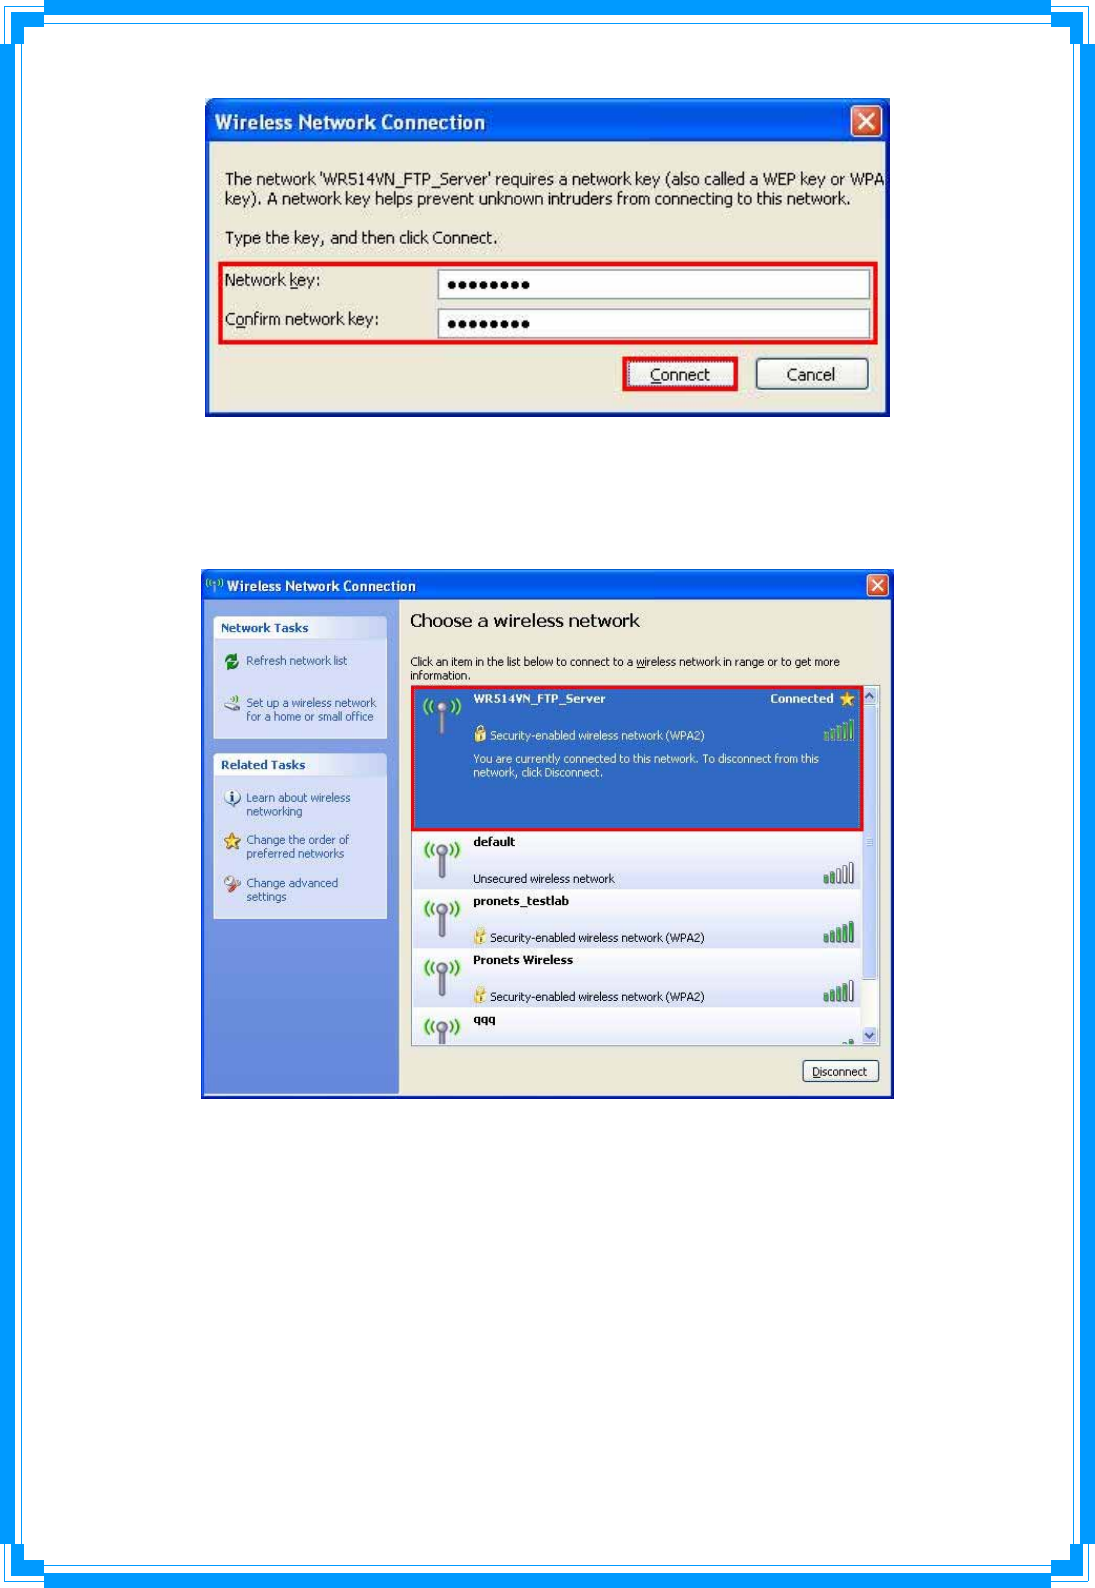
STEP3: All wireless access point in proximity will be display here. If the access point
you want to use is not display here, please try to move your computer closer to the
access point, or you can click “Refresh Network List” to rescan access points. Click
the access point you wan to use if it’s shown, then click “Connect”.
STEP4: If the access point is protected by encryption, you have to input its security key
or passphrase here. It must match the encryption setting on the access point.
18
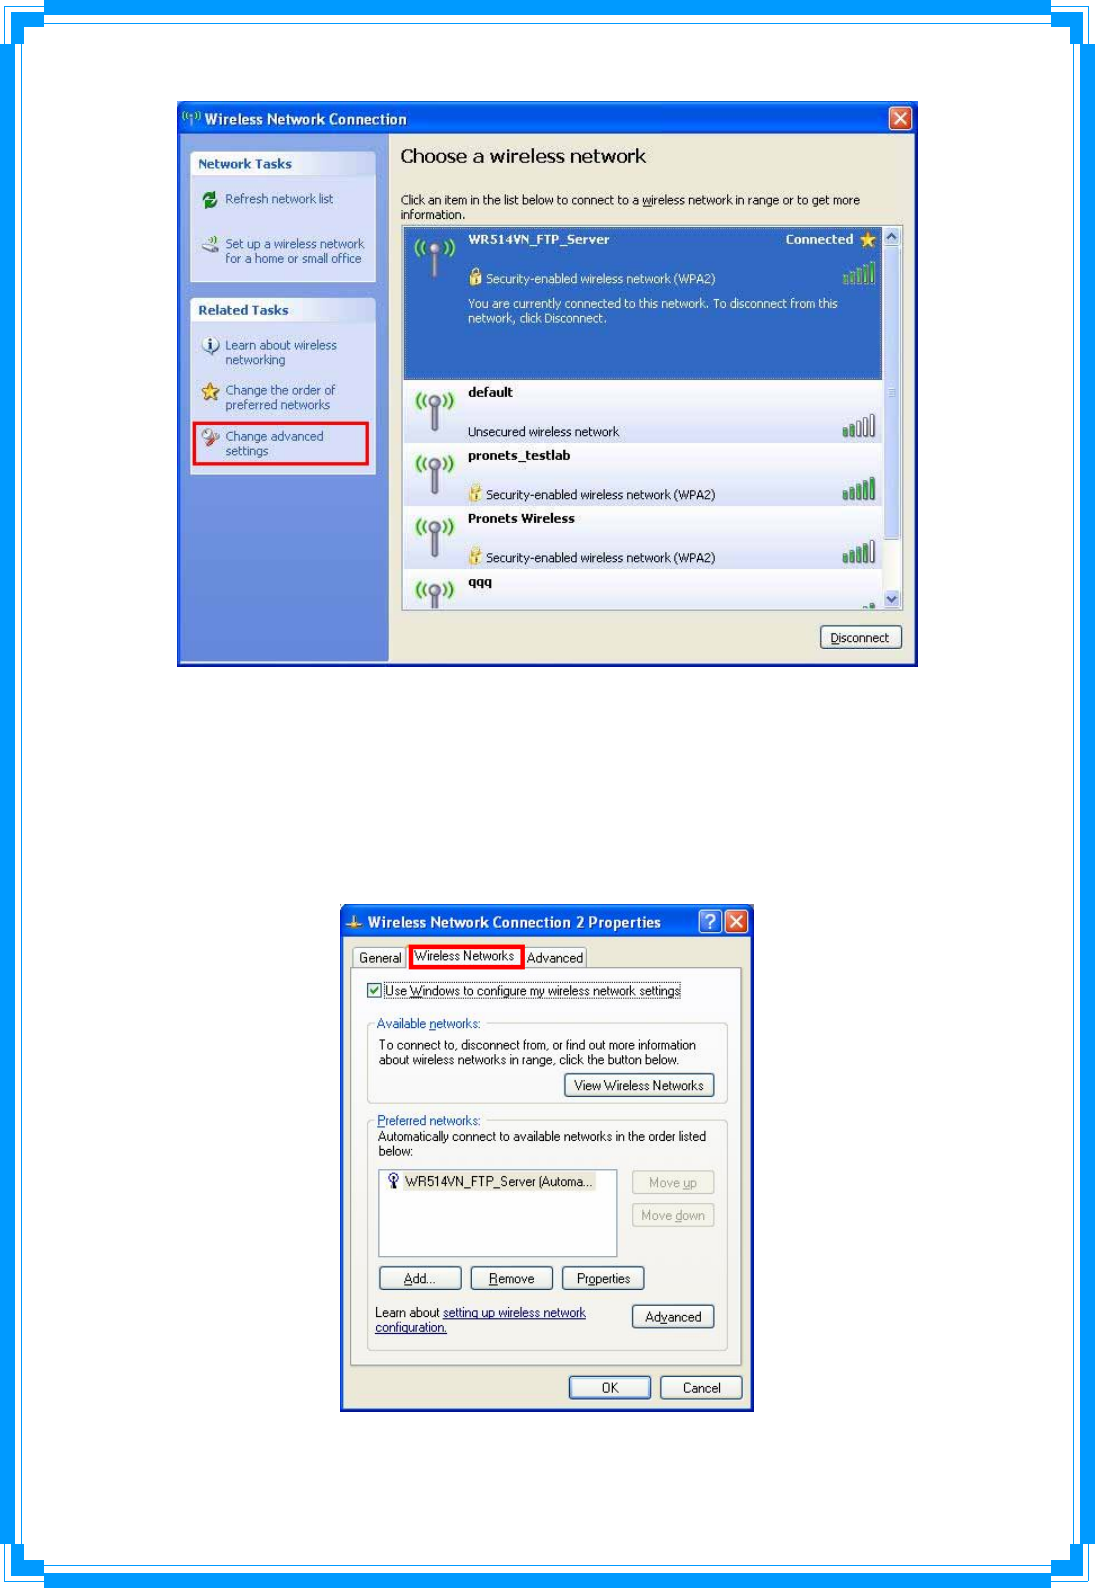
STEP5: When you see the “Connected” message, the connection between your
computer and wireless access point is successfully established.
STEP6: If you want to modify information about AP, click “Change advanced
settings”
19
STEP7: Choose “Wireless Networks” tab.
STEP8: Click “Properties” and then click “OK” button.
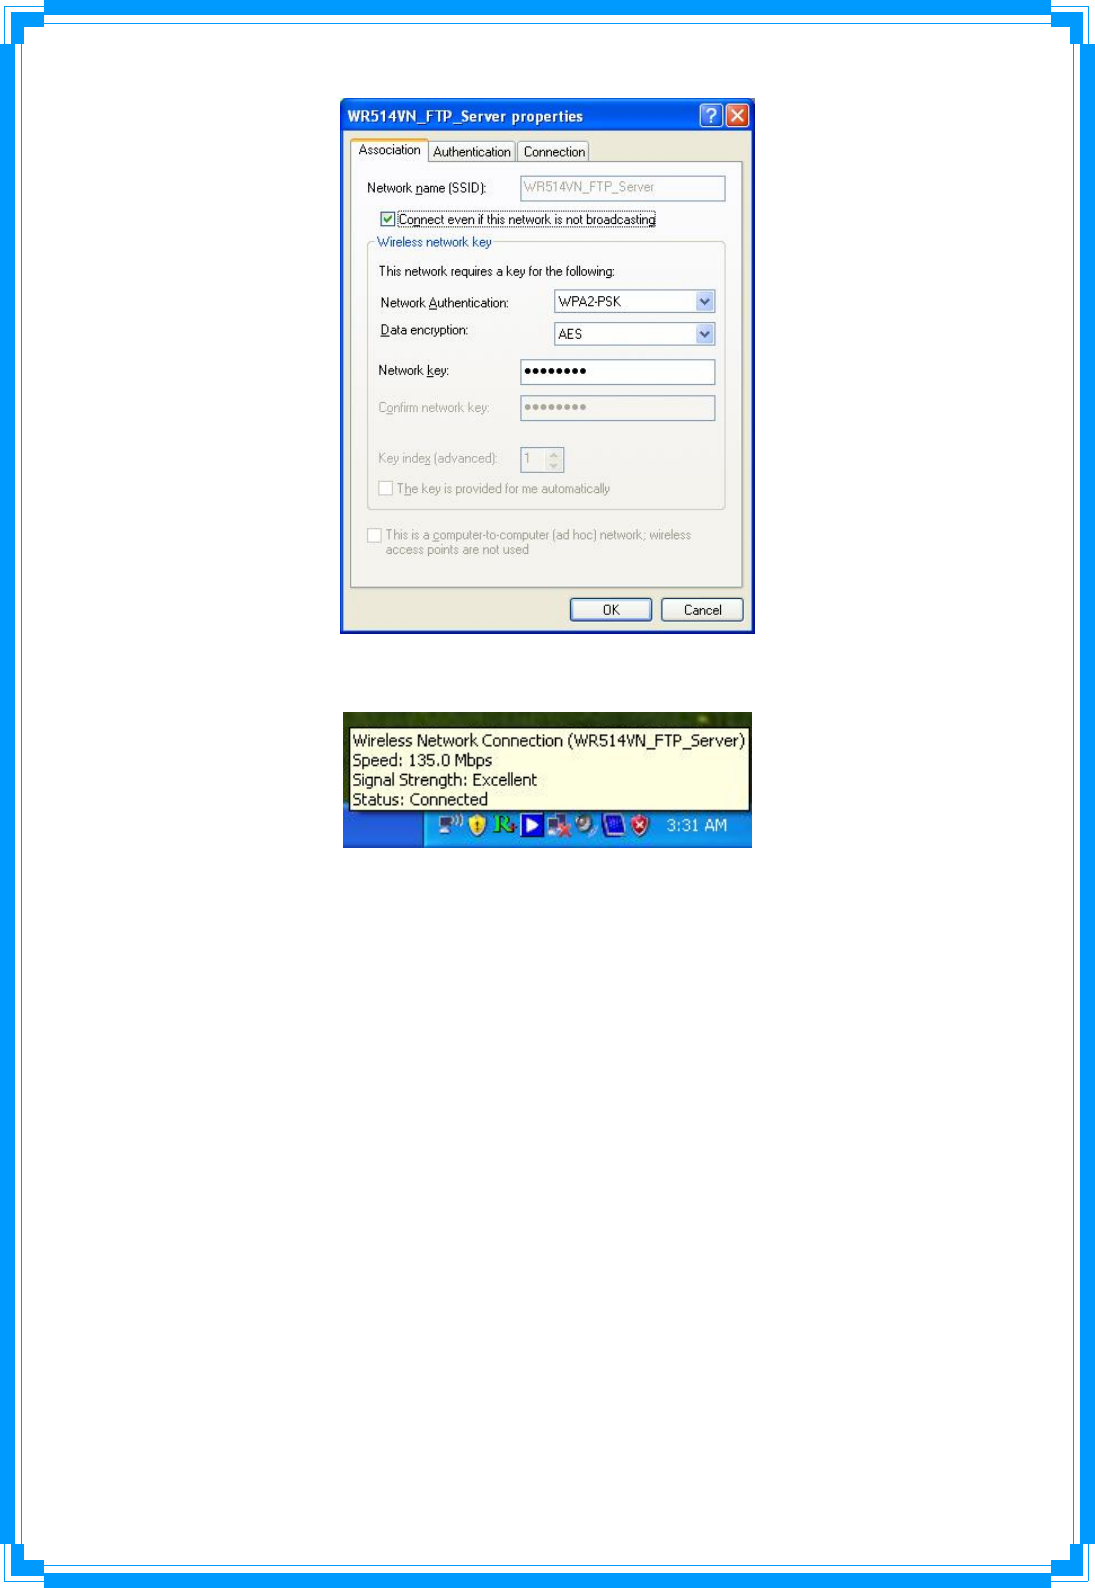
20
STEP9: After filling appropriate value, click “OK” button. And the status will prompt up
as below.
STEP10: Click the Ralink’s icon will bring up RaUI main window. User can find the
surrounding APs in the list. The current connected AP will also show with the green icon
indicated as below screen. User may user the available tab to configure more advanced
features provided by Ralink’s wireless NIC.
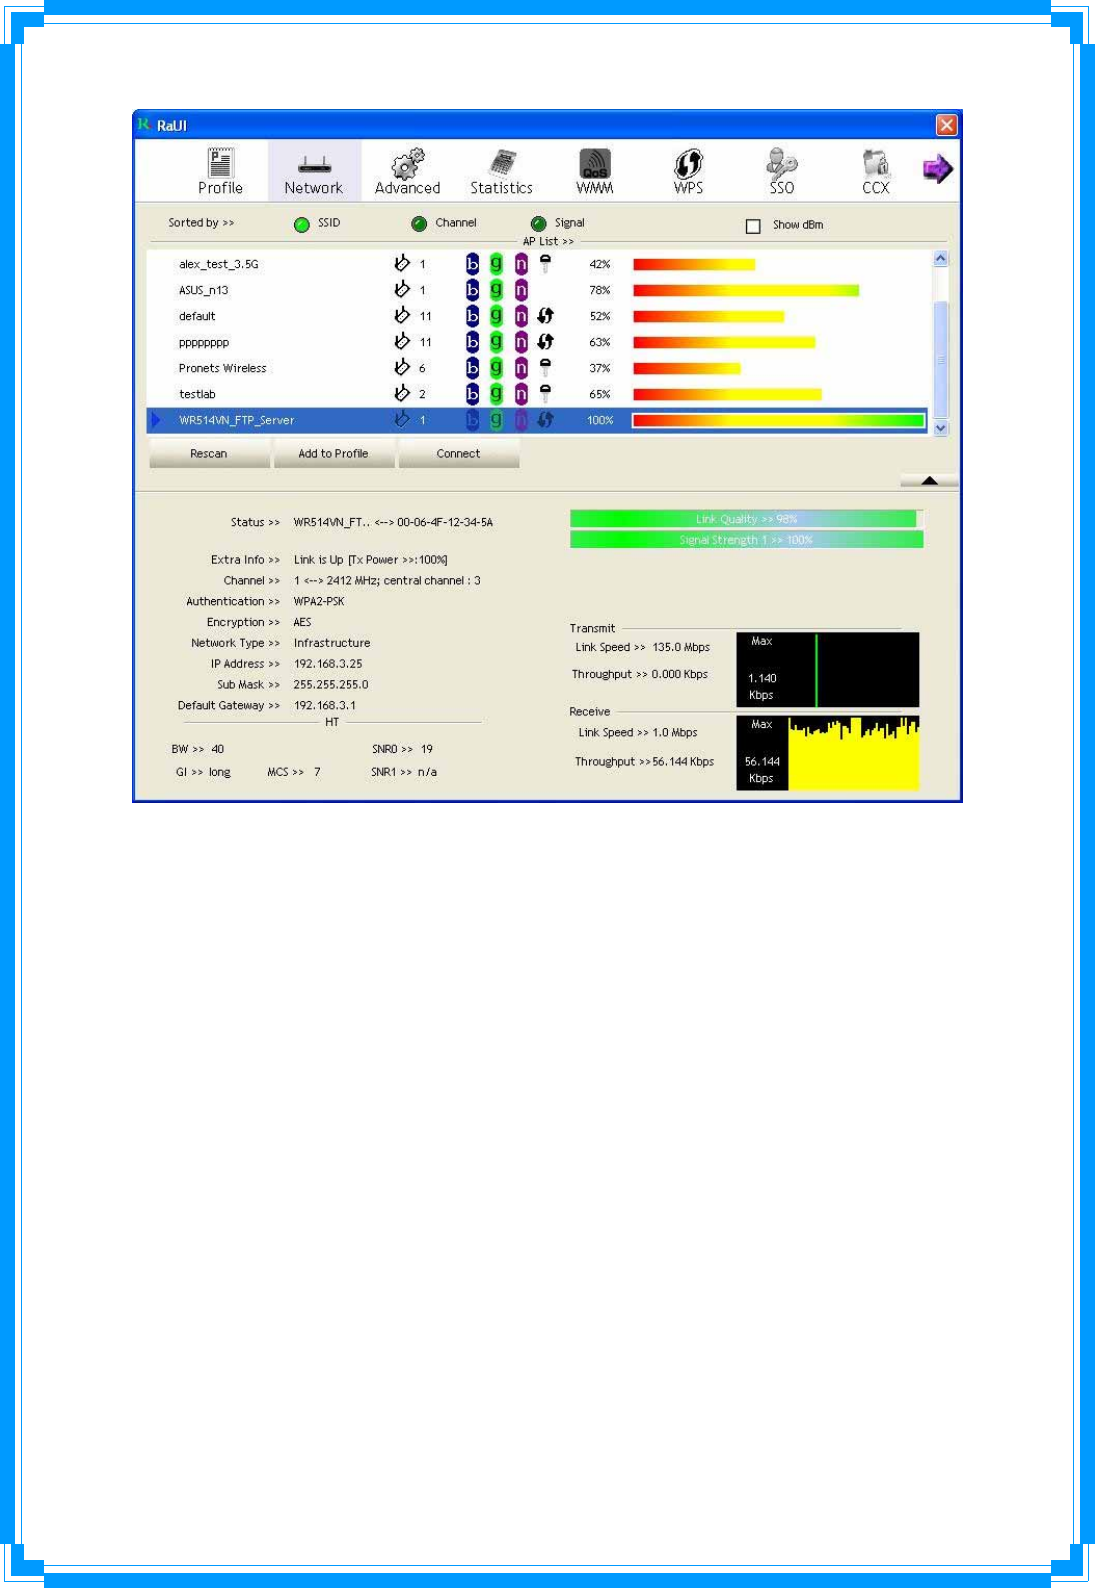
21
3.2 Start RaUI Utility
When starting RaUI, system will connect to the AP with best signal strength without
setting profile or matching profile setting. It will issue a scan command to wireless NIC.
After two seconds, the AP list will updated with the result of BSS list scan. The AP list
include most used fields, such as SSID, network type, channel used, wireless mode,
security status and signal percentage. The arrow icon indicates the connected BSS or
IBSS network.
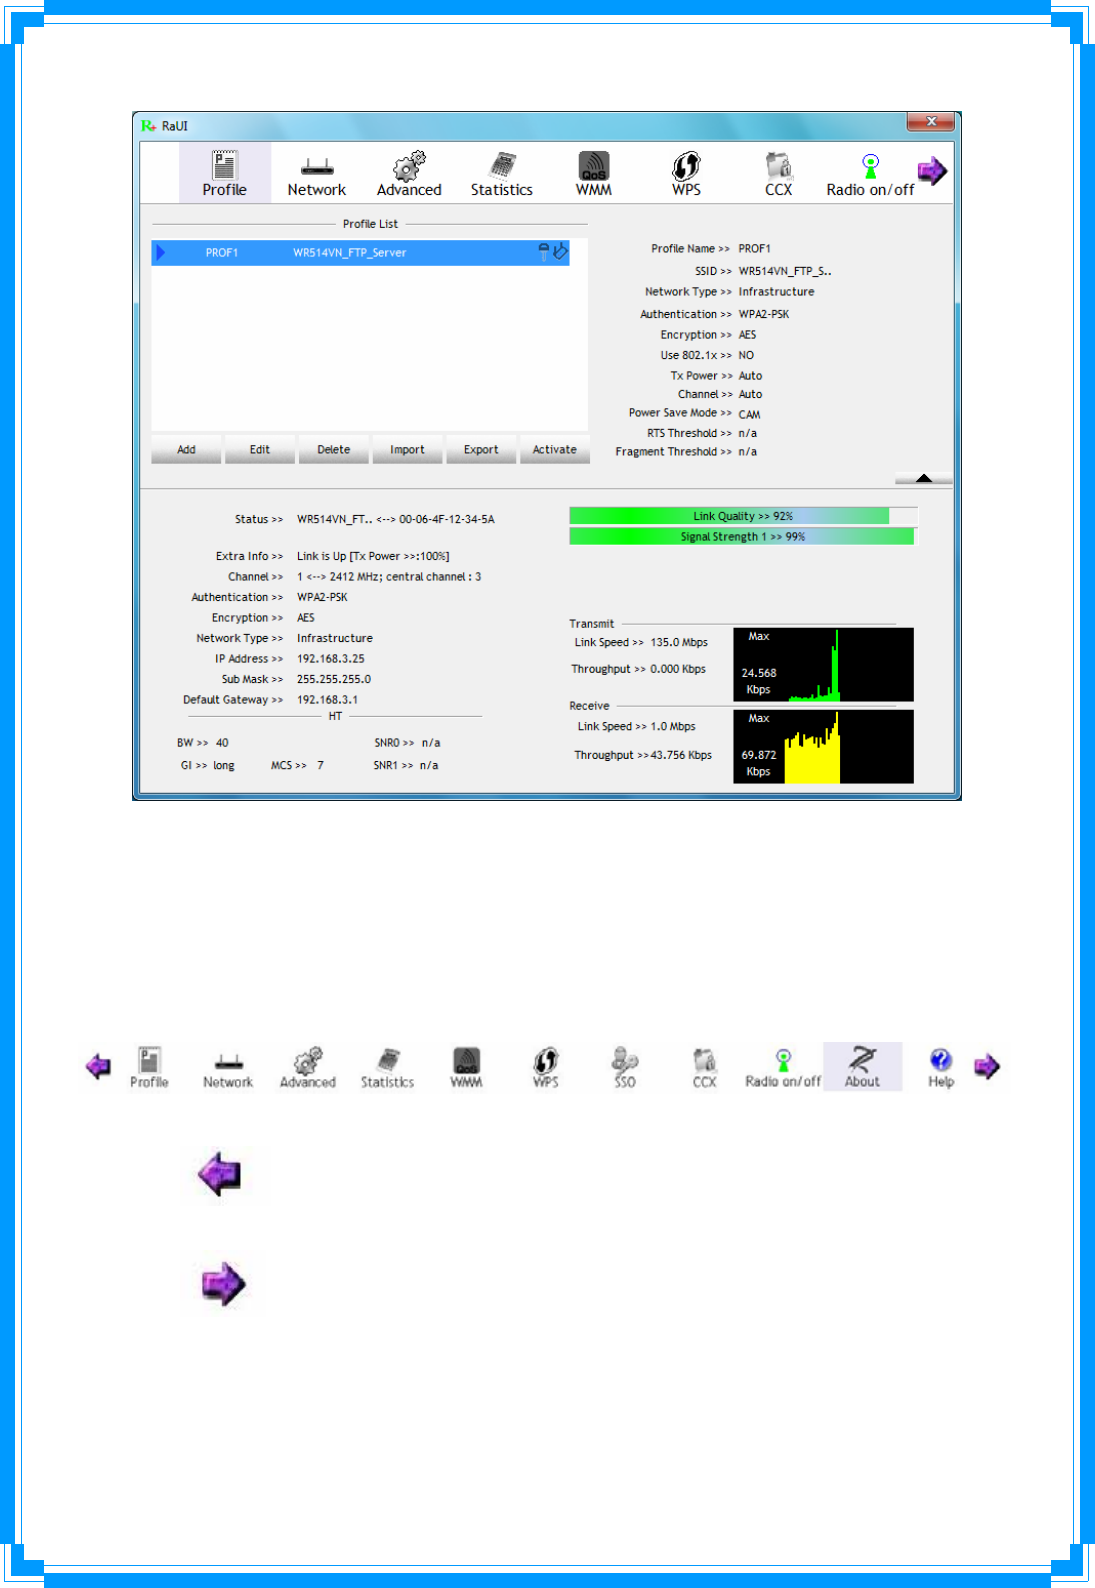
22
There are three sections in RaUI. These sections are briefly described as below.
Button Section: Include Profile page, Network page, Advanced page,
Statistics page, WMM page, WPS page, SSO page, CCX Page, About button,
Radio On/Off button and Help button.
Î Button Section
Î Move to the Left
Î Move to the Right
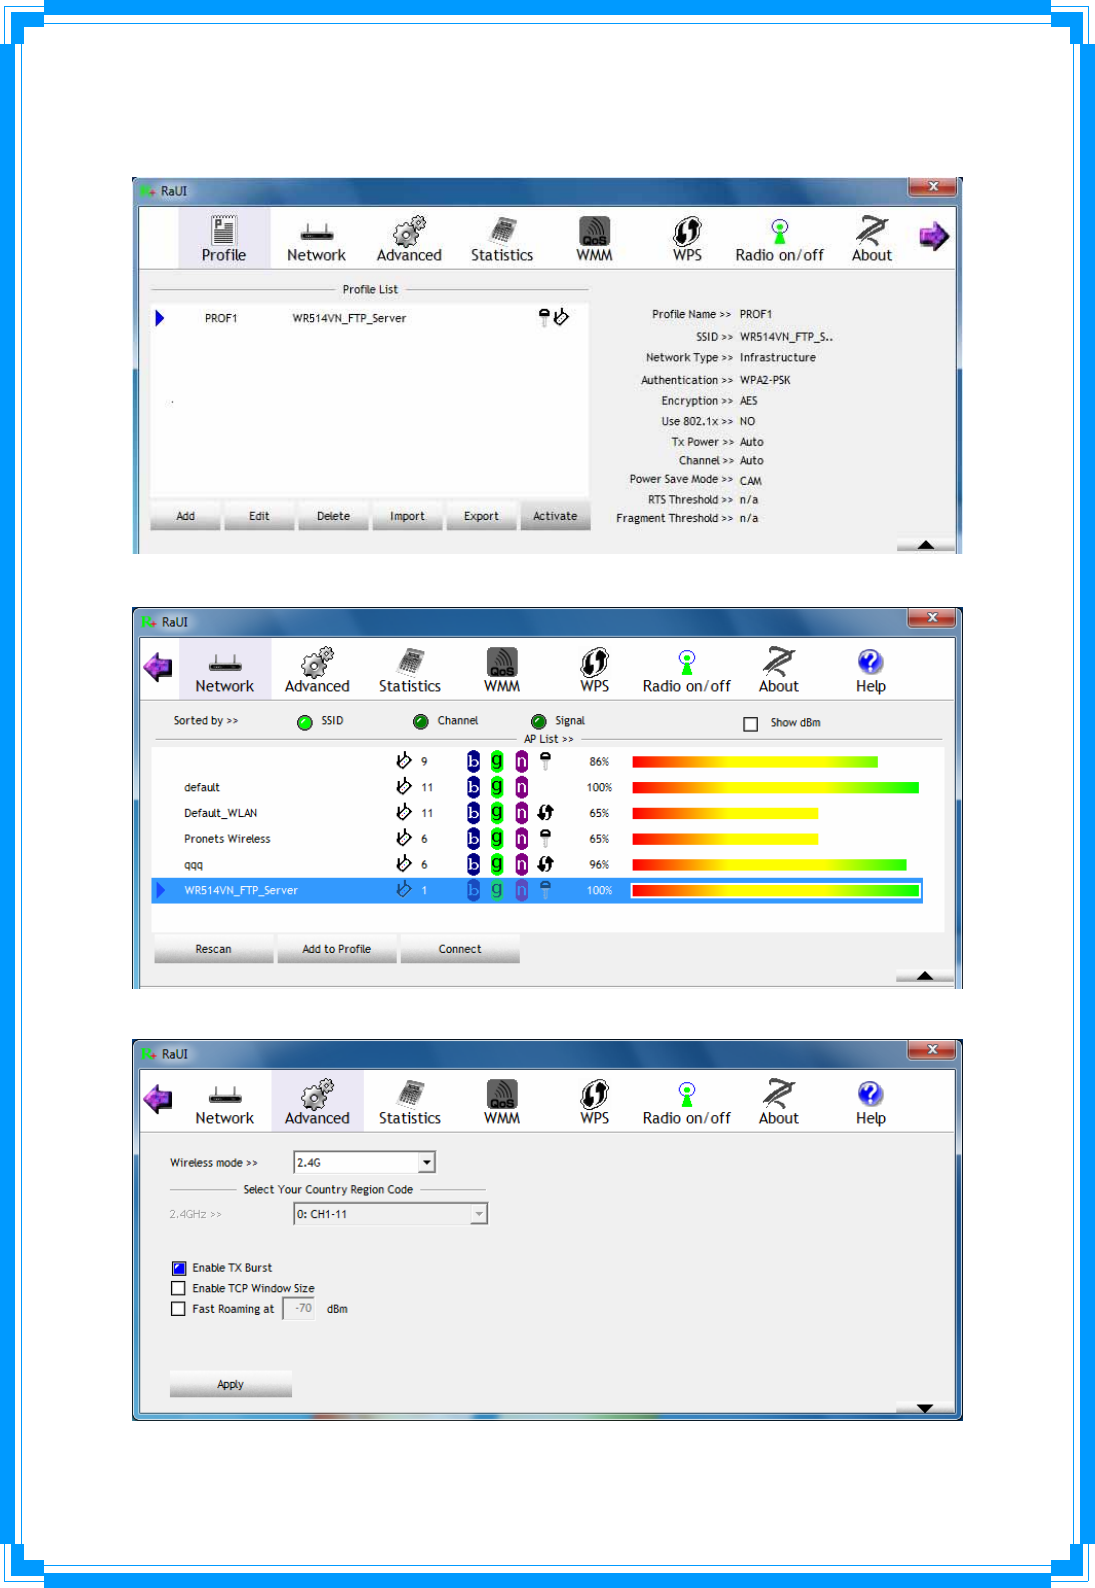
23
Function Section: Corresponding button
Î Profile Page
Î Network Page
Î Advanced Page
24
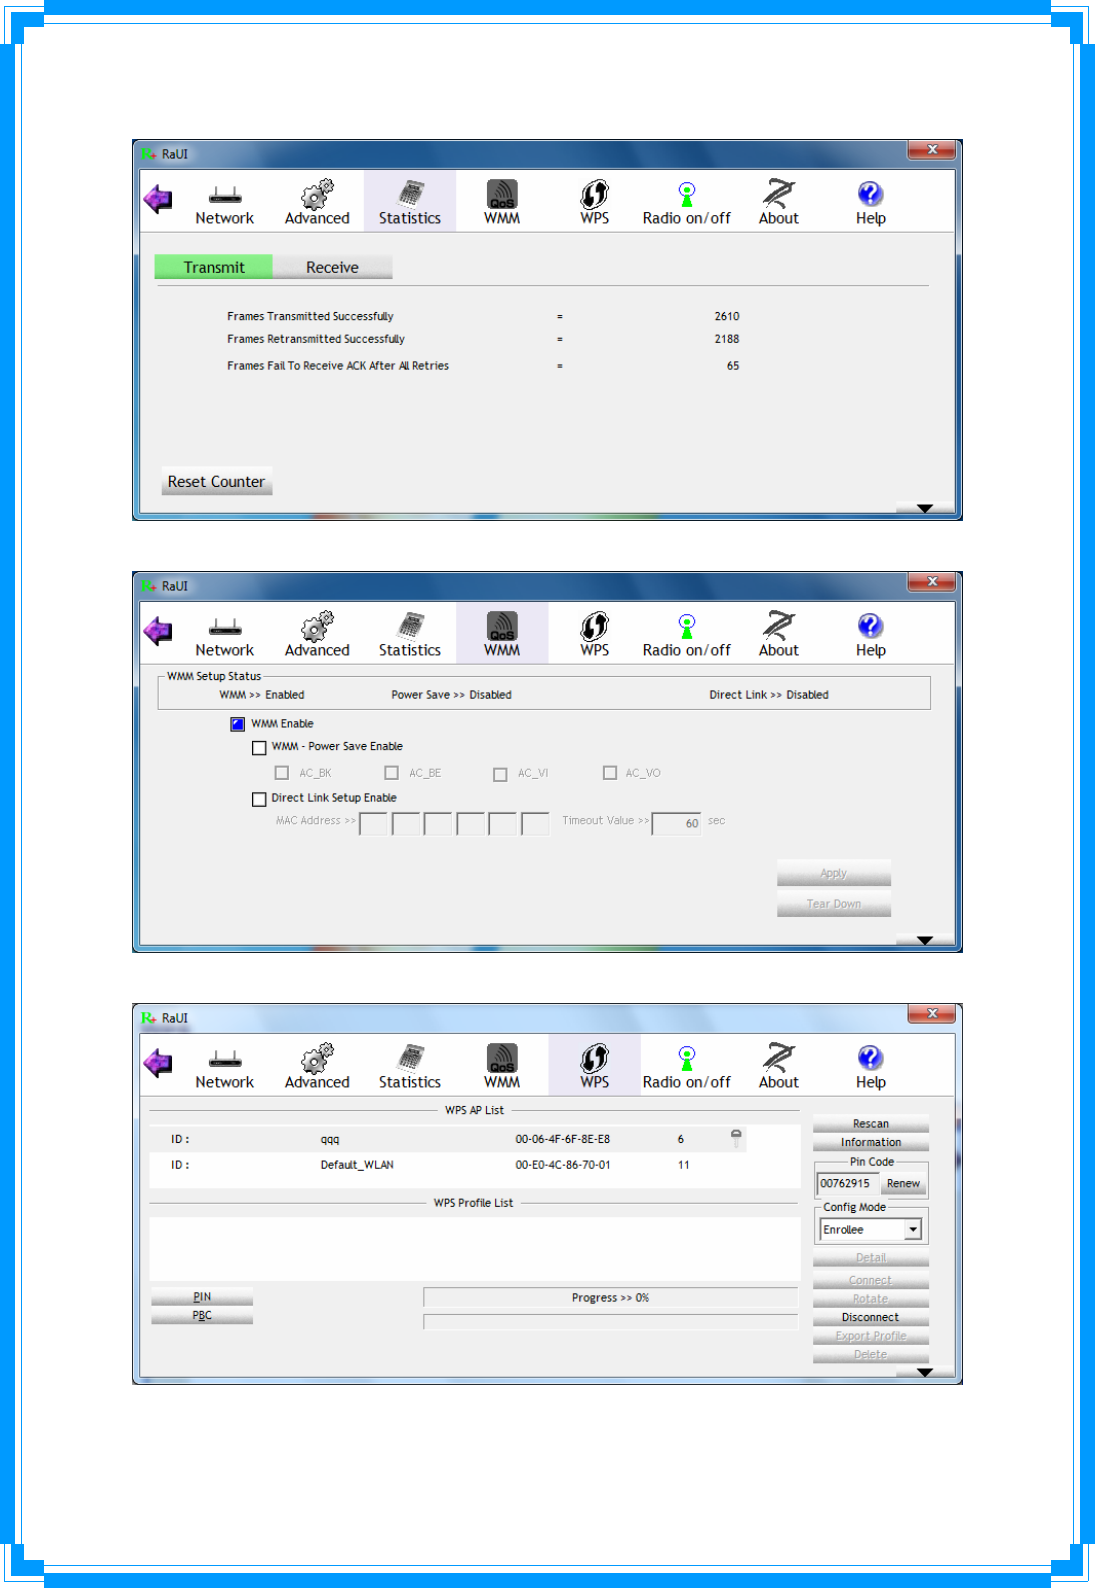
Î Statistics Page
Î WMM Page
Î WPS Page
25
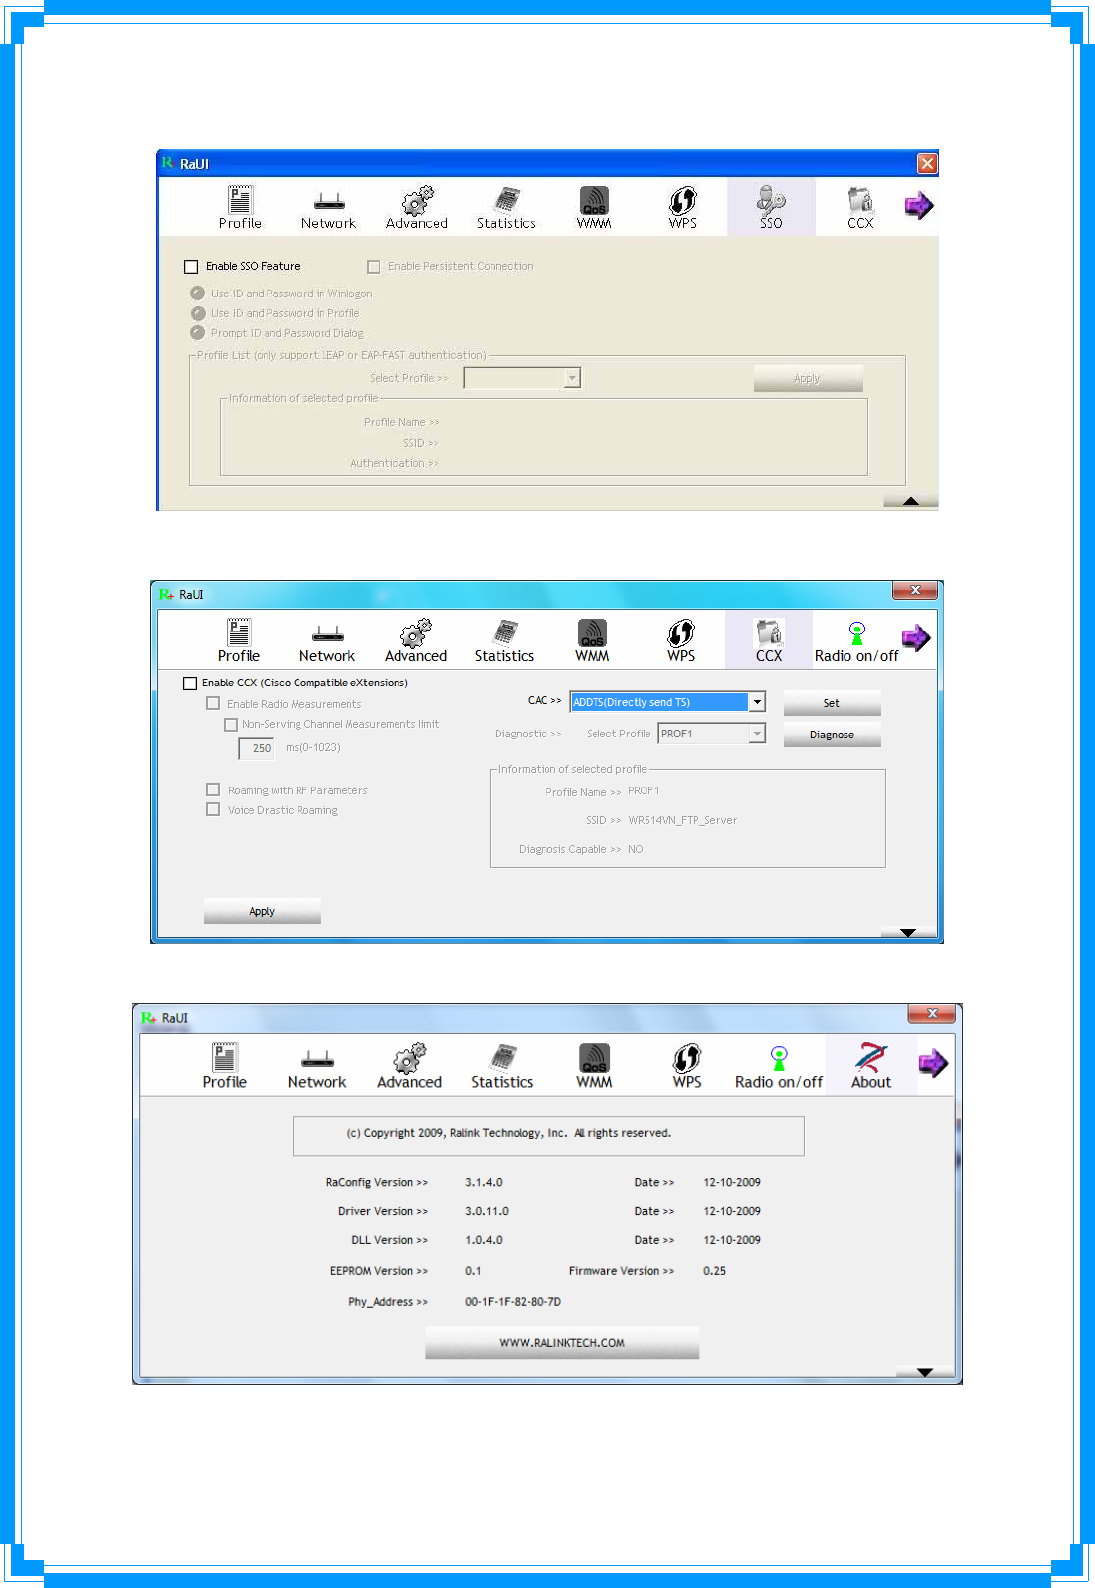
Î SSO Page (available on Windows XP & 2000 OS)
Î CCX Page (available on Windows Vista, XP & 2000 OS)
Î About Page
26
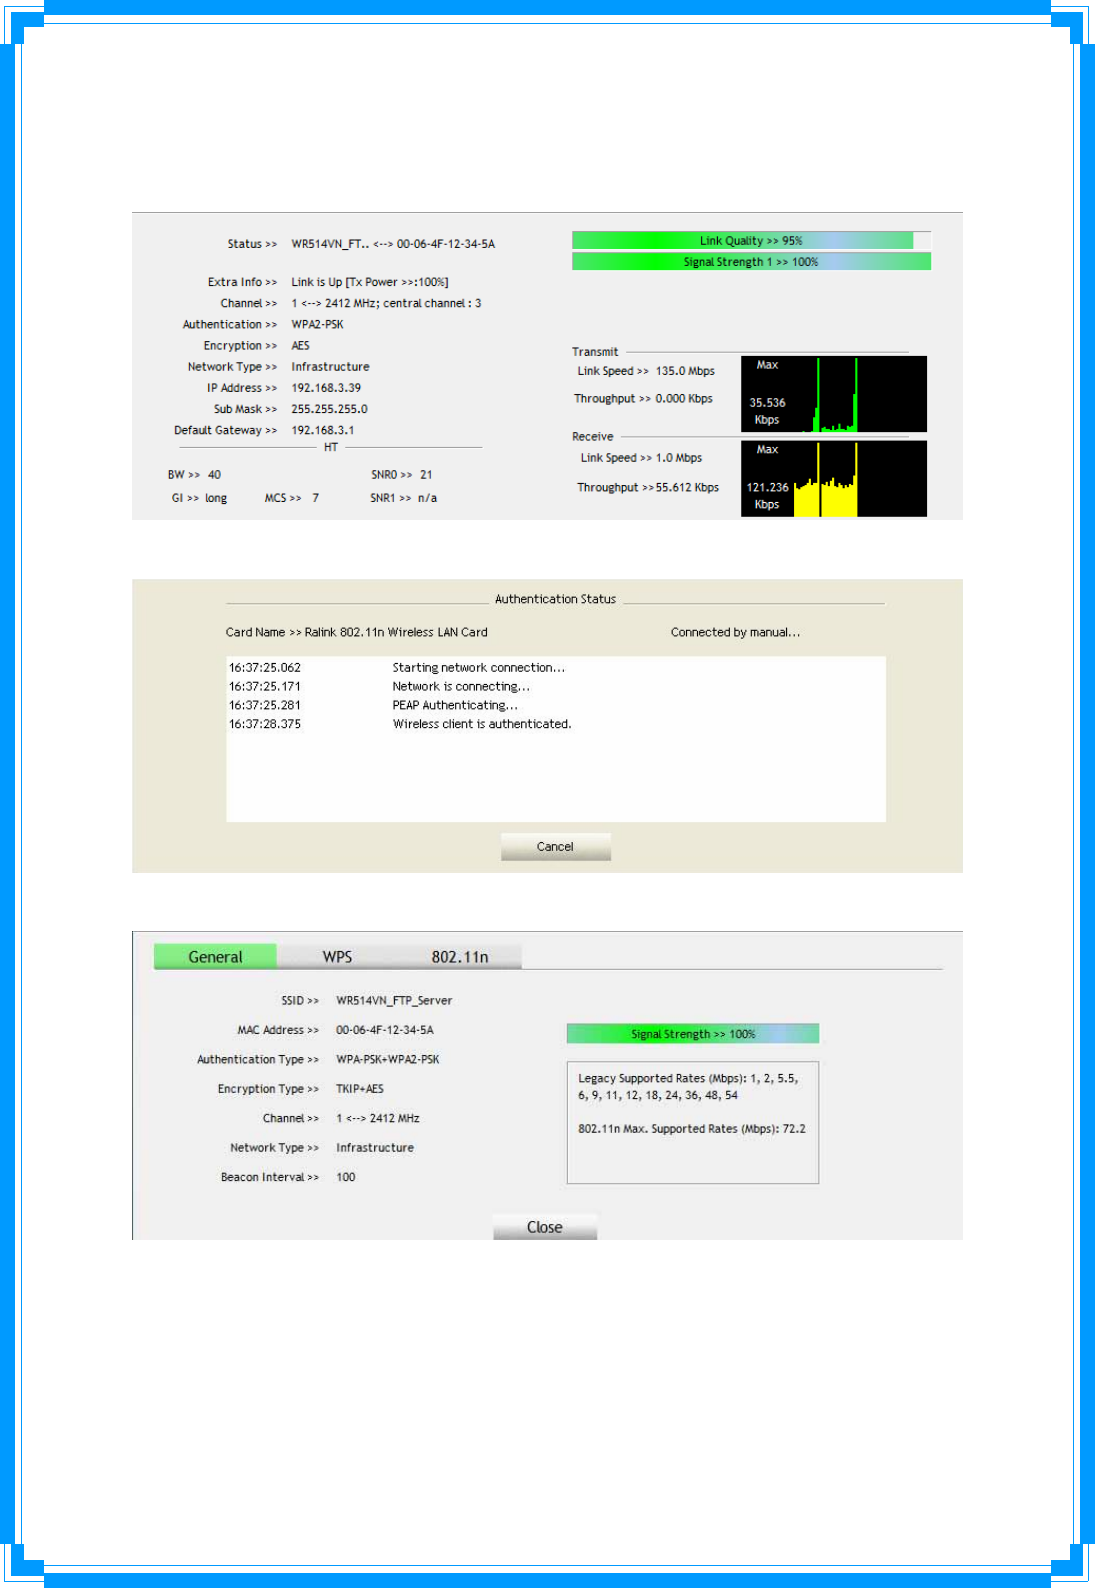
Status Section: Include Link Status, Authentication Status, AP’s information,
Configuration and retrying the connection when authentication is failed.
Î Link Status
Î Authentication Status
Î AP’s Information
27
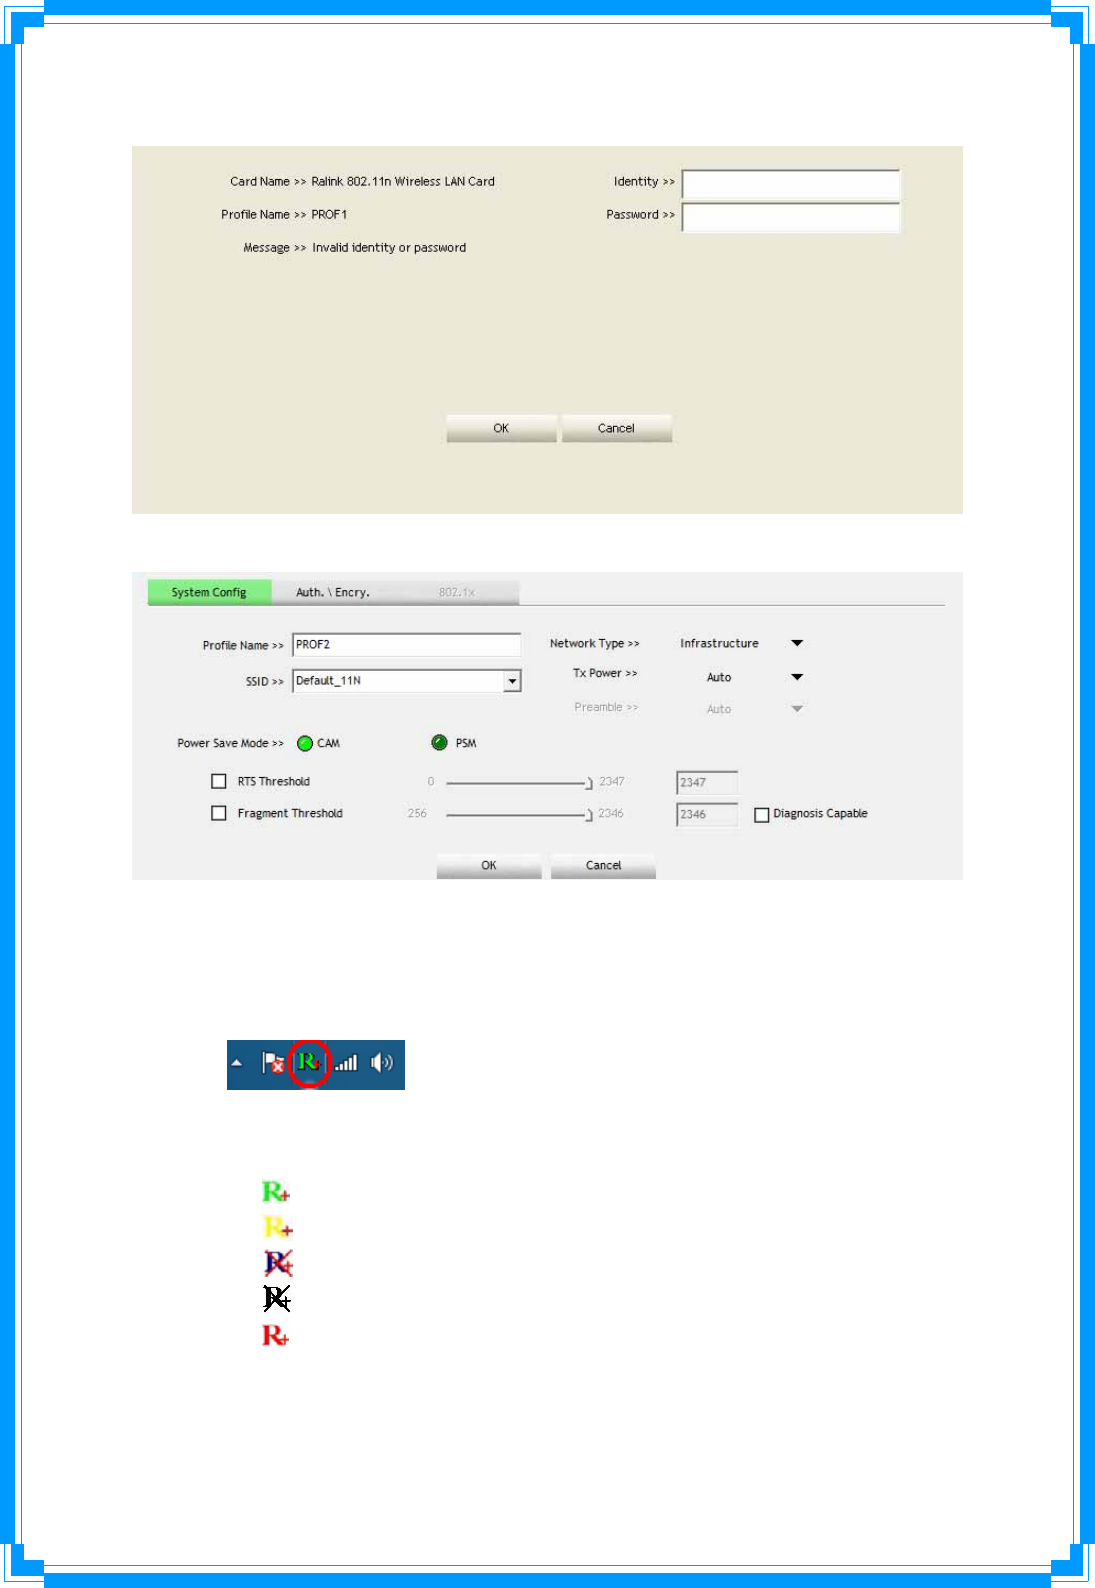
Î Retry the Connection
Î Configuration
At the mean time of starting RaUI, there is also a small Ralink icon appears
within windows taskbar as below. You may double click it to bring up the main
menu if you selected to close RaUI menu earlier. You may also use mouse;s
right button to close RaUI utility.
ÎÎ Ralink icon in system tray.
Besides, the small icon will change color to reflect current wireless network
connection status. The status indicates as follow:
Î -- indicate Connected and Signal Strength is Good.
Î -- indicate Connected and Signal Strength is Normal
Î -- indicate Wireless NIC is not connected yet
Î -- indicate Wireless NIC is not detected
Î -- indicate Connected and Signal Strength is Weak
28
3.3 Profile
Profile can book keeping your favorite wireless setting among your home, office, and
other public hot-spot. You may save multiple profiles, and activate the correct one at
your preference.
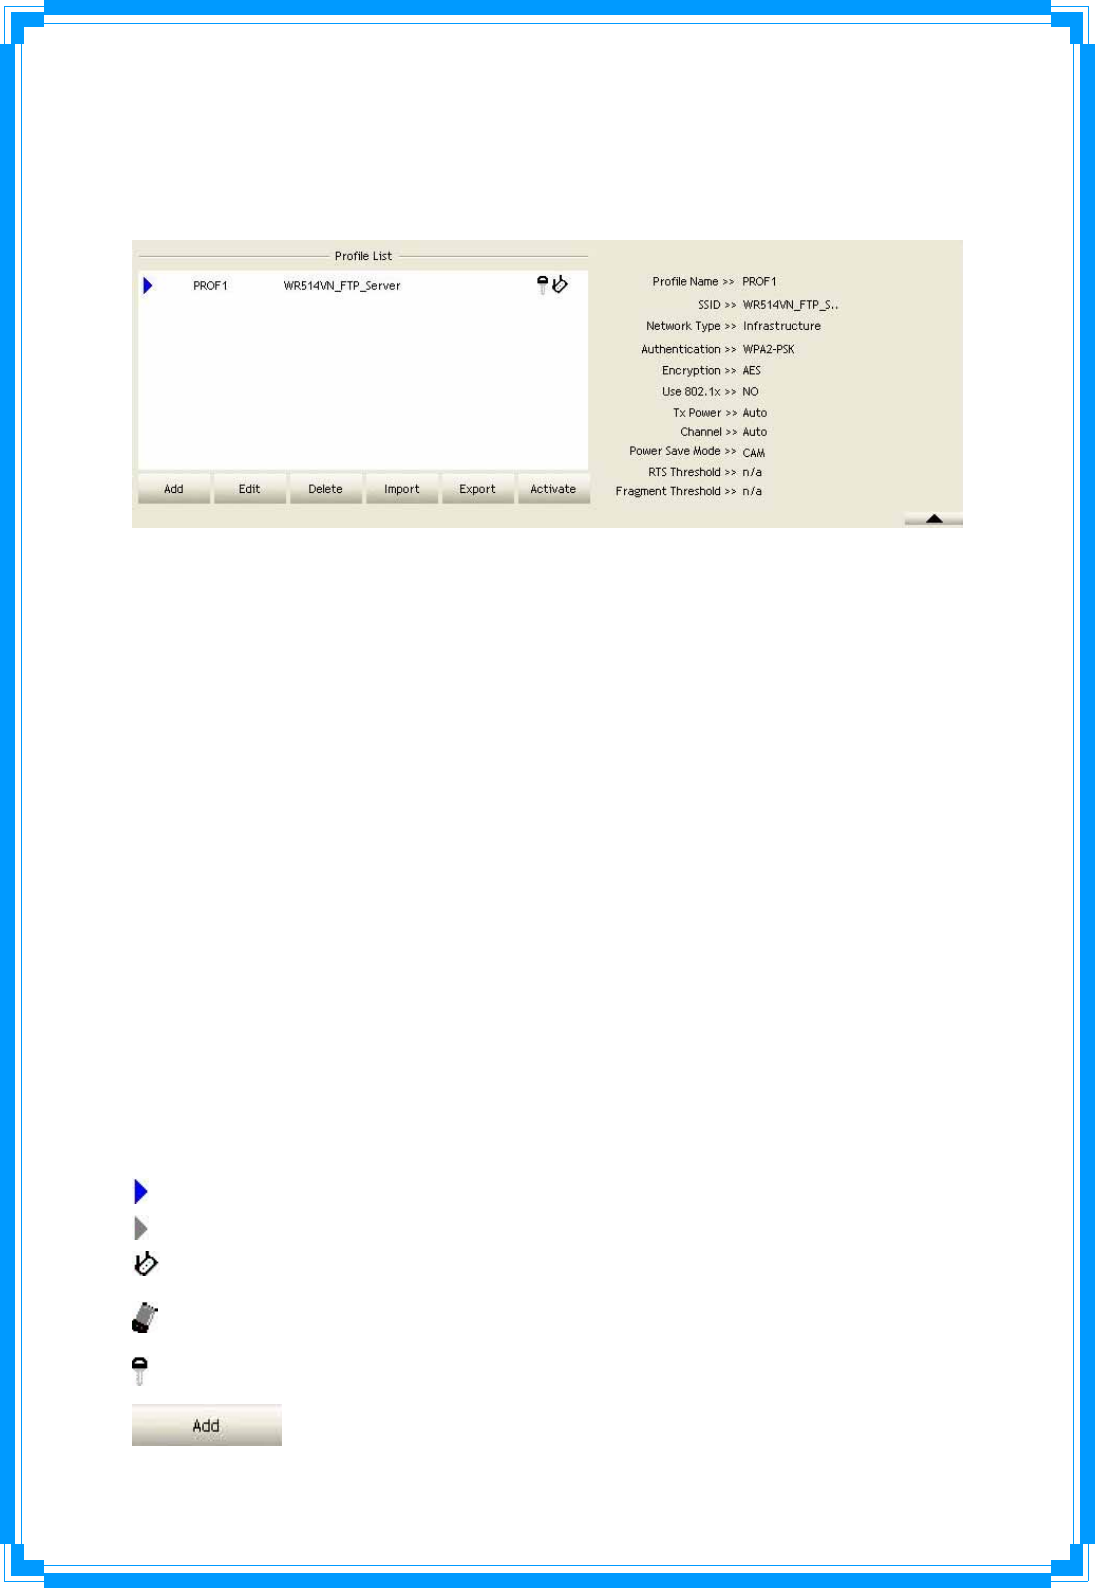
[Definition of each field]
Profile Name: Name of profile, preset to PROF﹡(﹡indicate 1,2,3,…)
SSID: AP or Ad-Hoc name
Network Type: Network’s type, including infrastructure and Ad-Hoc.
Authentication: Authentication mode
Encryption: Encryption Type
Use 802.1x: Whether or not use 802.1x feature
Tx Power: Transmit power, the amount of power used by a radio transceiver to send
the signal out.
Channel: channel in use for Ad-Hoc mode
Power Save Mode: Choose from CAM (Constantly Awake Mode) or Power Saving
Mode.
RTS Threshold: User can adjust the RTS threshold number by sliding the bar or key in
the value directly.
Fragment Threshold: User can adjust the Fragment threshold number by sliding the
bar or key in the value directly.
[Icons and buttons]
Î indicate connection is successful on currently activated profile
Î indicate connection is failed on currently activate profile
Î indicate network type is infrastructure mode
Î indicate network type is Ad-Hoc
Î indicate security-enabled wireless network
Î Add a new profile
29
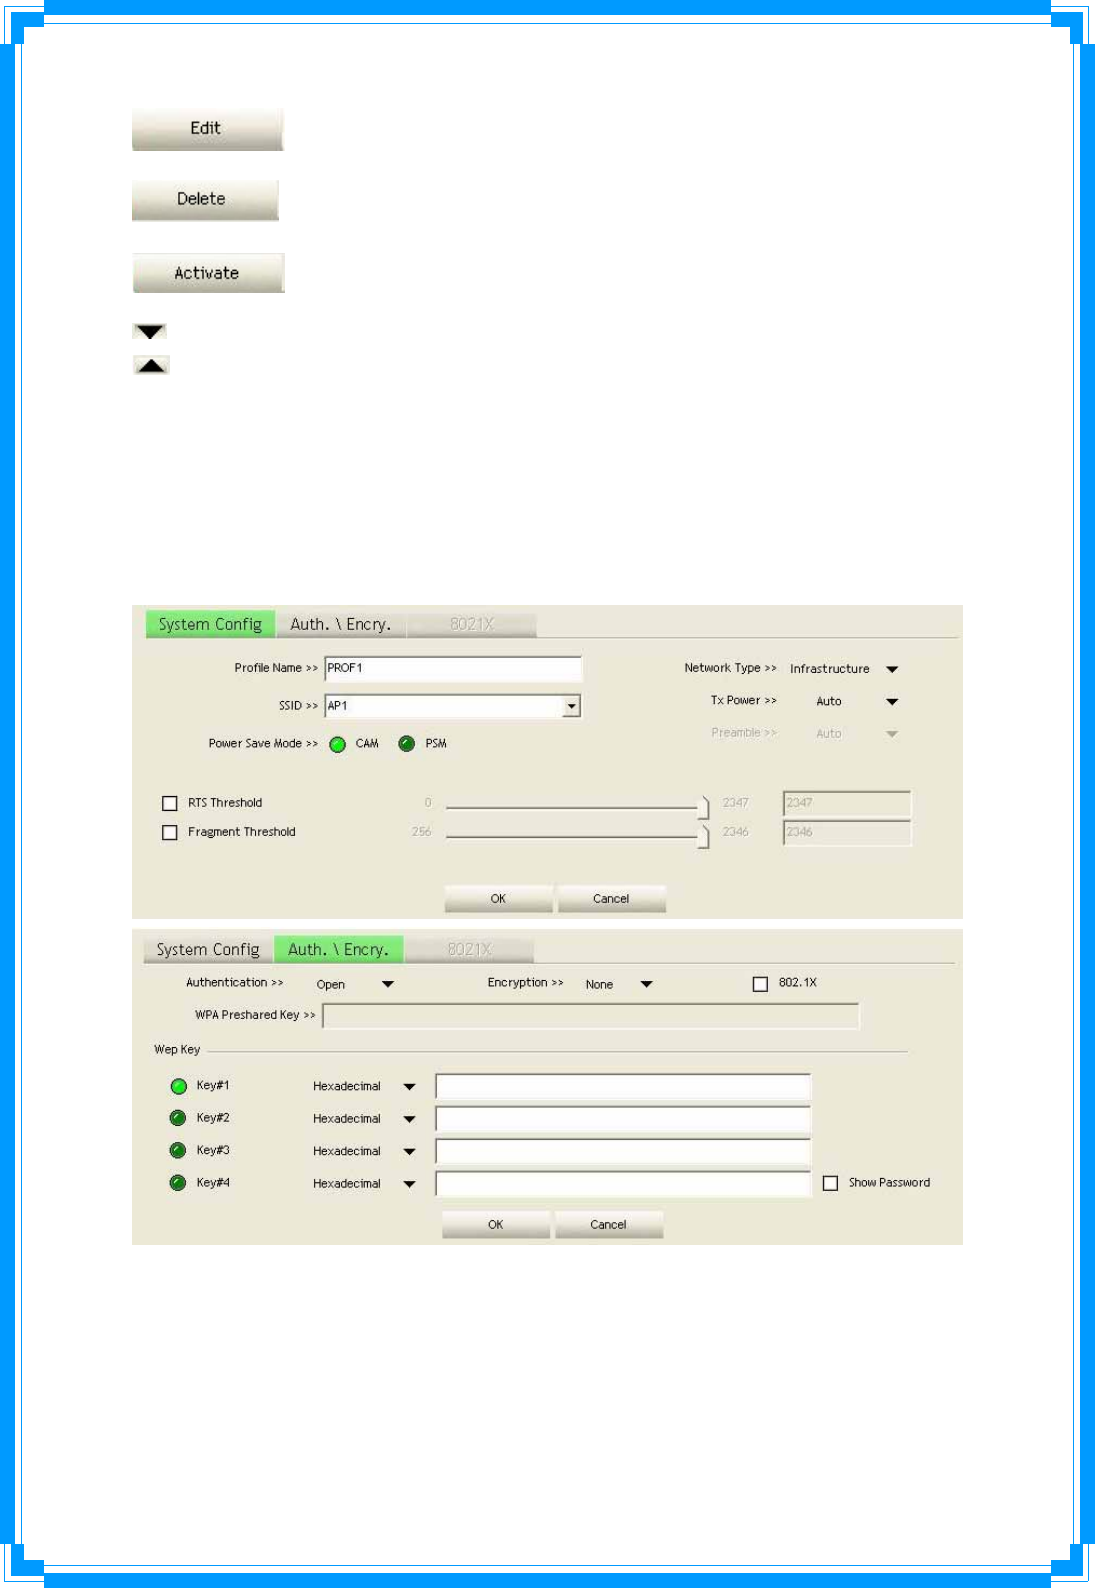
Î Edit an existing profile
Î Delete an existing profile
Î Activate selected profile
Î Show the information of Status Section
Î Hide the information of Status Section
3.3.1 Add/Edit Profile
There are 3 methods to open Profile Editor form:
Î You can open it from “Add to Profile” button in Site Survey function
Î You can open it form “Add” button in Profile function
Î You can open it from “Edit” button in Profile function
Profile Name: User can chose name for this profile, or use default name defined by
system.
SSID: User can key in the intended SSID name or use pull down menu to select from
available APs.
Power Save Mode: Choose from CAM [Constantly Awake Mode] or Power Saving
Mode.