Pro Nets Technology WR750RL WIRELESS ROUTER User Manual WR750RL User manua1
Pro-Nets Technology Corporation WIRELESS ROUTER WR750RL User manua1
User manual

Draft 802.11n
Wireless Broadband Router
User’s Manual
November 2009

1
FCC Warning
This equipment has been tested and found to comply with the limits for a Class B digital device,
pursuant to part 15 of the FCC Rules. These limits are designed to provide reasonable
protection against harmful interference in a residential installation. This equipment generates,
uses, and can radiate radio frequency energy and, if not installed and used in accordance with
the instructions, may cause harmful interference to radio communication. However, there is no
guarantee that interference will not occur in a particular installation. If this equipment does
cause harmful interference to radio or television reception, which can be determined by turning
the equipment off and on, the user is encouraged to try to correct the interference by one or
more of the following measures:
Reorient or relocate the receiving antenna.
Increase the separation between the equipment and receiver.
Connect the equipment into an outlet on a circuit different from that to which
Consult the dealer or an experienced radio/TV technician for help. the receiver is
connected.
FCC Caution: Any changes or modifications not expressly approved by the party responsible
for compliance could void the user’s authority to operate this equipment.
This device complies with Part 15 of the FCC Rules. Operation is subject to the following two
conditions: (1) This device may not cause harmful interference, and (2) this device must
accept any interference received, including interference that may cause undesired operation.
IMPORTANT NOTE:
FCC Radiation Exposure Statement:
This equipment complies with FCC radiation exposure limits set forth for an uncontrolled
environment. This equipment should be installed and operated with a minimum distance of
about eight inches (20cm) between the radiator and your body.
This transmitter must not be co-located or operated in conjunction with any other antenna or
transmitter.IEEE802.11b or 802.11g operation of this product in the USA is
firmware-limited to channels 1 through 11.
Notice
Changes or modifications to the equipment, which are not approved by the party responsible for
compliance could affect the user's authority to operate the equipment. Company has an on-going policy
of upgrading its products and it may be possible that information in this document is not up-to-date.
Please check with your local distributors for the latest information.

2
Copyright
2009 All Rights Reserved.
No part of this document can be copied or reproduced in any form without written consent from
the company.
Trademarks:
All trade names and trademarks are the properties of their respective companies.
Revision History
Revision History
V1 1st Release

3
Table of Contents
1. Introduction ............................................................................ 5
1.1 Features ........................................................................ 5
1.2 Package Contents .......................................................... 6
1.3 System Requirements..................................................... 6
1.4 LEDs Indication & Connectors of Wireless Router ............ 6
1.5 Installation Instruction ................................................... 7
2. PC Configuration..................................................................... 8
2.1 TCP/IP Networking Setup .............................................. 8
3. Configure Wireless Router via Web Based Utility .................. 19
3.1 Access Web Based Configuration Utility ....................... 19
3.2 Operation Mode .......................................................... 21
3.3 Quick Start .................................................................. 21
3.4 Internet Settings........................................................... 22
3.4.1 WAN.................................................................. 22
3.4.2 LAN ................................................................... 22
3.4.3 DHCP Clients ...................................................... 24
3.4.4 VPN Passthrough............................................... 25
3.4.5 DNS ................................................................... 26
3.4.6 Advanced Routing.............................................. 26
3.5 Wireless Settings ......................................................... 27
3.5.1 Basic .................................................................. 27
3.5.2 Advanced .......................................................... 29
3.5.3 Security ............................................................. 31
3.5.4 WDS .................................................................. 32
3.5.5 WPS................................................................... 34
3.5.6 Station list.......................................................... 36
3.5.7 Site Survey......................................................... 36
3.6 Firewall ....................................................................... 37
3.6.1 MAC/IP/Port Filtering Settings............................ 37
3.6.2 Port Forwarding................................................. 38
3.6.3 DMZ................................................................... 39
3.6.4 System Security Settings .................................... 39
3.6.5 Content Filtering................................................. 40
3.6.6 Port Trigger........................................................ 41
3.7 Administration............................................................. 42

4
3.7.1 DDNS Setting...................................................... 42
3.7.2 NTP Setting ........................................................ 43
3.7.3 Administration ................................................... 43
3.7.4 Upgrade Firmware............................................. 44
3.7.5 Setting Management.......................................... 44
3.7.6 Status................................................................. 45
3.7.7 Statistics............................................................. 45
3.7.8 System Log......................................................... 46
3.7.9 Logout................................................................ 47
5
1. Introduction
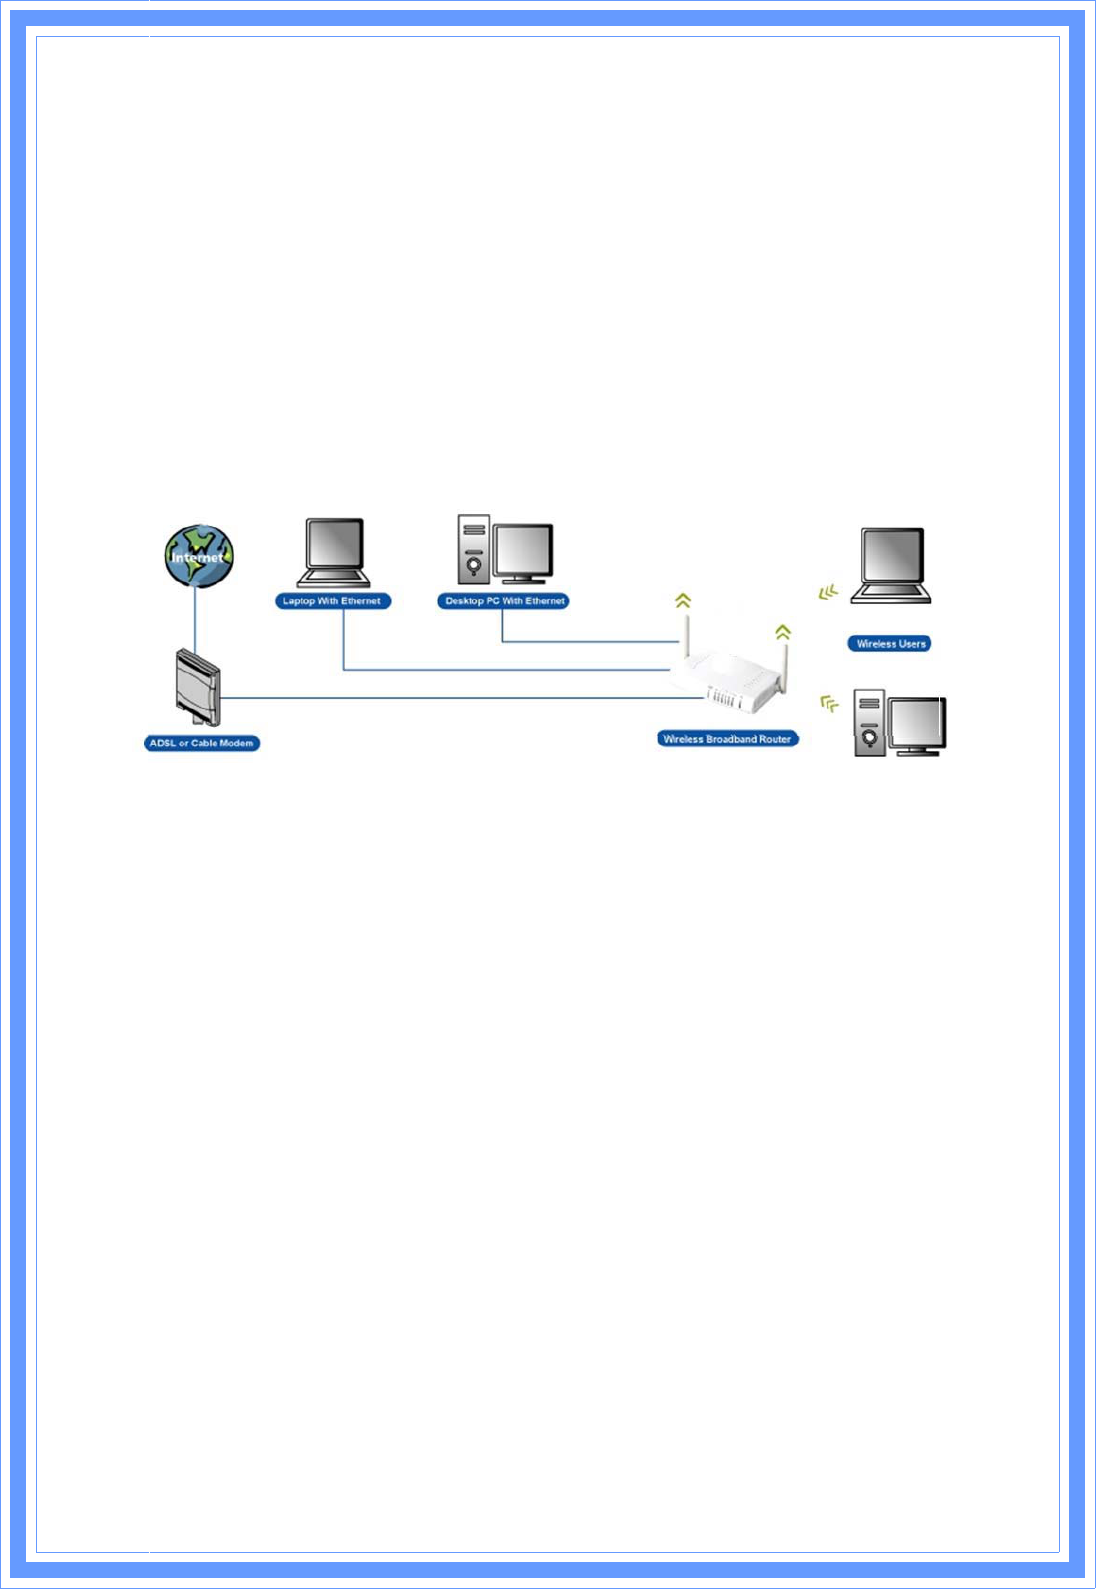
This Wireless Broadband Router is a draft 802.11n compliant device that provide faster and
farther range than 802.11g while backward compatible with 802.11g and 802.11b devices.
This Router uses advanced broadband router chipset and wireless LAN chipset solution let
you enjoy high-speed Wired and Wireless connection. Simply connect this device to a Cable or
DSL modem and then you can share your high-speed Internet access with multiple PCs at
your home. It creates a secure Wired and Wireless network for you to share photos, files,
video, music, printer and network storage. This device also supports the latest wireless
security features such as WEP, WPA, WPA2 and WPS to prevent from unauthorized access.
1.1 Features
Θ! Compliant with IEEE 802.11n draft 2.0 standard
Θ! Backward compatible with IEEE 802.11b/g
Θ! Supports NAT, NAPT, DHCP Server/Client
Θ! Supports VPN pass through - IPSec, PPTP, L2TP
Θ! Supports Virtual Server / Port Trigger
Θ! Supports Virtual DMZ Host, DNS Proxy, DDNS, UPnP
Θ! Supports 64/128-bit WEP Data Encryption
Θ! Supports WPA / WPA2 / WPS / 802.1x Authentication
Θ! Supports WDS (Wireless Distribution System) mode
Θ! Supports Quality of Service (QoS) – WMM
Θ! Supports MAC Filter, Client Filter, URL/IP Filter
Θ! Supports Hacker Pattern Detection
Θ! Supports Auto-crossover (MDI/MID-X) function
Θ! Supports software upgrade through Web
Θ! Friendly web-based GUI Configuration and Management

6
1.2 Package Contents
Θ! One Wireless AP Router with 1 antennas
Θ! One External Power Adapter
Θ! One CD-ROM (user’s manual)
Θ! One RJ-45 Ethernet Cable
1.3 System Requirements
Θ! Computers with an installed Ethernet adapter.
Θ! Valid Internet Access account and Ethernet based DSL or Cable modem.
Θ! 10/100Base-T Ethernet cable with RJ-45 connector.
Θ! TCP/IP protocol must be installed on all PCs.
Θ! System with MS Internet Explorer ver. 5.0 or later, or Netscape Navigator ver. 4.7 or
later.
1.4 LEDs Indication & Connectors of Wireless Router
Front Panel LEDs Indication
LED Light Status Description
On Wireless Router is powered on. PWR
Off Wireless Router is powered off.
On Wireless Router is hung. Status
Blinking Wireless Router is up and ready.
On LAN port is successfully connected. LAN
(1, 2, 3, 4) Blinking Data is being sent or received.
On WAN port is successfully connected WAN
Blinking Data is being sent or received.
Slow Blinking WLAN is successfully connected. WLAN
LINK/ACT Blinking Data is being sent or received.
7
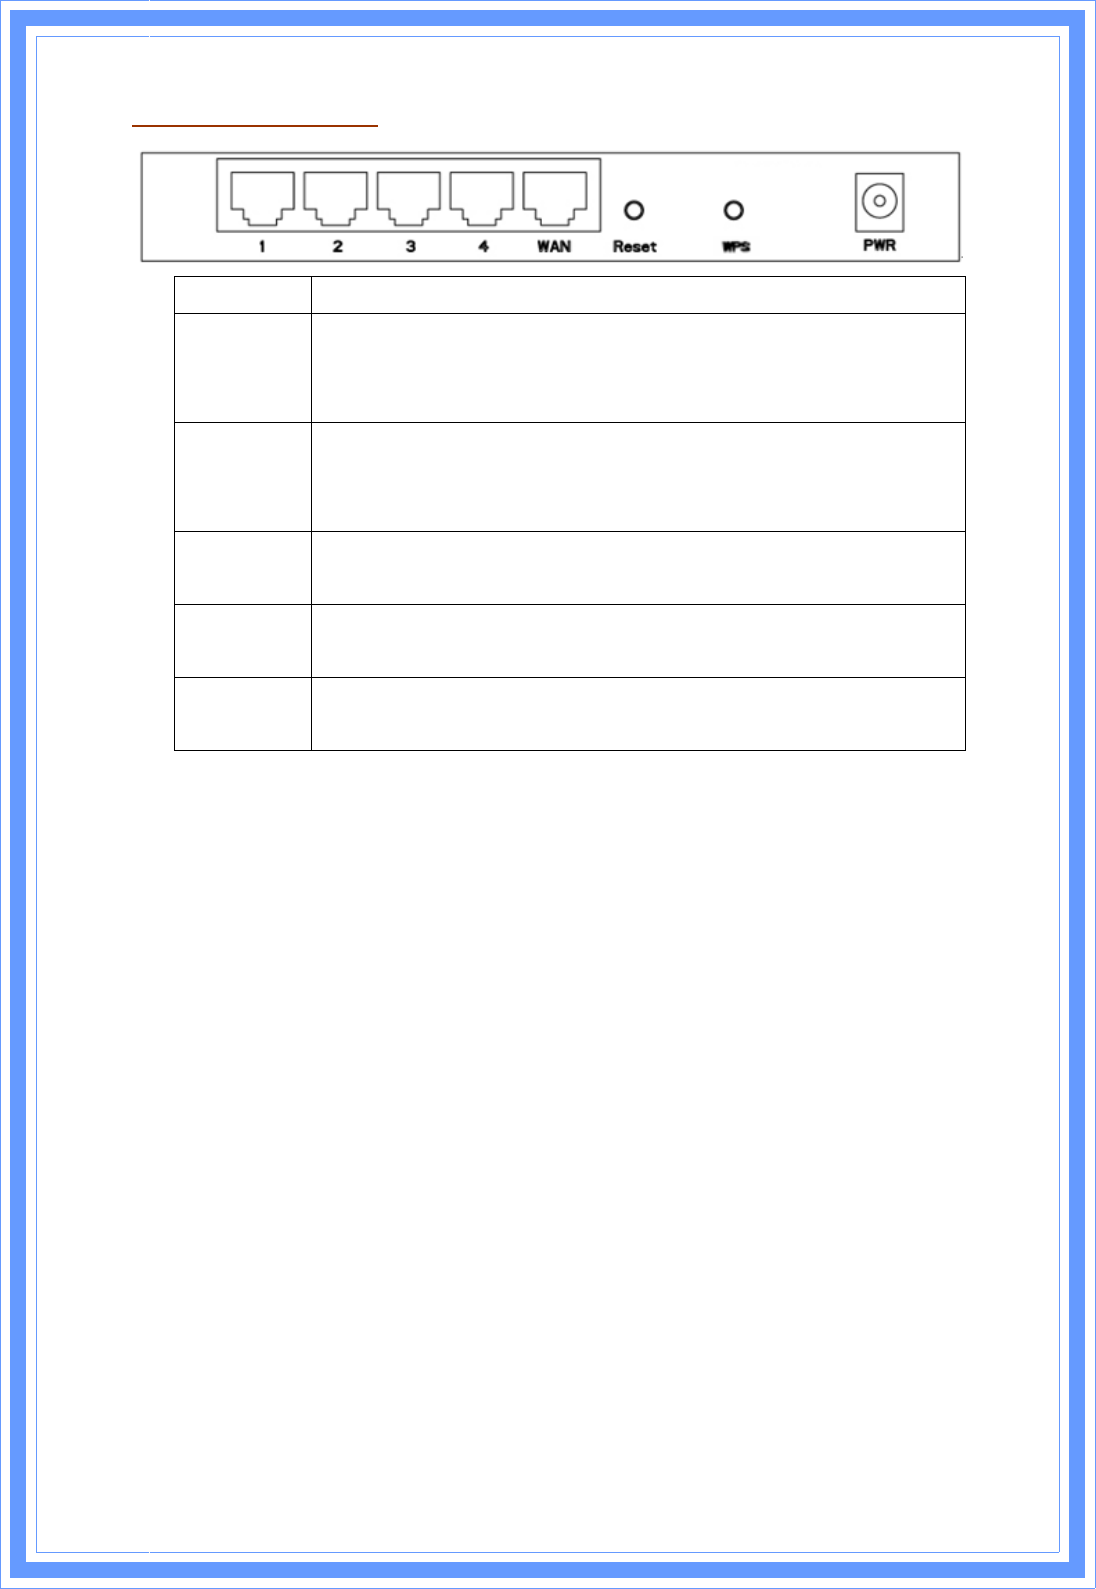
Back Panel Connectors
Button/Port Description
Reset Reset configurations to default. You would use the reset button only when
a program error has caused your 11n AP router to hang. Press the button
and hold for 10 seconds.
WPS Click WPS button about 2-3 seconds while you are connecting a PC of
wireless adapter with WPS function (you must enable WPS’ PBC
function).
LAN
(1x, 2x, 3x, 4x)
Ethernet RJ-45 connector, connect to PC with a RJ-45 Ethernet cable.
WAN Ethernet RJ-45 connector, connect to WAN access device, such as the
Cable modem or ADSL modem.
PWR Power connector, connect to the power adapter packaged with the AP
router.
1.5 Installation Instruction
1) Power off 802.11n AP Router and DSL/Cable modem.
2) Connect computer to the LAN port on the Wireless Router with Ethernet cable.
3) Connect the DSL or Cable modem to the WAN port on the Wireless Router with
Ethernet cable.
4) Power on DSL or Cable modem first, then connect power adapter to the power jack
on the rear panel of Wireless Router and plug the power cable into an outlet.
5) Check LEDs.
a) Once power on Wireless Router, Power LED should be on.
b) LAN LED should be on for each active LAN connection.
c) The WAN LED should be on when the DSL or cable modem is connected.
Warning: Only use the power adapter is provided from this package, use other power adapter
may cause hardware damage
8
2. PC Configuration
To communicate and configure 802.11n AP router, the PC on your LAN must install TCP/IP
protocol. Make sure the TCP/IP protocol of the PC is configured for Obtain IP address from
DHCP and is connected to LAN (Ethernet) port of the AP router. In doing so, the PC obtains an
IP address of 192.168.1.1 from 802.11n AP router.
The 802.11n AP router assumes an IP address of 192.168.1.1 without network connectivity.
This IP address is used for communicating with the 802.11n AP router via the web UI or Telnet,
with the PC connected to the LAN port.
The 802.11n AP router assumes a DHCP IP address on the WAN side if connected to the
network. In this case user can communicate with the same IP address 192.168.1.1 with PC
connected to the LAN port. PC in the network can communicate with the DHCP IP address
allocated to 802.11n router.
2.1 TCP/IP Networking Setup
Checking TCP/IP Settings for Windows 9x/Me
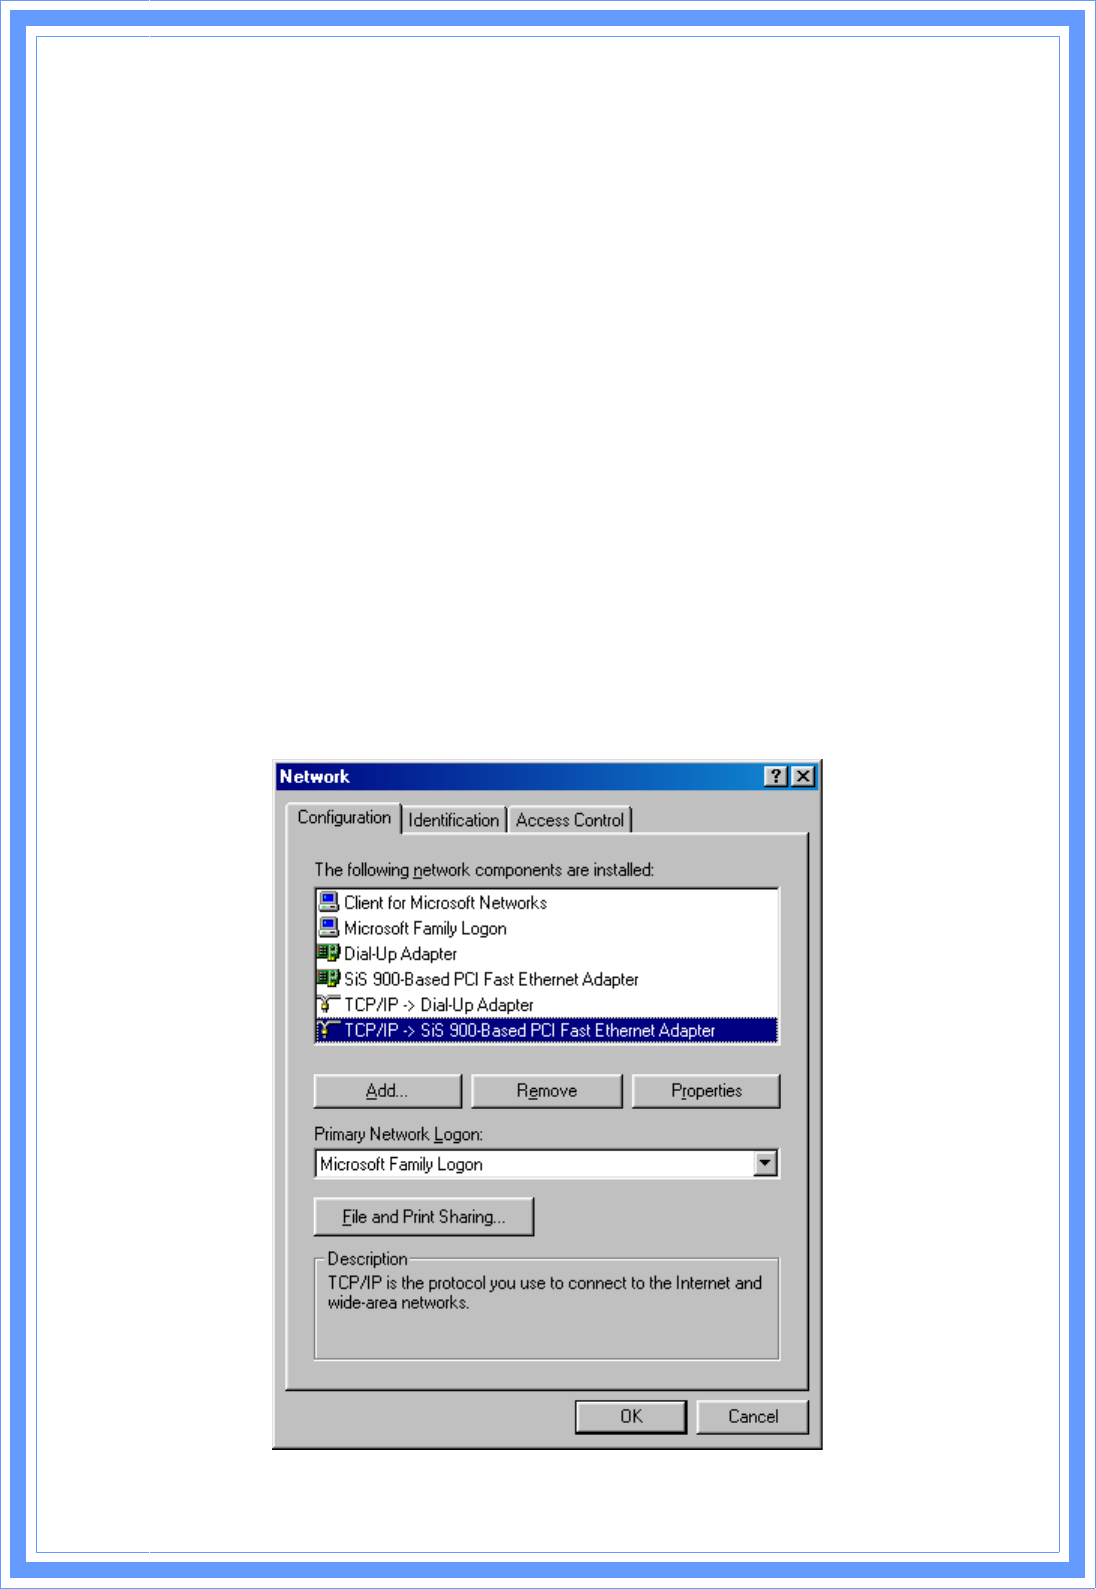
a) Select “Start Æ Control Panel Æ Network”, the window below will appear,
9
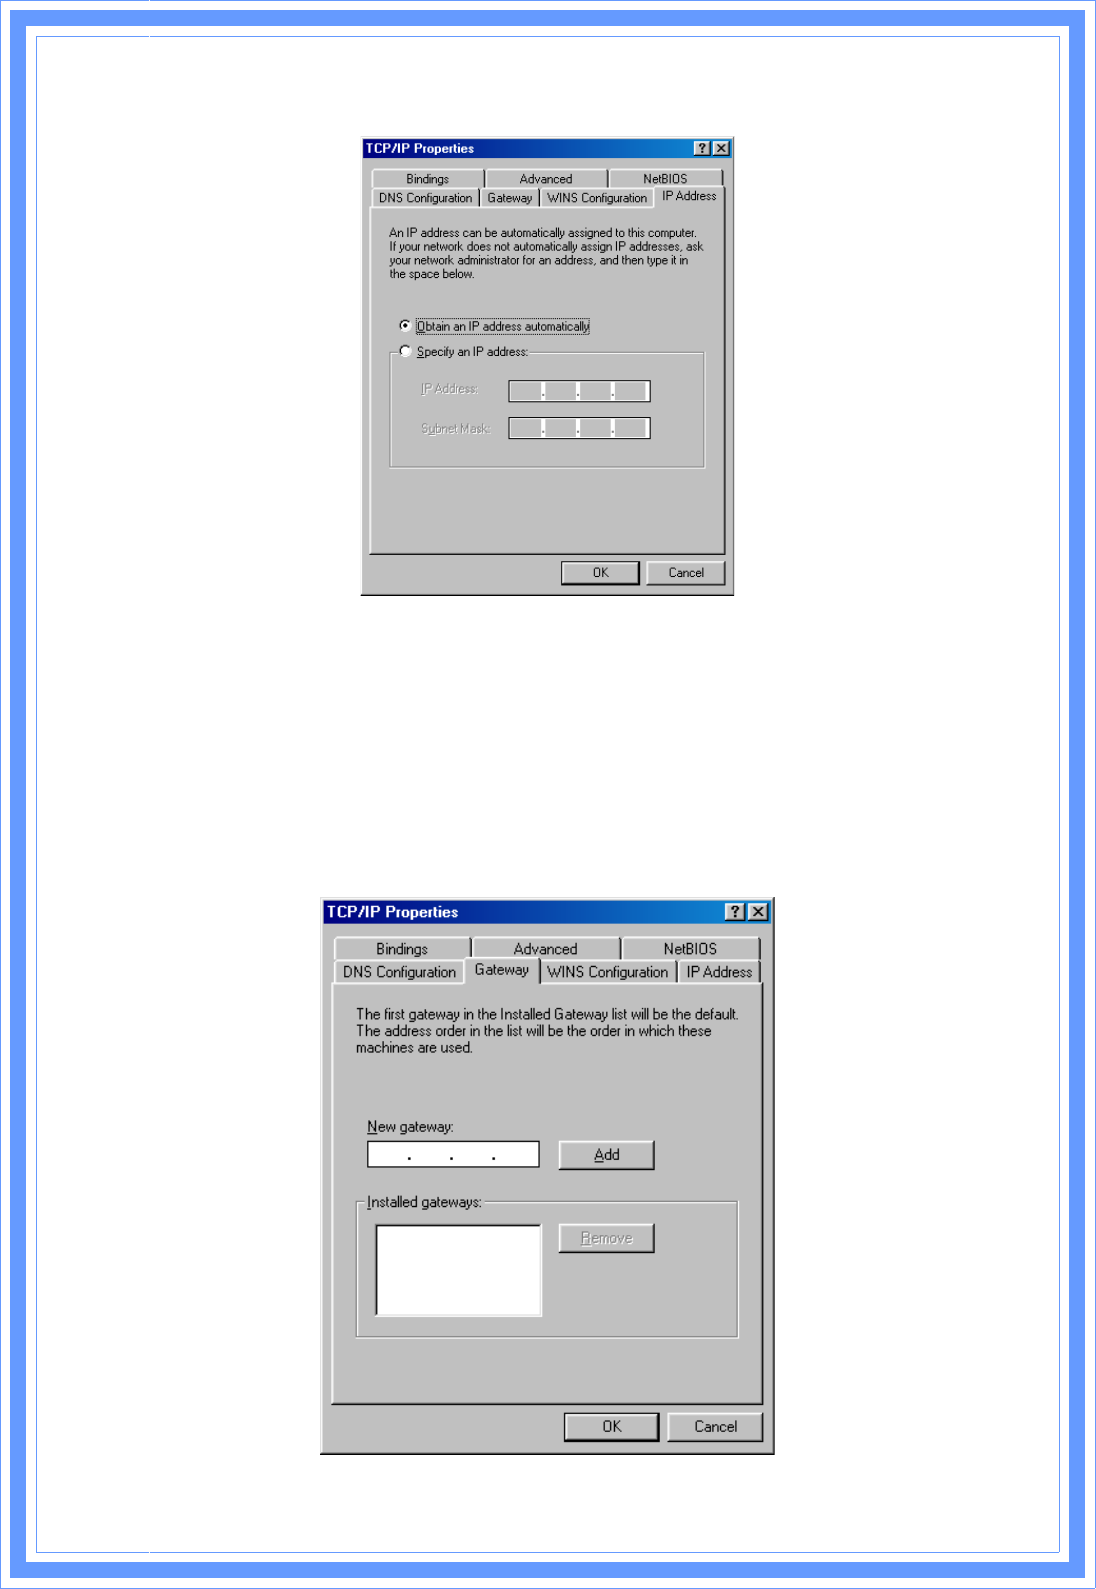
b) Click “Properties”, the window below will appear and then click “IP Address” tab,
Θ! If you decide to use DHCP, select “Obtain an IP address automatically”, then
click “OK” to confirm your settings. Once you restart your system, Wireless
Router will obtain an IP address for this system.
Θ! If you decide to use fixed IP address for your system, select “Specify an IP
address”, and make sure that IP Address and Subnet Mask are correct.
c) Select “Gateway” tab and enter correct gateway address in “New gateway” field, then
click “Add”,
1
0
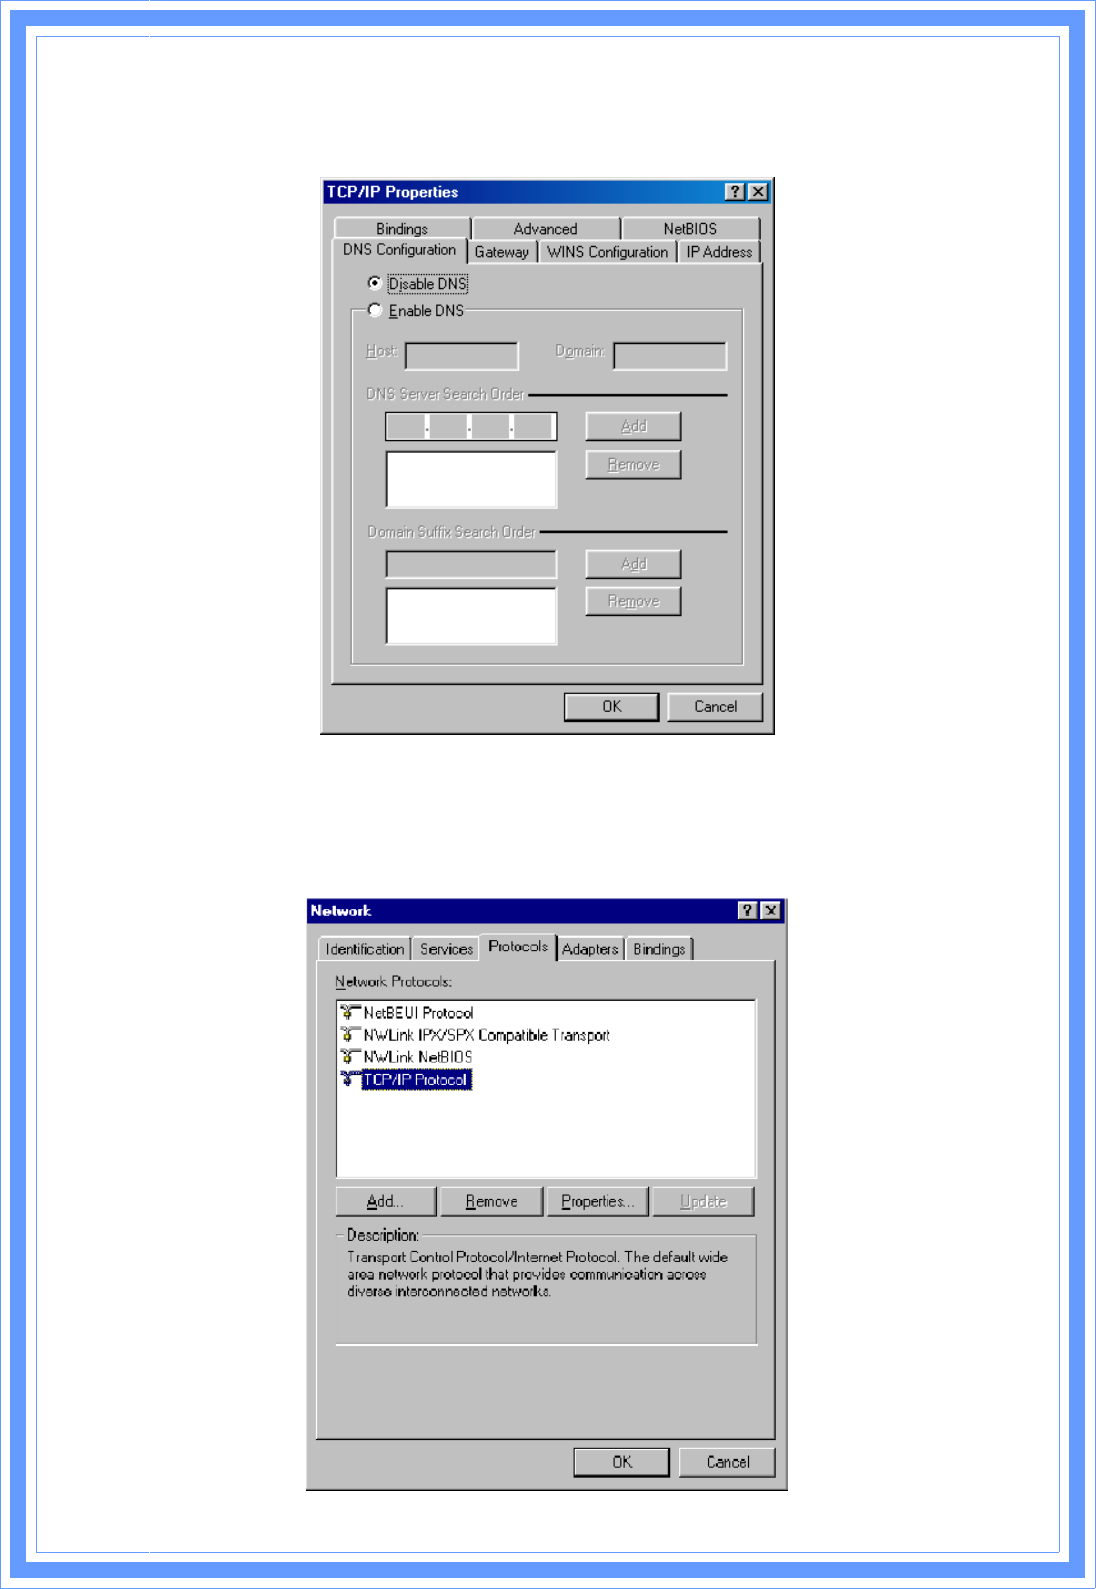
d) Select “DNS Configuration” tab and make sure select “Enable DNS”, enter the DNS
address provides from your ISP in the “DNS Server Search Order” field, then click “Add”,
Checking TCI/IP Setting for Windows NT4.0
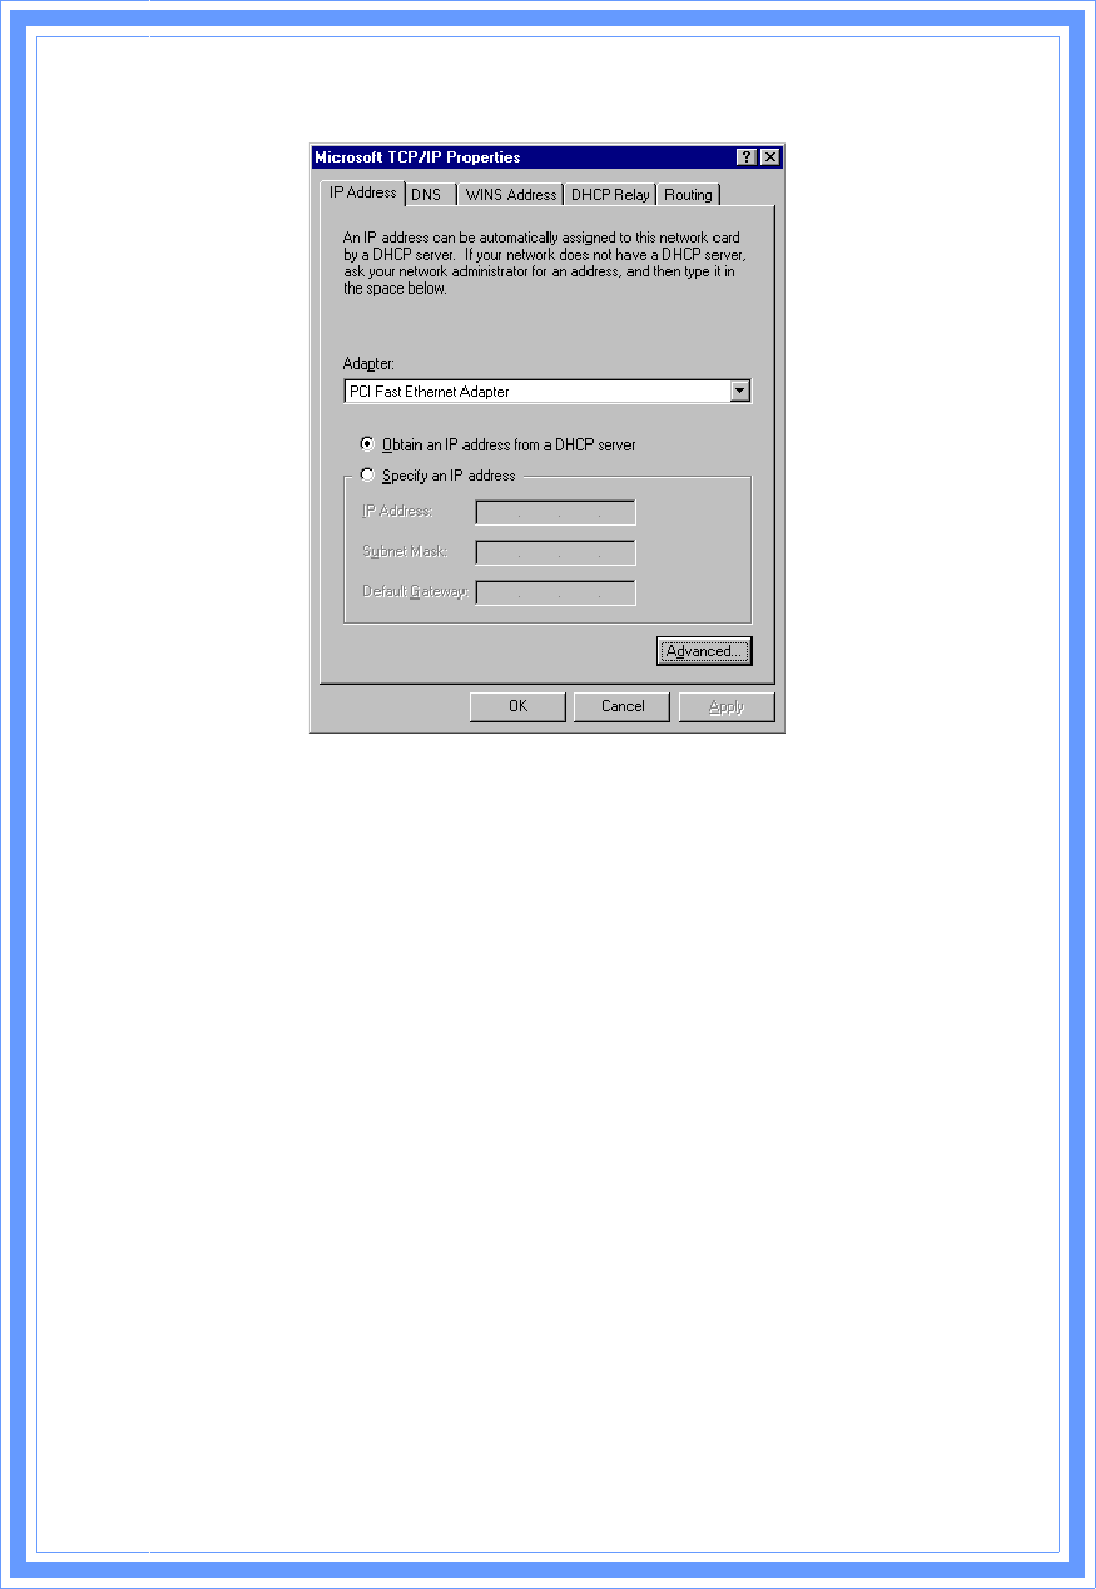
a) Select “Control Panel Æ Network”, window below will appear, click “Protocols” tab then
select “TCP/IP protocol”,
1
1
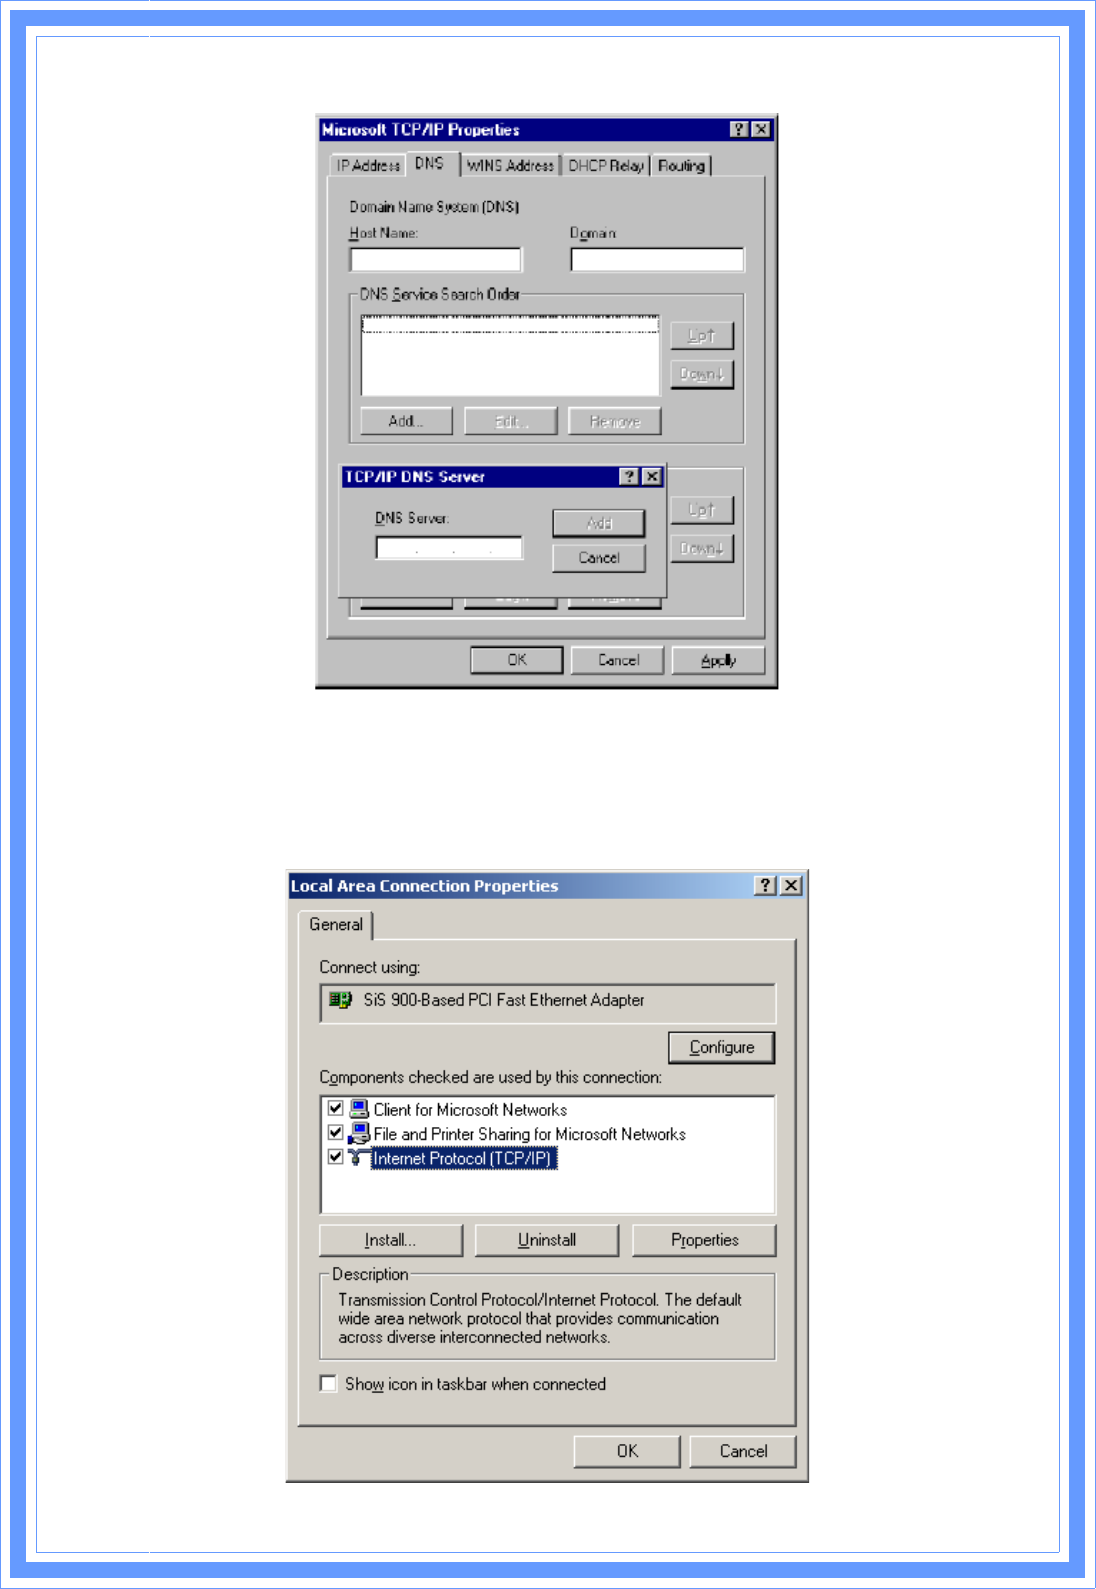
b) Click “Properties”, window below will appear.
Θ! Select the network card on your system from “Adapter” field.
Θ! If you decide to use IP address from Wireless Router, select “Obtain an IP
address from a DHCP server”.
Θ! If you decide to use the IP address you are desired, select “Specify an IP
address”. Make sure enter correct addresses in “IP Address” and “Subnet
Mask” fields.
Θ! You must set Wireless Router’s IP address as “Default Gateway”.
c) To enter DNS address is provided from your ISP. Select “DNS” tab, click “Add” under
“DNS Service Search Order” list, then enter DNS Server IP address in “TCP/IP DNS
Server” window and click “Add”.
1
2
Checking TCP/IP Settings for Windows 2000
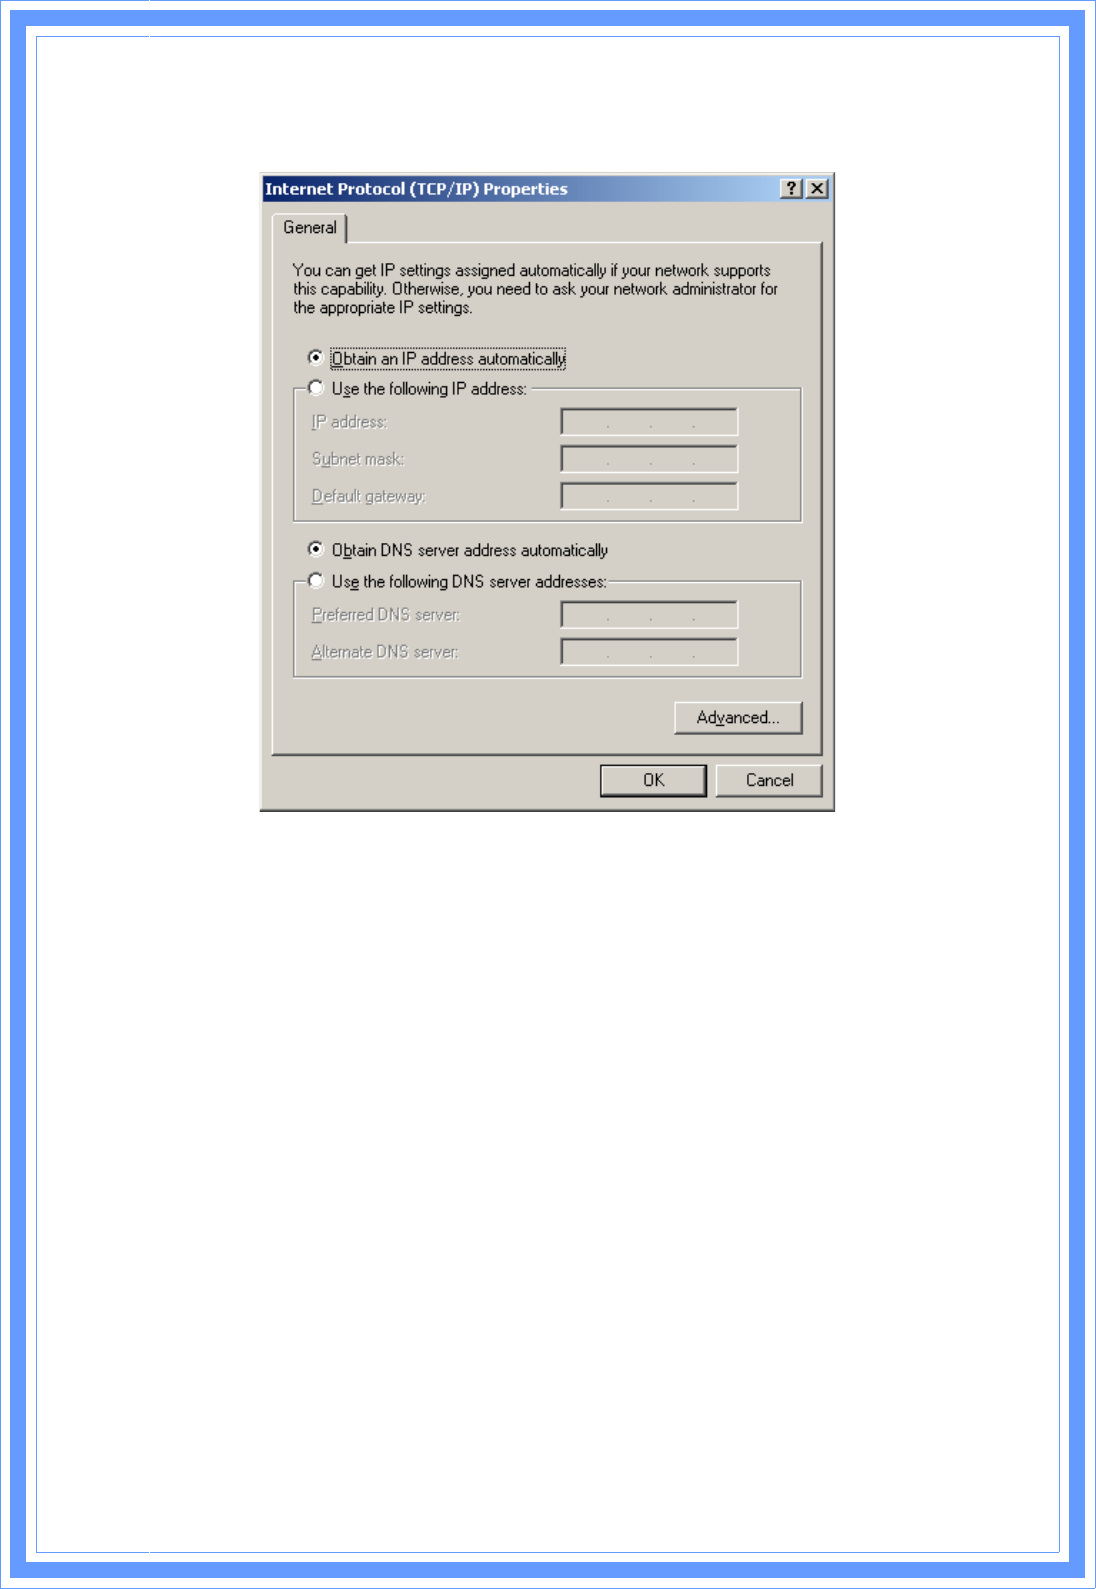
a) Select “Start Æ Control Panel Æ Network and Dial-up Connection” and right click
“Local Area Connection” then click “Properties”,
1
3
b) Select the “Internet Protocol (TCP/IP)” for the network card on your system, then click
“Properties”, window below will appear.
Θ! If you decide to use IP address from Wireless Router, select “Obtain an IP
address automatically”.
Θ! If you decide to use the IP address you are desired, select “Use the following
IP address”. Make sure enter correct addresses in “IP Address” and “Subnet
Mask” fields.
Θ! You must set Wireless Router’s IP address as “Default Gateway”.
Θ! If the DNS Server fields are empty, select “Use the following DNS server
addresses” and enter the DNS address is provided by your ISP, then click
“OK”.
Checking TCP/IP Settings for Windows XP
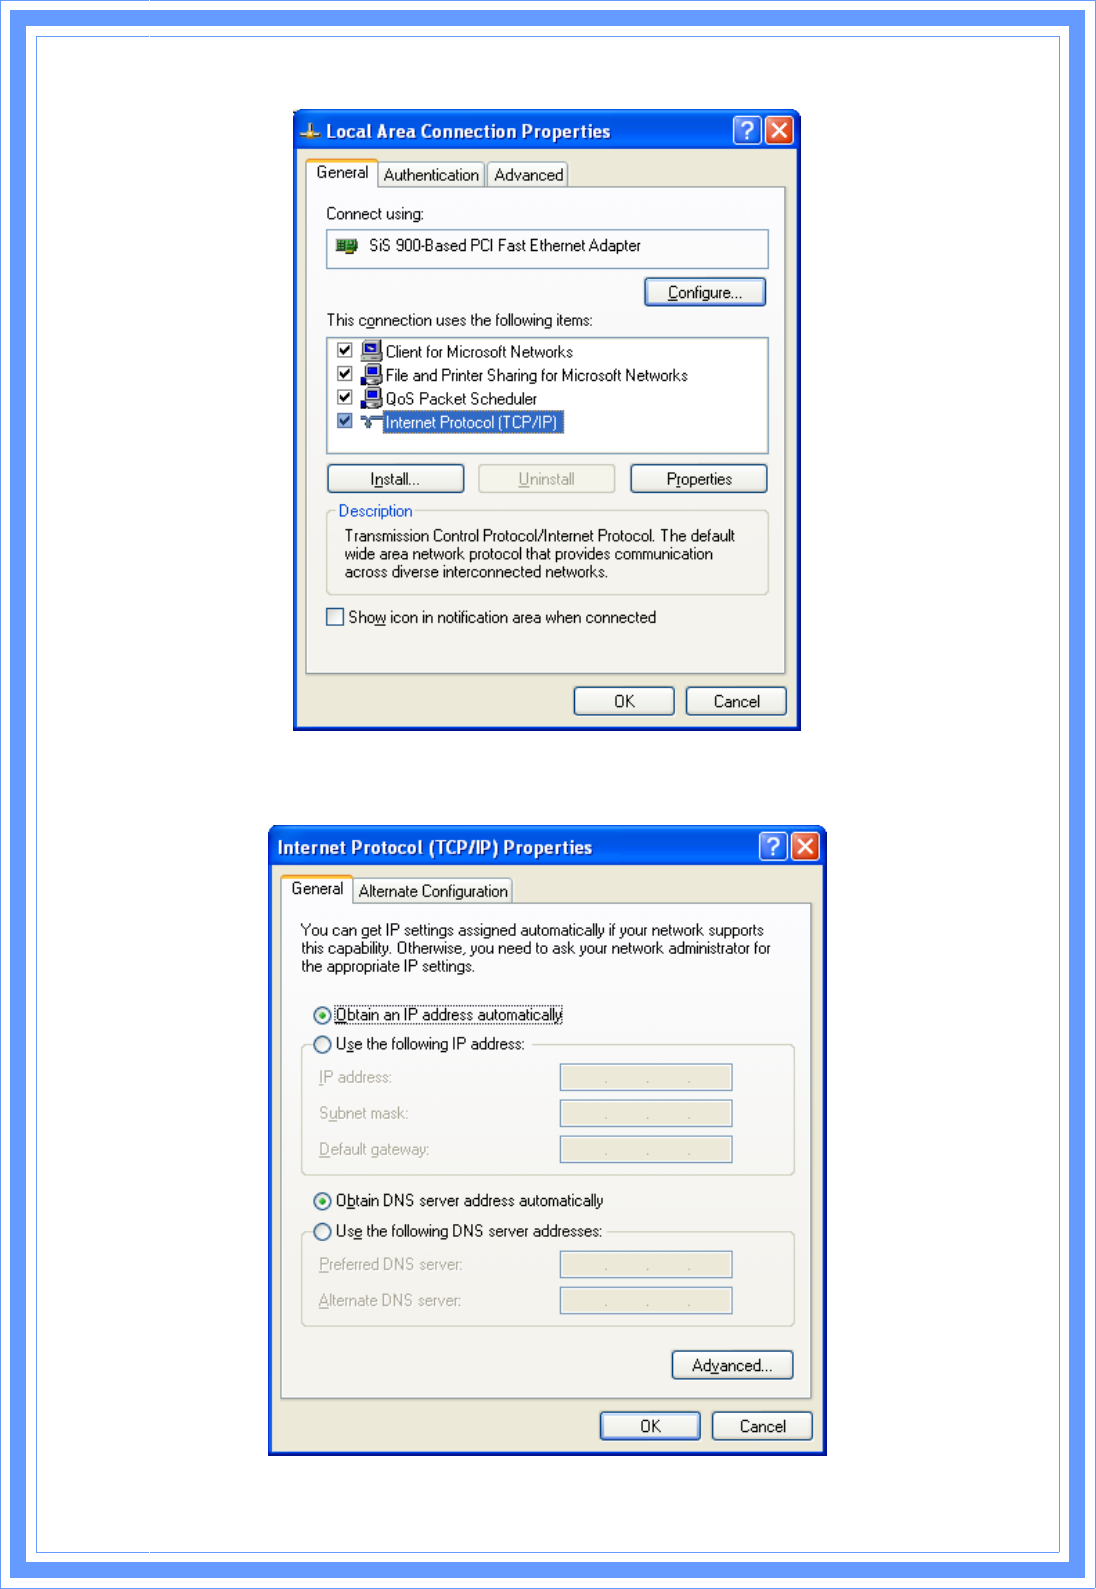
a) Click “Start”, select “Control Panel Æ Network Connection” and right click “Local Area
Connection” then select “Properties”, window below will appear.
1
4
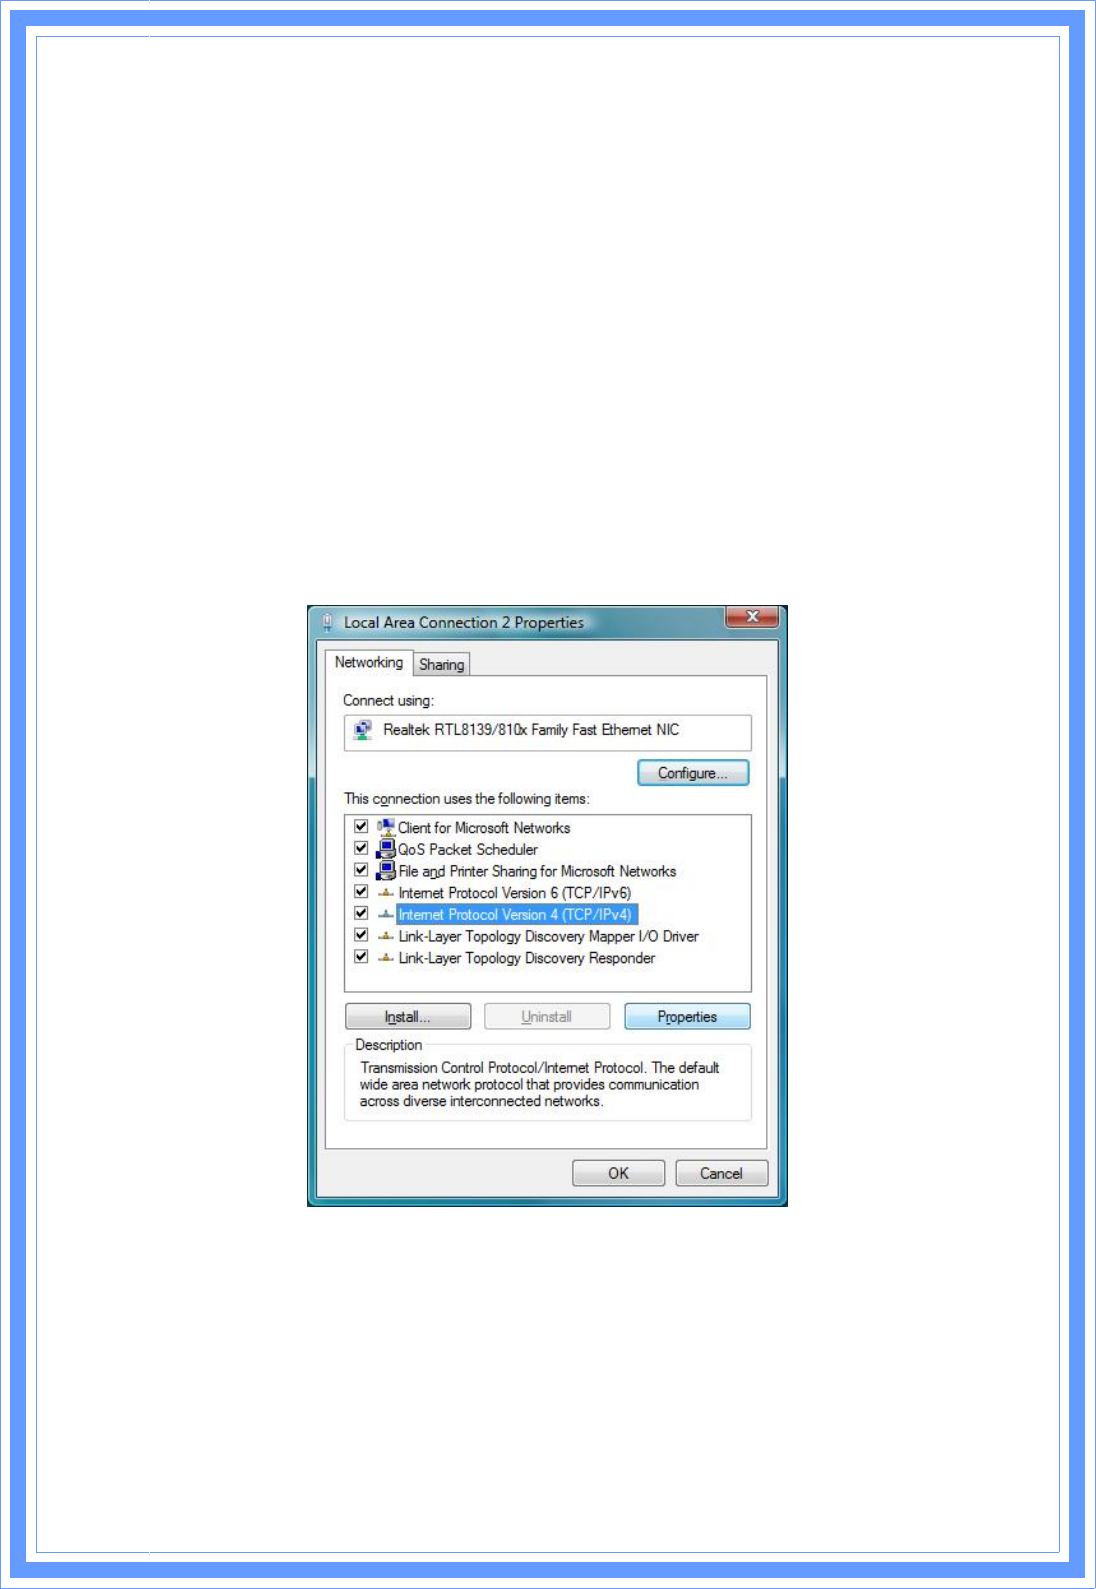
b) Select “Internet Protocol (TCP/IP)” then click “Properties”, window below will appear.
1
5
Θ! If you decide to use IP address from Wireless Router, select “Obtain an IP
address automatically”.
Θ! If you decide to use the IP address you are desired, select “Use the following
IP address”. Make sure enter correct addresses in “IP Address” and “Subnet
Mask” fields.
Θ! You must set Wireless Router’s IP address as “Default Gateway”.
Θ! If the DNS Server fields are empty, select “Use the following DNS server
addresses” and enter the DNS address is provided by your ISP, then click
“OK”.
Checking TCP/IP Settings for Windows Vista
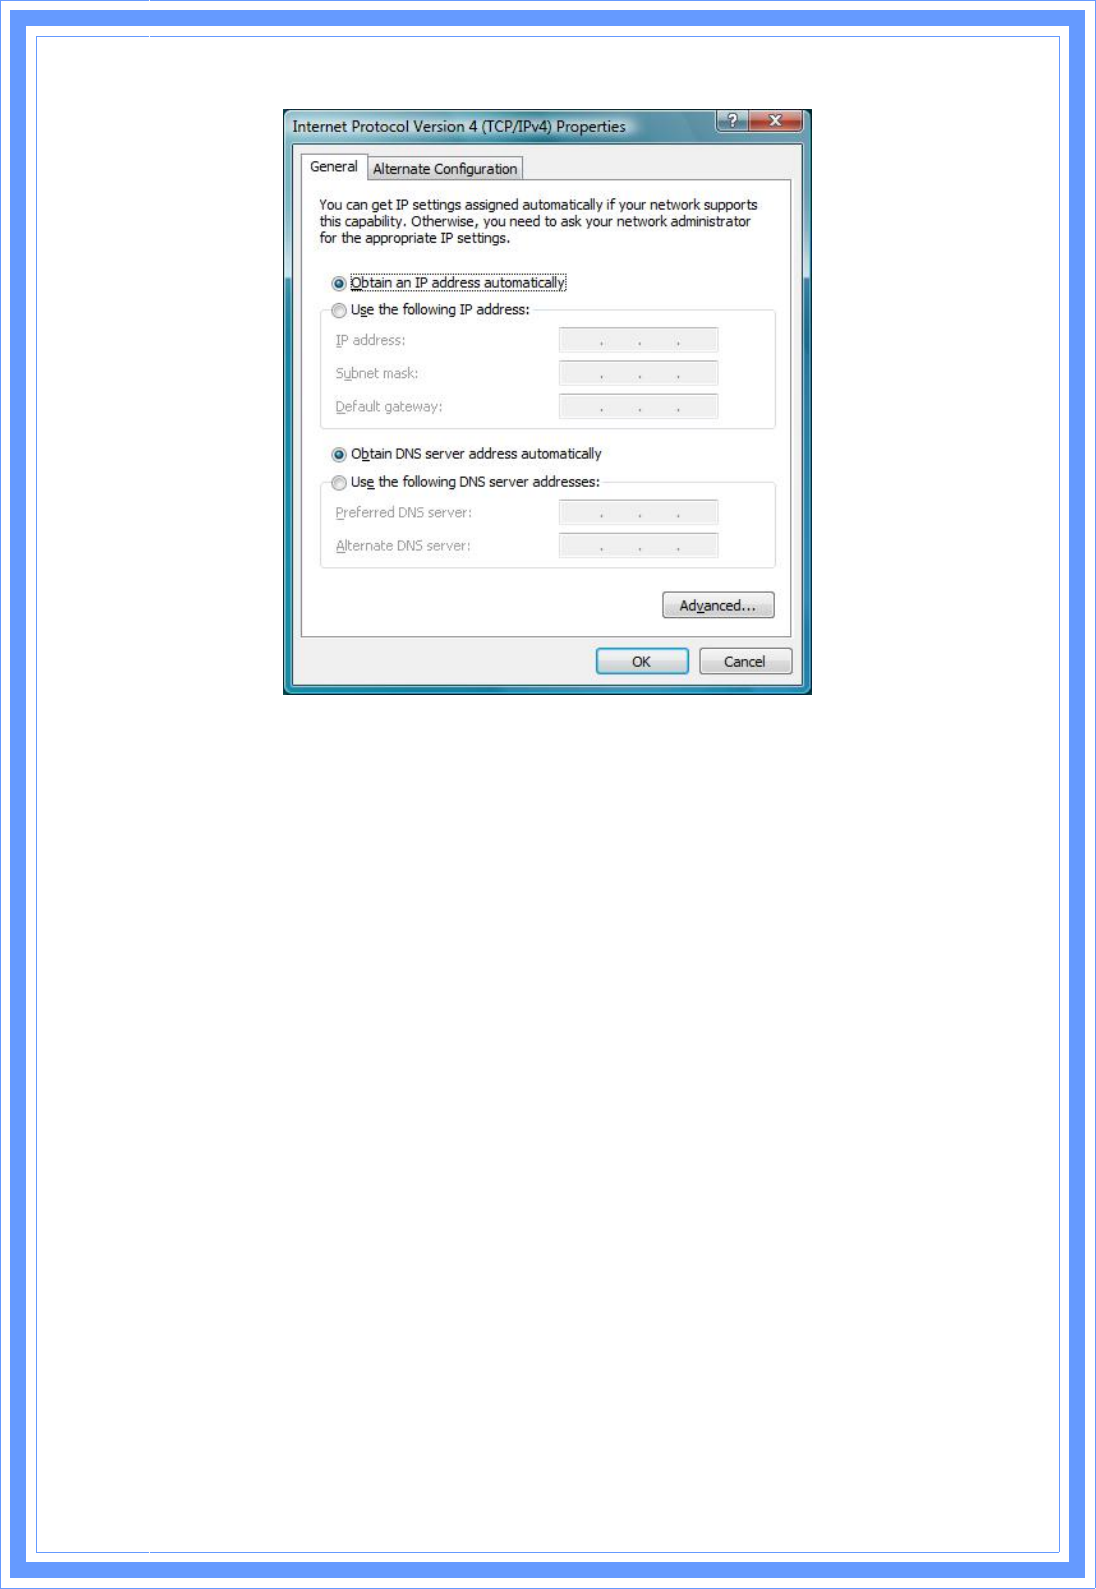
a) Click “Start” Æ“Control Panel Æ “Manage Network Connections” and right click
“Local Area Connection” then select “Properties”, window below will appear.
b) Select “Internet Protocol (TCP/IP)” then click “Properties”, window below will appear.
1
6
Θ! If you decide to use IP address from Wireless Router, select “Obtain an IP
address automatically”.
Θ! If you decide to use the IP address you are desired, select “Use the following
IP address”. Make sure enter correct addresses in “IP Address” and “Subnet
Mask” fields.
Θ! You must set Wireless Router’s IP address as “Default Gateway”.
Θ! If the DNS Server fields are empty, select “Use the following DNS server
addresses” and enter the DNS address is provided by your ISP, then click
“OK”.
Checking TCP/IP Settings for Windows 7
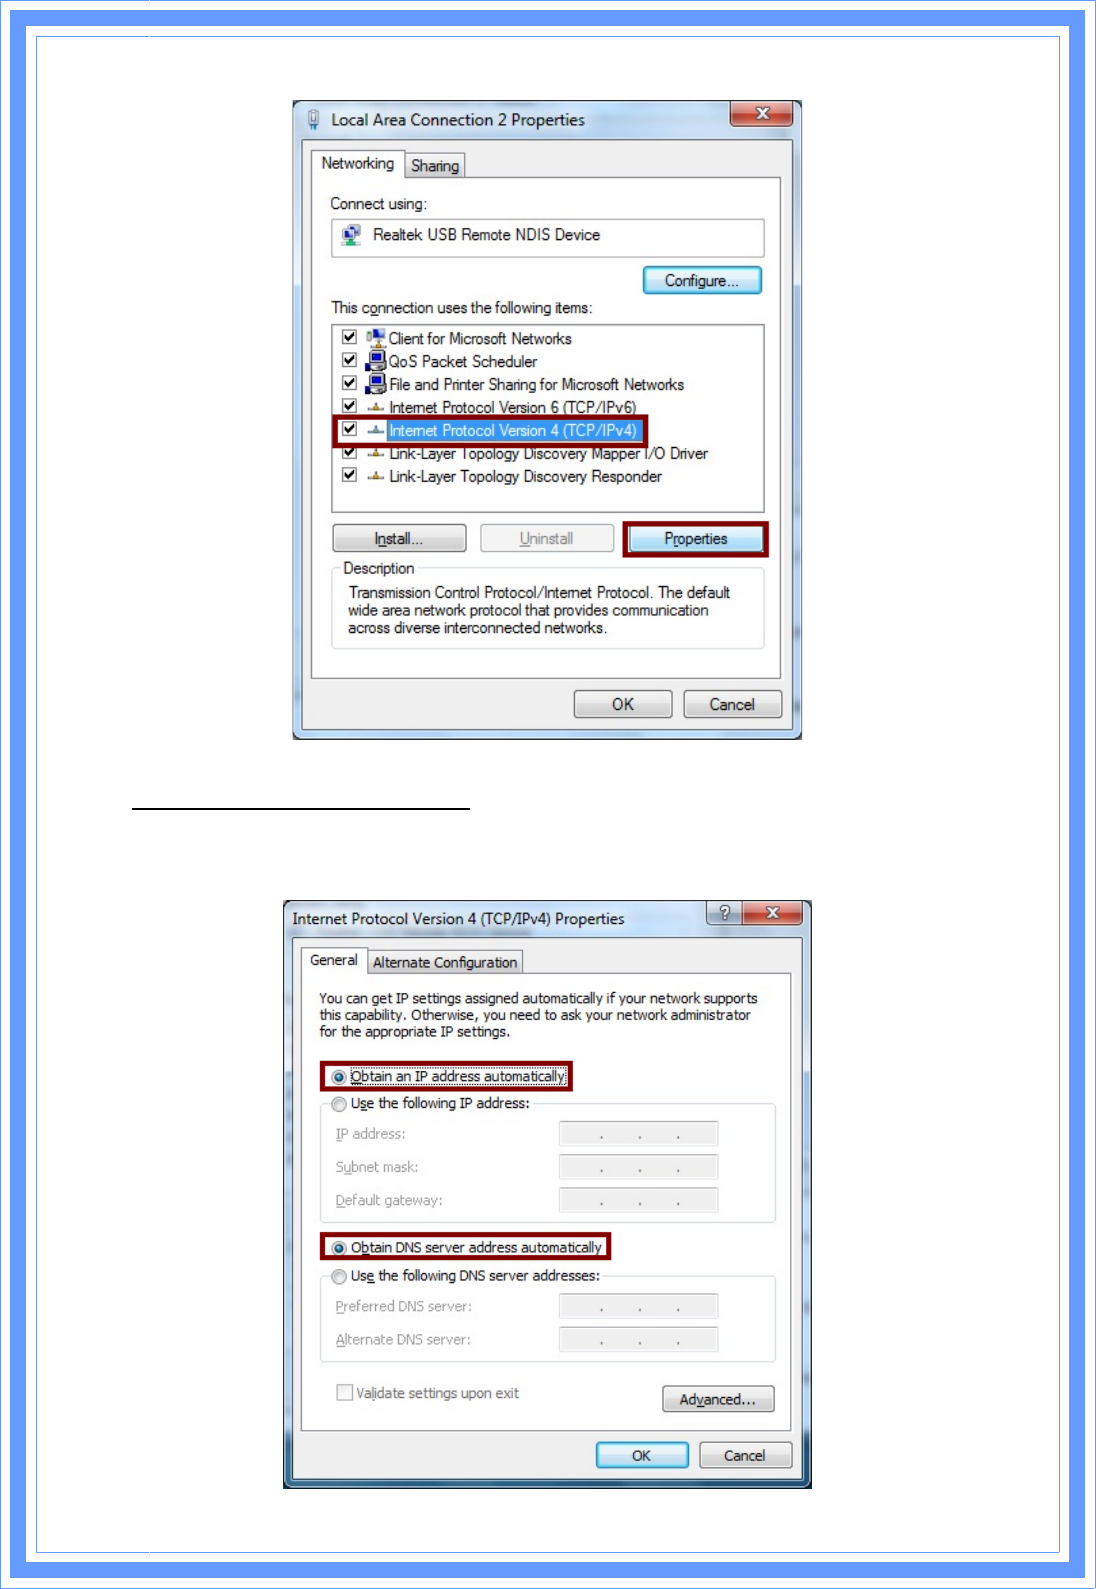
a) Click “Start” Æ “Control Panel“ÆDouble-click Network and Sharing Center icon Æ
Select “Local Area Connection #”. (Local network your ADSL hooked up with) Æ Select
“Properties”Æ Select “Internet Protocol Version 4 (TCP/IPv4)“ then click “Properties“
1
7
Configure IP address Automatically:
b) Select “Obtain an IP address automatically” and “Obtain DNS server address
automatically” Click “OK” to finish the configuration.
1
8
Configure IP Address Manually:
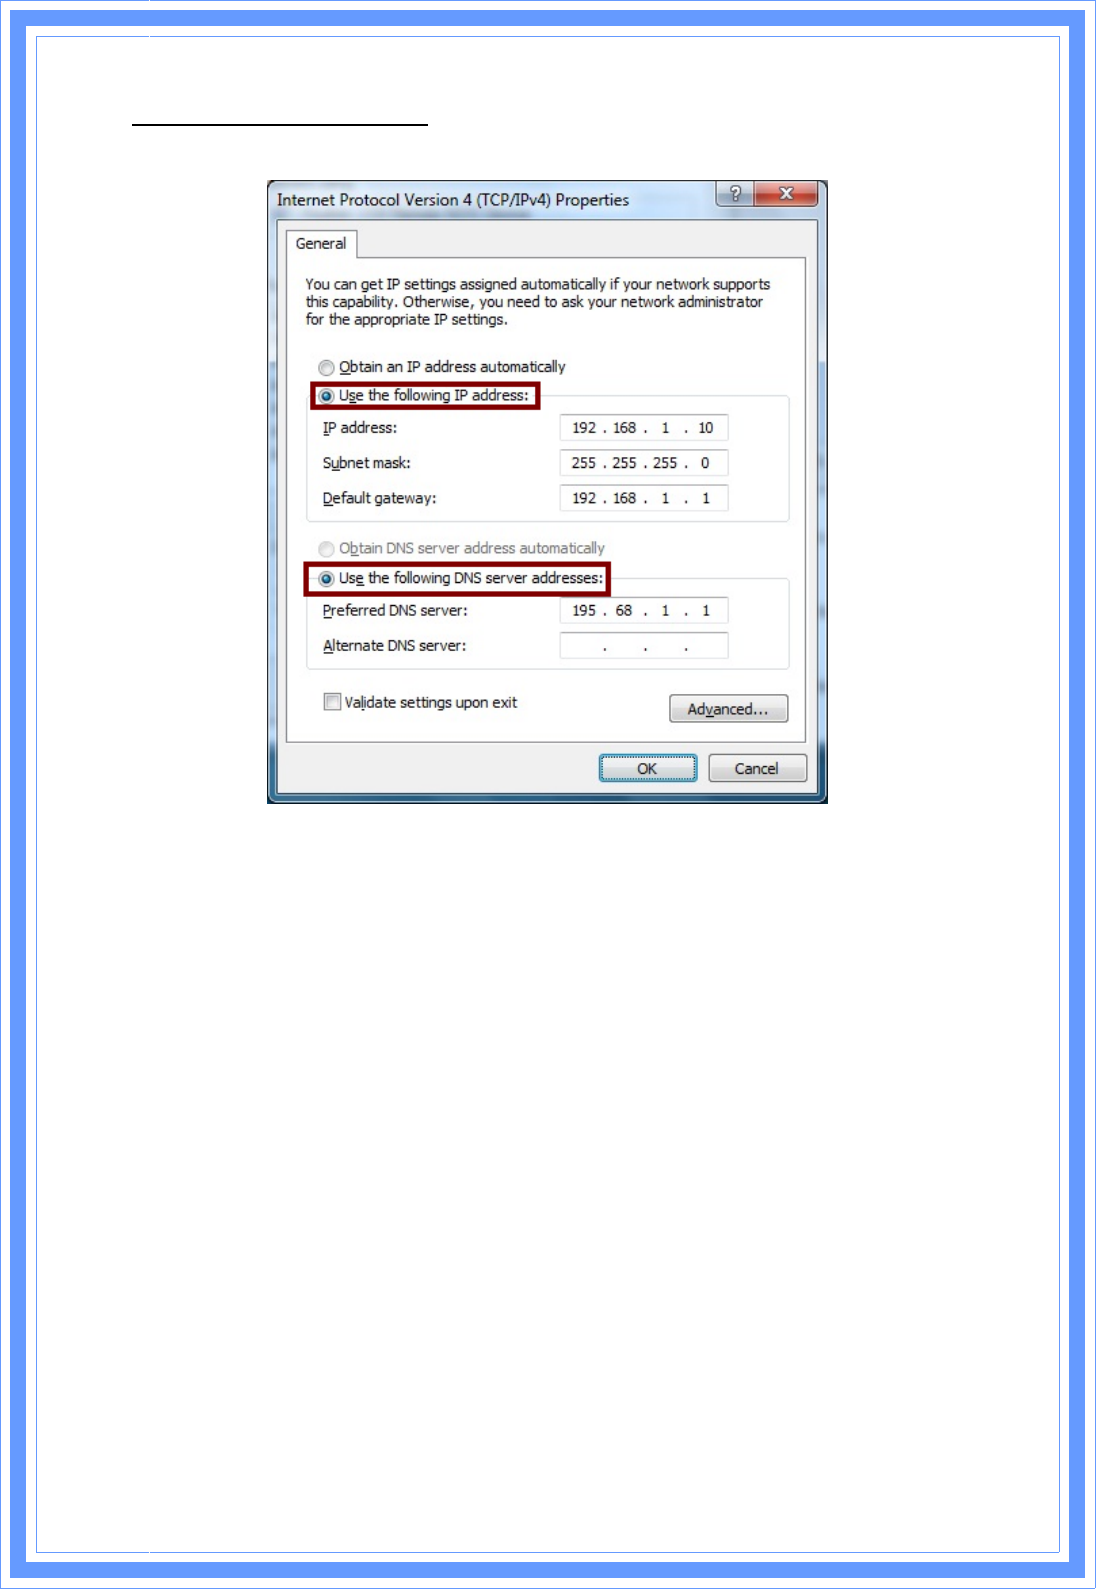
c) Select “Use the following IP address” and “Use the following DNS server addresses”.
IP address: Fill in IP address 192.168.1.x (x is a number between 2 to 254).
Subnet mask: Default value is 255.255.255.0.
Default gateway: Default value is 192.168.1.1.
Preferred DNS server: Fill in preferred DNS server IP address.
Alternate DNS server: Fill in alternate DNS server IP address.
Θ! If you decide to use IP address from Wireless Router, select “Obtain an IP address
automatically”.
Θ! If you decide to use the IP address you are desired, select “Use the following IP
address”. Make sure enter correct addresses in “IP Address” and “Subnet Mask”
fields.
Θ! You must set Wireless Router’s IP address as “Default Gateway”.
Θ! If the DNS Server fields are empty, select “Use the following DNS server addresses”
and enter the DNS address is provided by your ISP, then click “OK”.
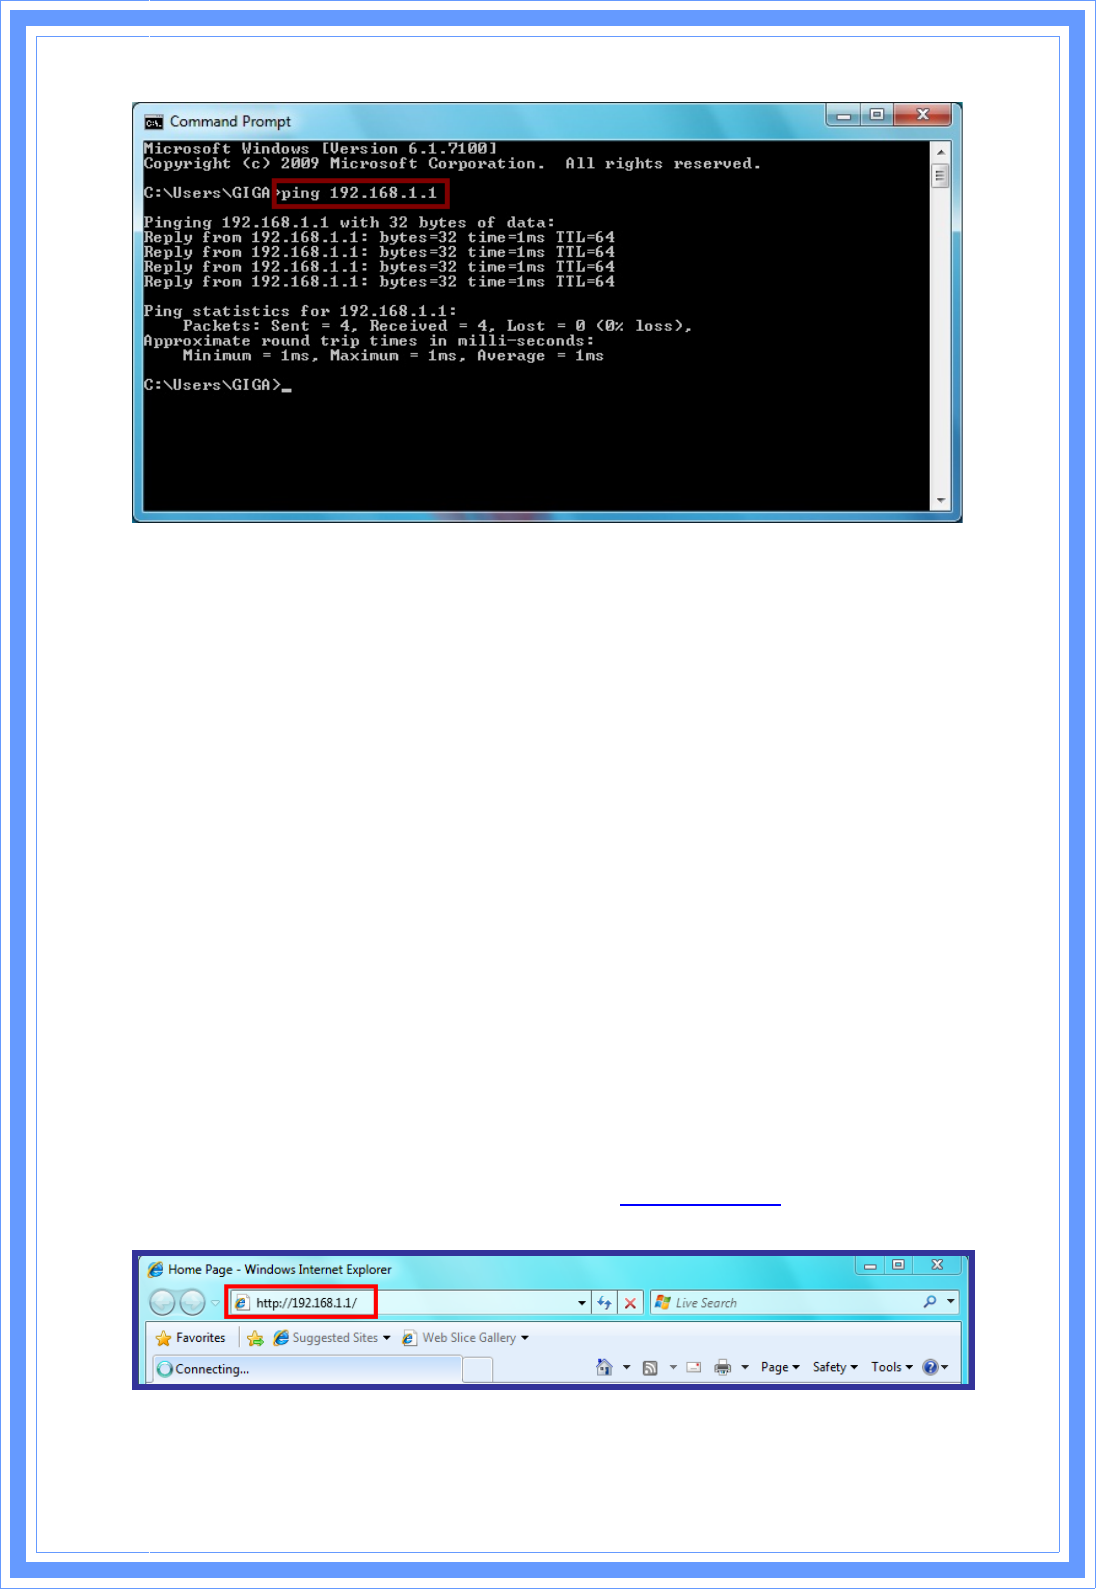
You can use ping command under DOS prompt to check if you have setup TCP/IP protocol
correctly and if your computer has successfully connected to this router.
1) Type ping 192.168.1.1 under DOS prompt and the following messages will appear:
1
9
If the communication link between your computer and router is not setup correctly, after you
type ping 192.168.1.1 under DOS prompt following messages will appear:
Pinging 192.168.1.1 with 32 bytes of data:
Request timed out.
Request timed out.
Request timed out.
This failure might be caused by cable issue or something wrong in configuration procedure.
3. Configure Wireless Router via Web Based Utility
The Wireless Router implements a Web server allowing user configure this device via the web
based Utility. This Utility provides comprehensive system management scheme, including
system configuration, performance monitoring, system maintenance and administration.
3.1 Access Web Based Configuration Utility
To access the Web-Based Configuration Utility, you have to launch your Internet Browser. (MS
IE 6.0 or later, Netscape Navigator 4.7 or later).
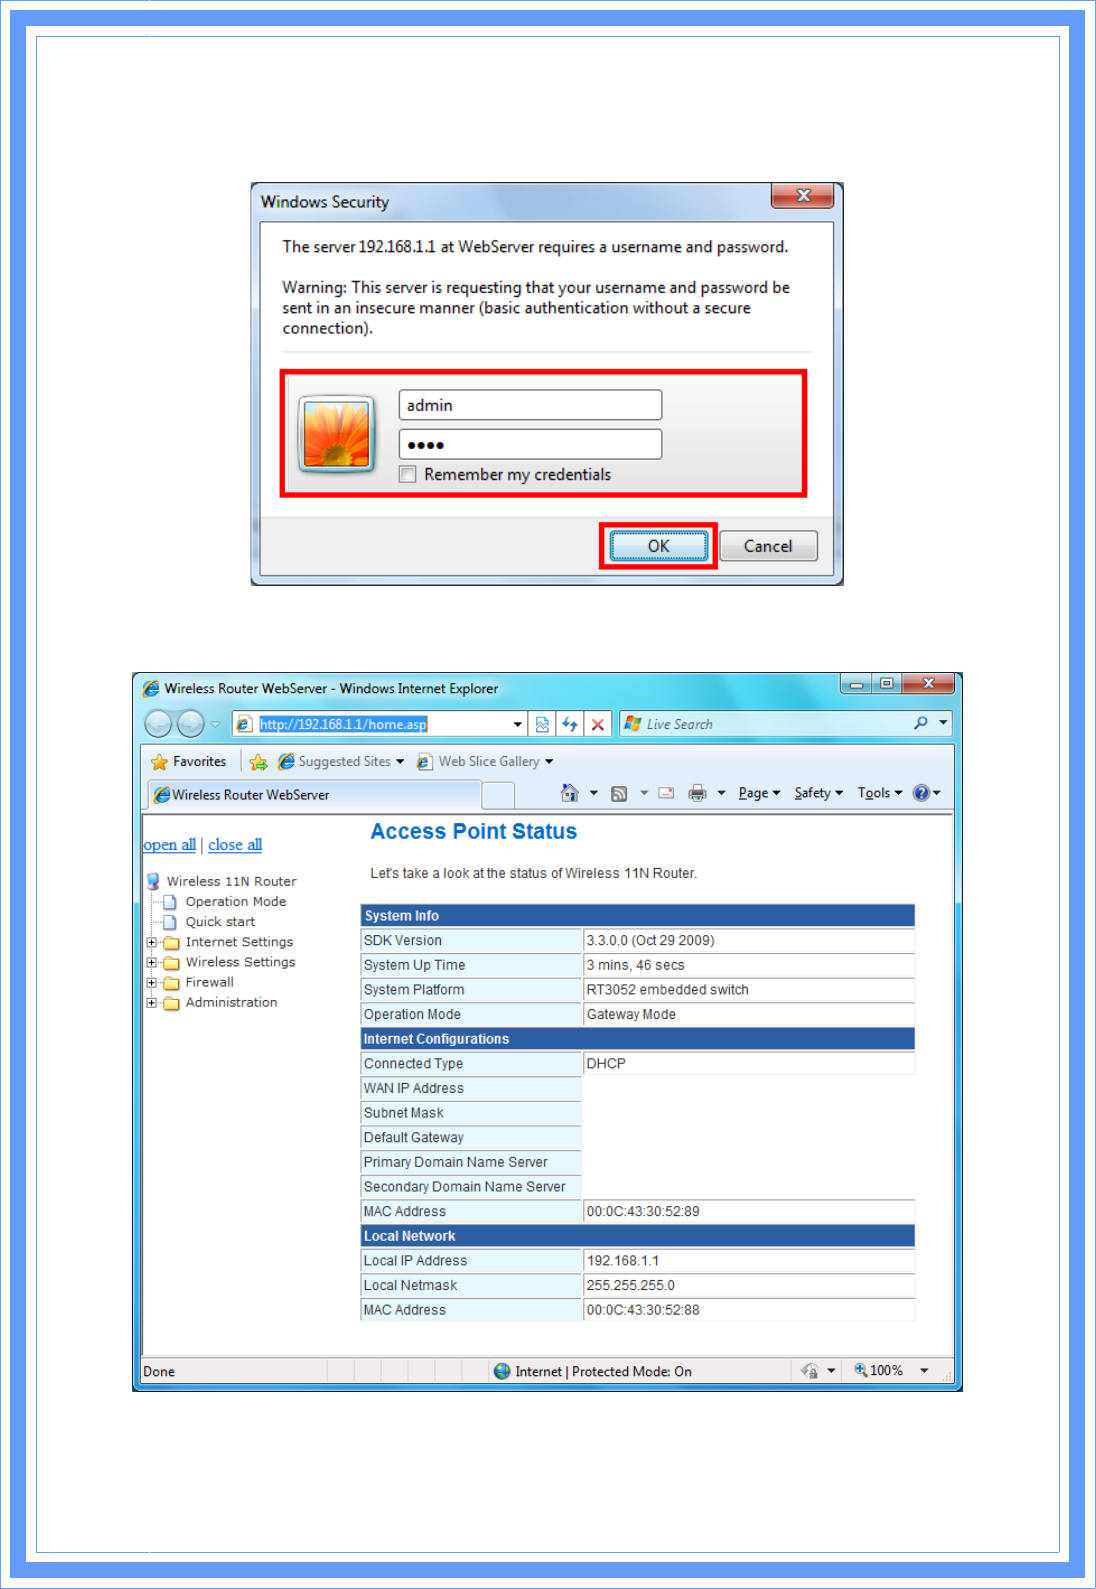
Step1: Enter Wireless Router’s default IP address as http://192.168.1.1 in the Address field
then press Enter.
2
0
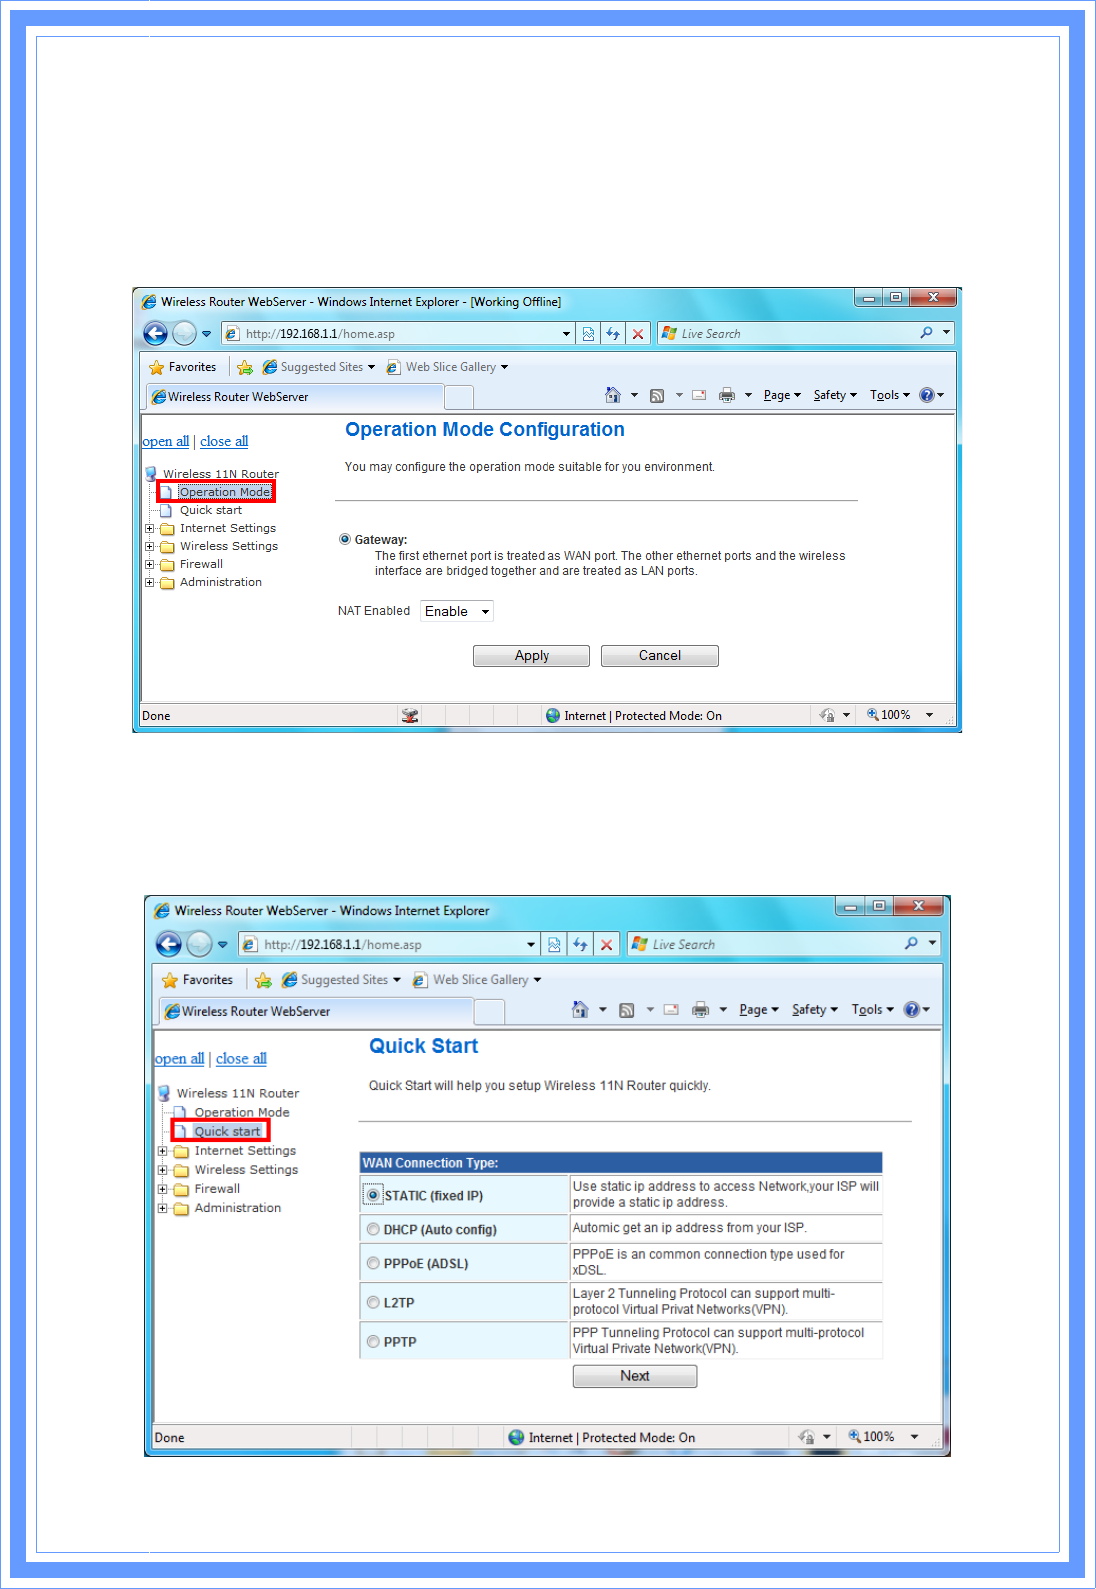
Step2: Login dialog box will appear, enter admin as Administrator Name and 1234 as default
Administrator Password, and then click “OK” to access Configuration Utility.
Step3: After log in, you can see the Main menu as below.
2
1
3.2 Operation Mode
In this option, you can configure the operation mode which suitable for your environment. The
default setting is Gateway. There have three modes is provided:
-- Gateway: The first Ethernet port is treated as WAN port. The other Ethernet ports and the
wireless interface are bridge together and are treated as LAN ports.
3.3 Quick Start
Quick Start will help you setup Wireless 11n Router quickly. There have five types of WAN
Connections: Static (Fixed IP), DHCP (Auto Config), PPPoE (ADSL), PPTP, and L2TP.
2
2
3.4 Internet Settings
The Internet Settings contains the following sections:
Ϩ WAN ϨLAN ϨDHCP Clients
Ϩ VPN Passthrough ϨDNS ϨAdvanced Routing
3.4.1 WAN
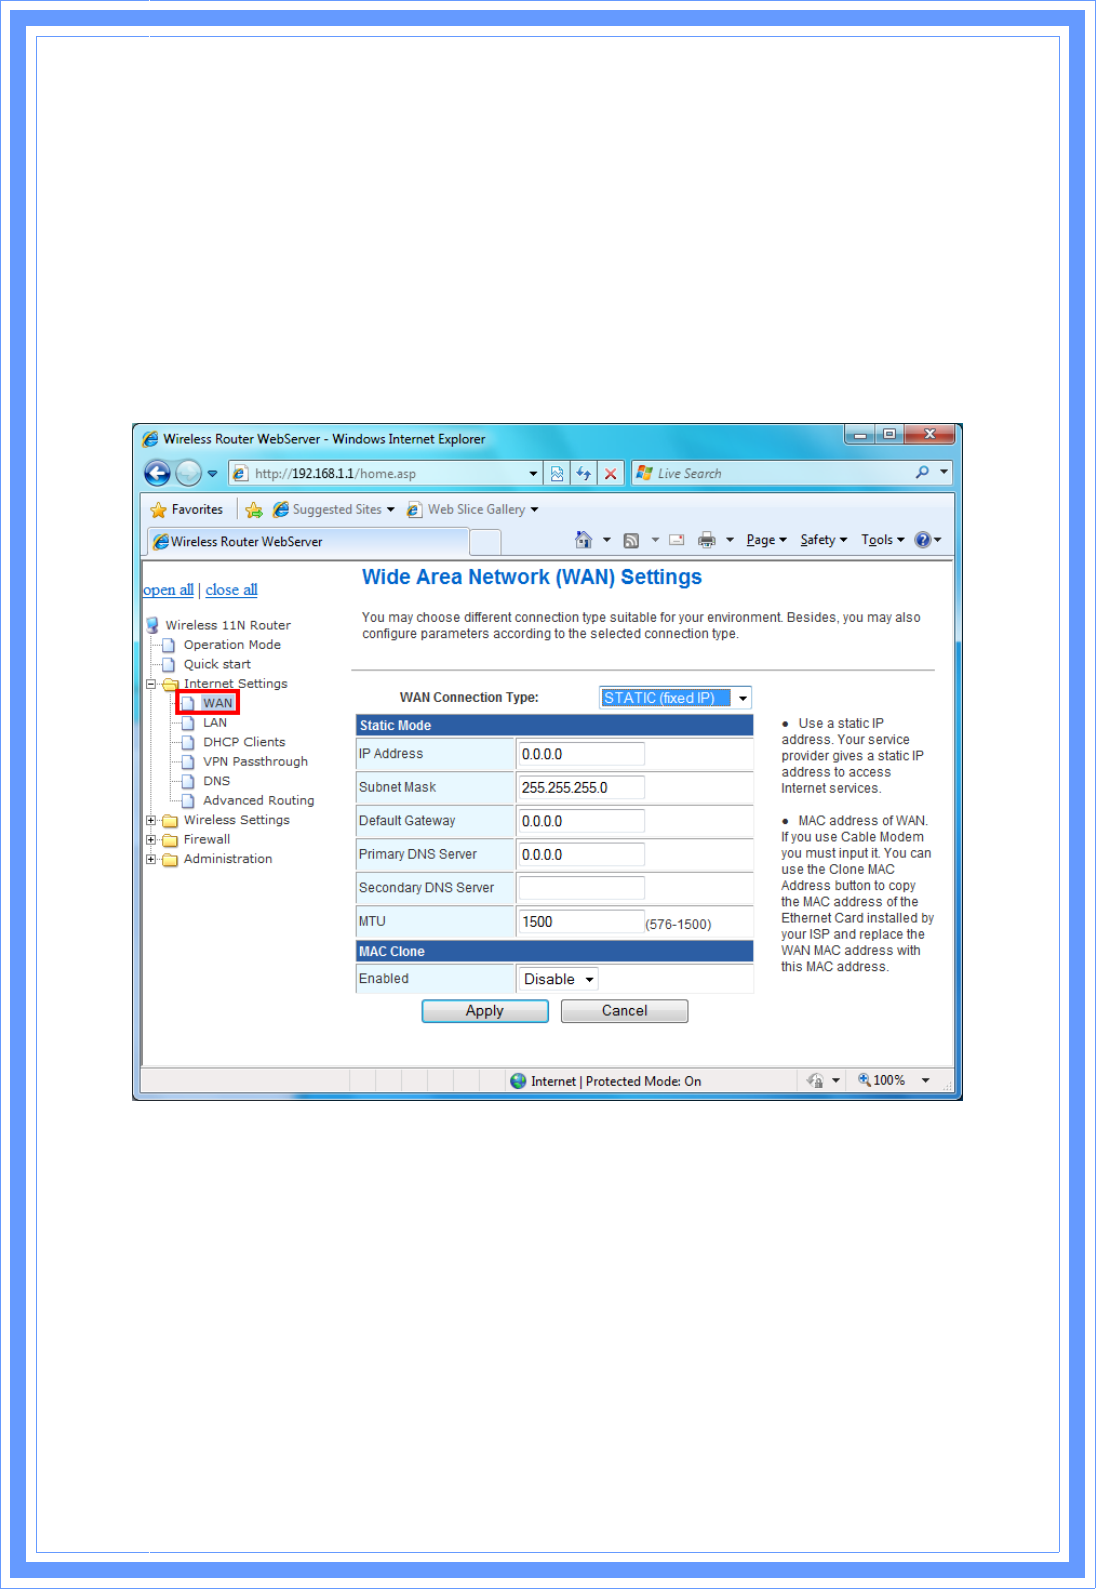
The WAN port is the connection of the 802.11n AP Router module to existing broadband
device such as Cable modem or ADSL CPE. Click WAN on Internet Setting, below screen will
prompt for WAN setting.
This AP Router supports 5 methods of obtaining the WAN IP Address:
-- Static IP (fixed IP): Use static IP address to access Network. Your ISP will provide a static
IP address.
-- DHCP (Auto Config): Automatic gets IP address from your ISP.
-- PPPoE (ADSL): PPPoE is an common connection type used for xDSL.
-- PPTP: PPP Tunneling Protocol can support multi-protocol Virtual Private Network (VPN).
-- L2TP: Layer 2 Tunneling Protocol can support multi-protocol Virtual Private Networks (VPN)
3.4.2 LAN
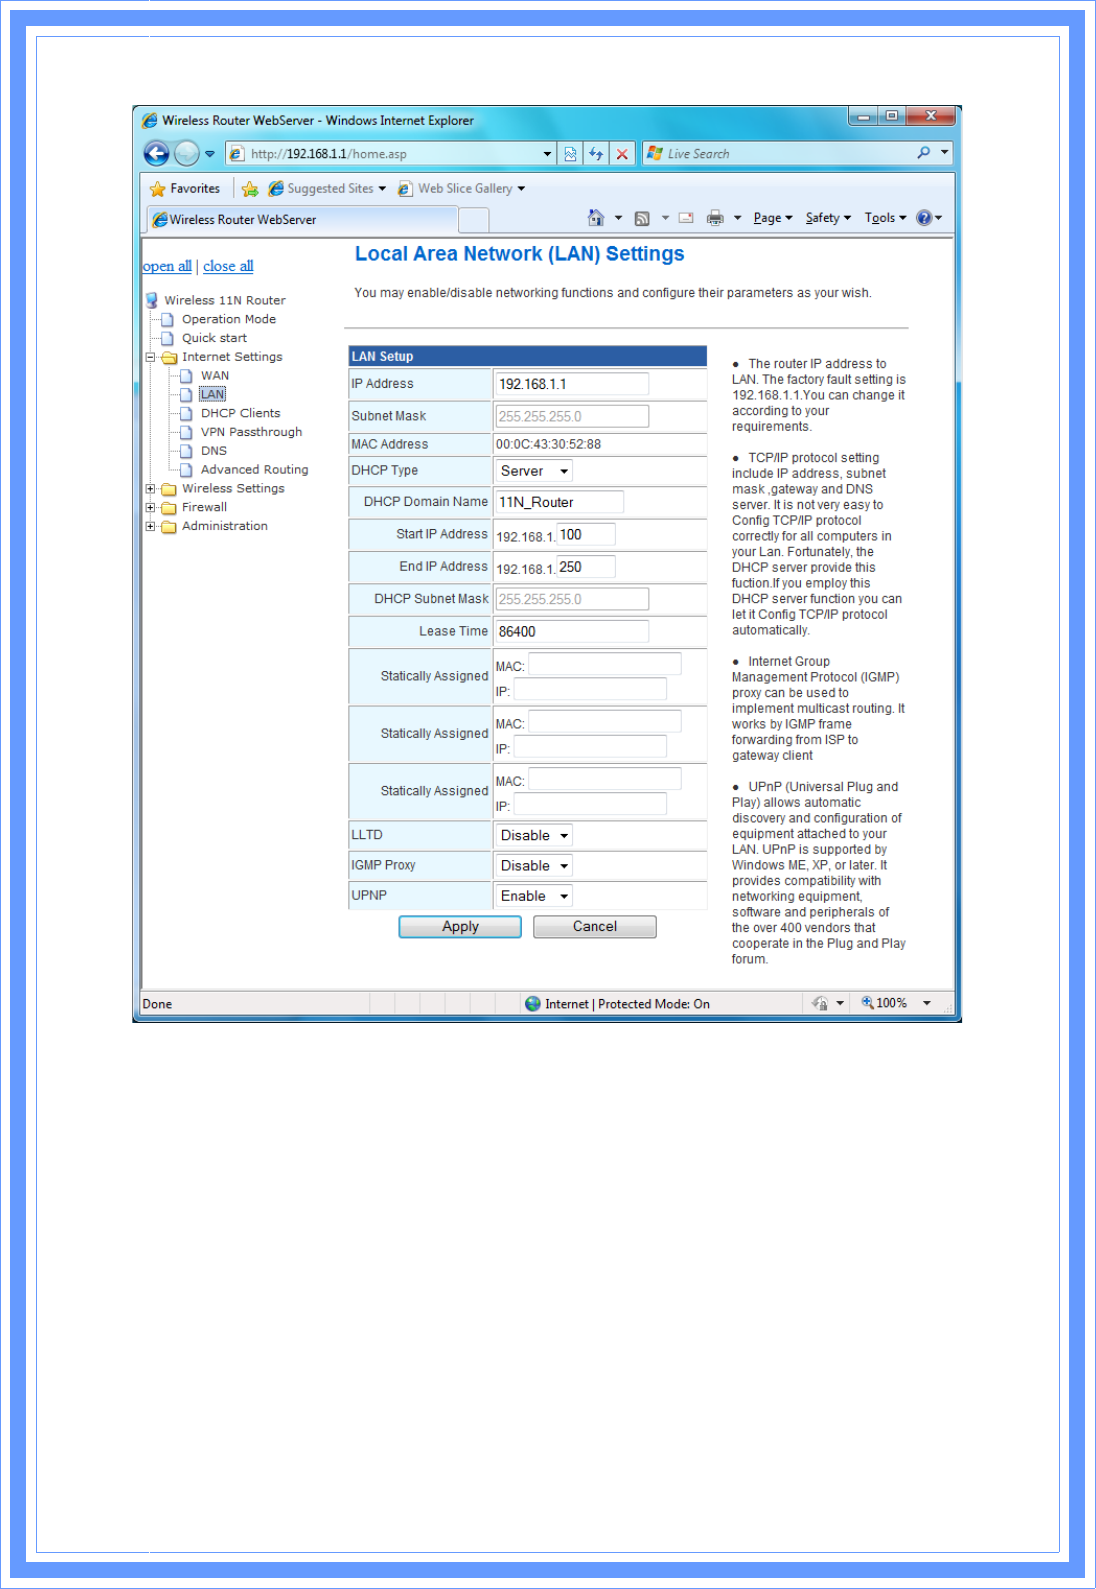
You may enable/disable networking functions and configure the parameters as your need.
2
3
IP Address: The router IP address to LAN. The factory default setting is 192.168.1.1. You can
change it according to your requirements.
Subnet Mask: The LAN net-mask. Default: 255.255.255.0
DHCP Type: Select Disable to disable this Router to distribute IP address. Select Server to
enable this Router to distribute IP addresses (DHCP server). And the following field will be
activated for you to enter this starting IP address.
Start IP address: Specify the starting IP address of the IP address pool. Default Start IP:
192.168.1.100.
End IP address: Specify the ending IP address of the IP address pool. Default End IP:
192.168.1.250.
Lease Time: Specify the time duration for which the settings will be in effect. Default: 86400
seconds.
2
4
LLTD: Default: Disable.
IGMP Proxy (Internet Group Management Protocol): IGMP proxy can be used to implement
multicast routing. It works by IGMP frame forwarding from ISP to gateway client. Default:
Disable.
UPnP (Universal Plug and Play): UPuP is architecture for pervasive peer-to-peer network
connectivity of PCs and intelligent devices or appliances, particularly within the home. UPnP
builds on Internet standards and technologies, such as TCP/IP, HTTP, and XML, to enable
these devices automatically connect with one another and work together to make networking –
particularly home networking – possible for more people. UPnP allows automatic discovery
and configuration of equipment attached to your LAN, UPnP is support Windows Me, XP or
later. It provides compatibility with networking equipment, software and peripherals of the over
400 vendors that cooperate in the Play and Play forum. Default: Disable.
3.4.3 DHCP Clients
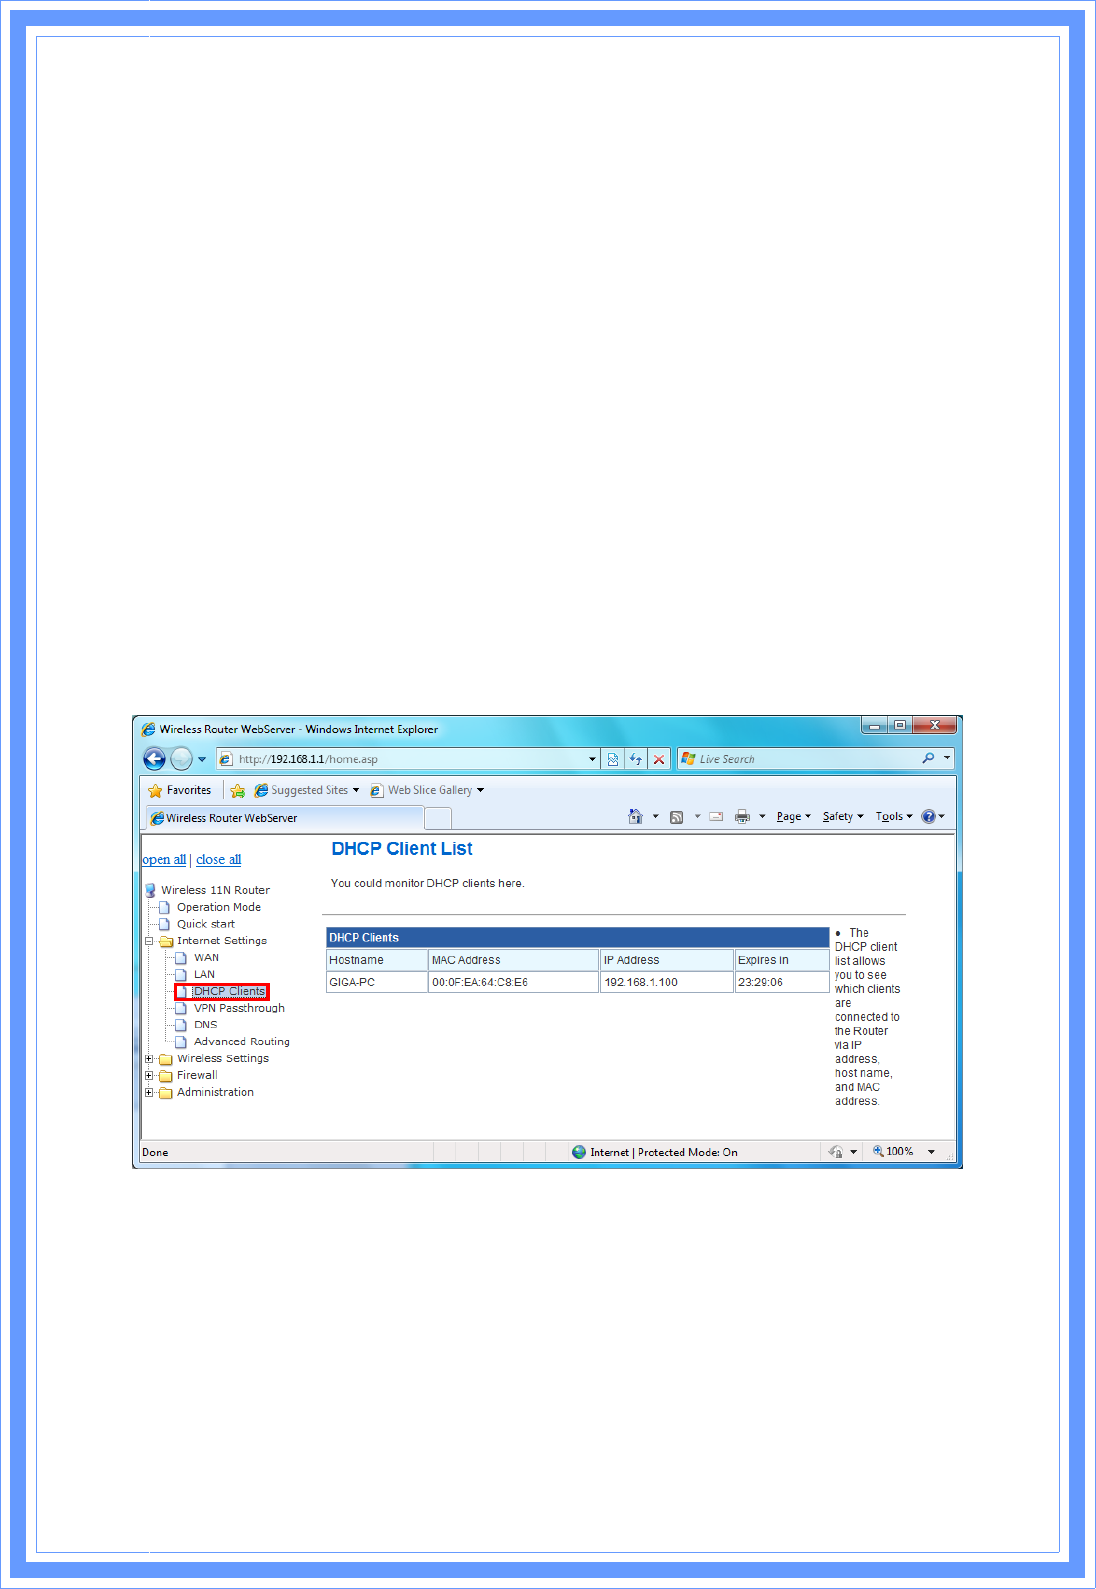
DHCP client computers connected to the device will have their information displayed in the
DHCP Client List table. The table will show the MAC Address, IP Address and Expired in of the
DHCP lease for each client computer.
MAC Address: Shows the client MAC address information.
IP address: Shows the client IP address information.
Expires in: Shows the expired time of the client.
2
5
3.4.4 VPN Passthrough
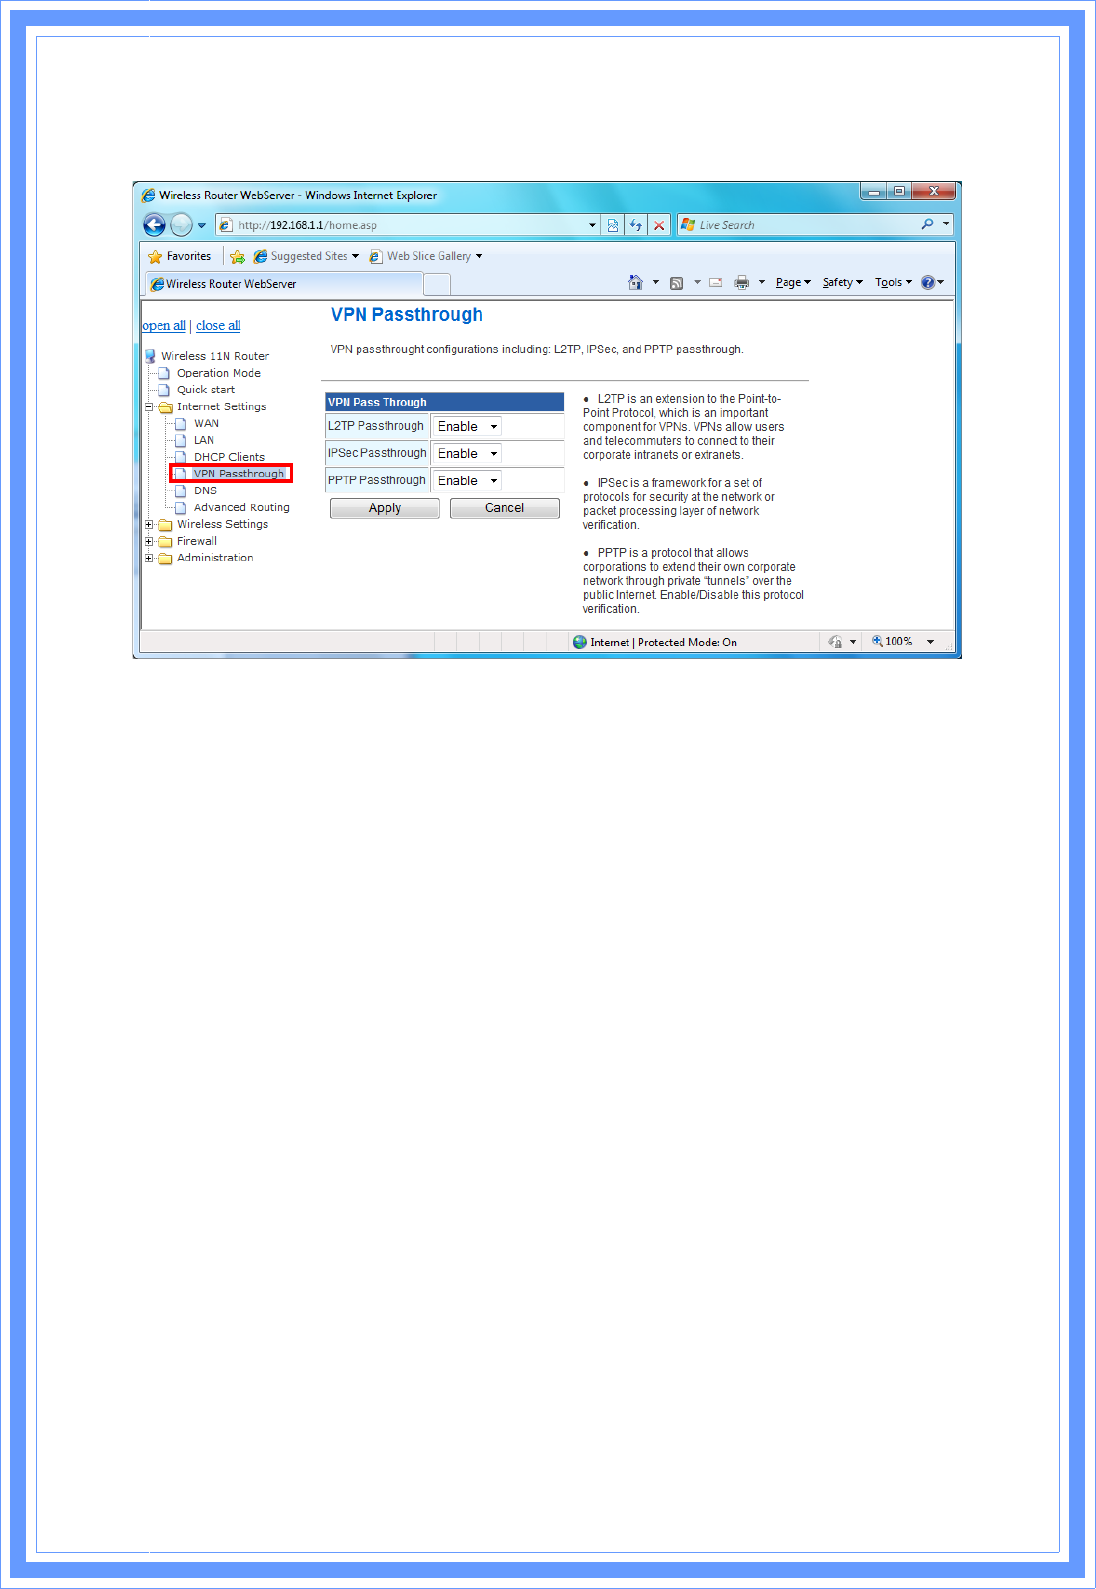
VPN passthrough configurations including: L2TP, IPSec, and PPTP passthrough.
L2TP Passthrough: L2TP is an extension to the Point-to-Point Protocol, which is an important
component for VPNs. VPNs allow users and telecommuters to connect to their corporate
intranets or extranets.
IPSec Passthrough: IPSec is a framework for a set of protocols for security at the network or
packet processing layer of network verification.
PPTP Passthrough: PPTP is a protocol that allows corporations to extend their own
corporate network through private “tunnels” over the public Internet. Enable/Disable this
protocol verification.
2
6
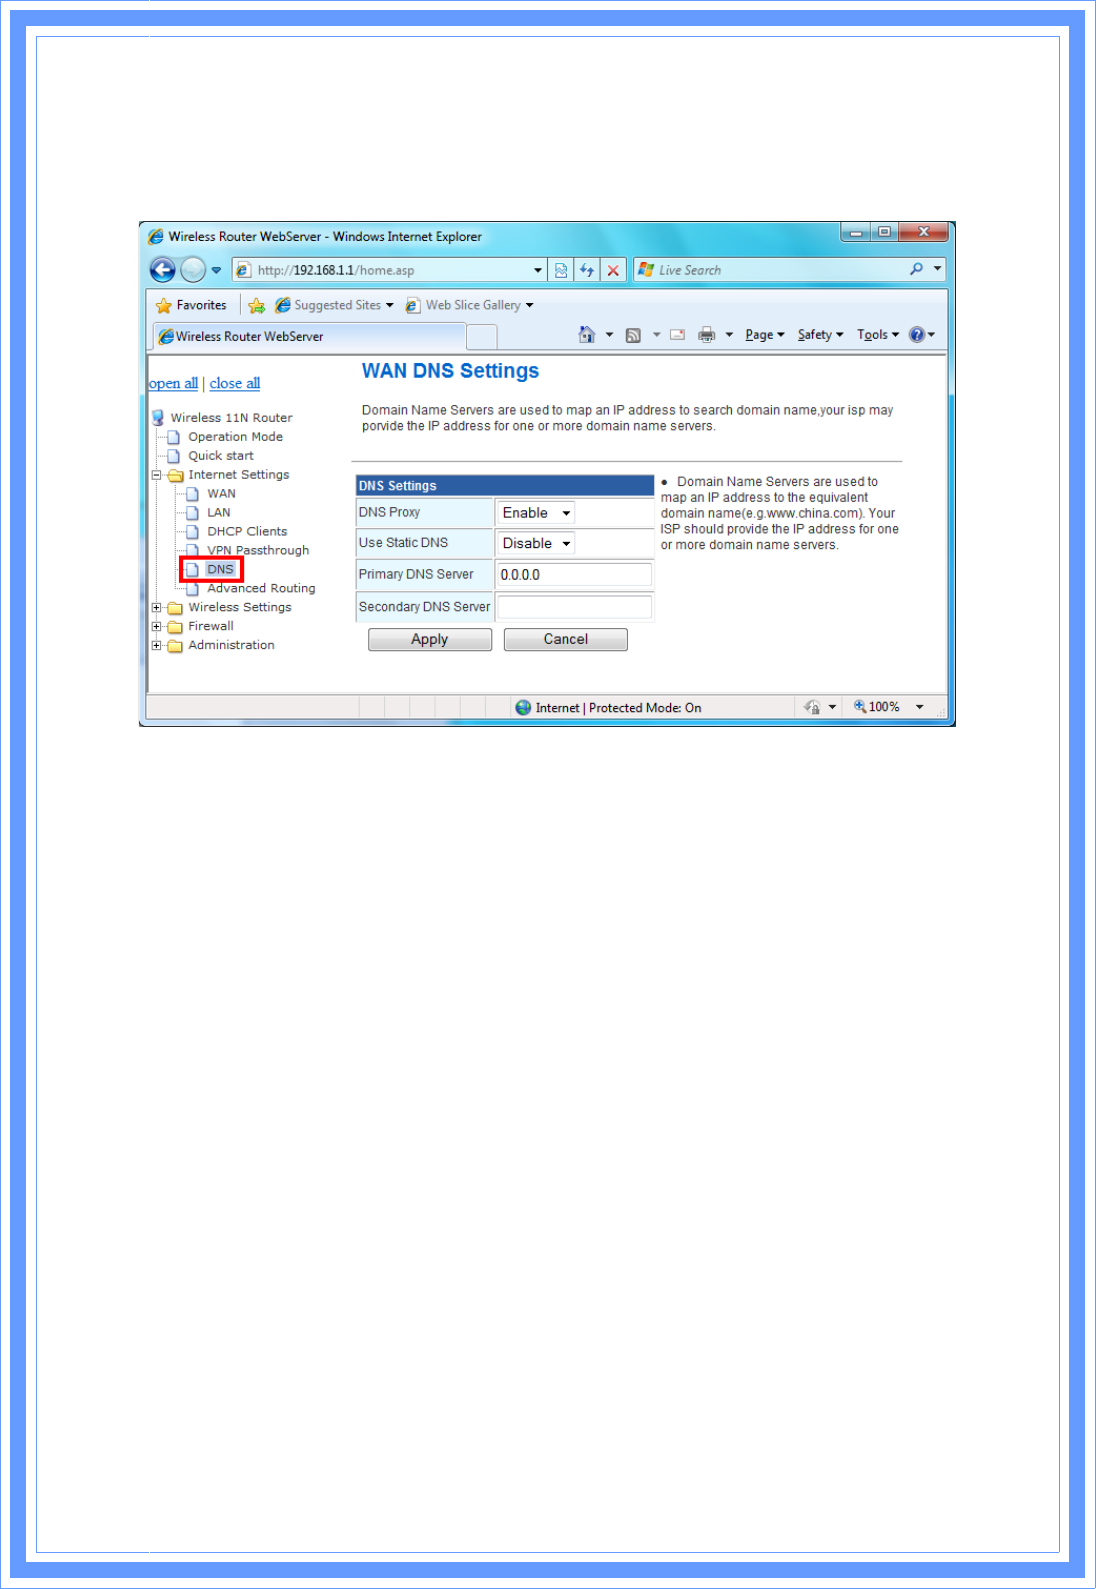
3.4.5 DNS
Domain Name Servers are used to map an IP address to search domain name, your ISP may
provide the IP address for one or more domain name servers.
DNS Proxy: Enable/Disable this Wireless Router DNS.
Use Static DNS: Specify the DNS server. Default is Disable.
Primary DNS Server: Enter the IP address of the Primary DNS Server provided by your ISP.
Secondary DNS Server: Enter the IP address of the Secondary DNS Server provided by your
ISP.
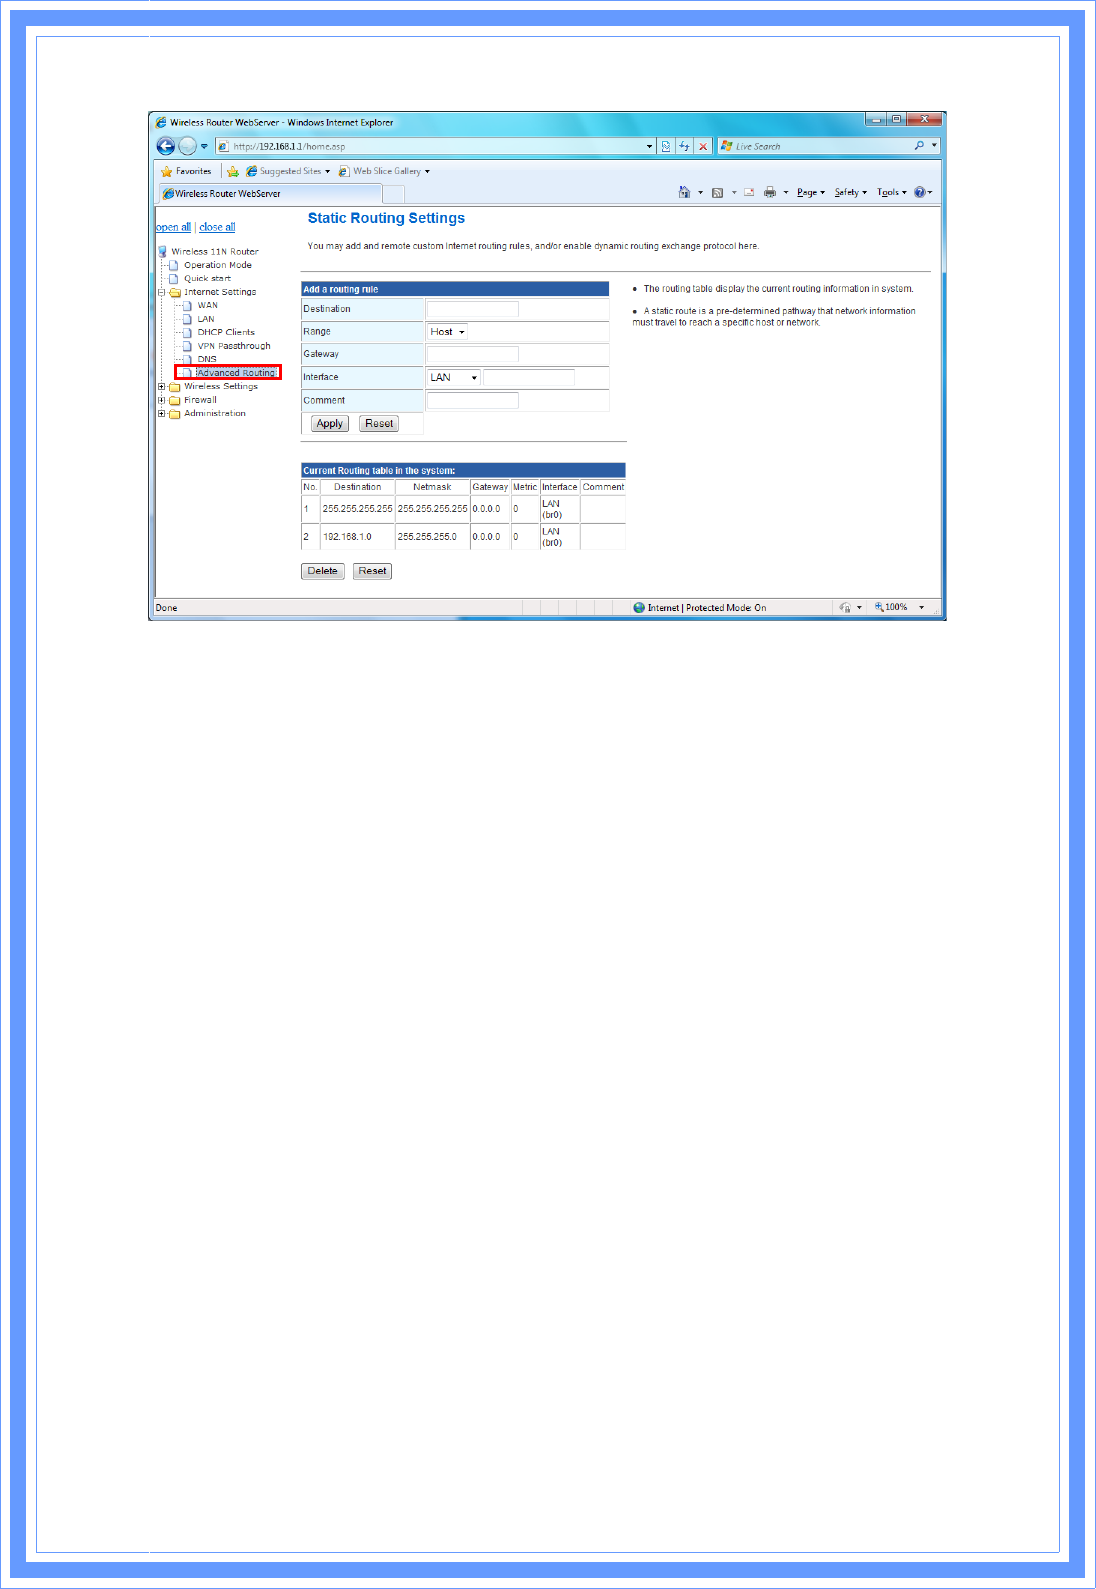
3.4.6 Advanced Routing
Static routes are special routes that the network administrator manually enters into the router
configuration. The route table allows the user to configure and define all the static routes
supported by the router. You may add and remote custom Internet routing rules, and/or enable
dynamic routing exchange protocol here.
2
7
<Add a routing rule>
Destination: Defines the base IP address (Network Number) that will be compared with the
destination IP address (after an AND with NetMask) to see if this is the target route.
Range: select the range from drop down list
Gateway: Enter IP address of the next hop router that will be used to route traffic for this route.
If this route is local (defines the locally connected hosts and Type = Host) then this IP address
MUST be the IP Address of the router.
Interface: Select the interface mode from drop down list.
Comment: Enter the comment for this static route.
<Current Routing table in the system>
To see the detail settings of current routing information in the system.
3.5 Wireless Settings
The wireless settings can be quickly configured as a wireless access point for roaming client
by setting the access identifier and channel number. It also supports data encryption and client
filtering. The Wireless Settings contains the following sections:
ϨBasic ϨAdvanced ϨSecurity ϨWDS
ϨWPS ϨStation List ϨSite Survey
3.5.1 Basic
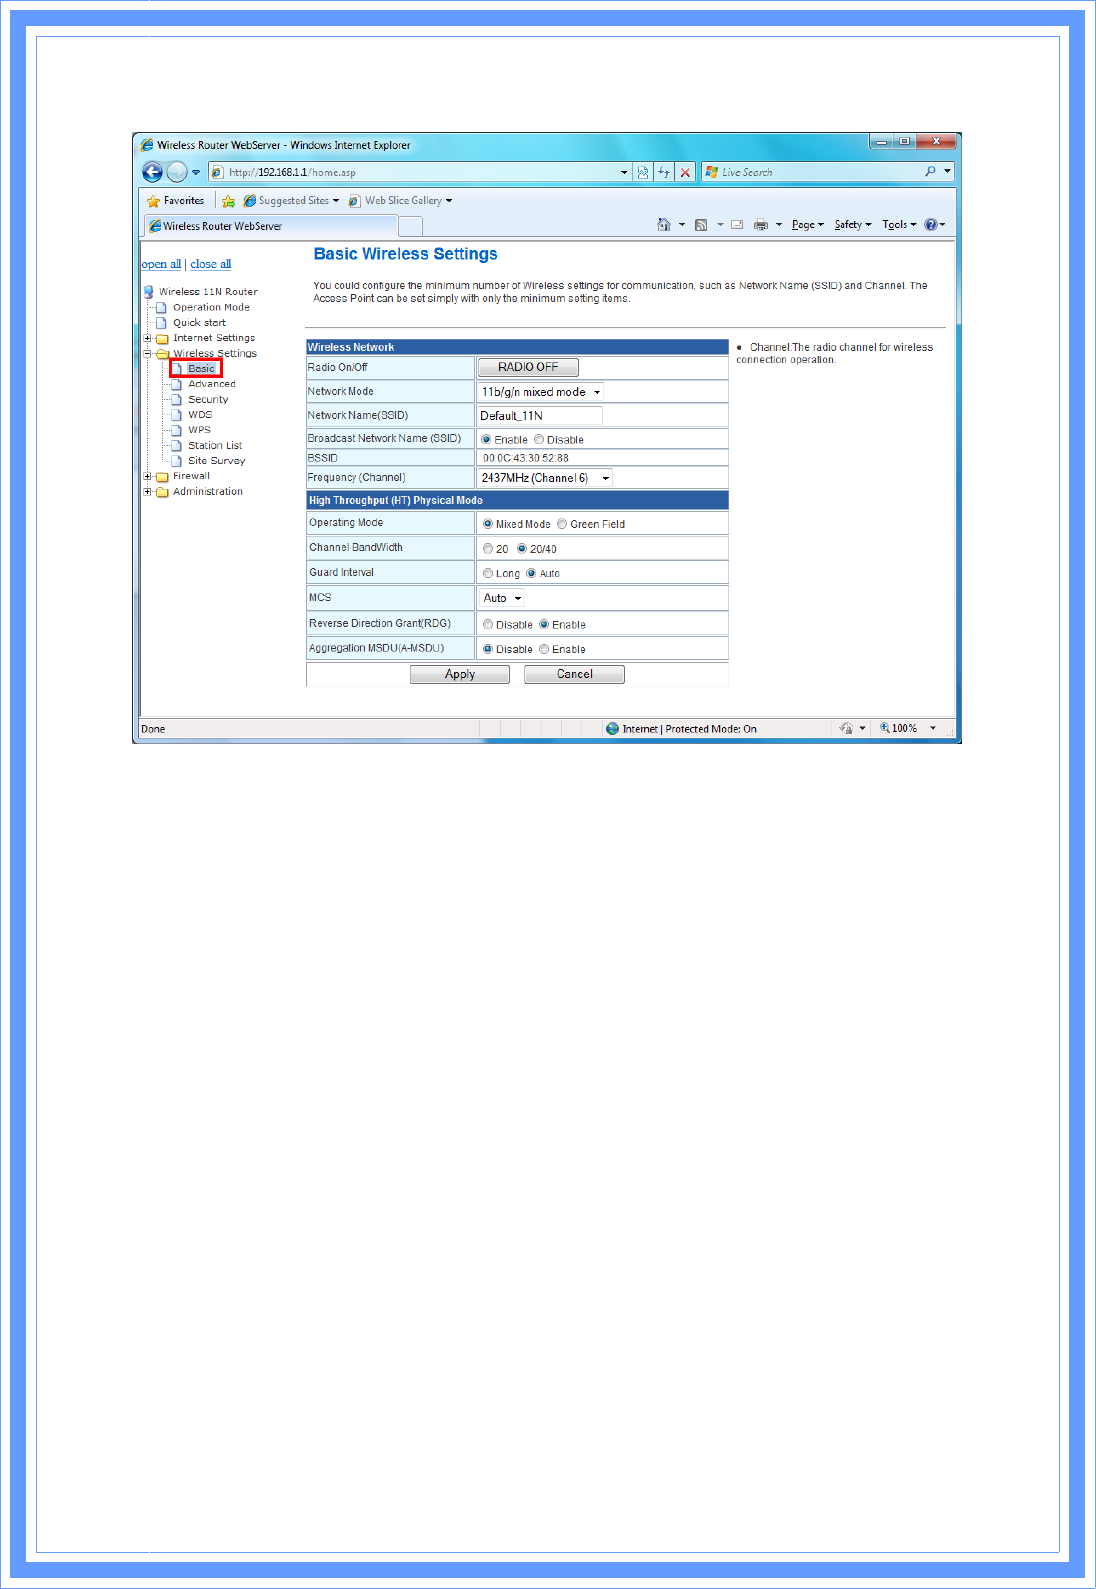
This function allows you to define SSID, and Channel for the wireless connection. These
parameters are used for the wireless stations to connect to the Access Point. Click Basic
2
8
Setting on Wireless Settings, below screen will prompt for Basic Setting.
[Wireless Network]
Radio On/Off: Enable/Disable the Wireless radio feature. Default setting is Radio OFF.
Network Mode: Choose a mode from the pull-down menu. Make sure that you have the
equipment you need. As you’re looking for products in stores or on the Internet, you might
notice that you can choose equipment that supports five different wireless networking
technologies: 802.11b/g/n Mixed,802.11b/g Mixed,802.11b,802.11g, and 802.11n
Network Name (SSID): Specify the network name. Each Wireless LAN network uses a unique
Network Name to identify the network. This name is called the Service Set Identifier (SSID).
When you set up your wireless adapter, you specify the SSID. If you want to connect to an
existing network, you must use the make up your own name and use it on each computer. The
name can be up to 20 characters long and contain letters and numbers. Default name is
Default_11N.
Broadcast Network Name (SSID): Enable- This wireless AP will broadcast its SSID to station.
Disable- This wireless AP will not broadcast its SSIF to stations. If stations ant to connect to
this wireless AP, this AP’s SSID should be known in advance to make a connection.
BSSID: MAC address of this wireless router.
Frequency: The radio channel for wireless connection operation. Select 1~13 or AutoSelect
from the pull-down menu.

2
9
[HT Physical Mode]
Operation Mode: Mixed mode operation – In this mode, both the MIMO-OFDM system and
the legacy systems shall co-exist. The MIMO system should have the capability to generate
legacy packets for the legacy system and high throughout packets for MIMO-OFDM systems.
So, the burst structure should be decodable to legacy systems and should provide better
performance to MIMO-systems. Green Field mode operation – This mode is similar to
mixed mode where the transmission happens only between the MIMO-OFDM systems in the
presence of legacy receivers. However, the MIMO-OFDM packets transmitted in this ode will
have only MIMO specific preambles and no legacy format preambles are present.
Channel Bandwidth: Specify the channel bandwidth. Select 20 or 20/40, default setting is
20/40.
Guard Interval: Guard-Interval is used to reduce interference of multi-path channel. Longer
guard periods allow more distant echoes to be tolerated. However, longer guard intervals
reduce the channel efficiency
MCS: The Modulation and Coding Scheme (MCS) is a value that determines the modulation,
coding and number of spatial channels. Select the MCS from the pull-down menu 0~15, 32 or
Auto. Default: Auto.
Reverse Direction Grant (RDG): Enable/Disable RDG function. Reverse Direction Grant
(RDG) essentially speeds up data transmission between clients and their wireless access
point/router by allowing other wireless workstations to send/receive data simultaneously
without contending for shared medium.
Aggregation MSDUA (A-MSDU): A-MSDU increases the maximum frame transmission size
from 2,304 bytes to almost 8k bytes (7935 to be exact) while A-MPDU allows up to 64k bytes.
3.5.2 Advanced
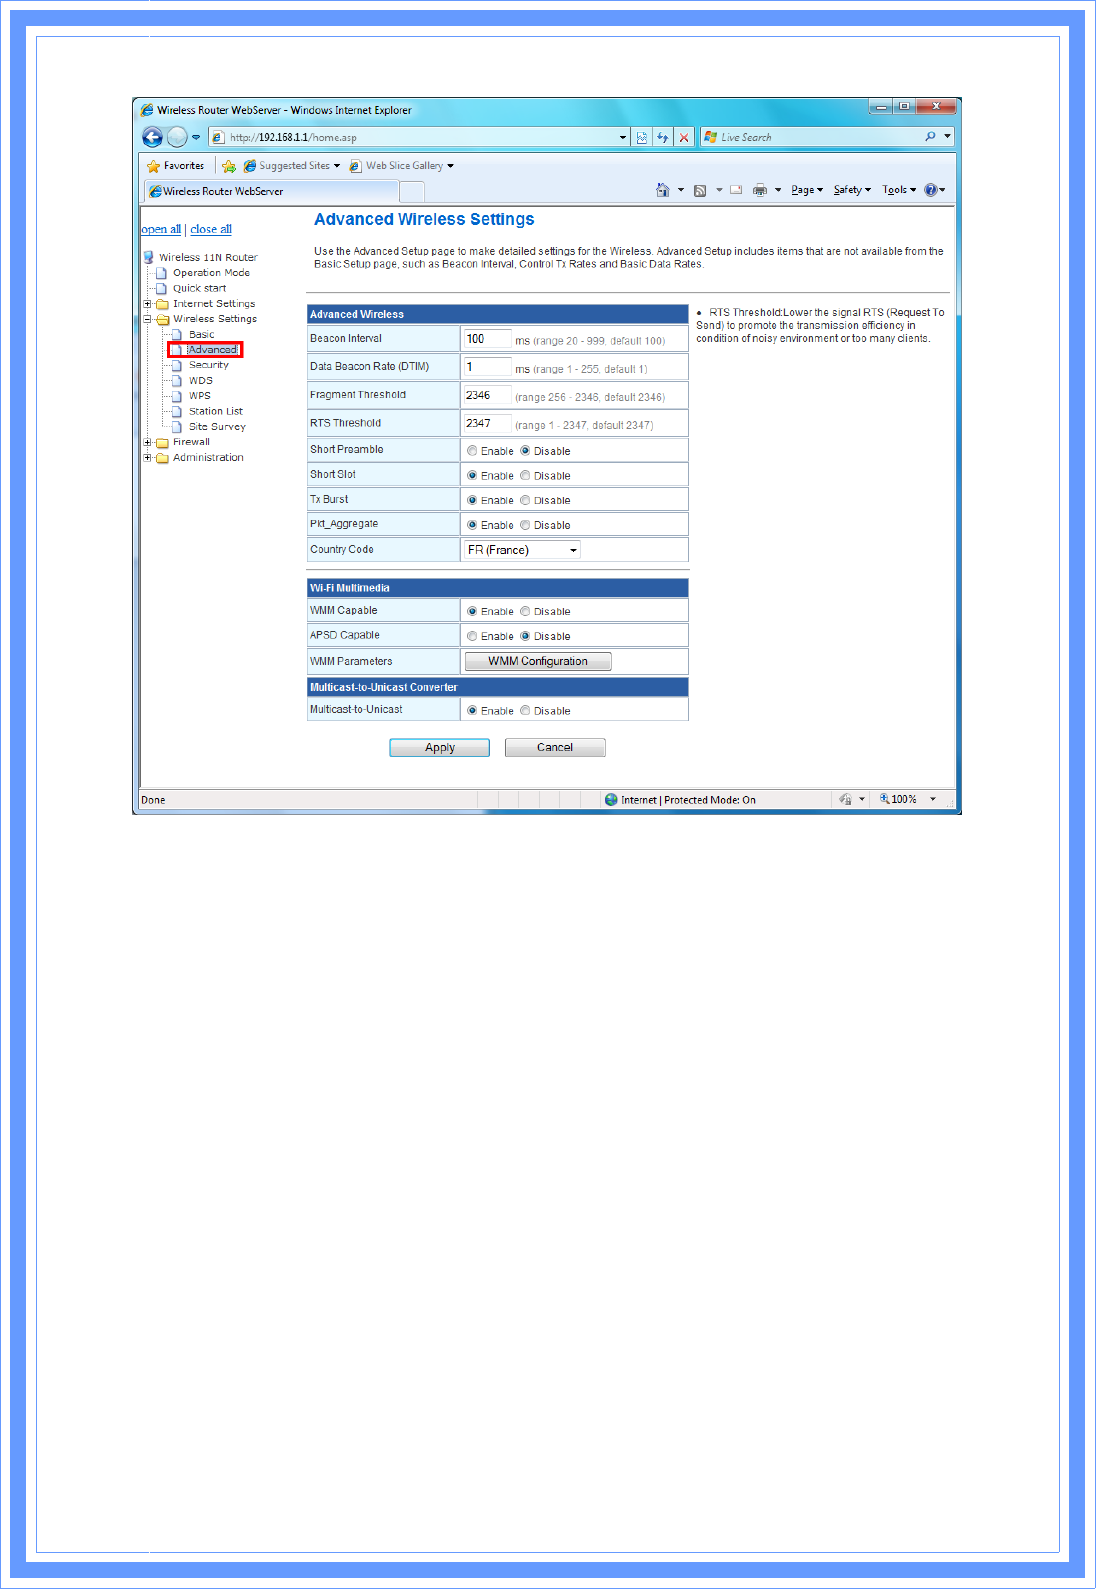
These settings are only for more technically advanced users who have a sufficient knowledge
about wireless LAN. These settings should not be changed unless you know what effect the
changes will have on your AP router. Click Advanced on Wireless Settings, below screen will
prompt for Advanced Setting.
3
0
[Advanced Wireless]
Beacon Interval: Beacon Interval is the amount of time between beacon transmissions.
Before a station enters power save mode, the station needs the beacon interval to know when
to wake up to receive the beacon. Range 20-999, default is 100.
Data Beacon Rate (DTIM): The DTIM period indicates how many beacon frames can transmit
before another DTIM is transmitted. Range from 1-255, default setting is 1.
Fragment Threshold: Fragmentation mechanism is used for improving the efficiency when
high traffic flows along in the wireless network. If the 802.11g MIMO Wireless Router often
transmit large files in wireless network, you can enter new Fragment Threshold value to split
the packet. The value can be set from 256 to 2346. The default value is 2346.
RTS Threshold: RTS stands for “Request to Send”. This parameter controls what size data
packet the low level RF protocol issues to an RTS packet. RTS Threshold is a mechanism
implemented to prevent the “Hidden Node” problem. If the “Hidden Node” problem is an issue,
please specify the packet size. The RTS mechanism will be activated if the data size exceeds
the value you set. The default is 2347.
Short Preamble: Select Disable or Enable this function, default setting is Disable. A preamble
is a signal used in wireless environment to synchronize the transmitting timing including
Synchronization and Start frame delimiter.
3
1
Short Slot: When short slot is Enable, the wireless device uses the short slot time only when
all clients associated to the 802.11g, 2.4-GHz radio supports short slot time. Short slot time is
an 802.11g-only feature and does not apply to 802.11a radios.
Tx Burst: Enable the transmitted time slot can increase transmission throughput.
Pkt_Aggregate: The parameter can be used to increase the delivered bandwidth in
community networks including fixed and mobile stations.
Country Code: Select your local Country code for pull-down menu. For Safety (FCC or CE
rule) reason, please don’t change this default setting.
[Wi-Fi Multimedia]
WMM prioritizes traffic according to four Access Categories (AC) - voice, video, best effort,
and background. However, it does not provide guaranteed throughput. It is suitable for simple
applications that require QoS, such as Voice over IP (VoIP) on Wi-Fi phones.
WMM Capable: Enable/Disable the Wi-Fi Multimedia (WMM) support.
APSD Capable: Enable/Disable the APSD support.
WMM Parameters: Click “WMM Configuration” to setup the WMM function.
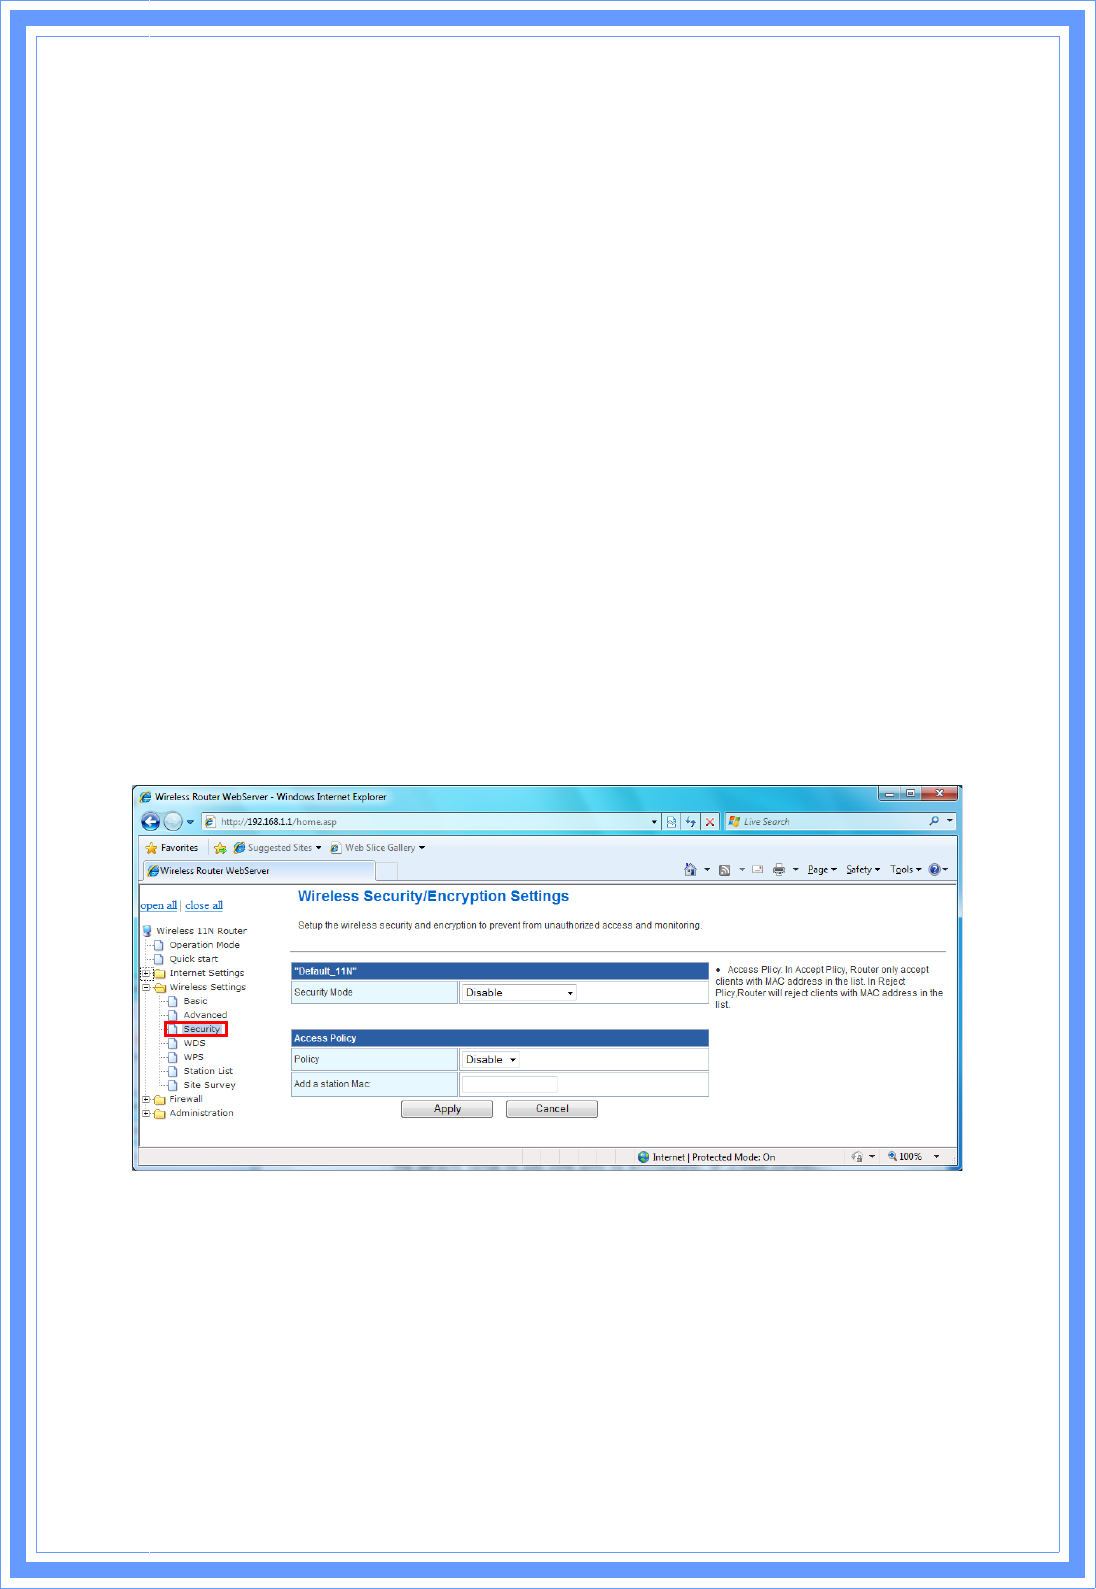
3.5.3 Security
This function allows you setup the wireless security. Setup the wireless security and
encryption to prevent from unauthorized access and monitoring.
Security Mode: This function allows you setup the wireless security. Enable security mode
could prevent any unauthorized access to your wireless network. [Open: If your wireless router
is using “Open” authentication, then the wireless adapter will need to set to the same
authentication type. Shared: Shared key is when both the sender and the recipient share a
secret key. WPA, WPA-PSK, WPA2, WPA2-PSK, WPA-PSK/WPA2-PSK, and WPA1/WPA2:
WPA-PSK offers two encryption methods, TKIP and AES. Select the type of algorithm, TKIP or
AES and then enter a WPA Shared Key of 8~64 characters in the WPA Pre-shared key field.]
Encryption Type: For Open & Shared authentication mode, the selection of encryption type

3
2
are None and WEP. For WPA, WPA2, WPA-PSK, and WPA2-PSK authentication mode, the
encryption type supports both TKIP and AES.
WPA Pre-shared Key: This is the shared secret between AP and STA, For WPA-PSK and
WPA2-PSK authentication mode, this field must be filled with character longer than 8 and less
then 64 lengths.
WEP Key: Only valid when using WEP encryption algorithm. The key must match with the
AP’s Key. There are several formats to enter the keys.
-- Hexadecimal (128bits): 26 Hex characters (0-9, a-f)
-- ASCII (128bits): 13 ASCII characters.
WPA Algorithms: Select TKIP,AES,TKIP/AES for the WPA Algorithms.
WPA Key Renewal Interval: This field specifies the interval (in seconds) after which a WPA
group key is changed.
Enable Pre-Authentication: The two most important features beyond WPA to become
standardized through 802.11i/WPA2 are: pre-authentication, which enables secure fast
roaming without noticeable signal latency.
RADIUS Server: RADIUS is an authentication, authorization and accounting client-server
protocol. The client is a Network Access Server that desires to authenticate its links. The
server is a server that has access to a user database with authentication information.
IP Address: The IP address of the RADIUS server for 802.1X wireless authentication and
dynamic WEP key derivation. Enter the RADIUS Server’s IP address provided by your ISP.
Port: The UDP port number for connection to the RADIUS server. Enter the RADIUS Server’s
port number provided by your ISP. The default is 1812.
Shared Secret (Connection Secret):Enter the password that the router shares with the
RADIUS Server.
Access Policy: In Accept Policy, Router only accepts clients with MAC address in the list. In
Reject Policy, Router will reject clients with MAC address in the list.
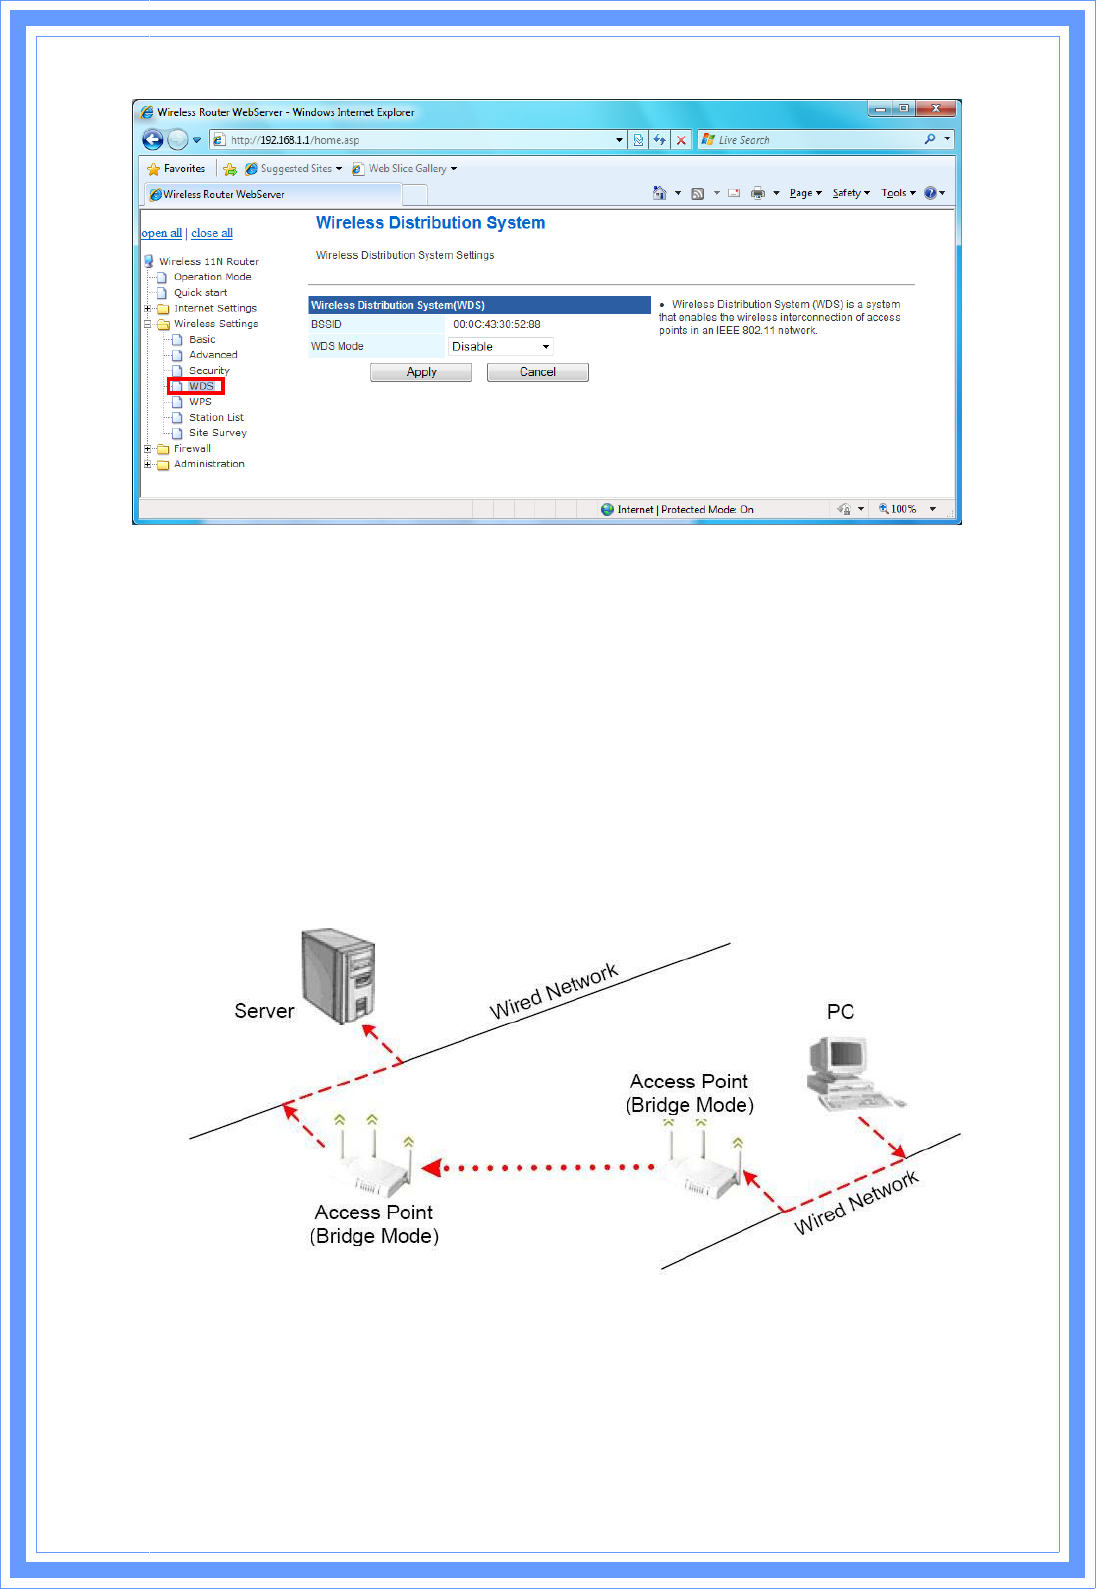
3.5.4 WDS
Wireless Distribution System (WDS) is a system that enables the wireless interconnection of
access points in an IEEE 802.11 network.
WDS is another way for AP router to join an existing Wi-Fi network. The WDS feature is
normally used in large, open areas where pulling a wire is restricted or not cost effective and in
residential circumstances. User can use this feature to build up a large wireless network in a
large space like airports, hotels and schools…etc. This feature is also useful when users want
to bridge networks between buildings where it is impossible to deploy network cable
connections between these buildings.
3
3
There are 3 modes of WDS:
(1) Lazy – Automatic detection of WDS peers: when a LAN user searches for a network, AP
router will attempt to connect to WDS devices in its vicinity.
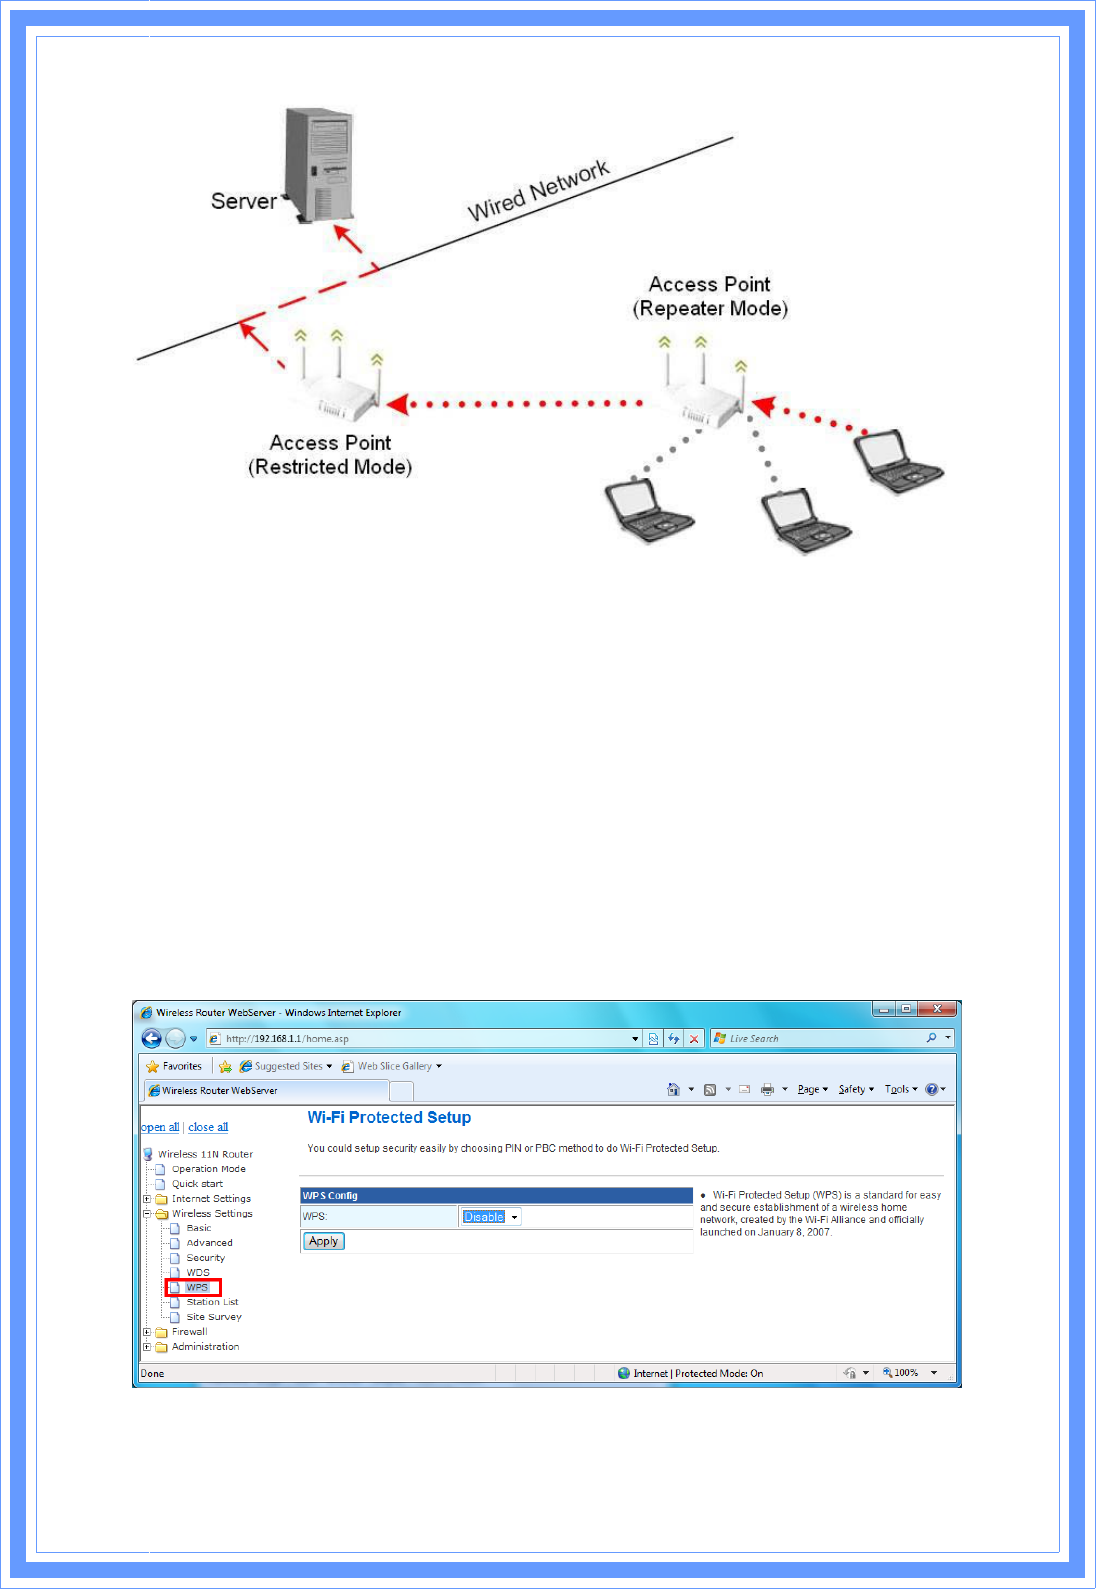
(2) Bridge – AP router will function as a wireless bridge, merely forwarding traffic between
access points, and will not respond to wireless requests. In fact, they become wireless bridges
while configured in this manner. Only a small number of access points on the market have
bridge functionality, which typically adds significant cost to the equipment. The WDS peers
must be manually stated and wireless stations will not be able to connect to AP router. You
can see from below diagram that clients do not associate to bridges, but rather, bridges are
used to link two or more wired segments together wirelessly.
(3) Repeater – AP router will act as a repeater, interconnecting between access points. WDS
peers can be determined by auto-detected (“Lazy” mode). In repeater mode, access points
have the ability to provide a wireless upstream link into the wired network rather than the
normal wired link. As you can see the below diagram, one access point serves as the
Restricted access point and the other serves as a wireless repeater.
3
4
The access point in repeater mode connects to clients as an access point and connects to the
upstream restricted access point as a client itself. Using an access point in Repeater mode is
not suggested unless absolutely necessary because cells around each access point in the
scenario must overlap by minimum of 50%.This configuration drastically reduces the range at
which clients can connect to the repeater access point. Additionally, the repeater access point
is communicating with the client as well as the upstream access point over the wireless link,
reducing throughput on the wireless segment. Users attached to the repeater access point will
likely experience low throughput and high latencies in the scenario. It is typical for wired
Ethernet port to be disabled while in repeater mode.
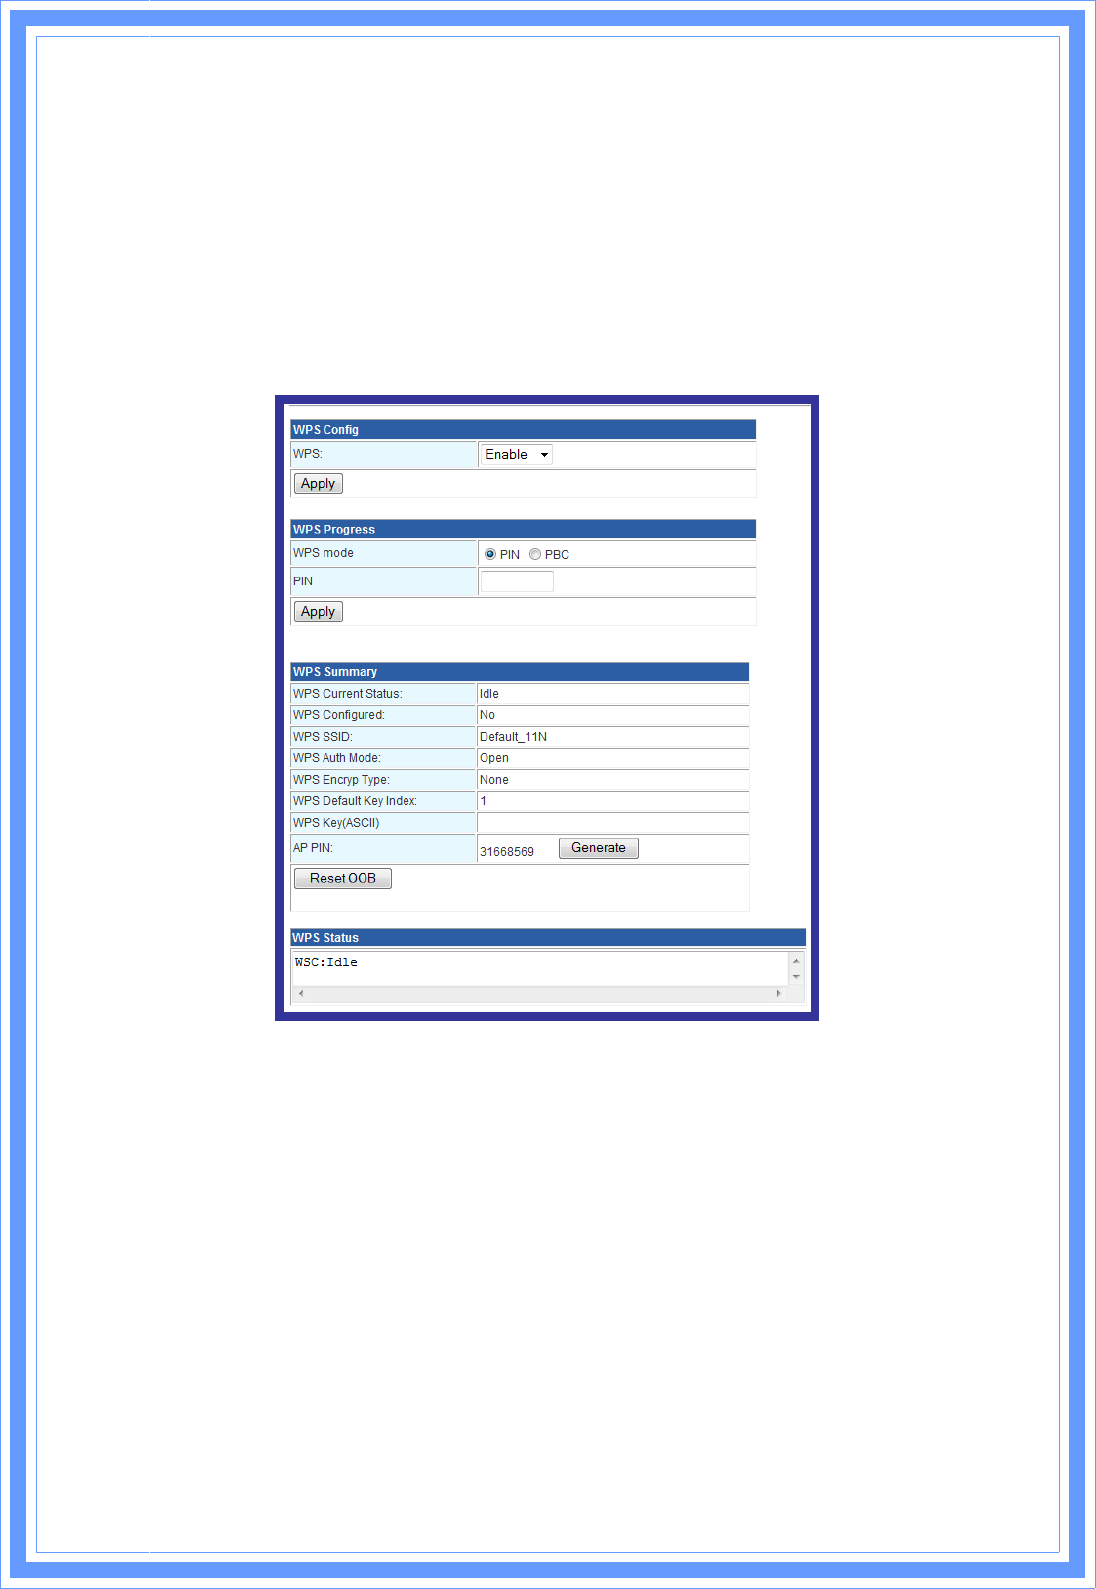
3.5.5 WPS
You could setup security easily by choosing PIN or PBC method to do Wi-Fi protected setup.
Wi-Fi Protected Setup was designed to ease setup of security enabled WiFi networks in the
home and small office environment. It supports methods that are familiar to most consumers to
3
5
configure a network and enable security, like pushing a button (PBC method) or entering a PIN
code (PIN method). The new system, which will be incorporated in Windows Vista, will work
with computers, gateways peripherals, and consumer electronics.
You would initiate a WPS mode on gateway and then enter a simple sequence of digits (like a
PIN code) or press a button, use a similarly easy method to start a secure key exchange to
retrieve the WPA/WPA2 key.
This function allows you to change the setting for WPS (Wi-Fi Protected Setup). WPS can help
your wireless client earlier automatically connect to the Access Point.
[WPS Summary]
From this section, you can view the current WPS status, Configured, SSID, Auth mode,
Encrypt Type, Default Key Index, WPS Key, and AP PIN information.
Reset OOB: Click this button to rest the settings.
[WPS Progress]
WPS Mode: Specify the AP router acts as a Registrar or an Enrollee.
In PIN method (PIN-Personal Identification Number), When your 11n router acts as a
Registrar, your must enter “Add Enrollee PIN code” on WPS config section, this Enrollee PIN
code should be provided by the Enrollee. If your 11n router acts as a Enrollee, in WPS config
section, the “PIN code of this AP” will automatically generate for you. The purpose of PIN
code is to provide the security key to Registrar (AP/Server). Therefore, WPS (Wi-Fi Protected
Setup) can be established completely.
3
6
In PBC Method (PBC-Push Button Communication), while the AP router acts as Registrar or
Enrollee, and click “Start WPS Config” button, the WPS (Wi-Fi Protected Setup) will establish
the connection automatically.
PIN: Enter the PIN code from the registrar or enrollee.
WPS Status: Here shows the current status of the WPS function.
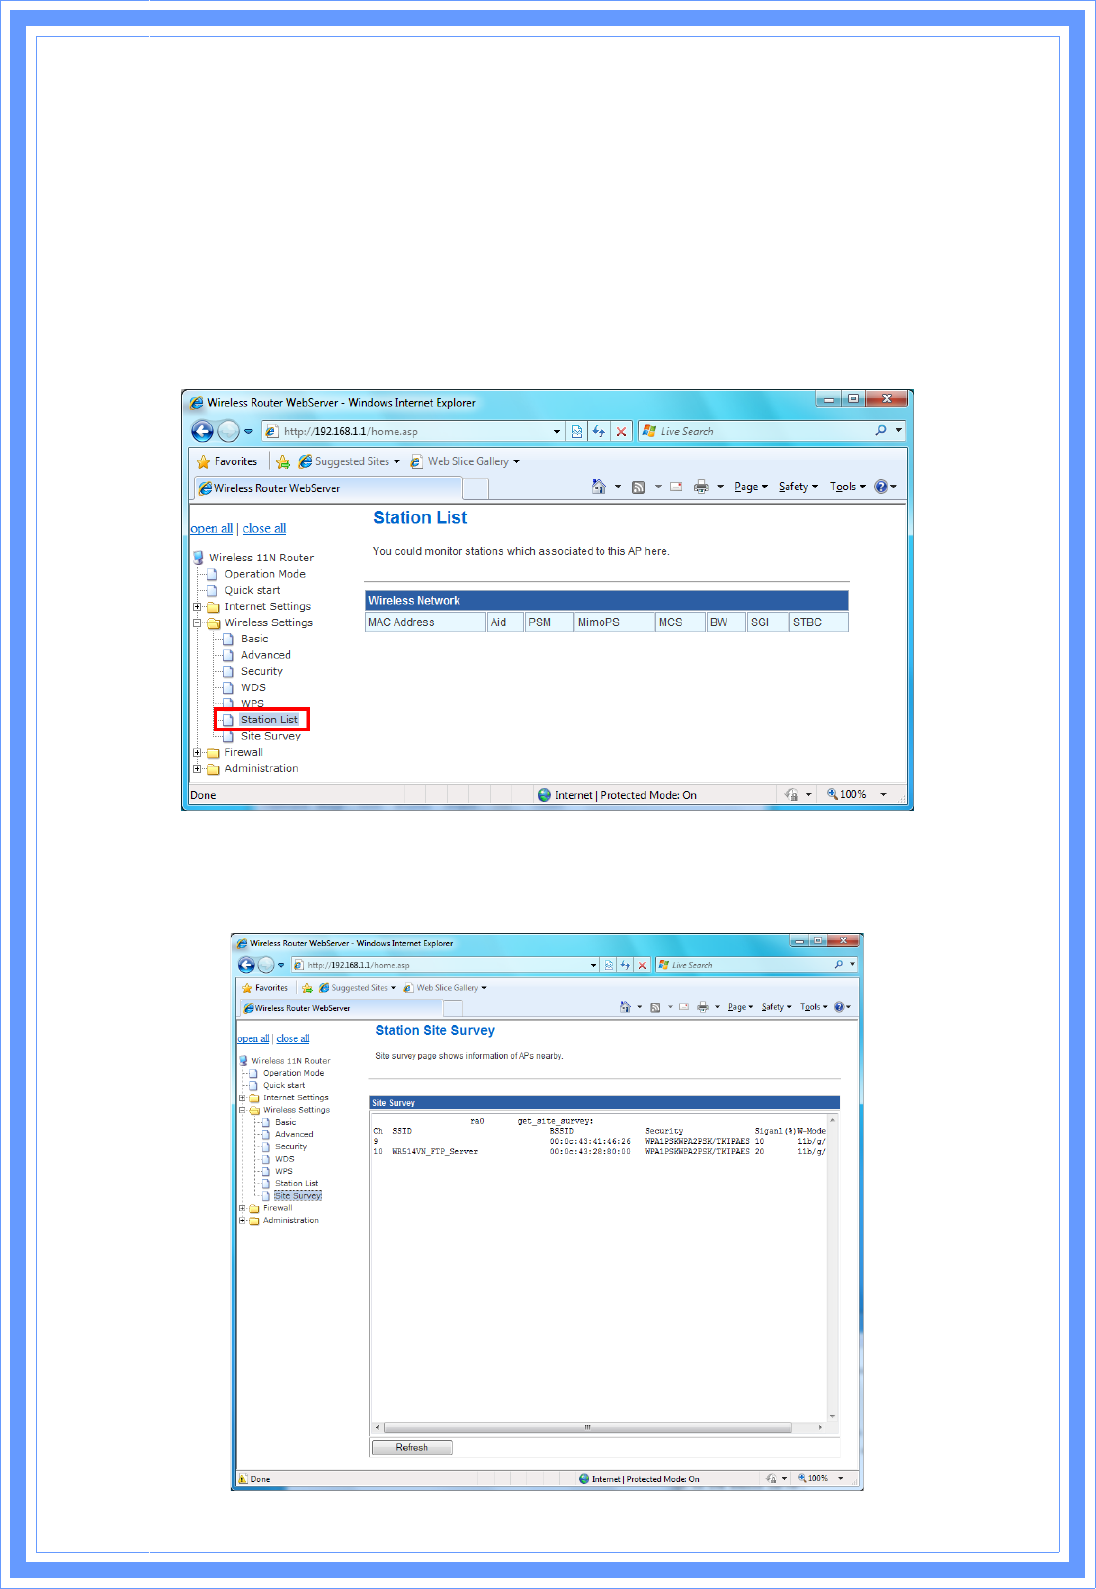
3.5.6 Station list
In this section, you can monitor stations which associated to this AP.
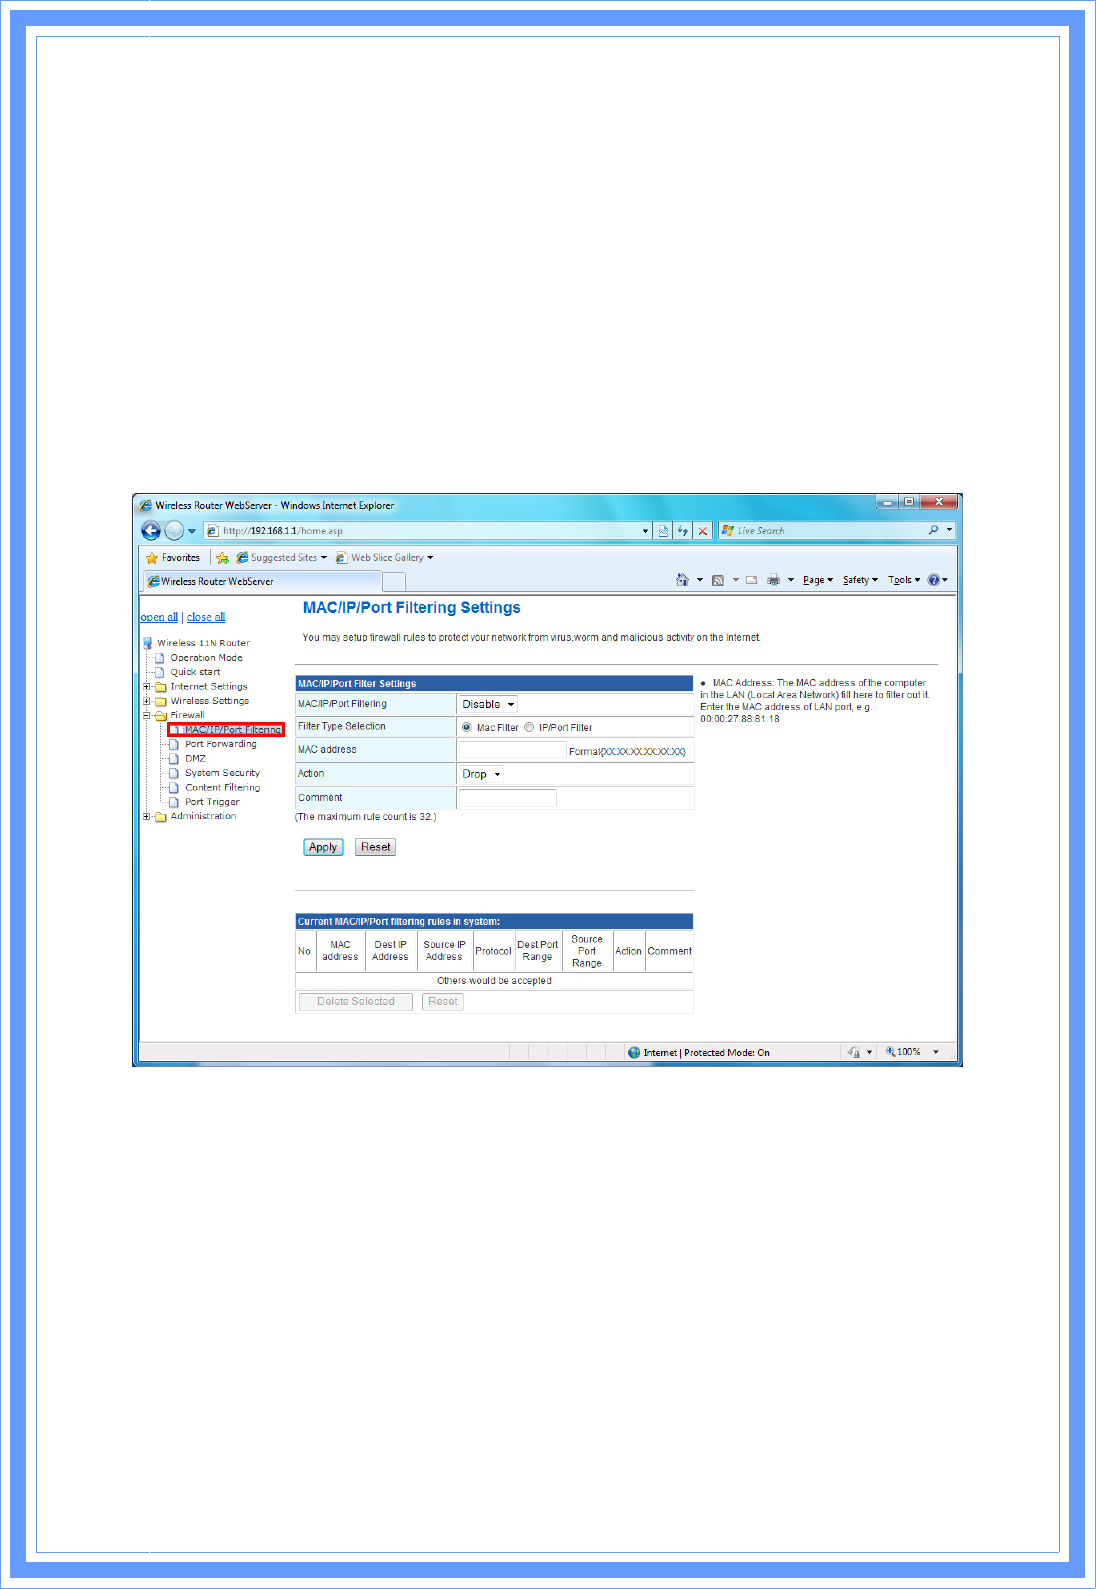
3.5.7 Site Survey
Site Survey page shows information of AP nearby.
3
7
3.6 Firewall
The Firewall contains the following sections:!
ϨMAC/IP/Port Filtering ϨPort Forwarding ϨDMZ
ϨSystem Security Setting ϨContent Filtering ϨPort Trigger
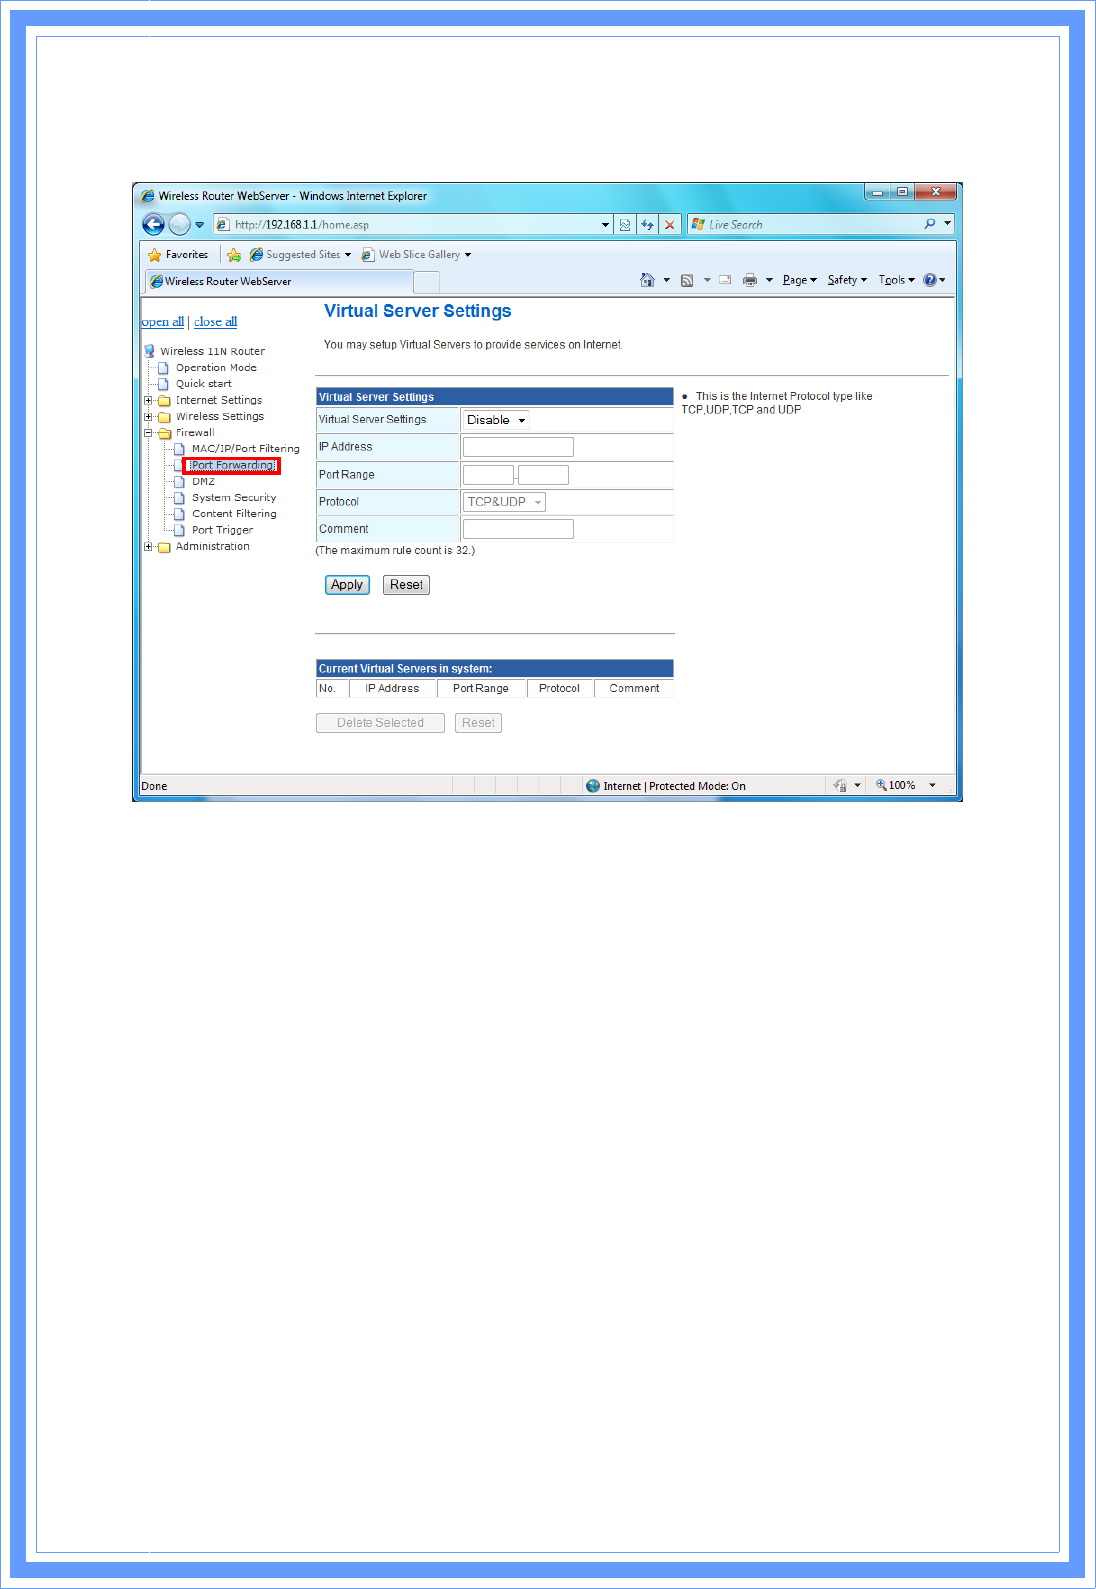
3.6.1 MAC/IP/Port Filtering Settings
You can setup firewall rules to protect your network from virus, worm and malicious activity on
the internet. Filters are used to deny or allow LAN computers from access the Internet. Within
the local area network, the unit can be setup to deny Internet access to computers using the
assigned IP or MAC addresses. The unit can also block users from accessing restricted web
site.
MAC/IP/Port Filtering: Enable this function, all list from the filtering will be deny the internet
access.
MAC Address: The MAC address of the computer in the LAN (Local Area Network) to be
used in the MAC filter table. Enter the MAC address of LAN port, e.g. 00:00:27:88:81:18
Dest IP Address: The IP address that will be denied to access.
Source IP Address: The IP address that will be denied access to the Internet.
Protocol: This is the protocol type that will be used with the Port that will be blocked.
Destination Port Range: The single port or port range that will be denied to access. If no port
is specified, all ports will be denied access.
Source Port Range: The single port or port range that will be denied access to the Internet. If
no port is specified, all ports will be denied access.
3
8
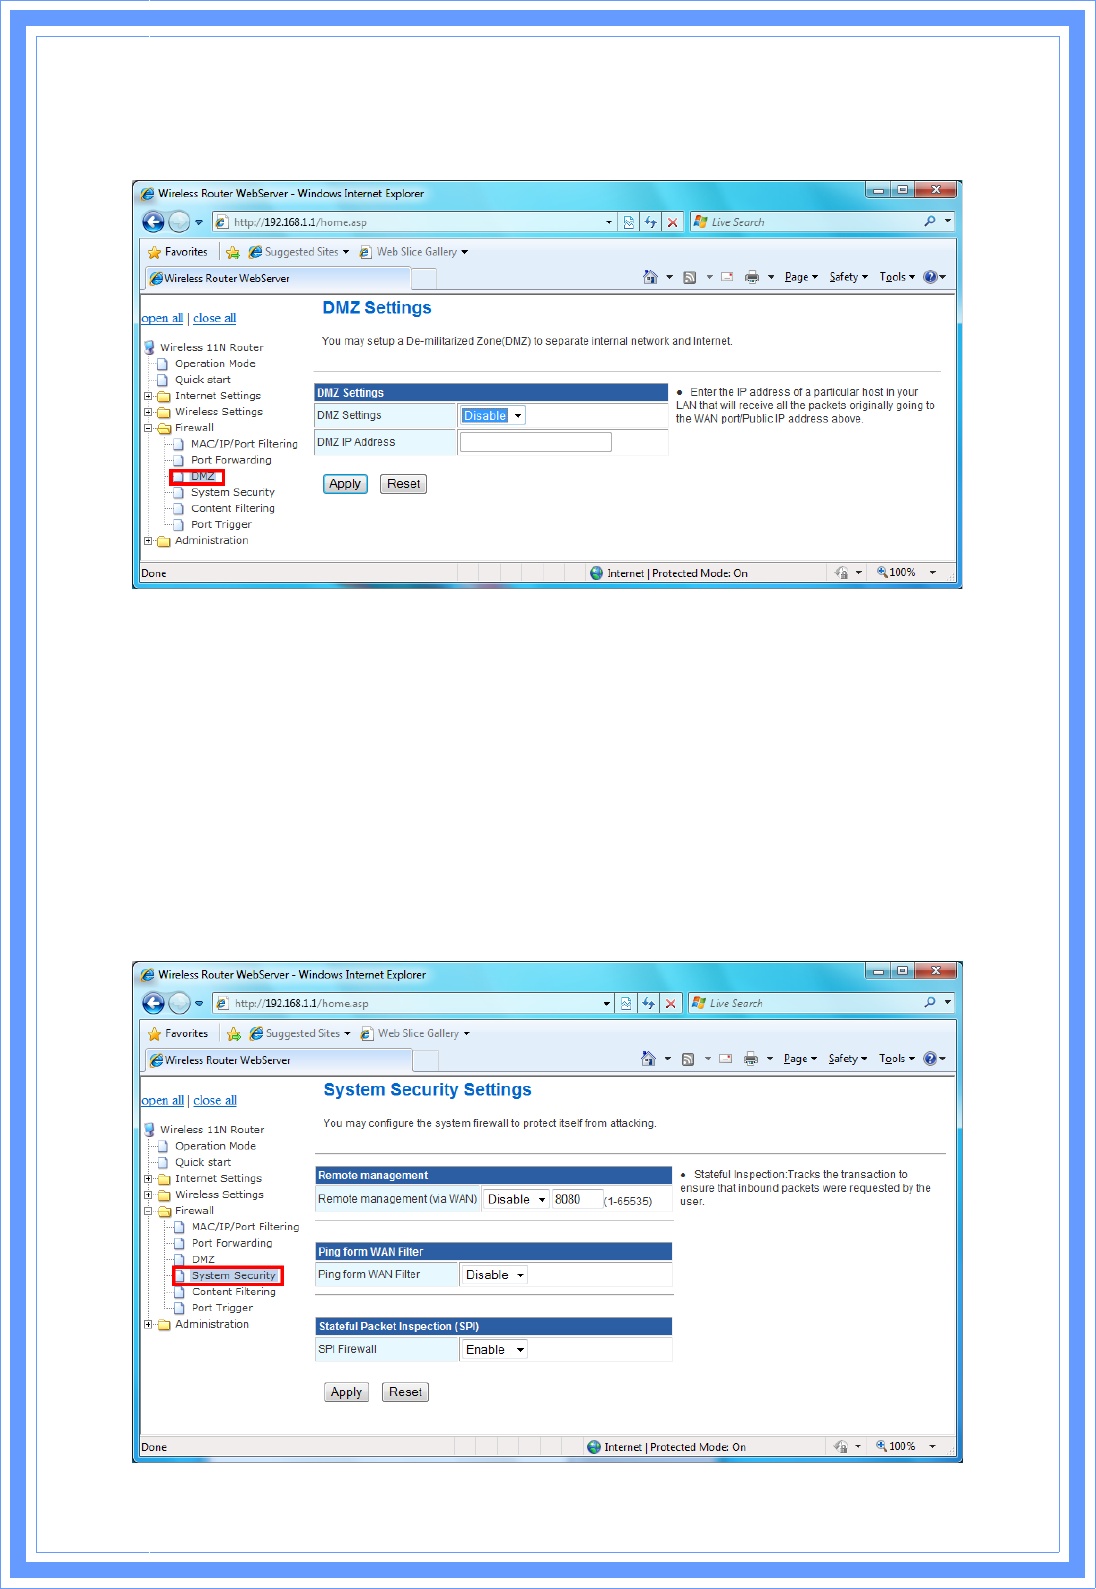
3.6.2 Port Forwarding
You may setup virtual servers to provide service on internet.
Virtual Server Setting: Enable/Disable the port forward.
IP Address: This is the port number on the WAN side that will be used to access the
application. You may define a single port or a range of ports. You can use a comma to add
multiple ports or port ranges.
Port Range: This is the port used to forward the application. It can be either a single port or a
range of ports. For the TCP and UDP services enter the beginning of the range of port
numbers used by the service. If the service uses a single port number, enter it in both the start
and finish fields.
Protocol: Select the protocol (TCP, UDP, or TCP & UDP) used to the remote system or
service.
Comment: You may key in a description for the IP address.
3
9
3.6.3 DMZ
You may setup a De-Militarized Zone (DMZ) to separate internet network and internet.
DMZ Setting: If the DMZ Host Function is enabled, it means that you set up DMZ host at a
particular computer to be exposed to the Internet so that some applications/software,
especially Internet/Online game can have two-way connections. Select Enable or Disable from
the pull-down menu.
DMZ IP Address: Enter the IP address of a particular host in your LAN that will receive all the
packets originally going to the WAN port/Public IP address above. Note: You need to give
your LAN PC clients a fixed/static IP address for DMZ to work properly.
3.6.4 System Security Settings
You may configure the system firewall to protect AP/Router itself from attacking.
4
0
Remote management: Let User could management router's web from WAN specify TCP port.
Ping form WAN Filter: Let Router WAN IP address could reply PING package.
Stateful Inspection: Tracks the transaction to ensure that inbound packets were requested by
the user.
3.6.5 Content Filtering
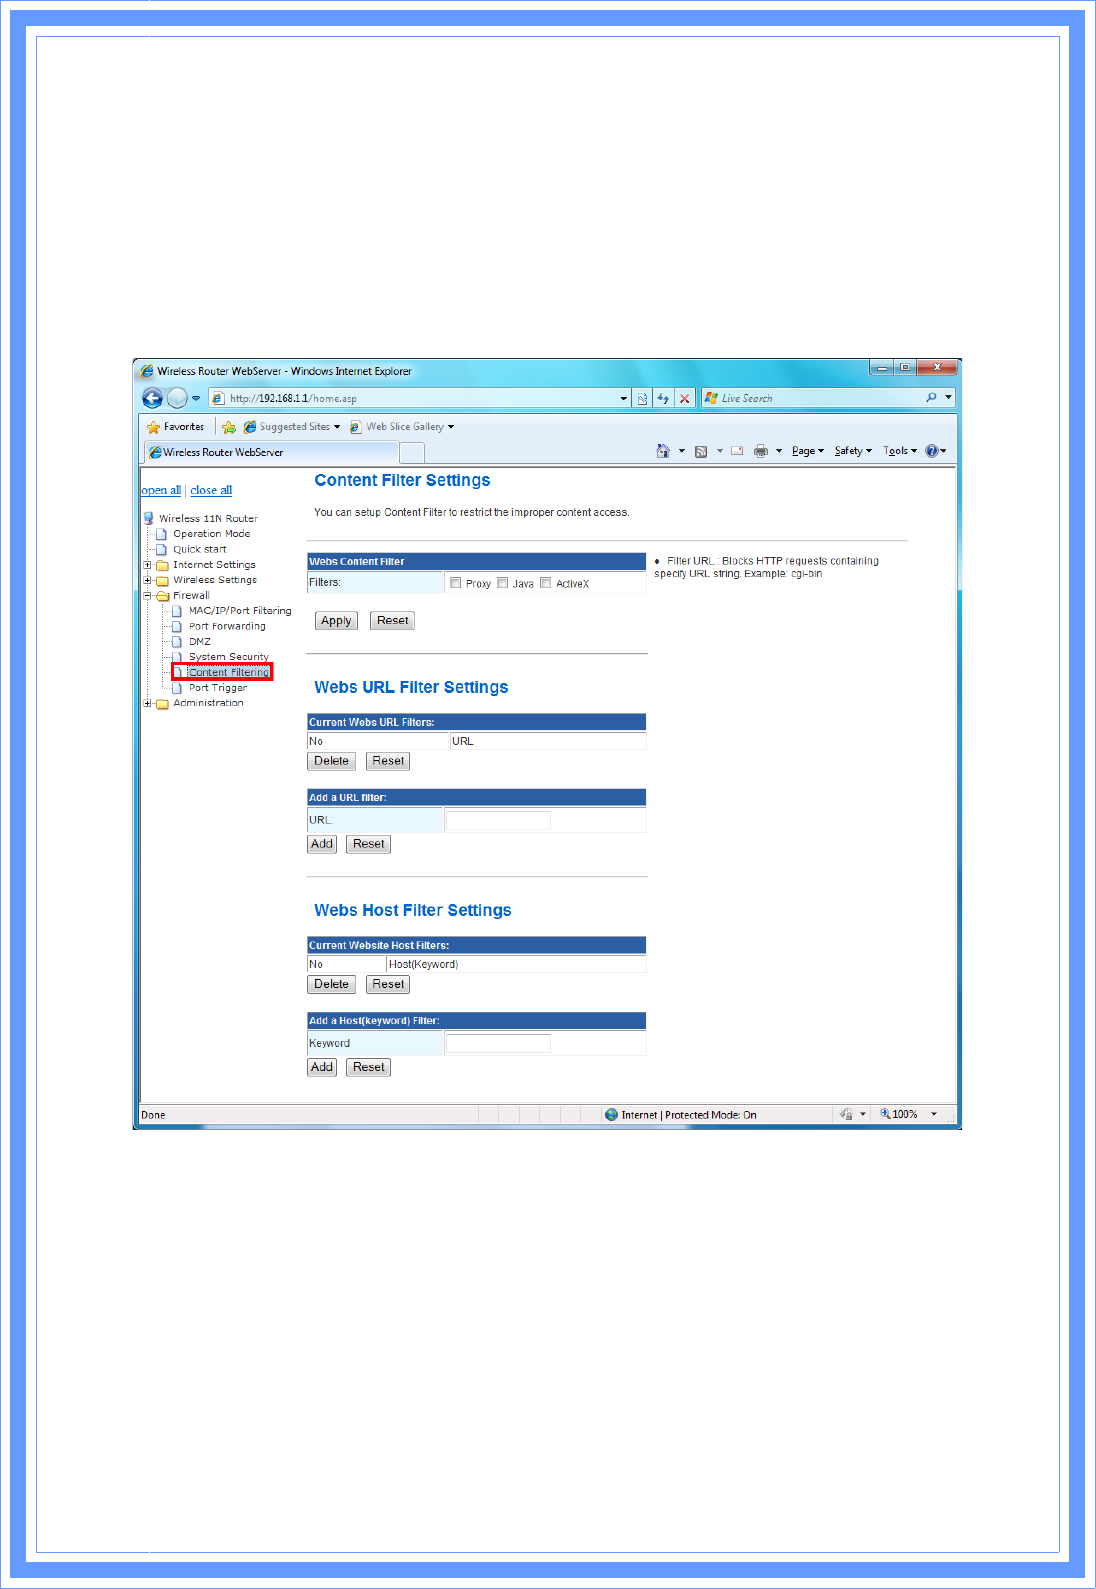
You can setup content filter to restrict the improper content access.
Content Filter Setting: There have three options for this filter – Proxy, Java, and ActiveX.
When those options are checked, the content filter will deny computer from access to the
internet by contented those options.
-- Filter Proxy: Blocks HTTP requests containing the (Host:) string.
-- Filter Java Applets: Blocks HTTP requests containing a URL ending in (.js) or (.class).
-- Filter ActiveX: Blocks HTTP requests containing a URL ending in (.ocx) or (.cab).
Web URL Filter Setting: With security reason, the URL Filter provides the enterprise to
manage and restrict employee access to non-business or undesirable content on the Internet.
URL Filter is a web solution that blocks web-sites access according the URL Filter String no
4
1
matter the URL string is found full or partial matched with a keyword.
-- Filter URL: Blocks HTTP requests containing specify URL string. Example: cgi-bin
-- Filter HOST: Blocks HTTP requests containing specify HOST string. Example:
www.xxx.com
Web Host Filter Settings: Web Host Filter is a web solution that blocks web-sites access
according the Web Host name or partial matched with a keyword.
3.6.6 Port Trigger
Some applications require multiple connections, such as Internet gaming, video conferencing,
Internet telephony and others. If you need to run applications that require multiple connections,
specify the port normally associated with an application in the “Trigger Port” field, select the
protocol type as TCP or UDP, then enter the public ports associated with the trigger port to
open them for inbound traffic.
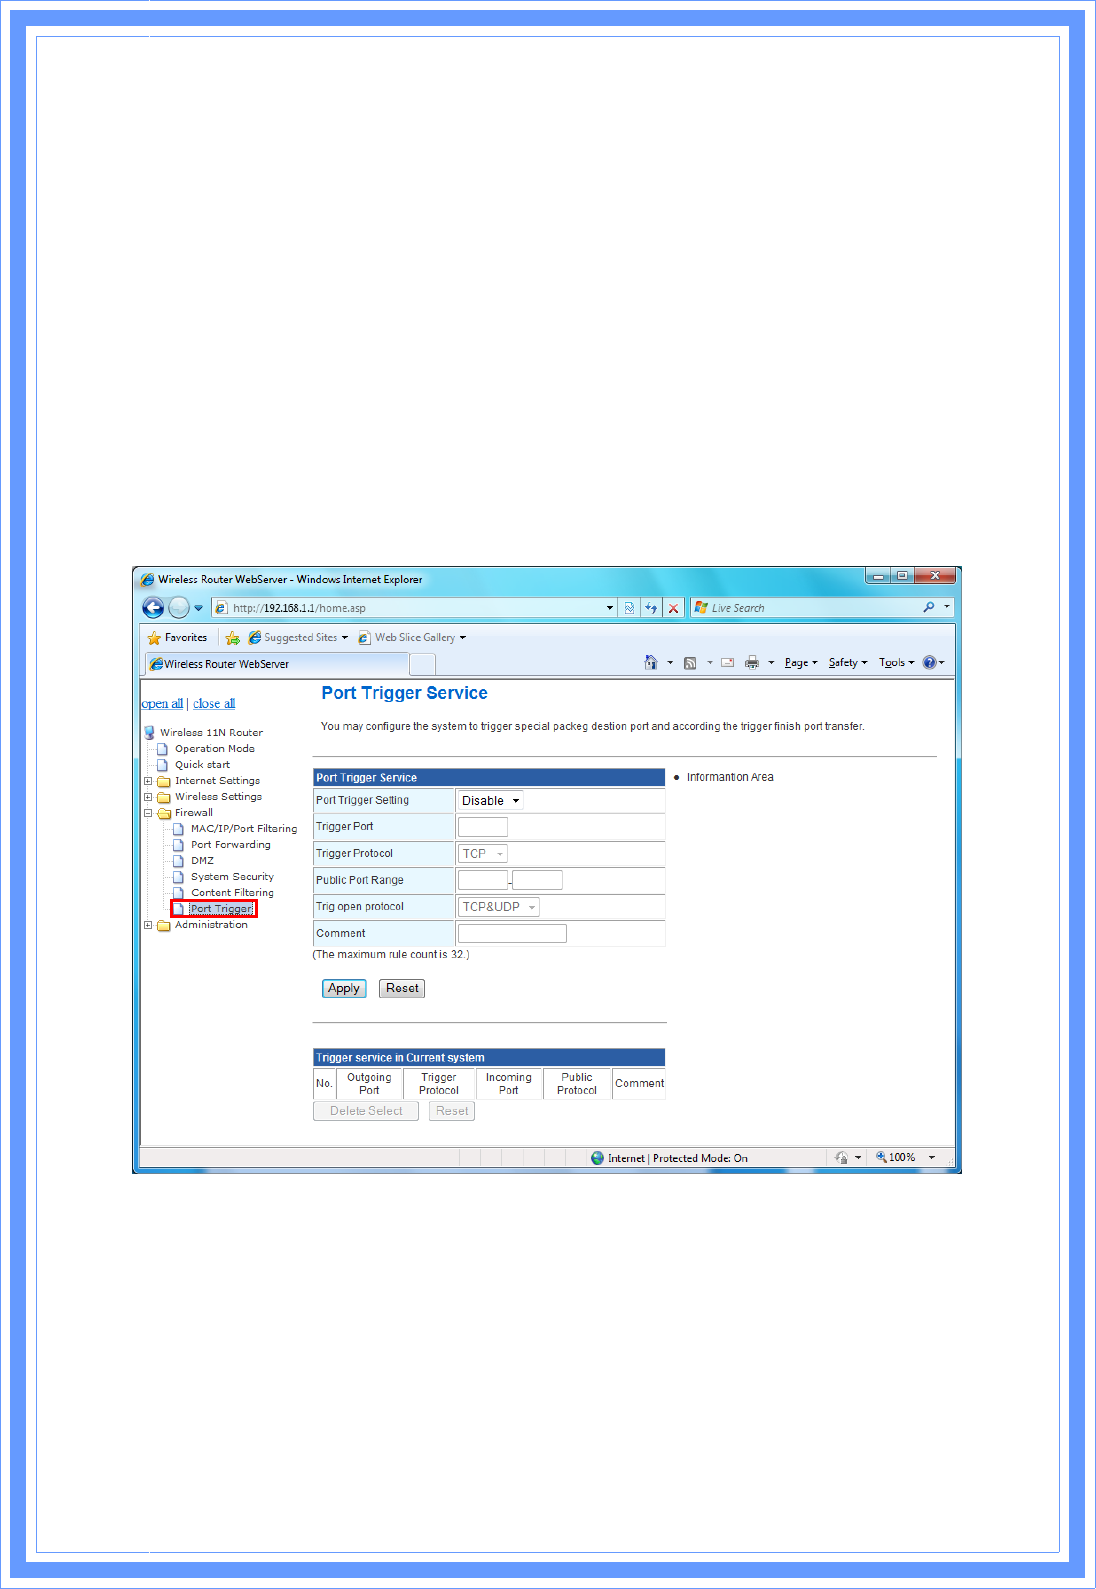
Port Trigger Setting: After Enable the Port Trigger, it allows a host machine to dynamically
and automatically forward a specific port back to itself. Port triggering opens an incoming
port(public port) when your computer is using a specified outgoing port(trigger port) for specific
traffic.
Trigger Port: This is the port used to trigger the application. It can be either a single port or a
range of ports.
Trigger Protocol: This is the protocol used to trigger the special application.
Public Port Range: This is the port number on the WAN side that will be used to access the
4
2
application. You may define a single port or a range of ports. You can use a comma to add
multiple ports or port ranges.
Trig open protocol: This is the protocol used for the special application.
3.7 Administration
The Administration contains the following sections:!
ϨDDNS ϨNTP Setting ϨAdministration
ϨUpload Firmware ϨSetting Management ϨStatus
ϨStatistics ϨSystem Log ϨLogout
3.7.1 DDNS Setting
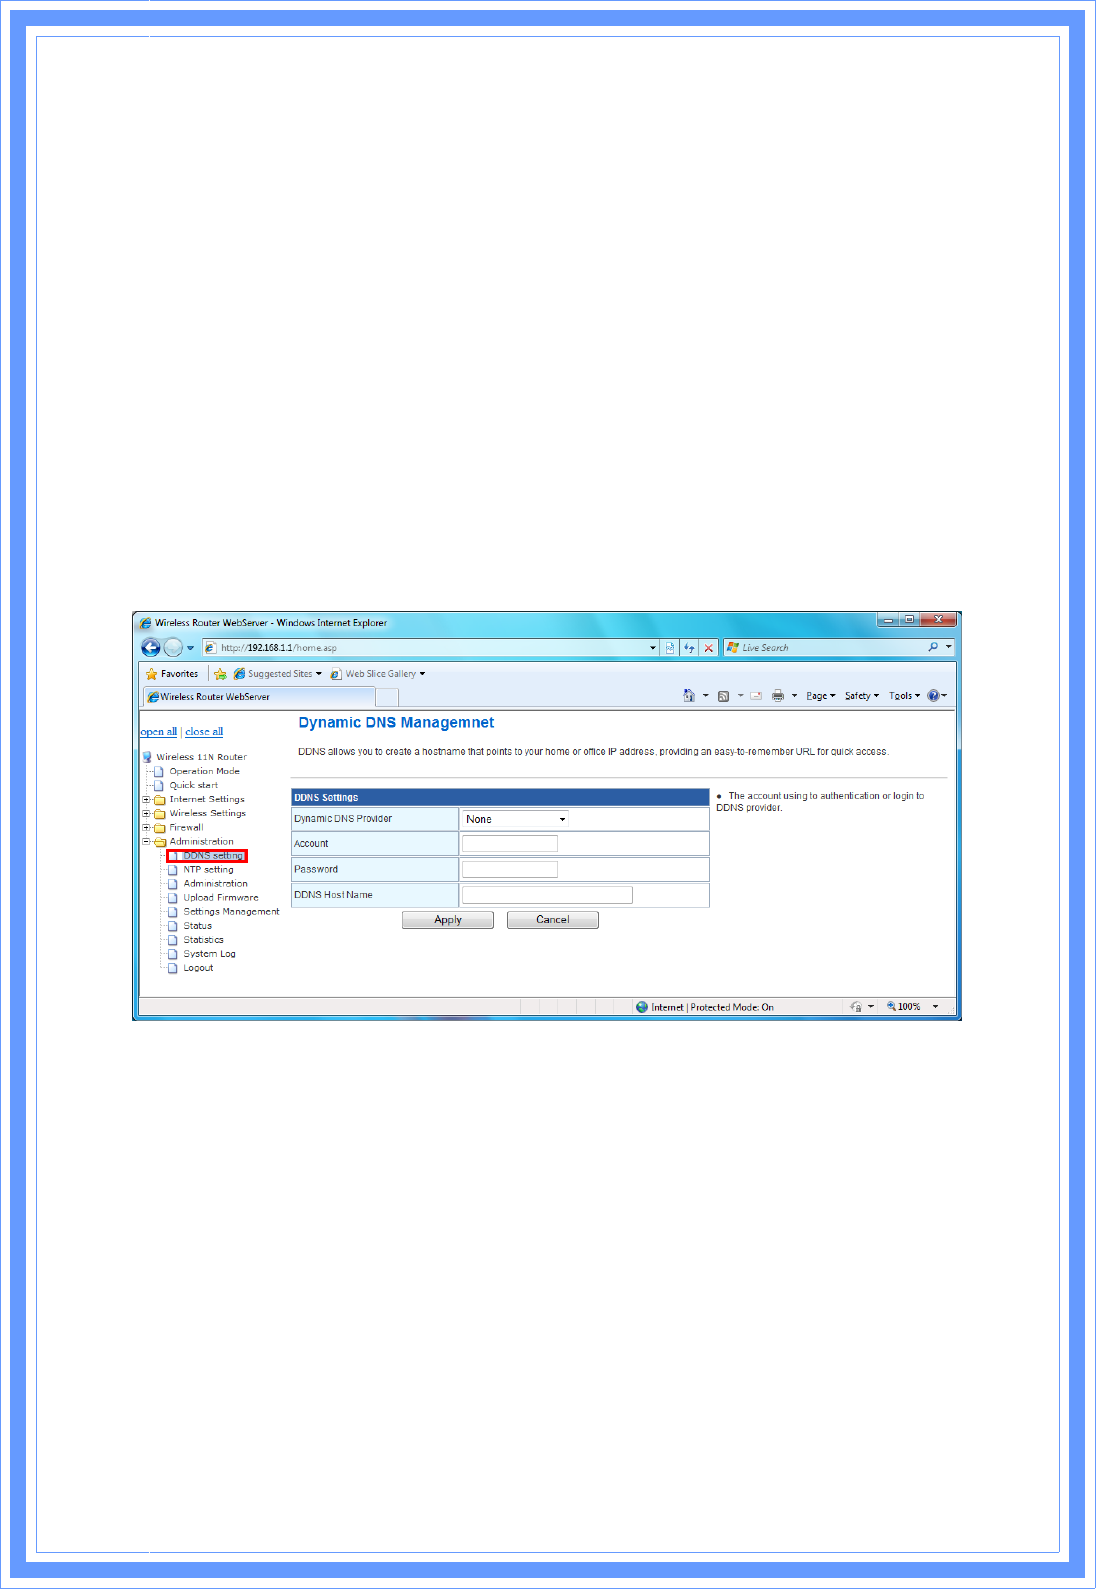
DDNS allows you to create a hostname that points to your home or office IP address, providing
and easy-to-remember URL for quick access.
Dynamic DNS providers: It provide a software client program that automates the discovery
and registration of client's public IP addresses
Account: The account using to authentication or login to DDNS provider.
Password: The password using to authentication or login to DDNS provider.
DDNS Host Name: Host Name field, you have to enter the fully qualified name of you dynamic
domain (e.g. myhostname.example.org).
4
3
3.7.2 NTP Setting
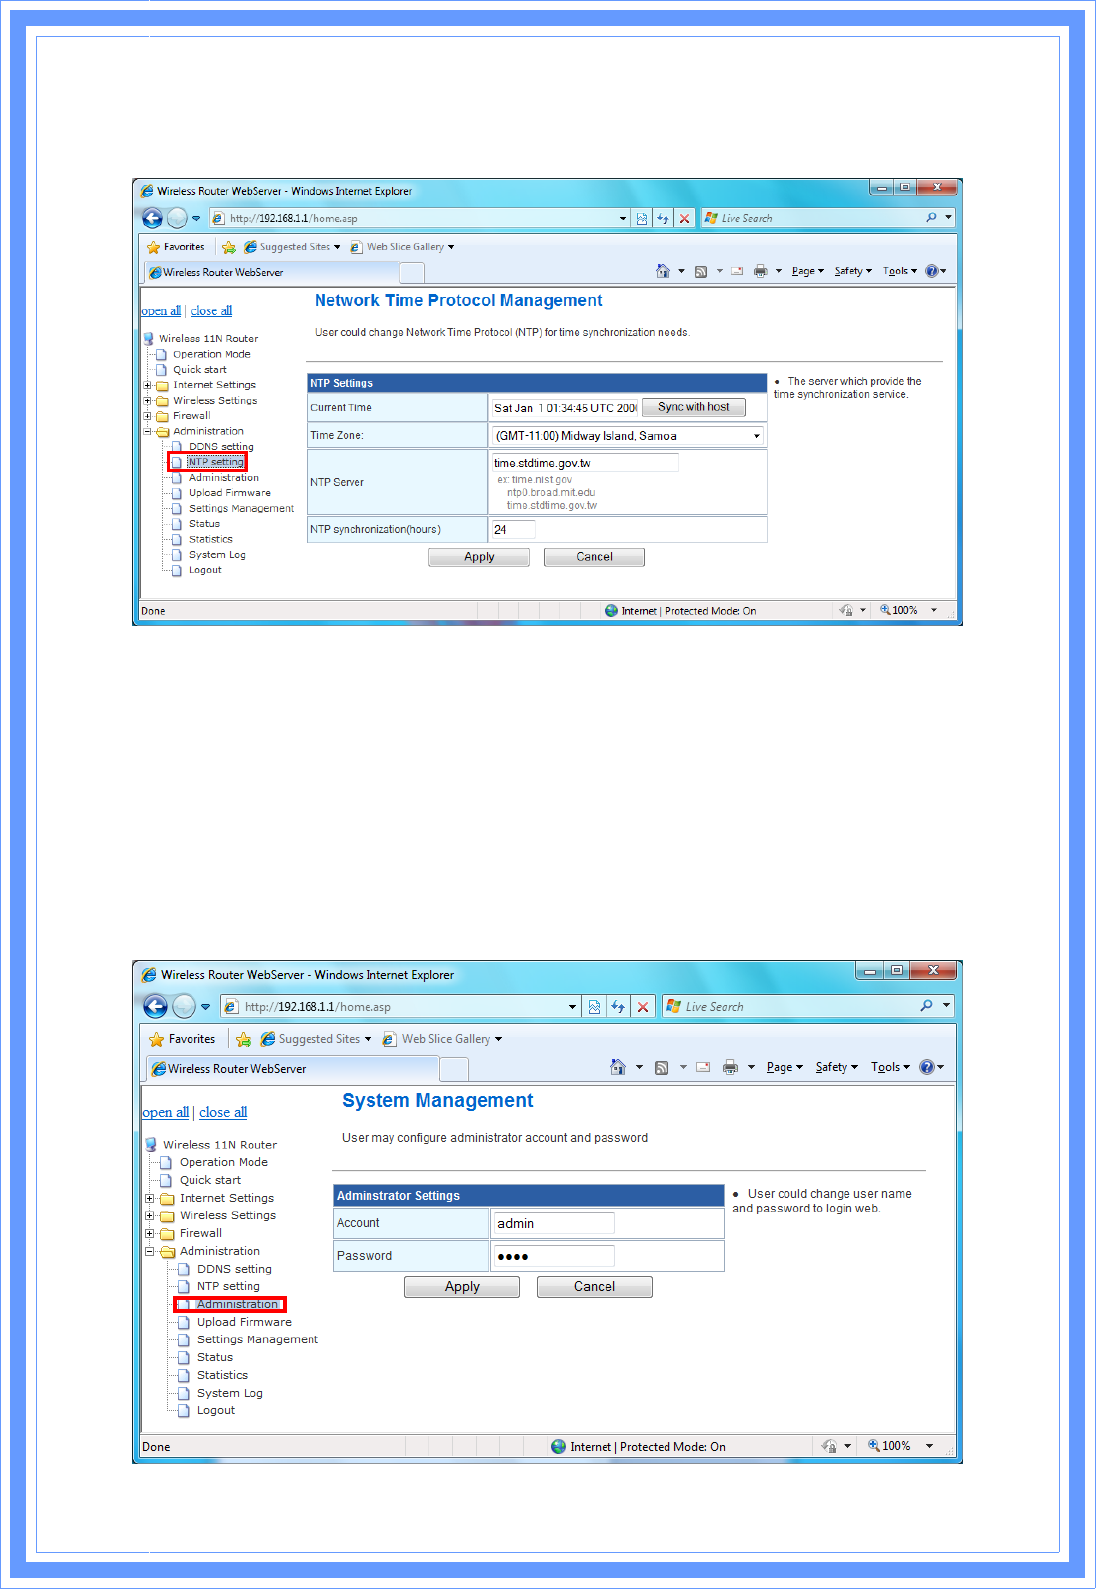
User could change Network Time Protocol (NTP) for time synchronization needs.
Current Time: Show router's current time.
Time Zone: Time zone is a region of the earth that has uniform standard time,
usually referred to as the local time. By convention, time zones compute their local time as an
offset from UTC (see also Greenwich Mean Time). Local time is UTC plus the current time
zone offset for the considered location.
NTP Server: The server which provide the time synchronization service.
3.7.3 Administration
You may configure administrator account and password in here.
4
4
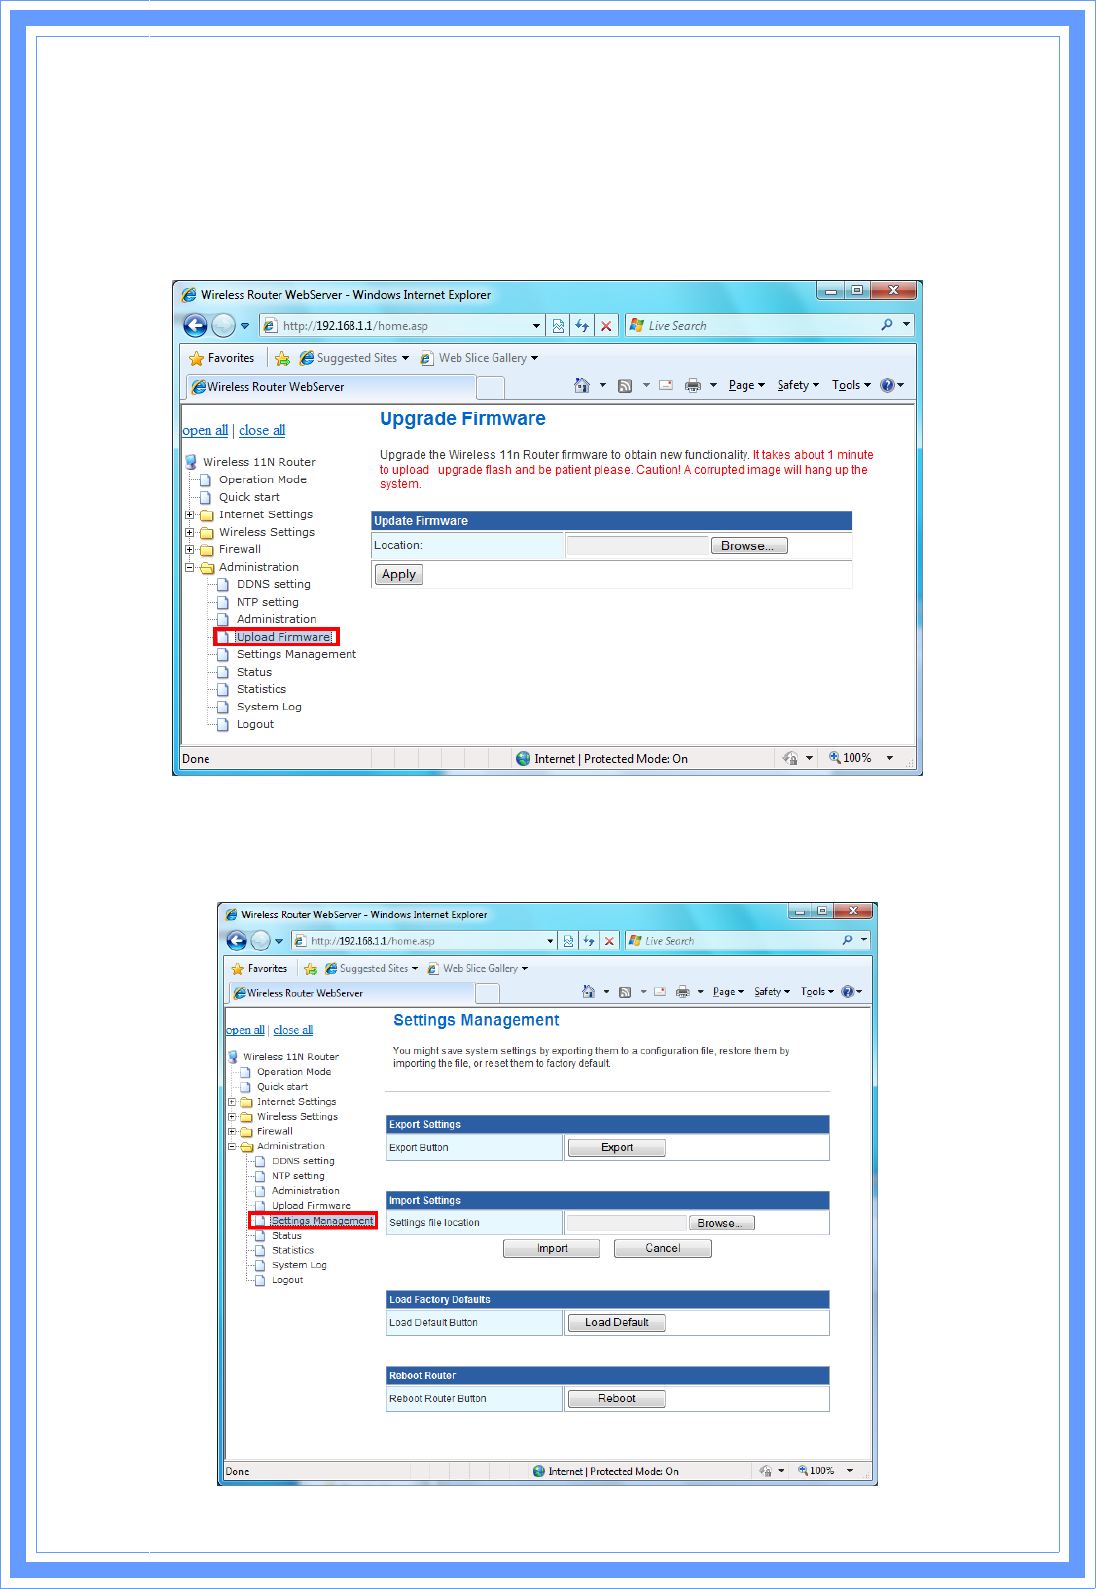
3.7.4 Upgrade Firmware
Firmware is the main software image, which the AP Router needs to perform all tasks in real
time. Firmware upgrades are required for adding new features or to resolves bugs. It takes
about 1 minute to upload/upgrade flash and be patient please.
Caution: A corrupted image will hang up the system.
3.7.5 Setting Management
You might save system settings by exporting them to configuration file, restore them by import
the file, or reset them to factory default.
4
5
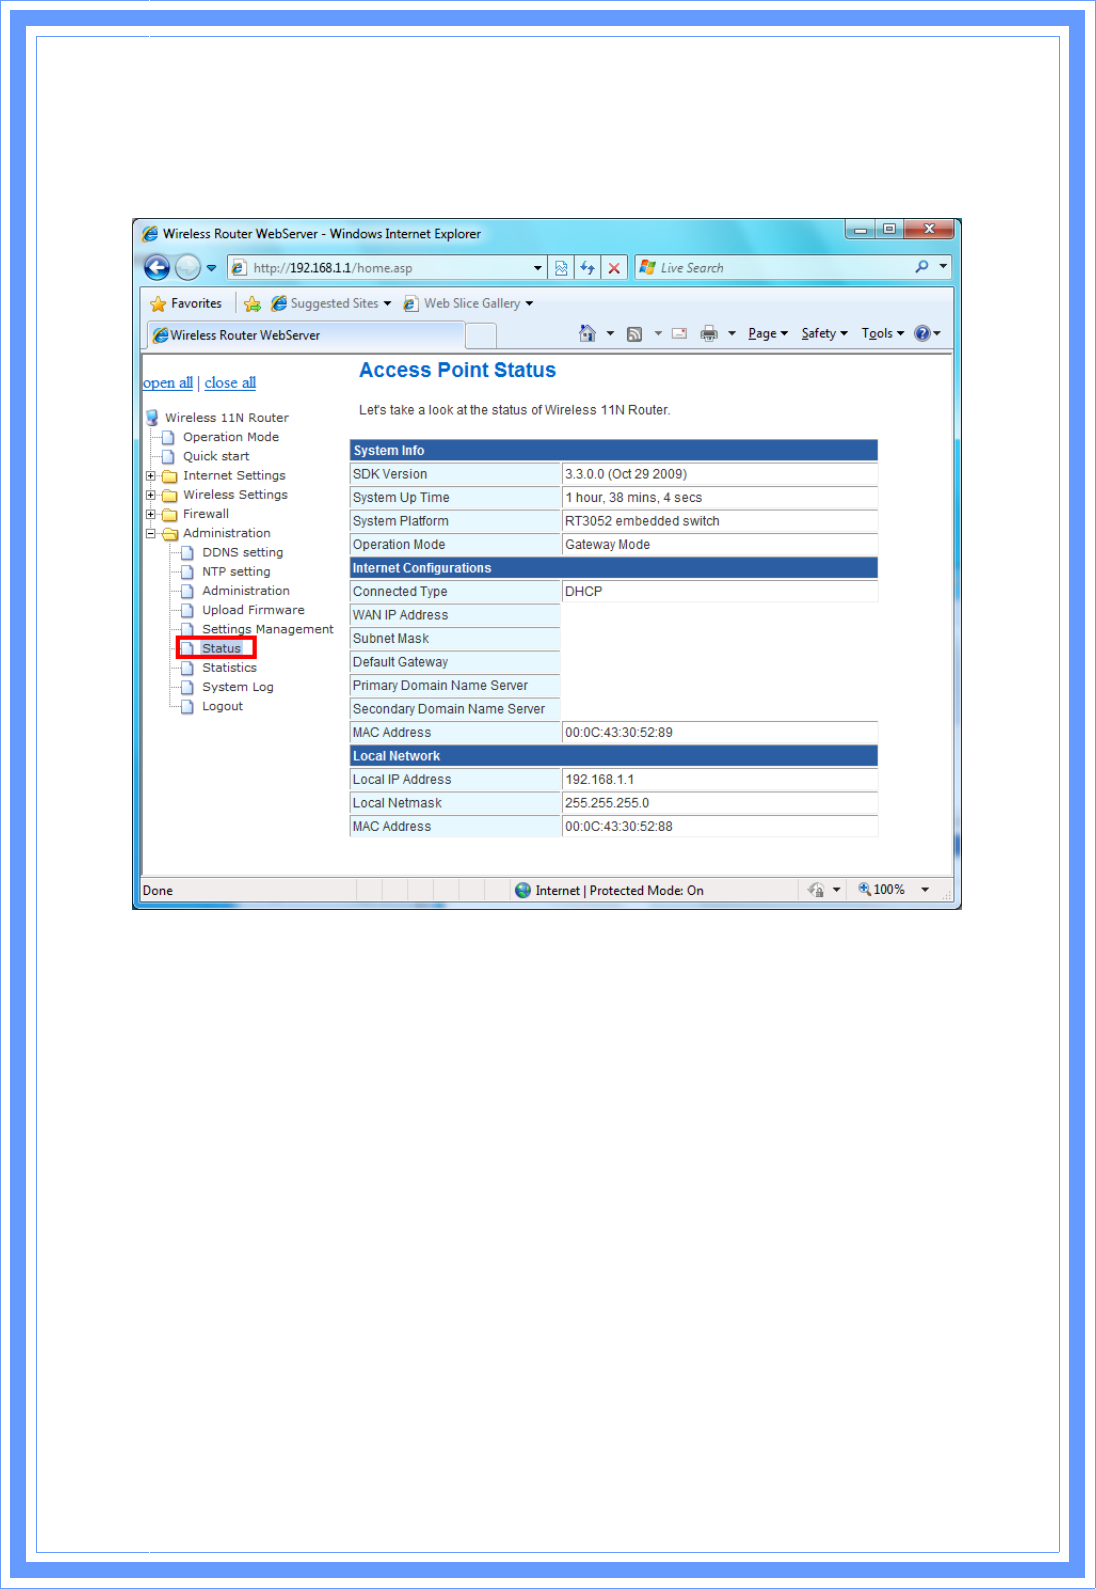
3.7.6 Status
In this section, you can look at the status of this wireless 11n Router, such as System Info,
Internet Configurations, and Local Network…etc.
3.7.7 Statistics
In this section, you can look at the statistics of this wireless 11n Router, such as Memory
statistics, WAN/LAN’s Rx & Tx packets…etc

4
6
3.7.8 System Log
This 802.11n Router supports sending system log (sending UDP packets and keeping log
messages in Log Server. Click Refresh on Administration, below screen will prompt for
System Log information
4
7
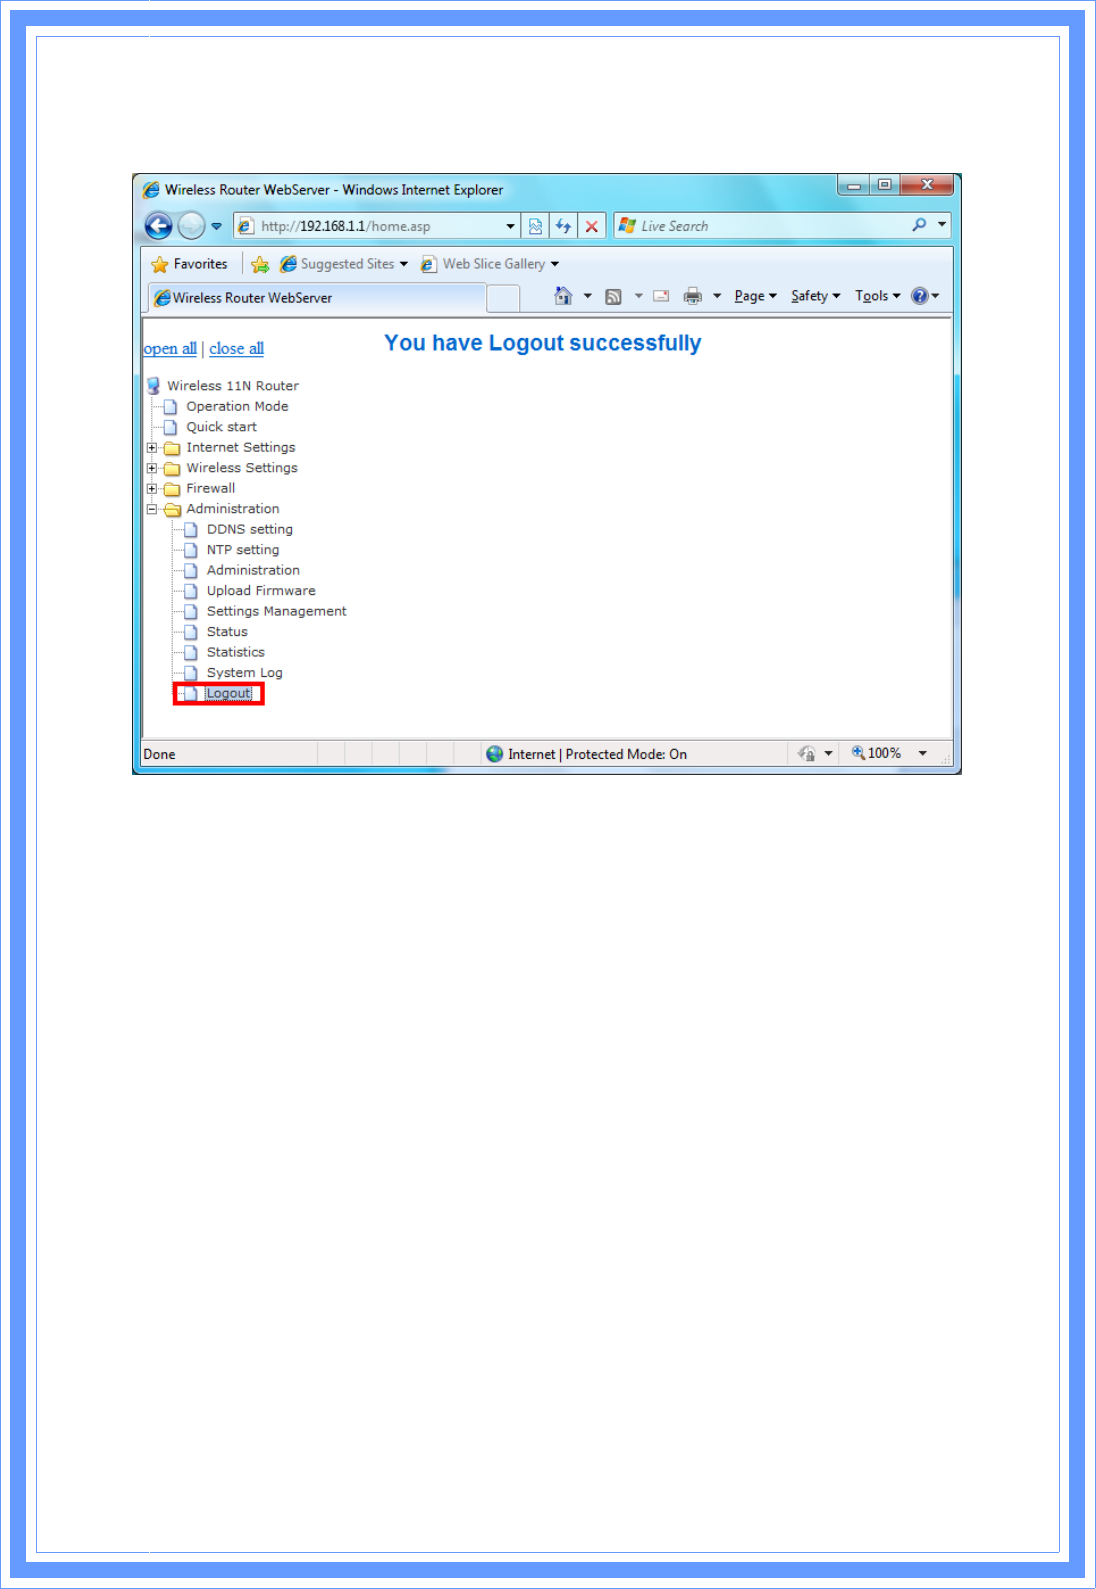
3.7.9 Logout
Click “Logout” to exit Wireless 11n router configuration page.