ProcessingPoint MB3000 POS terminal User Manual
ProcessingPoint, Inc. POS terminal
User Manual
多功能商用终端
用户手册
MB3000
User Manual
- - - - - - - - - - - - - - - - - - - - - - - - - - - - -
感谢您选购了 MB3000 多功能商用终端,使用本手册将帮助您了解本产
品最详尽的功能与操作。
Thank you for purchasing MB3000 POS Terminal!
This manual will help you to know the functions and operations of
MB3000.
产品概述 About the Product
MB3000 是集成打印机及客显的一体触控 POS 终端,有X86和ARM 两种
硬件平台,分别可运行 Windows 和 Android 系统,是零售和餐饮娱乐
业等不同业态的理想选择。
The MB3000 is all-in-one touch terminal with its built-in thermal printer
and customer display. There are two kinds hardware platform X86 and
ARM, running Android and windows system. It is ideally suited to the
most diverse range of markets in retail and hospitality.
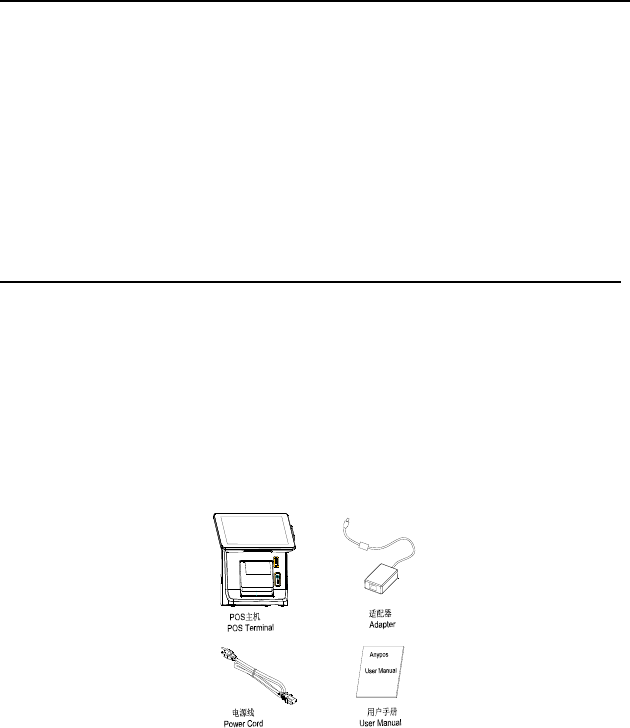
检查清单 Packaging list
打开包装后,请仔细检查内容,如果项目不全或受损,请联系经销商。
After unpack the carton, please check if the following items are included.
If any item is missing or damaged, please contact your dealer
immediately.

- - - - - - - - - - - - - - - - - - - - - - - - - - - - -
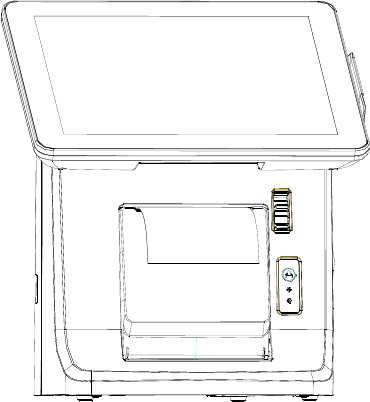
产品结构示意图 Outward Diagram
正面视图 Front view
说明/DESCRIPTION
1 刷卡器(选配)/Magnetic Card Reader(Optional)
2 打印机开盖器/Printer Open Button
3 进纸按键/Paper Feed Button
4 打印机电源指示灯/Printer Power LED
5 打印机错误指示灯/Printer Error LED
6 打印机前盖/Printer Cover
7 液晶屏幕、触摸屏/9.7inch TFT LCD and Touch screen
- - - - - - - - - - - - - - - - - - - - - - - - - - - - -
侧面视图 Side view
NOTE:
24V power switch
outside switch
protection, usually
do not use this
switch.
说明/DESCRIPTION
1 24V电源开关/24V Power Switch
2 iButton(选配)/(Optional)
3 主机开关/Power Switch
4 电源指示灯/Power LED
5 硬盘指示灯/Hard Disk LED
6 前置USB口(连接鼠标,键盘)/Front USB(connect mouse,
keyboard)
7 线仓盖/Cable Cover
8 客户显示器/Customer Display

- - - - - - - - - - - - - - - - - - - - - - - - - - - - -
底部视图 Rear view
1 2 3 45
6 7 8 910
说明/DESCRIPTION
1 串口3(连接密码键盘)/com3(connect PIN pad)
2 钱箱口/ Cash Drawer1 Port
3 12V DC 输出/12V DC out
4 24V DC 输入/24V DC input
5 串口1连接密码键盘/com1(connect PIN pad)
6 音频口/Audio port
7 USB OTG (接U盘)/USB OTG(connect U disk)
8 HDMI
9 网口/RJ-45 LAN port
10
USB 接口(接鼠标,键盘)/USB(connect mouse & keyboard)
- - - - - - - - - - - - - - - - - - - - - - - - - - - - -
开机 Starting up
点击机身左面24V电源开关 标有1的那一端,听到“啪”一声后
再打开机身右侧主机开关。
First hit the side marked 1 of the left 24V power switch, and then turn on
the right host power.
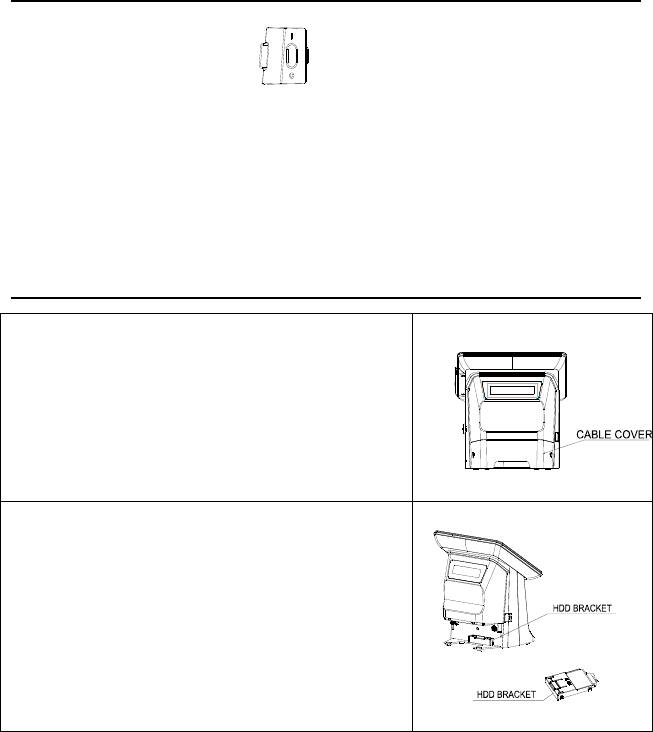
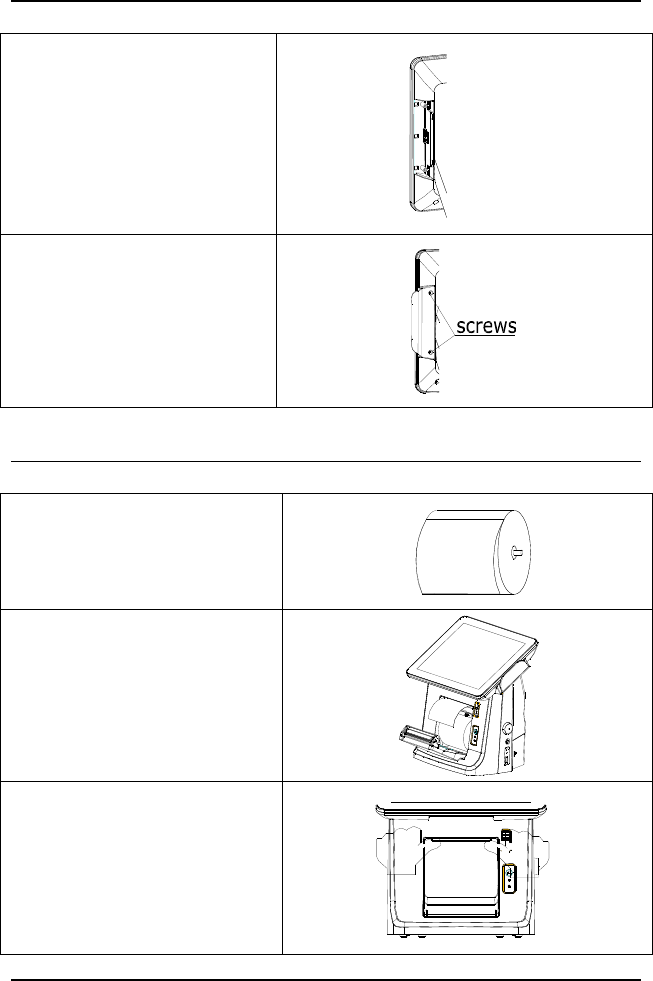
拆卸硬盘 Dismantle HDD
1、双手按住线仓盖两侧标示处,向后抽出,
拆下线仓盖后,露出硬盘托架。
Press the position of both sides as marked in
picture, pull the cap back, and take it down to
show the hard disk bracket.
2、按下硬盘托架上的卡扣,拔出硬盘托架,
完成硬盘的拆卸。
Press the button on the hard disk bracket, pull
the bracket out, and get the hard disk.
- - - - - - - - - - - - - - - - - - - - - - - - - - - - -
安装磁卡阅读器 Mounting the MSR
1、打开MSR盖,将刷卡器的
数据线线接到下面的接口板
上
Open the MSR cover, and
then connect the data wire of
MSR to the port board.
2、用2颗ST2.5*8的自攻螺丝
固定刷卡器。
Fix the MSR with 2 supplied
ST2.5*8 screws
打印纸安装 Install the Printer paper
1.将纸轴插入纸卷
Put paper roller into scroll
2.打开打印机开盖器,将纸卷
放入打印机
Press the printer open button,
and then put the scroll into
printer.
3.双手扶住机身并用大拇指
按下打印机前盖,用力推紧。
Hold the machine, and press
hard the enclosure of printer
with thumbs to stuff it up.
打印机自检 Printer self-test
- - - - - - - - - - - - - - - - - - - - - - - - - - - - -
按住进纸按键,打开 24V 电源开关后,打印机开始打印默认配置
Press the FEED button, turn on 24V power switch, the printer starts
printing the default configuration
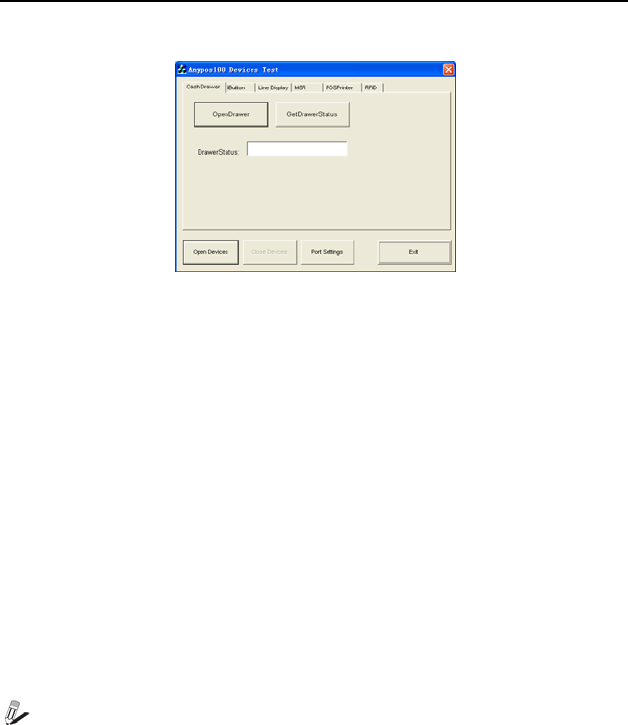
测试软件 Test Software
打开 D:\Tools\Anypos100Test.exe。
Run the D:\Tools\Anypos100Test.exe.
点击“Open Devices”后,可进行以下 6项测试:
1. 点击“CashDrawer”选项卡后开始钱箱测试。
2. 点击“IButton”选项卡后开始 IButton 测试。
3. 点击“Line Display”选项卡后开始客户显示器测试。
4. 点击“MSR”选项卡后开始磁卡阅读测试。
5. 点击“POSPrinter”选项卡后开始打印机测试。
点击 “Port Settings”后,可以进行接口设置。
点击“Exit”或者关闭窗口退出程序。
Click “Open Devices”, then do the 6 tests as list:
1. Click “CashDrawer” to test the cash drawer.
2. Click “IButton” to test the IButton.
3. Click “Line Display” to test the customer display.
4. Click “MSR” to test the magnetic card reader
6. Click “POSPrinter” to test the printer.
7. Click "Port Settings", you can set up to interface
8. Click “Exit” or close window to exit program.
注意:客户显示器和MSR的默认接口为COM6,打印机默认接口COM2。
NOTE:The default setting of customer display port and MSR is
COM6, The default setting of printer is COM2.
- - - - - - - - - - - - - - - - - - - - - - - - - - - - -
常见问题及故障排除 Troubleshooting
常见故障和建议处理方法如下表:
A few common hardware problems and suggested solutions are listed
below:
问题/PROBLEM 解决方法/SOLUTION
开机后无任何反应
Can’t turn on the
machine.
① 检查外部供电是否正常,适配器插头是否连
接。
② 检查适配器指示灯是否亮。
③ 检查打印机电源指示灯是否亮。
④ 检查主 24V 电源开关是否打开。
① Check if the external power supply is normal ,
if the adapter is connected.
② Check if the adapter LED is light on.
③ Check if the printer LED is light on
④ Check if the 24V power switch is turned on.
磁卡阅读器不读卡
The MSR doesn’t
work.
① 多试几张卡或换一种卡试验。
② 检查磁卡阅读器连线是否正确连接。
③ 检查串口是否设置为 COM6。
① Try another kind of card.
② Check if the cable of the MSR.
③ Check if the serial port is set to COM6
打印机故障灯闪烁
Printer error light
blinks
检查是否有打印纸,打印纸是否卡住不动,打印
机外壳是否按紧。
Check if there is paper or if paper gets stuck or not.
Check the printer cover is tight enclosure
液晶屏显示不清晰
Display is not clear.
设置屏幕分辨率为 1024*768。
Setup the resolutions to 1024*768.
无法连接网络
Unable to connect
to the network
确保网线没有问题,检查网线插头安装正确。
Make sure the cable all right, check the network
cable plugs are properly installed.
系统日期不正确
The date or time is
not right.
更改 BIOS 或者系统时间,如果无效更换电池。
Change the date or time in BIOS or OS, otherwise
change the battery.
触摸屏无效
The touch screen
doesn’t work.
重新安装触摸屏驱动,重新校准。
Reinstall the driver of touch.
Setup the touch screen to calibrate.
注意:遇到问题时请先联系您的供应商或服务商,请不要在没
- - - - - - - - - - - - - - - - - - - - - - - - - - - - -
有阅读使用手册的情况下拆开机器。
NOTE: Please consult your supplier or service provider first if problem
can’t be solved. Please don’t dismantle the machine without related
guide.
- - - - - - - - - - - - - - - - - - - - - - - - - - - - -
FCC WARNING:
This device complies with Part 15 of the FCC Rules. Operation is
subject to the following two conditions: (1) this device may not cause
harmful interference, and (2) this device must accept any interference
received, including interference that may cause undesired operation.
Any changes or modifications not expressly approved by the party
responsible for compliance could void the user's authority to operate
the equipment.
Note: This equipment has been tested and found to comply with the
limits for a Class B digital device, pursuant to part 15 of the FCC Rules.
These limits are designed to provide reasonable protection against
harmful interference in a residential installation. This equipment
generates, uses and can radiate radio frequency energy and, if not
installed and used in accordance with the instructions, may cause
harmful interference to radio communications. However, there is no
guarantee that interference will not occur in a particular installation. If
this equipment does cause harmful interference to radio or television
reception, which can be determined by turning the equipment off and on,
the user is encouraged to try to correct the interference by one or more
of the following measures:
—Reorient or relocate the receiving antenna.
—Increase the separation between the equipment and receiver.
—Connect the equipment into an outlet on a circuit different from that to
which the receiver is connected.
—Consult the dealer or an experienced radio/TV technician for help.