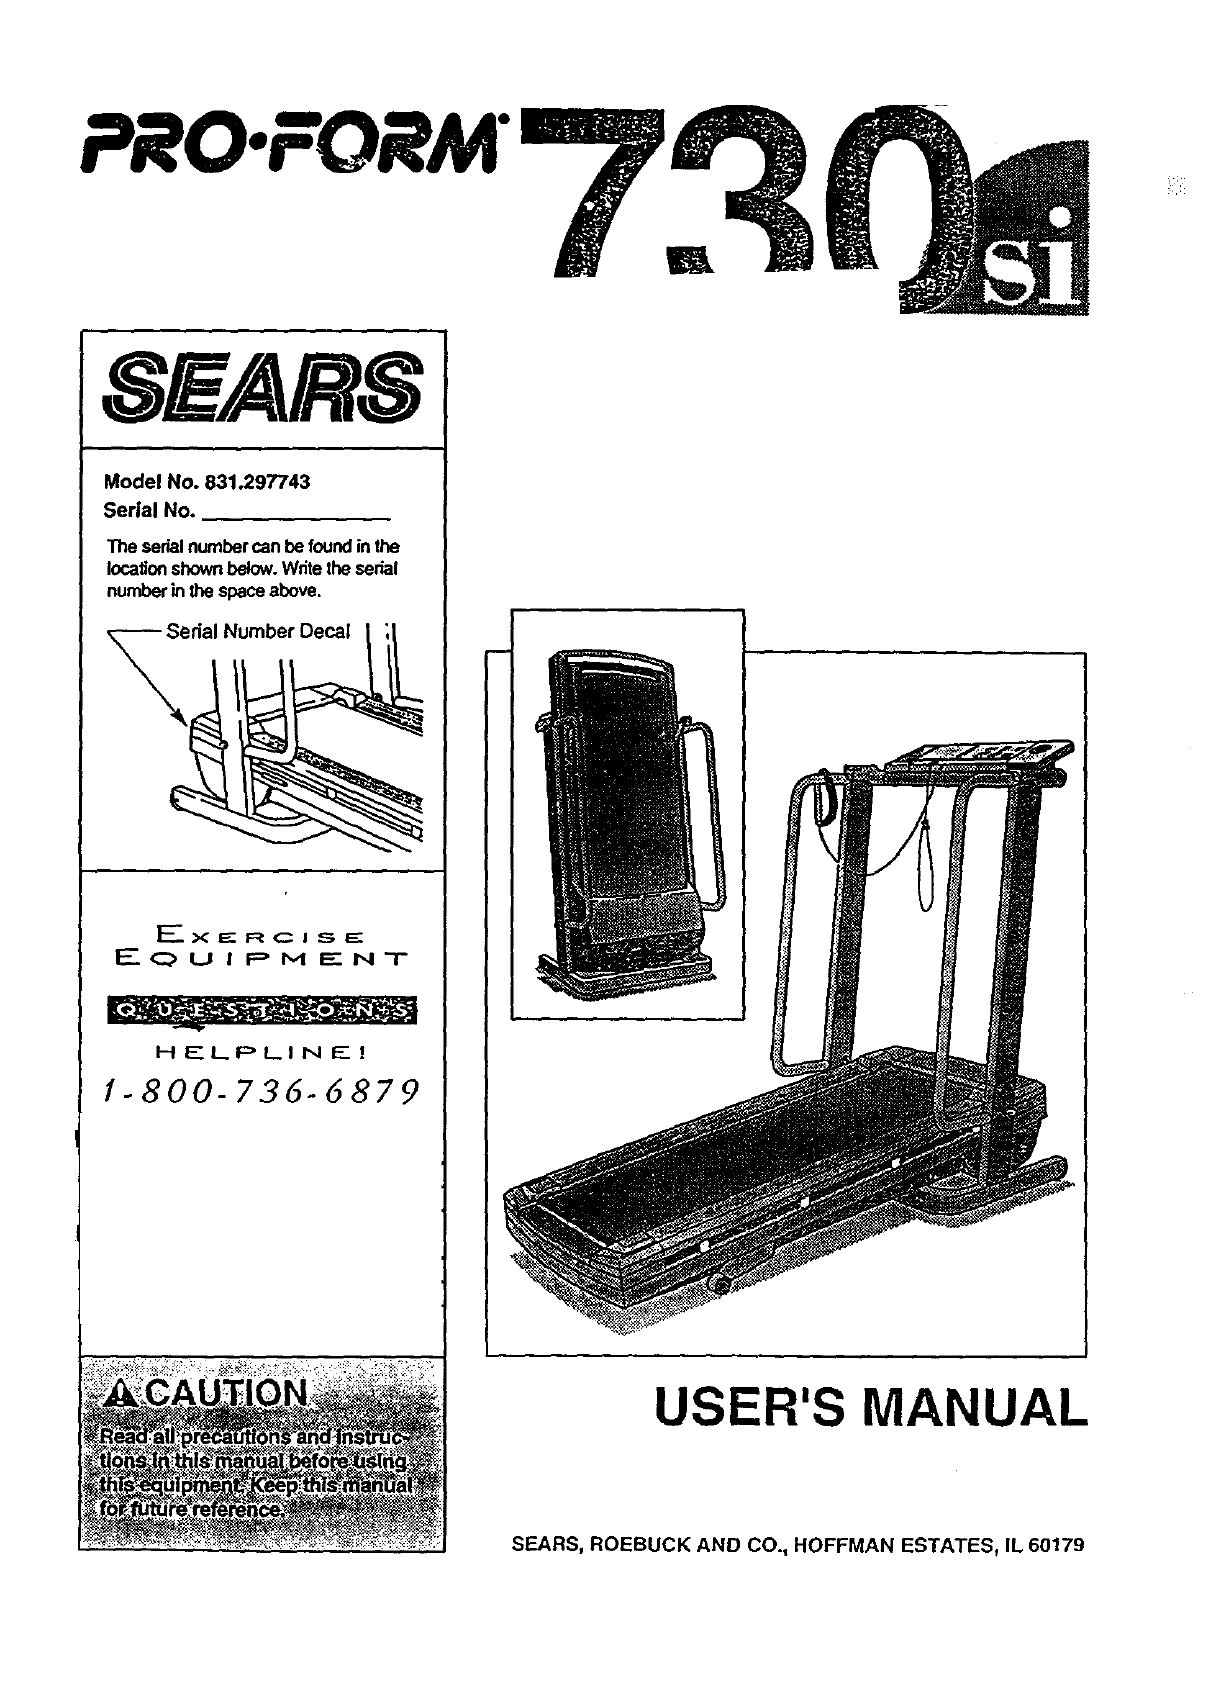
Proform 831297743 User Manual PROFROM SPACE SAVER 730 SI Manuals And Guides 99020143
PROFORM Treadmill Manual 99020143 PROFORM Treadmill Owner's Manual, PROFORM Treadmill installation guides
User Manual: Proform 831297743 831297743 PROFORM PROFROM SPACE SAVER 730 SI - Manuals and Guides View the owners manual for your PROFORM PROFROM SPACE SAVER 730 SI #831297743. Home:Fitness Equipment Parts:Proform Parts:Proform PROFROM SPACE SAVER 730 SI Manual
Open the PDF directly: View PDF ![]() .
.
Page Count: 24
SI/ARS
Model No. 831.297743
Serial No.
"rheserial number can be found in the
location shown below. Write the serial
number in the space above.
erial Number Decal
I_'- X ==--R C i SE:
EQUIPMENT
HELPLINE!
1-800-736-6879
w
USER'S MANUAL
SEARS, ROEBUCK AND CO., HOFFMAN ESTATES, IL 60179
PRO:FORM"
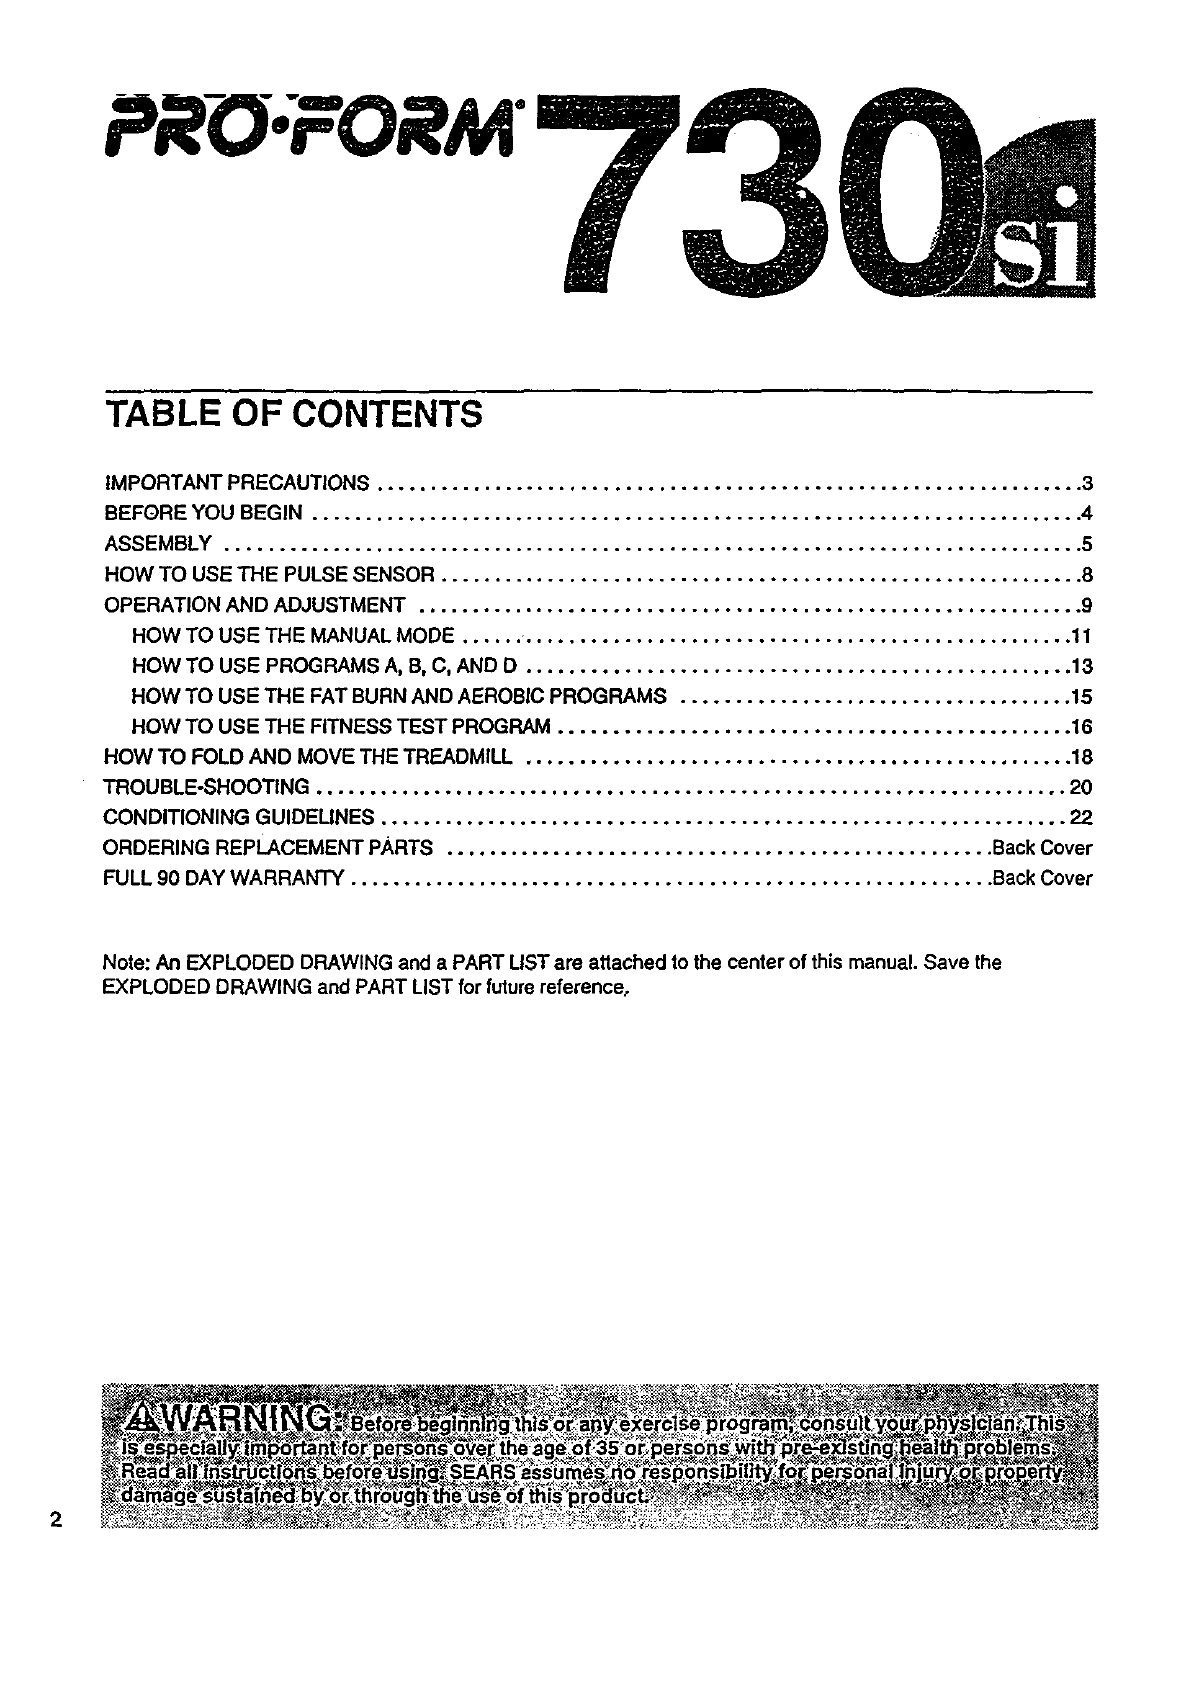
TABLE OF CONTENTS
IMPORTANT PRECAUTIONS ............................................
BEFORE YOU BEGIN ..................................................
ASSEMBLY ..........................................................
HOW TO USE THE PULSE SENSOR ......................................
OPERATION AND ADJUSTMENT ........................................
°°°°,°°°°,°.°°°......3
°°°,,°,,°,°°o,°°,,o.°4
°..°,°°°°°.°°°o°o°oo°5
o°°°°o°°,°°°°°°.°°°.o8
°°o°°°.o..,.°,°°°..°.9
HOW TO USE THE MANUAL MODE ...... .................................................. 11
HOW TO USE PROGRAMS A, B, C, AND D .................................................. 13
HOW TO USE THE FAT BURN AND AEROBIC PROGRAMS ......................... ... ... . . . .. 15
HOW TO USE THE FITNESS TEST PROGRAM ............................................... 16
HOW TO FOLD AND MOVE THE TREADMILL ..................................... .. .. . ........18
TROUBLE-SHOOTING ..................................................................... 20
CONDITIONING GUIDELINES ............................................................... 22
ORDERING REPLACEMENT PARTS .................................................. Back Cover
FULL 90 DAY WARRANTY ........................................................... Back Cover
Note: An EXPLODED DRAWING and aPART LIST are attached to the center of this manual. Save the
EXPLODED DRAWING and PART LIST for future reference,
2
IMPORTANT PRECAUTIONS
" 3

BEFORE'YOU BEGIN
Thank you for selecting the PROFORM ®730si tread-
mill. The 730si treadmill blends advanced technology
with innovative stylingto provide you with an excellent
form of cardiovascular exemise in the convenience and
privacy of your home. The 730si offers an impressive
array of features designed to make your workoutsmore
enjoyable and effective. And when you're not exercis-
Ing, the unique 730si can be folded up, requiringless
than half the floor space of other treadmills.
For your benefit, read thls manual carefully before
using the treadmill. If you have additional questions,
please call our toll-free HELPLINE at 1-800-736-6879,
Monday through Saturday, 7 a.m. until 7 p.m. Central
Time (excluding holidays). To help us assist you,
please note the product model number and serial num-
ber before calling. The model number of the treadmill
is 831.297743. The serial number can be found on a
decal attached to the treadmill (see the front cover of
this manual for the location).
Before reading further, please review the drawing
below and familiarize yourself with the parts that are
labeled.
Water Bottle*
"Water Bottle is not included
Storage Latch
Console,
Handrails
Walking
Foot Rails OnlOff
FRONT
BACK
Rear Roller
Adjustment Bolt
Cushioned Walking
Platform for maximum
exercise comfort
Power Cord /
RIGHT SIDE
4

ASSEMBLY
Assembly requires two people. Set the treadmill in a cleared area and remove all packing materials. Do not dis-
pose of the packing materials until assembly is completed. Toots required for assembly: The included allen
wrench Iand your phillips screwdriver ,,.==,===C;_) and two adjustable wrenches _.
1. Attach six Base Pads (95) to the bottom of the Base (73)
in the indicated locations (see the inset drawing). Note:
One additional Base Pad will be used in assembly step 6,
and one extra Base Pad is included.
2. Firmly hold the Updghls (6, 88) as shown. Raise the
Uprights untilthe Base (73) and the front Wheels (66)
are resting on the floor.
3. Loosen the Crossbar Bolts (1) in the ends of the Console
Crossbar (9). Pivot the Console (10) to the angle shown.
Look u._er the Left and Right Crossbar Brackets (3, 36)
and find the two small holes in each end of the Console
Crossbar (9). Tighten Crossbar Screws (84) into all four
holes.
Rotate the Console (10) upward until it stops. Using the
7/32" end of the Allen Wrench (83), tighten the Crossbar
Bolts (1) in the ends of the Console Crossbar (9).
4. Next, the treadmill should be raised to the storage posi-
tion. Hold the treadmill with your hands in the locations
shown at the right. To decrease the possibility of in-
jury, bend your legs and keep your back straight. As
you raise the treadmill, make sure to lift with your
legs rather than your back. Raise the treadmill about
halfway to the vertical position.
95
95
2 6
3
10
4
I
6
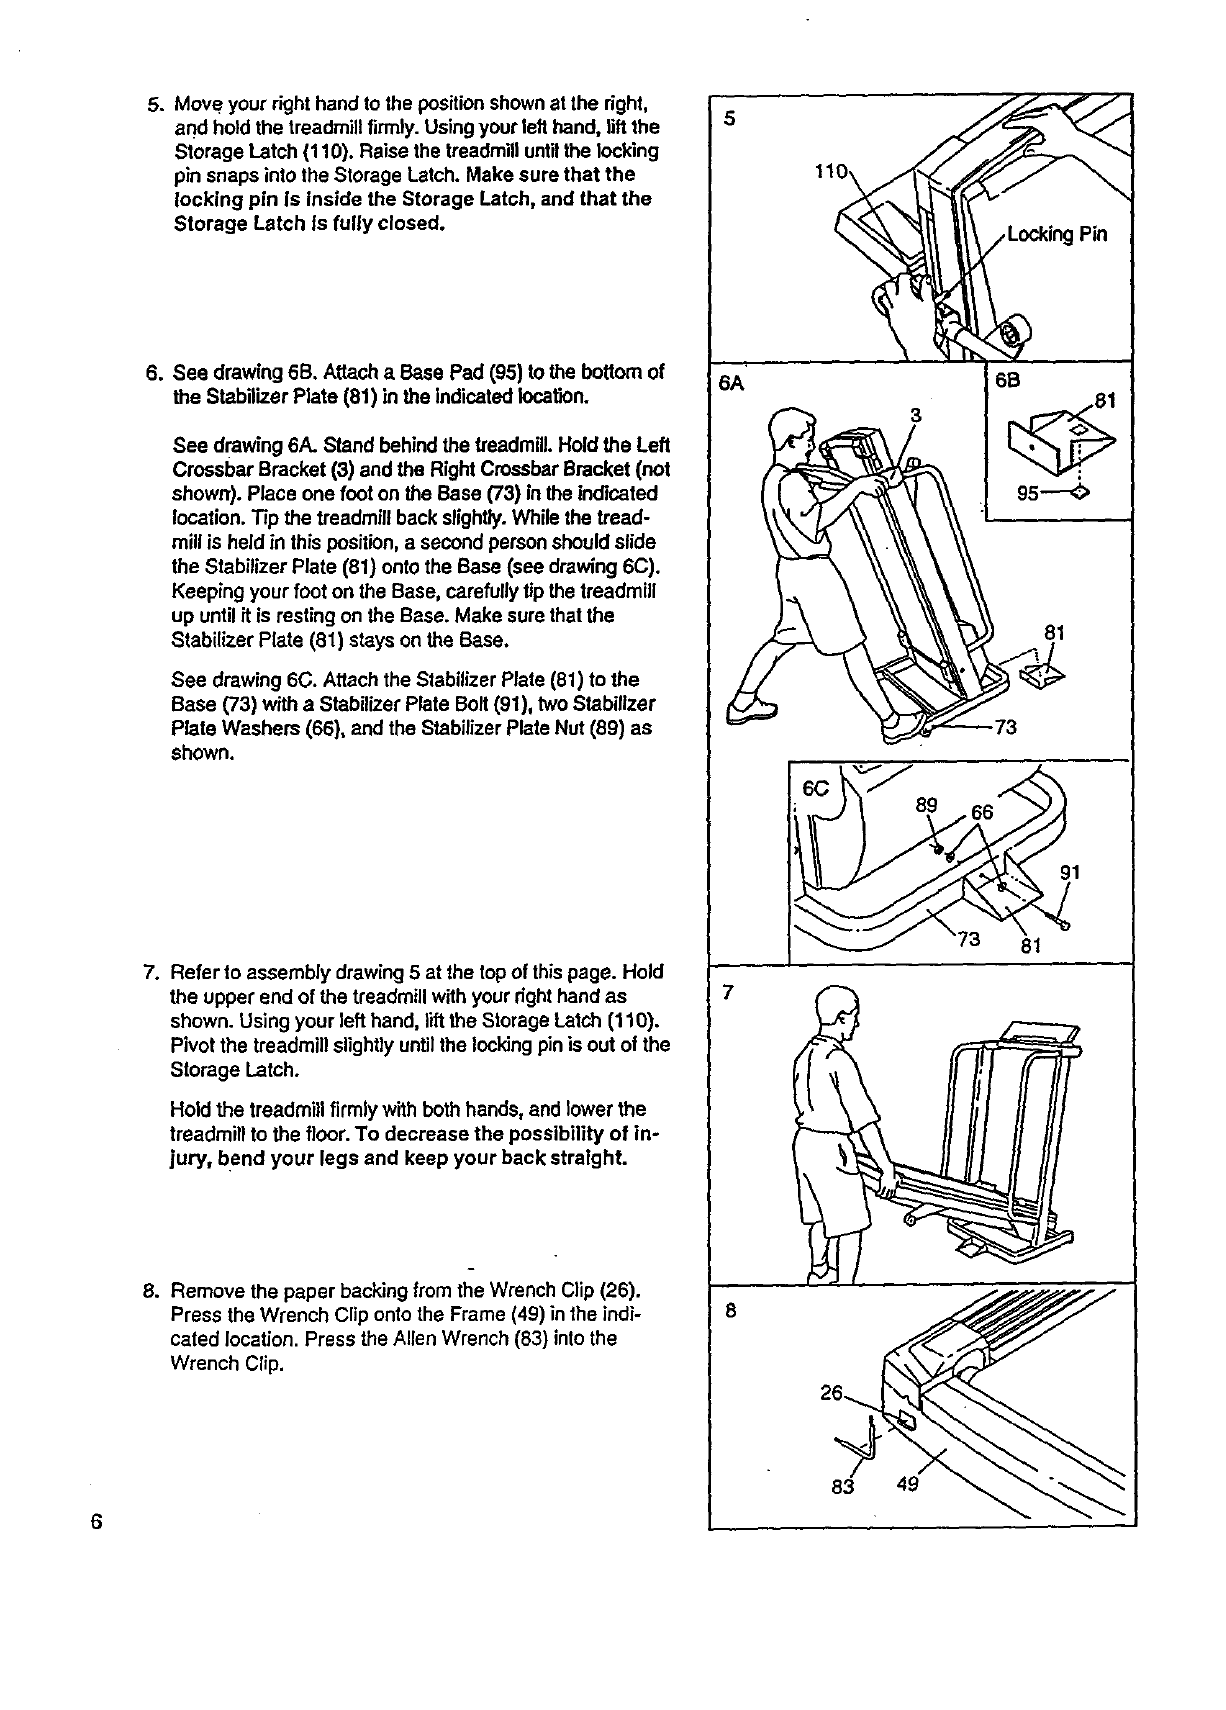
5. Move your right hand to the positionshown at the right,
and hold the treadmill firmly. Using your left hand, liftthe
Storage Latch (110). Raise the treadmill untilthe locking
pin snaps into the Storage Latch. Make sure that the
locking pin is inside the Storage Latch, and that the
Storage Latch is fully closed.
6. See drawing 6B. Attach aBase Pad (95) to the bottom of
the Stabilizer Plate (81) in the indicated location.
See drawing 6A. Stand behind the t_eadmiU.Hold the Left
Crossbar Bracket (3) and the Right Crossbar Bracket (not
shown). Place one foot on the Base (73) in the indicated
location. Tip the treadmill back slightly.While the tread-
mill is held in this position, a second person should slide
the Stabilizer Plate (81) onto the Base (see drawing 6C).
Keeping your foot on the Base, carefully tip the treadmill
up until it is resting on the Base. Make sure that the
Stabilizer Plate (81) stays on the Base.
See drawing 6C. Attach the Stabilizer Plate (81) to the
Base (73) with a Stabilizer Plate Bolt (91), two Stabilizer
Plate Washers (66), and the Stabilizer Plate Nut (89) as
shown.
.Refer to assembly drawing 5 at the top of this page. Hold
the upper end of the treadmill withyour right hand as
shown. Using your left hand, lift the Storage Latch (110).
Pivot the treadmill slightly untilthe lockingpin is out of the
Storage Latch.
Hold the treadmill firmly with both hands, and lower the
treadmill to the floor. To decrease the possibility of in-
jury, bend your legs and keep your back straight.
8. Remove the paper backing from the Wrench Clip (26).
Press the Wrench Clip onto the Frame (49) in the indi-
cated location. Press the Allen Wrench (83) intothe
Wrench Clip.
6
6A 6B
"_--'-'-- 73
WvJ
7
83 49
l
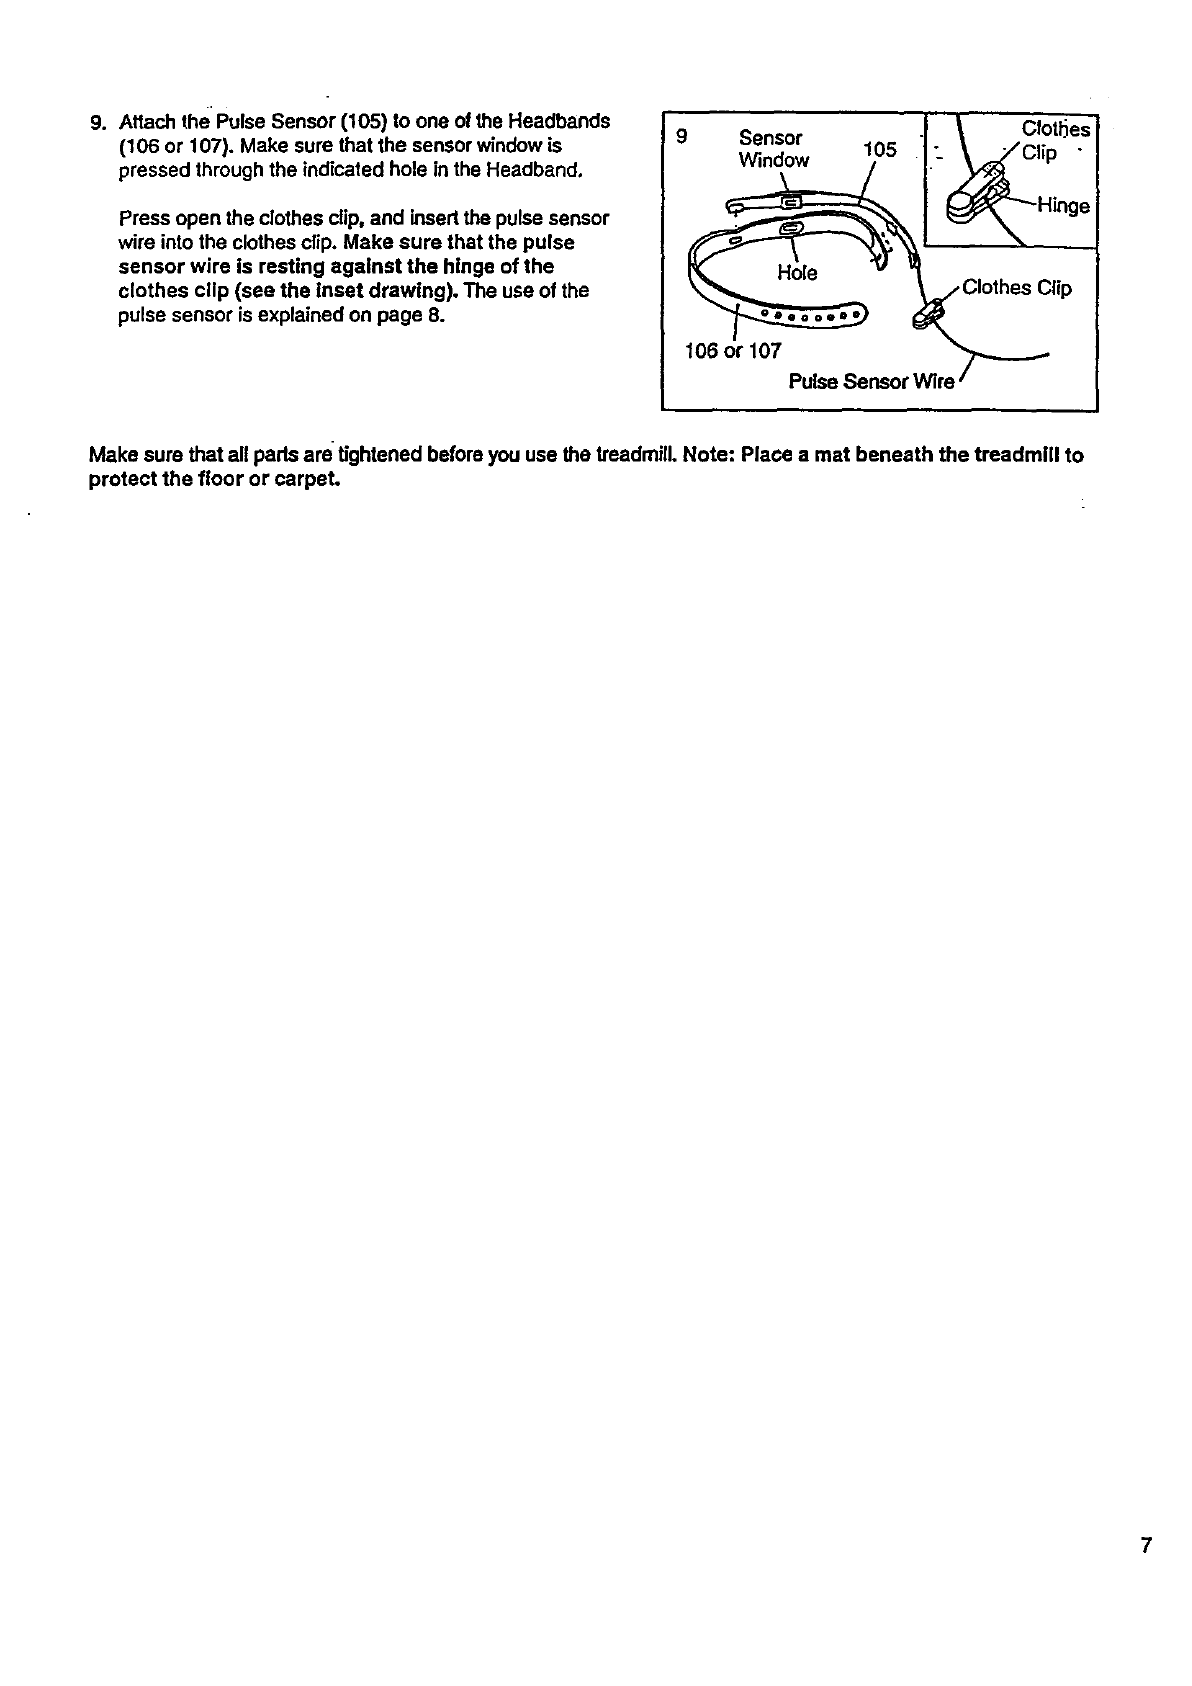
9. Attach the Pulse Sensor (105) to one of the Headbands
(106 or 107). Make sure that the sensor window is
pressed through the indicated hole in the Headband.
Press open the clothes clip, and insert the pulse sensor
wire into the clothes clip. Make sure that the pulse
sensor wire Is resting against the hinge of the
clothes clip (see the inset drawing). The use of the
pulse sensor is explained on page 8.
9 Sensor
Window
106 or 107
Clip
PulseSensorWire
Make sure that all pads are tightened before you use the treadmill. Note: Place a mat beneath the treadmill to
protect the floor or carpet.
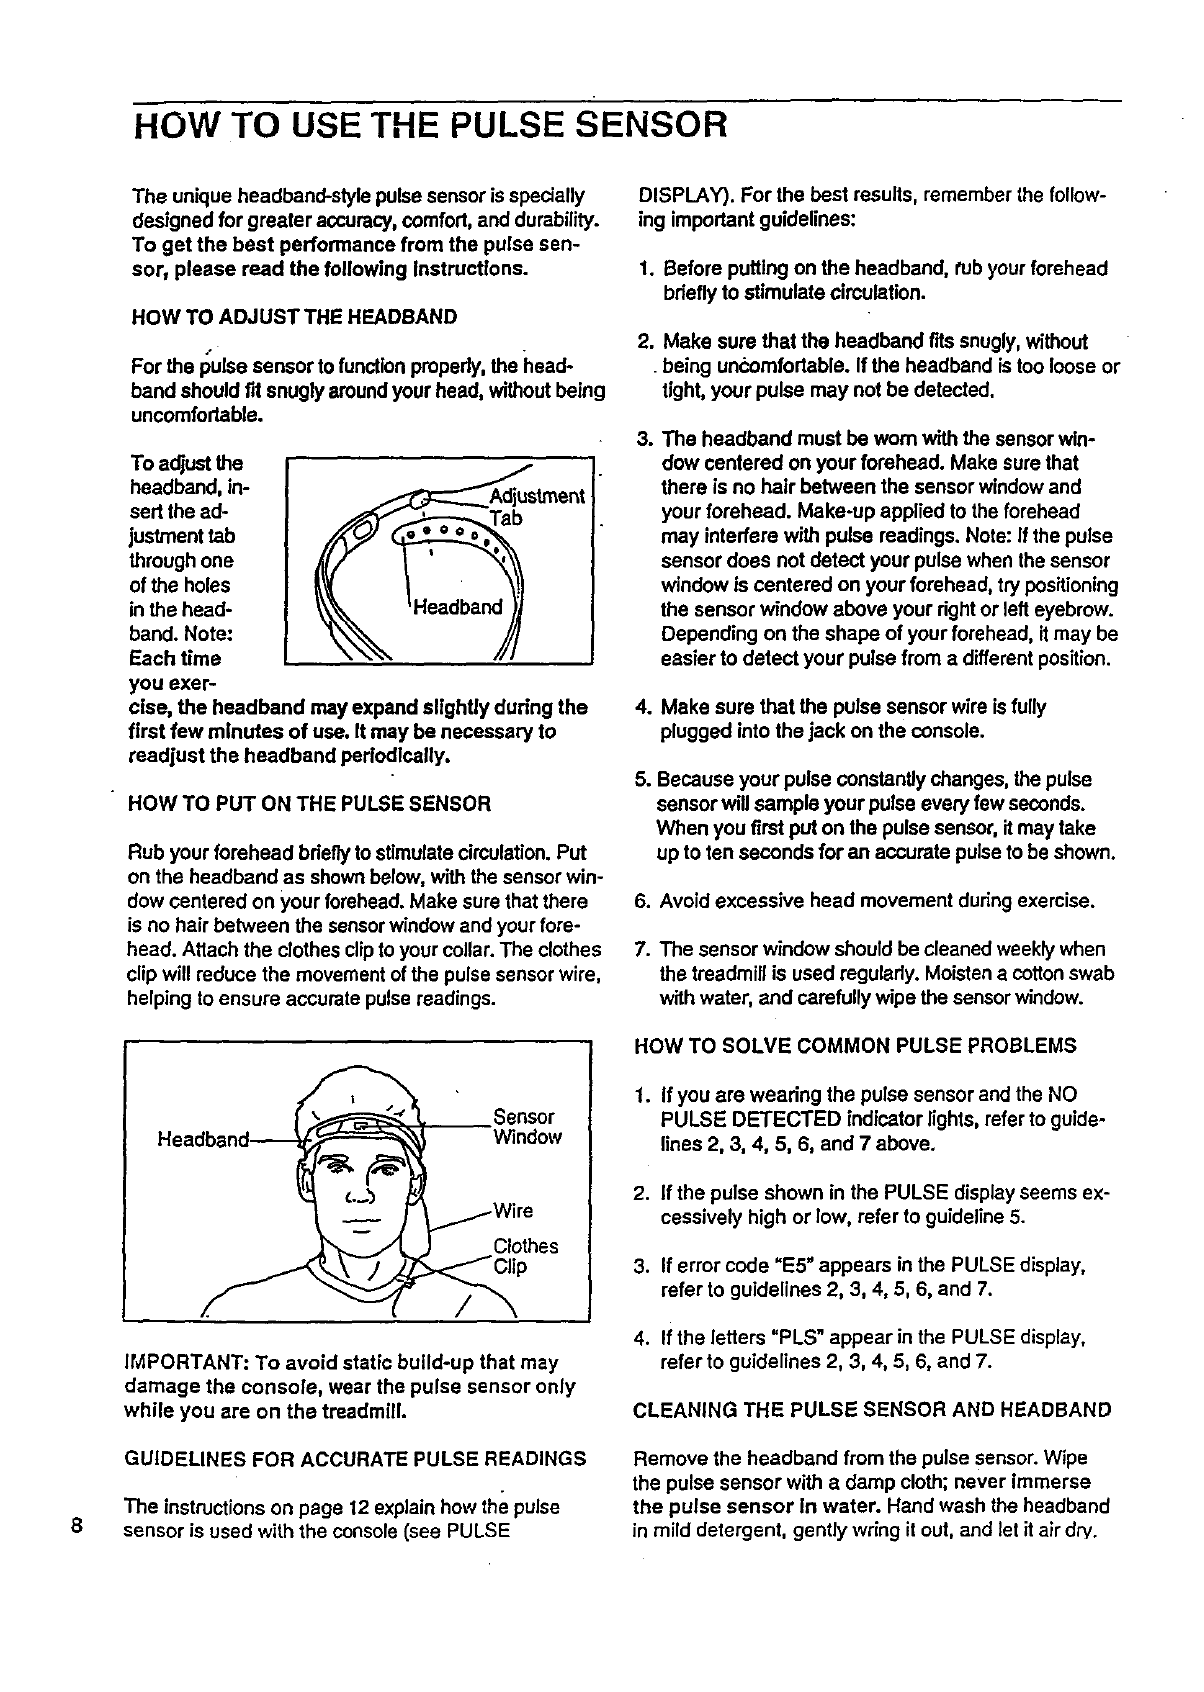
HOW TO USE THE PULSE SENSOR
8
The unique headband-style pulse sensor is specially
designed for greeter accuracy,comfort, and durability.
To get the best performance from the pulse sen-
sor, please read the following Instructions.
HOW TO ADJUST THE HEADBAND
For the i_ulse sensor to functionproperly, the head-
band should fit snugly aroundyour heed, withoutbeing
uncomfortable.
To adjust the
headband, in-
sert the ad-
justment tab
through one
of the holes
in the head-
band. Note:
Each time
_stmant
you exer-
cise, the headband may expand slightly during the
first few minutes of use. It may be necessary to
readjust the headband periodlcatly.
HOW TO PUT ON THE PULSE SENSOR
Rub your forehead bdefly to stimulate circulation. Put
on the headband as shown below, with the sensor win-
dow centered on your forehead. Make sure that there
is no hair between the sensorwindow end your fore-
head. Attach the clothes clip to your collar. The clothes
clip will reduce the movement of the pulse sensor wire,
helping to ensure accurate pulse readings.
Sensor
Window
Clothes
l/
IMPORTANT: To avoid static build-up that may
damage the console, wear the pulse sensor only
while you are on the treadmtll.
GUIDELINES FOR ACCURATE PULSE READINGS
The instructions on page 12 explain how the pulse
sensor is used with the console(see PULSE
DISPLAY). For the best results, remember the follow-
ing important guidelines:
1. Before putting on the headband, tub your forehead
briefly to stimulate circulation.
2. Make sure that the headband fits snugly, without
being uncomfortable. If the headband is too loose or
tight, your pulse may not be detected.
3. The headband must be worn with the sensor win-
dow centered on your forehead. Make sure that
there is no hair between the sensor window and
your forehead. Make-up applied to the forehead
may interfere with pulse readings. Note: If the pulse
sensor does not detect your pulse when the sensor
window is centered on your forehead, try positioning
the sensor window above your rightor left eyebrow.
Depending on the shape of your forehead, it may be
easier to detect your pulse from a different position.
4. Make sure that the pulse sensor wire is fully
plugged into the jack on the console.
5. Because your pulse constantly changes, the pulse
sensor will sample your pulse every few seconds.
When you first put on the pulse sensor, it may take
up to ten seconds for an accurate pulse to be shown.
6. Avoid excessive head movement duringexercise.
7. The sensor window should be cleaned weekly when
the treadmill is used regularly. Moisten e cotton swab
with water, end carefully wipe the sensor window.
HOW TO SOLVE COMMON PULSE PROBLEMS
1. If you ere wearing the pulse sensor and the NO
PULSE DETECTED indicator lights, refer to guide-
lines 2, 3, 4, 5, 6, and 7 above.
2. If the pulse shown in the PULSE display seems ex-
cessively high or low, refer to guideline 5.
3. If error code "E5" appears in the PULSE display,
refer to guidelines 2, 3, 4, 5, 6, end 7.
4. If the letters "PLS" appear in the PULSE display,
refer to guidelines 2, 3, 4, 5, 6, and 7.
CLEANING THEPULSESENSORANDHEADBAND
Remove the headband from the pulse sensor. Wipe
the pulse sensor with edamp cloth; never immerse
the pulse sensor in water. Hand wash the headband
in mild detergent, gently wdng it out, and let it air dry.
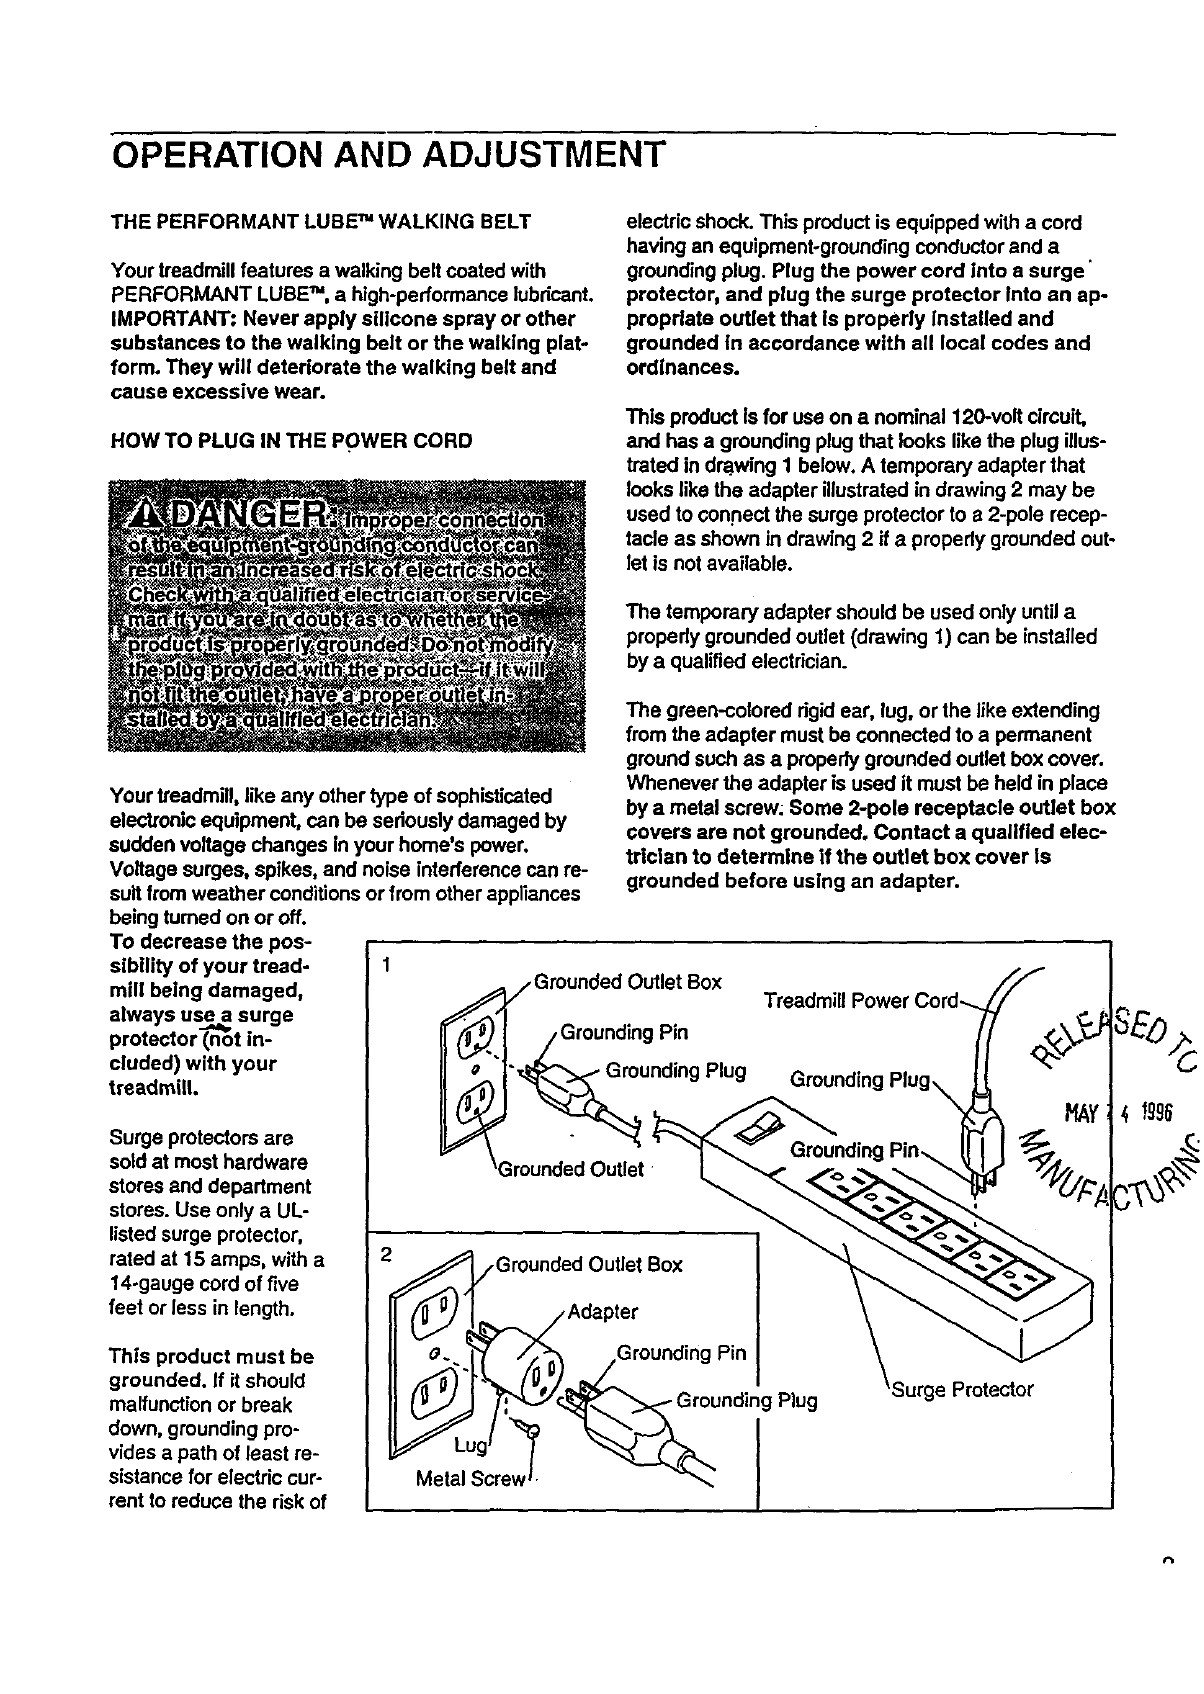
OPERATION AND ADJUSTMENT
THE PERFORMANT LUBE _WALKING BELT
Your treadmill features a walking belt coated with
PERFORMANT LUBE _', a high-pedormance lubdcant.
IMPORTANT: Never apply silicone spray or other
substances to the walking belt or the walking plat-
form. They will deteriorate the walking belt and
cause excessive wear.
HOW TO PLUG IN THE POWER CORD
electric shock. This product is equipped with a cord
having an equipment-grounding conductor and a
grounding plug. Plug the power cord Into a surge"
protector, and plug the surge protector Into an ap-
propriate outlet that Is propedy Installed and
grounded In accordance with all local codes and
ordinances.
This product Is for use on a nominal 120-volt circuit,
and has a grounding plug that looks like the plug illus-
trated in dra..wing1 below. A temporary adapter that
looks like the adapter illustrated in drawing 2 may be
used to con.nect the surge protector to a2-pole recep-
tacle as shown in drawing 2 if a properly grounded out-
let is not available.
The temporary adapter should be used only until a
propedy grounded outlet (drawing 1) can be installed
by a qualified electrician.
Your treadmill, like any other type of sophisticated
electronic equipment, can be seriously damaged by
sudden voltage changes In your home's power.
Voltage surges, spikes, and noise interference can re-
suit from weather conditions or from other appliances
being turned on or off.
To decrease the pos-
sibility of your tread-
mill being damaged,
always use a surge
protector (not in-
cluded) with your
treadmill.
Surge protectors are
sold at most hardware
stores and department
stores. Use only a UL-
listed surge protector,
rated at 15 amps, with a
14-gauge cord of five
feet or less in length.
This product must be
grounded. If it should
malfunction or break
down, grounding pro-
vides a path of least re-
sistance for electric cur-
rent to reduce the risk of
The green-colored dgid ear, lug, or the like extending
from the adapter must be connected to a permanent
ground such as a properly grounded outlet box cover.
Whenever the adapter is used it must be held in place
by a metal screw: Some 2-pole receptacle outlet box
covers are not grounded. Contact a qualified elec-
trician to determine if the outlet box cover Is
grounded before using an adapter.
Grounded Outlet Box
nding Pin
rounding Plug
__. ,Grounded Outlet Box
Adapter
_/_0"_ --Gr°unding Pin
,_ __undin
)
Metal Screw
Plug Protector
;4 Igg6
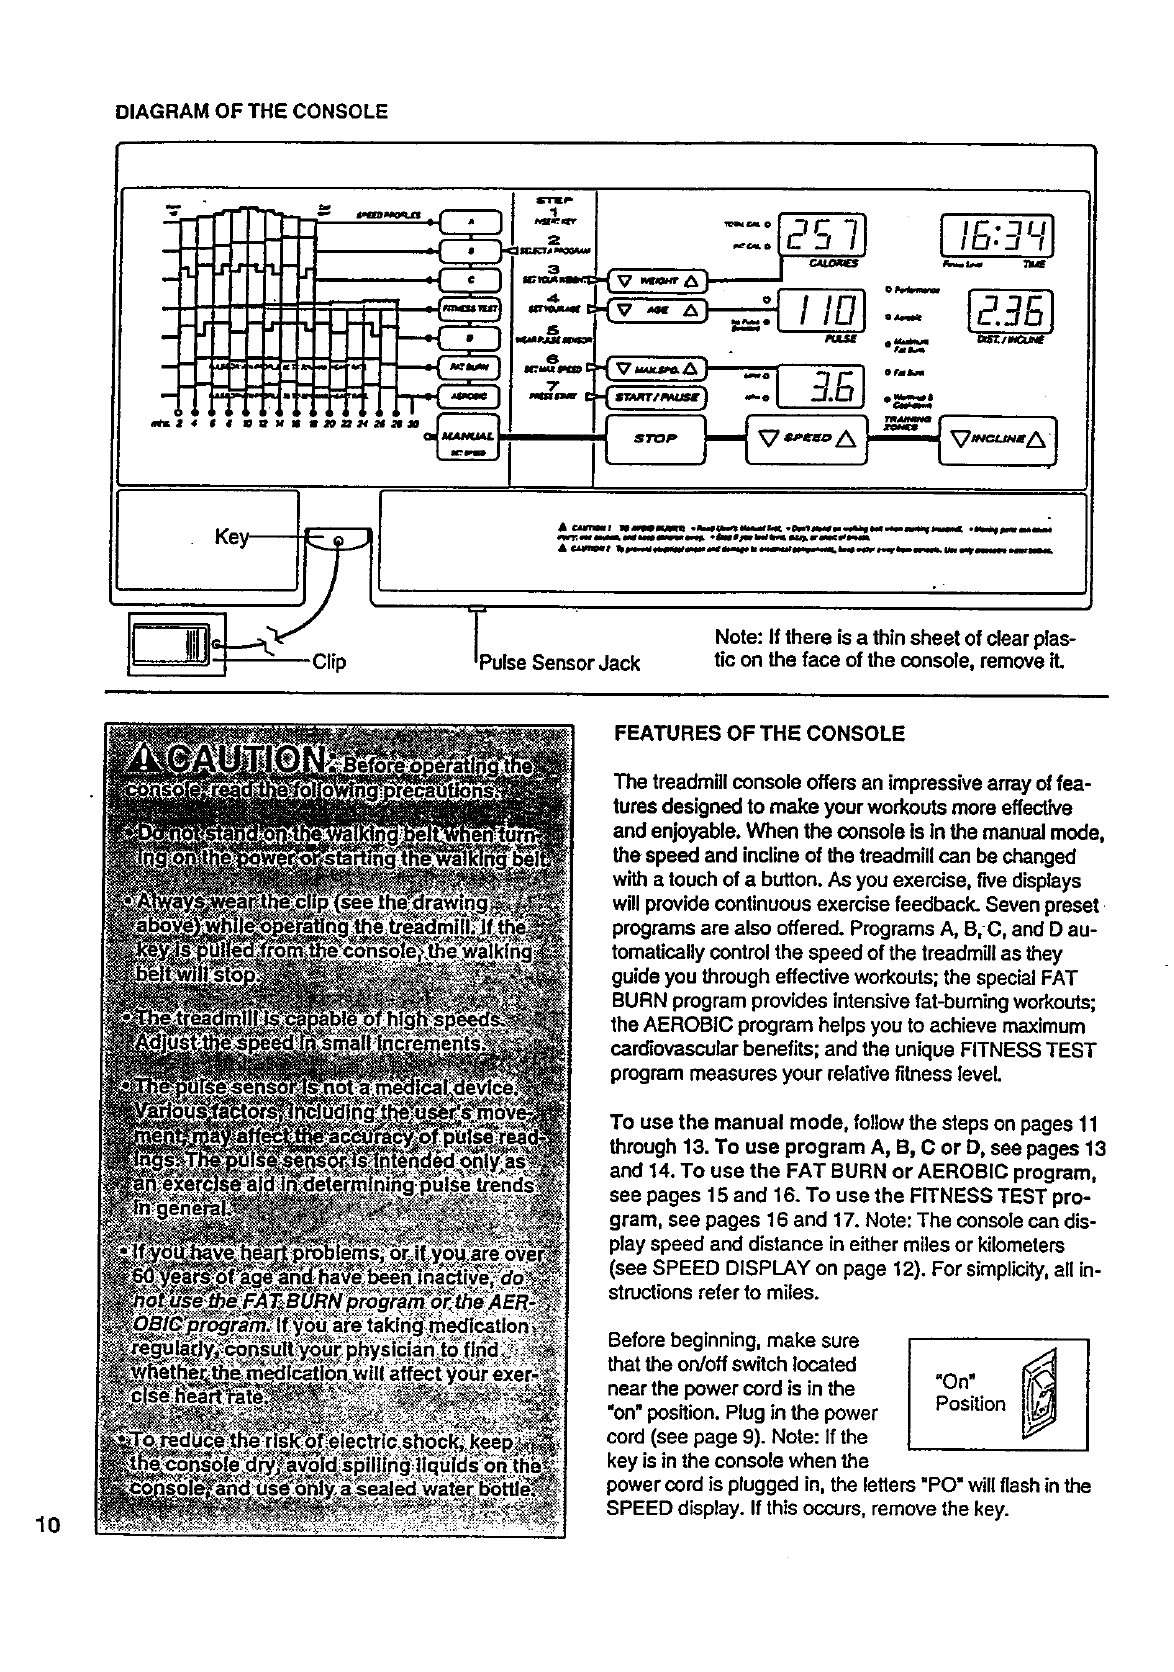
DIAGRAM OF THE CONSOLE
7
_KZ 4 6 8 aPs_ Mas ae.t_nas_q____ I
•0"='o _7C 7--I IC. 7UI
3.S] """
TPulse Sensor Jack Note: If there is a thin sheet of clear plas-
tic on the face of the console, remove it.
10
FEATURES OF THE CONSOLE
The treadmill console offers an impressive array of fea-
tures designed to make your workouts more effective
and enjoyable. When the console is in the manual mode,
the speed and incline of the treadmill can be changed
with atouch of abutton. As you exemise, five displays
will provide continuous exercise feedback. Seven preset
programs are also offered. Programs A, B,C, and D au-
tomaticallycontrol the speed of the treadmill as they
guide you through effective workouts;the special FAT
BURN program provides intensive fat-burning workouts;
the AEROBIC program helps you to achieve maximum
cardiovascular benefits; and the unique FITNESS TEST
program measures your relative fitness level.
To use the manual mode, follow the steps on pages 11
through 13. To use program A, B, C or D, see pages 13
and 14. To use the FAT BURN or AEROBIC program,
sea pages 15 and 16. To use the FITNESS TEST pro-
gram, see pages 16 and 17. Note: The console can dis-
play speed and distance in either miles or kilometers
(see SPEED DISPLAY on page 12). For simplicity,all in-
structions refer to miles.
Before beginning, make sure
that the on/off switch located
near the power cord is in the
"on" position. Plug in the power
cord (see page 9). Note: If the
key is inthe console when the iPosition
power cord is plugged in, the letters "PO" will flash in the
SPEED display. If this occurs, remove the key.
B
k'i
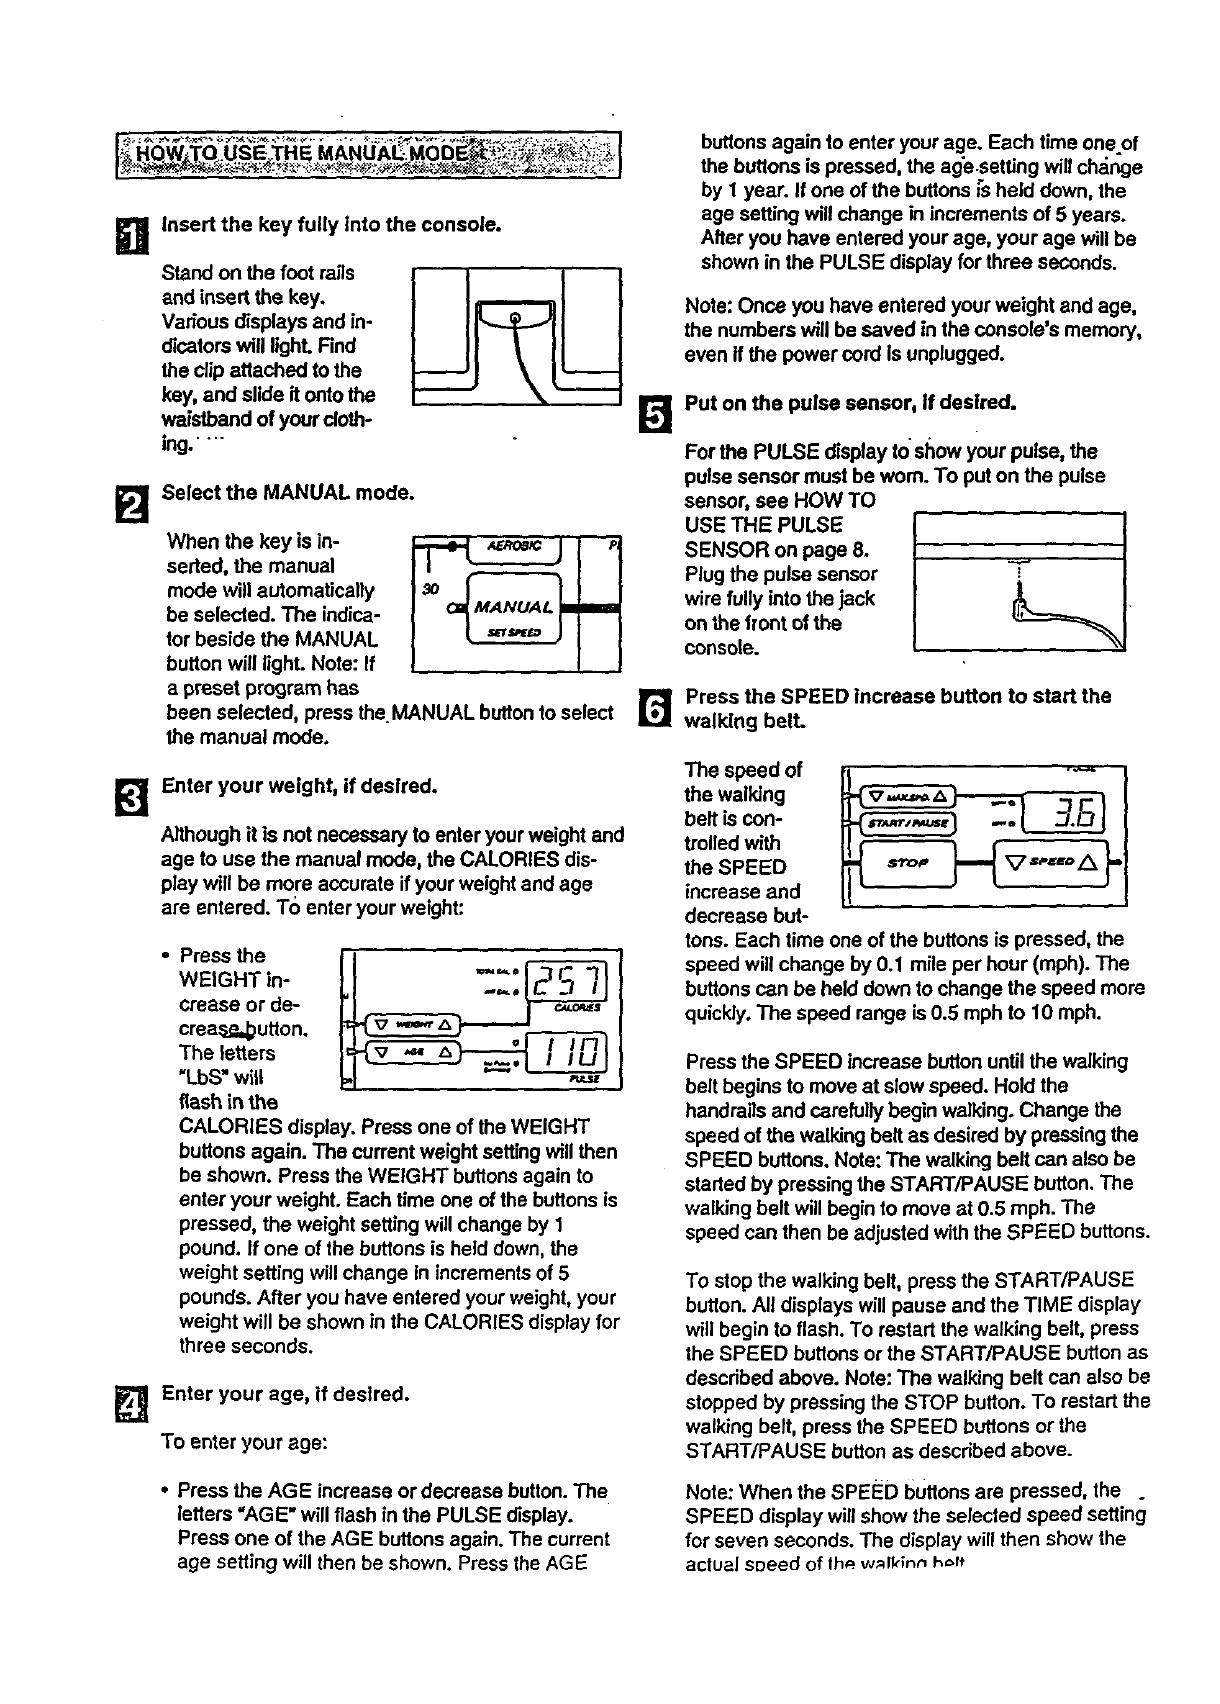
Insert the key fully Into the console.
Stand on the foot rails
and insert the key.
Various displays and in-
dicators will light. Find
the clip attached to the
key, and slide it onto the
waistband of your cloth-
ing."
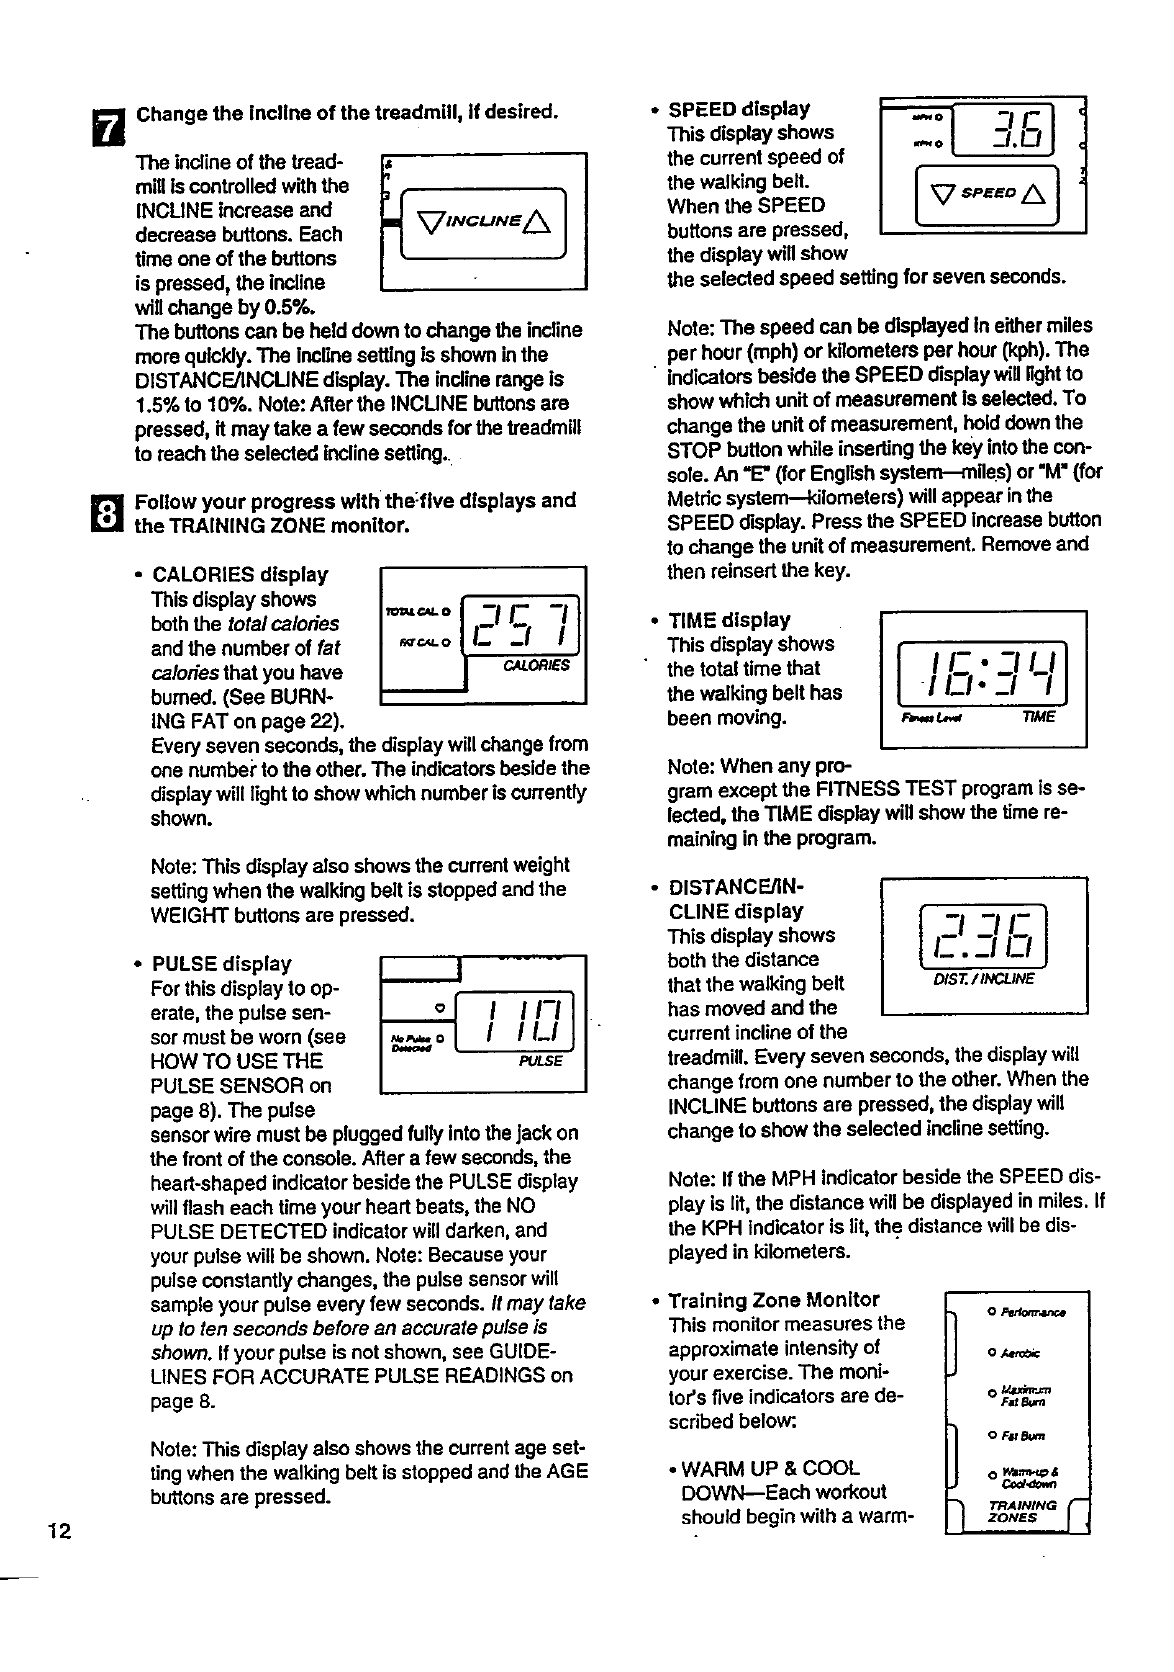
Select the MANUAL mode.
When the key is in-
serted, the manual
mode will automatically
be selected. The indica-
tor beside the MANUAL
button will light. Note: If
apreset program has
been selected, press the. MANUAL buttonto select
the manual mode.
Enter your weight, if desired.
Although it is not necessary to enter your weight and
age to use the manual mode, the CALORIES dis-
play will be more accurate if your weight and age
are entered. To enter your weight:
•Press the
WEIGHT in-
crease or de-
crea_p,_utton.
The letters
"LbS" will
flash in the
CALORIES display. Press one of the WEIGHT
buttons again. The current weight setting will then
be shown. Press the WEIGHT buttons again to
enter your weight. Each time one of the buttons is
pressed, the weight setting will change by 1
pound. If one of the buttons is held down, the
weight setting will change in increments of 5
pounds. After you have entered your weight, your
weight will be shown in the CALORIES display for
three seconds.
Enter your age, if desired.
To enter your age:
•Press the AGE increase or decrease button. The
letters "AGE" will flash in the PULSE display.
Press one of the AGE buttons again. The current
age setting will then be shown. Press the AGE
buttonsagain to enter your age. Each time oneof
the buttons is pressed, the age.setting will ch,_nge
by 1year. If one of the buttons _sheld down, the
age setting will change in increments of 5 years.
After you have entered your age, your age will be
shown in the PULSE display for three seconds.
Note: Once you have entered your weight and age,
the numbers will be saved in the console's memory,
even if the power cord Is unplugged.
Put on the pulse sensor, If desired.
For the PULSE display to show your pulse, the
pulse sensor must be worn. To put on the pulse
sensor, see HOW TO
USE THE PULSE
SENSOR on page 8.
Plug the pulse sensor
wire fully into the jack
on the front of the
console.
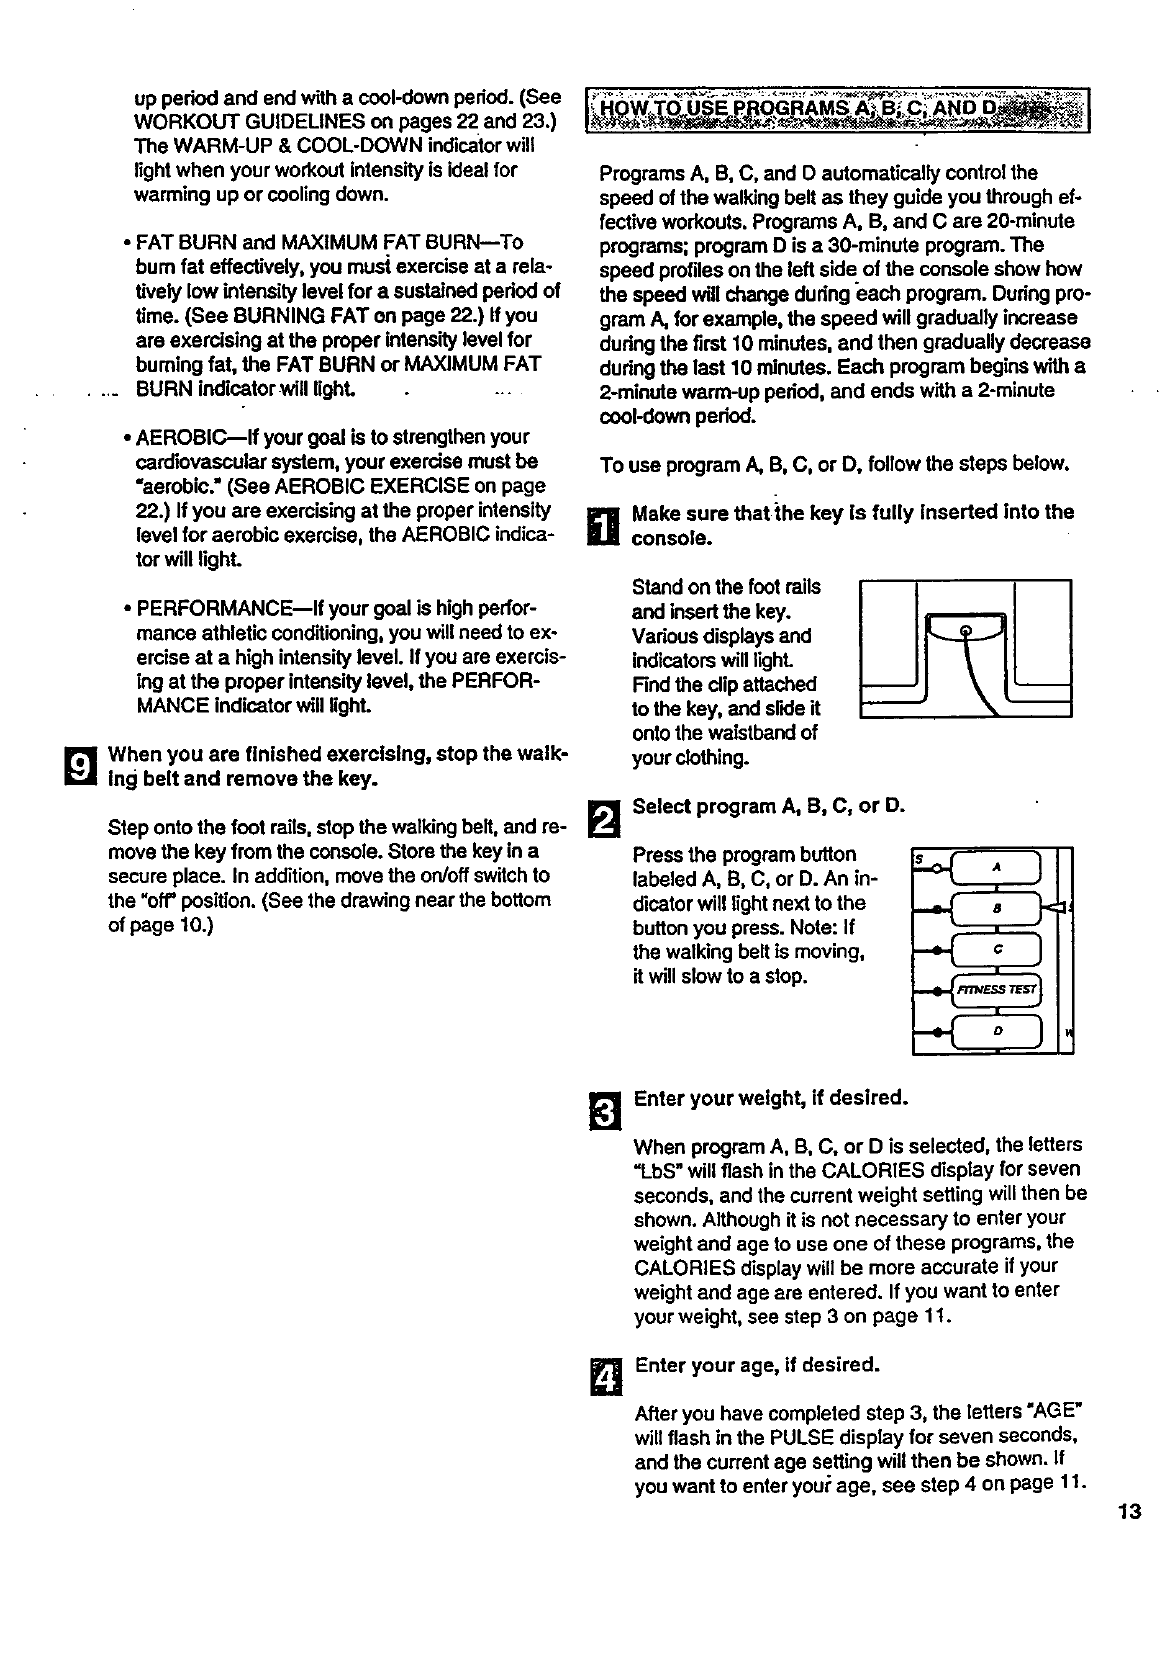
r_ Press the SPEED increase button to start the
walking belt.
The speed of
the walking
belt is con-
trolled with
the SPEED
increase and
decrease but-
tons. Each time one of the buttons is pressed, the
speed will change by 0.1 mile per hour (mph). The
buttons can be held down to change the speed more
quickly. The speed range is 0.5 mph to 10 mph.
Press the SPEED increase button until the walking
belt begins to move at slow speed. Hold the
handrails and carefully begin walking. Change the
speed of the waBdngbelt as desired by pressing the
SPEED buttons. Note: The walking belt can also be
started by pressing the START/PAUSE button. The
walking belt will begin to move at 0.5 mph. The
speed can then be adjusted with the SPEED buttons.
To stop the walking belt, press the START/PAUSE
button. All displays will pause end the TIME display
will begin to flash. To restart the walking belt, press
the SPEED buttons or the START/PAUSE button as
described above. Note: The walking belt can also be
stopped by pressing the STOP button. To restart the
walking belt, press the SPEED buttons or the
START/PAUSE button as described above.
Note: When the SPEED buttons are pressed, the .
SPEED display will show the selected speed setting
for seven seconds. The display will then show the
actual speed of the.w_lklnn hoff
12
i] The incline of the tread-
mill is controlled with the
INCUNE increase and
decrease buttons. Each
time one of the buttons
is pressed_the incline
will change by 0.5°/,.
Change the incline of the treadmill, if desired.
The buttons can be held down to change the incline
more quickly. The incline setting is shown in the
DISTANCFJINCUNE display. The incline range Is
1.5% to 10%. Note: After the INCUNE buttonsare
pressed, it may take a few seconds for the treadmill
to reach the selected incline setting.
[]Follow your progress with the:five displays and
the TRAINING ZONE monitor.
•CALORIES display
This display shows
both the totalca/oties
and the number of fat
ca/odes that you have
burned. (See BURN-
ING FAT on page 22).
Every seven seconds, the display will change from
one numbei"to the other. The indicatorsbeside the
display will light to show which number is currently
shown.
Note: This display also shows the currentweight
setting when the walking belt is stopped and the
WEIGHT buttons are pressed.
• PULSE display
For this display to op-
erate, the pulse sen-
sor must be worn (see
HOW TO USE THE
PULSE SENSOR on
page 8). The pulse
I I1-1
I ILl
PULSE
sensor wire must be plugged fully into the jack on
the front of the console. After a few seconds, the
heart-shaped indicator beside the PULSE display
will flash each time your heart beats, the NO
PULSE DETECTED indicator will darken, and
your pulse will be shown. Note: Because your
pulse Constantly changes, the pulse sensor will
sample your pulse every few seconds./t may take
up to ten seconds before an accurate pulse is
shown. If your pulse is not shown, see GUIDE-
LINES FOR ACCURATE PULSE READINGS on
page 8.
Note: This display also shows the current age set-
ting when the walking belt is stopped and the AGE
buttons are pressed.
•SPEED display
This display shows
the current speed of
the walking belt.
When the SPEED
buttons are pressed,
the display will show
_-'LQI
the selected speed setting for seven seconds.
Note: The speed can be displayed in either miles
per hour (mph) or kilometers per hour (kph). The
indicators beside the SPEED display will lightto
show which unit of measurement Is selected. To
change the unit of measurement, hold downthe
STOP button while inserting the key intothe con-
sole. An =E"(for English system--miles) or "M"(for
Metric system--kilometers) will appear in the
SPEED display. Press the SPEED increasebutton
to change the unit of measurement. Remove and
then reinsert the key.
TIME display
This display shows
the total time that
the walking belt has
been moving.
II/-•-I,,:,.-,'-,'l
_TIME
Note: When any pro-
gram except the FITNESS TEST program is se-
lected, the TIME display will show the time re-
maining in the program.
DISTANCE/IN-
CLINE display
This display shows
both the distance
that the walking belt
has moved and the
current incline of the
treadmill. Even] seven seconds, the displaywill
change from one number to the other. When the
INCLINE buttons are pressed, the display will
change to show the selected incline setting.
I -I -_I!-
/_.-i E.I1
DIST./INCLINE
Note: If the MPH indicator beside the SPEED dis-
play is lit, the distance will be displayed in miles. If
the KPH indicator is lit,the distance will be dis-
played in kilometers.
Training Zone Monitor
This monitor measures the
approximate intensity of
your exercise. The moni-
tor's five indicators are de-
scribed below:.
•WARM UP & COOL
DOWN--Each workout
should begin with a warm-
oPedom,.u_._
oAet_
O_
Fat&am
OF_ Bum
OWa,'nt-q_&
Co_,¢_vm
TRAINING r
ZONES
up period and end with acool-down period. (See
WORKOUT GUIDELINES on pages 22 and 23.)
The WARM-UP & COOL-DOWN indicatorwill
lightwhen your workout intensity is ideal for
warming up or cooling down.
•FAT BURN and MAXIMUM FAT BURN--To
bum fat effectively, you mus| exercise at a rela-
tively low intensity level for a sustained padod of
time. (See BURNING FAT on page 22.) If you
are exercising at the proper intensity level for
buming fat, the FAT BURN or MAXIMUM FAT
.... BURN indicator will UghL ...
•AEROBIC--If your goal is to strengthen your
cardiovascular system, your exercise must be
"aerobic." (See AEROBIC EXERCISE on page
22.) If you are exercising at the proper intensity
level for aerobic exercise, the AEROBIC indica-
tor will light.
•PERFORMANCE--If your goal is high perfor-
mance athletic conditioning, you will need to ex-
ercise at a high intensity level. If you are exemis-
ing at the proper intensity level, the PERFOR-
MANCE indicator will light.
[_1 When you are finished exercising, stop the walk-
ing belt and remove the key.
Step onto the foot rails, stop the walking belt, and re-
move the key from the console. Store the key in a
secure place. In addition, move the on/off switchto
the "off"position. (See the drawing near the bottom
of page 10.)
I_ __ __"-_ I
Programs A, B, C, and O automatically control the
speed of the walking belt as they guide you through ef-
fective workouts. Programs A, B, and C are 20-minute
programs; program D is a 30-minute program. The
speed profiles on the left side of the console show how
the speed will change dudng each program. Dudng pro-
gram A, for example, the speed will gradually increase
dudng the first 10 minutes, and then gradually decrease
dudng the last 10 minutes. Each program begins with a
2-minute warm-up padod, and ends with a 2-minute
cool-down period.
To use program A, B, C, or D, follow the steps below.
aMake sure that the key is fully inserted into the
console.
Stand on the foot roils
and insert the key.
Vedous displays and
indicatorswill lighL
Find the clip attached
to the key, and sl'_leit
onto the waistband of
your clothing.
E]Select program A, B, C, or D.
Press the program button
labeled A, B, C, or D. An in-
dicator will light next to the
button you press. Note: If
the walking belt is moving,
it will slow to a stop.
k'l
B
Enter your weight, if desired.
When program A, B, C, or D is selected, the letters
=LbS"will flash in the CALORIES display for seven
seconds, and the current weight setting will then be
shown. Although it is not necessary to enter your
weight and age to use one of these programs, the
CALORIES display will be more accurate if your
weight and age are entered. If you want to enter
your weight, see step 3 on page 1t.
Enter your age, If desired.
After you have completed step 3, the letters "AGE"
will flash in the PULSE display for seven seconds,
and the current age setting will then be shown. If
you want to enter you=:age, see step 4 on page 11.
13

[]
B
Put on the pulse sensor, if desired.
For the PULSE display I
to show your pulse, the I
pulse sensor must be
worn. To put on the
pulse sensor, see HOW
TO USE THE PULSE
SENSOR on page 8. Plug the pulse sensor wire
fully Into the jack on the front of the console.
Set a maximum speed for the program.
After you have
completed step
4, a number will
appear in the
SPEED display
and flash for
seven seconds.
STOP
This number shows the maximum speedthat the
walking belt will move during the program. The max-
imum speed setting can be from 3.0 mph up to 8.5
mph. If you want to change the maximum speed set-
ting, press the MAX. SPD. increase or decrease but-
ton. Note: The maximum speed se_ng will change
by 0.3 mph each time one of the MAX. SPD. buttons
is pressed, until it reaches 4.5 mph; the maximum
speed setting will then change by 0.5 mph each time
one of the buttons is pressed.
The indicators
below the
speed profiles
will show the
progress of
the program.
Dudng.the
first2 minutes of the program, the indicatorabove
the number 2 will lighL After 2 minutes, the indica-
tom above the numbers 2 and 4 will light. After 4
minutes, the indicators above the numbers 4 and 6
will light, and so on. The speed of the walking belt
will change periodically during the program as
shown by the speed profiles.The program will con-
tinue in this manner until the time shown in the TIME
display reaches zero. The walking belt will then slow
to astop and the program will be completed.
Note: The SPEED buttonswill not respond while pro-
gram A, B, C, or D is selected. Ifthe program is too
easy or too challenging, press the MAX. SPD; but-
tonsto set a new maximum speed. The new maxi-
mum speed setting will be shown in the SPEED dis-
play for 3 seconds. To stop the program temporarily,
press the START/PAUSE button. The TIME display
will begin to flash. To restartthe program, pressthe
START/PAUSE buttonagain. The program will re-
sume and the walldng beltwill returnto the latest
speed setting.To ten'ninatetheprogrambeforethe
programiscompleted,presstheSTOP button.
If the maximum speed setting is between 3.0 mph
and 5.0 mph, the walking belt will move at 1.5 mph
dudng the first 2minutes and the last 2 minutes of
the program (the warm-up and cool-down periods).
The speedrange during the rest of the program will
be 1.5 mph. For example, if the maximum speed
setting is 5.0 mph, the speed range will be 3.5 mph
lo 5.0 mph (a difference of 1.5 mph).
FJ
Change the lncllne of the treadmill, if desired.
When program A, B, C, or D is selected, the incline
of the treadmill can be changed with the INCLINE
buttons. See step 7 on page 12.
L_'_ Follow your progress with the five displays and
the TRAINING ZONE monitor.
If the maximum speed setting is between 5.5 rnph
and 8.5 mph, the walking belt will move st 3.0 mph
dudng the first 2 minutes and the last 2 minutes of
the program. The speedrange during the rest of the
program will be 2.0 rnph.
See TRAINING ZONE MONITOR on pages 12 and
13.
_] Wben you are finished exercising, stop the
walking belt and remove the key.
14
I_ Press the START/PAUSE button to start the pro-
gram.
When the
START/PAUSE
button is
pressed, the
TIME display
will begin count-
ing down from
20 minutes (or 30 minutes if program D is selected).
After a moment, the walking belt will begin to move.
Hold the handrails and carefully begin walking.
Step onto the foot rails, stop the walking belt, and re-
move the key from the console. Store the key in a
secure place. In addition, move the on/offswitch to
the "off" position. (See the drawing near the bottom
of page 10.)
I .HOW_T_.O._'";.;.* _, _ _ *_% *_ _:._ _ _.,_i,y _.+:: -. _:%;_ ;_*_._ =_,_..%. _.._ _ _:US E_:TH E. FAT a g RN vAN D_ ABROB|C_:. I_' :':_"h _: :*_ ""_ ,_ _..._.;_:_
I':PROGBAMS_S!_ _,_ -_""_: /:-:I
The FAT BURN and AEROBIC programs automatically
control the speed and incline of the treadmill to keep
your pulse within a predetermined range dudng your
workouts. Both programs are 30-minute programs. The
speed profiles on the left side of the console show how
your pulse will change dudng each program. Each pro-
gram begins with a warm-up pei'iod, and ends with a
cool-down period.
To use one of these programs, follow the steps below.
DMake sure that the key is fully Inserted into the
console.
Stand on the foot rails
and insert the key.
Vadous displays and in-
dicators will light. Find
the clip attached to the
key, and slide it onto the
waistband of your cloth-
ing.
BSelect the FAT BURN or AEROBIC program.
Press the FAT BURN or
AEROBIC button. An in-
dicator will light next to
the button you press.
Note: If the walking belt
is moving, it will slow to
a stop.
k3
Enter year weight.
When the FAT BURN or AEROBIC program isse-
lected, the letters 'l..bS" will flash in the CALORIES
display. You must enter your weight and age before
either of these programs can be staded. To enter
your weight, see step 3 on page 11. If you have al-
ready entered your weight, you must press one of
the WEIGHT buttons to vedfy the weight setting.
E!Enter your age,
After you have completed step 3, the letters "AGE"
will flash in the PULSE display. To enter your age,
see step 4 on page 11. If you have already entered
your age, you must press one of the AGE buttons to
vedfy the age setting.
_Put on the pulse sensor.
The pulse sensor must be wom when the FAT BURN
or AEROBIC program is used. To put on the pulse
sensor, see HOW TO
USE THE PULSE
SENSOR on page 8.
Plug the pulse sensor
wire fully into the jack
on the front of the con-
sole. Note: The FAT
BURN and AEROBIC programs can be startedwith-
out your pulse being detected; however, the pro-
grams will automatically stop if your pulse is not de-
tected 2 minutes after the programs are started.
B Press the START/PAUSE button to start the pro-
gram.
When the START/
PAUSE button is
pressed, the TIME dis-
play will begin count-
ing down from 30 min-
utes. After a moment,
the walking belt will
begin to move. Hold the handrails and carefully
begin walking.
The indicators
below the
speed profiles
will show the
progress of
the program.
Dudng the first
2 minutes of the program, the indicator above the
number 2 will light. After 2 minutes, the indicators
above the numbers 2 and 4 will light. After 4 min-
utes, the indicators above the numbers 4 and 6 will
light, and so on. The speed and incline of the tread-
mill will change periodically to keep your pulse
within apredetermined range, shown by the speed
profiles. When the time shown in the TIME display
reaches zero, the walking belt will slow to a stop and
the program will be completed.
Note: If your pulse is
not detected dudng
the program, the NO
PULSE DETECTED
indicator will light and
the letters "PLS" will
flash in the PULSE
display. (See GUIDELINEs FOR ACCURATE
PULSE READINGS on page 8.) If your pulse is not
detected at the end of any 2-minute period during
the program (after 2 minutes, after 4 minutes, after 6
minutes, etc.), the program will automatically stop.
PULSE
Note: Minor adjustments can be made to the speed
or incline of the treadmill dudng the program by
pressing the SPEED or INCLINE buttons. However, 15
if you increase the speed, the incline will automati-
cally decrease; if you decrease the speed, the in-
cline will automatically increase. If you increase the
incline_the speed will automatically decrease; if you
decrease the incline, the speed will automatically in-
crease. The console will always attempt to keep
your pulse near a predetermined setting. When the
incline reaches the highest setting,the speed can-
not be decreased any further. When the incline
reaches the lowest setting, the speed cannot be in-
creased any further.
Note: To stop the program temporarily,press the
START/PAUSE button. The TIME displaywill begin
to flash. To restart the program, pressthe
START/PAUSE buttonagain. The programwill re-
sume and the walking belt will return to the latest
speed setting. To terminate the program before the
pmgr_'n is completed, press the STOP button.
B Follow your progress with the five displays and
the TRAINING ZONE monitor.
See TRAINING ZONE MONITOR on pages 12 and
13.
_1-- When you are finished exercising, stop the walk-
ing belt and remove the key.
Step onto the foot rails, stopthe walking belt, and re-
move the key from the console. Store the key in a
secure place. In addition, move the on/off switchto
the "off' position. (See the drawing near the bottom
of page 10.)
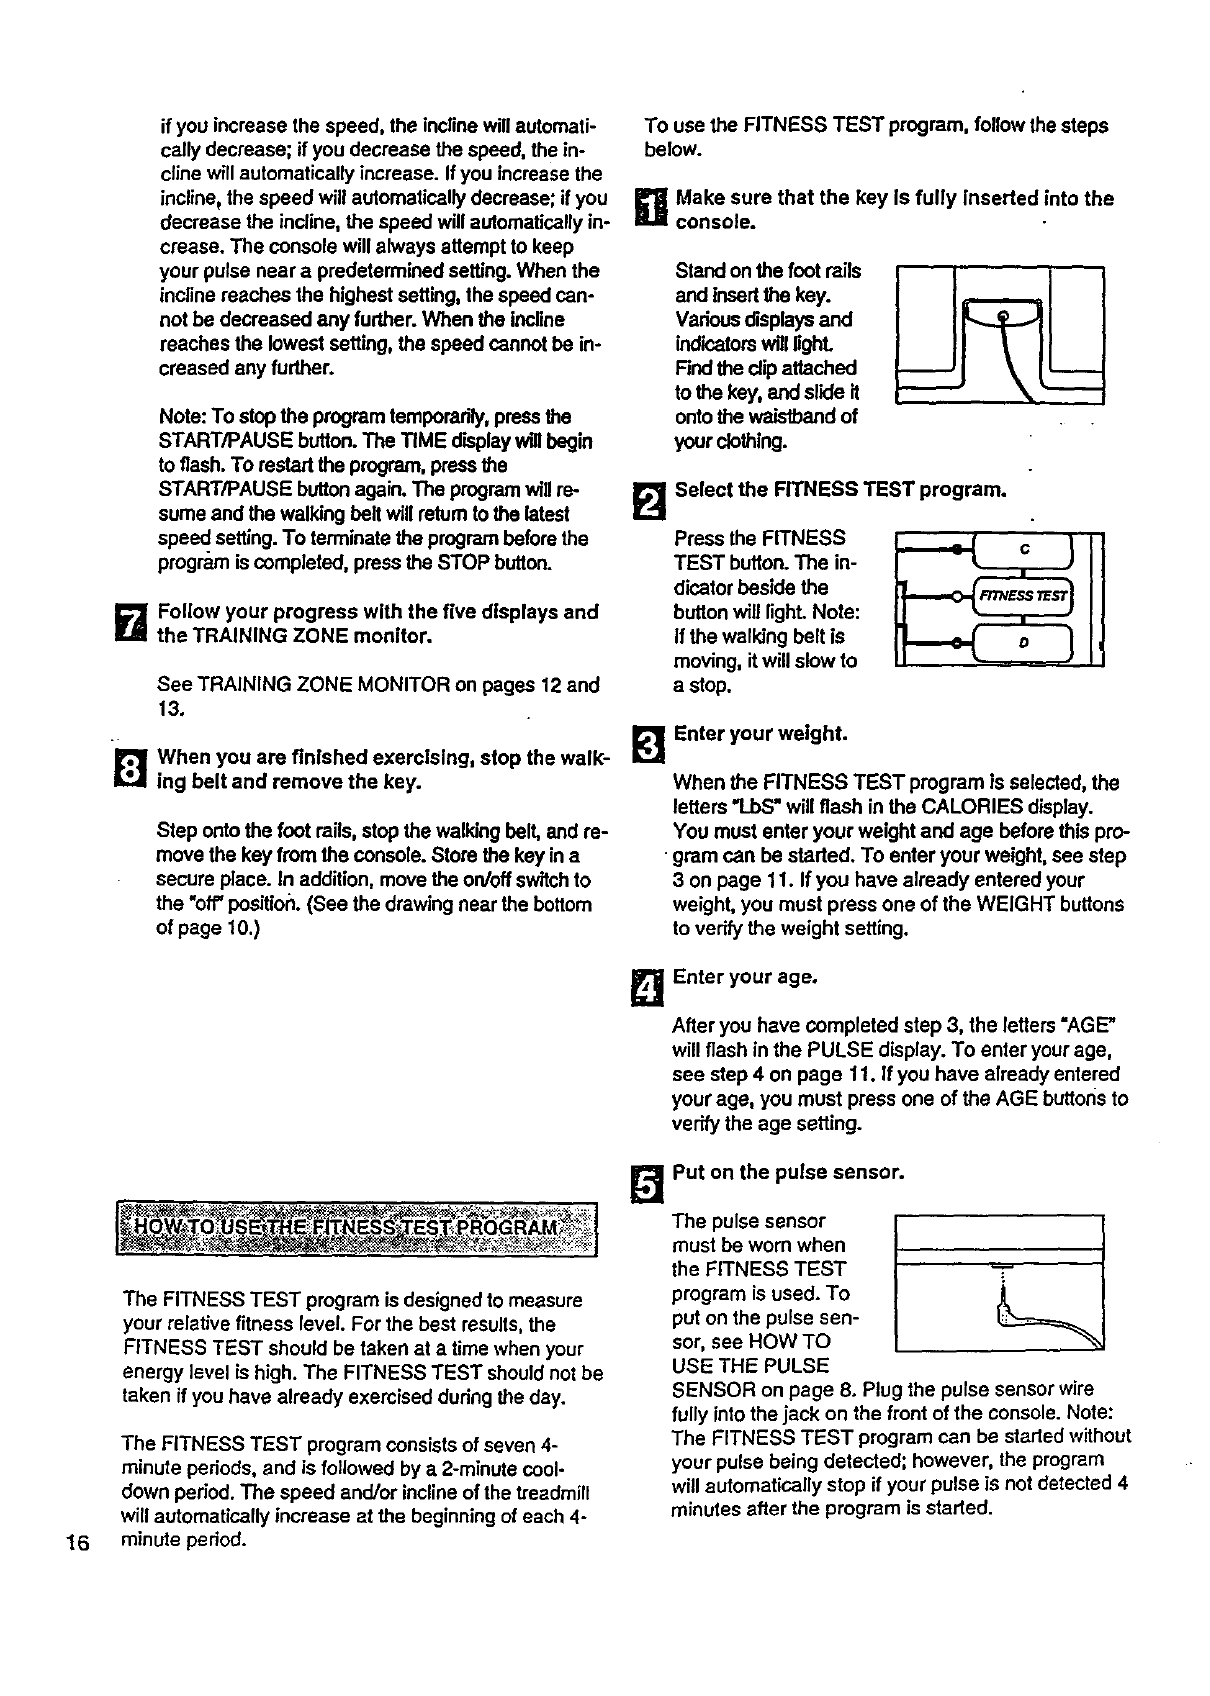
To use the FITNESS TEST program, followthe steps
below.
g Make sure that the key Is fully inserted into the
console.
Stand on the foot rails
and tnsedthe key.
Vadous displaysand
indicatorswill lighL
Find the clipattached
to the key, and slide it
onto the waistband of
your clothing.
FJ
Press the FITNESS
TEST button. The in-
dicator beside the
button will light. Note:
If the walking belt is
moving, itwill slow to
a stop.
Select the RTNESS TEST program.
_'_ Enter your weight.
When the FITNESS TEST program is selected, the
letters 'l..bS" will flash in the CALORIES display.
You must enter your weight and age before this pro-
gram can be staded. To enter your weight, see step
3 on page 11. If you have already entered your
weight, you must press one of the WEIGHT buttons
te verify the weight setting.
B Enter your age.
After you have completed step 3, the letters "AGE"
will flash in the PULSE display. To enter your age,
see step 4 on page 11. If you have already entered
your age, you must press one of the AGE buttoris to
verify the age setting.
16
The FITNESS TEST progrem is designed to measure
your relative fitness level. For the best results,the
FITNESS TEST should be taken at a time when your
energy level is high. The FITNESS TEST should not be
taken if you have already exemised during the day.
The FITNESS TEST program consists of seven 4-
minute pedods, and is followed by a 2-minute cool-
down period. The speed and/or incline of the treadmill
will automatically increase at the beginning of each 4-
minute period.
_Put on the pulse sensor.
The pulse sensor
must be worn when
the FITNESS TEST T
program is used. To
put on the pulse sen-
sor, see HOW TO
USE THE PULSE
SENSOR on page 8. Plug the pulse sensor wire
fully into the jack on the front of the console. Note:
The FITNESS TEST program can be started without
your pulse being detected; however, the program
will automatically stop if your pulse is not detected 4
minutes after the program is started.

Pressthe START/PAUSE button to start the pro-
r_ gram.
When the START/
PAUSE button is
pressed, the TIME dis-
play will begin counting
up. The CALORIES dis-
play will show '1. 1"
(level 1), indicating that
the first 4-minute pedod of the FITNESS TEST pro-
gram has begun. The incline of the treadmill will au-
tomatically adjust to 3.0%, and the walking belt will
begin to move at 1.5 mph. Hold the handrails and
carefully begin walking.
When the TIME display reaches 4 minutes, the
CALORIES display will show "L 2," indicating that
the second 4-minute period has begun. The incline
will increase to 4%, and the speed willincrease to
2.5 mph. At the beginning of each 4-minute period,
the speed and/or incline of the treadmill will auto-
matically increase. The FITNESS TEST will continue
in this manner untilyour pulse reaches 70% of your
maximum heart rate, and the current 4*minute period
is completed. The FITNESS TEST will then be com-
pleted, regardless of how many periods remain.
When the FITNESS TEST program is completed, the
letter =C"will be shown in the CALORIES display, in-
dicating that the cool-down pedod has begun. The
TIME display will count down from 2minutes. When
the cool-down pedod is completed, the walking belt
will slow to a stop, and your fitness level will be
shown in the TIME display. There are ten fitness
levels-fitness level 10
(FL:10) is the highest.
Reme.m,t_r, the FIT-
NESS TEST is intended
only to indicate your rel-
ative fitness level.
I-/._ •/..I _1
F,_= L,,_ TtME
Note: The SPEED and INCLINE buttons will notre-
spond while the FITNESS TEST program is selected.
If your pulse is not de-
tected during the pro-
gram, the NO PULSE
DETECTED indicator
will light and the letters
"PLS" will flash in the
PULSE display. If your
pulse is not detected
CALORIES
I1_1 I
PULSE
during the last thirty ssconds of.any 4-minute p_dod
(after 4 minutes, after 8 minutes, etc.), the walking
belt will slow to a stop, the FITNESS TEST will end,
and the TIME display will show a fitness level of 0
(FL:00). (See GUIDELINES FOR ACCURATE
PULSE READINGS on page 8.) The FITNESS
TEST program cannot be stopped temporarily and
then restarted. However, the program can be
stopped at any time by pressing the STOP button.
The TIME display will then show an estimated fit-
ness level. If the STOP buttonis pressed asecond
time, the MANUAL mode _'11be selected.
D When you are finished exercising, stop the walk-
ing belt and remove the key.
Step onto the foot roils, stop the walking belt, and re-
move the key from the console. Store the key in a
secure place. In addition, move the on/off switch to
the "off' position. (See the drawing near the bottom
of page 10.)
HOW TO SELECT THE INFORMATION MODE
The console features an information mode that keeps
track of the total time and distance accumulated on the
treadmill.
To access the information mode, hold down the STOP
buttonwhile inserting the key into the console. The
TIME display will show the total time accumulated on
the treadmill, in hours. The DISTANCE/INCLINE display
will show the total distance, in miles (if the total distance
exceeds 999, the thousands and ten thousands digits
will be shown in the PULSE display). Note: The SPEED
display will show an =E"(for English system--miles) or
"M"(for Metric system--kilometers) (see SPEED DIS-
PLAY on page 12).
To exit the information mode, remove the key from the
console.
17
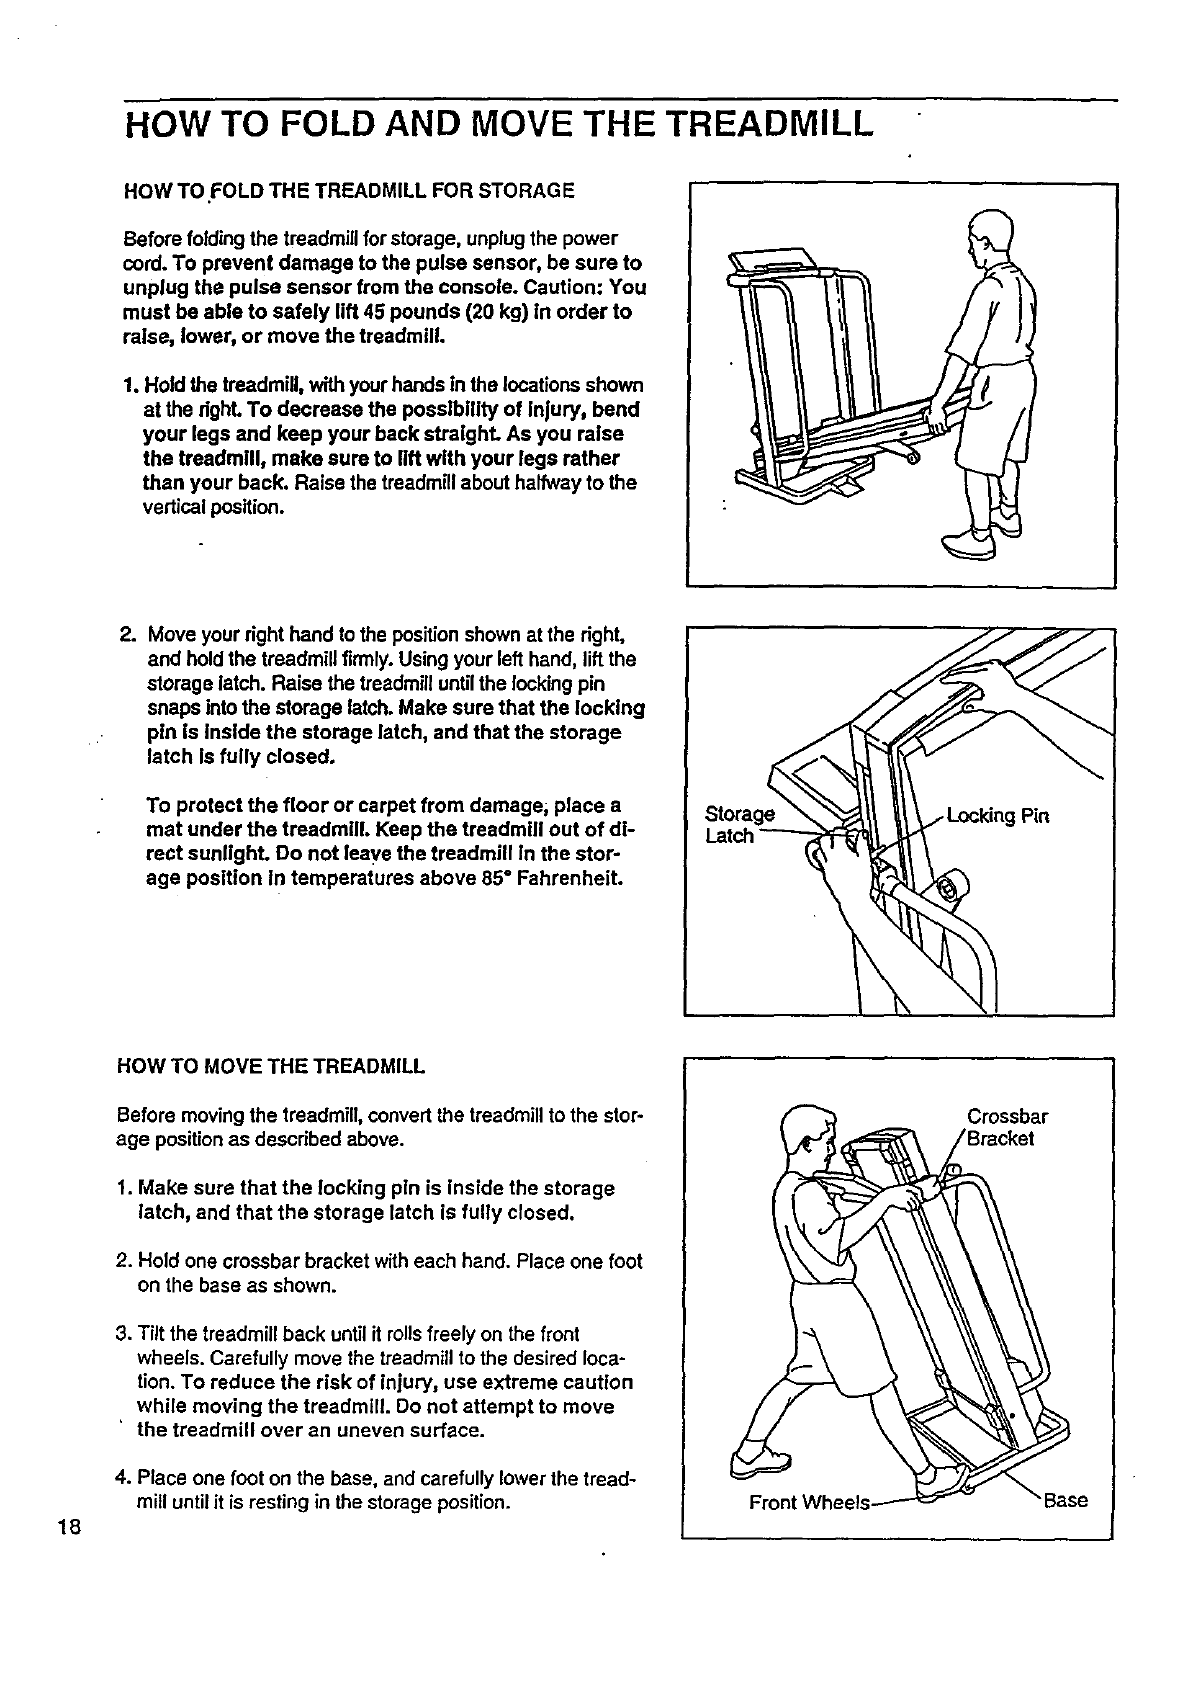
HOW TO FOLD AND MOVE THE TREADMILL
HOW TO.FOLD THE TREADMILL FOR STORAGE
Before folding the treadmill for storage, unplugthe power
cord. To prevent damage to the pulse sensor, be sure to
unplug the pulse sensor from the console. Caution: You
must be able to safely lift 45 pounds (20 kg) tn order to
raise, lower, or move the treadmill.
1. Hold the treadmill, with your hands In the locations shown
at the dghL To decrease the posslbitity of injury, bend
your legs and keep your back straighL As you raise
the treadmill, make sure to lift with your legs rather
than your back. Raise the treadmill about halfway to the
vertical position.
2. Move your right hand to the positionshown at the right,
and hold the treadmill firmly. Using your left hand, lift the
storage latch. Raise the treadmill untilthe locking pin
snaps into the storage latch. Make sure that the locking
pin is Inside the storage latch, and that the storage
latch Is fully closed.
To protect the floor or carpet from damage; place a
mat under the treadmill Keep the treadmill out of di-
rect sunllghL Do not leave the treadmill in the stor-
age position In temperatures above 85 °Fahrenheit.
Storage
18
HOW TO MOVE THE TREADMILL
Before moving the treadmill, convert the treadmill to the stor-
age position as described above.
1. Make sure that the locking pln is inside the storage
latch, and that the storage latch is fully closed.
2. Hold one crossbar bracket with each hand. Place one foot
on the base as shown.
3. Tilt the treadmill back until it rolls freely on the front
wheels. Carefully move the treadmill to the desired loca-
tion. To reduce the risk of injury, use extreme caution
while moving the treadmill. Do not attempt to move
'the treadmill over an uneven surface.
4. Place one foot on the base, and carefully lower the tread-
mill until it is resting in the storage position.
Crossbar
/Bracket
e
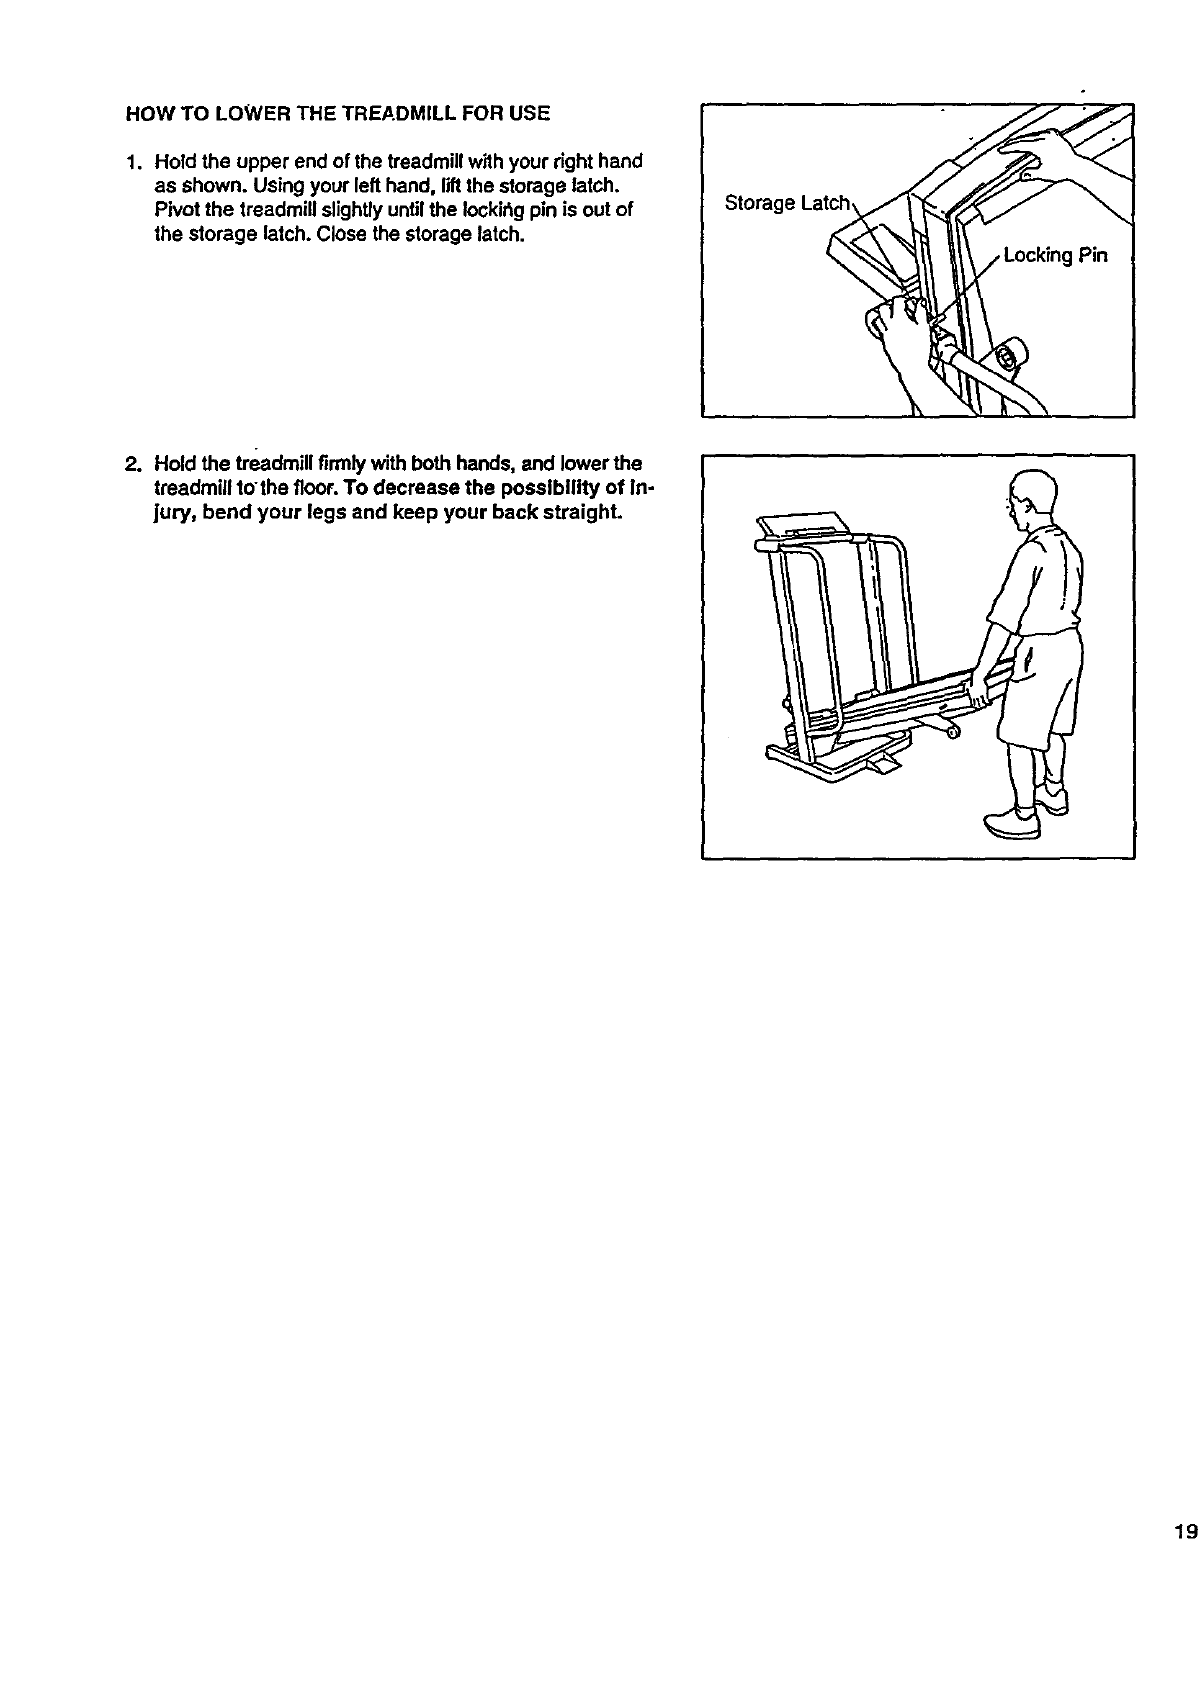
HOW TO LOWER THE TREADMILL FOR USE
1. Hold the upper end of the treadmill with your right hand
as shown. Using your left hand, liftthe storage latch.
Pivot the treadmill slightly untilthe Iockir_gpin is out of
the storage latch. Close the storage latch.
Storage Lat_
=*
2. Hold the treadmill firmly with both hands, and lower the
treadmill tothe floor. To decrease the possibility of In-
jury, bend your legs and keep your back straight.
19
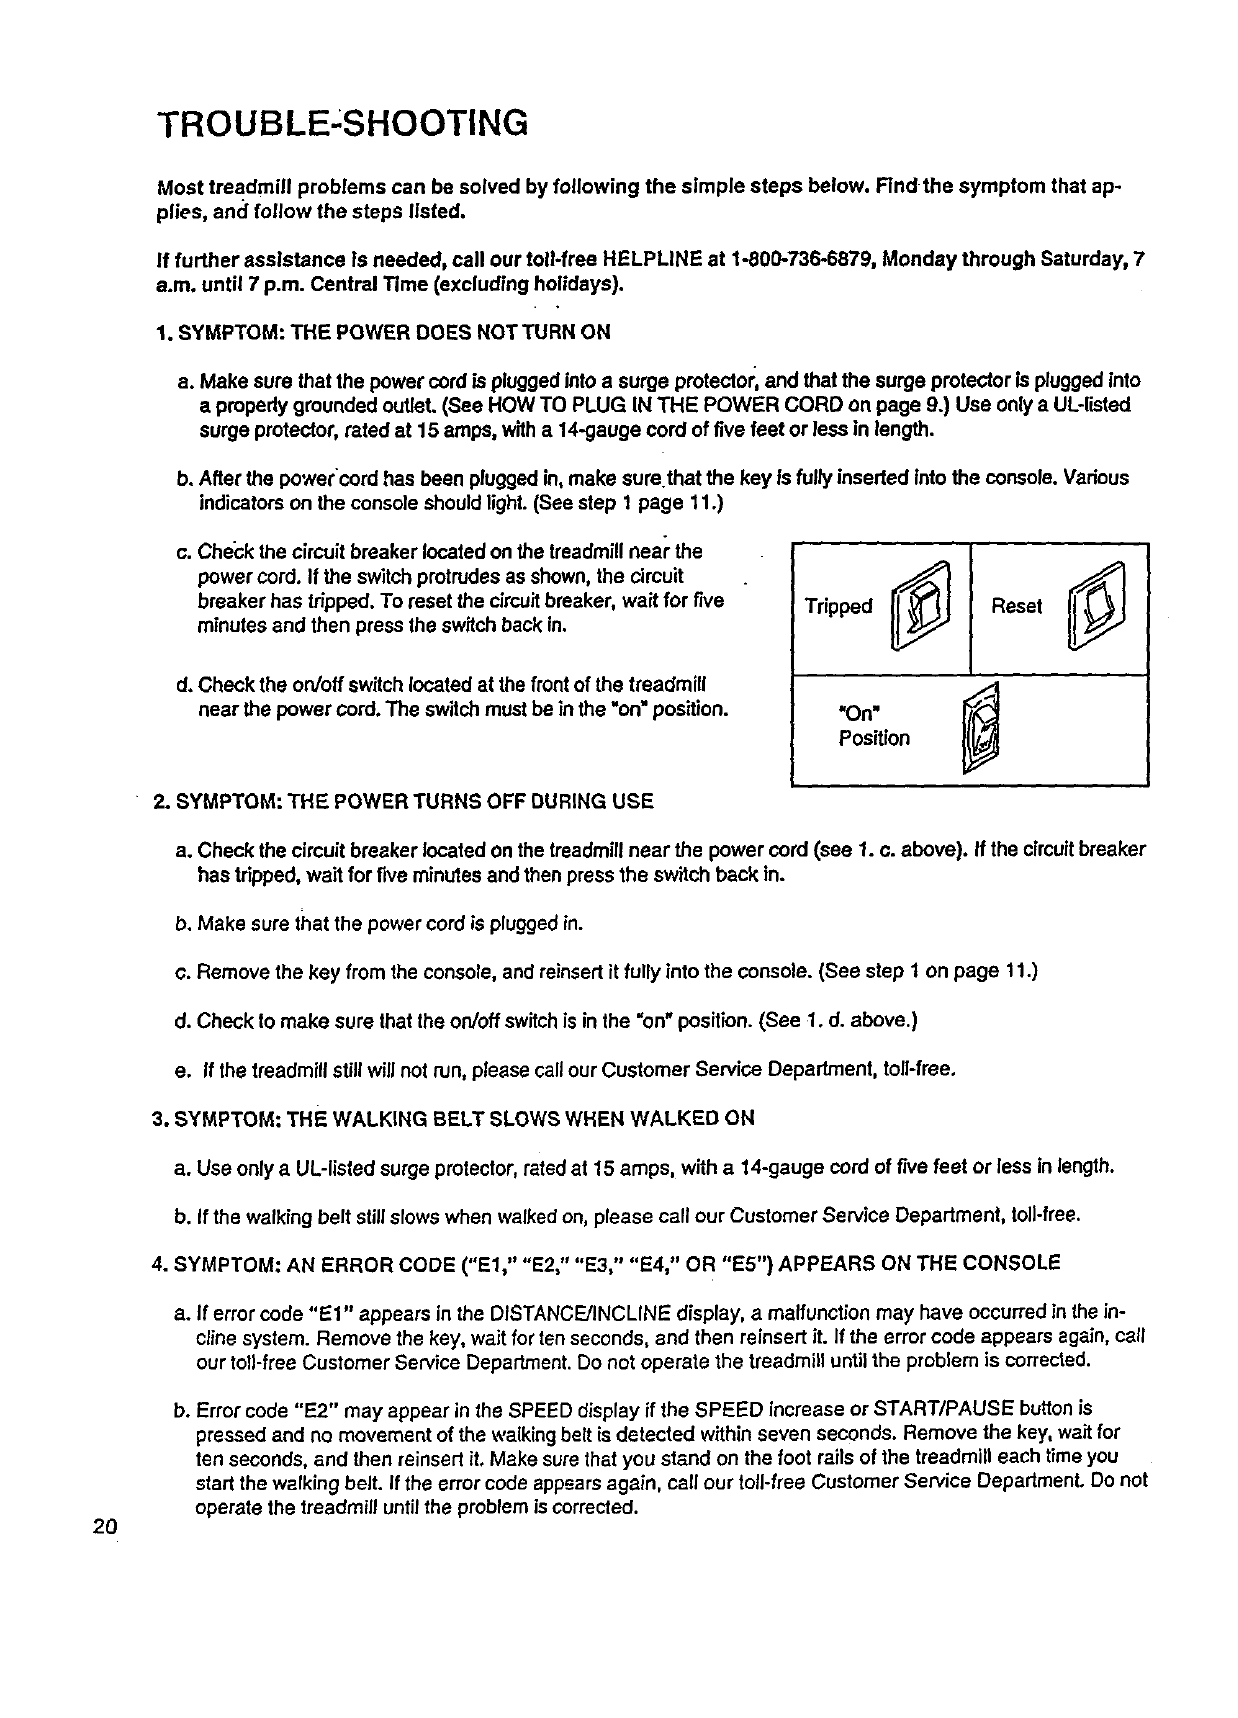
TROUBLE;SHOOTING
2O
Most treadmill problems can be solved by following the simple steps below. Find the symptom that ap-
plies, and follow the steps listed.
If further assistance is needed, call our toll-free HELPLINE at 1-800-736-6879, Monday through Saturday, 7
a.m. until 7 p.m. Central Time (excluding holidays).
1. SYMPTOM: THE POWER DOES NOT TURN ON
a. Make sure that the power cord is plugged into a surge protector, and that the surge protector is plugged into
apmpedy grounded outlet. (See HOW TO PLUG IN THE POWER CORD on page 9.) Use only a UL-listed
surge protector, rated at 15 amps, with a14-gauge cord of five feet or less in length.
b. After the powercord has been plugged in, make sure.that the key is fully inserted into the console. Various
indicators on the console should light. (See step 1page 11.)
c. Check the circuit breaker located on the treadmill near the
power cord. If the switch protrudes as shown, the circuit
breaker has tripped. To reset the c_rcuitbreaker, wait for five
minutes and then press the switch back in.
d. Check the on/off switch located at the front of the treadmill
near the power cord. The switch must be in the "on=position.
Tripped Reset
"On"
Position
2. SYMPTOM: THE POWER TURNS OFF DURING USE
a. Check the cimuit breaker located on the treadmill near the power cord (see 1. c. above). If the circuitbreaker
has tripped, wait for five minulss and then press the switch back in.
b. Make sure that the power cord is pluggedin.
c. Remove the key from the console, and reinsert it fully into the console. (See step 1 on page 11.)
d. Check to make sure that the on/off switch is in the "on" position. (See 1. d. above.)
e. If the treadmill still will not run, please call our Customer Service Department, toll-free.
3. SYMPTOM: THE WALKING BELT SLOWS WHEN WALKED ON
a. Use only a UL-listed surge protector, rated at 15 amps, with a 14-gauge cord of f'nte feet or less in length.
b. If the walking belt still slows when walked on, please call our Customer Service Department, toil-free.
4. SYMPTOM: AN ERROR CODE ("El," "E2," "E3," "E4," OR "E5") APPEARS ON THE CONSOLE
a. If error code "El" appears in the DISTANCE/INCLINE display, a malfunction may have occurred in the in-
cline system. Remove the key, wait for ten seconds, and then reinsert it. If the error code appears again, call
our toll-free Customer Service Department. Do not operate the treadmill untilthe problem is corrected.
b. Error code "E2" may appear in the SPEED display if the SPEED increase or START/PAUSE button is
pressed and no movement of the walking belt is detected within seven seconds. Remove the key, wait for
ten seconds, and then reinsert it. Make sure that you stand on the foot rails of the treadmill each time you
start the walking belt. If the error code appears again, call our toll-free Customer Service Department. Do not
operate the treadmill until the problem is corrected.
c. Error code "E3" may appear in the SPEED display if the speed of the walking bell surges above the selected.
speed setting. Remove the key, wait for ten seconds, and then reinsert it. It the error code alSpearsagain, call .
our toll-tree Customer Service Department. Do notoperate the treadmill untilthe problem is corrected.
d. Error code "E4" may appear in the SPEED display if the walking belt is moving at a slow speed, and there is
excessive stress on the motor. Remove the key, wait for ten seconds, and then reinsert it. It you weigh over
200 pounds, it may be helpful to increase the incline of the treadmill. If the errorcode appears again, call our
toll-free Customer Service Department. Do not operate the treadmill until the problem is corrected.
e. Error code "F.5" may appear in the PULSE display if a pulse error occurs. See HOW TO USE THE PULSE
SENSOR on pages 8 and 9, and PULSE DISPLAY on page 12.
5. SYMPTOM: THE PULSE SENSOR DOES NOT FUNCTION PROPERLY
a. See HOW TO USE THE PULSE SENSOR on page 8, and PULSE DISPLAY on page 12.
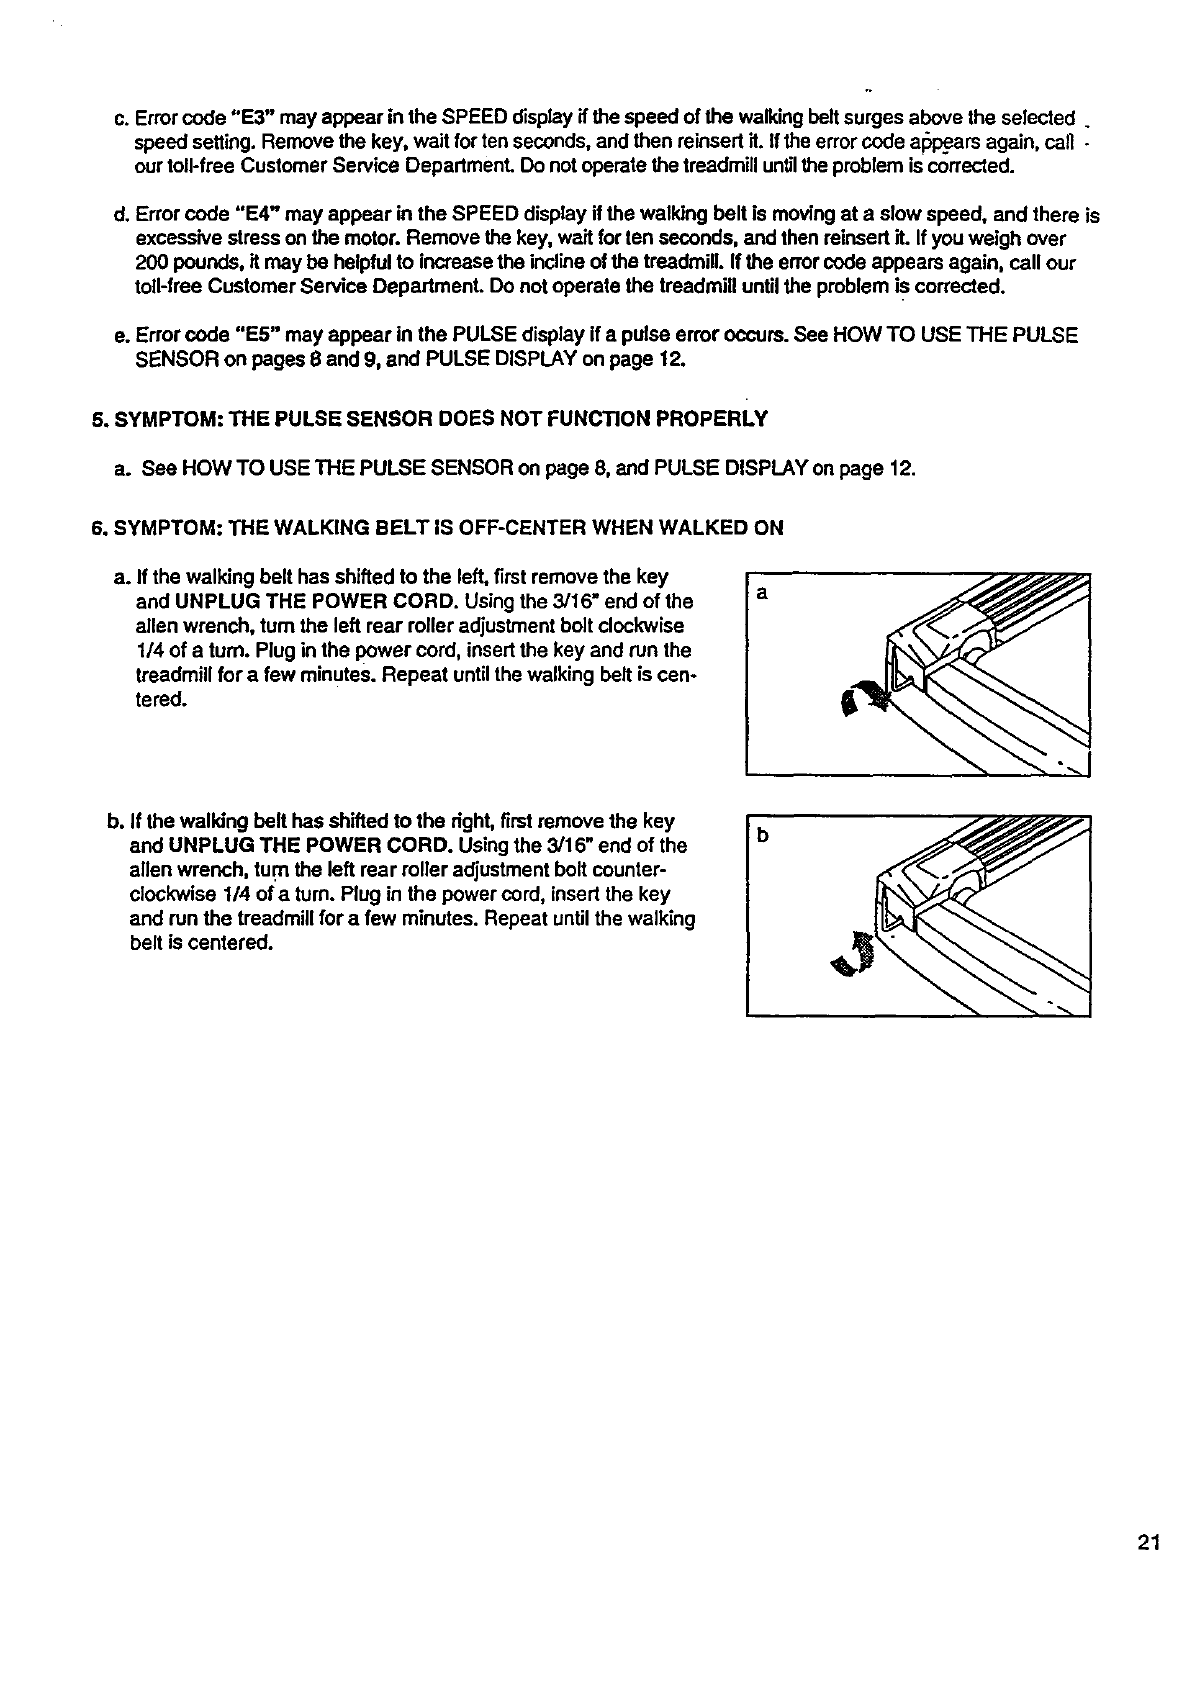
6. SYMPTOM: THE WALKING BELT IS OFF-CENTER WHEN WALKED ON
a. If the walking belt has shifted to the left, first remove the key
and UNPLUG THE POWER CORD. Using the 3/16" end of the
allen wrench, tum the left rear roller adjustment bolt clockwise
1/4 of a turn. Plug in the power cord, insert the key and run the
treadmill for afew minutes. Repeat until the walking bell is cen-
tered.
a
b. If the walking belt has shifted to the dght, firstremove the key
and UNPLUG THE POWER CORD. Using the 3/16" end of the
allen wrench, tum the left rear relier adjustment bolt counter-
clockwise 1/4 of a turn. Plug in the power cord, insert the key
and run the treadmill for afew minutes. Repeat until the walking
belt is centered.
_b
21
CONDITIONING GUIDELINES
The following guidelines will help you to plan your ex-
ercise program. Remember--these are general guide-
lines. For more detailed information about exercise,
obtain areputable book or consult your physician.
EXERCISE INTENSITY
Whether you want to bum fat, strengthen your cardio-
vascular system, or increase your athletic perfor-
mance, you can tailor your exercise to your specific
goals. The key to achieving the desired results is to ex-
• ercise with the proper intensity.
Burning Fat
To bum fat effectively, you must exercise at arelatively
low intensity level for a sustained period of time.
During the first few minutes of exercise, your body
uses easily accessible carbohydrate caloriesfor en-
ergy. Only after the first few minutes of exercise does
your body begin to use stored fat calories for energy.
If your goal is to bum fat, adjust the speed and incline
of the treadmill until the FAT BURN indicatoris lit. (See
TRAINING ZONE MONITOR on pages 12 and 13.)
Aerobic Exercise
If your goal is to strengthen your cardiovascular sys-
tem, your exercise must be "aerobic."Aerobic exercise
is activity that requires large amounts of oxygen for
prolonged pedods of time. This increases the demand
on the heart to pump blood to the muscles, and on the
lungs to oxygenate the blood. The proper intensity
level for aerobic exercise can be found by using your
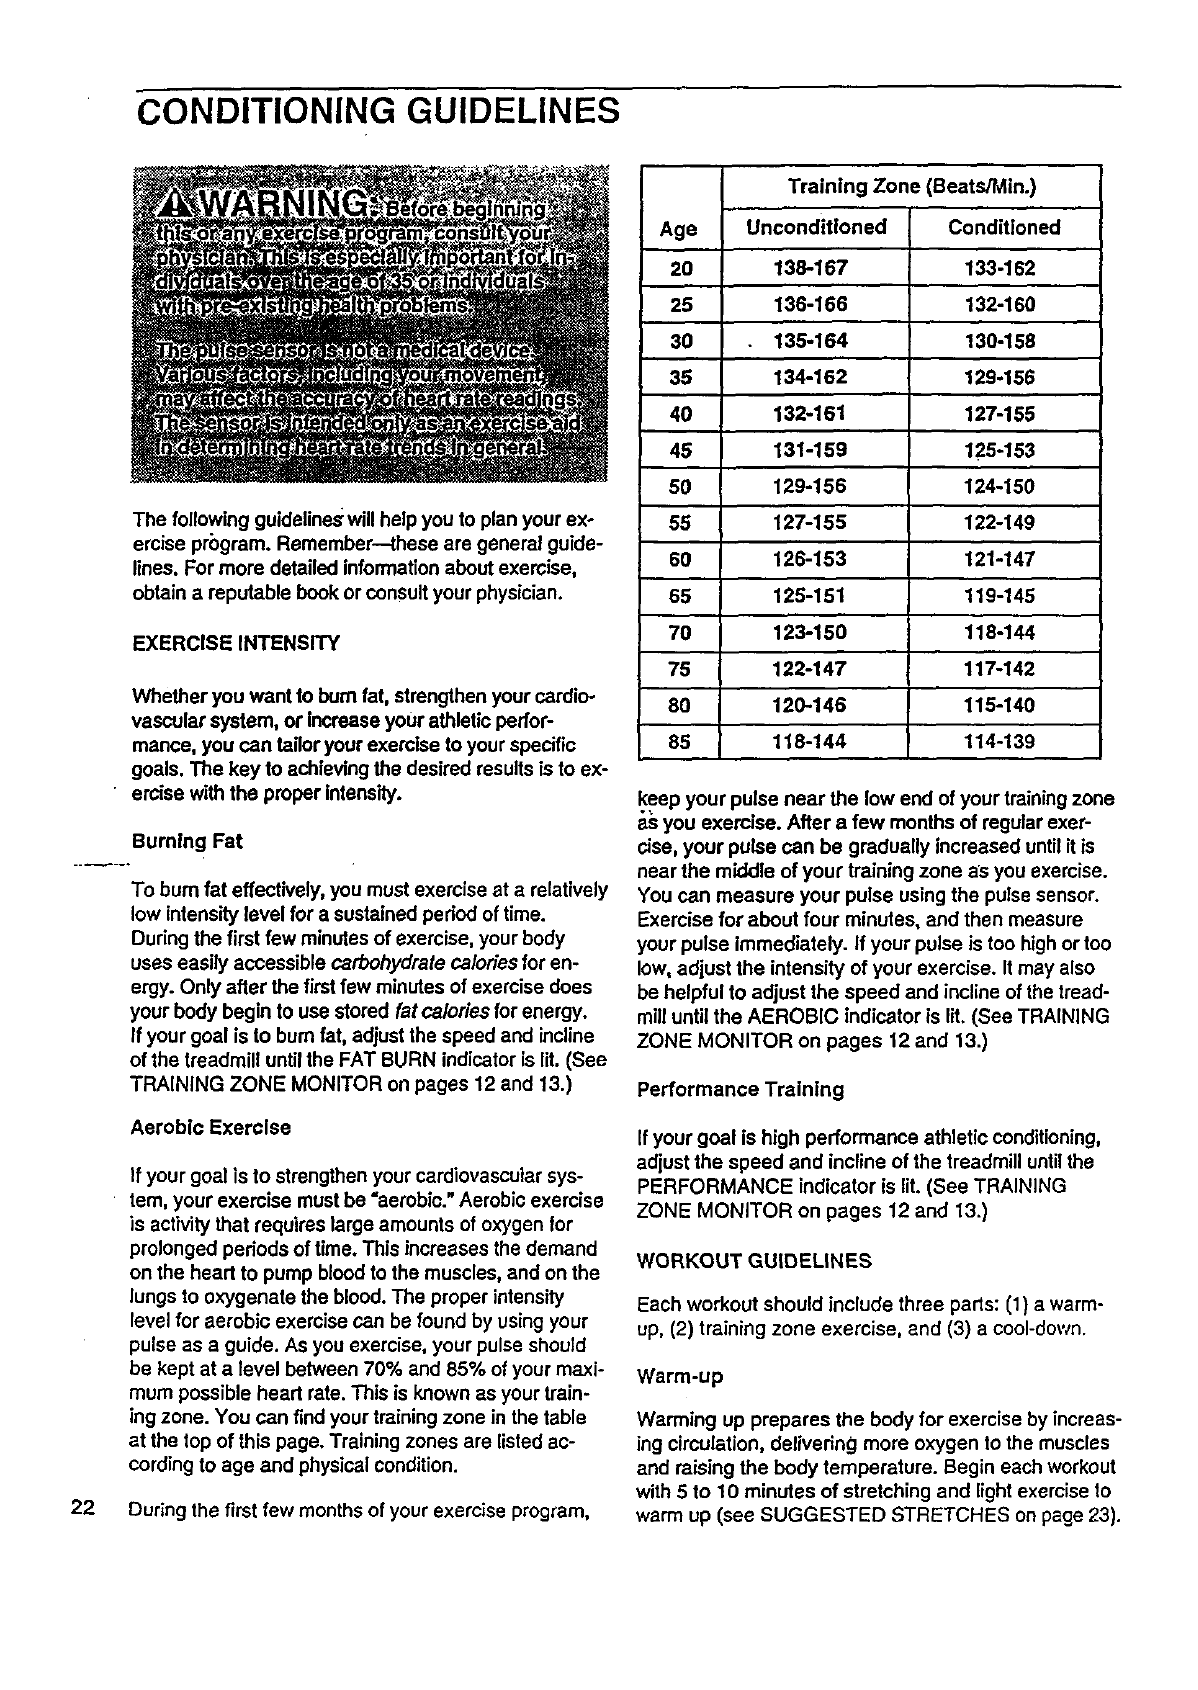
pulse as aguide. As you exercise, your pulse should
be kept at a level between 70% and 85% of your maxi-
mum possible heart rate. This is known as your train-
ing zone. You can find your training zone in the table
at the top of this page. Training zones are listed ac-
cording to age and physical condition.
22 During the first few months of your exercise program,
Training Zone (BeatS/Min.)
Age Unconditioned Conditioned
20 138-167 133-162
25 136-166 132-160
30 135-164 130-158
35 134-162 129-156
40 132-161 127-155
45 131-159 125-153
50 129-156 124-150
55 127-155 122-149
60 126-153 121-147
65 125-151 119-145
70 123-150 118-144
75 122-147 117-142
80 120-.146 115-140
85 118-144 114-139
keep your pulse near the low end of your training zone
a_ you exercise. After a few months of regular exer-
cise, your pulse can be gradually increased until it is
near the middle of your training zone as you exercise.
You can measure your pulse using the pulse sensor.
Exercise for about four minutes, and then measure
your pulse immediately. If your pulse is too highor too
low, adjust the intensity of your exercise. It may also
be helpful to adjust the speed and incline of the tread-
mill until the AEROBIC indicator is lit. (See TRAINING
ZONE MONITOR on pages 12 and 13.)
Performance Training
If your goal is high performance athletic conditioning,
adjust the speed and incline of the treadmill untilthe
PERFORMANCE indicator is lit. (See TRAINING
ZONE MONITOR on pages 12 and 13.)
WORKOUT GUIDELINES
Each workout should include three parts: (1) a warm-
up, (2) training zone exercise, and (3) a cool-down.
Warm-up
Warming up prepares the body for exercise by increas-
ing circulation, delivering more oxygen to the muscles
and raising the body temperature. Begin each workout
with 5 to 10 minutes of stretching and light exercise to
warm up (see SUGGESTED STRETCHES on page 23).
Training Zone Exercise
After warming up, increase the intensity of your exer-
cise untilyour pulse is in your training zone for 20 to
60 minutes. (During the firstfew weeks of your exer-
cise program, do not keep your pulse in your training
zone for longer than 20 minutes.) Breathe regularly
and deeply as you exercise--n_ver hold your breath.
Cool.down
Finish each workout with 5 to 10 minutes of stretching
to cool down. This will increase the flexibilityof your_-
muscies and will help to prevent post-_xemise'problem's.
Exercise Frequency
To maintain or improve your condition, complete three
workouts each week, with at least one day of rest be-
tween workouts. After a few months, you may com-
plete up to five workouts each week if desired.
The key to success is to make exercise aregular and
enjoyable part of your everyday life.
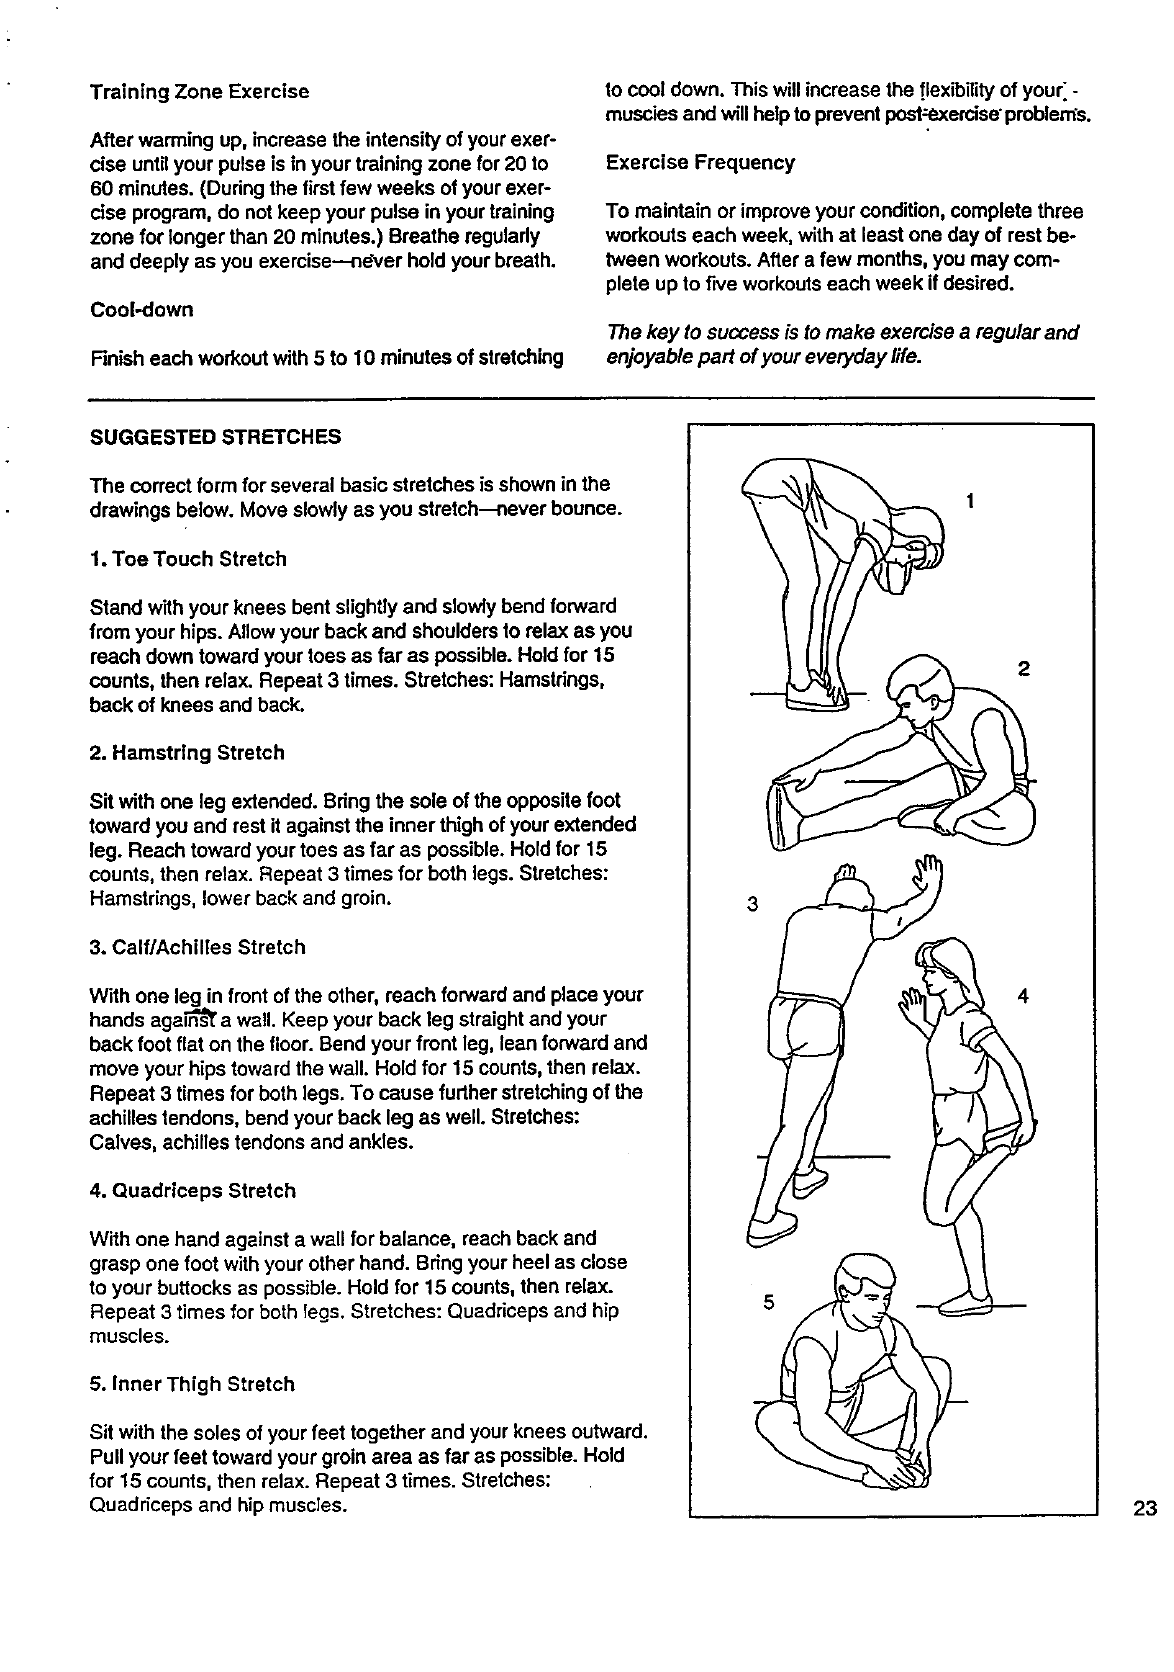
SUGGESTED STRETCHES
The correct form for several basic stretches is shown in the
drawings below. Move slowly as you stretch--never bounce.
1. Toe Touch Stretch
Stand with your knees bent slightly and slowly bend forward
from your hips. Allow your back and shoulders to relax as you
reach down toward your toes as far as possible. Hold for 15
counts, then relax. Repeat 3 times. Stretches: Hamstrings,
back of knees and back.
2. Hamstring Stretch
Sit with one leg extended. Bring the sole of the opposite foot
toward you and rest it against the inner thigh of your extended
leg. Reach toward your toes as far as possible. Hold for 15
counts, then relax. Repeat 3 times for both legs. Stretches:
Hamstrings, lower back and groin.
3. Calf/Achilles Stretch
With one leg in front of the other, reach forward and place your
hands agaln"_ awall. Keep your back leg straight and your
back foot flat on the floor. Bend your front leg, lean forward and
move your hips toward the wall. Hold for 15 counts, then relax.
Repeat 3 times for both legs. To cause further stretching of the
achilles tendons, bend your back leg as well. Stretches:
Calves, achilles tendons and ankles.
4. Quadriceps Stretch
With one hand against awall for balance, reach back and
grasp one foot with your other hand. Bring your heel as close
to your buttocks as possible. Hold for 15 counts, then relax.
Repeat 3 times for both legs. Stretches: Quadriceps and hip
muscles.
5. Inner Thigh Stretch
Sit with the soles of your feet together and your knees outward.
Pull your feet toward your groin area as far as possible. Hold
for 15 counts, then relax. Repeat 3 times. Stretches:
Quaddceps and hip muscles.
3
2
4
23
SWARS
Model No. 831.297743
QUESTIONS?
If you find that:
•you need help assembling or
operating the PROFORMe 730sl
treadmill
•apart is missing
•or you need to schedule repair
,service.
call our toll-free HELPLINE
1-800-736-6879
Monday-Saturday, 7 am-7 pm
Ce.ntral Time (excluding holidays)
REPLACEMENT
PARTS
If parts become worn and need
to be replaced, call the following
toll-free number
1-800-FON-PART
(1-800-366-7278)
The model number and serial number of your PROFORIVP 730si
treadmill are listed on a decal attached to the frame. See the front
cover of this manual to find the location of the decal.
All replacement parts are available for immediate purchase or
special order when you visit your nearest SEARS Service Center.
To request service or to order parts by telephone, callthe toll-free
numbers listed at the left.
When requesting help or service, or ordering parts, please be pre-
pared to provide the following information:
•The NAME OF THE PRODUCT (PROFORM ° 730si
treadmill)
•The MODEL NUMBER OFTHE PRODUCT (831.297743)
• The PART NUMBER OF THE PART (see the EXPLODED
DRAWING and PART LIST attached to the center of this manual)
• The DESCRIPTION OF THE PART (see the EXPLODED DRAW-
ING and PART LIST attached to the center of this manual)
IFULL 90 DAY WARRANTY 1
For 90 days from the date of purchase, if failure occurs due to defect in material or workmanship in this
SEARS TREADMILL EXERCISER, contact the nearest SEARS Service Center throughout the United
States and SEARS will repair or replace the TREADMILL EXERCISER, free of charge.
This warranty does not apply when the TREADMILL EXERCISER isused commemially or for rental pur-
poses.
This warranty gives you specific legal dghts, and you may also have other rights which vary from state
to state.
SEARS, ROEBUCK AND CO., DEPT. 817WA, HOFFMAN ESTATES, IL 60179
Part No. 130068 F01242-C R0596A Printed in USA © 1996 Sears, Roebuck and Co.
