user manual
ENGL-MFX - This device has a serial number located on the rear panel.
Please record it and retain it for your records. Serial number:
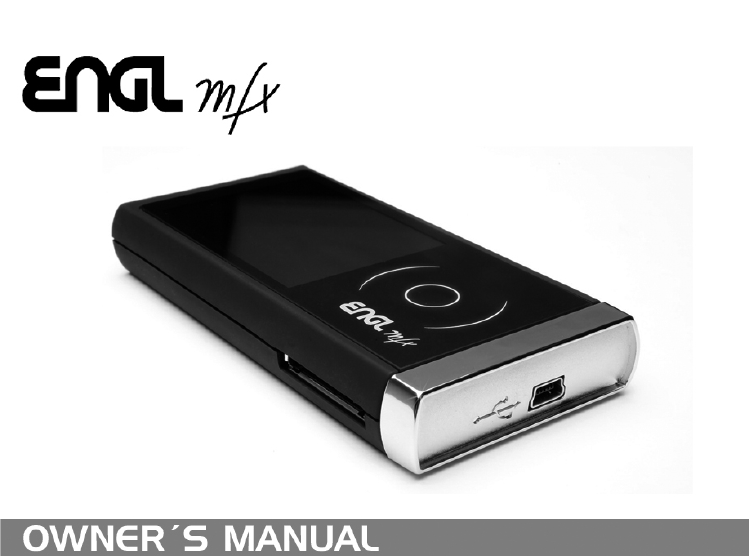
Portable
mp3
Player

Engl mfx page 2
1-Introduction ................................................................................................................. 4
Main functions ......................................................................................................... 4
Supplied accessories ............................................................................................ 4
Recycling the rechargeable battery ................................................................ 5
Trademarks ............................................................................................................... 5
Notes about this manual ..................................................................................... 5
2-Preparation ................................................................................................................. 6
About SD cards......................................................................................................... 6
Inserting the SD card ............................................................................................ 6
Removing the SD card .......................................................................................... 7
Powering the unit .................................................................................................. 8
Charging the battery ............................................................................................. 8
Charging with a computer........................................................................... 8
Charging with an AC adapter ..................................................................... 8
Turning the power on and off .......................................................................... 9
Resetting the unit ................................................................................................... 9
3-Part Names and Functions ................................................................................ 10
Top panel ................................................................................................................. 10
POWER key ...................................................................................................... 10
SD card slot ...................................................................................................... 10
Right side panel .................................................................................................... 11
USB port ............................................................................................................ 11
Left side panel ....................................................................................................... 12
GUITAR IN jack .............................................................................................. 12
HEADPHONE OUT jack .............................................................................. 12
Front panel ............................................................................................................. 13
Display................................................................................................................ 13
Wheel ................................................................................................................. 13
Rear panel ............................................................................................................... 14
Built-in stereo microphone ...................................................................... 14
Bottom panel ......................................................................................................... 15
Dock-Connector ............................................................................................. 15
4-Screen Overview ..................................................................................................... 16
Home Screen .......................................................................................................... 16
Status Bar: ................................................................................................................ 16
Back Button ...................................................................................................... 16
Level meter ............................................................................................................. 17
Elapsed time .................................................................................................... 17
Power indicator .................................................................................................... 17
Main Menu .............................................................................................................. 18
5-Making Connections ............................................................................................. 20
Connecting monitors .......................................................................................... 20
Connecting with a computer .......................................................................... 20
Disconnecting from a computer ................................................................... 20
Connecting a guitar ............................................................................................. 20
6-Playback ...................................................................................................................... 21
Selecting tracks ...................................................................................................... 21
Starting and stopping playback ..................................................................... 22
Play a track .............................................................................................................. 23
Stop playback ......................................................................................................... 23
Search forward and backward ...................................................................... 23
Adjusting the volume ......................................................................................... 23
Loop/repeat setting status ............................................................................... 23
7–Specifications .......................................................................................................... 24
Audio Input and Output .................................................................................... 24
GUITAR IN input ............................................................................................ 24
LINE In input ................................................................................................... 24
LINE OUT output ........................................................................................... 24
Audio performance ............................................................................................. 24
Audio file compatibility ..................................................................................... 24
Physical..................................................................................................................... 25
Computer requirements ................................................................................... 25
Windows ............................................................................................................ 25
Table of contents

Engl mfx page 3
Macintosh ......................................................................................................... 25
Recomended USB host controller ................................................................. 26
Supported OS ........................................................................................................ 26
Accessories available for purchase .............................................................. 26
8-FCC Compliance Statement ............................................................................... 27

Engl mfx page 4
1-Introduction
Thank you very much for purchasing the ENGL MFX Portable Player.
Please read this owner’s manual carefully in order to maximize your
use of all the unit’s features. We hope that you will enjoy using this
player for many years to come. Please make copies of this manual and
keep them in safe places for future reference.
Main functions
• Portable player designed for guitar players
• Uses an SD card as the playing media
• Choose MP3 (32 kbps–320 kbps, 44.1 kHz or 48 kHz) or WAV
(16-bit or 24-bit, 44.1 kHz or 48 kHz) audio file types
• Mix the input signal with the playing audio track
(overdubbing)
• Special playback functions include decreasing playback speed
without changing pitch and reducing the sound of a recorded
guitar during playback
• Built-in effects can be applied to the input signal, rhythm
machine or playback signal
• Copy audio files from a computer to this unit’s SD card by USB
connection
Supplied accessories
Soft case 1
SD card (in unit; contains copy of manual) 1
USB cable 1
Quick Start Guide 1
Warranty card 1
Guitar cable 25 inch length 1
Guitar cable 1
Dock connector cable 1
Please contact the store where you purchased this unit if any of these
accessories are missing or have been damaged during transportation.
1
-
Introduction

Engl mfx page 5
Recycling the rechargeable battery
This device uses a lithium ion battery. Please do not throw away the
battery when it is no longer necessary.
If you have any questions, please contact us (see the last page of this
manual for contact information).
Trademarks
Windows, Vista, Windows XP and Windows 2000 are trademarks of
Microsoft Corporation.
Macintosh, Mac OS, and Mac OS X are Trademarks of Apple Inc.
The SD Logo is a trademark.
Notes about this manual
Font use conventions
• Controls, keys and other parts on the ENGL-MFX are written like
this: MENU.
• Messages shown on the display are written like this: Are you sure?
• We use the term “buttons” and “sliders” to describe the various
icons on the ENGL-MFX.
Tracks and files are the same
Tracks are files, and files are tracks.
In this manual, we usually use the word “track” when we are
describing the playback of a song, for example, just as we would if
talking about songs on a CD or a portable music player. However,
when we talk about their data properties, such as sampling
frequencies and ID3 tags, we often refer to the same “tracks” as “files”
because they can be manipulated in ways similar to files on a
computer.
1
-
Introduction
Engl mfx page 6
2-Preparation
About SD cards
Since this unit uses a SD card for recording and playback, you must
insert a SD card into the unit before use. You can use 64 MB–2 GB SD
cards and 4 GB–32 GB SD HC cards with this unit.
Please see the ENGL web site (www.engl-amps.com) for information
about cards that have been tested with the ENGL-MFX.
NOTE
When new, this unit comes with a 1GB SD card inserted. This card
can be used for recording and playback as is. There is no need to
reinsert or format it.
Inserting the SD card
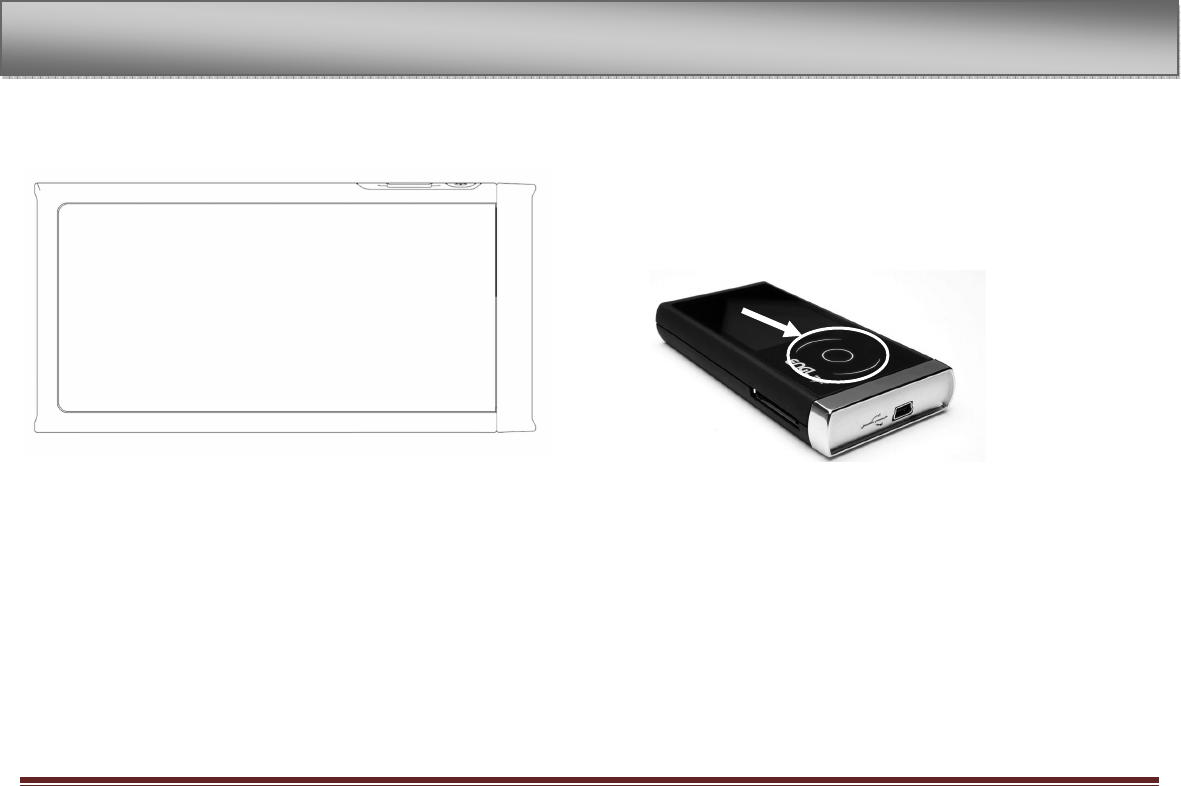
The SD card slot is on the top side of the unit.
Insert the included SD card in the SD card slot and push it until it
clicks fully into place.
2
-
Preparation
Engl mfx page 7
Removing the SD card
Press the inserted SD card in gently and it will disengage from the
unit so that you can pull it out completely.
CAUTION
Do not remove the SD card during recording or playback, or when the
unit is connected to the computer by USB.
2
-
Preparations
Engl mfx page 8
Powering the unit
The ENGL-MFX can be operated using an AC adapter (E 1041).
Additional AC adapters are available for purchase separately. You can
charge the battery by connecting the unit to a computer by USB or
using an AC adapter. When shipped new, the built in battery is not
sufficiently charged, so it must be charged before using the unit.
Charge the battery or connect the AC adapter before using the unit.
Charging the battery
There is several methods to charge the device.
Charging with a computer
Use the USB port on the right side panel, and use the included USB
cable to connect the unit’s USB port to a USB port on a computer.
Please connect this unit directly to a computer. Proper charging and
operation cannot be assured when using a USB hub.
When connecting via USB, the device starts. To save energy and to
fasten charging, turn it off by pressing the power switch on the top.
Even if the power for the unit is off, the battery charges when
connected to a computer by USB. The computer needs to be ON to
charge the battery.
Complete charging by USB takes about 2 hours (when the unit’s
power is OFF).
Charging with an AC adapter
Use the USB port on the right side panel, plug in the included USB
cable, connect the AC adapter to the USB cable and plug the adapter
into an electrical socket to charge the unit.
Complete charging with the adapter takes about 2 hours.
You can use this unit as usual as it is charged by the connected AC
adapter.
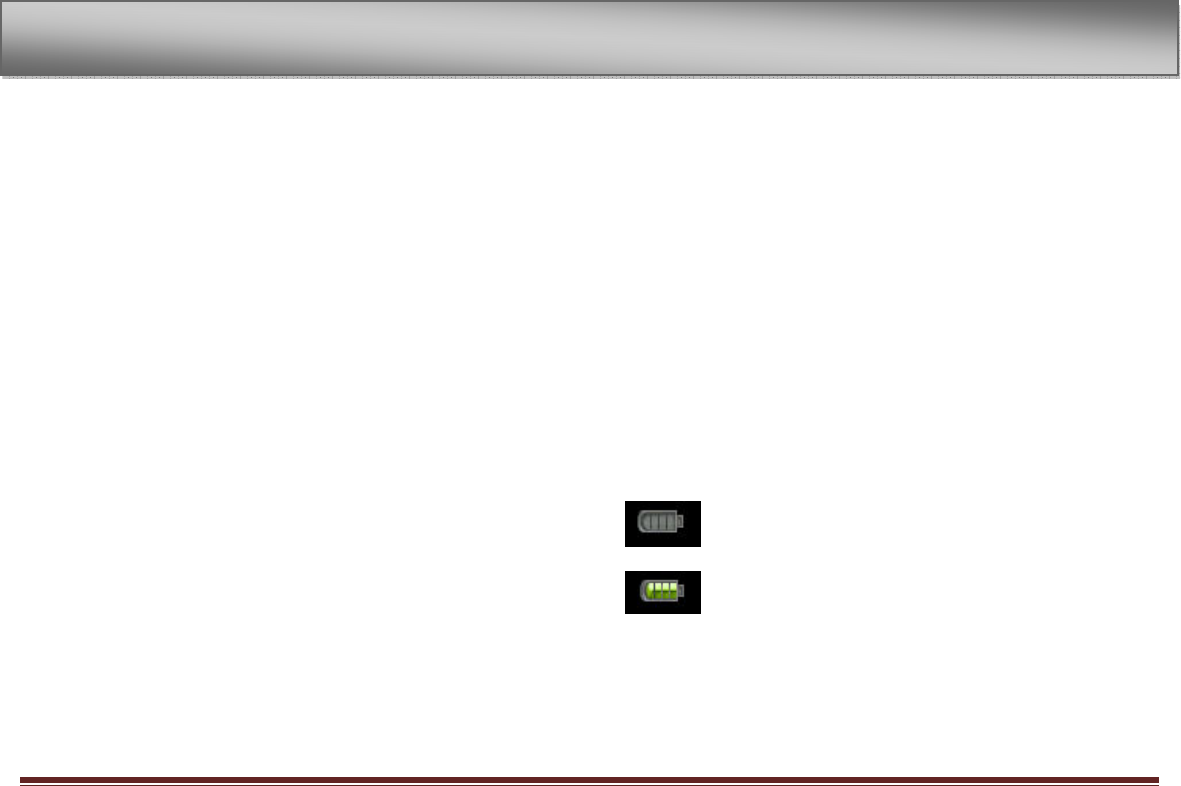
NOTE
The charging indicator to the top right of the display shows four
green bars when fully loaded. During charging one green bar after the
other is added.
Charging indicator:
Empty battery
Fully loaded battery
2
-
Preparation
Engl mfx page 9
Turning the power on and off
To turn the power ON, press the POWER key on the top panel. After
booting “ENGL-MFX” appears on the display.
To turn the power OFF, press and the POWER key, the display turns
black.
Resetting the unit
If the unit is operating abnormally, push the POWER key for a
minimum of 5 seconds. This turns the power OFF and resets the
ENGL-MFX’s system.
2
-
Preparations
Engl mfx page 10
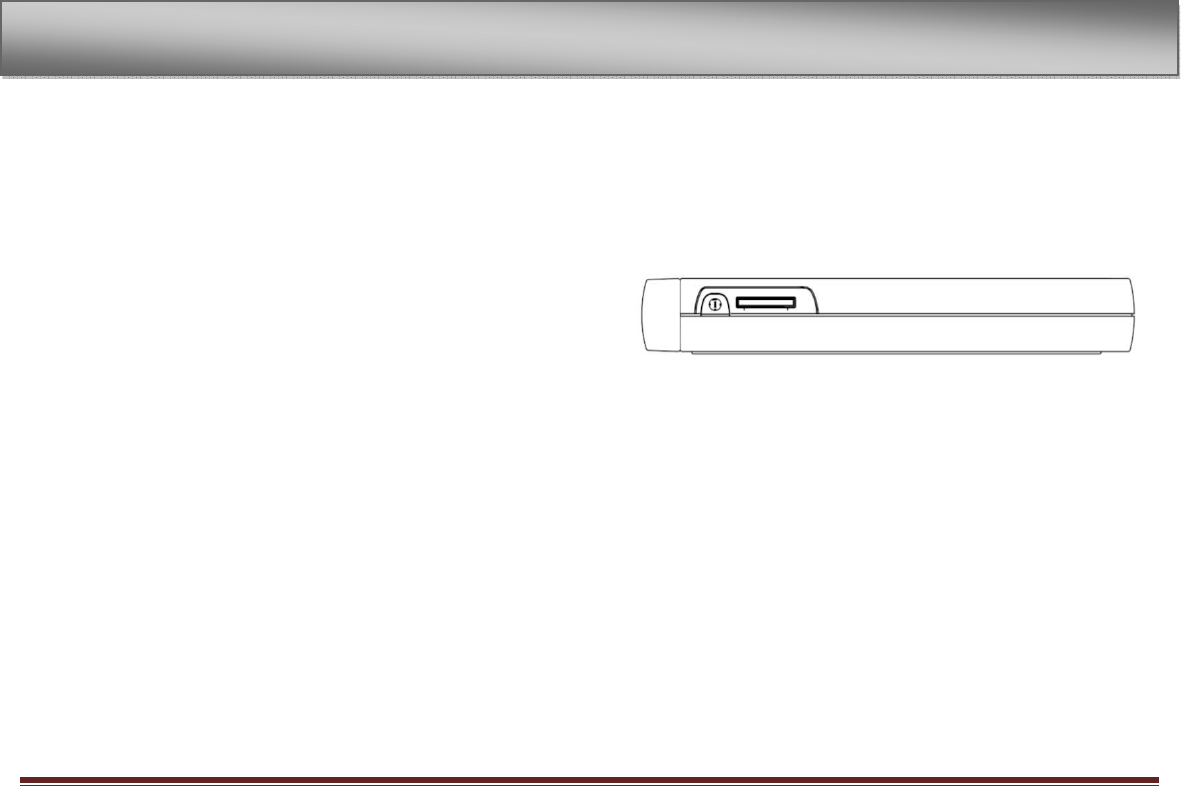
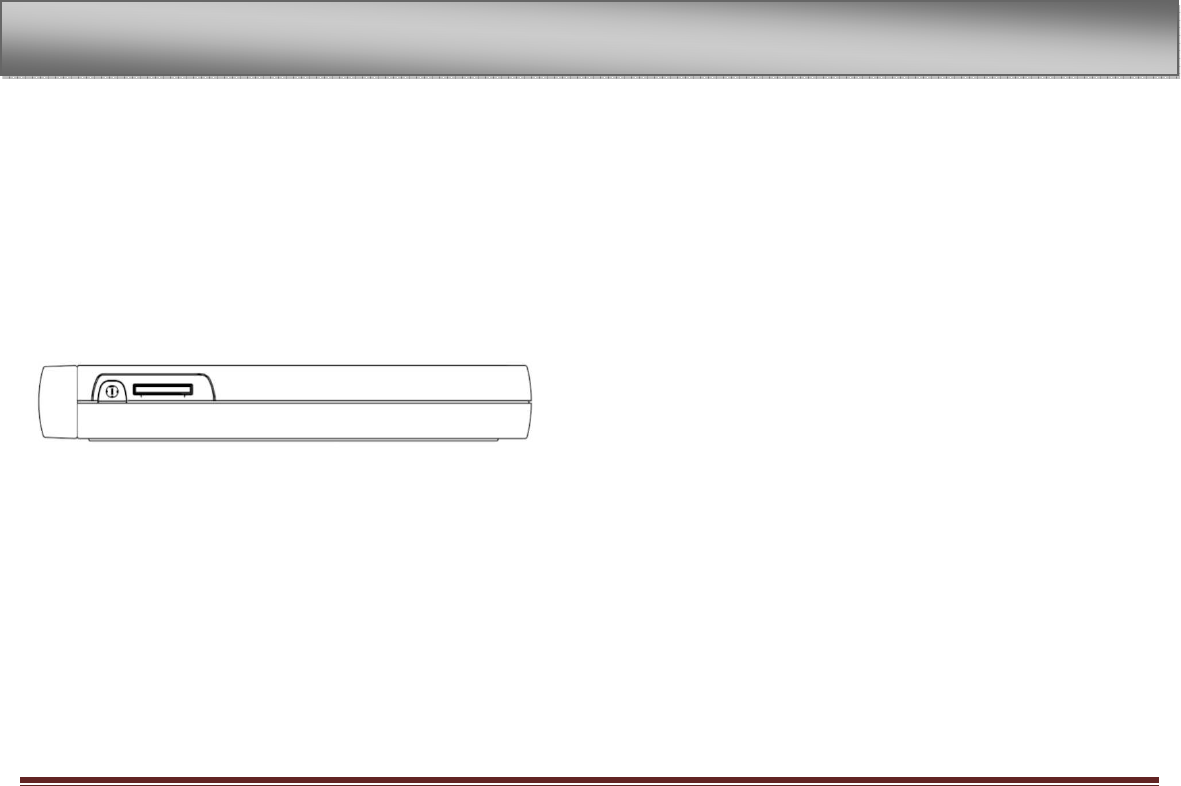
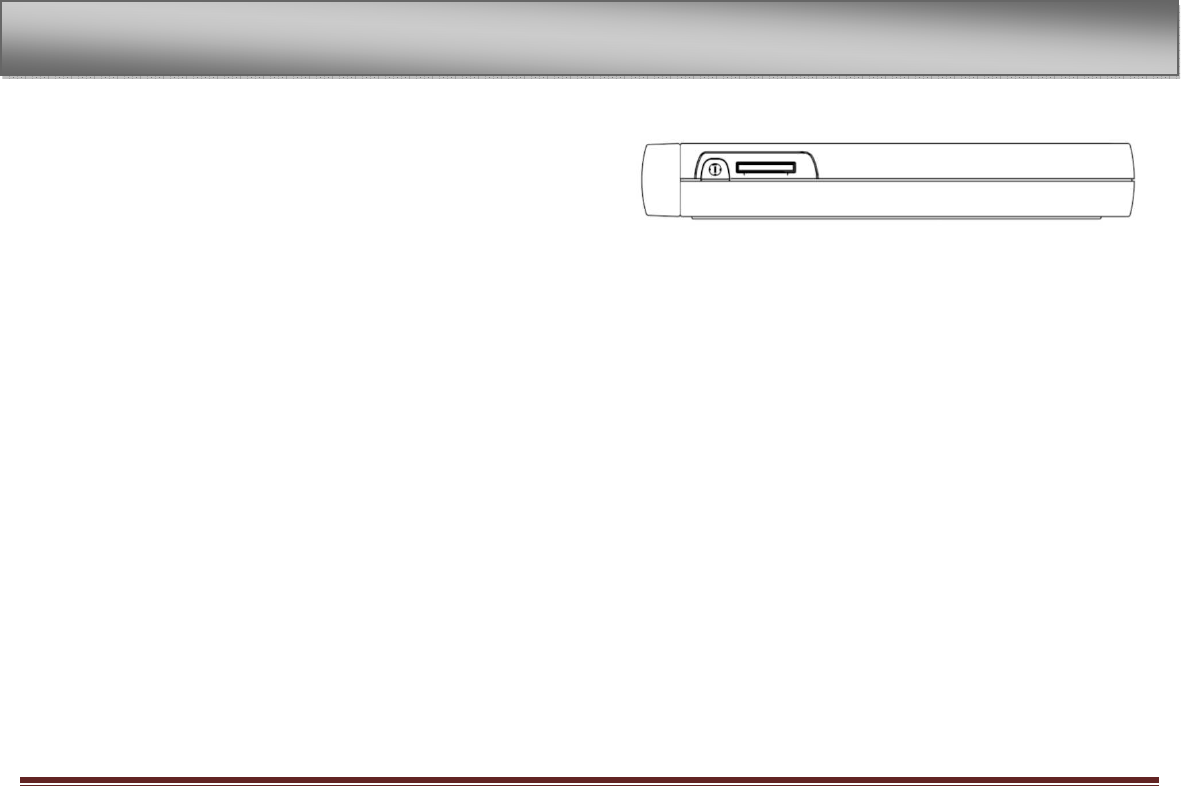
3-Part Names and Functions
Top panel
POWER key
Press this key to turn the unit’s power ON and OFF.
SD card slot
Insert an SD card into this slot. (See “About SD cards” on page 7.)
3
-
Part Names and Functions
Engl mfx page 11
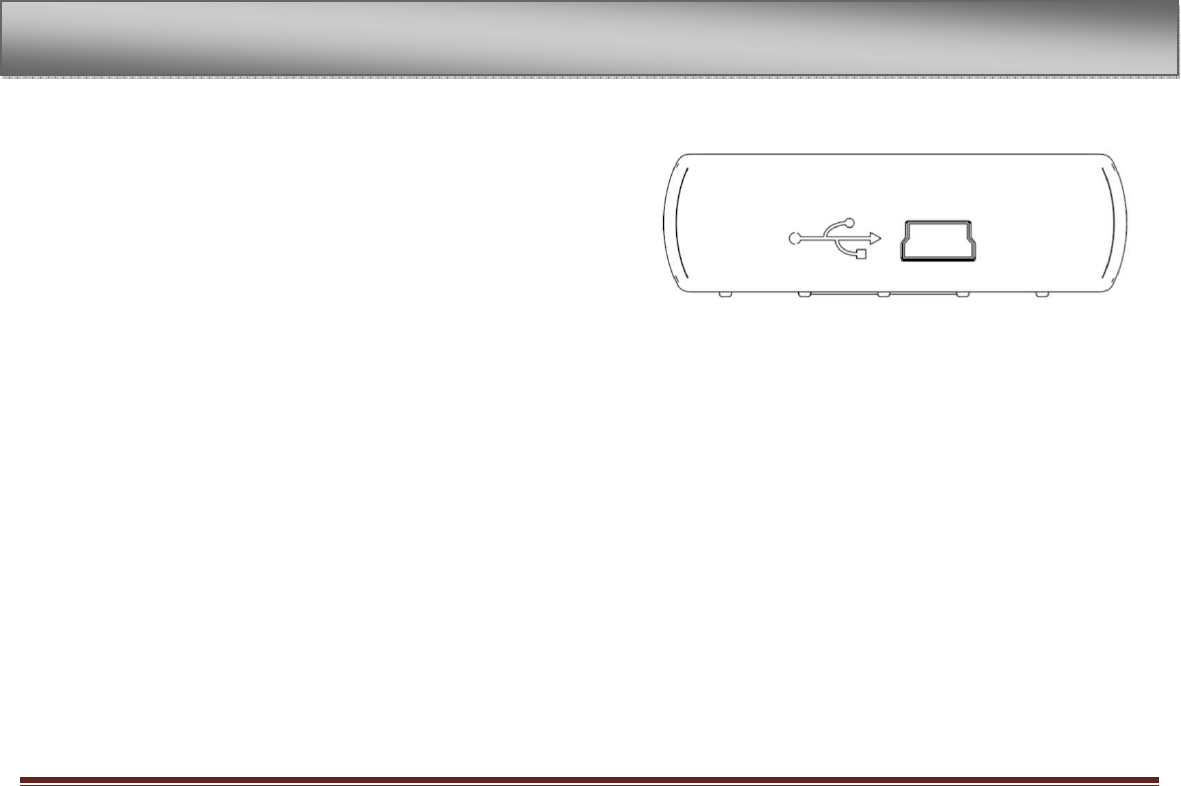
Right side panel
USB port
Use the included USB cable to connect with a computer USB port.
(See “Connecting with a computer” on page 36.). Or connect an
ENGL AC adapter to this jack.
3
-
Part Names and Functions
Engl mfx page 12
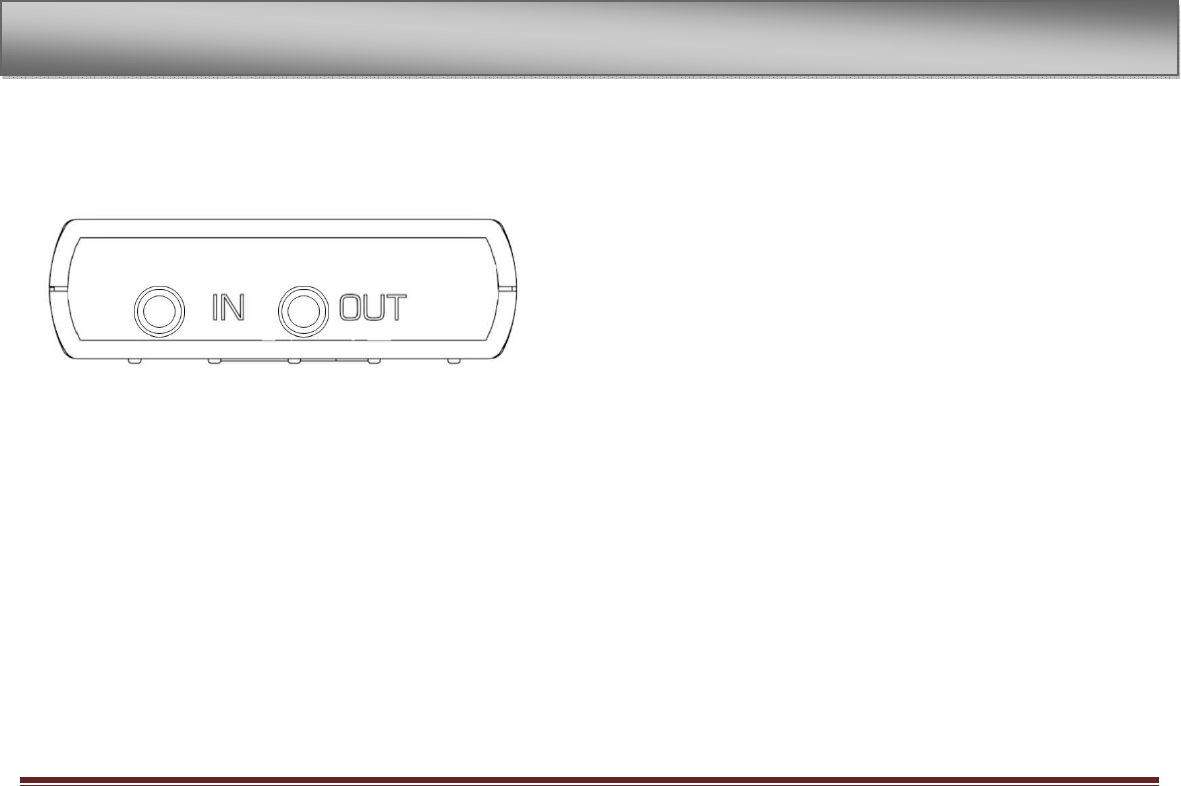
Left side panel
GUITAR IN jack
Use this jack to connect a guitar.
HEADPHONE OUT jack
Use this jack to connect with a headphone.
3
-
Part Names and Functions
Engl mfx page 13
Front panel
Display
The display consists of a capacitive touch screen. In addition to the
home screen, the display shows all other screens, various setting
screens, controls and other operation information by tapping icons
or the surface and moving the fingers on the screen.
Wheel
The touch wheel is also capacitive. When a screen is open, use the
touch wheel to move up and down or left and right, or to change
the setting of the selected item. To confirm a command, tap the
inner circle of the wheel.
Use the wheel to change the value of selected items.
3
-
Part Nam
es and Functions
Engl mfx page 14
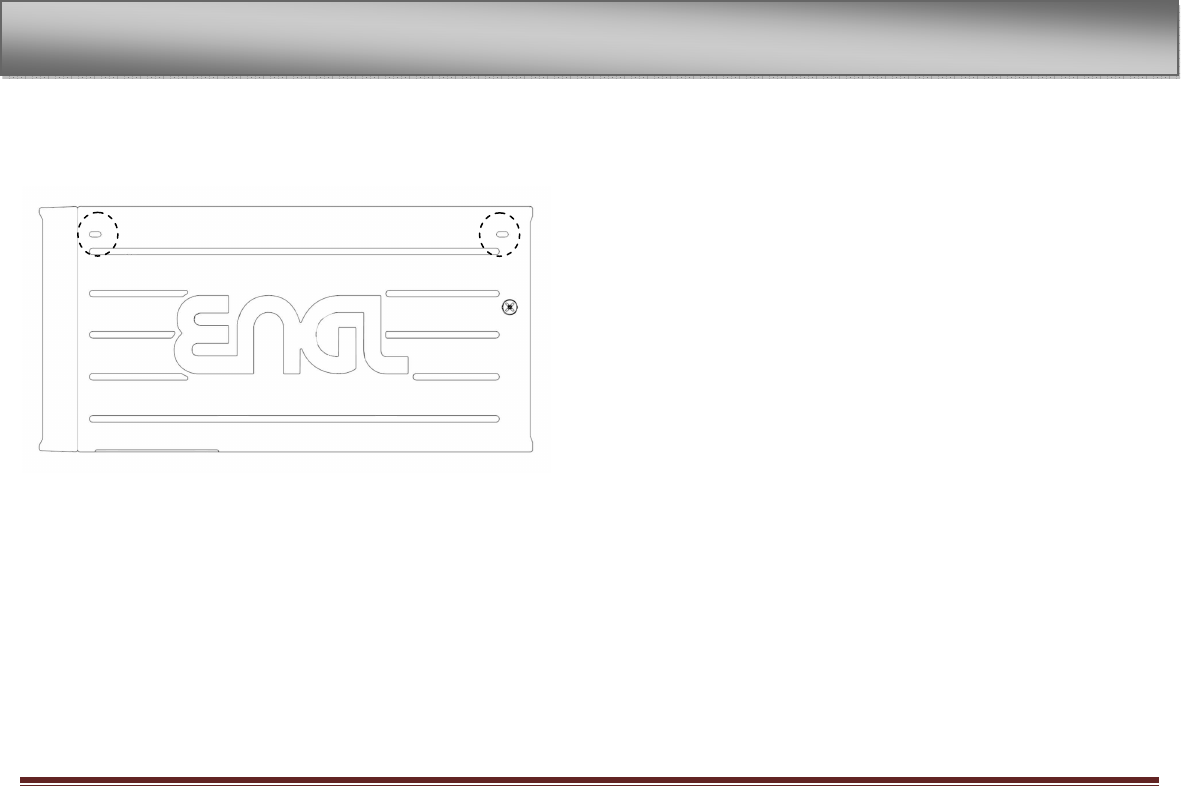
Rear panel
Built-in stereo microphone
To use this stereo electret condenser microphone as the input source,
select “INT/ MIC” on the input setting screen. If you connect an
external microphone to the MIC IN jack on the left side, the built-in
microphone becomes inactive.
3
-
Part Names and Functions

Engl mfx page 15
Bottom panel
Plug in the adapter cable to be able to use two lines in and two lines
out.
Dock-Connector
The dock connectors have different colours. Use the following dock
connectors for the following functions:
BLUE -> external –out (L/R)
WHITE -> external-in (L/R)
RED -> internal-out (L/R)
BLACK -> internal-in (L/R)
3
-
Part Names and Functions
Engl mfx page 16
4-Screen Overview
Various screens appear on the display.
• The Home Screen is shown during ordinary playback and when
playback is stopped.
• The Record Screen is shown when recording and in record
standby.
• Appropriate setting screens are shown when making various
settings.
This section explains the display and operation of the home screen
and the recording screen, as well as the appearance and operation of
the various setting screens.
Home Screen
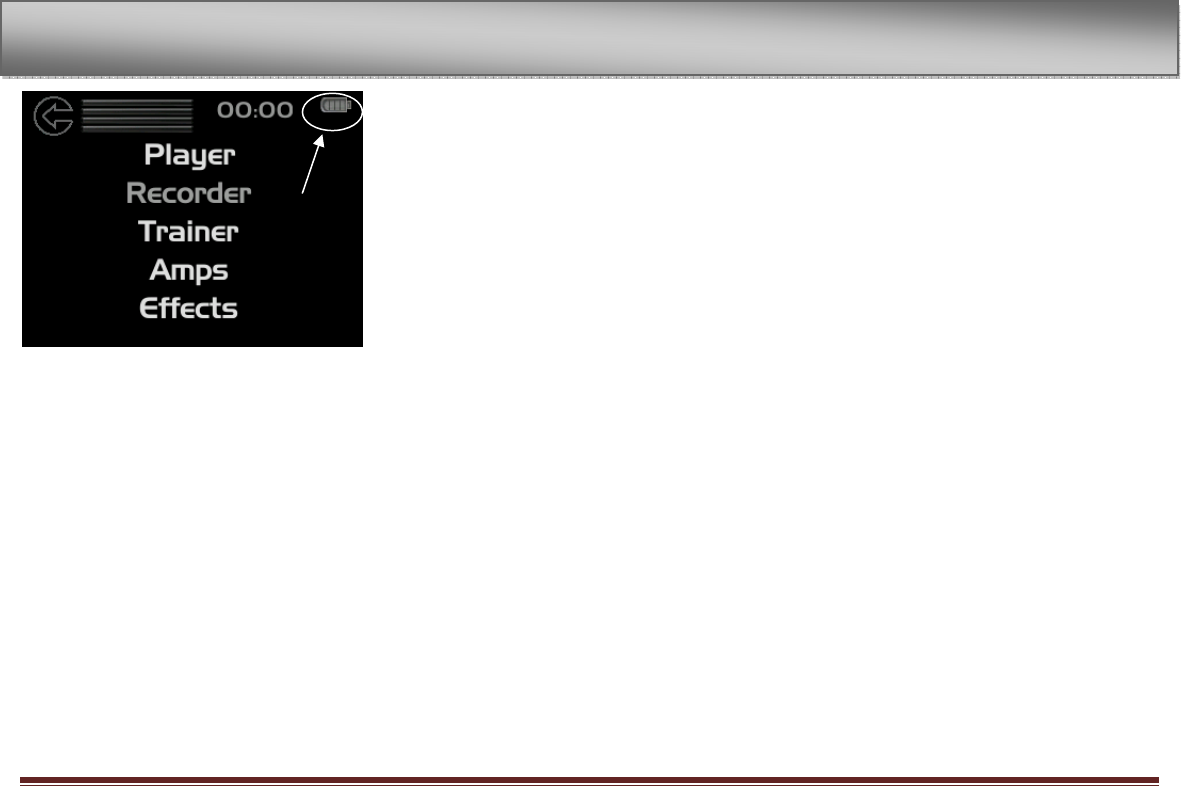
Status Bar:
The status bar on the top of the screen is always visible and performs
the following tasks:
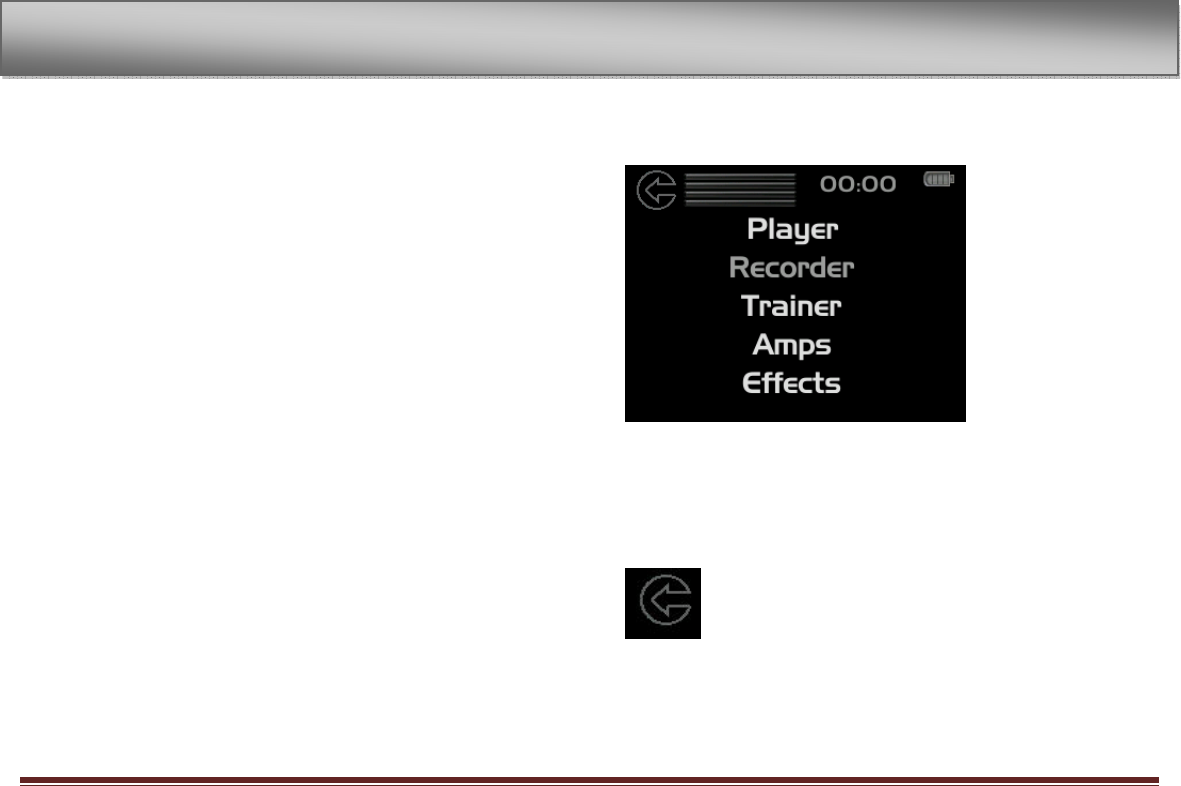
Back Button
Tap the back button to return to the previous level. To return to the
home screen, tap several times until you arrive at the main screen.
4
-
Screen Overview
Engl mfx page 17
Level meter
This bar shows the the current average recording level of the audio
streams. Tap on the bar to arrive at the setting screen of volume
control.
Elapsed time
The digits show the elapsed time - in minutes and seconds - of the
currently playing track.
Power indicator
The battery icon on the top right screen shows the current level of
remaining battery power. Four green bars show a fully charged
battery.
Battery requires charging as soon as no green bar is visible
anymore
or as soon as a screen with a big battery symbol is shown. A big
battery symbol appears, should the mfx have not enough battery
power when starting. Then you need to charge the battery as a
start. See chapter 2 - Preparation – to learn how to charge the
battery.
4
-
Screen Overview
Engl mfx page 18
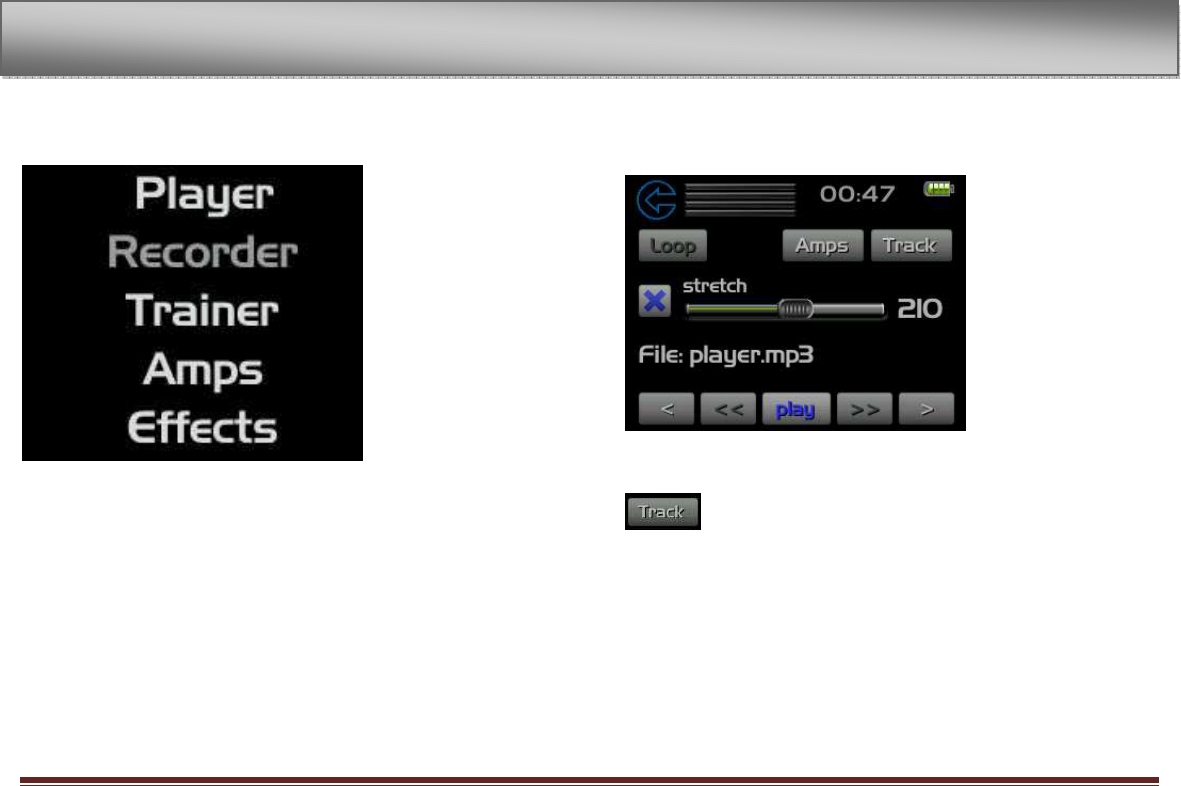
Main Menu
Scroll up and down to view the full main menu. Tap to choose one of
the menu items:
Info / Player / Trainer / Amps / Effects / Tuner / Replicator / Time
Pitch / Preset / Remote / System
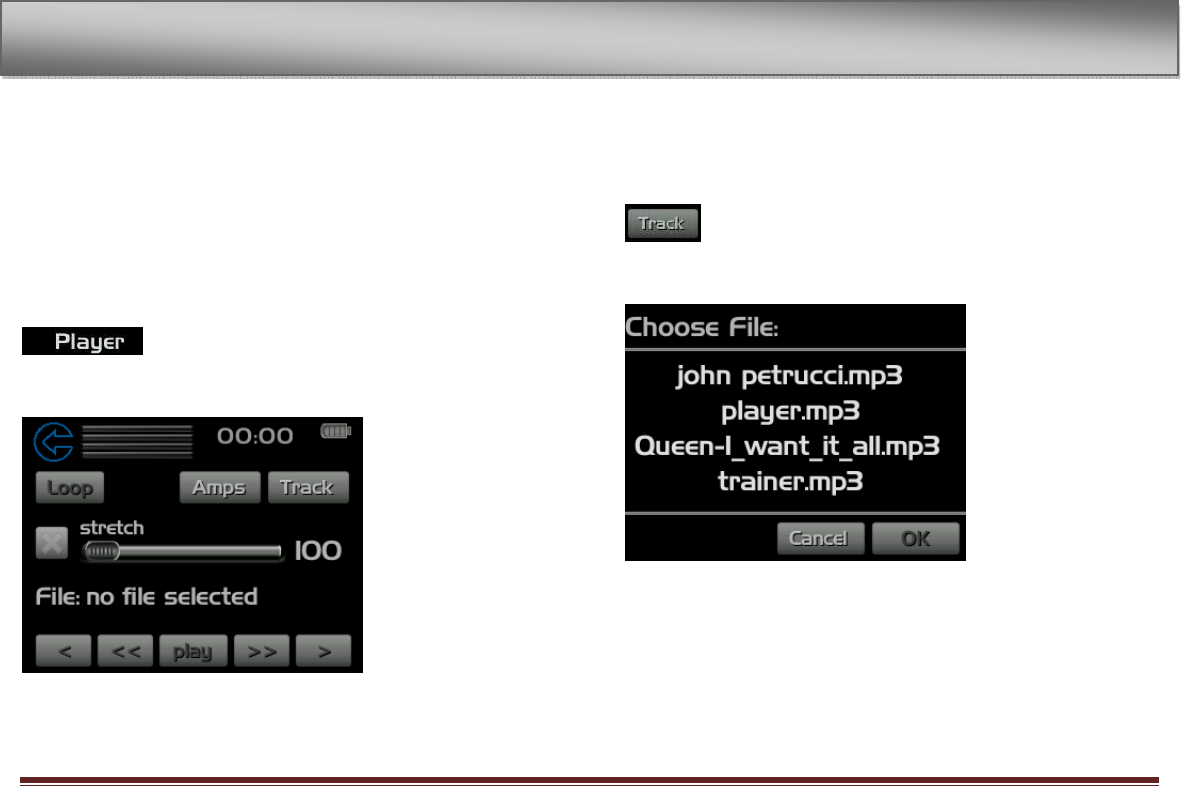
Player Screen
Select Player to arrive at the player menu:
Tap on Track to get to the Choose File menu.
4
-
Screen Overview
Engl mfx page 19
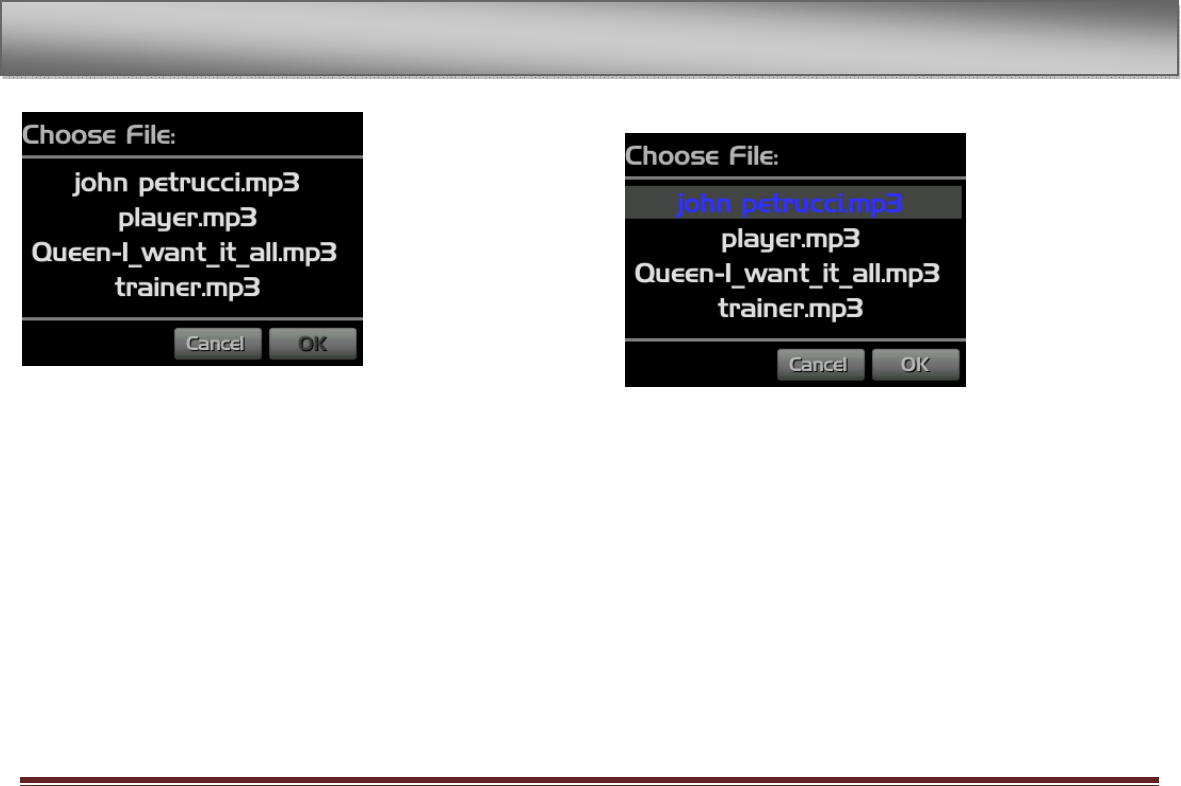
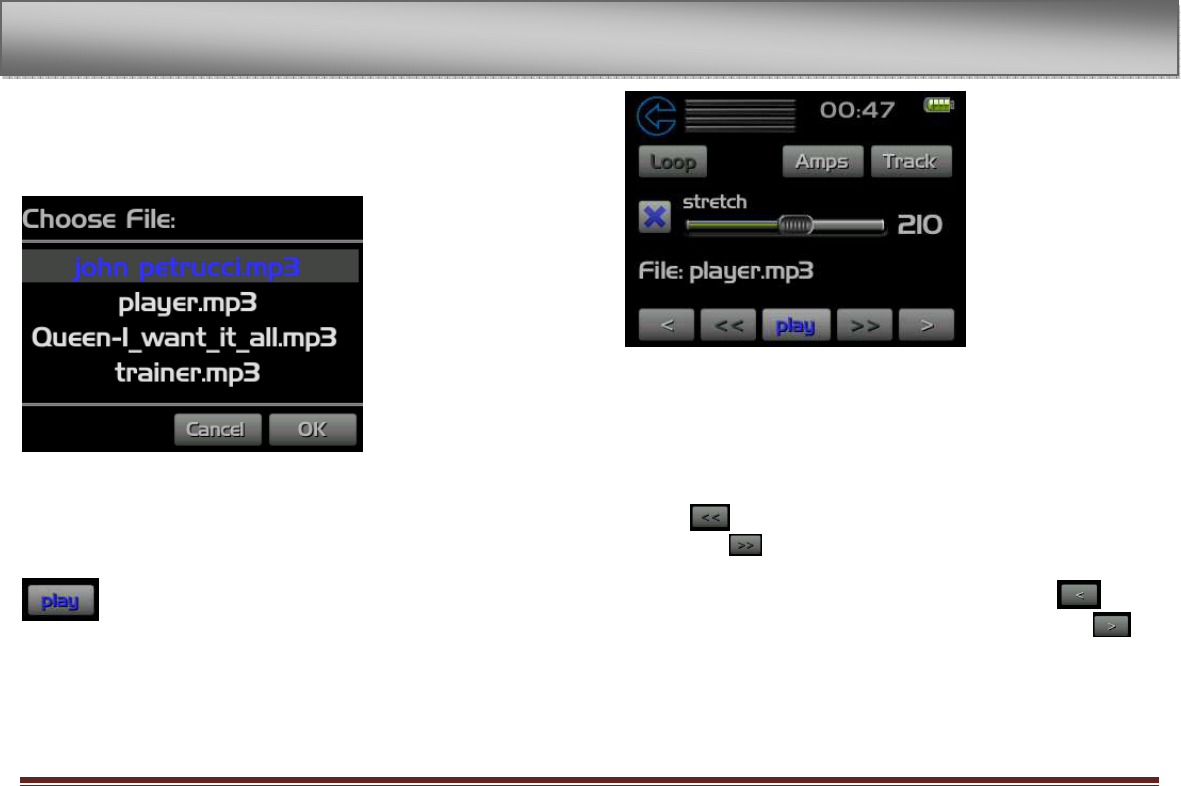
Choose the track you want to play.
The selected file turns blue.
Confirm with OK. To return to the player menu without choosing a
file, press Cancel.
4
-
Screen Overview

Engl mfx page 20
5-Making Connections
Connecting monitors
Connect headphones, speakers with built-in amplifiers, an amp and
speaker system or other monitoring system to the ENGL-MFX
/HEADPHONE OUT jack or to the dock connector cable.
Connecting with a computer
By connecting this unit with a computer, you can copy WAV, MP3,
PCM or Ogg music files from the computer to this unit. From the
computer you can also erase files on this unit and manipulate folders.
To connect to a computer, use the included USB cable to connect the
USB ports of the ENGL-MFX and the computer.
When connected, “USB – do you want to connect – yes or no” appears
on the ENGL-MFX screen. Choose Yes to connect to your computer.
The device appears on the computer screen as an external drive
named “ENGL-MFX.”
Disconnecting from a computer
To end the USB connection, first follow the procedures for your
computer to disconnect the ENGL-MFX and then remove the USB
cable.
See the computer manual for how to close the connection on the
computer.
NOTE
When shipped from the factory the “ENGL-MFX” drive contains the
“MUSIC” and “INSTALL” folders, as well as the “MANUAL” folder, which
contains a PDF copy of this owner’s manual.
Connecting a guitar
An electric guitar can be connected directly to the GUITAR IN jack
(standard mono phone jack) on the left panel.
5
-
Making Connections
Engl mfx page 21
6-Playback
The following procedures assume that there are audio files stored on
an SD card. To store files to the SD card see chapter 6 “Connecting
with a computer” in this manual.
When the home screen is displayed, tap PLAYER or use the touch
wheel to scroll to PLAYER and tap the inner circle of the wheel.
Thus the player menu appears.
Selecting tracks
Tap the TRACK icon to select tracks both during playing and when
playback is stopped.
The choose file menu appears.
6
-
Play
back
Engl mfx page 22
Scan all the tracks saved on the SD-card by using the wheel to scroll
up and down. Choose the file you want to play by tapping the inner
circle of the wheel or the track directly. The chosen file highlights in
blue.
To confirm, tap OK. The screen returns to the player menu. However
the play icon is highlighted in blue now, showing that a file was
selected.
Starting and stopping playback
Press PLAY to start playback of the chosen track. Repress PLAY to
stop playback respectively to pause.
During playback or when a track is stopped in the middle, press fast
rewind to return to the beginning of the current track. Press
fast forward to arrive at the end of the track.
When stopped at the beginning of a track, press rewind to
skip to the beginning of the previous track, or press forward to
skip to the beginning of the next track.
6
-
Playback
Engl mfx page 23
Play a track
When playback is stopped, press to start playback.
Stop playback
During playback, press to stop (or pause) at the current
position.
The digits on the display show the elapsed time - in
minutes and seconds - of the currently playing track.
Search forward and backward
Hold fast rewind to search backwards or fast forward
to search forwards.
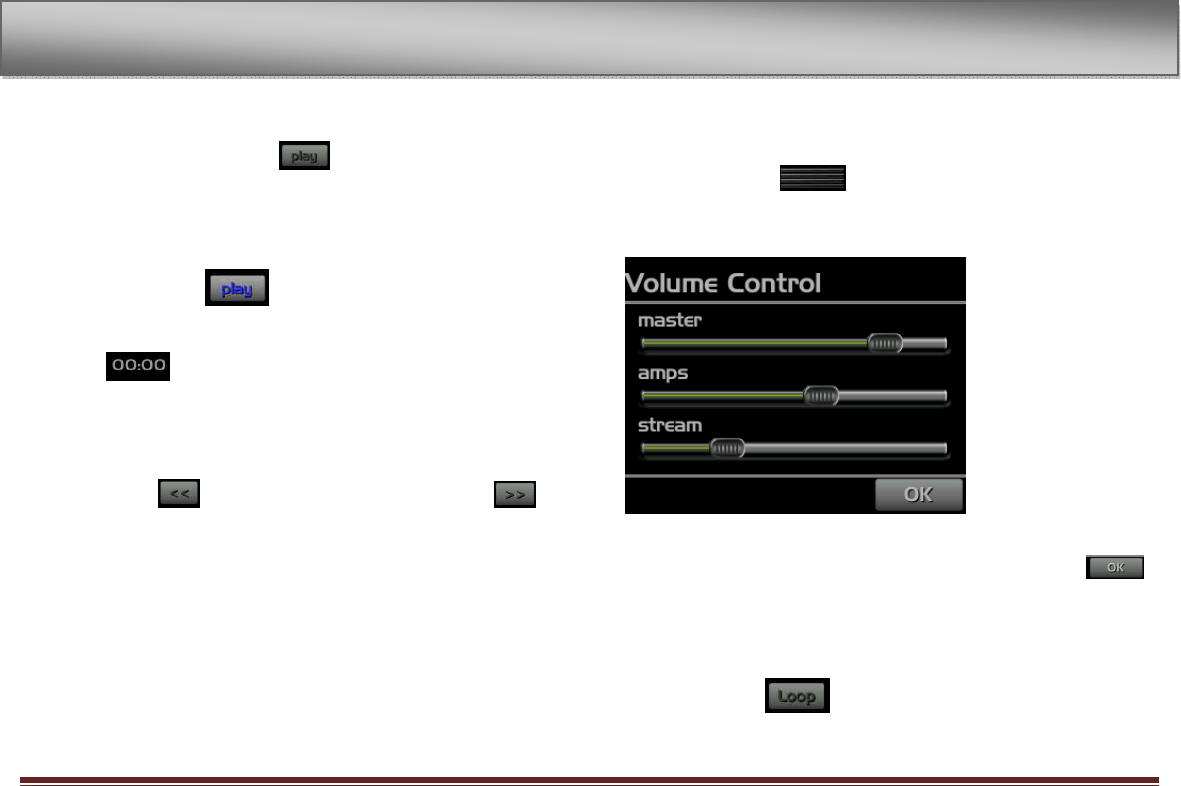
Adjusting the volume
Tap the level meter to adjust the volume.
The volume control menu appears.
Here you can adjust the volume of the amplifier, the played track and
both mixed together. This happens by using the sliders. Tap
when you feel ok with the volume. The screen returns to the player
menu.
Loop/repeat setting status
Tap the loop icon to repeat a track
6
-
Playback

Engl mfx page 24
7–Specifications
Audio Input and Output
GUITAR IN input
Jack 1/4., mono, unbalanced
Input impedance 1 Meg or more
Nominal input level -26 dBV
Maximum input level -10 dBV
LINE In input
Jack 3,5 mm phone (stereo)
Input impedance 23 k
Nominal input level -10 dBV
Maximum input level +6 dBV
LINE OUT output
Jack 3.5-mm phone (stereo)
Nominal line output -14 dBV
Maximum line output +2 dBV
Maximum headphones
output 15 mW + 15 mW
(with 32 Ω impedance headphones)
Audio performance
Frequency response
(LINE IN > /LINE OUT) 20 Hz–20 kHz, +1/-3 dB
Distortion
(LINE IN > /LINE OUT) 0.03% or less
S/N ratio
(LINE IN > /LINE OUT) 90 dB or more
Other specifications
Audio file compatibility
MP3 files 32–320 kbps
44.1/48 kHz sampling frequency
VBR (playback only)
ID3 tag support up to Ver 2.4
WAV files 44.1/48 kHz sampling frequency
16/24-bit rate
Recording medium SD card (64 MB–2 GB)
or SD HC card (4–32 GB)
File system FAT16/32
7
-
Specifications

Engl mfx page 25
Physical
Lithium ion battery 3.7 V, - 800 mAh
Battery life About 5 hours when recording
MP3 format with the built-in mic
(varies with operating conditions)
Power consumption 1 W (during MP3 playback)
Dimensions 5,0 (W) x 1,6 (H) x 10,2 (L) (cm)
1.97 (W) x 0,63 (H) x 4 (L) (inches)
Weight 100 g
Computer requirements
Windows
Pentium 300 MHz or faster
128 MB or more memory
USB port (USB 2.0 recommended, 500 mA bus power required)
Macintosh
Power PC, iMac, G3, G4 266 MHz or faster
64 MB or more memory
USB port (USB 2.0 recommended, 500 mA bus
power required)
7-Specifications

Engl mfx page 26
Recomended USB host controller
Intel chipset
Supported OS
Windows 2000, XP and Vista
Mac OS X 10.2 or later
Accessories available for purchase
AC adapter (E1041)
7
-
Specifications

Engl mfx page 27
8-FCC Compliance Statement
Changes or modifications not expressly approved by the party
responsible for compliance could void the user’s authority to operate
the equipment.
NOTE: This equipment has been tested and found to comply with the
limits for a Class B digital device, pursuant to Part 15 of the FCC Rules.
These limits are designed to provide reasonable protection against
harmful interference in a residential installation. This equipment
generates, uses and can radiate radio frequency energy and, if not
installed and used in accordance with the instructions, may cause
harmful interference to radio communications. However, there is no
guarantee that interference will not occur in a particular installation.
If this equipment does cause harmful interference to radio or
television reception, which can be determined by turning the
equipment off and on, the user is encouraged to try to correct the
interference by one or more of the following measures:
- Reorient or relocate the receiving antenna
- Increase the separation between the equipment and receiver
- Connect the equipment into an outlet on a circuit different from
that to which the receiver is connected
- Consult the dealer or an experienced radio/TV technician for
help.
This device complies with Part 15 of the FCC Rules. Operation is
subject to the following two conditions:
(1) this device may not cause harmful interference, and
(2) this device must accept any interference received, including
interference that may cause undesired operation.
8
-
FCC Compliance Statement

Engl mfx page 28
ENGL-MFX
ENGL Gerätebau GmbH
http://www.engl-amps.com