Promark 9E3UH16 Wireless Microphone User Manual UH16 Mnl wbk
Nady Systems Inc Wireless Microphone UH16 Mnl wbk
Promark >
users manual

Preliminary 01/02
UH16
UHF Wireless Microphone and Instrument System
16 Channel PLL Frequency Synthesized
OWNER’S MANUAL
TABLE OF CONTENTS:
A. INTRODUCTION
Using this Manual
B. SYSTEM FEATURES
UH-16 Transmitters
C. OPERATING INSTRUCTIONS
UH-16 Handheld Microphone Transmitter
1. Powering the Transmitter
2. Selecting the Operating Frequency
3. Selecting the Tone Squelch™ Mode
4. Locking the Keyboard
5. Microphone Operation
D. FREQUENCY GUIDE
E. CHANNEL DISPLAY AND UP/DOWN BUTTONS OPERATION
1. UH-16 Transmitters
a. Changing the Channel Assignment
b. Selecting Tone Squelch™ Mode
c. Selecting Keyboard Lock
F. SPECIFICATIONS
UH-16 Transmitters
G. SERVICE FOR YOUR NADY WIRELESS SYSTEM
U.S.
International
A. INTRODUCTION
Thank you for choosing the Nady UHF 16 wireless system, and congratulations on your
choice. The Nady UHF 16 systems are by far the best performance and price value
available in professional UHF wireless.
Offering clear channel operation on the wide open, uncluttered UHF band for
interference-free performance in any application or locale, the UHF 16 delivers 16 user
switchable, frequency synthesized channels in pre-programmed groups in the 726 - 865
MHz range.
The UHF 16 systems feature Nady's proprietary companding and low noise circuitry for
an industry best 120 dB Dynamic Range, and the clearest, most natural sound available in
wireless today.
Using this Manual

Preliminary 01/02
This booklet gives instructions for the operation of the UHF 16 systems, including the
UB-16 Bodypack Transmitter, and the UH-16 Handheld Microphone Transmitter. Please
read this instruction booklet completely before operating your system, and refer to the
Nady UHF 16 Frequency Guide for the frequency band(s) and channels utilized by your
system.
This manual will first explain the benefits of the UHF 16 and then will take you step by
step on how to operate your new system. Each section will give you detailed information.
Also, included in this manual is the frequency selection chart, complete system
specifications, and servicing information.
B. SYSTEM FEATURES
UH-16 Transmitters
Choice of transmitters: UH-16 handheld or UB-16 bodypack, both 16-channel selectable
• UH-16 and UB-16 both operate on 2 AA batteries for the longest reliable and
economical battery life.
• UH-16 handheld is a sleek, durable unit with internal antenna (with no archaic,
unattractive antenna protrusion) and the superior Nady DM-10D neodymium
dynamic cartridge for clear, powerful audio, maximum feedback rejection, and
minimal handling noise.
• UB-16 bodypack is a versatile unit with unique 3-way input switch allowing it
operation selectively as an instrument, lavalier mic, or headworn mic transmitter
(with convenient DC phantom powering in the mic settings for condensers). An
input level control allows optimal audio gain adjustment, and a locking 3.5 mm
jack provides secure connection to the instrument cable, lavalier or headworn mic
cord.
• Both the UH-16 and UB-16 transmitters feature OFF/STANDBY/On controls,
low battery LED indicators, and offer easy channel selection via UP/DOWN
buttons and a 2-segment LED Channel display.
Preliminary 01/02
C. OPERATING INSTRUCTIONS
UH-16 Handheld Microphone Transmitter
1. Powering the Transmitter
Slide open the BATTERY COMPARTMENT COVER (12) and remove, exposing the
BATTERY COMPARTMENT (14). Insert 2 fresh AA ALKALINE BATTERIES
(15), observing the correct polarity as marked, and slide the COVER back, closing the
BATTERY COMPARTMENT.
Two fresh alkaline AA Batteries can last up to 12 hours in use, but in order to ensure
optimum performance, it is recommended that you replace the batteries after every 8-10
hours of use.
All controls are at the base of the microphone. Turn on the UH-16 by sliding the
OFF/STANDBY/ON SWITCH (15) to the STANDBY position (transmitter on, audio
muted) or the ON position (transmitter and audio both on). The BATTERY
INDICATOR LED (16) will give a single quick flash, indicating usable battery strength.
In the case of dead or low batteries, the LED will either not go on at all, or will stay on
continuously, indicating that the batteries should be replaced with fresh ones. To preserve
battery life, turn the transmitter off when not in use. The channel number on the
CHANNEL LED DISPLAY (18) will extinguish in 10 seconds. The activity indicator
“ “ or “ “ LED will remain on.
2. Selecting the Operating Frequency
In order for the system to operate properly the same channel (frequency of operation)
must be selected for the UH-16 transmitter as was chosen for the UHF-16 receiver. Press
either the UP or DOWN CHANNEL SELECT BUTTON (17) until the channel number
indicated on the 2-segment CHANNEL LED DISPLAY (18) matches that of the UHF-
16 receiver.
3. Selecting the Tone Squelch™ Mode
Hold both the UP and DOWN BUTTONS (17) at the same time for 1 second. The Tone
Squelch™ will cycle from On to Off. See the CHANNEL DISPLAY AND UP/DOWN
BUTTON OPERATION section below.
4. Locking the Keyboard
To avoid accidental reconfiguration of the Channel setting or Tone Squelch™, the
keyboard can be locked by holding both the UP and DOWN BUTTONS (17) at the same
time for 3 seconds. See the CHANNEL DISPLAY AND UP/DOWN BUTTON
OPERATION section below.
5. Microphone Operation
AA
AA

Preliminary 01/02
The microphone is now ready to use. The RECEIVED RF LEVEL (11a) icon and
either the A or B DIVERSITY STATUS ICONS (11b) on the UHF-16 receiver should
now be lit, indicating a received signal from the transmitter. The receiver MUTE LED
INDICATOR (X) should be off. When ready to speak, slide the OFF/STANDBY/ON
SWITCH (15) to the ON position. Adjust the volume of the receiver as per the Audio
Output Microphone Connection section of the above UHF-16 receiver instructions.
(Note: Observe care in selecting P.A. volume, transmitter location and speaker
placement so that acoustic feedback, howling or screeching, will be avoided.)
The UHF-16 receiver is equipped with an AF DISPLAY (11c) icon, which displays up to
4 segments, depending on the strength of the audio signal from the transmitter.
Occasional flickering of the 4th bar segment of this display on loud inputs to the
transmitter is normal. If this segment displays continuously, and/or distortion is heard,
decrease the volume to the transmitter. Due to the wide available dynamic range,
generally no adjustment will ever be needed for the transmitter input gain. There is a
control under the mic ball assembly available for rare cases where it’s desirable to make
an input gain adjustment. For instructions on how to access this internal control, please
contact the Nady Systems Customer Service Department. See SERVICE section below.
(Note: Attn handheld mic users. Microphone element can easily be destroyed by the
buildup of salts and minerals from perspiration and saliva. It is good practice to put a
windscreen on the mic element at all times to protect it.)
Cautions
1. Feedback
Observe care in selecting P.A. volume, transmitter location and speaker placement so that
acoustic feedback, howling and screeching, will be avoided. Please also note the pickup
pattern characteristics of the microphone selected. Omnidirectional mics pick up sound
equally from all directions, and are prone to feedback if not used carefully. Unidirectional
mics are more resistant to feedback, but pick up sound sources best that are directly in
front of the mic. Also, mics that are farther from the sound source, such as lavaliers,
require more acoustic gain and thus are also more prone to feedback than close-source
mics such as handheld or headworn models that are used close to the mouth.
2. Microphone Damage
Note: headset and lavalier mic users. Microphone element can easily be destroyed by the
buildup of salts and minerals from perspiration and saliva. It is good practice to put a
windscreen on the mic element at all times to protect it.)
3. No Audio
If the receiver is configured for Tone Squelch™ mute the transmitter must also be
configured to send the tones, otherwise the receiver audio will remain muted.

Preliminary 01/02
3. No Audio
If the receiver is configured for Tone Squelch™ mute the transmitter must also be
configured to send the tones, otherwise the receiver audio will remain muted.
D. FREQUENCY GUIDE
The UHF 16 system is available with a choice of three frequency bands, each with 16
user-selectable frequencies. Select the band and frequencies appropriate to the
area/country in which the system is to be used.
U.S. CE CE
Channel Band 1 Band 2 Band 3 (this list will change)
1 726.00 MHz 793.40 MHz 845.60 MHz
2 726.40 MHz 794.00 MHz 846.00 MHz
3 726.90 MHz 796.60 MHz 846.50 MHz
4 728.20 MHz 799.50 MHz 847.10 MHz
5 729.40 MHz 801.10 MHz 847.80 MHz
6 730.60 MHz 802.80 MHz 848.80 MHz
7 732.50 MHz 804.90 MHz 850.90 MHz
8 734.50 MHz 805.85 MHz 851.85 MHz
9 735.90 MHz 807.45 MHz 853.45 MHz
10 736.60 MHz 808.85 MHz 854.85 MHz
11 737.40 MHz 810.05 MHz 856.05 MHz
12 739.70 MHz 812.55 MHz 858.55 MHz
13 741.40 MHz 813.35 MHz 859.35 MHz
14 742.50 MHz 816.05 MHz 862.05 MHz
15 744.10 MHz 817.60 MHz 863.60 MHz
16 745.90 MHz 819.05 MHz 864.05 MHz

Preliminary 01/02
E. CHANNEL DISPLAY AND UP/DOWN BUTTON OPERATION
1. UH-16 Transmitters
Operation of Channel Display and Up and Down buttons, Keyboard Lock, and Tone
Squelch™
a. Changing the Channel Assignment
Press Up or Down button to change channels.
The Channel number indicator will vanish after 10 seconds. The Tone Squelch™
indicator and Keyboard Lock indicator will show the transmitter is On.
b. Selecting Tone Squelch™ Mode
Hold both Up and Down buttons at the same time for 1 second. Tone Squelch™ will
cycle from On to Off.
If the receiver Tone Squelch™ is enabled, it must also be enabled on the transmitter
otherwise the audio will remain muted.
c. Selecting Keyboard Lock
Hold both Up and Down buttons at the same time for 3 seconds. Keyboard lock will
cycle from Locked to Unlocked.
F. SPECIFICATIONS
UHF 16 System
Operating Frequency Range: 16 channels switchable
pre-programmed bands up to 20 MHz wide in the
726-863 MHz range (country dependent)
Freq. Synthesized: PLL system with frequency stability <0.005%
Frequency Response: 30 HZ-15 KHZ ±3 dB
Dynamic Range: 120 dB
Harmonic Distortions: <0.5%
Modulation: FM ±25 KHz nominal
Operating Range: 250 feet typical (depending on site conditions)
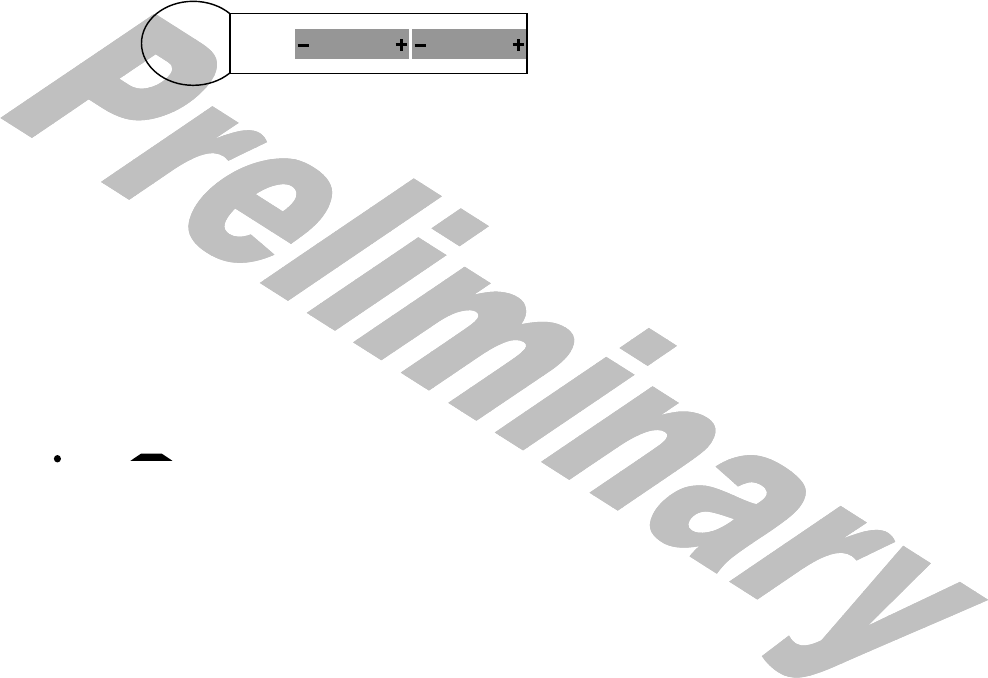
Channel #
Keyboard Locked
Tone Squelch™
Tones On
Tone Squelch™
Tones Off

Preliminary 01/02
up to 500+ feet optimum line of sight
UH-16 Transmitters
Models Available: UH-16 handheld mic, UB-16 bodypack
RF Output Power: 1 mW-50 mW max (country and band dependent)
Harmonic and Spurious Emissions: - 50 dB
Audio Input Level with ± 25 KHz nom. deviation:
UH-16: 24 mV RMS (nom.)
UB-16: 225 mV (Instr.), 150 mV (HM), 75 mV (Lav)
Input Impedance: UH-16: 10K Ohms
UB-16: 200K Ohm (Instr.), 10K Ohms (Lav), 20K Ohms (HM)
Controls: UH-16: Off/Mute/On switch, Channel Select Up/Down buttons
UB-16: Off/Mute/On switch, Channel Select Up/Down buttons,
Input Level Control, 3-way input select switch for: lavalier, head
mic, or music instrument
LED Indicator: Unit “ON” (single flash), Low Battery Alert (steady),
Selected Channel Display, and Transmitter Active.
Connectors: UH-16: None
UB-16: Locking 3.5 mm mini jack
Antenna Type: UH-16: Integral
UB-16: External permanent, 3 inch
Battery Type: 2 X AA alkaline
Battery Life: 8-12 hours nominal
Dimensions: UH-16: 8.75” x 1.4” (222 x 36 mm)
UB-16: 4.0” x 2.39” x 0.9” (102 x 61 x 23 mm)
Weight: UH-16: 6.9 oz (193g)
(w/o batteries) UB-16: 3.2 oz (89g)
G. SERVICE FOR YOUR NADY WIRELESS SYSTEM
(U.S.) If you are experiencing operational problems with your system, check out the
support page on the Nady website: www.nadywireless.com for help and for contacting
the Nady Service Department. Should your Wireless System require service, you must
contact the Nady Service Department at 510.652.2411 for a Return Authorization (R/A)
Number and a service quote (if out of warranty). Make sure the R/A Number is clearly
marked on the outside of package. Cashiers' check or money order is enclosed (if not
prepaid with credit card), and ship the unit prepaid to: Nady Systems, Inc., Service
Department, 6701 Shellmound Street, Emeryville, CA 94608. Include a brief description
of the problem you are experiencing. For service of a unit under Warranty follow the
instructions of your Warranty Card regarding Warranty Service.
(International) For service, please contact the NADY distributor in your country through
the dealer from whom you purchased this product.
DO NOT ATTEMPT TO SERVICE THIS UNIT YOURSELF, AS THAT WILL VOID
YOUR WARRANTY.

Preliminary 01/02
NOTE: OPERATION OF THIS DEVICE IN THE U.S. IS SUBJECT TO THE
FOLLOWING CONDITIONS:
1. THIS DEVICE MAY NOT CAUSE INTERFERENCE, AND
2. THIS DEVICE MUST ACCEPT INTERFERENCE, INCLUDING
INTERFERENCE THAT MAY CAUSE UNDESIRED OPERATION OF THE
DEVICE.