Psion 7505BTHC25 Handheld PC with GSM/EDGE/WCDMA and BT User Manual
Psion Inc Handheld PC with GSM/EDGE/WCDMA and BT
Psion >
Contents
- 1. User Manual Part 1
- 2. User Manual Part 2
- 3. User Manual Part 3
User Manual Part 2

Chapter 3: Get To Know The iKôn PDA
The LEDs
42 iKôn Rugged PDA (Windows Mobile 6) User Manual
3.6.1 The LEDs
Three LEDs are located on the upper-left side of the unit, just above the display. When you
press the Power button, the LED flashes green to indicate that the unit has been powered up.
The LED table following outlines the behaviour of the LED while the unit is docked in a
charger.
Keep in mind that the application running on the iKôn PDA can dictate how the application
LED operates. Review the documentation provided with your application to determine LED
behaviour.
If the unit is attached to an external power supply, the charge LED (the left-most LED) re-
flects the battery charge status.
3.7 Audio Indicators
The audio speaker provides a variety of sounds when a key is pressed, a keyboard character
is rejected, scan input is accepted or rejected, an operator’s entry does not match in a match
field or the battery is low. To specify how you want your iKôn PDA to respond under
various conditions, refer to “Sounds” on page 105.
Table 3.1 Function Of iKôn PDA LEDs
LED Function
Green Charge LED
(left-most LED)
Charge indicator. See the table below for descriptions of Charge
LED behaviour.
Yellow Application LED
(centre LED)
Application LED. This LEDs behaviour is application dependent.
Blue Radio Power LED
(right-most LED)
Radio power indicator.
Table 3.2 iKôn PDA Charge LED Behaviour
LED Behaviour Charge Status
Solid Green Charge complete
Fast Blinking Green Charge in progress. Battery charged to less than 80% capacity.
Slow Blinking Green Battery charged to greater than 80% capacity.
Solid Red Temperature outside charge range (0° C to 50° C)
Blinking Red Battery is not charging. Battery fault.

Chapter 3: Get To Know The iKôn PDA
Adjusting Speaker Volume
iKôn Rugged PDA (Windows Mobile 6) User Manual 43
The volume can be adjusted using the [UP ARROW] and [DOWN ARROW]. The increase
volume key is labelled with a plus (+) symbol and the decrease volume key is labelled with
a minus (-) symbol.
3.7.1 Adjusting Speaker Volume
The [VOLUME] button is located on the left side of the PDA, just below the [SCAN]
button. It is a rocker button; pressing the top half of the button increases volume while press-
ing the bottom half of the button decreases it.
3.8 Monitoring The Battery And Maximizing Run Time
As Lithium-Ion batteries age, their capacity decreases gradually, and they are generally con-
sidered depleted after approximately 2 years of use (less than 60% of original capacity
remaining). Keep in mind however that heavy usage or operating the unit at temperature ex-
tremes will shorten the battery life.
Lithium-Ion batteries do not require conditioning cycles and the iKôn PDA battery system
(including chargers) requires no user interaction to maintain peak performance.
To maximize the run time of your batteries, consider the following:
• The display backlight is the largest drain on the battery. Try to keep its brightness as low
as possible.
• The unit is ‘event’ driven—that is, when the unit is not in use, it reverts to sleep mode
(even when it appears to be running), saving battery power. Events include a key press,
touchscreen taps and scan triggers. Power consumption is reduced if you avoid unneces-
sary events, and allow the unit to sleep as much as possible.
• The battery is a ‘smart battery’ with built-in intelligence.
Tapping on the Power icon under Start>Settings>System tab displays a dialog box that pro-
vides detailed information about the battery status of the battery installed in your unit.
• When the unit is switched off, it goes into a low-power, suspend state but continues to
draw a small amount of power from the battery. This should not be an issue unless the
unit is left in suspend state for more than a week—for long-term storage, the battery
should be removed from the unit.
Note: When the battery is at 50% capacity, a ‘low battery’ warning is displayed. When the
battery is at approximately 10% capacity, a ‘very low battery’ notification bubble
appears.

Chapter 3: Get To Know The iKôn PDA
Storing Batteries
44 iKôn Rugged PDA (Windows Mobile 6) User Manual
3.8.1 Storing Batteries
Long term battery storage is not recommended. If storage is necessary:
• Always try to use a ‘first-in first-out’ approach to minimize storage time.
• Lithium-Ion batteries age much faster at elevated temperatures. Store batteries at tem-
peratures between 0° C and 20° C.
• Always charge batteries to at least 40 to 60% before storing them. Batteries can be
damaged by an over-discharge phenomenon that occurs when an empty battery is stored
for a long period of time such that the cell voltage drops below a lower limit.
• To minimize storage degradation, recharge stored batteries to 40 to 60% every 4 or 6
months to prevent over-discharge damage.
• A ‘never used’ Li-Ion battery that has been stored for 3 years may have limited or no
useful life remaining once put into service. Think of batteries as perishable goods.
3.9 Uploading Data In A Docking Station
The desktop docking station and quad docking station are typically used to upload transac-
tion data to a server computer when a radio link is not available.
The desktop docking station can complete batch uploads to a Client USB connected PC or
server. An optional 10/100baseT Ethernet module is also available.
Unlike the desktop docking station, the quad docking station supports only TCP/IP connec-
tions to a PC or server through a 10/100baseT Ethernet connection.
When a iKôn PDA is properly inserted in a docking station, a dock icon is displayed in the
navigation bar at the top of the screen. The unit also detects the presence of the Ethernet
network.
3.10 Bluetooth Radio
Important: Review the documentation provided with the user application installed in
your iKôn PDA before performing data uploads.
Note: Refer to “Chargers And Docking Stations” on page 245 for more details.
Note: Integrated Bluetooth class II radios are standard on iKôn PDA units. Keep in mind
also that Bluetooth is available simultaneously with WAN and 802.11g on a single
unit.
Chapter 3: Get To Know The iKôn PDA
Pairing A Bluetooth Headset Or Other Bluetooth Devices
iKôn Rugged PDA (Windows Mobile 6) User Manual 45
The iKôn PDA is equipped with an on-board Bluetooth radio. This type of radio enables
short range data communication between devices. The Bluetooth also provides the capabil-
ity to use a Bluetooth-enabled cellular phone as a data modem, exchanging information with
other Bluetooth devices and providing network access. Refer to “The Bluetooth GPRS
Phone” on page 188 for setup details.
3.10.1 Pairing A Bluetooth Headset Or Other Bluetooth Devices
Before pairing a headset or any other Bluetooth device with your unit, make certain that the
Bluetooth device power is enabled; it is enabled by default. If, for some reason, it has been
disabled:
• Tap on Start>Settings>System tab and then, tap on the Power icon to display the
Power dialog box.
• Tap on the Built-in Devices tab, and tap in the checkbox next to Enable Bluetooth.
Next you need to make your iKôn PDA visible to other Bluetooth devices; this option is set
to off by default.
• Tap on Start>Settings>Connections tab>Bluetooth icon.
• Tap on the Mode tab, and check both Turn on Bluetooth and Make this device visible
to other devices. Tap OK.
• Follow the headset manufacturer’s instructions to place the headset in pairing mode.
Some headsets will automatically initiate the pairing to the PDA, and you will be
prompted to pair with the headset.
If your headset does not initiate pairing automatically, carry out these steps:
• Tap on Start>Settings>Connections tab>Bluetooth icon.
•In the Devices tab, tap Add new device. Wait for the iKôn PDA to scan for devices.
• Choose the headset device from the list and tap on Next.
The iKôn PDA then prompts you to provide a passcode.
• Type the passcode (or PIN – Personal Identification Number), and then tap on Next.
The PDA unit then displays a services list with the Hands Free service type checked.
•With Hands Free checked (enabled), tap Finish. The headset is now paired.
3.11 Inserting The SD/MMC Card And SIM Card
There are two card slots available in the battery compartment of the PDA – the lower slot is
provided for a SD/MMC (Secure Digital/Multi-Media Card) and the upper slot is for a SIM
(Subscriber Identity Module) card.
Chapter 3: Get To Know The iKôn PDA
Inserting The Card ??
46 iKôn Rugged PDA (Windows Mobile 6) User Manual
SD/MMC cards provide additional non-volatile memory to your PDA. SIM cards provide
access to the PDA’s voice option, the Internet, and so on.
3.11.1 Inserting The Card ??
• Switch off the iKôn PDA.
• Remove the battery cover and the battery.
A hinged door in the battery compartment protects the connectors. It is hinged on the left
side.
• Pull the hinged SD door down as the arrow icon on the door indicates.
• Orient the SD/MMC or SIM card according to the legend stamped into the battery well
plastic.
• For SD/MMC cards, slide the card into the lower slot, pushing it inward until it latches
into place.
• For a SIM card, slide the card into the upper slot, pushing it inward until it latches into
place.
• Swing the hinged door back into place, and gently snap it shut.
To remove the card:
• Gently press the card inward until it unlatches, and the card is expelled from the slot.
3.12 General Maintenance
3.12.1 Caring For The Touchscreen
The top of the touchscreen is a thin, flexible polyester plastic sheet with a conductive
coating on the inside. The polyester can be permanently damaged by harsh chemicals and is
susceptible to abrasions and scratches. Using sharp objects on the touchscreen can scratch or
cut the plastic, or crack the internal conductive coating.
The chemicals listed below must not come into contact with the touchscreen:
• sodium hydroxide,
• concentrated caustic solutions,
• benzyl alcohol, and
• concentrated acids.
If the touchscreen is used in harsh environments, consider applying a disposable screen pro-
tector (model number ??). These covers reduce the clarity of the display slightly but will
Chapter 3: Get To Know The iKôn PDA
Cleaning The iKôn PDA
iKôn Rugged PDA (Windows Mobile 6) User Manual 47
dramatically extend the useful life of the touchscreen. When they become scratched and
abraded, they are easily removed and replaced.
3.12.2 Cleaning The iKôn PDA
Important: Do not immerse the unit in water. Dampen a soft cloth with mild detergent to
wipe the unit clean.
• Use only mild detergent or soapy water to clean the PDA unit.
• Avoid abrasive cleaners, solvents or strong chemicals for cleaning. The plastic case is
susceptible to harsh chemicals. The plastic is partially soluble in oils, mineral spirits and
gasoline. The plastic slowly decomposes in strong alkaline solutions.
• To clean ink marks from the keypad or touchscreen, use isopropyl alcohol.

iKôn Rugged PDA (Windows Mobile 6) User Manual 49
WORKING WITH WINDOWS MOBILE 6 4
4.1 Navigating In Windows Mobile 6 And Applications.................51
4.1.1 Navigating Using A Touchscreen And Stylus................51
4.2 Windows Mobile 6 Desktop–Today Screen......................51
4.2.1 Windows Mobile 6 Navigation Bar . . . ..................52
4.2.2 Today’s Date, Clock And Alarm.......................54
4.2.3 Ownership Information............................56
4.2.4 E-mail Notification..............................56
4.2.5 Task Notification...............................57
4.2.6 Calendar Of Upcoming Appointments. . ..................59
4.2.6.1 Creating And Editing Appointments ................59
4.2.6.2 Adding Reminders .........................60
4.2.6.3 Using Categories..........................61
4.2.6.4 Deleting Appointments .......................62
4.3 Start Menu.......................................62
4.3.1 Customising The Start Menu.........................63
4.4 Camera ??........................................64
4.5 Managing Files And Folders..............................64
4.5.1 Creating A New Folder............................65
4.5.2 Renaming A File...............................65
4.5.3 Copying A File . ...............................65
4.5.4 Deleting A File................................66
4.6 Using Menus..................................66
4.6.1 Pop-Up Menus................................66
4.7 The Softkey Bar ....................................67
4.8 Programs–Using Applications.............................68
4.9 Settings.........................................70
4.10 Help..........................................71
4.11 Entering Text.....................................71
4.11.1 Soft Keyboard . ...............................72
50 iKôn Rugged PDA (Windows Mobile 6) User Manual
4.11.2 The Transcriber ...............................72
4.11.3 Block Recognizer And Letter Recognizer ..................74
Chapter 4: Working With Windows Mobile 6
Navigating In Windows Mobile 6 And Applications
iKôn Rugged PDA (Windows Mobile 6) User Manual 51
4.1 Navigating In Windows Mobile 6 And Applications
Graphic user interfaces like Windows Mobile 6 for portable devices or desktop Windows
(2000, XP, etc.) utilize ‘point and click’ navigation. On the iKôn PDA, this is accomplished
using a touchscreen and stylus rather than a mouse.
4.1.1 Navigating Using A Touchscreen And Stylus
A touchscreen is a standard feature on all iKôn PDAs. Each is equipped with a stylus–a
pointing tool –stored in a slot at the bottom of the unit.
• Use the stylus to tap on the appropriate icon to open files and folders, launch applica-
tions and programs, make selections, and so on.
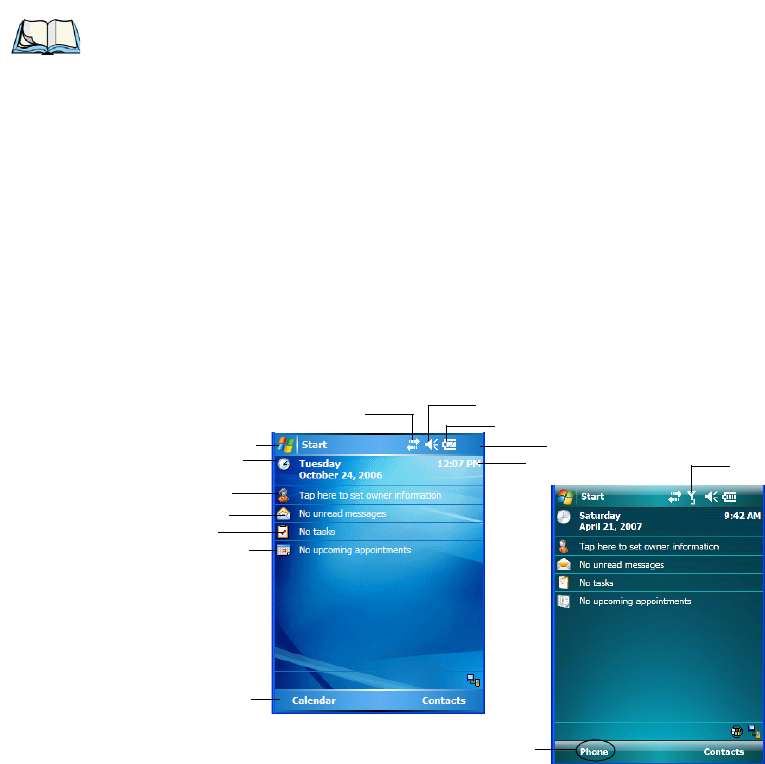
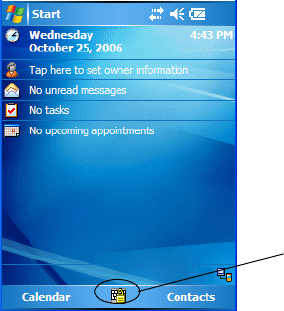
4.2 Windows Mobile 6 Desktop–Today Screen
Keep in mind that if your PDA is running Windows Mobile 6 Professional, the Today screen
will offer Phone connectivity in the Navigation Bar at the top of the screen and a Phone
softkey in the Softkey Bar at the bottom of the screen. Units running Windows Mobile 6
Classic provide a Calendar option in the Softkey Bar; phone options are not available with
this version of Windows Mobile 6.
Note: If the touchscreen is not registering your screen taps accurately, it may need recali-
bration. Refer to “Aligning (Calibrating) The Touchscreen” on page 40.
Calendar-Upcoming
Appointments
Battery Charge State
Today’s Date
Owner Information
E-mail Notification
Tasks To Complete
Connectivity Indicator Volume Control
Start Button Navigation Bar
Softkey Bar
Clock Phone Settings
Phone Softkey
Windows Mobile 6 Professional
Windows Mobile 6 Classic
Chapter 4: Working With Windows Mobile 6
Windows Mobile 6 Navigation Bar
52 iKôn Rugged PDA (Windows Mobile 6) User Manual
The Today screen displays all your important information–tasks, unread e-mails and upcom-
ing appointments–all in one place. The Start menu provides access to everything else you’ll
need.
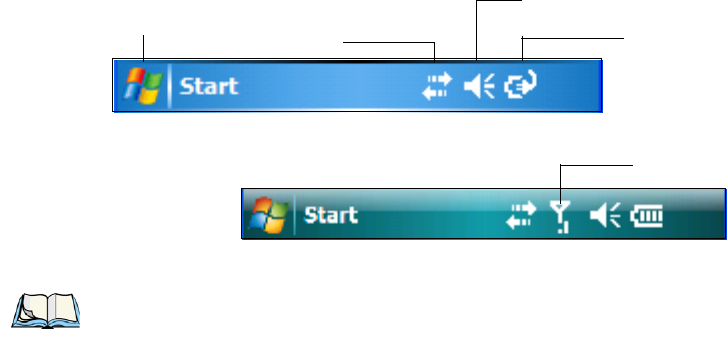
4.2.1 Windows Mobile 6 Navigation Bar
The navigation bar along the top of the screen provides icons that, when tapped, open their
associated programs. If you’re unit is equipped with Windows Mobile 6 Professional, you’ll
be see a Phone hotkey for quick access to phone settings.
Start Button
Tapping on the Start button displays the Start menu.
Start Button Connectivity Battery Capacity
Volume Control
Hotkeys
Phone Settings
Windows Mobile 6 Classic Navigation Bar
Windows Mobile 6 Professional Navigation Bar
Note: When a peripheral is attached to the docking/usb ?? port of the iKôn PDA, an asso-
ciated icon is displayed briefly in the navigation bar to indicate that the PDA has
recognized the connection.
Chapter 4: Working With Windows Mobile 6
Windows Mobile 6 Navigation Bar
iKôn Rugged PDA (Windows Mobile 6) User Manual 53
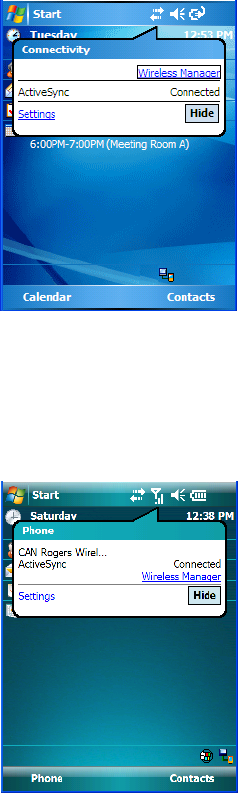
Connectivity
The Connectivity hotkey provides a shortcut to the Connections tab in the Settings window.
This tab provides access to Bluetooth, network, network card and internet connection setups.
Phone Settings
If your PDA is running Windows Mobile 6 Professional, it is equipped with a phone option.
A PDA in which a SIM card and GSM radio are installed can access phone settings along
with the Wireless Manager from this pop-up bubble. Any active connections are also listed
here.
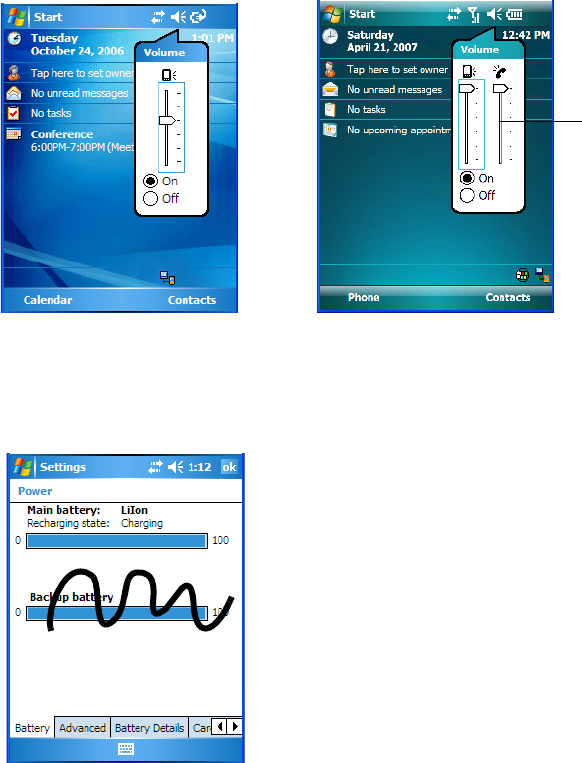
Volume Control
Tapping on this icon displays a sliding tab that allows you to adjust the speaker volume or
turn the speaker on and off.
Chapter 4: Working With Windows Mobile 6
Today’s Date, Clock And Alarm
54 iKôn Rugged PDA (Windows Mobile 6) User Manual
On units running Windows Mobile 6 Professional, two volume adjustments are provided –
one for the speaker volume and the other for the phone dialer volume.
Battery Capacity
Tapping on the Battery hotkey displays the Battery tab allowing you to view the remaining
battery capacity in the battery.
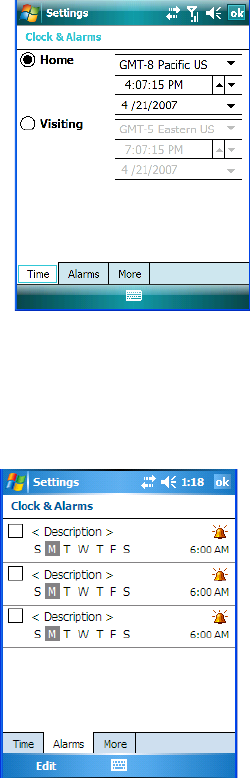
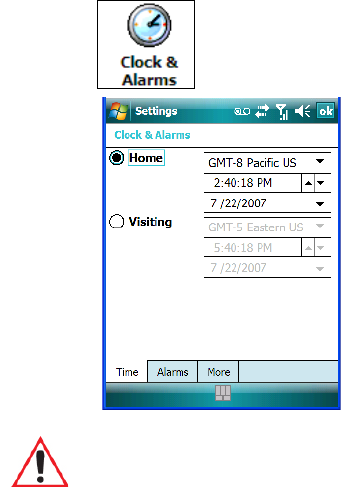
4.2.2 Today’s Date, Clock And Alarm
This option displays the current date. If you need to adjust the date or set an alarm:
•In the Today screen, tap on today’s date.
Phone
Dialer Volume
Windows Mobile 6 Classic Windows Mobile 6 Professional
Chapter 4: Working With Windows Mobile 6
Today’s Date, Clock And Alarm
iKôn Rugged PDA (Windows Mobile 6) User Manual 55
The Clock & Alarms screen is displayed.
• Tap on the drop-down menu arrows to set the GMT, time and date.
An option to set the date and time for a visiting time zone is also available.
To set an alarm:
• Tap on the Alarms tab.
You can set a maximum of three alarms.
• Tap in the checkbox to enable an alarm.
• Tap the day on which you want the alarm to go off–Sunday through Saturday.
• Tap on the clock and set the time of the alarm. Keep in mind that it can only be set for
hours–minutes cannot be specified.
Chapter 4: Working With Windows Mobile 6
Ownership Information
56 iKôn Rugged PDA (Windows Mobile 6) User Manual
• Tap on OK to save your changes.
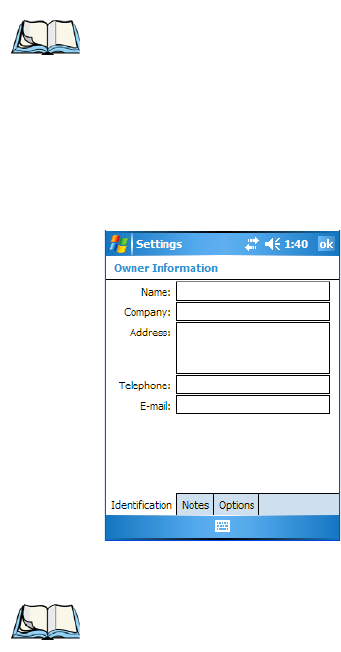
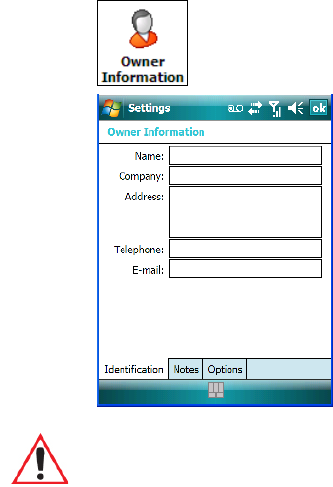
4.2.3 Ownership Information
This option allows you to add your personal information to the iKôn PDA. Some of this in-
formation will be displayed in the desktop Today screen.
• Tap on Owner to display a screen in which you can type information.
• Type your name, company name, address, telephone number and e-mail address.
The Ownership screen has two additional tabs–Notes where you can add any pertinent, addi-
tional information and Options where you can specify whether you want the desktop to
display your ‘identification’ information or your ‘note’ information.
4.2.4 E-mail Notification
If you have any e-mail, it will be indicated in the Today desktop screen. To view your e-mail,
tap on the E-mail Notification option.
Refer to “Messaging” on page 235 for details about setting up your Inbox.
Note: Tapping on the ‘More’ tab displays a dialog box in which you can choose to ‘Dis-
play the clock on the title bar in all programs’.
Note: You can type information using the iKôn PDA keyboard, or you can tap on the soft
keyboard icon in the bottom right corner of the softkey bar to display an onscreen
keyboard.
Chapter 4: Working With Windows Mobile 6
Task Notification
iKôn Rugged PDA (Windows Mobile 6) User Manual 57
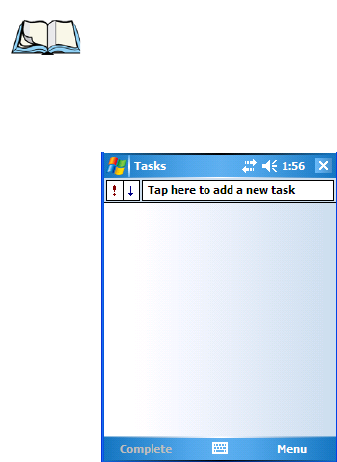
4.2.5 Task Notification
Task s lets you create lists of entries representing your responsibilities, upcoming projects,
and so on. If you’ve assigned any tasks, this option lets you know how many active tasks
you have.
• Tap on the Tasks option to display a list of tasks.
Creating A Task
• Tap in the field labelled Tap here to add a new task. The text is replaced with a blink-
ing cursor. If you prefer to type the task using the soft keyboard, tap on the soft keyboard
icon in the softkey bar.
• Type your task description.
• Tap anywhere in the blank part of the screen, or press [ENTER] to add the task to your
list.
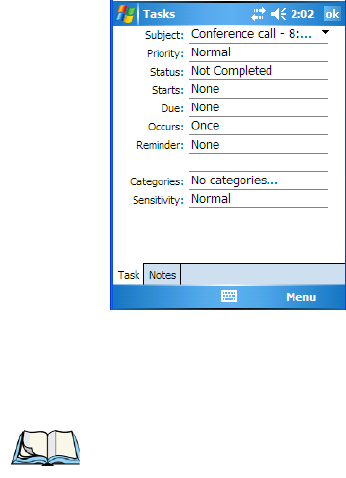
Editing A Task
• Tap on a task in the task list to highlight it. Tap Edit in the softkey bar to display a
detailed task screen where you can define task characteristics.
Note: You can synchronize the Task Notification option using ActiveSync so that any tasks
are displayed on your iKôn PDA as well as your PC. Refer to “Synchronization” on
page 221 for details.
Chapter 4: Working With Windows Mobile 6
Task Notification
58 iKôn Rugged PDA (Windows Mobile 6) User Manual
Figure 4.1 Task Details Screen
Each of the nine items in this screen, when tapped, displays a dropdown menu where you
can choose from a list of options.
• Once you’ve completed all the appropriate fields, tap on OK to save your changes.
Deleting A Task
• Press and hold the stylus on a task until a pop-up menu is displayed.
• Tap on Delete Task.
Marking A Task As Completed
•In the Tasks list, tap the checkbox next to the items that are completed.
Sorting Tasks
• Tap on the Menu option in the lower-right corner of softkey bar, and tap on Sort By.
You can choose from Status, Priority, Subject, Start Date or Due Date. The tasks are ar-
ranged in the list according to the criterion you chose.
Limiting The Tasks Displayed In The Task Screen
• Tap on Menu in the lower-right corner of softkey bar, and tap on Filter.
You can choose All Tasks, Recently Viewed, No Categories, Active Tasks, or Completed
Tasks. The tasks are displayed on the screen according to the preference you chose.
Note: You can also tap on the Notes tab to add additional information about the task your
are defining.
Chapter 4: Working With Windows Mobile 6
Calendar Of Upcoming Appointments
iKôn Rugged PDA (Windows Mobile 6) User Manual 59
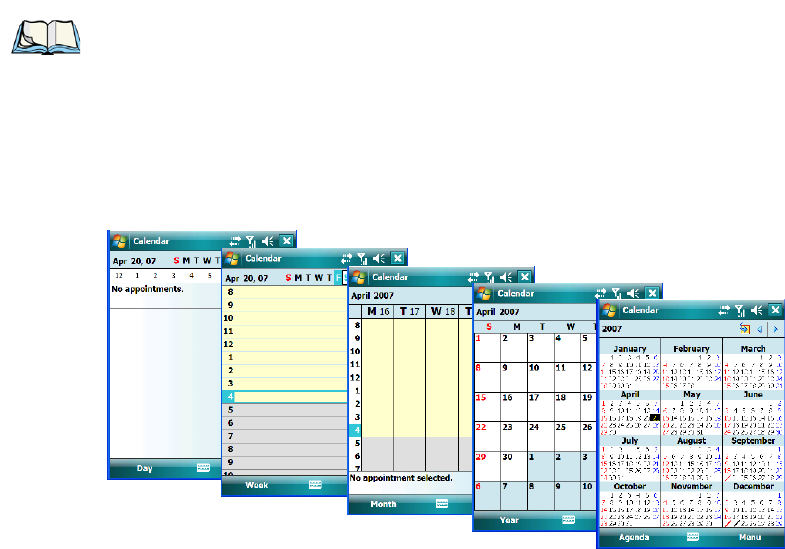
4.2.6 Calendar Of Upcoming Appointments
This option is used to map out all your upcoming appointments, meetings and so on in the
weeks, months and years ahead.
• Tap on the Upcoming Appointments option in the Today screen, or tap on Start>Cal-
endar to display the calendar.
If your unit is running Windows Mobile 6 Classic, you can tap on Calendar in the Softkey
Bar.
The default calendar displays an Agenda of appointments for the week, divided into days.
You can choose to leave the calendar as is, or you can tap on the Day softkey to reflect the
Week, Month or Year.
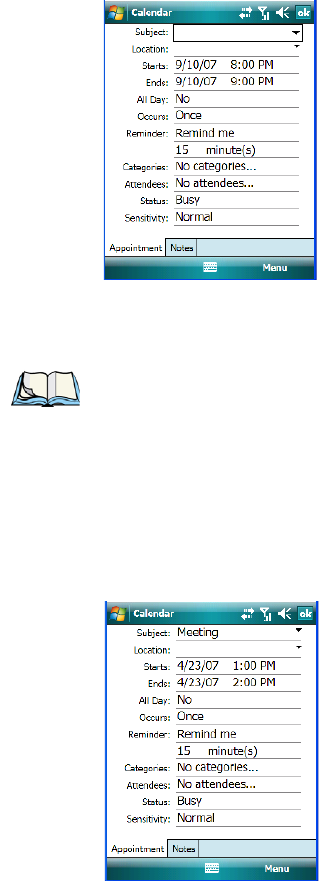
4.2.6.1 Creating And Editing Appointments
•In the Calendar screen, tap on Menu in the softkey bar, and then tap on New
Appointment.
Note: You can synchronize the Calendar using ActiveSync so that any meetings, appoint-
ments and so on are displayed on your iKôn PDA Today screen as well as on your
PC. Refer to “Synchronization” on page 221 for details.
Chapter 4: Working With Windows Mobile 6
Calendar Of Upcoming Appointments
60 iKôn Rugged PDA (Windows Mobile 6) User Manual
Figure 4.2 Appointment Detail Screen
•In the Subject field, name the appointment.
• Complete the remaining fields to reflect your appointment details.
• Tap on OK to save your changes and close the screen.
4.2.6.2 Adding Reminders
•In the Today screen, tap on the appointment for which you’d like a reminder. In the
Calendar detail screen, tap on the appointment. Tap on the Menu softkey and then,
choose the Edit command.
If you want to be reminded in advance of an appointment:
•In the Reminder field, choose Remind me from the drop-down menu.
Note: Refer to “Adding Reminders” on page 60 for details about reminders. Refer
to“Using Categories” on page 61 for information about this option.
Chapter 4: Working With Windows Mobile 6
Calendar Of Upcoming Appointments
iKôn Rugged PDA (Windows Mobile 6) User Manual 61
• In the second Reminder field, tap on the number in the field to display a dropdown
menu where you can define a numeric value of 1, 5, 10, 15, 30. Tap on minute(s) to
display a dropdown menu from which you can choose the time unit for your reminder–
minute(s), hour(s), day(s) or week(s).
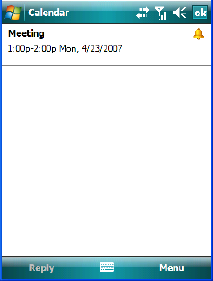
• Tap OK to finish. You are returned to the view you were in before adding the reminder.
• Tap the appointment in the Calendar screen to display it in a summary screen. The
reminder is indicated by the small, bell icon.
4.2.6.3 Using Categories
Categories help you organize and track the different types of data you keep on your PDA.
To assign an appointment to a category:
• Tap on an appointment in the Today screen. In the Calendar screen, tap on the
appointment again.

Chapter 4: Working With Windows Mobile 6
Start Menu
62 iKôn Rugged PDA (Windows Mobile 6) User Manual
• Tap the Categories field to display the Categories screen.
• Tap in the checkbox next to the category to which you want to assign the appointment.
•Tap OK. Your appointment is assigned to the category or categories you chose.
4.2.6.4 Deleting Appointments
• Tap and hold the stylus on the appointment you want to delete.
• Tap on Delete Appointment in the pop-up menu.
4.3 Start Menu
To display the Start menu:
Note: You can create a new category by tapping on New in the softkey bar at the bottom of
the screen.

Chapter 4: Working With Windows Mobile 6
Customising The Start Menu
iKôn Rugged PDA (Windows Mobile 6) User Manual 63
• Tap on the Start button in the upper-left corner of the Navigation Bar.
• Tap on the Start menu item with which you want to work.
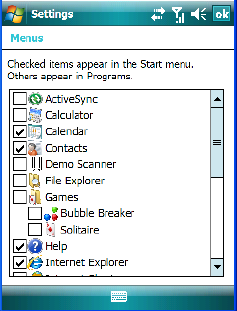
4.3.1 Customising The Start Menu
You can choose the items you want to appear in the Start menu–items you use most often.
• Tap on Start>Settings.
Most recently used
command centre
Windows Mobile
Navigation Bar
programs
Start Button
Custom-chosen
programs
Note: Keep in mind that if your PDA is running Windows Mobile 6 Classic, the Phone
option displayed in the sample screen above is not available; this option is only
offered on units running Windows Mobile 6 Professional.
Chapter 4: Working With Windows Mobile 6
Camera ??
64 iKôn Rugged PDA (Windows Mobile 6) User Manual
•In the Personal tab, tap on the Menus icon.
• Tap the checkboxes next to the items you would like to appear in your Start menu.
When you’ve finished your selections, tap on OK.
4.4 Camera ??
An optional camera is available with your iKôn PDA. It is an auto-focus, colour camera
which allows you to snap photos and take short videos.??
4.5 Managing Files And Folders
Windows Mobile 6 files are stored in folders and sub-folders that are accessible with File
Explorer. You can open, save, rename, copy and paste files in the same manner as you
would on any desktop PC.
Chapter 4: Working With Windows Mobile 6
Creating A New Folder
iKôn Rugged PDA (Windows Mobile 6) User Manual 65
• Tap on Start>Programs>File Explorer.
4.5.1 Creating A New Folder
•Tap Start>Programs>File Explorer.
•Tap Menu>New Folder in the softkey bar at the bottom of the screen.
• Use the iKôn PDA keyboard or the soft keyboard to assign a name to the folder.
4.5.2 Renaming A File
• Press and hold the stylus on the file you want to rename. A ring of dots is displayed fol-
lowed by a pop-up menu.
•Tap Rename. The file name is highlighted. Type a new name.
4.5.3 Copying A File
• Press and hold the stylus on the file you want to copy. A ring of dots is displayed fol-
lowed by a pop-up menu.
• Tap on Copy in the pop-up menu.
• Navigate to the location where you want to copy the file.
• Press and hold the stylus in a blank area of the screen—away from other icons—until a
pop-up menu is displayed.
• Tap Paste to copy the file to the new location.
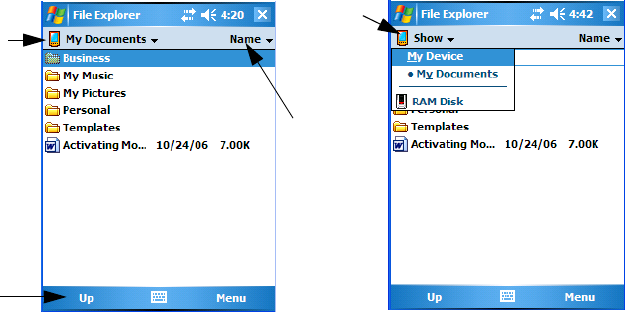
Files stored here
automatically
Tap to display
Tap to move
back one level
Tap to display
additional
storage/files
sorting options
Chapter 4: Working With Windows Mobile 6
Deleting A File
66 iKôn Rugged PDA (Windows Mobile 6) User Manual
4.5.4 Deleting A File
• Press and hold the stylus on the file or folder you want to delete until a pop-up menu is
displayed.
•Tap Delete to remove the file.
4.6 Using Menus
In Windows Mobile 6 Classic and Professional, the menu is located in the softkey bar at the
bottom of the screen.
To execute a command:
• Tap on Menu to display the commands associated with it, and then tap on the command
you want to execute.
4.6.1 Pop-Up Menus
Pop-up menus are available in many screens and programs. They offer quick access to a
group of useful commands in addition to those available in the menu bar. To display a pop-
up menu:
Softkey Bar Menu
Chapter 4: Working With Windows Mobile 6
The Softkey Bar
iKôn Rugged PDA (Windows Mobile 6) User Manual 67
• Gently press and hold the stylus on the screen. A ring of dots is displayed on the screen
followed by a pop-up menu.
• Tap on the command you want to execute.
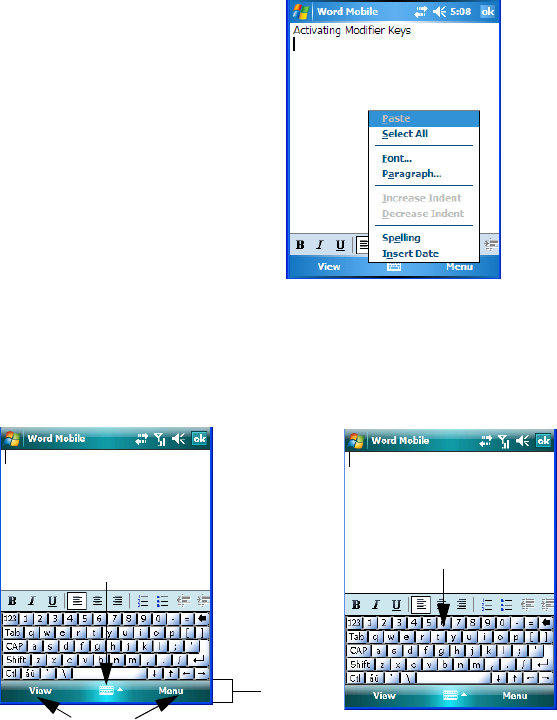
4.7 The Softkey Bar
The iKôn PDA is equipped with a softkey bar at the bottom of the screen. It displays softkeys
that allow you to access menus and commands. It also displays the soft keyboard icon.
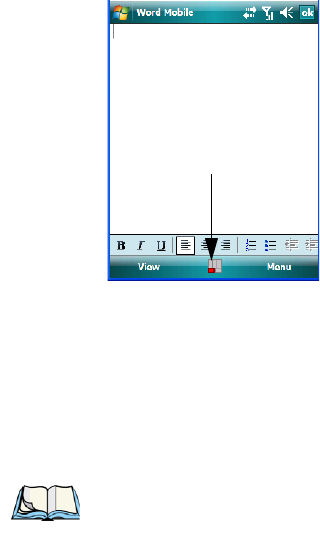
Softkey
Tapping on a softkey displays information associated with the softkey–for example, in the
sample screen above, the Menu softkey displays the commands associated with Word
Mobile. The View softkey lets you to tailor how the Word document will be displayed.
Softkey Bar
Softkeys
Soft keyboard icon Soft keyboard
Chapter 4: Working With Windows Mobile 6
Programs–Using Applications
68 iKôn Rugged PDA (Windows Mobile 6) User Manual
The Soft Keyboard Icon
Tapping on the soft keyboard icon displays an onscreen keyboard you can use as an alterna-
tive to the PDA keyboard.
Shift-State Indicator Icon
The softkey bar can also display the shift-state indicator icon. This icon indicates active
modifier keys–[SHIFT], [ALT], [CTRL], [FN/ORANGE] and [FN/BLUE].
• Tap on Start>Settings>Buttons>One Shots. Tap in the checkbox next to Show modi-
fier key state, to replace the soft keyboard icon with the shift-state indicator icon.
When a modifier key is pressed, it is displayed in the shift-state indicator icon. In the
example above, the [FN/ORANGE] key was activated.
To distinguish a ‘locked’ modifier key–a key that has been locked ‘on’–from a modifier key
that is only active until the next key is pressed, ‘locked’ keys are encircled in a black frame
in the shift-state indicator icon. Refer to “Activating Modifier Keys & The Shift-State Indi-
cator” on page 36 for details.
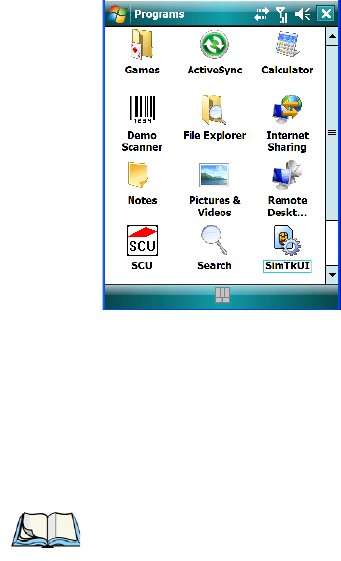
4.8 Programs–Using Applications
•Tap Start>Programs to display the programs installed on your iKôn PDA.
Shift-state indicator icon
Note: You can still access the soft keyboard while the shift-state indicator icon is displayed.
Tapping on this icon displays the soft keyboard. Tapping on the shift-state indicator
icon again removes the soft keyboard.
Chapter 4: Working With Windows Mobile 6
Programs–Using Applications
iKôn Rugged PDA (Windows Mobile 6) User Manual 69
Figure 4.3 Program Screen Icons
Opening An Application
• Tap on an icon in this screen to launch the associated program.
Minimizing An Application
• Tap on the X button in the upper-right corner of an application screen to minimize the
application.
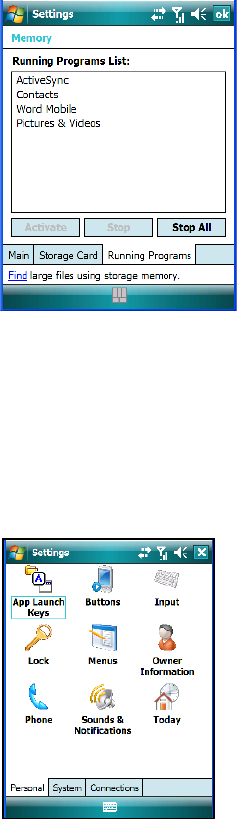
Closing An Application
•Tap on Start>Settings. Tap on the System tab and then the Memory icon–the Memory
screen is opened.
Note: Although it looks like a Close button, this button does not close the application–it
only minimizes it.
Chapter 4: Working With Windows Mobile 6
Settings
70 iKôn Rugged PDA (Windows Mobile 6) User Manual
• Tap on the Running Program tab to view a list of running applications.
• Tap on the application you want to shut down, and then tap on Stop. If you want to shut
down all running applications, tap on Stop All.
• To display a program from this list on your screen, tap on Activate.
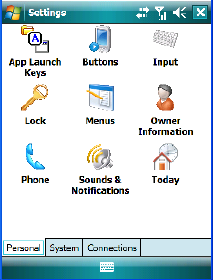
4.9 Settings
•Tap Start>Settings to display the setting options for your PDA.
Figure 4.4 Settings Icons
Settings are divided into three tabs–Personal, System and Connections. Refer to Chapter 5:
“Settings” for details about the options available to you.
Chapter 4: Working With Windows Mobile 6
Help
iKôn Rugged PDA (Windows Mobile 6) User Manual 71
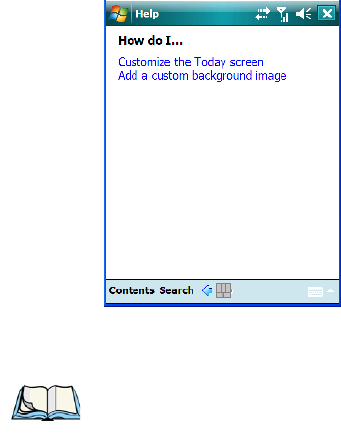
4.10 Help
Tapping on the Help option displays a screen of help topics that are content-specific; if for
example, the Today screen is displayed and you tap on Start>Help, the help screen will
provide topics about the Today screen. You can perform a help content search by tapping on
the Contents or Search softkeys. Keep in mind that help is not always available.
4.11 Entering Text
You can enter text using either the soft keyboard or the iKôn PDA keyboard. You can also
use the Transcriber to handwrite information directly on the touchscreen using your stylus.
• Open an existing document or create a new one– tap Start>Office Mobile>Word
Mobile and tap on New in the softkey bar to create a
new document.
If you’re using the iKôn PDA keyboard to enter text, there are no special steps. Just begin
typing–the text, spaces, etc. will appear in the document.
Note: For additional information about tailoring text entry using the soft keyboard, the
transcriber, the block recognizer and the letter recognizer, refer to “Input” on
page 95.
Chapter 4: Working With Windows Mobile 6
Soft Keyboard
72 iKôn Rugged PDA (Windows Mobile 6) User Manual
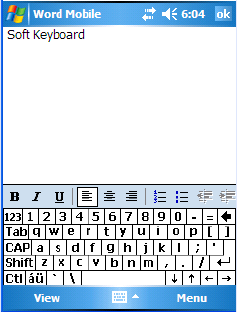
4.11.1 Soft Keyboard
The soft keyboard is laid out just like the keypad on a PC keyboard. By tapping the stylus on
letters and modifier keys like the [SHIFT] key, you can enter text in a document.
If the soft keyboard is not already displayed:
• Tap on the soft keyboard icon in the softkey bar.
• Tap on the letters in the keyboard to enter text in your document.
To switch to a numeric keyboard:
• Tap on the 123 key in the upper-left corner of the soft keyboard.
• Tap on this key again to return to the standard keyboard.
4.11.2 The Transcriber
To access the Transcriber, with your document opened:
• Tap on the arrow next to the keyboard icon, and choose Transcriber from the pop-up
menu.
• Review the introductory screen. It provides some shortcut symbols you can draw on
your screen to work with the Transcriber.
• When you’ve finished reading the introductory screen, tap OK.
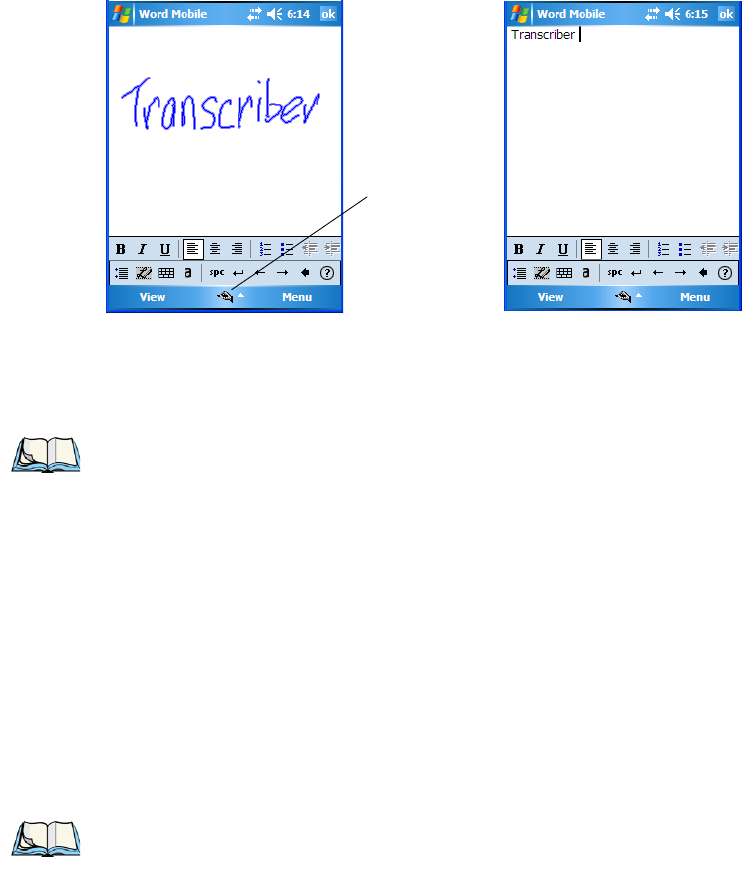
Chapter 4: Working With Windows Mobile 6
The Transcriber
iKôn Rugged PDA (Windows Mobile 6) User Manual 73
The Transcriber menu and icon bars are displayed at the bottom of the document.
Figure 4.5 Transcriber Screen
• Use your stylus to write a few words anywhere on the screen.
After a few seconds, your words are recognized (or not) and are transcribed into typed text.
Editing Text Within The Transcriber
With your document open, make certain that you are in transcriber mode–the Transcriber
icon should be displayed in the lower-right corner of the softkey bar.
• Double-tap to select a word or triple-tap to select a paragraph, or
Draw a line through the text you want to select and wait a few seconds until the Transcriber
highlights the text.
• Once the text is highlighted, write the new text that is to replace the highlighted infor-
mation, or
Press and hold the stylus on the selected text to display a pop-up menu. Choose Cut, Copy,
Paste or Clear (delete).
Transcriber icon
Note: Character recognition is more successful if you write using large letters.
Note: You can also use the softkey bar tools or the shortcuts listed in the introductory
screen to help you edit a document within the Transcriber.
Chapter 4: Working With Windows Mobile 6
Block Recognizer And Letter Recognizer
74 iKôn Rugged PDA (Windows Mobile 6) User Manual
4.11.3 Block Recognizer And Letter Recognizer
While the Transcriber attempts to recognize natural handwriting and transcribe it, Block
Recognizer and Letter Recognizer attempt to teach you how to conform your handwriting to
what the PDA can recognize.
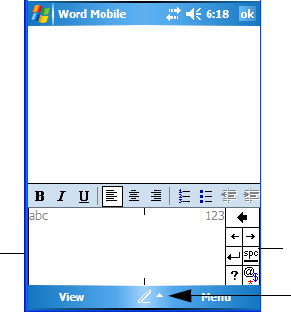
Block Recognizer
• Open a document, and tap on the arrow next to the input icon. Choose Block
Recognizer.
There are two points to remember when using Block Recognizer. First, limit your writing to
the Block Recognizer input panel–do not write in the body of the document. Second, write
only uppercase letters with your stylus.
• Tap on the ? icon in the Recognizer Icon Bar to display the Character Recognizer
screen. This screen provides a visual demonstration of how to enter letters that will be
recognized. Tap on a character in the soft keyboard for a demonstration of how to form
a recognizable letter.
•In the Block Recognizer panel, write letters to the left (abc) and numbers to the right
(123) on the input panel. Remember to write using uppercase letters–they will be
printed on the screen as lowercase unless you follow the step below to create an upper-
case letter.
• To create an uppercase character, draw a line straight up the ‘abc’ panel.
•Use the Recognizer Icon Bar to move around the screen, add spaces, special characters,
and so on.
Recognizer Icon Bar
Input Panel
Input Icon
Chapter 4: Working With Windows Mobile 6
Block Recognizer And Letter Recognizer
iKôn Rugged PDA (Windows Mobile 6) User Manual 75
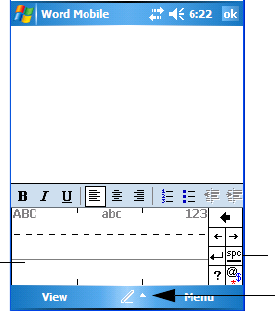
Letter Recognizer
• Open a document, and tap on the arrow next to the input icon. Choose Letter
Recognizer.
There are two points to remember when using Letter Recognizer. First, limit your writing to
the Letter Recognizer Input Panel–do not write in the body of the document. Second, write
only lowercase letters with your stylus.
• Tap on the ? icon in the Recognizer Icon Bar to display the Character Recognizer
screen. This screen provides a visual demonstration of how to enter letters that will be
recognized. Tap on a character in the soft keyboard for a demonstration of how to form
a recognizable letter.
• To create an uppercase character, write a lowercase letter on the left side (ABC) of the
input panel.
• To create a lowercase character, write a lowercase letter in the middle (abc) of the input
panel.
• Write numbers on the right side (123) of the input panel.
Recognizer Icon Bar
Input Panel
Input Icon

iKôn Rugged PDA (Windows Mobile 6) User Manual 77
SETTINGS 5
5.1 Settings.........................................83
5.2 Personal Settings....................................83
5.3 App Launch Keys ...................................83
5.4 Buttons Icon......................................86
5.4.1 Up/Down Control ..............................86
5.4.2 One Shots...................................87
5.4.3 Keyboard Macro Keys . . . .........................88
5.4.4 Unicode Mapping ..............................90
5.4.5 Scancode Remapping.............................91
5.4.6 Lock Sequence................................94
5.5 Input ..........................................95
5.5.1 Input Method Tab...............................96
5.5.1.1 Word Completion..........................100
5.5.2 Options–Additional Choices.........................100
5.6 Lock ..........................................101
5.7 Menus..........................................102
5.7.1 Start Menu Tab................................102
5.8 Owner Information...................................103
5.9 Phone (Windows Mobile 6 Professional Only) . . ..................104
5.10 Sound & Notifications . ...............................104
5.10.1 Sounds....................................105
5.10.2 Notifications.................................105
5.11 Today Screen.....................................106
5.11.1 Appearance.................................106
5.11.2 Items.....................................107
5.12 System Tab Settings..................................107
5.13 About .........................................107
5.14 About Device ??....................................108
78 iKôn Rugged PDA (Windows Mobile 6) User Manual
5.14 About Device ??...................................108
5.15 Backlight.......................................108
5.15.1 Battery Power...............................109
5.15.2 External Power...............................110
5.15.3 Intensity..................................110
5.16 Certificates......................................111
5.16.1 Choosing A Certificate. ..........................113
5.17 Clock & Alarms...................................113
5.18 Customer Feedback.................................114
5.19 Encryption......................................114
5.20 Error Reporting....................................115
5.21 External GPS (Global Positioning System).....................116
5.22 Manage Triggers...................................117
5.22.1 Trigger Mappings.............................118
5.22.1.1 Add And Edit Trigger Mapping .................119
5.23 Memory .......................................121
5.23.1 Main Tab..................................121
5.23.2 Storage Card................................121
5.23.3 Running Programs . . . ..........................122
5.24 Power Icon......................................122
5.24.1 Battery Tab.................................123
5.24.2 Advanced Tab...............................123
5.24.3 Battery Details...............................124
5.24.4 Built-In Devices..............................125
5.24.5 Suspend Threshold.............................126
5.24.5.1 Suspend Threshold And Estimated Battery Backup.......126
5.24.6 Wakeup Keys Tab.............................127
5.25 Regional Settings...................................127
5.26 Remove Programs..................................128
5.27 Screen Icon......................................128
5.28 Scanner Settings...................................129
5.28.1 Decoded (Internal) Scanners........................131
iKôn Rugged PDA (Windows Mobile 6) User Manual 79
5.28.1.1 Options–Decoded (Internal) Scanner...............131
5.28.1.2 Decoded (Internal) Advanced Options ..............132
5.28.1.3 Decoded (Internal) 2D Scanning Options.............133
5.28.1.4 Data Options–Decoded (Internal) Scanner............134
5.28.1.5 Code 39 ..............................135
5.28.1.6 Field Size/Chars..........................137
5.28.1.7 Code 128..............................138
5.28.1.8 EAN 13 ..............................138
5.28.1.9 Prefix/Suffix............................138
5.28.1.10 EAN 8 ..............................139
5.28.1.11 UPC A..............................139
5.28.1.12 UPC E ..............................140
5.28.1.13 UPC/EAN Shared Settings....................141
5.28.1.14 Code 93..............................142
5.28.1.15 Codabar..............................142
5.28.1.16 MSI Plessey............................143
5.28.1.17 Interleaved 2 of 5.........................144
5.28.1.18 Discrete 2 of 5..........................145
5.28.1.19 RSS Code.............................145
5.28.1.20 Composite ............................146
5.28.1.21 PDF-417.............................146
5.28.1.22 Micro PDF-417..........................147
5.28.2 Decoded...................................148
5.28.2.1 Options–Decoded Scanner.....................148
5.28.2.2 Advanced Options–Decoded Scanner...............148
5.28.2.3 Code 39 ..............................149
5.28.2.4 Code 128..............................150
5.28.2.5 EAN 13 ..............................152
5.28.2.6 EAN 8...............................152
5.28.2.7 UPCA...............................153
5.28.2.8 UPC E...............................153
5.28.2.9 UPC/EAN Shared.........................154
5.28.2.10 Code 93..............................155
5.28.2.11 Codabar..............................155
5.28.2.12 MSI Plessey............................156
5.28.2.13 Code 11..............................157
5.28.2.14 Interleaved 2 of 5.........................158
5.28.2.15 Matrix 2 of 5...........................158
5.28.2.16 Discrete 2 of 5..........................159
5.28.2.17 Telepen..............................160
5.28.2.18 RSS Code (Reduced Space Symbology) . ............160
80 iKôn Rugged PDA (Windows Mobile 6) User Manual
5.28.2.19 PDF-417.............................161
5.28.2.20 Micro PDF-417.........................161
5.28.2.21 Codablock............................161
5.28.3 Imager...................................162
5.28.3.1 Options–Imager..........................162
5.28.3.2 Advanced Options – Imager...................163
5.28.3.3 Code 39 Settings.........................166
5.28.3.4 Code 128 Settings.........................166
5.28.3.5 EAN 13..............................166
5.28.3.6 EAN 8...............................167
5.28.3.7 UPC A ..............................167
5.28.3.8 UPC E...............................167
5.28.3.9 Code 93..............................168
5.28.3.10 Codabar.............................168
5.28.3.11 Interleaved 2 of 5........................168
5.28.3.12 RSS Code (Reduced Space Symbology)............168
5.28.3.13 Composite............................169
5.28.3.14 PDF-417.............................169
5.28.3.15 Micro PDF-417.........................169
5.28.3.16 2D Data Matrix.........................169
5.28.3.17 2D QR Code...........................169
5.28.3.18 2D Maxicode..........................170
5.28.3.19 2D Aztec.............................170
5.28.3.20 Postal: PlaNET .........................170
5.28.3.21 Postal: PostNET.........................170
5.28.3.22 Postal: Australian........................170
5.28.3.23 Postal: Japanese.........................171
5.28.3.24 Postal: Korean..........................171
5.28.3.25 Postal: Royal...........................171
5.28.4 Options Tab ................................172
5.28.4.1 Double Click Parameters . ....................172
5.28.4.2 Display Parameters........................173
5.28.5 Translations Tab..............................174
5.28.5.1 Case Rules ............................175
5.29 Total Recall......................................176
5.29.1 Creating A Backup Profile.........................177
5.29.2 Restoring A Profile ............................180
5.30 Connections Tab...................................180
5.31 Beam.........................................182
iKôn Rugged PDA (Windows Mobile 6) User Manual 81
5.32 Bluetooth Setup....................................182
5.32.1 The Devices Tab ..............................183
5.32.1.1 Pairing A Device..........................184
5.32.2 Bluetooth Mode...............................185
5.32.3 Bluetooth COM Ports............................185
5.32.4 Outgoing Port................................186
5.32.5 Active Connections List ..........................187
5.32.6 About Tab . . . ...............................187
5.32.7 The Bluetooth GPRS Phone ........................188
5.33 Connections – Connecting To The Internet......................189
5.33.1 Modem Connection Setup .........................190
5.33.1.1 Advanced Modem Settings....................192
5.34 Wireless Power Icon .................................193
5.34.1 Flight Mode – Disabling Wireless Components . . ............194
5.34.2 Setting Up A Network Card ........................195
5.34.3 Network Adaptor Cards...........................195
5.34.4 Changing Network Card Settings......................196
5.34.5 VPN Connection Setup . . .........................196
5.34.6 Managing An Existing Connection.....................197
5.34.6.1 Editing A Connection .......................197
5.34.6.2 Changing A Connection Setting Name..............198
5.34.7 Selecting A Network............................199
5.34.8 Proxy Server Setup .............................200
5.34.8.1 Changing Advanced Proxy Server Settings............201
5.35 Wireless Statistics...................................202
5.36 Wireless WAN (Windows Mobile 6 Classic Only) ..................202
5.36.1 Softkey Bar Icons..............................202
5.36.2 Establishing A Connection .........................203
5.36.3 Disconnecting From A Network ......................204
5.36.3.1 Shutting Down The Wireless WAN User Interface........204
5.36.4 Advanced Information...........................204
5.36.4.1 Entering A PIN...........................204
5.36.4.2 Error States.............................205
5.36.5 Tools Menu.................................206
5.36.5.1 Data Connection Configuration ..................206
5.36.5.2 Security Configuration.......................210
82 iKôn Rugged PDA (Windows Mobile 6) User Manual
5.36.5.3 Network Configuration......................211
5.36.5.4 Driver Mode Configuration....................212
5.36.5.5 Modem Information .......................212
5.36.6 SMS Menu.................................214
5.36.6.1 New SMS.............................215
5.36.6.2 Inbox...............................215
5.36.6.3 Outbox..............................216
5.36.6.4 SMS Configuration........................217
Chapter 5: Settings
Settings
iKôn Rugged PDA (Windows Mobile 6) User Manual 83
5.1 Settings
The Settings screen is divided into three tabs–Personal, System and Connections.
• Tap on Start>Settings to display this screen.
Figure 5.1 Settings Tabs
5.2 Personal Settings
The Personal tab allows you to tailor the general behaviour of your iKôn PDA such as de-
fining input methods, Start menu options, owner information, password assignment, sound
specifications, and so on.
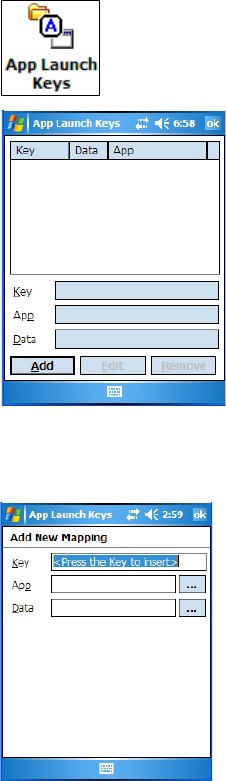
5.3 App Launch Keys
The App Launch Keys icon allows you to map a key to an application so that you can then
launch the application from a single key-press.
Chapter 5: Settings
App Launch Keys
84 iKôn Rugged PDA (Windows Mobile 6) User Manual
• Tap on Start>Settings, and then tap on the App Launch Keys icon.
To assign an application key:
• Tap the Add button.
• Press the key you want to use to launch an application. (If an unsupported key is
pressed, a message appears on this screen letting you know.)
Chapter 5: Settings
App Launch Keys
iKôn Rugged PDA (Windows Mobile 6) User Manual 85
The cursor moves to the App field and a new screen is displayed where you can choose the
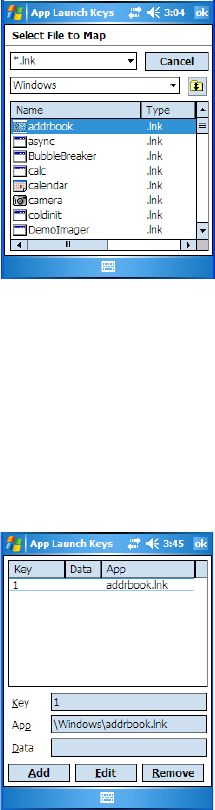
application to which you want to assign the application key. If you need to, you can Browse
through the information in your PDA until you locate the application you want to launch.
• Once you’ve selected the file you want to map, tap on OK.
The cursor moves to the Data field. You can use this field if you need to define special pa-
rameters to your application launch key. If you don’t want to assign any parameters, you can
leave the Data field blank. If, for example, you want to assign an application launch key to
launch the Word Mobile application, you can leave this field blank. If you want to assign an
application launch key that will open a specific document in the Word Mobile application,
you need to browse to and choose that document while the cursor is in the Data field.
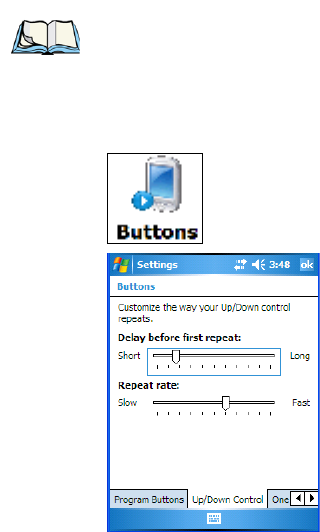
• Tap on OK.
• If you need to Edit, Remove or Add another App Launch Key, you can do it from this
final screen. Otherwise, tap on OK to save you Application Launch Key.
• To launch the application you chose, press the application key you assigned.
Chapter 5: Settings
Buttons Icon
86 iKôn Rugged PDA (Windows Mobile 6) User Manual
5.4 Buttons Icon
• Tap on Start>Settings, and then tap on the Buttons icon to display your options.
5.4.1 Up/Down Control
Sliding the Delay before first repeat bar to the left decreases the delay between key repeats
while sliding the bar to the right increases the repeat delay time.
Sliding the Repeat rate bar to the left slows the rate at which a key repeats when pressed.
Sliding the bar to the right increases the key repeat rate.
Note: The ‘Program Buttons’ option is not available on this unit.
Chapter 5: Settings
One Shots
iKôn Rugged PDA (Windows Mobile 6) User Manual 87
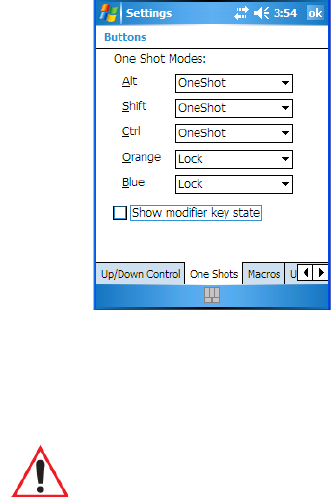
5.4.2 One Shots
The options in this tab allows you to determine how modifier keys on your iKôn PDA
behave. For each modifier key–[ALT], [SHIFT], [CTRL], [FN/ORANGE] and
[FN/BLUE]–you have the following options in the dropdown menu: Lock, OneShot, and
OneShot/Lock.
Lock
If you choose Lock from the dropdown menu, pressing a modifier key once locks it ‘on’
until you press the modifier key a second time to unlock or turn it off.
OneShot
If you choose OneShot, the modifier key remains active only until the next key
is pressed.
OneShot/Lock
OneShot/Lock allows you to combine these functions. When you choose this
option and you press the modifier key once, it remains active only until the next key is
pressed.
If you press the modifier key twice, it is locked ‘on’, remaining active until the modifier key
is pressed a third time to turn it ‘off’.
Important: Once you’ve assigned a One Shot mode to a modifier key, you need to tap on
the OK button at the top of the tab to activate your selection.
Chapter 5: Settings
Keyboard Macro Keys
88 iKôn Rugged PDA (Windows Mobile 6) User Manual
Show Modifier Key State
When you enable Show modifier key state, a shift-state indicator icon
replaces the soft keyboard icon in the softkey bar at the bottom of the screen. When a mod-
ifier key is pressed, a square in this icon is highlighted. A ‘locked’ modifier key is displayed
in the shift-state indicator icon with a black frame around it.
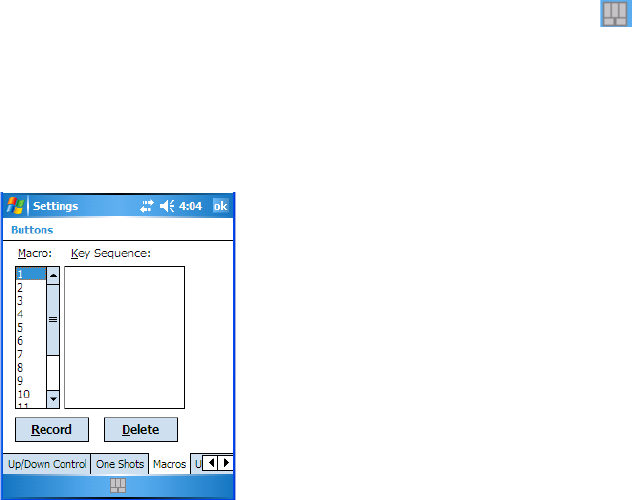
5.4.3 Keyboard Macro Keys
A macro has 20 programmable characters (or “positions”). The macro keys can be pro-
grammed to replace frequently used keystrokes, along with the function of executable keys
including [ENTER], [BKSP] and [DEL] ([FN/BLUE]-[BKSP]), function keys, and arrow
keys.
Recording And Saving A Macro
You can program up to 15 macro keys.
•In the Macro menu, highlight a macro key number–for example, macro 1 to assign a
macro to macro key [M1]. Tap on the Record button.
Chapter 5: Settings
Keyboard Macro Keys
iKôn Rugged PDA (Windows Mobile 6) User Manual 89
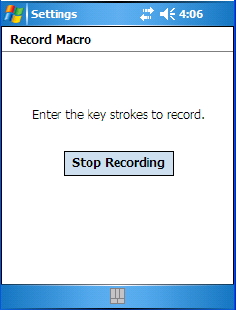
A Record Macro screen is displayed.
• Type the macro sequence you want to assign to the Macro key. You can type text and
numbers, and you can program the function of special keys into a macro.
• When you’ve finished recording your macro sequence, tap on the Stop Recording
button.
A new screen–Veri f y M a c ro –displays the macro sequence you created.
• Tap on the Save button to save your macro. Your macro key sequence is listed in the
Macro screen.
• Tap on OK to save your macro key assignment.
Executing A Macro
• Press the macro key to which you’ve assigned the macro. For example, if you created a
macro for macro key ‘1’, press [M1] ([FN/ORANGE][O]) to execute the macro.
Deleting A Macro
•In the Macros tab, highlight the macro number you want to delete.
• Tap on the Delete button.
Chapter 5: Settings
Unicode Mapping
90 iKôn Rugged PDA (Windows Mobile 6) User Manual
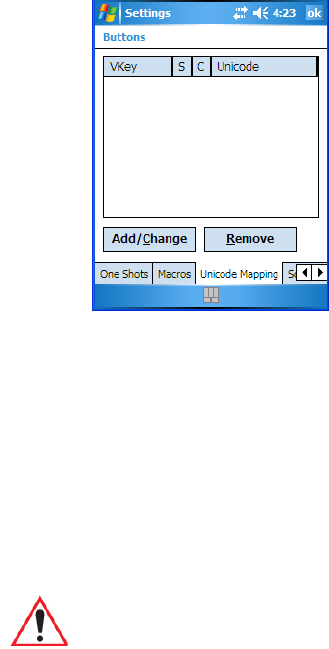
5.4.4 Unicode Mapping
• Tap on the Unicode Mapping tab to display this screen.
The Unicode Mapping tab is used to map combinations of virtual key values and [CTRL]
and [SHIFT] states to Unicode™ values. This tab shows the configured Unicode character
along with the Unicode value. For example, “a (U+0061)” indicates that the character “a” is
represented by the Unicode value “0061”, and so on. Keep in mind that Unicode configura-
tions are represented as hexidecimal rather than decimal values.
All user-defined Unicode mappings are listed in the Unicode Mapping tab in order of virtual
key value, and then by order of the shift state. If a Unicode mapping is not listed, the
Unicode mapping is mapped to the default Unicode value.
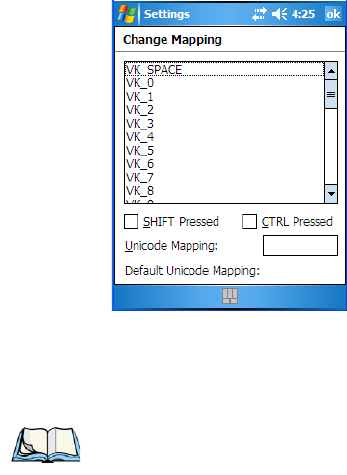
Adding And Changing Unicode Values
Important: Changes to Unicode mappings are not saved until you exit the Unicode
Mapping tab by tapping on [OK].
Chapter 5: Settings
Scancode Remapping
iKôn Rugged PDA (Windows Mobile 6) User Manual 91
• Tap on the Add/Change button.
• Highlight a value in the Unicode mapping list.
• Position the cursor in the Unicode Mapping field, and type a Unicode value for the
highlighted key.
Removing Unicode Values
•In the Unicode Mapping tab, highlight the item you want to delete, and tap the Remove
button.
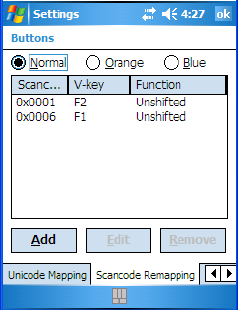
5.4.5 Scancode Remapping
A scancode is a number that is associated with a physical key on a keyboard. Every key has
a unique scancode that is mapped to a virtual key, a function, or a macro. Scancode Remap-
ping allows you to change the functionality of any key on the keyboard. A key can be
remapped to send a virtual key (e.g. VK_F represents the ‘F’ key; VK_RETURN represents
the [ENTER] key, etc.), perform a function (e.g. turn the scanner on, change volume/con-
trast, etc.) or run a macro.
There are three different tables of scancode mappings: the Normal table, the Blue table and
the Orange table. The Normal table defines unmodified key presses; the Blue table defines
key presses that occur when the [FN/BLUE] modifier is on; the Orange table defines key
presses that occur when the [FN/ORANGE] modifier is on. The default mappings of these
Note: To add a shifted state–[SHIFT] and/or [CTRL], tap on the checkbox next to ‘SHIFT
Pressed’ and/or ‘CTRL Pressed’.
Chapter 5: Settings
Scancode Remapping
92 iKôn Rugged PDA (Windows Mobile 6) User Manual
scancodes can be overwritten for each of these three tables using the Scancode Remapping
tab.
The first column in the Scancode Remapping tab displays the Scancodes in hexidecimal. If
the scancode is remapped to a virtual key, that virtual key is displayed in the next column la-
belled ‘V-Key’. A virtual key that is ‘Shifted’ or ‘Unshifted’ is displayed in the third column
labelled ‘Function’.
If the scancode is remapped to a function or a macro, the first and second columns remain
blank while the third column contains the function name or macro key number (e.g., Macro
2).
Adding A Remap
To add a new remapping:
• Tap the Add button at the bottom of the dialog box.

Chapter 5: Settings
Scancode Remapping
iKôn Rugged PDA (Windows Mobile 6) User Manual 93
The Remap Scancode dialog box is displayed.
• Type the scan code in hexidecimal in the field labelled Scancode.
Virtual Key, Function And Macro
The radio buttons at the bottom of the dialog box allow you to define to what the scan code
will be remapped to: Virtual Key, Function or Macro.
When Virtual Key is selected, you can choose to force [SHIFT] to be on or off when the
virtual key is sent. If No Force is selected, the shift state is dependent on whether the shift
state is on or off at the time the virtual key is sent.
When Function is selected, a list of valid functions appears in the dialog box.
When Macro is selected, the macro keys available on your unit are listed in the dialog box.
• Choose Virtual Key>Function or Macro.
• Choose a function from the Function list, and tap on OK.
Editing A Scancode Remap
•In the Scancode Remapping tab, tap on the remap you want to edit.
• Tap on the Edit button, and make the appropriate changes.
• Tap on OK to save your changes.
Note: The ‘Label’ field displays the default function of the scancode you
are remapping.
Chapter 5: Settings
Lock Sequence
94 iKôn Rugged PDA (Windows Mobile 6) User Manual
Removing A Remap
•In the Scancode Remapping tab, highlight the scancode you want to delete, and tap on
the Remove button.
• Tap on OK.
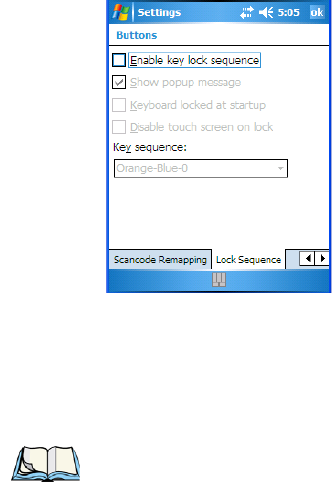
5.4.6 Lock Sequence
The Lock Sequence tab allows you to lock the PDA keyboard to prevent keys from being
pressed accidentally when, for example, the unit is inserted in a holster.
• To lock the keyboard, tap in the checkbox next to Enable key lock sequence.
• Tap in the checkbox next to Keyboard locked at startup.
•In the Key sequence dropdown menu, choose the key sequence you need to type to
unlock the keyboard.
Note: It is useful to leave the ‘Show popup message’ enabled (default) so that anyone
attempting to use the iKôn PDA keyboard will see the key sequence they will need to
enter to unlock the keyboard displayed on the screen.
Chapter 5: Settings
Input
iKôn Rugged PDA (Windows Mobile 6) User Manual 95
A locked keyboard icon is displayed in the softkey bar when the keyboard is locked.
• Type the key sequence to unlock the keyboard.
5.5 Input
The Input icon provides access to text input options you can use to tailor the soft keyboard,
block recognizer, letter recognizer and transcriber along with voice recording options.
Locked Keyboard
Icon

Chapter 5: Settings
Input Method Tab
96 iKôn Rugged PDA (Windows Mobile 6) User Manual
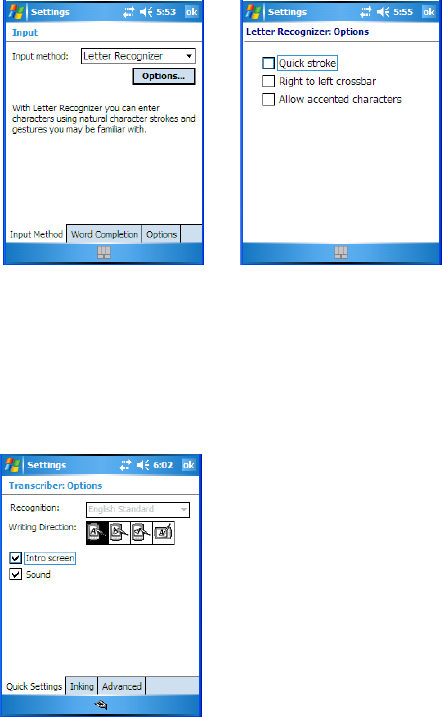
5.5.1 Input Method Tab
• Tap on Start>Settings and then on the Input icon to display your options.
A dropdown menu next to Input method allows you to tailor your methods of input–Block
Recognizer, Keyboard, Letter Recognizer and Transcriber.
Block Recognizer
Block Recognizer teaches you how to conform your handwriting to what the PDA can
recognize.
Important: Refer to “Block Recognizer And Letter Recognizer” on page 74 for addi-
tional details.
Chapter 5: Settings
Input Method Tab
iKôn Rugged PDA (Windows Mobile 6) User Manual 97
Keyboard Options
This screen is displayed when you choose Keyboard in the Input method drop-down menu.
You can use it to customize the soft keyboard. You can choose Large Keys or Small Keys to
increase or decrease the size of the keys displayed on the soft keyboard.
If you enable Use gestures for the following keys–these keys are removed from the soft key-
board. Gestures are handwriting shortcuts for the keyboard keys.
Letter Recognizer Options
Letter Recognizer teaches you how to conform your handwriting to what the PDA can
recognize.
To display additional letter recognition options, tap on the Options button in the Letter Rec-
ognizer screen.
Important: Refer to “Block Recognizer And Letter Recognizer” on page 74 for addi-
tional details.
Chapter 5: Settings
Input Method Tab
98 iKôn Rugged PDA (Windows Mobile 6) User Manual
Figure 5.2 Letter Recognizer Quick Settings
These options allow the Letter Recognizer to better interpret any specialized strokes and
accents you may wish to use.
Transcriber Options
When you choose Transcriber as the input method, three tabs of options are available to
you–Quick Settings, Inking and Advanced.
Quick Settings
The Quick Settings tab allows you choose the writing direction–the icons indicate direction.
In addition, you can choose to enable or disable the display of the Intro screen and the sound
each time you launch the Transcriber.

Chapter 5: Settings
Input Method Tab
iKôn Rugged PDA (Windows Mobile 6) User Manual 99
Inking
In the Inking tab, you are presented with a number of options. Recognition Delay allows you
to determine the time delay between writing something on the Transcriber screen and its
recognition into printed text.
Enabling Add space after automatically adds a space after each word you write. The Pen
option allows you to choose the line Width and Colour. Finally, tapping on Match Letter
Shapes to your writing displays a screen in which you can learn how to form letters to help
the PDA to recognize the most often used characters.
Advanced
In this tab, Shorthand allows you to create a shortened word that the Transcriber will recog-
nize and expand into a complete word automatically. You can also insert data such as a date
or run a program.
Chapter 5: Settings
Options–Additional Choices
100 iKôn Rugged PDA (Windows Mobile 6) User Manual
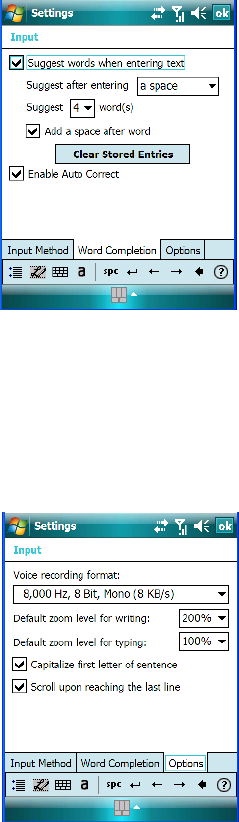
5.5.1.1 Word Completion
This tab speeds the writing process regardless of the input method chosen. When you begin
entering a word, this option displays what it assumes is the complete word, saving you
having to type the word in its entirety. You can also tailor how and when you want word sug-
gestions made.
5.5.2 Options–Additional Choices
This tab offers a few choices including choosing a voice recording format, zoom percentage
for writing and typing, automatic capitalization of the first letter in a sentence and automatic
scrolling when you’ve reached the bottom of the screen.
Chapter 5: Settings
Lock
iKôn Rugged PDA (Windows Mobile 6) User Manual 101
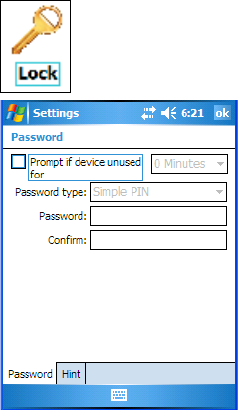
5.6 Lock
To protect the data stored in your iKôn PDA, you can assign a password that must be entered
each time the unit is switched on.
• Tap on Start>Settings, and then tap on the Lock icon.
It is critical that you store your password in a safe place. If you forget it, a ‘clean start’ must
be performed by certified Psion Teklogix personnel. A clean start returns the PDA to factory
settings. Only the data stored in a CF or SD memory card are preserved.
• Tap in the checkbox next to Prompt if device unused to turn on password protection.
• Choose the amount of time that the unit can remain idle before you are prompted to
enter your password.
•In the Password type dropdown menu, choose the type of password you prefer to assign.
Simple PIN allows you to enter a minimum of four numeric characters. Strong alphanu-
meric requires a minimum of 7 characters and must contain at least three of the
following: uppercase and lowercase alpha characters, numbers and punctuation.
• Tap on the Hint tab to enter a word or phrase that will remind you of your password.
The iKôn PDA will display the hint after the wrong password is entered five times.
• Tap on OK. A dialog box asks whether or not you want to save you password settings.
Tap on YES to save your password assignment.
Chapter 5: Settings
Menus
102 iKôn Rugged PDA (Windows Mobile 6) User Manual
5.7 Menus
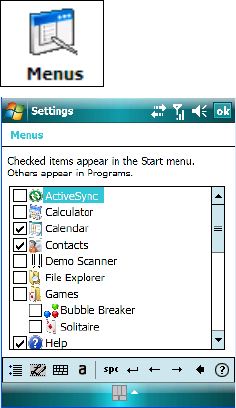
The Menus icon allows you to display options to customise the Start Menu.
• Tap on Start>Settings and then tap on the Menus icon.
5.7.1 Start Menu Tab
This tab allows you to define the items that will be listed in your Start menu.
•In the Start Menu dialog box, tap on the items you want to appear in your Start menu.
The checked items will be listed in your Start menu.
Chapter 5: Settings
Owner Information
iKôn Rugged PDA (Windows Mobile 6) User Manual 103
5.8 Owner Information
Tapping on Start>Settings and then tapping on the Owner Information icon allows you to
add your personal information to the iKôn PDA. Some of this information will be displayed
in the desktop Today screen.
Important: Refer to “Ownership Information” on page 56 for details about this option.
Chapter 5: Settings
Phone (Windows Mobile 6 Professional Only)
104 iKôn Rugged PDA (Windows Mobile 6) User Manual
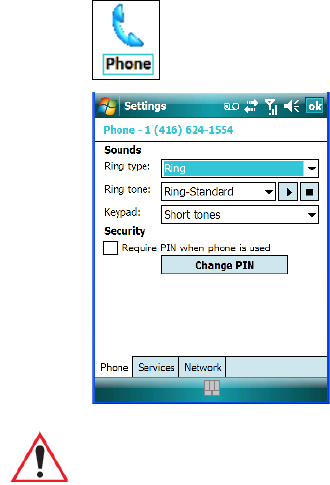
5.9 Phone (Windows Mobile 6 Professional Only)
Tapping on Start>Settings and then tapping on the Phone icon allows you to adjust phone
settings such as the ring type and tone, choose phone services such as barring calls, and you
can also determine network selections.
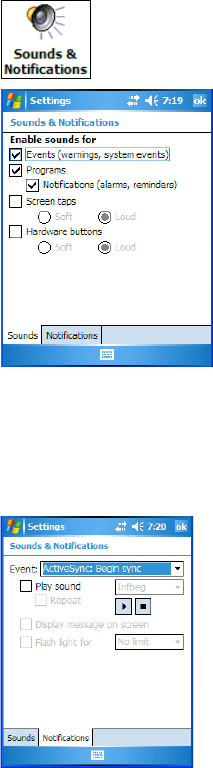
5.10 Sound & Notifications
The Sounds & Notifications icon allows you to specify when your iKôn PDA will emit
sounds.
Important: Refer to “Managing Phone Settings” on page 24 for details about this
option.
Chapter 5: Settings
Sounds
iKôn Rugged PDA (Windows Mobile 6) User Manual 105
5.10.1 Sounds
•Tap on Start>Settings and then tap on the Sounds & Notifications icon to display this
dialog box.
• Tap in the checkboxes and radio buttons to enable the event(s) that will cause your unit
to emit a sound.
5.10.2 Notifications
This tab allows you to determine how you are notified about different events.
• Choose an event from the Events drop-down menu.
• Choose the type of reminder–a special sound, a message or a flashing light –from the
dropdown menu next to Play sound.
Chapter 5: Settings
Toda y Scre en
106 iKôn Rugged PDA (Windows Mobile 6) User Manual
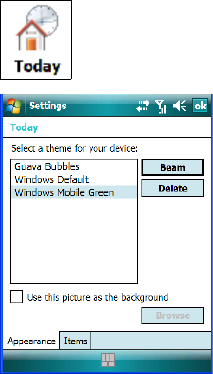
5.11 Today Screen
This option allows you to tailor the appearance of the Today screen– the desktop screen.
• Tap on Start>Settings, and then tap on the Today icon.
5.11.1 Appearance
This screen allows you to customize the background displayed on the Today screen.
• Choose the background you want to use from the list.
Chapter 5: Settings
Items
iKôn Rugged PDA (Windows Mobile 6) User Manual 107
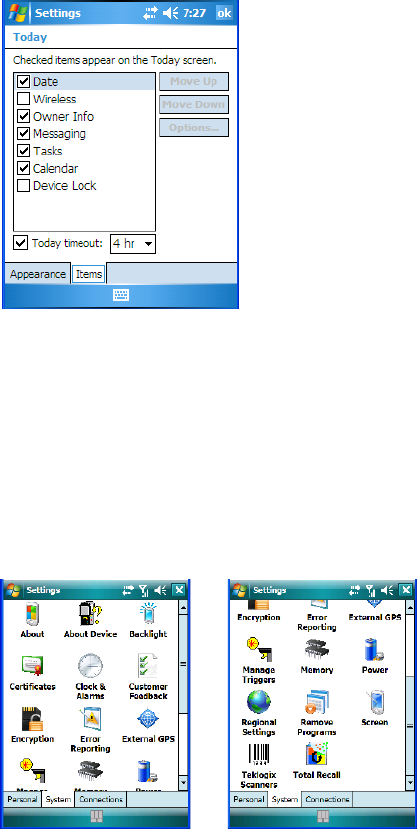
5.11.2 Items
This tab allows you to choose and to sort the item(s) that you want listed in the Today screen.
• Tap in the checkbox to the left of the item(s) you want displayed in the Today screen.
• To rearrange the list of items, highlight the item you want to move up or down and tap
on the Move Up or Move Down button. Keep in mind that the Date cannot be moved.
5.12 System Tab Settings
To display the icons grouped in the System tab:
• Tap on Start>Settings, and tap on the System tab.
5.13 About
Tapping on Start>Settings>System tab, and then the About icon displays a grouping of tabs
that provide device information.
Chapter 5: Settings
About Device ??
108 iKôn Rugged PDA (Windows Mobile 6) User Manual
Version Tab
This tab outlines the Windows Mobile 6 version, processor information, memory size and a
description of the expansion card, if one is in use.
Device ID Tab
This tab provides fields in which you can assign a Device name and Description (optional)
for the iKôn PDA. This name is used by the iKôn PDA to identify itself to other devices.
Keep in mind that this must be a unique name across a network. If you are unable to connect
to a network because another device with the same name is already connected, you’ll need
to assign a new name here.
Copyrights
The Copyright tab lists the copyright information for the software loaded on your iKôn
PDA.
5.14 About Device ??
Tapping on the About Device icon under Settings>System tab provides access to three tabs
related to your iKôn PDA. The Properties tab lists hardware information related to your
iKôn PDA. The Copyrights tab lists the copyrights that apply to your PDA. The Experience
tab allows you to choose a category to help you define your Experience. These categories
include Microsoft settings, Psion Teklogix settings and create Custom settings in a drop-
down menu. Each category contains a group of default settings. If you change a default
setting, the category is automatically changed to Custom settings.
5.15 Backlight
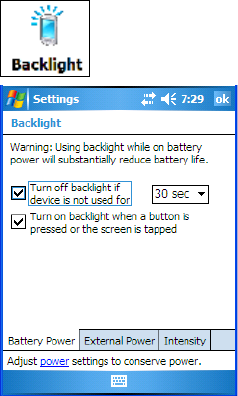
• Tap on Start>Settings, then tap on the Backlight icon. Tap on the System tab.
Tapping on the Backlight icon allows you to determine the power properties of the iKôn
PDA.
Chapter 5: Settings
Battery Power
iKôn Rugged PDA (Windows Mobile 6) User Manual 109
5.15.1 Battery Power
This tab allows you to tailor the iKôn PDA backlight behaviour to best preserve battery life.
• To define how long the backlight should stay on when the iKôn PDA is not in use, tap in
the checkbox to the left of Turn off backlight if device is not used for.
• Tap on the dropdown menu, and choose the number of seconds or minutes the backlight
will remain on when the PDA is idle.
•To Turn on backlight when a button is pressed or the screen is tapped, tap in the
checkbox to the left of this option.
Chapter 5: Settings
External Power
110 iKôn Rugged PDA (Windows Mobile 6) User Manual
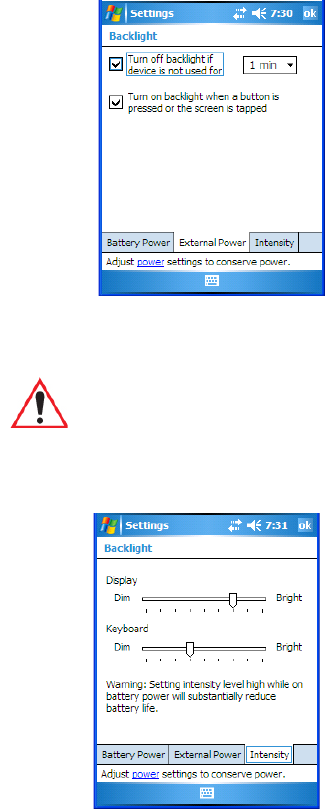
5.15.2 External Power
This tab determines the behaviour of the backlight when the PDA is using external rather
than battery power.
5.15.3 Intensity
This tab is used to adjust the light intensity of the display backlight and the keyboard back-
light. Sliding the bar to the left lowers the light intensity, and sliding it to the right raises the
intensity.
Important: Refer to “Battery Power” on page 109 for details about these options.
Chapter 5: Settings
Certificates
iKôn Rugged PDA (Windows Mobile 6) User Manual 111
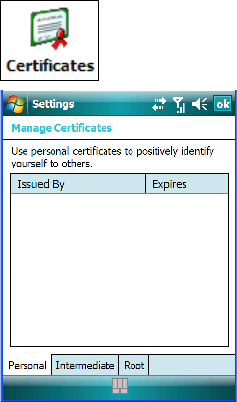
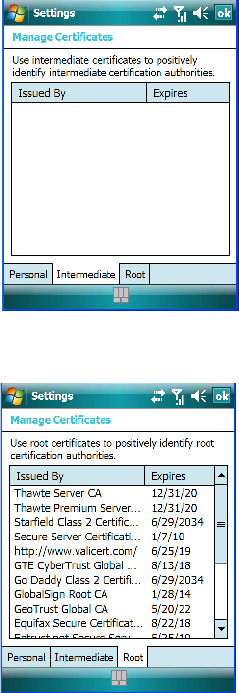
5.16 Certificates
A public key is transmitted as part of a certificate. The certificates listed in the Certificates
tabs ensure that the submitted public key is, in fact, the public key that belongs to the sub-
mitter. The PDA checks that the certificate has been digitally signed by a certification
authority that the PDA explicitly trusts.
Your iKôn PDA has certificates already preinstalled in the unit. Personal certificates estab-
lish your identity, intermediate certificates, as the name suggests, identifies intermediate
certification authorities and root certificates establish the identity of the servers with which
you can connect.
• Tap on Start>Settings, and then tap on the System tab.
• Tap on the Certificates icon.
Personal Tab
The Personal tab lists the name of the certificate issuer and the expiration date.
• To view additional information about a personal certificate, tap on a certificate in the
list.
• To delete a certificate, tap and hold the stylus on the item you want to delete until a pop-
up menu is displayed. Tap on the Delete command.
Chapter 5: Settings
Certificates
112 iKôn Rugged PDA (Windows Mobile 6) User Manual
Intermediate Certificates
The items in this list help identify intermediate certification authorities.
Root Certificates
• To view details about a certificate—who issued the certificate, to whom it was issued,
the issue date and the expiry date—tap on a certificate in the list.
• To delete a certificate, tap and hold the stylus on the certificate you want to delete.
• In the pop-up menu, tap on the Delete command.
Chapter 5: Settings
Choosing A Certificate
iKôn Rugged PDA (Windows Mobile 6) User Manual 113
5.16.1 Choosing A Certificate
Normally, certificates already configured for your network are chosen automatically by the
iKôn PDA. If a certificate cannot be chosen automatically, you must choose it from the Cer-
tificates list.
• To choose a certificate, tap the desired certificate. Your iKôn PDA will connect
automatically.
5.17 Clock & Alarms
Located under Start>Settings>System tab, the Clock & Alarm icon allows you to set the
current date and time, and it allows you to set up to three alarms.
Important: Refer to “Today’s Date, Clock And Alarm” on page 54 for details about
setting up these options.
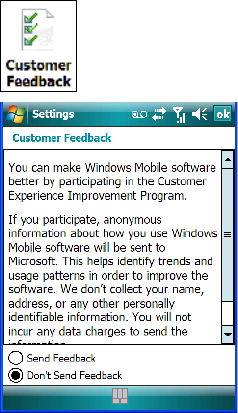
Chapter 5: Settings
Customer Feedback
114 iKôn Rugged PDA (Windows Mobile 6) User Manual
5.18 Customer Feedback
Tapping on Start>Settings, and then tapping on the System tab followed by the Customer
Feedback icon allows you to send your feedback to a Microsoft ‘Customer Experience Im-
provement Program’.
5.19 Encryption
This option allows you to encrypt the data on your storage card.
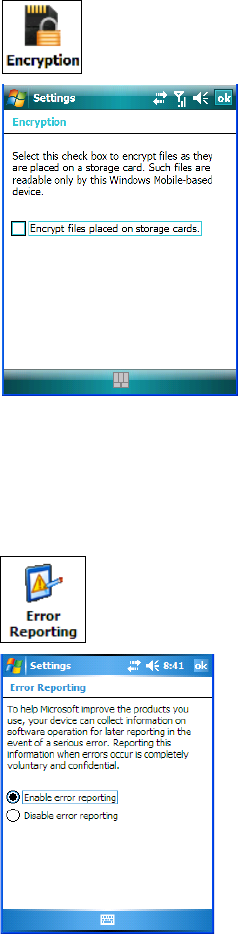
Chapter 5: Settings
Error Reporting
iKôn Rugged PDA (Windows Mobile 6) User Manual 115
• Tap on Start>Settings>System tab>Encryption icon.
5.20 Error Reporting
Error Reporting allows you to enable or disable Microsoft error reporting prompts.
• Tap on Start>Settings. Tap on the System tab followed by the Error Reporting icon.
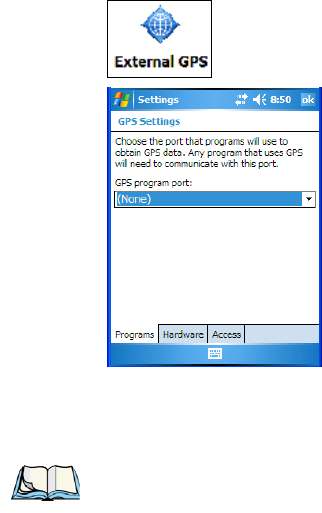
Chapter 5: Settings
External GPS (Global Positioning System)
116 iKôn Rugged PDA (Windows Mobile 6) User Manual
5.21 External GPS (Global Positioning System)
With a Global Positioning System (GPS) receiver, you can locate your exact position on a
map. However, even without a GPS receiver, several different mapping programs can run on
your PDA.
• Tap on Start>Settings>System tab>External GPS icon.
• Tap on the GPS program port dropdown menu and choose the communication (COM)
port that the GPS software will use to communicate with the GPS receiver.
Note: Your iKôn PDA may automatically detect the GPS receiver that you are using and
enter the settings in the Hardware tab. If not, you’ll need to enter this information
yourself. You can find this information in the user manual of the GPS receiver.