Psion 7505BTMC75 Handheld PC with GSM/EDGE and BT User Manual
Psion Inc Handheld PC with GSM/EDGE and BT
Psion >
Contents
- 1. User Manual Part 1
- 2. User Manual Part 2
- 3. User Manual Part 3
User Manual Part 1
ISO 9001 Certified
Quality Management System
iKôn Rugged PDA
(Windows Mobile 6
Classic & Professional)
User Manual
November 7, 2007 Part No. 8100149.A
© Copyright 2007 by Psion Teklogix Inc., Mississauga, Ontario
2100 Meadowvale Boulevard, Mississauga, Ontario, Canada L5N 7J9
http:\\www.psionteklogix.com
This document and the information it contains is the property of Psion Teklogix Inc., is
issued in strict confidence, and is not to be reproduced or copied, in whole or in part, except
for the sole purpose of promoting the sale of Psion Teklogix manufactured goods and ser-
vices. Furthermore, this document is not to be used as a basis for design, manufacture, or
sub-contract, or in any manner detrimental to the interests of Psion Teklogix Inc.
Windows® and the Windows Logo are trademarks or registered trademarks of Microsoft
Corporation in the United States and/or other countries.
The Bluetooth® word mark and logos are registered trademarks owned by Bluetooth SIG,
I
nc. and any use of such trademarks by Psion Teklogix Inc. is under license.
A
ll trademarks are the property of their respective holders.
This manual supports the following models:
7505-BT
7505-BTSDCM
7505-BTMC75
7505-BTHC25
7505-BTSDCMMC75
7505-BTSDCMHC25
Disclaimer
Every effort has been made to make this material complete, accurate, and up-to-date. In ad-
dition, changes are periodically added to the information herein; these changes will be incor-
porated into new editions of the publication.
Psion Teklogix Inc. reserves the right to make improvements and/or changes in the prod-
uct(s) and/or the program(s) described in this document without notice, and shall not be re-
sponsible for any damages, including but not limited to consequential damages, caused by
reliance on the material presented, including but not limited to typographical errors.

Ikôn Rugged PDA
(Model No. 7505)
Regulatory & Warranty Guide
November 8, 2007 PN 8000148.A
ISO 9001 Certified
Quality Management System
© Copyright 2007 by Psion Teklogix Inc., Mississauga, Ontario, Canada
This document and the information it contains is the property of Psion
Teklogix Inc., is issued in strict confidence, and is not to be reproduced or
copied, in whole or in part, except for the sole purpose of promoting the sale
of Psion Teklogix manufactured goods and services. Furthermore, this docu-
ment is not to be used as a basis for design, manufacture, or sub-contract, or
in any manner detrimental to the interests of Psion Teklogix Inc.
All trademarks are the property of their respective holders.

Return-To-Factory Warranty
Psion Teklogix provides a return to factory warranty on this product for a
period of twelve (12) months in accordance with the statement of Warranty
and Product Support provided at:
www.psionteklogix.com/warranty.
The warranty on Psion Teklogix manufactured equipment does not extend to
any product that has been tampered with, altered, or repaired by any person
other than an employee of an authorized Psion Teklogix service organization.
See Psion Teklogix terms and conditions of sale for full details.
Important: Psion Teklogix warranties take effect on the date of shipment.
Waste Electrical and Electronic Equipment (WEEE) Directive
2002/96/EC
This Product, and its accessories, comply with the requirements of the Waste
Electrical and Electronic Equipment (WEEE) Directive 2002/96/EC.
If your end-of-life Psion Teklogix product or accessory carries a label as
shown here, please contact your local country representative for details on
how to arrange recycling. For a list of international subsidiaries, please go to:
http://www.psionteklogix.com/EnvironmentalCompliance
Restriction on Hazardous Substances (RoHS) Directive 2002/95/EC
What is RoHS?
The European Union has mandated that high environmental standards be met
in the design and manufacture of electronic and electrical products sold in
Europe, to reduce hazardous substances from entering the environment. The
“Restriction on Hazardous Substances Directive (RoHS)” prescribes the max-
imum trace levels of lead, cadmium, mercury, hexavalent chromium, and
flame retardants PBB and PBDE that may be contained in a product. Only
products meeting these high environmental standards may be “placed on the
market” in EU member states after July 1, 2006.

RoHS Logo
Although there is no legal requirement to mark RoHS-compliant products,
Psion Teklogix Inc. indicates its compliance with the directive as follows:
The RoHS logo located either on the back of the product or underneath the
battery in the battery compartment (or on a related accessory such as the
charger or docking station) signifies that the product is RoHS-compliant as per
the EU directive. Other than as noted below, a Psion Teklogix product that
does not have an accompanying RoHS logo signifies that it was placed on the
EU market prior to July 1, 2006, and is thereby exempt from the directive.
Note: Not all accessories or peripherals will have a RoHS logo due to
physical space limitations or as a result of their exempt status.
Disclaimer
Every effort has been made to make this material complete, accurate, and up-
to-date. In addition, changes are periodically added to the information herein;
these changes will be incorporated into new editions of the publication.
Psion Teklogix Inc. reserves the right to make improvements and/or changes
in the product(s) and/or the program(s) described in this document without
notice, and shall not be responsible for any damages, including but not lim-
ited to consequential damages, caused by reliance on the material presented,
including but not limited to typographical errors.

Ikôn (7505) Rugged PDA Regulatory & Warranty Guide 1
Table Of Contents
1. Declaration Of Conformity. . . . . . . . . . . . . . . . . . . . . . . . . . . . . . . . 2
2. Safety Summary . . . . . . . . . . . . . . . . . . . . . . . . . . . . . . . . . . . . . . . . 2
3. The Battery . . . . . . . . . . . . . . . . . . . . . . . . . . . . . . . . . . . . . . . . . . . . 9
4. Support Services & Worldwide Offices . . . . . . . . . . . . . . . . . . . . . . 12
4.1 Technical Support . . . . . . . . . . . . . . . . . . . . . . . . . . . . . . . . . . 12
4.2 Product Repairs . . . . . . . . . . . . . . . . . . . . . . . . . . . . . . . . . . . . 12
4.3 Worldwide Offices. . . . . . . . . . . . . . . . . . . . . . . . . . . . . . . . . . 13

2 Ikôn (7505) Rugged PDA Regulatory & Warranty Guide
1. Declaration Of Conformity
Declaration of Conformity documents are provided at:
www.psionteklogix.com/DoC
2 . S a f e t y S u m m a r y
In-Vehicle Use
Do not use this product hand-held while driving a vehicle. Comply with any
specific regulations in the country of use.
When used in a residential, commercial or light industrial environment the
product and its approved UK and European peripherals fulfil all requirements
for CE marking.
R&TTE Directive 1999/5/EC
This equipment complies with the essential requirements of EU Directive
1999/5/EC (Declaration available: www.psionteklogix.com/DoC).
Cet équipement est conforme aux principales caractéristiques définies dans la
Directive européenne RTTE 1999/5/CE. (Déclaration disponible sur le site:
www.psionteklogix.com/DoC).
Die Geräte erfüllen die grundlegenden Anforderungen der RTTE-Richtlinie
(1999/5/EG). (Den Wortlaut der Richtlinie finden Sie unter: www.psiontek-
logix.com/DoC).
Questa apparecchiatura è conforme ai requisiti essenziali della Direttiva
Europea R&TTE 1999/5/CE. (Dichiarazione disponibile sul sito:
www.psionteklogix.com/DoC).
Este equipo cumple los requisitos principales de la Directiva 1995/5/CE de la
UE, “Equipos de Terminales de Radio y Telecomu-nicaciones”. (Declaración
disponible en: www.psionteklogix.com/DoC).
Este equipamento cumpre os requisitos essenciais da Directiva 1999/5/CE do
Parlamento Europeu e do Conselho (Directiva RTT). (Declaração disponível
no endereço: www.psionteklogix.com/DoC).

Ikôn (7505) Rugged PDA Regulatory & Warranty Guide 3
Ο εξοπλισμός αυτός πληροί τις βασικές απαιτήσεις της κοινοτικής οδηγίας
EU R&TTE 1999/5/EΚ. (Η δήλωση συμμόρφωσης διατίθεται στη
διεύθυνση: www.psionteklogix.com/DoC)
Deze apparatuur voldoet aan de noodzakelijke vereisten van EU-richtlijn
betreffende radioapparatuur en telecommunicatie-eindappa-ratuur 199/5/EG.
(verklaring beschikbaar: www.psionteklogix.com/DoC).
Dette udstyr opfylder de Væsentlige krav i EU's direktiv 1999/5/EC om
Radio- og teleterminaludstyr. (Erklæring findes på: www.psionteklogix.com/
DoC).
Dette utstyret er i overensstemmelse med hovedkravene i R&TTE-direktivet
(1999/5/EC) fra EU. (Erklæring finnes på: www.psionteklogix.com/DoC).
Utrustningen uppfyller kraven för EU-direktivet 1999/5/EC om ansluten tel-
eutrustning och ömsesidigt erkännande av utrustningens överensstämmelse
(R&TTE). (Förklaringen finns att läsa på: www.psionteklogix.com/DoC).
Tämä laite vastaa EU:n radio- ja telepäätelaitedirektiivin
(EU R&TTE Directive 1999/5/EC) vaatimuksia. (Julkilausuma nähtävillä
osoitteessa: www.psionteklogix.com/DoC).
PSION TEKLOGIX tímto prohlašuje, že
tohle mobilní zařízení
j
e ve sho
d
ě
se základními požadavky a dalšími příslušnými
ustanoveními sm
ě
rnice 1995/5/ES (NV č. 426/2000 Sb.) a
Prohlášení o shod
ě
je k dispozici na www.psionteklogix.com/DoC.
Toto zařízení lze provozovat v České republice na základ
ě
generální licence č. GL - 12/R/2000.
PSION TEKLOGIX týmto vyhlasuje, že
toto mobilné zariadenie
spĺ
ň
a základné požiadavky a všetky príslušné ustanovenia
Smernice 1995/5/ES (NV č. 443/2001 Z.z.) a Vyhlásenie o
zhode je k dispozícii na www.psionteklogix.com/DoC.
Toto zariadenie je možné prevádzkovať v Slovenskej republike
na základe Všeobecného povolenia č. VPR-01/2001.

4 Ikôn (7505) Rugged PDA Regulatory & Warranty Guide
Use of the 802.11 device in France: Owing to French Government
restrictions, the 802.11 device are limited to indoor use. They may be used
Настоящото устройство е в съответствие с основните
изисквания на европейската Директива 1999/5/EC
(Декларацията за съответствие може да бъде намерена
на адрес: www.psionteklogix.com/DoC)
Acest echipament satisface cerinţele esenţiale ale Directivei UE 1999/5/EC
(Declaraţia poate fi gasitã pe site-ul: www.psionteklogix.com/DoC)
Oprema je skladna z bistvenimi zahtevami EU direktive 1999/5/EC
(Deklaracija je na voljo: www.psionteklogix.com/DoC)
Käesolev seade vastab EU Direktiivile 1999/5/EC (selgitus saadaval:
www.psionteklogix.com/DoC)
Az eszköz megfelel az EU 1999/5/EC fő direktíváinak (a nyilatkozat
megtalálható: www.psionteklogix.com/DoC)
Š
ī aparatūra nodrošina nepieciešamas ES Direktīvas prasības
(Deklarācija ir pieejama: www.psionteklogix.com/DoC)
Įranga atitinka pagrindinius EU direktyvos 1999/5/EC reikalavimus
(Deklaraciją galima rasti www.psionteklogix.com/DoC)
Dan l-apparat huwa konformi mal-kriterji tad-direttiva ta' l- EU 1999/5/EC
(Din id-dikjarazzjoni tista ssiba fuq is sit www.psionteklogix.com/DoC)
To urządzenie spełnia wymagania zasadnicze dyrektywy Unii
Europejskiej 1999/5/EC (Deklarację zgodności można znaleźć
p
od adresem internetowym www.psionteklogix.com/DoC)
Ikôn (7505) Rugged PDA Regulatory & Warranty Guide 5
outdoors, on private property, only with prior authorization from the French
Ministry of Defense.
FCC Information To Users
Federal Communication Commission Interference Statement
This equipment has been tested and found to comply with the limits for a
Class B digital device, pursuant to Part 15 of the FCC Rules. These limits are
designed to provide reasonable protection against harmful interference in a
residential installation. This equipment generates, uses and can radiate radio
frequency energy and, if not installed and used in accordance with the
instructions, may cause harmful interference to radio communications. How-
ever, there is no guarantee that interference will not occur in a particular
installation.
If this equipment does cause harmful interference to radio or television
reception, which can be determined by turning the equipment off and on, the
user is encouraged to try to correct the interference by one of the following
measures:
• Reorient or relocate the receiving antenna.
• Increase the separation between the equipment and receiver.
• Connect the equipment into an outlet on a circuit different from that
to which the receiver is connected.
• Consult the dealer or an experienced radio/TV technician
for help.
This device complies with Part 15 of the FCC Rules. Operation is subject to
the following two conditions: (1) This device may not cause harmful interfer-
ence, and (2) this device must accept any interference received, including
interference that may cause undesired operation.
FCC Caution: Any changes or modifications not expressly approved by the
party responsible for compliance could void the user's authority to operate
this equipment.
IMPORTANT NOTE:
FCC Radiation Exposure Statement:
This equipment complies with FCC radiation exposure limits set forth for an
uncontrolled environment under 47 CFR 2.1093 paragraph (d)(2), for use in a
6 Ikôn (7505) Rugged PDA Regulatory & Warranty Guide
PDA. End users must follow the specific operating instructions for satisfying
RF exposure compliance.
This transmitter must not be co-located or operating in conjunction with any
other antenna or transmitter.
Some equipment in hospitals and aircraft are not shielded from radio fre-
quency energy. Do not use the PDA onboard aircraft, or in hospitals, without
first obtaining permission.
Do not use near pacemakers. The product may affect the operation of some
medically implanted devices such as pacemakers. Avoid placing your PDA
next to such devices. Keep a minimum distance of 20 cm between the device
and the PDA to reduce the risk of interference. If you have any reason to sus-
pect that interference is taking place, turn off the PDA and contact your car-
diologist for assistance.
Note: To maintain compliance with the FCC RF exposure guidelines, if
you wear the PDA on your body, use the Psion Teklogix approved
carrying case.
Use of non-approved accessories may violate FCC RF exposure
guidelines.
Emissions Information For Canada
This Class B digital apparatus meets all requirements of the Canadian Inter-
ference-Causing Equipment Regulations. When using the 802.11 radio
option, to prevent radio interference, this device is intended to be operated
indoors and away from windows to provide maximum shielding. Equipment
(or its transmit antenna) that is installed outdoors is subject to licensing.
Cet appareil numérique de la classe B respecte toutes les exigences du Règle-
ment sur le matériel brouilleur du Canada. En cas d’utilisation du module
radio 802.11, afin d'éviter toute interférence radio avec le service autorisé,
l'appareil doit être utilisé à l'intérieur, tout en tant éloigné de toute fenêtre afin
de garantir le maximum de protection. Si cet équipement (ou son antenne
émettrice) est installé à l'extérieur, il est alors soumis à licence.
Ikôn (7505) Rugged PDA Regulatory & Warranty Guide 7
Warning for Australia
The user needs to switch off the device when exposed to areas with potentially
explosive atmospheres such as petrol stations, chemical storage depots and
blasting operations.
Warning to Users
This product is a Class I/Class II laser product according to CDRH 21 CFR
1040.10 and 1040.11 and Class1/Class 2 laser product according to IEC
60825-1:1993+A1:1997+A2:2001
Laser Warnings
For your own safety, it is critical that you comply with the
following warnings:
Caution!
Do not look into the laser beam or point the beam at people or animals.
Caution!
Using controls or adjustments, or performing procedures other than those
specified herein may result in hazardous radiation exposure.
Caution!
The use of optical instruments with this product will increase
eye hazard.
Do Not Operate In An Explosive Atmosphere
Operating Psion Teklogix equipment where explosive gas is present may
result in an explosion.
Do Not Remove Covers Or Open Enclosures
To avoid injury, the equipment covers and enclosures should only be
removed by qualified service personnel. Do not operate the equipment
without the covers and enclosures properly installed.
Caution!
Danger of fire, explosion, leakage or other hazard if a battery is incor-
rectly handled, charged, disposed of or replaced.
All batteries recommended for this system have been qualified to
IEEE1725: 2006. Replace only with the same or equivalent type recom-
mended by Psion Teklogix. Dispose of used batteries according to the
instructions described in “The Battery” on page 9. Carefully review all
battery safety issues.
8 Ikôn (7505) Rugged PDA Regulatory & Warranty Guide
Vor si cht!
Explosiongefahr bei unsachgemäßem Austausch der Batterie Ersatz nur
durch denselben oder einen vom Hersteller empfohlenen gleichwertigen
Typ. Entsorgung gebrauchter Batterien nach Angaben des Herstellers.
Safety Instructions for the following:
• AC Wall Adaptor,
• Desktop Docking Stations, and
For your own safety, it is critical that you comply with the
following warnings:
Caution!
Before use, read all safety instructions for the Docking Station, the PDA
and the AC Wall Adaptor.
Caution!
To avoid the risk of fire or personal injury, use only the Psion Teklogix
recommended AC adaptor.
Caution!
Use of an attachment not recommended or sold by Psion Teklogix may
result in fire, electric shock, or personal injury.
Caution!
To reduce risk of damage to the electric plug and cord when unplugging
the charger, pull the plug rather than the cord.
Caution!
Make sure the cord is positioned so that it is not stepped on, tripped over,
or otherwise subjected to damage or stress.
Caution!
Do not operate with a damaged cord or plug. Replace immediately.
Caution!
Do not operate if the device has received a sharp blow, been dropped,
or otherwise damaged in any way; it should be inspected by qualified
service personnel.
Caution!
Do not disassemble; repairs must be carried out by Psion Teklogix quali-
fied service personnel. Incorrect reassembly may result in electric shock
or fire.

Ikôn (7505) Rugged PDA Regulatory & Warranty Guide 9
Caution!
The mains power cord shall comply with national safety regulations of
the country where the equipment is to be used.
Caution!
To reduce risk of electric shock, unplug the AC adapter from the outlet
before attempting any cleaning.
Caution!
An extension cord should not be used unless absolutely necessary. Use of
an improper extension cord could result in fire or electric shock. If an
extension cord must be used, make sure the plug pins on the extension
cord are the same number, size, and shape as those on the adapter, the
extension cord is properly wired and in good electrical condition and that
the wire size is larger than 16 AWG.
Caution!
The AC adaptor is for indoor use only. Do not expose the AC adaptor to
rain or snow.
3. The Battery
Warning: Counterfeit Lithium-ion Battery Packs!
Only use genuine Psion Teklogix battery packs. Counterfeit
battery packs and battery packs re-manufactured using non
original battery cells and components could pose a safety
hazard due to poor quality components and/or lack of safety
protection circuits. Non genuine battery packs are also not
likely to meet the strict functional and environmental specifica-
tion required for safe and correct operation when used in Psion
Teklogix equipment. Using or attempting to recharge non
genuine battery packs could result in poor performance,
product damage, excessive heat being generated, battery leak-
age, fire or explosion resulting in personal injury. To avoid
these issues only purchase and use genuine battery packs from
known and trusted Psion Teklogix distributors.

10 Ikôn (7505) Rugged PDA Regulatory & Warranty Guide
Battery must be fully charged before first use.
Warning: Before charging or using the battery pack, it is critical that the
safety information in this section be reviewed and that all warn-
ings are strictly followed.
BATTERIES ARE CONSIDERED HAZARDOUS WASTE.
For proper disposal, forward all used batteries to one of:
Psion Teklogix Inc. Psion Teklogix Corporation Psion Teklogix S.A.
2100 Meadowvale Blvd. 3000 Kustom Drive Parc Club Du Golf-Bat 1.
Mississauga, Ontario Hebron, Kentucky 13856 Aix-En-Provence
Canada USA 41048 Cedex 3
L5N 7J9 France
Warning: TO PREVENT the battery from leaking acid, generating heat
or exploding, adhere to precautions below.
• The battery incorporates built-in safety devices. To ensure their
proper function, do not disassemble or alter any parts of the battery.
• Do not short-circuit the battery by directly connecting any of the
exposed terminals with metal objects such as wire. Do not transport
or store the battery together with metal objects such as necklaces,
hair pins, etc.
• Do not dispose of batteries in fire as they may explode or release
toxic materials and cause burns.
• Do not use or leave the battery near a heat source such as a fire
or heater.
• Do not immerse the battery in water.
• When charging, use the battery charger specifically designed for the
battery.
• Do not pierce, strike, throw or step on the battery.
• Do not directly solder the battery.
• Do not connect the battery to an electrical outlet, vehicle
cigarette lighter, etc.
• Do not put battery into a microwave oven or pressurized
container.
• Do not use the battery in combination with primary batteries (such as
dry-cell batteries) or batteries of different capacities or brands.
Ikôn (7505) Rugged PDA Regulatory & Warranty Guide 11
• Immediately remove the battery from the device or battery charger
and stop use if the battery gives off an odour, generates heat,
becomes discoloured or deformed, or in any way appears abnormal
during use.
• Do not continue charging the battery if it does not recharge within the
specified charge time.
• The battery may burst or ignite if the battery leaks. Always ensure
that it is away from any exposed flames.
• If leaking electrolyte sprays into your eyes, rinse them with clean
running water, and immediately seek medical attention.
• Do not store the battery in extremely high temperatures
(e.g., a vehicle, strong direct sunlight, etc.). This may cause the bat-
tery to overheat or ignite, and it may also reduce the performance and
service life of the battery.
• Do not use in areas where static electricity is greater than what the
manufacturer guarantees.
• Keep batteries out of reach of children.
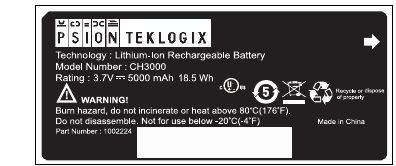
PN 1002224 – Battery Label
Ba r c ode a r e a
LISTED
I.T.E ACCESSORY
7G04
E1804259
SS
SMP

12 Ikôn (7505) Rugged PDA Regulatory & Warranty Guide
4. Support Services & Worldwide Offices
Psion Teklogix provides a complete range of product support services to its cus-
tomers worldwide. These services include technical support and product repairs.
4.1 Technical Support
For technical support in North America:
Call Toll free: +1 800 387 8898 Option 3, or
Direct Dial: +1 905 813 9900 Ext. 1999 Option 3.
For technical support in EMEA (Europe, Middle East and Africa), please
contact the local office listed in the following website below:
http://www.psionteklogix.com/EMEASupport
For technical support in Asia, please contact the local office listed in the
website below:
http://www.psionteklogix.com
Technical Support for Mobile Computing Products is provided via email
through the Psion Teklogix customer and partner extranets. To reach the web-
site, go to www.psionteklogix.com, and click on the appropriate Teknet link
on the home page. Then click on the “Login” button or the “Register” button,
depending on whether you have previously registered for Teknet. Once you
have logged in, search for the “Support Request Form”.
4.2 Product Repairs
For repair service in North America:
Call Toll free: +1 800 387 8898 Option 2 or
Direct Dial: +1 905 813 9900 Ext. 1999 Option 2.
For repair service in EMEA (Europe, Middle East and Africa), please
contact the local office listed in the following website:
http://www.psionteklogix.com/EMEASupport
For repair service in Asia, please contact the local office listed in the
website below:
http://www.psionteklogix.com
Ikôn (7505) Rugged PDA Regulatory & Warranty Guide 13
4.3 Worldwide Offices
COMPANY HEADQUARTERS
Psion Teklogix Inc.
2100 Meadowvale Boulevard
Mississauga
Ontario
Canada L5N 7J9
Tel: +1 905 813 9900
Fax: +1 905 812 6300
Email: salescdn@psion.com
CANADIAN SERVICE CENTRE
Psion Teklogix Inc.
7170 West Credit Ave., Unit #1
Mississauga, Ontario
Canada L5N 7J9
Tel: +1 800 387 8898 Option 2 - or -
Direct: + 1 905 813 9900 Ext. 1999 Option 2
Fax: + 1 905 812 6304
Web: www.psionteklogix.com
NORTH AMERICAN HEADQUARTERS AND U.S. SERVICE CENTRE
Psion Teklogix Corporation
3000 Kustom Drive
Hebron, Kentucky
USA 41048
Tel: +1 859 371 6006
Fax: +1 859 371 6422
Email: salesusa@psion.com
14 Ikôn (7505) Rugged PDA Regulatory & Warranty Guide
INTERNATIONAL SUBSIDIARIES
(see also www.psionteklogix.com/Subsidiaries)
Psion Teklogix S.A.
La Duranne
135 Rue Rene Descartes
BP 421000
13591 Aix-En-Provence
Cedex 3; France
Tel: +33 4 42 90 88 09
Fax: +33 4 42 90 88 88
E-mail: tekeuro@psion.com

TABLE OF CONTENTS
iKôn Rugged PDA (Windows Mobile 6) User Manual i
Chapter 1: Introduction
1.1 About This Manual......................................................................3
1.2 Text Conventions........................................................................4
1.3 iKôn Rugged PDA Features .............................................................4
1.3.1 The iKôn Rugged PDA. . . .......................................................6
Chapter 2: Basic Checkout
2.1 Preparing The iKôn PDA For Operation ................................................11
2.1.1 The Battery.....................................................................11
2.2 Turning The iKôn PDA On And Off....................................................11
2.2.1 Installing The Battery And Switching The Unit On.............................11
2.2.2 Switching The Unit Off (Suspend)..............................................12
2.3 The Getting Started CD ??..............................................................12
2.4 Connecting The iKôn PDA To A PC....................................................13
2.5 Data Transfer Between The PC & The Hand-Held......................................14
2.5.1 Using Microsoft® ActiveSync®................................................14
2.5.2 Using Microsoft® Vista®......................................................14
2.6 Aligning (Calibrating) The Touchscreen ................................................14
2.7 Setting Up A 802.11b/g Radio–Summit Client Utility. ..................................15
2.7.1 Assigning The IP Address......................................................15
2.7.2 Using The SCU To Connect To The WLAN....................................15
2.8 The Phone (Windows Mobile 6 Professional Only) . . . ..................................18
2.8.1 The Phone Keypad.............................................................18
2.8.1.1 Send & End Phone Calls Using The Phone Keypad ..................18
2.8.1.2 Make A Conference Call.............................................19
2.8.1.3 Receive An Incoming Call ...........................................19
2.8.1.4 Program Speed Dial..................................................20
2.8.2 Send & End Calls Using The iKôn PDA Keyboard.............................23
2.8.3 Managing Phone Settings. ......................................................24
2.8.3.1 Phone Tab............................................................25
2.8.3.2 Services Tab .........................................................26
2.8.3.3 Network Tab.........................................................27
2.9 Resetting The iKôn PDA ...............................................................27
Contents
ii iKôn Rugged PDA (Windows Mobile 6) User Manual
2.9.1 Performing A Warm Reset .....................................................27
2.9.2 Cold Resetting To The Windows Mobile 6 OS .................................27
Chapter 3: Get To Know The iKôn PDA
3.1 Features Of The iKôn Rugged PDA.....................................................31
3.2 The Batteries ...........................................................................32
3.2.1 Battery Safety..................................................................33
3.2.2 Removing The Battery Pack....................................................33
3.2.3 Battery Swap Time.............................................................33
3.2.4 Charging The Battery ..........................................................34
3.2.4.1 Chargers And Docking Stations......................................34
3.3 Switching The iKôn PDA On And Off..................................................35
3.4 The Keyboards .........................................................................35
3.4.1 iKôn PDA Keyboards..........................................................35
3.4.2 Modifier Keys..................................................................36
3.4.2.1 Activating Modifier Keys & The Shift-State Indicator................36
3.4.2.2 Locking Modifier Keys ..............................................37
3.4.3 The Keys.......................................................................37
3.4.4 The Numeric Keyboard – Accessing Alpha Keys ...............................39
3.4.4.1 Choosing A Single Alpha Character..................................39
3.4.4.2 Creating Uppercase Letters...........................................39
3.4.4.3 Choosing Multiple Alpha Characters.................................40
3.4.5 The Keypad Backlight..........................................................40
3.5 The Display.............................................................................40
3.5.1 Adjusting The Backlight........................................................40
3.5.2 Aligning (Calibrating) The Touchscreen........................................40
3.6 Indicators...............................................................................41
3.6.1 The LEDs......................................................................42
3.7 Audio Indicators........................................................................42
3.7.1 Adjusting Speaker Volume.....................................................43
3.8 Monitoring The Battery And Maximizing Run Time....................................43
3.8.1 Storing Batteries................................................................44
3.9 Uploading Data In A Docking Station...................................................44
3.10 Bluetooth Radio ........................................................................44
3.10.1 Pairing A Bluetooth Headset Or Other Bluetooth Devices ......................45
3.11 Inserting The SD/MMC Card And SIM Card ...........................................45
3.11.1 Inserting The Card ??...........................................................46
3.12 General Maintenance ...................................................................46
Contents
iKôn Rugged PDA (Windows Mobile 6) User Manual iii
3.12.1 Caring For The Touchscreen ...................................................46
3.12.2 Cleaning The iKôn PDA .......................................................47
Chapter 4: Working With Windows Mobile 6
4.1 Navigating In Windows Mobile 6 And Applications ....................................51
4.1.1 Navigating Using A Touchscreen And Stylus...................................51
4.2 Windows Mobile 6 Desktop–Today Screen .............................................51
4.2.1 Windows Mobile 6 Navigation Bar.............................................52
4.2.2 Today’s Date, Clock And Alarm ...............................................54
4.2.3 Ownership Information.........................................................56
4.2.4 E-mail Notification.............................................................56
4.2.5 Task Notification...............................................................57
4.2.6 Calendar Of Upcoming Appointments..........................................59
4.2.6.1 Creating And Editing Appointments..................................59
4.2.6.2 Adding Reminders...................................................60
4.2.6.3 Using Categories.....................................................61
4.2.6.4 Deleting Appointments...............................................62
4.3 Start Menu..............................................................................62
4.3.1 Customising The Start Menu ...................................................63
4.4 Camera ??..............................................................................64
4.5 Managing Files And Folders............................................................64
4.5.1 Creating A New Folder.........................................................65
4.5.2 Renaming A File...............................................................65
4.5.3 Copying A File.................................................................65
4.5.4 Deleting A File.................................................................66
4.6 Using Menus ...........................................................................66
4.6.1 Pop-Up Menus.................................................................66
4.7 The Softkey Bar ........................................................................67
4.8 Programs–Using Applications ..........................................................68
4.9 Settings.................................................................................70
4.10 Help....................................................................................71
4.11 Entering Text...........................................................................71
4.11.1 Soft Keyboard..................................................................72
4.11.2 The Transcriber ................................................................72
4.11.3 Block Recognizer And Letter Recognizer.......................................74
Chapter 5: Settings
5.1 Settings.................................................................................83
Contents
iv iKôn Rugged PDA (Windows Mobile 6) User Manual
5.2 Personal Settings .......................................................................83
5.3 App Launch Keys.......................................................................83
5.4 Buttons Icon............................................................................86
5.4.1 Up/Down Control..............................................................86
5.4.2 One Shots......................................................................87
5.4.3 Keyboard Macro Keys .........................................................88
5.4.4 Unicode Mapping..............................................................90
5.4.5 Scancode Remapping...........................................................91
5.4.6 Lock Sequence.................................................................94
5.5 Input....................................................................................95
5.5.1 Input Method Tab .. ............................................................96
5.5.1.1 Word Completion...................................................100
5.5.2 Options–Additional Choices...................................................100
5.6 Lock...................................................................................101
5.7 Menus.................................................................................102
5.7.1 Start Menu Tab................................................................102
5.8 Owner Information ....................................................................103
5.9 Phone (Windows Mobile 6 Professional Only).........................................104
5.10 Sound & Notifications .................................................................104
5.10.1 Sounds ........................................................................105
5.10.2 Notifications ..................................................................105
5.11 Today Screen..........................................................................106
5.11.1 Appearance ...................................................................106
5.11.2 Items..........................................................................107
5.12 System Tab Settings ...................................................................107
5.13 About. . . ...............................................................................107
5.14 About Device ?? .......................................................................108
5.15 Backlight..............................................................................108
5.15.1 Battery Power.................................................................109
5.15.2 External Power................................................................110
5.15.3 Intensity.......................................................................110
5.16 Certificates ............................................................................111
5.16.1 Choosing A Certificate........................................................113
5.17 Clock & Alarms .......................................................................113
5.18 Customer Feedback....................................................................114
5.19 Encryption.............................................................................114
5.20 Error Reporting........................................................................115
Contents
iKôn Rugged PDA (Windows Mobile 6) User Manual v
5.21 External GPS (Global Positioning System).............................................116
5.22 Manage Triggers.......................................................................117
5.22.1 Trigger Mappings.............................................................118
5.22.1.1 Add And Edit Trigger Mapping.....................................119
5.23 Memory...............................................................................121
5.23.1 Main Tab......................................................................121
5.23.2 Storage Card ..................................................................121
5.23.3 Running Programs . ...........................................................122
5.24 Power Icon ............................................................................122
5.24.1 Battery Tab....................................................................123
5.24.2 Advanced Tab.................................................................123
5.24.3 Battery Details ................................................................124
5.24.4 Built-In Devices...............................................................125
5.24.5 Suspend Threshold............................................................126
5.24.5.1 Suspend Threshold And Estimated Battery Backup..................126
5.24.6 Wakeup Keys Tab.............................................................127
5.25 Regional Settings......................................................................127
5.26 Remove Programs.....................................................................128
5.27 Screen Icon............................................................................128
5.28 Scanner Settings.......................................................................129
5.28.1 Decoded (Internal) Scanners...................................................131
5.28.1.1 Options–Decoded (Internal) Scanner................................131
5.28.1.2 Decoded (Internal) Advanced Options...............................132
5.28.1.3 Decoded (Internal) 2D Scanning Options............................133
5.28.1.4 Data Options–Decoded (Internal) Scanner...........................134
5.28.1.5 Code 39.............................................................135
5.28.1.6 Field Size/Chars.....................................................137
5.28.1.7 Code 128............................................................138
5.28.1.8 EAN 13.............................................................138
5.28.1.9 Prefix/Suffix........................................................138
5.28.1.10 EAN 8..............................................................139
5.28.1.11 UPC A..............................................................139
5.28.1.12 UPC E..............................................................140
5.28.1.13 UPC/EAN Shared Settings..........................................141
5.28.1.14 Code 93.............................................................142
5.28.1.15 Codabar.............................................................142
5.28.1.16 MSI Plessey.........................................................143
5.28.1.17 Interleaved 2 of 5 ...................................................144
5.28.1.18 Discrete 2 of 5 ......................................................145
5.28.1.19 RSS Code...........................................................145
Contents
vi iKôn Rugged PDA (Windows Mobile 6) User Manual
5.28.1.20 Composite ..........................................................146
5.28.1.21 PDF-417............................................................146
5.28.1.22 Micro PDF-417.....................................................147
5.28.2 Decoded.......................................................................148
5.28.2.1 Options–Decoded Scanner..........................................148
5.28.2.2 Advanced Options–Decoded Scanner ...............................148
5.28.2.3 Code 39.............................................................149
5.28.2.4 Code 128............................................................150
5.28.2.5 EAN 13.............................................................152
5.28.2.6 EAN 8..............................................................152
5.28.2.7 UPCA ..............................................................153
5.28.2.8 UPC E..............................................................153
5.28.2.9 UPC/EAN Shared ..................................................154
5.28.2.10 Code 93.............................................................155
5.28.2.11 Codabar.............................................................155
5.28.2.12 MSI Plessey.........................................................156
5.28.2.13 Code 11.............................................................157
5.28.2.14 Interleaved 2 of 5 ...................................................158
5.28.2.15 Matrix 2 of 5........................................................158
5.28.2.16 Discrete 2 of 5 ......................................................159
5.28.2.17 Telepen .............................................................160
5.28.2.18 RSS Code (Reduced Space Symbology). .. ..........................160
5.28.2.19 PDF-417............................................................161
5.28.2.20 Micro PDF-417.....................................................161
5.28.2.21 Codablock ..........................................................161
5.28.3 Imager ........................................................................162
5.28.3.1 Options–Imager.....................................................162
5.28.3.2 Advanced Options – Imager.........................................163
5.28.3.3 Code 39 Settings....................................................166
5.28.3.4 Code 128 Settings...................................................166
5.28.3.5 EAN 13.............................................................166
5.28.3.6 EAN 8..............................................................167
5.28.3.7 UPC A..............................................................167
5.28.3.8 UPC E..............................................................167
5.28.3.9 Code 93.............................................................168
5.28.3.10 Codabar.............................................................168
5.28.3.11 Interleaved 2 of 5 ...................................................168
5.28.3.12 RSS Code (Reduced Space Symbology). .. ..........................168
5.28.3.13 Composite ..........................................................169
5.28.3.14 PDF-417............................................................169
5.28.3.15 Micro PDF-417.....................................................169
5.28.3.16 2D Data Matrix .....................................................169
Contents
iKôn Rugged PDA (Windows Mobile 6) User Manual vii
5.28.3.17 2D QR Code........................................................169
5.28.3.18 2D Maxicode .......................................................170
5.28.3.19 2D Aztec............................................................170
5.28.3.20 Postal: PlaNET......................................................170
5.28.3.21 Postal: PostNET.....................................................170
5.28.3.22 Postal: Australian ...................................................170
5.28.3.23 Postal: Japanese.....................................................171
5.28.3.24 Postal: Korean ......................................................171
5.28.3.25 Postal: Royal........................................................171
5.28.4 Options Tab...................................................................172
5.28.4.1 Double Click Parameters............................................172
5.28.4.2 Display Parameters..................................................173
5.28.5 Translations Tab...............................................................174
5.28.5.1 Case Rules..........................................................175
5.29 Total Recall............................................................................176
5.29.1 Creating A Backup Profile.....................................................177
5.29.2 Restoring A Profile............................................................180
5.30 Connections Tab.......................................................................180
5.31 Beam..................................................................................182
5.32 Bluetooth Setup........................................................................182
5.32.1 The Devices Tab ..............................................................183
5.32.1.1 Pairing A Device....................................................184
5.32.2 Bluetooth Mode...............................................................185
5.32.3 Bluetooth COM Ports .........................................................185
5.32.4 Outgoing Port.................................................................186
5.32.5 Active Connections List.......................................................187
5.32.6 About Tab.....................................................................187
5.32.7 The Bluetooth GPRS Phone...................................................188
5.33 Connections – Connecting To The Internet.............................................189
5.33.1 Modem Connection Setup.....................................................190
5.33.1.1 Advanced Modem Settings..........................................192
5.34 Wireless Power Icon...................................................................193
5.34.1 Flight Mode – Disabling Wireless Components................................194
5.34.2 Setting Up A Network Card...................................................195
5.34.3 Network Adaptor Cards.......................................................195
5.34.4 Changing Network Card Settings..............................................196
5.34.5 VPN Connection Setup........................................................196
5.34.6 Managing An Existing Connection............................................197
5.34.6.1 Editing A Connection...............................................197
Contents
viii iKôn Rugged PDA (Windows Mobile 6) User Manual
5.34.6.2 Changing A Connection Setting Name..............................198
5.34.7 Selecting A Network..........................................................199
5.34.8 Proxy Server Setup . ...........................................................200
5.34.8.1 Changing Advanced Proxy Server Settings..........................201
5.35 Wireless Statistics......................................................................202
5.36 Wireless WAN (Windows Mobile 6 Classic Only) .....................................202
5.36.1 Softkey Bar Icons .............................................................202
5.36.2 Establishing A Connection ....................................................203
5.36.3 Disconnecting From A Network...............................................204
5.36.3.1 Shutting Down The Wireless WAN User Interface ..................204
5.36.4 Advanced Information.........................................................204
5.36.4.1 Entering A PIN .....................................................204
5.36.4.2 Error States .........................................................205
5.36.5 Tools Menu...................................................................206
5.36.5.1 Data Connection Configuration .....................................206
5.36.5.2 Security Configuration..............................................210
5.36.5.3 Network Configuration..............................................211
5.36.5.4 Driver Mode Configuration .........................................212
5.36.5.5 Modem Information.................................................212
5.36.6 SMS Menu....................................................................214
5.36.6.1 New SMS...........................................................215
5.36.6.2 Inbox ...............................................................215
5.36.6.3 Outbox..............................................................216
5.36.6.4 SMS Configuration .................................................217
Chapter 6: Programs
6.1 Programs ..............................................................................221
6.2 Games.................................................................................221
6.3 ActiveSync®..........................................................................221
6.3.1 Synchronization...............................................................221
6.4 Calculator .............................................................................222
6.5 Demo Scanner.........................................................................222
6.6 Office Mobile..........................................................................222
6.6.1 Excel Mobile..................................................................222
6.6.1.1 Workbook Components .............................................223
6.6.2 Word Mobile..................................................................223
6.6.2.1 Data Entry Modes...................................................224
6.6.2.2 Sharing Documents With Your PC ..................................224
6.6.3 PowerPoint Mobile............................................................225
Contents
iKôn Rugged PDA (Windows Mobile 6) User Manual ix
6.7 File Explorer...........................................................................225
6.8 Internet Sharing........................................................................225
6.8.1 Creating An Internet Connection ..............................................225
6.8.2 Using Internet Sharing.........................................................226
6.9 Notes..................................................................................227
6.9.1 Creating A Note...............................................................227
6.9.2 Converting Handwritten Notes To Text. .......................................228
6.9.3 Renaming A Note.............................................................230
6.9.4 Recording Notes ..............................................................230
6.9.5 Synchronizing A Note.........................................................231
6.10 Pictures & Videos......................................................................231
6.10.1 Moving Photos To The iKôn PDA.............................................231
6.10.2 Opening A Photo..............................................................232
6.10.3 Deleting A Photo..............................................................232
6.10.4 Editing A Photo...............................................................232
6.10.5 Creating A Slide Show........................................................232
6.11 Summit Client Utility (SCU)...........................................................233
6.12 Search.................................................................................234
6.12.1 Internet Explorer..............................................................234
6.12.2 Browsing Web Sites...........................................................234
6.13 Messaging.............................................................................235
6.13.1 Folders........................................................................235
6.13.2 Synchronizing E-mail With Outlook...........................................236
6.13.3 Changing Synchronization Settings............................................237
6.14 Tasks ..................................................................................238
6.15 Remote Desktop Mobile...............................................................238
6.15.1 Connecting To A Terminal Server.............................................238
6.15.2 Disconnecting Without Ending A Session .....................................238
6.15.3 Ending A Session .............................................................238
6.16 Windows Media .......................................................................238
6.17 Windows Update ......................................................................239
Chapter 7: Peripheral Devices & Accessories
7.1 Carrying Accessories ..................................................................243
7.1.1 The Hand Strap................................................................243
7.1.2 Protective Carrying Case ?? ...................................................244
7.1.3 Soft Shell Holster ??...........................................................244
7.2 The Battery............................................................................244
Contents
xiKôn Rugged PDA (Windows Mobile 6) User Manual
7.3 Adaptor Cable Options ??..............................................................244
7.4 Chargers And Docking Stations........................................................245
7.4.1 Installation–Chargers And Docking Stations. . .................................245
7.4.2 Power Consumption Considerations...........................................245
7.4.3 Operator Controls.............................................................246
7.4.4 Important Charger Safety Instructions.........................................246
7.5 Desktop Docking Station ..............................................................247
7.5.1 Charging A Battery Installed In The iKôn PDA................................248
7.5.2 Charging A Spare Battery.....................................................248
7.5.3 Battery Charge Duration.......................................................249
7.5.4 Charger LED Indicators.......................................................249
7.5.5 Troubleshooting The Charging Operation Of The Dock .......................249
7.5.5.1 Excessive Charge Duration..........................................249
7.5.5.2 Indicator Flashing Red..............................................250
7.5.5.3 Power LED Does Not Light Up.....................................250
7.5.5.4 Indicator Does Not Light Up When Battery Installed................250
7.5.6 Linking A iKôn PDA To A PC................................................250
7.5.7 Linking A iKôn PDA To An Ethernet Network................................251
7.5.7.1 Network Access.....................................................251
7.5.8 Troubleshooting The Docking Station Operations .............................252
7.6 AC Wall Adaptor– Model #PS1050-G1??..............................................252
7.7 Automotive Power Adaptor–Model #WA3113-G2 ?? ..................................252
7.8 Single Battery Charger–Model #WA3001-G1 ??.......................................253
7.8.1 Inserting A Battery In The Single Battery Charger.............................253
7.8.2 Battery Charge Duration.......................................................254
7.8.3 Charge Indicators–The LED...................................................254
7.9 Quad Docking Station–Model # ??.....................................................255
7.9.1 Quad Docking Station Setup...................................................255
7.9.2 Quad Indicators ...............................................................255
7.9.3 Inserting A iKôn PDA In The Quad Docking Station..........................256
7.9.4 Network Access ...............................................................256
7.9.4.1 Network Addressing................................................256
7.9.5 Battery Charging–LED Behaviour ??..........................................256
7.9.6 Troubleshooting...............................................................257
7.9.6.1 Network Link Unsuccessful.........................................257
7.9.6.2 PDA LED Does Not Light When Docked...........................257
7.10 The Vehicle Cradle ....................................................................257
7.10.1 Vehicle Cradle Mounting Recommendations..................................258
7.10.1.1 Mounting Template.................................................258
Contents
iKôn Rugged PDA (Windows Mobile 6) User Manual xi
7.10.2 Wiring Guidelines.............................................................258
7.10.3 Using The Vehicle Cradle.....................................................259
7.10.4 Maintaining The Vehicle Cradle...............................................259
7.10.5 Powered Cradle Installation In High Voltage Vehicles.........................259
7.10.6 Powered Vehicle Cradle Installation...........................................260
7.10.6.1 Wiring Vehicle Power To The Cradle................................260
7.11 The Port Replicator ??.................................................................261
7.12 Scanners And Imagers.................................................................261
7.12.1 Scanning Techniques..........................................................262
7.12.2 Troubleshooting...............................................................262
7.12.3 Operating One Dimensional (1D) Laser Scanners..............................263
7.12.4 Operating Two Dimensional (2D) Imagers ....................................263
7.13 Bluetooth Peripherals..................................................................264
Chapter 8: Specifications
8.1 iKôn PDA Specifications (Model No. 7505)...........................................269
8.1.1 Hardware......................................................................269
8.1.2 Software ......................................................................270
8.1.3 Wireless Communication......................................................271
8.1.4 Bar Code Applications (optional)..............................................272
8.1.5 RFID Modules ................................................................272
8.1.6 Accessories . ..................................................................273
8.1.7 Approvals.....................................................................273
8.2 Radio Specifications...................................................................274
8.2.1 802.11 b/g WLAN Radio......................................................274
8.2.2 Siemens MC75 GSM/GPRS/EDGE Radio ....................................274
8.2.3 Siemens HC25 UMTS Modem................................................276
8.2.4 Bluetooth Radio...............................................................278
8.3 Lithium-Ion 5000 mAh Battery Specifications – Model No. ??.........................278
8.3.1 Electro-Chemical Description .................................................278
8.3.2 Electrical Specifications.......................................................280
8.3.3 Environmental And Safety Specifications .....................................280
8.4 Scanner/Imager Model Numbers.......................................................281
8.5 Scanner Specifications.................................................................282
8.5.1 SE 955HP Specifications .....................................................282
8.5.1.1 SE 955HP Decode Zone ............................................282
8.5.2 EV15 Imager Specifications...................................................283
8.5.2.1 EV15 Imager Decode Zone .........................................283
Contents
xii iKôn Rugged PDA (Windows Mobile 6) User Manual
8.5.3 SX5400 Imager ...............................................................284
8.5.3.1 SX5400 Near, Far & Depth Of Reading*............................285
Appendix A: Summit Client Utility (SCU)
A.1 SCU Tabs............................................................................. A-1
A.2 Main Tab............................................................................. A-1
A.3 Config Tab............................................................................ A-2
A.3.1 SCU Security Capabilities.................................................... A-4
A.3.2 EAP Credentials.............................................................. A-5
A.3.3 ThirdPartyConfig............................................................. A-6
A.4 Global Settings Tab................................................................... A-7
A.5 Status Tab ............................................................................ A-9
A.6 Diags Tab............................................................................A-10
Appendix B: Port Pinouts
B.1 Dock Interface Connector Pinout......................................................B-1
B.2 Desktop Dock Spare Battery Charger Connector Pinout................................B-2
B.3 Battery Contact Pinout.................................................................B-2

iKôn Rugged PDA (Windows Mobile 6) User Manual 1
INTRODUCTION 1
1.1 About This Manual ....................................3
1.2 Text Conventions .....................................4
1.3 iKôn Rugged PDA Features...............................4
1.3.1 The iKôn Rugged PDA. . . ..........................6
Chapter 1: Introduction
About This Manual
iKôn Rugged PDA (Windows Mobile 6) User Manual 3
1.1 About This Manual
This manual describes how to configure, operate and maintain the iKôn Rugged PDA
(Model Number 7505).
Chapter 1: Introduction
provides a basic overview of the iKôn Rugged PDA.
Chapter 2: Basic Checkout
describes the steps required to get the unit ready for operation
Chapter 3: Get To Know The iKôn PDA
describes the features and outlines how to charge and maintain the battery. This chapter
also provides information about indicators, Micro SD and MMC card installation and
general maintenance.
Chapter 4: Working With Windows Mobile 6
describes the Microsoft® Windows Mobile 6 Today screen and how to use it. This chapter
also outlines basics like moving around a window, displaying menus, and so on.
Chapter 5: Settings
provides details about Windows Mobile 6 Settings options and how to use them.
Chapter 6: Programs
provides a description of the Windows Mobile 6 Programs options and how to
use them.
Chapter 7: Peripheral Devices & Accessories
describes the peripherals and accessories available for your PDA.
Chapter 8: Specifications
details radio, PDA, scanner and battery specifications.
Appendix A: Summit Client Utility (SCU)
provides details about the Summit Client Utility (SCU) screens.
Appendix B: Port Pinouts
describes port pinouts.

Chapter 1: Introduction
Text Co n v entions
4iKôn Rugged PDA (Windows Mobile 6) User Manual
1.2 Text Conventions
1.3 iKôn Rugged PDA Features
The iKôn PDA is a ruggedized personal digital assistant that can be ordered with one of the
following operating systems: Windows Mobile 6 Professional with a phone option or
Windows Mobile 6 Classic. This PDA is intended for use in commercial and light industrial
applications with a focus on real time wireless data transactions. All possible bar code input
methodologies are supported by one of a variety of scanners available. Optimization for spe-
cific operational environments is supported with a wide range of peripheral options and
carrying accessories.
Model
• iKôn Rugged PDA – Model Number 7505
Processor
• Intel XScale PXA270 624 MHz
• 128 MB flash, 128 MB RAM
Operating System
• Microsoft Windows Mobile 6 Professional
• Microsoft Windows Mobile 6 Classic
Note: Notes highlight additional helpful information.
Important: These statements provide particularly important instructions or addi-
tional information that is critical to the operation of the equipment.
Warning: These statements provide critical information that may prevent physical
injury, equipment damage or data loss.
Important: For all safety, regulatory and warranty information, refer to the ‘iKôn
Rugged PDA Regulatory & Warranty Guide’, PN 8000148.
Chapter 1: Introduction
iKôn Rugged PDA Features
iKôn Rugged PDA (Windows Mobile 6) User Manual 5
Multi-Media Chipset
• NVIDIAGoForce 4000 Multi-Media Processor
Real-Time Clock
• CPU independent RTC capable of maintaining the system date and time for at least 3
months with a fully charged backup battery ?? still true with super-caps?
User Interface
• Colour Touchscreen Display 3.7 in. (9.398 cm)
- Full VGA 480 x 640 resolution
- Transflective, portrait mode TFT
- Adjustable Backlight
• Touchscreen
- Passive stylus or finger operation
- Signature capture
• Keyboards
- Full Alpha-Numeric
-Numeric
- Ergonomically enhanced for ambidextrous, one-hand operation
- Backlit, high durability hard-capped keys
Wireless Communication
Optional expansion modules for:
• 802.11b/g (proprietary module) operating in the 2.4GHz band:
- Supports IEEE 802.11b data rates of 1,2,5.5 and 11Mbps using Direct Sequence
Spread Spectrum (DSSS)
- Supports IEEE 802.11g data rates of 6,9,12,24,36,48 and 54Mbps,using Orthagonal
Frequency Division Multiplexing (OFDM) base band modulation
• GSM/GPRS EDGE (via expansion interface)
- Quad-Band – 850/900/1800/1900
- Voice and Data
- GPRS Class B, Multi-Slot Class 12
- EGPRS Class B,Multi-Slot Class 12
Chapter 1: Introduction
The iKôn Rugged PDA
6iKôn Rugged PDA (Windows Mobile 6) User Manual
•UMTS ??
- UMTS specs??
•Bluetooth class II, ver 2
- support Enhanced Data Rate (EDR) for up to 3Mbps data rate
- support Advanced Frequency Hopping (AFH) for reduced interference with
802.11b/g radio
1.3.1 The iKôn Rugged PDA
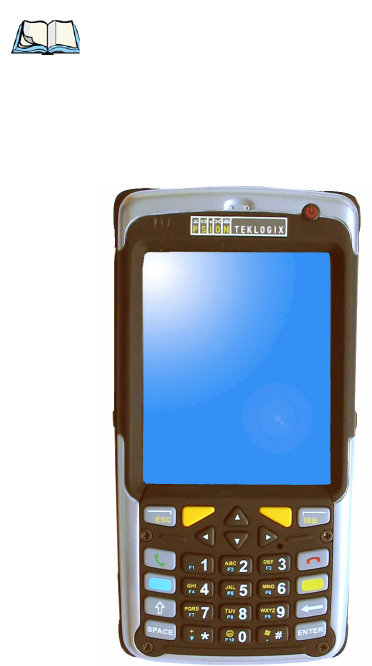
Figure 1.1 iKôn Rugged PDA ?? require alphanumeric & non-phone PDA pics
Note: 802.11b/g, GSM, and Bluetooth are available simultaneously.
Chapter 1: Introduction
The iKôn Rugged PDA
iKôn Rugged PDA (Windows Mobile 6) User Manual 7
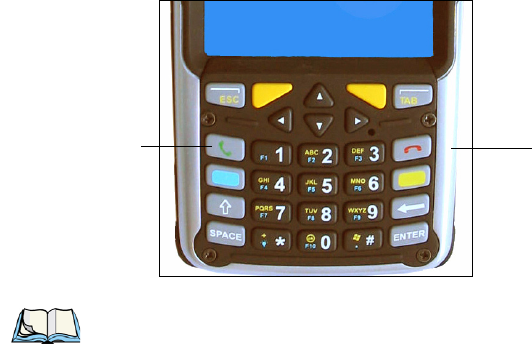
Figure 1.2 Phone Labels
Talk
Key Key
End
Note: The [Talk] and [End] phone keys printed on the PDA shown in the picture above are
useful for units equipped with Windows Mobile 6 Professional that support the phone
feature. Refer to “Send & End Phone Calls Using The Phone Keypad” on page 18
for details

iKôn Rugged PDA (Windows Mobile 6) User Manual 9
BASIC CHECKOUT 2
2.1 Preparing The iKôn PDA For Operation........................11
2.1.1 The Battery..................................11
2.2 Turning The iKôn PDA On And Off..........................11
2.2.1 Installing The Battery And Switching The Unit On.............11
2.2.2 Switching The Unit Off (Suspend)......................12
2.3 The Getting Started CD ??...............................12
2.4 Connecting The iKôn PDA To A PC. .........................13
2.5 Data Transfer Between The PC & The Hand-Held ..................14
2.5.1 Using Microsoft® ActiveSync®.......................14
2.5.2 Using Microsoft® Vista®..........................14
2.6 Aligning (Calibrating) The Touchscreen........................14
2.7 Setting Up A 802.11b/g Radio–Summit Client Utility.................15
2.7.1 Assigning The IP Address..........................15
2.7.2 Using The SCU To Connect To The WLAN.................15
2.8 The Phone (Windows Mobile 6 Professional Only) ..................18
2.8.1 The Phone Keypad..............................18
2.8.1.1 Send & End Phone Calls Using The Phone Keypad . . ......18
2.8.1.2 Make A Conference Call......................19
2.8.1.3 Receive An Incoming Call.....................19
2.8.1.4 Program Speed Dial.........................20
2.8.2 Send & End Calls Using The iKôn PDA Keyboard . ............23
2.8.3 Managing Phone Settings ..........................24
2.8.3.1 Phone Tab..............................25
2.8.3.2 Services Tab.............................26
2.8.3.3 Network Tab.............................27
2.9 Resetting The iKôn PDA................................27
2.9.1 Performing A Warm Reset..........................27
2.9.2 Cold Resetting To The Windows Mobile 6 OS . . . ............27

Chapter 2: Basic Checkout
Preparing The iKôn PDA For Operation
iKôn Rugged PDA (Windows Mobile 6) User Manual 11
2.1 Preparing The iKôn PDA For Operation
2.1.1 The Battery
The iKôn PDA is powered with a 5000 mAh Lithium-Ion battery pack, model number ??.
Before charging the battery, it is critical that you review the battery safety guidelines in the
“iKôn Rugged PDA Warranty & Regulatory Guide”, PN 8000148.
Battery packs shipped from the factory are charged to approximately 40% and must be fully
charged prior to use. Batteries can be charged using a variety of chargers and docking sta-
tions along with a iKôn PDA internal charger. When using the internal charger, a suitable
power source is required. All chargers and docking stations are described in Chapter 7: “Pe-
ripheral Devices & Accessories”.
2.2 Turning The iKôn PDA On And Off
2.2.1 Installing The Battery And Switching The Unit On
• To unlock the battery cover, turn the left-hand battery fastener to the left, and turn the
right-hand battery fastener to the right.
• Remove the battery cover.
• Ensure that the ON/OFF switch in the battery compartment is set to ON before inserting
the battery.
Important: Before opening the battery cover on your iKôn PDA, press the Power button
to turn off the unit. When the battery cover is removed, a power-off switch is
automatically activated and the unit power is switched off; if the battery
cover is opened while the hand-held is still powered on, the unit may reboot.
Important: Before replacing a battery, please read “Removing The Battery Pack” on
page 33 for details about safely swapping the battery.
Important: If the unit is currently on, press the Power button to turn off the hand-held
before opening the battery cover on your iKôn PDA. When the battery cover
is removed, a power-off switch is automatically activated switching the unit
off; if the battery cover is opened while the hand-held is still powered on, the
unit may reboot.

Chapter 2: Basic Checkout
Switching The Unit Off (Suspend)
12 iKôn Rugged PDA (Windows Mobile 6) User Manual
• Snap the charged battery into the unit. Replace the battery cover, and lock the fasteners
in place.
To switch on the iKôn PDA:
• Press and hold down the Power button for at least one second.
• When the LED flashes green, release the Power button.
The desktop Today screen is displayed.
2.2.2 Switching The Unit Off (Suspend)
• Press the Power button.
2.3 The Getting Started CD ??
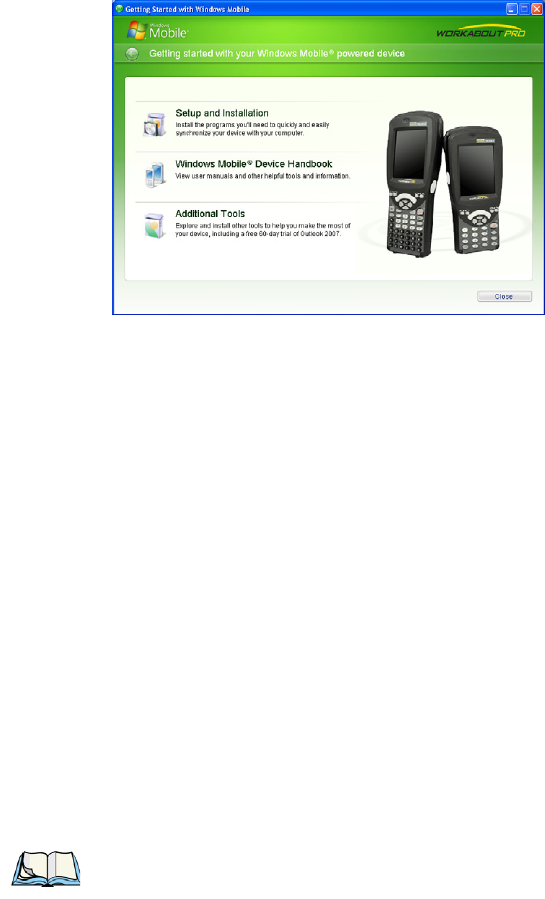
The Getting Started CD shipped with your unit runs automatically when inserted, Display-
ing a start-up screen.
Note: If you are using a docking station or an external power supply, you can insert an
uncharged battery, dock the unit and switch it on.
Note: If the unit was already in use–the unit may be off (suspend state)–pressing [ENTER]
‘wakes’ the unit from this state. The screen in which you were working prior to the
suspend state is displayed. “Wakeup Keys Tab” on page 127 describes how you can
assign other ‘wakeup’ keys or enable a two-key ‘power on’ sequence.
Chapter 2: Basic Checkout
Connecting The iKôn PDA To A PC
iKôn Rugged PDA (Windows Mobile 6) User Manual 13
Tapping on Next in the start-up screen displays a screen listing your setup and installation
options.
Tapping on one of the following options provides the following options:
•Setup and Installation–allows you to install the Windows Mobile® Device Handbook
and ActiveSync. When you tap on this option, only items that are not already present on
your PC are installed. For example, if you’ve previously installed ActiveSync, it is auto-
matically detected and is not reinstalled.
•Windows Mobile® Device Handbook–guides you through the steps required to access
these options:
Additional Windows Mobile Resources–lists Windows Mobile web sites that provide
additional, helpful information
Free Ringtones, Downloads, Help and Other Benefits–with registration at Microsoft,
you can receive free ring tones, downloads, newsletters and information to help you use
your hand-held to full advantage.
Set up E-mail–provides step-by-step instructions to help you set up your e-mail
account.
•Additional Tools–allows you to download a 60 day trial of Microsoft Office Outlook
2007.
2.4 Connecting The iKôn PDA To A PC
The iKôn PDA can be connected to a PC using the desktop docking station.
Note: Refer to “Linking A iKôn PDA To An Ethernet Network” on page 251for more
details about the desktop docking station and how to link to a PC.
Chapter 2: Basic Checkout
Data Transfer Between The PC & The Hand-Held
14 iKôn Rugged PDA (Windows Mobile 6) User Manual
• Insert the unit in the desktop docking station.
• Use a Client USB connector to complete the communication link between the hand-held
and the PC.
2.5 Data Transfer Between The PC & The Hand-Held
Data transfer options vary slightly depending on the type of operating system installed in
your PC. Microsoft® ActiveSync® is PC connectivity software that can be used to connect
your hand-held to PCs running this software. ActiveSync works only with the Windows XP
SP2 operating system or earlier.
If the Microsoft® Vista® operating system is installed in your PC, ActiveSync is not re-
quired to transfer data between your iKôn PDA and your PC.
By connecting the iKôn PDA to a PC with a cable, you can:
• View iKôn PDA files from Windows Explorer.
• Drag and drop files between the iKôn PDA and the PC in the same way that you would
between PC drives.
• Back up iKôn PDA files to the PC, then restore them from the PC to the hand-held
again, if needed, and so on.
2.5.1 Using Microsoft® ActiveSync®
You can install active sync using the Getting Started CD provided with your unit. Refer to
“The Getting Started CD ??” on page 12 for details. You can also follow the step-by-step in-
structions provided at the following website:
http://www.microsoft.com/windowsmobile/activesync/activesync45.mspx
2.5.2 Using Microsoft® Vista®
If you have Windows Vista, your iKôn PDA data transfers do not require ActiveSync. To
transfer data between your PC and your hand-held:
• Tap on Start>Computer to display the drives. Your iKôn PDA will be visible here.
• Open drives, files and folders as you would on your PC.
2.6 Aligning (Calibrating) The Touchscreen
Refer to “Aligning (Calibrating) The Touchscreen” on page 40 for details.
Chapter 2: Basic Checkout
Setting Up A 802.11b/g Radio–Summit Client Utility
iKôn Rugged PDA (Windows Mobile 6) User Manual 15
2.7 Setting Up A 802.11b/g Radio–Summit Client Utility
This section describes the steps required to set up the 802.11b/g Summit Radio using the
Summit Client Utility (SCU).
To review details about the option within the SCU tabs – Main, Config, Status, Diags and
Global Settings – review Appendix A: “Summit Client Utility (SCU)”.
2.7.1 Assigning The IP Address
Before launching the SCU, you need to configure the method by which the IP address will
be obtained.
• Tap on Start>Settings>Connections tab>Wireless Power icon.
•In the Wireless Power dialog box, tap on the Settings button.
In the Configure Network Adaptors dialog box:
• Tap on Summit WLAN Adapter in the adaptor list.
The Summit WLAN Adapter dialog box is displayed. You have two options:
• Tap on Use server-assigned IP address to have an address assigned automatically, or
If you want to use a particular IP address, tap on Use specific IP address, and type the
preferred address.
If you tap on the Name Servers tab, you can statically configure the DNS servers; how-
ever, if you use DHCP for IP address assignment, DNS is usually supplied by the same
server that supplied the IP addresses.
2.7.2 Using The SCU To Connect To The WLAN
This section provides a quick set of steps to create a profile (referred to as a config). Detailed
information about each of the SCU tabs – Main, Config, Status, Diags and Global Settings –
is provided under Appendix A: “Summit Client Utility (SCU)”.
To launch the SCU so that your hand-held can connect to a wireless LAN:

Chapter 2: Basic Checkout
Using The SCU To Connect To The WLAN
16 iKôn Rugged PDA (Windows Mobile 6) User Manual
• Tap on Start>Programs, and then tap on the SCU icon.
• Tap on the Config tab.
• Tap on New to define a new config.
• Type a name for your configuration using any alpha-numeric combination to uniquely
identify this config.
• Tap on OK to return to the Config tab.
• Tap on Commit to save the config name.
• When a pop-up message indicates that your configuration will be saved, tap on OK.

Chapter 2: Basic Checkout
Using The SCU To Connect To The WLAN
iKôn Rugged PDA (Windows Mobile 6) User Manual 17
To configure the SSID for the network to which you want to associate:
• Type an SSID in the text box to the right of SSID. This field is limited to 32 characters.
• Tap on Commit and then, in the pop-up message, tap on OK to save your SSID setting.
To configure authentication:
• Tap on the EAP type dropdown menu, and choose the appropriate type of authentica-
tion – LEAP, EAP-FAST, PEAP-MSCHAP, and PEAP-GTC.
• Next, tap on the Credentials button, and type credentials for IEEE 802.1X EAP types.
To configure encryption:
• Tap on the Encryption dropdown menu, and choose the appropriate type of encryption
– Manual WEP, Auto WEP, WPA PSK, WPA TKIP, WPA2 PSK, WPA2 AES, or CCKM
TKIP.
If you choose Manual WEP, WPA PSK or WPA2 PSK:
• Tap on the WEP/PSK Keys button. For Manual WEP, choose up to four static WEP
keys. For PSK, type an ASCII passphrase or hex PSK.
• Configure any other settings that are supplied by the network administrator for the SSID
to which you will associate.
• Make certain that you tap on Commit following each change.
Once you’ve completed the configuration:
• Tap the Main tab. Tap on the Active Config button – your new config will be listed in
the dropdown menu.
When you tap on the config you created, the 802.11b/g radio module attempts to connect to
the network using the following steps:
1. Authenticate to the network.
2. If EAP authentication is being used, derive dynamic encryption keys.
3. If DHCP is being used by the network, obtain an IP address.
Important: To learn more about the other options available in the radio attributes list,
refer to “Config Tab” on page A-2 in Appendix A: “Summit Client Utility
(SCU)”.
Important: Refer to “SCU Security Capabilities” on page A-4 and Appendix A: “EAP
Credentials” in Appendix A: “Summit Client Utility (SCU)” for details about
security settings.

Chapter 2: Basic Checkout
The Phone (Windows Mobile 6 Professional Only)
18 iKôn Rugged PDA (Windows Mobile 6) User Manual
If the 802.11b/g is not connecting properly:
• Tap on the Status tab.
The Status dialog box lists the IP and MAC address, and indicates the current state of the
radio, the signal strength, channel and so on.
You can also use the Status screen for DHCP renewal and ICMP Echo Requests (Pings).
2.8 The Phone (Windows Mobile 6 Professional Only)
iKôn PDAs running Windows Mobile 6 Professional are equipped with phone capabilities.
2.8.1 The Phone Keypad
The phone keypad provides phone services like those you use on your cellular phone. You
can use the phone keypad provided with your iKôn PDA to, for example, send and receive
phone calls, make conference calls, view a list of your phone calls (call history), set up speed
dial numbers, etc.
2.8.1.1 Send & End Phone Calls Using The Phone Keypad
To display the phone keypad:
•In the Today screen, tap the Phone softkey in the softkey bar at the bottom of the screen.
Important: For details about the Status dialog box, refer to “Status Tab” on page A-9 in
Appendix A: “Summit Client Utility (SCU)”.
Note: Remember that you can use the Help feature to find more details about phone
options. Help screens are context-sensitive–that is, the help displayed is generally
specific to the dialog box you have opened. To further narrow your search, tap on the
Search softkey in the Help screen, and type the topic about which you require addi-
tional information.
Note: You can also press the [Talk] key on the iKôn PDA keyboard to display the phone
keypad providing it’s been activated. The [Talk] key is labelled with a green tele-
phone receiver icon.Refer to “Send & End Calls Using The iKôn PDA Keyboard”
on page 23 for details.
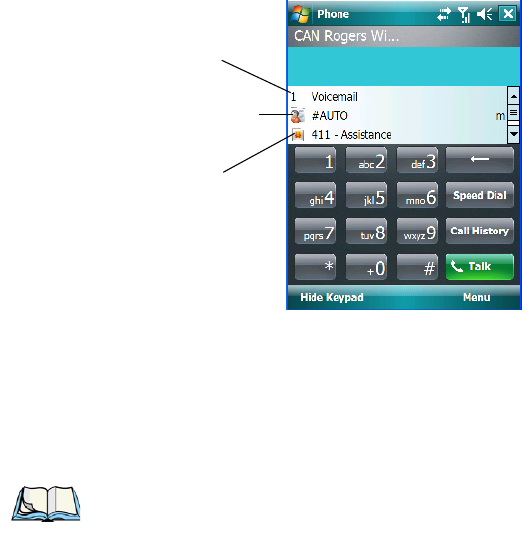
Chapter 2: Basic Checkout
The Phone Keypad
iKôn Rugged PDA (Windows Mobile 6) User Manual 19
To send a number:
• Use the phone keypad to enter the phone number, and tap on [Talk] to dial the phone
number.
To end a phone call:
• Tap on [End] button on the phone keypad.
2.8.1.2 Make A Conference Call
To set up a conference call between yourself and two or more other parties:
• In the phone keypad, type the first phone number. Tap on [Talk].
• While you are connected to the first number, tap on Menu>Hold.
• Type the second number. Tap on [Talk].
• Tap on Menu>Conference.
• To add another party, tap on Menu>Hold, type the number, and then tap
Menu>Conference.
• Tap on [End] to disconnect all calls.
2.8.1.3 Receive An Incoming Call
To answer an incoming call:
• Tap on the [Talk] button; it’s labelled with a green phone receiver.
Network emergency
number
Phone settings
Directory Assistance
Note: You can also tap on the [End] key on the physical keyboard of the iKôn PDA to end
the call. The [End] key is labelled with a red phone receiver. Refer to “Send & End
Calls Using The iKôn PDA Keyboard” on page 23 for details.
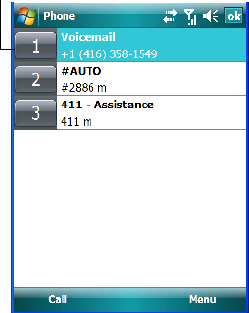
Chapter 2: Basic Checkout
The Phone Keypad
20 iKôn Rugged PDA (Windows Mobile 6) User Manual
2.8.1.4 Program Speed Dial
The phone keypad provides a Speed Dial button for quick access to often used numbers.
• In the phone keypad, tap on the Speed Dial button to display the speed dial Phone
dialog box.
This dialog box lists the phone numbers and the speed dial key to which the phone number
has been assigned.
• Tap on the Speed Dial Number (to the left of the phone number you want to dial), or
Tap on the Call softkey; the number is dialled for you.
Using The Phone Keypad To Program a Speed Dial
There are a number of ways to add a speed dial number. You can create a speed dial number
using the Contacts list or by using the Speed Dial button on the phone keypad.
Adding A New Phone Number
•In the phone keypad, tap on the Speed Dial button.
• In the speed dial Phone dialog box, tap on Menu>New.
Speed Dial Number
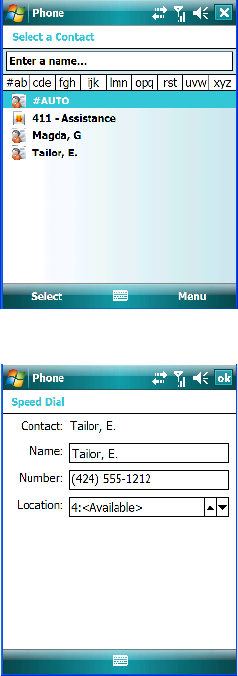
Chapter 2: Basic Checkout
The Phone Keypad
iKôn Rugged PDA (Windows Mobile 6) User Manual 21
• In the list, choose a contact for a speed dial.
• Tap on Enter a name, and type a contact name, or tap on a name in the list.
A sequential speed dial key is automatically assigned in the Location field. You can tap on
the Location dropdown menu and change the auto assignment.
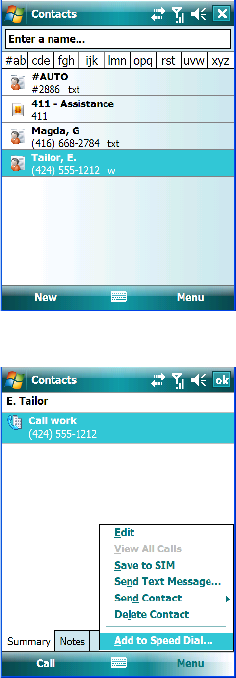
Chapter 2: Basic Checkout
The Phone Keypad
22 iKôn Rugged PDA (Windows Mobile 6) User Manual
Using The Contact List To Program A Speed Dial
•Tap Contact in the softkey bar at the bottom of the Today screen.
• Tap on the Contact to which you want to assign a speed dial number.
•In the Summary screen, tap on Menu>Add to Speed Dial.
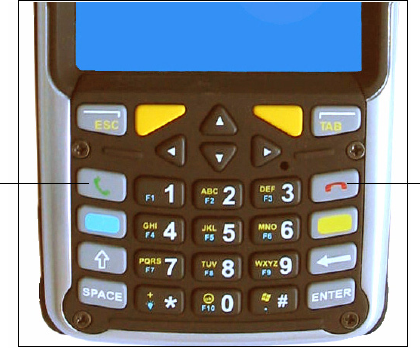
Chapter 2: Basic Checkout
Send & End Calls Using The iKôn PDA Keyboard
iKôn Rugged PDA (Windows Mobile 6) User Manual 23
2.8.2 Send & End Calls Using The iKôn PDA Keyboard
A iKôn PDA that supports the phone feature is equipped with a [Talk] and an [End] call key
on the unit keyboard.
Using these phone keys, you can display the phone keypad and answer, send and terminate
phone calls. If you press the [Talk] or [End] key with no result, you may first need to acti-
vate them.
Activating The [Talk] And [End] Keyboard Phone Keys
To activate the phone function of these keys:
• Tap on Start>Settings>System tab>About Device icon.
Ta l k E n d
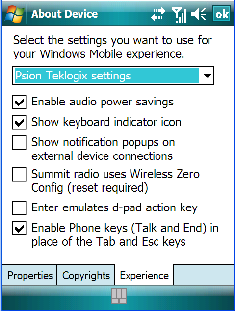
Chapter 2: Basic Checkout
Managing Phone Settings
24 iKôn Rugged PDA (Windows Mobile 6) User Manual
• Tap on the Experience tab.
• If it’s not chosen by default, choose Psion Teklogix Settings in the dropdown menu at
the top of the screen. The checkbox next to ‘Enable Phone keys (Talk and End) in
place of the Tab and Esc keys’ should be checked automatically. If not, check it and
tap on OK.
2.8.3 Managing Phone Settings
You can adjust phone settings such as the ring type and tone, choose phone services such as
barring calls, and you can also determine network selections. There are a number of ways
you can access phone settings.
•In the Navigation Bar, tap on the Phone Settings hotkey. In the pop-up Phone bubble,
tap on Settings, or
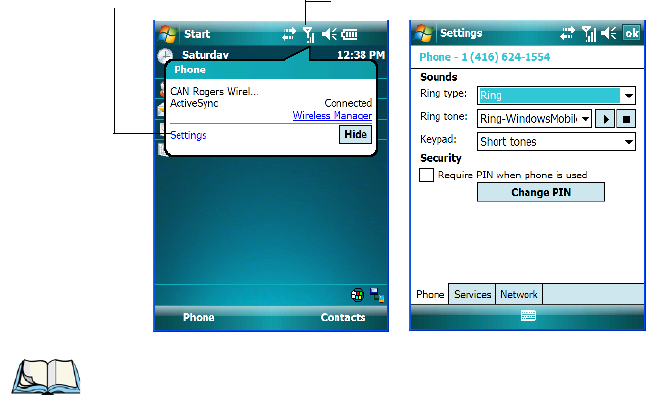
Chapter 2: Basic Checkout
Managing Phone Settings
iKôn Rugged PDA (Windows Mobile 6) User Manual 25
• Tap on Start>Settings>Phone icon.
2.8.3.1 Phone Tab
Ring Type And Ring Tone
Ring Type allows you to tailor the type of ring used for incoming calls.
The Ring Tone dropdown menu allows you to determine the ring tone of incoming phone
calls.
Keypad
This option allows you to determine the type of sound that keypad keys emit as you tap
them. You can also turn off keypad sounds.
Security
This option allows you to assign a PIN (Personal Identification Number) so that your hand-
held is protected from unauthorized use. Your SIM card manufacturer provides the default
PIN which you can change in this field.
Change Pin
Tapping on this button allows you to change your PIN (Personal Identification Number).
Your SIM manufacturer provides a default PIN that you can enter here, and then change. Re-
Phone Settings Hotkey
Ta p o n Se tt i n gs
Note: If the phone keypad is opened, tap on Menu>Options to display the Phone Settings
dialog box.
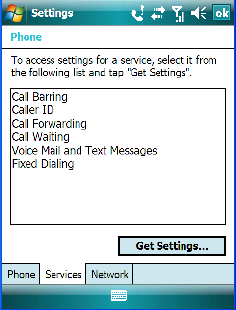
Chapter 2: Basic Checkout
Managing Phone Settings
26 iKôn Rugged PDA (Windows Mobile 6) User Manual
member too that you must enable the Security checkbox if you require that the PIN be
entered phone can be used.
2.8.3.2 Services Tab
The Services tab allows you to customize the behaviour of your phone. You can, for exam-
ple, block all incoming calls, tailor to whom your caller ID will be transmitted, set up call
forwarding and so on.
• Tap on the service you want to set up. Tap on Get Settings.
The service dialog boxes allow you to tailor your available services to meet your require-
ments. Remember that when a particular service dialog box you’ve chosen is displayed, you
can always tap on Start>Help to get additional information.
Voice Mail Setup
If your service includes Voi ce M a il , a temporary passcode is automatically assigned. It is
mailed to you as a text message.
• Tap on Start>Messaging to display your temporary passcode.
To activate your voice mail:
• From a land line, dial your wireless phone number.
• Allow the hand-held to ring until it is automatically picked up by the voice mail service.
At the greeting, type #.
You will be prompted to enter your temporary passcode. A tutorial will lead you through the
voice mail setup. When you’ve assigned your personalized passcode, keep it in a secure
place.
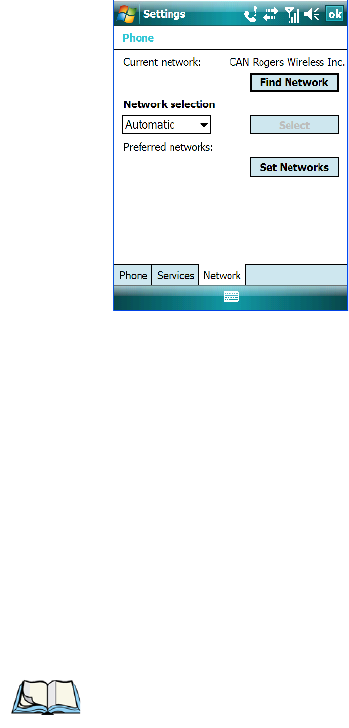
Chapter 2: Basic Checkout
Resetting The iKôn PDA
iKôn Rugged PDA (Windows Mobile 6) User Manual 27
2.8.3.3 Network Tab
This dialog box identifies your current network, and allows you to view available networks
and determine the order in which other preferred networks will be accessed if the current
one is unavailable.You can also specify manual or automatic network changes, and you can
add a network.
2.9 Resetting The iKôn PDA
When you reset your hand-held, the registry settings and any installed programs (stored on
the flash file system) and data are preserved.
2.9.1 Performing A Warm Reset
• Press and hold down the [FN/BLUE] key and the [ENTER] key simultaneously for a
minimum of six seconds. When the splash screen appears, release the keys.
2.9.2 Cold Resetting To The Windows Mobile 6 OS
To perform a cold reset and launch the Windows Mobile 6 operating system (bypassing the
BooSt menu):
• Press and hold down the [FN/BLUE] [FN/ORANGE] and [ENTER] keys simultane-
ously for a minimum of six seconds.
Note: You do not need to reset your iKôn PDA after configuring the radio.

iKôn Rugged PDA (Windows Mobile 6) User Manual 29
GET TO KNOW THE IKÔN PDA 3
3.1 Features Of The iKôn Rugged PDA..........................31
3.2 The Batteries......................................32
3.2.1 Battery Safety ................................33
3.2.2 Removing The Battery Pack.........................33
3.2.3 Battery Swap Time..............................33
.......................................33
3.2.4 Charging The Battery.............................34
3.2.4.1 Chargers And Docking Stations...................34
3.3 Switching The iKôn PDA On And Off.........................35
3.4 The Keyboards.....................................35
3.4.1 iKôn PDA Keyboards............................35
3.4.2 Modifier Keys................................36
3.4.2.1 Activating Modifier Keys & The Shift-State Indicator.......36
3.4.2.2 Locking Modifier Keys.......................37
3.4.3 The Keys...................................37
3.4.4 The Numeric Keyboard – Accessing Alpha Keys . . ............39
3.4.4.1 Choosing A Single Alpha Character ................39
3.4.4.2 Creating Uppercase Letters.....................39
3.4.4.3 Choosing Multiple Alpha Characters ................40
3.4.5 The Keypad Backlight............................40
3.5 The Display.......................................40
3.5.1 Adjusting The Backlight...........................40
3.5.2 Aligning (Calibrating) The Touchscreen...................40
3.6 Indicators........................................41
3.6.1 The LEDs...................................42
3.7 Audio Indicators....................................42
3.8 Monitoring The Battery And Maximizing Run Time.................43
3.8.1 Storing Batteries...............................44
3.9 Uploading Data In A Docking Station.........................44
3.10 Bluetooth Radio....................................44
30 iKôn Rugged PDA (Windows Mobile 6) User Manual
3.10.1 Pairing A Bluetooth Headset Or Other Bluetooth Devices.........45
3.11 Inserting The SD/MMC Card And SIM Card.....................45
3.11.1 Inserting The Card ?? ............................46
3.12 General Maintenance..................................46
3.12.1 Caring For The Touchscreen.........................46
3.12.2 Cleaning The iKôn PDA...........................47
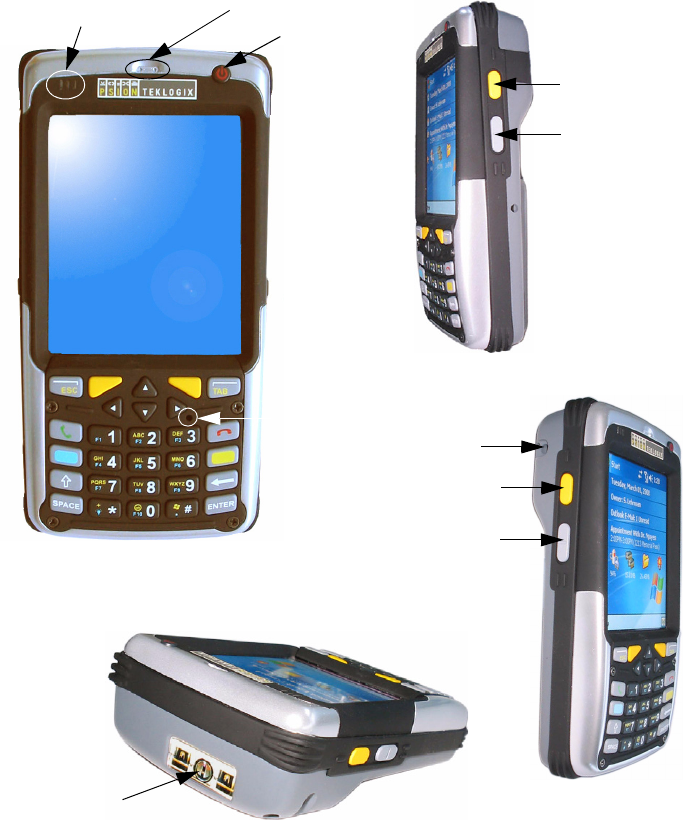
Chapter 3: Get To Know The iKôn PDA
Features Of The iKôn Rugged PDA
iKôn Rugged PDA (Windows Mobile 6) User Manual 31
3.1 Features Of The iKôn Rugged PDA
3 LEDs
(Light Emitting Diodes) Receiver
Power Button
RIGHT SIDE
Enter Button
Vertical Scroll
FRONT
LEFT SIDE
Scan Button
Volume Button
Audio Port
TOP
Scanner/Imager
Button
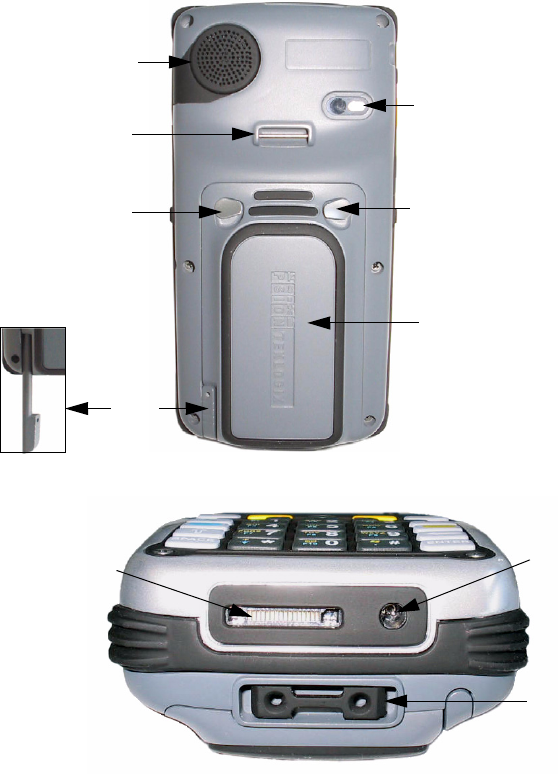
Chapter 3: Get To Know The iKôn PDA
The Batteries
32 iKôn Rugged PDA (Windows Mobile 6) User Manual
Figure 3.1 Back of iKôn PDA
Figure 3.2 Ports
3.2 The Batteries
The PDA operates with a Lithium-Ion battery pack. Preparing the unit for operation requires
that a battery pack be charged and installed in the iKôn PDA.
The iKôn PDA operates with a 5000 mAh, Lithium-Ion battery, model number ??
Speaker
Hand Strap
Battery Latch
Stylus
Camera
Battery Latch
Cover for Battery &
Anchor
(optional)
SIM/Micro SD Card
Compartments
Docking Port/
USB On-The-Go DC IN Port
Hand Strap
Anchor

Chapter 3: Get To Know The iKôn PDA
Battery Safety
iKôn Rugged PDA (Windows Mobile 6) User Manual 33
3.2.1 Battery Safety
3.2.2 Removing The Battery Pack
Refer to “Installing The Battery And Switching The Unit On” on page 11.
3.2.3 Battery Swap Time
Assuming the default power saving parameters and battery reserve level have not been al-
tered, battery swap time is approximately 5 minutes—you will not lose data if the battery is
replaced within this time frame.
To protect data, the safest place to store data is on a SD/MMC memory card or externally to
the device on a USB memory stick or on a PC.
The Suspend Threshold feature allows you to determine the battery capacity at which the
PDA will be shut down. If left at the default value, Maximum Operating Time, the unit will
run until the battery is completely empty; the RAM is only backed up for a short period of
time. If you choose Maximum Backup Time, the PDA shuts off with more energy left in the
battery so RAM can be backed up for a longer period of time.
(Refer to “Suspend Threshold” on page 126 for details about reserving battery power for
data backup purposes.)
Important: Before attempting to install, use or charge the battery pack, it is critical that
you review and follow the important safety guidelines in the quick refer-
ence guide entitled ‘iKôn Rugged PDA Regulatory & Warranty Guide’,
PN 8000148.
Important: Always switch the unit off before opening the battery cover to remove the bat-
tery. When the cover is removed, a power-off switch is automatically activated
and the unit power is switched off; if the battery cover is opened while the
PDA is still powered on, the unit may reboot. Any active sessions may be lost.
Keep in mind also that while the battery is installed, the iKôn PDA internal,
super-capacitors will save the current data for up to 5 minutes.
Important: Before opening the battery cover on your unit to remove the battery, you must
turn off the PDA. If the battery cover is opened while the unit is still powered
on, the unit may reboot.

Chapter 3: Get To Know The iKôn PDA
Charging The Battery
34 iKôn Rugged PDA (Windows Mobile 6) User Manual
3.2.4 Charging The Battery
Batteries shipped from the factory are charged to approximately 40% of capacity. They must
be fully charged prior to use.
Keep in mind also that, along with the battery, the iKôn PDA is equipped with internal,
super-capacitors that preserves data stored on the unit for a short period of time while the
battery is swapped.
3.2.4.1 Chargers And Docking Stations
Lithium-Ion battery packs must be charged before use. These batteries can be charged with a
variety of chargers and docking stations. These include:
• AC wall adaptor (Model # ??PS1050-G1) ??– operates as an AC power source and
when plugged in, also charges the battery installed in the unit.
• Desktop Docking Station (Model # ??WA4003-G2) – ??operates as both a charger and a
docking station. Operating as a charger, both the battery installed in the PDA and a spare
battery can be charged simultaneously.
• Quad Docking Station – (Model # ?? can charge the battery of up to four iKôn PDAs
inserted in the docking station.
• Single Battery Charger (Model # ?? WA3001-G1) – charges a single battery.
It can take up to 4 hours to charge a battery. The iKôn PDA intelligent charging system pro-
tects the battery from over-charging by terminating the charge process when the battery is at
maximum capacity.
Important: FOR DETAILED INFORMATION about chargers and docking stations,
refer to Chapter 7: “Peripheral Devices & Accessories” beginning on
page 241.
Note: Refer to “Monitoring The Battery And Maximizing Run Time” on page 43 for addi-
tional information about the battery.
Important: To avoid damaging the battery, chargers will not begin the charge process
until the battery temperature is between 0° C to 40° C (32° F to 104° F).

Chapter 3: Get To Know The iKôn PDA
Switching The iKôn PDA On And Off
iKôn Rugged PDA (Windows Mobile 6) User Manual 35
3.3 Switching The iKôn PDA On And Off
Switching On The iKôn PDA
• Press and hold down the Power button for at least one second. ??
• When the LED flashes green, release the Power button. ??
The startup Today screen is displayed.
Switching Off The iKôn PDA (Suspend)
To switch off the iKôn PDA:
• Press the Power button.
3.4 The Keyboards
3.4.1 iKôn PDA Keyboards
The following iKôn PDA keyboards are available:
• 28-key numeric keyboard
• 47-key alpha-numeric keyboard
Most of the keys on these keyboards operate much like a desktop computer. Where a key or
key function is not consistent with the PC keyboard, the differences are noted.
The [FN/BLUE] and [FN/ORANGE] modifier keys provide access to additional keys and
system functions. These functions are colour coded in orange and blue print above the key-
board keys.
Note: If the iKôn PDA is in suspend state, pressing the Power button ?? or ?? [ENTER]
key ?? OR EITHER ?? ‘wakes’ the unit from this state. The screen in which you were
working before the computer entered suspend state is displayed. Section 5.24.6 on
page 127 describes how you can assign other ‘wakeup’ keys or enable a two-key
‘power on’ sequence ??.
Important: Keep in mind that turning off the iKôn PDA does not result in a complete
reboot; rather, the unit enters a power-saving, “suspend” state. When the
unit is turned on from suspend state, operation resumes within a few
seconds.
Note: Depending on the operating system installed in your unit – Windows Mobile 6 Clas-
sic or Windows Mobile 6 Professional – the keyboard keys will vary slightly.

Chapter 3: Get To Know The iKôn PDA
Modifier Keys
36 iKôn Rugged PDA (Windows Mobile 6) User Manual
3.4.2 Modifier Keys
The [SHIFT], [CTRL], [ALT], [FN/BLUE] and [FN/ORANGE] keys are modifier keys.
Pressing a modifier key changes the function of the next key pressed. ?? For example, on a
iKôn PDA C, 47-key keyboard, a square bracket is printed in orange print above the [4] key.
Pressing the [FN/ORANGE] key followed by the [4] key displays a square bracket rather
than the number 4. ??
The [SHIFT], [CTRL] and [ALT] keys operate much like a desktop keyboard except that
they are not chorded (two keys held down simultaneously). The modifier key must be
pressed first followed by the key whose function you want modified.
3.4.2.1 Activating Modifier Keys & The Shift-State Indicator
When a modifier key is pressed, it is represented in the shift-state indicator icon in the
softkey bar at the bottom of the screen, making it easier to determine whether or not a modi-
fier key is active. If the shift-state indicator icon is not visible (you can only see the soft
keyboard icon), you may need to take a few steps to display the shift-state indicator icon.
• Tap on Start>Settings followed by the Buttons icon.
• Tap on the One Shots tab at the bottom of the screen.
• Tap in the check box next to Show modifier key state to display the shift-state indicator
icon.
Figure 3.3 Shift-State Indicator Icon
Note: Almost all keys can be reprogrammed to suit your requirements.
Soft Keyboard Icon
Shift-State Indicator Icon
replaces Soft Keyboard Icon

Chapter 3: Get To Know The iKôn PDA
The Keys
iKôn Rugged PDA (Windows Mobile 6) User Manual 37
3.4.2.2 Locking Modifier Keys
When a modifier key is locked ‘on’, it will remain active until it is pressed again to unlock
or turn it off.
To help you identify when a modifier key is locked ‘on’, the key is represented in the shift-
state indicator icon with a black frame around it.
Figure 3.4 Shift-State Indicator Icon – Locked Modifier Key
Once a modifier key is unlocked or turned off, it is no longer displayed in the shift-state in-
dicator icon.
3.4.3 The Keys
The [SHIFT] Key
The [SHIFT] key is used to display uppercase alpha characters and provide access to the
symbols above the numeric keys. You can lock this key ‘on’ so that when you press an alpha
key, an upper case character is displayed. When you press a numeric key, the associated
symbol on the numeric key is displayed on the screen.
If you press the [SHIFT] key twice, it is locked ‘on’ essentially acting as a [CAPS] key, dis-
playing uppercase characters. In this state, if you type a numeric key, the number rather than
the symbol above it is displayed. Press [SHIFT] again to turn the [CAPS] function off.
The Arrow Keys
The Arrow keys are located near the top of the keyboard. The arrow keys move the cursor
around the screen–up, down, left and right. The cursor is the flashing box or underline char-
acter that indicates where the next character you type will appear.
The [BKSP/DEL] Key
The [BKSP] key (sometimes referred to as destructive backspace) moves the cursor one
character to the left, erasing the incorrectly entered key stroke.
The [DEL] key ([FN/BLUE] [BKSP]) erases the character at the cursor position.
Note: The locking behaviour of the modifier keys can be changed so that, for example,
pressing a modifier key once will lock the key ‘on’. Refer to “One Shots” on page 87
for details. Note too that by default, the [FN/ORANGE] key is locked ‘on’ when
pressed only once.
Chapter 3: Get To Know The iKôn PDA
The Keys
38 iKôn Rugged PDA (Windows Mobile 6) User Manual
The [ALT] And [CTRL] Keys
The [ALT] and [CTRL] keys modify the function of the next key pressed and are application
dependent. Note that if your keyboard is equipped with [Talk] and [End] phone keys, the
[ALT] and [CTRL] keys are displayed as softkeys on the PDA screen.
The [TAB] Key
Typically, the [TAB] key moves the cursor to the next field to the right or downward.
The [ESC] Key
Generally, this key is used as a keyboard shortcut to close the current menu, dialog box or
activity and return to the previous one.
The [SPACE] Key
Pressing this key inserts a blank space between characters. In a Windows dialog box, press-
ing the [SPACE] key enables or disables a checkbox.
The [SCAN] Keys
The iKôn PDA is equipped with two [SCAN] keys located just below the display and a
[SCAN] button situated on the left of the unit. [SCAN] keys activate the scanner beam. For
units that do not have internal scanners, these keys can be remapped to serve other functions.
The Function Keys–[F1] to [F10]
Function keys [F1] to [F10] perform special, custom-defined functions. These keys are ac-
cessed by pressing [FN/BLUE] followed by numeric keys [1] to [10]. They can be used with
the Windows Mobile 6 operating system or another application. Keep in mind that the fol-
lowing function keys are used by the Windows Mobile 6 operating system: [F1] - softkey 1,
[F2] - softkey 2, [F6] - volume up, and [F7] - volume down.
Function keys [F1], [F2], [F3] and [F4] labelled in grey boxes next to the [TAB], [ALT],
[ESC] and [CTRL] keys allow you to remap these keys for your application.
The Macro Keys–[M1] to [M3] ??
Macro keys [M1] to [M3] contain up to 20 programmable characters (“positions”) and exe-
cutable keys. These keys are accessed by pressing [FN/ORANGE] followed by alpha keys
[O], [P] or [Q]. When pressed, the macro key executes a custom-defined string of characters,
including executable keys.

Chapter 3: Get To Know The iKôn PDA
The Numeric Keyboard – Accessing Alpha Keys
iKôn Rugged PDA (Windows Mobile 6) User Manual 39
3.4.4 The Numeric Keyboard – Accessing Alpha Keys
On numeric keypads, you’ll need to take a few extra steps to access the alphabetic
characters.
3.4.4.1 Choosing A Single Alpha Character
The examples below illustrate how to access, A, B and C, all of which are printed in orange
characters above the numeric key [2].
To choose the letter a:
• Press the [FN/ORANGE] key, and type the numeric key [2].
To choose the second letter in the sequence—in this example, the letter b:
• Lock the [FN/ORANGE] key ‘on’. A shift-state indicator icon in the softkey bar repre-
sents the orange key with a black frame around it to indicate that this key is locked ‘on’.
• Press numeric key [2] twice to display the letter b.
To choose the third letter in the sequence—in this example, the letter c:
• Lock the [FN/ORANGE] key ‘on’.
• Press numeric key [2] three times to display the letter c.
3.4.4.2 Creating Uppercase Letters
To display capital letters, you need to first lock the [SHIFT] key ‘on’.
• Press the [SHIFT] key twice.
Important: The letters you choose appear in the softkey bar, providing a visual indicator
of which letter will be displayed on the screen.
Note: To choose the second, third or fourth alpha character assigned to a numeric key, you
may want to lock the [FN/ORANGE] key ‘on’. By default, the [FN/ORANGE] key is
locked ‘on’ when pressed once. However, depending on how your unit is set up in the
‘One Shots’ tab, you may find that you need to press the [FN/ORANGE] key twice to
lock it ‘on’. Refer to “One Shots” on page 87 for details.
Note: Keep in mind that there is a timeout if you pause for one second between key presses
when selecting the second, third or fourth letters on a key. For example, suppose you
want to type the letter ‘c’ – you would need to press the [2] key three times. With the
[FN/ORANGE] key locked ‘on’, if you press [2] twice and then pause between key
presses for 1 second, the letter ‘b’ will be selected automatically.

Chapter 3: Get To Know The iKôn PDA
The Keypad Backlight
40 iKôn Rugged PDA (Windows Mobile 6) User Manual
All alpha keys are displayed in uppercase until you press the [SHIFT] key again to ‘unlock’
(switch off) the function of this key.
3.4.4.3 Choosing Multiple Alpha Characters
• Lock the [FN/ORANGE] key ‘on’.
Each time you press a numeric key from [2] through [9], an alpha character will be dis-
played on the screen. Remember that you can refer to the softkey bar for a visual indication
of which alpha key will be displayed on the screen.
3.4.5 The Keypad Backlight
The intensity of the keypad backlight can be configured using the Backlight icon accessed
by tapping on Start>Settings. Refer to “Backlight” on page 108 for details about this option.
3.5 The Display
iKôn PDAs are equipped with display backlighting to improve character visibility in low
light conditions. The backlight switches on when a key is pressed or the screen is tapped.
3.5.1 Adjusting The Backlight
To set the backlight intensity and the duration of time that the backlight will remain on,
you’ll need to choose the Backlight icon.
• Tap on Start>Settings and then, tap on System tab>Backlight icon.
Refer to “Backlight” on page 108 for details.
3.5.2 Aligning (Calibrating) The Touchscreen
If your touchscreen has never been aligned (calibrated) or if you find that the stylus pointer
is not accurate when you tap on an item, follow the steps below.
Important: Once you have finished typing alpha characters, remember to turn off or
unlock the [FN/ORANGE] key. Check the shift-state indicator icon (refer to
Figure 3.4 on page 37) to make certain that the key is turned off.
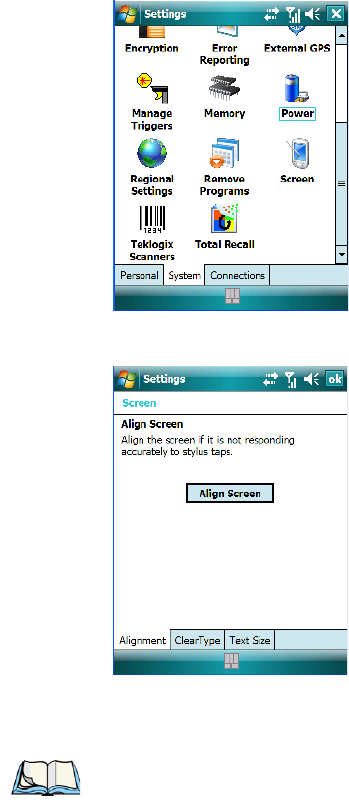
Chapter 3: Get To Know The iKôn PDA
Indicators
iKôn Rugged PDA (Windows Mobile 6) User Manual 41
• Tap on Start>Settings. Tap on the System tab to display the Screen icon.
• Tap on the Screen icon to display the Alignment tab.
• Tap on the Align Screen button, and follow the directions on the screen to align (cali-
brate) the screen.
3.6 Indicators
The iKôn PDA uses LEDs (Light Emitting Diodes), onscreen messages and audio tones to
indicate the various conditions of the PDA, the batteries, the scans and so on.
Note: This window provides two additional tabs: ClearType and Text Size. Tapping on the
ClearType tab allows you to enable the ClearType option to smooth screen font
appearance. The Text Size tab allows you to increase or decrease the size of the font
displayed on the screen.