Psion 7505BTMC75 Handheld PC with GSM/EDGE and BT User Manual
Psion Inc Handheld PC with GSM/EDGE and BT
UserManual.wiki
>
Psion
>
7505BTMC75 User Manual
>
User Manual Part 3
Contents
1.
User Manual Part 1
2.
User Manual Part 2
3.
User Manual Part 3
User Manual Part 3
Navigation menu
Upload a User Manual
Namespaces
Wiki Guide
HTML
PDF
Info
Views
User Manual
Discussion / Help
Navigation
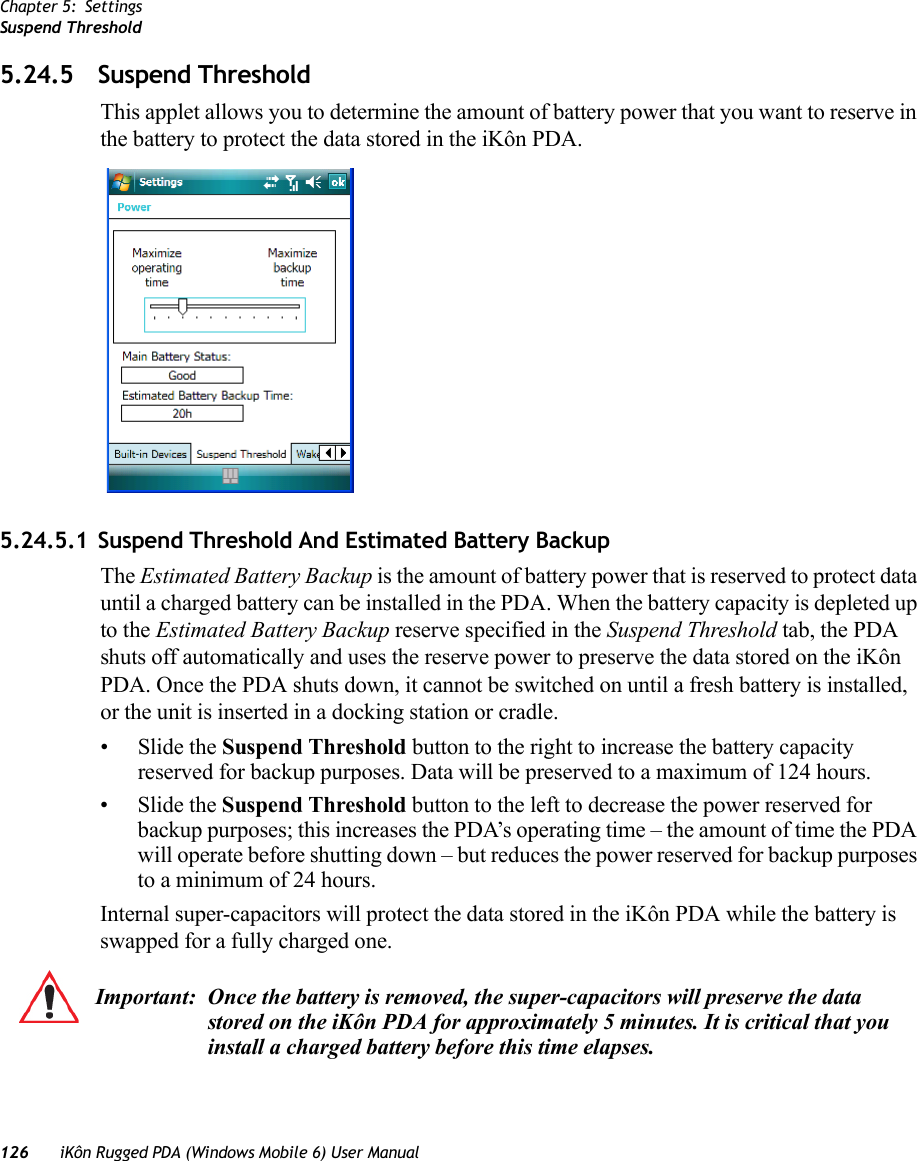
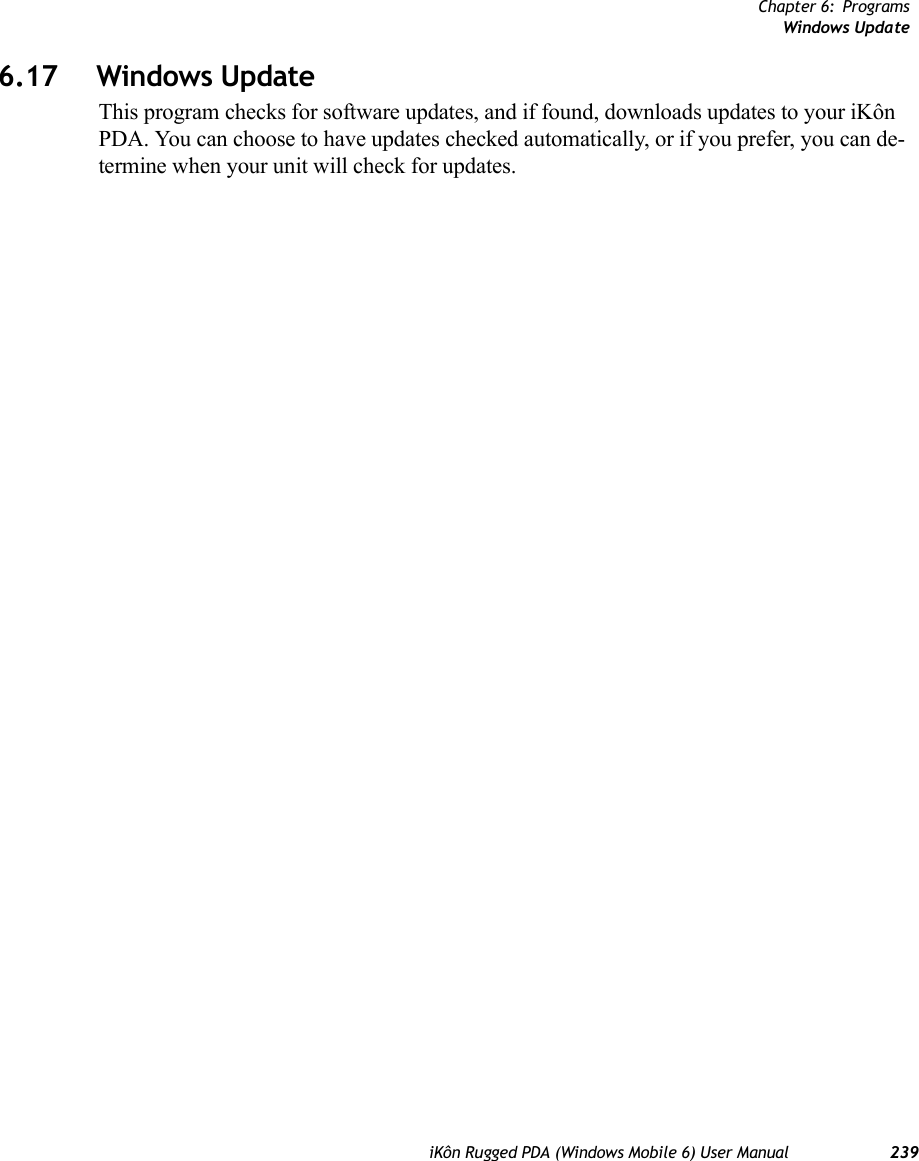
![Chapter 5: SettingsTrigger Mappings118 iKôn Rugged PDA (Windows Mobile 6) User Manual• Tap on Start>Settings>System tab>Manage Triggers icon.5.22.1 Trigger MappingsA trigger mapping is an association between a particular key on the keyboard and a driver or application, the module(s)– sometimes referred to as “trigger consumer(s)”–of the trigger source. Along with keyboard keys, trigger sources can also be grip triggers, external hard-ware triggers or software-based. When the specified key is pressed, the trigger consumer (for example, a decoded scanner) is sent a message.Double-ClickWhen a key is pressed and released, then pressed again within the configured time (between 0 to 1000 milliseconds), a double-click occurs. See also “Trigger Press Type” on page 120.Important: It is not possible to have two or more identical mappings—for example [F1] cannot be mapped to the Non-Decoded Scanner twice—even if the trigger type is different.A keyboard key that is used as a trigger source will no longer generate key data or perform its normal function. For example, if the space button is used as a trigger source, it will not be able to send space characters to applications.](https://usermanual.wiki/Psion/7505BTMC75.User-Manual-Part-3/User-Guide-875136-Page-2.png)
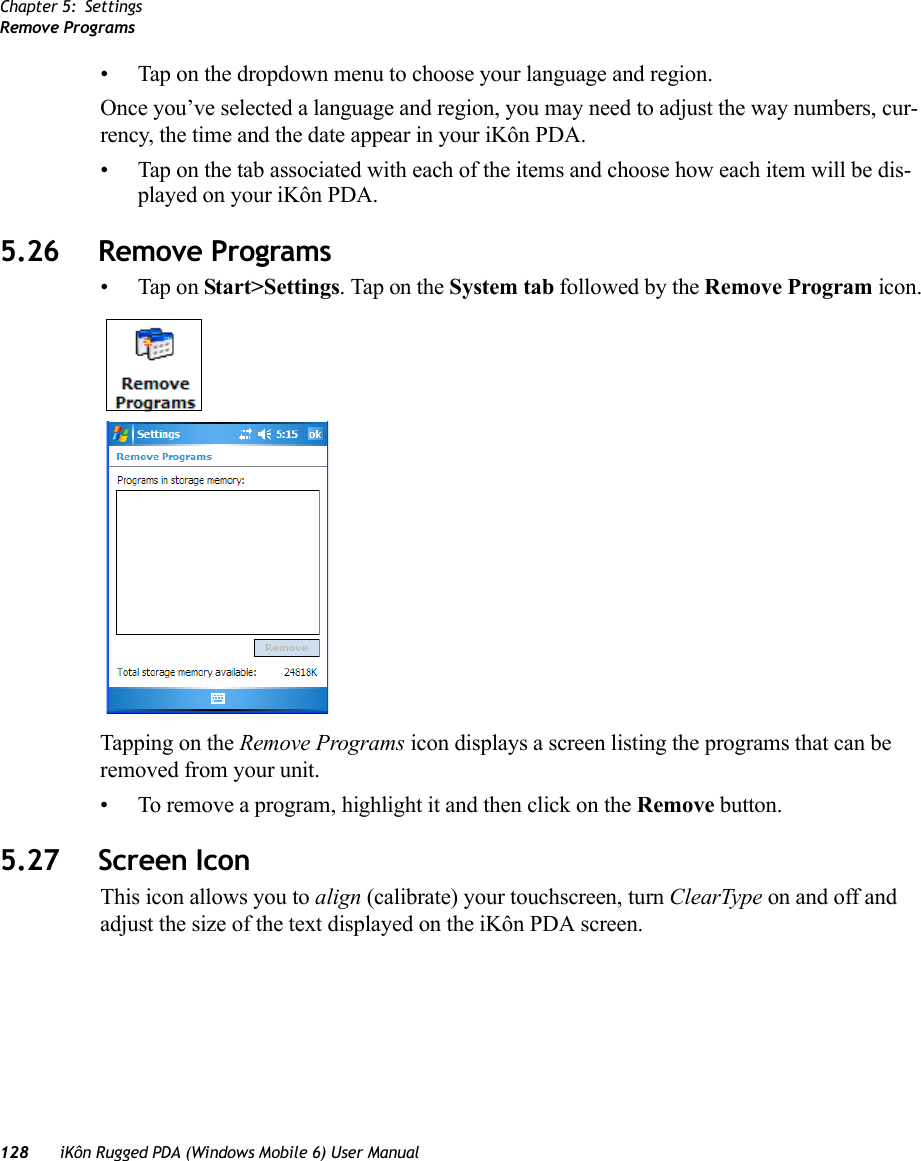
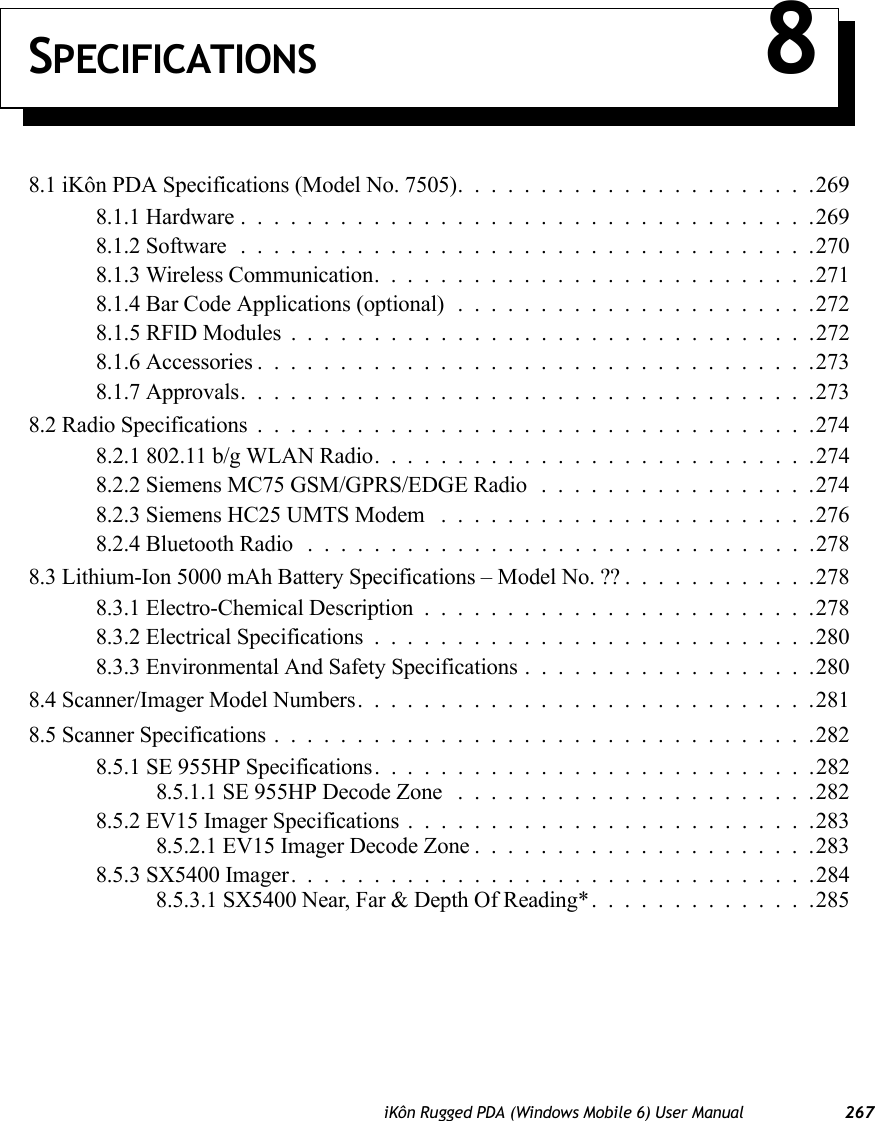
![Chapter 5: SettingsTrigger MappingsiKôn Rugged PDA (Windows Mobile 6) User Manual 119Show All ModulesBy default, the trigger mapping list only shows active mappings. Mappings for drivers or applications that are not currently active are not normally displayed. By checking this checkbox, all mappings, both active and inactive, are displayed.AddTapping this button brings up the Add mapping dialog (see below), so that you can add new trigger mappings.EditTapping this button brings up the Edit mapping dialog, so that you can edit existing trigger mappings.RemoveTapping this button removes an existing mapping.OKThe OK button in the top right of the Manage Triggers screen saves all changes made. If the [ESC] key is pressed, all changes made will be discarded.5.22.1.1 Add And Edit Trigger Mapping• Tap on Add to add a new trigger map, or tap on Edit to edit an existing trigger map.Trigger KeyThis dropdown list allows you to specify the source of the trigger events, such as the Grip Trigger, Left Scan, etc., for the trigger module selected.](https://usermanual.wiki/Psion/7505BTMC75.User-Manual-Part-3/User-Guide-875136-Page-3.png)
![Chapter 5: SettingsWakeup Keys TabiKôn Rugged PDA (Windows Mobile 6) User Manual 1275.24.6 Wakeup Keys TabThis option allows you to define which key can be pressed to wake the PDA from a suspend state.If the Two key wakeup option is checked, the operator will need to press two keys ?? – [FN/BLUE][ENTER] – to switch the PDA on.5.25 Regional SettingsTo display the Regional Settings screen, tap on Start>Settings, and then tap on the System tab followed by the Regional Settings icon.](https://usermanual.wiki/Psion/7505BTMC75.User-Manual-Part-3/User-Guide-875136-Page-11.png)
![134 iKôn Rugged PDA (Windows Mobile 6) User ManualChapter 5: SettingsDecoded (Internal) ScannersData Options–Decoded (Internal) ScannerDouble-tapping on this parameter displays a dialog box in which you can enter a value from 1 to 15. 5.28.1.4 Data Options–Decoded (Internal) ScannerTransmit Code ID CharA code ID character identifies the scanned bar code type. In addition to any single character prefix already selected, the code ID character is inserted between the prefix and the decoded symbol.When you double-tap on this parameter, a dialog box is displayed in which you can choose a transmit code: None, AIM or Symbol.Scan Data FormatThis parameter allows you to change the scan data transmission format. Double-tapping on “Scan Data Format” displays the following options from which you can choose a data format: data (as-is), data [S1], data [S2], data [S1][S2], [P] data, [P] data [S1], [P] data [S2] and [P] data [S1][S2].Prefix [P], Suffix [S1] And Suffix [S2]A prefix and/or one or two suffixes may be appended to scan data for use in data editing.When you double-tap on these parameters, a dialog box is displayed in which you can enter a value from 0 to 255.Delete Char Set ECIsSetting this parameter to on enables the scanner to delete any escape sequences representing Character Set ECIs – Extended Channel Interpretations (also known as GLIs) from its buffer before transmission. When this parameter is enabled, the scanner transmits data from PDF417 and MicroPDF417 bar codes containing Character Set ECIs, even when the ECI Protocol is disabled.Note: These parameters are only used when either Programmable Raster or Always Raster is assigned to the “2D Scanning Mode” parameter. “2D Raster Height” and “2D Raster Expand Rate” are intended for very specific applications and are usually not required for normal scanning purposes.](https://usermanual.wiki/Psion/7505BTMC75.User-Manual-Part-3/User-Guide-875136-Page-18.png)
![iKôn Rugged PDA (Windows Mobile 6) User Manual 139Chapter 5: SettingsDecoded (Internal) ScannersEAN 8Suffix CharThis character, if non-zero, is added after a successfully decoded bar code. Press the key you want to insert in the dialog box attached to this parameter. The ASCII/Unicode key value of the keypress is displayed.Strip LeadingThis parameter determines the number of characters that will be removed from the begin-ning of the bar code before the prefix character is added.Strip TrailingThe value entered in this parameter determines the number of characters that will be removed from the end of the bar code before the suffix character is added.5.28.1.10EAN 8EnabledSet this parameter to on to enable “EAN 8”.EAN-8 Zero ExtendWhen this parameter is enabled, five leading zeros are added to decoded EAN-8 symbols, making them compatible in format to EAN-13 symbols. Disabling this parameter returns EAN-8 symbols to their normal format.Prefix/SuffixRefer to page 137 for details.5.28.1.11UPC AEnabledSet this parameter to on to enable “UPC A”.UPC-A, Check DigitIf you enable this parameter, the check digit is included with the decoded bar code data.Note: The appended character is treated as any other keyboard character. For example, if [BKSP] is pressed, the usual action for that keyis performed.](https://usermanual.wiki/Psion/7505BTMC75.User-Manual-Part-3/User-Guide-875136-Page-23.png)

![iKôn Rugged PDA (Windows Mobile 6) User Manual 147Chapter 5: SettingsDecoded (Internal) ScannersMicro PDF-4175.28.1.22Micro PDF-417EnableSetting this parameter to on enables “Micro PDF-417” bar code scanning. Micro PDF-417 is a multi-row symbology that is useful for applications requiring greater area efficiency but lower data capacity than PDF-417.Code 128 EmulationWhen this parameter is enabled, the scanner transmits data from certain Micro PDF-417 symbols as if it was encoded in Code 128 symbols. If Code 128 Emulation is enabled, the following Micro PDF-417 symbols are transmitted with one of the following prefixes:]C1 if the first codeword is 903-907, 912, 914, 915]C2 if the first codeword is 908 or 909]C0 if the first codeword is 910 or 911If Code 128 Emulation is set to off, the Micro PDF-417 symbols are transmitted with one of the following prefixes:]L3 if the first codeword is 903-907, 912, 914, 915]L4 if the first codeword is 908 or 909]L5 if the first codeword is 910 or 911Field Size/CharRefer to page 137 for details.](https://usermanual.wiki/Psion/7505BTMC75.User-Manual-Part-3/User-Guide-875136-Page-31.png)
![Chapter 5: SettingsDecodediKôn Rugged PDA (Windows Mobile 6) User Manual 151GS1-128 Identifier“GS1-128 Identifier” allows the AIM ID " ]C1" for EAN 128 to be transmitted or removed. By default, this identifier is transmitted if EAN 128 is enabled.GTIN CompliantGTIN (global trade item number) processing transmits EAN 128 as the 14-character EAN/UCC GTIN. To use GTIN processing, you must activate the EAN 128 symbology.FNC1 Conversion“FNC1 Conversion” allows the embedded FNC1 character to be converted to another char-acter for applications that cannot use the default <GS> Group Separator or hex (1d). Double-tapping on this option displays a dialog box listing the allowable range – 0 to 255. Enable ISBT 128 To successfully scan this type of bar code (International Society of Blood Transfusion), this option must be set to on. If you enable this type of bar code, Code 128/EAN 128 is deacti-vated to avoid any confusion.ISBT Concat TransmitThe codes are not concatenated by default. You need to choose one of the options provided for this parameter to send concatenated code. Choosing Only Concatenated Codes transmits only concatenated codes—single codes will not be transmitted. Choosing Concatenated or Single transmits single codes or concatenated codes. If only one code of a pair is read, that code will be transmitted as a single code. If both codes in a pair are detected, they will be concatenated provided that ISBT Concat Any Pair (see below) is enabled.ISBT Concat Any PairEnabling this parameter causes all code pairs that can be, to be concatenated even if they do not comply with Section 4.1 of the “ISBT 128 Bar Code Symbology and Application Speci-fication for Labeling of Whole Blood and Blood Components” (June 2000, Version 1.2.1).Reading RangeDetermines the reading distance from which a bar code can be successfully scanned. The default setting Extended, allows for increased reading distance. Important: When EAN 128 and GTIN processing are both activated, it is not possible to read normal EAN 128 Codes.](https://usermanual.wiki/Psion/7505BTMC75.User-Manual-Part-3/User-Guide-875136-Page-35.png)
![Chapter 5: SettingsDecodediKôn Rugged PDA (Windows Mobile 6) User Manual 161Field Size/CharRefer to “Field Size” on page 137 for details.5.28.2.19PDF-417EnabledSet this parameter to on to enable “PDF-417”.Field Size/CharRefer to “Field Size” on page 137 for details.5.28.2.20Micro PDF-417EnabledSet this parameter to on to enable “Micro PDF-417”.Code 128 EmulationWhen this parameter is enabled, the scanner transmits data from certain Micro PDF-417 symbols as if it was encoded in Code 128 symbols. If Code 128 Emulation is enabled, the following Micro PDF-417 symbols are transmitted with one of the following prefixes:]C1if the first codeword is 903-907, 912, 914, 915]C2if the first codeword is 908 or 909]C0if the first codeword is 910 or 911If Code 128 Emulation is set to off, the Micro PDF-417 symbols are transmitted with one of the following prefixes:]L3if the first codeword is 903-907, 912, 914, 915]L4if the first codeword is 908 or 909]L5if the first codeword is 910 or 911Field Size/CharRefer to “Field Size” on page 137 for details.5.28.2.21CodablockEnable Codablock ASet this parameter to on to enable “Codablock type A”.](https://usermanual.wiki/Psion/7505BTMC75.User-Manual-Part-3/User-Guide-875136-Page-45.png)


![Chapter 5: SettingsAdvanced InformationiKôn Rugged PDA (Windows Mobile 6) User Manual 205• Type your PIN, and press [ENTER].Once the correct PIN or PUK is entered or if none was required, the modem is instructed to perform a GSM network registration followed by a GPRS attach. The main Wireless WAN dialog box reflects the progress of the initialization.• Searching for modem• Initializing modem•SIM is ready• Searching for network• Registered on network• Searching for packet data• Ready to connectIf the modem loses the connection to the GSM network, the following states are repeated: Searching for network, Registered on network, Searching for packet data and Ready to connect. 5.36.4.2 Error StatesThe following temporary error states–states that may disappear without interaction– may be displayed:• Emergency calls onlyThe modem has found a network but is not allowed to register (e.g. no roaming agreement between networks). The modem keeps searching for another network.• No network foundA network is not currently available. The modem continues searching for a network.• Packet data not availableThe current network does not support packet data.• Packet data not allowedThe modem is not allowed to use packet data on the current network (e.g. no packet data roaming agreement between network; a roaming agreement for voice may still be in place). It is also possible that you do not have a subscription for packet data at all.The remaining error states are permanent:Note: If you exceed the number of allowable attempts, a PUK entry window is brought to the foreground. You’ll need to enter a new PIN number.](https://usermanual.wiki/Psion/7505BTMC75.User-Manual-Part-3/User-Guide-875136-Page-89.png)


![Chapter 8: SpecificationsSiemens HC25 UMTS Modem276 iKôn Rugged PDA (Windows Mobile 6) User ManualInterfaces: Hirose U.FL-R-SMT 50 ohm antenna connectorAntenna solder padMolex 80-pin board-to-board connector- Power supply- Audio: 2x analog, 1x digital- serial interface (ITU-T V.24 protocol)- SIM card interface 3 V, 1.8 V8.2.3 Siemens HC25 UMTS ModemFrequency bands: UMTS/HSDPA: Triple band, 850//1900/2100MHzGSM/GPRS/EDGE: Quad band, 850/900/1800/1900MHzGSM class: Small MSOutput power (as per Release 99): Class 4 (+33dBm ±2dB) for EGSM850Class 4 (+33dBm ±2dB) for EGSM900Class 1 (+30dBm ±2dB) for GSM1800Class 1 (+30dBm ±2dB) for GSM1900Class E2 (+27dBm ± 3dB) for GSM 850 8-PSKClass E2 (+27dBm ± 3dB) for GSM 900 8-PSKClass E2 (+26dBm +3 /-4dB) for GSM 1800 8-PSKClass E2 (+26dBm +3 /-4dB) for GSM 1900 8-PSKClass 3 (+24dBm +1/-3dB) for UMTS 2100, WCDMA FDD BdIClass 3 (+24dBm +1/-3dB) for UMTS 1900, WCDMA FDD BdIIClass 3 (+24dBm +1/-3dB) for UMTS 850, WCDMA FDD BdVRoHS: All hardware components fully compliant with EU RoHS DirectiveHSDPA features: 3GPP Release 5, DL 3.6 Mbps, UL 384 kbpsUE CAT. [1-6], 11, 12 supportedUMTS features: 3GPP Release 4, PS data rate – 384 kbps DL / 384](https://usermanual.wiki/Psion/7505BTMC75.User-Manual-Part-3/User-Guide-875136-Page-134.png)
![Chapter 8: SpecificationsElectrical Specifications280 iKôn Rugged PDA (Windows Mobile 6) User Manual8.3.2 Electrical Specifications8.3.3 Environmental And Safety SpecificationsDescription SpecificationCommunication interface Smart Management Bus (SMB)Internal Battery Data Dependent upon cell parameters. Vendor to calculate and provide data.Charge control CV 4.2V, CC5.0A- dependant on cell manufacturer, Pre-charge 100mA, Current taper 100 - 250mAFuel gauge Texas Instruments BQ27350PW Accuracy: +/- 1% of remaining battery capacity Resolution: 10 steps minimumCalibration Self CalibratingCurrent accuracy Charge/discharge: +/- 5%Voltage accuracy Charge/discharge: +/- 1%, measured at cell stackBattery temperature +/- 5°C (from -20°C to +60°C)Battery Authentication Texas Instruments BQ26100 SHA-1 encryptionSeries resistance Max. 180m (contact + shunt + safety components + cells) Internal electronics consump-tionNormal operation 300µA MaxPower-down Mode 20µA Max Description SpecificationInternal Protection Over-temperature: thermal fuse disconnect above 90°COver-voltage: temporary disconnect if any cell voltage > 4.40V (discharge not inhibited)Electronics shall support 5.0A continuous load at 60°C without tripping the protection circuit.Over-current: temporary disconnect above 10.0A for > 20ms [shorting of battery terminals shall not damage the electronics or cells. Over current pro-tection will have two series devices - Polyswitch/ fuse and switch FETs.]Under-voltage: temporary disconnect if total cell voltage < 2.75V (protection circuit to enter power-down mode and gas gauge function should be prohibited, but data shall not be lost as long as one cell is over 1.5V.)](https://usermanual.wiki/Psion/7505BTMC75.User-Manual-Part-3/User-Guide-875136-Page-138.png)