Psion 7505BTSDCMCF10 Handheld PC with WLAN and BT User Manual
Psion Inc Handheld PC with WLAN and BT
UserManual.wiki
>
Psion
>
7505BTSDCMCF10 User Manual
>
User Manual Part 2
Contents
1.
User Manual Part 1
2.
User Manual Part 2
3.
User Manual Part 3
User Manual Part 2
Navigation menu
Upload a User Manual
Namespaces
Wiki Guide
HTML
PDF
Info
Views
User Manual
Discussion / Help
Navigation
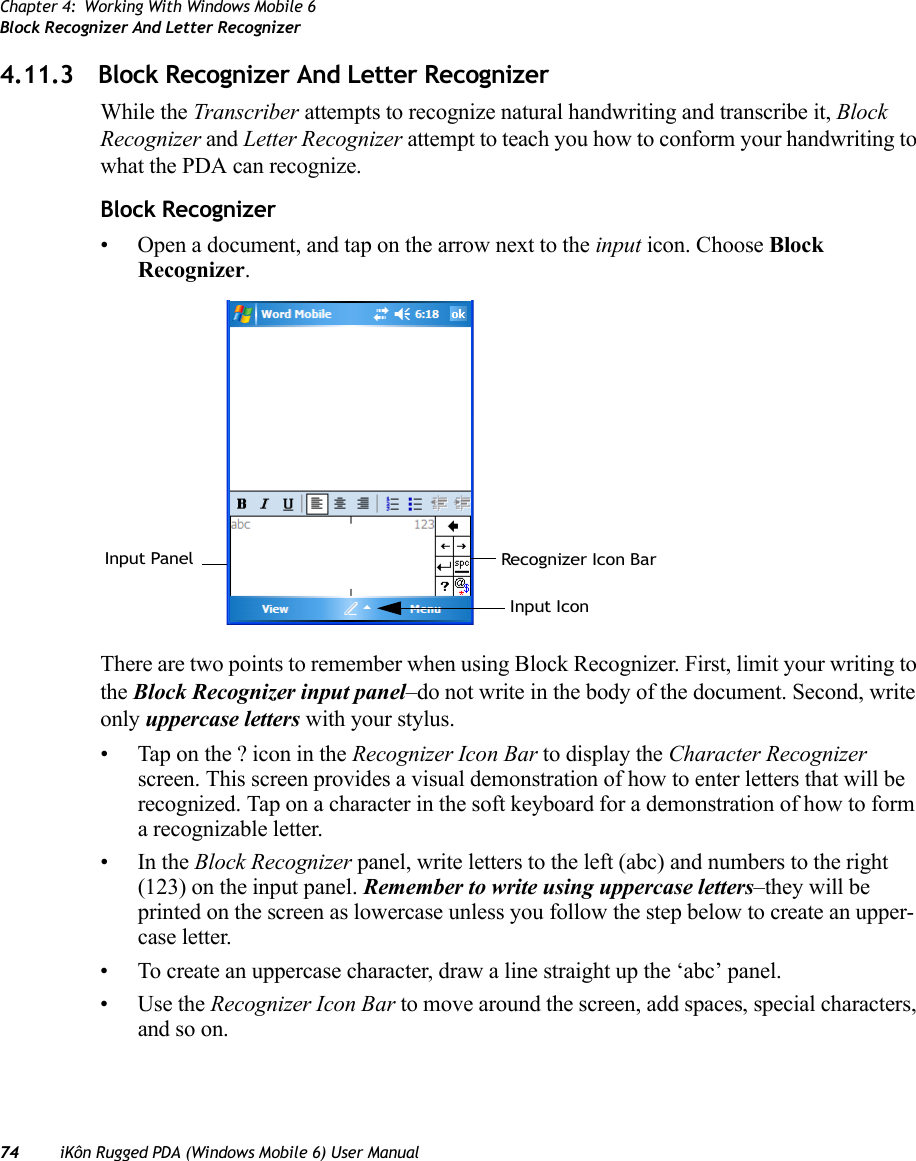
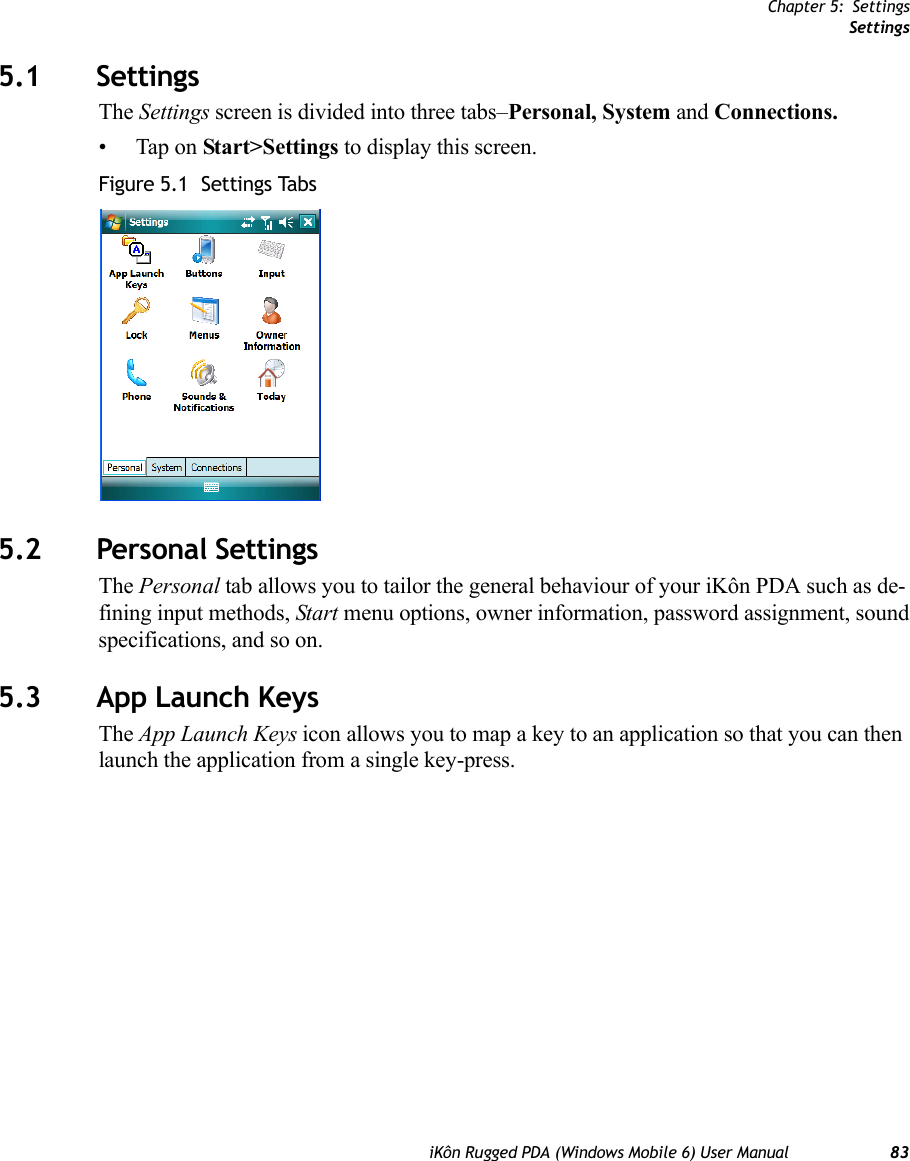
![Chapter 3: Get To Know The iKôn PDAAdjusting Speaker VolumeiKôn Rugged PDA (Windows Mobile 6) User Manual 43The volume can be adjusted using the [UP ARROW] and [DOWN ARROW]. The increase volume key is labelled with a plus (+) symbol and the decrease volume key is labelled with a minus (-) symbol.3.7.1 Adjusting Speaker VolumeThe [VOLUME] button is located on the left side of the PDA, just below the [SCAN] button. It is a rocker button; pressing the top half of the button increases volume while press-ing the bottom half of the button decreases it.3.8 Monitoring The Battery And Maximizing Run TimeAs Lithium-Ion batteries age, their capacity decreases gradually, and they are generally con-sidered depleted after approximately 2 years of use (less than 60% of original capacity remaining). Keep in mind however that heavy usage or operating the unit at temperature ex-tremes will shorten the battery life.Lithium-Ion batteries do not require conditioning cycles and the iKôn PDA battery system (including chargers) requires no user interaction to maintain peak performance.To maximize the run time of your batteries, consider the following:• The display backlight is the largest drain on the battery. Try to keep its brightness as low as possible. • The unit is ‘event’ driven—that is, when the unit is not in use, it reverts to sleep mode (even when it appears to be running), saving battery power. Events include a key press, touchscreen taps and scan triggers. Power consumption is reduced if you avoid unneces-sary events, and allow the unit to sleep as much as possible.• The battery is a ‘smart battery’ with built-in intelligence. Tapping on the Power icon under Start>Settings>System tab displays a dialog box that pro-vides detailed information about the battery status of the battery installed in your unit. • When the unit is switched off, it goes into a low-power, suspend state but continues to draw a small amount of power from the battery. This should not be an issue unless the unit is left in suspend state for more than a week—for long-term storage, the battery should be removed from the unit.Note: When the battery is at 50% capacity, a ‘low battery’ warning is displayed. When the battery is at approximately 10% capacity, a ‘very low battery’ notification bubble appears.](https://usermanual.wiki/Psion/7505BTSDCMCF10.User-Manual-Part-2/User-Guide-875550-Page-2.png)

![Chapter 4: Working With Windows Mobile 6Task NotificationiKôn Rugged PDA (Windows Mobile 6) User Manual 574.2.5 Task NotificationTask s lets you create lists of entries representing your responsibilities, upcoming projects, and so on. If you’ve assigned any tasks, this option lets you know how many active tasks you have. • Tap on the Tasks option to display a list of tasks.Creating A Task• Tap in the field labelled Tap here to add a new task. The text is replaced with a blink-ing cursor. If you prefer to type the task using the soft keyboard, tap on the soft keyboard icon in the softkey bar.• Type your task description.• Tap anywhere in the blank part of the screen, or press [ENTER] to add the task to your list.Editing A Task• Tap on a task in the task list to highlight it. Tap Edit in the softkey bar to display a detailed task screen where you can define task characteristics.Note: You can synchronize the Task Notification option using ActiveSync so that any tasks are displayed on your iKôn PDA as well as your PC. Refer to “Synchronization” on page 221 for details.](https://usermanual.wiki/Psion/7505BTSDCMCF10.User-Manual-Part-2/User-Guide-875550-Page-16.png)

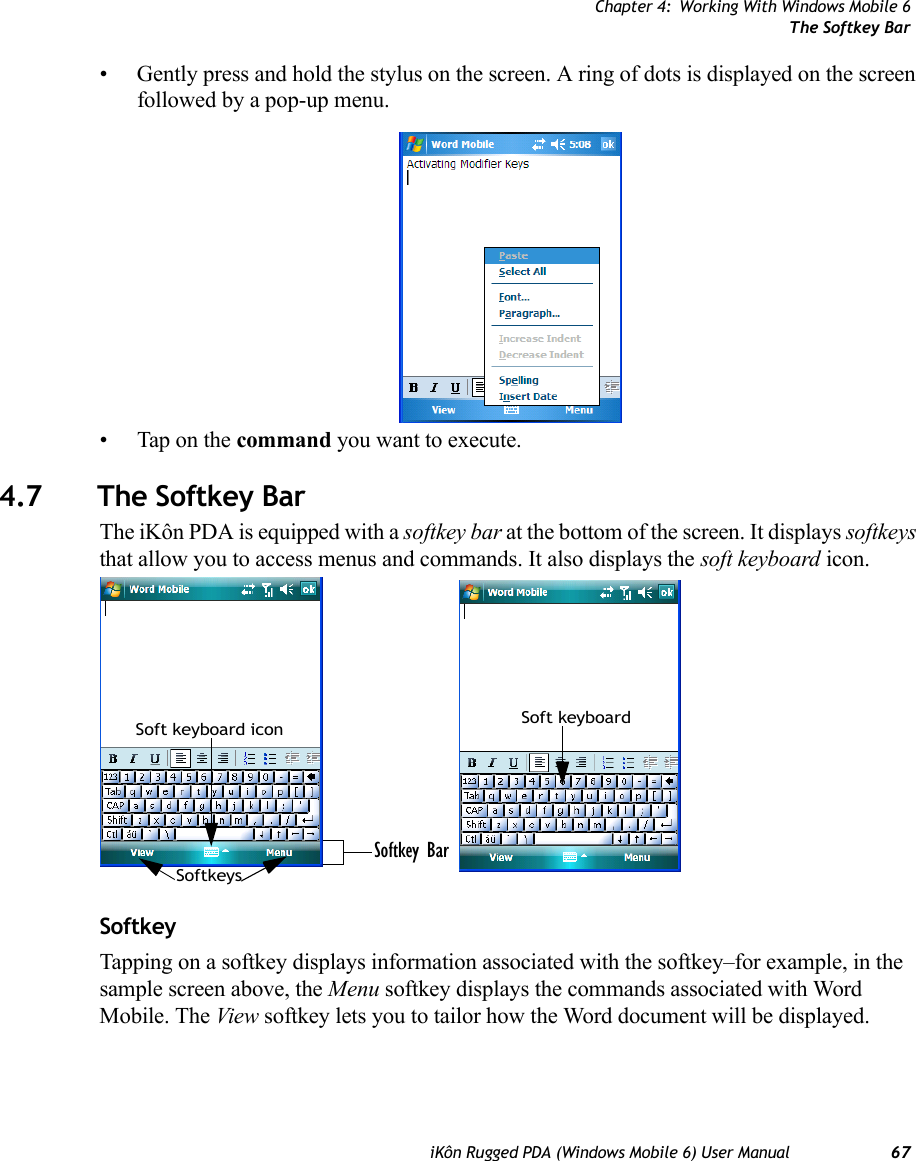
![Chapter 4: Working With Windows Mobile 6Programs–Using Applications68 iKôn Rugged PDA (Windows Mobile 6) User ManualThe Soft Keyboard IconTapping on the soft keyboard icon displays an onscreen keyboard you can use as an alterna-tive to the PDA keyboard.Shift-State Indicator IconThe softkey bar can also display the shift-state indicator icon. This icon indicates active modifier keys–[SHIFT], [ALT], [CTRL], [FN/ORANGE] and [FN/BLUE]. • Tap on Start>Settings>Buttons>One Shots. Tap in the checkbox next to Show modi-fier key state, to replace the soft keyboard icon with the shift-state indicator icon.When a modifier key is pressed, it is displayed in the shift-state indicator icon. In the example above, the [FN/ORANGE] key was activated.To distinguish a ‘locked’ modifier key–a key that has been locked ‘on’–from a modifier key that is only active until the next key is pressed, ‘locked’ keys are encircled in a black frame in the shift-state indicator icon. Refer to “Activating Modifier Keys & The Shift-State Indi-cator” on page 36 for details.4.8 Programs–Using Applications•Tap Start>Programs to display the programs installed on your iKôn PDA.Shift-state indicator iconNote: You can still access the soft keyboard while the shift-state indicator icon is displayed. Tapping on this icon displays the soft keyboard. Tapping on the shift-state indicator icon again removes the soft keyboard.](https://usermanual.wiki/Psion/7505BTSDCMCF10.User-Manual-Part-2/User-Guide-875550-Page-27.png)
![Chapter 4: Working With Windows Mobile 6Soft Keyboard72 iKôn Rugged PDA (Windows Mobile 6) User Manual4.11.1 Soft KeyboardThe soft keyboard is laid out just like the keypad on a PC keyboard. By tapping the stylus on letters and modifier keys like the [SHIFT] key, you can enter text in a document.If the soft keyboard is not already displayed:• Tap on the soft keyboard icon in the softkey bar.• Tap on the letters in the keyboard to enter text in your document.To switch to a numeric keyboard:• Tap on the 123 key in the upper-left corner of the soft keyboard.• Tap on this key again to return to the standard keyboard.4.11.2 The TranscriberTo access the Transcriber, with your document opened:• Tap on the arrow next to the keyboard icon, and choose Transcriber from the pop-up menu.• Review the introductory screen. It provides some shortcut symbols you can draw on your screen to work with the Transcriber. • When you’ve finished reading the introductory screen, tap OK.](https://usermanual.wiki/Psion/7505BTSDCMCF10.User-Manual-Part-2/User-Guide-875550-Page-31.png)

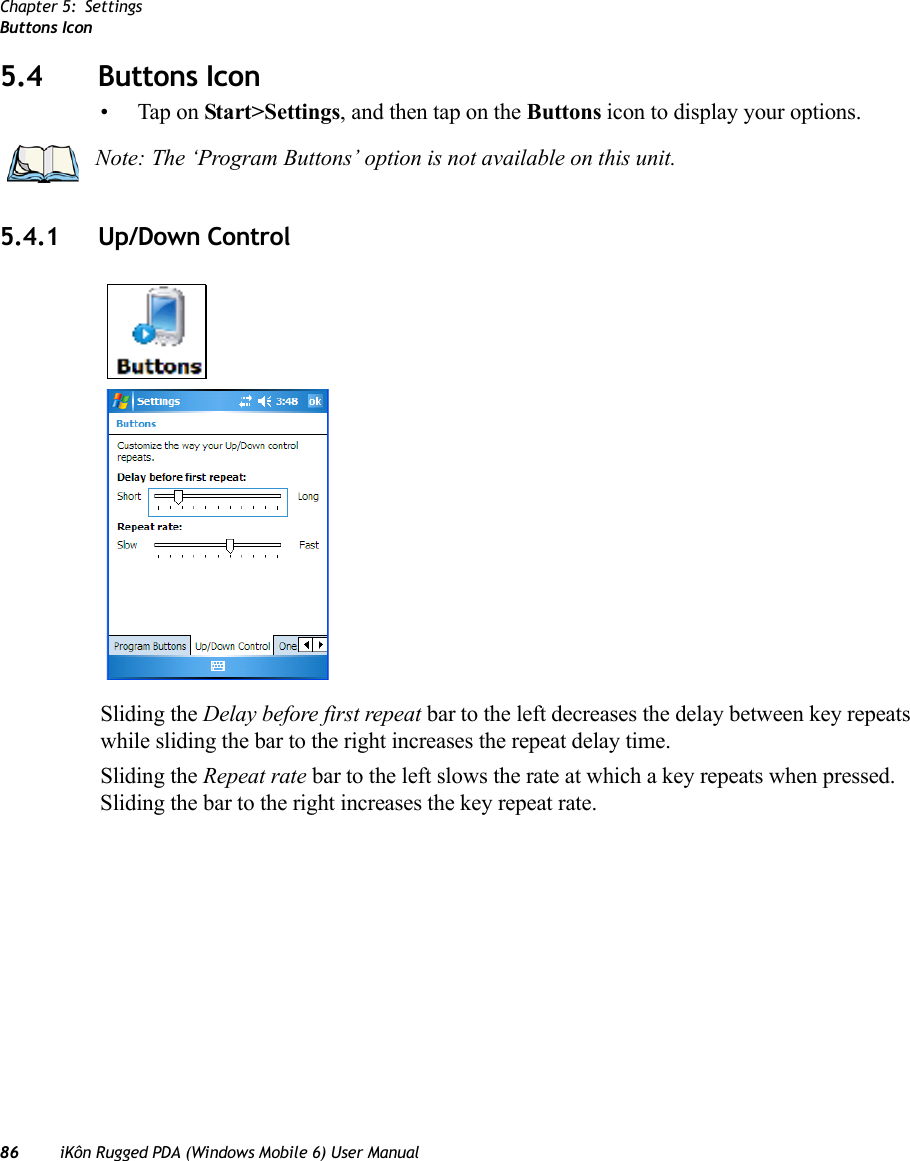
![Chapter 5: SettingsOne ShotsiKôn Rugged PDA (Windows Mobile 6) User Manual 875.4.2 One ShotsThe options in this tab allows you to determine how modifier keys on your iKôn PDA behave. For each modifier key–[ALT], [SHIFT], [CTRL], [FN/ORANGE] and [FN/BLUE]–you have the following options in the dropdown menu: Lock, OneShot, and OneShot/Lock.LockIf you choose Lock from the dropdown menu, pressing a modifier key once locks it ‘on’ until you press the modifier key a second time to unlock or turn it off. OneShotIf you choose OneShot, the modifier key remains active only until the next key is pressed.OneShot/LockOneShot/Lock allows you to combine these functions. When you choose this option and you press the modifier key once, it remains active only until the next key is pressed. If you press the modifier key twice, it is locked ‘on’, remaining active until the modifier key is pressed a third time to turn it ‘off’.Important: Once you’ve assigned a One Shot mode to a modifier key, you need to tap on the OK button at the top of the tab to activate your selection.](https://usermanual.wiki/Psion/7505BTSDCMCF10.User-Manual-Part-2/User-Guide-875550-Page-46.png)
![Chapter 5: SettingsKeyboard Macro Keys88 iKôn Rugged PDA (Windows Mobile 6) User ManualShow Modifier Key StateWhen you enable Show modifier key state, a shift-state indicator icon replaces the soft keyboard icon in the softkey bar at the bottom of the screen. When a mod-ifier key is pressed, a square in this icon is highlighted. A ‘locked’ modifier key is displayed in the shift-state indicator icon with a black frame around it.5.4.3 Keyboard Macro KeysA macro has 20 programmable characters (or “positions”). The macro keys can be pro-grammed to replace frequently used keystrokes, along with the function of executable keys including [ENTER], [BKSP] and [DEL] ([FN/BLUE]-[BKSP]), function keys, and arrow keys.Recording And Saving A MacroYou can program up to 15 macro keys.•In the Macro menu, highlight a macro key number–for example, macro 1 to assign a macro to macro key [M1]. Tap on the Record button.](https://usermanual.wiki/Psion/7505BTSDCMCF10.User-Manual-Part-2/User-Guide-875550-Page-47.png)
![Chapter 5: SettingsKeyboard Macro KeysiKôn Rugged PDA (Windows Mobile 6) User Manual 89A Record Macro screen is displayed.• Type the macro sequence you want to assign to the Macro key. You can type text and numbers, and you can program the function of special keys into a macro.• When you’ve finished recording your macro sequence, tap on the Stop Recording button. A new screen–Veri f y M a c ro –displays the macro sequence you created. • Tap on the Save button to save your macro. Your macro key sequence is listed in the Macro screen. • Tap on OK to save your macro key assignment.Executing A Macro• Press the macro key to which you’ve assigned the macro. For example, if you created a macro for macro key ‘1’, press [M1] ([FN/ORANGE][O]) to execute the macro.Deleting A Macro•In the Macros tab, highlight the macro number you want to delete.• Tap on the Delete button.](https://usermanual.wiki/Psion/7505BTSDCMCF10.User-Manual-Part-2/User-Guide-875550-Page-48.png)
![Chapter 5: SettingsUnicode Mapping90 iKôn Rugged PDA (Windows Mobile 6) User Manual5.4.4 Unicode Mapping• Tap on the Unicode Mapping tab to display this screen.The Unicode Mapping tab is used to map combinations of virtual key values and [CTRL] and [SHIFT] states to Unicode™ values. This tab shows the configured Unicode character along with the Unicode value. For example, “a (U+0061)” indicates that the character “a” is represented by the Unicode value “0061”, and so on. Keep in mind that Unicode configura-tions are represented as hexidecimal rather than decimal values.All user-defined Unicode mappings are listed in the Unicode Mapping tab in order of virtual key value, and then by order of the shift state. If a Unicode mapping is not listed, the Unicode mapping is mapped to the default Unicode value.Adding And Changing Unicode ValuesImportant: Changes to Unicode mappings are not saved until you exit the Unicode Mapping tab by tapping on [OK].](https://usermanual.wiki/Psion/7505BTSDCMCF10.User-Manual-Part-2/User-Guide-875550-Page-49.png)
![Chapter 5: SettingsScancode RemappingiKôn Rugged PDA (Windows Mobile 6) User Manual 91• Tap on the Add/Change button.• Highlight a value in the Unicode mapping list.• Position the cursor in the Unicode Mapping field, and type a Unicode value for the highlighted key.Removing Unicode Values•In the Unicode Mapping tab, highlight the item you want to delete, and tap the Remove button.5.4.5 Scancode RemappingA scancode is a number that is associated with a physical key on a keyboard. Every key has a unique scancode that is mapped to a virtual key, a function, or a macro. Scancode Remap-ping allows you to change the functionality of any key on the keyboard. A key can be remapped to send a virtual key (e.g. VK_F represents the ‘F’ key; VK_RETURN represents the [ENTER] key, etc.), perform a function (e.g. turn the scanner on, change volume/con-trast, etc.) or run a macro.There are three different tables of scancode mappings: the Normal table, the Blue table and the Orange table. The Normal table defines unmodified key presses; the Blue table defines key presses that occur when the [FN/BLUE] modifier is on; the Orange table defines key presses that occur when the [FN/ORANGE] modifier is on. The default mappings of these Note: To add a shifted state–[SHIFT] and/or [CTRL], tap on the checkbox next to ‘SHIFT Pressed’ and/or ‘CTRL Pressed’.](https://usermanual.wiki/Psion/7505BTSDCMCF10.User-Manual-Part-2/User-Guide-875550-Page-50.png)
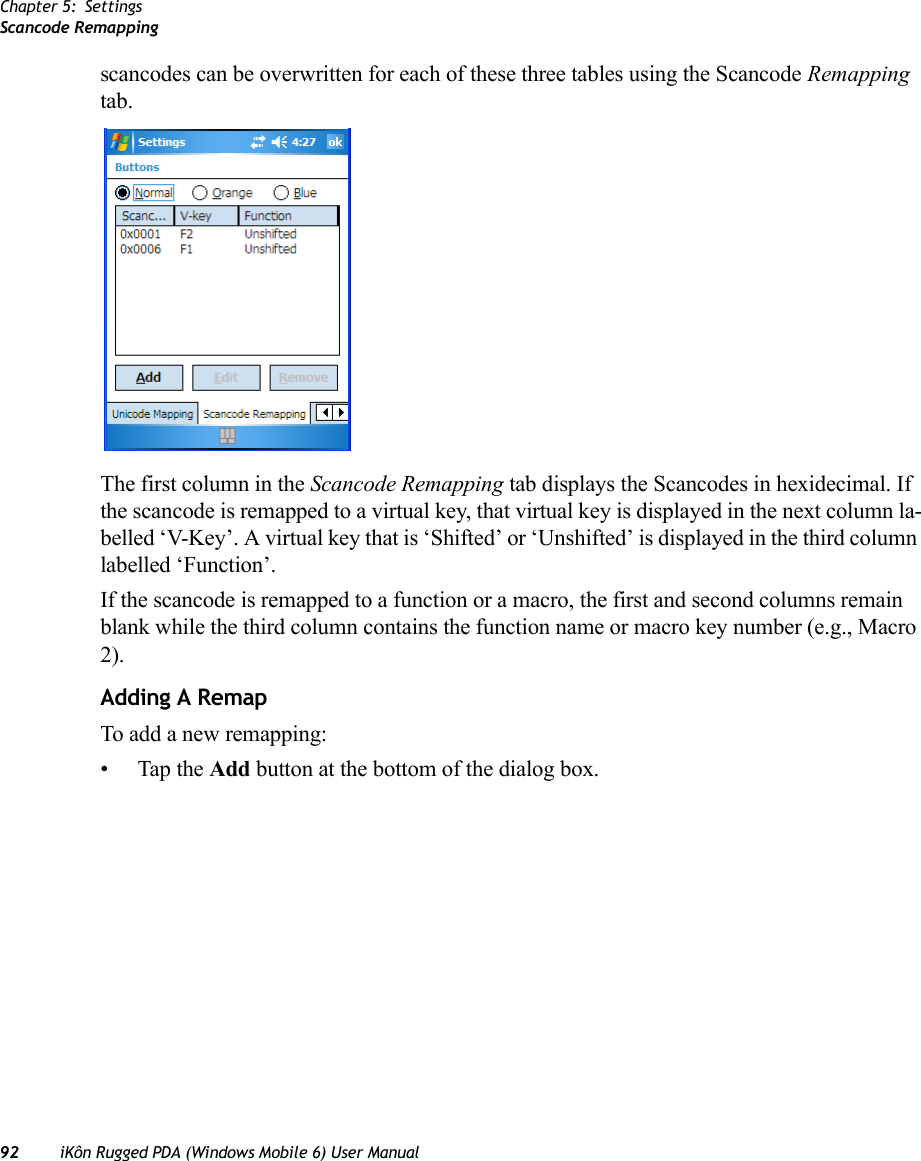
![Chapter 5: SettingsScancode RemappingiKôn Rugged PDA (Windows Mobile 6) User Manual 93The Remap Scancode dialog box is displayed.• Type the scan code in hexidecimal in the field labelled Scancode.Virtual Key, Function And MacroThe radio buttons at the bottom of the dialog box allow you to define to what the scan code will be remapped to: Virtual Key, Function or Macro. When Virtual Key is selected, you can choose to force [SHIFT] to be on or off when the virtual key is sent. If No Force is selected, the shift state is dependent on whether the shift state is on or off at the time the virtual key is sent.When Function is selected, a list of valid functions appears in the dialog box. When Macro is selected, the macro keys available on your unit are listed in the dialog box.• Choose Virtual Key>Function or Macro.• Choose a function from the Function list, and tap on OK.Editing A Scancode Remap•In the Scancode Remapping tab, tap on the remap you want to edit.• Tap on the Edit button, and make the appropriate changes.• Tap on OK to save your changes.Note: The ‘Label’ field displays the default function of the scancode you are remapping.](https://usermanual.wiki/Psion/7505BTSDCMCF10.User-Manual-Part-2/User-Guide-875550-Page-52.png)