Psion 8530G2 VEHICLE-MOUNT COMPUTER User Manual netpad Win CE Quick Start Guide
Psion Inc VEHICLE-MOUNT COMPUTER netpad Win CE Quick Start Guide
Psion >
USERS MANUAL
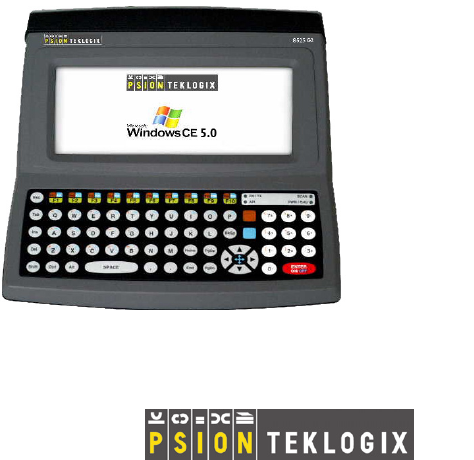
8525 G2/8530 G2
Vehicle-Mount Computer
Quick Start Guide
April 7, 2006 PN 8000001.A
ISO 9001 Certified
Quality Management System
© Copyright 2006 by Psion Teklogix Inc., Mississauga, Ontario, Canada
This document and the information it contains is the property of Psion
Teklogix Inc., is issued in strict confidence, and is not to be reproduced or
copied, in whole or in part, except for the sole purpose of promoting the sale
of Psion Teklogix manufactured goods and services. Furthermore, this docu-
ment is not to be used as a basis for design, manufacture, or sub-contract, or
in any manner detrimental to the interests of Psion Teklogix Inc.
All trademarks are the property of their respective holders.

Return-To-Factory Warranty
Psion Teklogix provides a return to factory warranty on this product for a
period of twelve (12) months in accordance with the Statement of Limited
Warranty and Limitation of Liability provided at www.psionteklogix.com/
warranty. (If you are not already a member of Teknet and you attempt to view
this warranty, you will be asked to register. As a member of Teknet, you’ll
have access to helpful information about your Psion Teklogix products at no
charge to you.) In some regions, this warranty may exceed this period. Please
contact your local Psion Teklogix office for details. For a list of offices, refer
to “Support Services & Worldwide Offices” on page 52. The warranty on
Psion Teklogix manufactured equipment does not extend to any product that
has been tampered with, altered, or repaired by any person other than an
employee of an authorized Psion Teklogix service organization. See Psion
Teklogix terms and conditions of sale for full details.
Important: To ensure prompt warranty service in North America,
please register the serial number of this device to activate its
warranty coverage by contacting Psion Teklogix at 1-800-
835-5644 ext. 209, or via web-link americascontracts@tek-
logix.com. Failure to do so could affect Psion Teklogix’s
ability to effectively service, repair, or support this device.
Service
Psion Teklogix provides a complete range of product support services to its
customers. For detailed information, please refer to “Support Services &
Worldwide Offices” on page 52. This section also provides information about
accessing support services through the Psion Teklogix web site.
Waste Electrical and Electronic Equipment
(WEEE) Directive 2002/96/EC
This Product, and its accessories, comply with the requirements of the Waste
Electrical and Electronic Equipment (WEEE) Directive 2002/96/EC.
If your end-of-life Psion Teklogix product or accessory carries a label as
shown here, please contact your local country representative for details on
how to arrange recycling.

For a list of international subsidiaries, please go to:
www.psionteklogix.com/public.aspx?s=us&p=Contacts.
Restriction On Hazardous Substances
(RoHS) Directive
2002/95/EC
What is RoHS?
The European Union has mandated that high environmental standards be met
in the design and manufacture of electronic and electrical products sold in
Europe, to reduce hazardous substances from entering the environment. The
“Restriction on Hazardous Substances Directive (RoHS)” prescribes the max-
imum trace levels of lead, cadmium, mercury, hexavalent chromium, and
flame retardants PBB and PBDE that may be contained in a product. Only
products meeting these high environmental standards may be “placed on the
market” in EU member states after July 1, 2006.
RoHS Logo
Although there is no legal requirement to mark RoHS-compliant products,
Psion Teklogix Inc. indicates its compliance with the directive as follows:
The RoHS logo located either on the back of the product or underneath
the battery in the battery compartment (or on a related accessory such
as the charger or docking station) signifies that the product is
RoHS-compliant as per the EU directive. Other than as noted below, a
Psion Teklogix product that does not have an accompanying RoHS logo
signifies that it was placed on the EU market prior to July 1, 2006,
and is thereby exempt from the directive.
Note: Not all accessories or peripherals will have a RoHS logo
due to physical space limitations or as a result of their
exempt status.
Disclaimer
Every effort has been made to make this material complete, accurate, and up-
to-date. In addition, changes are periodically added to the information herein;
these changes will be incorporated into new editions of the publication.
Psion Teklogix Inc. reserves the right to make improvements and/or changes
in the product(s) and/or the program(s) described in this document without
notice, and shall not be responsible for any damages, including but not lim-
ited to consequential damages, caused by reliance on the material presented,
including but not limited to typographical errors.

Psion Teklogix 8525 G2/8530 G2 Vehicle-Mount Computer Quick Start Guide 1
Table Of Contents
Approvals And Safety Summary . . . . . . . . . . . . . . . . . . . . . . . 3
Program License Agreements . . . . . . . . . . . . . . . . . . . . . . . . . 8
1. Basic Preparation . . . . . . . . . . . . . . . . . . . . . . . . . . . . . . . . . 15
1.1 Vehicle-Mount Safety Instructions . . . . . . . . . . . . . . . . 15
1.2 8525 G2/30 G2 Freezer & Outdoor Guidelines . . . . . . 16
1.2.1 Important Operating Instructions . . . . . . . . . . . . 16
1.3 Switching The Unit On. . . . . . . . . . . . . . . . . . . . . . . . . 18
1.4 Connecting To An 802.11 Network . . . . . . . . . . . . . . . 19
1.5 Calibrating The Touchscreen . . . . . . . . . . . . . . . . . . . . 20
1.6 Resetting The 8525 G2/8530 G2 Vehicle-Mount. . . . . 20
2. Getting To Know Your 8525 G2/8530 G2 . . . . . . . . . . . . . . 21
2.1 8525 G2/8530 G2 Features. . . . . . . . . . . . . . . . . . . . . . 21
2.1.1 8525 G2 Ports. . . . . . . . . . . . . . . . . . . . . . . . . . . 22
2.1.2 8530 G2 Ports. . . . . . . . . . . . . . . . . . . . . . . . . . . 22
2.2 The Internal Backup Battery . . . . . . . . . . . . . . . . . . . . 23
2.3 The Keyboard . . . . . . . . . . . . . . . . . . . . . . . . . . . . . . . . 23
2.3.1 Modifier Keys . . . . . . . . . . . . . . . . . . . . . . . . . . 24
2.3.2 The Keys . . . . . . . . . . . . . . . . . . . . . . . . . . . . . . 25
2.3.3 Adjusting The Keypad Backlight. . . . . . . . . . . . 27
2.4 The Display . . . . . . . . . . . . . . . . . . . . . . . . . . . . . . . . . 28
2.4.1 Adjusting The Display Backlight. . . . . . . . . . . . 28
2.4.2 Calibrating The Touchscreen . . . . . . . . . . . . . . . 29
2.5 8525 G2/8530 G2 Indicators . . . . . . . . . . . . . . . . . . . . 30
2.5.1 LEDs. . . . . . . . . . . . . . . . . . . . . . . . . . . . . . . . . . 30
2 Psion Teklogix 8525 G2/8530 G2 Vehicle-Mount Computer Quick Start Guide
2.5.2 Onscreen Indicators . . . . . . . . . . . . . . . . . . . . . . 33
2.5.3 Audio Indicators . . . . . . . . . . . . . . . . . . . . . . . . . 37
2.6 Monitoring The Network Connection . . . . . . . . . . . . . 37
2.7 Scanning Techniques . . . . . . . . . . . . . . . . . . . . . . . . . . 38
2.7.1 Scan LED Indicators. . . . . . . . . . . . . . . . . . . . . . 38
3. Navigating In Windows CE. . . . . . . . . . . . . . . . . . . . . . . . . . 39
3.1 Navigating A Touchscreen . . . . . . . . . . . . . . . . . . . . . . 39
3.2 Navigating Using The Keyboard . . . . . . . . . . . . . . . . . 40
3.3 The Startup Desktop . . . . . . . . . . . . . . . . . . . . . . . . . . . 41
3.3.1 Accessing Desktop Icons . . . . . . . . . . . . . . . . . . 41
3.3.2 The Taskbar . . . . . . . . . . . . . . . . . . . . . . . . . . . . 42
3.4 The Start Menu . . . . . . . . . . . . . . . . . . . . . . . . . . . . . . . 43
3.5 Using A Dialog Box . . . . . . . . . . . . . . . . . . . . . . . . . . . 49
4. General Maintenance. . . . . . . . . . . . . . . . . . . . . . . . . . . . . . . 51
4.1 Caring For The Touchscreen . . . . . . . . . . . . . . . . . . . . 51
4.2 Cleaning The 8525 G2/8530 G2. . . . . . . . . . . . . . . . . . 51
5. Support Services & Worldwide Offices . . . . . . . . . . . . . . . . 52
5.1 Technical Support . . . . . . . . . . . . . . . . . . . . . . . . . . . . . 52
5.2 Product Repairs. . . . . . . . . . . . . . . . . . . . . . . . . . . . . . . 52
5.3 Worldwide Offices . . . . . . . . . . . . . . . . . . . . . . . . . . . . 53

Psion Teklogix 8525 G2/8530 G2 Vehicle-Mount Computer Quick Start Guide 3
Approvals And Safety Summary
CE Marking
When used in a residential, commercial or light industrial environ-
ment the product and its approved UK and European peripherals
fulfil all requirements for CE marking.
R&TTE Directive 1999/5/EC
This equipment complies with the essential requirements of EU Direc-
tive 1999/5/EC (Declaration available: www.psionteklogix.com).
Cet équipement est conforme aux principales caractéristiques défin-
ies dans la Directive européenne RTTE 1999/5/CE. (Déclaration dis-
ponible sur le site: www.psionteklogix.com).
Die Geräte erfüllen die grundlegenden Anforderungen der RTTE-
Richtlinie (1999/5/EG). (Den Wortlaut der Richtlinie finden Sie
unter: www.psionteklogix.com).
Questa apparecchiatura è conforme ai requisiti essenziali della Diret-
tiva Europea R&TTE 1999/5/CE. (Dichiarazione disponibile sul
sito: www.psionteklogix.com).
Este equipo cumple los requisitos principales de la Directiva 1995/5/
CE de la UE, “Equipos de Terminales de Radio y Telecomu-nica-
ciones”. (Declaración disponible en: www.psionteklogix.com).
Este equipamento cumpre os requisitos essenciais da Directiva 1999/
5/CE do Parlamento Europeu e do Conselho (Directiva RTT).
(Declaração disponível no endereço: www.psionteklogix.com).
Ο εξοπλισμός αυτός πληροί τις βασικές απαιτήσεις της κοινοτικής
οδηγίας EU R&TTE 1999/5/EΚ. (Η δήλωση συμμόρφωσης
διατίθεται στη διεύθυνση: www.psionteklogix.com)
Deze apparatuur voldoet aan de noodzakelijke vereisten van EU-
richtlijn betreffende radioapparatuur en telecommunicatie-eindappa-
ratuur 199/5/EG. (verklaring beschikbaar: www.psionteklogix.com).

4 Psion Teklogix 8525 G2/8530 G2 Vehicle-Mount Computer Quick Start Guide
Dette udstyr opfylder de Væsentlige krav i EU's direktiv 1999/5/EC
om Radio- og teleterminaludstyr. (Erklæring findes på: www.psion-
teklogix.com).
Dette utstyret er i overensstemmelse med hovedkravene i R&TTE-
direktivet (1999/5/EC) fra EU. (Erklæring finnes på: www.psiontek-
logix.com).
Utrustningen uppfyller kraven för EU-direktivet 1999/5/EC om ans-
luten teleutrustning och ömsesidigt erkännande av utrustningens
överensstämmelse (R&TTE). (Förklaringen finns att läsa på:
www.psionteklogix.com).
Tämä laite vastaa EU:n radio- ja telepäätelaitedirektiivin
(EU R&TTE Directive 1999/5/EC) vaatimuksia. (Julkilausuma
nähtävillä osoitteessa: www.psionteklogix.com).
PSION TEKLOGIX tímto prohlašuje, že 8525 G2/8530 G2 je
ve shod
ě
se základními požadavky a dalšími příslušnými
ustanovenímism
ě
rnice1995/5/ES (NV č. 426/2000 Sb.) a
Prohlášení o shod
ě
je k dispozici na www.PsionTeklogix.com.
Toto zařízení lze provozovat v České republice na základ
ě
g
enerální licence č. GL - 12/R/2000.
PSION TEKLOGIX týmto vyhlasuje, že 8525 G2/8530 G2 spĺ
ň
a
základné požiadavky a všetky príslušné ustanovenia Smernice
1995/5/ES (NV č. 443/2001 Z.z.) a Vyhlásenie o zhode je k
dispozícii na www.PsionTeklogix.com.
Toto zariadenie je možné prevádzkovať v Slovenskej republike
na základe Všeobecného povolenia č. VPR-01/2001.
Psion Teklogix 8525 G2/8530 G2 Vehicle-Mount Computer Quick Start Guide 5
Use of the 802.11 8525 G2/8530 G2 in France:
Owing to French Government restrictions, the 802.11 8525 G2/
8530 G2 is limited to indoor use. They may be used outdoors, on
private property, only with prior authorization from the French
Ministry of Defense.
FCC Information To Users
Federal Communication Commission Interference Statement
This equipment has been tested and found to comply with the limits
for a Class B digital device, pursuant to Part 15 of the FCC Rules.
These limits are designed to provide reasonable protection against
harmful interference in a residential installation. This equipment
generates, uses and can radiate radio frequency energy and, if not
installed and used in accordance with the instructions, may cause
harmful interference to radio communications. However, there is no
guarantee that interference will not occur in a particular installation.
If this equipment does cause harmful interference to radio or televi-
sion reception, which can be determined by turning the equipment
off and on, the user is encouraged to try to correct the interference by
one of the following measures:
• Reorient or relocate the receiving antenna.
• Increase the separation between the equipment and receiver.
• Connect the equipment into an outlet on a circuit different
from that to which the receiver is connected.
• Consult the dealer or an experienced radio/TV technician
for help.
This device complies with Part 15 of the FCC Rules. Operation is
subject to the following two conditions: (1) This device may not
cause harmful interference, and (2) this device must accept any inter-
ference received, including interference that may cause undesired
operation.
L
6 Psion Teklogix 8525 G2/8530 G2 Vehicle-Mount Computer Quick Start Guide
FCC Caution: Any changes or modifications not expressly
approved by the party responsible for compliance could void the
user's authority to operate this equipment.
IMPORTANT NOTE:
FCC Radiation Exposure Statement:
The separation distance between the antennas of RA2040 and RA1001 radios
and between antennas and the 8525 G2/8530 G2 should be greater than 20 cm.
Some equipment in hospitals and aircraft are not shielded from radio
frequency energy. Do not use the 8525 G2/8530 G2 onboard aircraft,
or in hospitals, without first obtaining permission.
Do not use near pacemakers. The product may affect the operation
of some medically implanted devices such as pacemakers, causing
them to malfunction. Avoid placing your product next to such
devices. Keep a minimum distance of 20 cm between the device and
the product to reduce the risk of interference. If you have any reason
to suspect that interference is taking place, turn off the 8525 G2/
8530 G2 and contact your cardiologist for assistance.
Note: In August 1996 the Federal Communications Commission
(FCC) of the US adopted an updated safety standard for
human exposure to radio frequency energy emitted by FCC
regulated transmitters. The design of this product complies
with the FCC guidelines and those standards. To maintain
compliance with the FCC RF exposure guidelines, ensure the
antenna is at least 20 cm from your body when transmitting.
Emissions Information For Canada
This Class B digital apparatus meets all requirements of the Cana-
dian Interference-Causing Equipment Regulations. When using the
802.11 radio option, to prevent radio interference, this device is
intended to be operated indoors and away from windows to provide
maximum shielding. Equipment (or its transmit antenna) that is
installed outdoors is subject to licensing.
Psion Teklogix 8525 G2/8530 G2 Vehicle-Mount Computer Quick Start Guide 7
Cet appareil numérique de la classe B respecte toutes les exigences
du Règlement sur le matériel brouilleur du Canada. En cas d’utilisa-
tion du module radio 802.11, afin d'éviter toute interférence radio
avec le service autorisé, l'appareil doit être utilisé à l'intérieur, tout en
tant éloigné de toute fenêtre afin de garantir le maximum de protec-
tion. Si cet équipement (ou son antenne émettrice) est installé à
l'extérieur, il est alors soumis à licence.
Warnings to Users
RF EXPOSURE
Warning: To satisfy FCC RF exposure requirements for vehicle
mount transmitting devices, a separation distance of 20
centimetres should be maintained between the antenna
of this device and persons during device operation. To
ensure compliance, operations at closer than this dis-
tance is not recommended.
DO NOT REMOVE COVERS OR OPEN ENCLOSURES
To avoid injury, the equipment covers and enclosures should only
be removed by qualified service personnel. Do not operate the
equipment without the covers and enclosures properly installed.
CAUTION
Use of the Vehicle Mount Computer while charging the fork
truck battery is prohibited.
CAUTION
Use of additional wiring and attachments not recommended or
sold by the manufacturer may result in fire, electric shock or per-
sonal injury.
CAUTION
If using an AC adaptor, use only the AC adaptor recommended
by manufacturer.

8 Psion Teklogix 8525 G2/8530 G2 Vehicle-Mount Computer Quick Start Guide
CAUTION
Do not operate the vehicle-mount computer with a damaged cord
or plug. Replace immediately.
CAUTION
Make sure the cord is positioned so that it is not stepped on,
tripped over or otherwise subjected to damage or stress.
CAUTION
An extension cord should not be used unless absolutely neces-
sary. Use of an improper extension cord could result in fire or
electric shock.
CAUTION
To reduce risk of electric shock, unplug the vehicle-mount
computer from the DC source before attempting any maintenance
or cleaning.
Warning: Physically disconnect the 8525 G2/8530 G2 from
the vehicle battery during battery charging (into
AC outlet).
Program License Agreements
Microsoft's End User License Agreement
You have acquired a device (“DEVICE”) that includes software licensed by
Psion Teklogix Inc. from Microsoft Licensing Inc. or its affiliates (“MS”).
Those installed software products of MS origin, as well as associated media,
printed materials, and “online” or electronic documentation (“SOFTWARE”)
are protected by international intellectual property laws and treaties. The
SOFTWARE is licensed, not sold. All rights reserved.
IF YOU DO NOT AGREE TO THIS END USER LICENSE AGREEMENT
(“EULA”), DO NOT USE THE DEVICE OR COPY THE SOFTWARE.
INSTEAD, PROMPTLY CONTACT PSION TEKLOGIX INC. FOR
INSTRUCTIONS ON RETURN OF THE UNUSED DEVICE(S) FOR A
REFUND. ANY USE OF THE SOFTWARE, INCLUDING BUT NOT
LIMITED TO USE ON THE DEVICE, WILL CONSTITUTE YOUR
Psion Teklogix 8525 G2/8530 G2 Vehicle-Mount Computer Quick Start Guide 9
AGREEMENT TO THIS EULA (OR RATIFICATION OF ANY PRE-
VIOUS CONSENT).
GRANT OF SOFTWARE LICENSE. This EULA grants you the follow-
ing license:
• You may use the SOFTWARE only on the DEVICE.
•NOT FAULT TOLERANT. THE SOFTWARE IS NOT FAULT
TOLERANT. PSION TEKLOGIX INC. HAS INDEPENDENTLY
DETERMINED HOW TO USE THE SOFTWARE IN THE
DEVICE, AND MS HAS RELIED UPON PSION TEKLOGIX INC.
TO CONDUCT SUFFICIENT TESTING TO DETERMINE THAT
THE SOFTWARE IS SUITABLE FOR SUCH USE.
• NO WARRANTIES FOR THE SOFTWARE. THE SOFTWARE is
provided “AS IS” and with all faults. THE ENTIRE RISK AS
TO SATISFACTORY QUALITY, PERFORMANCE, ACCU-
RACY, AND EFFORT (INCLUDING LACK OF NEGLI-
GENCE) IS WITH YOU. ALSO, THERE IS NO WARRANTY
AGAINST INTERFERENCE WITH YOUR ENJOYMENT OF
THE SOFTWARE OR AGAINST INFRINGEMENT. IF YOU
HAVE RECEIVED ANY WARRANTIES REGARDING THE
DEVICE OR THE SOFTWARE, THOSE WARRANTIES DO NOT
ORIGINATE FROM, AND ARE NOT BINDING ON, MS.
•Note on Java Support. The SOFTWARE may contain support for
programs written in Java. Java technology is not fault tolerant and is
not designed, manufactured, or intended for use or resale as online
control equipment in hazardous environments requiring fail-safe per-
formance, such as in the operation of nuclear facilities, aircraft navi-
gation or communication systems, air traffic control, direct life
support machines, or weapons systems, in which the failure of Java
technology could lead directly to death, personal injury, or severe
physical or environmental damage. Sun Microsystems, Inc. has con-
tractually obligated MS to make this disclaimer.
• No Liability for Certain Damages. EXCEPT AS PROHIBITED BY
LAW, MS SHALL HAVE NO LIABILITY FOR ANY INDI-
RECT, SPECIAL, CONSEQUENTIAL OR INCIDENTAL
DAMAGES ARISING FROM OR IN CONNECTION WITH
THE USE OR PERFORMANCE OF THE SOFTWARE. THIS
LIMITATION SHALL APPLY EVEN IF ANY REMEDY FAILS
OF ITS ESSENTIAL PURPOSE. IN NO EVENT SHALL MS
BE LIABLE FOR ANY AMOUNT IN EXCESS OF U.S. TWO
HUNDRED FIFTY DOLLARS (U.S. $250.00).
10 Psion Teklogix 8525 G2/8530 G2 Vehicle-Mount Computer Quick Start Guide
•Limitations on Reverse Engineering, Decompilation, and Disas-
sembly. Yo u may not reverse engineer, decompile, or disassemble
the SOFTWARE, except and only to the extent that such activity is
expressly permitted by applicable law notwithstanding this limita-
tion.
•SOFTWARE TRANSFER ALLOWED BUT WITH RESTRIC-
TIONS. Yo u may permanently transfer rights under this EULA only
as part of a permanent sale or transfer of the Device, and only if the
recipient agrees to this EULA. If the SOFTWARE is an upgrade, any
transfer must also include all prior versions of the SOFTWARE.
•EXPORT RESTRICTIONS. You acknowledge that SOFTWARE is
subject to U.S. export jurisdiction. You agree to comply with all
applicable international and national laws that apply to the SOFT-
WARE, including the U.S. Export Administration Regulations, as
well as end-user, end-use and destination restrictions issued by U.S.
and other governments. For additional information see http://
www.microsoft.com/exporting/.
Psion Teklogix Inc. End User License Agreement
IMPORTANT - READ CAREFULLY:
This License Agreement (“Agreement”) is a legal agreement between you
and Psion Teklogix (“we”), the licensor of this software package (“Soft-
ware”), for your use of the Software only as authorized in this Agreement.
By clicking on the “Accept” or other appropriate assent button and/or install-
ing the Software, you agree to be and are hereby bound by the terms and con-
ditions of this Agreement. If you do not agree with this Agreement, we do not
grant you a license to the Software, and you may not install or use the Soft-
ware or any accompanying documentation.
The Software is the property of Psion Teklogix Inc. or its licensors and is pro-
tected by copyright laws and international copyright treaties, as well as other
intellectual property laws and treaties. The Software is licensed, not sold.
Psion Teklogix Inc. provides the Software and licenses its use worldwide.
You assume responsibility for the selection of the Software to achieve your
intended results, and for the use and results obtained from it.
1. GRANT OF LICENSE
We hereby grant you and you hereby accept a non-exclusive, non-transfera-
ble, limited license to install and use the Software in object code form only,
subject to the terms and restrictions set forth in this Agreement. Except as
Psion Teklogix 8525 G2/8530 G2 Vehicle-Mount Computer Quick Start Guide 11
explicitly set forth below, (i) you are not permitted to copy, sell, lease or rent,
distribute or sublicense the Software or to use the Software in a time-sharing
arrangement or in any other unauthorized manner; (ii) no license is granted to
you in the human readable code of the Software (source code); and (iii) this
Agreement does not grant you any rights to patents, copyrights, trade secrets,
trademarks, intellectual property or any other ownership rights with respect
to the Software.
2. DESCRIPTION OF REQUIREMENTS, RESTRICTIONS,
RIGHTS AND LIMITATIONS
a. Copy. The right and license granted to you shall be limited to installation
and use of the Software up to but not exceeding the number of copies you
have licensed. However, you may make a copy of the Software for
backup or archival purposes. You shall not remove any copyright notice
or proprietary notices, labels or marks in or on the Software.
b. Evaluation. As part of evaluation, you may install and use the Software
only during the specified evaluation period. Unless you register the license as
described below, the evaluation license shall expire upon the expiration of the
evaluation period.
c. License Registration. You will be required to provide a license ID, unique
to each device, for registering your Software license. As part of your soft-
ware license registration, we will provide you a corresponding license key for
each device.
d. No Modifications. You may not modify or create any derivative work of
the Software or any copy or portion thereof nor may you remove any Soft-
ware identification, copyright or other notices.
e. No Distribution. You may not distribute the Software, in whole or in part,
to any other third party.
f. Virus Program. You may not develop or knowingly incorporate any virus
program that may be harmful to a computer or a network in conjunction with
the Software, or use the Software for any other purpose as which may be
harmful to a third party.
g. Assignment. You may not assign or transfer the Software to a third party
or allow a third party to use the same.
h. Reverse Engineering. Modification, reverse engineering, reverse
compiling, disassembly, unbundling or extraction of the Software is
expressly prohibited.
12 Psion Teklogix 8525 G2/8530 G2 Vehicle-Mount Computer Quick Start Guide
i. Export Restrictions. You agree to comply with all applicable laws and
regulations and that you will not export or re-export the Software, or any part
or copies thereof, or any products utilizing the Software in violation of appli-
cable laws or regulations of the United States or the country in which you
obtained them.
3. HIGH RISK ACTIVITIES
The Software is not fault-tolerant and is not designed, manufactured or
intended for use or resale as on-line control equipment in hazardous environ-
ments requiring fail-safe performance, such as in the operation of nuclear
facilities, aircraft navigation or communication systems, air traffic control,
direct life support machines, or weapons systems, in which the failure of the
Software could lead to death, personal injury, or severe physical or environ-
mental damage (“High Risk Activities”). We specifically disclaim any
express or implied warranty of fitness for High Risk Activities.
4. DISCLAIMER OF WARRANTY
We do not warrant uninterrupted or error free operation of the Software nor
do we warrant that the Software will meet your requirements. THE SOFT-
WARE IS PROVIDED “AS-IS” WITHOUT ANY WARRANTY WHAT-
SOEVER AND WITHOUT ANY TECHNICAL SUPPORT OF ANY
KIND. WE DISCLAIM ANY AND ALL REPRESENTATIONS, WAR-
RANTIES AND CONDITIONS, WHETHER EXPRESS OR IMPLIED,
INCLUDING, BUT NOT LIMITED TO, THE IMPLIED WARRANTIES
OR CONDITIONS OF MERCHANTABLE QUALITY OR FITNESS FOR
A PARTICULAR PURPOSE. WE DO NOT WARRANT OR MAKE ANY
REPRESENTATIONS REGARDING THE USE OR THE RESULTS OF
THE USE OF THE SOFTWARE IN TERMS OF ITS CORRECTNESS,
ACCURACY, RELIABILITY, USE WITH FUTURE PSION TEKLOGIX
DEVICES INTRODUCED, OR OTHERWISE. YOU EXPRESSLY
ACKNOWLEDGE AND AGREE THAT USE OF THE SOFTWARE IS AT
YOUR SOLE RISK AND YOU ARE RESPONSIBLE FOR INSTALLA-
TION OF THE SOFTWARE ON YOUR COMPUTER.
5. LIMITATION OF LIABILITY
We are liable for no more than the value of the license fee that you paid for
the Software. This limitation is cumulative and our responsibility for multiple
claims will not exceed in aggregate this limit.
Under no circumstances are we or our third party suppliers liable for dam-
ages of third parties claimed against you, or for harm to your records or data,
Psion Teklogix 8525 G2/8530 G2 Vehicle-Mount Computer Quick Start Guide 13
or special, incidental, indirect, or consequential damages, including but not
limited to lost profits, lost business revenue or failure to realize expected sav-
ings, loss of data, loss of use of the Software or any associated equipment,
downtime and user's time, even if you informed us of their possibility, or for
breach of any express or implied warranty, breach of contract, negligence,
strict liability or any other legal theory related to the Software. This limitation
applies whether you are entitled to claim damages from us or our third party
suppliers as a matter of contract or tort.
6. COPYRIGHTS, OWNERSHIP AND PROPRIETARY RIGHTS
All title and copyrights in and to the Software, and any copies thereof, are
owned by Psion Teklogix Inc. or its suppliers. The Software also contains
copyrighted material licensed from our suppliers or obtained from open
source and all rights to such copyrighted material rests with such suppliers.
Additional third party license terms and conditions may apply. We retain title
to the Software and any copies made from it. Any copies of the Software you
made are subject to the restrictions of this Agreement.
WE DISCLAIM ALL WARRANTIES AND INDEMNITIES, EXPRESS,
IMPLIED OR STATUTORY, FOR PATENT OR COPYRIGHT INFRINGE-
MENT.
7. CONFIDENTIALITY
You agree not to use or disclose any proprietary information provided by us,
except for the purposes of this Agreement. You agree not to reproduce any of
the copyrighted materials unless expressly permitted by this Agreement.
8. ENDING THIS AGREEMENT
We may terminate this Agreement and your license immediately without
notice if (a) you fail to comply with any term of this Agreement, or (b) your
rights are assigned by you, by operation of law or otherwise. In such event,
you must return or destroy all copies and component parts of the Software
and documentation, as well as any other Psion Teklogix proprietary informa-
tion in your possession, within fourteen (14) days of the date of termination.
Any rights and obligations under this Agreement that by their nature continue
after it ends will remain in effect until they are completed.
9. GENERAL
The laws of the Province of Ontario and the federal laws applicable therein,
excluding the conflict of laws provisions, govern this Agreement. If any pro-
vision of this Agreement is deemed invalid or unenforceable by any country,
that particular provision will be deemed modified to the extent necessary to
14 Psion Teklogix 8525 G2/8530 G2 Vehicle-Mount Computer Quick Start Guide
make the provision valid and enforceable, and the remaining provisions will
remain in full force and effect. Failure by us to insist on strict performance or
to exercise a right when entitled, does not prevent us from doing so at a later
time, either in relation to that default or any subsequent one.
No modifications of this Agreement shall be effective unless in writing and
approved by us.
You acknowledge that you have read this Agreement, understand it, and that
it is the complete agreement between you and Psion Teklogix with respect to
the subject matter hereof and supersedes all prior agreements, oral or written.

Psion Teklogix 8525 G2/8530 G2 Vehicle-Mount Computer Quick Start Guide 15
1. Basic Preparation
Important: All approval and safety information is outlined in the
‘8525 G2/8530 G2 Vehicle-Mount Computer User
Manual’ – part number 8000083. It is important that
you review all safety guidelines before charging a
battery or operating a scanner.
This quick start guide provides basic information on the operation
and features of the Psion Teklogix 8525 G2/8530 G2 vehicle-mount
computers. For more detailed information, refer to the 8525 G2/8530
G2 Vehicle-Mount Computer User Manual, online help, or the docu-
mentation supplied with the application you are using.
Typically, 8525 G2/8530 G2 vehicle-mounts are configured at the
factory and arrive ready for use. Although the 8525 G2/8530 G2 is
equipped with an internal Compact Flash and SD I/O slots, these
slots are not intended for user modification. If a device needs to be
changed or added in these slots, contact qualified Psion Teklogix
personnel.Refer to “Support Services & Worldwide Offices” on page
52 for the service number closes to you.
1.1 Vehicle-Mount Safety Instructions
• The cord should be installed in the vehicle so that it is not
subjected to damage or stress.
• Use of an attachment to the power cord not recommended
or sold by manufacturer may result in fire, electric shock, or
personal injury.
• An extension cord should not be used unless absolutely
necessary. Use of an improper extension cord could result
in fire or electric shock. If an extension cord must be used,
make sure:
• The plug pins on the extension cord are the same
number, size, and shape as those on the adaptor.
16 Psion Teklogix 8525 G2/8530 G2 Vehicle-Mount Computer Quick Start Guide
• The extension cord is properly wired and in good
electrical condition and that the wire size is larger
than 16 AWG.
• When connected to the battery or AC adaptor, the mains
power cord shall comply with National safety regulations of
the country where the equipment is to be used.
• Do not operate the battery or AC adaptor with a damaged
cord or plug. Replace it immediately.
• Do not operate the AC adaptor if it has received a sharp blow,
been dropped, or otherwise damaged in any way; it should be
inspected by qualified service personnel.
• Do not disassemble the AC adaptor; it should be repaired by
qualified service personnel. Incorrect reassembly may result
in electric shock or fire.
• To reduce risk of electric shock, unplug the battery or AC
adaptor from the outlet before attempting any maintenance
or cleaning.
• Do not expose the battery or AC adaptor to rain or snow.
1.2 8525 G2/30 G2 Freezer & Outdoor Guidelines
8525 G2/8530 G2 vehicle-mounts are sealed against dust and high-
pressure water jets to the international standard IP66.
1.2.1 Important Operating Instructions
Warning: IT IS CRITICAL that this information be reviewed and
that any guidelines applicable to your vehicle-mount be
strictly followed.
For All Freezer Vehicle-Mounts
• Use vehicle-mounts only in the environments for which they
are designed.
• All Psion Teklogix freezer vehicle-mounts have built-in heat-
ers where required to warm internal components. To help

Psion Teklogix 8525 G2/8530 G2 Vehicle-Mount Computer Quick Start Guide 17
maintain the temperature, units should be switched on before
entry into a freezer environment and should be left connected
to vehicle power and running at all times while in a freezer
environment.
• When moving between freezer and warm, humid environ-
ments, window condensation or icing on the outside of the
display window is a normal occurrence. Wiping the conden-
sation from the window may help, but the operator may need
to wait until the condensation stops forming before use.
• To reduce condensation and frost on vehicle-mount displays,
use an anti-fogging agent once a week or as required.
• Contact lubricant and connector caps must be used on all
external connectors to maintain a moisture barrier and pre-
vent corrosion during freezer and outdoor use. On all
8525 G2/8530 G2 vehicle-mount computers, the contact
lubricant –PN 95146 (Nyogel) must be used. Further, the
appropriate contact lubricant should be replaced at least
monthly in applications requiring daily or frequent removal
of cables. Refer to the table below for connector cap part
numbers.
Backup Battery
The vehicle-mount back up battery capacity is reduced as the operat-
ing temperature cools. The table below provides a general outline of
battery capacity based on the operating temperature. Charging of the
back up battery will occur between +5° C and +45° C.
Note: If the backup battery temperature is less than +10° C and a
brown-out occurs, the display backlight will switch off in
order to maintain vehicle-mount operations. The backlight
Vehicle-Mount Type Connector Cap Part Number
8525 G2/8530 G2 26-pin DSUB Female 9008295
8525 G2/8530 G2 9-pin DSUB 9008296
8530 G2 26-pin DSUB Male 9008294

18 Psion Teklogix 8525 G2/8530 G2 Vehicle-Mount Computer Quick Start Guide
will switch back on when external power is restored or the
battery temperature is above +10° C.
Warning: Do not install the 8525 G2/8530 G2 in such a way that
the power cable is bent 90 degrees as this may damage
the power cable and power cable strain relief.
• To prevent condensation when a vehicle-mount is moved
from a freezer to a warmer environment, it is recommended
that the computer power be left on for at least five minutes.
• When not in use, vehicle-mount freezer units should be stored
in temperatures above 0° C (32° F).
• To prevent keyboard keys from freezing up, the keyboard
should be mounted off the horizontal plane. This allows water
to run off the keyboard and prevents it from pooling on the
keypad, freezing and finally physically jamming the keys.
Mounting the keyboard off the horizontal plane also prevents
water from dripping onto the keypad area.
1.3 Switching The Unit On
Switching The 8525 G2 On And Off
• Press the [ENTER/ON] key.
Note: If the 8525 G2/8530 G2 is in suspend state, pressing
[ENTER/ON] key ‘wakes’ the unit from this state. The
screen in which you were working before the computer
entered suspend state is displayed.
Temperature Backup Battery
Capacity
-30° C (-22° F) 35%
-20° C (-4° F) 45%
-10° C (14° F) 60%
0° C (32° F) close to 80%

Psion Teklogix 8525 G2/8530 G2 Vehicle-Mount Computer Quick Start Guide 19
To switch off the 8525 G2:
• Press the [BLUE] key, and then press the [ENTER/ON] key.
Turning off the 8525 G2/8530 G2 does not result in a complete
reboot; rather, the unit enters a power-saving, “suspend” state. When
the 8525 G2/8530 G2 is turned on from suspend state, operation
resumes within a few seconds.
Important: If the word ‘BLUE’ is displayed in uppercase in the
taskbar at the bottom of the screen, this key is locked
‘on’ – the 8525 G2/8530 G2 will not switch off. Press
the [BLUE] key again to unlock it; then press
[BLUE] [ENTER/ON] to switch the 8525 G3 off.
If, however, you’ve disabled the ‘Blue Key’ in the
‘One Shot’ dialog box, the 8525 G2/8530 G2 can be
turned off even when the [BLUE] key is locked ‘on’.
Refer to ‘Keyboard One Shot Modes’ in the ‘8525
G2/8530 G2 Vehicle-Mount Computer User Manual’.
Switching The 8530 G2 On And Off
• Press the [ON/OFF] switch on right side of the 8530 G2 to
turn the unit on and off, or
Press the [ENTER/ON] key to turn the 8530 G2 on, and press
[BLUE] [ENTER/ON] to turn the unit off.
Note: Pressing the 8530 G2 ON/OFF switch or using the
[BLUE][ENTER/ON] key combination does not result in a
complete reboot. The unit enters a ‘suspend’ state until it is
switched on.
1.4 Connecting To An 802.11 Network
In most cases, the 8525 G2/8530 G2 must be configured before it
can connect to an 802.11 wireless network. The 8525 G2/8530 G2
Vehicle-Mount Computer User Manual (PN 8000083) describes this
20 Psion Teklogix 8525 G2/8530 G2 Vehicle-Mount Computer Quick Start Guide
configuration process. Refer to “Configuring An IEEE 802.11
Radio” in Chapter 2: Basic Checkout for details. Once the 8525 G2/
8530 G2 is properly configured, it automatically connects to your
wireless network within a few moments of switching on. A radio
icon in the taskbar indicates a successful network connection along
with the quality of the radio reception.
1.5 Calibrating The Touchscreen
Before using your 8525 G2/8530 G2, you will need to calibrate the
touchscreen. Refer to “Calibrating The Touchscreen” on page 20
for details.
1.6 Resetting The 8525 G2/8530 G2 Vehicle-Mount
Important: Because Psion Teklogix cannot guarantee what has
been saved (registry) after a reset, this should be con-
sidered as a last resort.
To reset the 8525 G2/8530 G2:
• Press and hold down the [BLUE] key and the [ENTER/ON]
key simultaneously for a minimum of six seconds.
A reset results in a complete reboot of the unit. All RAM memory
contents are lost. While it is most likely that the contents of the flash
memory and memory card will be preserved, Psion Teklogix cannot
guarantee this.
Note: On the 8530 G2, pressing and holding down the ‘on/off’
switch on the right side of the unit for 10 or more seconds
resets the unit.
22 Psion Teklogix 8525 G2/8530 G2 Vehicle-Mount Computer Quick Start Guide
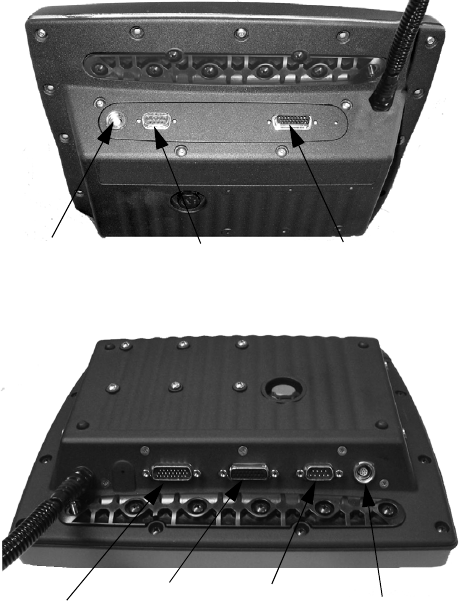
2.1.1 8525 G2 Ports
2.1.2 8530 G2 Ports
Tether Port RS232 Serial Port Auxiliary Port
Auxiliary Port
Keyboard Port RS232 Port Tether Port

Psion Teklogix 8525 G2/8530 G2 Vehicle-Mount Computer Quick Start Guide 23
2.2 The Internal Backup Battery
The 8525 G2/8530 G2 vehicle-mount is equipped with an internal
battery that will provide backup power to the unit for up to fifteen
minutes of normal operation. After 15 minutes, the unit will shut off
to preserve the contents of RAM.
The backup battery is not user accessible. It must be replaced by
authorized Psion Teklogix personnel.
2.3 The Keyboard
The 8525 G2/8530 G2 offers three keyboard layouts – QWERTY,
ABC and AZERTY. The 8530 G2 is equipped with an external
keyboard offering the same layouts as the 8525 G2 vehicle-mount.
Most of the keys on these keyboards operate much like a desktop
computer. If a key or key function is not consistent with the PC
keyboard, the differences are noted.
Note: The 8525 G2/8530 G2 provides the framework to design
your own SIP. On the 8530 G2, a soft keyboard that is an
exact replica of the external keyboard is available. Refer
to the ‘8525 G2/8530 G2 Vehicle-Mount Computer User
Manual’ (PN 8000083) for details.
Keyboard Port
24 Psion Teklogix 8525 G2/8530 G2 Vehicle-Mount Computer Quick Start Guide
2.3.1 Modifier Keys
The [SHIFT], [CTRL], [ALT], [BLUE] ad [ORANGE] keys are
modifier keys. Pressing a modifier key changes the function of the
next key pressed. For example, on a QWERTY keyboard, a square
bracket is printed in orange print above the [4] key. Pressing the
[ORANGE] key followed by the [4] key displays a square bracket
rather than the number 4.
The [SHIFT], [CTRL] and [ALT] keys operate much like a desktop
keyboard except that they are not chorded (two keys held down
simultaneously). The modifier key must be pressed first followed by
the key whose function you want modified.
Activating Modifier Keys
When a modifier key is pressed once, it is displayed in lowercase let-
ters in the taskbar at the bottom of the 8525 G2/8530 G2 screen. For
example, if the [CTRL] key is pressed, ctrl key is displayed at the bot-
tom of the unit screen. Once another key is pressed, the modifier key
becomes inactive and disappears from the taskbar.
Locking Modifier Keys
When a modifier key is ‘locked’ on, it is displayed in uppercase let-
ters in the taskbar. For example, pressing the [BLUE] key twice
locks it on – it is displayed as BLUE KEY in the taskbar at the bottom of
the computer screen.
The locked modifier key will remain active until it is pressed a
third time to unlock or turn it off. Once a modifier key is unlocked,
the uppercase representation at the bottom of the screen is no
longer displayed.
Note: The locking function of any modifier key can be disabled so
that pressing it once will lock the key ‘on’.
If you disable the ‘One Shot’ function (accessible through the
Control Panel ‘Keyboard’ icon) of a modifier key, pressing
the key once will lock it ‘on’. Pressing the same key a second
time will unlock or turn it ‘off’.
Psion Teklogix 8525 G2/8530 G2 Vehicle-Mount Computer Quick Start Guide 25
2.3.2 The Keys
The [BLUE] And [ORANGE] Keys
The [BLUE] and [ORANGE] modifier keys provide access to addi-
tional symbols and keys. These additional symbols and keys are col-
our coded in blue and orange print above the keyboard keys.
• Press the [BLUE] key to access functions or characters dis-
played in blue print on the keyboard. Press the [ORANGE]
key to access functions or characters displayed in orange
print on the keyboard.
The [SHIFT/CAPS] Key
The [SHIFT/CAPS] key is used to display uppercase alpha charac-
ters. Pressing [BLUE][SHIFT] turns the [CAPS] key on so that all
alpha characters are printed in uppercase until the [BLUE][SHIFT]
sequence is pressed again.
The Arrow Keys
The Arrow keys move the cursor around the screen in the direction
of the arrow – up, down, left and right. The cursor is the flashing box
or underline character that indicates where the next character you
type will appear.
The [INS] Key
The [INS] key inserts a character at the cursor position.
The [DEL] Key
The [DEL] key erases the character at the cursor position.
The [BKSP] Key
The [BKSP] key (sometimes referred to as destructive backspace)
moves the cursor one character to the left, erasing the incorrectly
entered key stroke.
26 Psion Teklogix 8525 G2/8530 G2 Vehicle-Mount Computer Quick Start Guide
The [CTRL] And [ALT] Key
The [CTRL] and [ALT] keys modify the function of the next key
pressed and are application dependent.
The [TAB] Key
Typically, the [TAB] key moves the cursor to the next field to the
right or downward.
The [ESC] Key
Generally, this key is used as a keyboard shortcut to close the current
menu, dialog box or activity and return to the previous one.
The [SPACE] Key
Pressing this key inserts a blank space between characters. In a Win-
dows dialog box, pressing the [SPACE] key enables or disables a
checkbox.
The [HOME] Key
The [HOME] key moves the cursor to the top of the form or page.
The [END] Key
The [END] key moves the cursor to the bottom of the form or page.
The [PgUp] And [PgDn] Keys
The [PgUp] key displays the previous screen of information. The
[PgDn] key displays the next screen of information.
Function Keys And Macro Keys
In addition to alphanumeric keys that are directly accessible on the
keyboard (no key combination is required) and the keys described in
this chapter, the 8525 G2/8530 G2 keyboard is also equipped with
thirty function keys and twelve macro keys.
Function keys [F1] through [F30] and Macro keys [M1] to [M12]
can be used with the CE operating system or another application.
All function keys and macro keys can be custom defined for each
Psion Teklogix 8525 G2/8530 G2 Vehicle-Mount Computer Quick Start Guide 27
application. Refer to the manual provided with your application
for details.
2.3.3 Adjusting The Keypad Backlight
Note: If you’re uncertain how to access the Control Panel, refer to
“The Start Menu” on page 43.
To adjust the intensity of the keypad backlight and the conditions
under which this backlight is activated.
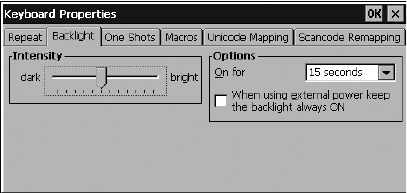
•In the Control Panel, choose the Keyboard icon.
•In the Keyboard Properties dialog box, open the
Backlight tab.
Intensity
This parameter is used to adjust the light intensity of the 8525/8530
keyboard backlight. Sliding the bar to the left darkens the keyboard
backlight intensity, and sliding it to the right lightens the intensity.
ON For
The value chosen from this dropdown menu determines the duration
of time that the keyboard backlight stays on when a unit is not in use.
Note:Tapping in the checkbox next to ‘When using external power,
keep the backlight always ON’ forces the keypad backlight to
28 Psion Teklogix 8525 G2/8530 G2 Vehicle-Mount Computer Quick Start Guide
remain on when the unit is operating with external power
such as a vehicle battery or A/C adaptor.
2.4 The Display
8525 G2/8530 G2s are equipped with display backlighting to
improve character visibility in low light conditions. The backlight
switches on when a key is pressed or the touchscreen is tapped. The
backlight intensity and the duration of time that the backlight will
remain at full intensity can be specified in the Display Properties
dialog box in the Control Panel.
2.4.1 Adjusting The Display Backlight
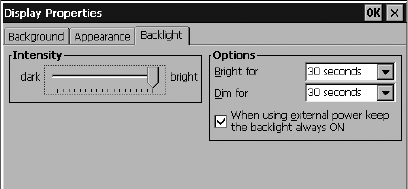
•In the Control Panel, choose the Display icon and select the
Backlight tab.
Intensity
This parameter is used to adjust the light intensity of the backlight.
Sliding the bar to the left lowers the light intensity, and sliding it to
the right raises the intensity.
Bright For
The value chosen from this dropdown menu determines the duration
of time that the backlight stays on at the configured intensity when a
unit is not in use.
Psion Teklogix 8525 G2/8530 G2 Vehicle-Mount Computer Quick Start Guide 29
Dim For
The value chosen from this dropdown menu determines the duration
of time that the backlight stays on at half the configured intensity
(dimmed backlight) when a unit is not in use.
External Power Checkbox
When you select the checkbox next to ‘When using external power
keep the backlight always ON.’, the backlight remains ON at the
configured intensity when the 8525/8530 is operating with external
power (not internal battery power). If the 8525/8530 is drawing
power from a battery, this option is ignored and the other parameters
defined in Display Properties dialog box take affect.
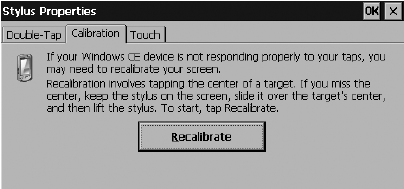
2.4.2 Calibrating The Touchscreen
The Stylus Properties dialog box in the Control Panel allows you to
recalibrate the screen.
•In the Control Panel, choose the Stylus icon to display the
Stylus Properties window.
• Choose the Calibration tab, and then tap on the Recalibrate
button.
• Follow the directions on the calibration screen to calibrate
the screen.
30 Psion Teklogix 8525 G2/8530 G2 Vehicle-Mount Computer Quick Start Guide
2.5 8525 G2/8530 G2 Indicators
8525 G2/8530 G2s use LEDs (Light Emitting Diodes), onscreen
messages and audio tones as indicators.
2.5.1 LEDs
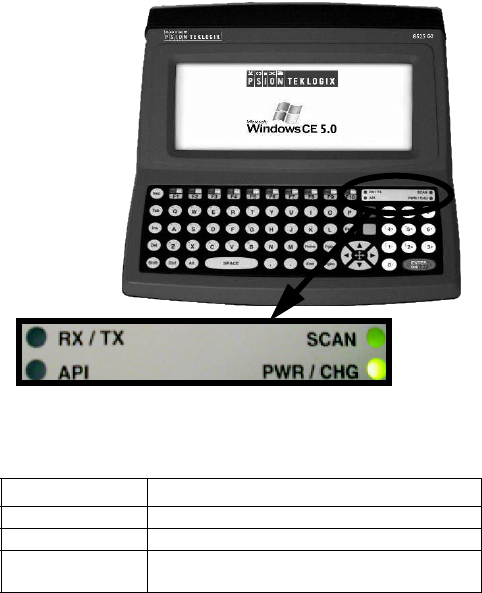
The 8525 G2/8530 G2 is equipped with four tri-coloured LEDs
located in the upper-right corner of the keyboard. If you have an
8530 G2 and are using the onscreen, soft keyboard, only the API and
Rx/Tx LEDs are available in the taskbar.
Important: You should proceed cautiously if a LED is illumi-
nated in red; this generally indicates an abnormal
operating condition or an active laser emission.
Psion Teklogix 8525 G2/8530 G2 Vehicle-Mount Computer Quick Start Guide 31
PWR/CHG – Charge LED
The lower-right LED is reserved for internal charger/power status.
This LED operates as follows:
LED Behaviour Description
Solid green External power in use. Backup battery is present.
Slow flashing green External power in use. Backup battery not present.
Blinking yellow External power not in use. Unit drawing power
from backup battery.

32 Psion Teklogix 8525 G2/8530 G2 Vehicle-Mount Computer Quick Start Guide
RX/TX – Radio Traffic LED
The upper-left LED on your 8525 G2/8530 G2 flashes either yellow
or green to indicate when the radio transmits and receives data.
Note: Keep in mind that while 802.11b/g radios support the
transmit/receive LED, not all radios support this function.
Scan LED
Successful scans are indicated in two ways – with a scan LED and
with an audio tone.
API – User Application LED
This indicator is available for user-loaded custom Windows CE
applications. Refer to the 8525/8530 SDK Manual for details about
this LED. Neither Windows CE nor Tekterm use this LED.
Function Radio Traffic LED Behaviour
Radio Transmit LED flashes yellow.
Radio Receive LED flashes green.
Function Scan LED Behaviour
Scan in progress LED displays solid red during scan.
Successful scan LED displays solid green after decode.
Off when scan ended.
Unsuccessful scan LED flashes red.
Psion Teklogix 8525 G2/8530 G2 Vehicle-Mount Computer Quick Start Guide 33
2.5.2 Onscreen Indicators
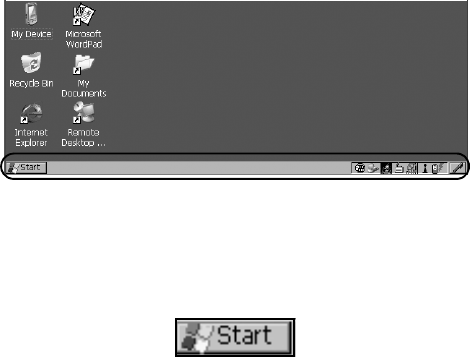
The taskbar at the bottom of the screen displays a variety of system
status indicators.
The taskbar changes dynamically, and only those icons that are
applicable are displayed. For example, if a radio is not installed in
your unit, the radio signal icon is not displayed in the taskbar.
Windows Start Button
The Windows Start button in the taskbar displays the Start Menu.
Modifier Key Indicators
Note: The behaviour of the modifier keys is defined in the ‘One
Shot’ dialog box accessible by choosing the Keyboard Icon
from the Control Panel.
[SHIFT], [CTRL], [ALT], [BLUE] and [ORANGE] are modifier
keys that have onscreen indicators to show when a key is active or
locked. If when you press a modifier key, it is displayed in the task-
bar in lowercase characters, this indicates that the key will remain
active only until the next key is pressed. If you press a modifier key,
and it is displayed in uppercase letters in the taskbar, this indicates

34 Psion Teklogix 8525 G2/8530 G2 Vehicle-Mount Computer Quick Start Guide
that the key is locked ‘on’; the modifier key will remain active until
it is pressed again to unlock or turn it off.
Battery Icons
Battery In Use
This icon indicates that the 8525 G2/8530 G2 is drawing power from
the backup battery rather than external DC power.
Battery Very Low
When the 8525 G2/8530 G2 is running on the backup battery (rather
than external power) and the battery power is nearly depleted, this
icon is displayed in the taskbar.
Battery Charging
This battery icon indicates that the vehicle-mount is running on
external DC power, and that the backup battery is present.
External DC Power
This external DC power icon is displayed in the taskbar when
the unit is using external DC power and the backup battery is
not present.
Psion Teklogix 8525 G2/8530 G2 Vehicle-Mount Computer Quick Start Guide 35
Onscreen LEDs (8530 G2 Only)
When the 8530 G2 keyboard is removed, two onscreen-LEDs are
displayed in the taskbar. The left LED acts as the API indicator, and
the right LED acts as the TX/RX (transmit and receive) indicator.
These onscreen LEDs behave in the same way as those on the key-
board, changing colour to indicate different operations. For details
about LED behaviour, refer to “RX/TX – Radio Traffic LED” and
“API – User Application LED” on page 32.
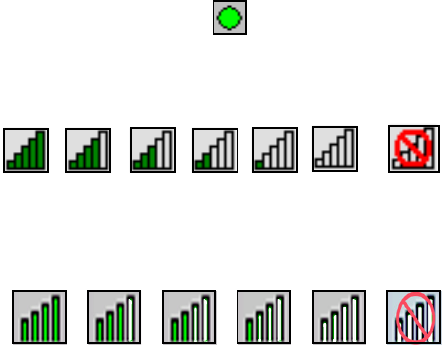
802.11 Radio Signal Quality
Increasing radio signal quality is represented by longer, filled bars
within this icon.
Narrow Band Radio Signal Quality
Increasing radio signal quality is represented by longer, filled bars
within this icon.
The radio signal is determined when the 8525 G2/8530 G2 receives
a message. If the unit receives no messages within a second, the “no
signal” icon is displayed. The signal strength icon shows the follow-
ing cases: No signal, 1% to 25% bar, 26% to 50% bar, 51% to 75%
bar and 75% to 100% bar.
No Radio LinkGood Reception
Weak Reception
Good Reception No Radio Link
Weak Reception
36 Psion Teklogix 8525 G2/8530 G2 Vehicle-Mount Computer Quick Start Guide
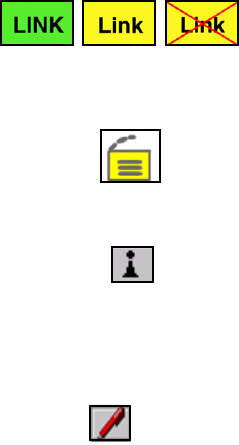
Link Status
The Narrow Band radio displays one of three link state icons. An
uppercase ‘LINK’ with a green background indicates the radio is
powered on and that the unit is online and locked onto a channel. A
lowercase ‘Link’ with a yellow background indicates that the radio
is powered on but the 8525 G2/8530 G2 is not online or not locked
onto a channel. A lowercase ‘Link’ with a yellow background and a
red ‘X’ through it indicates that the radio is not powered on, is not
online and is not locked onto a channel.
Security Level
Security levels can be set to limit access and prevent inadvertent
changes to application settings.
Bluetooth Radio
This icon indicates that a Bluetooth radio is installed in your unit.
Input Panel Button (8530 G2 Only)
Tapping on the Input Panel Button in the taskbar displays a soft key-
board on the 8530 G2 screen. Use the stylus to tap on the keys. Keep
in mind that the soft keyboard is not displayed when a physical key-
board is attached to the vehicle-mount.
Psion Teklogix 8525 G2/8530 G2 Vehicle-Mount Computer Quick Start Guide 37
2.5.3 Audio Indicators
Note: Care must be taken when routing cabling to the external port
as audio volume can be adversely affected if these cables
block the beeper.
The 8525 G2/8530 G2 beeper provides a variety of sounds and can
be configured to emit a sound when a key is pressed, a keyboard
character is rejected, scan input is accepted or rejected or an opera-
tor’s entry does not match in a match field.
The Volume & Properties icon in the Control Panel allow you to
define beeper behaviour. Refer to ‘Volume And Sound Properties’ in
the 8525 G2/8530 G2 Vehicle-Mount Computer User Manual,
PN 8000083, for details.
Adjusting The Beeper Volume Manually
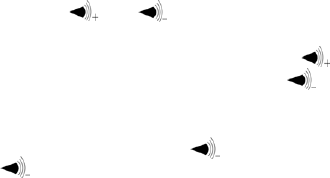
The volume keys – and – are represented in blue print
above the [C] and [V] characters on a QWERTY keyboard.
The increase volume key is labelled with a plus sign and the
decrease volume key is labelled with a minus sign .
To adjust the beeper volume:
• Lock the [BLUE] key ‘on’.
• Press the increase volume key or the decrease volume
key until the volume meets your needs.
• Press the [BLUE] key again to ‘unlock’ it.
2.6 Monitoring The Network Connection
If your vehicle-mount is equipped with a wireless-LAN radio, it will
typically associate with the nearest access point. The radio signal
quality meter in the taskbar indicates the relative strength of the
communication link.
38 Psion Teklogix 8525 G2/8530 G2 Vehicle-Mount Computer Quick Start Guide
To access the radio signal icon from the keyboard:
• Double-tap on the radio icon in the taskbar to display the
Wireless Statistics dialog box.
Note: Moving in and out of the radio coverage area can have vary-
ing effects on a network session. At times, you may need to
renew your connection by logging in again.
2.7 Scanning Techniques
Note: External scanners can be connected to the 8525 G2/8530 G2
tether, serial or USB device port.
• Hold the scanner at an angle. Do not hold it perpendicular to
the bar code.
•Do not hold the scanner directly over the bar code. In this
position, light can reflect back into the scanner’s exit window
and prevent a successful decode.
• Scan the entire bar code. If you are using a 1D or 2D scanner,
make certain that the scan beam crosses every bar and space
on the bar code, including the margins on either end of
the symbol.
• If you are using a 2D imaging scanner, make certain the red,
oval-shaped framing mark is centered within the bar code you
want to scan.
• Hold the scanner farther away for larger bar codes.
• Hold the scanner closer for bar codes with bars that are
close together.
2.7.1 Scan LED Indicators
The 8525 G2/8530 G2 scanner LED (the upper-right LED) indicates
whether or not your scan is successful. Keep in mind that scan indi-
cators only function when using a non-decoded 1D laser scanner
connected to the tether port. All other external scanners have inte-
grated LED indicators that are not controlled by the 8525/8530.

Psion Teklogix 8525 G2/8530 G2 Vehicle-Mount Computer Quick Start Guide 39
The LED behaves as follows:
• Scan In Progress: scan LED displays solid red colour.
• Successful Scan: scan LED displays solid green colour and
turns off when the scan is ended.
• Unsuccessful scan: scan LED flashes red.
A bar code icon appears on the screen during a scan. While the scan-
ner beam is active, the onscreen message states – SCANNING. If the
scan is successful, the bar code data is displayed on the screen until
the scan trigger is released.
3. Navigating In Windows CE
Graphic user interfaces like Windows CE for portable devices and
desktop Windows (2000, XP, etc.) utilize ‘point and click’ naviga-
tion. An equivalent keyboard shortcut is also available for every
‘point and click’ action.
Windows CE supports the same ‘point and click’ user interface and
keyboard shortcuts as desktop Windows with one difference – the
‘point and click’ action is accomplished using a touchscreen rather
than a mouse. Actions can be performed using any combination of
keyboard shortcuts or touchscreen tapping.
Note: Keep in mind that while the 8530 G2 is always equipped with
a touchscreen, the 8525 G2 can be ordered with or without
a touchscreen.
3.1 Navigating A Touchscreen
Note: If the touchscreen is not registering your screen taps accu-
rately, it may need recalibration. Refer to “Calibrating The
Touchscreen” on page 29.
A touchscreen is an optional feature on 8525 G2s. Units with a
touchscreen are equipped with a stylus—a pointing tool that looks
like a pen. It is used to select objects on the touchscreen.

40 Psion Teklogix 8525 G2/8530 G2 Vehicle-Mount Computer Quick Start Guide
Note: To prevent damage to the touchscreen, use only the stylus
(pen) supplied with your unit.
To open a file, launch an applet or open a folder:
• Double-tap on the appropriate icon.
To navigate through a dialog box – for example, display the informa-
tion in a tab, choose a radio button, check a checkbox and so on:
• Tap the stylus on a tab, radio button, checkbox and so on.
3.2 Navigating Using The Keyboard
Note: Refer to “The Keyboard” on page 23 for more detail about
the keyboard keys.
If your unit is not equipped with a touchscreen or the touchscreen
has been disabled, you can choose icons and navigate dialog boxes,
display the desktop, and so on using the keyboard.
Keep in mind that unlike a desktop computer, vehicle-mounts do not
support key chording (pressing two keys at the same time). You must
press one key followed by the next in sequence.
Operation Key or Key Combination
Switch between applications [ALT] [TAB]
Open the task manager screen [ALT] [ESC]
Move the cursor Arrow keys
Open file, folder or icon [ENTER]
Exit & Save [ENTER]
Close/Exit & Do Not Save [ESC]
Navigate Dialog Boxes
[TAB]
To move cursor up: [SHIFT][TAB]
To display the next ‘tab’ in a dialog
box: [CTRL][TAB]
Psion Teklogix 8525 G2/8530 G2 Vehicle-Mount Computer Quick Start Guide 41
3.3 The Startup Desktop
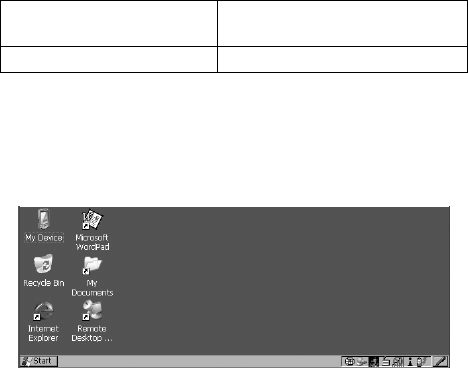
When the 8525 G2/8530 G2 boots up, the startup desktop is dis-
played. Any applications stored in the Startup folder will start up
immediately. The Startup folder is located in \Windows\Startup and
\Flash Disk\Startup.
3.3.1 Accessing Desktop Icons
• Use the arrow keys to highlight the icon, and press [ENTER]
to launch the highlighted icon.
Note: If the arrow keys do not highlight the desktop icons, the desk-
top may not be selected. Press [BLUE] 0 (zero) to display the
Start Menu, and choose Desktop. Now the desktop will be
“in focus” and the arrow keys will highlight the icons.
If you’re using a touchscreen:
• Tap an icon to select it, double-tap on it to open a dialog box
or, in the case of an application icon, launch an application.
Select Radio Button/
Press Button [SPACE]
Go to Start Menu [BLUE][0]
42 Psion Teklogix 8525 G2/8530 G2 Vehicle-Mount Computer Quick Start Guide
3.3.2 The Taskbar
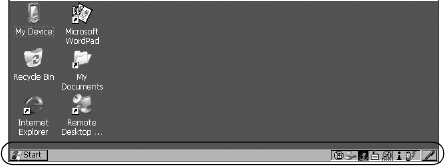
The 8525 G2/8530 G2 has a taskbar at the bottom of the screen. It
displays icons through which you can view the internal battery
capacity, the radio signal quality of your unit, and so on. If the vehi-
cle-mount is attached to a peripheral device, an associated icon is
displayed. In addition, the taskbar displays the application(s) cur-
rently running on your unit and the security level assigned to your
8525 G2/8530 G2.
The taskbar also displays active modifier keys – [SHIFT], [ALT],
[CTRL], [BLUE] and [ORANGE]. Keys that have been locked ‘on’
are displayed in uppercase letters.
Using The Taskbar
If you’re using a keyboard:
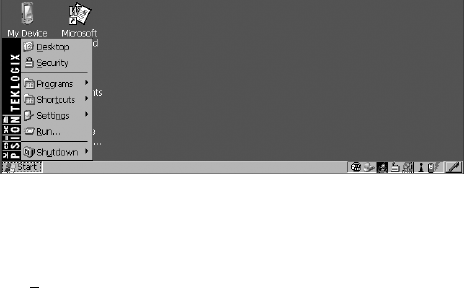
• Press [BLUE] [0] to display the Start Menu.
• Press the [DOWN] arrow key to highlight the Shortcut menu.
Press the [RIGHT] arrow key to display the sub-menu. Type
[Y] to choose System Tray from the sub-menu.
• Press the [LEFT] and [RIGHT] arrow keys to highlight the
icon in the taskbar about which you’d like more information.
A tooltip is displayed as each taskbar icon is highlighted. The tooltip
provides the status of each icon.
• Press [ENTER] to display the associated dialog box.
Psion Teklogix 8525 G2/8530 G2 Vehicle-Mount Computer Quick Start Guide 43
If you’re using touchscreen:
• Tap and hold the stylus on an icon to display the icon's
tooltip. Double-tap the icon to open the Control Panel dialog
box associated with the icon.
3.4 The Start Menu
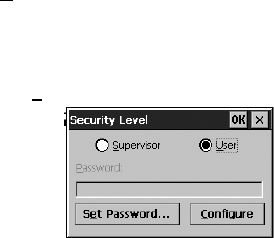
The Start Menu lists operations you can access and work with. It is
available from the startup desktop or from within any application.
To display the menu:
• Press [BLUE] [0] (zero).
• Use the arrow keys to highlight a menu item, and press
[ENTER], or
If the menu item has an underlined character:
• Type the underlined alpha character—for example, to display
Security, type the letter s.
If you’re using a touchscreen:
• Tap on the Start button in the taskbar. Tap on the item in the
menu with which you want to work.
44 Psion Teklogix 8525 G2/8530 G2 Vehicle-Mount Computer Quick Start Guide
The Desktop
Choosing Desktop from the Start Menu displays the 8525 G2/
8530 G2 desktop.
Security Settings
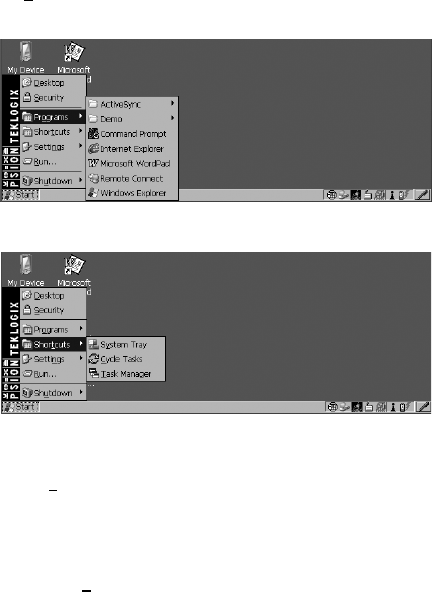
To assign a security level:
• Choose Security from the Start Menu.
• Choose a security level from the dialog box. To allow access
to all the Start Menu and taskbar options, choose the Supervi-
sor security level.
• Type the appropriate password in the Password: textbox, and
press [ENTER].
To change the password:
Note: Keep in mind that this is the same password as that assigned
through the Password Control Panel applet.
• Choose a security level, and enter the existing password in
the Password field.
• Choose the [Set Password] button.
In the Password Properties dialog box:
• Type the new password in the Password: textbox, and retype
the new password in the Confirm Password: textbox.
Psion Teklogix 8525 G2/8530 G2 Vehicle-Mount Computer Quick Start Guide 45
Programs
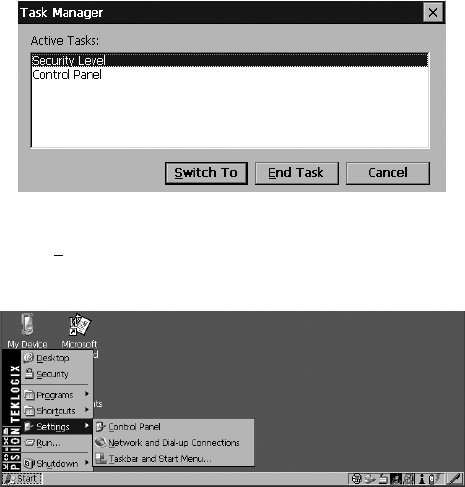
The Programs menu contains a sub-menu of programs available
on your vehicle-mount.
Shortcuts
The System Tray
If your unit is not equipped with a touchscreen or if it has been disa-
bled, the System Tray option in the Shortcuts sub-menu allows
access to the icons in the taskbar at the bottom of the screen. The
taskbar displays indicators such as a battery capacity gauge and the
security level. These indicators are attached to dialog boxes that pro-
vide additional information.
• Choose System Tray from the Start Menu.
46 Psion Teklogix 8525 G2/8530 G2 Vehicle-Mount Computer Quick Start Guide
When System Tray is chosen, the taskbar icons become accessible.
To display the dialog box attached to an icon:
• Use the [LEFT] and [RIGHT] arrow keys to highlight an
icon—for example, the security icon.
• Press [ENTER] to display the security level dialog box.
If you’re using a touchscreen, you don’t need to use System Tray
option. You have direct access to the icons in the taskbar.
• Tap and hold the stylus on a taskbar icon to display a tooltip –
a brief description of the status of the icon.
To display the dialog box associated with an icon:
• Double-tap on the icon with which you want to work.
Cycle Tasks
When Cycle Tasks is selected (and the Task Manager is not open),
you can cycle through active applications.
• Press [BLUE] [0] (zero) [T] [C] to cycle to the next active
task, or
Press [ALT][TAB].
The Task Manager
The Task Manager option allows you to switch to another task or to
end an active task. To display the task manager window:
• Press [BLUE] [0] (zero) [T] [T], or
Psion Teklogix 8525 G2/8530 G2 Vehicle-Mount Computer Quick Start Guide 47
Press [ALT][ESC].
Settings
The Settings menu provides access to the Control Panel applets, lets
you configure your radio (Network and Dial-up Connections) and
customize the Taskbar and Start Menu.
48 Psion Teklogix 8525 G2/8530 G2 Vehicle-Mount Computer Quick Start Guide
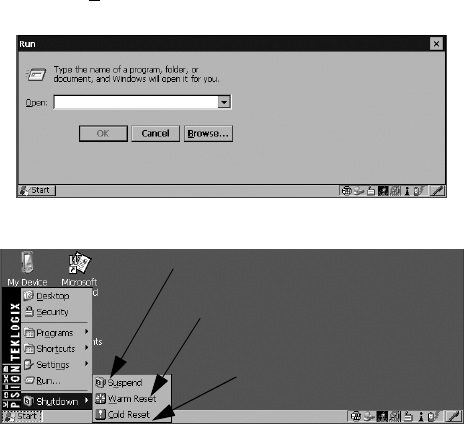
Run
Choosing the Run option displays a dialog box in which you can
enter the name of the program, folder or document you want to open.
Shutdown
Note: The Shutdown menu varies depending on the security level
chosen. At ‘Supervisor’ security level, a sub-menu like the
one in the sample screen is displayed. At ‘User’ security
level, choosing ‘Suspend’ causes the computer to shut down
immediately. A sub-menu is not available.
At ‘Teklogix’ security level, an additional option is availa-
ble in the sub-menu—Bootloader. This option behaves like
cold-reset, except that the 8525 G2/8530 G2 starts Boot-
loader rather than Windows CE.
Suspends the 8525/30 G2 immediately – equivalent
to turning the unit off.
Resets the 8525/30 G2, leaving all saved files
and (registry) settings intact. Unsaved data
is lost.
Resets the 8525/30 G2. Files stored
outside of permanent memory are lost.
Psion Teklogix 8525 G2/8530 G2 Vehicle-Mount Computer Quick Start Guide 49
3.5 Using A Dialog Box
A dialog box appears when you need to make selections and enter
further information.
Important: If you’re using a touchscreen, use the stylus to tap on
an element in a dialog box to select or deselect it,
display dropdown menus, save your selections,
and so on. If you’re using a keyboard, follow the
directions in this section.
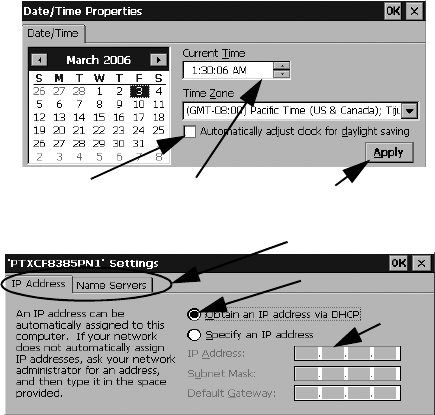
Checkbox Dropdown Menu Button
Textbox
Radio
Button
Tabs
50 Psion Teklogix 8525 G2/8530 G2 Vehicle-Mount Computer Quick Start Guide
Dialog boxes contain one or more of the following elements:
Tab: A tab separates different elements of a dialog box. Press the
[TAB] key until a tab in the dialog box is highlighted. To display
adjoining tabs, press the [RIGHT] or [LEFT] arrow key.
To display the information in the next tab from anywhere in the win-
dow, press [CTRL] [TAB].
Textbox: A textbox requires that you type information. Press the
[TAB] key to highlight the textbox and then type the appropriate
information.
Dropdown: This type of menu is identified by up and down arrows
next to the dropdown menu to indicate that additional options are
available. Press the [TAB] key to highlight the menu, and use the
arrow keys on your keyboard to cycle through the options.
Checkbox: This box allows you to select or deselect an option. To
select or deselect a checkbox, press the [TAB] key to highlight the
checkbox, and press the [SPACE] key to select or deselect it.
Radio buttons: These buttons allow you to choose from a number of
options. For example, in the sample screen under section 3.5 on page
49, you can choose to ‘Obtain an IP address via DHCP’ or ‘Specify
an IP address’. Press the [TAB] key to highlight a radio button
option, and then select a radio button by pressing the arrow keys to
highlight the appropriate option.
Buttons: This type of button allows you to ‘Save’, ‘Delete’ and so
on the options you’ve chosen in a dialog box. Use the [TAB] key
to highlight the button you want to use. Press the [ENTER] key to
activate it.
Saving Your Choices: Once you’ve made all your changes, press
the [ENTER] key to save your changes and exit the window.
Note: A dialog box item that is displayed in grey text indicates that
it is not currently available.

Psion Teklogix 8525 G2/8530 G2 Vehicle-Mount Computer Quick Start Guide 51
4. General Maintenance
4.1 Caring For The Touchscreen
The top of the touchscreen is a thin, flexible polyester plastic sheet
with a conductive coating on the inside. The polyester can be perma-
nently damaged by harsh chemicals and is susceptible to abrasions
and scratches. Using sharp objects on the touchscreen can scratch or
cut the plastic, or crack the internal conductive coating.
If the touchscreen is used in harsh environments, consider applying a
disposable screen protector (PN 1008009). These covers reduce the
clarity of the display slightly but will dramatically extend the useful
life of the touchscreen. When they become scratched and abraded,
they are easily removed and replaced.
The chemicals listed below must not come into contact with the
touchscreen:
• mustard, ketchup,
• sodium hydroxide,
• concentrated caustic solutions,
• benzyl alcohol, and
• concentrated acids.
4.2 Cleaning The 8525 G2/8530 G2
Important: Do not immerse the unit in water. Dampen a soft
cloth with mild detergent to wipe the unit clean.
•Use only mild detergent or soapy water to clean the vehicle-
mount unit.
• Avoid abrasive cleaners, solvents or strong chemicals
for cleaning.
• To clean ink marks from the keypad and touchscreen, use iso-
propyl alcohol.

52 Psion Teklogix 8525 G2/8530 G2 Vehicle-Mount Computer Quick Start Guide
5. Support Services & Worldwide Offices
Psion Teklogix provides a complete range of product support serv-
ices to its customers worldwide. These services include technical
support and product repairs.
5.1 Technical Support
Technical Support for Mobile Computing Products is provided via
e-mail through the Psion Teklogix customer and partner extranets.
To reach the website, go to www.psionteklogix.com and click on the
appropriate Teknet link on the home page. Then click on the
“Log-in” button or the “Register” button, depending on whether you
have previously registered for Teknet. Once you have logged in,
search for the “Support Request Form”.
5.2 Product Repairs
International
For technical support outside of Canada or the U.S.A., please contact
your local Psion Teklogix office listed on our worldwide website:
http://www.psionteklogix.com
Click on the heading labelled “Contacts” to choose a Psion Teklogix
technical support representative closest to you.
Canada/U.S.A
Canadian and U.S. customers can receive access to repair services,
by calling the toll-free number below, or via our secure website (see
Technical Support, above).
Note: Before calling the toll-free number, have your Psion Teklogix
customer number or trouble ticket number available.
Voice: 1 800 387-8898 (press option “2”)
Fax: 1 905 812-6304
Psion Teklogix 8525 G2/8530 G2 Vehicle-Mount Computer Quick Start Guide 53
5.3 Worldwide Offices
COMPANY HEADQUARTERS AND CANADIAN SERVICE CENTRE
Psion Teklogix Inc.
2100 Meadowvale Blvd.
Mississauga, Ontario
Canada L5N 7J9
Tel: +1 905 813 9900
Fax: +1 905 812 6300
E-mail: salescdn@psion.com
NORTH AMERICAN HEADQUARTERS AND U.S. SERVICE CENTRE
Psion Teklogix Corp.
1810 Airport Exchange Boulevard
Suite 500
Erlanger, Kentucky
USA 41018
Tel: +1 859 371 6006
Fax: +1 859 371 6422
E-mail: salesusa@psion.com
INTERNATIONAL SUBSIDIARIES (SEE ALSO WWW.PSIONTEKLOGIX.COM)
Psion Teklogix S.A.
La Duranne
135 Rue Rene Descartes
BP 421000
13591 Aix-En-Provence
Cedex 3; France
Tel: +33 4 42 90 88 09
Fax: +33 4 42 90 88 88
E-mail: tekeuro@psion.com