Psion HFAM1XT10 ST9210 HF RFID POD User Manual HFAM1XT10 UserMan
Psion Inc ST9210 HF RFID POD HFAM1XT10 UserMan
Psion >
Contents
- 1. Users Manual
- 2. User Manual
Users Manual
Mississauga, Ontario
Canada
Installation Instruction
THE INFORMATION CONTAINED IN THIS DOCUMENT IS CONFIDENTIAL AND IS THE EXCLUSIVE INTELLECTUAL PROPERTY OF PSION INC. IT MAY ONLY BE USED FOR THE PURPOSE FOR
WHICH IT IS SUPPLIED AND MUST NOT BE REPRODUCED, STORED OR DISSEMINATED TO THIRD PARTIES BY ANY MEANS, IN WHOLE OR IN PART, WITHOUT THE EXPRESS WRITTEN
PERMISSION OF PSION INC.
MATERIALS AND PROCESSES USED TO PRODUCE THIS PART OR ASSEMBLY MUST COMPLY WITH EUROPEAN DIRECTIVE 2002/95/EC, RESTRICTION OF HAZARDOUS
SUBSTANCES (RoHS), AND REGULATION (EC) No: 1907/2006, REGISTRATION, EVALUATION, AUTHORISATION AND RESTRICTION OF CHEMICALS (REACH), OR LATEST VERSION
THEREOF.
TITLE: INSTRUCTION SHEET HF-AM1-OMNII RFID MODULE DRAWN BY: Nicolas FORNIER DATE:
11/03/23
SIZE
A
DRAWING NO.
8000236 REV.
A.0
http://plm.ad.psion.com/Windchill/Library/Templates/Installation Instruction_Portrait_Template.doc
SHEET 1 OF 8
Important: All Approval and safety information is outlined in the ‘OMNII Handheld-computer User Manual’ – part number
8100157. This manual is available on our website www.psion.com through the community website
http://community.psion.com/home/default.aspx.
Important: The OMNII with the RFID option must not be held closer than 20 cm from the rest of the body. This
product must not be used in a holster or on a belt-clip.
Easily installable expansion modules for the OMNII allow you to customise this hand-held to meet your specific mobile
computing requirements. This chapter outlines how to install the RFID Module HF-AM1-OMNII.
Before installing a module in the OMNII, all power sources must be turned off.
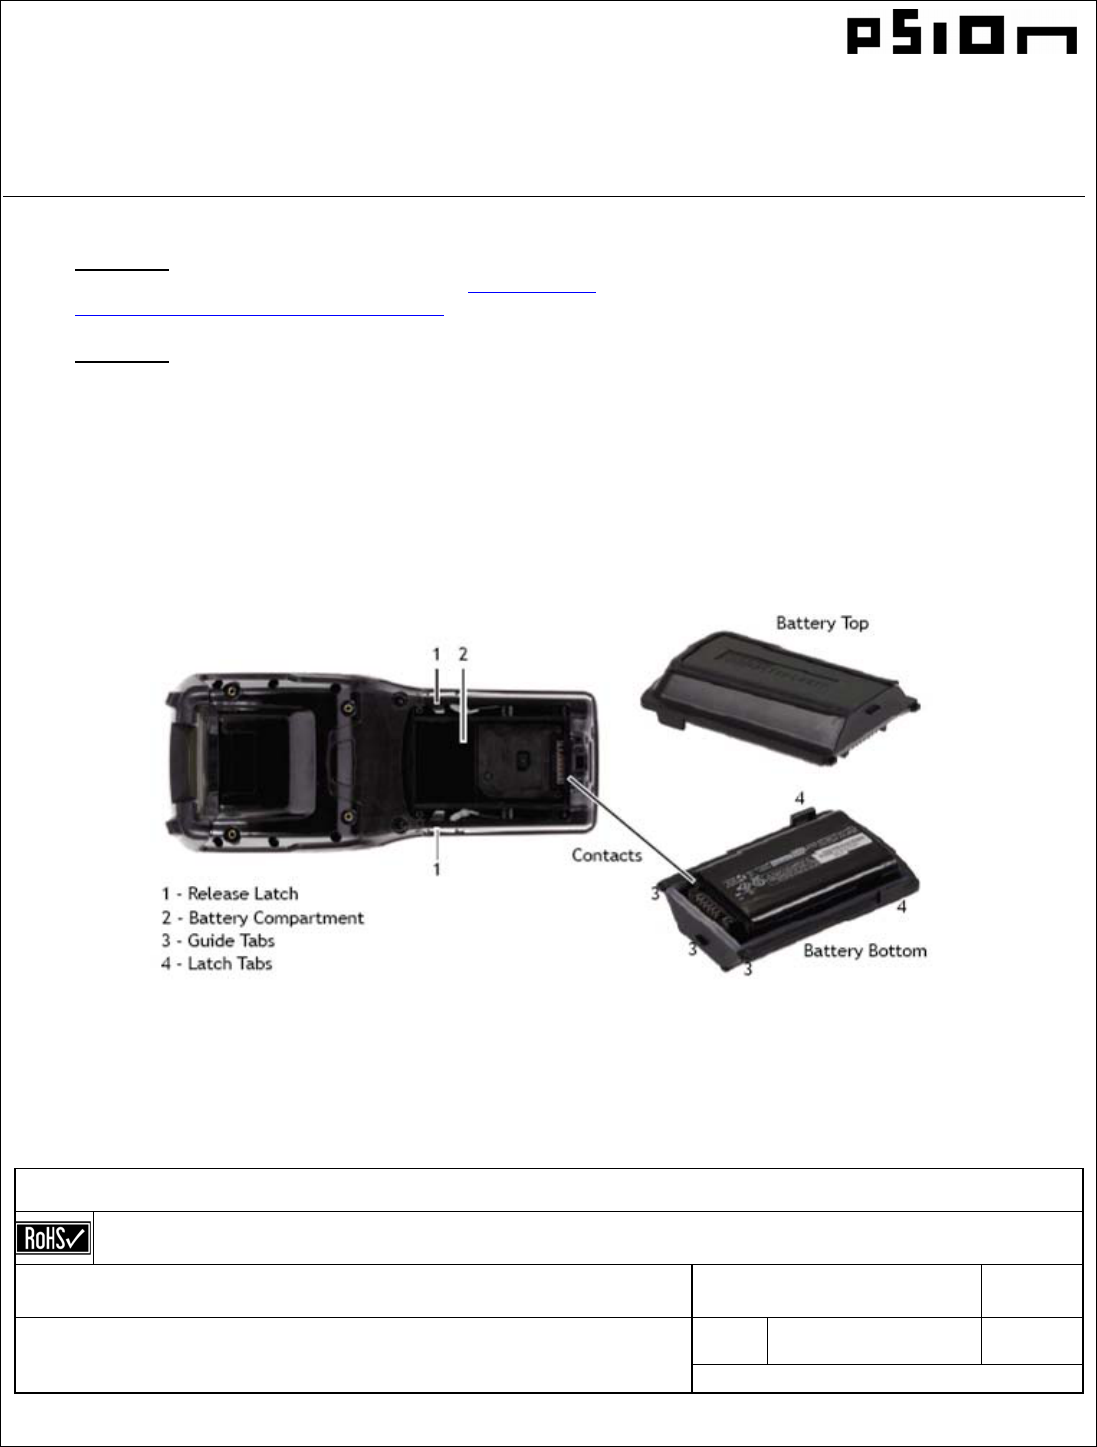
• Remove the Battery Pack. If your unit is using AC power, disconnect it:
Press the two latch buttons at the sides of the compartment simultaneously, and slide the
battery out.
PART NUMBER: 8000236 REV: A.0
SHEET 2 OF 10
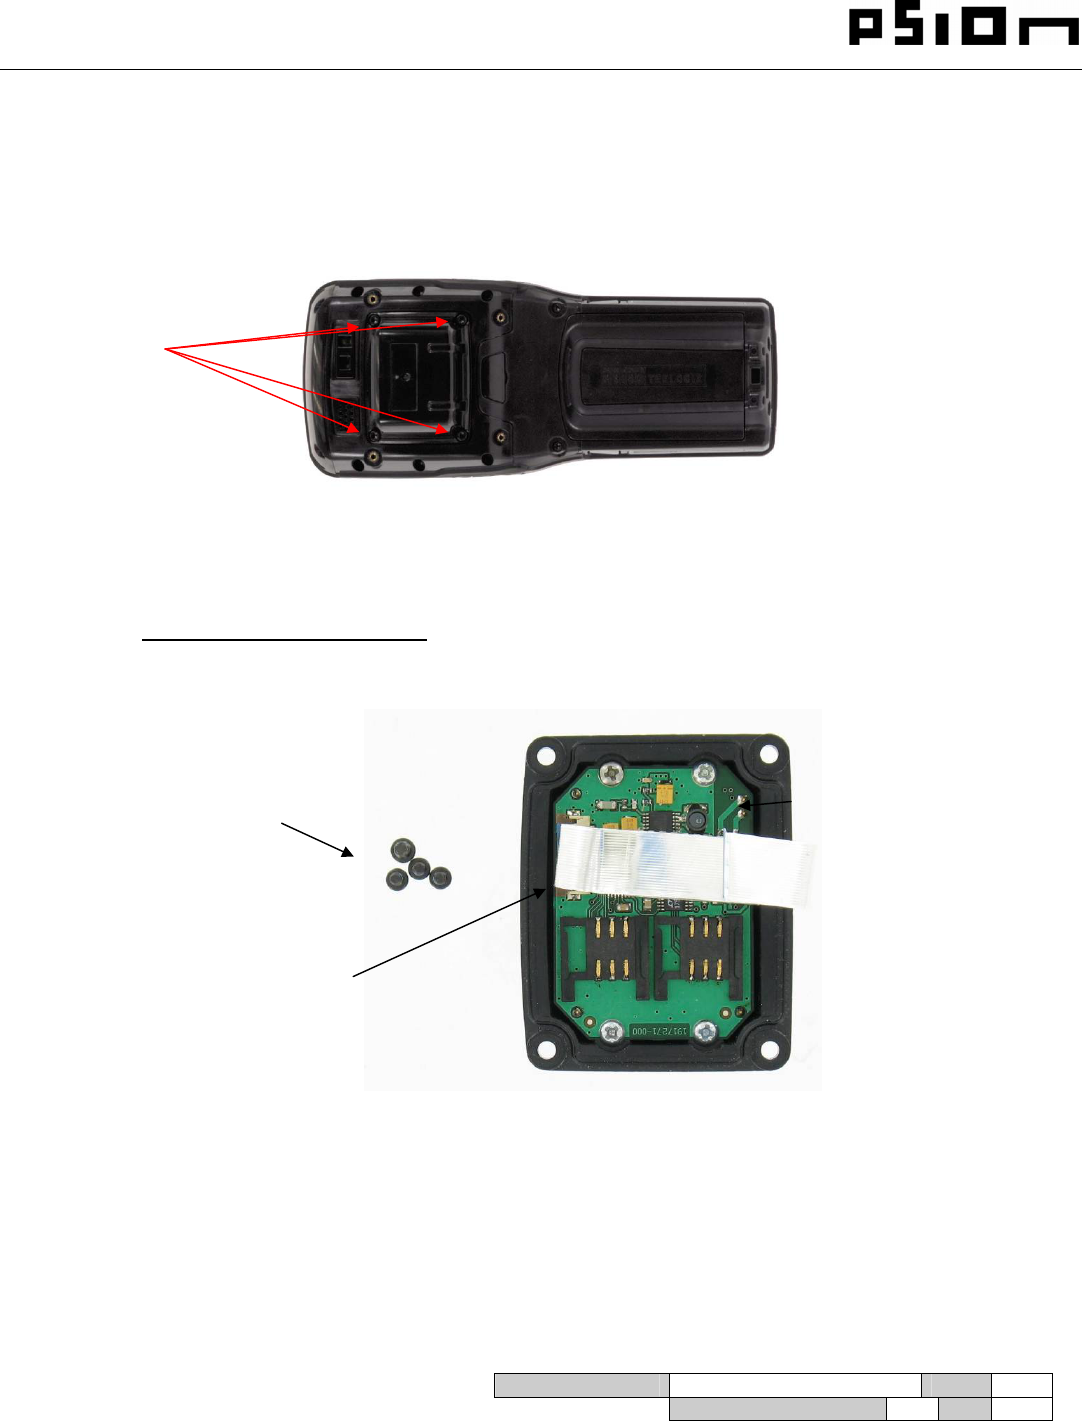
• Remove the existing Scanner pod or blank plate.
1. Remove the four M3X5 Torx screws securing the scanner pod on the main housing.
2. Lift the Pod or plate from the unit
3. Disconnect the scanner flex cable from the unit.
You can now install the RFID Module HF-AM1-OMNII
¾ Installing the RFID Module:
The RFID Module HF-AM1-OMNII includes one slim plastic pod, one flex cable and four M3X5MM Torx screws.
Generic Plastic Pod
Flex cable
PART NUMBER: 8000236 REV: A.0
SHEET 3 OF 10
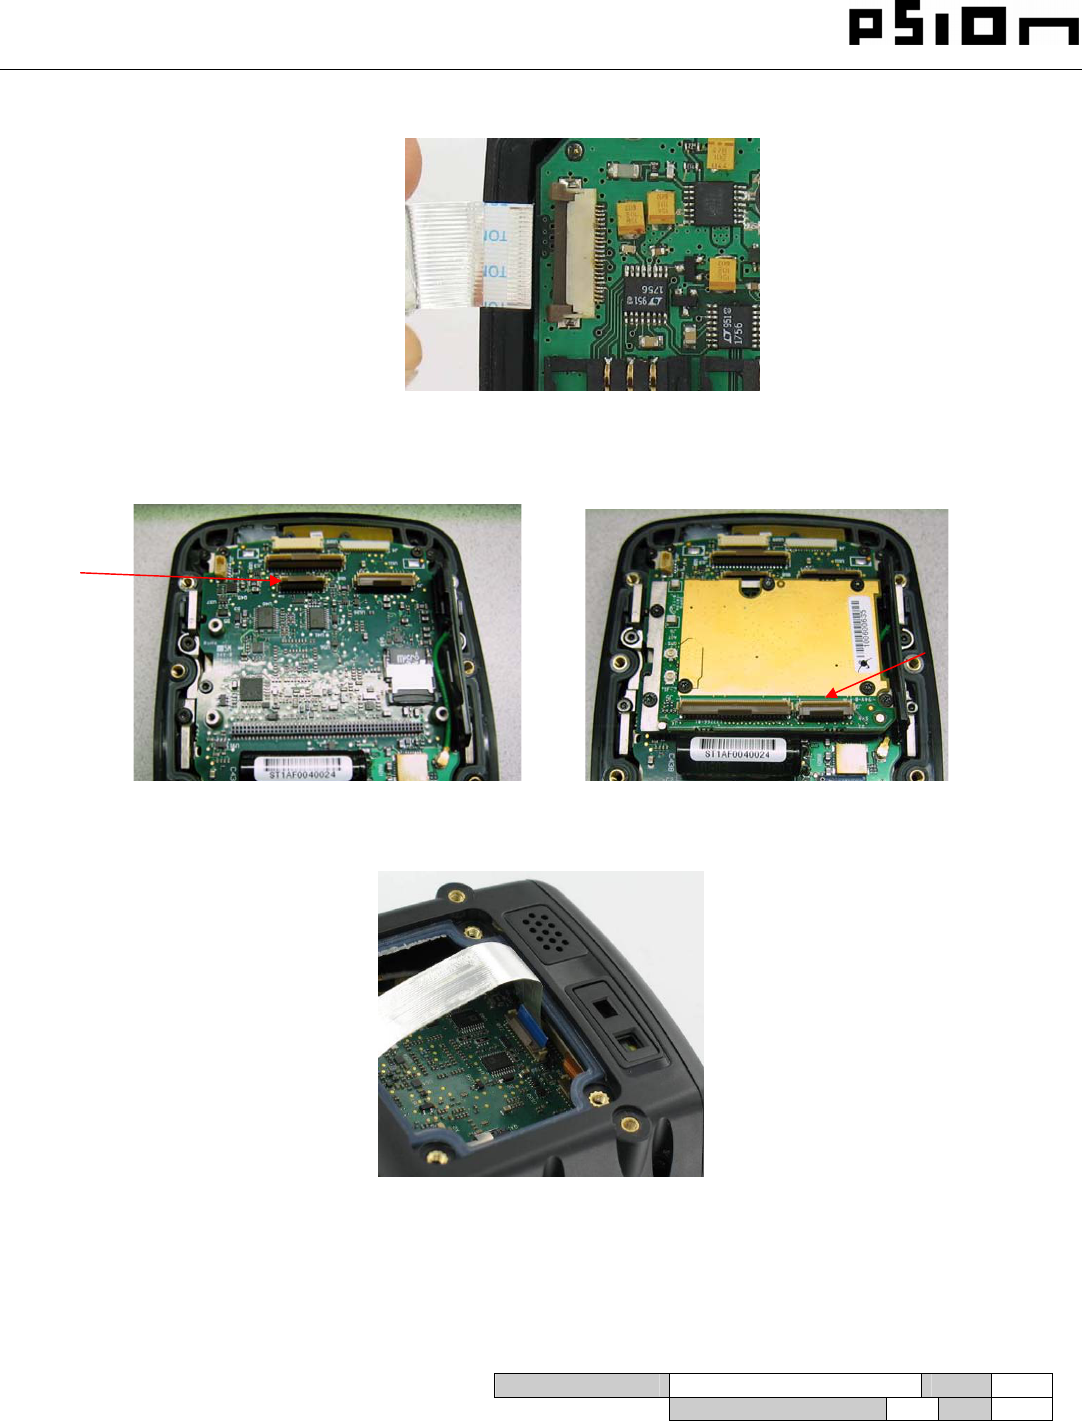
o Connect the Flex cable to the RFID Module HF-AM1-OMNII as shown hereafter:
o The RFID module HF-AM1-OMNII can be plugged on the OMNII using either expansion port 1 or expansion port 3.
(GPS option)
1. Expansion port 1: Connect the Flex cable to the main logic board as shown hereafter:
Expansion port 1
Expansion port 3
PART NUMBER: 8000236 REV: A.0
SHEET 4 OF 10
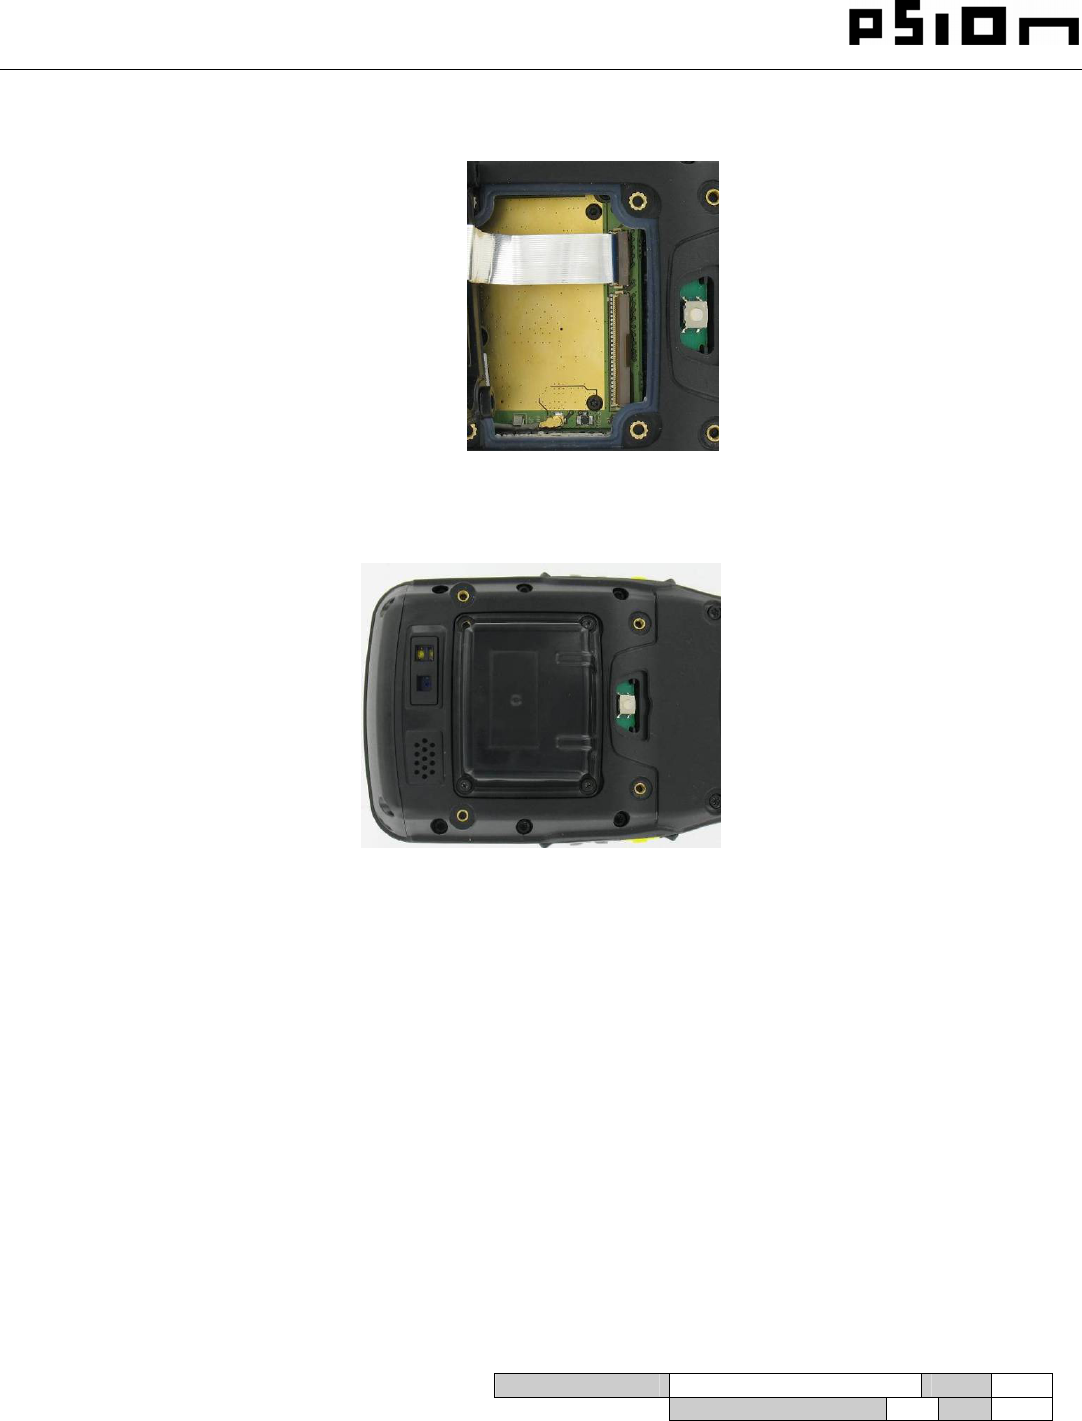
2. Expansion port 3: Connect directly the Flex cable to the radio card as shown hereafter:
o Seat the Slim RFID pod on the main housing
o Insert and tighten four M3X5 T10 Torx screws to secure the RFID pod module to the main housing
o Install the Battery Pack:
Slide the charged battery with the contoured plastic facing you into the unit with the contacts matching position and the
guide tabs moving into the corresponding slots at the base of the compartment. Click both sides of the battery into
place.
PART NUMBER: 8000236 REV: A.0
SHEET 5 OF 10
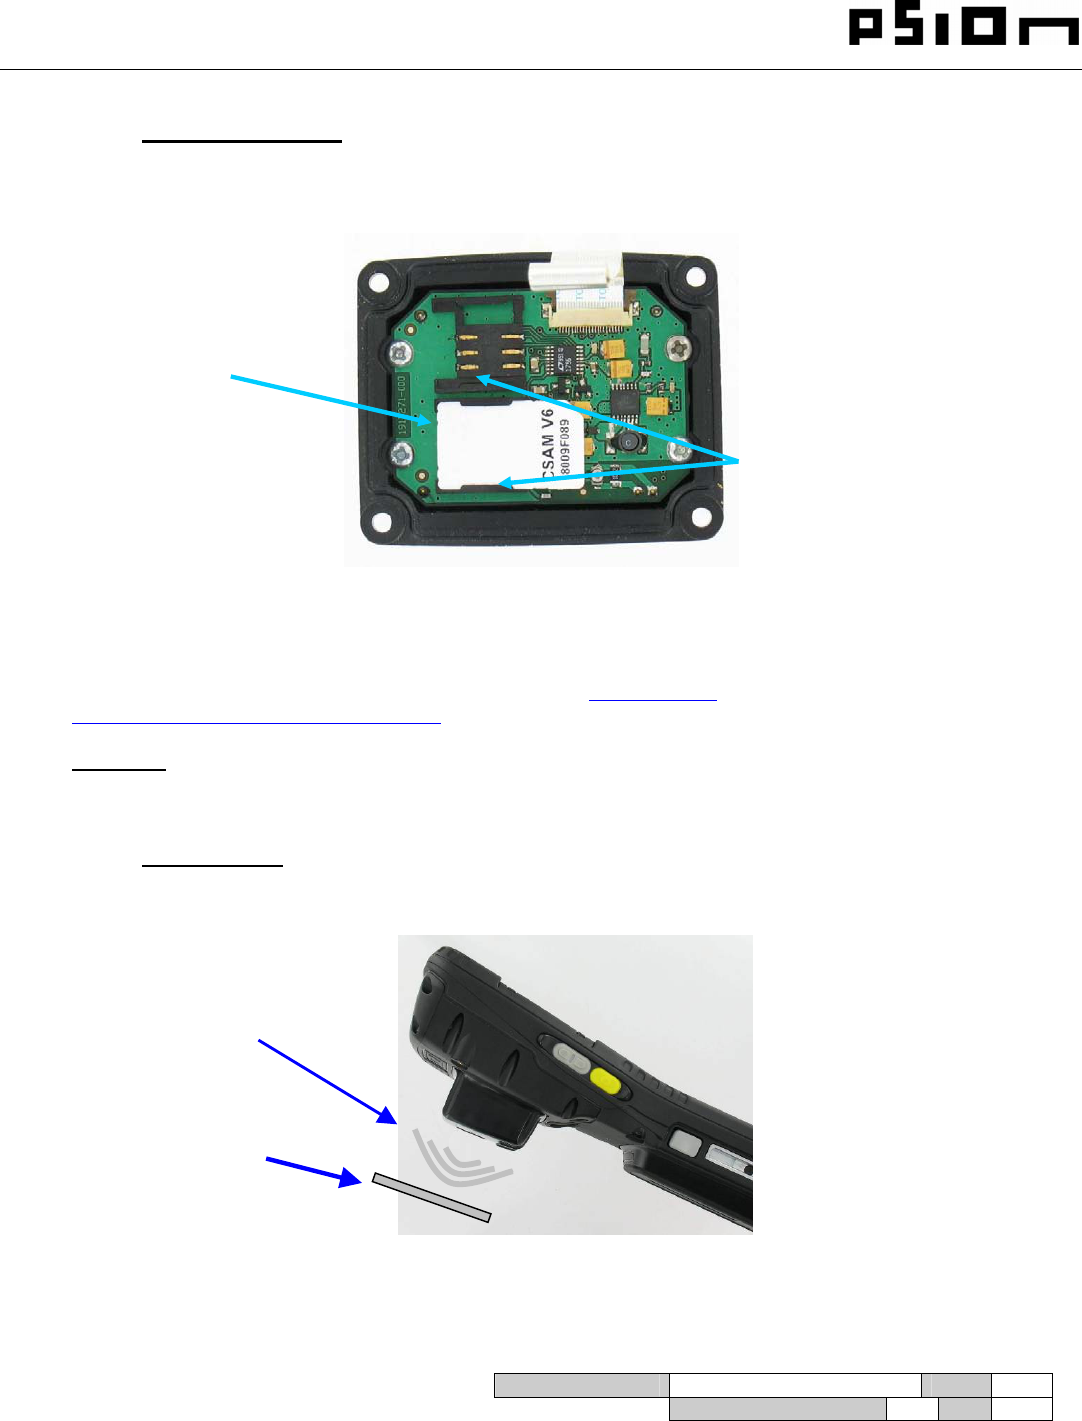
¾ Adding SAM cards:
To add Sam cards, you have to open the Slim RFID Pod.
o Remove the four Torx screws around of the pod.
o Insert one or two SAM cards in their sockets:
o Seat The RFID pod on the main housing and tighten four Torx screws.
For detailed instructions, pleased refer to the OMNII Hand-Held Computer User Manual and to the RFID MODULE HF-AM1-
OMNII User manual. These manuals are available on our website www.psion.com through the PSION community website
http://community.psion.com/home/default.aspx.
Important: The OMNII with the RFID option must not be held closer than 20 cm from the rest of the body. This
product must not be used in a holster or on a belt-clip.
¾ Reading area:
This area depends on the TAG type, TAG packaging, Tag position and environment (metallic or not).
Reading Area
Tag
SAM Sockets
SAM card
PART NUMBER: 8000236 REV: A.0
SHEET 6 OF 10
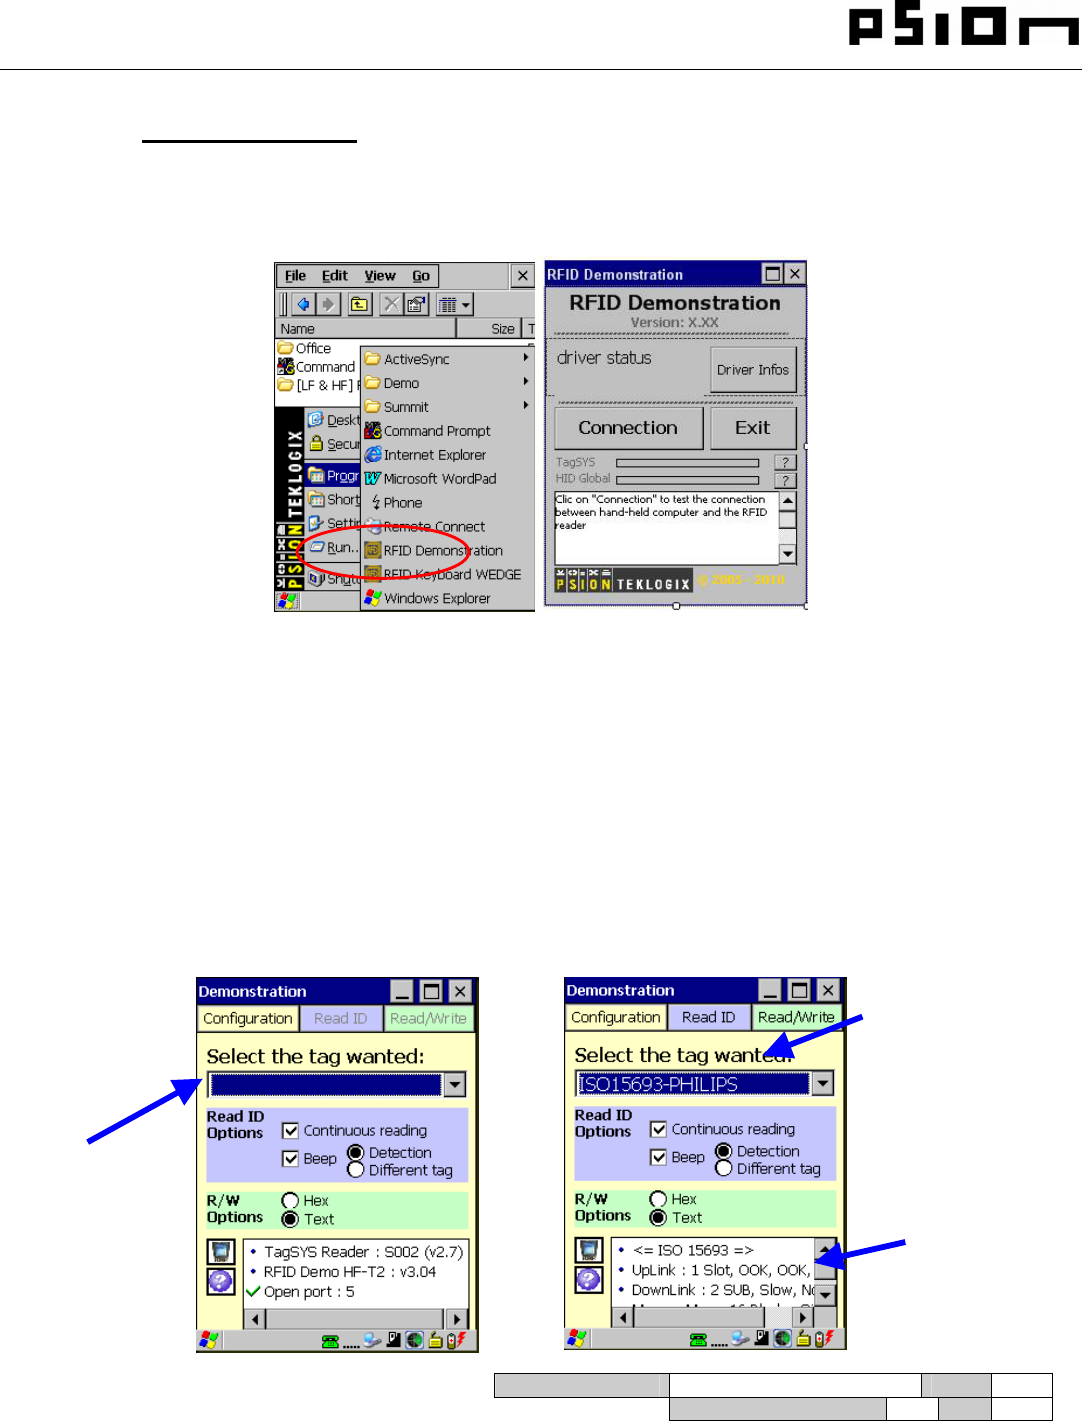
¾ Software installation:
o Copy and install the two CAB file named ““[LF & HF] RFID Tools.v5.0.CAB” and “RFID
Driver_OMNII_HF_AM1_OMNII.CAB”
o After installation, select “RFID Demonstration” in Programs, the connection panel opens:
o In Connection panel, Click on Driver Infos button ,If the driver status is “the driver is not installed” , Install
the Driver_OMNII_HF_AM1_OMNII.CAB”
o Click on the Connection button to launch the RFID demo. The configuration tab opens :
Window status
Select Read ID
options
Select TAG type
PART NUMBER: 8000236 REV: A.0
SHEET 7 OF 10
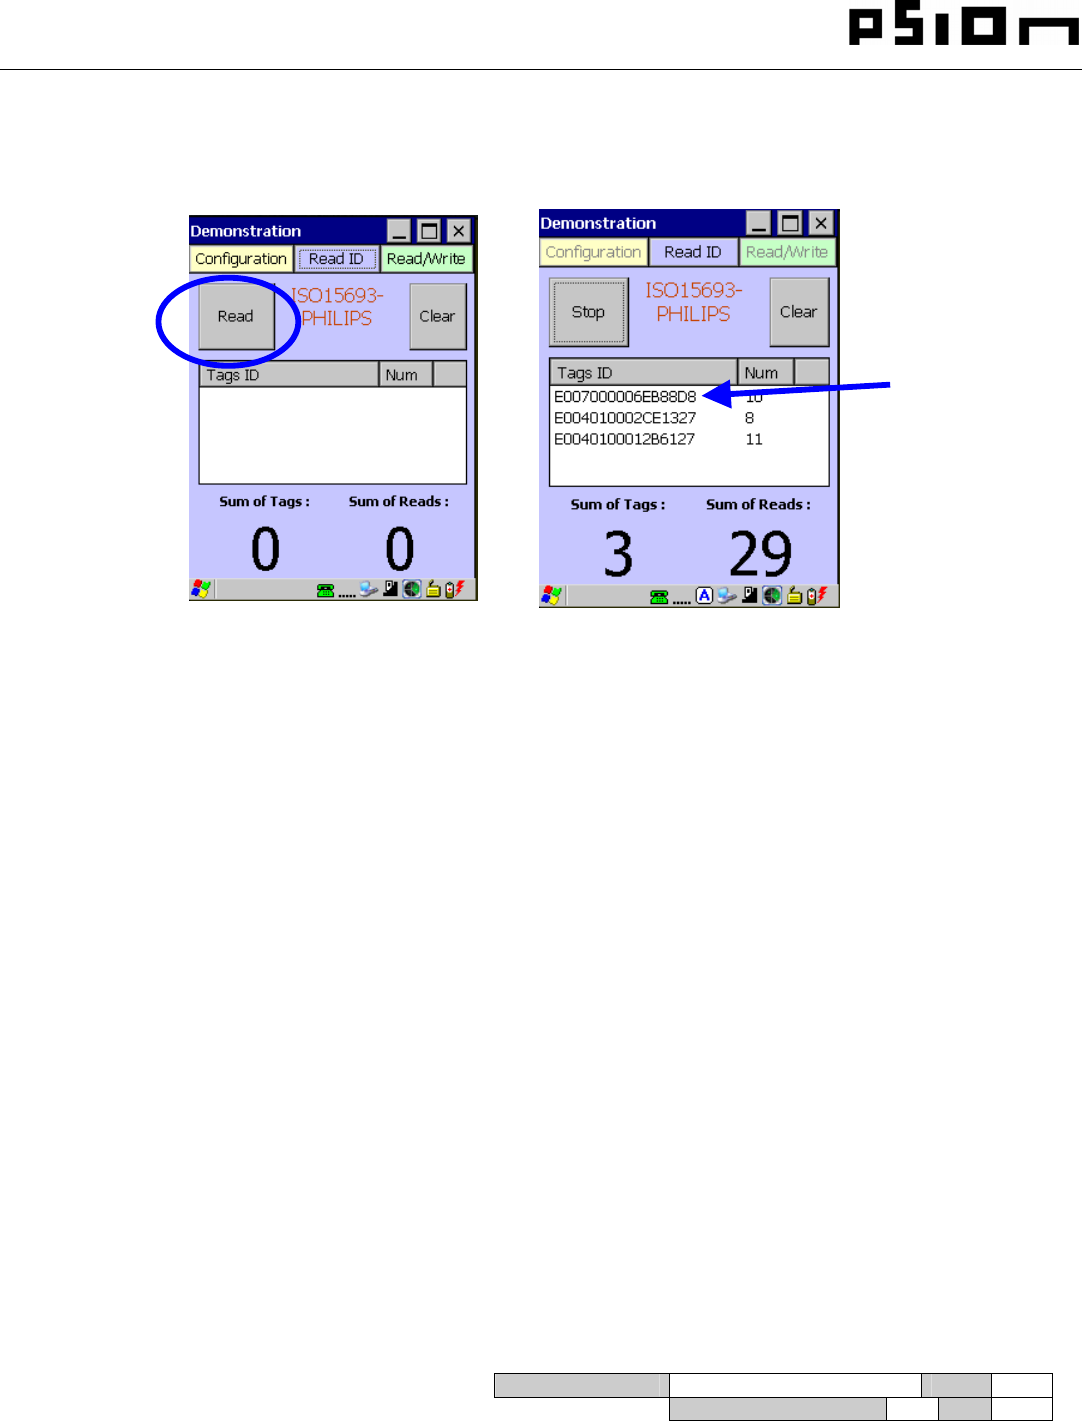
o To read the ID of a TAG, select Read tab and press the Read button. Put the TAG in front of the antenna.
ID tag

PART NUMBER: 8000236 REV: A.0
SHEET 8 OF 10
OMNII RFID MODULE HF-AM1-OMNII
RFID Regulatory Information
IMPORTANT NOTE FOR NORTH AMERICA:
The RFID must not be used whilst the host OMNII is being powered by the ac/dc adaptor.
FCC Information to Users:
This product and it antennas must not be co-located or operated in conjunction with any other antenna or transmitter.
Radiation Exposure Compliance
This product complies with the FCC RF exposure limits for an uncontrolled environment. For continued compliance, the
product must not be held closer than 20 cm from the rest of the body. This product must not be used in a holster or on a belt-clip.
Federal Communication Commission Interference Statement.
This equipment has been tested and found to comply with the limits for a Class B digital device, pursuant to Part 15 of the FCC Rules.
These limits are designed to provide reasonable protection against harmful interference in a residential installation. This equipment
generates uses and can radiate radio frequency energy and, if not installed and used in accordance with the instructions, may cause
harmful interference to radio communications. However, there is no guarantee that interference will not occur in a particular installation.
If this equipment does cause harmful interference to radio or television reception, which can be determined by turning the equipment off
and on, the user is encouraged to try to correct the interference by one of the following measures:
• Reorient or relocate the receiving antenna.
• Increase the separation between the equipment and receiver.
• Connect the equipment into an outlet on a circuit different from that to which the receiver is connected.
• Consult the dealer or an experienced radio/TV technician for help.
THIS DEVICE COMPLIES WITH PART 15 OF THE FCC RULES. OPERATION IS SUBJECT TO THE FOLLOWING TWO
CONDITIONS: (1) THIS DEVICE MAY NOT CAUSE HARMFUL INTERFERENCE, AND (2) THIS DEVICE MUST ACCEPT
ANY INTERFERENCE RECEIVED, INCLUDING INTERFERENCE THAT MAY CAUSE UNDESIRED OPERATION.
FCC Caution: Any changes or modifications not expressly approved by the party responsible for compliance could void the user's
authority to operate this equipment.
Emissions Information for Canada:
This Class B digital apparatus complies with Canadian ICES-003.
Cet appareil numérique de la classe B est conforme à la norme NMB-003 du Canada.
This device complies with Industry Canada license-exempt RSS standard(s). Operation is Subject to the following two conditions: (1)
this device may not cause interference, and (2) this device must accept any interference, including interference that may cause undesired
operation of the device.

PART NUMBER: 8000236 REV: A.0
SHEET 9 OF 10

PART NUMBER: 8000236 REV: A.0
SHEET 10 OF 10