551221 2 See Water Inc. Simple Simplex 1 Control Panel Installation Instructions
551220 2 See Water Inc. Simple Simplex 1 Control Panel Installation Instructions 551220_2_See Water Inc. Simple Simplex 1 Control Panel Installation Instructions
551220 2 Seewater Inc. Simple Simplex 1 Control Panel Installation Instructions 551220_2_SeeWater Inc. Simple Simplex 1 Control Panel Installation Instructions
551221 2 Seewater Inc. Simple Simplex 1 Control Panel Installation Instructions 551221_2_SeeWater Inc. Simple Simplex 1 Control Panel Installation Instructions 551221_2_SeeWater Inc. Simple Simplex 1 Control Panel Installation Instructions pdf pumpproducts
: Pump 551221 2 See Water Inc. Simple Simplex 1 Control Panel Installation Instructions 551221_2_See Water Inc. Simple Simplex 1 Control Panel Installation Instructions pdf
Open the PDF directly: View PDF ![]() .
.
Page Count: 2
Simple Simplex®
Installation and Operator’s Manual
Simple Simplex® Control Panel
The Simple Simplex® Control Panels will alert of a high
liquid level and are designed to control a single phase pump.
Applications include sewage pump chambers, sump pump
basins, lift stations, and onsite installations. The controls are
housed in a 8”x 6”x 4” NEMA 4X indoor/outdoor polycarbonate
enclosure and UL listed in the United States and Canada.
Models:
SSP-1 (2 Float Operation)
SSP-1-3 (3 Float Operation)
Features:
• Designed to Control One 120VAC pump in sewage
applications
• Operates pumps up to 1HP
• UL Listed for the United States and Canada
• NEMA 4X polycarbonate enclosure with stainless steel
lockable latches
• Alarm visible features: red beacon alarm light, alarm test
and silence buttons
• Alarm horn sounds at 85 decibels at 10’
• Includes oat switches with 20′ cords and mounting
hardware
Panel Installation:
1. Caution: To maintain the NEMA 4X rating, make
all wiring connections with seal tight cable grips
or conduit connections.
2. Determine mounting location for control panel.
Mount panel using mounting feet supplied.
3. The control panel should not be mounted in
an area that is subject to submersion.
4. Run pump cable and oat cables through
conduit. Make eld connections as shown on
wiring diagram.
5. Run power line conductor through conduit. Wire
to terminals per enclosed schematic. Branch
circuit protection to be provided by contractor.
6. Mount oat switches at appropriate levels. Be
sure that the oats have a free range of motion
to prevent entanglement.
To test the alarm circuit, push the test button the
audible alarm shall sound and the red beacon will
light. Press the silence button to silence the alarm.
Service:
Caution: Before checking electrical connections
within the control or attempting to replace any
components, turn o all branch circuits supplying
power to the main control panel.
1. All installations must be in accordance with the National Electrical
Code, and any other applicable state and local electrical
requirements.
IM392, Rev. 0217
www.seewaterinc.com
951.487.8073 • 888.733.9283
Email: info@seewaterinc.com
121 North Dillon Avenue • San Jacinto, CA 92583
P.O. Box 1269 • San Jacinto, CA 92581
Simple Simplex® Control Panel
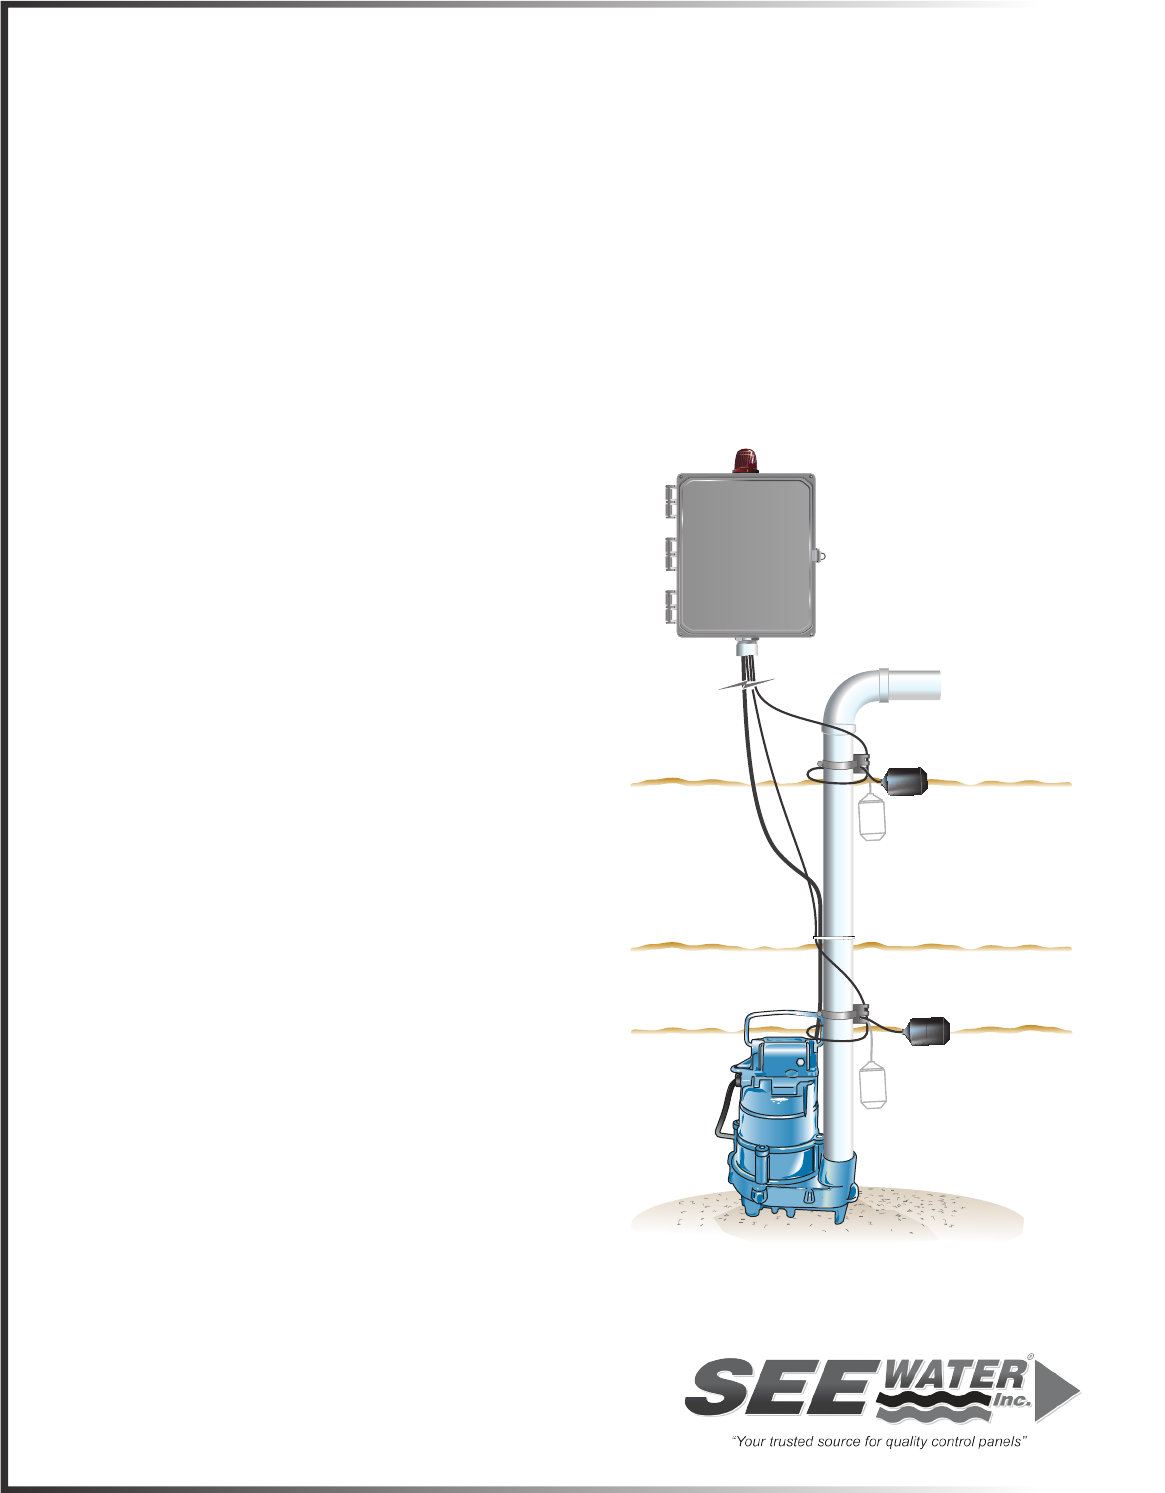
Typical Installation for Simple Simplex® Control
Panel
A typical Simple Simplex installation showing a wide
angle oat (stop and start) and a narrow angle high
liquid alarm oat. An SSP-2-3 would include 3 narrow
angle oats.
Additional Panel Options:
LL - Low Level Alarm Circuit (optional)
Includes normally closed low level oat switch. Alarm horn
will sound and red beacon will light in the event of a low level.
Comes with form c dry contact.
HH - High High Level Alarm (optional)
Includes normally open level oat switch. Alarm horn will
sound and red beacon will light in the event of a high high
level. Comes with form c dry contact.
AF - Alarm Flasher
BB - 9V Battery Backup
S3 - No Floats Included
Troubleshooting:
Alarm Circuit
To test the alarm light and buzzer, press the test button on the
front panel. If either the light or buzzer do not indicate, replace
the light bulb or buzzer with same type.
Control Board and Fuse
The control board is rated for 120VAC. If the power on light is
not illuminating on the circuit board check the voltage at TS1-1
and TS1-2 with a voltage meter. If voltage present, check the
fuse in the fuse block. If fuse is blown, replace fuse with same
type. The dry contacts are rated for 0-125VAC.
Floats
Check oats for entanglement, full range of motion. Replace
damaged oats.
Conduit
sized by
end-user
HIGH LIQUID
ALARM
WIDE ANGLE FLOAT
FOR STOP & START
Simple Simplex
Control Panel
www.seewaterinc.com
951.487.8073 • 888.733.9283 • Email: info@seewaterinc.com
121 North Dillon Avenue • San Jacinto, CA 92583
P.O. Box 1269 • San Jacinto, CA 92581
