Punkt Tronics MP01 GSM feature Phone User Manual
Punkt Tronics AG GSM feature Phone
User Manual
1


1
List of languages
02 English
24 Français
48 Deutsch
72 Italiano
94 Español

2
Congratulations on
your new MP 01 Mobile
Phone designed by Jasper
Morrison. The MP 01
is a simple phone that
supports basic calling and
text messaging.
Disconnect and rediscover
the simple things in life.
Enjoy!
Unpacking your new
Punkt. MP 01
What’s in the box:
· Punkt. MP 01
Mobile Phone
· MP 01 Quick Guide
· USB Charger
· Micro-USB cable
· Micro-USB headset
· Micro-USB to 3.5mm
plug headset converter
· SIM tray opener pin
· SIM adapter
Some of the
aforementioned
accessories may also be
sold separately. Do not
connect incompatible
accessories.
For the full user manual,
please access punkt.ch
MP 01 Mobile Phone.

3
04 Your MP 01
06 Getting started
08 Inserting a SIM card
10 Charging the battery
11 Turningthephoneon/o
Locking and unlocking the keypad
12 Setting the date and time
Saving contacts
13 Making calls
Answering / rejecting calls
14 Sending messages
Composing a message
16 Setting the alarm
Creating a reminder
17 Using Bluetooth
Setting Ringtones
18 Product and safety information

4
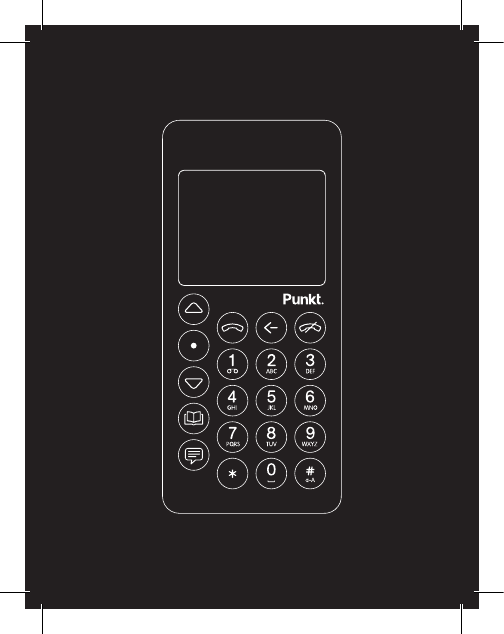
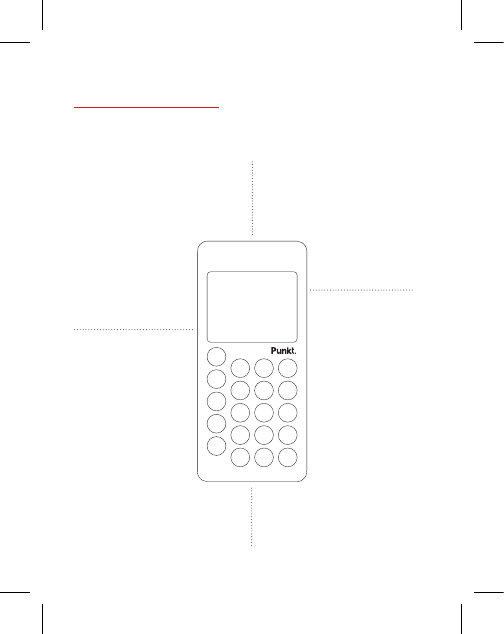
High quality
audio with noise
cancellation
Gorilla Glass 3
anti-reection&
anti-ngerprint
coating
1,000mAh battery
290 mins talk time
3 wks standby
Full-colour
2.0 inch high
resolution
LCD display
Your MP 01.
5
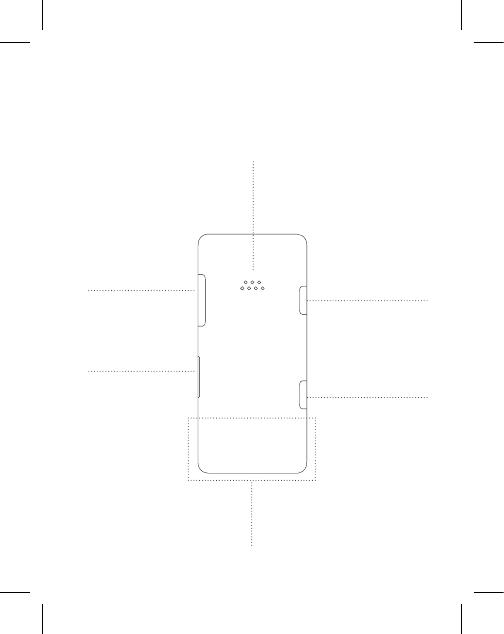
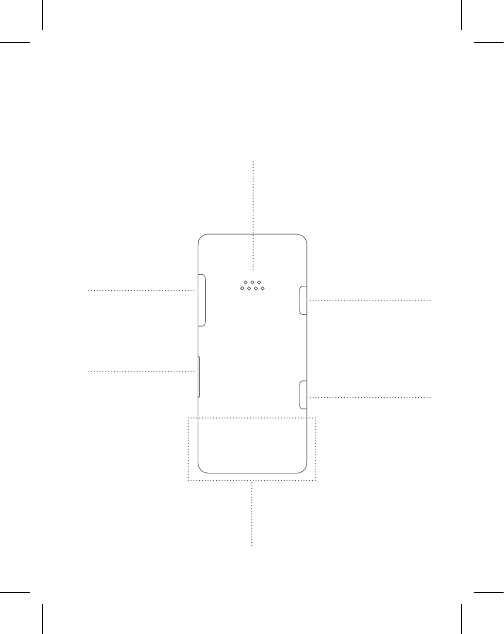
Loudspeaker
Micro USB for
phonebook
sync, charging
and headset
Power and
key lock
Volume
External
SIM tray
Size 116.5 x 53 x 14.5mm. Weight 88 grams. UI/UX by Punkt.
Network Quad-band GSM. Functions Calls, SMS,
Month View Calendar, Alarm Clock, Bluetooth.
Antenna area
6
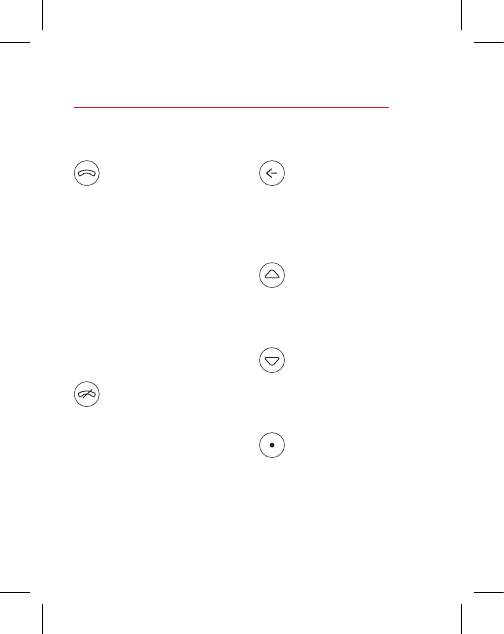
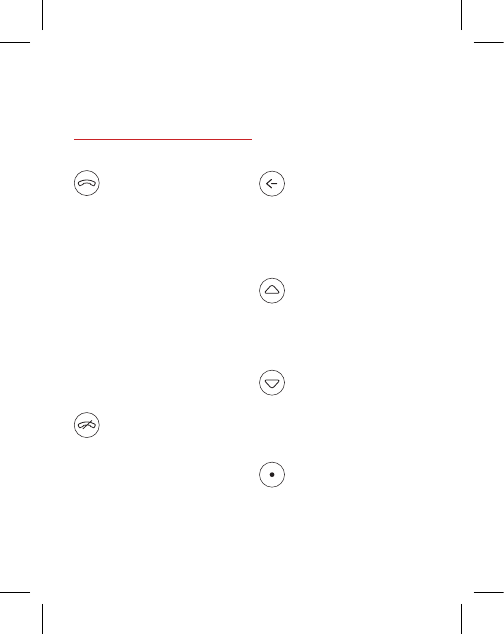
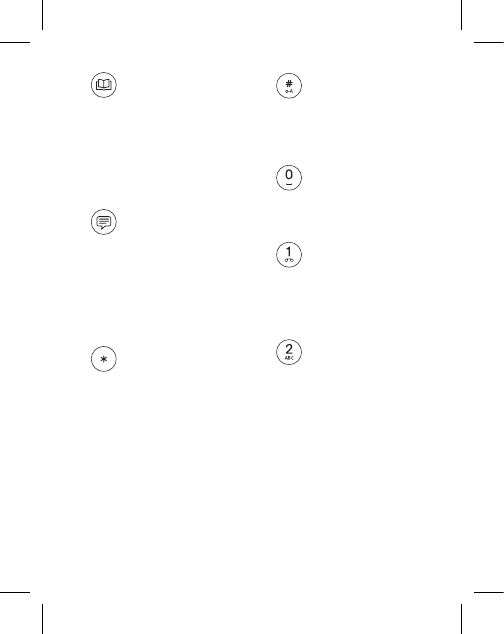
Send
· Places a call to the number
selected or keyed in
· Answers an incoming call
· TogglesHoldon/o
· LONG PRESS on an
incoming call:
answers the call with
speakerphone
· On Home Screen:
opens Call History
End
· Ends a call and/or
navigates to the
home screen
· On Home Screen:
access to shortcuts
Back
· Navigates back one step
· Clears characters when
in an editor
Up
· Moves content into
focus or moves cursor
Down
· Moves content into
focus or moves cursor
Punkt.
· Selects the item in focus
· On Home Screen: opens
the main menu
Getting started: Front keys.

7
Hash
· Alternates input modes
in message composer
Zero
· In Message Composer:
Space or “0” (zero)
One
· LONG PRESS: dials
voicemail
Other Numeric
Keys (2–9)
· LONG PRESS on Home
Screen: Speed dial to the
assigned number
Contacts
· Opens Contacts or
create new contact
· On Home Screen:
LONG PRESS to
create new contact
Messages
· Opens Messages or
message composer
· On Home Screen:
LONG PRESS opens
Message Composer
Star
· Symbols in a numeric
editor or dialer
· LONG PRESS: mute
on/o,duringacall
· In Message Composer:
Symbol picker
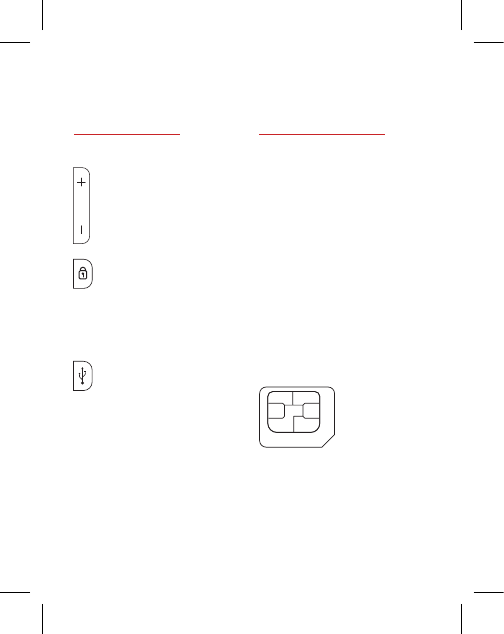
8
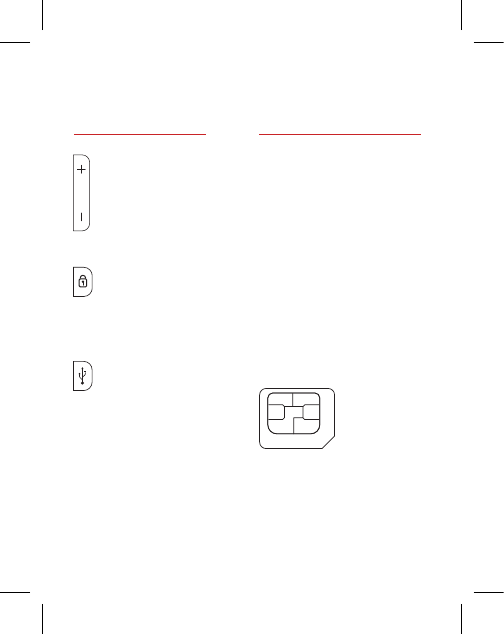
· The MP 01 is designed
to be used with a Micro-
SIM (3FF) only (see
image below).
· Incompatible SIM
cards can damage the
card or device, and may
corrupt data stored in
the card. Permanent use
of SIM adapter is not
recommended.
Micro-SIM
card (3FF)
Volume
· Volume up/down on
the ringer, speaker and
headset (if connected)
Lock
· Lock/Unlock screen
· LONG PRESS: Power
On/O
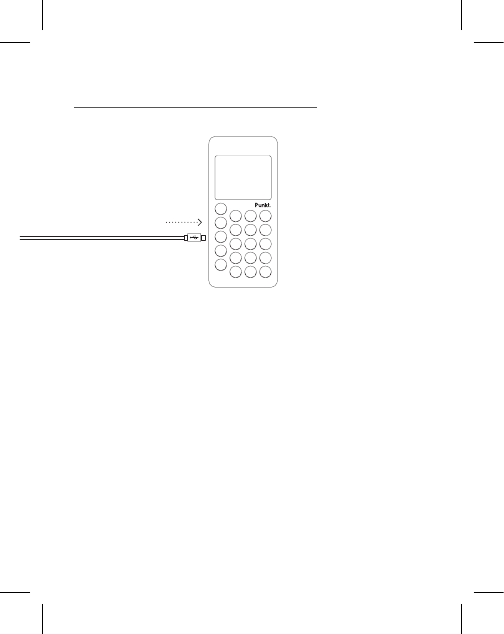
USB Connector
· Open the door to connect
USB cable to charge
Antenna Area
· Avoid touching or covering
while the antenna is in use.
Contactmayaectthe
communication quality
and drain battery.
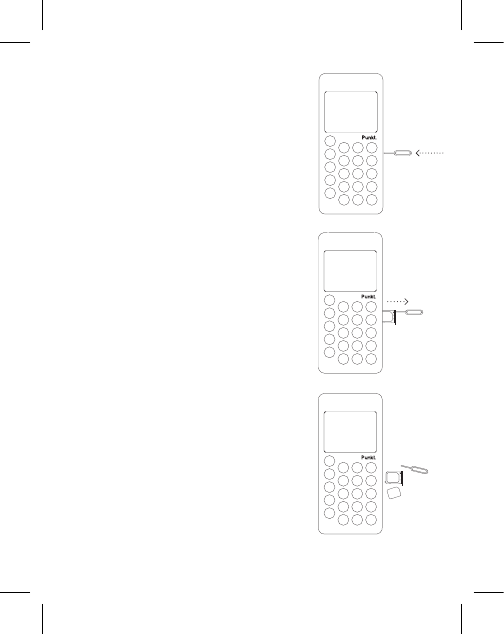
Side
and back. Inserting
a SIM card.
9
1.SwitchotheMP01
and disconnect the charger
before opening the external
SIM tray on the right side.
Always store and use the
MP 01 with the SIM
tray closed.
2. Insert the SIM tray
opener pin into the
small hole on the SIM
tray, located on the right
side of MP 01, and push
gently until the SIM tray
pops out.
3. Remove the SIM tray
and place the SIM card
inside it with the contact
area face down.
4. Reposition the tray
in the slot (the small hole
on the top side) and push
it gently back into the
phone before switching
on the MP 01.
10
Charging the battery.
· The battery may be
partially charged when
you unpack your phone
but you should recharge
it fully before you start
using it.
· When the battery is
completely discharged,
it may take several
minutes before the
battery charging screen
is displayed.
· When the battery runs
low, a low battery alert
is displayed.
· When the battery is empty,
the phone automatically
shuts down.

11
· To turn your phone
ON, press and hold the
LOCK KEY.
· If you have set the
passcode request on,
the phone will ask you
to enter the passcode.
By default the passcode
is 7658 and request is
settoo.
· If your SIM has PIN code
set, the phone will ask
you to enter the PIN.
· To turn your phone
OFF, press and hold
the LOCK KEY.
· To lock the keypad,
press the LOCK KEY on
the side of the phone.
When locked, press and
hold the LOCK KEY
to unlock.
· If you have set a passcode
for the phone, you will
be asked to enter it to
unlock the keypad.
Locking and
unlocking
the keypad.
Turning
the phone
on/o.

12
Setting
the date
and time.
· When you use the phone
forthersttimeyou
will be guided through
the time and date
setting process.
· Use the UP and DOWN
KEYS to set the date
and time, then save the
selected option by
pressing the PUNKT. KEY.
· To set the date and time
later, access “Settings”
from the main menu,
then select “Time
and date”.
Saving
contacts.
1. Key in the number.
2. Select “Options” then “Add
to contacts”, or alternatively
press the CONTACTS KEY,
then choose from “Create
new” or “Add to existing”.
3. You will be asked to
conrmthenumberentered,
then to label the number
(Home, Work, Mobile, etc.).
4. At this point enter the
name (or save the number
without a name), then choose
“Save” from the “Options”.
5. Press the BACK KEY to
navigate back through each
step or clear characters
when editing.

13
Answering
/ rejecting
calls.
· Press the SEND KEY to
accept an incoming call.
· A LONG PRESS of the
SEND KEY answers the
call and activates the
speakerphone.
· The END KEY rejects
the call.
· The MESSAGE KEY
rejects the call and sends
a message to the caller.
Making
calls.
1. Select the number
from your contacts or
key in a number directly.
If the country code is
recognized, the country
is displayed below
the number.
2. When the number
is recognized in the
contacts, the contact
name is displayed
below the number.
3. Press the PUNKT. KEY
to access options, or
simply press the SEND
KEY to place the call.

14
Sending
messages.
1. Press the MESSAGE
KEY then select “Create
message”, or alternatively
press and hold the MESSAGE
KEY to create a new message.
2. Compose your message
then press the PUNKT.
KEY and select “Options”
to choose the recipient.
3. Select “Options” then
“Send” or alternatively
press the SEND KEY to
send the message.
Composing
a message.
· To turn predictive
inputon/o,change
the settings using the
“Options” menu.
· With predictive input on,
the predictive text box
appears, displaying
suggested words.
· To delete characters in
the predictive text box
one at a time, use the
BACK KEY.

15
· To choose a word from
the predictive text box
use the UP / DOWN
KEYS to move between
the words suggested.
The UP KEY moves the
focus to the LEFT, the
DOWN KEY moves the
focus to the RIGHT.
· To insert the highlighted
word into your message,
press “0”(zero) (space
automatically added) or
the PUNKT. KEY.
· A SHORT PRESS of the
numeric keys scrolls
through the available
letters.
· To insert a number into
a text message, press
and hold the key in
question (LONG
PRESS). The ONE KEY
(1) scrolls through
frequently used
punctuation symbols.
To select from other
symbols press the STAR
KEY (*) to access the
symbol selector, or go to
Options > Insert symbol.
· Note: When the
predictive text box is
displayed, all key presses
relate to the words in
the box (not the body
of the message).

16
Creating a
reminder.
1. To create a reminder,
access the main menu and
select “Reminders”, then
“Create reminder”.
2. Key in the text of your
reminder then select “Save”
from the options menu.
3. To add an alert to the
reminder, select the date
and time when prompted,
then choose “Save”.
4. To edit a reminder,
select the reminder in
question from the Home
screen or Reminder menu,
select “Options” then
“Edit reminder”.
Setting
the alarm.
1. To set the alarm, key in
the desired alarm time.
2. Select “Options”, then
“Set alarm”.
3.Toturnothealarm,
select Alarm on the
HOME screen or access
“Alarm” from the main
menu,thenselect“O”
for “Alarm status” using
the PUNKT. KEY.

17
Setting
Ringtones.
1. To select a ringtone
go to “Settings” from
the main menu and select
“Sounds”.
2. Select “Calls” to choose
the desired ringtone
for incoming calls, and
“Messages” to choose
the tone for incoming
messages.
Using
Bluetooth.
· To use Bluetooth go
to “Settings” from
the main menu, then
“Connectivity” then
“Bluetooth”. Press the
PUNKT. KEY to toggle
betweenon/o.
18
· MP 01 only works with GSM 850,
900, 1800 and 1900 MHz networks.
· MP 01 has an estimated battery
life of 290 minutes talk time and
500 hours stand by time.
· Variousfactorsmayaectthe
talk and stand by times stated
such as network conditions,
feature usage, battery condition,
temperature etc.
· Failure to comply with the
instructions may cause injury
or damage to properties.
· Never operate the phone while
driving.
· Alwaysturnoyourmobile
phone inside an aircraft.
· Store the device between 15°c
and 25°c for optimal performance.
Do not store the device in extreme
temperatures. Exposure to
extreme temperatures may
cause the phone not to work
temporarily, continued exposure
may damage the device or battery.
· Do not use or store the device in
wet conditions, avoid humidity
or moisture, keep the device dry.
· Do not expose the battery to
re,itmayexplode.
· Do not store the device in dusty
or dirty conditions.
· Do not open, dismantle or
modify the device.
· Do not drop, impact, or shock
your device.
· Never use the device if it is
damaged.
· Use the device and accessories
for intended use only.
· Keep your device out of the
reach of small children.
· The device emits radio, which
may interfere with electronic
devices, avoid usage close
to potentially inadequately
shielded devices.
· Continuous exposure to loud
volume settings may damage
your hearing.
· Headsetusagemayaect
your ability to hear outside
sounds and may lead to lack of
attention.
· Separate collection of electrical
and electronic
equipment and
packaging materials.
Do not dispose and
return to dedicated
collection points.
Product and
safety information.
19
re,itmayexplode.
· Do not store the device in dusty
or dirty conditions.
· Do not open, dismantle or
modify the device.
· Do not drop, impact, or shock
your device.
· Never use the device if it is
damaged.
· Use the device and accessories
for intended use only.
· Keep your device out of the
reach of small children.
· The device emits radio, which
may interfere with electronic
devices, avoid usage close
to potentially inadequately
shielded devices.
· Continuous exposure to loud
volume settings may damage
your hearing.
· Headsetusagemayaect
your ability to hear outside
sounds and may lead to lack of
attention.
· Separate collection of electrical
and electronic
equipment and
packaging materials.
Do not dispose and
return to dedicated
collection points.
Please carefully read and
observe the terms below:
Distance of operation
This device model has
been tested and meets
radiofrequency exposure
guidelines when used as follows:
— Against the ear: Place or
receive a device call and hold
the device as you would a wire
line telephone.
— Body worn: When
transmitting, place the device in
a carry accessory that contains
no metal and positions the device
a minimum of 1.5 cm from your
body. Use of other accessories
may not ensure compliance
with radiofrequency exposure
guidelines. If you do not use a
body worn accessory and are
not holding the device at the ear,
position the device a minimum of
1.5 cm from your body.
— Data operation: When using a
data feature, position the phone
a minimum of 1.5 cm from your
body for the whole duration of
the data transmission.
Adapter
Adapter shall be installed near
Regulatory Conformance
Hereby, Punkt. Tronics AG
declares that this device is in
compliance with the essential
requirements and other relevant
provisions of Directive 1999/5/EC.
Safety Information and Notices
Failure to comply with the following
precautions may be dangerous
or illegal. Never attempt to
disassemble your device. You alone
are responsible for how you use
your device and any consequences
of its use. As a general rule, always
switchoyourdevicewherever
the use of a device is prohibited.
Use of your device is subject to
safety measures designed to
protect users and their environment.
Do not use your device in damp
areas (bathroom, swimming
pool…). Protect it from liquids and
other moisture. Do not expose your
device to extreme temperatures
lower than - 0°C and higher than
+ 40°C. Do not leave your device
within the reach of small children
(certain removable parts may be
accidentally ingested).
0700
20
the equipment and shall be
easily accessible.
Sound pressure safety
Use carefully with
the earphone as an
excessive sound pressure from
earphones and headphones can
cause hearing loss.
Caution
Risk of explosion if battery is
replaced by an incorrect type.
Dispose of used batteries
according to the instructions.
Proper use
As described in this manual,
your device can be used only in
right location. If possible, please
do not touch the antenna area
on your device.
FCC Regulations:
This device complies with part
15 of the FCC Rules. Operation
is subject to the following two
conditions: (1) This device may
not cause harmful interference,
and (2) this device must accept any
interference received, including
interference that may cause
undesired operation.
This mobile phone has been tested
and found to comply with the
limits for a Class B digital device,
pursuant to Part 15 of the FCC
Rules. These limits are designed
to provide reasonable protection
against harmful interference in a
residential installation.
This equipment generates, uses
and can radiated radio frequency
energy and, if not installed
and used in accordance with
the instructions, may cause
harmful interference to radio
communications. However, there
is no guarantee that interference
will not occur in a particular
installation. If this equipment
does cause harmful interference
to radio or television reception,
which can be determined by
turningtheequipmentoandon,
the user is encouraged to try to
correct the interference by one or
more of the following measures:
— Reorient or relocate the
receiving antenna.
— Increase the separation between
the equipment and receiver.
— Connect the equipment into
anoutletonacircuitdierent
from that to which the receiver
is connected.
— Consult the dealer or an

21
experienced radio/TV technician
for help.
Changesormodicationsnot
expressly approved by the party
responsible for compliance
could void the user’s authority to
operate the equipment.
RF Exposure Information (SAR)
This device meets the government’s
requirements for exposure to
radio waves. This device is designed
and manufactured not to exceed
the emission limits for exposure to
radio frequency (RF) energy set
by the Federal Communications
Commission of the U.S. Government.
The exposure standard for
wireless devices employs a unit
of measurement known as the
SpecicAbsorptionRate,or
SAR. The SAR limit set by the
FCC is 1.6 W/kg. *Tests for SAR
are conducted using standard
operating positions accepted
by the FCC with the phone
transmittingatitshighestcertied
power level in all tested frequency
bands. Although the SAR is
determinedatthehighestcertied
power 20 level, the actual SAR
level of the phone while operating
can be well below the maximum
value. This is because the
phone is designed to operate
at multiple power levels so as
to use only the poser required
to reach the network. In
general, the closer you are to a
wireless base station antenna,
the lower the power output.
The highest SAR value for the
model phone as reported to
the FCC when tested for use at
the ear is 0.603W/kg and when
worn on the body, as described
in this user guide, is 0.294W/
kg (Body-worn measurements
dieramongphonemodels,
depending upon available
enhancements and FCC
requirements.) While there
maybedierencesbetweenthe
SAR levels of various phones
and at various positions, they
all meet the government
requirement.
The FCC has granted an
Equipment Authorization
for this model phone with all
reported SAR levels evaluated
as in compliance with the FCC
RF exposure guidelines. SAR
information on this model
phoneisonlewiththeFCC
and can be found under the

22
The Bluetooth® word mark and
logos are registered trademarks
owned by Bluetooth SIG, Inc. and
any use of such marks by Punkt.
Tronics AG is under license.
Other trademarks and trade names
are those of their respective owners.
Warranty
Punkt. guarantees this product
for a period of two years from the
date of purchase. The warranty
only applies to defects attributable
to the production process or
materials used. The product
covered by the warranty may be
repaired or replaced after being
assessed by Punkt. The service for
products covered by the warranty
can only be obtained by presenting
proof of purchase (a valid receipt)
and the original packaging.
The warranty does not cover parts
subject to normal wear and tear
due to daily use of the product,
such as batteries (if provided with
the product), power cords, various
cables, connectors or sockets,
external parts and plastic parts
that do not show obvious signs
Display Grant section of http://
www.fcc.gov/oet/fccid after
searching on FCC ID: Z3PMP01.
For body worn operation, this
phone has been tested and meets
the FCC RF exposure guidelines
for use with an accessory that
contains no metal and that
positions the handset a minimum
of 1.5 cm from the body. Use of
other enhancements may not
ensure compliance with FCC RF
exposure guidelines. If you do not
use a body-worn accessory and are
not holding the phone at the ear,
position the handset a minimum
of 1.5 cm from your body when the
phone is switched on.
IC Statement
This device complies with CAN
ICES-3 (B)/NMB-3(B). This device
complies with Industry Canada
licence-exempt RSS standard(s).
Operation is subject to the
following two conditions: (1) this
device may not cause interference,
and (2) this device must accept
any interference, including
interference that may cause
undesired operation of the device.

23
of manufacturing defects. The
warranty does not cover accidental
damage, misuse, negligence and
is null and void if the product
has been tampered with by
unauthorized persons.
For further information, or if other
problems arise, please contact the
Punkt. dealer closest to you, or get
in touch with us using the form on
the Punkt. website punkt.ch.
Punkt. Customer Care
In the unlikely event that a problem
should occur with one of our
products, we kindly ask you to
return the product to the store
whereitwaspurchased.Thesta
will be able to help solve the
problem and, should the product
malfunction be due to defects
in workmanship or materials,
they will handle the replacement
procedure. Only products covered
by the warranty will be replaced.
If you are unable to return the
product to the store where it was
purchased, please use the form on
the Punkt. website, punkt.ch.
Your personal information will
only be used for Punkt. customer
care purposes and will therefore
only be communicated to other
companies providing repair
services. Your information will
not be used for sending you
information or promotional
material from Punkt. or its
partners.
Contact us
If you have any questions or
would like to comment on our
products, please write to info@
punkt.ch.
For more product information
visitPunkt.’socialwebsite
punkt.ch

24
Félicitations pour votre
acquisition du téléphone
mobile MP 01 conçu par
Jasper Morrison. Le MP 01
est un téléphone simple
qui propose des fonctions
de base pour passer des
appels et envoyer des SMS.
Déconnectez-vous et
redécouvrez les choses
simples de la vie.
Vous apprécierez !
Déballage de votre
nouveau Punkt. MP 01
Contenu de la boîte :
· Téléphone mobile
Punkt. MP 01
· Mini guide MP 01
· Chargeur USB
· Câble micro USB
· Kit oreillette micro USB
· Adaptateur micro USB
vers jack 3,5 mm
· Outil d'extraction de
carte SIM
· Adaptateur de carte SIM
Certains accessoires
mentionnés ci-dessus
peuvent également être
vendus séparément.
Ne connectez
pas d'accessoires
incompatibles.
Pour le manuel de
l'utilisateur complet,
veuillez consulter punkt.ch
Téléphone mobile MP 01.

25
26 Votre MP 01
28 Démarrage
30 Insérer une carte SIM
32 Recharger la batterie
33 Allumer/éteindre le téléphone
Verrouiller et déverrouiller le clavier
34 Régler la date et l'heure
Enregistrer des contacts
35 Passer des appels
Répondre/refuser des appels
36 Envoyer des messages
Écrire un message
38 Régler le réveil
Créer un rappel
39 Utiliser Bluetooth
Régler les sonneries
40 Informations produit et consignes de sécurité
26
Audio haute qualité
avec annulation
de bruit
Verre Gorilla Glass 3
à revêtement
anti-réexion
et anti-empreintes
Batterie 1000 mAh
290 min de conversation
3 sem en veille
Écran LCD
couleur
2 pouces haute
résolution
Votre MP 01.
27
Haut-parleur
Micro USB pour
synchronisation
du répertoire,
mise en charge et
kit oreillette
Marche/arrêt et
verrouillage
des touches
Volume
Tiroir de carte
SIM externe
Taille 116,5 x 53 x 14,5 mm. Poids 88 grammes. UI/UX par
Punkt. Réseau GSM quadri-bande. Fonctions Appels, SMS,
Calendrier en vue mensuelle, Réveil, Bluetooth.
Zone de l'antenne
28
Envoyer
· Passe un appel au numéro
sélectionné ou tapé
· Répond à un appel entrant
· Bascule entre l'activation
et la désactivation de la
mise en attente
· PRESSION LONGUE
lors d'un appel entrant :
répond à l'appel avec
le haut-parleur
· Sur l'écran d'accueil :
ouvre l'Historique
des appels
Fin
· Metnàunappelet/ou
navigue jusqu'à l'écran
d'accueil
· Sur l'écran d'accueil :
accès aux raccourcis
Retour
· Retourne à l'écran
précédent
· Eacedescaractères
dans un éditeur
Haut
· Met le contenu en
surbrillance ou déplace
le curseur
Bas
· Met le contenu en
surbrillance ou déplace
le curseur
Punkt.
· Sélectionne l'élément
en surbrillance
· Sur l'écran d'accueil :
ouvre le menu principal
Démarrage : touches
de la face avant.
29
Dièse
· Change de mode de
saisie dans l'éditeur de
message
Zéro
· Dans l'éditeur de message :
espace ou « 0 » (zéro)
Un
· PRESSION LONGUE :
appelle la messagerie
vocale
Autres touches
numériques (2–9)
· PRESSION LONGUE
sur l'écran d'accueil :
numérotation abrégée
dunuméroaecté
Contacts
· Ouvre les contacts ou
crée un nouveau contact
· Sur l'écran d'accueil :
PRESSION LONGUE
pour créer un nouveau
contact
Messages
· Ouvre les messages ou
l'éditeur de message
· Sur l'écran d'accueil :
PRESSION LONGUE
pour ouvrir l'éditeur de
message
Étoile
· Symboles dans un
éditeur numérique ou
numéroteur
· PRESSION LONGUE :
active/désactive le
silencieux, pendant
un appel
· Dans l'éditeur de
message : sélecteur
de symbole
30
· Votre MP 01 peut
seulement être
utilisé avec une carte
Micro-SIM (3FF)
(voir l'image ci-dessous).
· L'utilisation d'une carte
SIM incompatible risque
d'endommager la carte
ou l'appareil et d'altérer
les données stockées
sur la carte. L'utilisation
continue d'un adaptateur
de carte SIM n'est pas
recommandée.
Carte
Micro-SIM
(3FF)
Volume
· Augmente/baisse
le volume pour la
sonnerie, le haut-
parleur et le kit
oreillette
(si connecté)
· Verrou
· Verrouille/déverrouille
l'écran
· PRESSION LONGUE :
allume/éteint l'appareil
· Connecteur USB
· Ouvrez la trappe pour
connecter un câble USB
et recharger le téléphone
Zone de l'antenne
· Évitez de la toucher ou de
la couvrir quand l'antenne
est utilisée. Tout contact
peut nuire à la qualité
de la communication et
décharger la batterie.
Côté et
face arrière. Insérer
une carte SIM.

31
1. Éteignez le MP 01 puis
déconnectez le chargeur
avant d'ouvrir le tiroir
de carte SIM externe sur
le côté droit. Rangez et
utilisez toujours le MP 01
avec le tiroir de carte SIM
fermé.
2. Insérez l'outil
d'extraction de carte SIM
dans le petit trou du tiroir
SIM, sur le côté droit
du MP 01, et poussez-le
délicatement jusqu'à ce que
le tiroir SIM s'éjecte.
3. Retirez le tiroir SIM et
placez la carte SIM dedans,
zone de contact orientée
vers le bas.
4. Remettez le tiroir en
place dans son logement
(petit trou en haut) et
poussez-le délicatement
dans le téléphone avant de
l'allumer.

32
Recharger la batterie.
· Il est possible que
la batterie soit
partiellement chargée
quand vous déballerez
votre téléphone, mais
vous devez la charger
complètement avant de
commencer à l'utiliser.
· Quand la batterie est
complètement déchargée,
quelques minutes peuvent
s'écouleravantl'achage
de l'écran de recharge de
batterie.
· Quand la batterie est
presque épuisée, une
alerte de faible batterie
s'ache.
· Quand la batterie est
complètement épuisée,
le téléphone s'éteint
automatiquement.

33
· Pour allumer votre
téléphone, appuyez
longuement sur la
TOUCHE VERROU.
· Si vous avez activé le
code secret, le téléphone
vous demandera de le
saisir. Par défaut, le code
secret est 7658 et il est
désactivé.
· Si un code PIN est
dénipourvotreSIM,
le téléphone vous
demandera de le saisir.
· Pour éteindre votre
téléphone, appuyez
longuement sur la
TOUCHE VERROU.
· Pour verrouiller le
clavier, appuyez sur la
TOUCHE VERROU sur
le côté du téléphone.
Une fois verrouillé,
appuyez longuement sur
la TOUCHE VERROU
pour le déverrouiller.
· Sivousavezdéni
un code secret pour
le téléphone, vous
devrez le saisir pour
déverrouiller le clavier.
Verrouiller et
déverrouiller
le clavier.
Allumer/
éteindre
le téléphone.

34
Régler la date
et l'heure.
· Quand vous utiliserez
le téléphone pour la
première fois, vous serez
guidé dans le processus
de réglage de la date et
de l'heure.
· Utilisez les TOUCHES
HAUT et BAS pour
régler la date et l'heure,
puis enregistrez l'option
sélectionnée en
appuyant sur la
TOUCHE PUNKT.
· Pour régler la date et
l'heure ultérieurement,
sélectionnez l'option
« Réglages » dans
le menu principal
puis sélectionnez
« Date et heure ».
Enregistrer
des contacts.
1. Tapez le numéro.
2. Sélectionnez « Options »
puis « Ajouter aux contacts »,
ou bien appuyez sur la
TOUCHE CONTACTS, puis
choisissez « Créer nouveau »
ou « Ajouter
au contact existant ».
3. Il vous sera demandé de
conrmerlenumérosaisi
puisd'identierlenuméro
(Domicile, Travail,
Mobile, etc.).
4. Entrez ensuite le nom
(ou enregistrez le numéro
sans nom), puis sélectionnez
« Enregistrer » dans les
« Options ».
5. Appuyez sur la TOUCHE
RETOUR pour revenir à
l'étape précédente ou pour
eacerdescaractèreslorsde
l'édition.

35
Répondre/
refuser
des appels.
· Appuyez sur la
TOUCHE ENVOYER
pour accepter un appel
entrant.
· UNE PRESSION
LONGUE de la
TOUCHE ENVOYER
permet de répondre à
l'appel et d'activer le
haut-parleur.
· La TOUCHE FIN a pour
eetderefuserl'appel.
· La TOUCHE MESSAGE
refuse l'appel et envoie
un message à l'appelant.
Passer
des appels.
1. Sélectionnez le numéro
dans vos contacts ou tapez
un numéro directement.
Si le code de pays est
reconnu,
le pays est indiqué
sous le numéro.
2. Si le numéro est reconnu
dans les contacts, le nom du
contact est indiqué sous le
numéro.
3. Appuyez sur la
TOUCHE PUNKT.
pour accéder aux options,
ou directement sur la
TOUCHE ENVOYER pour
passer l'appel.

36
Envoyer
des messages.
1. Appuyez sur la
TOUCHE MESSAGE
puis sélectionnez « Créer
message », ou bien
appuyez longuement sur la
TOUCHE MESSAGE pour
créer un nouveau message.
2. Écrivez votre message
puis appuyez sur la
TOUCHE PUNKT. avant
de sélectionner « Options »
pour choisir le destinataire.
3. Sélectionnez « Options »
puis « Envoyer » ou bien
appuyez sur la TOUCHE
ENVOYER pour envoyer le
message.
Écrire
un message.
· Pour activer/désactiver
la saisie prédictive,
changez les réglages
à l'aide du menu
« Options ».
· Quand la saisie
prédictive est activée,
la boîte de texte prédictif
s'acheaveclesmots
suggérés.
· Poureaceruncaractère
à la fois dans la boîte de
texte prédictif, utilisez la
TOUCHE RETOUR.

37
· Pour choisir un mot dans
la boîte de texte prédictif,
utilisez les TOUCHES
HAUT/BAS pour passer
d'un mot à l'autre dans
les mots suggérés.
La TOUCHE HAUT
déplace la sélection
vers la GAUCHE, et la
TOUCHE BAS déplace
la sélection vers la
DROITE.
· Pour insérer le mot
en surbrillance dans
votre message, appuyez
sur « 0 » (zéro)
(un espace est ajouté
automatiquement) ou
sur la TOUCHE PUNKT.
· Une PRESSION BRÈVE
des touches numériques
permetdedélerdans
les lettres disponibles.
· Pour insérer un numéro
dans un message texte,
appuyez longuement sur
la touche en question
(PRESSION LONGUE).
La TOUCHE UN (1)
permetdedélerdansles
symboles de ponctuation
souvent utilisés. Pour
sélectionner d'autres
symboles, appuyez sur
la TOUCHE ÉTOILE (*)
pour accéder au sélecteur
de symbole, ou allez
dans Options > Insérer
symbole.
· Remarque : Quand la
boîte de texte prédictif
estachée,toutesles
pressions de touche sont
associées aux mots dans
la boîte (et non pas dans
le corps du message).

38
Créer
un rappel.
1. Pour créer un rappel,
sélectionnez « Rappels »
dans le menu principal,
puis « Créer rappel ».
2. Tapez le texte de votre
rappel puis sélectionnez
« Enregistrer » dans le
menu des options.
3. Pour ajouter une alerte
au rappel, sélectionnez la
date et l'heure quand vous
y êtes invité puis choisissez
« Enregistrer ».
4.Pourmodierunrappel,
sélectionnez le rappel
en question dans l'écran
d'accueil ou dans le menu
Rappel, puis sélectionnez
«Options»et«Modier
rappel ».
Régler
le réveil.
1. Pour régler le réveil,
tapez l'heure de réveil
souhaitée.
2. Sélectionnez
« Options » puis « Régler
réveil ».
3. Pour éteindre le réveil,
sélectionnez Réveil dans
l'écran d'ACCUEIL ou
sélectionnez « Réveil »
dans le menu principal,
puis«O»pour
« État réveil » à l'aide
de la TOUCHE PUNKT.

39
Régler
les sonneries.
1. Pour choisir une
sonnerie, sélectionnez
« Réglages » dans le menu
principal puis « So