Q See Qc Rtsp Setup User Manual
Qc-Rtsp Setup QC-RTSP setup QC-RTSP setup Manuals Oracle Backup q-see 3:
2016-11-23
User Manual: Q-See Qc-Rtsp Setup
Open the PDF directly: View PDF ![]() .
.
Page Count: 15

Using RTSP on QC Series DVRs and NVRs
The purpose of this document is to detail the necessary steps for setting up a Real Time
Streaming Protocol (RTSP) for our QC Series DVRs and NVRs. Prior to setting up a RTSP, your QC
series DVR/NVR must be set up for Remote Viewing; for video instructions, CLICK HERE.
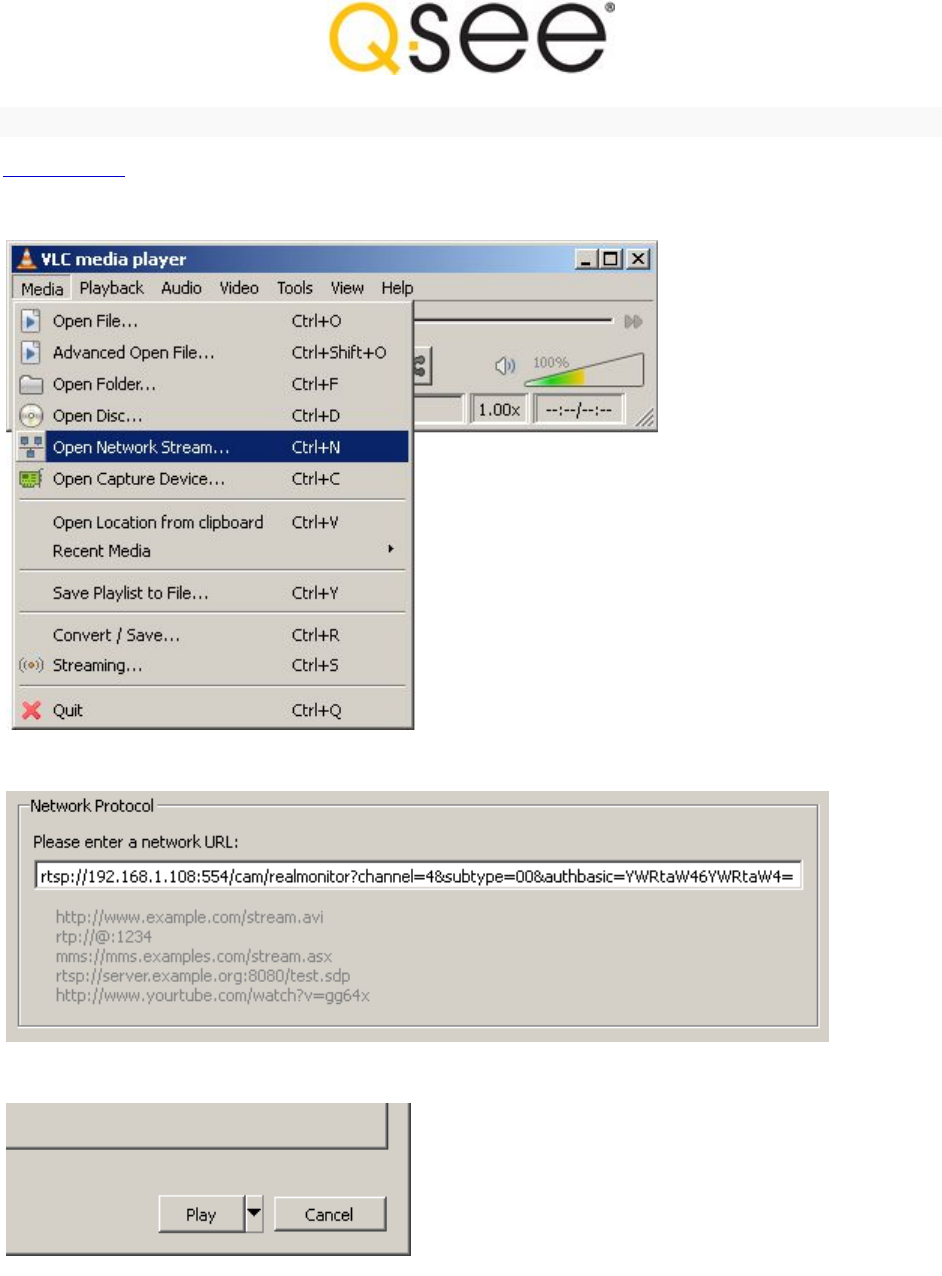
Step 1: Create the RTSP Command
This is the format of the RTSP command for QC DVRs
rtsp://IP:PORT/cam/realmonitor?channel=CHANNEL&subtype=ENCODING&authbasic=LOGIN
Example values using DVR default settings ..
IP: 192.168.1.108
Port: 554
Channel: 1
Encoding: 00 (Main Stream)
Login: YWRtaW46YWRtaW4= (admin)
Using the above values, this is the RTSP connection to a QC DVR
rtsp://192.168.1.108:554/cam/realmonitor?channel=1&subtype=00&authbasic=YWRtaW46YWRtaW4=
QC RTSP Port
In most cases the port is fixed and cannot be changed.
QC RTSP Channel
The channel number can be 1-32.
QC RTSP Encoding
This can be Main Stream (00) or Extra Stream (01).
QC RTSP Login
The login is encoded with base64 and uses the format user:password
Login examples:
admin:admin
Encoded: YWRtaW46YWRtaW4=
666666:666666
Encoded: NjY2NjY2OjY2NjY2Ng==

Using RTSP on QC Series DVRs and NVRs
Create your RTSP command ..
Enter IP address
192.168.1.108
Enter Port
554
Select Channel
1
Select Encoding
Main Stream
Enter user:password
admin:admin
Create only the base64 login ..
Enter user:password
admin:admin
Step 2: IP Camera RTSP Command
The RTSP command for QC IP Cameras sends the login as plain text.
This is the format of the RTSP command for QC IP Cameras ..
rtsp://LOGIN@IP:PORT/cam/realmonitor?channel=CHANNEL&subtype=ENCODING
Using the above format, this is a sample RTSP connection to a QC IP camera ..
rtsp://admin:admin@192.168.1.108:554/cam/realmonitor?channel=1&subtype=1
Important
1) For remote access, forward the RTSP port in your router settings
2) Verify the user account actually exists and is not locked
Using RTSP on QC Series DVRs and NVRs
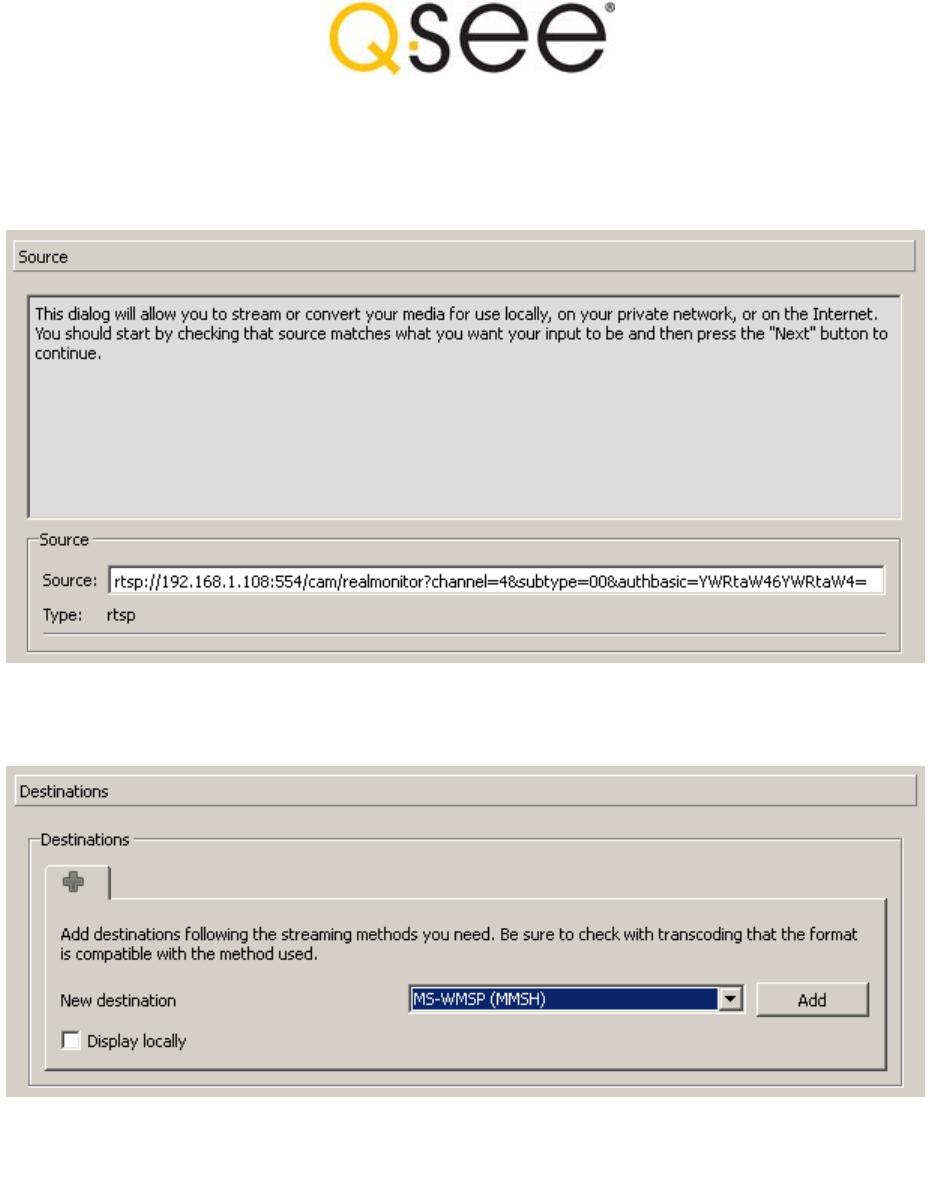
You will then see the Stream Output window appear.
The Source tab will show your RTSP command. This cannot be edited.
If you need to make changes click "Cancel" and start again.
Click the "Next" button to continue.
Under the Destinations tab select "MS-WMSP (MMSH)" from the drop down box.
To view live video on this computer check the "Display locally" box (not recommended).
Click "Add" to show the Network options.
Here you can change the default port or leave it as is - this step must be completed either way.
For remote access to the live stream this port must be forwarded to the computer running VLC.
Using RTSP on QC Series DVRs and NVRs
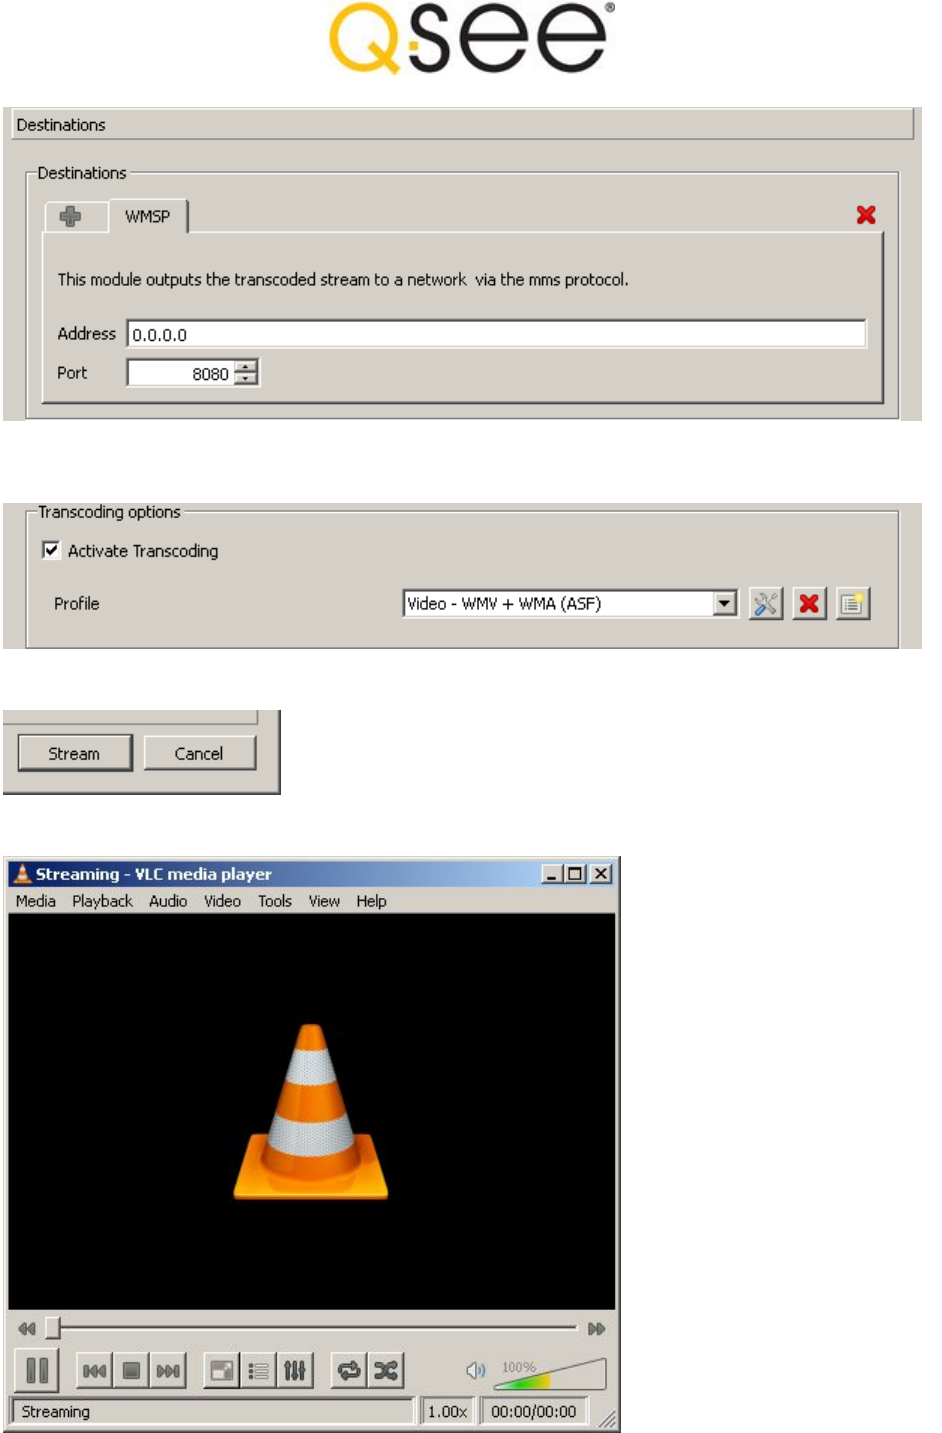
Under Transcoding Options select "Video - WMV + WMA (ASF)" from the drop down box.
Verify the "Activate Transcoding" box is checked.
Click "Stream" to begin streaming live video from the DVR.
If you selected "Display locally" you will see live video.
Otherwise you can just minimize the VLC window.
Using RTSP on QC Series DVRs and NVRs
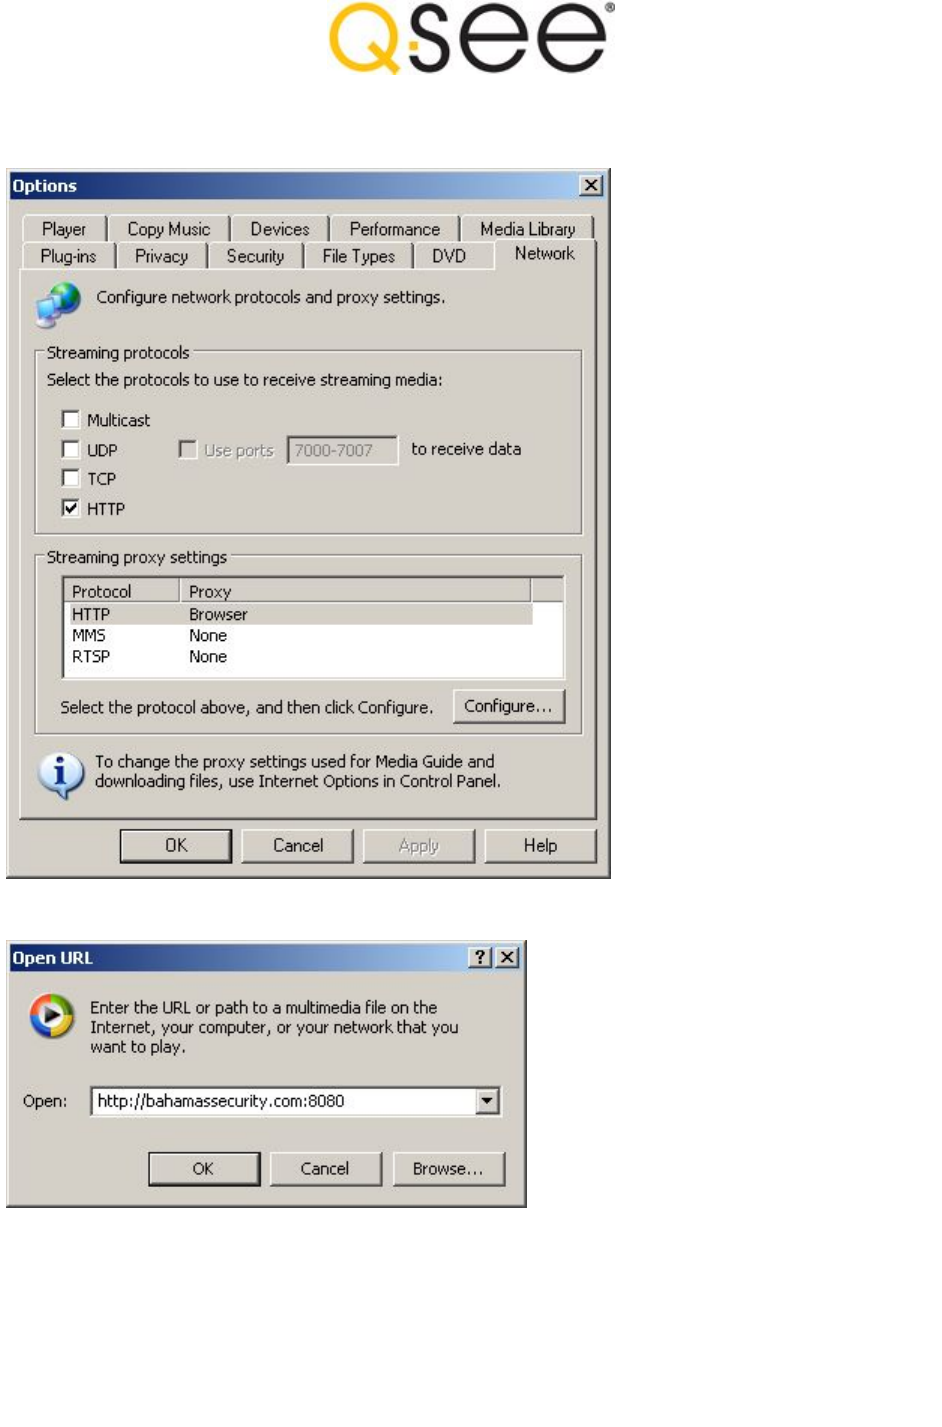
Open Windows Media Player on your remote computer.
Verify HTTP is enabled in the Network options.
Goto "File", "Open URL", and enter the IP/Domain and port number of your VLC computer.
Using RTSP on QC Series DVRs and NVRs
Click "Ok" to begin streaming live video from VLC.
Step 5: Stream Live Video on a Webpage
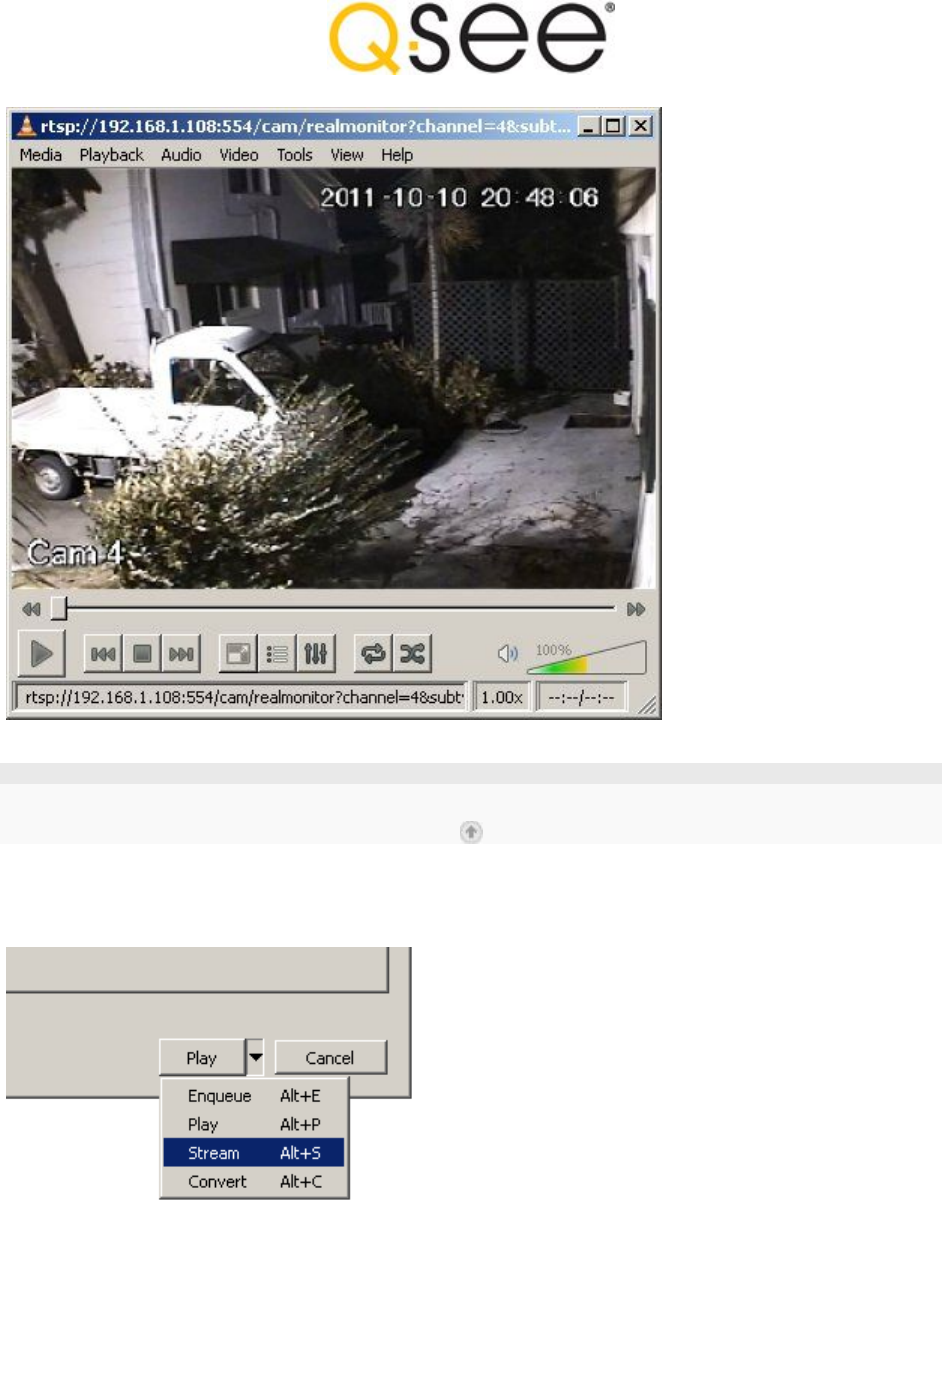
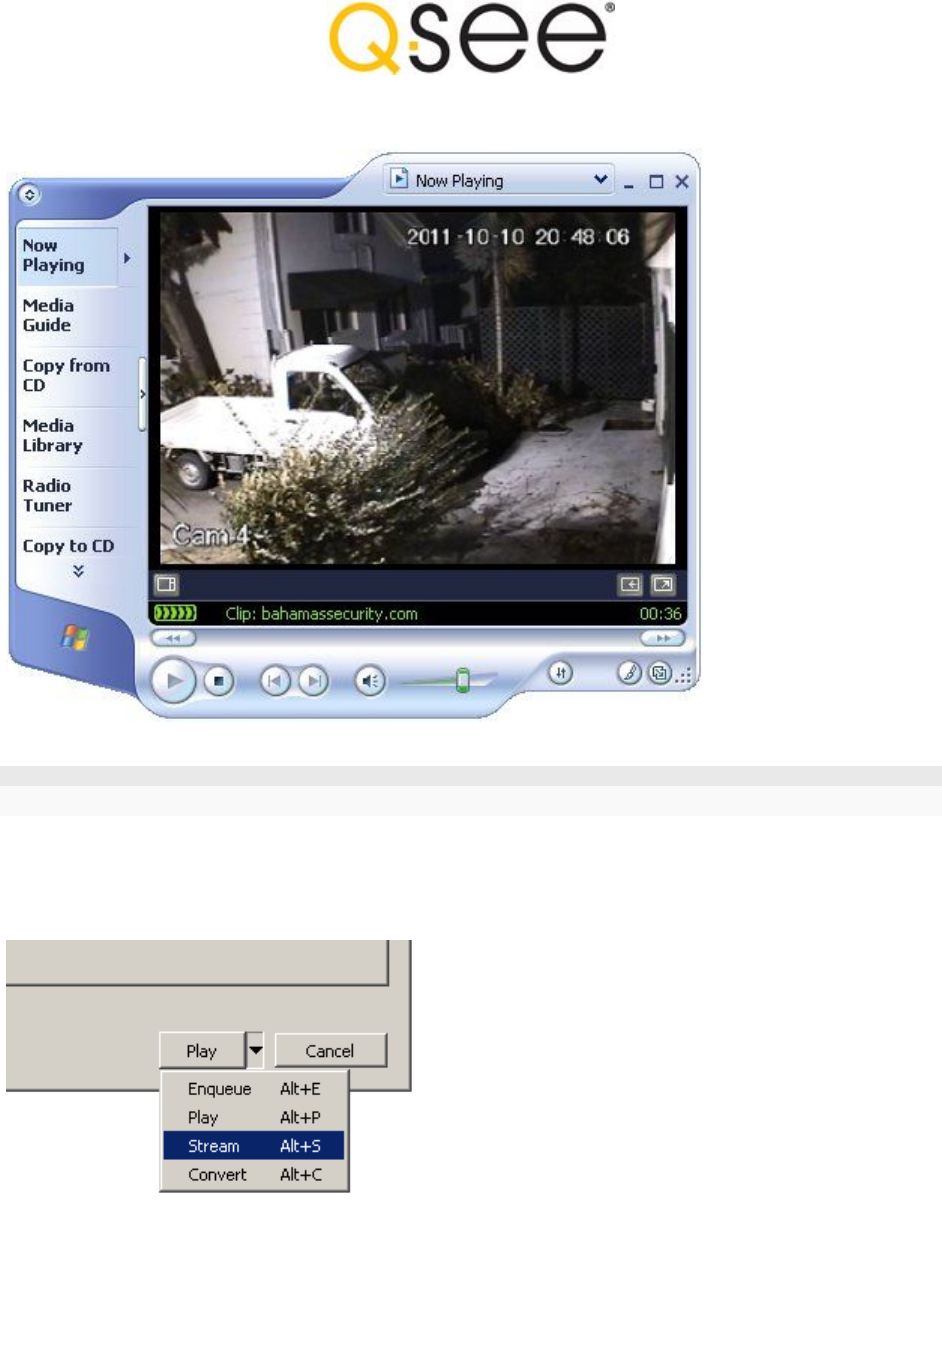
Open VLC if it is not already open, or stop any previous video.
Select "Media", "Open Network Stream", and enter your full RTSP command as before.
Select "Stream" from the drop down menu.
You will then see the Stream Output window appear.
The Source tab will show your RTSP command. This cannot be edited.
If you need to make changes click "Cancel" and start again.
Skip "Destinations" and click the "Options" tab.
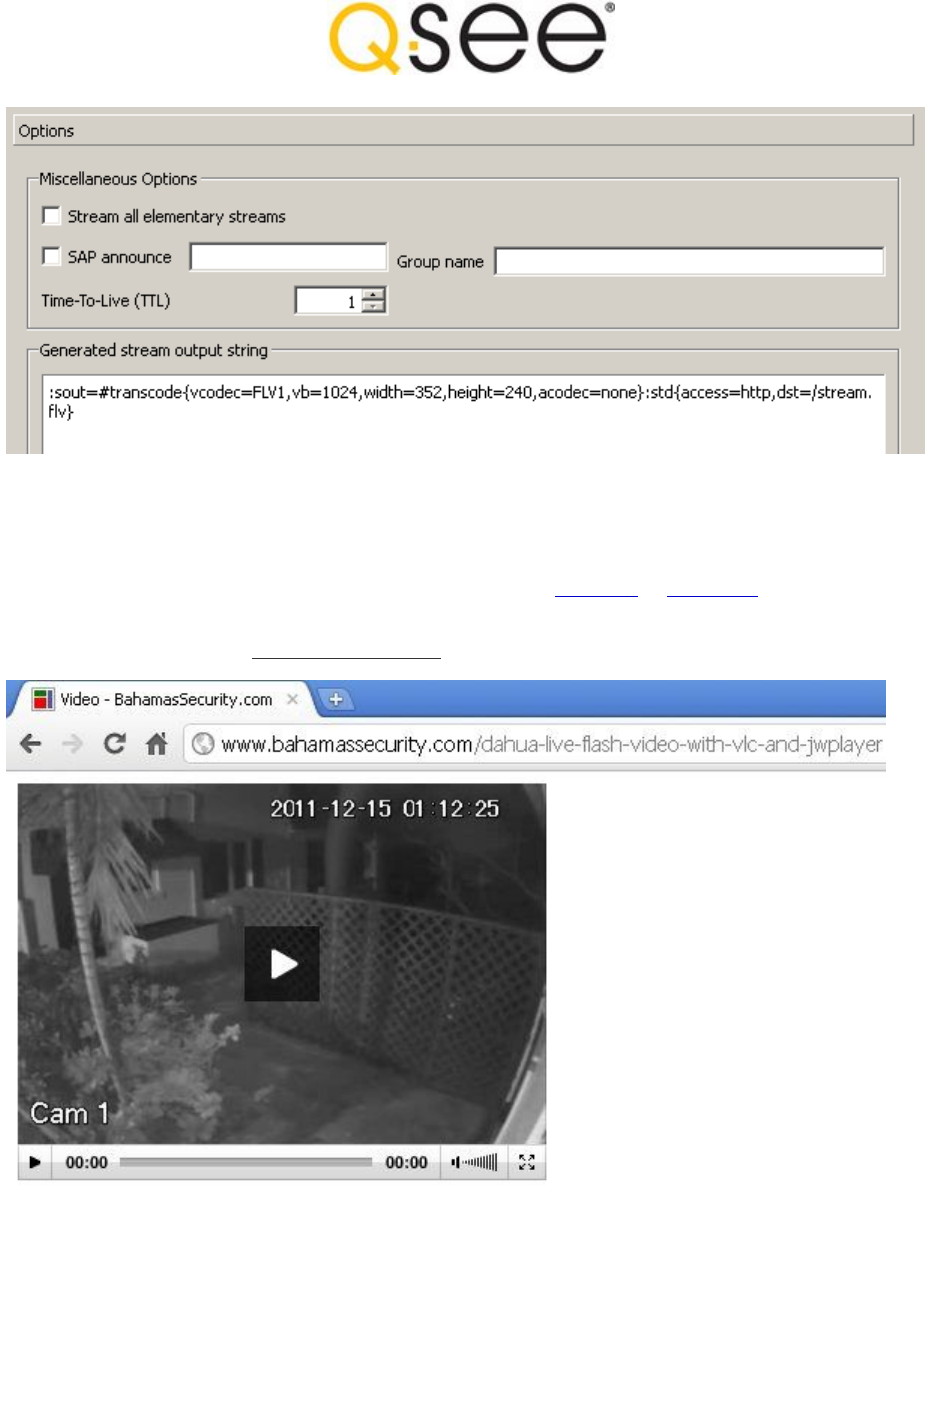
Using RTSP on QC Series DVRs and NVRs
Enter the VLC stream output string and click "Stream".
I will provide you with example strings below.
JW Player in Google Chrome ..
You can now stream this video from compatible players such as JW Player or FlowPlayer.
This allows you to embed it into your website using JavaScript and Flash.
The stream format would be http://IP:PORT/FILE
VLC Stream Output Strings ..
I will will show you 3 examples for QC DVRs - FLV and H.264 encoded.
All 3 examples will output FLV (flash) files for live streaming video.
Adjust the scale value based on your original encode size.
To use the original encode size you can simply leave out the scale setting.
Incorrect scale/bitrate/fps values result in a corrupted video stream.
Using RTSP on QC Series DVRs and NVRs
Example 1: FLV Codec (CIF)
This is better suited for busy websites.
VLC Stream Output String:
:sout=#transcode{vcodec=FLV1,vb=256,fps=7,scale=1,acodec=none}:std{access=http,dst=:8061/stream1.flv}
RTSP Connection
Stream Type Extra Stream (01)
QC Device Settings
Encode Extra Stream
Encode Size CIF
Encode FPS 7
Encode Type VBR
Encode Bitrate 256
Encode Quality Highest
VLC Stream Output Settings
Video Codec FLV1
Video Bitrate 256
Video FPS 7
Video Scale 1.0 (none)
Video Size 352x240
Deinterlace No
Audio No
Player URL http://mydomain.com:8061/stream1.flv
Example 2: FLV Codec (D1)
This is for websites that want higher quality.
VLC Stream Output String:
:sout=#transcode{vcodec=FLV1,vb=1024,fps=7,acodec=none}:std{access=http,dst=:8062/stream2.flv}
RTSP Connection
Stream Type Main Stream (00)
QC Device Settings
Encode Main Stream
Encode Size D1
Encode FPS 7
Encode Type VBR / CBR
Encode Bitrate 640 / 1024
VLC Stream Output Settings
Video Codec FLV1
Video Bitrate 640 / 1024
Video FPS 7
Video Scale 0.5 / No
Video Size 352x240 / 704x480
Deinterlace No
Audio No
Player URL http://mydomain.com:8062/stream2.flv
Using RTSP on QC Series DVRs and NVRs
Example 3: H.264 Codec (D1)
This is higher quality deinterlaced video.
The video can take longer to start.
VLC Stream Output String:
:sout=#transcode{vcodec=h264,vb=1024,fps=7,deinterlace,acodec=none}:std{access=http,dst=:8063/stream3.flv}
RTSP Connection
Stream Type Main Stream (00)
QC Device Settings
Encode Main Stream
Encode Size D1
Encode FPS 7
Encode Type CBR
Encode Bitrate 1024
VLC Stream Output Settings
Video Codec H264
Video Bitrate 1024
Video FPS 7
Video Scale No
Video Size 704x480
Deinterlace Yes
Audio No
Player URL http://mydomain.com:8063/stream3.flv
The above settings are just examples to show you how it works.
You will need to adjust this for your own device and application.
TIP - If you don't have a static IP or DDNS server or just want to use a domain name instead;
purchase a domain name through a domain name registrar, sign up for a free account at
FreeDNS.afraid.org, add the afraid.org name servers to your domain name registrar account,
then download one of the FreeDNS update programs at afraid.org.

Using RTSP on QC Series DVRs and NVRs
JW Player Sample Code ..
Click here for full details on embedding flash video with JW Player
<html>
<head>
<title>JW Player Example</title>
<script src="jq-1.4.3.min.js"></script>
</head>
<body>
<!-- INTERNET EXPLORER -->
<object classid="clsid:D27CDB6E-AE6D-11cf-96B8-444553540000" width="352" height="264" id="player1"
name="player1">
<param name="movie" value="player.swf">
<param name="allowfullscreen" value="true">
<param name="allowscriptaccess" value="always">
<param name="flashvars" value="file=http://mydomain.com:8061/stream1.flv&autostart=true&bufferlength=1">
<!-- CHROME / FIREFOX / SAFARI -->
<embed id="player1"
name="player1"
src="player.swf"
width="352"
height="264"
allowscriptaccess="always"
allowfullscreen="true"
flashvars="file=http://mydomain.com:8061/stream1.flv&autostart=true&bufferlength=1"
/>
</object>
</body>
</html>
No Static IP? No Domain Name?
With VLC on your home PC streaming the video, schedule a script to hit a webpage on your remote server
every 30 minutes or so to update the IP. That webpage saves your updated IP to a database or text file, the
main video page on the remote server always grabs that latest IP.

Using RTSP on QC Series DVRs and NVRs
Step 6: Auto start VLC streaming
Create a single VLC stream ..
Example: create a new text document and name it Stream1.cmd
Right click "Edit" and enter the following then hit save.
@ECHO OFF
set vlc="%PROGRAMFILES%\VideoLAN\VLC\vlc.exe"
set
rtsp="rtsp://192.168.1.108:554/cam/realmonitor?channel=1&subtype=01&authbasic=YWRtaW46YWRta
W4="
set
sout=":sout=#transcode{vcodec=FLV1,vb=256,fps=7,scale=1,acodec=none}:std{access=http,dst=:8
061/stream1.flv}"
ECHO VLC LOADING ...
start "" %vlc% %rtsp% %sout%
exit
Track when the stream is open and closed ..
Before the batch file starts VLC, write the number "1" to a log file.
Start VLC and wait for it to exit by adding "/wait" in the start line.
Then when VLC exits write "0" to say the stream is offline.
Example based on the above code.
This example will wait until VLC exits before closing the command window.
@ECHO OFF
set vlc="%PROGRAMFILES%\VideoLAN\VLC\vlc.exe"
set
rtsp="rtsp://192.168.1.108:554/cam/realmonitor?channel=1&subtype=01&authbasic=YWRtaW46YWRta
W4="
set
sout=":sout=#transcode{vcodec=FLV1,vb=256,fps=7,acodec=none}:std{access=http,dst=:8061/stre
am1.flv}"
set log=c:\inetpub\wwwroot\logs\stream1.log
title VLC STREAM 1 ..
echo 1 >%log%
cls
ECHO.
ECHO =====================================================
ECHO VLC Streaming ...
ECHO -----------------------------------------------------
ECHO INPUT : 192.168.1.108, Port 554, Ch-1, Extra Stream

Using RTSP on QC Series DVRs and NVRs
ECHO OUTPUT : FLV1, 256, 7fps, 8061, Stream1.flv
ECHO =====================================================
ECHO.
start "" /wait %vlc% %rtsp% %sout%
echo 0 >%log%
exit
You could then read that log file on your server to see if it is streaming or not.
It is not a 100% fail safe method but it should do the job.
Create multiple streams ..
You can create separate files for each channel using the above code.
However each one will run a separate instance of VLC.
Therefore you could instead create a configuration file and load that from the command line.
It would only be one instance of VLC for multiple channels.
TIP - if you want to track whether each channel is online or offline,
separate files may be preferred
Example: create a new text document and name it vlm.vlm
Right click "Edit" and enter the following then hit save.
Then copy this vlm file to the VLC path.
new channel1 broadcast enabled
setup channel1 input
rtsp://192.168.1.108:554/cam/realmonitor?channel=1&subtype=01&authbasic=YWRtaW46YWRtaW4=
setup channel1 output
#transcode{vcodec=FLV1,vb=256,fps=7,acodec=none}:std{access=http,dst=:8061/stream1.flv}
new channel2 broadcast enabled
setup channel2 input
rtsp://192.168.1.108:554/cam/realmonitor?channel=2&subtype=01&authbasic=YWRtaW46YWRtaW4=
setup channel2 output
#transcode{vcodec=FLV1,vb=256,fps=7,acodec=none}:std{access=http,dst=:8062/stream2.flv}
new channel3 broadcast enabled
setup channel3 input
rtsp://192.168.1.108:554/cam/realmonitor?channel=3&subtype=01&authbasic=YWRtaW46YWRtaW4=
setup channel3 output
#transcode{vcodec=FLV1,vb=256,fps=7,acodec=none}:std{access=http,dst=:8063/stream3.flv}
new channel4 broadcast enabled
setup channel4 input
rtsp://192.168.1.108:554/cam/realmonitor?channel=4&subtype=01&authbasic=YWRtaW46YWRtaW4=
setup channel4 output
#transcode{vcodec=FLV1,vb=256,fps=7,acodec=none}:std{access=http,dst=:8064/stream4.flv}
control channel1 play
control channel2 play
control channel3 play
control channel4 play
Next create another new text document and name it StreamAll.cmd
Edit and paste the following into it and hit save.

Using RTSP on QC Series DVRs and NVRs
@ECHO OFF
ECHO VLC LOADING ...
start "" vlc --extraintf telnet --vlm-conf vlm.vlm
exit
Copy this cmd file to the VLC path and make a shortcut to your desktop.
When you run this it will start streaming all 4 channels.
