QOMO HiteVision QRF600-TR QClick (Audience Response System) User Manual XQGQRF600 Rev2
QOMO HiteVision, LLC. QClick (Audience Response System) XQGQRF600 Rev2
XQGQRF600 User manual Rev2

Page 19 of 109
QOMO HiteVision, LLC. QClick FCC ID: XQGQRF600-RE
QOMO HiteVision,LLC.
User’s Manual
Part 1. QRF600 ARS Overview
The QRF600 Audience Response System (ARS) is an easy-to-use RF response system that
obtains immediate feedback from each participant (up to 400 persons) synchronously. Working
completely out of Power Point, the QClick software is both easy to learn and use. The system is
also organized for instructors to use any no-Power Point formats of document exam files or
hardcopy exam paper to start an exam, or with free style of system setting, an instructor can start a
quiz even without considering a quiz file or a quiz paper ahead before starting a quiz. The instance
captured quiz questions and answers can be easily saved to the system after a quiz is finished.
The system is composed of hardware (instructor remote keypad, participants’ remote keypads,
RF main receiver, and extended USB cable, etc) and PC software. The instructor keypad is
equipped with a remote mouse and PC keypad functions making it easy to control any formats of
showing slice and the system functions in a far distance.
The QRF600 LCD display and no volatile memory in student and instructor keypads make it
possible that remote control can be used in any classes with the features of virtually log into a class
which is located by automatic RF channel searching. The beauty of RF communication makes it
easy for a student to raise a question by directly communicating to an instructor with one single key
press, but not interrupting other people. At the same time, an instructor can view each student’s
exam performances and the exam statistical data on the remote LCD display without sharing the
private student exam info with others. The no volatile memory in the student remote keypad can
hold as much as a whole semester’s homework and exam answers for later review. Students can
use the keypads to receive the homework assignment, do the homework from home, and then turn
in the assignment in the class with just a simple key press. Each student keypad keeps one unique
Student ID which can be easily set and reset by a manager or by a user. If a student keypad is lost
or damaged, it can be replaced with any new keypad by just resetting its Student ID.
The QRF600 ARS encourages participation and elicits individual response through the
following no free style activities: Normal Quiz, Paper Quiz, Homework, Rush Quiz, Elimination,
Survey, Vote, and Roll Call and free style activities: Normal Quiz, Rush Quiz and Elimination. The
QRF600 displays the instant results in the form of a histogram and score board after each question
is finished in a quiz.
Page 20 of 109
QOMO HiteVision, LLC. QClick FCC ID: XQGQRF600-RE
QOMO HiteVision,LLC.
Part 2. Hardware & System Installation Illustration
1. Student keypad
1.1 Specifications
Dimensions (l w h): 130mm x 52mm x18.5mm
Keys: 21
Power required: 2 AAA Batteries
RF transmission distance: ~200 feet
Battery life: 6 months to 1 year dependent on the usage
Function: Transmit response signals
Frequency band : 2404.1-2480.0 MHz ISM/SRD band systems
The working frequency of QRF 600 system
1. Adopting the 2404.1-2480.0 MHz ISM/SRD band systems
2. The specific value of 50 carrier wave frequency points are as follows:
0 2404.1 2424.0 2444.0 2464.0
1 2405.6 2425.6 2445.6 2465.6
2 2407.2 2427.2 2447.2 2467.2
3 2408.8 2428.8 2448.8 2468.8
4 2410.4 2430.4 2450.4 2470.4
5 2412.0 2432.0 2452.0 2472.0
6 2413.6 2433.6 2453.6 2472.6
7 2415.2 2435.2 2455.2 2474.5
8 2416.7 2436.8 2456.8 2476.2
9 2418.4 2438.4 2458.4 2478.8
10 2412.0 2440.0 2460.0 2480.0
11 2421.6 2441.6 2461.6
12 2423.2 2443.2 2463.2

Page 21 of 109
QOMO HiteVision, LLC. QClick FCC ID: XQGQRF600-RE
QOMO HiteVision,LLC.
1. 2. Illustration
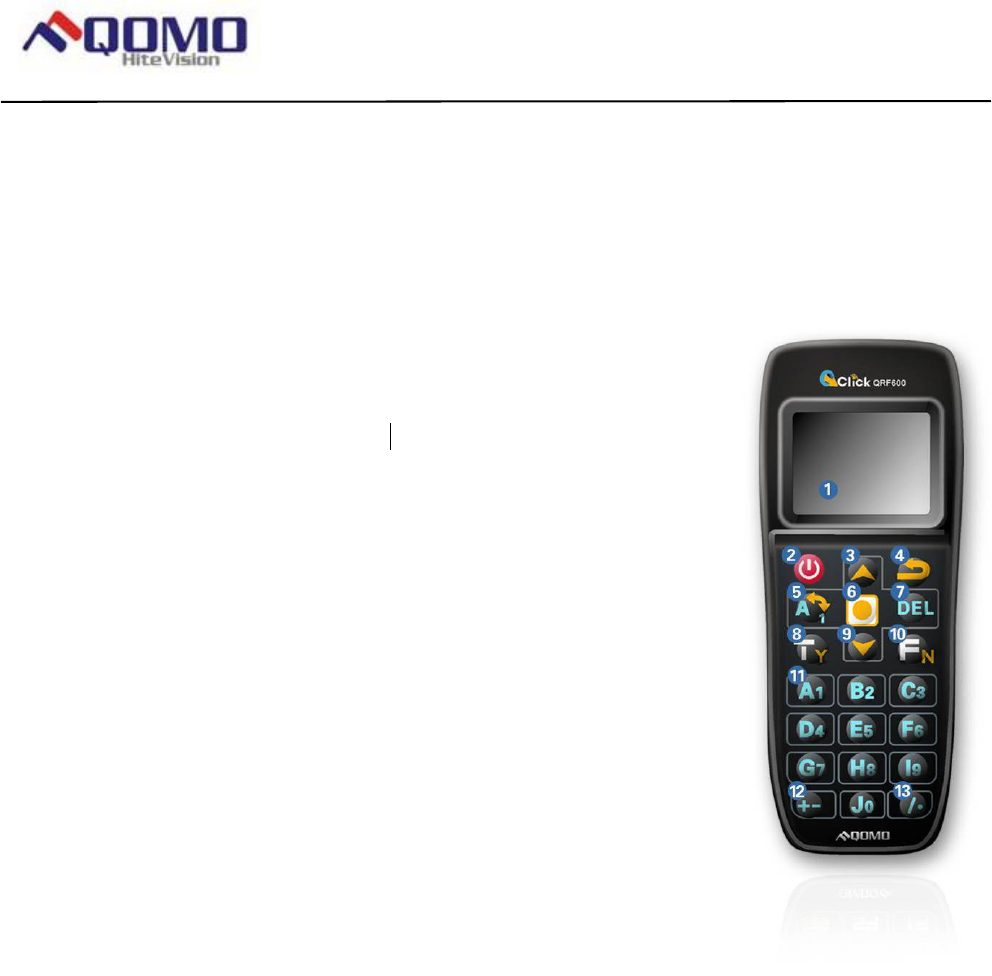
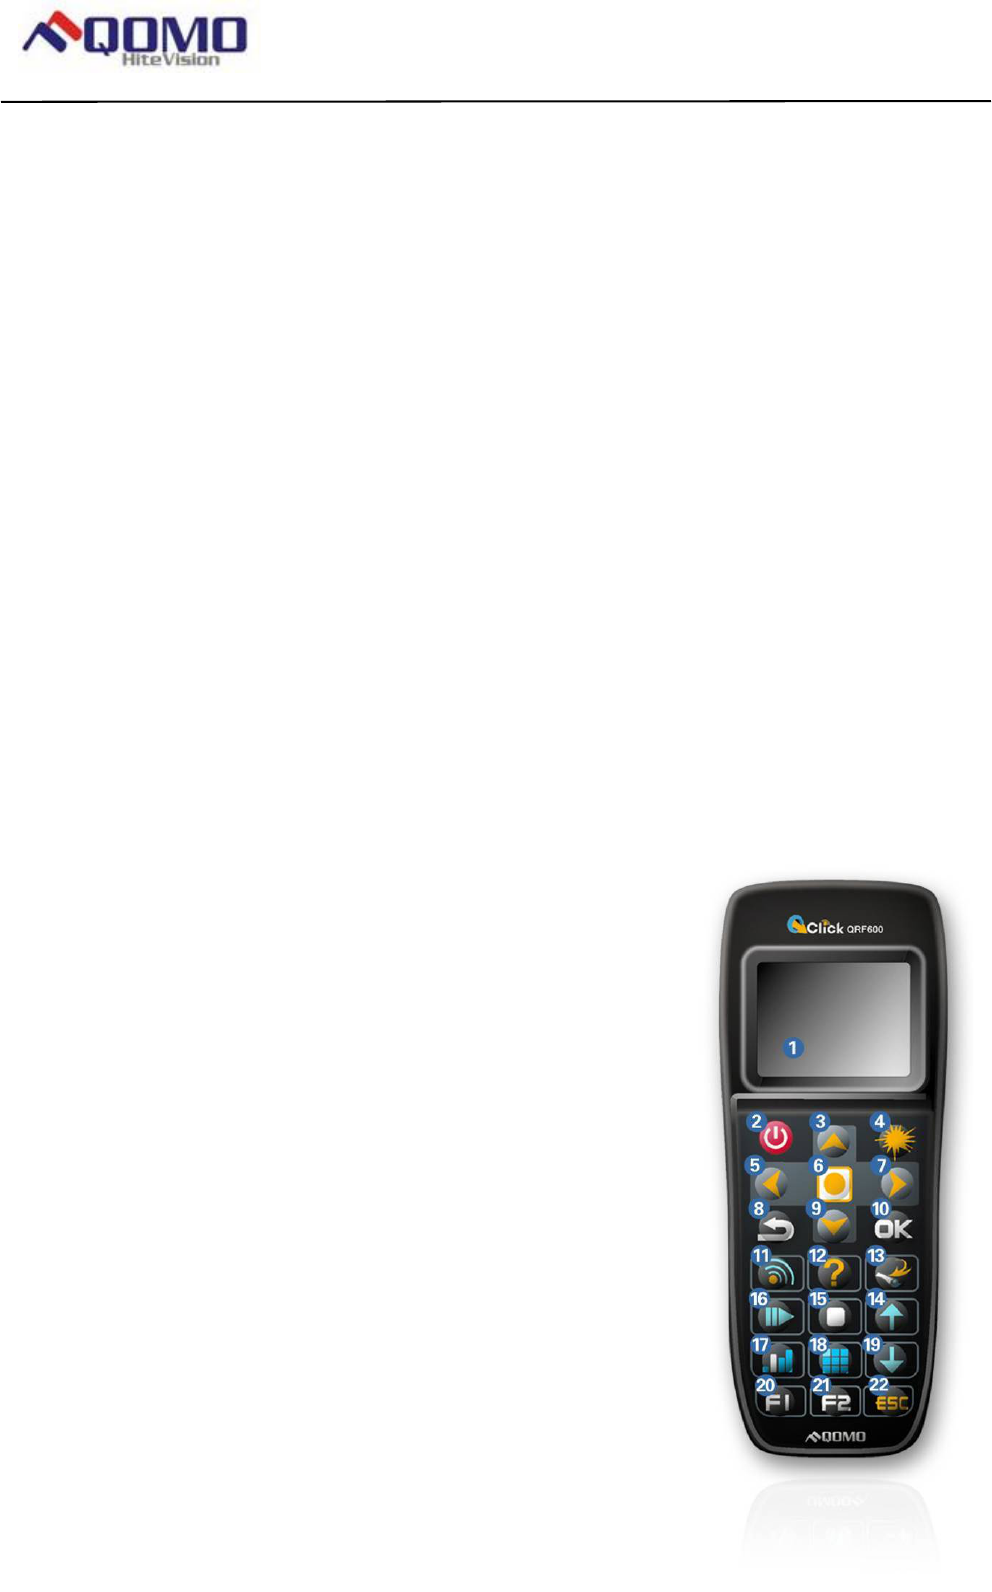
1.2.1 Student Keypad Layout:
1- LCD
2- Power Key: Press and hold for at least 0.5 seconds to turn on or off the keypad.
3- Up Key: To scroll the screen display up when pressed.
4- Return Key: To return menu to one level up. Special function is used to enter a
function selection menu when a user exits from the answer screen in homework or
paper quiz mode (see 1.2.2 section 6).
5- Alpha-Numeric Key: To toggle between alpha and numeric key functions.
6- Enter key: To confirm a selection or to enter the main menu when pressed.
7- Del key: To back space or to delete an exam under Paper Quiz or Home Work.
8- T/Y Key: To respond to Yes/No or True/False prompt for T (TRUE) or Y (YES).
9- Down Key: To scroll the screen display down when pressed. A special function is
used for auto registration.
10- F/N Key: To respond to Yes/No or True/False prompt for F (FALSE) or N (NO).
11- Choice Keys: Labeled “A1” to “J0” for alpha numeric inputs.
12- Operation +/- Key: For”+” “-” sign enter.
13- Operation /. Key: For the division “/” and the decimal point “.” sign enter.

Page 22 of 109
QOMO HiteVision, LLC. QClick FCC ID: XQGQRF600-RE
QOMO HiteVision,LLC.
1.2.2 Student Keypad Instruction:
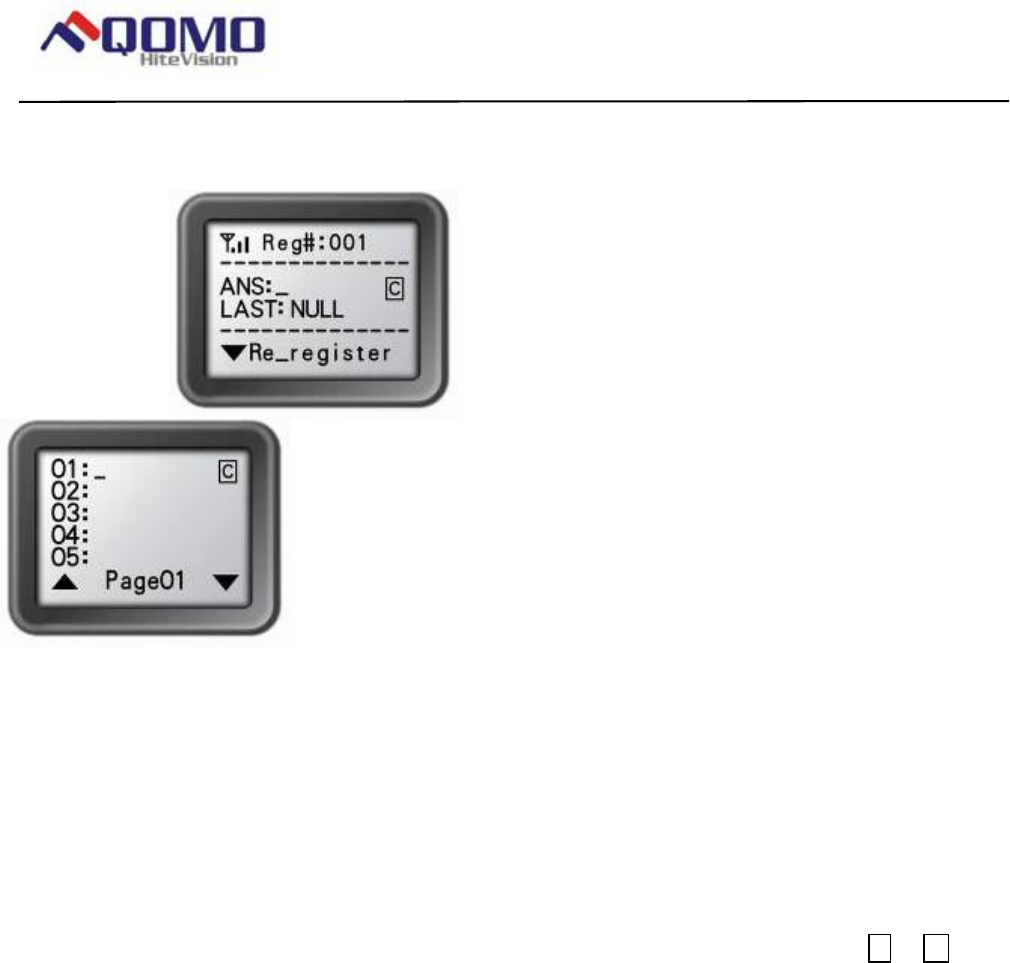
1- NoHost Screen:
The following information is displayed:
1) RF Signal strength is displayed on the upper left corner of LCD.
2) Battery remaining sign is displayed on the upper right corner of LCD.
3) Student ID.
4) The class name registered last time.
The following functions can be performed under this display:
1) To enter main menu by pressing the “Enter Key”.
2) To auto register by pressing “Down Key”.
3) To search class by pressing “F/N Key”.
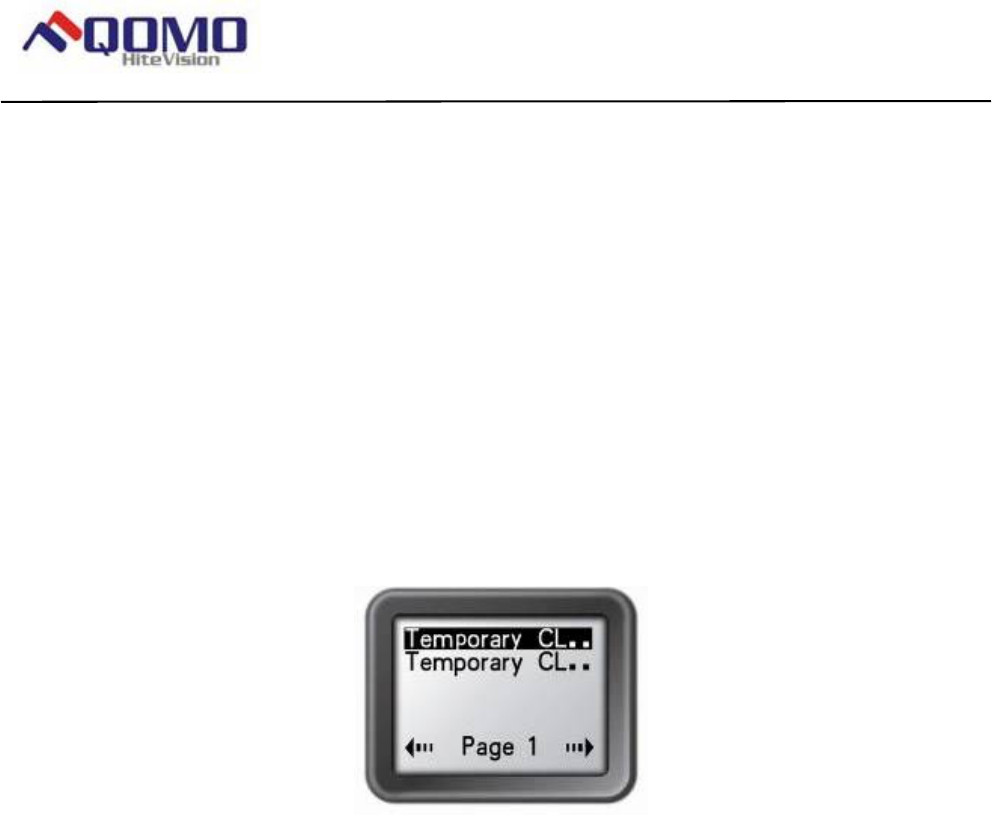
2- Menu Screens:
Use “Up Key” or “Down Key” to scroll selection of the menu item. The item selected
will be highlighted. Press “Enter Key” to select the menu item. The shortcut to select
a menu item is by directly pressing “Choice Keys” number corresponding to the
submenu items number shown at front of each item.
Page 23 of 109
QOMO HiteVision, LLC. QClick FCC ID: XQGQRF600-RE
QOMO HiteVision,LLC.
3- Input Screens:
The shown cursor prompts a user to input characters or numeric numbers. The
user can press “Choice Keys” or press its combination of “Alpha-Numeric Key” to
enter desired characters. Or just simply press “T/Y Key” or “F/N Key” to enter “true”
or “false” or “yes” or “no” selection. Pressing “Del Key” will backspace to remove the
character just entered. Pressing “Enter Key” will save or send a setting.
For convenience of multiple fields setting, after finishing setting for one field, if
press the “Enter Key”, it will advance the cursor to next field. When a page is turned
over, the content of the turned page is automatically saved in the memory.
If the input area is alpha numeric type, at the end of the line, a or sign will
indicate whether the current input mode is either alphabetic or numeric. Use the
“Alpha-Numeric Key” to toggle the input mode. Under the Homework menu and
under the Find-By-Title screen, the “Alpha-Numeric Key” is used to toggle a
selection of upper or lower case letter.
N
C
Page 24 of 109
QOMO HiteVision, LLC. QClick FCC ID: XQGQRF600-RE
QOMO HiteVision,LLC.
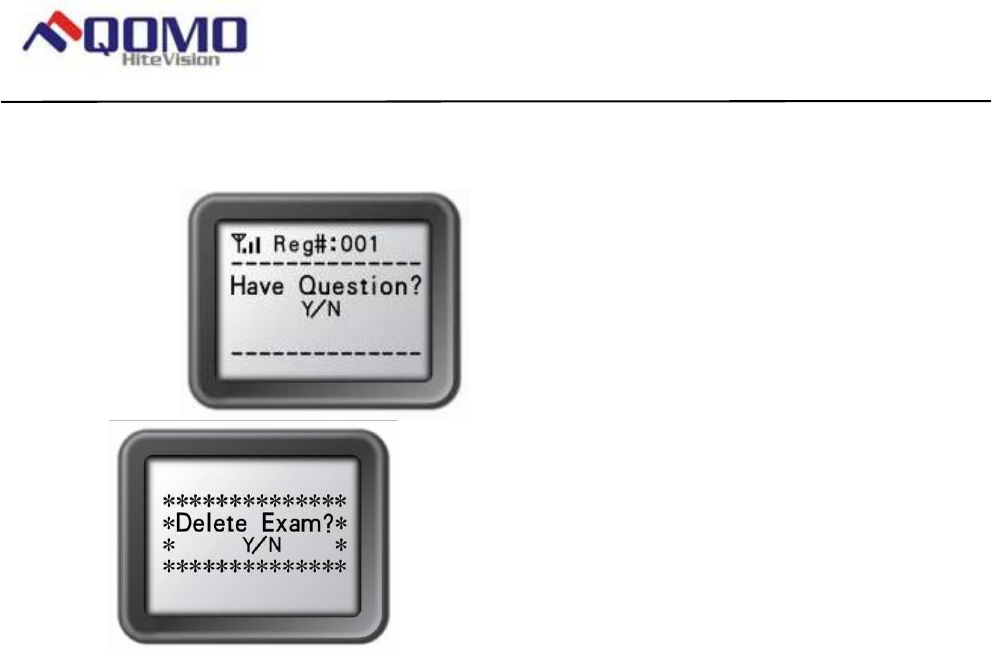
4- Confirmation Screens:
Some operations require user’s confirmation because these operations are not
recoverable. For example, deletion of an exam is not recoverable. Once it is deleted, it
is permanently removed.
The user either press “T/Y Key” to confirm or press “F/N Key” to cancel the current
operation.
5- Connecting student keypads to a host:
After a keypad connecting to a host, the student can start to take an exam by pressing
choice keys to respond to the questions in the normal, rush and elimination modes, or
start to receive the exam ID and the exam titles in paper and homework modes, or to
raise questions, etc.
6- Functions and Operations:
(1) Setting up Student ID:
Before logging in, a valid Student ID (stored in the class database) must be set
for each student keypad.
To set a Student ID:
1) Under the NoHost screen, press the “Enter key” to enter to the main
menu.
2) Select “4.Hardware” submenu.
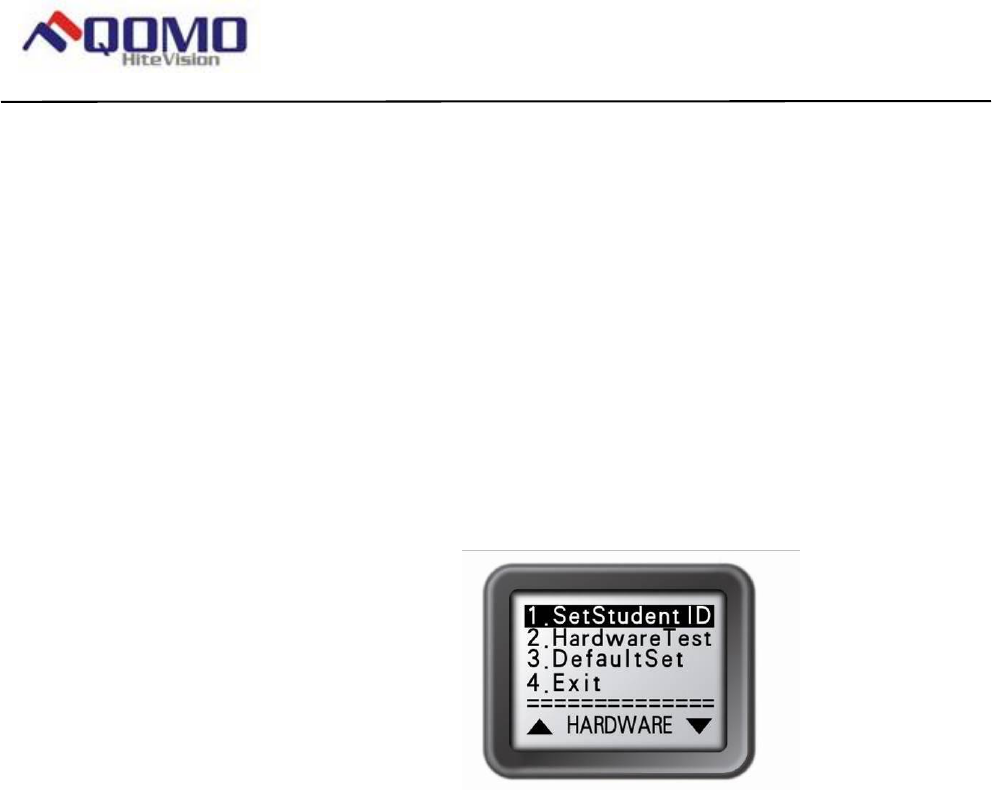
3) Under the Hardware screen, select “1.SetStudentID” submenu.
4) Under the SetStudentId screen, enter a valid Student ID and press the
Page 25 of 109
QOMO HiteVision, LLC. QClick FCC ID: XQGQRF600-RE
QOMO HiteVision,LLC.
“Enter key” to save.
Note: All submenu items can be selected by directly pressing its
corresponding item number shown at the front of each item.
(2) Find a class:
To find a class to log in:
1) Under the No Host screen, press the “Enter key” to enter to the main
menu.
2) Select “1.FindingClass” to find classes.
Or
Under the NoHost screen, press the “F/N Key” to find classes.
After finishing searching, a list of classes will display. The nearest class
will be displayed on the top of list.
While the searching is in progress, you may press any key to discontinue
the searching.
Note 1: Only classes in an exam state will be listed (See Software Portion).
Note 2: Previously logged in class names are saved in the keypad. To log into the
previously logged in class, just select the class name from the list.
(3) Log into a class:
After finding a class, a user can select a class from the list to login.
Login:
1) Under the NoHost screen, press the “Down Key” to log into the
class you logged in from the previous time. The name of the class just
logged in will be shown on the screen.
Or
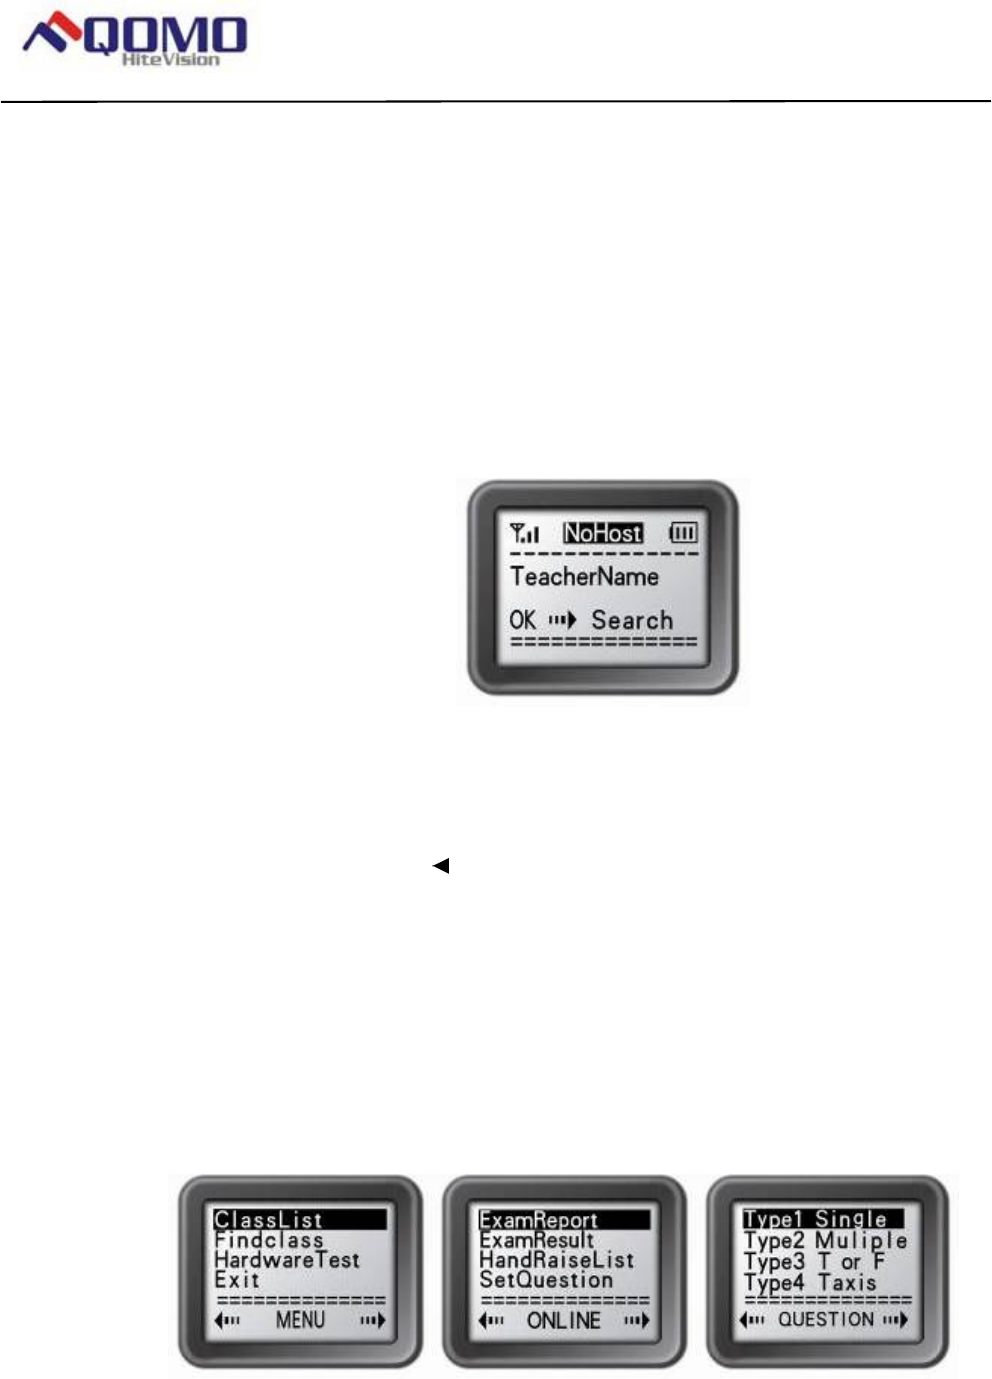
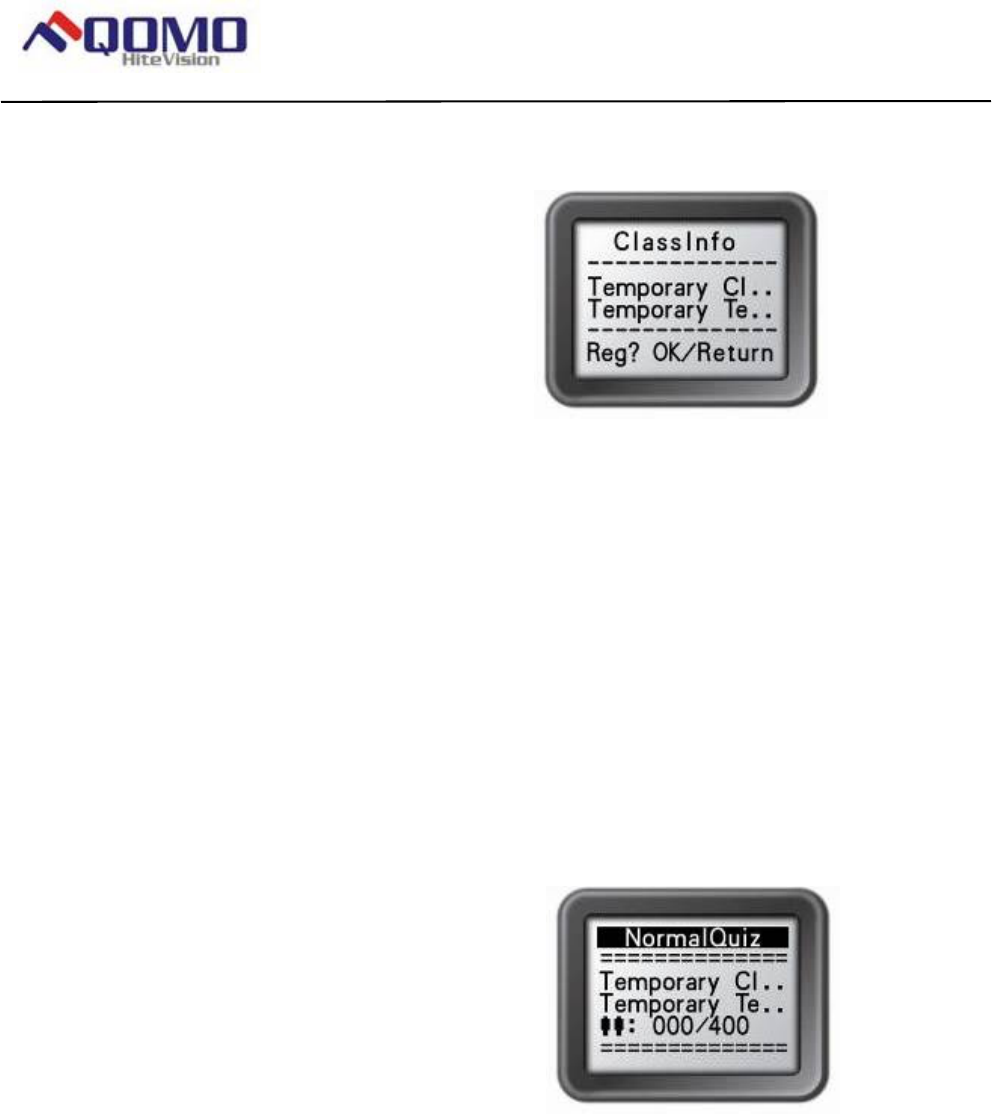
2) Under the main menu, select “ClassList” to display the class list.
Select a class and enter to the ClassInfo screen.Press the “Enter
Key” or “T/Y Key” to login.

Page 26 of 109
QOMO HiteVision, LLC. QClick FCC ID: XQGQRF600-RE
QOMO HiteVision,LLC.
After successfully logging in, the login screen will show the displays
according to the activity mode. These will be introduced in the section (4).
Once logged in, an assigned registration number will show on the screen.
If login has failed, one of the following messages will be displayed:
1) “Failure!” Not able to connect to a host.
2) “Wait to Start!” Software has not yet entered to exam state.
3) “Invalid ID!” Software is not able to recognize the student ID.
(4) The screen displays after successfully logging in:
One of the following screens will display according to the activity modes:
1) Normal Exam Screen:
This applies to the PC software activity modes: Normal Quiz, Rush Quiz,
Elimination, Survey and Vote.
Under the Normal Exam screen, the following functions can be performed:
1) Input your answer by pressing the “Choice Keys” and then press
the “Enter Key” to send. A message will be displayed to
acknowledge the operation. The inputted choices for the previous
question will be shown on the screen for your reference.
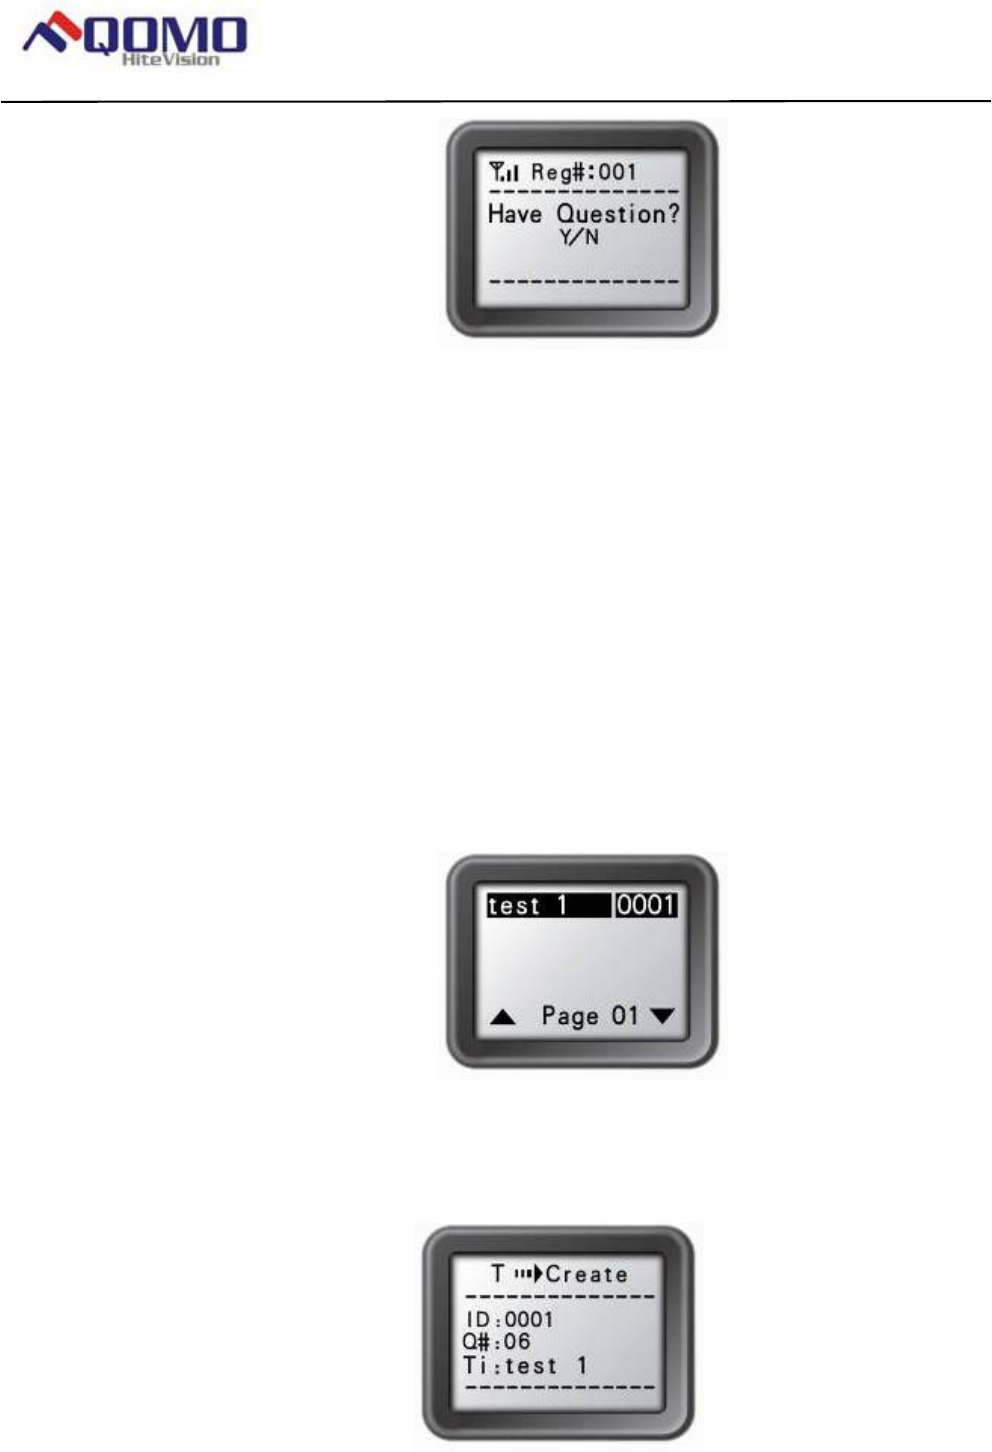
2) Press the “Up Key” to enter into the “Raise a Hand Screen”, and
then press the “T/Y Key” if you have any questions. The ARS
system will show a marker at the bottom of the main exam question
display screen to bring up an alert to the instructor. Then the
instructor can use the instructor keypad to search for the persons
who are asking questions.
Page 27 of 109
QOMO HiteVision, LLC. QClick FCC ID: XQGQRF600-RE
QOMO HiteVision,LLC.
3) Press the “Down Key” to re-register if the ARS system is logged
out, for example, if an instructor switches to other exams, the
student keypad should re-register.
4) Press the “Return Key” to exit exam. You will be prompted for
confirmation. Press the “T/Y Key” to exit the current exam or the
“F/N Key” to cancel the operation and return to the previous screen.
If the “T/Y Key” is pressed, it will bring you to the NoHost screen.
2) Paper Quiz Screen:
This applies to the PC software activity modes: Paper Quiz and
Homework.
There are two cases under the Paper Quiz Screen:
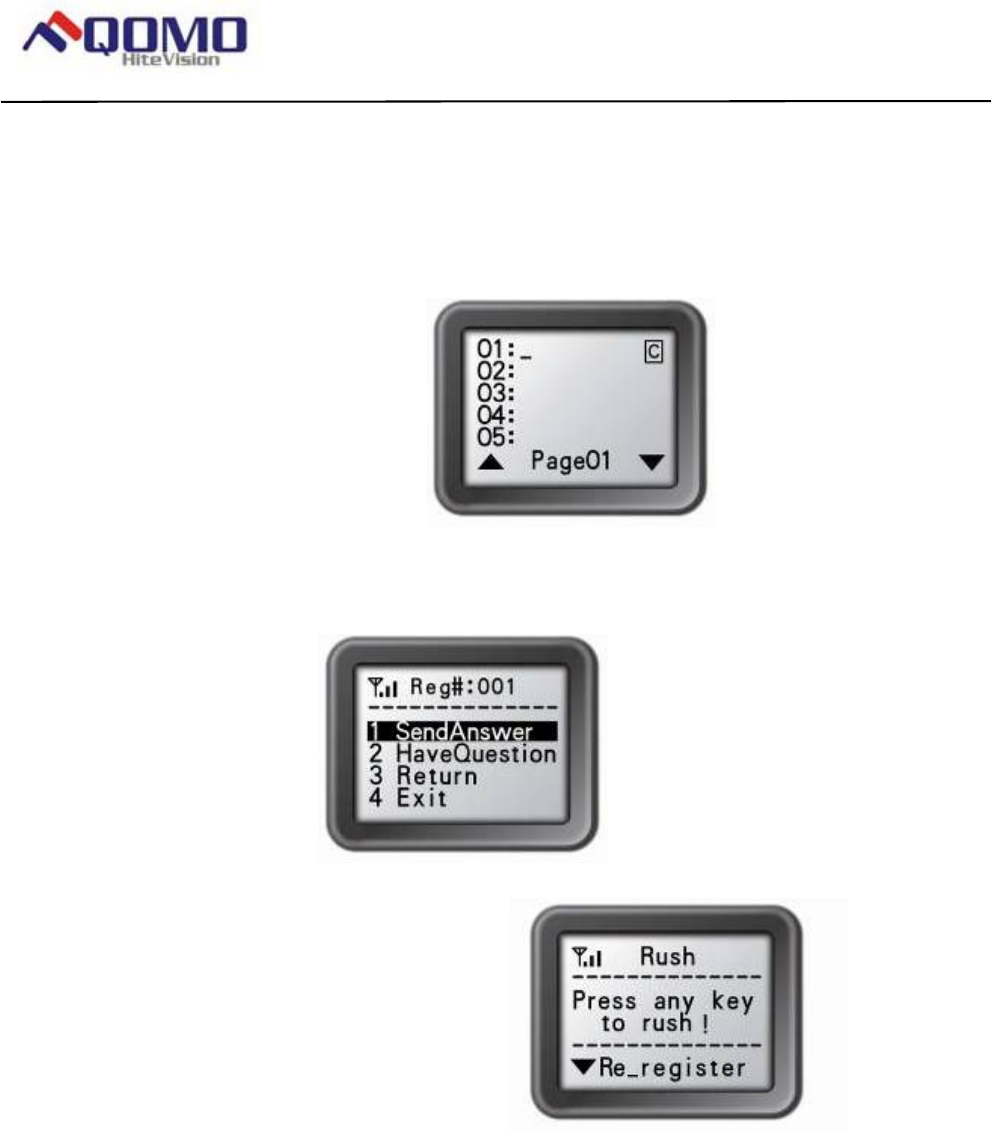
1) If Test ID selected is already saved in the student keypad, the
test title name with this Test ID will display on the screen. Student
can start the exam by selecting the test.
2) If Test ID selected is not saved in the student keypad, the
“creating a new test screen” will display. Only the test title can be
modified on this screen. Under this screen, press the “Enter Key” to
start the exam.
The following functions can be performed under the Paper Quiz Screen:
Page 28 of 109
QOMO HiteVision, LLC. QClick FCC ID: XQGQRF600-RE
QOMO HiteVision,LLC.
<1> Enter your answers by pressing “Choice Keys”, then press the
“Enter Key” or the “Down Key” to save the answer to the keypad. The
cursor then advances to next question. Going to the next page, the
previous page answers were saved to the student keypad. Use the “Del
Key” to delete the inputs if an answer needs to be modified.
<2> Press the “Return Key” to enter the paper quiz menu. Select a
menu item and press the “Enter Key” to confirm the operation.
3) Rush Quiz and Roll Call Screen:
This applies to the following activity modes: Rush Quiz and Roll Call.
Under the Rush Quiz and Roll Call Screens, the following functions can be
performed:
1) Press any key (except “Power Key”, “Up Key”, “Down Key”, and
“Return Key”) to respond to the Rush Quiz or Roll Call. If it is in Rush
Quiz, Normal Exam Screen will pop up to allow a student to submit an
answer. After sending the answer, it will return to the Rush Quiz or the
Roll Call Screen.
2) Press the “Up Key” to enter into the “Raise a Hand Screen” and
then press the “T/Y Key” if you have any questions. The ARS system
Page 29 of 109
QOMO HiteVision, LLC. QClick FCC ID: XQGQRF600-RE
QOMO HiteVision,LLC.
will show a marker at the bottom of the main question screen to bring
an attention to the instructor. The names of person who are asking
questions can be shown on the instructor keypad screen.
3) Press the “Down Key” to return to the previous screen.
4) Press the “Return Key” to exit the exam. You will be prompted for
confirmation. Press the “T/Y Key” to exit the current exam or the “F/N Key”
to cancel the operation and return to the previous screen. If “T/Y Key” is
pressed, it will bring you to the NoHost screen.
7- Homework Mode:
Under the main menu, select “3.ExamList” to enter into the Homework submenu.
The Homework submenu has the following items:
(1) ID & Title List: All tests saved in this keypad will be shown when this item is
selected. Each line corresponds to one test. Press the “Alpha-Numeric Key” to
toggle displays between test names and test IDs. Use the “Up Key” or “Down
Key” to select the desired test. Selected tests will be highlighted. Press the
“Enter Key” to go to the Paper Quiz Screen; Press the “Del Key” to delete the
test.
(2) FindByExamID: The TestId Search screen will display when this item is selected.
Enter a TestId to find a test. After entering a TestId, press the “T/Y Key” to start
searching. If there is a matching, a listing of matched tests will display. Otherwise,
an error message will display. Only a numeric Id can be entered. Use the “Del
Key” to modify the input.
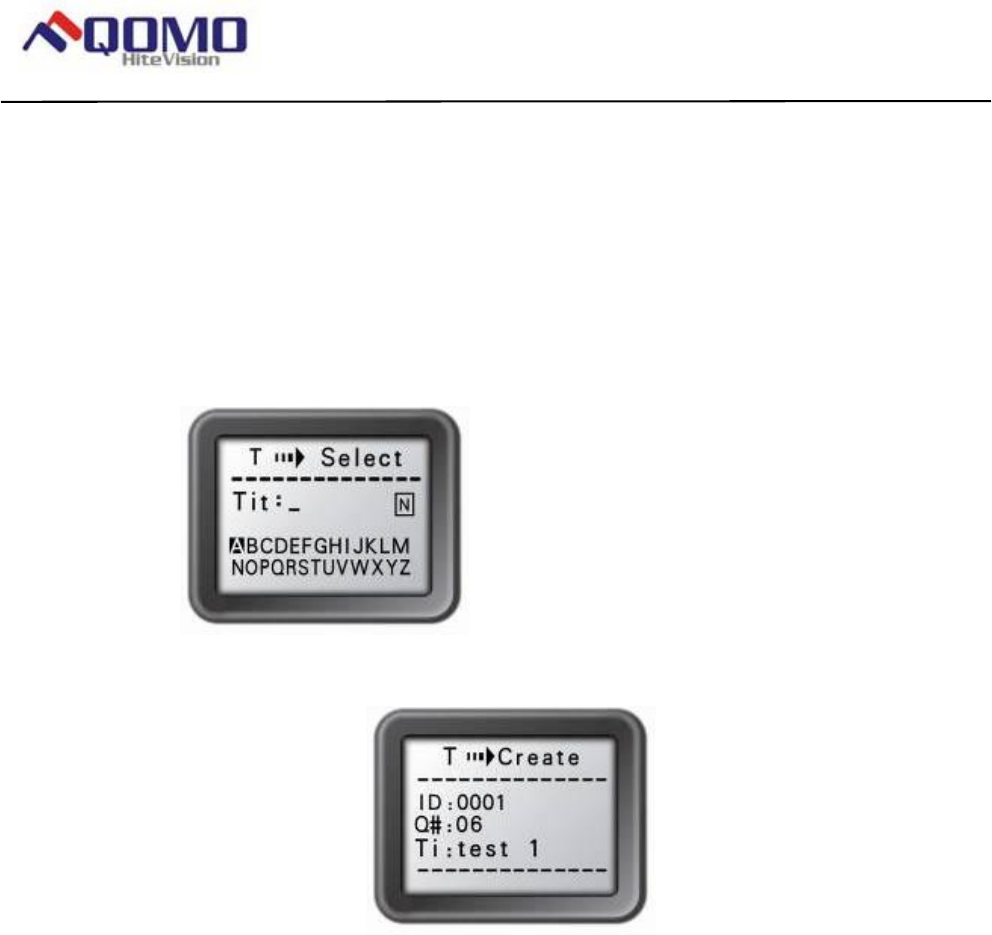
(3) FindByTitle: The Title Search screen will display when this item is selected. Enter
Page 30 of 109
QOMO HiteVision, LLC. QClick FCC ID: XQGQRF600-RE
QOMO HiteVision,LLC.
a test title to search. There is no need to enter complete title. All close matches
will be displayed in a test list screen. For example, if only A is entered, all tests
with test tile starting with ‘A’ will be listed.
Alphabet is provided on screen. Use the “Up Key” or “Down Key” to select a
character, and use the “Alpha-Numeric Key” to switch case. After selecting a
character, press the “T/Y Key” to enter the selection. Press the “Enter Key” to
start your search. Use the “Del Key” to modify your input.TTL
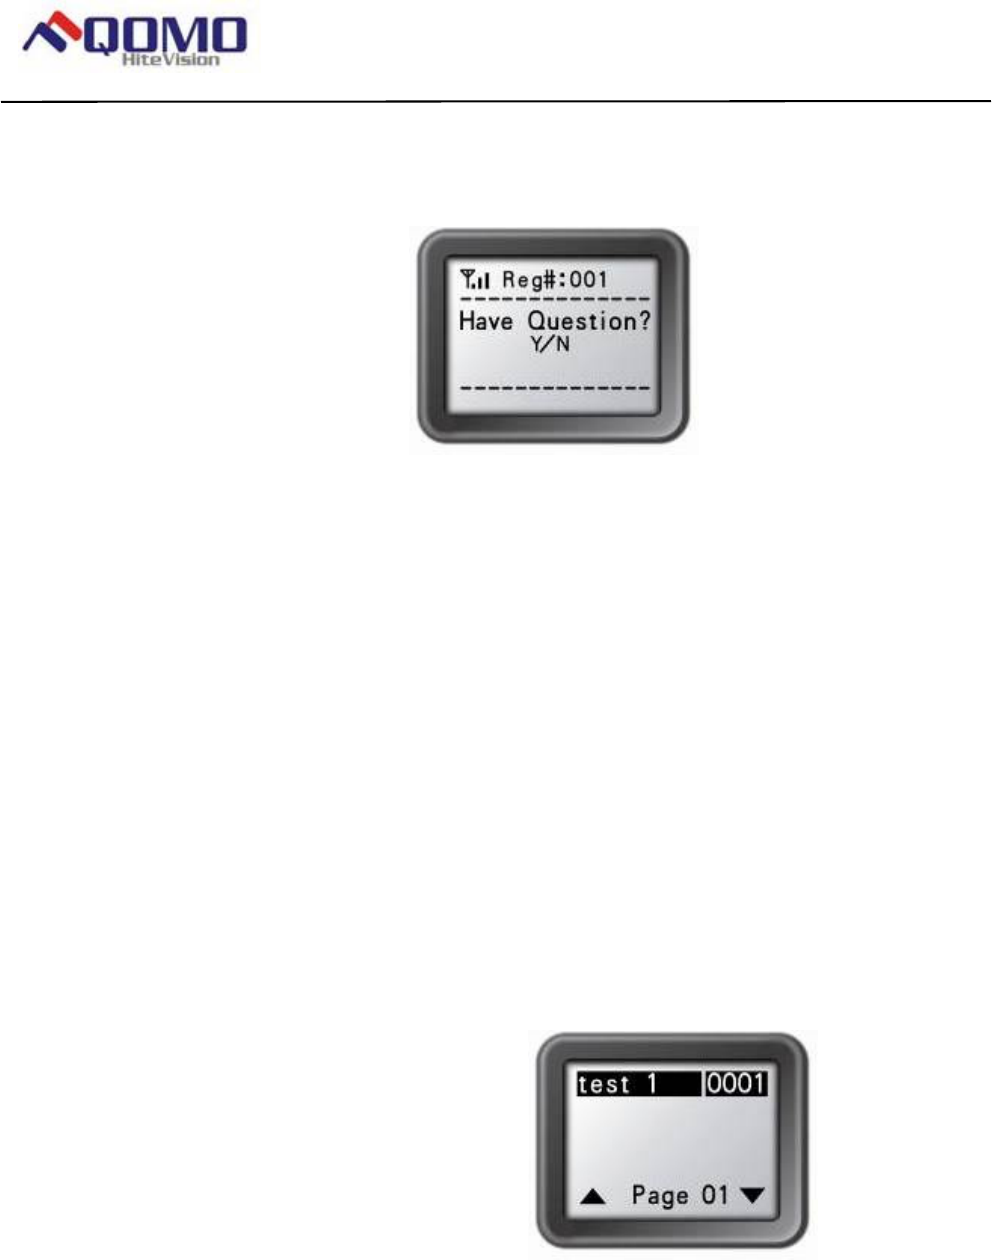
(4) BeginNewExam: Selecting this item will allow you to create a new test answer
frame. Once a frame is created, it can be used to store answers.
To create a new test answer frame, the following items need to be filled in:
1) “ID:” The Test’s ID. This item will be used to match the Test taken when
the homework is submitted and the ID is also used for the identification for
searching a test later. The ID will be assigned if the Test is in electronic
format which is delivered through the ARS system in Homework or Paper
Mode. If a test is distributed in paper format, a Test ID will be assigned by
the teacher and the Test ID will be entered by students using their
keypads.
2) “Q#:” Number of questions. This item will be used to tell how many
questions there are in a test. The number of questions will be assigned if
the Test is in electronic format, delivered through the ARS system in
Homework or Paper Mode. If a Test is distributed in paper format, the
number of questions needs to be filled in by a student to match the total
number of questions assigned in the paper.
TTL
Page 31 of 109
QOMO HiteVision, LLC. QClick FCC ID: XQGQRF600-RE
QOMO HiteVision,LLC.
3) “Ti:”Test Title. It is used for easily locating a test later. The ARS system
does not use this info, hence it can be assigned by a user to any easily
remembered text title. However the “Choice Keys” letters are limited to a
range from “A” to “J”, the title name entered has its limits. But in the
electronic format, there is no limit.
All of above fields must be filled to complete the setting. When the setting
is done, press the “T/Y Key”, the exam screen will show. Press the
“Return Key”, to go back to the previous menu if needed.
8- Student keypad special functions:
(1) Hardware Test
The PC software must be in hardware test mode in order to do the hardware test.
This function can be used to test the student keypad.
To enter to the Hardware test screen:
Under the main menu, select item “4.Hardware” to enter to the Hardware
submenu. Select “2.HardwareTest” submenu to enter to the test screen.
Enter the channel number, which is the same as the host machine’s channel
number selected by the PC software, and then press the “T/Y Key” or the “Enter
Key”. If the channel number matches the host machine’s channel number, the
PC software will display the student keypad’s student ID on a row in a first come
first serve order. Additionally, the register number is also shown on this test
screen in the keypad. Otherwise, the failure error message will show on the top
of this test screen in the keypad.
(2) Student keypad factory settings:
WARNING: Using this function will clear all user data stored, including all the test
answers in this keypad. It is NOT recoverable.
Sometimes it is convenient to clear all data stored in this keypad without
Page 32 of 109
QOMO HiteVision, LLC. QClick FCC ID: XQGQRF600-RE
QOMO HiteVision,LLC.
spending much time, simply by restoring the factory settings.
To use this function:
Under the main menu, select item “4.Hardware” to enter the Hardware submenu.
Under the Hardware submenu, select “3.DefaultSet” submenu in order to restore
factory settings. Press the “T/Y Key” to confirm the operation.
9- Student keypad sleep mode:
In order to increase the battery life of the response pads, a sleep mode is
implemented.
After 5 minutes without any operation in a keypad, the keypad will enter into
sleep mode which will shut down the screen’s display. The user can press any
key to wake up the keypad and return to the previous display.
After 10 minutes without any operation in the keypad, the keypad will be powered
off automatically. At this point, the user can not wake up the keypad simply by
pressing any key. Instead, the user must power on the keypad to start over by
pressing the “Power Key”.
2. Instructor Keypad
2.1. Specifications
Dimension (l w h): 130mm x52mm x18.5 mm
Keys: 21
Power required: 2 AAA Batteries
RF transmission distance: ~200 feet
Battery life: 6 months to 1 year depending on the usage (not
including the laser pointer usage)
Function: Used by the instructor/presenter
Frequency band : 2404.1-2480.0 MHz ISM/SRD band
systems
2.2. Illustration
2.2.1 Instructor Keypad Layout:
1 – LCD
2 – Power Key: Press and hold > 0.5S to turn on or off the
keypad.
3 – Up Key: Scroll the screen display up
4 – Laser pointer Key: Hold the key to keep the laser on

Page 33 of 109
QOMO HiteVision, LLC. QClick FCC ID: XQGQRF600-RE
QOMO HiteVision,LLC.
5 – Left Key: Move the input cursor left
6 – Enter Key: To confirm or to enter to main menu.
7 – Right Key: Move the input cursor to the right.
8 – Return Key: To return the menu to one level up.
9 – Down/login Key: Scroll the screen display down, or
to view a list of the students with questions
or to re-log into a class
10 – Ok Key: To confirm an operation
11 – Mouse Key: Toggle between the mouse and keypad control
12 – Question Key: To view the students who have a question.
13 – View Key: To view student records.
14 – Slide Up Key: PPT slide page-up or previous question.
15 – Stop Key: To stop the current activity.
16 – Start/Pause Key: Toggle between start and pause
an activity or used to an exam
17 – Result Key: Displays a histogram of results.
18 – Report Key: Displays the Score Board.
19 – Slide Down Key: PPT slide page-down or next question
20 – F1 Key: F1 function key
21 – F2 Key: F2 function key
22 – ESC Key: To escape or exit an exam
2.2.1 Remote Mouse Keypad Definition:
2 – Power Key: Press and hold > 0.5S to turn on or off the keypad.
3 – Up Key: Cursor moving up.
4 – Laser pointer Key: Hold the key to keep the laser on.
5 – Left Key: Cursor moving left.
6 – Enter Key: Mouse left click
7 – Right Key: Cursor moving right.
8 – Return Key: Mouse hold left button.
9 – Down Key: Cursor moving down.
10 – Ok Key: Mouse double click
11 – Mouse Key: Toggle between the mouse and keypad control
12 – Question Key: “Tab key” PC keyboard
13 – View Key: Mouse right click
14 – Slide Up Key: “Page up key” PC keyboard
15 – Stop Key: “Enter key” PC keyboard
16 – Start/Pause/Login Key: “Up key” PC keyboard
17 – Result Key: “Left key” PC keyboard
Page 34 of 109
QOMO HiteVision, LLC. QClick FCC ID: XQGQRF600-RE
QOMO HiteVision,LLC.
18 – Report Key: “Right key” PC keyboard
19 – Slide Down Key: “Page down key” PC keyboard
20 – F1 Key: “Down key” PC keyboard
21 – F2 Key: Free style cut picture function key
22 – ESC Key: “Esc key” PC keyboard
2.2.2 Instructor keypad operation guides:
1- NoHost screen display:
The following information will display on this screen:
1) Signal strength displayed in the upper left corner.
2) Battery remaining sign displayed in upper right corner.
3) The instructor’s name whose was logged in most recently.
4) The prompt to press the Ok Key to search a class.
The following functions can be performed under this screen:
1) Press the Enter key to enter the main menu.
2) Press the Login Key to log in to the previous class selected.
3) Press the Ok Key to search for an existing class.
2- Menu screens display:
Use the Up Key or Down Key to scroll up or down the selection. Press the Ok Key or
Enter Key to select the submenu and the keypad will go to the screen or the submenu.
3- Input screens display:
Page 35 of 109
QOMO HiteVision, LLC. QClick FCC ID: XQGQRF600-RE
QOMO HiteVision,LLC.
The shown cursor highlight indicates that the user can input characters. A list of valid
characters or numbers display and the user can use the Up Key, Down Key, Left Key or
Right Key to move the cursor to select the desired character or number and then press the
Ok Key to enter the selection.
Pressing the Return Key will backspace to remove any entered characters, and will
revert to the menu one level up if all of the characters have been removed.
4- Connecting instructor’s keypad to the host:
(1) Find a class
Use the following steps to find an online class:
1) Under the NoHost screen, press the Ok Key to find a list of all online
classes.
2) Under the main menu, select “2.FindingClass” to start searching.
A list of online classes will be displayed and the nearest class will be listed
on the top. When the search is in progress, pressing any key will
discontinue the searching.
Note 1: Unlike the student keypad, the instructor keypad can search for a
class once the host has communicated with the PC software. The instructor’s
keypad will be notified if no class and/or no exam has been selected or loaded.
Note 2: The instructor keypad can log in to any class previously logged in.
Note 3: The Ok Key can be used to toggle the display of class name and the
number of students in the class.
Page 36 of 109
QOMO HiteVision, LLC. QClick FCC ID: XQGQRF600-RE
QOMO HiteVision,LLC.
(2) Log in to a class:
After finding a class, using the following methods to log into a class
1) Under the NoHost screen, press the Login Key to log in to any class
logged in previously. There is a list of classes logged in previously
stored in the keypad.
2) Go to the main menu, select the item ClassList to display the previous
logged in class list. Find and select the class to enter to the ClassInfo
screen, press the Enter Key or Ok Key to log in.
3) After finishing the class searching, find and select a class from the list to
enter to the ClassInfo screen, and then press the Enter Key or Ok Key
to log in.
After logging in, the instructor keypad will show the connected screen and the
following information display:
1) The activity mode the software set
2) The selected class name
3) The instructor name
4) The number of student key pads registered and the number of total
students in the class
5- Instructions after login:
After an instructor’s keypad is logged in, the instructor keypad can have the
following functions:
1) The displayed software power point slides can be turned up or down by
Page 37 of 109
QOMO HiteVision, LLC. QClick FCC ID: XQGQRF600-RE
QOMO HiteVision,LLC.
pressing the Slide Up Key or Slide Down Key.
2) An exam can be started, paused, or stopped by pressing the Start/Pause
Key or Stop Key.
3) Exit an exam by pressing the ESC Key.
4) View the histogram of the current question’s grade and reports in the
displayed software screen by pressing the “Report Key” and “Result Key”.
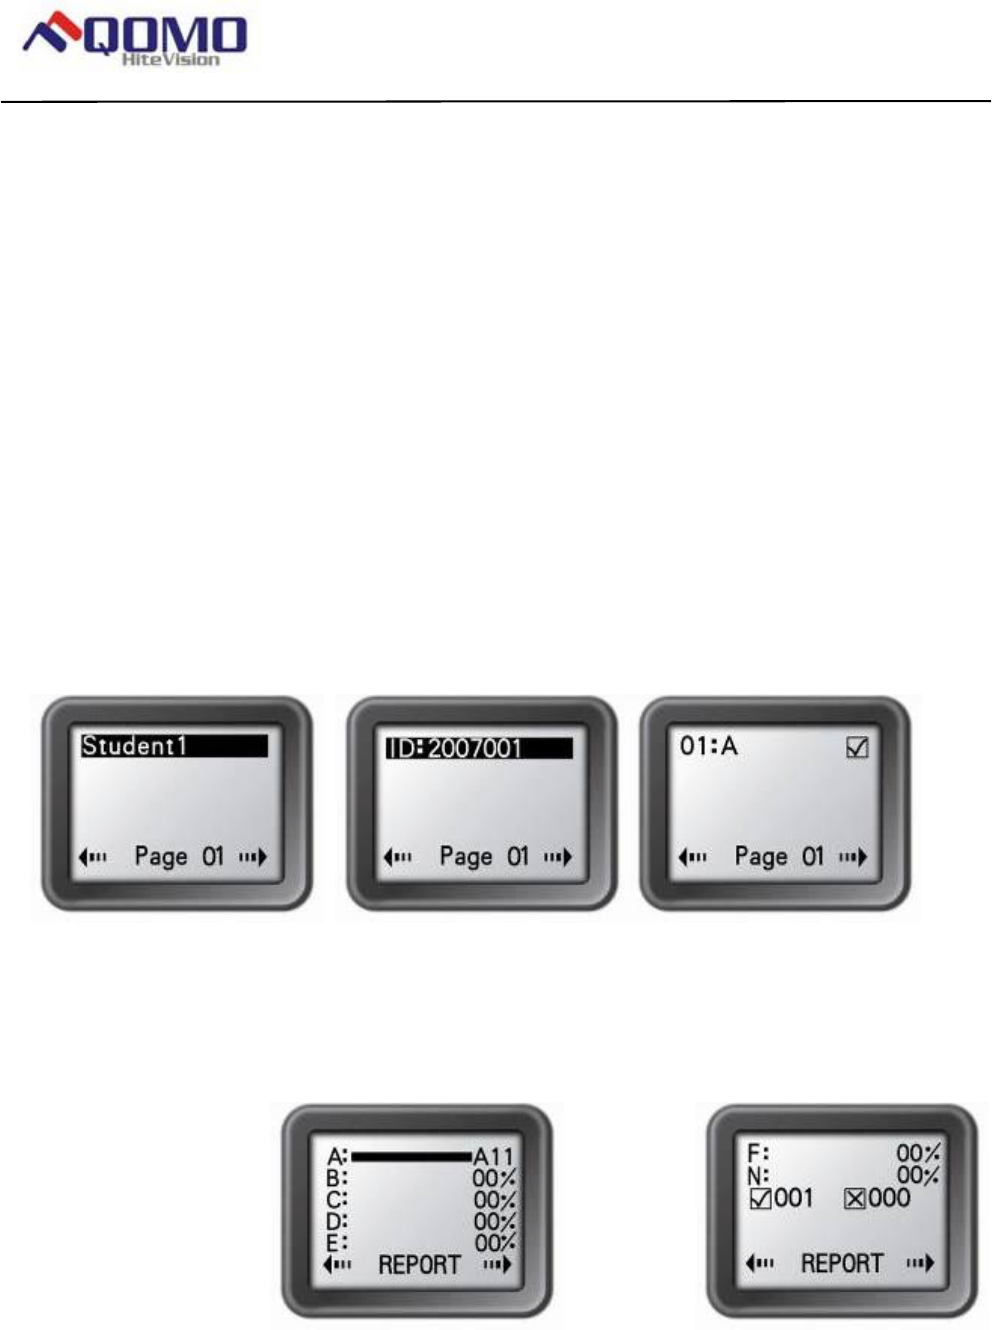
5) View an individual student exam performance in the keypad screen.
<1> Press the View Key to view a list of the students, then use Up Key or
Down Key to scroll the selection and then press Enter Key to select the
student to view the result.
Or
<2> Under the connected screen showing, press the Enter Key to enter to
network function menu. Go to the sub screen with a list of the student
names by selecting “ExamReport”. Find and select a student name and
then press the Enter Key to view the results. Only the current
question/answer from the exam will be shown for the student selected.
Note 1: Under the student list screen showing, press the Ok Key to toggle
the display between the student name and the student ID.
Note 2: A message will be displayed if the student list is empty
6) View the histogram of the current question grade in the instructor keypad.
Under the connected screen showing, press the “Enter Key” to enter to the
Network Function menu. Select item “ExamResult” to display the histogram.
Note: This function only applies to the following activity modes: Normal Quiz
and Elimination.
Page 38 of 109
QOMO HiteVision, LLC. QClick FCC ID: XQGQRF600-RE
QOMO HiteVision,LLC.
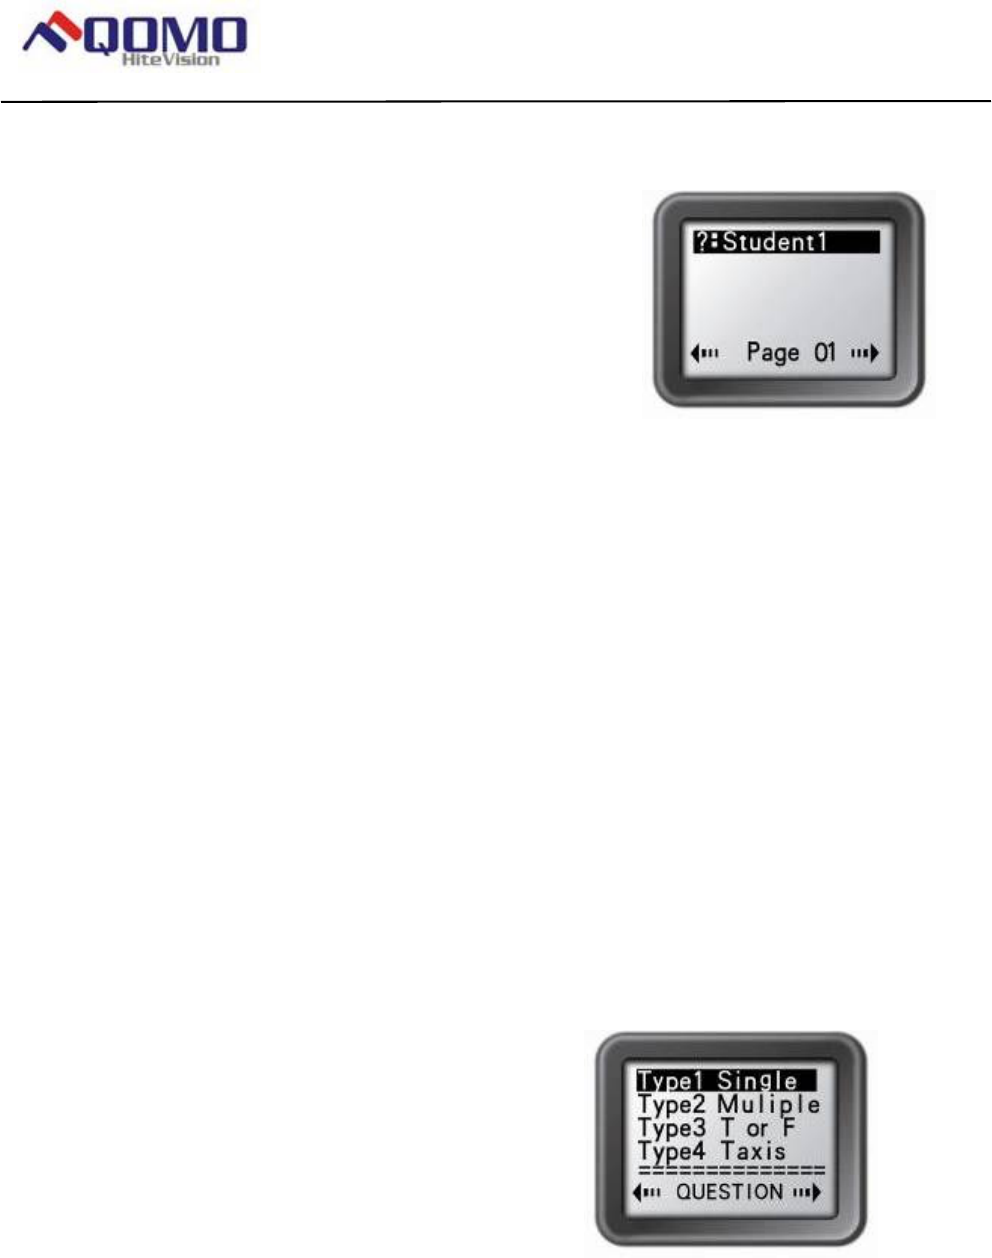
7) Respond to student’s questions:
View the name of the student who has a question:
<1> Under the connected screen showing, press the Question Key to list the
students who have a question.
Or
<2> Under the connected screen showing, press the Enter Key to enter the
network function menu. Select “HandraiseList” to view the list of student
who has questions.
Note: After responding to the student’s request, select the student by his or
her name and press the Enter Key to remove the student name from the
list.
8) Set up an instant question:
Only under free style modes can an instructor set up an instant question:
<1> Under the connected screen showing, press the Enter Key to enter to
the network function menu. Select “SetQuestion” to view the question type
list.
Set up an instant question:
<2> Select a question type from the list and then press the Enter Key to go
to setting answer screen.
Page 39 of 109
QOMO HiteVision, LLC. QClick FCC ID: XQGQRF600-RE
QOMO HiteVision,LLC.
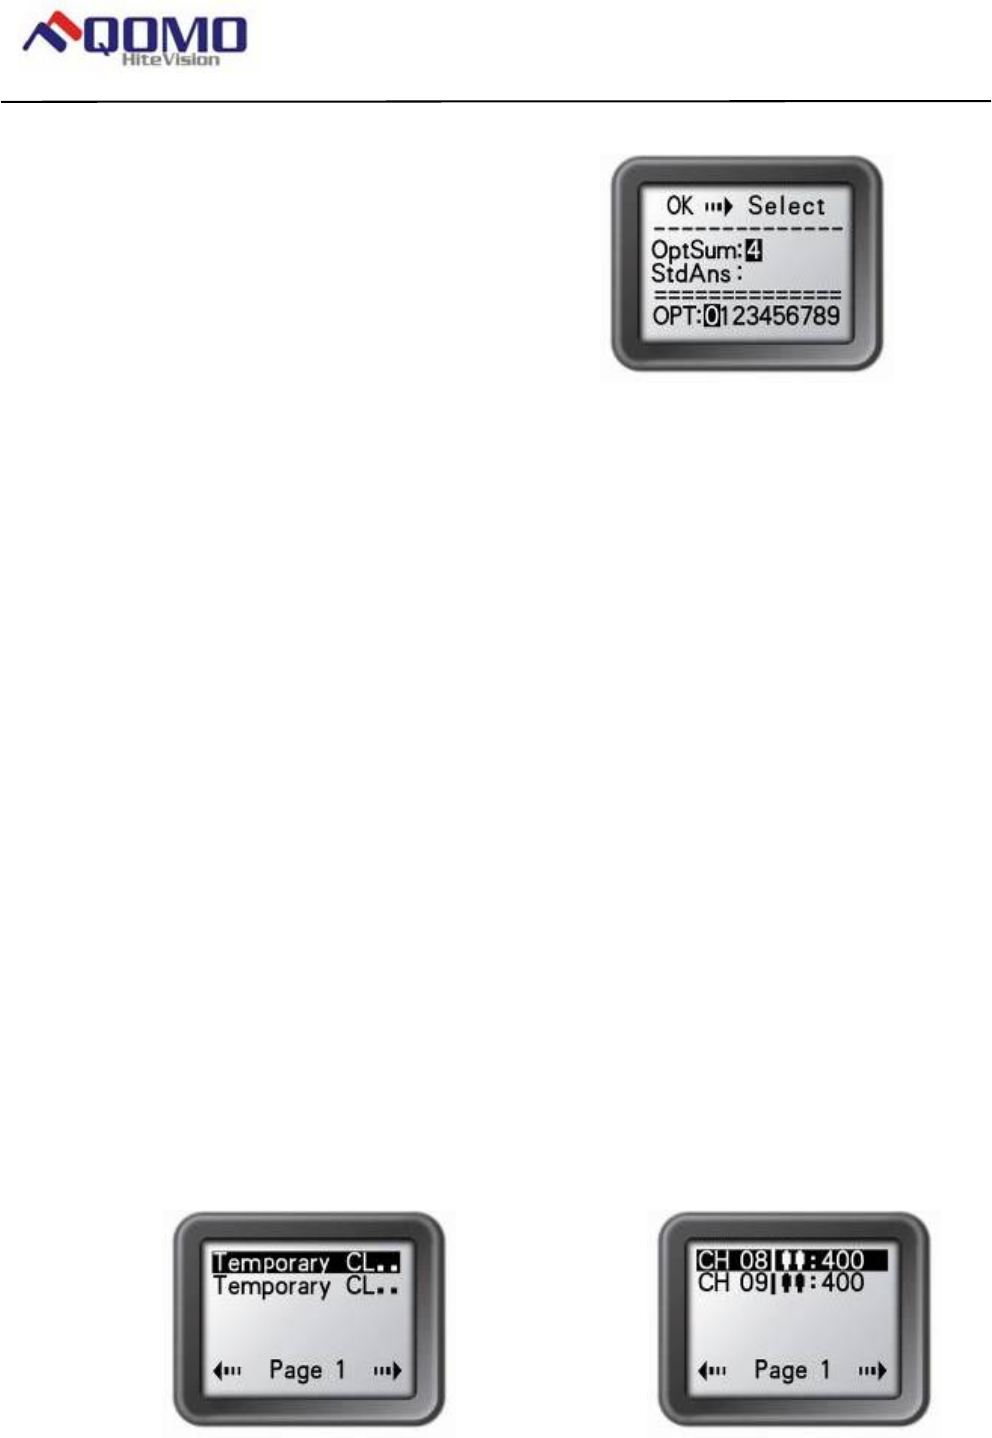
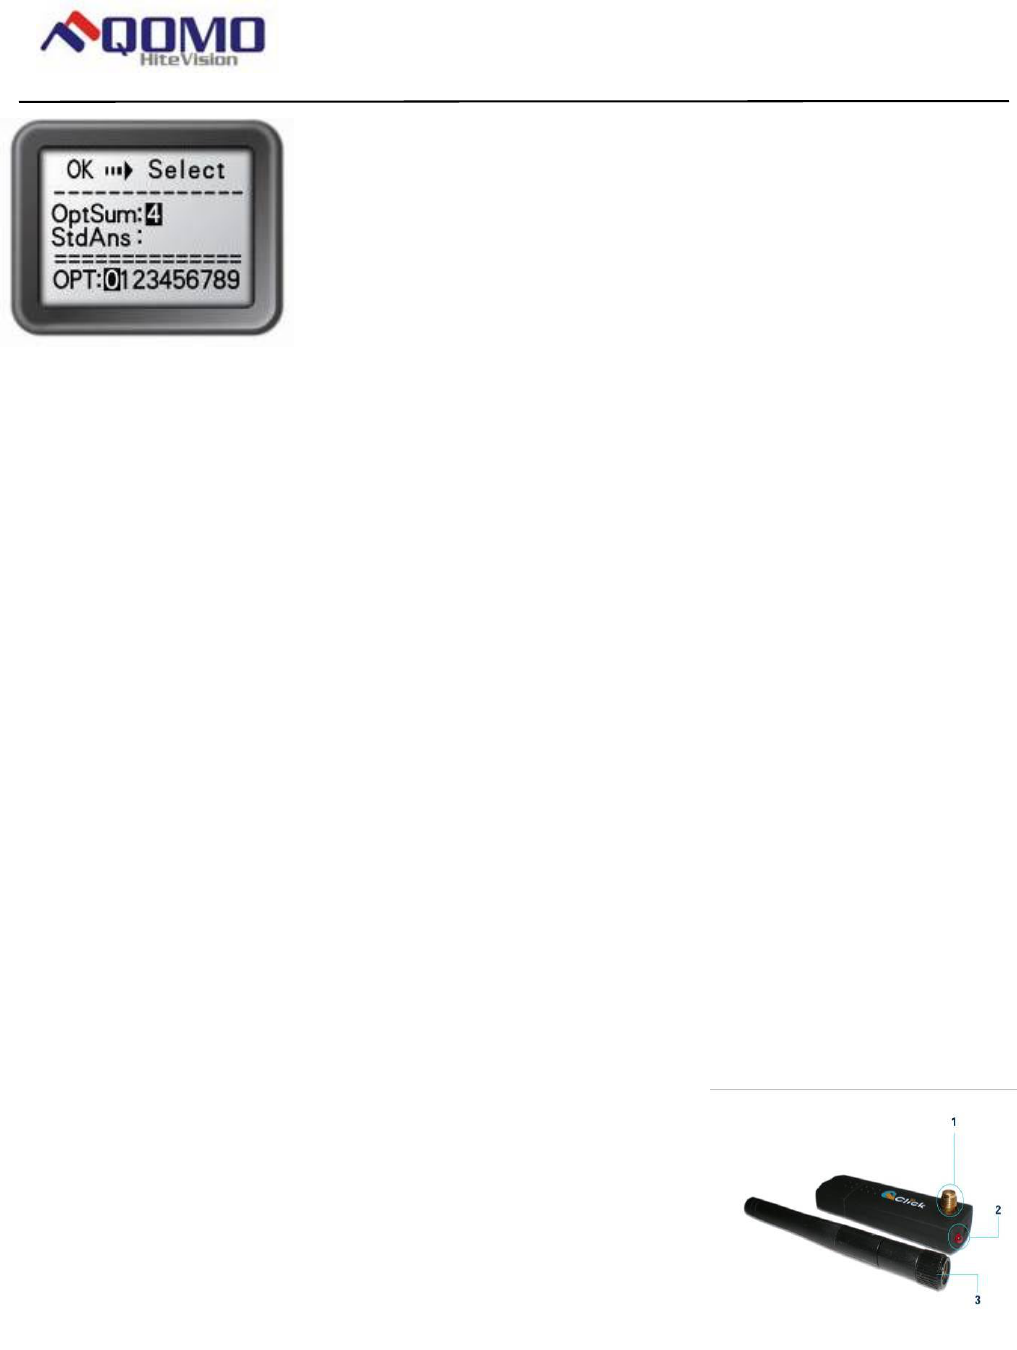
<3> Under “OptSum:” Set the totle number of option and under ”StdAns:”
set the standard answer. Use the Up Key or Down Key, and Left Key or
Right Key to select the desired character or number and then press the Ok
Key to input the character or number selected. After setting up, press the
Enter Key to send. The test will start automatically through the successful
sending.
6- Instructor keypad sleep mode:
For saving the battery, a sleep mode is implemented.
After 5 minutes without any operation in the keypad, the keypad will enter to the
sleep mode and will shut off the instructor screen display. The user can press any
key to wake up the keypad to return to the previous display.
After 10 minutes without any operation in the keypad, the keypad will power off. The
user can not wake up keypad by simply pressing any key at this point. The user
then needs to power on the keypad to start it over.
3. Main Receiver and USB Cable
The main receiver is used to send and receive signals to and from the remote keypads and to
exchange data with the host computer. The main receiver can be directly plugged into a computer
USB port or connected to a computer through USB cable.
Specifications
Dimensions (l w h): 76 mm x 23 mm x 10 mm
Weight: 26g
Operating Temperature: 0-40 degree
Operating Relative Humidity: 0-90%
Transmitting and receiving distance: ~200 feet radial
Function: Used to send or receive signals to and from the
remotes and exchange data with the computer.
Frequency band : 2404.1-2480.0 MHz ISM/SRD band
systems
Page 40 of 109
QOMO HiteVision, LLC. QClick FCC ID: XQGQRF600-RE
QOMO HiteVision,LLC.
Illustration
1- Antenna Terminal.
2- Power light (Signal light): when the main receiver is plugged into the USB port of a
computer, the power light will light up red. The flashing red light indicates the main receiver is
receiving and processing the data.
3- Antenna: helps to pick up a weak signal to extend the RF transmitting distance.
4- Extension USB cord: extend the connection between the main receiver and the computer.
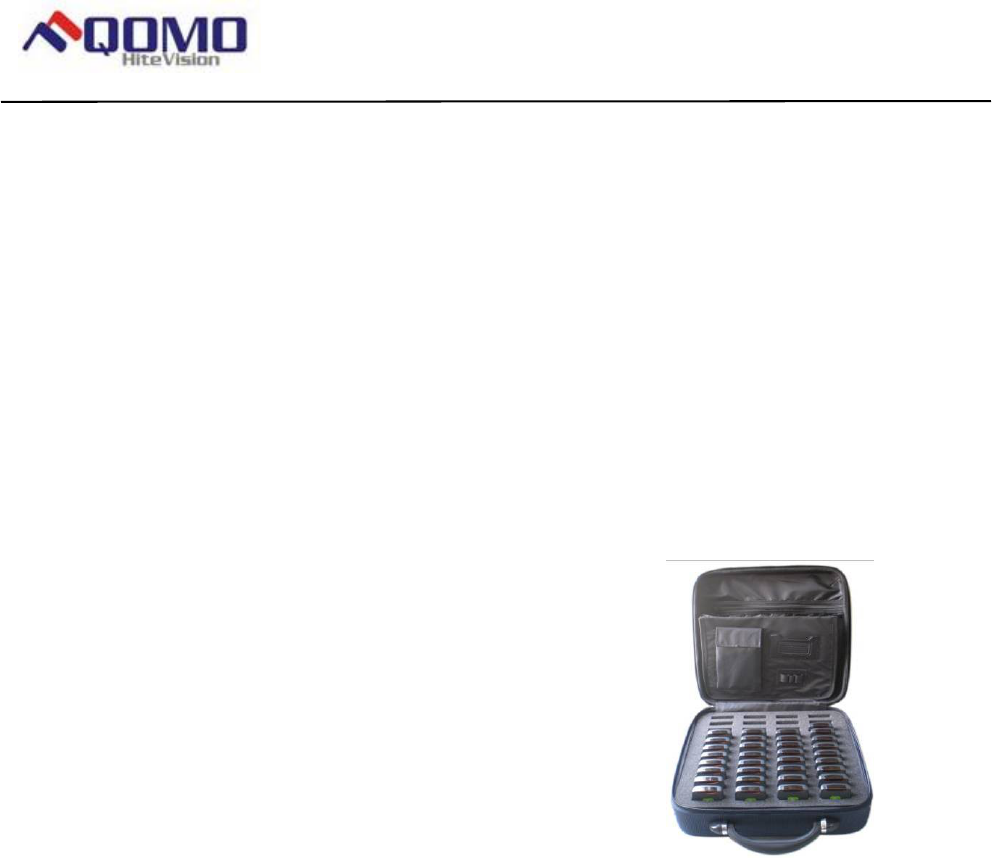
4. Keypad pack
Convenient carrying case that holds audience remotes, instructor remote, receiver, software disk,
and cables

Page 41 of 109
QOMO HiteVision, LLC. QClick FCC ID: XQGQRF600-RE
QOMO HiteVision,LLC.
Part 3. Software
Software Overview
The QClick Software has 5 main functions: Quiz Genius, Exam Editor, Template Design, Reports
and Settings.
The Quiz Genius is used to set up classes, to conduct quizzes, games, survey and vote.
The Exam Editor is used for creating and editing the power point exam slides and for setting the
slide question answers. It is also used for creating and editing answer sheets for the examinations
without using power point files.
The Template Design is used for designing and editing the user test templates.
The Reports is used to query or modify quiz session data results, or used to grade tests and to
generate the student performance reports; and also used to create the student session data not
obtained from using the QClick hardware system. The other function of Reports is used for
generating subject grade books and final report cards.
The Settings is used for the system set up, for the QClick hardware testing, for setting the channel
number of QClick receiver, for managing the system database, for the system administration set up
and for displaying the hardware and software version information.
System Requirements
PC with Intel Pentium 4 or higher processor and with at least one USB port available
A minimum of 512 MB RAM
At least 200 MB of hard drive space for software
Microsoft Windows XP/Vista
Microsoft Office 2003 or higher (The security level of PowerPoint should be set to
“medium”)
Screen resolution of 1024x768 or higher
Projection system, i.e. projector, Liquid Crystal Display (LCD), or TV (recommended, but not
required)
Installation
1. Place the software disk into your computer CD drive.
2. Open the disk and double click on the “QClick.exe” file in the root directory.
3. Follow the instruction displays during the installation.
Page 42 of 109
QOMO HiteVision, LLC. QClick FCC ID: XQGQRF600-RE
QOMO HiteVision,LLC.
If the program has been previously installed, we suggest you remove the older version of the
program prior to installing the new program.
The default installation path is : C:\QOMO, and it will produce one shortcut icon
on the desktop: QClick.
How to Use the Software
Quiz Genius
Note: You should remember two important definitions in the QClick system when using the Power
Point file as your quiz material:
One PPT file = one quiz paper
One slide = one question
Run the QClick program by double click the QClick icon on the desktop. If the QRF600 main
receiver is plugged into the USB port, the software will automatically switch to QRF600 software.
Otherwise, the software will prompt you with a system selection window. You may plug the QRF600
main receiver into the USB port at this time. The software will automatically switch to QRF600
system and prompt you the logon window. If you don’t have the hardware, but if you still want to
practice the QRF600 software system, you may select the system QRF600 from the system
selection drop-down menu. The next step is to logon the QClick system by typing the user name
and the password. The software sets the default login user name to “qomo” and password to
“qomo” too. If you do not desire to logon to the system, just click the Cancel button, the system
allows you to do some limitation of operations; at least the system database won’t get updated.
Note: The QClick software monitors the QRF600 main receiver plug-in status all the time; display
“RF600 No Host” for Offline and “RF600 Connected” for Online.
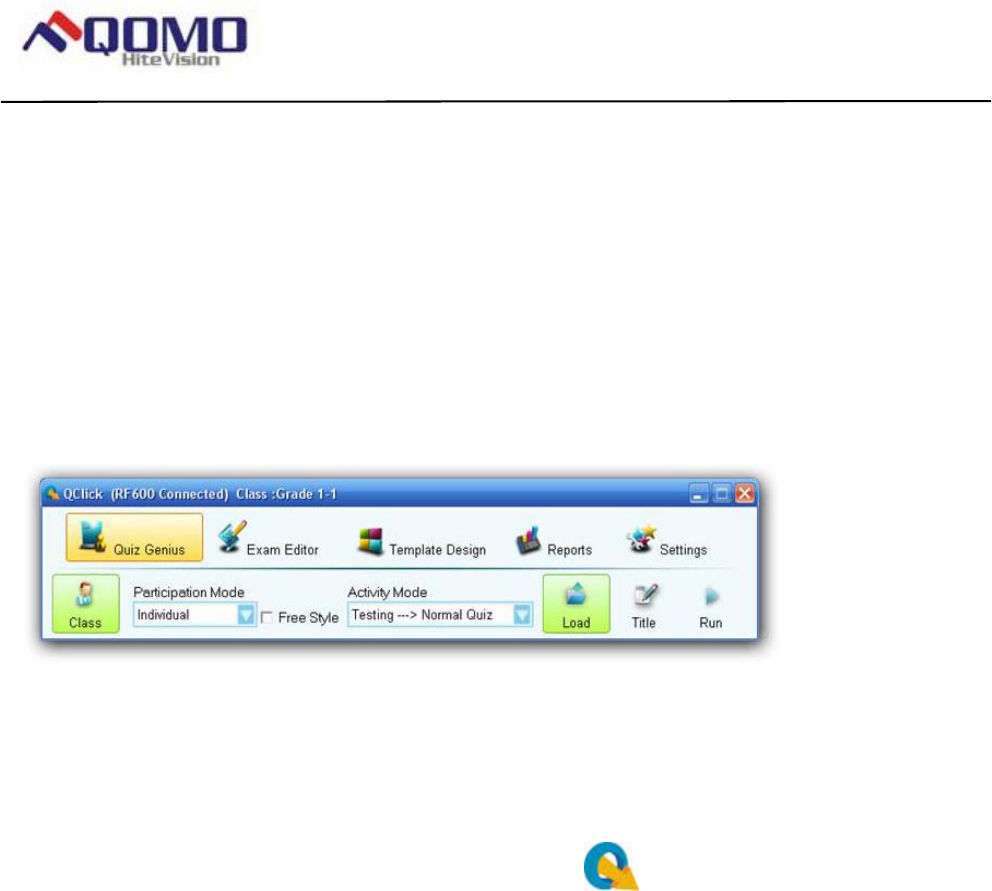
Once the application starts running, the software displays the following control Tab windows, Quiz
Genius, Exam Editor, Template design, Reports, and Settings on the top of screen. The active
default Tab is set to Quiz Genius.
Before conducting a quiz, you should set up a class. If the class information is not available at this
time but if you intend to use the system casually, you may choose some software preset examples
Page 43 of 109
QOMO HiteVision, LLC. QClick FCC ID: XQGQRF600-RE
QOMO HiteVision,LLC.
for classes, subjects and teachers. The student roster table always goes with the class selection.
The roster includes the student ID number, name and grouping information. The student profile is
embedded under the student record.
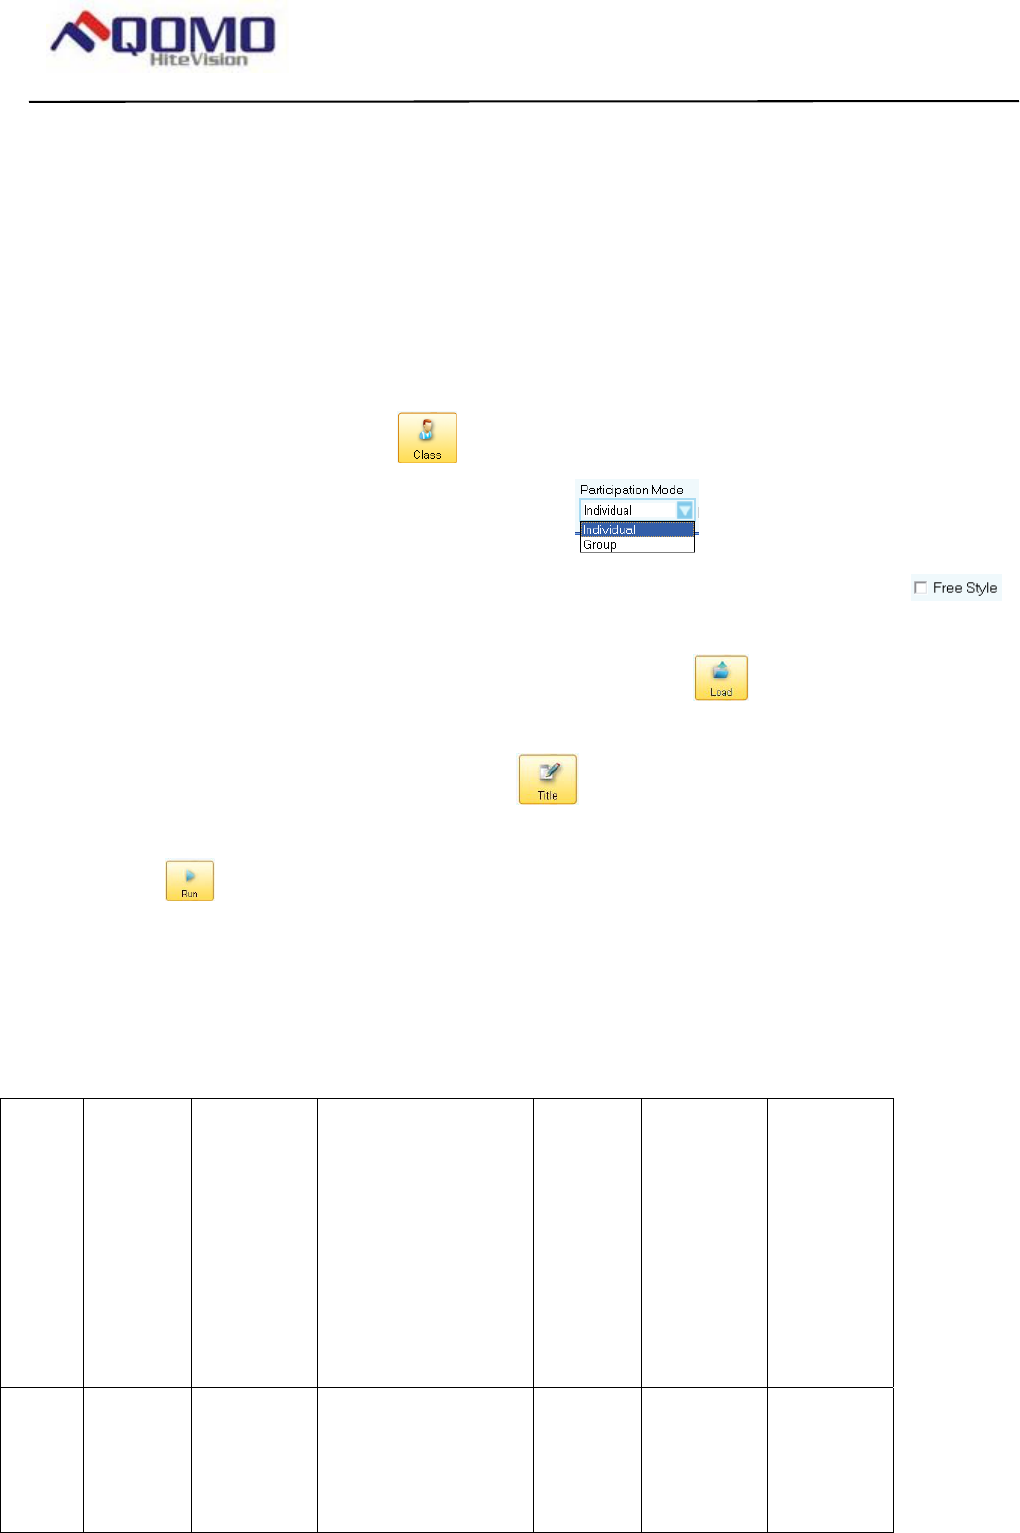
The Normal Routine of Running a Quiz Genius:
To run a quiz genius, follow these steps:
Set up a class by clicking the Class icon, refer to session 1.1.1 Class for detail set up.
Select a participate mode from the Participate Mode drop-down menu.
To choose or not to choose the free style by checking or un-checking the Free Style check
box; refer to session 1.2.10 Free Style Normal/Rush/Elimination.
Load an exam file and or an answer sheet, by clicking the Load icon to display the browser;
refer to session 1.1.4 Load.
You may change the test ID by clicking the Title icon to set the change or use the system
default ID number; refer to session 1.1.5 Title.
Click the Run icon to start the quiz, refer to session 1.1.6 Run /Start a Quiz.
Depend on the selection, not all these steps are necessary. The following table shows the
relationship:
Free
Style
Activit
y Mode
Type of
File
Loaded
Title & Test ID Need
to
Load
an
Answe
r Sheet
Before
Test?
Need
Answers
After
Each
Test of
Question
?
Need
Answers
After the
Whole
Test
Finish?
No Normal,
Rush,
Eliminat
ion,
System
PPT file
The loaded exam
file name is used
as the title name,
the s
y
stem
No No No

Page 44 of 109
QOMO HiteVision, LLC. QClick FCC ID: XQGQRF600-RE
QOMO HiteVision,LLC.
Multiple
Mode,
Survey
default test ID
number can be
changed
No Normal,
Rush,
Eliminat
ion,
Multiple
Mode,
Survey
Any
format of
exam
files
The loaded exam
file name is used
as the title name,
the system
default test ID
number can be
changed
Yes No No
No Paper
Quiz,
Homew
ork
Hardcopy The loaded
answer sheet file
name is used as
the title name, the
system default
test ID number
can be changed
Yes* No No
No Vote System
PPT file
The loaded vote
file name is used
as the title name,
the system
default test ID
number can be
changed
No No No
No Roll
Call
Not
needed
Not needed No No No
Yes Normal,
Rush,
Eliminat
ion
Not
needed
Not needed No Maybe** Maybe**
*A system exam PPT file could be used as an answer sheet.
**If answers are not provided before a test, the answers can be entered after each question test is
finished or can be entered in the QClick report system.
Page 45 of 109
QOMO HiteVision, LLC. QClick FCC ID: XQGQRF600-RE
QOMO HiteVision,LLC.
Class:
The QClick system uses the class to engage a quiz session. A class must be created or selected
prior to any activities. The class is used by the QClick system to form a group of students. A teacher
and a subject are associated with a class. The students in the class can be grouping. In the class
setting, there are many ways to enter the class info. You can choose to import a student roaster
from a spreadsheet or choose to type in student info in the program. In the same way, the teacher
info and subject name can be imported from a spreadsheet or entered in the QClick system. To
create, to select or to modify class info, please follow these steps:
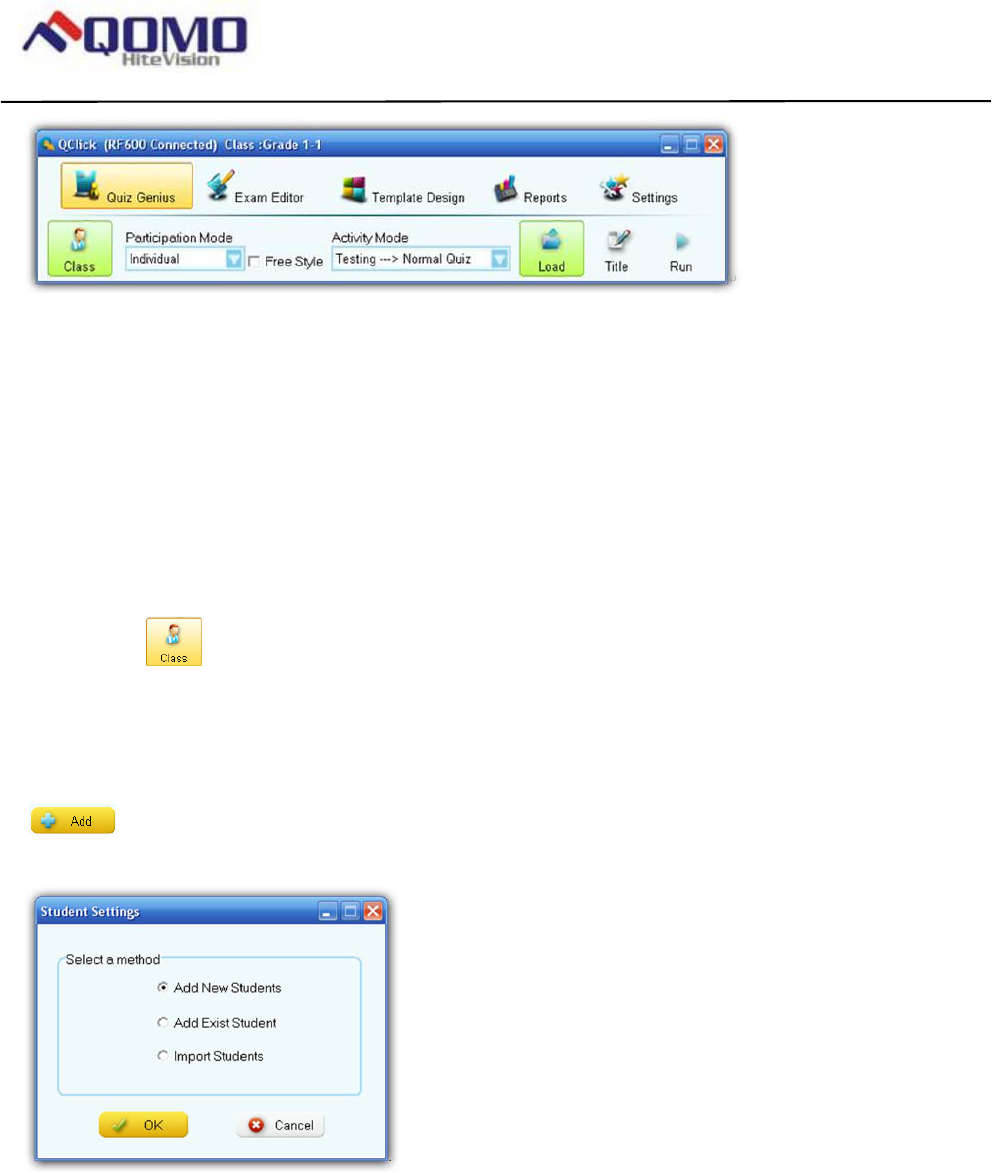
Click the Class button under Quiz Genius Tab window to display the Class Settings window.
Select a class from the Class Name drop-down list. A student roster associated with the class will
be updated following this selection.
If you want to add a new class, select the Add tab. Type in the new class name and click the
Add button. The Student Settings window display with three choices, Add New Students,
Add Exist Student and Import Student from a spreadsheet.
Select one of choices in Student Settings to enter the student info.
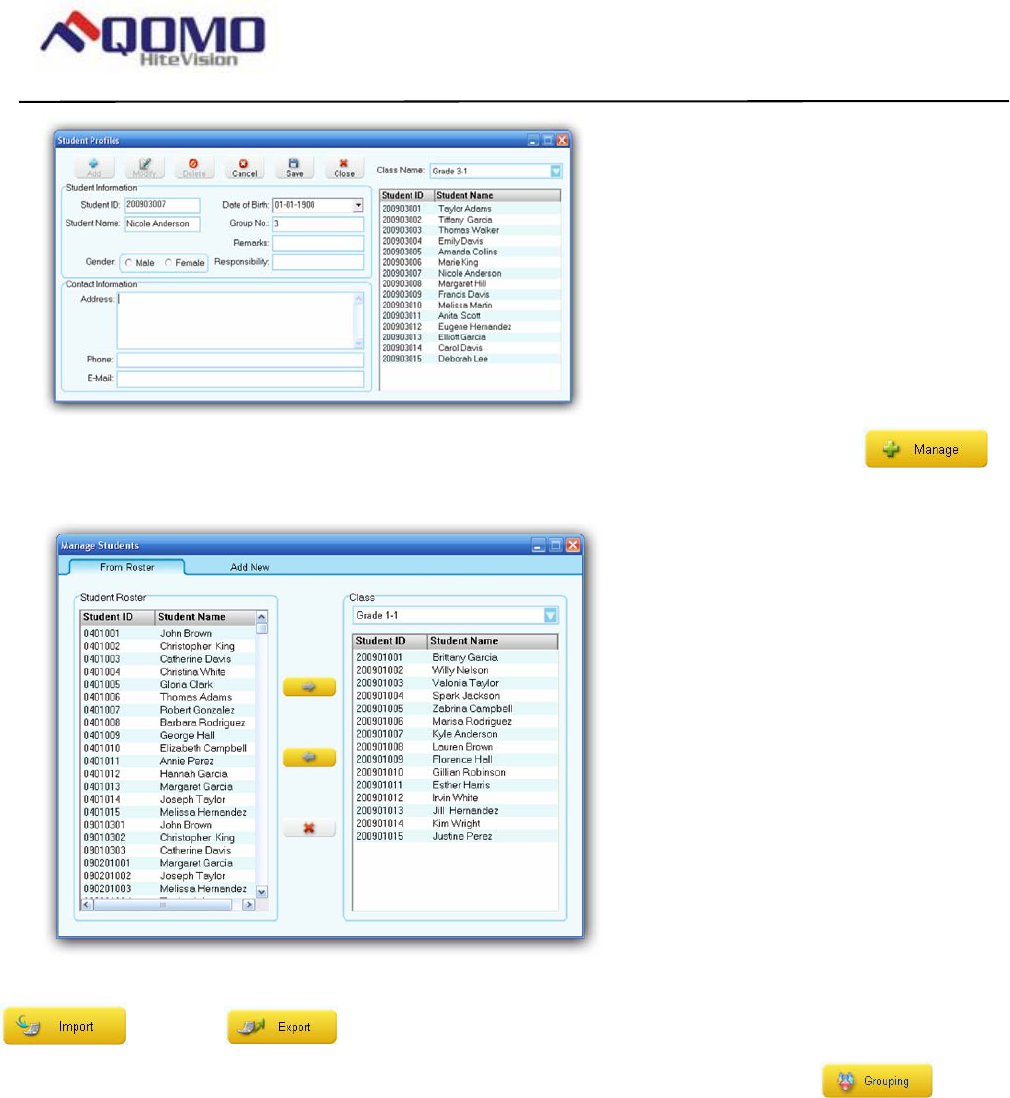
You may modify the student info by directly double clicking on the student row in the roster to
display the Student Profile window.
Page 46 of 109
QOMO HiteVision, LLC. QClick FCC ID: XQGQRF600-RE
QOMO HiteVision,LLC.
If you want to add or remove the students to or from the class, click the Manage
button to display the Manage Students window.
If you want to import or export the student roster from or to a spreadsheet, click the Import
or Export button to display the file browser.
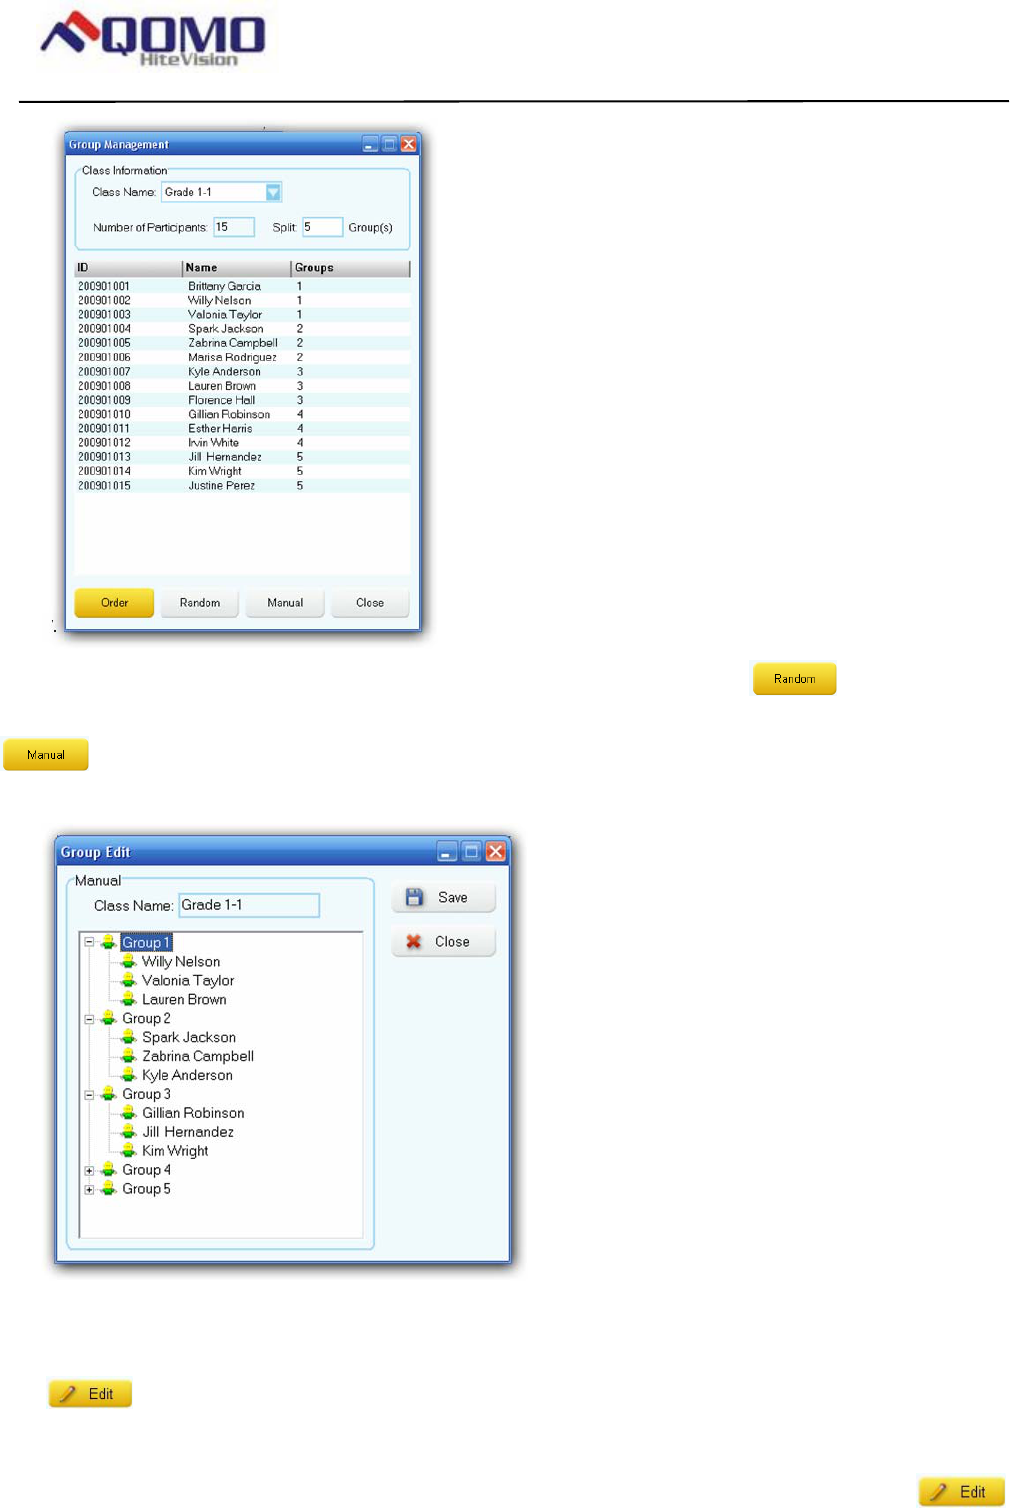
If you want to set up the grouping for the students in the class, click Grouping to display
the Group Management window.
Page 47 of 109
QOMO HiteVision, LLC. QClick FCC ID: XQGQRF600-RE
QOMO HiteVision,LLC.
There are two grouping methods, random and manual. Click Random button for the
random grouping, the software will randomly pick up students for the grouping. Click Manual
button to display Group Edit window for the manual grouping. You can simply click and
hold the left mouse button to drag and drop a student from a group to the other group.
Select the subject associated with the class from the Subject Name drop-down list.
You may Add, Delete, or Modify a subject name to the subject list by clicking the
Edit button next to the Subject Name drop-down list.
Select the teacher associated with the class from the Teacher Name drop-down list.
You may Add, Delete, or Modify a teacher info to the teacher list by clicking the Edit
Page 48 of 109
QOMO HiteVision, LLC. QClick FCC ID: XQGQRF600-RE
QOMO HiteVision,LLC.
button next to the Teacher Name drop-down list. The teacher list can be imported or exported from
or to a spreadsheet by clicking the Import or Export button under the
teacher group window.
If you don’t login to the QClick system, it is not allowed to add, delete or modify the student roster,
the teacher name list and the subject name list in the database. Click the Login/Logout
button to login or logout the QClick system.
Note: Once a class is selected, the color of Class button turns into green.
Participation Mode:
The QClick system has two participation modes Individual and Group. The system sets the default
mode to Individual. You can select either Individual or Group participation mode from the
Participation Mode drop-down list. In the Individual mode, the performance test score is taken
and reported individually. In the Group mode, the performance test scores and reports are handled
in group. The grouping information is abstained from the class setting. Please refer to section 1.1.1
Class step 8 about how to make a grouping. Only the activity mode Normal Quiz, Rush Quiz and
Elimination apply to the group participation mode.
Activity Modes:
The QClick system has these activity modes: Normal Quiz, Paper Quiz, Homework, Rush Quiz,
Elimination, Multiple Mode, Survey, Vote and Roll Call. You should choose a mode from the
Activity Modes drop-down list before engaging a quiz or activity session. For further detail
information about these modes and about how to choose a mode, please refer to section 1.2
Activity Modes.
Load:
The load function is used for the system loading a quiz file or loading an answer sheet. The system
Power Point quiz file usually contains the quiz answer information. It is no necessary to load an
answer sheet after loading a Power Point quiz file. However, if you choose to use a no Power Point
quiz file for the quiz session, an answer sheet file is required to be loaded after loading a quiz file for
these activity modes Normal Quiz, Rush Quiz, and Elimination. If a quiz is engaged under a
hardcopy paper or you choose the homework mode, you only need to provide the answer
information to the system. Then you just need to load in an answer sheet or a Power Point quiz file
which contains the answer information. To load a quiz file or an answer sheet, simply just click the
Page 49 of 109
QOMO HiteVision, LLC. QClick FCC ID: XQGQRF600-RE
QOMO HiteVision,LLC.
Load button to display the file browser. To make an easily using the quiz genius, the system
automatically asks you what kind of file you need to load into the system, based on the activity
mode you select and based on what kind of quiz file you are using.
Note: Once the loading is finished, the color of Load button turns into green.
Title
The QClick system uses the title information for the engaging quiz or an activity. The title name and
the test ID are used for the quiz management and for the searching use in the student keypads
which store the quiz info. For example, the student keypad may store the homework questions for
you to bring home to finish. The title and test ID help you to locate the homework. Once a quiz file
or an answer sheet is loaded to the system, the quiz or answer sheet file name is copied and saved
to the quiz title name area and the test ID embedded in the quiz or answer sheet file is read into the
system. If a quiz or an answer sheet file is first time loaded to the system, and there is no test ID
embedded in the file, the system will automatically assign a test ID and save it to the file for the
engaging quiz. The test ID number is kept by increasing by one when every time the system uses
the test ID number to save it to the file. The valid test ID number is from 1 to 9999. When the
maximum number 9999 reaches, the system will reset the number to 1. You may click the
Title button to display the Set Test ID window to change the test ID number you desire to set
and or to write a memo to the engaging quiz.
Run / Start a Quiz
Once a class is selected and a quiz file or an answer sheet is loaded, you can start the engaged
quiz session by clicking the Run button. Or you may press the “Play” button on the
instructor remote keypad to start the engaged session as well. The loaded Power Point or other
format of quiz file will display on the screen with a tool bar at the bottom, if you select no free style
activity modes other than Paper quiz, Homework and Roll Call.
Note: To hide the tool bar, click the sign on the right up corner of tool bar window; to show the
tool bar, move the cursor to the bottom line of whole window.
The display screen is divided into three sessions:
• Register/Answering Status Bar

Page 50 of 109
QOMO HiteVision, LLC. QClick FCC ID: XQGQRF600-RE
QOMO HiteVision,LLC.
• Questions display
• Tool Status Bar
Register/Answering Status Bar: Displays audience logged in register number .The number is
displayed in increasing first come first serve order. Each number has a background color, the
meaning of the color is:
• Gray color – indicates the student keypad is in logout state
• Green color – indicates the student keypad is in login state
• Blue/Brown color – indicates response signal received. The color is toggled between blue and
brown when each time the answer is changed, the system only record the last response
received before the timeout.
Tool Status Bar:
1. Control Buttons:
• Start/Pause – to start or to pause the timer
• Stop – to stop the timer
• Previous – to turn to previous page of question
• Next – to turn to next page of question
• Exit – to exit the engaged quiz session
• F1 – To control the Register/Answering Status Bar size, by continue pressing
the button to cycle the size from large, small and disappear.
• F2 – To control the Register/Answering Status Bar position, by continue
pressing the button to cycle the position from top, left and right.
• Report/Result / T– To view the instance report and the result.
Refer to session 1.1.7 Result and Report.
Note: All these control buttons are also implemented and displayed on the instructor remote
keypad.
2. The Question Answer Timer:
• The timeout value is preset for each question when the quiz file is set up.
• Timer box background color indicates: Black: Stop; Green: Running; Yellow: Pause.
Page 51 of 109
QOMO HiteVision, LLC. QClick FCC ID: XQGQRF600-RE
QOMO HiteVision,LLC.
• The left up/down button to reset the timer Minute : Press up or down button on
the left side of timer box to increase or decrease the timer Minute setting.
• The right up/down button to reset the timer Second : Press up or down button on
the right side of timer box to increase or decrease the timer Second setting.
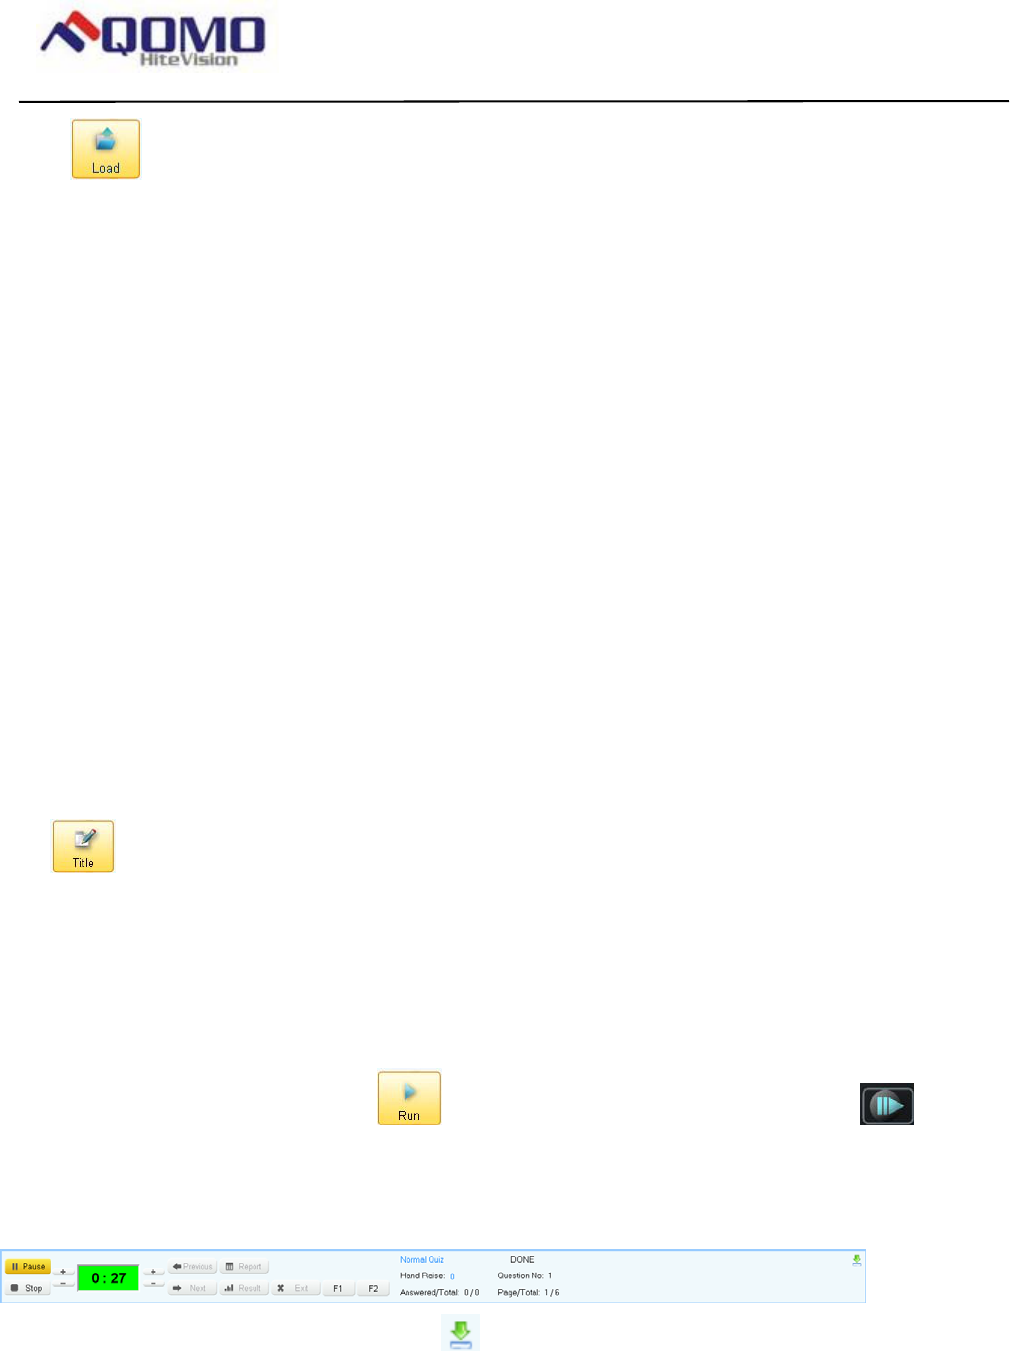
3. Quiz Status:
• Activity Mode: Indicate the current activity you select.
• Hand Raise: Indicate the number of students who use the raise hand function in their
keypad.
• Answered/Total: Indicate the ratio of the number of people who answer the question
over the total number of people who have logged on.
• Question Done: When the question is finished, the sign Done will display.
• Question No: Indicate the current question number.
• Page/Total: The current page number over the total pages.
To begin gathering responses from the participants, click the Start/Pause button or use
the instructor remote keypad play . The register number corresponding to each individual
clicker logged in appears on the top of your screen.
Count down timer will display the remaining time in minute and seconds. You may increase or
decrease the timer timeout value by pressing the up/down button before or during the question is
conducting. Once the timer is at 0 second, the receiver will no longer receive audience/participant
responses. The timer window will then illuminate in black. The instructor can always stop the
timer ahead of time to stop gathering information or press the Start/Pause button to stop
the countdown temporarily.
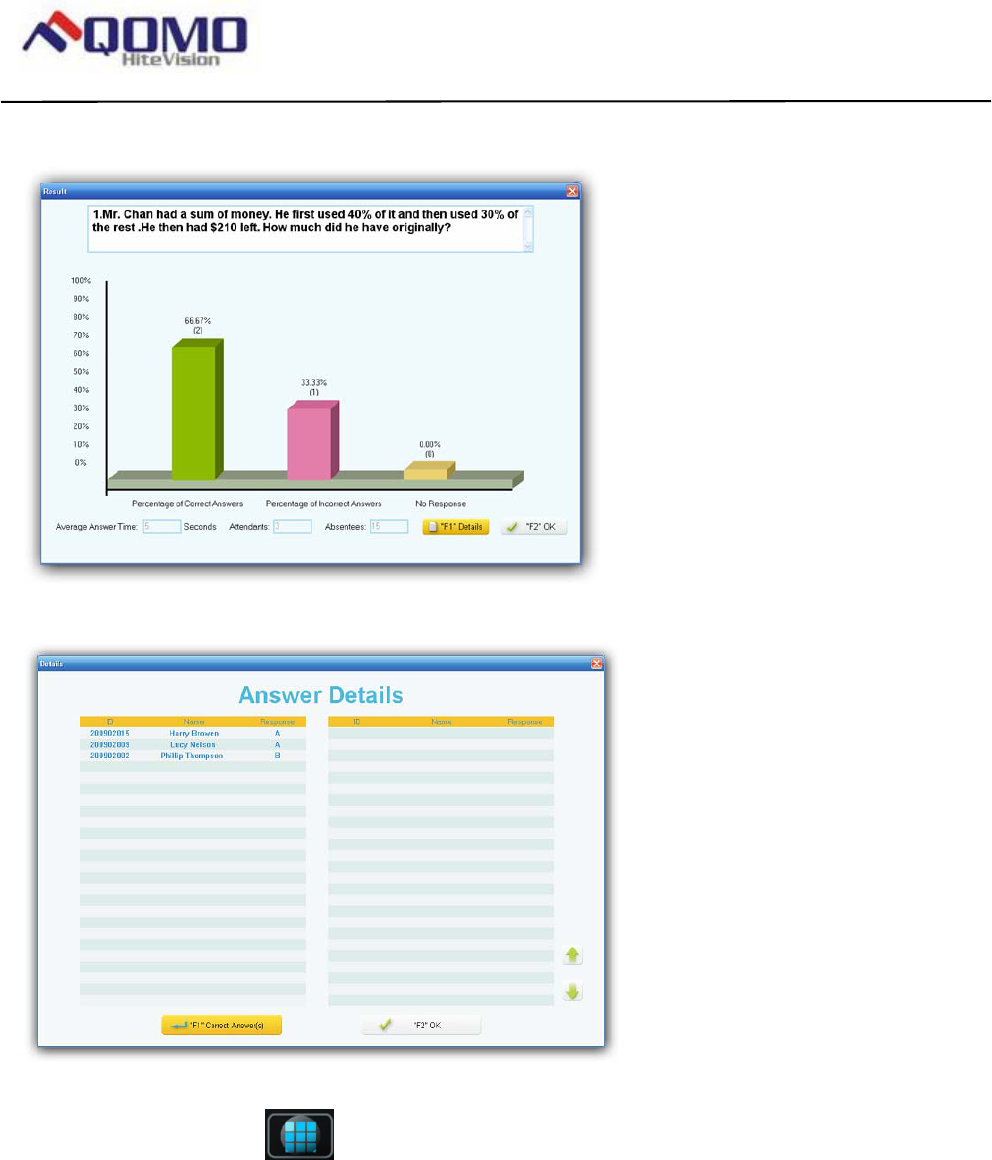
Result and Report
By pressing the Result button (using the PC or the instructor’s remote mouse, or through the
instructor remote Result , the instructor can view the responses to the individual quiz
question. Results are displayed in a histogram. Green color indicates the correct answer
responses. Pink color indicates incorrect answer responses. The correct answer response and
Page 52 of 109
QOMO HiteVision, LLC. QClick FCC ID: XQGQRF600-RE
QOMO HiteVision,LLC.
incorrect answer response are displayed in percentage in the histogram.
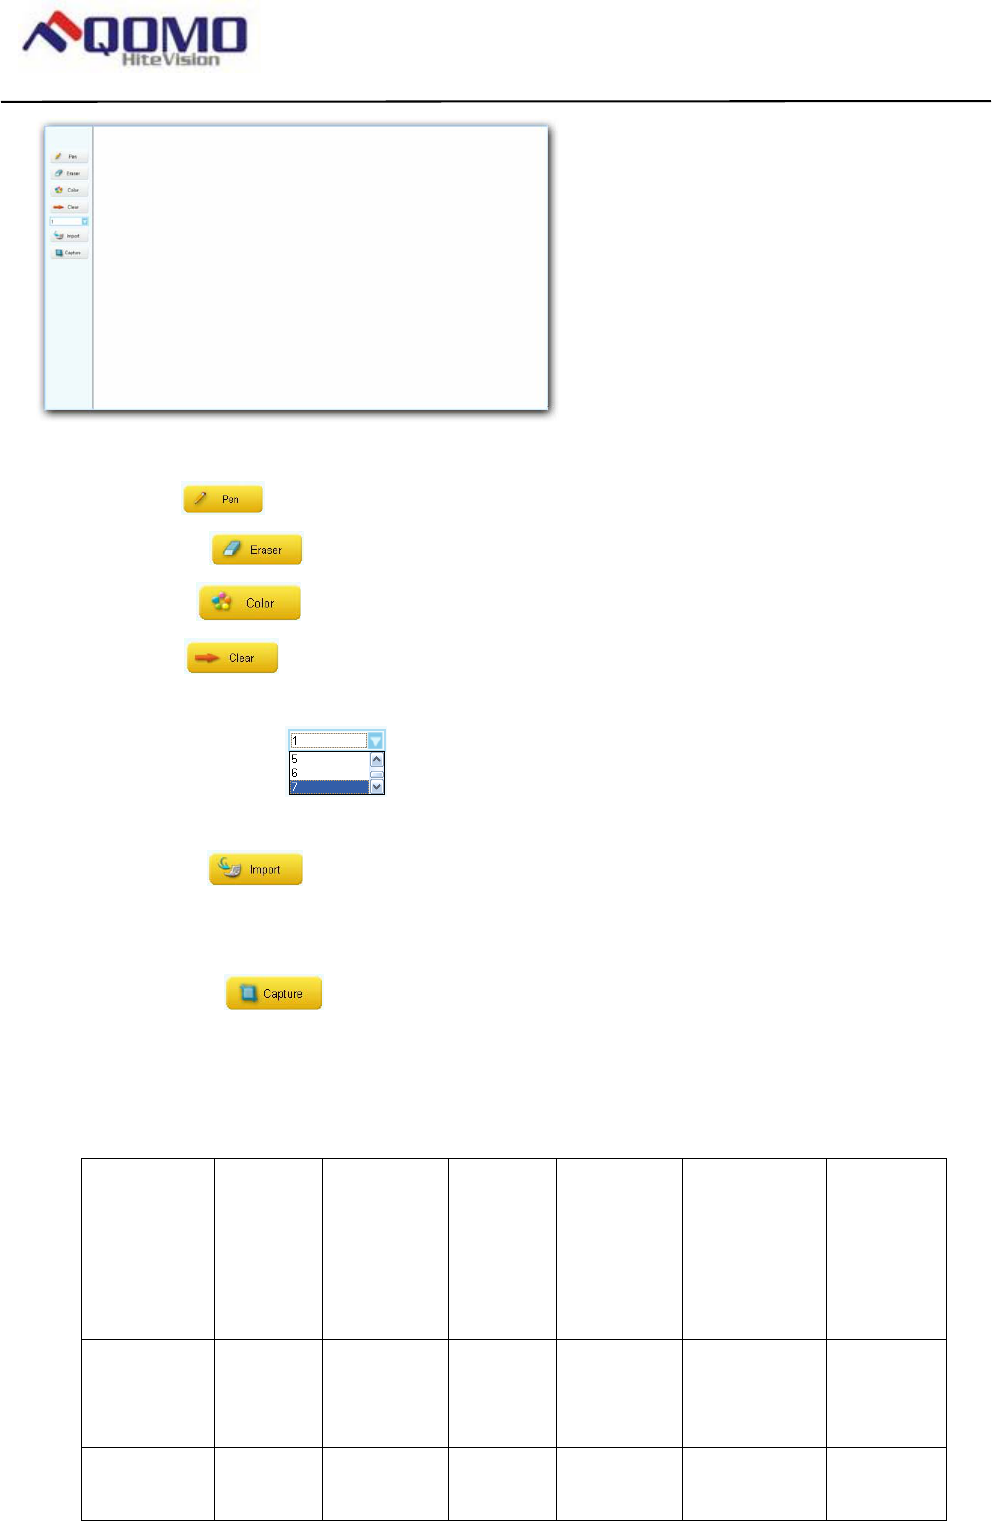
Press the F1 key to show the detail response answer for each participant.
By pressing the Report button (using the PC or the instructor’s remote mouse, or through the
instructor remote Report key), the instructor can view the responses to the individual quiz
question. Results are displayed in a table. The table shows the register number, the student ID, the
student names, the group number, point info and the response time. Press the F1 key to show the
detail response answer percentage in the histogram for each question option.

Page 53 of 109
QOMO HiteVision, LLC. QClick FCC ID: XQGQRF600-RE
QOMO HiteVision,LLC.
Exit
You can exit the engaged quiz session by pressing the ESC key on the PC keyboard or on the
instructor remote keypad, or by pressing the Exit button on the screen (using the PC or the
instructor’s remote mouse). The system will prompt you for saving the data to the system database,
when the completed session is exit.
Note: If the completed session data are not saved, they will be permanently lost.
Activity Modes
The QClick system has 8 activity modes: Normal Quiz, Paper Quiz, Homework, Rush Quiz,
Elimination, Multiple Mode, Survey, Vote, and Roll Call associated with no Free Style and 3
activity modes: Normal Quiz, Rush Quiz and Elimination associated with Free Style. The detail
description for each mode is as follow:
Normal Quiz:
In the Normal Quiz, a quiz file should be provided with the correct answer for each question
prior to starting the quiz. The quiz file is either in the Power Point format with the embedded
answers or in no Power Point format with the answer sheet file provided. The instructor controls the
pace of a question answering in a session. The question could be in the format of
standardized multiple-choice with one correct answer, or multiple choice with correct answer
more than one choices, or the answer in the format of cloze test or with a short answer in text.30
Paper Quiz:
A quiz file is not needed to be loaded to the system in Paper Quiz. The quiz questions are

Page 54 of 109
QOMO HiteVision, LLC. QClick FCC ID: XQGQRF600-RE
QOMO HiteVision,LLC.
displayed on the sheets of hardcopy paper. But the answer sheet associated with the paper quiz
should be loaded prior to starting the session. After the Paper Quiz is started, the instructor should
set up a time for the whole quiz in the timer window displayed on the bottom of tool bar. Registered
students will receive the quiz information in their keypad. The quiz title, quiz ID and question frame
are automatically received by the student keypads. The students need to hit the ‘T’ key to create the
paper quiz broadcast information into the keypad. It is ready for the students to start to answer the
questions in their keypad. The quiz pace is controlled by the individual participant. When the paper
quiz is finished by a student, he or she can directly submit the whole quiz answers without waiting
for the others.
Homework:
The Homework activity is used for the instructor to send the homework question frames to the
student keypads for students to take home to finish and also used to collect the homework answers
by receiving the answers from the student keypad. The answers either embedded in the Power
Point file or from the answer sheet file should be loaded prior to starting the homework session. The
homework title from the answer sheet file name or from the Power Point file name and the test ID
created by the system or set up in the Title window (refer to session 1.1.5 Title) are used for the
system tracking of the reports in the database and also used in the student keypad homework
searching. There is no time limit for the Homework activity.
Note: Homework Mode is either running in the state of assigning (Sending) or in the state of
receiving. When the engaged homework session is running but before the Start button is pressed
or pressed again, the homework session stays in the state of assigning (Sending Homework).
Pressing the Start button will trigger Homework mode switching from the state of assigning
(Sending Homework) to the state of Receiving.
Rush Quiz:
This mode is similar to the normal mode. Except that the first audience member who presses any
effective “Rush Quiz” buttons gets the power to answer the question in a given time. If the answer is
right, the audience will get the credit point. If wrong, he or she will get the negative credit point.
Elimination:
This mode is similar to the normal mode. Except that the audience members who answer the
question correctly in the previous question have permission to enter the next round of question
answering, the loser is eliminated by the system automatically.

Page 55 of 109
QOMO HiteVision, LLC. QClick FCC ID: XQGQRF600-RE
QOMO HiteVision,LLC.
Multiple Mode:
The Multiple Mode activity is to combine the Normal Quiz, Rush Quiz and Elimination in one
single quiz session. The loaded quiz file or the answer sheet contains the mode activity information
in each question set up. If you choose the Multiple Mode as your quiz session activity mode, the
system automatically selects the activity mode for the current quiz question based on what activity
mode the system reads from the embedded mode set up for each question in the quiz file or in the
answer sheet. If a loaded quiz file or a loaded answer sheet contains questions with multiple modes
set up, but you use Normal Quiz, or Rush Quiz, or Elimination as the whole quiz session activity
mode, the activity mode you select will overwrite the embedded mode set up in each question. For
example, if you select the Normal Quiz as your current quiz session activity mode, but the current
question mode is set to Rush Quiz, the system will ignore the Rush Quiz activity mode but use the
Normal Quiz as the whole quiz session activity mode.
Survey:
The Survey activity is used for surveying objects. The QClick system collects the audience
surveying responses for the survey object and provides the report of the survey result. You may use
the system Exam Editor to create a survey file with the survey object names and the items
associated with the objects. A set of value points from high to low is assigned to the items, which is
used as the numeric evaluation of the surveying object and also used in the system reporting. The
survey file to be loaded to the system could be the Power Point file with the weight information
embedded in the file or could be no Power Point file. If no Power Point survey files are used, the
answer sheets with the item weight information associated with the survey file should be loaded
prior to starting surveying activity. The responses from the audiences are just used to evaluate the
survey object and there are no correct or incorrect answers information related to the responses.
Vote:
The Vote activity mode is similar to the Survey activity mode. The audience responses contain no
correct or incorrect answer information. When you select the Vote activity mode, the system only
allows you to load in the vote file in Power Point format. No an answer sheet is needed to be loaded
to the system prior to starting the Vote activity. In this activity mode, the audiences vote responses
help to choose one successor among many candidates.

Page 56 of 109
QOMO HiteVision, LLC. QClick FCC ID: XQGQRF600-RE
QOMO HiteVision,LLC.
Roll Call:
The Roll Call mode is used for helping the instructor to roll call the attendances. When you select
the Roll Call activity mode, the system won’t ask you to load in any quiz files or any answer sheets
prior to starting the Roll Call activity. The roll call result can be saved to the system database for
the later reporting use, or can be instantly viewed after the activity.
Free Style Normal/Rush/Elimination:
The QClick system uses the Free Style control for the Normal Quiz, Rush Quiz and Elimination
activity mode. The Free Style control is used for the instructor to start a quiz session without loading
a prepared quiz file or an answer sheet. The quiz question information could be the captured
images from the computer or from the internet or could be from a third party white board or from the
system built in white board drawing or even from the instructor’s dictation. The correct answers for
the questions could be provided after finishing each question answering or provided after the whole
quiz session is completed. The main advantage of Free Style over the No Free Style is to give the
instructor more freedom to use the QClick system, which is not to restricted to the well preparing
material examination before the instructor to start a quiz session, and at the same time, it does not
lose any student quiz performance data.
To use the Free Style control, follow these steps:
1. Under Quiz Genius tab window, check the Free Style check box to select the Free Style
control.
2. Select the Normal Quiz or Rush Quiz or Elimination activity mode from the Activity Mode
drop-down list.
3. Click Run button to start the Free Style activity mode.
4. The status tool bar displays on the bottom of screen. If you don’t want to capture any
images or to use the system white board tool to draw or to write a quiz question, you may
click the Start button on the status tool bar to start an oral quiz.
5. To capture an image, right click on the status tool bar area. Select the Cut Picture item
from the pop-up window. The cursor changes the shape and the color. Hold the left mouse
button and draw a selection rectangular window on the objective image you want to capture.
Then double click on the selection rectangular box. The system white board tool displays the
image you capture on the center of the white board screen.
6. If you want just to use the system white board to draw or write a quiz question, right click on
the status tool bar area. Select the Manage Picture item from the pop-up window. The
system white board tool displays.
Page 57 of 109
QOMO HiteVision, LLC. QClick FCC ID: XQGQRF600-RE
QOMO HiteVision,LLC.
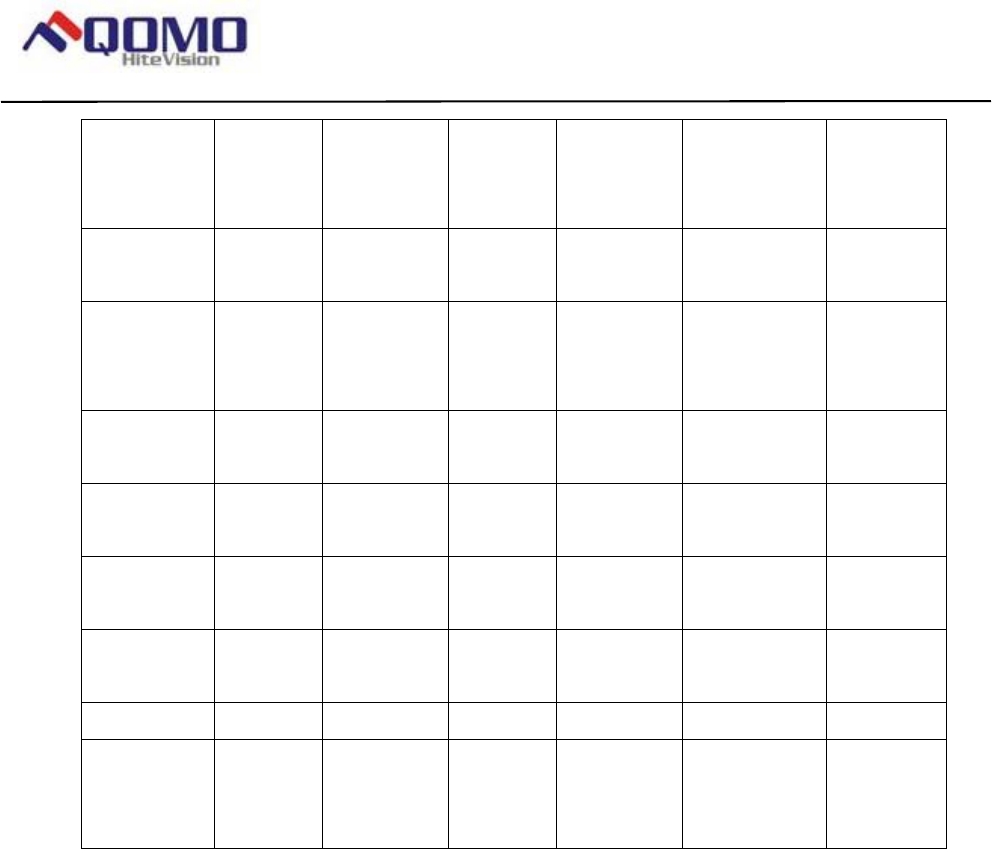
7. The system white board tool contains these controls:
• Pen button – Click the button to select the pen function.
• Eraser button – Click the button to select the eraser function.
• Color button – Used for the selection of a color for the pen drawing.
• Clear button – Click the button to clear all the drawing on the white board
screen.
• Pen Thickness drop-down list – Click to select the thickness number for the
pen drawing. The bigger number is the thicker.
• Import button – Click the button to display the import browser to import an
image file. The import function only takes the “.bmp” file format. The imported image
will display on the white board window.
• Capture button – Click the button to capture an image to display it on the
white board window. Refer to step 5 for about how to capture an image.
Table of Comparing the Mode Selections with Their Functions
Activity
modes
Multiple
choices
with
one
answer
Cloze or
short text
answer
Need
correct
answer
?
Group
participat
e mode
restricted
?
Instance
result
histogram
available?
Report
available
?
No-Free
Normal
Quiz
√ √ √ √ √
No-Free
Paper
√ √ √ √ √
Page 58 of 109
QOMO HiteVision, LLC. QClick FCC ID: XQGQRF600-RE
QOMO HiteVision,LLC.
No-Free
Homewor
k
√ √ √ √ √
No-Free
Rush
√ √ √ √ √
No-Free
Eliminatio
n
√ √ √ √ √
No-Free
Survey
√ √ √ √
No-Free
Vote
√ √ √ √
No-Free
Roll Call
√ √ √
Free
Normal
√ √ √* √** √
Free Rush √ √ √* √ √
Free
Eliminatio
n
√ √ √* √ √
“√” (Yes) means the activity mode can support the function. Blank (No) means the activity mode
cannot support the function.
“*” Provide answers after a quiz question answer or a session is completed.
“**” Pressing the result key brings you the roll call result table.
Logon and Force Login
Logon
The QClick system requires the instructor and student keypad should logon to the system RF
network before starting to conduct a quiz session. The instructor must select a class containing a list
of student ID before starting a quiz session. If students want to attend the quiz or the exam, they
need to set up their keypad student IDs. These ID numbers should be from the class student roster
list. When the class is selected, the instructor and the student can start to logon the system RF
network. Please refer to the hardware manual session about how to use the instructor and students
keypad to logon the system RF network. Once students are logged on to the system RF network,
they can keep staying there unless the instructor selects a different class.
Page 59 of 109
QOMO HiteVision, LLC. QClick FCC ID: XQGQRF600-RE
QOMO HiteVision,LLC.
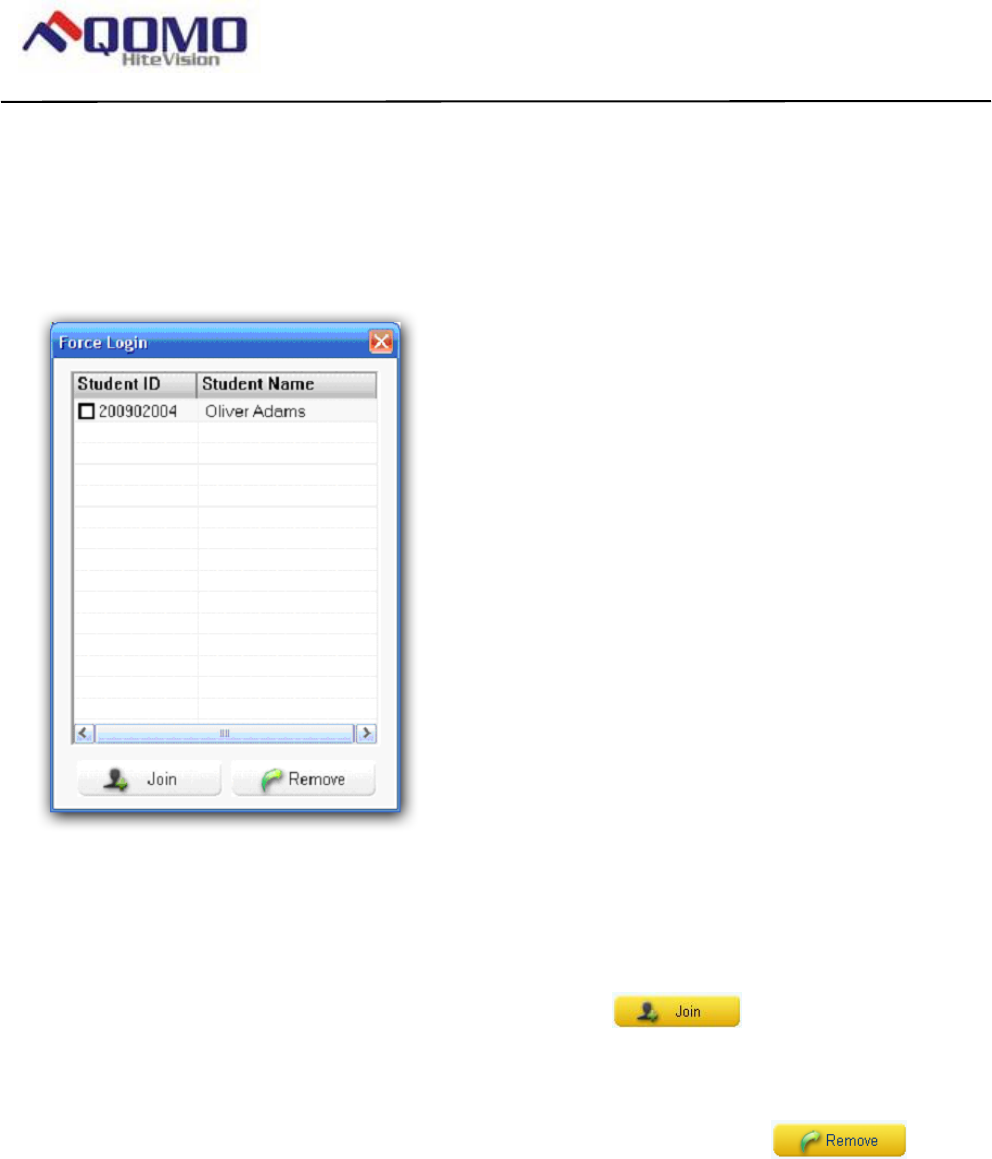
Force Login
If a student’s ID is not included in the student ID roster list of the class the instructor selects, but he
or she still want to take the quiz or the exam, then use the same way as the normal students do to
logon the system RF network. However, when this happens, the software will pop up a Force Login
window.
The ID and the name of the student who want to force login will be displayed on the Force Login
window. Then, the instructor can decide to allow the student in or not. To operate the Force Login
function, follow these steps:
1. Crick the check box on Force Login student list window to select the student.
2. If you allow the student Force Login, click the Join button. The student ID and
name will be automatically saved to the student roster of the class. And the session test data
will also be automatically saved to the system database.
3. If you want to reject the student to Force Login, click the Remove button. The
student will be unable to attend the session quiz.
4. Weather the student is permitted to Force Login or not, the “Invalid ID” is displayed on the
student keypad before permission. After the instructor approves the Force Login, the
student should try one more time to logon to the system RF network.
Exam Editor
Page 60 of 109
QOMO HiteVision, LLC. QClick FCC ID: XQGQRF600-RE
QOMO HiteVision,LLC.
The QClick system software well handles plug-in Microsoft Power Point software. It is very
convenient to use the QClick system to conduct a quiz if you choose to use the Power Point file as
the quiz question presentation materials. The instructor keypad fully controls the Power Point slide
just with a single key press. But before using the Power Point quiz file, you should need to create
and edit the Power Point quiz file. The QClick Exam Editor is there for you to easily create a Power
Point quiz file and to set up the correct answers and the related information. If you choose not to
use the Power Point as the quiz material presentation software tool, The QClick can still handle it.
Actually, you can have various methods to conduct quizzes. The quiz material could be from third
party format file, like ExamView, or could be from MS word documents, or could be from Adobe
PDF files, or with the Free Style mode, the quiz materials could be from the white board, or from the
images captured from PC or from the internet, or even from the dictation of the instructor. In all
these methods, you should provide the correct answers information to the system in order for the
system to grade the quizzes and to generate reports. The Exam Editor allows you to create and
edit the Answer Sheets used for these methods of quizzes.
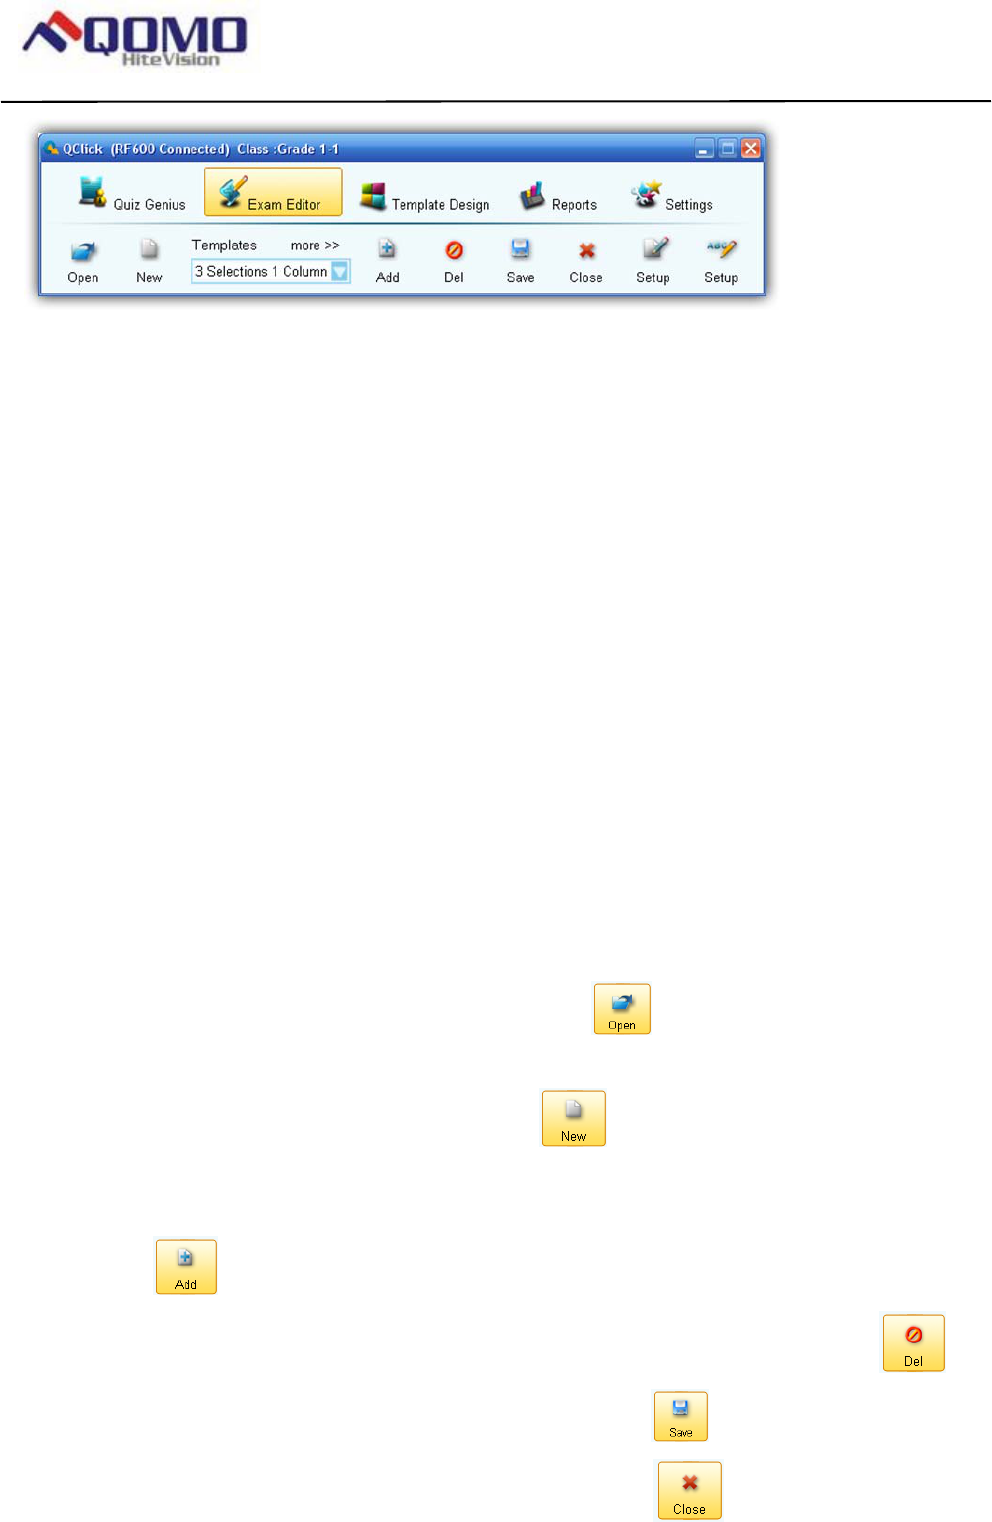
To use the Exam Editor, follow these steps:
1. Select Exam Editor Tab window.
2. To edit an existing Power Point file, click Open button; the Open file browser will
display to allow you to choose a file.
3. To edit a new Power Point file, click New button; a blank Power Point slide will
displays on the window.
4. To add a new slide, select a Templates slide from the Template drop-down list. Then Click
the Add button. If you want to open other template lists, click more>>.
5. To delete the current editing slide from Power Point quiz file, click the Delete button.
6. To save the edited Power Point quiz file, click the Save button.
7. To close the edited Power Point quiz file, click the Close button.
Page 61 of 109
QOMO HiteVision, LLC. QClick FCC ID: XQGQRF600-RE
QOMO HiteVision,LLC.
8. To set up the power point quiz file, click the Power Point Setup button. This will bring
you to the Power Point Setup window. Refer to the session 2.8 Power Point Setup for
detail.
9. To set up an answer sheet, click the Answer Sheet Setup button. This will bring you
to the Answer Sheet Setting window. Refer to the session 2.11 Answer Sheet Setup for
detail.
Note: The system always loads the template list which was loaded last time when you use the
Exam Editor.
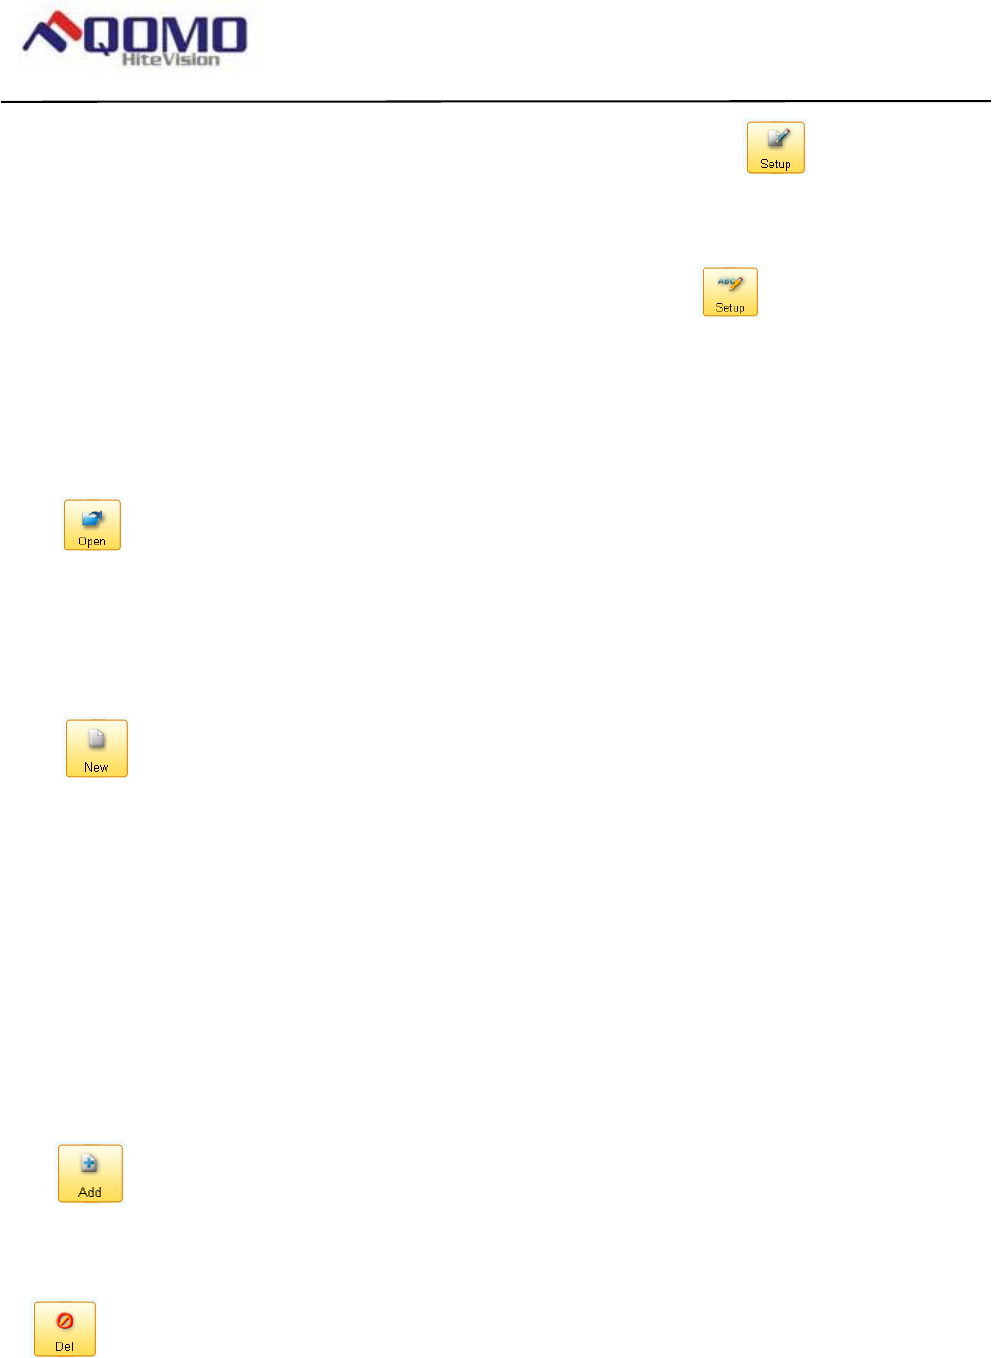
Open :
Open function is used to open the existing Power Point quiz file for editing. A file browser will
display after you clicking the Open button to allow you to choose a Power Point quiz file. The
default loading path is: “(Installation Path)\QClick\User\QRF600\Paper Base.”
New :
New function is used to open a new Power Point quiz file. Clicking the New button will bring up a
blank slide.
Templates:
The Templates drop-down list provides you template models for the easily quiz questions
editing .The default provided system template file is loaded when you first time use the Exam
Editor. The user defined template file can be opened by clicking the control “more >>”. The
software always loads the last time used template file.
Add :
Add function is used to add the selected Template model slide to your editing Power Point quiz file.
Del :
Del function is used to delete the editing slide from the Power Point quiz file. The software will
prompt you for the confirmation of delete when the Del button is clicked.
Page 62 of 109
QOMO HiteVision, LLC. QClick FCC ID: XQGQRF600-RE
QOMO HiteVision,LLC.
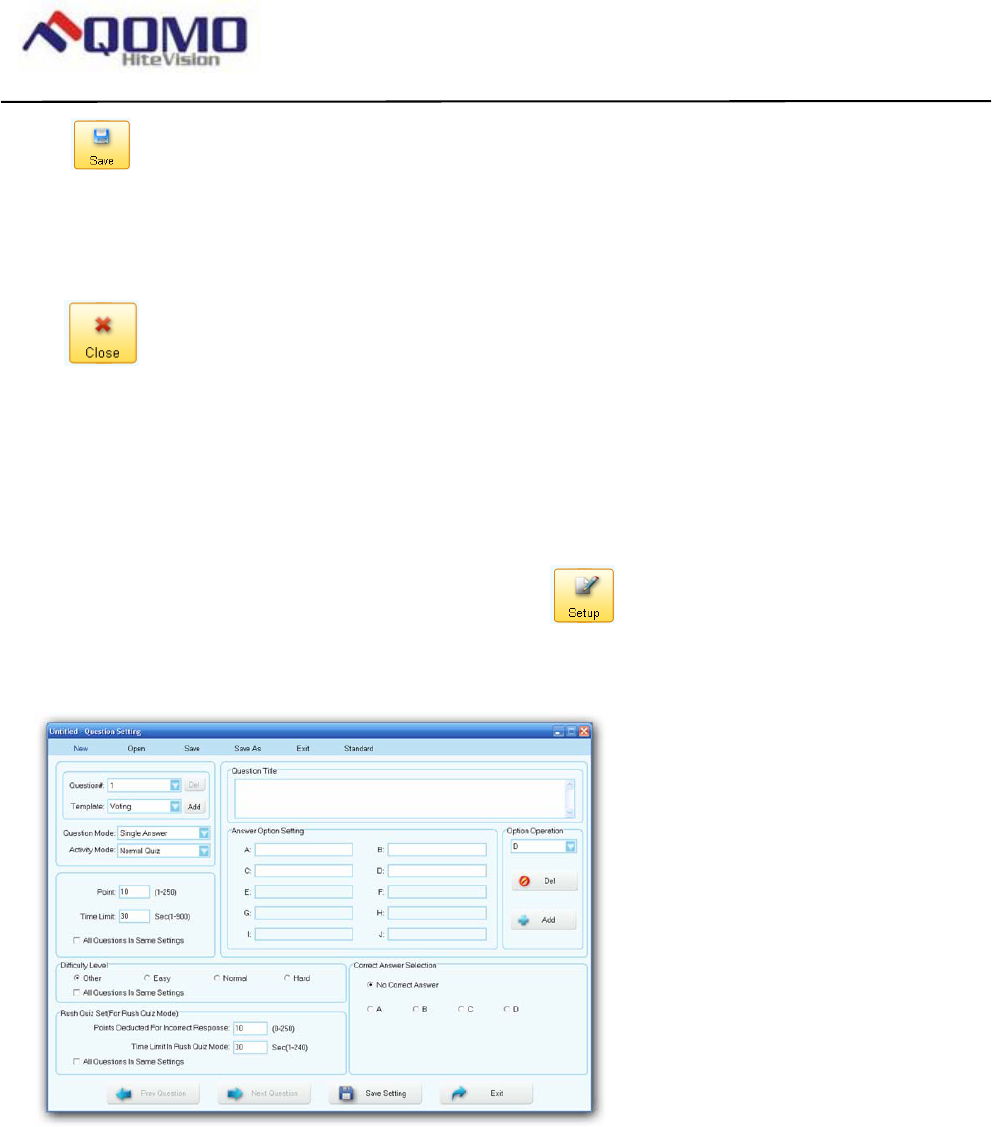
Save :
Save function is used to save the current editing Power Point quiz file. The default path is:
“(Installation Path)\ QClick \ User\QRF600 \Paper base.”
Close :
Close function is used to close the current editing Power Point quiz file. The software will prompt
you for the saving, if the opened Power Point quiz file has been changed.
Power Point Questions Setup
Under Exam Editor Tab window, clicking the Setup button will bring you to the Power Point
Question Settings window. If a Power Point quiz file is open, the file name will display on the top of
the window bar, meaning you are setting up the questions for the quiz file.
To set up questions for the open Power Point quiz file, follow these steps:
1. Have a Power Point quiz file open from Exam Editor, refer to session 2.1 Open; or click on
menu Open shown on the top of this window to open an existing Power Point quiz file; or
create a new Power Point quiz file from the Exam Editor, refer to session 2.2 New; or click on
menu New shown on the top of this window to open an new Power Point quiz file.
2. The detail description for the window menus as following:
• New – To new a Power Point quiz file for the questions set up.
• Open – To open a Power Point quiz file for the questions set up. Clicking on menu Open
will bring you to the file browser to open an existing Power Point quiz file.
Page 63 of 109
QOMO HiteVision, LLC. QClick FCC ID: XQGQRF600-RE
QOMO HiteVision,LLC.
• Save – To save the questions set up to the open Power Point quiz file.
• Save As – To save the current open Power Point quiz file as other file name. Clicking on
the menu Save As will bring you to the file browser to save the existing Power Point quiz
file to the other name.
• Exit – To exit this Question settings window.
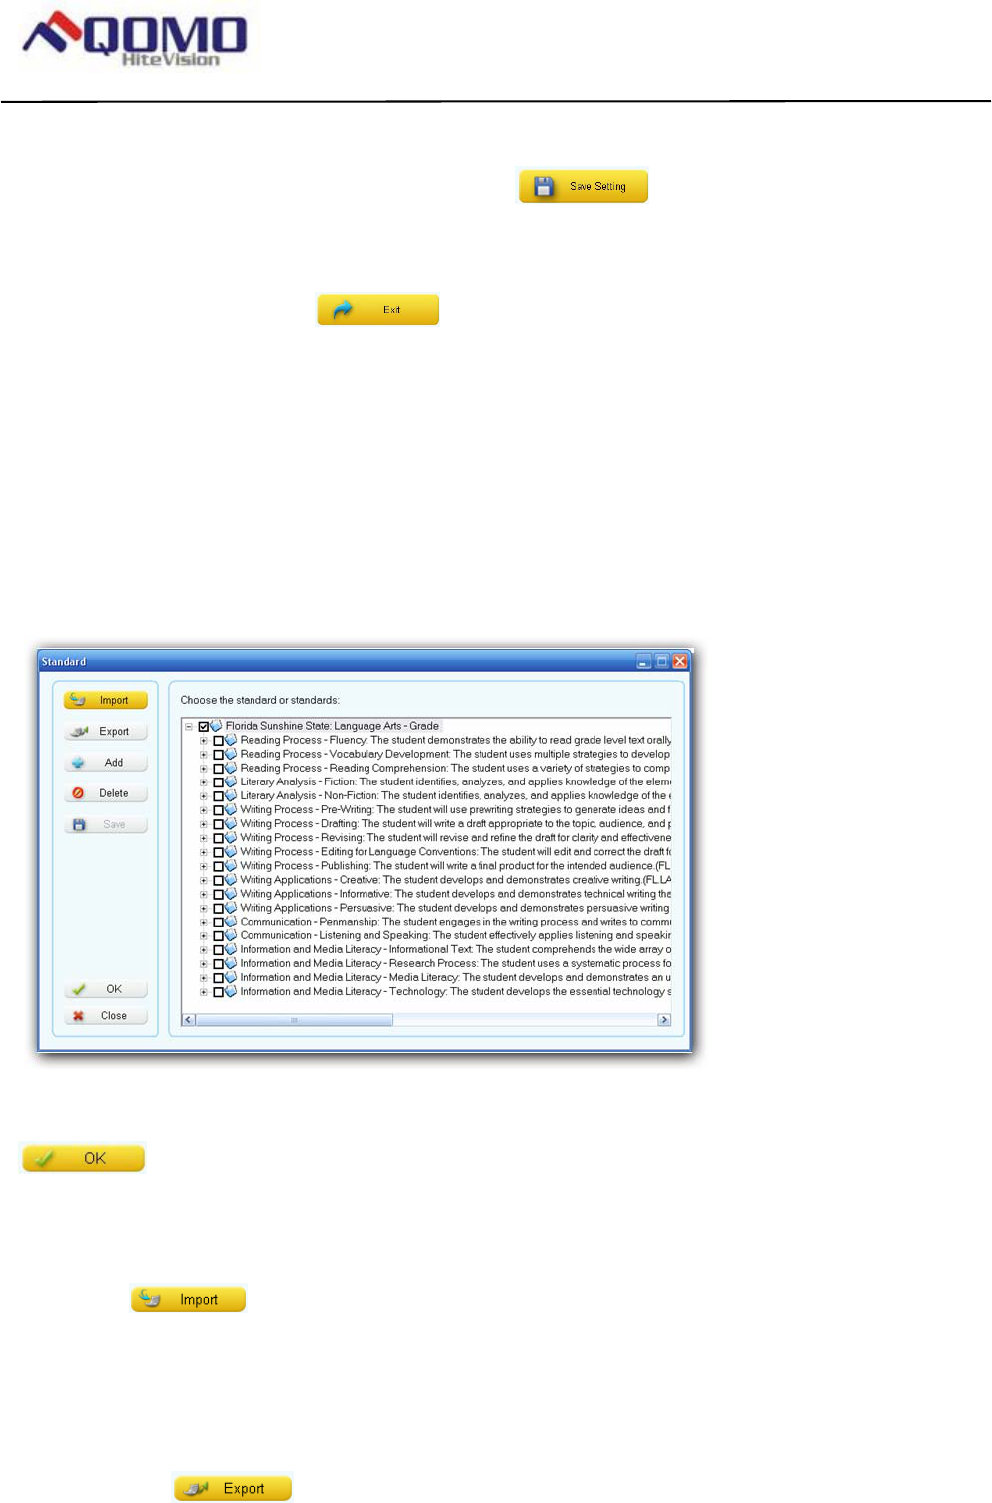
• Standard – To open the state education standard hierarchical chart for you to choose a
standard for the question setup. Refer to session 2.9 Standard.
3. The detail description for the function items in the window as following:
• Question#: -- Select a question you desire to set up from the Question# drop-down list.
• Add a Question: -- Click the Add button to add one more question right after the
current display question.
• Delete a Question: -- Click the Del button to delete the current display question.
• Template: -- Click the Template drop-down list to select the template for the current
question set up. Refer to session 2.3 Template for detail.
• Question Mode: -- Click the Question Mode drop-down list to select the question mode
for the current question set up. Refer to session 2.10 Question Mode for detail.
• Activity Mode: -- Click the Activity Mode drop-down list to select the activity mode for the
current question set up. This function is used for the software to pick up a mode from
Normal Quiz, Rush Quiz and Elimination for the conducting question when you select
the Multiple Mode as your quiz session activity mode.
Note: When you select Survey or Vote mode from the Activity Mode drop-down list, you will select
to switch the Question Setting to Survey or Vote Setting. The Question Title will be changed to
Survey Title or Vote Title.
• Question Title: -- The question title window is used to edit the question title content. If you
create a New Power Point quiz file, then this window will be blank. But if you open the
existing Power Point quiz file and the Question Title has been entered before. The
Question Title window will display the last saved Question Title content.
• Answer Option Setting: -- The software assigns default 4 options to each new created
question. You may increase or decrease the total number of options by clicking the
Add button or Del button under Option Operation area. Edit the active
option as you desire to set.
• Option Operation: -- Use Add button or Del button to increase or

Page 64 of 109
QOMO HiteVision, LLC. QClick FCC ID: XQGQRF600-RE
QOMO HiteVision,LLC.
decrease the total number of options. The Option drop-down list provides you a selection
of option you desire to delete. When you add or delete the options, the Correct Answer
Selection will be automatically updated.
• Correct Answer Selection: -- Click on radio button next to the letter option to indicate the
correct option. If you don’t want to have a correct answer for the question, then click the
ratio button “No Correct Answer”.
• Point: -- The point specifies the mark for the question answered correctly. The valid point
number is from 1 to 250 and the default value is set to 10.
• Time Limit: -- Specifies the time limit for the question answering. The session running
timer copies this time limit value when every question is started. The valid time is from 1
second to 900 seconds and the default value is set to 10 seconds.
Note: The new set timer value in a running session will overwrite the time limit value set here in the
question set up.
• All Questions in Same Setting: -- If you check the box All Questions in Same Setting,
you will apply the Point and Time Limit setting for the current question to all other
questions. If you want to have different Point and Time Limit setting for the questions,
then you need to uncheck this box. The other two All Questions in Same Setting check
boxes are located in Difficulty Level area and Rush Quiz Set area. They have the
similar function. Except they represent the different function setting.
• Difficulty Level: -- Select the Difficulty Level for the current question setting, by clicking on
the corresponding radio button.
• Rush Quiz Set: -- The Rush Quiz Set is only applied to the Rush Quiz activity mode.
• Points Deducted For Incorrect Response: -- Set the points valid from 0 to 250 for
incorrect answering deduction when the session is in Rush Quiz mode. The default point
is set to 10.
• Time Limit in Rush Quiz Mode: -- Set the time limit for the Rush Quiz answering. When a
student wins the question rushing, then he or she will be given this time limit to answer
the question.
Note: The new set timer value in a running session will overwrite the time limit value set here in the
Rush Quiz question set up.
• Prev Question: -- Prev Question button is used to view or to edit the
previous question set up. When clicking the button, the Question Settings window will
display the previous question.
• Next Question: -- Next Question button is used to view or to edit the next
question set up. When clicking the button, the Question Settings window will display the
Page 65 of 109
QOMO HiteVision, LLC. QClick FCC ID: XQGQRF600-RE
QOMO HiteVision,LLC.
next question.
• Save Setting: -- Click the Save Setting button to save any questions setting
changes to the open Power Point quiz file. If you exit the question setting window without
saving the changes, the changes will be lost.
• Exit: -- Click the Exit button to exit the question setting window. The software
will prompt you to save the changes, if you change the question setting. If it is not saved,
the changes will be lost.
Standard Setup
Refer to 2.8 Power Point Question Setup, about menu Standard in the Question Setting window.
The state education standard can be set up for a question setting. Click the menu Standard under
the Question Setting window, the Standard set up window will display.
The standard hierarchical chart is displayed on the right of the window. Select a standard applied for
the question setting from the chart by clicking the corresponding check box, and then click
OK button. The standard setting will be saved to the question. This state education
standard is used in the QClick reports system. There are some controls displayed on the left of the
Standard window. They are:
Import: -- Import function is used to import the state education standard XML file. Click the
Import button to display the Import Standard window. Then click the Browse
button; the import file browser will display. Load in the file and then choose the standard you
desire to import from the list in Choose the standard or standards window. Current import
function only supports XML format files.
Export: -- Export function is used to export the state education standards to XML files. Click
the Export button; the export file browser will display. Save the exporting
Page 66 of 109
QOMO HiteVision, LLC. QClick FCC ID: XQGQRF600-RE
QOMO HiteVision,LLC.
standard to a XML format file you desire.
Add: -- Add function is used to add a standard under an existing parent state education
standard. Select the parent standard by clicking the check box on the right hierarchical
standard chart window. Then click the Add button; the Standard Setting
window will display. In the window, enter the code into the Code text box and enter the
standard title into the Title text box. Then click the button Save and Close.
Delete: -- Delete function is used to delete a standard from the hierarchical standard chart.
Select the standard you desire to delete by clicking the check box on the right hierarchical
standard chart window. Then click the Delete button to delete the standard.
The software will prompt you for the confirmation of the deletion.
Save: -- Click the Save button to save all the standard setting changes. If you
close the Standard window without saving the change, all the standard setting changes will
be lost.
Close: -- Click the Close button to close the Standard window. The software
will prompt you to save the standard setting changes if there are any changes to the
standard setting.
Question Modes
Refer to session 2.8 Power Point Question Setup about the Question Mode setup item. The
QClick examination system handles 5 question modes: Single Answer, Multiple Answer, Cloze
Test, Short Answer and Teaching Plan. The detail description for each question mode is as
following:
• Single Answer: -- The multiple choices question has the correct answer with only one single
option choice.
• Multiple Answer: -- The multiple choices question has the correct answer with the combination
of more than one option choices. For example, a multiple choices question with options from
A to D has the correct answer set to the combination of option A and option C.
• Cloze Test: -- This kind of question is usually not a multiple choices question. The answer
could be the numeric numbers of fractions or the decimal numbers or letters.
• Short Answer: -- This kind of question is usually not a multiple choices question, but a
question has the answer with a short of sentence.
• Teaching Plan: -- If a question is set up as a teaching plan, the question cannot be used as
the quiz question. It is used for the presentation of teaching material.
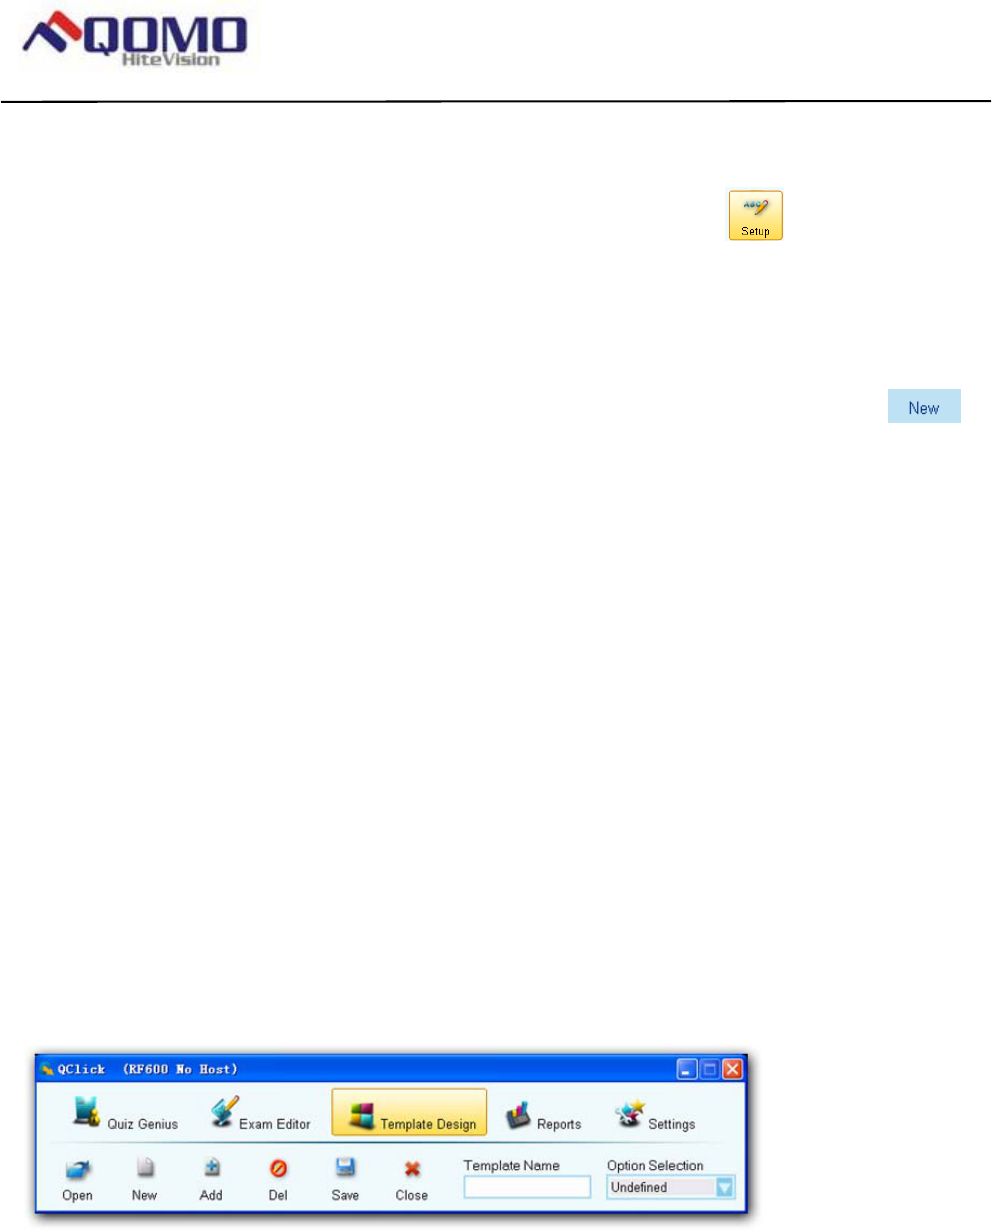
Page 67 of 109
QOMO HiteVision, LLC. QClick FCC ID: XQGQRF600-RE
QOMO HiteVision,LLC.
Answer Sheet Setup
Under Exam Editor Tab window, clicking the Answer Sheet Setup button will bring you to
the Answer Sheet Settings window to allow you to set up an answer sheet. Please refer to the
Chapter 2 Exam Editor about why and when you need to load in an answer sheet. The Answer
Sheet Setting window looks and functions very similar to the Power Point Question Setup window.
You may open an existing answer sheet to edit by clicking the menu Open under the window menu
bar or you may create a new answer sheet to edit by clicking the menu New. Most of
function controls in the Answer Sheet Setting window are the same as those in the Power Point
Question Setup window. Refer to session 2.8 Power Point Question Setup. Two functions
Import and Export are added to the Answer Sheet Setting window. The detail description for these
two functions is as following:
• Import: -- Import function is used to import the Microsoft spreadsheet format of answer sheet
to this Answer Sheet Setting window. Clicking the menu Import to bring you to the import
file browser to allow you to select a file name. Then click the Open button to confirm the
importing.
• Export: -- Export function is used to export the answer sheet setting in this Answer Sheet
Setting window to a Microsoft spreadsheet format file. Clicking the menu Export to bring you
to the export file browser to allow you to select a file name. Then click the Save button to
confirm the exporting.
Template Design
A good template model would bring a convenience to a question editing. In the Template Design,
you can design various types of template models and save them into the system. Then, when you
create quit questions, you can easily bring these template models up to your question designs in the
Exam Editor. The QClick system provides a basic of system default template model and it is loaded
when you use the Template Design first time.
To use the Template Design, follow these steps:
Page 68 of 109
QOMO HiteVision, LLC. QClick FCC ID: XQGQRF600-RE
QOMO HiteVision,LLC.
1. Select Template Design Tab window.
2. To edit an existing template design file, click Open button; the Open file browser
displays to allow you to choose a file.
3. To edit a new Template Model file, click New button; a blank Power Point slide will
displays on the window.
4. Click Add button; the software will bring you a system question Template list with
different option orientations. Then click on one of the template option orientation; the selected
template will be added to your template design.
5. Provide names for the template designs. The system would pick up the default name “Slide1,
Slide2, Slicde3 …” for the new added Templates slides. Click on the Template Name text
box to enter the name for the current editing designed template and then press “Enter” key.
6. Normally, when you add a template from the system Template list, the block of question title
on the Power Point slide display is assigned and the block of option order is assigned in
alphabet order starting from letter ‘A’. But if you want to do the re-assignment, click the block
you desire to assign on the Power Point Slide display (Question Title, Options…) and then
click the Option Assignment drop-down list to select either “Qu_Title” or “Options”. For
example, you want the first option block to be assigned to option B, click to select the first
option block and then click the Option Assignment drop-down to select “OptionB”.
7. To delete the current editing template slide from Power Point template file, click the Delete
button. The software will prompt you for the deletion of confirmation.
8. To save the edited Power Point template file, click the Save button.
9. To close the edited Power Point template file, click the Close button. If changes have
been made, the software will ask you to save the changes, otherwise, the changes will be
lost.
The detail description for the template design control is as following:
Open :
The Open function is used to open the existing Power Point template file for editing. A file browser
will display after you clicking the Open button to allow you to choose a Power Point quiz file. The
template file extension is “.pot” or “.potx”. The default loading path is: “( Installation
Page 69 of 109
QOMO HiteVision, LLC. QClick FCC ID: XQGQRF600-RE
QOMO HiteVision,LLC.
Path)\QClick\User\QRF600\Module”.
New :
The New function is used to create a new Power Point template file. Clicking the New button will
bring up a blank template slide.
Add :
The Add function is used to add a new template model selected from the system Template list with
different option orientations, appending to the last template in the file.
Del :
Del function is used to delete the editing template slide from the opened Power Point template file.
The software will prompt you for the confirmation of deletion when the Del button is clicked.
Save :
Save function is used to save the current editing Power Point template file “.POT”. The default
saving path is “(Installation Path)\QClick\User\QRF600\Module”.
Close :
Close function is used to close the current editing Power Point template file. The software will
prompt you for the saving, if the opened Power Point template file has been changed.
Template Name:
Template Name is the editing window used to re-name the template model name.
Option Assignment:
Option Assignment is used to determinate which block on the template Power Point slide is
assigned to the Question Title, which block is assigned to Option A or Option B and so on. If the
template question model is created by the system template, the choices will be
automatically denominated. Otherwise, the Question Title and each option assignment should be
denominated manually.
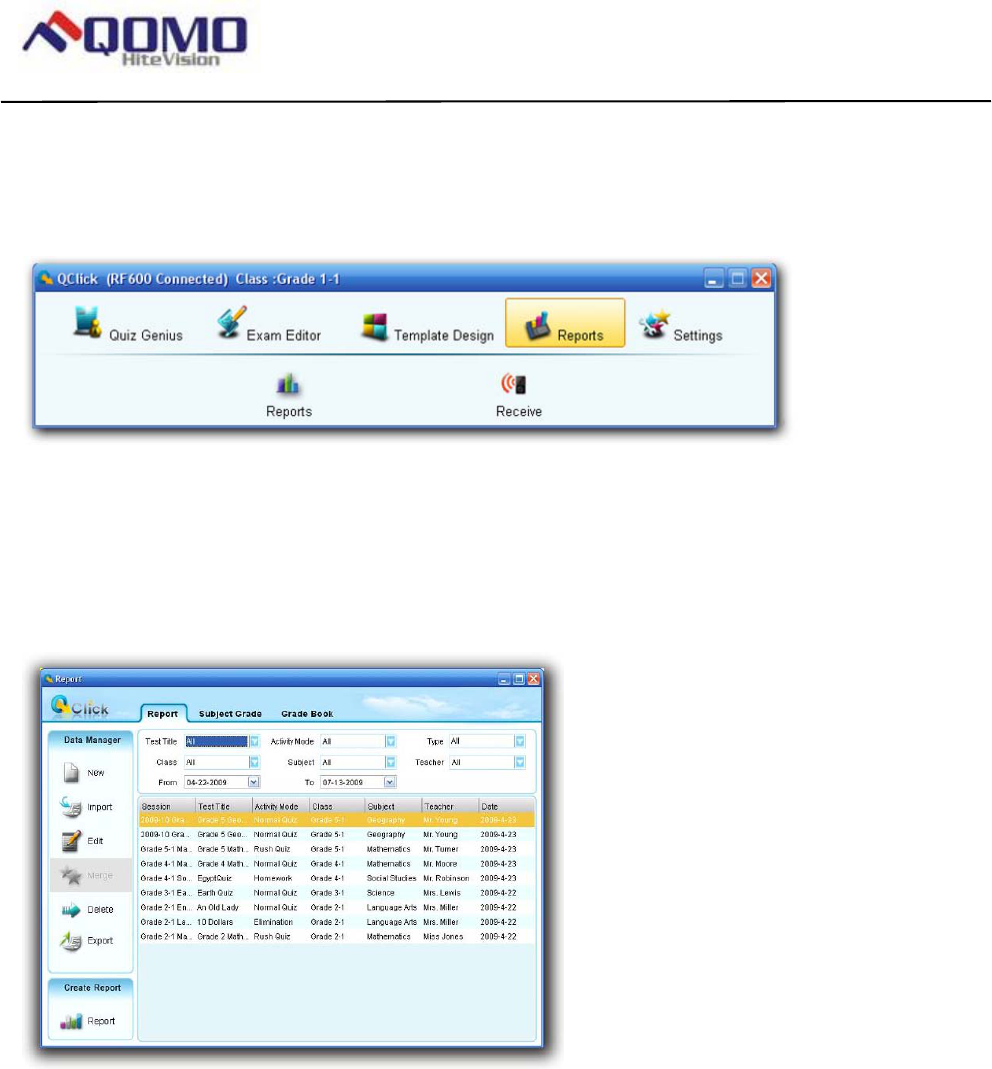
Page 70 of 109
QOMO HiteVision, LLC. QClick FCC ID: XQGQRF600-RE
QOMO HiteVision,LLC.
jjj3
Reports
Reports
Reports
Click the Reports tab on the QClick main window then click Report. This opens the reports tool.
QClick Reports has two main categories; Data Manager and Create Report:
Data Manager
• Creating a new session
• Import a data session to the system database from a file
• Edit a session
• Merge two or more sessions
• Delete selected sessions
• Export a session from the system database to a file
Create Report
Session data are recorded during the session activities in a class; or created using this reporting tool under Data
Manage then New. The session information is recorded in the system database once a session is completed. The
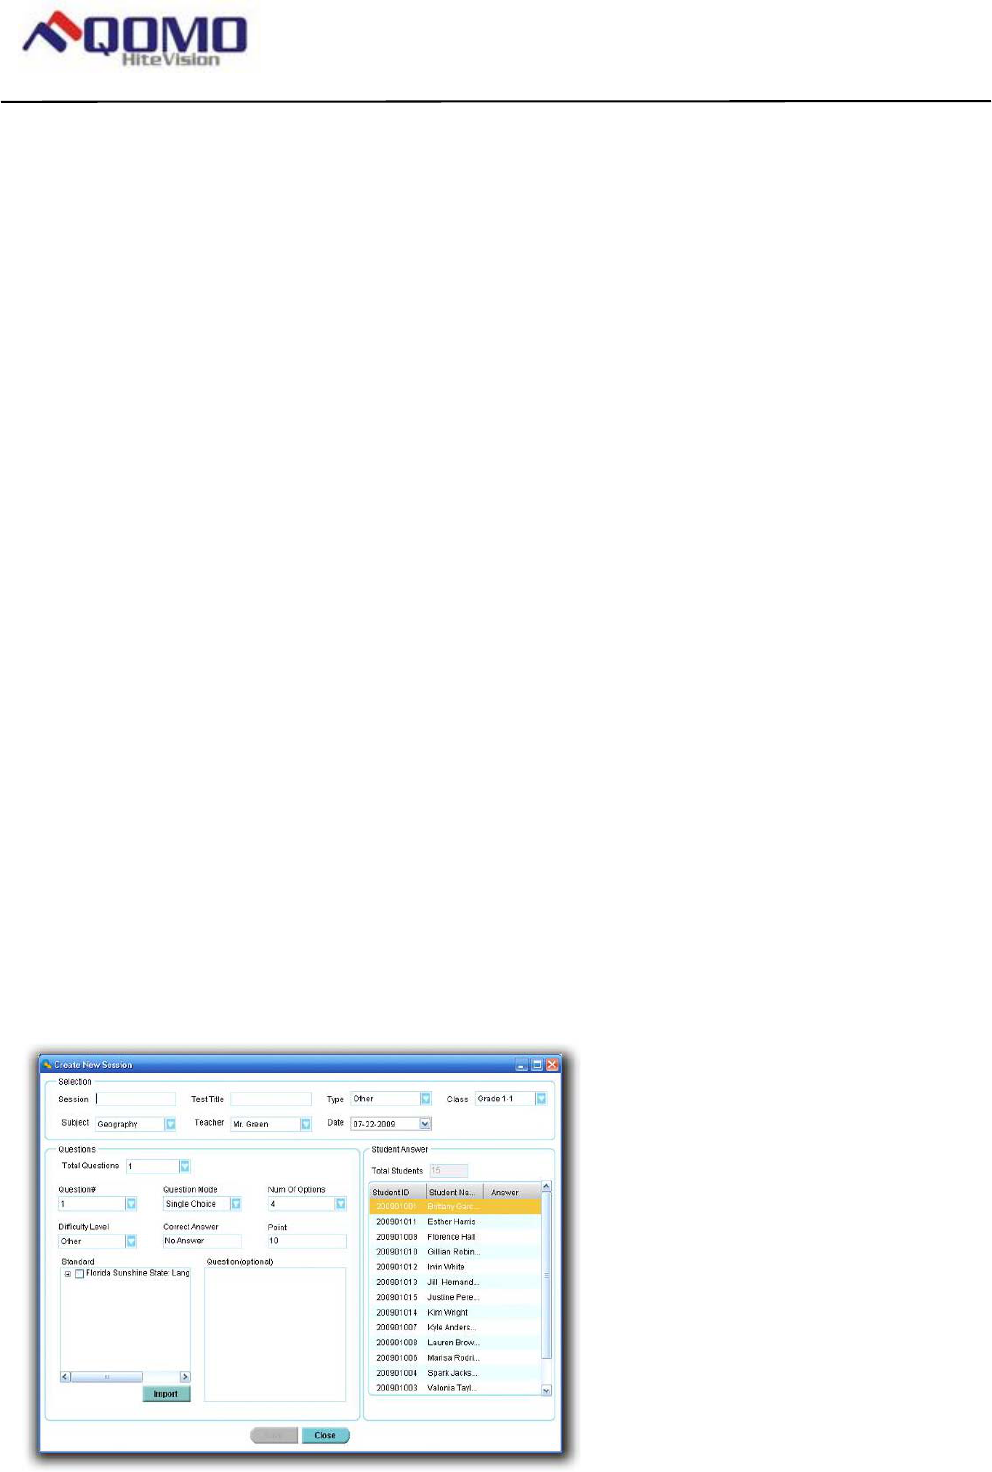
Page 71 of 109
QOMO HiteVision, LLC. QClick FCC ID: XQGQRF600-RE
QOMO HiteVision,LLC.
QClick Create Reports generates reports from sessions regardless of the activity mode. When you access the
Create Report tab and select an individual or a group of students and the type of report you desire, QClick
organizes the recorded data around the class associated with the previous session and in the report form you
selected.
In the Reports interface, there are several filters to help you select an engaged session from which you want a
report. If you select All for a filer selection, the filter functioning is Off. The filters are:
• Test Title – Related to an individual electronic or paper test title used in the system.
• Activity Mode – The mode selected during a test. These modes include Normal Quiz, Paper Quiz, and
Homework.
• Type – Indicates session type. For example, class participation, exam, lab or a game. When an activity mode
is selected during a test, the session type is automatically generated.
• A session type also can be entered when a new session is created using this reporting software. Please refer
to the Creating a new session in the following headings.
• Class – Select a class name to filter a session
• Subject – Select a subject name to filter a session
• Teacher – Select a teacher name to filter a session
• Time period – Select a period of time to cover a date that an activity has taken place to accurately locate a
session
Typically, the session data is recorded after a classroom test activity. When an activity is finished, the system asks
whether you want to save the test session just completed. If the answer is yes, the session is saved to the system
database. In the report tool, the session can be viewed and a report can be created from the session.
Occasionally, session data is not available. The student scores could be from lab exams or an activity that is not
possible to obtain using the QClick system. However, teachers still want the system grade book software to
include these test results. In this application, the session data can be entered manually.
To create a new session, follow these steps:

Page 72 of 109
QOMO HiteVision, LLC. QClick FCC ID: XQGQRF600-RE
QOMO HiteVision,LLC.
In Data Manager groups, click the button New to begin creating a new session.
1. Type in a session name into the Session box.
2. Type in a test title name into the Test Title box. The test title should correspond to the electronic or paper
copy test title or a file name loaded in a classroom activity. In order to make the session being created
consistent with the session generated in an activity test, the test title is entered for the purpose of filtering
to easily locate a session in order to generate a report.
3. Select a type for the session being created from the drop down list Type.
4. Select a class name for the session being created from the drop down list Class.
5. Select a subject name for the session being created from the drop down list Subject.
6. Select a teacher name for the session being created from the drop down list Teacher.
7. Select a date for the session being created from the calendar table Date.
8. Select the total question number from the drop down list Total Questions. The maximum number
default is 100.
9. Questions may now be answered and in any order desired! Questions may be selected from the drop
down list Question #.
10. Select the question type by selecting from the drop down list Question Type for the question you are
working on.
11. Select the difficulty level by selecting from the drop down list Difficulty Level for the question you are
working on.
12. Enter a correct answer for the question you are working on into the box labeled Correct Answer. The
default is set to No Answer.
13. If the question type is single choice or multiple choices, the number of options for the question should be
selected from the drop down list Num of Option. The default number of options is set to 4.
14. Select the point value for the question you are working on from the drop down list Point. The default point
value is 10.
15. If you want to associate the question you are working on to a state standard, then you need to select that
association from the drop down list Standard.
16. The question content is optional. It serves as a hint for the current question. It may also be used as the
question comment. Just type in the text or copy and paste the text in the box marked Question
(Optional).
17. Select a student name and ID by clicking the student information row in the Student Answer area to
enter an individual student answer to the current selected question.
18. Repeat step 17 to finish entering all the student answers to the current selected question.
19. Repeat from step 9 to 18 until all questions are finished.
20. Click the Save button and then click the Close button to close the creating a new session window. The
saved session data will be recorded in the system database.
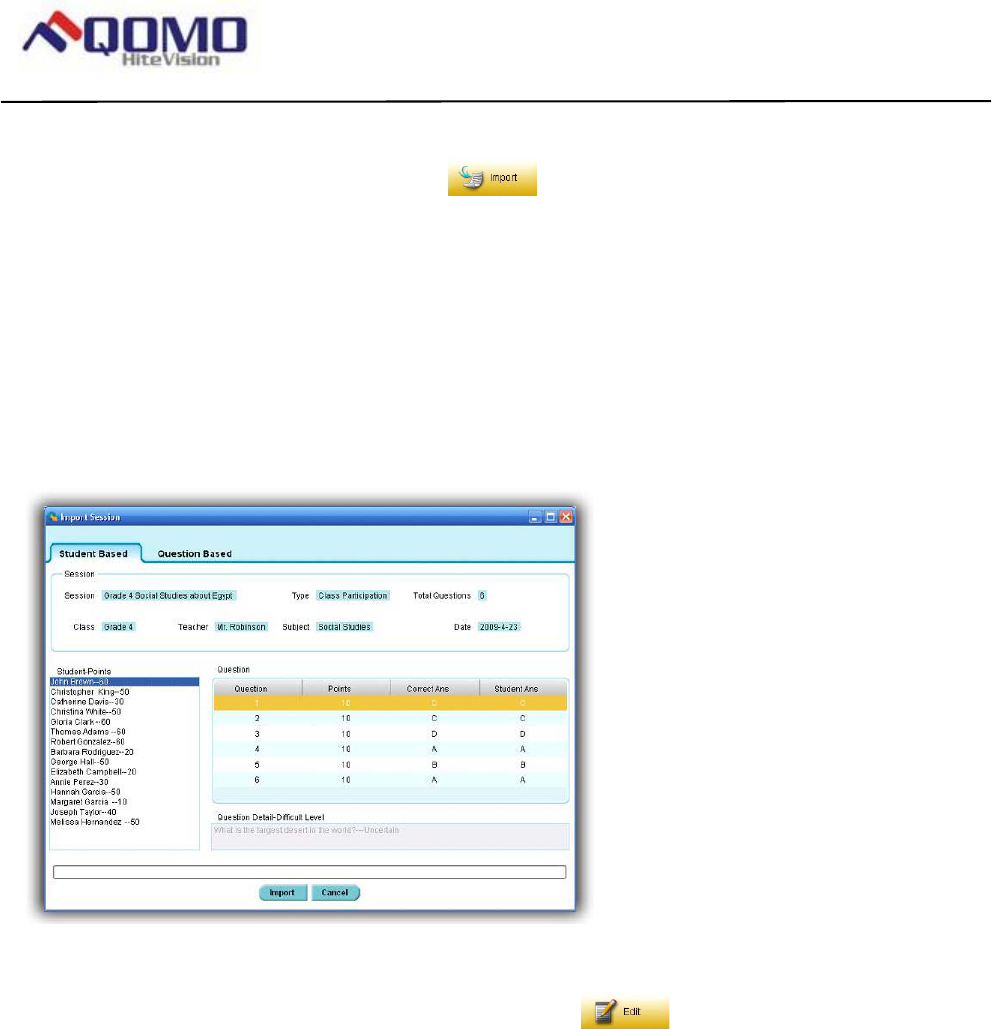
Page 73 of 109
QOMO HiteVision, LLC. QClick FCC ID: XQGQRF600-RE
QOMO HiteVision,LLC.
Import a data session to the system database from a file
In Data Manager groups, click the Import button to open the file browser to import a session stored in a
file. The import and export of session data allows you to transfer this data from one computer to another. The
export function allows you retrieve a session from the QClick system database and save it to another file that you
have created. The import function allows you to merge the session data from that data file to a different QClick
system database. The file takes the extension .dat format. When a file to be imported is selected, the import
session previews the session data in two tabs, the student based tab and the question based tab. Select the
student you want to preview in the left Student Points window inside the student based window. The right window
Question shows the question number, points, correct answer and the student answer. Select the question you
want to preview in the left Question Point Standard window inside the question based window. The right window
Student shows each individual student’s answers to the question. These let you preview the data being imported.
Click the Import button to start importing. If the data to be imported is already in the system database, the
software will prompt you with a message saying “Session already exists”; the importing is still successful.
Edit a session
Select a session you wish to edit and then click the Edit button in the Data Manager Groups to open
the Edit Session window. This window contains two tabs; Edit Question and Edit Student Answer Sheet.
Under the Edit Question tab, you can change the session name, session type, session date, and subject, if
desired. All question information contained in the session can also be modified. Under the Edit Student Answer
sheet tab, you can change the answers to a question and re-grade the student’s answers as well as the point
value.
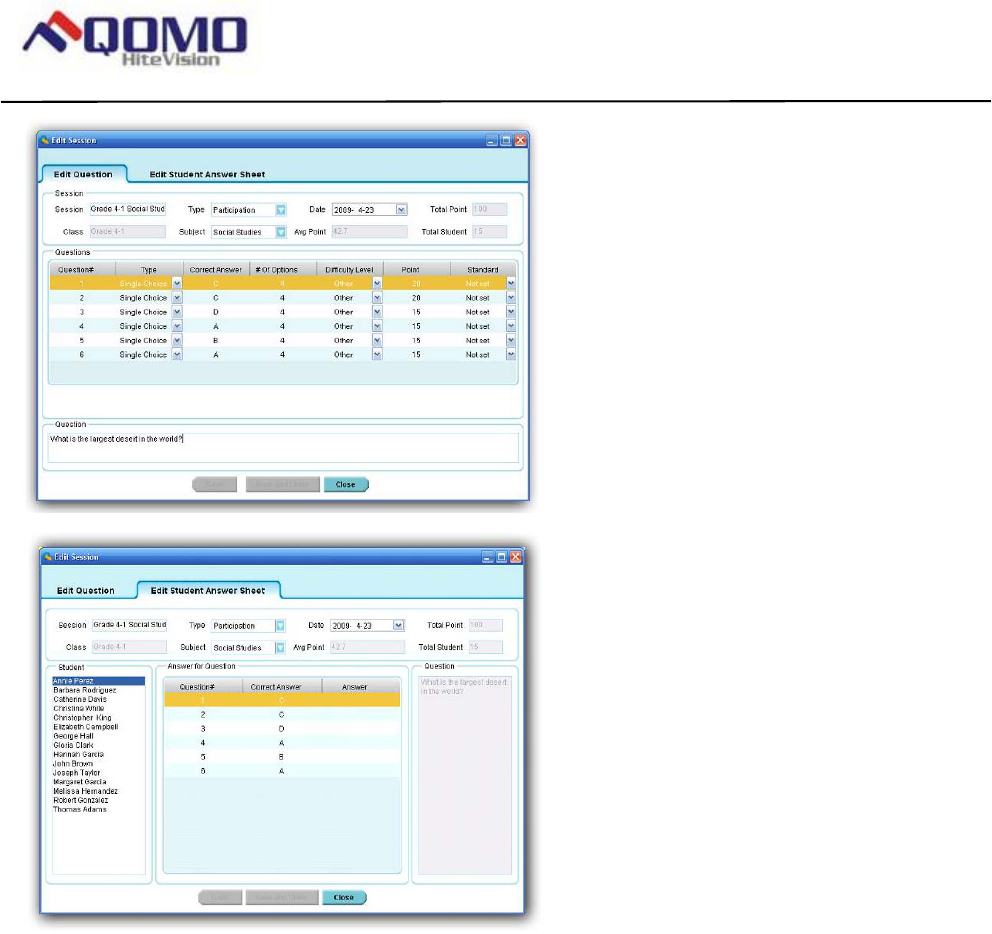
Page 74 of 109
QOMO HiteVision, LLC. QClick FCC ID: XQGQRF600-RE
QOMO HiteVision,LLC.
This following section will demonstrate how to:
• Modify session information
• Re-assign the type of questions
• Re-calculate the questions (including point value)
• Re-grade the students test
MODIFY SESSION INFORMATION
Session information is contained in both the Edit Question and Edit Student Answer Sheet tabs.
To modify the information in a session, follow these steps:
1. Click either the Edit Question or Edit Student Answer Sheet tab.
2. Move the cursor into the Session text box by clicking the session name edit box and then type the text
directly into the box to change the session name.
3. Click the Type drop down list to select the new type of session if desired.
4. Click the Date drop down list to select a new date if desired.
5. Click the Subject drop down list to select a new subject if desired.

Page 75 of 109
QOMO HiteVision, LLC. QClick FCC ID: XQGQRF600-RE
QOMO HiteVision,LLC.
6. Click the Save button and then click the Close button or click the Save and Close button to close the edit
session window. The saved edited session data will be recorded in the system database. If the edited
session data is not saved, the editing changes will be lost.
RE-ASSIGN THE TYPE OF QUESTIONS
A question type can be modified from single choice to multiple choices or the close type. To modify
the type of question, follow these steps:
1. Click the Edit Question tab.
2. Select the question you wish to edit by clicking the question number and highlight the question number.
3. Click the Type drop down list in the Questions area; then select the new type of question desired.
4. Click the Save button then click the Close button or click the Save and Close button to close the edit
session window. The saved edited session data will be recorded in the system database. If the edited
session data is not saved, the editing changes will be lost.
Edit QUESTIONS
Editing question(s) will allow you to make these changes:
• Edit the correct answer to a question
• Change the answer selection
• Change the difficulty level of a question
• Change the point value of a question
• Change the associated standard of a question
Follow these steps to Edit a Question
1. Click the Edit Question tab.
2. Select a question you wish to edit by clicking the question number and highlighting it.
3. Click the Correct Answer edit box in the Questions area and type in the new correct answer into the box.
If the question type is single or multiple choices, then typing the character should be within the range. For
example, with a single choice type of question with 4 options, the maximum allowed is ‘D’.
4. Click the # Of Option edit box in the Questions area and type in the new number option you desire for
single or multiple choice questions. The number entered will be checked against the correct answer. For
example, if you change the number option to 2 but the correct answer is kept as ‘D’, this will not correlate
to the existing settings.
5. Click the Difficulty Level drop down list in the Questions area then select a new difficulty level if desired.
6. Click the Point edit box in the Questions area and type in the new point value you desire.
7. Click the Standard drop down list menu in the Questions area and select a new standard level for the
question if you choose to associate the standard to the question.
8. Click the Save button then click the Close button or click the Save and Close button to close the edit
session window. The saved edited session data will be recorded in the system database. If the edited
session data is not saved, the editing changes will be lost.
EDIT STUDENTS ANSWERS

Page 76 of 109
QOMO HiteVision, LLC. QClick FCC ID: XQGQRF600-RE
QOMO HiteVision,LLC.
A student answer can be edited and the correct answer changed. To edit a student answer, follow
these steps:
1. Click the Edit Student Answer Sheet tab.
2. Select the student you choose to edit by clicking the student name and highlighting it in the Student list
window.
3. Select a question you choose to edit by clicking the question number in the Answer for Question window.
4. Click the Correct Answer edit box in the Answer for Question area and type in the new correct answer.
If the question type is single or multiple choices, the typing character should be within the range. For
example, with a single choice type of question with 4 options, the maximum allowed is ‘D’.
5. Click the Answer editing box in the Answer for Question area and type in the new correct answer. If the
question type is single or multiple choices, the typing character should be within the range. For example,
with a single choice of 4 questions, the maximum allowed is ‘D’.
6. Click the Save button then click the Close button or click the Save and Close button to close the edit
session window. The saved edited session data will be recorded in the system database. If the edited
session data is not saved, the editing changes will be lost.
Merge two or more sessions
From the session list window, select two or more existing sessions with the same class and subject
and then click the Merge button to begin the merging function. The merge function is
useful when you have a make-up session but don’t want to keep two separate sessions; one for the
regular and one for the make-up with the same class and the same subject, using the same activity
test. This way, you can merge the make-up session and regular session together to form a single
session. To begin the merge function, follow these steps:
1. Select two or more sessions with the same class and subject from the session list window by holding the
Ctrl key and clicking the session selected. An alternative method to select multiple sessions would be to
hold the Shift key and then click the start and the end session in the list. All of the sessions between the
start and end session are now selected.
2. The Merge button becomes available after step 1. Click the Merge button.
3. If the sessions to be merged have the same class and subject name, the merge window will appear;
otherwise, an error message will prompt you to select the same class and the same subject to merge.
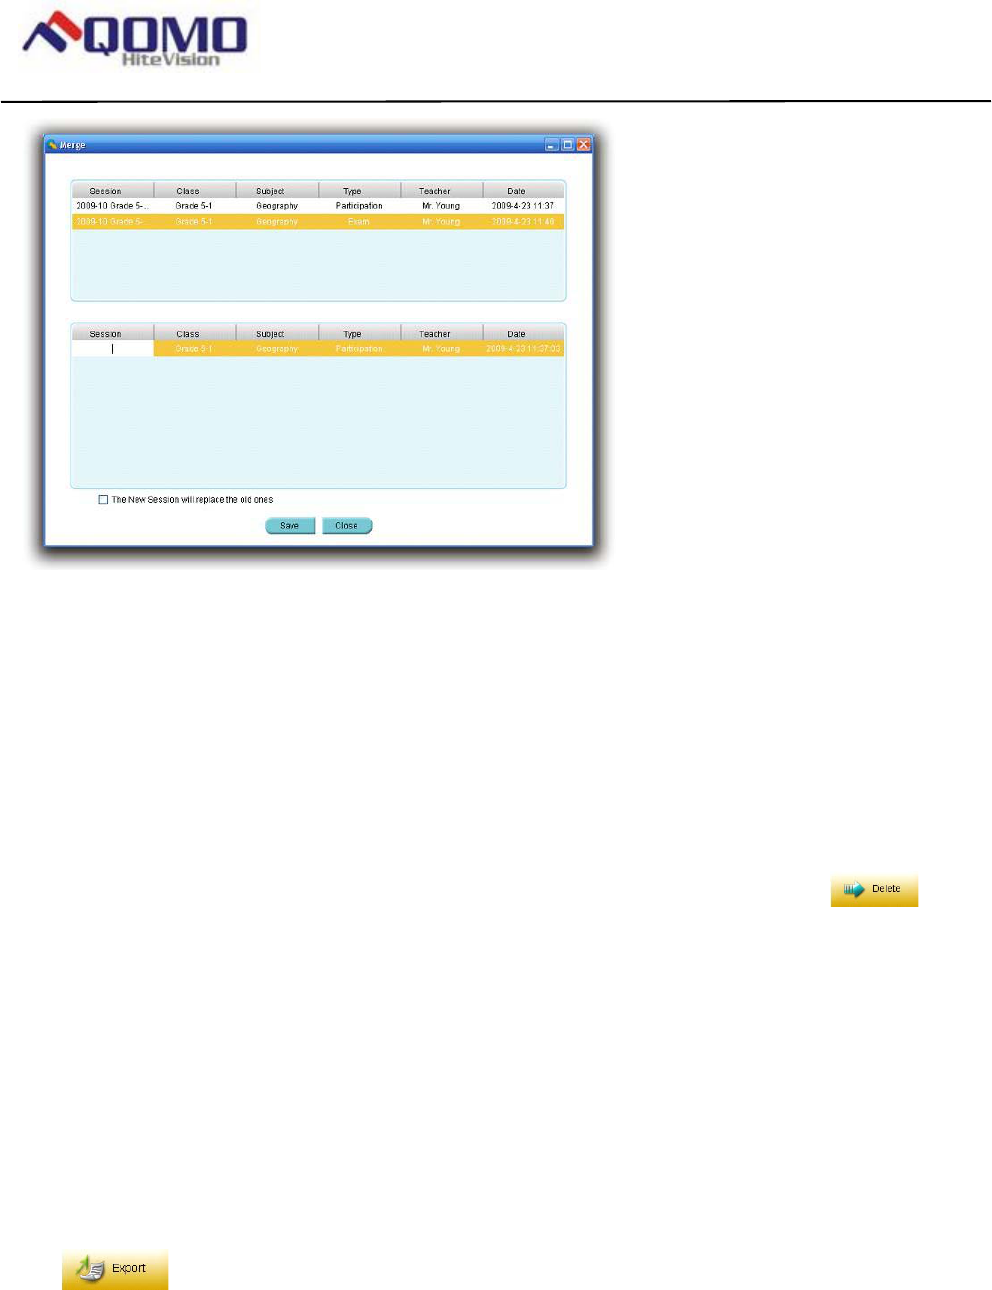
Page 77 of 109
QOMO HiteVision, LLC. QClick FCC ID: XQGQRF600-RE
QOMO HiteVision,LLC.
4. The Merge window consists of two sections. The top section lists all the sessions to be merged, and the
lower section lists a single session to be created. Create a new session name by clicking the area under
the session title, then type in your text.
5. At the bottom of the Merge window there is a check box, you may choose to replace the old sessions with
the new one.
6. Click the Save button to begin merging. The new created session will be stored in the system database.
Delete selected sessions
Select one or more sessions you wish to delete and then click the Delete button in the
Data Manager groups to delete the selected sessions in the list. To delete sessions, follow these
steps:
1. Select the sessions you wish to delete by holding the Ctrl key and click the session you have selected
from the list. You may select multiple sessions by holding the Shift key and clicking the start and the end
session in the list. All of the sessions between the start and the end session will be selected.
2. Click the Delete button; the system will prompt you with a message verifying the deletion. Click the Yes or
No button to continue or to cancel the deletion.
Export a session from the system database to a file
Select a session from the list you wish to export. In the Data Manager groups, click the Export
button to open the file browser to export the selected session to a file. The import and
export of the session data is a pairing function to let you transfer session data from one computer to
the other. The export function allows you to retrieve session data from the QClick system database
from one computer and save it to a file that you have selected. The import function allows you to
merge the session data from the data file to the other computer’s QClick system database. The file
takes the extension .dat format. To export a session, follow these steps:
1. Click the session you wish to export from the list.

Page 78 of 109
QOMO HiteVision, LLC. QClick FCC ID: XQGQRF600-RE
QOMO HiteVision,LLC.
2. Click the Export button to begin exporting.
3. The file browser will open allowing you to select a file you wish to save the session data into.
4. Click the Save button to start saving. If the session data file already exists, the system will prompt you to
replace it or not. By selecting the No button, the exporting is canceled.
Create Report
The QClick reporting system generates various category reports using the student class activity performance data.
There are four categories of reports, each report focusing on different areas. These categories are:
• Individual Student Reports
• Class Response Reports
• Question Reports
• Survey and Vote Reports
The QClick system generates these reports for the session selected:
• Student Grade Report
• Student Response Result
• Question Report
• Class Response Report
• Study Guide
• Class study guide
• Item Analysis
• Absentee Report
• Standard Analysis Report
• Roll Call
• Survey Report
• Vote Report
The QClick system provides these reporting functions.
• Generate reports
• Print reports
• Control of previewing a report
• Export reports
All reports include a Report Title which includes:
• Class Name
• Date of Session
• Subject Name
• Teacher Name
• Session Name
Additionally, each report includes the following:
STUDENT GRADE REPORT
The student grade report lists students overall
performance in the session. This list includes:
• Report Title
• Student name and ID
• Correct answer ratio relating to the
total number of questions.
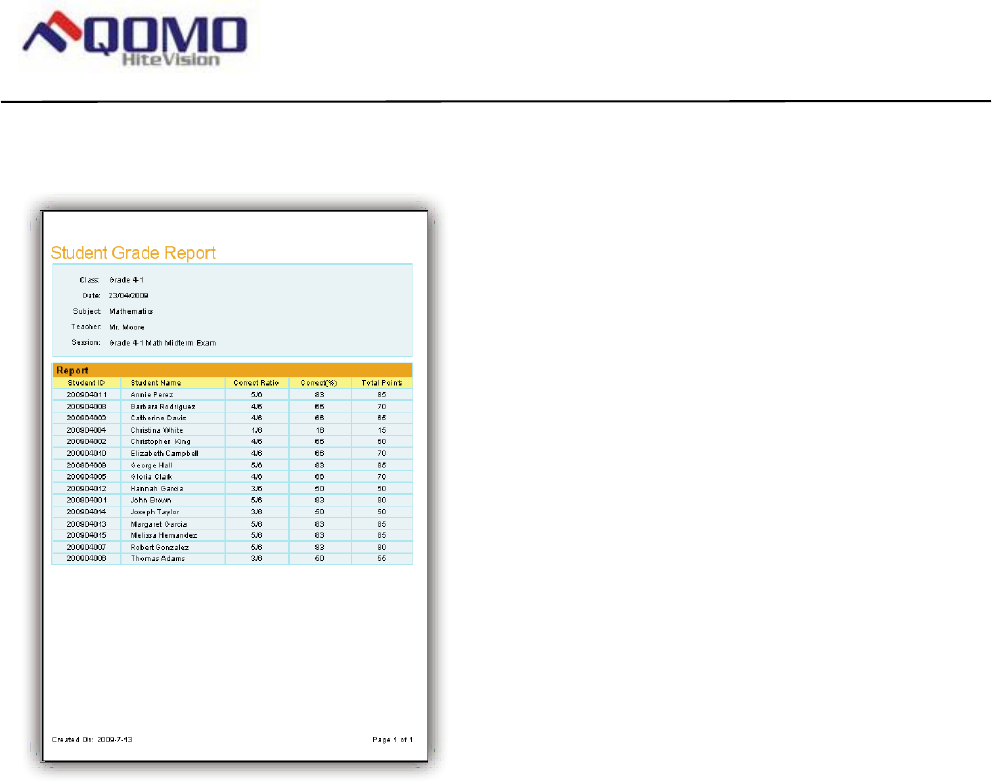
Page 79 of 109
QOMO HiteVision, LLC. QClick FCC ID: XQGQRF600-RE
QOMO HiteVision,LLC.
• Correct answer percentage.
Total points for student performance in the
Session
STUDENT RESPONSE RESULT
The student response report provides detailed
information for each question by the student.
This report includes:
• Report Title
• Student name and the total points
earned during the session
• Questions and option content
• Student answer and checker
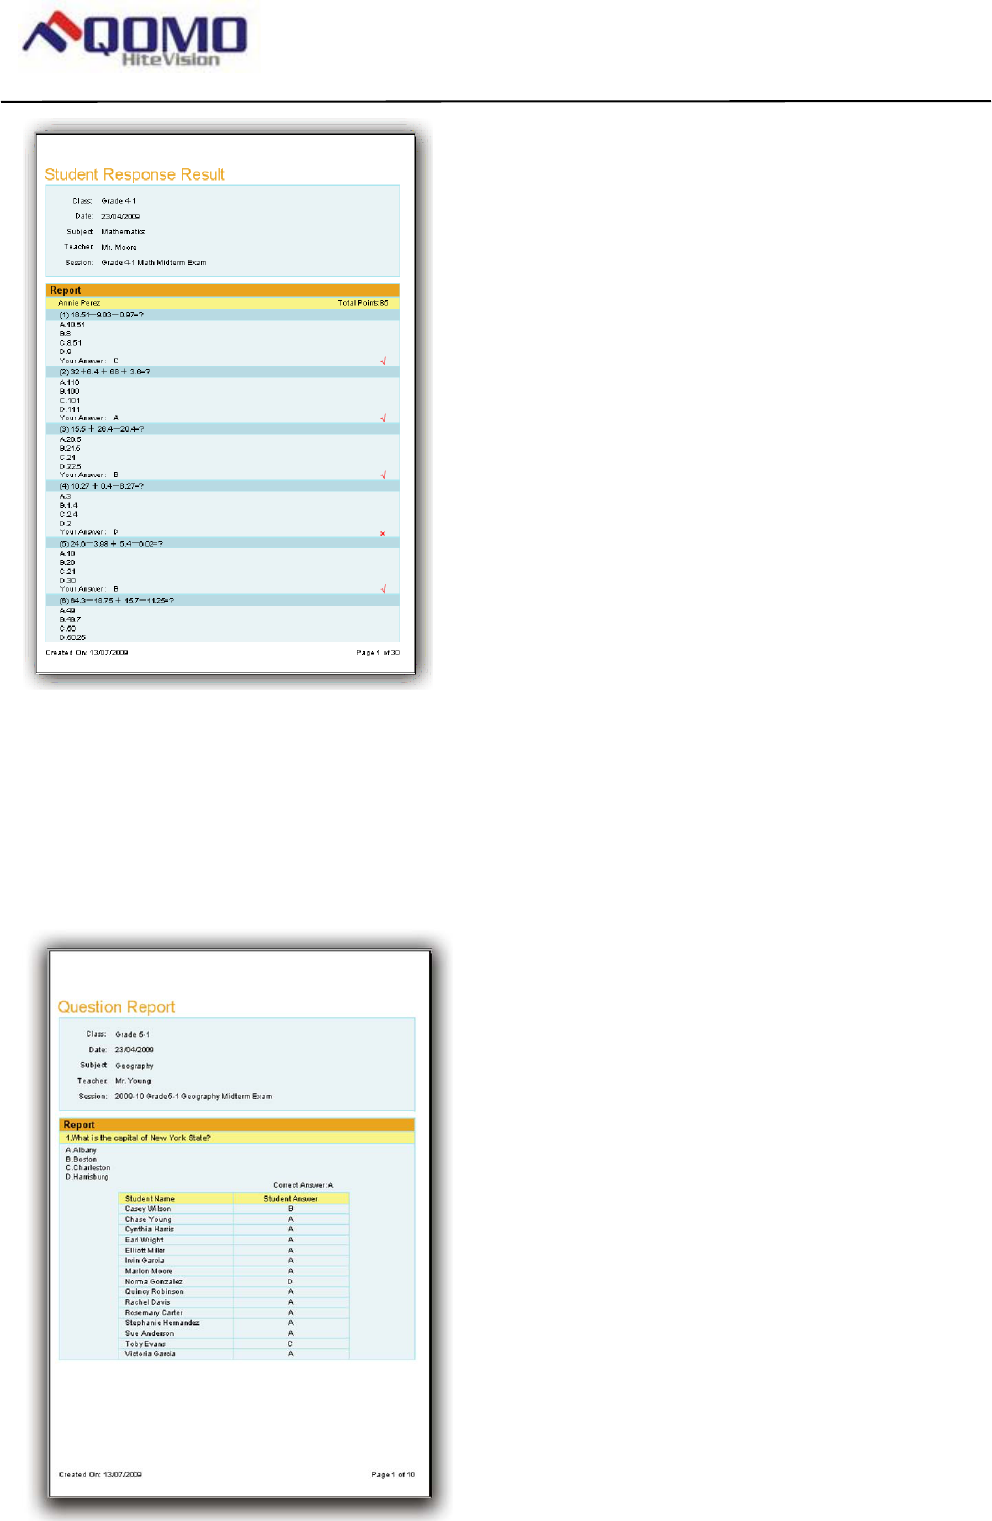
Page 80 of 109
QOMO HiteVision, LLC. QClick FCC ID: XQGQRF600-RE
QOMO HiteVision,LLC.
QUESTION REPORT
The question report provides a composite analysis of each question. The question report list includes:
• Report Title
• Question and option content
• A table listing all of the student responses to the question
• Answer Key per question
• Distribution bar chart for the selected options.
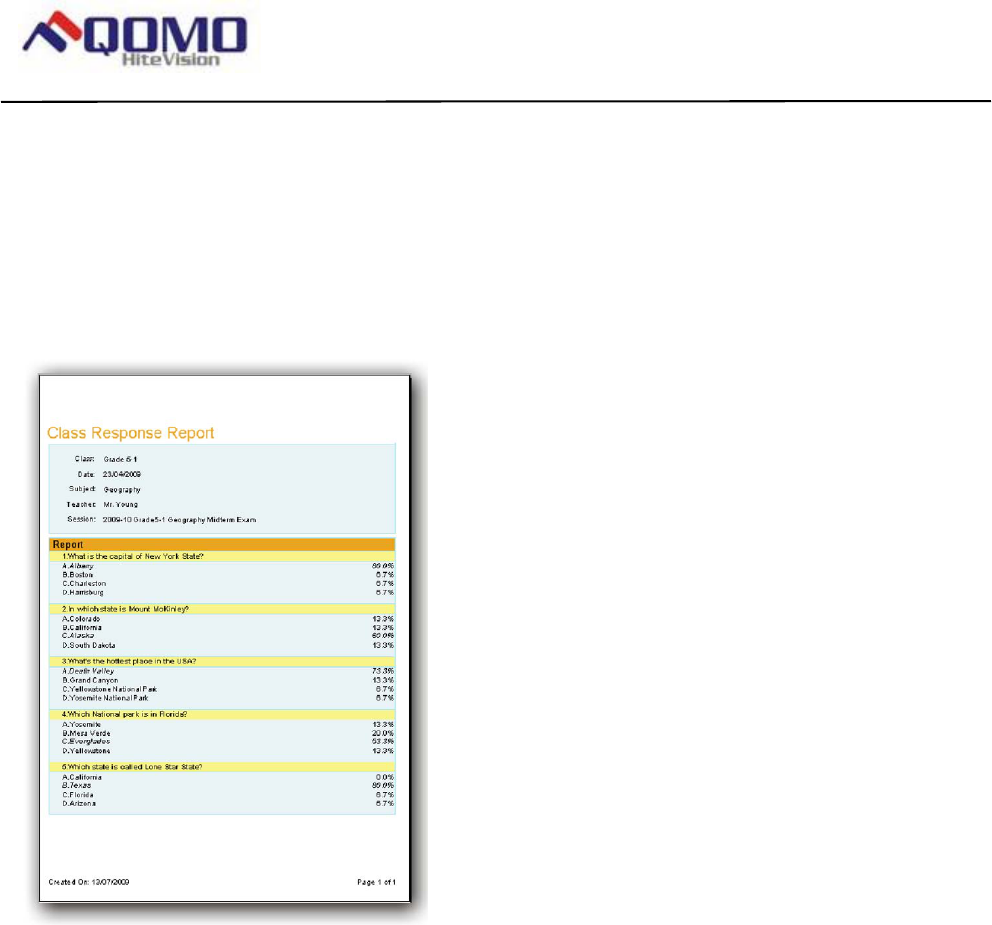
Page 81 of 109
QOMO HiteVision, LLC. QClick FCC ID: XQGQRF600-RE
QOMO HiteVision,LLC.
CLASS REPONSE REPORT
The class response report provides a composite
analysis of the overall class performance.
The class response report list includes:
• Report Title
• Question and option content
• Student response percentages per question
• Highlighted correct answer per question
STUDY GUIDE
The study guide report provides a list of incorrect answers per student providing the instructor the information
necessary to develop a study guide for the individual student. The study guide report includes:
• Report Title
• Incorrect Question and option identification per student
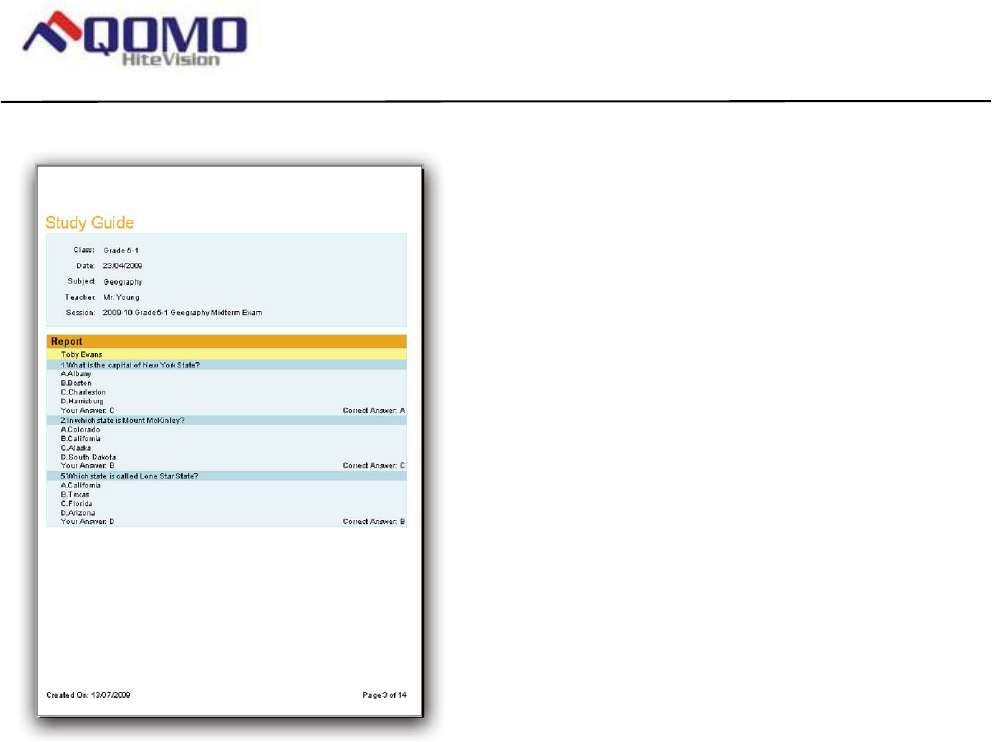
Page 82 of 109
QOMO HiteVision, LLC. QClick FCC ID: XQGQRF600-RE
QOMO HiteVision,LLC.
• Correct/Incorrect answer comparison per question for each student
CLASS STUDY GUIDE
The class study guide report lists the percentage of incorrect answers per student in the class as well as no
response to the question. The Class study guide report list includes
• Report Title
• Student name
• Incorrect percentage
• Question number, indicating the correct answer and the incorrect answer per student
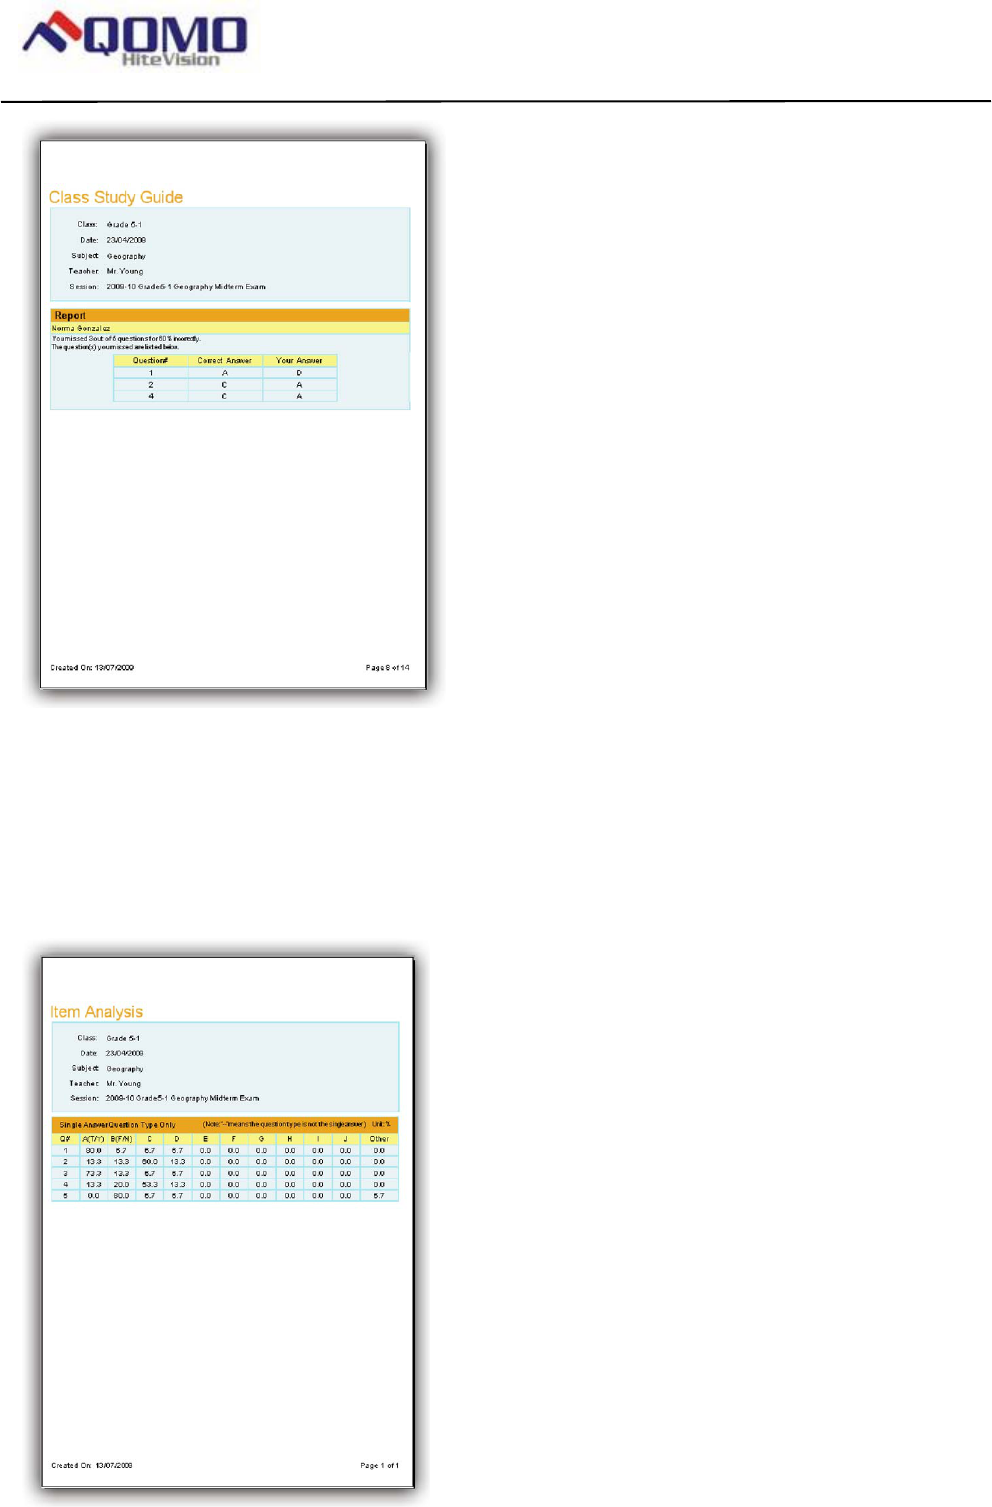
Page 83 of 109
QOMO HiteVision, LLC. QClick FCC ID: XQGQRF600-RE
QOMO HiteVision,LLC.
ITEM ANALYSIS
The item analysis report provides an analysis of the options available for every question in the session. A table is
provided showing the overall response percentage of the class to the individual item. The item analysis report
includes:
• Report Title
• Question number
• List of all option items and the percentage of responses to the item.
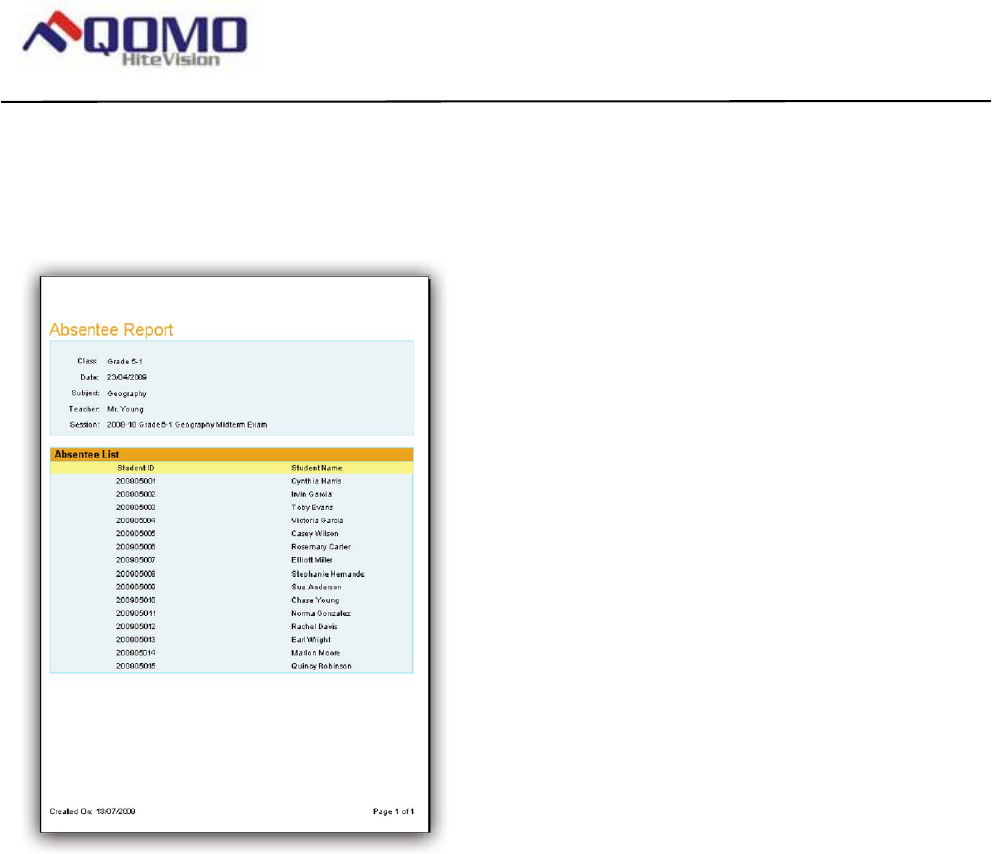
Page 84 of 109
QOMO HiteVision, LLC. QClick FCC ID: XQGQRF600-RE
QOMO HiteVision,LLC.
ABSENTEE REPORT
The absentee report lists the names of student
who are absent. The absentee report list includes:
• Report Title
• The names of students who are absent for this session and their ID.
STANDARD ANALYSIS REPORT
The standard analysis report provides the code and standard of each question if the question is associated to a
standard. This report also provides the percentage of correct responses to the question as well as identifying
individual student performance for each standard code. The Standard Analysis report includes:
• Report Title
• Code and standard associated to the question
• Percentage of correct responses to the question
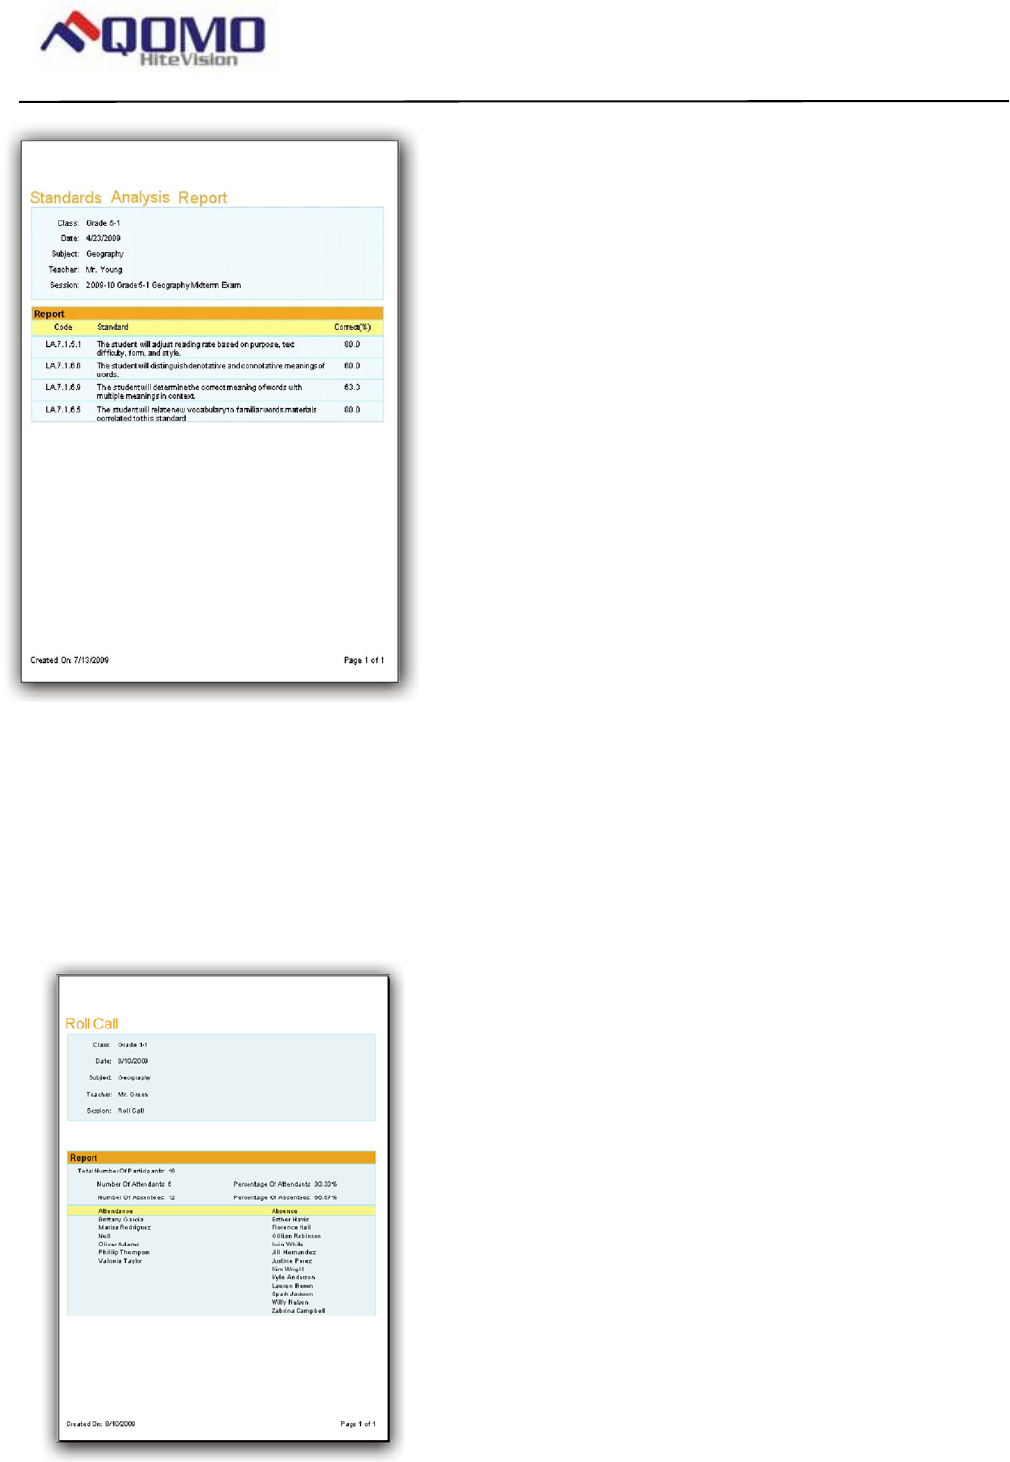
Page 85 of 109
QOMO HiteVision, LLC. QClick FCC ID: XQGQRF600-RE
QOMO HiteVision,LLC.
ROLL ACLL REPORT
The Roll Call report is reserved for the roll call activity session. This report lists those in
attendance as well as those students who are absent. The Roll Call Report also provides the comparative
percentage of those in attendance and those students who are absent. The roll call report list includes
• Report Title
• Total number of students in a class, attendance number and absent number
• Percentage of those in attendance and those who are absent
• Names of students in attendance and absent
RESULTS OF SURVEY
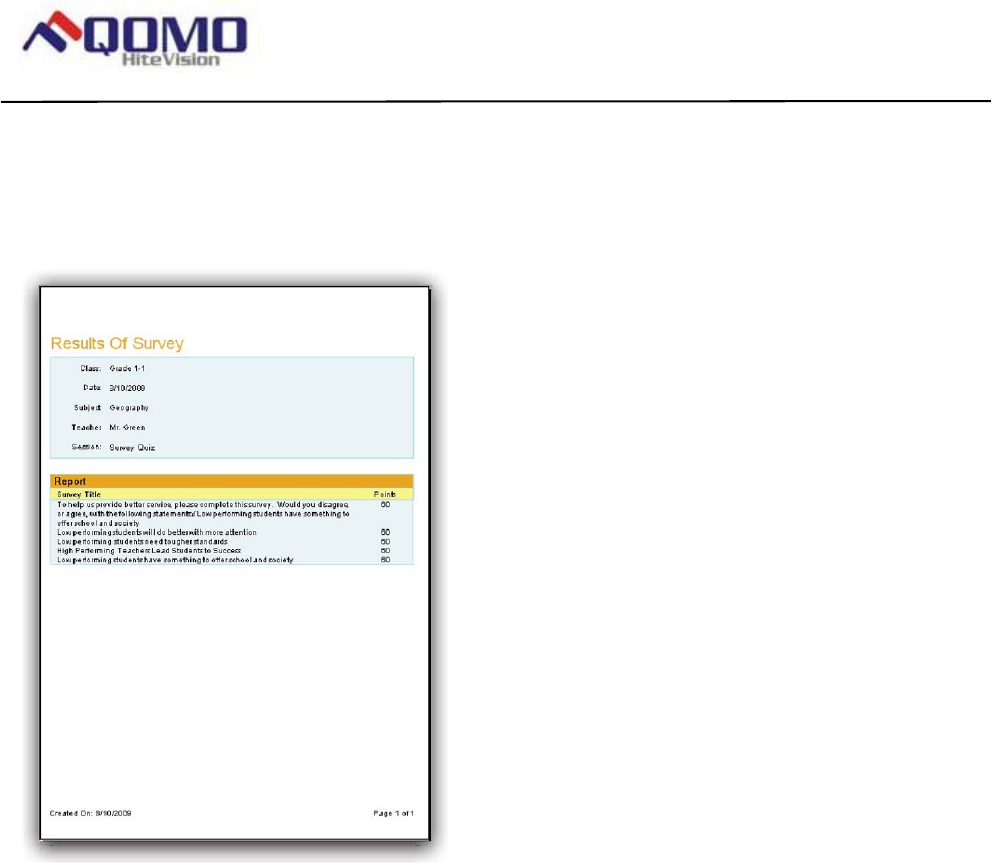
Page 86 of 109
QOMO HiteVision, LLC. QClick FCC ID: XQGQRF600-RE
QOMO HiteVision,LLC.
The Results of survey provides the result for each survey item. The survey report is reserved for the survey
activity session. This report lists the total points for each survey item calculated upon the survey point design. The
survey report includes
• Report Title
• List of survey title and the survey result
VOTE REPORT
The vote report is reserved for the vote activity session. This report lists how the participants voted. The report
provides the participants name, how many participants voted, and the percentage of yes and no responses for
each participant. The vote report list includes
• Report Title
• Participant name and individual responses
• Percentage of the participants yes or no responses
• Total abstained vote count
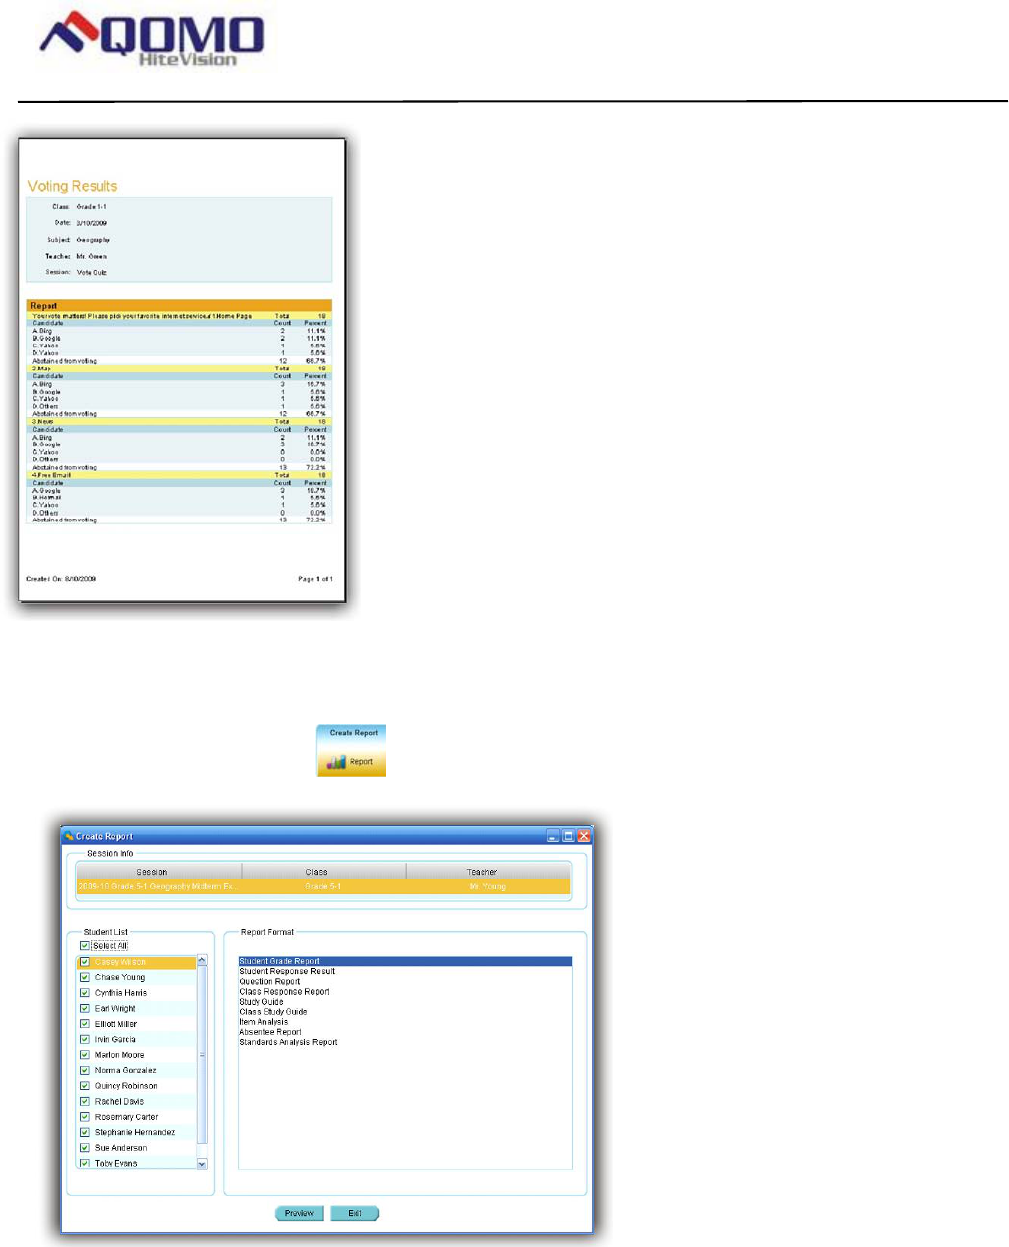
Page 87 of 109
QOMO HiteVision, LLC. QClick FCC ID: XQGQRF600-RE
QOMO HiteVision,LLC.
GENERATE REPORTS
To generate a report, follow these steps:
1. Click a session you wish to generate a report from.
2. Click the Report button in the Create Report group.
3. The Create Report window appears.
The session name, class and teacher name for the selected session are displayed on the top of the
window. The list of students in the class is displayed in the Student List window and all of the available
report formats are displayed in the Report Format window.
4. Select the student(s) by checking the box in front of each student name or by clicking the Select All check
box to select all students.
5. Select the report formats desired from the list in the Report Format window by checking one of them. The
item selected will be highlighted.
6. You can double click the report format you select or click the Preview button to preview the report
contents.
PRINT REPORTS
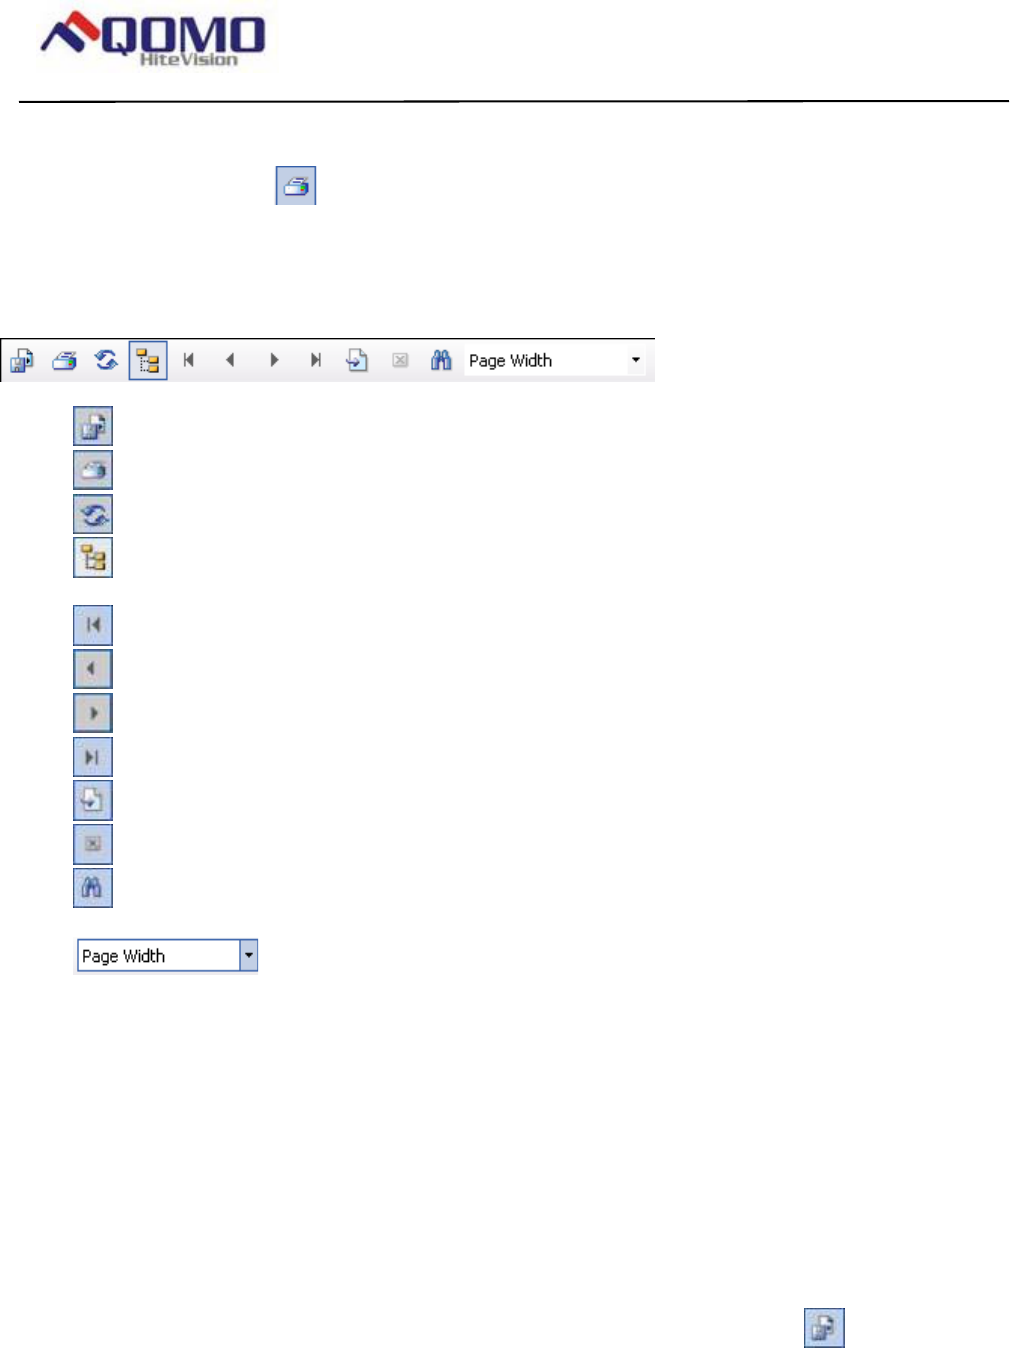
Page 88 of 109
QOMO HiteVision, LLC. QClick FCC ID: XQGQRF600-RE
QOMO HiteVision,LLC.
From the report preview window, you can directly print the preview report to a local or network printer. To print the
preview report, follow these steps:
1. Click the printer icon on the menu bar at the top of the Create Report window. The printer selection
window will be displayed.
2. Choose the printer from the list and click the Print button or click the Cancel button to cancel the printing.
CONTROL OF PREVIEWING A REPORT
The tool bar on the top of Create Report window provides optional controls for previewing a report.
• Control of report exporting function
• Control of report printing function
• Refresh the report viewing
• Group Tree Function To turn on/off the group tree. When the group tree is displayed, you can click a
specific report to view in the tree. The corresponding report will be displayed on the right
• Go to the first page of report viewing
• Go to the previous page of report viewing
• Go to the next page of report viewing
• Go to the last page of report viewing
• Go to the particular page you wish by typing the page number in the Go to page dialogue window
• Close the current report viewing
• Search a word or sentence in the viewing report. Type the word or sentence you wish to search in the
Search dialogue window then click the Next button to continue the search.
• Select a zoom control from the Zoom drop-down list to properly view a report.
EXPORT REPORTS
The preview report can be exported to these third-party software applications:
• Crystal Report (*.rpt)
• Adobe Acrobat (*.pdf)
• Microsoft Excel (*.xls)
• Microsoft Excel Data Only (*.xls)
• Microsoft Word (*.doc)
• Rich Text Format (*.rtf)
To export a preview report, follow these steps:
1. From the tool bar on the Create Report preview window, click the Export icon
2. The Export Report file browser window will be displayed. Click the Save as type drop-down list to choose
a third party application from the list.
3. Type in the file name of the exporting report in the File name text box.
4. Click the Save button to begin exporting. If the preview report is long, it may take some additional time to
export.
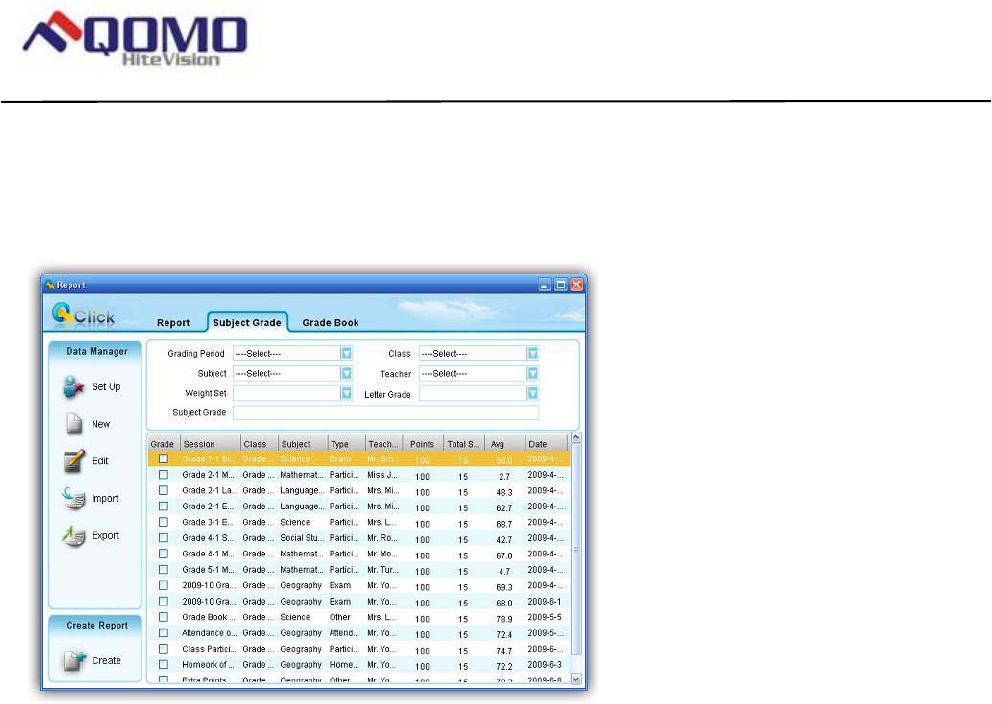
Page 89 of 109
QOMO HiteVision, LLC. QClick FCC ID: XQGQRF600-RE
QOMO HiteVision,LLC.
Subject Grade
Click the Reports tab on the QClick main window then click the Report button. This opens the reports tool.
Under the report tool tab, select the Subject Grade tab. The QClick Subject Grade has two main categories;
Data Manager and Create Report:
Data Manager
• Subject grade set up
• Create a new subject grade session
• Edit a subject grade session
• Import a subject grade session to the system database from a file
• Export a subject grade session from the system database to a file
Create Report
Subject grade session data are either stored when a session activities is completed or created by this reporting
tool Data Manage New. The subject grade session data may include the detailed question information and
the answer and score to each question, like the report session data or may just contain the overall grade
information for the session not associated with any question. For example, the subject grade session is about an
overall lab grade. The QClick Subject Grade Create Reports generates reports from a group of subject
sessions selected and from the Weight and Letter Grade setting associated to the group. (See the detail about
how to set up the Weight and Letter Grade in the Subject grade set up session.) The Weight setting should
match the selection of the subject grade sessions. For example, if a Weight setting includes the attribute of
“Attendance” in the list, then the selection of the group of Subject grade should include a session with a type of
“Attendance”. Click the CreateReport tab to enter the Create Subject Grade Report window. There are 4
types of reports to be previewed and printed including:
• Progressive Report
• Academic Summary
• Report Card Summary

Page 90 of 109
QOMO HiteVision, LLC. QClick FCC ID: XQGQRF600-RE
QOMO HiteVision,LLC.
• Grade Post Summary
In the Subject Grade tab window, 4 filters allow you to select a group of subject grade sessions for generating the
subject grade book. These filters are:
• Grading Period – Set up in the Subject Grade Setting window to define the start and end date for the
grade book.
• Class – Select a class name associated with the subject grade session.
• Subject – Select a subject name associated with the subject grade session.
• Teacher – Select a teacher name associated with the subject grade session.
There are 2 settings associated with the subject grade book. These settings are:
• Weight Set – Set up in the Subject Grade Setting window; this sets the weight percentage in the subject
grade book for a type in the subject grade sessions.
• Letter Grade – Set up in the Subject Grade Setting window; this associates letters to the final score of the
group in the subject grade sessions.
Subject grade set up
The QClick subject grade setup interface provides users a method of defining the setup for generating a grade
book. To generate a grade book, first determine a period of time to count all the subject sessions completed. Next,
determine how to calculate the final score based on these sessions. The weight setting will allow you to define the
weight percentage of each type of session for the final grade. The subject grade setup also provides a method to
define a list of session types. For example, you may define several exams in one semester into types, Term1
exam, Term2 exam, Mid Term exam, and final Term exam. The Session Type provides an interface to define a
list of types to be used in the weight setting. Finally, the subject grade setup provides a letter grade setup to
output the letter grade based upon your setup parameters. To enter the Subject grade set up, click the button Set
Up under the Data Manager group. Subject grade set up includes
• Set Period
• Set Weight
• Letter Grade
• Session Type
To set up a period, follow these steps:
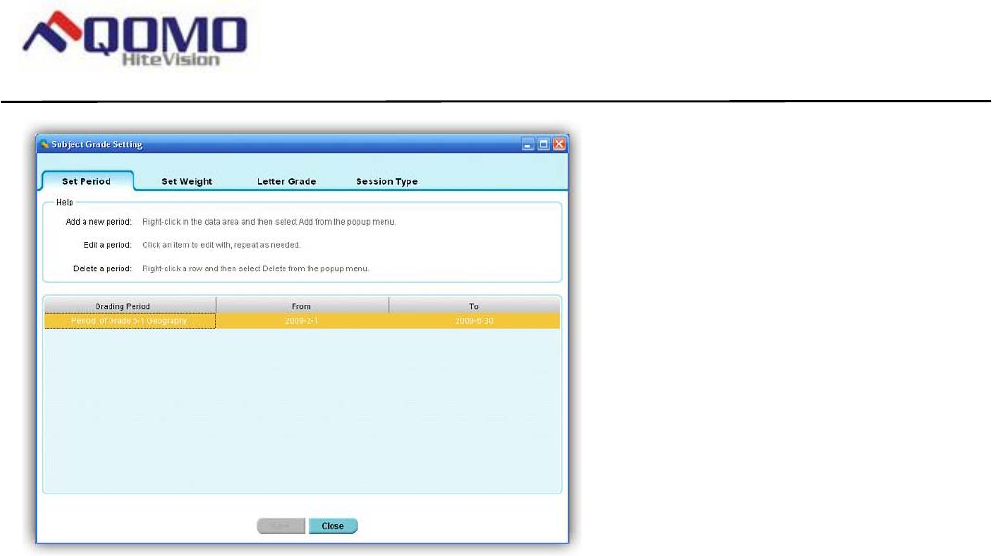
Page 91 of 109
QOMO HiteVision, LLC. QClick FCC ID: XQGQRF600-RE
QOMO HiteVision,LLC.
1. Click the Set Up button in the Data Manager group.
2. Select the Set Period tab; the set period window appears.
3. The text box window on the top shows a summarized help guide providing information on how to add a
new period, and how to edit and delete an existing period.
4. To add a new period, right click on the data showing area, then select Add from the pop-up drop-down
menu.
5. The system assigns the default grading session title name and assigns the current date as the starting and
ending date of the period.
6. To edit an existing period, click on the period data you choose to edit. Click the Grading Session if you
choose to edit the grading session title name. To change the date period, select the date in the “From” or
“To” area. Both can be changed by clicking on the date area to select a day from the calendar.
7. To delete an existing period, right click on the period setup you choose to delete. Then select Delete from
the pop-up, drop-down menu.
To set up a weight, follow these steps:
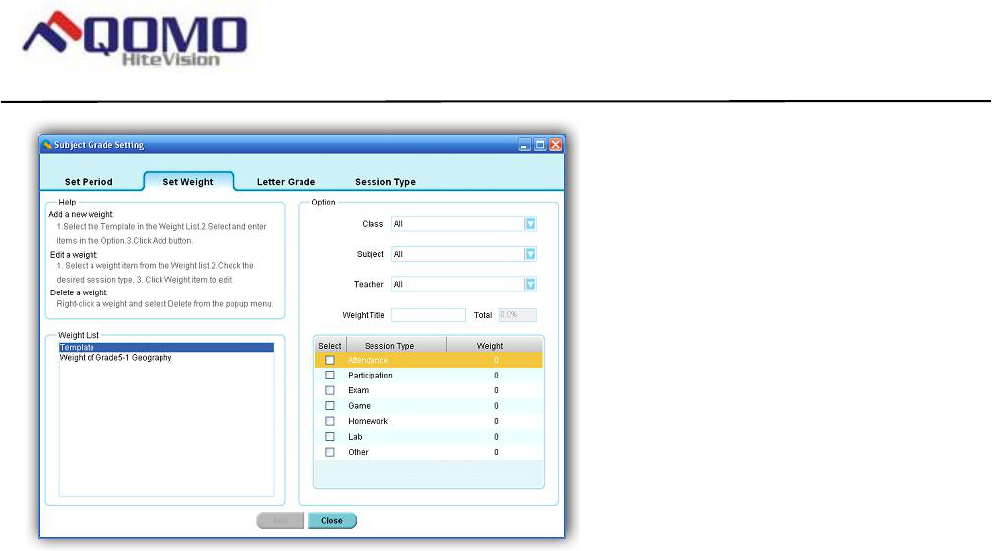
Page 92 of 109
QOMO HiteVision, LLC. QClick FCC ID: XQGQRF600-RE
QOMO HiteVision,LLC.
1. Click the Set Up button in the Data Manager group.
2. Click the Set Weight tab; the set weight window appears.
3. The text box window on the upper left corner provides a summarized help guide showing how to add a
new weight setup, and how to edit and delete an existing weight setup.
4. To add a new weight setup, click on the system template in Weight List, then select the class name,
subject name, and teacher name associated to the weight from the drop-down lists. Enter the weight title
in the Weight Title text box.
5. All the session types set up in the subject grade setup are shown in the weight list. Each session type has
a weight setting associated with it. Click on the weight item to enter the percentage of the selected weight
item you wish to edit.
6. Click the checkboxes corresponding to the weight applied to the subject grade report. The total weight
percentage added together should be 100%.
7. To edit a weight setup, click the weight item you wish to edit in the Weight List window. Edit the contents
in the Option window, as previously described.
8. To delete a weight setup, right click the weight item you wish to delete in the Weight List window. From
the popup drop-down menu select delete.
To set up a letter grade, follow these steps:
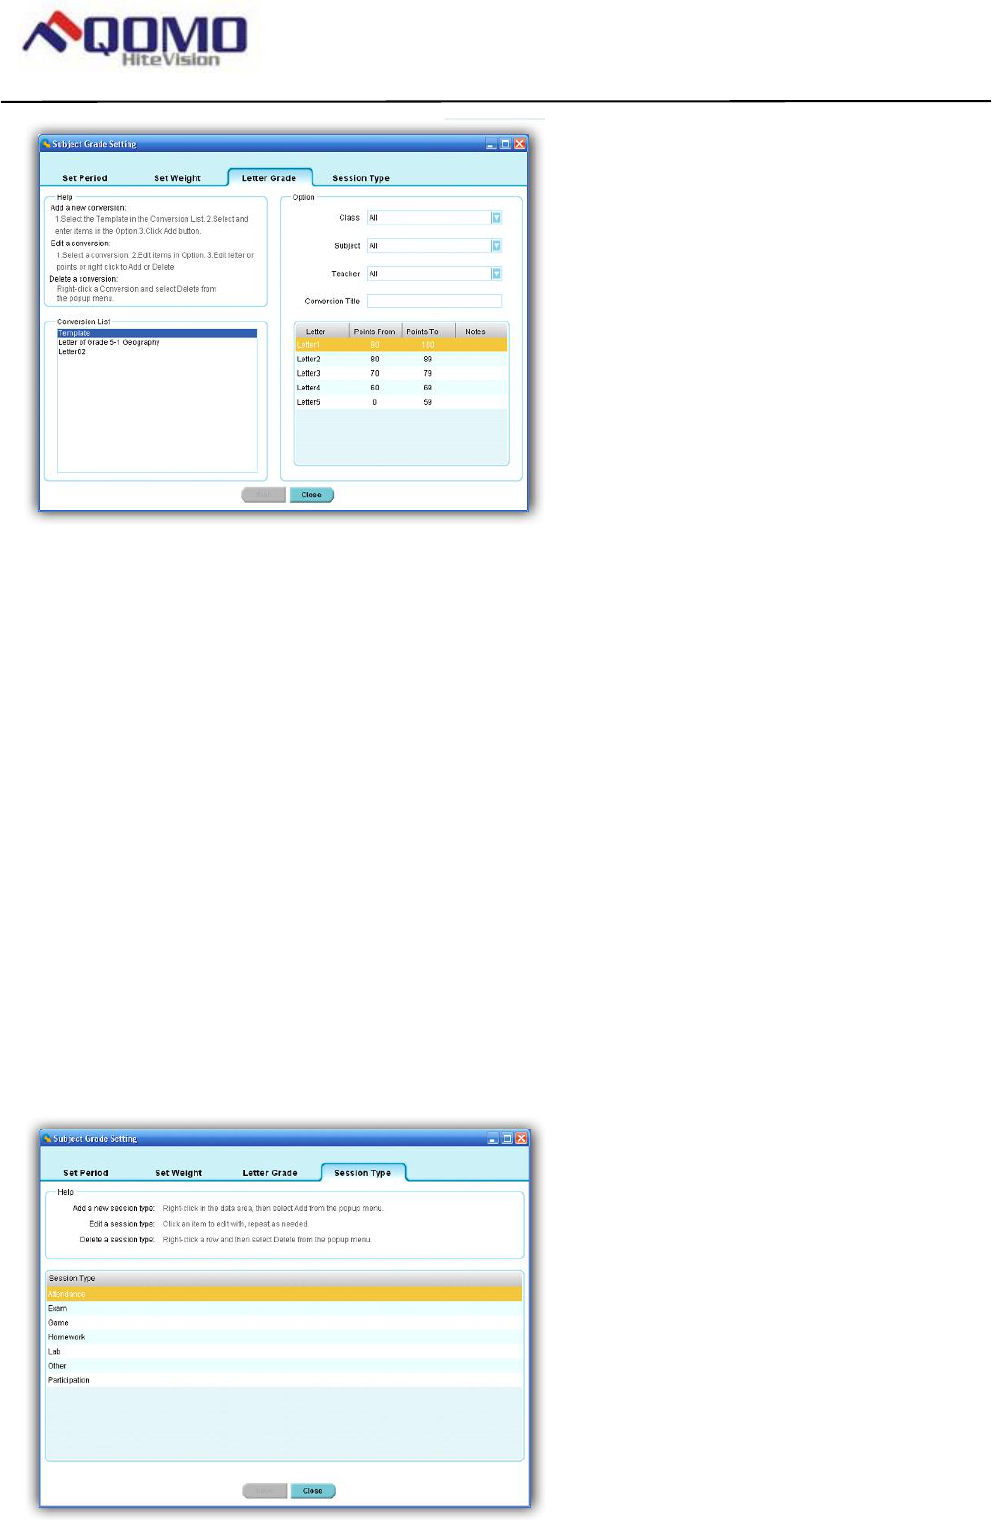
Page 93 of 109
QOMO HiteVision, LLC. QClick FCC ID: XQGQRF600-RE
QOMO HiteVision,LLC.
1. Click the Set Up button in the Data Manager group.
2. Click the Letter Grade tab; the letter grade window appears.
3. The text box window on the upper left corner provides a summarized help guide showing how to add a
new letter grade conversion, and how to edit and delete an existing letter grade conversion.
4. To add a new letter grade conversion, click on the system template in Conversion List then select the
class name, subject name, and teacher name associated with the letter grade conversion from the
drop-down lists. Enter the conversion title in the Conversion Title text box.
5. Edit the letter and points by clicking on the item. To add more letters or to delete a letter conversion, right
click on the letter list window, and then select add or delete from the popup, drop-down menu. The points
range setup should not be overlapped!
6. To edit a letter grade conversion, click on the conversion you wish to edit in the Conversion List. Edit the
items in the Option window as previously described.
7. To delete a letter grade conversion, right click the letter grade conversion you wish to delete in the
Conversion List window. From the popup, drop-down menu select delete.
To set up a session type, follow these steps:
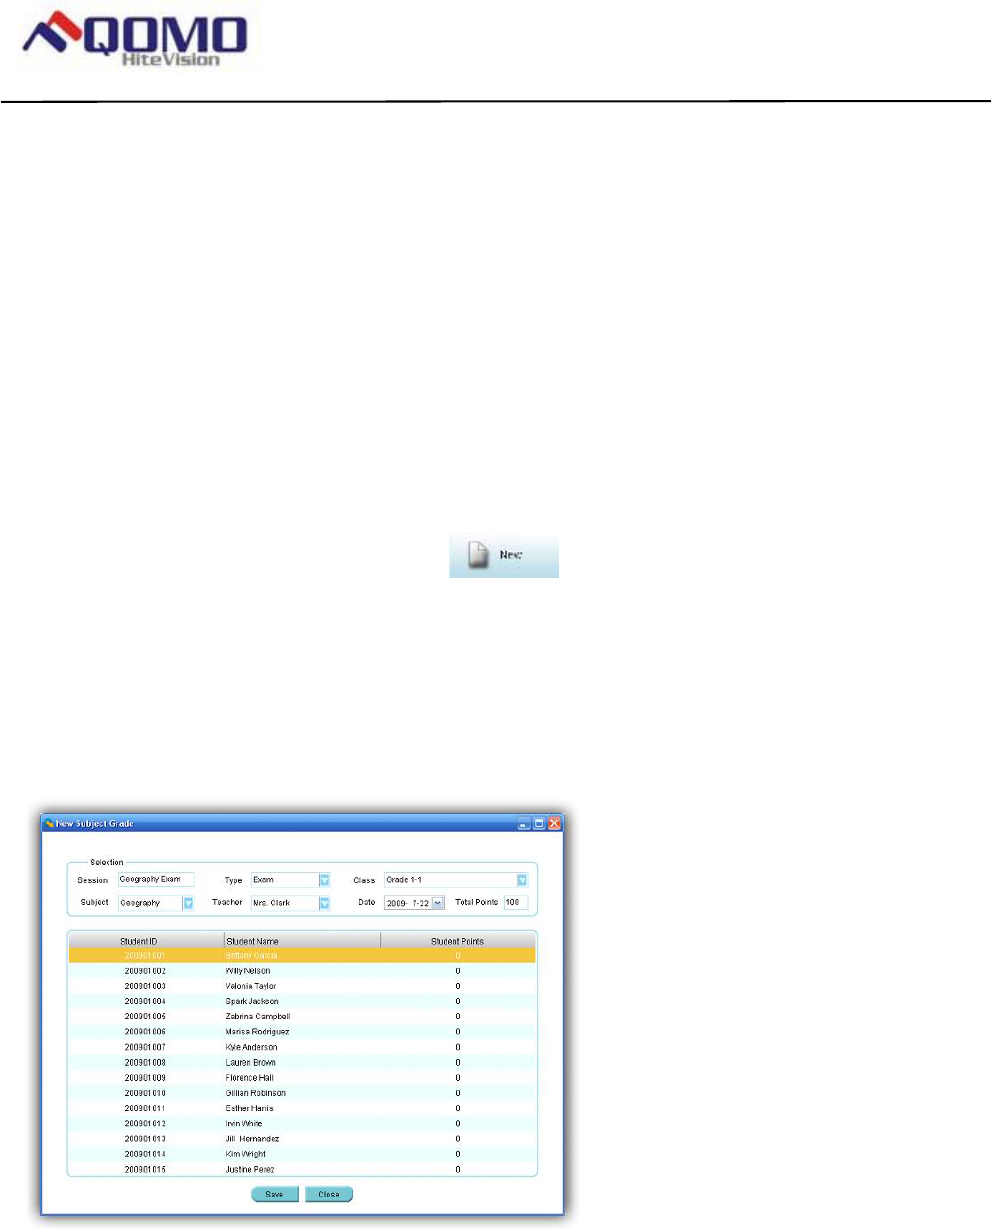
Page 94 of 109
QOMO HiteVision, LLC. QClick FCC ID: XQGQRF600-RE
QOMO HiteVision,LLC.
1. Click the Set Up button in the Data Manager group.
2. Click the Session Type tab; the session type window will appear.
3. The text box window on the top provides a summarized help guide showing how to add a new session
type, and how to edit and delete an existing session type.
4. To add a new session, right click in the session type data and then select Add from the popup, drop-down
menu. Enter the session type name. The new added session type will be shown in the weight setup list.
Please refer to the Weight setup session.
5. To edit a session type, click on the session type you wish to edit.
6. To delete a session type, right click on the session type you choose to delete in the Session Type
window. From the popup, drop-down menu select delete.
Create a new subject grade session
In the Data Manager groups, click the “New “button to open the New Subject Grade
window. Similar to the creation of a new data session in the reporting section, the creation of a new
subject grade session creates a new editing data session. This data session cannot be obtained in
the classroom activity. The difference between the report data session and subject grade session is
the report data session includes the detailed question information as well as the answer and score
for each question. The subject grade session only contains the overall score for the session. To
create a new subject grade session, follow these steps:
1. Click the New button in the Data Manager group; the New Subject Grade window appears.
2. Enter the new subject grade session name in the Session text box.
3. Select an associated class name with the session from the Class drop-down list. When a class is selected,
a list of student names and student ID’s in the class will be shown in the student list window.
4. Select a type for the new subject grade session from the Type drop-down list.
5. Select an associated subject name and teacher name for the session from the Subject and Teacher
drop-down lists.
6. Select a date for the new subject grade session from the Date calendar list.
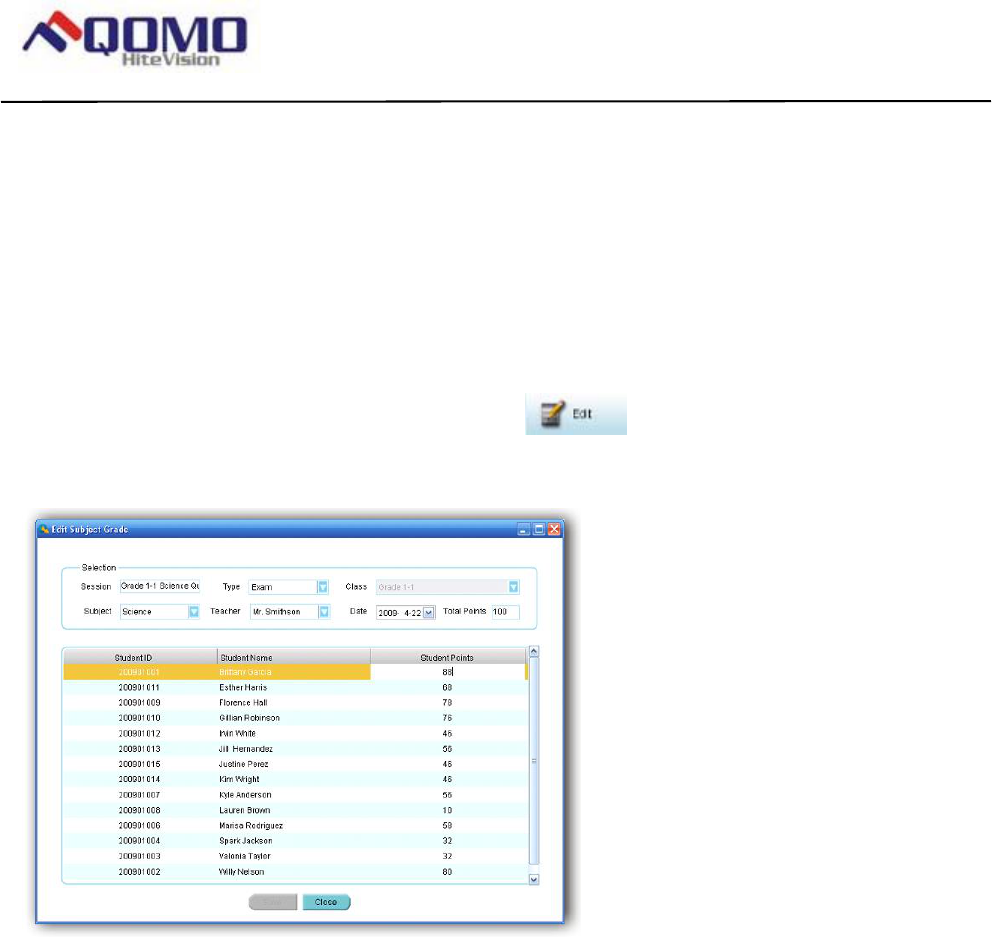
Page 95 of 109
QOMO HiteVision, LLC. QClick FCC ID: XQGQRF600-RE
QOMO HiteVision,LLC.
7. Enter the total points for the new subject grade session into the Total Points text box. The total points
default is 100.
8. Click a student name and enter the student points in the Student Points text box.
9. Repeat step 8 until all of the students points are entered for the new subject grade session.
10. Click the Save button to save all of the selections and input data for the new session to the system
database. If the window is closed without saving, all of the input data will be lost.
Edit a subject grade session
Select the session you choose to edit then click the Edit button in the Data Manager Groups to
open the Edit Subject Grade window. The alternate way to open the Edit Subject Grade window is by double
clicking on the session you wish to open.
The following SESSION INFORMATION can be modified:
• Session title
• Session type
• Subject and teacher name
• Session created date
• Session total points
The SESSION POINTS for students can also be modified
MODIFYING SESSION INFORMATION
To modify the session information, follow these steps:
In the Selection window:
1. Click the Session text box to edit the session title name, if desired.
2. Select a new type from the Type drop-down list, if desired.
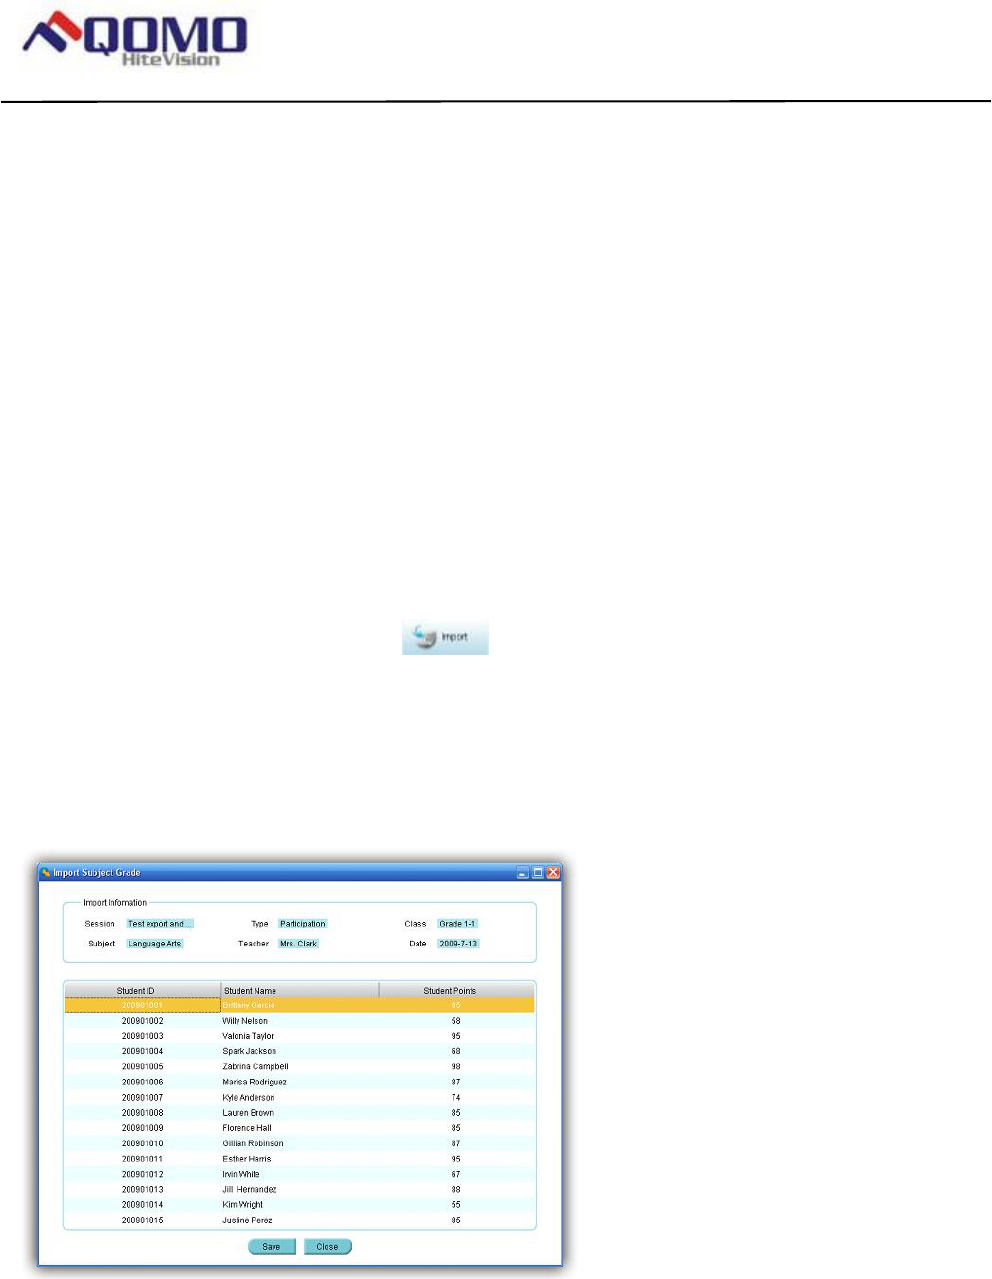
Page 96 of 109
QOMO HiteVision, LLC. QClick FCC ID: XQGQRF600-RE
QOMO HiteVision,LLC.
3. Select a new subject name from the Subject drop-down list, if desired.
4. Select a new teacher name from the Teacher drop-down list, if desired.
5. Select a new date from the Date calendar, if desired.
6. Click the Total Points text box to edit the session total points, if desired.
To modify session points for students, follow these steps:
In the student list window:
1. Click the student session points you choose to edit; then edit the points in the Students Points text box.
2. Repeat step 1 if you choose to edit other student session points.
Click the Save button to save all of the edited changes to the system database. If the window is closed without
saving, all of the edited changes will be lost.
Import a subject grade session to the system database from a file
In the Data Manager groups click the Import button to open the file browser to import a subject grade
session data stored in a file. The import and export of a subject grade session data is a pairing function allowing
you to transfer the subject grade session data from one computer to the other. The export function allows you to
retrieve a subject grade session data from the QClick system database from one computer to save it into a file
with a dedicated name and path. The import function allows you to merge the subject grade session data from the
data file to another computer QClick system database. The file takes the extension “.gat” format. When a file to be
imported is selected, the import session previews the subject grade session data in two groups, the Import
Information and the student session point list.
In the Import Information group; the session name, session type, class name, subject name, teacher name and
the session creation date are shown. In the student session point list; the student ID, student name and the
student session points are shown. These allow you to preview the data being imported. Click the Import button to
start importing. If the data to be imported is already in the system database, the software will prompt you with a
message saying “Record already exists in the local Grade Book” and the importing is still successful.
Export a subject grade session from system database to a file
Select a subject grade session from the list you wish to export. In the Data Manager groups, click
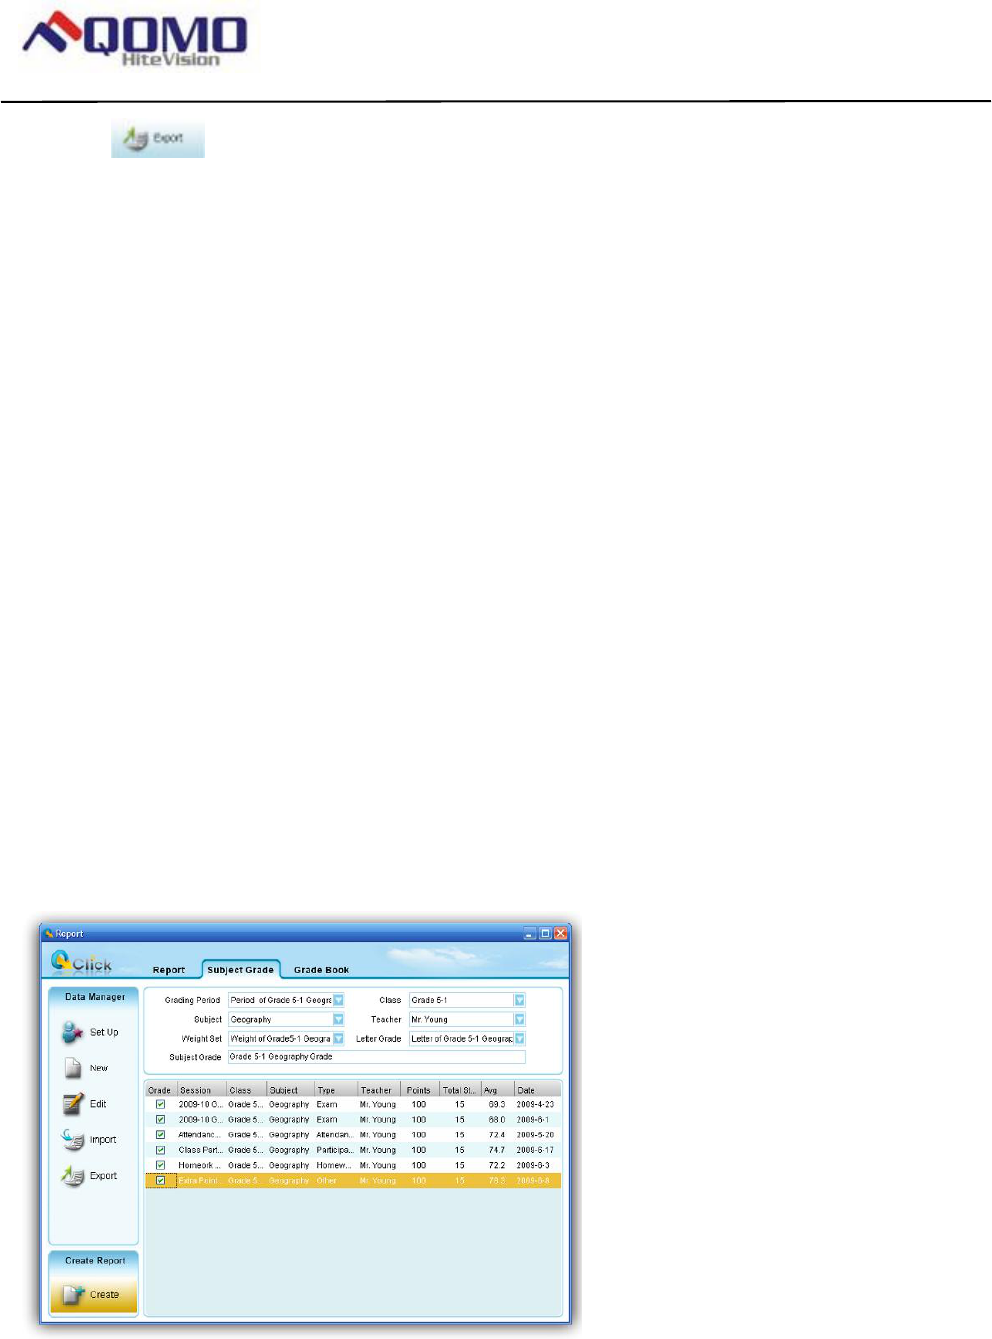
Page 97 of 109
QOMO HiteVision, LLC. QClick FCC ID: XQGQRF600-RE
QOMO HiteVision,LLC.
the Export button to open the file browser to export the selected subject grade session to
a file. The import and export of the subject grade session data is a pairing function allowing you to
transfer a subject grade session data from one computer into another. The export function allows
you to retrieve a subject grade session data from the QClick system database from one computer
and save it to a file that you have selected. The import function allows you to merge the subject
grade session data from the data file into another computer’s QClick system database. This file
takes the extension “.gat” format. To export a subject grade session, follow these steps:
1. Click the subject grade session you wish to export from the list.
2. Click the Export button to begin the export.
3. The file browser will open allowing you to select a file you wish to save the subject grade session data into.
4. Click the Save button to start saving. If the subject grade session data file already exists, the system will
prompt you to replace it or not. By selecting the No button, the exporting is canceled.
Create Subject Grade Report
The QClick Subject Grade system generates a subject grade report using the student class performance data.
Usually, the subject grade report covers a period of time, which includes many completed session data in the
period. Typically this period would be a semester. The generation of the subject grade book is based upon the
weight set up for each type of session included in the period defined. For detail on how to set up the weight,
please check the session 5.1 Subject Grade Set up.
Note: The weight used for the Subject Grade report generation should contain the number of session types
exactly the same as the number of session types included in all sessions selected for the Subject Grade period.
You should select a set of letter grade conversions to finish the configuration before generating the Subject Grade
report. The grading period, class name, subject name, and the teacher name work as filters allowing you to select
the sessions used to create the Subject Grade report.
To generate a Subject Grade report, follow these steps:
1. Under the report window select the Subject Grade window tab.
2. Select a grading period from the Grading Period drop-down list.
3. Select a class name from the Class drop-down list.
4. Select a subject name from the Subject drop-down list.
5. Select a teacher name from the Teacher drop-down list.
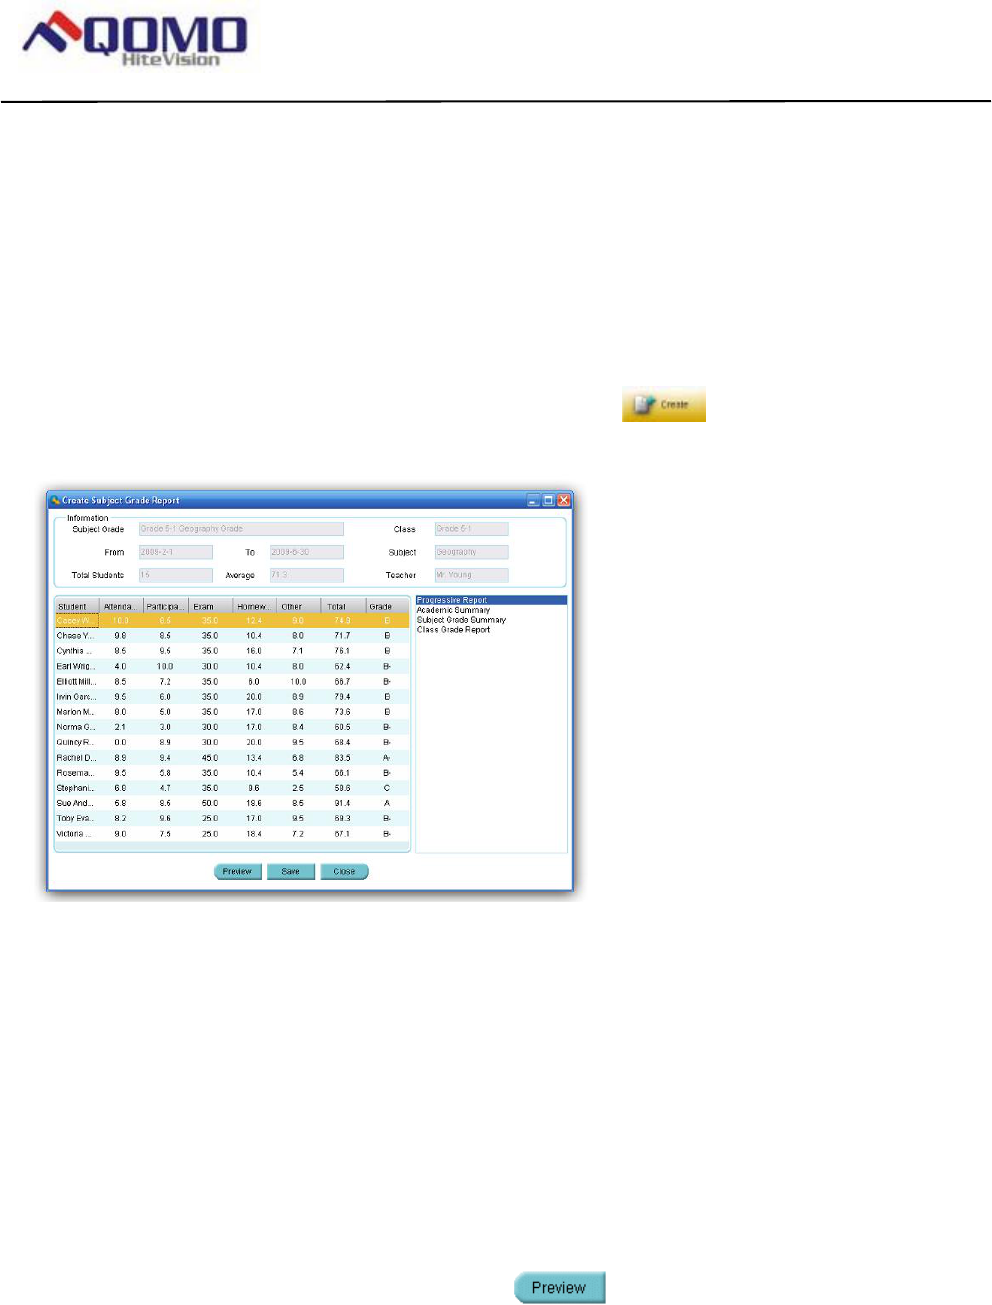
Page 98 of 109
QOMO HiteVision, LLC. QClick FCC ID: XQGQRF600-RE
QOMO HiteVision,LLC.
6. In the session list window, only those sessions which are satisfied with the parameters set in steps 2
through 5 will be displayed. You may select the sessions you wish to include in the Subject Grade report
by checking the box in front of them.
7. Select a weight set for the Subject Grade report from the Weight Set drop-down list.
8. Select a letter grade set for the Subject Grade report from the Letter Grade drop-down list.
9. Enter the Subject Grade book name in the Grade Book text box.
10. Click the Save button, to save the current selected Subject Grade report to the system database.
Note: The Subject Grade report is uniquely determined by the time period, class name, subject name and by the
teacher name.
To open the Create Subject Grade Report window, click the Create button under the Create Report
group. If there are no errors involving the weight setting, the Create Subject Grade Report Window will be
displayed.
The grade book name, class name, subject name and the teacher name selected will be displayed in the Create
Subject Grade Report window. The start time and the end time, the total number of students in the class and the
average points for the whole class will be displayed in the Information window as well. The student’s point after
weight calculation for each type of session will be listed in the student list window. The total grade points and the
final letter grade for each student will also be listed. These are the four reports for the Subject Grade:
• Progressive Report – Lists each session points for a student and the session class average points before
the weight setting is applied.
• Academic Summary – Lists each type of session average points for a student and the class average point
for this type of session before the weight setting is applied.
• Subject Grade Summary – Lists each type of session average points for a student and the class average
point for this type of session after the weight setting is applied. This list also includes the letter grade for
each session, the final grade point and the final letter grade for the student.
• Class Grade Report – Lists all students final grade point and their letter grade in the class.
Select one of these four reports and click on the Preview button to preview the Subject Grade Report.
You may choose to print the preview report or to export it to a third-party software application. These export
options include:
• Crystal Report (*.rpt)
• Adobe Acrobat (*.pdf)
• Microsoft Excel (*.xls)
• Microsoft Excel Data Only (*.xls)
• Microsoft Word (*.doc)
• Rich Text Format (*.rtf)
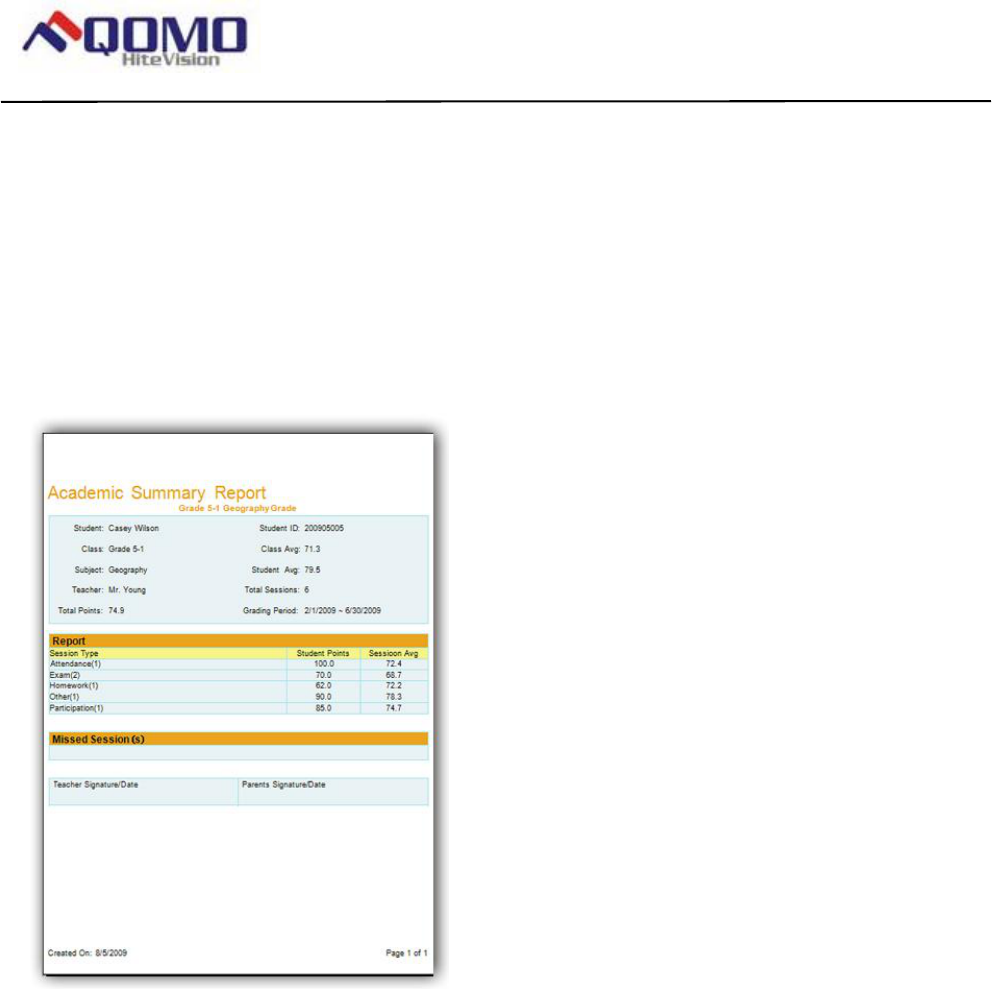
Page 99 of 109
QOMO HiteVision, LLC. QClick FCC ID: XQGQRF600-RE
QOMO HiteVision,LLC.
To preview the report and export and print the preview report, please refer to the session 4.7 Create Report about
the portion PRINT REPORTS, EXPORT REPORTS and CONTROL OF PREVIEWING REPORT.
To generate the Progressive Report, follow these steps:
1. Follow the above 10 steps to generate a Subject Grade Report then click the Create button under the
Create Report group to open the Create Subject Grade Report window.
2. Click Progressive Report from the four reports listed in the window.
3. Select the student you choose to report by clicking on the student name in the Subject Grade Report list.
4. Click the Preview button and the Progressive Report window for the student will be displayed.
To generate the Academic Summary, follow these steps:
1. Follow the above 10 steps to generate a Subject Grade Report then click the Create button under the
Create Report group to open the Create Subject Grade Report window.
2. Click the Academic Summary from the four reports listed in the window.
3. Select the student you choose to report by clicking on the student name in the Subject Grade Report list.
4. Click the Preview button and the Academic Summary window for the student will be displayed.
To generate the Subject Grade Summary, follow these steps:
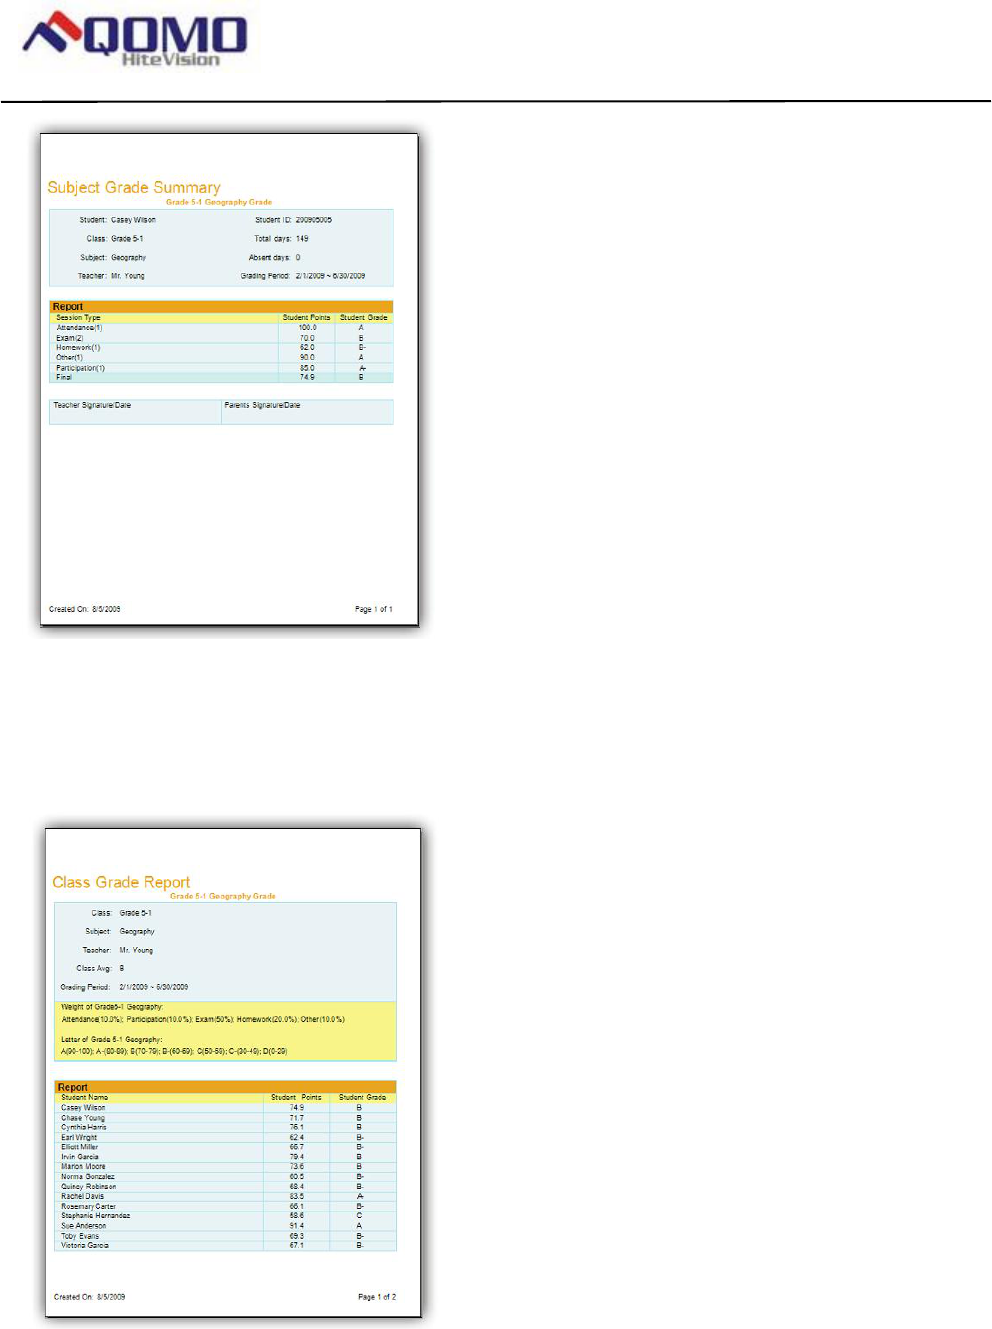
Page 100 of 109
QOMO HiteVision, LLC. QClick FCC ID: XQGQRF600-RE
QOMO HiteVision,LLC.
1. Follow the above 10 steps to generate a Subject Grade Report then click the Create button under the
Create Report group to open the Create Subject Grade Report window.
2. Click Subject Grade Summary from the four reports listed in the window.
3. Select the student you wish to report by clicking on the student name in the Subject Grade Report list.
4. Click the Preview button and the Subject Grade Summary window for the student will be displayed.
To generate the Class Grade Report, follow these steps:
1. Follow the above 10 steps to generate a Subject Grade Report then click the Create button under the
Create Report group to open the Create Subject Grade Report window.
2. Click Class Grade Report from the four reports listed in the window.
3. Click the Preview button and the Class Grade Report window for the class will be displayed.
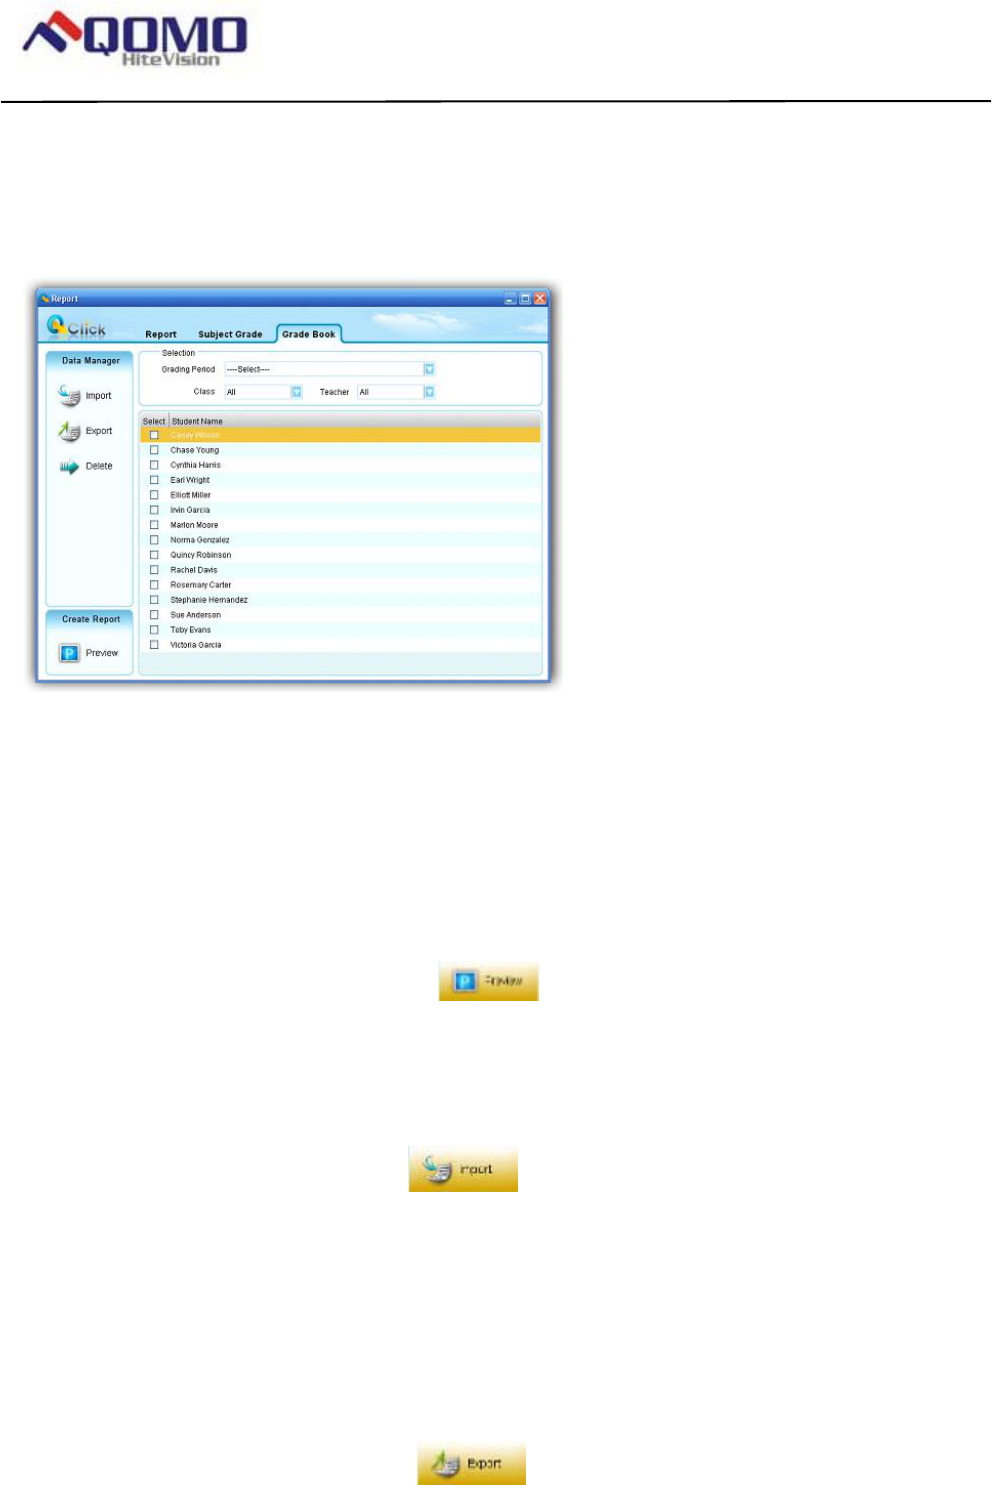
Page 101 of 109
QOMO HiteVision, LLC. QClick FCC ID: XQGQRF600-RE
QOMO HiteVision,LLC.
Grade Book
Click the Reports tab on the QClick main window then click the Report button. This opens the
reports tool. Under the report tool tab, select the Grade Book tab. The QClick Grade Book has
two main categories; Data Manager and Create Report.
Data Manager
• Import a grade book to the system database from a file
• Export a grade book from the system database to a file
• Delete a grade book in the system database
Create Report
From the Create Report group click the Preview button to preview a student grade book. A grade book
for a student integrates the student subject grade for a time period such as a semester or an academic year.
Select all the subjects associated with the student you choose to report and select the grade book report period.
The class name and the teacher name will help filter the student selection. If you choose to turn off the filter in
order to view all students in the list, select “All” from the drop-down list of Class name and Teacher name.
Import a grade book to the system database from a file
In the Data Manager groups, click the Import button to open the file browser to import a grade book
stored in a file. The import and export of grade book data is a pairing function allowing you to transfer one or more
subject grade data from one computer into another. The export function allows you to retrieve one or more subject
grade data from the QClick system database in one computer to save it to a dedicated file name and path. The
import function allows you to merge the subject grade data from the data file into another computer QClick system
database. This file takes the extension “.gbd” format.
Export a grade book from system database to a file
Select a grading period you choose to export from the Grading Period drop-down list. In the Data
Manager groups, click the Export button to open the subject selection dialog window.
From the window, select one or more subjects you choose to export to the grade book. If you select

Page 102 of 109
QOMO HiteVision, LLC. QClick FCC ID: XQGQRF600-RE
QOMO HiteVision,LLC.
one subject, the related subject grade data regardless of class selection will be exported. If you
select all subjects, the grade data for all subjects regardless of class selection will be exported. After
the subject selection, a file browser will open allowing you to select or enter the file and path you
wish to use for the export file. The import and export of the grade book data is a pairing function
allowing you to transfer the grade data for one or more subjects from one computer into another.
The export function allows you to retrieve the subject grade data for one or more subjects from the
QClick system database in one computer, and save it to the file you have chosen. The import
function allows you to merge the grade data for one or more subjects from the data file into another
computer’s QClick system database. The file takes the extension “.gbd” format. To export a grade
book, follow these steps:
1. Under the report window select the Grade Book window tab.
2. Click the Grading Period drop down list and select the period you choose to export.
3. Click the Export button to open the subject selection dialog window.
4. Select one or more subjects in the subject selection dialog window and click the Ok button.
5. The file browser is open allowing you to provide a dedicated file name and path to save the grade book
data into.
6. Click the Save button to start exporting.
Delete a grade book in the system database
Select the grading period you wish to delete from the Grading Period drop-down list. In the Data
Manager groups, click the Delete button to open the subject selection dialog window.
From the window, select one or more subjects you want to delete from the grade book. If you select
one subject, all grade data associated with this subject regardless of classes are deleted from the
system database. If you select all subjects, the grade data for all subjects regardless of classes are
deleted. To delete a grade book, follow these steps:
1. Click the Grading Period drop down list and select the period you choose to delete.
2. Click the Delete button to open the subject selection dialog window.
3. Select one or more subjects in the subject selection dialog window and click the Ok button.
4. The deletion confirmation message window is open to ask if you want to delete or not.
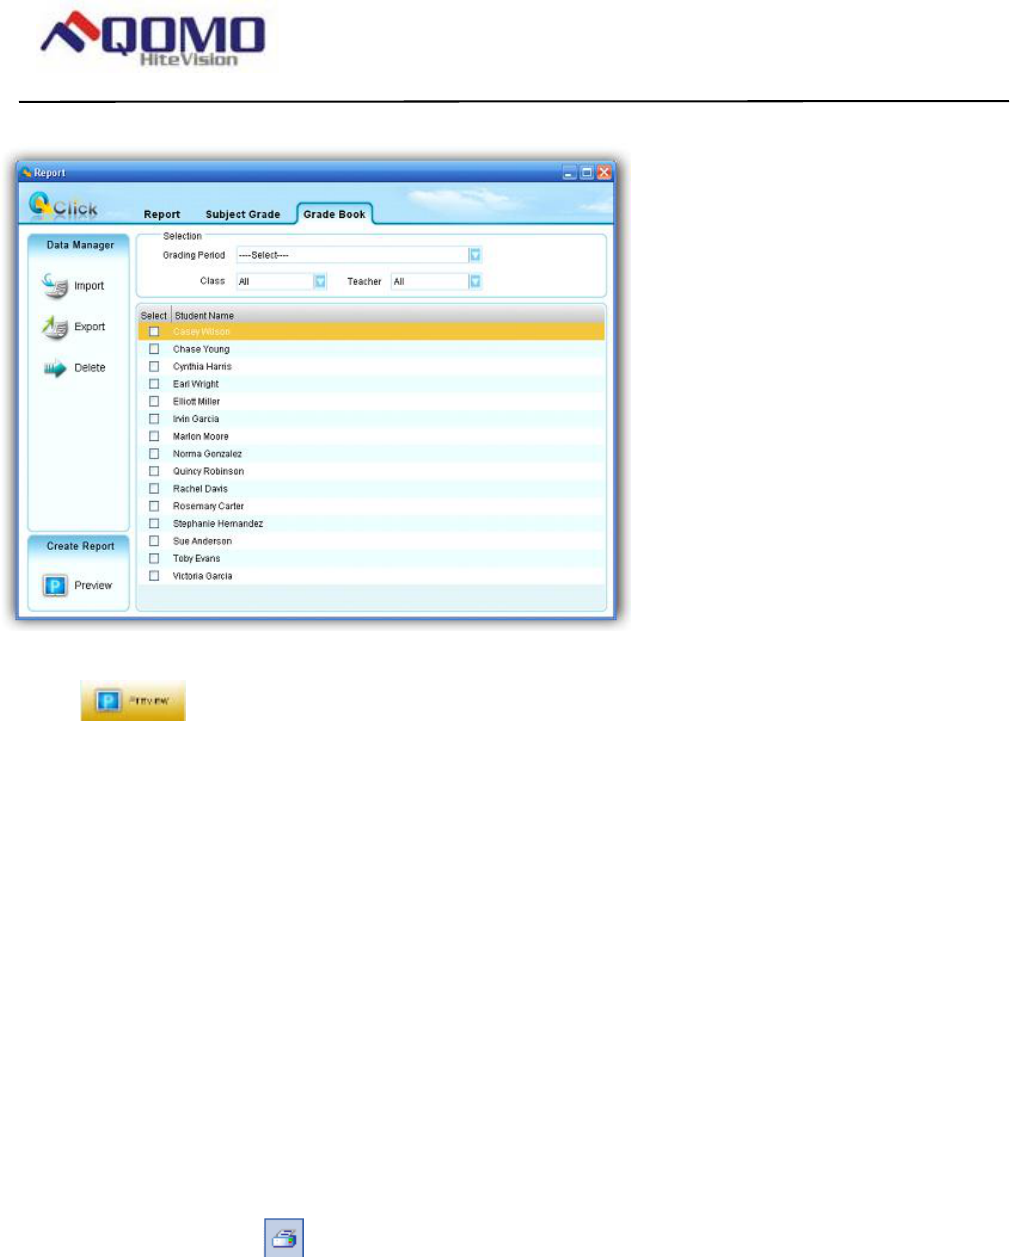
Page 103 of 109
QOMO HiteVision, LLC. QClick FCC ID: XQGQRF600-RE
QOMO HiteVision,LLC.
Create Grade Book Report
Select the grading period you wish to create from the Grading Period drop-down list. Select the students you
wish to create in the grade book from the student list window. In the Create groups, click the
Preview button to open the Create Report window. The student grade book report is actually the report
card that includes the period, a list of subjects the student has taken and the student score and letter grade for
each subject. To control viewing the preview report and how to export and print the preview report, please refer to
session 4.7 Create Report about the portion PRINT REPORTS, EXPORT REPORTS and CONTROL OF
PREVIEWING REPORT.
To generate a student report card, follow these steps:
1. Under the report window select the Grade Book window tab.
2. Select a grading period from the Grading Period drop-down list.
3. Select a class name from the Class drop-down list, if you don’t want the class to filter the student list,
select “All” from the list.
4. Select a teacher name from the Teacher drop-down list, if you don’t want the teacher to filter the student
list, select “All” from the list.
5. Check the boxes by the student names to select the students that you wish to generate the report card for.
6. Click the Preview button to preview the report card.
You can print and export the report card.
PRINT REPORT CARD
From the report card preview window, you can directly print the preview report card to a local or network printer.
To print the preview report card, follow these steps:
1. Click the printer icon on the menu bar at the top of the Create Report window. The printer selection
window will be displayed.
2. Choose the printer from the list and click the Print button or click the Cancel button to cancel the printing.
EXPORT REPORT CARD
The preview report card can be exported to third-party software applications. These export options include:
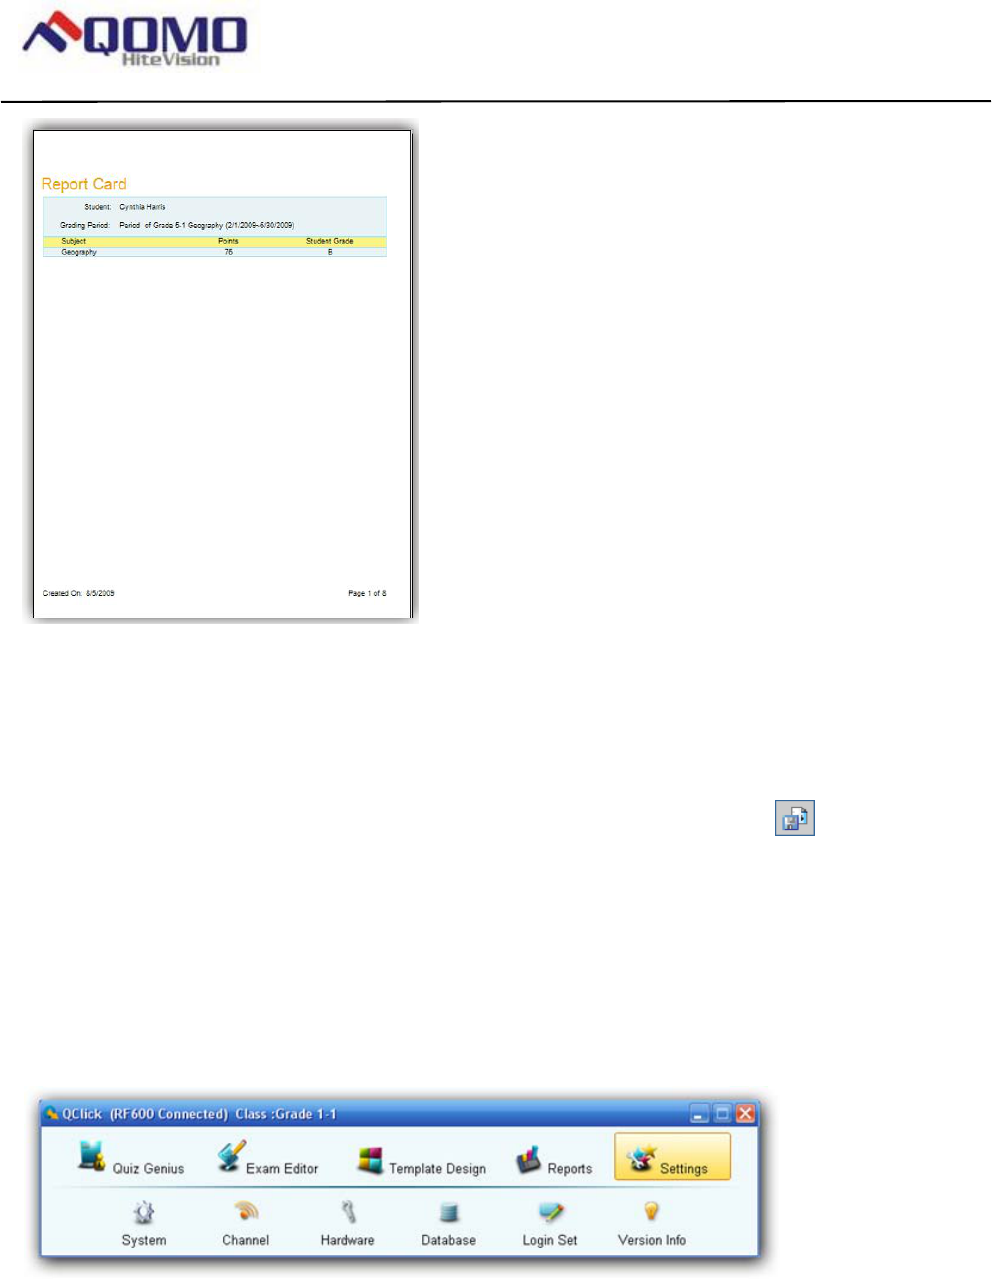
Page 104 of 109
QOMO HiteVision, LLC. QClick FCC ID: XQGQRF600-RE
QOMO HiteVision,LLC.
• Crystal Report (*.rpt)
• Adobe Acrobat (*.pdf)
• Microsoft Excel (*.xls)
• Microsoft Excel Data Only (*.xls)
• Microsoft Word (*.doc)
• Rich Text Format (*.rtf)
To export a preview report card, follow these steps:
1. From the tool bar on the Create Report preview window, click the Export icon .
2. The Export Report file browser window will be displayed. Click the Save as type drop-down list and
select a third party application from the list.
3. Type in the file name of the exporting report in the File name text box.
Click the Save button to begin exporting. If the preview report card is long, it may take additional
time to export.
Settings
System:
The System settings contain audio setting and the instructor remote mouse control sensitivity
setting.
The audio setup is used for the selection of your favorite sounds used when the activity entering a
quiz, start taking response and stop taking response. If the check box is unchecked, the sound will
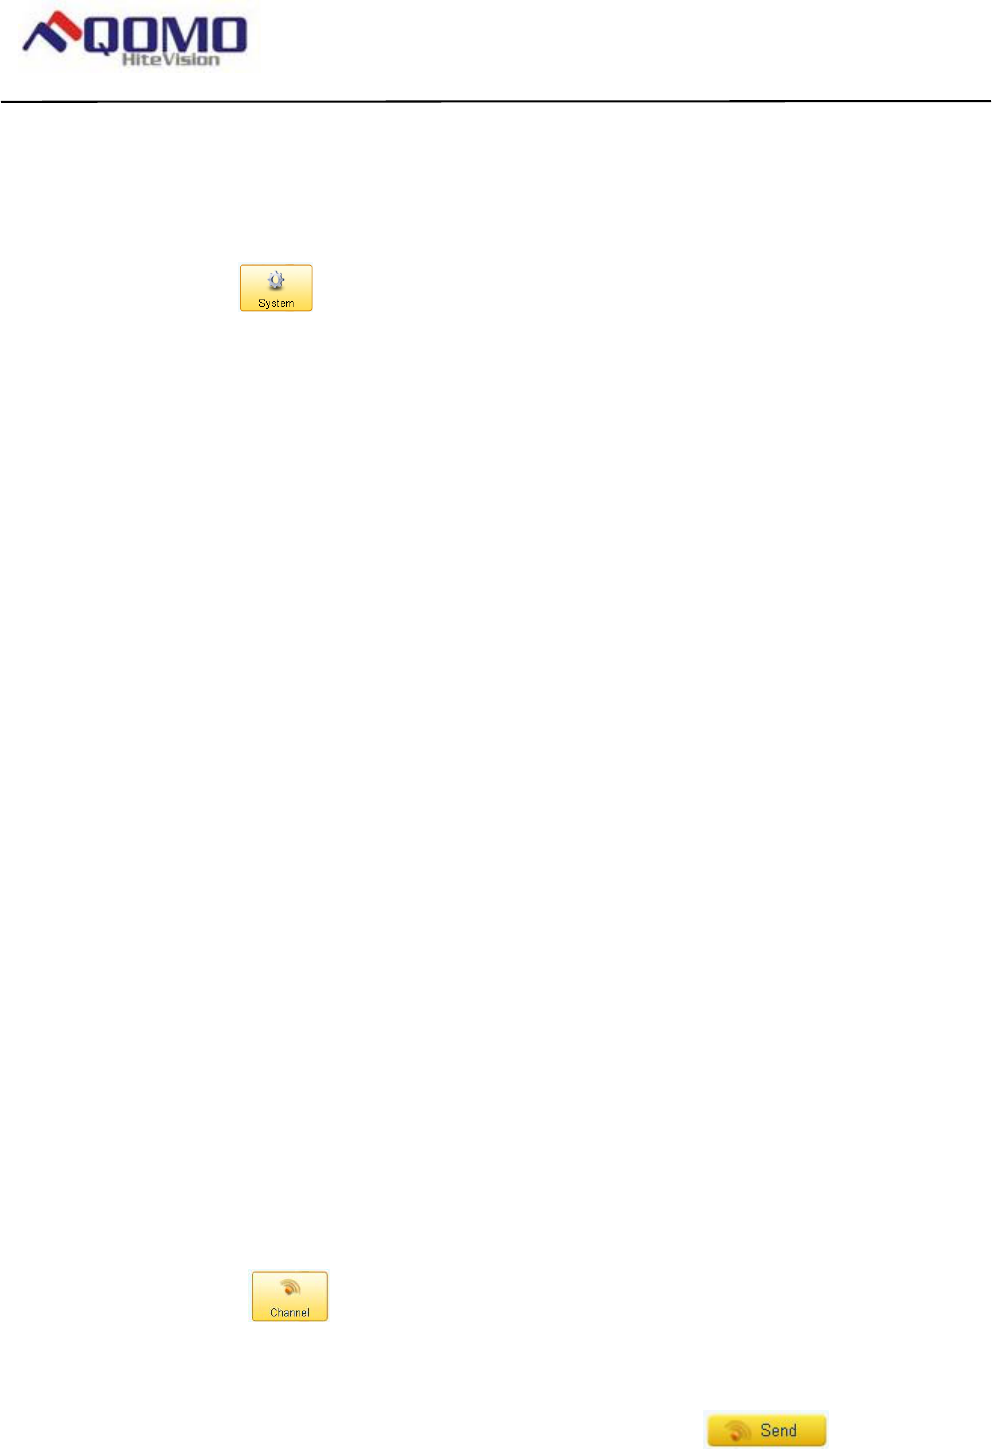
Page 105 of 109
QOMO HiteVision, LLC. QClick FCC ID: XQGQRF600-RE
QOMO HiteVision,LLC.
be muted for that activity.
To set up the audio sounds and the instructor remote mouse control sensitivity, follow these steps:
1. Select Settings Tab window.
2. Click the System icon; this will bring up the System Settings window.
3. Click on one of sound activity check boxes that you are going to work on; the Browse…
button will become active. Click the Browse… button; this will bring up the sound file open
browser. Select your favorite sound file for the activity and then click Save button to save it to
the system.
4. Repeat step 3, if you desire to set up more sounds to other activities.
Note: If the check box is unchecked, the sound will be muted for that activity.
5. To set up the remote mouse sensitivity, move the cursor onto the indicator on the Mouse
Sensitivity Setting level bar, and then click and hold the left mouse button to drag the level
indicator to left or right for decreasing or increasing the remote mouse sensitivity.
6. Click the Save button to save the system setting. Then click the Close button to close the
setting.
Channel:
The Channel setup is used to read the channel number of the main receiver connected to the
system and also used to set a new channel number for the main receiver. The channel number has
been preset when a main receiver is delivered from the factory. Under rare circumstances, the
channel number needs to be set to a different number to avoid interference of other main receiver
nearby. For QRF600 system, the change of main receiver channel number will not affect the
instructor and student keypad communication, because the keypad can automatically allocate a
main receiver.
To set up the main receiver channel, follow these steps:
1. Select Settings Tab window.
2. Click the Channel icon; this will bring up the Set Channel window.
3. If a main receiver is plugged into a USB port, the channel number of the receiver will be
displayed on the Set Channel text box. Click on the text box to enter the channel number
you desire for the main receiver. Then click on the Send button to send the
change to the main receiver. The valid channel number is from 0 to 49.

Page 106 of 109
QOMO HiteVision, LLC. QClick FCC ID: XQGQRF600-RE
QOMO HiteVision,LLC.
Hardware test:
The Hardwar test interface is used as hardware testing tool for the main receiver ,
instructor, and student keypad.
To use the hardware test tool, follow these steps:
1. Select Settings Tab window.
2. Click the Hardware icon; this will bring up the Hardware test window.
3. If a main receiver is plugged into a USB port, the channel number of the receiver will be
displayed on the Hardware Channel text box.
4. Use the instructor keypad or the student keypad to go into the hardware test menu. Refer to
the instructor and student hardware manual for the detail about how to enter the hardware
test menu. Then select the same channel number as the one displayed on the Hardware
Channel text box.
5. If the word “Teacher” or the Student ID number for the instructor or for the student keypad
displays on the student ID list window, it means the communication between the main
receiver and PC and the communication between the main receiver and the instructor
keypad or the student keypad are successful. Otherwise, it means the hardware test is failure.
The failure could be from the main receiver or from the instructor or the student keypad.
6. Click the Ok button to close the hardware testing.
Database Management:
The QClick system database management allows you to perform some basic database
managements which includes database backup and recovery. You can also perform some
basic data clean up like deleting session test data, deleting students, teachers, classes, and
subjects records. Please practice with caution by backing up important data and information before
the data clean up, because once the data or records are purged, there is no way to rollback.
Database Backup:
Backup the current database to a file which could be used for recover. Please remember the login
information for later use when you need to recover from this backup file.
Database Recover:
A backed up file can be used to recover the database.
Page 107 of 109
QOMO HiteVision, LLC. QClick FCC ID: XQGQRF600-RE
QOMO HiteVision,LLC.
Caution: all records in the current database will be lost after the recovery operation. Also please
change the login information immediately.
Clear Session:
To purge all test records in the database .You will be prompted to backup the test records if you
need to.
Del All Records:
This operation will clear all user generated and created records. You will be prompted to backup the
database if you need to.
To use database management tool, follow these steps:
1. Select Settings Tab window.
2. Click the Database icon; this will bring up the Data Management window.
3. Click Backup button, if you want to backup the current database; this will bring up
the backup file browser to allow you to choose a file to use for the backup.
4. Click Recover button, if you want to recover the database from a recover file; this
will bring up the recover file browser to allow you to choose the file for the recovering.
5. Click Clear Session button, if you want to clear all session test data. The
software will prompt you to backup the current database first.
Note: The cleared session test data won’t be recovered if you don’t backup the database containing
the session test data.
6. Click Del All Records button, if you want to delete all input records. The software will
prompt you to backup the current database first.
Note: The delete all records won’t be recovered if you don’t backup the database containing the
records.
7. Click Ok button to close the Data Management window.
Login Setup:
You can change the login user name and the password. It is recommended to do so after the first
time running QRF600. The default login name and password are: Login: qomo; Password: qomo.
Page 108 of 109
QOMO HiteVision, LLC. QClick FCC ID: XQGQRF600-RE
QOMO HiteVision,LLC.
To change the login user name and the password, follow these steps:
1. Select Settings Tab window.
2. Click the Login Set icon; this will bring up the Change Password window.
3. Enter the current user name and the password and then enter the new user name and the
new password. The new password needs to be re-entered to confirm.
Version Info:
Version Info is used to display the QClick system hardware and software version information as
well as the PC Microsoft Office and window operating system version info.
To view the version information, follow these steps:
1. Select Settings Tab window.
2. Click the Version Info icon; this will bring up the Version Info window. The
information for Window Operating System version, the MS office version, the host main
receiver hardware version and this software version will display on this window.
3. Click Ok button to close the Version Info window.
Warning:
This device complies with part 15 of the FCC rules. Operation is subject To the following two
conditions: (1) This device may not cause harmful Interference, and (2) This device must accept any
interference received Including interference that may cause undesired operation
Page 109 of 109
QOMO HiteVision, LLC. QClick FCC ID: XQGQRF600-RE
QOMO HiteVision,LLC.
NOTE: THE MANUFACTURER IS NOT RESPONSIBLE FOR ANY RADIO OR TV
INTERFERENCE CAUSED BY UNAUTHORIZED MODIFICATIONS TO THIS
EQUIPMENT. SUCH MODIFICATIONS COULD VOID THE USER’S
AUTHORITY TO OPERATE THE EQUIPMENT.