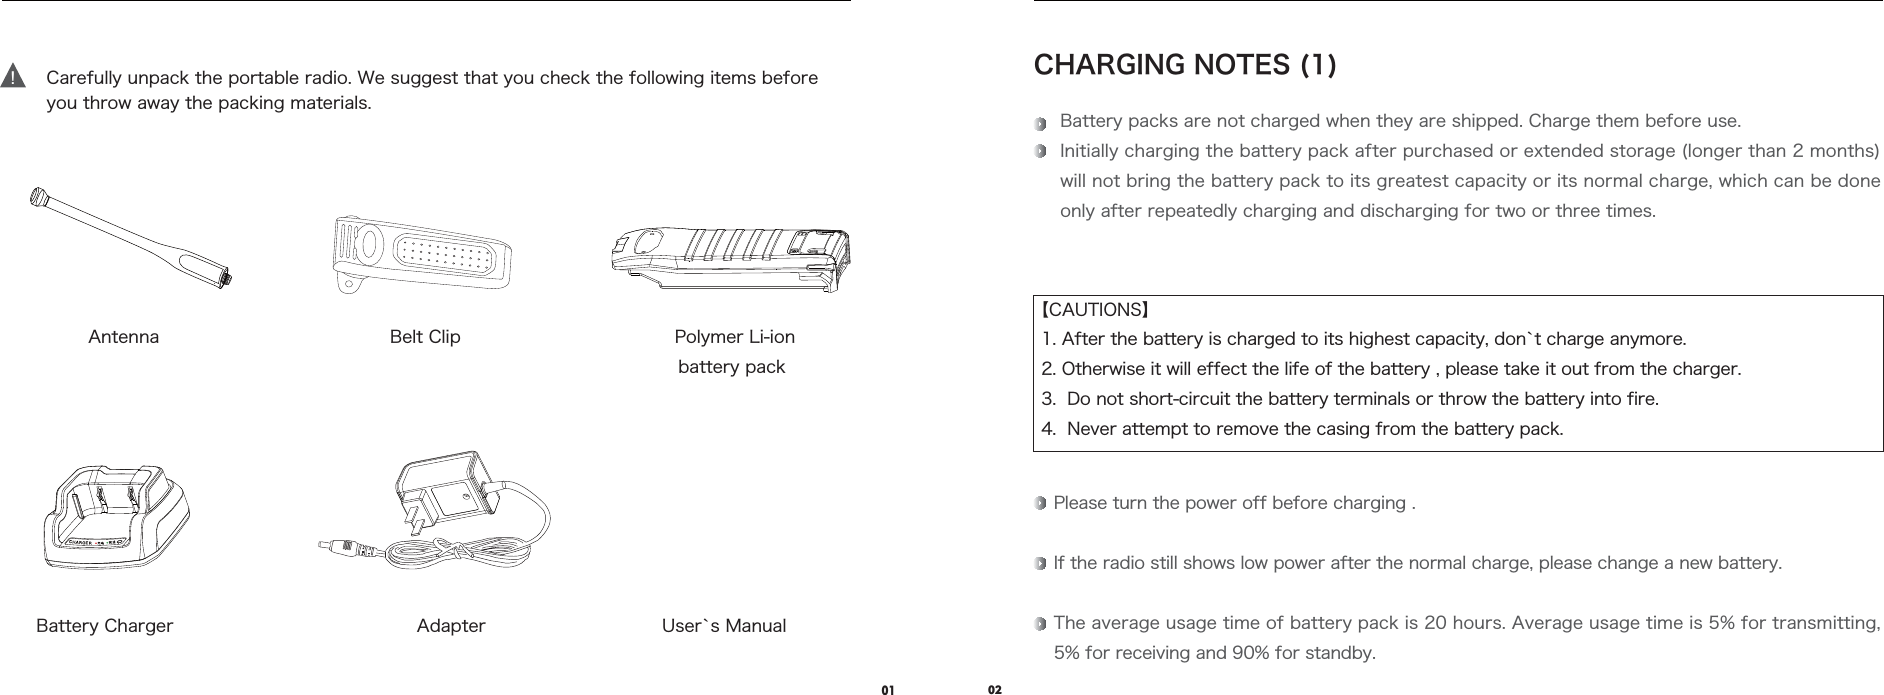
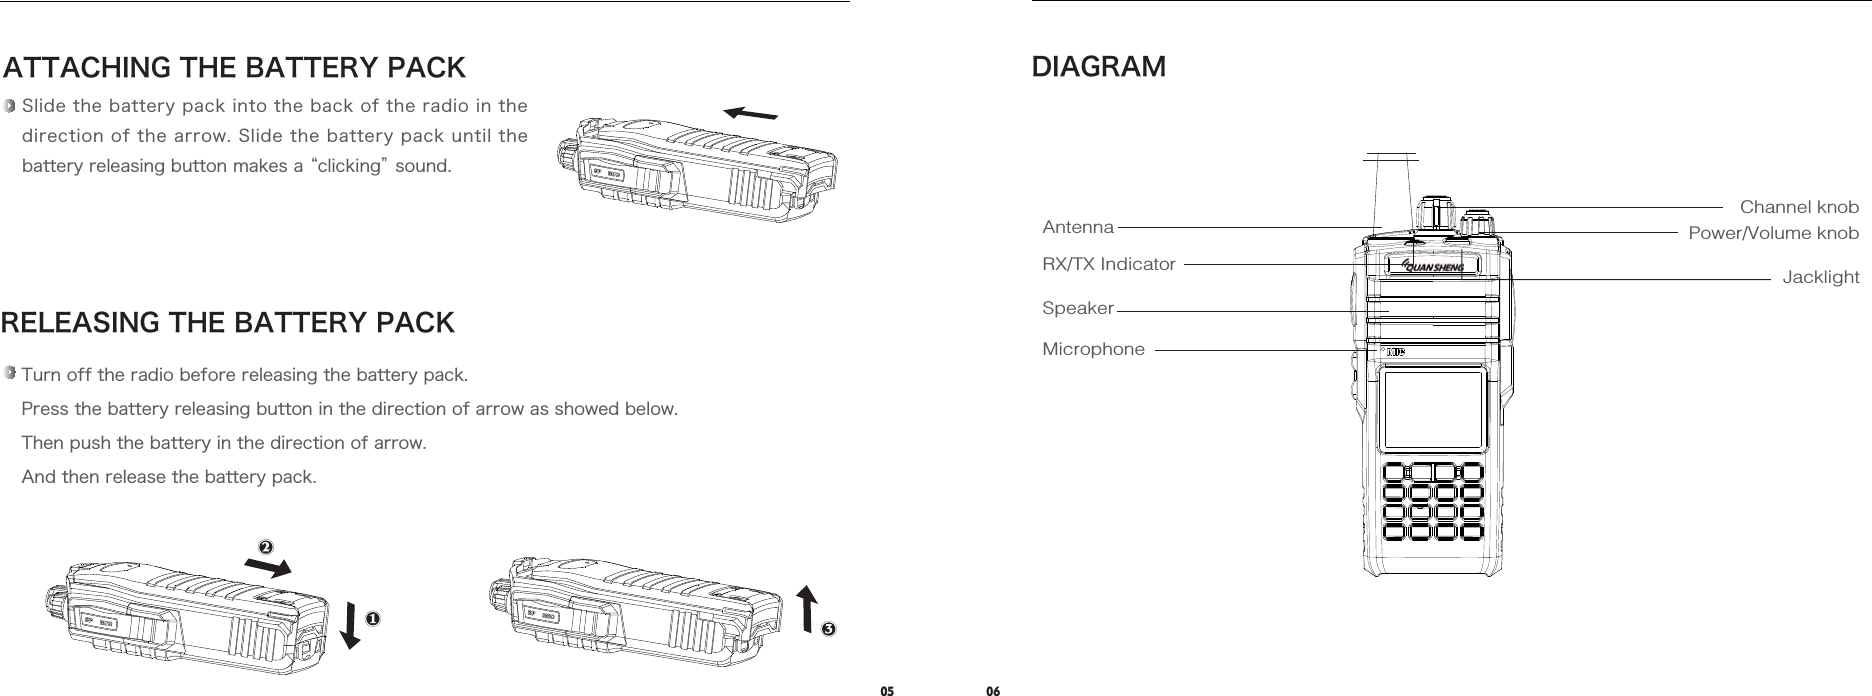
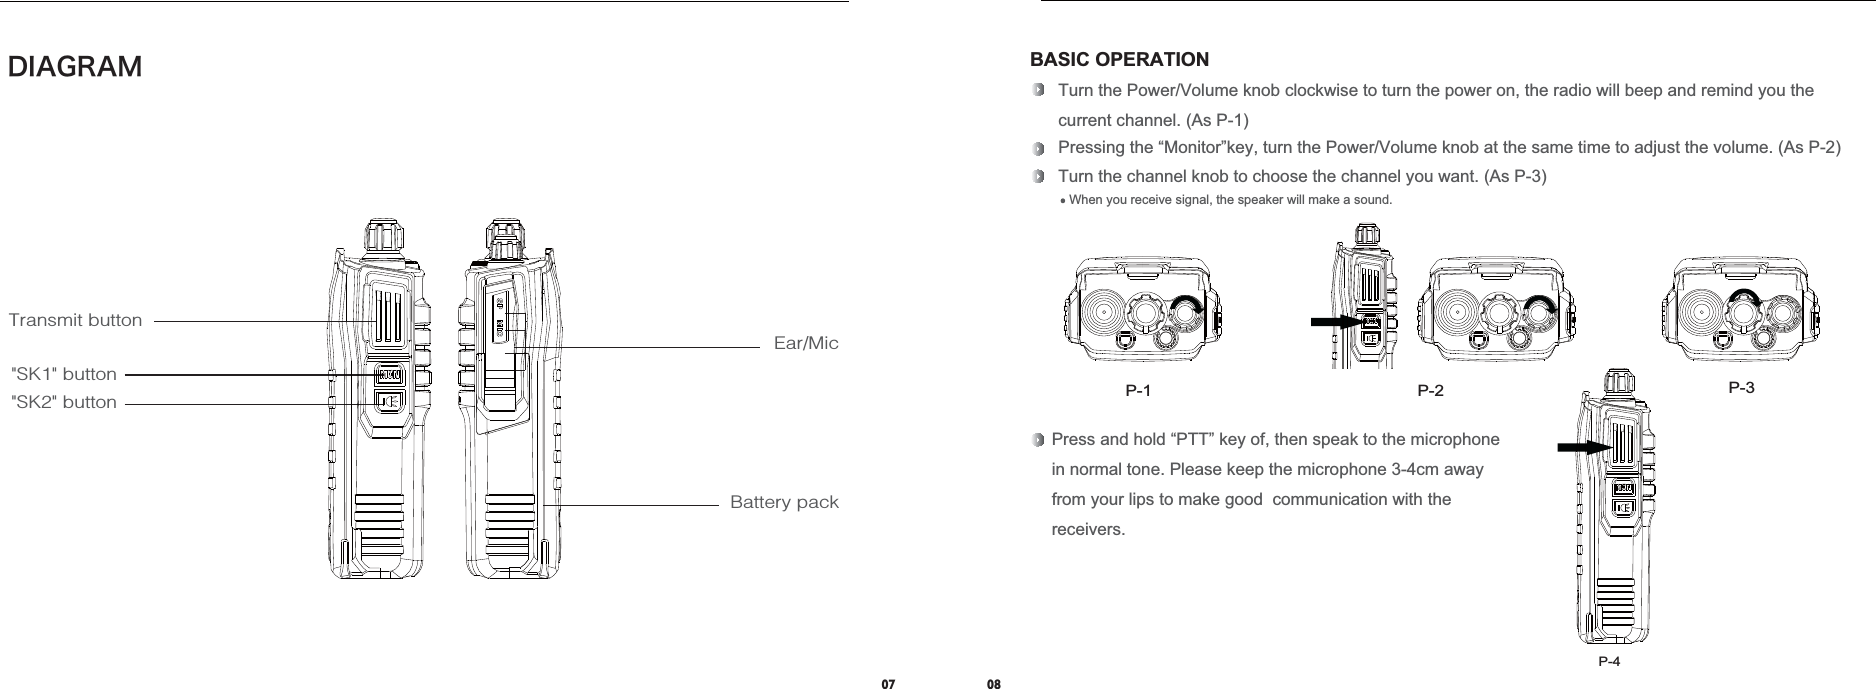
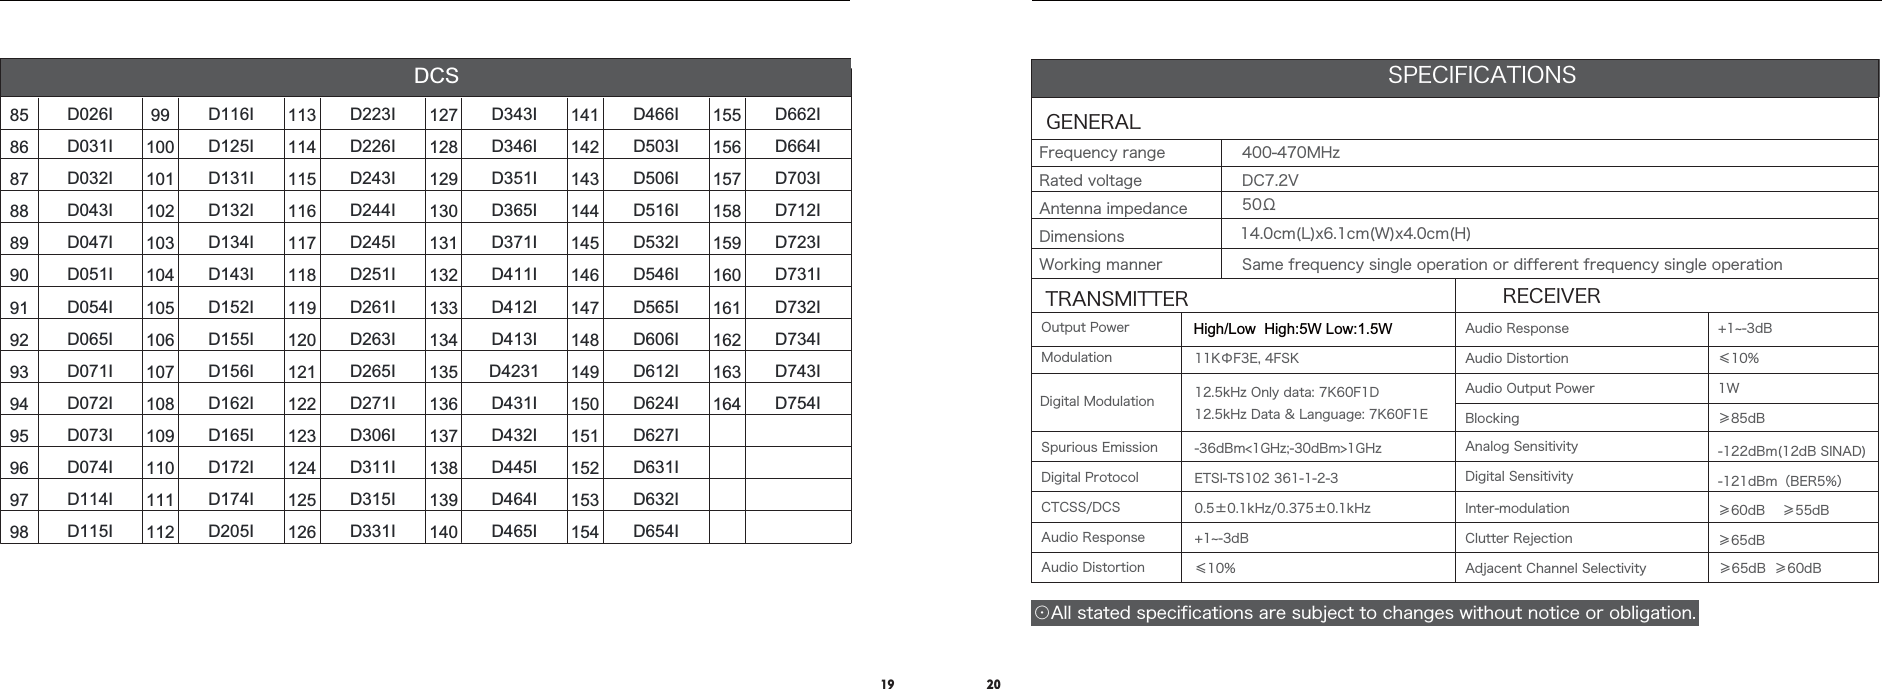
QUANSHENG ELECTRONICS AT-D5 DMR Two Way Radio User Manual

Fujian Nanan Quansheng Electronics Co., Ltd. DMR Two Way Radio

User Manual

USER'S MANUAL
     Thank you for purchasing this                Radio.We believe this radio is new, powerful, stable and easy-to-use.As a result, we know that you will be pleased with the quality and features of this product.Conventional functional featuresQT/DQTHigh/Low power selectPower save/Low battery alarmEmergency callTail Tone EliminationN bandTime displayRecording functionMultiple scan modesBusy lockTOTANI codeDTMF signal settingBattery saveMessage functionEncryption
     Thank you for purchasing this                Radio.We believe this radio is new, powerful, stable and easy-to-use.As a result, we know that you will be pleased with the quality and features of this product.Conventional functional featuresQT/DQTHigh/Low power selectPower save/Low battery alarmEmergency callTail Tone EliminationN bandTime displayRecording functionMultiple scan modesBusy lockTOTANI codeDTMF signal settingBattery saveMessage functionEncryption
!ʎ+GYOR_K^VRUJKJKT\OXUTSKTZMGYJ[YZGTJSOYZKZIʎ)[ZULLZNKVU]KXY[VVR_]NORKXKL[KROTMUXVGXQOTMGZZNKMGYYZGZOUTPRECAUTIONS BEFORE USING IMPORTANT INSTRUCTIONSPlease be sure to comply with the specifications and notes as follows when using battery. Please pay attention that the battery overheat may cause fire or explosion by misuse.    Read battery labels and manual before use.    Use battery at room temperature between -25 and 35 degrees, Humidity:  65±20%.    Do not expose battery pack to direct sunlight (heat) for extended periods.    Do not knock the battery.    Charge battery with Quansheng charger, DO NOT charge over 24 Hours.    Never make wrong polarity connection when charging and discharging battery packs.    Charging the battery every 2 months to keep it fresh if you don't use it.    Keep the battery away from metal in case of any damage.    The storage area should be clean, cool, dry,and ventilated.    Do not abandon battery in water or fire.    Do not keep the battery in washing machine, cooking utensils, pressure vessel.    Charge battery with good quality battery charger. A poor quality charger can be dangerous.    Stop charging battery if NOT fully charged in stated time.    Do not use the battery when it is deformed, odorous, allochroic etc.    If electrolyte drip to your skin or clothes, please wash with water immediately.    If electrolyte drip to your eye, do not rub your eye, go see doctor immedi.Please read the User’s Manual before using . It gives you important information about how to operate the portable radio.Please put the radio and accessories where the children can not touch.Maintenance can only be performed by professional technicians.Please use the standard battery pack and charger in order not to destroy the radio.Please use the standard antenna , in order not to shorten the distance.Do not expose the radio to sunlight for a long period of time , nor put it near the heat , nor use it in a high temperature environment.Keep it dry . ( Rain or moisture will erode the electronic board ) .Do not transmit when the antenna is not installed .If you find bad smell or smog , please turn off the radio immediately . And take the battery off the radio , then contact with NUT agent.Warning
CONTENTSWARNINGSStore or use the battery away from places with electrostatic electricityMust keep battery pack away from children.Guardian should explain instructions to children before they use. Read instructions carefully before charging and discharging batteries. Change the battery when it works shorter time than normal.Take battery out when it is over cycle lifeGet the battery out of radio if not use it for long time, and keep it in clean, cool, dry, and ventilated place.SUPPLIED ACCESSORIES ………………………………………………… 01CHARGING NOTES ……………………………………………………… 02-03INSTALLING ANTENNA  …………………………………………………… 04INSTALLING BELT CLIP …………………………………………………… 04 INSTALLING EXTERNAL SPEAKER/MICROPHONE ………………… 05 ATTACHING/RELEASING BATTERY PACK ………………………… 05-06DIAGRAM ………………………………………………………………… 07BASIC OPERATION ……………………………………………………… 08-10FUNCTION INSTRUCTION  …………………………………………… 10-15CTCSS …………………………………………………………………………… 16DCS ………………………………………………………………………… 17-18SPECIFICATIONS  …………………………………………………………… 19
!0102Carefully unpack the portable radio. We suggest that you check the following items before you throw away the packing materials.Antenna Belt ClipBattery Charger User`s ManualPolymer Li-ionbattery pack Battery packs are not charged when they are shipped. Charge them before use.Initially charging the battery pack after purchased or extended storage (longer than 2 months) will not bring the battery pack to its greatest capacity or its normal charge, which can be done only after repeatedly charging and discharging for two or three times.CHARGING NOTES (1)【CAUTIONS】1. After the battery is charged to its highest capacity, don`t charge anymore. 2. Otherwise it will effect the life of the battery , please take it out from the charger.3.  Do not short-circuit the battery terminals or throw the battery into fire. 4.  Never attempt to remove the casing from the battery pack.Please turn the power off before charging .If the radio still shows low power after the normal charge, please change a new battery.The average usage time of battery pack is 20 hours. Average usage time is 5% for transmitting, 5% for receiving and 90% for standby.Adapter
Put the output plug of the adaptor into the charger base, and put the plug of the adaptor into the eletrical power (as showed in the picture).03 04Slide the Li-ion battery pack or radio with a Li-ion battery pack into the charger.⊙Make sure the battery pack is in connected with the charging terminals. ⊙When charging begins, the RED LED light displays.⊙When the battery pack is charged to its greatest capacity, the GREEN LED light displays.CHARGING NOTES (2)Attach the antenna to the radio as illustrated on the right.INSTALLING BELT CLIPAttach the belt clip with the supplied screws by using a Phillips screw driver.INSTALLING ANTENNAINSTALLING EXTERNAL SPEAKER/MICROPHONEInsert the speaker/microphone plugs into the speaker/microphone jacks.⊙NOTE: The radio is not fully water-resistant while using the external speaker/microphone.
0605ATTACHING THE BATTERY PACKSlide the battery pack into the back of the radio in the direction of the arrow. Slide the battery pack until the battery releasing button makes a “clicking” sound.RELEASING THE BATTERY PACKTurn off the radio before releasing the battery pack.Press the battery releasing button in the direction of arrow as showed below.Then push the battery in the direction of arrow.And then release the battery pack..JDSPQIPOF4QFBLFS3959*OEJDBUPS"OUFOOB$IBOOFMLOPC1PXFS7PMVNFLOPC+BDLMJHIUDIAGRAM
0708P-1 P-2P-4P-35SBOTNJUCVUUPO&BS.JD#BUUFSZQBDL4,CVUUPO4,CVUUPODIAGRAM BASIC OPERATIONTurn the channel knob to choose the channel you want. (As P-3)Turn the Power/Volume knob clockwise to turn the power on, the radio will beep and remind you the current channel. (As P-1)Pressing the “Monitor”key, turn the Power/Volume knob at the same time to adjust the volume. (As P-2)When you receive signal, the speaker will make a sound.Press and hold “PTT” key of, then speak to the microphone in normal tone. Please keep the microphone 3-4cm away from your lips to make good  communication with the receivers.
1. Press MENU & choose MSG.2. Press MENU & CREATEMSG to write message.3. Press MENU into message editing.4. Press  #  key to choose input method: PY(Chinese)/12(Number)/ab(English)/AB(English, Capital)5. Press number key, ▲ or ▼ , MENU for message editing.09 10Press MENU keyPress ▲ or ▼ to choose CONTACTS and press  MENUBASIC OPERATIONChannel SelectDigital channel editThis radio consists of 1024 channels and is divided into 64 zones, every zone consists of up to 16 channels.Zone select: Press MENU → Settings → Zone → Select the zone number → Press MENU to save & back to main pageAfter zone selection, choose the channel you need through channel knob.1. Press any number key into edit mode.2. Press  SK1  or  SK2  button to choose the edit items (RX/TX frequency, color code).3. Press number key to input TX frequency.4. Press number key to input RX frequency.5. Press ▲ or ▼ to change color code.6. Press MENU key to save and exit.7. Press EXIT key to exit while editing, it will not save any data you change or edit.8. Time slot select: Press MENU → Settings → Parameter → Slot → Slot 1 or Slot 2 → Press MENU to save9. Change Contact person:Analog channel editMessage edit   Press  ▲ or ▼  to select the Call number and press MENU   Press  ▲ or ▼  to to choose SELECT   Press  MENU  to save   You can press  EXIT  while editing, it will not save any data you change or edit and will be back to the previous menu.1. Press any number key into edit mode.2. Press  SK1  or  SK2  button to choose the edit items (RX/TX frequency, N band, CTCSS/DCS)3. Press number key to input TX frequency4. Press number key to input RX frequency5. Press ▲ or ▼ to choose N band6. Press ▲ or ▼ to choose CTCSS/DCS7. Press MENU key to save and exit8. Press EXIT key to exit while editing, it will not save any data you change or edit.
11 12Menu SettingMessageFUNCTION INSTRUCTIONPress MENU to choose the items you want to set in the menu. While setting, press MENU to save and and press EXIT to exit and back to the previous menu.This function can be used to send messages or common messages set in the radio to designated ID.The sub-menu of MSG (message) consists of:1. INBOX (the received messages sent by other ID users)2. CREATEMSG (for message editing)3. OUTBOX (the messages the radio sent to other ID users)4. COMMMSG (the common messages the radio edit and save before, which can be edited/added/deleted)5. DELMSG (fast delete the messages in INBOX/OUTBOX/COMMMSG)【Note】 This function is not available in analog channel mode.ContactsCall LogSettingsThis function can be used to check the contact information the radio save before, which can be edited/added/deleted.The sub-menu of CONTACTS consists of:1. DISP (description: name/number/type)2. ADD (adding contact information, note: the upper limit of contact number is 1024, you need to delete some contact information if you want to save more information when it is full)3. EDIT (editing contact name/number, note: type can not be changed, you need to delete this contact person`s information and re-edit if you want to change “type”)4. SENDMSG (fast sending message to this contact person)5. SELECT (select the contact person and back to the main page)【Note】 This function is not available in analog channel mode.This function can be used to check the missed/received/call out calls.The sub-menu of CALLLOG consists of:1. MISSCALL (the missed calls called by other ID users)2. RECECALL (the received calls called by other ID users)3. CALLNUMB (the calls the radio made to other ID users)4. DELLOGS (delete the call history you want: missed/received/call out calls)【Note】 This function is not available in analog channel mode.This function can be used for setting operations.Setting items:6. Press  *  key to clear the contents you write.7. Press MENU to save after finishing editing.
13 14RecordProgrammable side key functions1. LOCAL (check the radio`s serial/group number)2. PARAMETER (choose the call time, H/L power, slot) 3. ZONE (choose the zone)4. DATA/TIME (change the date/time/week/data form)5. TONE (change the reminding voice of profiles/keypad/power/message)6. OTHERS (change the language/lock key/led light and time and check the version)7. SIDE KEY (change the functions of long/short pressing of side key 1 & side key 2)8. DEFAULT (back to factory settings)This function can be used to record the radio`s conversation contents for checking.The sub-menu of RECORD consists of:1. RECORD SET (change the record mode)2. RECORD LIST (check the saved record contents)RevivePress the sidekey which is set as Radio revive, emit revive code, it is used to revive the radio.【Note】 This function is not available in analog channel mode.DetectKillPress the side key to make sure if there are other active radios that will not affect the radio in the system. No voice or visual notice will show on target radios.Press the sidekey which is set as Radio kill, emit kill code, it is used to kill radio.【Note】 This function is not available in analog channel mode.High/Low powerPress the sidekey to change HIGH/LOW POWER.MonitorPress the sidekey which is set as monitor, will hear noise. This function is used to check if the current channel is occupied before starting communication, it can temporarily clear all anti-interference code (CTCSS / DCS), and also help to receive weak signals.【Note】 This function is not available in analog channel mode.Set sidekey 1, sidekey 2 (long press or short press) for the following functionsbit error ratio            single work switchMonitor Scan Kill Revive H/L power Jacklight VOX Emergency mode(open) Emergency mode (close) Repeat/talk around Zone optionalDirect call 1,Direct call 2,Direct call 3,Direct call 4,Direct call 5,bit error ratio single work switch.
15 16Emergency mode openPress the sidekey which is set as EMERGENCY MODE OPEN, it is used for emergency call.【Note】 This function is not available in analog channel mode.Emergency mode closePress the sidekey which is set as EMERGENCY MODE CLOSE to stop emergency call.【Note】 This function is not available in analog channel mode.Zone optionalPress the sidekey which is set as ZONE OPTIONAL, it is used to select different zones set in the programming software.Scan ON/OFFScan On:Press the sidekey, scan from the present channel, when one channel gets signals, LED green light will be on. Scan will be stopped.Scan Off: press the sidekey again to quit from scan.VOXPress the sidekey which is set as VOX to turn on the VOX function, then you can turn off the VOX function by pressing the PTT key.One button callThis function can help key1,2,3,4,5 to fulfill the calling function.One button callPress the sidekey to turn on the bit error ratio (BER).Repeat/Talk aroundPress the sidekey to open the REPEAT/TALK AROUND function. Apart from the repeater, the radio will communicate with related groups. RX/TX frequency are the same, and RX/TX code are the same.JacklightPress the sidekey which is set as JACKLIGHT, it is used as torchlight in the dark and other occasions.Single work modePress the sidekey which is set as SINGLE WORK mode, then the radio can work singly until the designated time (the designated time could be set in the programming software).Low battery alarmWhen the radio power is lower than 6.2V, the radio will be in low power alert: the red light flashes and voice reminding every 2s to remind the users to get charged or change the battery.
17 18'&6Ӑ丩ᮦ⸷㺞01020304050607080910111213141516171819202122232425262728D114ND115ND116ND125ND131ND132ND134ND143ND152ND155ND156ND162ND165ND172N29303132333435363738394041424344454647484950515253545556D315ND331ND343ND346ND351ND365ND371ND411ND412ND413ND423ND431ND432ND445N5758596061626364656667686970D464ND465ND466ND503ND506ND516ND532ND546ND565ND606ND612ND624ND627ND631N7172737475767778798081828384D632ND654ND662ND664ND703ND712ND723ND731ND732ND734ND743ND754ND023ID025IDCSD023ND025ND026ND031ND032ND043ND047ND051ND054ND065ND071ND072ND073ND074ND174ND205ND223ND226ND243ND244ND245ND251ND261ND263ND265ND271ND306ND311N62.567.069.371.974.477.0 79.7 82.5 85.4 88.5 91.594.8 97.4100.0 103.5 107.2 110.9 114.8 118.8 123.0 127.3131.8 136.5 141.3 146.2151.4 156.7 159.8 162.2 165.5 167.9171.3173.8 177.3 179.9 183.6 186.2189.9 192.8 196.6 199.5203.5 206.5 210.7 218.1 225.7 229.1 233.6 241.8250.3 254.1010203040506070809101123242526272829303132331213141516171819202122343536373939404142434445464748495051CTCSS
8586878889909192939495969798D026ID031ID032ID043ID047ID051ID054ID065ID071ID072ID073ID074ID114ID115I99100101102103104105106107108109110111112D116ID125ID131ID132ID134ID143ID152ID155ID156ID162ID165ID172ID174ID205I113114115116117118119120121122123124125126D223ID226ID243ID244ID245ID251ID261ID263ID265ID271ID306ID311ID315ID331I127128129130131132133134135136137138139140D343ID346ID351ID365ID371ID411ID412ID413ID4231D431ID432I    D445I    D464ID465I141142143144145146147148149150151152153154D466ID503ID506ID516ID532ID546ID565ID606ID612ID624ID627ID631ID632ID654I155156157158159160161162163164D662ID664ID703ID712ID723ID731ID732ID734ID743ID754IDCS19 20⊙All stated specifications are subject to changes without notice or obligation.SPECIFICATIONSGENERALTRANSMITTER RECEIVER400-470MHz   DC7.2VRated voltageAntenna impedanceSame frequency single operation or different frequency single operationDimensionsWorking manner14.0cm(L)x6.1cm(W)x4.0cm(H)Output PowerModulationSpurious EmissionDigital ProtocolCTCSS/DCSAudio ResponseAudio Distortion11KФF3E, 4FSK 12.5kHz Only data: 7K60F1D12.5kHz Data & Language: 7K60F1E-36dBm<1GHz;-30dBm>1GHzETSI-TS102 361-1-2-30.5±0.1kHz/0.375±0.1kHz+1~-3dB≤10%Frequency rangeAnalog SensitivityDigital SensitivityAudio ResponseAudio DistortionAudio Output PowerBlocking+1~-3dB≤10%1W≥85dBInter-modulationClutter RejectionAdjacent Channel Selectivity        ≥65dB  ≥60dB-122dBm(12dB SINAD)-121dBm(BER5%)≥60dB    ≥55dB ≥65dB  50ΩDigital ModulationHigh/Low  High:5W Low:1.5W
21 22  Any Changes or modifications not expressly approved by the party responsible for the user’ s authority to operate the equipment. This device complies with part 15 of the FCC Rules. Operation is subject to the  1) This device may not cause harmful interference, and 2) this device must accept any interference received, including interference that operation.FCC Statements:FCC Statements:FCC Statements: may cause undesiredfollowing two conditions:compliance could voidRF Exposure Compliance and Control Guidelines and Operating Instructions  To control your exposure and ensure compliance with the occupational/controlled dhere to the following procedures.  Guidelines:   Do not remove the RF Exposure Label from the device.   User awareness instructions should accompany device when transferred to other users.   Do not use this device if the operational requirements described herein are not met.  RF Exposure Compliance and Control Guidelines and Operating Instructions  RF Exposure Compliance and Control Guidelines and Operating Instructions  environment exposurelimits always aTransmit no more than the rated duty factor of 50% of the time.To transmit(talk),pushthe Push-To-Talk(PTT) key.To receive calls,release the PTT key.Transmitting 50% of theless,is important because the radio generates measurable RF energy only when (in terms of measuring for standards compliance). time,or transmittingAn appropriate warning lable is affixed to all units.In order to comply with RF a minimum distance of 2.5cm must be maintained whenacessories (belt clip).     Do not use this device when antenna shows obvious damages body-worn operationsexposure requirements,NOTICE:This radio is intended for use in occupational/controlled conditions, where users have full knowledge of their exposure and can exercise control over their exposure to meet FCC limits. This radio device is NOT authorized for general population, consumer,or any other use.held-to-face,  and  are restricted to the approved original

Navigation menu