User Manual
QT11A
Tablet PC
User Manual
Copyright
Copyright 2013. All rights reserved. No part of this publication may be reproduced,
transmitted, transcribed, stored in a retrieval system or translated into any language
or computer language, in any form or by any means, electronic, mechanical,
magnetic, optical, chemical, manual or otherwise, without the prior written
permission of this company.
Disclaimer
This company makes no representations or warranties, either expressed or implied,
with respect to the contents hereof and specifically disclaims any warranties,
merchantability or fitness for any particular purpose. Further, this company reserves
the right to revise this publication and to make changes from time to time in the
contents hereof without obligation to notify any person of such revision or changes.
Windows is a registered trademark of Microsoft Corporation in the United States and
other countries/regions. Others are copyrights of their respective companies or
organizations.
Safety Instructions
Before operating this device, please read carefully and follow the safety instructions
below.
• Read the safety and operating instructions carefully before using the product. All
warnings on the product and in the operating instructions should be observed.
• Do not place this product under direct sunlight or near heat sources, such as in a
closed car under sunlight or near a stove. The outer casing of this product may
become deformed and the sophisticated sensors inside may become damaged due to
excessive heat.
• Do not use this product near water, in the rain or allow any liquid to get inside this
product. Water and moisture may cause short-circuit to the electronic components
and lead to malfunctions.
• Do not use this product near strong electromagnetic sources, such as a microwave
oven. The electromagnetic interference may cause this product to malfunction.
• Do not drop or apply shock/vibration to this product. Strong impacts may damage
the components inside.
• Do not insert objects other than compatible memory cards into the SD card slot of
this product. The metal contacts inside the slot can easily become damaged by
foreign objects.
• Do not use an unknown power adapter other than the one supplied with this product.
Connecting this product to an unknown power adapter is very dangerous and may
lead to fire or explosion.
• Do not cut, bend, modify, place heavy objects, or step on the cable of the power
adapter. Otherwise the external insulation may be damaged and result in short-
circuit or fire.

• If there are strange odors or heat emitting from this product or any signs of
malfunction, disconnect this product from the power immediately and contact your
dealer for inspection or service.
• If a foreign substance or water gets in this product, please turn the power off
immediately and disconnect the power adapter. Next, remove the foreign substance
or water, if possible, and then send the product to your nearest service center.
Do not attempt to disassemble or modify this product. There are no user
serviceable parts inside this product, and unauthorized modifications will
cause the warranty to void.
If the battery is depleted or fails to function properly, send the product to
your nearest service center for battery replacement. Do not attempt to
replace the battery by yourself.
Cleaning Instructions
• Clean the tablet with cotton swabs dipped in rubbing alcohol.
• Use a smooth, soft microfiber cloth to clean the surface of the touchscreen. Do not
use liquid cleaners or glass cleaners.
Identifying Your Tablet and Dock.......................................................1
Overview of Your Tablet..............................................................................1
Rear View..............................................................................................3
Overview of Your Dock................................................................................4
Front View.............................................................................................4
Rear View..............................................................................................5
Side Views.............................................................................................6
Starting Up Your Tablet......................................................................7
Charging...................................................................................................7
Battery maintenance...............................................................................8
Booting Up................................................................................................8
To reboot your tablet ..............................................................................9
Powering Off..............................................................................................9
Entering / Resuming from Sleep Mode......................................................... 10
Adjusting the Sound ................................................................................. 10
Connecting to a Wi-Fi Network................................................................... 11
Inserting an SD Card (Optional)................................................................. 12
To remove the SD card.......................................................................... 12
More Ways of Using Your Tablet ......................................................13
Docking Your Tablet ................................................................................. 13
Using Your Tablet (with Tablet Dock) On The Go........................................... 15
Undocking Your Tablet .............................................................................. 17
Wall-mounting Your Tablet ........................................................................ 18
Outputting Your Tablet Display to an HDMI-enabled TV or Monitor .................. 20
Troubleshooting...............................................................................21
Specifications ..................................................................................23
FCC Statement .................................................................................25
Federal Communication Commission Interference Statement...................... 25
Table of Contents
Overview of Your Tablet 1
Chapter One Identifying Your Tablet and Dock
Identifying Your Tablet and Dock
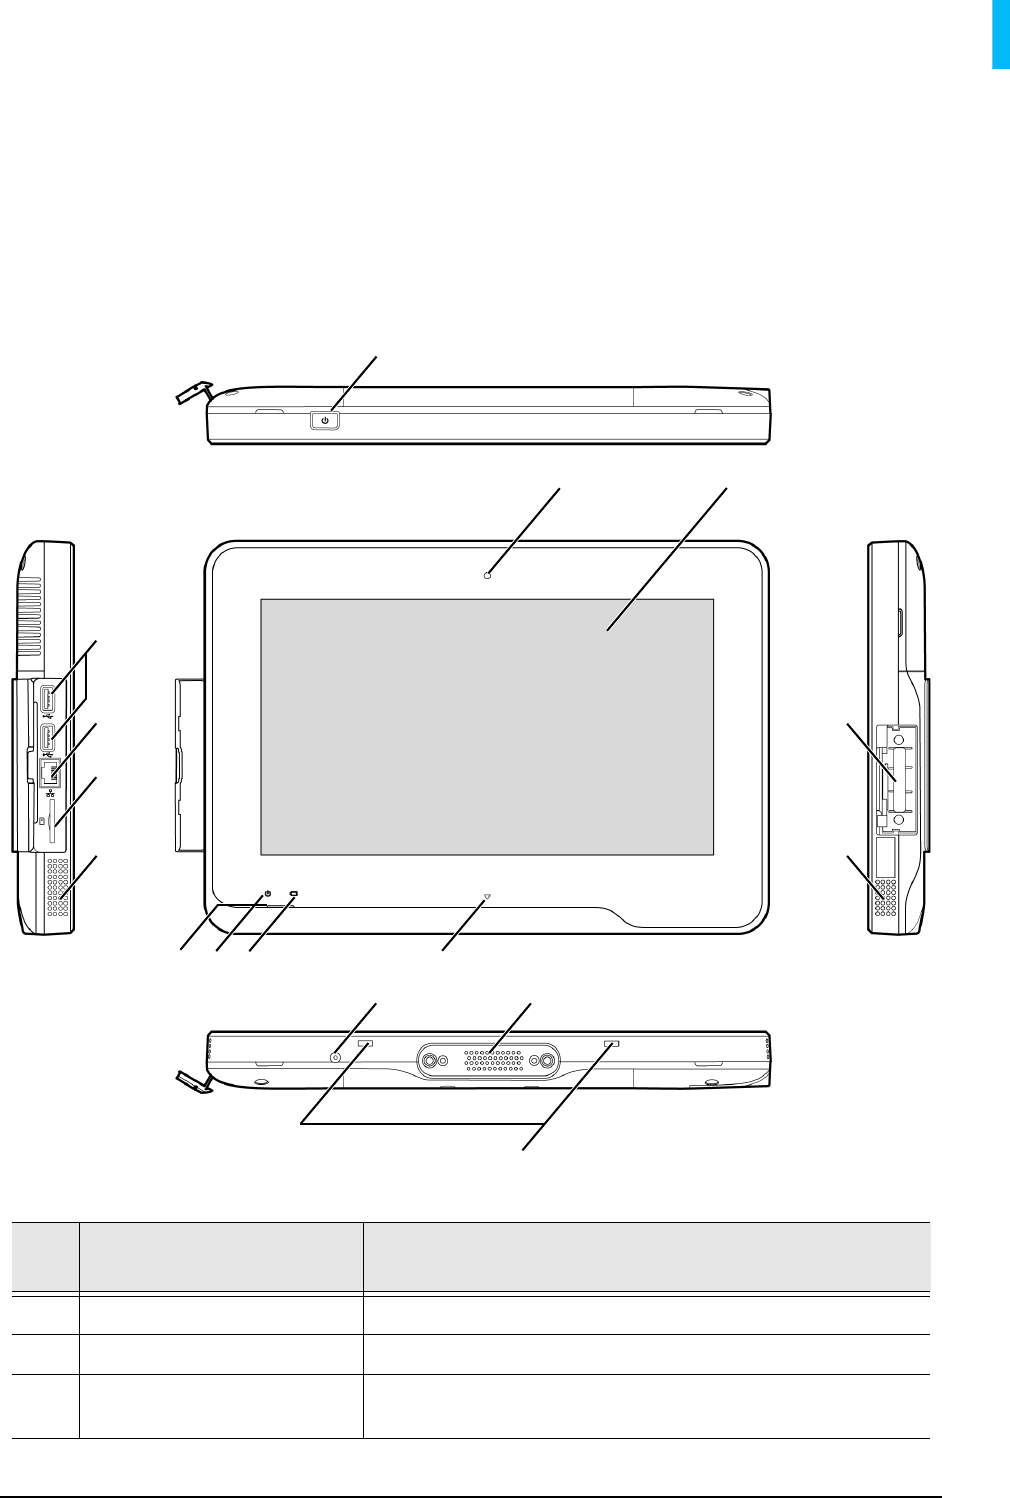
Overview of Your Tablet
No. Keys/Connectors/
Indicators Functions
1Power key Press and hold this key to turn on the tablet.
2Camera lens Used to take pictures or record videos.
3Touchscreen Displays information and allows you to perform
operations using different gestures.
15
32
1
5
9
6
8 7
14
13
1011
5
4
12
Overview of Your Tablet
2
Chapter One Identifying Your Tablet and Dock
4Connection socket Connects to an external device.
5Speakers Built-in speakers for playing sounds, which are
software-controlled.
6Latches Secures the tablet to the dock.
7Dock connector port Connects the tablet to the dock.
8Power input socket Connects the tablet to power using the supplied
power adapter and power cord.
9Arrow sign Used as a marker to align the tablet with the dock
when docking the tablet.
10 Battery indicator When the tablet is connected to power:
• Steadily on orange when the battery is charging.
• Steadily on green after the battery is charged.
When the tablet is not connected to power:
• Blinks orange when the battery is low and needs to
be charged.
11 Power indicator Blinks blue after the tablet enters Sleep mode.
12 Microphone Used for voice recording.
13 SD card slot Insert an SD card into the SD card slot to access files
stored on the card.
14 Ethernet socket Connects to an Ethernet-based network.
15 USB ports Connects to USB 2.0 or USB 3.0 devices, such as
keyboards, pointing devices, cameras or portable
storage devices.
No. Keys/Connectors/
Indicators Functions
Overview of Your Tablet 3
Chapter One Identifying Your Tablet and Dock
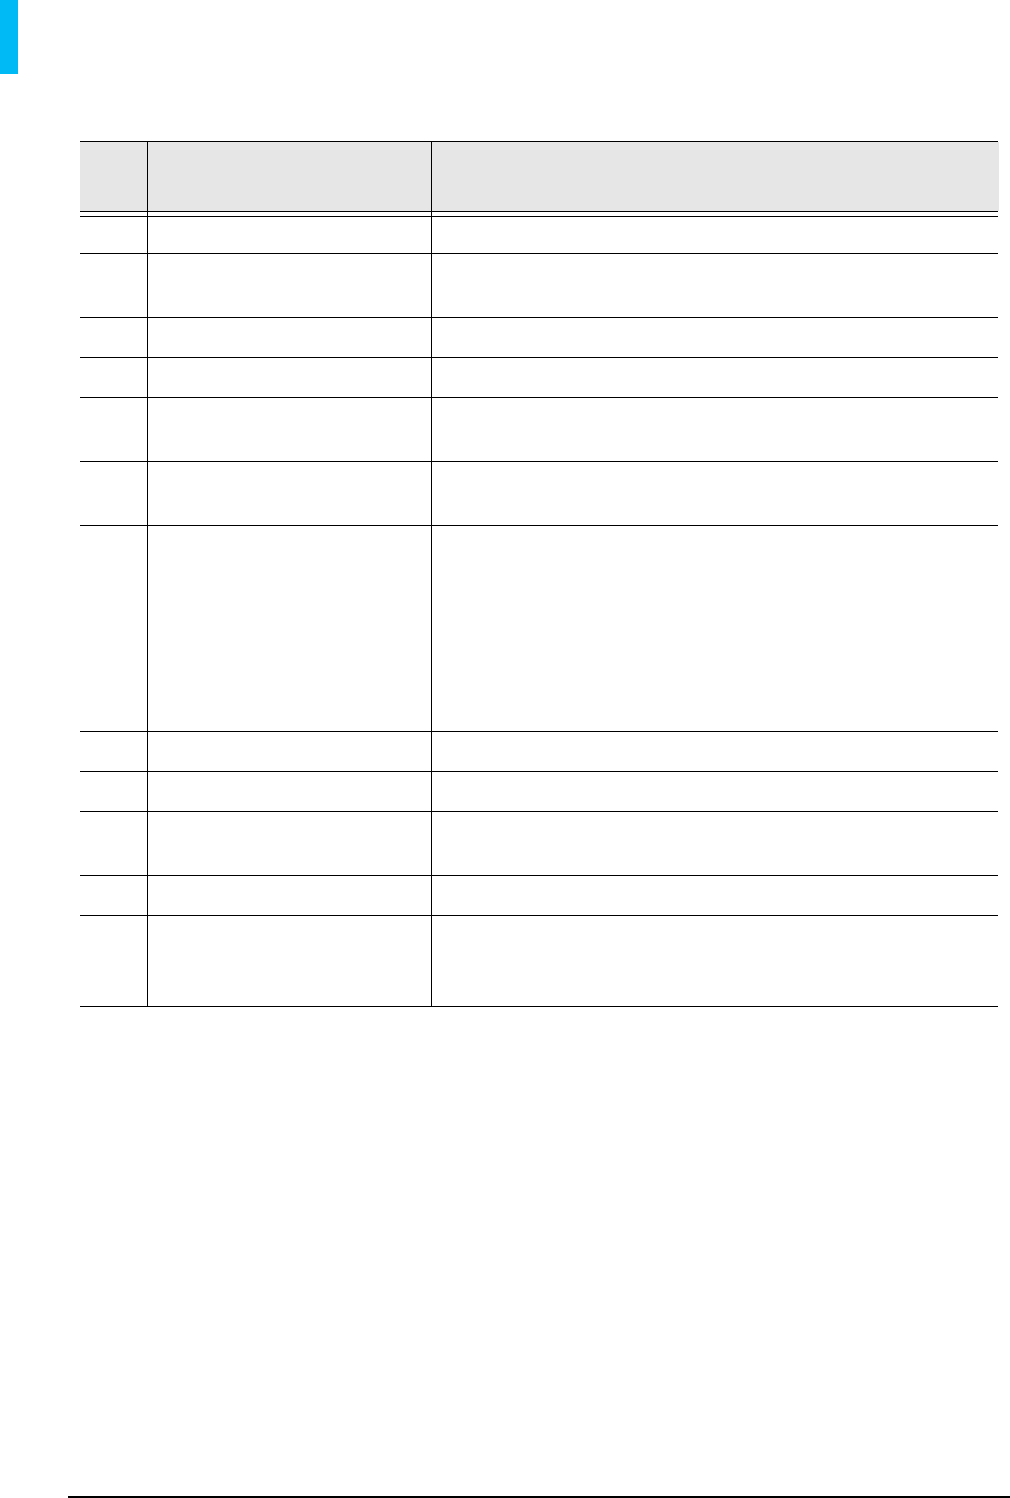
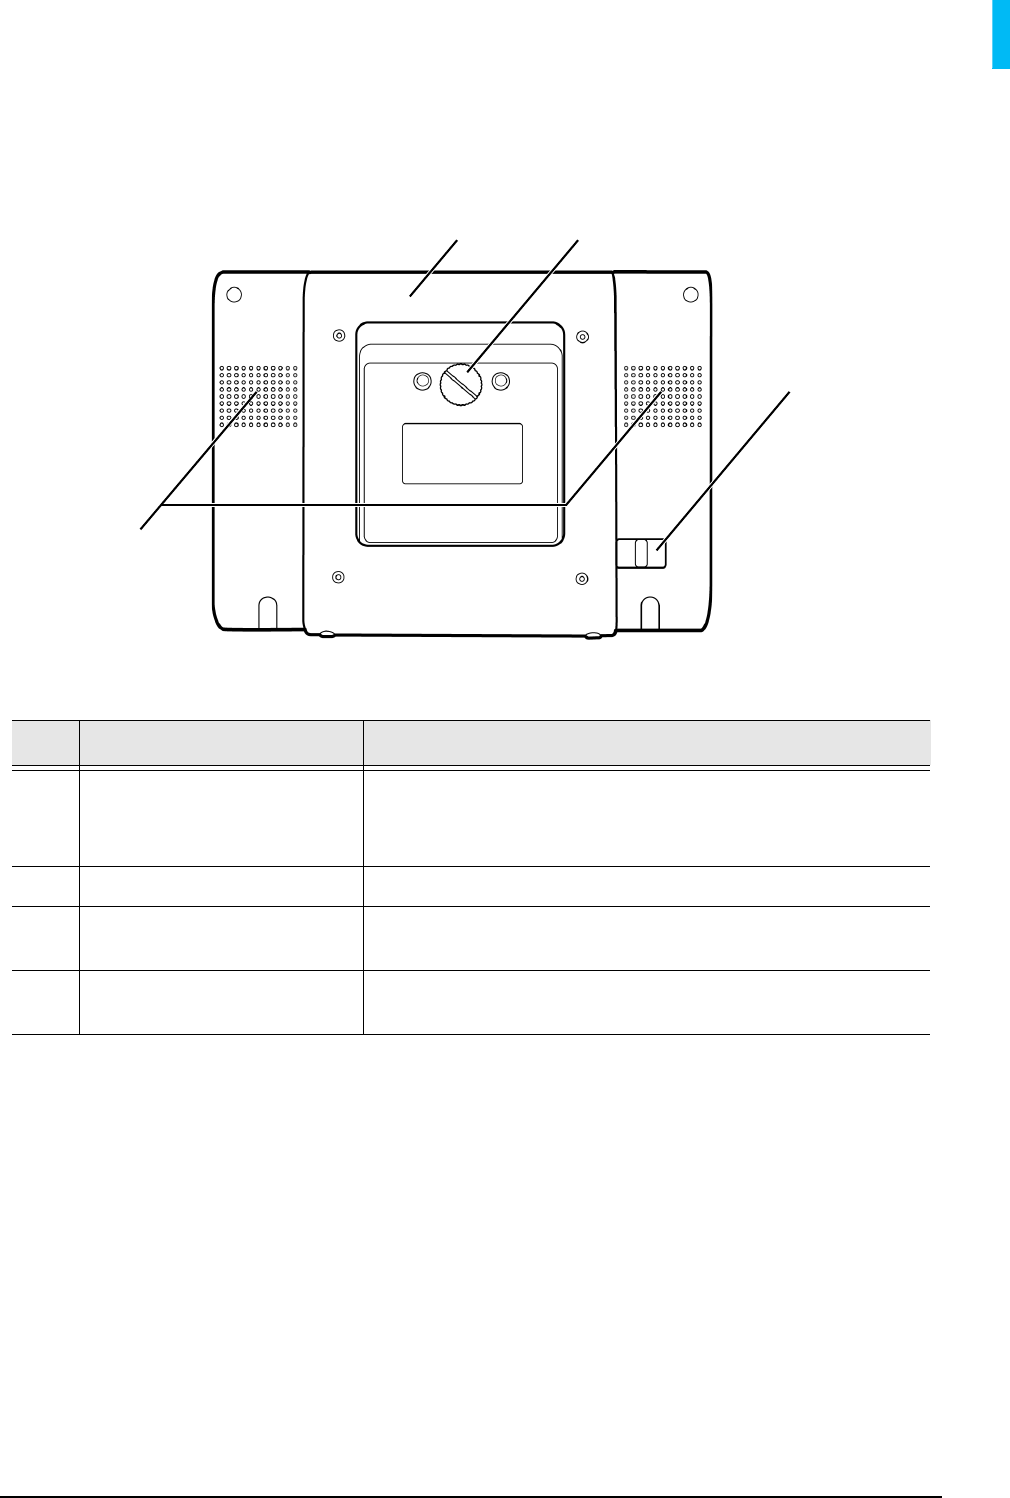
Rear View
No. Connectors Functions
16 Screw hole Rotate the fixed screw on the dock into this screw
hole to lock the tablet to the dock.
17 Ventilation slots Release excessive heat during operation to keep the
tablet in a safe operating temperature.
18 Anti-theft lock slot Locks your tablet securely to a solid surface to
protect it from theft.
171617
18
17
Overview of Your Dock
4
Chapter One Identifying Your Tablet and Dock
Overview of Your Dock
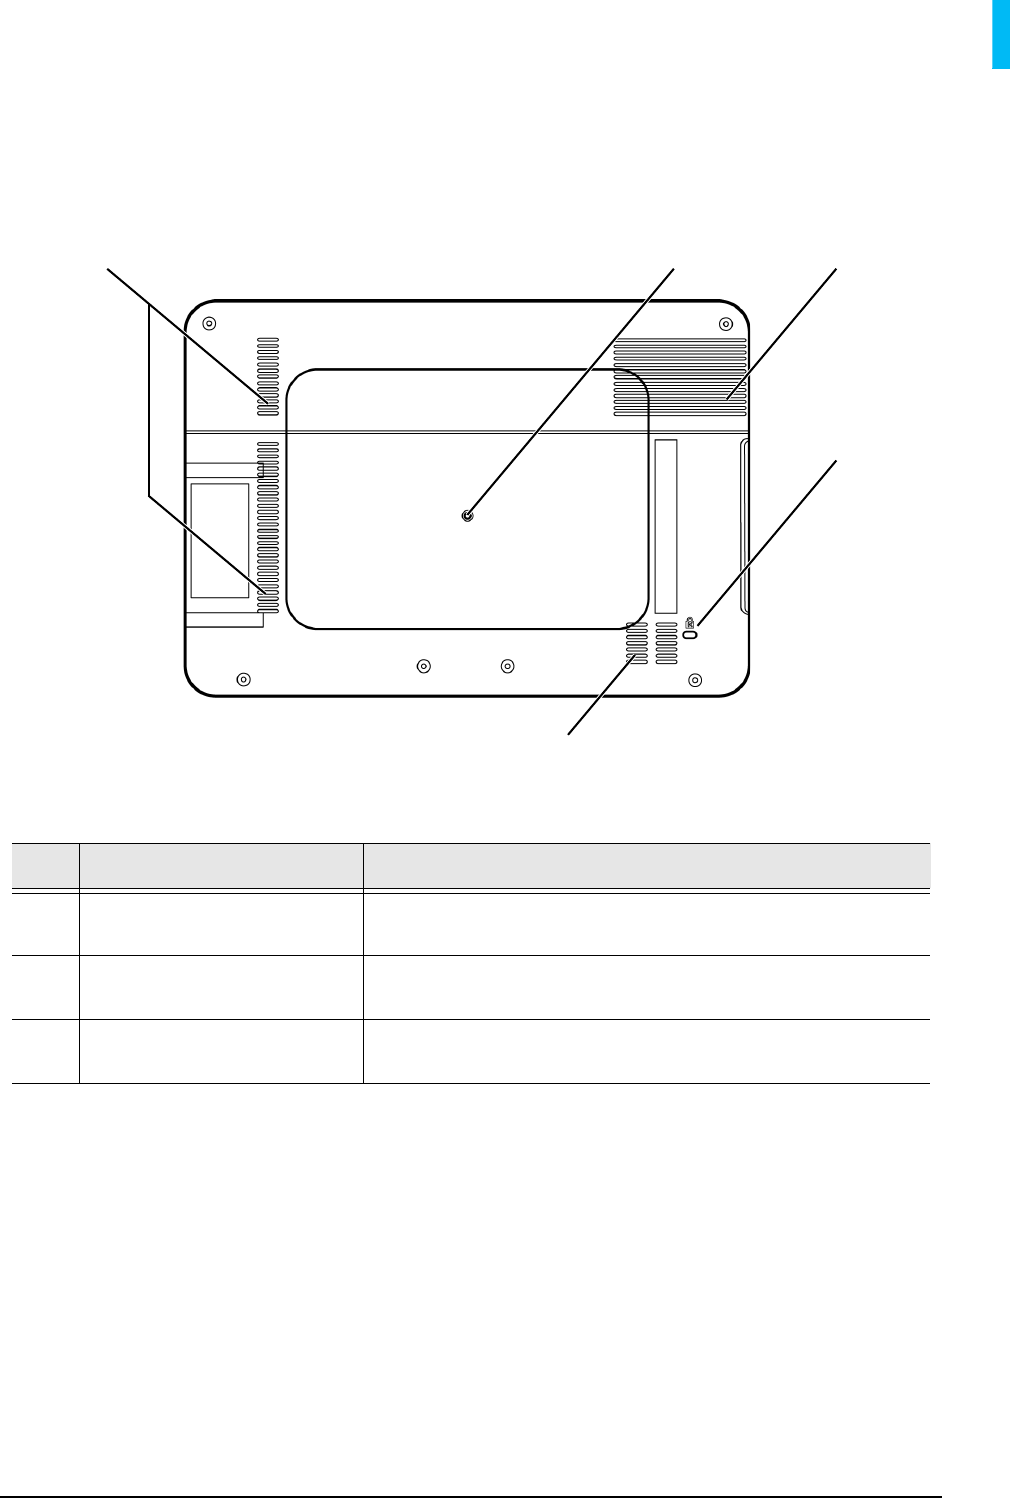
Front View
No. Connectors Functions
1latches Secures the tablet to the dock.
2Release latch Press and hold the this latch to release the tablet
from the dock.
3Arrow sign Used as a marker to align the tablet with the dock
when docking the tablet.
4Dock connector Connects the tablet to the dock.
3
1
42
Overview of Your Dock 5
Chapter One Identifying Your Tablet and Dock
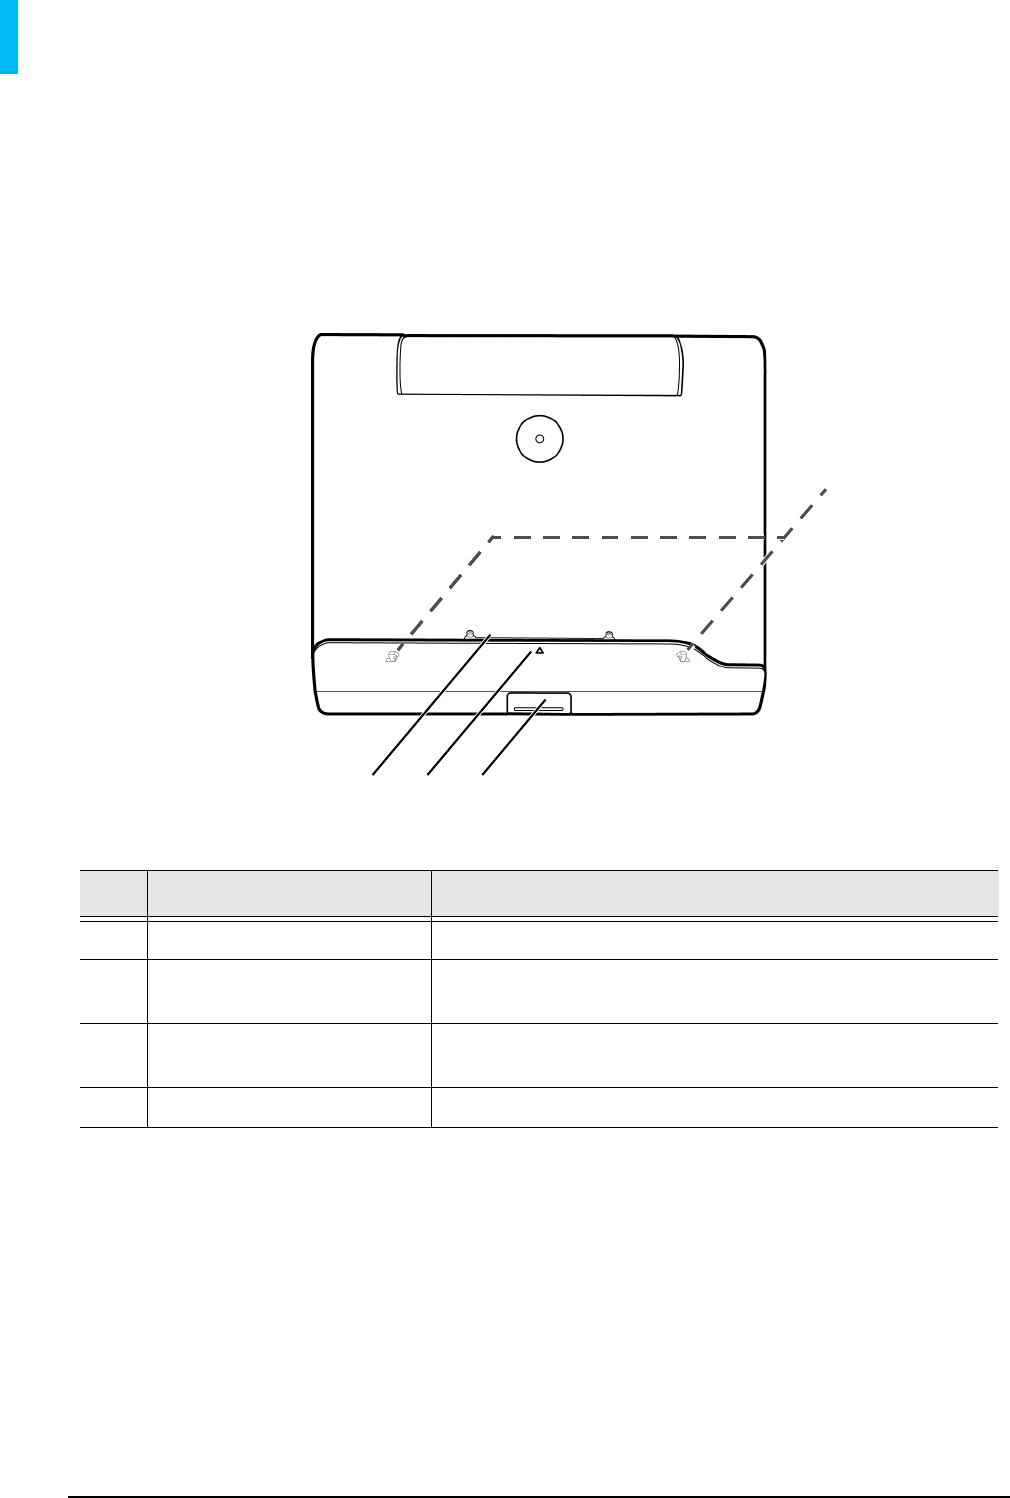
Rear View
No. Connectors Functions
5Rotating back stand • Pulls out to sustain the tablet on a flat surface.
• Can be rotated by 180 degree and used as a
handle.
6Fixed screw Tightens the screw to lock the tablet to the dock.
7Lock switch Secures the back stand to the dock when it is not in
use.
8Speakers Built-in speakers for playing sounds, which are
software-controlled.
8
5
7
6
Overview of Your Dock
6
Chapter One Identifying Your Tablet and Dock
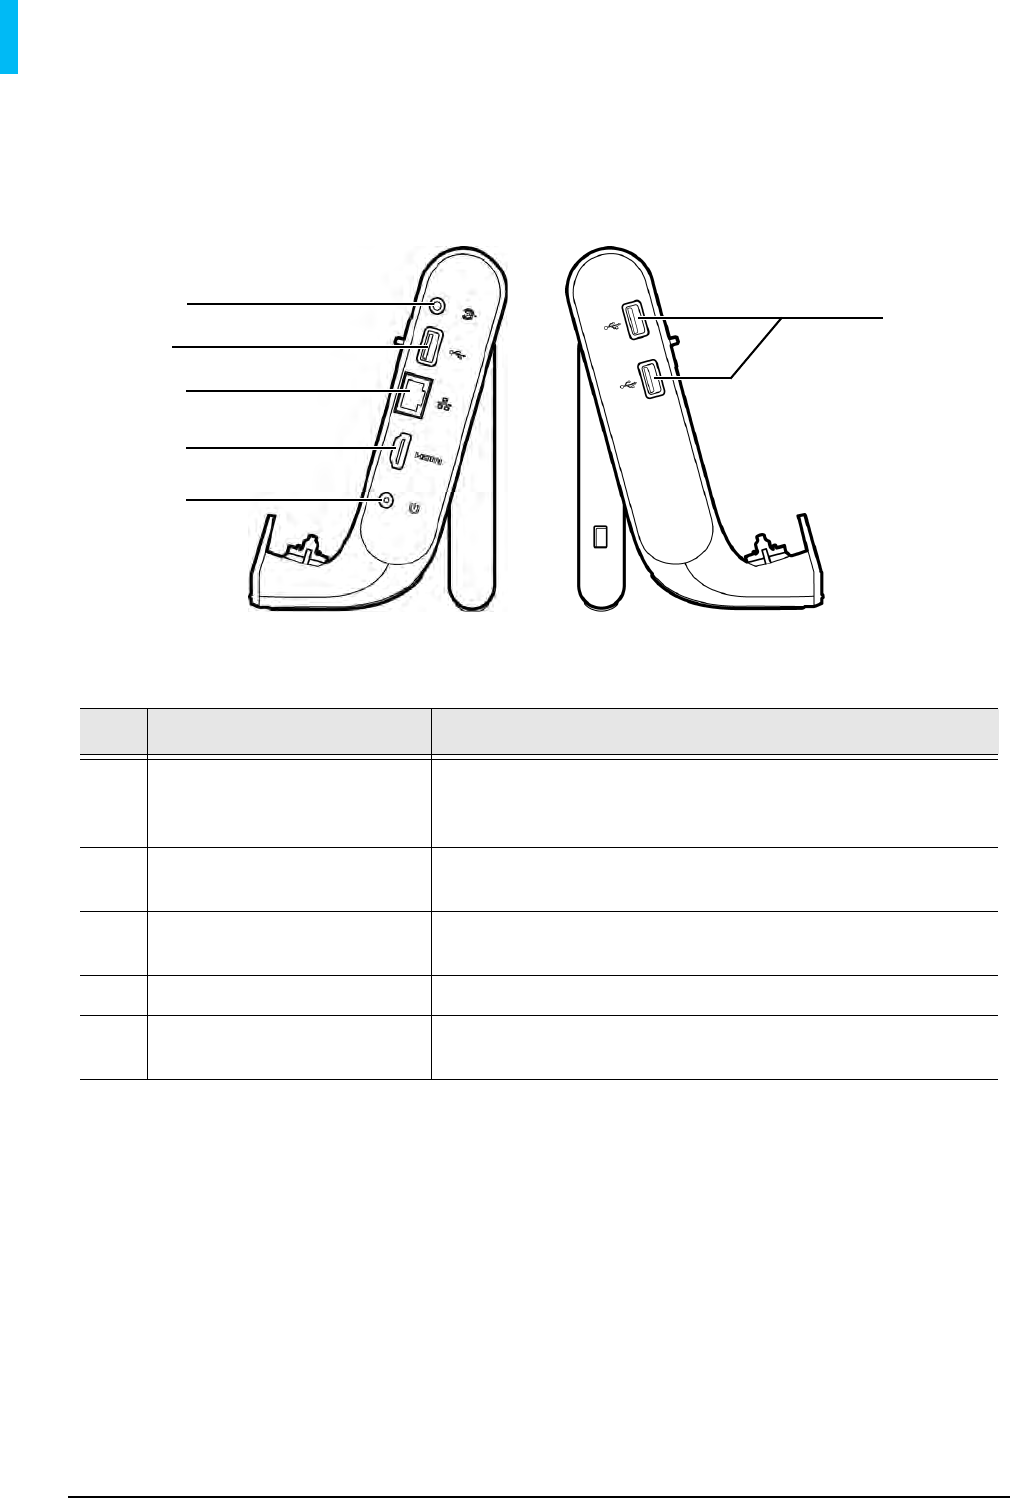
Side Views
No. Connectors Functions
9USB ports Connects to USB 2.0 or USB 3.0 devices, such as
keyboards, pointing devices, cameras or portable
storage devices.
10 Power input socket Connects the tablet (through the dock) to power
using the supplied power adapter and power cord.
11 HDMI port Connects to an HDMI (High-Definition Multimedia
Interface) device.
12 Ethernet socket Connects to an Ethernet-based network.
13 Headphone jack Connects to an audio device, such as headphones or
speakers.
9
13
9
12
11
10

Charging 7
Chapter Two Starting Up Your Tablet
Starting Up Your Tablet
Charging
Your tablet is only partially charged when first unpacked. Charge the battery fully for
2.5 hours before using your tablet for the first time.
Warning:
If your tablet is not in use for a long time, the battery will completely run
out and may not be powered on immediately even if it is connected to
power. When this occurs, fully charge your tablet for 2.5 hours before use.
1. Insert the supplied power cord’s connector into the power adapter.
2. Connect the power adapter’s connector into your tablet’s power input socket.
3. Plug the power cord’s three-wire grounding plug into an electric outlet to start
charging. The battery indicator lights up in orange.
4. After the battery is completely charged, the battery indicator turns green.
Remove the power adapter and the power cord from both the power outlet and
the tablet.
Note:
• To check the current battery status and select preferred power management, tap the
Power icon from the notification area of the Windows Taskbar.
1
2
3
Booting Up
8
Chapter Two Starting Up Your Tablet
Warning:
• Use only the supplied power adapter and power cord for charging. Do
not remove the cord during charging to avoid possible damage.
• Do not try to replace the battery by yourself. Any attempt to
disassemble the tablet may cause damage to the tablet or result in
personal injury.
Battery maintenance
This tablet contains a built-in Li-Ion rechargeable battery. The capacity of the battery
will reduce each time it is charged / depleted. However, you can still extend the
battery life by following the suggestions below:
• Use the tablet at least once a week.
• Charge the battery regularly and fully. Never leave the battery fully discharged
for a long time.
• Always keep the tablet away from heat.
• If the tablet only works when the power adapter is connected, contact your local
dealer to replace the battery.
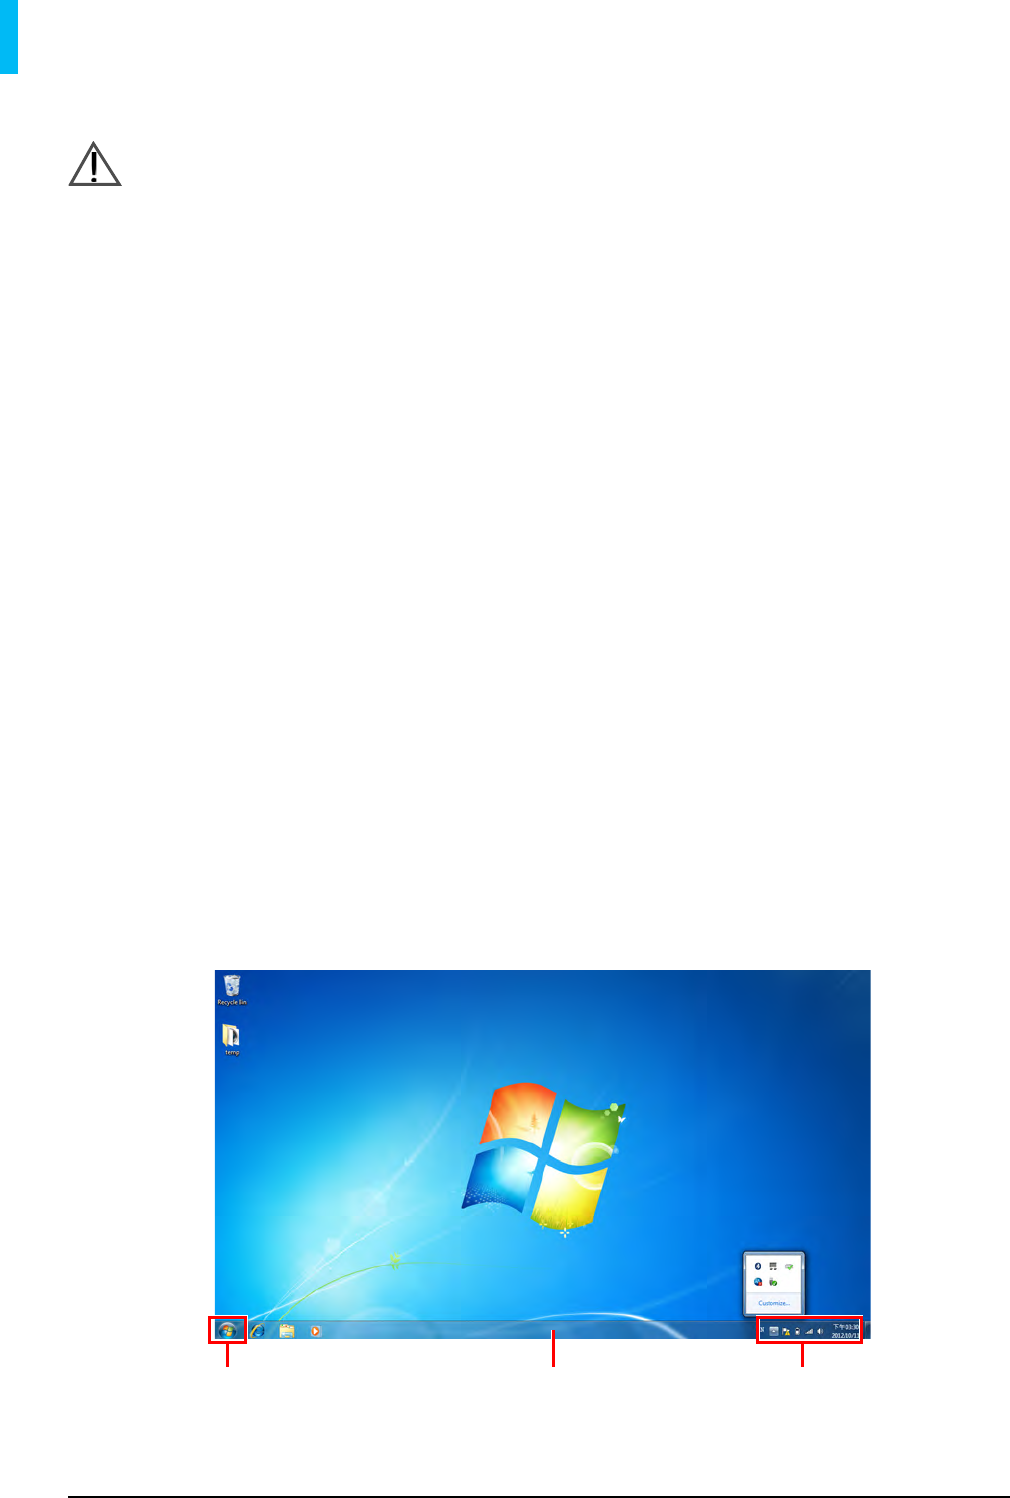
Booting Up
Press and hold the Power Key to turn on your tablet. You will enter the Windows
desktop after system startup. Use finger gestures, such as tapping or dragging, to
perform typical mouse operations.
Notification areaWindows TaskbarWindows icon
Powering Off 9
Chapter Two Starting Up Your Tablet
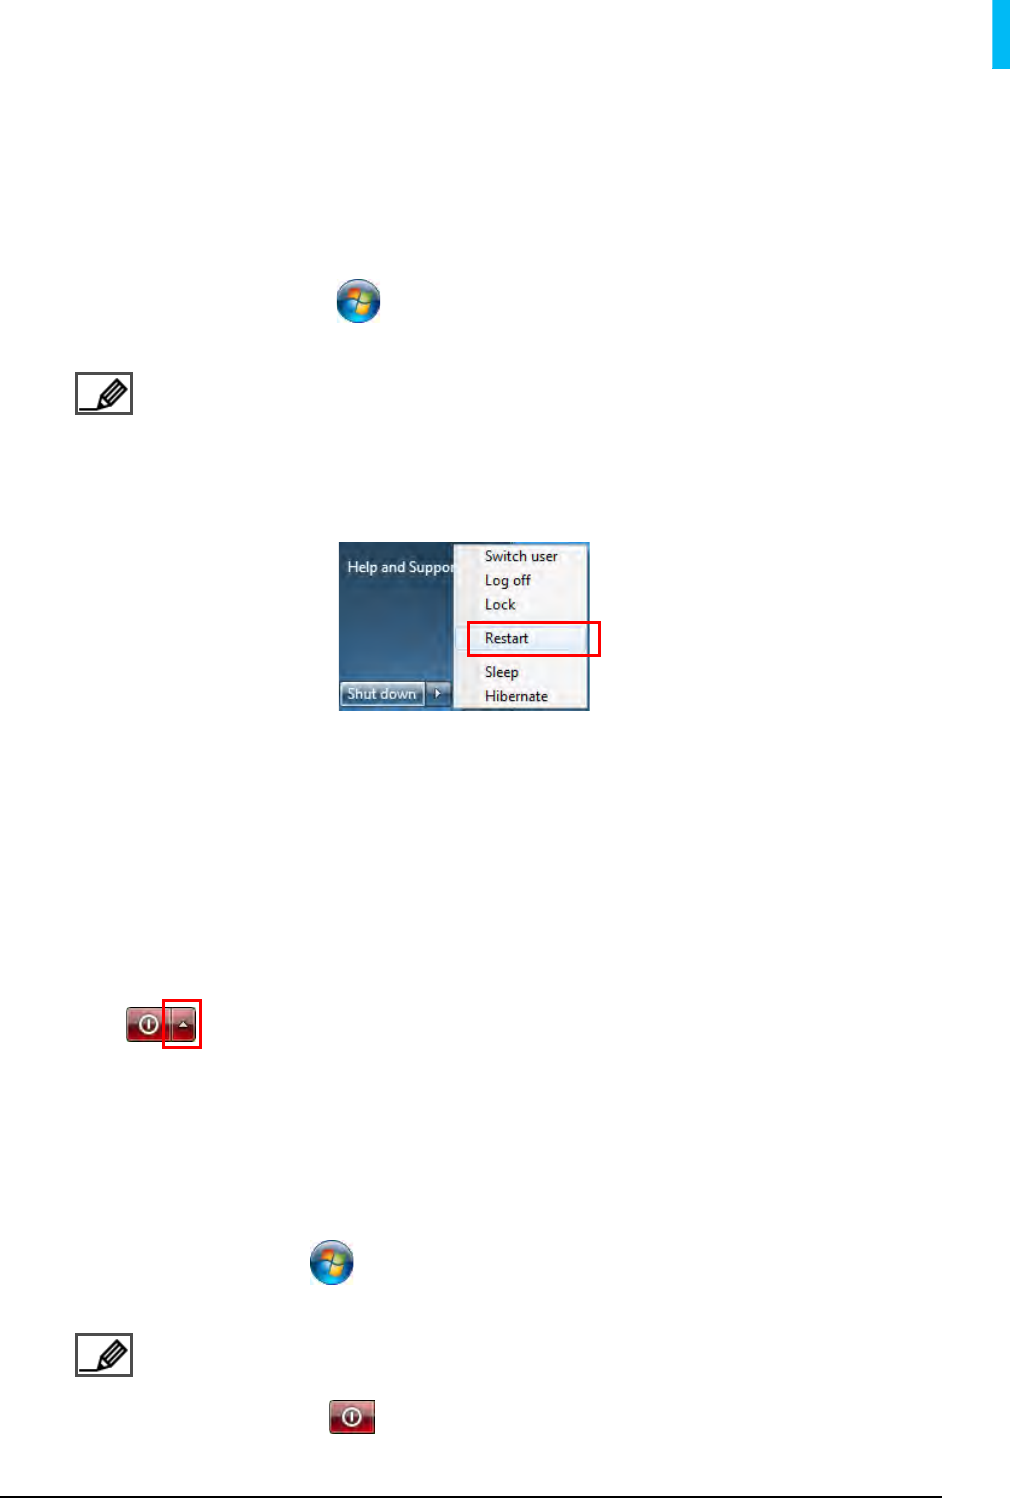
To reboot your tablet
There are two ways of rebooting your tablet.
• To reboot your tablet after installing new programs or updates:
1. Tap the Windows icon from the Windows Taskbar to display the Start
menu.
Note: If the Windows Taskbar is hidden, use your finger to drag
up the Taskbar from the bottom of the desktop.
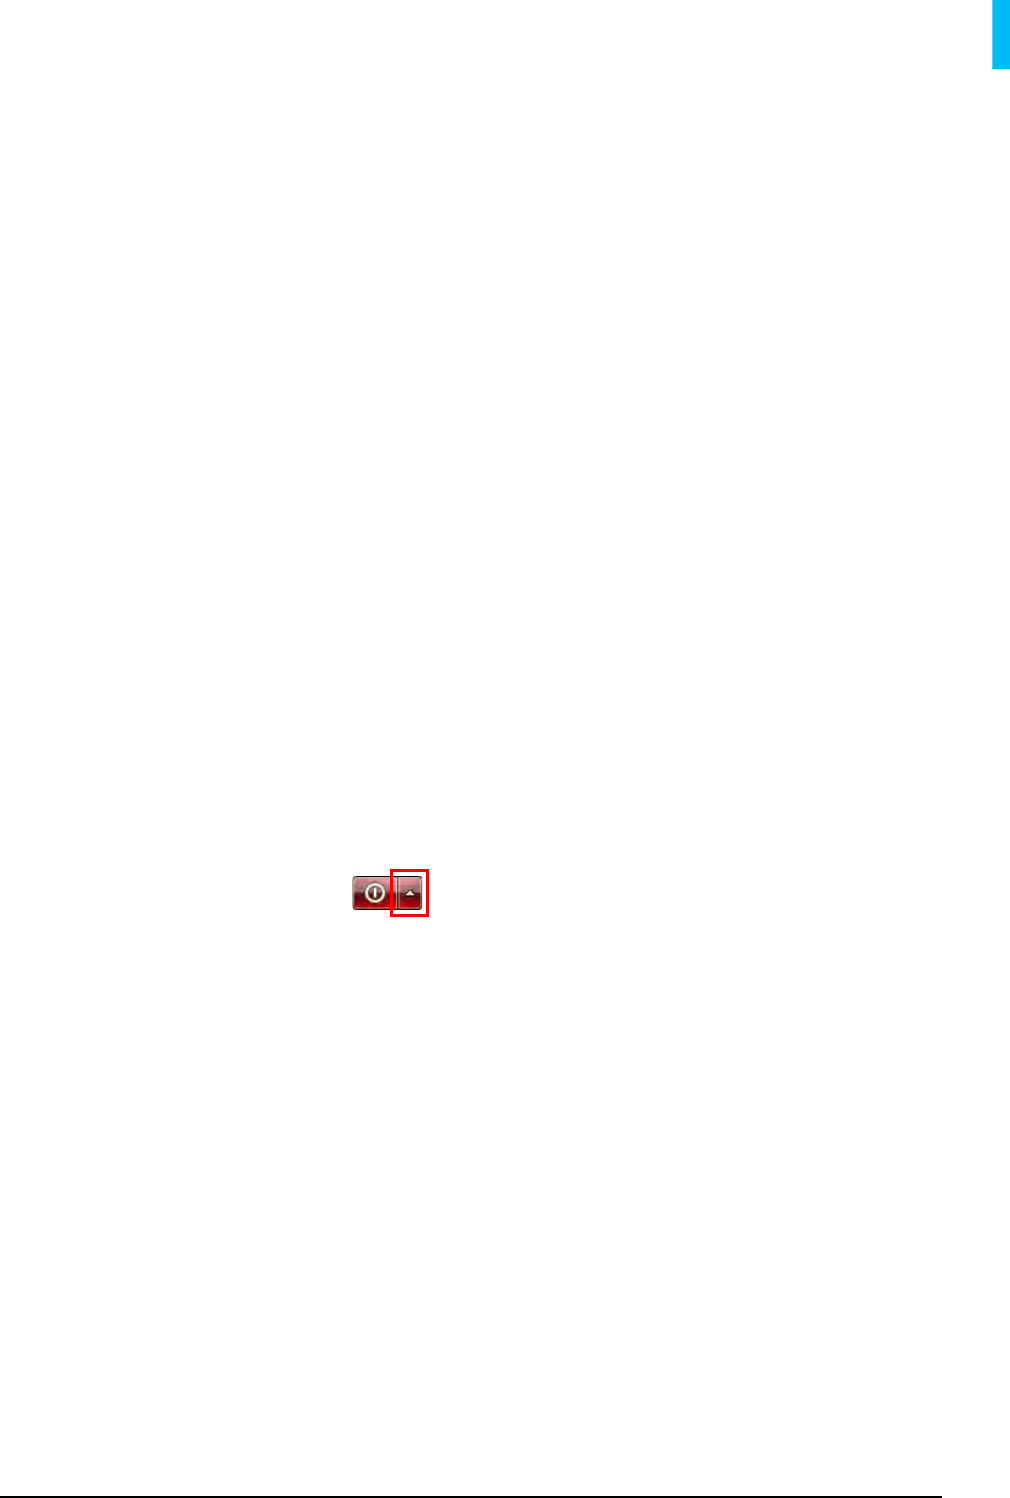
2. Tap the right arrow next to the Shut down button to display more options.
3. Tap to select “Restart”.
• To forcibly reboot your tablet when the touchscreen does not respond to any
operations:
1. Connect an USB keyboard to your tablet via the USB port.
2. From the keyboard, press and hold the Ctrl and Alt keys, and then press the
Delete key to display Windows Security Screen.
3. Press the Tab key repeatedly to select the up arrow next to the Shut down
icon , and press the Enter key to display the Shut down menu.
4. Use the Up, Down keys to select Restart, and press the Enter key.
Powering Off
1. Tap the Windows icon from the Windows Taskbar to display the Start
menu.
Note: If the Windows Taskbar is hidden, use your finger to drag
up the Taskbar from the bottom of the desktop.
2. Tap the Shut down icon .
Entering / Resuming from Sleep Mode
10
Chapter Two Starting Up Your Tablet
Entering / Resuming from Sleep Mode
Sleep mode is a power-saving state that allows your tablet to resume work quickly,
faster than a standard system reboot.
There are two ways of entering Sleep mode.
• Press the Power Key.
• a. Tap the Windows icon from the Windows Taskbar to display the Start
menu.
Note: If the Windows Taskbar is hidden, use your finger to drag
up the Taskbar from the bottom of the desktop.
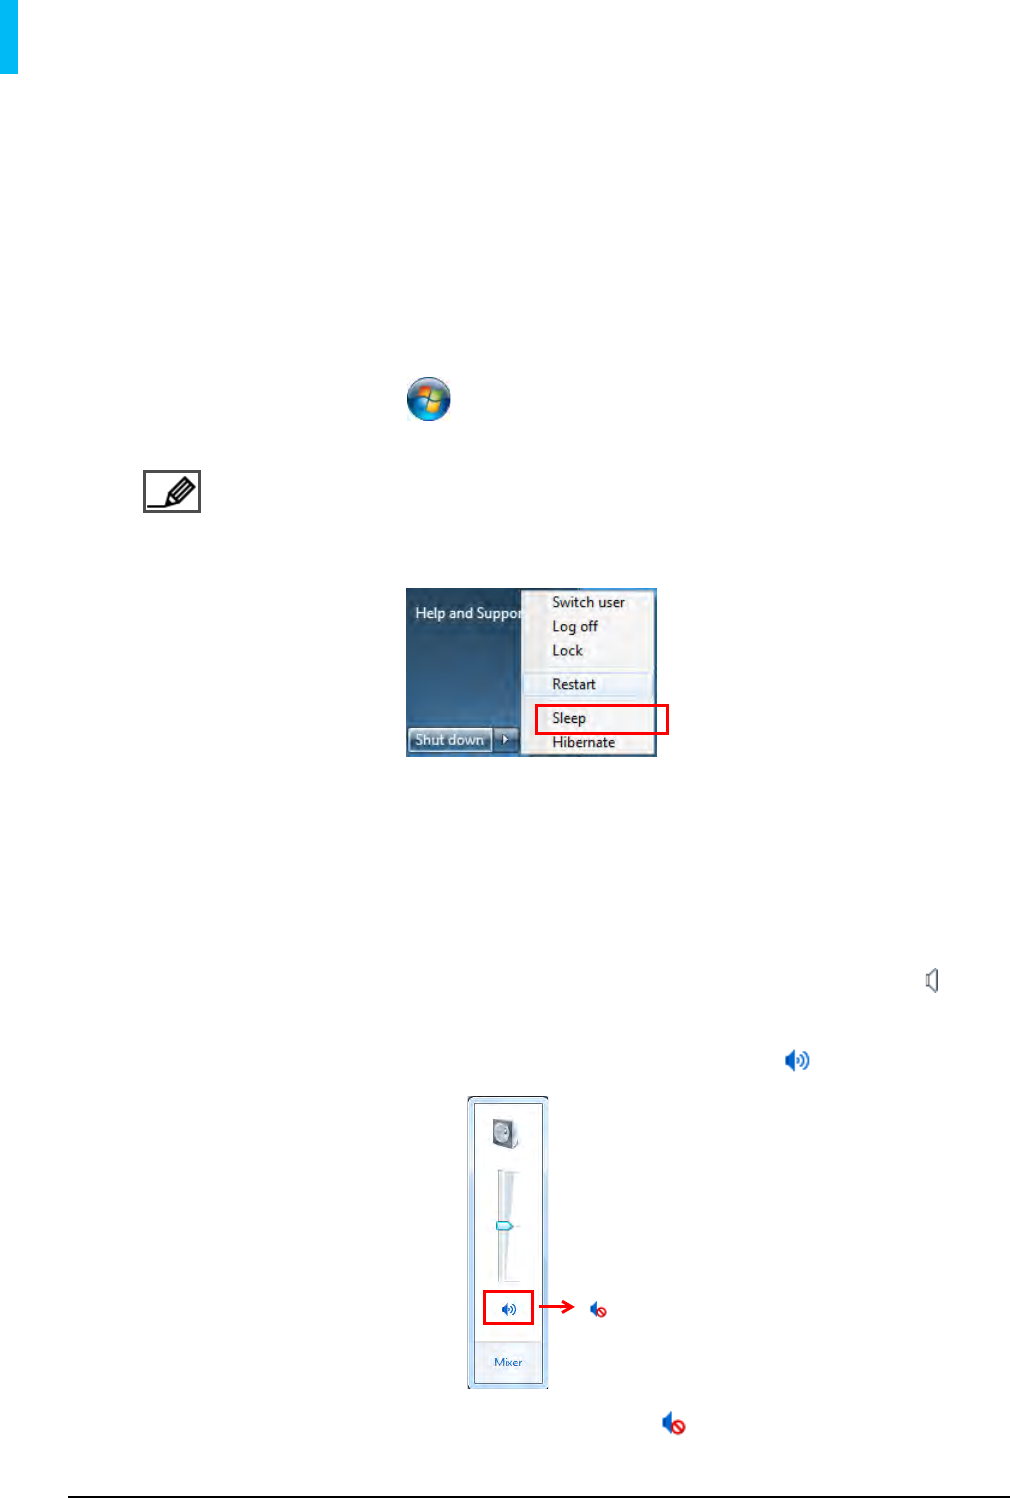
b. Tap the right arrow next to the Shut down button to display more options.
c. Tap to select “Sleep”.
To wake up from Sleep mode, press the Power Key.
Adjusting the Sound
1. From the notification area of the Windows Taskbar, tap the Volume icon .
2. Move the sliders up or down to increase or decrease the volume.
3. To mute the sound of your tablet, tap the Speaker On icon below the slider.
To resume the sound, tap the Speaker Off icon .
Connecting to a Wi-Fi Network 11
Chapter Two Starting Up Your Tablet
Connecting to a Wi-Fi Network
To browse the webpages or use other Web applications, connect your tablet to the
Web first via a wireless network.
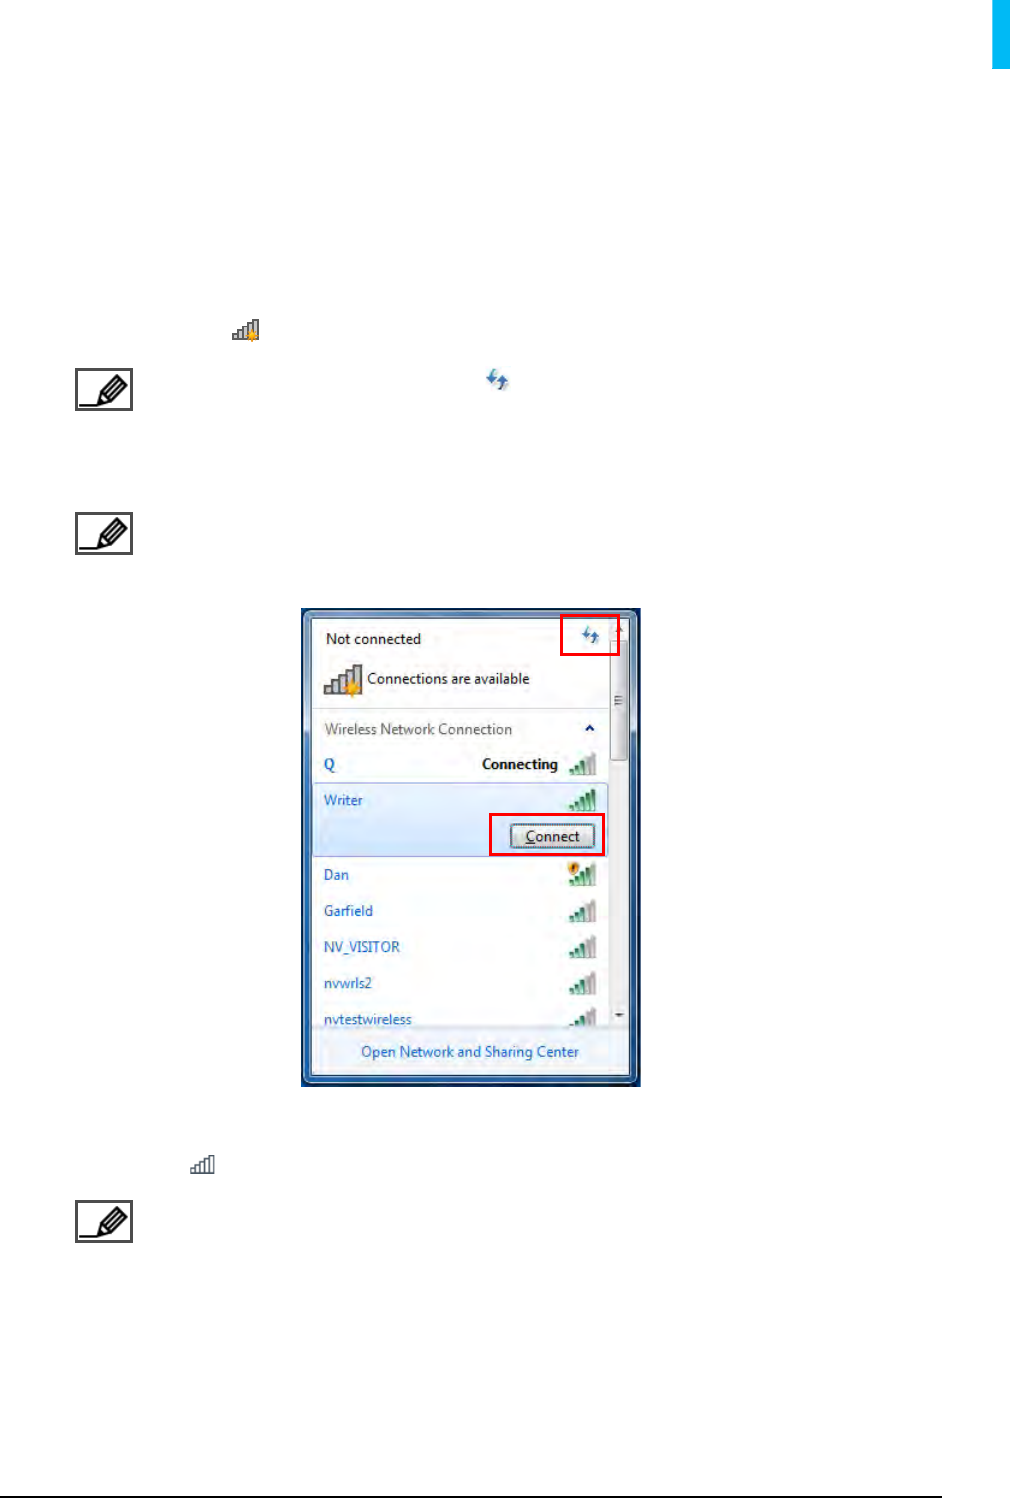
1. From the notification area of the Windows Taskbar, tap the Network (Not
connected) icon . Your tablet then scans for available Wi-Fi networks.
Note: Tap the Refresh icon to start a new search for the
available Wi-Fi networks.
2. The network names (SSID) of discovered Wi-Fi networks display in a list. Tap the
preferred network, and then tap Connect.
Note: You may need to enter the password or security key to
access a secured network.
3. After your tablet connects successfully to the Internet, the Network (Internet
access) icon appears in the notification area of the Windows Taskbar.
Note: To disconnect from the current Wi-Fi network, tap its
name, and then tap Disconnect.
Inserting an SD Card (Optional)
12
Chapter Two Starting Up Your Tablet
Inserting an SD Card (Optional)
Insert the SD card with its metal contacts facing downwards into the SD card slot,
and push it in until it clicks into place.
To remove the SD card
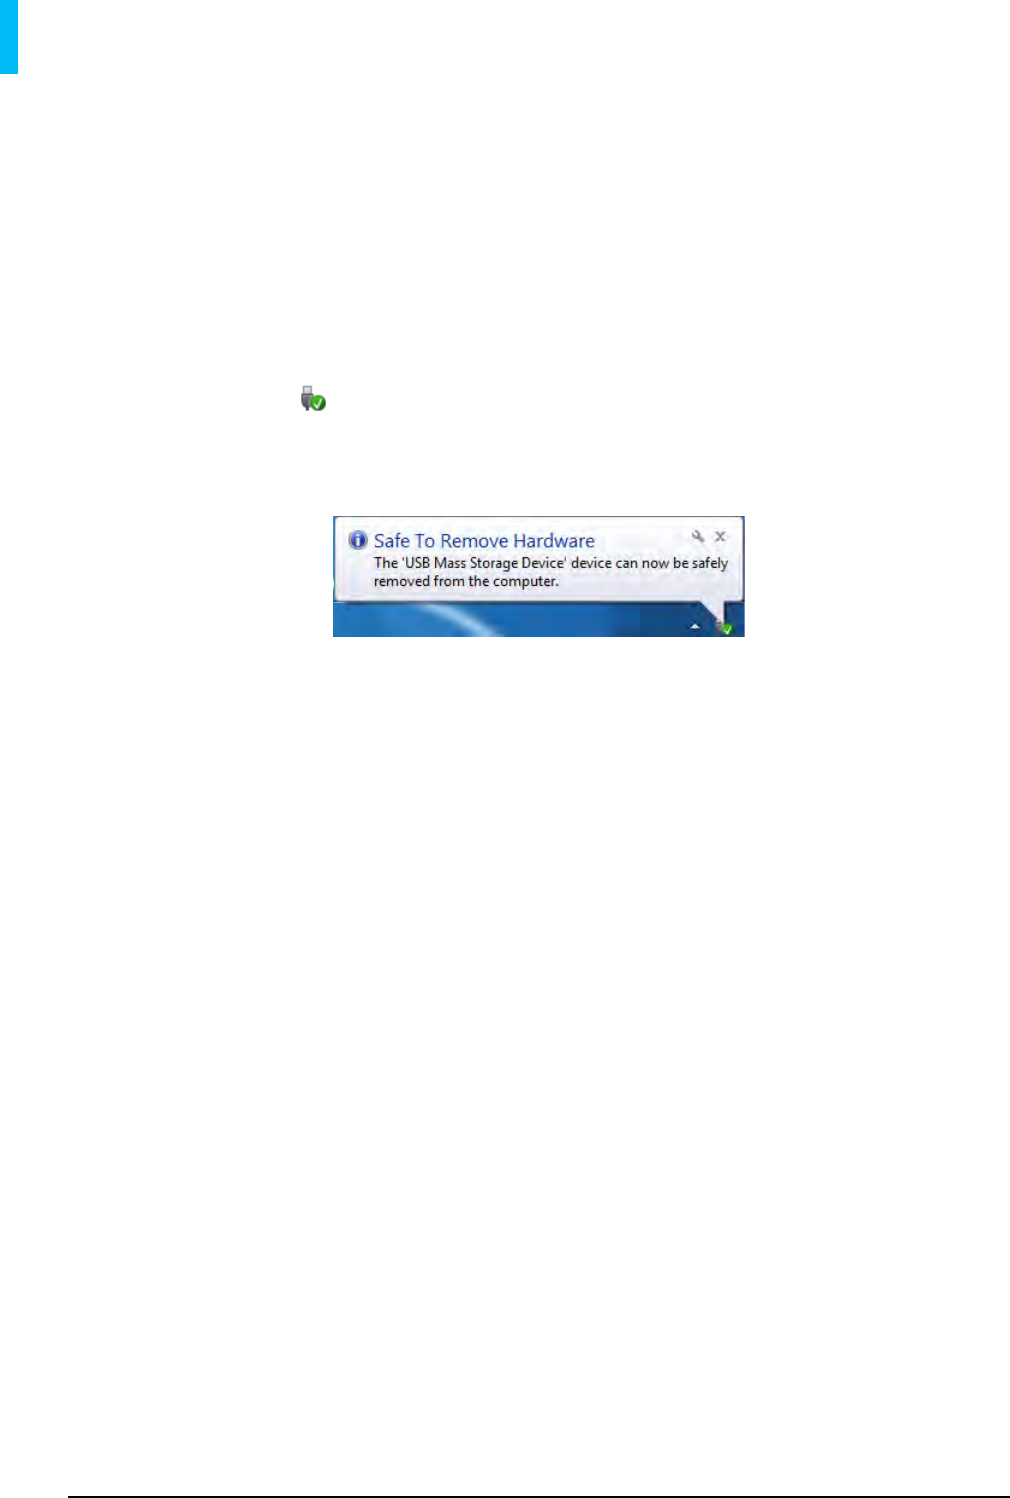
1. From the notification area of the Windows Taskbar, tap the Safely Remove
Hardware icon .
2. From the list of the devices inserted, tap the SD Card drive. You will be notified
with a “Safe to Remove Hardware” notice.
3. Push the SD card in to eject it from the SD card slot.

Docking Your Tablet 13
Chapter Three More Ways of Using Your Tablet
More Ways of Using Your Tablet
To fulfill the diverse needs of mobile computing, your tablet can also be used on the
dock, on the go, fixed onto a wall, or outputted to an HDMI-enabled TV or monitor.
Docking Your Tablet
1. Use your fingertip to push the lock switch to the right until the back stand is
released.
Docking Your Tablet
14
Chapter Three More Ways of Using Your Tablet
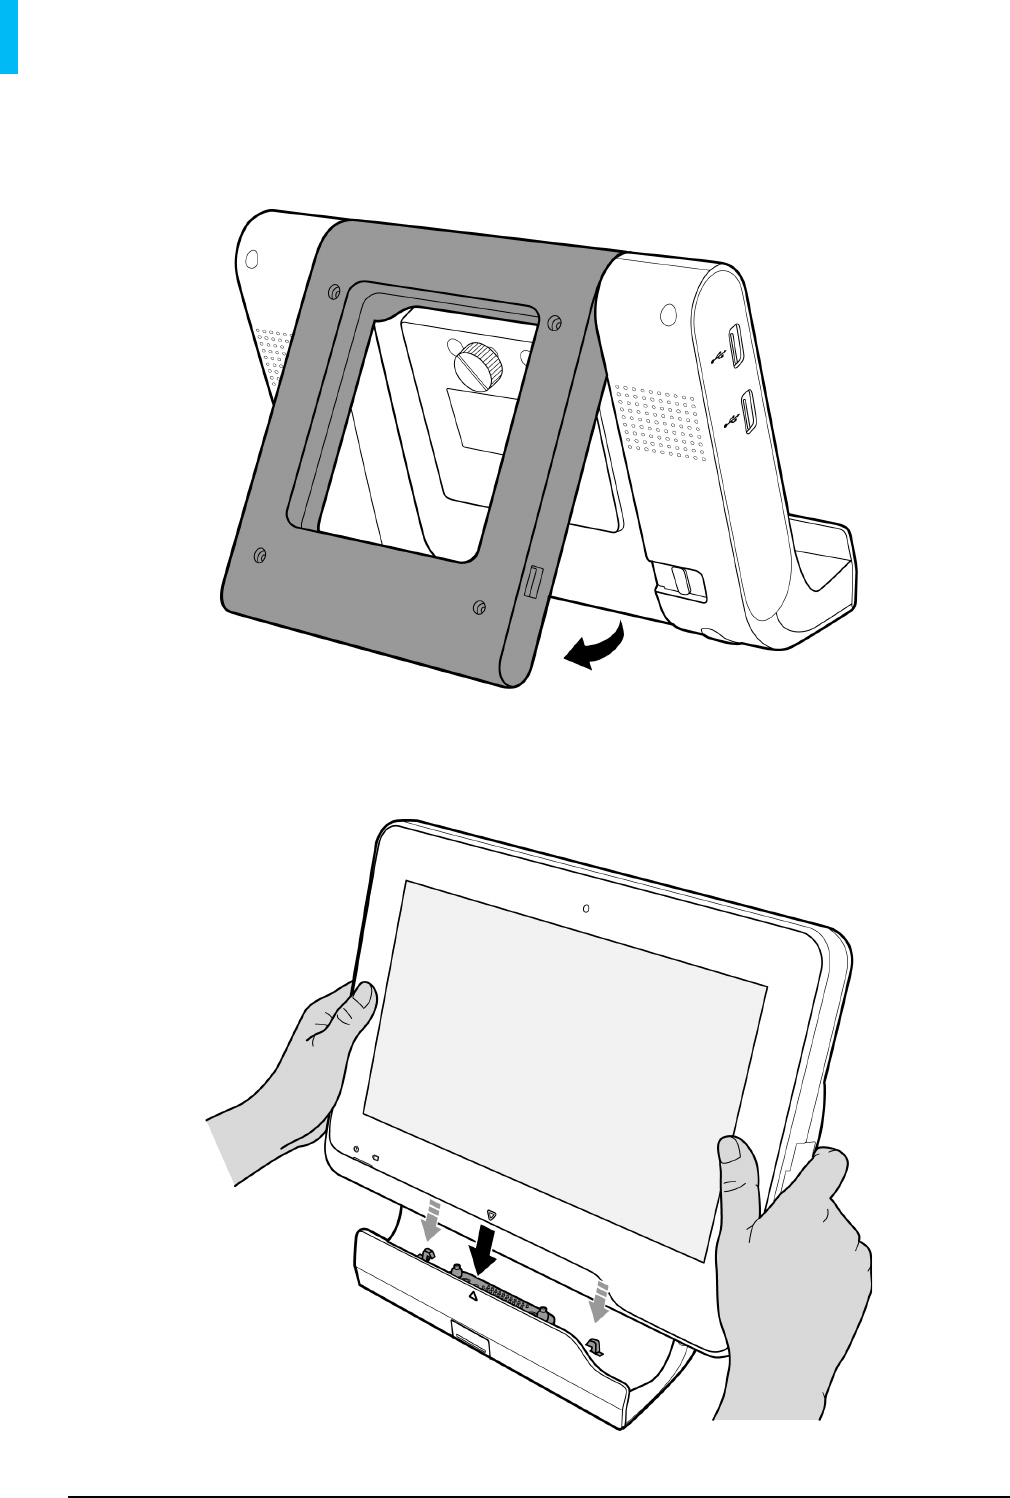
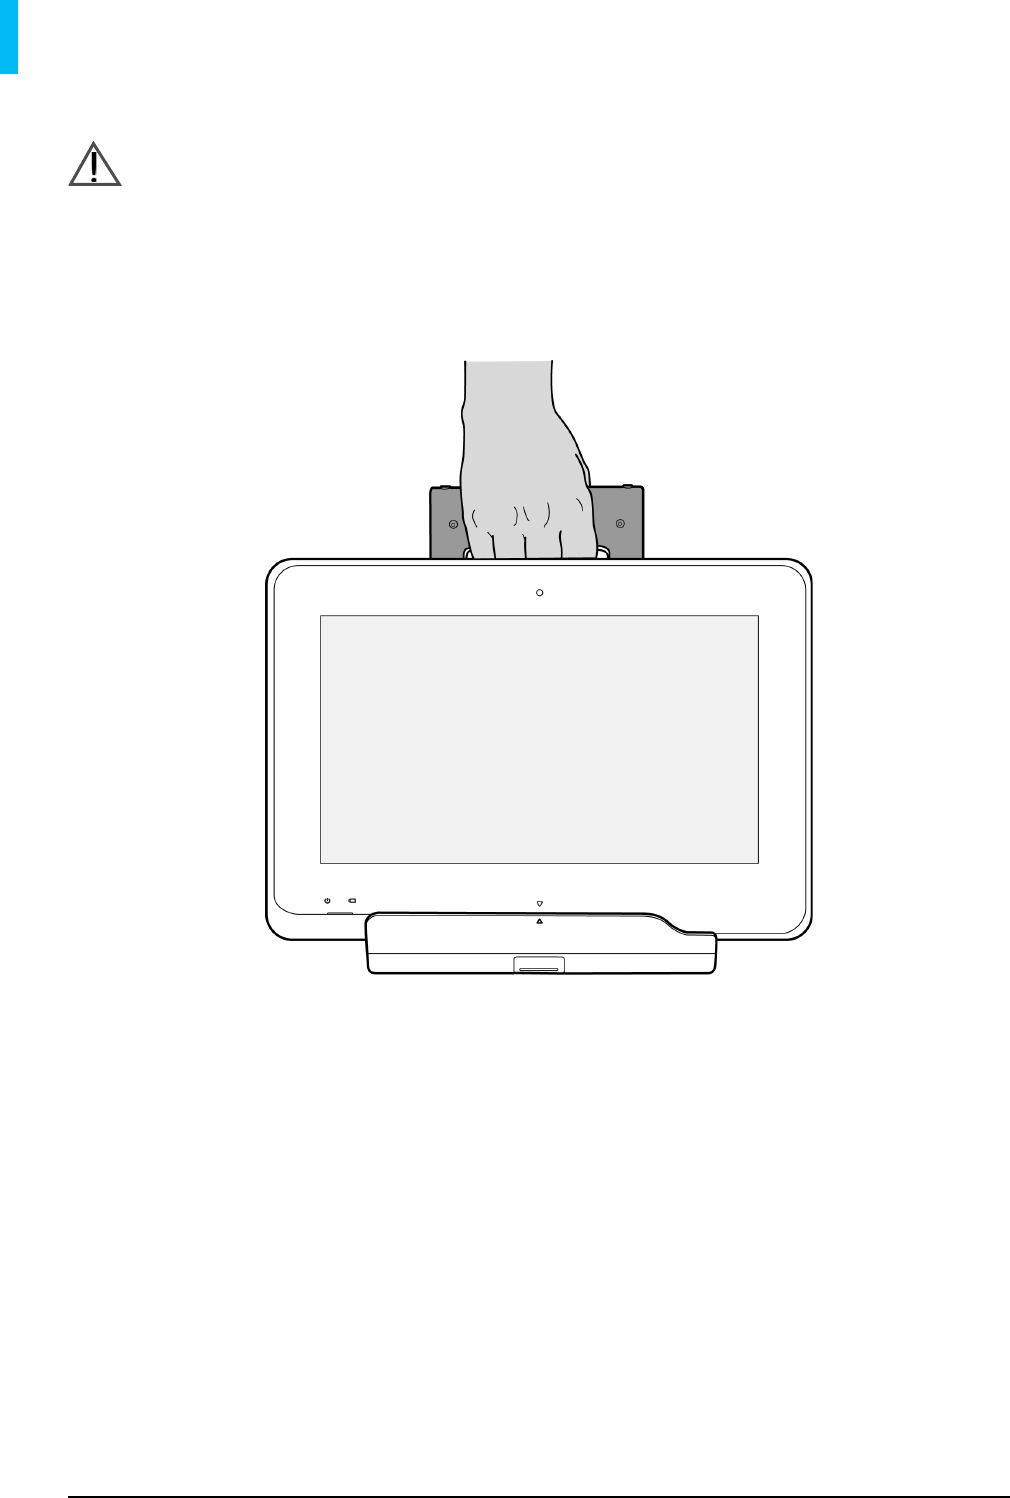
2. Gently pull out the back stand to the degree that suits your preferred viewing
angle.
3. Hold two sides of your tablet with both hands firmly, and align the arrow sign on
the tablet with the one on the dock. Carefully push the tablet towards the dock
connector until you hear a click.

Using Your Tablet (with Tablet Dock) On The Go 15
Chapter Three More Ways of Using Your Tablet
4. Rotate the fixed screw clockwise on the rear side of the dock to lock your tablet
firmly onto the dock.
Using Your Tablet (with Tablet Dock) On The
Go
1. After locking your tablet firmly onto the dock, pull out and rotate the back stand
by 180 degree.
Using Your Tablet (with Tablet Dock) On The Go
16
Chapter Three More Ways of Using Your Tablet
Warning:
Make sure you have tightened the fixed screw before rotating the back
stand.
2. Use the rotating back stand as a handle to carry your tablet around.
Undocking Your Tablet 17
Chapter Three More Ways of Using Your Tablet
Undocking Your Tablet
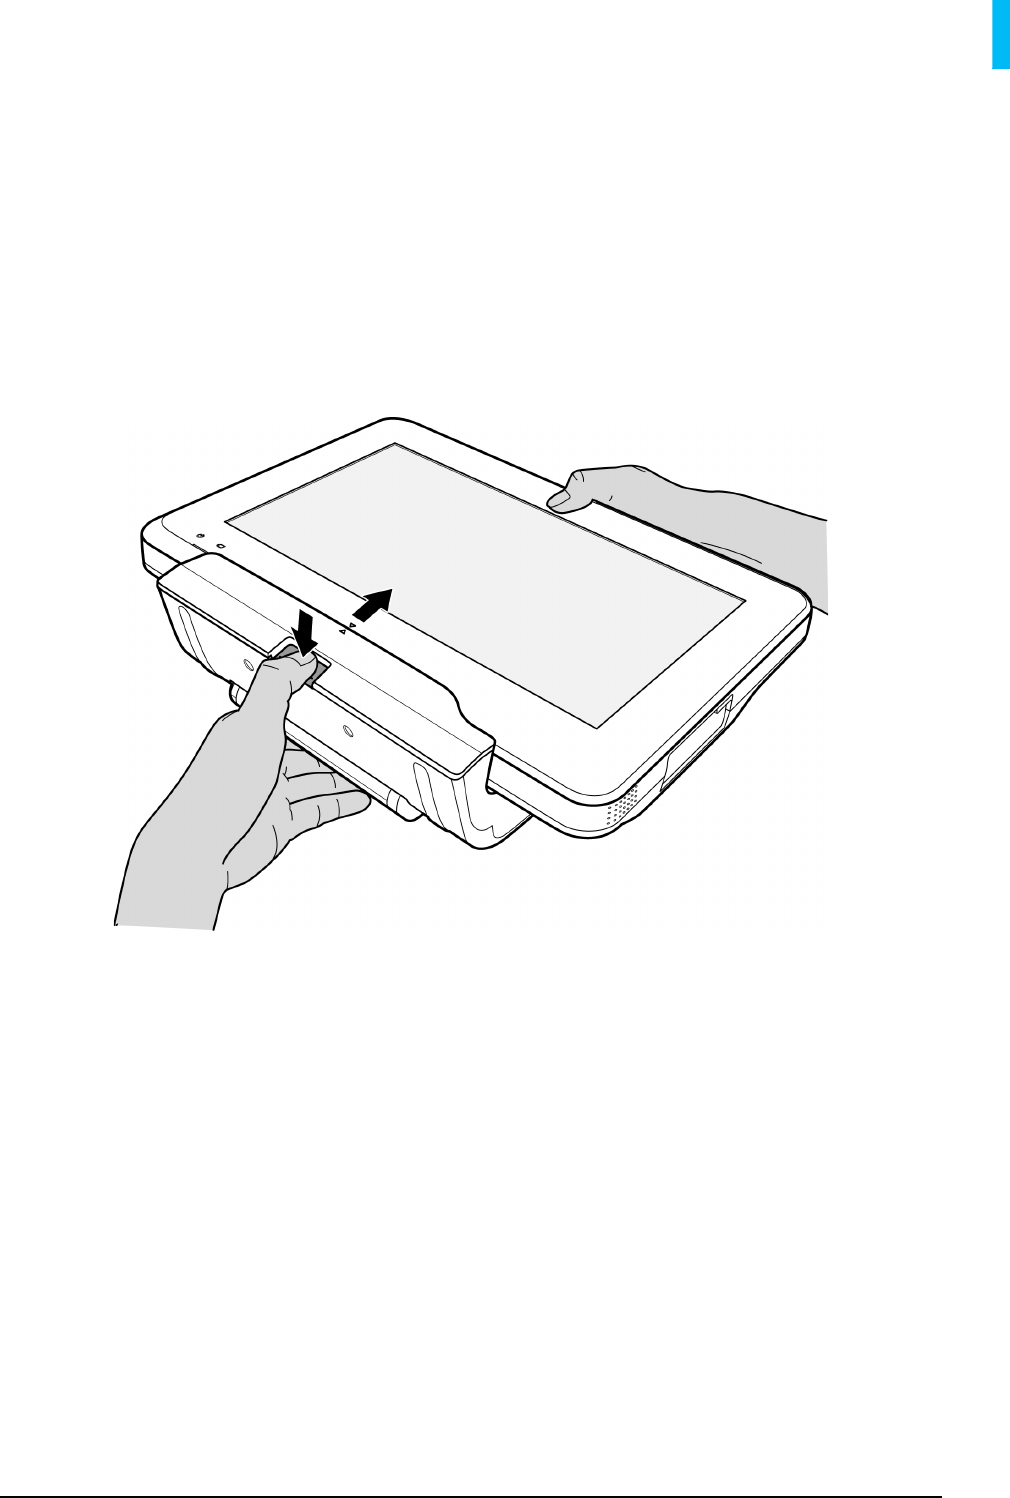
1. Rotate the fixed screw counterclockwise on the rear side of the dock to unlock
your tablet from the dock.
2. Hold the bottom of the dock with your left hand and the top of the tablet with
your right hand firmly, and hold them in a horizontal position. Press and hold the
release latch on the dock, and carefully pull out the tablet from the dock.
Wall-mounting Your Tablet
18
Chapter Three More Ways of Using Your Tablet
Wall-mounting Your Tablet
The hole pattern on the rear side of your dock is compliant with VESA standard.
Therefore, you can install your tablet with the dock on any VESA wall mounts,
desktop or ceiling mounts.
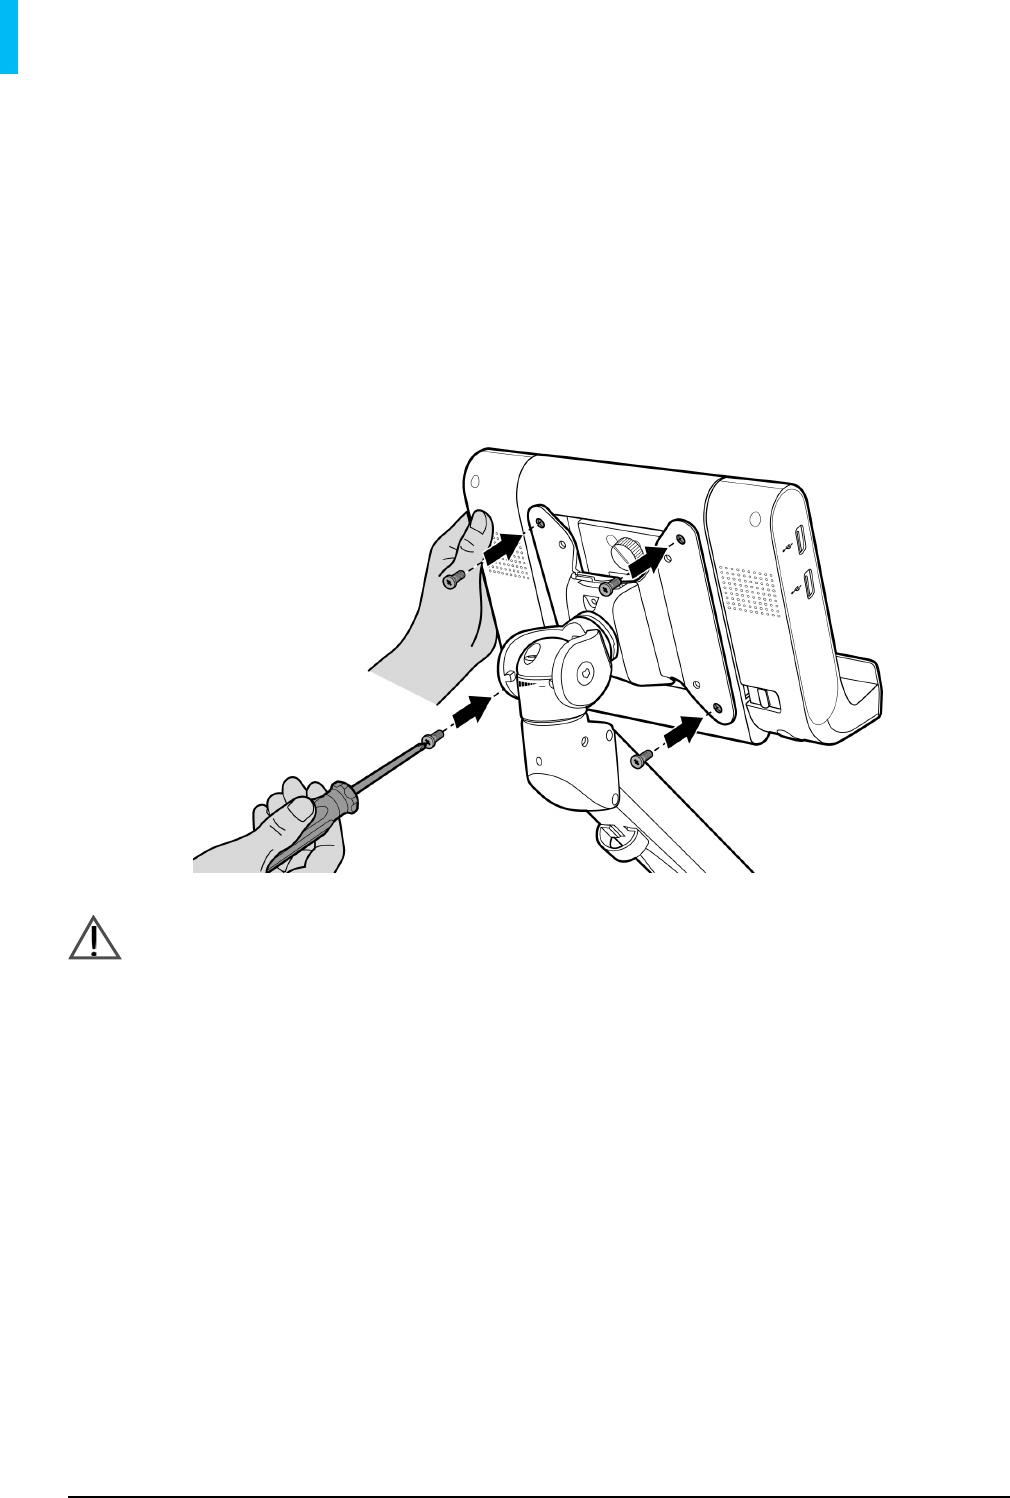
1. Hold the dock firmly with one hand and position it precisely to the front of the
mount plate where the hole patterns on both the back of the dock and the plate
meet.
Warning:
Make sure you have undocked the tablet before installing the dock to the
mount plate.
Wall-mounting Your Tablet 19
Chapter Three More Ways of Using Your Tablet
2. Hold an appropriate Phillips screwdriver with the other hand and carefully drive
four screws to tighten the dock with the mount plate.
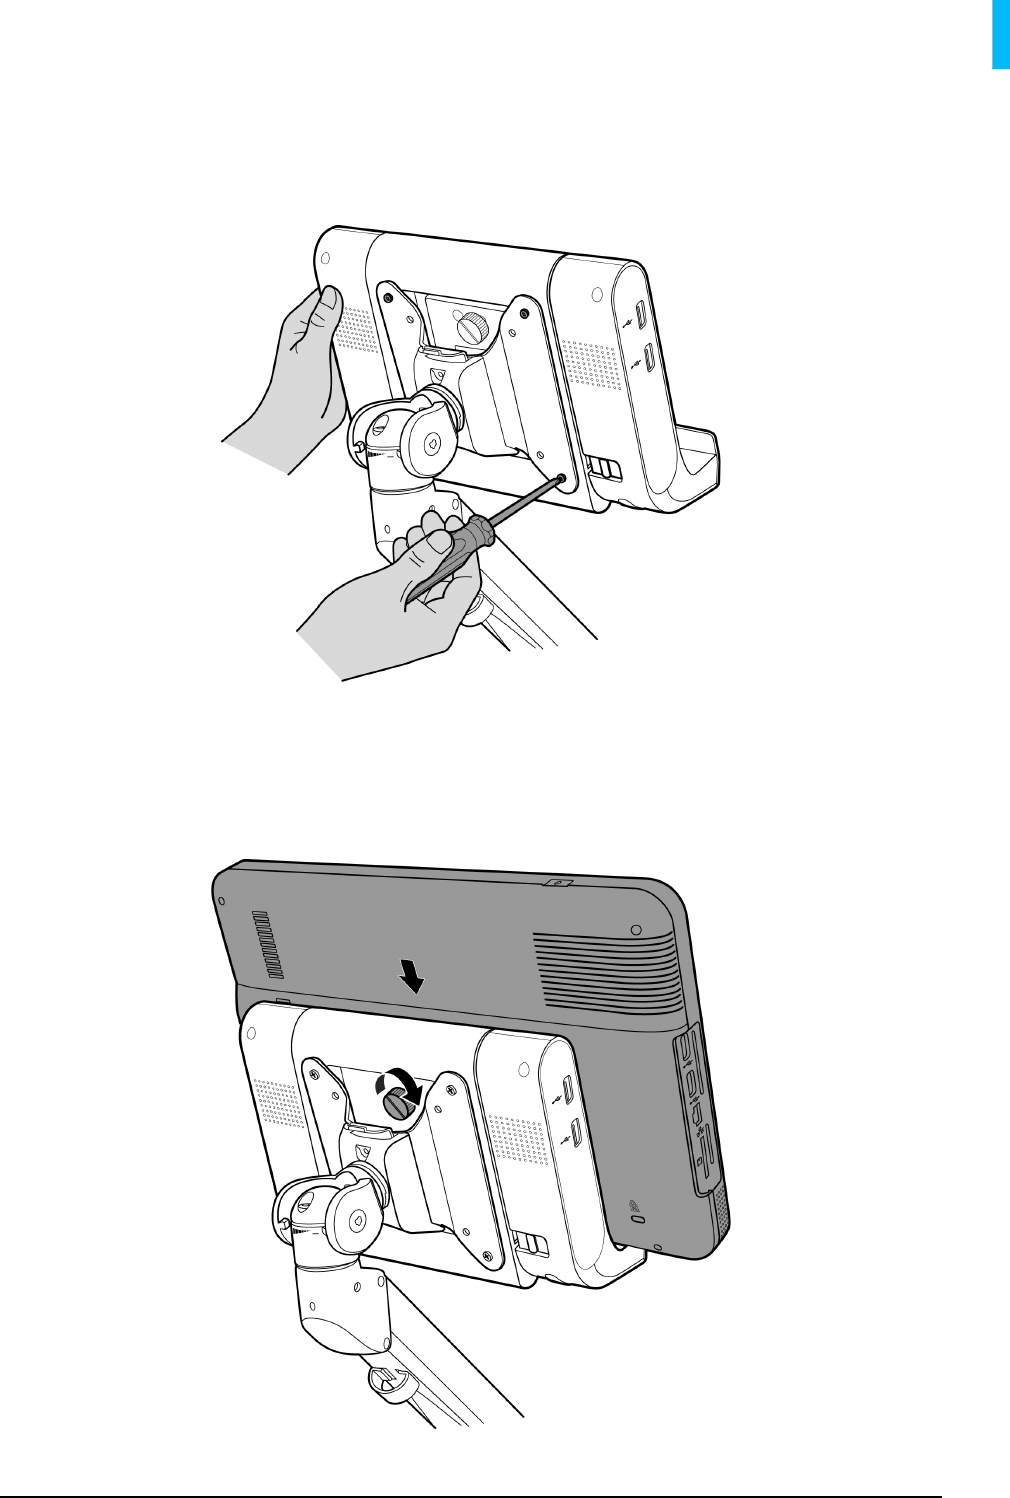
3. Hold two sides of your tablet with both hands firmly, and align the arrow sign on
the tablet with the one on the dock. Carefully push the tablet towards the dock
connector until you hear a click. Rotate the fixed screw clockwise on the rear side
of the dock to lock your tablet firmly onto the dock.

Outputting Your Tablet Display to an HDMI-enabled TV or Monitor
20
Chapter Three More Ways of Using Your Tablet
Outputting Your Tablet Display to an HDMI-
enabled TV or Monitor
You can connect your tablet to an HDMI-enabled TV or monitor using an HDMI cable.
1. Insert one end of an HDMI cable to your tablet’s HDMI port. Ensure that the
arrow side faces up.
2. Insert the other end of the HDMI cable to your HDMI-enabled TV’s or monitor’s
HDMI port.
3. On your TV or monitor, select the proper input source.
Note:
• Refer to the documentation of your HDMI-enabled television or monitor for
detailed connections and settings.
Troubleshooting 21
Chapter Four Troubleshooting
Troubleshooting
Problem:Your tablet does not boot up after turning on the power.
Solution: •The Power indicator is not lit, indicating that the battery is depleted.
Charge the device first.
Problem:Nothing appears on your tablet screen.
Solution: •You have selected “Power Saver” as the power plan for your tablet,
which automatically turns off the display within a short period of time
in order to save power. Tap anywhere on the screen to turn the
display back on.
•The Power indicator blinks blue, indicating that your tablet is in Sleep
mode. Press the Power Key to resume your tablet from sleep.
Problem:The touchscreen does not respond to your finger gestures.
Solution: •An internal error may have occurred. Refer to the following steps to
forcibly reboot your tablet:
1. Connect an USB keyboard to your tablet via the USB port.
2. From the keyboard, press and hold Ctrl and Alt keys, and then
press the Delete key to display Windows Security Screen.
3. Press the Tab key repeatedly to select the up arrow next to the
Shut down icon , and press the Enter key to display the
Shut down menu.
4. Use the Up, Down keys to select Restart, and press the Enter
key.

Troubleshooting
22
Chapter Four Troubleshooting
Problem:No audio is heard from your tablet.
Solution: •Your tablet may be muted. From the notification area of the Windows
Taskbar, tap the Volume icon .Tap the Speaker off icon below
the slider to resume the sound. Move the sliders up to increase the
volume if needed.
•If your tablet is currently connected to the dock, a pair of
headphones or earphones may have been inserted to the dock’s
headphone jack. Remove the headphones or earphones.
Problem:After connecting your tablet to an HDMI output device, no
images are shown on the screen.
Solution: •Check if the HDMI cable is connected firmly and correctly onto both
the tablet and the HDMI output device.
•Reboot your tablet.
Specifications 23
Chapter Five Specifications
Specifications
Note:
• Specifications are subject to change without notice.
11.6" Tablet PC
Items Descriptions
Display 11.6 inch wide view angle LCD, 16.2 M color
WXGA 1366 RGB (H) x 768 (V)
Touch
Technology Multi-Touch capacitive touch
CPU Intel Ivy Bridge Core i7 (17W) 3517UE
OS Win7 / Win8
Camera Front Camera 1.3 M
Memory DDR3-1333 ECC SO-DIMM 2GB
RAM Transcend mSATA 128G SSD
Card Reader SD/SDHC/SDXC (up to 64 GB)
USB Port USB 3.0 * 2
Ethernet RJ45 * 1 (10/100M/1Gb)
Speakers 0.5w * 2
Microphone Yes
Battery 63 Wh
Adapter I/P: 100-240 Vac, 47-63 Hz, 1.2-0.5 A
Wi-Fi Wi-Fi 2.4 GHz, IEEE 802.11 b/g/n
Bluetooth Bluetooth 2.1 + EDR
Dimension 321 * 224 * 32 (mm)
Weight 2.12 Kg (with battery)
Specifications
24
Chapter Five Specifications
Dock
Items Descriptions
Charging Charging slot for device
Ethernet RJ45 * 1 (10/100M/1Gb)
USB Port USB 3.0 * 2
HDMI output
port HDMI 1.3
Audio out (Line
out) 3.5 mm
Weight 0.57 Kg

FCC Statement 25
Chapter Six FCC Statement
FCC Statement
Federal Communication Commission Interference
Statement
This equipment has been tested and found to comply with the limits for a Class B
digital device, pursuant to Part 15 of the FCC Rules. These limits are designed to
provide reasonable protection against harmful interference in a residential
installation. This equipment generates, uses and can radiate radio frequency energy
and, if not installed and used in accordance with the instructions, may cause harmful
interference to radio communications. However, there is no guarantee that
interference will not occur in a particular installation. If this equipment does cause
harmful interference to radio or television reception, which can be determined by
turning the equipment off and on, the user is encouraged to try to correct the
interference by one of the following measures:
• Reorient or relocate the receiving antenna.
• Increase the separation between the equipment and receiver.
• Connect the equipment into an outlet on a circuit different from that to which the
receiver is connected.
• Consult the dealer or an experienced radio/TV technician for help.
FCC Caution: Any changes or modifications not expressly approved by the party
responsible for compliance could void the user's authority to operate this equipment.
This device complies with Part 15 of the FCC Rules. Operation is subject to the
following two conditions: (1) This device may not cause harmful interference, and (2)
this device must accept any interference received, including interference that may
cause undesired operation.
For product available in the USA/Canada market, only channel 1~11 can be
operated. Selection of other channels is not possible.
This device and its antenna(s) must not be co-located or operation in conjunction
with any other antenna or transmitter.
IMPORTANT NOTE:
FCC Radiation Exposure Statement:
This equipment complies with FCC radiation exposure limits set forth for an
uncontrolled environment. This equipment should be installed and operated with
minimum distance 20cm between the radiator & your body.