User Manual
English
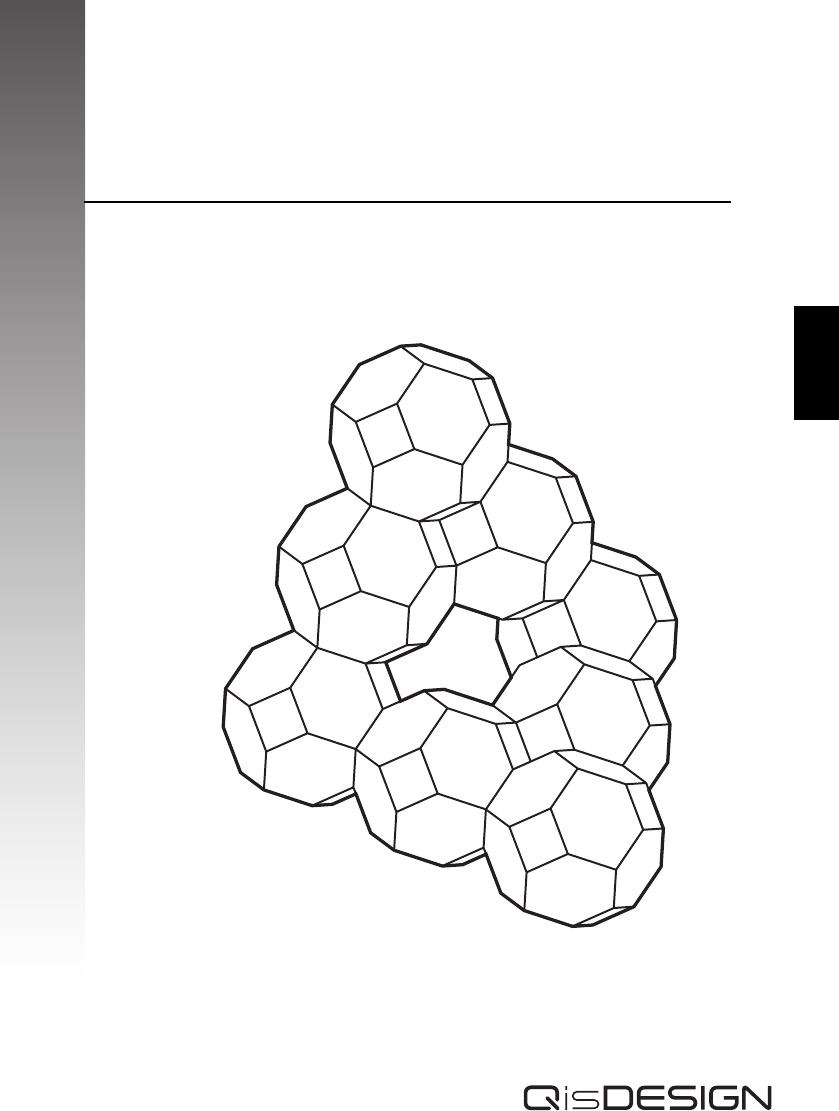
Crystal LED Lamp
User Guide
English2
English
Introduction
Thank you for purchasing the Coral LED (Light-Emitting Diode) Table Lamp. To ensure your
safety against any potential hazards and to optimize your lighting experience, please read
this guide carefully prior to use, and keep it in a safe place for future reference.
Features
The features of this lamp include:
• Modular units that can be assembled: units of Crystal LED Lamp can be ssembled to create
various combinations either while on or off.
• Two pre-programmed lighting modes: Gradient (default), Full Spectrum.
• Semiconductive solid light source: no heat radiation and no fragile components inside
(shatter-free)
• No ultraviolet (UV) emissions. No need to worry about the risk of developing skin cancer
• Energy-conserving switching-type power supply
• CE certified
Package Contents
Check the packaging for the following items. If any is missing or damaged, please contact
the place of purchase immediately.
For Your Safety
This lamp has been tested and certified under strict regulations and standards for illuminating
devices. To ensure your safety, please pay attention to the warnings and cautions below,
and follow the instructions in this guide when using the lamp.
• To prevent electric shock, do not disassemble the lamp for any reasons.
• Do not attempt to modify the lamp. Doing so may cause the lamp to malfunction or result
in irrecoverable damage.
• Use only the supplied power adapter and connect only to a suitable outlet power (Model:
FSP024-DMCE1). Otherwise the lamp will fail to work normally or result in fire.
• Do not pull the power cord out of the power outlet by grasping the cable itself, as you may
damage the cable and the power outlet. Only ever remove the power cord by grasping
the plug on the end of the cable.
• Do not place any foreign objects inside any parts of the lamp. Doing so may cause the
lamp to malfunction.
• To avoid potential injuries, do not touch contact pins with wet objects or fingers.
• Place the lamp only on a flat and stable surface. Otherwise the lamp may topple over and
cause damage to it.
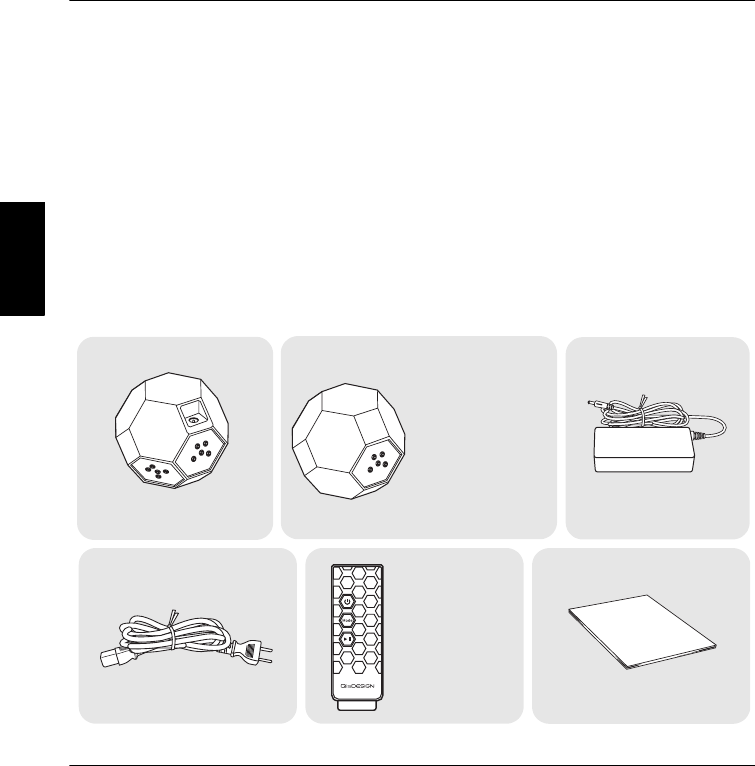
Crystal LED Table Lamp
Master Unit
(with DC power socket) x 1
Power Cord x 1
(A)
Remote Control
x 1, including 1
mercury battery
(CR2025 3V)
Mode
Check the number
of Slave Units
(without DC power
socket) included,
according to the
purchased model:
• NV01 _6: 5
• NV01 _8: 7
• NV01 _12: 11 Power Adapter x 1
User Guide x 1
(B) (C)
(D) (E) (F)
English 3
English
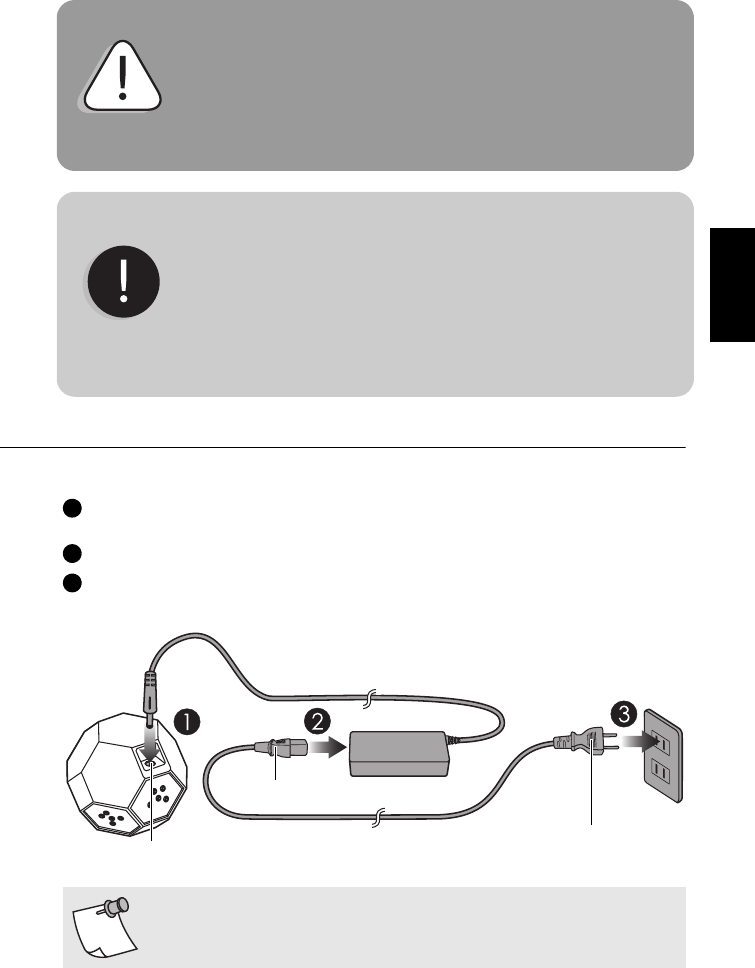
Installation: Please follow the procedures below
1. Connecting the power cord to the master unit
Take the master unit and locate the power socket. Then, connect the DC output on the
power adapter to the power socket.
Connect the power cord to the AC input on the power adapter.
Plug the power cord into the wall outlet. When the lamp is successfully connected, the
master unit will start to flash to indicate: the lamp is on the standby status and can be
operated by remote control.
In case of the following situations, unplug the lamp from the power outlet
immediately and contact the authorized service center or a qualified
service person for inspection or repair:
• When the outer casing of the lamp is broken
• When there are strange odors coming from the lamp
• When the lamp flickers
• When the insulation of the lamp's wiring is damaged or frayed, and the
metal strings inside can be seen.
• When unknown chemical liquids are spilled on the lamp
• Do not use the lamp in a humid environment (like in a bathroom or
outdoors). Otherwise the components inside may short-circuit and result
in accidents.
• The lamp containes magnets. To avoid any damage or malfunction, the
lamp should be kept away from objects containing iron or magnetic
materials (e.g. paperclips or magnets).
• To prevent electric shock and product damage, never put wet objects
on the connectors (contact pins) on the unit.
• This lamp is designed for indoor use only. Do not use it outdoors.
• This lamp is not a toy. Keep it away from children.
• Never disassemble the lamp or remove any components from it, as
doing so may result in accidents and will void the product warranty.
WARNING
CAUTION
Make sure "the master unit of Crystal LED lamp flashes" as a confirmation for
being connected. Afterwards, you can start to operate the Crystal LED Lamp
with the remote control.
1
2
3
Plug the power cord into the wall outlet
Connect one end of the power cord to
the power adapter
Connect the DC output from the power adapter
to the DC power socket on the master unit
(A) (C)
(D)
English4
English
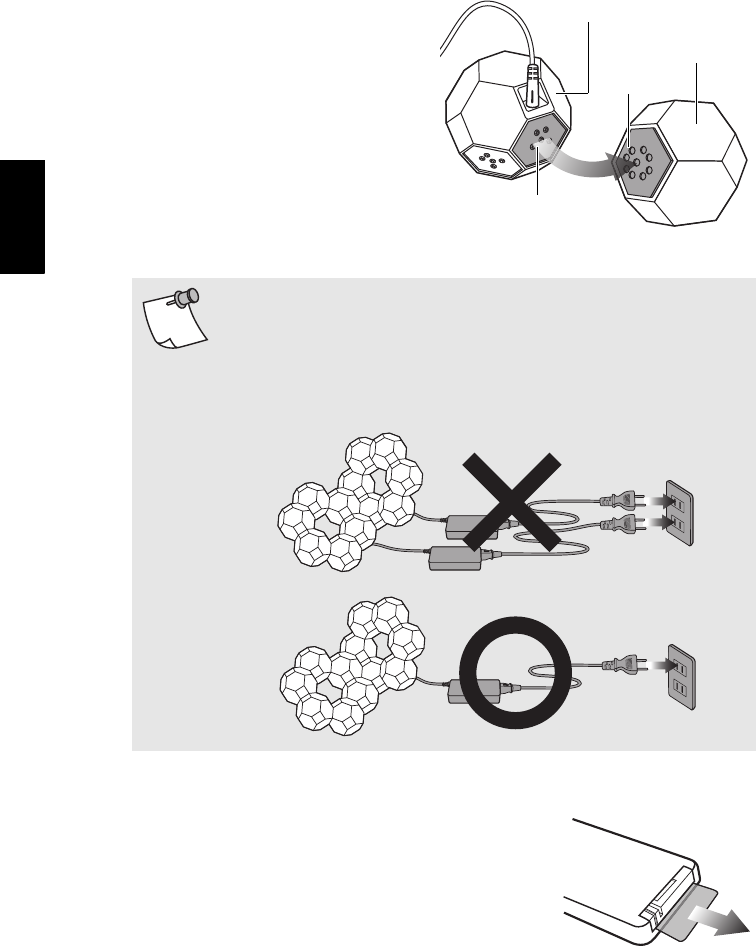
2. Assembling the Crystal LED Lamp units
Each unit of Crystal LED Lamp can be connected to other units. Therefore, you can follow
these instructions to assemble units and create various combined integral:
b. Apply this method to assemble other slave units. You can refer to the "Assembly Examples"
for ideas on how to create your own Crystal LED Lamp integral.
3. Get ready to use the Remote Control
a. Align the contact faces on the two units
(as illustrated contact pins), in order to
assemble the two units. Pay attention to
the polarity of magnets: Opposite
polarities on the units will attract and like
polarities will repel.
• The Crystal LED Lamp can be assembled in any combination either while on
or off.
• To avoid toppling over or being damaged, you should assemble the Crystal
LED Lamp units on a flat and stable surface. Make sure that the Crystal LED
Lamp assembly is also stable.
• You may combine up to 16 units with more than one master unit. But only
one power cord can be connected. Do not connect more than one power
cord to a set of interconnecting Crystal LED Lamps; otherwise the Crystal LED
Lamp will malfunction.
Contact pins
Contact pins
Master Unit
Slave Unit
(A)
(B)
Prior to first use of the remote control, pull out the insulating
piece on the remote control (refer to the illustration).
Effective distance of the remote control is 6 meters. Use the
remote control to operate the Crystal LED Lamp within this
distance.
(E)

English 5
English
Operate the Crystal LED Lamp with remote control
Turning on the Crystal LED Lamp
Turning off the Crystal LED Lamp
Switch the Lighting Mode
When the Crystal LED Lamp is on standby, push the Power
button on the remote control to turn on the Crystal
LED Lamp.
When the Crystal LED Lamp is turned on, push the Power
button on the remote control again to turn off the
Crystal LED Lamp (dimmed).
Gradient (default)
When the Crystal LED Lamp is turned on, it will be activated to the gradient mode.
Full Spectrum
When the Lamp is on the gradient mode, push the Mode
button on the remote control, Crystal will turn into to
the full spectrum mode.
Keep the lighting effect
When the Crystal LED Lamp is on, push the Pause
button on the remote control, the lamp will keep showing
the same color effect.
• Use the remote control to control the lighting modes. Attention: "pushing on
the contact points on the Crystal LED Lamp master and slave units" cannot
and will not control the lighting mode.
• You can disassemble or reassemble units while the Crystal LED lamp is
turned on (without the need to turn the lamp off.)
• If the assembled unit does not light up, push the Power button on the
remote control to turn off the Crystal LED Lamp. Then push the Power
again to restart the Crystal LED Lamp.
Mode
(E)
Mode
(E)
Mode
(E)
Mode
(E)
English6
English
Maintenance and Troubleshooting
Cleaning the Lamp
Turn off the lamp first, and unplug the lamp from the power outlet. Use a soft and dry cloth to
wipe any smears or dusts off the lamp's outer casing. Do not use any chemical solvents like
kerosene, naphtha and so on, as the lamp's casing may become damaged.
Cleaning the Wiring
• Use only a dry and soft cloth to wipe the lamp's wiring clean. Never use a wet cloth, as it
may cause an electric shock.
• Do not rinse the lamp or any of its components directly with water.
Troubleshooting
If you encounter problems when using the lamp, check the following:
• Are there loose connections between the DC output of power cord and the power socket
on the Crystal LED Lamp master unit?
• Do not simultaneously plug the power cords of two master units to the wall outlet. If the
Crystal LED Lamp set includes two master units, make sure that "only one master unit is
connected to the wall outlet by the power cord".
• If a single unit in the combination does not light up, make sure that the contact faces
between each unit are tightly secured.
• If the remote control does not work, try using it at a closer distance to the Crystal LED Lamp
master unit, and check the battery. Replace the battery when necessary.
If the problem persists, please contact your nearest authorized service center for help.
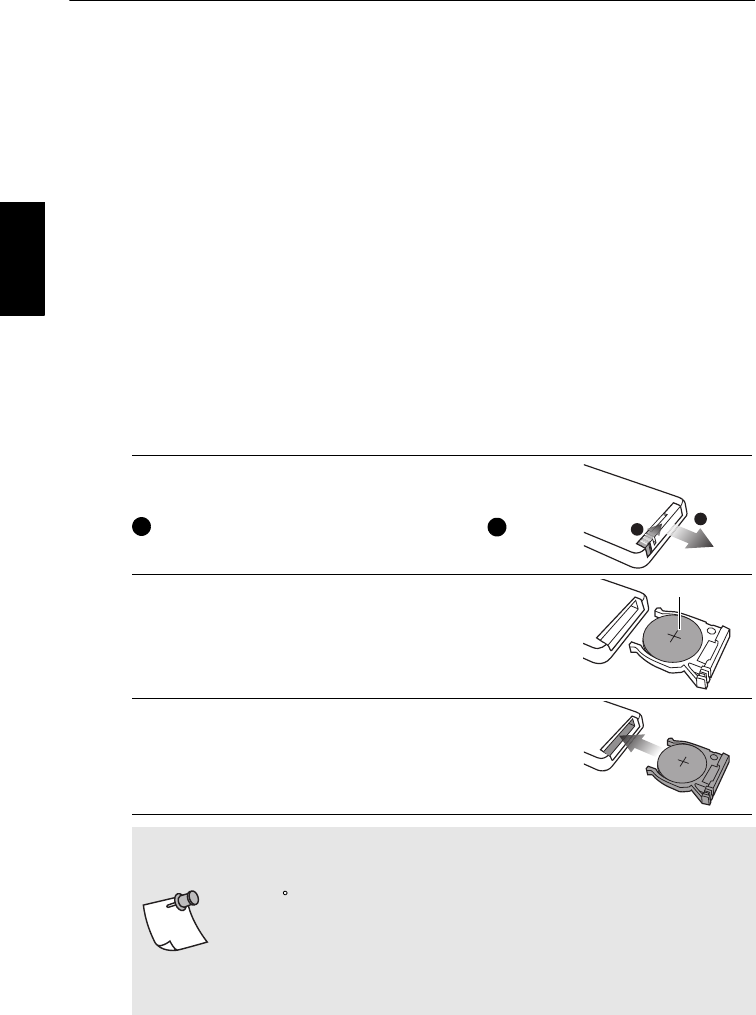
Replacing the battery on the remote control
If the remote control is not working or if the effective distance has become shorter, follow the
instructions and illustrations below to replace the battery:
1. Remove the battery tray in the direction illustrated:
Locate the battery tray at the back of the remote control.
User your finger to push the latch and slide it out. Pull
out the battery tray.
2. Replace the battery (type: CR2025 3V).
When inserting the new battery, take note of the polarity so
that the "+" sign is facing up.
3. Reinsert the battery tray:
Note the direction of the battery tray.
122
1
This side up
• To reduce adverse impact on the environment and prevent health hazards,
please properly discard the battery according to your local recycling
regulations.
• Do not place the battery near a fire, under direct sunlight, or in locations
over 60 C.
• Do not submerge the battery in water or store in a humid location.
• Do not disassemble, hit, or make modifications to this battery or it may short
circuit and pose a hazard.
• Do not attempt to recharge discarded batteries or expose them to fire.
• Remove the battery if the battery is depleted or if the remote control will not
be used for a long period of time; otherwise chemicals inside the battery
may leak and damage the remote control.
English 7
English
Specifications
• Model: NV01, NV01 _6, NV01 _8, or NV01 _12
• Unit Dimensions (Lx Wx H): 73mm x 73mm x 73mm
• Power input: AC Input 100-240V 50-60Hz 0.6A, DC Output 15V 1.6A
• Power Adapter: FSP024-DMCE1
• Max Power Consumption (16 units): 15W
• Operating Temperature: 0 C - 40 C
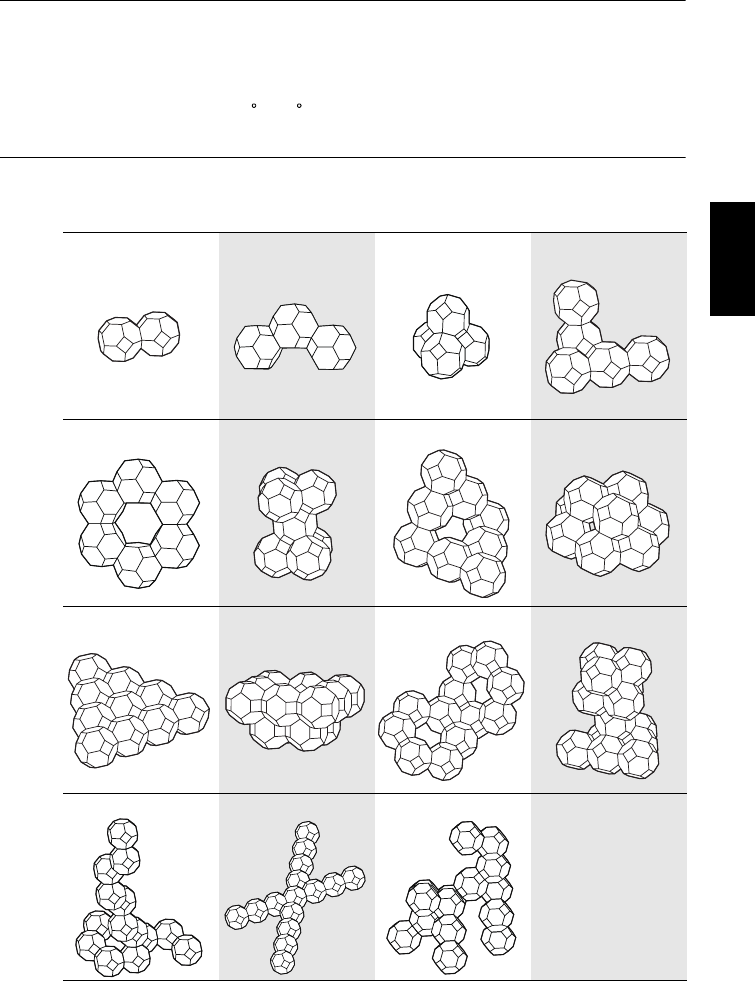
Assembly Examples
You may use different combinations of master and slave units to create your Crystal LED
Lamp assembly. The following are possible combination examples and the number of units
for your reference:
2345
6789
10 11 12 13
14 15 16

English8
English
Regulatory Information
FCC Compliance Notice
This device complies with part 15 of FCC Rules. Operation is subject to the following two
conditions: (1) this device may not cause harmful interference, and (2) this device must
accept any interference received, including interference that may cause undesired
operation.
This equipment has been tested and found to comply with the limits for a Class B digital
device, pursuant to part 15 of the FCC Rules. These limits are designed to provide reasonable
protection against harmful interference in a residential installation. This equipment
generates, uses, and can radiate radio frequency energy, and if not installed and used in
accordance with the instructions, may cause harmful interference to radio communications.
However, there is no guarantee that interference will not occur in a particular installation. If
this equipment does cause harmful interference to radio or television reception, which can
be determined by turning the equipment off and on, the user is encouraged to try to correct
the interference by one or more of the following measures:
• Reorient or relocate the receiving antenna.
• Increase the separation between the equipment and receiver.
• Connect the equipment into an outlet on a circuit different from that to which the receiver
is connected.
• Consult the dealer or an experienced radio/TV technician for help.
Warning: You are cautioned that changes or modifications not expressly approved by the
party responsible for compliance could void your authority to operate the equipment.