Qisda UH100N Diagnostic Ultrasound System User Manual 2
Qisda Corporation Diagnostic Ultrasound System Users Manual 2
UserManual.wiki
>
Qisda
>
UH100N User Manual
>
Users Manual-2
Contents
1.
Users Manual-1
2.
Users Manual-2
Users Manual-2
Navigation menu
Upload a User Manual
Namespaces
Wiki Guide
HTML
PDF
Info
Views
User Manual
Discussion / Help
Navigation
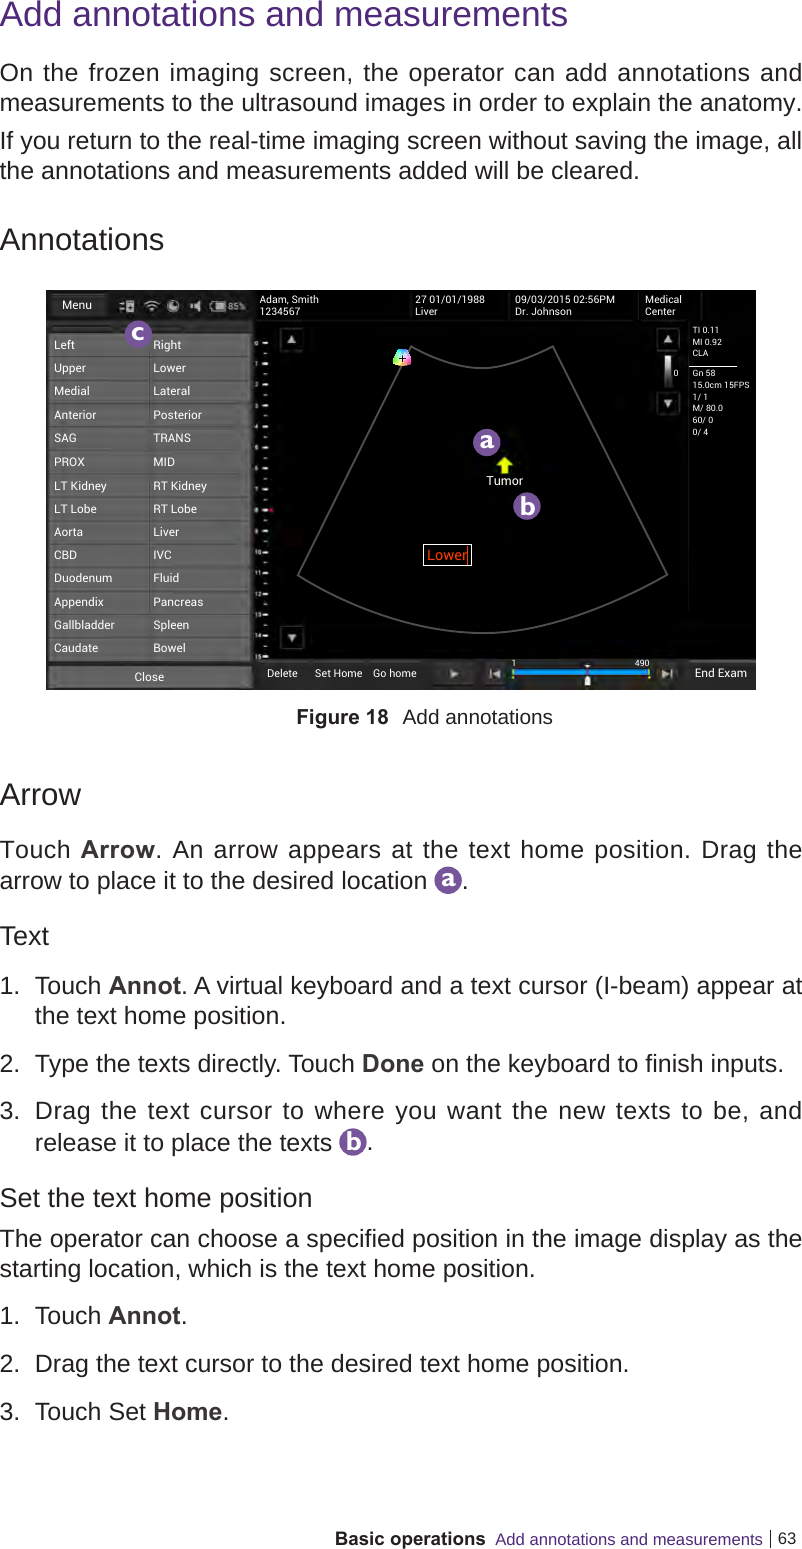
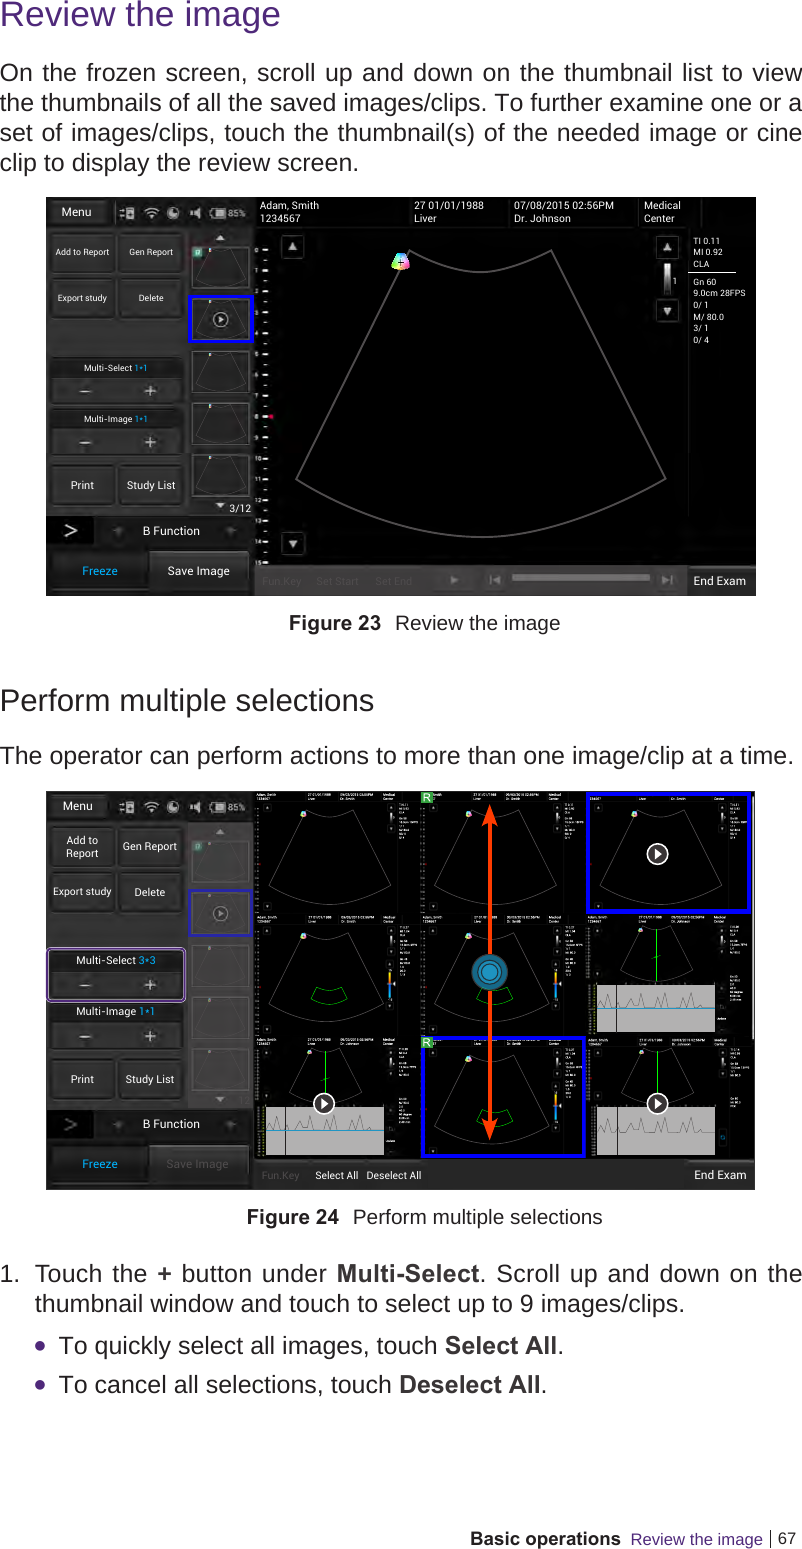

![Appendix Acoustic output Reporting for Track 3Acoustic output tables for UH100 TransducersAcoustic output reporting table for Track 3 for the C52A transducerUH100 Diagnostic Ultrasound System in B modeIndex label MITIS TIBTICScan Non-scanAaprt ≤ 1 cm2Aaprt > 1 cm2Global maximum index value 0.0282 0.088 # # # (b)Associated acoustic parameterPr.3 (MPa) 0.053W0(mW) 24.4 # # #Min of W.3(z1), ITA.3(z1)] (mW) #z1(cm) #zbp (cm) #zsp (cm) #z@PII.3max (cm) 5.9deq(zsp) (cm) #fc(MHz) 3.5 3.5 # # # #Dim of AaprtX (cm) 2.25 # # # #Y (cm) 1.1 # # # #Other informationPD (microsec) 0.37PRF (Hz) 5900pr@PIImax (MPa) 0.109deq@PIImax (cm) #Focal length FLx (cm) 7 # # #FLy (cm) 7 # # #Ipa.3 at MImax (W/cm2) 0.09Operating control conditionsControl 1 B B # # # #Control 2 7 cm 7 cm # # # #Control 3 5917 5917 # # # #Control 4 100% 100% # # # # # No data are reported for this operating condition since the global maximum index value is not reported for the reason listed. (a) This index is not required for this operating mode. (b) This transducer is not intended for transcranial or neonatal cephalic uses. (c) This formulation for TIS is less than that for an alternate formulation in this mode. (d) Control 1: Mode (e) Control 2: Focal distance (f) Control 3: PRF (g) Control 4: Power89](https://usermanual.wiki/Qisda/UH100N.Users-Manual-2/User-Guide-2782596-Page-37.png)
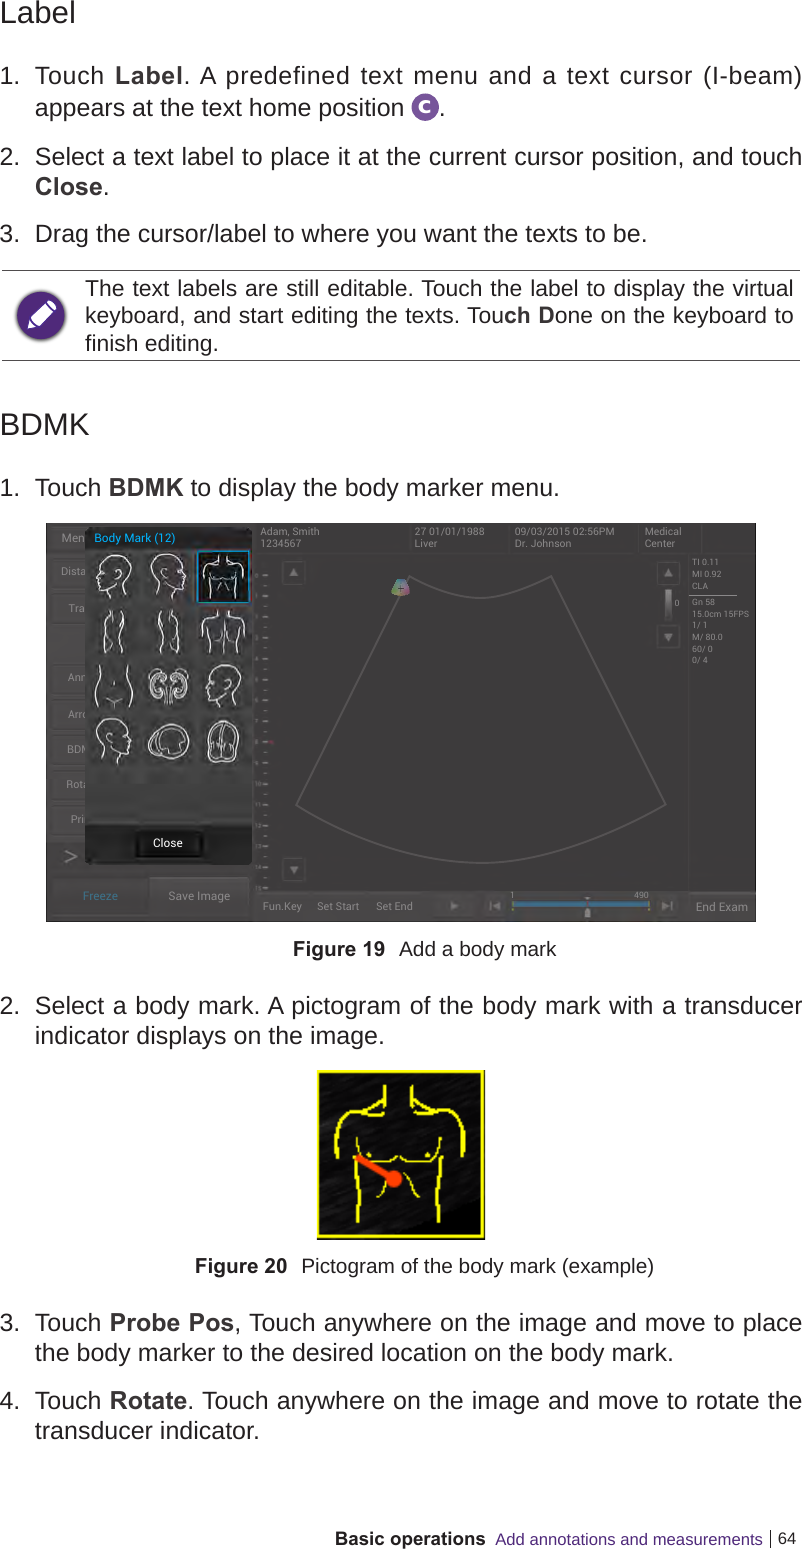
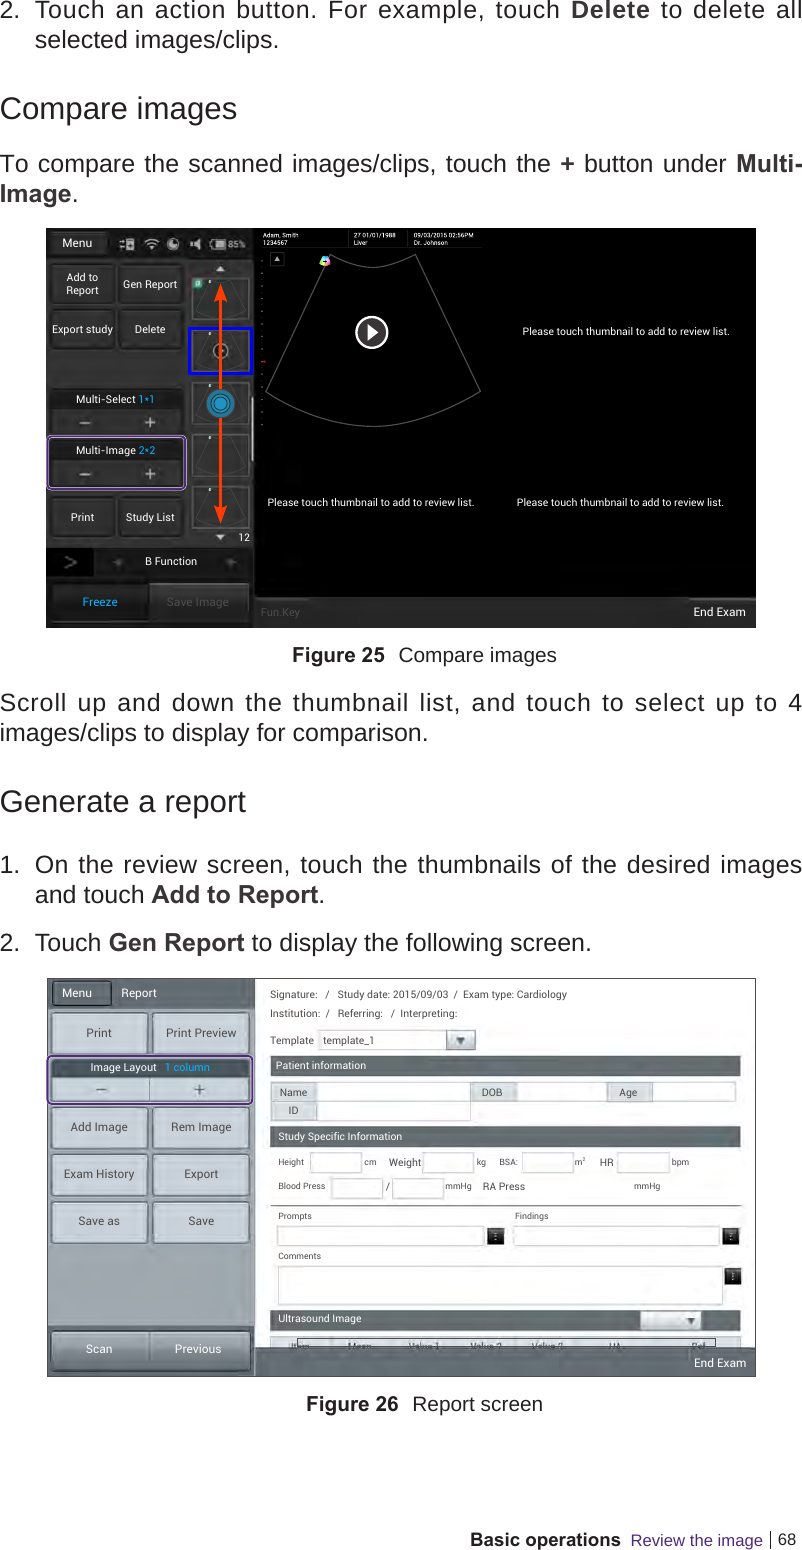
![Appendix Acoustic output Reporting for Track 3Acoustic output reporting table for Track 3 for the C52A transducerUH100 Diagnostic Ultrasound System in CFM-B modeIndex label MITIS TIBTICScan Non-scanAaprt ≤ 1 cm2Aaprt > 1 cm2Global maximum index value 0.132 0.138 # # # (b)Associated acoustic parameterPr.3 (MPa) 0.209W0(mW) 58 # # #Min of W.3(z1), ITA.3(z1)] (mW) #z1(cm) #zbp (cm) #zsp (cm) #z@PII.3max (cm) 4.6deq(zsp) (cm) #fc(MHz) 2.5 2.5 # # # #Dim of AaprtX (cm) 2.25 # # # #Y (cm) 1.1 # # # #Other informationPD (microsec) 1.5PRF (Hz) 5000pr@PIImax (MPa) 0.303deq@PIImax (cm) #Focal length FLx (cm) 5 # # #FLy (cm) 7 # # #Ipa.3 at MImax (W/cm2) 2.96Operating control conditionsControl 1 CFM CFM # # # #Control 2 5 cm 5 cm # # # #Control 3 5 KHz 5 KHz # # # #Control 4 100% 100% # # # # # No data are reported for this operating condition since the global maximum index value is not reported for the reason listed. (a) This index is not required for this operating mode. (b) This transducer is not intended for transcranial or neonatal cephalic uses. (c) This formulation for TIS is less than that for an alternate formulation in this mode. (d) Control 1: Mode (e) Control 2: Focal distance (f) Control 3: PRF (g) Control 4: Power90](https://usermanual.wiki/Qisda/UH100N.Users-Manual-2/User-Guide-2782596-Page-38.png)
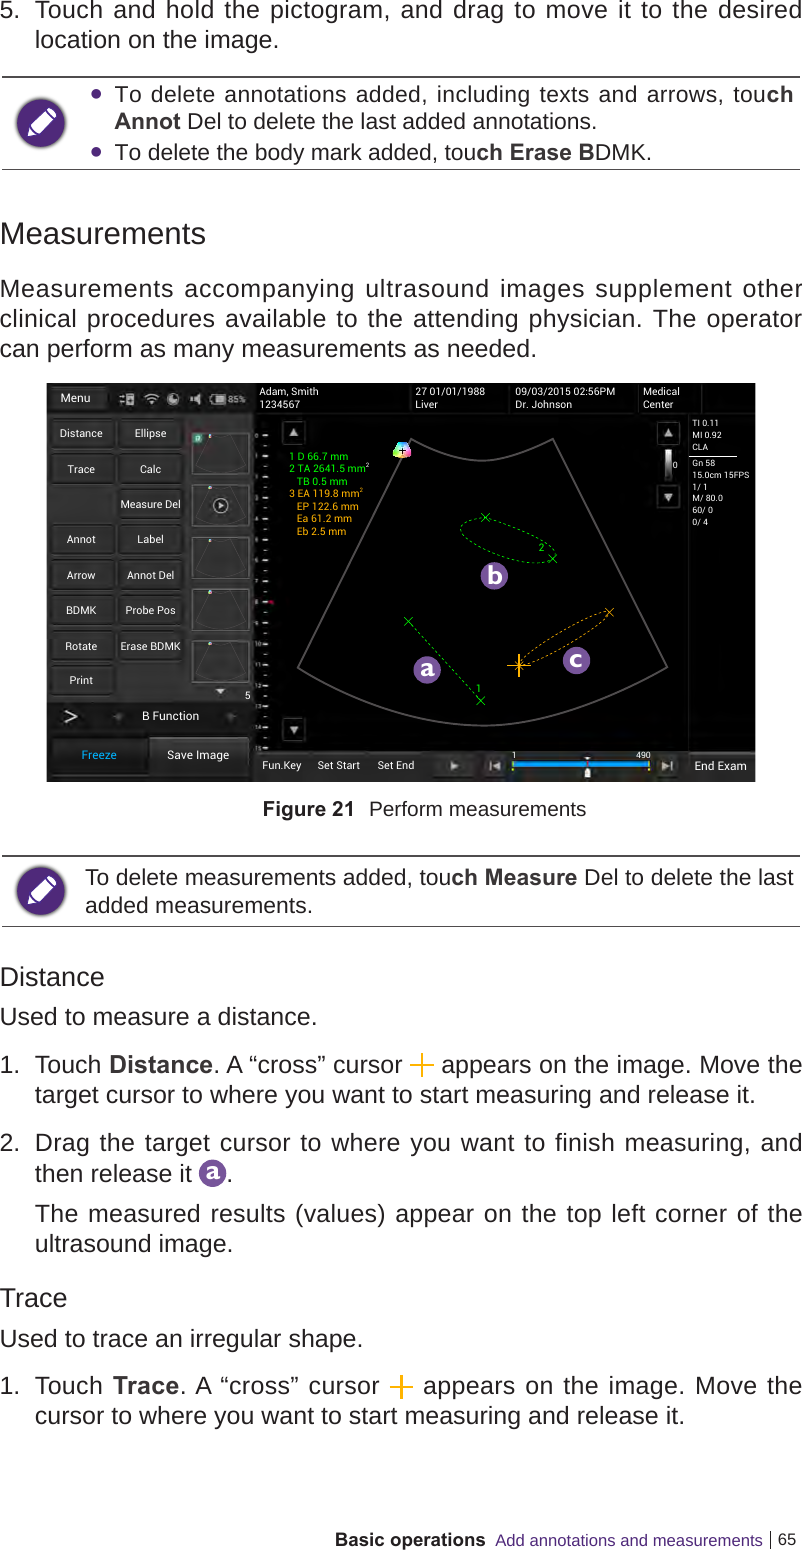
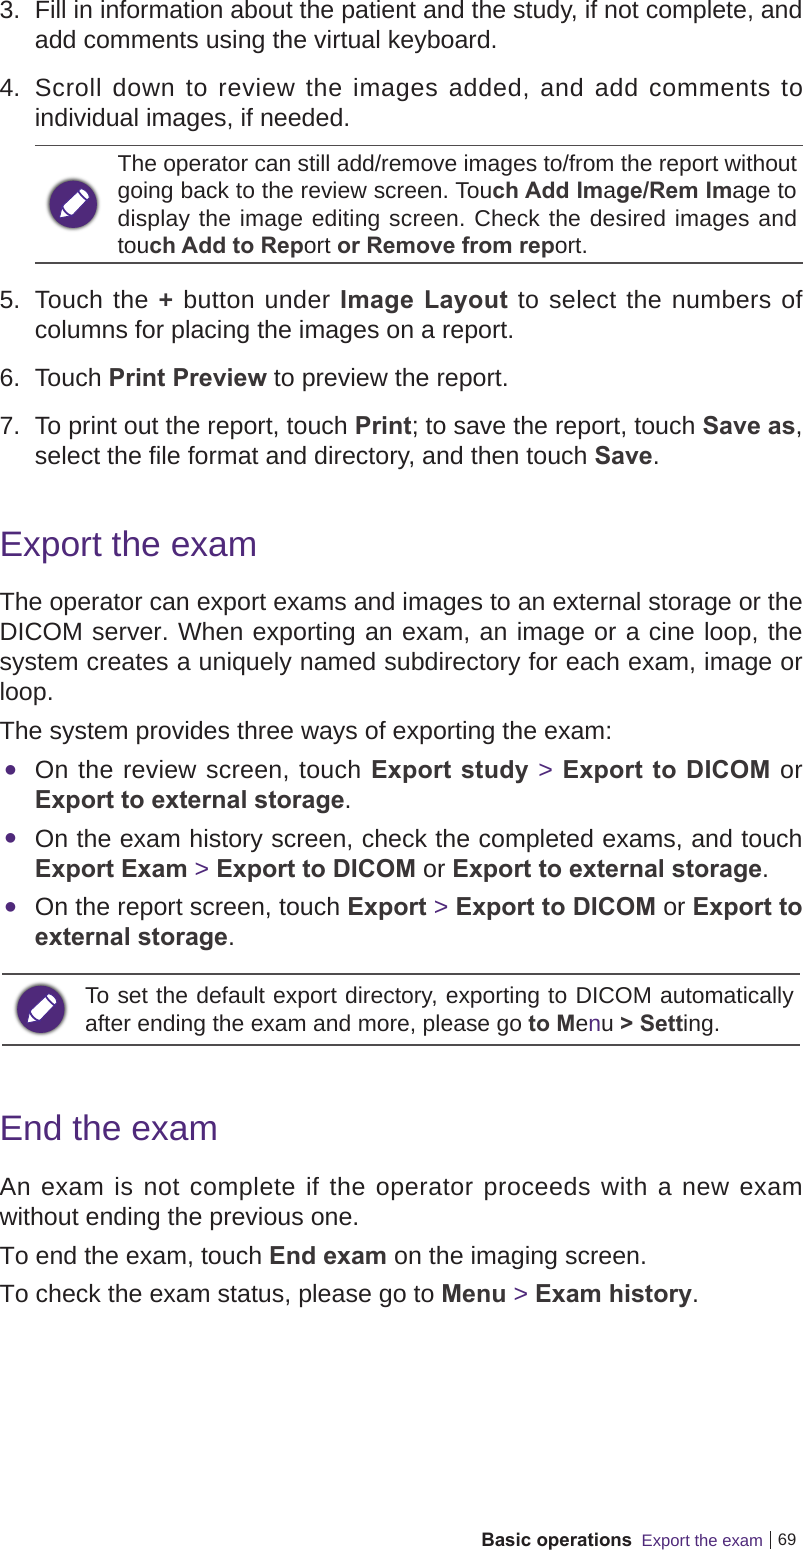
![Appendix Acoustic output Reporting for Track 3Acoustic output reporting table for Track 3 for the C52A transducerUH100 Diagnostic Ultrasound System in B/M modeIndex label MITIS TIBTICScan Non-scanAaprt ≤ 1 cm2Aaprt > 1 cm2Global maximum index value 0.133 # # 0.0199 0.077 (b)Associated acoustic parameterPr.3 (MPa) 0.246W0(mW) # # 37 #Min of W.3(z1), ITA.3(z1)] (mW) 1.23z1(cm) 5zbp (cm) 2.66zsp (cm) 4.5z@PII.3max (cm) 5deq(zsp) (cm) 3.4fc(MHz) 3.4 # # 3.4 3.4 #Dim of AaprtX (cm) # # 2.25 2.25 #Y (cm) # # 1.1 1.1 #Other informationPD (microsec) 1.2PRF (Hz) 250pr@PIImax (MPa) 0.47deq@PIImax (cm) 3.2Focal length FLx (cm) # # 7 #FLy (cm) # # 7 #Ipa.3 at MImax (W/cm2) 3.4Operating control conditionsControl 1 M # # M M #Control 2 7 cm # # 7 cm 7 cm #Control 3 250 # # 250 250 #Control 4 100% # # 100% 100% # # No data are reported for this operating condition since the global maximum index value is not reported for the reason listed. (a) This index is not required for this operating mode. (b) This transducer is not intended for transcranial or neonatal cephalic uses. (c) This formulation for TIS is less than that for an alternate formulation in this mode. (d) Control 1: Mode (e) Control 2: Focal distance (f) Control 3: PRF (g) Control 4: Power91](https://usermanual.wiki/Qisda/UH100N.Users-Manual-2/User-Guide-2782596-Page-39.png)
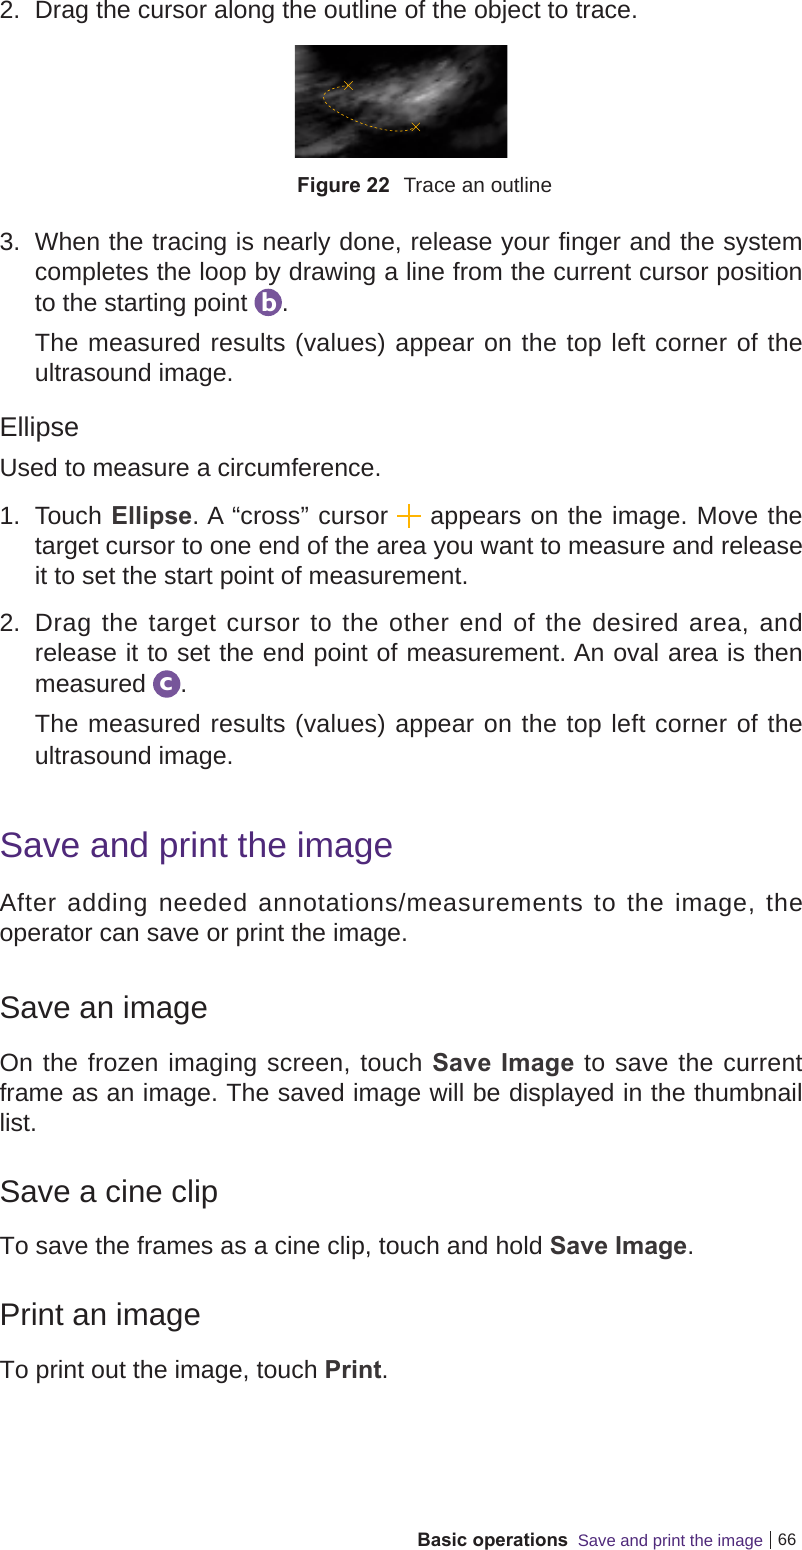
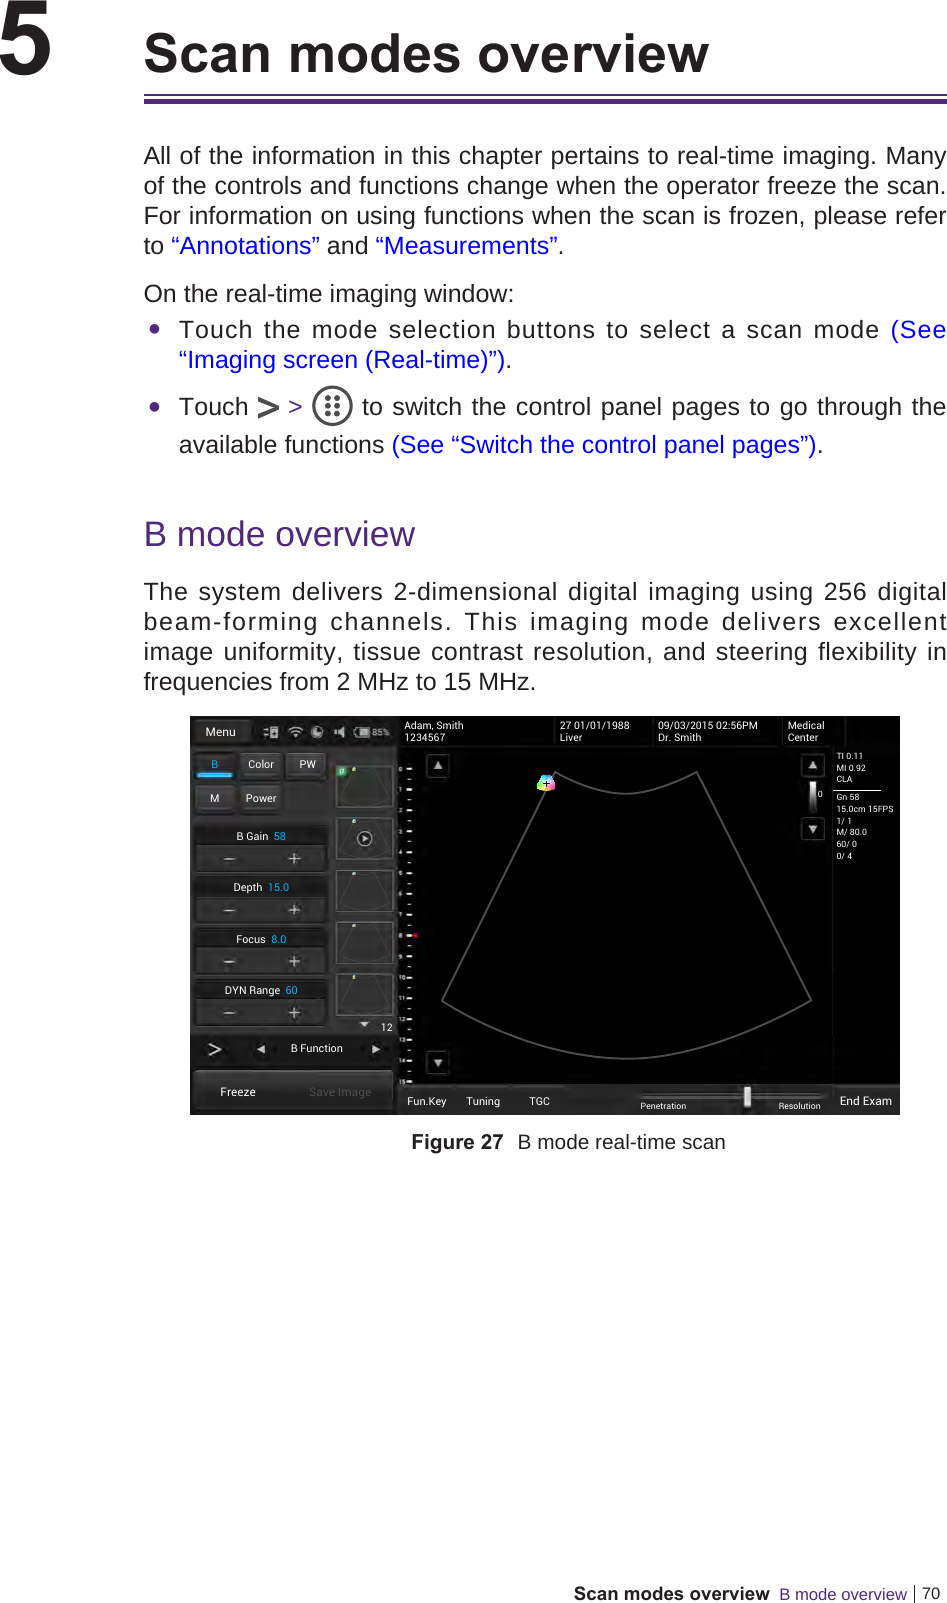
![Appendix Acoustic output Reporting for Track 3Acoustic output reporting table for Track 3 for the C52A transducerUH100 Diagnostic Ultrasound System in PW modeIndex label MITIS TIBTICScan Non-scanAaprt ≤ 1 cm2Aaprt > 1 cm2Global maximum index value 0.127 # # 0.209 0.52 (b)Associated acoustic parameterPr.3 (MPa) 0.241W0(mW) # # 165 #Min of W.3(z1), ITA.3(z1)] (mW) 12.1z1(cm) 5zbp (cm) 2.66zsp (cm) 4.2z@PII.3max (cm) 5deq(zsp) (cm) 2.22fc(MHz) 3.6 # # 3.6 3.6 #Dim of AaprtX (cm) # # 2.25 2.25 #Y (cm) # # 1.1 1.1 #Other informationPD (microsec) 1.08PRF (Hz) 3000pr@PIImax (MPa) 0.43deq@PIImax (cm) 2.1Focal length FLx (cm) # # 7 #FLy (cm) # # 7 #Ipa.3 at MImax (W/cm2) 2.84Operating control conditionsControl 1 PW # # PW PW #Control 2 7 cm # # 7 cm 7 cm #Control 3 3000 # # 3000 3000 #Control 4 100% # # 100% 100% # # No data are reported for this operating condition since the global maximum index value is not reported for the reason listed. (a) This index is not required for this operating mode. (b) This transducer is not intended for transcranial or neonatal cephalic uses. (c) This formulation for TIS is less than that for an alternate formulation in this mode. (d) Control 1: Mode (e) Control 2: Focal distance (f) Control 3: PRF (g) Control 4: Power92](https://usermanual.wiki/Qisda/UH100N.Users-Manual-2/User-Guide-2782596-Page-40.png)
![Appendix Acoustic output Reporting for Track 3Acoustic output reporting table for Track 3 for the L115A transducerUH100 Diagnostic Ultrasound System in B modeIndex label MITIS TIBTICScan Non-scanAaprt ≤ 1 cm2Aaprt > 1 cm2Global maximum index value 0.055 0.07 # # # (b)Associated acoustic parameterPr.3 (MPa) 0.142W0(mW) 1.4 # # #Min of W.3(z1), ITA.3(z1)] (mW) #z1(cm) #zbp (cm) #zsp (cm) #z@PII.3max (cm) 1.79deq(zsp) (cm) #fc(MHz) 6.7 6.7 # # # #Dim of AaprtX (cm) 0.6 # # # #Y (cm) 0.6 # # # #Other informationPD (microsec) 0.183PRF (Hz) 9800pr@PIImax (MPa) 0.209deq@PIImax (cm) #Focal length FLx (cm) 1.5 # # #FLy (cm) 1.9 # # #Ipa.3 at MImax (W/cm2) 1.13Operating control conditionsControl 1 B B # # # #Control 2 1.5 cm 1.5 cm # # # #Control 3 9804 9804 # # # #Control 4 100% 100% # # # # # No data are reported for this operating condition since the global maximum index value is not reported for the reason listed. (a) This index is not required for this operating mode. (b) This transducer is not intended for transcranial or neonatal cephalic uses. (c) This formulation for TIS is less than that for an alternate formulation in this mode. (d) Control 1: Mode (e) Control 2: Focal distance (f) Control 3: PRF (g) Control 4: Power93](https://usermanual.wiki/Qisda/UH100N.Users-Manual-2/User-Guide-2782596-Page-41.png)
![Appendix Acoustic output Reporting for Track 3Acoustic output reporting table for Track 3 for the L115A transducerUH100 Diagnostic Ultrasound System in CFM-B modeIndex label MITIS TIBTICScan Non-scanAaprt ≤ 1 cm2Aaprt > 1 cm2Global maximum index value 0.107 0.188 # # # (b)Associated acoustic parameterPr.3 (MPa) 0.237W0(mW) 32 # # #Min of W.3(z1), ITA.3(z1)] (mW) #z1(cm) #zbp (cm) #zsp (cm) #z@PII.3max (cm) 2.57deq(zsp) (cm) #fc(MHz) 4.9 4.9 # # # #Dim of AaprtX (cm) 3.8 # # # #Y (cm) 0.6 # # # #Other informationPD (microsec) 0.81PRF (Hz) 3000pr@PIImax (MPa) 0.37deq@PIImax (cm) #Focal length FLx (cm) 1.5 # # #FLy (cm) 1.9 # # #Ipa.3 at MImax (W/cm2) 5.6Operating control conditionsControl 1 CFM CFM # # # #Control 2 3 cm 3 cm # # # #Control 3 3 KHz 3 KHz # # # #Control 4 100% 100% # # # # # No data are reported for this operating condition since the global maximum index value is not reported for the reason listed. (a) This index is not required for this operating mode. (b) This transducer is not intended for transcranial or neonatal cephalic uses. (c) This formulation for TIS is less than that for an alternate formulation in this mode. (d) Control 1: Mode (e) Control 2: Focal distance (f) Control 3: PRF (g) Control 4: Power94](https://usermanual.wiki/Qisda/UH100N.Users-Manual-2/User-Guide-2782596-Page-42.png)
![Appendix Acoustic output Reporting for Track 3Acoustic output reporting table for Track 3 for the L115A transducerUH100 Diagnostic Ultrasound System in B/M modeIndex label MITIS TIBTICScan Non-scanAaprt ≤ 1 cm2Aaprt > 1 cm2Global maximum index value 0.13 # 0.36 # 0.047 (b)Associated acoustic parameterPr.3 (MPa) 0.35W0(mW) # 10.7 10.7 #Min of W.3(z1), ITA.3(z1)] (mW) #z1(cm) #zbp (cm) #zsp (cm) 2.01z@PII.3max (cm) 2.11deq(zsp) (cm) 1.85fc(MHz) 7.1 # 7.1 # 7.1 #Dim of AaprtX (cm) # 0.71 # 0.71 #Y (cm) # 0.6 # 0.6 #Other informationPD (microsec) 0.68PRF (Hz) 250pr@PIImax (MPa) 0.58deq@PIImax (cm) 1.82Focal length FLx (cm) # 1.5 # #FLy (cm) # 1.9 # #Ipa.3 at MImax (W/cm2) 7.7Operating control conditionsControl 1 M # # M M #Control 2 3 cm # # 3 cm 3 cm #Control 3 250 # # 250 250 #Control 4 100% # # 100% 100% # # No data are reported for this operating condition since the global maximum index value is not reported for the reason listed. (a) This index is not required for this operating mode. (b) This transducer is not intended for transcranial or neonatal cephalic uses. (c) This formulation for TIS is less than that for an alternate formulation in this mode. (d) Control 1: Mode (e) Control 2: Focal distance (f) Control 3: PRF (g) Control 4: Power95](https://usermanual.wiki/Qisda/UH100N.Users-Manual-2/User-Guide-2782596-Page-43.png)
![Appendix Acoustic output Reporting for Track 3Acoustic output reporting table for Track 3 for the L115A transducerUH100 Diagnostic Ultrasound System in PW modeIndex label MITIS TIBTICScan Non-scanAaprt ≤ 1 cm2Aaprt > 1 cm2Global maximum index value 0.1 # 1.18 # 0.38 (b)Associated acoustic parameterPr.3 (MPa) 0.27W0(mW) # 34 34 #Min of W.3(z1), ITA.3(z1)] (mW) #z1(cm) #zbp (cm) #zsp (cm) 2.06z@PII.3max (cm) 2.15deq(zsp) (cm) 0.71fc(MHz) 7.3 # 7.3 # 7.3 #Dim of AaprtX (cm) # 0.41 # 0.41 #Y (cm) # 0.6 # 0.6 #Other informationPD (microsec) 1.03PRF (Hz) 4000pr@PIImax (MPa) 0.46deq@PIImax (cm) 0.69Focal length FLx (cm) # 1.5 # #FLy (cm) # 1.9 # #Ipa.3 at MImax (W/cm2) 6.4Operating control conditionsControl 1 PW # PW # PW #Control 2 3 cm # 3 cm # 3 cm #Control 3 4000 # 4000 # 4000 #Control 4 100% # 100% # 100% # # No data are reported for this operating condition since the global maximum index value is not reported for the reason listed. (a) This index is not required for this operating mode. (b) This transducer is not intended for transcranial or neonatal cephalic uses. (c) This formulation for TIS is less than that for an alternate formulation in this mode. (d) Control 1: Mode (e) Control 2: Focal distance (f) Control 3: PRF (g) Control 4: Power96](https://usermanual.wiki/Qisda/UH100N.Users-Manual-2/User-Guide-2782596-Page-44.png)
![Appendix Acoustic output Reporting for Track 3Acoustic output reporting table for Track 3 for the P42A transducerUH100 Diagnostic Ultrasound System in B modeIndex label MITIS TIBTICScan Non-scanAaprt ≤ 1 cm2Aaprt > 1 cm2Global maximum index value 0.149 0.39 # # # (b)Associated acoustic parameterPr.3 (MPa) 0.235W0(mW) 44 # # #Min of W.3(z1), ITA.3(z1)] (mW) #z1(cm) #zbp (cm) #zsp (cm) #z@PII.3max (cm) 5.7deq(zsp) (cm) #fc(MHz) 2.48 2.48 # # # #Dim of AaprtX (cm) 1.92 # # # #Y (cm) 1.4 # # # #Other informationPD (microsec) 0.53PRF (Hz) 5600pr@PIImax (MPa) 0.35deq@PIImax (cm) #Focal length FLx (cm) 6 # # #FLy (cm) 8 # # #Ipa.3 at MImax (W/cm2) 2.14Operating control conditionsControl 1 B B # # # #Control 2 6 cm 6 cm # # # #Control 3 5555 5555 # # # #Control 4 100% 100% # # # # # No data are reported for this operating condition since the global maximum index value is not reported for the reason listed. (a) This index is not required for this operating mode. (b) This transducer is not intended for transcranial or neonatal cephalic uses. (c) This formulation for TIS is less than that for an alternate formulation in this mode. (d) Control 1: Mode (e) Control 2: Focal distance (f) Control 3: PRF (g) Control 4: Power97](https://usermanual.wiki/Qisda/UH100N.Users-Manual-2/User-Guide-2782596-Page-45.png)
![Appendix Acoustic output Reporting for Track 3Acoustic output reporting table for Track 3 for the P42A transducerUH100 Diagnostic Ultrasound System in CFM-B modeIndex label MITIS TIBTICScan Non-scanAaprt ≤ 1 cm2Aaprt > 1 cm2Global maximum index value 0.205 1.74 # # # (b)Associated acoustic parameterPr.3 (MPa) 0.32W0(mW) 207 # # #Min of W.3(z1), ITA.3(z1)] (mW) #z1(cm) #zbp (cm) #zsp (cm) #z@PII.3max (cm) 5.1deq(zsp) (cm) #fc(MHz) 2.48 2.48 # # # #Dim of AaprtX (cm) 1.92 # # # #Y (cm) 1.4 # # # #Other informationPD (microsec) 1.46PRF (Hz) 2000pr@PIImax (MPa) 0.49deq@PIImax (cm) #Focal length FLx (cm) 6 # # #FLy (cm) 8 # # #Ipa.3 at MImax (W/cm2) 5.5Operating control conditionsControl 1 CFM CFM # # # #Control 2 7 cm 7 cm # # # #Control 3 2 KHz 2 KHz # # # #Control 4 100% 100% # # # # # No data are reported for this operating condition since the global maximum index value is not reported for the reason listed. (a) This index is not required for this operating mode. (b) This transducer is not intended for transcranial or neonatal cephalic uses. (c) This formulation for TIS is less than that for an alternate formulation in this mode. (d) Control 1: Mode (e) Control 2: Focal distance (f) Control 3: PRF (g) Control 4: Power98](https://usermanual.wiki/Qisda/UH100N.Users-Manual-2/User-Guide-2782596-Page-46.png)
![Appendix Acoustic output Reporting for Track 3Acoustic output reporting table for Track 3 for the P42A transducerUH100 Diagnostic Ultrasound System in B/M modeIndex label MITIS TIBTICScan Non-scanAaprt ≤ 1 cm2Aaprt > 1 cm2Global maximum index value 0.242 # # 0.043 0.207 (b)Associated acoustic parameterPr.3 (MPa) 0.38W0(mW) # # 67 #Min of W.3(z1), ITA.3(z1)] (mW) 3.6z1(cm) 4.8zbp (cm) 2.77zsp (cm) 4.6z@PII.3max (cm) 4.8deq(zsp) (cm) 3.2fc(MHz) 2.48 # # 2.48 2.48 #Dim of AaprtX (cm) # # 1.92 1.92 #Y (cm) # # 1.4 1.4 #Other informationPD (microsec) 1.49PRF (Hz) 250pr@PIImax (MPa) 0.56deq@PIImax (cm) 3.12Focal length FLx (cm) # # 6 #FLy (cm) # # 8 #Ipa.3 at MImax (W/cm2) 9.5Operating control conditionsControl 1 M # # M M #Control 2 7 cm # # 7 cm 7 cm #Control 3 250 # # 250 250 #Control 4 100% # # 100% 100% # # No data are reported for this operating condition since the global maximum index value is not reported for the reason listed. (a) This index is not required for this operating mode. (b) This transducer is not intended for transcranial or neonatal cephalic uses. (c) This formulation for TIS is less than that for an alternate formulation in this mode. (d) Control 1: Mode (e) Control 2: Focal distance (f) Control 3: PRF (g) Control 4: Power99](https://usermanual.wiki/Qisda/UH100N.Users-Manual-2/User-Guide-2782596-Page-47.png)
![Appendix Acoustic output Reporting for Track 3Acoustic output reporting table for Track 3 for the P42A transducerUH100 Diagnostic Ultrasound System in PW modeIndex label MITIS TIBTICScan Non-scanAaprt ≤ 1 cm2Aaprt > 1 cm2Global maximum index value 0.248 # # 0.77 2 (b)Associated acoustic parameterPr.3 (MPa) 0.39W0(mW) # # 340 #Min of W.3(z1), ITA.3(z1)] (mW) 65z1(cm) 4.8zbp (cm) 2.77zsp (cm) 4.5z@PII.3max (cm) 4.8deq(zsp) (cm) 1.72fc(MHz) 2.48 # # 2.48 2.48 #Dim of AaprtX (cm) # # 1.92 1.92 #Y (cm) # # 1.4 1.4 #Other informationPD (microsec) 1.53PRF (Hz) 4000pr@PIImax (MPa) 0.59deq@PIImax (cm) 1.69Focal length FLx (cm) # # 6 #FLy (cm) # # 8 #Ipa.3 at MImax (W/cm2) 10.9Operating control conditionsControl 1 PW # # PW PW #Control 2 7 cm # # 7 cm 7 cm #Control 3 4000 # # 4000 4000 #Control 4 100% # # 100% 100% # # No data are reported for this operating condition since the global maximum index value is not reported for the reason listed. (a) This index is not required for this operating mode. (b) This transducer is not intended for transcranial or neonatal cephalic uses. (c) This formulation for TIS is less than that for an alternate formulation in this mode. (d) Control 1: Mode (e) Control 2: Focal distance (f) Control 3: PRF (g) Control 4: Power100](https://usermanual.wiki/Qisda/UH100N.Users-Manual-2/User-Guide-2782596-Page-48.png)
![Appendix Acoustic output Reporting for Track 3Acoustic output reporting table for Track 3 for the E94A transducerUH100 Diagnostic Ultrasound System in B modeIndex label MITIS TIBTICScan Non-scanAaprt ≤ 1 cm2Aaprt > 1 cm2Global maximum index value 0.109 0.069 # # # (b)Associated acoustic parameterPr.3 (MPa) 0.266W0(mW) 4.1 # # #Min of W.3(z1), ITA.3(z1)] (mW) #z1(cm) #zbp (cm) #zsp (cm) #z@PII.3max (cm) 2.47deq(zsp) (cm) #fc(MHz) 6 6 # # # #Dim of AaprtX (cm) 1.75 # # # #Y (cm) 0.6 # # # #Other informationPD (microsec) 0.216PRF (Hz) 7000pr@PIImax (MPa) 0.44deq@PIImax (cm) #Focal length FLx (cm) 3.5 # # #FLy (cm) 2.6 # # #Ipa.3 at MImax (W/cm2) 3.9Operating control conditionsControl 1 B B # # # #Control 2 3.5 cm 3.5 cm # # # #Control 3 6973 6973 # # # #Control 4 100% 100% # # # # # No data are reported for this operating condition since the global maximum index value is not reported for the reason listed. (a) This index is not required for this operating mode. (b) This transducer is not intended for transcranial or neonatal cephalic uses. (c) This formulation for TIS is less than that for an alternate formulation in this mode. (d) Control 1: Mode (e) Control 2: Focal distance (f) Control 3: PRF (g) Control 4: Power101](https://usermanual.wiki/Qisda/UH100N.Users-Manual-2/User-Guide-2782596-Page-49.png)
![Appendix Acoustic output Reporting for Track 3Acoustic output reporting table for Track 3 for the E94A transducerUH100 Diagnostic Ultrasound System in CFM-B modeIndex label MITIS TIBTICScan Non-scanAaprt ≤ 1 cm2Aaprt > 1 cm2Global maximum index value 0.113 0.195 # # # (b)Associated acoustic parameterPr.3 (MPa) 0.284W0(mW) 13.2 # # #Min of W.3(z1), ITA.3(z1)] (mW) #z1(cm) #zbp (cm) #zsp (cm) #z@PII.3max (cm) 2.02deq(zsp) (cm) #fc(MHz) 6.3 6.3 # # # #Dim of AaprtX (cm) 1.75 # # # #Y (cm) 0.6 # # # #Other informationPD (microsec) 0.48PRF (Hz) 3010pr@PIImax (MPa) 0.43deq@PIImax (cm) #Focal length FLx (cm) 2.5 # # #FLy (cm) 2.6 # # #Ipa.3 at MImax (W/cm2) 7.6Operating control conditionsControl 1 CFM CFM # # # #Control 2 2.5 cm 2.5 cm # # # #Control 3 3 KHz 3 KHz # # # #Control 4 100% 100% # # # # # No data are reported for this operating condition since the global maximum index value is not reported for the reason listed. (a) This index is not required for this operating mode. (b) This transducer is not intended for transcranial or neonatal cephalic uses. (c) This formulation for TIS is less than that for an alternate formulation in this mode. (d) Control 1: Mode (e) Control 2: Focal distance (f) Control 3: PRF (g) Control 4: Power102](https://usermanual.wiki/Qisda/UH100N.Users-Manual-2/User-Guide-2782596-Page-50.png)
![Appendix Acoustic output Reporting for Track 3Acoustic output reporting table for Track 3 for the E94A transducerUH100 Diagnostic Ultrasound System in B/M modeIndex label MITIS TIBTICScan Non-scanAaprt ≤ 1 cm2Aaprt > 1 cm2Global maximum index value 0.15 # # 0.049 0.034 (b)Associated acoustic parameterPr.3 (MPa) 0.37W0(mW) # # 4 #Min of W.3(z1), ITA.3(z1)] (mW) 1.64z1(cm) 1.96zbp (cm) 1.73zsp (cm) 1.82z@PII.3max (cm) 1.96deq(zsp) (cm) 3.4fc(MHz) 6.3 # # 6.3 6.3 #Dim of AaprtX (cm) # # 1.75 1.75 #Y (cm) # # 0.6 0.6 #Other informationPD (microsec) 0.62PRF (Hz) 250pr@PIImax (MPa) 0.55deq@PIImax (cm) 1.14Focal length FLx (cm) # # 2.5 #FLy (cm) # # 2.6 #Ipa.3 at MImax (W/cm2) 12.3Operating control conditionsControl 1 M # # M M #Control 2 2.5 cm # # 2.5 cm 2.5 cm #Control 3 250 # # 250 250 #Control 4 100% # # 100% 100% # # No data are reported for this operating condition since the global maximum index value is not reported for the reason listed. (a) This index is not required for this operating mode. (b) This transducer is not intended for transcranial or neonatal cephalic uses. (c) This formulation for TIS is less than that for an alternate formulation in this mode. (d) Control 1: Mode (e) Control 2: Focal distance (f) Control 3: PRF (g) Control 4: Power103](https://usermanual.wiki/Qisda/UH100N.Users-Manual-2/User-Guide-2782596-Page-51.png)
![Appendix Acoustic output Reporting for Track 3Acoustic output reporting table for Track 3 for the E94A transducerUH100 Diagnostic Ultrasound System in PW modeIndex label MITIS TIBTICScan Non-scanAaprt ≤ 1 cm2Aaprt > 1 cm2Global maximum index value 0.153 # 0.84 # 0.32 (b)Associated acoustic parameterPr.3 (MPa) 0.38W0(mW) # 28.1 28.1 #Min of W.3(z1), ITA.3(z1)] (mW) #z1(cm) #zbp (cm) #zsp (cm) 1.82z@PII.3max (cm) 1.93deq(zsp) (cm) 0.86fc(MHz) 6.3 # 6.3 # 6.3 #Dim of AaprtX (cm) # 1.14 # 1.14 #Y (cm) # 0.6 # 0.6 #Other informationPD (microsec) 0.62PRF (Hz) 3000pr@PIImax (MPa) 0.56deq@PIImax (cm) 0.84Focal length FLx (cm) # 2.5 # #FLy (cm) # 2.6 # #Ipa.3 at MImax (W/cm2) 11.4Operating control conditionsControl 1 PW # # PW PW #Control 2 2.5 cm # # 2.5 cm 2.5 cm #Control 3 3000 # # 3000 3000 #Control 4 100% # # 100% 100% # # No data are reported for this operating condition since the global maximum index value is not reported for the reason listed. (a) This index is not required for this operating mode. (b) This transducer is not intended for transcranial or neonatal cephalic uses. (c) This formulation for TIS is less than that for an alternate formulation in this mode. (d) Control 1: Mode (e) Control 2: Focal distance (f) Control 3: PRF (g) Control 4: Power104](https://usermanual.wiki/Qisda/UH100N.Users-Manual-2/User-Guide-2782596-Page-52.png)