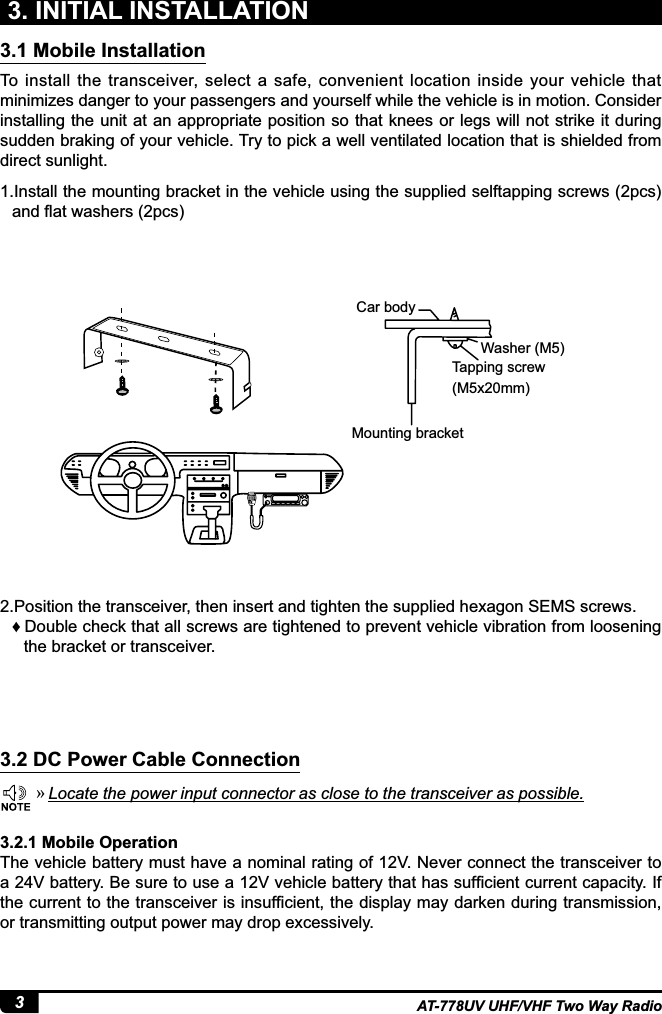
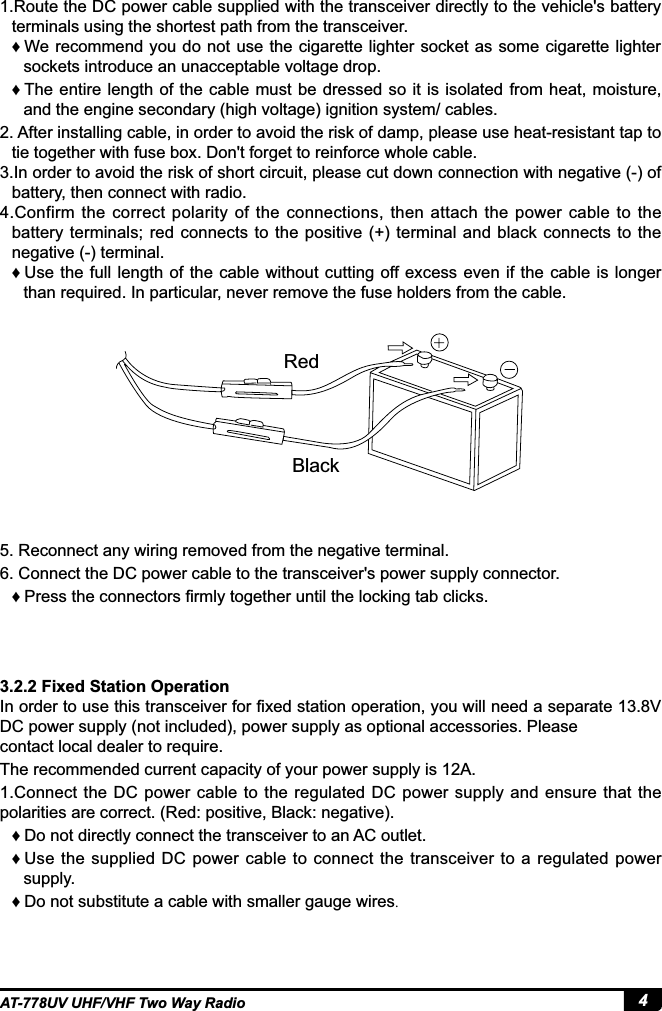
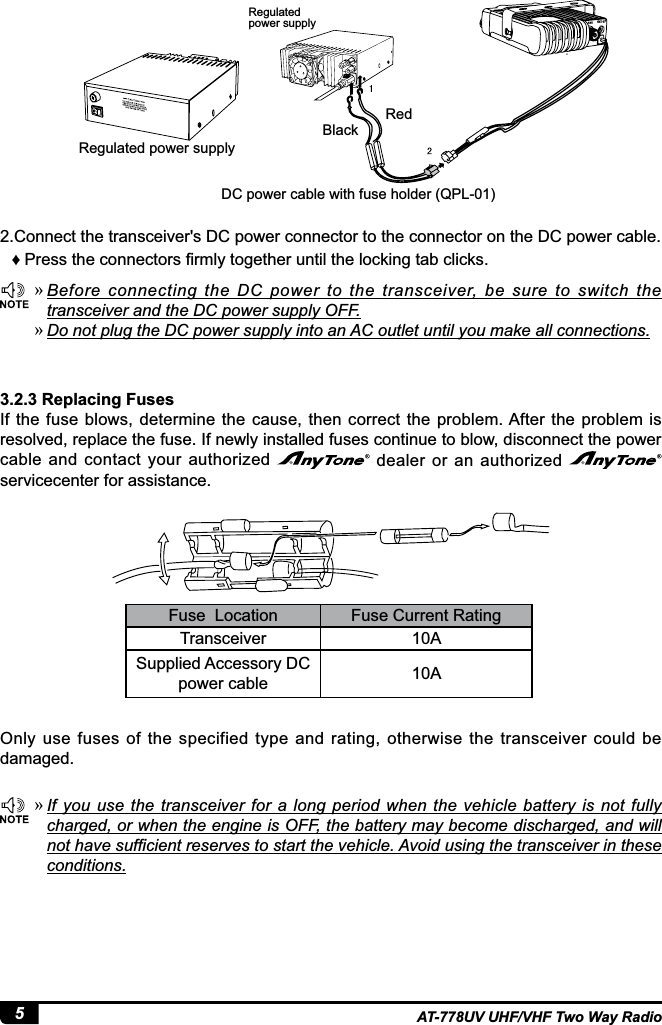
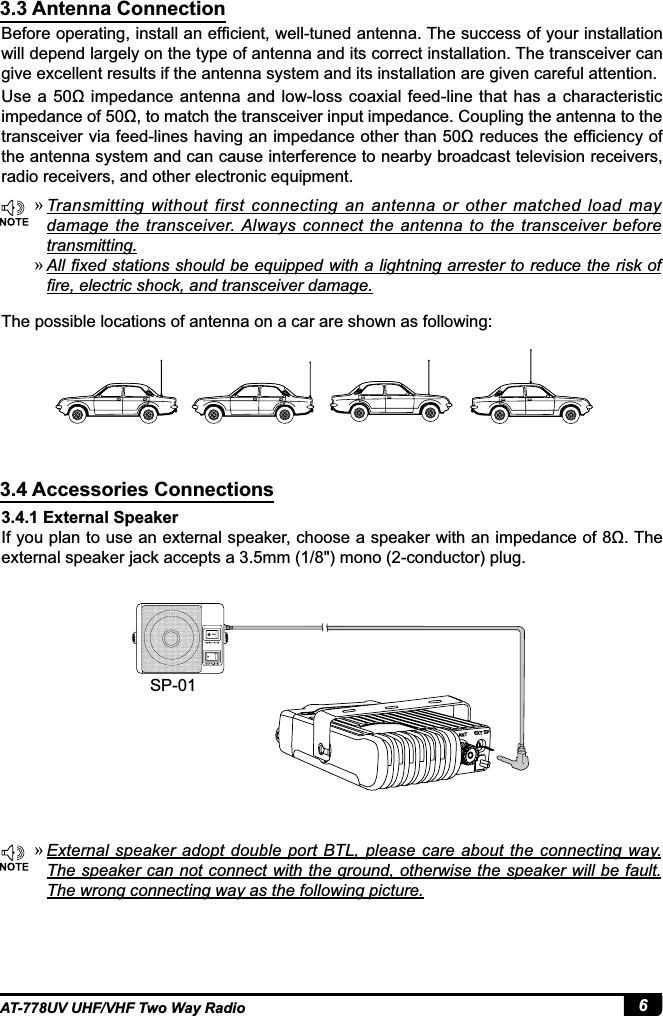
Qixiang Electron Science and Technology 778UV Scanning Receiver of an Amateur Radio User Manual
Qixiang Electron Science& Technology Co., Ltd Scanning Receiver of an Amateur Radio
UserManual.wiki
>
Qixiang Electron Science and Technology
>
778UV User Manual
Users Manual
Navigation menu
Upload a User Manual
Namespaces
Wiki Guide
HTML
PDF
Info
Views
User Manual
Discussion / Help
Navigation


![12AT-778UV UHF/VHF Two Way Radio6. BASIC OPERATIONS6.1 Switching the Power On/Off6.2 Adjusting the Volume6.3 Adjusting Frequency6.4 Adjust Channel1. In standby mode, short press the [PX] key programmed as VOL control, the LCD GLVSOD\VOL:XXWKHQWXUQWKHFKDQQHOVZLWFKWRDGMXVWYROXPHOHYHO2. In standby mode, short press WRPXWHWKHVSHDNHUWKH/&'GLVSOD\AUDIO:MTshort press it again to return last volume level.1. Power On: in power off state press WKH/&'GLVSOD\VWELCOMEWKHQZLOOdisplays current frequency or channel.2. Power Off: in power on state, press IRUVHFRQGVWKH/&'GLVSOD\VCLOSINGthen the LCD display disappears.1. By channel knob: In VFO mode, turn channel knob can adjust frequency, push channel NQREWKHPDWFKLQJFKDUDFWRUZLOOÀDVKWKHQWXUQFKDQQHONQREWRDGMXVWWKHIUHTXHQF\by step size 1K, 10K, 100K, 1Mz or 10MHz.1. Adjust channel by channel switch: In channel mode, turn channel knob to adjust the channel, the [UP]/[DOWN] key in the microphone can also adjust the main channel. »During communication, volume level can be adjusted more accurate. »7KH PLFURSKRQH >83@>'2:1@ NH\ FDQ DOVR DGMXVW WKH IUHTXHQF\ HDFK SUHVVmove one step size. hold the [DOWN] key can decrease one step size. if the channel knob is programmed as VOL function, users need press the PX key which programmed as FRQ function, when the LCD displays "VFO FREQ", turn channel NQREWRDGMXVWIUHTXHQF\ »,I WKHUH LVDQ HPSW\ FKDQQHOWKHUDGLRZLOO MXPSRYHU LWWR QH[WFKDQQHO ,IWKHchannel knob is programmed as VOL function, users need press the PX key which programmed as CH function, when the LCD displays "CH XX ", turn channel knob to adjust channel.2. By number key: In VFO mode, you can input wanted frequency by the microphone number key. For example if want 145.125Mhz, just press key 1, 4, 5, 1, 2, 5, if want 145Mhz, just press 1, 4, 5. The input is invalid if the frequency is over range.2. By number key: In CH mode, you can input wanted channel by the microphone input QXPEHUVVWDQGVIRUFKDQQHOVWDQGVIRUFKDQQHOLILQSXWchannel is an empty channel, the radio will report error and return to last channel.](https://usermanual.wiki/Qixiang-Electron-Science-and-Technology/778UV/User-Guide-3731629-Page-16.png)
![13 AT-778UV UHF/VHF Two Way Radio6.5 Receiving6.6 Transmitting6.7 Switch between Main Channel and Sub Channel6.8 Switch between VFO and Channel Mode6.9 Channel EditWhen the channel you are operating being called, the screen shows red RX and field strength in this way you can hear the calling.Hold [PTT] and speak into microphone. the radio start transmit, the screen shows red 7;DQG¿HOGVWUHQJWK+ROGWKHPLFURSKRQHDSSUR[LPDWHO\FPIURP\RXUOLSVDQGspeak to microphone in your normal speaking voice to get best timbre.This radio work by single channel dual watch , in standby, the frequency in the upper side is main channel and down side is sub channel, the transmit is available only on main channel.1. Short press [FUNC] to switch function group, choose the [PX] key defined as A/B function.2. 6KRUWSUHVV >3;@NH\GH¿QHGDV$%IXQFWLRQWKHQ UHSHDWHGO\SUHVVWKLVNH\ RUWXUQchannel knob to switch main channel and sub channel, the LCD displays Main:XX.3. Hold [PUSH] or [FUNC] key to store and exit, or wait 10 seconds the radio will store the setting and exit.1. Short press [FUNC] to switch function group, choose the [PX] key defined as V/M function.2. Short press [PX] key defined as V/M function, then repeat press this key or turn channel knob to switch main channel and sub channel, the LCD displays V/M:XX.3. Hold [PUSH] or [FUNC] key to store and exit, or wait 10 seconds the radio will store the setting and exit.1. In VFO mode, turn channel knob or the [UP]/[DOWN] key in microphone to adjust frequency.2. Short press [FUNC] to switch function group, choose the [PX] key defined as CDT function. Press [PX] key defined as CDT function to set CTCSS/DCS code. turn channel knob or the [UP]/[DOWN] key in microphone to choose CTCSS/DCS code.3. Long press [FUNC] key to enter channel setting menu, to choose wanted setting.4. Short press [FUNC] key to switch function group, hold the [PX] key defined as V/M IXQFWLRQXQWLOWKHFKDQQHOQXPEHUÀDVKHVLIWKHFKDQQHOQXPEHULVUHGPHDQVFXUUHQWchannel is valid, if the channel number is green, means current channel is empty.5. Turn the channel knob or microphone [UP]/[DOWN] key to choose the channel number to be stored.6. +ROGWKH>3;@NH\GH¿QHGDV90IXQFWLRQWRFRQ¿UPDQGVWRUHWKHFKDQQHOWKHFKDQQHOQXPEHUVWRSÀDVKDQGUDGLRHPLWVDEHHSVRXQGWKHFKDQQHOLVVWRUHGVXFFHVVIXOO\ »:KHQWKH5;LFRQDQG¿HOGVWUHQJWKÀDVKHVEXWFDQQRWKHDUWKHFDOOLQJLWPHDQVcurrent channel receive a matching carrier but unmatching signaling. Refer to CTCSS/ DCS CODE or Optional Signaling setup in Page 14). »Only available transmit on main channel.](https://usermanual.wiki/Qixiang-Electron-Science-and-Technology/778UV/User-Guide-3731629-Page-17.png)
![14AT-778UV UHF/VHF Two Way Radio6.10 Channel Delete6.11 CTCSS/DCS Encode and Decode Setup6.12 CTCSS Scan6.13 DCS Scan1. In channel mode, turn the channel knob or microphone [UP]/[DOWN] key to choose an unwanted channel.2. 6KRUWSUHVV>)81&@NH\WRVZLWFKIXQFWLRQJURXSFKRRVHWKH>3;@NH\GH¿QHGDV9M function, press this key together with [FUNC] key for 2 seconds, current channel is deleted and automatical jump to next channel.1. Short press [FUNC] to switch function group, choose the [PX] key defined as CDT function.2. 6KRUWSUHVV3;GH¿QHGDV&'7IXQFWLRQWKHQUHSHDWHGO\VKRUWSUHVVWKLVNH\VHWWKHcurrently channel if use CTCSS/DCS encode and decode. 3. When the LCD displays: RCDT:XXX, turn channel knob or press microphone [UP]/[DOWN] key to choose if add CTCSS/DCS decode signaling to current channel. Press [PUSH] button then turn channel knob or press microphone [UP]/[DOWN] key to choose wanted CTCSS/DCS decode signaling.4. When the LCD displays: TCDT:XXX, turn channel knob or press microphone [UP]/[DOWN] key to choose if add CTCSS/DCS encode signaling to current channel. Press [PUSH] button then turn channel knob or press microphone [UP]/[DOWN] key to choose wanted CTCSS/DCS encode signaling.5. &7&66+]SOXVRQHVHOIGH¿QHJURXSWRWDOJURXSVDCS: 000N-777I total1024 groups.N is positive code, I is inverse code.Press FUNC key can choose positive or inverse code.6. Hold [PUSH] or [FUNC] key to store and exit, or wait 10 seconds the radio will automatically store the setting and exit.In channel or VFO mode, short press [FUNC] to switch function group, choose the [PX] NH\GH¿QHGDV&'7IXQFWLRQVKRUWSUHVVWKLVNH\WR HQWHU &7&66FRGHVHWWLQJ ZKHQthe LCD displays CTC, long press this key to enter CTCSS scan. turn channel knob or SUHVVPLFURSKRQH>83@>'2:1@NH\FDQFKDQJHVFDQGLUHFWLRQ2QFH¿QGLQJDPDWFKLQJCTCSS signaling, it will stop 5 seconds then scan again, short press any key to exit CTCSS scan.In channel or VFO mode, short press [FUNC] to switch function group, choose the [PX] NH\GH¿QHGDV&'7IXQFWLRQ VKRUWSUHVVWKLVNH\WRHQWHU'&6FRGHVHWWLQJ:KHQWKHLCD displays DCS, long press this key to enter DCS scan, turn channel knob or press PLFURSKRQH>83@>'2:1@NH\FDQFKDQJHVFDQGLUHFWLRQ2QFH¿QGLQJDPDWFKLQJ'&6signaling, it will stop 5 seconds then scan again, press any key to exit DCS scan. »Under channel mode,this operation can be temporarily used by user. Once the radio is turned off or switched to another channel, the temporary setting will be erased. If the channel setting programmed for valid, the temporary setting will keep YDOLGXQWLO QH[WFKDQJHWXUQRIIUDGLR RUVZLWFKWRDQRWKHUFKDQQHOWKHWHPSRUDU\setting will not changed.](https://usermanual.wiki/Qixiang-Electron-Science-and-Technology/778UV/User-Guide-3731629-Page-18.png)
![15 AT-778UV UHF/VHF Two Way Radio6.14 Frequency/Channel Scan6.15 Scan Skip6.16 Squelch off/ Squelch off Momentary6.17 KEYPAD LOCKOUTFrequency ScanIn frequency (VFO) mode, this function is designed to monitor signal of all frequency points under each step size.1. In VFO mode, short press [FUNC] key to switch function group, choose the [PX] key GH¿QHGDV6&1IXQFWLRQ2. Short press the [PX] key defined as SCN function to start frequency scan, the LCD GLVSOD\VS3. Turn channel knob or press microphone [UP]/[DOWN] key can change scan direction.4. Turn channel knob or press any key except microphone [UP]/[DOWN] key to exit.,QFKDQQHOPRGHSUHVV>)81&@NH\WRVZLWFKIXQFWLRQJURXSFKRRVHWKH>3;@NH\GH¿QHGas SCN function. Hold this key to add into or delete from scan list. 1. When LCD displays:S, the current channel is in scan list. 2. When LCD not displays:S, the current channel is not in scan list.7KH>3;@NH\GH¿QHGDV021IXQFWLRQFDQPRQLWRUWKHZHDNVLJQDO1. Press [FUNC] key to switch function group, choose the [PX] key defined as MON function.2. Short press the [PX] key defined as MON function to turn squelch off / squelch off PRPHQWDU\WKH/&'GLVSOD\VUHGRXLFRQ6TXHOFKRIISUHVVWKH>3;@NH\GH¿QHGDV021WRGLVDEOHVTXHOFKSUHVV>021@NH\WRresume squelch. 6TXHOFKRIIPRPHQWDU\KROGWKH>3;@NH\GH¿QHGDV021WRGLVDEOHVTXHOFKUHOHDVH[MON] key to resume squelch. Avoiding unintentional operation, this function will lock the keys except [PTT], [PUSH], Keys.1. Long press [PUSH] button, the downside of the LCD displays Key Lock, means the keypad is locked.2. Long press [PUSH] button again, the downside LCD displays : Key Unlock, means the keypad is unlocked. »127(:KHQ NH\SDG ORFNRXW H[FHSW key, [PUSH] button and [PTT] key is available, other keys are invalid .Channel ScanIn channel mode, this function is designed to monitor signal of all channel.1. In channel mode, press [FUNC] key to switch function group, choose the [PX] key GH¿QHGDV6&1IXQFWLRQ2. Short press the [PX] key defined as SCN function to start channel scan, the LCD displays: S.3. Turn channel knob or press microphone [UP]/[DOWN] key can change scan direction.4. Turn channel knob or press any key except microphone [UP]/[DOWN] key to exit.](https://usermanual.wiki/Qixiang-Electron-Science-and-Technology/778UV/User-Guide-3731629-Page-19.png)
![16AT-778UV UHF/VHF Two Way Radio6.18 Transmit DTMF/5 Tone Signaling6.19 Transmit Tone burst frequency6.20 Transmit DTMF by Microphone KeypadIf the current channel is with DTMF/5TONE signaling, hold PTT and [UP] key will transmit selected Pre-programmed signaling.Hold PTT and [DOWN] key will transmit selected Pre-programmed tone burst frequency.Hold PTT, then input DTMF signaling by the microphone keypad.7. FUNCTION MENU1. Hold [FUNC] key to enter SELECT MENU interface.2. Short press [P4], [P6] key or turn channel knob to choose menu list. Short press [P5] can fast turn page.3. Press [PUSH] button to enter FUNC MENU setting.4. Short press [P4], [P6] key or turn channel knob to choose wanted setting.1. Enter FUNCTION MENU list, choose No.01 function. 2. Press [PUSH] button, the menu value in LCD turns to green color.3. Turn channel knob to choose wanted setting.Off~5: 6 levels available.Off: Turn off BEEP function.4. 3UHVV>386+@EXWWRQRU>3@NH\WRVWRUHVHWWLQJDQGH[LW1. Enter FUNCTION MENU list, choose No.02 function 2. Press [PUSH] button, the menu value in LCD turns to green color.3. Turn channel knob to choose wanted setting.7RWDO&KDQQHOVWHSVL]HDYDLODEOH........DQG.4. 3UHVV>386+@EXWWRQRU>3@NH\WRVWRUHVHWWLQJDQGH[LW7.1 Beep7.2 FREQUENCY STEP SIZE SETUP](https://usermanual.wiki/Qixiang-Electron-Science-and-Technology/778UV/User-Guide-3731629-Page-20.png)
![17 AT-778UV UHF/VHF Two Way Radio7KLVUDGLRKDVGLIIHUHQWGLVSOD\)UHTXHQF\&KDQQHODQG&KDQQHOQDPH7DJPRGH1. (QWHU)81&7,210(18OLVWFKRRVH1RIXQFWLRQ2. Press [PUSH] button, the menu value in LCD turns to green color.3. Turn channel knob to choose wanted setting.FRQ: Frequency+Channel mode(Amateur transceiver mode)CH: Channel mode(professional transceiver mode)NM: Channel+name mode+ Channel mode(Amateur transceiver mode), If channel not named, it display Fequency + Channel mode, otherwise displays the channel name( Amateur transceiver mode).4. 3UHVV>386+@EXWWRQRU>3@NH\WRVWRUHVHWWLQJDQGH[LWThis function use for setting RX signal strength, the calling will be heard only when reach setted level, otherwise the radio will keep mute.1. Enter FUNCTION MENU list, choose No.04 function 2. Press [PUSH] button, the menu value in LCD turns to green color.3. Turn channel knob to choose wanted setting.Off-9: Total 10 levels, OFF is lowest level, squelch is off4. 3UHVV>386+@EXWWRQRU>3@NH\WRVWRUHVHWWLQJDQGH[LW1. Enter FUNCTION MENU list, choose No.05 function 2. Press [PUSH] button, the menu value in LCD turns to green color.3. Turn channel knob to choose wanted settingWRWDOOHYHOVDYDLODEOH4. 3UHVV>386+@EXWWRQRU>3@NH\WRVWRUHVHWWLQJDQGH[LWAfter enable this function, must be input correct password then can turn on the transceiver.1. Enter FUNCTION MENU list, choose No.06 function 2. Press [PUSH] button, the menu value in LCD turns to green color.3. Turn channel knob to choose wanted settingON: Turn on password function.OFF: Turn off password function4. 3UHVV>386+@EXWWRQRU>3@NH\WRVWRUHVHWWLQJDQGH[LW1. Enter FUNCTION MENU list, choose No.07 function. 2. Press [PUSH] button, the menu value in LCD turns to green color.3. Turn channel knob to choose wanted setting.7.3 Display mode setup7.4 Squelch level Setup7.5 Volume level setting7.6 Password setting7.7 Scan Dwell Time Setup](https://usermanual.wiki/Qixiang-Electron-Science-and-Technology/778UV/User-Guide-3731629-Page-21.png)
![18AT-778UV UHF/VHF Two Way Radio1. Enter FUNCTION MENU list, choose No.08 function 2. Press [PUSH] button, the menu value in LCD turns to green color.3. Turn channel knob to choose wanted setting5S : It pauses 5s once scanning a matching signal, then resume scan10S : It pauses 10s once scanning a matching signal, then resume scan15S : It pauses 15s once scanning a matching signal, then resume scan4. 3UHVV>386+@EXWWRQRU>3@NH\WRVWRUHVHWWLQJDQGH[LWWhen turn off AOP, the radio need press key to power on when connect with the power supply.1. Enter FUNCTION MENU list, choose No.09 function. 2. Press [PUSH] button, the menu value in LCD turns to green color.3. Turn channel knob to choose wanted settingON : Enable AOP functionOFF: Power off by manual4. 3UHVV>386+@EXWWRQRU>3@NH\WRVWRUHVHWWLQJDQGH[LW7.8 Scan Pause Time Setup7.9 AOP (Automatic power on setup)TO: It pause for preset pause time when scanning a matching signal, then resume scan.CO: It pauses once scanning a matching signal, and resume scan when signal disappears.SE: It stops once scanning a matching signal.4. 3UHVV>386+@EXWWRQRU>3@NH\WRVWRUHVHWWLQJDQGH[LW1. Enter FUNCTION MENU list, choose No.10 function 2. Press [PUSH] button, the menu value in LCD turns to green color.3. Turn channel knob to choose wanted settingON: Enable Dual Watch functionOFF: Disable Dual Watch function4. 3UHVV>386+@EXWWRQRU>3@NH\WRVWRUHVHWWLQJDQGH[LW1. Enter FUNCTION MENU list, choose No.11 function 2. Press [PUSH] button, the menu value in LCD turns to green color.3. 7XUQFKDQQHONQREWRFKRRVHEULJKWOHVVOHYHOOHYHODYDLODEOH4. 3UHVV>386+@EXWWRQRU>3@NH\WRVWRUHVHWWLQJDQGH[LW7.10 Dual Watch setup7.11 Backlight Brightless Setup](https://usermanual.wiki/Qixiang-Electron-Science-and-Technology/778UV/User-Guide-3731629-Page-22.png)
![19 AT-778UV UHF/VHF Two Way RadioThe time-out timer limits continuous transmitting time. When transmit time last over programmed value, the transmitting will stop and emit a prompt.1. Enter FUNCTION MENU list, choose No.12 function 2. Press [PUSH] button, the menu value in LCD turns to green color3. Turn channel knob to choose wanted setting.PLQXWHVUDQJHDYDLODEOHE\PLQXWHVWHSOFF: Turn off TOT function4. 3UHVV>386+@EXWWRQRU>3@NH\WRVWRUHVHWWLQJDQGH[LWOnce APO is activated, the transceiver will be automatically switched off when the pre-set timer running out.1. (QWHU)81&7,210(18OLVWFKRRVH1RIXQFWLRQ2. Press [PUSH] button, the menu value in LCD turns to green color.3. Turn channel knob to choose wanted setting0LQ$XWRPDWLFDOSRZHURIIDIWHUPLQXWHV60Min: Automatical power off after 60 minutes.120Min: Automatical power off after 120 minutesOFF: Automatical power off function is off4. 3UHVV>386+@EXWWRQRU>3@NH\WRVWRUHVHWWLQJDQGH[LWThis function uses to start repeater. It needs a certain intensity Pilot Frequency to start dormant repeater. As usual, no need to send pilot frequency again once repeater started.1. Enter FUNCTION MENU list, choose No.14 function 2. Press [PUSH] button, the menu value in LCD turns to green color.3. Turn channel knob to choose wanted setting1000Hz: Pilot frequency 1000Hz1450Hz: Pilot frequency 1450Hz1750Hz: Pilot frequency 1750Hz 2100Hz: Pilot frequency 2100Hz4. 3UHVV>386+@EXWWRQRU>3@NH\WRVWRUHVHWWLQJDQGH[LW1. Enter FUNCTION MENU list, choose No.15 function 2. Press [PUSH] button, the menu value in LCD turns to green color.3. Turn channel knob to choose wanted settingFAIL: Revers displaySTAN: normal display4. 3UHVV>386+@EXWWRQRU>3@NH\WRVWRUHVHWWLQJDQGH[LW7.12 TOT(Time Out Timer)7.13 APO (Automatic Power OFF)7.14 Pilot Frequency7.15 DIR (LCD display direction setup)](https://usermanual.wiki/Qixiang-Electron-Science-and-Technology/778UV/User-Guide-3731629-Page-23.png)
![20AT-778UV UHF/VHF Two Way Radio1. Enter FUNCTION MENU list, choose No.16 function 2. Press [PUSH] button, the menu value in LCD turns to green color3. Turn channel knob to choose wanted setting.M&H: Turn on Main speaker and microphone speaker.MAIN: Turn on Main speaker.HAND: Turn on microphone speaker4. 3UHVV>386+@EXWWRQRU>3@NH\WRVWRUHVHWWLQJDQGH[LWThis radio has dissimilar frequency function, when this function is on the frequency in upside of LCD is RX frequency, and the downside frequency is TX frequency. You can revise the RX frequency by numberic key in microphone, you can revise TX frequency by WKH$%NH\LQPLFURSKRQHRUWKH3;NH\GH¿QHGDV$%IXQFWLRQ1. Enter FUNCTION MENU list, choose No.17 function.2. Press [PUSH] button, the menu value in LCD turns to green color.3. Turn channel knob to choose wanted settingON: Turn on RTDF function.OFF: Turn off RTDF function4. 3UHVV>386+@EXWWRQRU>3@NH\WRVWRUHVHWWLQJDQGH[LWIf you radio seems to be malfunctioning because of wrong operation or setup, this function will be able to resume all setup and channels to factory default.1. Enter FUNCTION MENU list, choose No.18 function 2. Press [PUSH] button, the menu value in LCD turns to green color.3. Turn channel knob to choose wanted settingALL: All channel, signaling function setup resume factory default.OPT: All function menu setup resume factory default except CHAN MENU.4. 3UHVV>386+@EXWWRQRU>3@NH\WRVWRUHVHWWLQJDQGH[LW7.16 Microphone Speaker7.17 RTDF ( RX/TX dissimilar frequency Setup)7.18 Reset Factory Default »Only can turn on RTDF function in VFO mode..](https://usermanual.wiki/Qixiang-Electron-Science-and-Technology/778UV/User-Guide-3731629-Page-24.png)
![21 AT-778UV UHF/VHF Two Way Radio1. Hold [FUNC] key to enter SELECT MENU interface.2. Short press [P4] key, [P6] key or turn channel knob to choose menu list. Short press [P5] key can fast turn page.3. Press [PUSH] button to enter CHAN MENU list4. Short press [P4],[P6] key or turn channel knob to choose wanted setting8. CHANNEL MENU1. Enter CHAN MENU, choose No.1 function2. Press [PUSH] button, the menu value in LCD turns to green color.3. Turn channel knob to choose wanted settingOFF: Turn off CTCSS/DCS decode.CTCSS: Choose CTCSS decode.DCS: Choose DCS decode.4. When choose CTCSS/DCS decode, press [PUSH] button to enter CTCSS/DCS decode setup, then turn channel knob to choose wanted CTCSS/DCS decode.&7&66+]DQGRQHVHOIGH¿QHJURXSWRWDOJURXSVDCS: 000N-777I, total 1024 groupsN is positive code, I is inverse code.Press [FUNC] key can choose positive or inverse code5. 3UHVV>386+@EXWWRQRU>3@NH\WRVWRUHVHWWLQJDQGH[LW1. Enter CHAN MENU, choose No.2 function2. Press [PUSH] button, the menu value in LCD turns to green color.3. Turn channel knob to choose wanted setting.OFF: Turn off CTCSS/DCS encode.CTCSS: Choose CTCSS encode.DCS: Choose DCS encode.4. When choose CTCSS/DCS encode, press (PUSH) button to enter CTCSS/DCS encode setup, then turn channel knob to choose wanted CTCSS/DCS encode.&7&66+=DQGRQHVHOIGH¿QHJURXSWRWDOJURXSVDCS: 000N-777I, total 1024 groupsN is positive code, I is inverse code.5. 3UHVV>386+@EXWWRQRU>3@NH\WRVWRUHVHWWLQJDQGH[LW1. (QWHU&+$10(18FKRRVH1RIXQFWLRQ2. Press [PUSH] button, the menu value in LCD turns to green color8.1 RCDT (CTCSS/DCS Decode Setup)8.2 CTCSS/DCS Encode Setup8.3 HIGH/MID/LOW Power Selection »7KHZRUNLQJRI&7&66'&6GHFRGHVKDOOEHZRUN DVVRFLDWHGZLWKWKHVTXHOFKmode setup. (Refer to Signaling Combination setup in page 21).](https://usermanual.wiki/Qixiang-Electron-Science-and-Technology/778UV/User-Guide-3731629-Page-25.png)
![22AT-778UV UHF/VHF Two Way Radio1. Enter CHAN MENU, choose No.4 function;2. Press [PUSH] button, the menu value in LCD turns to green color.3. Turn channel knob to choose wanted setting.0~99: Total 100 groups 5Tone encode for selection.4. 3UHVV>386+@EXWWRQRU>3@NH\WRVWRUHVHWWLQJDQGH[LW8.4 5TENC (5TONE ENCODE SELECT)8.5 T-DEC (Add Optional Signaling) »5Tone group name and connect shall be programmed by PC software. If the choose 5Tone encode has a group name, the LCD will display group name only. »7KHZRUNLQJRIRSWLRQDOVLJQDOLQJVKDOOEHZRUNDVVRFLDWHGZLWKWKHVTXHOFKPRGHVHWXS5HIHUWR6TXHOFK0RGHVHWXSLQSDJH;;3. Turn channel knob to choose wanted settingHI: Choose high power level.MI: Choose middle power level.LO: Choose low power level.4. 3UHVV>386+@EXWWRQRU>3@NH\WRVWRUHVHWWLQJDQGH[LWThis transceiver has 2 optional signaling: DTMF/5Tone/. those signaling function similar to CTCSS/DCS signaling. When the receiver adds an optional signaling, the caller shall transmit matching signaling. DTMF and 5Tone signaling can be applied for other advanced features such as ANI, PTT ID, group call, select call, remotely stun, remotely kill waken…etc.1. Enter CHAN MENU, choose No.4 function2. Press [PUSH] button, the menu value in LCD turns to green color.3. Turn channel knob to choose wanted settingDT: means DTMF signaling is added.5T: means DTMF signaling is added.OFF: Turn off optional signaling.4. 3UHVV>386+@EXWWRQRU>3@NH\WRVWRUHVHWWLQJDQGH[LWThis function can improve the level of blocking irrelative signals.1. Enter CHAN MENU, choose No.6 function.2. Press [PUSH] button, the menu value in LCD turns to green color.3. Turn channel knob to choose wanted setting.SQ:You can hear the calling when receive a mathcing carrrier.CDT:You can hear the calling when receive a matchng carrier and CTCSS or DCS signalingTONE: You can hear the calling when receives matching carrier + optional signaling.C&T: You can hear the calling when receives matching carrier + CTCSS/DCS + optional signaling.8.6 Signaling Combination Setup](https://usermanual.wiki/Qixiang-Electron-Science-and-Technology/778UV/User-Guide-3731629-Page-26.png)
![23 AT-778UV UHF/VHF Two Way RadioSelect suitable bandwidth in accordance with different local conditions1. Enter CHAN MENU list, choose No.7 function2. Press [PUSH] button, the menu value in LCD turns to green color.3. Turn channel knob to choose wanted setting.WID: band width is 25k(Wide band) MID: band width is 20k(Middle band) NAR: band width is 12.5k(Narrow band)4. 3UHVV>386+@EXWWRQRU>3@NH\WRVWRUHVHWWLQJDQGH[LWWith this function on, the transceiver will be able to communicate with a transceiver in same network without through a repeater.1. Enter CHAN MENU list, choose No.8 function2. Press [PUSH] button, the menu value in LCD turns to green color.3. Turn channel knob to choose wanted setting.ON: Turn on reverse functionOFF: Turn off reverse function4. 3UHVV>386+@EXWWRQRU>3@NH\WRVWRUHVHWWLQJDQGH[LW8.7 Band-width Selection8.8 Frequency Reverse »This settting is valid only when CTCSS/DCS signaling added. »)UHTXHQF\UHYHUVH LV WXUQ RQWKH7;DQG5;IUHTXHQF\ZLOOEH H[FKDQJHG WKH&7&66RU'&6VLJQDOLQJDOVRZLOOEHH[FKDQJHGLIH[LVWHGLQFXUUHQWFKDQQHOC/T: You can hear the calling when receives any matching carrier or CTCSS/DCS or optional signaling.4. 3UHVV>386+@EXWWRQRU>3@NH\WRVWRUHVHWWLQJDQGH[LW »This function is hide when RTDF function is on.1. Enter CHAN MENU list, choose No.9 function2. Press [PUSH] button, the menu value in LCD turns to green color.3. Turn channel knob to choose wanted settingON: Turn on talk around functionOFF: Turn off talk around function4. 3UHVV386+EXWWRQRU3NH\WRVWRUHVHWWLQJDQGH[LW8.9 Talk Around1. Enter CHAN MENU list, choose No.10 function2. Press [PUSH] button, the menu value in LCD turns to green color.3. Turn channel knob to choose wanted setting, press [FUNC] key to set the offset direction.8.10 Offset Freqeuncy And Direction Setup](https://usermanual.wiki/Qixiang-Electron-Science-and-Technology/778UV/User-Guide-3731629-Page-27.png)
![24AT-778UV UHF/VHF Two Way Radio »2))6(7IUHTXHQF\LVDGMXVWHGDFFRUGLQJWRVWHSVL]HVHWXS 7KLVIXQFWLRQLVKLGHwhen RTDF function is on. »,Q)UHTXHQF\9)2PRGHRU57')IXQFWLRQLVRQWKLVIXQFWLRQZLOOEHDXWRKLGGHQAfter edit a name for a channel, if the display mode is channel name, the radio will display the name edited in this menu. Otherwise it will display the frequency.1. Enter CHAN MENU list, choose No.11 function2. Press [PUSH] button, the menu value in LCD turns to green color.3. 7XUQFKDQQHONQREWRFKRRVHZDQWHGVHWWLQJ3UHVV>386+@WRFRQ¿UPDQGHQWHUHGLWLQJfor next charactor.4. 3UHVV>386+@EXWWRQRU>3@NH\WRVWRUHVHWWLQJDQGH[LWBusy channel lockout is disable transmitting, once the channel is busy and you press [PTT], the raido will beep as warning and get back to receiving.1. Enter CHAN MENU list, choose No.12 function2. Press [PUSH] button, the menu value in LCD turns to green color.3. Turn channel knob to choose wanted setting.BU: Signaling busy lockout, transmitting is inhibited when current channel receives a matching carrier.RL: Signaling busy lockout, transmitting is inhibited when currentchannel receives a matching carrier but dis-matching CTCSS/DCS code.OFF: Busy channel lockout is disabled.Transmitting is allowed in any receiving status4. 3UHVV>386+@EXWWRQRU>3@NH\WRVWRUHVHWWLQJ1. (QWHU&+$10(18OLVWFKRRVH1RIXQFWLRQ2. Press [PUSH] button, the menu value in LCD turns to green color.3. Turn channel knob to choose wanted setting.ON: TX allowed, press [PTT] to transmitOFF: TX not allowed, only work in RX mode, press [PTT] will emit a beep.4. 3UHVV>386+@EXWWRQRU>3@NH\WRVWRUHVHWWLQJDQGH[LW1. Enter CHAN MENU list, choose No.14 function;2. The LCD will display current channel DTMF ID or 5Tone ID.8.11 Editing Channel Name8.12 Busy Channel Lockout8.13 TX OFF8.14 OWNID (SELF ID ENQUIRY)-: Minus offset, means transmitting frequency lower than receiving frequency.+: Plus offset, means transmitting frequency higher than receiving frequency.OFF: OFFSET is turn off. 9+)0K]IUHTXHQF\DYDLDEOHUHF: 0 - 90 Mhz frequency avaiable.4. 3UHVV>386+@EXWWRQRU>3@NH\WRVWRUHVHWWLQJDQGH[LW](https://usermanual.wiki/Qixiang-Electron-Science-and-Technology/778UV/User-Guide-3731629-Page-28.png)
![25 AT-778UV UHF/VHF Two Way Radio1. Hold [FUNC] key to enter SELECT MENU interface. 2. Short press [P4] key, [P6] key or turn channel knob to choose menu list. Short press [P5] can fast turn page.3. Press [PUSH] button to enter MINI KEY menu list.4. Turn channel knob to choose wanted setting.5. Short press [PUSH] button to choose wanted keypad group .6. 6KRUWSUHVV>3@a>3@NH\WRFKRRVHZDQWHGVHOIGH¿QHNH\7. 3UHVV>)81&@WRFRQ¿UPDQGH[LW1. Hold [FUNC] key to enter SELECT MENU interface. 2. Short press [P4] key, [P6] key or turn channel knob to choose menu list. Short press [P5] can fast turn page.3. Press [PUSH] button to enter HANDY KEY menu list.4. Short press [P4] key, [P6] key or turn channel knob to choose wanted setting.1. Hold [FUNC] key to enter SELECT MENU interface.2. Short press [P4] key, [P6] key or turn channel knob to choose menu list. Short press [P5] key can fast turn page.3. Press [PUSH] button to enter HAND KEY menu list, choose No.1 function, press [PUSH] key to enter value setting, the menu value in LCD turns to green color.4. 7XUQFKDQQHONQREWRFKRRVHZDQWHGVHWWLQJWKHPLFURSKRQHNH\SDGKDV2))WRWDOEULJKWQHVVOHYHOV2))PHDQVWXUQRIIEDFNOLJKWEULJKWQHVV5. 3UHVV>386+@EXWWRQRU>3@NH\WRVWRUHVHWWLQJDQGH[LW9.1 Main unit keypad menu setup9.2 H-DIM Microphone keypad backlight setup9.3 Microphone keypad backlight brightness Setup9. KEYPAD MENU SETUP1. Hold [FUNC] key to enter SELECT MENU interface2. Short press [P4] key, [P6] key or turn channel knob to choose menu list. Press [P5] can fast turn page.3. Press [PUSH] button to enter HANDY KEY menu list.choose NO.2-5 function, then press [PUSH] button to enter value setting. the menu value in LCD turns to green color4. Turn channel knob to choose wanted setting.5. 3UHVV>386+@EXWWRQRU>3@NH\WRVWRUHVHWWLQJDQGH[LW+3$+3'0LFURSKRQHVHOIGH¿QHNH\SDGVHWXS](https://usermanual.wiki/Qixiang-Electron-Science-and-Technology/778UV/User-Guide-3731629-Page-29.png)
![26AT-778UV UHF/VHF Two Way Radio1. Enter DTMF menu. choose No.1 function2. Press [PUSH] button, the menu value in LCD turns to green color.3. Turn channel knob to choose wanted setting.1-16 total 16 groups DTMF encode for selection.4. If choosed group is empty, Press PUSH to edit DTMF code, the LCD displays “= = = = = = = =”.5. 7XUQFKDQQHONQREWRFKRRVHZDQWHGFKDUDFDWRUSUHVV386+WRFRQ¿UPDQGPRYHWRnext characator selection.6. 3UHVV>3@NH\WRVWRUHVHWWLQJDQGH[LW1. Enter DTMF menu. choose No.2 function2. Press [PUSH] button, the menu value in LCD turns to green color.3. Turn channel knob to choose wanted setting.50MS: The time for transmit a single DTMF encode and the interval is 50MS,100MS: The time for transmit a single DTMF encode and the interval is 100MS,200MS: The time for transmit a single DTMF encode and the interval is 200MS,067KHWLPHIRUWUDQVPLWDVLQJOH'70)HQFRGHDQGWKHLQWHUYDOLV06500MS: The time for transmit a single DTMF encode and the interval is 500MS.4. 3UHVV>386+@EXWWRQRU>3@NH\WRVWRUHVHWWLQJDQGH[LW10.1 DTMF Encode group setting10.1 DTMF Encode Transmitting Time10. DTMF SETTTING](https://usermanual.wiki/Qixiang-Electron-Science-and-Technology/778UV/User-Guide-3731629-Page-30.png)
![28AT-778UV UHF/VHF Two Way Radio12.1 Default Setting after Resetting12.2 Trouble Shooting12. MAINTENANCEFrequency band VHF UHFVFO frequency 145.150MHz 0+]Memory channel -- --Offset direction -- --Offset frequency 600KHz 5MHzChannel step 10KHz 10KHzCTCSS encode and decode -- --CTCSS tone frequency 88.5Hz 88.5HzDCS encode and decode -- --DCS Code 000N 000NOutput power HI HITOT APO OFF OFFVOL 28 28Squelch Level Problem Possible Causes and Potential Solutions(1) Power is on, nothing appears on Display+ and - polarities of power connection are reversed. Connect red lead to plus terminal and black lead to minus terminal of DC power supply(2) Fuse is blown Check and solve problem resulting in blown fuse and replace fuse with new fuse(4) No sound comes from speaker6TXHOFKLVPXWHG'HFUHDVHVTXHOFKOHYHO7RQHRU&7&66'&6VTXHOFKLVDFWLYH7XUQ&7&66RUDCS squelch off(5) Key and Dial do not function Key-lock function is activated. Cancel Key-lock function(6) No Scan Did not list the channel in the scan when programmedThe whole band with noise after programmed The squelch has opened during programmedCommunication range was short, bad sensitivitya. Check the antenna is well or not, and check the antenna port whether well connected.b. Antenna connector has debris or damaged. Whether set Low powerCan not talk with other members within the groupa. Frequency/channel different, pls modifyb. CTCSS/DCS different, pls resetc. Out of the communication range](https://usermanual.wiki/Qixiang-Electron-Science-and-Technology/778UV/User-Guide-3731629-Page-32.png)
![29 AT-778UV UHF/VHF Two Way Radio13. SPECIFICATIONSGENERALFrequency Range (89HUVLRQ9+)0+]8+)a0+]86$9HUVLRQ9+)0+]8+)a0+]5;Number of Channels 200 channelsChannel Spacing 25K (Wide Band) 20K(Middle Band) 12.5K (Narrow band)Phase-locked Step 2.5KHz, 5KHz, 6.25KHz, 10KHz, 12.5KHz, 20KHz, 25KHz, .+].+]Operating Voltage 9'&Squelch Carrier/CTCSS/DCSFrequency Stability SSPOperating Temperature -20č~+60čDimensions(mm) :['[+Weight about 0.64KgRECEIVERWide band Narrow bandSensitivity (12dB Sinad) ȝ9 ȝ9Adjacent ChannelSelectivity G% G%Audio Response aG%a.+] aG%a.+]Hum & Noise G% G%Audio distortion Audio power output >2W@8TRANSMITTERWide band Narrow bandPower Output 25W / 15W / 5WModulation .ĭ)( .ĭ)(Adjacent Channel PowerG% G%Hum & Noise G% G%Spurious Emission G% G%Audio Response aG%a.+] aG%a.+]Audio Distortion »Specifications are subject to change without notice due to advancements in technology.9+)0+]8+)a0+]7;](https://usermanual.wiki/Qixiang-Electron-Science-and-Technology/778UV/User-Guide-3731629-Page-33.png)