Qixiang Electron Science and Technology QZQX289G TWO-WAY RADIO User Manual
Qixiang Electron Science& Technology Co., Ltd TWO-WAY RADIO Users Manual
UserManual.wiki
>
Qixiang Electron Science and Technology
>
QZQX289G User Manual
user manual
Navigation menu
Upload a User Manual
Namespaces
Wiki Guide
HTML
PDF
Info
Views
User Manual
Discussion / Help
Navigation

![ProfessionalFM TransceiverIIGETTING ACQUAINTED .................................................................................................... 11Indicator Status and Beep ..................................................................................................................13[PF1] & [PF2] Key Default ...................................................................................................................13BASIC OPERATIONS ......................................................................................................... 14Switch on / off Transceiver ..................................................................................................................14Adjusting Volume ................................................................................................................................14Channel Selection ...............................................................................................................................14Group Selection ..................................................................................................................................15Receiving ............................................................................................................................................15Transmitting ........................................................................................................................................15Emergency Alarm Function .................................................................................................................16ADVANCED OPERATIONS ................................................................................................ 17Call 1/Call 2 .........................................................................................................................................17Monitor ................................................................................................................................................17Momentary Monitor .............................................................................................................................17Temporary Deletion of the Interfering Channel ..................................................................................18Squelch Levels Enquiry ......................................................................................................................18Squelch Levels Setup .........................................................................................................................18Scan ....................................................................................................................................................19CONTENTS](https://usermanual.wiki/Qixiang-Electron-Science-and-Technology/QZQX289G/User-Guide-1389480-Page-6.png)

![ProfessionalFM Transceiver 13GETTING ACQUAINTEDIndicator Status and BeepWarning on low voltage Transceiver emits a low voltage beep at intervals of 60 seconds, and red light twinkles.Transmitting/Reading Frequency Lightens red all the time.Receiving/Writing Frequency Lightens green all the timeScan Green light twinkles every second.DTMF Successfully Decoded Red and green light twinkles at the same time.Key Operation Voices "DU" into any function, "DU DU" or beep voice prompt to exit any function[PF1] & [PF2] Key DefaultPress [PF1] Battery Capacity EnquiryPress [PF2] Squelch offPress and hold [PF1] WhisperPress and hold [PF2] TX Power Switch](https://usermanual.wiki/Qixiang-Electron-Science-and-Technology/QZQX289G/User-Guide-1389480-Page-21.png)
![ProfessionalFM Transceiver14BASIC OPERATIONSSwitch on / off TransceiverSwitch on Transceiver: Under power-off state, turn POWER / VOLUME clockwise till hearing "Click" to switch on the transceiver. The transceiver will announce "Power on" when power-on.Switch off Transceiver: Under power-off state,turn POWER / VOLUME anticlockwise till hearing "Click" to switch off the transceiver.Adjusting VolumeUnder power-on state, turn POWER / VOLUME switch to adjust the volume. Turn clockwise to increase the volume, and anticlockwise to decrease the volume. You can press the programmed key of momentary squelch off [PF1] / [PF2] to monitor current volume.NOTE: You can firstly press the programmed key of momentary squelch off [PF1] / [PF2] to monitor the background noise and meanwhile turn POWER / VOLUME to adjust the volume. Under the communicating state, you can adjust volume as per your need more accurately.Channels SelectionUnder the standby conditions, turn channel selector knob to choose the desired channel, and the transceiver will announce the adjusted channel. Turn clockwise to increase the channel, anticlockwise to decrease the channel. NOTE: The transceiver will emit a voice prompt when current channel is blank.](https://usermanual.wiki/Qixiang-Electron-Science-and-Technology/QZQX289G/User-Guide-1389480-Page-22.png)
![ProfessionalFM Transceiver 15BASIC OPERATIONSGroup SelectionThere are128 channels in total which are divided into 8 groups with 16 channels in each group. After the first channel is selected, press [PF2] to switch on the transceiver. Holding [PF2] for 2 seconds, the transceiver will announce current group number. Under this condition, turn the selector knob to choose the desired group. NOTE: You can enable or disable the group selection function by programming software. ReceivingYou can hear the transmitting party's calling when the channel you are operating is called and the LED light turns green.NOTE:You may not receive the calling if you set a high squelch off level of the transceiver.If current channel has been programmed with signaling, you can only hear the call from a same signaling, other calls can not be heard. TransmittingBefore transmitting, make sure that the channel you want to use is not in busy state through monitoring for a while by pressing the programmed Momentary Squelch off [PF1] / [PF2] key. Under these conditions, press the [PTT] key and speak into microphone. Please keep around 2.5-5cm distance between microphone and your lip. And please speak in normal tone to make the receiver obtain best tone quality.](https://usermanual.wiki/Qixiang-Electron-Science-and-Technology/QZQX289G/User-Guide-1389480-Page-23.png)

![ProfessionalFM Transceiver 17ADVANCED OPERATIONSThe [PF1] and [PF2] keys are programmable. They can realize the following functions by programming software.NOTE: When programming the following functions as [PF1] 1S key or [PF2] 1S key, you need to press the [PF1] / [PF2] key for one second till the transceiver beeps and then release the key to realize the programmed function.Call 1/Call 2Under the standby conditions, press the programmed key of Call1/Call2 ( [PF1]/[PF2] ) to transmit the prestored and selected DTMF signaling.MonitorUnder the standby conditions, pressing the programmed key of monitor [PF1] / [PF2], the transceiver emits "DU" beep and then comes into the monitor state. Under these conditions, transceiver will ignore CTCSS / DCS decode and monitor signal of the other party as long as receiving the matched carrier wave. Press this key again, transceiver emits "DU DU" beep and exits the monitor state.Momentary MonitorUnder the standby conditions, press and hold the programmed key of momentary monitor [PF1]/](https://usermanual.wiki/Qixiang-Electron-Science-and-Technology/QZQX289G/User-Guide-1389480-Page-25.png)
![ProfessionalFM Transceiver18[PF2], the transceiver emits "DU" beep and then comes into monitor state. Under these conditions, transceiver will ignore CTCSS/DCS decode and monitor signal of other party as long as receiving the matched carrier wave. Release this key, transceiver emits "DU DU" beep and exits the monitor state.ADVANCED OPERATIONSTemporary Deletion of the Interfering Channel This function can temporarily delete the interfering channel or occupied channel from scan list. When scan stops on one channel, pressing the programmed key of Temporary Deletion of the Interfering Channel, transceiver emits "DU" beep and temporarily deletes this channel from scan list. But the priority channels cannot be temporarily deleted. If only one or two channels are in scan list, this operation is not available. Restart the transceiver to add the temporarily deleted channels into scan list again.Squelch Levels EnquiryUnder the standby conditions, pressing the programmed Squelch Levels Enquiry key, transceiver will announce current squelch level.Squelch Levels SetupThis function is used to setup the receiving signal intensity. If the receiving signal intensity reaches a certain level, you can hear the other party calling, otherwise transceiver will remain mute.](https://usermanual.wiki/Qixiang-Electron-Science-and-Technology/QZQX289G/User-Guide-1389480-Page-26.png)
![ProfessionalFM Transceiver 19ADVANCED OPERATIONSUnder the standby conditions, pressing the programmed Squelch Levels Setup, transceiver will voice the adjusted squelch level.ScanScan function can be used in monitoring every channel of current group.Under the standby conditions, pressing the programmed scan key, transceiver emits "DU" beep and comes into scan state. It scans channels in scan list one by one. When one channel receives a matching signal, the transceiver will temporarily stay in this channel till the signal disappears. Pressing the scan key again, transceiver emits "DU DU" beep, exits scan and switches the working channel to returned channel which is programmed by users in advance (Please refer to returned channel in the programming software.).Scramble Setup (Encryption)This special audio process can offer a more condential communication. It makes transceivers of same frequency receive disordered noises only. Under the standby conditions, pressing the programmed Scramble key, transceiver emits "DU" beep and enables Scramble function. Repeat the same operation, transceiver emits "DU DU" beep and disables the Scramble function.Squelch offUnder the sandby conditions, pressing the programmed key of Squelch off [PF1] / [PF2], the](https://usermanual.wiki/Qixiang-Electron-Science-and-Technology/QZQX289G/User-Guide-1389480-Page-27.png)
![ProfessionalFM Transceiver20squelch circuit is not mute and at present you can hear the background noise. Press this key again, transceiver emits "DU DU" beep, and the squelch circuit becomes mute. By using this function you can monitor the weaker signal which is hard to receive.ADVANCED OPERATIONSTemporary Squelch off Under standby conditions, press and hold programmed key of Temporary Squelch off [PF1]/[PF2], transceiver emits "DU" beep and the squelch circuit is not mute and at present you can hear the background noise. Release this key, then the transceiver emits “DU DU” and the squelch circuit is mute. By using this function you can monitor weak signal which is hard to receive.Talk AroundUnder the standby conditions, pressing the programmed key of Talk Around, transceiver emits "DU" beep and then the current channel comes into Talk Around state. Under these conditions, transceiver will transmit by receiving frequency. Also, the setting code (CTCSS / DCS) will interchange encoding signal as decoding signal. Press this key again, transceiver emits "DU DU" beep and exits the Talk Around state.Note:Under the talk around state, the transceiver can not communicate with other transceivers through repeaters.](https://usermanual.wiki/Qixiang-Electron-Science-and-Technology/QZQX289G/User-Guide-1389480-Page-28.png)
![ProfessionalFM Transceiver24BACKGROUND OPERATIONS 3.This transceiver is set with 16 groups of DTMF code, users can program and use them exibly.Wide / Narrow Band SetupOn the basis of national conditions, users can set channel spacing as 25K (wide band), 20K ( middle band) or12.5K (narrow band) to communicate on the transceiver by programming software.This transceiver can realize 25K (wide band), 20K (medium band) or 12.5K (narrow band) as communication way.Busy Channel LockoutWhen BCL function is enabled, you can not transmit in busy channel. BCL prevents you from interfering with other parties who is using the same frequency point that you select. Under this condition, if you press the [PTT] to transmit, the transceiver will emit beep prompt and return to receiving mode.Users can set Busy Channel Lockout mode by programming software.Repeater(BTL):1. Repeat lockout, transmitting is inhibited when current channel receives a matched carrier with different CTCSS/DCS. Carrier wave(BCL):2. Carrier busy lockout, transmitting is inhibited when current channel receives a matched carrier wave. 3. Close: BCL disabled, you can do transmission under whatever receiving state.](https://usermanual.wiki/Qixiang-Electron-Science-and-Technology/QZQX289G/User-Guide-1389480-Page-32.png)
![ProfessionalFM Transceiver 25BACKGROUND OPERATIONSSignaling Relations SetupUsers can set relations between CTCSS/DCS signal and DTMF signal by programming software.AND: Only when a matching CTCSS/DCS signal and a DTMF signal are received, can calling of other party be heard.OR: As long as a matching CTCSS/DCS signal or a DTMF signal is received, calling of the other party can be heard.Channel Scan SkipUsers can choose whether to set current channel as Scan Skip by programming software. Transceiver will skip current channel during scan when it is set as Scan Skip.TX OFF Users can enable or disable the Transmitting Inhibited Function in current channel by programming software. Once this function is enabled, [PTT] key becomes invalid key, and the transceiver only works in receiving mode. Battery Save SetupWhen this function is enabled, the transceiver can efficiently reduce battery consumption. The transceiver will automatically switch on Battery Save Function when not receiving any signal or making any operations. But when the transceiver receives a matching signal or make operations, it](https://usermanual.wiki/Qixiang-Electron-Science-and-Technology/QZQX289G/User-Guide-1389480-Page-33.png)
![ProfessionalFM Transceiver 27the [PTT] key.Users can enable or disable the VOX function by programming software.BACKGROUND OPERATIONSPriority Scan Setup This transceiver can be set with two priority channels at the same time.Users can set the desired priority scan by programming software. If transceiver set priority scan, under scanning and receiving no signal state, it will scan every channel and also test priority channel at a time. When the non-priority channel receives signal, it will test priority channel according to yback time A and yback time B setup by users.Resume Factory DefaultOnce transceiver works abnormally for wrong operations or wrong programming, users can start this function to resume all functions and channels as Factory Default.Press [PTT] and [PF1] key synchronously to switch on transceiver. Holding the two keys for more than 1 second, the transceiver will resume Factory Default after announcing current channel number.](https://usermanual.wiki/Qixiang-Electron-Science-and-Technology/QZQX289G/User-Guide-1389480-Page-35.png)
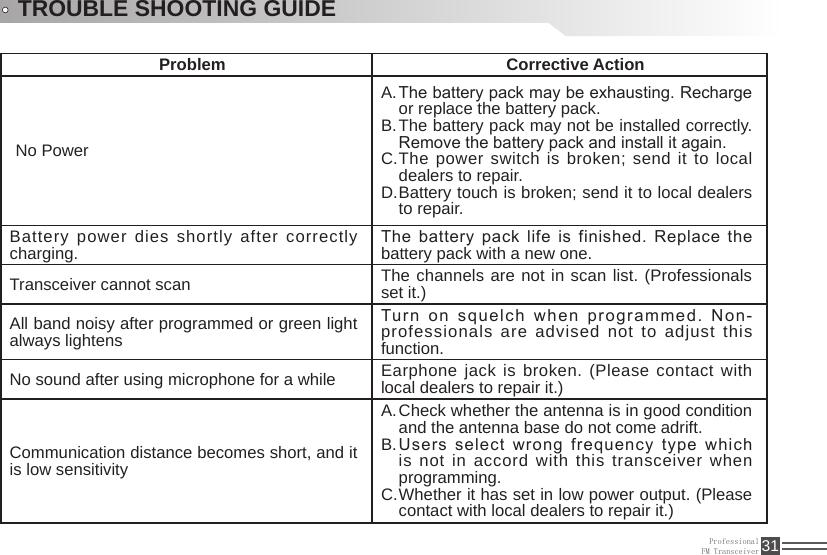
![ProfessionalFM Transceiver32Cannot talk to or hear other members in your groupDifferent frequency or channel, please change it.A. Different CTCSS / DCS please reset it.B. Out of communication range.C. Can not power on or frequent power-off Check whether the battery touch is out of sharp or broken.The receiver gets low or intermittent voice from the caller Check weather the MIC is stoppage. (Otherwise, please contact with local dealers to repair it.)Unstable communication with loud background noise Out of communication range or obstruct by tall buildings or in basement and so on.Loudspeaker become lower or with “ka ka” sound after using a certain timeCheck whether the loudspeaker net is broken. Iron powder or sundries is in the loudspeaker. (Please contact with local dealers to repair it.)Receive voice from the other party but can not transmit Check [PTT] key. (Please contact with local dealers to repair it.)Receiving Indicator (green light) lightens but no sound Low volume, please turn on clockwise.A. Loudspeaker is broken. (Please contact with B. local dealers to repair it.)Earphone jack is broken. (Please contact with C. local dealers to repair it.)Volume switch is broken. (Please contact with D. local dealers to repair it.)TROUBLE SHOOTING GUIDE](https://usermanual.wiki/Qixiang-Electron-Science-and-Technology/QZQX289G/User-Guide-1389480-Page-40.png)