Qualnetics WE-ADK WE-ADK User Manual Title Of the
Qualnetics Corporation WE-ADK Title Of the
User Manual
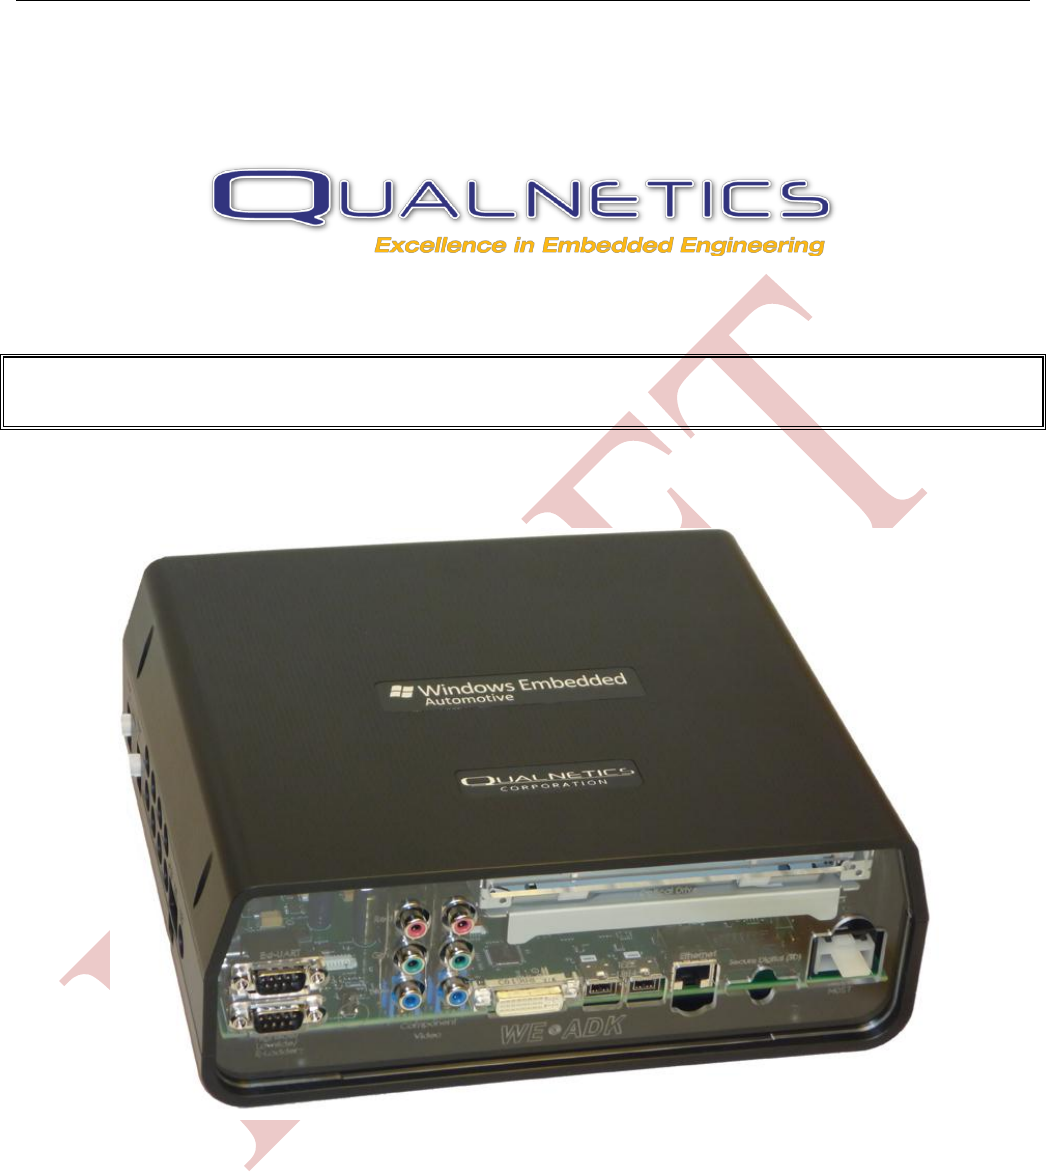
GETTING STARTED WITH THE WE-ADK
VERSION: 1.1
SEPT 14, 2010

Getting Started with the WE-ADK
(09/15/10) Qualnetics Confidential (Copyright 2010) Page 1
CONTENTS
1. INTRODUCTION ........................................................................................................2
1.1 RECOMMENDED HARDWARE ....................................................................................2
1.2 REQUIRED SOFTWARE ...............................................................................................2
1.3 OPTIONAL SOFTWARE ...............................................................................................2
1.4 SOFTWARE INSTALL ORDER ......................................................................................2
1.5 PDK DIRECTORY STRUCTURE ..................................................................................3
2. HARDWARE PERIPHERALS ......................................................................................4
2.1 TOP BOARD (EXPLODED VIEW) ................................................................................4
2.2 BOTTOM BOARD (COVERS REMOVED) ......................................................................5
2.3 FRONT PANEL ...........................................................................................................6
2.4 RIGHT PANEL ............................................................................................................7
2.5 REAR PANEL .............................................................................................................8
2.6 LEFT PANEL ..............................................................................................................9
2.7 DIP SWITCH CONFIGURATION ................................................................................10
3. SETTING UP YOUR WE-ADK ...............................................................................11
3.1 SETTING UP THE DISPLAY .......................................................................................11
4. BUILDING AN OS IMAGE .......................................................................................12
4.1 INSTALLED BUILD WINDOWS ..................................................................................12
4.2 CREATING A CUSTOM BUILD WINDOW (OPTIONAL) ................................................12
4.3 BUILDING THE IMAGE .............................................................................................13
5. DOWNLOAD INSTRUCTIONS ..................................................................................14
5.1 OPEN RUN-TIME IMAGE ..........................................................................................14
5.2 PREPARE CONNECTIVITY OPTIONS .........................................................................14
5.3 DOWNLOAD THE OS IMAGE ....................................................................................15
6. TEST APPLICATIONS ..............................................................................................16
6.1 MEDIAPLAYERSAMPLE ...........................................................................................16
6.2 RADIOAPPSAMPLE ..................................................................................................16
6.3 PHONESAMPLE ........................................................................................................17
7. CASE ASSEMBLY ....................................................................................................18
7.1 REQUIRED COMPONENTS ........................................................................................18
7.2 ASSEMBLY INSTRUCTIONS ......................................................................................18
APPENDIX A – HARDWARE COMPONENTS .......................................................................19
APPENDIX B – LIMITED WARRENTY ................................................................................20
APPENDIX C – FCC GUIDLINES ........................................................................................21

Getting Started with the WE-ADK
(09/15/10) Qualnetics Confidential (Copyright 2010) Page 2
1. INTRODUCTION
This document provides instructions on getting started with the Windows Embedded Automotive Platform
(WEAP) and the Windows Embedded Automotive Development Kit (WE-ADK).
After reading through this document, you will be able to setup the Microsoft Automotive development
environment, build an MS Auto image, and download an image to the WE-ADK.
1.1 Recommended Hardware
Windows Embedded Automotive Development Kit (WE-ADK)
WE-ADK Deployment Kit
USB to Serial Adapter (if serial port is not available on the development PC)
Ethernet Router capable of issuing DHCP addresses
1.2 Required Software
The following software is required to build and download WEAP 4.1 images to the WE-ADK
Visual Studio 2005 (Service Pack 1)
Platform Builder for Windows Embedded CE 6.0
o Platform Builder 6.0 Service Pack 1
o Platform Builder 6.0 R2
o Platform Builder 6.0 R3
Microsoft Auto 4.1 PDK
Microsoft Auto 4.1 Update
Terminal Emulator Software (HyperTerm, Teraterm, etc…)
o HyperTerminal is provided with Windows XP
Check the Release Notes for late-breaking pre-requisite information.
1.3 Optional Software
Expression Studio
1.4 Software Install Order
Install the software in the following order. You may be required to re-install all the software if the order is not
correctly followed.
1. Visual Studio 2005
2. Visual Studio Service packs (If necessary)
3. Platform Builder for Windows Embedded CE 6.0
o Ensure support for ARMV4I and x86 microprocessors are selected when Platform Builder is
installed. Only Installing ARMV4I may result the in MSAuto PDK asking you to install “At least
one CPU”
4. Platform Builder 6.0 SP1
5. Platform Builder 6.0 R2
6. Platform Builder 6.0 R3
7. Microsoft Auto 4.1 PDK

Getting Started with the WE-ADK
(09/15/10) Qualnetics Confidential (Copyright 2010) Page 3
8. Microsoft Auto 4.1 Update
1.5 PDK Directory Structure
1. After the PDK installation process is complete, the components of the PDK are installed to the Windows
Embedded CE directory structure at <installation_point>\WINCE600, where <installation_point> is the
location where you installed CE 6.0, for example, "C:\".
2. The following table shows the main directories that you use for platform and application development.
Directory
Description
Platform\MARP-F2
Platform-specific files and directories for the MARPF1 hardware
platform.
Public
Source code and APIs for Windows Embedded CE and
Microsoft Auto.
Public\AutoComp
Automotive components that can be used to build a Microsoft
Auto platform.
In this directory, the OAK subdirectory includes APIs,
resources, and samples for Microsoft Auto platform
development. The SDK subdirectory includes APIs and
samples for Microsoft Auto software development. The
CESYSGEN subdirectory contains the Makefile that supports
the Sysgen tool, called Sysgen.bat.
The header files mentioned in the Microsoft Auto API topics
are located under the OAK and SDK directories.
Public\AutoCell
Components for the automotive implementation of Cellcore.
Cellcore provides a basic set of wireless connection-oriented
services, including SMS, Configuration Manager, Connection
Manager, and Radio Interface Layer (RIL).
Public\Common
Windows Embedded CE APIs, drivers, and catalog items.
Others
Components available to developers during software
development, such as ATL and the .NET Compact Framework
class library.
Getting Started with the WE-ADK
(09/15/10) Qualnetics Confidential (Copyright 2010) Page 4
2. HARDWARE PERIPHERALS
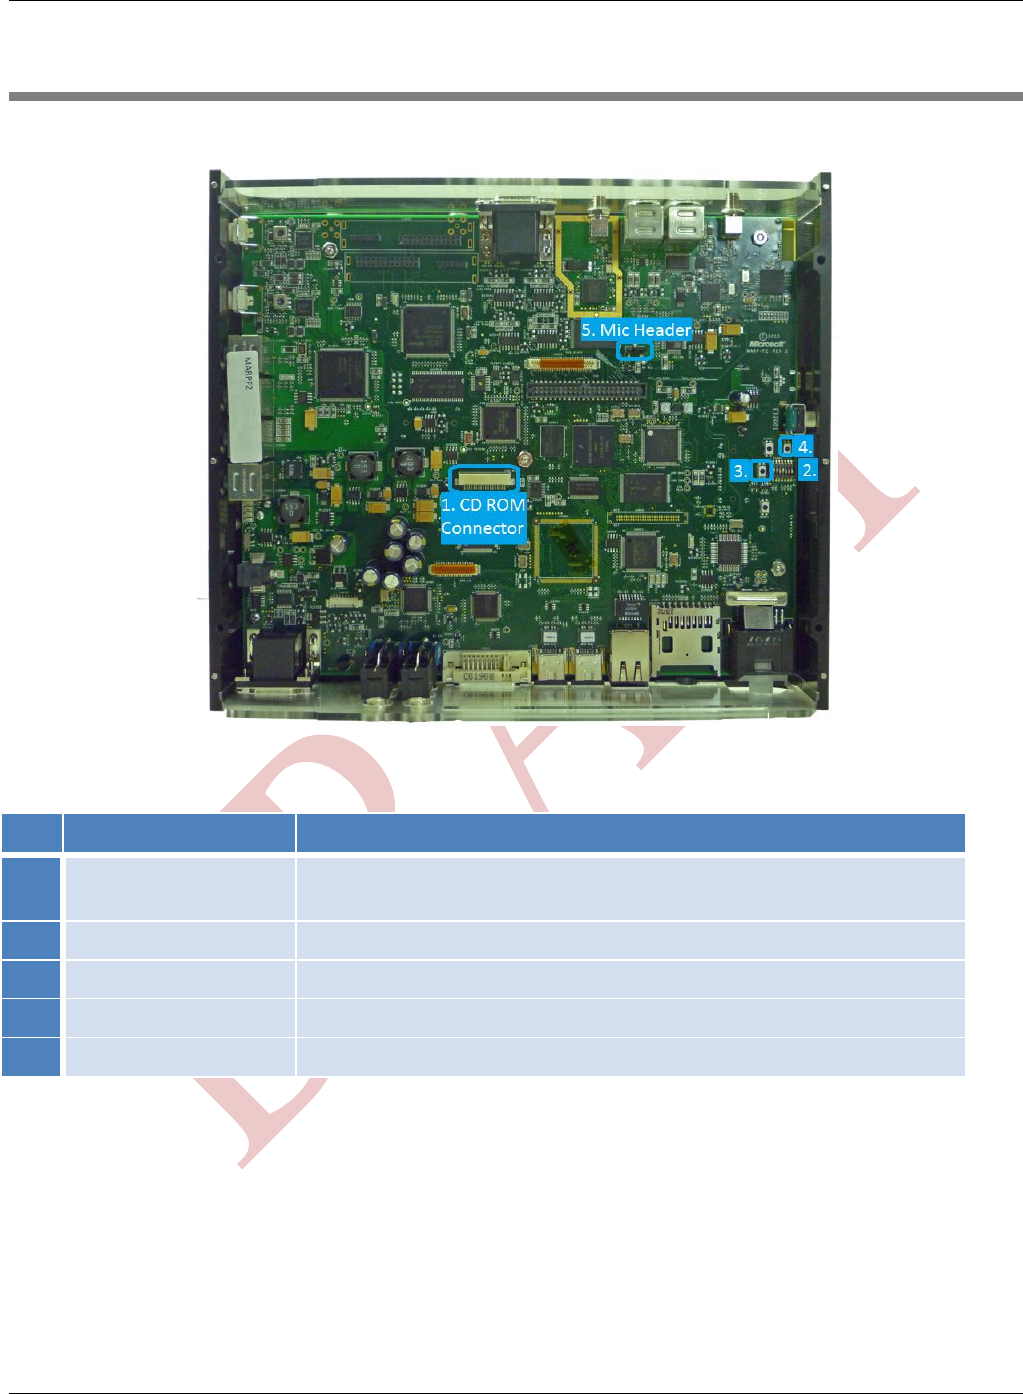
2.1 Top Board (Exploded View)
Table 2.1 WE-ADK Top
ID
Label
Comment
1
PLDS CD-ROM
connector
I2S+I2C cable to connect CD-ROM drive
2
Boot DIP Switches
(See DIP Switch Settings Table below)
3
Reset button
Cold reset button
4
Safe Power-off button
Saves Audio & Radio settings then power-off
5
Microphone Header
3-pin header; jumper pins 1 & 2 to enable
Getting Started with the WE-ADK
(09/15/10) Qualnetics Confidential (Copyright 2010) Page 5
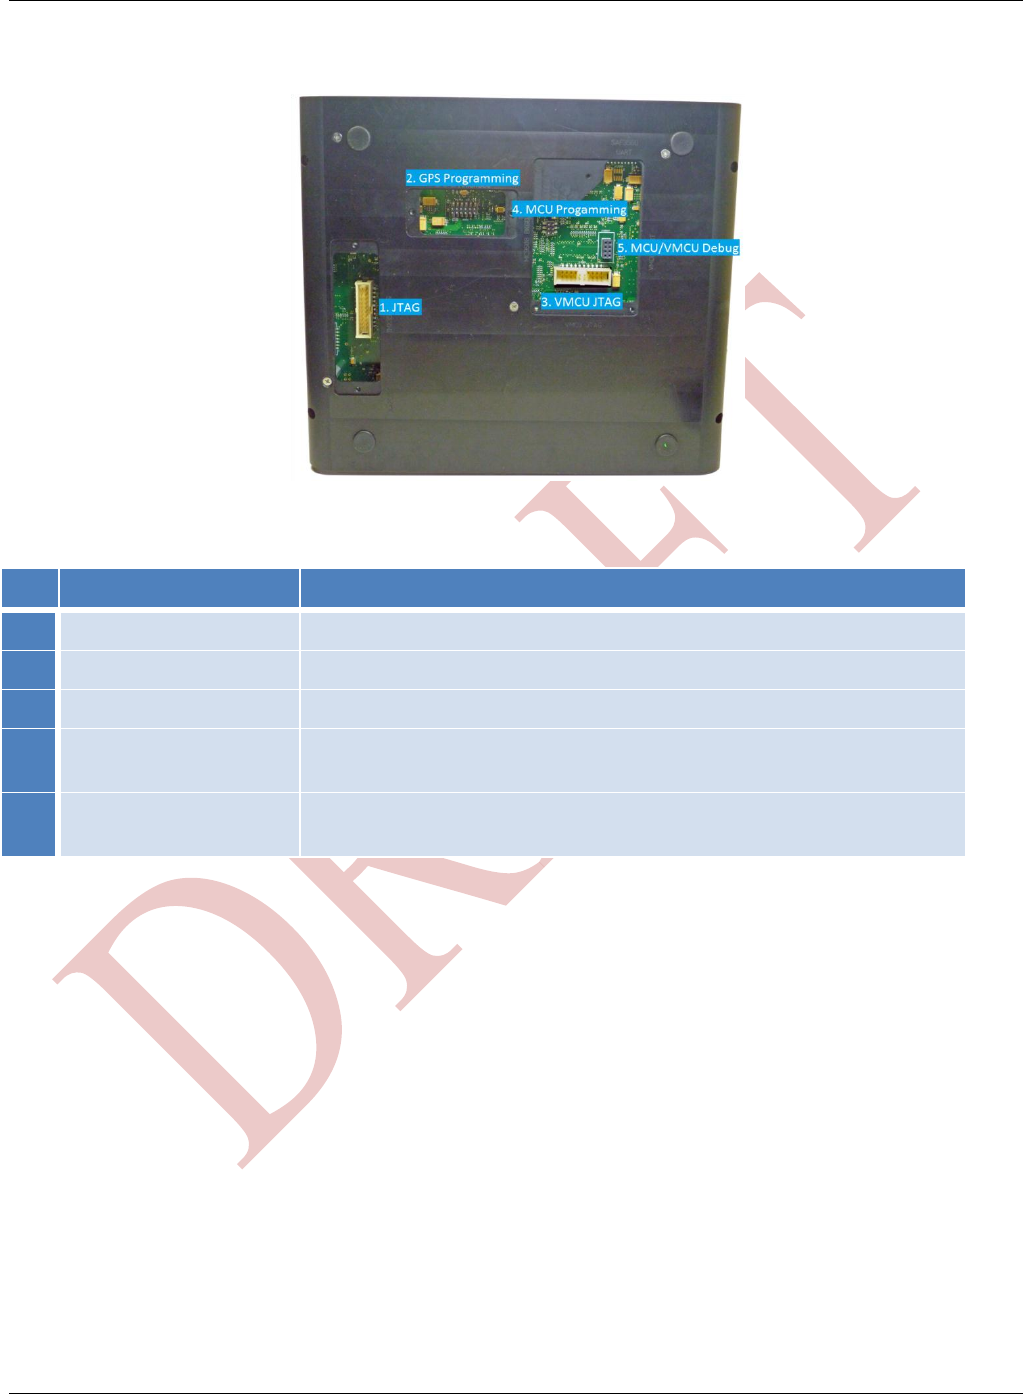
2.2 Bottom Board (Covers Removed)
Table 2.2 WE-ADK Bottom
ID
Label
Comment
1
JTAG
Required to re-flash the board
2
SiRFstar3 Programming
GPS feature not enabled
3
VMCU JTAG
VMCU Feature not enabled
4
MCU Programming
MCU provides support for IR, Temp sensor and R-Ladder and
Voulme+Mixer Knob
5
MCU/VMCU Debug
Mutually exclusive usage debug – can either have MCU or VMCU.
Once VMCU feature is enabled, MCU no longer functional.
Getting Started with the WE-ADK
(09/15/10) Qualnetics Confidential (Copyright 2010) Page 6
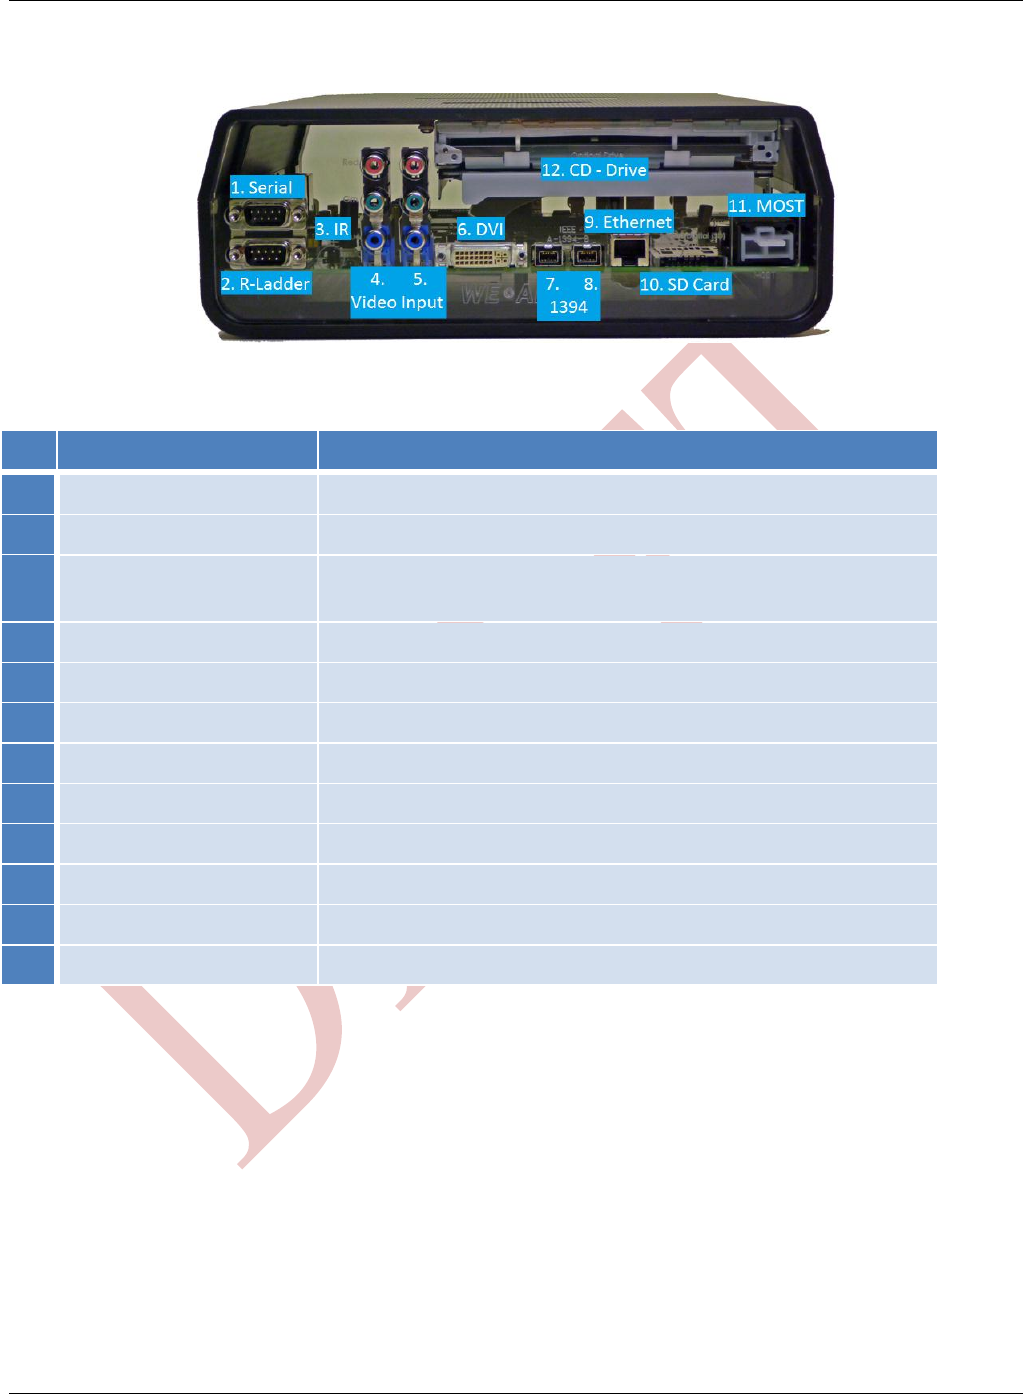
2.3 Front Panel
Table 2.3 WE-ADK Front
ID
Label
Comment
1
Serial
Used for Debug output. Default Baud 115200
2
R-Ladder
3
IR receiver
Requires SMK standard remote control using QuatroPulse IR
protocol for Windows Media Centre
4
Component Video Input-1
5
Component Video Input-2
6
DVI Output
7
IEEE 1394B-1
(Not available on all development platforms)
8
IEEE 1394B-2
(Not available on all development platforms)
9
Ethernet
10
SD Card
Insert card with the pins facing up
11
MOST
12
CD – Drive
Getting Started with the WE-ADK
(09/15/10) Qualnetics Confidential (Copyright 2010) Page 7
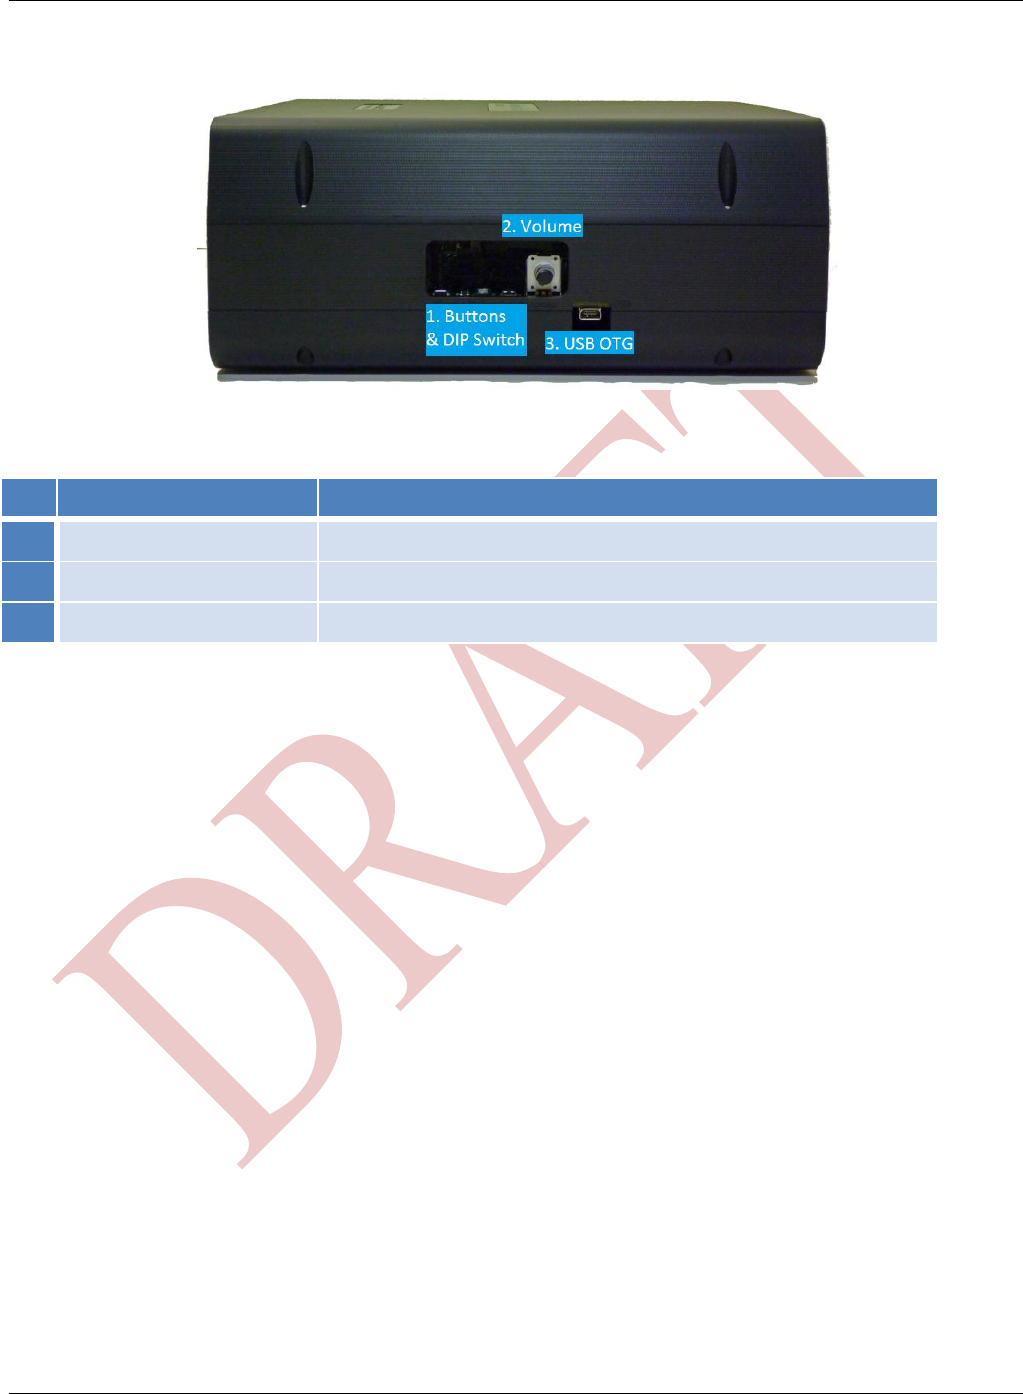
2.4 Right Panel
Table 2.4 WE-ADK Right
ID
Label
Comment
1
Buttons and Dip Switch
2
Volume+Mixer Knob
(see Board Overview Table above)
3
USB OTG
Also supports Function driver for SBOOT
Getting Started with the WE-ADK
(09/15/10) Qualnetics Confidential (Copyright 2010) Page 8
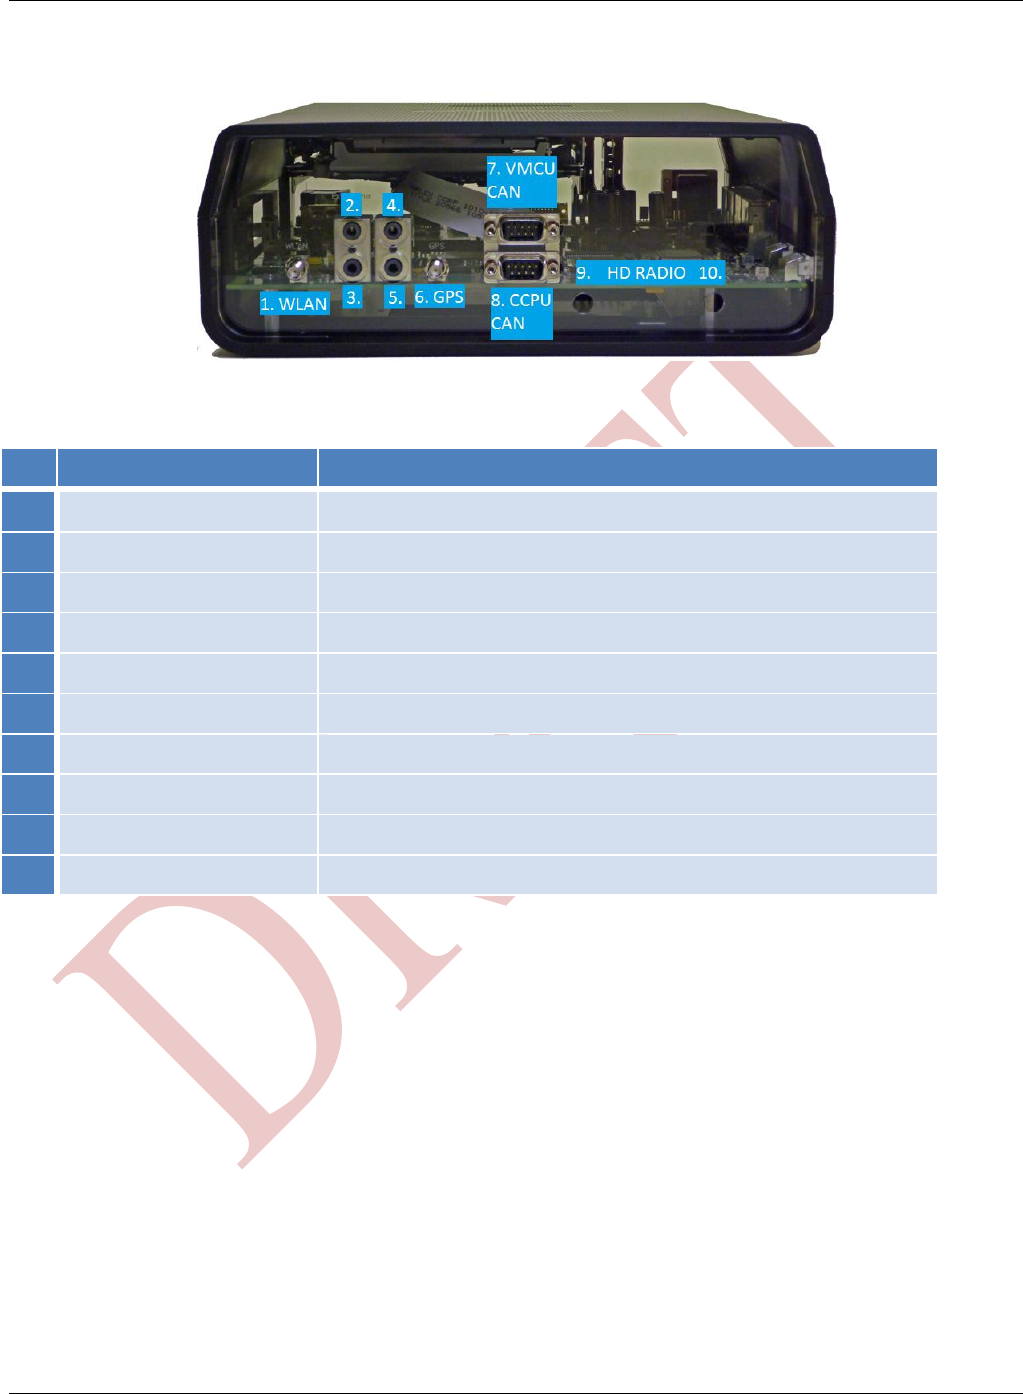
2.5 Rear Panel
Table 2.5 WE-ADK Back
ID
Label
Comment
1
WLAN
2
Ext Phone In
3
Ext Phone Out
4
Microphone 1
5
Microphone 2
6
GPS
7
VMCU - CAN
8
CCPU - CAN
9
HD Radio – A
(Not available on all development platforms)
10
HD Radio – B
(Not available on all development platforms)
Getting Started with the WE-ADK
(09/15/10) Qualnetics Confidential (Copyright 2010) Page 9
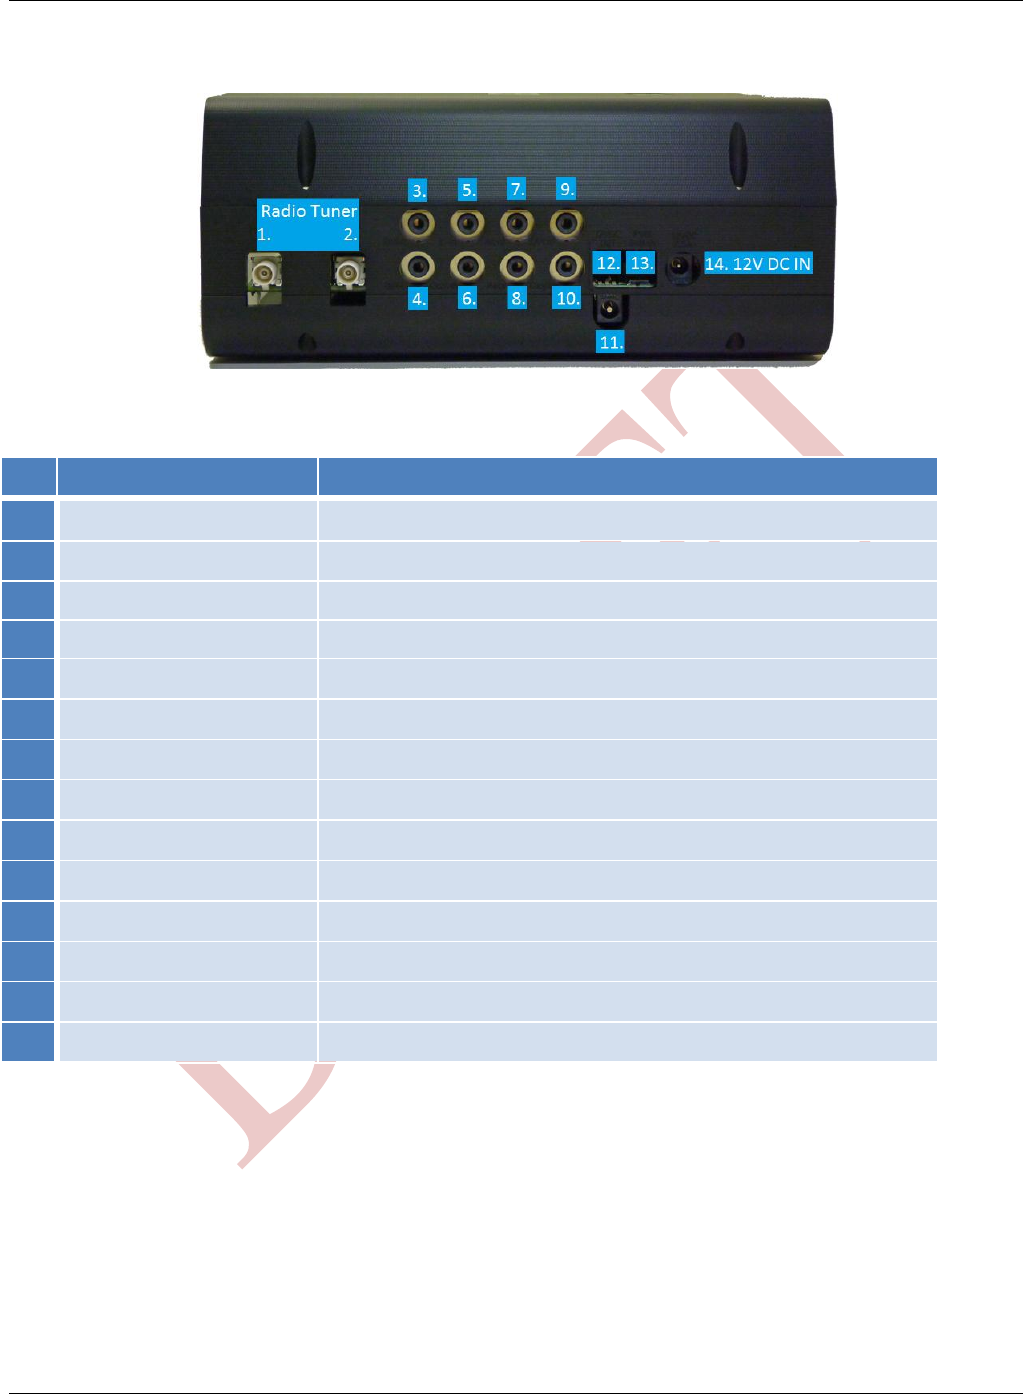
2.6 Left Panel
Table 2.6 WE-ADK Left
ID
Label
Comment
1
Tuner – A
(Fakra B Connector) AM/FM Radio Antenna Input
2
Tuner – B
(Fakra B Connector) AM/FM Radio Antenna Input
3
Line1 IN Right
Differential Audio pair
4
Line1 IN Left
Differential Audio pair
5
Line 2 In
Single-Ended (Also used to test Pass-thru Audio)
6
Line 3 In
Common Mode
7
Audio Out (Front)
8
Audio Out (Rear)
9
S/PDIF Out
10
Audio Out (Center/Sub)
11
12VDC Out
Supplies power to the Xenarc Display
12
Voltage LEDs
13
Power Switch
14
12VDC In
Main Power Input
Getting Started with the WE-ADK
(09/15/10) Qualnetics Confidential (Copyright 2010) Page 10
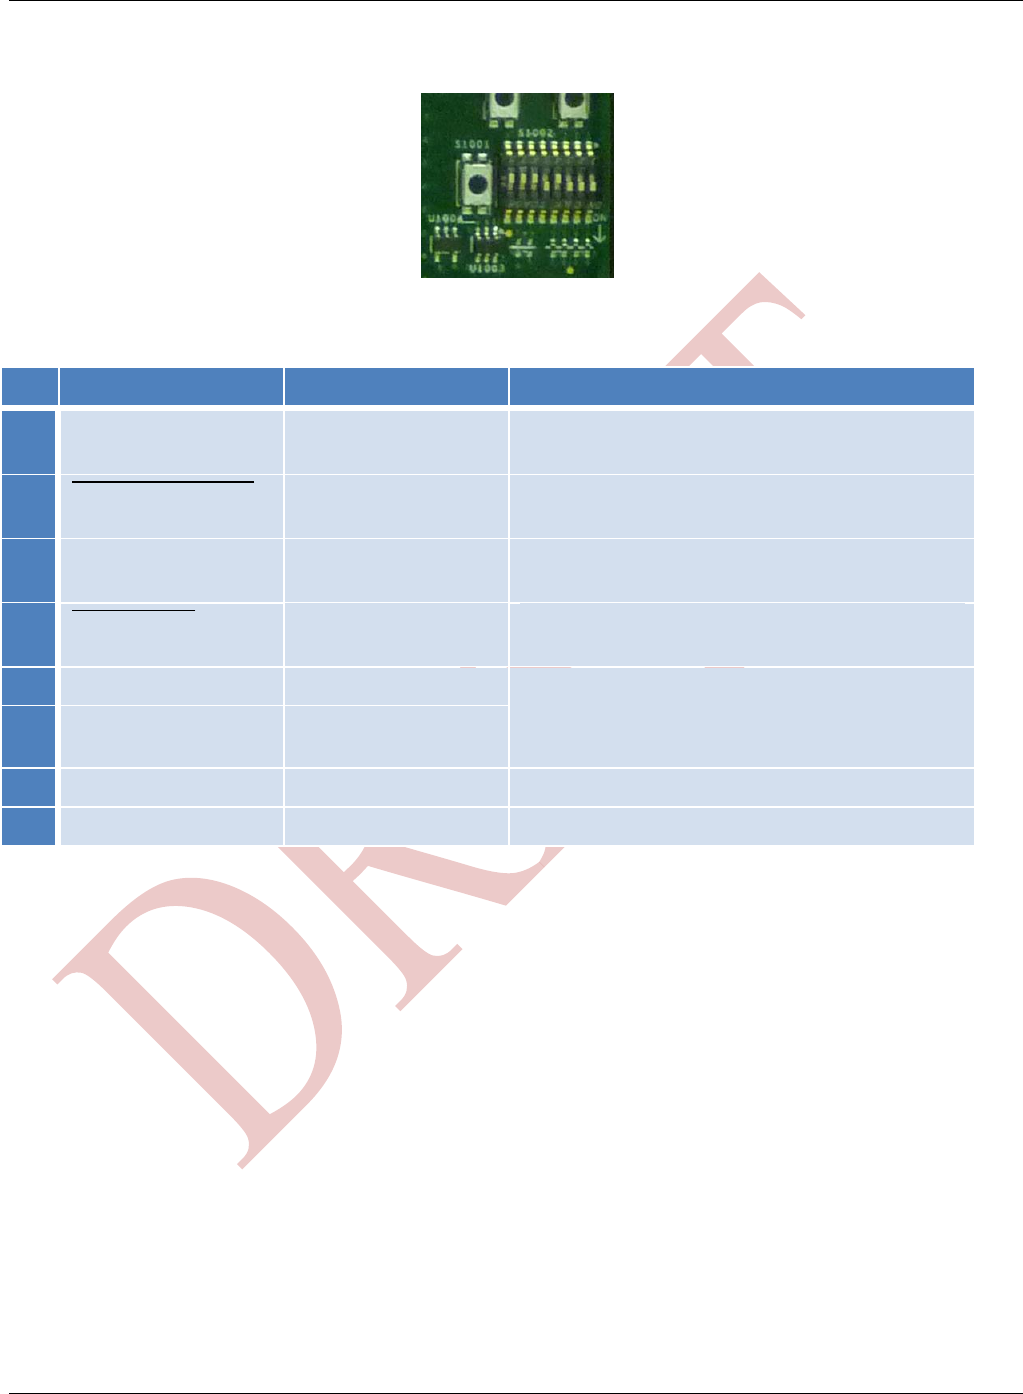
2.7 DIP Switch Configuration
Table 2.7 DIP Switch Settings
ID
Label
Default (Open)
Comment
1
VMCU_MODE
Closed
Open= VMCU Enabled
Closed= VMCU Disabled
2
WDOG_DISABLE
Closed
Open=Watchdog Disabled
Closed=Watchdog Enabled
3
SJC_MODE
Closed
Open=only SOC in JTAG chain;
Closed=SOC+SDMA+ARM ICE in chain
4
EOL_BOOT
Open
Open=Normal boot process
Closed=EOL boot process
5
BOOT_MODE0
Closed
Switches 5 & 6 provide four i.MX35 boot modes
(see ref manual)
Default setting => external NAND flash boot
6
BOOT_MODE1
Open
7
Unused
Open
8
Unused
Open

Getting Started with the WE-ADK
(09/15/10) Qualnetics Confidential (Copyright 2010) Page 11
3. SETTING UP YOUR WE-ADK
Power-On Setup
To download an image, the following setup is required:
1. Orient the Device so that the CD player is facing you. This is the front.
2. Plug the Serial Cable into the DB9 port on the front of the board labeled “Ext-UART”
3. Plug the Ethernet Cable into “Ethernet” port located on the front of the device
4. Plug the power cable into the Left side of the board (12VDC 2.5A)
3.1 Setting up the Display
Display Hardware
Inside the box for the display you will find:
7” Touchscreen Display
Adjustable Display Stand
AC Power adapter
Custom Power Cable (Used to connect directly to the WE-ADK)
Remote Control
Other items used to connect the display (Located in the Deployment Kit Box):
Xenarc Display Multi-Cable
USB to USB Coupler
USB to Mini-USB cable
Standard Setup
1. Attach the Display to the Stand.
2. Plug the Custom power cable into the “DC IN” on the back of the display.
3. Plug the 2.5mm x 5.5mm side of the custom power cable into left side of the board labeled “12VDC Out”
4. Plug the multi-cable into the “VGA/DVI IN” on the back of the display.
5. Find the DVI end of the multi-cable and plug it into the DVI port on the front of the WE-ADK
6. Find the USB end of the multi-cable and plug it into the USB to USB coupler included in the deployment
kit.
7. Plug the USB to mini-USB cable between the USB to USB coupler and the USB port on the right side of
the WE-ADK.
Initial Setup
1. Power on the display
a. If using the custom power cable, you will need to boot into an image that includes the display.
b. If using the wall adapter, simply plug the display into the wall for power
2. The display will attempt to use the “PC” (VGA) connector as its initial input. If there is no input the
display will power down.
3. Press the ‘S’ button on the front of the display until you see “DVI” on the upper left hand of the display
4. If the display powers off, check the connection to the DVI and verify that signal is being sent.
Getting Started with the WE-ADK
(09/15/10) Qualnetics Confidential (Copyright 2010) Page 12
4. BUILDING AN OS IMAGE
Microsoft Auto 4.1 uses the component-based build system and the standard build configurations: AutoMin and
AutoMax.
AutoMin
Contains only the core components used for Update Loader (ULDR) and EOL samples. This build configuration
produces NAND flash images.
AutoMax
Includes all the standard Microsoft Auto components. This build configuration produces NAND flash images.
Note: Microsoft Auto 4.1 uses a command-line build system.
4.1 Installed Build Windows
After installing the MS Auto PDK 4.1, multiple build windows will be available to you in the Start menu.
The build windows can be located here:
StartAll ProgramsMicrosoft Auto 4.1 PDKMicrosoft Auto 4.1 PDK Build Windows
The build windows labeled with MARPF2 are compatible with WE-ADK.
In our example, we will be using “Automax MARPF2 retail build environment”
4.2 Creating a Custom Build Window (optional)
Not all flavors of build windows are listed in the MSAuto PDK. To create your own version of Automin or
Automax, perform the following actions.
1. Right-click on your desktop and select NewShortcut.
2. Choose one of the following image types:
Build Type
Command Line
AutoMin
Retail
%windir%\system32\cmd.exe /k set _WINCEDRIVE=c:&&set
_WINCEROOT=c:\WINCE600&&C:\WINCE600\private\bat\bldwnd.bat
c:\WINCE600 ARMV4I automin marpf2 retail automin
AutoMin
Debug
%windir%\system32\cmd.exe /k set _WINCEDRIVE=c:&&set
_WINCEROOT=c:\WINCE600&&C:\WINCE600\private\bat\bldwnd.bat
c:\WINCE600 ARMV4I automin marpf2 debug automin
AutoMax
Retail
%windir%\system32\cmd.exe /k set _WINCEDRIVE=c:&&set
_WINCEROOT=c:\WINCE600&&C:\WINCE600\private\bat\bldwnd.bat
c:\WINCE600 ARMV4I autobase marpf2 retail automax
AutoMax
Debug
%windir%\system32\cmd.exe /k set _WINCEDRIVE=c:&&set
_WINCEROOT=c:\WINCE600&&C:\WINCE600\private\bat\bldwnd.bat
c:\WINCE600 ARMV4I autobase marpf2 debug automax
3. Paste the Command Line of your desired build type into Shortcut text box and click Next
4. Enter the name of your new shortcut. Ex: AutoMin_Retail
5. Click Finish

Getting Started with the WE-ADK
(09/15/10) Qualnetics Confidential (Copyright 2010) Page 13
4.3 Building the Image
After you have created and opened up your build window, complete the following steps:
1. Select “Automax MARPF2 retail build environment” using the process in section 4.1
2. At the command line, type blddemo to start the build process.
3. To start a clean build, type: “blddemo clean cleanplat –c”.
4. For more information, see Advanced Build OS Menu Options in Help.
5. When the build is complete, the resulting files are stored in
“c:\WINCE600\release\<buildType>\<CPUINDPATH>”.

Getting Started with the WE-ADK
(09/15/10) Qualnetics Confidential (Copyright 2010) Page 14
5. DOWNLOAD INSTRUCTIONS
Downloading an image to the device requires Platform Builder and Visual Studio 2005 to be installed.
5.1 Open Run-Time Image
When you create an MSAuto 4.1 image, it creates a file with the extension “.nb0”. This is the data that will be
loaded onto the device.
1. Open Platform Builder by choosing All Programs, Microsoft Visual Studio 2005 from the Start menu.
2. From the menu bar, choose File, Open, File.
3. In the Files of type drop–down menu, choose Windows Embedded CE Run-Time Images.
4. In the directory structure, navigate to the flat release directory and locate the .nb0 file to download.
5. Select the file and then click OK.
5.2 Prepare Connectivity Options
In order for VS 2005 to download the image, it must first create a connection via Ethernet to the target device.
The device needs to send messages to the VS 2005, these messages contain the IP address of the device. When
the IP address is obtained, then the image can be downloaded to the device.
1. With the HyperTerminal window in focus and the E–Boot menu open (see Task 3 for more information),
press "D" to initiate a download. Within one minute of pressing the "D" button, you should complete
the remainder of steps in this task.
2. In Visual Studio, choose Connectivity Options from the Target menu.
3. Under the Service Configuration label on the left side of the dialog box, make sure that Kernel Service
Map is selected.
4. Click Add Device.
5. In the New target device name: field, type a name for your prototype board.
6. Set Associated OS Design/SDK (optional): field to "(none)".
7. Click Add.
8. Set Target Device: as the new name of the prototype board.
9. Set Download: to "Ethernet".
10. Set Transport: to "Ethernet".
11. Set Debugger: to "KdStub".
12. Click the Settings button that is located next to the Download: drop–down menu. The Ethernet
Download Settings dialog box appears, which displays the name of the prototype board that you set up
to communicate with the development workstation.
13. Select the prototype board displayed in the Active Devices list (the device boot name is prefixed with
"MARPF2" and may also be shown in parentheses in the Target Device Connectivity Options dialog box),
and click OK. Note that other devices on the network may be listed in the Active Devices list.
14. Click the Settings button that is located next to the Transport drop–down menu. In the
Ethernet KITL settings dialog box, check the Use device name from bootloader box
and click OK.
15. Click Apply.
16. Click Close.

Getting Started with the WE-ADK
(09/15/10) Qualnetics Confidential (Copyright 2010) Page 15
5.3 Download the OS image
1. In the PDK directory structure, navigate to the.nb0 file located in the flat release directory
to download to the prototype board. For example,
C:\WINCE600\Release\automin.automin.MARPF2.retail\automin.MARPF2.nb0.
2. Select the file and then click OK.
3. Verify that the .nb0 file is opened and displayed in the OS Design View, and that the
appropriate target device is visible in the drop–down menu on the Platform Builder toolbar.
For more information, see Task 5.
4. In Platform Builder, choose Target, Attach device. You will see a dialog box titled
Download Runtime Image to <your target device's name>.
5. With the HyperTerminal window active, power up the prototype board. To do this, turn the
power supply ON.
6. With the HyperTerminal window in focus on the desktop, quickly press the space bar (within
5 seconds of powering up the prototype board) to launch the E-boot menu.
7. Press the "D" key on your keyboard to start an image download.
Important Do not power down the prototype board system at this time or the image will not
download correctly.
8. After you complete the above steps, there is download activity in the Platform Builder
Debug window. When the download is complete and the image has launched, the download
dialog box in Platform Builder displays the message "Download Complete!"
9. When the download is complete, the OS will automatically launch and you can execute
commands for Microsoft Auto shell debugging in the Target Control Window. To open this
window, click the Target Control button on the Target toolbar in Visual Studio. For
example, type "gi proc" in the target control window to see all running processes on the
device. For more information, see Command-Line Options with Target Control.
Note After downloading an AutoMin image, select "U" to download the ULDR image as the AutoMin
image is downloaded into the ULDR location in flash.
Getting Started with the WE-ADK
(09/15/10) Qualnetics Confidential (Copyright 2010) Page 16
6. TEST APPLICATIONS
A number of Test Applications are included with the Windows Embedded Automotive Platform. The executables
will be included in your image if you perform a MAX build.
All of the test applications listed here use the Display and Touch Screen.
Set up your Touchscreen
1. Using the Multi-Connector, connect your Xenarc display to the DVI connector on the front of the board
2. Obtain the USB to Mini-USB cable
3. Connect the USB cable from the Xenarc Multi-Cable to the aforementioned USB cable using the USB to
USB Coupler
To execute the programs
1. Establish a KITL connection between Platform Builder and your device
2. Open up a Target Control window in Platform Builder
a. TargetTarget Control
3. In the Target Control, type ‘s’ followed by the name of the sample application you would like to run
a. Ex: “Windows CE> s mediaplayersample.exe”
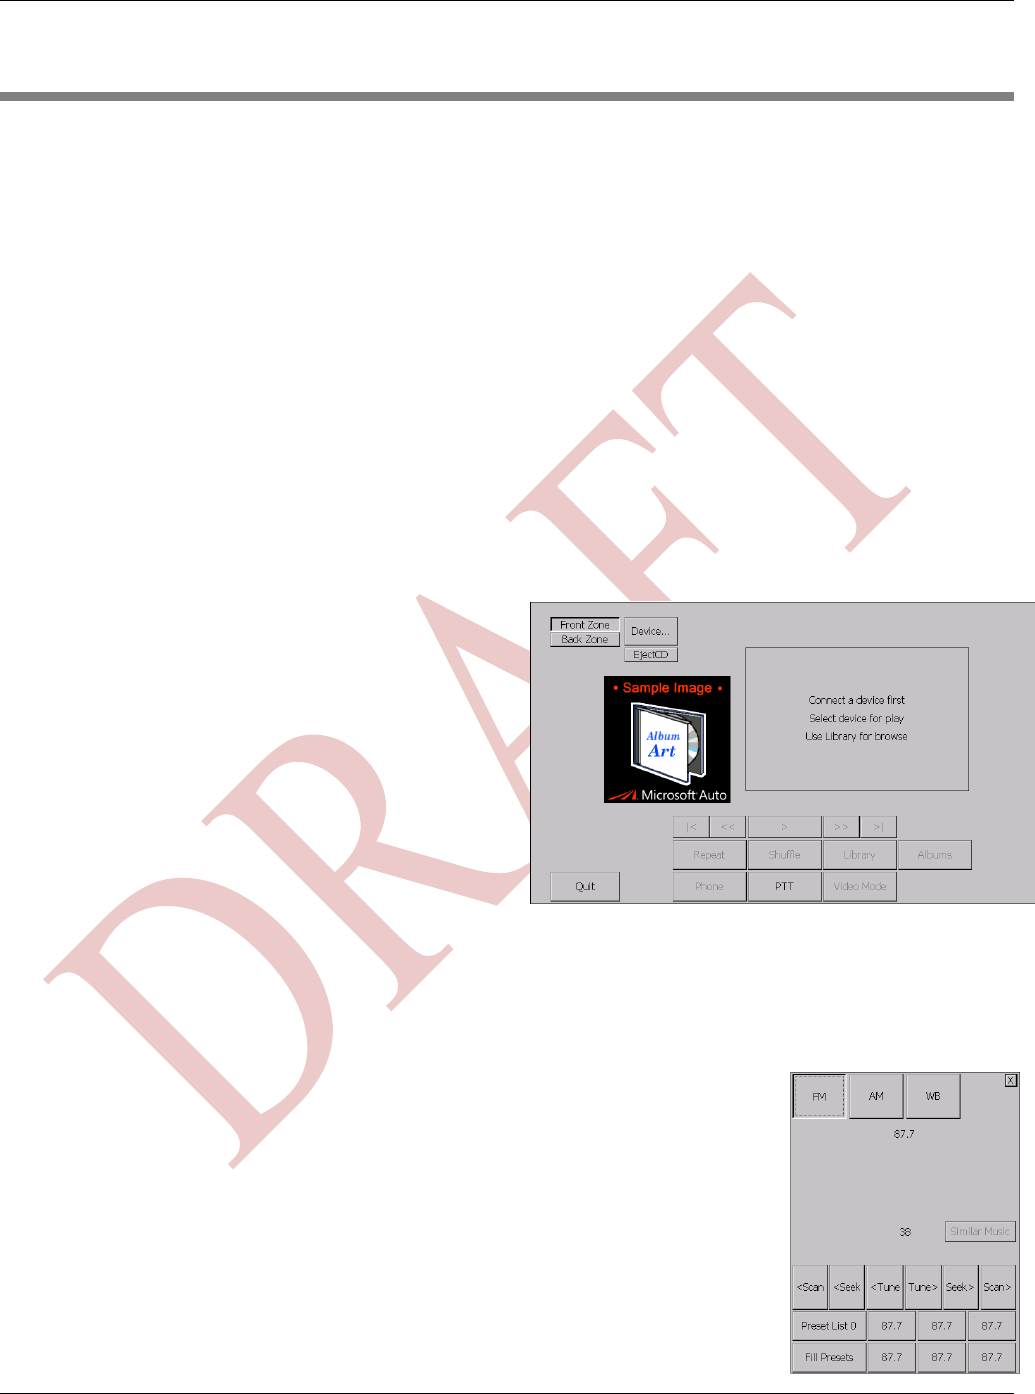
6.1 MediaPlayerSample
Features
Play CDs
Play Digital Media from USB Drives, Portable
Media Players
Connect to an iPod (may require a Made For
iPod license)
Stream Music over Bluetooth
Push To Talk (PTT) voice commands
Basic Instructions
Select the Source of your media using the Device
button
Choose specific tracks, albums, and artists using the Library button
Play, Fwd, Rev, Track Fwd, Track Back, Shuffle, Repeat just like a normal media player
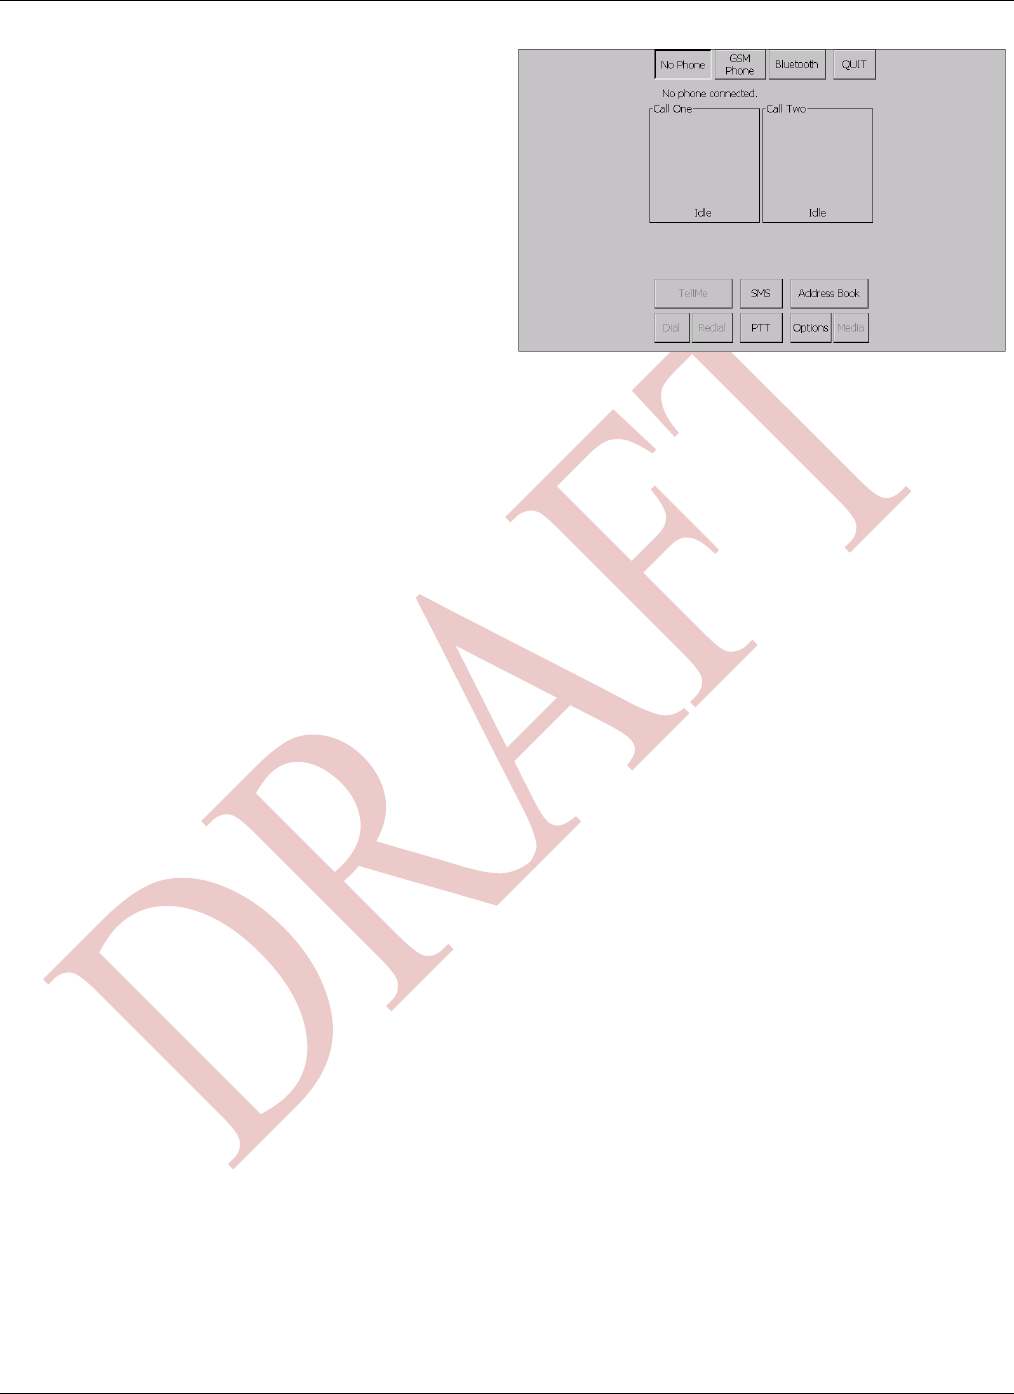
6.2 RadioAppSample
Features
AM/FM/Digital Radio
Track information is displayed when available
Signal Strength Meter
Preset Fill
Basic Instructions
Choose Band (AM, FM, Digital)
Press “Fill Presets” and then select your desired station
Click “Preset List” to cycle through preset lists
Getting Started with the WE-ADK
(09/15/10) Qualnetics Confidential (Copyright 2010) Page 17
6.3 PhoneSample
Features
Pair with Bluetooth Phone
Address Book Download
Hands Free Operation
Push To Talk (PTT) voice commands
Send/Receive Text Messages
Basic Instructions
Pair
1. Press “Bluetooth” button
2. Search for the WE-ADK on your phone
3. Pair with the WE-ADK
Download Phonebook
1. Press “Options”
2. Press “Download”
Hands Free
1. Perform the two previous tasks
2. Plug the Microphone into “Microphone 1”
3. Plug Speakers or headphones into “Audio Out Front”
4. Press “PTT”
5. Speak the name of a contact
a. “Call <John Doe> on Cell”
6. Phone Call should be placed

Getting Started with the WE-ADK
(09/15/10) Qualnetics Confidential (Copyright 2010) Page 18
7. CASE ASSEMBLY
7.1 Required Components
Description
QTY
Function
4-40 SS Hex Nuts
4
Fasten Board to Standoffs
4-40 x .187 SS Flathead UC Screw
9
Screw Fasten Covers to Bottom and Side
4-40 x .187 SS Panhead Screw
4
Fasten CD Drive to Top
4-40 x .250 SS Panhead Screw
5
Fasten Board to Bottom
4-40 x .312 SS Flathead Screw
4
Fasten Standoffs to Bottom
6-32 x .562 SS SHCS
8
Fasten Top and Bottom to Sides
M3 X 6MM SS Flathead Screw
4
Screw Fasten SSD Mounting straps
7.2 Assembly Instructions
1. Place 4-40 x .312 Flathead Screws into the bottom of the Case
2. Screw Standoffs into the Screws
3. Use a screwdriver to tighten the Screws into the Standoffs
4. Place case bottom-down on the table and set board onto the standoffs
5. Use 4-40 Hex Nuts to Secure the board to the standoffs
6. Use a single 4-40 x .250 Panhead Screw to secure the front left side of the board to the case.
a. The screw hole can be found immediately behind the dual RS232 port.
7. Insert Case sides into the case base
8. Invert the case to access the bottom of the case
9. Use 6-32 x .562 SHCS to fasten the sides to the bottom
a. Use a hex wrench to tighten. Start with the Back of the board
10. Attach the Hard Drive (if available) to the Hard Drive Mounting brackets using M3 x 6MM Flathead
Screws
11. Attach the Hard Drive Mounting brackets to the case top using the 4-40 x .250 Panhead Screws
12. Attach the CD Drive to the case top using the 4-40 x .187 Panhead Screws
13. Place the front-plate and back-plate on the case. Wiggling may be required
14. Attach the Ribbon cable to the Board
15. Connect the Ribbon Cable to the CD Drive
16. Place the case top onto the case.
17. Use 6-32 x .562 SHCS to fasten the top to the sides.
18. Flip the case onto its top
19. Fasten covers to the bottom using 4-40 .187 Flathead Screw

Getting Started with the WE-ADK
(09/15/10) Qualnetics Confidential (Copyright 2010) Page 19
APPENDIX A – HARDWARE COMPONENTS
The following is a list of major functionality paired with its key hardware components and manufacturer
Function
Component/s
Manufacturer
1394
MB88388
Fujitsu
Audio Input
CS5345
Cirrus Logic
Audio Controller
SAF3560
NXP
Bluetooth
BC4
CSR
CCPU
i.MX35
Freescale
CPLD
XA2C128
Xilinx
Differential Audio
MSM7716
OKI
Ethernet
LAN9218i
SMSC
GPS
GSC3e/LPa-7686
SiRF
MOST
OS81050
Oasis
Radio (FM, AM, HD)
SAF7741
TEF7000
NXP
NXP
Video Capture
ADV7180
Analog Devices
Video Output
TFP410
Texas Instruments
VMCU
TMS470R1A384
Texas Instruments
WiFi
88w8686
Marvell

Getting Started with the WE-ADK
(09/15/10) Qualnetics Confidential (Copyright 2010) Page 20
APPENDIX B – LIMITED WARRENTY
WARRANTY: Qualnetics warrants the hardware components of each Product against defects in material and
workmanship under normal use for a period of ninety (90) days from the date of delivery to Customer.
Qualnetics’ sole obligation under this limited warranty shall be, at its election, to repair or replace the defective
Product, or refund the Customer the purchase price of the defective Product. Repaired or replacement Products
provided under warranty are similarly warranted for a period of ninety (90) days from the date of delivery to
Customer or the remainder of the original warranty term, whichever is longer. This limited warranty does not
apply to any firmware, the Microsoft software or any other software used in connection with the WE-ADK
Product.
DISCLAIMER: SAVE FOR THE LIMITED WARRANTY PROVIDED ABOVE, QUALNETICS, ITS
LICENSORS AND ITS SUPPLIERS DO NOT MAKE ANY REPRESENTATION OR WARRANTY OF ANY
KIND WHETHER EXPRESS, IMPLIED (EITHER IN FACT OR BY OPERATION OF LAW), OR
STATUTORY, AS TO ANY MATTER WHATSOEVER IN CONNECTION WITH THE PRODUCT.
QUALNETICS, ITS LICENSORS AND ITS SUPPLIERS EXPRESSLY DISCLAIM ALL IMPLIED
WARRANTIES OF MERCHANTABILITY, FITNESS FOR CUSTOMER’S PURPOSE, QUALITY,
ACCURACY, TITLE, AND NONINFRINGEMENT. THEY DO NOT WARRANT AGAINST
INTERFERENCE WITH THE ENJOYMENT OF THE PRODUCT. THEY DO NOT WARRANT THAT THE
PRODUCT WILL OPERATE ERROR-FREE OR MEET CUSTOMER’S REQUIREMENTS. THEY
EXERCISE NO CONTROL OVER AND EXPRESSLY DISCLAIM ANY LIABILITY ARISING OUT OF THE
USE OF THE PRODUCT.
LIMITATION OF LIABILITY: NOTWITHSTANDING ANYTHING TO THE CONTRARY CONTAINED
IN THIS AGREEMENT, QUALNETICS, ITS LICENSORS AND ITS SUPPLIERS WILL NOT, UNDER ANY
CIRCUMSTANCES, BE LIABLE TO A CUSTOMER FOR CONSEQUENTIAL, INCIDENTAL, SPECIAL,
OR EXEMPLARY DAMAGES ARISING OUT OF OR RELATED TO THE PURCHASE OR USE OF THE
PRODUCT AS CONTEMPLATED UNDER THIS AGREEMENT, INCLUDING BUT NOT LIMITED TO
LOST PROFITS OR LOSS OF BUSINESS, WHETHER BASED IN CONTRACT, TORT OR ANY OTHER
LEGAL THEORY, EVEN IF QUALNETICS, ITS LICENSORS AND ITS SUPPLIERS ARE APPRISED OF
THE LIKELIHOOD OF SUCH DAMAGES OCCURRING. FURTHER, UNDER NO CIRCUMSTANCES
WILL THE LIABILITY OF QUALNETICS, ITS LICENSORS AND ITS SUPPLIERS ARISING OUT OF OR
RELATED TO A CUSTOMER’S PURCHASE AND USE OF THE PRDUCT (INCLUDING BUT NOT
LIMITED TO WARRANTY CLAIMS), REGARDLESS OF THE FORUM AND REGARDLESS OF
WHETHER ANY ACTION OR CLAIM IS BASED ON CONTRACT, TORT, OR OTHERWISE, EXCEED
$250.00.

Getting Started with the WE-ADK
(09/15/10) Qualnetics Confidential (Copyright 2010) Page 21
APPENDIX C – FCC GUIDLINES
This device complies with part 15 of the FCC Rules. Operation is subject to the following two conditions: (1) This
device may not cause harmful interference, and (2) this device must accept any interference received, including
interference that may cause undesired operation.
CAUTION: Changes or modifications not expressly approved by Qualnetics Corporation could void the user's
authority to operate the equipment.
NOTE: This equipment has been tested and found to comply with the limits for a Class A digital device, pursuant
to Part 15 of the FCC Rules. These limits are designed to provide reasonable protection against harmful
interference in a residential installation. This equipment generates, uses and can radiate radio frequency energy
and, if not installed and used in accordance with the instructions, may cause harmful interference to radio
communications. However, there is no guarantee that interference will not occur in a particular installation. If this
equipment does cause harmful interference to radio or television reception, which can be determined by turning
the equipment off and on, the user is encouraged to try to correct the interference by one or more of the following
measures:
Reorient or relocate the receiving antenna.
Increase the separation between the equipment and receiver.
Connect the equipment into an outlet on a circuit different from that to which the receiver is connected.
Consult the dealer or an experienced radio/TV technician for help."