Quanta Computer MKX wireless miniPCI Card User Manual
Quanta Computer Inc wireless miniPCI Card Users Manual
Users Manual
Versa User's Guide
V
ersa User's Guide

About Your Online Documentation
Should you have any questions or remarks concerning the User's Documentation or the packaging of you
r
computer, and you have a valid Internet connection, please send us an e-mail at the following address:
nec.authors@nec-computers.com
Please do not use this e-mail address for questions or remarks regarding your computer. If you have a
question or remark related to the technical aspects of your computer (e.g. Internet/e-mail access, registration
problems, software and hardware problems), please refer to the 'NEC UltraCare Warranty Terms &
Conditions Guide', where you will find a full list of contact addresses and numbers.
Web Site
www.nec-online.com
If you would like to know more about our products or if you nee
d
A
bout Your Online Documentation

Navigating in this Guide
Use one of the means described below to browse through this online documentation.
Note: we recommend you to print this documentation. It will then be easily accessible even when your system
is shut down.
Using Microsoft® Internet Explorer Toolbar
When reading the guide, a menu bar appears across the top of the window, providing easy access to the
following commands.
Hide/Show
Click Hide to hide the left-tab components (table of contents, index or search results list) in the window. Click
Show to display the left-tab components (table of contents, index or search results list) in the window.
Back
Click Back to display the previously displayed page.
Forward
Click Forward to display the next page in a previously displayed sequence of pages.
Print
Click the page you want to print and then click Print in the menu bar. The print dialogue box appears, allowing
you to define your print options. To print a pop-up page, right-click inside the pop-up window, and then click
Print Topic.
Using Hyperlinks
The user’s guide contains hyperlinks, which allow you to quickly locate information related to the topic you are
viewing. Hyperlinked information usually appears in the form of blue or white underlined text. When you
position your cursor over a text or graphic hyperlink, your cursor will change into a hand symbol with a pointed
finger. You can select the hyperlink either by clicking or double-clicking on it with the mouse.
Finding a Topic
To see a list of index entries, click the Index tab in left window and then either type a word or scroll
through the list.
To search for words or phrases that may be contained in a topic, click the Search tab. Type the word
or phrase, then click on List topics. Choose the topic in the list and click on Display.
Navigating in this Guide

Text Set-up
To make this guide as easy to use as possible, the text is laid out as follows.
Note: notes give particularly important information about whatever is being described.
Caution: cautions indicate situations that can damage the system hardware or software.
Warning: warnings alert you to situations that could result in serious personal injury or loss of life.
Names of keys are printed as they appear on the keyboard.
For example, Ctrl,Alt, or Enter.
Text that you must type is printed in bold type.
For example, type dir.
Window titles, field names, pane names, application names, list box names... are printed in italic type.
For example, the Power Options Properties window.
Buttons, check box names, tabs, icons, menus, menu choices, key names... are printed in bold type.
For example, click Start, and select Programs.
Click on this hyperlinked button ( ) for more information on the subject.
Text Set-up
Basic Care and Handling Tips
System Care
Follow these guidelines to maintain the condition and performance of your computer.
Caution:immediately turn off and unplug the Versa under the following conditions:
the power cord is damaged or frayed.
liquid spills on or into the Versa.
someone drops the system or damages the casing.
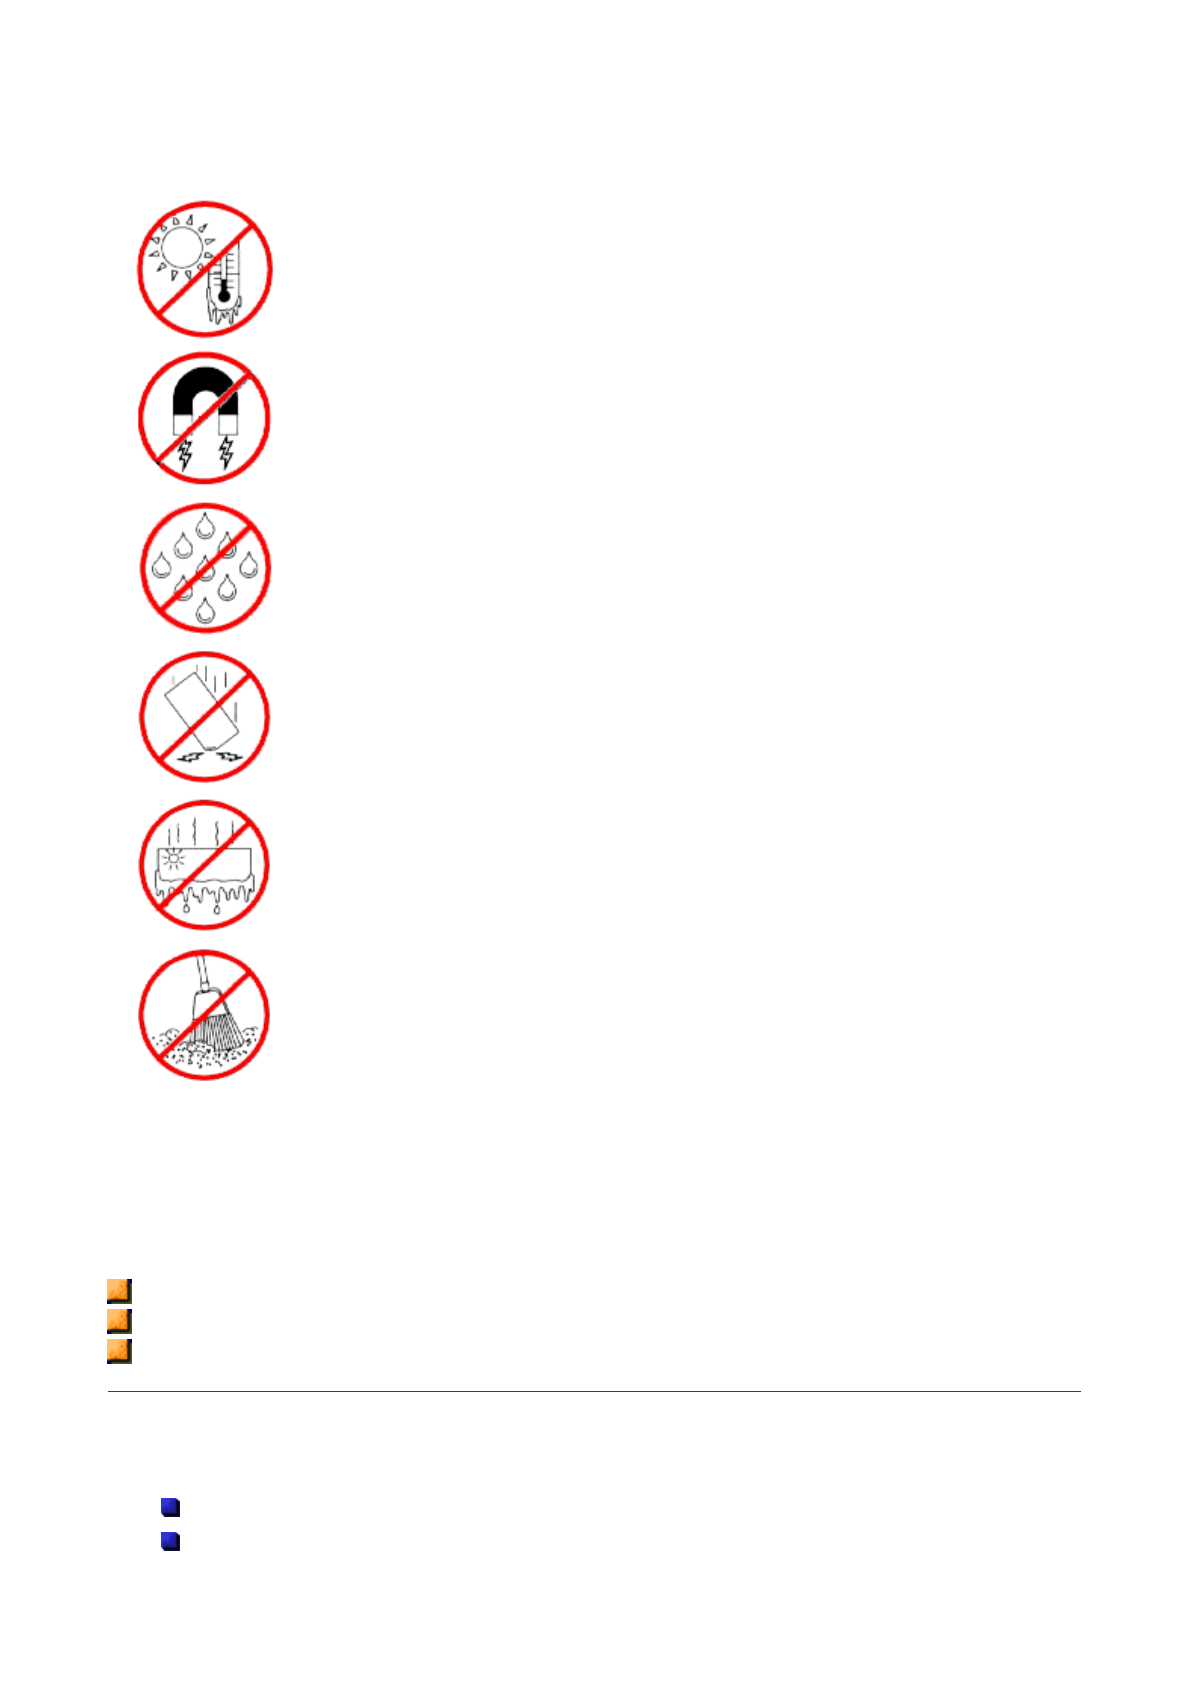
Precautions for System Use
Follow these precautions when using your Versa computer and AC adapter.
Avoid dropping or bumping the computer or the AC adapter.
Do not stack heavy objects on the computer, the AC adapter, or the battery packs.
Protect the computer from extremely low or high temperatures. Let the computer warm
(or cool) to room temperature before using it.
Keep the computer away from magnetic forces (some airline tray tables are magnetic,
do not set your notebook on top of them. Doing so can destroy the data on your hard
drive).
Keep the computer dry.
Do not wash the computer with a wet cloth or pour fluid into it.
Protect the computer from being bumped or dropped.
Check the computer for condensation.
If condensation is present, allow it to evaporate before switching on the computer.
Keep the computer away from dust, sand and dirt.
Care and Handling

Do not place items near the Versa that could block air vents and cause overheating.
Avoid moving the Versa during system operation, especially while the hard disk, floppy disk, or optical
disc drive is being accessed.
When using the AC adapter, make sure the power source falls within the system's compatible range.
Never use the AC adapter if the voltage falls outside this range. (Watch for this when travelling to
other countries.)
Turn computer power off before attaching or removing non-plug and play devices.
Disconnect the notebook from the electrical outlet if it is not going to be used for a long time. This will
avoid damage by transient over-voltage.
Do not attempt to disassemble the computer.
Do not push any foreign objects into the Versa bays, connectors or slots.
Do not set the computer on top of a magnetised area. Doing so can destroy the data on your hard
disk drive. (Some airline tray tables are magnetic.)
Avoid using the computer or AC adapter for extended periods in direct sunlight.
Do not use the system in humid or dusty environments.
Keep liquids and food away from the system.
Turn computer power off before cleaning it.
Avoid exposing the Versa or AC adapter to extreme changes in temperature or humidity. If it is
unavoidable, allow your Versa to adjust to room temperature before use.
When cleaning the system, use a soft, clean, dry cloth. Avoid wiping the display surface with abrasive
material, including rough fabric. Do not use a cleaning solution; this may damage the notebook's
plastic.
If the AC adapter becomes extremely hot, unplug the adapter and let it cool.
Be sure to follow these power cord safety tips:
Unplug by the plug only; do not pull on the cable.
Place the power cord so that it cannot be tripped or stepped on, and do not place items
directly on the power cord.
Use an electrical outlet that is as close as possible to the computer.
Note: you may refer to the 'Using Your Versa' section for additional information on these matters.
Storage Requirements
Store the computer and AC adapter in an environment that meets the following conditions:
If the temperature of the Versa suddenly rises or falls (for example, when you move the system from a cold
place to a warm place), vapour condenses inside the system. Turning on the system under this condition can
damage the internal system components.
Before turning on the system, wait until the system's internal temperature equalises with the new environment
and any internal moisture evaporates.
Operate and store your system within the recommended temperatures and humidity levels (refer to
the 'System Components' section for more information).
Keep the storage area free from vibration and magnetic fields.
Keep the system and its components away from organic solvents or corrosive gases.
Avoid leaving the system and its components in direct sunlight or near heat sources.
Routine Cleaning
Clean or dust your system as follows:
Caution: never use harsh solutions, household cleaners, or spray cleaners that contain caustic materials
Care and Handling

on the Versa computer. These cleaners are usually high in alkalinity which is measured in pH. Using these
cleaners can cause the plastic surface to crack or discolour.
LCD screen - carefully wipe the LCD screen with a soft cloth or a screen wipe designed for that
purpose. Special screen wipes are available through your local computer dealer.
System case - we recommend you carefully wipe the case with a slightly damp, almost dry cloth.
Care and Handling

Safety Notices
European Notice
FCC Notice
Modem
Wireless LAN Regulations (if applicable)
Modifications to the Product
- CE Mark Certification
- Radio Frequency Interference
Radio Frequency Interference Statement
Connections and Remote Earths
- PELV (Protected Extra Low Voltage)
- SELV (Safety Extra Low Voltage)
- Remote Earths
- Building Supply
- BABT's Apparatus Approval
Batteries
- Replacing Batteries
- Battery Disposal
Laser Compliance Statement
Thunderstorm Warning
Additional Notices
Electrostatic Discharge (ESD)
Safety Notices

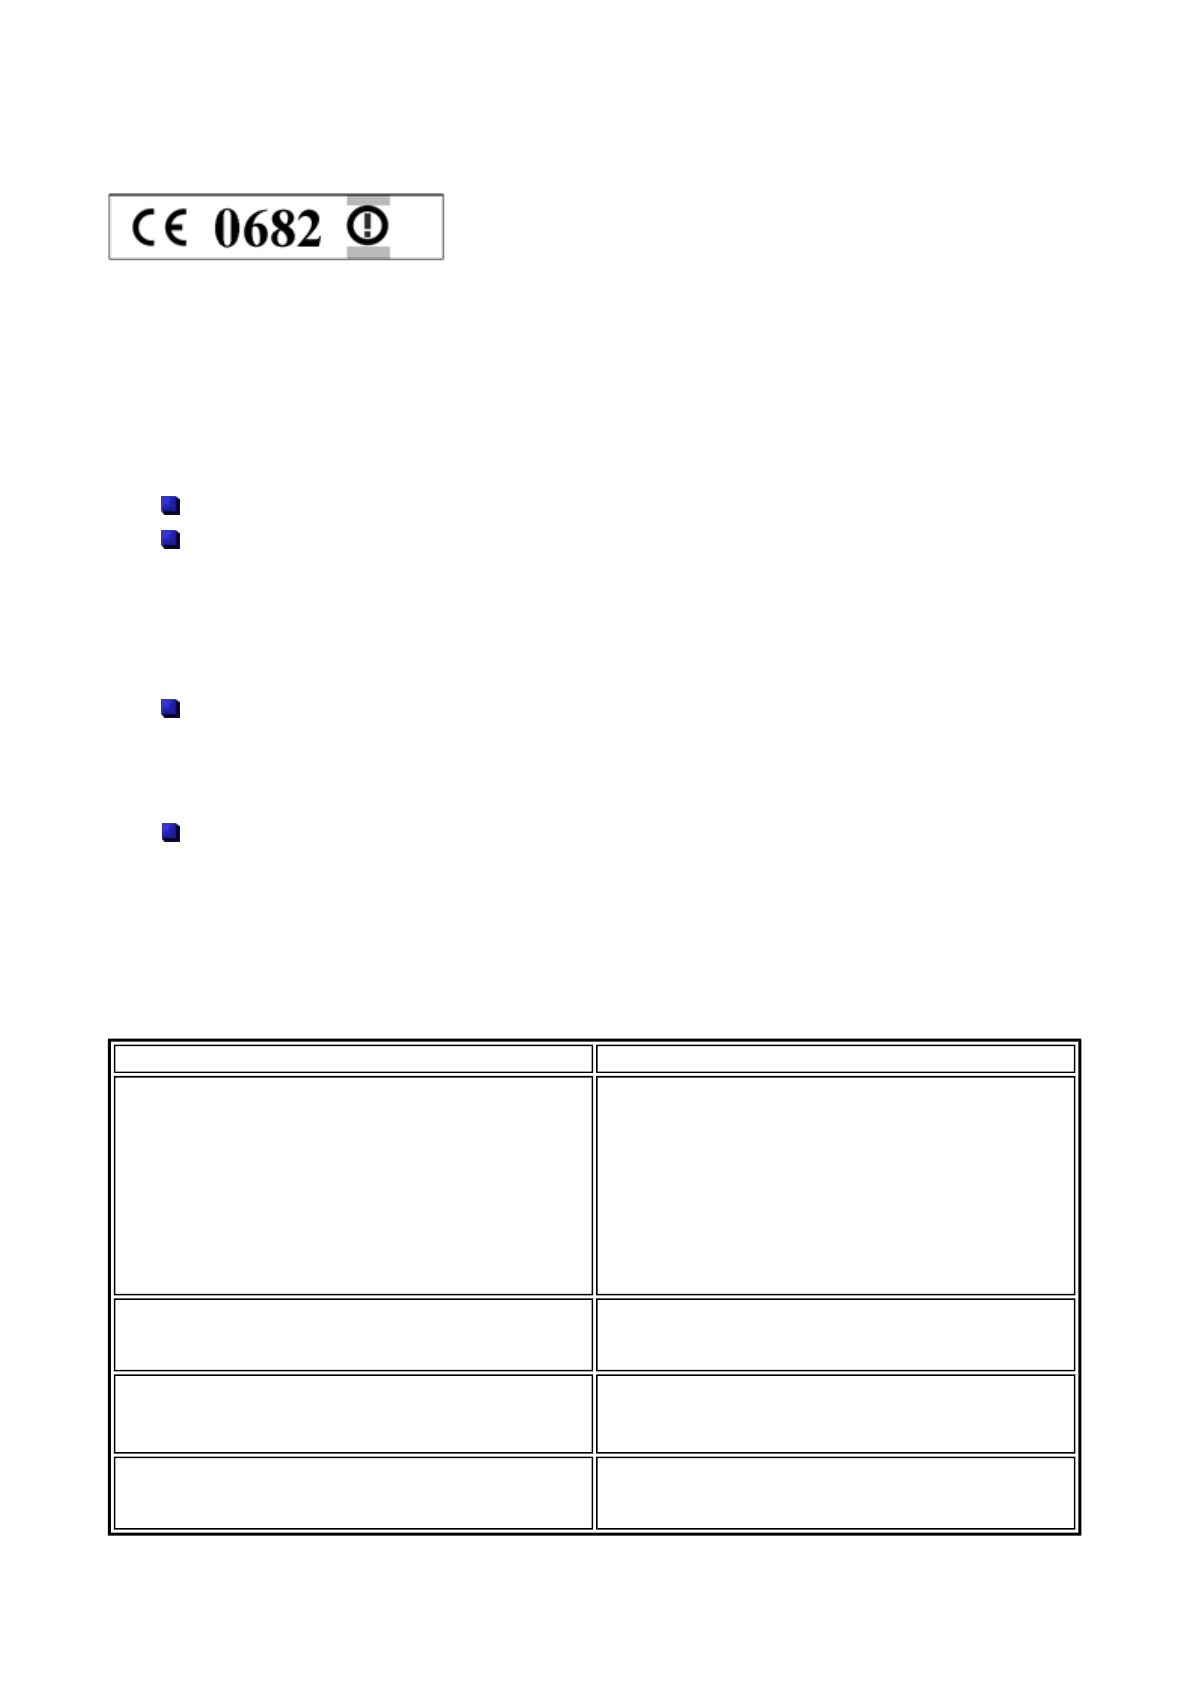
European Notice
Products with the CE marking comply with both the ElectroMagnetic Compatibility Directive (89/336/EEC) and
the Low Voltage Directive (72/23/EEC) - modified by the Directive 96/68/EEC - issued by the Commission o
f
the European Community.
Compliance with these directives implies conformity to the following European Standards:
EN55022 : Radio disturbance characteristics.
EN55024: Immunity characteristics.
EN6100-3-2: Limits for harmonic current emissions.
EN6100-3-3: Limitation of voltage fluctuation and flicker in low-voltage supply system.
EN50082-1 : Electromagnetic immunity.
EN60950 : Product safety.
If your computer includes a telecommunication network board, the input/output socket is classified as
Telecommunication Network Voltage (TNV-3)
FCC Notice
Note: the FCC Notice applies only to products that feature the FCC mark.
This device complies with Part 15 of the FCC rules. Operation is subject to the following two conditions:
This device may not cause harmful interference.
This device must accept any interference received, including interferences that may cause undesired
operation.
Modem
The equipment has been approved in accordance with Council Decision 98/482/EC for pan-European single
terminal connection to the Public Switched Telephone Network (PSTN). However, due to differences between
the individual PSTNs provided in different countries, the approval does not, of itself, give an unconditional
assurance of successful operation on every PSTN network termination point.
In the event of problems, you should contact your equipment supplier in the first instance.
Radio-communications Regulations (if
applicable)
Specific regulations apply when using wireless radio-communication products. Follow the links below for more
information on these regulations:
802.11b, also known as Wireless LAN
Safety Notices

Bluetooth
Note: hereby, NEC Computers International, declares that this notebook is in compliance with the essential
requirements and other relevant provisions of Directive 1999/5/EC.
Modifications to the Product
CE Marking
NEC Computers International cannot be held responsible for modifications made by the User and the
consequences thereof, which may alter the conformity of the product with the CE Marking.
Radio Frequency Interference
The manufacturer is not responsible for any radio or TV interference caused by unauthorised modifications to
this equipment.
Radio Frequency Interference Statement
WARNING: changes or modifications to this unit not expressly approved by the party responsible for
compliance could void the user's authority to operate the equipment.
Note: this is a Class B Digital Device. This equipment has been tested and found to comply with the limits for
a Class B digital device, pursuant to Part 15 of the FCC Rules. These limits are designed to provide
reasonable protection against harmful interference in a residential installation. This equipment generates,
uses and can radiate radio frequency energy and, if not installed and used in accordance with the instructions,
may cause harmful interference to radio communications.
There is no guarantee, however, that interference will not occur in a particular installation. If this equipment
does cause harmful interference to radio or television reception, which can be determined by turning the
equipment off and on, the user is encouraged to try to correct the interference by one or more of the following
measures.
Reorient or relocate the receiving antenna.
Increase the distance between the equipment and receiver.
Connect the equipment to an outlet on a circuit different from the one to which the receiver is
connected.
To meet FCC standards, shielded cables and power cords are required to connect this device to a personal
computer or other Class B certified device.
Connections and Remote Earths
PELV (Protected Extra Low Voltage)
To ensure the extra-low voltage integrity of the equipment, only connect equipment with mains-protected
electrically-compatible circuits to the external ports.
SELV (Safety Extra Low Voltage)
Every input and output of this product is classified as Safety Extra Low Voltage, except the modem, which is
Safety Notices

classified as TNV-3.
Remote Earths
To prevent electrical shock, connect all local (individual office) computers and computer support equipment to
the same electrical circuit of the building wiring. If you are unsure, check the building wiring to avoid remote
earth conditions.
Building Supply
Only connect the equipment to a building supply that is in accordance with current wiring regulations in you
r
country. In the U.K., those are the IEE regulations.
British Approvals Board for Telecommunications (BABT)'s Apparatus Approval
This equipment complies with BABT's Apparatus Approval No. NS/G/1234/J/100003 with regard to indirect
Connection to the BT Public Switched Telephone Network. Refer to OFTEL statement SA29 for furthe
r
information.
Batteries
Replacing batteries
A
lithium battery in some computers maintains system configuration information. In the event that the battery
fails to maintain system configuration information, we recommend you replace the battery. For battery
replacement information, call your dealer or your Customer Assistance Centre.
WARNING: there is a danger of explosion if the battery is incorrectly replaced. Replace only with the
same or equivalent type recommended by the manufacturer. Discard used batteries according to the
manufacturer's instructions.
Battery Disposal
Ultimate disposal of this product should be handled according to all national laws and regulations. Do not
place used batteries in your regular waste: the incineration, land filling or mixing of batteries with the municipal
solid waste stream is prohibited by law in most countries.
Contact your local waste management officials for other information regarding the environmentally sound
collection, recycling and disposal of the batteries.
Laser Compliance Statement
The optical devices are tested and certified to be compliant with International Electro-technical Commission
IEC825-1 and European Norm EN60825-1 and EN60825-2 regulations for Class 1 laser products.
Class 1 laser products are not considered hazardous. The optical devices are designed such that there is
never human access to laser radiation above a Class 1 level during normal operation or prescribed
maintenance conditions.
The optical devices installed in your computer are designed for use solely as components of such electronic
product and therefore do not comply with the appropriate requirements of Code of Federal Regulation Sec.
1040.10 and Sec. 1040.11 for COMPLETE laser products.
Thunderstorm Warning
Safety Notices
In thunderstorm conditions, make sure that you disconnect your modem from the telephone line. A lightning
strike to nearby telephone lines could damage your modem or even your whole computer system. Please
note that the product warranty does not apply if damage to your computer is the result of a lightning strike.
Additional Notices
Every input or output of this product are classified as Safety Extra Low Voltage (SELV).
Electrostatic Discharge (ESD) and ESD
Protection
WARNING: ESD can damage disk drives, cards, memory modules and other parts. We recommend that
you do all procedures in this guide only at an ESD workstation. If one is not available, provide some ESD
protection by wearing an antistatic wrist strap attached to any unpainted metal surface when handling parts. If
you don't have one, discharge static electricity from yourself and your clothing by touching a nearby metal
surface before handling any internal components.
Safety Notices
Wireless LAN Regulations
Low power radio LAN product operating in 2.4 GHz band for Home and Office
environments.
This product complies with the Radio and Telecommunications Terminal Equipment (R&TTE) Directive
( 1999/5/EC) issued by the Commission of the European Community.
Compliance with this directive implies conformity to the following European Norms:
EN 60950 - Product Safety.
EN 300 328-2 V1.2.1 (11-2001)
Electromagnetic compatibility and Radio Spectrum Matters (ERM); Wideband Transmission systems;
Data transmission equipment operating in the 2,4 GHz ISM band and using spread spectrum
modulation techniques; Part 2: Harmonized EN covering essential requirements under article 3.2 of
the R&TTE Directive.
EN 301 489-01 V1.3.1 (09-2001)
Electromagnetic compatibility and Radio spectrum Matters (ERM); ElectroMagnetic Compatibility
(EMC) standard for radio equipment and services; Part 1: Common technical requirements.
EN 301 489-17 V1.1.1 (09-2000)
Electromagnetic compatibility and Radio spectrum Matters (ERM); ElectroMagnetic Compatibility
(EMC) standard for radio equipment and services; Part 17: Specific conditions for Wideband data and
HIPERLAN equipment.
Note: channel 14 may not be used in European countries. In some countries, using the product may be
subject to specific and additional restrictions, as listed in the table below.
Country Restriction(s)
France Only the channels 10, 11, 12 and 13 (2457 MHz,
2462 MHz, 2467 MHz and 2472 MHz respectively)
may be used to operate this device.
A license is required for indoor use. Please contact
the ART (Autorité de Régulation des
Télécommunications) for more information.
Outdoor use is not allowed.
Germany A license is required for outdoor installations. Check
with an authorised reseller for the procedure to
follow.
Italy A license is required for indoor use.
Outdoor use is not allowed.
The Netherlands A license is required for outdoor installations. Check
with an authorised reseller for the procedure to
follow.
Wireless LAN (802.11b) Regulations

Note: this device is qualified for use within the following countries: Germany, France, Italy, Spain, The
Netherlands, and the United Kingdom.
Wireless LAN (802.11b) Regulations

Copyright
Copyright

Proprietary Notice and Liability Disclaimer
Copyright¤ 2002 NEC Computers International BV.All Rights Reserved.
The information disclosed in this document, including all designs and related materials, is the valuable
property of NEC Computers International B.V. (hereinafter "NEC C.I.") and/or its licensors. NEC C.I. and/or its
licensors, as appropriate, reserve all patent, copyright and other proprietary rights to this document, including
all design, manufacturing, reproduction, use, and sales rights thereto, except to the extent said rights are
expressly granted to others.
The NEC C.I. product(s) discussed in this document are warranted in accordance with the terms of the
Warranty Statement accompanying each product. However, actual performance of each such product is
dependent upon factors such as system configuration, customer data, and operator control. Since
implementation by customers of each product may vary, the suitability of specific product configurations and
applications must be determined by the customer and is not warranted by NEC C.I.
To allow for design and specification improvements, the information in this document is subject to change at
any time, without notice. Reproduction of this document or portions thereof without prior written approval o
f
NEC C.I. is prohibited.
Trademark Acknowledgements
Versa® is a registered trademark, VersaGlide™ and PortBar™ are trademarks of NEC Corporation, used
under license.
Intel®, Pentium® II, Pentium® III, Pentium® 4, Pentium®4 Processor-M, Celeron®, Dixon™ and Pentium® are
trademarks or registered trademarks of Intel Corporation.
A
MD, the AMD logo, and combinations thereof are trademarks of Advanced Micro Devices, Inc.
MS-DOS®, Microsoft®, Windows NT®, Windows® 95, Windows® 98, Windows® Me, Windows® 2000 and
Windows® XP are trademarks or registered trademarks of Microsoft Corporation in the United States and/o
r
other countries.
PS/2 is a trademark of International Business Machines, Inc.
As an ENERGY STAR® Partner, NEC Computers International B.V. has determined that
this product meets the ENERGY STAR® guidelines for energy efficiency.
Other product names mentioned in this manual may be trademarks or registered
trademarks of their respective companies. NEC C.I. claims no interest in trademarks other than its own.
Copyright

Introducing Your Versa
Getting to Know your Versa
Getting to Know Your Versa
Warning: prolonged or improper use of a computer workstation may pose a risk of serious injury. To
reduce your risk of injury, set up and use your computer in the manner described in, 'Setting Up a Healthy
Work Environment'.
A
fter completing the steps in the Quick Start Guide that comes with your computer, your Versa notebook
computer is ready to go! To get started, do the following:
Read 'Setting Up a Healthy Work Environment' for guidelines that help you use your compute
r
productively and safely. Information includes how to set up and use your computer to reduce your risk
of developing nerve, muscle, or tendon disorders.
Read through this online documentation to familiarise yourself with the Versa.
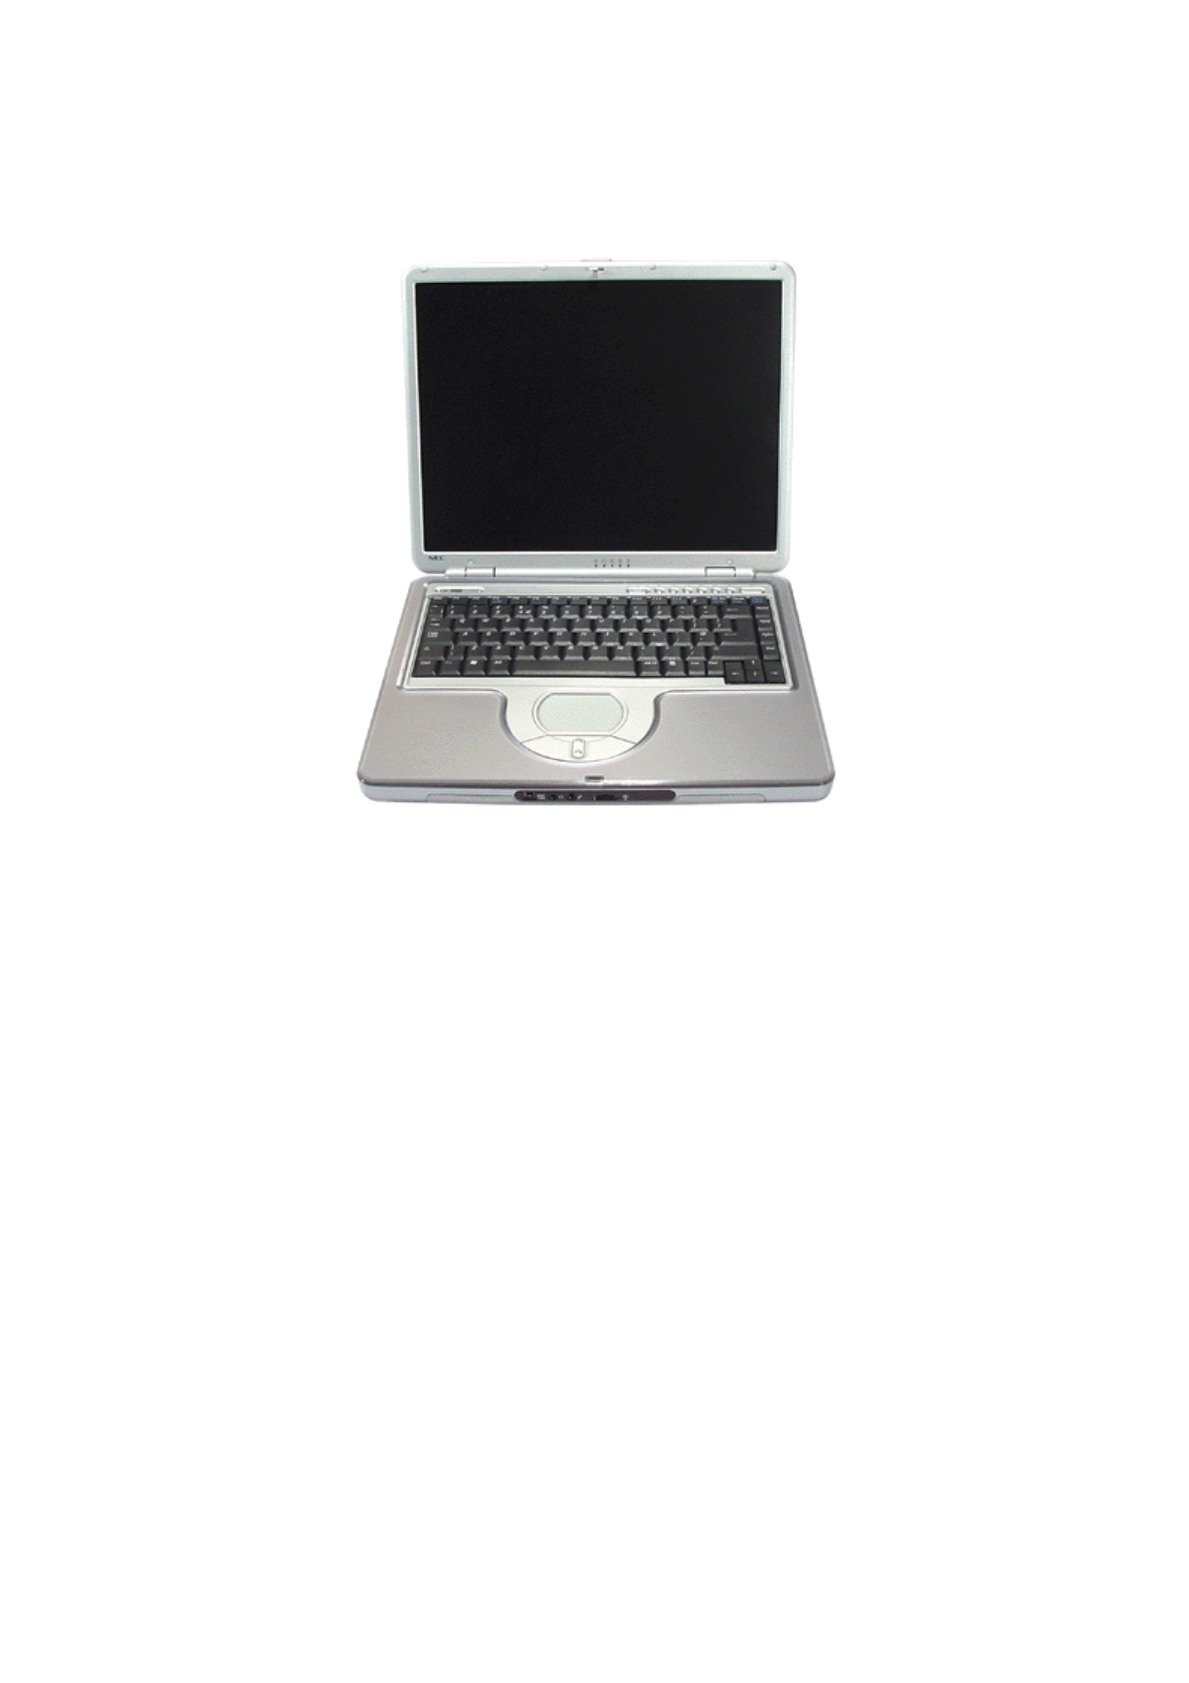
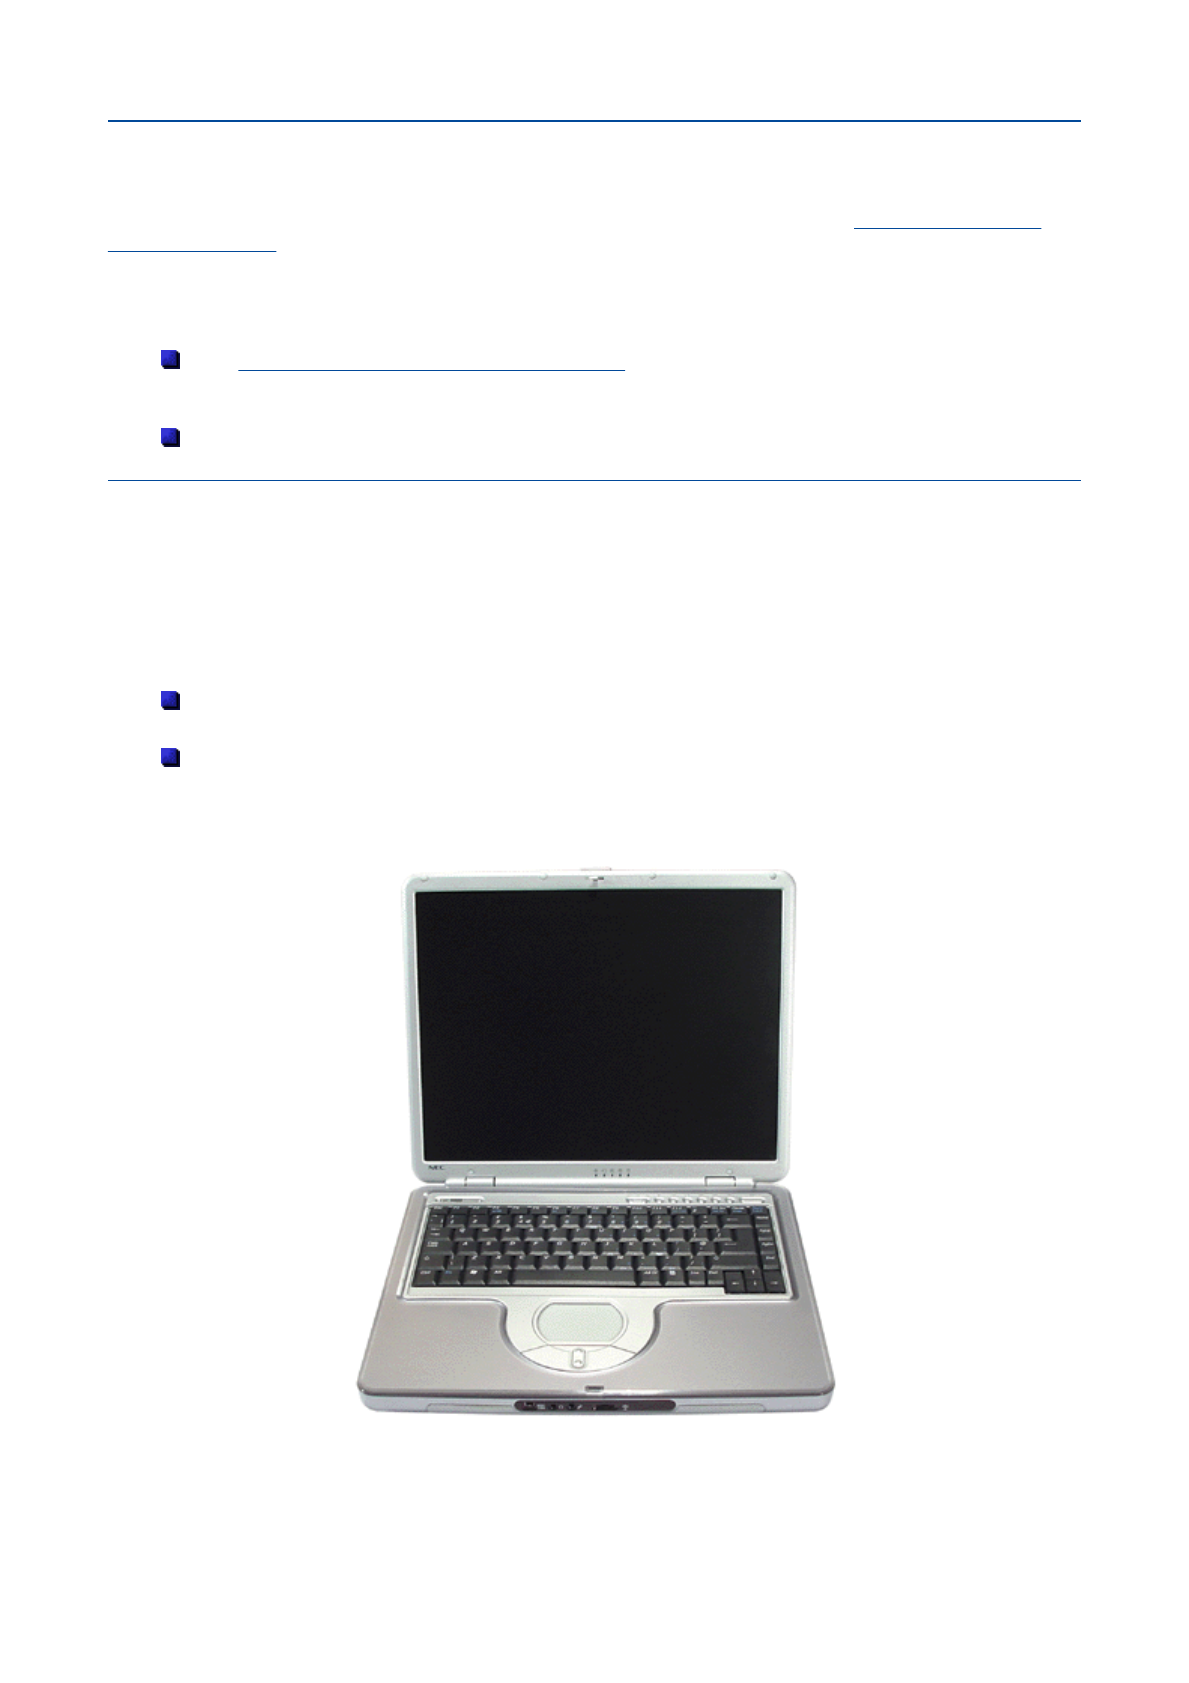
Versa Notebook
The Versa notebook computer offers you a portable system filled with exciting resources for home, business
or travel. Standard features include either a powerful Intel®Pentium®4 Processor-M or Mobile Intel® Celeron®
processor that works together with the latest Peripheral Component Interconnect (PCI) architecture, a hard
disk drive, and PC Card support.
In addition, your system may feature the following high-performance components:
an optical disc drive; either a CD-ROM drive, a DVD-ROM drive or a DVD-ROM/CD-R/CD-RW
combination drive.
connectivity options; an integrated modem, integrated LAN, and/or IEEE 802.11b support.
The Versa comes with Windows® XP preinstalled.
To get comfortable with your notebook, read the following sections and take a tour around your system!
Getting to Know your Versa

Around the Front of the System
A
round the Front of the System
The Versa is compact with features on every side. First, look at the front of the system.
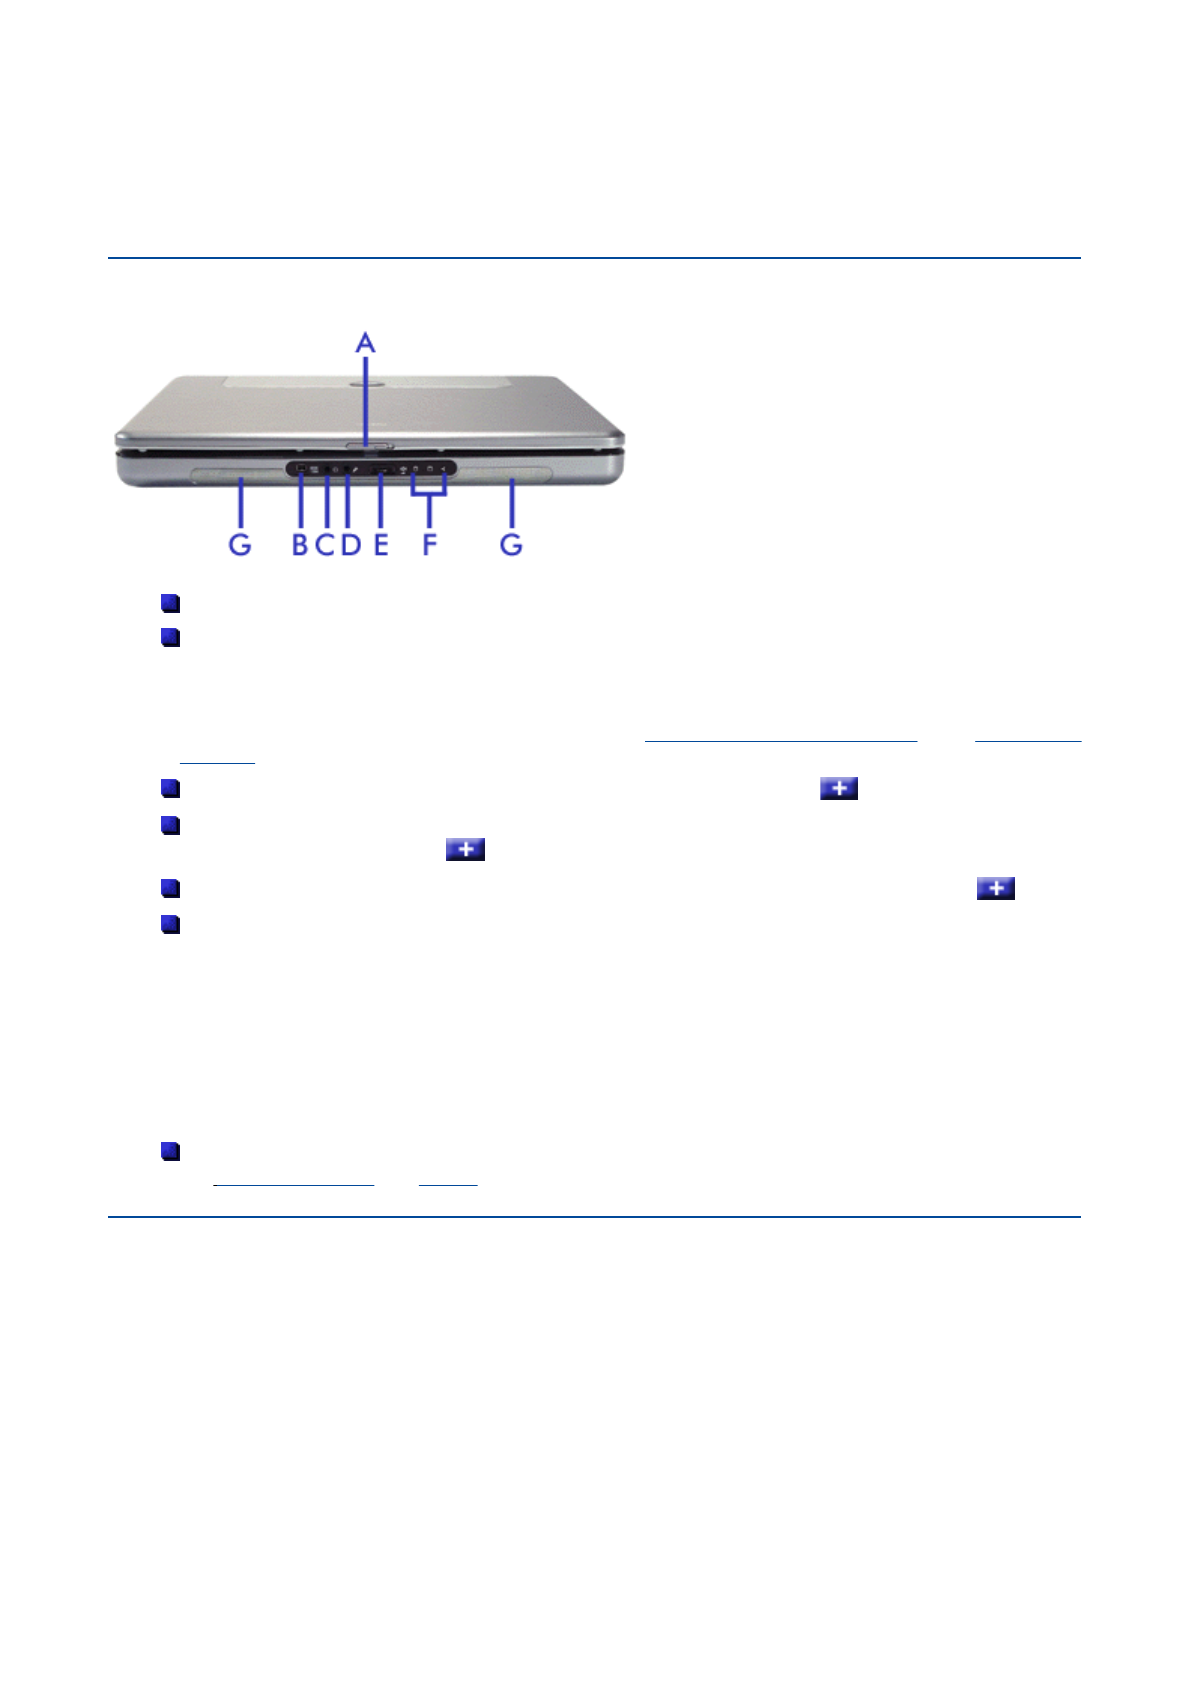
Front Features
The Versa contains the following features.
Closed
Top Cover Latch (A) - slide the latch to the right and raise the panel to open the notebook.
Mini-IEEE 1394 Port (B) - use this ports to daisy chain up to 63 IEEE 1394-compliant (also known as
FireWire® or i-Link®) devices to your system. IEEE 1394 devices support Plug and Play connectivity
for transfer rates of up to 400 Mbits/s. This high-speed serial bus provides enhanced PC connectivity
for a wide range of devices, especially consumer electronics audio/video (A/V) appliances and
storage peripherals. Refer to the corresponding 'Frequently Asked Questions' and 'IEEE 1394
Devices' sections for more information.
Line Out (C) - lets you plug in stereo headphones or external speakers.
Microphone In (D) - allows you to connect an external microphone for monophonic recording o
r
amplification through the unit.
Volume Control (E) - allows you to control the speaker volume through the thumb wheel.
Activity LEDs (F) - allow you to monitor the drives and wireless feature activity. From left to right:
-Hard Disk/Optical Disc Drive Activity LED - blinks green when the hard disk or optical disc drive
is active.
-Floppy Disk Drive Activity LED - blinks green when the floppy disk drive is active.
-Wireless Status LED - lights blue when the Wireless On/Off button is switched to On.
Note: this LED exists only on notebooks that feature Wireless LAN capabilities.
Speakers (G) - provide stereo sound for your multimedia presentations or listening pleasure. Refer to
the 'Using Multimedia' and 'Audio' sections for more information.
O
p
en
A
round the Front of the System
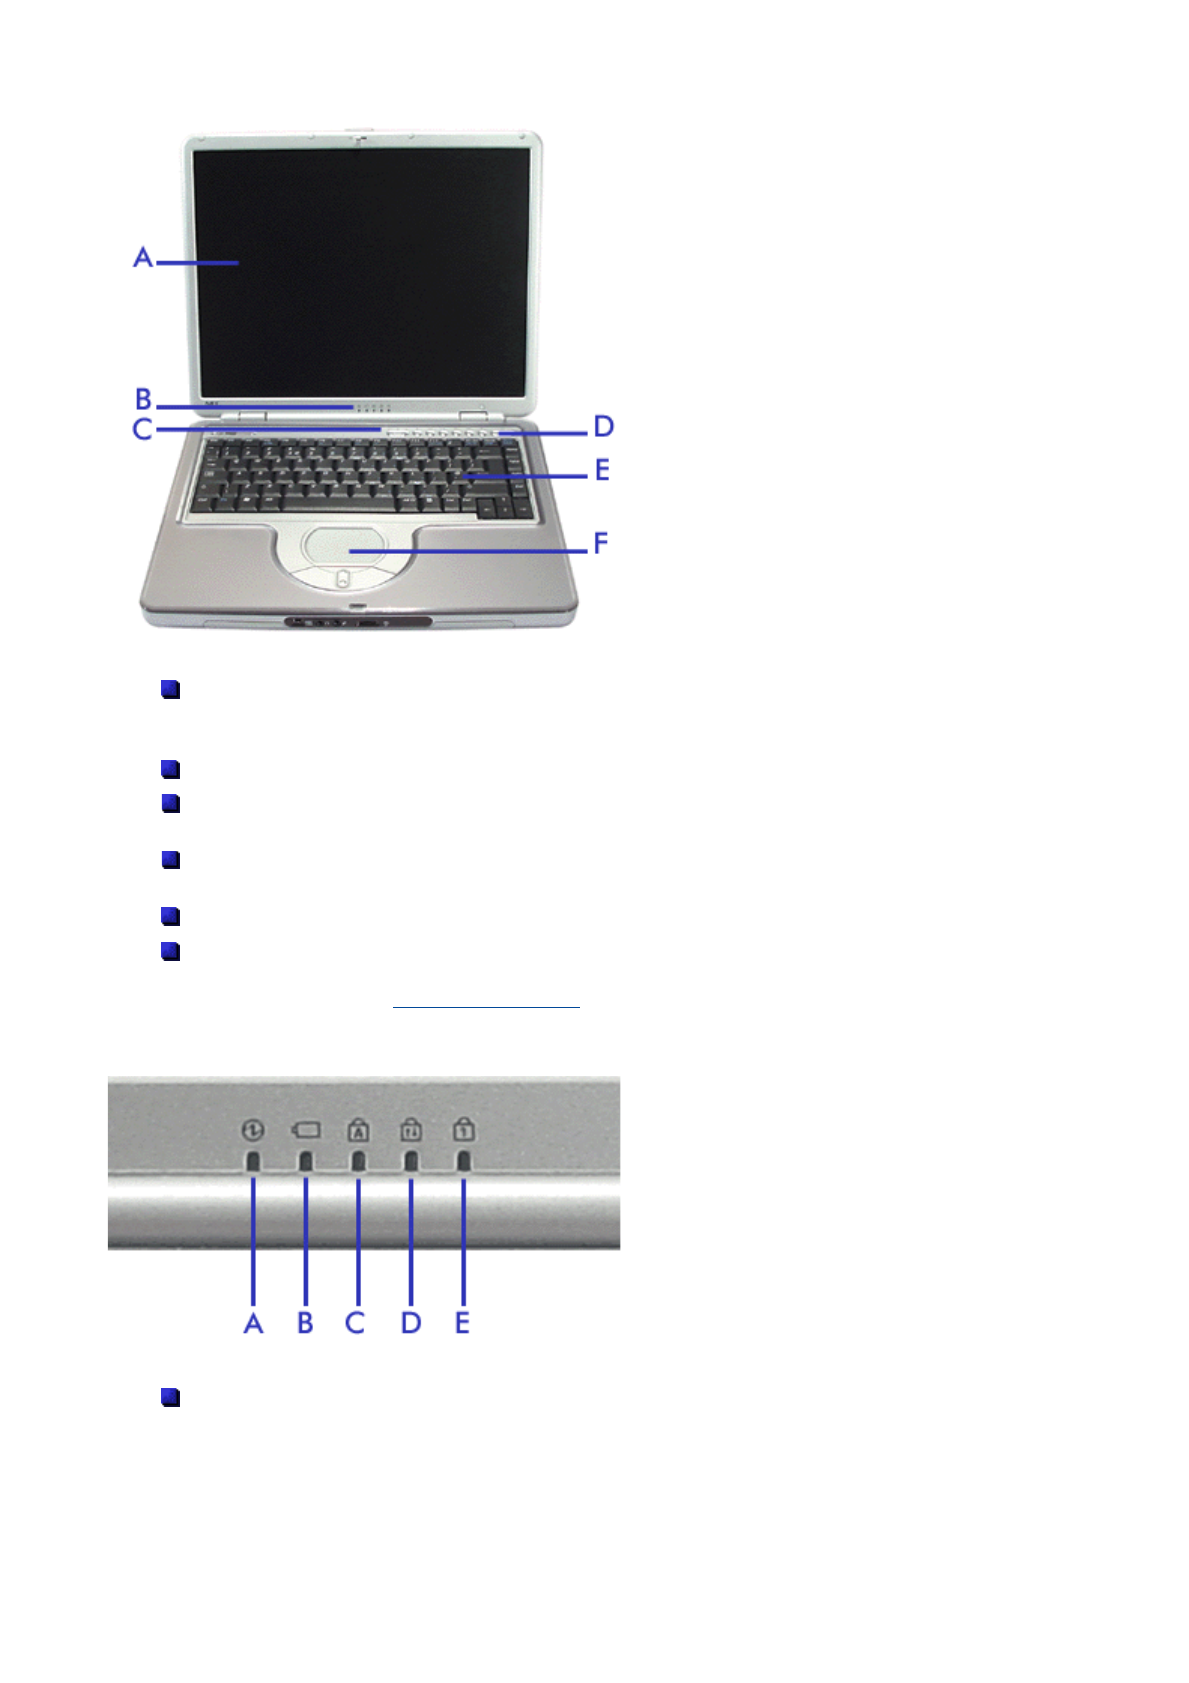
LCD Panel (A) - the Versa comes with a colour LCD panel that you can adjust for a comfortable
viewing position. The LCD panel is either a 12.1-inch Extended Graphics Array (XGA) TFT colou
r
display.
Power and Status LEDs (B) - refer to the 'Power and Status LEDs' section below for details.
Quick Launch and CD Control buttons (C) - refer to the 'Quick Launch and CD Control Buttons
'
section below for details.
Power Button (D) - press the button to power on/off the system. Refer to the 'Power Buttton' section
below for details.
Keyboard (E) - standard QWERTY-key layout. Refer to the 'Keyboard' section below for details.
Touchpad (F) - works like a standard computer mouse. Simply move your fingertip over the touchpad
to control the position of the cursor. Use the left and right selection buttons below the touchpad to
select menu items. See 'Using the Touchpad' for information about customising touchpad settings.
Power and Status LEDs
Power Status LED* (A) - lights when the Versa is powered on.
- Lights green when powered on AC or battery power.
- Flashes green when in Standby mode (AC power or battery power).
- Lights orange when battery power is at 8% or less (AC power or battery power).
A
round the Front of the System
- Flashes orange when battery power is at 8% or less, and the notebook is in standby mode (battery
power only).
- Lights amber when battery power is at 3% or less (battery power only).
- Flashes amber when battery power is at 3% or less, and the notebook is in standby mode (battery
power only).
Battery Status LED* (B) - lights to indicate battery charging status.
- Turns off when using battery power, or to indicate the battery is fully charged.
- Lights amber to indicate the battery is charging.
- Flashes amber to indicate a charging error.
*These LEDs are replicated on the back of the LCD panel and can be viewed even when the LCD is closed.
Caps Lock (C) - lights green when caps lock is active.
Scroll Lock (D) - lights green when scroll lock is active.
Num Lock (E) - lights green when num lock is active.
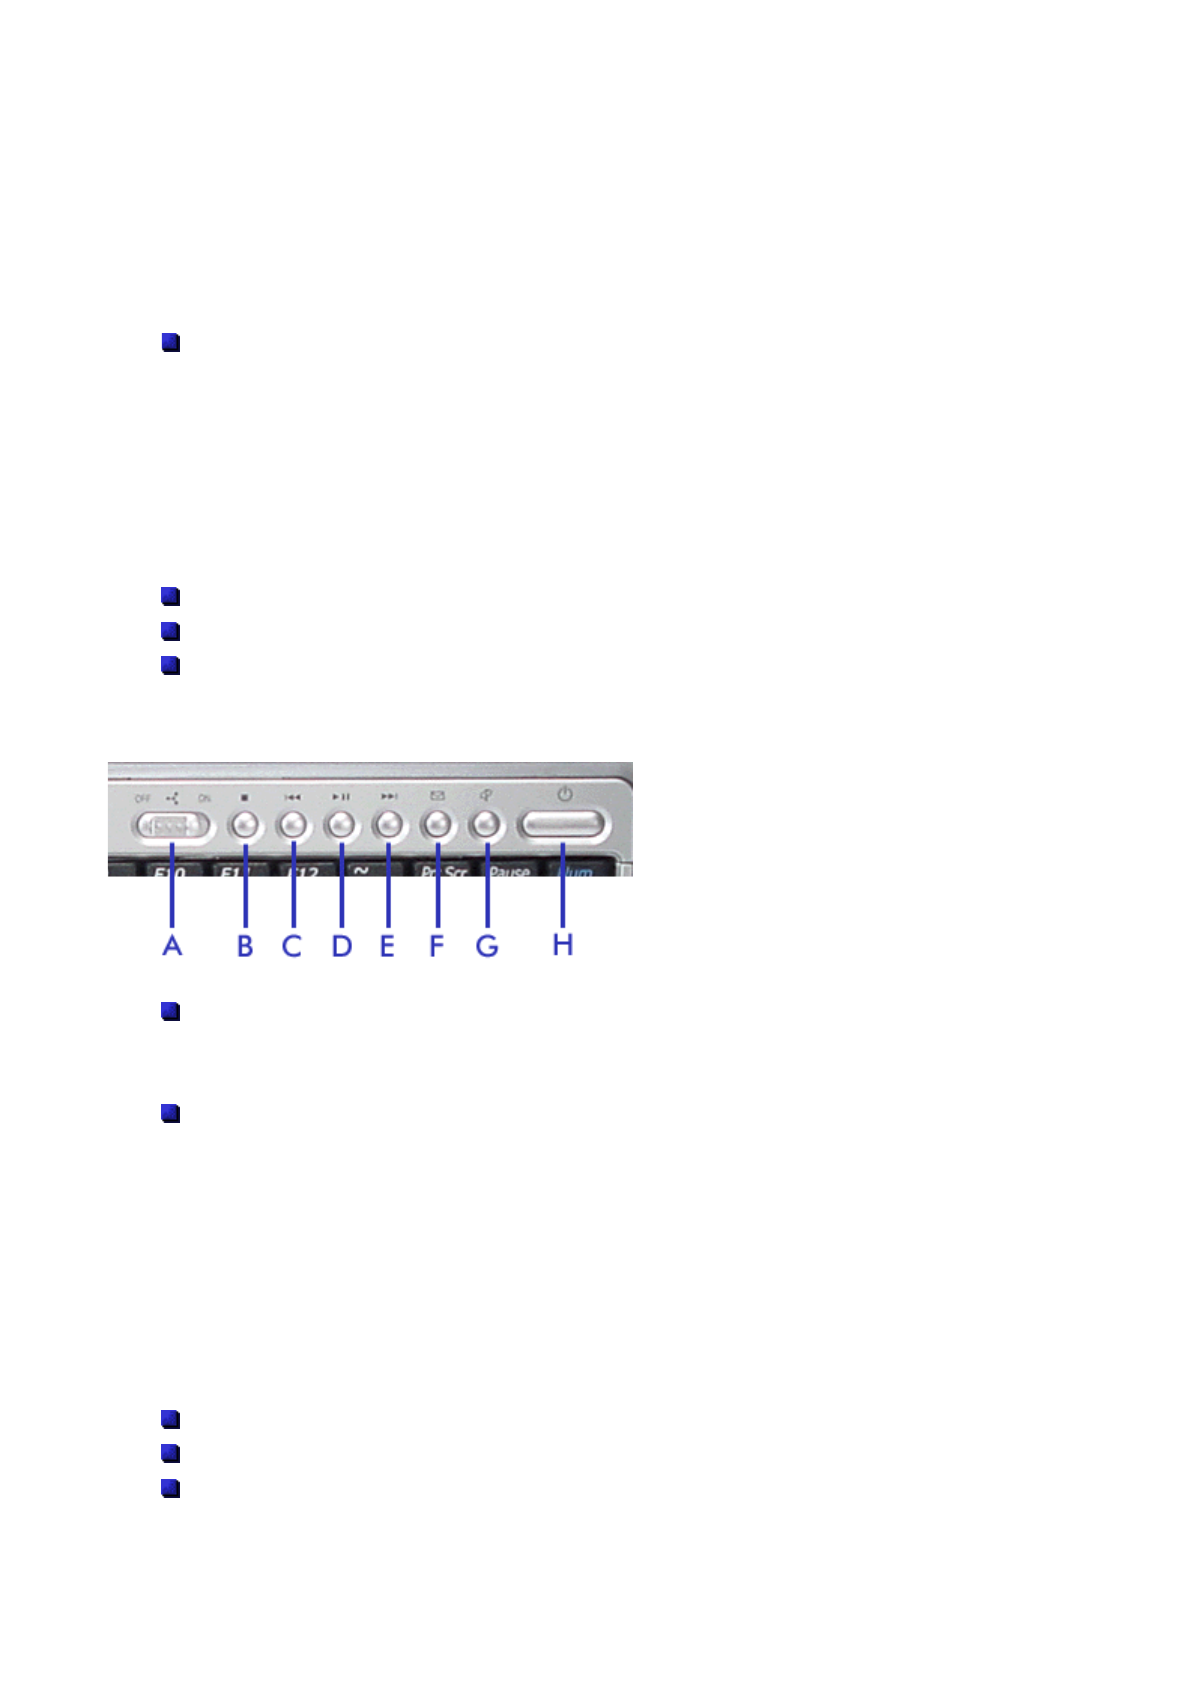
Quick Launch and CD Control buttons
Wireless On/Off Button (A) - slide the button to enable or disable the Wireless LAN feature.
Note: this button exists only on notebooks that feature Wireless LAN capabilities.
Audio CD Controls
-Stop (B) - press this button to stop playback.
-Reverse/Rewind (C) - press this button to skip back; hold it down to fast reverse.
-Play/Pause (D) - press this button to begin playback. Press again to pause playback.
-Cue/Fast Forward (E) - press this button to advance to the next track; hold it down to fast
forward.
Note: if no media player is running, pressing any of these buttons launches either the Windows Media
Player, or the DVD Player (depending on your configuration). Press the relevant button again to perform its
action.
Email Button (F) - press the button to launch Outlook Express.
Internet Button (G) - press the button to launch Internet Explorer.
Power Button (H) - press the button to power on/off the system. Refer to the 'Power Buttton' section
below for details.
A
round the Front of the System
Power Button
The Power button is a "smart" switch, meaning that it recognises when the system is in Standby mode. If in
Standby mode, you cannot power off until you press the Power button to resume operation.
Use the Power button in the following ways:
Press the Power button to power on.
Press the Power button to put your system into Standby mode.
Press the Power button to resume from Standby mode and proceed with normal operation.
Press and hold the Power button in place for 4 or more seconds to initiate power override (powers of
f
the system). Only use this option if you cannot power off your system using the normal procedure
described in the 'Tips' section relevant to your operating system.
Put the unit in Standby mode when you need to be away from your system for a short period of time and want
to return to where you left off. Standby mode shuts down all devices in the system while retaining data and
system status.
Check the 'Managing System Power' section relevant to your operating system for more information on the
power management states.
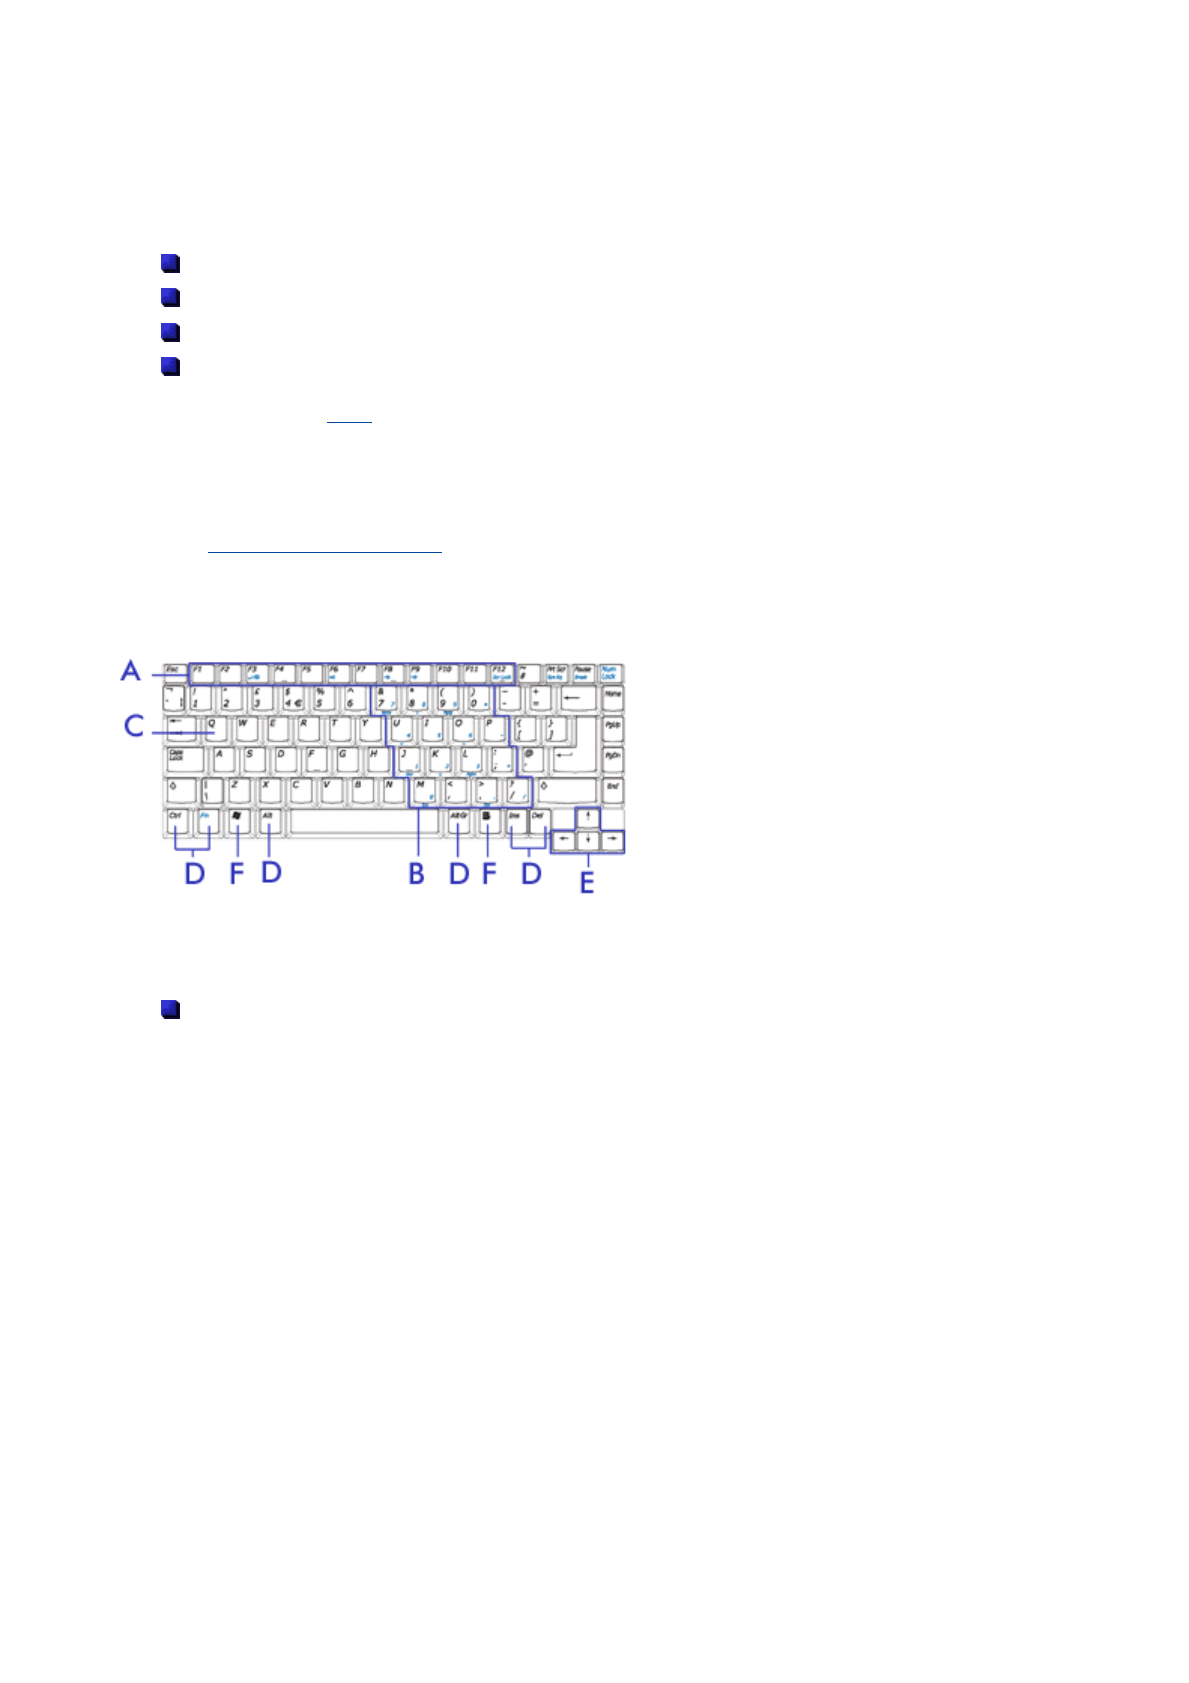
Keyboard
h
e keyboard is equipped with many features. These include:
Function Keys (A) - twelve function keys, F1 through F12, are available on the Versa keyboard.
These keys work together with the Fn key to activate special functions. Some of these keys (printed
in yellow) are pre-programmed with dual functions.
Function keys are application-driven. See the specific application's user guide for information about
how each function key works within the application you are using.
The following function key combinations are pre-programmed for the Versa.
F1 - in most software applications, launches the help.
Fn-F3 - toggles the video mode between LCD only, CRT only, LCD/CRT simultaneous display, and
TV-Out mode.
Fn-F6 - toggles the internal speaker on and off.
Fn-F8 - increases the LCD brightness.
Fn-F9 - decreases the LCD brightness.
Fn-Prt Sc (Sys Rq in blue) - enables the SysRq key, used in combinations with other keys by
programmers to perform specific actions.
Fn-Num Lk - activates the numeric keypad (see the numeric keypad section below).
Fn-Pause (Break in blue) - performs a "Break". This key is used in programming and debugging
applications. It has no function in most programs.
Fn-J (End in blue) - moves the cursor to the end of a line.
A
round the Front of the System

Fn-7 (Home in blue) - moves the cursor to the beginning of a line.
Fn-9 (PgUp in blue) - moves the cursor one page up.
Fn-L (PgDn in blue) - moves the cursor one page down.
Numeric Keypad (B) - pressing Fn-Num Lk on the keyboard activates the numeric keypad numbers
and functions printed in blue on the bottom right corner of the keys.
The keypad lets you type numbers and mathematical operands (+, -) as you would on a calculator.
The keypad is ideal for entering long lists of numbers.
When you press Fn-Num Lk again, the keys revert to their normal functions as typewriter keys.
Typewriter keys (C) - typewriter keys (also called alphanumeric keys) are used to enter text and
characters. Keys with blue print on them behave differently when combined with control keys or the
Fn key.
Control keys (D) - Ctrl,Alt,Fn,Alt Gr and Shift are controls used in conjunction with other keys to
change their functions. To use control keys, press and hold the control key while pressing anothe
r
key. For example, "Press Ctrl c" means to hold down the Ctrl key and press the ckey. Key
combinations are specific to the application you are running.
Cursor Control keys (E) - cursor control keys let you position the cursor on the screen where you
want. On the screen, the cursor is a blinking underline, block, or vertical bar depending on the
application. The cursor indicates where the next typed text will be inserted.
Windows keys (F) - use the following two keys to facilitate your work.
Shortcut/Application key - provides quick access to shortcut menus. (This key acts like
a right mouse button.)
Floating Window key - displays the Start menu.
A
round the Front of the System
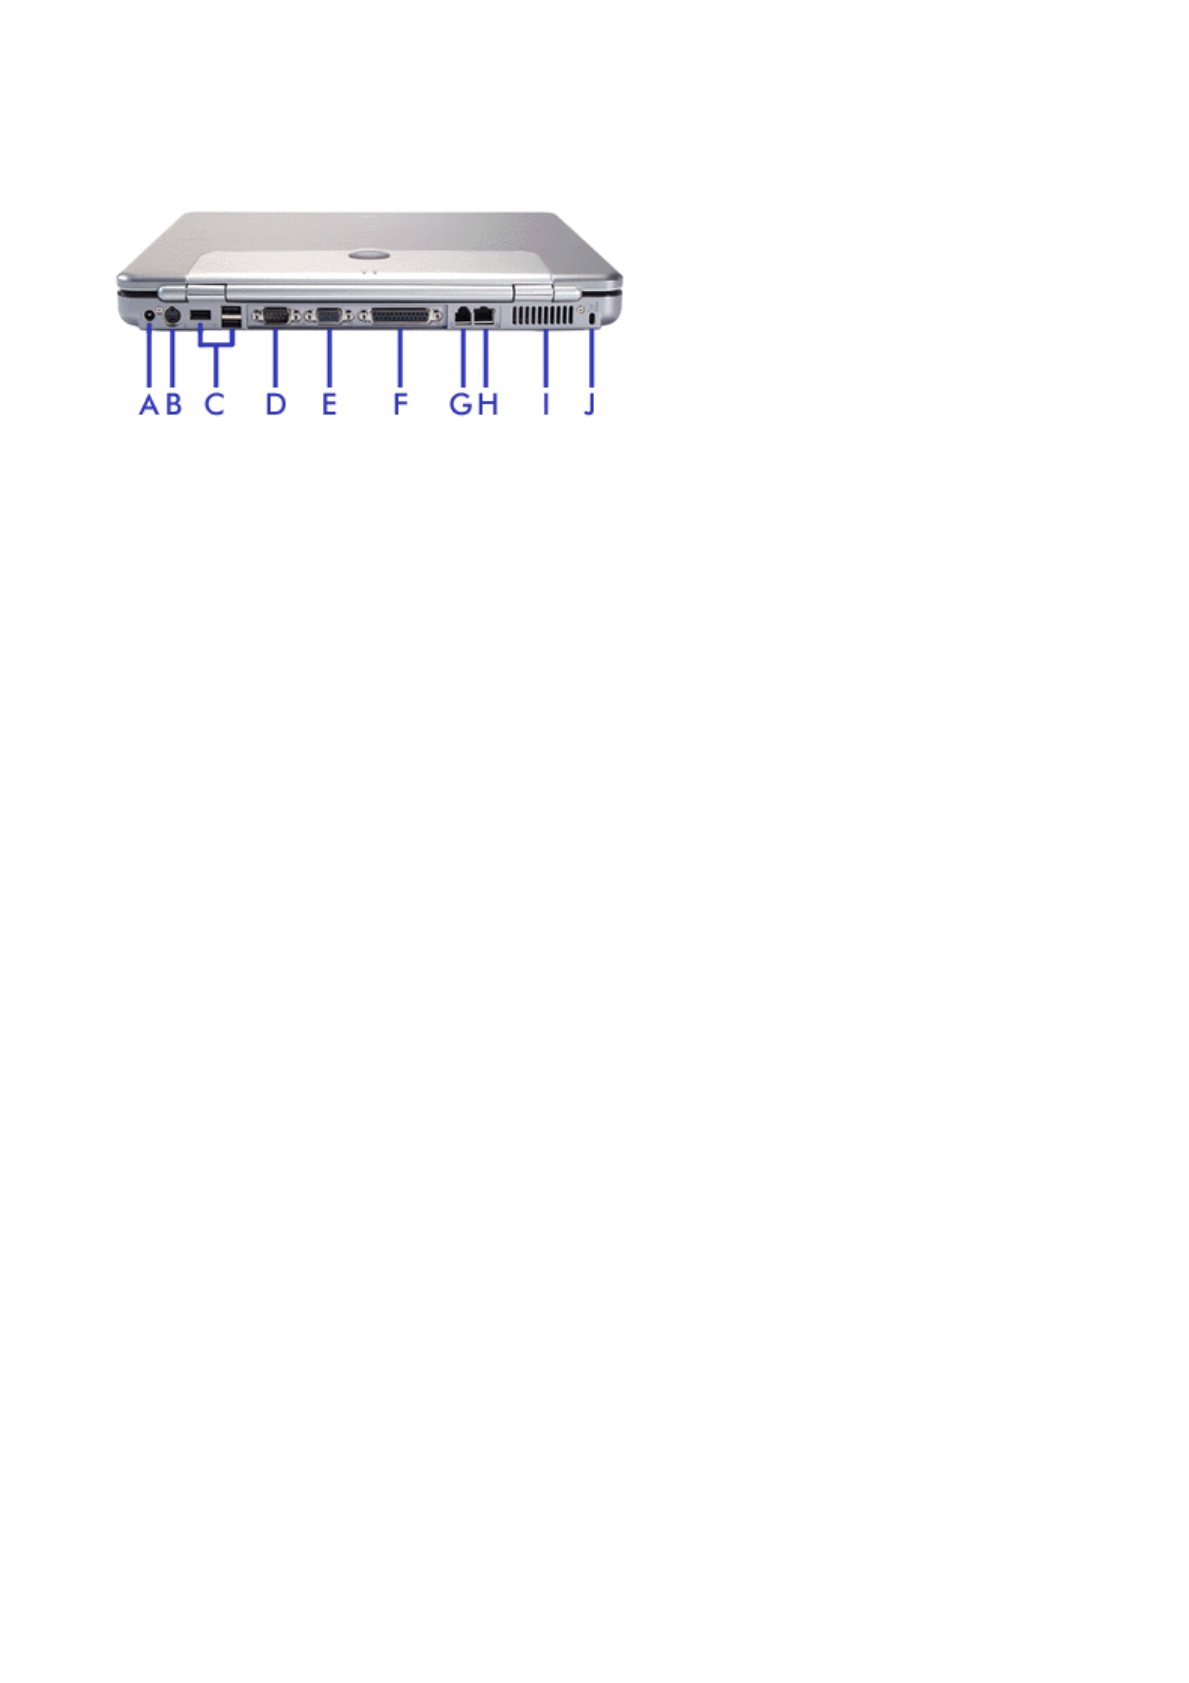
Around the Back of the System
A
round the Back of the System

You'll find system ports for connecting your Versa to optional devices (like a printer or external monitor) on the
back of your Versa.
Note: for more information on how to connect the devices described below, you may refer to the 'Using
Peripheral Devices' section of this guide. Clicking on the '+' button will take you directly to the corresponding
section.
AC Power Port (A) - lets you attach the Versa to the AC power source using the AC adapter that
comes with your system. Keep the system connected to AC power whenever possible to keep the
battery pack and internal CMOS battery charged.
S-video TV-Out (B) - use this port to connect to a compatible television or other display device. The
computer supports PAL and NTSC signals.
USB Ports (C) - a Universal Serial Bus (USB) port allows you to connect up to 127 USB-equipped
peripheral devices (for example, printers, monitors, scanners) to your Versa.
Serial Port (D) - use this port to connect a serial printer or other serial device.
VGA Port (E) - use this 15-pin port to attach an external monitor to your Versa.
Parallel Port (F) - use this port to connect a parallel printer or other parallel device. The parallel port
default supports the Enhanced Capabilities Port (ECP) standard. The port also supports bi-directional
and output only protocols.
Modem Port (G) - a 56K fax/data modem card is included with your system. Refer to the 'Interna
l
Modem' and to the 'Specifications' sections for more information.
LAN Port (H) - a 10/100 Mbps LAN feature is included with your system. Refer to the 'Internal LAN
'
and to the 'Specifications' sections for more information.
Fan Vents (I) - allow your system to cool properly and maintain a safe operating environment.
Warning: do not block the fan vents while the Versa is in use.
Kensington Lock Latch (J) - this latch allows you to attach a Kensington security lock or any othe
r
compatible lock to secure the notebook from theft. For more information, refer to the 'Using you
r
Versa' section of this guide.
A
round the Back of the System
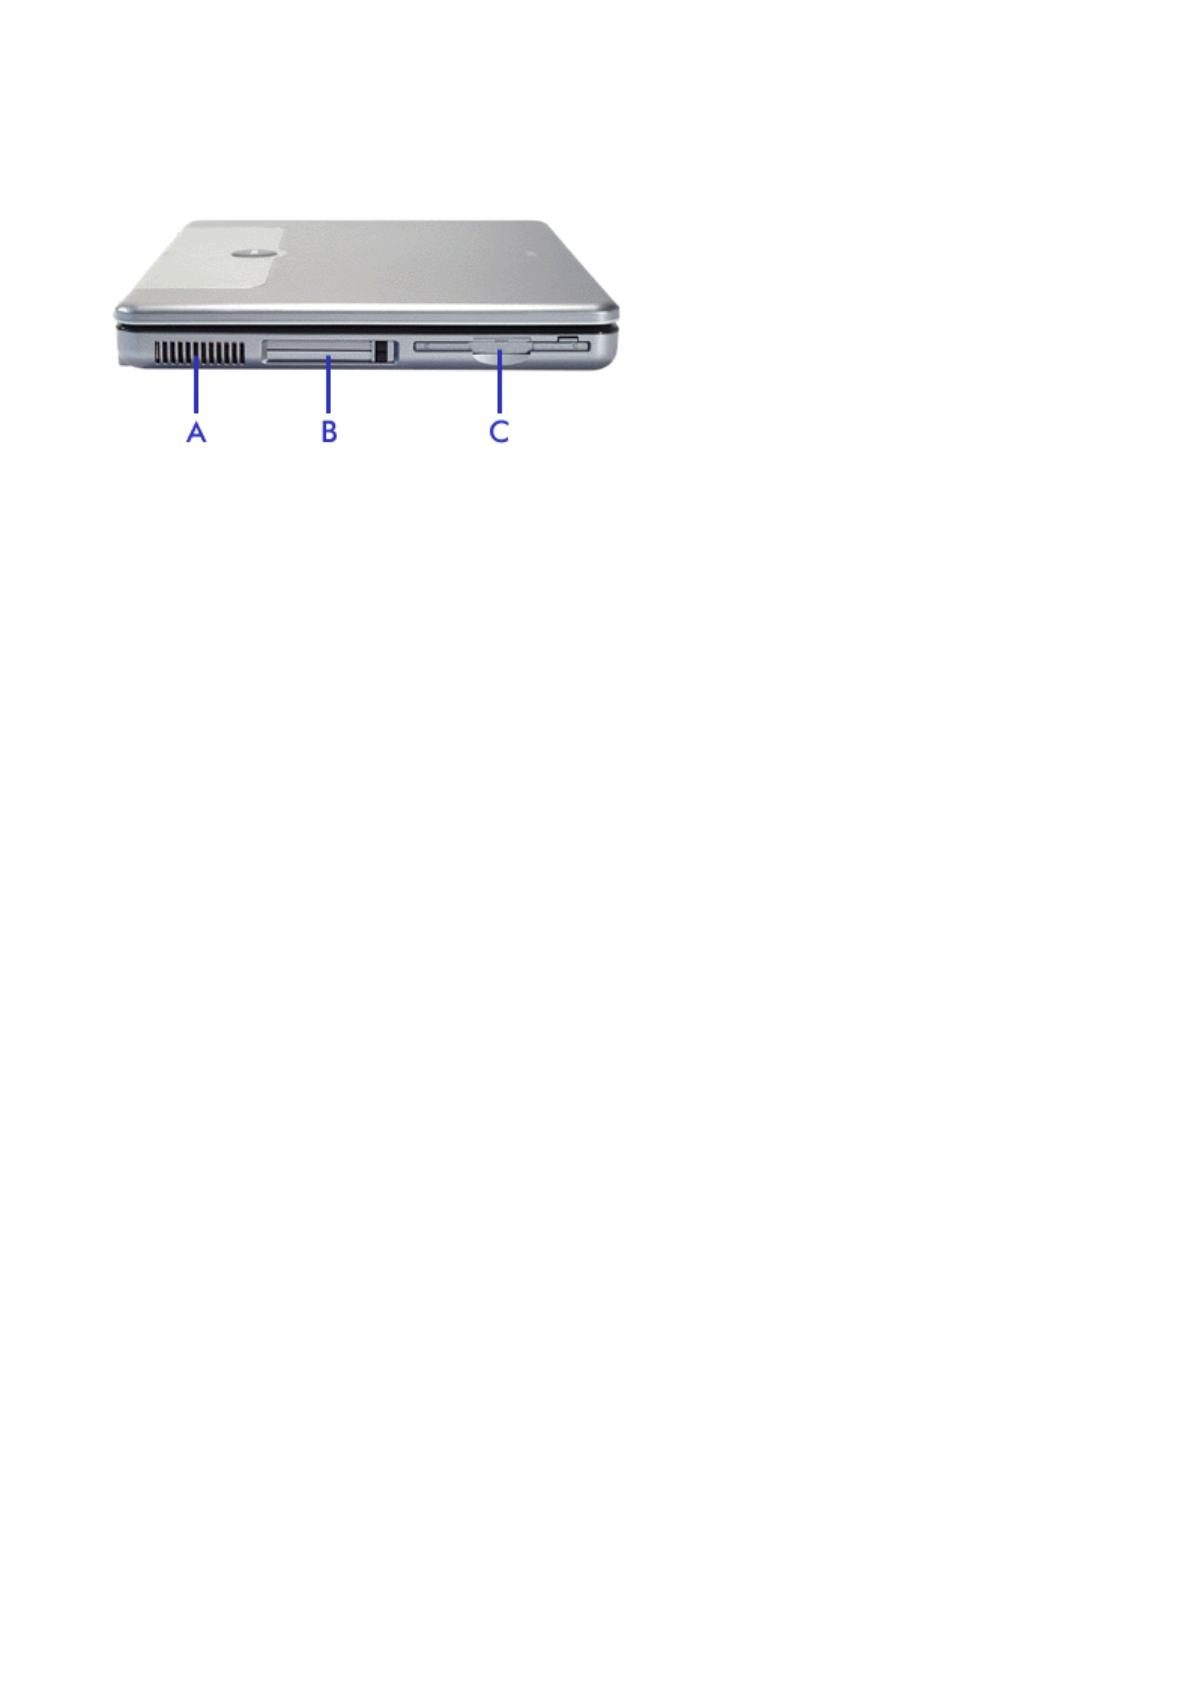
Around the Left Side of the System
A
round the Left Side of the System

The left side of your Versa provides the features shown in the figure.
Fan Vents (A) - allow your system to cool properly and maintain a safe operating environment.
Warning: do not block the fan vents while the Versa is in use.
PC Card Slots (B) - two PC card slots allow you to insert two Type II PC cards or one Type III PC
card in the bottom slot. Refer to the 'PC Cards' section of this guide for more information.
Floppy Disk Drive (C) - A 3.5-inch, 1.44-MB floppy disk drive is installed in your system.
A
round the Left Side of the System
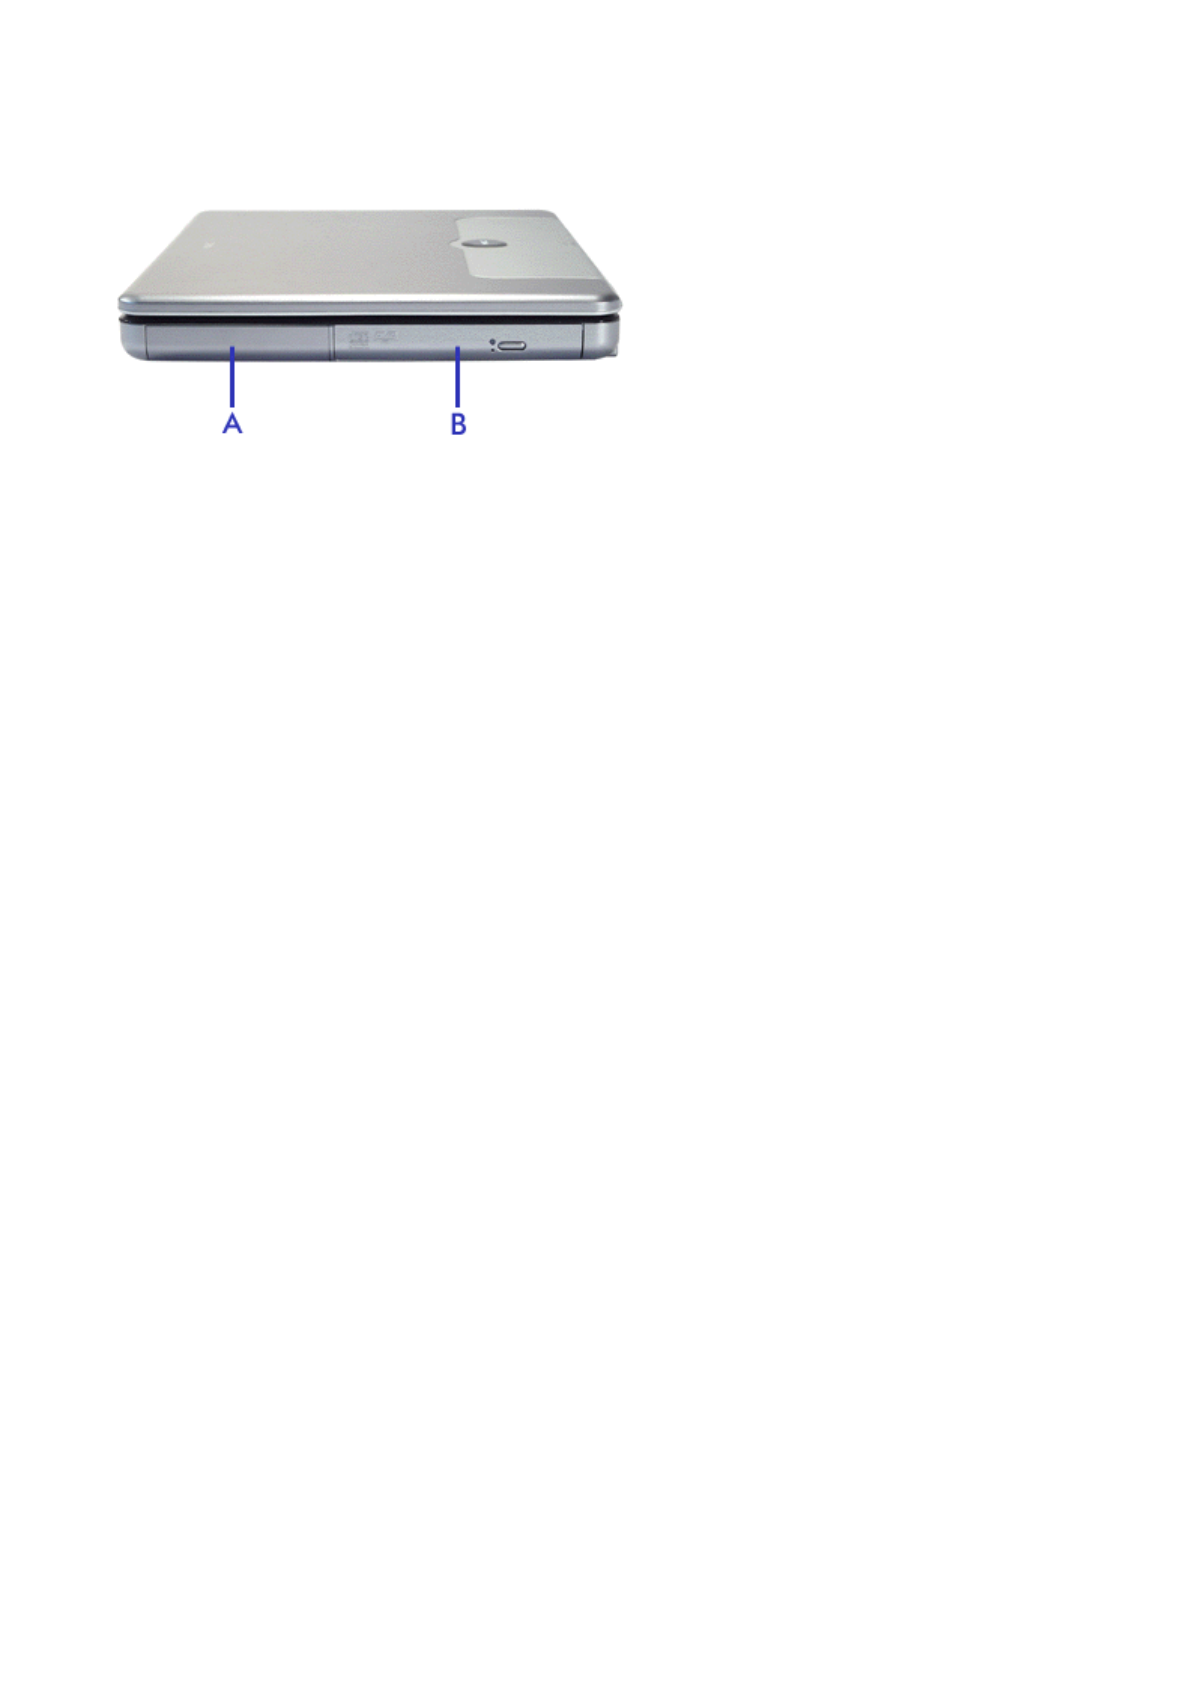
Around the Right Side of the System
A
round the Ri
g
ht Side of the System

The right side of the Versa offers the following features.
Battery Bay (A) - equipped with a rechargeable battery.
Optical Disc Drive (B) - allows you to load and start programs from an optical disc, and play audio
CDs. Depending on your configuration, your system is equipped with a CD-ROM drive, a DVD-ROM
drive, or a DVD-ROM/CD-R/CD-RW combination drive.
A
round the Ri
g
ht Side of the System
Around the Bottom of the System
A
round the Bottom of the System

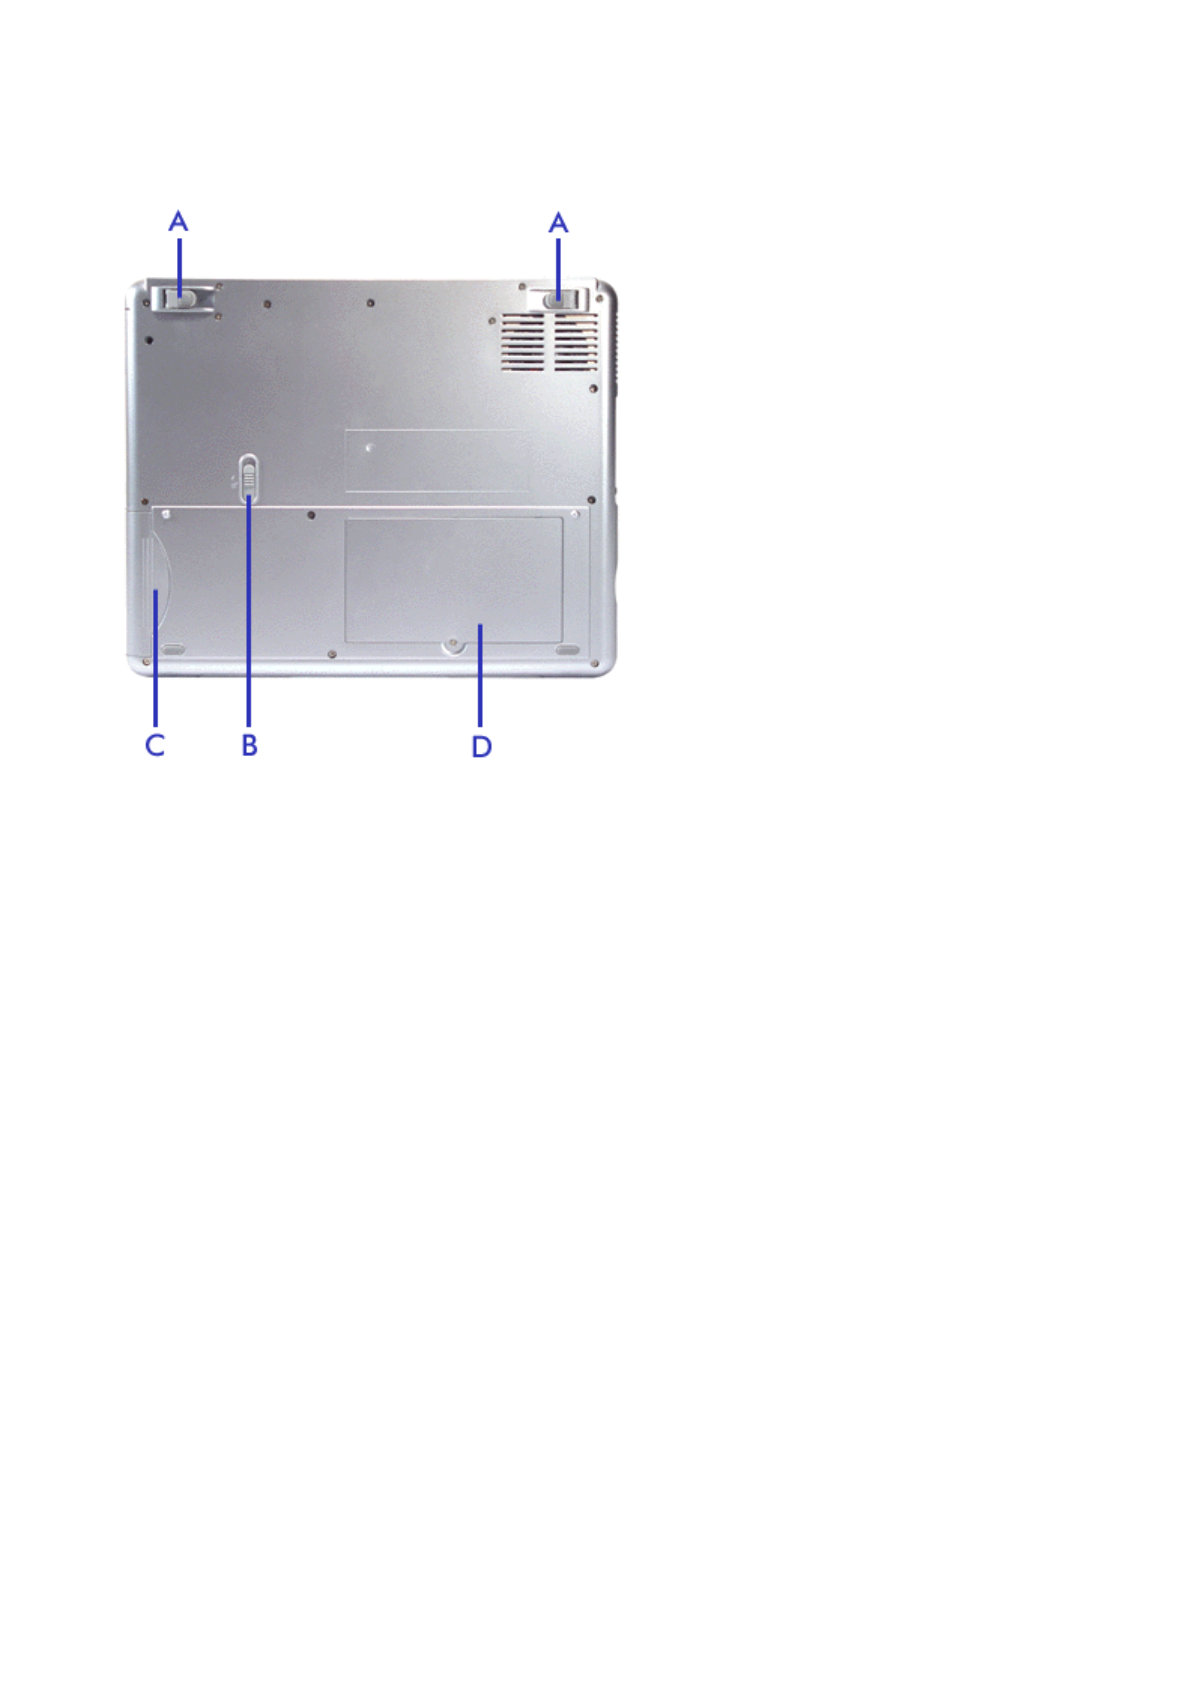
The bottom of the Versa offers the following features.
Tilt feet (A) - Adjust to provide flexible keyboard angle.
Battery Bay Release Latch (B) - slide the latch to the right of the system and hold it while you slide
the battery out of the system.
Battery Bay (C) - equipped with a rechargeable battery.
Memory & Mini-PCI Bay (D) - remove the screw to find the SO-DIMM and Mini-PCI expansion slots.
Refer to the 'Memory Modules' section of this guide for more information on adding memory, and to
the 'Mini-PCI Slot' section for more information on adding a Mini-PCI card.
A
round the Bottom of the System

Optional Accessories
Auto Adapter
AC Adapter
Batteries
Port Replicator
Memory Upgrades
DiskOnKey
Carrying Case
Remote Control
USB Mouse
USB Keyboard
USB Numeric Keypad
802.11b Access Point
Optional Accessories
NEC has developed a complete range of accessories for your portable computer. You will find below an
introduction to the most popular ones.
Note: the accessories described below may not be available for all notebooks. Refer to the Accessories
Leaflet delivered with your Versa to check which accessories are available for your notebook. To order these
accessories, reference their Part Numbers, and contact your local sales representative.
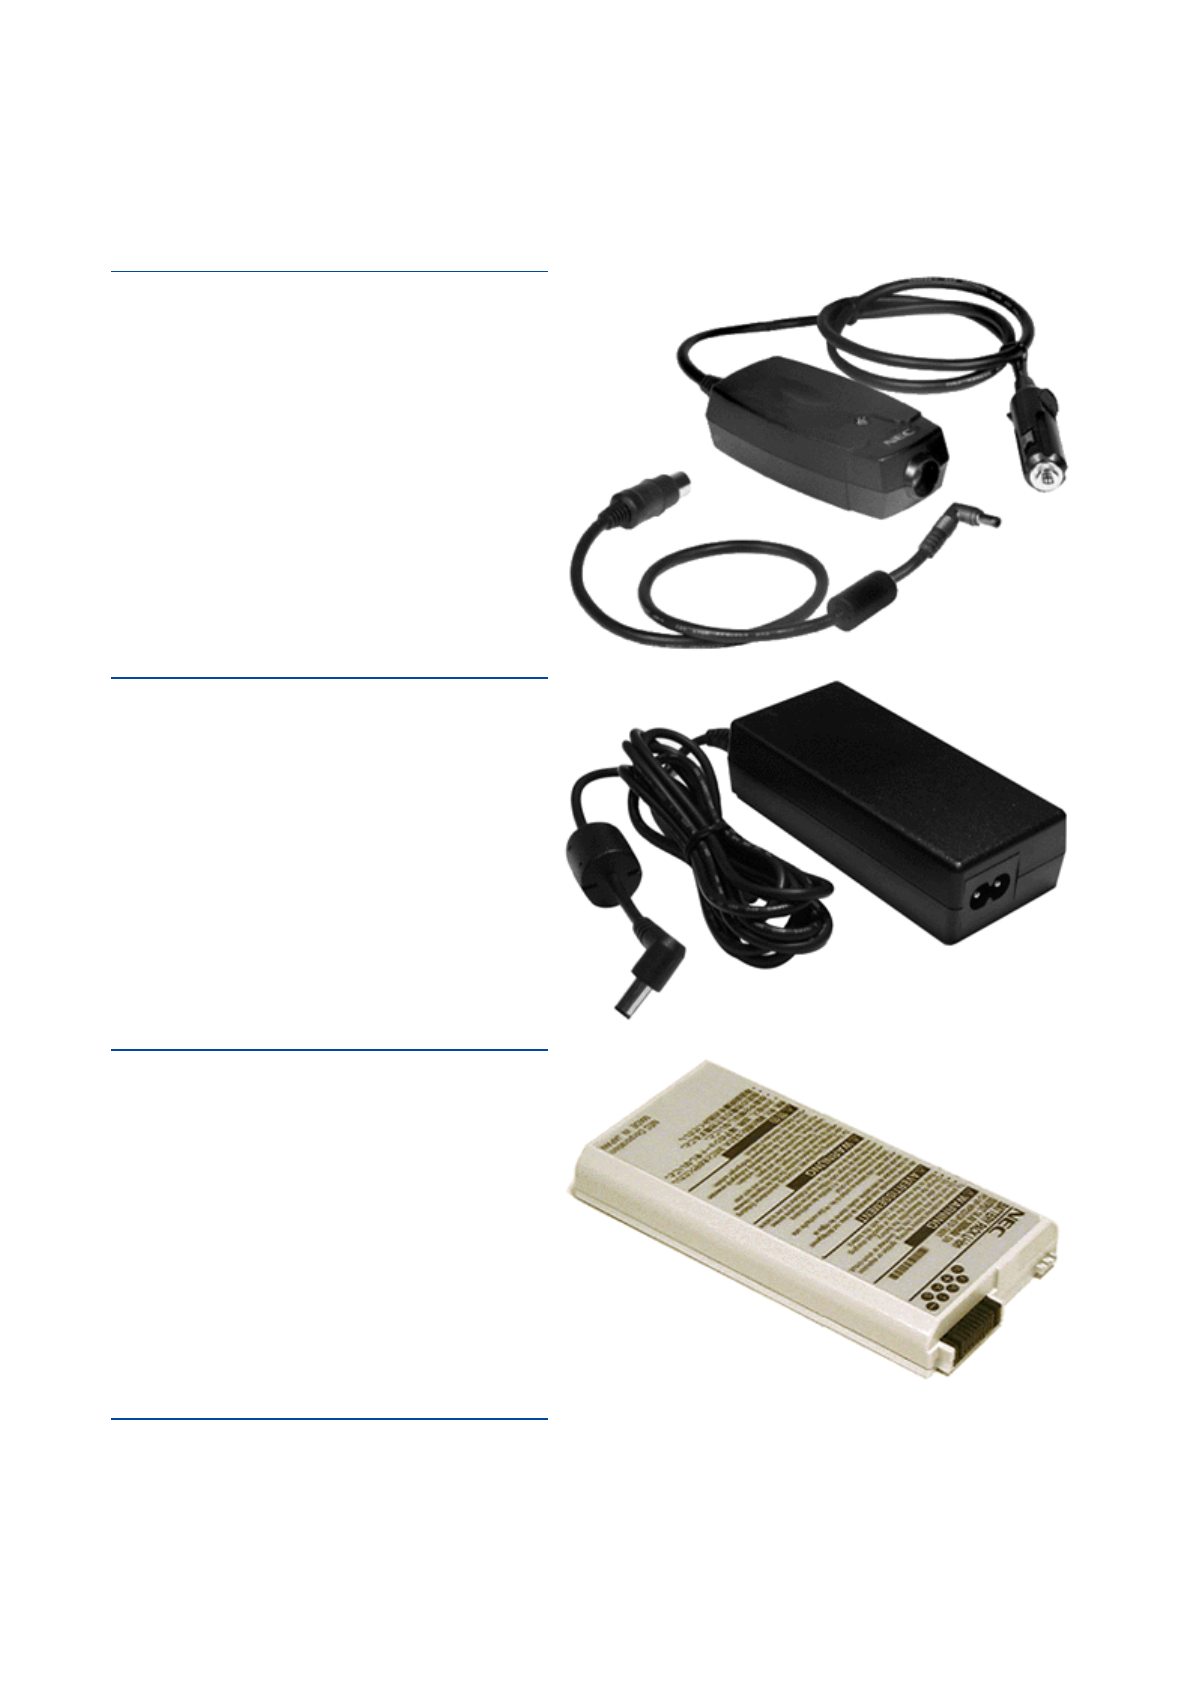
Auto Adapter
Use your computer while you travel, without
running down your battery. Plug the Auto
Adapter into a standard cigarette lighter socket
and operate or charge your computer from the
vehicle’s battery.
AC Adapter
Connects your computer to an AC power socket
to provide power when using the computer or
charging the battery. We recommend you to
leave an AC Adapter at the office, connected to
your Port Replicator, and to keep a spare at
home or in your carrying case.
Batteries
Either for peace of mind when working long
hours on an important document, or just extra
independence, an additional battery will increase
the time you can use your computer without
returning to a power socket. You can even gain
enough time to watch a DVD movie while far
from home!
Port Replicator
The PortBar or Port Replicator duplicates many
of the ports found on your computer, usually
even adding additional ports. Your PortBar can
stay connected to your peripherals at the office
Optional Accessories
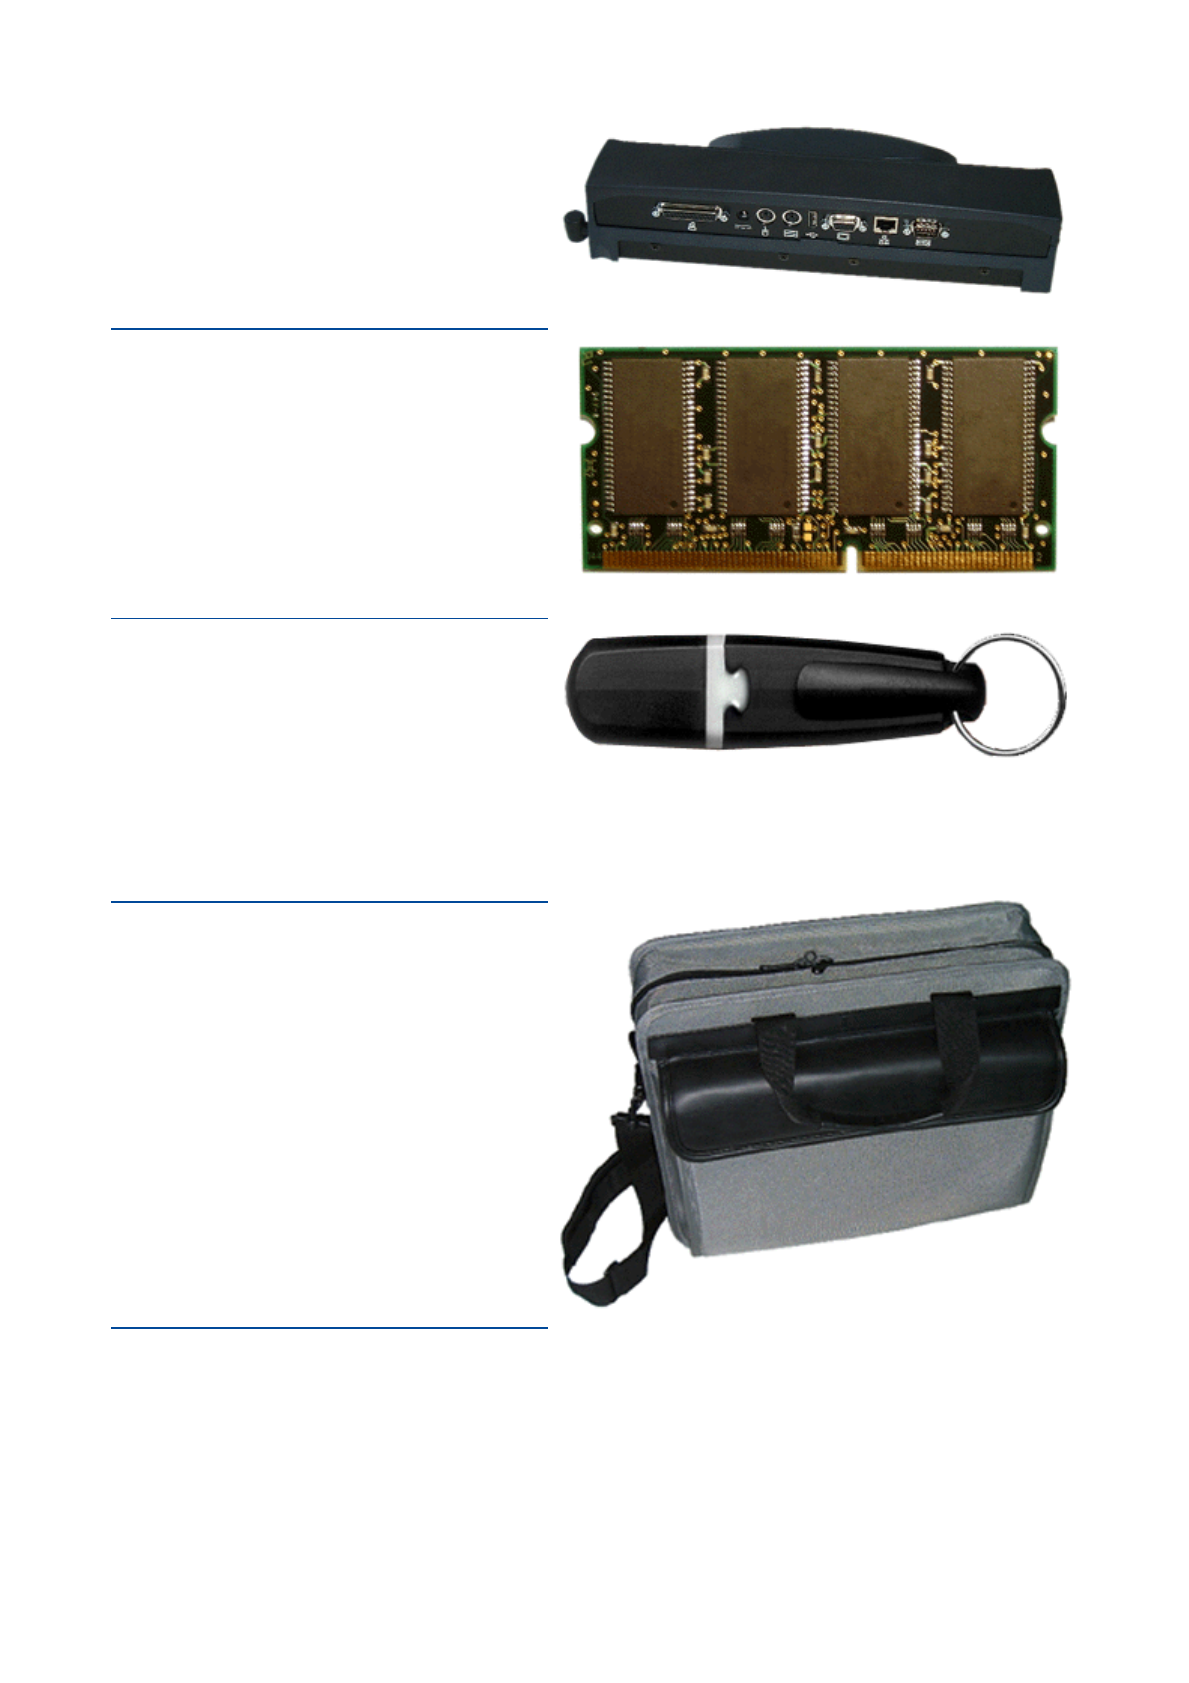
while you are on the move, meaning you don't
have to reconnect all your peripherals everytime
you return to your desk.
Memory Upgrades
Extra memory allows your computer to speed
through memory intensive presentations, games
or calculations.
DiskOnKey
DiskOnKey operates as a secure, reliable,
removable disk, using a standard Universal
Serial Bus (USB) device interface. It is available
in 8, 16, 32, 64, and 128 MB capacities. The
device is automatically detected as a removable
disk and is assigned a drive letter.
No bigger than a pen, you only need to remove
the cap and insert the DiskOnKey into the USB
port to access the device.
Carrying Case
Take your Versa anywhere in a specially
designed carrying case (several models may be
available).
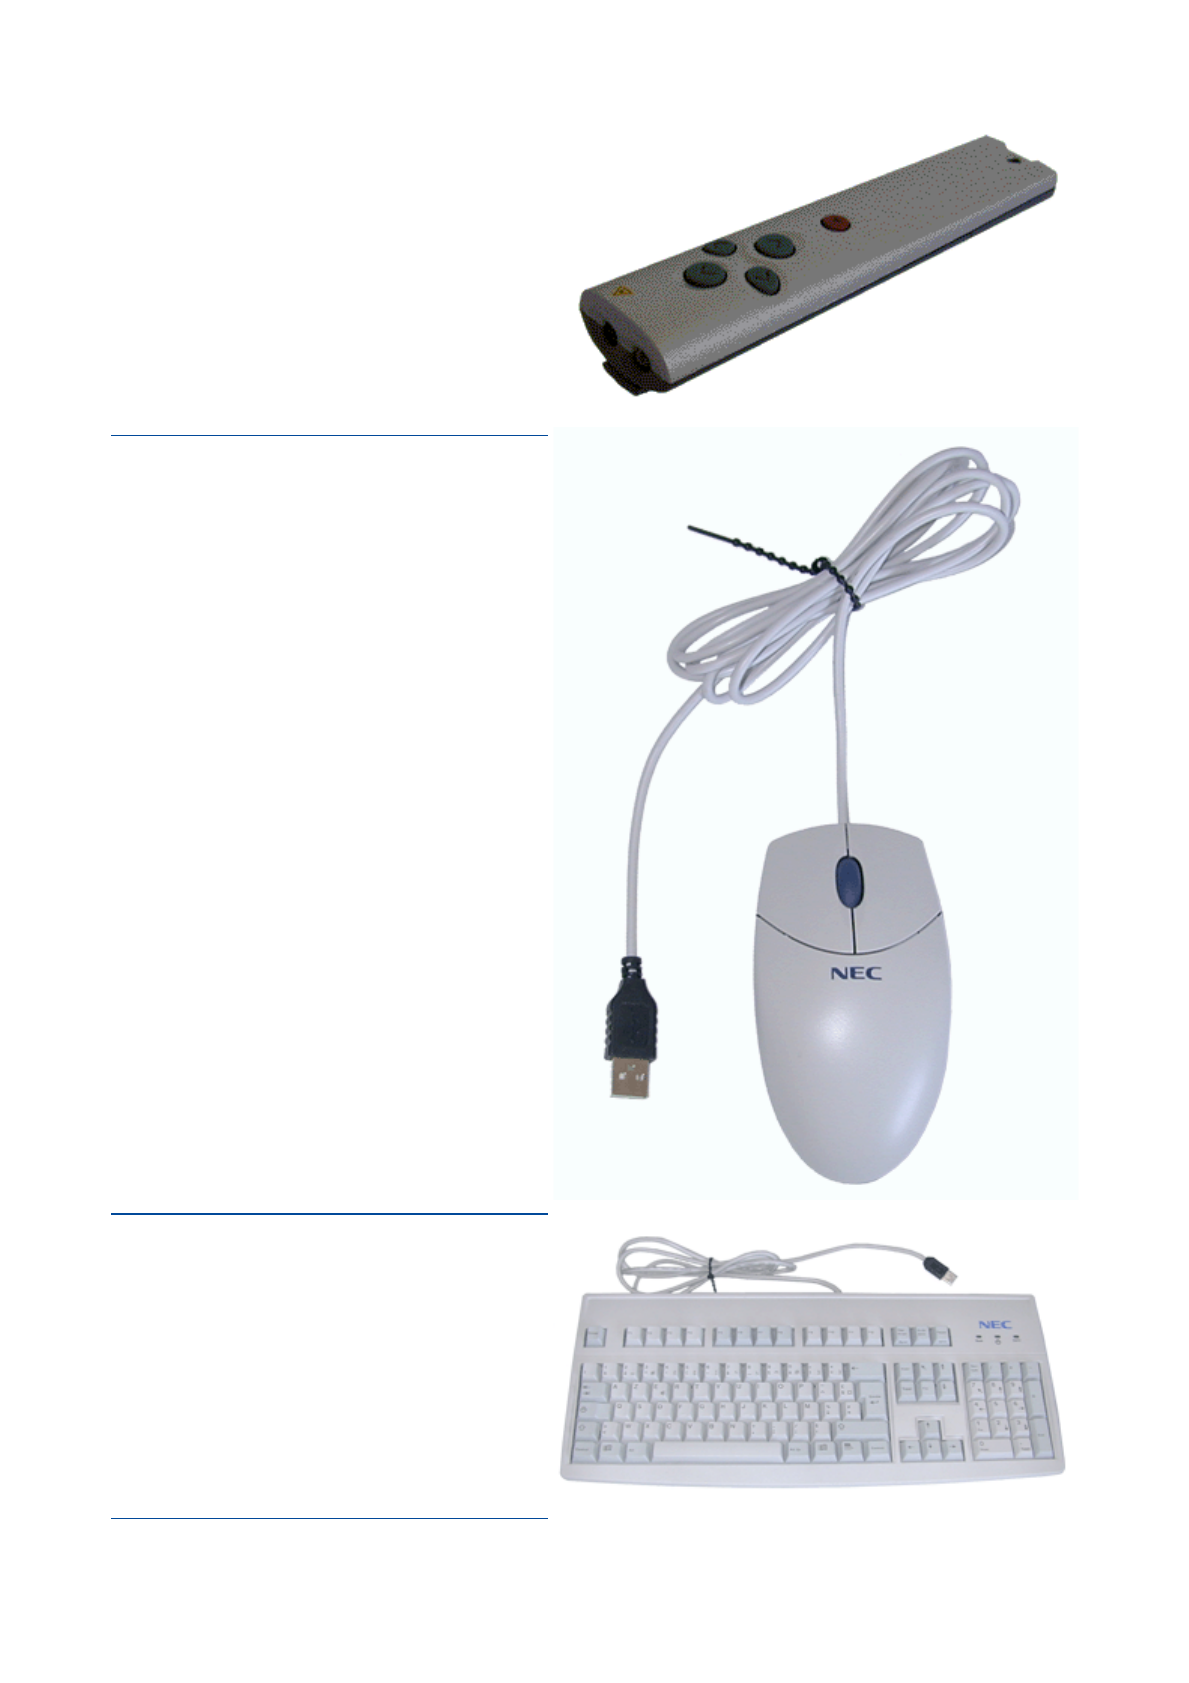
Remote Control
Use this remote control to browse forward or
backward in your slides during a presentation, for
instance. An integrated laser pointer will also
prove extremely useful to liven up your
presentation.
Optional Accessories
USB Mouse
While working at your desk, plug the mouse into
one of your Versa's USB port to increase your
efficiency and create an ergonomic workplace.
This USB mouse uses the optical technology; the
conventional ball and roller mechanisms of a
traditional mouse with a light source and motion
sensor. That way, you can use the mouse on
most surfaces without worrying about the mouse
pad, dirt accumulation or cleaning issues
associated with a mechanical mouse.
USB Keyboard
While working at your desk, plug the keyboard
into one of your Versa's USB port to increase
your efficiency and create an ergonomic
workplace.
USB Numeric Keypad
Optional Accessories
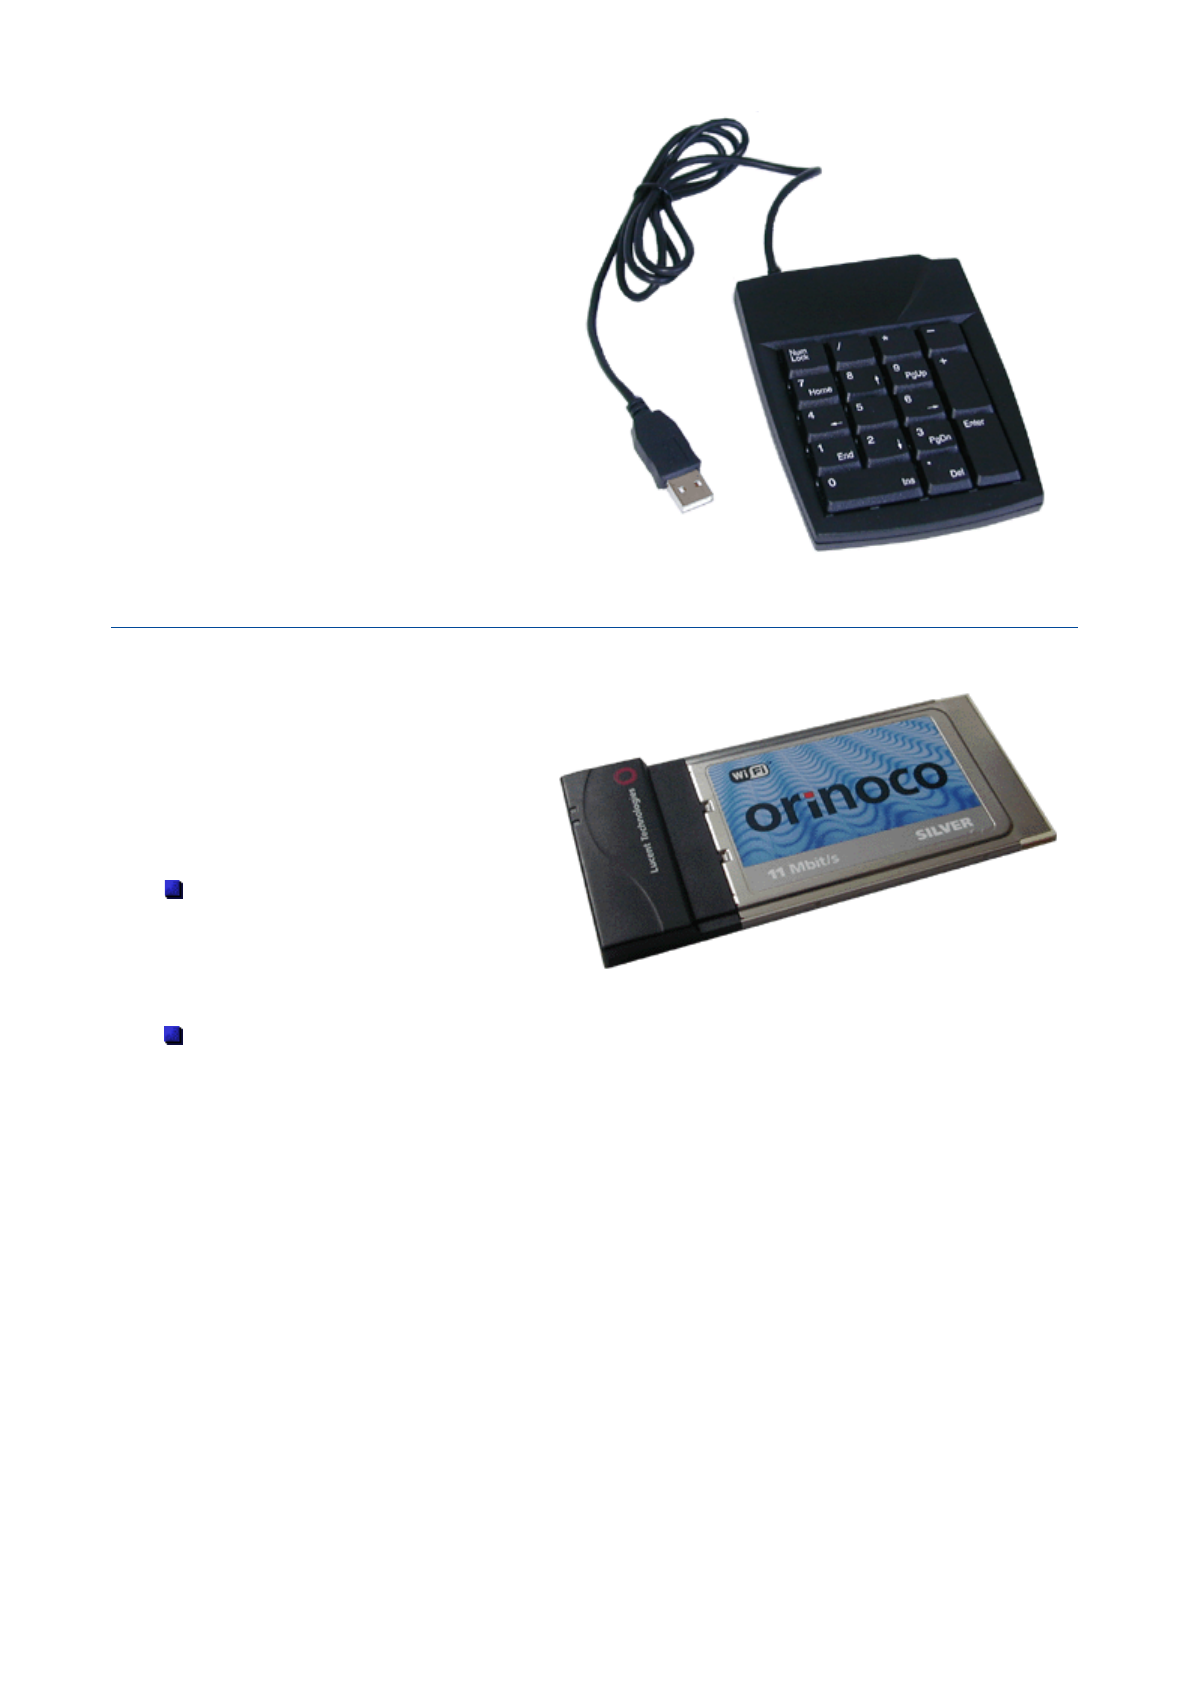
Note: the actual accessories may differ from the pictures shown above.
If you need to enter long list of numbers, this
numeric keypad will prove extremely useful.
Simply plug the numeric keypad into one of your
Versa's USB port and immediately increase your
efficiency.
802.11b Access Point (PC Card interface)
If your Versa features 802.11b Wireless LAN
capabilities, you may want to purchase an
access point in order to benefit from the
services provided by your usual wired network,
such as printers, file servers, internet access...
Please note that the 802.11b standard defines
two modes:
In infrastructure mode, the wireless
network consists of at least one access
point connected to the wired network
infrastructure and a set of wireless end
stations. Since most corporate WLANs
require access to the wired LAN for services, they will operate in infrastructure mode.
In Ad hoc mode (also called peer-to-peer mode or an Independent Basic Service Set), a set of
802.11 wireless stations communicate directly with one another without using an access point or any
connection to a wired network. This mode is useful for quickly and easily setting up a wireless
network anywhere that a wireless infrastructure does not exist or is not required for services, such as
a hotel room, convention centre, or airport, or where access to the wired network is barred (such as
for consultants at a client site).
Optional Accessories
Using the Touchpad
The touchpad is an easy way to control the cursor with your finger. Lightly glide your finger across the
touchpad and the cursor follows.
To use the touchpad, you can:
Single tap to the touchpad, or single click on the left button, equivalent to a single click of the primary
mouse button.
Double tap to the touchpad, or double click on the left button, equivalent to a double click of the
primary mouse button.
Click and hold, then drag your finger across the touchpad, equivalent to a click and drag of the
primary mouse button.
Press the scroll button up, down, left or right, to scroll your document or screen.
If you find the double tap difficult to use, go to the next section for general directions about adjusting the
touchpad properties.
Note: if you install another mouse driver over the shipping default, the double-tap capability may be lost.
Making Touchpad Adjustments
The touchpad offers a number of options that let you customise how it functions. To access these options,
locate the Control Panel and double click the Mouse icon. (In Windows XP, the Mouse icon is classified in
the Printers and Other Hardware category).
The options let you control the size and colour of the cursor, cursor speed, the accepted double-click speed,
and selection button orientation.
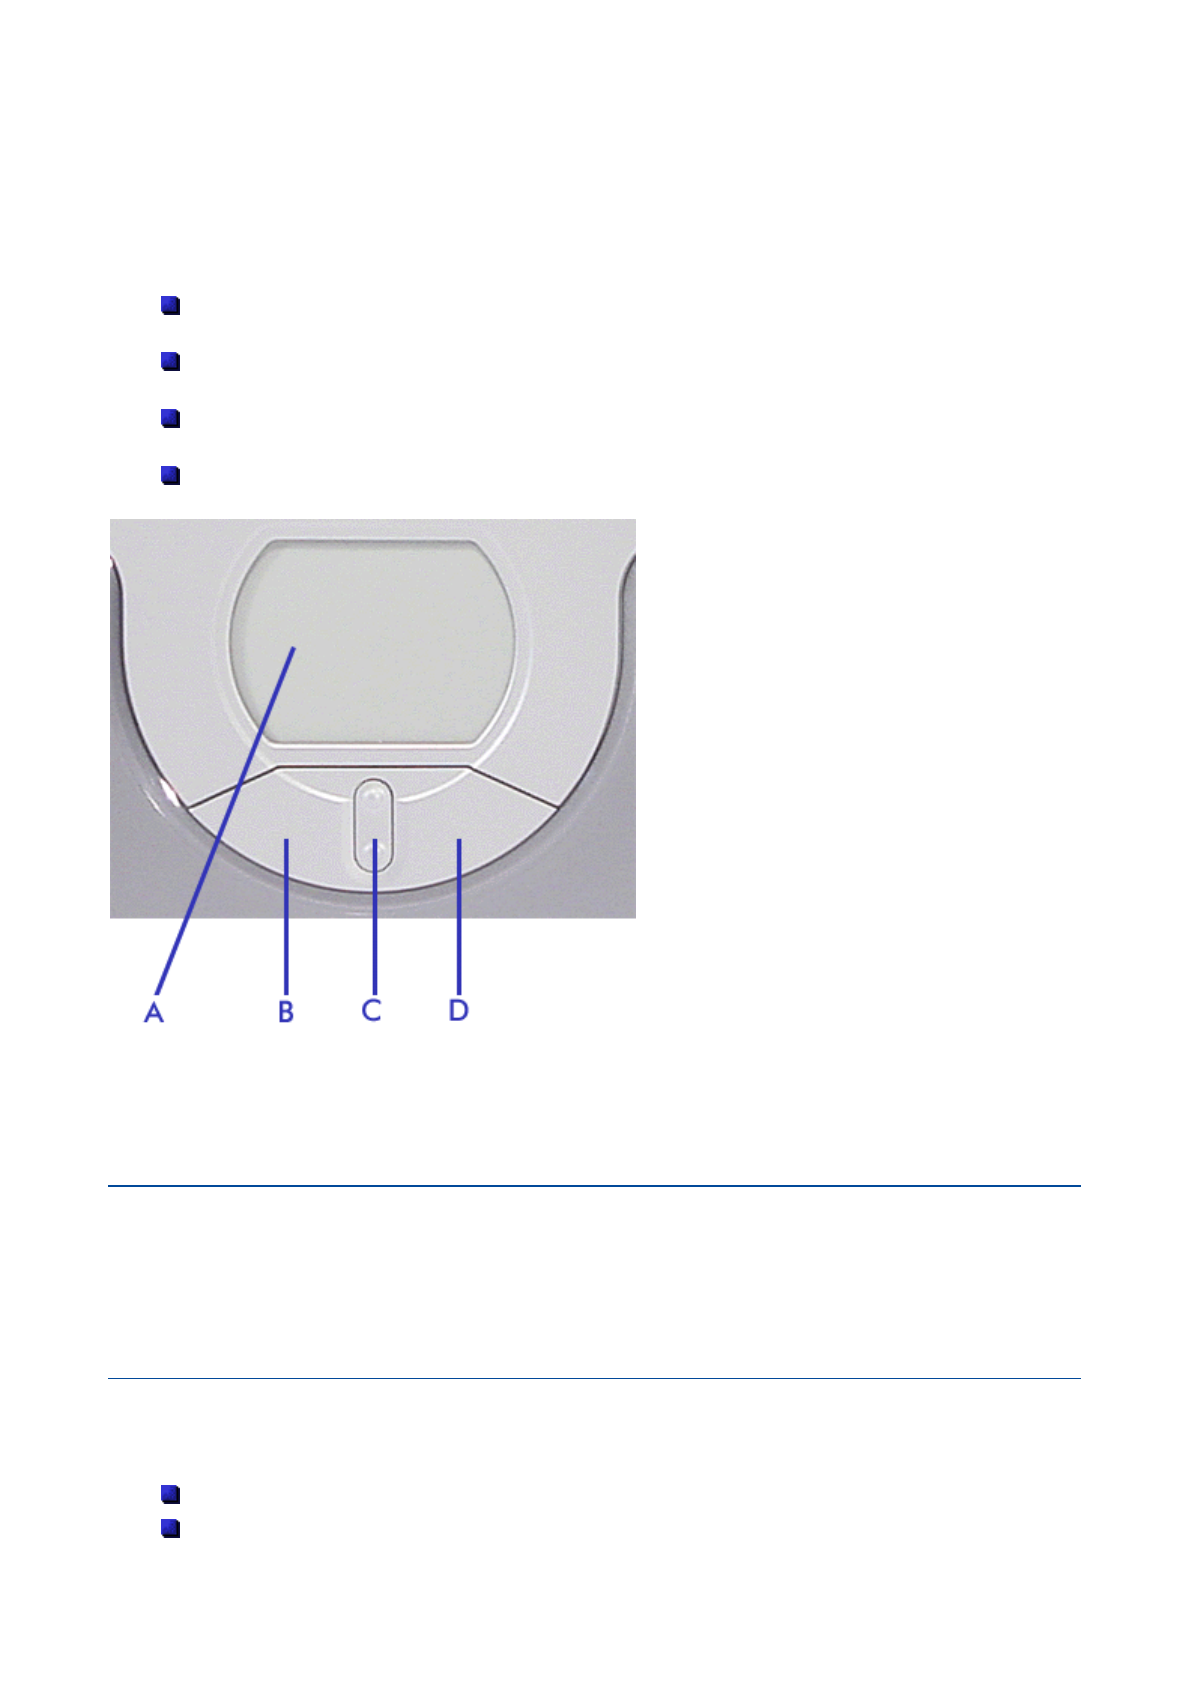
Touchpad Tips
Follow these basic ergonomic tips while working:
Use a light touch on the touchpad surface.
Set up the Versa with your keyboard and touchpad at a comfortable height. Keep your forearms
parallel to the floor. Your wrists should be relaxed and straight.
(A) Touchpad
(B) Left Button
(C) Scroll button
(D) Right Button
Using the Touchpad

While using the keyboard and touchpad, keep your shoulders and arms as relaxed as possible.
Take regular breaks from the computer to rest your eyes. Perform stretching exercises to relax you
r
fingers, hands, wrists, forearms and shoulders.
See 'Setting Up a Healthy Work Environment' for more information.
Using the Touchpad
Power Sources
The Versa can be powered using three different sources, making it a truly portable system.
Operate your Versa just about anywhere using one of the following power sources:
the AC adapter connected to an electrical wall outlet (using AC power),
the battery pack,
the optional Auto adapter (for details about its use, refer to the booklet that ships with the option).
Read the following sections for specific information about using the power sources.
AC Adapter
Use the AC adapter and power cable that came with your Versa to run your computer on alternating current
(AC) power, or to recharge the battery pack. Use the AC adapter whenever a wall outlet is nearby.
Keep the adapter connected whenever possible. The AC adapter charges the battery when it is connected,
whether the Versa is powered on or off.
Warning: do not attempt to disassemble the AC adapter. The AC adapter has no user-replaceable or
serviceable parts inside. Dangerous voltage in the AC adapter can cause serious personal injury or death.
The AC adapter is intended for use with a computer and must meet EN609050 standards.
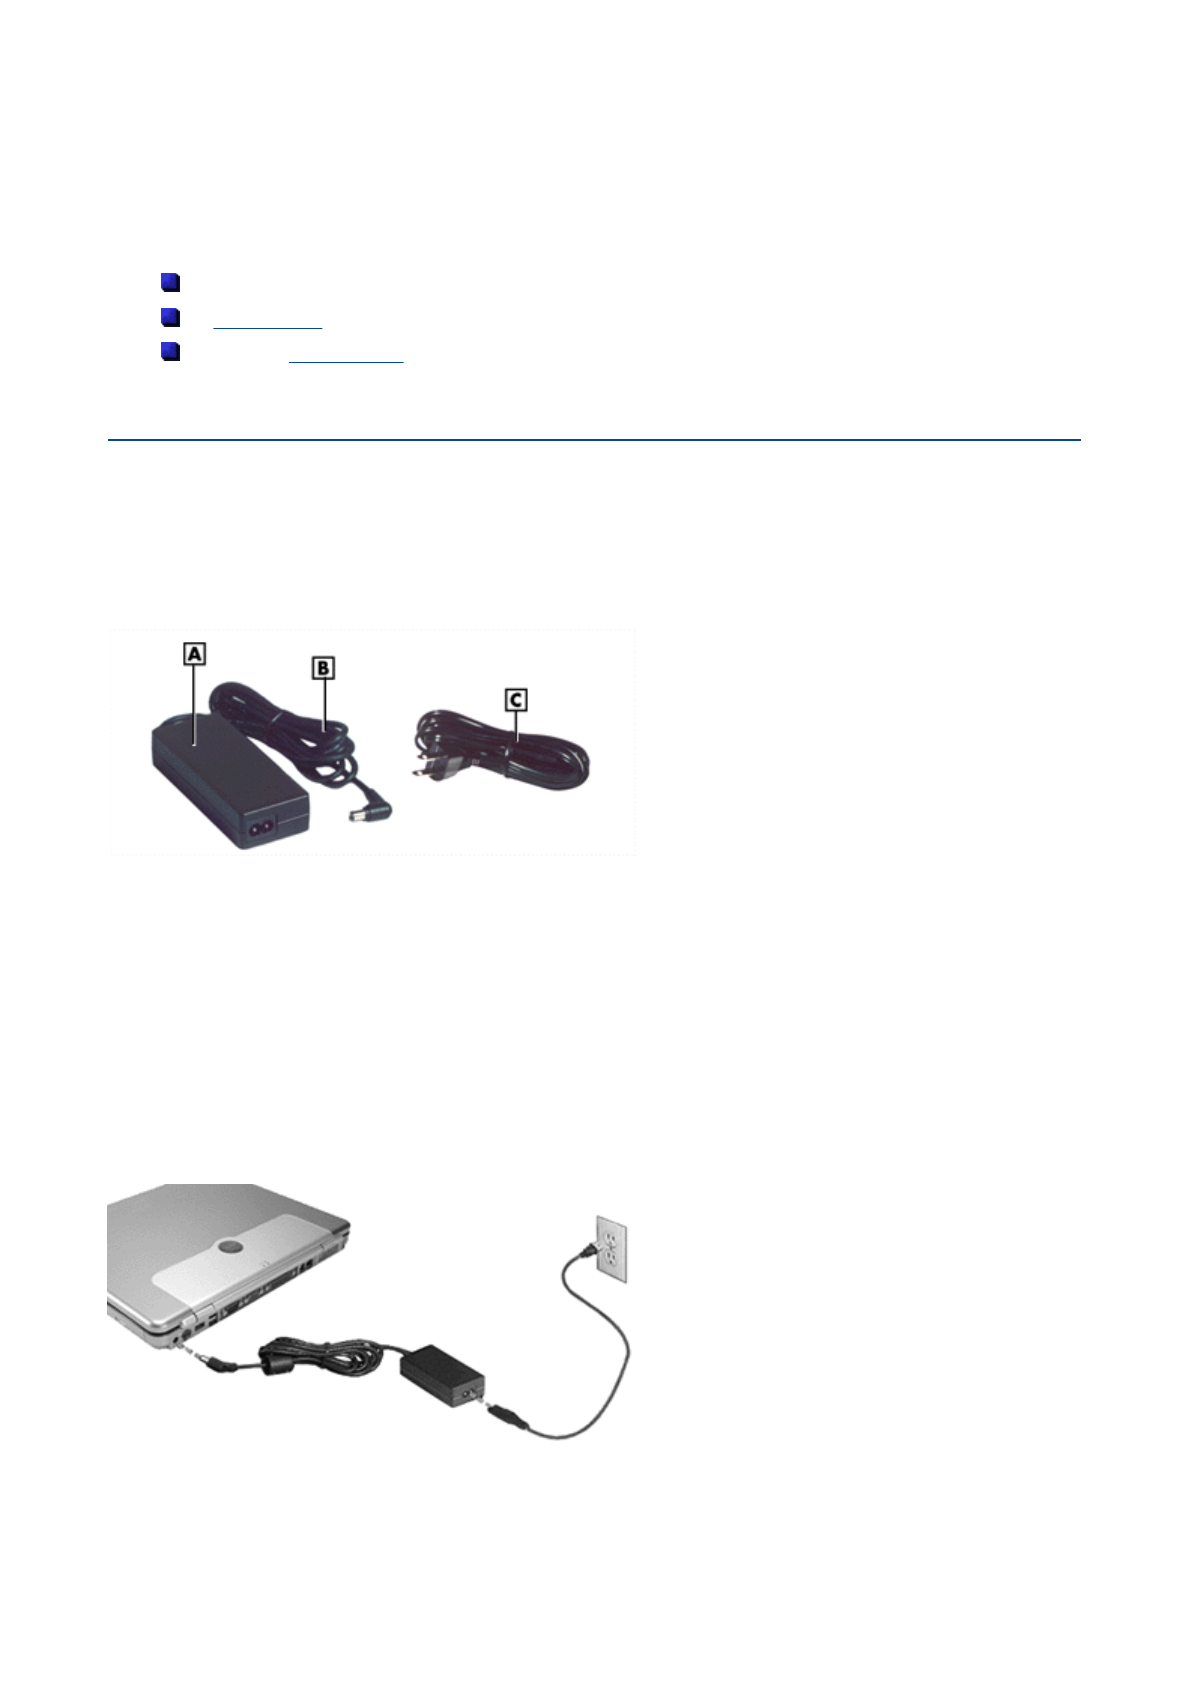
Connecting the AC Adapter
Connect the AC adapter as follows:
1. Connect the AC adapter cable to the power port on your Versa.
2. Plug one end of the AC power cable into the AC adapter and the other end into a properly grounded
120- or 240-volt, 50 or 60-Hz wall outlet.
(A) AC Adapter
(B) Adapter Cable
(C) Power Cable
Caution: zdo not cover or place objects on the AC adapter. Keeping the adapter clear of objects
Power Sources

Powering The System On and Off
To power on, locate the power button above the keyboard and press it.
For more information on how to power off the system, refer to the 'Tips' section relevant to your operating
system.
Caution: this equipment uses an ungrounded power cable. Replace the cord if it becomes damaged. The
cord must be rated for at least 250VAC at 10 amps, and must indicate international safety agency approval.
The plug must be a type appropriate for the country where it is used. Check with your local dealer for HAR
type 18 AWG, 2 conductor cord, or better. Obtain replacement cords at an authorised service centre. The
replacement must be of the same type and voltage rating as the original cord.
lets the adapter cool properly during use.
zonly use the AC adapter that comes with your Versa. Although other adapters look
similar, using them can damage your system.
Power Sources

Using the Battery
The Versa system comes with a rechargeable battery. Refer to the 'System Specifications' chapter for more
information.
Battery packs are easy to install and remove.
Note: although the battery is fully charged at the factory, transit and shelf time may reduce the initial battery
charge. We recommend that the first time you use your system, you connect it to AC power using the AC
adapter. This also recharges your battery.
When battery power reaches 10%, the Battery Charge Indicator blinks and the system beeps a warning.
A
lways respond by immediately saving your data, and connect your system to the AC adapter. If an AC
adapter is not available, change the battery using the battery replacement procedure described below.
If you do not take any action, the system will beep for two minutes, and then automatically go into Hibernation
(Save To File) mode.
Warning: to prevent accidental battery ignition or explosion, adhere to the following:
Keep the battery away from extreme heat.
Keep metal objects away from the battery terminals to prevent a short circuit.
Make sure the battery is properly installed in the battery bay.
Read the precautions printed on the battery, and/or on the Warning Leaflet inserted between your
keyboard and LCD screen.
Charging the Battery
Charge time depends on whether or not you are using the system. When the system is off and the AC adapte
r
is connected, charge time is approximately 3 hours.
For maximum battery performance, fully discharge the battery before recharging it. To do so, unplug the AC
adapter, turn off power management features (through BIOS Setup and Windows power management), and
turn on the system. Once the battery is fully discharged, plug in the AC adapter and recharge the battery.
The warning beep that sounds when battery power becomes critically low is always a true indicator that
battery power is low. Be sure to save your data when you hear the beep and take proper steps to provide
power to your system.
Refreshing the Battery
If you detect that your battery is draining more quickly than expected, you can try a couple of things to refresh
its performance:
Remove and then reinstall the battery.
Fully recharge the battery (to 100%).
Refresh the battery, by completely discharging and then recharging it. To do so, follow the
instructions below:
- Unplug your AC adapter, and power on your computer.
- Press the F2 key when prompted by the start-up screen.
- In the Exit menu, select Battery Refresh and press Enter.
- When prompted to continue battery refresh, press Enter.
- The system will automatically discharge the battery. When the countdown reaches 0%, the system
will automatically shutdown.
Note: if the battery was completely charged, this process may take several hours to complete.
- To finish the refresh process you will have to recharge the battery. Plug the AC adapter and
charge the battery until the Battery Charge LED turns off. You may use the computer during this
time.
Using the Battery

Precautions for Recharging the Battery
A
dhere to the following precautions when recharging the battery.
Use only the battery charger designed for your Versa battery type. Different Versa models require
different batteries and battery chargers.
Charge the battery for the specified charge time only.
During charging, keep the environmental temperature between 5°C and 35°C.
Read the instructions that came with the battery charger before charging the battery.
Low Battery Power
When battery power gets low, connect your system to the AC adapter.
If no AC adapter is available, change the battery using the battery replacement procedure. Click here for more
information.
Conserving Battery Power
The battery performance is affected by the following conditions:
when it is new and fully charged.
when no peripherals are connected to your Versa.
when you have no options installed.
While on the road, it is important to be aware of the simple things you can do to extend the life of the system's
main battery. For instance, turning down the screen brightness (Fn-F9) extends battery life.
Power Management Features
Enabling power management features increases battery life.
The Hibernate power management state, also known as Save-To-File (STF), saves the system's current
working environment to the system's hard drive, then powers down the system to conserve battery power.
You can configure your power management settings to enter hibernation when your system reaches a critical
low battery state.
Click here for more information on the power management settings relevant to your operating system.
Battery Precautions
To prevent accidental battery ignition, rupture, or explosion, adhere to the following precautions.
WARNING: there is a danger of explosion if the battery is incorrectly replaced. Replace only with the same
or equivalent type recommended by the manufacturer. Discard used batteries according to the manufacturer's
instructions.
To avoid personal injury and property damage, read these battery precautions on handling, charging and
disposing batteries.
Keep the battery away from heat sources including direct sunlight, open fires, microwave ovens, and high-
voltage containers. Temperatures over 60ºC may cause damage.
Do not drop or impact the battery.
Do not disassemble the battery.
Do not solder the battery.
Do not puncture the battery.
Do not use a battery that appears damaged or deformed, has any rust on its casing, is discoloured,
overheats, or emits a foul odour.
Keep the battery dry and away from water.
Keep metal objects away from battery terminals. Metal objects in contact with the connectors can cause a
short circuit and damage.
Using the Battery

If the battery leaks:
If the battery leaks onto skin or clothing, wash the area immediately with clean water. Battery fluid can
cause a skin rash and damage fabric.
If battery fluid gets into eyes, DO NOT rub; rinse with clear water immediately and consult a doctor.
Take extra precautions to keep a leaking battery away from fire. There is a danger of ignition or explosion.
Using the Battery
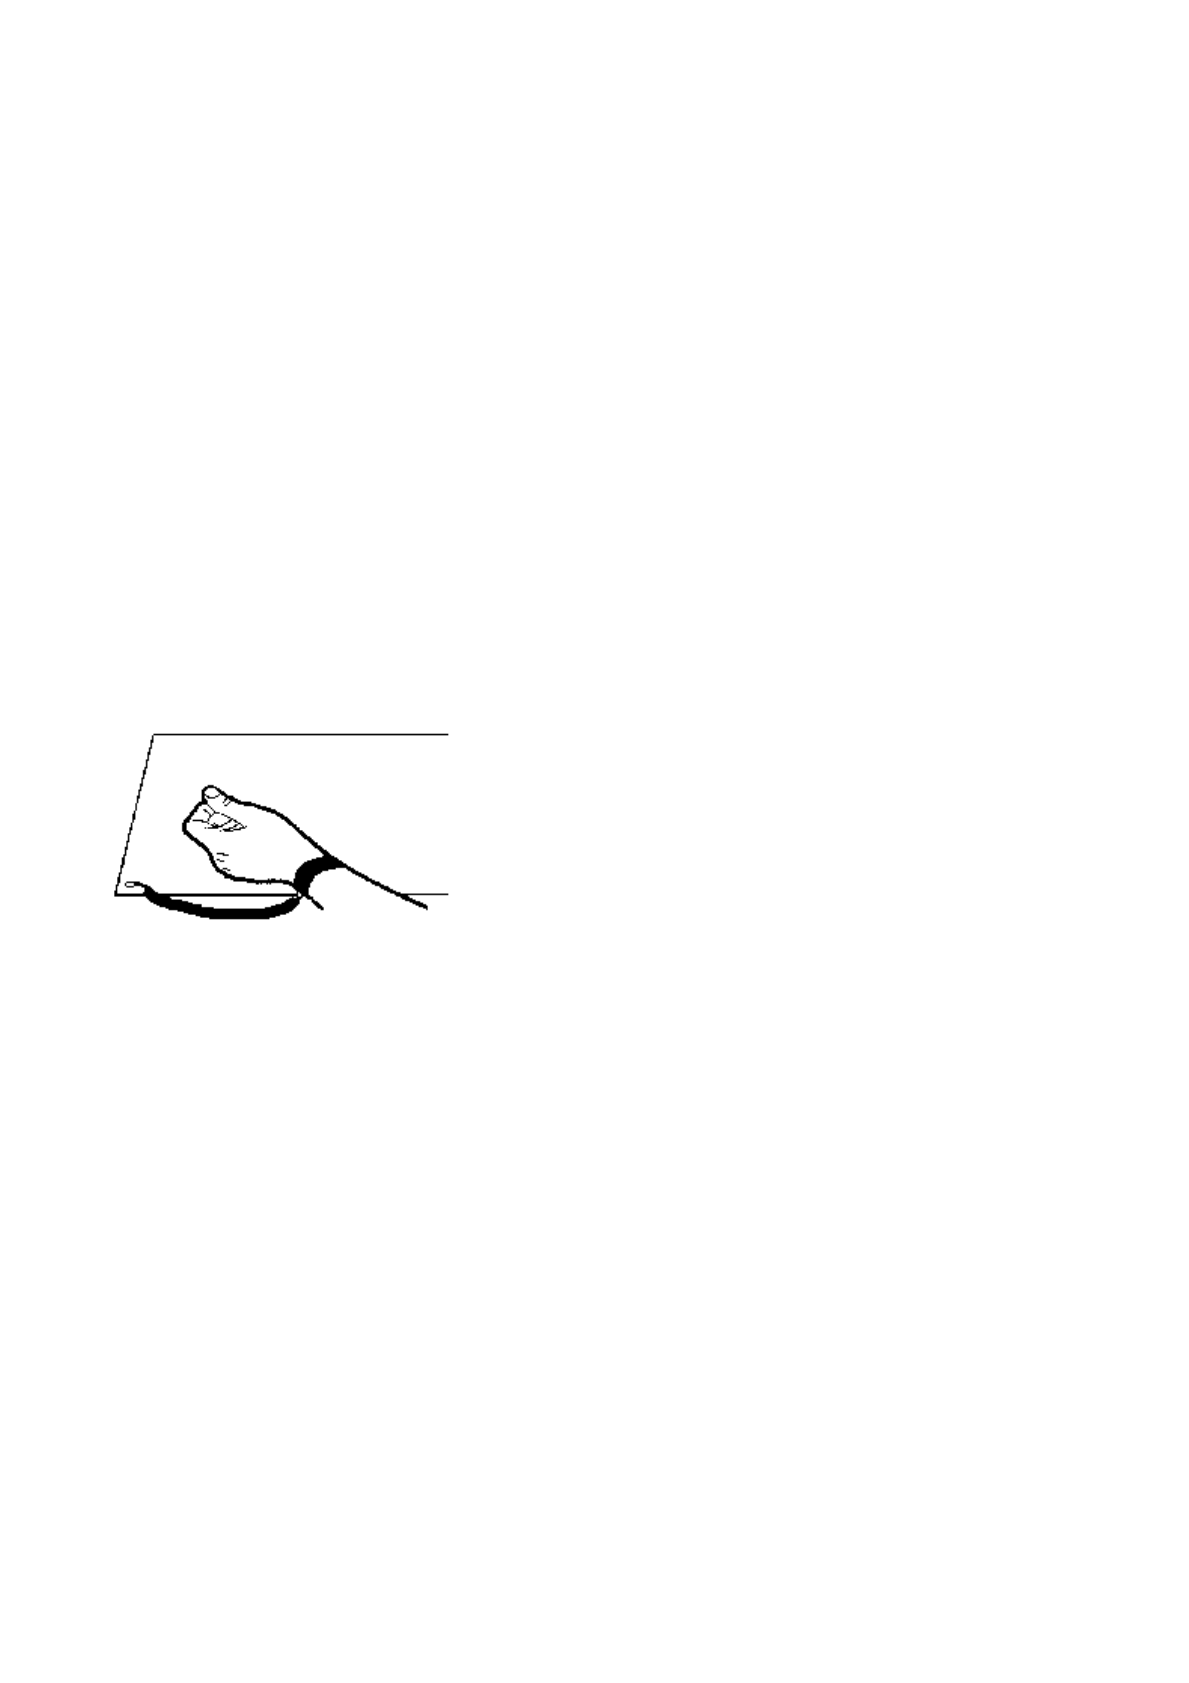
Replacing the Battery
Battery packs are easy to install and remove.
Warning: to prevent accidental battery ignition or explosion, adhere to the following:
Keep the battery away from extreme heat.
Keep metal objects away from the battery terminals to prevent a short circuit.
Make sure the battery is properly installed in the battery bay.
Read the precautions printed on the battery, and/or on the Warning Leaflet inserted between your
keyboard and LCD screen.
Installing the Battery in your System
Caution: be sure to save your data before replacing the battery pack or connecting the AC adapter.
Failure to do so can result in data loss.
1. Save your files, exit Windows, and turn off system power.
2. Close the LCD panel and turn the system over.
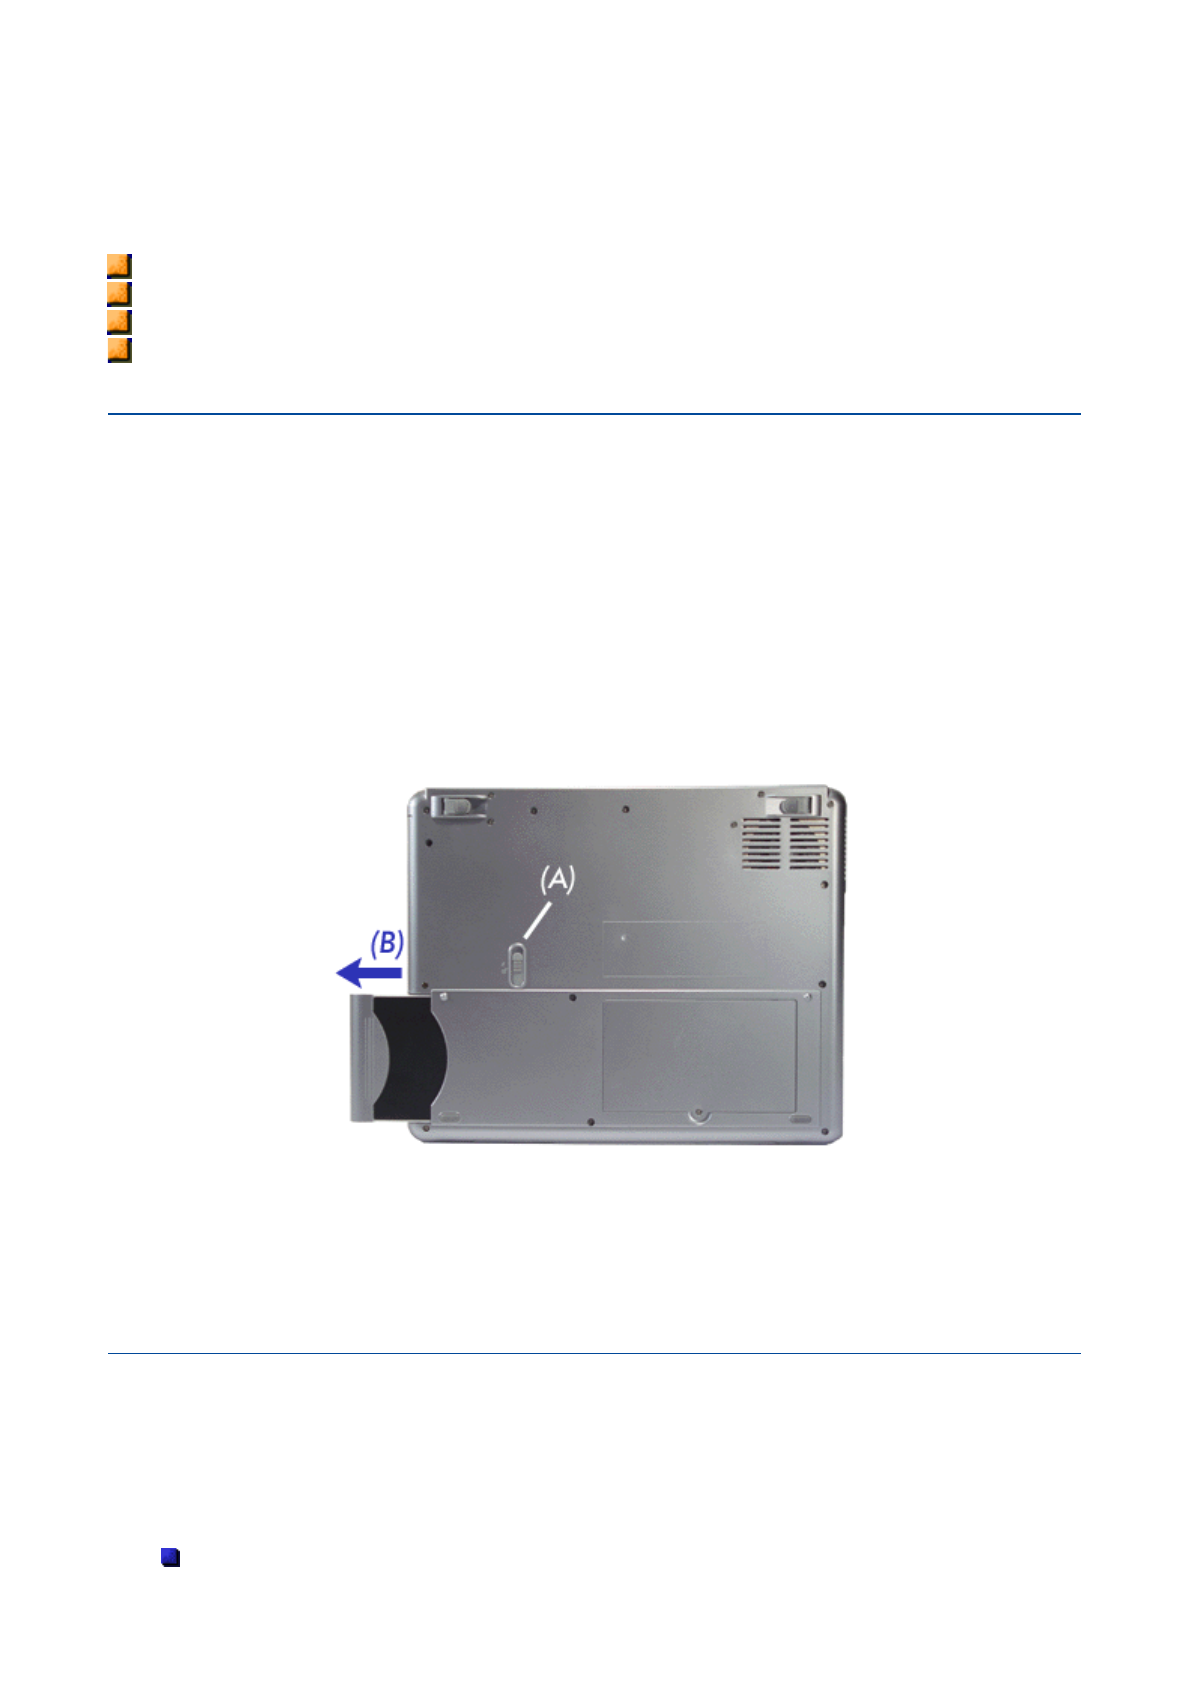
3. Remove the battery as follows:
zSlide the battery release latch upwards and hold it firmly in place (A).
zSlide the battery pack out of its compartment (B), and set it aside.
4. Insert the new battery as follows:
zSlide the battery pack in its compartment until it locks into place.
5. Turn the system over.
Handling the Battery
Review the following before handling the system battery.
Caution: use the battery only in the Versa computer for which it is designed. Mixing other Versa batteries,
other manufacturer's batteries, or using a combination of very old and new batteries can deteriorate battery
and equipment performance.
Turn off power to the system after use.
Replacing the Battery

Clean the battery connectors with a dry cloth if they get dirty.
When not in use, store the battery in a cool dry area.
The following symptoms indicate that battery life is nearing an end. Discard batteries that display these
symptoms:
shorter work times
discolouration, warping
hot to the touch
strange odour.
Disposing of the Battery
Before disposing of the battery, put adhesive tape on the connectors. Contact your local waste management
officials for information regarding environmentally sound collection, recycling and disposal of batteries.
Replacing the Battery

CMOS Battery
The CMOS battery provides power to maintain system configuration settings.
This battery provides battery backup and prevents data loss in the system's complementary metal-oxide
semiconductor (CMOS) RAM. This memory area contains information on the system's configuration, fo
r
example, date, time, drives and memory.
Please contact your service representative or your Technical Support Centre if this CMOS battery needs to be
replaced.
CMOS Battery

Introducing BIOS Setup
Your Versa computer comes with a hardware program called BIOS Setup that allows you to view and set
system parameters. BIOS Setup also allows you to set password features that protect your system from
unauthorised use.
Use BIOS Setup to:
set the current time and date
customise your operating system to reflect your computer hardware
secure your system with a password
balance your performance needs with power conservation.
Entering BIOS Setup
A
ccess the BIOS utility at powe
r
-on. Just press F2 when the following prompt appears.
Press <F2> to enter BIOS Setup
When you press F2 to enter BIOS Setup, the system interrupts the Power-On Self-Test (POST) and displays
the current CMOS RAM settings.
If the system detects an error during POST, it prompts you with a double beep and a message: "Press <F1>
to resume." If you press F1, the system enters BIOS Setup automatically. If you want to fix the error, carefully
read the error message that appears above the prompt (taking notes if you want), and press F2. You will see
this message if your CMOS battery becomes fully discharged.
BIOS Setup Menus
A
fter you press F2, the system displays the BIOS Setup Main Menu screen. Use the left and right arrow keys
(located on the lower right corner of the keyboard) to toggle through the BIOS Setup menu items.
The Setup utility features five menus which are listed on the menu bar at the top of the screen.
Main - use this menu for basic system configuration.
Advanced - use this menu to set various boot and DOS-mode options.
Security - use this menu to set user and supervisor passwords and password on boot.
Boot - use this menu to set the boot sequence.
Exit - use this menu to exit the Setup utility with various save or discard options.
Use the keys listed in the legend bar on the bottom of the Setup menu to make the selections or exit the
current menu.
Note: for more detailed information about these menus, please click on the PDF button below. This will open
a PDF file, which we recommend you to print and store for future use. If you need to make any changes to the
default configuration of the BIOS Setup menus, write these down on the printout of the PDF file.
BIOS Setup Utility - System Parameters and Standard Settings
Introducing BIOS Setup

Updating the BIOS
The BIOS is the code transmitted onto your system's Flash ROM. As indicated in this chapter, you use the
BIOS Setup utility to configure your system's software and hardware features. Only use the BIOS update files
for your specific model to update your Versa system BIOS.
Caution: you only need to update the BIOS if significant improvements or fixes have been made to the
current system BIOS. Your authorised dealer or Support Services representative can help you determine this.
Obtaining the BIOS Update
If you are informed that the default BIOS needs an update, you can access the Web site, www.nec-
online.com to obtain a copy of the BIOS update. You will need to download three files:
Winflash.exe, which is the Windows-based utility used to flash the BIOS,
a ROM file, which contains the BIOS settings,
a system file.
Download these files in the same directory on your hard drive, and make sure to note the exact path where
you save them.
Note: for your convenience, these files may have been stored in a single zip archive. In this case, download
the archive and extract the files in the directory of your choice under Windows XP.
Performing the BIOS Update
Follow these steps to perform the BIOS update.
1. Open the directory where you saved the files downloaded on the internet, and double-click on the
WinFlash application to open it.
2. On the main screen, in the WinPhlash Operation area, select Backup BIOS and Flash BIOS with
new settings. This option saves a backup copy of the current BIOS before upgrading it.
3. Click on the Flash BIOS button. When prompted, click on OK to confirm (if applicable, close any
other software application you may be running).
Note: the BIOS update will take about 30 seconds; do not use your computer in the meantime.
4. Once the update is finished, your notebook will reboot automatically.
5. When prompted, press F2 at start-up to enter the BIOS Setup.
6. Press F9 on your keyboard to load the BIOS default settings.
7. Press F10 to save current changes and exit the BIOS Setup.
Updating the BIOS
Operating Systems Introduction
The operating system is the most important program that runs on a computer. Every computer must have an
operating system to run other programs. Operating systems perform basic tasks, such as recognizing input
from the keyboard, sending output to the display screen, keeping track of files and directories on the disk, and
controlling peripheral devices such as disk drives and printers.
Your Versa may come pre-installed with one of several operating systems.
Microsoft® Windows® Operating Systems
The Microsoft® Windows® operating systems provide a means of running applications, navigating through
your file structure, and using your notebook computer. Each operating system offers its own look and tools
through an easy-to-use graphical interface.
Introduction
Select your operating system from the list and click the Next button
Managing System Power
Select your operating system from the list and click the Next button
Tips
Select your operating system from the list and click the Next button
Utilities
For more information, select the utility and click the Next button
Applications
For more information, select the application and click the Next button
FreeDOS Operating System
FreeDOS aims to be a 100% MS-DOS compatible operating system. FreeDOS is released under the GNU
General Public License. The GNU license, created by the Free Software Foundation, means you have access
to the source code for all FreeDOS programs.
For more information about FreeDOS, please refer to the www.freedos.org internet site.
Windows XP Next
Windows XP Next
Windows XP Next
Smart Restore® Next
Acrobat® Reader® Next
Operating System Introduction

Microsoft® Windows® XP
Microsoft® Windows® XP features include a Desktop with room to manoeuvre, a taskbar for quick access to a
variety of system functions, state-of-the-art plug and play support, powerful system utilities, enhanced
entertainment features and a fully integrated Internet experience.
Among the new features are:
Fast User Switching - You may now switch users more easily, as a new user can log in while
retaining the other user’s system state. A user does not have access to the other user’s running
applications.
Explorer - Explorer windows have also had their functionality expanded. Explorer windows now are
3-paned windows, with extra information and functionality in the middle window.
Preview Applet - For viewing and editing images is included an enhanced Preview Applet that lets
you view, zoom in and out, rotate, print, save (as), and delete images. Are supported the Windows
Bitmap, JPEG, GIF, TIF and PNG formats.
Professional versus Home Edition
Your system may feature either the Windows XP Professional or the Windows XP Home edition. Note that all
the features available in the Home edition are also included in the Professional edition.
The Professional edition also includes support for:
Remote Desktop - allows you to remotely access your system from another PC in order to work with
all of your data and applications while away from your office.
Offline Files and Folders - allows you to access files & folders on a network share when
disconnected from the server.
Encrypting File System - protects sensitive data in files that are stored on disk using the NTFS file
system.
Access Control - restricts access to selected files, applications, and other resources.
Multi-processoring.
Microsoft Windows Servers and management solutions.
Desktop Icons
With Windows XP, the following icons* are installed on your Desktop:
Recycle Bin - Gives you a container in which to put and discard unwanted files or allows you to
restore these same files back to their original location.
Internet Explorer - Provides your default Internet program.
Note: depending on your configuration, you may also find a Release Notes icon on the desktop. Double-click
on this icon to read last-minute information that was not yet available when this online documentation was
written.
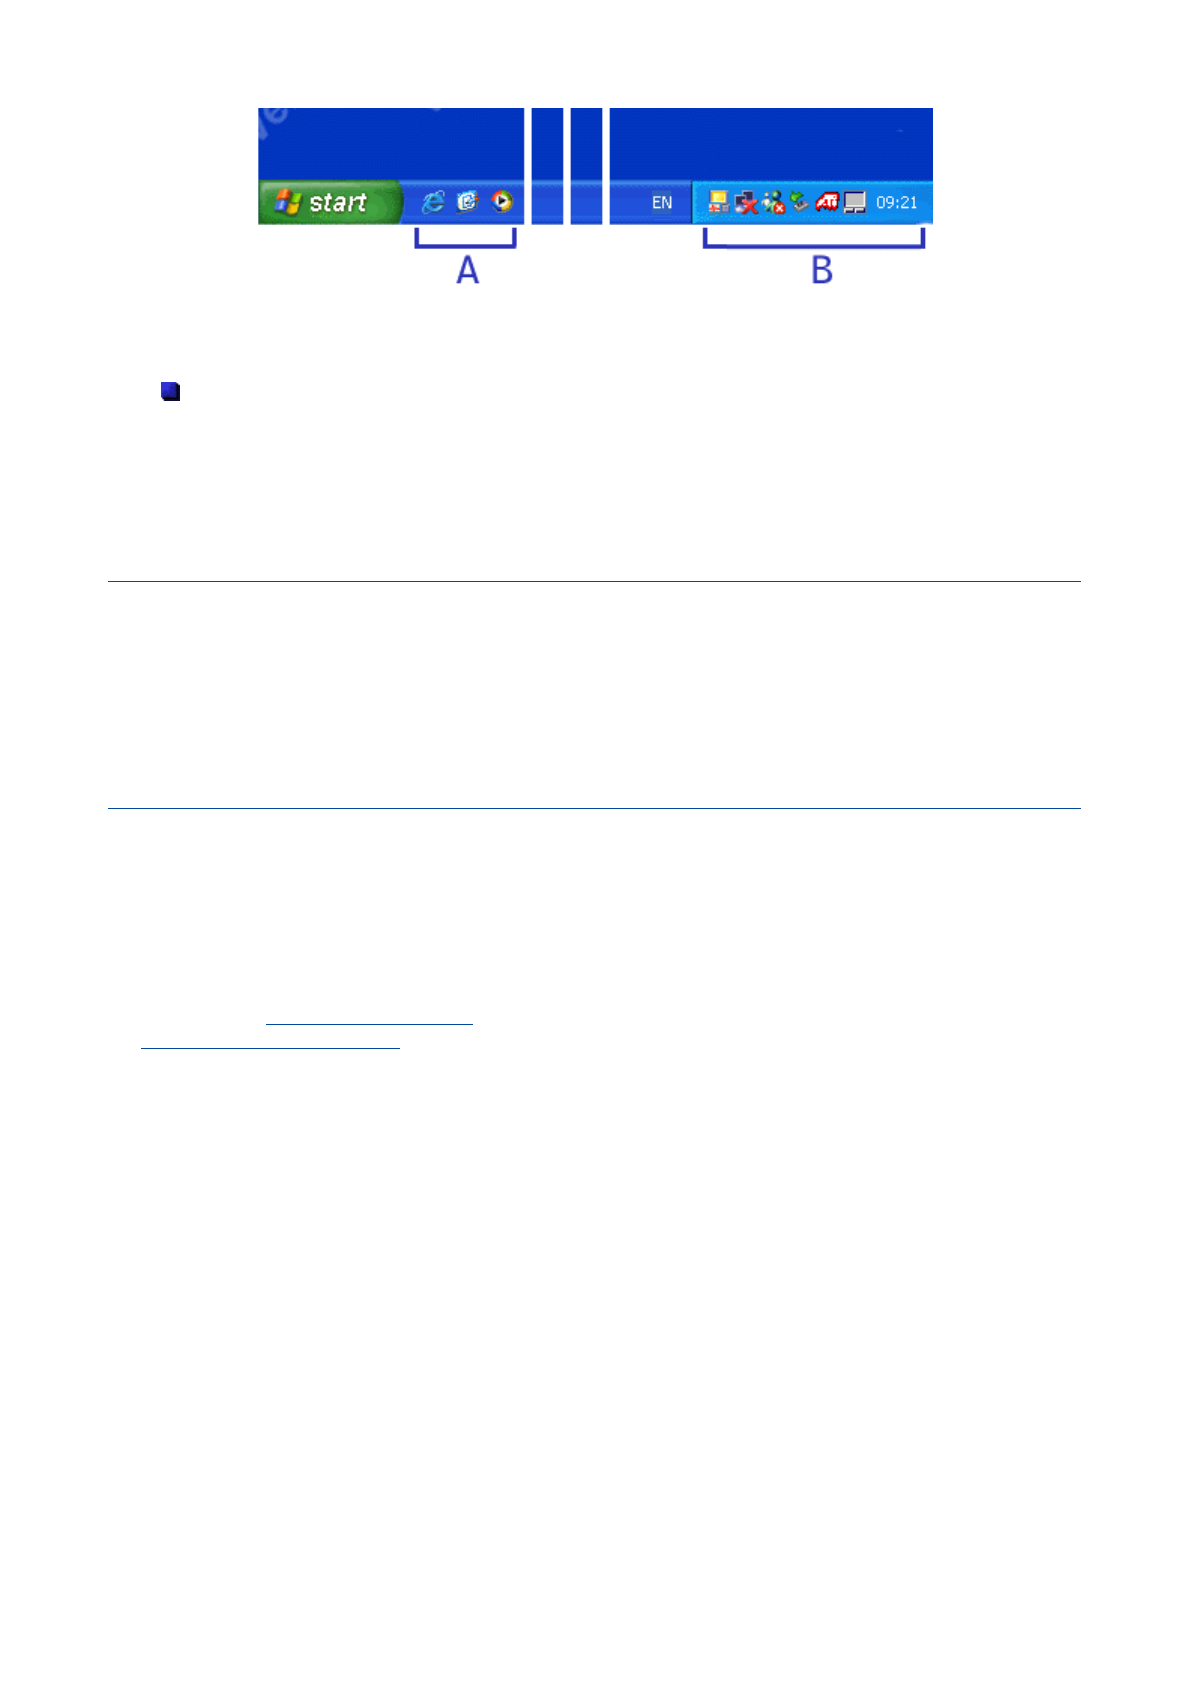
Taskbar Icons
With Windows XP, a number of icons appears on the taskbar. Use the cursor to hover over the icon and
display its function. Right-click on the icon to display its menu options, or double-click on the icon to launch it.
Right click an empty area of the taskbar and select Properties to customise the taskbar (refer to the 'Tips
'
section for more information). The quick launch (A), i.e the left hand side of the taskbar can be hidden o
r
active. The notification area (B), i.e the right hand side of the taskbar, can be easily configured, for instance,
to hide icons that are not used frequently. Some hardware items or software titles will place a small icon in
this area, allowing you to easily customise and control their settings or status (examples are virus scanners,
printers, PC cards...).
Microsoft Windows XP
The following icons* normally appear in the notification area:
Time Clock - Allows you to adjust the time and date, select your time zone, and offers the possibility
to automatically synchronise the time with an internet time server.
For more information about the Desktop and taskbar icons, refer to the Windows XP online help. To do this,
click on Start, and select Help and Support.
* Depending on the version of Windows XP installed on your Versa or if you have deactivated certain
p
rograms, the icons described here may differ slightly and/or may be accompanied by others.
Start Menu
The Start menu features a whole new look and feel. The Internet Explorer and Outlook Express icons have a
prominent place now. You will also notice that Windows XP places your frequently used programs in the white
area of the Start menu. It is safe to remove an item from this list by right-clicking the icon and selecting
Remove from this list, as the software program itself will not be deleted.
You can access your installed software and other Windows programs by selecting All Programs. Recently
installed programs are highlighted.
Technical Support Information
The technical support phone numbers for your country are also quickly available in Windows XP.
1. Select Start, right-click on My Computer and select Properties.
2. On the General tab, click on the Support Information button.
Note: refer to the 'If you need assistance' section for more information about your system’s warranty and to
the 'Frequently Asked Questions' for more information on how to contact the technical support teams.
Microsoft Windows XP
Managing System Power (Windows XP)
In the Windows XP environment, your Versa manages its power resources using the Advanced Configuration
and Power Interface (ACPI) while the system is powered on using AC or battery (DC) power. ACPI enables
the operating system to manage the power given to each attached device and to turn off a device when not in
use.
Take advantage of the opportunity to manage power on your system to:
Minimise battery drain.
Preserve the life of your Versa.
Save time. When you return from that urgent call or meeting, you don’t have to reboot, just press the
Power button to resume system operation.
Windows XP Power Options Properties
In Windows XP, most ACPI power management settings are controlled through Windows Power Options
Properties, not through the BIOS Setup utility, unless otherwise noted. To access Windows Power Options
Properties, go to Start,Control Panel, select Performance and Maintenance, and click on Power Options.
The Power Options Properties are broken down as follows:
Power schemes
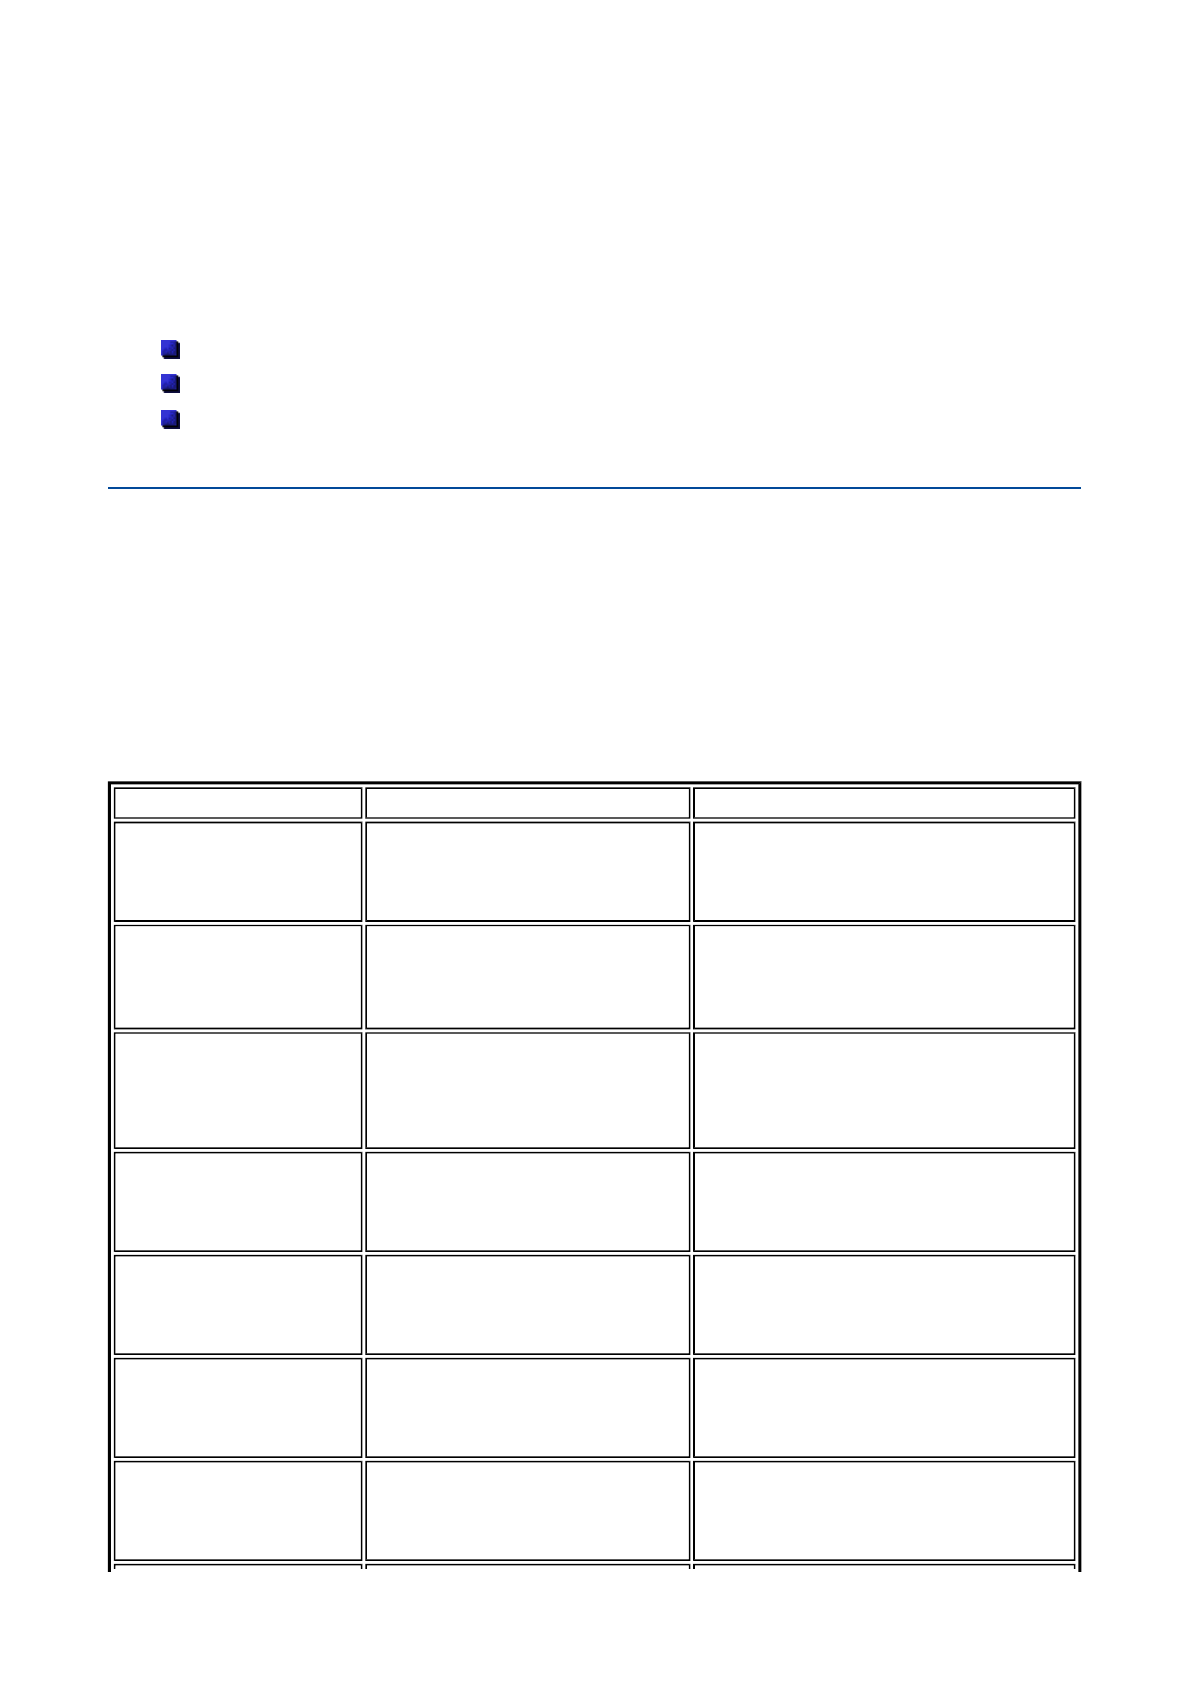
Use the Power Schemes tab options to define the appropriate power scheme for your system, and to set
timeouts for standby, monitor, and hard disk.
Parameter Options Description
Power Schemes Portable/laptop
Home/office desk
Always On
Defines the most appropriate power
scheme for your computer.
Turn off monitor (plugged
in)
1/2/3/5/10/15/20/25/30/45 minutes
1/2/3/4/5 hours
Never
Selects the time delay before your LCD
panel turns off.
Turn off monitor (running
on batteries)
1/2/3/5/10/15/20/25/30/45 minutes
1/2/3/4/5 hours
Never
Selects the time delay before your LCD
panel turns off.
Turn off hard disks
(plugged in)
3/5/10/15/20/25/30/45 minutes
1/2/3/4/5 hours
Never
Selects the time delay before your hard
disk(s) power down.
Turn off hard disks
(running on batteries)
3/5/10/15/20/25/30/45 minutes
1/2/3/4/5 hours
Never
Selects the time delay before your hard
disk(s) power down.
System Standby (plugged
in)
1/2/3/5/10/15/20/25/30/45 minutes
1/2/3/4/5 hours
Never
Selects the system standby timeout
period for your system when running
under AC power.
System Standby (running
on batteries)
1/2/3/5/10/15/20/25/30/45 minutes
1/2/3/4/5 hours
Never
Selects the system standby timeout
period for your system when running
under DC power.
Managing System Power (Windows XP)
Default settings are shown in red.
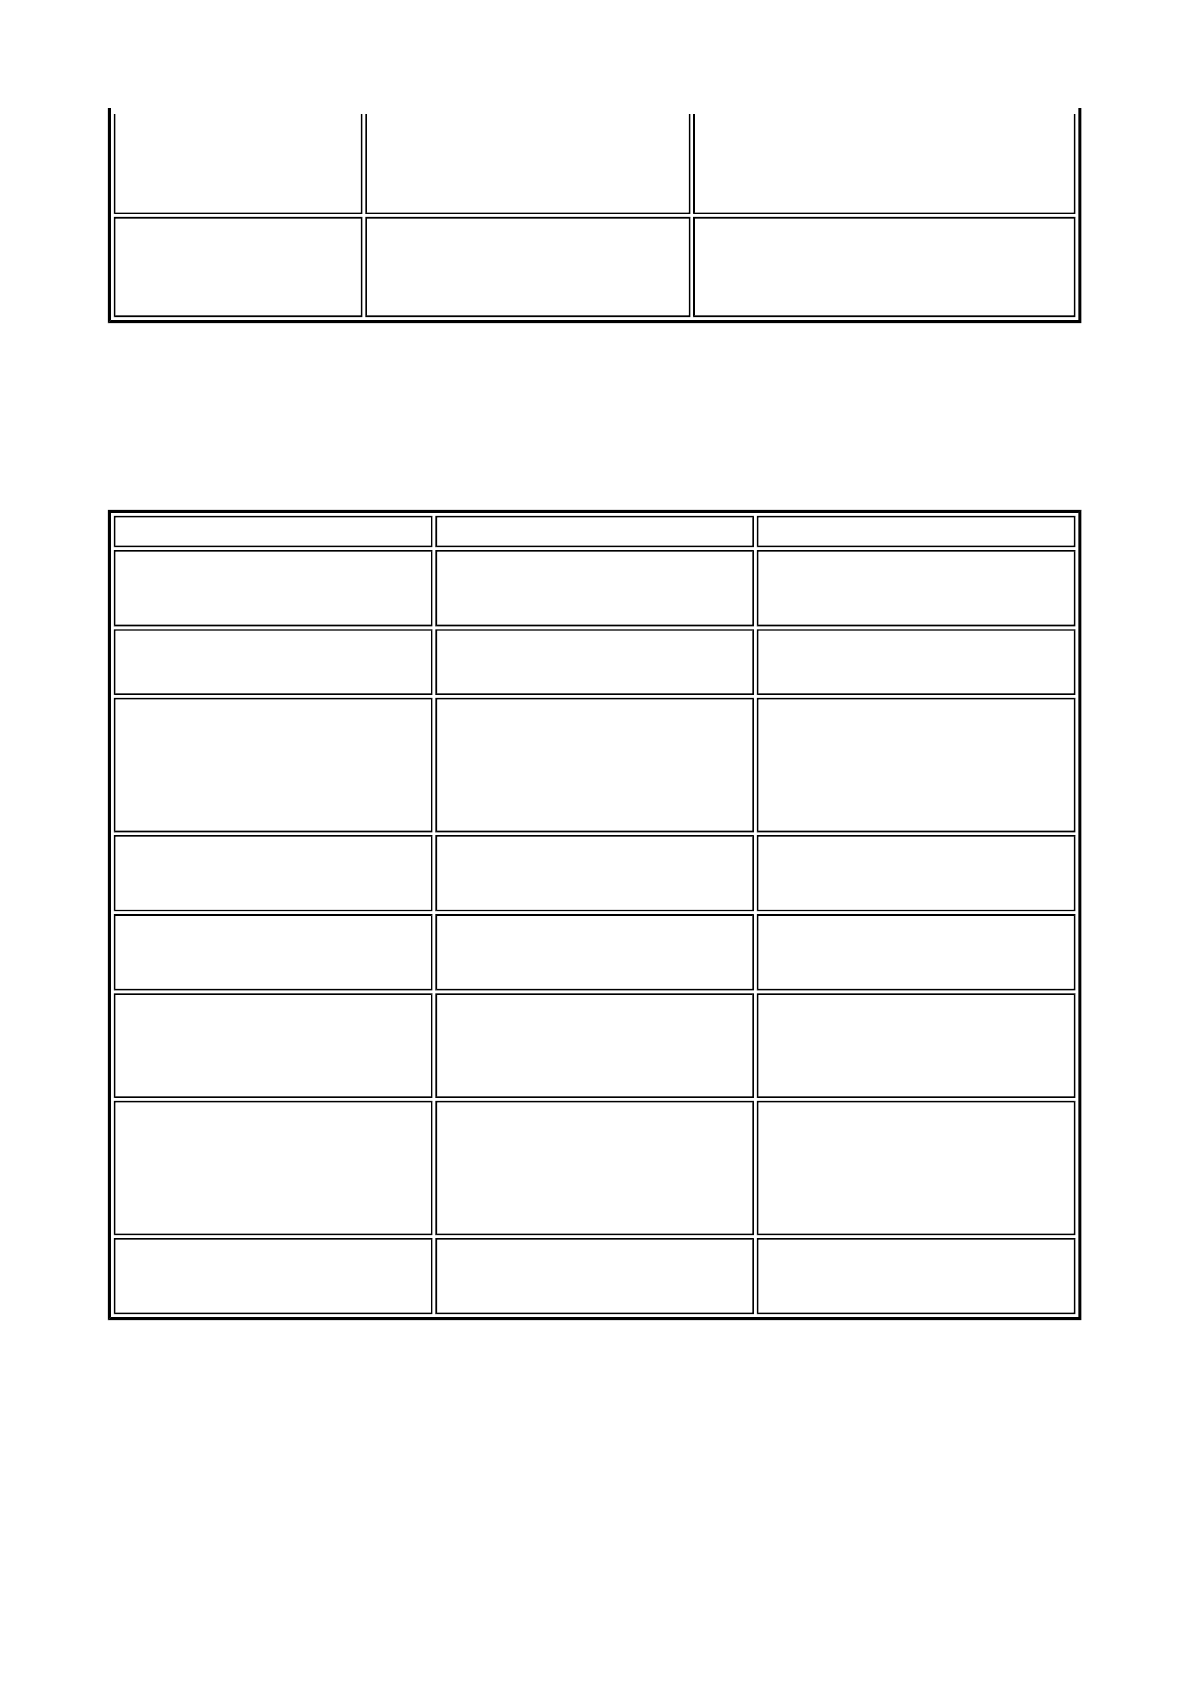
Alarms
Use the Alarms tab to define the point at which the battery alarm activates. Define the alarm to either sound,
display a warning message, or invoke Standby, Hibernate or Shutdown.
Default settings are shown in red.
Power Meter
The Power Meter tab displays the remaining battery power and charging status for the primary and
secondary batteries (if applicable). Choose to display either a percentage progress bar or a battery icon with
percentage indicator for your battery status information.
Advanced
System Hibernates
(plugged in)
25/30/45 minutes
1/2/3/4/5/6 hours
Never
Selects the system hibernation timeout
period for your system when running
under AC power.
System Hibernates
(running on batteries)
10/15/20/25/30/45 minutes
1/2/3/4/5/6 hours
Never
Selects the system hibernation timeout
period for your system when running
under DC power.
Parameter Options Description
Low battery alarm 10%
0-100%
Allows you to define a low battery
alarm percentage, notification, and
system action.
Notification Display message
Sound alarm
Allows you to define whether the
alarm is visual or auditive.
Alarm Action Standby
Hibernate
Shut down
No action
Allows you to define which action
is taken by the system when the
alarm goes off.
Run a program None Allows you to define which
program is launched when the
alarm goes off.
Critical battery alarm 3%
0-100%
Allows you to define a critical
battery alarm percentage,
notification, and system action.
Notification Display message
Sound alarm
Allows you to define whether the
alarm is visual or auditive.
Alarm Action None
Standby
Hibernate
Power off
Allows you to define which action
is taken by the system when the
alarm goes off.
Run a program None Allows you to define which
program is launched when the
alarm goes off.
Managing System Power (Windows XP)
The Advanced tab allows you to select the power-saving settings you want to use.
Default settings are shown in red.
Hibernate
Use the Hibernate tab to enable hibernate support, see the amount of free disk space, and the amount o
f
disk space required to hibernate. When your system hibernates it performs a save-to-disk or save-to-file
(STF). Your current working environment is saved to the hard disk. Use the Power button to resume from
hibernation and your system returns to its previous state.
Windows XP Power Management States
The Advanced Configuration and Power Interface (ACPI) uses different levels or states of powe
r
management. These power management states occur automatically, based on the system’s default settings,
or manually, when invoked.
The Windows XP ACPI power management states include:
Monitor timeout - manages power at the lowest level by shutting down the monitor.
Standby - also known as Save-to-RAM (STR), Standby manages power by saving your current
working environment to memory and shutting down most system devices.
Hibernation - also known as Save-To-Disk, or Save-To-File (STF), Hibernation manages power by
saving the current working environment to an area on your hard disk before turning off your computer.
When you restart the computer, any programs and documents that were open when you turned the
computer off are restored on the Desktop.
Recognising the Power Management States
It is important to recognise your system’s behaviour when in each of these power management states. The
following table describes the system behaviour for each power management state.
Parameter Options Description
Always show icon on taskbar Checked
Unchecked
determines whether or not the Power Meter icon displays
on the taskbar.
Prompt for password when
computer resumes from standby
Checked
Unchecked
Determines whether or not the system prompts for your
Windows password when resuming from Standby.
When I close the lid on my
computer
Standby
Do nothing
Hibernate
Defines the system action when the LCD panel is closed.
When I press the Power button
on my computer
Shut down
Standby
Hibernate
Do nothing
Ask me
what to do
Defines the system action when the Power button is used.
LCD Timeout Standby (STR) Hibernate (STF)
Default
Setting
5 minutes, DC
power
15 minutes,
AC power
5 minutes, DC power
20 minutes, AC power
2 hours, DC power
3 hours, AC power
Managing System Power (Windows XP)
(1) Only when set in Advanced Windows Power Management Properties.
Manually
Invoke
-
Go to Start,Turn off computer,
Standby
Close the LCD panel (1)
Press or slide the power button (1).
Close LCD panel (1)
Press or slide the power button (1)
Right-click on the taskbar, select Task
Manager,Shut Down, and Hibernate.
Go to Start,Turn off computer, and
hold the Shift key as you select
Standby.
System
Behaviour
LCD panel is
blank
Power LED
(AC or
battery) lights
green
LCD panel is blank
Power LED (AC or battery) blinks
green
LCD panel is blank
Power LED (AC or battery) turns off
Progress bar indicates that current
working environment saved to hard
disk.
Resume Press any key Press or slide the power button Press or slide the power button
Managing System Power (Windows XP)

Tips for Using Microsoft® Windows® XP
Click on one of the links below to jump to the related tips.
Booting
- Booting in Safe Mode
- Creating a Startup Disk
Using
- Changing the Autoplay Setting
- The Internet Connection Wizard
- Changing the Display Resolution
- Establishing Passwords
- Customising the Taskbar
- Customising the Desktop
Shutting down
Tips for Using Microsoft Windows XP

This section provides various tips that should help you get the most of your Microsoft® Windows® XP
operating system.
Note: if you are familiar with previous versions of Microsoft Windows, we advise you to check out the new
features specific to Windows XP. To do so, click on Start, click on Help and Support, and pick the What's
new in Windows XP topic.
Booting in Safe Mode
Safe mode helps you diagnose problems. If a symptom does not reappear when you start in safe mode, you
can eliminate the default settings and minimum device drivers as possible causes. If a newly added device o
r
a changed driver is causing problems, you can use safe mode to remove the device or reverse the change.
In safe mode, you have access to only basic files and drivers (mouse, monitor, keyboard, mass storage, base
video, default system services, and no network connections)
There are circumstances where safe mode will not be able to help you, such as when the system files that are
required to start the system are corrupted or damaged. If your computer does not start successfully using the
safe mode, you might need to use either the Windows Recovery Console feature (click on Start,Help and
Support for more information), or to restore your system using the Recovery Program (refer to the Quick Start
Guide delivered with your notebook).
Restarting in Safe Mode
1. Click on Start,Turn Off Computer, and then click on Restart.
2. When you see the message Please select the operating system to start, press F8.
3. Use the arrow keys to highlight the appropriate safe mode option, and then press Enter.
zSafe Mode - starts using only the basic files and drivers (see above). Use this mode to
run the system tools, such as the Disk Defragmenter.
zSafe Mode with Networking - starts using only the basic files and drivers (see above),
and network connections.
zSafe Mode with Command Prompt - starts using only the basic files and drivers (see
above). After logging on, the command prompt is displayed instead of the graphical
user interface. You will be asked to choose a user, or to log on as administrator.
Depending on what your choose, the default directory of the command prompt will be
different.
zEnable Boot Logging - the system creates a log file (Ntbtlog.txt) that records the
loading of each service and device. The boot log is useful in determining the exact
cause of system start-up problems.
zEnable VGA Mode - starts Windows using the basic VGA driver.
zLast Known Good Configuration - starts your computer using the registry information
and drivers that was saved at the last shutdown. Any changes made since the last
successful start-up will be lost.
Note: the Directory Services Restore Mode (Windows domain controllers only) and Debugging Mode
are not relevant for notebooks.
zDebugging Mode
zStart Windows Normally - normal Windows start-up.
zReboot - reboots the system, and starts Windows XP.
Tips for Using Microsoft Windows XP

4. If you have a dual-boot or multiple-boot system, choose the installation that you need to access
using the arrow keys, and then press Enter.
Creating a Startup Disk
In some cases, you may need to create a startup disk that will allow you to boot into MS-DOS mode.
1. Insert a blank high-density floppy disk in your floppy disk drive.
2. Click on Start,My Computer.
3. Right-click on the 3 ½ Floppy Disk Drive icon, and select Format in the pop-up menu.
4. Put a check mark in front of the Create an MS-DOS startup disk, and click on Start.
5. Click on OK when prompted, and on Close when the floppy disk is created.
Tips for Using Microsoft Windows XP
Using your Versa
This guide provides the information on how to use your Versa. Some of the information provided includes:
Drives and Bays
Select the type of drive and click the Next button
Taking Care of Your System
Select the topic and click the Next button
Security
BIOS - refer to the relevant BIOS chapter for more information on how to set Supervisor and User
passwords.
Operating System - refer to the 'Tips' section relevant to your Microsoft operating system for more
information on how to set user accounts and passwords.
Hardware - Your notebook may feature a Kensington Lock slot (refer to the description of your
notebook for more information). This lock prevents your computer from being moved or stolen.
Install an optional Kensington Lock as follows:
1. Select the object in the room to which you will secure your computer. Choose an
immovable piece of furniture or fixture (a table or desk leg with a cross bar).
2. Take the looped end of the steel cable (optional) and wrap around an immovable
object. Choose an object that prevents an intruder from slipping the cable out from
under the object.
3. Feed the locking device through the looped end of the cable.
4. To install the Kensington Lock, make sure that the lock is in the unlocked position. To
do so, insert the key into the lock and, holding the locking device stable, turn the key
clockwise to the unlocked position.
5. Insert the locking device into the Kensington Lock slot in your computer. Turn the key
90° counter-clockwise to lock and remove the key. Check that the Kensington Lock is
secure by gently pulling on the locking device.
CD-ROM drive Next
System Care Next
Using Your Versa

Floppy Disk Drive
LEDs and Controls
The front bezel of the floppy disk drive may feature the following LEDs and controls:
Diskette release button - press this button to release a diskette from the floppy disk drive.
Floppy disk drive busy lamp - lights when the diskette drive is reading from or writing to a diskette.
Using Floppy Disks
Follow these steps to insert a 3.5-inch floppy disk in the standard floppy disk drive.
1. Hold the floppy disk at its top edge and insert the diskette label side facing up.
2. Insert the floppy disk all the way into the drive until you hear a click.
Note: if your floppy disk did not come formatted, you must format it before storing information on it. See your
operating system documentation for information about formatting a diskette.
To remove a diskette from the diskette drive, press the release button on the 3.5-inch diskette drive.
Caution: do not remove a diskette from the diskette drive when the diskette drive lamp is lit. Doing so can
damage both the data on the diskette and the drive. Do not turn off the system power while the diskette is
being accessed.
Floppy Disk Drive
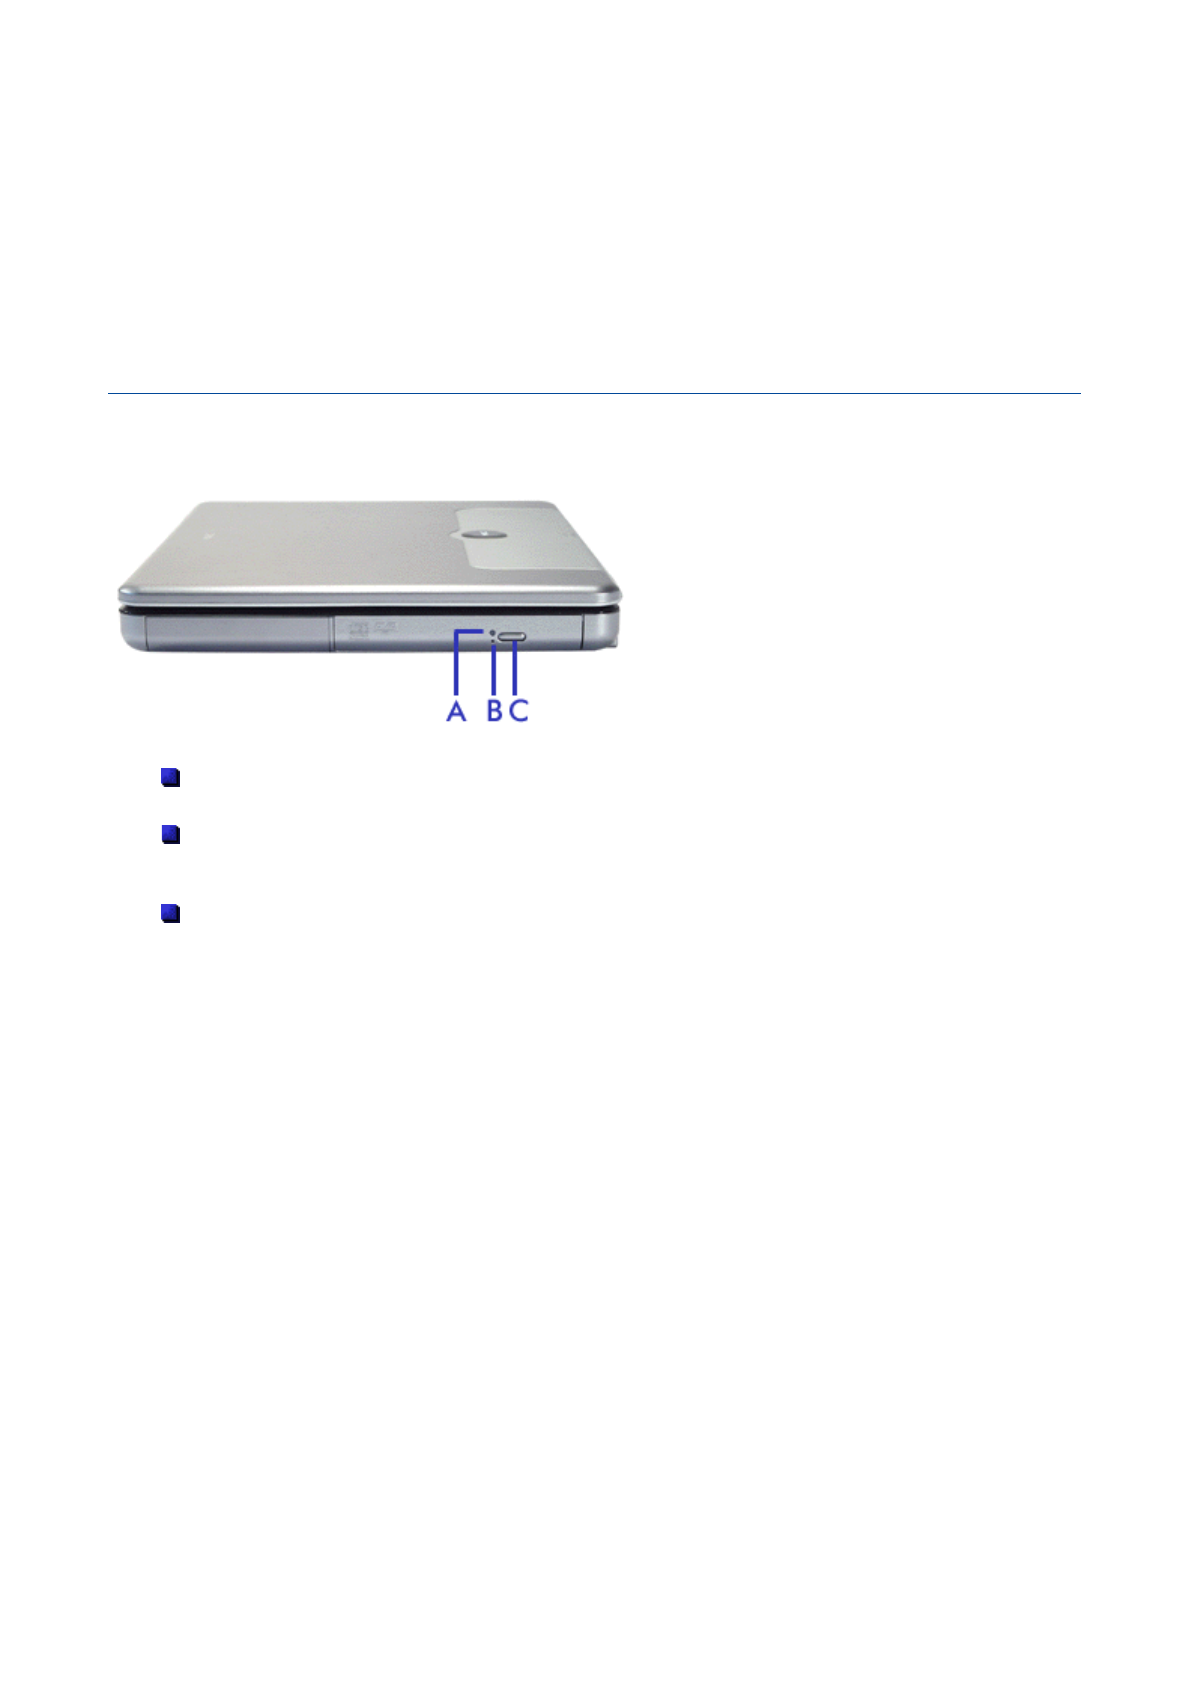
CD-ROM Drive
Your Versa may ship with a CD-ROM drive that features the latest in CD-ROM technology. The CD-ROM
drive is assigned an available drive letter.
Use the CD-ROM drive to load and start programs from a compact disc (CD). You can also use the CD-ROM
drive to play your audio CDs. The CD-ROM drive is fully compatible with Kodak Multisession Photo CDs™
and standard audio CDs.
The CD-ROM drive operates at different speeds depending on whether the CD you are using contains data o
r
music. This allows you to get your data faster and to see smoother animation and video.
LEDs and Controls
The front bezel of the CD-ROM drive may feature* the following LEDs and controls:
Status LED (A) - lights during data read operations. Do not eject the CD or turn off the Versa when
the indicator is lit.
Emergency Eject Hole (B) - allows you to manually remove a disc from the CD-ROM drive if the
eject function is disabled by software or a power failure occurs. To remove a disc, insert the end of a
paper clip into the eject hole, and push in until you hear a click. Manually open the drawer.
Release Button (C) - ejects the disc tray. Press this button when power is on to insert a CD into o
r
remove a CD from the drive.
* Please note that the CD-ROM drive included with your system may differ slightly from the one shown in the
p
icture.
CD-ROM Drive
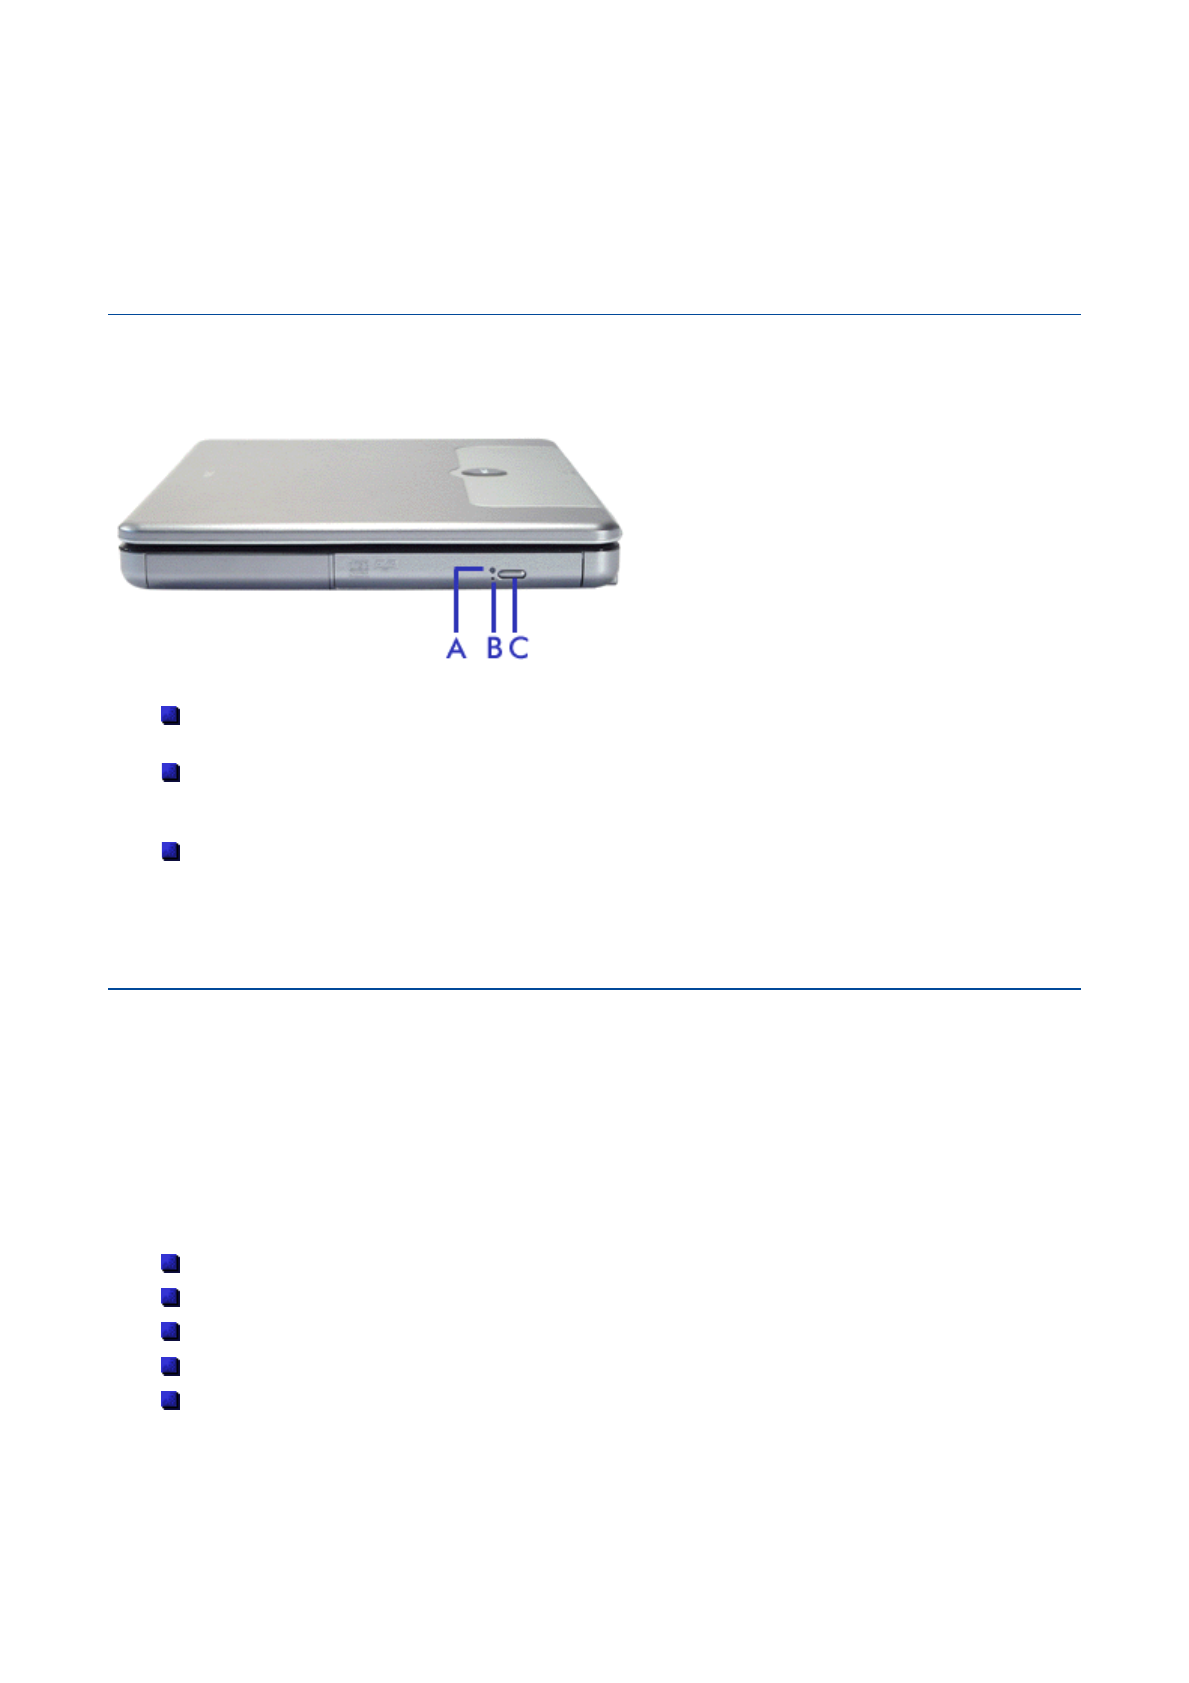
DVD-ROM Drive
Your Versa may ship with a DVD-ROM drive that features the latest in DVD-ROM technology. The DVD-ROM
drive is assigned an available drive letter.
Please note that a DVD Player is provided with your system, allowing you, for instance, to watch full-length
movies on your Versa notebook.
LEDs and Controls
The front bezel of the DVD-ROM drive may feature* the following LEDs and controls:
Status LED (A) - lights during data read operations. Do not eject the disc or turn off the Versa when
the indicator is lit.
Emergency Eject Hole (B) - allows you to manually remove a disc from the DVD-ROM drive if the
eject function is disabled by software or a power failure occurs. To remove a disc, insert the end of a
paper clip into the eject hole, and push in until you hear a click. Manually open the drawer.
Release Button (C) - ejects the disc tray. Press this button when power is on to insert a disc into o
r
remove a disc from the drive.
* Please note that the DVD-ROM drive included with your system may differ slightly from the one shown in the
p
icture.
Features
The DVD-ROM drive offers many improvements over the standard CD-ROM technology including superio
r
video and audio playback, faster data access, and greater storage capacities. The drive uses the latest DVD
technology which reads from specially designed DVD discs as well as standard audio and video CDs.
If your computer is equipped with a DVD drive, you can watch feature length films wherever your compute
r
may be!
The DVD Player allows you to watch DVD films on your computer. DVD films offer a range of advantages
over VHS or laser disk formats, for instance:
DVD titles are divided into several chapters allowing easy retrieval.
Parental control allows lockout of content that is not appropriate for children.
Choice between several languages (up to 8) for dialogue and subtitles.
Full support for several video standards.
Multi-angle support for scenes filmed with different cameras.
Notes: zit is not recommended that you use the DVD player while other programs are active. This will
affect the performance of the player, reducing display quality.
zwhen you insert a DVD disc it may take a while before it is recognised and the DVD player is
launched. Please be patient and wait for a few seconds when starting a DVD title.
DVD-ROM Drive

Region Coding Note
Region coding is a requirement by the DVD specification that prevents DVD content from being played in
areas of the world for which it was not intended. This allows films to be released on DVD in one area, while
still playing in cinemas in others. The region code on DVD discs you purchase should correspond to the
region code of your DVD drive. For European countries this code is 2.
If you purchase a DVD disc from any other region, it will not function on your system. Discs coded fo
r
other regions are found in the “import”section of some shops that sell DVD discs, or abroad. The region code
should be shown on the back of the DVD case. It is represented by a small map of the world, with a numbe
r
super-imposed over the top; this number is the region code. If you cannot find this, ask a sales assistant.
DVD-ROM Drive

Combination DVD-ROM and CD Read/Write
Drive
Your system may ship with a combination DVD-ROM and CD Read/Write drive.
Use the drive to load and start programs from a compact disc (CD) or to play your audio CDs, write
information to a CD, or play digital videodiscs (DVDs).
For information on these features, see the sections entitled 'CD-RW Drive' and 'DVD-ROM Drive'.
Combination DVD-ROM and CD Read-Write Drive

Hard Disk Drive
The hard disk drive can be upgraded to a larger capacity drive. Refer to the 'Specifications' chapter for more
information on your hard disk drive.
Note: please contact your authorised service representative if you wish to replace your hard disk drive. This
procedure should only be performed by a qualified technician.
Hard Disk Drive

Memory Modules
The notebook computer offers two 64-bit memory slots using 144-pin SO-DIMM (Small Outline Dual Inline
Memory Module). This configuration supports single SO-DIMM module insertion in the memory slot.
For more information about the type of memory supported by your Versa, refer to the 'System Specifications
'
chapter.
Follow these steps to upgrade the system memory.
1. Power off the system and disconnect the AC power cord from the wall and the system.
Disconnect any other external devices.
2. On the bottom of the Versa, remove the
screw (A) securing the Memory and Mini-
PCI bay cover.
3. Lift the bay cover and set it aside.
Note: you may need to use the tip of a small knife
to pop up the slot cover. Gently insert the blade
under the screw hole, and slide the blade outwards
to the left until the tab is released. Repeat this
operation sliding the blade to the right to release
the second tab.
4. Locate the available memory bay, here
shown as (B) in the picture.
5. Align the notch with the notch in the bay
connector and install the module as
follows:
Hold the SO-DIMM module at a 60-
degree angle and align the SO-
DIMM connector with the slot in the
system. Push the connector into
the slot.
Press down on the edge of the SO-
DIMM module until the locking tabs
on the sides snap into place,
securing the module.
Note: to remove a SO-DIMM module, press the
locking tabs away from the sides of the module until
the module pops up. Then, remove the SO-DIMM
module.
6. Replace the memory bay cover, making sure the three tabs on the back edge are lined up in
their respective slots, and press on the two tabs located on each side of the screw hole in order
to secure the cover.
7. Secure the screw that was removed during step 2.
Memory Modules

Mini-PCI Slot
Your notebook computer features a Mini-PCI slot which supports the installation of an additional expansion
card.
Note: if your notebook features Wireless LAN capabilities, this slot cover is not available; it is already fitted
with the Wireless LAN expansion card.
Installing a Mini-PCI Card
Removing a Mini-PCI Card
1. Power off the system and disconnect the AC power cord from the wall and the system.
Disconnect any other external devices.
2. On the bottom of the Versa, remove the
screw (A) securing the Memory & Mini-
PCI Bay cover.
3. Lift the bay cover and set it aside.
Note: you may need to use the tip of a small knife
to pop up the slot cover. Gently insert the blade
under the screw hole, and slide the blade outwards
to the left until the tab is released. Repeat this
operation sliding the blade to the right to release
the second tab.
4. Align the notch on the expansion card
with the notch in the slot connector and
install the card as follows:
Hold the card at a 60-degree angle
and align its connector with the slot
in the system. Push the connector
firmly into the slot.
Press down on the edge of the
card opposite to the connector until
the locking tabs on the sides snap
into place, securing the card.
5. Replace the Memory & Mini-PCI Bay cover, making sure the three tabs on the back edge are
lined up in their respective slots, and press on the two tabs located on each side of the screw
hole in order to secure the cover.
6. Secure the screw that was removed during step 2.
1. Power off the system and disconnect the AC power cord from the wall and the system.
Disconnect any other external devices.
2. On the bottom of the Versa, remove the
screw (A) securing the Memory & Mini-
PCI Bay cover.
3. Lift the bay cover and set it aside.
Note: you may need to use the tip of a small knife
to pop up the slot cover. Gently insert the blade
under the screw hole, and slide the blade outwards
to the left until the tab is released. Repeat this
Mini-PCI Slot

operation sliding the blade to the right to release
the second tab.
4. If applicable, unplug any cables
connected to the motherboard.
5. Press the locking tabs away from the
sides of the Mini-PCI card until the card
pops up. Carefully remove the card from
the system.
6. Replace the Memory & Mini-PCI Bay cover, making sure the three tabs on the back edge are
lined up in their respective slots, and press on the two tabs located on each side of the screw
hole in order to secure the cover.
7. Secure the screw that was removed during step 2.
Mini-PCI Slot

System Care
Your system is a durable, dependable computer built for heavy use. With protective measures and prope
r
care, you can prevent problems and promote the successful operation and long life-span of your computer.
Protecting Your System From Power Outages
Fortunately, there are tools that can help when power supply is interrupted. Basically there are two types o
f
protection against power problems, a passive form such as those provided by surge suppressors and a multi-
featured back-up power source like the Uninterruptible Power Supply (UPS).
Surge Suppressors - although computers are equipped with some surge protection, it is wise to
acquire a separate surge suppressor for added protection. A surge suppressor protects powe
r
supplies and communication lines from electrical surges but does not offer a back-up power source.
While some suppressors have a manual on-off switch, other types combine switched and unswitched
circuits. A mix of switched and unswitched circuits can be a useful feature since you can keep, fo
r
instance, a battery charger while shutting off the power for other equipment.
Back-UPS units - equipped with a battery to maintain power during outages, the UPS allows users to
save data and properly shut down the computer. Most UPS also include surge protection as a feature.
There are two basic UPS types, the standby power supply (the least expensive choice) and the multi-
featured on-line UPS systems.
Below are tips on power protection and some hardware features to consider before buying these
devices:
Be sure to unplug your PC, including the line to the modem, during lightning storms.
Always use a proper power cord to plug your system to the line power. When using an extension cord
make sure it is a reliable cord.
Look into the energy absorption features. Surge suppressors are rated by the amount of energy they
can absorb, which is measured in joules. The higher the surge ratings the better the unit. Experts say
around 200 joules is basic protection, 400 joules provide good protection and 600 joules or more is fa
r
better.
Check if a surge suppressor has a circuit breaker or fuse. Many suppressors are equipped with eithe
r
a circuit breaker or fuse that will blow or trip in case of a short circuit and severe surges. Compared to
fuses, circuit breakers are preferred because fuses have to be replaced when damaged by a short
circuit.
Protecting Your System From Damage
There are several ways in which you can protect your computer from possible damage. We strongly
recommend the following protective measures:
Connect a Back-UPS unit (see 'Protecting Your System From Power Outages' above) between you
r
computer and the grounded wall outlet. A Back-UPS unit protects your system from sudden transient
increases and decreases in electrical power.
Be sure to connect all peripherals, such as your monitor and printer, to the Back-UPS unit that should
be the only device that you plug into the wall outlet.
Avoid repeated power-on cycles. These subject the system components to temperature variations
and stress.
Disconnect your system from telephone, LAN and power lines when an electrical storm threatens. I
f
you have a fax/modem, lightning can travel in on the phone line and can damage both the fax/modem
and the system unit. Lightning can also travel in on power lines and damage your monitor and system
unit.
Note: please note that the product warranty does not apply if damage to your computer is the result of a
lightning strike.
System Care

Be sure that system power is off before you connect or disconnect a cable (except USB and IEEE
1394 devices, that can bot hot-swapped and hot-plugged). Never make cable changes when the
system power is on. Doing so could damage your system and its peripherals.
Use appropriate virus detection software regularly to protect your system from computer viruses.
Place your computer away from direct sunlight and extreme temperatures. Operate and store you
r
system within the recommended temperatures and humidity levels (refer to the 'System Components
'
section for more information).
After turning off power, wait about five seconds for the hard disk to spin down before you power on
again.
Be sure that nothing is placed on top of your AC adapter and system power cables.
Prevent dust from entering your system by covering it when it is not in use.
Keeping Your System in Good Condition
Maintain the condition of your system by periodically using the following general procedures.
Warning: for safety, power off and unplug your system, monitor and any external devices before cleaning
them.
Clean the outside of the computer with a soft clean cloth. You can remove stubborn stains with a cloth
slightly dampened with a mild detergent. Never use a strong cleaner or solvent on any part of the
system.
Keep food and liquids away from your computer.
Periodically clean the keyboard with a vacuum cleaner brush attachment. Do not use any liquid
cleaners on the keyboard as they can damage it.
Clean the monitor screen with a monitor glass cleaner and wipe it with a clean, lint-free cloth.
If you connect an external mouse to your notebook, periodically clean the mouse as explained below:
- Power off your computer and any peripherals attached to it.
- Invert the mouse. Locate the mouse
ball cover (A).
- Rotate the ball cover counterclockwise
and remove the cover.
- Turn the mouse over so that the cover
and ball fall into your palm.
- Clean the mouse as follows; first use
tap water, or tap water and a mild
detergent, to clean the mouse ball. Use
a clean, lint-free cloth to dry the ball,
and blow into the mouse socket to
remove remaining dust or lint.
- Gently put the ball back into the
mouse.
- Fit the ball cover back into the mouse and turn the cover clockwise until it locks in place.
System Care

Operating Environment
Caring for your system also requires taking into account the effect of temperature, humidity, and moisture on
computer components. Like any other electronic products, notebooks are vulnerable to drastic changes in
temperature, and especially moisture on system components.
Please follow the tips below regarding the recommended operating environment:
Avoid using your computer in high humidity - computers are best used in moderate humidity
conditions. Although PCs are more sensitive to temperature than to humidity, using a PC in a humid
environment can present problems especially when the humidity reaches extreme levels. A few humid
days is not really a cause for concern but using, for instance, a laptop in a tropical jungle can present
wear-out issues. Humidity hastens corrosion and increases the risk of condensation that can damage
certain PC parts. Going directly from a cold to a warm environment leads to condensation. Cooling a
PC is also difficult when humidity is high.
Before switching on, allow the computer to adjust to room temperature - in general, electronic
equipments that have been exposed or stored in very low temperatures should adjust gradually to
room temperature before they are switched on. Immediately powering on a PC that has been stored
for some time at low temperatures in an environment with high temperatures increases the risk o
f
damaging parts.
Do not expose the computer to moisture and spills - users tend to stretch the limits by using and
leaving their notebooks at the most unlikely places like the kitchen, the bathroom, on the garden table
or by the swimming pool where the chance of it getting wet is high. Placing a notebook near an open
window is also not advisable since it can easily collect and expose some parts to moisture. Be wary o
f
liquid spilling into the power supply since it may trigger an electric short-circuit.
Keep your system cool - the key components in your system that require special attention when it
comes to cooling and proper ventilation are the power supply, the central processing unit (CPU), the
hard drive and the motherboard.
zThe fan in the power supply is designed not only to provide better airflow to the entire
case, but also to cool parts of the power supply that easily heat up.
zCPUs are equipped with sophisticated heat sinks and fans to increase reliability and
prevent cooling-related problems like system lockups.
zFans do not directly cool the hard drive and components of the motherboard, but
provide better airflow to these parts. Cleaning the box and removing dust are beneficial
since accumulated dust can insulate the notebook making it difficult to cool the system.
Ensure effective ventilation for your computer - even with sophisticated power supply and CPU
fans it is still important to install your system where there is good ventilation to avoid overheating.
Airflow, obviously, is more important in a warm room than in a cool area. Pay attention to the obvious,
such as providing space for the power supply fan to blow freely and by not blocking the air vents that
keeps your PC, monitor and other devices from overheating. Good operating temperatures would be
from 15 to 25°C, and cooler temperatures are generally better than higher temperatures.
Operating Environment

Preventive Maintenance
The following information will help you to set up a preventive maintenance plan in order to prevent system
problems. Depending on what your computer is being used for, adapt them to your own needs.
These suggestions are classified according to the recommended frequency.
First Time Use
Back up your BIOS settings: these parameters saved in the CMOS memory define how your compute
r
works and minor changes to them can modify the way your computer functions. To back up the BIOS settings,
take a piece of paper, enter the BIOS and note the settings and their values.
Note: do not forget to modify what is written on this piece of paper each time you modify the BIOS settings.
Every Day
Note: the suggestions below are only relevant to Microsoft operating systems.
Scan for viruses: your system is delivered with an antivirus software pre-installed on your hard drive. Fo
r
better security we recommend you use the automatic scanning option and perform on-demand scanning.
Refer to the software documentation for more information.
Caution: update the virus definition files at least every month, and as soon as you hear about a new virus.
Back up your data on a regular basis: you can use the Microsoft® Backup tool to save your files from you
r
computer to media such as a floppy diskette, a CD or a removable hard disk. Refer to the Windows online
help for more information.
Every Week
Note: the suggestions below are only relevant to Microsoft operating systems.
Scan for hard disk logical and physical errors: to do so, use Microsoft® ScanDisk, also known as the
Error-checking tool (depending on the operating system). Refer to the Windows online help for more
information.
Clean up your hard drive by using the Disk Cleanup option in Windows.
Defragment your hard drive: it will allow your computer to run at peak performance. You can use Microsoft
®
Disk Defragmenter to perform this process. Refer to the Windows online help for more information.
Preventive Maintenance

General Information about Optical Discs
Disc Loading
To insert a disc into the optical disc drive, follow these steps.
1. Press the Release button. The disc tray emerges a short way out of the drive door.
2. Gently pull the tray out until you can easily position a disc in the tray.
3. Put the disc, printed side up, into the circular impression in the tray.
4. Push the disc tray in until it clicks shut.
Note: some discs vibrate when playing. This does not affect the optical disc drive.
Disc Care
When handling optical discs, keep the following guidelines in mind.
Hold optical discs by the outer edge and the inner hub to avoid damaging the surface. Avoid direct
contact with the disc's surface.
Avoid scratching or soiling both sides of the disc.
Do not write on or apply labels to either side of the disc. Never write with a ballpoint on the surface o
f
the disc.
zDo not use stickers, labels or write on both sides of a disc. Unless you use specific
label kits, never use a tape or sticky material to label optical discs. Since the data layer
of a disk is right beneath the printed label, writing with a pen can scratch the thin
reflective aluminium coating. Use soft-tip pens especially for re-writable disks that are
even more sensitive.
zDo not scratch or polish the label side. The pits and lands (microscopic holes and flat
areas) that encode the information in the CD are on the label side, and not on the
surface read by the lens. Large scratches on the underside, however, can often be
repaired using special polishing kits. Most of the time, the laser, which focuses on a
layer within the clear base, is able to see past small scratches, in much the same way
the human eye can focus on objects outside when looking through a window.
Keep the disc away from direct sunlight, high temperatures, and humidity.
zKeep optical discs away from high temperatures. Don't subject disks at temperature
levels exceeding 37°C. Exposure to direct sunlight over long periods easily warps a
disk. Low temperatures are not a hazard, but wait for a stable temperature before
loading a disk. Disks burned using CD-writer drives are more sensitive and should be
stored at room temperature whenever possible.
zMoisture does not affect other types of discs, but avoid exposing re-writable disks to
liquids. In case of accidental spills on discs, rinse it off with lukewarm water and wipe
dry with a soft cloth. Be careful with sticky or oily substances that trap dirt and dust.
Proper cleaning is important to achieve optimal performance. Using a soft, slightly damp cloth, wipe
the disc from inside the disk and rub outwards. Do not wipe in circles but clean in the same outward
direction. Wiping the label side in circles can scratch a section of the data track. Slightly dipping the
cloth in warm water is enough. Using cleaners and solvents can do damage.
Caution: since discs are coated with thin layers of aluminium and plastic, avoid using benzene, paint
thinner, record cleaner, static repellent, or any other chemical to clean the disc. Chemicals and cleaners can
damage the disc.
General Information about Optical Discs

Optical Disc Drive Care
To get the most from your optical disc drive, keep the following guidelines in mind.
Never forcibly pry open a drive whenever a disc gets stuck. The plastic tray is a relatively fragile and
vulnerable mechanism. Loading a CD off-centre is a common mistake that can jam the tray. If this
happens use the eject button, or the emergency eject hole (refer to the relevant optical disc drive fo
r
more information on these features). If that fails, ask for professional help.
Avoid excessive dirt and dust build-up on optical discs. Optical discs can tolerate accumulated dirt
and dust much better than floppy disks since CDs are not read by direct contact with the read lens.
Excessive dirt, however, will eventually affect the drive's performance. Thoroughly clean the discs
whenever necessary.
General Information about Optical Discs

Shipping Your System
Use these steps to prepare your system for shipping:
1. Back up the files on the hard disk drive to diskettes, Zip disks, or CDs.
Note: be sure to take precautions for storing and transporting Zip disks, floppy disks, or CDs so that they are
not exposed to magnetic fields or electrical impulses.
2. Remove any media from its respective drive.
3. Turn off the system unit and any external options connected to it.
4. Unplug the AC adapter from the wall outlet or Back-UPS unit, then from the notebook itself.
5. Pack the system components in the original shipping materials and cartons. If these are not
available, be sure to use adequate packing materials to protect the components.
Shipping Your System

PC Cards
Your Versa system is equipped with two PC card slots that support both Type II and Type III PC cards.
PC cards are all approximately the same size and vary only in thickness. All have a standard 68-pin
connector. Your Versa supports the installation of the PC cards described next.
Type II Cards
Type II cards have a thickness of 5.0 millimetres (mm). Type II cards are often storage or communication
devices such as Static Random Access Memory (SRAM), Read Only Memory (ROM), Flash Memory, LAN,
and Small Computer System Interface (SCSI). Typically Type II cards include input/output (I/O) features such
as modems.
Type II Extended Cards
Many PC cards are Type II extended cards. The extended card has an additional physical component that
protrudes beyond the traditional card size. The extension can be as large as 40 mm deep by 9.65 mm high.
This extension provides room for additional electronics as well as a location for external connectors.
Type III Cards
Type III cards are thicker (10.5 mm) than Type II cards. Type III card uses include advanced function I/O
cards with additional features such as wireless modems, multimode cards (cards with more than one function
such as a combined LAN/modem card), and small hard drive storage.
PC Card Slots
Your Versa notebook integrates two PC or CardBus slots for inserting two Type II PC cards or one Type III
PC card.
Using the system's PC card slots, you can add optional PC cards and connect external devices to your Versa.
These devices include peripheral devices, such as modems, LAN cards and storage cards.
Inserting a PC Card
To insert a PC card, follow these steps.
1. Align the card so that the 68-pin connector points towards the slot and the arrow shows on the top
face of the card.
2. Slide the card into the slot. A low tone followed by a high tone lets you know that the card is fully
inserted and recognised. (If you turn off the sound through the function keys or volume control, no
sound is emitted.)
Caution: other tone sequences such as high, then low tones, indicate that the card is inserted, but the
card type is unknown.
PC Cards
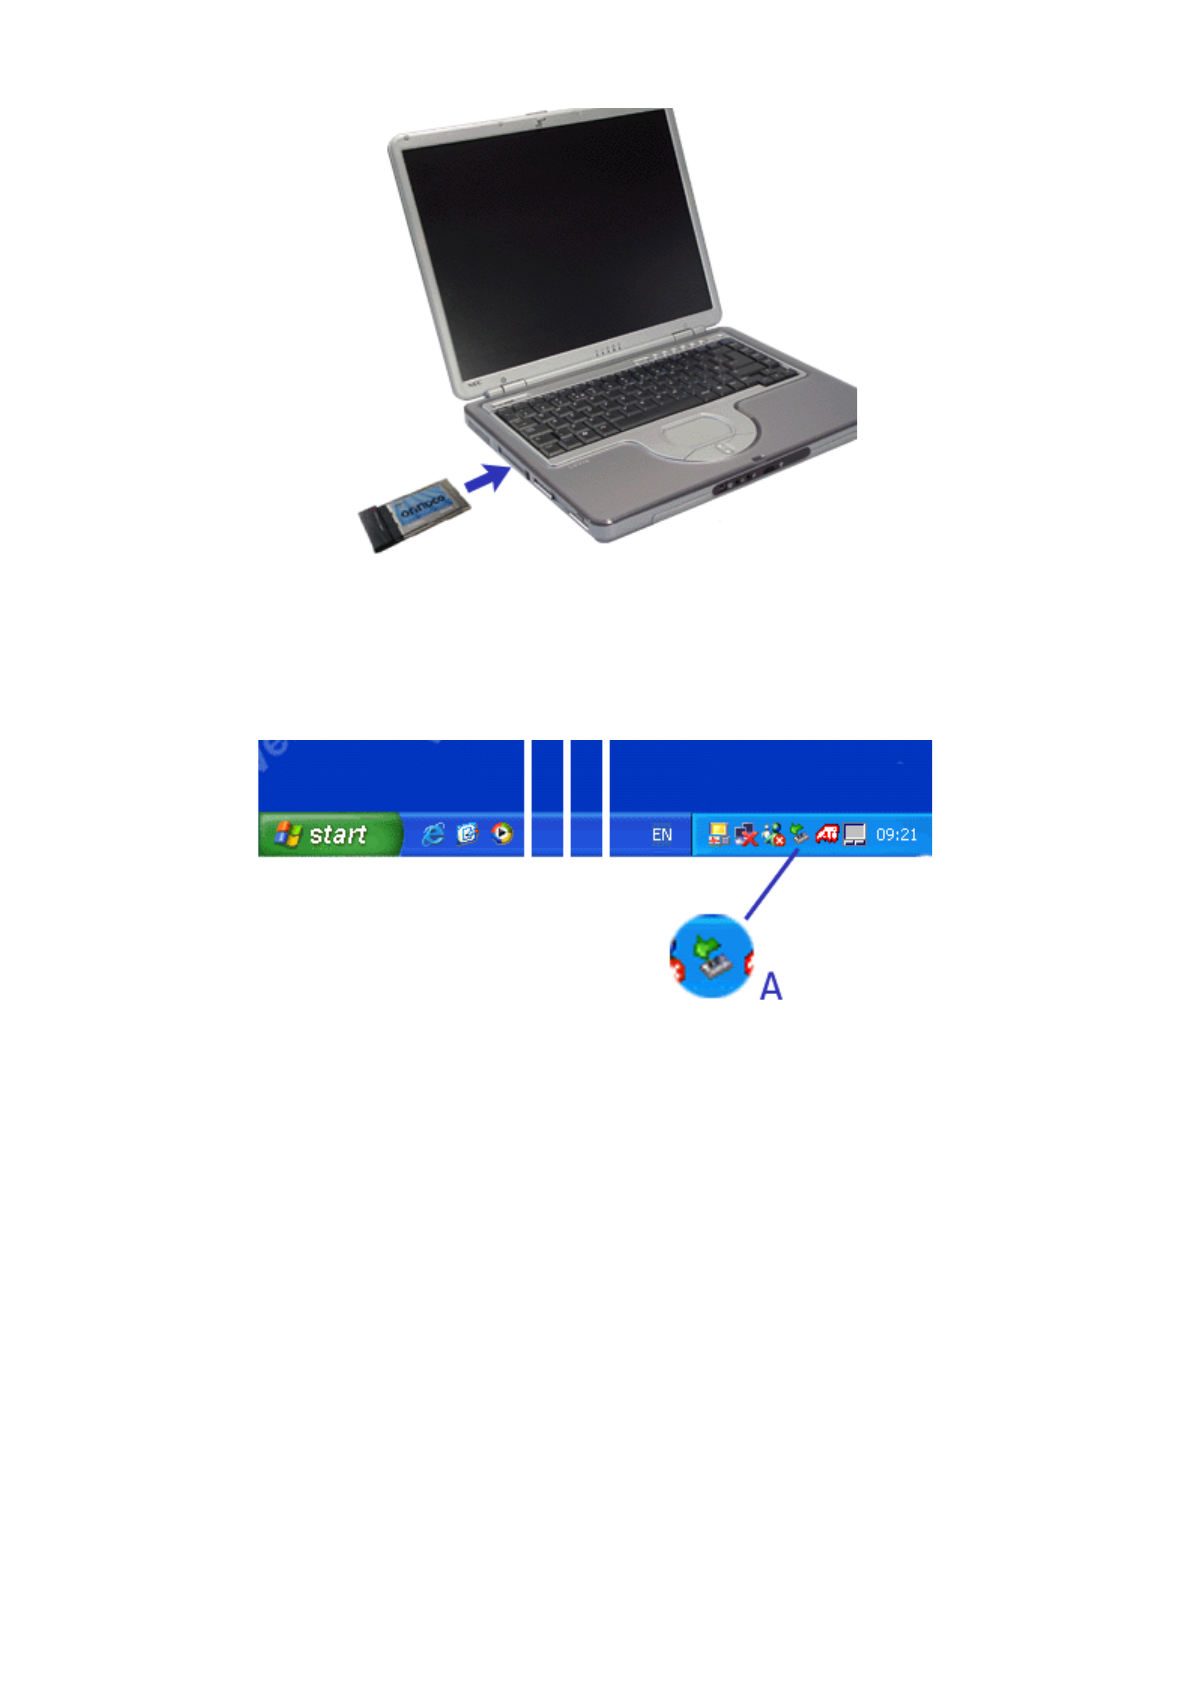
Removing a PC Card
1. Double-click on the Safely Remove Hardware (A) icon located in the notification area of the
taskbar.
2. In the Safely Remove Hardware window, select the PC card you wish to remove, and click on the
Stop button.
3. When prompted, click OK to confirm.
4. Press the button on the side of the PC card slot, and eject the card.
5. Click on Close to close the Safely Remove Hardware window.
PC Cards

Internal Modem
The Versa may come equipped with a 56K capable fax/data modem that allows you to communicate with
others via fax, e-mail, or connect to an online service or bulletin board. (The modem is only available on some
models.)
Note: due to FCC regulations in effect at the time this document was printed, the 56K modem transmits at a
maximum speed of 52K.
The speed of data transmission is dependent on the quality of telephone lines. Digitally terminated lines
improve the speed of data transmission. Contact your service provider for more information.
Note: in some instances, your modem may not detect the correct country as your default country settings. In
this case, you will need to change the country settings manually.
(1) In Windows XP, select Start,Control Panel, click on Printers and Other Hardware,Phone and Modem
Options, and click on Edit to change the dialling settings for the specified location.
(2) In Windows 2000, select Start,Settings, Control Panel, double-click on Phone and Modem Options,
and click on Edit to change the dialling settings for the specified location.
(3) In other Windows operating systems, select Start,Settings, Control Panel, and double-click on
Modems. Click on the Dialing Properties button to specify the relevant location information.
Connecting the Modem
The fax/data modem provides one standard phone connector. We provide one analogue cable for you
r
convenience.
Note: when using a modem outside your country, you might need an international telephone adapter,
available at most electronics supply shops.
Warning: use only 26AWG phone line when connecting the modem.
Use the following steps to connect the analogue phone cable to your modem.
Note: when using a modem outside of the country where you purchased it, you might need an international
telephone adapter, available at most electronics supply stores.
1. Locate the analogue phone cable that ships with the Versa. Each end of the cable is fitted with a RJ-
11 connector.
2. Connect one end of the cable into a standard telephone wall outlet.
3. Connect the other end of the cable into the modem port on your Versa.
Internal Modem

Internal LAN
Your Versa system may ship with an internal LAN feature that allows you to connect your system to a local
area network. The internal LAN feature allows a 10/100 Ethernet LAN connection and supports Wake-on-LAN
and network boot functions.
Follow these steps to take advantage of the internal LAN feature.
1. Locate the LAN port on the Versa.
2. Plug one end of your LAN cable into the LAN port jack.
3. Plug the other end of the LAN cable to a local area network.
Internal LAN

802.11b Wireless LAN Card
Some Versa notebooks come with built-in wireless LAN capabilities featuring the Wi-Fi™ (wireless fidelity)
IEEE 802.11b High Rate (HR) standard for business users. Wireless LAN eliminates the need for connecting
cables between your computer and your local area network, facilitating mobility, minimising downtime, and
improving your productivity.
The Wi-Fi compliant radio technology provides high-speed (11 Mbps) wireless networking with the
performance capabilities of a wired 10BaseT LAN connection.
See the following sections for information about using the wireless LAN solution, and the corresponding
'Frequently Asked Questions' section for additional information about wireless networking.
Caution: as explained in the Quick Start Guide, your notebook features several ways to perform a
recovery process, should it be necessary. Depending on your configuration, you may choose to restore from
the hard disk drive, from a set of master CDs, or from a network.
However, we recommend you to NOT select Recovery From a Network. As no DOS drivers are available for
the wireless LAN feature, you will not be able to recover your system from a network.
Enabling Wireless LAN
Use the Wireless on/off button to enable or disable the 802.11b Wireless LAN feature. A LED located on the
right side of your Versa, near the volume control knob lights up green when the Wireless LAN feature is
available.
Connecting to a Wireless Network
1. Make sure that the Wireless on/off button is set to ON.
2. Locate in the notification area of the taskbar the Wireless Connection icon (identical to the Local
Area Network icon), and right-click on it.
3. Click on View Available Wireless Networks; the Connect to Wireless Network window opens.
4. Select the available network of your choice, and click on Connect.
Note: later on, your notebook may automatically reconnect to your preferred network. Click on the Advanced
button, and add the network in your Preferred networks list.
To disconnect from a wireless network, slide the Wireless on/off button to OFF.
Wireless LAN Software Interface
Client Manager
Click on Start, select All Programs,Wireless and click on Client Manager.
Use the Client Manager to display or edit the current configuration profile (opens the Wireless Networ
k
Connection Properties window), but also to diagnose wireless connection troubles resulting from hardware
problems or radio signals quality.
Help is available by pressing F1, clicking on the Help button or on Help in the menu bar.
Wireless LAN Regulations
Specific regulations apply when using wireless LAN products. Click here for more information on these
regulations.
802.11b Wireless LAN Card

Preparing for Travel
The Versa computer makes a natural travelling companion. With a little preparation you can use the compute
r
anywhere you go, to prepare your business documents, confirm your travel plans, surf the Internet, or simply
stay in touch with those back home!
Here is what you should do before you leave home:
Note: speed the trip through airport security by carrying a charged system. Inspectors want to see the screen
display a message. The boot message is usually sufficient.
If your system is fully charged, the inspection only takes a minute or so. Otherwise, be prepared to attach the
A
C adapter and power cable. And if you don't have these, the inspection might include a disassembly of the
system.
Back up your Versa's hard disk.
Insert a fully charged battery to make sure your system is ready to quickly boot up at the airport
security check.
Fully charge all your batteries.
Tape your business card to your Versa, AC adapter, and batteries.
If you run your system with battery power, maximise battery life by using power-saving features
whenever possible.
Take along any application or data files on diskette that you might need.
Check that you have everything you need before you leave on a trip.
What To Take
The following are what you should take with you when you travel with your Versa.
Extra fully charged batteries.
Single-outlet surge protector.
Appropriate AC plug adapter for international voltage requirements.
AC extension cord.
Extra phone cord to reach wall jacks.
Copy of proof of purchase for your computer and other equipment or customs registration form fo
r
customs check.
The UltraCare Technical Support Pocket Memo, detailing the international technical support phone
numbers.
Customer support phone numbers for your software.
Your notebook's Quick Start Guide.
Power Connections
With the right accessories, you can run your Versa almost anywhere! Your system self-adjusts to various
power sources. The United States, Canada and most of Central and South America use 120-volt alternating
current (AC). Most other countries of the world use 240-volt AC. Make sure the power source falls within the
system compatible range.
There are a few countries with areas that use direct current (DC) as their main power source. You need a DC-
to-AC converter in particular areas of Argentina, Brazil, India, Madeira and South Africa.
To use your system outside of your country, you need an adapter plug. There are several different plugs
available worldwide. You can buy these at an electronics supply store.
Gettin
g
Throu
g
h Customs
Preparing for Travel

With so many countries in the world, you can be sure that there are a variety of customs regulations. Plan
wisely to get your Versa notebook computer through customs by carrying the appropriate documentation to
assure the customs agent that your system is not a recent purchase.
Travellers are often asked, when returning to their home country, whether or not they purchased the compute
r
while outside the country. Sometimes, the proof of purchase such as a bill of sale, insurance policy, o
r
purchase receipt is sufficient. Taking along the purchase receipt for your notebook may sound practical, but
may not always suffice, particularly when the purchaser of the computer is your company and the original
receipt is not available to you.
Connecting Using Your Modem (if applicable to your system)
Whether you are on a business trip or on holiday, connecting to the Internet while you travel can be expensive
and frustrating unless you are prepared.
Here are some tips on how to avoid frustration and expenses while on the road.
1. Before leaving home, check with your Internet Service Provider to see if it has:
a local access number at your point of destination.
a toll-free number that can also save you money.
in the absence of a local ISP access number or toll-free number, charging the call to you
r
home phone can be less expensive than charging the call to your hotel room.
2. Prepare your system for phone line access in another country.
Line access outside of a hotel may require an additional digit preceding the phone numbe
r
string. Be sure to modify your dial-up connection, as required.
To avoid unusual dialling tone sounds sometimes encountered in hotels, you may have to
modify a modem configuration setting to ignore the dialling tone.
3. Always check the phone line to determine whether or not it is digital or analogue. The internal
modem in your Versa system has built-in protection that detects the presence of a digital phone line
and displays a warning message to alert you.
Connecting Using a LAN (if applicable to your system)
Many hotels and Convention Centres now offer direct Internet access for a nominal fee. If your hotel provides
this service, follow these guidelines for connecting and configuring your system.
Many hotels can provide a LAN cable by prearrangement, so you can travel with a minimum of accessories.
1. Plug the LAN cable into your system and the LAN connector in the room or hall where you want to
access the Internet.
2. After connecting the LAN cable, connect your system to an AC power outlet (if desired) and powe
r
on your system.
3. Try launching your browser (Microsoft Internet Explorer, or Netscape Communicator, for example):
If your TCP/IP network settings are already configured to "Use DHCP for WINS Resolution
"
you should be able to access the Internet.
If your TCP/IP network settings are not set to use DHCP, a help screen may appear, or you
may be directed to call the LAN provider for assistance configuring your system.
Follow the instructions that are provided to you completely, so your settings work effectively with the
provider's system.
Preparing for Travel
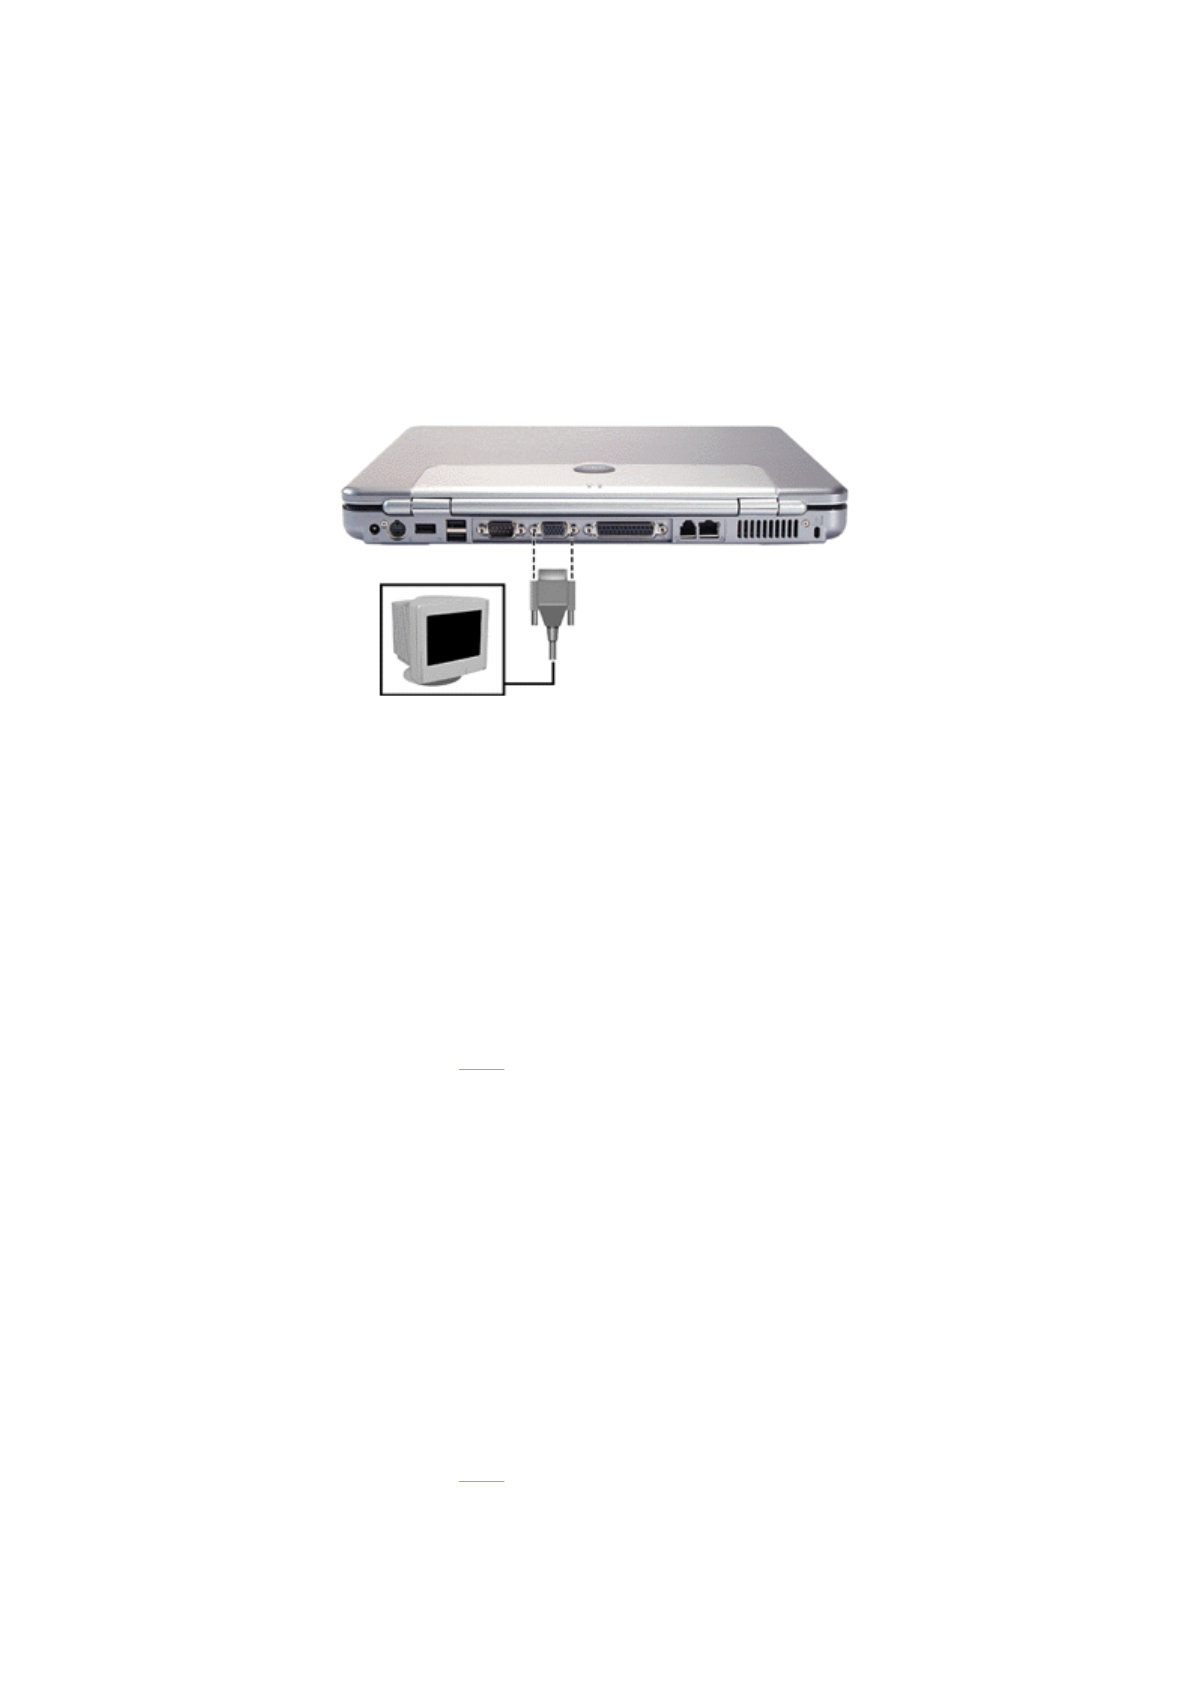
External Monitor
You can add a standard external monitor to your Versa system using a display signal cable (usually provided
with the monitor). One end of the cable must have a 15-pin connector for the system.
Connect an external monitor to your system as follows.
1. Check that the Versa is powered off and the monitor power switch is turned off.
2. Attach the 15-pin cable connector to the monitor port on the system. Secure the cable connection
with the screws provided.
3. Connect the monitor power cable and plug it into a properly grounded wall outlet.
4. Follow any set-up instructions in the monitor's user's guide.
5. Turn on power to the system and device.
6. Use Fn-F3 to toggle through the different display modes (LCD only, CRT only, LCD/CRT
simultaneous display, and TV-Out mode).
Display Properties window
Should it be necessary, you can also switch to the CRT display or LCD/CRT simultaneous display using the
Display Properties window.
1. Open the Display Properties window, and click on the Settings tab. (For more information on how to
open this window, refer to the 'Tips' section of this guide relevant to your operating system.)
2. Click on the Advanced button, and select the Displays tab.
3. In the Display Devices area, select the Monitor, click on Apply and then on Yes.
Using the Extended Mode
Using two display devices connected at the same time, such as a CRT monitor and your notebook LCD, you
can extend your Windows XP desktop on both these display devices, allowing you to display for instance your
email software application on one screen, and to work in a word processor on the second screen.
Follow the steps below to benefit from the extended mode:
1. Connect an external display device following the steps 1 to 6 detailed above.
2. Use Fn-F3 to toggle to the LCD/CRT simultaneous display mode.
3. Open the Display Properties window, and click on the Settings tab. (For more information on how to
open this window, refer to the 'Tips' section of this guide relevant to your operating system.)
4. The monitor 1 is selected by default. Click on the monitor 2, select the option Extend my Windows
desktop onto this monitor, and click on Apply.
5. Both displays are now active, the monitor 2, being the extension of the monitor 1. Click on Identif
y
V
GA Port for External Monitor

to display temporarily on each screen which is 1 and which is 2.
6. On the Settings tab, notice that the monitor 2 is virtually located to the right of the monitor 1. To
understand this point, drag the Display Properties window to the right of your monitor 1 screen. You
should see it appear on the left of the monitor 2 screen...
7. Drag the window back on the monitor 1, and on the Settings tab, drag the monitor 2 icon to the left o
f
the monitor 1. Click on Apply. Now, if you drag any item from the monitor 1 desktop fully to the left,
you should see it appear on the right of the monitor 2 screen.
Note: to change the display resolution of a monitor, select the monitor via the Display drop-down box, and
drag the cursor to the resolution of your choice in the Screen resolution area.
V
GA Port for External Monitor
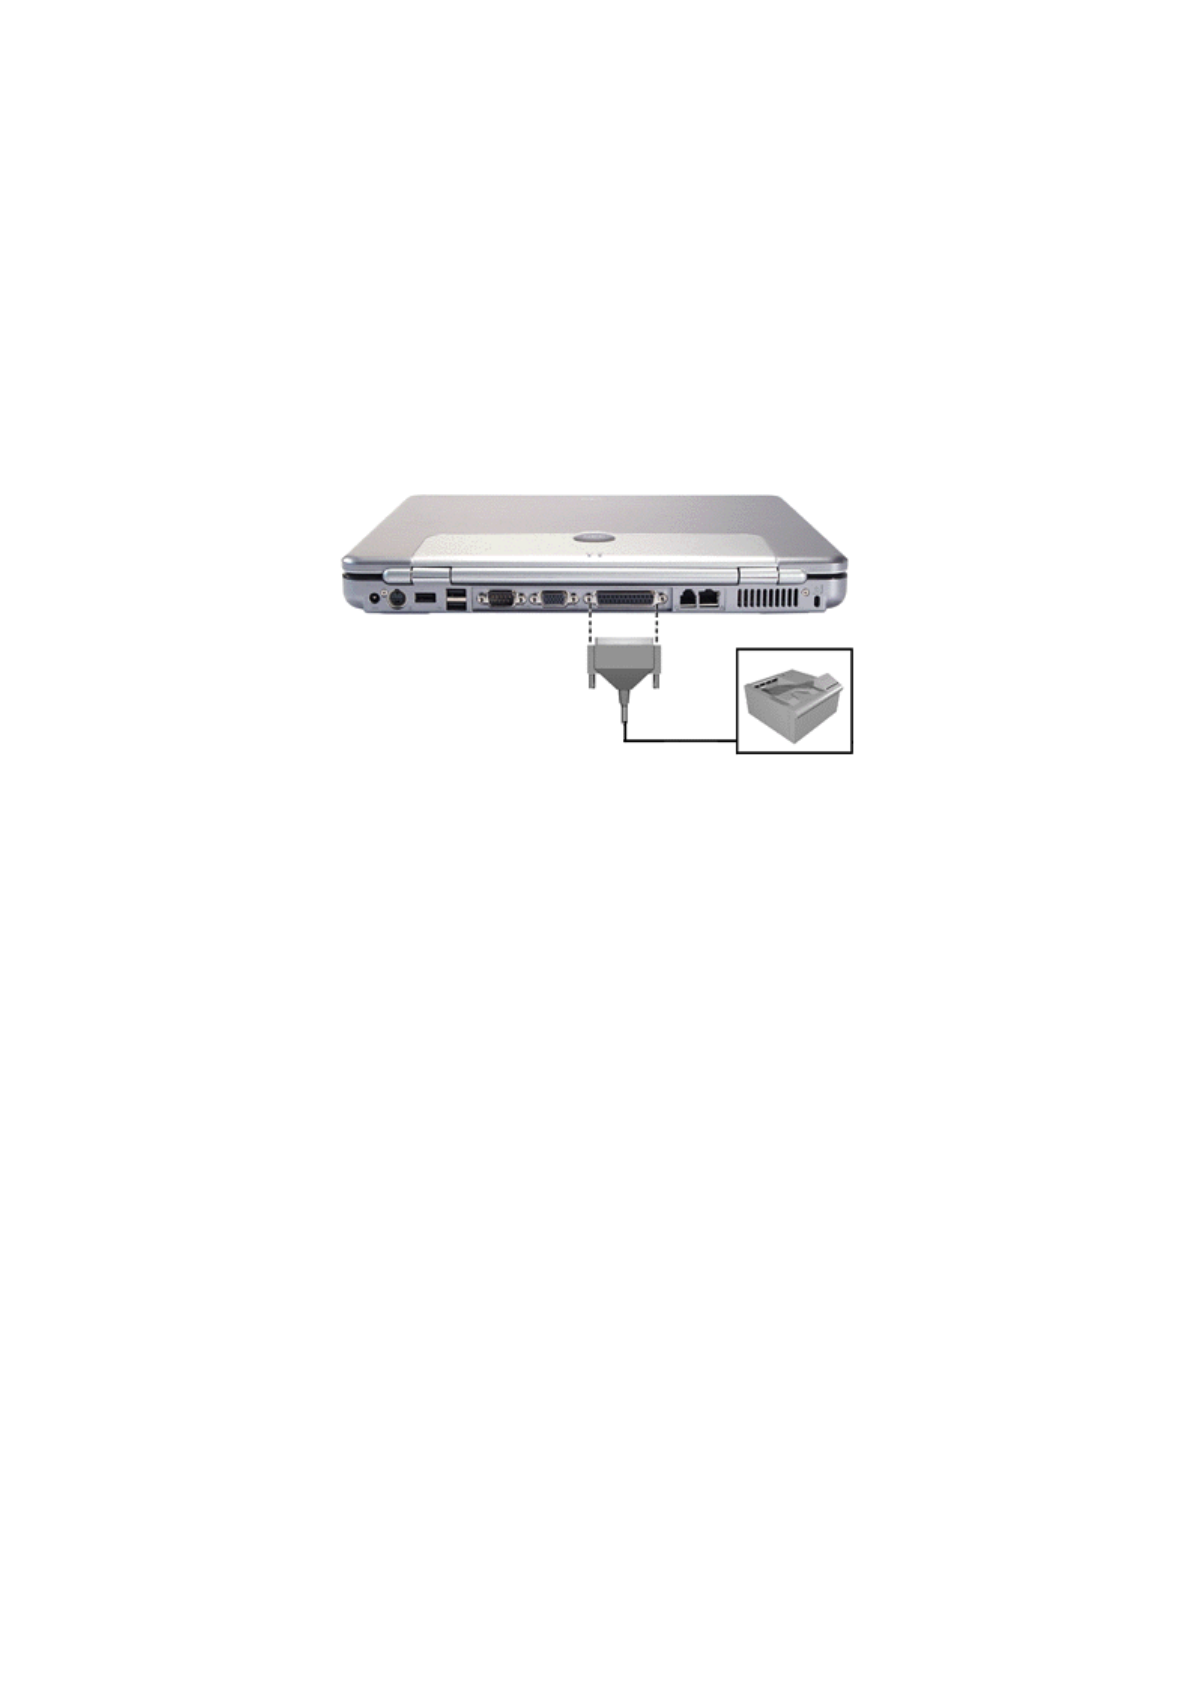
Parallel Devices
Note: in Windows, when you connect a printer, be sure to install the appropriate printer driver through the
Control Panel.
Connect a parallel device to your system as follows.
1. Check that power to both the Versa and the device is off.
2. Align and connect the 25-pin parallel cable (small end) connector to the port on the system and
either lock the connector clips or secure the thumb screws.
3. Align and connect the other end of the cable to the parallel port on the device. Either lock the
connector clips or secure the thumb screws.
4. Connect the power cable to the device and a properly grounded wall outlet.
5. Follow any specific set-up instructions in the device's user's guide.
6. Turn on power to the system and the device.
Note: check that the device is online before you try to use it. Refer to the device's documentation for
instructions.
Parallel Port
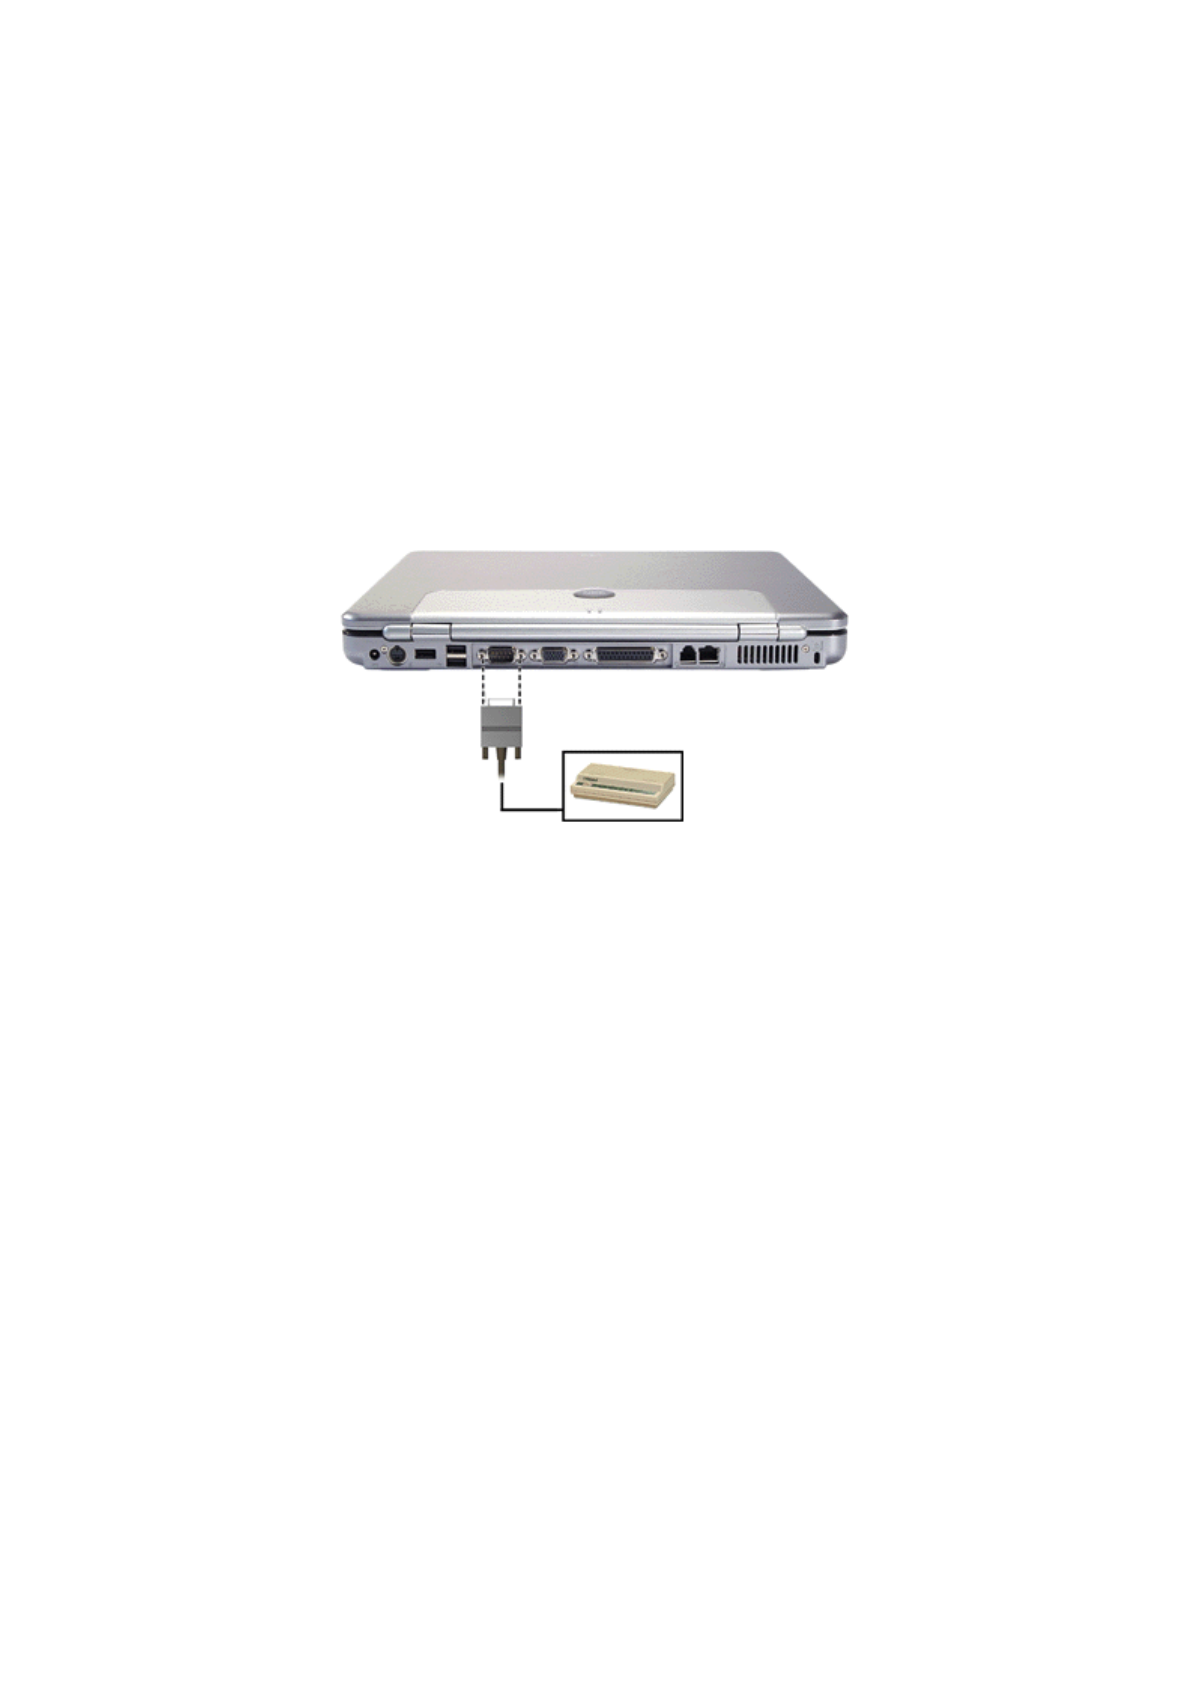
Serial Devices
To install a serial device such as a printer or an external modem, you need a cable with a female 9-pin
connector.
Note: in Windows, when you connect a printer or modem, be sure to install the appropriate driver through the
Control Panel.
Connect a serial device to your system as follows.
1. Check that power to both the Versa and the device is off.
2. Align and connect the 9-pin connector with the serial port on the system. Secure the connection with
the screws provided.
3. Align and connect the other end of the cable to the appropriate port on the device. Secure the
connections with the screws provided.
4. Connect the power cable to the device and a properly grounded wall outlet.
5. Follow any specific set-up instructions in the device's user's guide.
6. Turn on power to the system and the device.
Note: make sure your device is online before trying to use it. Refer to the device's documentation for
instructions.
Serial Port
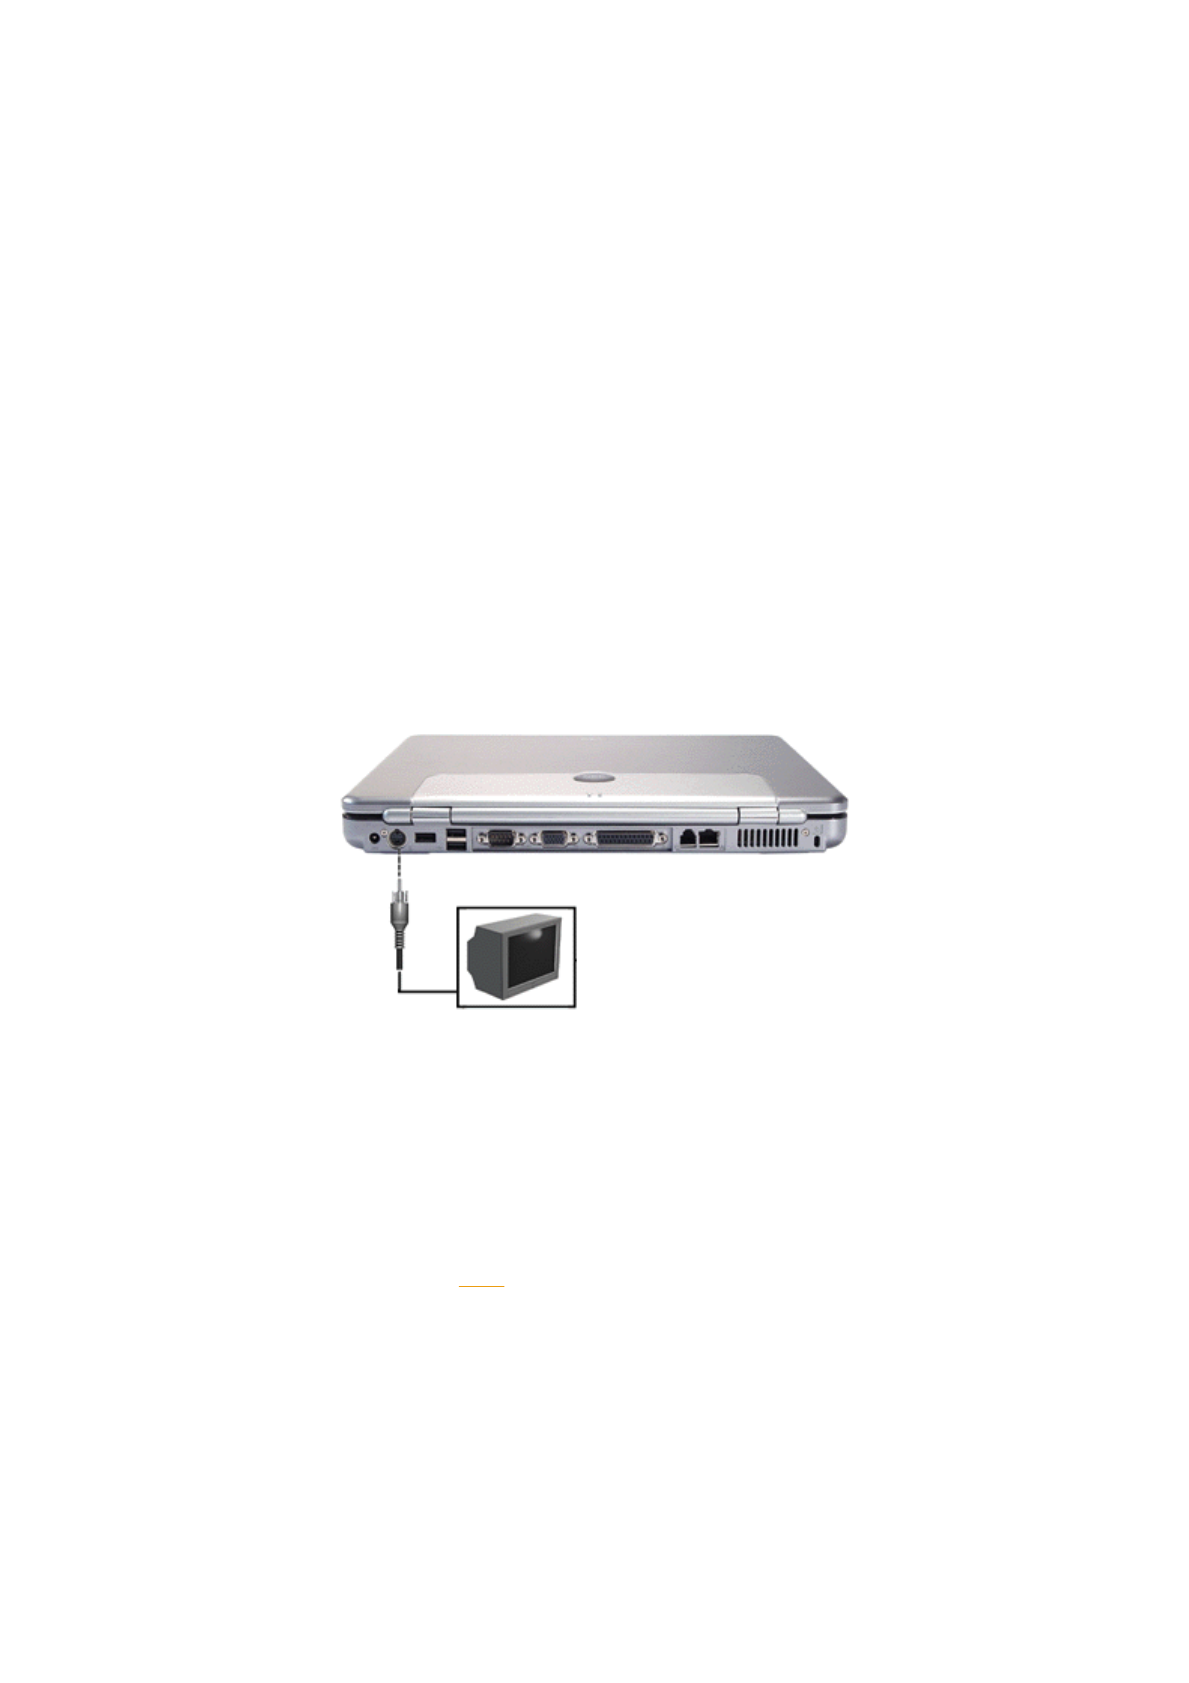
Television Connection
Your Versa is equipped with an S-Video out port that allows you to use a television as an external display
device in the Windows environment.
Note: if possible, you should avoid using an adapter cable that changes the connection type (e.g. S-Video to
RCA), since this can effect image quality. Furthermore, some S-Video to RCA adapter cables may not be
supported. Please contact an authorised sales representative for more information.
The TV out port supports 640x480, 800x600, and 1024x768 display settings. However, for optimal resolution
when using the TV out port, select the following settings:
z640x480 or 800x600 when the video output device is a television.
zup to 1400x1050 (Versa with SXGA 15-inch screen) or 1024x768 (Versa with 14-inch or 15-inch
XGA screen) when the video output device is an LCD panel or an external monitor (CRT).
Note: the Versa does not support the SECAM signals used in some countries.
Follow these steps to connect your television as an external display device.
1. Connect one end of the standard composite cable into the S-Video Out port on your Versa and the
other end of the cable into the standard S-Video connector on your television or VCR.
2. Switch on your television and computer.
3. Use Fn-F3 to toggle through the different display modes (LCD only, CRT only, LCD/CRT
simultaneous display, and TV-Out mode).
Display Properties window
Should it be necessary, you can also switch to TV-Out mode using the Display Properties window.
1. Open the Display Properties window, and click on the Settings tab. (For more information on how to
open this window, refer to the 'Tips' section of this guide relevant to your operating system.)
2. Click on the Advanced button, and select the Displays tab.
3. In the Display Devices area, select the TV, click on Apply and then on Yes.
Television Connection (S-Video Port)
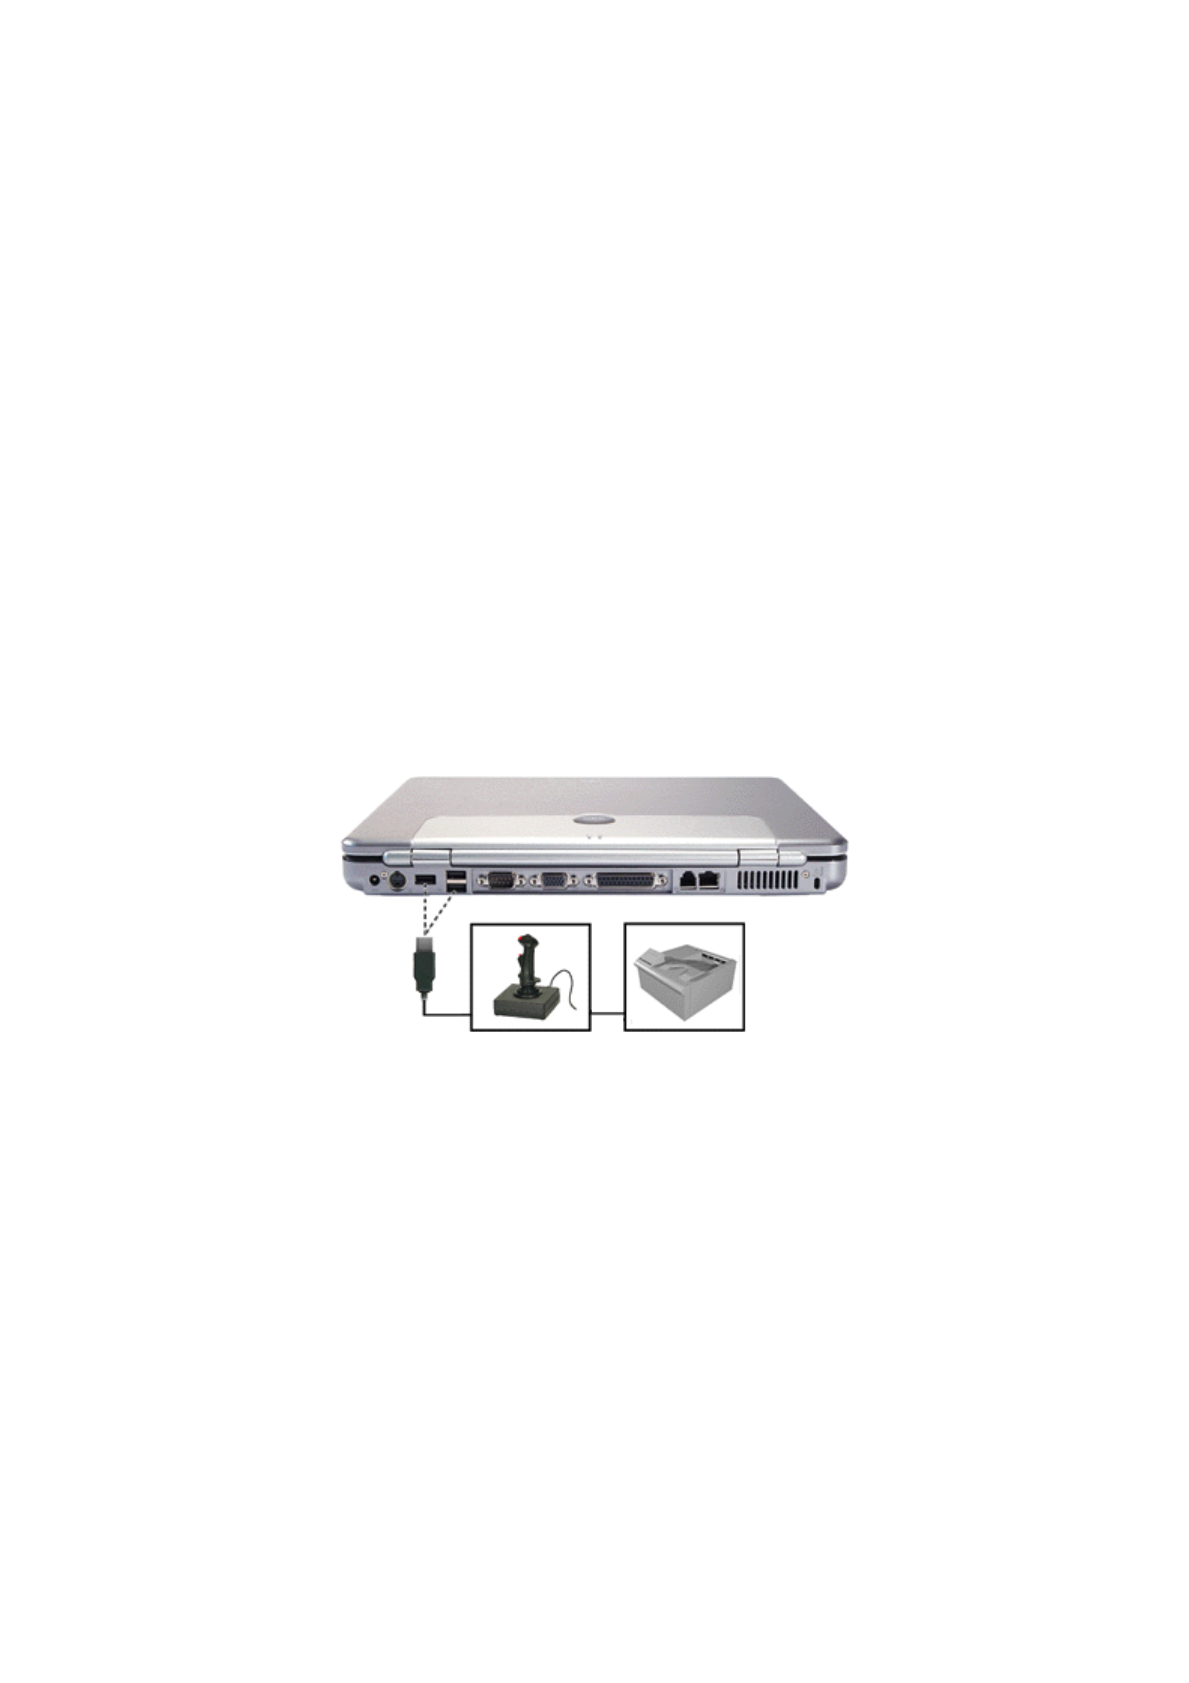
USB Ports
Your Versa is equipped with two USB ports that increase your connectivity choices. The USB ports allow you
to connect up to 127 USB-equipped peripheral devices to your Versa notebook computer. These peripherals
may include a digital camera, scanner, printer, CD-ROM drive, modem, mouse, keyboard, telephone, or game
device.
USB devices called USB hubs can serve as connection ports for other USB peripherals. Only one device
needs to be plugged into your Versa. Additional peripherals can be connected in a daisy chain configuration
where one device is connected to another in a series. Up to 127 devices can be connected together in this
way.
Note: some USB devices draw their power from the notebook power system, thereby reducing battery life.
A
lways connect your system to an AC power source before connecting these devices.
Connect an external USB device to your system as follows.
1. Locate any of the USB ports on your system.
2. Follow any specific set-up instructions in the device's user's guide.
Note: USB devices can be hot-swapped or plugged, meaning that you do not need to turn off your system
before plugging or removing USB devices.
3. Plug the USB device into one of the USB ports. Another USB device can be plugged into the othe
r
port.
Note: refer to the device's documentation for any additional instructions.
USB Ports
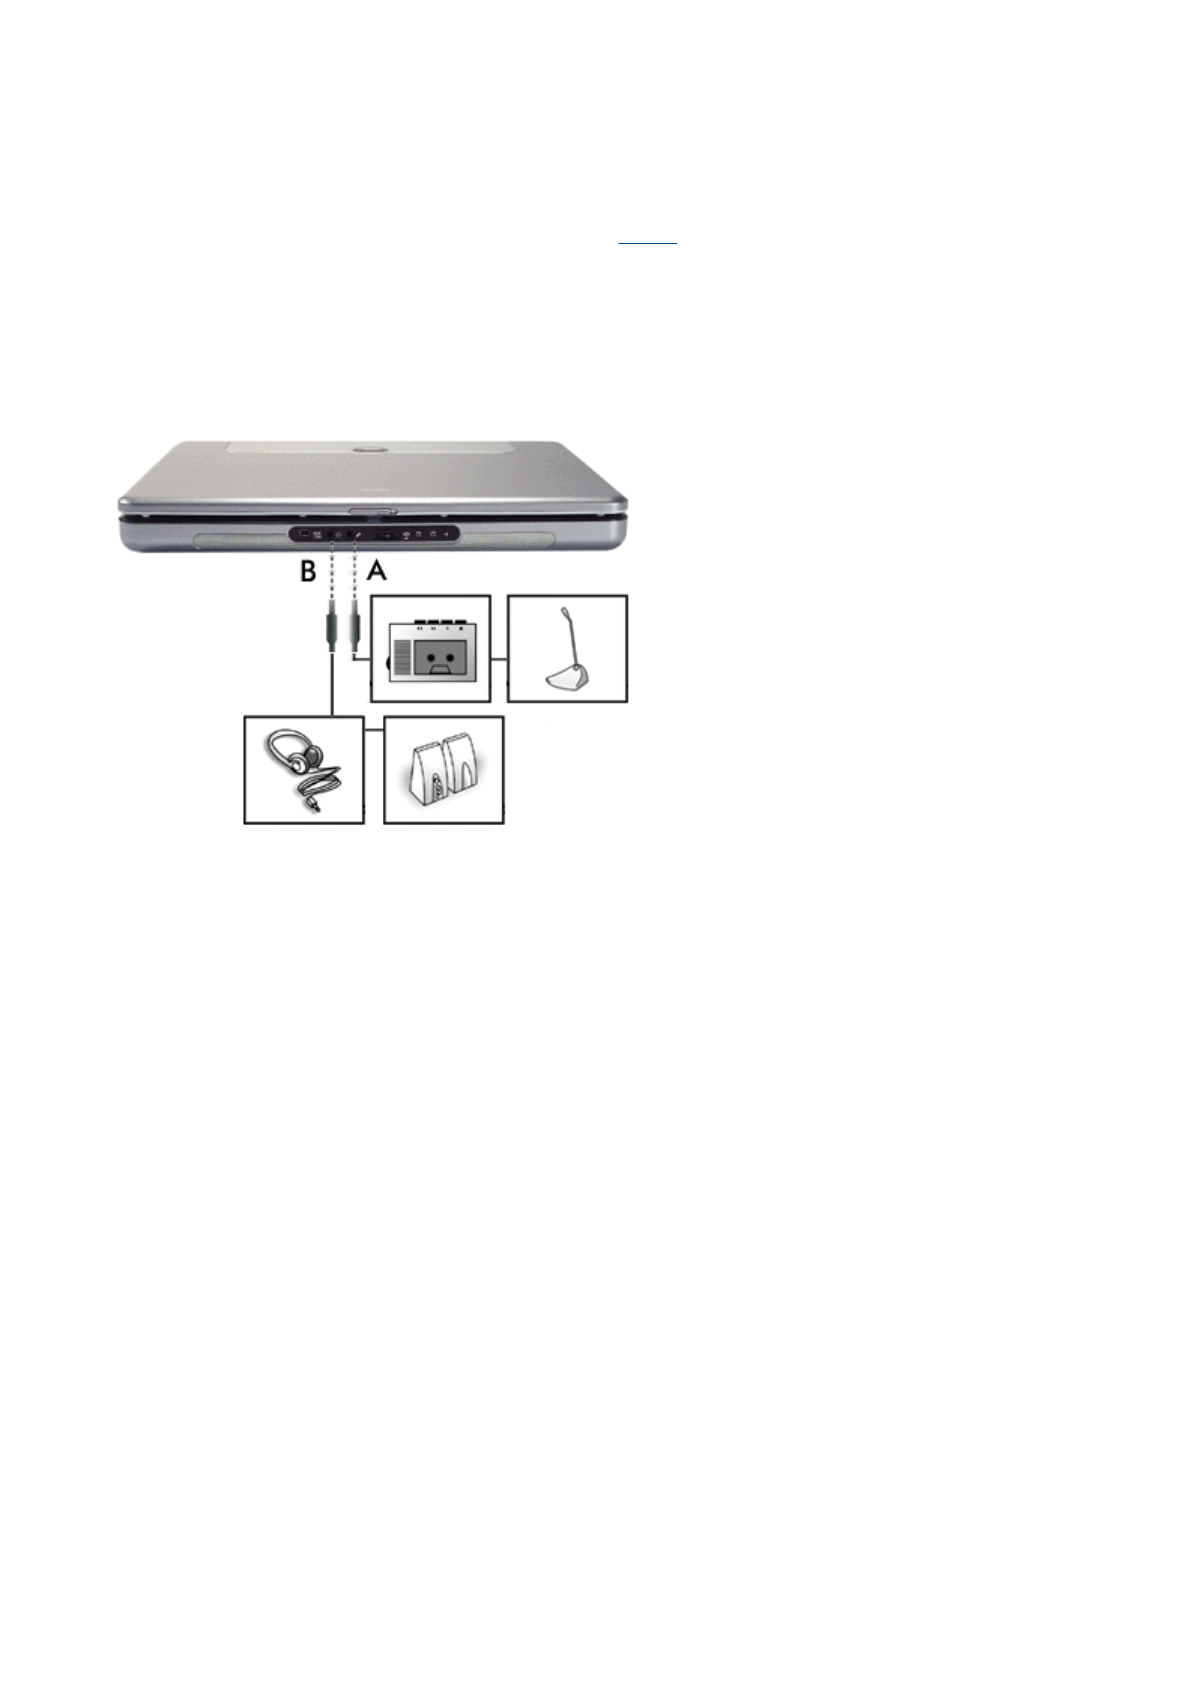
Audio Options
The Versa comes equipped with built-in audio ports that let you record and play sound.
Note: for more information on Audio features, refer to the 'Audio' section of this guide.
Connect audio jacks, like a microphone, headphones, or external speakers to the audio ports as
follows.
1. Locate the audio port that you want to use.
2. Plug the jack into the appropriate port on the Versa.
Note: if you are using external speakers or an external microphone and experience sound distortion or
feedback, lower the volume.
Some feedback is caused by having the microphone and speakers too close to each other, so moving the
external audio option away from the unit may also help.
(A) Microphone In
(B) Line Out
A
udio Ports
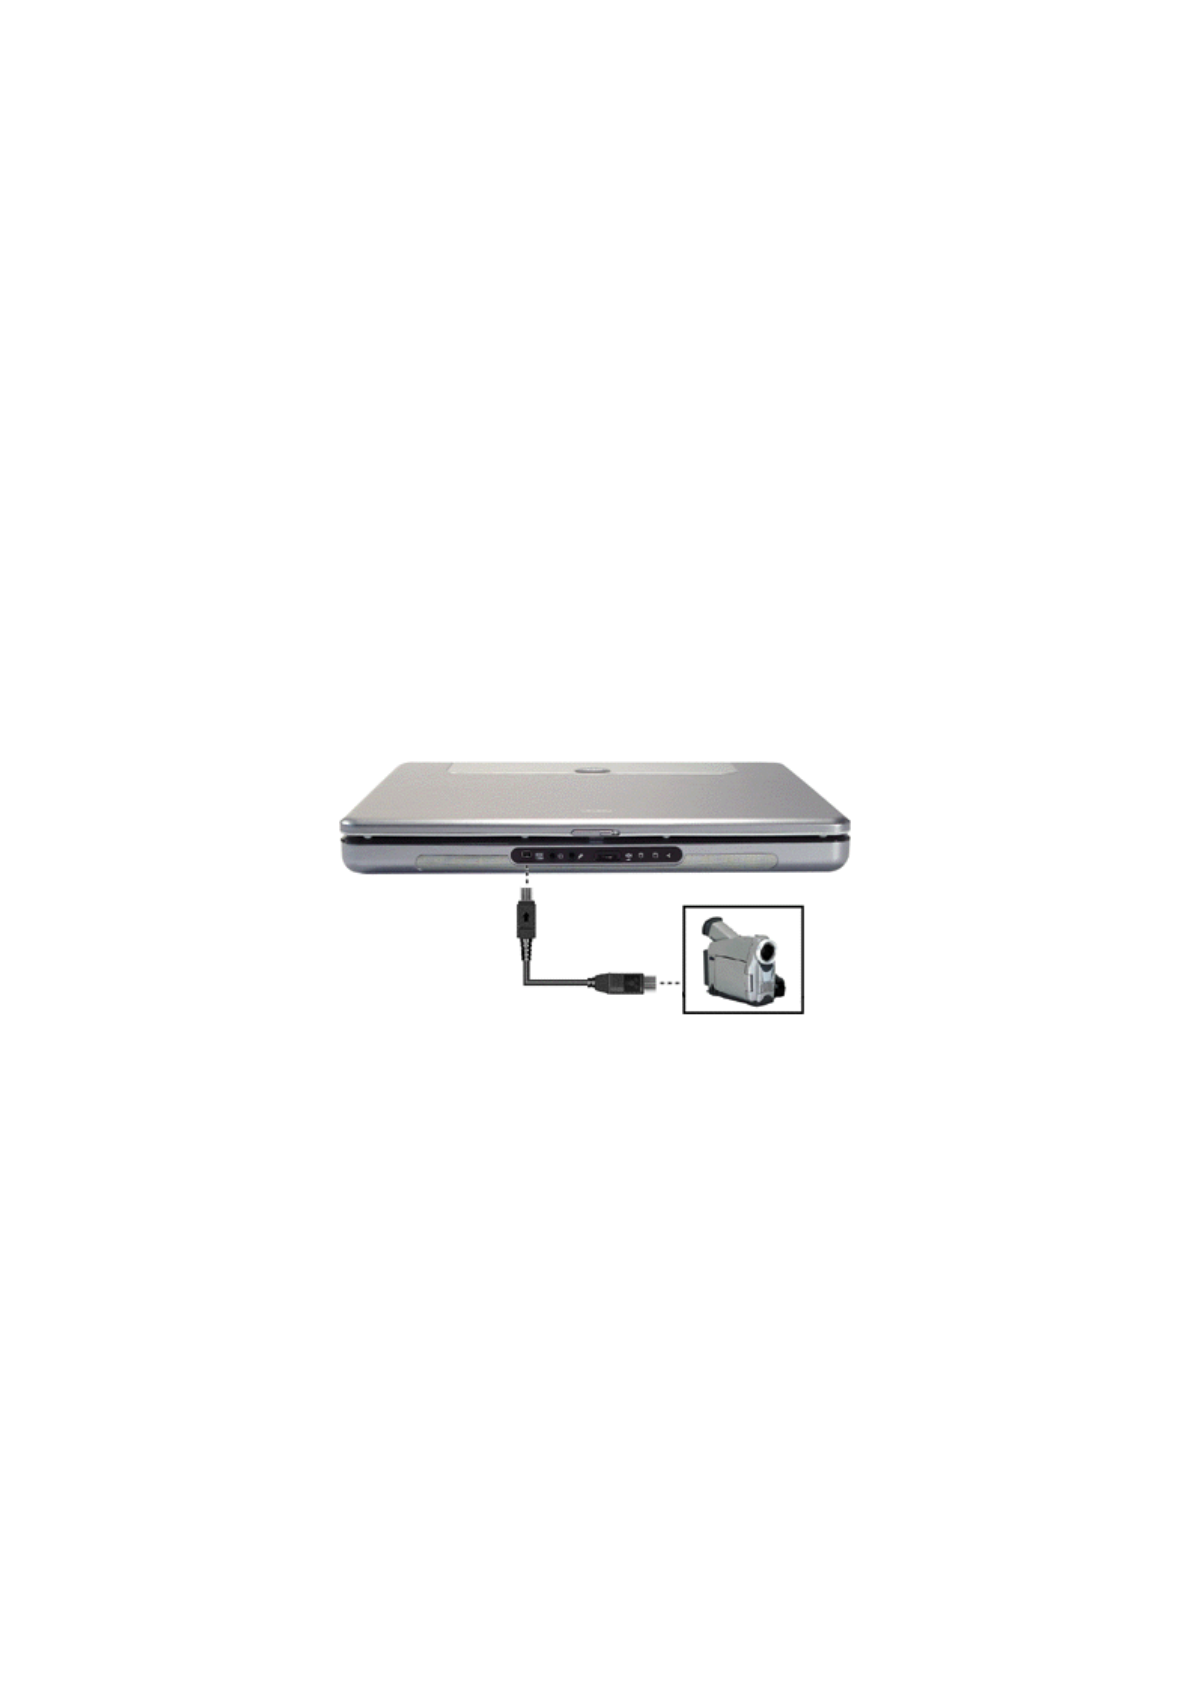
IEEE 1394 Devices
Your Versa is equipped with an IEEE 1394 port that increases your connectivity choices. This port allows you
to daisy chain up to 63 IEEE 1394 devices to your system. IEEE1394 devices support Plug and Play
connectivity for transfer rates of up to 400 Mbps. These peripherals may include a digital camera, scanner,
printer, or other device.
Note: IEEE 1394 connectors of two types (4-pin, also known as Mini-IEEE 1394, or 6-pin) are widely
available. Make sure that your IEEE 1394 cable is equipped with the plugs that fit in your notebook and IEEE
1394-compliant device. Both devices must not necessarily be equipped with the same type of plug.
Connect a IEEE 1394 device to your system as follows.
1. Install the drivers for your device in Windows.
2. Locate the mini-IEEE 1394 port on your system.
Note: some IEEE 1394 devices draw their power from the notebook power system, thereby reducing battery
life. Always connect your system to an AC power source before connecting these devices.
3. Plug the IEEE 1394 device into the mini-IEEE 1394 port.
Note: IEEE 1394 devices can be hot-swapped or plugged, meaning that you do not need to turn off your
system before plugging or removing IEEE 1394 devices.
Note: refer to the device's documentation for any additional instructions.
Firewire (IEEE 1394) Port
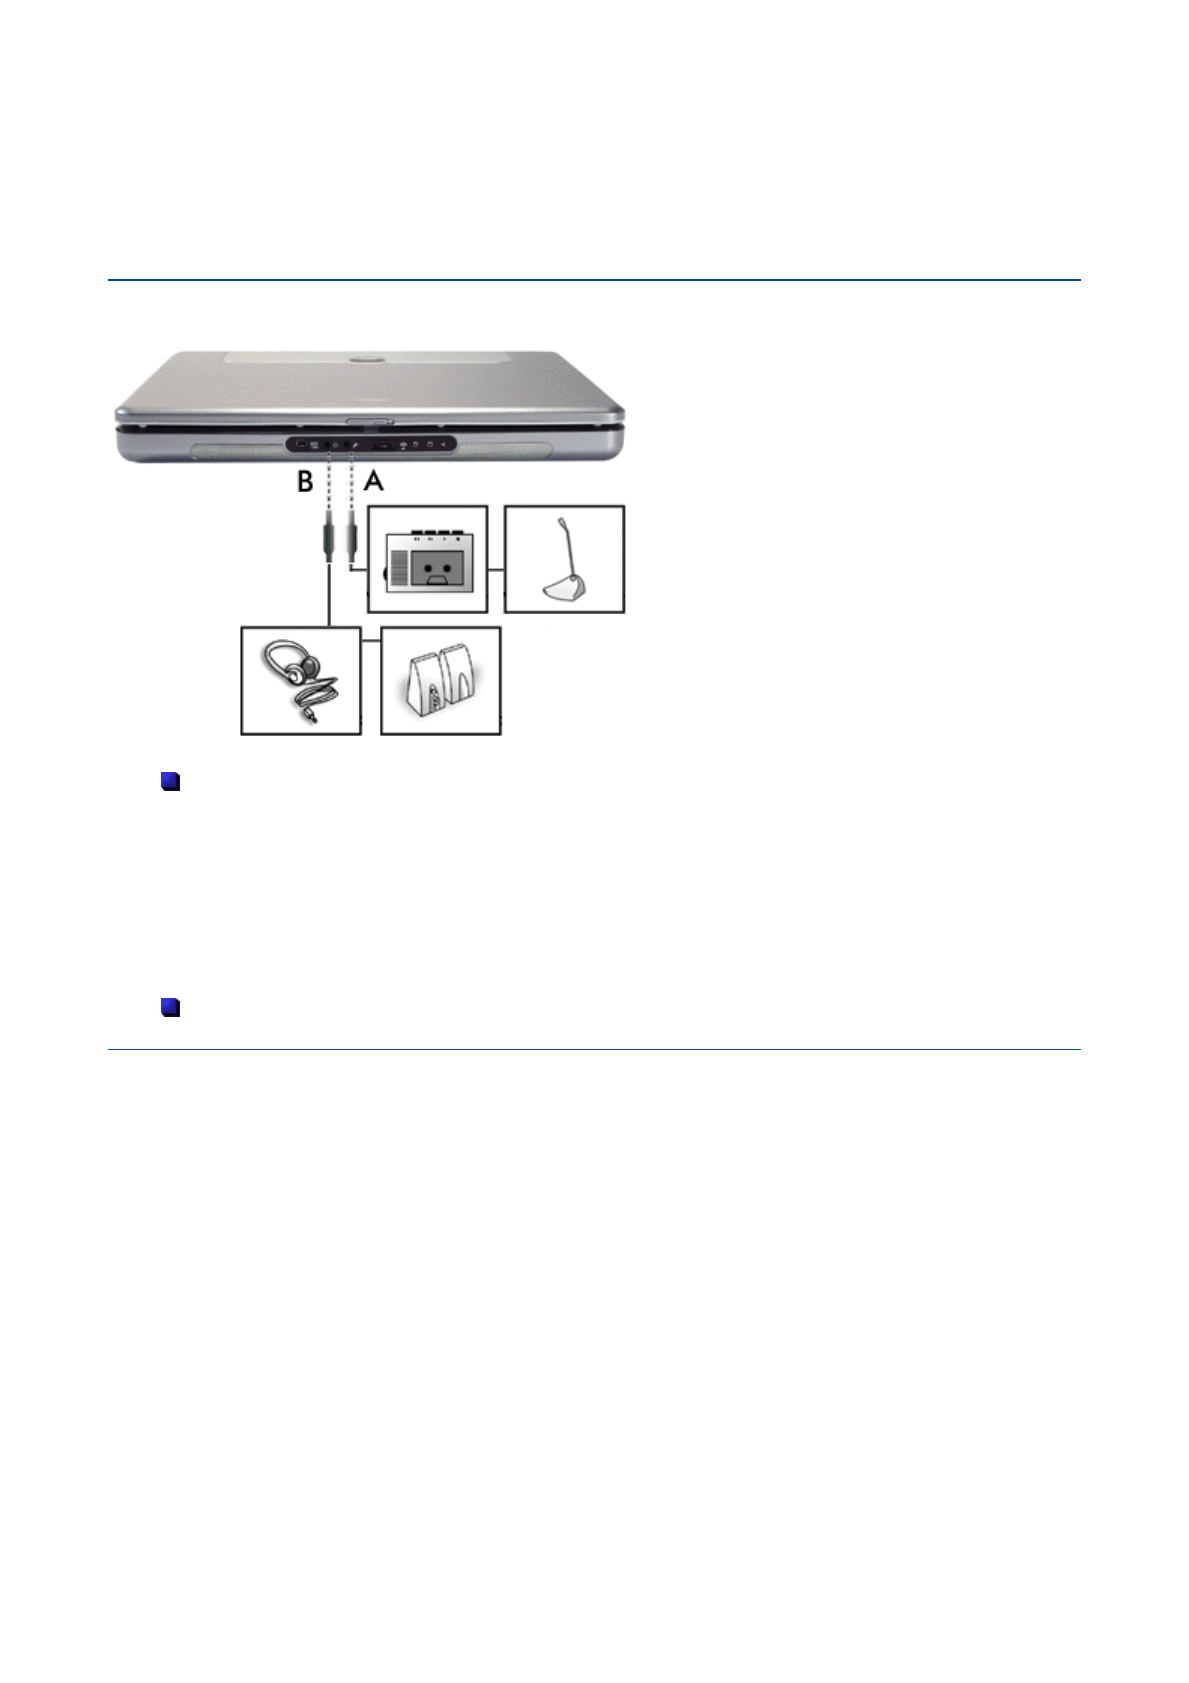
Audio
The Versa provides entertainment-level sound quality through internal stereo speakers. It handles MIDI files
and digital audio files recognising .WAV, .MID, .MP3 and other formats. The system also provides PC99
compliant audio.
Audio Controls on your Versa
Microphone In (A) - allows you to connect an external microphone for monophonic recording o
r
amplification through the unit.
You can capture and record sounds through the internal microphone on the Versa or through an
external microphone that connects to the system through the line in port. You can record voice-overs
for narration, reminders, or special instructions. Plugging in an external microphone disables the built-
in microphone.
See the 'Recording' section below for details about recording sound with the microphone.
Line Out (B) - lets you plug in stereo headphones or powered speakers.
Recording
The following procedure describes how to use the Microsoft Sound Recorder to record sound into a file on the
Versa. (For details, see the online help that is available when you open the Sound Recorder.)
1. Locate the Sound Recorder by sliding the cursor over Start,Programs/All Programs,
Accessories,Entertainment and select the Sound Recorder line.
2. Use the touchpad to press the Record button on the screen. The Record button has a red circle in
the middle.
3. Speak into the microphone to create a sound file.
4. When you finish recording, press the Stop button. Be careful when recording; audio files can
become quite large.
Compact Disc Input
You can record music and sound effects from a CD (compact disc) and store them on your hard disk. The
audio signal from the CD-ROM or DVD-ROM drive connects directly to your Versa.
Simply follow the instructions below to record sound from an audio CD.
1. Go to Start,Pro
g
rams/All
p
ro
g
rams,Accessories,Entertainment and select the Windows
A
udio

Media Player.
2. Click on Copy from CD on the taskbar located on the left of the application window.
Note: help bubbles can be displayed for any item that is shown on the Windows Media Player window. Let the
mouse cursor hover for a second over any button to display the corresponding help bubble.
3. Insert an audio CD in the optical disc drive. The notebook will automatically start playing the first
track located on the CD. Click on the Stop button located on the bottom of the window to stop the
playback.
4. Select the tracks you wish to record on your hard disk drive (by default, all the tracks are selected).
5. Click on the Copy Music button located above the tracks. The selected tracks will be automatically
copied to the Media Library.
Note: to select the Media Library path, click on Tools, select Options, and make the relevant changes on the
Copy Music tab.
Later on, if you wish to listen to the tracks you recorded to your hard drive, click on Media Library on the
taskbar located on the left of the application window, select the track(s) of your choice, and click on the Play
button.
For more information on the Windows Media Player, press F1 or click on Help in the Windows Media Player
menu bar.
Playing Back
You can play back your recorded soundtrack through stereo headphones, the internal Versa stereo speakers,
or external stereo speakers. You can play several types of audio files as well as audio CDs.
Play audio from files or audio devices as follows*.
1. Go to Start,Programs/All programs,Accessories,Entertainment and select the Windows
Media Player.
2. Click File,Open, and select the file of your choice. Click on Open. The selected file will
automatically start playing. Press the Stop button to stop the playback.
Note: if the audio files were stored in the Windows Media Player Media Library, you can easily access them
by clicking on Media Library on the taskbar located on the left of the application window.
* This example shows how to use the Windows Media Player application in Accessories. You can also play
audio through the Sound Recorder. See the Sound Recorder help files for details on its use.
Adjusting the volume
Use any of the following means to adjust the playback volume:
volume control feature that can be found in the Accessories menu or on the toolbar,
volume control knob located on your Versa,
volume control located on the external speakers (if applicable).
Using Headphones
The Versa headphones port delivers sound at half a watt. Stereo headphones (available at an electronics
supply store) plug in through the Line Out jack located on the Versa.
Note: using headphones disables the internal speakers.
Using the Built-In Speakers
The Versa has built-in stereo speakers that are available wherever you take it.
Usin
g
External Stereo S
p
eakers
A
udio

For full stereo sound impact, you can plug a pair of stereo speakers into the headphones jack.
Note: using external speakers disables the internal speakers.
A
udio

Video
The Versa features a TFT panel and superior resolution, allowing for sharp effective visuals right on the
system or projected onto an external CRT monitor.
Use your Versa to run full motion, full-screen MPEG video.
Using Digital Video Files
Your Versa may feature an IEEE 1394 port that allows you to plug any video device, including VCRs,
televisions, camcorders and laser disc players into your Versa and record motion graphics to your hard drive.
For more information on these features, please refer to the corresponding 'Frequently Asked Questions
'
section.
Using Animation Files
You can create a dynamic presentation using an animation application. Animation can illustrate a concept,
drive home an important point, or command attention. Graphics animation can add punch to a presentation
with an animated illustration, a flashing arrow, or a flying logo.
V
ideo

Multimedia Applications
A
growing number of multimedia applications are available for PC/Notebook users. These multimedia
software packages include graphics packages, animation software, and presentation authoring systems as
follows:
Animation software allows you to create 3-D effects and 3-D titles and add interest to an otherwise
static presentation.
Authoring packages let you pull all the elements of your design into an exciting, interactive multimedia
presentation.
Multimedia Applications

Setting Up a Healthy Work Environment
Click on one of the links below to jump to the related section.
Arrange Your Equipment
- Your Chair
- Your Desk
- Your Input Devices
- Your Screen or Monitor
Reducing the Risk of Injuries
- Vary Your Workday
- Practice Some Stretching Exercises
Potential Medical Conditions
- Repetitive Strain Injury
- Pre-Existing Conditions and Psychosocial Factors
Setting Up a Healthy Work Environment
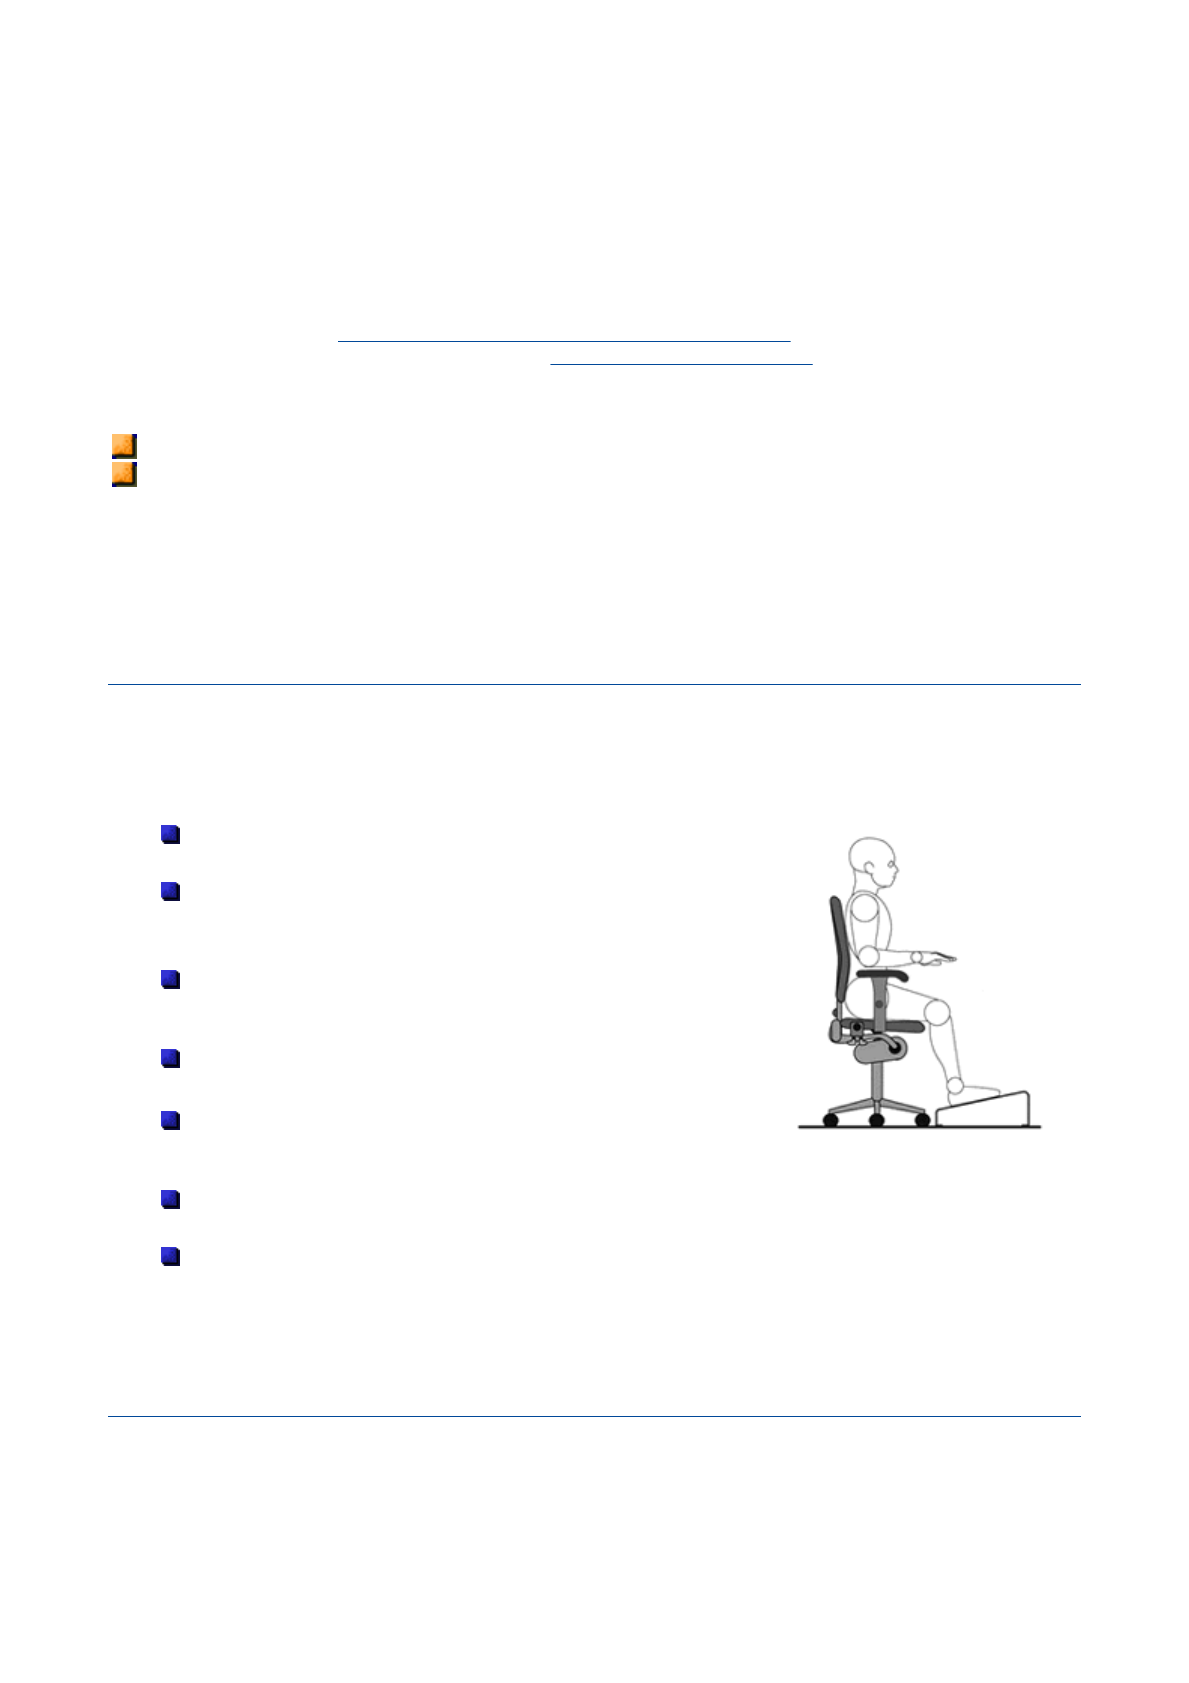
Arrange Your Equipment
You will find below explanations on how to set up your computer to fit your physical needs. This information is
based on ergonomics - the science of making the workplace fit the needs of the worker.
Warning: prolonged or improper use of a computer workstation may pose a risk of serious injury. To
reduce your risk of injury, set up and use your computer in the manner described below. Please note that
some people are more susceptible to developing these disorders due to pre-existing conditions or
psychosocial factors (see 'Pre-existing Conditions and Psychosocial Factors' ), and that precautions can be
taken in order to prevent physical discomfort (see 'Reducing the Risk of Injuries').
Note: to increase your comfort and safety when using your notebook computer as your primary computer
system at your home or office, note the following recommendations:
use a separate, external keyboard attached to your notebook computer
use a separate, external monitor attached to your notebook computer.
A
rrange your equipment so that you can work in a natural and relaxed position. Place items that you use
frequently within easy reach. Adjust your workstation set-up to the proper height (as described below) by
lowering the table or stand that holds your computer equipment or raising the seat height of your chair.
Position your notebook computer directly in front of you for increased safety and comfort.
Y
our Chair
Your chair should be adjustable and stable. Vary your posture throughout the day.
Check the following:
Keep your body in a relaxed yet upright position. The backrest of
your chair should support the inward curve of your back.
Use the entire seat and backrest to support your body. Tilt the
backrest slightly (90° to 105°). The angle formed by your thighs
and back should be 90° or more.
Your seat depth should allow your lower back to comfortably
contact the backrest. Make sure that the backs of your lower legs
do not press against the front of the chair.
Extend your lower legs slightly so that the angle between your
thighs and lower legs is 90° or more.
Place your feet flat on the floor. Only use a footrest when
attempts to adjust your chair and workstation fail to keep your
feet flat.
Be sure that you have adequate clearance between the top of your thighs and the underside of you
r
workstation.
Use armrests or forearm supports to support your forearms. If adjustable, the armrests or forearm
supports should initially be lowered while all the other adjustments discussed in this section are
made. Once all these adjustments are completed, raise the armrests or adjust the forearm supports
until they touch the forearms and allow the shoulder muscles to relax.
Y
our Desk
There is no specific height recommended for your desk. This can vary between 60 to 70 cm, depending upon
your size. The standard workaround is that it should be at approximately your elbow height.
The desktop should be clean and organized in such a way that frequently used objects are close enough
without excessive reaching. If you use a document holder, it should be placed at approximately the same
Setting Up a Healthy Work Environment

height as the monitor and at the same distance from the eyes to prevent frequent eye shifts.
The area underneath the desk should be clean to accommodate your legs and allow for stretching.
Y
our Input Devices
Note the following points when positioning your notebook computer or any external input devices.
Position your keyboard directly in front of you. Avoid reaching when using your keyboard or mouse.
If you use a mouse, position it at the same height as the keyboard and next to the keyboard. Keep
your wrists straight and use your entire arm when moving a mouse. Do not grasp the mouse tightly.
Grasp the mouse lightly and loosely.
Adjust the keyboard height so that your elbows are near your body and your forearms are parallel to
the floor, with your forearms resting on either armrests or forearm supports, in the manner described
previously. If you do not have armrests or forearm supports, your upper arms should hang
comfortably at your sides.
Adjust the keyboard slope so that your wrists are straight while you are typing.
Type with your hands and wrists floating above the keyboard. Use a wrist pad only to rest your wrists
between typing. Avoid resting your wrists on sharp edges.
Type with your wrists straight. Instead of twisting your wrists sideways to press hard-to-reach keys,
move your whole arm. Keep from bending your wrists, hands, or fingers sideways.
Press the keys gently; do not bang them. Keep your shoulders, arms, hands and fingers relaxed.
Y
our Screen or Monitor
Correct placement and adjustment of the screen or external monitor can reduce eye, shoulder, and neck
fatigue. Check the following when you position the screen or external monitor.
Adjust the height of your screen or external monitor so that the top of the screen is at or slightly below
eye level. Your eyes should look slightly downward when viewing the middle of the screen or external
monitor.
Position your screen or external monitor no closer than 30cm and no further away than 75cm from
your eyes. The optimal distance is between 35cm and 45cm inches.
Rest your eyes periodically by focusing on an object at least 6 metres away. Blink often.
Position the screen or external monitor at a 90° angle to windows and other light sources to minimise
glare and reflections. Adjust the monitor tilt so that ceiling lights do not reflect on your screen o
r
external monitor.
If reflected light makes it hard for you to see your screen or external monitor, use an anti-glare filter.
Clean your screen or external monitor regularly. Use a lint-free, non-abrasive cloth and a non-alcohol,
neutral, non-abrasive cleaning solution or glass cleaner to minimise dust.
Adjust the screen or external monitor's brightness and contrast controls to enhance readability.
Use a document holder placed close to the screen or external monitor.
Position whatever you are looking at most of the time (the screen or reference material) directly in
front of you to minimise turning your head while you are typing.
Get regular eye check-ups.
Setting Up a Healthy Work Environment

Click on one of the shortcuts below to jump to the selected piece of information.
System Processor
Random Access Memory (RAM)
Read-Only Memory (ROM)
Calendar Clock
Audio
Input/Output (I/O) Facilities
PC Card Slots
LCD Panel
Keyboard
Internal Hard Disk Drive
24x CD-ROM Drive (depending on the model)
8x/24x DVD-ROM Drive (depending on the model)
8x/10x/16x/24x DVD-ROM/CD-RW Combination Drive (depending on the model)
LAN Feature
MDC Modem
Mini-PCI 802.11b Wireless LAN card (depending on the model)
Power
Dimensions
Weight
Recommended Environment
System Components

System Components
The following system component specifications are standard except where noted.
Note: the specifications listed here vary according to the model and are subject to change without notice.
System Processor
Depending on the model:
Intel®Pentium®4 Processor-M 1.6 GHz or higher
Mobile Intel® Celeron® processor 1.4 GHz or higher
Random Access Memory (RAM)
1 memory slot available for expansion
- Minimum of 128 MB installed
- un-buffered PC2100 compatible DDR SO-DIMM (bus speed fixed at 133 MHz)
- Expandable in 128 MB, 256 MB, or 512 MB increments
- Maximum 1024 MB total
Video RAM - 32 MB shared with system memory
Cache Memory: either 256 KB (Celeron®) or 512 KB (Pentium®4 Processor-M) L2 cache
Read-Only Memory (ROM)
4 Mb Flash ROM
Calendar Clock
Year/month/day/hour/minute/second maintained by internal back-up battery
Audio
PCI based, AC97 Codec rev 2.1 compliant
SoundBlaster compatible
Input/Output (I/O) Facilities
Integrated industry-standard interfaces
System Components
DC In - 1 port, for AC adapter cable
TV out - 1 port, RCA signal
USB port - 3 ports, 4 pin
Serial port - 1 port, 9-pin D-sub
VGA port - 1 port, 15-pin high-density D-sub
Parallel port - 1 port, 25-pin D-sub
Modem port - 1 port, RJ-11 jack (depending on the model)
LAN port - 1 port, RJ-45 jack (depending on the model)
IEEE 1394 - 2 ports, 4 pin
Microphone - 1 port, 3-pin, Mini Pin jack
Headphones - 1 port, 3-pin, Mini Pin jack
PC Card - see below for more information
PC Card Slots
Two 32-bit card slots for two Type II PC cards or one Type III PC card, 5 V or 3.3 V interface
LCD Panel
Panel:
- 14 or 15-inch Thin Film Transistor (TFT) Extended Graphics Array (XGA) colour
Supported resolutions:
Keyboard
Membrane keys with standard QWERTY-key layout (depending on the model)
Function keys - 12 keys
Cursor Control keys - 4 keys; arrow keys arranged in inverted T layout
Numeric keypad - embedded
Special Windows key set
Fn key - function key for ROM-based key functions
Internal Hard Disk Drive
Output device Recommended resolution Maximum resolution
LCD screen 1024 x 768 2048 x 1536
CRT monitor 1024 x 768 2048 x 1536 (depends also on the CRT screen used)
Tv-out mode 800 x 600 800 x 600
System Components

Specifications vary depending upon model:
Internal, 2.5 inch, IDE
Capacity: 20, 30, 40 GB or higher
24x CD-ROM Drive (depending on the model)
Thin-type CD-ROM Pack
Burst Transfer Rate:
- PIO Mode 4/Multiword DMA mode 2: 16.7 MB/s
- Ultra DMA mode: 33.3 MB/s
Read Rate
- CD, approx 3600 KB/sec
Average Access Time
- Random: 110 ms typical
- Full Stroke: 220 ms typical
Data Buffer: 1 MB
Interface: IDE (ATAPI)
CD Compatibility: CD-DA, CD-ROM, CD-XA, Multi-session Photo CD, CD-I, CD-Plus, CD-R, and CD-
RW discs.
8x/24x DVD-ROM Drive (depending on the model)
Burst Transfer Rate:
- Ultra DMA 33: 33.3 MB/s
Transfer Rate
- CD, 3600 KB/sec max
- DVD-ROM (single layer), 10800 KB/sec max
- DVD (dual layer), 10800 KB/sec max
Average Access Time
- DVD-ROM (single layer), 90 ms (Random)
- DVD-ROM (dual layer), 130 ms (Random)
- CD, 85 ms (Random)
Data Buffer: 512 KB
Interface: IDE (ATAPI)
CD Compatibility: CD-Audio, CD-ROM, CD-ROM XA (mode 2, form 1, form 2), CD-R, CD-RW, Photo
CD, CD-Extra, CD-I
DVD Compatibility: DVD-ROM (DVD-5, DVD-9, DVD-10, DVD-18), DVD-R (3.95 and 4.7 GB/side),
DVD-RW (4.7 GB/side), DVD+RW (4.7 GB/side), DVD-RAM (2.6 and 4.7 GB/side)
System Components

DVD-ROM/CD-RW Combination Drive (depending on the model)
8x DVD/ 10x CD-RW/ 16xCD-R/ 24x combination drive
Speed
- Read, 24X max (CD), 8X max (DVD)
- Write, 16X (CD-R), 10X (CD-RW)
Read Transfer Rate
- CD, 3600 KB/s max (mode1)
- DVD, 10800 KB/sec max
Average Access Time - 180 ms (DVD), 130 ms (CD)
Data Buffer - 2MB
CD Compatibility - CD-DA, CD-ROM, CD-ROM XA, CD-I Ready, Photo CD, Video CD, Multisession
CD, CD-R, CD-RW, CD-Extra, CD-text
DVD Compatibility - DVD-Video, DVD-ROM, DVD-5, DVD-9, DVD-10, DVD-18, DVD-R (3.9 GB, 4.7
GB)
LAN Feature
10BASE-T and 100BASE-TX compatible
Remote Power On, Wake on LAN
LAN Boot support and WFM 2.0 compliant
MDC Modem (depending on the model)
Internet connection rates up to 56 kbits/s
Data modem: supports ITU-T V.92, V.90 (56 kbits/s), V.34 (33.6 kbits/s). Backward compatibility with
previous standards.
Fax modem: supports ITU-T V.17 (14,4 kbits/s), V.29. Backward compatibility with previous
standards.
Data compression V.42bis, MNP Class 5
Error correction V.42 LAPM and MNP 2-4
AT Command set: TIA/EIA 602 standard
Telephony: Dual Tone Multi Frequency (DTMF) compliant
Mobile Daughter Card (MDC) V1.0 form factor
AC'97 2.1 compliant
Wake on Ring support
Mini-PCI 802.11b Wireless LAN card
(
de
p
endin
g
on the model
)
System Components

Up to 11Mb/s data transfer rate by incorporating Direct Sequence Spread Spectrum. The rate can be
manually set to 11, 5.5, 2, 1 or the Fully Auto transmit rate.
IEEE 802.11b compatible.
Connect to Access Point mode: the PC can access the LAN or WAN by connecting automatically to
the access point set within the proper range of the system.
Peer-to-Peer mode: PCs can easily build an Ad Hoc wireless LAN by using Ad Hoc mode with the
same channel and SSID, and without any access point.
Specifications:
Frequency band: 2400 to 2497 MHz (2.4 GHz band)
Channel support:
- US/Canada: 11 (1 to 11)
- Major European countries: 13 (1 to 13)
- France: 4 (10 to 13)
- Spain: 2 (10 to 11)
- Japan: 14 (1 to 14)
Current consumption:
- Transmitting: 380 mA max
- Receiving: 215 mA max
- Standby: 90 mA max
Radio power: 14 dBm ± 2 dBm
Operating range:
- Indoor: 37 meters at 11Mb/s
- Outdoor: 122 meters at 11Mb/s
Mini-PCI V1.0 compliant
Power
AC Adapter
Input Voltage: 110 to 240 volts (V) AC, 47/63 Hz (auto-switching)
Output Voltage: 19.0 volts DC, 3.16 A
Main Battery
Type: Lithium-Ion (Li-Ion), 8 cells
- Output Voltage: 14.8 v
- Capacity: 4000 mAh
Recharging Time:
- approximately 2.5 hours when the system is not in use
- approximately 5 hours when the system is in use.
System Components

Dimensions
Width: 329 mm
Depth: 265 mm
Height: 36,5 mm
Weight
2,77 kg
Recommended Environment
Operation
Temperature: 5°C to 35°C (41°F to 95°F)
Relative Humidity: 20% to 80% (Non-condensing)
Storage
Temperature: -20°C to 40°C (-4°F to 104°F)
Relative Humidity: 20% to 80% (Non-condensing)
System Components

Memory Map
The system supports system and video shadowing, both controlled through complementary metal oxide
semiconductor (CMOS). The system supports BIOS as a cacheable area with write protection.
If you need to check the memory allocations, follow the procedure described below.
1. Click on Start, and right-click on My Computer. Click on Properties.
2. In the System Properties window, click on the Hardware tab. Click on the Device Manager button.
3. In the Device Manager window, click on the View menu, and click on Resources by type.
4. Click on the + sign in front of Memory.
Memory Map

Interrupt Controllers
The Interrupt Controllers are automatically assigned by Windows XP. If you need to check which IRQ is
assigned to a specific device, follow the procedure described below.
1. Click on Start, and right-click on My Computer. Click on Properties.
2. In the System Properties window, click on the Hardware tab. Click on the Device Manager button.
3. In the Device Manager window, click on the View menu, and click on Resources by type.
4. Click on the + sign in front of Interrupt request (IRQ) to display a list of IRQs and thei
r
assignments.
Interrupt Controllers
Problem Checklist
First check the items in the following list. If these items don't help, see the table that follows the list.
Power to the computer is on.
The electrical outlet to which your AC adapter is connected is working. Test the outlet by plugging in a
lamp or other electrical device.
All cables are tightly connected.
The display setting is configured correctly.
The display brightness control is adjusted properly.
If using battery power, check that the battery pack is properly inserted and fully charged.
Problem Resolution
The system does not power on If you are operating the system with battery power, check that the
battery pack is correctly inserted. Attach the AC adapter to recharge
the battery.
If you have the AC adapter attached, check that you are using a
working electrical outlet.
LCD screen is dark and blank Power-saving mode has shut off the backlight. Press a keyboard key.
The built-in LCD may not be selected. Press Fn-F3 once or twice to
select the LCD video mode.
Screen brightness needs adjustment. Use the Fn-F8 and Fn-F9
functions keys.
The system entered Standby mode due to low battery power. Plug in
the AC adapter before resuming operation.
Battery power does not last long Use power-saving modes. Refer to the 'Managing System Power'
chapter relevant to your operating system.
Fully charge and discharge the battery several times to recondition it.
Refer to the 'Using the Battery' chapter for more information.
Replace the battery.
Information on the LCD is difficult to
see
Use the Fn-F8 and Fn-F9 functions keys to adjust the brightness
control.
Tilt the LCD screen slightly forward or backward.
An optional component does not
work
Make sure the component is securely installed or connected.
Refer to the optional component documentation.
The Standby/Resume function
does not work.
If the system does not enter Standby mode, a disk drive might be
busy. Wait until the disk drive stops and try again.
If system does not resume, it may have auto suspended on a low
battery. Attach the AC adapter and try again.
Problem Checklist
Start-Up Problems
The system displays an invalid configuration error message at power on when there are the following
conditions:
the current configuration information doesn't match configuration information stored in Auto Setup,
such as when an internal option is added.
the system loses configuration information.
If either condition is true, the system displays an "invalid configuration information" message.
To continue start-up procedures, press F2 (or F1 when prompted) and run the Setup utility to set current
system parameters.
If an error message appears before the operating system starts, look up the error message in the following
table. Follow the instructions. If you see other error messages, the hardware might need repairing.
If the system frequently loses the Setup configuration data, the internal CMOS battery may need to be
replaced at an authorised repair centre.
Post Error Messages
The Versa notebook has a built-in checking program that automatically tests its components when you turn
the system power on. This diagnostic test is called the Power-On Self-Test (POST). If the system finds a
problem during the POST, the system displays an error message. If this happens, follow the instructions in the
POST Error Messages table.
Message Resolution
Failure Fixed Disk Fixed disk is not configured or working properly. Check to see if the fixed disk is
attached properly. Run Setup. Find out if the fixed-disk type is correctly identified.
Stuck Key A key is stuck on the keyboard.
Keyboard error The keyboard is not working. Try replacing it.
Keyboard
Controller failed
The keyboard controller failed test. You may have to replace the keyboard controller.
Extended RAM
Failed at offset:
nnnn
Extended memory not working or not configured properly at offset nnnn.
System RAM
Failed at offset:
nnnn
System memory not working or not configured properly in the 64k block in which the
error was detected.
Shadow RAM
Failed at offset:
nnnn
Shadow memory not working or not configured properly in the 64k block in which the
error was detected.
System battery is
dead - Replace
and run Setup
The CMOS clock battery indicator is dead. Contact your authorised service
representative to replace the battery.
System CMOS
checksum bad -
replace and run
SETUP
CMOS has been corrupted or modified incorrectly, perhaps by an application program
that changes data stored in CMOS. Run Setup and reconfigure the system either
using the Default Values and/or making your own selections.
System CMOS
checksum bad -
Default
configuration used
CMOS has been corrupted or modified incorrectly, perhaps by an application program
that changes data stored in CMOS. The BIOS used the default values. If necessary,
run Setup and reconfigure the system by making your own selections. If the error
persists, contact your authorised service representative.
System timer error The timer test failed. Requires repair of the system board.
Real time clock Real-time clock fails BIOS test. It may require board repair.
Start-Up Problems
error
Check date and
time settings
The BIOS found the system time out of range and reset the Real Time Clock. Run
Setup and reconfigure the date and time.
Previous boot
incomplete -
Default
configuration used
POST loads default values and offers to run Setup. If the failure was caused by
incorrect values and they are not corrected, the next boot will likely fail.
On systems with wait states, improper Setup settings can also terminate POST and
cause this error on the next boot. If applicable, run Setup and verify that the wait-state
configuration is correct. This error is cleared the next time the system is booted
Diskette drive A
error.
Drive A: is present but fails the BIOS POST diskette tests. Check to see that the drive
is defined with the proper diskette type in Setup.
Incorrect Drive A
type - run Setup
Type of floppy drive A: not correctly identified in Setup.
System cache
error - cache
disabled
The RAM cache failed, and the BIOS disabled the cache. Contact your authorised
service representative.
Failing Bits: nnnn The hex number nnnn is a map of the bits at the RAM address (in System, Extended,
or Shadow memory) which failed the memory test. Each 1 (one) in the map indicates a
failed bit.
Operating system
not found
An Operating system cannot be located on either drive A: or drive C:. Enter Setup and
see if fixed disk and drive A: are properly identified.
Parity Check 1
nnnn
A parity error was found in the system bus. The BIOS attempts to locate the address.
If it cannot locate the address, it displays ????.
Parity Check 2
nnnn
A parity error was found in the I/O bus. The BIOS attempts to locate the address. If it
cannot locate the address, it displays ????.
Start-Up Problems
Federal Communication Commission Interference Statement
This equipment has been tested and found to comply with the limits for a Class B digital device,
pursuant to Part 15 of the FCC Rules. These limits are designed to provide reasonable protection
against harmful interference in a residential installation. This equipment generates, uses and can
radiate radio frequency energy and, if not installed and used in accordance with the instructions,
may cause harmful interference to radio communications. However, there is no guarantee that
interference will not occur in a particular installation. If this equipment does cause harmful
interference to radio or television reception, which can be determined by turning the equipment off
and on, the user is encouraged to try to correct the interference by one of the following measures:
- Reorient or relocate the receiving antenna.
-Increase the separation between the equipment and receiver.
-Connect the equipment into an outlet on a circuit different from that to which the receiver is
connected.
-Consult the dealer or an experienced radio/TV technician for help.
FCC Caution: To assure continued compliance, (example - use only shielded interface cables when
connecting to computer or peripheral devices) any changes or modifications not expressly approved
by the party responsible for compliance could void the user's authority to operate this equipment.
This device complies with Part 15 of the FCC Rules. Operation is subject to the following two
conditions: (1) This device may not cause harmful interference, and (2) this device must accept any
interference received, including interference that may cause undesired operation.
Statement Needed to be Shown on End Product
Since this module is installed inside the end product, the end product should be affixed a label on
visible area showing that this product contain a RF module, and also its FCC ID.
IMPORTANT NOTE:
FCC Radiation Exposure Statement:
This equipment complies with FCC radiation exposure limits set forth for an uncontrolled
environment. This equipment should be installed and operated with minimum distance 20cm
between the radiator & your body.
This transmitter must not be co-located or operating in conjunction with any other antenna or
transmitter.

If You Need Assistance
If you have a problem with your computer, first review the 'Checklist' and the 'Start-Up Problems
'
troubleshooting table. You may also want to check out the 'Frequently Asked Questions' section.
Note: reference the NEC UltraCare Warranty Terms and Conditions guide and its included UltraCare Pocket
Memo, or UltraCare Standard Warranty Sheet to find out how to contact the local office in your country.
For technical support such as BIOS upgrades, consult our Web site at the following address: www.nec-
online.com.
If You Need Assistance

Frequently Asked Questions
Click on one of the shortcuts below to jump to the corresponding FAQs.
Technical Support
Boot Problems
PC Cards
Floppy Disk Drive
Computer Viruses
Internet
Miscellaneous
Wireless Communication Protocols
Digital Video and IEEE 1394 Devices
Frequently Asked Questions

These Frequently Asked Questions are common to a wide range of notebooks; please note that some ma
y
not be relevant to your Versa.
Wireless Communication Protocols
Note: your Versa may feature Wireless LAN 802.11b and/or Bluetooth support. Please refer to the 'System
Components' section for the detailed specifications of your wireless card (if applicable).
Basically, wireless communication can be divided in three categories:
Wireless Personal Area Network (WPAN) - connecting personal wireless products to you
r
computer, for instance synchronising a personal digital assistant (PDA) to a personal computer. This
can be achieved via the Bluetooth standard. The range of this connectivity is about 10 meters in ideal
conditions.
Wireless Local Area Network (WLAN) – a wireless connection to an office or campus. There is still
an existing Ethernet network, but the connection to the PC is wireless. This way, a person can take a
portable PC around an office or campus while remaining connected to the network. The range of this
wireless connectivity will be about 100 meters in a place with buildings and walls. This can be
achieved via the 802.11b standard.
Wireless Wide Area Network (WWAN) – access to the Internet/Intranet on the road or elsewhere,
away from an office or campus. This type of wireless connection offers slower data rates but broad
availability. This can be achieved via the third generation of mobile phones (such as GPRS and
UMTS).
BluetoothTM
What is Bluetooth?
Bluetooth is a high-speed wireless (maximum 723 Kb/s) link system that is designed to work with portable
equipment such as laptops, PDAs, cell phones or wired telephone access points.
How does it work?
Bluetooth operates in the unlicensed Industrial, Scientific and Medical (ISM) band at 2.45GHz, which is
globally available for products. The link constantly switches channel to avoid interference, roughly about 1600
times a second through 79 frequency bands (83MHz bandwidth). All devices on a piconet (2 or more
Bluetooth units sharing a channel) are synchronised and controlled by a master device to prevent
simultaneous operation on the same frequency. Any device can be master, and is elected dynamically when
the link starts up.
802.11b
What is 802.11b?
The Institute of Electrical and Electronics Engineers (IEEE) ratified the 802.11b standard (also known as
802.11 High Rate) for wireless LAN transmissions of up to 11 Mbps (5.5 and 11 Mb/s).
How does it work?
This standard defines two modes:
in infrastructure mode, the wireless network consists of at least one access point connected to the
wired network infrastructure and a set of wireless end stations. This configuration is called a Basic
Service Set (BSS). An Extended Service Set (ESS) is a set of two or more BSSs.
in Ad hoc mode, also called peer-to-peer mode or an Independent Basic Service Set (IBSS), a set o
f
802.11 wireless stations communicate directly with one another without using an access point or any
connection to a wired network.
Frequently Asked Questions

Technical Support
Refer to the UltraCare Warranty Terms and Conditions Guide for more information about your system's
warranty.
Note: depending on your configuration, you may not benefit from this warranty.
Where can I find the call centre phone number?
The technical support phone numbers for your country can be found on the UltraCare Pocket Memo.
If your system features Windows XP, you may also select Start, right-click on My Computer and select
Properties. On the General tab, click on the Support Information button.
Is there a technical support web site?
Yes. Connect to the following web site for any technical information on your computer system. The web site
features a Frequently Asked Questions (FAQ) database, a new drivers and utilities download section, as well
as a documentation library.
While connected to the internet, go to www.nec-online.com, select your country, and click on the Support
icon on top of the page.
Can I get help by email?
Yes. While connected to the internet, go to www.nec-online.com, select Europe, and click on the Contacts
icon on top of the page. Under the Technical Support section, click on your country. This will create a mail
message directly addressed to the relevant technical support team.
Frequently Asked Questions