Quanta Computer OA8BCM94306MP NoteBook User Manual Using Your Gateway M275 Notebook
Quanta Computer Inc NoteBook Using Your Gateway M275 Notebook
Contents
Users Manual System 2
71
Searching for files
www.gateway.com
3Continue double-clicking/double-tapping folders and their subfolders until
you find the file or folder you want.
Searching for files
If you are looking for a particular file or folder or a set of files or folders that
have characteristics in common, but you do not remember where they are
stored on your hard drive, you can use the Search utility to search by:
■Name or part of a name
■Creation date
■Modification date
■File type
■Text contained in the file
■Time period in which it was created or modified
You can also combine search criteria to refine searches.
Files and folders found using this utility can be opened, copied, cut, renamed,
or deleted directly from the list in the results window.
Help and
Support For more information about browsing for files and folders,
click/tap Start, then click/tap Help and Support.
Type the keyword files and folders in the Search box
, then click/tap the arrow.
72
Chapter 4: Windows Basics
www.gateway.com
Using the Windows Search utility
To find files and folders using the Search utility:
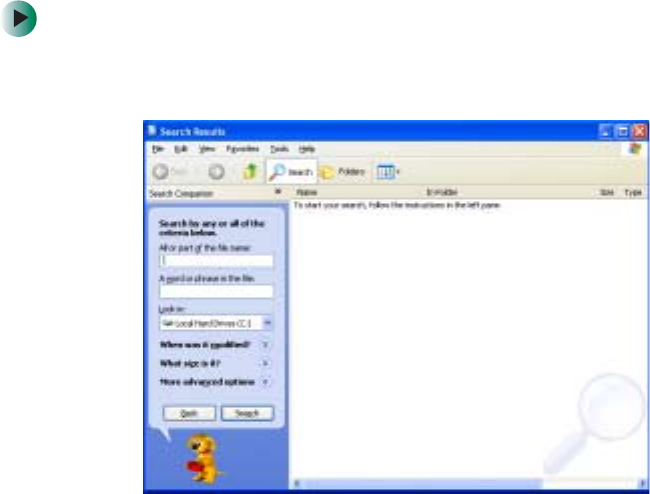
1Click/Tap Start, then click/tap Search. The Search Results window opens.
Click/Tap All files and folders.
2If you want to search by file or folder name, type in all or part of the file
or folder name in the name box in the left pane of the window.
■If you type all of the name, Search will list all files and folders of that
name.
■If you type part of the name, Search will list all of the file and folder
names containing the letters you typed.
73
Searching for files
www.gateway.com
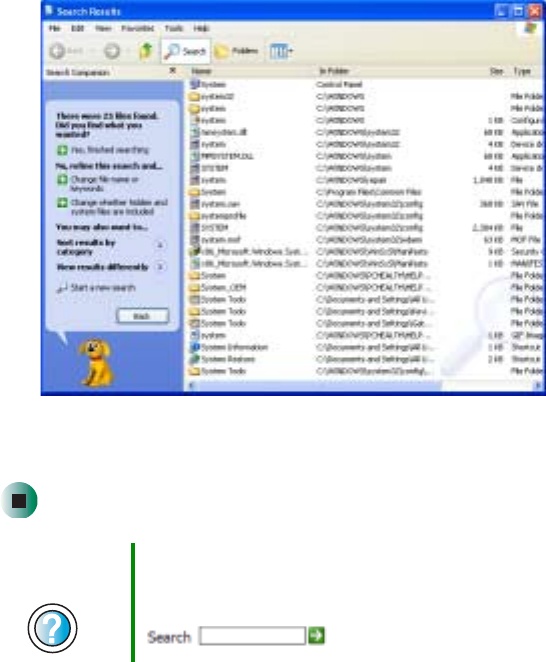
3Click/Tap Search. When the search is completed, Windows lists the files
and folders whose names contain the text that you searched for.
4Open a file, folder, or program by double-clicking/double-tapping the
name in the list.
Using advanced search options
Search can find files meeting more criteria than file name. You can narrow your
search by selecting the search options that you want. You can search by the:
■Date the file was created or modified.
■Size of the file.
■Type of file, such as a program or a text document.
Help and
Support For more information about searching for files and folders,
click/tap Start, then click/tap Help and Support.
Type the keyword searching in the Search box
, then click/tap the arrow.
74
Chapter 4: Windows Basics
www.gateway.com
Working with documents
Computer documents include word processing files, spreadsheet files, or other
similar files. The basic methods of creating, saving, opening, and printing a
document apply to most of these types of files.
The following examples show how to create, save, open, and print a document
using Microsoft® WordPad. Similar procedures apply to other programs such
as WordPerfect, Microsoft Word, and Microsoft Excel.
For more information about using a program, click/tap Help on its menu bar.
Creating a new document
To create a new document:
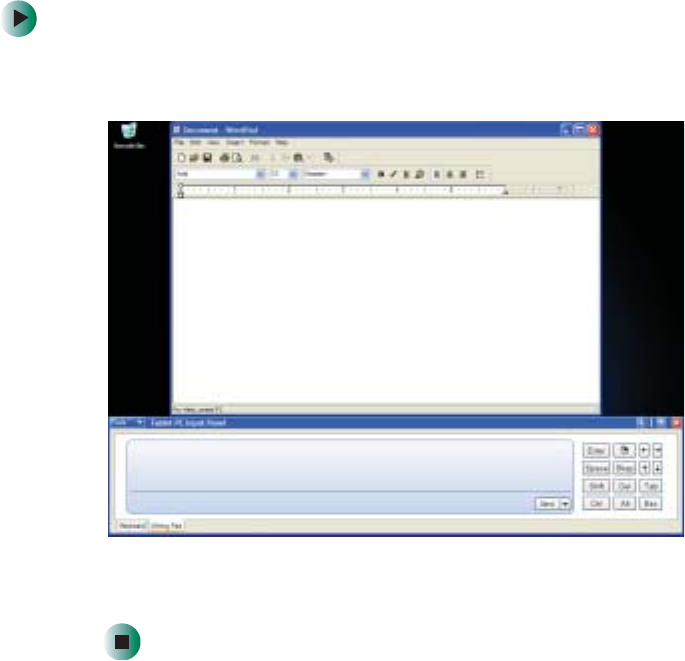
1Click/Tap Start, All Programs, Accessories, then click/tap WordPad. Microsoft
WordPad starts and a blank document opens.
2Begin composing your document. Use the menus and toolbar buttons at
the top of the window to format the document.
75
Working with documents
www.gateway.com
Saving a document
After you create a document, you need to save it if you want to use it later.
To save a document:
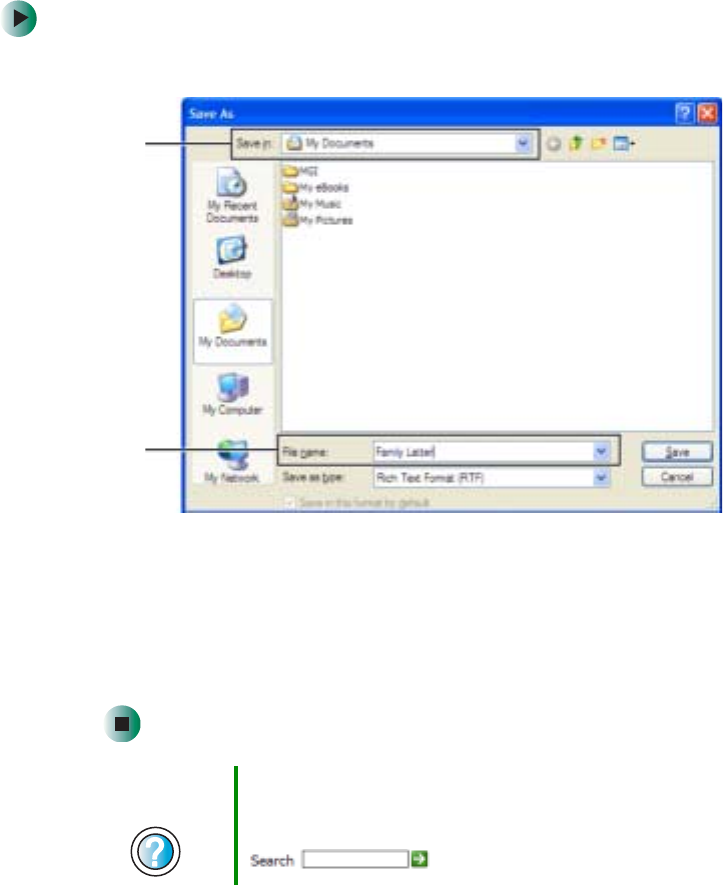
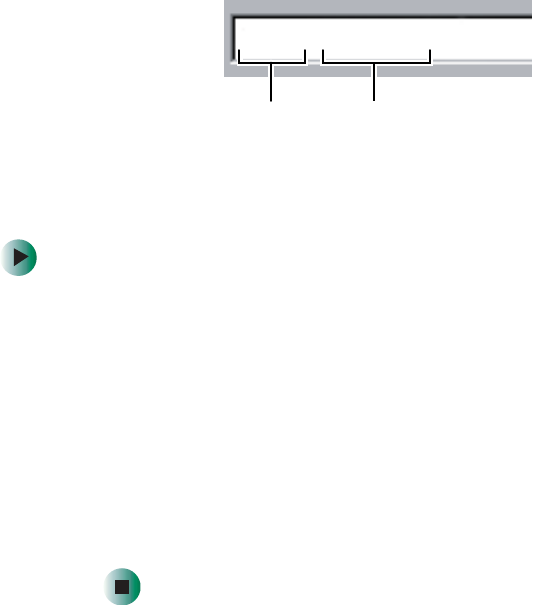
1Click/Tap File, then click/tap Save. The Save As dialog box opens.
2Click/Tap the arrow button to open the Save in list, then click/tap the folder
where you want to save the file. If you do not see the folder you want,
browse through the folders listed below the Save in list.
3Type a new file name in the File name box.
4Click/Tap Save.
Help and
Support For more information about saving documents, click/tap
Start, then click/tap Help and Support.
Type the keyword saving in the Search box
, then click/tap the arrow.
Save in
list
File
name
76
Chapter 4: Windows Basics
www.gateway.com
Opening a document
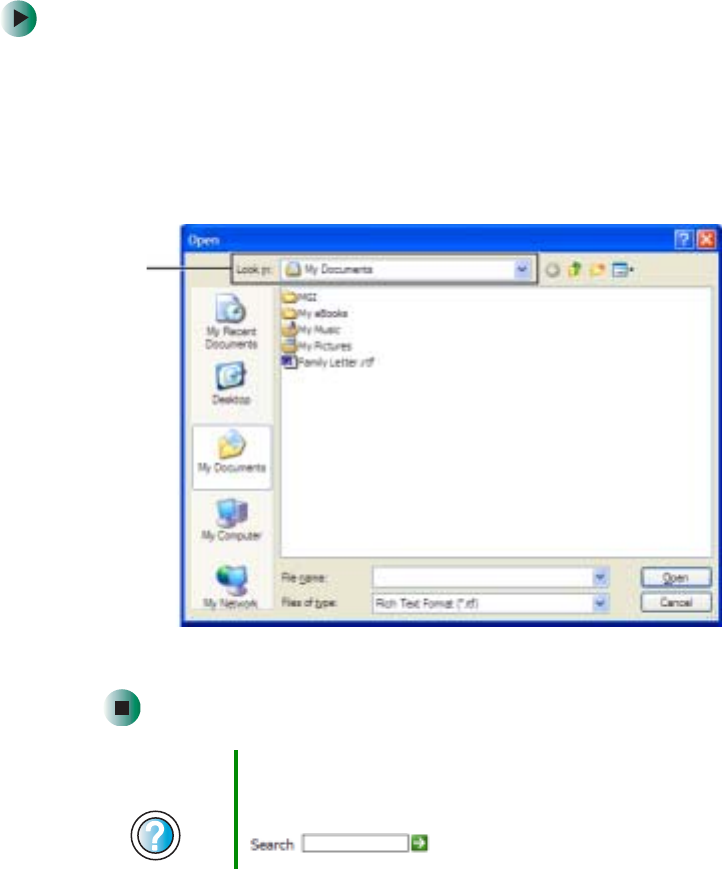
To view, revise, or print an existing document, first you need to open it. Open
the document in the program that it was created in.
To open a document:
1Start the program.
2Click/Tap File, then click/tap Open.
3Click/Tap the arrow button to open the Look in list, then click/tap the folder
you want to open. If you do not see the folder you want, browse through
the folders listed below the Look in list.
4Double-click/Double-tap the document file name. The document opens.
Help and
Support For more information about opening documents, click/tap
Start, then click/tap Help and Support.
Type the keyword opening files in the Search box
, then click/tap the arrow.
Look in
list
77
Working with documents
www.gateway.com
Printing a document
To print a document, you must have a printer connected to your convertible
tablet PC or have access to a network printer. For more information about
installing or using your printer, see the printer documentation.
To print a document:
1Make sure that the printer is turned on and loaded with paper.
2Start the program and open the document.
3Click/Tap File, then click/tap Print. The Print dialog box opens.
4Set the print options, then click/tap OK. The document prints.
Help and
Support For more information about printing documents, click/tap
Start, then click/tap Help and Support.
Type the keyword printing in the Search box
, then click/tap the arrow.
78
Chapter 4: Windows Basics
www.gateway.com
Keyboard shortcuts
The following table shows a few shortcuts that you can use in Windows and
almost all programs that run in Windows. For more information about
shortcuts, see your Windows or program documentation.
To... Do this...
Copy a file, folder, text, or graphic Click the item, then press CTRL +C.
Cut a file, folder, text, or graphic Click the item, then press CTRL +X.
Paste a file, folder, text, or graphic Click inside the folder or window where you want to paste
the object, then press CTRL +V.
Select multiple items in a list or window Click the first item, press and hold down the CTRL key,
then click each of the remaining items.
Select multiple adjacent items in a list
or window Click the first item in the list, press and hold down the
SHIFT key, then click the last item in the list.
Permanently delete a file or folder Click the file or folder, then press SHIFT +DELETE. The
file or folder is permanently deleted. The file or folder is
not stored in the Recycle Bin.
Rename a file or folder Click the file or folder, press F2, type the new name, then
press ENTER.
Close the active window or program Press ALT +F4.
Switch to a different file, folder, or
running program Press ALT +TAB.
Help and
Support For more information about Windows keyboard shortcuts,
click/tap Start, then click/tap Help and Support.
Type the keyword Windows keyboard shortcuts in the
Search box , then click/tap the
arrow.

5
79
Using the
Internet
This chapter provides information about the Internet and
the World Wide Web. Read this chapter to learn how to:
■Set up and access an Internet account using
America Online®
■Connect to a Web site using a browser
■Download files from the Internet
■Send and receive e-mail using America Online
80
Chapter 5: Using the Internet
www.gateway.com
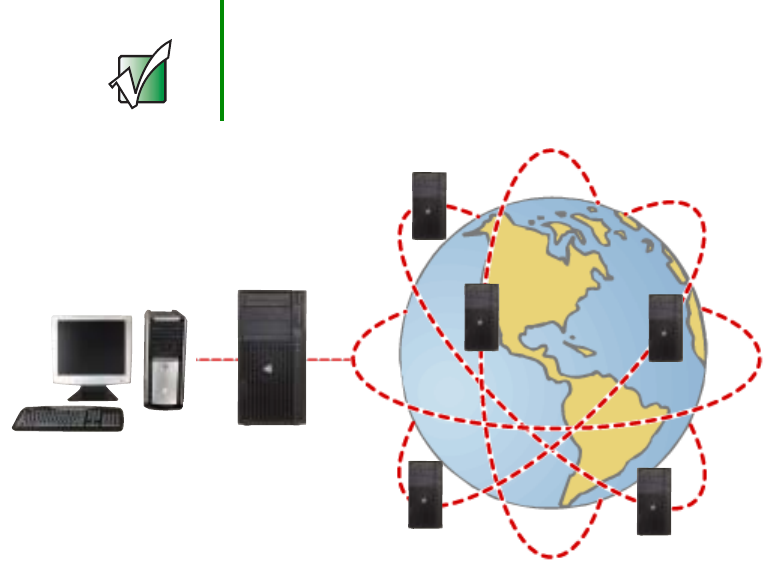
Learning about the Internet
The Internet is a worldwide network of computers linked together to provide
information to people everywhere. The two most popular services on the
Internet are e-mail and the World Wide Web. You can access this network by
connecting your convertible tablet PC to a telephone, DSL (Digital Subscriber
Line), or cable line and signing up with an Internet service provider (ISP).
Cable and DSL modems, a connection known as broadband, use your TV cable
or special telephone lines to connect to your ISP and access the Internet. Cable
and DSL modems connect to your convertible tablet PC through an Ethernet
jack and provide a faster connection speed than a standard telephone modem.
Important For the location of your modem and Ethernet jacks, see
“Right Side” on page 5, “Back” on page 6, and “Back” on
page 280.
Your computer
connects to the
Internet through
an ISP.
ISP Servers
let you connect to
the Internet and
access your e-mail
messages.
Internet Servers
store information so other
computers can access it
from the Internet.

81
Setting up an Internet account
www.gateway.com
If you want to access the Internet you need:
■A modem – a device that connects your convertible tablet PC to other
computers or servers using a telephone, DSL, or cable line.
■An Internet service provider – a company that provides access to the
Internet through an ISP server. When you connect to an ISP, the ISP server
lets you access the Internet and your e-mail messages.
■A Web browser – a program that displays information from the World
Wide Web.
■An e-mail program – a program that lets you create, send, and receive
e-mail messages over the Internet.
Setting up an Internet account
Before you can view the information on the World Wide Web, you need to
set up an Internet account with an Internet service provider (ISP). If you have
chosen America Online as an ISP, follow these instructions to set up and
connect to your account. To set up a different ISP service or to transfer an
existing account to this convertible tablet PC, contact the ISP directly.
If you set up an account with America Online, an Internet e-mail address is
created for you. After completing the setup, you are ready to access the Internet.
To set up an Internet account with America Online:
1Click/Tap Start, All Programs, then click/tap America Online.
2Follow the on-screen instructions. After setting up your account, you can
connect to the Internet and access your e-mail services.
82
Chapter 5: Using the Internet
www.gateway.com
Accessing your Internet account
To connect to your America Online Internet account:
1Click/Tap Start, All Programs, then click/tap America Online.
2Complete the member name and password information, then click/tap
Connect. Your convertible tablet PC dials the Internet account telephone
number. After connecting, the Welcome window opens.
If you are using a service other than America Online, check with your ISP for
the correct procedure for connecting.
To disconnect from your America Online Internet account:
■Click/Tap X in the top-right corner of the America Online window. Your
convertible tablet PC disconnects from the Internet.
If you are using a service other than America Online, check with your ISP for
the correct procedure for disconnecting.
Important Make sure that your convertible tablet PC disconnects
correctly from your Internet account. If you do not have an
“unlimited hours” ISP account, you may have to pay for the
time that you are connected, even if you are not at your
convertible tablet PC.
Help and
Support For general information about using Internet accounts,
click/tap Start, then click/tap Help and Support.
Type the keyword ISP in the Search box
, then click/tap the arrow.
83
Using the World Wide Web
www.gateway.com
Using the World Wide Web
The World Wide Web is a multimedia window to the Internet that gives you
access to millions of information sources.
Information on the Web comes to you on Web pages, which are electronic
documents that you view using a Web page display program called a browser.
You can use any of the commercially available Web browsers, like Microsoft
Internet Explorer (which comes installed on your new convertible tablet PC),
Netscape Navigator, or the browser built into America Online.
Web pages can contain text, animations, music, and other multimedia features.
A group of related Web pages is called a Web site. You can access Web sites to
shop, track investments, read the news, download programs, and much more.
You can explore a Web site or visit other Web sites by clicking/tapping areas
on a Web page called links or hyperlinks. A link may be colored or underlined
text, a picture, or an animated image. You can identify a link by moving the
mouse pointer over it. If the pointer changes to a hand, the item is a link.
To learn more about using the Web browser, click/tap Help in the menu bar.
Web
page
Link
Linked Web
page
84
Chapter 5: Using the Internet
www.gateway.com
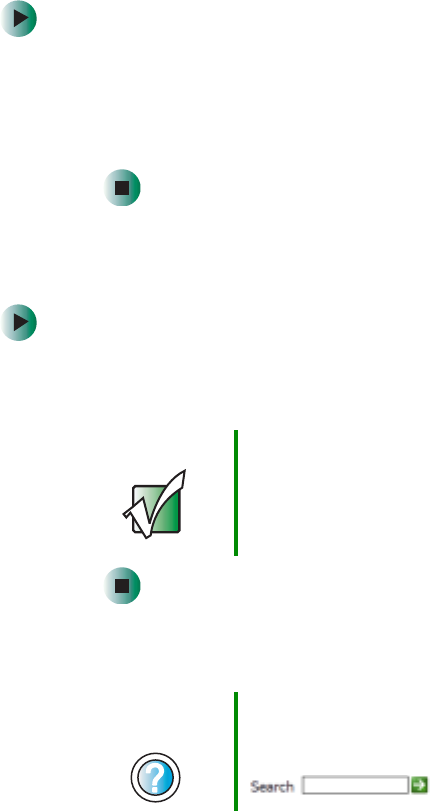
Connecting to a Web site
After you set up an account with an Internet service provider (ISP) such as
America Online, you can access the many information sources on the World
Wide Web.
To connect to a Web site:
1Connect to your Internet account. After your convertible tablet PC
connects, a default opening page or welcome screen opens.
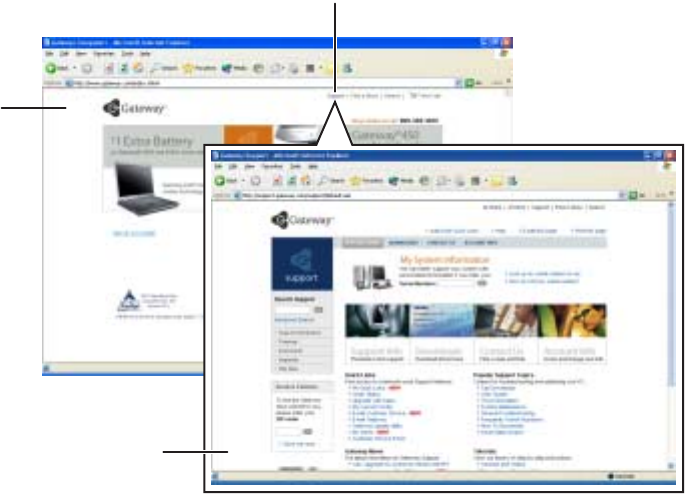
2To go to a different Web site, type the address (called a URL for “Universal
Resource Locator”) in the browser address bar (for example
www.gateway.com), then click/tap GO on the browser address bar.
- OR -
On the current Web page, click/tap a link to a Web site.
The Web browser locates the server computer on the Internet, downloads
(transfers) data to your convertible tablet PC, and displays the page on the
site that you requested.
Sometimes Web pages display slowly. The speed that a Web page displays on
your screen depends on the complexity of the Web page and other Internet
conditions. Additionally, the speed of your connection will determine how fast
Web pages display.
Help and
Support For more information about connecting to a Web site,
click/tap Start, then click/tap Help and Support.
Type the keyword connecting to Web site in the Search
box , then click/tap the arrow.
85
Using the World Wide Web
www.gateway.com
Downloading files
Downloading is the process of transferring files from a computer on the Internet
to your convertible tablet PC.
To protect your convertible tablet PC against viruses, make sure that you scan
the files you download. For more information, see “Protecting your convertible
tablet PC from viruses” on page 233.
To download files or programs from a Web site:
1Connect to your Internet account.
2In the address bar, type the address of the Web site that contains the file
or program you want to download, then click/tap GO on the browser
address bar.
- OR -
Click/Tap a link on a Web page to navigate to the Web site containing the
file that you want to download.
3Create or locate the folder where you want to store the file on your
convertible tablet PC. For more information, see “Working with
documents” on page 74.
4Click/Tap the link on the Web page for the file that you want to download.
5Follow the on-screen instructions for saving the file in the folder that you
want. A copy of the file is downloaded to your convertible tablet PC. The
time that it takes to transfer the file to your convertible tablet PC depends
on file size and Internet conditions.
6Open the folder that you created.
7Install or view the downloaded file by double-clicking/double-tapping it.
If applicable, follow the instructions provided on the Web site to run or
install the program.
Help and
Support For more information about downloading files, click/tap
Start, then click/tap Help and Support.
Type the keyword downloading files in the Search box
, then click/tap the arrow.
86
Chapter 5: Using the Internet
www.gateway.com
Using e-mail
E-mail (electronic mail) lets you send messages to anyone who has an Internet
connection and e-mail address. E-mail is usually a free service of your Internet
account.
The Internet never closes, so you can send e-mail messages at any time. Your
e-mail messages arrive at most e-mail addresses in minutes.
An e-mail address consists of a user name, the @ symbol, and the Internet domain
name of the Internet service provider (ISP) or company that “hosts” that user.
Your e-mail address is assigned when you sign up for an account with an ISP.
For example, a person with an account with America Online might have an
e-mail address that is similar to this one:
Sending e-mail
To send e-mail using America Online:
1Connect to your America Online account.
2Click/Tap Write.
3Type the e-mail address of the recipient you want to send e-mail to in the
Send To box.
4Type the subject of your e-mail in the Subject box.
5Type the e-mail message.
6When finished, click/tap Send Now. Your e-mail is sent over the Internet
to the e-mail address you specified.
jdoe@aol.com
User name Internet domain name
87
Using e-mail
www.gateway.com
Checking your e-mail
To check your e-mail using America Online:
1Connect to your America Online account.
2Click/Tap Read.
3Double-click/Double-tap the message you want to read.
For more information about managing and organizing your e-mail messages,
see the online help in your e-mail program.
Help and
Support For general information about using e-mail, click/tap Start,
then click/tap Help and Support.
Type the keyword e-mail in the Search box
, then click/tap the arrow.
88
Chapter 5: Using the Internet
www.gateway.com
6
89
Sending and
Receiving Faxes
Microsoft Fax lets you send and receive faxes using the
modem. Read this chapter to learn how to:
■Install and configure Fax
■Create and send a new fax
■Set up a fax cover page template
■Fax a document you scanned or created in another
program
■Receive, view, and print a fax
Help and
Support For more information about sending and
receiving faxes, click/tap Start, then
click/tap Help and Support.
Type the keyword Fax in the Search box
, then click/tap the
arrow.
90
Chapter 6: Sending and Receiving Faxes
www.gateway.com
Installing and configuring Fax
Installing Fax
Microsoft Fax lets you send and receive faxes using your modem. When
Windows XP was originally installed on your convertible tablet PC, Fax was not
installed. You need to install Fax from your blue Operating System CD.
To install Fax:
1Insert the blue Operating System CD in your DVD or DVD/CD-RW drive.
2If the Welcome to Microsoft Windows XP dialog box opens, click/tap Install
optional Windows components. The Windows Components Wizard opens.
-OR-
If the Welcome to Microsoft Windows XP dialog box does not open, click/tap
Start, then click/tap Control Panel. The Control Panel window opens.
Click/Double-click/Tap/Double-tap Add and Remove Programs. The Add or
Remove Programs dialog box opens. Click/Tap Add/Remove Windows
Components. The Windows Components Wizard opens.
3Click/Tap Fax Services, then click/tap Next.
4Click/Tap Finish to exit the Windows Components Wizard.
5Click/Tap Exit to close the Welcome to Microsoft Windows XP dialog box.
-OR-
Click/Tap Close to close the Add or Remove Programs dialog box.
Important Your modem cable must be installed before you can send
and receive faxes. You cannot use your standard
telephone modem to connect to the Internet while sending
and receiving faxes.
91
Installing and configuring Fax
www.gateway.com
Configuring Fax
Before you send your first fax, you need to set up your user information. Your
fax cover sheets and fax headers contain this information, some of which is
required by law. The Fax Configuration Wizard opens the first time you try to
send a fax.
To configure Microsoft Fax:
1Click/Tap Start, All Programs, Accessories, Communications, Fax, then
click/tap Fax Console. The Fax Configuration Wizard opens.
2On the Welcome to Fax Configuration Wizard screen, click/tap Next. The
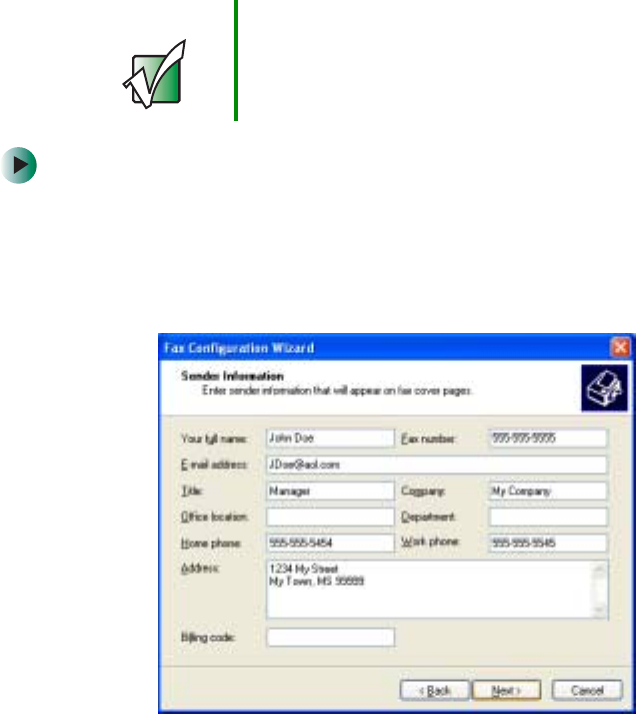
Sender Information screen opens.
3Type the information about yourself that you want to appear on your fax
cover page, then click/tap Next. The Select Device for Sending or Receiving
Faxes screen opens.
Important The first time you run the Fax Configuration Wizard, you
may need to provide information in the Location
Information and the Phone and Modem Options dialog
boxes.
92
Chapter 6: Sending and Receiving Faxes
www.gateway.com
4Click/Tap the arrow to open the Please select the fax device list, then
click/tap the modem you are using to send and receive faxes.
5If you want the modem to automatically answer the telephone in order
to receive faxes, click/tap the Enable Receive check box.
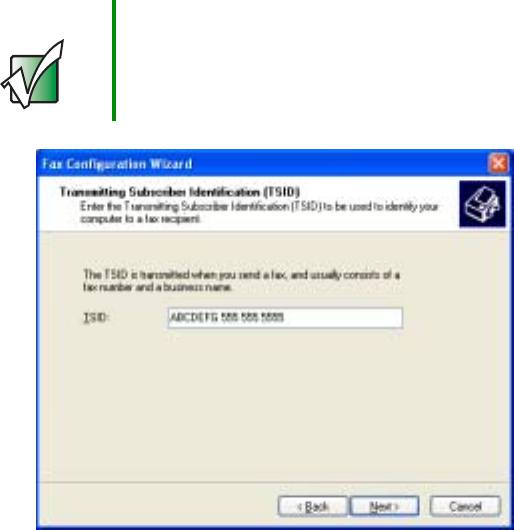
6Click/Tap Next. The Transmitting Subscriber Identification (TSID) screen
opens.
7Type the transmitting fax identifier information. This identifier
information is required by law. You can type up to 20 characters in the
text box. We suggest using eight characters for your identifier name,
followed by 12 characters for your telephone number.
8Click/Tap Next.
9If you set up your convertible tablet PC to receive faxes, type the receiving
fax identifier information, then click/tap Next. This identifier information
is required by law and can be the same identifier that you typed in Step 7.
The Routing Options screen opens.
Important Some fax machines cannot use special characters such
as hyphens. We suggest using spaces instead of hyphens
in telephone and fax numbers.

93
Sending a simple fax
www.gateway.com
10 If you set up your convertible tablet PC to receive faxes, select a folder you
want to store received faxes in and a printer you want to print received
faxes on, then click/tap Next. The Configuration Summary screen opens.
11 Click/Tap Finish.
Sending a simple fax
You can use the Send Fax Wizard to send a simple one-page fax to one or more
recipients.
To send a simple fax:
1Click/Tap Start, All Programs, Accessories, Communications, Fax, then
click/tap Send a Fax. The Send Fax Wizard opens.
2On the Welcome to Fax Configuration Wizard screen, click/tap Next. The
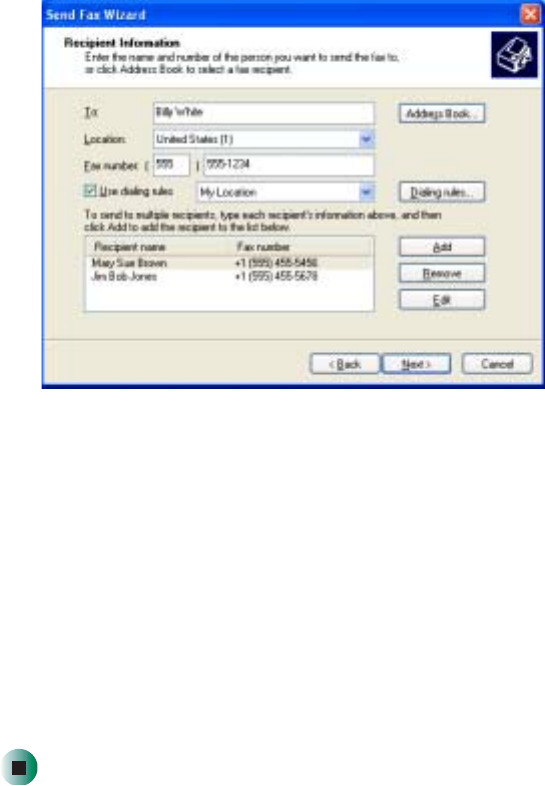
Recipient Information screen opens.
3Type the name and fax number of the recipient of your fax.
4If you need to use the area code for your recipient, click/tap Use dialing
rules to type the full ten-digit fax number.
94
Chapter 6: Sending and Receiving Faxes
www.gateway.com
5If you want to send your fax to more than one recipient, click/tap Add and
type the name and fax number of the next recipient.
6When you have added all your recipients, click/tap Next. The Preparing the
Cover Page screen opens.
7Click/Tap the arrow to open the Cover page template, then click/tap the
cover page template you want to use.
8Type the subject text in the Subject line area.
9Type the message text in the Note area, then click/tap Next. The Schedule
screen opens.
10 Select when you want to send the fax and a priority for the fax, then
click/tap Next. The Completing the Send Fax Wizard screen opens.
11 Click/Tap Finish.

95
Setting up your cover page template
www.gateway.com
Setting up your cover page
template
You can create your own cover page template that you can use in place of the
cover page templates that Microsoft Fax provides for you. To create a cover page
template, you use the Fax Cover Page Editor. On this template, you insert
information fields that automatically import values you enter in both the Send
Fax Wizard and the Fax Configuration Wizard when you send your fax.
To set up your fax cover page template:
1Click/Tap Start, All Programs, Accessories, Communications, Fax, then
click/tap Fax Cover Page Editor. The Cover Page-Fax Cover Page Editor
opens. If the Cover Page Editor Tips dialog box opens, click/tap OK.
2If you want to include fields that are imported from either the Send Fax
Wizard or the Fax Configuration Wizard (such as To or From), add them
to the page by using the Insert menu, then move them to the appropriate
place on your template. You can also use the Insert menu to include
information that is automatically calculated (such as number of pages or
date and time sent).
3If you want to include text that always appears on your cover page (such
as a letterhead or address), draw a box using the text box tool, type your
text inside of it, then move the box to the appropriate place on your
template.
4If you want to include a logo that appears on your cover page, copy it to
the Windows clipboard, then paste it into the Cover Page Editor and move
it to the appropriate place on your template.
5To save your cover page template, click/tap File, then click/tap Save As.
The Save As dialog box opens with your personal cover pages folder already
in the Save in list.
6Type the new cover page template name.
7Click/Tap Save.

96
Chapter 6: Sending and Receiving Faxes
www.gateway.com
Faxing from programs
To fax a document directly from most programs:
1Open your document in the program it was created in.
2Click/Tap File, then click/tap Print. The Print dialog box opens.
3Click/Tap the arrow button to open the Name list, then click/tap the Fax
printer.
4Click/Tap Print or OK. The Send Fax Wizard opens.
5Complete the wizard by following the instructions in “Sending a simple
fax” on page 93.
Faxing a scanned document
To fax a document that you have scanned:
1Scan the document using the program for your scanner.
2With the scanned file open, click/tap File, then click/tap Print. The Print
dialog box opens.
3Click/Tap the arrow button to open the Name list, then click/tap the Fax
printer.
4Click/Tap Print or OK. The Send Fax Wizard opens.
5Complete the wizard by following the instructions in “Sending a simple
fax” on page 93.

97
Receiving and viewing a fax
www.gateway.com
Receiving and viewing a fax
To receive and view a fax:
1Click/Tap Start, All Programs, Accessories, Communications, Fax, then
click/tap Fax Console. The Fax Console opens. When the Fax Console is
open, it detects incoming faxes and stores them in the Inbox.
2To view a fax, click/tap Inbox, then double-click/double-tap the fax you
want to view. The fax viewer opens, where you can view and print the fax.
Canceling a fax
You can cancel a fax that you have set up to send at a time in the future.
To cancel a fax that has not been sent:
1If Fax is not open, click/tap Start, All Programs, Accessories, Communications,
Fax, then click/tap Fax Console. The Fax Console opens.
2Click/Tap Outbox, then right-click/button-tap the fax you want to cancel.
3Click/Tap Delete to cancel the fax.
4Click/Tap Yes.
98
Chapter 6: Sending and Receiving Faxes
www.gateway.com
Automatically retry sending a fax
You can set up Fax so it continues to try sending your fax if the receiving fax
machine is busy.
To automatically retry sending a fax:
1Click/Tap Start, then click/tap Control Panel. The Control Panel window
opens.
2If your Control Panel is in Category View, click/tap Printers and Other
Hardware. Click/Tap View installed printers or fax printers. The Printers and
Faxes window opens.
-OR-
If your Control Panel is in Classic View, double-click/double-tap the
Printers and Faxes icon. The Printers and Faxes window opens.
3Right-click/Button-tap Fax, then click/tap Properties. The Fax Properties
dialog box opens.
4Click/Tap the Devices tab, then click/tap Properties. The Modem dialog box
opens.
5Specify the number of retries and the amount of time between retries.
6Click/Tap OK.
Important Fax is automatically set up to retry three times at ten
minute intervals.

99
Automatically cancelling a fax
www.gateway.com
Automatically cancelling a fax
If your convertible tablet PC tried to send a fax and failed to connect to a fax
machine, you can automatically cancel a failed fax.
To automatically cancel a failed fax:
1Click/Tap Start, then click/tap Control Panel. The Control Panel window
opens.
2If your Control Panel is in Category View, click/tap Printers and Other
Hardware. Click/Tap View installed printers or fax printers. The Printers and
Faxes window opens.
-OR-
If your Control Panel is in Classic View, double-click/double-tap the
Printers and Faxes icon. The Printers and Faxes window opens.
3Right-click/Button-tap Fax, then click/tap Properties. The Fax Properties
dialog box opens.
4Click/Tap the Devices tab, then click/tap Properties. The Modem dialog box
opens.
5Click/Tap the Cleanup tab.
6Click/Tap to select the Automatically delete failed faxes after check box and
specify the number of days.
7Click/Tap OK.
100
Chapter 6: Sending and Receiving Faxes
www.gateway.com

7
101
Using Multimedia
This chapter provides information on using the multimedia
capabilities of your convertible tablet PC. Read this chapter
to learn how to:
■Adjust the volume
■Record and play audio files
■Use Windows Media Player
■Use a DVD or DVD/CD-RW drive
■Play CDs and DVDs
■Use MusicMatch
■Create CDs
■Use the memory card reader and optional diskette
drive
■Attach a digital camera or digital video camera to your
convertible tablet PC
■View the display on a monitor, projector, or television

102
Chapter 7: Using Multimedia
www.gateway.com
Adjusting the volume
You can use the volume controls to adjust the overall volume and the volume
of specific sound devices in your convertible tablet PC.
To adjust the overall volume level using hardware controls:
■If you are using external speakers, turn the knob on the front of the
speakers.
-OR-
Use the mute and volume control buttons on the keyboard. For more
information, see “System key combinations” on page 30.
To adjust the overall volume level from Windows:
1Click/Tap Start, then click/tap Control Panel. The Control Panel window
opens. If your Control Panel is in Category View, click/tap Sounds, Speech,
and Audio Devices.
2Click/Double-click/Tap/Double-tap the Adjust the system volume or Sounds
and Audio Devices. The Sounds and Audio Devices Properties dialog box opens.
103
Adjusting the volume
www.gateway.com
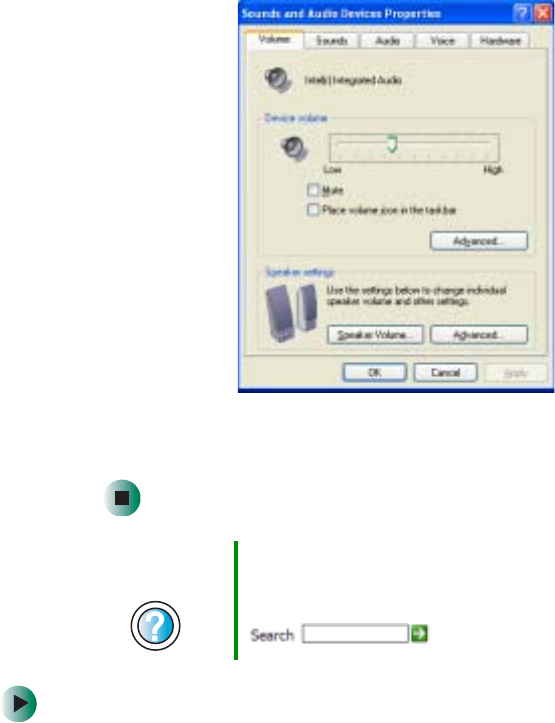
3Click/Tap the Volume tab.
4Drag the Device Volume slider to change the volume or click/tap to select
the Mute check box, then click/tap OK.
To adjust specific volume levels:
1Click/Tap Start, then click/tap Control Panel. The Control Panel window
opens. If your Control Panel is in Category View, click/tap Sounds, Speech,
and Audio Devices.
2Click/Double-click/Tap/Double-tap the Adjust the system volume or Sounds
and Audio Devices. The Sounds and Audio Devices Properties dialog box opens.
Help and
Support For more information about adjusting the volume, click/tap
Start, then click/tap Help and Support.
Type the keyword adjusting volume in the Search box
, then click/tap the arrow.
104
Chapter 7: Using Multimedia
www.gateway.com
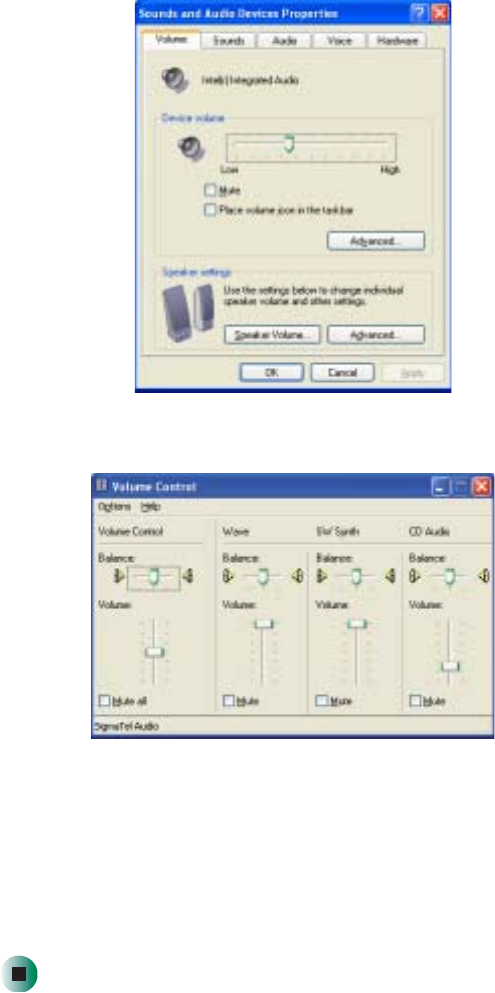
3Click/Tap the Volume tab.
4Click/Tap Advanced in the Device volume area.
If the device you want to adjust does not appear in the window, click/tap
Options, Properties, the check box next to the audio device you want to
adjust, then click/tap OK.
5Drag the volume level and balance sliders for the device you want to adjust.
For more information about the controls, click/tap Help in the window.
6Click/Tap X in the top-right corner of the window to close it.
105
Recording and playing audio
www.gateway.com
Recording and playing audio
Use the following instructions to make an audio recording by speaking into
the built-in microphone or an optional external microphone.
To make an audio recording:
1Plug a microphone into the Microphone jack on your convertible tablet PC
or port replicator. For the location of the Microphone jack, see “Left Side”
on page 3 and “Back” on page 280.
-OR-
Use the built-in microphone located on the LCD panel.
2Click/Tap Start, All Programs, Accessories, Entertainment, then click/tap
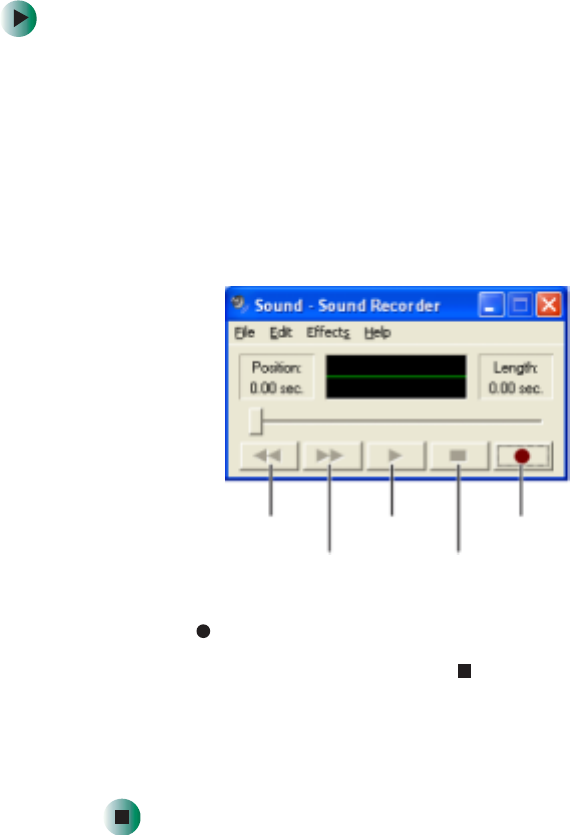
Sound Recorder. The Sound Recorder opens.
3Click/Tap (record), then speak into the microphone.
4When you finish recording, click/tap (stop).
5Click/Tap File, then click/tap Save As. The Save As dialog box opens.
6Name the recording, specify the location where you want to save the
recording, then click/tap Save. The recording is saved.
Rewind
Fast Forward
Play
Stop
Record
106
Chapter 7: Using Multimedia
www.gateway.com
To play an audio recording in Sound Recorder:
1Open the Sound Recorder.
2Click/Tap File, then click/tap Open. The Open dialog box opens.
3Click/Tap the file you want to play, then click/tap Open.
4Play the file by clicking/tapping (play), then stop playing the file by
clicking/tapping (stop).
Help and
Support For more information about making or playing an audio
recording, click/tap Start, then click/tap Help and
Support.
Type the keyword recording audio or playing audio in
the Search box , then click/tap the
arrow.
107
Playing audio and video files with the Windows Media Player
www.gateway.com
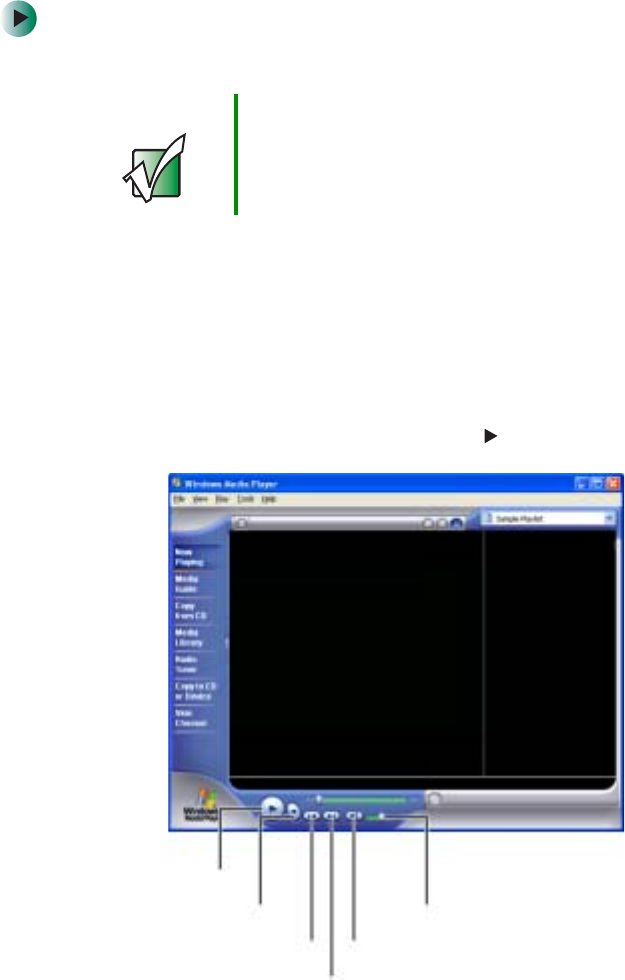
Playing audio and video files with
the Windows Media Player
The Windows Media Player can play several types of audio and video files,
including WAV, MIDI, MP3, AU, AVI, and MPEG formats. For more information
about using the Windows Media Player, click/tap Help.
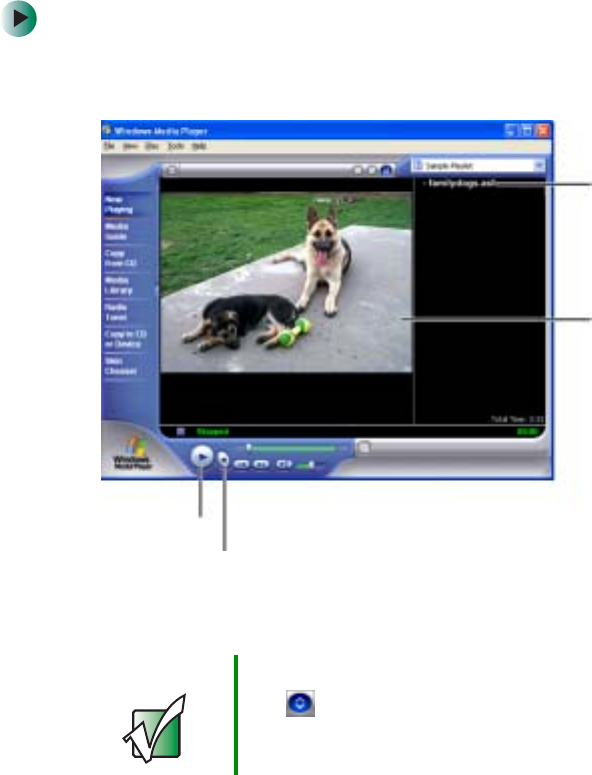
To play a file using the Windows Media Player:
1Click/Tap Start, All Programs, then click/tap Windows Media Player. The
Windows Media Player opens.
2Click/Tap File, then click/tap Open. The Open dialog box opens.
Important If the menu bar does not appear, click/tap the show menu
bar button.
Video file
information
Video
screen
Stop
Play

108
Chapter 7: Using Multimedia
www.gateway.com
3Click/Tap the file you want to play, then click/tap Open.
4Play the file by clicking/tapping (play), then stop playing the file by
clicking/tapping (stop).
Using S/PDIF digital audio
To listen to your convertible tablet PC on a stereo system using the S/PDIF
digital audio jack, you must activate S/PDIF.
To activate S/PDIF digital audio:
1Plug one end of the Toslink cable into the S/PDIF digital audio jack on
the back of your port replicator.
2Plug the other end of the Toslink cable into your stereo receiver.
Help and
Support For more information about playing audio and video using
the Windows Media Player, click/tap Start, then click/tap
Help and Support.
Type the keyword Media Player in the Search box
, then click/tap the arrow.
Important To use the S/PDIF function on your convertible tablet PC,
you must use the Gateway M275 port replicator. For more
information, see “Using the Gateway M275 Port
Replicator” on page 277.
109
Using S/PDIF digital audio
www.gateway.com
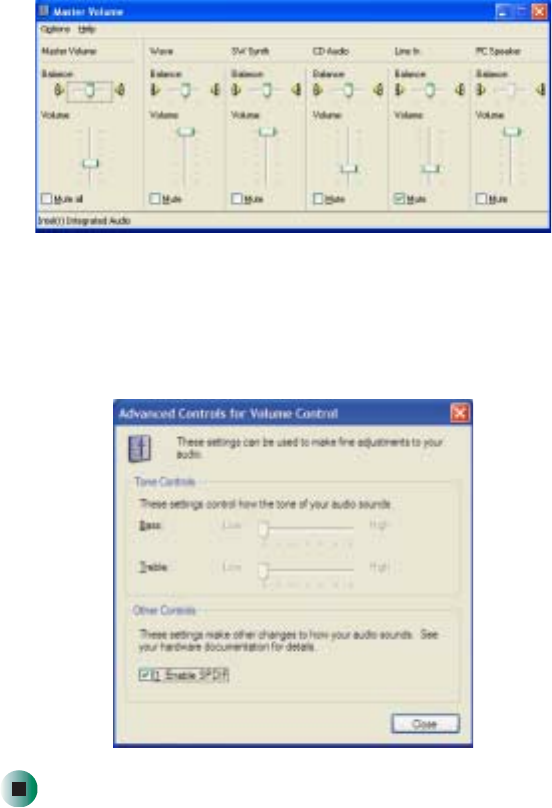
3Open the Master Volume window. For more information, see “Adjusting the
volume” on page 102.
4Click/Tap Advanced in the Master Volume area. If the Advanced button does
not appear in the Master Volume area, click/tap Options, then Advanced
Controls.
5Click/Tap Enable SPDIF.
110
Chapter 7: Using Multimedia
www.gateway.com
Changing modules
Your convertible tablet PC’s modular bays support different bay modules, such
as a DVD or combination DVD/CD-RW drive, or a secondary battery.
To change bay modules:
1If you are removing a drive, make sure that the drive is empty.
2Turn off your convertible tablet PC (do not place it in Standby or Hibernate
mode).
3Close the LCD panel.
4Disconnect your convertible tablet PC from the optional port replicator
(see “Disconnecting from the port replicator” on page 283).
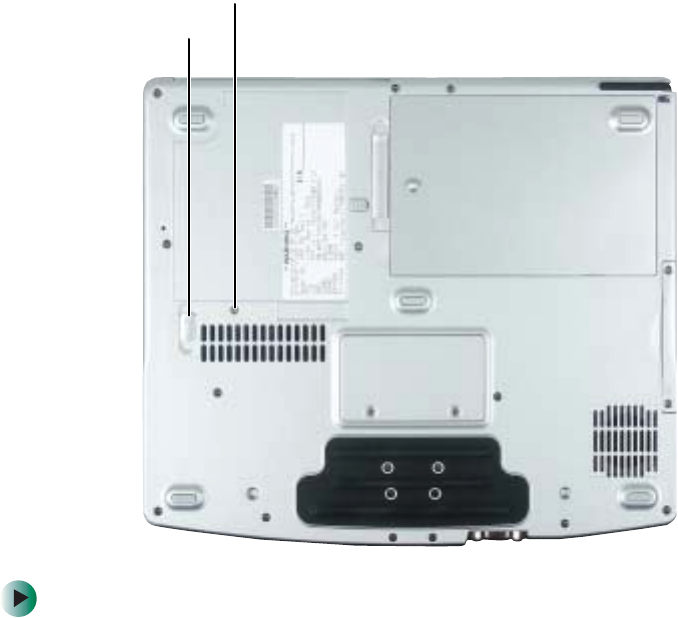
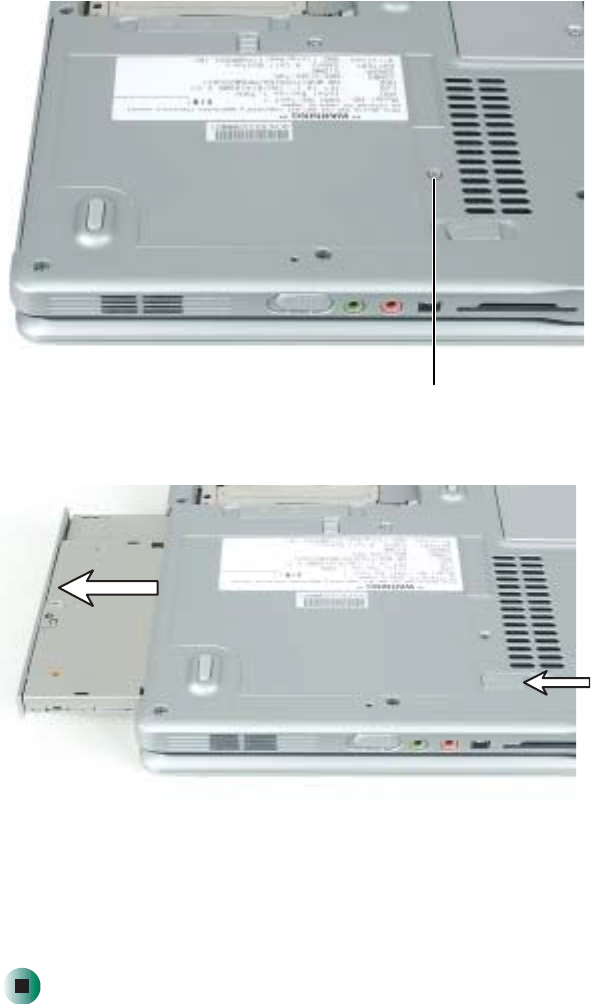
5Turn your convertible tablet PC over so the bottom is facing up.
Module bay
screw
Module bay
latch
111
Changing modules
www.gateway.com
6Remove the module bay screw.
7Slide and hold the module bay latch. The module may move out slightly.
8Slide the module out.
9Firmly push the new module straight into the bay until the latch clicks
into place.
10 Replace the module bay screw.
Screw
112
Chapter 7: Using Multimedia
www.gateway.com
Using the DVD or DVD/CD-RW
drive
You can use your convertible tablet PC to enjoy a wide variety of multimedia
features.
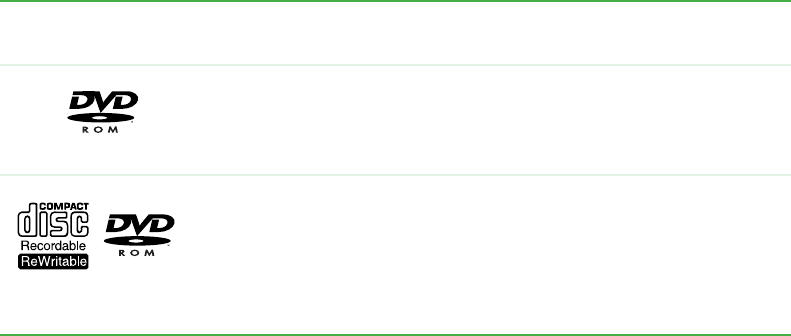
Identifying drive types
Your Gateway convertible tablet PC may contain one of the following drive
types. Look on the front of the drive for one of the following logos:
If your drive has this
logo... This is your drive
type... Use your drive for...
DVD drive installing programs, playing audio CDs, playing
DVDs, and accessing data.
You cannot use this drive to create CDs or
DVDs.
Combination
DVD/CD-RW drive installing programs, playing audio CDs, playing
DVDs, accessing data, and recording music
and data to CD-R or CD-RW discs.
You cannot use this drive to create DVDs.
For more information, see “Creating CDs using
Nero Express” on page 136.
113
Using the DVD or DVD/CD-RW drive
www.gateway.com
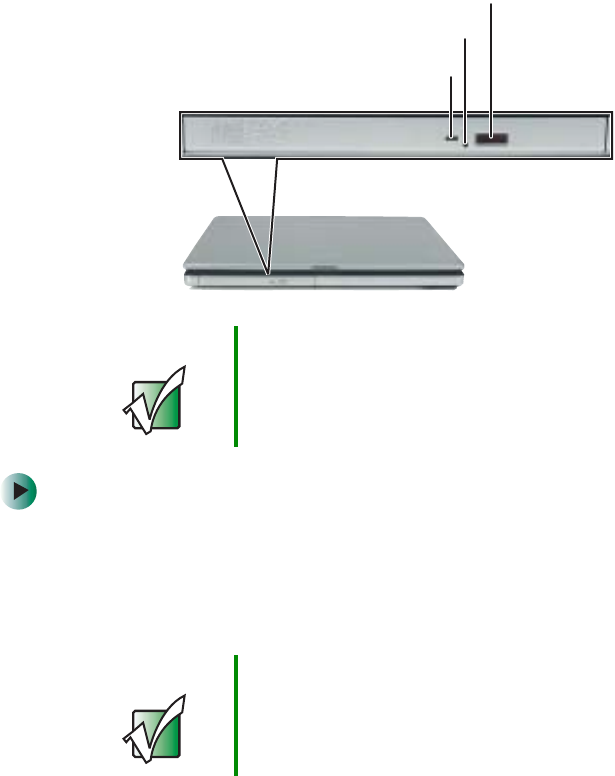
Inserting a CD or DVD
To insert a CD or DVD:
1Press the eject button on the DVD or DVD/CD-RW drive. After the disc
tray opens slightly, pull the tray completely open.
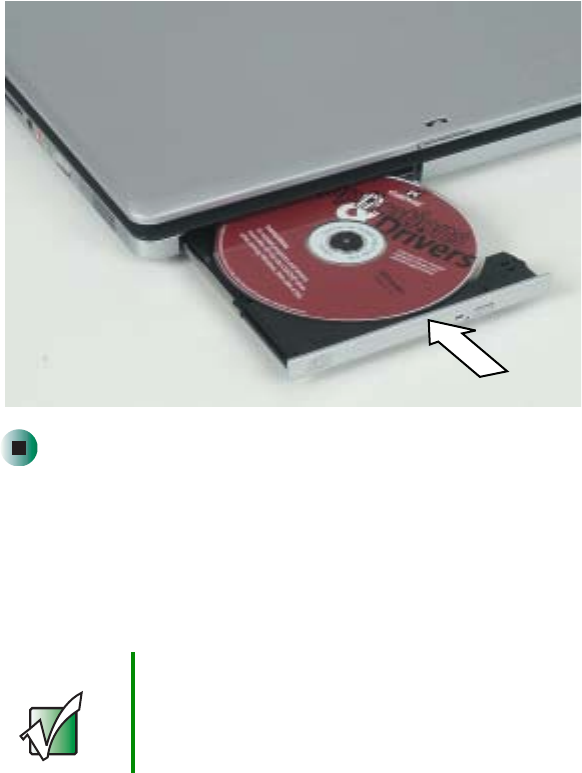
2Place the disc in the tray with the label facing up, then press down carefully
on the disc until it snaps into place
Important Some music CDs have copy protection software. You may
not be able to play these CDs on your convertible
tablet PC.
Important When you place a single-sided disc in the tray, make sure
that the label side is facing up. If the disc has two playable
sides, place the disc so the name of the side you want to
play is facing up.
Activity indicator
Manual eject hole
Eject button
114
Chapter 7: Using Multimedia
www.gateway.com
3Push the tray in until it is closed.
Listening to CDs
You can use the DVD or DVD/CD-RW drive on your convertible tablet PC to
listen to music CDs.
Listening to CDs
Use the Windows Media Player to listen to CDs. For more information about
using the Windows Media Player, click/tap Help. You can also use
MUSICMATCH to listen to CDs. For more information, see “Using
MUSICMATCH” on page 116.
Important Some music CDs have copy protection software. You may
not be able to play these CDs on your convertible
tablet PC.
115
Listening to CDs
www.gateway.com
To play a CD:
1Insert a CD into the DVD or DVD/CD-RW drive.
2If a dialog box opens with a list of CD players, click/tap
Windows Media Player. The Windows Media Player opens.
- OR -
If a dialog box does not open with a list of CD players, click/tap Start, All
Programs, then click/tap Windows Media Player. The Windows Media Player
opens.
3When the media player opens, click/tap (play).
Important If the drive you want to use is not in the modular bay, you
need to swap modules. For more information about
swapping modules, see “Changing modules” on page 110.
Play
Stop
Next
Previous Mute
Volume
116
Chapter 7: Using Multimedia
www.gateway.com
If you do not hear sound or you want to change the volume, see “Adjusting
the volume” on page 102.
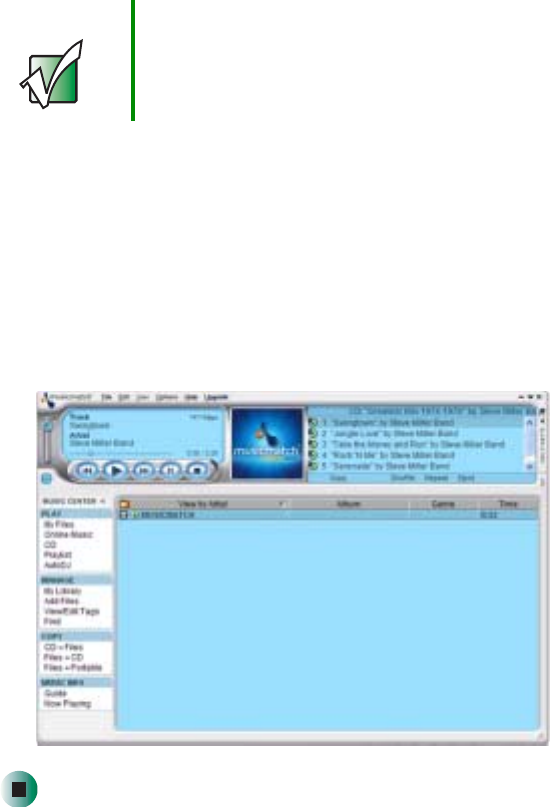
Using MUSICMATCH
Using MUSICMATCH®, you can:
■Play music CDs
■Create MP3 music files from your music CDs
■Edit music track information
■Use your music files to build a music library
■Listen to Internet Radio
For more information on using MusicMatch, see its online help.
Playing CDs
You can use the MUSICMATCH program to play music CDs.
To play a music CD:
1To have MUSICMATCH automatically list the album, artist, and track
names of your CD, connect to the Internet before inserting your CD.
Help and
Support For more information about playing CDs, click/tap Start,
then click/tap Help and Support.
Type the keyword playing CDs in the Search box
, then click/tap the arrow.
Important Some music CDs have copy protection software. You may
not be able to play these CDs on your convertible
tablet PC.
117
Using MUSICMATCH
www.gateway.com
2Insert the music CD into the DVD or DVD/CD-RW drive on your
convertible tablet PC.
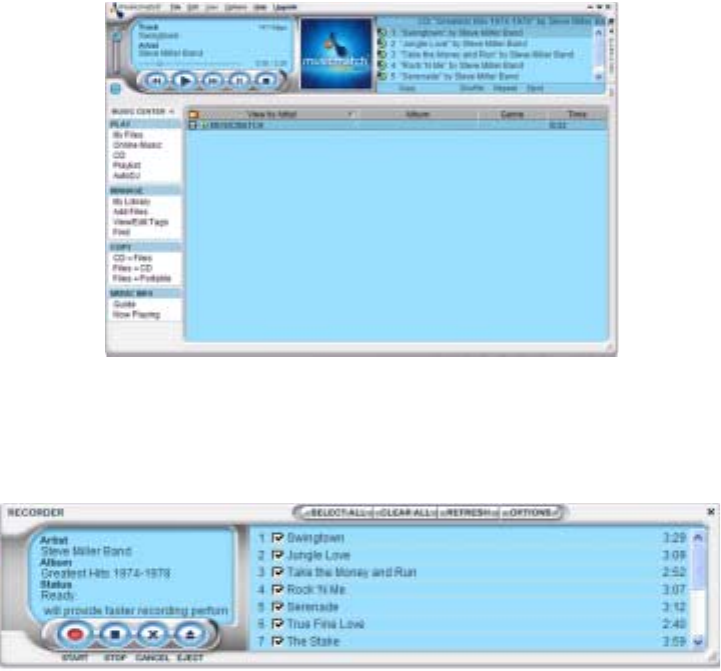
3If an Audio CD dialog box opens, click/tap Play Audio CD using MUSICMATCH
Jukebox, then click/tap OK. The musicmatch window opens, the CD begins
playing, and the names of the music tracks appear in the playlist area.
- OR -
If a dialog box does not open, click/tap Start, All Programs, MUSICMATCH,
then click/tap MUSICMATCH Jukebox. The musicmatch window opens, the
CD begins playing, and the names of the music tracks appear in the playlist
area.
Important If the drive you want to use is not in the modular bay, you
need to swap modules. For more information about
swapping modules, see “Changing modules” on page 110.
118
Chapter 7: Using Multimedia
www.gateway.com
Creating MP3 music files
Using MUSICMATCH, you can copy the tracks from a music CD to your
convertible tablet PC’s hard drive as MP3 files. MP3 (MPEG Layer 3) is a standard
for digitally compressing high-fidelity music into compact files without
noticeably sacrificing quality. MP3 files end in the file extension .MP3.
To create MP3 files:
1To have MUSICMATCH automatically list the album, artist, and track
names of your CD, then use that information for naming and storing your
MP3 files, connect to the Internet before inserting your CD.
2Insert a music CD into your DVD or DVD/CD-RW drive.
Important Some music CDs have copy protection software. You
cannot copy tracks from these CDs.
Important If the drive you want to use is not in the modular bay, you
need to swap modules. For more information about
swapping modules, see “Changing modules” on page 110.
119
Using MUSICMATCH
www.gateway.com
3If an Audio CD dialog box opens, click/tap Play Audio CD using MUSICMATCH
Jukebox, then click/tap OK. The musicmatch window opens.
- OR -
If a dialog box does not open, click/tap Start, All Programs, MUSICMATCH,
then click/tap MUSICMATCH Jukebox. The musicmatch window opens.
4If the CD is playing, click/tap Stop.
5In the MUSIC CENTER area, under COPY, click/tap CD -> Files. The
MUSICMATCH recorder opens.
6Click/Tap to clear the check box for any track you do not want to record.
120
Chapter 7: Using Multimedia
www.gateway.com
7Click/Tap Start.
8When a message appears that tells you the CD drive needs to be configured,
click/tap OK. After the drive is configured, MUSICMATCH records the
tracks to your hard drive as MP3 files. A progress bar appears next to each
track as it is recorded.
Editing track information
After you add a CD track as an MP3 file to your music library, you can edit
the track’s information.
To edit track information:
1Open MUSICMATCH.
2If a CD is playing, click/tap the stop button.
3In the MUSIC CENTER area, click/tap the track you want to edit.
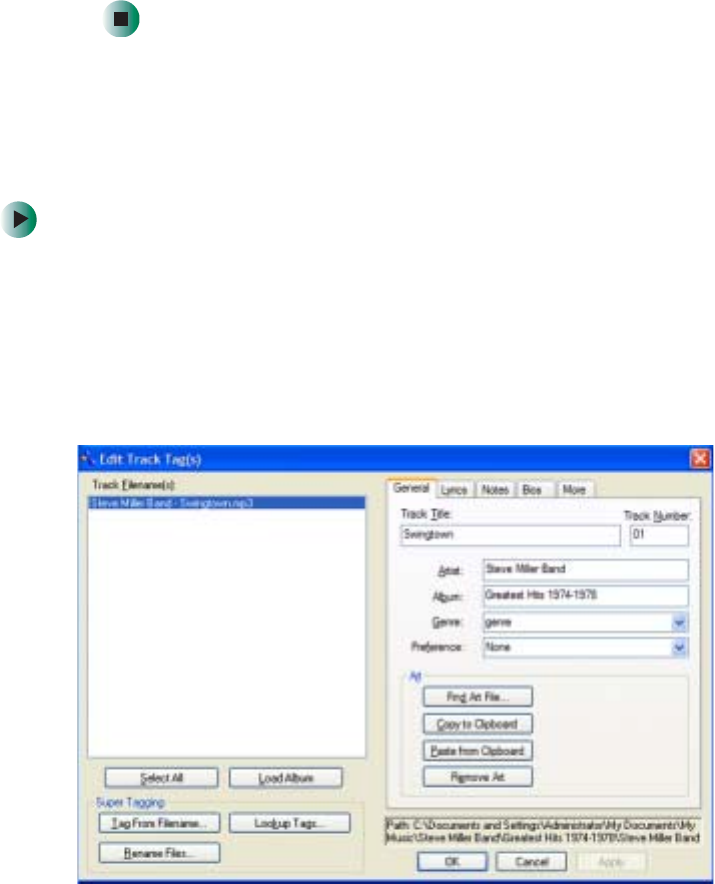
4Click/Tap Options, Music Library, then click/tap Edit Track Tag(s). The Edit
Track Tag(s) dialog box opens.
121
Using MUSICMATCH
www.gateway.com
5Enter information such as track title, lead artist, album, and genre.
6Click/Tap OK. The new track information appears in the MUSICMATCH
playlist, music library, and recorder window.
Building a music library
Use MUSICMATCH to build a music library. You can organize your music tracks
by categories, find a track quickly by using the sort features, and add
information to a music file.
You can add music tracks to your music library by:
■Creating MP3 files – When you create MP3 files from the tracks on your
music CD, MUSICMATCH automatically adds these files to your music
library.
■Dragging and Dropping – Drag and drop files from Windows Explorer
or your desktop to the music library.
■Downloading files from the Internet – When you are connected to the
Internet, MP3 files that you download are automatically added to your
music library.
Caution During the download process, MP3 files may become
corrupt. If you are having trouble listening to, or working
with, a downloaded file, try downloading the file again.
122
Chapter 7: Using Multimedia
www.gateway.com
Changing the music library display settings
To change the music library display settings:
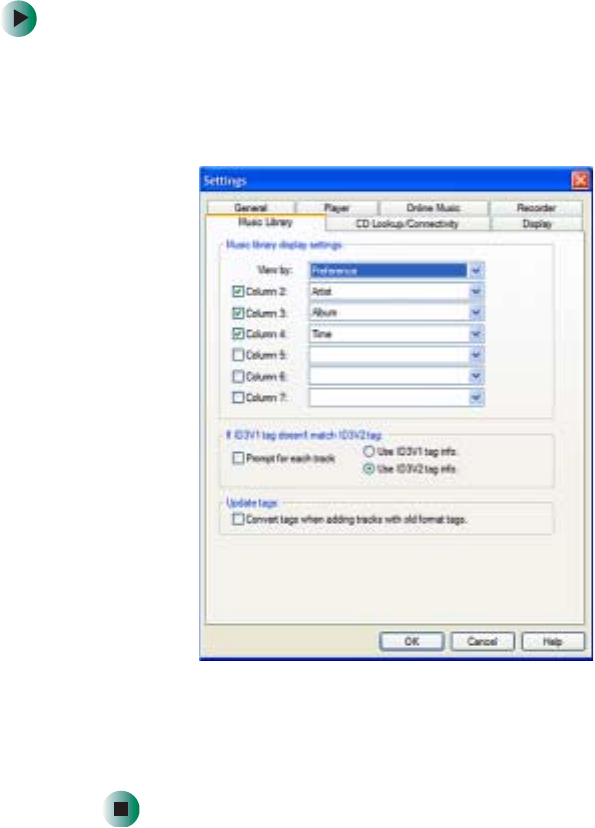
1In MUSICMATCH, click/tap Options, then click/tap Settings. The Settings
window opens.
2Click/Tap the Music Library tab.
3Click/Tap an arrow button to open a column list, then click/tap the
category that you want to display in the column.
4When you have finished selecting categories, click/tap OK.
123
Using MUSICMATCH
www.gateway.com
Listening to Internet radio
To listen to an Internet radio station:
1Connect to the Internet, then open MUSICMATCH.
2In the MUSIC CENTER area, under PLAY, click/tap Online Music.
3To select one of the MUSICMATCH Internet radio stations, click/tap
Featured Radio Stations or Radio Stations, the radio station, then click/tap
the arrow in the play this station box. MusicMatch connects to the station
and plays the audio. If you do not see Featured Radio Stations or Radio
Stations, drag the scroll bar on the left.
- OR -
To play another Internet radio station, click/tap Broadcast Radio, the
appropriate category in the Broadcast Stations list, the radio station, then
click/tap the arrow in the play this station box. MusicMatch connects to
the station and plays the audio. If you do not see Broadcast Radio, drag
the scroll bar on the left.
Using advanced features
You can also use MusicMatch to create your own music CDs and to download
MP3 files to your portable MP3 player. For more information, see the
MusicMatch online help.
Tips & Tricks See Do More With Gateway for more information about
using your convertible tablet PC to play digital music and
download music from the Internet. Click Start, then click
Do More With Gateway. If you are in the Business
Solutions view, click Consumer Solutions. Click Digital
Music.
124
Chapter 7: Using Multimedia
www.gateway.com
Playing a DVD
A Digital Versatile Disc (DVD) is similar to a standard CD but has greater data
capacity. Because of this increased capacity, full-length movies, several albums
of music, or several gigabytes of data can fit on a single disc. You can play DVDs
with the InterVideo DVD Player program or Windows Media Player. For more
information about playing DVDs, click/tap Help in the DVD player program.
To play a DVD:
1Make sure that the speakers are turned on or headphones are plugged in
and that the volume is turned up.
2Turn off your screen saver and standby timers.
3To play a DVD using InterVideo DVD, click/tap Start, All Programs, DVD,
then click/tap DVD Player. The InterVideo DVD Player video screen and
control panel open.
-OR-
To play a DVD using Windows Media Player, click/tap Start, All Programs,
then click/tap Windows Media Player. The Windows Media Player opens.
4Insert a DVD into the DVD drive, then click/tap (play). The DVD plays.
Use the volume controls in the DVD player to adjust the volume. For more
information on using the DVD player, see its online help.
Important If the InterVideo DVD player is not on your Start menu, and
if Windows Media Player cannot play a DVD, you will need
to install the InterVideo DVD program. To install the
InterVideo DVD program, insert the InterVideo DVD
Software disc into your DVD drive and follow the on-screen
instructions.
Important If the drive you want to use is not in the modular bay, you
need to swap modules. For more information about
swapping modules, see “Changing modules” on page 110.
125
Creating CDs using Roxio Easy CD Creator
www.gateway.com
Creating CDs using Roxio Easy
CD Creator
You can use your DVD/CD-RW to create data CDs, music CDs, or copies of CDs.
For more information about your drive’s capabilities, see “Identifying drive
types” on page 112.
Creating data CDs
Use Roxio Easy CD Creator to create data CDs. Data CDs are ideal for backing
up important files such as tax records, letters, MP3s, digital movies, or photos.
For information on creating music CDs, see “Creating music CDs” on page 130.
Help and
Support For more information about playing DVDs, click/tap Start,
then click/tap Help and Support.
Type the keyword playing DVDs in the Search box
, then click/tap the arrow.
Important We recommend that you do not use your convertible
tablet PC for other tasks while creating CDs.
Important If you record copyrighted material on a CD, you need
permission from the copyright owner. Otherwise, you may
be violating copyright law and be subject to payment of
damages and other remedies. If you are uncertain about
your rights, contact your legal advisor.
126
Chapter 7: Using Multimedia
www.gateway.com
To create a data CD:
1Insert a blank, writable CD into your recordable CD drive.
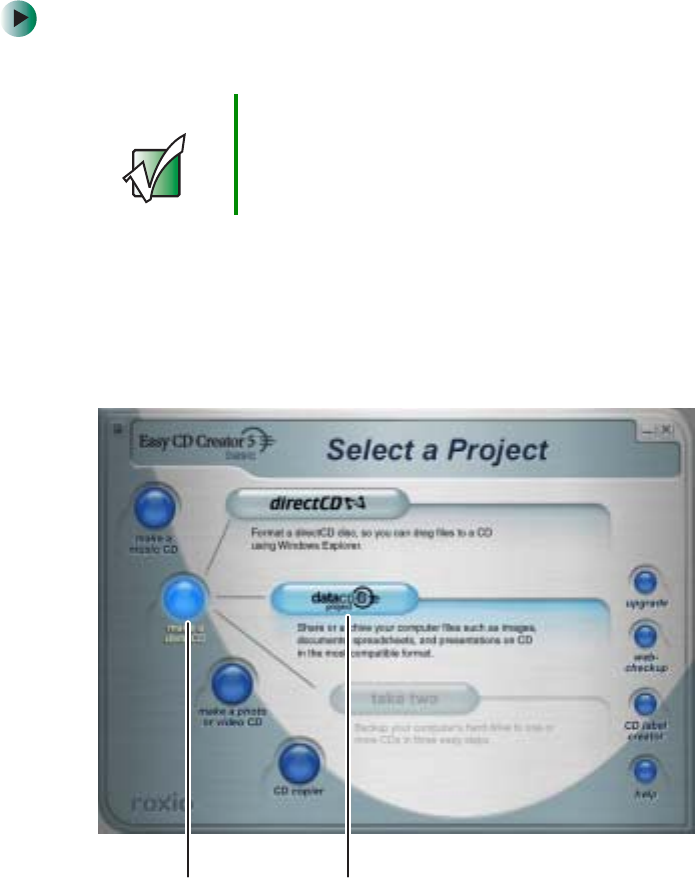
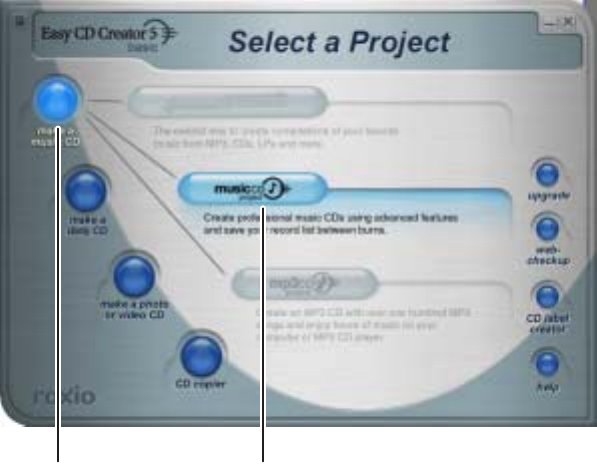
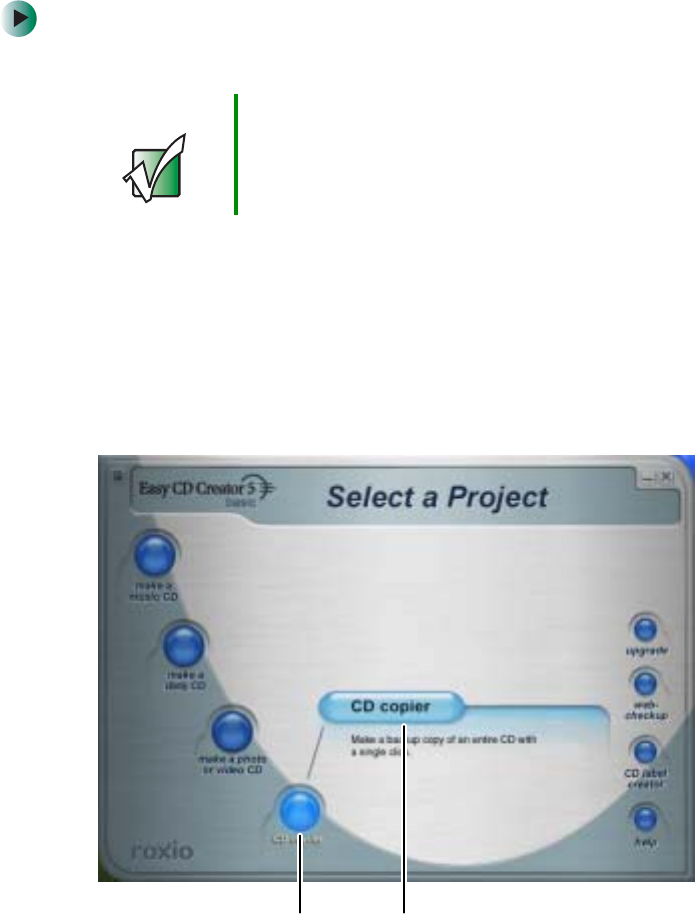
2If a CD Drive dialog box opens, click/tap Create a CD using Roxio Easy CD
Creator, then click/tap OK. The Select a Project window opens.
- OR -
If a dialog box does not open, click/tap Start, All Programs, Roxio Easy CD
Creator, then click/tap Project Selector. The Select a Project window opens.
Important If the drive you want to use is not in the modular bay, you
need to swap modules. For more information about
swapping modules, see “Changing modules” on page 110.
make a data CD dataCD project
127
Creating CDs using Roxio Easy CD Creator
www.gateway.com
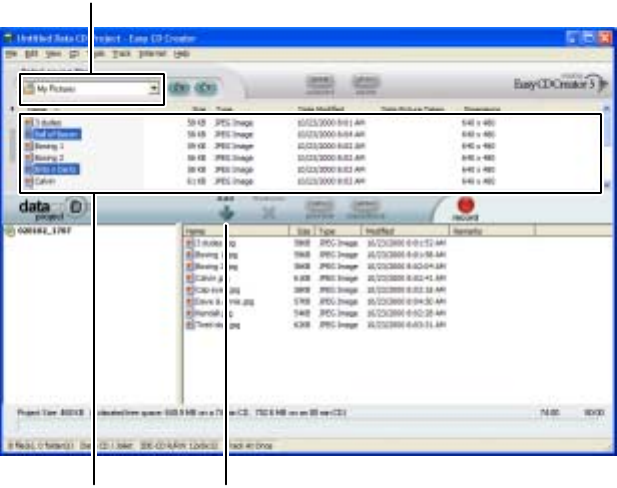
3Move your pointer over make a data CD, then click/tap dataCD project. The
Easy CD Creator window opens.
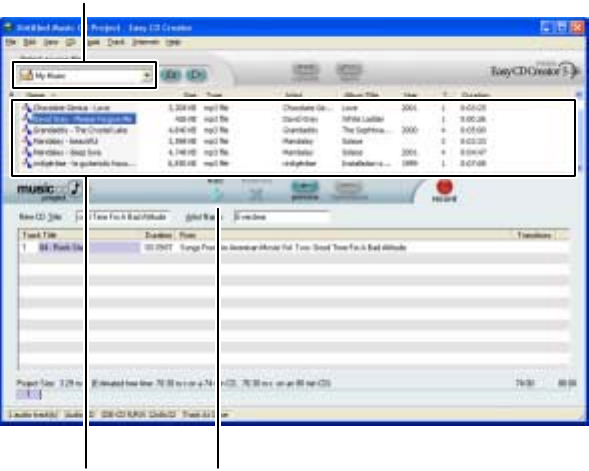
4Click/tap the arrow button to open the Select Source Files list, then
click/tap the drive or folder where the files you want to add to the writable
CD are located. If you do not see the folder you want, browse through the
folders in the Source pane.
Source Pane Add
Select Source Files
128
Chapter 7: Using Multimedia
www.gateway.com
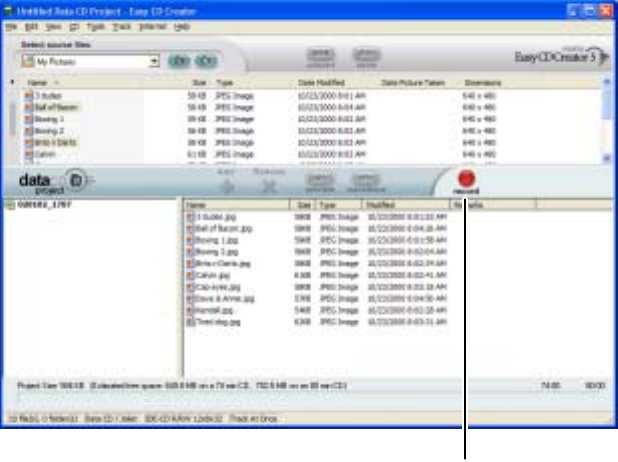
5Click/tap the file you want to record (hold down the CTRL or SHIFT key
when you click/tap to select multiple files) in the Source pane, then
click/tap Add.
record
129
Creating CDs using Roxio Easy CD Creator
www.gateway.com
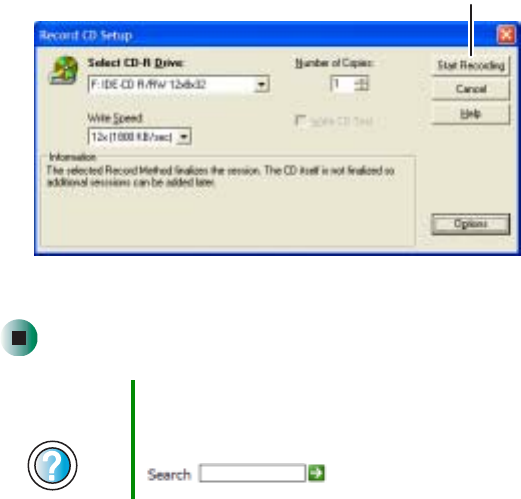
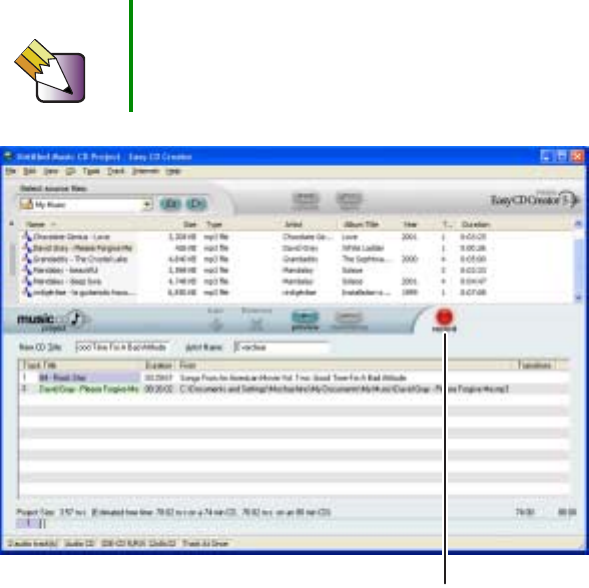
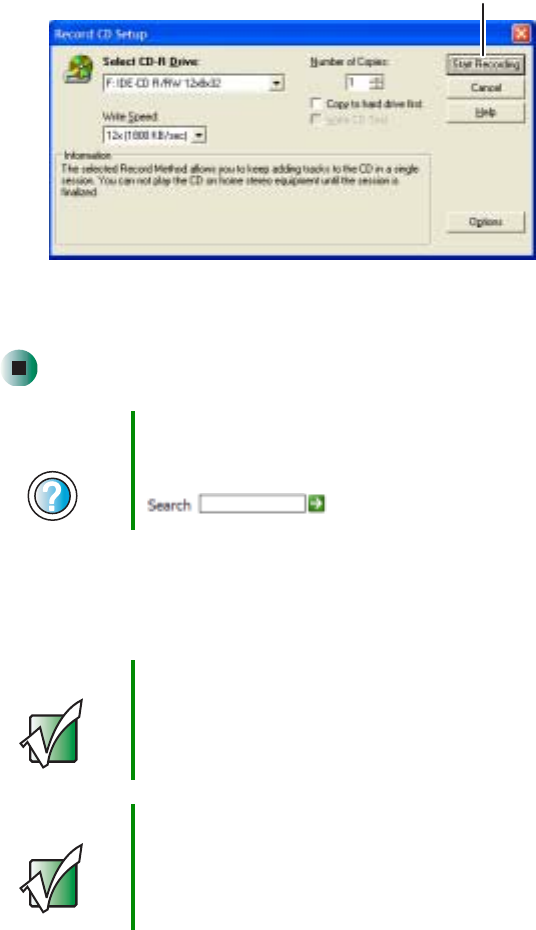
6After you have added all of your files, click/tap record. The Record CD Setup
dialog box opens.
7Click/tap Start Recording.
Help and
Support For more information about creating CDs, click/tap Start,
then click/tap Help and Support.
Type the keyword creating CDs in the Search box
, then click/tap the arrow.
Start Recording
130
Chapter 7: Using Multimedia
www.gateway.com
Creating music CDs
Use Roxio Easy CD Creator to create music CDs from other music CDs or MP3
files. For information on creating data CDs, see “Creating data CDs” on
page 125.
To create music CDs:
1Insert a blank, writable CD into your recordable CD drive.
Important We recommend that you do not use your convertible
tablet PC for other tasks while creating CDs.
Important If you record copyrighted material to a CD, you need
permission from the copyright owner. Otherwise, you may
be violating copyright law and be subject to payment of
damages and other remedies. If you are uncertain about
your rights, contact your legal advisor.
Important Some CDs have copy protection software. You cannot
create MP3 files from these CDs and you may not be able
to listen to these CDs on your convertible tablet PC.
Important If the drive you want to use is not in the modular bay, you
need to swap modules. For more information about
swapping modules, see “Changing modules” on page 110.
Tips & Tricks Most home and car stereos can read CD-R discs, but
cannot read CD-RW discs. To make sure that the CD that
you create will play on home and car CD players, use a
CD-R disc.
131
Creating CDs using Roxio Easy CD Creator
www.gateway.com
2If a CD Drive dialog box opens, click/tap Create a CD using Roxio Easy CD
Creator, then click/tap OK. The Select a Project window opens.
- OR -
If a dialog box does not open, click/tap Start, All Programs, Roxio Easy CD
Creator, then click/tap Project Selector. The Select a Project window opens.
make a music CD musicCD project
132
Chapter 7: Using Multimedia
www.gateway.com
3Move your pointer over make a music CD, then click/tap musicCD project.
The Easy CD Creator window opens.
4Click/tap the arrow button to open the Select Source Files list, then
click/tap the drive or folder where the music files that you want to add
to the writable CD are located. If you do not see the folder you want,
browse through the folders in the Source pane.
Source pane Add
Select Source Files
133
Creating CDs using Roxio Easy CD Creator
www.gateway.com
5Click/tap the file you want to record (hold down the CTRL or SHIFT key
when you click/tap to select multiple files) in the Source pane, then
click/tap Add.
Tips & Tricks You can add any combination of music tracks or MP3 files
to a music CD project. You can add up to 99 tracks and
files, or up to 650 MB (74-minute CD) or 700 MB
(80-minute CD) of tracks and files to a music CD project.
record
134
Chapter 7: Using Multimedia
www.gateway.com
6After you have added all of your tracks and files, click/tap record. The Record
CD Setup dialog box opens.
7Click/tap Start Recording. When the recording is complete, you may see a
Record Complete dialog box. Select the appropriate option.
Copying CDs
CD Copier can make backup copies of almost any type of CD.
Help and
Support For more information about creating CDs, click/tap Start,
then click/tap Help and Support.
Type the keyword creating CDs in the Search box
, then click/tap the arrow.
Important We recommend that you do not use your convertible
tablet PC for other tasks while creating a CD.
Important If you record copyrighted material on a CD, you need
permission from the copyright owner. Otherwise, you may
be violating copyright law and be subject to payment of
damages and other remedies. If you are uncertain about
your rights, contact your legal advisor.
Start Recording
135
Creating CDs using Roxio Easy CD Creator
www.gateway.com
To copy a CD:
1Insert the CD you want to copy into your recordable drive.
2If a dialog box opens, click/tap Take no action.
3If a CD Drive dialog box opens, click/tap Create a CD using Roxio Easy CD
Creator, then click/tap OK. The Select a Project window opens.
- OR -
If a dialog box does not open, click/tap Start, All Programs, Roxio Easy CD
Creator, then click/tap Project Selector. The Select a Project window opens.
Important If the drive you want to use is not in the modular bay, you
need to swap modules. For more information about
swapping modules, see “Changing modules” on page 110.
CD copier CD copier
136
Chapter 7: Using Multimedia
www.gateway.com
4Move your pointer over CD copier, then click/tap CD copier. The CD Copier
window opens.
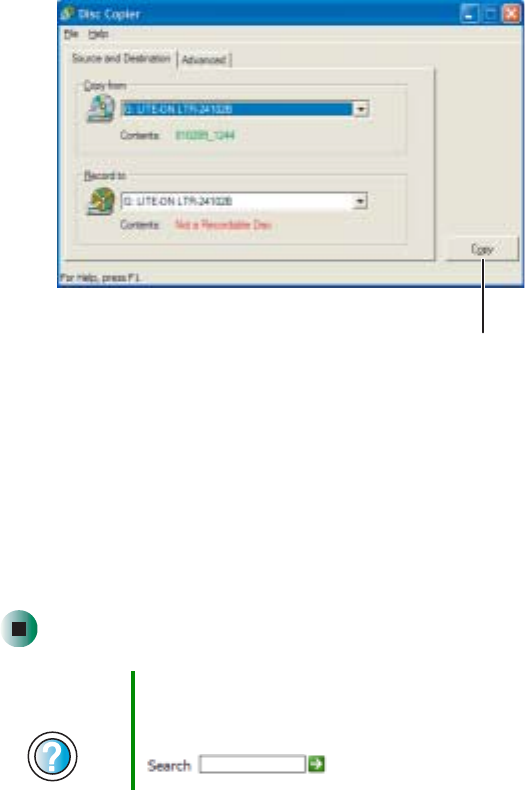
5On the Source and Destination tab, click/tap the arrow button to open the
Copy from list, then click/tap the recordable drive.
6Click/Tap the arrow button to open the Record to list, then click/tap the
recordable drive.
7Click/Tap Copy. CD Copier copies the information on the source CD to
your hard drive, prompts you to insert the blank CD, then copies the
information from the hard drive to the blank CD.
Creating CDs using Nero Express
You can use Nero Express to copy tracks from a music CD to your hard drive,
copy or create data CDs, create music CDs, and more.
Help and
Support For more information about copying CDs, click/tap Start,
then click/tap Help and Support.
Type the keyword copying CDs in the Search box
, then click/tap the arrow.
Copy
137
Creating CDs using Nero Express
www.gateway.com
Important We recommend that you do not use your convertible
tablet PC for other tasks while creating CDs.
Important If you record copyrighted material on a CD, you need
permission from the copyright owner. Otherwise, you may
be violating copyright law and be subject to payment of
damages and other remedies. If you are uncertain about
your rights, contact your legal advisor.
Important Some CDs have copy protection software. You cannot
create MP3 files from these CDs and you may not be able
to listen to these CDs on your convertible tablet PC.
138
Chapter 7: Using Multimedia
www.gateway.com
Creating a data CD
To create a data CD:
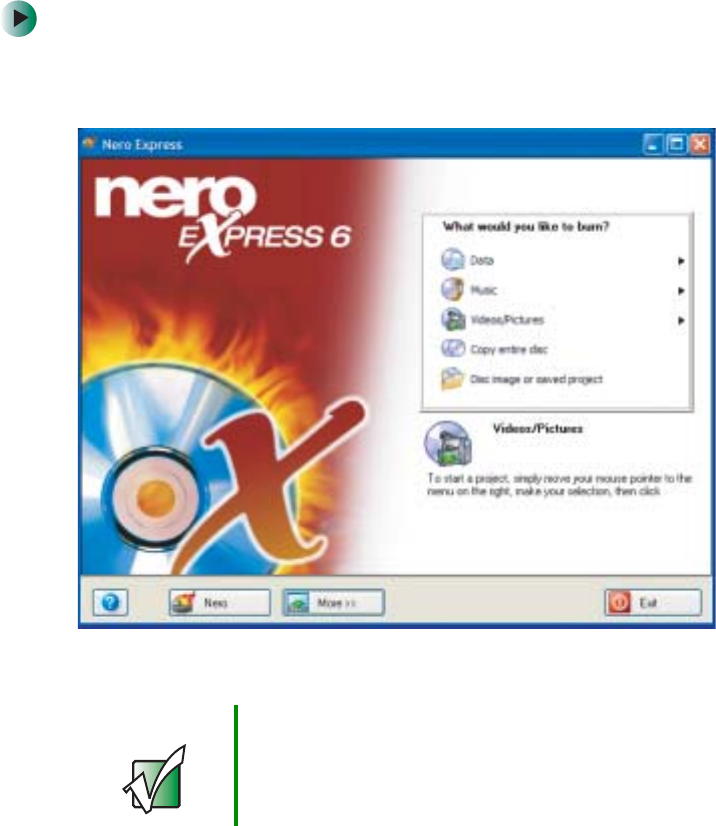
1Click/Tap Start, All Programs, Burn a CD or Data DVD, Nero Programs, then
click/tap Nero Express. Nero Express opens.
2Insert a blank, writable CD into your recordable drive.
3If a dialog box opens, click/tap Take no action, then click/tap OK.
Important If the drive you want to use is not in the modular bay, you
need to swap modules. For more information about
swapping modules, see “Changing modules” on page 110.
139
Creating CDs using Nero Express
www.gateway.com
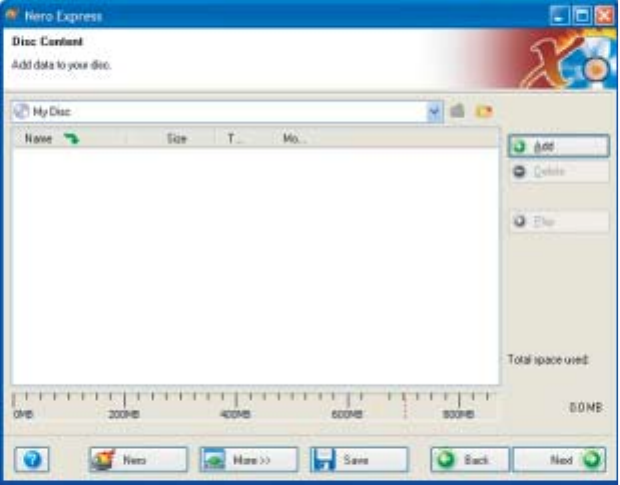
4Move your pointer over Data, then click/tap Data Disc. The Disc Content
screen opens.
140
Chapter 7: Using Multimedia
www.gateway.com
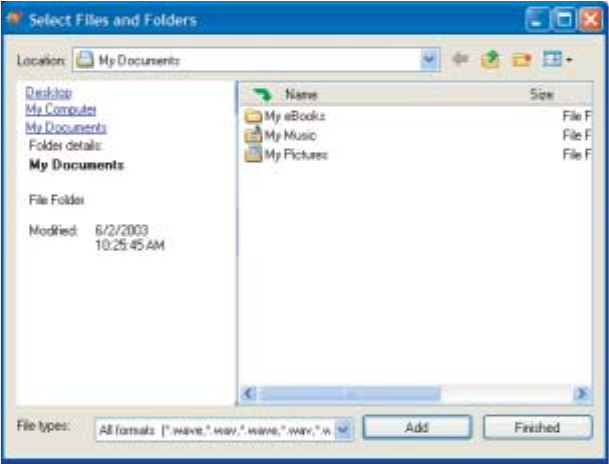
5Click/Tap Add. The Select Files and Folders dialog box opens.
6Browse to the folder that contains the files you want to add. You can
click/tap the arrow to open the Location list, then click/tap a drive or folder,
or you can click/tap folders in the Name list. Press and hold the CTRL key
to select multiple files.
7Click/Tap Add. You can continue to select files and click/tap Add.
8After you select all your files, click/tap Finished.