Quanta Computer OA8WM3B2100 NoteBook User Manual Using Your Gateway M275 Notebook
Quanta Computer Inc NoteBook Using Your Gateway M275 Notebook
Contents
Users Manual System 4

211
Using a wired Ethernet network
www.gateway.com
Using a wired Ethernet network
A wired Ethernet network consists of two or more computers connected
together through an Ethernet cable. This connection type is commonly used
in offices around the world and can be used to build computer networks in
the home.
Ethernet, Fast Ethernet, or Gigabit Ethernet
Ethernet is available at three different speeds. Standard Ethernet runs at
10 Mbps, Fast Ethernet runs at 100 Mbps, and Gigabit Ethernet runs at
1000 Mbps. Most home networks are built using Standard or Fast Ethernet
components. Business networks are typically built using Fast or Gigabit Ethernet
components.
To create a wired Ethernet network, you or your electrician must:
■Install special Ethernet cables in your home or office
■Install an Ethernet card in each of your desktop computers (if your
computers do not already have built-in Ethernet jacks)
■Install an Ethernet PC Card in each of your notebooks or convertible
tablet PCs (if your notebooks or convertible tablet PCs do not already have
built-in Ethernet jacks)
■Install an Ethernet router, switch, or hub
Important Check local code requirements before installing Ethernet
cable or other wiring in your home or office. Your
municipality may require you to obtain a permit and hire
a licensed installer.
Tips & Tricks If you are connecting just two computers (known as a
peer-to-peer wired Ethernet network), you can eliminate
the router, switch, or hub and use a special crossover
cable.
212
Chapter 11: Networking Your Gateway M275
www.gateway.com
Example wired Ethernet network
The following is an example of a wired Ethernet network. The network is made
up of a router, a cable or DSL modem, your computers, and cables connecting
each of these components. The router is the central control point for the
network. Attached to the router are all of your computers or Ethernet-ready
devices. Also connected to the router is a cable or DSL modem that provides
access to the Internet.
Tips & Tricks To add the ability to access a wireless Ethernet network
to your wired Ethernet network, connect an access point
to the router, switch, or hub. For more information about
accessing a wireless Ethernet, see “Using a wireless
Ethernet network” on page 214.
Cable/DSL modem
Router,
switch,
or hub

213
Using a wired Ethernet network
www.gateway.com
Equipment you need for a wired Ethernet
network
For a wired Ethernet network you need:
■An Ethernet jack on each desktop computer, notebook, tablet PC, and
convertible tablet PC.
- OR -
An Ethernet card (also called network interface cards or NICs) installed in
each desktop computer.
- OR -
An Ethernet PC Card installed in each notebook or convertible tablet PC.
■An Ethernet router. Select a router that gives you the following features:
■A jack for connecting to a cable or DSL modem.
■The ability to assign IP addresses to your networked computers
dynamically. This prevents intruders from seeing the computers over
the Internet.
■A built-in firewall to protect the computers on your network from
intruders trying to access your data over the Internet.
■Built-in switching (with enough ports for all computers and devices
on the network) so you will not have to purchase a hub or switch.
■If you did not purchase a router that includes built-in switching or if the
router does not have enough ports to attach all of your computers, an
Ethernet hub or switch with enough ports for all computers and devices
in the network.
■Ethernet cable going from each computer to the router, hub, or switch.
Important For best results, all Ethernet components should be either
standard Ethernet (10 Mbps), Fast Ethernet (100 Mbps or
10/100), or Gigabit Ethernet (1000 Mbps or 10/100/1000).
A mixture of components rated at different speeds will
result in your network running at the speed of the slowest
rated component.

214
Chapter 11: Networking Your Gateway M275
www.gateway.com
Using a wireless Ethernet network
A wireless Ethernet network is ideal for creating a home or office network or
adding mobility to an existing wired Ethernet network. A wireless Ethernet
network allows you the freedom to move about your home or office with your
notebook, tablet PC, or convertible tablet PC. For example, you can take your
notebook, tablet PC, or convertible tablet PC from your home office to your
patio without having an Ethernet jack available.
Warning Radio frequency wireless communication can interfere
with equipment on commercial aircraft. Current aviation
regulations require wireless devices to be turned off while
traveling in an airplane. IEEE 802.11a, IEEE 802.11b, and
IEEE 802.11g communication devices are examples of
devices that provide wireless communication. For
instructions to turn wireless Ethernet on and off, see
“Turning your wireless Ethernet emitter on or off” on
page 220.
Important If your convertible tablet PC came equipped with an
internal radio frequency wireless device, see “Safety,
Regulatory, and Legal Information” on page 315 for
general wireless regulatory and safety guidelines. To find
out if your convertible tablet PC has an internal wireless
device, check the label (see “Identifying your model” on
page 10) or the device manager.

215
Using a wireless Ethernet network
www.gateway.com
Wireless Ethernet speed and frequency
Wireless Ethernet is available at two different speeds and at two different
frequencies. The following table compares the various wireless Ethernet
network types.
The two most common types of wireless Ethernet networks are access point
and peer-to-peer.
Network Type Speed Frequency Advantages Disadvantages
IEEE 802.11a 54 Mbps 5 GHz Less possible
interference than
IEEE 802.11b and
IEEE 802.11g
■Shorter range (25 to
75 feet) than
IEEE 802.11b and
IEEE 802.11g
■Not compatible with
IEEE 802.11b or
IEEE 802.11g
networks
IEEE 802.11b 11 Mbps 2.4 GHz ■Large number of
access points already
exist in airports,
college campuses, and
businesses
■Compatible with
IEEE 802.11g
networks
■Longer range (100 to
150 feet) than
IEEE 802.11a
■Possible interference
from cordless phones
and microwaves
■Not compatible with
IEEE 802.11a
networks
IEEE 802.11g 54 Mbps 2.4 GHz ■Compatible with
IEEE 802.11b
networks
■Longer range (100 to
150 feet) than
IEEE 802.11a
■Possible interference
from cordless phones
and microwaves
■Not compatible with
IEEE 802.11a
networks
Important The speed of a wireless network is related to signal
strength. Signal strength is affected by the distance
between your wireless network devices, by radio
interference, and by interference from natural obstructions
such as walls, floors, and doors.
216
Chapter 11: Networking Your Gateway M275
www.gateway.com
Example access point wireless Ethernet
network
By using an access point, you can join a wireless Ethernet network and access
a wired Ethernet network. The following example shows how an access point
also lets you access the Internet.
The following is an example of an access point wireless Ethernet network. The
network is made up of an access point, a cable or DSL modem, and your
computers. The access point is the central control point for the network.
Attached to the access point is the cable or DSL modem that provides access
to the Internet. Each of the computers or Ethernet-ready devices communicate
with the access point using radio waves. If your computer does not have built-in
wireless Ethernet capabilities, you need to add a wireless PCI card (desktop),
PC card (notebook or convertible tablet PC), or USB adapter.
Tips & Tricks If you want to access a wireless Ethernet network from
your wired Ethernet network, connect an access point to
the router, switch, or hub. For more information about
accessing a wired Ethernet, see “Using a wired Ethernet
network” on page 211.
Cable/DSL modem
Access point
USB wireless
adapter

217
Using a wireless Ethernet network
www.gateway.com
Equipment you need for an access point
wireless Ethernet network
For an access point wireless Ethernet network you need:
■A wireless Ethernet PCI card installed in each desktop computer
- OR -
A wireless Ethernet USB adapter attached to each desktop or notebook
computer, or convertible tablet PC
- OR -
A notebook, tablet PC, or convertible tablet PC with wireless Ethernet
built-in
- OR -
A wireless Ethernet PC Card installed in each notebook or convertible
tablet PC that does not have wireless Ethernet built-in
■A wireless Ethernet access point to connect your wireless Ethernet network
to the Internet or a wired Ethernet network
Important IEEE 802.11b and IEEE 802.11g use the same radio
frequency. IEEE 802.11a uses a different radio frequency
than IEEE 802.11b and IEEE 802.11g. All wireless
Ethernet components must use the same frequency. A
combination of IEEE 802.11a and IEEE 802.11b or
IEEE 802.11a and IEEE 802.11g components will
not work. Some wireless devices can broadcast and
receive signals on both frequencies.
A mixture of IEEE 802.11b and IEEE 802.11g components
will result in your network running at the speed of the
slower IEEE 802.11b components.
218
Chapter 11: Networking Your Gateway M275
www.gateway.com
Example peer-to-peer wireless Ethernet
network
Use a peer-to-peer (also known as ad hoc) wireless Ethernet network if you are
setting up or joining a temporary computer-to-computer network. This type of
network does not include access into a wired network or the Internet. You can
create this type of network to quickly move files from one computer to another.
219
Using a wireless Ethernet network
www.gateway.com
Equipment you need for a peer-to-peer
wireless Ethernet network
For a peer-to-peer wireless Ethernet network you need:
■A wireless Ethernet PCI card installed in each desktop computer
- OR -
A wireless Ethernet USB adapter attached to each desktop or notebook
computer or convertible tablet PC
- OR -
A notebook, tablet PC, or convertible tablet PC with wireless Ethernet
built-in
- OR -
A wireless Ethernet PC Card installed in each notebook or convertible
tablet PC that does not have wireless Ethernet built-in
For more information
For more information about purchasing equipment for your home or office
Ethernet network, discuss your particular needs with your Gateway
representative. In addition, several books and Internet sites are dedicated to
networking (for example: www.homenethelp.com). See these sources for more
information about networking your home or office with wired or wireless
Ethernet.
Help and
Support For more information about networking, click/tap Start,
then click/tap Help and Support.
Type the keyword networking in the Search box
, then click/tap the arrow.

220
Chapter 11: Networking Your Gateway M275
www.gateway.com
Using your convertible tablet PC
on a network
Installing and configuring your convertible
tablet PC for Ethernet networking
The Setting Up Your Windows Network guide has been included on your hard
drive. It provides instructions for installing and configuring both wired and
wireless Ethernet networking on your convertible tablet PC. To access this
guide, click/tap Start, All Programs, then click/tap Gateway Documentation.
Turning your wireless Ethernet emitter on or
off
Warning Radio frequency wireless communication can interfere
with equipment on commercial aircraft. Current aviation
regulations require wireless devices to be turned off while
traveling in an airplane. IEEE 802.11a, IEEE 802.11b, and
IEEE 802.11g communication devices are examples of
devices that provide wireless communication.
Warning In environments where the risk of interference to other
devices or services is harmful or perceived as harmful, the
option to use a wireless device may be restricted or
eliminated. Airports, Hospitals, and Oxygen or flammable
gas laden atmospheres are limited examples where use
of wireless devices may be restricted or eliminated. When
in environments where you are uncertain of the sanction
to use wireless devices, ask the applicable authority for
authorization prior to use or turning on the wireless device.

221
Using your convertible tablet PC on a network
www.gateway.com
To turn the wireless Ethernet emitter on or off:
1Click/Tap Start, then click/tap Control Panel. The Control Panel window
opens. If your Control Panel is in Category View, click/tap Network and
Internet Connections. The Network and Internet Connections window opens.
2Click/Double-click/Tap/Double-tap Network Connections. The Network
Connections window opens.
3Right-click/Button-tap Wireless Network Connection, then click/tap Enable to
turn on the wireless Ethernet emitter or click/tap Disable to turn off the
wireless Ethernet emitter.

12
221
Moving From
Your Old
Computer
If your new convertible tablet PC is replacing an old
computer, you may have personal data files, Internet
settings, a printer or other peripheral devices, and other
unique computer settings that you want to move from your
old computer to your new one. Read this chapter to learn
about:
■Using the Files and Settings Transfer Wizard
■Transferring Files
■Transferring Internet Settings
■Installing your old printer or scanner
■Installing your old programs
222
Chapter 12: Moving From Your Old Computer
www.gateway.com
Using the Files and Settings
Transfer Wizard
You can move your data files and personal settings, such as display, Internet,
and e-mail settings, from your old computer to your new one by using the Files
and Settings Transfer Wizard. The wizard also moves specific files or entire
folders, such as My Documents, My Pictures, and Favorites.
To open the Files and Settings Transfer Wizard:
■Click/Tap Start, All Programs, Accessories, System Tools, then click/tap Files
and Settings Transfer Wizard.
Transferring files
You can manually transfer your personal data files by copying them to
removable media, such as a diskette, writable CD, USB flash drive, or Zip disk,
or by using a home network. For more information, see “Creating CDs using
Nero Express” on page 136 and “Networking Your Gateway M275” on page 207.
Finding your files
Many programs automatically save your personal data files in the
My Documents folder. Look in your old computer’s My Documents folder for
personal data files. Use Windows Find or Search to locate other personal data
files. For more information, see “To find files using Find or Search:” on page 224,
or “Searching for files” on page 71.
Help and
Support For more information about using the Files and Settings
Transfer Wizard, click/tap Start, then click/tap Help and
Support.
Type the keyword using transfer wizard in the Search
box , then click/tap the arrow.

223
Transferring files
www.gateway.com
To find files in the My Documents folder:
1In Windows XP, click/tap Start, then click/tap My Documents. The My
Documents window opens and displays many of your saved personal data
files. Go to Step 4.
- OR -
In Windows 98, Windows Me, or Windows 2000, double-click the
My Computer icon on the desktop. Go to the next step.
2Double-click/Double-tap the C:\ drive icon.
3Double-click/Double-tap the My Documents folder. The My Documents
window opens and displays many of your saved personal data files.
4Copy your personal data files to removable media or to another computer
on your network.
You can often identify different data file types by looking at the file’s extension
(the part of the file name following the last period). For example, a document
file might have a .DOC extension and a spreadsheet file might have an .XLS
extension.
File type File usually ends in...
Documents .DOC, .TXT, .RTF, .HTM, .HTML, .DOT
Spreadsheets .XLS, .XLT, .TXT
Pictures .JPG, .BMP, .GIF, .PDF, .PCT, .TIF, .PNG, .EPS
Movies .MPEG, .MPG, .AVI, .GIF, .MOV
Sound and Music .WAV, .CDA, .MP3, .MID, .MIDI, .WMA

224
Chapter 12: Moving From Your Old Computer
www.gateway.com
To find files using Find or Search:
1In Windows XP, click/tap Start, then click/tap Search. The Search Results
window opens.
- OR -
In Windows 98, Windows Me, or Windows 2000, click Start, Find or Search,
then click For Files or Folders. The Search Results window opens.
2Use Windows Find or Search to locate data files by file name or file type.
For help on finding files, click/tap Help, then click/tap Help and Support
Center or Help Topics. For more information, see “Searching for files” on
page 71.
Transferring Internet settings
You can use different methods to transfer your Internet account from your old
computer to your new one.
Setting up your ISP
■If your current Internet service provider (ISP) software came preinstalled
on your new convertible tablet PC, run that setup program. If it asks to
set up a new account or an existing one, choose to set up an existing
account.
■If your current ISP software is not preinstalled on your new convertible
tablet PC, locate the original Internet setup program provided by your local
ISP, or contact your ISP to see if they have an updated version of their
software, and install it on your new convertible tablet PC.
■If you use MSN as your ISP, or if you know your ISP settings, use the
Windows Internet Connection Wizard.
Help and
Support For more information about finding files, click Start, then
click/tap Help and Support.
Type the keyword searching for files in the Search box
, click/tap the arrow, then click/tap
the Full-text Search Matches button.
225
Installing your old printer or scanner
www.gateway.com
To use the Internet Connection Wizard:
1Click/Tap Start, All Programs, Accessories, Communications, then click/tap
New Connection Wizard. The New Connection wizard opens.
2Configure your Internet settings by following the on-screen instructions.
Transferring your e-mail and address book
See your old e-mail program’s online help for information on exporting and
importing e-mail messages and the address book. You can often export all of
your old e-mail messages or address book to recordable media, then import
them into your new convertible tablet PC’s e-mail program. You may also want
to consider printing the old information or using your old computer to send
the e-mail messages to yourself, then using your new convertible tablet PC to
retrieve the e-mail messages.
Transferring your Internet shortcuts
You can export and import your old Netscape Navigator bookmarks or
Microsoft Internet Explorer favorites. For more information, see your Internet
browser program’s online help.
Installing your old printer or
scanner
Windows may have built-in support for older printers, scanners, or other
peripheral devices. This means you do not need any additional software. Newer
devices, however, usually require your original software installation CDs or
diskettes.
Help and
Support For more information about setting up an Internet
connection, click/tap Start, then click/tap Help and
Support.
Type the keyword Internet connection in the Search
box , then click/tap the arrow.

226
Chapter 12: Moving From Your Old Computer
www.gateway.com
If you have trouble after you install the software for your old devices, you can
use System Restore to restore your convertible tablet PC’s previous settings.
Installing a USB printer or scanner
USB devices may have special installation instructions. See your USB device’s
installation guide.
Installing a parallel port printer
You can usually install parallel port printers by following these steps.
To install your old printer:
1Shut down and turn off your convertible tablet PC.
2Connect your parallel port printer.
3Turn on your printer, then turn on your convertible tablet PC.
4If Windows detects your printer, install your printer by following the
on-screen instructions. You are finished.
- OR -
If Windows does not detect the printer, go to the next step.
5Click/Tap Start, then click/tap Control Panel. The Control Panel window
opens. If your Control Panel is in Category View, click/tap Printers and Other
Hardware.
6Click/Double-click/Tap/Double-tap the Printers and Faxes icon, then
click/tap Add a printer. The Add Printer wizard opens.
7Install your printer by following the on-screen instructions.
Help and
Support For information about restoring your convertible tablet PC’s
previous settings, click/tap Start, then click/tap Help and
Support.
Type the keyword System Restore in the Search box
, then click/tap the arrow.
227
Installing your old programs
www.gateway.com
See your peripheral device’s user guide for installation information and tips.
Because most installation software is periodically updated, you should also
check the manufacturer’s Web site for software updates.
Installing your old programs
You probably use some programs that did not come installed on your new
convertible tablet PC, such as personal finance software, graphics programs, or
games.
Spend some time going through your old computer’s Start and Programs menus,
making note of any programs you want to install on your new convertible
tablet PC. Locate your original program installation CDs and installation
guides. Your original CDs and guides should contain any serial numbers or
product ID keys that may be required for program installation and registration.
Remember to check the publisher’s Web site for important program updates.
If you have trouble after installing your old programs, you can restore your
convertible tablet PC’s previous settings using System Restore.
Help and
Support For more information about installing a printer, click/tap
Start, then click/tap Help and Support.
Type the keyword installing a printer in the Search box
, then click/tap the arrow.
Tips & Tricks If your new convertible tablet PC comes with a newer
version of a program, it is usually better to use the newer
version than to reinstall the old one.
Help and
Support For more information about restoring your convertible
tablet PC’s previous settings, click/tap Start, then click/tap
Help and Support.
Type the keyword System Restore in the Search box
, then click/tap the arrow.
228
Chapter 12: Moving From Your Old Computer
www.gateway.com

13
229
Maintaining Your
Gateway M275
This chapter provides basic information about maintaining
your convertible tablet PC hardware and software. Read
this chapter to learn how to:
■Care for your convertible tablet PC
■Protect your convertible tablet PC from viruses
■Manage hard drive space
■Back up files
■Clean your convertible tablet PC
230
Chapter 13: Maintaining Your Gateway M275
www.gateway.com
Caring for your convertible
tablet PC
To extend the life of your convertible tablet PC:
■Be careful not to bump or drop your convertible tablet PC, and do not put
any objects on top of it. The case, although strong, is not made to support
extra weight.
■When transporting your convertible tablet PC, we recommend that you
put it in a carrying case.
■Keep diskettes, modular drives, and your convertible tablet PC away from
magnetic fields. Magnetic fields can erase data on both diskettes and hard
drives.
■Never turn off your convertible tablet PC when the hard drive light is on
because data on the hard drive could be lost or corrupted.
■Avoid subjecting your convertible tablet PC to extreme temperature
changes. The case and LCD panel can become brittle and easy to break in
cold temperatures and can melt or warp in high temperatures. Damage due
to either extreme is not covered by your warranty. As a general rule, your
convertible tablet PC is safest at temperatures that are comfortable for you.
■Keep all liquids away from your convertible tablet PC. When spilled onto
computer components, almost any liquid can result in extremely expensive
repairs that are not covered under your warranty.
■Avoid dusty or dirty work environments. Dust and dirt can clog the
internal mechanisms.
■Do not block the ventilation fan.
■When storing your convertible tablet PC for an extended period of time,
unplug AC power and remove the battery after discharging it partway.
Display screen
■Use only your convertible tablet PC’s pen on the display. Do not write on
the surface with an ink pen or pencil.
■Nothing heavier than your writing hand should be placed on top of the
display.
231
Caring for your convertible tablet PC
www.gateway.com
■Protect the display surface from unnecessary contact by turning the screen
so it is in the notebook orientation and closing it when transporting the
Gateway convertible tablet PC. For more information, see “Converting the
display from notebook to tablet mode” on page 39.
■Never spray or pour liquids directly on the display surface.
■Avoid prolonged exposure to direct sunlight.
■Use a soft fabric to wipe away dust and fingerprints. Dampen the cloth
with water but never spray anything directly on the surface. If liquid
collects around the edges, wipe it up immediately.
Pen
■Always store the pen in the Gateway convertible tablet PC’s pen holder
when not in use. For more information, see “Right Side” on page 5.
■Store extra pens horizontally in a box or drawer.
■Pens should not be stored vertically on the tip because constant tip pressure
can affect pen-screen interaction.
■The pen has electronics in it, so it should not be exposed to or immersed
in liquids.
Replacing the pen point
Normal use wears down the pen’s point, so the pen ships with extra points
and a replacement tool. To use the tool, grasp the old point with the ring and
pull. Insert a new point and apply slight pressure to set it in place.

232
Chapter 13: Maintaining Your Gateway M275
www.gateway.com
Maintenance schedule
Use the following table to set up a regular maintenance schedule.
Maintenance task Monthly When needed See...
Check for viruses X X page 233
Manage hard drive space X page 236
Clean up hard drives X X page 237
Scan hard drive for errors X X page 238
Defragment hard drive X X page 240
Back up files X X page 242
Recalibrate the battery X page 170
Clean convertible tablet PC case X page 244
Clean keyboard X page 245
Clean convertible tablet PC
screen Xpage 245
Clean mouse X page 245

233
Protecting your convertible tablet PC from viruses
www.gateway.com
Protecting your convertible
tablet PC from viruses
A virus is a program that attaches itself to a file on a computer, then spreads
from one computer to another. Viruses can damage data or cause your
convertible tablet PC to malfunction. Some viruses go undetected for a period
of time because they are activated on a certain date.
Protect your convertible tablet PC from a virus by:
■Using the Norton® AntiVirus program to check files and programs that are
on diskettes, attached to e-mail messages, or downloaded from the
Internet.
■Checking all programs for viruses before installing them.
■Disabling macros on suspicious Microsoft Word and Excel files. These
programs will warn you if a document that you are opening contains a
macro that might have a virus.
■Periodically updating the Norton AntiVirus program to protect against the
latest viruses.
Help and
Support For more information about protecting your convertible
tablet PC against viruses, click/tap Start, then click/tap
Help and Support.
Type the keyword viruses in the Search box
, then click/tap the arrow.
234
Chapter 13: Maintaining Your Gateway M275
www.gateway.com
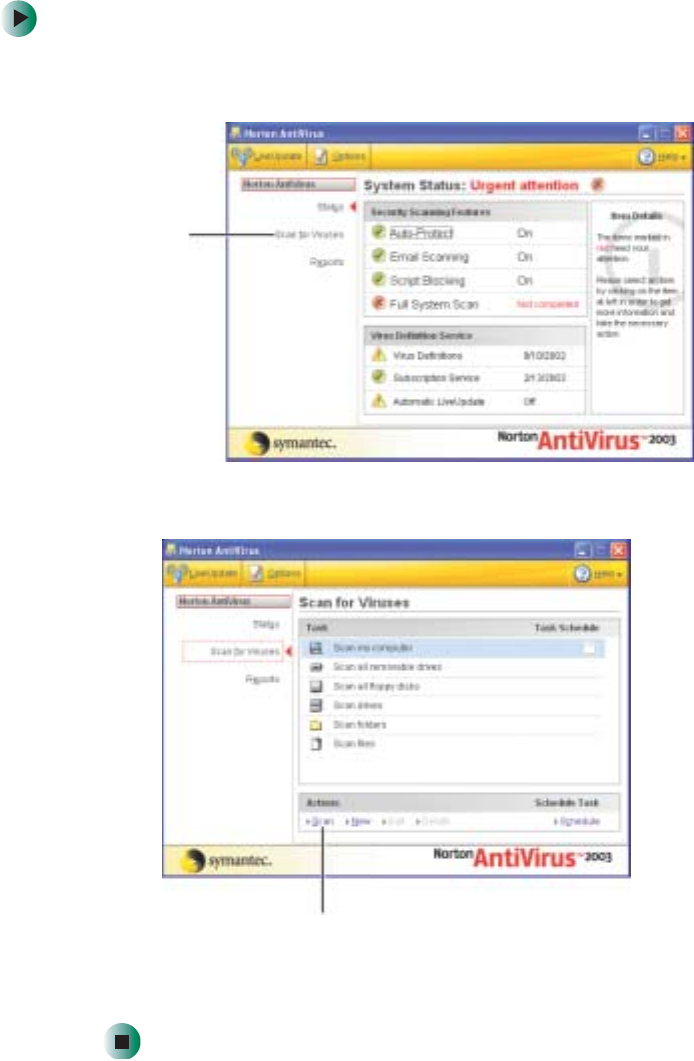
To scan for viruses:
1Click/Tap Start, All Programs, Norton AntiVirus, then click/tap Norton
AntiVirus 2003. Norton AntiVirus opens.
2Click/Tap Scan for Viruses.
3Click/Tap the type of scan you want to make in the Scan for Viruses area,
then under Actions, click/tap Scan.
Scan for
viruses
Scan

235
Protecting your convertible tablet PC from viruses
www.gateway.com
To remove a virus:
1If Norton AntiVirus finds a virus, follow all on-screen instructions to
remove the virus.
2Turn off your convertible tablet PC and leave it off for at least 30 seconds.
3Turn on your convertible tablet PC and rescan for the virus.
To update Norton AntiVirus:
1Make sure that you are connected to the Internet.
2Click/Tap Start, All Programs, Norton AntiVirus, then click/tap LiveUpdate -
Norton AntiVirus. The LiveUpdate wizard opens.
3Follow the on-screen instructions to update your Norton AntiVirus
program with the latest virus protection files.
4When the program has finished, click/tap Finish.
236
Chapter 13: Maintaining Your Gateway M275
www.gateway.com
Managing hard drive space
Windows provides several utilities you can use to manage your hard drive.
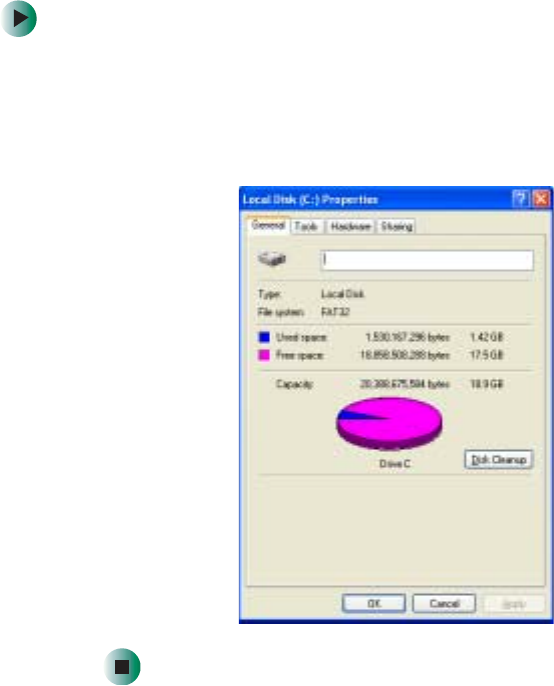
Checking hard drive space
To check hard drive space:
1Click/Tap Start, then click/tap My Computer. The My Computer window
opens.
2Right-click/Button-tap the drive that you want to check for available file
space, then click/tap Properties. Drive space information appears.
237
Managing hard drive space
www.gateway.com
Using Disk Cleanup
Delete unnecessary files, such as temporary Windows files, to free hard drive
space.
To use the Windows Disk Cleanup program:
1Click/Tap Start, then click/tap My Computer. The My Computer window
opens.
2Right-click/Button-tap the hard drive that you want to delete files from,
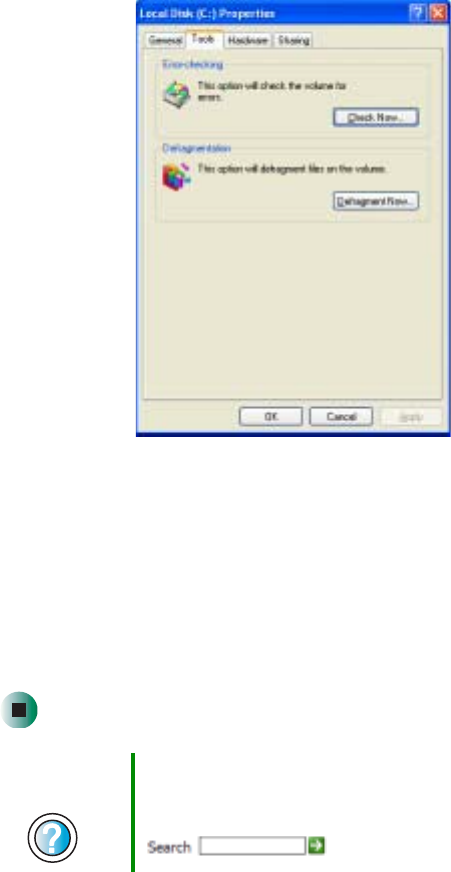
for example Local Disk (C:), then click/tap Properties. The Properties dialog
box opens at the General tab.
3Click/Tap Disk Cleanup. The Disk Cleanup dialog box opens.
4Make sure that the check box beside each file type you want to delete is
selected. For more information about file types you can delete, read the
descriptions in the Disk Cleanup dialog box.
5Click/Tap OK, then click/tap Yes.
238
Chapter 13: Maintaining Your Gateway M275
www.gateway.com
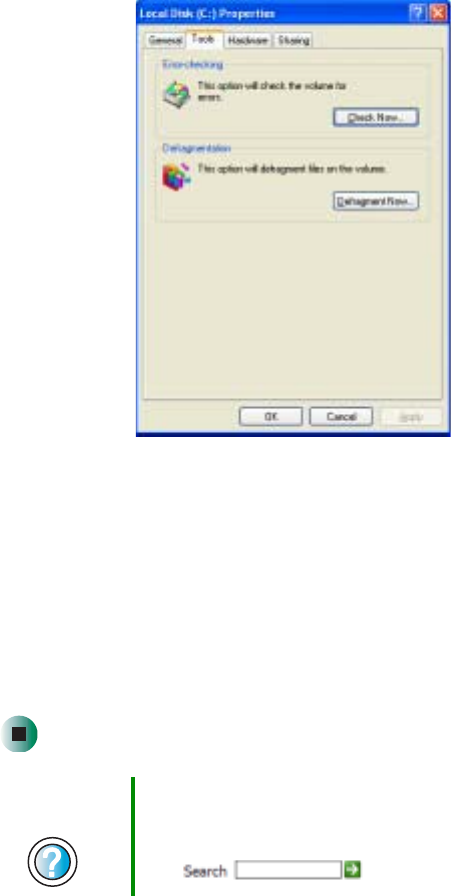
Checking the hard drive for errors
The Error-checking program examines the hard drive for physical flaws and file
and folder problems. This program corrects file and folder problems and marks
flawed areas on the hard drive so Windows does not use them.
If you use your convertible tablet PC several hours every day, you probably want
to run Error-checking once a week. If you use your convertible tablet PC less
frequently, once a month may be adequate. Also use Error-checking if you
encounter hard drive problems.
To check the hard drive for errors:
1Click/Tap Start, then click/tap My Computer. The My Computer window
opens.
2Right-click/Button-tap the hard drive that you want to check for errors,
for example Local Disk (C:), then click/tap Properties. The Properties dialog
box opens.
Help and
Support For more information about keeping the hard drive space
free of unnecessary files, click/tap Start, then click/tap
Help and Support.
Type the keyword disk cleanup in the Search box
, then click/tap the arrow.
239
Managing hard drive space
www.gateway.com
3Click/Tap the Tools tab.
4Click/Tap Check Now.
5Click/Tap the options you want to use, then click/tap Start. For help, press
F1. Windows checks the drive for errors. This process may take several
minutes. After Windows has finished checking the drive for errors, it
provides a summary of the problems that it found.
6Correct any problems that are found by following the on-screen
instructions.
7Click/Tap OK.
Help and
Support For more information about checking the hard drive for
errors, click/tap Start, then click/tap Help and Support.
Type the keyword checking for disk errors in the Search
box , then click/tap the arrow.

240
Chapter 13: Maintaining Your Gateway M275
www.gateway.com
Defragmenting the hard drive
When working with files, sometimes Windows divides the file information into
pieces and stores them in different places on the hard drive. This is called
fragmentation, and it is normal. In order for your convertible tablet PC to use
a file, Windows must search for the pieces of the file and put them back
together. This process slows the hard drive performance.
The Disk Defragmenter program organizes the data on the drive so each file is
stored as one unit rather than as multiple pieces scattered across different areas
of the drive. Defragmenting the information stored on the drive can improve
hard drive performance.
While the Disk Defragmenter program is running, do not use your keyboard
or mouse because using them may continuously stop and restart the
defragmenting process. Also, if you are connected to a network, log off before
starting Disk Defragmenter. Network communication may stop the
defragmentation process and cause it to start over.
To defragment the hard drive:
1Click/Tap Start, then click/tap My Computer. The My Computer window
opens.
2Right-click/Button-tap the hard drive that you want to defragment, for
example Local Disk (C:), then click/tap Properties. The Properties dialog box
opens.
241
Managing hard drive space
www.gateway.com
3Click/Tap the Tools tab.
4Click/Tap Defragment Now.
5If Disk Defragmenter does not start automatically, click/tap Defragment or
Start.
Disk Defragmenter shows its progress on the computer display. When
finished, Disk Defragmenter asks if you want to quit the program.
6Click/Tap Close or Yes, then click/tap the X in the top-right corner to close
the Disk Defragmenter window.
Help and
Support For more information about defragmenting the hard drive,
click/tap Start, then click/tap Help and Support.
Type the keyword defragmenting in the Search box
, then click/tap the arrow.

242
Chapter 13: Maintaining Your Gateway M275
www.gateway.com
Backing up files
Backing up files and removing them from the hard drive frees space for new
files on the hard drive. It also protects you from losing important information
if the hard drive fails or you accidentally delete files.
You should back up your files regularly to a writable CD (if you have a
recordable drive) or to diskettes (if you have a diskette drive). Use a backup
device, such as a recordable drive or Zip drive, to do a complete hard drive
backup. For more information, see “Creating CDs using Nero Express” on
page 136. If you do not have a high-capacity backup device and you want to
purchase one, you can contact Gateway’s Add-on Sales department or visit the
Accessories Store at accessories.gateway.com.
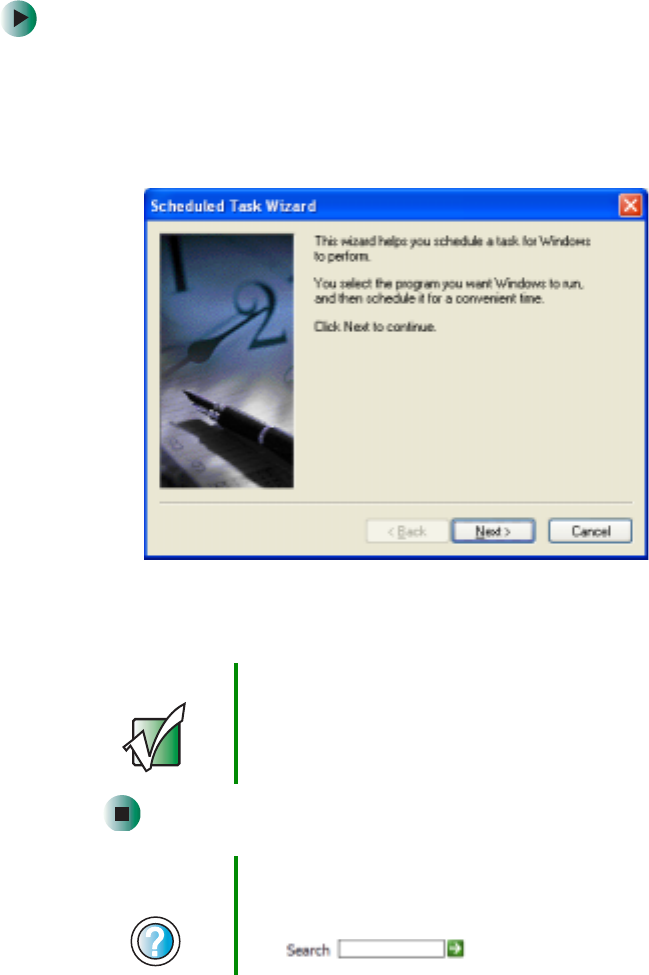
Using the Scheduled Task Wizard
The Scheduled Task Wizard lets you schedule maintenance tasks such as
running Disk Defragmenter and Error-checking.
Help and
Support For more information about backing up files, click/tap
Start, then click/tap Help and Support.
Type the keyword saving files in the Search box
, then click/tap the arrow.
243
Managing hard drive space
www.gateway.com
To start the Scheduled Task Wizard:
1Click/Tap Start, All Programs, Accessories, System Tools, then click/tap
Scheduled Tasks. The Scheduled Tasks window opens.
2Double-click/Double-tap the Add Scheduled Task icon. The Scheduled Task
Wizard opens.
3Click/Tap Next, then click/tap the task or program you want to schedule
and follow the on-screen instructions to customize the task.
Important Your convertible tablet PC must be on during scheduled
tasks. If your convertible tablet PC is off, scheduled tasks
will not run.
Help and
Support For more information about using the Scheduled Tasks
Wizard, click/tap Start, then click/tap Help and Support.
Type the keyword Scheduled Task Wizard in the Search
box , then click/tap the arrow.

244
Chapter 13: Maintaining Your Gateway M275
www.gateway.com
Cleaning your convertible
tablet PC
Keeping your convertible tablet PC clean and the vents free from dust helps
keep your convertible tablet PC performing at its best. You may want to gather
these items and put together a convertible tablet PC cleaning kit:
■A soft, lint-free cloth
■An aerosol can of air that has a narrow, straw-like extension
■Isopropyl alcohol
■Cotton swabs
■A CD or DVD drive cleaning kit
Cleaning the exterior
Always turn off your convertible tablet PC and other peripherals, then remove
the main and optional secondary batteries before cleaning any components.
Use a damp, lint-free cloth to clean your convertible tablet PC and other parts
of your convertible tablet PC. Do not use abrasive or solvent cleaners because
they can damage the finish on components.
Your convertible tablet PC is cooled by air circulated through the vents on the
case, so keep the vents free of dust. With your convertible tablet PC turned off
and unplugged, brush the dust away from the vents with a damp cloth. Be
careful not to drip any water into the vents. Do not attempt to clean dust from
the inside of your convertible tablet PC.
Warning When you shut down your convertible tablet PC, the power
turns off, but some electrical current still flows through your
convertible tablet PC. To avoid possible injury from
electrical shock, unplug the power cord and modem cable
from the wall outlets.

245
Cleaning your convertible tablet PC
www.gateway.com
Cleaning the keyboard
You should clean the keyboard occasionally by using an aerosol can of air with
a narrow, straw-like extension to remove dust and lint trapped under the keys.
If you spill liquid on the keyboard, turn off your convertible tablet PC and turn
your convertible tablet PC upside down. Let the liquid drain, then let the
keyboard dry before trying to use it again. If the keyboard does not work after
it dries, you may need to replace it.
Cleaning the convertible tablet PC screen
Use a soft cloth and water to clean the convertible tablet PC screen. Squirt a
little water on the cloth (never directly on the screen), and wipe the screen with
the cloth.
Cleaning the mouse
If you have a mouse and the mouse pointer begins moving erratically across
the computer screen or becomes difficult to control precisely, cleaning the
mouse will likely improve its accuracy.
Clean your optical mouse by wiping the bottom of the mouse with a damp
lint-free cloth.
Warning The convertible tablet PC screen is made of specially
coated glass and can be scratched or damaged by
abrasive or ammonia-based glass cleaners.
246
Chapter 13: Maintaining Your Gateway M275
www.gateway.com
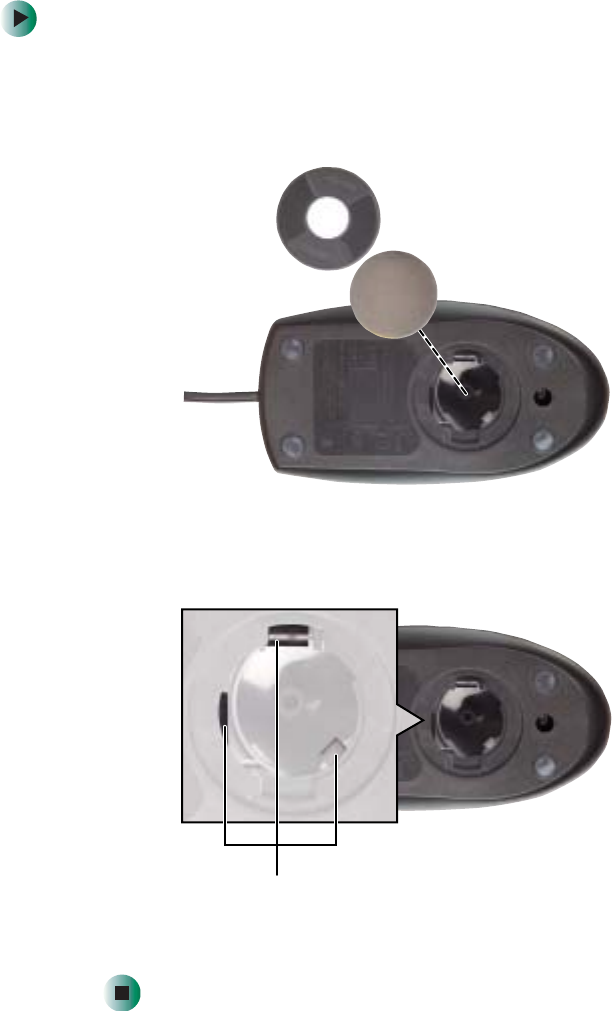
To clean your trackball mouse:
1Turn the mouse upside down.
2Rotate the retaining ring on the bottom of the mouse counter-clockwise,
then remove the retaining ring and mouse ball.
3Remove any dust, lint, or dirt from the mouse ball with a soft cloth.
4Clean the mouse rollers with a cotton swab dipped in isopropyl alcohol.
5Replace the mouse ball and lock the retaining ring into place.
Mouse rollers

14
247
Restoring
Software
Read this chapter to learn how to:
■Reinstall device drivers
■Update device drivers
■Reinstall programs
■Reinstall Windows
If you are not comfortable with the procedures covered in
this chapter, seek help from a more experienced computer
user or a computer service technician.

248
Chapter 14: Restoring Software
www.gateway.com
Using the Restoration CDs
Use the Gateway Restoration CDs to reinstall device drivers, your operating
system, and other programs that were preinstalled at the factory.
Important Before you try to fix a problem by reinstalling software from
your Gateway Restoration CDs, make sure that you have
tried these steps first:
■Use the diagnostics and troubleshooting tools found in
Help and Support. For more information about
diagnostics and troubleshooting tools, click/tap Start,
then click/tap Help and Support.
Type the keyword troubleshooting in the Search box
, then click/tap the arrow.
■Run System Restore. For more information about
System Restore, click/tap Start, then click/tap Help and
Support.
Type the keyword System Restore in the Search box
, then click/tap the arrow.
■See the Troubleshooting chapter of this guide.
If these steps do not resolve the problem, use the Gateway
Restoration CDs to reinstall device drivers or programs.
If reinstalling device drivers or programs does not resolve
the problem, reinstall Windows.

249
Reinstalling device drivers
www.gateway.com
Reinstalling device drivers
Device drivers are programs that control devices such as the computer display,
DVD drives, and modems. Drivers translate information between computer
devices and programs.
Drivers for your original convertible tablet PC hardware are installed at
Gateway. If you install a new device, you need to install the drivers provided
by the device manufacturer.
You should reinstall device drivers:
■If directed to do so while troubleshooting
■If you see a message indicating that there is a problem with a device driver
If you need to reinstall device drivers because you are directed to do so while
troubleshooting or if a message tells you that there is a problem with a device
driver, reinstall the device drivers by following the instructions below.
If you just reinstalled Windows XP, the device drivers were automatically
reinstalled.
To reinstall device drivers:
1Insert the red Drivers and Applications CD into the DVD or DVD/CD-RW
drive. If the program starts automatically, go to Step 5.
- OR -
If the program does not start automatically, go to Step 2.
2Click/Tap Start, then click/tap Run. The Run dialog box opens.
3In the Open text box, type d:\runmenu.exe (where d is the drive letter of
your DVD or DVD/CD-RW drive).
4Click/Tap OK.
Important If the drive you want to use is not in the modular bay, you
need to swap modules. For more information about
swapping modules, see “Changing modules” on page 110.
250
Chapter 14: Restoring Software
www.gateway.com
5If this is the first time you have inserted the red Drivers and Applications
CD, accept the End User License Agreement (EULA) by clicking/tapping
Yes, I accept it, then clicking/tapping Continue. The Gateway Driver and
Application Recovery program starts and the Drivers and Application
Recovery tab appears.
6Select a single device driver to reinstall.
- OR -
Click/Tap Automatic Installation, then select multiple device drivers to
reinstall. (Grayed out drivers are not available for Automatic Installation.
To select these drivers, click/tap Manual Installation.)
7Click/Tap Install.
8Follow any additional on-screen instructions. Depending on the device
driver you are reinstalling, you may only need to restart your convertible
tablet PC to complete the installation. However, if a setup wizard opens
when you restart your convertible tablet PC, follow the on-screen
instructions.
Help and
Support For more information about reinstalling device drivers,
click/tap Start, then click/tap Help and Support.
Type the keyword drivers in the Search box
, then click/tap the arrow.

251
Updating device drivers
www.gateway.com
Updating device drivers
The Restoration CDs contain a device driver update utility that works over the
Internet. If you do not have an Internet service provider, the update utility
works by direct-dialing the device driver update service.
To update device drivers:
1Insert the red Drivers and Applications CD into the DVD or DVD/CD-RW
drive. If the program starts automatically, go to Step 5.
- OR -
If the program does not start automatically, go to Step 2.
2Click/Tap Start, then click/tap Run. The Run dialog box opens.
3In the Open text box, type d:\runmenu.exe (where d is the drive letter of
the DVD or DVD/CD-RW drive).
4Click/Tap OK.
Important If your convertible tablet PC came equipped with a wireless
device, only use the drivers approved for the country the
device will be used in. See the red Drivers and
Applications CD or the Gateway Technical Support Web
site (support.gateway.com).
If your convertible tablet PC came equipped with an
internal embedded wireless device, see “Safety,
Regulatory, and Legal Information” on page 315 for
general wireless regulatory and safety guidelines.To find
out if your convertible tablet PC has an internal wireless
device, check the label (see “Identifying your model” on
page 10).
Important If the drive you want to use is not in the modular bay, you
need to swap modules. For more information about
swapping modules, see “Changing modules” on page 110.
252
Chapter 14: Restoring Software
www.gateway.com
5If this is the first time you have inserted the red Drivers and Applications
CD, accept the End User License Agreement (EULA) by clicking/tapping
Yes, I accept it, then clicking/tapping Continue. The Gateway Driver and
Application Recovery program starts and the Drivers and Application
Recovery tab appears.
6Click/Tap the Web Updates tab.
7Click/Tap Check Now. The Connect window opens.
8Install available updated device drivers by following the on-screen
instructions. Depending on the device driver you are updating, you may
only need to restart your convertible tablet PC to complete the installation.
However, if a setup wizard opens when you restart your convertible
tablet PC, follow the on-screen instructions.
Reinstalling programs
If you have problems running a program or if you have reinstalled your
operating system, you can reinstall programs from the red Drivers and
Applications CD and other program CDs. If you are reinstalling programs from
other program CDs, follow the installation instructions on each CD. If you want
to reinstall a program, uninstall the old version first.
To reinstall programs from the Drivers and Applications CD:
1If you just reinstalled Windows, go to Step 4. Otherwise, go to the next
step.
2Click/Tap Start, Control Panel, then click/tap Add or Remove Programs.
3In the Currently Installed Programs list, click/tap the program you want to
uninstall, then click/tap Change/Remove and follow the on-screen
instructions.
Help and
Support For more information about updating device drivers,
click/tap Start, then click/tap Help and Support.
Type the keyword updating drivers in the Search box
, then click/tap the arrow.

253
Reinstalling programs
www.gateway.com
4Insert the red Drivers and Applications CD into the DVD or DVD/CD-RW
drive. If the program starts automatically, go to Step 8.
- OR -
If the program does not start automatically, go to Step 5.
5Click/Tap Start, then click/tap Run. The Run dialog box opens.
6In the Open text box, type d:\runmenu.exe (where d is the drive letter of
your DVD or DVD/CD-RW drive).
7Click/Tap OK.
8If this is the first time you have inserted the red Drivers and Applications
CD, accept the End User License Agreement (EULA) by clicking/tapping
Yes, I accept it, then clicking/tapping Continue. The Gateway Driver and
Application Recovery program starts and the Drivers and Application
Recovery tab appears.
9Select a single program to reinstall.
- OR -
Click/Tap Automatic Installation, then select multiple programs to reinstall.
(Grayed out programs are not available for Automatic Installation. To select
these programs, click/tap Manual Installation.)
10 Click/Tap Install.
11 Follow any additional on-screen instructions. Depending on the programs
you are reinstalling, you may only need to restart your convertible
tablet PC to complete the installation. However, if a setup wizard opens
when you restart your convertible tablet PC, follow the on-screen
instructions.
Important If the drive you want to use is not in the modular bay, you
need to swap modules. For more information about
swapping modules, see “Changing modules” on page 110.
254
Chapter 14: Restoring Software
www.gateway.com
To reinstall other programs from a CD:
1If you just reinstalled Windows, go to Step 4. Otherwise, go to the next
step.
2Click/Tap Start, Control Panel, then click/tap Add or Remove Programs.
3In the Currently Installed Programs list, click/tap the program you want to
uninstall, then click/tap Change/Remove and follow the on-screen
instructions.
4Insert the program CD into the DVD or DVD/CD-RW drive.
5Complete the program reinstallation by following the instructions
included with the program CD.
Reinstalling Windows
If your convertible tablet PC is not working correctly, try the following options
to correct the problem:
■Troubleshooting. For more information, see “Troubleshooting” on
page 285.
■Running System Restore.
■Reinstalling device drivers. For more information, see “Reinstalling device
drivers” on page 249.
Help and
Support For more information about reinstalling programs, click/tap
Start, then click/tap Help and Support.
Type the keyword installing programs in the Search box
, then click/tap the arrow.
Important If the drive you want to use is not in the modular bay, you
need to swap modules. For more information about
swapping modules, see “Changing modules” on page 110.
255
Reinstalling Windows
www.gateway.com
If the options above do not correct the problem, you can use the Restoration
CDs to reinstall Windows and other software.
The Restoration CDs step you through reinstalling Windows XP. If you are
reinstalling Windows XP, the Restoration CDs automatically reinstall the
hardware device drivers and some programs as well. You can install any
remaining programs by using the program CDs that came with your convertible
tablet PC. To reinstall your programs, follow the instructions in “Reinstalling
programs” on page 252.
To reinstall Windows XP and the device drivers:
1Insert the red Drivers and Applications CD into the DVD or DVD/CD-RW
drive.
2Restart your convertible tablet PC.
3Select 2. Boot from CD-ROM.
4Select a language option.
5Select 1. Delete all files (Automated Fdisk/Format).
6Select 1. Continue deleting all files and restart.
7When prompted, press any key to continue.
Important If you are prompted for your Windows product key when
you reinstall Windows, you can find the key on the
Microsoft Certificate of Authenticity label located on the
bottom of your convertible tablet PC case. For more
information, see “Microsoft Certificate of Authenticity” on
page 11.
Caution Back up your personal files before you use this option.
All files on your convertible tablet PC will be deleted!
Important If the drive you want to use is not in the modular bay, you
need to swap modules. For more information about
swapping modules, see “Changing modules” on page 110.

256
Chapter 14: Restoring Software
www.gateway.com
8Select 2. Boot from CD-ROM.
9Select a language option.
10 Select 2. Automated installation of Windows (XP).
11 When prompted, remove the red Drivers and Applications CD and insert
the blue Operating System CD into the DVD or DVD/CD-RW drive, then
press any key to continue.
12 When prompted, accept the License Agreement by pressing Y.
13 Wait while the setup program copies files to your hard drive. When your
convertible tablet PC restarts, do NOT press any key to boot from CD.
14 When prompted, insert the red Drivers and Applications CD, then click/tap
Continue. The Gateway Application Loader automatically installs your
drivers and programs. Your convertible tablet PC restarts several times
during this process. Do not press any keys or buttons during this process
unless prompted to do so.
15 When the Gateway Application Loader has finished, go to the Windows
desktop by clicking/tapping OK.
16 Install additional programs by following the instructions in “Reinstalling
programs” on page 252.
17 Install other software, such as Microsoft Works Suite and gaming software,
by following the instructions in “To reinstall other programs from a CD:”
on page 254.

15
257
Upgrading Your
Gateway M275
This chapter provides information about adding hardware
devices to your convertible tablet PC. Read this chapter to
learn how to:
■Add and remove PC Cards
■Add and replace memory
■Replace the hard drive
258
Chapter 15: Upgrading Your Gateway M275
www.gateway.com
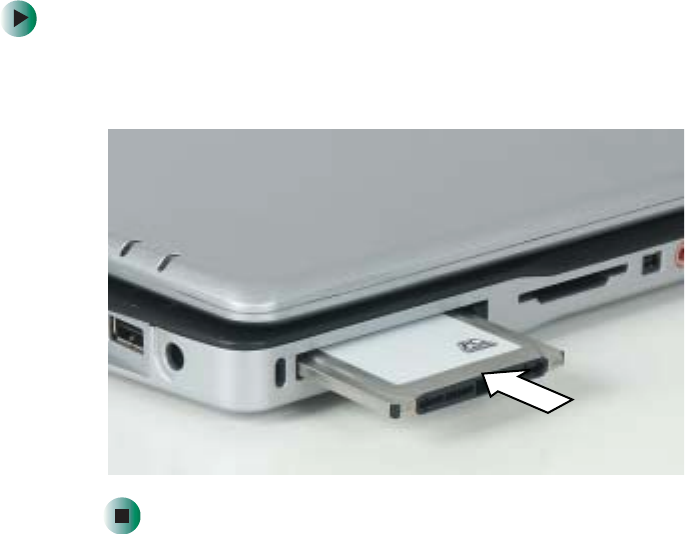
Adding and removing a PC Card
Your convertible tablet PC has a PC Card slot (also known as a PCMCIA card
slot). This slot accepts one Type II card.
You do not need to restart your convertible tablet PC when changing most cards
because your convertible tablet PC supports hot-swapping. Hot-swapping means
that you can insert a PC Card while your convertible tablet PC is running. If
your PC Card does not work after hot-swapping, see the PC Card manufacturer’s
documentation for further information.
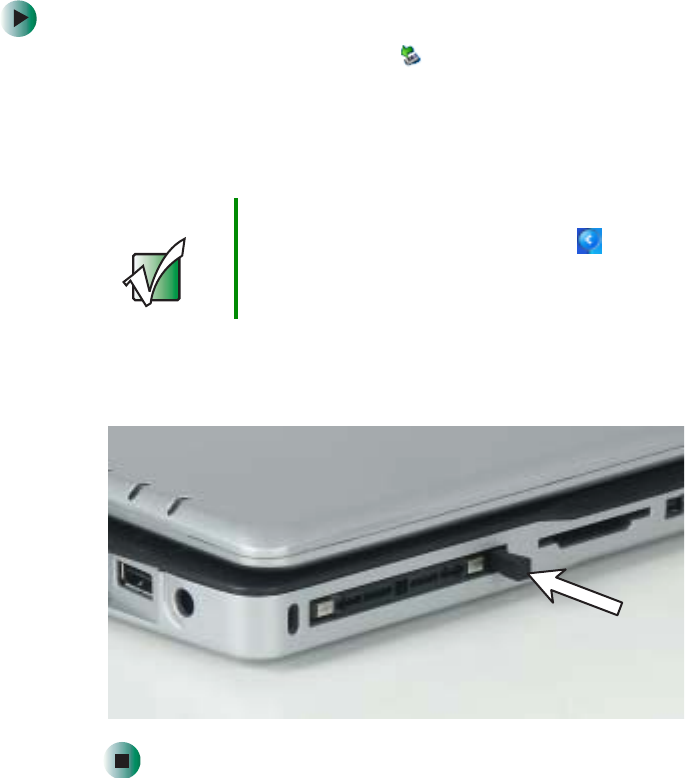
To insert a PC Card:
■Push the card firmly into the PC Card slot label-side up until the outer edge
of the card is flush with the side of your convertible tablet PC.
259
Adding and removing a PC Card
www.gateway.com
To remove a PC Card:
1Click/Tap the remove hardware icon in the taskbar, the PC Card name,
then click/tap Stop.
-OR-
Turn off your convertible tablet PC.
2Press the PC Card eject button once to release the eject button.
3Press the PC Card eject button again to eject the PC Card.
Important If the remove hardware icon does not appear on the
taskbar, click/tap the show hidden icons button.

260
Chapter 15: Upgrading Your Gateway M275
www.gateway.com
Preventing static electricity
discharge
The components inside your convertible tablet PC are extremely sensitive to
static electricity, also known as electrostatic discharge (ESD).
Before installing memory or replacing the hard drive, follow these guidelines:
■Turn off your convertible tablet PC.
■Wear a grounding wrist strap (available at most electronics stores) and
attach it to a bare metal part of your workbench or other grounded
connection.
■Touch a bare metal surface on your workbench or other grounded object.
■Unplug the power cord and the modem and network cables.
■Remove the main battery (and secondary battery, if installed). For more
information, see “Changing batteries” on page 171.
■Disconnect all peripheral devices and remove any PC Cards.
Warning ESD can permanently damage electrostatic
discharge-sensitive components in your convertible
tablet PC. Prevent ESD damage by following ESD
guidelines every time you install memory or replace the
hard drive.
Warning To avoid exposure to dangerous electrical voltages and
moving parts, turn off your convertible tablet PC and
unplug the power cord and modem and network cables
before opening the case.
Warning To prevent risk of electric shock, do not insert any object
into the vent holes of your convertible tablet PC.
261
Adding or replacing memory
www.gateway.com
Before working with computer components, follow these guidelines:
■Avoid static-causing surfaces such as carpeted floors, plastic, and packing
foam.
■Remove components from their antistatic bags only when you are ready
to use them. Do not lay components on the outside of antistatic bags
because only the inside of the bags provide electrostatic protection.
■Always hold components by their edges. Avoid touching the edge
connectors. Never slide components over any surface.
Adding or replacing memory
Your convertible tablet PC uses memory modules called SO-DIMMs (Small
Outline Dual Inline Memory Modules). The modules are available in various
capacities and any module can be placed in the memory bay. Use only memory
modules designed for the Gateway M275 for upgrading your memory.
SO-DIMMs are located in two places inside your convertible tablet PC. Both
SO-DIMMs can be upgraded. For instructions on upgrading the SO-DIMM
located on the bottom of your convertible tablet PC, see “Adding or replacing
memory in the memory bay” on page 262. For instructions on upgrading the
SO-DIMM located under the keyboard of your convertible tablet PC, see
“Replacing memory under the keyboard” on page 265.
262
Chapter 15: Upgrading Your Gateway M275
www.gateway.com
Adding or replacing memory in the memory
bay
To add or replace memory modules:
1Follow the instructions under “Preventing static electricity discharge” on
page 260.
2Turn off your convertible tablet PC, disconnect the AC adapter and modem
and network cables.
3Disconnect your convertible tablet PC from the optional port replicator
(see “Disconnecting from the port replicator” on page 283).
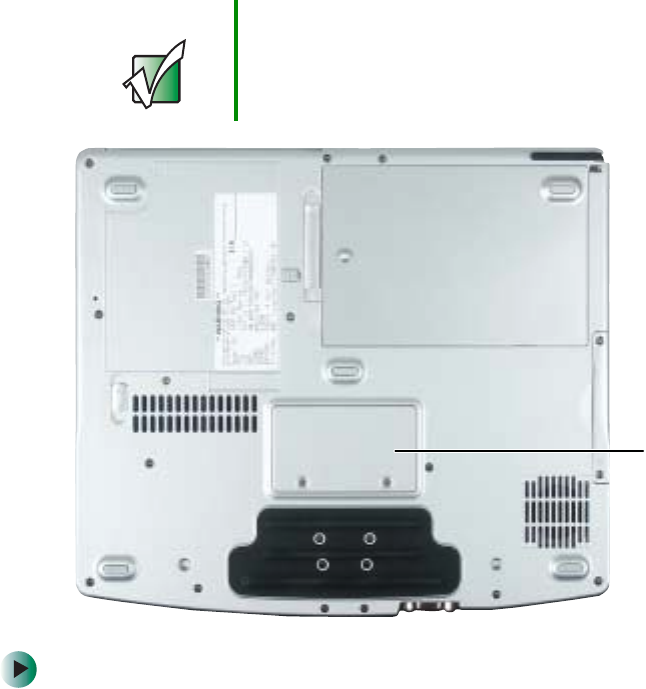
4Turn your convertible tablet PC over so the bottom is facing up.
Important Use only memory modules designed for the
Gateway M275.
Memory
bay
263
Adding or replacing memory
www.gateway.com
5Remove the main and optional secondary batteries. For more information,
see “Changing batteries” on page 171.
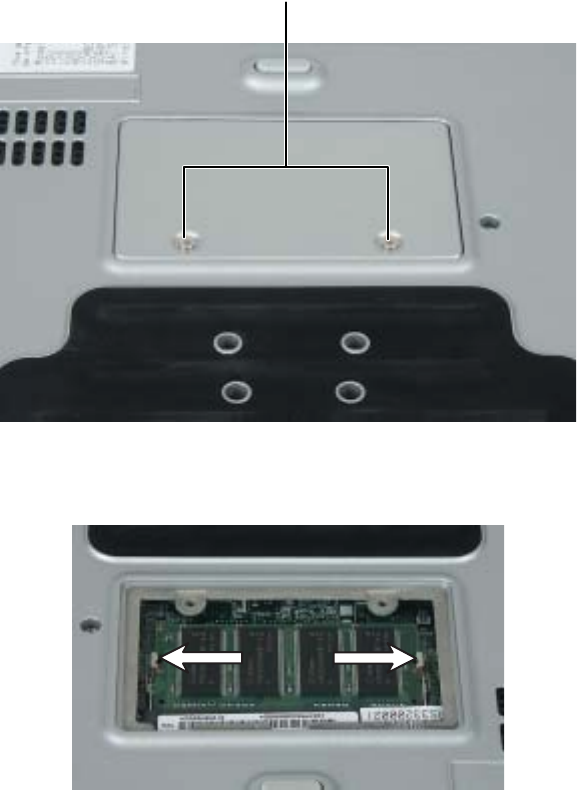
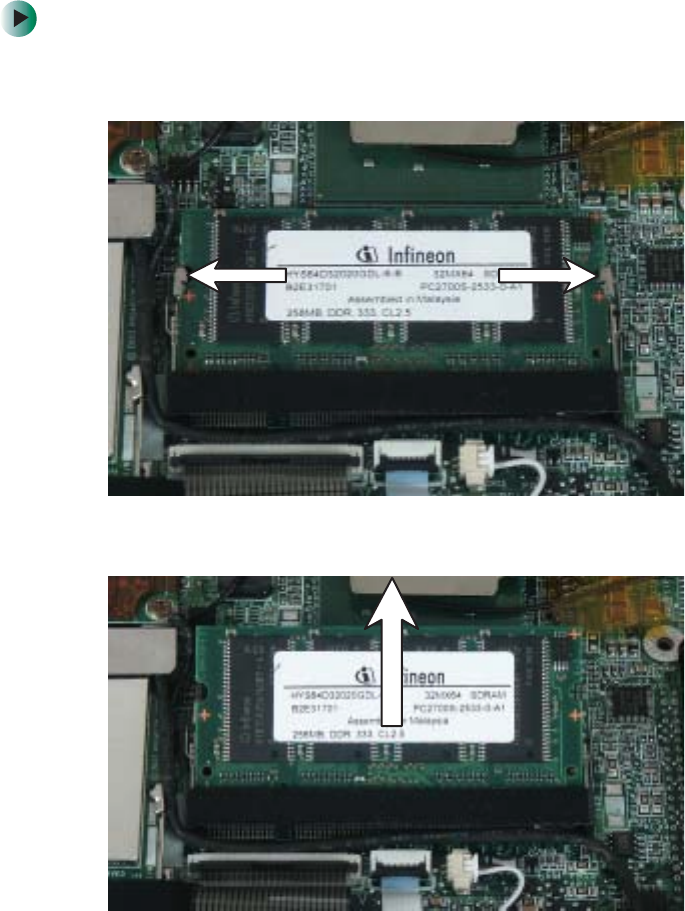
6Loosen the two memory bay cover screws, then remove the memory bay
cover.
7If you are removing a module, gently press outward on the clip at each
end of the memory module until the module tilts upward.
Screws
264
Chapter 15: Upgrading Your Gateway M275
www.gateway.com
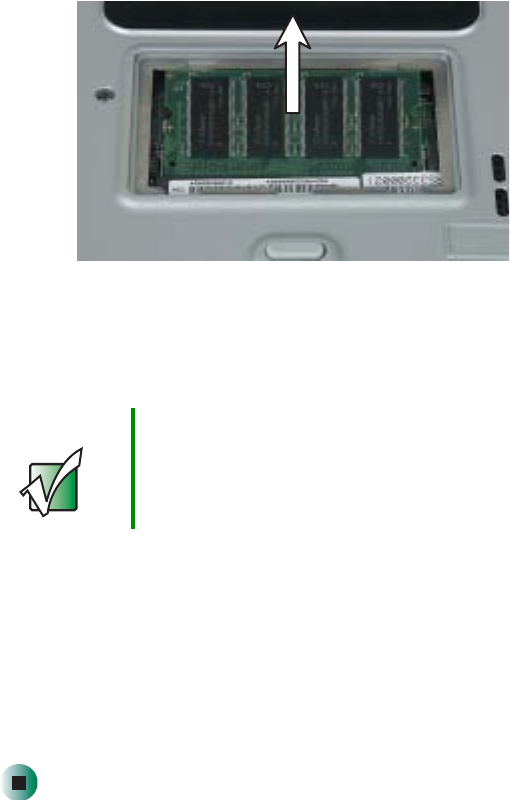
8Pull the memory module out of the slot.
9Hold the new or replacement module at a 30-degree angle and press it into
the empty memory slot. This module is keyed so it can only be inserted
in one direction. If the module does not fit, make sure that the notch in
the module lines up with the tab in the memory bay.
10 Gently push the module down until it clicks in place.
11 Replace the memory bay cover and tighten the cover screws.
12 Insert the batteries, then turn your convertible tablet PC over.
13 Reattach the optional port replicator.
14 Connect the power adapter and modem and network cables, then turn on
your convertible tablet PC.
Important Use only memory modules designed for the
Gateway M275.

265
Adding or replacing memory
www.gateway.com
Replacing memory under the keyboard
Installing replacement memory under the keyboard is a process consisting of
three procedures that must be done in sequence:
1Open the keyboard compartment.
2Replace the memory.
3Reattach the keyboard.
Opening the keyboard compartment
To open the keyboard compartment:
1Follow the instructions under “Preventing static electricity discharge” on
page 260.
2Turn off your convertible tablet PC, disconnect the AC adapter and modem
and network cables.
3Turn your convertible tablet PC over so the bottom is facing up.
4Remove the main and optional secondary batteries. For more information,
see “Changing batteries” on page 171.
Important Use only memory modules designed for the
Gateway M275 for upgrading your memory.
266
Chapter 15: Upgrading Your Gateway M275
www.gateway.com
5Remove the two keyboard screws.
6Turn your convertible tablet PC over so the top is facing up.
7Open the LCD panel to the normal viewing position.
Screw Screw
267
Adding or replacing memory
www.gateway.com
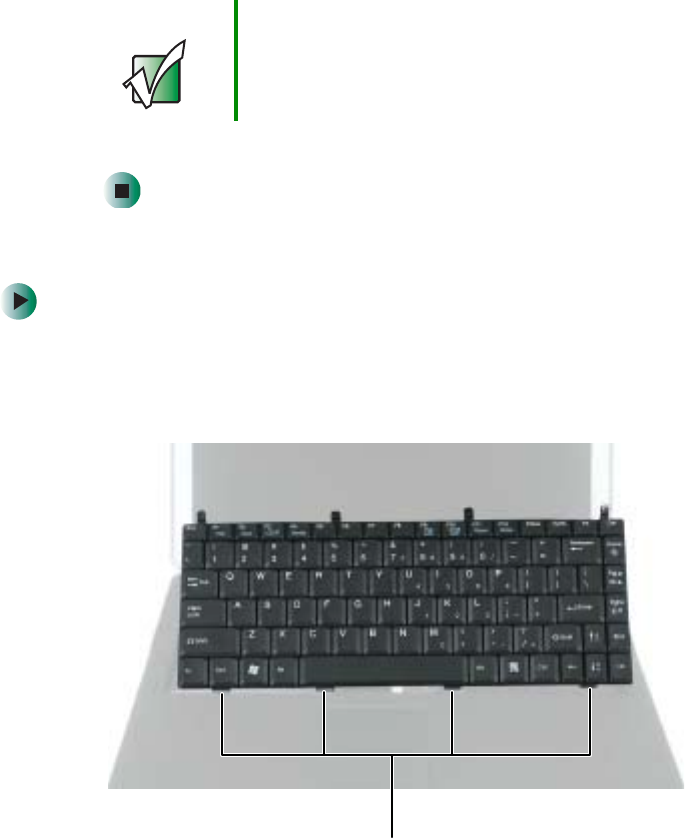
8Insert the small flat-blade screwdriver under the bottom of the keyboard
bezel between the F11 and F12 keys and gently pry it up.
9Remove the bezel from your convertible tablet PC by pulling the bezel
toward you and at the same time lifting its front to clear the keyboard.
You will hear small snapping sounds as the bezel comes away from your
convertible tablet PC. Be careful not to break off the tabs found on the
bottom of the bezel.
Important Inserting a piece of cloth between the screwdriver and
keyboard will help prevent damage to your convertible
tablet PC.
268
Chapter 15: Upgrading Your Gateway M275
www.gateway.com
10 With a small Phillips screwdriver, remove the four keyboard screws and
put them in a safe place.
Screws
269
Adding or replacing memory
www.gateway.com
11 Lift the back edge of the keyboard, then slowly rotate it toward you so it
lies keys-down on top of your convertible tablet PC. Be careful not to
damage the LCD panel.
270
Chapter 15: Upgrading Your Gateway M275
www.gateway.com
Replacing the memory
To replace the memory:
1Gently press outward on the clip at each end of the memory module until
the module tilts upward.
2Pull the memory module out of the slot.
271
Adding or replacing memory
www.gateway.com
3Hold the new or replacement module at a 30-degree angle and press it into
the empty memory slot. This module is keyed so it can only be inserted
in one direction. If the module does not fit, make sure that the notch in
the module lines up with the tab in the memory bay.
4Gently push the module down until it clicks in place.
Reattaching the keyboard
To reattach the keyboard:
1Rotate the keyboard toward the LCD panel until the keyboard is
almost face-up.
2Insert the tabs on the front of the keyboard under the palm rest.
Important Use only memory modules designed for the
Gateway M275.
Tabs
272
Chapter 15: Upgrading Your Gateway M275
www.gateway.com
3Gently press the keyboard down until it is flat all the way across. The
keyboard should easily fall into place. Be careful not to damage the
LCD panel.
4Replace the four keyboard screws.
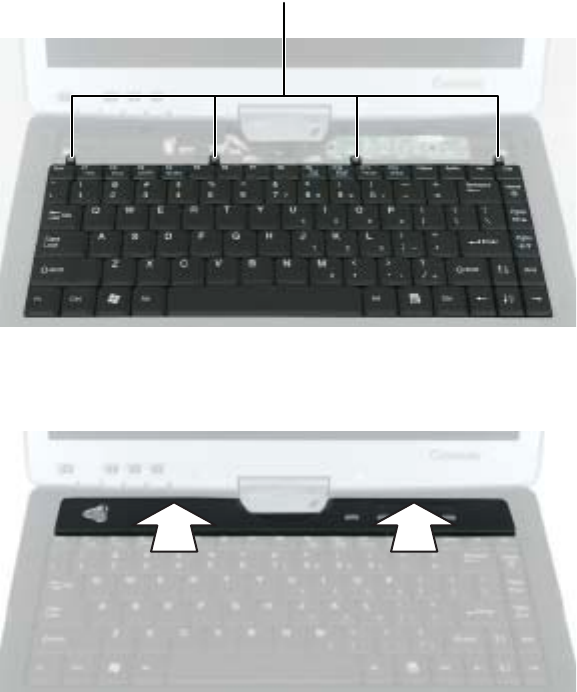
5Slide the tabs on the bottom side of the bezel under your convertible tablet
PC frame.
6Press down on the bezel in several places to make sure it is correctly
mounted. The bezel is correctly mounted when you can run you finger
along the bezel and find no loose spots. The bezel should be flat all the
way across.
Screws
273
Replacing the hard drive kit
www.gateway.com
7Turn your convertible tablet PC over so the bottom is facing up.
8Replace the two keyboard screws.
9Insert the batteries, then turn your convertible tablet PC over.
10 Connect the power adapter and modem and network cables, then turn on
your convertible tablet PC.
Replacing the hard drive kit
If you would like more hard drive capacity, you can replace your original drive
with a higher-capacity drive.
Warning If the bezel is not correctly replaced, your convertible tablet
PC could be damaged when you try to close the LCD
panel.
Hard
drive
274
Chapter 15: Upgrading Your Gateway M275
www.gateway.com
To replace the hard drive kit:
1Follow the instructions under “Preventing static electricity discharge” on
page 260.
2Turn off your convertible tablet PC, disconnect the AC adapter and modem
and network cables.
3Disconnect your convertible tablet PC from the optional port replicator
(see “Disconnecting from the port replicator” on page 283).
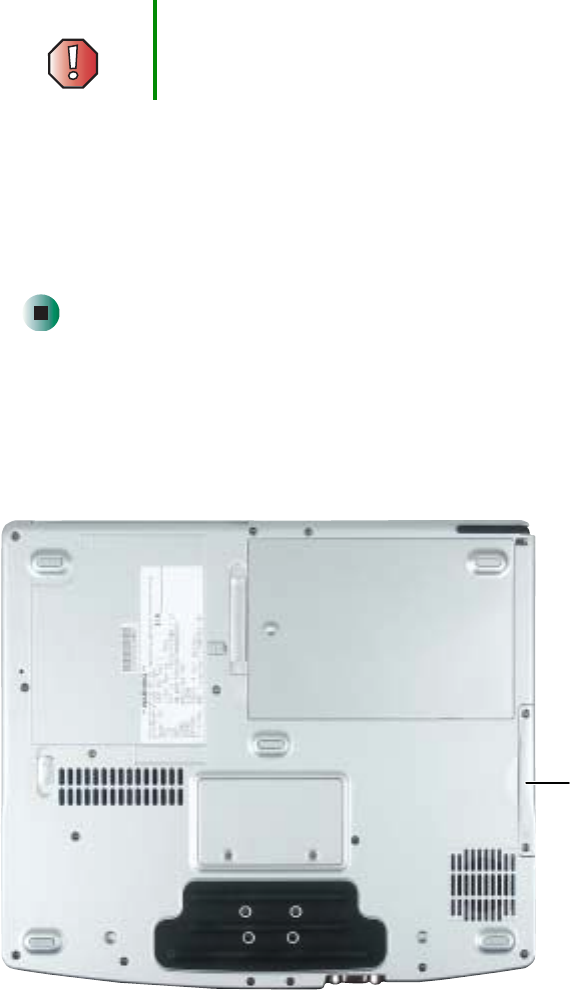
4Turn your convertible tablet PC over so the bottom is facing up.
5Remove the main and optional secondary batteries. For more information,
see “Changing batteries” on page 171.
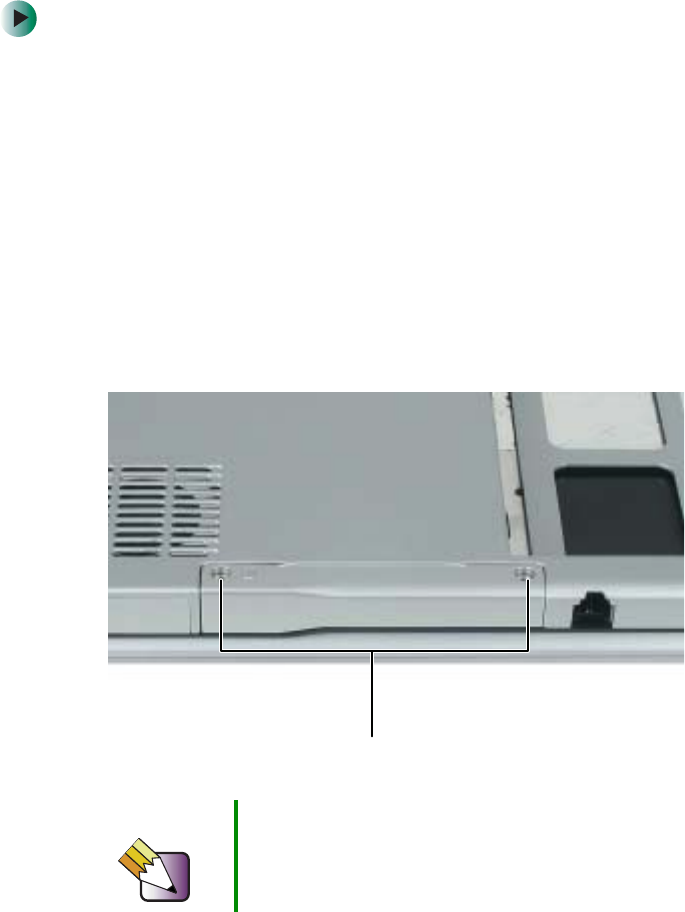
6Remove the two hard drive kit screws.
Tips & Tricks Use a magnetic screwdriver or turn your convertible
tablet PC over to remove the screws.
Screws
275
Replacing the hard drive kit
www.gateway.com
7Slide the old hard drive kit out of your convertible tablet PC.
8If your new hard drive already includes the hard drive kit bracket, go to
Step 13.
-OR-
If you need to move the hard drive kit bracket from your old hard drive
kit to your new hard drive, go to Step 9.
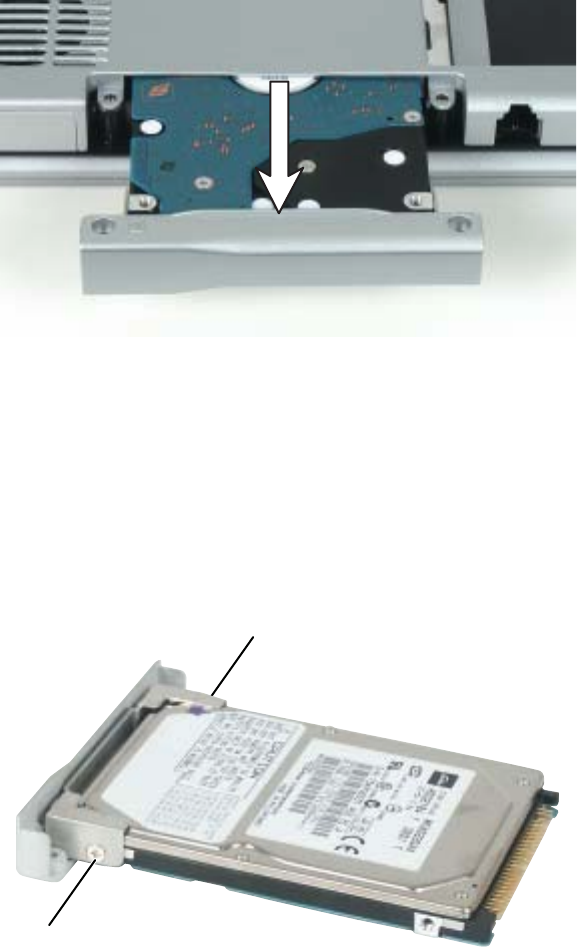
9Remove the two screws that secure the hard drive to the hard drive kit
bracket.
Screw
Screw

276
Chapter 15: Upgrading Your Gateway M275
www.gateway.com
10 Remove the bracket from the old drive.
11 Insert the new drive into the bracket so the screw holes line up.
12 Replace the two screws that secure the bracket to the drive.
13 Place the new hard drive kit into the bay and slide it into the connector.
14 Replace the screws that secure the hard drive kit to your convertible
tablet PC.
15 Insert the batteries, then turn your convertible tablet PC over.
16 Reattach the optional port replicator.
17 Connect the power adapter and modem and network cables, then turn on
your convertible tablet PC.

16
277
Using the
Gateway M275
Port Replicator
The optional port replicator gives you a convenient way to
attach external devices such as a monitor, a full-size
keyboard, or an AC adapter.
Although devices can be attached directly to the ports on
your convertible tablet PC, the port replicator lets you
make all of those connections in one step. The port
replicator also gives you access to additional ports not
found on your convertible tablet PC.
Read this chapter to learn:
■Where ports and jacks are located
■How to connect and disconnect the port replicator
■How to secure the port replicator with a locking cable
278
Chapter 16: Using the Gateway M275 Port Replicator
www.gateway.com
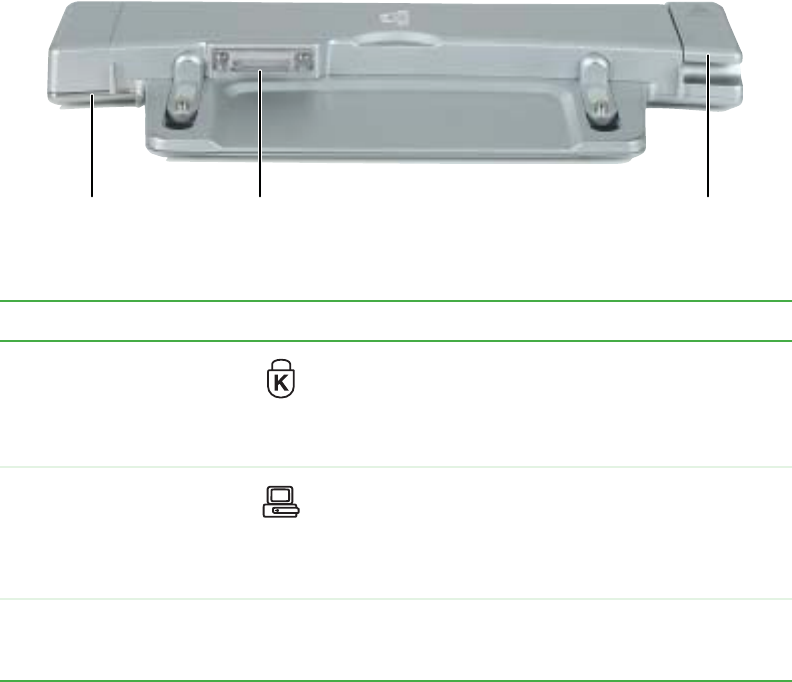
Front
Component Icon Description
Kensington™ lock ring Secure your convertible tablet PC and port replicator to
an object by connecting a Kensington cable lock through
this ring and into the Kensington lock slot on your
convertible tablet PC. For more information, see
“Securing your port replicator” on page 284.
Docking port Connect your convertible tablet PC to this port.
Warning! Power is passed through this port. This
docking connection is certified to UL 1950 for use only
with convertible tablet PCs designed for your Gateway
port replicator.
Docking release latch Press the release latch to attach the convertible
tablet PC. Lift the release latch to release your
convertible tablet PC.
Docking
port Docking
release
latch
Kensington
lock ring

279
Left side
www.gateway.com
Left side
Component Icon Description
USB port Plug USB (Universal Serial Bus) devices (such as a
diskette drive, flash drive, Iomega™ Zip™ drive, printer,
scanner, camera, keyboard, or mouse) into this port.
USB port