Quanta Computer PX3 Quanta Video Presence Solution User Manual TempConfidential rev
Quanta Computer Inc Quanta Video Presence Solution TempConfidential rev
TempConfidential_User Manual_rev
QuantaComputerInc.
PX3VideoPresenceSolutionQuickStartGuide
PackageContents
Cameraunitx1
Keypadunitx1
5V/3Apoweradapterx1forcameraunit
12V/2Apoweradapterx1forkeypadunit
MicroHDMIcable(typeD)x1
HDMIcable(typeA)x1
VGAcablex1
LANcablex1
Quickstartguidex1
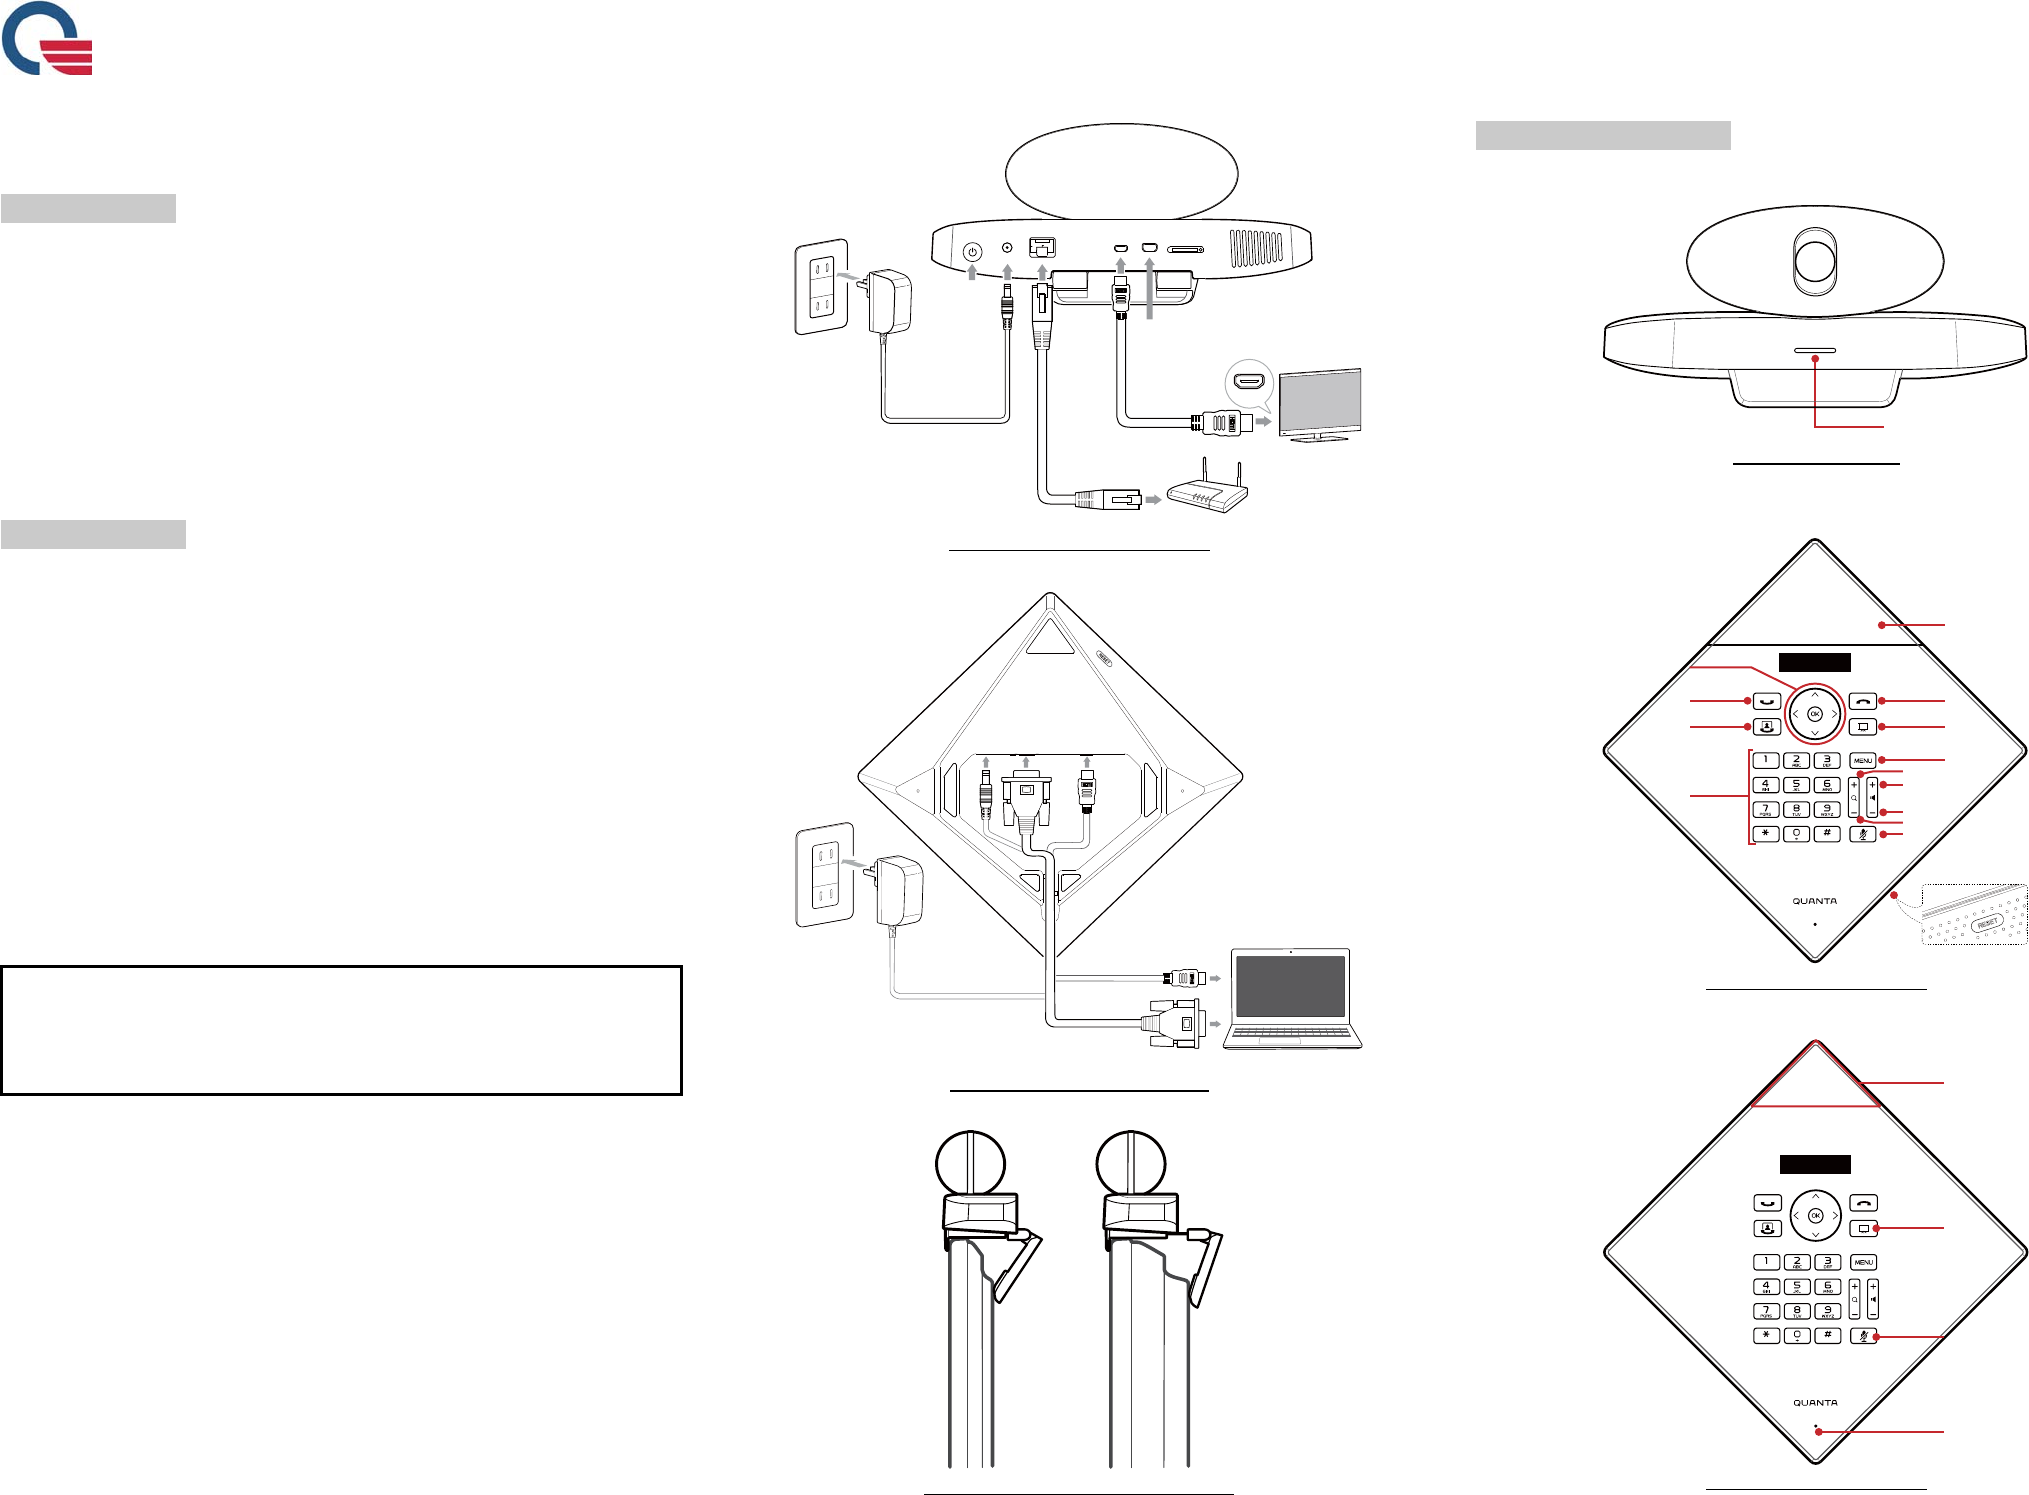
InstallingyourPX3
1.Installcameraunit:ConnectLANcable,microHDMIcable,andpoweradapterto
cameraunitasshowedinFigure1.
2.PlacethecameraunitontopoftheTVandadjustthestandtofixPX3asshowed
inFigure3.
3.TurnonTVandswitchtothededicatedHDMIoutputchannel.WhenPX3menu
isdisplayedonTV,continuetoinstallthekeypadunit.
4.Installkeypadunit:Placethekeypadunitonthemeetingtable.Connectpower
adaptertokeypadunitasshowedinFigure2.ConnectHDMIcableorVGA
cable(dependingonthenotebookinterface)tokeypadunitifyouwanttouse
projectormodeorscreensharing.
5.WhentheLCDdisplayonthekeypadunitshows“Welcome”,yourPX3isready
foruse.
Note1:Itisimportanttoinstallthecameraunitpriortothekeypadunitto
establishwirelessconnectionbetweenthesetwoparts.
Note2:Themaximumdistancerangebetweencameraunitandkeypadunitis5
meters.AnyfartherwilldegradethefunctionalityofPX3.
Figure1cameraunitinstallation
Figure2keypadunitinstallation
Figure3cameraunitstandinstallation
GettingtoknowyourPX3
ThephotosbelowshowthedetailsofPX3cameraunitandkeypadunit.
Figure4cameraunit
Figure5keypadunitview1
Figure6keypadunitview2
5V/3Aadapter
POWER LAN TV MINI USB
Power key
OTG port
HDMI IN
TV
Router
12V/2Aadapter
POWER VGA HDMI
Notebook
M
Ma
ai
in
n
L
LE
ED
D
12:34
PM
S
Sp
pe
ea
ak
ke
er
r
E
En
nd
d
C
Ca
al
ll
l
P
Pr
r
o
oj
je
ec
ct
to
or
r
/
/
s
sc
cr
r
e
ee
en
n
s
sh
ha
ar
ri
in
ng
g
m
mo
od
de
e
M
Me
en
nu
u
Z
Zo
oo
om
m
I
In
n
V
Vo
ol
lu
um
me
e
U
Up
p
V
Vo
ol
lu
um
me
e
D
Do
ow
wn
n
Z
Zo
oo
om
m
O
Ou
ut
t
M
Mu
ut
te
e/
/U
Un
nm
mu
ut
te
e
R
Re
es
se
et
t
b
bu
ut
tt
to
on
n
4
4
D
Di
ir
r
e
ec
ct
ti
io
on
n
K
Ke
ey
ys
s,
,
O
OK
K
b
bu
ut
tt
to
on
n
A
Au
ud
di
io
o
C
Ca
al
ll
l
V
Vi
id
de
eo
o
C
Ca
al
ll
l
N
Nu
um
me
er
ri
ic
c
K
Ke
ey
ys
s
12:34
PM
T
To
op
p
L
LE
ED
D
P
Pr
r
o
oj
je
ec
ct
to
or
r
/
/
S
Sc
cr
re
ee
en
n
S
Sh
ha
ar
ri
in
ng
g
M
Mo
od
de
e
L
LE
ED
D
M
Mu
ut
te
e/
/
U
Un
n-
-m
mu
ut
te
e
L
LE
ED
D
M
Mi
ic
cr
ro
op
ph
ho
on
ne
e
QuantaComputerInc.
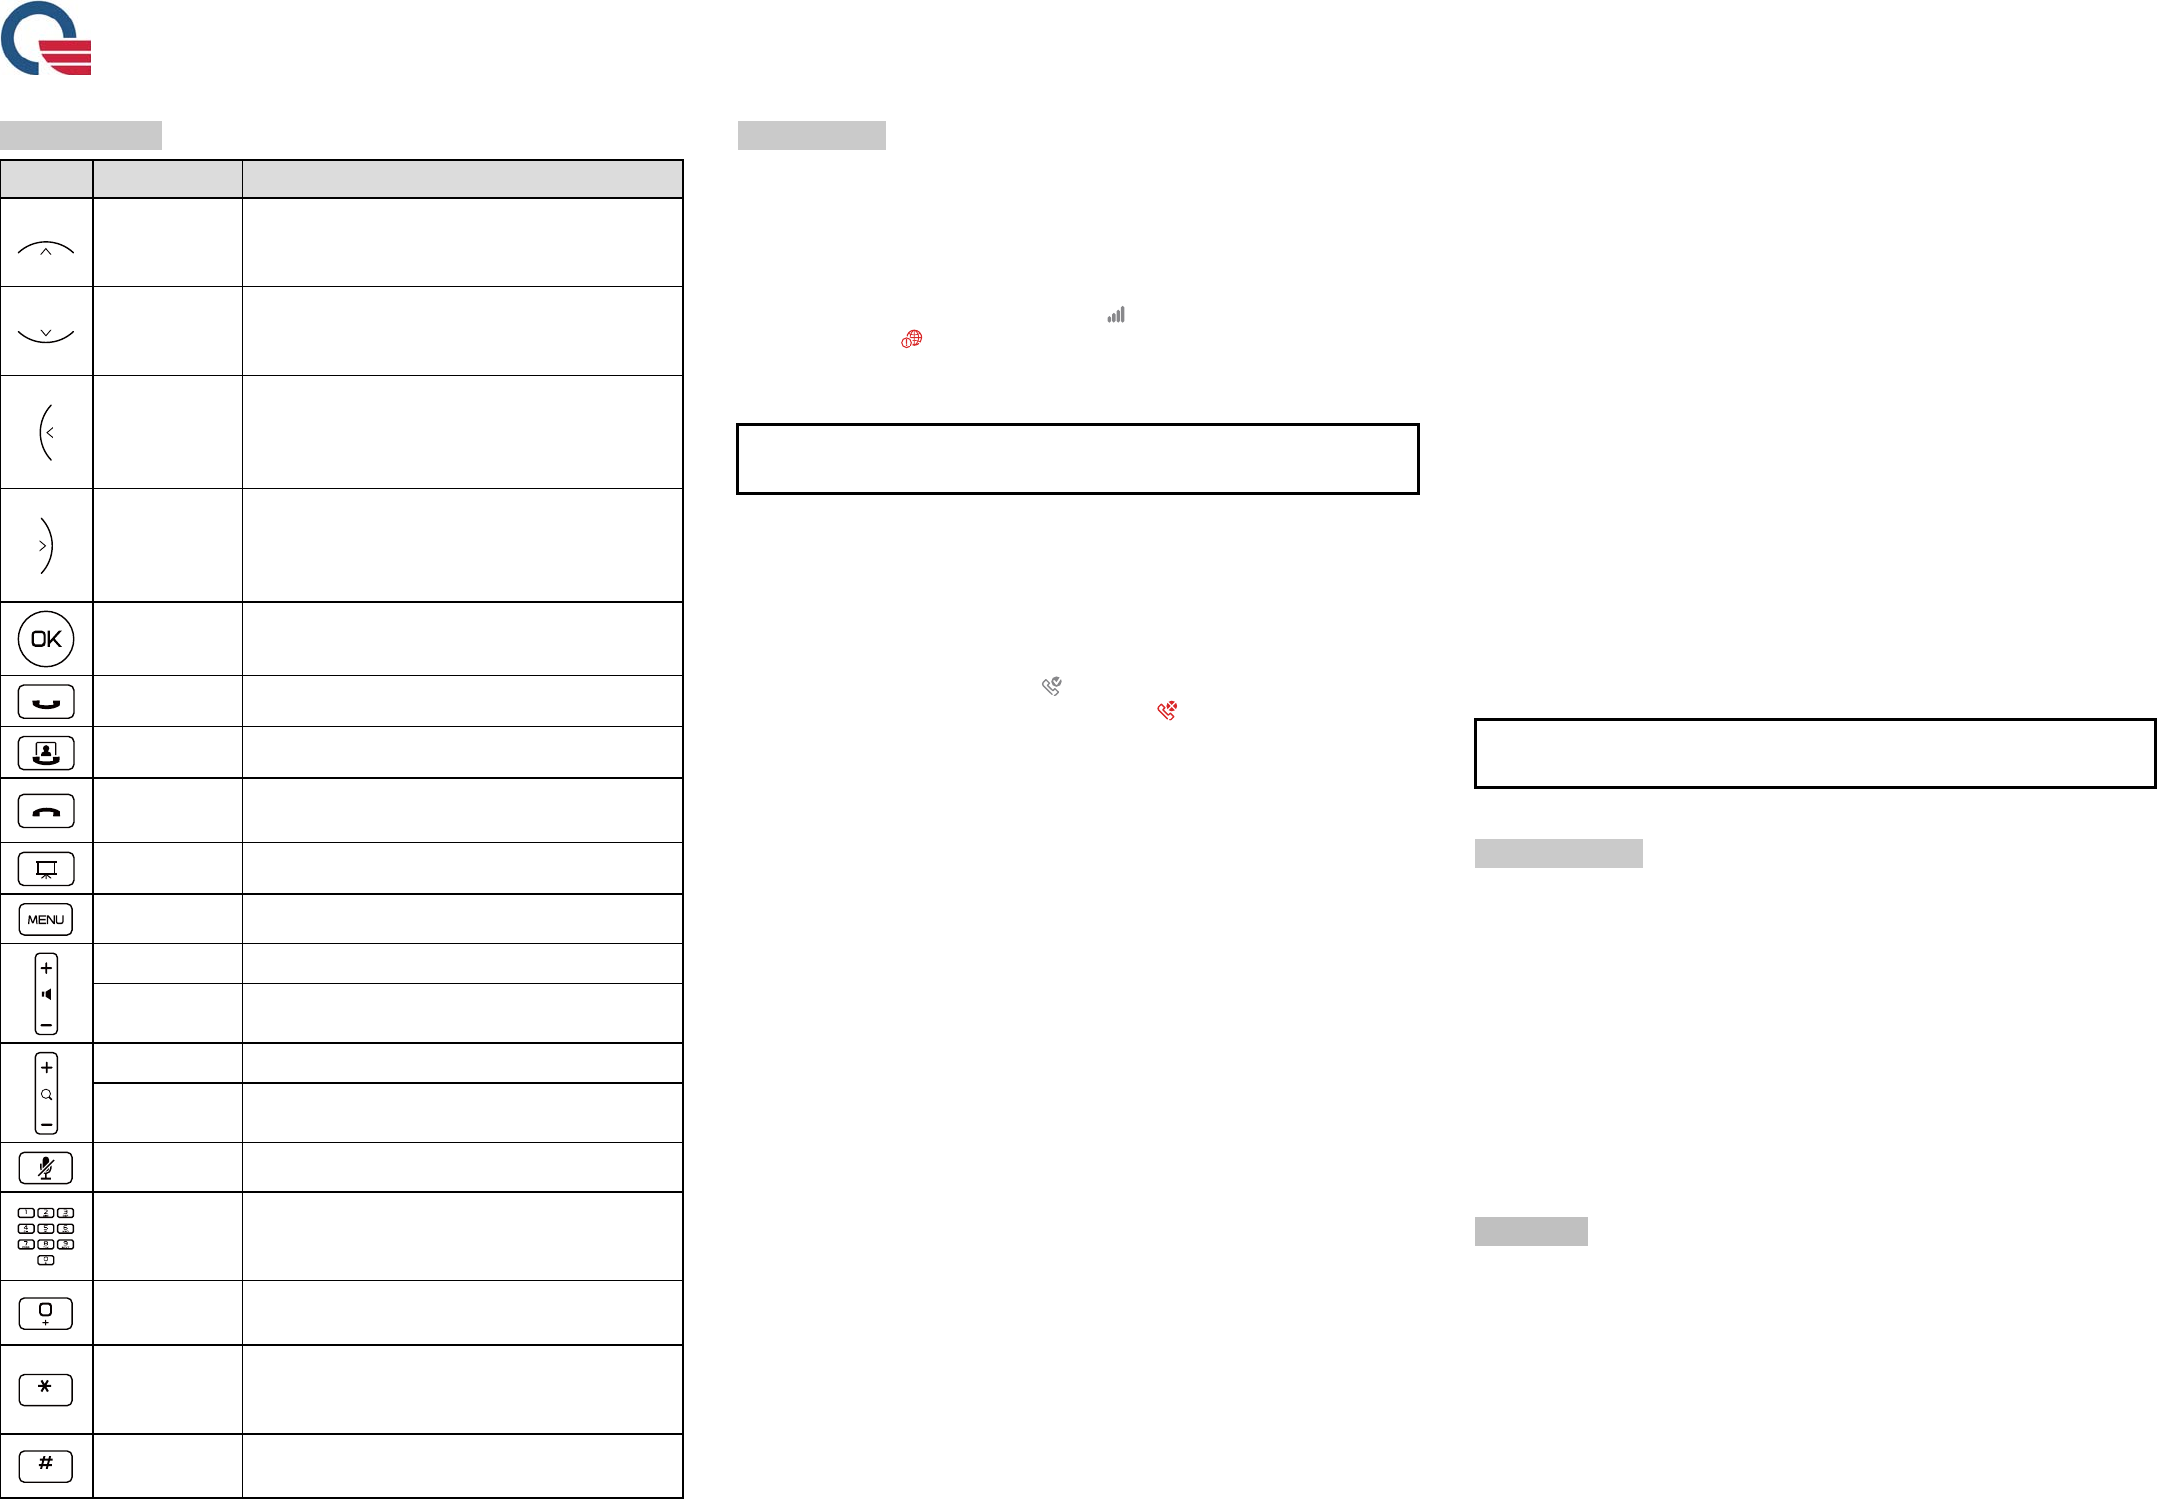
Keypadfunction
KeyNameFunction
Up
Inmenupage,itisusedtomovecursorupward.
Inprevieworvideocallsession,itisusedtorotate
camera’sviewangleupward.
Down
Inmenupage,itisusedtomovecursordownward.
Inprevieworvideocallsession,itisusedtorotate
camera’sviewangledownward.
Left
Inmenupage,itisusedtomovemenusorcursor
leftward.
Inprevieworvideocallsession,itisusedtorotate
camera’sviewangleleftward.
Right
Inmenupage,itisusedtomovemenusorcursor
rightward.
Inprevieworvideocallsession,itisusedtorotate
camera’sviewanglerightward.
OKItisusedtoconfirmtheselectionorpopupsoft
keyboardineditingcolumns.
AudioCallMakeaudiocalltothedialednumbers.
VideoCallMakevideocalltothedialednumbers.
EndCallInacallsession,endavideooraudiocall.
Inmenupage,returntothelastpageorstatus.
ModeswitchEnableprojectororscreensharingmode
MenuEnable/disablemenu
VolumeUpTurnvolumeup
VolumeDownTurnvolumedown
ZoomInZoomincamera
ZoomOutZoomoutcamera
MuteEnable/disablemutefunction
Numerickeys
Inanymenupage,pressanynumerickeytopopup
dialpageandinputnumbers.
Intextinputfield,itisusedtoinputthenumbers.
0Indialpageortextinputfield,press“0”for2
secondsandthenreleasetoinput“+”.
*
Inanymenupage,press“*”topopupdialpageand
input“*”.
Intextinputfieldinput“*”.
#Inanymenupage,press“#”topopupdialpageand
input“#”.Intextinputfieldinput“#”.
UsingyourPX3
• Howtosetupthenetwork
GotoSettings→NetworkSettings.SelectDHCPtoassignIPaddress.Aftersetup,
press[Save]toexit.ForfixedIPusers,pleaseunclickDHCPandspecifyanIP/DNS
address.Intextinputfield,PressOkkeytoactivatethesoftkeyboard.Press
[Done]keyonsoftkeyboardtofinisheditingeachcolumn.Press[Save]keyon
menutoexit.ReturntothemainmenubypressingtheMenubuttononthe
keypadunit.ThenetworkconnectioniconontoprightofTVscreenshould
beon.Ifyouseeiconinstead,pleasereturntonetworksettingpageto
reconfirmthesetting.Ifnetworkconnectionstillfails,contactyourMISfor
furtherassistance.
Note:PleasecheckwithyourMISfortheIP/DNSaddressinformationrequired
inthenetworksettingpage.
• HowtosetuptheSIPaccount
GotoSettings→SIPAccountforsetup.YoucanfindtheSIPsettinglabelonthe
bottomofkeypadunit.PleaseinputalltheinformationonthatlabelintotheSIP
accountsettingpage.Intextinputcolumn,pressokkeytoactivatesoftkeyboard.
Press[Done]keyonsoftkeyboardtofinisheditingeachcolumn.Aftersetup,
press[Save]toexist.ReturntothemainmenubypressingtheMenubuttonon
thekeypadunit.ThehandseticonontoprightofTVscreenwillturnwhite
whentheSIPaccountisreadyforuse.Ifyouseeinstead,pleasereturntoSIP
Accountpagetore‐confirmthesetting.
• Howtomakeavideocallwithphonenumbers
Inputphonenumberswiththekeypadonthekeypadunitandthenpressthe
Videocallkey.
• Howtomakeavideocallfromcontactlist
GotoContactsanduseLeft/Rightkeyonthekeypadunittobrowscontactlist.
PressOkkeytoselectoneofthecontactsyouwishtocall.Inthecontactinfo
window,select[Videocall]andpressOkkeyonkeypadunittomakevideocall.
• Howtomakeanaudiocallwithphonenumbers
Inputphonenumberswiththekeypadonthekeypadunitandthenpressthe
Audiocallkey.
• Howtomakeanaudiocallfromcontactlist
GotoContactsanduseLeft/Rightkeyonthekeypadunittobrowscontactlist.
PressOkkeyselectoneofthecontactsyouwishtocall.Inthecontactinfo
window,select[Audiocall]andthenthenpressOkkeyonkeypadunittomake
audiocall.
• Howtoaddanewcontact
GotoContacts.PressMenukeyonthekeypadunit.Select[Addanewcontact].
UseUp/Downkeytogotothedesiredcolumnforediting.PressOkkeyto
activatesoftkeyboardforedit.Press[Done]keyonsoftkeyboardtofinishediting.
Press[Save]keytoexit.
• Howtouseprojectormode
InanypageofPX3TVscreen,connectyournotebookorvideoplayertoPX3
keypadunitwitheitheraHDMIcableorVGAcable.PressModeswitchkeyon
thekeypadunittouseprojectormode.
• Howtousescreensharing
Duringavideocall,connectyournotebooktoPX3keypadunitwitheithera
HDMIoraVGAcableandthenpressModeswitchkeyonthekeypadunitto
sharethecontents.
• Firmwareupdate
PX3willautomaticallydownloadnewversionsoftwareifavailableonserver.Go
toSettings→FirmwareUpdatetocheckifthereisnewversioninfodisplayedat
thebottomrightofthescreen.Select[Update]ifyouwishtoupdateyourPX3
withthenewsoftware.
• HowtoshutdownPX3
Pressthepowerbuttononthecameraunit(asshowedinFigure1)for3seconds.
TheTVscreenwilldisplay“Shuttingdown”messageindicatingPX3isshutting
down.
• HowtorestartPX3
Pressthepowerbuttononthecameraunit(asshowedinFigure1)for3seconds.
TheTVscreenwilldisplay“Shuttingdown”messageindicatingPX3isshutting
down.WhentheTVscreenisoff,presspowerkeyonthecameraunitagainto
restartPX3.WhenPX3menuisdisplayedonTV,presstheresetbuttonon
keypadunitasshowedinFigure5toresetkeypadunit.WhentheLCDdisplay
onkeypadunitshowed“Welcome”,yourPX3isreadyforuse.
Note: PleasealwaysshutdownandrestartPX3bypressingthepowerbutton.
ShuttingdownPX3byunpluggingpowercorddirectlymaydamagethesystem.
Troubleshooting
• Resetkeypadunit
Ifyoucannotsetuptheconnectionbetweenthecameraunitandkeypadunit,
pleasepresstheresetbuttononkeypadunitasshowedinFigure5.
• ResetPX3
Ifunexpectedsystemfailureoccurs,pleasepressthepowerbuttononcamera
unitasshowedinFigure1for10secondstoshutdownthesystem.Pressthe
powerbuttonagaintorestartthesystem.WhenPX3menuisdisplayedonTV,
presstheresetbuttononkeypadunitasshowedinFigure5toresetkeypadunit.
WhentheLCDdisplayonkeypadunitshows“Welcome”,yourPX3isreadyfor
use.
CEMarking
Thisdevicehasbeentestedtoandconformstotheregulatoryrequirementsofthe
EuropeanUnionandhasattainedCEMarking.TheCEMarkisaconformitymarking
consistingoftheletters“CE”.TheCEMarkappliestoproductsregulatedbycertain
Europeanhealth,safetyandenvironmentalprotectionlegislation.TheCEMarkis
obligatoryforproductsitappliesto:themanufactureraffixesthemarkinginorder
tobeallowedtosellhisproductintheEuropeanmarket.
ThisproductconformstotheessentialrequirementsoftheR&TTEdirective
1999/5/ECinordertoattainCEMarking.

QuantaComputerInc.
TheCEMarkingisnotaqualitymark.Foremost,itreferstothesafetyratherthanto
thequalityofaproduct.Secondly,CEMarkingismandatoryfortheproductit
appliesto,whereasmostqualitymarkingsarevoluntary.
Marking:TheproductshallbeartheCEmark.
FederalCommunicationsCommission(FCC)Statement
15.21
Youarecautionedthatchangesormodificationsnotexpresslyapprovedbythepart
responsibleforcompliancecouldvoidtheuser’sauthoritytooperatethe
equipment.
15.105(b)
ThisequipmenthasbeentestedandfoundtocomplywiththelimitsforaClassB
digitaldevice,pursuanttopart15oftheFCCrules.Theselimitsaredesignedto
providereasonableprotectionagainstharmfulinterferenceinaresidential
installation.Thisequipmentgenerates,usesandcanradiateradiofrequencyenergy
and,ifnotinstalledandusedinaccordancewiththeinstructions,maycause
harmfulinterferencetoradiocommunications.However,thereisnoguaranteethat
interferencewillnotoccurinaparticularinstallation.Ifthisequipmentdoescause
harmfulinterferencetoradioortelevisionreception,whichcanbedeterminedby
turningtheequipmentoffandon,theuserisencouragedtotrytocorrectthe
interferencebyoneormoreofthefollowingmeasures:
‐Reorientorrelocatethereceivingantenna.
‐Increasetheseparationbetweentheequipmentandreceiver.
‐Connecttheequipmentintoanoutletonacircuitdifferentfromthat
towhichthereceiverisconnected.
‐Consultthedealeroranexperiencedradio/TVtechnicianforhelp.
ThisdevicecomplieswithPart15oftheFCCRules.Operationissubjecttothe
followingtwoconditions:
1)thisdevicemaynotcauseharmfulinterferenceand
2)thisdevicemustacceptanyinterferencereceived,includinginterferencethat
maycauseundesiredoperationofthedevice.
FCCCaution:Anychangesormodificationsnotexpresslyapprovedbytheparty
responsibleforcompliancecouldvoidtheuser'sauthoritytooperatethis
equipment.
Thistransmittermustnotbeco‐locatedoroperatinginconjunctionwithanyother
antennaortransmitter.
whereFCCID:2ACIK‐HS6618Uisthemodule'sFCCcertificationnumber.
RFstatement
ThisequipmentcomplieswithFCCradiationexposurelimitssetforthforan
uncontrolledenvironment.Thisequipmentshouldbeinstalledandoperatedwith
minimumdistance20cmbetweentheradiator&yourbody.
TheKeypadUnitsupportsRFfunctionsincluding5.2GHz、5.8GHzwirelessdigital
audiotransceiverandUWB/WiMediaBandGroups3receiver.Wirelessdigitalaudio
transceiverisdesignedforDARR83‐APKWirelessAudioProcessorandAiroha
AL5230SRFTransceiverconnectedtoAntennaDiversityswitchfor5.2GHz、5.8GHz
802.11astandardOFDMmodulationapplicationthenIthavepoint‐to‐pointand
point‐to‐multipointandsimplepairingnetworkarchitectures.
It’saOEMmodule(20x40mm)namedWLL7011byAskeyagendamanufacture
andwithembeddedPCBdual‐banddiversityantennastoavoiddropoutsdueto
multipathfading.
UWBisbaseduponAlereonAL5100UWBRFtransceiverandAlereonAL6301
MAC/BBforWiMediastandardanditcanbeusedonDevicesideradioapplication.
It’sasmallmodule(20x27mm)namedHS6618U‐DbyHanshin
agendamanufactureandwithoneWiMediaBandGroups3PCBantenna.