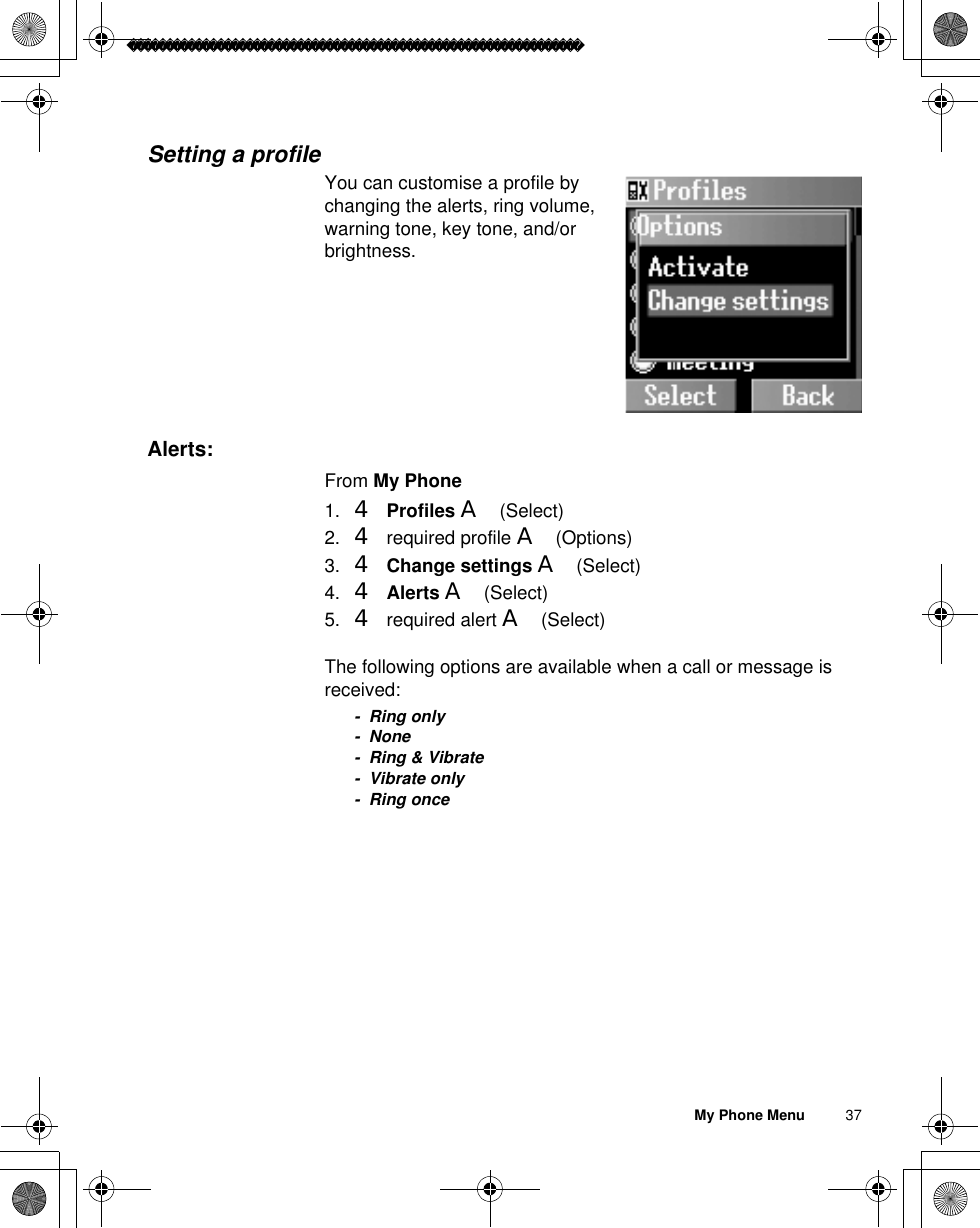
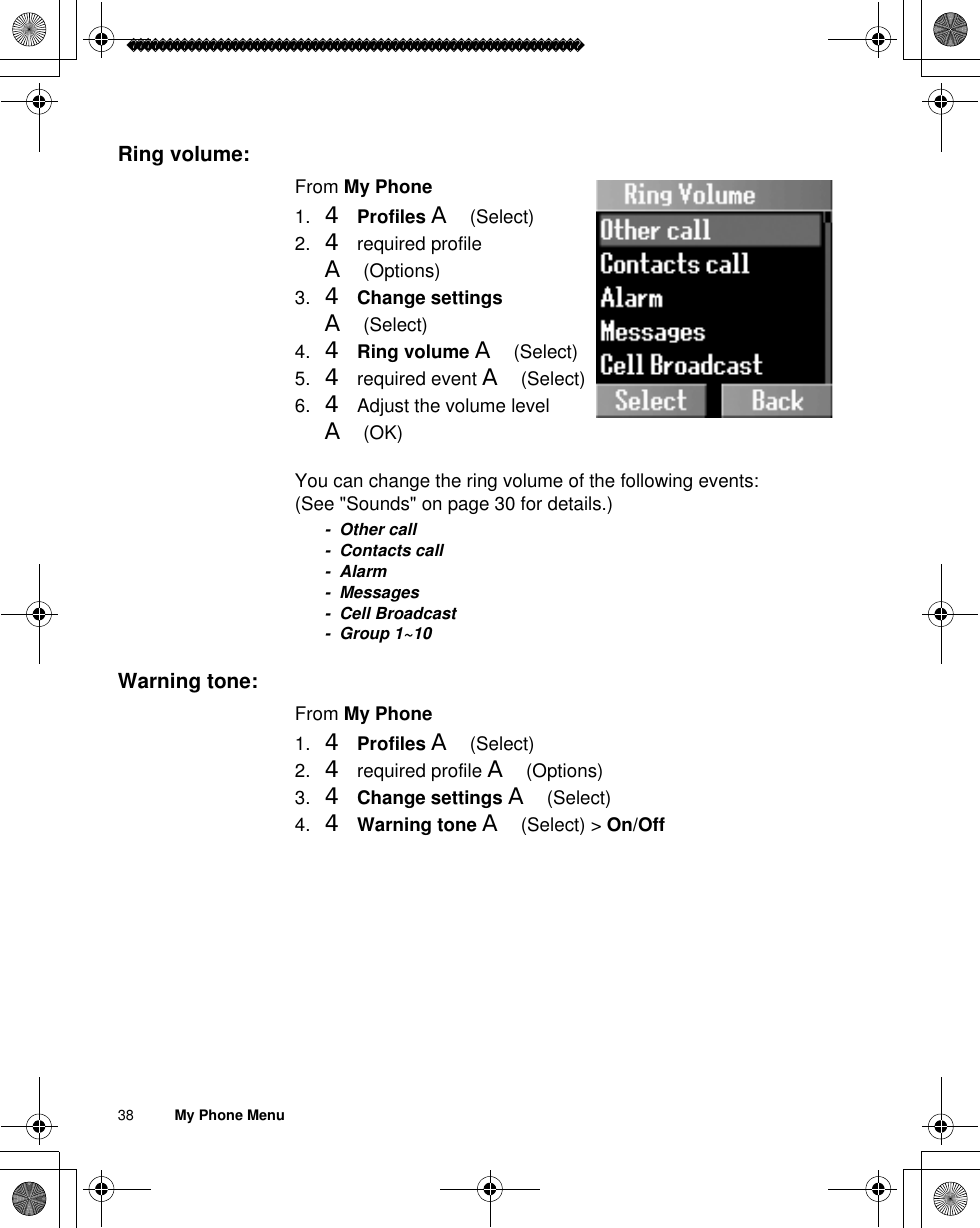
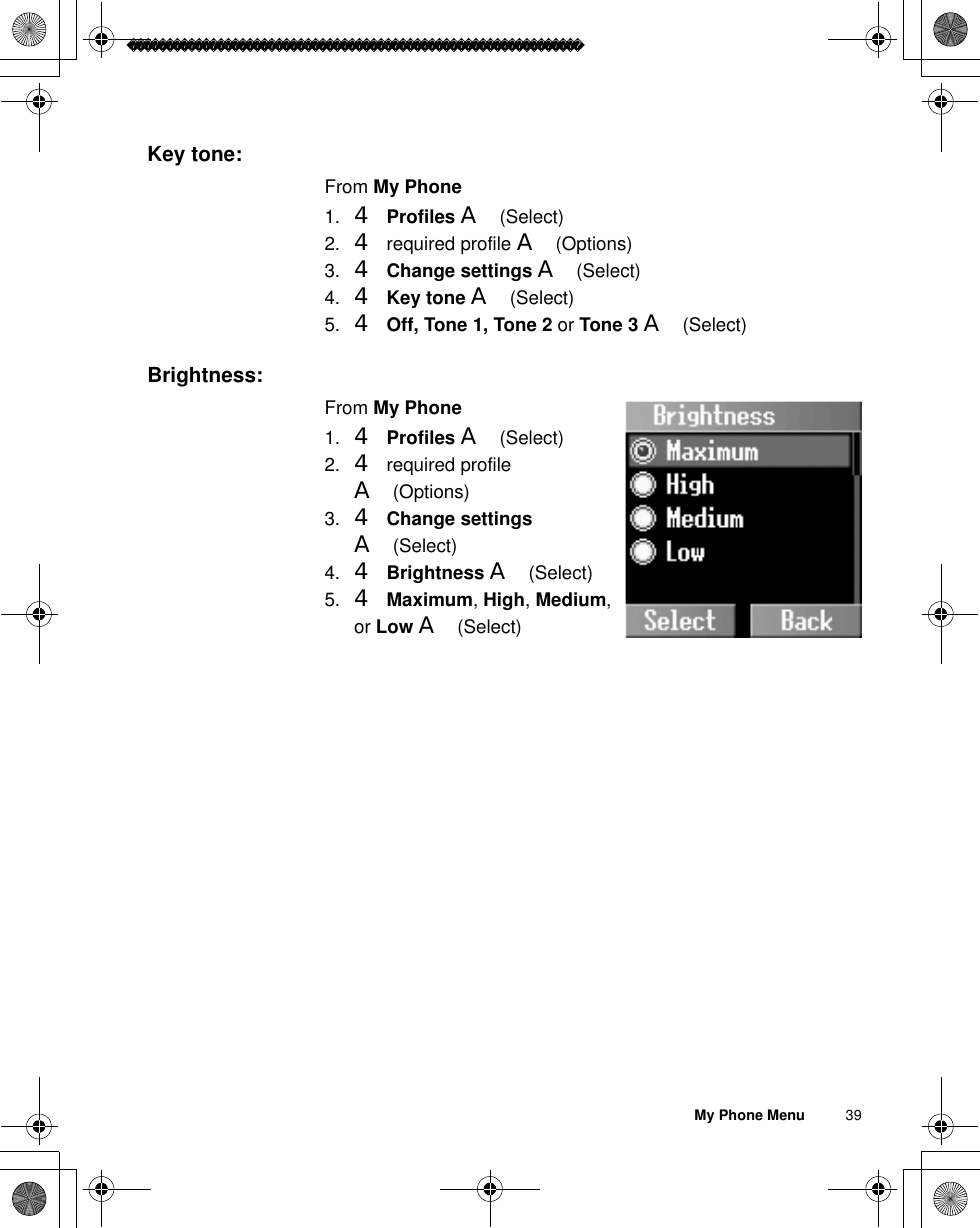
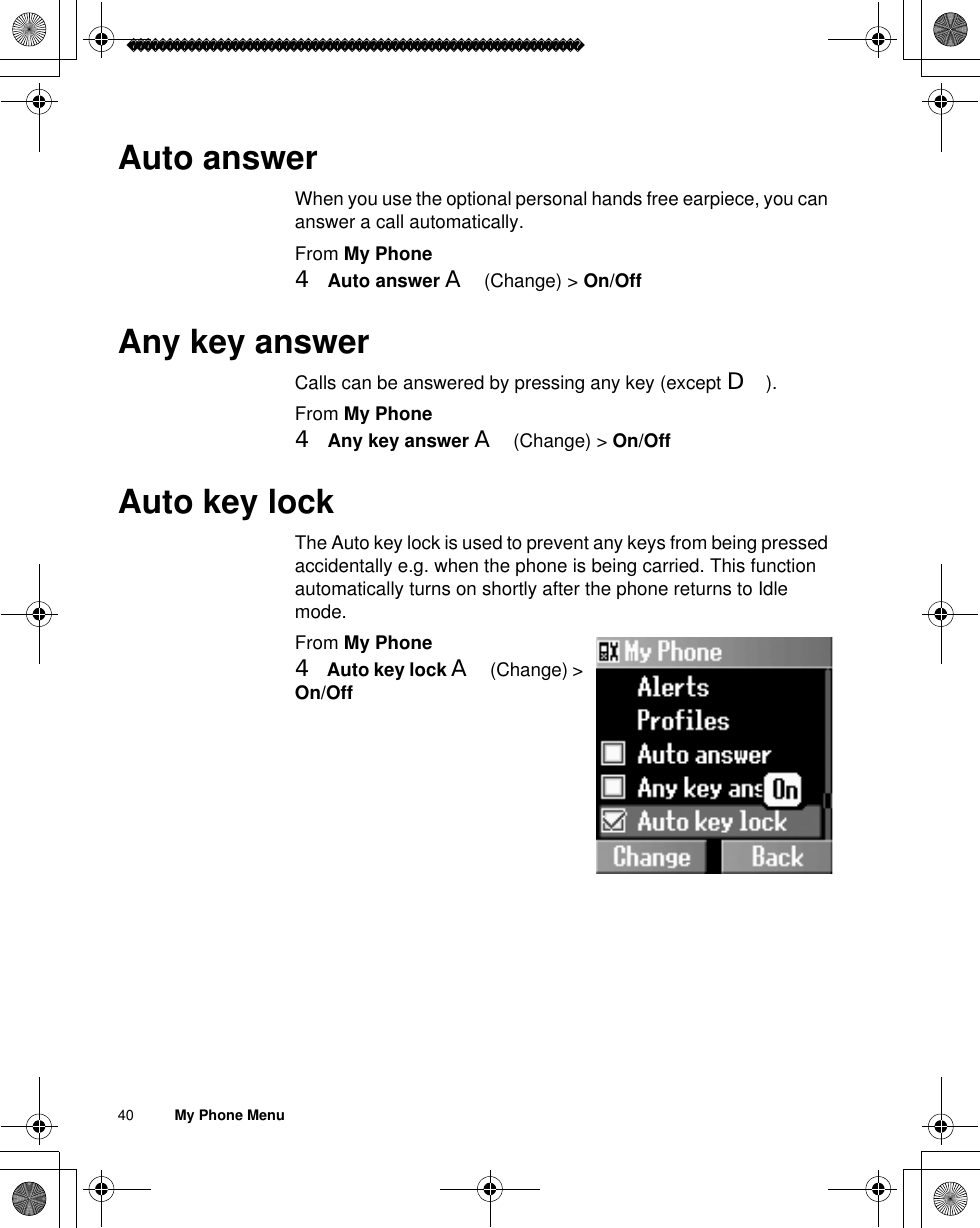
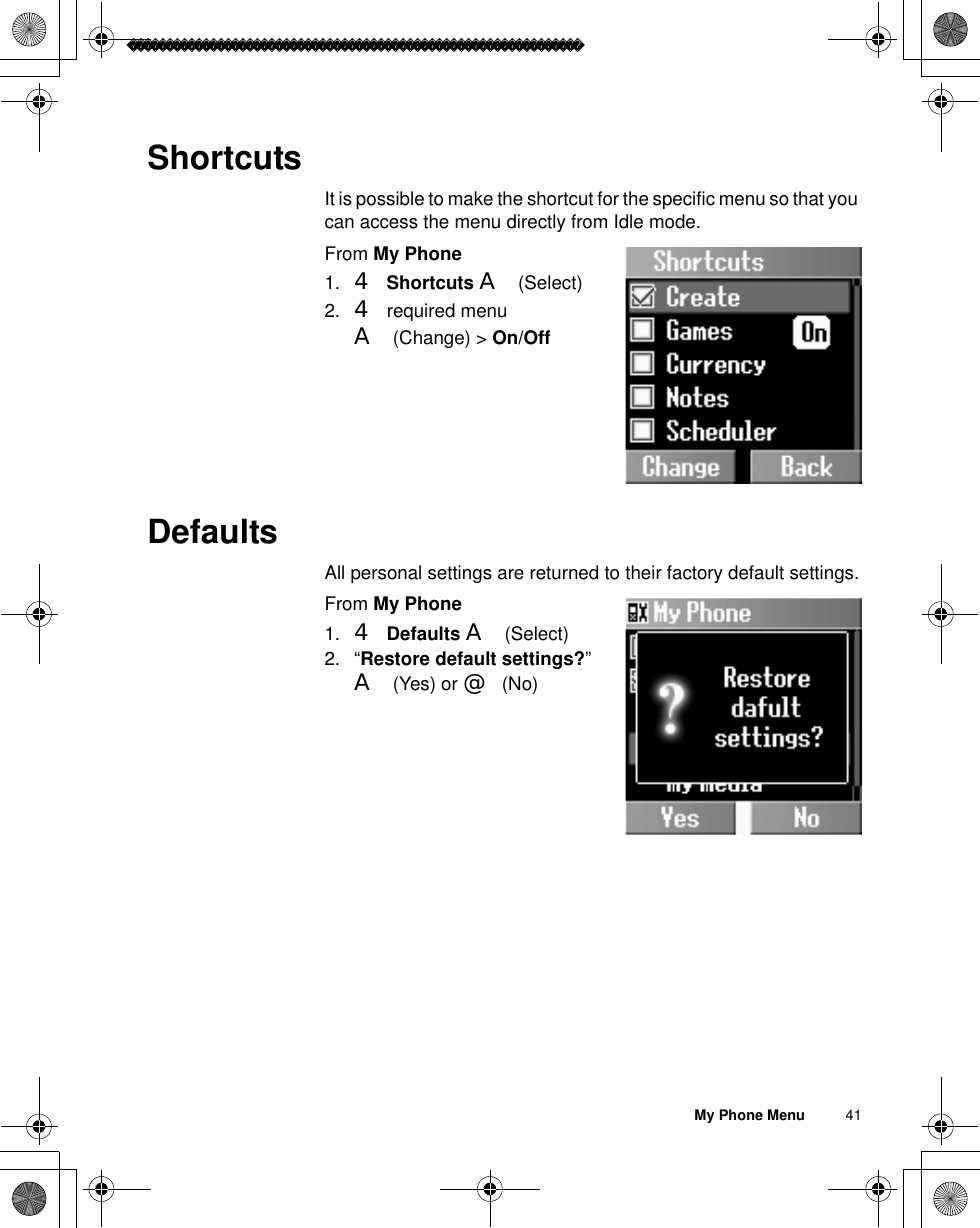
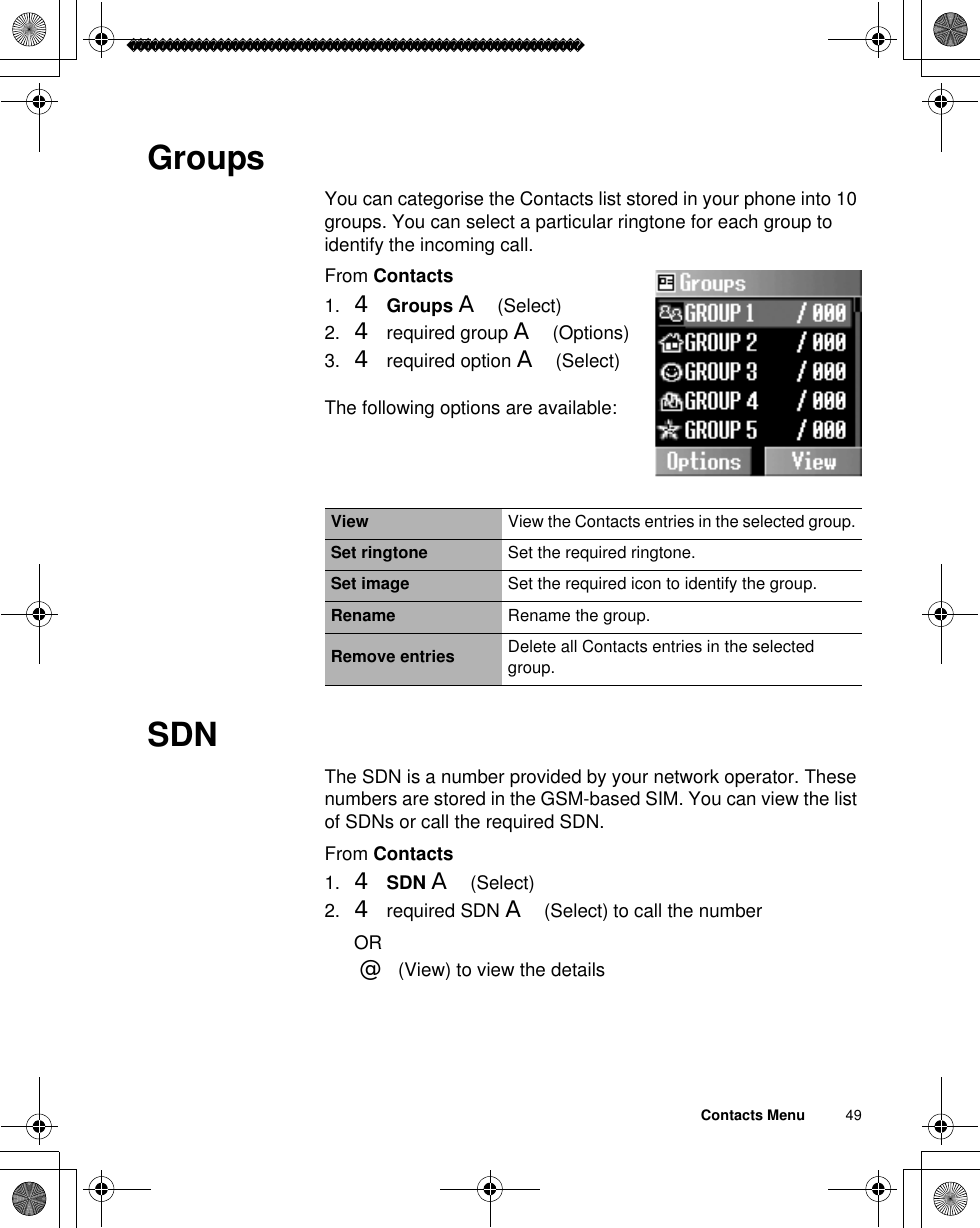
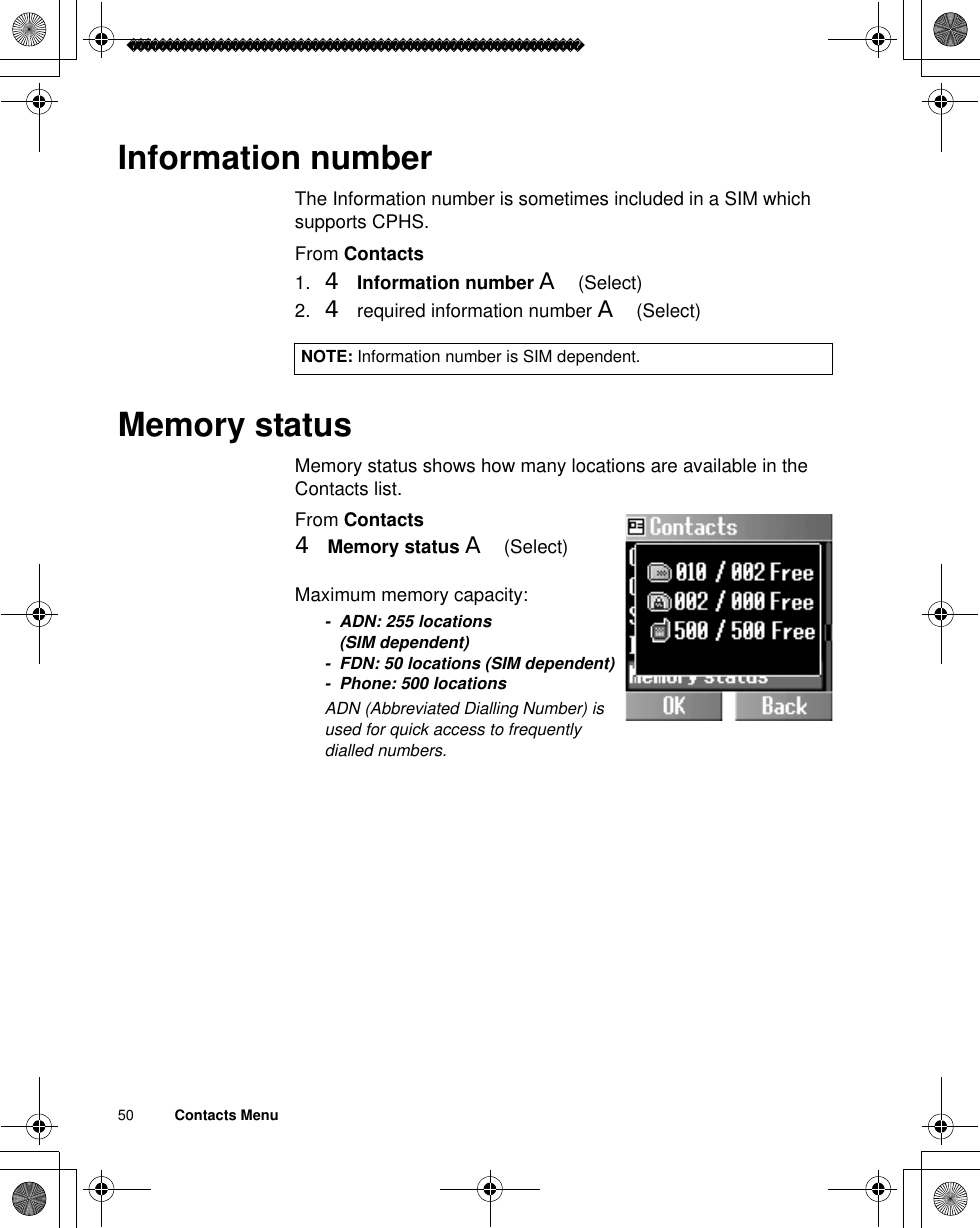
Quanta Computer X300 1900 MHz GSM / GPRS Cellular Phone User Manual 1A

Quanta Computer Inc 1900 MHz GSM / GPRS Cellular Phone 1A

Contents

User Manual 1A

Contents          iContentsIntroduction ........................1Safety Considerations................ 1Care and Maintenance .......5Getting Started ...................6Your phone................................. 6Key functions.............................. 7Displays...................................... 9Fitting and removing the battery.. 11Fitting and removing the SIM ... 12Charging the battery................. 12Battery level indicator............... 13Low battery power warning ...... 13Symbols used in this manual ... 13Basic Operations..............14Switching the phone on/off....... 14Making a call ............................ 14Answering a call....................... 16In-call operations...................... 17Incoming call while on a call..... 19DTMF ....................................... 21Text entry ................................. 22Menu Display ........................... 24Exploring the Menus........25My Phone Menu................26My Media.................................. 27Sounds..................................... 30Display ..................................... 32Language ................................. 35Alerts........................................ 35Profiles ..................................... 36Auto answer ............................. 40Any key answer........................ 40Auto key lock............................ 40Shortcuts .................................. 41Defaults.................................... 41Contacts Menu..................42Browsing the Contacts list ........ 43Creating a Contacts list ............ 46Groups...................................... 49SDN.......................................... 49Information number .................. 50Memory status.......................... 50My Numbers............................. 51Hotkey dial................................ 52My Contacts ............................. 52Games Menu.....................53Puddleland ............................... 53Quadball................................... 54Exode ....................................... 54Browser Menu...................55Server settings ......................... 56Starting the Browser................. 57Bookmarks ............................... 58Push setting.............................. 59Connectivity.............................. 60Camera Menu....................61Your camera............................. 62Taking a picture........................ 63Camera settings ....................... 66Recording a video clip.............. 70Messages Menu................73MMS settings............................ 74Creating an MMS message...... 76Sending an MMS message ...... 78Receiving an MMS message.... 78Viewing an MMS message in the Outbox.......................... 80SMS settings ............................ 81Creating an SMS message ...... 82Receiving an SMS message .... 83
ii          ContentsViewing an SMS message in the Outbox.......................... 84User Messages ........................ 84Memory status.......................... 85Connectivity.............................. 85Cell Broadcast.......................... 85Phone Menu ..................... 88Call Service .............................. 89Call Diverts............................... 93Security .................................... 94Network .................................... 99Records Menu................ 100Last dialled/Answered/Unanswered number............ 100Deleting the records ............... 101Applications Menu......... 102Games.................................... 103Calendar................................. 103Scheduler ............................... 106Notes...................................... 108Clock ...................................... 108Calculator ............................... 111Currency................................. 112Melody composer................... 113Phone menu........................... 114Troubleshooting ............ 115Important Error Messages...................... 117Glossary of Terms......... 119Specifications ................ 121Index ............................... 123
Introduction          1IntroductionThank you for purchasing this Panasonic digital cellular phone. This phone is designed to operate on GSM networks – GSM900, GSM1800 and GSM1900. It also supports GPRS for packet data connections. Please ensure the battery is fully charged before use.Safety ConsiderationsThe following information should be read and understood as it provides details, which will enable you to operate your phone in a manner which is both safe to you and your environment, and conforms to legal requirements regarding the use of cellular phones.This equipment should only be charged with approved charging equipment to ensure optimum performance and avoid damage to your phone. Other usage will invalidate any approval given to this apparatus and may be dangerous. Ensure the voltage rating of the Travel Charger is compatible with the area of use when travelling abroad. A Travel Charger EB-CAG70xx* is supplied with the Main Kit.NOTE*: xx identifies the charger region, e.g. CN, EU, UK, AU, US.Use of another battery pack than that recommended by the manufacturer may result in a safety hazard.Switch off your cellular phone when in an aircraft. The use of cellular phones in an aircraft may be dangerous to the operation of the aircraft, disrupt the cellular network and may be illegal. Failure to observe this instruction may lead to the suspension or denial of cellular phone services to the offender, or legal action or both.Do not incinerate or dispose of the battery as ordinary rubbish. The battery must be disposed of in accordance with local regulations and may be recycled.PowerBatteryAircraftDisposing of the Battery
2          IntroductionIt is advised not to use the equipment at a refuelling point.Users are reminded to observe restrictions on the use of radio equipment in fuel depots, chemical plants or where blasting operations are in progress. Never expose the battery to extreme temperatures (in excess of 60°C).It is imperative that the driver exercises proper control of the vehicle at all times. Do not hold a phone while you are driving; find a safe place to stop first. Do not speak into a handsfree microphone if it will take your mind off the road. Always acquaint yourself thoroughly with restrictions concerning the use of cellular phones within the area where you are driving and observe them at all times.Care must be taken when using the phone in close proximity to personal medical devices, such as pacemakers and hearing aids.For most efficient use, hold the phone as you would any normal phone. To avoid deterioration of signal quality or antenna performance, do not touch or “cup” the antenna area while the phone is switched on. Do not leave the camera facing direct sunlight to avoid impairing camera performance. Unauthorised modifications or attachments may damage the phone and violate applicable regulations. The use of an unapproved modification or attachment may result in the invalidation of your guarantee – this does not affect your statutory rights. When your handset, the accompanying battery or charging accessories are wet, do not put those in any type of heating equipment, such as a microwave oven, a high pressure container, or a drier or similar. It may cause the battery, handset and/or charging equipment to leak, heat up, expand, explode and/or catch fire. Moreover, the product or accessories may emit smoke and their electrical circuits may become damaged and cause the Do Not UseDrivingElectronic Devices Efficient UseHeating Equipment
Introduction          3products to malfunction. Panasonic is not responsible for any and all damages, whether direct or indirect, howsoever caused by any misuse.The colour liquid crystal display (LCD) uses high-precision production technology, and in certain circumstances pixels may appear brighter or darker. This is due to characteristics of the LCD and is not a manufacturing defect. This equipment should only be used with Panasonic approved accessories to ensure optimum performance and avoid damage to your phone. Panasonic is not responsible for damage caused by using non-Panasonic approved accessories.This phone must be used in compliance with any applicable international or national law or any special restrictions governing its use in specified applications and environments. This includes but is not limited to use in hospitals, aircraft, whilst driving and any other restricted uses. It is recommended that you create a copy or backup, as appropriate, of any important information and data which you store in your phone’s memory. In order to avoid accidental loss of data, please follow all instructions relating to the care and maintenance of your phone and its battery. Panasonic accepts no liability for any and all losses howsoever arising from any loss of data, including but not limited to direct and indirect losses (to include, but not limited to consequential loss, anticipated savings, loss of revenue). Your phone has the capability of storing and communicating personal information. It is recommended that you take care to ensure that any personal or financial information is stored separately from your phone. You should use security features, such as the SIM lock to protect information held in your phone. Panasonic accepts no liability for any and all losses howsoever arising from any loss of data, including but not limited to direct and indirect losses (to include, but not limited to consequential loss, anticipated savings, loss of revenue).Backup Copies and Security
4          IntroductionYour phone has the capability of downloading and storing information and data from external sources. It is your responsibility to ensure that in doing this you are not infringing any copyright laws or other applicable legislation. Panasonic accepts no liability for any and all losses howsoever arising from any loss of data or any such infringement of copyright or intellectual property rights, including but not limited to direct and indirect losses (to include, but not limited to consequential loss, anticipated savings, loss or revenues). You are advised to take appropriate care over the use of the internal camera. It is your responsibility to ensure that you have permission to take photographs of people and objects and that you do not infringe any personal or third party rights when using the camera. You must comply with any applicable international or national law or other special restrictions governing camera use in specific applications and environments. This includes not using the camera in places where the use of photographic and video equipment may be prohibited. Panasonic accepts no liability for any and all losses howsoever arising from any infringement of copyright or intellectual property rights, including but not limited to direct and indirect losses.The display layouts and screenshots within this document are for illustrative purposes and may differ from the actual displays on your phone. Panasonic reserves the right to change the information in this document without prior notice.This Panasonic mobile phone is designed, manufactured and tested to ensure that it complies with the specifications covering RF exposure guidelines applicable at the time of manufacture, in accordance with EU, USA FCC, and Australian ACA regulations.Please refer to our website for latest information/standards and compliance in your country/region of use. http://www.panasonicmobile.comDownloadingCamera
Care and Maintenance          5Care and MaintenancePressing any of the keys may produce a loud tone. Avoid holding the phone close to the ear while pressing the keys.Extreme temperatures may have a temporary effect on the operation of your phone. This is normal and does not indicate a fault.The display quality may deteriorate if the phone is used in environments over 40°C for a long time.Do not modify or disassemble the equipment. There are no user serviceable parts inside.Do not subject the equipment to excessive vibration or shocks.Do not drop the battery.Avoid contact with liquids. If the equipment becomes wet, immediately remove the battery and contact your dealer.Do not leave the equipment in direct sunlight or a humid, dusty or hot area.Never throw a battery into a fire. It may explode.Keep metallic items that may accidentally touch the terminals away from the equipment/battery.Batteries can cause property damage, injury, or burns if terminals are touched with a conductive material (i.e. metal jewellery, keys, etc.).Always charge the battery in a well ventilated area, not in direct sunlight, between +5°C and +35°C. It is not possible to recharge the battery if it is outside this temperature range.When disposing of any packing materials or old equipment, check with your local authorities for information on recycling.
6          Getting StartedGetting StartedYour phone(Side view)(Front view)Camera LensLens Cover:Slide halfway down to activate the camera.Slide the cover all the way down to pop open the display.EarpieceDisplayShutter Key:Take a picture/record a video clip.Switch Camera Preview mode on.Navigation Key:Scroll/move through menus.Right Soft Key:Cancel/Exit.Perform functions indicated in the lower right-hand corner of the display.Power/End Key:Press and hold to switch the phone on/off.Silent Mode Key:Press and hold to switch the Silent Mode on/off.Charging ConnectorAsterisk Key:Press and hold to activate the Browser.Send Key:Answer/make a call.Left Soft Key:Perform functions indicated in the lower left-hand corner of the display.Self-portrait Mirror
Getting Started          7Key functionsKey Function4Navigation Key: Scroll or move through menus, text and phone numbers. In idle mode, press to activate the Shortcuts menus or press and hold 1 to turn the Auto Key lock on. ALeft Soft Key: Perform the functions indicated by text shown in the lower left-hand corner of the display. In idle mode, press to activate the Menu display, or press and hold to activate the Messages menu.@Right Soft Key: Perform the functions indicated by text shown in the lower right-hand corner of the display. Mainly used to cancel and return to the previous menu level. In text entry mode, press to delete text. In idle mode, press to access the Contacts list, or press and hold to activate the Profiles menu.# ~ ,Numeric Keys: Enter numbers. Press and hold one of the keys from %to , for Hotkey dialling, or $ for voice message setting. In text entry mode, enter text, numbers and characters. Press and hold # to enter a “+” (international access code) or “P” (extension number code). To dial an extension number, dial the phone number first, press and hold # to add a “P”, then enter the extension number.CSend Key: Make a call or answer a call. In idle mode, press to check the last dialled list. In text entry mode, press to switch between input methods. DPower/End Key: End/reject a call. During key operations, press to return to the previous display or press and hold to return to idle mode. In idle mode, press and hold to switch the phone on/off.!Silent Mode Key: In idle mode, press to enter “#”, or press and hold to switch the Silent Mode (Vibration on/Ring off) on/off. In text entry mode, press to switch T9 smart English input mode on/off, or press and hold to enter characters. "Asterisk Key: In idle mode, press to enter “ ”, or press and hold to activate the Browser. "
8          Getting StartedDuring a callMinimal menu options are available during a call by pressing the following keys.In Camera Preview modeShutter Key: Press to take a picture or record a video clip.Key FunctionAActivate Hands free/Hand held, Conference call, Call transfer, End, Split, Contacts list, Messages menu, Call status.@Put the call on hold or resume while connected to a calling party.Swap among calls while connected to two or more calling parties.1Increase the volume.5Decrease the volume.CDisplay the last dialled records list. Answer another call. If a phone number is entered, hold the active call and call the number.#~,!" Send DTMF. Press and hold ! to switch the Hands free speaker on/off.
Getting Started          9DisplaysIdle displayIdle clockThe clock appears on the display one minute after you press the last key.NOTE: All screen images in this manual are simulated.NOTE: Some services described in this manual are network dependent or may only be available on a subscription basis. Some functions are SIM dependent. For more information, contact your service provider.Status iconsRight Soft Key Selection AreaLeft Soft Key Selection AreaWallpaper
10          Getting StartedStatus iconsThe status icons are displayed or animated according to the currently activated functions. The Antenna, Signal and Battery icons are displayed when the handset is switched on and connected to a network. If there is no network connection, the Signal icon will not be displayed.Icon MeaningIndicate the received signal strength – No CPHS.Indicate the received signal strength and Line 1 is enabled. The SIM supports CPHS.Indicate the received signal strength and Line 2 is enabled. The SIM supports CPHS.Registered to a non-home network – roaming.Call Diverts is on.Auto key lock is enabled.Message area is full.Unread message is stored.Voice mail indicator (voice mail has been received) – No CPHSAlarm is set.All tones or ring volume is off.Vibration alert is on.GPRS is active.GPRS service is available.Battery charged.Battery is charging.Low batteryAbnormal charging
Getting Started          11Fitting and removing the batteryBefore removing the battery, ensure that the phone is switched off and the charger is disconnected from the phone.Remove the battery compartment cover.Insert the battery, ensuring the 3 gold contacts align with the 3 gold pins in the phone.Fitting the batteryRemoving the batteryPush and hold the release latch ò towards the top of the phone using the cover clip, then lift the battery out ù.
12          Getting StartedFitting and removing the SIMThe SIM is inserted under the battery.Charging the batteryConnecting and disconnecting the Travel ChargerThe battery must be fitted in the phone before the charger is connected. Insert the Charging Connector into the socket at the base of the phone before connecting the charger to the mains outlet. Once connected, the Battery level indicator will start scrolling (see "Battery level indicator" on page 13). It is recommended to charge the battery for a minimum of 4 hours before first use.When charging is complete, disconnect the charger from the outlet before removing the plug from the phone.NOTE: DO NOT force the connector as this may damage the phone and/or the charger. If the battery has been deeply discharged, it may take several minutes before the Battery level indicator is displayed.Fitting the SIM Removing the SIMEnsure the gold contacts are facing downwards before sliding the SIM into the SIM holder. Whilst holding the tab down, slide the SIM out.
Getting Started          13Battery level indicatorLow battery power warningWhen the battery power is low, a “Battery is low” message will be displayed. If this occurs during conversation, finish your call immediately. The power will automatically switch off after the warning tone. Fully recharge the battery. See "Charging the battery" on page 12. (Calls can be made and received while the phone is charging.)Symbols used in this manualPhone Status While charging Charging completePhone on >Phone offSymbols Meaning154 Press Navigation Key in the direction indicated by the arrow.APress Left Soft Key.@Press Right Soft Key.#~,Press Numeric Keys.CPress Send Key.DPress Power/End Key."Press Asterisk Key.!Press Silent Mode Key.
14          Basic OperationsBasic OperationsSwitching the phone on/off1. Press and hold D for 2 to 3 seconds2. The phone starts in idle mode3. Press and hold D again to switch the power offMaking a callEnsure that the signal strength meter shows network coverage is available in the current area. ãTo make a call, start in idle mode.Standard dialling1. Enter the area code and phone number CãThe dialled number is displayed.2. When the other party answers, talk into the microphoneContacts dialling1. @(Contacts)2. 4required phone number CEarpiece volume: During a call, press 4to adjust the earpiece volume.
Basic Operations          15Last number dialling1. C2. 4required phone number CInternational diallingThe international access code (+) and the destination country/region code should be entered, followed by the area code and phone number.1. Press and hold #until “+” is displayed, then enter the country/region code2. Enter the area code and phone number CEmergency callTo make an emergency call, the antenna ( ) must be present.When SIM is inserted:Enter the emergency number 112 CWhen SIM is not inserted:Enter the emergency number 112 COR@(SOS) > “Emergency call”A(Yes)Ending a callTo hang up,DãThe duration of the call will be displayed.ãIf Max cost is on, the remaining units will be displayed. For setting "Max cost", please refer to page 92.NOTE: Many countries/regions include an initial “0” in the area code. This should, in most cases, be omitted when dialling international numbers. If you have difficulties making international calls, contact your service provider. NOTE: Most countries support the international emergency number 112. If you find the number does not work on your phone, please call your service provider. Making emergency calls without a SIM is country or network operator dependent. 
16          Basic OperationsAnswering a callCORIf “Any key answer” is on,In idle modepress any key except D(See “Any key answer” on page 40.)Rejecting an incoming call:Press DRing volume:From My Phone1. 4Sounds > Volume A(Select)2. 4 required Ringtone A(Select)3. 4 Adjust the volume level A(OK) One click mute on incoming call:To set the ringtone and the vibration off, @(Mute)• To answer the call when Mute is enabled, A(Reply)• To reject the call when Mute is enabled, @(Reject)
Basic Operations          17In-call operationsDuring a call, the following options are available by pressing A(Menu) or @(Hold):Hands free/Hand heldYou can switch the phone between hands free and hand held.During a call: 1. A(Menu)2. 4 Hands free or Hand held A(Select)Contacts listYou can access the Contacts list that is stored in the SIM or in your phone. During a call:1. A(Menu)2. 4Contacts list A(Select)MessagesYou can create, check, or send a message while on a call. Please refer to "Creating an MMS message" on page 76 or "Creating an SMS message" on page 82.During a call:1. A(Menu)2. 4 Messages A(Select)
18          Basic OperationsHoldYou can put a call on hold.During a call:@(Hold)To resume:A(Back)Making a second callDuring a call:1. Enter the second phone number or select a phone number from the Contacts list(see "Contacts list" on page 17).2. CThe first call is put on hold.NOTE: Hold is network dependent.NOTE: Making a second call is network dependent.
Basic Operations          19Incoming call while on a callDuring a call, you may receive another call.1. To answer another call, C (The first call is placed on hold.)To disconnect another call, A(Reject)2. During a conversation with a second caller, the following options are available by pressing A(Menu) or @(Swap):ConferenceTo create a conference call, you must be connected to more than one call.In a conference call, you can talk with up to 5 parties.During a call:1. A(Menu)2. 4 Conference A(Select)Call transferCall transfer connects your calling party to the other party on hold, then disconnects your line, leaving the two callers in the conversation.During a call:1. A(Menu)2. 4 Call Transfer A(Select)NOTE: Call waiting must be on – see “Call waiting” on page 89. Call waiting is network dependent. NOTE: Conference is network dependent.NOTE: Call transfer is network dependent.
20          Basic OperationsEndYou can select one of the calls to disconnect while in a conference call.During a call:1. A(Menu)2. 4End A(Select)SplitYou can separate an individual from the active conference call.During a call:1. A(Menu)2. 4Split A(Select)Call statusCall status allows you to disconnect the line or put a call on hold with the active party. You can also activate a call that is put on hold.During a call:1. A(Menu)2. 4 Call status A(Select)3. 4required active call A(Select)4. A(End) to disconnect the lineOR@(Hold) to put the call on hold• To resume, A(Back).• You can activate the required inactive call by pressing A(Join) in step 3.SwapWhen you are connected to two calls, you can switch between the active call and the held call.During a call:@(Swap) to switch to the other call on holdNOTE: Split is network dependent.
Basic Operations          21DTMFDTMF can be sent during a conversation. These are often used to access voice mail, paging and computerised home banking. For example, you may need to enter a number to remotely access voice mail messages. A phone number may be stored in the Contacts together with a DTMF sequence, allowing the number to be dialled upon recall and the DTMF sequence to be sent automatically.To send DTMF during a call:Enter digits (# ~ ,,! or ").Pause dialUsing pauses allows you to send DTMF automatically.1. Enter the phone number2. Press and hold # until a “P” is displayed at the end of the phone number entered3. Enter the DTMF digits after the pause, e.g. enter the number to access voice mail messages4. CãWhen the call is connected, the DTMF sequence will be sent after 3 seconds.
22          Basic OperationsText entryYou can use alphanumeric characters to enter text:NOTE: Displayed characters in the T9 mode vary depending on the selected input language.Use ! to toggle T9 on/off. In T9 mode, press A repeatedly until the correct word is displayed. When "-" is reached, press @ to spell the word you require.Key Text mode Numeric T9®(T9abc, T9Abc, T9ABC)(Input language: English) Multi tap (Input mode indicator: abc, Abc or ABC) (0~9)#Space 0. , ?!  + - = : ¿ ¡  ” ’ ; _ 0$1 / (  ) <  > [ ] { } % ~ _& 1%A B C 2 - (a b c 2 -) A B C 2 Ä (a b c 2 ä à ç) 2&D E F 3 - (d e f 3 -) D E F 3 É (d e f 3 é è) 3'G H I 4 - (g h i 4 -) G H I 4 (g h i 4 ì) 4(J K L 5 - (j k l 5 -) J K L 5 (j k l 5) 5)M N O 6 - (m n o 6 -) M N O 6 Ö Ñ (m n o 6 ö ñ ò) 6*P Q R S 7 - (p q r s 7 -) P Q R S 7 (p q r s 7 ß) 7+T UV 8 - (t u v 8 -) T U V 8 Ü (t u v 8 ü ù) 8,W X Y Z 9 - (w x y z 9 -) W X Y Z 9 Æ Ø Å (w x y z 9 æ ø å) 9CShift mode"*ī∆   Θ   Λ   ȄȆȈĭȌȍ *! (Hold) Space # £ $ ¥ ¤ @ \ § ^I(new paragraph) #
Basic Operations          23Shift mode changeIn text entry mode, you can change mode by pressing and holding C.Text entry mode changeIn text entry mode, to switch T9 mode on/off, press !.Auto capital changeAuto capital affects Abc and T9Abc.When the entry mode is changed to Abc or T9Abc, the first character is input as upper case and subsequent letters as lower case.When one of the following characters [. (Period) or ! or ? ] is input before a space, the next character is input as upper case.T9 Text Input:Using this mode of text entry dramatically reduces the required number of key presses.Press a key once for any letter you require on that key. The desired letter may not be displayed. Continue pressing other keys until the end of a word is reached, then check that the word has been typed correctly before continuing on to the next word. If the combination of letters typed has produced a word which is not the one you require, press A repeatedly until the correct word is displayed. Then continue to the next word.Example of Text entry in T9 ModeTo type a new message, follow these steps:1. At the beginning of a new message, press and hold @(Clear) to delete previous text, if necessary2. Press C to change letter case, if necessary3. Press %%(( . “Call” is displayedNote that the displayed words change as you type. Always type to the end of the word before editing.T9 languages can be selected from T9 Input – see “T9 Input“ on page 35.If the word you require is not in the internal dictionary, it should be entered using the Multi tap mode.Multi tap Tegicabc Æ Abc Æ ABC Æ 123 T9abc Æ T9Abc Æ T9ABC Æ 123
24          Basic OperationsOther text modesMulti tap mode (abc, Abc or ABC):Each time a key is pressed in quick succession, the next character available on that key is displayed. Releasing the key or pressing another key enters the character displayed. The cursor moves to the next position.In T9 (Abc) or Multi tap (Abc) mode, the first entered letter in a sentence is in upper case.Menu DisplayThe menu system allows you to access functions which do not have their own dedicated buttons on the keypad.In idle mode1. A(Menu)The main menu display has 9 menu options(see “Exploring the Menus” on page 25)2. 4 required menu A(Select)To go back to the Menu display:D or @ repeatedly until the Menu display returns.NOTE: Menu display contents are dependent on your SIM.
Exploring the Menus          25Exploring the MenusThe 9 main menus are as follows:My PhoneMy Media................................ 27Sounds................................... 30Display ................................... 32Language ............................... 35Alerts...................................... 35Profiles ................................... 36Auto answer ........................... 40Any key answer...................... 40Auto key lock.......................... 40Shortcuts ................................ 41Defaults .................................. 41Phone Menu (or STK)*Call Service ............................ 89Call Diverts .............................93Security...................................94Network ..................................99*STK (SIM Tool Kit) is SIM dependent.BrowserStart browser.......................... 57Bookmarks ............................. 58Settings .................................. 56Push setting ........................... 59Connectivity............................ 60ContactsBrowse ................................... 43Create .................................... 46Groups ................................... 49SDN........................................ 49Information number ................ 50Memory status........................ 50My Numbers........................... 51Hotkey dial ............................. 52My Contacts ........................... 52Camera- (Camera)Camera Preview mode...........63Still Picture mode....................63- (Video)Video Preview mode...............70Still Picture mode....................70RecordsLast dialled ...........................100Answered..............................100Unanswered .........................100Delete records ...................... 101MessagesCreate...............................76, 82Inbox................................. 78, 83Outbox..............................80, 84User Messages.......................84Memory status........................85Settings............................. 74, 81Connectivity............................85Cell Broadcast ........................ 85ApplicationsGames..................................103Calendar...............................103Scheduler .............................106Notes .................................... 108Clock.....................................108Calculator .............................111Currency ...............................112Melody composer .................113(Phone Menu).......................114GamesPuddleland ............................. 53Quadball................................. 54Exode ..................................... 54
26          My Phone MenuMy Phone MenuAuto answerShortcutsAny key answerMy PhoneDefaultsAuto key lockMy Pictures................................27My Videos..................................27My Sounds ................................28User 1~4....................................29Memory status........................... 29Volume ......................................30Ringtones ..................................30Key tone ....................................31Warning tone.............................31Shutter sound............................ 31Wallpaper ..................................32Greeting.....................................32Animation ..................................33Contrast.....................................33Brightness .................................33Colour themes ........................... 34DisplaySoundsMy MediaT9 Input ..................................... 35Display Languages....................35LanguageAlertsRing only ................................... 35None.......................................... 35Ring & Vibrate ........................... 35Vibrate only ............................... 35Ring once ..................................35ProfilesNormal.......................................36Quiet..........................................36Outdoors.................................... 36Headset.....................................36Meeting...................................... 36Customer................................... 36.......................................................................................40.......................................................................................40.......................................................................................40.......................................................................................41.......................................................................................41
My Phone Menu          27My MediaMy PicturesPictures taken by the built-in camera or images downloaded from the Internet are stored in the My Pictures folder.From My Phone1. 4My Media A(Select)2. 4My Pictures A(Select) 3. 4 required picture A(Select)4. 4 required option A(Select)The following options are available after selecting the picture:-View- Send via MMS- Set as wallpaper- Rename- Copy-Cut-Paste- Delete- Delete allMy VideosVideo clips recorded by the built-in video recorder are stored in the My Videos folder.From My Phone1. 4My Media A(Select)2. 4My Videos A(Select) 3. 4 required video A(Select)4. 4 required option A(Select)
28          My Phone MenuThe following options are available after selecting the video clip:-View- Send via MMS- Rename-Copy-Cut- Paste- Delete- Delete allMy SoundsDownloaded sounds are stored in the My Sounds folder.From My Phone1. 4My Media A(Select)2. 4My Sounds A(Select) 3. 4 required sound A(Select)4. 4 required option A(Select)The following options are available after selecting the sound:- Send via MMS- Set as ringtone- Rename-Copy-Cut- Paste- Delete- Delete all
My Phone Menu          29User 1~4You can also store your pictures, videos and sounds in the user defined folders: From My Phone1. 4My Media A(Select)2. 4My Pictures,My Videos, or My Sounds A(Select)3. 4 required file A(Select)4. 4Copy A(Select)5. User 1,User 2,User 3, or User 4 A(Select)6. A(Select) Paste A(Select)Memory statusFrom My Phone1. 4My Media A(Select)2. 4Memory statusA(Select)ãThe available memory space, and used memory space are displayed. 
30          My Phone MenuSoundsVolumeYou can change the volume of the following events:- Other call- Contacts call-Alarm- Messages- Cell Broadcast- Group 1~10From My Phone1. 4Sounds A(Select)2. 4Volume A(Select)3. 4 required events A(Select)4. 4 Adjust the volume level A(OK)RingtonesYou can change the ringtones of the following events:- Other call- Contacts call-Alarm- Messages- Cell Broadcast- Group 1~10From My Phone1. 4Sounds A(Select)2. 4Ringtones A(Select)3. 4 required event A(Select)4. 4Embedded melody,Downloaded melody or Composed melody A(Select)5. 4 required ringtone A(Select)
My Phone Menu          31Key toneThe key tone is the sound you hear when you press a key.From My Phone1. 4Sounds A(Select)2. 4Key tone A(Select)3. 4Off, Tone 1, Tone 2 orTone 3 A(Select)Warning toneThe warning tone informs you of low battery.From My Phone1. 4Sounds A(Select)2. 4Warning tone A(Select) > On/OffShutter soundThe phone makes a shutter sound when you take a picture.From My Phone1. 4Sounds A(Select)2. 4Shutter soundA(Select)3. 4Shutter sound 1, 2, or 3 A(Select)
32          My Phone MenuDisplayWallpaperYou can change the wallpaper on the idle display. Idle mode can also change to the clock. From My Phone1. 4Display A(Select)2. 4Wallpaper A(Select)3. 4Default image,Download image or Off A(Select)4. 4 required wallpaper A(Options)5. 4Select A(Select)GreetingYou can create a greeting message that is displayed each time the phone is switched on.From My Phone1. 4Display A(Select)2. 4Greeting @(Edit)3. Enter the greeting A(OK)4. A(On/Off)
My Phone Menu          33AnimationYou can change the animation on the display when the phone is switched on.From My Phone1. 4Display A(Select)2. 4Animation A(Select)3. 4Animation 1 or Animation 2 A(Select)ContrastYou can adjust the contrast of the display.From My Phone1. 4Display A(Select)2. 4Contrast A(Select)3. 4 Adjust the contrast A(OK) BrightnessYou can adjust the brightness of the display.From My Phone1. 4Display A(Select)2. 4 Brightness A(Change)3. 4 Maximum,High,Medium, or Low A(Select)
34          My Phone MenuColour themesYou can change the colour themes on the display.From My Phone1. 4Display A(Select)2. 4 Colour themes A(Change)3. 4required colour themeA(Select)
My Phone Menu          35LanguageT9InputWhen you create text, this function dramatically reduces the number of key presses.From My Phone1. 4 Language A(Select)2. 4T9 Input A(Select)3. 4 required input type A(Change) > On/OffDisplay LanguagesIt is possible to change the display language on your phone.From My Phone1. 4Language A(Select)2. 4Display Languages  A(Select)3. 4 required language A(Select)AlertsYou can set your phone to ring and/or vibrate when you receive a call or message.From My Phone1. 4Alerts A(Select)2. 4 required alert A(Select)The following options are available when a call or message is received:- Ring only- None- Ring & Vibrate- Vibrate only-Ring once
36          My Phone MenuProfilesActivating a profileYou can switch between 6 different profiles in your phone, each with a distinct combination of alert method, ringtone, etc. Profiles are set up for use in different environments.From My Phone1. 4Profiles A(Select)2. 4 required profile A(Options)3. 4Activate A(Select)The following profiles are available:Normal Suitable for everyday settings.Quiet Ringtone for formal occasions.Outdoors For noisy environments.Headset Ringing with vibration when it is difficult to hear the ringtone.Meeting For meetings.Customer For business settings.
My Phone Menu          37Setting a profileYou can customise a profile by changing the alerts, ring volume, warning tone, key tone, and/or brightness. Alerts:From My Phone1. 4Profiles A(Select)2. 4 required profile A(Options)3. 4Change settings A(Select)4. 4Alerts A(Select)5. 4 required alert A(Select)The following options are available when a call or message is received:- Ring only- None- Ring & Vibrate- Vibrate only-Ring once
38          My Phone MenuRing volume:From My Phone1. 4Profiles A(Select)2. 4 required profile A(Options)3. 4Change settingsA(Select) 4. 4Ring volume A(Select)5. 4 required event A(Select)6. 4 Adjust the volume level A(OK)You can change the ring volume of the following events: (See "Sounds" on page 30 for details.)- Other call- Contacts call-Alarm- Messages- Cell Broadcast- Group 1~10Warning tone:From My Phone1. 4Profiles A(Select)2. 4 required profile A(Options)3. 4Change settings A(Select) 4. 4Warning tone A(Select) > On/Off
My Phone Menu          39Key tone:From My Phone1. 4Profiles A(Select)2. 4 required profile A(Options)3. 4Change settings A(Select) 4. 4Key tone A(Select)5. 4Off, Tone 1, Tone 2 or Tone 3 A(Select)Brightness:From My Phone1. 4Profiles A(Select)2. 4 required profile A(Options)3. 4Change settingsA(Select) 4. 4Brightness A(Select)5. 4Maximum,High,Medium,or Low A(Select)
40          My Phone MenuAuto answerWhen you use the optional personal hands free earpiece, you can answer a call automatically.From My Phone4Auto answer A(Change) > On/OffAny key answerCalls can be answered by pressing any key (except D).From My Phone4Any key answer A(Change) > On/OffAuto key lockThe Auto key lock is used to prevent any keys from being pressed accidentally e.g. when the phone is being carried. This function automatically turns on shortly after the phone returns to Idle mode.From My Phone4Auto key lock A(Change) > On/Off
My Phone Menu          41ShortcutsIt is possible to make the shortcut for the specific menu so that you can access the menu directly from Idle mode.From My Phone1. 4Shortcuts A(Select)2. 4 required menu A(Change) > On/OffDefaultsAll personal settings are returned to their factory default settings.From My Phone1. 4Defaults A(Select) 2. “Restore default settings?”A(Yes) or @(No)
42          Contacts MenuContacts MenuMy NumbersMy ContactsContactsSDNHotkey dialSIM ............................................43Phone ........................................43SIM ............................................46Phone ........................................47Group 1~10 ...............................49Memory statusInformation numberGroupsSIM ............................................52Phone ........................................52CreateBrowse.......................................................................................49.......................................................................................50.......................................................................................50.......................................................................................51.......................................................................................52
Contacts Menu          43Browsing the Contacts listViewing the Contacts list in your SIM/PhoneYou can search for a number in the Contacts list.From Contacts1. 4Browse > SIM or PhoneA(Select)2. 4 required contact entry @(View)OREnter a letter to find a contact beginning with the specific letter 3. A(Options)4. 4View A(Select)Editing the Contacts listFrom Contacts1. 4Browse > SIM or PhoneA(Select)2. 4 required contact entry A(Options)3. 4Edit A(Select)4. Enter the name 55. Enter the phone number 56. @(Change) required location 57. @(Change) required record number A(Save)
44          Contacts MenuDeleting a Contacts entryFrom Contacts1. 4Browse > SIM or Phone A(Select)2. 4 required contact entry A(Options)3. 4Delete A(Select)4. “Delete this entry?”A(Yes) or @(No)Deleting all Contacts entriesFrom Contacts1. 4Browse > SIM or Phone A(Select)2. A(Options)3. 4Delete all A(Select)4. “Delete all entries?”A(Yes) or @(No)Copying the Contacts entries to your SIM/PhoneFrom Contacts1. 4Browse > SIM or PhoneA(Select)2. 4 required contact entry A(Options)3. 4Copy to SIM or Copy to Phone A(Select)4. “Copy entry to phone?” or “Copy entry to SIM card?”A(Yes) or @(No)
Contacts Menu          45Copying all Contacts entries to your SIM/PhoneFrom Contacts1. 4Browse > SIM or Phone A(Select)2. 4 required contact entry A(Options)3. 4Copy all to SIM or Copy all to Phone A(Select)4. “Copy all entries to phone?” or “Copy all entries to SIM card?”A(Yes) or @(No)Sending as SMSFrom Contacts1. 4Browse > SIM or Phone A(Select)2. 4 required contact entry A(Options)3. 4Send SMS A(Select)4. Enter text A(Options)5. 4 required option A(Select)The following options are available:- Send- Save- Save & send- Picture & sound-Format- User MessagesãPlease see “Creating an SMS message” on page 82 for details.Sending as MMSFrom Contacts1. 4Browse > SIM or Phone A(Select)2. 4 required contact entry A(Options)3. 4Send MMS A(Select)4. @(Insert)5. 4 required media to insert A(Select)6. A(Options)7. 4 required option A(Select)
46          Contacts MenuThe following options are available when adding a required item to your MMS message:- Insert picture- Insert text- Insert video- Insert sound- Insert pageThe following options are available after completing your MMS message:- Send-Store- Delete object-Info- Page timing- Preview page- Preview MMSãPlease see “MMS Options” on page 77 for details.Creating a Contacts listStoring a Contacts entry in your SIMFrom Contacts1. 4Create A(Select)2. 4SIM A(Select)3. Enter the name 54. Enter the phone number 55. @(Change) required location 56. @(Change) required record number A(Save)ã"Saved in SIM card" is displayed.ãYou can select the country code by pressing @(+List) in step 4.NOTE: The length and amount of data are SIM dependent.
Contacts Menu          47Storing a Contacts entry in your phoneFrom Contacts1. 4Create A(Select)2. 4Phone A(Select)3. Enter the name 54. Enter the phone number 55. Enter the E-mail address 56. Enter notes 57. @(Change) required group 58. A(Options) > 4Change A(Select) > 4 required caller ID 59. A(Options) > 4Change A(Select) > 4 required melody A(Select)10. When entries are completed, A(Options)11. 4Save A(Select)ã“Saved in phone” is displayed.ãYou can select the country code by pressing @(+List) in step 4.ãYou can also enter or select an office phone number and mobile phone number under the phone number box following the same procedure as in step 4.ãThe entries are grouped together and are retained even if you damage your SIM.
48          Contacts MenuFDNStoring a Contacts entry in FDN:To store a fixed dial number, you need to enter your PIN2 code.The Fixed dial feature allows you to limit your outgoing calls to a certain set of numbers saved in FDN, which is located in your SIM. When this function is on, only the Fixed dial numbers can be dialled, and any attempt to call any other number will fail.From Contacts1. 4Create A(Select) 2. 4SIM A(Select)3. Enter the name 54. Enter the phone number 55. @(Change) FDN 56. @(Change) required record number A(Save)7. Enter your PIN2 A(OK)ãTo activate this function, you need to set Fixed dial on. See page 97.ãYou can select the country code by pressing @(+List) in step 4.
Contacts Menu          49GroupsYou can categorise the Contacts list stored in your phone into 10 groups. You can select a particular ringtone for each group to identify the incoming call.From Contacts1. 4Groups A(Select)2. 4 required group A(Options)3. 4 required option A(Select)The following options are available: SDNThe SDN is a number provided by your network operator. These numbers are stored in the GSM-based SIM. You can view the list of SDNs or call the required SDN. From Contacts1. 4SDN A(Select)2. 4 required SDN A(Select) to call the numberOR@(View) to view the detailsView View the Contacts entries in the selected group.Set ringtone Set the required ringtone.Set image Set the required icon to identify the group.Rename Rename the group.Remove entries Delete all Contacts entries in the selected group.
50          Contacts MenuInformation numberThe Information number is sometimes included in a SIM which supports CPHS.From Contacts1. 4Information number A(Select)2. 4 required information number A(Select)Memory statusMemory status shows how many locations are available in the Contacts list.From Contacts4Memory status A(Select) Maximum memory capacity:- ADN: 255 locations (SIM dependent)- FDN: 50 locations (SIM dependent)- Phone: 500 locationsãADN (Abbreviated Dialling Number) is used for quick access to frequently dialled numbers.NOTE: Information number is SIM dependent.
Contacts Menu          51My NumbersMy Number is a handy phone book where names and phone numbers can be stored and viewed.From Contacts1. 4My Numbers A(Select)2. 4 required entry A(Options)3. 4Edit A(Select)4. Enter the phone number 55. Enter the name A(Save)After selecting the required entry in step 2, you can view My Numbers entries by pressing @(View).The following options are available by pressing A(Options) in step 2:View View the selected My Numbers entry.Edit Edit the selected My Numbers entry.Delete Delete the selected My Numbers entry.
52          Contacts MenuHotkey dialSetting the Hotkey dialYou can quickly dial phone numbers stored at locations 002~009 in the Contacts list. From Contacts1. 4Hotkey dial A(Select)2. 4 required Hotkey @(Edit)3. 4 required Contacts entry A(Select)4. 4 required phone number A(Select)5. “Switch on hotkey setting”A(Yes) or @(No)6. 4 required Hotkey A(On/Off)ãYou must assign a required Contacts entry a Hotkey before switching the Hotkey on/off.Using the Hotkey dialIn idle modePress and hold a numeric key (% ~ ,)My ContactsYou can select SIM or Phone so that the Contacts list directly accessed from Idle mode is set to the SIM or Phone Contacts list.From Contacts1. 4My Contacts A(Select)2. 4SIM or Phone A(Select)NOTE: This function is SIM dependent. 
Games Menu          53Games MenuTo select the game:From Games4Puddleland,Quadball or Exode A(Select).PuddlelandYou cannot help falling in love with the cute little frog making his way by swallowing his enemies and spitting them out. Even the monsters are adorable. But don’t be mistaken by the brilliant and lovable characters. This is a challenging platform game, where you need to keep on your toes if you want to stay ahead.To start the game:Press 4 to select Start, then press A.Key operation:' or C (move left), ) or D (move right), 5,& or + (down), 1,$ or # (jump), A (swallow and spit out), @ (Quit), " or ! (pause).GamesPuddlelandExodeQuadball.......................................................................................53.......................................................................................54.......................................................................................54
54          Games MenuQuadballYou direct the differently coloured bubbles, and they merge with bubbles of the same shape.To start the game:Press A to start the game.Key operation:' or C (left), )or D (right), % or 1 (rotate left), + or 5 (rotate right), A or ( (quickly down), @ or ! (paused).ExodeThe ball bounces off the walls and the bar that you control.You pick up different objects that fall down when you destroy the “bricks”.To start the game:Press A or ( to start the game.Key operation:C or ' (left), D or ) (right), A (start), @ or ! (paused).
Browser Menu          55Browser MenuStart browserBrowserBookmark 1~10 ......................... 58BookmarksSettingsConnectivityCSD settings .............................60GPRS settings........................... 60GPRS Info ................................. 60Push settingAlways all ..................................59Always none .............................. 59Always this specific SMS centre..59.......................................................................................57.......................................................................................56
56          Browser MenuServer settingsThe phone’s WAP (Wireless Application Protocol) Browser enables you to access Internet services supported by the network, such as news, weather reports, sport etc.Before Internet services can be accessed, you need to subscribe to your network operator or Internet service provider (ISP) to enable the relevant configuration information. Please contact your network service provider if you have problems with your network settings. From Browser1. 4Settings A(Select)2. 4 required server @(Edit)Five server settings can be set up in the phone. If you find your server's name under the settings option, select the server and @(Edit).If no settings are present, contact your network service provider for these settings. You can edit the following settings:- Server name- IP address-IP port- Homepage-Linger time- Connection (Auto, CSD or GPRS setting)- CSD settings- GPRS settingsNOTE: Modifying the default settings may cause failure of the Browser.NOTE: You need to set CSD settings or GPRS settings before setting the server information. See “Connectivity” on page 60.
Browser Menu          57Those configuration options will be given by your network service provider.After completing the entry, press A(Save), then press A(Launch).The first time that the Browser is activated there will be no content stored so the Home URL content will be displayed (as defined by the network operator). The Home URL will be recalled from the cache each time the Browser is activated (the cache is the phone's memory that stores content downloaded in the past).Starting the BrowserFrom Browser1. 4Start browser A(Select)2. Follow the instructions on the displayãWhile browsing a home page, press C.The menus below will be displayed.ãTo end the Browser, press and hold D.Home Jump to the home page which is pre-defined in Settings.Bookmarks Select one of your bookmarks and jump to the page, or bookmark the page.Save Items Save items in the currently displayed page.Reload Reload and update the currently displayed page.Go To URL Enter a URL and jump to the currently displayed page.Show URL Display the URL of the currently displayed page.SnapShots Capture the screen image of the currently displayed page.Advanced Inbox,Restart Browser and About can be selected.Settings Scroll Mode,Downloads,Security,View Title Region and Send Referrer can be selected.
58          Browser MenuBookmarksOnce you set your favourite page as a bookmark, you can quickly jump to the page.Adding the Bookmark from the Browser menuFrom Browser1. 4Bookmarks A(Select)2. 4 required empty bookmark A(Options)3. 4Edit A(Select)4. Enter the title and URL A(Save)Adding the Bookmark to the home page1. 4Start browser A(Select)2. 4Bookmarks A(Select)3. 4Mark Site A4. Enter the URL A(Save)To bookmark Panasonic Box:Enterhttp://wap.panasonicbox.comin step 4, then press A to save.NOTE: Panasonic Box is network dependent.
Browser Menu          59Viewing the BookmarkFrom Browser1. 4Bookmarks A(Select)2. 4 required bookmark A(Options)3. 4Launch A(Select)OR@(Launch) after selecting the required bookmarkPush settingYou can set the push setting to decide how you want to receive push messages sent by your service provider.From Browser1. 4Push setting A(Select)2. 4Always all,Always none or Always this specific SMS centre A(Select)NOTE: This service is network dependent or may only be available on a subscription basis.
60          Browser MenuConnectivityYou must set the data connections (GPRS and CSD settings) before setting the server information.From Browser1. 4Connectivity A(Select)2. 4CSD settings,GPRS settings or GPRS InfoA(Select)3. 4 required setting A(Select)4. Edit the required information A(Save)You can edit the following after selecting the required connection setting:CSD settings:- Server name- Call type (ISDN/Analogue)- Dial number- Login name- PasswordGPRS settings:- Server name- GPRS APN- Login name- Password- Authentication (Activate/Deactivate)GPRS Info:You can also select the GPRS info in step 2 to view the memory and duration of the GPRS service used.
Camera Menu          61Camera MenuCameraVideoVideo Preview modeQuality .................................... 70Default settings.......................70Still Picture modePlay......................................... 71Viewfinder...............................71Send via MMS ........................71View videos ............................ 72CameraCamera Preview modeSelf timer ................................ 66Frame ..................................... 66Image size .............................. 67Quality .................................... 67Brightness...............................68Special effects ........................68Twilight ................................... 68Close up mode ....................... 69Anti flicker...............................69Default settings.......................69Still Picture modeViewfinder...............................64Send via MMS ........................64Set as wallpaper..................... 65View pictures ..........................65
62          Camera MenuYour camera(Left side view) (Right side view: LCD Open)Shutter Key:Press to take a picture or record a video clip.If the Camera Preview mode is not on even with the Lens Cover open, press to turn the Camera Preview mode on.LCDLens Cover:Slide the cover halfway down to turn the Camera Preview mode on. When the cover is in the uppermost position, the Camera Preview mode is off. When the cover is slid all the way down, the LCD pops open.Camera LensSelf-portrait Mirror
Camera Menu          63Taking a pictureYou can take pictures with the built-in camera and send them in multimedia (MMS) e-mail messages. You can also use them as wallpaper. Camera Preview mode:In Idle mode or from the Camera menu, slide the Lens Cover halfway down to launch the Camera Preview mode. You can also turn the Camera Preview mode on by pressing the Shutter Key if the Camera Preview mode is not on even with the Lens Cover open.Still Picture mode:In Camera Preview mode, press the Shutter Key to take a picture. The display then turns into the Still Picture mode.In Camera Preview modePress the Shutter Key to take a picture
64          Camera MenuKey functions in Camera Preview modeZoomIn Camera Preview modePress 1 to zoom in or 5 to zoom out.ViewfinderIn Still Picture mode1. A(Options)2. 4Viewfinder A(Select)ãThe viewfinder brings you back to the Camera Preview mode.Sending the picture via MMSIn Still Picture mode1. A(Options)2. 4Send via MMS A(Select)3. @(Insert) to add multimedia files4. A(Options)5. 4Send via MMS A(Select)6. Enter the required information A(Options)7. 4Send A(Select)Key Function1Press to zoom in.5Press to zoom out.!Press to activate the camera function menu."Press to display the camera function icons. To activate one of the functions, press $ ~ ).
Camera Menu          65Setting the picture as WallpaperIn Still Picture mode1. A(Options)2. 4Set as wallpaper A(Select)Viewing the stored pictureIn Still Picture mode1. A(Options)2. 4View pictures A(Select)3. 4 required picture A(Select)
66          Camera MenuCamera settingsSelf timerThe self timer delays shooting for 10 seconds.In Camera Preview mode1. A(Options)2. 4Self timer A(Select)3. 4On or Off A(Select)FrameYou can take a picture with a frame of your choice.In Camera Preview mode1. A(Options)2. 4Frame A(Select)3. 4Off or Frame 1~10A(Select)
Camera Menu          67Image sizeYou can make your picture larger or smaller.In Camera Preview mode1. A(Options)2. 4Image size A(Select)3. 4 required image size A(Select)The following image sizes are available:- VGA (640 x 480 pixels)- CIF (352 x 288 pixels)- QVGA (320 x 240 pixels)- QCIF (176 x 144 pixels)- QQVGA (160 x 120 pixels)- Sub-QCIF (128 x 96 pixels)QualityYou can choose the image quality of your picture.In Camera Preview mode1. A(Options)2. 4Quality A(Select)3. 4Fine (90%), Normal (80%) or Economy (50%) A(Select)ãFine produces a large file with a high resolution, while Economy produces a small file with a low resolution.
68          Camera MenuBrightnessYou can adjust the brightness in 5 steps.In Camera Preview mode1. A(Options)2. 4Brightness A(Select)3. 4 Adjust the brightness A(Select)Special effectsYou can change your picture’s colours.In Camera Preview mode1. A(Options)2. 4Special effects A(Select)3. 4Normal,Mono,Sepia or Bluish A(Select)TwilightYou can turn the Twilight mode on when taking a picture in low light conditions.In Camera Preview mode1. A(Options)2. 4Twilight A(Select)3. 4On or Off A(Select)
Camera Menu          69Close up modeYou can turn the close up mode on when taking a picture at a close range.In Camera Preview mode1. A(Options)2. 4Close up mode A(Select)3. 4On or Off A(Select)Anti flickerThe anti flicker indicates how many times an image appears on a display per second. The higher the anti flicker, the less obvious the screen flicker is.In Camera Preview mode1. A(Options)2. 4Anti flicker A(Select)3. 450 (Hz) or 60 (Hz) A(Select)Default settingsAll personal settings can be returned to their factory default settings.In Camera Preview mode1. A(Options)2. 4Default settings A(Select)
70          Camera MenuRecording a video clipWhile the Camera Preview mode is active, the camera can be switched to a video recorder.Video Preview mode:In Idle mode or from the Camera menu, slide the Lens Cover halfway down and press the Right Soft Key to launch the Video Preview mode. You can also turn the Video Preview mode on by pressing the Shutter Key followed by the Right Soft Key.Still Picture mode:In Video Preview mode, press the Shutter Key to record a video clip. The display then turns into the Still Picture mode.To switch the Camera Preview mode to the Video Preview mode: press @.Key functions in Video Preview modeQualityIn Video Preview mode1. A(Options)2. 4Quality A(Select)3. 4Fine,Normal or Economy A(Select)Default settingsIn Video Preview mode1. A(Options)2. 4Default settings A(Select)Key Function!Press to activate the video function menu."Press to display the video function icon.
Camera Menu          71RecordingIn Video Preview modePress the Shutter Key to start recording a video clipPress the Shutter Key once more to stop recording a video clip.Playing the video clipIn Still Picture mode1. A(Options)2. 4Play A(Select)ViewfinderIn Still Picture mode1. A(Options)2. 4Viewfinder A(Select)Sending the video clip via MMSIn Still Picture mode1. A(Options)2. 4Send via MMS A(Select)3. @(Insert) to add multimedia files4. A(Options)5. 4Send via MMS A(Select)6. Enter the required information A(Option)7. 4Send A(Select)
72          Camera MenuViewing the stored video clipsIn Still Picture mode1. A(Options)2. 4View videos A(Select)3. 4 required video clip A(Select)
Messages Menu          73Messages MenuMessagesUser MessagesCell BroadcastCreate MMS.......................................... 76SMS........................................... 82OutboxMemory statusSettingsInbox MMS ..........................................78SMS........................................... 83MMS..........................................80SMS........................................... 84MMS..........................................85SMS........................................... 85Auto display............................... 85Read Messages ........................ 86Message List ............................. 86Topic list .................................... 86Languages.................................87MMS..........................................74SMS........................................... 81.......................................................................................84Connectivity CSD settings ............................. 85GPRS settings........................... 85
74          Messages MenuMMS settingsConfiguring MMSFrom Messages1. 4Settings A(Select)2. 4MMS A(Select)3. 4Server list A(Select)4. 4 required server @(Edit)Five server settings can be set up in the phone. If you find your server’s name under the settings option, select the server and @(Edit). If no settings are present, contact your network service provider for these settings.You can edit the following settings:- Server name- IP address-IP port- Homepage-Linger time- Connection (Auto, CSD or GPRS setting)- CSD settings- GPRS settingsNOTE: Your network operator may have pre-installed this number. Do not change this number as it may cause failure of MMS messaging.
Messages Menu          75Setting the Send OptionsFrom Messages1. 4Settings A(Select)2. 4MMS A(Select)3. 4Send Options A(Select)4. 4 required send option A(Select)The following Send options are available:Setting the Receive OptionsFrom Messages1. 4Settings A(Select)2. 4MMS A(Select)3. 4Receive Options A(Select)4. 4 required receive option A(Select)Delivery reportDecide whether or not you want confirmation that your message has been delivered. Select On or Off.Own addressChoose whether or not to let the recipient see your address.Select Show or Hide.Priority Set the priority level for your sent messages.Select High, Normal or Low.
76          Messages MenuThe following receive options are available when you want to decide how to deal with incoming MMS message:Creating an MMS messageInserting a multimedia fileFrom Messages1. 4Create A(Select)2. 4MMS A(Select)3. @(Insert)4. 4 required insert option A(Select)The following options are available to select the required multimedia file:- Insert picture- Insert text- Insert video- Insert sound- Insert pageValidity period Set the duration that your message is stored at the message centre. Select 1 Hour, 12 Hours, 1 Day, 1 Week or Maximum.Normal Select Auto retrieve, Auto reject or Auto defer.Anonymous sender Select Auto retrieve or Auto reject.Advertisements Select Auto retrieve or Auto reject.Delivery report Select Permit or Reject.
Messages Menu          77MMS OptionsFrom Messages1. 4Create A(Select)2. 4MMS A(Select)3. @(Insert) to add the required media A(Select)4. A(Options)5. 4 required option A(Select)After completing an MMS message, you can select one of the following options:.Send MMSSend the completed MMS message. Press A(Options) to recall the Contacts list, then select the recipient’s phone number. Press A(Options) once more to send the message.Store MMS Store the completed MMS message. Press A(Select) to confirm that the message has been saved.Delete items Delete the selected text, picture, sound and/or video clip.Info Show the page timing, the type of image and/or attached sound files, the message size, and the resolution.Page timing Set the time intervals at which each page is sent.Delete page Delete the selected page.Preview page Preview the selected page.Preview MMS Preview the completed MMS message.
78          Messages MenuSending an MMS messageFrom Messages1. 4Create A(Select)2. 4MMS A(Select)3. @(Insert) to add the required media A(Select)4. A(Options)5. 4Send MMS A(Select)6. Enter the phone numberORA(Options) 4Contacts list A(Select) to select the phone number7. A(Options) Send A(Select)Receiving an MMS messageFrom Messages1. 4Inbox A(Select)2. 4MMS A(Select)3. 4Waiting A(Select)4. 4 required MMS messageA(Select) > A(Receive) to receive the remainder of the MMS messageOR4Received A(Select)

Navigation menu