Quanta Computer YEELOONG8089 Notebook Computer User Manual Yeeloong 8089 Notebook User s Manual
Quanta Computer Inc Notebook Computer Yeeloong 8089 Notebook User s Manual
User manual
Yeeloong 8089 Notebook Quick Guide
(V1.2)
Jiangsu Lemote Technology Corporation
Limited
September 2008
1. Product introduction
Yeeloong 8089 notebook is the computer with low power consumption and high performance,
launched by Lemote. The series of Loongson 2F high-performance processor is one of the important
scientific achievements supported by China 863 Program. The notebook owns advantages of high
performance, low power consumption, ultra-portable, safe and reliable and can be widely used in
learning and working, etc.
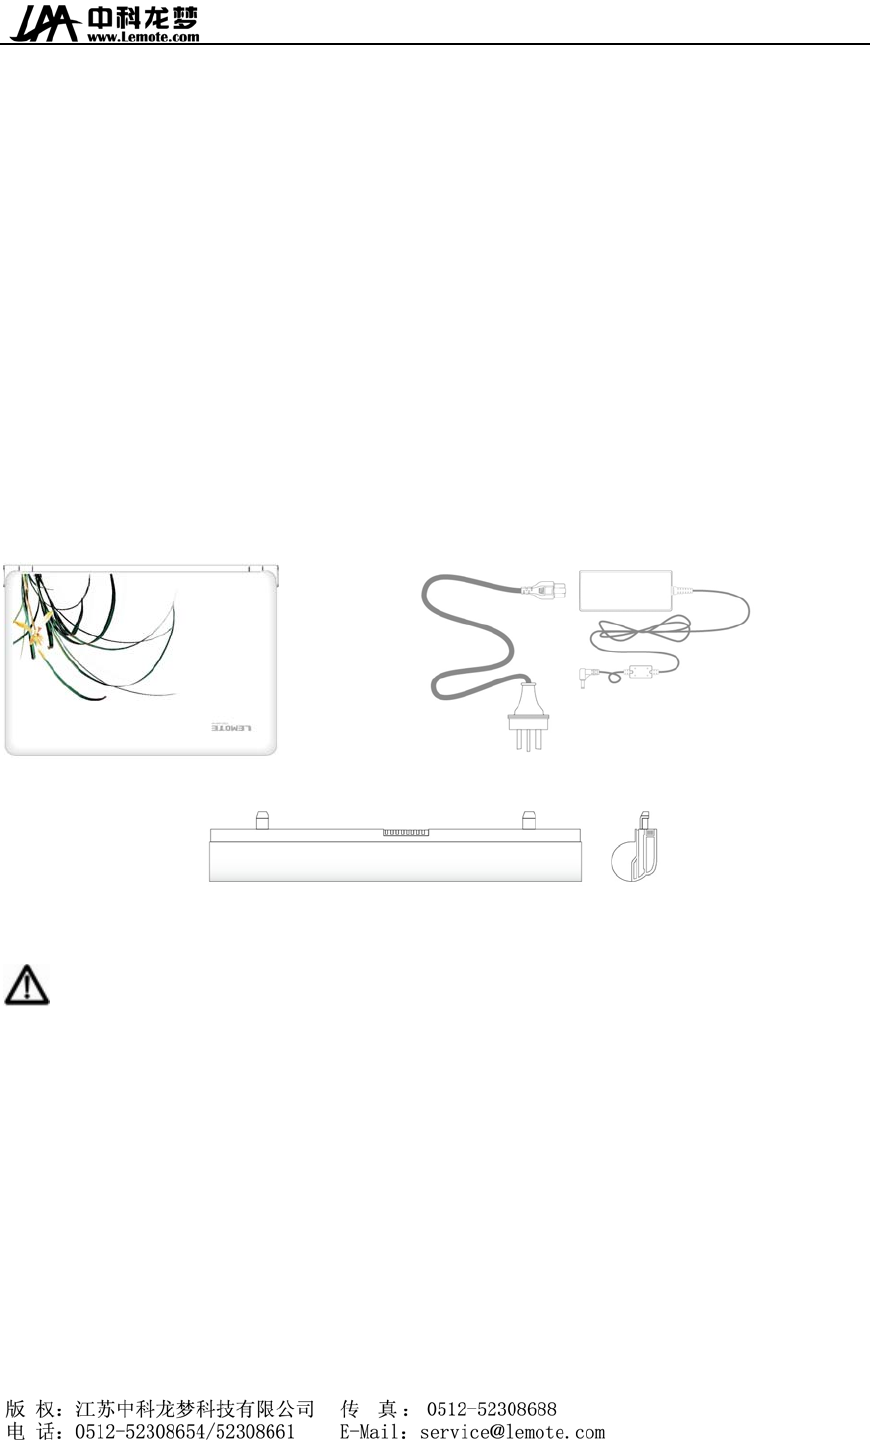
1.1. Product components
The following pictures contain all main components:
Yeeloong8089 notebook Power adaptor + power cord
Notebook battery pack
-------------------------------------------------------------------------------
Note: Some components may be replaced by similar products,and the color of some components may be
different from those in this manual, for illustration purpose only.
--------------------------------------------------------------------------------------------
1.2. Product appearance
Top side
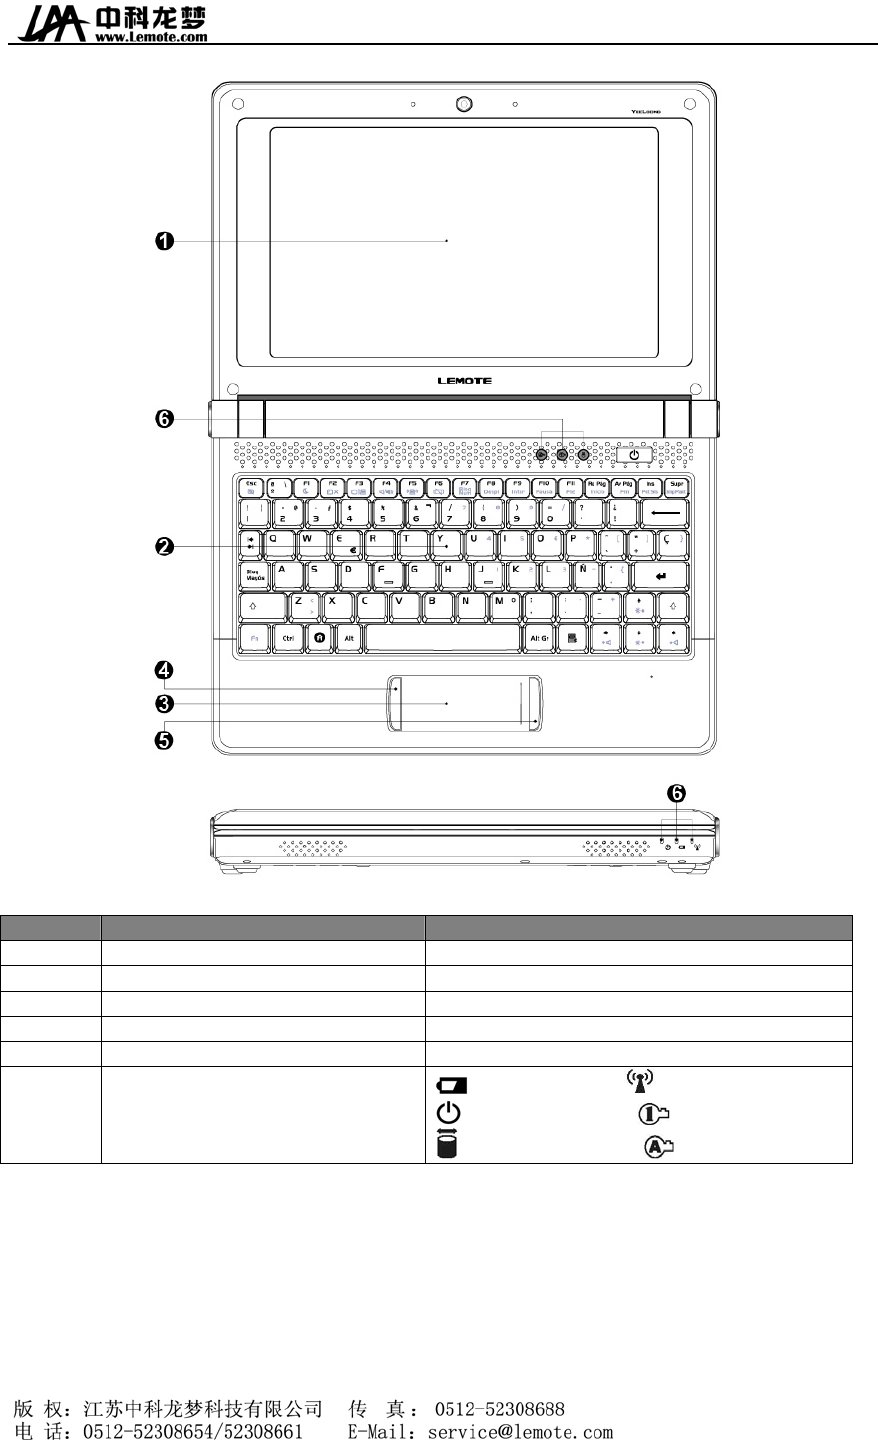
Num Function Specification
1 Color LCD Display panel
2 keyboard Key in information
3 touchpad Control cursor and work as Mouse
4 Right touchpad work as the right mouse button
5 Left touchpad work as the left mouse button
6 Status indicators /LED
Power Indicator Wireless Indicator
Battery Indicator Numlock LED
Hard disk Indicator CapsLockLED
Bottom side
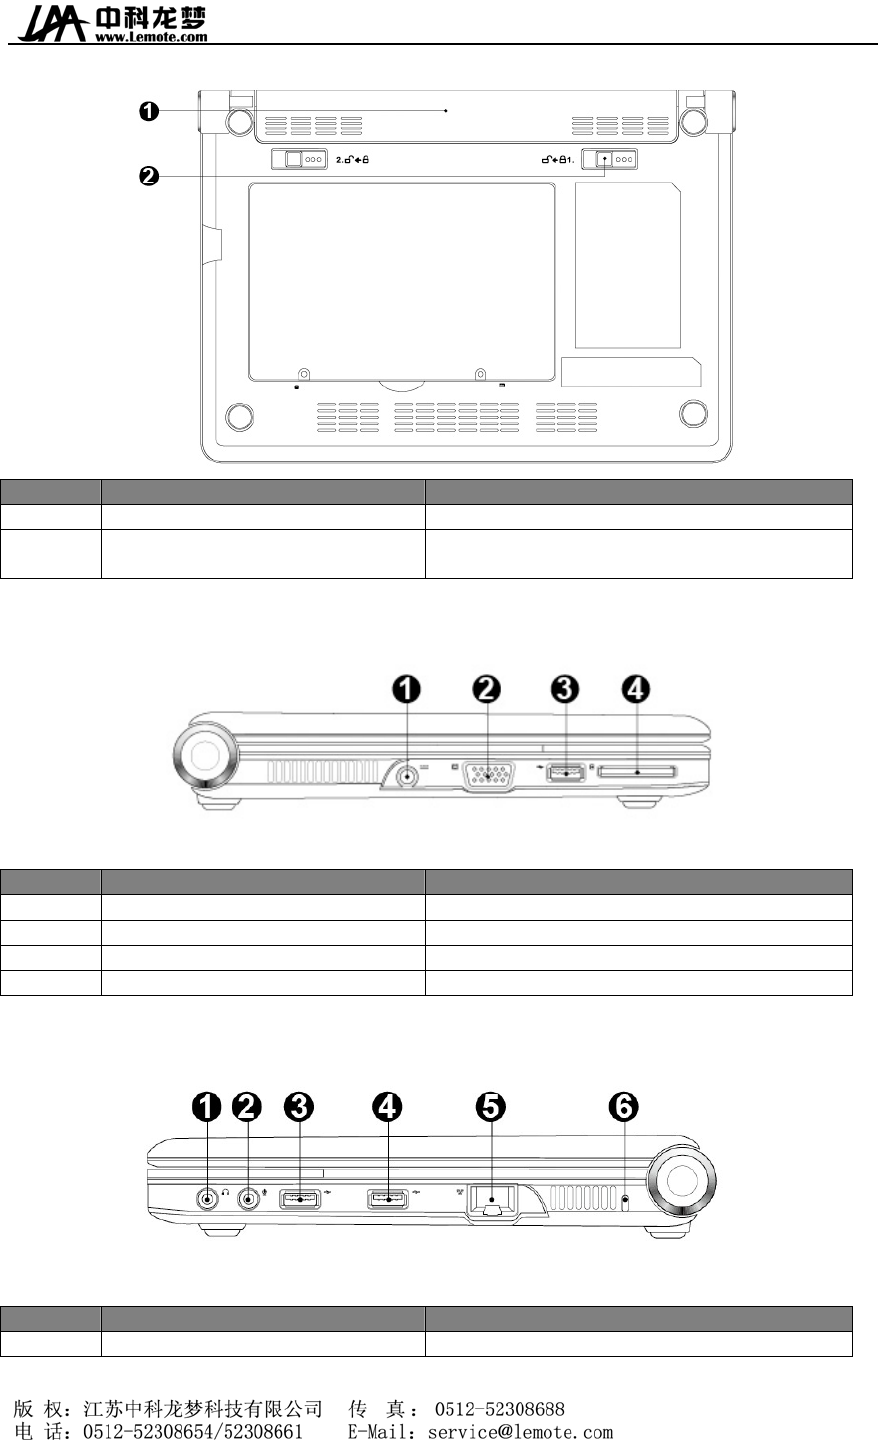
Mum Function Specification
1 Battery pack Movable battery pack, power supplying
2 Battery pack spring lock Move the lock to unlocked position to insert
and remove battery pack
Left side
Mum Function Specification
1 Power (DC) input Connect power adaptor
2 VGA output jack Connect monitor
3 USB port Connect USB device
4 Card reader SD/MMC/MS 3in1
Right side
Mum Function Specification
1 Headphone output jack Connect headphone
2 Microphone input jack Connect microphone
3/4 USB port Connect USB device
5 LAN port Connect network
6 Notebook lock Connect lock
1.3. Hardware specification
CPU Loongson 2F, 800M~900MHz,PCI-X/PCI
Chipset Northbridge: AMD CS5536
Memory 512MB/1GB DDR2 533
Storage 2-8G SSD/160GB
Monitor 8.9’TTL LCD,LED backlight; VGA port
Graphics SM712
LED indicators Power status; Battery status; Hard disk write; Capital / Number Lock
Keyboard Keyboard, Touchpad
USB port 2/3×external USB2.0 port
Network 1×10/100Mbps RJ45 port
Wireless 802.11b/g(Optional)
Camera: 300K Pixels(Optional)
Card reader SD/MMC/MS
Audio 1×mircophone port; 1×headphone port; 1×built-in double-channel 2W
speaker
Power adaptor Output: 20V AC, 2A, 40W;
Input: 100-240 V AC, 50-60Hz, 1.5A
Battery pack 3 cell/6 cell battery
Work time (Saving mode)≥2.5h
Relative
Temperature -10 ~℃+50℃
Relative Humidity 0%~80%
Size 25.5×18.8×2.5(cm)
Weight 1.04Kg(Without battery)/1.565Kg(include battery, adaptor and power
cord)
2. Guidance for use
Before use this notebook, please install battery and connect power. There are two kinds of power
supply: AC power adaptor and battery. We recommend you use AC power indoor, at home and in
office while use battery outdoors.
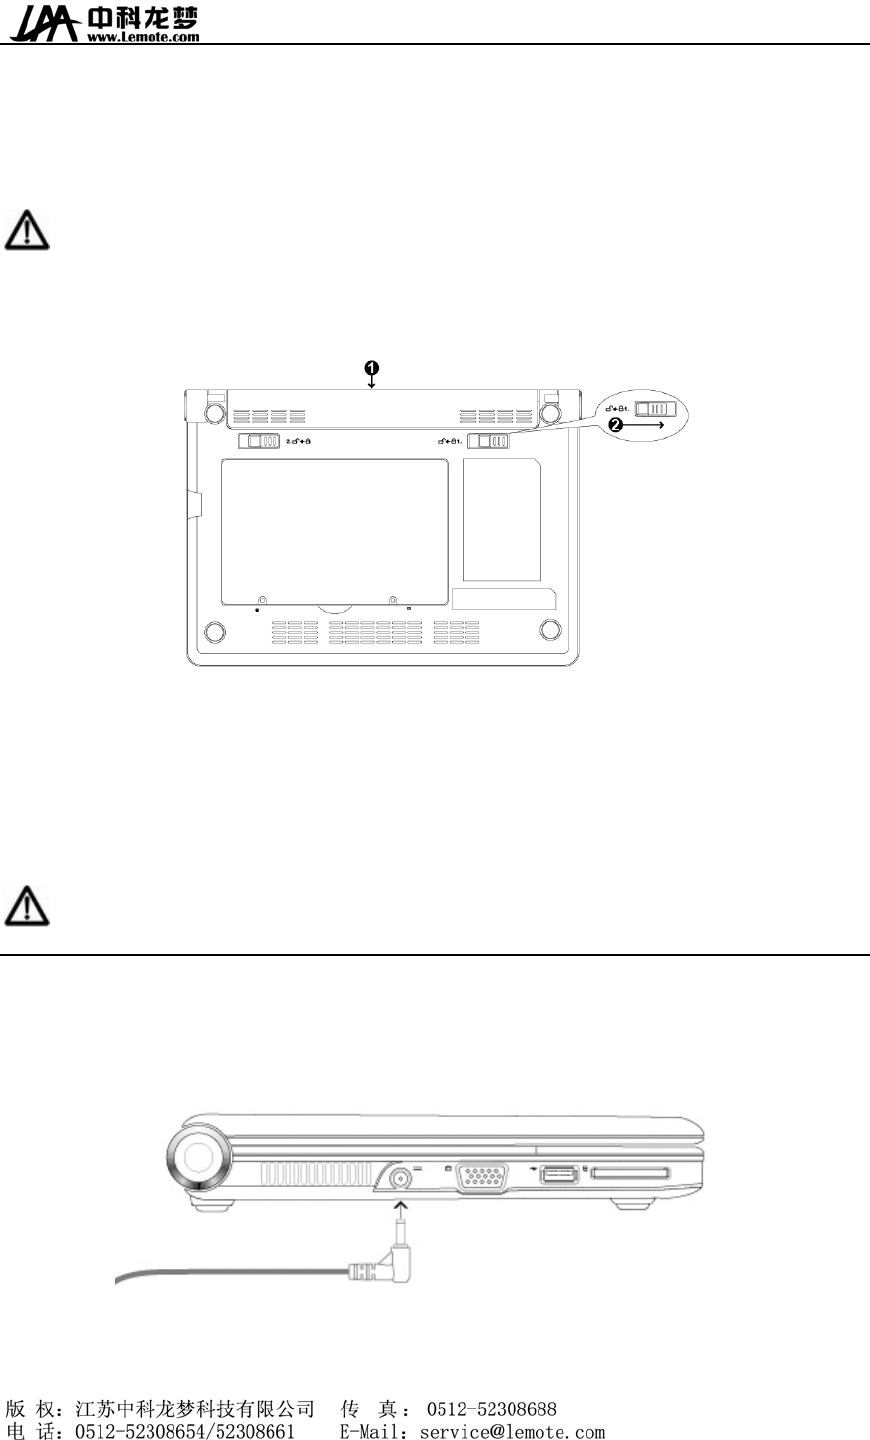
2.1. Install of battery pack
1. Push battery to the groove along the track at the bottom of the notebook computer.
----------------------------------------------------------------------------------------------------------------------
Note: Push the battery pack again along the track if not success. Do not force the battery pack into which may
cause battery damage.
----------------------------------------------------------------------------------------------------------------------
2. When the battery pack into, then its switch would be back into its position and lock the battery
pack.
2.2. Remove of battery pack
1. Turn off the computer and disconnect all external peripherals.
2. Push the spring switch when back side of computer is up on.
3. Pull and remove the battery pack with holding the spring switch.
----------------------------------------------------------------------------------------------------------------------
Warning: Never attempt to remove the battery pack while the notebook is turn ON, as this may result in the loss
of working data.
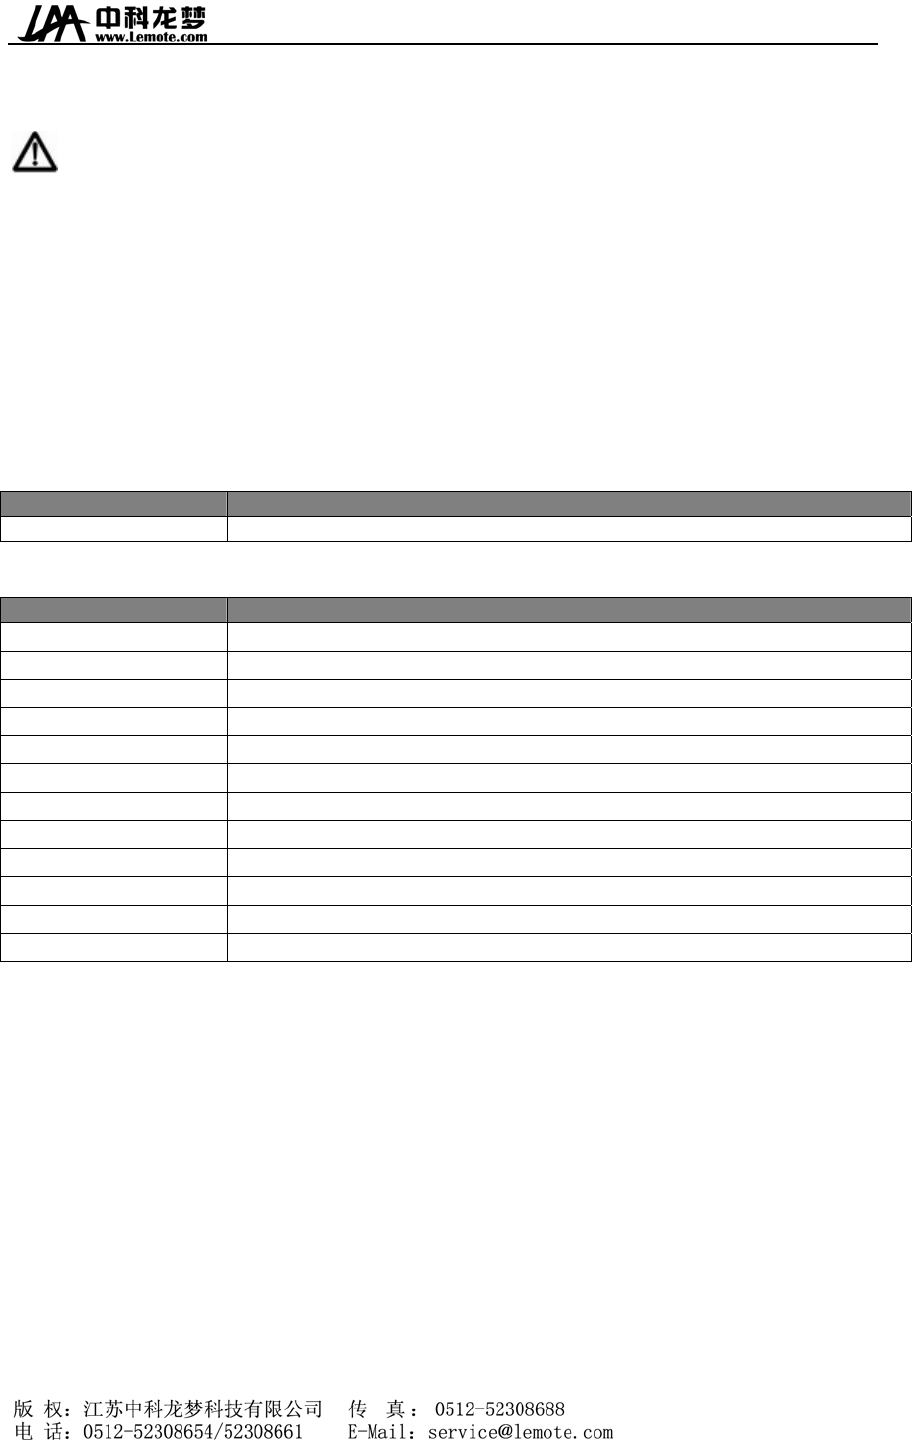
2.3. Using AC power
1. Insert power adaptor into Power Jack in left side of notebook.
2. Insert another side of power adaptor into electric socket.

2.4. Start computer
1. Turn on the Display Panel.
----------------------------------------------------------------------------------------------------------------------
Warning: When it is on, do not press this display panel down or back, which lead to the break of the hinge.
Never lift the notebook computer by grabbing the display panel!
----------------------------------------------------------------------------------------------------------------------
2. Press the power button then start computer.
2.5. Emergency shutdown
In case your computer cannot properly turn off, hold the power button until shutdown.
2.6. Use of touchpad
1. Introduction of touchpad: The function of touchpad is just as a standard desktop mouse and light
pressure with finger is that all required to operate the touchpad. Place your finger in the working area
of the touchpad and slide in a direction to move the cursor. Left touchpad button works as left mouse
button to click item or run program while right touchpad button works as right mouse button.
2. Clicking/Tapping: With the cursor over an item, press the left button or use your fingertip to touch
the touchpad lightly, keeping your finger on the touchpad until the item is selected.
3. Double-clicking/Double-tapping: Move the cursor over the icon you wish to execute, press the left
button or tap the pad twice in rapid succession, and the system launches the corresponding program.
4. Dragging: You can move the cursor over the item you select, and while keeping the left button
depressed, moving the cursor to desired location, then release the button. Or, you can simply
double-tap on the item and hold while dragging the item with your fingertip.
5. Scrolling: Slide your finger up and down side to scroll a window up or down, which is convenient
to view files and web.
----------------------------------------------------------------------------------------------------------------------
Note: Use and care of touchpad
1. Do not use any sharp objects in place of your finger to operate the touchpad or else, damage may occur to touchpad’s
surface.
2. Keep the touchpad away from any dirty liquid and grease.
3. Do not touch the touchpad if your fingers are dirty or wet.
4. Do not rest heavy objects on the touchpad or touchpad buttons.
5. The touchpad is pressure sensitive and tape too hard does not increase the sensitivity of the touchpad. So please
avoid tapping too hard as possible.
----------------------------------------------------------------------------------------------------------------------
2.7. Introduction of special function keys
Single-function keys
Button Function
Menu Start / shutdown Start Menu
Combination keys
Button Function
Fn+F2 LCD backlighting ON/OFF
Fn+F3 CRT display switch
Fn+F4 The speaker ON/OFF
Fn+F5 Wireless LAN ON/OFF
Fn+F6 Touchpad ON/OFF
Fn+F7 Number Lock
Fn+Page Up Home
Fn+Page Down End
Fn+↓ Decrease the display brightness
Fn+↑ Increase the display brightness
Fn+← Decrease the volume
Fn+→ Increase the volume
3. Notes for use
Please pay attention to the following notes to ensure your notebook computer safe.
1. Do not expose to sunshine or close to source of heat.
2. Please use the notebook computer in environment in between 5°C (41°F) and 35°C(95°F).
3. Do not expose the notebook computer to magnetic field.
4. Do not expose to moisture or leaky environments.
5. Do not expose to or close to liquids.
6. Do shake notebook computer excessively.
7. Do not expose to dirty or dusty environments.
8. Do not place objects on top in case damage may cause.
9. Do not place on uneven, unstable surface or cotton materials surface (such as bed and blankets)
which may cause temperature rise.
Please pay attention to the following steps when you clean notebook computer.
1. Turn off notebook computer power and remove the battery pack.
2. Unplug the adapter.
3. Use wet soft cloth.
4. Do not use any liquid or foam detergent.
Please contact with distributors and service personnel if any following condition occurs:
1. The notebook drop to the ground or damage.
2. Liquid leaks into product.
3. The notebook computer runs into error.
Notes for clean of vent or fan
Please clean fan regular to make sure system be in best cooling condition. You can use soft clothe or
suction to remove the dust accumulated in the vent.
ANNEXE
PROCLAMATION
This user manual is no guarantee, position expression or other implication of any kind. Our Company
and its employees shall not be responsible for direct or indirect loss of data and interest caused by the
information in this manual. The product specifications and information in this manual are for
reference only, which will be updated at any time without notice. Our company will not be liable for
any errors of this manual, including software and hardware.
----------------------------------------------------------------------------------------------------------------------
Warning: Our company does not assume any responsibility for damage caused by personal improper use.

Declarations and Safety Statements
Federal Communications Commission Statement
This device complies with FCC Rules Part 15. Operation is subject to the following
two conditions:
• This device may not cause harmful interference, and
• This device must accept any interference received, including interference that
may cause undesired operation.
This equipment has been tested and found to comply with the limits for a class B
digital device, pursuant to Part 15 of the Federal Communications Commission (FCC)
rules. These limits are designed to provide reasonable protection against harmful
interference in a residential installation. This equipment generates, uses, and
can radiate radio frequency energy and, if not installed and used in accordance
with the instructions, may cause harmful interference to radio communications.
However, there is no guarantee that interference will not occur in a particular
installation. If this equipment does cause harmful interference to radio or
television reception, which can be determined by turning the equipment off and on,
the user is encouraged to try to correct the interference by one or more of the
following measures:
• Reorient or relocate the receiving antenna.
• Increase the separation between the equipment and receiver.
• Connect the equipment into an outlet on a circuit different from that to which
the receiver is connected.
• Consult the dealer or an experienced radio/TV technician for help.
The use of a shielded-type power cord is required in order to meet FCC emission
limits and to prevent interference to the nearby radio and television reception.
It is essential that only the supplied power cord be used. Use only shielded cables
to connect I/O devices to this equipment. You are cautioned that changes or
modifications not expressly approved by the party responsible for compliance could
void your authority to operate the equipment.

Note:
Any changes or modifications not expressly approved by the party responsible for
compliance could void the user’s authority to operate this equipment. “The
manufacture declares that this device is limited to Channels 1 through 11 in the
2.4GHz frequency by specified firmware controlled in the USA.”
RF exposure warning
This equipment complies with FCC radiation exposure limits set forth for an uncontrolled
environment.
The equipment must not be co-located or operating in conjunction with any other antenna
or transmitter.
The measured SAR levels evaluated are in compliance with the FCC RF exposure
guidelines.
YEELOONG 8089_*(* can be A-Z, 0-9 or blank) Series Max. SAR Measurement (1g)
802.11b SAR Value: 0.025W/kg; 802.11g SAR Value: 0.032W/kg.
1