Quanzhou YANTON Electronics T-518 Two Way Radio User Manual
Quanzhou YANTON Electronics Co., Ltd. Two Way Radio Users Manual
User Manual
UserManual
TwoWayRadio
BrandName:YANTON
ModelName:T‐518
FCCID:SV8T‐518

Introduction
Thank you for purchasing Series Radio. The Series radios provide
cost effective communications for businesses, they are the perfect
communications solution for all of todays fast-paced industries.
Please read this guide carefully so you know how to properly
operate the radio before use.

Safety and General Information
Important Information on Safe and
Efficient Operation.
Read This information Before Using Your Radio.
The information provided in this document supersedes the general
safety information contained in user guides published before.
Transmit and Receive Procedure
Your two-way radio contains a transmitter and a receiver. To
control your exposure and ensure compliance with the occupational/
controlled environment exposure limits, always adhere to the
following procedure:
◆ Transmit no more than 50% of the time.
◆ To transmit (talk), press the Push to Talk (PTT) button.
◆ To receive calls, release the PTT button.
Transmitting 50% of the time, or less, is important because the radio
generates measurable RF energy exposure only when transmitting
(in terms of measuring standards compliance).
Portable Radio Operation and EME
Exposure
Antenna Care
Use only the supplied or an approved replacement antenna.
DO NOT hold the antenna when the radio is "IN USE"
Holding the antenna affects the effective range.
Two-Way Radio Operation
When using your radio as a traditional two-way radio, hold the radio
in a vertical position with the microphone 1 to 2 inches (2.5 to 5 cm)
away from the lips.
Body-Worn Operation
If you wear a radio on your body when transmitting, always place
the radio in a supplied or approved clip, holder, holster, case, or
body harness for this product. If you do not use one of the supplied
or approved body-worn accessories, and are not using the radio
held in the normal use position, ensure the radio and its antenna are
at least 1 inch (2.5 cm) from your body when transmitting.
Data Operation
If applicable, when using any data feature of the radio with or
without an accessory cable, position the radio and its antenna at
least 1 inch (2.5 cm) from the body.
Electromagnetic Interference/Compatibility
Note: Nearly every electronic device is susceptible to electromagnetic
interference (EMI) if inadequately shielded, designed, or otherwise
configured for electromagnetic compatibility.
Facilities
To avoid electromagnetic interference and/or compatibility conflicts,
turn off your radio in any facility where posted notices instruct you
to do so. Hospitals or health care facilities may be using equipment
that is sensitive to external RF energy.
Aircraft
When instructed to do so, turn off your radio when on board' an
aircraft.
Any use of a radio must be in accordance with applicable regulations
per airline crew instructions.
Medical Devices Pacemakers
The Advanced Medical Technology Association recommends
that a minimum separation of 6 inches (15 cm) be maintained
between a handheld wireless radio and a pacemaker. These
recommendations are consistent with the independent research
by,and recommendations of the U.S. Food and Drug Administration.
Persons with pacemakers should:
◆ALWAYS keep the radio more than six inches (15 cm) from their
pacemaker when the radio is turned ON.
◆Not carry the radio In the breast pocket.
◆Use the ear opposite the pacemaker to minimize the potential
for interference.
◆Turn the radio OFF immediately if you have any reason to
suspect that interference is taking place.
Hearing Aids
Some digital wireless radios may interfere with some hearing aids.
In the event of such interference, you may want to consult your
hearing aid manufacturer to discuss alternatives.
Other Medical Devices
If you use any other personal medical device, consult the
manufacturer of your device to determine if it is adequately shielded
form RF energy.
Your physician may be able to assist you in obtaining this
information.
Safety and General Use While Driving
Check the laws and regulations on the use of radios in the area
where you drive. Always obey them. When using your radio while
driving, please:
◆Give full attention to driving and to the road.
◆Use hands-free operation, if available.
Pull off the road and park before making or answering a call if
driving conditions so require.

Operational Warnings
! Warnings
◆For Vehicles with an Air Bag
Do not place a portable radio in the area over an air bag or in
the air bag deployment area. Air bags inflate with great force.
If a portable radio is placed in the air bag deployment area
and the air bag inflates, the radio may be propelled with great
force and cause serious injury to occupants of the vehicle.
◆Potentially Explosive Atmospheres
Turn off your radio prior to entering any area with a potentially
explosive atmosphere, unless it is a radio type especially
qualified for use in such areas as "Intrinsically Safe." Do not
remove, install, or charge batteries in such areas. Sparks in a
potentially explosive atmosphere can cause an explosion or
fire resulting in bodily injury or even death.
Note: The areas with potentially explosive atmospheres
referred to above include fueling areas such as below decks
on boats, fuel or chemical transfer or storage facilities, areas
where the air contains chemicals or particles, such as grain,
dust or metal powders, and any other area where you would
normally be advised to turn off your vehicle engine. Areas with
potentially explosive atmospheres are often but not always
posted.
◆Blasting Caps and Areas
To avoid possible interference with blasting operations, turn
off your radio when you are near electrical blasting caps, in
a blasting area, or in areas posted: "Turn off two-way radio.
Obey all signs and instructions.
Operational Cautions
Antennas
Do not use any portable radio that has a damaged antenna. If a
damaged antenna comes into contact with your skin, a minor burn
can result.
Batteries
All batteries can cause property damage and/or bodily injury such
as burns if a conductive material such as jewelry, keys, or beaded
chains touch exposed terminals. The conductive material may
complete an electrical circuit (short circuit) and become quite hot.
Exercise care in handling any charged battery, particulariy when
placing it inside a pocket, purse, or other container with metal
objects.
Battery Charger Safety Instructions
Save these Instructions
1. Do not expose ttie charger to rain or snow.
2. Do not operate or disassemble the charger if it has received a
sharp blow, or has been dropped or damaged in any way.
3. Never alter the AC cord or plug provided with the unit. If the
plug will not fit the outlet, have the proper outlet installed by a
qualified electrician. An improper condition can result in a risk
of electric shock.
4. To reduce the risk of damage to the cord or plug, pull the plug
rather than the cord when disconnecting the charger form the
AC receptacle.
5. To reduce the risk of electric shock, unplug the charger from
the outlet before attempting any maintenance or cleaning.
6. Use of an attachment not recommended or sold by SMP may
result in a risk of fire, electric shock, or personal injury.
7. Make sure the cord is located so it will not be stepped on,
tripped over, or subjected to damage or stress.
8. An extension cord should not be used unless absolutely
necessary.
Use of an improper extension cord could result in a risk of fire
and/or electric shock. If an extension cord must be used, make
sure that:
◆The pins on the plug of the extension cord are the same
number, size, and shape as those on the plug of the
◆charger.
◆The extension cord is properly wired and in good electrical
condition.
◆The cord size is 18 AWG for lengths up to 100 feet, and 16
AWG for lengths up to 150 feet.
9. The supply cord of this charger can not be replaced.

CONTENTS
CHECK EQUIPMENT ................................................. 1
ACCESSORIES ..................................................................... 1
START ........................................................................ 2
CHARGE BATTERY .............................................................. 2
INSTALL/REMOVE BATTERY ............................................... 4
INSTALL ANTENNA ............................................................... 5
INSTALL BELT CLIP .............................................................. 5
INSTALL SPEAKER/MICROPHONE .....................................6
INSTALL THE COVER OVER THE SPEAKER/
MICROPHONE JACKS .......................................................... 6
CONTROLS ................................................................ 7
OPERATIONS AND SETTINGS ................................ 8
BUSY CHANNEL LOCK ......................................................... 8
VOX SENSITIVITY ................................................................. 8
TX POWER ............................................................................ 8
SQUELCH LEVEL .................................................................. 8
BEEP SETTING ...................................................................... 9
TIME OUT TIMER (TOT) ....................................................... 9
CTCSS/DCS ........................................................................... 9
WIDE/NARROW BAND .......................................................... 9
EMERGENCY CALL .............................................................. 9
BATTERY SAVE .................................................................. 10
END ROGER ........................................................................ 10
LOW BATTERY WARNING ................................................. 10
CABLE CLONE .................................................................... 10
PTT ID TRANSMIT MODE ................................................... 11
THE SIDE KEY CAN BE PROGRAMMED THE FUNCTIONS
AS FOLLOW, ....................................................................... 11
TROUBLESHOOTING ............................................. 14
DEFAULT SETTING ................................................ 15
1
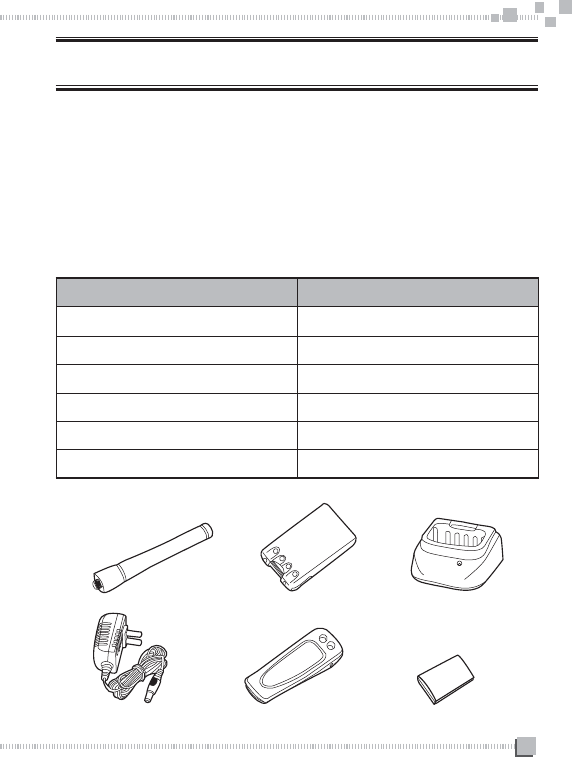
CHECK EQUIPMENT
Welcome to use our radio. Please check if any damage to the
packing box before use. Carefully unpacks the radio, identify the
items list below, please inform the seller if any Item missed or
damaged.
ACCESSORIES
ITEMS QUANTITY
ANTENNA 1
CHARGER 1
ADAPTOR 1
Ll-ion BATTERY 1
BELT CLIP 1
USER MANUAL 1
ANTENNA CHARGER
ADAPTOR
Ll-ion BATTERY
BELT CLIP USER'MANUAL
2
START
CHARGE BATTERY
The battery hasn't been charged at the factory, please charge it
before use.
Charge it for the first time, or recharge it after unusing for a long time
(over two months), it needs charging two or three times to reach
normal capacity.
Note
◆The environment temperature for charging is from 5'C to 40*C.
The battery can not be fully charged beyond this temperature.
◆Please turn off the radio before charging.
◆It will affect charging process if you use the radio during
charging.
◆ When operating time becomes short, even if it is fully charged,
please replace the battery pack.
! Warnings
◆If the battery was completely charged, do not charge it again.
Otherwise the life of battery may be losed or damaged.
◆After battery was completely charged, please remove the
battery from the charger. Charging over 5 hours may cause
damage.
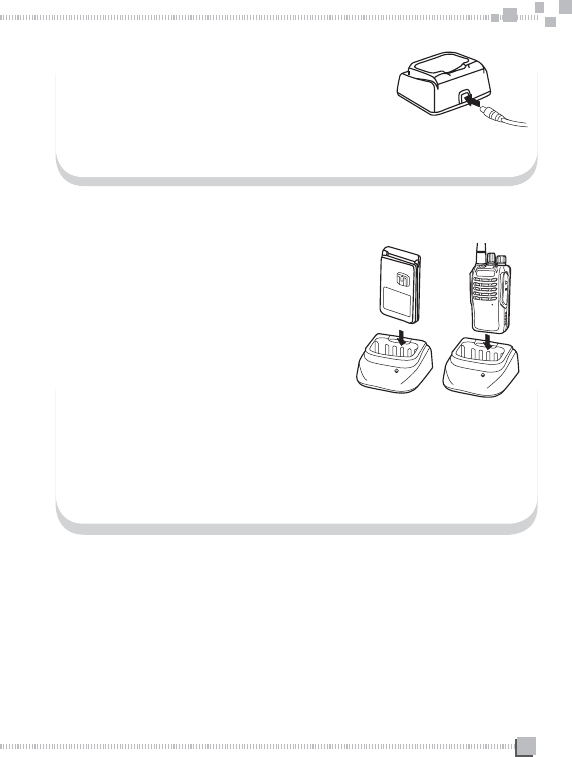
3
Plug the Li-ion battery or radio with
battery into the charger.
◆Ensure the battery is in touch with
the contacts of the charger.
◆The charger Indicator light flashing
red means charging start.
Insert the plug of the adaptor into the socket
which on the back of the charger.
The AC power adapter should be plugged into AC power output.
After charging for 4 hours, please remove it from the charger.
◆The charger indicator light becomes green after fully charged.
Remove the AC power adaptor from the AC power output.
MIC
MIC
4
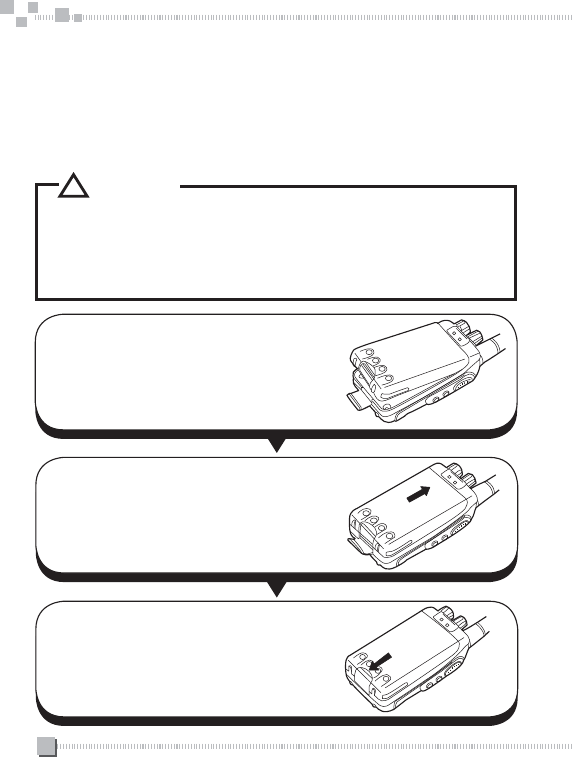
INSTALL/REMOVE BATTERY
The average use time of the battery pack is 10 hours.
It calculated as 5% TX time, 5% RX time and 90% standby
time.
! CAUTION
◆Don't short circuit the battery charger contacts or threw
the battery into fire.
◆Don't disassemble the case of the battery.
Match the top of the battery pack with
the corresponding grooves on the radio.
Push the battery onto the bottom of the
radio, buckle the safety lock.
To remove the battery pack, lift the
safety lock and pull the battery pack
away from the radio.
5
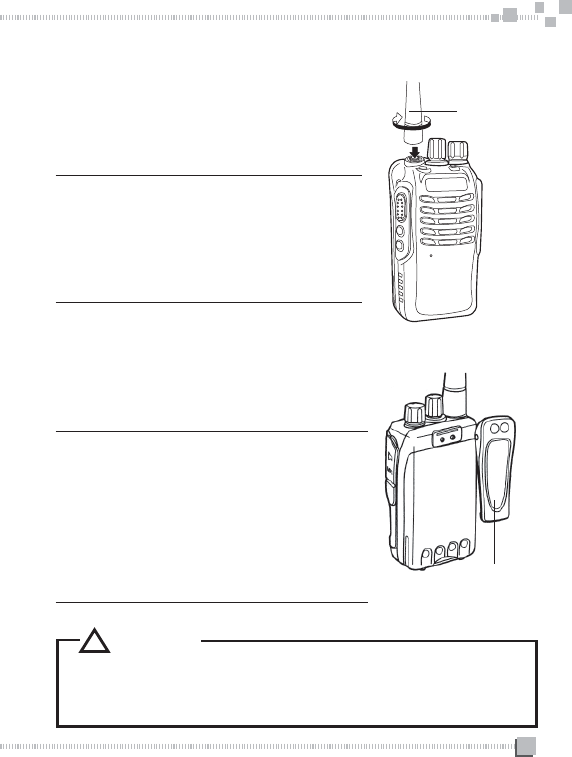
INSTALL ANTENNA
Hold the radio, screw the antenna into the
connector on the top of the radio. Hold the
antenna and turn it clockwise until being
tight.
Note:
Don't use the antenna as handle,
keychain or speaker/microphone hook, it
will damage the antenna and affect the
function of the radio.
INSTALL BELT CLIP
When necessary, you can install the belt
clip to the back of the radio.
Note:
Without installing the belt clip, the
installing area will become hot due to
continuous communication or put in hot
environment.
You should remove the belt clip first
before disassemble the battery pack.
Antenna
Belt clilp
! CAUTION
◆Please don't use glue to fix the screws of belt clip|
otherwise it may ruin the housing!
6
INSTALL SPEAKER/MICROPHONE
INSTALL THE COVER OVER THE
SPEAKER/ MICROPHONE JACKS
Insert the speaker/microphone plugs
into the speaker/microphone jack.
Note:
The radio is not entirely waterproof
when use the speaker/microphone.
If not use a speaker/microphone, please
use the screw to install the cover over the
speaker/microphone jack.
Speaker/
Microphone
Speaker/
Microphone Jack

7
ANTENNA
LED INDICATOR
Lights red while transmitting.
Lights green while receiving.
Flashing red if the battery
voltage become low while
transmitting.
SPEAKER
POWER SWITCH/
VOLUME CONTROL
Turn clockwise to switch
on the transceiver. Rotate
to adjust the volume. To
switch off the transceiver,
turn counterclockwise fully.
MICROPHONE
PTT(push to
talk) BUTTON
Press this key, then speak
into the microphone to ca
Release it to receive.
SIDE 2 KEY/
SIDE 3 KEY
Both of them are
programmable
function keys.
SPEAKER/
MICROPHONE
JACK
BATTERY PACK
NOTE: Side 2 key and side 3 key can be programmable by software. They
can be programmed as follow:
1.N0NE, 2. MONITOR, 3. SCAN ON/OFF,
4. HIGH/LOW POWER, 5. TALK AROUND, 6. REVERSE,
7. PRIORITY SCAN, 8. VOX ON/OFF.
CONTROLS
CHANNEL SWITCH
Rotate to select a
channel from 1 to 16.
MID

8
OPERATIONS AND SETTINGS
BUSY CHANNEL LOCK
This function can prevent other two way radio from disturbing. There
are two choices for customer to select in the programming software.
◆FREQUENCY: It is not allowed to transmit or make other
operation while the radio is receiving.
◆CTCSS/DCS: While receiving signal, the radio is allowed to
transmit when the CTCSS/DCS received is different; and it is
not allowed to transmit if both frequency and CTCSS/DCS are
the same.
VOX SENSITIVITY
You can use programming software to select the level of the VOX
sensitivity (1-9 levels).
TX POWER
You can choose the high power or low power for each channel by
programming software.
SQUELCH LEVEL
You can use programming software to adjust the squelch level (0-9
levels).

9
BEEP SETTING
You can hear a beep sound when turn on the radio or press a key.
You can use programming software to open or close this function.
TIME OUT TIMER (TOT)
TOT is used to prevent any user from using a channel for a long
time. It will damage the radio if transmit for a long time.
CTCSS/DCS
You can use the programming software to set the CTCSS/ DCS
for each channel. There are 38 groups of CTCSS and 83 groups of
DCS for you to select.
WIDE/NARROW BAND
You can use the programming software to set the wide/ narrow band
for each channel.
EMERGENCY CALL
In case of emergency, press emergency key the radio will sound
alert tone and also send alert.

10
BATTERY SAVE
This function can decrease power consumption when no signal is
received, and no operation is performed. You can use programming
software to open or close this function.
END ROGER
It is very useful for hand free users to eliminate the End Roger Beep,
You can use programming software to open or close this function.
LOW BATTERY WARNING
Low battery warning alerts you that the battery should be recharged
or replaced. While transmitting or receiving, the LED will blink red if
the battery is low. Please replace the battery if "du du" tone sounds
every 30 seconds.
CABLE CLONE
Step:
1. Use cable to connect Master unit to slave unit, and turn on the
slave unit. Press and hold programmable Side Key 2 to turn ON
master unit, LED flash Orange twice.
2. Press PTT of Master unit to transmit the data and Slave unit
begin to receive data from Master unit
3. During cable cloning Master unit blink red and Slave unit blink
Green

11
4. When cloning completed, slave unit restart automatically.
5. Switch to next slave unit and power on, press side key 2 of
master unit to clone.
6. Power off master unit to exit.
◆During data transmission, if no data received 3 seconds Master
unit flash Red (0.5s ON, 0.5S OFF)
PTT ID TRANSMIT MODE
1. Press PTT to send. 2. Release PTT to send.
3. Both. 4. OFF (DTMF Encode only)
◆OFF: Press PTT or release it will not send ANI code.
◆PRE-ONLY: Press PTT to send the ANI.
◆POST-ONLY: Release PTT to send the ANI.
◆BOTH: Both press and release PTT to send ANI.
THE SIDE KEY CAN BE PROGRAMMED
THE FUNCTIONS AS FOLLOW,
1. NONE 2. MONITOR
3. SCAN ON/OFF 4. HIGH/LOW POWER
5. TALK AROUND 6. REVERSE
7. PRIORITY SCAN 8. VOX ON/OFF
1)NONE
◆No function to be set

12
2)MONITOR
◆If press the monitor key, it can detect if the channel is busy, it
can ignore all the interference codes temporarily and receive
weak signal.
3)SCAN ON/OFF
◆Scan ON: The radio will scan from the current channel.
◆Scan OFF: To press the side key again.You can exit.
4)HIGH/ LOW POWER SWITCH
◆Press the key to switch High/Low Power Switch.
5)TALK AROUND
◆Talk around allows you to communicate directly with other
radios without the repeater. When using talk around, the
transmitting frequency is same with receive frequency.
Press talk around key (programmed key) to enter this function
and press it again to exit.
6)REVERSE
◆Transmitting frequency can reverse with receiving frequency.
Codes will reverse too.
◆Press frequency reverse key (programmed key) to enter this
function and press it again to exit.
7)PRIORITY SCAN
◆Set priority channel: open the programming software, and select
the priority channel (1-16 optional). Suppose channel 6 was
selected.

13
◆Programming side key: program one of the side key to be
priority channel function.
Press the programmed side key to enter the priority scan mode,
the radio will scan like this: 6-1, 6-2, 6-3….
◆Turn off PRI: press PRI on/off key to exit
8)VOX ON/OFF
Radio will transmit when detects voice, without press PTT key.
Use VOX earpiece or radio micphone to talk hands-free, operation
as follows:
◆Programming the VOX ON/OFF key.
◆Press the side key to open this function.
◆To communicate by earphone you should plug the earphone
before turning on the radio.
◆Speak to VOX earpiece or radio micphone to send the voice.
◆Press this side key again to exit
Caution:
1)When use VOX by earpiece, press the PTT key to exit.
2)If use PTTA/OX earpiece. It is not allowed to switch to VOX
directly during PTT call.
Because it will transmit without ending. Please switch to PTT
to return to normal.

14
TROUBLESHOOTING
Problem Solution
No Power
◆The battery pack may be dead.
Recharge or replace it.
◆The battery pack may not be
installed correctly. Remove it
and install it again.
Battery power dies shortly
after charging
◆The battery pack life Is finished.
Replace the battery pack with a
new one.
Cannot talk to or hear other
members in your group
◆Make sure you are using the
same frequency and CTCSS/
DCS tone as the other members
in your group.
◆Other group members may be
too far away. Make sure you
are within the range of the other
radios.
Other voices (besides group
members) are present on
the channel.
◆Change the CTCSS/DCS tone.
Be sure to change the CTCSS/
DCS on all radios in your group.

15
DEFAULT SETTING
1) Default frequency list in factory
CHANNEL NO. FREQUENCY(MHz) BAND(KHz)
1
2
3
4
5
6
7
8
9
10
11
12
13
14
15
16
REMARK:
The frequency from 1-16 channels of this product is same as
our company product T-518 frequency list from 17-32 channels.

16
2)PTT ID: OFF
3)TOT: 60 seconds
4)VOX sensitivity: 5
5)SQL: 3
6)CTCSS/DCS: CTCSS code 1 (67.0Hz)
7)SIDE KEY: (1) short/long press: MONITOR
(2) stiort/long press: SCAN ON/OFF