Quest Retail Technology VX2 Wireless Point-of-Sale Terminal (POST) User Manual Programming a VX Terminal
Quest Retail Technology, PTY LTD. Wireless Point-of-Sale Terminal (POST) Programming a VX Terminal
User Manual
Programming a VX Terminal
Programming a VX Terminal
VX Terminals
About the VX Terminal
Understanding the VX Hardware
How to program and configure a VX Terminal
About the VX Terminal
The VX Terminal introduced to the POS market by Quest Retail Technology harnesses the latest in Wireless and
TCP/IP POS technology within a robust stainless steel casing making it ideal for environments that aren't easily
cabled. The VX Terminal is ideal for sites who like to "think outside the square".
Completely portable, the VX Terminal can be purchased with a variety of options including Battery, integrated
Receipt Printer, Card Swipe etc and can be customized to suit all ranges of operations. Containing just one Serial
Port, it is possible to split this port using a CAB-DPA into both ComPort 1 and 2, providing support for a variety of
peripherals.
Upon purchasing a VX Terminal it is necessary to first program the unit and this document has been designed to
guide the user through this process.
Please ensure before progressing that the packaging containing your unit consists of the following;
1 x VX Terminal (refer to the sticker located under the base of the unit for Model # details)
1 x Power Pack
1 x Battery
1 x RJ45 Coupler
1 x Wireless Bridge Installation CD and Manual
NOTE: Although one is not provided with the unit, a standard "Cross Over" cable will be required to perform the
configuration process. Such a cable can be purchased directly from Quest if required
IMPORTANT NOTE:
FCC Radiation Exposure Statement:
This equipment complies with FCC radiation exposure limits set forth for an uncontrolled environment.
The antenna(s) used for this equipment must be installed to provide a separation distance of at least
eight inches (20 cm) from the operator. This equipment must not be operated in conjunction with any
other antenna.
NOTE: This equipment has been tested and found to comply with the limits for a Class A digital device,
pursuant to Part 15 of the FCC Rules. These limits are designed to provide reasonable protection
against harmful interference when the equipment is operated in a commercial environment. This
equipment generates, uses, and can radiate radio frequency energy and, if not installed and used in
accordance with the instruction manual, may cause harmful interference to radio communications.
Operation of this equipment in a residential area is likely to cause harmful interference in which case
the user will be required to correct the interference at his own expense.
Page 1
Programming a VX Terminal
CAUTION: Changes or modifications not expressly approved by the manufacturer
responsible for compliance could void the user’s authority to operate the equipment. The
VX terminal is to be used with the supplied antenna only. Should you require replacement
antennas, please approach Quest as the use of alternative/unapproved antennas could
affect the regulatory compliance of the VX terminal and could also void the user’s
authority to operate the equipment
Understanding the VX Hardware
How to program and configure a VX Terminal
It is recommended for the purpose of this exercise that you remove the PC that will be used to program your VX
Terminal/s from the Network. Although this is not entirely necessary, and the programming can be done whilst the
PC is still on the network, the steps below assume that the PC has been removed from the network.
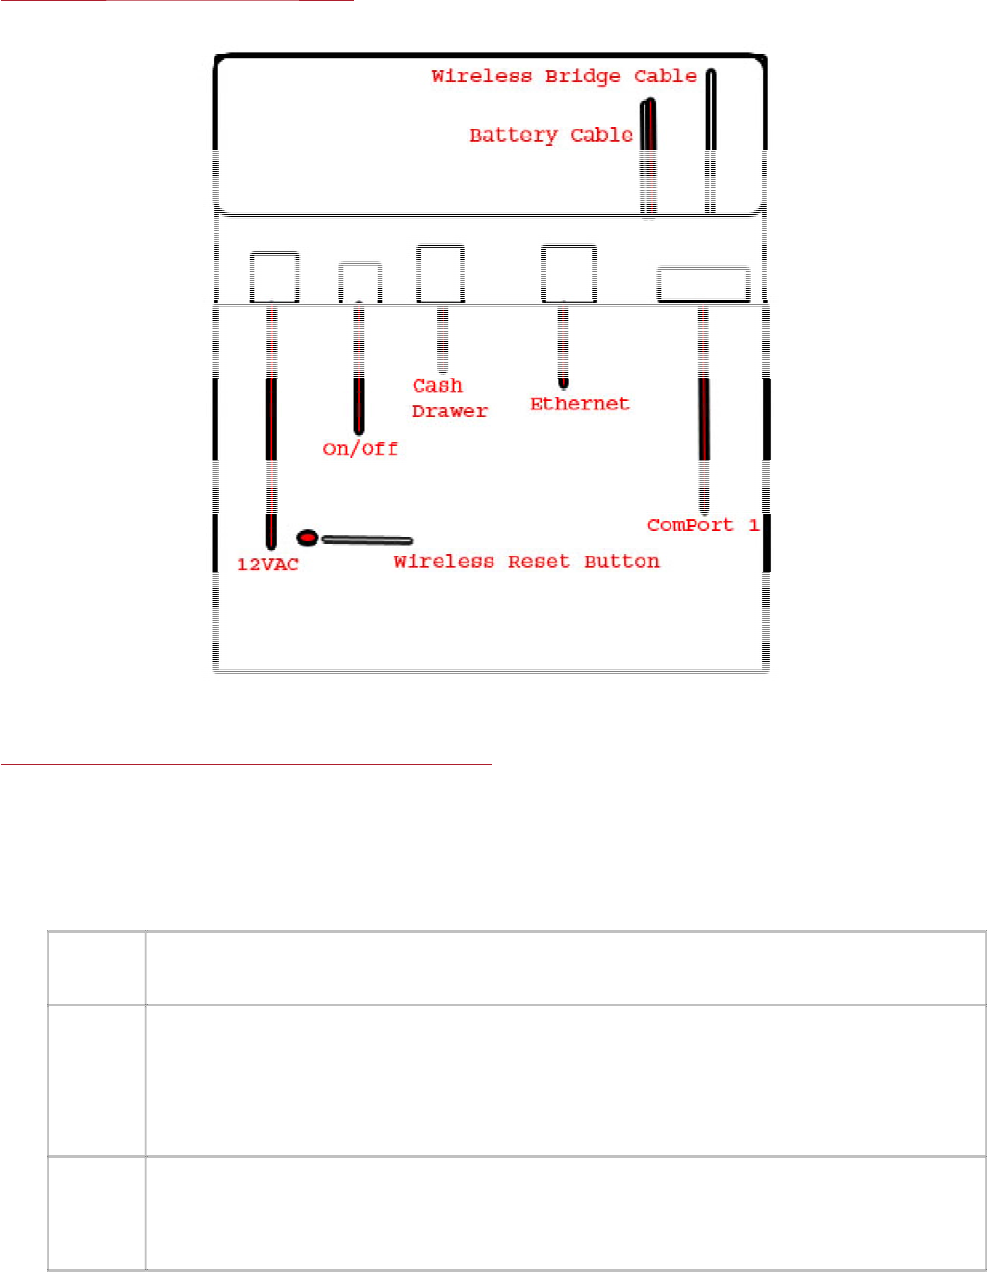
Preparing the hardware for configuration
Configuring the Wireless Bridge
1. Remove the VX Terminal from the box in which it was received. Remove the tape from the
Antenna at the top left of the unit and extend the antenna vertically
2. Turn the unit over so the keypad membrane is facing downwards. Connect the white connector
socket to the battery pack, placing the Battery pack within the cavity at the top of your VX unit,
pushing it towards the rear and securing the push screw tightly
NOTE: It is important to have charged the battery pack for 48 hours prior to achieve full power
capacity prior to installing it within your VX Terminal
3. Remove the black cable connected to the Ethernet socket on the VX Terminal. Connect the RJ45
Coupler connector provided with the VX Terminal to the end of this black cable and attached the
"cross over" patch lead mentioned above. Connect the opposite end of the patch lead to the
Network socket at the rear of your PC
Page 2
Programming a VX Terminal
NOTE: At the base of the VX Terminal
,
y
ou will find a sticker titled "Wireless Brid
g
e Reset". This can be used to
1. On the PC to which the VX Terminal has been connected, access the following;
Start> Control Panel> Network Connections. Open the LAN Connections setting to configure
further
2. With the Local Area Connection Status dialogue open on screen, select the Properties button
at the base of screen
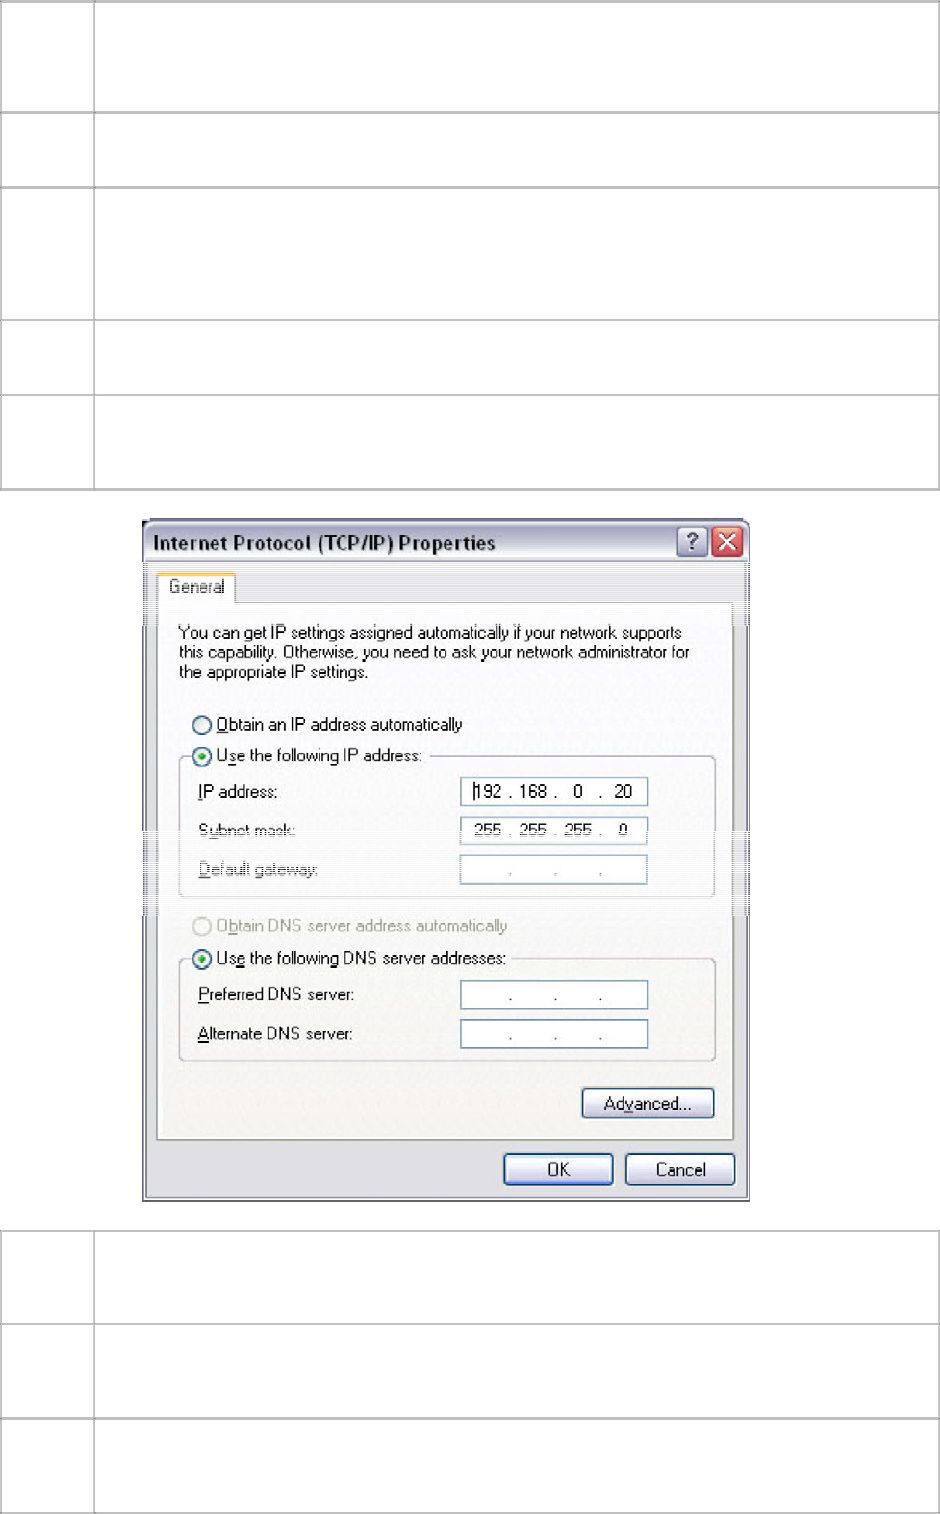
3. Scroll down to the Internet Protocol (TCP/IP) option, highlight and select the Properties
button.
NOTE: It is important to note the current IP and DNS settings, as you will need to change them in
order to program the Wireless Bridge.
4. Select the Use the Following IP Address option and enter an IP address which is of the same
format as that of the Wireless Bridge (the default IP address is 192.168.0.30)
5. Configure the Subnet Mask to 255.255.255.0 and leave the Default Gateway blank. Select OK to
save changes and to return to the Local Area Connection Status dialogue. Close out to return to
the Control Panel
6. Open Internet Explorer and in the Address field enter 192.168.0.30, the default IP address
of the Wireless Bridge followed by <Enter>. The Wireless Bridge configuration page will be
displayed
7. When prompted, enter the Username (admin) and Password (leave this blank) followed by OK
in order to gain access to the Wireless Configuration page. Select the page named "Wireless" to
configure your device
8. For information on the various settings programmable for your Wireless Bridge, refer to the
programming manual which was issued with your VX Terminal. Alternatively, contact your
Quest representative for further information
Page 3

Programming a VX Terminal
reset the settings within the Wireless Bridge if required, simply by penetrating the sticker with a pen or other
sharp object while the unit is powered and depressing the Reset button for a period of 10 seconds.
Programming the ECM
Establish the IP of the ECM either simply by selecting the ECM IP key on the keypad (located in the first column,
two rows from the bottom of the keypad), or by powering the unit down and up, waiting for a period of 2 minutes,
while the unit attempts to receive a signal from a DHCP Server, and waiting for it to default to the IP of
10.0.0.254.
1. Once Wireless Bridge has been configured using the steps listed above, disconnect the patch
lead from the Wireless Bridge cable (and RJ45 Coupler)
2. On your PC, re-enter the Network Connections dialogue and once again modify the IP address
of your Local Area Connection- TCP/IP settings.
In this instance, configure the IP of your PC in the same format as that of your ECM i.e
10.0.0.20, leaving the Subnet as 255.255.255.0 and Default Gateway blank. Select OK to save
changes and to return to your Desktop
3. Open Internet Explorer, and in the Address field, enter the IP address of the ECM i.e
10.0.0.254 followed by <Enter>
3. When prompted, enter the Username and Password for the ECM. By default, the Username will
be Quest and Password will be quest. For information on how to configure the ECM settings,
please refer to About the Web Configuration page
Page 4