RASTAR GROUP XH170515BT Battery Operated Ride-on User Manual
RASTAR GROUP Battery Operated Ride-on
User Manual
+++
RASTAR
RASTAR GROUP
Manufactured
In
China under licence from Bentl
ey
Motors Limited England. "Bentley" , the
'B'
in
wings device and
other
associated logos
and
names are trademarks
of
Bentley
Motors Limited. The body designs
of
Bentley motor cars are protected
by
Bentley Motors
Limited under design, trademark and intellectual property law.
Licensee: RASTAR GROUP
Manufacturer: XINGHUI BABY SUPPLIES CO.,LTD.
Add : North Area, Zhaoan Industrial Park, Zhengzhou, Fujian, China.
Http://www. rastar.
en
08 06.821000 0
01
802
•++
RAS
TAR
RASTAR GROUP
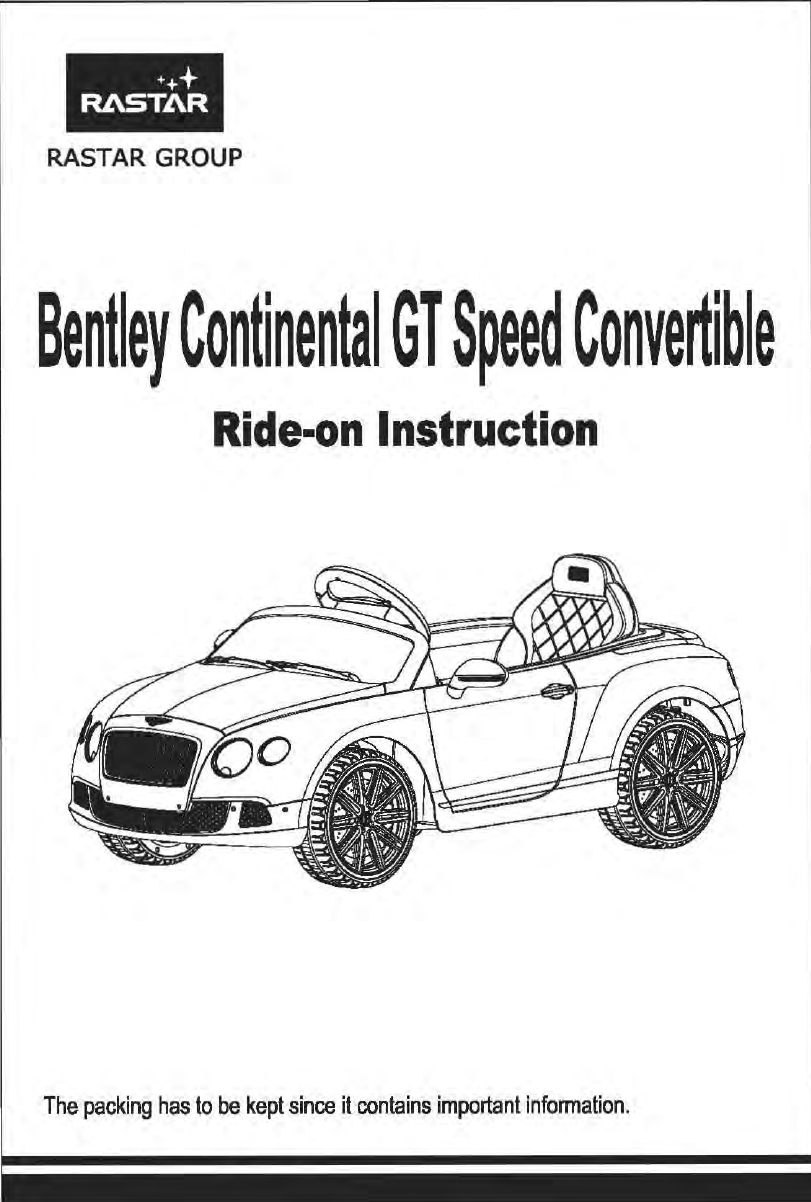
Bentle~
Continental
GT
S~ee~
Converti~le
Ride-on
Instruction
The
packing
has
to
be
kept
since
it
contains
important
information.
CONTENTS
ABOUT "RASTAR BABY''
PRODUCT-
-
-------
-
--
-
01
SPECIFICATION 02
PARTS 03
ASSEMBLY 04
REPLACE BATTERY OF TRANSMITTER AND STEERING WHEEL 06
NORMAL OPERATI
ON
07
STORAGE
BA
TIERY
MAINTENANCE 07
OVERCURRENT PROTECTOR 08
OPERATING FUNCTION 08
WARNING
10
CARE AND MAINTENANCE
11
MALFUNCTI
ON
SHOOTI
NG
GU
I
DE
11
RIDE-ON ELETRICAL ILLUSTRATION 12
MAINTENANCE 13
ABOUT "RASTAR BABY" PRODUCT
Thank
you
for
purchasing
our
products.
We
have devoted ourselves to
amling
comfortable
and
safe
electronic
remote
control
toys,
and creating a
colorful
childhood
for
your
children.
r:l
•
m
It Is very Important to read this Instruction carefu
ll
y before usage.This
instruction not only specifys assembly process and proper application
method, but also help you
to
avoid injury
or
damaging the product
in
case
of
Incorrect operation .
XINGHUI BABY SUPPLIES CO., LTD. reserves the right
of
the final
explanation to a
ll
the pictures and descriptions contained in this manual.
The manual is subject to change without separate notice. Please contact
your local distributor or
directly consult
us
if
you
have any questions.
This product can
be
operated in Battery operated/Radio control mode,
together with forward, reverse, left, right, and equipped with functions
li
ke
headlight, built-in music playing .
NO. Style Remark
82100
Radio
control
with painting Both Radio control and
Battery operated
01
SPECIFICATION
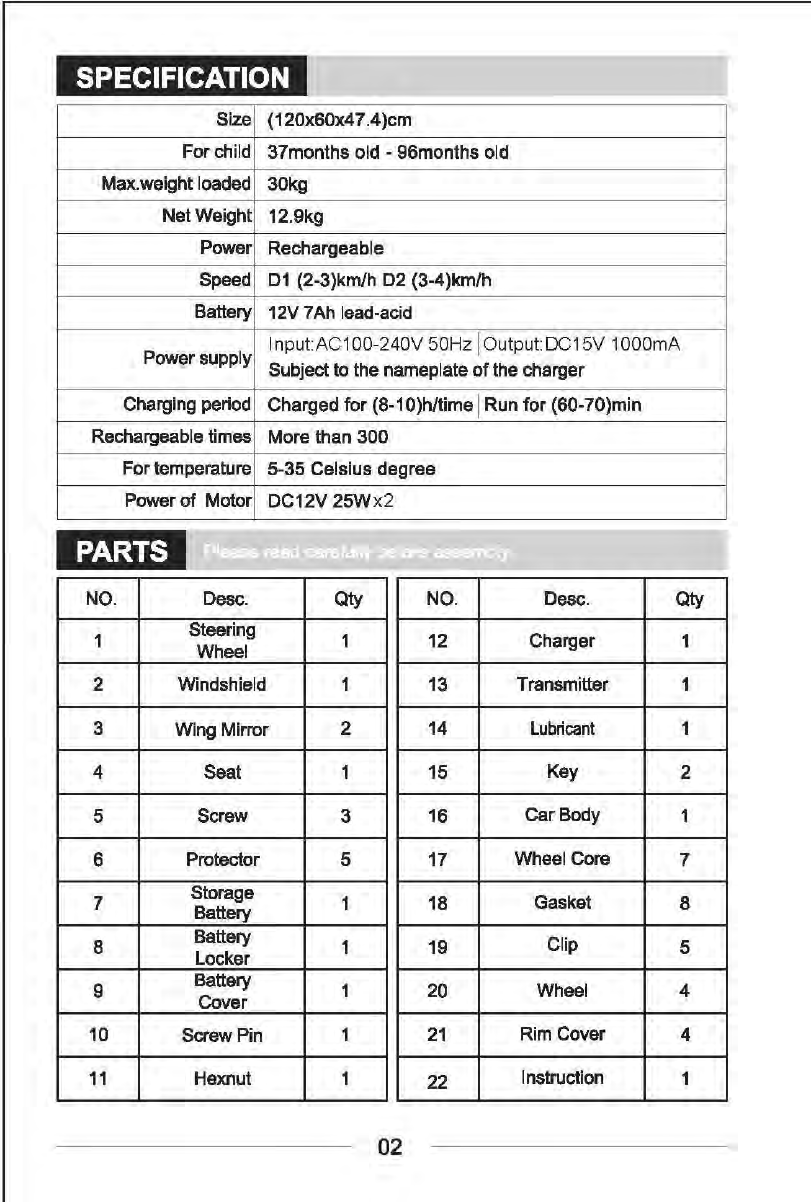
Size ( 120x60x4 7 .4 )cm
For child 37months old -96months old
Max.weight loaded 30kg
Net Weight 12.9kg
Power Rechargeable
Speed
D1
(2-3)km/h
02
(3-4)km/h
Battery 12V 7Ah lead-acid
Power supply I nput:AC100-240V 50Hz I Output: DC15V 1
OOOmA
Subject to the nameplate
of
the charger
Charging period Charged for (8-10)h/time I Run
for
(60-70)min
Rechargeable times More than 300
For temperature 5-35 Celsius degree
Power
of
Motor DC12V
25Wx2
PARTS
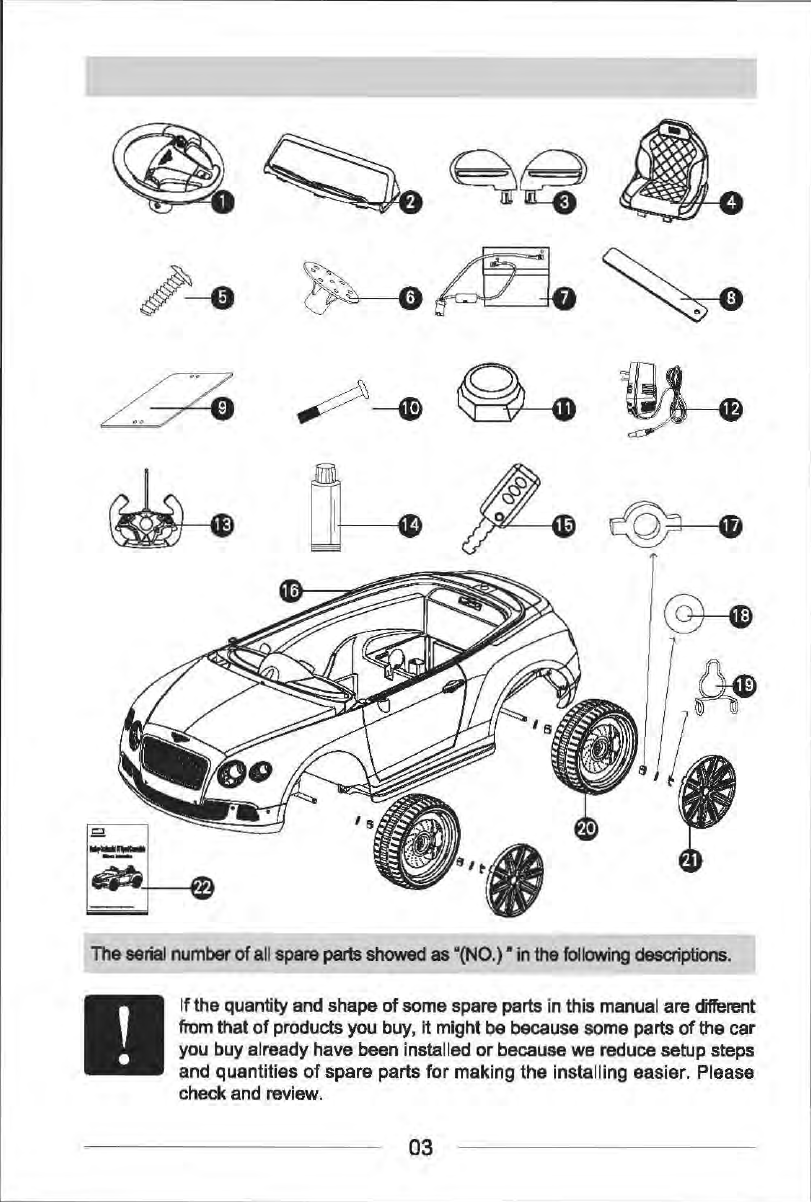
NO. Desc. Qty NO. Desc. Qty
1 Steering 1
Wheel 12 Charger 1
2 Windshield 1 13 Transmitter 1
3 Wing Mirror 2 14
Lubricant
1
4 Seat 1 15 Key 2
5 Screw 3 16
Car
Body 1
6 Protector 5 17 Wheel Core 7
7 Storage 1
Battery 18 Gasket 8
8 Battery 1
Locker 19 Clip 5
9 Battery 1
Cover
20
Wheel 4
10 Screw Pin 1
21
Rim Cover 4
11
Hexnut 1
22
Instruction 1
02
~~
~
~3.
,
-e
~~
~
The serial number
of
all spare parts showed
as
"(NO.) •
in
the
following
desaiptions.
II
If
the
quantity
and
shape
of
some spare parts in
th
is manual are different
from that
of
products you buy, it might be because some parts
of
the car
you buy already have been installed
or
because
we
reduce setup steps
and
quantities
of
spare
parts
for
mak
i
ng
the
installing easier. Please
check and review.
03
ASSEMBLY
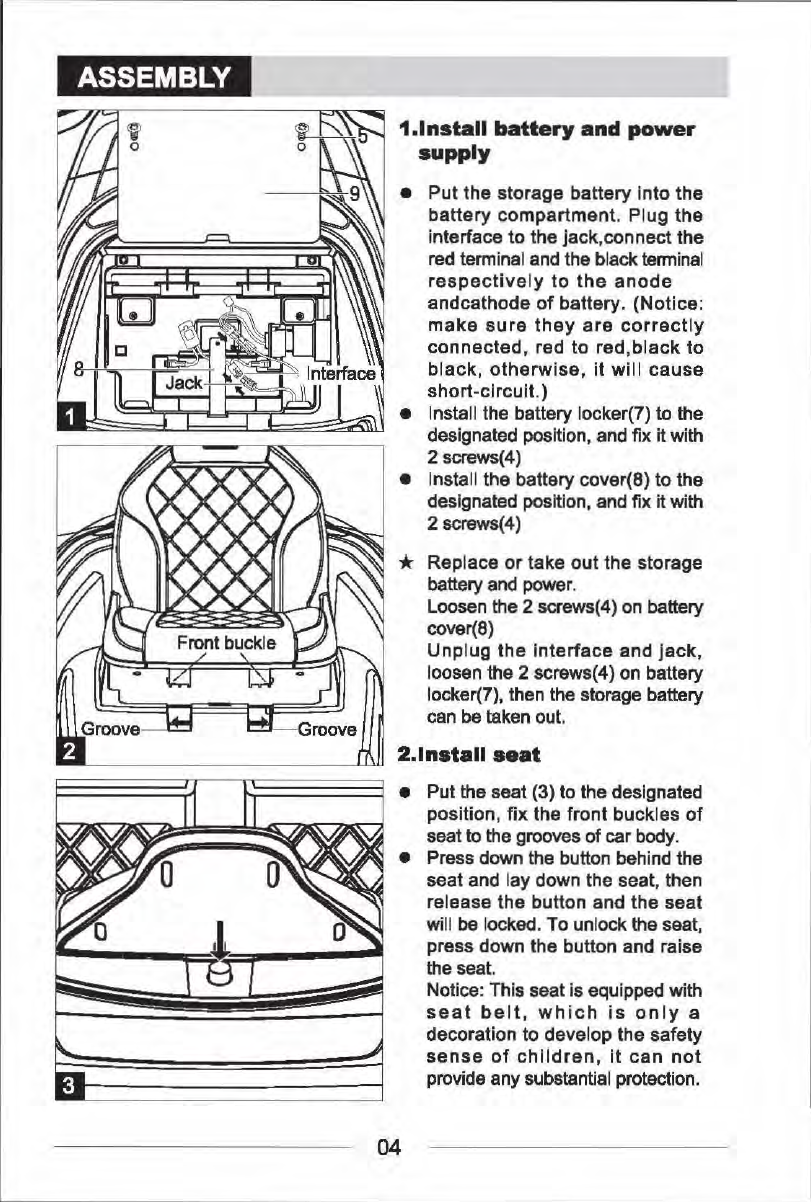
1.1
nstall
battery
and
power
supply
• Put the storage battery into the
battery
compartment. Plug the
interface
to
the jack.connect the
red terminal and the black
termina
l
respective
ly
to
the
anode
andcathode
of
battery. (Notice:
make
sure
they
are
correctly
connected, red
to
red,black
to
black,
otherwise,
it
will
cause
short-circuit.)
• Install the battery locker(?) to the
designated position, and fix it with
2 screws(4)
• Install the battery cover(8)
to
the
designated position, and fix it with
2 screws(4)
* Replace
or
take
out
the storage
battery
and
power.
Loosen the 2 screws(4) on battery
cover(8)
Unplug
the
interface
and
jack,
loosen the 2 screws(4) on battery
locker(?), then the storage battery
can be taken out.
2.1
nstall
seat
• Put the seat (3) to the designated
position, fix the front buckles
of
seat to the grooves of car body.
• Press down the button behind the
seat and lay down the seat, then
release the button and the seat
will
be
locked. To unlock the seat,
press down the button and raise
the seat.
04
Notice: This seat Is equipped with
seat
belt
,
which
is
on
ly a
decoration to develop the safety
sense
of
children,
it
can
not
provide any substantial protection.
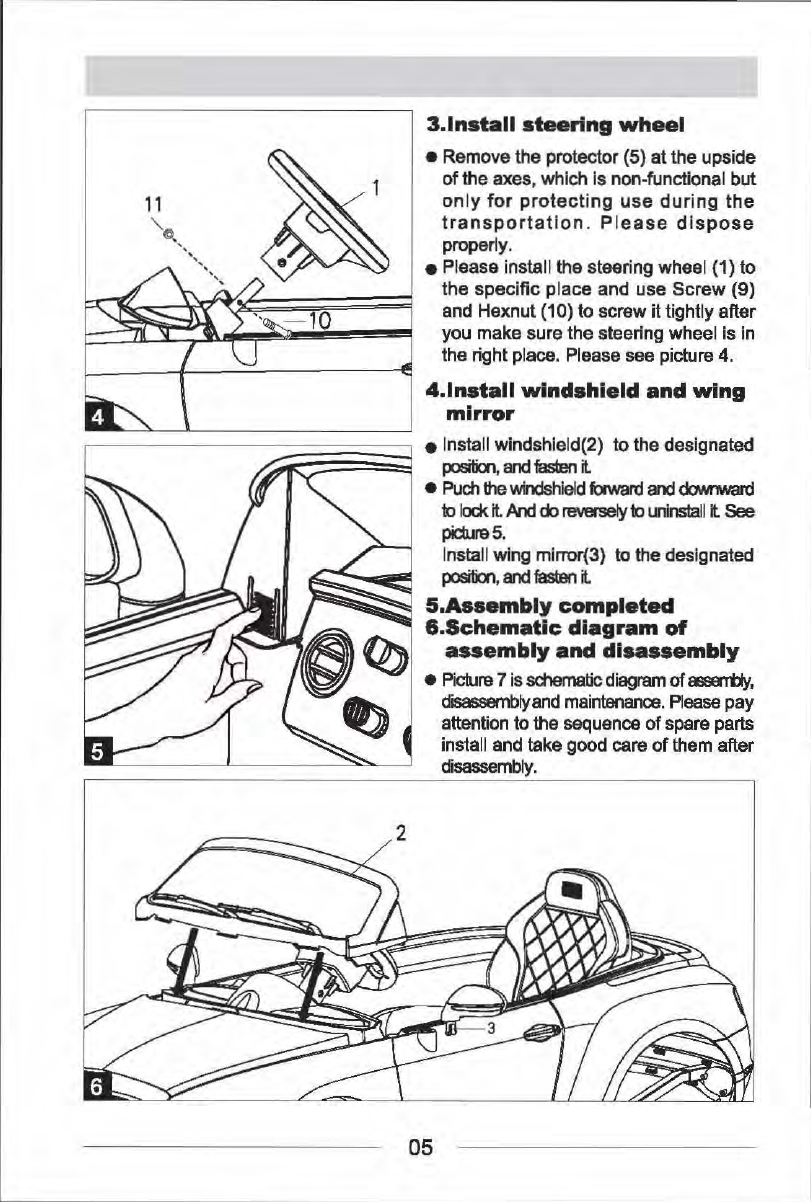
3.lnstall
steering
wheel
• Remove
the
protector (5)
at
the
upside
of
the
axes, which
is
non-functional but
only
for
protecting
use
during
the
transportation
. P l
ease
dispose
properly.
•Please
install the steering wheel (1)
to
the
specific
place
and
use
Screw
(9)
and Hexnut (10) to screw it tightly after
you make sure
the
steering wheel
is
in
the right place. Please see picture 4.
4.lnstall
windshield
and
wing
mirror
1
------
~;;::~~;;~
• Install windshield(2)
to
the
designated
I
position,
and
a.teri
it
•
Puch
the windshield faward
and
downward
to
l
ock
it
And
do reversely
to
uninstall
it
See
pictura5
.
Install wing mlrror(3) to the designated
position,
and t.Eerl
it
5.Assembly
completed
&.Schematic
diagram
of
assembly
and
disassembly
• Picture 7 is
schematic
diagram
of
assErrt)y,
disassemblyand maintenance. Please pay
attention to the sequence
of
spare parts
install and take good care
of
them after
disassembly.
05
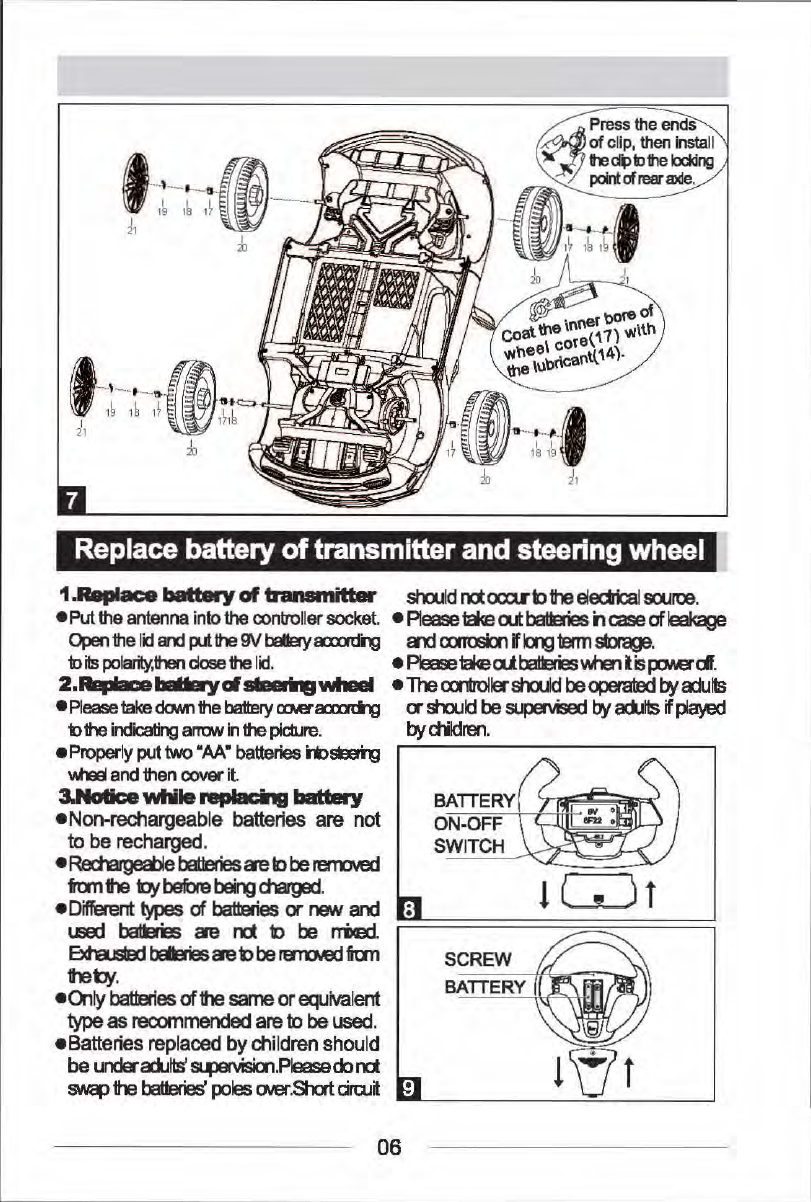
Replace battery of transmitter
and
steering wheel
1.Raplace batt8I y
of
transmitter sin.lid m
ocnrb
the eledri:al
sooroe.
•Put
the
antenna
into the
contro
ll
er
socket.
•
Please
1ake
out ba!Bies
il
case
a
leakage
Open
the
l
id
and
put
the W tBklry
axmii"g
al:!
cxmBrl
If~
term
sbage.
bits
po
l
arity,
then
dose
the l
id.
•
Pease~
aJ
OO!Be;Ykien I
is
fXMe"df.
2.Rew
..
•lllMl!lyd
--••wheel
•The
cxrdl'Olersln.lld
be
operated
by
a:Julls
•Please
take
doMl
the
battery
CXMl'axn<i g a sin.lid
be
supervised
by
ad.Ills
if
played
b the
indicati~
alTO'v'V
in
the
pidure.
by
dlldren.
•Properly put
two
•AA•
batteries
i1:>5Eeri"g
------------
W'leel
and
then
cover
it.
3.Nolica while
raplacq
battllll y
•Non-rechargeable batteries are not
to
be
recharged.
•
Red'a'gea>le
'-ballel......_,ies_
ae
b
be
rerroved
mn
1he
qt
before
bei~
cf'larged.
BATIERY
ON-OFF
SWITCH
•Different
types
a
batteries
or
reN
and
_:~===
=
==::
~
===~
l.E
batEries
ae
rd
t>
be rri>ai
.--
Bcta.JSted
teBies aet> be
raiu.e:l
fian
reb,'
.
•Olly
batteries
of
the
same
or
equiva
lent
type
as
recommended
are
to
be
used.
•Batteries repl
aced
by children should
be
unclerad..llls'~.Pleasedom
SCREW
BATIERY
swap
the
OOlleries'
poles
CM!r.Shcrt
dlQJ~
··-------==-----__J
06

NORMAL OPERATION
Indicator
Charging socket
•
• Charging socket is under the filler cap. Open the filler cap and injksert the
plug
of
charger, then connect the charger with power.
•
Every
one
hour'
s running needs 8
to
10 hours' charging. Every
single
charging can not over 24 hours.
• Both charger and storage batteries will occur mildly warm during charging.
• Do
not
use
mal-functioned
adapter
or
storage
battery
unless
they
are
repaired.
• This manual has to be kept since
it
contains important information.
• Charger and storage batteries are not considered as toys.
• Please make periodical inspection for storage battery, especially for adapter
wires and plugs.
• Please turn
off
the switch when the ride-on is
not
in use. Please make full
charging after long-term suspended.
• ONLY use the charger supplied by Rastar or Rastar Baby.
STORAGE BATTERY MAINTENANCE
•Please
charge
20
to
24 hours before
first
time use.
• Please use the suitable adapter
to
charge storage battery, otherwise
the ride-on
will
be damaged.
• Please charge the car once the speed
is
slower than normal,
otherwise
it
will derease storage battery life.
• Please
fully
charge
the
battery before
you
put
your
ride-on away,
and
remember
to
recharge
the
battery
every
30 days.
This
will
ensure
the
normal use
of
the battery, otherwise, the
battery
can
not
be charged.
•
For
safety, please ONLY
use
the
battery
supplied
by
Rastar
or
Rastar Baby,
whichhas
been protected
with
polarity
anti-reverse
structure.
07
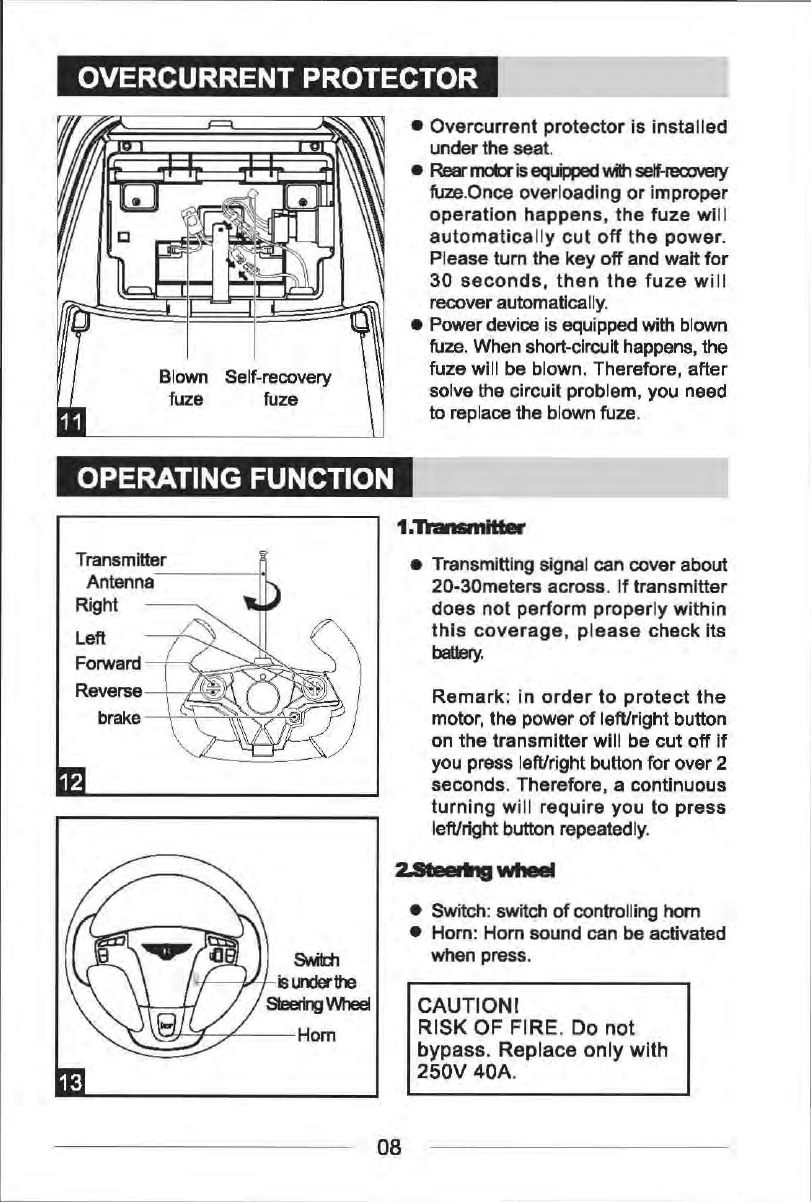
OVERCURRENTPROTECTOR
Blown
Self-recovery
fuze fuze
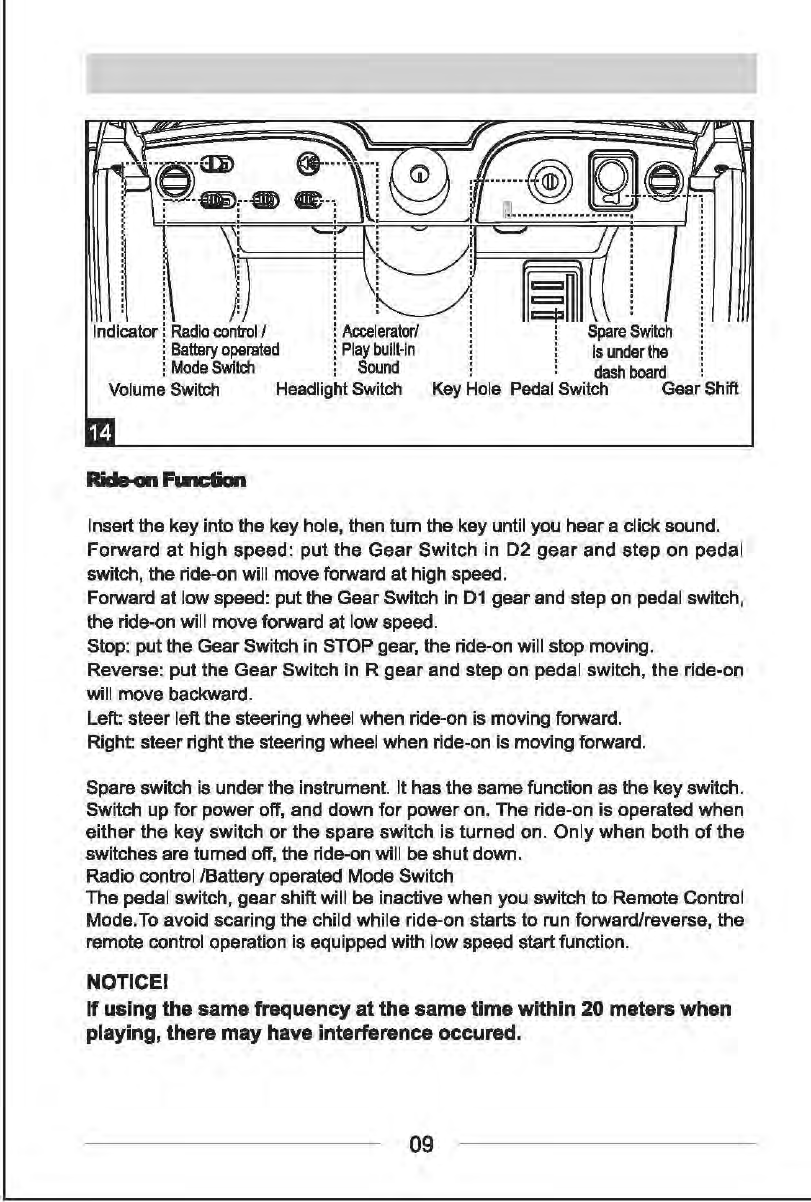
OPERATING
FUNCTION
Transmitter
Antenna
-----!oi
Right
Left
Forward
Reverse
--+---1'-'IR?
brake
__\~
=:s;
~~
~il~~
• Overcurrent protector is installed
under the seat.
•
Rear
matt
is
eqc
lipped
'Nilh
self-recxJVel)'
fuze
.Once overloading
or
improper
operation
happens, the fuze wil I
automatically
cut
off
the
power
.
Please turn the key
off
and wait
for
30
seconds,
then
the
fuze
will
recover automatically.
• Power device is equipped with blown
fuze.
When short-circuit happens, the
fuze will be blown. Therefore, after
solve the circuit problem, you need
to replace the blown fuze.
1.Tlamnitta
• Transmitting signal can cover about
20-30meters across. If transmitter
does
not
perform properly within
this
coverage
,
please
check its
battery.
Remark:
in
order
to
protect
the
motor, the power
of
left/right button
on
the
transmitter will be cut
off
if
you press left/right button for over 2
seconds. Therefore, a continuous
turning
will require you to press
left/right button repeatedly.
• Switch: switch
of
controlling horn
• Horn: Horn sound can
be
activated
when press.
CAUTION!
RISK
OF FIRE. Do
not
bypass.
Replace
only
with
250V
40A
.
08
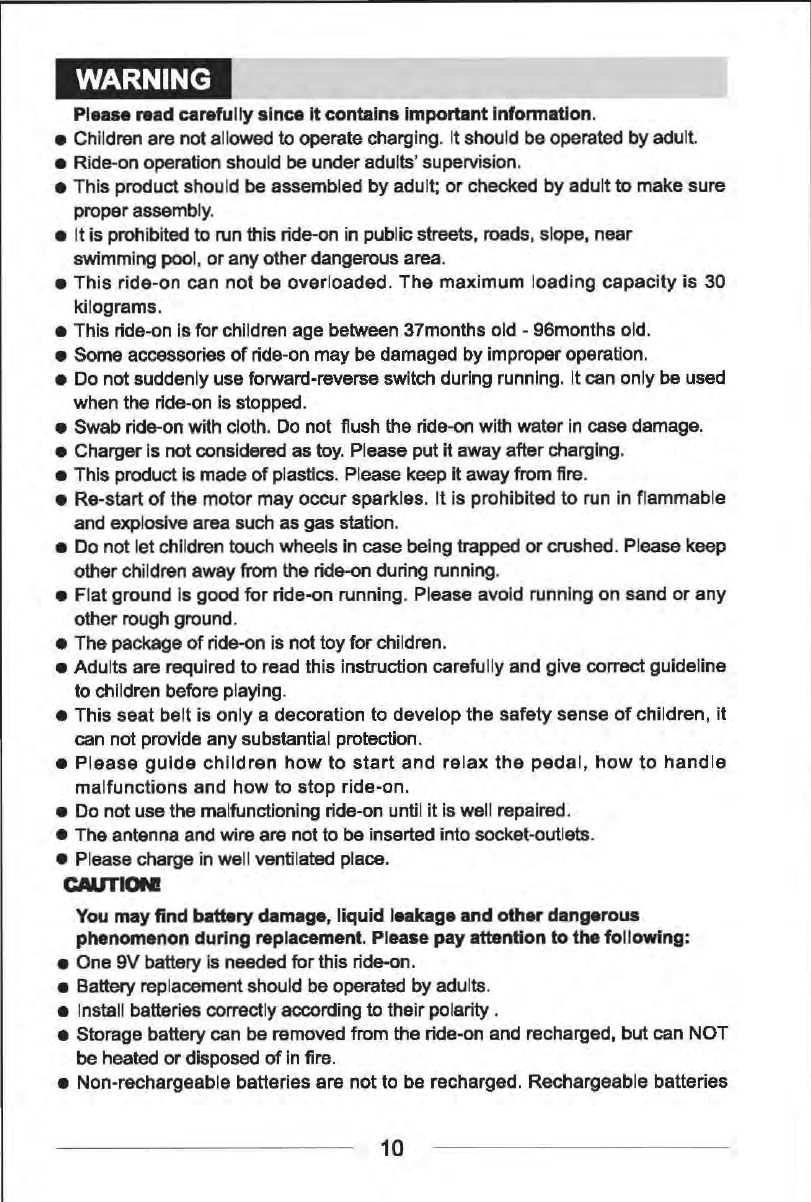
. }
Indicator i
Radio
control/
Accelerator/
Play
built-in
Sound
Headlight Switch
!
Battery
operated
i
Mode
Switch
Volume
Switch
------@~0--
----------------------·
Insert the key into the key hole, then
tum
the key until you hear a click sound.
Forward
at
high
speed:
put
the
Gear
Switch in
02
gear
and
step
on pedal
switch, the ride-on will move forward
at
high speed.
Forward
at
low speed: put the Gear Switch in 01 gear and step on pedal switch,
the ride-on will move forward
at
low speed.
Stop: put the Gear Switch in STOP gear, the ride-on will stop moving.
Reverse: put the Gear Switch in R gear and step
on
pedal switch, the ride-on
will move backward.
Left: steer left the steering wheel when ride-on is moving forward.
Right: steer right the steering wheel when ride-on
is
moving forward.
Spare switch is under the instrument. It has the same function as the key switch.
Switch up
for
power off, and down for power on. The ride-on is operated when
either
the
key switch
or
the spare switch is turned on.
Only
when both
of
the
switches are turned off, the ride-on will be shut down.
Radio control /Battery operated Mode Switch
The pedal switch, gear shift will be inactive when you switch
to
Remote Control
Mode.To avoid scaring the child while ride-on starts to run forward/reverse, the
remote control operation is equipped with low speed start function.
NOTICE!
If
using
the
same
frequency
at
the same time within
20
meters when
playing, there
may
have interference occured.
09
WARNING
Please read carefully since
it
contains important information.
• Chlldren are not allowed
to
operate charging. It should be operated
by
adult.
• Ride-on operation should be under adults' supervision.
•
This
product should be assembled
by
adult;
or
checked by adult
to
make sure
proper assembly.
• It is prohibited
to
run this ride-on in publ
ic
streets, roads, slope, near
swimming poo
l,
or
any other dangerous area.
•This
ride-on
can
not
be
over
l
oaded.
The
maximum
l
oading
capacity
is
30
kilograms.
• This ride-on
Is
for children age between 37months old -96months old.
• Some accessories
of
ride-on may be damaged by improper operation.
• Do not suddenly use forward-reverse switch during running. It can only be used
when the ride-on
Is
stopped.
• Swab ride-on with cloth.
Do
not flush the ride-on with water in case damage.
• Charger Is not considered as toy. Please put it away after charging.
• This product Is made
of
pl
ast
i
cs
. Please keep it away from fire.
• Re-start
of
the
motor
may
occur
spark
l
es
. It is prohibited
to
run
in
flammable
and explosive area such
as
gas station.
• Do not let ch
ll
dren touch wheels in case being trapped
or
crushed. Please keep
other children away from the ride-on during running.
• Fl
at
ground Is good
for
ride-on running. Please avoid running
on
sand
or
any
other rough ground.
• The package
of
ride-on is not
toy
for children.
•Adu
l
ts
are required
to
read this instruction carefu
ll
y and give correct guidel
ine
to
children before playing.
•
This
seat belt
is
only a decoration to develop the safety sense
of
children,
it
can not provide any substantial protection.
•
Please
guide
children
how
to
start
and
relax
the
pedal,
how
to
handle
malfunctio
ns and
how
to
stop
ride-on.
• Do not use the malfunctioning ride-on until
it
is
we
ll
repaired.
• The antenna and wire are not
to
be inserted into socket-outlets.
• Please charge in
we
ll
ventilated place.
CAUTION!
You
may find battery
damage,
liquid leakage and other dangerous
phenomenon during replacement. Please pay attention
to
the following:
• One
9V
battery
Is
needed
for
this ride-on.
• Battery replacement should be operated
by
adults.
• Insta
ll
batteries correctly according to their polarity .
• Storage battery can be removed from the ride-on and recharged, but can NOT
be heated
or
disposed
of
in fire.
• Non-rechargeable batteries are
not
to
be recharged. Rechargeable batteries
10
can be recharged under
adu
lts' supervision; Rechargeable batteries are
to
be
taken
out
from ride-on during charging.
• When batteries are short
of
power, the remote control distance wi
ll
be shorten.
Please replace with
new
batteries.
• Take
out
batteries
if
ride-on is
not
in use
for
an extended preriod in case liquid
leakage. Remove batteries when they are used up.
• Supply terminals are not
to
be short-circuit.
• This ride-on is not
for
children under 36 months since It
may
have
sma
ll
parts
that can detach during running.
• Transmitter can only be operated
by
adults
or
under adults' supervision.
CARE AND MAINTENANCE
• Please
do
not play until
it
is fixed perfectly
if
there
Is
any
damaged.
• Please check and maintain the
car
in regular time
for
keeping your child safe.
• Please periodica
ll
y check and
make
sure there are no screws loosening and
spare parts damaged.
• Before insta
ll
ing and using the
car
, please check a
ll
spare parts carefu
ll
y.
•
For
avo
i
ding
unnecessary
damages
,
please
read
th
is Instruction
in
detail
before assembly and disassembly.
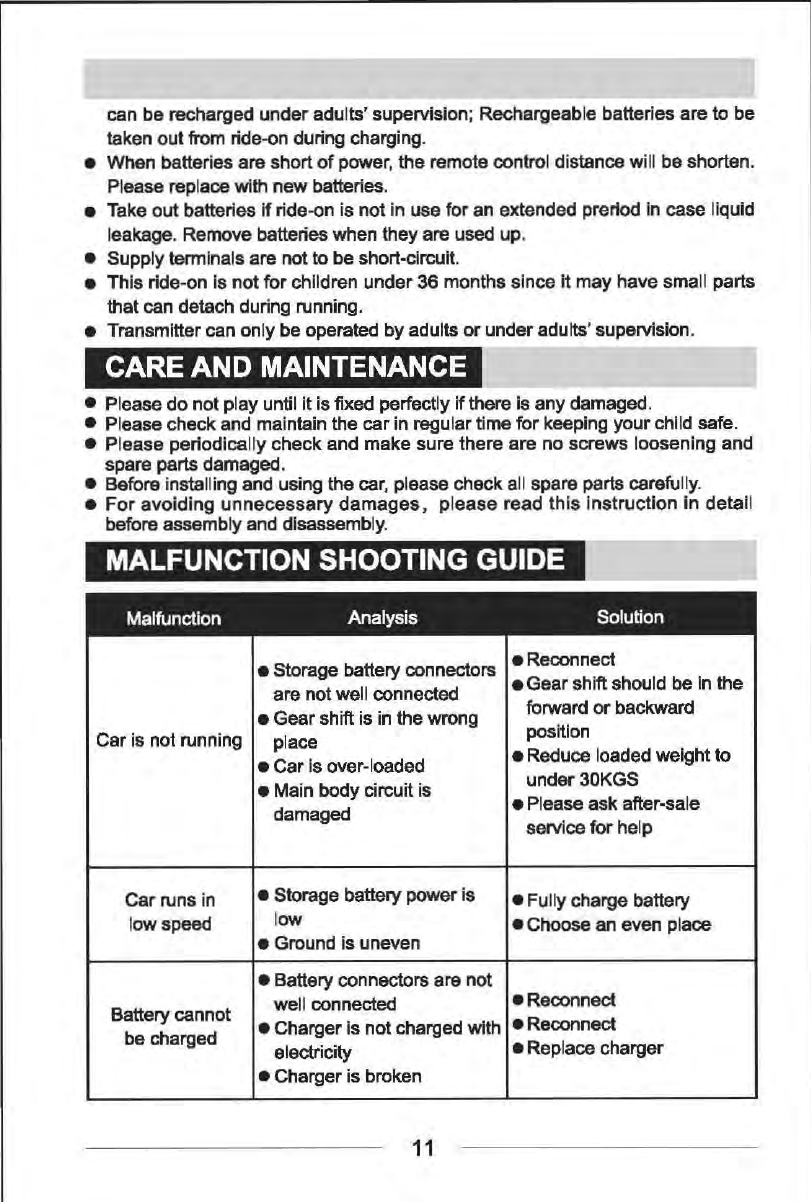
MALFUNCTION SHOOTING GUIDE
Malfunction Analysis Solution
• Storage battery connectors
•Reconnect
are not well connected
•Gear
shift should be
in
the
• Gear shift is
in
the wrong forward
or
backward
Car is not running place position
• Car is over-loaded
•Reduce
loaded weight
to
• Main body circuit
is
under30KGS
damaged
•P
lease
ask
after-sale
service
for
help
Car runs in • Storage battery
pow
er is
•Fully
charge battery
l
ow
speed l
ow
•Choose
an even place
• Ground is uneven
• Battery connectors are not
Battery cannot
we
ll
connected
•Reconnect
• Charger is not charged with
•Reconnect
be charged electricity
•Replace
charger
• Charger is broken
11

Malfunction Analysis
Car
cannot stop • Car is damaged
Continue range • Battery
is
not
fully charged
is short • Battery
is
over used
Faint sound and
heat occurs when • Chemical reaction
charging battery
Gear box is noisy • Gear is broken
Power led is
off
• Car power switch is
off
• Battery is power-off
Charger led is off • Charger is broken
RIDE.ON ELETRICAL ILLUSTRATION
(Transmltter-operted I Pedal-operated)
Solution
• Please
ask
after-sale
service
for
help
•Re-charge
• Replace battery
•Normal
reaction
•Please
ask after-sale
service
for
help
• Tum on the power switch
• Charge the battery
• Please
ask
after-sale
service
for
help
Remark: Specification may vary from this eletrical illustration.
12
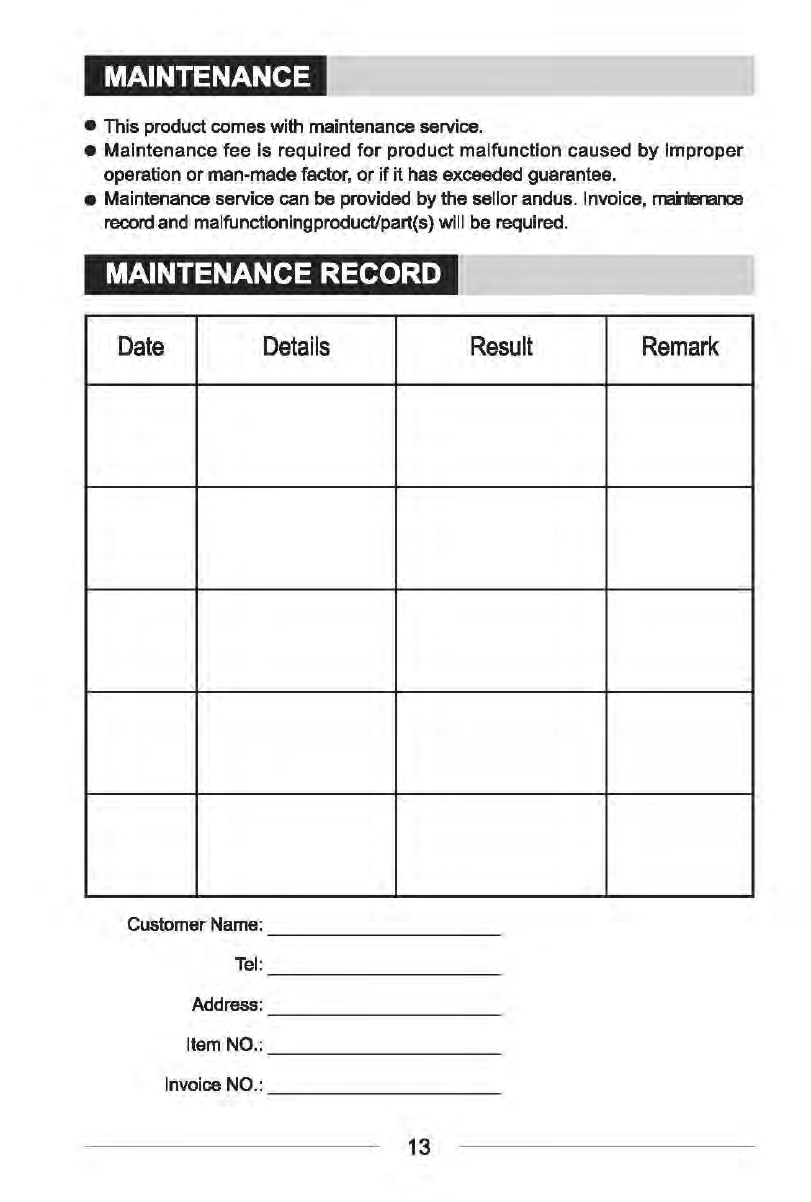
MAINTENANCE
• This product comes with maintenance service.
•
Maintenance
fee is required
for
product
malfunction
caused
by
improper
operation
or
man-made factor,
or
if
it
has exceeded guarantee.
• Maintenance service can be provided
by
the sellor andus. Invoice, mai'1le-ance
record and malfunctioningproducVpart(s) will be required.
MAINTENANCE RECORD
Date
Details
Result
Remark
Customer Name:
---------
Address:
Invoice NO.:
________
_
13
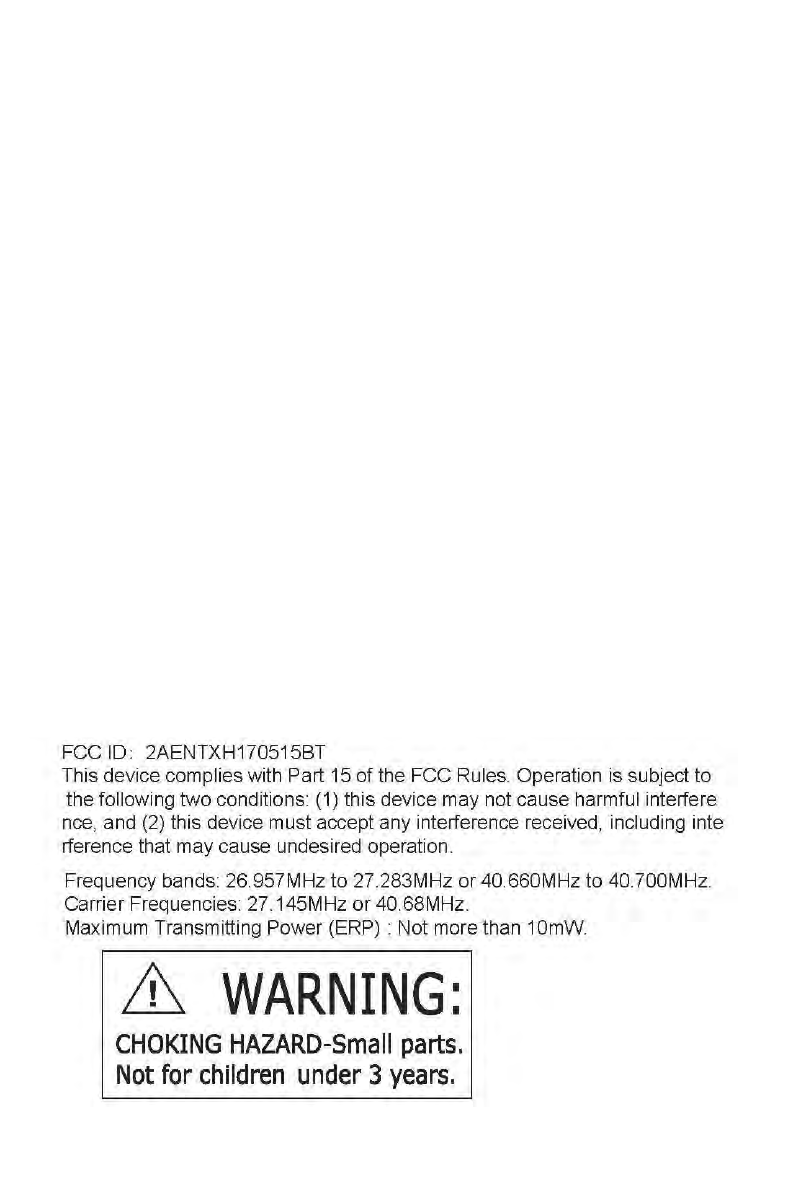
FCC ID : 2AENTXH170515BT
This device complies with Part 15
of
the FCC Rules. Operation is subject to
the following two conditions: (1) this device may not cause harmful interfere
nee, and
(2)
this device must accept any interference received, including inte
rference that may cause undesired operation.
Frequency bands: 26.957MHz
to
27.283MHz
or
40.660MHz
to
40.700MHz.
Carrier Frequencies: 27.145MHz
or
40.68MHz.
Maximum Transmitting Power
(ERP):
Not more than 10mW.
&
WARNING:
CHOKING
HAZARD-Small
parts.
Not
for
children
under
3
years.
changes or modifications not expressly approved by the party
responsible for compliance could void the user’s authority to operate
the equipment.
This equipment has been tested and found to comply with the limits for
a Class B digital device, pursuant to Part 15 of the FCC Rules. These
limits are designed to provide reasonable protection against harmful
interference in a residential installation. This equipment generates, uses
and can radiate radio frequency energy and, if not installed and used in
accordance with the instructions, may cause harmful interference to
radio communications. However, there is no guarantee that interference
will not occur in a particular installation.
If this equipment does cause harmful interference to radio or television
reception, which can be determined by turning the equipment off and
on, the user is encouraged to try to correct the interference by one or
more of the following measures:
-- Reorient or relocate the receiving antenna.
-- Increase the separation between the equipment and receiver.
-- Connect the equipment into an outlet on a circuit different from that
to which the receiver is connected.
-- Consult the dealer or an experienced radio/TV technician for help.