RCA Communications Systems BR850U1 Two-Way Radio User Manual BR850 manual cover
RCA Communications Systems Two-Way Radio BR850 manual cover
User Manual
Copyright © 2012 Discount Two-Way Radio Corporation - North American Distributor
1
BR850TM Professional Two-Way Radio Instruction Manual
Congratulations on selecting the BR850TM Intrinsically Safe Radio from
RCA Communications Systems - The most trusted name in radio!
Our new series of professional communications equipment establishes a new benchmark in
premium radio products made to perform awlessly under the most demanding commercial
conditions. Cutting edge design, professional grade materials and components, simple operation
and superior assembly quality: RCA Communications Systems has it all, including our exclusive no-
nonsense, three-year “Warranty Protection Program,” one of the most comprehensive warranties
in the communications industry.
To ensure you achieve maximum performance from your BR850TM radio, please be sure to carefully
read this manual.
MODELS COVERED IN THIS MANUAL:
• BR850TM VHF Two-Way Radio
• BR850TM UHF Two-Way Radio
C
O
M
P
L
I
A
N
T
N
A
R
R
O
W
B
A
N
D
CODED SQUELCH
DIGITAL
TM
Emergency Signaling
MAN DOWN
SecurEncrypt ™
MDC1200
COMPATIBLE
ANSI/UL 913
C
CSA C22.2 No. 157

Copyright © 2012 Discount Two-Way Radio Corporation - North American Distributor
BR850TM Professional Two-Way Radio Instruction Manual
2
Safety and General Information.....................4
Intrinsically Safe Radio Info........................6-7
Product Inspection.....................................8-9
RCA BR850TM Overview..........................10-11
LED Indicator..........................................12-14
Battery Information.....................................15
Initial Use..............................................15
Applicable Battery Packs........................15
Caution.................................................15
Battery Tips...........................................15
Prolong Battery Life...............................16
Battery Storage.....................................16
Charging the Battery.............................17
Steps for Setting Up Your Battery Charger...18
Antenna Information...................................19
Assembly and Disassembly...........................19
Attaching/Removing the Battery.......19-20
Attaching/Removing the Antenna..........20
Attaching/Removing the Belt Clip..........21
Attaching the Earpiece/Speaker Mic.......21
Basic Operations..........................................22
Programmable Auxiliary Functions...............22
Advanced Operations..................................23
Call 1/Call 2..........................................23
Emergency............................................23
Lone Worker (optional).........................23
Lone Worker Backup (optional).............24
Man Down (optional)............................24
Man Down Backup (optional)...............24
Monitor/Squelch Off (optional).............25
Squelch Level Check/Selectable Squelch Level
(SQL)...25
Scan (optional).....................................26
Scan Backup (optional).........................26
Scrambler (optional).............................27
Talk Around (optional)..........................28
Output Power Check/Adjust Power Level....28
Whisper (optional)...............................28
CONTENTS:

Copyright © 2012 Discount Two-Way Radio Corporation - North American Distributor
3
BR850TM Professional Two-Way Radio Instruction Manual
Whisper Backup (optional)..................28
Battery Power Indicator.......................28
Rental Timer Indicator.........................29
Channel Annunciation Temporary Enable..29
Channel Annunciation........................29
Auto Contact (optional).....................29
Auto Contact Temporary Delete.........30
Channel Lock (optional).....................30
Time-Out Timer (TOT)(optional).........30
Busy Channel Lockout (optional).......30
Battery Save (optional)......................31
Low Battery Alert..............................31
Safety Check (optional).....................31
CTCSS/CDCSS...................................31
DTMF (optional)................................32
2-Tone /MDC1200/RDC2400TM (optional).32
Signalling Logic.................................32
BOT ID and EOT ID (PTT ID) (optional).33
Care and Cleaning......................................33
CONTENTS continued
Troubleshooting..........................................34
Optional Accessories (Intrinsically Safe)..35-37
Radio Specications.....................................38
Glossary......................................................39
Warranty Statement...............................40-43

Copyright © 2012 Discount Two-Way Radio Corporation - North American Distributor
BR850TM Professional Two-Way Radio Instruction Manual
4
SAFETY AND GENERAL INFORMATION
Please observe the following general safety
precautions during all phases of operation,
service and repair of this equipment.
»Unauthorized modication of the radio
may result in failure of the Intrinsically Safe
protection.
Note: “Intrinsically Safe” is for equipment
used in areas where explosion risk can exist.
»Unauthorized service or repair is prohibited.
»Do not disassemble any Intrinsically Safe
products.
»The radio must not be opened in a
hazardous area.
»The battery must be changed in a non-
hazardous area.
»Additional or spare batteries must not be
carried into a hazardous area.
»Use only the intrinsically safe battery
(B850LI-IS) specied by RCA. The use of
other batteries is strictly prohibited and
will result in failure of the Intrinsically Safe
protection.
»The battery must be charged in a non-
hazardous area with the designated
charger CH850R1-IS or CH850R6-IS.
»Use only RCA approved accessories.
»Ensure that the radio is not taken into
Zone 0 areas.
»To avoid electromagnetic interference and/
or compatibility conicts, turn off your
radio in any area where posted notices
instruct you to do so.
»Turn off your radio before boarding an
aircraft. Any use of a radio must be in
accordance with airline regulations or
crew instructions.
»Turn off your radio before entering a
blasting area.
»For vehicles with an air bag, do not place a
radio in the area over an air bag or in the
air bag deployment area.
Copyright © 2012 Discount Two-Way Radio Corporation - North American Distributor
5
BR850TM Professional Two-Way Radio Instruction Manual
»Do not use any portable radio that has a
damaged antenna. If a damaged antenna
comes into contact with your skin, a minor
burn can result.
»Do not expose the radio to direct sunlight
over a long time, nor place it close to
heating source.
»When transmitting with a portable radio,
hold the radio in a vertical position with
the microphone 3 to 4 centimeters away
from your lips. Keep antenna at least 2.5
centimeters away from your body when
transmitting.
Please use the Intrinsically Safe BR850TM radio
unit only with RCA dedicated Intrinsically
Safe batteries and accessories in a hazardous
location; otherwise, a dangerously unsafe
condition may result.
Warning:
Copyright © 2012 Discount Two-Way Radio Corporation - North American Distributor
BR850TM Professional Two-Way Radio Instruction Manual
6
Intrinsically Safe Radio Information
Certication -
Intrinsically Safe
Intrinsically Safe Classication
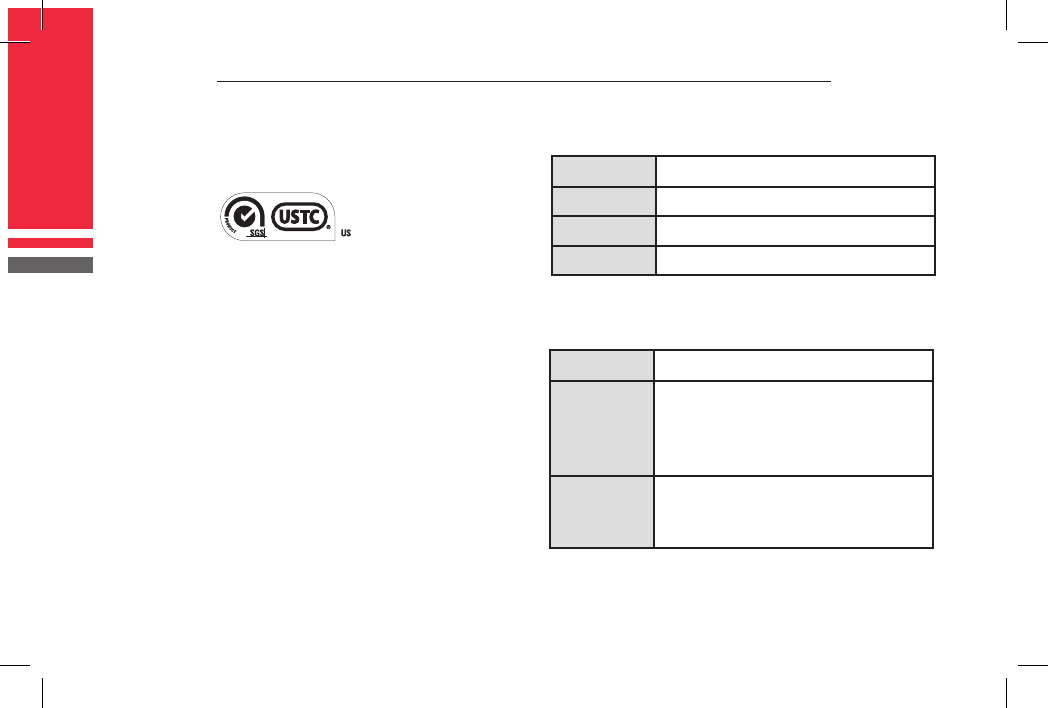
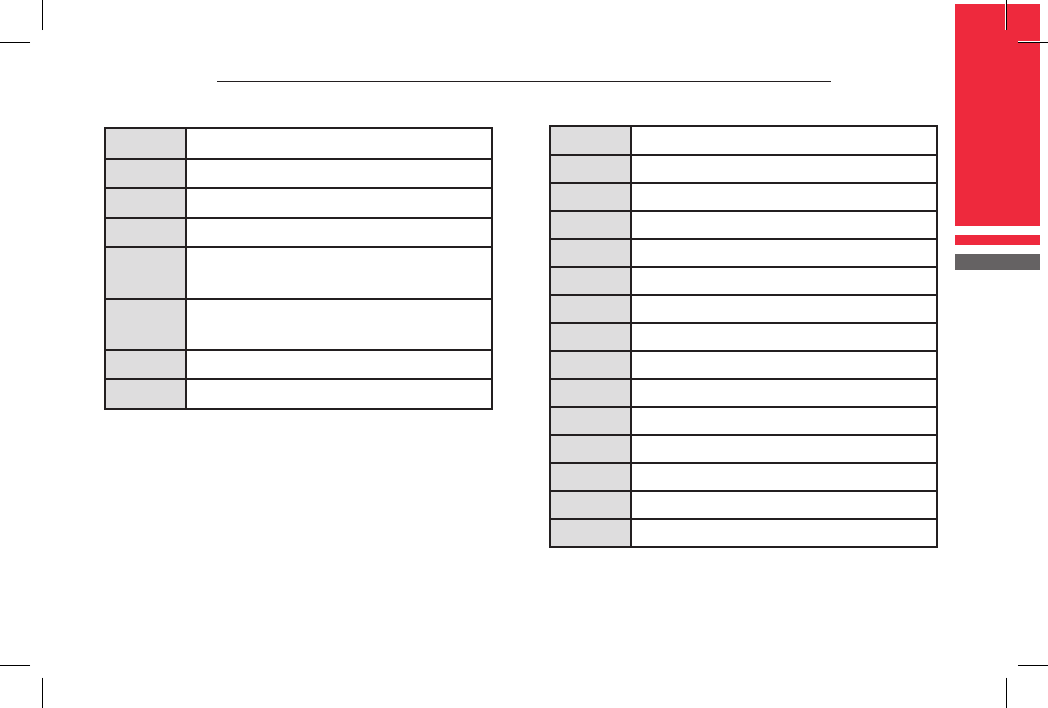
“Intrinsically Safe” is a re safety rating given
to the equipment by SGS North America Inc.
according to ANSI/UL 913 (U.S.) and CSA C22.2
No. 157 (Canada) certication standards.
When the equipment is given this rating, it is
considered safe to use in certain ammable
or combustible atmospheres. Flammable
atmospheres have been categorized by Class,
Division, and Group as described below:
I.S. Classes I, II, III, Division 1,
Groups CDEFG, T3
Class Material
IGas, Vapor, Liquid
II Dust
III Fiber, Flying
Area Classication:
Division Description
1An area where there is or could be
an explosive atmosphere most of
the time under normal operating
conditions
2An area where an explosive
atmosphere exists only under fault
conditions
ANSI/UL 913
C
CSA C22.2 No. 157
Copyright © 2012 Discount Two-Way Radio Corporation - North American Distributor
7
BR850TM Professional Two-Way Radio Instruction Manual
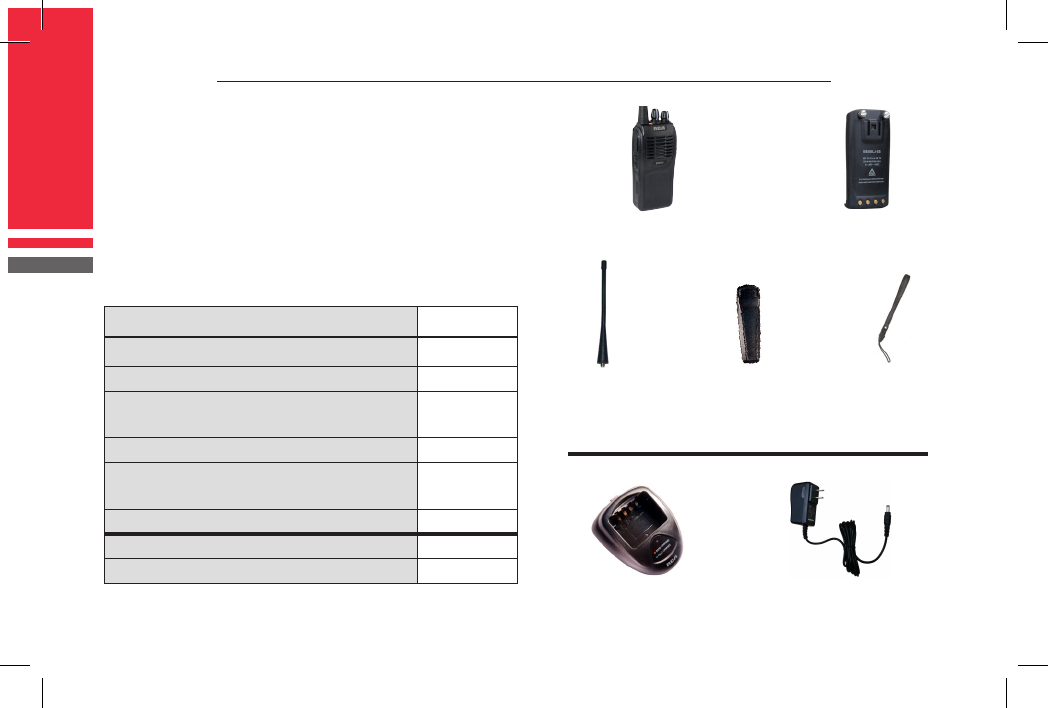
Group Typical Hazard
AAcetylene
BHydrogen
CEthylene, ethyl ether, cyclopropane
DGasoline, naphtha, butane, propane,
alcohol, acetone, benzol, natural gas
EMetal dust including aluminum, mag-
nesium, and their alloys
FCarbon black, coal or coke dust
GFlour, starch, or grain dust
Classication of Atmospheres:
Class Maximum Surface Temperature
T1 842°F (450°C)
T2 572°F (300°C)
T2A 536 °F (280°C)
T2B 500 °F (260°C)
T2C 446 °F (230°C)
T2D 419 °F (215°C)
T3 392 °F (200°C)
T3A 356 °F (180°C)
T3B 329 °F (165°C)
T3C 320 °F (160°C)
T4 275 °F (135°C)
T4A 248 °F (120°C)
T5 212 °F (100°C)
T6 185 °F (85°C)
Classication of Atmospheres:
Copyright © 2012 Discount Two-Way Radio Corporation - North American Distributor
BR850TM Professional Two-Way Radio Instruction Manual
8
PRODUCT INSPECTION
Prior to unpacking the BR850TM portable
radio, please inspect the packaging for
signs of damage and report any damage or
missing components immediately to your RCA
Communications Systems Sales and Service
Outlet. Every BR850TM portable radio comes
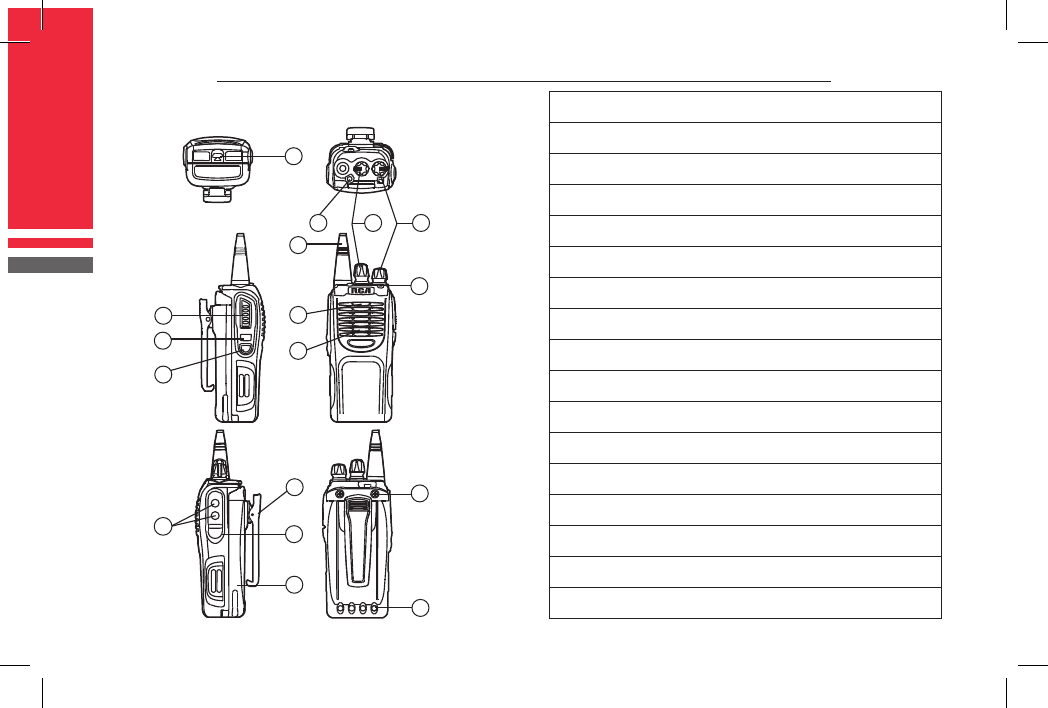
with the following items:
Item Qty.(PCS)
BR850-IS - Handheld Radio 1
B850LI-IS - Li-Ion Battery (1700 mAh) 1
AN850U - Antenna for UHF Models
AN950V - Antenna for VHF Models 1
BC850 - Belt Clip 1
STR850 - Handy Carry Strap
(prevents dropping the BR850TM) 1
Instruction Manual 1
CH850R1-IS* - Desktop Rapid Charger 1
PS 50R* - Power Supply 1
B850LI-IS
Li-Ion Battery (1700 mAh)
CH850R1-IS
Desktop Rapid Charger
PS 50R
Power Supply
BC850
Belt Clip
STR850
Handy Carry Strap
Antenna
AN850U - UHF models
AN950V - VHF models
BR850-IS
Handheld Radio
* Items come in separate box if ordered.
2
2

Copyright © 2012 Discount Two-Way Radio Corporation - North American Distributor
9
BR850TM Professional Two-Way Radio Instruction Manual
STR850
Handy Carry Strap
Note:
The frequency band of the BR850TM is marked
on the radio label. If it is not visible, identify
the frequency band according to the color
circle on the antenna: red indicates UHF and
green indicates VHF.
Copyright © 2012 Discount Two-Way Radio Corporation - North American Distributor
BR850TM Professional Two-Way Radio Instruction Manual
10
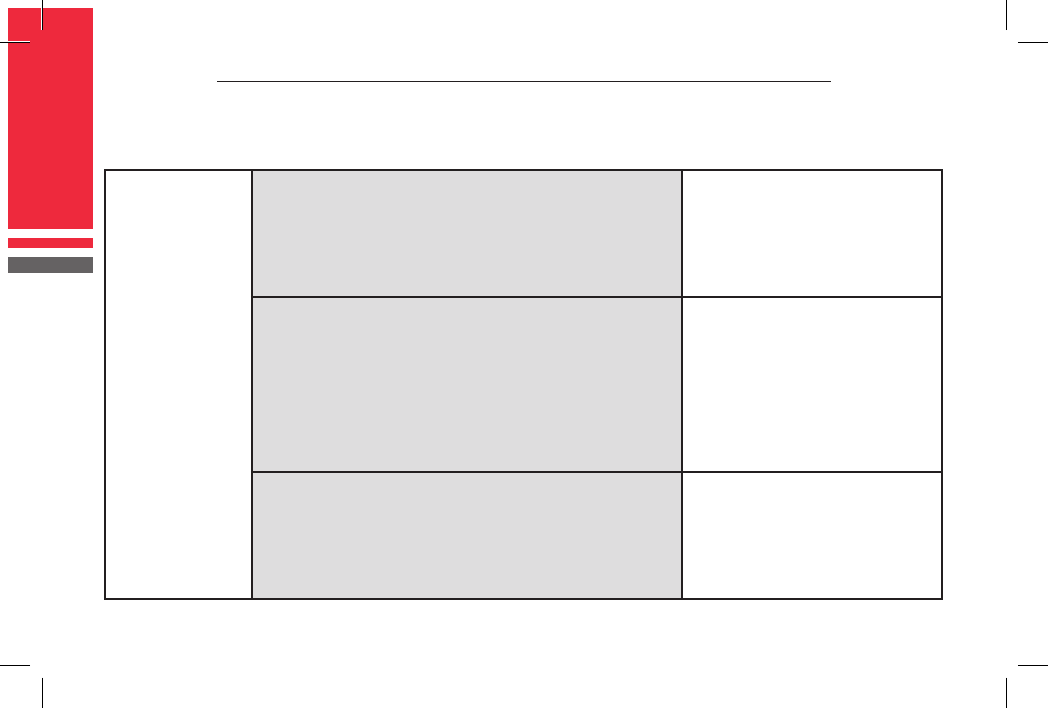
RCA BR850TM Overview (1) PTT (Push-to-Talk) key
(2) SK1 (Side Key 1) (programmable)
(3) SK2 (Side Key 2) (programmable)
(4) Antenna
(5) Microphone
(6) Speaker
(7) TK (Top Key)
(8) Channel Selector Knob
(9) Radio On-Off/Volume Control Knob
(10) LED Indicator
(11) Accessory Jack
(12) Battery Latch
(13) Belt Clip
(14) Accessory Cover
(15) Battery
(16) Screw
(17) Electrode Charging Piece
BR850
1
2
3
4
5
6
789
10
11
12
13
14
15
16
17

Copyright © 2012 Discount Two-Way Radio Corporation - North American Distributor
11
BR850TM Professional Two-Way Radio Instruction Manual
PTT (Push-to-Talk) Key
Press and hold down the PTT key to transmit,
release it to receive.
SK1 (Side Key 1)
Side Key 1 is the programmable key to which
your dealer can assign long and short press
function. (See Glossary for denitions of long
and short press.)
SK2 (Side Key 2)
Side Key 2 is the programmable key to which
your dealer can assign long and short press
function. (See Glossary for denitions of long
and short press.)
Channel Selector Knob
Turn the knob to select a desired channel.
TK (TopKey)
Programmable function key.
Radio On-Off/Volume Control Knob
Turn the knob clockwise to turn the radio on,
and turn the knob fully counter-clockwise until
it clicks to turn the radio off.
Turn the knob clockwise to increase the
volume, or counter-clockwise to decrease the
volume. WARNING!! Make sure the BR850TM
is at low volume prior to using any earpiece
accessory, and then adjust the volume to a
comfortable level. Failing to do so may cause
hearing damage.
Accessory Cover & Accessory Jack
The jack is used to connect speaker,
microphone, external PTT, earpiece, headset,
programming cable and cloning cable.
Copyright © 2012 Discount Two-Way Radio Corporation - North American Distributor
BR850TM Professional Two-Way Radio Instruction Manual
12
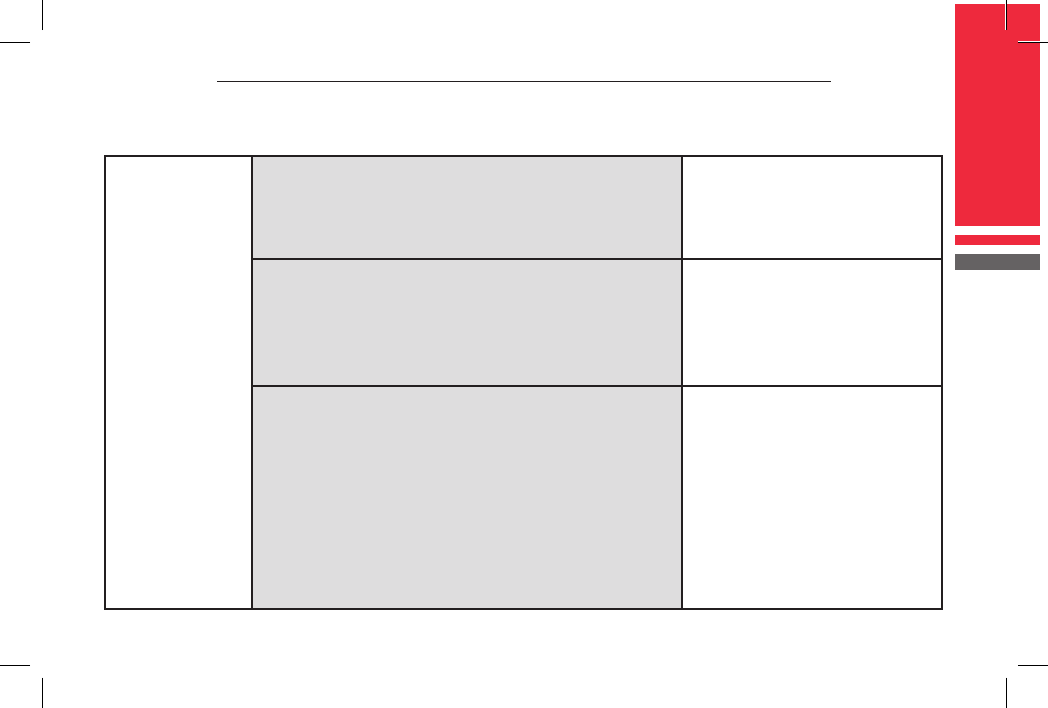
Wired Clone Source radio: Turn the source radio on while
holding down the PTT and SK2 keys.
Target radio: Rotate the Radio On-Off/Volume
Control knob clockwise to turn the target radio
on.
The LED ashes orange
twice.
Source radio (power on the target radio and
connect the cloning cable, and then press the
PTT key of the source radio to initiate cloning.)
1. The LED solidly glows red
during cloning;
2. The LED goes out when
cloning is nished.
Note: The LED ashes red
when cloning fails.
Target radio 1. The LED solidly glows
green during cloning;
2. The LED goes out when
cloning is nished.
LED Indicator
The following tables explain the functions of the LEDs and beeps.
Copyright © 2012 Discount Two-Way Radio Corporation - North American Distributor
13
BR850TM Professional Two-Way Radio Instruction Manual
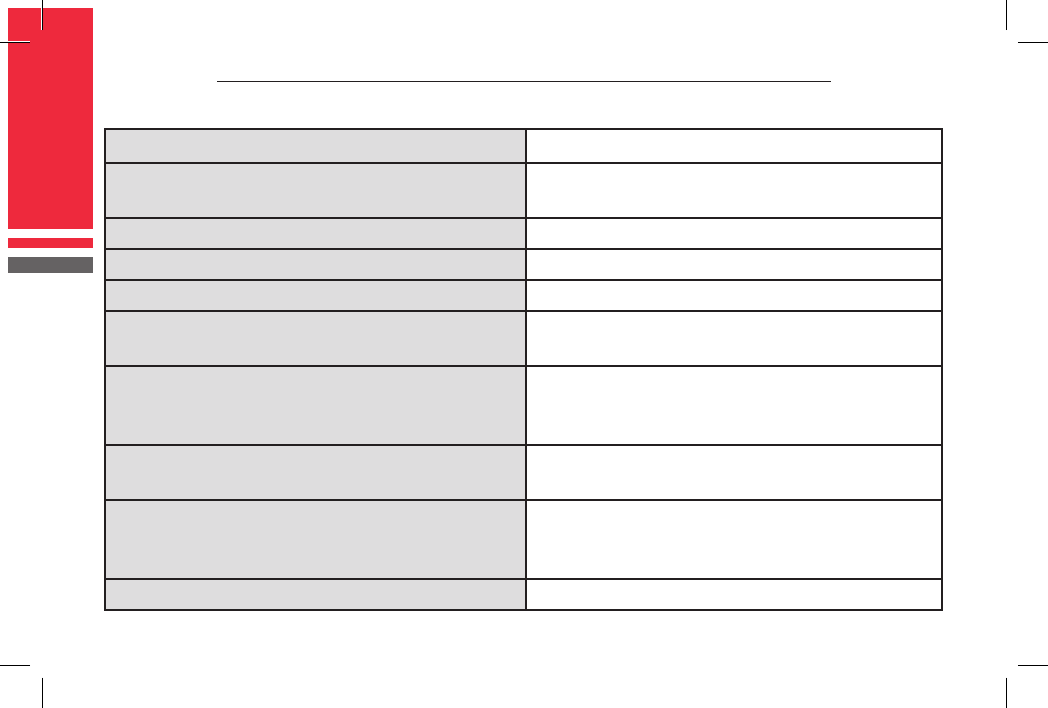
Wireless
Clone
Turn on both the source radio and target radio
while holding down the PTT and SK1 keys. Both
radios are required to be on the same channel
for cloning.
The LED ashes orange
once.
Source radio (turn on both the source radio and
target radio while holding down the PTT and
SK1 keys, and then press the PTT key of the
source radio while both radios are on the same
channel to initiate cloning.)
The LED solidly glows red
during cloning.
Target radio 1. The LED solidly glows
green during cloning;
2. The LED ashes green
and the radio sounds the
beep tone, when cloning
is nished.
Note: The LED ashes red
when cloning fails.
LED Indicator (continued)
Copyright © 2012 Discount Two-Way Radio Corporation - North American Distributor
BR850TM Professional Two-Way Radio Instruction Manual
14
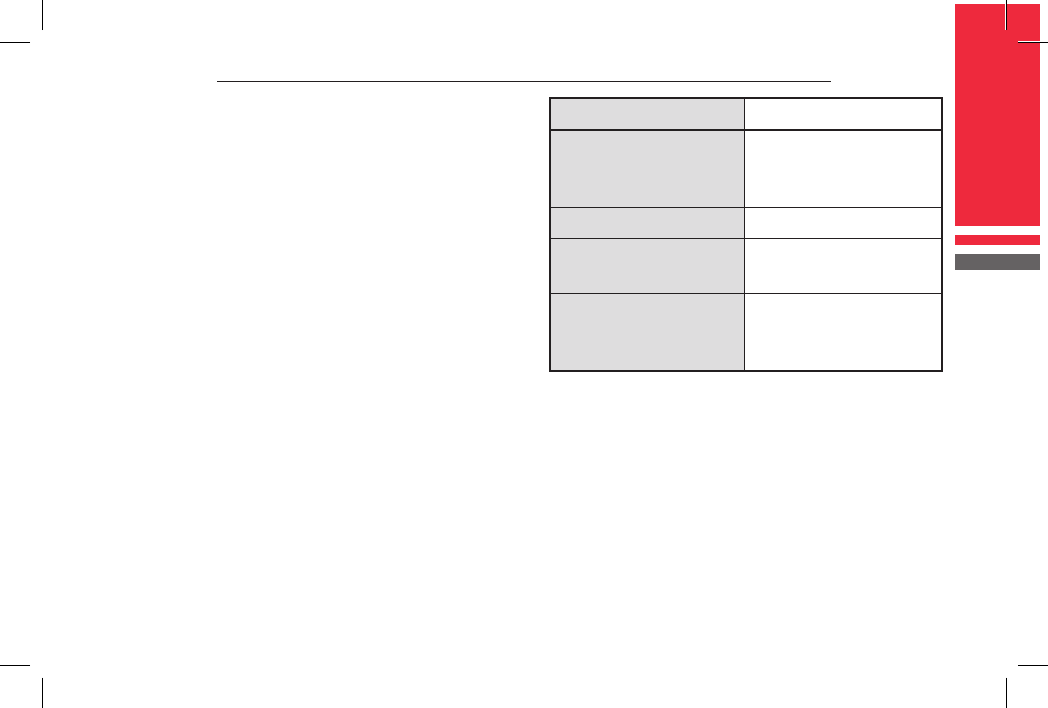
Power On The LED ashes green once.
Low Battery Alert The LED ashes red, and the radio sounds
three beeps every 30 seconds.
Transmitting The LED glows red
Receiving The LED glows green when carrier presents.
Scanning The LED ashes green once every 1 second.
Programming Reading: the LED glows red;
Writing: the LED glows green.
Encoding
(DTMF/PTT ID/2-Tone /MDC1200/RDC2400TM)
1. The LED glows red while transmitting;
2. The LED glows orange when transmission
is over.
Decoding (2-Tone/MDC1200/RDC2400TM) The LED ashes orange after the signalling is
successfully decoded.
Select Power Level 1W: One beep is heard.
2W: Two beeps are heard.
4W/5W: Three beeps are heard.
Function Key Press One beep to enable, two beeps to disable.
LED Indicator (continued)

Copyright © 2012 Discount Two-Way Radio Corporation - North American Distributor
15
BR850TM Professional Two-Way Radio Instruction Manual
BATTERY INFORMATION
Initial Use
New batteries are shipped from the
factory uncharged. Charge a new battery
approximately 12 hours prior to initial use
(applies to Ni-CD, Ni-MH and Li-Ion batteries
charged with slow or rapid rate charger).
NOTE: The Indicator Light will turn GREEN
approximately one hour after battery is
placed in a Rapid Rate Charger; however, it is
strongly recommended the battery charge for
12 hours. This initializes it and allows for the
best performance. Maximum battery capacity
is normally achieved after two or three full
charge / discharge cycles. If battery power
runs low, recharge the battery. Batteries that
are brand new or that have been stored for an
extended period of time (several weeks), may
require more time to fully charge.
Applicable Battery Packs
To reduce the risk of injury, use only batteries
specied by RCA Communications Systems.
Caution:
1. To avoid risk of personal injury, do not
dispose of batteries in a re.
2. Dispose of batteries according to local
recycling regulations. Do not dispose as
household waste.
3. Never attempt to disassemble the battery.
Battery Tips:
1. When charging a battery, keep it at a
temperature between 41°F ~ 104°F (5°C ~
40°C) to ensure a full charge. Temperatures
outside this range signicantly reduce
battery life.
2. Before charging a battery attached to a
radio, turn the radio off to ensure a full
charge. Never leave a radio on while in the

Copyright © 2012 Discount Two-Way Radio Corporation - North American Distributor
BR850TM Professional Two-Way Radio Instruction Manual
16
charger, as it can damage both the battery
and the radio; the charger is not a radio
stand.
3. Do not cut off the power supply or remove
battery while charging.
4. Never charge a battery that is wet. Dry it
with soft cloth prior charging.
5. The battery will eventually weaken. When
the operating time (talk-time and standby
time) is noticeably shorter than normal,
replace the battery.
6. Charge the Intrinsically Safe battery
B850LI-IS outside the hazardous area
with the designated charger CH850R1-IS.
Unauthorized chargers could damage the
battery.
Tips To Prolong Battery Life:
1. Battery performance greatly decreases at
temperatures below -4°F (-20°C).Having
a spare battery is always necessary in
extremely cold environments. A cold
battery may work again when it returns to
room temperature,so keep it for later use.
2. Dust on the battery contact may cause the
battery not to work or charge properly. Use
a clean dry cloth to wipe it before attaching
the battery to the radio.
3. Batteries with damaged contacts can be
extremely dangerous. Any battery with
damage to one or more contacts should be
replaced immediately and not used under
any circumstances.
Battery Storage
1. Fully charge a battery before storing it for
an extended period of time to avoid battery
damage due to over-discharge.
2. Recharge a battery after three months
storage to avoid reduced battery capacity
due to over-discharge.
3. When storing a battery, keep it in a dry
Copyright © 2012 Discount Two-Way Radio Corporation - North American Distributor
17
BR850TM Professional Two-Way Radio Instruction Manual
place at room temperature.
Charging the Battery
1. When the battery level is very low, recharge
it. It is never recommended to completely
drain the battery, which may cause your
battery to malfunction and no longer
accept a charge.
2. Use only chargers specied by RCA
Communications Systems. When the
charger’s LED illuminates red, it is an
indication that the battery is being correctly
charged. When the LED illuminates green,
the battery charge is complete.
Status Charger LED
Standby (no-load)
Red LED slowly
ashes (0.2s on/3s
off )
Battery is charging Red LED solidly glows
Battery is fully
charged
Green LED solidly
glows
Error
Red LED rapidly
ashes (0.2s on/0.2s
off)
Copyright © 2012 Discount Two-Way Radio Corporation - North American Distributor
BR850TM Professional Two-Way Radio Instruction Manual
18
• After the battery is placed properly, the
LED solidly glows red indicating the battery
is charging, or ashes indicating that
the battery is damaged or the ambient
temperature is over high/low.
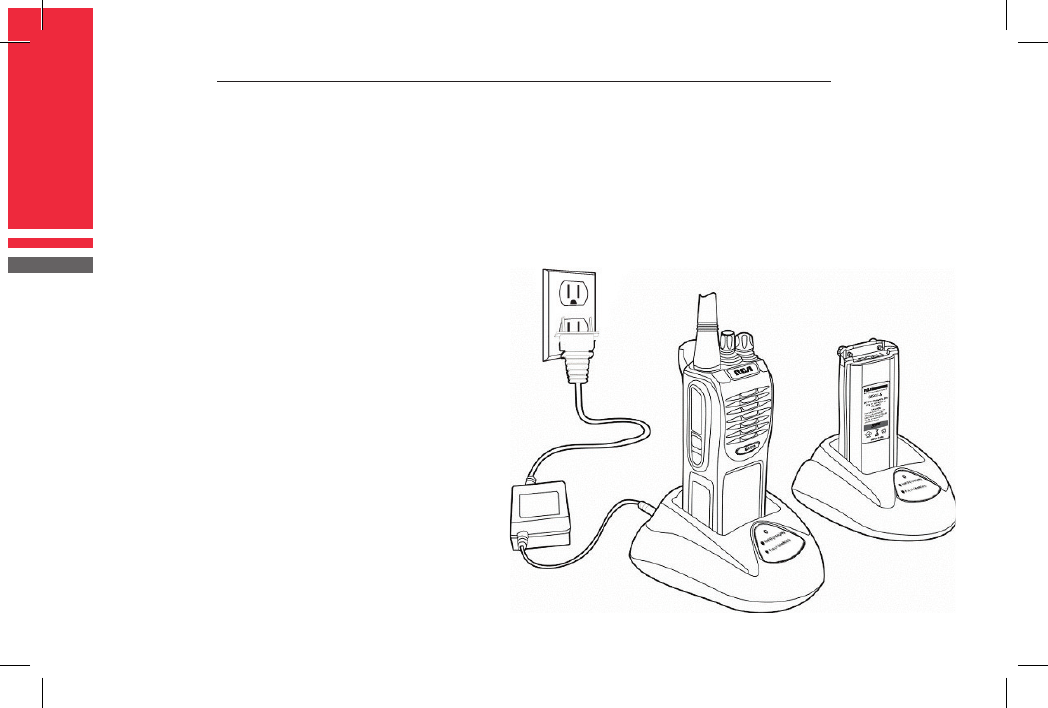
Steps for setting up your charger:
1. Plug the power cord into the adapter.
2. Plug the AC connector of the adapter into
the AC outlet socket.
3. Plug the DC connector of the adapter into
the DC socket on the back of the charger.
4. Place the radio with the battery attached,
or the battery alone, in the charger.
5. Make sure the battery is in well contact
with the charging terminals. The charging
process initiates when the red LED lights.
6. The greed LED lights about 3 hours later
indicating the battery is fully charged. Then
remove the radio with the battery attached
or the battery alone from the charger.
Notes:
• It is normal that the charger LED ashes
before inserting battery into the charger.
• Do not change the battery in the charger
until the charger LED is stabilized.
Copyright © 2012 Discount Two-Way Radio Corporation - North American Distributor
19
BR850TM Professional Two-Way Radio Instruction Manual
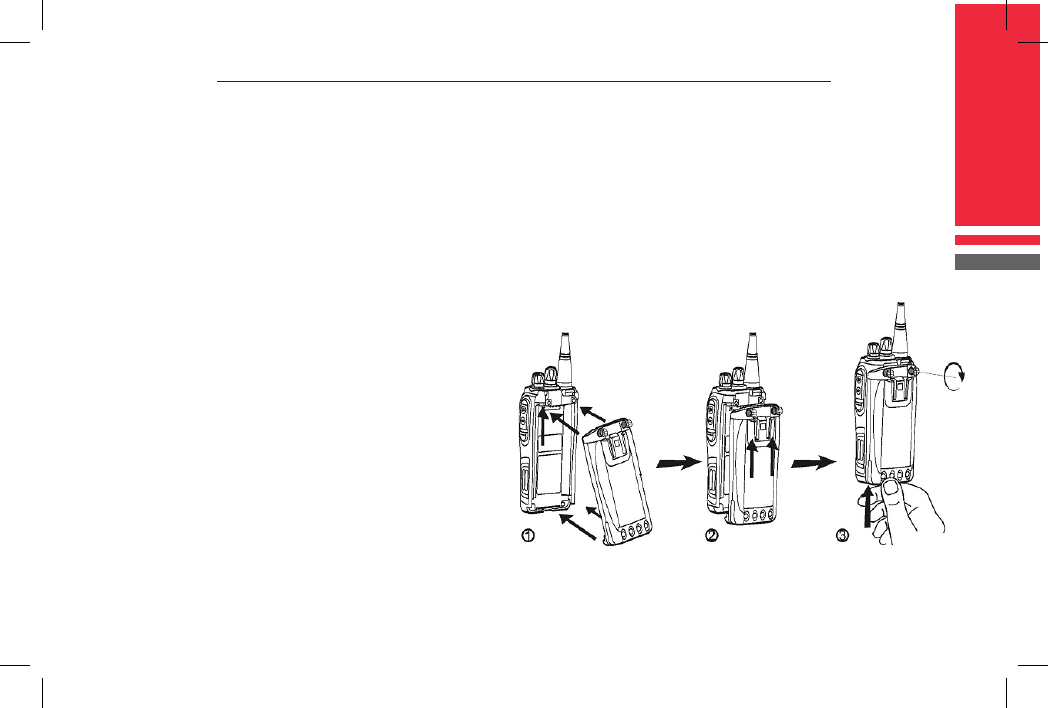
aluminum chassis are connected completely.
Then push the battery upward until you hear a
“click.” (see Fig. 1)
Step 3 -Hold the battery bottom and push the
battery upward. Align the two screws on the
battery with the screw holes on the radio body,
and then tighten the screws (see Fig. 1).
Fig. 1
ASSEMBLY AND DISASSEMBLY
Attaching the Battery
Step 1 -Insert the battery top into the
aluminum chassis, and make sure the battery
top is positioned correctly. (see gure 1)
Step 2 - Press the battery to make it cling to the
guide rails, and make sure the battery and the
Copyright © 2012 Discount Two-Way Radio Corporation - North American Distributor
BR850TM Professional Two-Way Radio Instruction Manual
20
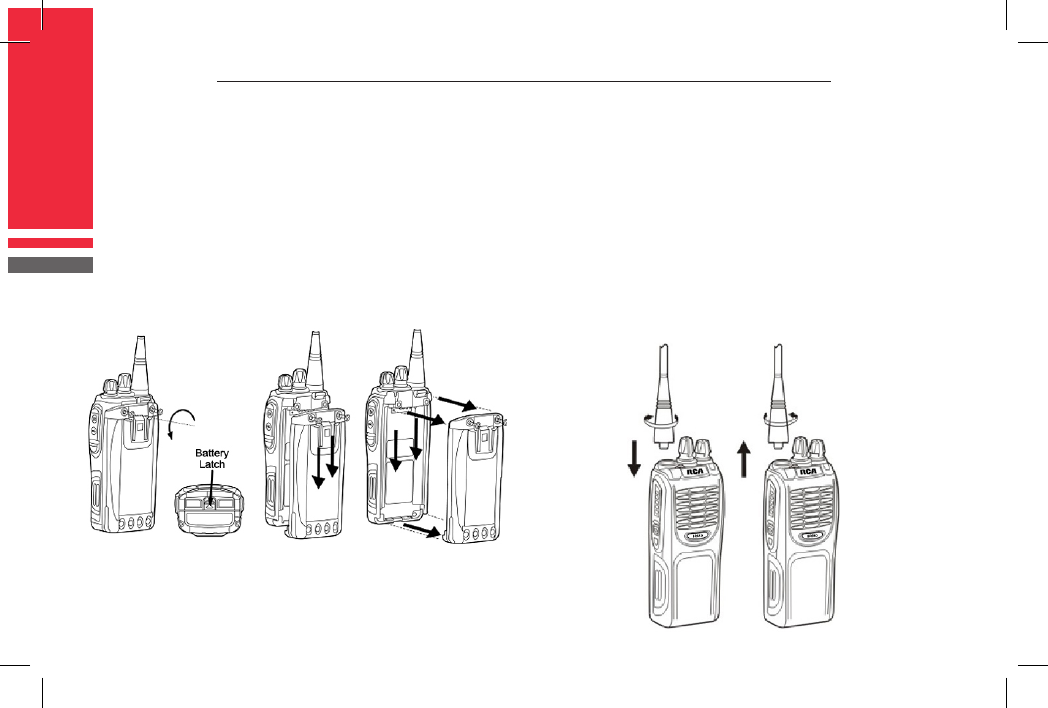
Removing the Battery
With the radio off, loosen the screws, but
never remove them from the battery. Slide the
battery latch away from the battery, and slide
down the battery for 1 to 2 centimeters. Then
remove the battery from the radio unit. (see
Fig. 2).
Fig. 2
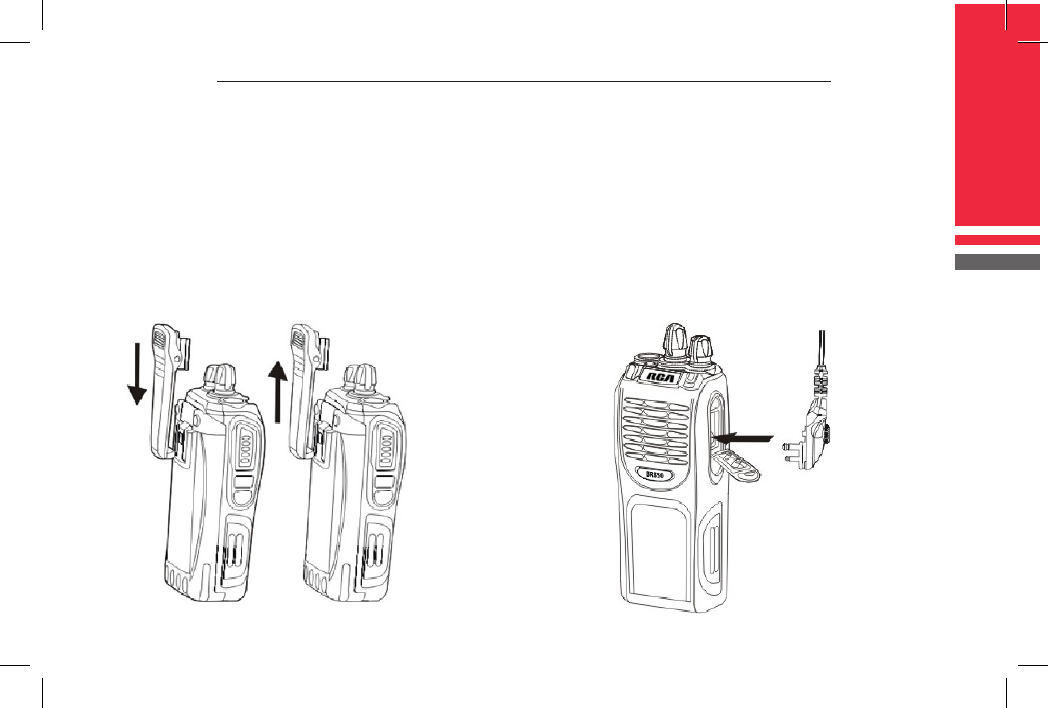
ATTACHING/REMOVING THE ANTENNA
Attaching the Antenna
1. With the radio off, insert the antenna into
the big screw thread hole on top of the
main unit.
2. Turn the antenna clockwise until it is
screwed down as shown. (see Fig.3)
Removing the Antenna
With the radio off, remove the antenna by
turning it counter-clockwise as shown. (see
Fig.3)
Fig. 3
Copyright © 2012 Discount Two-Way Radio Corporation - North American Distributor
21
BR850TM Professional Two-Way Radio Instruction Manual
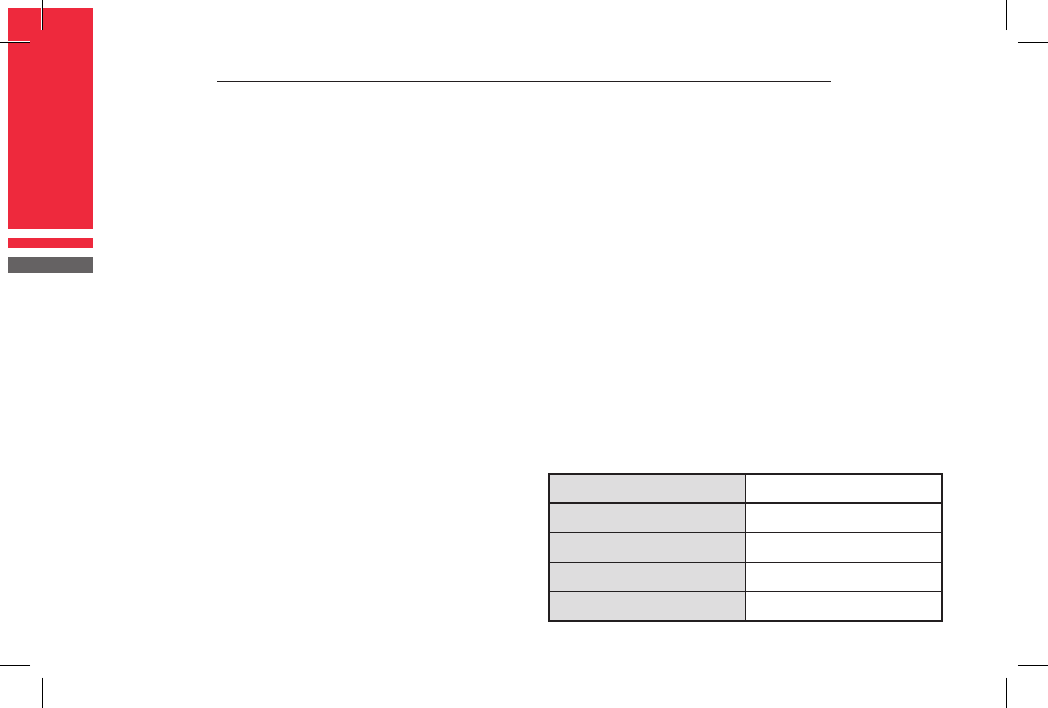
ATTACHING/REMOVING THE BELT CLIP
Attaching the Belt Clip
Align the metal holder with the groove of the
battery, and press the belt clip downwards to
attach it (see Fig. 4).
Removing the Belt Clip
Lift up the dome, and slide the belt clip
upwards to remove it (see Fig. 4).
Fig. 4
ATTACHING EARPIECE / SPEAKER MIC
Open (don’t remove) the accessory cover,
and plug the audio accessory rmly into the
accessory jack. Then secure the screw using
your hand or a coin. Please loosen the screw
prior to removing the audio accessory. (See Fig.
5).
Note: Use of the audio accessory may affect
the waterproof performance of the radio.
Fig. 5

Copyright © 2012 Discount Two-Way Radio Corporation - North American Distributor
BR850TM Professional Two-Way Radio Instruction Manual
22
BASIC RADIO OPERATIONS
1. Rotate the Radio On-Off/Volume Control
knob clockwise to turn the radio on, with
green LED ashing once. You will hear a
beep if the alert tone is already set by your
dealer.
2. Press the programmed Monitor key or
Squelch Off key to hear activities on the
current channel, and then rotate the Radio
On-Off/Volume Control knob clockwise
to adjust the volume.
3. Rotate the Channel Selector knob to
select a desired channel. If the Channel
Annunciation feature is enabled by your
dealer, your radio will automatically
announce the channel the knob is set at.
4. To transmit, press and hold down the PTT
key, and speak into the microphone at your
normal voice level. Hold the radio about 2.5
to 5 centimeters away from your mouth.
5. Release the PTT key to receive.
PROGRAMMABLE
AUXILIARY FUNCTIONS
Your dealer may assign the TK, SK1, SK2 (long
or short press) keys with the following auxiliary
functions.
• None
• Call1/Call2
• Emergency
• Emergency Cancel
• Lone Worker
• Lone Worker Backup
• Man Down (optional)
• Man Down Backup (optional)
• Monitor
• Monitor Momentary
• Nuisance Channel Temporary Delete
• Nuisance Channel Delete
• Squelch Level Check
• Selectable Squelch Level (SQL)
• Scan
• Scan Backup

Copyright © 2012 Discount Two-Way Radio Corporation - North American Distributor
23
BR850TM Professional Two-Way Radio Instruction Manual
• Scrambler
• Scrambler Backup
• Squelch Off
• Squelch Off Momentary
• Talk Around
• Output Power Check
• Adjust Power Level
• Whisper
• Whisper Backup
• Battery Power Indicator
• Rental Time Indicator
• Channel Annunciation Temporary Enable
• Channel Annunciation
• External Scrambler (optional)
• External Scrambler Backup (optional)
• Auto Contact
• Auto Contact Temporary Delete
• Channel Lock
• Patrol Event Select
• Transmit Afrm
ADVANCED OPERATIONS
The following functions are not active by
default, but can be programmed by your
dealer upon request.
Call1/Call2 (optional)
Press the programmed Call1/Call2 key to
transmit the stored DTMF code, 2-Tone,
MDC1200 or RDC2400TM signalling.
Emergency (optional)
Press the programmed Emergency key
to transmit emergency alarm, or send ENI
(Emergency Number Identity)/background
tone to a pre-dened person or the dispatcher
(selectable via the programming software).
You may long or short press the function key
to cancel the emergency procedure.
Lone Worker (optional)
The feature provides added security and safety
for individuals who work remotely from their
team. Press the programmed function key to

Copyright © 2012 Discount Two-Way Radio Corporation - North American Distributor
BR850TM Professional Two-Way Radio Instruction Manual
24
activate the Lone Worker feature. The radio is
set to request a response from a user at regular
intervals. Should a user not press any key as a
response to a regular warning tone, a dened
emergency procedure will be activated.
The Lone Worker status will not be memorized
once the radio is powered off.
Lone Worker Backup (optional)
The feature provides added security and safety
for individuals who work remotely from their
team. Press the programmed function key to
activate the Lone Worker feature. The radio
is set up to request a response from a user
at regular intervals. Should a user not press
any key as a response to a regular warning
tone, a dened emergency procedure will be
activated.
The Lone Worker status will be memorized
after the radio is powered off and on again.
Man Down (optional)
Press the programmed function key to activate
the Man Down mode, in which horizontally or
inversely positioning the radio will activate an
alert tone. A dened emergency procedure is
activated if the radio is horizontally or inversely
positioned for a certain length of time. Place
the radio vertically to cancel the emergency
procedure.
The Man Down status will not be memorized
once the radio is powered off.
Man Down Backup (optional)
Press the programmed function key to activate
the Man Down mode, in which horizontally or
inversely positioning the radio will activate an
alert tone. A dened emergency procedure is
activated if the radio is horizontally or inversely
positioned for a certain length of time. Place
the radio vertically to cancel the emergency
procedure.
The Man Down status will be memorized after
the radio is powered off.

Copyright © 2012 Discount Two-Way Radio Corporation - North American Distributor
25
BR850TM Professional Two-Way Radio Instruction Manual
Monitor/Squelch Off (optional)
• Monitor
In this mode, the receiving party can receive
incoming calls from the transmitting party
regardless of CTCSS/CDCSS condition. If
carrier condition is not satised, the receiving
party will fail to receive any incoming calls.
Press the Monitor key to open signalling
squelch. Press the key again to close it.
• Monitor Momentary
Refer to Monitor. Press the Monitor
Momentary key to open signalling squelch.
Release the key to close it.
• Squelch Off
In this mode, the speaker is unmuted in
any condition and receives any sound on
the current channel. When audio signal
is received on the channel, audio will be
heard. Otherwise, background noise will be
heard. Press the Squelch Off key to open
noise squelch. Press the key again to close
it.
• Squelch Off Momentary
When audio signal is received on the
channel, audio will be heard. Otherwise,
background noise will be heard. Hold down
the programmed key continuously to enter
this mode, and release the key to exit. Press
the Squelch Off Momentary key to open
noise squelch. Release the key to close it.
Squelch Level Check/Selectable Squelch
Level (SQL)
Upon long press of the programmed Squelch
Level Check key, the radio reports the squelch
level set on the current channel.
Short press the Adjust Squelch Level key to
change the squelch level. The squelch increases
by 1 level upon every press of the function key
(level 9~0 cycle, selecting level 0 activates a
beep tone with the squelch always open), and
then save your change.

Copyright © 2012 Discount Two-Way Radio Corporation - North American Distributor
BR850TM Professional Two-Way Radio Instruction Manual
26
Scan (optional)
Press the programmed Scan key to initiate
radio scanning from the current channel,
and scanning ascends through the channel
numbers in the Scan list. The green LED ashes
when scanning proceeds, and solidly glows
when a signal is received with signalling match
on a channel. Press the Scan key again to exit
radio scanning. The Scan status will not be
memorized once the radio is powered off.
• Nuisance Channel Temporary Delete
1. When scanning pauses on an unwanted
channel such as a nuisance channel, press the
programmed Nuisance Channel Temporary
Delete key to temporarily delete the channel
from the Scan list.
2. The priority channel can be deleted temporarily
only.
3. If the current Scan list contains only one or two
channels, Nuisance Channel Temporary Delete
is not possible.
4. Once the radio exits the Scan mode, or is
powered off and on again, the temporarily
deleted channel will appear in the Scan list
again.
• Nuisance Channel Delete
When scanning pauses on an unwanted channel
such as a nuisance channel, press the programmed
Nuisance Channel Delete key to permanently
delete the channel from the Scan list. The deleted
channel will not appear in the Scan list once the
radio exits the Scan mode, or is powered off and
on again.
1. The priority channel can be deleted temporarily
only.
2. If the current Scan list contains only one or
two channels, Nuisance Channel Delete is not
available.
Scan Backup (optional)
Press the programmed Scan key to initiate
radio scanning from the current channel,
and scanning ascends through the channel
numbers in Scan list. The green LED ashes
when scanning proceeds, and solidly glows

Copyright © 2012 Discount Two-Way Radio Corporation - North American Distributor
27
BR850TM Professional Two-Way Radio Instruction Manual
when a signal is received with signalling match
on a channel. Press the Scan key again to exit
radio scanning.
The Scan status will be memorized after the
radio is powered off and on again.
Scrambler (optional)
The feature includes Scrambler and Scrambler
Backup.
In order for members of your own group to
understand your call while you are using
the Scrambler, all other members must also
activate the Scrambler on their radios. When
the feature is activated, any other party
listening on your channel will be unable to
understand your conversation.
◊ Scrambler
Press the programmed function key to activate
the Scrambler feature. When the feature
is activated, any other party who is on your
channel is prevented from listening to your
conversation.
The Scrambler status will not be memorized
once the radio is powered off and on again.
◊ Scrambler Backup
Press the programmed function key to activate
the Scrambler Backup feature. When the
feature is activated, any other party listening on
your channel is prevented from eavesdropping
your conversation.
The Scrambler status will be memorized after
the radio is powered off and on again.
◊ External Scrambler (optional)
The external scrambler is controlled from the
programmed External Scrambler key.
The External Scrambler status will not be
memorized once the radio is powered off and
on again.
◊ External Scrambler Backup (optional)
The external scrambler is controlled from the
programmed External Scrambler key.
The External Scrambler status will be
memorized after the radio is powered off and
on again.
Copyright © 2012 Discount Two-Way Radio Corporation - North American Distributor
BR850TM Professional Two-Way Radio Instruction Manual
28
Talk Around (optional)
Press the programmed function key to activate
the Talk Around feature. With the feature
activated, the Rx frequency will be used in
place of the Tx frequency during transmission.
Output Power Check/Adjust Power Level
Upon long press of the programmed Output
Power Check key, the radio reports the output
power level set on the current channel, with
one beep for low power level, two beeps for
medium power level, or three beeps for high
power level.
Short press the Adjust Power Level key to
change the power level. The power increases
by 1 level upon every press of the function key
(low~med~high cycle), and then save your
change.
Whisper (optional)
Press the programmed function key to activate
the Whisper feature. When the feature is
activated, you can speak quietly into the radio
and still be heard clearly. Press the key again to
exit the feature. The Whisper status will not be
memorized once the radio is powered off and
on again.
Whisper Backup (optional)
Press the programmed function key to activate
the Whisper feature. When the feature is
activated, you can speak quietly into the radio
and still be heard clearly. Press the key again
to exit the feature. The Whisper status will be
memorized after the radio is powered off and
on again.
Battery Power Indicator
Upon press of the programmed Battery
Power Indicator key, the radio sounds “1”,
“2”, “3”, or “4” to indicate the current
battery level.
Audible Indicator Battery Level
“1” Very Low
“2” Low
“3” Satisfactory
“4” High

Copyright © 2012 Discount Two-Way Radio Corporation - North American Distributor
29
BR850TM Professional Two-Way Radio Instruction Manual
Rental Timer Indicator (optional)
Upon press of the programmed Rental Time
Indicator key, the radio sounds “1”, “2”, “3”,
“4”, or “5” to indicate the remaining time
that the user is allowed to use the radio. The
Rental Time is programmable by your dealer.
Channel Annunciation Temporary Enable
Press the programmed Channel Annunciation
Temporary Enable key to activate the
following two situations:
a. If the current channel number is heard:
Press the function key. If two beeps are
heard, the Channel Annunciation will be
temporarily canceled. The current channel
number will be heard when the radio is
turned on again.
If one beep is heard, the Channel
Annunciation will be temporarily activated.
The current channel number will be heard
when the radio is turned on again.
b. If the current channel number is not heard:
Press the function key. If two beeps are
heard, the Channel Annunciation will be
temporarily canceled. The current channel
number will not be heard when the radio is
turned on again.
If one beep is heard, the Channel
Annunciation will be temporarily activated.
The current channel number will not be
heard when the radio is turned on again.
Channel Annunciation (optional)
Press the programmed Channel Annunciation
key. If two beeps are heard, the Channel
Annunciation will be canceled. The current
channel number will not be heard when the
radio is turned on again.
If one beep is heard, the Channel Annunciation
will be activated. The current channel number
will be heard when the radio is turned on
again.
Auto Contact (optional)
When a group of radios is set with Auto

Copyright © 2012 Discount Two-Way Radio Corporation - North American Distributor
BR850TM Professional Two-Way Radio Instruction Manual
30
Contact, the radio will automatically sound
the alert tone if the user is out of the
communication range.
Auto Contact Temporary Delete
Press the programmed Auto Contact
Temporary Delete key to temporarily delete
the selected ID from the current Auto Contact
list.
Channel Lock (optional)
When the Channel Lock feature is activated,
channels cannot be selected via the Channel
Selector knob.
Time-out Timer (TOT) (optional)
The feature allows for more efcient use of
channels by limiting the maximum time of each
transmission. Once a continuous transmission
exceeds the preset time (programmable by your
dealer), the transmission will be automatically
terminated and an alert tone will be heard.
Release the PTT key to cancel the alert tone.
Your dealer may program the alert tone sounds
before the TOT timer nearly expires.
Busy Channel Lockout (BCL) (optional)
When the BCL feature is enabled, you are
prevented from transmitting on a channel that
is already in use. Press the PTT key on a channel
that is already in use, the radio will sound an
alert tone and turn back to the Receive mode.
Carrier: If BCL is set on the current channel,
press the PTT key while the channel is already
in use, and the radio will sound beeps without
transmission.
CTCSS/CDCSS: If CTCSS/CDCSS and BCL are

Copyright © 2012 Discount Two-Way Radio Corporation - North American Distributor
31
BR850TM Professional Two-Way Radio Instruction Manual
set on the current channel, press the PTT key
while the channel is already in use, and the
radio will sound beeps without transmission.
Optional Signalling: If 2-Tone/MDC1200/
RDC2400TM signalling and BCL are set on the
current channel, press the PTT key while the
channel is already in use, and the radio will
sound beeps without transmission.
Battery Save (optional)
If the feature is programmed by your dealer,
Battery Save will be automatically activated
once no activity is present on the channel and
no operation is performed (no key press and
no knob selection) for extended operation
time.
Once the radio detects no activity on the
channel and no operation is performed during
standby time, it will automatically enter
Battery Save mode in 12 seconds. Pressing any
key or receiving a signal will cause the radio
to restore to normal operation and exit from
Battery Save.
Low Battery Alert (optional)
For extra convenience, the red LED ashes and
the radio sounds three beeps every 30 seconds,
to alert the user to recharge the battery if the
battery level runs low.
Safety Check (optional)
Once the radio receives a safety check signal,
an alert tone will be heard, requesting the user
to make some operation (pressing any key).
Should the user not respond to a safety check
signal, a dened emergency procedure will be
activated.
CTCSS/CDCSS
If CTCSS/CDCSS is set on the current channel,
a CTCSS/CDCSS match is required on an
incoming signal for the radio to unmute.
Radios set with the same CTCSS/CDCSS, or
not set with CTCSS/CDCSS, can receive from
you.

Copyright © 2012 Discount Two-Way Radio Corporation - North American Distributor
BR850TM Professional Two-Way Radio Instruction Manual
32
Your dealer may program the current channel
with CTCSS/CDCSS, to prevent unwanted
conversations on the same frequency.
The radio will not unmute to an incoming call
with invalid CTCSS/CDCSS. This feature does
not mean that your conversation will not be
heard by others.
DTMF (optional)
The DTMF signalling can be enabled/disabled
by your dealer. If DTMF signalling is set on the
current channel, press the programmed key to
transmit DTMF code.
The red LED solidly glows during encoding,
and goes out when encoding is over.
2-Tone/MDC1200/RDC2400TM (optional)
The 2-Tone/MDC1200/RDC2400TM signalling
can be enabled/disabled by your dealer. If
2-Tone/MDC1200/RDC2400TM signalling is set
on the current channel, press the programmed
Call 1/Call 2 key to transmit 2-Tone/MDC1200/
RDC2400TM signalling. The preset function
will be performed when the radio receives an
incoming signal with match 2-Tone/MDC1200/
RDC2400TM. Radios set with match 2-Tone/
MDC1200/RDC2400TM can receive from you.
• The red LED solidly glows during encoding;
after encoding, the orange LED solidly glows
until the preset time expires.
• The green LED solidly glows during decoding;
after successful decoding, the orange LED
ashes until the preset time expires.
Signalling Logic
CTCSS/CDCSS “AND” / “OR” 2-Tone/
MDC1200/RDC2400TM
“AND”: The radio unmutes when both
the CTCSS/CDCSS and 2-Tone/MDC1200/
RDC2400TM conditions are satised.
“OR”: The radio unmutes when either
the CTCSS/CDCSS or 2-Tone/MDC1200/

Copyright © 2012 Discount Two-Way Radio Corporation - North American Distributor
33
BR850TM Professional Two-Way Radio Instruction Manual
RDC2400TM condition is satised.
BOT ID and EOT ID (PTT ID) (optional)
Your dealer may congure whether to transmit
Connect ID (BOT ID) or Disconnect ID (EOT
ID), to connect or disconnect to a repeater or
telephone system.
BOT ID: sent upon each press of the PTT key.
EOT ID: sent upon each release of the PTT
key.
Both: sent upon each press and release of the
PTT key.
CARE AND CLEANING
• Do not directly handle the radio by its
antenna or external microphone.
• Do not place the radio in a dusty or dirty
environment.
• Clean the radio with a lint-free cloth
moistened with clean water and/or a mild
dish washing liquid to remove dirt, grease,
and dust.
• Avoid subjecting the radio to corrosives,
solvents or spirits.
Copyright © 2012 Discount Two-Way Radio Corporation - North American Distributor
BR850TM Professional Two-Way Radio Instruction Manual
34
Symptom Solution
Cannot power on the radio
a. The battery needs charging. Recharge the battery or replace it
with a fresh one.
b. The battery is not properly installed. Remove the battery and
reattach it.
The operating time is notice-
ably shorter than normal even
though the battery is properly
charged.
a. The battery has worn out; it is time to buy a new battery.
b. The battery is not fully charged. Make sure that the battery is
removed after LED indicator has turned green.
Cannot talk to or hear group
members
a. Make sure that your radio operates on the same frequency and has
the same CTCSS/CDCSS settings as your group members.
b. Make sure you are within their communication range.
Hear non-group members Please change your CTCSS/CDCSS settings and have your group
members do so, also.
No voice or low voice while
transmitting
a. Turn the volume control knob to its maximum volume.
b. Return the radio to your dealer to check for microphone damage.
Noise always on Move within communication range of other group members. Next,
turn the radio off and back on again to retry communication.
TROUBLESHOOTING
Copyright © 2012 Discount Two-Way Radio Corporation - North American Distributor
35
BR850TM Professional Two-Way Radio Instruction Manual
Optional Accessories (Intrinsically Safe)
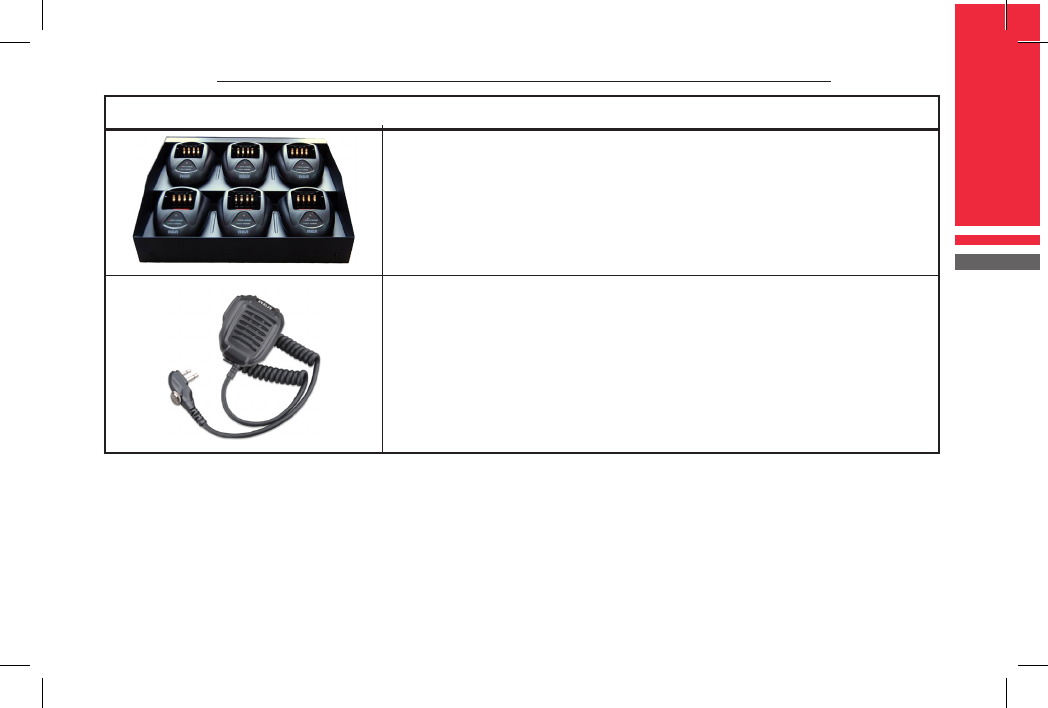
Multi-Unit Rapid-Rate Charger
CH850R6-IS
More convenient and saves space by using one power outlet for
6 radios.
Remote Speaker Microphone
SM850L-IS
No need to remove the radio from your waist, which prevents
radio damage or loss.
Copyright © 2012 Discount Two-Way Radio Corporation - North American Distributor
BR850TM Professional Two-Way Radio Instruction Manual
36
Optional Accessories continued
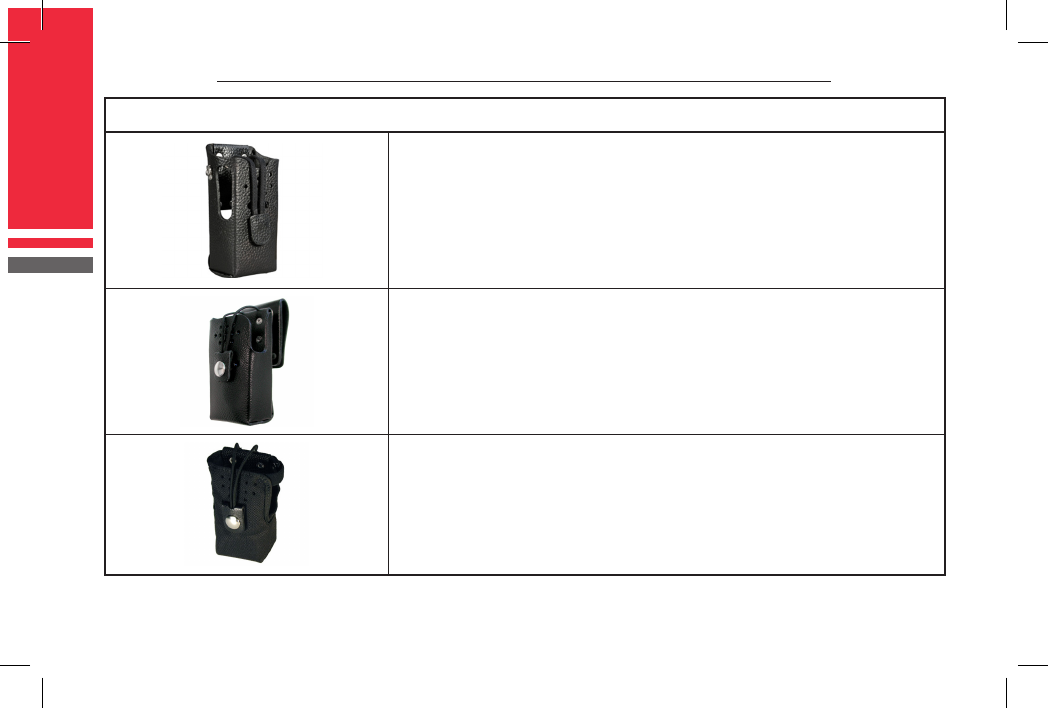
Leather Holster xed belt loop
HL850L
Durable and strong, the leather holster offers the best
protection for your BR850TM radio.
Leather Holster w/ swivel belt loop
HL850SL
Durable and strong, the leather holster offers the best protection
for your BR850TM radio.
Nylon Holster xed belt loop
HN850L
Durable and strong, nylon holster offers great protection for
your BR850TM radio.
Copyright © 2012 Discount Two-Way Radio Corporation - North American Distributor
37
BR850TM Professional Two-Way Radio Instruction Manual
Optional Accessories continued
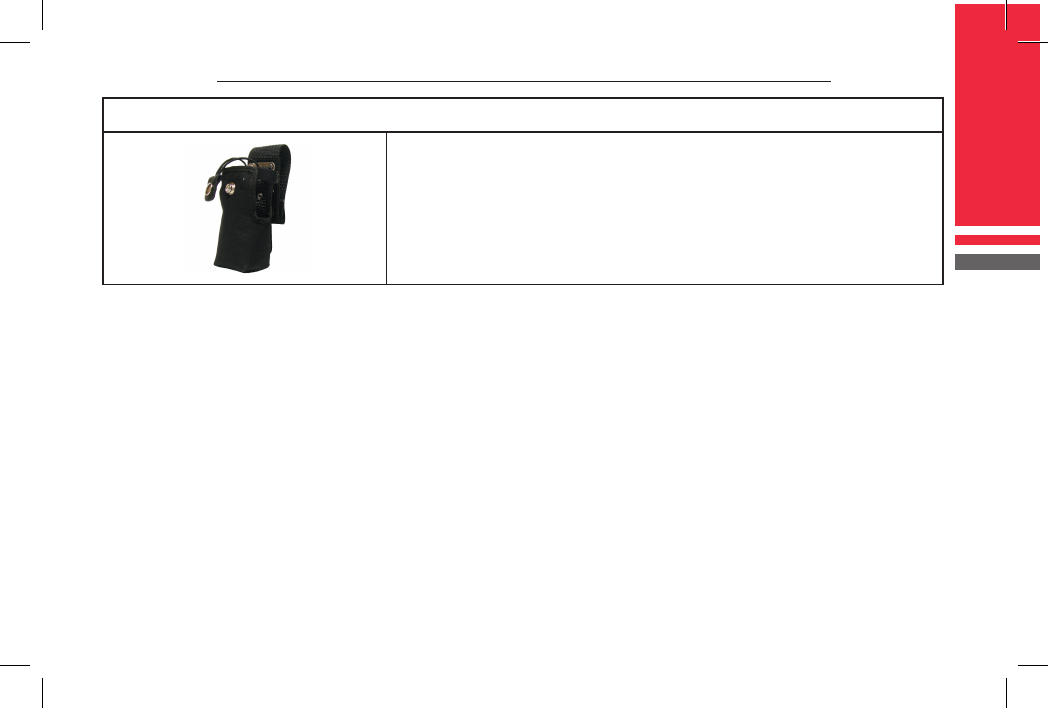
Nylon Holster w/ swivel belt loop
HN850SL
Durable and strong, nylon holster offers great protection for
your BR850TM radio.
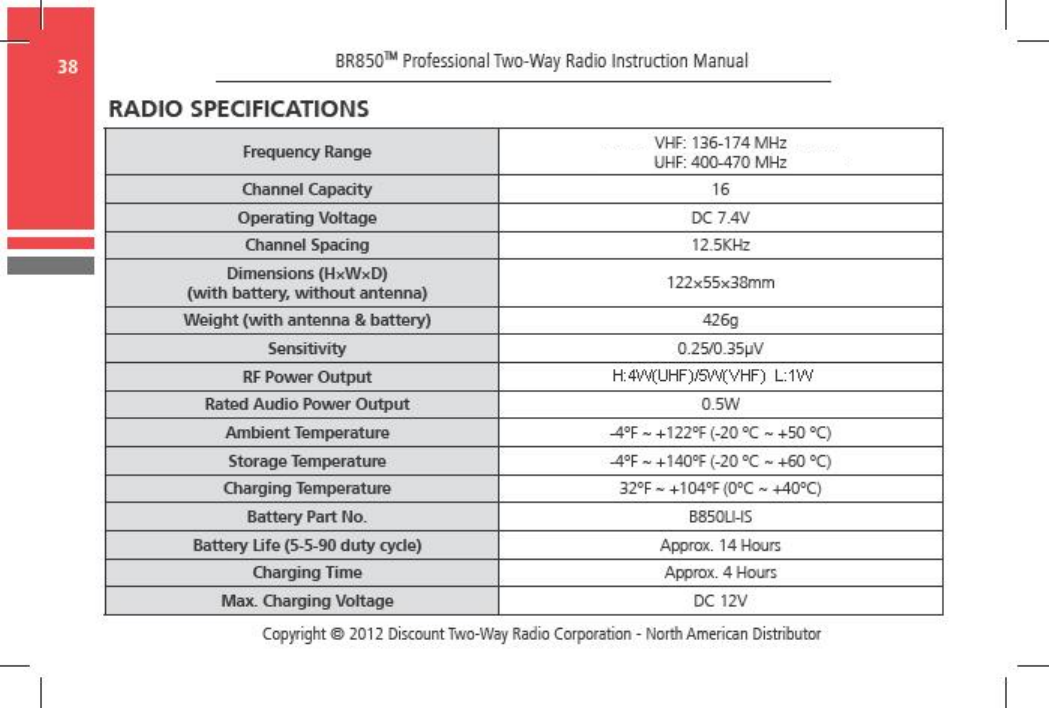

Copyright © 2012 Discount Two-Way Radio Corporation - North American Distributor
39
BR850TM Professional Two-Way Radio Instruction Manual
GLOSSARY
Short Press - Key press shorter than 1.5 seconds
Long Press - Key press longer than 1.5 seconds
Standby Status - In normal mode, no key operation is made on the radio and the radio is in
receiving status.
CTCSS/CDCSS - The setting of CTCSS/CDCSS code in transmitting party must match that in the
receiving party for the receiver to unmute its output audio.
Battery Save - The function is to save battery power and prolong the operation time. Once no
activity or operations are occurring on the channel, the radio will be on and off alternately.
Time-out Timer (TOT) - The time-out timer feature stops someone from talking too long and tying
up the channel.
Squelch - The purpose of squelch is to mute audio output from the speaker when no signals are
present. Open the squelch to unmute radio speaker.
Squelch Off - Always unmute speaker to receive audio as well as background noise.
Monitor - Carrier condition must be satised for the radio to unmute to an incoming call, regardless
of CTCSS/CDCSS condition.
continued >

Copyright © 2012 Discount Two-Way Radio Corporation - North American Distributor
BR850TM Professional Two-Way Radio Instruction Manual
40
Momentary - Hold down the Function key to activate the status, and release it to turn it off.
Scan - The scan feature enables the radio to continuously scan each channel for activity.
Busy Channel Lockout - Avoid interference with users on same channel by preventing transmission
if another talk group is already on the air.
VOX - The radio will automatically begin transmitting when you speak.
WARRANTY STATEMENT
RCA Communications Systems warrants each new radio product it supplies to be free from defects in
material and workmanship under normal use and service for the time period listed below, provided
that the user has complied with the requirements stated herein.
The warranty period begins on the date of purchase from an Authorized RCA Communications
Systems Sales and Service Outlet. This warranty is offered to the original end user and is not assignable
or transferable. RCA Communications Systems is not responsible for any ancillary equipment which
is attached to or used in conjunction with RCA Communications Systems products.
RCA Communications Systems offers to the original end user a Three (3) Year Limited Warranty on
the RCA BR850TM Radio Handset. The BR850TM Antenna, BR850TM Battery and the BR850TM Battery
Charger are covered under a One (1) Year Limited Warranty. The BR850TM Belt Clip is not covered
under the warranty.

Copyright © 2012 Discount Two-Way Radio Corporation - North American Distributor
41
BR850TM Professional Two-Way Radio Instruction Manual
During this period, if the product fails to function under normal use because of manufacturing
defect(s) or workmanship, it should be returned to the Authorized RCA Communications Systems
Sales and Service Outlet from which it was purchased. The Sales and Service Outlet will repair the
product to full operating specications or replace the product with a new product of the same
make and model. The user is responsible for all charges incurred in returning the product to the
Authorized RCA Communications Systems Sales and Service Outlet. RCA Communications Systems
will be responsible for all charges in returning the product to the end user via standard ground
shipping service.
RCA Communications Systems shall have no obligation to repair or replace the product, if there
is damage as a result of normal wear and tear or if the damage is caused in whole or in part by
catastrophe, fault or negligence of the user, improper or unauthorized alterations or repairs to the
product, incorrect wiring, use of the product in a manner for which it was not designed, or by
causes external to the product. This warranty is void if the product serial number is altered, defaced
or removed.
THE EXPRESS WARRANTIES CONTAINED HEREIN ARE IN LIEU OF ALL OTHER WARRANTIES, EITHER
EXPRESSED OR IMPLIED OR STATUTORY, INCLUDING, WITHOUT LIMITATION, ANY WARRANTY OF
MERCHANTABILITY OR FITNESS FOR A PARTICULAR PURPOSE.
FOR ANY PRODUCT WHICH DOES NOT COMPLY WITH THE WARRANTY SPECIFIED, THE SOLE
REMEDY WILL BE REPAIR OR REPLACEMENT. IN NO EVENT WILL RCA COMMUNICATIONS SYSTEMS
BE LIABLE TO THE BUYER OR ITS CUSTOMERS FOR ANY DAMAGES, INCLUDING ANY SPECIAL,

Copyright © 2012 Discount Two-Way Radio Corporation - North American Distributor
BR850TM Professional Two-Way Radio Instruction Manual
42
INCIDENTAL, INDIRECT OR CONSEQUENTIAL DAMAGES, OR THE LOSS OF PROFIT, REVENUE OR
DATA ARISING OUT OF THE USE OR THE INABILITY TO USE THE PRODUCT.
RCA Communications Systems endeavors to achieve the accuracy and completeness of this
manual, but is not liable for any possible omission and printing mistakes.
All the above specications and design are subject to change without prior notice.
All the reproduction and translation of this manual without authorization is prohibited.
In this manual, we strive to achieve accuracy and completeness, but provide no warranty of
accuracy or reliability. All the above specications and design are subject to change without notice
due to continuous development.
No part of this manual may be copied, reproduced, translated, stored in a retrieval system,
distributed, or transmitted in any form or by any means, electronic or mechanical, for any purpose
without the expressed, written permission from RCA Communications Systems.
The end-user of any two-way radio is solely responsible for obtaining any license or other
authorizations required by the Federal Communications Commission (FCC). For further
information visit www.fcc.gov or call 1-888-CALL-FCC (1-888-225-5322).

Copyright © 2012 Discount Two-Way Radio Corporation - North American Distributor
43
BR850TM Professional Two-Way Radio Instruction Manual
For Sales, Warranty and Customer Support please contact:
Discount Two-Way Radio Corporation – North American Distributor
1430 240th Street
Harbor City, CA 90710
Phone: 310-224-5100 / Fax: 310-224-5101
www.discounttwo-wayradio.com
RCA COMMUNICATIONS SYSTEMS strives to achieve accuracy and completeness of this manual,
but no warranty of accuracy or reliability is given. All the above specications and design are subject
to change without notice due to continuous development.
No part of this manual may be copied, reproduced, translated, stored in a retrieval system,
distributed, or transmitted in any form or by any means, electronic or mechanical, for any purpose
without the express written permission of RCA.

Copyright © 2012 Discount Two-Way Radio Corporation - North American Distributor
BR850TM Professional Two-Way Radio Instruction Manual
44
NOTES:
PO Box 80222
Indianapolis, IN 46240
Phone: (877) 822-2915
Fax: (317) 536-3718
The Most Trusted Name In Radios
PO Box 80222
Indianapolis, IN 46240
Phone: (877) 822-2915
Fax: (317) 536-3718
The Most Trusted Name In Radios
RF Energy Exposure Awareness and Control Information and Operational Instructions for Occupational Use
NOTICE: This radio is intended for use in occupational / controlled conditions where users have full knowledge of their exposure and can exercise control over their exposure to
meet the occupational limits in FCC and International standards. This radio device is NOT authorized for general population consumer use.
This two-way radio uses electromagnetic energy in the radio frequency (RF) spectrum to provide communications between two or more users over a distance. It uses radio
frequency (RF) energy or radio waves to send and receive calls. RF energy is one form of electromagnetic energy. Other forms include, but are not limited to, sunlight and x-rays.
RF energy, however, should not be confused with these other forms of electromagnetic energy, which when used improperly, can cause biological damage. Very high levels of
x-rays, for example, can damage tissues and genetic material.
Experts in science, engineering, medicine, health, and industry work with organizations to develop standards for safe exposure to RF energy. These standards provide
recommended levels of RF exposure for both workers and the general public. These recommended RF exposure levels include substantial margins of protection.
All RCA Communications Systems’ two-way radios are designed, manufactured, and tested to ensure they meet government-established RF exposure levels. In addition,
manufacturers also recommend specic operating instructions to users of two-way radios. These instructions are important because they inform users about RF energy exposure
and provide simple procedures on how to control it.
Please refer to the following websites for more information on what RF energy exposure is and how to control your exposure to assure compliance with established RF exposure
limits:
http://www.fcc.gov/oet/rfsafety/rf-faqs.html
http://www.osha.gov/SLTC/radiofrequencyradiation/index.html
Federal Communication Commission (FCC) Regulations
The FCC rules require manufacturers to comply with the FCC RF energy exposure limits for portable two-way radios before they can be marketed in the U.S. When two-way
radios are used as a consequence of employment, the FCC requires users to be fully aware of and able to control their exposure to meet occupational requirements. Exposure
awareness can be facilitated by the use of a product label directing users to specic user awareness information. RCA Communications Systems’ two-way radio has a RF Exposure
Product Label. Also, RCA Communications Systems’ user manual or separate safety booklet includes information and operating instructions required to control your RF exposure
and to satisfy compliance requirements.
Compliance with RF Exposure Standards
RCA Communications Systems’ two-way radio is designed and tested to comply with a number of national and International standards and guidelines (listed below) for human
exposure to radio frequency electromagnetic energy. This radio complies with the IEEE (FCC) and ICNIRP exposure limits for occupational / controlled RF exposure environments
at operating duty factors of up to 50% talk - 50% listen and is authorized by the FCC for occupational use only. In terms of measuring RF energy for compliance with these
exposure guidelines, your radio generates measurable RF energy only while it is transmitting (during talking), not when it is receiving (listening) or in standby mode.
RCA Communications Systems’ two-way radio complies with the following RF energy exposure standards and guidelines:
• United States Federal Communications Commission, Code of Federal Regulations; 47CFR part 2 sub-part J
• Ministry of Health (Canada) Safety Code 6. Limits of Human Exposure to Radio frequency Electromagnetic Fields in the Frequency Range from 3 kHz to 300 GHz, 1999
• Australian Communications Authority Radio Communications (Electromagnetic Radiation - Human Exposure) Standard, 2003
PO Box 80222
Indianapolis, IN 46240
Phone: (877) 822-2915
Fax: (317) 536-3718
The Most Trusted Name In Radios

• American National Standards Institute (ANSI) & Institute of Electrical and Electronic Engineers (IEEE) C95.1-1992
• Institute of Electrical and Electronic Engineers (IEEE) C95.1-2005 Edition
• International Commission on Non-Ionizing Radiation Protection (lCNIRP) 1998
• ANATEL ANNEX to Resolution No. 303 of July 2, 2002 “Regulation of limitation of exposure to electrical, magnetic and electromagnetic eld in the radio frequency
range between 9 KHz and 300GHz “and “Attachment to resolution # 303 from July 2, 2002.”
RF Exposure Compliance and Control Guidelines and Operating Instructions
To control your exposure and ensure compliance with the occupational / controlled environment exposure limits, always adhere to the following procedures.
Guidelines:
• Do not remove the RF Exposure label from the device.
• User awareness instructions should accompany device when transferred to other users.
• Do not use this device if the operational requirements described herein are not met.
Operating Instructions
• Transmit no more than the rated duty factor of 50% of the time. To transmit (talk), push the Push-To-Talk (PTT) button. To receive calls, release the PTT button.
Transmitting 50% of the time, or less, is important because this radio generates measurable RF energy exposure only when transmitting (in terms of measuring for
standards compliance).
Two-Way Radio Operation
• Hold the radio in a vertical position in front of the face with the microphone (and other parts of the radio including the antenna) at least one inch (2.5 centimeters)
away from the nose or lips. Antenna should be kept away from the eye. Keeping the radio at a proper distance is important since RF exposures decrease with
increasing distance from the antenna.
Body Worn Operation
• When worn on the body, always place the radio in a RCA Communications Systems -approved clip, holder, holster, case, or body harness for this product. Using
approved body worn accessories is important because the use of non- RCA Communications Systems -approved accessories may result in exposure levels, which exceed
the FCC occupational/controlled environment RF exposure limits.
• If you are not using a body-worn accessory and are not using the radio in the intended use position in front of the face, ensure the antenna and the radio are kept at
least one inch (2.5 centimeters) from the body when transmitting. Keeping the radio at a proper distance is important because RF exposures decrease with increasing
distance from the antenna.
• DO NOT hold the antenna when the radio is transmitting. Holding the antenna affects call quality and may cause the radio product to operate at higher or lower
level than needed.
• DO NOT touch the metal surface of the antenna (in extended position) when he radio is transmitting. RF discomfort may result.
Use only RCA-approved supplied or replacement antennas, batteries, and accessories. Use of non-RCA-approved antennas, batteries, and accessories may exceed the FCC (IEEE)
and ICNIRP RF exposure guidelines.