RCA Direct View Digital 27 To 40 TV Manual 97090177
User Manual: RCA RCA Direct View Digital 27 to 40 TV Manual RCA Direct View Digital 27 to 40 TV Owner's Manual, RCA Direct View Digital 27 to 40 TV installation guides
Open the PDF directly: View PDF ![]() .
.
Page Count: 63
Model: PS35153
Features
First-Time Operation
¢
Pt_
Detailed Operating Instructions
4Remote Control (TV Function,,)
8 PiP (Picture-m-picture) Oper,mon
11 Front Panel Controls
12 Video Menu
13 Audio Menu
14 Graphic Equalizer
16 Stereo and SAP Broadcasts
17 Expanded Stereo and Surround Sound Audio
20 Setup Menu
21 Closed Captioning
Monitor Panel
35 Tips Before Connecting
36 Monitor Panel
.-)._
"_3
24
25
26
2?,
28
29
3('
31
3.3
Sle_p -Fimer
Alarm
Labehng Channels
Parental Control
Programn-ing Channel Memory _
Adding ard Erasing Channels
Setting up VCR Channels ""
Ch_mglng Antenna Inpat
Setting up Cable Box Channel
Progr_mrr,ing Remote to Control VCR_
Programming Remote Io Control Audio
Connections
38
39
41
42
43
45
46
48
Home Antenna Connecttons
Cable-TV Connections
Programming Remote to Control Ca01e Box
Cable-TV Information and (hamml Chart
VCR Connecuonb
Camcorder Connections
Amplifier or Cassette Tape Deck
External or Surround Speakers
Reference Section
50 Trouble Checks
52 Warranty
52 Design Specificauons
53 Cleaning and ('are
54 Cables and Optional Accessone,,,
55 Accessory Order Form
Index (Inside Back Cover)
Quick-Refelence Grade tlnslde Back Cover)
€
€

PRC)SCAN
So advanced. Yet so simple. FM
We're building our reputation on products that are so
advanced, they're simple. If you want all the benefits of
the latest technology, without the complexity, we have a
very simple ..solution.
It's called ProScan. State-of-the-art technology that real
people can use.
Thank you for choosing ProScan. And welcome to our
company-wide commitment to your complete satisfaction
and viewing enjoymem.
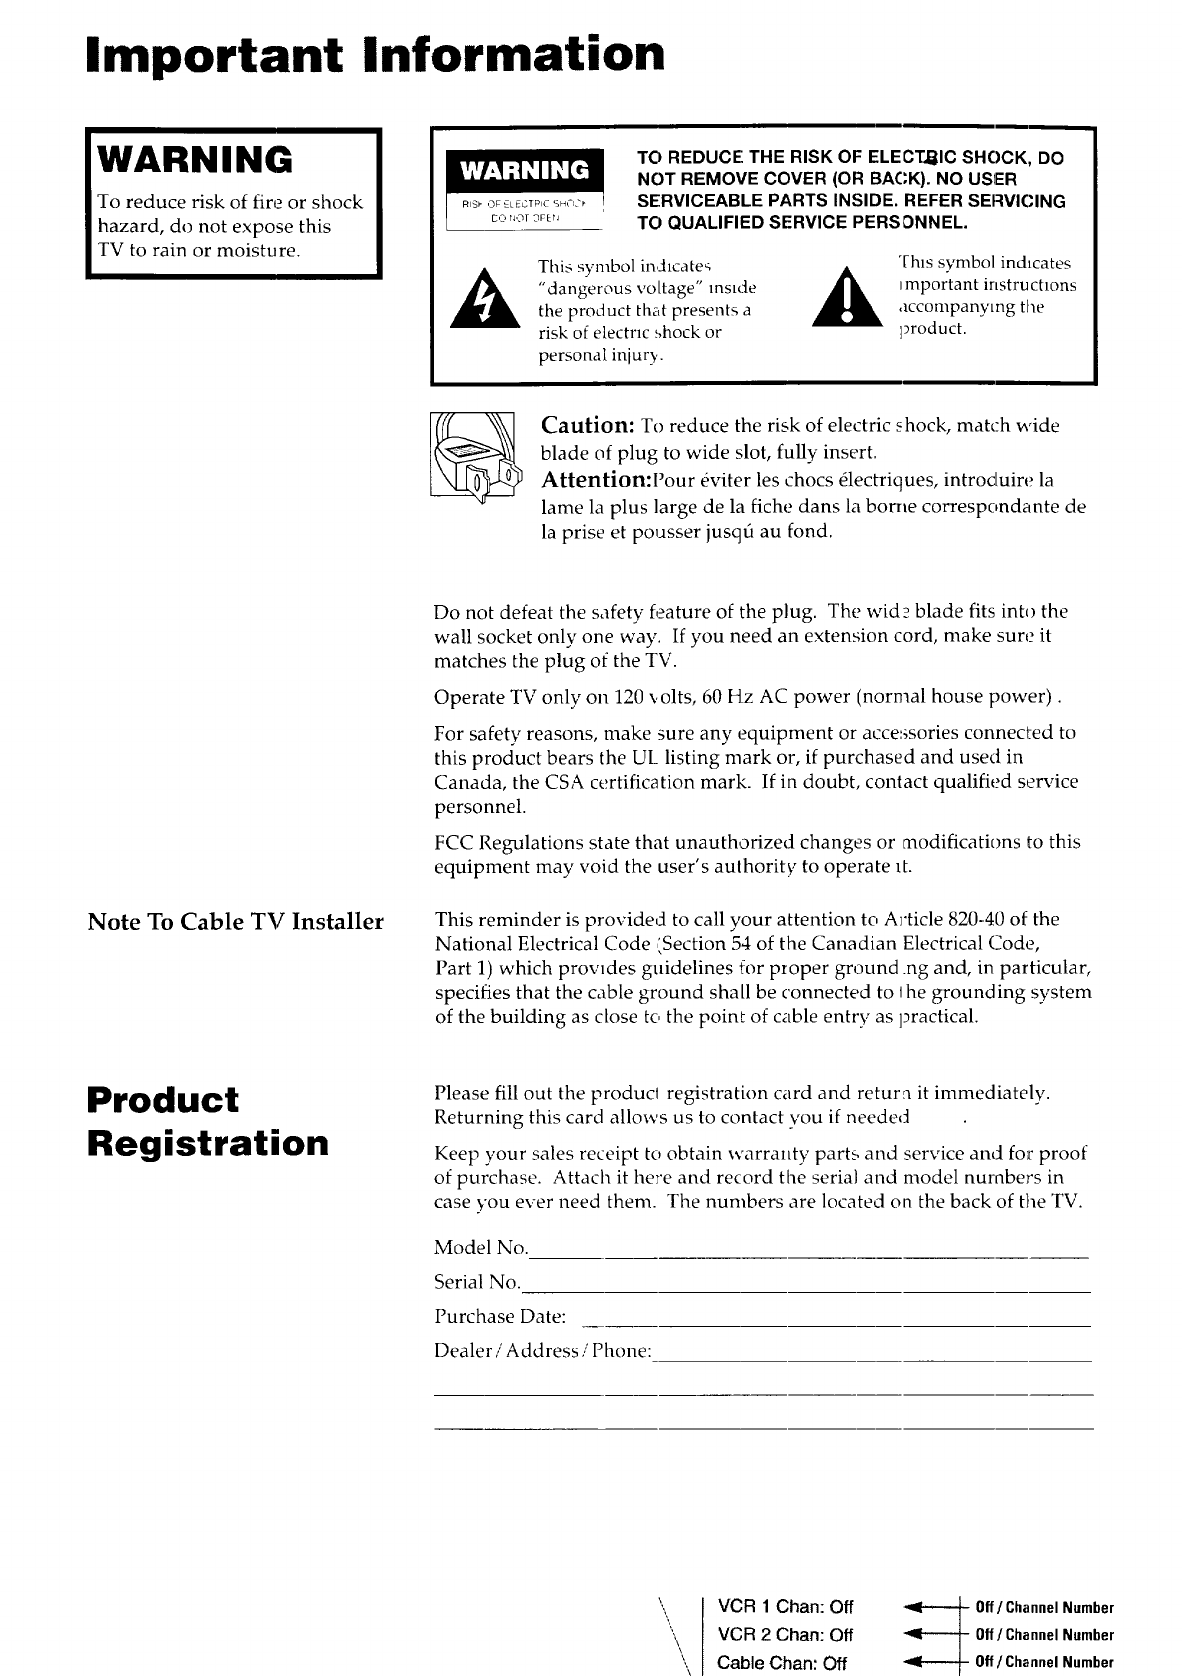
Important Information
WARNING
To reduce risk of fire or shock
hazard, do not expose this
TV to rain or moisture.
TO REDUCE THE RISK OF ELECTRIC SHOCK, DO
NOT REMOVE COVER (OR BACK). NO USFER
SERVICEABLE PARTS INSIDE. REFER SEF:WICING
TO QUALIFIED SERVICE PERSONNEL.
This symbol in,dlcate_
"dangerous voltage" msMe
the product that presents a
risk of electric .',hock or
personal iniur.y.
This symbol indicates
_mportant instruchons
accompanying the
product.
Caution: To reduce the risk of electric shock, match wide
blade of plug to wide slot, fully insert.
Attention:Pour eviler les chocs Olectriques, introduire la
lame la plus large de la fiche dans la borne correspondante de
la prise et pousser jusqfi au fond.
Note To Cable TV Installer
Do not defeat the safety feature of the plug. The wid? blade fits into the
wall socket only one way. If you need an extension cord, make sure it
matches the plug of the TV.
Operate TV only on 120 x,olts, 60 Hz AC power (normal house power).
For safety reasons, make sure any equipment or accessories connected to
this product bears the UL listing mark or, if purchased and used in
Canada, the CSA certification mark. If in doubt, contact qualified service
personnel.
FCC Regulations state that unauthorized changes or modifications to this
equipment may void the user's authority to operate 1L
This reminder is provided to call your attention to A]'ticle 820-40 of the
National Electrical Code ,',Section 54 of the Canadian Electrical Code,
Part 1) which prowdes guidelines {or proper ground .ng and, in particular,
specifies that the cable ground shall be connected to lhe grounding system
of the building as close to the point of cable entry as practical.
Product
Registration
Please fill out the produd registration card and return it imnlediately.
Returning this card allows us to contact vou if needed
Keep };our sales receipt to obtain warranty parts and service and for proof
of purchase. Attach it here and record the serial and model numbers in
case you ever need them. The numbers are located on the back of the TV.
Model No.
Serial No.
Purchase Date:
Dealer /Address /Phone:
",,,
\\
\
\
VCR 1Chan: Off
VCR 2 Chart: Off
Cable Chan: Off
Off/Channel Number
Off/Channel Number
Off/ChannelNumber
So Advanced. Yet So Simple.
Your ProScan television is more than state-of-the-art
technology. It's tcchnology tailored to you. Features
dcsigncd to dclivcr viewing and listening cnjoymcnl
beyond expectations. Innovation and simplicity of
operation becoine onc-ProScan.
ImprovingYour Image
•A Cleaner Picture: The Digital Comb l:iltcr cxtcnds resolution
and minimizes color int,trference pancrns for grealcr dclail.
•Nn (;lai'e _ Picture: iX,nti (iNuc lAth)ran Silicate Faccpla:c'
virtually eliminates glare while enhancing contrast.
• Increased Clarity: Up to 560 lines of horizontal resolution,*
surpass)he Ihe capabilities of all avaihlble signal sources.
:: through S-VIDEO conncctor.
SoundThinking
• Dolby* Surround Sound recreates the audio experience of a
movie theater by decoding the surround sound signal on most
prerecorded VHSihi-fi tapes (with optional speakers). For details,
see pages 18-19.
• Acoustic Suspension Speaker Syste'm sealed enclosures and high
compliance speakers provide higher fidelity and extended bass.
response.
• On-Screen Graphic Equalizer permits precise adjustment of
seven frequency bands Io complement your room's acoustics:
For details, see pages 14.
• 10 Watts Per Channel **
• dbx*** Noise Reduction
• Second Audio Program (SAP)For details, seepage 16.
• Dolby is a registered trademark of Dolby l.aboratories Licensing Corp.
• * RMS rating, into 8 ohms, 50 .to 20,000 Hz +_3db, with less than
1% THD.
• **dbx is a registered trademark of Carillon Electronics Corp.
Creative Entertainment
•Advanced Color Picture-in-Picture lets you watch two programs
at once (with VCR).
SWAP, MOVE/ FREEZE - for viewing convcnicncc.
•CHANNEL GUIDE - displays a still picture of 12 channels at one time
for a quick review of available programs.
plx ZOOM -- enlarges any desired video image for a closer look.
PIX PAN -- lets you mow: across the enlarged video image to select
any portion for v!ewing.
For details, see pages 8 and <_-10.
• Channel Labeling lets you hlbel channel numbers with tip to
4-letter names reg. NBC, VH-1, ESPN). For details, see page24.
OneMinute Manual
•{-In-Screen Menus for simple operation of picture, sound, and set-
up functions by remote control.
•AutoProgramming autonaatically searches for and stores all
active channels. Eliminates the need ff_r manual set-up. For
details, see page 20.
• Frequent-)' Synthesis Tuning automatically and accurately tunes
each channcl.
•Automatic VCR Setup with the push of a button, your TV is ready
for VCR play: both TV and V('R turn on and TV tunes to correct
channel/input, l"or details, seepage2&
• Automatic Cable Box Setup offers convenience when cable
company requires you to use cable box. For detai& see page .70.
• On-Screen Clock/Channel Display For detail.s, see page 11.
• Picture Reset For detail,_, see page 12.
Connections
(;old Phited I'hono ,Jacks fitr Snpvrinr Perfornuince:
• Two Sets of Audin/Video Inputs for VCR, Laser Disc player,
Camcorder ,etc. For details, see pares 36-3Z
• ()ne Set nf And)n/Video Outputs for vidco dubbing. For details,
see pages 30-37.
•{-)ne Set of'Volume-Controlled Audio Outputs(HI-R) to retain
]emote volumc when connected tc an external amplifier. For
,Ic._,_M. _,'c !,a,_c 4S.
• line Set of Vnlunie-Contrnlled SURR Audio Outputs Io connect
I:he surround sound to an external amplifier. For details, see
i_,';£,e 47.
Other ('lmnections to Expand YolF System:
• S-Video input cmmector for dire,:t input to your S-VHS VCR,
Camcorder, etc. t:or details, see pages 36-3Z
••Four Speaker Jacks to allow hook up of optional external or
,urround sound speakers. For det:dls, see pages 4S-49.
• Dual RF Inputs t,, allow direct ct,nnection of up to two basic
cable, cable box, or other RF sources. For details, .,(ee pages 36.
• Front-Mounted Stereo tleadphcne Jack for private listening
with optional headphones. For &tails, seepage 1I.
At YourCommand
• The PROSCAN Universal Remote is preprogrammcd so there's no
need to teach additional or new c_ des. Operation is as easy as "
entering a channel. It operate.,; all major ProScan TV and VCR
functions. Operates the basic :functions of 81 different VCR
brands and 39 different brands of :able boxes, eliminating the need
for additional remotes.
• Fhe PROSCAN Sitnple Remote 6 buttons control everyday TV
functions for the ultimate in simplicity.
At YourService
Our Human Touch policy offe:'s all these valuable
benefits:
•1-800-PROSCAN Call our information service any time
Monday - F'riday, 9:0(I A.M. to 6:)0 P.M. EsT.
• Nationwide Independent Authorized Service Centers
• PROSCAN Limited Warranty for U.S.A. ln-homc service of all
parts and labor for one year, picture tube for two years. For
details see page'{2.
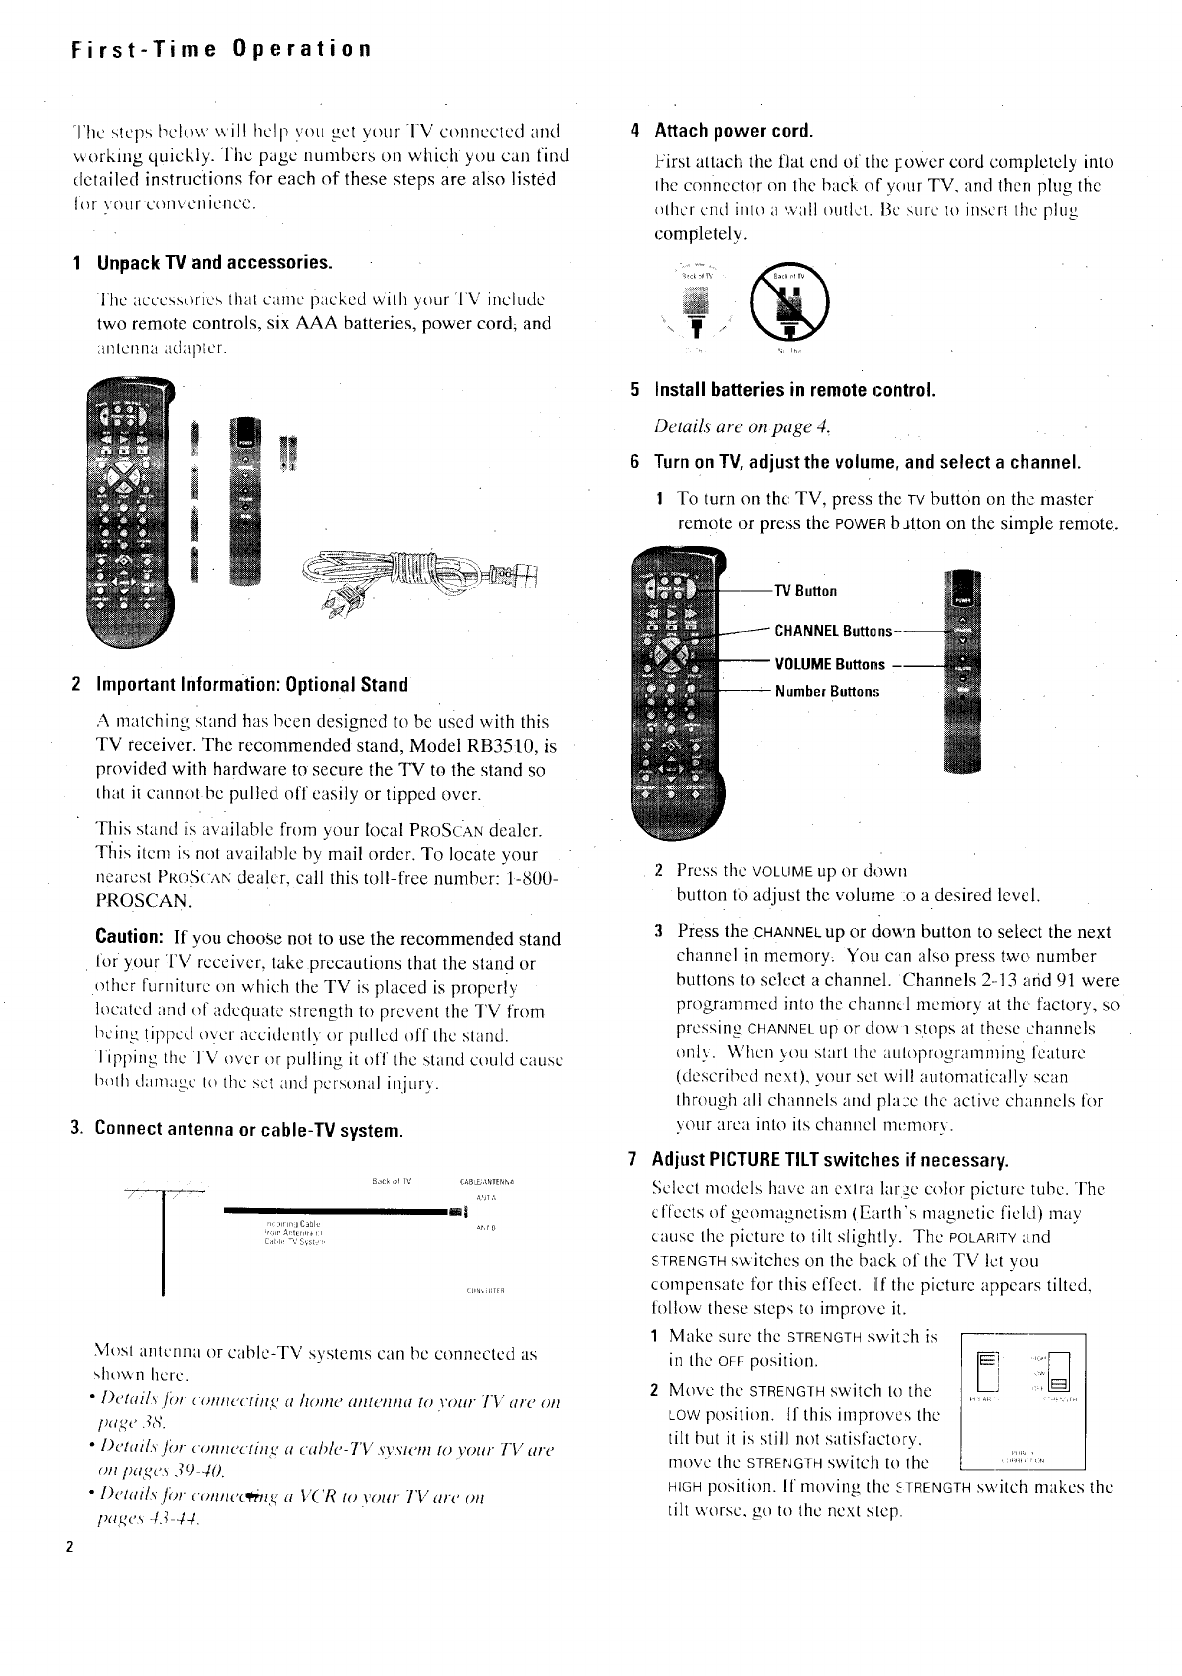
First-Time Operation
G'hc steps bel,._w will help vet] _-ct .','cur TV omnected and
,a orkmg quickly. lhc page numbers on which you can find
detailed instructions for each of these steps are also listed
I{H \'{)tI[ COT/VCIliCRCC.
Unpack TV and accessories.
]he ac'ccssorR'_ real came packed wilh }our 1\/ im:lude
two remote controls, six AAA batteries, power cord. and
_il] [C nl]JJ ddap[cl-.
!
t
i
1'WT-_
@r#
Attach power cord.
]Sirst attact_, the flat end of the l:owcr cord completely into
lhe connector on the back of v{mr TV. and then plug the
{}thor end inh} a wall outlet. Fic >,tile It} insert thc plug
completely.
¥
5Install batteries in remote control.
Details are' on page 4.
6Turn on TV adjust the volume, and select a channel.
1 To turn on th{ TV. press the TVbutton on the master
remote or press the POWERbJtton on the simple remote.
Bu_on
2 ImportantInformation:Optional Stand
A matching stand has been designed to be used with this
TV receiver. The recommended stand, Model RB3510. is
provided with hardware to secure the TV to the stand so
that it cannot be pulled off easily or tipped over.
This stand _<:available fr{}nqyour local PROSCANdealer.
Tfiis item is not available by mail order. To locate your
nearesI PR{_ScANdealer, call this toll-free number: 1-8{/0-
PROSCAN.
Caution: If vou choose not to use the recommended stand
lot your TV receiver, take precautions that the sland or
other furniture on which the TV is placed is properl 3
located and of adequate strength to prevent the TV from
being !ippo, l over accidentlv or pulled off the stand.
]ipl)ing the 1 V over t}r pulling it off the stan.d could cause
hoih d;ill/ap>c I{} the set and personal ii]jtu').
3. Connect antenna or cable-TV system.
8ae_ ol rV ca,Bf, auten_,_
_ 4,Jr ,',
itl
C_t,h, -_' S_st:, ,,
Most antenna or cable-TV systems can be connected as
shown here.
•I){'tails ft, c()#m('c[i#t<c_a/t(,ndanl_'nna to wmr TV ard on
Fag{, .T&
•l){'miL_ Jbr ('omwclm<c, a ca/}l{'-TV .Tv/(>m to your TV ard
on/)aR{,.s .7{) 40.
•[){>ltlilxjbr {'()/lll{,(_il>#lq, a V('R to volt#- TV arc {)It
pa<gcs43-44.
Number Button,,;
Press the VOLUME up o[ down
button to adjust the volume .o a desired level.
Press the CHANNELup or down button to select the next
channel in memory. You can also press two number
buttons to select a channel. Channels 2-.13 and 91 were
programmed into the channel memory at the factory, so
pressing CHANNEL up Or dow 1 s.tops at these channels
onl\. When 5,ou start Ihc atiloprogramming feature
(described next), your set will automatically scan
through all channels and pla:e lhe active channels for
your area into its chanllel nlcmor_,.
Adjust PICTURE TILT switches if necessary.
Select models have an exlra lar7e color picture tuhc, The
clfects of geomagnetism (Earth's magnetic fieM) may
cause the picture to tilt slightly. The POLARITY:lnd
STRENGTH s'witches on the back c}l the TV let you
compensate for this effect, l[fthe picture appears tilted,
follow' these steps to improve it.
1 Make sure the STRENGTH switch is
2Move the STRENGTH switch to the
LOWposition, tf this improves the
tilt but it is still not satisfactory, p..,,
move the STRENGTHswitch to the ...............
HIGHposition. If moving the STRENGTHswitch makes the
tilt worse, ><,oto the next step.
3 Change lhe position of Ille .POLARITY swilch, lr this
improves tile tilt bulil is still i1o1 satislactoly, move Ihc
STRENGTH switch l:o the HIGH position. This should
corrccl the siluafi, m.You may need to reset the POLARITY
and STRENGTH switches if the TV is moved or
repositioned in th0 room, especia!ly if the TV will be
facing a different direction.
8 AutoProgramthe TV's channel memory.
7"o start the TV auh)t)rogranmlin _ itself, press lhe MENU
butt,on repeatedly to select the seTuP MENUand lhen
press the + button to display the setup functions. Press
MENU again.to select the AUTOPROGRAMfunction, then
press + Details are on paL'e 26.
Mute Set-Alarm
Video.Menu Chart Label
Audio Menu Parental Ctrl: Off
Chan Ctrl: Normal- _o_
You can also add and delete channels from memory as
desired. Press MENU repeatedly to select the SETUP
MENU. then press + to display the setup functions. Press
MENU repeatedly to select the THAN MEM function, then
select the desired channel number and press + to add or
to erase the channel Details are on page. 27.
Mute "
Video Menu
Audio Menu
Setthe clock.
Chan Label
Parental Ctrl: Off
Chan Ctrl: Normal
1Repeatedly press, the MENUbutton to select the SETUP
MENUand then press +. Press MENUrepeatedly again to
select the CLOCK:SET display.
Mute Cable/Air: Cable
Video Menu VCR 1 Than: Off
Audio Menu VCR 2 Chan: Off
Cable Than: Off
Ill l'i'l'l,,'tt,,-,l?'dm_"likll i_Iii m
ik,%'dll[l!lliF21
Press and hold the - button tt) select the correct hour.
Then press and hold the + button to select the correct
minute.
The correct time ,,viii now appear on the screen
whenever you change channels or press the DISPLAY
button.
Note: It po',', cr is interrupted for {111cxlcndcd timc, VOtl ;viii nccd
to rcscl Ihc clock.
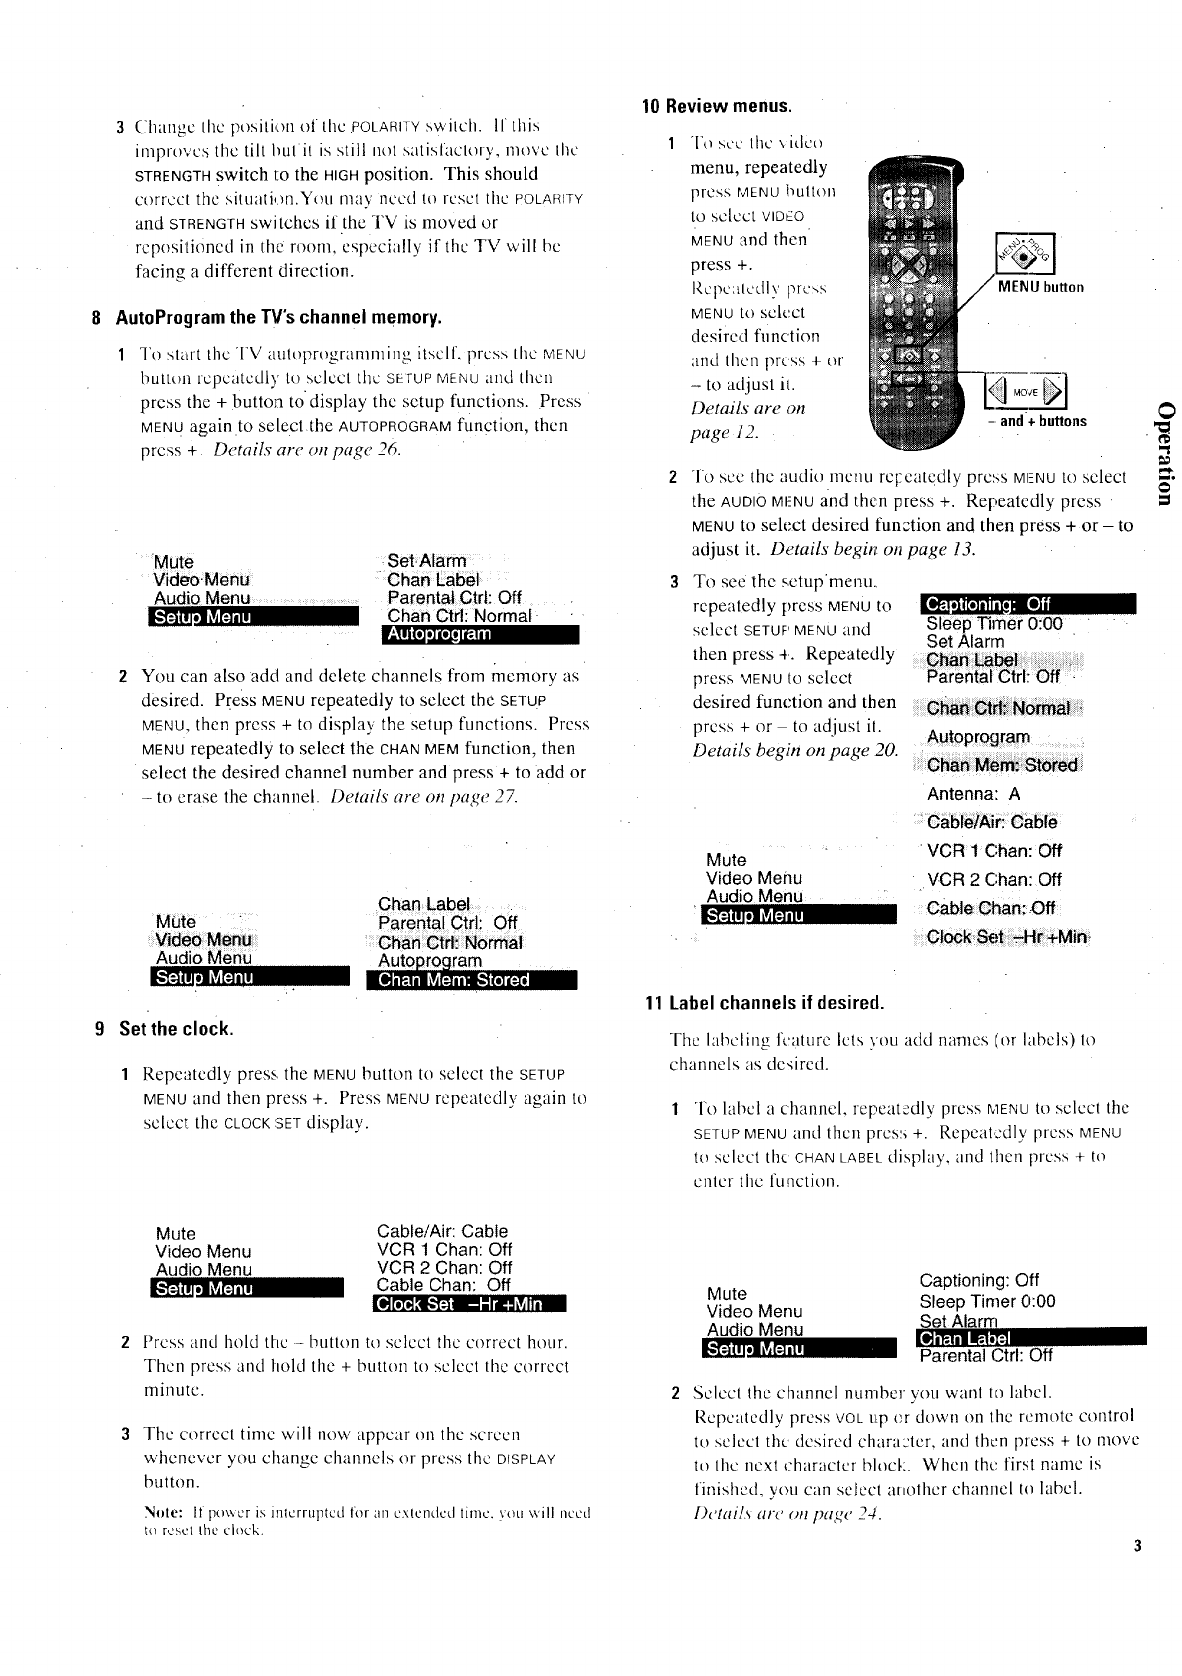
10 Review menus.
1"1"osec the xidco
menu, repeatedly
press MENU !'_ulloll
to select VIDEO
MENUand then
press +.
I,tcl)C:tledly press
MENU 10 select
desired fllnction
and then press + or
- to adjust it.
Details are on
page i2.
MENU button
-and+ buHons
]o ,-,c-c:the audio lneml ret:catqdly press MI-NU tO select
the AUDIOMENUand then press +. Repeatedly press
MENU10select desired function and then press + or - to
adjust it. Details begi_ on page 13.
To see 1he setupmenu.
repeatedly press MENUto
select SETUF MENU and
then press +. Repeatedly
press MENU10 select
desired function and then
press - or to adjust 11
Details begin on page 20.
Sleep Timer 0:00
Set Alarm
Chan Label
Parental Ctrl: Off -
Clian Ctd_:Normal.
Autoprogram
Chart Mem:, Stored
Antenna: A
Cable/Air: Cable
Mute
Video Menu
Audio Menu
VCR 1 Chan: Off
VCR 2 Chan: Off
Cable Chan: :Off
Clock Set -,-Hr+Min ,
11 Label channels if desired.
The labeling feature lets you add names (or labels) to
channels as desired.
To label a channel, repeatedly press MENUtO select the
SETUPMENUand then pres:_ +. Repeatedly press MENU
to select the CHANLABELdisplay, and then press + 1o
Pilfer the function.
Captioning: Off
Mute Sleep Timer 0:00
Video Menu
Audio Menu Set Alarm
CArl.Off
Parental " •
Select the channel number you walll to label.
Repcaledly press VOL t]:p cr down on the remote control
to select the desired chara:ter, and then press + to move
It) file nexl character blocL. When the first name is
finished, you can select another channel to label.
Detai/,_ are on page 24.
p
-2:
I
e
Remote Control" TV Functions
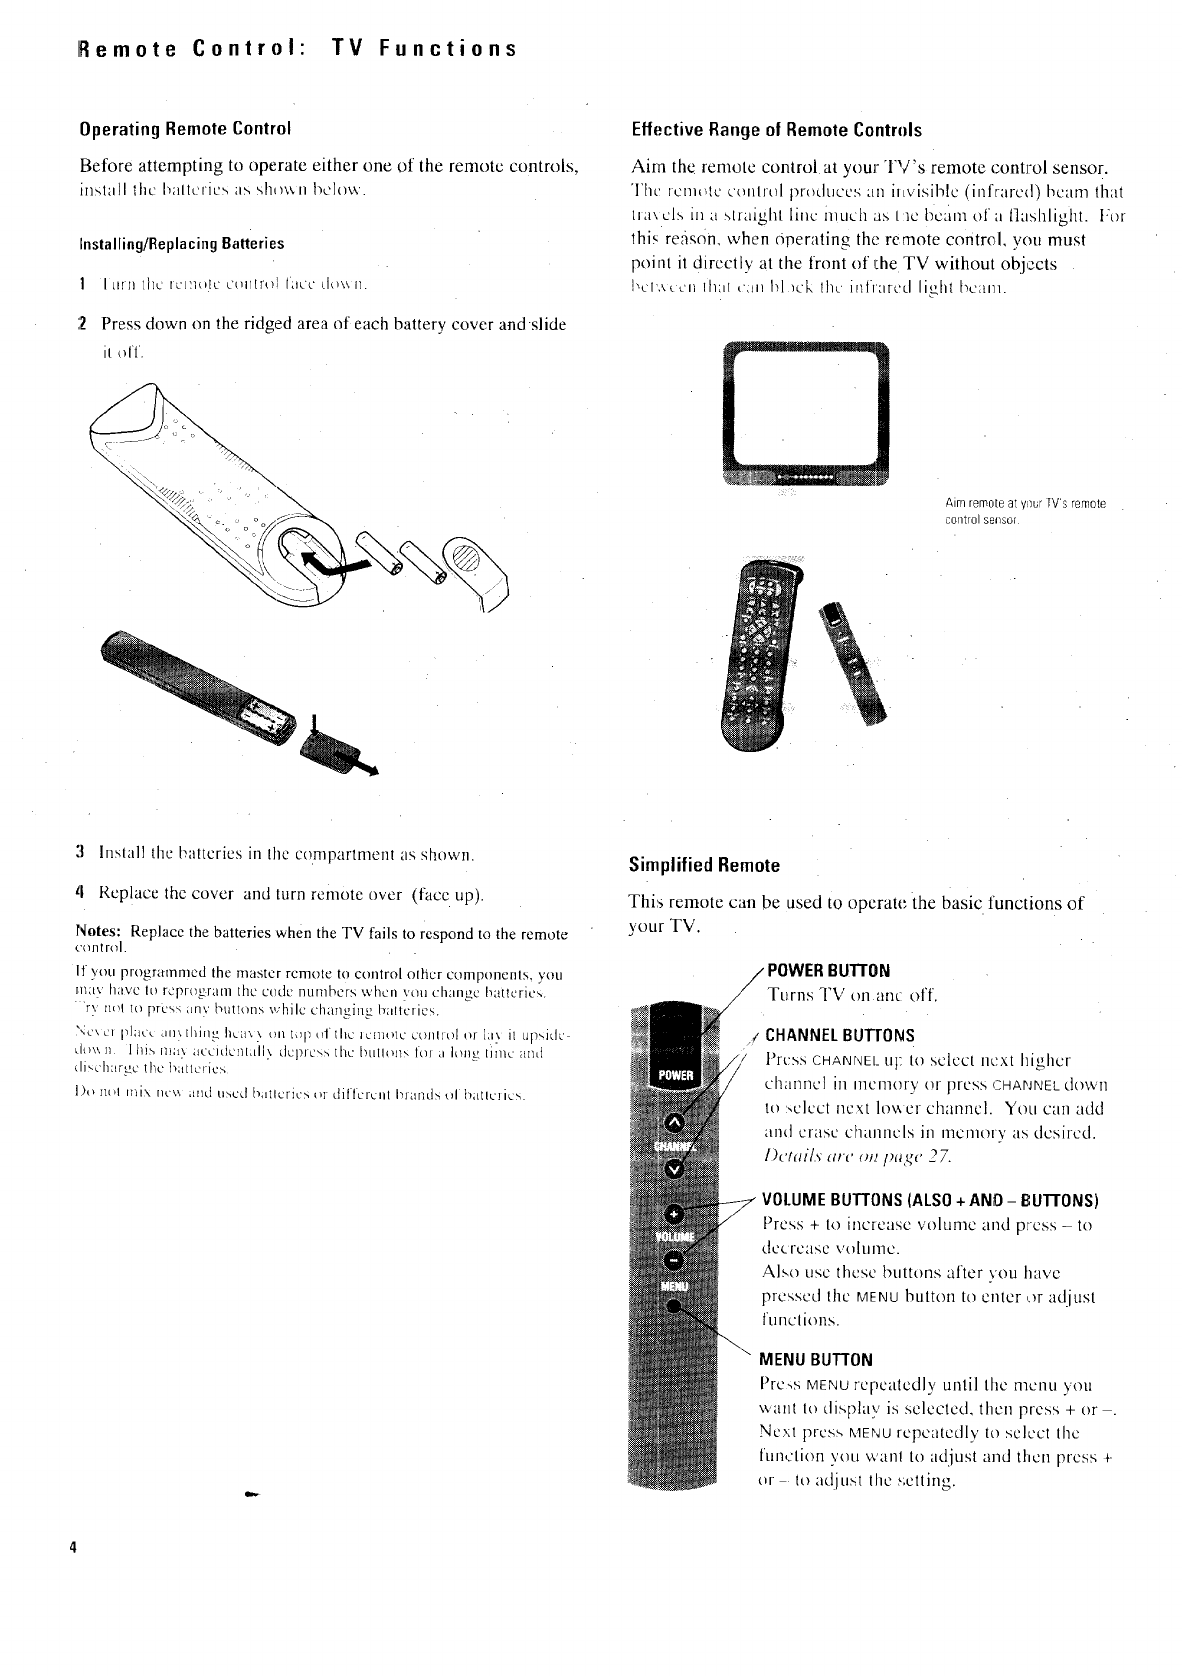
Operating Remote Control
Before attempting to operate either one of the remote controls,
install the I,',lltcrics as shay,,'.,n bcIo\v.
Installing/Replacing Batteries
! iLIII} [hL' IL']]IH[U __'_lll(['t)] [OL'L' till\\ I1.
2 Press down on the ridged area of each battery cover andslide
it off.
Effective Range ot Remote Controls
Aim the remote control at your TV's remote control sensor.
The Icmolc conlrol prodticcs ;in iltvisiblc (infrared) beam that
Ha\ cls in _l_haighl line much as llC bc:iln of il flashlight. For
this re<qs0n, when Operating the remote control, you must
poi nt it directly at the front of l:he TV without objocts
!'cl',_.ccllIHHIt'Hllhl_ckIlk'nfrarcdlighlbcanl.
A,rr/ remo[ e at v lbr TV's remora
comrc SSllSOr
3Install the batteries n] the co.mpartmenl as shown.
4Replace the cover and turn remote over (face. up).
Notes: Replace the batteries when the TV fails to respond to the remote
control.
If you programmed the master rcmote to control olticr componenls, you
may have 1o rcprogranl the c()dc numbers when you change haUcricx.
'r\' zl_l lo prcs<; ;IIIV buttons while charlging halicries.
"'-;<..x_'1 plcicc dll\[hillg Ileal\ \ ()11 till3 oflhc IvHI]OtL' L't)llllt)l or 1_1\ il up',Jdc
ch_\_n I hb, ma,, a*ccidcntall? clcpic',', lhc I)tilh'q>, for a long tilnc _uld
di<,ch;trgc the batteries
1)o I_ol mix n,..'\_. ;llld tlSt.'tl batteries oi diflcrcnl I_iancJs ol bath:] its.
Simplified Remote
This remote can be used to operate the basic functions of
),our TV.
POWER BUII'ON
Turns TV on ant off.
CHANNELBUTTONS
l'rcss CHANNLL uF to select next higher
channel in memory or press CHANNEL dowl]
to :,elect next lov,cr channel. Yoti can add
and erase channels in memory as desired.
l)ctail.v arc oL!pa<_e2Z
VOLUMEBUTTONS(ALSO+ANO-BuI-rONS)
Press +to increase volnmc and prcss - to
dec roast v(iltllllC.
Also use these buttons after you have
pressed the MENUbutton to enter or adjust
fu lad IO11S.
MENU BU'FrON
Prc,,s MENUrepeatedly until the menu you
want 1o display is selected, then press + or .
Ncxl press MENUrepeatedly to select lhc
function VOLtWalll tO adjust and then press +
or to adjust the _;clling.
Remote Control: TV Functions
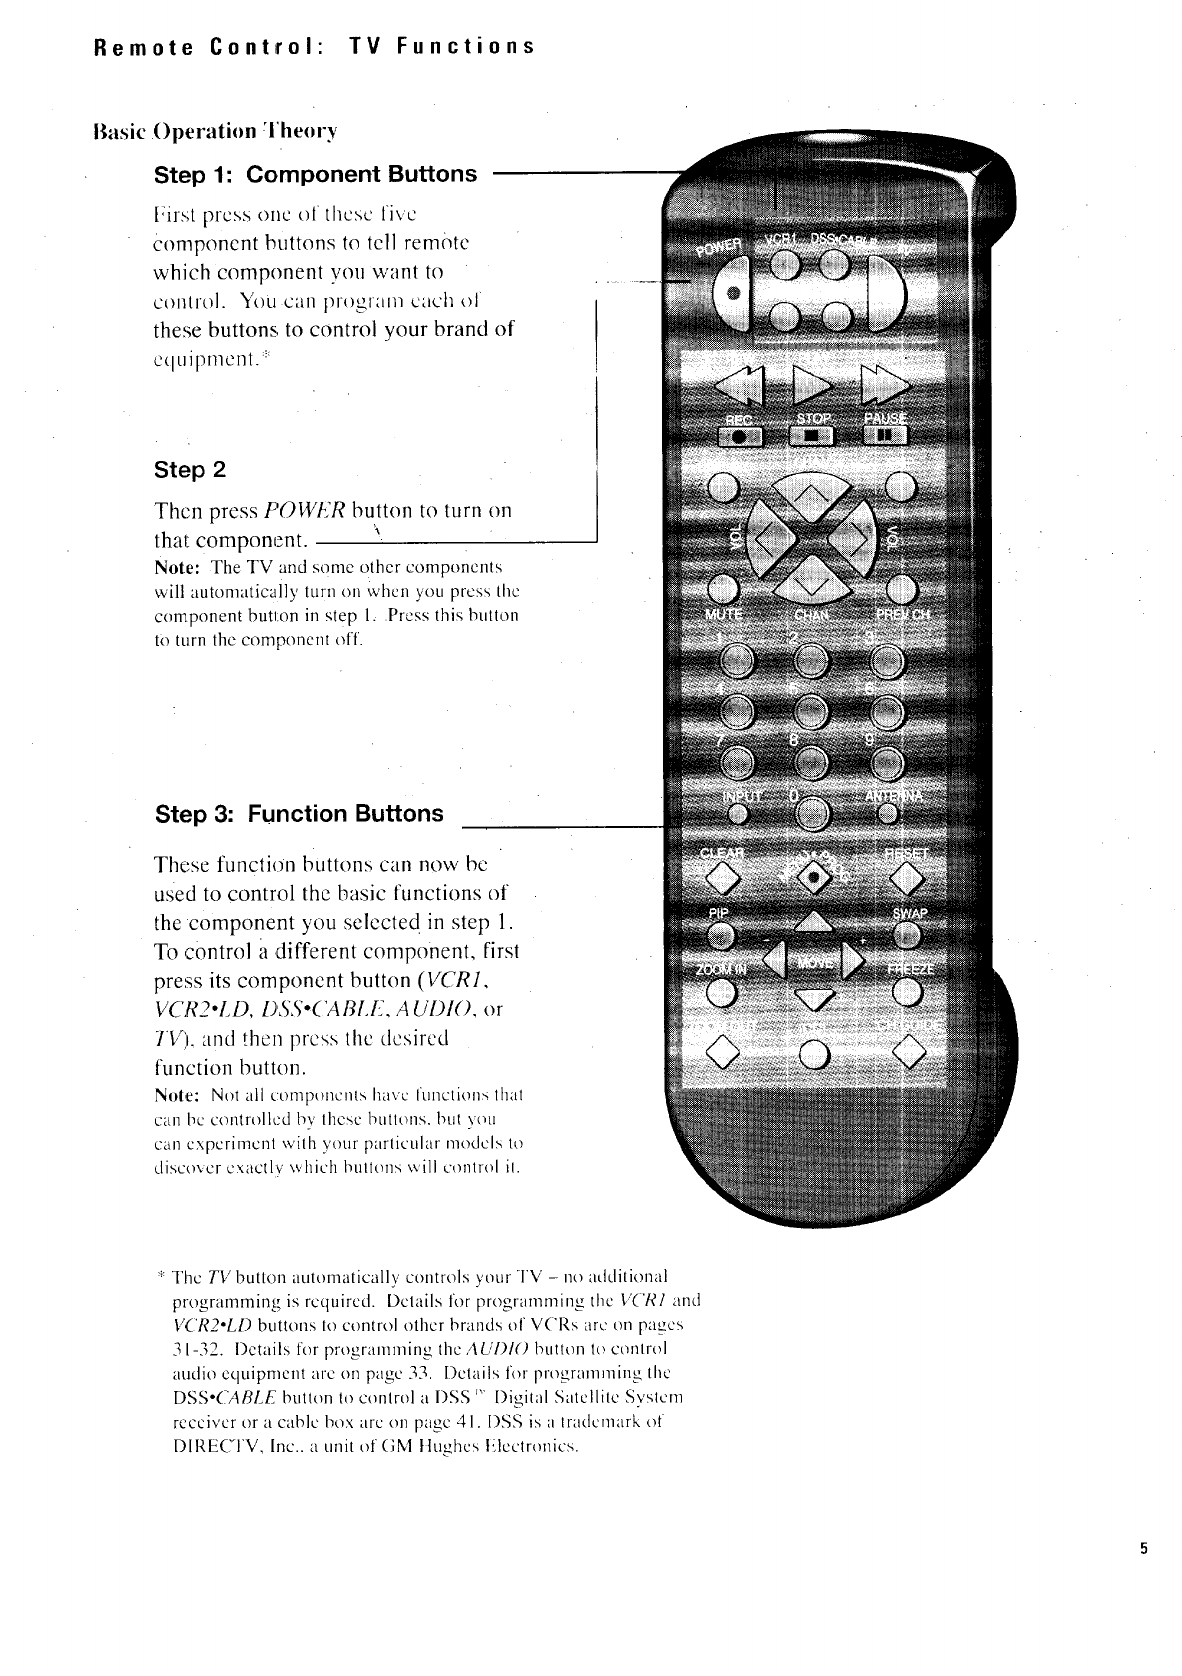
Basic Operation Theory
Step 1: Component Buttons
First press one of these five
Component buttons to tell remote
which component you want to
control. You can program cach o/
these buttons, to control your brand of
c( luipment.*
Step 2
Then press F'OWER button to turn on
that. component.
Note: The TV and some other components
will automatically turn on When you press thc
component button in step 1< .Press this button
to turn the component off.
Step 3: Function Buttons
These function buttons can now be
used to control the basic functions of
the component you selected in step 1.
To ,control a different component, first
press its component button (VCRI,
VCR2"LD, I)SS'('ABI.I2, A UDIO, or
TV), and then press the desired
function button.
Nole: Not all components have functions that
can bc controlled bv these btltlOllS, but \ou
can experiment with your particular models to
discover exactly which btlltolls will control it.
The TV button automatically controls your TV - no additional
programmi W is required. Details for programming the V('R] and
VCR2oLD buttons to control other brands of VCRs arc on pages
31-32. l)etails for programtning the A UI)IO button to contr(fl
audio equipment arc on pagc 33. Details for lm_gramming the
DSS'(ABLE button to control a I)SS '" Digital Satellite Svslcm
receiver or a cable box arc on page 41. I)SS is :i tra(lcmark of
DIRECTV, Inc.. a unit of GM tlughcs t_,lcclronics.
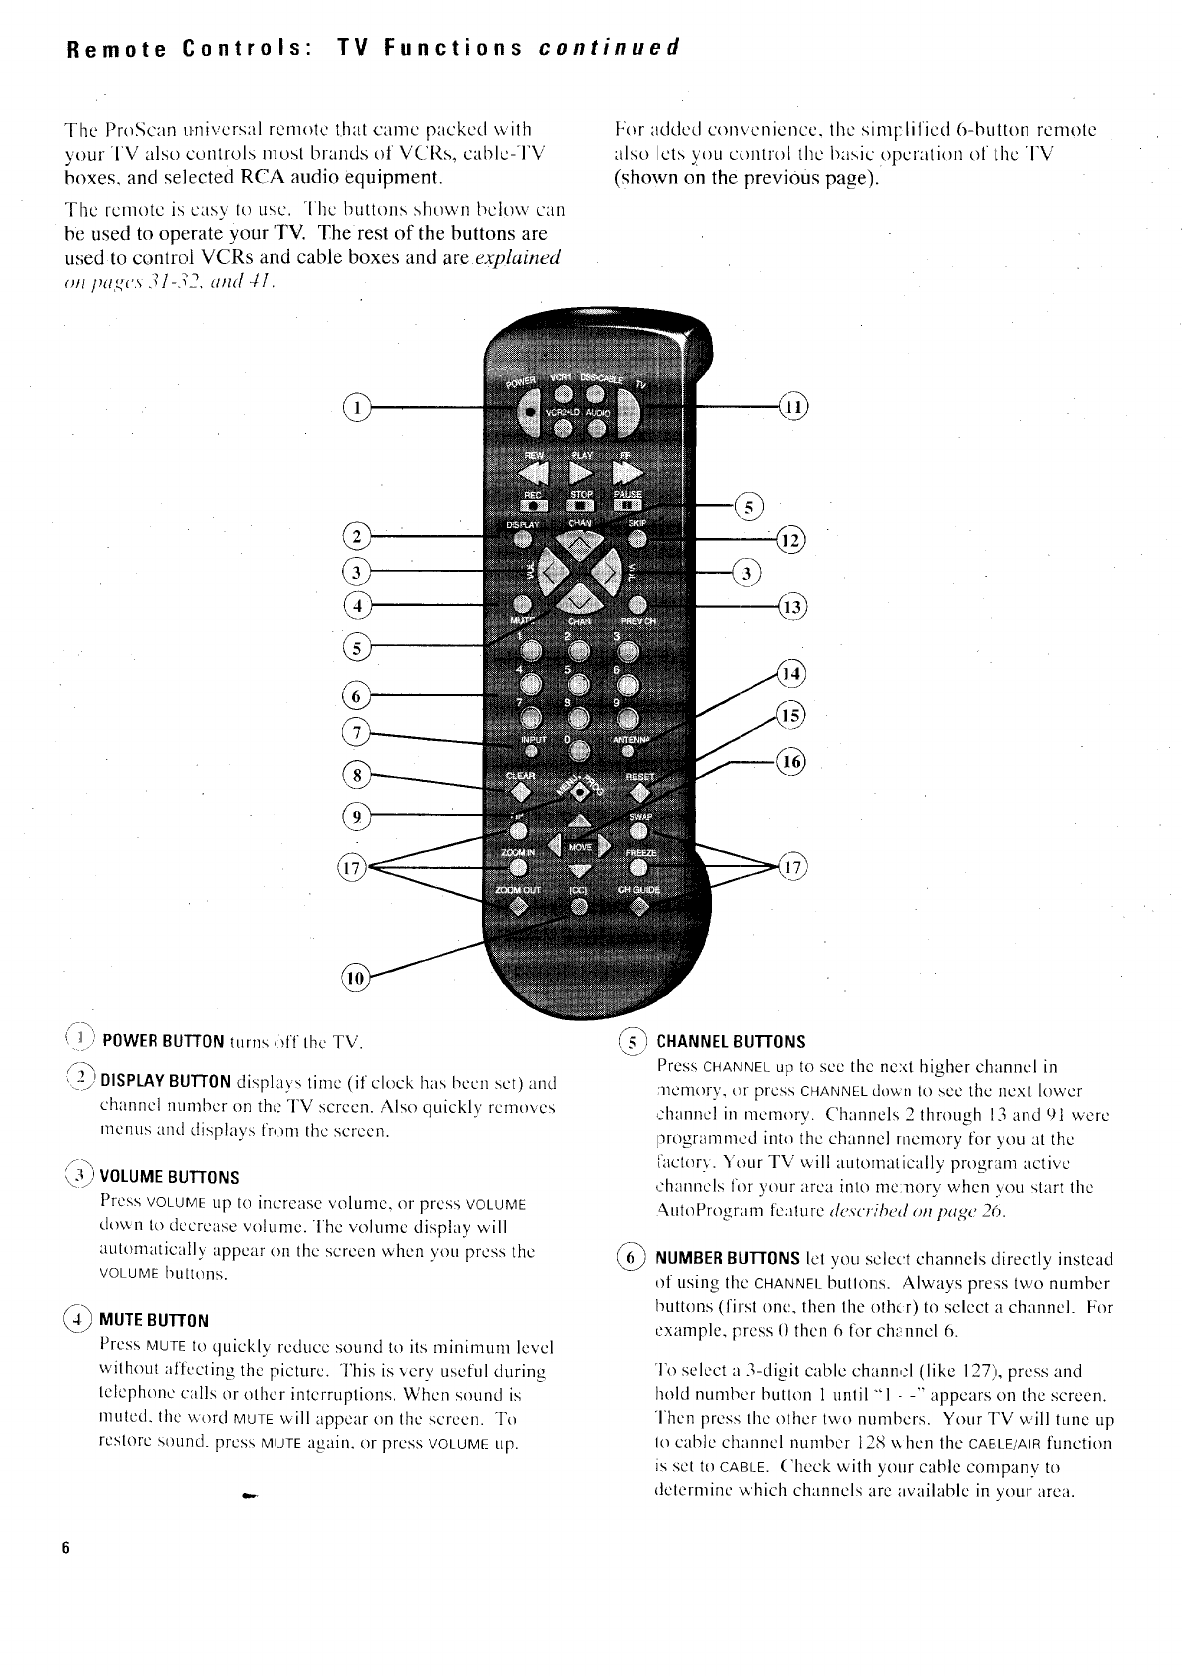
Remote Controls" TV Functions continued
The ProScan u.nivcrsal renlolc fllat canlc packed with
your TV also controls most brands of VCRs, cablc-TV
boxes, and selected RUA audio equipment.
The remote is easy to use. "the buttons shown below can
be used to operate your TV. The rest of the buttons are
used to control VCRs and cable boxes and are explained
on pa_,u._ d/-d2, aml 4I.
For added convenience, the sim['.lificd O-button remote
also lets you o:mtrol the basic operation el LhcTV
(shown on the previous page).
Ii!, POWER BUTTON ttlrT1s,fffthe TV.
(__ DISPLAYBu'r-rONdisplays time (it clock has been set) and
--J +
channel number on the TV screen. Also quickly removes
menus and displays from lhc screen.
/_-x,
(,__L,:'VOLUME BU'I3ONS
Press VOLUME tip to increase volume, or press VOLUME
dov,,n to decrease volume. The volume display will
automatically appear on the screen when you press the
VOLUME buttons.
_MUTE BU170N
Press MUTEto quickly reduce sound to its mhlimum level
without affccling the picture. This is xerv useful during
telephone calls or other interruptions. When sound is
muted, the word MUTEwill appear on the screen. To
rcslorc sound, press MUTEagain, or press VOLUME up.
49
CHANNELBUTTONS
Press CHANNEL up to See the next higher channel in
]]emery, or press CHANNEL down lo see the next lower
channel in memory. ('hannels 2 tllrou<_h13 al'id 91 were
]_rogrammedinto the channel rnemory for you :it the
{aclorx. Your TV will automatically program active
channels for your area into me:nory when you start lhe
.4utoPro,,ranle feature dv.scr,;Ix'd on page 241.
NUMBERBUTTONSlet yell select channels directly instead
of using the CHANNELbUIIOELS. Always press two number
buttons (first one, then the oth_.r) to select a channel. For
example, press t) then 6 tor chunnel 6.
To select a3-digit cable chann,;l (like 127), press and
hold number hutlon I unlil "<l - -'" appears on the screen.
Then press lhc other two numbers. Your TV will tune tip
Io cable channel number t28 v_hen the CAE,LE/AIRfunction
is set to CABLE. ('l_eck with your cable company to
determine which channels are available in your area.
/-7-) INPUTBUTTONIcls you quickly view signals IYomflw
INPUTjacks. Pressing this button switches the TV from
its current channel directly to channel 00, lhen channel
t)l, then channel 92. ('hanncl 90 lets you sec the signals
coming from a device that is connected to the S-VIDEO
connector. Channel 91 accesses the INPUTrjacks, and
channel 92 accesses the INPUT2jacks.
I_,_ CLEARBUTTON
Pressing CLEARquicMy clears the sc"IIccl] of all on-screen
display messages (except 111tllCand parental control). It
is also used to cancel the Commercial Skip count-down
clock and to erase channel labelsl
9MENU,PROGBuTr0N
Press MENU-PROG(called MENUin this Owner's Manual/
repeatedly until the menu you want to display is selected.
then press + or -. Next press Mi_NUrepeatedly to select
the function you want to adjust and then press + or - to
adjust the setting. Details about using each fimction
begin on page 12,
[CC]CLOSEDCAPTIONINGBU'FrON
Once you have selected a captioning mode through the
Setup men, press [cc] to turn the capttoning on and off.
1_ TVBUTTON turns on TV and puts remote in "'TV Mode
so that the other remote buttons will control the TV.
Also displays time (if clock has been set) and channel
number on the TV screen.
SKIPBUFrON
Use this button when you wanl to scan other channels
during a commercial break. When a program break
occurs, press SKIPonce before changing channels. The
TV will count down 30 seconds on the screen and then
automatically switch back to the original channel you
were watching.
Prcss SKP twice if you want the TV to count down (fit
seconds. Each additional press will add another 3(1
seconds to the cotint-down time (up to five minutes) and
then each additional press will add another 60 seconds to
the countdown time (up to 60 minutes).
To cancel, press CLEAR. The countdown clock will
disappear from the screen, and the TV ,,viii stay tuned to
the channel it was on when you pressed CLEAR.
PREVCH (PREVIOUSCHANNEL)BUT[ON
Pressing the PREYCHbutton causes the TV to change back
to the last-tuned channel.
To operate, select the first channel you want to watch.
Then select the other channel by pressing two number
buttons. The TV will now change back and forth
between the two ch;mnels each time you press the PREV
CHbutton.
ANTENNA BUTfON
Because your TV has two different antenna inputs on the
back (labeled ANTA and ANT B) you can connect more than
one antenna or signal source. Press the ANTI:iNNAbutton to
switch from one input to the other.
l'hc colur of the ['hanncl nurfl_er on the '_creen indicates
which antenna input you are watching. The channel
numbers are bhie for ANTA and yellow for ANTg. If the
channel numbers are blue, v,m are watching whatever is
connected to the ANTA input on the back of II-leTV. if the
channel numbers are yellow you are watching whatever
is connected to the ANTBinput on the back of the TV.
Details are on page 29.
1_) RESETBUTTON
Resets the TV back to its original factory settings.
MOVE+ AND- BUTTONS
Use the MOVE + and -button_, (called + and -- in this
Owner's Manual) to enter or adjust functions after you
have pressed the MENUbutton.
©PIP(PICTURE:IN-PICTURE)BU'q'ONSare used to display two
pictures on the TV screen at once. The small picture can
be moved, frozen, or switched with the big picture. Use
the zoom IN/ZOOMOUT butto:ls to make Ihe picture bigger.
Use the CHGUIDEbutton to Cisplay several channels
simultaneously. Use the FREEZEbutton LOfreeze the
picture. Press again to retura to an action picture.
Important Note: Most buttons on Ihe remote conlrol \viii not "
control the TV tmless the I('IllO[C iS ill tho "'TV l%']o(k'". If [ll]olhgr
COIllpt)IIClll button (such {is VCRq b is pressed. It,c iClll(llc \_, ill no
longer be in the "TV Mode". "lk, gel back into the "TV Mode",
simply press the butlon hlbclcd TV. The remote ,,,,ill go back inlo the
"'TV Mode'" and will control the TV again.
Picture-in-Picture (PIP) Operation
\ltcr ",.'till t_',HIIlccI ,lllothcr ',. Ideo _tl|cc flike _1 r('m )to _ol]1
I'V, you'll bc able to display iv,u dillctcut program,, on tile
"1-%'at the same time For example, two different football
!_'dlllC'_ d% _ho_k11 I_elm_'_tiLl L'dll aI',_lc_ lllllCCt ;I _. itletl CdIllCid
or camcorder to use as a su_'eillance system for a baby's
I oonl.
T,,'v,3FootLall I'_dlrle_ :burvelllar-lce "3'vg[em
:StartingPicture-in-Picture (PIP)
'1 Connect another video source (such as a VCR or
canlcorder) to INPUTS 1 or INPUTS 2 on )'our TV (LL:.,show I1
on page<, 43-45).
2 Turn on TV and select the TV channel w)u want to watch.
•It tile _dier ',Duroc i', c_mnected to the -I'V's INPUT1 lUCk',,
",ulccl l\ channel Ul tit-,co the ",lgxl,il. iI ',.tiLl hd\c
programmed the vcm (or vcrm) button tc automatically
,,clccl chdllnel U l ,is ,/,'s( ,'ll),'d oil pa,-v 21, pless VCRI(el
VCR2).
•Select channel 02 if the other source is connected to the
TV', INPUT 2 jack',. If ",,'('ltlh.:_,c programmed the VCR1 (nr
_CR2) bu Ion [tl ,itlhqil<i[lC<lll\ ,,u I____'tcl!,ll ncl t)2 as
tit's{ #'lbU,'t Oil [,'tlgt' 21, press 'lcm (oi roB2).
•Seleel ch:inncl o0 if the nthei ,,omce i9 connected to the
TV", S VIDEO utllllleC[tli I t_,CillCmbcr 111 l],,tl Utlllnect the
regular video ctible to tilt.' VIDEO INPUT 1 jack lor Dcturc-
in-picture viewing.). [hc T\" automatically minimizes
an), annoying diffcrcnces in lint bctwecil the small and
laige picture b\ clcctronicdlI_ coupling the S-VIDEOinput
to the INPUT 1 Illptlt. It '_Otl h l\e programnlcd the VCR1
(or VCR2) button to automatically select channel 9(1 as
described on page 21, press ,/cm (or VCR2).
Changing Channels (PIP)
To change channels on the pic urc from the TV, press the TV
bur'-on on the remote, and then prt ss either th,:. CHANNELLip
or clown button or two number bu:tons.
PicturefromTV
3Pros <,the PiP button on the retnotc. A little picture will
appear on the screen. Thc little picture and the big picturc
\_ ill be the same. To change channels on the piclure coming from the VCR,
pre';s the vcm or VCR2button (if you've programrried one of
the,.e buttons I.o control the V( R a.s desc# tbeU on Page 29)
and then pro,,, either the CHANup or down button or two
ntunbcr btlttt)n'.,. Ynu can also ch'mge the \"( R',, picture tw
pre,,',ing the CHANNEL button', 1111the lrnnt of the \ ('R
\tilt': I lit l,_[ntllc fllll',[ [_: III ttl_ "T\ [IhltlC \\ hell \ OU pith', the' Pip
btll[oI1 Ill ptll re'ill, lie, ii1 " I'V llllldc" . plC,, _, the TV till[hill
ln get ,i pictcuc lionl [hc other 4ourcc t\"('R, c,uncorder.
etc.). [li,,l ttlin till the other ',otlrce, and then _,clccl TV
chaili/el _)11,CJl. or 1)2 (expl<|ined tit lop of ilCXl cE/lunln).
1 he picture irom the uther _ource \_ ill appear in the little
plCltlrC
PicturefromTV
Picture fromVCR
PicturefromVCR
Additional Features (PIP)
\Vhenexci the pictuic-in-pictur TM feature is activated, the small
pict_ue can be nlo_ cd. fi_/zer,. _lr s,vitched \_it I the main
plctJre a,, desiied, l)clad_ a.,c ()#'l _h(' ,tl('.V[ [)_ll.'{'.
('aulilln: \\'hen U,,lllg [-g g<tlrllc,-, uom[ILltCrn, dnd ',lmd.lr pr_lducl,, \\ lih
\tltlr I V. Ixcc'p IRe t_rlgl lilt<,\ ,ind L'tlnlr<l.,i itillCllt)ll,, dl ]tl\\ _,Cnlll_k 11.i
[l\Ct (lltln-fYitl\ 111_] p,ltlc'rn I', loll (!11 lhi _,c'rcLI1 for hll _ pc ltid _, tl/ilrllC
.it d hi,2h brlghllit ,,4 or cQII[I<iM nCnlli_, the image C<lil bc pcrmanclill__
iiiiprllllt.'d t)flitl il'c xcrcc II 1 hc_,c i} pl..,, i_[ lfllpl-lnik ,ire ilti[ c()\ urcd b;
t,I)ur %_<lrr<llli _, hCL,ILI_,C the\ Arc' iho rc.,tll o[ IIlIkLP.L
Whenever you have the picture-in-picture
(Pll 7) feature activated as ctcscrihcd on the
previous page, you can move, enlarge,
reduce, freeze, or switch ttl_t big and little
picture s as desired.
Note: The remote must bc in the "TV mode'" to
operate lhc spcciul fcaturc_ shown below. Pfcssing
the mYhuu.n p_>, lhc icnl_h' in l[Ic "TV nl{_dc.'"
1,
li
• ,.
[PIP Buttons What they do when TV is in PIP mode "
ZOOMIN
©ZOOM OUT
SWAP
FREEZE-
A
APress and hold one of the four MOVEarrow kevs
to move the small picture in that direction.
Repeatedly press ZOOMINto enlarge the small
picture. Five sizes arc available.
Repeatedly press ZOOMOUTto reduce the size
of the small picture back to the smallest size.
Press SWAPto switch lhe small picture with the
main picture.
Press FRI-EZEtl) freeze the srnall picture.
Press FRFEZEa_ain to return to an action
Channel Guide
Starting ChannelGuide (with remoteonly)
To s!;irl ch;tllllCl _tl[(]c, prcs<,lht "CH GUIDE butlon.
•The screen will display al! the channels that are
ptogranmlcd into Chamlcl Memory, 1__ at ;t time.
•Each little screen will display a stop-action picture that
will be continuously ttpdatcd.
•To stop the screens from updating, press FREEZE.
•While the 12 channels are on Lhcscreen, you can use the
ZOOMIN button to enlarge the picture and then use the
arrow buttons to move around the screen. To return to
normal size, press ZOOMour.
Note: When using the ZOOMIN t'cature, you will scc a mosaic patlcHl
as the picture is made larger.
• To select one of the channels being displayed inthe
channel guide, press the two corresponding number
buttons for that channel.
i_ote: Channels 2-13 and. 91 were programmed into the Channel Scan
Memory at the factory. These are the channels that \_ilI appcar during
clanncfgiddc unless you autoprogram the chaimcl memory or add and
eJ:ase channels as described on page.s 26.
Stopping Channel Guide
•To select one of the channels being displayed in lhe
channel guide, press the two corresponding number
[)tlllollS for ltlal channel. That will stop channel _uictc 'and
take you directly to the channel you selected.
• Or. stop channel guide by pressing CHGUIDEagain.
10
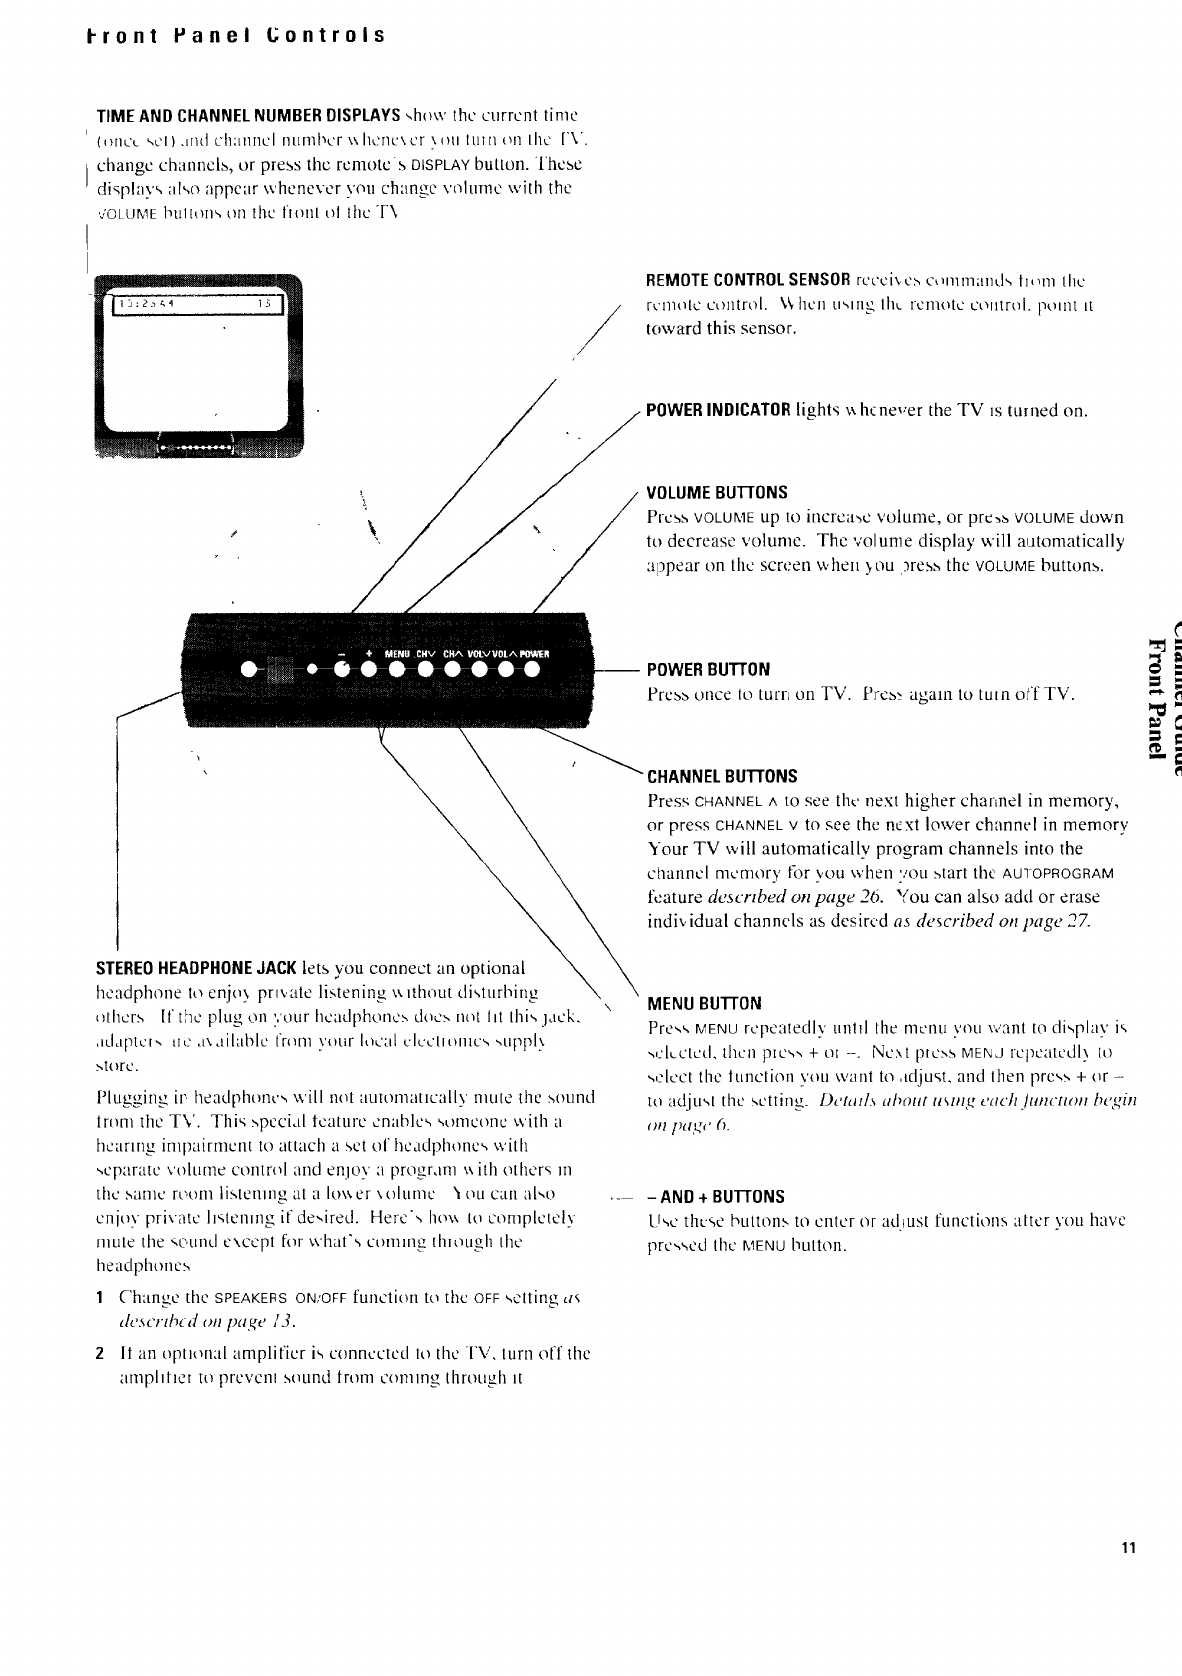
I-ront Panel L;ontrols
TIME AND CHANNELNUMBER DISPLAYS-,how the current time
(_)[IL'L '-,L'I )JIIL] Ch'AIIIlCI ntlrllbL'r \\ IICIIL'\ L'r \ l)l.l ILl] 11 011 IIIc ['V.
changc channclb, or press thc rcnlotcs DISPLAY button. These
display', al,,o appear whenever you change vcflutne v,,ith the
v'OLUME bl.lltoII `+,011 [hc ltnnt ol the "1'\
REMOTE CONTROL SENSOR rccci',,c_ c,mmland,, ll,ml the
lumotc u't)lllrt/[. \_. hcll Ll'-,lIIg lhL rglllOtC COlltrt)J. pOIllt It
tov,,ard this sensor.
POWERINDICATORlights _ hcnever the TV is turned on.
VOLUMEBunONS
Prc:_b VOLUME up to inCl-Ca_c 'voltlnle, or pr_:,b VOLUME down
to decrease volume. The volume display will automatically
appear on the screen when ._ou __res_the VOLUME buttons.
\
STEREOHEADPHONEJACKlets you connect an optional
headphone to enjo 3 private li_,tening _ nhuut di,,turbing
nthcr.,, [f the plug on your headphone:, doe:, not lit thi,, jack.
,=ul_lptc_,, t_,:,_,.ailablc Irnm \'our I,nctlJc'lcdlOIllC _,",tlpp[}
store.
Plugging ir headphone,, ',,,'ill not automatically mute the ,',ound
tram the TV. Thi,_ _,pccial lcaturc enable', _,omconc with a
hearing impairment to attach a set of headphone', with
,,cparatc volume control and enjoy a program u ith others m
the .'-,atilt rt;t)m tiMenlng at a Iov, er \ohlmc '_oil cail al,,o
cnioy private h,,tening it de,,ired. Here',, he\\ ttl completely
mute tile ,,ound except for what',, coming through tile
headt) honc_,
1 Change the SPEAKERS ON/OFF function to the OFF setting as
ddscrg_rd on page/3.
2It an opllonal amplifier is connected to the TV, turn o[[ tile
amphher to prcvcnl sound troll1 comlllg [[lrOtlu'h_ It
-- POWERBUTrON
Press once to turn on TV. [';cb,_ again to turn olff TV.
CHANNELBUTTONS
Press CHANNELA tO see tlw next higher channel in memory,
or press CHANNELV to see the next lower channel in memory
Your TV will automatically program channels into the
channel nrcmory for \,eLl when '/OU.,,tart the AUIOPROGRAM
feature described on page 26. '{ou can also add or erase
indi_.idual channels as desired as described on page 27.
MENU BuI-rON
Pre,,',,MENUrepeatedly unhl tile nlcnu \,ou vvant to di'.,play i'.,
.,,:l,..ctcd. then pxc,,., + ol -. Nc:,t ptc.-,s MENJ rcpcatcdl\ to
,,,:loot the lunction \'ou want to ,tdjust, and then prcs_, + or -
to adjt,_,t tilt: setting. Dctatl5 al_out using each ltmctlo, b('gin
¢.l pa,k'c h.
_- -AND +BU'I-rONS
LI',,._" thu-,-,e btlttolls, tO enter or adlust function.,, after you have
prc.,,,ed the MENU htltton.
t"
-'€1
11
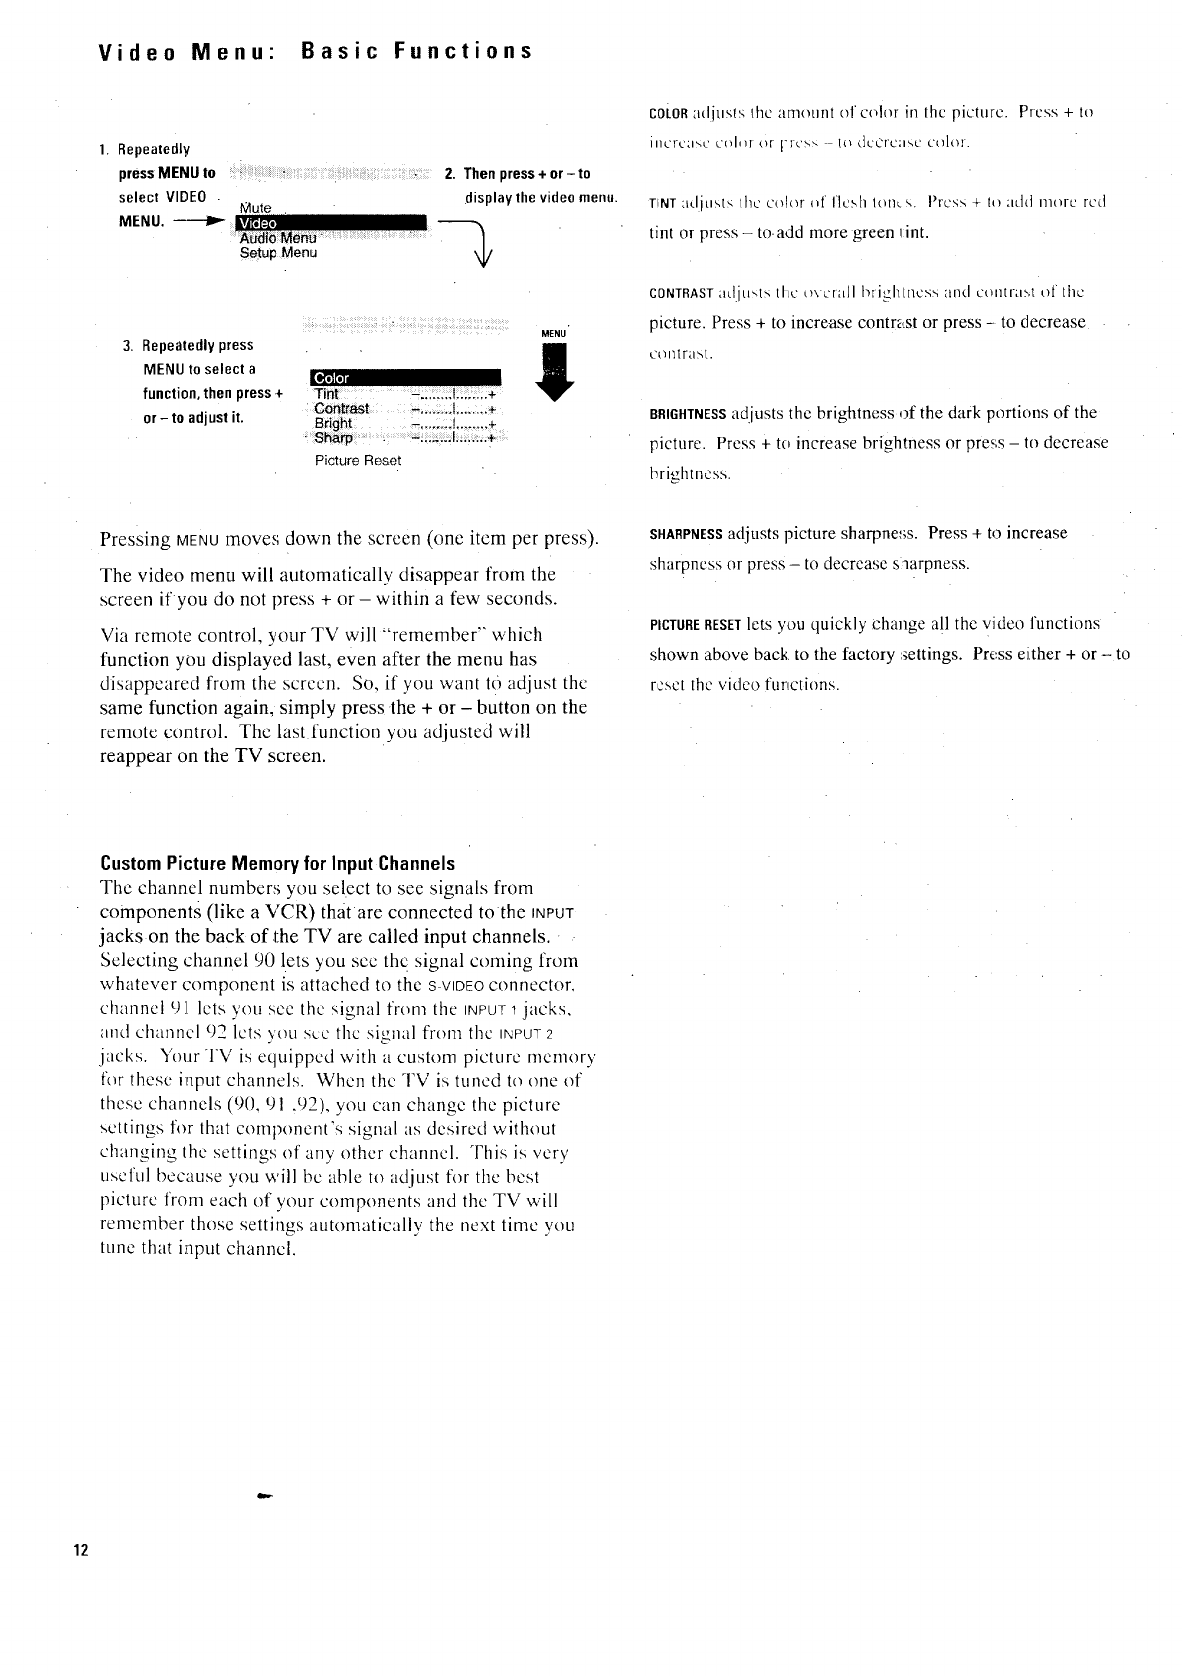
Video Menu: Basic Functions
1. Repeatedly
press MENU to 2. Then press + or -to
select VIDEO . display the video menu.
Mute
MENU. ------I.'-IkV_[=z,'IIIII
Setup Menu
3. Repeatedly press I
MENU to select a
function, then press ÷ Tint -. ....... 1........ +
I_l][ll
Contrast -. ....... l........ +
or - to adjust it, Bright -. ....... t.........
• Sharp ......... f.....:..+
Picture Reset
coLoR adjusts the amount of co!or in the picture. Press + to
il]L'['L'HNL' L'[_IIHor ['Ic:-,_, 1o dcCrca_,c C(}]o].
T!NT :tdjLiSt_; 1hecolor (H Ilc_,hlotk_,. Press + tt_add IllOrured
tint or press- to. add more green lint.
CONTRAST _Id.iltKt>,the o\ura[ll',tighLncssand ccunra:-,tof the
picture. Press +to increase contrast or press -to decrease
COlnrast.
BRIGHTNESS adjusts the brightness of the dark portions of the
picture• Press + to increase brightness or press - to decrease
brightt]ess.
Pressing MENUmoves; down the screen (one item per press).
The video menu will automatically disappear from the
screen ifyou do not press + or within a few seconds.
Via remote control, your TV will "'remember" which
function you displayed last. even after the menu has
disappeared from the screen. So, if you want to adjust the
same function again, simply press the + or - button on the
remote control. The last function you adjusted will
reappear on the TV screen.
SHARPNESS adjusts picture sharpness. Press + to increase
sharpness or press - to decrease s larpness.
PICTURERESETlets you quickly change all the video functions
shown above back to the factory settings. Press either + or -to
reset the video functions.
Custom Picture Memoryfor InputChannels
The channel numbers you select to see signals from
components (like a VCR) that are connected tothe INPUT
jacks on the back of.the TV are called input channels. -
Selecting channel 90 lets you scc the signal coming from
whatever component is attached to the s VIDEOconnector,
channel 91 lets you see the signal from the INPUT1 jacks,
and channel 92 lets you see the signal from the INPUT2
jacks. Your TV is equipped with a custom picture memory
for these input channels• When the TV is tuned to one of
these channels (90, 91 .92), you can change the picture
settings for that component's signal as desired without
changing lhc settings of any other channel. This is very
useful because you will bc able to adjust for the best
picture from each of your components and the TV will
remember those settings automatically the next time you
tune that input channel.
12

Audio Menu" Basic Functions
1. Repeatedly ..........................................
press MENU to
Mute
select AUDIO
MENU. tP_ Ir.'_T_l_Va=],.
SetUp Menu
2. Then press+ or to
displaythe audio menu.
3. Repeatedly press
MENU to select a
function, then press +
or- to adjust it.
i=ltlJF,IIr4=l
Stereo/SAP!Stereo
Rear Vol -. ....... I........ +
Surr BaI " - ........ I........ +
Expand S_reo: Off
....._eakers! _ : :
Pressing MENUmoves down the screen (one item per press).
The audio menu will automatically disappear from the
screen if you do not press + or - within a few seconds.
Via remote control, your TV will "remember" which
function you displayed last, even after the menu has
disappeared from the screen. So, if you want to adjust the
same function again, simply press the + or - button on the
remote control. The last function you adjusted will
reappear on the TV screen.
['hw EQUALIZERfuncHon lcls v{)u display an on-screen graphic
cquali;'cl _,o \t_u can ittnltilt_'l)adju_.l audio bandwidths lt)r
dill?rent environments or individual tastes. Press + to display
graM:. Ihcn press MENU 1{', select b',t Rlwidlh. Pr.:'ss _ to il]crcasc or
pre',_s - to decrease setting. DetaiLs areon pages 14-15.
ItR' BALANCE]tLncti(_n 'adjt]_t'; hc IcIUright I_al;tllcc t_i soLHld from
the speakers. When adjusting the balance, sit in you[ normal
vic'.*Jing scat _,,hilc t-,rcssing the o:- + button until the sound
_,ccms to origi'natc fit)Ill tl point halfway between lilt.: speakers.
The STEREO]SAP function lets you choose either monaural or stereo
audio and SAP (Sec,,md Audio Pro_,,ram) audio wlieq il is available
by :_rcssing the + or -: butlon. Norraally, you can leave Ihis
function sct to stereo, and your TV will automalically pr0duce
either monaural or stereo audio--whichever is broadcast.
l)etailx about stereo and-SAP are on pa,ge 16.
The SURROUNDfnncti,m lets you cho,.)se one of five types of
surround sound modes: OFF, DOLB¥, MATRIX, HALL, or STADIUM.
l)etail_ ar_"on pa£,e.';1,_-10.
The REARVOLUMEdisplay lets you ad.iust the volume level of
external surround speakers that are connected to the SURROUND
SPEAKER jacks on the back of tim TV. It also controls the level of
volume coming out of the SURROU-rjacks whe_ connected to an
am!-Hifier. Details are on pa£res 18. [0 and 48.
m, i
The SURROUNDBALANCEdisplay allows you to opt:imize the surround
out audio to compensate for program sources with unbalanced
right and left audio. When adjusting this functi,:m, the internal
speakers (or the speakers conne,,:ted to the EXTERNAL SPEAKERS
Icrminals) will be muted so that you only hear Ihc surround sound
ZttU.]i_,). l)_'tt_i/L',_/rc (,'nI){t£'c_ /6' 19.
The EXPANDEDSTEREO fealure can be lurned on or off by pressing +
or --. This fezr:ure adds greater depth and dimerlsion to stcreo
broadcasts, l)_'tailx al)out C.vl)a_(led.st_'reoar_' _.,_p%g,e17.
The SPEAKERS0N/OFF fLIllCtion Ict_.yOU turn off the TV's speakers by
prc,_sing + or . You will probably want to lea',e the TV's
speakers turned on unless you desire private lislening through the
headphone jack or unless you conm2ct an amplilier (with its own
set of speakers) to the appropriate jacks on the back of the TV as
described on page 511. Turning this function off, turns off not only
the TV's internal speakers bill also any external speakers
connected to _hc TV's EXTERNAtSPEAKERSlerminals. S{}und will
then only come thr{}ugh the spcake_s connected to the amplifier
and any speakers connected to the ':_V's SURROUNDSPEAKERS
terminals, l){',ai/x ar_" (m P_,_I{',IN.
13
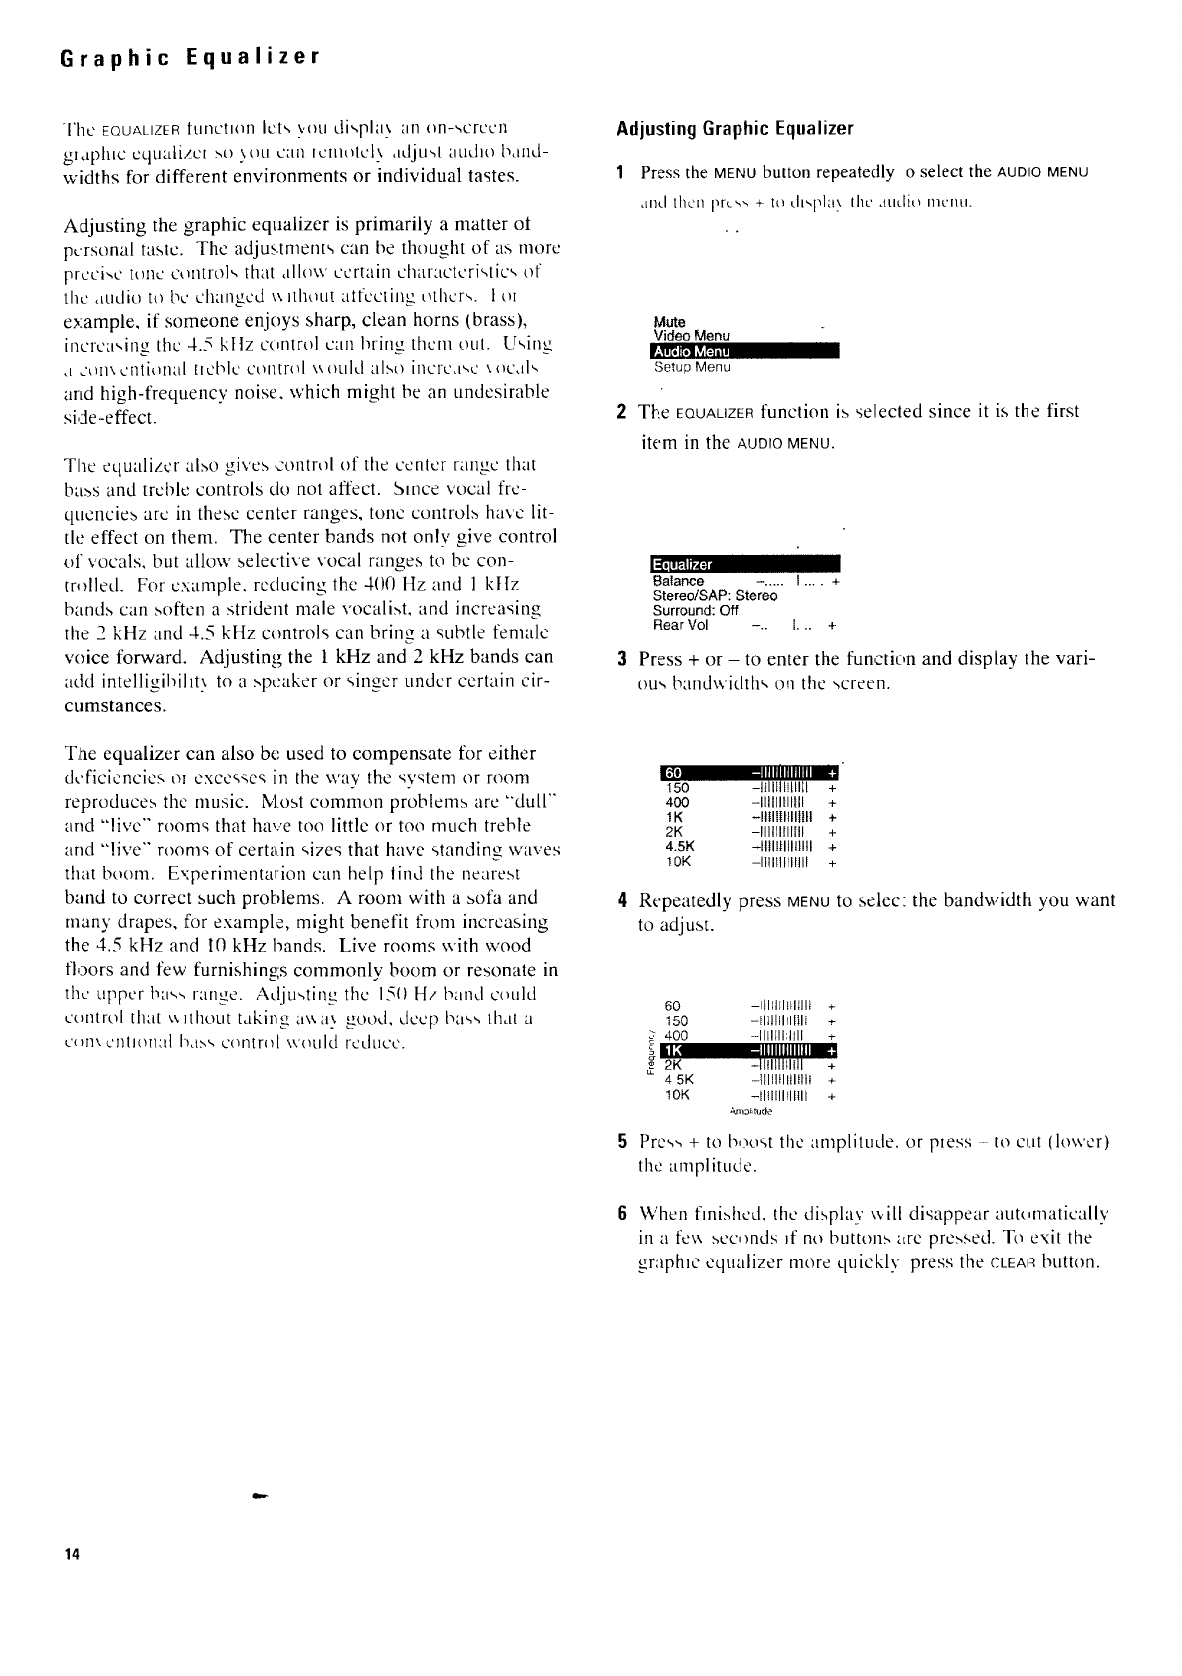
Graphic Equalizer
The EQUALIZER [tl[1L'tl(In ICts \,OLI di,,pla} an on-screen
gtaphtc uqualizct ._o _ou cart tcmotcb, ddju'+,t audio band-
widths for different environments or individual tastes.
Adjusting the graphic equalizer is primarily a matter ot
personal taste. The adjustment'-, can be thought of a,-,more
prcci,,c tone controls that allow curtain characteristics of
the audio to bc changed ',: Hhout atfccting others. I ut
example, if someone enjoys sharp, clean horns (brass),
incrca,,ing the 4.5 kllz control can bring thorn out. Using
,t COIl\ Ctlti'.ql;tl [tobit ct',llti-ol \\Otlld also hlctc,ls, c \oc,d,,
artd high-frequency noise, which might be an undesirable
side -effect.
The equalizer al.,,o gives contrtfl of the center range that
ba,,,s and trchle controls do not affect. Since vocal fre-
quertcie_ arc in these center ranges, tone control,,, have lit-
fie effect on them. The center bands not only give control
of vocals, but allow selective vocal ranges to be con-
tr,_lled. For example, reducing the 400 Hz and I ktIz
bands can soften a strident male vocali.,,t, and increasing
the _ kHz and 4.5 kHz controls can brim, a subtle female
voice forward. Adjusting the 1 kHz and 2 kHz bands can
add intelligibillt 5to a .,,peaker or singer under certain cir-
cumstances.
II II P-11P'4.'4
The equalizer can also be used to compensate for either
d.,,ficiencies ot excesse_ in the way the '.;vstem or room
reproduces the nlusic. Most comtnon problems are "'dull'"
and "live'" rooms that have too little or too much treble
and "'live'" rooms of certain sizes that have standing waves
thatboorn. Experimentarion can help lind the nearest
band to correct such problems. A room with a _ofa and
many drapes, for example, might benefit from increasing
the 4.5 kHz and t0 kHz bands. Live rooms with wood
floors and few furnishing, s commonly boom or resonate in
the upper t-,ass range. Adjusting the 15{) H/band could
control that \,, ]thout takir, oe a\,.',t,, +£o°d, dccp bass that a
u'{)ll\ClltlOll'd]bu,',s centrist \vt}uld redtlcC.
Adjusting Graphic Equalizer
1Press the MENUbutton repeatedly o select the AUDIOMENU
dl]d then l',r,._', "+,+ t,.+ ,.h,,pla}. the AtltliO I]I£'IlLI.
•+
Mute
Video Menu
Setup Menu
2The EQUALIZERfunction is selected since it is the first
item in the AUDIO MENU.
Balance -. .... I .... +
Stereo/SAP: Stereo
Surround: Off
Rear Vol -.. I... +
Press + or - to enter the function and display the vari-
ou-, bandwidth', on the ,,creen.
II{- .-411_IIIIIII,--t
I50 -lfllll[flllll +
400 -IIIIIIII1111 +
1K -Illlt|ttllltll +
2K -Illlll!ll[ll +
4.5K -II{IIHIIIIIII +
10K -lifllllll!tll +
4Repeatedly press MENUto selec: the bandwidth you want
to adjust.
60 -Illllll_lllllt +
150 -llfllllflllll +,-
400 -IIIllll:lfll +
ll: ,,llllllllllh_ ,
,,++2K -tltl{ll+lfll +
4 5K -illllilltltlll +
1OK -iltll!lIIIlll +
Ama+,tude
5Press + to boost the amplitude, or press - to cut (lov,'er)
the anlplJtude.
6 When fini.shcd, the disphiy \_,ill disappear autumaticalh,'
in a fev, :-,co.rods _f no buttons _trc pre_,sed. To exit the
gr:tphlc equulizer more quickly press the CLEA_button.
14
m
g--'-':
m,
g
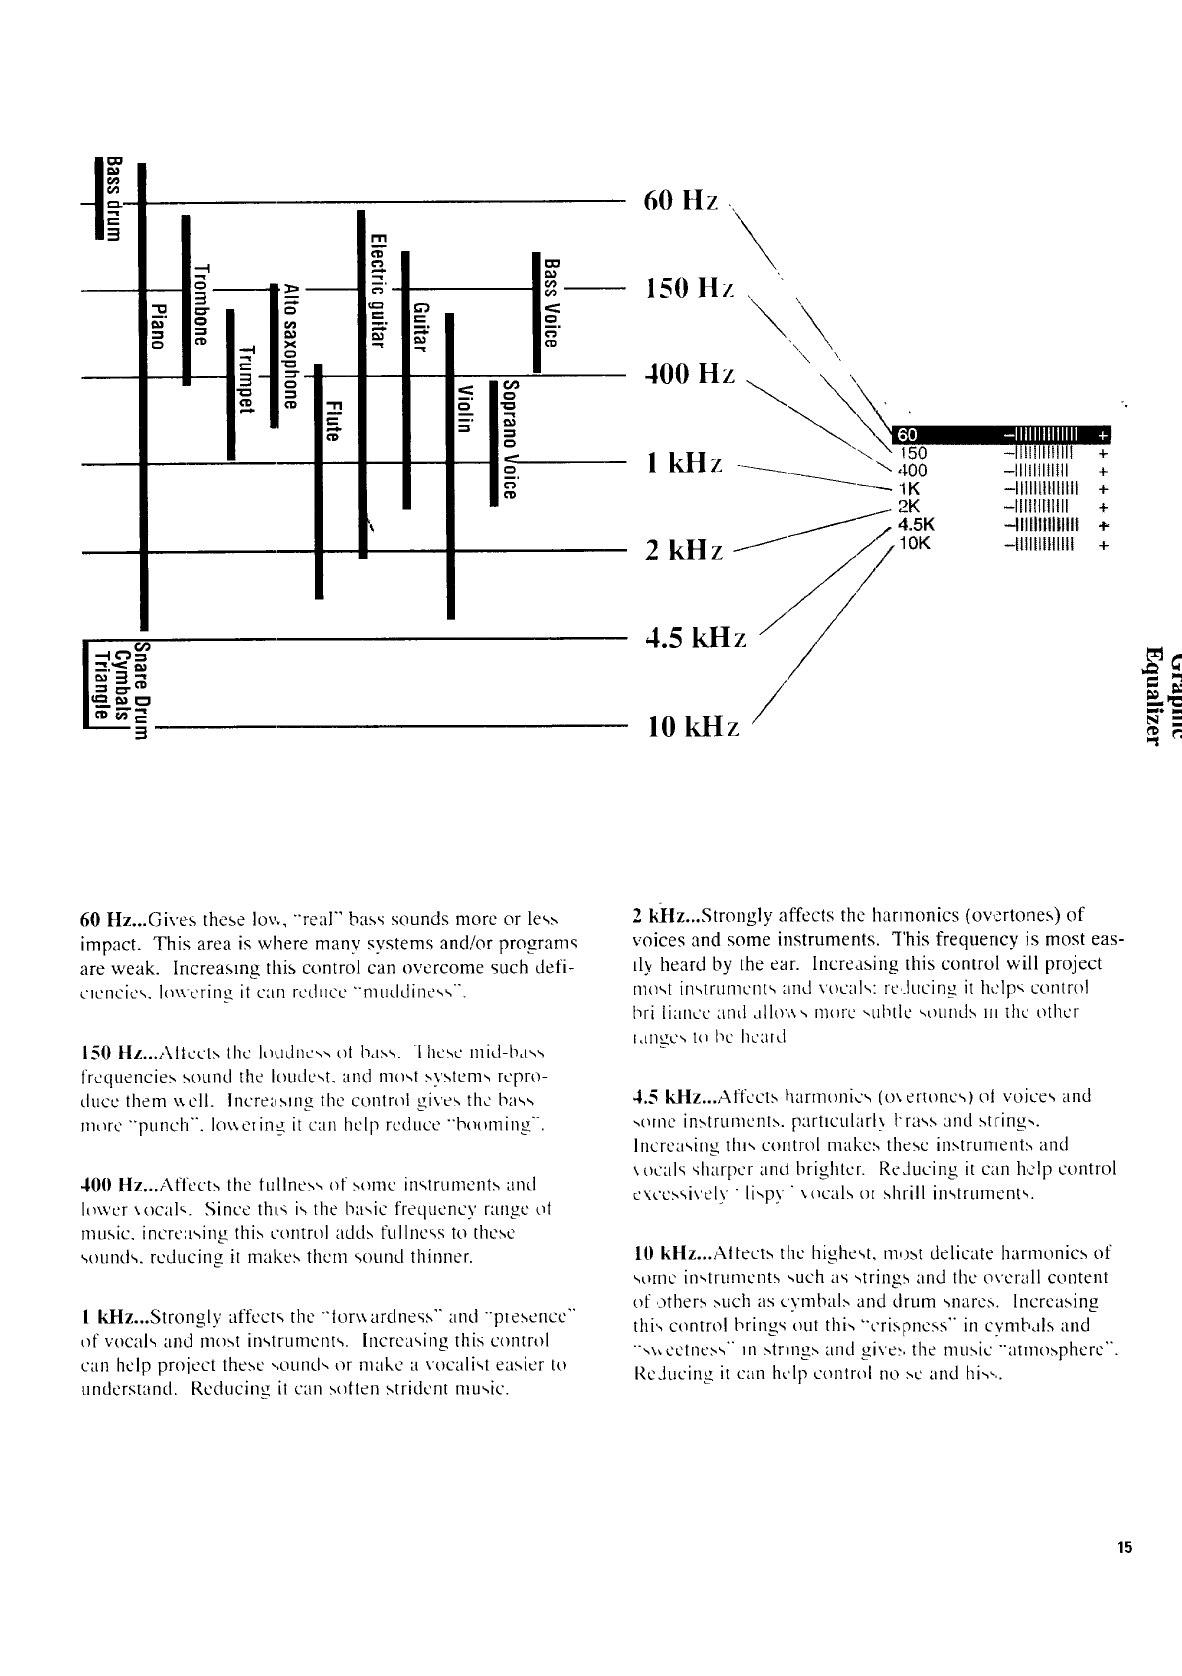
60 Hz ,,
k\
150 ltz ,
400 Hz
\150
_00 --lilIItBIINB
1K -t11111ttltltll
I 2K -IIIIIIHItll
__ 4,sK mmmmm,
2 kHz J_ 1OK -IIIII111t111t
+
+
+
+
4"
+
4.5 kHz
10 kHz /
60 Hz...Gives these lov,, "'real" bass sounds more or les,,,
impact. This area is where many svstems and!or programs
are weak. Increasing this control can overcome such deft-
clencies, lowering it can r-educe"'muddine,,s".
150 Hz...Allcct.', the IoIddllc', ", OI IMI,',",. -I hesc mid-ba',',
frcquencie.,, sound the Ioudc,,t, and most ,",vstenl_ repro-
duct them x,,cll. Incre_,smg the control _ives the bm,s
more "'punch". low e[in< it can help reduce "'booming".
400 Hz...Aflect,,, the tullnes,, of .,,omc instrument.s and
lower \ocalq. Since th_Lsis the basic frequency range ol
lnusic, increasing thi.,, control add.,, fullness to these
sounds, reducing it makes them sound thinner.
1"ld-lz...Strongly affects the "'lor\_ ardness'" and "'p[esencc'"
of vocals and most instruments. Increasing this control
can help proiect these -.ound,, or make a vocalist easier to
understand. Reducing it can soften strident music.
2 kHz...Strongly affects the harmonics (overtones) of
voices and some instruments. 'This frequency is most eas-
dy heard by the ear. Increasing this control will project
m(r,t in_,trumcnt _,and vocal,,: reducing it help,_ control
bri [lance and allo',_s m_rc ",tlbtle ,,ounds ill the other
I,llIgC", t(JI'tC Ilc:.lld
4.5 Ld-lz...Affccts harmoni,.'s (o,.ertoncs) ol voices and
-,orne int,truments, part_cularlx t'rass and string,.
Increasing tins control make,', these instrument,, and
xocal'_ sharper an0 brighter. Reducing it can h,elp control
cxcc.,,sivelv li,,py" xocals or shrill instruments.
10 kHz...Altects the highest, most delicate harmonics of
,,orne in,,truments such as ,,trings and the overall content
of ,others :,uch as cymbal,,, and drum snares, hlcrcasing
thi', control brings out this "crispness" in cvmbals and
',,x, cctne,',s'" _n strings and give>, tile music "'atmosphere".
t_,c,tucin_git can help control no ,',cand his,..
15
Audio Menu" Basic Functions continued
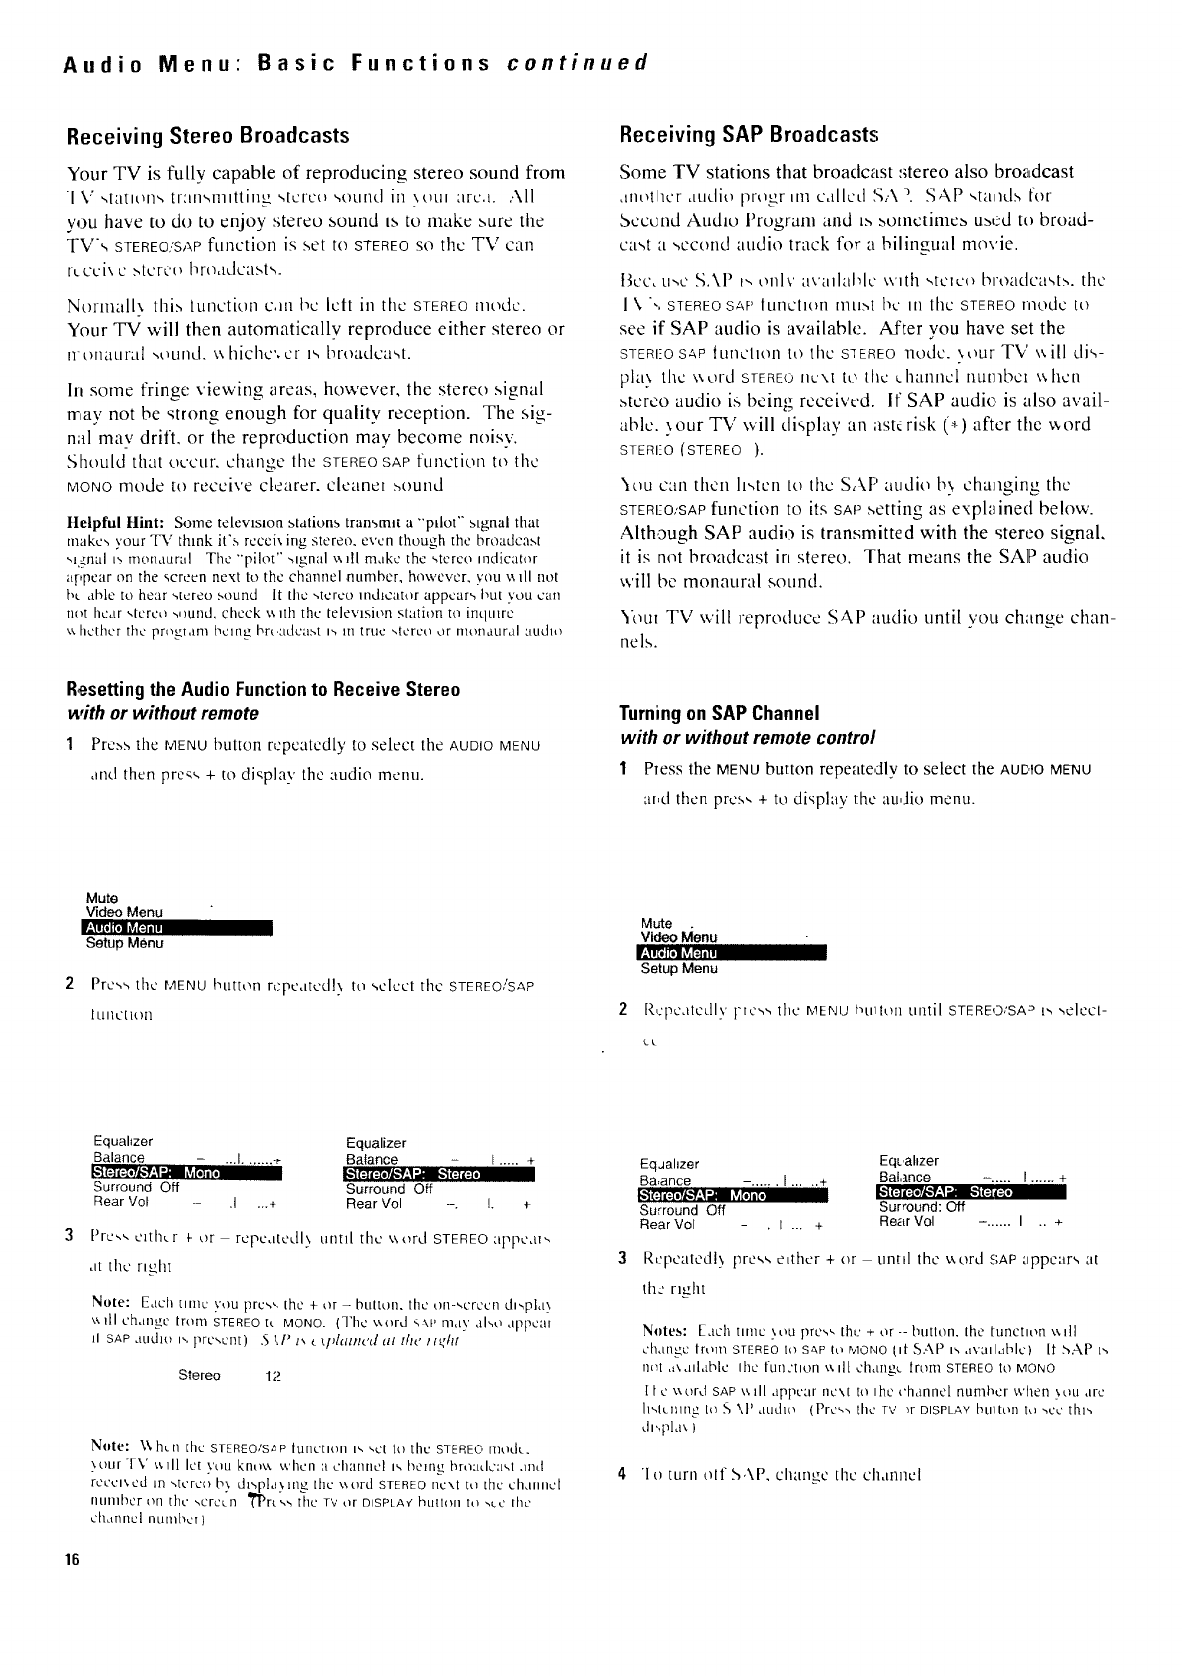
Receiving Stereo Broadcasts
Your TV is fully capable of reproducing stereo sound from
[ %," -.tatlt',11'-, tr:m'.,n]Itting ,,tcte_ '.,Otltld it] \OUl arc.t. ,.\11
you have to do to enjoy stereo sound is to make sure the
TVs STEREO,:SAPfttnction is set to STEREOSOthe TV can
t-Loci<,c ,,,terco broadcasts.
Not-trtall'_ thi.., luncti,an can l+,cIclt in the STEREOmode.
Your TV will then atttomatically reproduce either stereo or
IttHlaLlra[ '_Ol_llld. \\ hichc'+ L'r IS brt)adt.'aM.
hi some fringe viewing areas, however, the stereo signal
rr,ay not be strong enough for quality reception. The sig-
nal may drill, or the reproduction may become noisy.
.Should that occur, change the STEREOSAPfunction to the
MONOFnode to receive ct,zarcr, cleanm ,',,outld
Helpful Hint: Some telewmon stations transmit a "'pdot '+stgnal that
makes ,,.'our TV think it's rccci\ ing stereo, even though the broadca.',t
',l.7.nal p, monaural The "pilot" signal x,,fll make the <,tereo mdicator
appear on the screen next to the channel number, however, wm v,fll not
bt able to hear stereo sound It the stereo indicator appears but you can
not hear ,,terco -,.rand. check v,ith the television siatitm to inqutrc
'._.hcthcr the prt+gtam ['lCl[l_ brt,'Jklca.M IS 111 true ",tcrco or motlaurdI 'Judlo
Resettingthe Audio Functionto Receive Stereo
with or without remote
1Pre,-,s the MENU button repeatedly to select the AUDIOMENU
and then pre_,', + to display the audio menu.
Receiving SAP Broadcasts
Some TV stations that broadcast stereo also broadcast
<tilt',thcr <ttiditl progr lilt callcd ',';,.\+..SAP ',tailcl._ [or
Second Audio l)rogranl and is botnetinIeb ubcd to broad-
cast a ,,econd attdio track for a bilingnal movie.
l]cc< u'+c N.\]) i-, only a,+'allablc wlttl <,teico bioadca'q>,, tile
] \ ",, STEREO SLtP IUllCII+<II1 illii.'+,l bc ill tttc STEREO rnocle It)
see if SAP audio is available. After you have set the
STEREO SAP ttillCliOll it) the STEREO llOdc. \,,',tlr TV v.. ill dis-
pht) the \<,ord STERE()nu\t tc the uhanncl nut]lbct \_,hcil
stcreo audio i.,,being received. If SAP audio is also avail-
able. \our TV \,,'ill disphty an ask risk (*) after the _,ord
STEREO (STEREO }.
'_tiu can then h-,tcn to the SAP audio b'_ cha]tging the
STERI_-O,,SAPfunction to its SAP setting as explained below.
Although SAP audio is transmitted with the stereo signal,
it is not broadcast in stereo. That means the SAP audio
will be monatiral sound.
51+tit TV \\.'ill reproduce SAP audio until you change chan-
nels.
Turningon SAP Channel
with or without remote control
1Press the MENU button repeatedly to select the AUDIOMENU
at,d then pro+,, + to display the au,Jio menu.
Mute
Video Menu
I'-.lln_It_ Lvjm L
Setup Menu
Press the MENU bttttc, n rcpeatcdl,, to '-,elect the STEREO/SAP
[LIlle[ I+,)II
Mute
Video Menu
Setup Menu
[_.,:pc,itcdly i'tcss the MEI'.JU htllhm until STEREO,'SA _ t', ,,elect-
C_L
Equahzer Equalizer
Balance - ...I....... -,- Balance - I ..... +
!,,,"1(.:tlX,TiI_'.I.,II ill[,lit
Surround Off Surround Off
Rear Vol - .I ...+ Rear Vol -. !. +
Pro,,', citllur t- or rcpc,itcdl\ until thc ',\ord STEREO appc<tt',
<it the right
Note: Each tlnlu you pros,, the + or -button, the on-<,crccn dl,,pl,t.x
,.',ill change from STEREO tt MONO. (The ,.,.ord s',t' re<iv also JppCill
il SAP audltl i., prc'.cnt) .S _,P t_ t tph.tt('d at the /tk'ht
Stereo 12
Note: \\ hun tim STEREO/S_P |UtlCtlon I_, '+,Ci It) the STEREO triode.
; otir "IV '¢, Ill let \'ou kntv,_, when :t channel is being broudca'q and
reccl'., cd in -.t,.'rc{) b\ dlspla_,, lllg tilt_' \_, ord STEREO next to thc ch<lllllC[
lltlnlbcr t',rl [hc ,,crcLrl I_i_rt'-.h the TV or DISPLAY htlttOll to ".,CO the
chdlrHlcl nunlbct )
Eqaahzer Eqbahzer
Balance -. .... I ...... +
Ba,ance -. ..... I ..... +
[+'_1=]_:+.Yl,,_';I_ _,1.1I[. l_'_i(:li[:z'7_'_!l-'_"_'_I 1:]i[:l'
Surround Off Surround: Off
Rear Vol . I ... + Rear Vol -. ..... I .. +
3Rt:pcatcdl} pro<, ,,etthcr +or until the u.ord ..;APappear+., at
thz right
Nntes: Each tllnC _.otl riTeS'-, the + or -- button, the tunctlon will
change lrom STEREO lo SAP io MONO [It SAP nsavailable) It sAP is
tlclt .t'.anl,tblc Ihc ftin.'tlon t,. ill ch,Lng__ lrom STEREO to MONO
[ t c v, ord SAP ',_.tll appear next to the channel numt_cr when _,uu arc
h',iunmg to N ",,1' audio (Pro<, -, t[ic TV +r DISPLAY htllttln I,I ncc this
di',pla'. )
4It) turn off S,XP, change the ch<tn]lcl
16
Expanded Stereo
_our-IV includes an lz.\pandcd Stcrco tcaturc v_hich adds
greater depth and dimension to _tereo broadcasts. Yot,r
T\: clcctromcallv inctca-,es the audio scparati_,n perccp-
tion of the :speakers so you perceive an "'expanded" more
spacious .,,tereo sot, nd effect.
\hhough you C<tll ca,ilv ttllil lhc e'q)anctcd ,,tcico feature
on and off ,:isdesired, you may prefer to leave it turned on.
That way your TV wil! automatically process and c\pand
thc stereo signal,, \'_ bent\ CI <t,,torte broadc<tst is rcccix cd
(or whenever a stereo tape is played through a stereo 'V('R
connected lo the TV'< audio/video jacks labeled iNPUT).
Because this feature expands stereo sound, it processes
only stereo signals. I[ a TV program is broadca.',t iit inono
instead ot stereo, your TV will automatically reproduce
monaural audio. You will not be.0ble to hear Expanded
Stereo because expansion has no effect on monaural
audio.
Stereo expansion enhances the anabience of music and
program material. Dramatic ctfects of spatial enhance-
ment can be experienced with music. Talk shows with
background crowd noise also benefit frorn expansion by
engulfing the listener in a wider sound field than would be
experienced without c'cpandcd stereo. The effect will vary
with program material.
The perception of greater stereo separation is created by
cancelling the cross-coupled sound from the right speaker
that arrive.,, at the left ear (and the left speaker that arrive.,,
at the right ear). Like stereo headphones, stereo expansion
i.,,olate.s the left and right .,,ignals that arrive at the ears. As
a result, the speakers seem to be farther away from the TV.
Notes:.The ExpandedStereofeaturewill haveno effectunless the pro-
gram (s broadca>tIn _tcrct,
When the E,q_<lnded Stereo fcdiure is turncd on, _,omc ,qt'lt(lld\_ ill b_'
hc.trd I[onl c,t_.h spcdkcl r_ g.,rdlc-,s el the BALANCE control ,,cuing
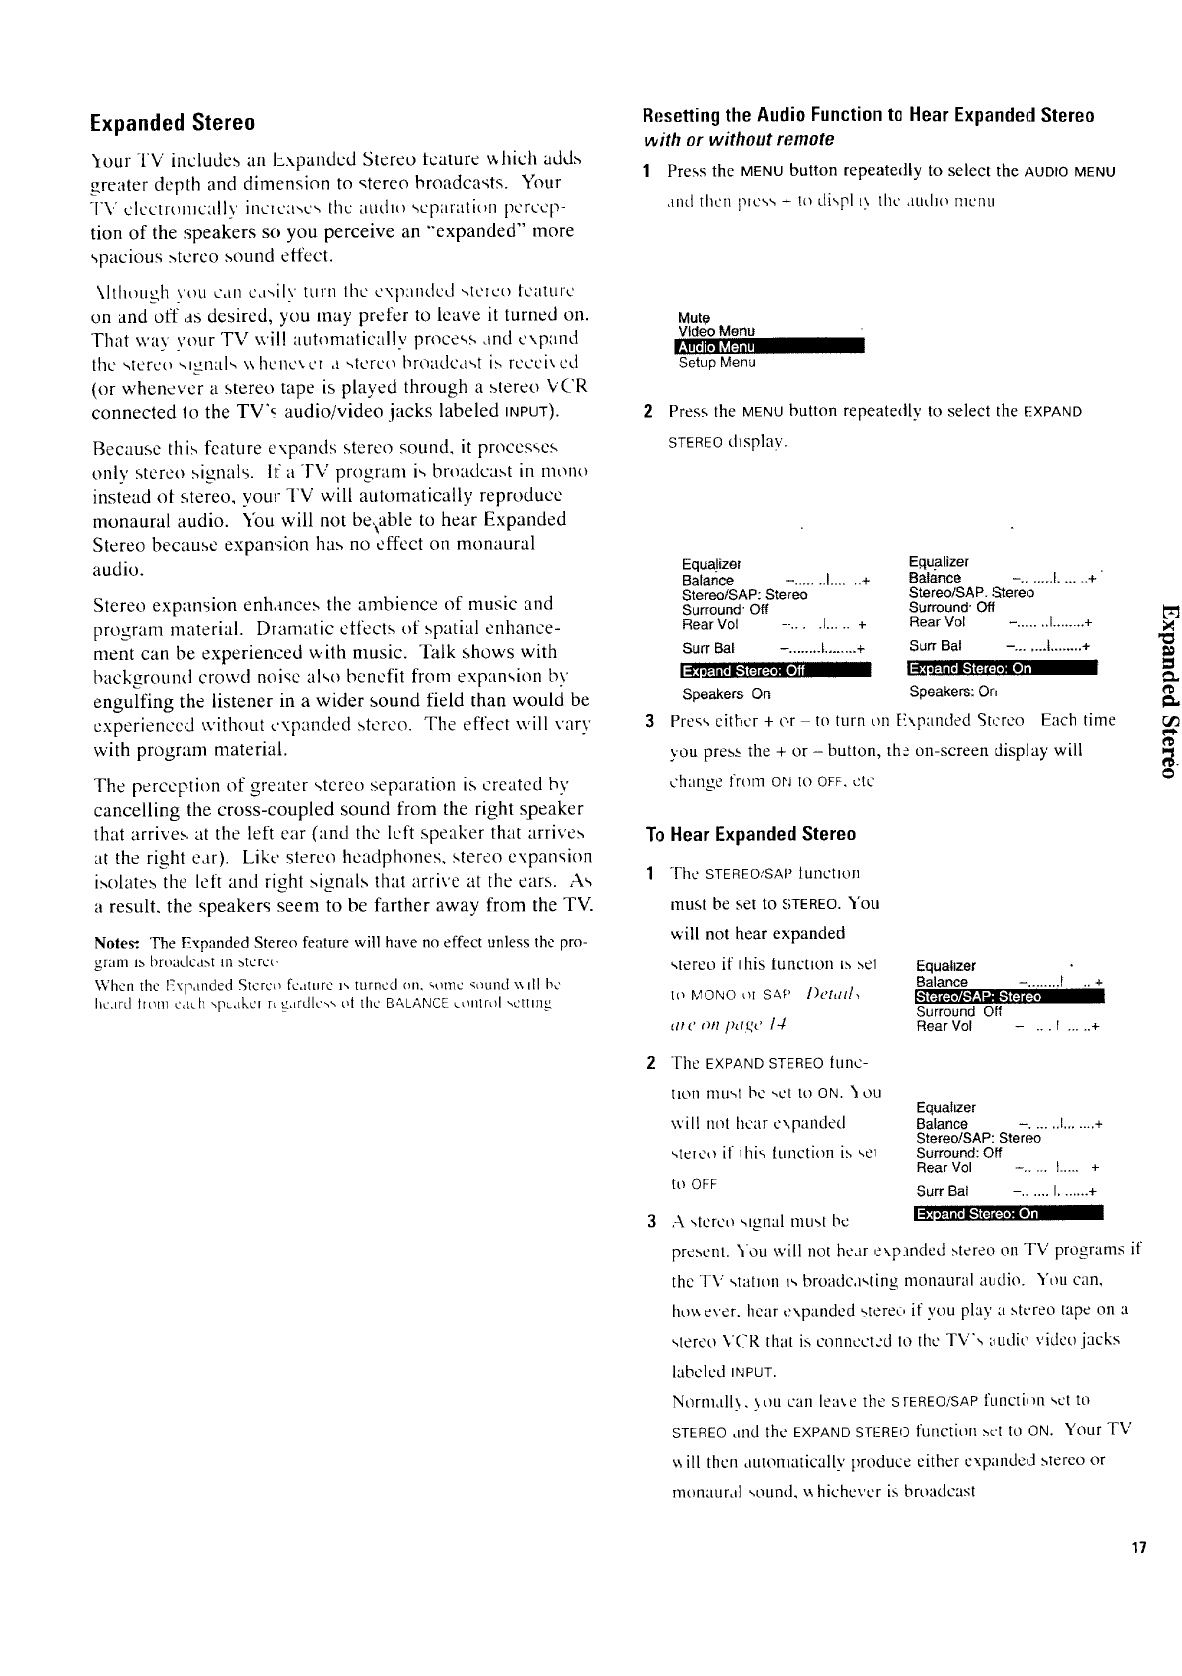
Resettingthe Audio Functionta Hear ExpandedStereo
with or without remote
IPress the MENU button repeatedly to select the AUDIO MENU
<lndthen p_c',',- to di',pl L_the audio nicRl.i
Mute
Video Menu
I[:l i toi_il'iF.4 ill
Setup Menu
Press the MENUbutton repeatedly to select the [-XPAND
STEREO thsplay.
Equalizer
Balance -. ...... I...... +
StereotSAP: Stereo
Surround' Off
Rear Vol --....I ..... +
Sun" Bat -. ....... t........ +
l_,m,lo'._4eal=_o.u)t"III I II
Speakers On
Pre_', either + or to turn on {!\panded St,:reo
E.qualizer
Balance -. ...... I...... +
Stereo/SAP. l_ereo
Surround Off
Rear Vol -. ...... I........ +
Sun Bal -. ...... t........ +
t._! i_ I I[I l/'_l [=t (:lllll] I
Speakers: Or,
Each time
you press the + or - button, the on-screen display will
change from ON to OFF. ctc
To
1
Hear Expanded Stereo
The STEREOISAP lunctloll
must be set to STEREO.You
will not hear expanded
<,tereoif this tuncuon n>._el
[('l IV]ONe OI SAP l)etatl,
_ttt >oft p_t,qt' 14
Equalizer
Balance -. ....... f .. +
Surround Off
RearVol - ...f ..... +
2The EXPAND STEREO [unc-
tion must be '.,el It) ON. "1otl
Equahzer
will n(>t hear c\panded Balance -. ..... I....... +
Stereo/SAP: Stereo
steieo if _his [unction is ,,el Surround: Off
Rear Vol -. .... I..... +
tO OFF Surr Bal -. ..... I....... +
3 A ,4tree _,Ignal mum I've l_._,_li[,i_"i(=li:_a*)ll.i
present. You will not hear ,expanded.,,tereooil TV programs if
the TV' Marion is broadc,p,ting monaural atJdio. You can,
[lm_ever. hearexpanded <,terec,if you plat' a stereo tape on a
stereo VCR thai i_ conncct,:d to the TV's audio video jacks
labeled INPUT.
Normally. )OU can lea'_ e the s FEREOiSAPfuncti,m _,ctto
STEREO dlld the EXPAND STEREO ftlnctioil .-,el to ON. Your TV
_sill then ,iUtolnatically produce either c'<panded stereo or
nu)nattrul '.,oLin(l,'&hichcvcr is broadcast
17
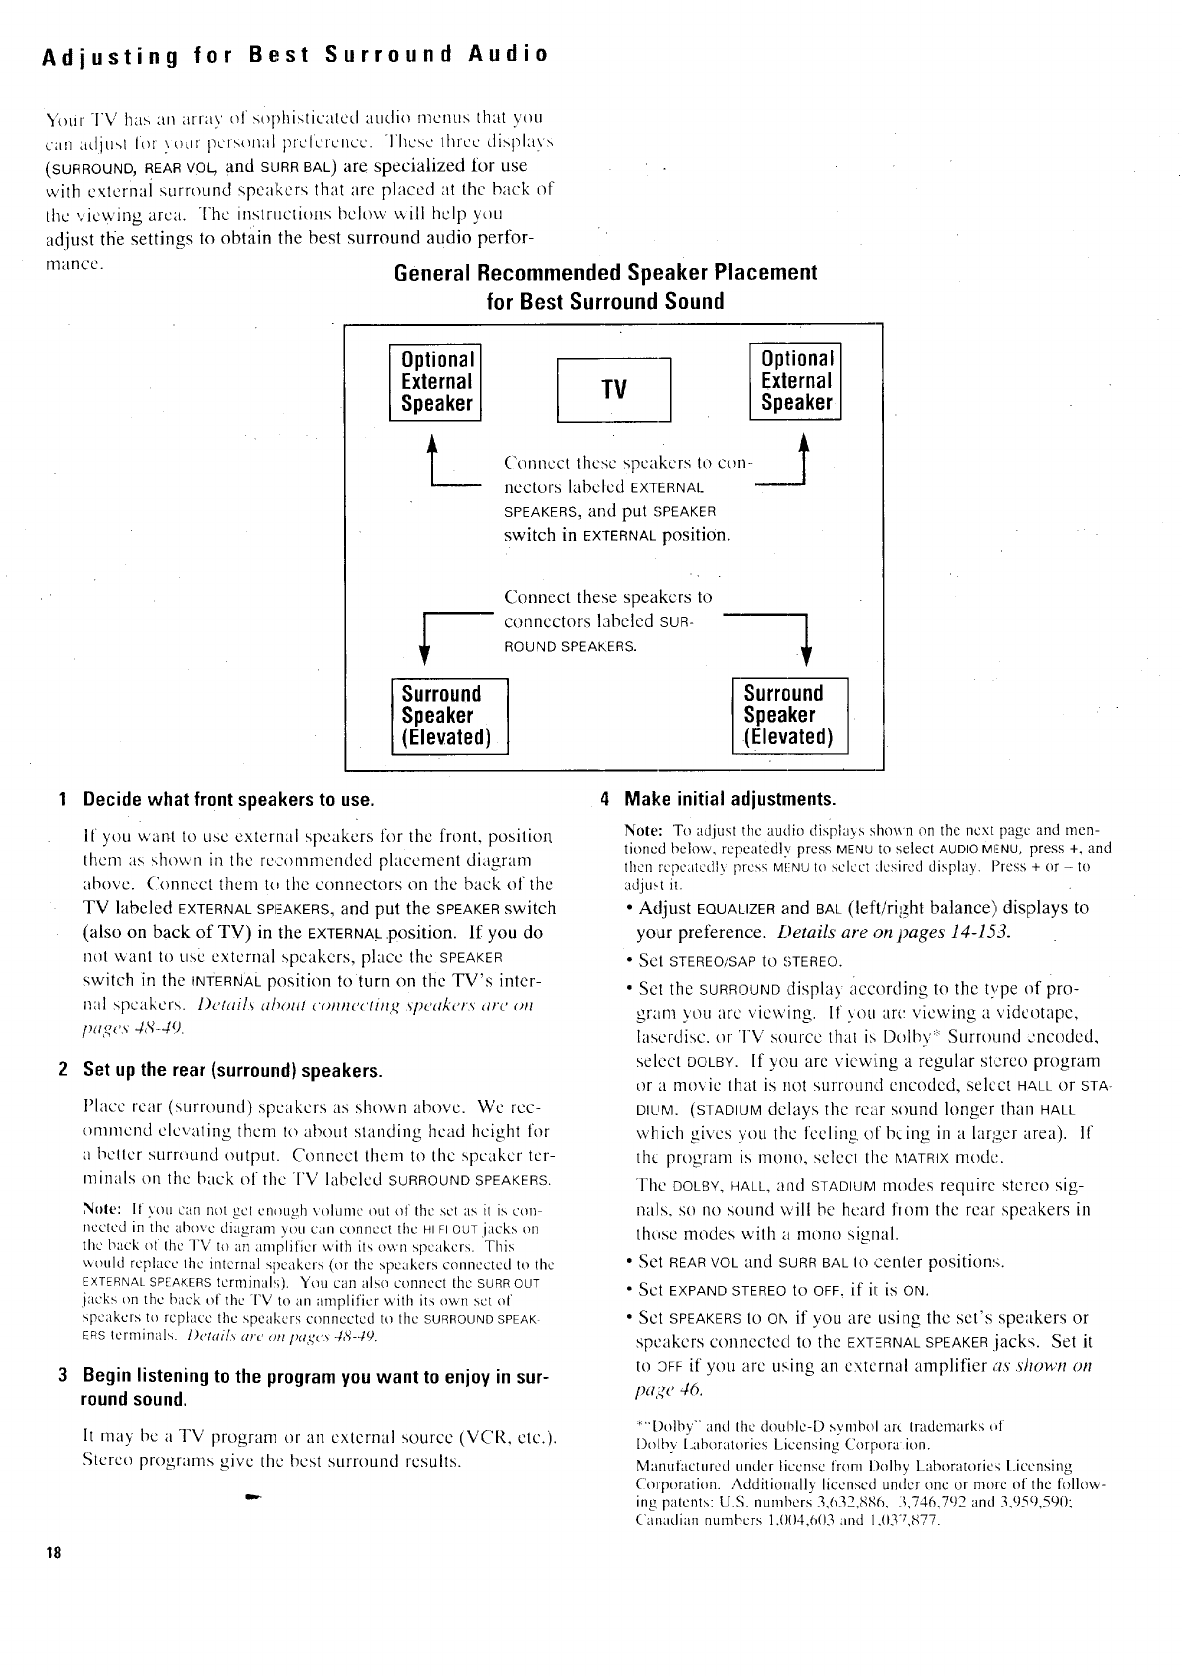
Adjusting for Best Surround Audio
V{)l.ir TV has ;.m aiTa',' Of sophisticated audio menus that you
can 'adiu',l lot\ o0r pcxs{mal prclcrcncc. ]he_,e Ihicc di:,play_,
(SU_ROUNO, REARVOL,and SURR BAL)are specialized lor use
with external surround speakers that arc placed at the back of
thevicwingarca. Thcinstructionsbclowwillhclpyou
adjust the settings to obtain the best surround audio perfor-
mance. General Recommended Speaker Placement
for Best Surround Sound
Optional
External
Speaker
I Surround
Speaker
, (Elevated)
TV
Connect these speakers to coil-
hectors labeled EXTERNAL
SPEAKERS,and put SPEAKER
switch in EXTERNALposition.
Connect these speakers to
connectors labeled SUR-
ROUNDSPEAKERS.
Optional I
External
Speaker
Surround
Speaker
(Elevated)
18
1 Decide what front speakers to use.
If you warn to use external speakers lk)r the front, position
them its, shown in the rc,,zonlmended placement diagram
above. Connect them t{, the connectors on the back of the
TV labeled EXTERNALSPI=_AKERS,and put the SPEAKERswitch
(also on back of TV) in the EXTERNA!_.position. If yOU do
not want to use external speakers, place thc SPEAKER
switch in the INTERNAL position to turn on the TV's inter-
hal speakers. Details tl/)Oltl t'O!/!ICCIDlff _;[)Cdkt'l "_, _ll'C 01l
pa qt'.s 4N-49.
2 Set upthe rear (surround)speakers.
l'lacc rear (surround) speakers as shown abovc. We rec-
ommend elevating them to about standing head height for
',l better surround output. Connect them to the speaker ter-
minals on the back of the TV labeled SURROUNDSPEAKERS.
,'_ole: 1[ ;eLl c_tn not gel Cll{}tlgh v{)lLIlllC ell[ {}l" the set as it is con
ncctcd in thc above diagram you can connect the HIFIOUTjacks on
the back {}tlhc TV t{}an amplificr with its ownspcakcrs. This
\',ould replace Ihc internal speakers (or the speakers connected to the
EXTERNAL SPEAKERS terminals;). You can also connect the SURR OUT
.iacks_)nthc back of tile TV to an amplifier with its ov,,nsetof
speakers to replace thc speakers connected to the SURROUND SPEAK
ERS lerminals, lJetails are on t>a£,cs 4,%49.
Beginlistening to the programyou want to enjoy in sur-
roundsound.
It may bc a TV program or an cxtcrnal sourcc (VCR, ctc.).
Stereo programs give the best surround results.
Make initial adjustments.
Note: To adjust thc audio displa_s shown on the ncxt pagc and men-
tioncd below, rcF,eatedly press MENUto select AUDIOMENU,press +, and
then repeatcdl 5 press MENU10select desired display. Press +or - to
adjust it.
• Adjust EOUAUZERand BAL(left/right balance)displays to
yo_ar preference. Details are on pages 14-133.
• Set STEREO/SAP to STEREO.
• Set the SURROUNDdispla} accordin,, to the type of pro-
gr:,lm you are viewing. If ;ou are vicwir, g a videotape,
laserdisc, or TV source thai is D{}lhv* Surrom]d encoded,
select DOLBY. If you are viewing a regular stereo program
or a mo\ie that is not surroLllld encoded, select HALL or STA-
DIUM. (STADIUM delays the rear sound longer than HALL
which gives you the feeling of being in a larger area). If
the program is mono, selecl the MATRIX mode.
The DOLBY,HALL,and STADIUMmodes require stereo sig-
nals, so no sound will be heard flora the rear speakers in
thuse modes with a mono signal.
• Set REARVOLand SURR BALIo ,center positions.
• Set EXPAND STEREO to OFF, if it is ON.
• Set SPEAKERS to ON if you are using the set's speakers or
speakers con:nected to the EXTERNALSPEAKERjacks. Set it
to DFFif yOU arc us.ing all external amplifier ,rs shown on
pa,_,,e 46.
*"Dolbv" and Ihe double-D symbol at( Irademarks {,f
Do/by l,aboratories Licensing Corpora ion.
Manufactured under license from Dolby Laboratorie_ Licensing
(orporation. Additionally licensed under talc or more Df the follow-
ing patcnts: U.S. numbers 3jG2,886, 3,746,792 and 3,050,590:
Canadian numbcrs 1.(}04,6(13 and 1,(t3"L877.
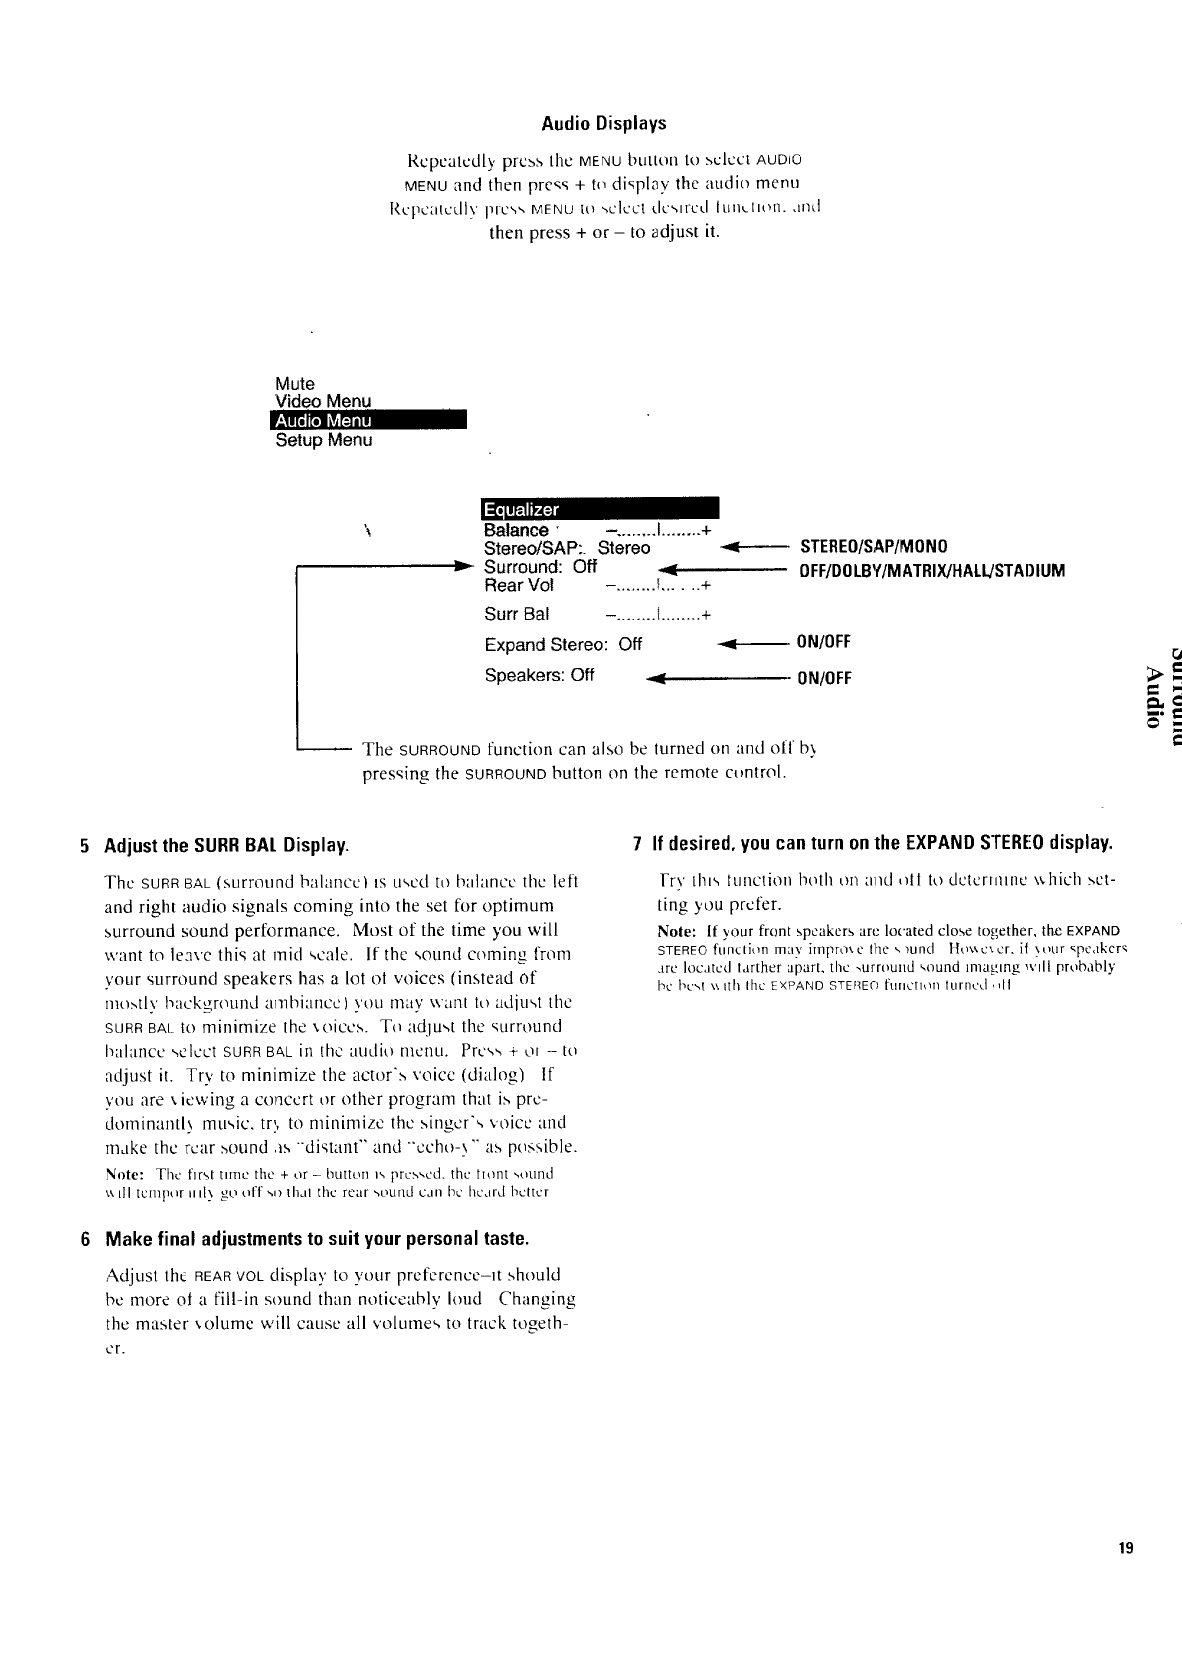
Audio Displays
Repeatedly prcbs tile MENU button to .,,elect AUDIO
MENU and thenpre_s+ todisplaythe audio menu
b{,,_'pcatcdly pro,,,, MENU to '-,L'l,..'L'l dc_,lrc'd lun,._llo[1, and
then press + or - to adjust it.
Mute
Video Menu
Setup Menu
Balance --. ....... I........ +
Stereo!SAP:. Stereo
Surround: Off
Rear Vol -. ....... I...... +
Surr Bal -. ....... I........ +
Expand Stereo: Off
Speakers: Off
STEREO/SAP/MONO
0FF/DOLBY/MATRIX/HALL/STAI)IIJM
.q_,n ON/0FF
ON/OFF
The SURROUND function can also be turned on and o[f b}
pressing the SURROUNDbutton on the remote ct,ntrol.
5Adjustthe SURRBAt Display.
The SURR BAL (surround balancc l is u_,cd tO balance the left
and right audio signals coming into the set for optimum
surround sound performance. Most of the time you will
want to leave this at mid ,,tale. If the ,,ound coming from
your surround speakers has a lot ol voices (instead of
mo,,,tlv background anlbiancc) you tnay WaIlt [tl adiu'4 the
SURR BAL tO minimize the xoiccs. To adju,4 the '_urround
balancc '_elcct SURR BAL ill the audio nlcDU. Pro',,, + ol - to
adjust it. Try to minimize the actor'n voice (dialog) If
you are _lowing a concert or other program that is prc-
dotninanth mu,dc, tr,, to minimize the singer',, voice and
make thc rear bound .Is 'di,qant'" and "'ccho-x'" as possible.
Note: TIle first tune tile + or -button _,,prc.-.',cd,the hont ,,ound
v, Ill tcmpor udx go off M/ II1¢1lthe rear sOulld Call bc hcurd bcltcr
6Make final adjustmentsto suit your personal taste.
Adjust the REARVOLdispla.v to your prefcrencc-tt should
bc more ol a fill-in sound than noticeably loud Changing
the master solume will cause all volumes to track togeth-
or.
7 If desired, you can turn onthe EXPANDSTEREOdisplay.
Fry thin tunction both on and oil to dctcrtmnc \_hich set-
ting you prefer.
Note: If your front speakers art."located close together, the EXPAND
STEREO function may ilnprme lhe ', rand Hox_cxcr, it }our <pe,lker_
are located turtherapart, the ,urround ,,ound imaging wdt probably
bc }',c'-d ",.\lib IRe EXPAND STEF_EO ftlllCtlOll turned, ,11
19
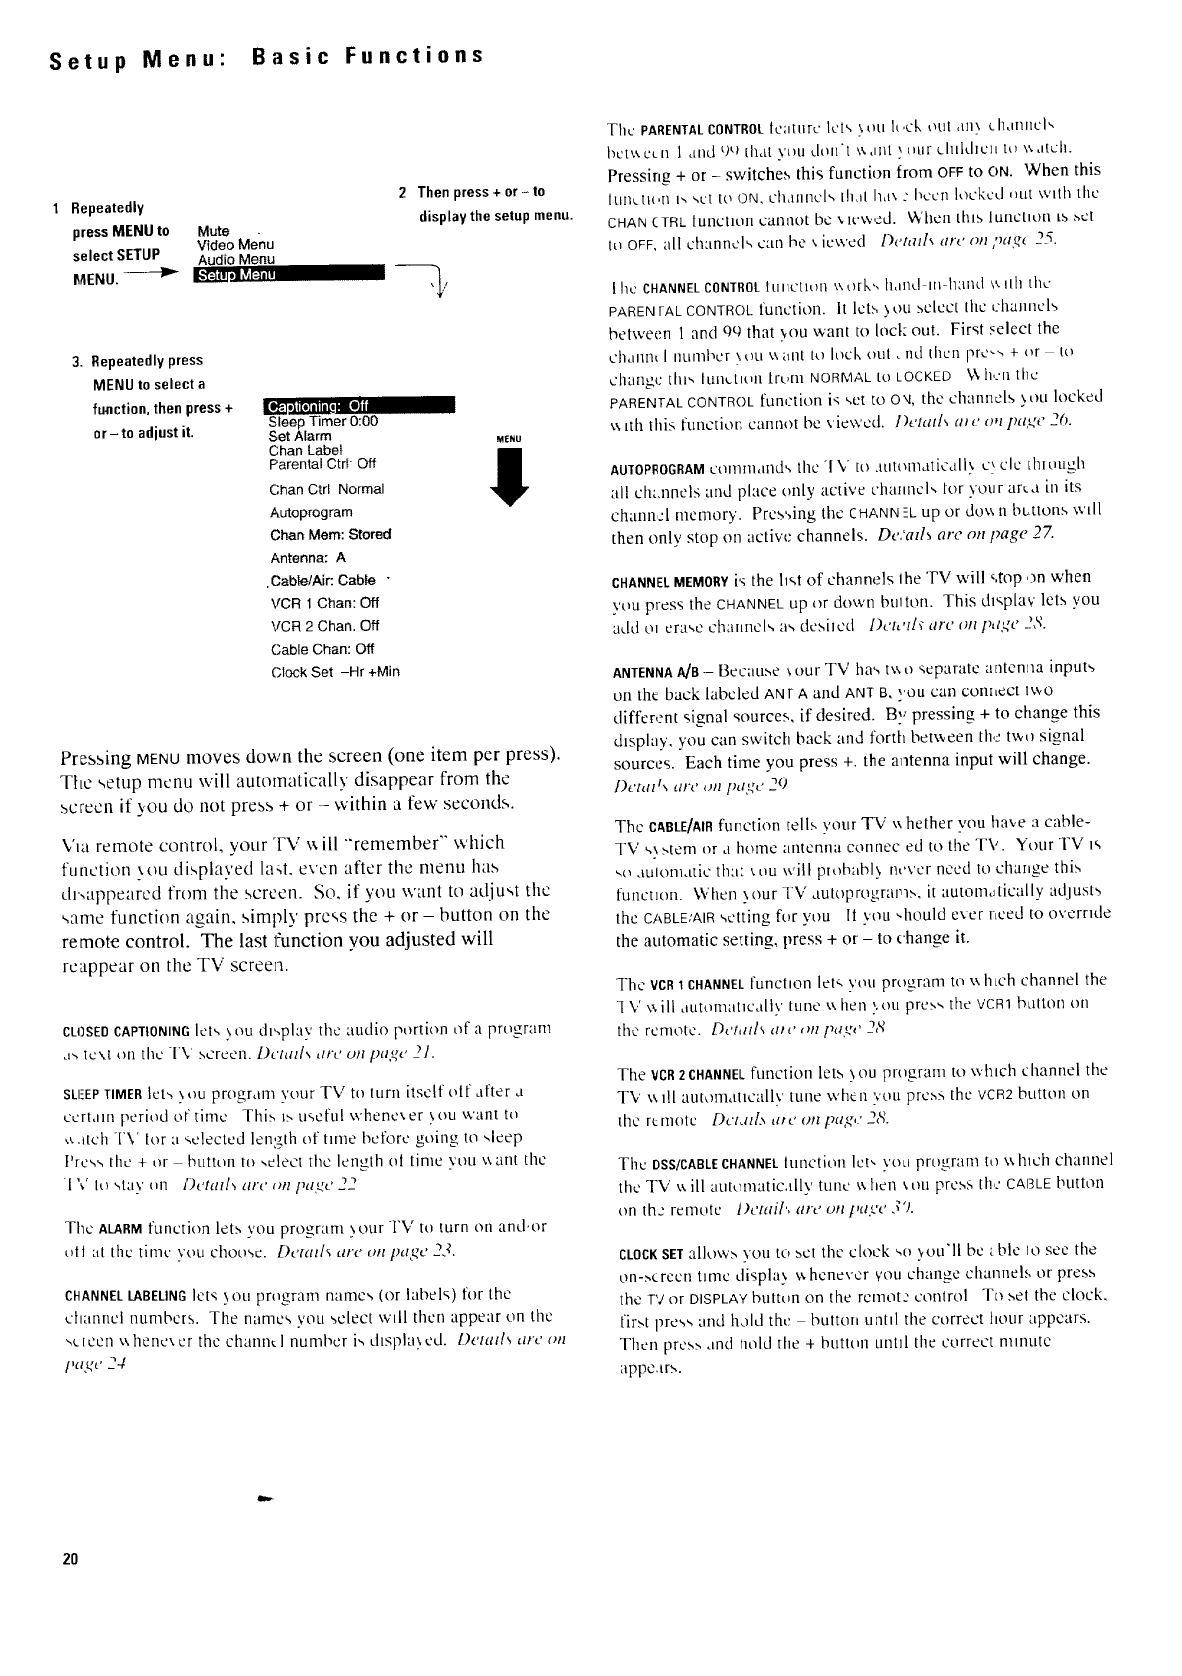
Setup Menu" Basic Functions
Repeatedly
press MENU to Mute
Vfdeo Menu
select SETUP Audio Menu
MENU. _ II_'r_im-_,v,m=.
2 Then press + or - to
display the setup menu.
3. Repeatedlypress
MENU to select a
function,then press+
or-to adiust it.
I[,,,ll_ |,]111|[, _lJi
Sleep Timer 0:00
Set Alarm
Chan Label
Parental CtrI- Off
Chart Ctd Normal
Autoprogram
Chan Mere: Stored
Antenna: A
•Cable/Air. Cable "
VCR I Chan: Off
VCR 2 Chan. Off
(;able Chan: Off
Clock Set -Hr +Min
MENU
I
Pressing MENUmoves down the screen (one item per press).
The setup menu will automatically disappear from the
.screen if 5,ou do not press + or - within a few seconds.
Via remote control, your TV x`'ill "'remember" which
function `'ou displayed la,t, even after the menu has
dl',appeared from the screen. So, if you want to adjust the
same function again, simply press the + or - button on the
remote control. The last lhtnction you adjusted will
reappear on the TV screen.
CLOSED CAPTIONING lets \ ou display the audio portion of a program
a-,icxt on the [V screen. [)t'lallx dtt' oil ptt.t_{,21.
SLEEPTIMERlets \ou program your TV to tUrll itself elf after a
t_'crt<liilperiod or time This Ix usetuI whene',er \ou want to
,_arch TV lora ,,elected length of time before going to ,,loop
Prow, the + or l!l.ltton to ,,€lect the length ot time `"tiLl_A all[ the
[ ",.' It} st;.IV {iil f)t'I_ll[_ arc .n pa,gc 22
The A_RM functhm lets you program 5our TV to turn on and,or
till at the tinlc`"ou chotlsc. Details are Oil/Jagt' 23.
CHANNELLABELINGlots )oil program nailles (or labels) for the
channel numbers. The names you ',elect will then appear on the
-<icon _.,.hone\ cr the channel number is dzspla.\ed. Delatls are on
I,a_e 24
The PARENTALCONTROL lcaturc let,, \tltl It ,t_'k out <ill', ch<mncl <,
bct_t ot_n I dlld t)tl that ,,'(iLl dollt \,,dill _ titlr c_luidicn to \c<itcil.
Pressing + or - switches this function from OFFto ON. When this
ltlilcti_,n i', set to ()iN. challncls Ih<il h,l\ ." lieon locked ,lilt with the
CHAN (TRL iuuction canllot be _,lC\\.,2d. Wtlen this ltinCllOU is _cl
IOOFF, :ill ch:mncls can lie \ io\\'ed l)etat[s arc on ,,_a,c,_25.
Ihc CHANNEL CONTIlOI_iullctio_l t_ ark,, h<lncl ill-hand _t iIh Ilk"
PAREr'.] rAL CONTROL fuuction. It lot.,, \ till .>,CICOtthe channel,,
between 1 and qq that _,oti want to loci: out. First select the
chdllilt [ ilUlllbc'r \ t)l_l \\ {lilt it) hick ou[ < nd thcI1 pro-,, + <_r to
change thi,, hlnctltiil [rom NORMAL it) LOCKED _v\ h,:n the
PARENTAL CONTROL function is sot to O'4, the channels )tiLl locked
_ ltil this functioi; calluot be viewed, lit'fallS a/L' opt l_a.k'_" 2(_.
AUTOPROGRAMconln/ai1O', the "1V to .lut_mlaticall\ cxtic through
all ciualrlels and pl'tce only active channel,, for ,,'our area in its
chann,:l memory. Pres',ing tile CHANN -L up or do,,\ n bLtlons ',,,'ill
then only stop on active channels. De.<atls are on page 27.
CHANNELMEMORYis the list of channels Ihe TV will ,,top ,in when
y'ou press the CHANNEL tip or clown bultOfl. This di'_p[av lets you
add oi erase chaimels as desiicd l)ct,,tlq arc' oft pa<_4e_?S.
ANTENNAA/B--[{e,:ause _,our TV ha', t\\ o separate antenna input,,
on the back labclcd ANrA a/td ANT B, yOU Call conlicCt lWO
different _ignal sources, if desired. By pressing + to change this
display, you can switch back and forth betv_een th,_'tv, o signal
sources. Each tirne you press +. the a_ltenna input ,,viiichange.
[)Cgtll 1, _ll't' Oil [)tl,!_t ' 20
The CI_BLE/AIRfuiwtion tells vent TV \'+hether wm hax,e a cable-
TV 5\ stem or a tlome antenna coililec ed to the TV. Your TV is
,,o aulonlatic tha: \ ou will piobabl.,, never need to charige this
function. \\;hen \ our TV autoprograins, it autonla ticaily ad.lust,,
the CABLE,'AIRsetting for ytiu It you ,hould ever riced to override
the automatic setting, press + or - to change it.
The VCR1 CHANNEl.funchon let':, VOti program to \\ tl tch channel the
1 V \_ ill <ittttlmaticailv tune \\ hen ,,tiu pros,, the VORt bullion on
tile remote. Dcmt£ ate ,m pa.,.',' 2,q
The VCR2CHANNELfunction lets ._ou program to which channel the
T¥ \_ ill alitomatieallv tune `",'he n you press the VCR2 button on
the rL hi(tic Dcl,.lll.x tilt' Oil [)tl<q,' _<q.
The DSS/CABLECHANNEL hiriction lot, yogi prtlgran'i to v, hlch channel
the TV \_ill ai.lttlnlatic.illv ttlilC \\ hen \ till press th,.' C&BLE button
on th,: rciIloto l)ctail', are on paye 3').
CLOCK SET allow.,, \'ou to, set the clock _,o _oti'll bc tble IO see the
on-`screen time disphi 3 _ hcnevcr voti challge channels or press
the TVor DISPLAYbuttt,n on the remote control Tc_.set the clock.
first press and hold the bultoli until the correct hour appears.
Then pres.,, and field the + btittt,n tintll the correct nlinuto
appears,
2O
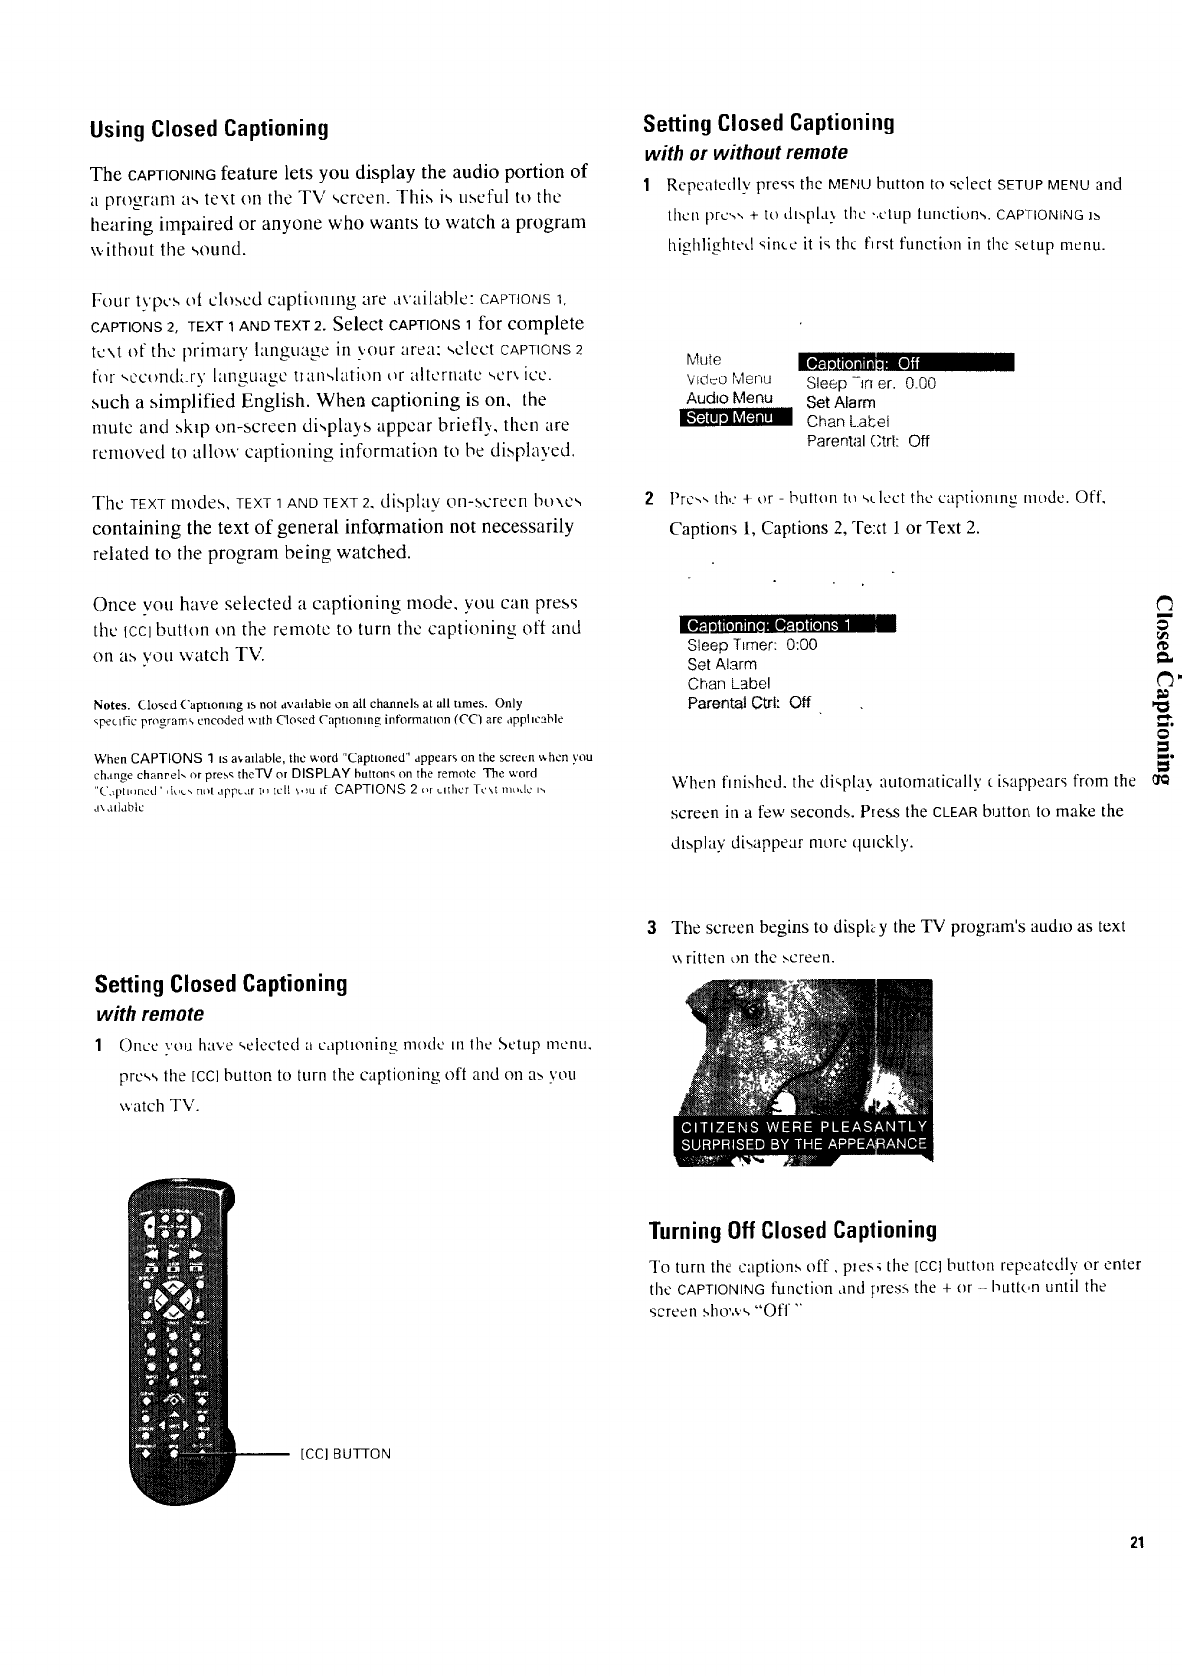
Using Closed Captioning
The CAPTIONINGfeature lets you display the audio portion of
a program a,, text on tile TV ,,creen. This i,, useful to the
hearing impaired or anyone who wants to watch a program
without tile ,,ound.
Setting Closed Captioning
with or without remote
1Repeatedly press the MENU button to select SETUPMENU and
then prc'_,, + to ,h_pla,, the ,.ctup tunction,,. CAPTIONINGl_
highlighted since it is the first function in the setup menu.
Four types el closed captitmlng are available: CAPTIONS1,
CAPTIONS 2, TEXT 1 AND TEXT 2. Select CAPTIONS 1 for complete
tc\t of the primary language in ',,our area: ,,elect CAPTIONS2
for ,,ocon&_ry language tl an,,lation or alternate scr_ ice.
such a simplified English. When captioning is on, the
mute and skip on-screen di,,pla)s appear briefl),, then tire
removed to allow captioning information to be displayed.
The TEXT modes, TEXT 1 AND TEXT 2. display,' on-screen bu\cs
containing the text of general information not necessarily
related to the program being watched.
Once you have selected a captioning mode, you can press
the lOCIbutton on the remote to turn the captioning oft and
on a:+,you watch TV.
Notes. Closed ('apttonmg 15not avadable on all channels at all times. Only
,,petit'it prograrr,_, encoded with Clo_ed Captioning information (CC) are apphcable
When CAPTIONS Iis a',allable, the v.'ord "Capttoned" appears on the screen _,hen you
change chanrel- or pres_ theTV or DISPLAY butmn_ on the remote The word
"('aptt, lP, cd ' ,k,£_ not appc.tr t,, tell _,_u if CAPTIONS 2 or Lither Tc\t llltldc is
.ixailablc
Mute lO_'1_ll[o]|In|]•In.O]i
Vmlco Mer,u Sleep --in er. 0.00
Audio Menu Set Alarm
Chan L.agel
Parental CtrI: Off
2Pro,+, the + or - button to sclcct the captioning triode. Off.
Captions 1, Captions 2, Text 1 or Text 2.
I[Ot_+lilI[I|IIII[I IIIIIP4II|I[I|It-_II I
Sleep TLmer: 0:00
Set Alarm
Chan Label
ParentalOtrl: Off
When fnnishcd, the di',pkt_,, automatically c isappears from the
screen in a few seconds. Ptess the CLEAR button to make the
dr+play disappear more quickly.
m
=f
p,
ii.
Setting Closed Captioning
with remote
1Once you have ,,elected acaptioning modc in the .Setup menu,
pre',s the [ccI button to tnrn the captioning oft and on a> you
watch TV.
The screen begins to dispky the TV program's audio as text
_ ritten on the .',creen.
Turning Off Closed Captioning
To turn the captions off, pxes_ the [cc] button repeatedly or enter
the CAPTIONINGfunction ,md press the + or -I_utt(,n until the
screen shows "'Off ""
-- [CC] BUTTON
21

Setup Menu" Basic Functions continued
Setting the Sleep Timer
\_'ith the Sleep timer, you can program >our TV to turn
itself off after a period of up to four hours. This is useful
x,,hen xou want to watch T\.' for a selected length of lime
before going to sleep.
SettingSleep Timer
with or without remote
1Repcatedl.x prc',s the MENUbutton to '.,cite[ SETUPMENUand
then press + to display the setup lunctlons.
l hc Sleep l imer walt begin to count down tt) zero. -['h.cword
SLEEP_,_.ill appear on the _,cr_en ,,_hcnever you change
channel.', t)[ press the rv button It) lcl xt)u know the Sleep
"litncr is .tctivated.
10 41PM 12
Sleep
Mute
Video Menu
Aud'_ Menu
l he SLEEPTIMER.,,hould be ,,clotted. If not. repeatedly press
the MENU button to .,,elect It.
Captioning: Off
!,."1[_ ohmmnnnl_lnILOXOII
Set Alarm
Chan Label
Parental Ctrl: Off
Pro:,,, the +or - button to _,elcct the length of time (up to tour
hours) _,,ou,,,'ant the T\: to stax on. Each press of the button
lncrea.,,c.,, the time 311nllnutes (up to [our hours). Then the
time display will start over with 0:00.
The dlllOlllll ot tllllC rCllldLlll,l_ he[ore the J'_" ",Ill_It _, I[.',clJ tl['t
'.'. Ill appear in th,: SLEEP I,ME Rnlenu \_. hone\ cr ',,t)u prc>s tile
MENUbu_ton to select lhe SETUPMENUand then press +.
Captioning. Off
I_,_J[--z=].zZiln=t=zml_J: "_'-- 1 hour and
Set Alarm 28 minutes
Chan Label
Parental Ctrl: Off remaining
6When the Sleep Timer corralS, down to 0:00, the SLEEPTIMER
di',pla,, _ ill appear tm tht ,,, rcen for a fe_ ,cconds. Then the
TV ,,,,'illturn itself off. 11v,)u want the TV to stay on when
thi.', dtsplay appcar.s, pro,,', the TV ['_tlt[O[I011 he uni'. ersal
rcmole. Fhe Sleep-[ imer wdl be cancelled. To add more
tm_e to the Sleep Timer \_h_n this dl.,,play appears, press the +
button.
Captioning: Off
Ibl[-4=_,mmn,,t=_ml_[a ..,,91- 1 hour and
Set Alarm 30 minutes
Chan Label
Parentat Ctd: Off
Clearing Sleep Timer
Tt, cancel the sleep ttmcr, enter the Sleep Tm_-r ttlnction and
then prc_,', the +or btltton until the ,creen slt,,_', {l:(l().
The dlspla_ xsIll automaHcally disappear from the screen in a
It\,, ',cconds. It ,.,,ill d_sappcar more qunckly if the DISPLAY or
CLEAR button is pressed.
22
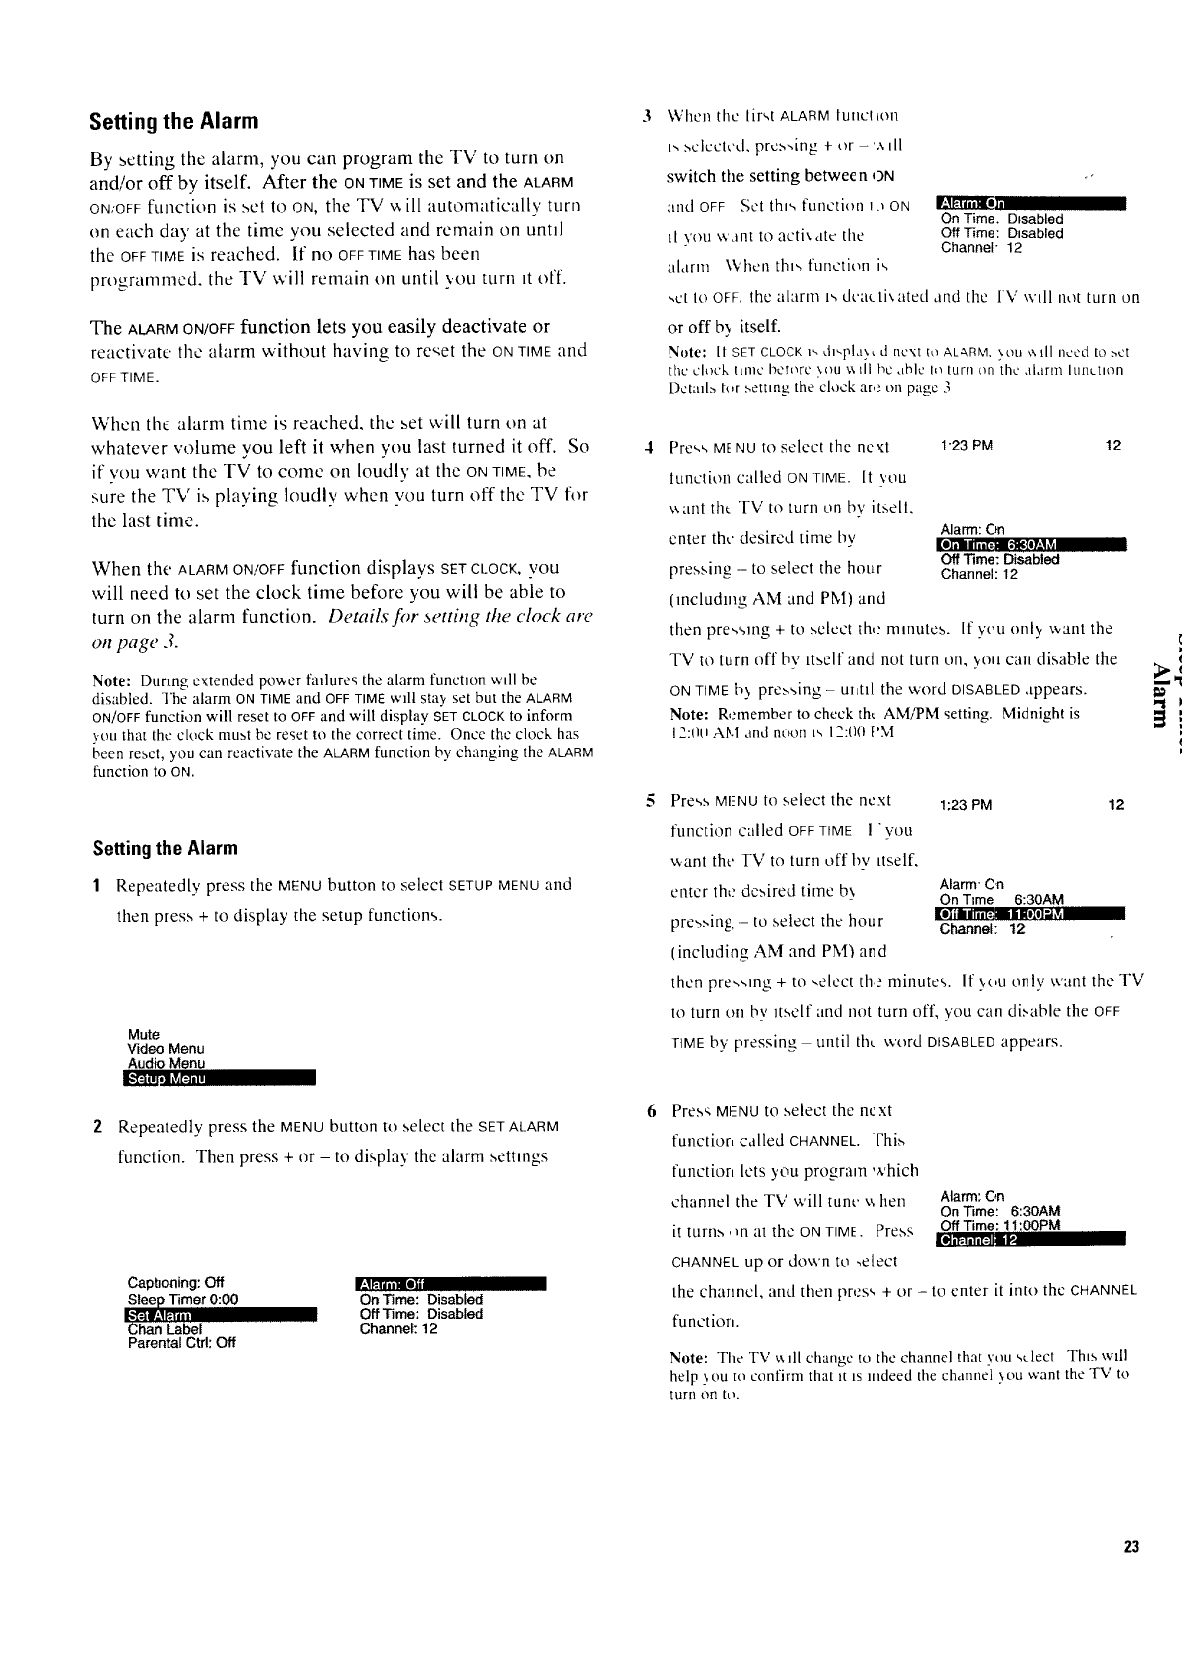
Setting the Alarm
By setting the alarm, you can program the TV to turn on
and/or off by itself. After the ONTIMEis set and the ALARM
ON,'OFFfunction is set to ON,the TV w ill automatically turn
on each day at the time you selected and remain on unnl
the OFFTIMEis reached. If no OFFT_MEhas been
programmed, the TV will remain on until you turn it ot'f.
The ALARMON/OFFfunction lets you easily deactivate or
reactivate the ahtrm without having to re'_et the ONTIME and
OFF TIME.
When the alarm time is reached, dEcset will turn on at
whatever w31ume you left it when you last turned it off. So
if you want the TV to come on loudly at the ONTIME, be
sure the TV is playing loudly when you turn off the TV for
the last time.
When the ALARM ON/OFF function displays SET CLOCK, VOU
will need to set the clock time before you will be able to
turn on the alarm function. Details for setting the clock atv
on page 3.
Note: Dunng extended pov,er fadures the alarm funcnon wdl be
disabled. ]'he alarm ONTIMEand OFFTIMEwill stay set but the ALARM
ON/OFFfunction will reset to OFFand will display SETCLOCKto inform
.votlthat the clock mu_t be reset to the correct time. Once the clock has
been reset, you can reactivate the ALARMfunction by changing the ALARM
function to ON.
Setting the Alarm
1Repeatedly press the MENU button to select SETUPMENUand
then press + to display tire setup functions.
Mute
Video Menu
Audio Menu
I_"Nilyril #J[=]=l=
Repeatedly press the MENU button to select the SET ALARM
function. Then press + or - to display the alarm settings
Capboning: Off
Sleep Timer 0:00 On Time: Disabled
l_'_m., 0ff Time: Disabled
Label Channel: 12
Parental Ctrt: Off
3When the first ALARM lullctlon
I., selected, prc.',-,ing + or - v. dl
switch the setting between ON
and OFF Set thi,, functi()n I._ ON
_I you want to acti',atc the
alarm When this function is
On Time. Dlsabted
Off Time: Disabled
Channel- 12
",ct tO OFF, the akron 1_,deactixatcd and the IV wdl not turn on
or off b_ itself.
Note: It SETCLOCKp,de,pla}, d next to ALARM.}on _\dl need to ..,ct
the clock ItlllC bemrc \ou ,atll bc dbJc In turn on the alarm hlnutn_n
Detail.',tor .',ettmg the clock at,."on page 3
Press ME NU to select the next 1-23 PM 12
lunctiou called ON TIME. [t ','OU
_ant the TV to turn on by it.,,ell.
enter the desired time by Alarm:On
- tel iI lii Ii:.ie-l_lly.,1 _
OffTime:Disabled
pressing -- to select the hour Channel: 12
(mcludlng AM and Phi) and
then pres,,mg +to select the minutes. If you onl._ want the
TV to turn off hv ttself and not turn on, ._ou cat| disable the
ON TIME [-,', pre_s,,ing - UlttlI the word DISABLED appears.
Note: Remember to check tht AM/PM setting. Midnight is
12:(Iti AM anti nuon ts 12:(1(I I'M
Press MI-NUto select the next 1:23 PM 12
function called OFF TIME l " yOU
want tht' 1-V to turn off by itself,
enter the dc.,,ired time b\ Alarm On
On Time 6:30AM
pres..,ing-- to select the hour [lliIisl"[:'_iiE°l°l'a_
Channel: 12
(including AM and PM/and
then pre,,,,mg +to ,elect th._ minutes. It ,,ou only want the TV
to turn on bv itself and not turn off, you can di.'.able the OFF
TIME by pressing until thL word DISABLED appears.
Pres_ MENU to select the next
functior,,=ailed CHANNEL. ['hi_
function lets you program which
channel the TV will tune v,tten Alarm:On
On "time: 6:30AM
it tnrn.,, ,m at the ONTIME. Press OffTime: 11:00PM
[eI._u],[:]il'
CHANNEL up or down 1o -,elect
the channel, and then pres,, + or - to enter it into the CHANNEL
function.
Note: The TV _lll change to the channel that you sdecl This wdl
help you to confirm that u is indeed the channel ',ou want the TV to
turn on to.
£
23
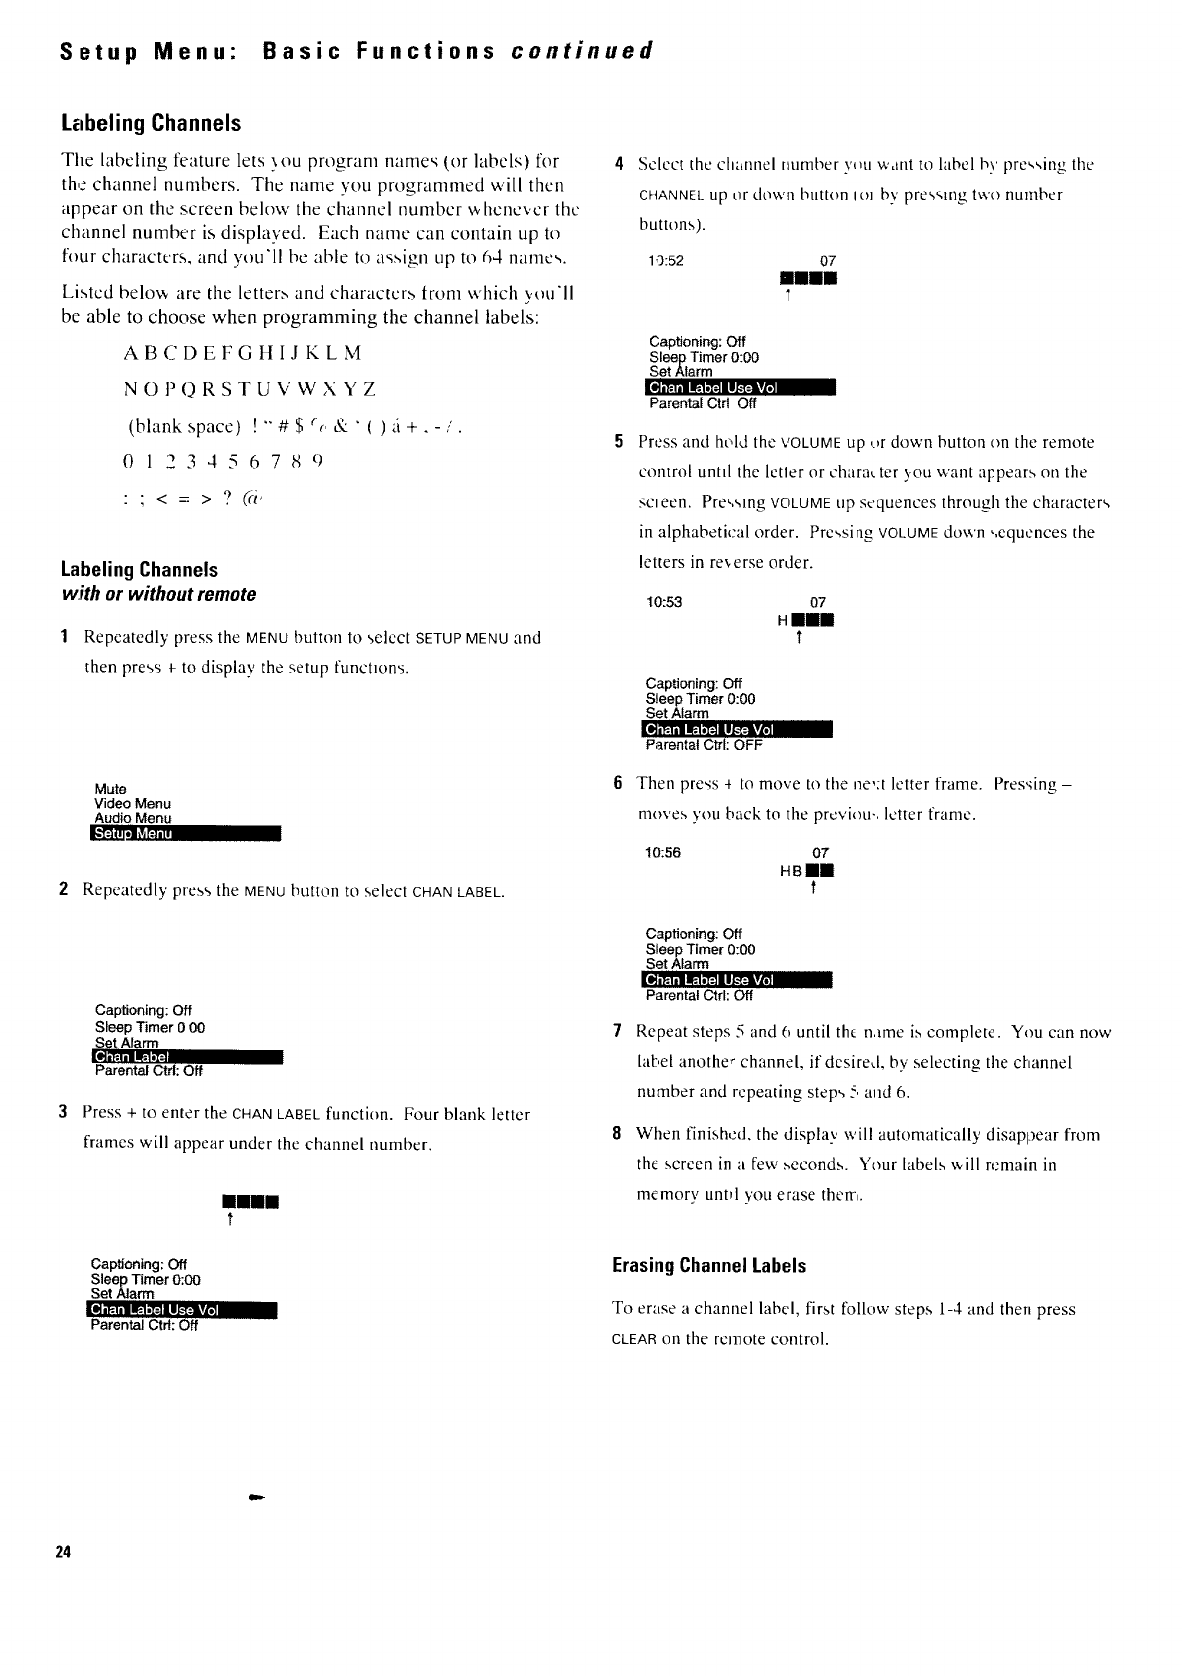
Setup Menu" Basic Functions continued
Labeling Channels
Tile labeling feature lets _ou program name,€ (or labels) for
the channel numbers. The name you programmed will then
appear on the screen below the channel number \,, henevcr the
channel number is displayed. Each name can contain up to
flmr characters, and you'll be able to assign up to 64 names.
Listed helots are the letter_ and characters Iron] which },ou'll
be able to choose when programming the channel labels:
ABCDEFGHIJ KLM
N O P Q R S T U V W X Y Z _*'_"_ I!_'I."_tl.L'r_vJ[,
(blank space) !"#$%&+( )_i+,-i.
0123456780
:;<=>?(ci+
Labeling Channels
with or without remote
1Repeatedly press the MENUbutton to select SETUPMENUand
then press 4-to display the setup functzons.
Mute
Video Menu
Audio Menu
,"_ tli_ +T_[p,] I L I
2Repeatedly press the MENU button to select CHAN LABEL.
Captioning: Off
Sleep Timer 0 69
Set Alarm
[oJiP.iia i_'l.'l_
Parental Ctd: Off
Press + to enter the CHANLABELfunction. Four blank letter
frames will appear under the channel number.
Captioning: Off
Sleep Timer 0:(30
Set Alarm
Parental Ctrt: Off
mill
?
Select the channel number you want to label b)' pre,,qng the
CHANNELup or down button IO] by pres_qng two number
bunons).
10:52 07
Illl
T
Captioning: Off
Sleep Timer 0:00
Set Alarm
Parental Ctrt Off
Press and hold the VOLUMEup ,.,r down button on the remote
control until the Idler or chara_ ter _.ou want aFpears on the
sc_een. Pre,,smg VOLUME up sequences through the characters
in alphabetical order. Pressing VOLUMEdown ,,equences the
letters in reverse order.
10:53 07
HIII?
Captioning: Off
Sleep Timer 0:00
Set Alarm
ll,] i'_'ill !TI,"I_11I.L"_Iv£,
Parental Cb'l: OFF
Then press -_ to move to the ne,:t letter frame. Pressing -
moves you back to the prcviou,, letter frame.
10:56 07
HBI!f
Captioning: Off
Sleep Timer 0:00
Set Alarm
Eli lEt"ill!TI,"El! I_'_IILVz,
Parental Ctrl: Off
Repeat steps 5and 6until th{ name is complete. You can nov,,
label anothe_ channel, if desired, by selecting the channel
number and repeating steps _,aud 6.
When finished, the display, will automatically disappear from
the screen in it few ,seconds. Your labels ,,,,illremain in
memory untd you erase theE,.
ErasingChannelLabels
To erase achannel label, first follow steps 1-4 and then press
CLEAR on the remote control.
24

Parental Control
The PARENTALCTRLand CHANCTRLfunctions let you lock out
any channels between 1 and 99 that wm choose so they
cannot be viewed by your children.
Channels that have been locked out can be viewed only
when the PARENTALCTRLfunction is set to OFF. This can
only be done with the remote control-it can not be changed
with the buttons on the front of the TV. Therefore. after
you turn on PARENTALCTRL,yOU simply hide the remote
control so that your children can not watch the locked-out
channels.
The locked-out channels will remain unvicwable even if
the TV is unplugged or the channels are autoprogrammed
again. The only way to view locked-out channels is to use
the remote control to set the PARENTALCTRLfunction to OFF.
Activating Parental Control
with remote only
The PARENTALCTRLand the CHANCTRLfunctions work hand-
in-hand. The instructions below will first tell you how to
turn parental control on or off with the PARENTALCTRL
function and then how to lock out desired channels with
the tHAN CTRLfunction.
1Repeatedly press the MENU button to .,,elect SETUP MENU and
then press + to display the setup functions.
2Repeatedly press MENU to select the PARENTAL CTRL function.
Mute
Video Menu
Audio Menu
I[,,"_1i[IT'ilN_,',A[_ ap
3To lock out channel',, pre,',s Ihe MENUbuttor, to select the CHAN
CTRL function.
Sleep T_mer 0.00
Set Alarm
Chan Label
Parental Ctrlo On
Select a channel yotLwant to lock out b_ pr,2ssing CHANNELup
or down. Then press + or- The CHAN CTRLsetting ',vnll
change tram NORMAL 10 tO( KED when that channel is locked-
out.
Repeat spep 3 for each than le[ you ,,_,ant to lock out.
If the PAFIFNTALCTRL functiun is set to ON v,bile you are
locking out channels, each channel ,a ill go blank as you lock
it out.
When the PARENTALCTRL function is set to ON and a channel
which has been locked out ts tuned, the TV will display the
word.,, PARENTAL.CONTROl_to let your childr.zn know you have
locked it out.
m
Pressing +or - changes this function between ON and OFF.
Captioning: Off
Sleep Timer 0:00
Set Alarm
Ohanka_[
Note: You may v,ant to lock uut the same channels m both ANTENNAA
and ANTENI_AB modes This pro cents someone from moving the cable
to the a,_TB input to watch channels locked out in the _,NrEt_NAA mode
• When this function is set to ON, PARENTALCTRLis activated
and any channels you locked out with the CHANCTRL
function will not be viewable.
• When this function is set to OFF, PARENTAL CTRLis
deactivated and all channels are viewable.
25
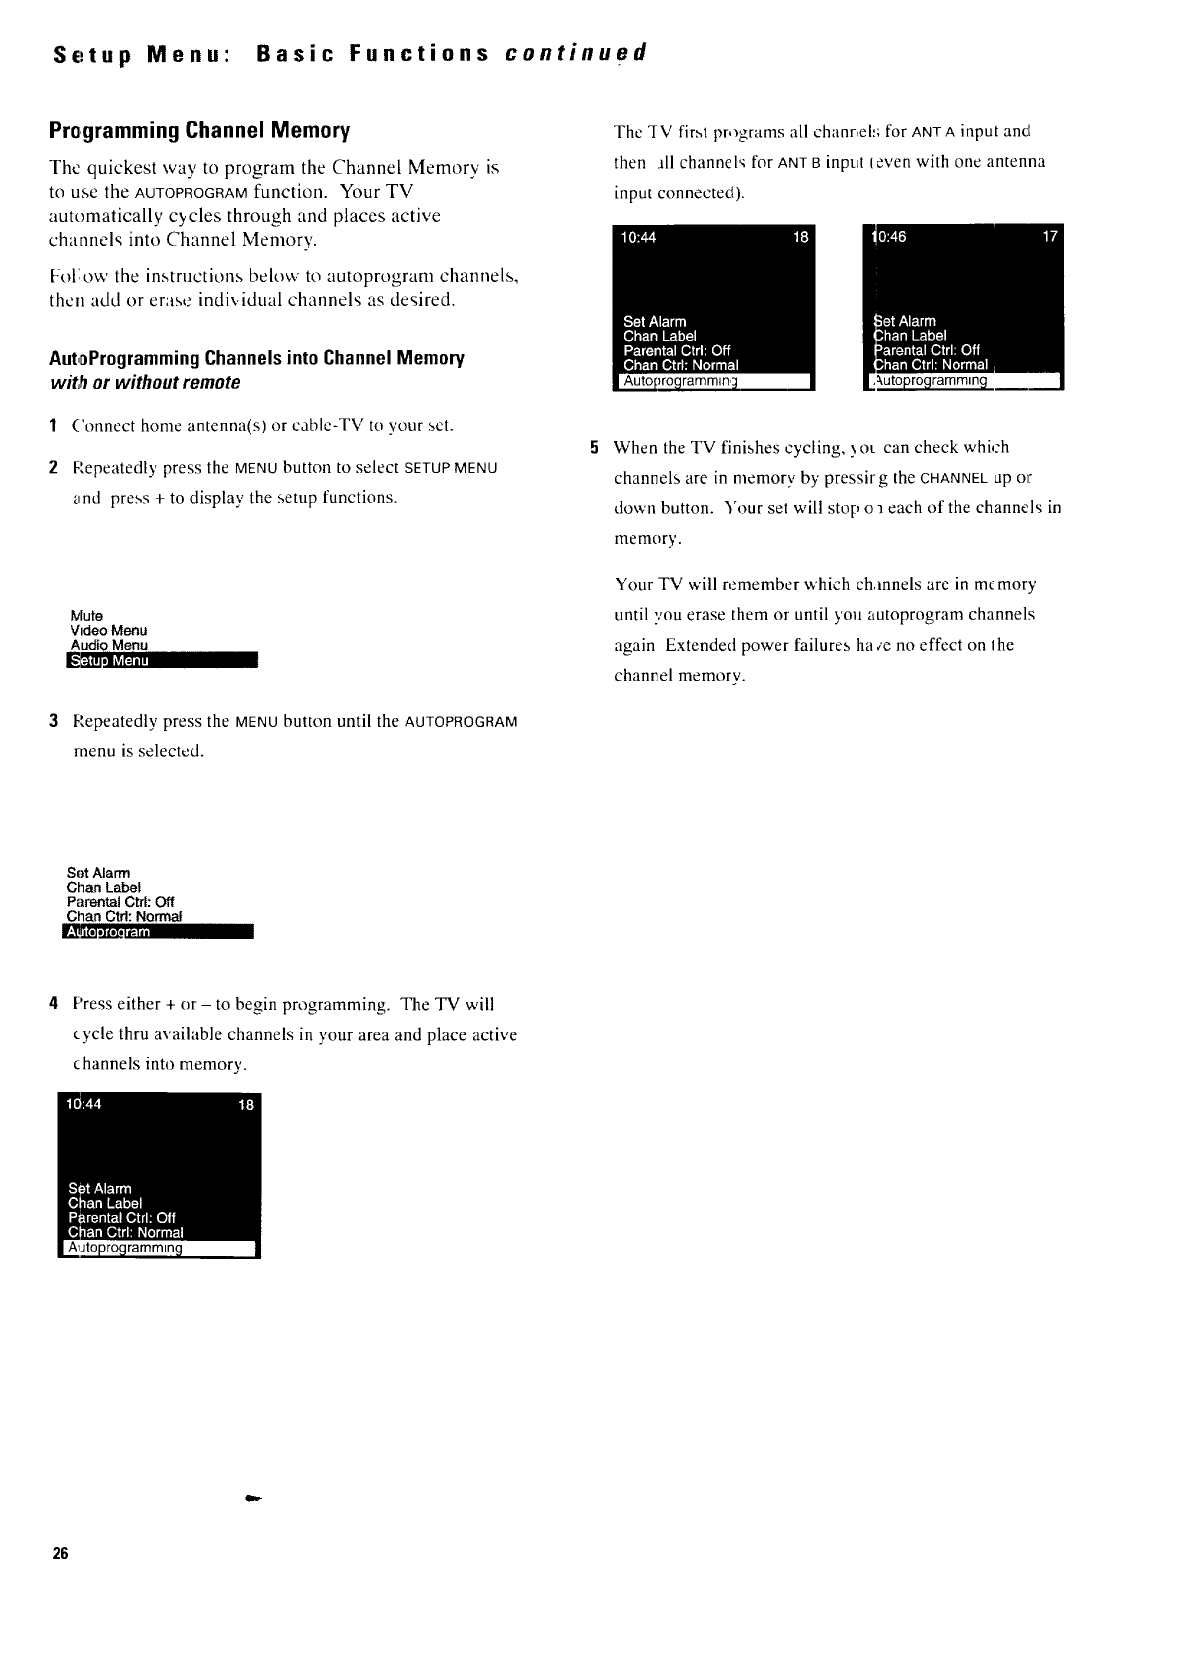
Setup Menu: Basic Functions continued
Programming Channel Memory
The quickest way to program the Channel Memory is
to use the AUTOPROCRAMfunction. Your TV
automatically cycles through and places active
channels into Channel Memory.
Fol: ow the instructions below to autoprogram channels,
then add or erase individual channels as desired.
The 'IV first programs all chanr,el:; for ANT A input and
then all channel'¢ for ANTB input (even with one antenna
input connected).
AutoProgrammingChannelsinto ChannelMemory
wit,_or without remote
1Connect home antenna(s) or cable-TV to your sct.
2Pepeatedly press the MENUbutton to select SETUPMENU
_nd press + to display the setup functions.
lVlute
Video Menu
ALamOMenu
L_i"_i _1 ['..] lII
3P,epeatedly press the MENUbutton until the AUTOPROGRAM
menu is selected.
When the TV finishes cycling, ._Ot can check whi,:h
channels are in memory by pressir g the CHANNEL ap or
down button. Your sel will stop o a each of the channels in
memory.
Your TV will remember which ch.mnels are in memory
until vou erase them or until you autoprogram channels
again Extended power failures ha,'e no effect on Ihe
channel memory.
Set Alarm
than Label
Parental Ctrk Off
Chan Ctrl: Normal
Press either + or - to begin programming. The TV will
cycle thru available channels in >'our area and place active
channels into memory'.
26
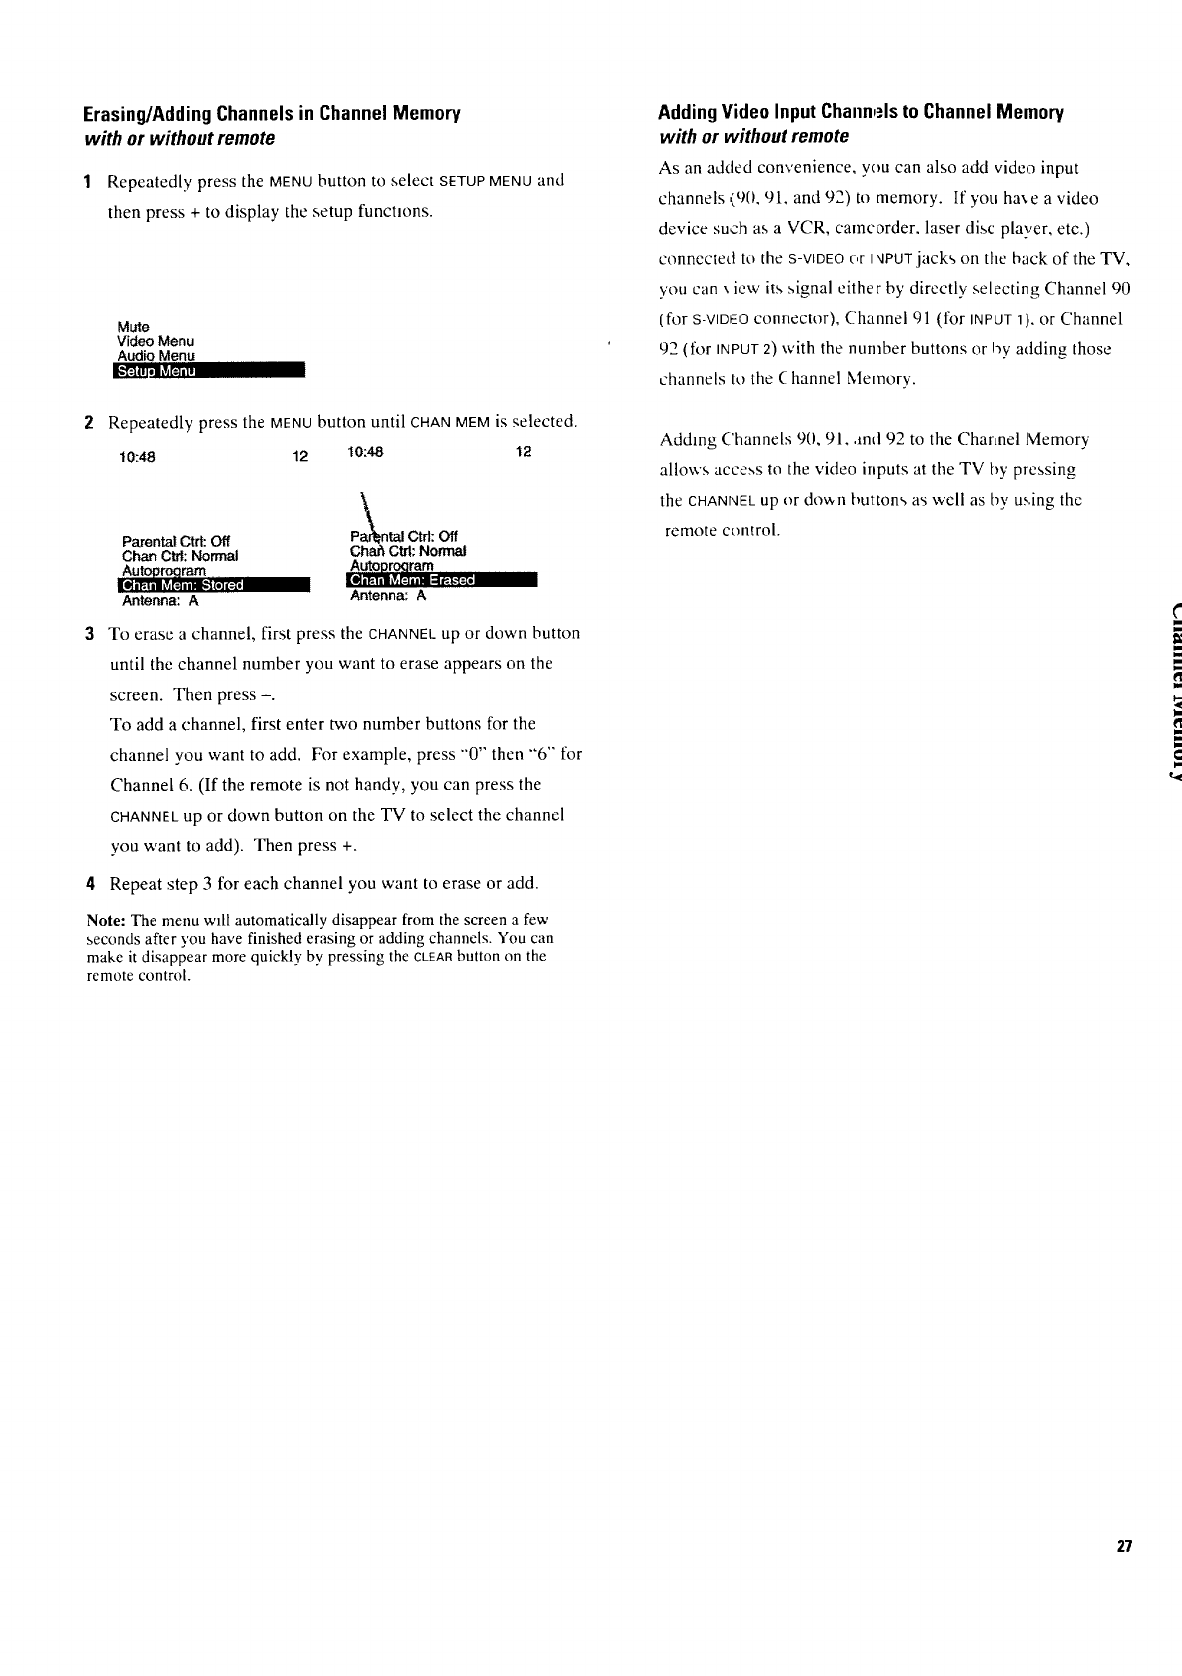
Erasing/AddingChannelsin ChannelMemory
with or withoutremote
1Repeatedly press the MENUbutton to select SETUPMENUand
then press + to display the setup funchons.
Mute
Video Menu
Audio Menu
I,,'T_JIIT¢II__,i,
2 Repeatedly press the MENUbutton until CHAN MEMis selected.
10:48 12 10:48 t2
\
Parental Ctrl: Off Pax_ntalCtrl: Off
Chart Ctrl: Normal Chah Ctrl: Normal
Auto_roaram AutoDroQram
I ,I
Antenna: A Antenna: A
3To erase a channel, first press the CHANNEL up or down button
until the channel number you want to erase appears on the
screen. Then press -.
To add a channel, first enter two number buttons for the
channel you want to add. For example, press "'0'" then "'6" for
Channel 6. (If the remote is not handy, you can press the
CHANNEL up or down button on the TV to select the channel
you want to add). Then press +.
4Repeat step 3 for each channel you want to erase or add.
Note: The menu will automatically disappear from the screen a few
seconds after you have finished erasing or adding channels. You can
make it disappear more quickly by pressing the CLEAnbutton on the
remote control.
AddingVideo InputChannelsto ChannelMemory
with or withoutremote
As an added convenience, you can also add video input
channels ,_t_0,91, and 92) to memory. If you ha',e a video
device suclnas a VCR, camcorder, laser disc player, etc.)
connected to the S-VIDEO or I',IPUTjacks on the back of the TV,
you can xiew its signal either by directly selecting Channel 90
(for S-VIDEOconnector), Channel 91 (for INPLJT1],,or Channel
92 (for INPUT2) with the number buttons or by adding those
channels to the ( hannel Memory.
Adding ('hannels 90, 91, .rod92 to the Charmel Memory
allows access to the vkteo inputs at the TV by prcssing
the CHANNI£L up or do'.A,nbuttons as well as by using the
remote ctmtrol.
27
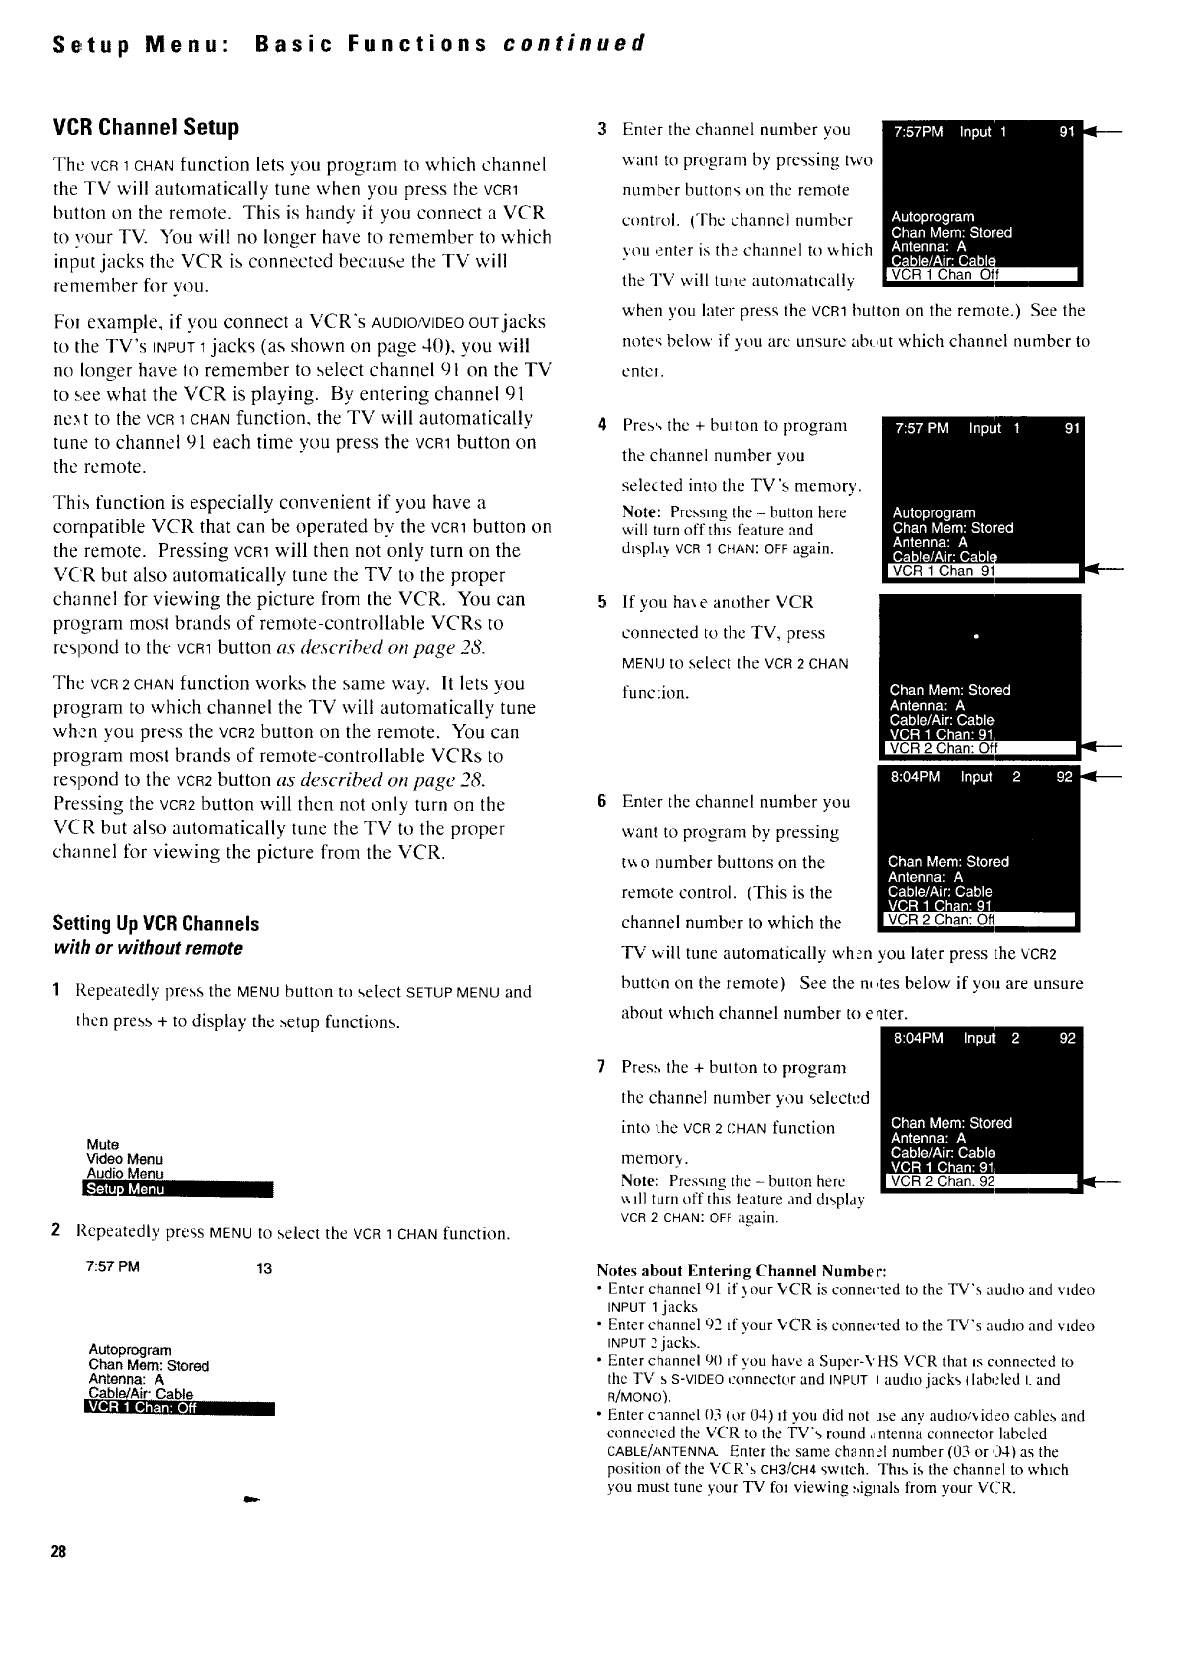
Setup Menu" Basic Functions continued
VCR Channel Setup
The VCR1CHANfunction lets you program to which channel
the TV will atttomatically tune when you press the VCR1
button on the remote. This is handy it you connect a VCR
to your TV. You will no longer have to remember to which
input jacks the VCR is connected because the TV will
remember for you.
Fol example, if you connect a VCR's AUDIO/VIDEOOUTjacks
to the TV's iNPUT1jacks (as shown on page 4(I), you will
no longer have 1o remember to select channel 91 on the TV
to .,,ee what the VCR is playing. By entering channel 91
ne._t to the VCR1CHANfunction, the TV will atttomatically
tune to channel 91 each time you press the VCR1button on
the remote.
This function is especially convenient if you have a
compatible VCR that can be operated bv the VCR1button on
the remote. Pressing vcm will then not only turn on the
VCR but also atttomatically tune the TV to the proper
channel for viewing the picture from the VCR. You can
program most brands of remote-controllable VCRs to
respond to the VCR1button as de.scribed on page 28.
The VCR2 CHANfunction works the same way. It lets you
program to which channel the TV will automatically tune
\vh,zn you press the VCR2button on the remote. You can
program most brands of remote-controllable VCRs to
respond to the VCR2button as described on page 28.
Pressing the VCR2button will then not only turn on the
VCR but also automatically tune the TV to the proper
channel for viewing the picture from the VCR.
Setting UpVCRChannels
wilh or withoutremote
1P,epeatedly press the MENU button to select SETUP MENU and
then press + to display the setup functions.
Mute
Video Menu
Audio Menu
IG,'I_RITiI_,[:a,i,
2Repeatedly press MENUtO select the VCRqCHANfunction.
7:57 PM 13
Autoprogram
Chan Mern: Stored
Antenna: A
Cable/Air" Cable
I"_e_=JD],_.u_e]i II
Enter the channel number you
wanl to program by pressing two
number buttons tin the remote
control. (The channel number
you ,enter is the channel to v,hich
the TV will tune automatically
when you later press the VCR_button on the remote.) See the
note,_ below if you arc unsure ab_,ut which channel number to
entel.
Pres', the +button to program
the channel number you
selected into the TV's memory.
Note: Pressing the - button here
will turn off this feature and
dzspla__VCR1 CHAN:OFFagain.
If you ha_e another VCR
connected to tile TV, press
MENUtOselect the VCR2 CHAN
func:ion.
Enter the channel number you
want to program by pressing
t_ 0 number buttons on the
remote control. (This is the
channel number to which the
TV will tune automatically when you later press LheVCR2
button on the remote) See the m,tes below if you are unsure
about which channel number to eater.
Pres.sthe +bu_ton to program
the channel number you selected
into _.heVCR2 CHANfunction
memory.
Note: Pressingthe- buttonhere
x_ill tarnoff thisfeatureandd_',play
VCR 2 CHAN: OFF again.
Notes about Entering Channel Number:
•Enter channel Ol if 3 our ¥CR is connected to the TV's audm and video
INPUT 1jacks
• Enter channel 92 if 3,our _,'CR is connected to the TV's audio and video
iNPUT2 jacks.
• Enter channel 90 _f you have a Super-\'HS VCR that _sconnected to
the ]'V s S-VIDEOconnector and INPLITI audio jacks Ilabeled L and
R/MONO).
•Enterc'_annelt)3(or04) ]tyou did not Jseany audio/,,ideocablesand
connec]cdthe VCRto theTV's round,mtennaconnectorlabeled
CABLE/ANTENNA. Enterthesame chann,qnumber(03or ,)4) as the
positionof the\"CR's CH3/CH4switch. This is thechannelto which
you must tune yourTV fmviewing.,,ignalsfrom yourVCR.
28
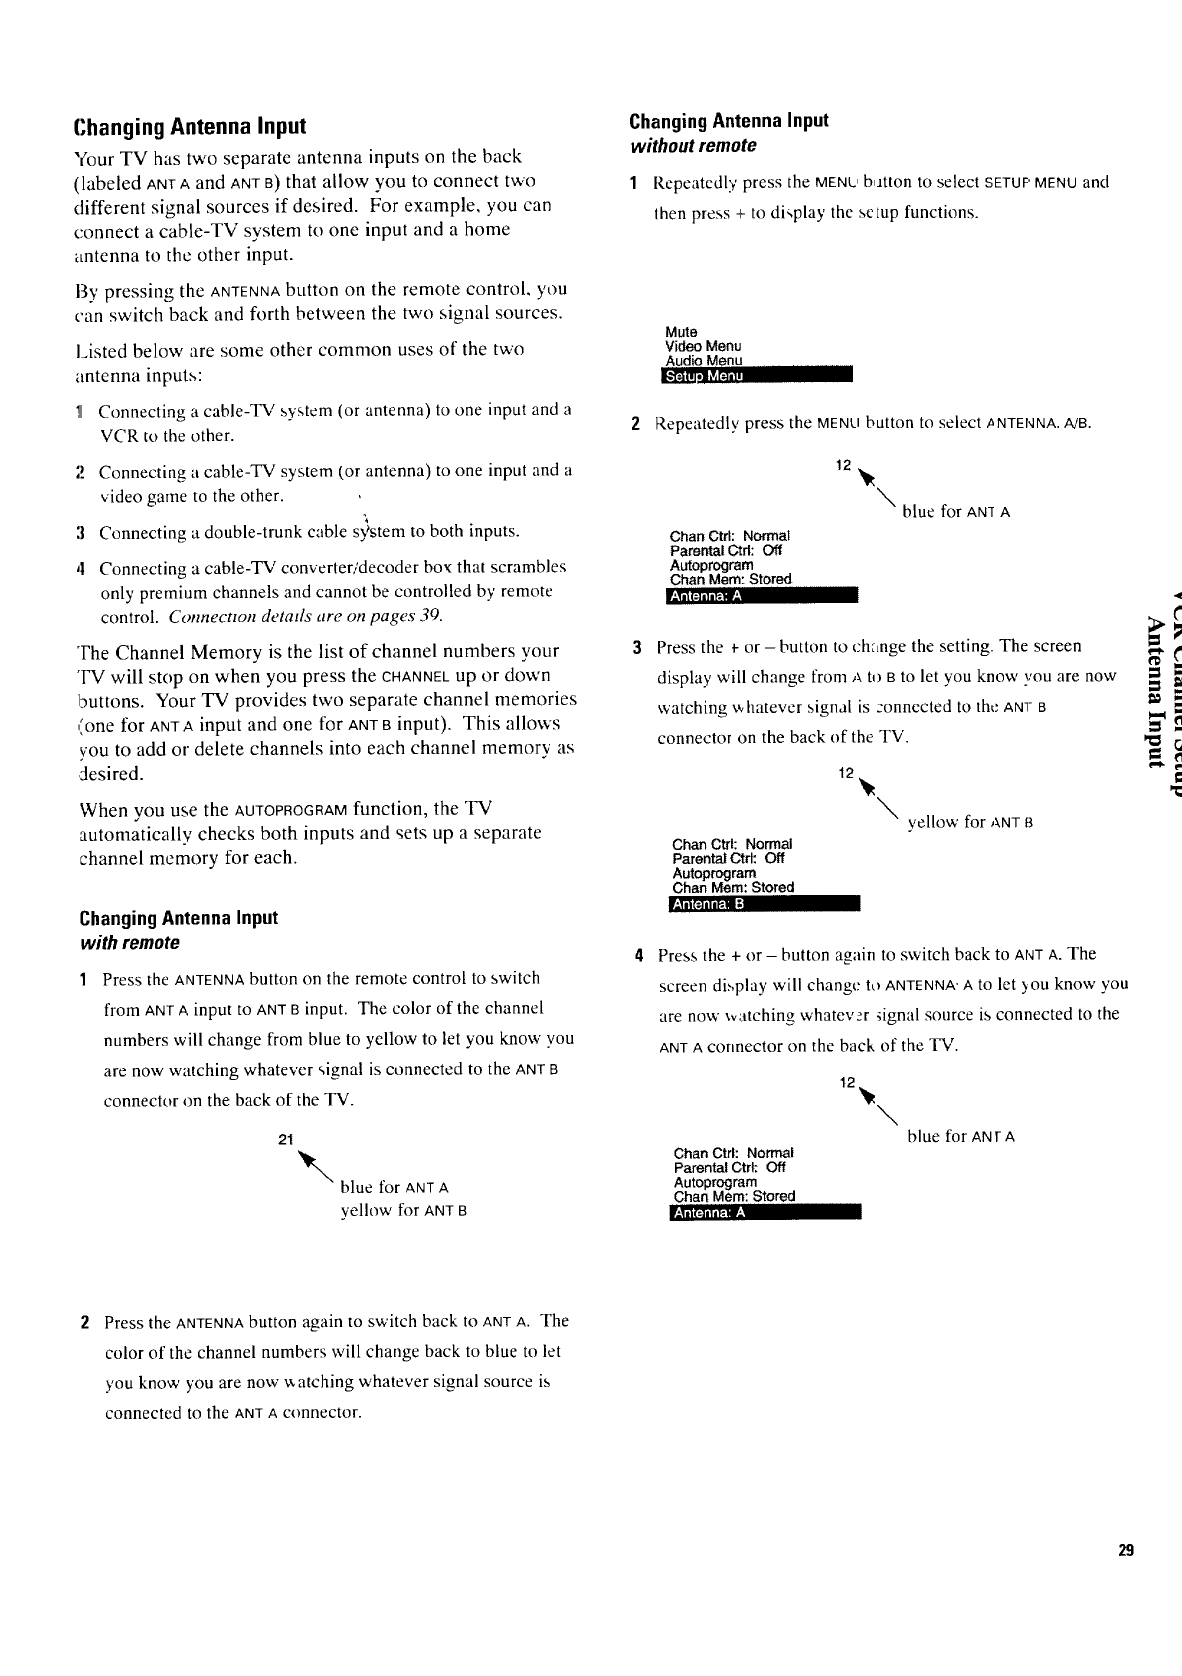
(;hanging Antenna Input
"(our TV has two separate antenna inputs on the back
(labeled ANt Aand ANTB) that allow you to connect two
different signal sources if desired. For example, you can
connect a cable-TV system to one input and a home
antenna to the other input.
13y pressing the ANTENNAbutton on the remote control, you
can switch back and forth betv,,een the two signal sources.
Listed below are some other common uses of the two
antenna inputs: ,_ [J]_Ji _1_['.I ill
11 Connecting a cable-TV system (or antenna) to one input and a
VCR to the other.
3
'1
Connecting a cable-TV system (or antenna) to one input and a
video game to the other.
Connecting a double-trunk cable sy_stemto both inputs.
Connecting a cable-TV convcrter/'decoder box that scrambles
only, premium channels and cannot be controlled by' remote
control. Connecnon detatls are on pages 39.
,_'1 (_1 i] I_.|- _
The Channel Memory is the list of channel numbers your
'IV will stop on when you press the CHANNELup or down
buttons. Your TV provides two separate channel memories
,lone for ANTAinput and one for ANTBinput). This allows
you to add or delete channels into each channel memory as
desired.
When you use the AUTOPROGRAMfunction, the TV
automatically checks both inputs and sets up a separate
channel memory for each.
:*]'_ {'-]II l_-| I-"
ChangingAntenna Input
with remote
1Press the ANTENNA button on the remote control to switch
from ANTA input to ANTBinput. The color of the channel
numbers will change from blue to yellow to let you know you
are now watching whatever signal is connected to the ANT B
connector on the back of the TV.
21
blue for ANT A
yellow for ANT B
ChangingAntenna Input
without remote
1Repeatedly press the MENU b,mon to select SETUP MENU and
lhen press + to di,,play the selup functions.
Mute
Video Menu
Audio Menu I IIIII I
2Repeatedly press the MENLIbutton to select ,aNTENNA.A/B.
Chart Ctrl: Normal
Parental Ctrl: Off
Autoprogram
Chan Mem" Stored
12
\blue for AN] A
Press the +-or - button to ch_Lngethesetting. The screen
display,will change from Ato Bto let you know you are now
watching '_,,hateversignal is :onnected to the ANTB
connector on the back of the TV.
Chart Ctrt: Normal
Parental Ctrl: Off
Autoprogram
Chan Mere: Stored
\yellow for ANT B
Press the + or - button again to switch back to ANTA. The
screen dL,,play will chang(: to ANTENNA'A to let 5'ou knox,,' you
are now watching whatever dgnal source is connected to the
ANTA cormector on the back of the TV.
\
blue for ANt A
Chart Ctrf: Normal
Parental Ctrl: Off
Autoprogram
Chart Mem: Stored
I=
t,,l
,_r¢l (-..] iill= i!_
Press the ANTENNAbutton again to switch back to ANTA. The
color of the channel numbers will change back to blue to let
you know you are now v,atching whatever signal source is
connected to the ANTAconnector.
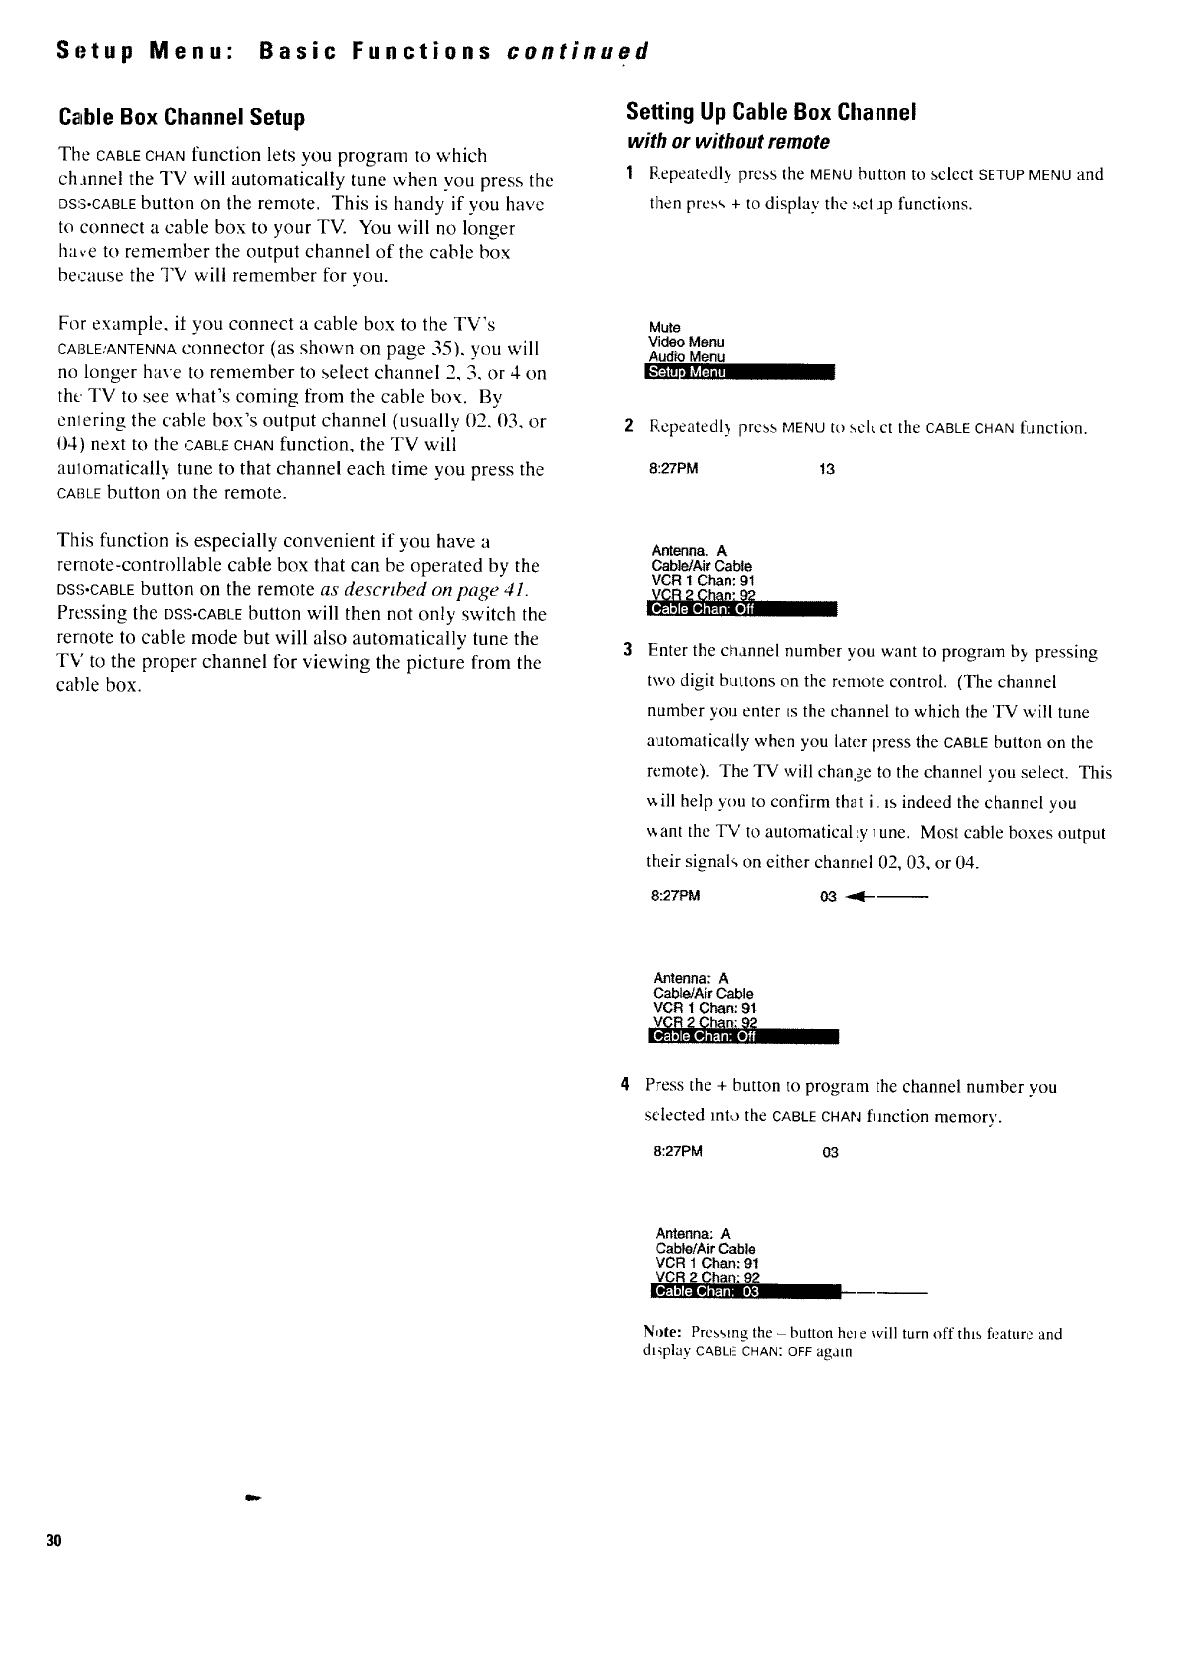
Setup Menu: Basic Functions continued
Cable Box Channel Setup
The CABLECHAN function lets you program to which
chJnnel the TV will automatically tune when vou press the
OSS-CABLEbutton on the remote. This is handy if you have
to connect a cable box to your TV. You will no longer
have to remember the output channel of the cable box
be,:ause the T'V will remember for you.
For example, it you connect a cable box to the TV's
CABLE,'ANTENNAconnector (as shown on page 35), you will
no longer have to remember to select channel 2, 3, or 4 on
the TV to see what's coming from the cable box. By
enlering the cable box's output channel (usually 02.03, or
{)4) next to the CABLECHANfunction, the TV will
aulomaticall.,v tune to that channel each time you press the
CABLEbutton on the remote.
This function is especially convenient if you have a
remote-controllable cable box that can be operated by the
DSS.CABLEbutton on the remote as described on page 41.
Pressing the DSS,CABLEbutton will then not only switch the
remote to cable mode but will also automatically tune the
TV to the proper channel for viewing the picture from the
cable box.
Setting Up Cable Box Channel
with or without remote
1Repeatcdl,,, press the MENU button to select SETUP MENU and
then press + to display' the ',el Jp functions.
Mute
Video Menu
Audio Menu
I_'i_llll*i kf/[_ I|1
2Repeatedl.,, press MENU to sek ct the CABLE CHANfunction.
8:27PM 13
Antenna, A
Cable/Air Cable
VCR I Chan: 91
VCR 2Chan: 92
I[eRI,'lF4[lt, _-,i,_eJ
Enter the channel number you want to program b,_pressing
two digit bLtttonson the remote control. (The channel
number you enter ts the channel to which the TV will tune
automatically when you later press the CABLEbutton on the
remote). The TV will change to the channel you select. This
v,ill help yon to confirm that i. is indeed the channel you
v,ant the TV to automatical:y _une. Most cable boxes output
their signals on either channel 02, 03, or 04.
8:27PM 03 _---
Antenna: A
Cable/Air Cable
VCR 1Chan: 91
VCR 2 Chin:
11)_'1.'1r:Jl[i,J=_ii)ill| i
Press the +button to program Ihe channel number you
selected into the CABLECHANfunction memory.
8:27PM 03
Ar_enna: A
Cable/Air Cable
VCR 1 Cban: 91
VCR 2 Chan: 92
Note: Pressingthe- buttonhe]ewill turnoff thLsfeatureand
d_pla,,' C&BLI--CHAN: OFF again
3O
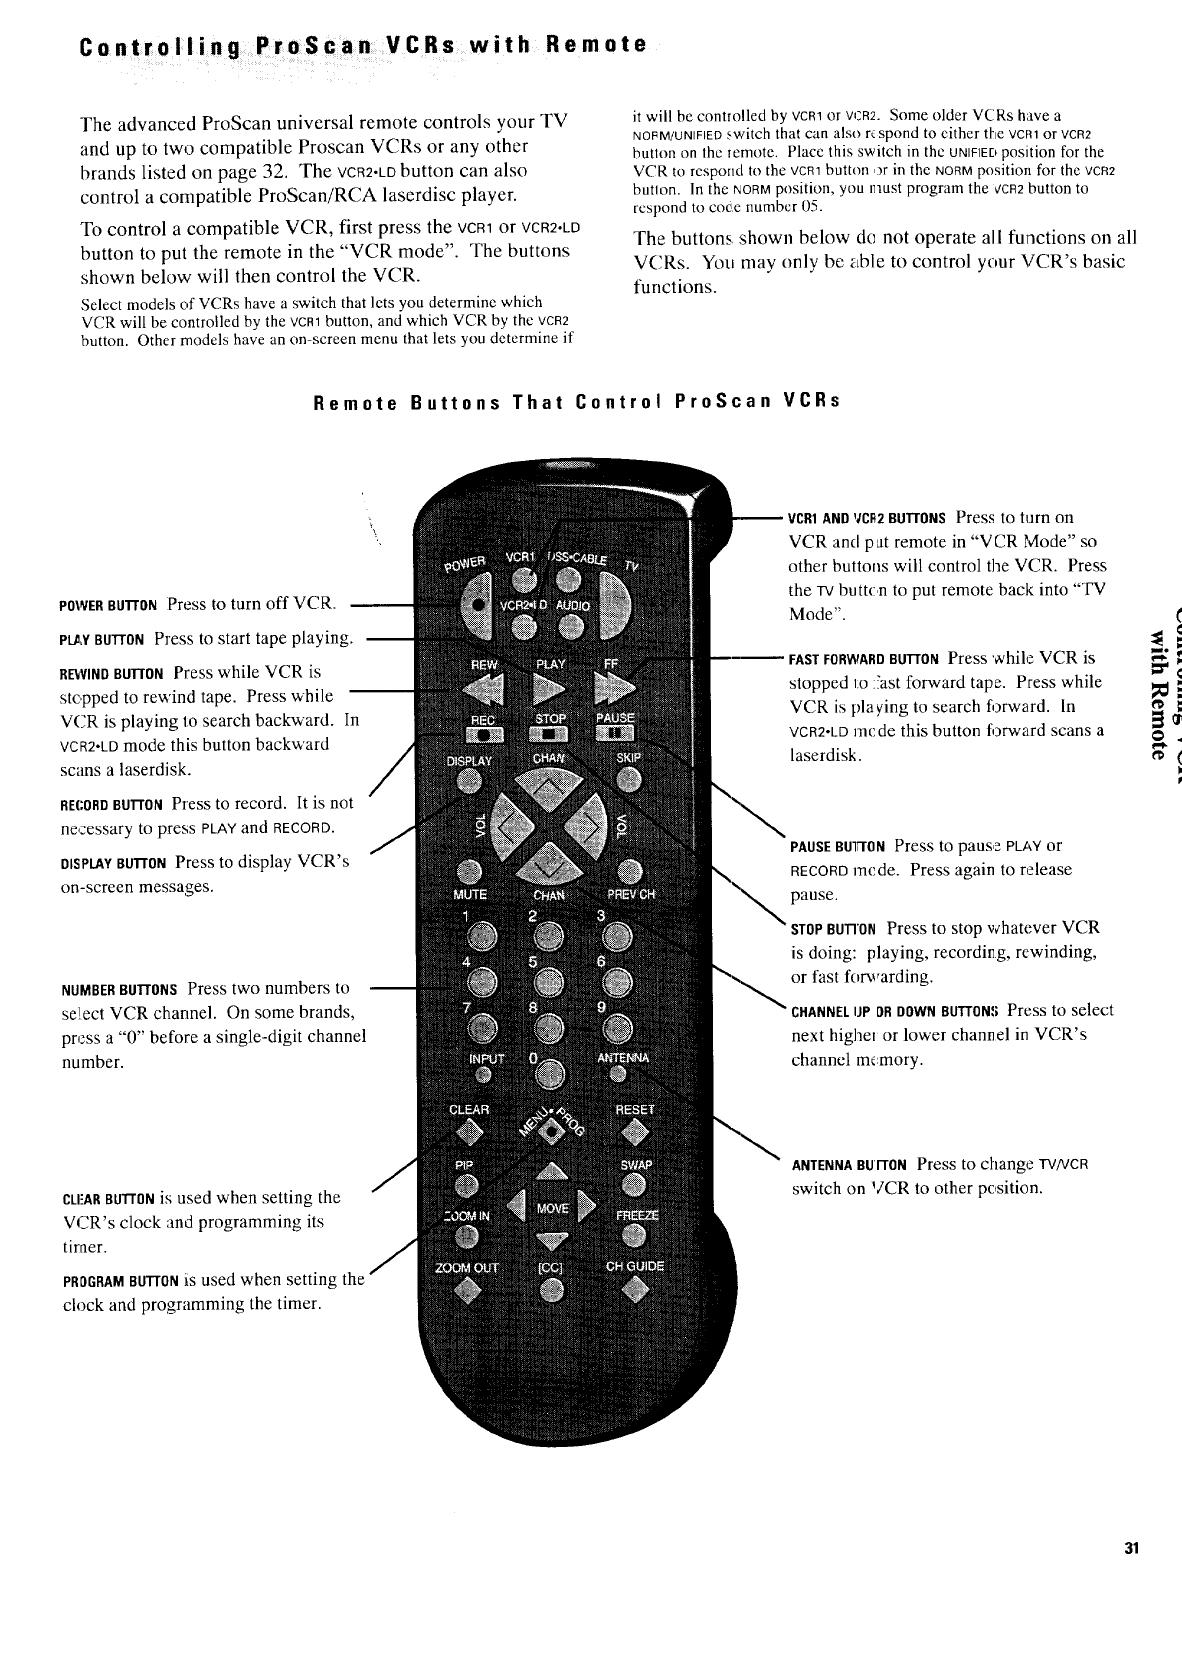
Controlling ProScan::VCRs with Remote
i i i
The advanced ProScan universal remote controls your TV
and up to two compatible Proscan VCRs or any other
brands listed on page 32. The VCR2.LDbutton can also
control a compatible ProScan/RCA laserdisc player.
To control a compatible VCR, first press the VCR1or VCR2"LD
button to put the remote in the "VCR mode". The buttons
shown below will then control the VCR.
Select models of VCRs have a switch that lets you determine which
VCR will be controlled by the VCR1button, and which VCR by the VCR2
button. Other models have an on-screen menu that lets you determine if
it will be controlled by veto or WZR2. Some older VCRs have a
NOIqM/UNIFIEDswitch that can also r_ spond to either the VCR1 or VCR2
butlon on the remote. Place this switch in the UNIFIEDposition for the
VCR to respond to the vcR1 button ,)r in the NORMposition for the VeR2
butlon. In the NORMposition, you must program the ¢CR2button to
respond to coce number 05.
The buttons, shown below de not operate all functions on all
VCRs. You may only be able to control your VCR's basic
functions.
Remote Buttons That Control ProScan VCRs
POWER BUT[ON Press to turn off VCR.
PLAY BUFrON Press to start tape playing.
R_VINDBUII'ONPress while VCR is
stopped to rewind tape. Press while
VCR is playing to search backward. In
VCR2-LDmode this button backward
scans a laserdisk.
RECORDBUTTON Press to record. It is not
necessary to press PLAYand RECORD.
DISPLAYBuTr0N Press to display VCR's
on-screen messages.
NUMBER BUTTONS Press two numbers to
se]ect VCR channel. On some brands,
press a "0" before a single-digit channel
number.
CLrAR BUTTONis used when setting the
VCR's clock and programming its
timer.
PROGRAM BUTTONiS used when setting the
clock and programming the timer.
VCR1 AND VCE2 BUTr0NS Press to turn on
VCR and pat remote in "VCR Mode" so
other buttons will control the VCR. Press
the zv button to put remote back into "TV
Mode".
Press while VCR is
stopped Io 5ast forward tape. Press while
VCR is playing to search forward. In
VCR2-LD mode this button forward scans a
laserdisk.
PAUSE BUT-I0N Press to pause PLAY or
RECORD mcde. Press again to release
pause.
STOPBU'I-rONPress to stop whatever VCR
is doing: playing, recording, rewinding,
or fast forwarding.
CHANNEL IJP OR DOWN BUTTONS Press to select
next higher or lower channel in VCR's
channel m_mory.
ANTENNA BUI-ION Press to change TV/VCR
switch on VCR to other position.
31
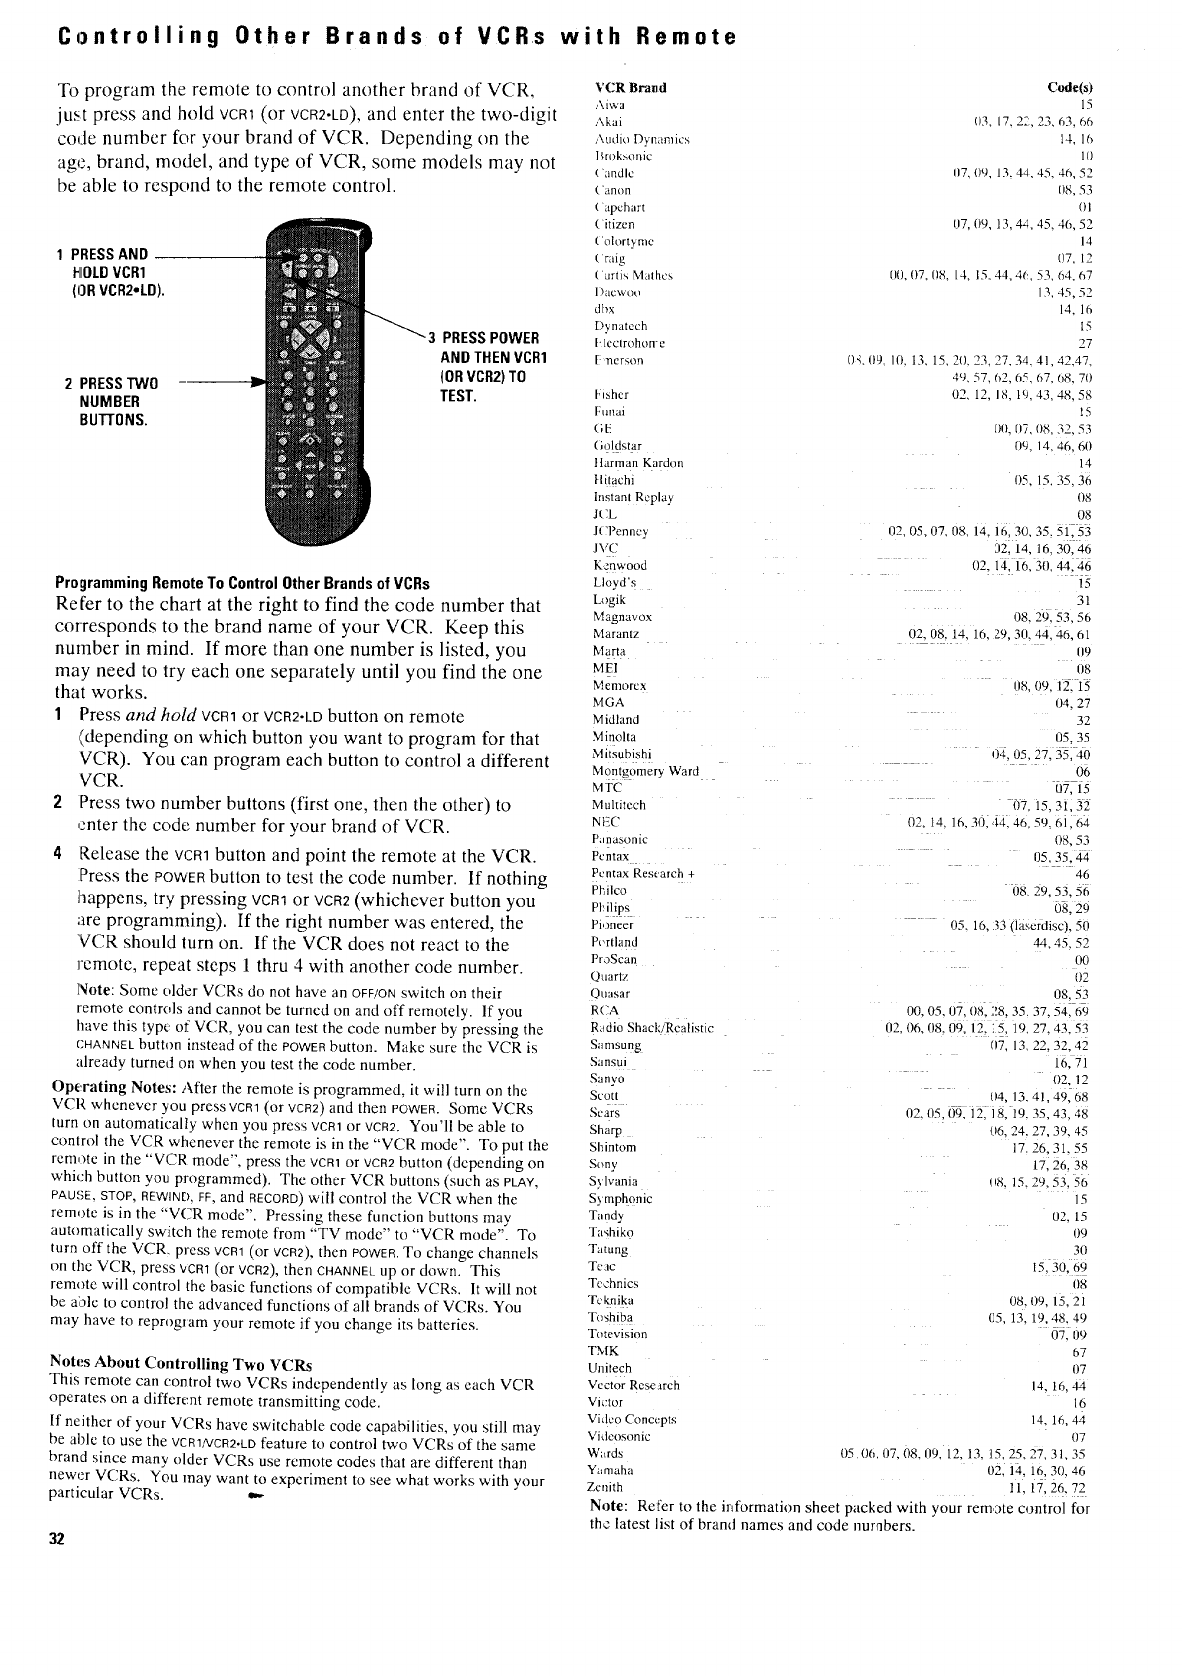
Controlling Other Brands of VCRs with Remote
To program the remote to control another brand of VCR,
just press and hold VCR1(or VCR2"LD), and enter the two-digit
code number for your brand of VCR. Depending on the
age, brand, model, and type of VCR, some models may not
be able to respond to the remote control.
1PRESSAND
HOLDVCR1
(ORVCR2.LD).
2 PRESSTWO
NUMBER
BUTTONS.
PRESSPOWER
AND THENVCR1
(ORVCR2)TO
TEST.
Programming Remote To Control Other Brands of VCRs
Refer to the chart at the right to find the code number that
corresponds to the brand name of your VCR. Keep this
number in mind. If more than one number is listed, you
may need to try each one separately until you find the one
that works.
1Press and hold YCRqor VCN2-LD button on remote
(depending on which button you want to program for that
VCR). You can program each button to control a different
VCR.
2Press two number buttons (first one, then the other) to
enter the code number for your brand of VCR.
4Release the veal button and point the remote at the VCR.
Press the POWERbutton to test the code number. If nothing
happens, try pressing VCRqor VCR2(whichever button you
are programming). If the right number was entered, the
VCR should turn on. If the VCR does not react to the
remote, repeat steps 1 thru 4 with another code number.
Note: Some older VCRs do not have an OFF/ONswitch on their
remote controls and cannot be turned on and off remotely. If you
have this type of VCR, you can test the code number by pressing the
CHANNELbutton instead of the POWERbutton. Make sure the VCR is
already turned on when you test the code number.
Operating Notes: After the remote is programmed, it will turn on the
VCR whenever you press vcm (or YEa2) and then POWER. Some VCRs
turn on automatk:ally when you press VCR1or VCR2. You'll be able to
control the VCR whenever the remote is in the "VCR mode". To put the
remote in the "VCR mode", press the VCR1or VCR2button (depending on
which button you programmed). The other VCR buttons (such as pLAY,
PAUSE,STOP,REWIND,FF,and RECORD) will control the VCR when the
remote is in the "VCR mode". Pressing these function buttons may
automatically switch the remote from "TV mode" to "VCR mode". To
turn off the VCR, press VCR1(or Yen2),then POWER.To change channels
on the VCR, press VCR1(or Yen2), then CHANNELup or down. This
remote will control the basic functions of compatible VCRs. It will not
be able to control the advanced functions of all brands of VCRs. You
may have to reprogTam your remote if you change its batteries.
Notes About Controlling Two VCRs
This remote can control two VCRs independently as long as each VCR
operates on a different remote transmitting code.
If neither of your VCRs have switchable code capabilities, you still may
be able to use the VER1/VCR2.LDfeature to control two VCRs of the same
brand since many older VCRs use remote codes that are different than
newer VCRs. You may want to experiment to see what works with your
particular VCRs.
32
VCR Brand Code(s)
.,\iWa 15
Akai 03, 17, 22,23, 63, 66
Audio Dynanlics 14, 16
l_rok_(mic l(}
('andle ll7, 0% 13.4d 45, 46, 52
('anon [18, 53
( apehart 01
( itizen 137, 09, 13, 44, 45, 46, 52
('olort3,mc 14
( raig [)7, 12
(urtis Mathcs 00, 07 118, 14, 15, 44, 4{:, 53, 64, 67
1)acwot, 13, 45, 52
dt',x /4, 16
Dynatech 15
t'leclrohon e27
_(1, _3, 27, 34.41,42,47,[,nerson ()4 (19. 10, 13, 15, _ "_
49, 57, 62, 65, 67 08, 70
tqsher 02, 12, 18, 19,43,48,58
[-unai 15
GE {10, 117, 08, 32, 53
(ioldstat bg. 14.46.60
it trman Kardo,n 14
[Ittachi 1)5. 15, 35, 36
lnstam Replay tm
JCL 08
J('Penncy 02, 05.07, 08, 14. 16, 30.35.51.53
JVC J2. 14. 16.30.46
K,:nwood "(12. 14. 16.3t), 44.46
15
Lloyd's
Logik 31
Magnavox 08.2i0. 53.56
Marantz 02. 08 14. 16. 29.3(I. 44.46. 61
Marta 119
MEt ob
Memorcx 08.09. 12. 15
MGA 04.27
Midland 32
Minolta 05.35
Mitsubishi 04.05.27. 35.40
Montgomery Ward 06
MTC 07. 15
Multiteclq 07 15.31.32
NEC 02. 14. 16. 30.4.4.46.59, 61.64
Pana_onic 08. 53
Pcntax I15, 35.44
Pcntax Rest arch + 46
Pt'A|eo 08 29.53.56
PI' [lips _ 08. 29
Pl,meer 05. 16. _3 (lascrdiscL 50
P_,rtland 14.45.52
ProScan /)0
Quar[z 02
Quasar 08.53
R('A 00.05.07, 08. "!8, 35.37. 54, 69
R,_dio Shack Realistic 02, 06. 08- 09. 12. 15. [9. 27.43.53
07. 13, 22, 32.42
Samsung
Sansm [6. 71
02. 12
Sanyo
Scott 04, 13.41, 49.68
Sears (12, 05- 09. 12. 18. 19.35.43.48
Sharp 06.24.27, 39. 45
Shintom 17.26. 31.55
Sony 17, 26.38
S_,lvania 118, 15.29.53.56
S', mphonic 15
Tandy 02. 15
Ta'ahiko ()9
ratung 311
Tcac 15, 30. 69
IIN
Technics
Tcknika 08.1)9, 15, 21
T, _shiba C5. 13. 19.48.49
07. t!9
Totevision
FMK 67
Unitech 117
Vector Research t4. 16.44
Victor 16
Video Concepts 14. 16.44
Vidcosonic lY;'
Wards (15 06. {!7.08.09, [2. 13. 15.25.27.31.35
Yamaha 02. 14. 16 30. 46
Zenith 11. 17, 26. 72
Note: Re{'er to the information sheet packed with your remote control for
the latest list of bramt names and code numbers.
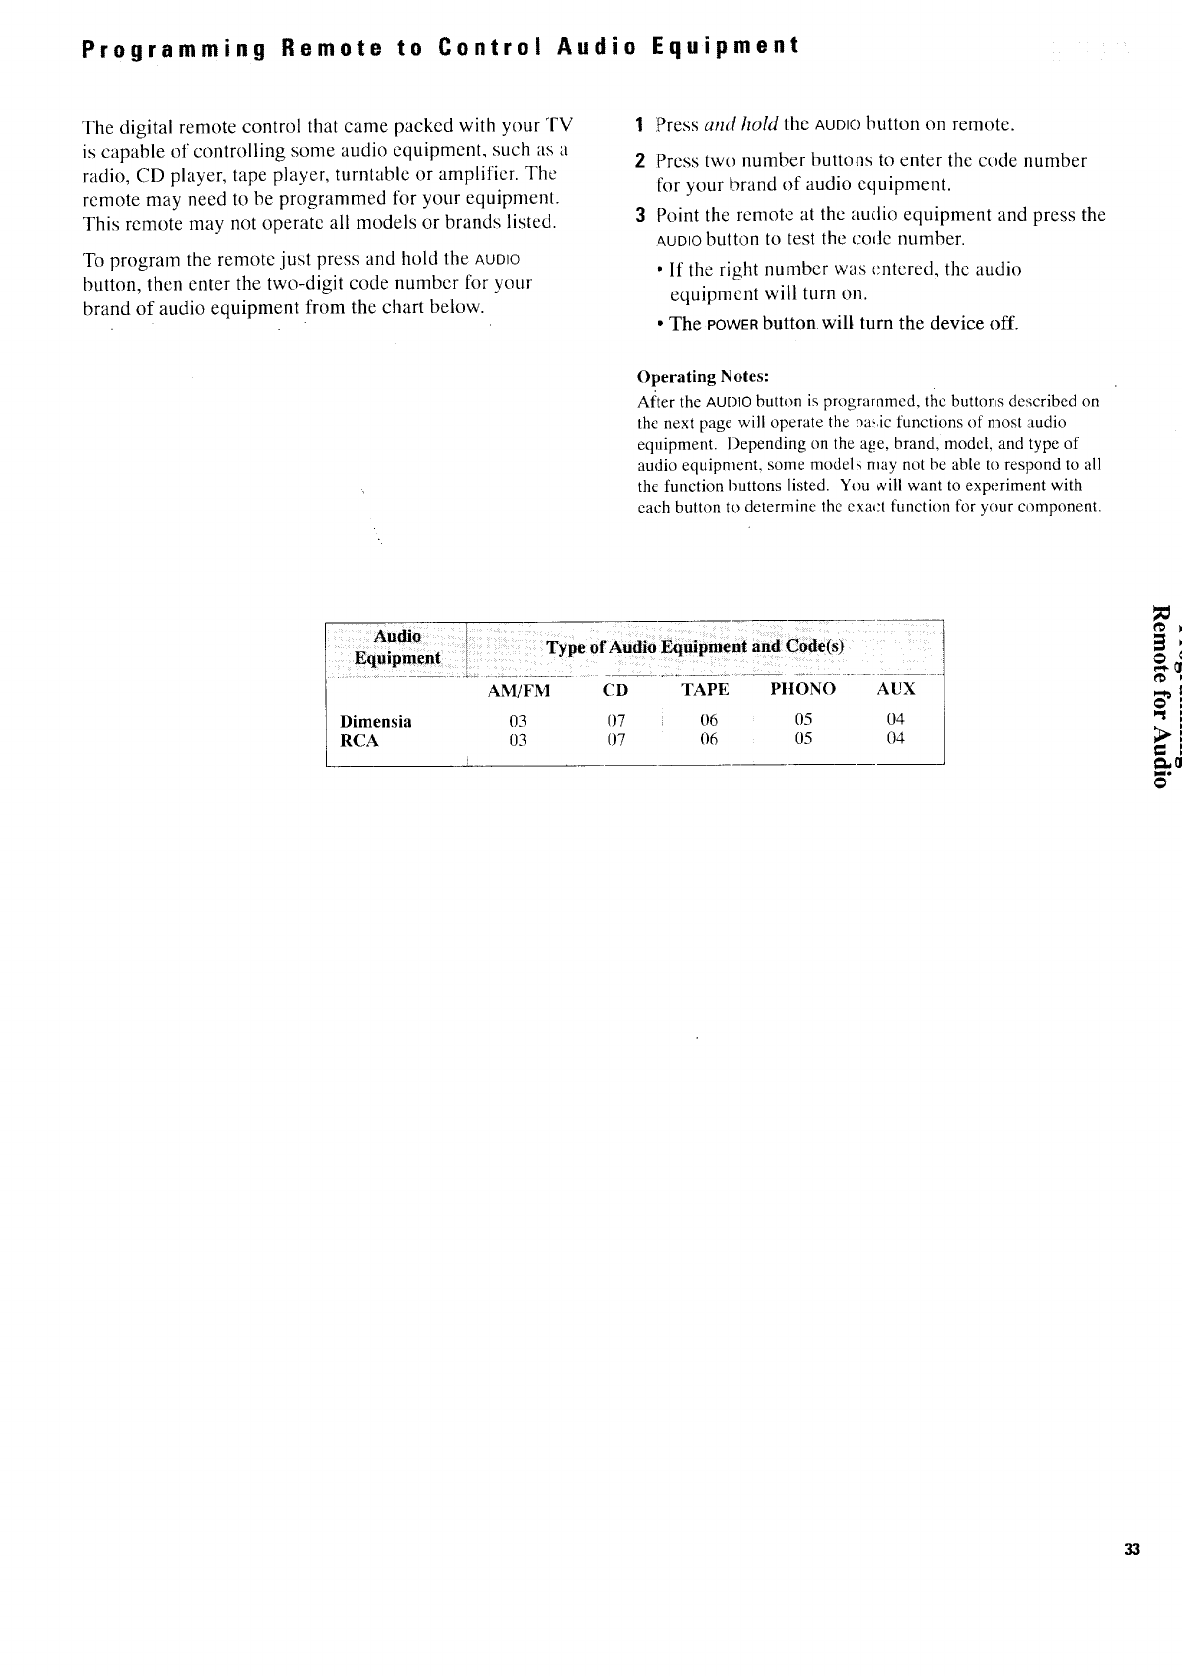
Programming Remote to Control Audio Equipment
The digital remote control that came packed with your TV
is capable of controlling some audio equipment, such as a
radio, CD player, tape player, turntable or amplifier. The
remote may need to be programmed for your equipment.
This remote may not operate all models or brands listed.
To program the remote just press and hold the AUDIO
button, then enter the two-digit code number for your
brand of audio equipment from the chart below.
1Press and hold the AUDtObutton on remote.
2 Press two number buttons to enter the code number
for your brand of audio equipment.
3Point the remote at the audio equipment and press the
_,UDIObutton to test the code number.
• If the right number was entered, the audio
equipment will turn on.
• The POWERbutton will turn the device off.
Operating Notes:
At_ter the AUDIO button is programmed, tile buttor_s described on
the next page will operate the _a_ic functions of n_ost audio
equipment. Depending on the age, brand, model, and type of
audio equipment, some models may not be able to respond to all
the function buttons listed. You ovill want to experiment with
each button to determine the exact function for your component.
AM/FM CD
Dimensia 03 07
RCA 03 07
TAPE PIIONO AUX
06 05 04
06 05 04
_,, Illl
lio
33
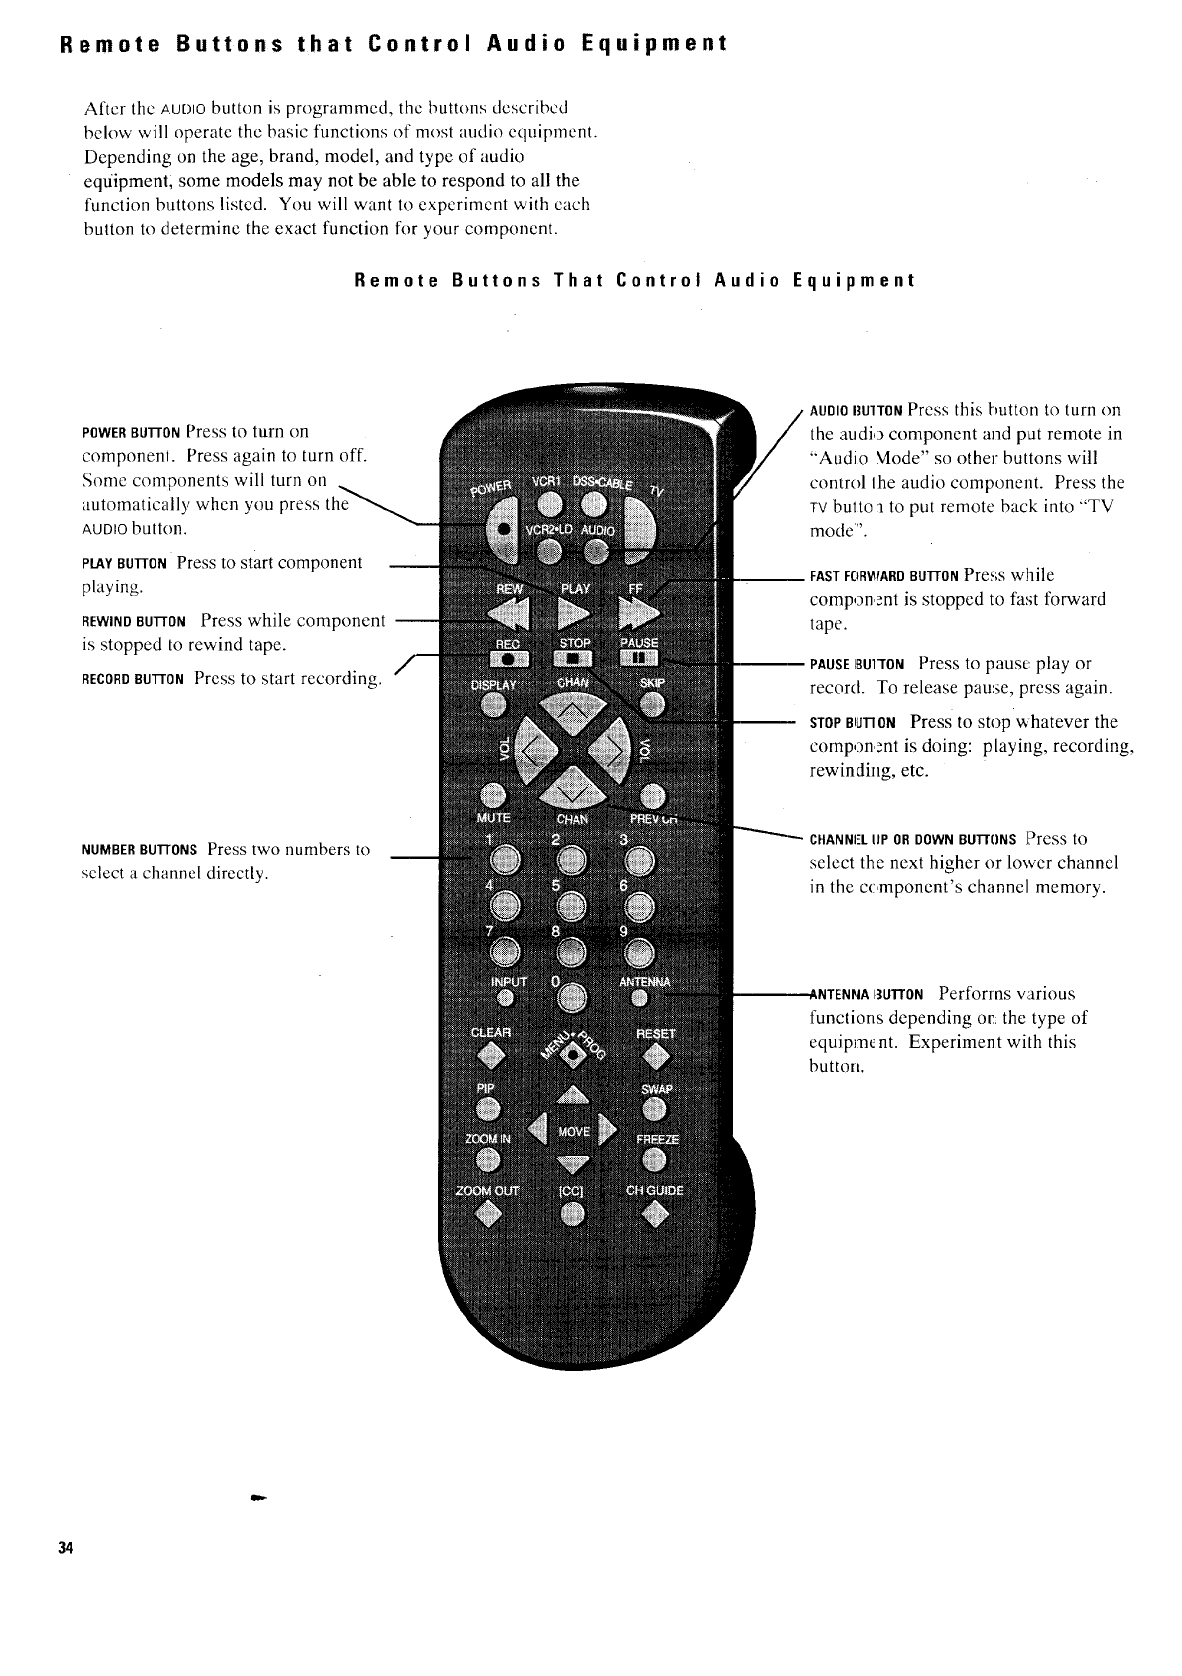
Remote Buttons that Control Audio Equipment
After thc AUt)tObutton is programmed, the buttons described
below will operate the basic functions of most audio equipment.
Depending on the age, brand, model, and type of audio
equipment; some models may not be able to respond to all the
function buttons listed. You will want to experiment with each
button to determine the exact function for your component.
Remote Buttons That Control Audio Equipment
POWERBUTTONPress to turn on
componenl. Press again to turn off.
Some components will turn on
automatically when you press
AUDIO button.
PLAY BUIION Press to start component
playing.
REWINDBu]-rONPress while component
is stopped to rewind tape.
RECORDBUTTONPress to start recording.
NUMBER BuI-rONS Press two numbers to
select a channel directly.
.AUDIO BU]TONPress this button to turn on
the audio component and pat remote in
"Audio Mode" so other buttons will
control Ihe audio component. Press the
TV butto a to put remote back into "TV
mode".
FAST FORVVARDBUTTON Press while
compon.:nt is stopped to fast forward
tape.
PAUSE]{]u]rONPress to pause: play or
record. To release pau:se, press again.
STOP BItJr[0N Press to stop w_hatever the
compon:nt is doing: playing, recording,
rewinding, etc.
CHANNI:'L liP OR DOWN Bu]-rONS Press to
select the next higher or lower channel
in the c_,mponent's channel memory.
Performs various
functions depending or the type of
equipment. Experiment with this
button.
34
Tips to Read Before Connecting Components
Compatible Components
A wide variety of compatible Video Cassette Recorders
(VCRs), camcorders, laser disc players, and audio
components are available. Check with your dealer for
details.
Other brands of components can also be connected to your
TV. Refer to thc component's owner's mmnlal for tile
manufacturer's rccommendcd hookup instructions.
PositioningComponentson Shelves
3b ensurc the best performance from your components,
follow these general guidelines when arranging them on
tile shelves of a conrponent compartment.
Amplifiers, receivers, and VCRs generate heat during
operation, so special care should _ taken when arranging
these components in the compartment. Do not stack an •
amplifier (or receiver) and a VCR directly on top of each
other because each component generates heat and may not
provide the best performance if stacked together. Do not
stack other components directly on top of an amplifier,
receiver, or VCR.
If you include both an amplifier (or receiver) and a VCR,
put the amplifier on the top shelf and put the VCR on the
bottom shelf. Leave at least four inches of clearance above
the amplifier (Or receiver) and at least two inches of
clearanceabove other components.
If you have just a VCR and no amplifier (or receiver),
position the VCR on the bottom shelf. Do not stack
anything else directly on top of the VCR. Leave at least
two inches of clearance between the VCR and the shelf
above it.
Some VCRs may cause interference in TV sets if they are
placed too close to the TV. The ProScan cabinets have a
built-in interference barrier to help eliminate this type of
intcrfcrence. If you are using another type of cabinet and
interference is present when using your VCR, try placing
the VCR on the bottom shelf or try plugging the TV and
VCR powei cords into different wall sockets.
Plugging in Power Cords
Do not plug any power cord into a wall outlet until you are
finished making connection,.;.
Many components have "convenience outlets" on their
back panels so you can plug power cords from other
components into a "convenience outlet" instead of a wall
outlet. Usttally these outlets will be labeled ei!:her
"switched" or "unswitched"
If the outlet is labeled "switched", that means power to the
outlet will be swilched off' v,hen the component's power
button is switched off.
If the outlet is labeled "unswitched", that means power will
always be available at that outlet, even when fine
component is turned off.
Depending on the size of your system, you may prefer to
use an extension cord or a "multiple adapter '' to get enough
outlets for all your components.
The power cords on your PraScan components are
"polarized" (one blade is wider than the other). Be sure
the extension cord or multiple adapter is also polarized.
The plug should fit in the ot tlet only one way.
Position Cables to Avoid Hum
The possibility of picking up hum (interference noise) in
the audio/video cables ,,viii be reduced if you keep them
away from the back of the TV. Route the ,cables to the
sides of the TV's back pane instead of straight down the
middle.
All cable phJgs should be firmly seated in the jacks where
they connect to the equipment. If a plug is no!: connected
firmly, audio hum or smeared video may result.
If your antenna cable is fiat twin-lead cable, try to keep it
away from the audio/video cables as much as possible.
Excess flat, twin-lead cable should be cut off instead of
coiled behind the TV. Round, coaxial, antenna cable is
usually shielded and can be coiled or placed next to
au dio/video cables without causing interference.
,..,._
_mo
TurnOff Power Before Connecting Components
Always turn off power to all components before you
connect or disconnect any cables. This will protect your
components from possible electrical surges that could
damage your equipment.
This is a good practice for all your audio and video
components - TVs, VCRs, audio systems, computers, etc.
Position Speakersto Avoid Interference
Placing external speakers with unshielded magnets too
close to the TV may result i n the speaker magnets affecting
the quality of the picture. Such speakers should be located
at least eight inches away.
If unshielded speakers are too close to the TV, colored
streaks will appear along the sides of the picture. If this
happens, turn off the TV 1:oIseveral minules while moving
the speakers farther away Then turn the TV back on.
The ProScan SPK060 speakers are completel> shielded
and can be positioned next to the TV without affecting the
picture.
35
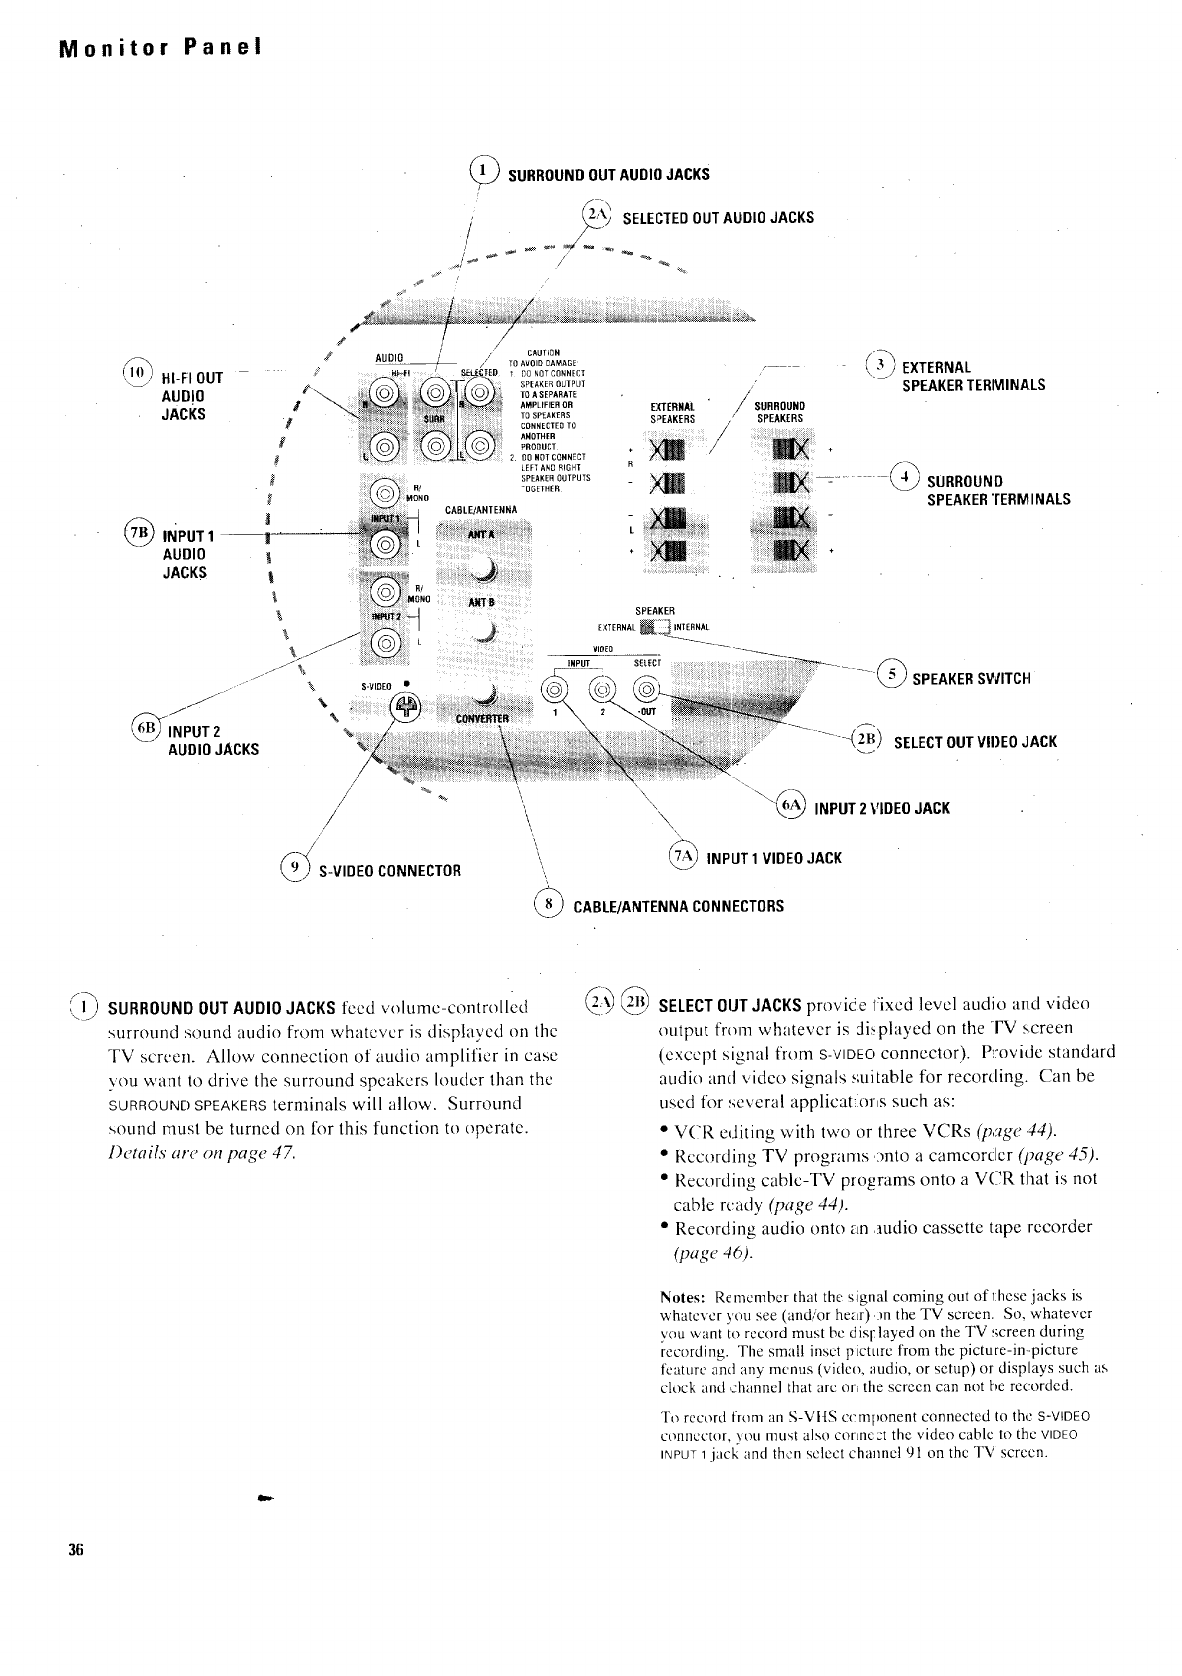
Monitor Panel
SURROUNDOUTAUDIO JACKS
ELECTEDOUTAUDIO JACKS
/
TO AVC DDAMAGE
_LE_EED I DO NOT CONNECt
SPEAKER OUTPUt
TO A SEPARATE
AMPUFIER OR EXTERNAL
TDSPEAKERS S_EAKERS
CONNECTED TO
ANOTHER
_ROOUCT
20[ NOT CONNECT
_EFTANDRIGHI
SPEAKER OUTPUTS
-DGETHER
i/SURROUND
SPEAKERS
('3} EXTERNAL
SPEAKERTERMINALS
@ SURROU.O
SPEAKERTERMINALS
2.B) SELECTOUTVIDEO JACK
/
///
//
_S-VIDEO CONNECTOR
-\.
"_ INPUT2 VIDEOJACK
INPUT1 VIDEOJACK
CABLE/ANTENNACONNECTORS
',,. SURROUND OUT AUDIO JACKS feed volume-controlled
surround sound audio from whatever is displayed on the
TV screen. Allow connection of audio amplifier in case
you want to drive the surround speakers louder than the
SURROUND SPEAKERS terminals will allow. Surround
sound must be turned on fl)r this function to operate.
1)etails arv on page 47.
SELECTOUTJACKSprovide fiixed level audio and video
output fronl whatever is :li_phtyed on the TV screen
(except signal from S-VIDEO connector). P:ovidc standard
audio and video signals suitable for recording. Can be
used for several applicat:or,s such as:
•VCR editing with two or three VCRs (page 44).
• Recording TV programs onto a camcorcler (page 4.5).
• Recording cablc-TV programs onto a VCR that is not
cable ready (page 44).
• Recording audio onto an ,audio cassette tape recorder
(page 46).
Notes: Remembcr that the signal coming out of l:hesejacks is
whatever ye,u see (and/or he_tr).on the TV screen. So, whatever
vou want torecord must be disFlayed on the TV screen during
recording. The small inset picture from the picture-in-picture
feature and any menus (video, audio, or setup) or displays such as
clock and channel that arc or, the screen can not be recorded.
To record from an S-VIIS component connected tothe S-VIDEO
connector, }ou must also connect the video cable to the VIDEO
nNPUT1 jack and then select channel 91 on the TV screen.
36
/\,
(3,_ EXTERNALSPEAKERTERMINALSpcrnfit direct conncction
of auxiliary speakers. Connection details are on
pagc,_ 4S-4_).
_4_1 SURROUND SPEAKER pcrnlit
TERMINALS dircL'[ COIII'ICCtiOI1
of auxiliary speakers for surround-sound effects. Details
are ol; pages 17-18 and 48-40.
Note: f{ithcr4-ohm or ,'-;-ohmspeakers Mlouldbe used. 8-ohm
speakers are preferred.
(7_ _) INPUT1JACKSprovide for direct conncclion of video
devices (like VCRs, camcorders, and laser disc players)
or comp',ttiblc home computers and TV games with
video/audio outputs. '[o see the signals from a device
connected to the INPUT1jacks,select TV channel 91.
_) CABLE/ANTENNACONNI'C'TORSare used when attaching
either a home antenna _m,Ji0ra cable-TV system to your
TV. ('omtcction demi,'s rex"on pages 3,%40.
SPEAKERSWITCH
This switch lets you turn off TV's internal speakers so
that sound will instead come th)'ough speakers connected
to EXTERNAL SPEAKERS terminals.
Details about connecting speakers to the TV are on
pages 48-49.
Important: Always place switch in INTERNALposition if no
external speakers are used (or if external speakers arc ever
disconnected).
@ @ INPUT2 JACKSprovide for direct connection of video
devices (like VCRs, camcorders, and laser, disc players)
or compatible home computers and TV _ames with
video!audio outputsl To see the signals from a device
connected to the INPUT2jacks, select TV channel 92.
S-VIDEOCONNECTORprovides for direct S-VI tS video
connection from S-VHS VCR or camcorder. Remember
to also connect the S-VHS VCRs or camcorder's audio
jack(s) to the TV's tNPLJT1LEFTand/or R/MONOaudio
jacks. -['his is necessary because S-Video cables only
carry the super video (pk:ture), not the audio signal.
Connection details ar_- o,l pages 44-45.
To see the signals from a device connected to the S-VIDEO
jacks, select TV channel 90.
_OUTAUDIOJACKSfeed volume=controlled stereo
HI-FI
audio out from whatever is displayed on the TV screen.
Allow,'; connection of audio amplifier so you can adjust
sound level with TV's remote. Connection details are
on page46. "'
Caution: When using TV games, computers, and similar products with
your TV, keep the brightness and contrast functions at low settings. If a
fixed (non-moving) pattern is left on the screen for long periods of time
at a high brightness or contrast setting, the image can be permanently
imprinted onto the screen. These types of imprints are not covered by
your warranty because they are the result of misuse.
37
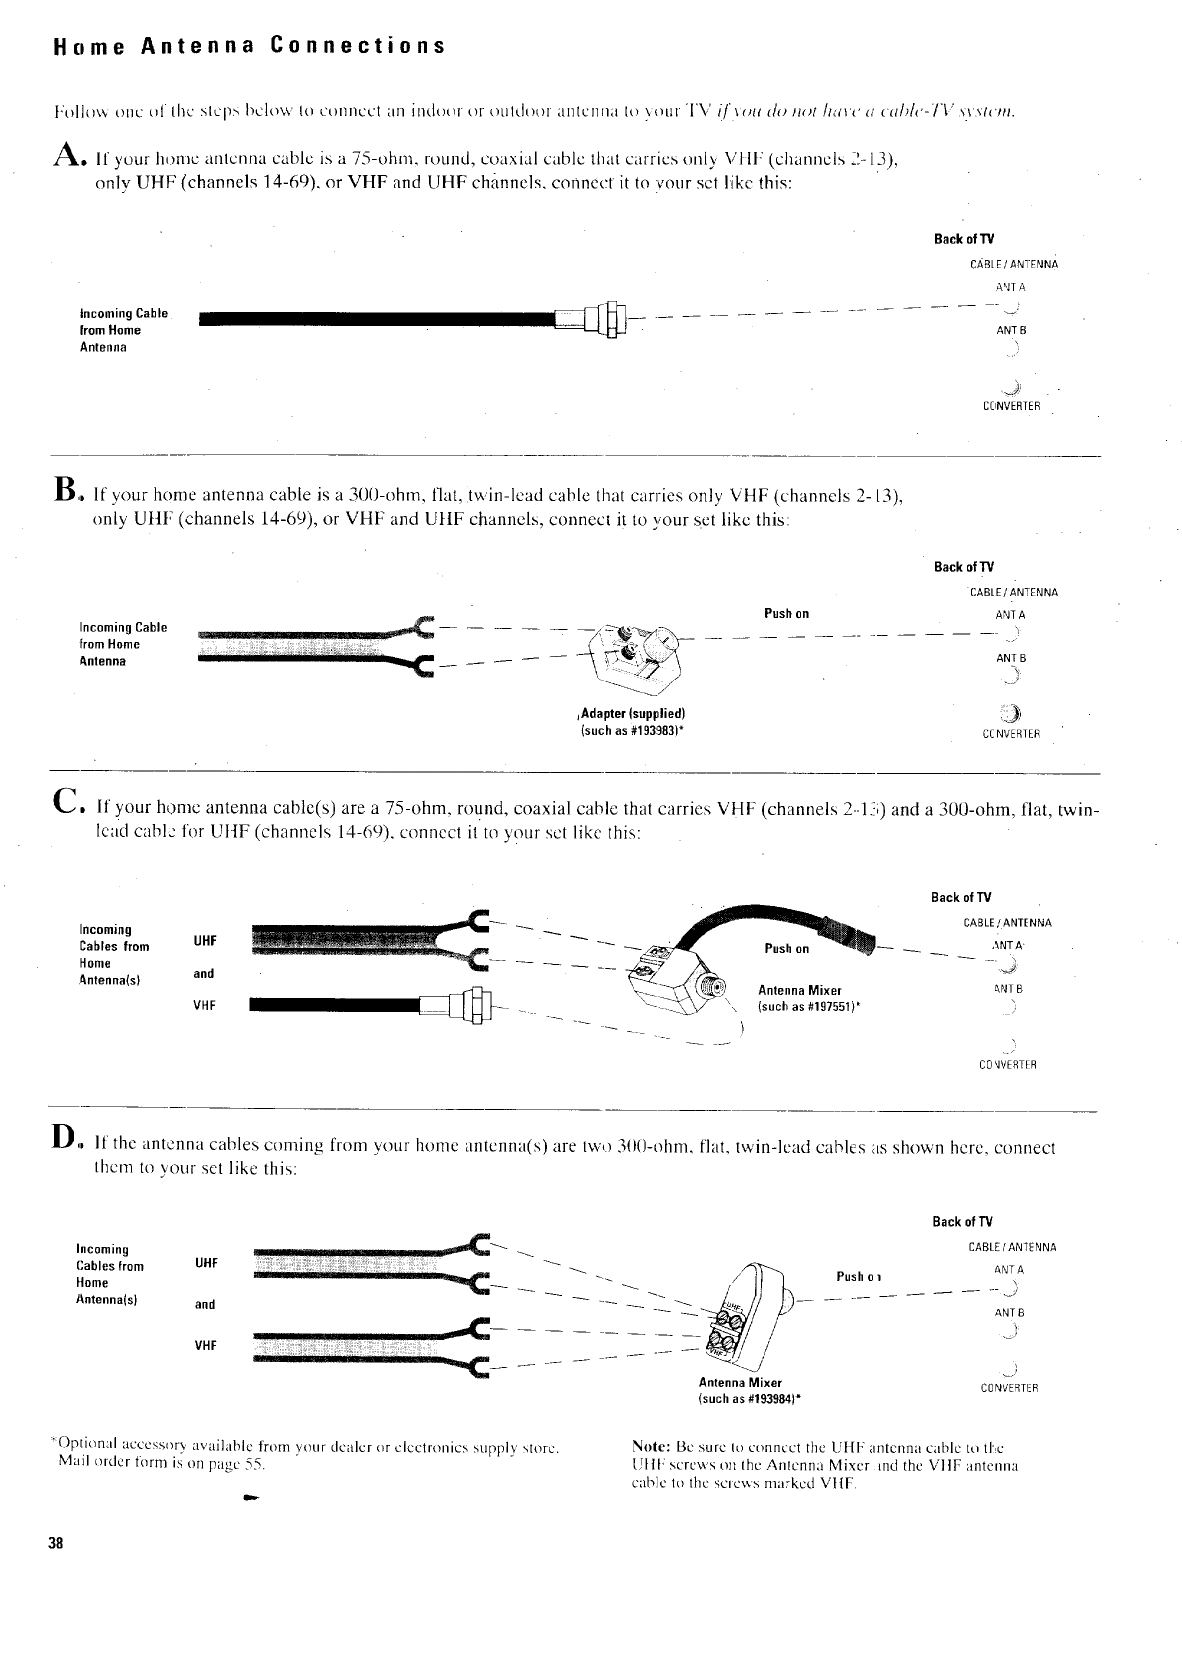
Home Antenna Connections
["[)I]{ ) _ r[)[1 _ [ )I I {hu slops below 1o t'()ImCCt all in(.I()()rOF outdool aIl[L'III1;Ib,) \()[|r "['\,' i/'_()[l (/_) _]()[ /I_'{' (_ (' [ _/)/() I 7" _ ' _ _ _ _I I{ _ _ _ I
A. It ),our home antenna cable is a 75-ohm, round, coaxial cable that carries only, V}IF (channels 2-13),
only UHF (channels 14-69). or VHF and UHF channels, connect it to your set like this:
Back of"IV
CABt E /ANTENNA
A_JT A
Incoming Cable F_-_ .................... "_'_
from Home _--7 ANT B
Antenaa
CONVERTER
B,,If your home antenna cable is a 3(}(}-ohm, fiat, twin-lead cable that carries only VHF (channels 2- 13),
only UIIF (channels 14-69), or VHF and UIIF channels, connect it to )*our set like this:
Incoming Cable
Irom Home
_,ntenna
Back ofTV
CABtE/ANTENNA
Pushon ANTA
jAdapter (supplied) .__
(such as #193983)* ccNVERTER
C, If your home antenna cable(s) are a 75-ohm, round, coaxial cable that carries VHF (channels 2--11!i)and a 300-ohm, flat, twin-
lead cable for UHF (Channels 14-60), connect it to your set like this:
Incoming
Cables from
Home
_ntenna(s)
Back of TV
_ _ _'\ " _ CABLE/ANTENNA
and ....
_NTB
VHF -_ -_ )
CO WERT[ R
_,, If the antenna cables coming from your home antenna(s) are two 3()O-ohm, flat, twin-lead cables _tsshown here, connect
them to your set like this:
Incoming
Cables from UHF
ttome
Antenna(s) and
VHF
:: -------.
Back ofl'V
CABLEIANTENNA
_ -_- /Push01 .,
-_ _ _ _' -- ANT B
_)
Antenna Mixer CONVERTkR
(such as #193984)*
*Optional accessnrx, available from your dealer or electronics supply store.
Mail order form is on page 55.
Note: Bc sure Io c(mncct the UHF antenna cable to IL,e
ITtIF" screws on {he Anlcnna Mixer md the VI]F antenna
cab]e Io the sclews ma:kcd VHF
38
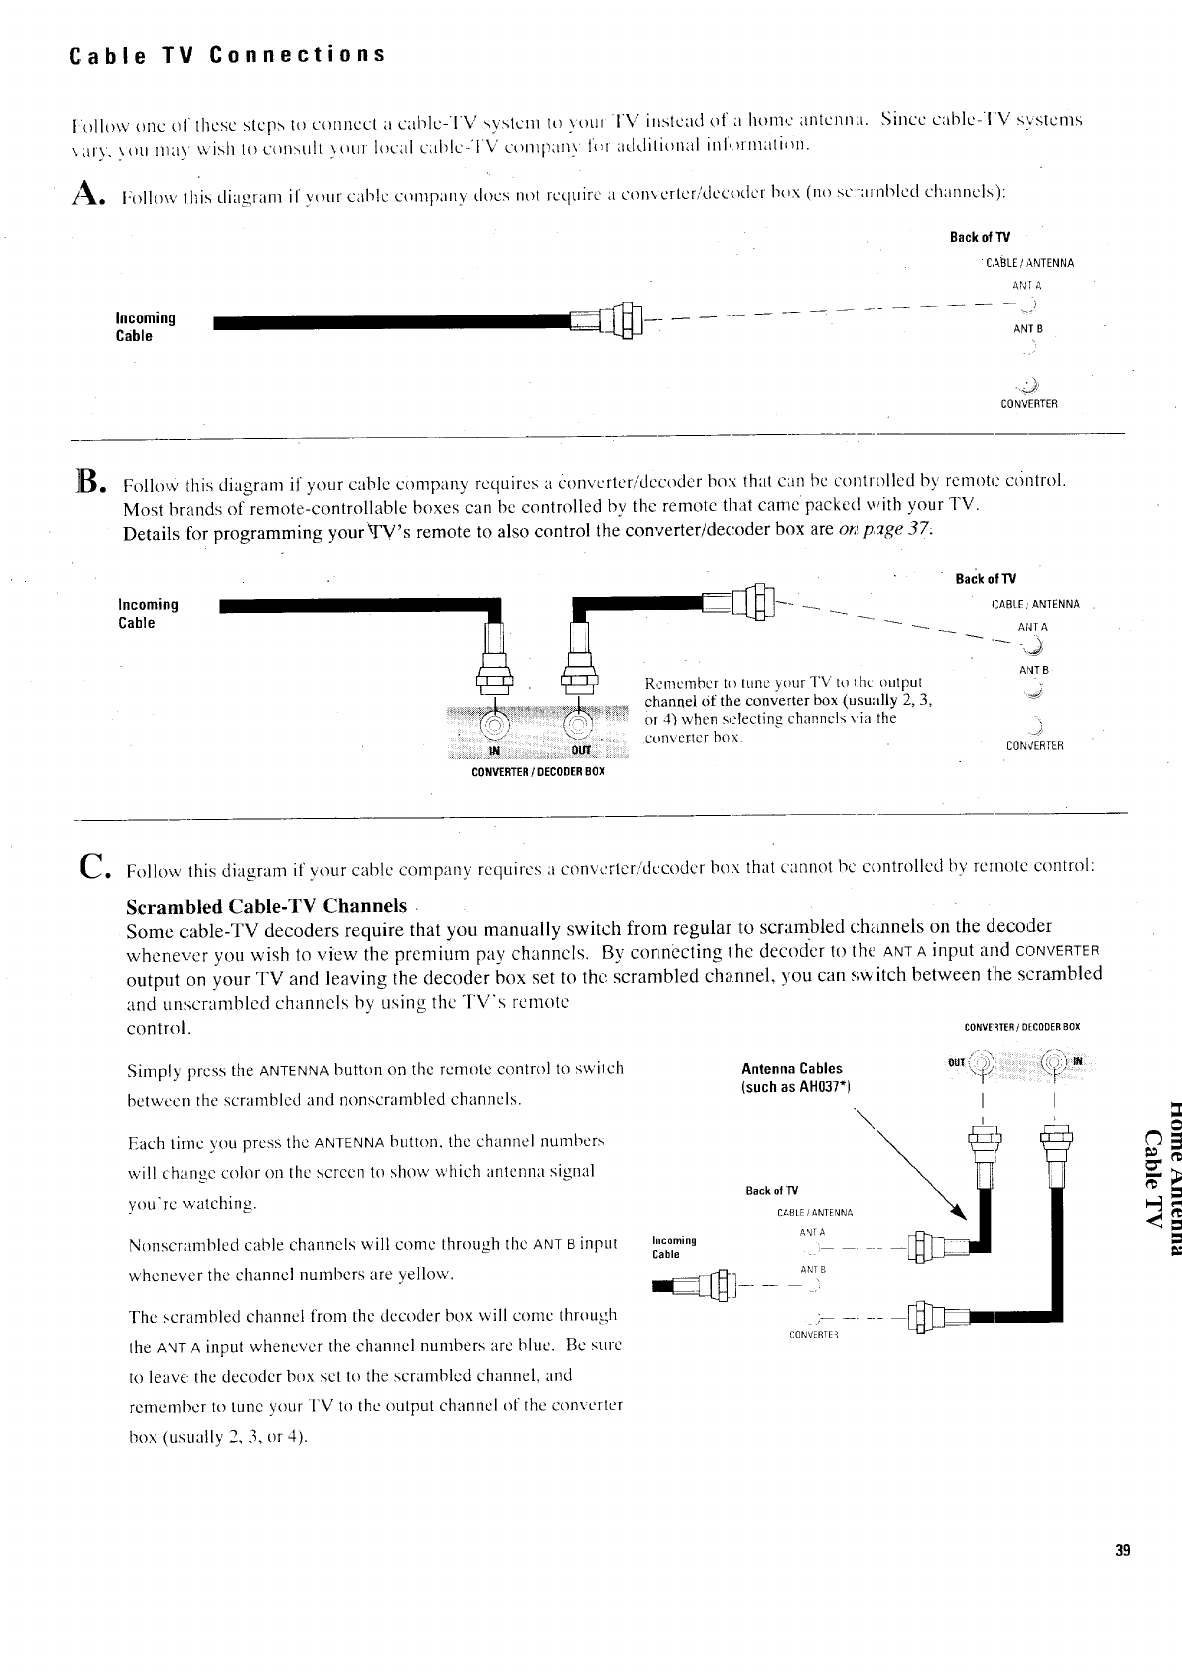
Cable TV Connections
]olh),,,_ one of these step.', to coimecI a cable:IV systcnl to \oul I'V instead of 'a home autenn_l. Since cable-l'V systems
,.'arv. ',ou may ,aish to ccmsult \our local c;dflc/lV COlnp;m} l_z addilionaI inl,_rmati,m.
1_. Follow 1his diagram if your cable company does nol require a conNertcr/dec<)der hox (no scainbled channels):
Incoming
Cable
Back of"IV
•CA'BLE IANTENNA
M,,/r A
ANT B
CONVERTER
B. Follow this diagram if your cable compan.y requires a Gmvcrter,,'deo._der box that can be contr_flled by remote ccmtrol.
Most brands of remote-controllable boxes can be controlled by the remote that came packed with },our TV.
Details for programming your_TV's remote to also control the converter/decoder box are o_ page 37:
Incoming
Cable
P, en_cmbcr to tune your TV to lhc output
channel Of the converter box (usually 2, 3,
or J0 when selecting channels via the
converter box
Back ofTV
CABLE,, ANTENNA .
ANT A
._ -,_
ANT B
J
CONCERTER
CONVERTER/DECODERBO_
C. Folh)w this diagram it' your cable company requires a converter/decoder box that cannot bc controlled by remote control:
Scrambled Cable-TV Channels
Some cable-TV decoders require that you manually switch from regular to scrambled channels on the decoder
whenever you wish to view the premium pay channels. By connecting Ihe decoder to the ANTA input and CONVERTER
output on your TV and leaving the decoder box set to the scrambled channel, you can switch between tlhe scrambled
and unscrambled channels by using the TV"s remote
control. CONVE _TER /DECODERBOX
Simply press the ANTENNA button on the remote control to swilch
between the scrambled and nonscrambled channels.
Each time you press the ANTENNAbutton, the channel numbers
',,,'ill change color on the screen to show which antenna signal
youre watching.
Nonscrambled cable channels will come through the ANTB inptlt
whenever the channel numbers are yell(),,,,'.
The scrambled channel froin the decoder box will come through
Ihe ANT A input whenever the channel numbers arc blue. Bc sure
to leave the decoder box set to the scrambled channel, and
remember to tune your I'V to the output channel of the eonveEter
Incoming
Cable
Antenna Cables
(such as AH037*)
OUT
\
Back ofW
CABLE/ANTENNA
ANTA
I
I
ANT B
CONVERTE3
box (usually 2, 3, or 4).
°;
39
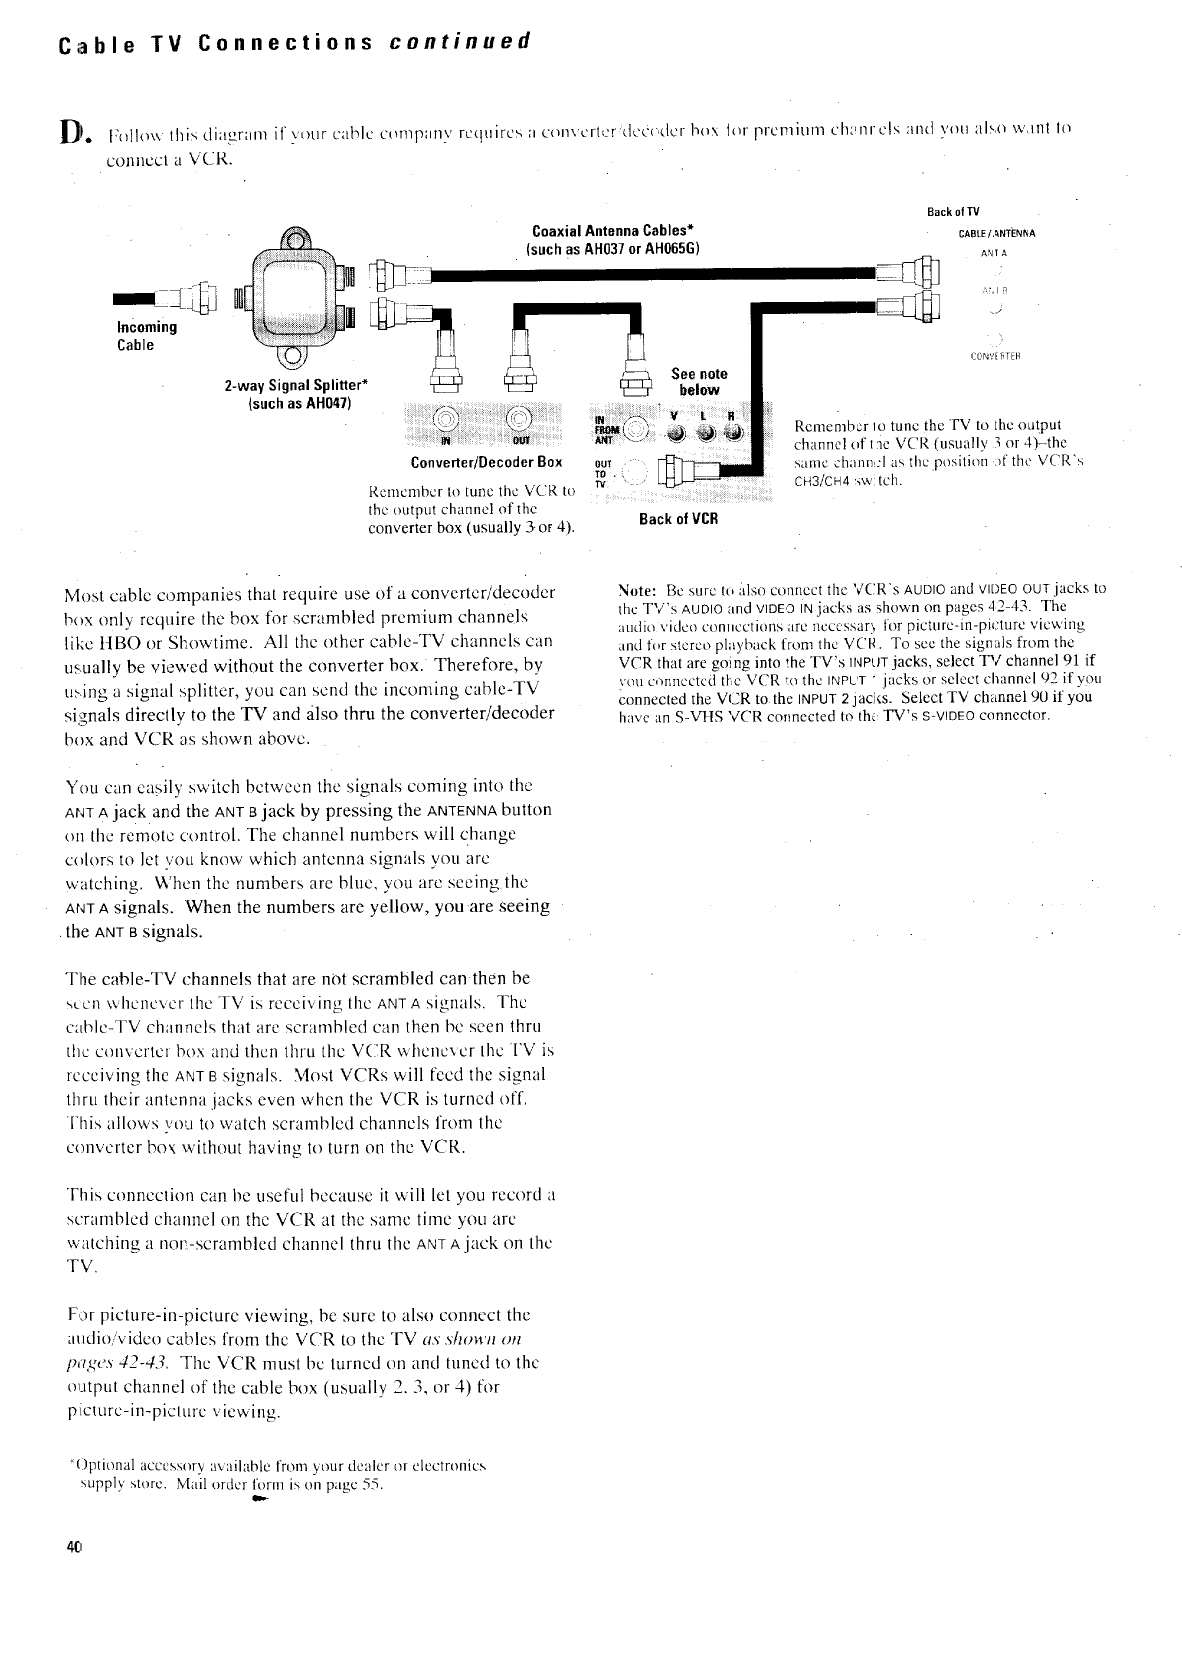
Cable TV Connections continued
D}. f:cdlow ihis dingr'<im if vltnr cable company rcquircs :i convcrlL'r dccc,dcr I_ox for preinitinl ch_!nrels and \'ou al_,o w,int 1o
connect a \,"CIr.
Incoming
Cable ........_<_u>_<<_>_l_
2-way Signal Splitter* _j"
(such as AH047)
CoaxialAntennaCables*
(suchas AH037orAH065G)
See note
below
Converter/Decoder Box out
TO .
l_.cmcmbcr to tunc tl_c VCR to w
the output channel of the Back of VCB
converterbox (usually3.or 41.
Back of TV
CABLElANTENNA
ARIA
ALl _
.J
C C,NI,I[_TE]g
Rememb<:r Io tune the TV to Ihc OLltput
channel of the VCR (tisu;'illy _ or -l)-the
:_alnc chann :1 as thcposition 4f the VUR's
CH3ZCHa..,w tch.
Most cable companies that require use of a converter decoder
box only require the box for scrambled premium channels
like tIBO or Skowtime. All the other cable-TV channels can
usually be viewed without the converter box. Therefore. bv
ubJnga signal splitter, you can send the incoming cable-TV
signals directly to the TV and _ilsothru the converter/decoder
box and VCR as shown above.
You can easily switch bctween the signals coming into the
ANTAjack and the ANTBjack by pressing the ANTENNAbutton
on the remote control. The channel numbers will change
colors to let you know which antenna signals you arc
watching. When the numbers are blue, you are seeing the
ANTA signals. When the numbers are yellow, you are seeing
the ANTBsignals.
The cable-TV channels that are not scrambled can then be
s_.enwhenever the TV is receiving the ANTA signals. The
c;It_Io-TVchannels that are scrambled can then be seen thru
the ct)nvertel box add then thru the VCR whcnc,_cr the I'V is
receiving the ANTBsignals. Most VCRs ,<'+illfeed the signal
thru their antenna ,lacks even when the VCR is turned off.
This allows YeLlto watch scrambled channels from the
converter box without having to turn on the VCR.
This connection can be useful because it will let you record a
scrambled channel on the VCR at the same time you arc
watching a non-scrambled channel thru the ANTAjack on the
TV.
Note: Be sure It, also connect tire VCR's AUDIOand VIDEOOUTjacks to
the TV's AUDIOand VIDEg N iacks as shown on pages 42-43. The
audio video connections are ncccssar> for picture-in-picture ,<'icwine
and lor stereo pla 3back l.rom the V('tt. To see the signals from the
VCR that are going into the TV's INPtITjacks, select TV channel 91 if
re! omnectcd tPe VUR _o the INPLT "jacks or select channel 92 if you
connected the VCR to the INPUT2 jac,€.s. Select TV channel 90 if you
have an S-VHS VCR connected to thv TV's S-VIDEOconnector.
For picture-in-picture viewing, be sure to also connect the
audio/video cables from the VCR to the TV as s't2own o#1
l_,lg¢',s42-4,7. The VCR must be turned on and tuned to the
output channel of the cable box (usually 2.3, or 4) for
picture-in-picture viewing.
_()ptional accessory a\.ailable from your dealer or electronics
supply store. Mail order fl)rm is on page 55.
40
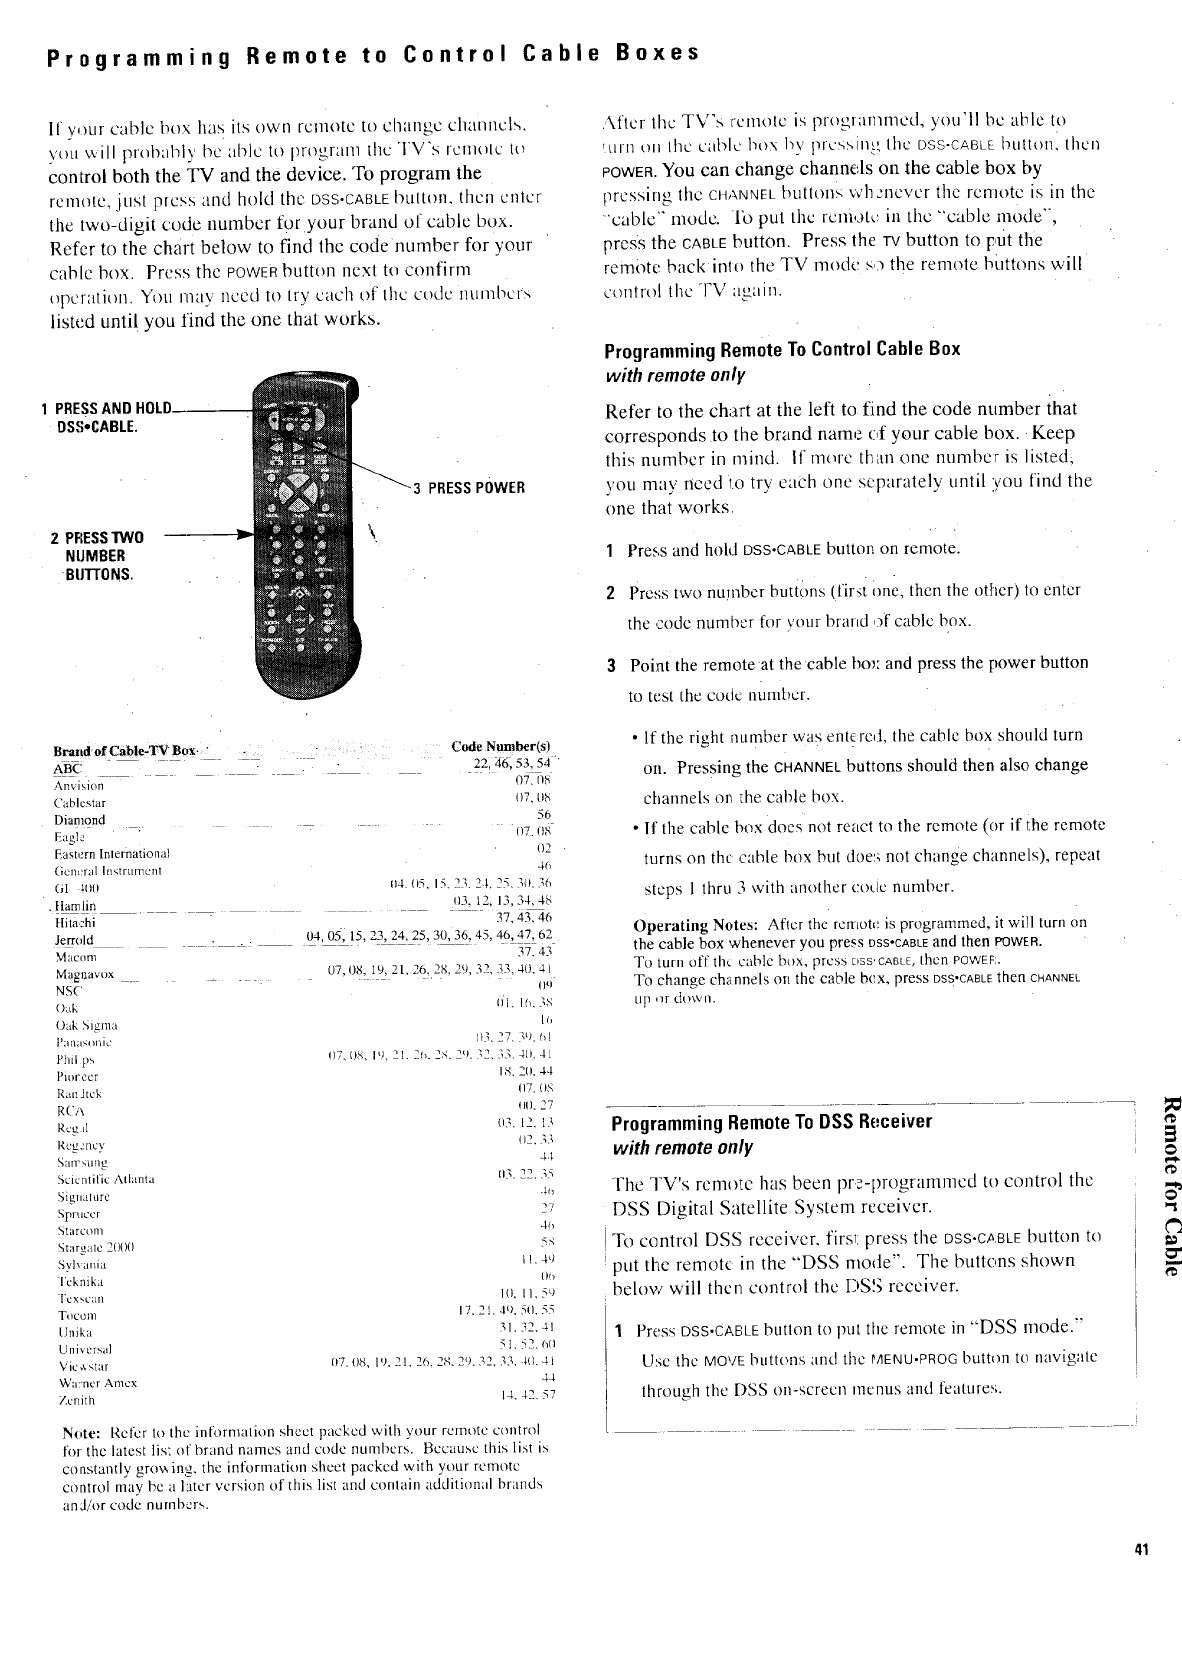
Programming Remote to Control Cable Boxes
If y,)ur cable box has its own remote to change channels.
\'ou will probably be able to program the TV's Ienl(flc lt'_
control both the TV and the device. To program the
remote, just press and hold the DSS.CABLEbutton, thcll enlcr
the two-digit code number fgr your brand of cable box.
Refer to the chart below to find the code number for your
cable box. Press the POWERbutton next to confirm
operation. You may need to try each of the code numbci;s
listed unti ! you find the one that works.
1 PRESSAND HOLD.
DS,q,CABLE
2 PRESSTWO
NUMBER
BUTrONS.
PRESSPOWER
BrandofCable-TV Box. " . Code Number(s)
ABC ..... 22.46. 53, 54
&nvlslon 070_
(';ib/ostar 07, {Jb,
Diamond 5/)
Eagl_ --" - _ 07. (IS
Eastern [nlernationai t)2 .
(}Cllcral [n_;tr_lmenl 4(_
_4 ....GI l.(l{! 114.nS, I.... _. 3 _(_
•Hanql!n ..... 03, 12, 13, 34&48
Hita,zhi 37, 43, 46
Jem:,ld ..... !)4, 05; !5, 23, 24, 25, 30,36, 45, 46, 47, 62
Macom 37, 43
Ma_zrlavox _ 07,08. 19,_1,_6..8,_),32.33,40,41
NSC II0
()ztk (l'[. ! 6, 3S
Oak Sigma I/,
l'anasonic 1)3.27.3% fl!
Phd ps 07.0N, 19.21. 2b. 28.2% 32.33, 40, 41
t'iorecr 18,2(L 4.1
Ran Jtck 07. nS
Re,,\ nil. 27
RCgL[ 03. 12, 13
Regency (12, .;3
5;aw_,tmg 44
Scientific Athmta _,. 22, 35
Sigmmtrc -{l_
Sprucer _,_
NtarCOll/ 40
Stargalc 2000 5,q
Sylvania I!. 4q
Tcknik t Oo
"rCXSt.'_{ll 1(t. I 1, 5Q
Tocon] 17.21.4t), 50, 55
Unika 31,32, 4!
Universal 51,52, {_ll
Vic_,,star 07.08, It). 21, 26.28.2% 32.33.40.41
Warner Amcx 44
Zenith 14.42, 57
Note: Refer to the information sheet packed wilh your remote control
for the latest lis: of brand names and code numbers. Beeauscthislistis
constantly grow ing, the information sheet packed with your remote
control may be a later version of this list and contain addition;d brands
and!or code numbers.
.\fief the TV's i-emote is proglamrned, you'll bc able tt)
turn on Ihc c'ablc box hy prcssin,.: the DSS-CABLE buttonl then
RowEa.You can change channels on the cable box by
pressing the CHANNELbuttonk wh _'ncvcr the remote is in the
"cable'" mode. lo put the rciliotc ill the "'cable mode",
press the CABLEbuttOn. Press the Iv button to put the
remote back into the TV mode s,_ the remote buttons will
control the TV ;lgain.
ProgrammingRemoteToControlCable Box
with remote only
Refer to the chart at the left to find the code number ihat
corresponds to the brand name of your cable box. Keep
this number in mind. If more th'dn one number is listed,
you may need to try each one separately until you find the
one that works
1Press and hohJ DSS.CABLE button on remote.
2Press two number buttons (fir,;t one, then the other) to enter
the code number for your brand ,ff cable box.
3Point the remote at the cable bo_:and press the power button
to test the colic llLIlllbcr.
•If the righl number was entcrol, the cable box should turn
on. Pressing the CHANNELbuttons should then also change
channels or_l:hecable box.
• If the cable box does not react to the remote (or if the remote
turns on the cable box but doe:; not change channels), repeat
steps 1 thru 3 with another code number.
Operating Notes: After the remote is programmed, it will turn on
the cable box whenever you press DSS'CABLEand then POWER.
To turn oft" the cable box, press DSS'CaaLE,then POWEF.
To change channels on the cable box, press Dss,eABLEthen CHANNEL
tip or do','v n.
ProgrammingRemoteTo DSSReceiver
with remote only
Fhe TV's remote has been pre-programmed to control the
DSS Digital Satellite System receiver.
To control DSS receiver, first: press the DSS'CABLE button to
put the remot_ in the "DSS mode". The buttons shown
below will then control the DSS receiver.
Press DSS.CABLEbutton to l)tJl the remote in "DSS mode."
Use the MOVFbuttons and the MENU.PROGbutton to navigate
through the DSS on-screen menus and features.
pc
41
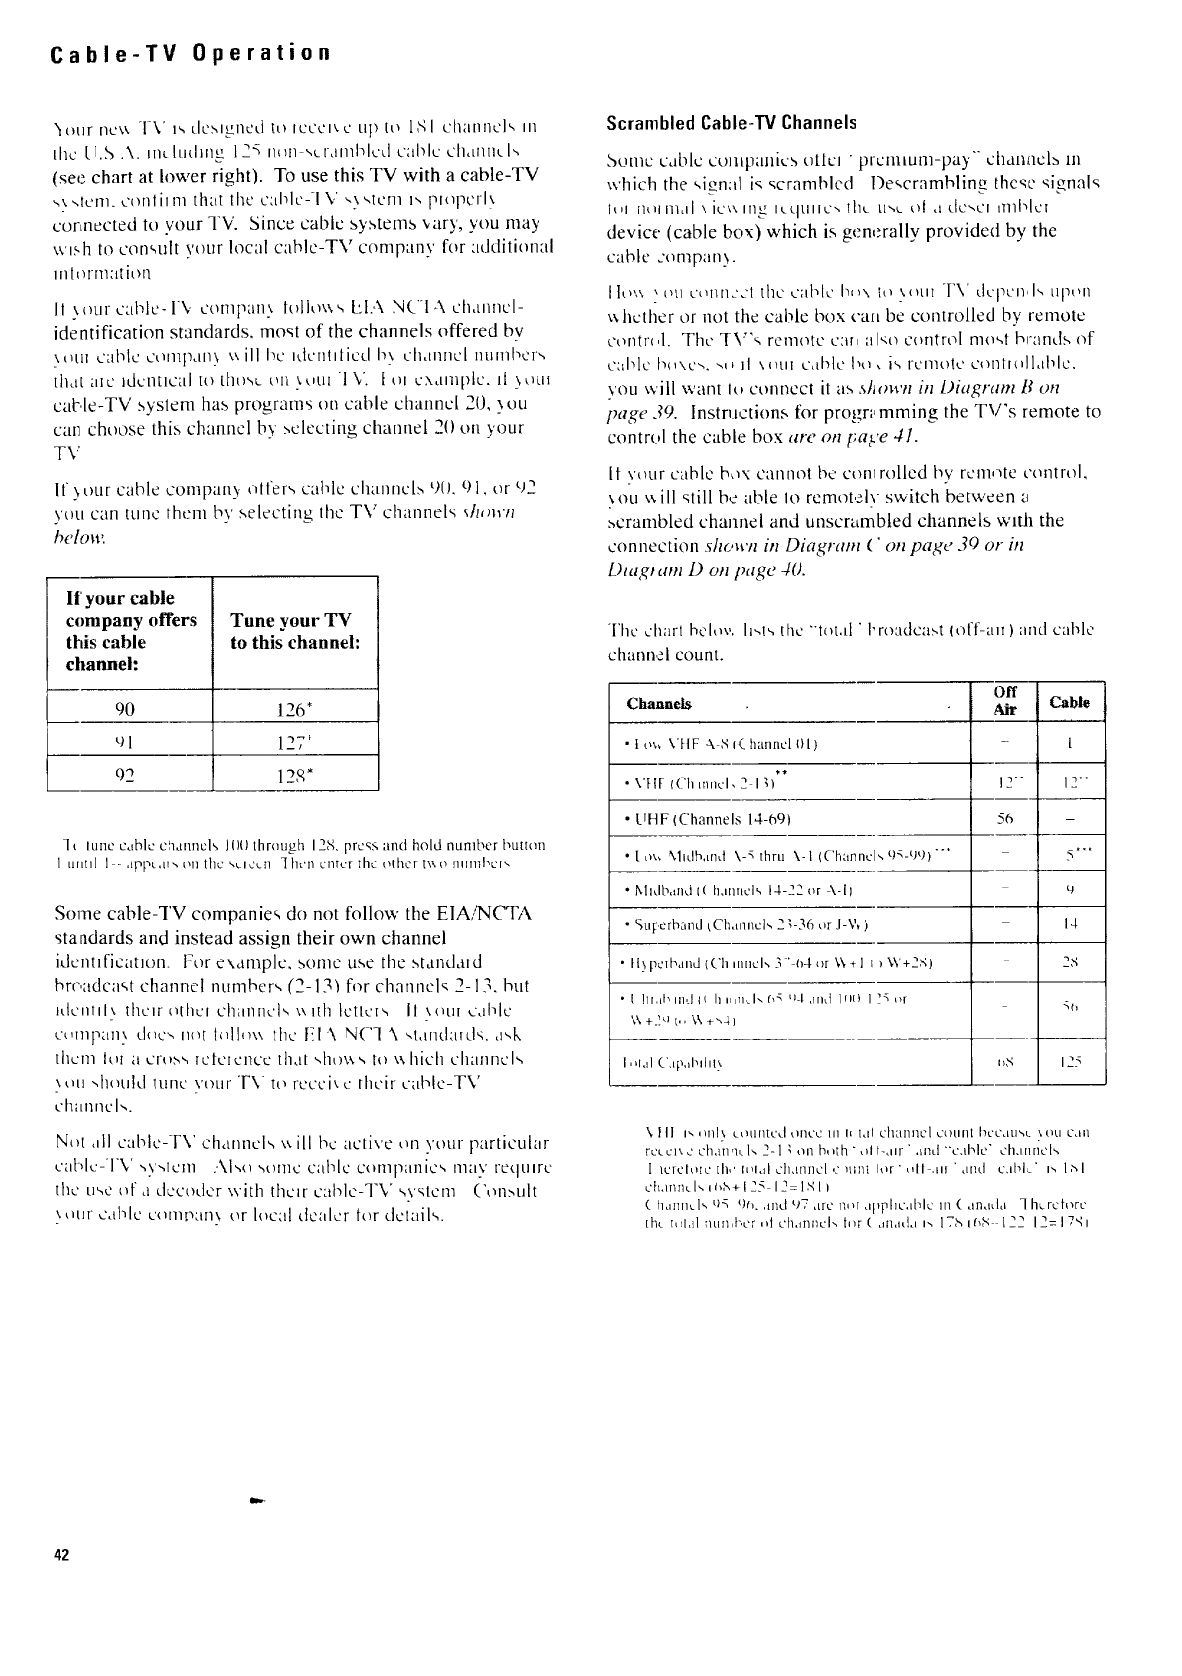
Cable-TV Operation
"_our nc_ TV _s ulcnl_ncd to Icccl,.c up to IS I channel <,In
Ihc [t,S .\. muludlng 1"_ n_m ,,crdmblcd cable channel-,
(see chart at h)wer right). To use this TV with a cable-TV
,,\ .,rein. conlii rn that lhc c;tbh_'-I \: ".x,,lcm p, piopcrl\
cormected to your TV. Since cable systems _,ary, you may
wish to con<,ult your local cahle-TV company for .ldditional
l il l i'q1YI;l [ i O I1.
11\our cable- l\. coi11p_lll} h>llo_ <,[:l.& NtI & ch,umcl-
identification standards, most of the channels offered by
\_tii cable COillpdll.\ \t ill bc idcniiJied b\ chdlll/C[ lltllllbcr',
lhd[ alC IdmntlC;.lI to [ht)'.,c_ t_ii \tiul 1 V. tt)l ux<unpic, li \tltll
cal:',le-TV syslem has programs on cable channel 20, )ou
mail choose this channel by :,electing channel 20 on your
T\:
It.\ our cable compan), otl'er,_ catqe channel.', 9(!. 91, or 92
yOU can [LlIlc7 [helll b v selecting the T\; channel'_ _h<m'n
helon'
It' your cable
company offers
this cable
channeh
Tune your TV
to this channel:
90 126"
ell 127 _
02 12& _
]t IUIIC cable challncls ll)fl through 128, press and hold number button
1till[I) ] - ,llTIl_C,ll% OI1 the <_ulUc.[! ]ht'II enter the oilier t_o rllllltbUlx
Some cable-TV companie<, do not follow the EIA/NCTA
standards and instead assign their own channel
idcI/tlfiCatIon. ]7or e\amplc, some use the stanclald
brc,adca<,t channel nnmber<, (2-13_ for channel_ 2-13. but
itlctllll\ Ihclr ethel ch',mncl,, \\ lib Icucrs II \otil <dlqc
CtllllpUll_ d(it2,_II('l[ hfll,)\_ ilk' I-I '\ N("I _ ,,hindaid<:,. <i',k
them loi ,t Cl-t_s,_ICIClc.'IlCC th,i[ ,,11o\_s 1o ,,%hich channels
\ Oil ",hould ltlnc VOClrTV to recci\ c iheir cable-TV
challncl',.
N_t all ctiblc-TV ch,lnncl <`_\ ill bc active on VOtlr particular
cablc-TV ,,\'sic'ill .,\lk(I St)lilt cable companie <,nl{l\' require
Ilk' tl<-,e t)f <t decoder with their cable-TV %'glen1 ('on.,,nll
\Ollr c<llqc COlllD'<iII\ or local de;llcr for delail<_.
Scrambled Cable-TV Channels
Some cdblc conipanics ottci "prcnnum-pay' channels In
which the <,ign:il i_ _cramtqed De<,crambling the<_o <dgnaN
h,I fl_llHl<ij \ ic\\ I11_ Icqtllic-. Ilk tl".L Ol d dcxcl II111"jcl
device. (cable box) which is generally provided by the
cable :ompan_.
I lo,,_ , i_ll u'OllllJJl tiw c;iblc bc_x h_ \litl! T\' dcpcn, I', tlptql
x_hcttier or not the calqe box can he controlled by remote
contt€ ,1. Ttlc _[V'<, remote c:tli ;11_ocontrol moq brsnds of
c',dqc b(_\cx, x_ II \1}lll c,lblc be, i <,rClllt)Ic conti(dl<iblc.
you will want lt_ connect it as AliOV¢ll ill J)i_lgram _1 o11
page 39. Instructions for progr;_mming the TV's remote to
con<rid the cab[e box at# on Fage 41.
1| \'our cable b,),; canilOl bc conlrolled by rcmnte control,
xou \_ ill still be able Io remotely s_vitch between _
,,,crambled channel and unscrambled channels with the
connection shown it, Diagram (" on page 30 or in
LkIII<_/ tll!l D (Jll page 40.
The chart helm,, h',I', Ihc "'lot,ll " I'ro'ldca.',t
chanIl,21 count.
Channels
1 o_, VttF _ ,'; I(. hanncl 1)1)
VIII ICh uuicl, 2 I I)**
UHF (Channels 14-691
t o_, Miclb,md \-_, thrtl \-I (Channel,, t)q-Ug)'"
b-hdS,md I( hanncl', 14-2 "_or &-[I
<>uF.erbai'ld tChanncl,, 2 "4-36 or .I-V_ )
• tl)pcibdnd(('huuicl,,3'O4or\\+]l "W+"X)
• I !lhibUld I( hiiiti..Ix f_4 u-I ,ui<t 1!111 ] !qor
\\ +_]cl C,, \\ +",41
off-all ) and cable
off
Air Cabl_
ii
- l
12"" 12""
56
c_
14
_5
qfl
1, _i<d (',lp,ibll it). I_S 125
_, 1(] D, ,IT/I_, LtlLIIll.cd tlncc Ii1 Ii 1<11 ch{li]llOl COl.lfli bcCdtl'-,t. \tiLl Cdll
rcccl,.d ch,mq,.I,, 2-1 ; on both ",fll-dir" ,ind "'c,llqo" ch,ul[lcl,,
I Icrehuc th,' hqdl oh,ins)el ,: _t1ii1 Ior'<,ll .ill " dllt] c,iblL" is I,',1
ctl.mtklsil>h+!25 I__-lSli
( hann__l', tlq 9fl. ,illd tt- ,ire Fief <i[iphc.lblc 111( <irl<idd ] hc_rcforc
the hd,d ;/tlll,t",cr _d chdnncl-, lnr ( <m<_dai, 17b, if_<k 1__2 12= I 7'ql
42
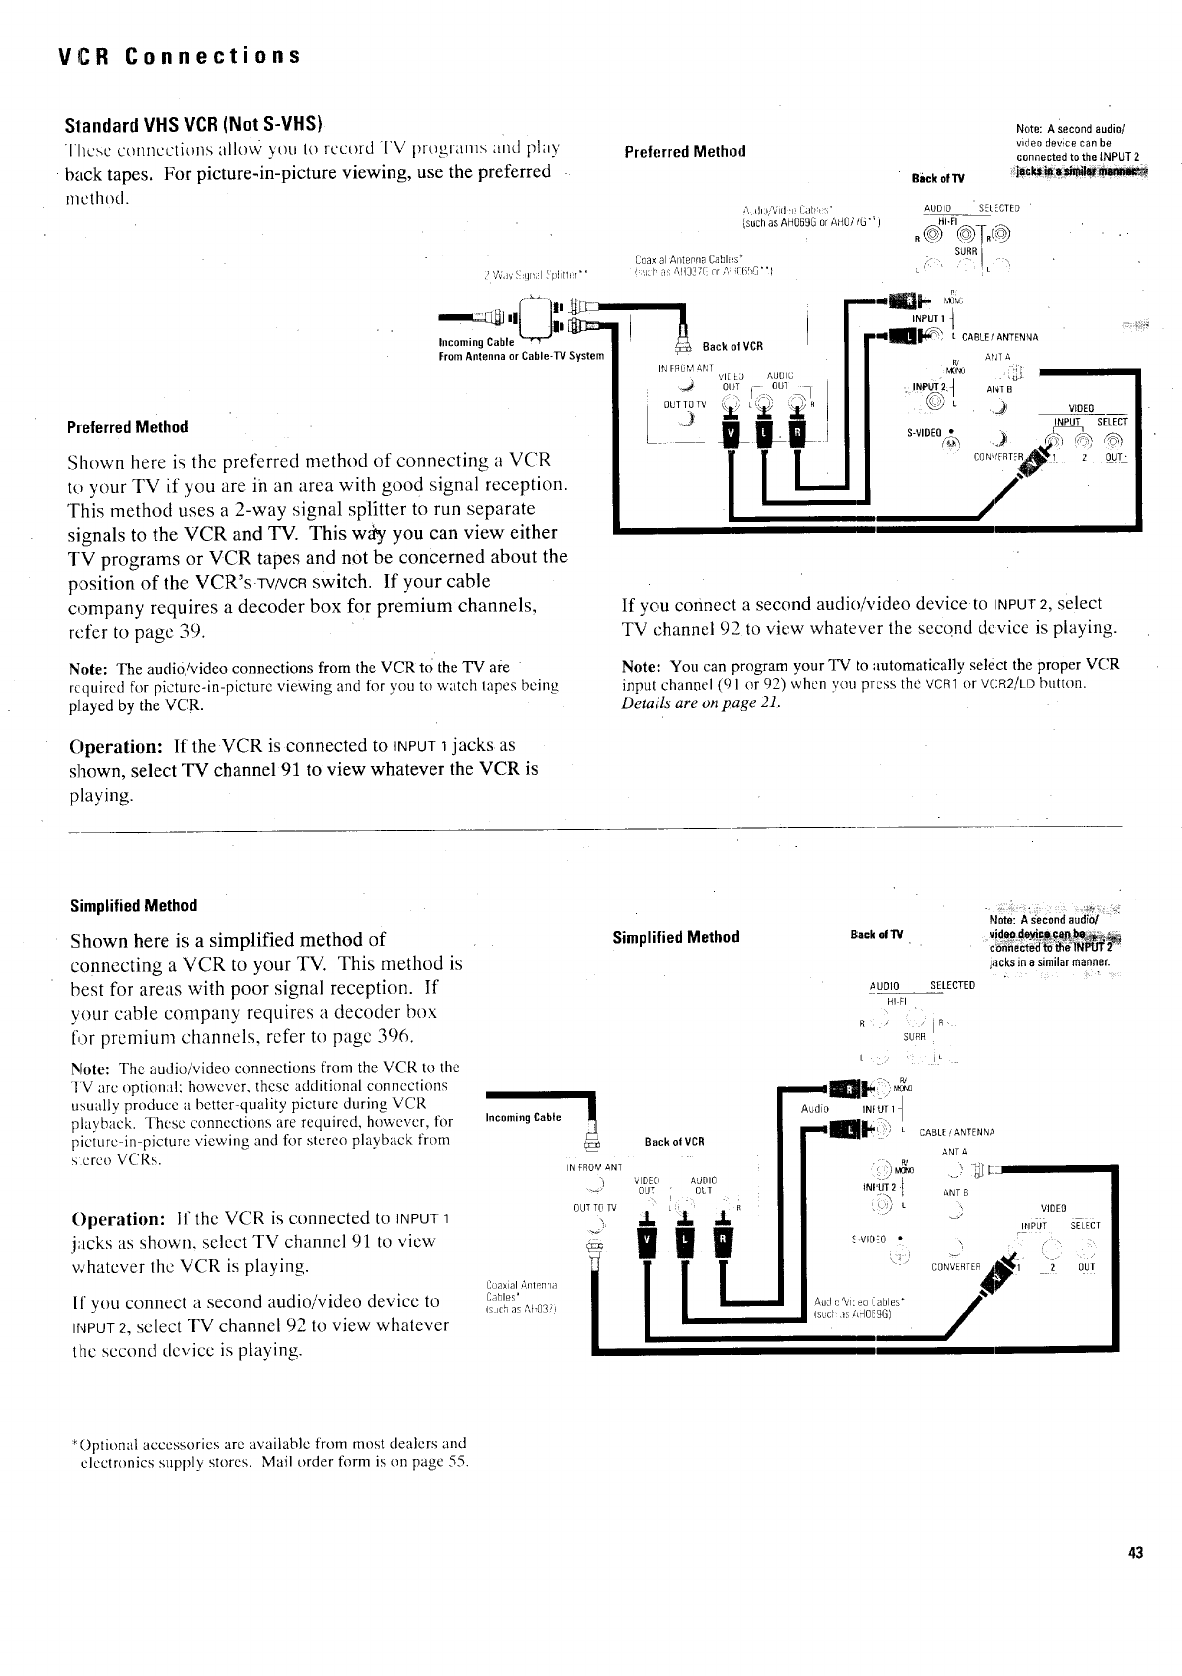
VCR Connections
Standard VHS VCR (Not S-VHS)
These connccthms allow you to record TV progranls and play
back tapes. For picture-in-picture viewing, use the preferred •
method.
Incoming Cable
From Antenna or Cable-TV System
Preferred Method
Shown here is the preferred method of connecting a VCR
to your TV if you are in an area with goo d signal reception.
This method uses a 2-way signal splitter to run separate
signals to the VCR and TV. This wfi3' you can view either
TV programs or VCR tapes and not be concerned about the
position of the VCR's-TWVCRswitch. If your cable
company requires a decoder box for premium channels,
refer to page 39.
Note: The audio/video connections from the VCR tothe TV aie
required for picture-in-picture viewing and for you to watch tapes being
played by the VCR.
Operation: If the VCR is connected to INPUT1 jacks as
shown, select TV channel 91 to view whatever the VCR is
playing.
Preferred Method
/I dJ:_,&'Jd '_:,l ah _ "
{suchasAH063GorA_40/iG''
Coax al Antepna Cabh_s*
!:u: I_ a_ All337( _ or A; lC(ifl,3' t l
Back ol VCR
IN FRE,M _NT AUD_ff
Biick of'11/
Note: A second audio/
video device can be
connected to the INPUT 2
AUDI0 SELECTED
HI-FI
.@
sU_"I
;;,7 _k:?'
iNPUT l !
•-i_ CAa_,ANTENNA
r_Nu ANTA
IN_Ji"2 t ANT B
S-VIOEQ •
VIDEO
INPUT SELECT
If you connect a second audio/video device to INPUT2, select
TV channel 92 to view whatever the second device is playing.
Note: You can program your TV to automatically select the proper VCR
input channel (91 or 92) when you press the VCR1or VCR2/LDbutton.
Details are on page 21
Simplified Method
Shown here is a simplified method of
connecting a VCR to your TV. This method is
best for areas with poor signal reception. If
your cable company requires a decoder box
for premium channels, refer to page 396.
Note: Theaudio/videoconnectionsfromthe VCRto the
TVarc optional; however,these additionalconnections
usually producea better-quality picture during VCR
playback. These connectionsare required, however, for
picture-in-picture viewing andfor stereo playback from
s creo VCRs.
Operation: If the VCR is connected to INPUT1
j',tcks as shown, select TV channel 91 to view
whatever the VCR is playing.
If you connect a second audio/video device to
INPUT2, select TV channel 92 to view whatever
the second device is playing.
Incoming Cable
Coaxial 4nlen qa
Cables'
IsJch as A_O3;i
Simplified Method Back,fw
/_UDIO SELECTED
H! El
Note: asecond audiol:.....
flicks in a similar manner.
O/i_,
SURR
t • _.F ' i. L
---,IIF:? ÷
Audio IN[ UT 1 I
CABLE _ANTENN,_
ANT A
IN FROM ANT ,7", &_
OUT OLT/ 7X t
ou ,rv i ["(_;'_" t-Vl[)=O •
AuJ O_.d2eo i abJe5 *
Isu,d as Z_HOISgG)
AN TB
', VICE{?
Ir,IPLFF SELECT
-, {
/
*Optional accessories arc available from most dealers and
electronics supply stores. Mail order form is on page 55.
43
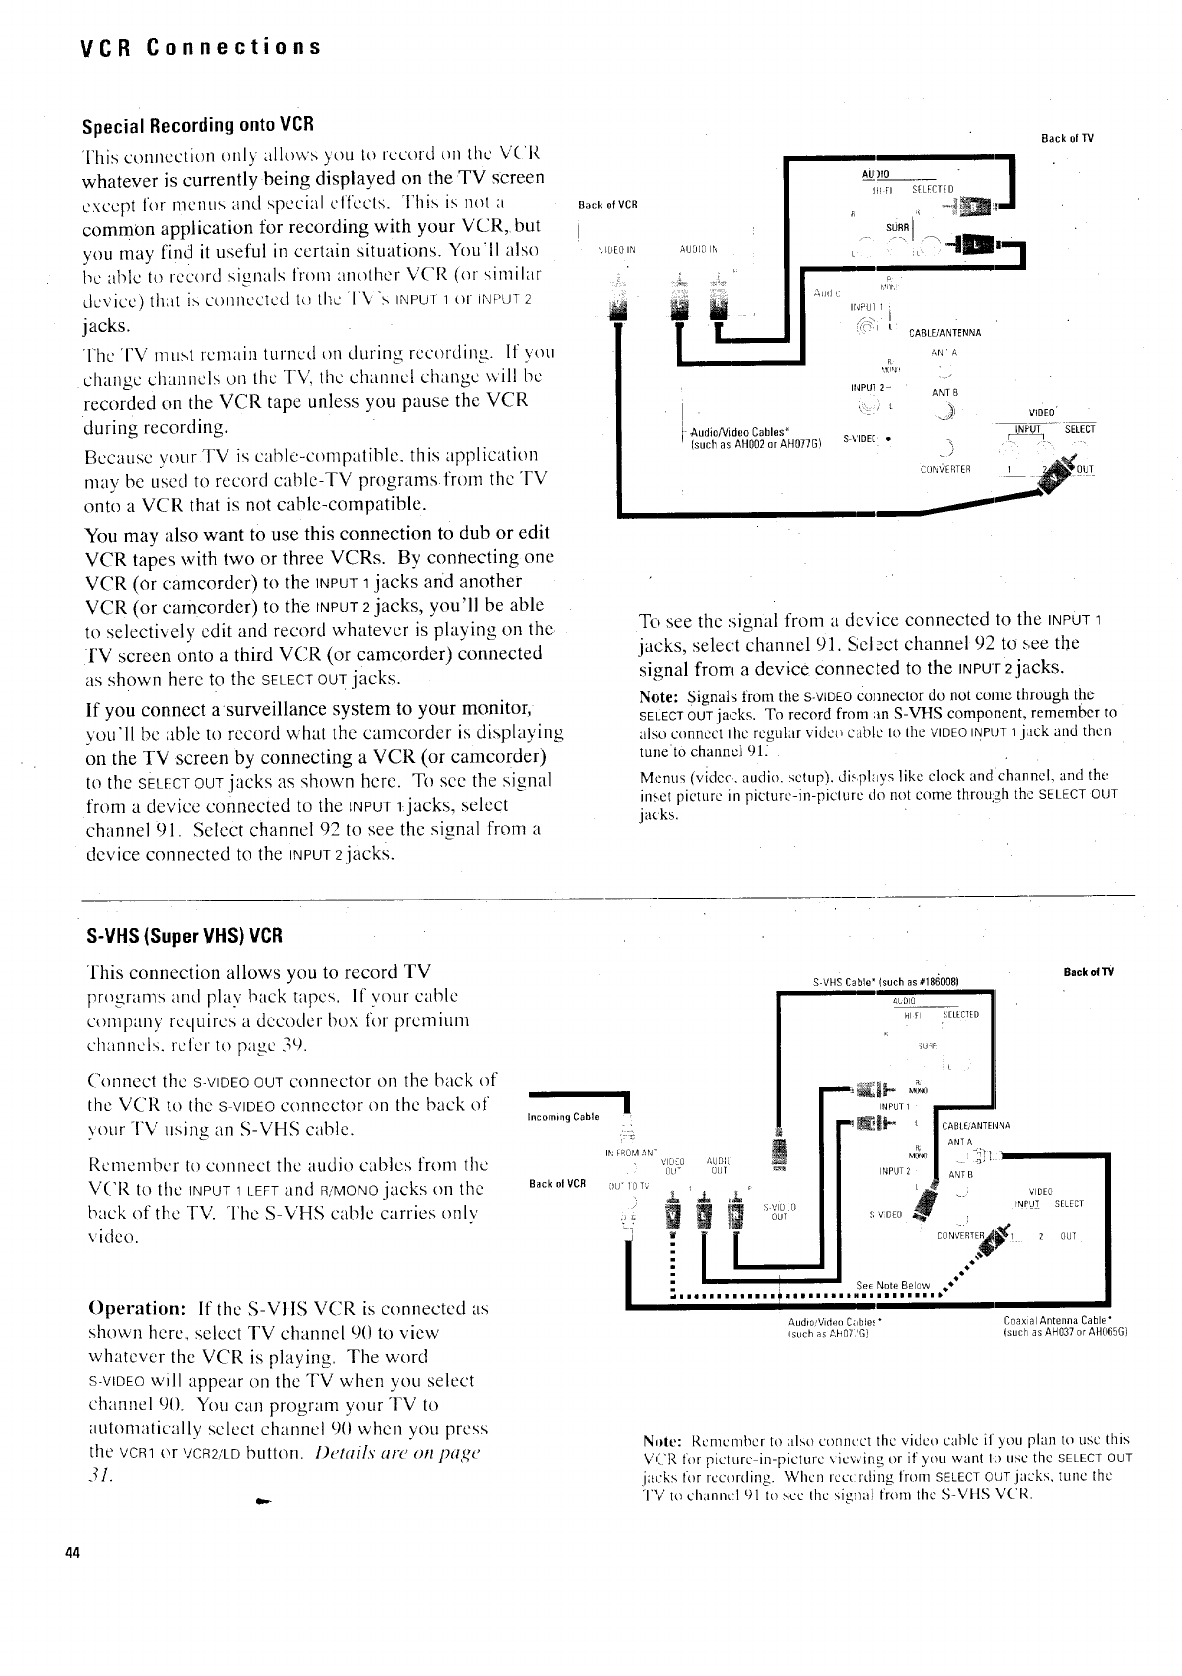
VCR Connections
Special RecordingontoVCR
This connection only allows you to record on the VC'R
whatever is currently being displayed on the TV screen
except for menus and special cffects. This is not a
common application for recording with your VCR, but
you may find it useful in certain situations. You'll also
bc able to re__'ordsignals from another VCR (or similar
device) that i>, connected to the T\ "s INPUT ] or iNPUT 2
jacks•
The TV must remain turncd on during recording- If you
change channels on the TV, the channct change will bc
recorded on the VCR tape unless you pause the VCR
during recording.
Because your TV iS cable-compatible, this application
may be used to record cable-TV programs from the TV
onto a VCR that is not cable-compatible.
You may also want to use this connection to dub or edit
VCR tapes with two or three VCRs. By connecting one
VCR (or camcorder) to the INPUT1jacks and another
VCR (or camcorder) to the INPUT2jacks, you'll be able
to selectively edit and record whatever is phtying on the
FV screen onto a third VCR (or camcorder) connected
as shown here to the SELECTOUTjacks.
If you connect asurveillance system to your monitor,
you'll be able to record what the camcorder is displaying
on the TV screen by connecting a VCR (or camcorder)
to the SELECTOUTjacks as shown here. To see the signal
from a device connected to the *NPUT1:jacks, select
channel 91. Select channel 92 to see the signal from a
device connected to the INPUT2jacks.
Back of VgR
I
', ID[O IN
N
AUOt0 IN
I
Audie/Viduo Cables"
(such as AH002 o AH077G
Back of 13/
SUBR
41M,,,l
NPUI
I
R
,_rlr
NPUI 2-
S _lDE[ *
CABLE/ANTENNA
ANT B
_.)) VIDEO
.INPUT SELECT
To see the signal from a device connected to the INPUT"
jacks, select channel 91. Sel ect channel 92 to see the
signal from a device connected to the NPUT2jacks.
Note: Signals from the s-v DEe coJmector do not come through the
SELECTOUTlacks. To recordfrom m S-VHScomponent,rememberto
also connectIhcregular vidct, c_blc1oIheVIDEO INPUT1jack andthen
tuneto channc]t91:
Menus (video,audio,setup), disphtys like clock andchannel,andthe'
ins.etpictureinpicturc-in-picluredo not come through theSELECTOUT
jacks.
S-VHS (SuperVHS) VCR
This connection allows you to record TV
programs aml play back tapcs, lfvourcable
company requires a decoder box for premium
channels, refer to page 39.
Connect the S-VIDEOOUTconnector on the back of
the V('R ,:o the s VIDEOconnector on the back of
your TV using an S-VHS cable.
Remember to connect the audio cables from the
V('R to the INPUT1LEFTand RiMONOjacks on the
back of the TV. The S-VHS cable carries only
video.
Operation: If the S-VtlS VCR is connected as
shown here_ select TV channel 9(1to view
whatever the VCR is playing. The word
S-VIDEOwill appear on the TV when you select
channel 90. You can program your TV to
automatically select channel 90 when you press
the vet or VCR2/LDbutton. Details are on page
3/.
Incoming Cable
Back ol VCR
IN FROM *"_N-
•VIDEO &UDIL
0LF OUT
D[J" ] 0 TV
)
a ,a
I r
& d_ ,,I,
I'1
i i
:............. i......... s:_,.N_o,_,%%.."
Audi0/Video CaNe!*
Isuch as #,Id07 'G}
Back of W
S-VHS Cable' (such as #1860081
i
auDl_ _ ] .
HI FI F .tlLECTED1.¢ELECTED
_tJqF
c
INPUT 1 _1
_, ANTA
INPUT 2 | ANTBANTB
L __t VIDEO
" _NPUT SELECT
S VDEO
C 0 N',_iRTE_¢! 2 OUT
Coaxial Antenna Cable*
tsuch as AH037 or AH065G)
Note: Rcn]cmbcr to also connect the video cable if you plan to use this
V('I ), for picture in-picture viewing or if you want 1:) use the SELECTOUT
jacks for recording. When rcct rding from SELECTOUT,jacks, tune the
'I'V to channel 91 to see Ihc sigmfl from the S-gllS VCR.
44
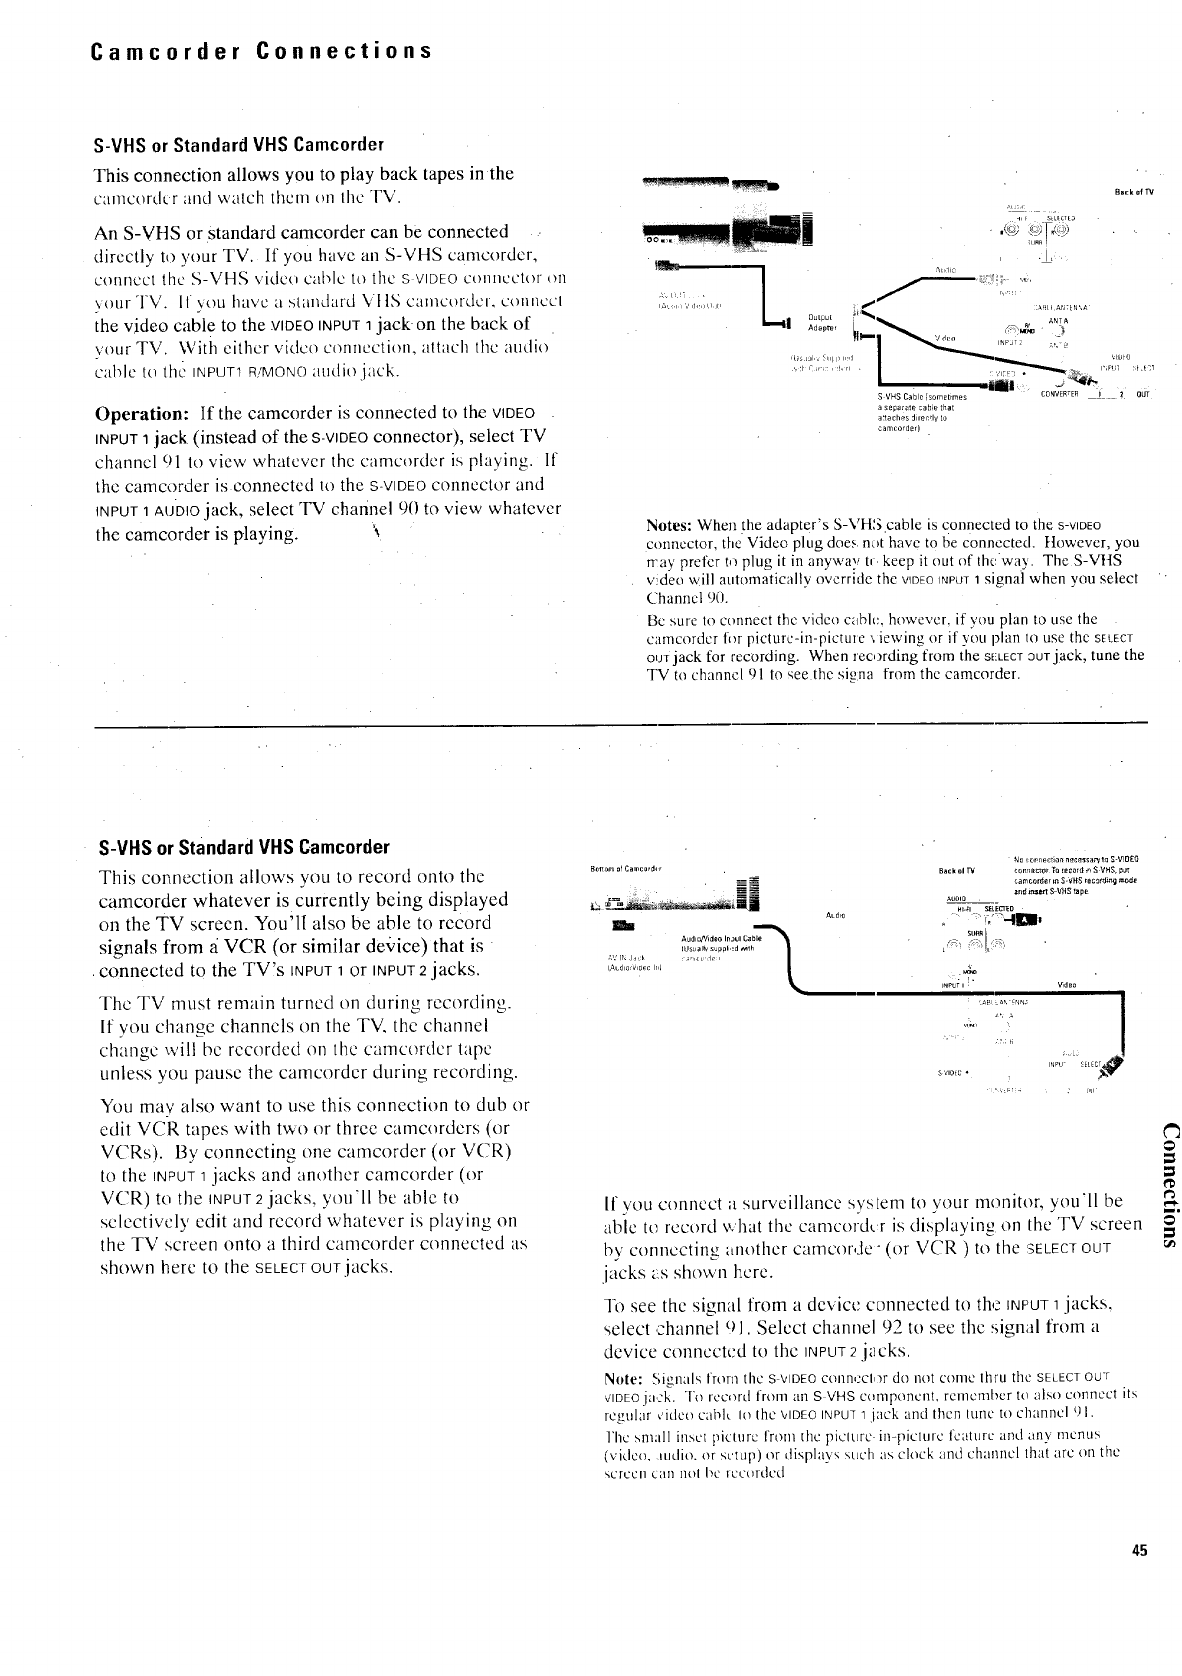
Camcorder Connections
S-VHS or Standard VHS Camcorder
This connection allows you to play back tapes in the
eante,._rd(r ',rod watch them on the TV.
An S-VHS or standard camcorder can be connected
directly to your TV. If you have an $-VHS eamcordcr,
connect the S-VHS video cable to the s VIDEOet)llliCctor on
\our TV. If you have a standard \"I IS camct)rder, et)linCc'l
the video cable to the VIDEOINPUT1jack •on the back of
your TV. With either video connection, attach the audio
caMe to the INPUTGR/MONaaudio.j_ek.
Operation: If the camcorder is connected to the VIDEO .
INPUT1jack (instead of the S-ViDEOconnector), select TV
channel 91 to view whatever the camcorder is playing. If
the camcorder is connected to the S-ViDEOconnector and
INPUT1AUDIOjack, select TV channel O_!to view whatever
the camcorder is playing.
_tge:
.,<........ El
i& _+, ,_,,h,,, clJt,
_,_ sZic_ta
• iQtg;) i, 4"
aseparate :able that
ariaches ]irecrly to
camcorder)
Notes: When the adapter's S-VHS.cable is connected to the S-VIDEO
connector, the Video plug does not have to be connected, ttowever, you
n-ay prefer tn plug it in anywa:, t, keep it out of theway. The S-VIIS
wdeo will automatically override the WDEONPOT1 signal when you select
Channel 9o.
Bc sure to c_,nnec[ the video cabh:, however if wm plan to use the
camcordcr liar picmre-in-plcmle ',iewing or if you plan to use the SELECT
Om jack for recording. When recording from the SELECTauTjack, tune the
TV to channel 91 to see the sign: from the camcorder.
S-VHS or StandardVHS Camcorder
This connection allows you to record onto the
camcorder whatever is currently being displayed
on the TV screen. You'll also be able to record
signals from a VCR (or similar device/that is
connected to the TV's INPUT1or INPUT2jacks.
The TV must remain turned on durinu recordine.
If you change channels on the TV. the channel
change will bc recorded on the camcordcr tape
unless vou pause the camcorder during recordintz.
You may also want to use this connection to dub or
edit VC-R tapes with tv<o or three camcordcrs (or
VCRs). By connecting one camcorder (or VCR)
to the INPUT] jacks and another camcorder (or
VCR) to the INPUT2jacks, you'll be able to
selectively edit and record whatever is phiying on
the TV screen onto a third camcorder connected as
shown here to the SELECTOUTjacks.
If you connect asurveillance sysLem to your monitor, you'll be
able to record what the camcordcr is displaying on the TV screen
by connecting another camcorde- (or VCR ) to the SELECTOUT
jacks as shown h.cre.
To see the signal from adevice connected to the INPUT1jacks,
select channel 0:1.Select channel 92 to see the signal from a
device connected to the INPUT2j:_cks.
Note: Signals frorn the s VIDEOconn,.'cl,)r do not come lhru the SELECTOUT
VIDEOjack. l_ record from all S VHS component, remember to also connect its
regular video cable Io the VIDEOINPUT1 jack and then tune to channel g l.
l'hc small inset picture from the picltirc in-pichire feature ant! any menus
(video, .iudio. or st'tLlp) Or display<; sttch :is clock and chai'lnel that arc on the
'.,,crCCll C{lll I101 bC lt.'cordcd
45

Component Connections
Audio Amplifier
If yotU amplilicl is not part t)l a-ss, slcm that has its own
remote, connect it to the TV as shown here. (If the amplifier
is part of a system that has its own remote, you i]lav choo_,e
to connect it to the TV as shown below using the SELECTOUT
ja,cks.)
',%ith the connection >,ho\'_n Iwrc. 3,ou'll hc ahlc to chzu]gu and
mute volume with the TV's remote control. You'll also be
al,lc to rcmotcl'¢ control bass and treble functions
Connection: Connect the "L" and "R" HIFIOUTjacks to the
corresponding input jacks on the stereo amplifier Isuch as
AU×,TUNER,or CD). Do not use the F'HONOinputs. If your
amplifier is not stereo (mono), connect it to the TV's R/MONO
jack. Consult the anaplifier's owner's manual fl_r the
manufacturer's recommended hookup.
Operation: If desired, turn off TV's internal speakers as"
described on page 13. Adjust the amplifier for normal
listening. You can also control sound with the VOLUMEand
MUTEhuttons on the TV's remote.
Aud, Video Cables"
_ucr" ,_s AH072C
_L_O0
HIll SELECI'ED
_,,,,,lUi._ _o_',
Back of13/
_IONO
iNPUT I -
tCABLUA_JTEN _A
ANT A
hP_l 2 _ ANT 8
".;_,"t
S VI9E0 •
:I3NVE _TFI
VIDE0
NPUT SELEC_
,_
-,Ull-
,_z_, STEREO;AMPL|FIER
Audio Cassette Recorder orAmplifier
If vour amplifier is part of a "system" that has its own
remote control, connect it to the SELECT OUTjacks as shown
11_2r C.
The "fixed level" audio signal present at these jacks is also
ideal for connecting an audio cassette recorder to record
audio from the TV.
This constant audio signal is not affected by pressing the
V,qumc hutto[> on the TV's front panel or the T\,"s
remote control.
('onnection: (_onncct SELECTOUT"L" and "R" to the
onresponding input jacks on the stereo amplifier or audio
c;,ssctlc recorder (such as AUX,TUNER,or CO}. Do not use
ll_c PHONOinputs. If your amplifier is not stereo (rounD),
c,mncct it to the TV's R/MONOjack. Consult the
equipment's owner's manual for the manufacturer's
rccomn_endcd hookup.
()peration: Select a TV channel and turn down the sound
on the TV, or turn off TV's internal speakers as described
m_ page 13. Adjust sound with controls on the amplifier
or cassette recorder. If the amplifier or cassette recorder is
part of a "system" that has its own reinote, use the
systems remote to adjust sound.
_Optional accessories arc available froin most dealers and
electronics supply stores. ,Mail order ['orm is (m page 55.
Back of 13/
Auo,o.
HI-FI
'NU' {
r¢0_0
'.iuT l
L
S VIOEO ,,
SELECrEO
CABLFjANTI_NNA
ANT A
ANT B
..)
5
.J
CONVFB1 EFI
VIDEO
iNPOT SELECT
F
1 2 OUT
"1"T
CASSETTERECORDER
ORAMPLIFIER (STEREO)
4ti
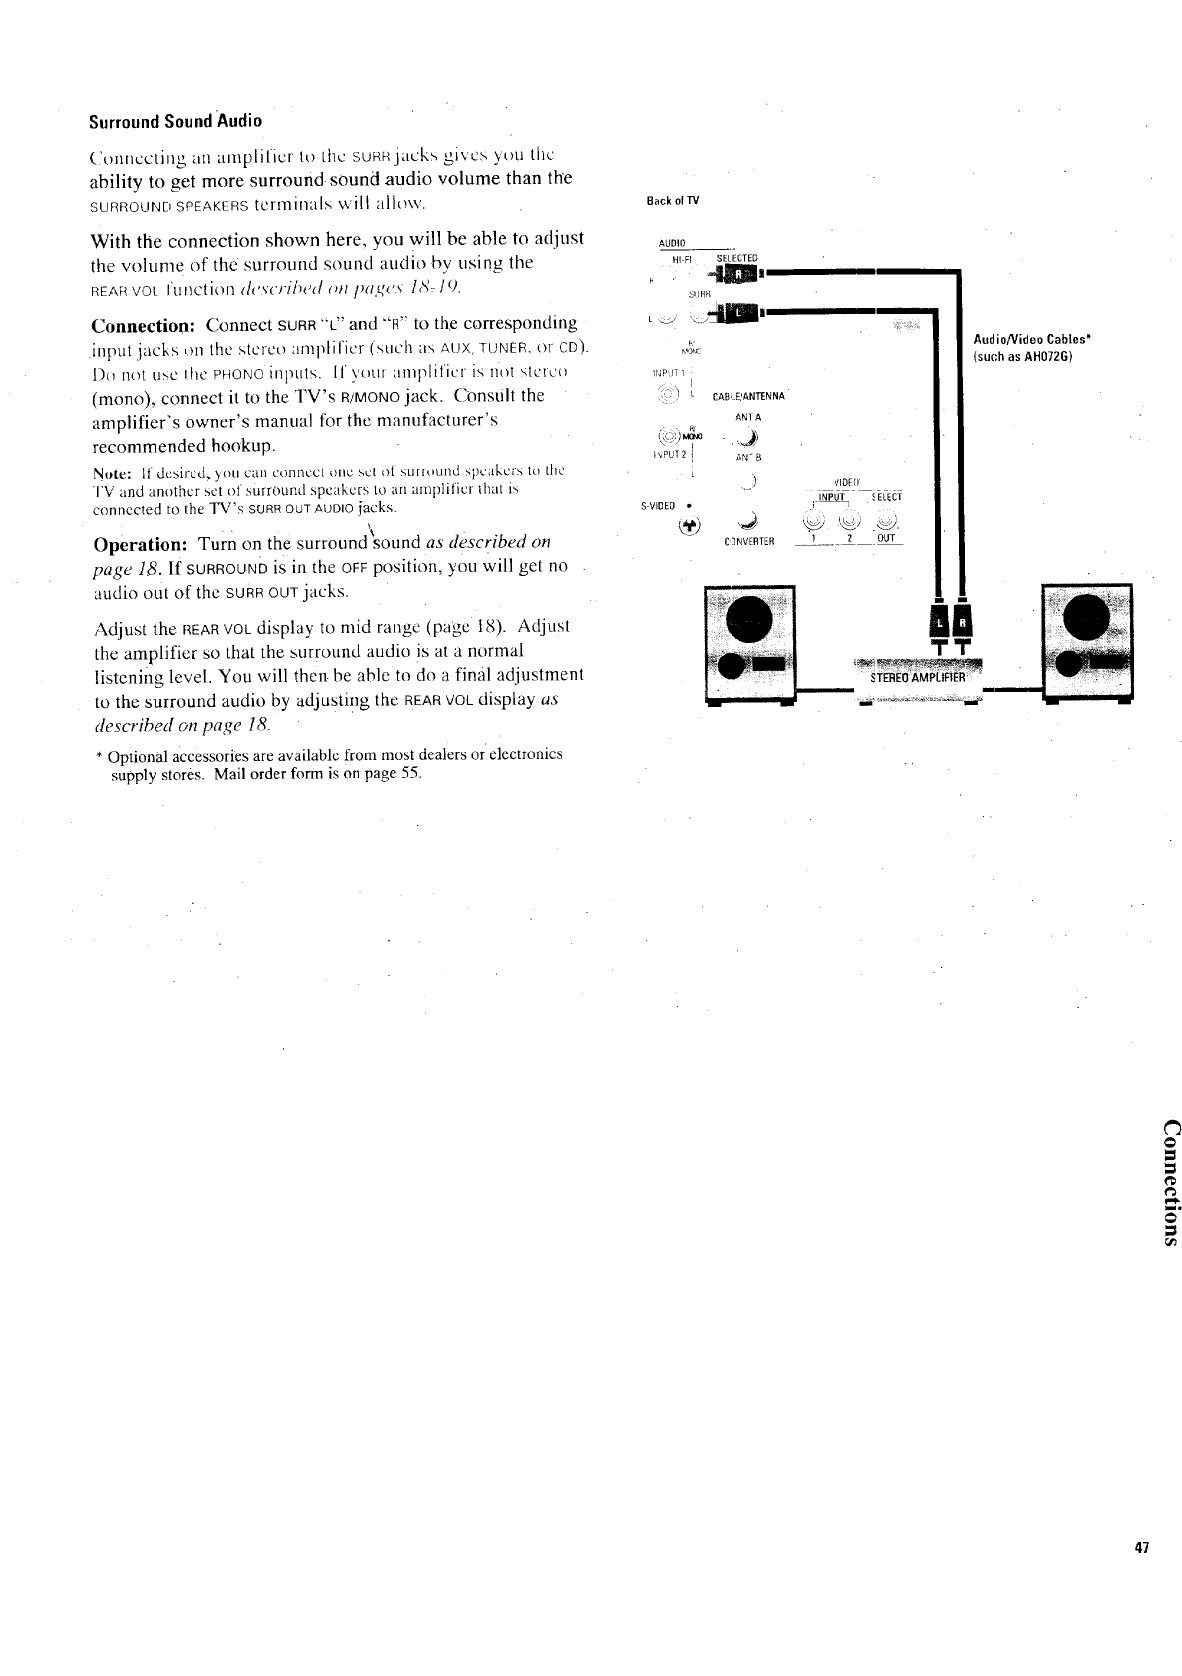
Surround SoundAudio
Connecting an amplifier It) the suRe,jacks _i_cs yt)u the
ability to get more surround sound audio volume than the
SURROUND SPEAKERS lerminal,_ will allow.
With the connection shown here. you will be able to adjust
the volume of the surrormd sound audio bv usin_ the
REAR VOL lunction a'vwrii)ed _m/m_c_ 1%/O.
Connection: Connect SURR"'L"and "'R'"to the corresponding
inpul jacks L)nthe stereo mnplificr _such as AUX TUNER. o! CDI
l)(I I]()I t!>C Ihe aHONO inpuls. If \'tmr amplifier is not 'qclc(_
(mono), connect it to the TV's R/MONOjack. Consult the
amplifiers owner's manual for the manufacturer's
recommended hookup.
Note: if desired. 3Oil C[lIl COI]I]UC. OIIC soL OI S[I/ItlLIIIL1 btlcakclb LO Lilt
TV and another set OIsurround speakers to an atE]plificr flint is
connecled to the TV's SURROUTAUDIOiacks.
\
Operation: Turn on the surround sound as described on
page 18. If SURROUND is in the OFFposition. ) ou will get no
audio out of the SURROUTjacks.
Adjust the REARVOLdisplay to mid range (pagc 181. Adjusl
the amplifier so that the surround audio is at a normal
listening level. You will then. be able to do a final adjustment
to the surround audio by adjusting the REARVOLdisplay as
described on page 18.
Optional accessories are available from most dealers or electronics
supply stores. Mail order form is on page 55.
Back olD,/
AUDIO
ul _l SELECTED
41111,
SIJR_
.... /a II
4PdT ]
DABE_ANTENNA
ANT A
a,,
_,PUT 2 aN- g
S VIDEO •
C INVERTER
VIDE
_UT _ELECI
20brr
AudioNideo Cables*
-such as AH072G,
'1"1"
STEREOAMPLIFIER'
47
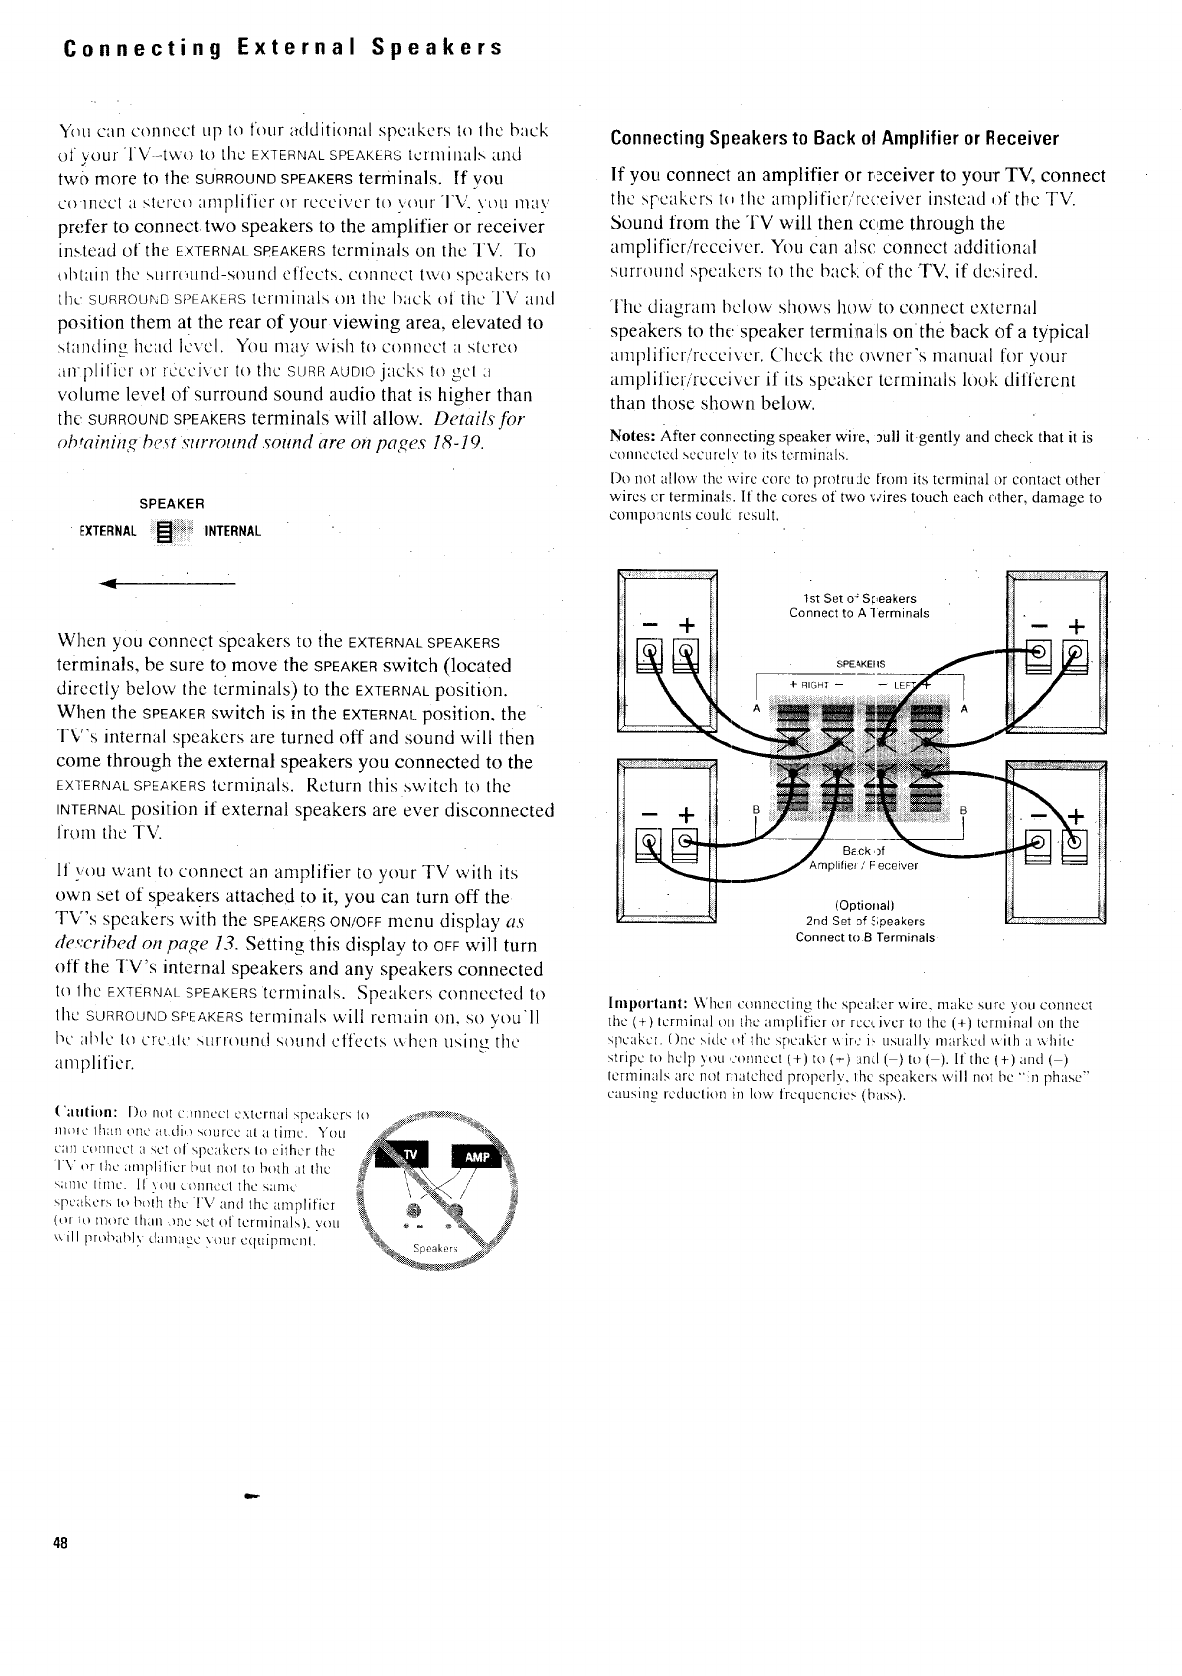
Connecting External Speakers
You can connect tip Io four additional speakers to lhc back
of )'our "I'M -tWO it) the EXTERNAL SPEAKERS tc[mimtl.,, ;.tlld
two more to lhe SURROUND SPEAKERS terminals. If you
co meet a slcrco <mq_lifier or receiver to WOtlrTV. \oil nlav
prefer to connect two speakers to the amplifier or receiver
in,,.tead of the EXTERNALSPEAKERSterminals Oil the TV. To
obtain the _,ulrouncl-SOulld effects, coilllCC[ ivvo spcclkcrs to
ilk: SURROUf'_DSPEAKERSterminals on llic back of ttlc TV and
po_ition them at the rear of your viewing area, elevated to
Mailcting head k'vcl. You may wish to connect a :-;[creo
an-plifier or rccci\cr to the SLJRRAUDIO jacks It) gel ;i
volume level of surround sound audio that is higher than
the SURROUNDSPEAKERSterminals will allow. Details for
oh_ainin<_ best ,vurround sound are on pa<_es 18-10.
SPEAKER
,91
When you connect speakers to the EXTERNALSPEAKERS
terminals, be sure to move the SPEAKERswitch (located
directly below the terminals) to the EXTERNALposition.
When the SPEAKERswitch is in the EXTERNALposition, the
TV's internal speakers are turned off and sound will then
come through the external speakers you connected to the
EXTERNALSPEAKERSterminals. Return this :->witch to the
INTERNALposition if external speakers are ever disconnected
froul the TV.
If you want to connect ;.inamplifier to your TV with its
own set of speak_:rs attached to it, you can turn off the
TV's speakers with the SPEAKERSON/OFFmenu display a.s
de<:crihed on pa_e 13. Setting this display to OFFwill turn
off the TV's internal speakers and any speakers connected
to lhc EXTERNALSPEAKERS tcrnfinals. Speakers connected to
llic SURROUND SPEAKERS terminals will rentain on, so youll
bc able Io CFC lit; "-qlfrot!fld souI]d cl'tccls \\:hell using the
amplifier.
Connecting Speakers to Back otAmplifier or Receiver
If you connect an amplifier or r,_ceiver to your TV, connect
the sl:',cakers t{, the arnplificr/"receiver instead ,fl tbc TV.
Sound from the TV will then come through the
amplifier/receiver. You can also connect additional
surround speakers to the back of the TV, if desired.
The diagram t_clow shows how to connect external
speakers to the speaker termina/s onthe back of a typical
amlflificr/rcccivcr. Check the owner's manual for your
amplifier/receiver if its speaker terminals look different
than those shown below.
Notes: After conrecting speaker wire, _ull it-gently and check that it is
connected SCcLlrelv to its termi[lalS.
Do no! allow the wire core to prohuJe from its terminal or contact other
wires cr terminals. If the cores of two wires touch each other, damage to
components coulc result.
a ......
Back ,)f
3lifiel IF eceiver
(Optional)
2nd Set of Speakers
Connect to El Terminals
Imporlant: \\'hclq collncclillg the speaker wire, make sure you COllllCC[
the (+) Icrmimil Oli the amplifier or roe. ivcr to the (+) tern]thai on the
N_c'akcl. ()Pc _,hlc of the spc'akcr \_.ire i:- usuall; maikud x_ilh awhite
stripctohclp}ou,:olmect(+)to(,-)and( )to( ).lfthe(+)and( )
icrn-iinals arc nol imiichcd properly, ihc speakers will not bc "n phase"
causin.g reduclion hi low lroqucm.'lcs (bass).
48
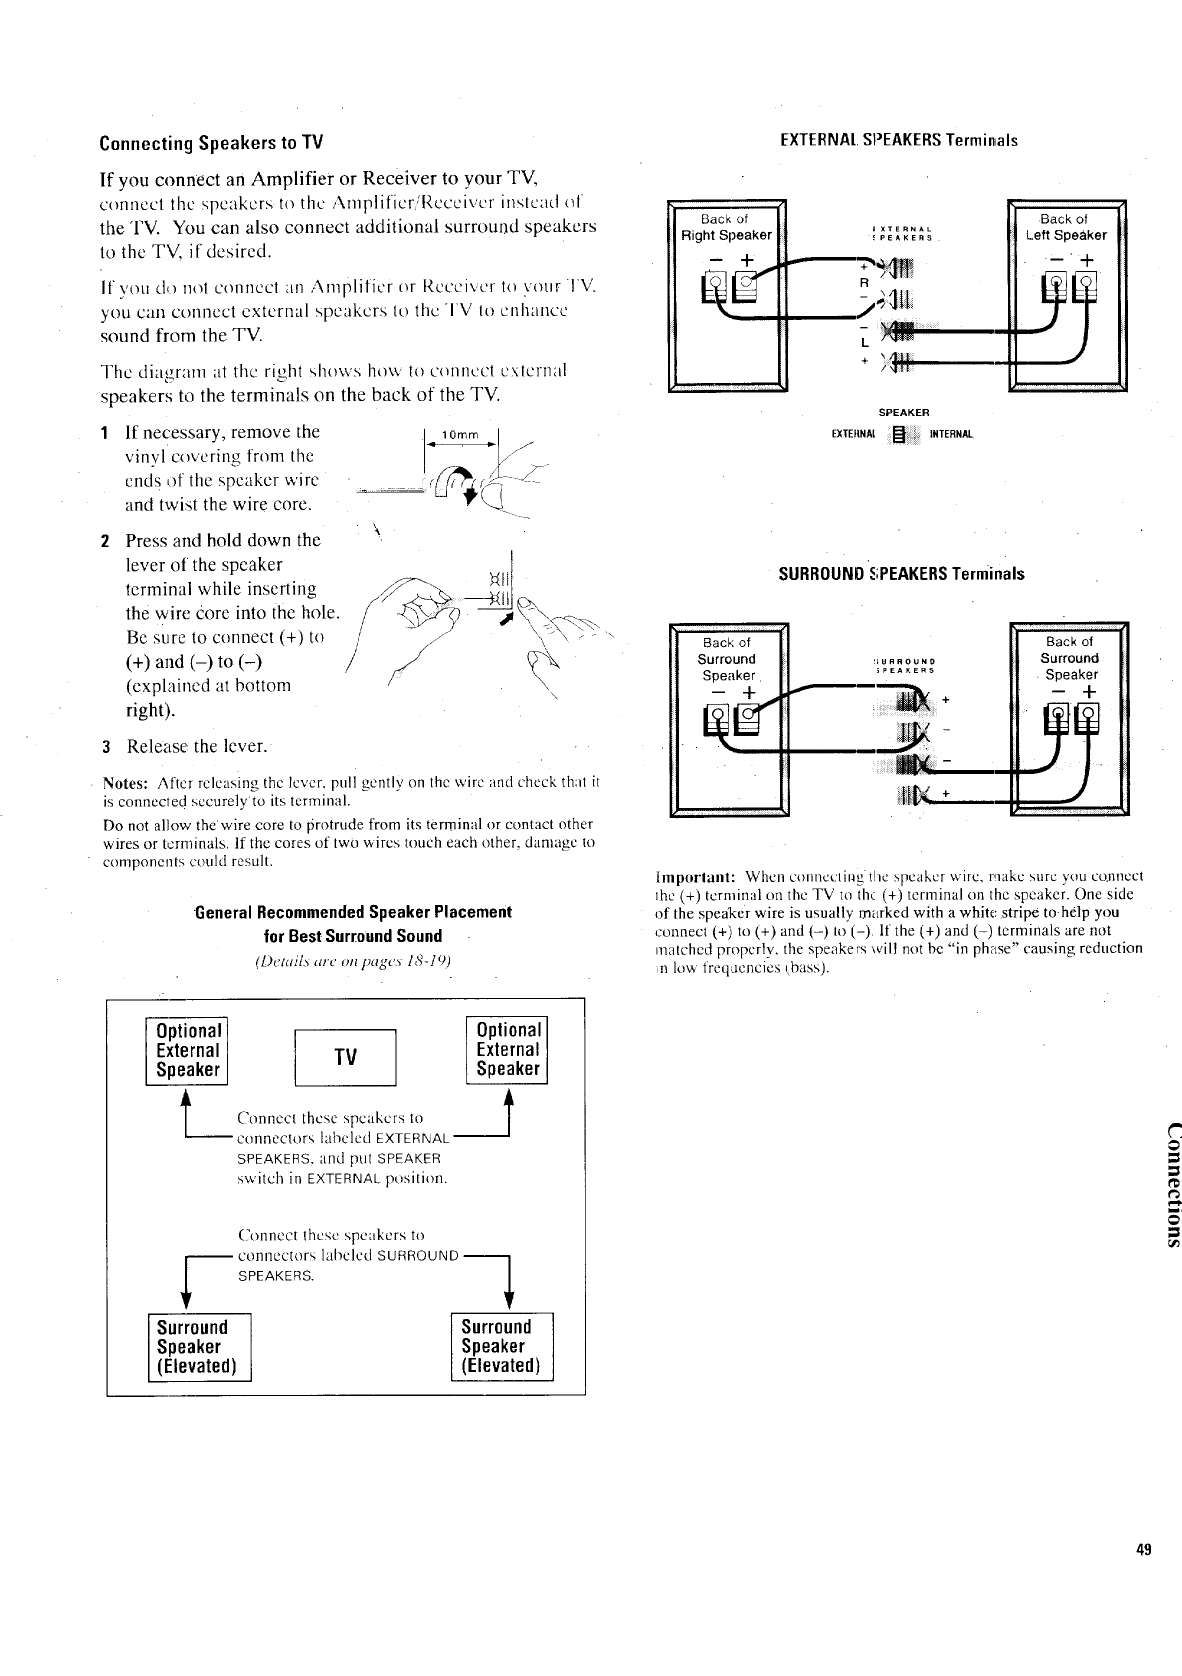
Connecting Speakers to TV
If you connect an Amplifier or Receiver to your TV,
connect the speakers to the Amplifier/Receiver instead of
the TV. You can also connect additional surround speakers
to the TV, if desired.
If you d,_ no1 connect an Amplifier or Receiver to \'our TV.
you can connect external speakers to the TV to enhance
sound from the TV.
The diagram at the right shov,'s ho\v to connccl cxlcrnal
speakers to the terminals on the back of the TV.
If necessary, remove the
vinyl covering from the
ends of the speaker ,,,,'ire
and twist the wire core.
Press and hold down the
lever of the speaker
terminal while inserting
the wire core into the hole.
Be sure to connect (+) to
(+) and (-) to (-)
(explained at bottom
right).
3Release the lever.
lOmm l. /
%
\\
\
Notes: After releasing thc lever, pull gently on the wire and check that tt
is connected securely to its terminal.
Do not allow thewire core to protrude from its terminal or contact other
wires or terminals. If the cores of two v, ircs touch each other, damagc to
• components could result.
•General RecommendedSpeaker Placement
for BestSurroundSound
(Dclail._ arc on t)agcs IS-I_))
EXTERNAl.SPEAKERSTerminals
Back of
Right Speaker
ccr IXTERNAL
!PEAKERS
R
),;alt
k
+\/l}tl:[
)',I t _?
SPEAKER
Back of
Left Speaker
SBRROUNOSPEAKERSTerminals
_;URROUND
;PEAKERS
.
_',-
Back of
Surround
Speaker
- +
Important: Whell connecting the speaker wirc, make sure you co.nncct
Ihe (+) tcrminal on the TV to the (+) terminal on the speaker. One side
of the speaker wire is usually marked with a white stripe to-help you
connect (+) to (+) and (-) to (-) If the (+) and (-) terminals are not
matched properly, the speakers will not be "in phase" causing reduction
m lov, lreqacncies qbass).
Optional
External
Speaker
t_
Optional
External
TV Speaker
&
Connect thcse speakers to T
connectors labeled E×TERNAL-- J
SPEAKERS. and put SPEAKER
switch in EXTERNAL position.
Connect these spca&crs to
connectors labeled SURROUND
-'-_ SPEAKERS. "_
Surround Surround
Speaker Speaker
(Elevated) (Elevated)
49
Trouble Checks
lroubles Stmletinlcs are caused by simple qaulls'" Ihal vcm
can ca,ql,, coirec't without the help of a service tcchm,,:i,ai_ b\
first checking a few basic remedies.
BuR)re you call or take your unil to an Authorized ProScan
TV Servicenter. look below for the type of trouble you are
experiencing. Then perform the simple checks and
,diustments listed for that trouhle.
TV will not turn on
•Check to make sure it is plugged in.
• Check the wall receptacle (or extension cord) to make sure
it is "'live'" by, plugging in something else.
• Maybe batteries in remote control are "dead".
• Maybe remote control was not aimed at remote sensor.
• Make sure power cord is fully inserted into back of TV.
Controls don't work
•If using remote control, make sure remote is in "TV Mode"
by first pressing TVbutton.
•Try unplugging set for two minutes and then turning it on
aJgain.
• Make sure power cord is fully inserted into back of TV.
In*termittent or no remote
•Mavbe something was be_,een the remote and the remote
sensor.
• Maybe the rcnlotC was not aimcd directly at the component
( l'V t)I V('l<) }o11 \_,crc trying to control.
•b/lavbc remote is not in "']¥ Mode". Press the IV button so
r,:nmte will control TV.
• Maybe baltcries in remote arc wcak or dead. Try replacing
leatterics.
• Maybe balteries were installed incorrectly. Try replacing
batteries correctly.
Turns off while playing
• SLEEP TIMER function may haxc bccn activated.
•ALARMOFFfunction may have been aclivalcd.
5O
• l'Jcctrtmic ptc, tcction circuit mav have bccn activated
[lCCaUSC O1 ;t pt)_._,cr surge. \Vail 3(1 seconds and then turn on
again. If this happens frequenlly, thevollage in y:mr house
may bc abnormally high.
• Make sure power cord is fully inserted into back of TV.
Turns on unexpectedly
•ALARMON fnnclion may have b,.'en activated.
ALARMdoes not turn offTV at correct time
• Check ALARMON/OFFfunction. Must bc set to ON:
• Check to make sure CLOCKfunction is set to the correct
time.
Blank screen
• Maybe Channel 90, 91, or 9:2 i:_selected, but device
connected to those INPUTjacks is not turned on.
•Try another channel.
No sound, picture okay
• Maybe Sound is muted.
restore sound.
Try pressing VOLUMEup button to
•Maybe TV's speakers are turned off. Check SPEAKERS
ON/OFF function.
•If using channel 90 (S-VIDEOinput) with an S-VHS
component, _cnlemher to also connect the cqmpolmnt's
'Jlqd R AUDIO C)UT,iacks to thc TV's Land R INPLT 1 jacks.
• Maybe SPEAI<ERsvv'itch on back of TV is not in the INTERNAL
position.
Can't select certain channel
•Channel nra3 not be in Channel Memory. Try pressing two
number bultt,ns.
• If u:dng a VCR, cheek to make sure the TV/VCFIswitch on the
VCR is ill the correct position.
• To ,';elect cable channcls 100 through 128, press number
button 1 until l-- appears. Then press the other two
nunfl_cr buttons. The CABLE/AIR function must be ill CABLE
mode to select channcls higher than 69.
Noisy stereo reception
•May bca ,,_,cak statioI|. Use AUDIO [_tl[[OII It) cllallgc STEREO SAP
flmetion to MONOmode insteadof STEREO.
No picture, no sound but power light is on
•_'I;./\})L' ",OI]ICOIIL' chall_C(I CABLE/AIR ttllltli{)l/ h) \VIOll_ position.
•Maybe avacant channel is tuned.
•For Channels 90, 91, and 92, make sure the co]nponcnt
connected to those INPUTjacks is turned on in order to see
picture.
• If watching VCR (connected only through antenna input),
make sure TV is tuned to channe,1 3 or 4 same as CH3iCH4
switch on VCR. Also check to make sure TV/VCRswitch on
VCR is in correct position.
Sound okay, picture poor
• Check antenna connections.
• Try adjusting SHARPNESSfunction to improve weak signals.
Can't get two channels tbr pictureinpicture
• One channel must come through ANTA or Bconnecior and the
other channel must come through the INPUT1or 2jacks.
• If using the vcm or vcR2button, make sure it is programmed to
select the proper video input channel as described on page 24.
• Check position of TV/VCRswitch on VCR.
•If using an S-VHS component, make sure its regular VIDEOcable
is connected to INPUT1'VIDEOjack on 'I'M.
No picture while using picture in picture, with S VHS VCR
or camcorder
•If you have tin S-VttS VCR or camcorder connected, you must
also connect a cable from the VCR's VIDEOOUTjack to the
FV's corresponding VIDEOiNPUT1jack in addition to the S-Vl IS
cable.
Small picture does not have color
•The small picture will not have color if the large picture signal
does not have the color burst reference. All color signals anti
some bhick-and-whitc signals are sent with color burst. Tr\'
changing the channel of the big picture.
Black Box appears un the screen:
Turn off the CAPTIONINGlcalure. 51
Warranty Information
Limited Warranty
What your warranty covers: .,
*Any defect in material or workmanship.
For how long after your purchase:
*One year for labor charges.
• One year for parts.
• Two years tot picture tube.
What we will do:
• Pay any Authorized ProScan Television Servicenter the
labor charges to repair your television.
• Pay any Authorized ProScan Television Servicenter for
the new or, at our option, refurbished replacement parts
and picture tube.required to repair your television.
How you get service:
• Request in-home service from any Authorized ProScan
Television Servicenter. To identify your nearest
Auth0rized ProScan Television Servicenter, ask your
dealer or call. 1-800-PROSCAN.
• Show the service technician your evidence ofpurehase
date.
What your warranty does not cover:
• Customer instruction. (Your Owner's Manual clearly
describes how to install, adjust, and operate your
television. Any additional information should be
obtained from your dealer.)
•Installation and related adjustments.
• Signal reception problems not caused by your
television.
• Damage from misuse or neglect.
• Remote control batteries.
• A television that has been modified or incorporated into
other products or is used for institutional or other
commercial purposes.
• A television purchased or serviced outside the USA.
Product Registration:
• Please complete and mail the Product Registration
Card packed with your set. It will make it easier to
contact you should it ever be necessary. The return of
the card is not required for warranty coverage.
How state law relates to this warranty:
• This warranty gives you specific legal rights, and you
also may have other rights that vary from state to state.
If you purchased your product outside the U.S.A.:
• See your dealer fkwdetails.
52
Cleaning and Care Design Specifications
You can clean the TV as required, using a sc,fl cloth or
the dusting ;ittachmcnt for your vacuum clc:mcr. Be
sure to occasionally vacuum the ventilation slots in the
cabinet to help assure adeqnate ventilation.
"lb clean the faceplate (screen) of the picture tube. usc a
nonabrasive glass cleaner with it soft cloth. Oil\ foods
like peanut butter can be effectively cleaned from the
laccpliitc \,,ith gla>_,tic<me>,.
Do notuse furniture polish on the TV cabinet or
faceplate of the picture tube. Because textured finishes
are porous, using furniture polish could mar their
appearance. They can be easily cleaned with a damp,
soft cloth. Furniture polish is probably the most
difficult material to clean off a picture tube under
normal conditions. To remove furniture polish front lhe
TV screen, use 100_ isopropyl alcohol (a component
in most glass cleaners) with a Soft cloth.
While cleaning, do not allow liquid to run down the
screen and inside the. instrument. Also avoid placing
drinks or vases with water on top of your TV.
When turning the set on after cleaning the faceplate.
there may be some rainbow effects if the screen is not
completely dry.
,\ll tcattlres _!l/d specification', arc sub cot h_ change v, ill/out notice.
General Spevificalions
('(dol Y,lamlat d:
PowerRequirements:
Pc1,\ er ( "Oll-,t!ll/ptiOll:
_2!: line NTS(' ('clot
'L'I ('I (¢;. >,_flid _,latv. tHlil i/ed
12(IVAC + 10%, 60Hz
[ 1)5\\ nmximum
Remote Conl rol
Nlodc
il311MI1 i_,hlon <_\ Sit'Ill
Batteries:
['Litter\ l itc:
,<'RK<<R3Dand CRK(I(),\
I)i!titally encoded inlr:lre .1 lignl
CRK83D: 4 AAA Size
I,IKo(IA 2,,\AA _,/c
tJne _I C:II ill Noim,ll [;>c
Power (?()rd l} ?e SJT 2
RF Specifications
Tuning S}stem Type:
Band Coverage:
Frequency ('overage'
Tuner Type:
el" annel Access:
CL.annel Indication:
Antenna Inputs:
Sensitivitv:
Quartz-controlled
Mcdtiband Frequency S3 nthcsis
V1 IF channels 2-6. 7-13
U! IF Channels 14-69
El,\ Cable Channels 1- 12S
Complete chart is on page 45.
54 806 Mllz
Solid State
Pr¢lgrammable Scan Up,,Down
Di-cot Access With Remote
ell-Screen
Two 75-ohm VHF,'UHF combined inputs
15xVVHF. 30uVUHF
Video Specifications
Horizontal Luminance
R_s_ dution:
Black to White Rise Time
Luminance Bandwidth
Video Input:
Vidco Outpul :
ItV r_ Zero Beam current:
up _o 560 Lines (lrom s VIDEOinput)
usm_ \\.idcband video socirce
75 "_s
8.75 MHz.{from S-VIDEOnputl
1_ p-p; 75 ohms: ne gatiye sync
1_ p-p: 75 ohms: tie gative sync
27' 5kV Nmninal
Audio Specifications
[=r,:qucncy Response:
_leleO S\ Slelil:
StcreoiMono Switching:
|i;, panded Stereo:
l\udio hlpul:
,.\udio lnt_ul
In _pcd:lncc:
Audio PoWcl :
Audio ()utpui:
Selected ()Utl_UtS:
()utputs TO t li-Fi:
Output hnpcdaIlCC:
Spcakcr T} pc:
(2-\ray)
Speaker Impedance:
5(I 2(),00(I Hz (at rated output)
MTS Stereo with SAP (Second
AI.clio Program )
,%1.tomalic
Switchable
45) mV RMS typic:ll, 1 V RMS maxiinum
(;reazer than 50 kOhms (Stereo!:
Greater than 25 kOhms (Mono)
10 watts/channel RMS tile 8 ohms
wilh less than I<:_TI ID
Otitput level tracks input:,; within + l,'-2dB
2 V RMS inaximun:, colntrolled by
\ olumc, mule, cqua:izer, and balance
.Surround '<nld Ill Pi oulpl.its less
th_in 2.5(1(! ohms
Two 21/? ' x5" MMiiligh l)rivers
Two 130nun Enclo_-.cd Woofers
[lllcrnal, N ohms (ncmimil)
[;.xicrnal, _ ohms
53
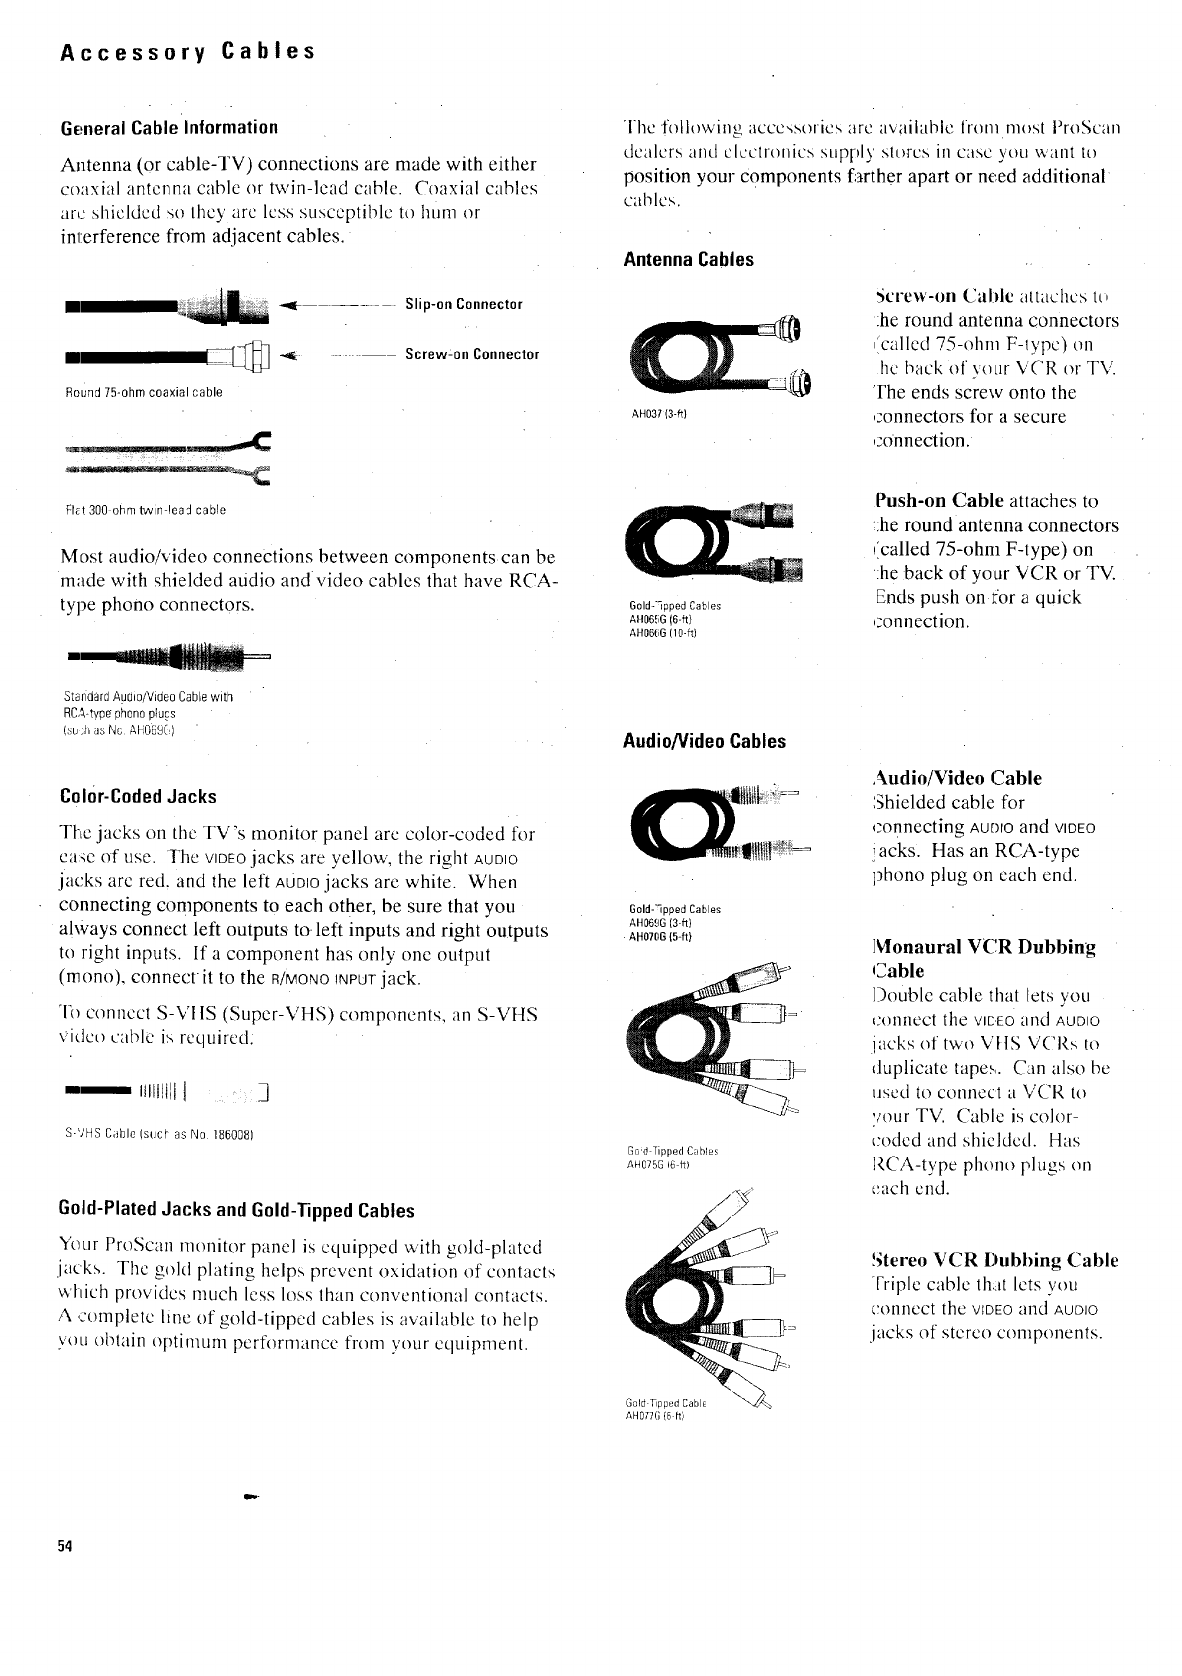
Accessory Cables
General Cable Information
Antenna (or cable-TV) connections are made with either
coaxial antenna cable or twin-lead cable. Coaxial cables
arc shielded _;othey are less susceptible to hum or
interference from adjacent cables.
m_ -_ -Slip-on Connector
[_ -,_ .-- Screw-on Connector
Round7f-ohm ¢oaxia cable
F1_1300 ohm tw n-lead caole
Most audio/video connections between components can be
made with shielded audio and video cables that have RCA-
type phono connectors.
The following accc,_sories are available from most ProScan
dealers and el,commies supply stores in case you v_,antto
position your components farther apart or need additional
canes.
AntennaCables
AH031 3-ftl
':;crew-on Cable attaches It,
.he round antenna connectors
called 75-ohm Fqypel on
he back of VOLIr'v('R or TM
Fhe ends screw onto the
zonnectors for a secure
zonnection.
Gold-qooed Cab es
AH06,_G 16-fl
AH06t G 10-ft)
Push-on Cable attaches to
:he round antenna connectors
called 75-ohm F-type) on
.he back of vour VCR or TV.
Ends push on for aquick
:onnection
Standard Auu_o Vioeo CaNe with
:lCA-tvoe ohono DTUCS
_u.hasNs AH% c:l
Col0r-Coded Jacks
Thc jacks on the TV's monitor panel arc color-coded fl)r
ea_e of use The VIDEOjacks are vellow, the right AUDIO
jacks arc red. and the left AUDIOjacks are white. When
connecting components to each other, be sure that you
always connect left outputs to.left inputs and right outputs
to right inputs. If a component has only one output
(monoh connecril to the R/MONOINPUTjack.
_I_ connect S-VI tS (Super-VHS} components, an S-VHS
video cable is recluirccl.
•,_-- mlt!t_J]
S-VHS Cable (stJcb as No 186008)
Gold-PlatedJacks and Gold-TippedCables
"rk_urProScan monitor panel is ecluipped with gold-plated
jacks. The gold plating helps prevent oxidation of contacts
,Milch provides much less loss than conventional contacts.
A complete line of gold-tipped cables is available to help
you obtain optimunl performance from your equipment.
Audio/Video Cables
Gold--" 3oed Cab es
AH06.qG 3-fl
AH07[IG {5-ft)
God Tipped Cabies
AH075G 16 It)
Audio!Video Cable
_hielded cable for
connecting AUDrOand VIDEO
acks. Has an RCA-type
phono plug on each end
Monaural VCR Dubbing
Cable
]Double cable thai Jets you
uOlnlec[ tile VIEEO and AUDIO
-acks ,_ftwo Mils V('Rs to
duplicate tapes. Can also be
used to connect a VCR to
your TV. Cable is color-
coded and shielded. Has
]{CA-type phono plugs on
each end.
Stereo VCR Dubbing Cable
friple cable that lets you
connect the VIDEO and AUDIO
jacks of stereo components.
54
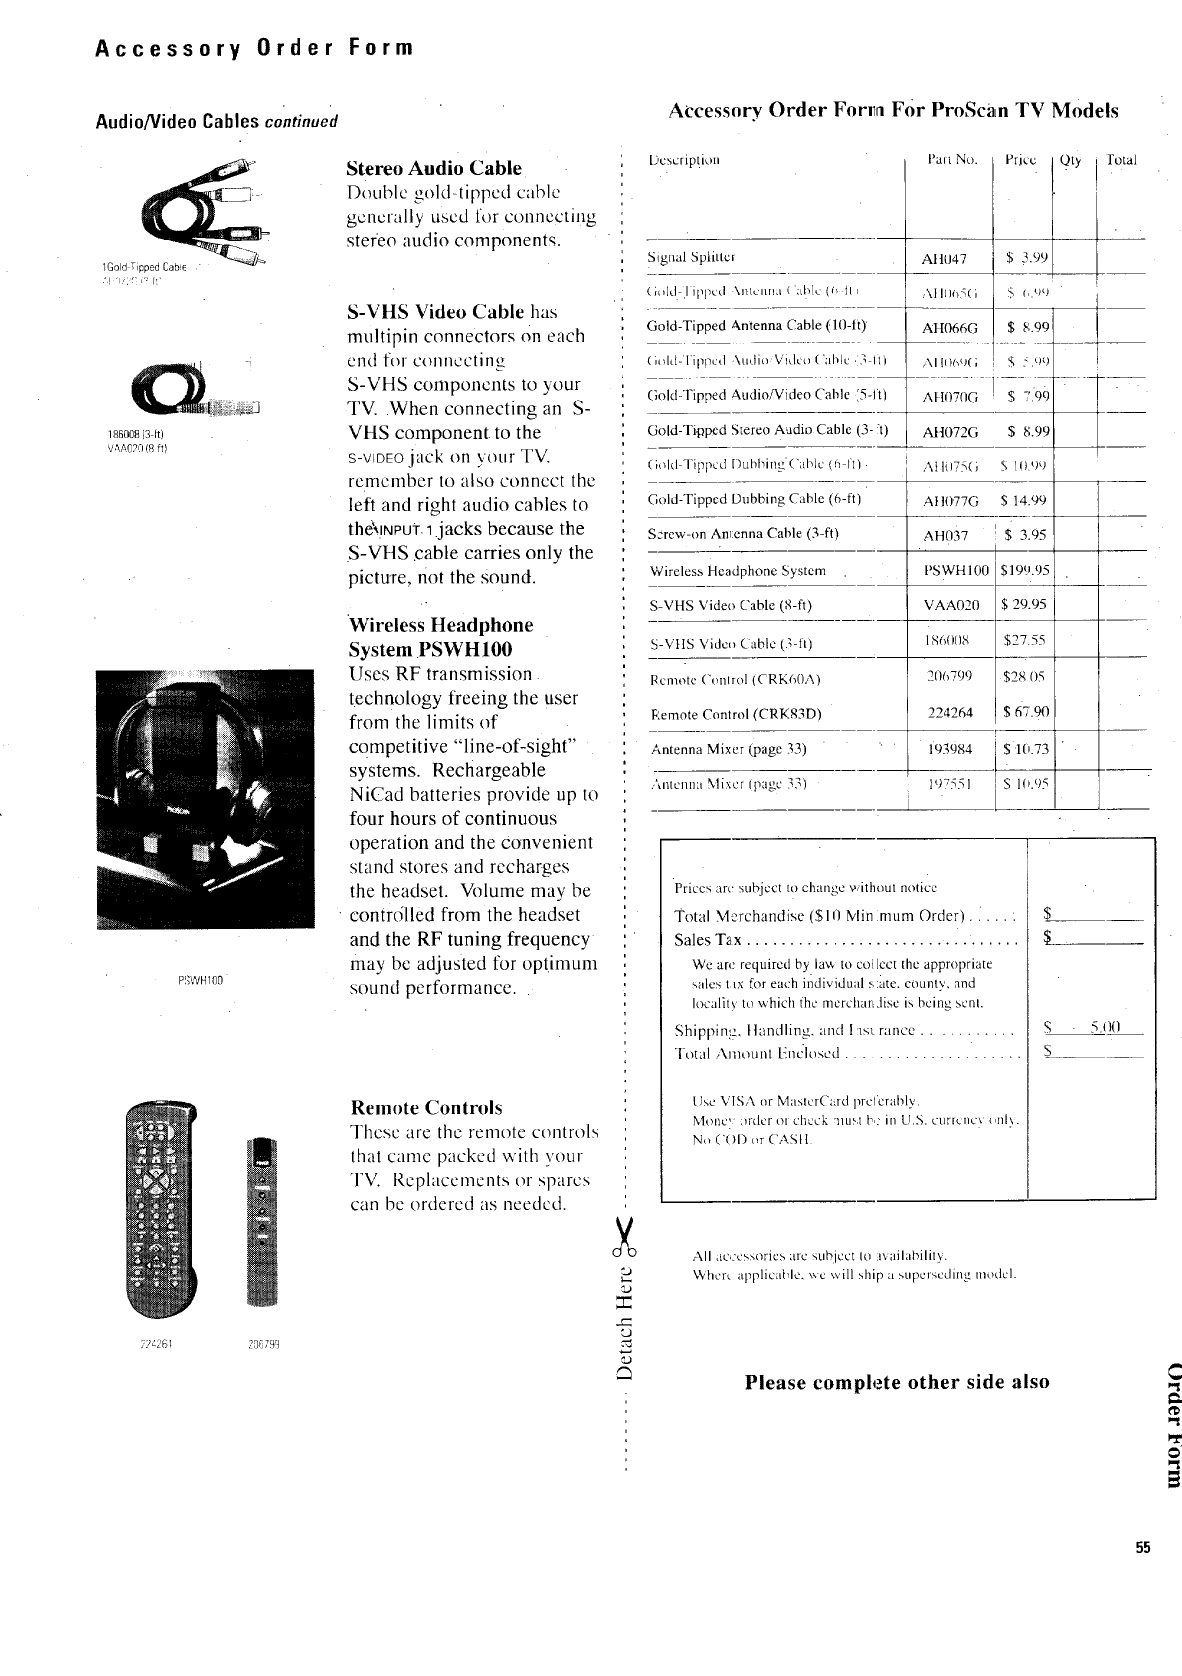
Accessory Order Form
Audio/VideoCables continued
1Gold Tipped Cabie
186008(3 It)
v&a020 (8 ft)
PSWH100
22_261 20679'3
Stereo Audio Cable
Double gold-tipped cable
generally used for conilcctmg
stereo audio components.
S-VHS Video Cable has
mnltipin connectors on each
end for connecting
S-VHS components to your
TV. •When connecting an S-
VHS component, to the
S-VIDEOjack on your TV.
remember to also connect the
left and right audio cables to
the'_lNPUt _jacks because the
S-VHS cable carries only the
picture, not the sound
Wireless Headphone
System PSWH100
Uses RF transmission
technology freeing the user
from the limits of
competitive "line-of-sight"
systems. Rechargeable
NiCad batteries provide up to
four hours of continuous
operation and the convenienl
stand stores and recharges
the headset. Volume may be
controlled from the headset
and the RF tuning frequency
may be adjusted for optimum
sound performance
Remote Controls
These are the remote controls
lhat came packed with your
TV. l),eplaccments or spares
can be ordered as needed.
Accessory Order Forln For ProScan TV Models
[;,(scrip[ion Pair No. Prkc / Qty
/
S_gnal Spiiucr AItU47 $ 3.9t__2_
/
(Mid .I ippcd \lltcl/N4 ( ;tlil_ (l, il All{ _ <( ] S(I,{J[J /
Gold-Tipped Antenna Cable (t0-it) EH066G $ 8.99 i
..... -1
(i_dd-Iil_pcd \udiu _,"_clt'c_('ab[c ,3 Iti ,\l!O¢_u(; 5, :.uO
Gold-Tipped Audio/Video Cable 15-I'll Att07(IG ] $ 7.90 -_ "
Gold-Tipped S[ereo A,adio Cable [3- "t AH072G $ 8.99
(;old "1 ,?pod l)ul_bine ('able {h ftl ,,\tlt!7q(i 7; 1000
Gold-Tipped Dubbing Cable (O-fl)
Screw-on Anlenna Cable (3-fl'_
Wireless Headphone System
S-VHS Video ('able/8-ft)
-VttS Vidcn Cable IL?-I!
Remote ('onlrol (CRK6()A}
Remote Conlml (CRKg3Dl
Antenna Mixer _page 33'1
.,'_.ntcnn:l Mixer ! page 331
At tl)77G
AH037
t'SWH 100
VAA020
186008
206799
224264
193984
19v551
$ 14.99
3.95
$199.95
$ 29.95
$27.55
$28 05
$67.90
r
$ 1(,.73
S 10.95
I'otal
Prices art' stlbjecI [o change without notice
Total Merchandise ($10 Min mum Order ...... :
Sales Tax ...............................
We arc required by ta'_ to collect the appropriate
_,alcs t tx for each individual :-,ate. cotintv, and
Iocalit_ to which {he merchanJisc is bciim scnl.
Shippin!z. tlandling, and I lsl rallce ...........
[oral .,XmouIIt lillc:loscd
Use VISA or MaslcrCard prcfcrably.
Monc' :_rdcr ol check :l/tlS.I 1",,2ill U.S. current,, <,hi).
No ('()I) {_r('AStt
$
S 5 .o0
S
P.
¢.)
r.-.
L)
."'d
,Z
All ao:cssorics arc subject Io l,,ailabilil}.
Wtlcrc applicable, v,c will ship asup(is(drag nlodcl.
Please complete other side also
55
Accessory Order Form
( IlaIgu }l!tll (1[11('1 (IEI \IILll \1_,\
or MasterCard by
filling in below
USE YOUR CREDIT CARD
IMPORTANT: Copy complete account nmnbcr
from \nur \/IS \ ,.'ard
I I I I
VISA"
IMI+ORT.+kNT: ('opv complete account num!+cr
IIOtll \_!tlr _Iktht(?l( "aid
-TT-q rT-rT-qVrT-r] r-rTT]
(_opy Number
above your
name Oll
MastcrC_rd
My.card E-T---] r-T-- ]
expires:
AUTHORIZED SIGNATURE
Prices arc subject to change without notice.
PLEASE Print or type your name and
address clearly. This will be your
mailing label.
A complete and corrccI order will
save you day, s of w.aiting.
NaMe:
Slrecl:
("it,, -
Apt:
State: Zip:
--.1
To order accessories, ('otitact yol|r local ProScal| I)t'aler.
II adcalc_ is _toI ncarl_>, >r_}l,(--';11]also l'oIh_\' lhc i;lMructions
below to order by telephone
United States and Canadian Orders
To place your order by phonc, havc your Visa or MastcrCard
rcadx and call Ihc toll-free nnrrd_er listed heh_w hch,.een 8AM
and ,";I'M Fw,lcrn Standard limc. Use this number only to
placean order for accessory items listed on this order form.
I--800 -338 -0376
Most times _rc,ur order will be :;hipped UPS within 72 hours of
rcceipt. If ever it is not possible to ship within 30 days, we will
notfy you with an update on v 3ur order and an option to cancel.
To place your ardor by mail. detach and nrai[ the completed
order form with credit card information, money order, or check
in U.S. currency (made payable to Thomson C'onsumer
Electronics, Inc.) to the follow ng address.
ProScan Video Accessorieg
P.O. Box 8419
Ronks, PA 17573
For more infi)rmation on these accessories (or current
prices), write to the following: address:
Video Accessories Cl_stomer Service
Thomson Consumer Electronics, Inc.
Distributor & Special Products
2000 Clements Bridge Rd
Deptford, NJ 08(196-2088
International Orders
Thi_ offer is valid only in the 50 United State,'; and Canada. For
international orders, plcase sendyour request for quotation (not
an order) to:
International Customer Service
Thoms(m Consumer l!',lectronics, lnc.
• Distributor & Special Products
20(111Clements Bridge Rd
l)cplford, NJ USA (),_;()96-2(188
56
Please make sure thal both sides of (l_isform have
bccn filled out CO'l_plclc[y.
"r"
r'-
E
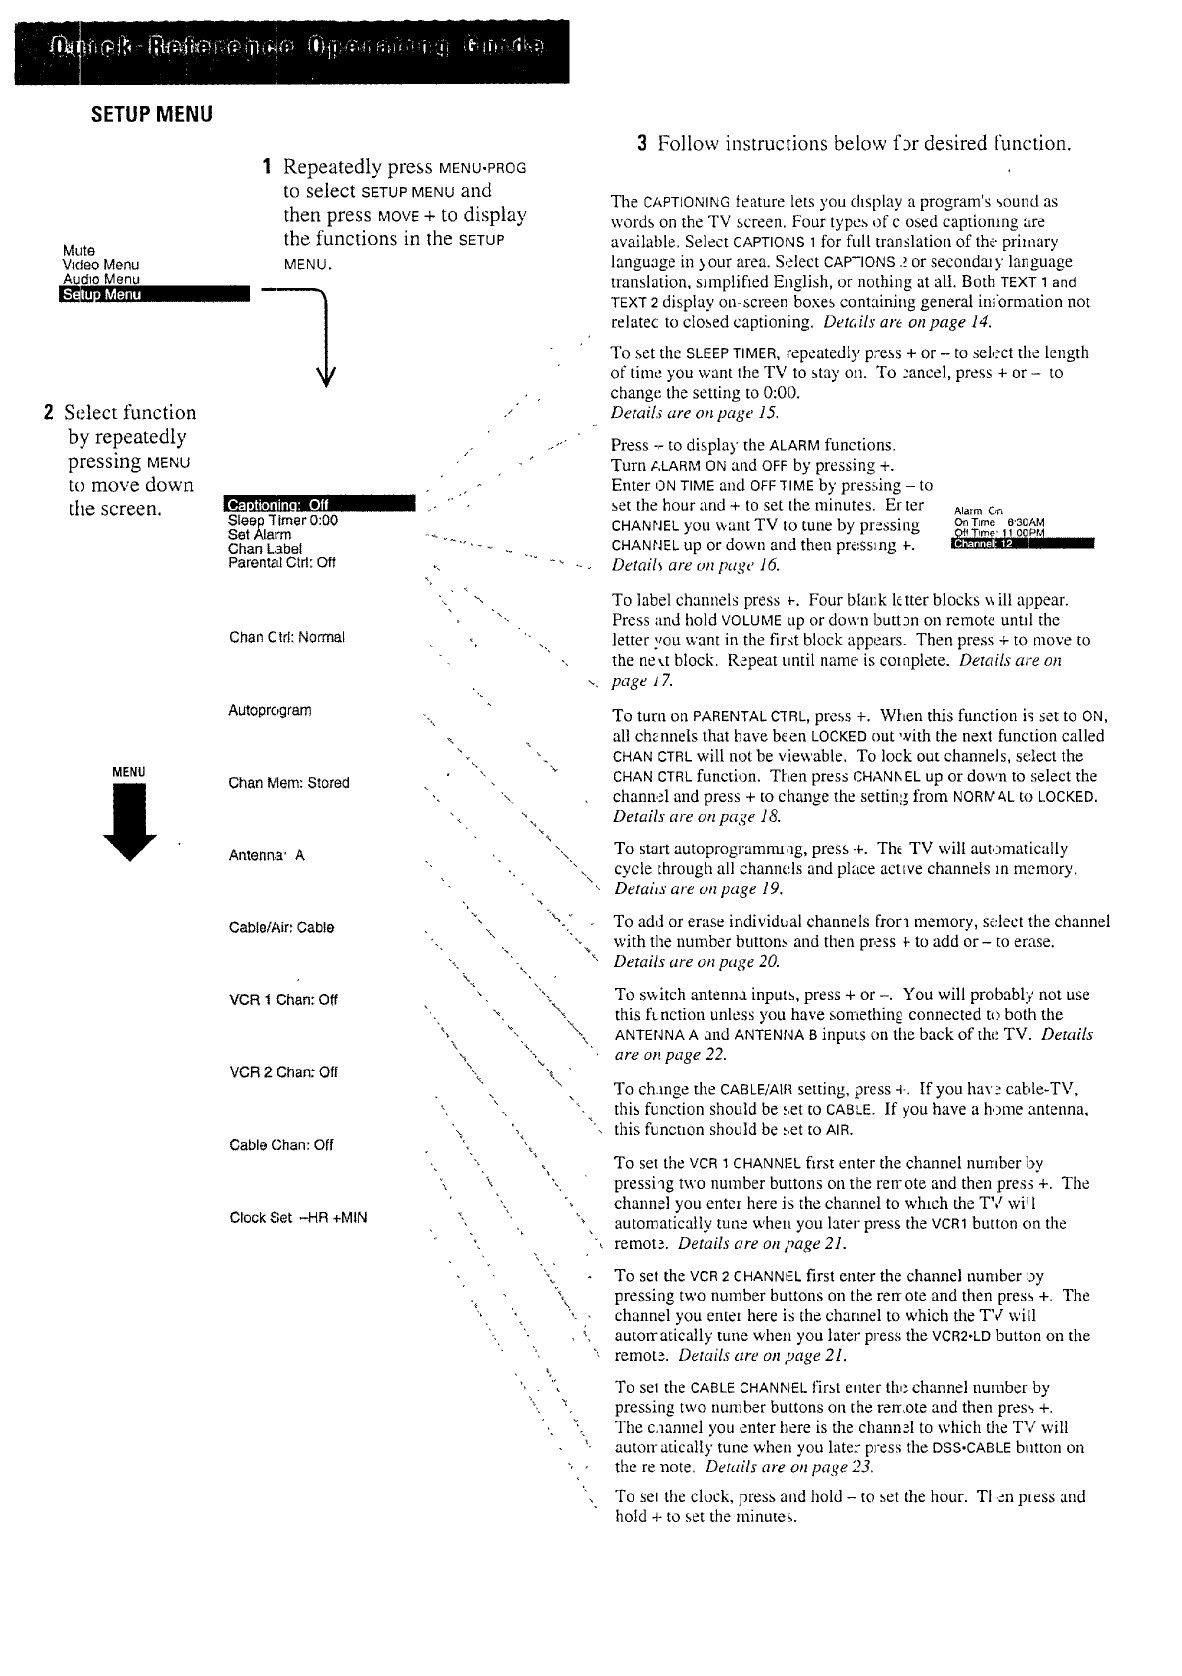
SETUP MENU
Mute
VKleo Menu
Audio Menu
2Select function
by repeatedly
pressing MENU
to move down
tile screen.
MENU
1Repeatedly press MENU,PROG
to select SETUPMENUand
then press MOVE+ tO display
the functions in the SETUP
MENU.
z
/
IL_El_i_om!!t,mwll ,-
Steep Timer 0:00
Set Alarm -_ _.,
Chan Label "- _ .-
ParentN Ctfl: Off o. "' --
Chan Ctd: Normal
Autoprogram
Chan IVlem:Stored
Antenna' A
CabletAir: Cable
VCR 1 Chan: Off
VCR 2 Chart: Off
Cable Chan: Off
Clock Set .-4-IR +MIN
v
,, ",,•
• -\
"-,%
"% -\
',i x ",, ,
• ,\ \
%
3Follow instructions below f_r desired function.
The CAPTIONINGfeature lets you display a program's sound as
words on the TV screen. Four types of c osed captioning are
available. Select CAPTIONS1for fitl[ translation of the"primary
language in _our area. Select CAP-IONS2or secondm y language
translation, s_mplifled English, or nothing at all. Both TEXT1and
TEXT 2 display on-screen boxes containing general information not
relatec to closed captioning. Detc,ils are on page 14.
To set the SLEEPTIMER,:epeatedly press + or - to select the length
of time you want the TV to stay on. To :ancel, press + or - to
change the setting to 0:00.
Details are on page 15.
Press -_to display the ALARMfunctions.
Turn ALARMON and OFFby pressing +.
Enter ONTIMEand OFFTIME by' pressing -to
set the hour and + to set the minutes. Er ter
CHANHELyou want TV to tune by pressing
CHANrlELup or down and then pressing 4-.
Details are on pa,,e 16.
Alarm C,n
On Time 6'30AM
_f T,me' ! 100P M
I_,_flllt_lliP /
To label channels press +-. Four blat:k ktter blocks x_ill appear.
Press and hold VOLUMEup or down buttJn on remote untd the
letter ,,ou want in the first block appears. Then press + to move to
the ne,.t block. Repeat until name is complete. Details a_'e on
page 17.
To turn on PARENTALC[RL, press +. When this function is set to ON,
all chennels that [nave been LOCKEDout with the next function called
CHANCTRLwill not be viewable. To lock out channels, select the
CHANCTRLfunction. Then press CHANt,ELup or down to select the
chann,,'l and press + to change the setting from NOR_'t_Lto LOCKED.
Details are on page 18.
To start autoprogramrtuqg, press +. Tht TV will aut,:)matically
cycle _hrough all channels and place actwe channels ]n memory.
Detai_s are o,z page 19.
To add or erase individual channels flora mentory, select the channel
with the number button_, and then press _-to add or- to erase.
Details are on page 20.
To switch antenna inputs, press + or -. You will probably not use
this fLnction unless you have something connected to both the
ANTENNAA and ANTENNAB inputs on the back of the TV. Details
are on page 22.
To ch.mge the CABLE/AIRsetting, press 4-. If you have cable-TV,
this function should be set to CABLE.If you have a h,:)me antenna,
this funcuon should be .,,et to AIR.
To set the VCR1CHANNI-Lfirst enter the channel number by
pressing two number buttons on the ren-ote and then press +. The
channel you ente[ here is the channel to whtch the TV wir l
automatically tuns when you later press the VCR1button on the
remote. Details are on page 21.
To set the VCR2 CHANN_:Lfirst enter the channel number :ay
pressing two number buttons on the rerrote and then press +. The
channel you enter here is the channel to which the TV will
autotr atically tune when you later press the VCR2*LDbutton on the
remote. Details _¢reon page 2l.
To set the CABLECHANNELfirst enter th,: channel number by
pressing two number buttons on the remote and then pres_ +.
The c,mnnel you ,enter here is the channel to which the TV will
autmr atically tune when you later press the DSS.CABLEbutton on
the re note. Details are on page 23.
To sel the clock, press and hold - to set the hour• Tt an press and
hold 4-to set the minutes.
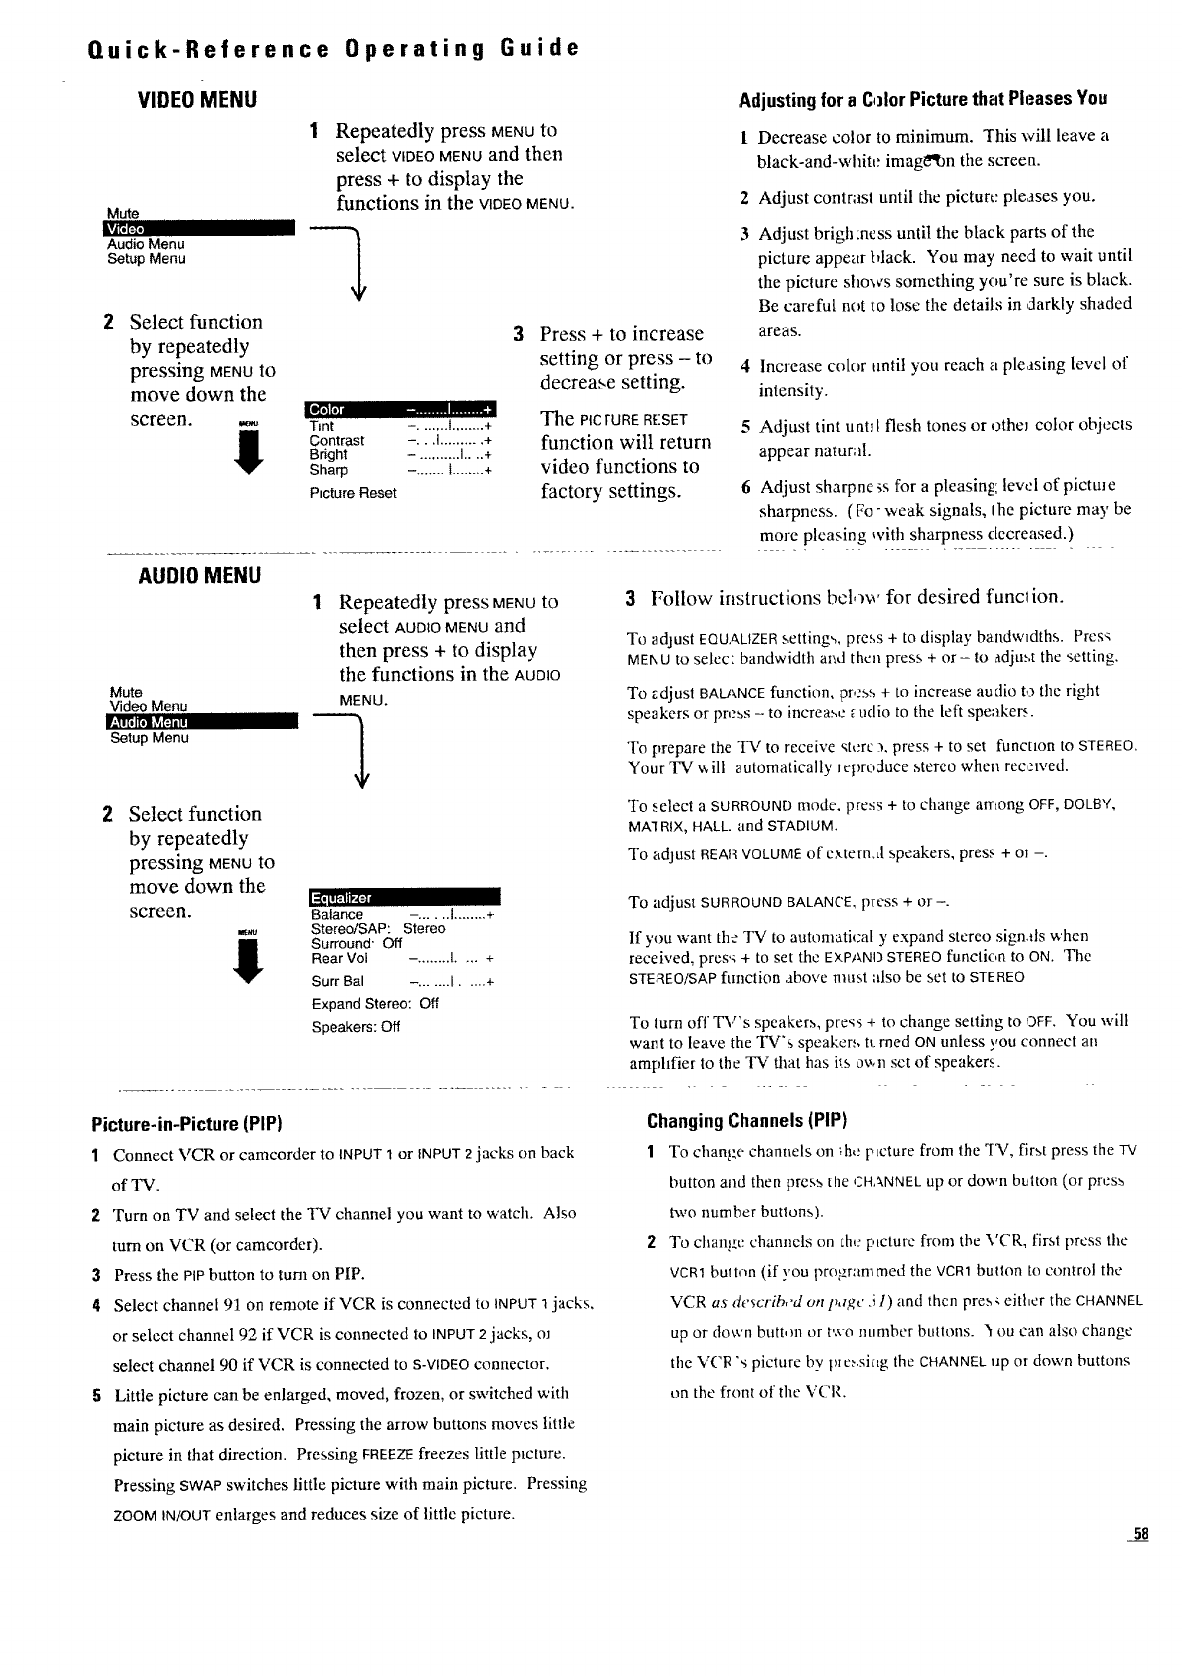
Quick-Reference Operating Guide
VIDEO MENU
Mute
Audio Menu
Setup Menu
2Select function
by repeatedly
pressing MENUto
move down the
screen. ._
!!
AUDIO MENU
Mute
Video Menu
r-,ll[, i[,= ,va=m=
Setup Menu
2Select function
by repeatedly
pressing MENUto
move down the
screen. _LI_-IIP4=I
I
Repeatedly press MENUto
select VIDEOMENUand then
press + to display the
functions in the WDEOMENU.
I[ll'_ Ill .........
Tint -. ...... t........ +
Contrast -...I .......... +
Bright -. ......... I....+
Sharp -. ...... t........ +
P=cture Reset
3
Repeatedly press MENUto
select AUDIOMENUand
then press +to display
the functions in the AUDIO
Balance -. ..... I........ +
Stereo/SAP: Stereo
Surround Off
Rear Vol -. ....... l.... +
Press + to increase
setting or press - to 4
decrease setting.
The PIC FORE RESET 5
function will return
video functions to
factory settings. 6
Adjusting for a C,)lor Picture that Pleases You
l Decrease color to minimum. This will leave a
black-and-white imag_qbn the screen.
2 Adjust contrasl until the picture pleases you.
3 Adjust brigh :ncss until the black parts of the
picture appear black. You may need to wait until
the picture shows something you're sure is black.
Be careful not _o lose the details in ,darkly shaded
areas.
Increase color until you reach a pleasing level of
intensity.
Adjust tint uatr[ flesh tones or otheJ color objects
appear natural.
Adjust sharpne _s for a pleasing: lew:l of pictme
sharpness. (Fo- weak signals, Ihe picture may be
more pleasing with sharpness decreased.)
Surr Bal -. ...... [ ..... +
Expand Stereo: Off
Speakers: Off
3Follow instructions bel,)w for desired function.
To _djust EQUALIZER setting,,, press +to display bandwzdths. Pres,_
MEt, U to selec: bandwidth and then press + or- to adjm.t the setting.
To zdjust BAU\NCEfunction, pr,:ss +to increase audio to the right
speakers or press- to increas,: _udio to the left speaker.
To prepare the TV to receive stere 3. press + to set funcuon to STEREO.
Your TV _ ill automatically lq)roduee stereo when rec,.qved.
To select a SURROUND mode. press + to change arrtong OFF, DOLBY,
MA1 RIX, HALL. and STADIUM.
To adjust REAR VOLUME of extern,d speakers, press +ol -.
To adjust SURROUND BALANCE, p]ress+ or-.
If you want the TV to automatical y expand stereo sign,ds when
received, pres'_ + to set the EXPANO STEREO function to ON. The
STEm:lEO/SAPftmction above must :dso be set to STEREO
To lurn off _,"s speakers, press + to change setting to OFF. You will
want to leave the TV's speaker,', t_.rned ON unless you connect an
amphfier to the TV tltat has its o_,n set of speakers.
Picture-in-Picture (PIP)
1Connect VCR or camcorder to iNPUT1or INPUT 2jacks on back
of TV.
2Turn on TV and select the TV channel you want to watch. Also
turn on VCR (or camcorder).
3 Press the PIP button to turn on PIP.
4Select channel 91 on remote ifVCR is connected to INPUT1 jacks,
or select channel 92 if VCR is cnnnected to INPUT2 jacks, oJ
select channel 90 if VCR is connected to S-VIDEOconnector.
5Little picture can be enlarged, moved, frozen, or switched with
main picture as desired. Pressing the arrow buttons moves little
picture in that direction. Pressing FREEZEfreezes little picture.
Pressing SWAPswitches little picture with main picture. Pressing
ZOOM IN/OUTenlarges and reduces size of tittle picture.
Changing Channels (PIP)
1To change channels on _h,."ptcture from the _1_, first press the qh/
button and then press the CHANNELup or down button (or press
two number butlons).
2To change channels on chc ptcture from tbe VCR, first press the
VCR1buTtnn (if you program, rned the VeR1 button to control the
VCR as describ,'d on page 51) and then pres_ either the CHANNEL
up or down butt, m or two number buttons. ] ou can also change
the VClq "s picture by p_e_,.si,rtgthe CHANNELup or down buttons
on the front of the VCR.
5J
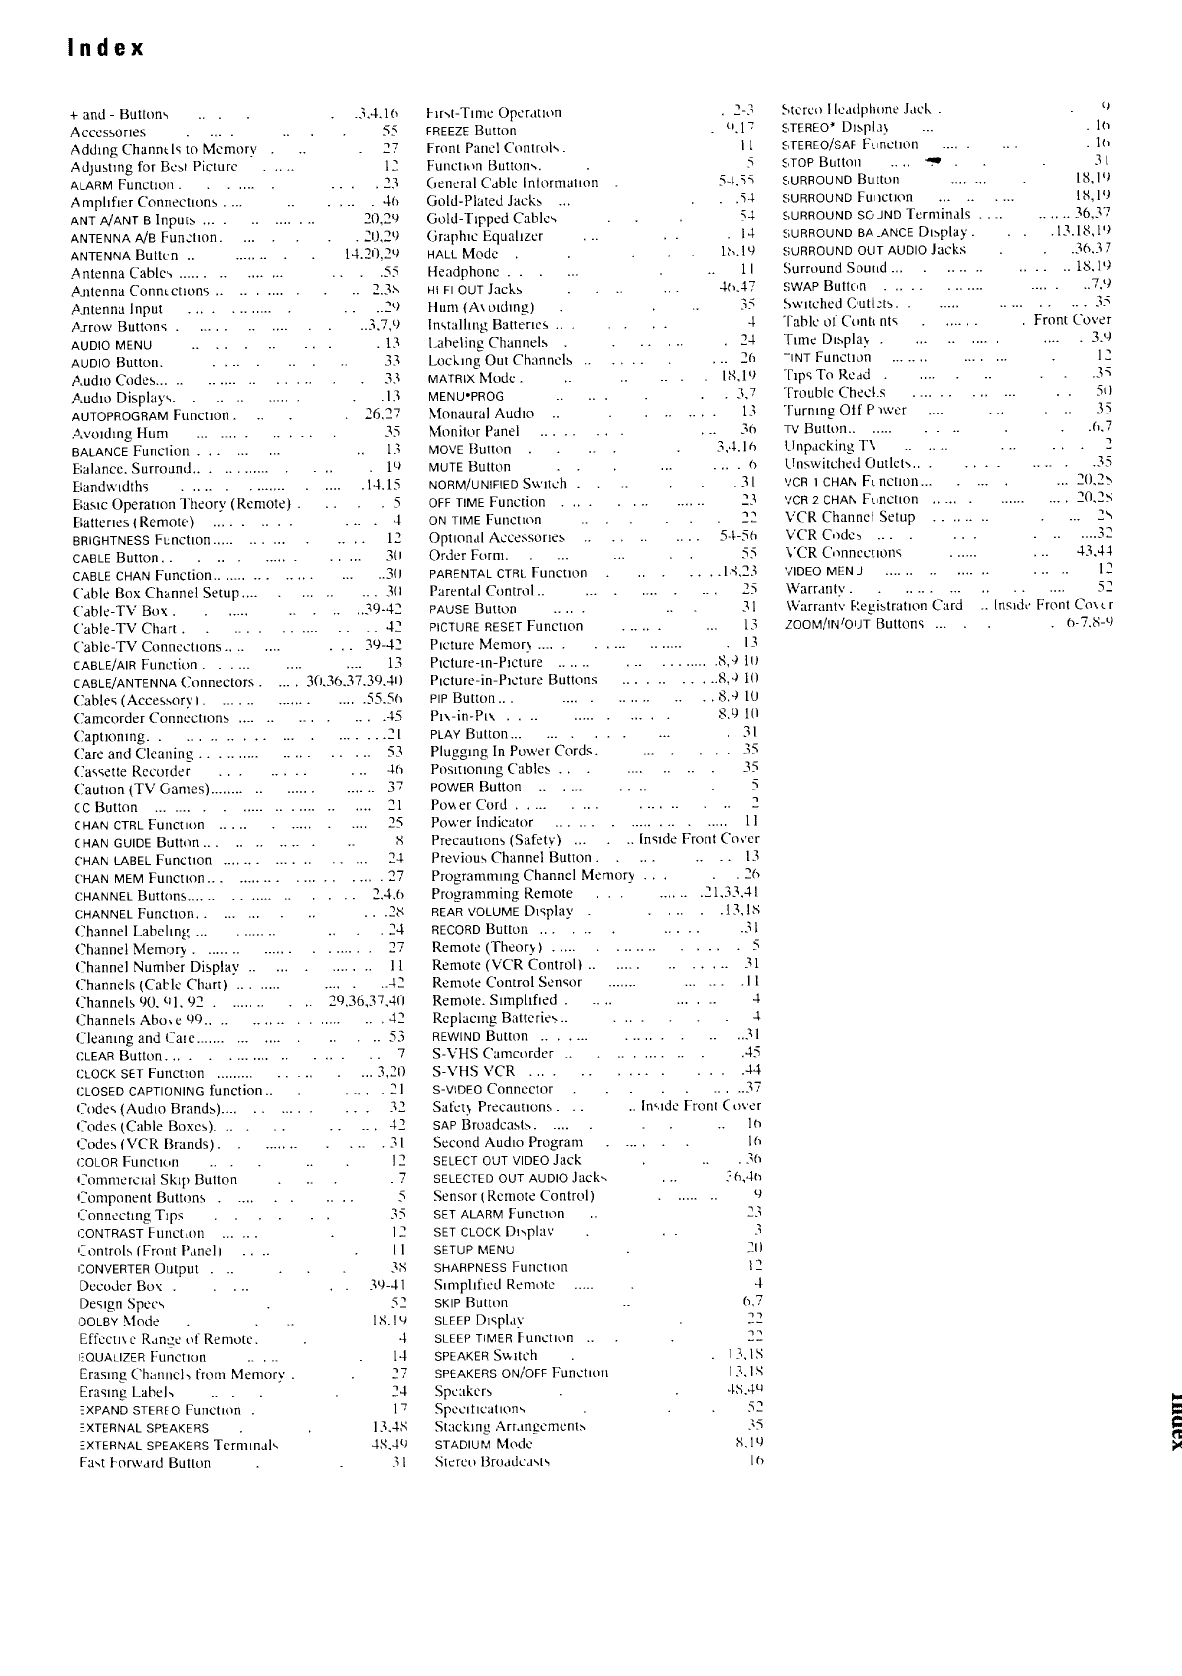
Index
+ and - Buttons .... 3,4,16
Accessories ..... .. 55
Adding Channds to Memory . 27
AdJusting for Bea_ Picture ..... 12
ALARM Funcnon .......... 23
A mphfier Connecttons ......... 4€'_
ANT A/ANT B Inputa ............. 20,2u
ANTENNA A/B Fun-hon ...... 20,29
ANTENNA Buttcn ......... 14.2f),2U
Antenna Cables ................... 55
Pmtenna Connt cnons ............. 2.3.',
Antenna Input ................. 2_)
,axrow Buttons .............. ....-_.7,,9
AUDIOMENU ........... 13
AUDIOButton ........ 33
Audio Codes .................... 33
Audio Displays ............ 13
AUTOPROGRAMFunction. 26,27
Avmdmg Hum .............. 35
BALANCEFunclion ......... 13
E;alance, Surroand ............... It_
Bandv,'tdths .................... 14.15
Basra Operation "l'heory (Remote) ..... 5
Batteries {Remote.) ............. 4
BRIGHTNESSFuncnon ............... 12
CABLEButton ................. 30
CABLE CHAN Ftmction .................... 3(I
('able Box Channel Setup ............ 311
Cable-TV Box ........... 39-42
('able-TV Chart ................ 42
('able-TV Connecnons ........... 39-42
CABLE/AIR Function .............. 13
CABLE/ANTENNAConnectors ..... 30,30.37.39,41)
Cables (Accessory I ................... 55.5,'_
Camcorder Connections .............. 45
Captioning ....................... 21
(7are and Cleaning .................... 53
Cas';ette Recorder ........... 46
Caution {TV Games) ...................... 37'
CCButton ........................... 21
( NAN CTRL Funct ff)n ................ 25
(HAN GUIDE Button .............. S
('HAN LABEL Function .................. 24
Flr-.t-Tm_c Operation . 2-3
FREEZEButton %17
Front Panel Controb,. I [
Function Button-,. 5
General C'ablc Inlormanon 54.55
Gold-Plated Jacks ... .54
Gold-Tipped Cable,, 54
Graphic Equahzer .... 14
HALL Mode 1,',. 19
Headphone ..... 1I
HI FI OUT Jacks 4(,.47
[tun'_{A\ otdmg) 35
lnstalhng Battertes ....... 4
Labeling Channels ...... 24
Locking Out Channels .......... 2h
MATRIXMode ...... I,q,1t)
MENU.PROG .... -_7
Monaural Audio ....... 13
Monitor Panel ........
MOVE Button
MUTE Button ...
NORM/UNIFIED Sv,,nch . ..
OFF TIME Function ..............
ON TIME Function
Optional Accessories ........
Order Form .......
PARENTAL CTRL Funcuon ..
Parental Cnntrol ..............
... 36
3,4.16
.... ()
.31
23
22
54-5_
55
•. 1&23
25
PAUSEButton ....... 31
PICTURERESETFunction ......... 13
Pmture Memor_ ................. 13
P_cture-m-P_cture .................. 8,4 10
Picture-in-Picture Buttons ........... 8,4 10
PIPButton .................. 8,4 10
Plx-in-Ptx ............... 8.9 1(I
PLAYButton ............. 31
Plugging In Pov,'er Cords ........ 35
Posmomng Cables ........ 35
POWERButton ........ 5
Pox,,er Cord ......... "_
Power Indicator ..................... 11
Precauttons (Safety) ..... Inside Front Coeer
Previous Channel Button ...... 13
('HAN MEMFuncDon ...................... 27 Programming Channel Memory ..... 26
CHANNELButtons ................... 2,4,6 Programming Remote ......... "1 "_1 4 l
CHANNELFunctmn ........... 28 REARVOLUMED_splay' . ...... 13,18
Channel Labehng .............. 24 RECORDButton ............ 31
Channel Memor 3 "_-z Remote (Theor_) .................. 5
Channel Number Display' ............ 1l Remote (VCR Controll ............ 31
Channels (Cable Chart) ............... 42 Ren'tote Control Sensor .............. 11
Channels 90. ql. 92 ........... 20,36,37,4(I Remote. Slmphfled ........... 4
Channels Abo, e q9 .................... 42 Replacing Battcrie', ......... 4
Cleamng and Caxe ................... 53 REWINDButton .................. 31
CLEARButton ..................... 7 S-VHS Camcorder .............. 45
{'LOCKSET Funcnon .................. 3,20 S-VHS VCR ............... 44
CLOSEDCAPTIONINGfunction ....... 21
Code', (Audio Brand_) .............. 32
Codes {Cable Boxes) ........... 42
Codes (VCR Brands).
COLORFuncnon .. .
Commercial Skip Button
Component Buttons .......
Connecting Tips ....
CONTRASTFunctam ......
Controls [Front Panell ....
CONVERTEROutput . ..
Decoder Box: .....
Design Specs
OOLBYMode ..
Effectp. e Ranae of Remote.
I_OUALIZERFuncnon .....
Erasing Channel-, from Memory .
Erasmg Label ....
EXPAND STEREO Funchon .
-XTERNAL SPEAKERS
EXTERNAL SPEAKERS Terminal',
Fa,,t Forward Button
.... 31
12
.7
,. 5
35
12
II
3,S
39-41
52
18.1'4
4
ld
27
24
17
13.4S
4,R.49
31
S-VIDEOConnector _37
Safer) Precautions ..... Inqde Front Cover
SAP Broadcast.,, ..... 1_
Second Audio Program ....... 1(_
SELECT OUT VIDEO Jack .3(_
SELECTED OUT AUDIO Jack-, ... .':"fl,4{'J
Sensor tRemote Control) .......
SET ALARMFuncuon .. 23
SET CLOCK Dp,plav . .3
SETUP MENU 21)
SHARPNESSFunction 12
Smlphficd Renrote ..... 4
SKIPButton 6,7
SLEEPDisplay 22
SLEEP TIMER [unction .. "_
SPEAKER Switch . I 2,,1_
SPEAKERS ON/OFF Functknl I3, I N
Spcakcr_ 4,%4u
Specltlcahon,, 52
Stacking Arrangement.,, 35
STADIUMMode ,'-',,1u
Slcreo Broadcasts 16
Stereo tIcadphone Jack .
STEREO_'D_spla3 ...
S1-EREO/SAF Fvncnon .....
STOPButton .... ._" . .
SURROUND Button .......
SURROUND Fwlctlon ....
SURROUNDSOJND Terminals ....
SURROUND BA_ANCE De, play.
SURROUND OLIT AUDIO Jacks
Surround Sound .........
SWAP Buttt,n ............
• In
3L
lS, lq
18,19
...... 36,3"7
.13.18,1'?
.36.37
...... 18, P)
....... 7,,9
Switched Outlets ................. 35
Table of Cuntt nt_ ........ Front Cover
Ttme Displa.,, .............. 3.q
-INT FuneUon .............. 12
-hps To Read ...... 3q
Trouble ChecLs .............. 50
Turning Olf P)wer ....... 3_,
TV Button ............ ft.7
Unpacking T\ ............ 2
Llnswitched Outlet,, ............. 35
WCR 1 CHAN FL nctlon .......... 20,2>
VCR 2 CHAN Fvncnon ................ 20,21_
VCR Channet Setup ........... 2',
VCR Code_ ........ q"
VCR Connecuons ......... 43,44-
VIDEOMENJ ................... 12
Warranty .................. 52
Warranty [-',egistratlon Card .. [ns_dt' Front Cox _r
ZOOM!INIOUT Buttons ... 6-7,8 -t)
PROSCAN
®
We are committed to your complete satisfaction and viewing enjoyment.
Any time you have a question or want information about your ProScan
product, call our friendly toll-free number listed below. We're always ready to
help you Monday through Friday, 9:00 A.M. to 6:00 P.M. EST.
1-800-PROSCAN
If you would like a copy of this manual in French, please follow the
instructions below:
Si un livret d'instructions en fran_ais n'est pas inclus avec votre appareil,
vous pouvez en obtenir un (indiquer le numdro de modble, votre nom. et
votre adresse) en vous adressant _:
Thomson f_lectronique Grand Public du Canada
Service des donndes techniques
6540 Tomken Rd
Mississauga, Ontario L5T 2E9
An RCA
Entertainment
Product
Thomson Consumer Electronics
600 N Sherman Dr, PO Box 1976
Indianapolis, IN 46206-1976
@1994 Thomson Consumer Electronics, Inc.
Trademark(s) ® Registered
Marca(s) Registrada(s)
Printed in U.S.A.
Part Number 1Q57 494-01A
