RCA Projection/Digital 42 And Above TV Manual 97100080
User Manual: RCA RCA Projection/Digital 42 and above TV Manual RCA Projection/Digital 42 and above TV Owner's Manual, RCA Projection/Digital 42 and above TV installation guides
Open the PDF directly: View PDF ![]() .
.
Page Count: 89
Models PS52682andPS60682
Features
2 Features
First-Time Operation
3
3
3
4
4
5
6
6
7
Unpack TV and Accessories
Connect an Antenna or Cable-TV System
Install the Batteries in Remote Controls
Turn on TV
Auto-Help Displays
(Optional) Converge the TV
AutoProgram TV' s Channel Memory Scan List
Add or Erase Channels to Channel Memory
Set the Clock
Detailed
8-11
12
13
14-15
16
17
18-21
22-36
37
38-39
4O
Operating Instructions
Remote Control (TV Functions)
Front Panel Controls
MAIN MENU and HELP MENU
Freeze, Zoom, and Pan (Main Picture)
DVE (Digital Video Effects) (Main Picture)
Channel Guide
PIP (Picture-ln-Picture) Operation
Audio Section (AUDIO ADJUSTMenu)
VIDEO ADJUST Menu
MEMORY MENU
SETUP MENU (Basic Functions)
Monitor Panel and Connections
58-59 Monitor Panel
60 Tips to Read Before Connecting Components
61 Home Antenna Connections
62-63 Cable-TV Connections
64 Programming Remote to Control Cable Box
65 Cable-TV Information and Channel Chart
41 Changing Antenna Input
42 Priority Channels
43 VCR/Cable Setup
44-45 SCHEDULER
46-47 Programming Channel Memory Scan List
48-49 Channel Labeling
50 Parental Control
51 SPECIALITEM,";Menu (BasicFunctions)
52 SLEEPTIMER
53 Using Remote to Control Laser Disc Player
54-55 Programming Remote to Control VCR's
56-57 Programming Remote to Control
Audio Equipment
66-67 VCR Connections
68 Laser Disc Player Connections
69 Camcorder Connections
70-71 Amplifier or Cassette Tape Deck
72-73 External or Surround Speakers
Optional Accessories
74-75 Accessory Cables
75-76 Accessory Order Form
Reference Section
77 Design Specifications
77 Cleaning and Care
78-79 Trouble Checks
79 Warranty
80-81 Index (Alphabetical)
82-83 Quick-Reference Guide (Inside Back Cover)
Quick-Reference Menu Operating-Guide •.,. ,
PIP ON Menu
This menu appears
if PIP is on.
PIP OFFMenu
This menu appears
if PIP is off.
Press the MENU button
to display the MAIN
MENUon the TV screen.
Press the + or- button
to highlight the desired
function, then press the
MENU button to enter or
adjust that function.
When one of the menus
shown at the right
appears_ repeatedly
press the + or- button
to highlight the desired
function, and then press
the MENUbutton to
enter or adjust that
function or display the
next menu.
AUDIOSETUPMENUS
The individual setup
menus allow you to
adjust individual
features for the
audio mode
you have
selected.

PROSCAN°
So advanced. Yet so simple. TM
We're building our reputation on products that are so advanced, they're
simple. If you want all the benefits of the latest technology, without the
complexity, we have a very simple solution. It's called ProScan.
State-of-the-art technology that real people can use.
Thank you for choosing ProScan. And welcome to our company-wide
commitment to your complete satisfaction and viewing enjoyment.
This page folds open to display the menus. We
designed this page so that you could leave it open
and use it as a quick-reference guide while
reviewing the manual.
If you suspect that liquid has entered the TV, unplug it
imrnediately and have it inspected by an Authorized TV
Servicenter. Turning it off is not enough - your TV has
power applied to some circuits even when the TV is turned
off.
(_kd[_
l_e 5ght_ng flesh
and arrowhead
within the triangle is
a warning sign
aler_ng you Of
"dangerous voltage"
inside the product
that presents e risk
of electric shock,
RISK OF ELECTRIC SHOCK
DO NOT OPEN
CAUTION: TO REDUCE THE RISK
OF ELECTRICAL SHOCK, DO NOT
REMOVE COVER (OR BACK). NO
USER-SERVICEABLE PARTS
INSIDE. REFER SERVICING TO
nUALIFIEO SERVICE PERSONNEL.
The exclamation
point within the
triangle iSa warning
sign alerting you of
important
instructions
accompanying the
product.
Caution: Maintain electrical safety. Powerline-operated
equipment or accessories connected to this unit should bear
the UL listing mark or CSA certification mark on the
accessory itself and should not have been modified so as to
defeat the safety features. This will help avoid any potential
hazard from electric shock or fire. If in doubt, contact
qualified service personnel.
Your TV operates on 120 volts, 60 Hz AC power (normal
house power) and has a polarized AC plug. Because one
blade of the plug is wider than the other, the plug fits into the
wall socket only one way. Do not defeat the safety feature of
this plug. If you need an extension cord, make sure it is
polarized.
Caution: To prevent electric shock, do not use
the polarized plug on this TV with an extension
cord, receptacle, or other outlet unless both
blades can be fully inserted to prevent blade
exposure. Match wide blade of plug to wide slot,
fully insert.
Mise En Garde: Pour prrvenir les chocs
6lectriques, ne pas utiliser la fiche polaris_e de cet
appareil avec une rallonge, une prise de courant
ou une autre sortie, h moins que les lames ne
puissent &re ins_rres _tfond sans qu'aucune partie ne soit
laissre _ drcouvert. Introduire la lame la plus large de la
fiche darts la borne correspondante de la prise et pousser
jusqti au fond.
All operating controls and their functions are identified and
explained in this manual. For warranty service or routine
maintenance, contact the nearest Authorized ProScan TV
Servicenter. All servicing and adjustments to electrical
components should be done by a qualified service technician.
•Warning: To prevent fire or shock hazard, do not
expose this TV to rain or moisture.
Note to Cable TV Installer: This reminder is provided to call your attention
to Article 820-40 of the National Electrical Code (Section 54 of the Canadian
Electrical Code, Part 1) which provides guidelines for proper grounding and,
in particular, specifies that the cable ground shall be connected to the
grounding system of the building as close to the point of cable entry as
practical.
]!]][[:ii]]]
:i?,iiii;i!i
iii!ii]igli;i_
i!_!':!_i:i
i!i:_ii:}ii!iii:
iiiJi!i;!ii!:i
il!i}iii_i
iii,_!i?i_
iii!!ii_iiii
!iiiiii!i_i!_i
ili!!iiiiiiii!!!
:i_il;iiiii?_ii
_iii[i.i!iiil
!!i_!ili_i!il
s_.i!_i!i/!i;
ii_:]ir}i
_iiiiiiiiii!ii
ii_ii_iliiiil
Mail YourRegistrationCardToday
AProduct Registration Card is packed with your set. Please
fill out the card and return it immediately.
Your prompt submission of this card confirms your right to
the protection available under the terms and conditions of
the warranty and also allows us to contact you should it ever
become necessary.
With your card on file, we can also help you in the event of
loss or theft by verifying your ownership.
If you did not receive a Product Registration Card, please
contact your dealer.
AttachYourSales ReceiptHere and File at HomeFor
FutureReference
To obtain warranty parts and service, you must show your
sales receiPt (or other evidence of purchase) to your
Authorized ProScan TV Servicenter.
Tape or staple your sales receipt to this manual so you will
have it handy should service ever be needed. Do not mail
your sales receipt to us. File it at home with your owner's
manual for future reference.
RecordVital InformationHere
No other set has the same serial number as yours. You will
find the serial number and the model number on the back of
your set.
Make sure you record both numbers below so that you will
have them in case your set is stolen or if you need a
complete description for identification.
Model Number:
Serial Number:
Purchase Date:
Dealer Name/Address/Phone:
__1
YourProScantelevisionismorethanstate-of-the-art
technology.It'stechnologytailoredtoyou.Features
designedtodeliverviewingandlisteningenjoymentbeyond
expectations.Innovationandsimplicityofoperationbecome
one-ProScan.
Improving Your Image
•IDTV (Improved Definition TV): High tech video processing
gives you twice the number of video scan lines as conventional
TVs for superior picture quality.
oACleaner Picture: The Digital Comb Filter reduces distortion
and extends resolution.
• Greater Contrast: Dynamic Gamma Correction automatically
extends the dynamic range of the luminance signal, producing
blacker blacks and whiter whites.
•Increased Clarity: Edge Replacement enhances image edges.
That along with dynamic focus give you crisp clean details-with up
to 600 lines of horizontal resolution.
Sound Thinking
• Flexibility: Eight different audio modes built right into the TV.
From basic stereo, to Dolby* 3 stereo, to Dolby* prologic, and all
the steps between. For details, see pages 22-36.
• On-Screen Graphic Equalizer permits precise adjustment of
seven frequency bands to complement your room's acoustics.
For details, see pages 26-27.
•10 Watts Per Channel **
•dbx*** Noise Reduction
•Second Audio Program (SAP) For details, see page 30.
*Dolby is a registered trademarkof Dolby LaboratoriesLicensing Corp.
**RMS rating, into 8 ohms, 50 to 20,000 Hz -+3db,with less than
1% THD.
***dbx is a registered trademark of Carillon Electronics Corp.
Creative Entertainment
* DVE (Digital Video Effects) lets you control the speed of mosaic
and solarization effects on the large picture. For details, see page 16.
•Advanced Color Picture-in-Picture using two tuners lets you
watch two programs at once. You can swap, freeze, move, or pan
either picture-for viewing convenience. You do not need a VCR
or external video source for additional picture. For details see
pages 18-21.
•Zoom - enlarges any desired video image for a closer look. Also
changes the size of the inset Picture-In-Picture. For details, see
pages 14-15 and 18.
•Pan - allows you to move across the enlarged video image to
select any portion for viewing. For details, see pages 14-15.
• Channel Guide - displays a still picture from 12 different channels
at one time for a quick review of available programs.
For details, see page 1Z
° Channel Labeling lets you label channels with one of over 100
built-in labels or create your own five-character label. For details,
see pages 48-49.
• Scheduler allows you to enter up to three separate programs to run
only once or to run at the same time every week. The TV will turn
on, tune to the selected channel, and turn off-all automatically.
For details, see pages 44-45.
• Commercial Skip For details, see page 11.
• Sleep Timer For details, see page 52.
• Parental Control For details, see page 50.
• Previous Channel Feature For details, see page 10,
o 181 Channel Tuning Capability in U.S.A.* For details,
see page 65.
* Check your cable company's compatibility requirements.
One Minute Manual
• On-Screen Menus for operation of all features.
• AutoProgramming automatically searches for and stores all active
channels. Eliminates the need for manual set-up. For details, see
page 46.
•Frequency Synthesis Tuning automatically and accurately tunes
each channel.
• Automatic VCR Setup: With the push of a button, your TV is
ready for VCR play: Both TV and VCR turn on, and TV tunes to
the correct channel or input. For details, see page 43.
• Automatic Cable Box Setup: With the push of a button, your TV
is ready for cable box operation: Both TV and cable box turn on,
and TV tunes to the correct channel or input.
For details, see page 43.
• On-Screen Clock/Channel Display For details, see page Z
• Picture and Audio Reset For details, see pages 38-39.
• Auto Demos For details, see page 51.
Networking
Gold Plated Phono Jacks for Superior Performance:
• Two Sets of Audio/Video Inputs including S-Vt0E0 for VCR,
Laser Disc Player, Camcorder etc. For details, see
pages 66 and 68-69.
• One Set of Audio/Video Outputs including S-video for video
dubbing. For detaUs, see pages 67 and 69.
• One Set of Volume-Controlled Audio Outputs (Hi Fi) to retain
remote volume when connected to an external amplifier. For
details, see page 70.
•One Volume-Controlled SURROUNDAudio Output jack to
connect surround sound to an external amplifier. For details,
see page 71.
•One Volume-Controlled CENTERAudio Output jack to connect
center sound to an external amplifier. For details, see page 71.
Other Connections to Expand Your System:
•Four Speaker Jacks to allow hook up of optional external or
surround sound speakers. For details, see page 73.
• Dual RF Inputs to allow direct connection of up to two basic
cable, cable box, or other RF sources. For details, see pages
41 and 61-63.
• Front-Mounted Stereo Headphone Jack for private listening
with optional headphones. For details, see pages 12 and 25.
At Your Command
Your ProScan television includes two remote controls.
•The ProScan Universal Remote: Operation is as easy as entering
a channel. It operates all major ProScan TV, VCR, and LaserDisc
player functions. It also operates the basic functions of 60 different
VCR brands and 28 different brands of cable boxes, eliminating the
need for additional remotes.
•The ProScan Simple Remote: 6 buttons control most TV
functions for the ultimate in simplicity.
At Your Service
Our Human Touch policy offers all these valuable benefits:
• 1-800-ProSean: Call our information service Monday through
Friday, 7 a.m. to 7 p.m. EST, year round.
• Nationwide Authorized Independent Service Centers
• ProScan Limited Warranty for U.S.A.: In-home service of all
parts and labor for one year, picture tube for two years. For details,
see page 79. A separate warranty for Canada is enclosed with all
televisions sold in Canada.
L__
The steps below will help you get your TV connected and
working quickly. The page numbers on which you can
find detailed instructions for each of these steps are also
listed for your convenience.
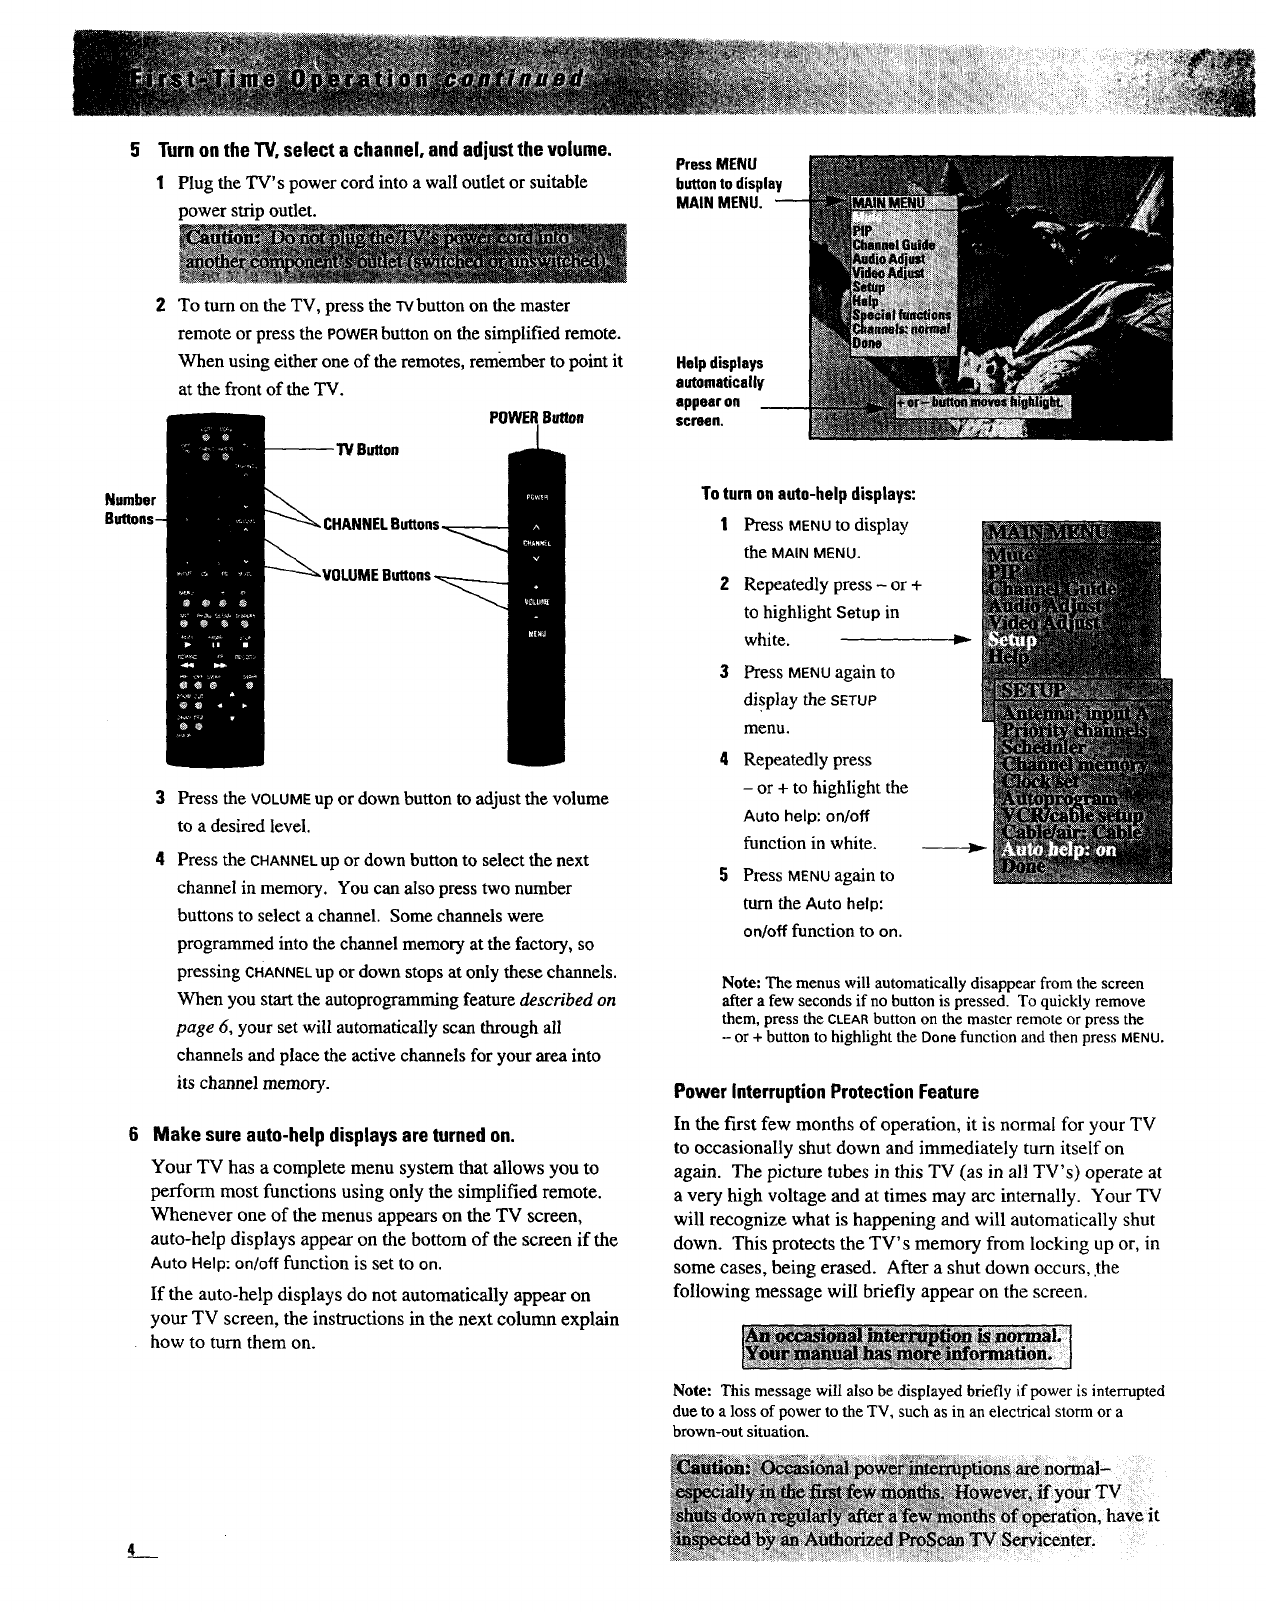
Unpack TV and accessories.
The accessories that came packed with your TV include
two remote controls, six AAA batteries, antenna adapter,
four wing nuts, and a VCR shelf.
Ilace
included VCR
shelf here. I
!
Note: The VCR shelf allows
you to position a VCR or other
component on top of your TV.
Simply place the shelf on top of
your TV as shown above, and
then place the VCR on the shelf.
2 Extendback coven
Your projection TV has been specially designed with a
collapsible back cover. This design makes it easier for you
to move the TV through doorways because the collapsed
back makes the TV narrower. After the TV is positioned
in your home, you can easily extend the back cover to its
normal operating position by following the instructions
below.
1Remove the four wing nuts from the literature bag.
2Remove the two screws (labeled A) from the shipping
brackets. You will use these screws later in step 6.
Back Collapsed
Hole for
Locating
Pin
Alignment
Hole for
Locating
Pin
3Grasp the shipping brackets and gently pull the back cover
up and out until the locating pins enter the _dignment holes.
Keep the back cover tight against the cabinet by holding the
shipping bracket on the right side. Then attach wing nut to
built-in hole screw in hole #1. Hand tighten.
4Hold left shipping bracket and attach wing nut to built-in
screw in hole #2. Hand tighten.
Back Extended
other two
screws here
Wooden Rail
5Attach remaining wing nuts to screws in holes #3 and #4 to
ensure stability and best picture quality.
6Remove the shipping brackets from the back cover and
attach them to the wooden rail with the two screws (A) from
step 2. Reinsert the other two screws from the shipping
brackets into the back of the TV as shown, so they will be
available in case you need to move your TV and want to
collapse the back again.
Connect an antenna or cable-TV system.
Most antenna or cable-TV systems can be connected as
shown here.
Incoralq CzVakz
from Aahmea or
Cable-W System
i. _UCT*
i¸¸ i iiiiiiiiiii?ii/i @
i! iii ! iii? iii! iii iiiii!i¸
i!: i_ ii!ii! !!iiii_!_ii_i¸ ! _ iiiiiii
•Details for connecting a home antenna to your TV are on
page 61.
• Details for connecting a cable-TV system to your TV are on
pages 62-63.
• Details for connecting a VCR to your TVare on
pages 66-67.
• Details for connecting a laser disc player to your TVare on
page 68.
4 Installthe batteries in remotecontrols.
• Details are on page 8.
(continuedonnextpage)
J
Turnonthe TV,select a channel, andadjustthe volume.
1Plug the TV's power cord into a wall outlet or suitable
power strip outlet.
PressMENU
buttonto display
MAIN MENU.
Number
To turn on the TV, press the TVbutton on the master
remote or press the POWER button on the simplified remote.
When using either one of the remotes, remember to point it
at the front of the TV.
POWERButton
Press the VOLUMEup or down button to adjust the volume
to a desired level.
Press the CHANNELup or down button to select the next
channel in memory. You can also press two number
buttons to select a channel. Some channels were
programmed into the channel memory at the factory, so
pressing CHANNELup or down stops at only these channels.
When you start the autoprogramming feature described on
page 6, your set will automatically scan through all
channels and place the active channels for your area into
its channel memory.
Make sure auto-helpdisplaysare turnedon.
Your TV has a complete menu system that allows you to
perform most functions using only the simplified remote.
Whenever one of the menus appears on the TV screen,
auto-help displays appear on the bottom of the screen if the
Auto Help:on/off function is set to on.
If the auto-help displays do not automatically appear on
your TV screen, the instructions in the next column explain
how to turn them on.
Helpdisplays
automatically
appearon
SOl'sen.
To turn onauto-helpdisplays:
1Press MENUtOdisplay
the MAIN MENU.
2Repeatedly press -or +
to highlight Setup in
white.
3Press MENUagain to
display the SETUP
menu.
4Repeatedly press
- or + to highlight the
Auto help: on/off
function in white.
5Press MENUagain to
tum the Auto help:
on/off function to on.
Note: The menus will automatically disappear from the screen
after a few seconds if no button is pressed. To quickly remove
them, press the CLEARbutton on the master remote or press the
- or + button to highlight the Done function and then press MENU.
Power Interruption Protection Feature
In the first few months of operation, it is normal for your TV
to occasionally shut down and immediately turn itself on
again. The picture tubes in this TV (as in all TV's) operate at
a very high voltage and at times may arc internally. Your TV
will recognize what is happening and will automatically shut
down. This protects the TV's memory from locking up or, in
some cases, being erased. After a shut down occurs, .the
following message will briefly appear on the screen.
Note: This message will also be displayed briefly if power is interrupted
due to a loss of power to the TV, such as in an electrical storm or a
brown-out situation.
(Optional)ConvergeyourTV.
Your projection TV has three color projection tubes-one for
red, one for green, and one for blue. When mixed together in
the proper proportion, the output of these three color tubes
can produce many colors. To produce these colors, the
beams must be precisely aligned over each other so that the
colors can be mixed. The process of aligning these picture
beams is called "convergence".
Over a period of time, the picture tubes can drift out of
alignment due to normal bumps and vibrations or moving the
'1"_/.If you move your TV or notice colored tings or halos
around objects in the picture, you may want to converge
(align) the colors.
To simplify convergence, an on-screen menu is provided that
allows you to display a test pattern of lines on the screen.
Properly converged, the lines appear white-which is actually
a combination of the output of the three color tubes. The
position of the green lines is stationary. The positions of the
red and blue lines are adjustable. When properly adjusted,
the red and blue lines should lie directly over the green lines
to produce single white lines.
ToConverge (Align) the Colors.
1Turn on the TV and select a channel that is active in your
area. Allow the TV to operate at least ten minutes before
converging.
2Display the CONVERGENCEmenu.
1Press MENUtO display
the MAIN MENU.
2Repeatedly press -or +
to highlight Video --tz,,-
Adjust in white.
3Press MENu again to
display the VIDEO
ADJUST menu.
4Repeatedly press - or
+ to highlight -z_
Projection setup in
white.
Press MENUagain to
display the
CONVERGENCE menu,
When properly converged, all three colors in the pattern (red,
blue, and green) should align to form white lines. If you see
any red or blue lines in the pattern, you can move them to
align with the green lines by following the steps in the next
column. Singlewhiteverticalline
Singlewhite
horizontalline
4Adjust horizontal convergence.
1Press +or- to select (underline)
the red horizontal function.
2 [_ess MENU tO
highlight in
white (activate)
red horizontal
convergence.
3 Press + to move
the line to the
tight or press -
to move the line
to the left.
4 Press MENUagain to return to the CONVERGENCEmenu.
5Repeat steps 1-3 above to adjust the blue horizontal function.
Note: When adjusting convergence make sure the red and blue lines
are exactly centered on green line in order to form a white line.
5 Adjust vertical convergence.
1Press + or- to select (underline)
the redvertical function.
2Press MENU to
highlight in white
(activate)
red vertical
convergence.
3Press + to move
the line up or
press - to move
the line down.
4Press MENU again to return to the CONVERGENCE menu.
5Repeat steps 1-3 above to adjust the blue vertical
Note: When adjusting convergence make sure the red and blue lines
are exactly centered on the green line in orderto form a white line.
6When you are finished, press the CLEARbutton on the remote
control, or press the - button to highlight Done and then press
the MENUbutton to remove the menu from the screen.
(continuedonnextpage)
_5
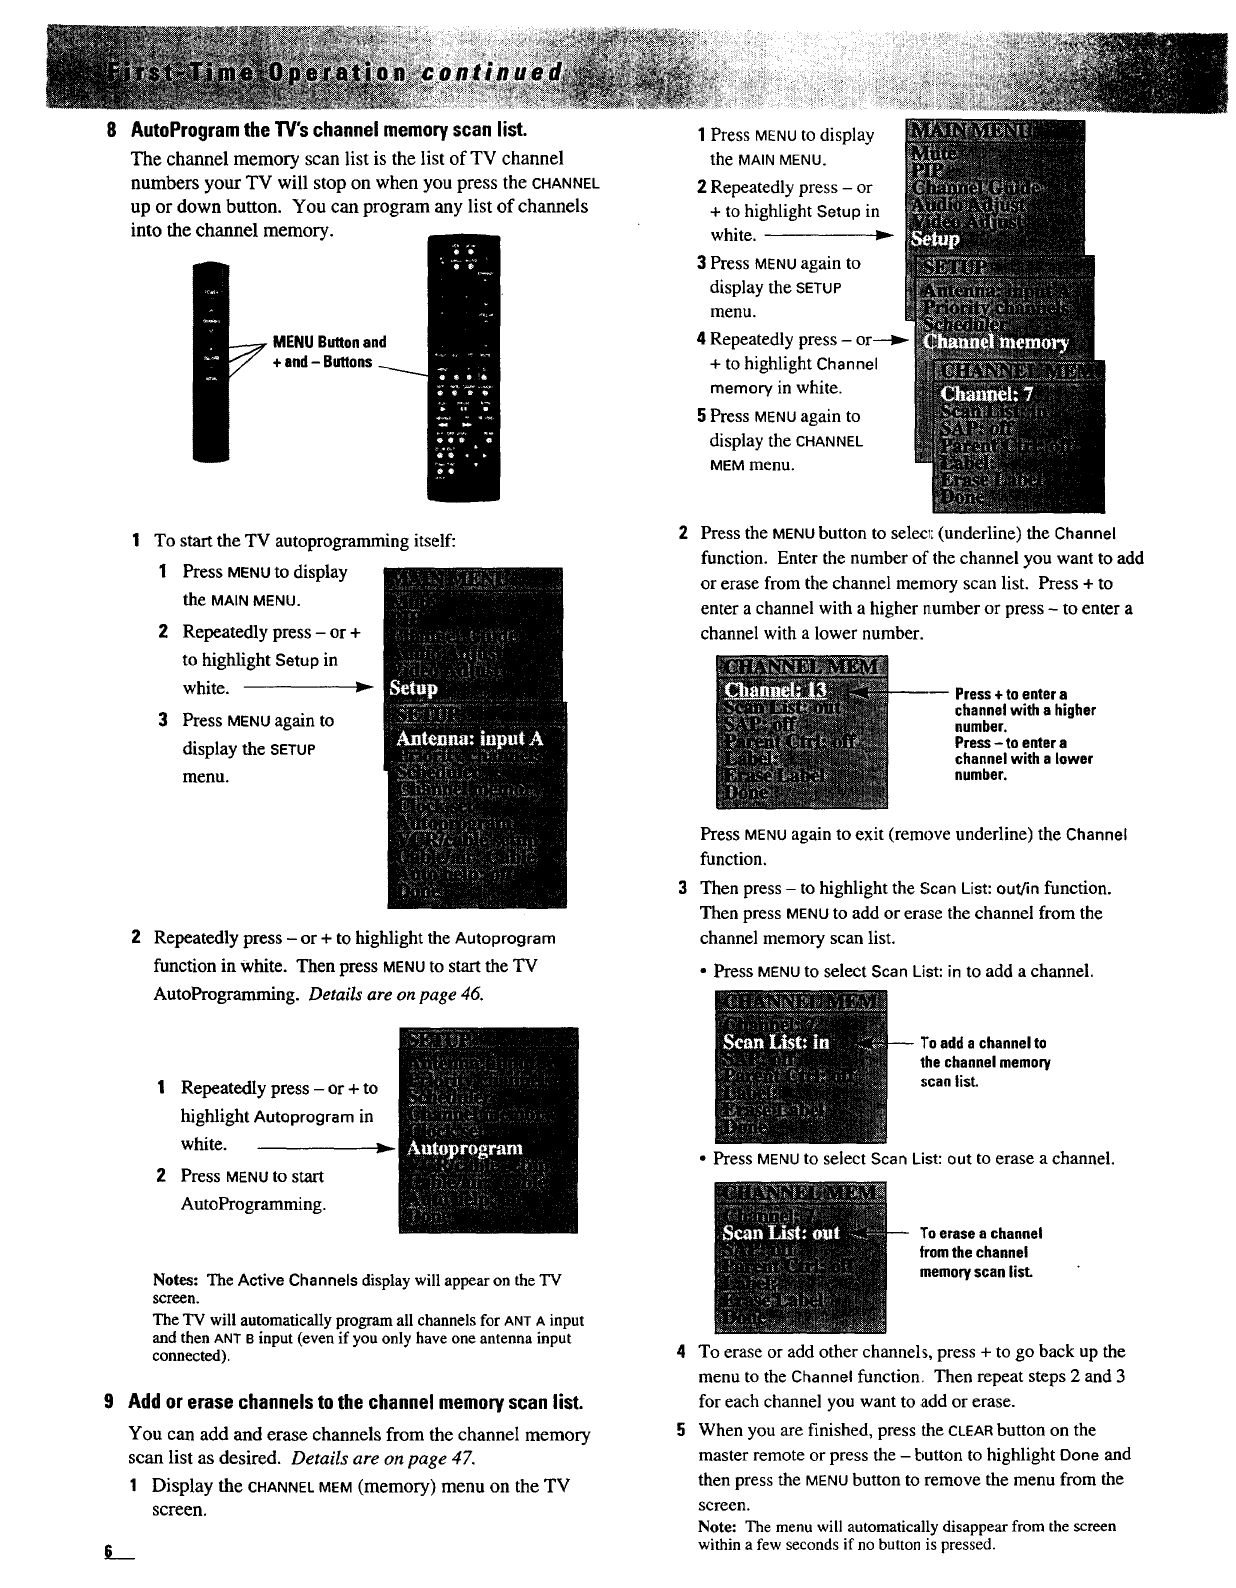
8AutoProgramthe TV'schannel memoryscan list.
The channel memory scan list is the list of TV channel
numbers your TV will stop on when you press the CHANNEL
up or down button. You can program any list of channels
into the channel memory.
MENU Buttonand
+and - Buttons
To start the TV autoprogramming itself:
1Press MENUto display
the MAIN MENU.
2Repeatedly press - or +
to highlight Setup in
white, r"-
3Press MENUagain to
display the SETUP
menu.
2Repeatedly press - or + to highlight the Autoprogram
function in White. Then press MENUto start the TV
AutoProgramming. Details are on page 46.
!Repeatedly press - or + to
highlight Autoprogram in
white.
2Press MENUto start
AutoProgramming.
Notes: TheActive Channelsdisplay will appearon theTV
scr_n.
The TV will automatically program all channels for ANTAinput
and then ANTBinput (even if you only have one antenna input
connected).
Add orerase channelsto the channelmemoryscan list.
You can add and erase channels from the channel memory
scan list as desired. Details are on page 47.
1Display the CHANNELMEM(memory) menu on the TV
screen.
L
1Press MENUto display
the MAIN MENU.
2Repeatedly press - or
+ to highlight Setup in
white.
3Press MENUagain to
display the SETUP
menu.
4Repeatedly press - or---I_
+ to highlight Channel
memory in white.
5Press MENUagain to
display the CHANNEL
MEM menu.
Press the MENUbutton to select: (underline) the Channel
function. Enter the number of the channel you want to add
or erase from the channel memory scan list. Press + to
enter a channel with a higher number or press -to enter a
channel with a lower number.
---- Press+ to entera
channel with a higher
number.
Press- to entera
channel with a lower
number.
Press MENUagain to exit (remove underline) the Channel
function.
Then press - to highlight the Scan List: out/in function.
Then press MENUto add or erase the channel from the
channel memory scan list.
•Press MENUto select Scan List: in to add a channel.
BToadda channelto
thechannelmemory
scanlist.
• Press MENUto select Scan List:out to erase a channel.
To erase a channel
fromthechannel
memoryscanlist.
To erase or add other channels, press + to go back up the
menu to the Channel function. Then repeat steps 2 and 3
for each channel you want to .add or erase.
When you are finished, press the CLEARbutton on the
master remote or press the - button to highlight Done and
then press the MENUbutton to remove the menu from the
screen.
Note: The menu will automatically disappear from the screen
within a few seconds if no button is pressed.
10 Setthe clock.
The clock must be set before the time will automatically
appear on the TV screen. Once the time is set, it will
automatically appear whenever you turn on the TV,
change channels or press the o,soLAv button. The clock
must also be set before you can use some of the special
features, such as the scheduler.
1Display the CLOCK SET menu on the TV screen.
Press MENU to display
the MAIN MENU.
2Repeatedly press - or
+ tohighlight the
Setupfunction. --
3Press MENU again to
display the SETUP
menu.
4Repeatedly press -or
+ to highlight the
Clock set function.
Press MENUto display
the CLOCKSETmenu.
Press + to select (underline) day of week. Then press
MENUtO enter (highlight) the day. Press +or - to enter the
correct day of the week.
Press MENU tO exit (remove highlight) the day of the week
function. Then press +to select (underline) Done and then
press MENU tO start the clock.
Press the Iv, DISPLAY or CHANNELup or down button to see
if the correct time and day of the week appear on the TV
screen along with the channel number display.
Time Dis
Note: The CLOCKSETmenu will automatically disappear from the
screen within a few seconds if no button is pressed.
Press MENUto select (highlight) hr, and then press + or -
to enter the correct hour.
3 Press MENU again to exit (remove highlight) the hr
function, and then press + to select (underline) rain.
Press MENUto select (highlight) rain, and then + or - to
enter the correct minutes.
Press MENU to exit (remove highlight) the min function,
and then press + to select (underline) ampm. Press
MENUto select am or pro.
The correct time will now appear on the screen
whenever you change channels or press the D,SPLAYor
IV button.
Notes: The CLOCKSET menu will automatically disappear from
the screen within a few seconds if no button is pressed. If the
CLOCKSET menu disappears from the screen before you have
finished setting the clock, none of the settings will be saved. You
must enter the time and the day of the week, and then select
Done. Then press the MENUbuttort to start the clock.
To correct the time or day of the week, follow the steps above for
the part you want to correct. Then press the + button to select
(underline) Done and press MENUto enter your change.
If power is interrupted for an extended time, you will need to
reset the clock.
11 Review menusandotherfeatures.
When you feel comfortable with your TV and remote
controls, review the menus. Most of the menus are
shown inside the front cover. You can fold this pa.ge out
for quick reference while reading the manual.
The Help function on the MASNMENUoffers a variety of
help screens to assist you in the connection and
operation of your TV. Details .are on page 13.
The rest of this manual can be used as a reference guide
with detailed information about each operating control,
menu, and function. There is an alphabetical index in
the back for your convenience.
Inside of the back cover is a quick-reference operating
guide. This page is designed so it can be removed from
the manual.
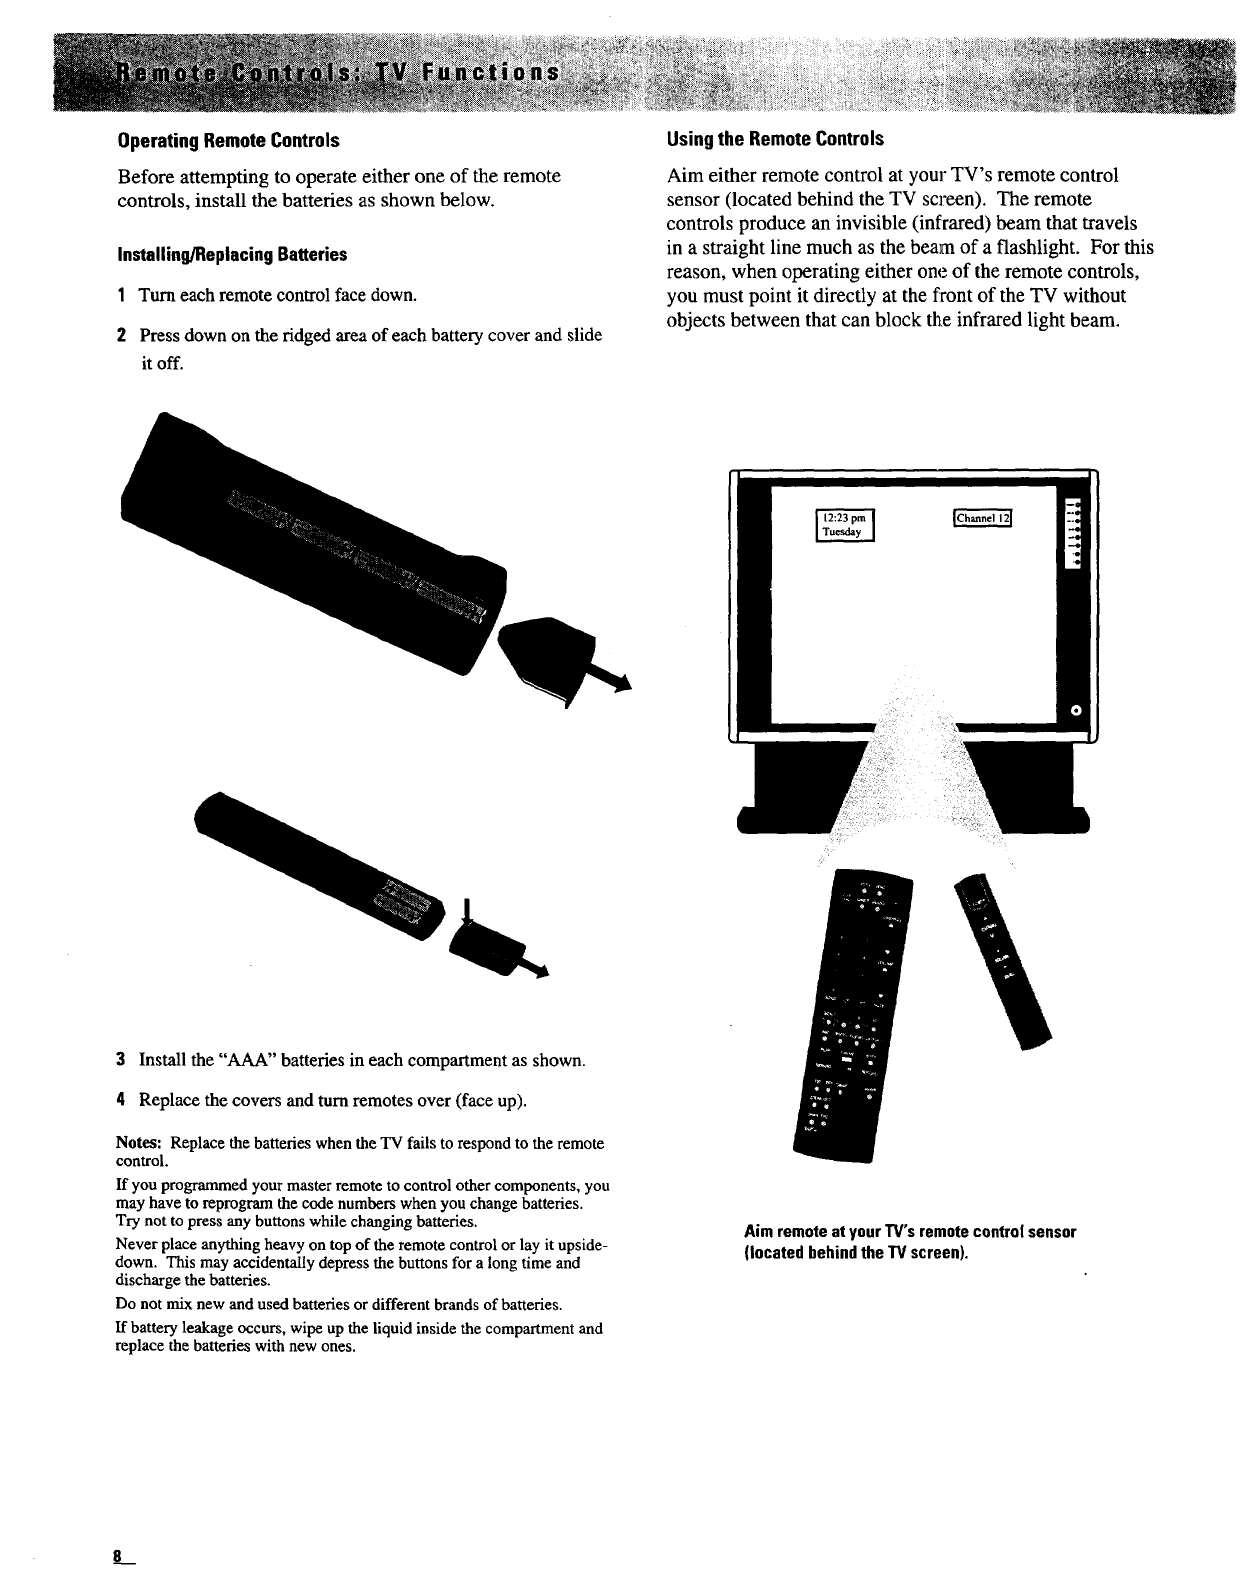
OperatingRemoteControls
Before attempting to operate either one of the remote
controls, install the batteries as shown below.
Installing/Replacing Batteries
1Turn each remote control face down.
2Press down on the ridged area of each battery cover and slide
it off.
Usingthe RemoteControls
Aim either remote control at your TV's remote control
sensor (located behind the TV screen). The remote
controls produce an invisible (infrared) beam that travels
in a straight line much as the beam of a flashlight. For this
reason, when operating either one of the remote controls,
you must point it directly at the front of the TV without
objects between that can block the infrared light beam.
3Install the "AAA" batteries in each compartment as shown.
4Replace the covers and turn remotes over (face up).
Notes: Replace the batteries when the TV fails to respond to the remote
control.
If you programmed your master remote to control other components, you
may have to reprogram the code numbers when you change batteries.
Try not to press any buttons while changing batteries.
Never place anything heavy on top of the remote control or lay it upside-
down. This may accidentally depress the buttons for a long time and
discharge the batteries.
Do not mix new and used batteries or different brands of batteries.
If battery leakage occurs, wipe up the liquid inside the compartment and
replace the batteries with new ones.
Aimremoteat yourTV'sremotecontrolsensor
(located behindtheTV screen).
e__
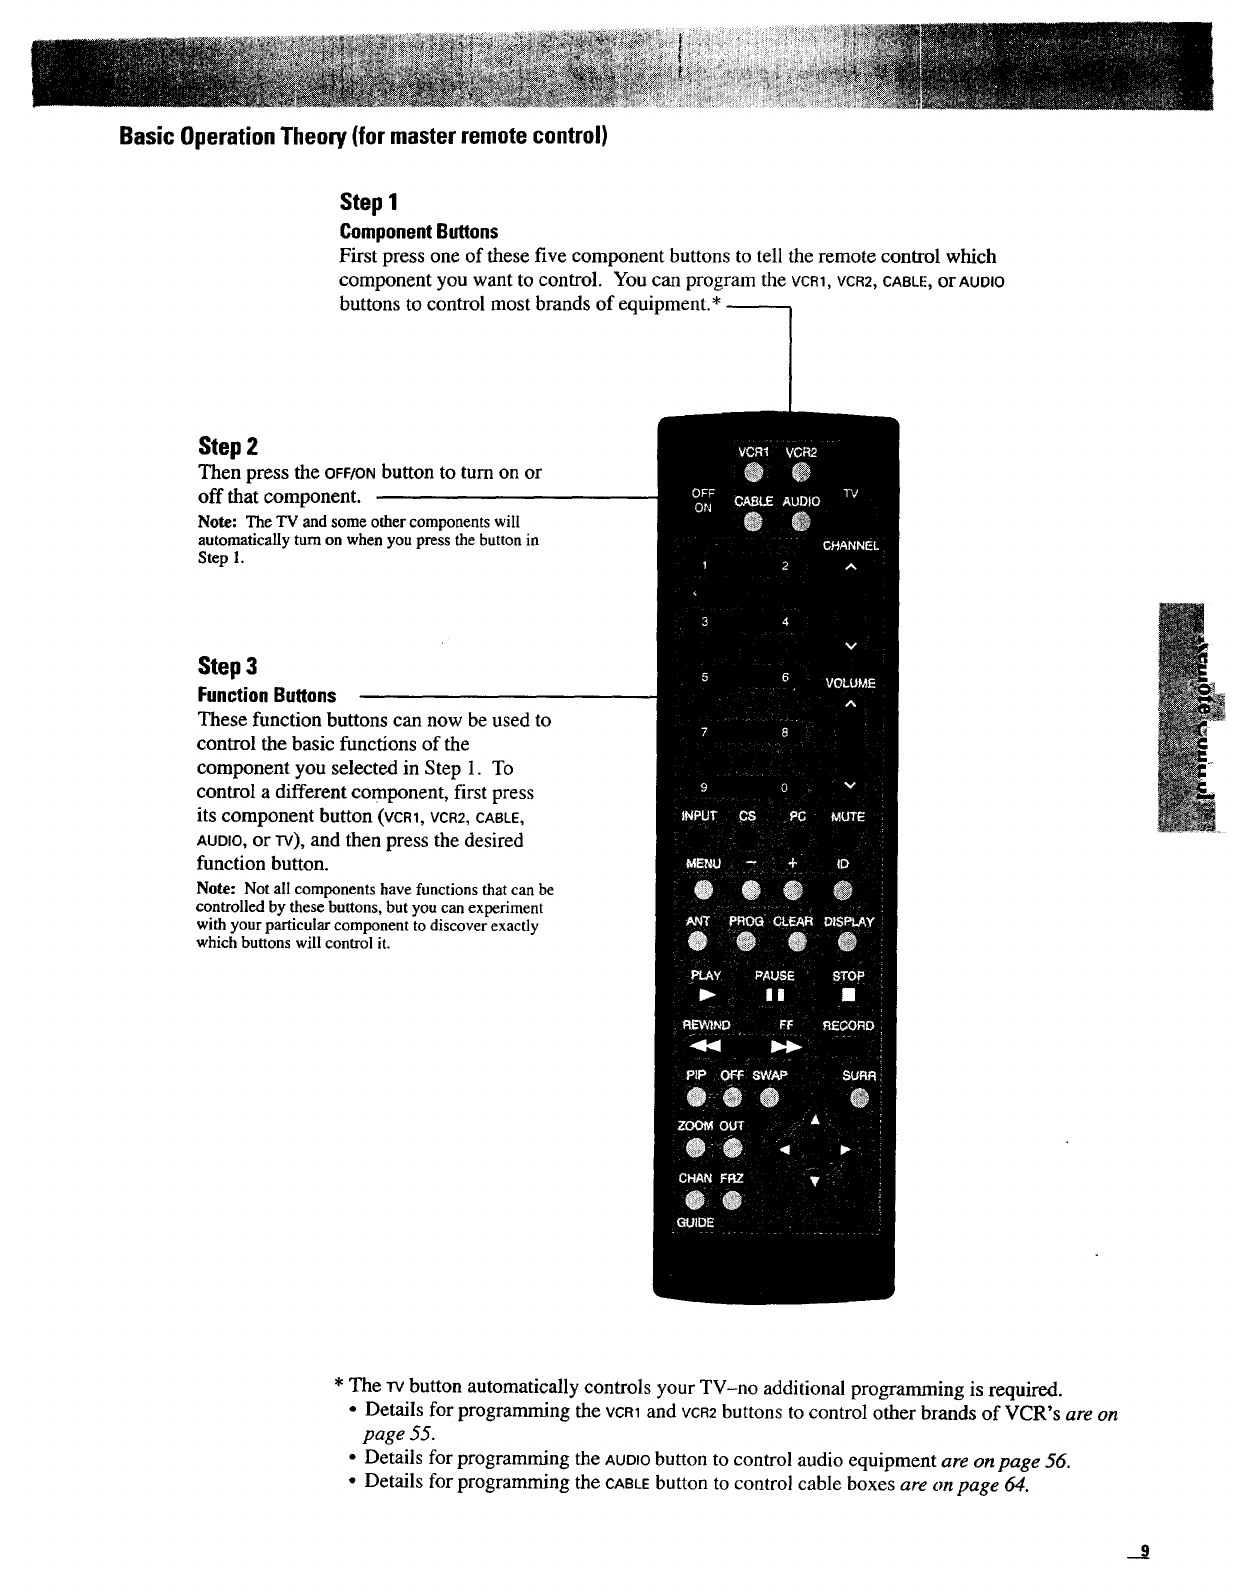
Basic Operation Theory (for master remote control)
Step 1
ComponentButtons
First press one of these five component buttons to tell the remote control which
component you want to control. You can program the vcR1, vcR2, CABLE',OrAOOJO
buttons to control most brands of equipment.*
Step 2
Then press the OFF/ON button to turn on or
off that component.
Note: The TVandsomeothercomponentswill
automatically turn on whenyou pressthebuttonin
Step 1.
Step 3
FunctionButtons
These function buttons can now be used to
control the basic functions of the
component you selected in Step 1. To
control a different component, first press
its component button (vcnl, VCR2,CABLE,
AUDIO,or TV),and then press the desired
function button.
Note: Not all components have functions that can be
controlled by these buttons, but you can experiment
with your particular component to discover exactly
which buttons will control it.
* The rv button automatically controls your TV-no additional programming is required.
• Details for programming the vcR1 and VCR2buttons to control other brands of VCR's are on
page 55.
•Details for programming the AUOIObutton to control audio equipment are on page 56.
•Details for programming the CABLEbutton to control cable boxes are on page 64.
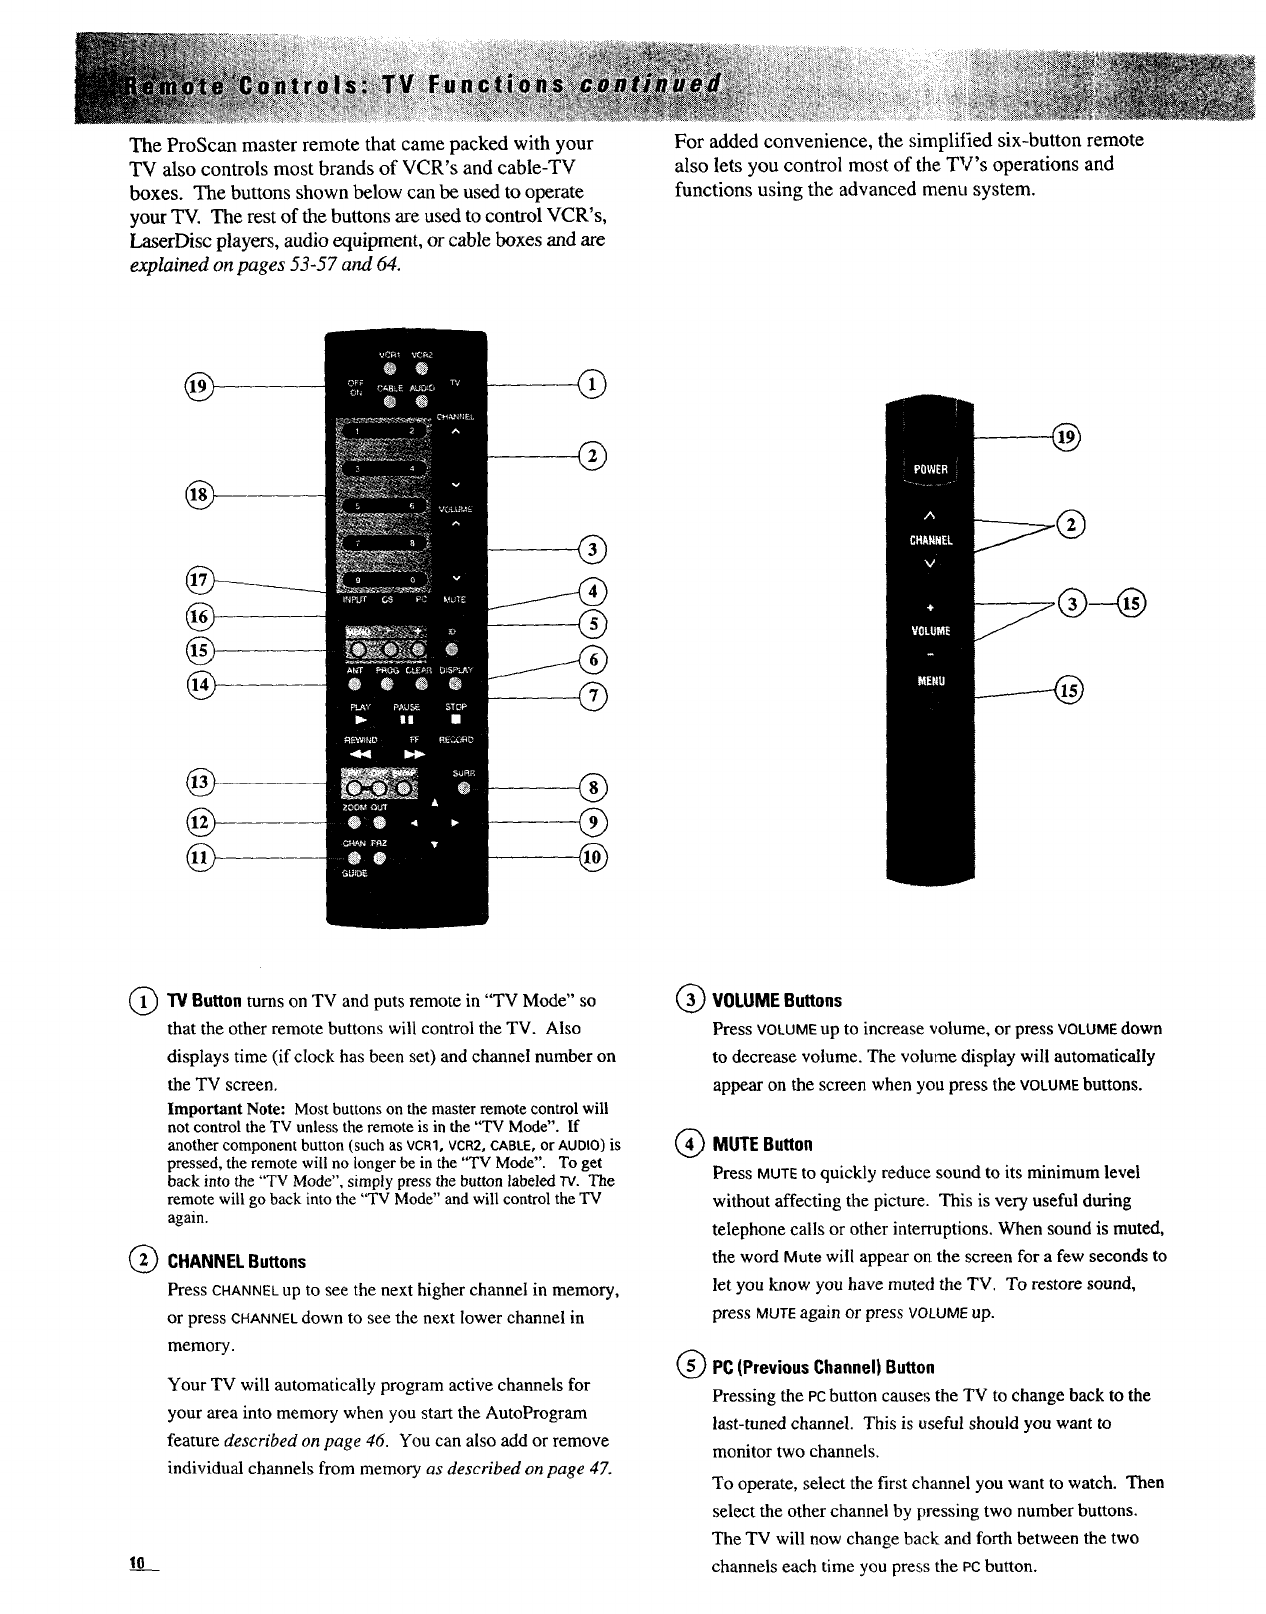
The ProScan master remote that came packed with your
TV also controls most brands of VCR's and cable-TV
boxes. The buttons shown below can be used to operate
your TV. The rest of the buttons are used to control VCR's,
LaserDisc players, audio equipment, or cable boxes and are
explained on pages 53-57 and 64.
For added convenience, the simplitled six-button remote
also lets you control most of the TV's operations and
functions using the advanced menu system.
@
®
®
®
®
@
(_)TV Button TV and in "TV Mode"
turns on puts remote so
that the other remote buttons will control the TV. Also
displays time (if clock has been set) and channel number on
the TV screen.
Important Note: Most buttons on the master remote control will
not control the TV unless the remote is in the "TV Mode". If
another component button (such as VCR1, VCR2, CABLE,or AUDIO) is
pressed, the remote will no longer be in the "TV Mode". To get
back into the "TV Mode", simply press the button labeled "Iv. The
remote will go back into the "TV Mode" and will control the TV
again.
(_ CHANNELButtons
Press CHANNELup to see the next higher channel in memory,
or press CHANNELdown to see the next lower channel in
memory.
Your TV will automatically program active channels for
your area into memory when you start the AutoProgram
feature described on page 46. You can also add or remove
individual channels from memory as described on page 47.
10
®
®
®
VOLUME Buttons
Press VOLUMEup to increase volume, or press VOLUMEdown
to decrease volume. The volume display will automatically
appear on the screen when you press the VOLUMEbuttons.
MUTE Button
Press MUTEto quickly reduce sound to its minimum level
without affecting the picture. This is very useful during
telephone calls or other inten_aptions. When sound is muted,
the word Mute will appear on the screen for a few seconds to
let you know you have muted the TV. To restore sound,
press MUTE again or press VOLUMEup.
PC (Previous Channel) Button
Pressing the PCbutton causes the TV to change back to the
last-tuned channel. This is useful should you want to
monitor two channels.
To operate, select the first channel you want to watch. Then
select the other channel by pressing two number buttons.
The TV will now change back and forth between the two
channels each time you press the PC button.
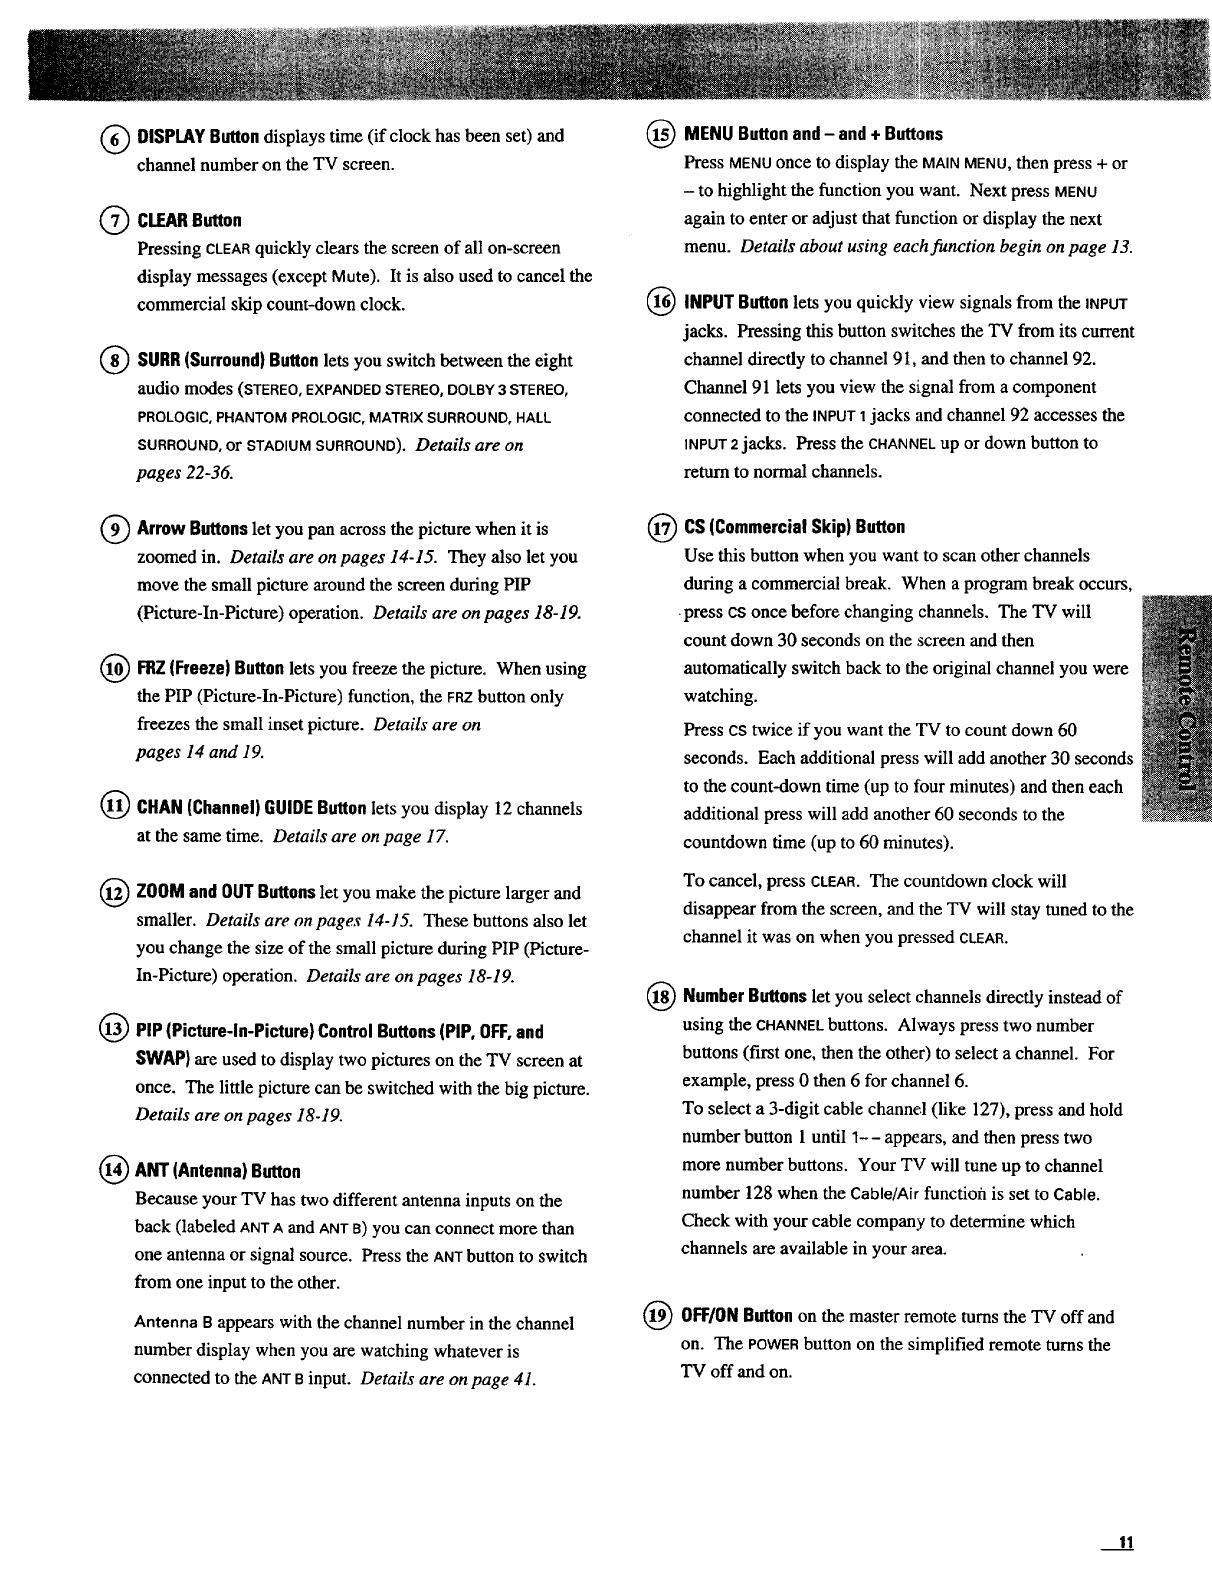
(_) DISPLAY Buttondisplays time (if clock has been set) and
channel number on the TV screen.
CLEARButton
Pressing CLEARquickly clears the screen of all on-screen
display messages (except Mute). It is also used to cancel the
commercial skip count-down clock.
(_) SURR (Surround) lets you switch betweenthe eight
Button
audio modes (STEREO, EXPANDED STEREO, DOLBY 3 STEREO,
PROLOGIC, PHANTOM PROLOGIC, MATRIX SURROUND, HALL
SURROUND, or STADIUM SURROUND). Details are on
pages 22-36.
Arrow Buttonslet the when it is
you pan across picture
zoomed in. Details are on pages 14-15. They also let you
move the small picture around the screen during PIP
(Picture-In-Picture) operation. Details are on pages 18-19.
FRZ(Freeze) Button lets freeze the Whenyou picture. using
the PIP (Picture-In-Picture) function, the FRZbutton only
freezes the small inset picture. Details are on
pages 14 and 19.
(_) CHAN (Channel) GUIDE Buttonlets you display 12 channels
at the same time. Details are on page 17.
(_ ZOOM and OUTButtonslet maLe the andyou picture larger
smaller. Details are onpages 14-15. These buttons also let
you change the size of the small picture during PIP (Picture-
In-Picture) operation. Details are on pages 18-19.
(_) PIP (Picture-In-Picture) Control Buttons(PIP, OFF,and
SWAP) are used to display two pictures on the TV screen at
once. The little picture can be switched with the big picture.
Details are on pages 18-19.
(_) ANT (Antenna) Button
Because your TV has two different antenna inputs on the
back (labeled ANTA and ANTB) yOUcan connect more than
one antenna or signal source. Press the ANTbutton to switch
from one input to the other.
Antenna B appears with the channel number in the channel
number display when you are watching whatever is
connected to the ANTB input. Details are on page 41.
®
@
MENU Button and - and + Buttons
Press MENUonce to display the MAINMENU,then press + or
- to highlight the function you want. Next press MENU
again to enter or adjust that function or display the next
menu. Details about using each function begin on page 13.
INPUT Buttonlets you quickly view signals from the INPUT
jacks. Pressing this button switches the TV from its current
channel directly to channel 91, and then to channel92.
Channel 91 lets you view the signal from a component
connected to the INPUT1jacks and channel 92 accesses the
INPUT2jacks. Press the CHANNELup or down button to
return to normal channels.
(_CS (Commercial Skip) Button
Use this button when you want to scan other channels
during a commercial break. When a program break occurs,
•press cs once before changing channels. The TV will
count down 30 seconds on the screen and then
automatically switch back to the original channel you were
watching.
Press cs twice if you want the TV to count down 60
seconds. Each additional press will add another 30 seconds
to the count-down time (up to four minutes) and then each
additional press will add another 60 seconds to the
countdown time (up to 60 minutes).
To cancel, press CLEAR.The countdown clock will
disappear from the screen, and the TV will stay tuned to the
channel it was on when you pressed CLEAR.
)Number you directly instead of
Buttons let select channels
using the CHANNELbuttons. Always press two number
buttons (first one, then the other) to select a channel. For
example, press 0 then 6 for channel 6.
To select a 3-digit cable channel (like 127), press and hold
number button 1until 1-- appears, and then press two
more number buttons. Your TV will tune up to channel
number 128 when the Cable/Air functiofa is set to Cable.
Check with your cable company to determine which
channels are available in your area.
(_) OFF/ON on master remote turns the TV off and
Button the
on. The POWERbutton on the simplified remote turns the
TV off and on.
11
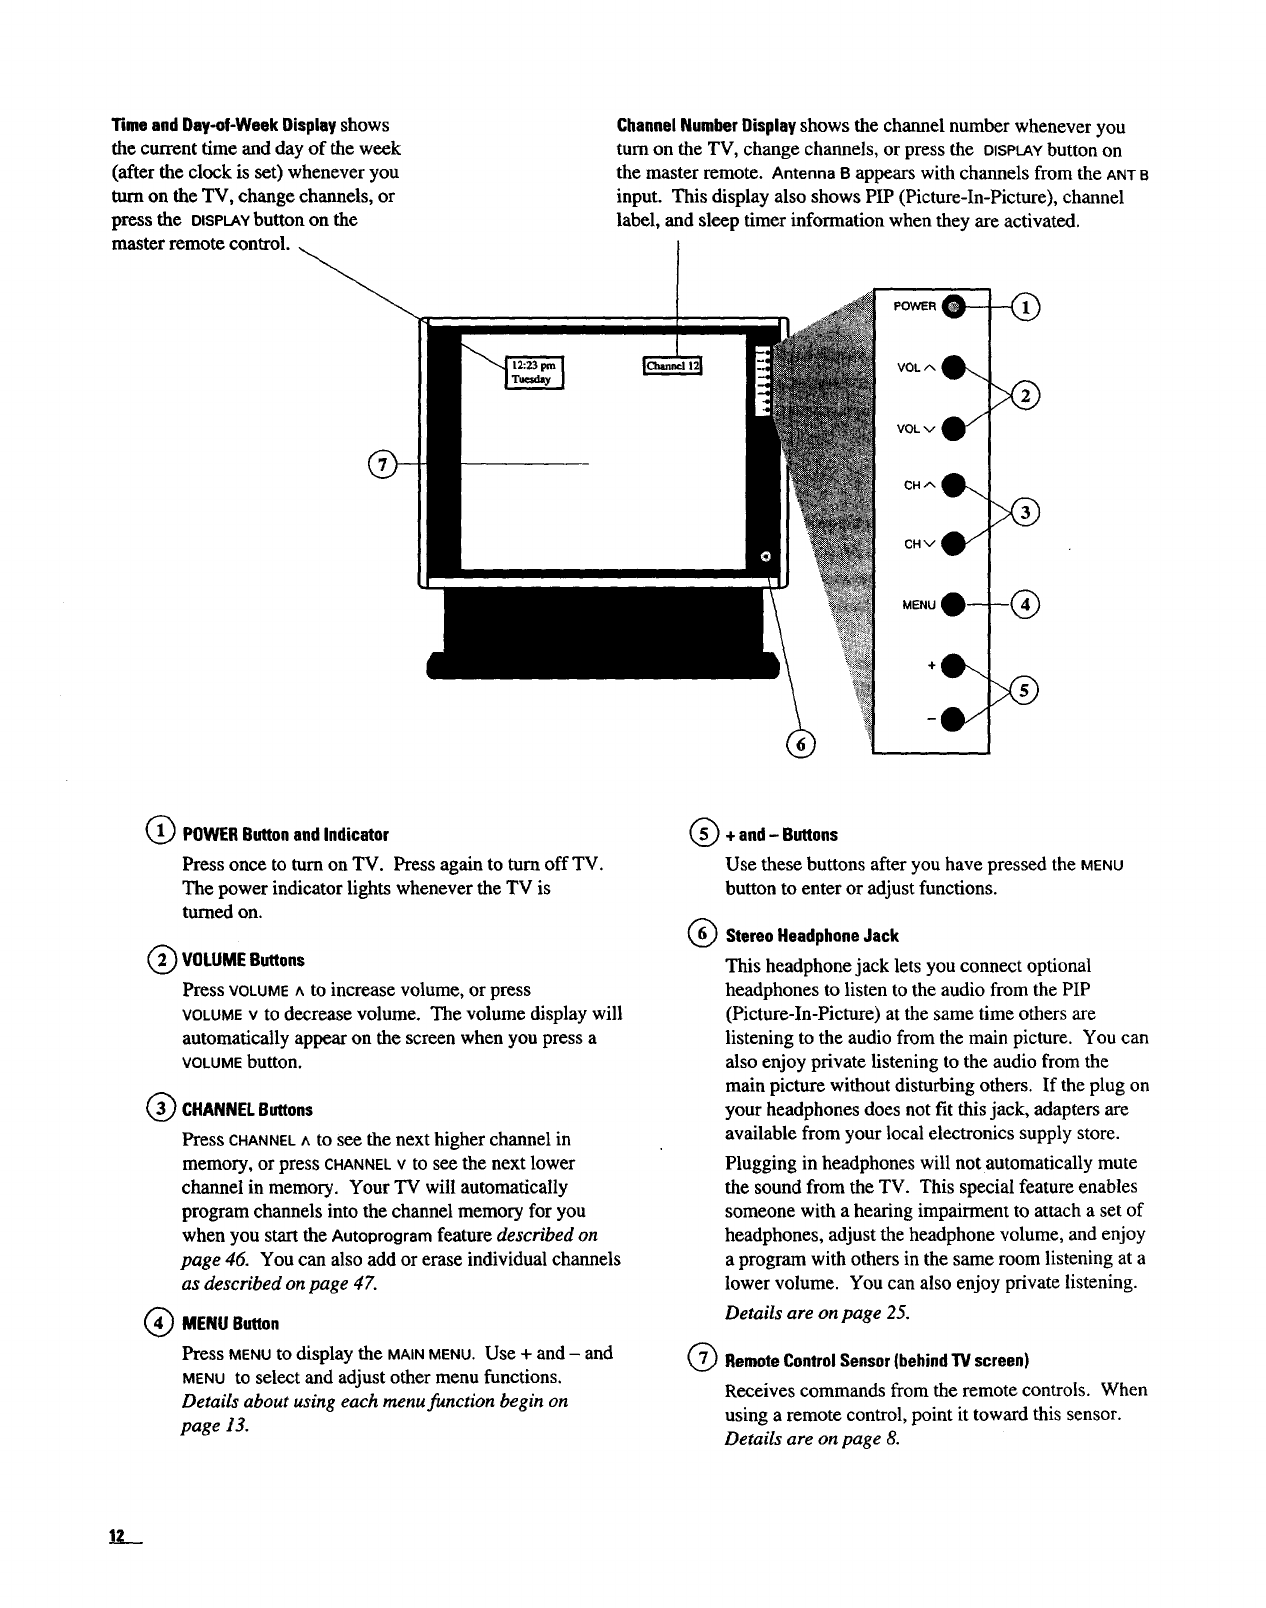
TimeandDay-of-WeekDisplayshows
the current time and day of the week
(after the clock is set) whenever you
turn on the TV, change channels, or
press the DISPLAYbutton on the
master remote control.
ChannelNumberDisplayshows the channel number whenever you
turn on the TV, change channels, or press the DISPLAYbutton on
the master remote. AntennaBappears with channels from the ANTS
input. This display also shows PIP (Picture-In-Picture), channel
label, and sleep timer information when they are activated.
POWER _-
VOL A
VOL v
CHA
CHV
MENU e--
-O
-®
(_ POWERButtonand Indicator
Press once to turn on TV. Press again to turn off TV.
The power indicator lights whenever the TV is
turned on.
(_) VOLUMEButtons
Press VOLUMEA to increase volume, or press
VOLUMEVto decrease volume. The volume display will
automatically appear on the screen when you press a
VOLUME button.
QCHANNELButtons
Press CHANNEL A to see the next higher channel in
memory, or press CHANNELV to See the next lower
channel in memory. Your TV will automatically
program channels into the channel memory for you
when you start the Autoprogramfeature described on
page 46. You can also add or erase individual channels
as described on page 47.
MENUButton
Press MENU to display the MAIN MENU. Use +and -and
MENUto select and adjust other menu functions.
Details about using each menu function begin on
page 13.
®
®
Q
+ and- Buttons
Use these buttons after you have pressed the MENU
button to enter or adjust functions.
Stereo HeadphoneJack
This headphone jack lets you connect optional
headphones to listen to the audio from the PIP
(Picture-In-Picture) at the same time others are
listening to the audio from the main picture. You can
also enjoy private listening to the audio from the
main picture without disturbing others. If the plug on
your headphones does not fit this jack, adapters are
available from your local electronics supply store.
Plugging in headphones will not automatically mute
the sound from the TV. This special feature enables
someone with a hearing impairment to attach a set of
headphones, adjust the headphone volume, and enjoy
a program with others in the same room listening at a
lower volume. You can also enjoy private listening.
Details are on page 25.
RemoteControlSensor(behindTVscreen)
Receivescommandsfrom the remote controls. When
using a remote control, point it toward this sensor.
Details are on page 8.
IZ
Your TV's advanced menu system allows you to select and
operate any of the TV's functions through the MAiNMENU
using either remote control or the TV's front control panel.
Several of the TV functions (such as mute, freeze, zoom,
PIP, channel guide, etc.) can be directly accessed using
buttons on the master remote control.
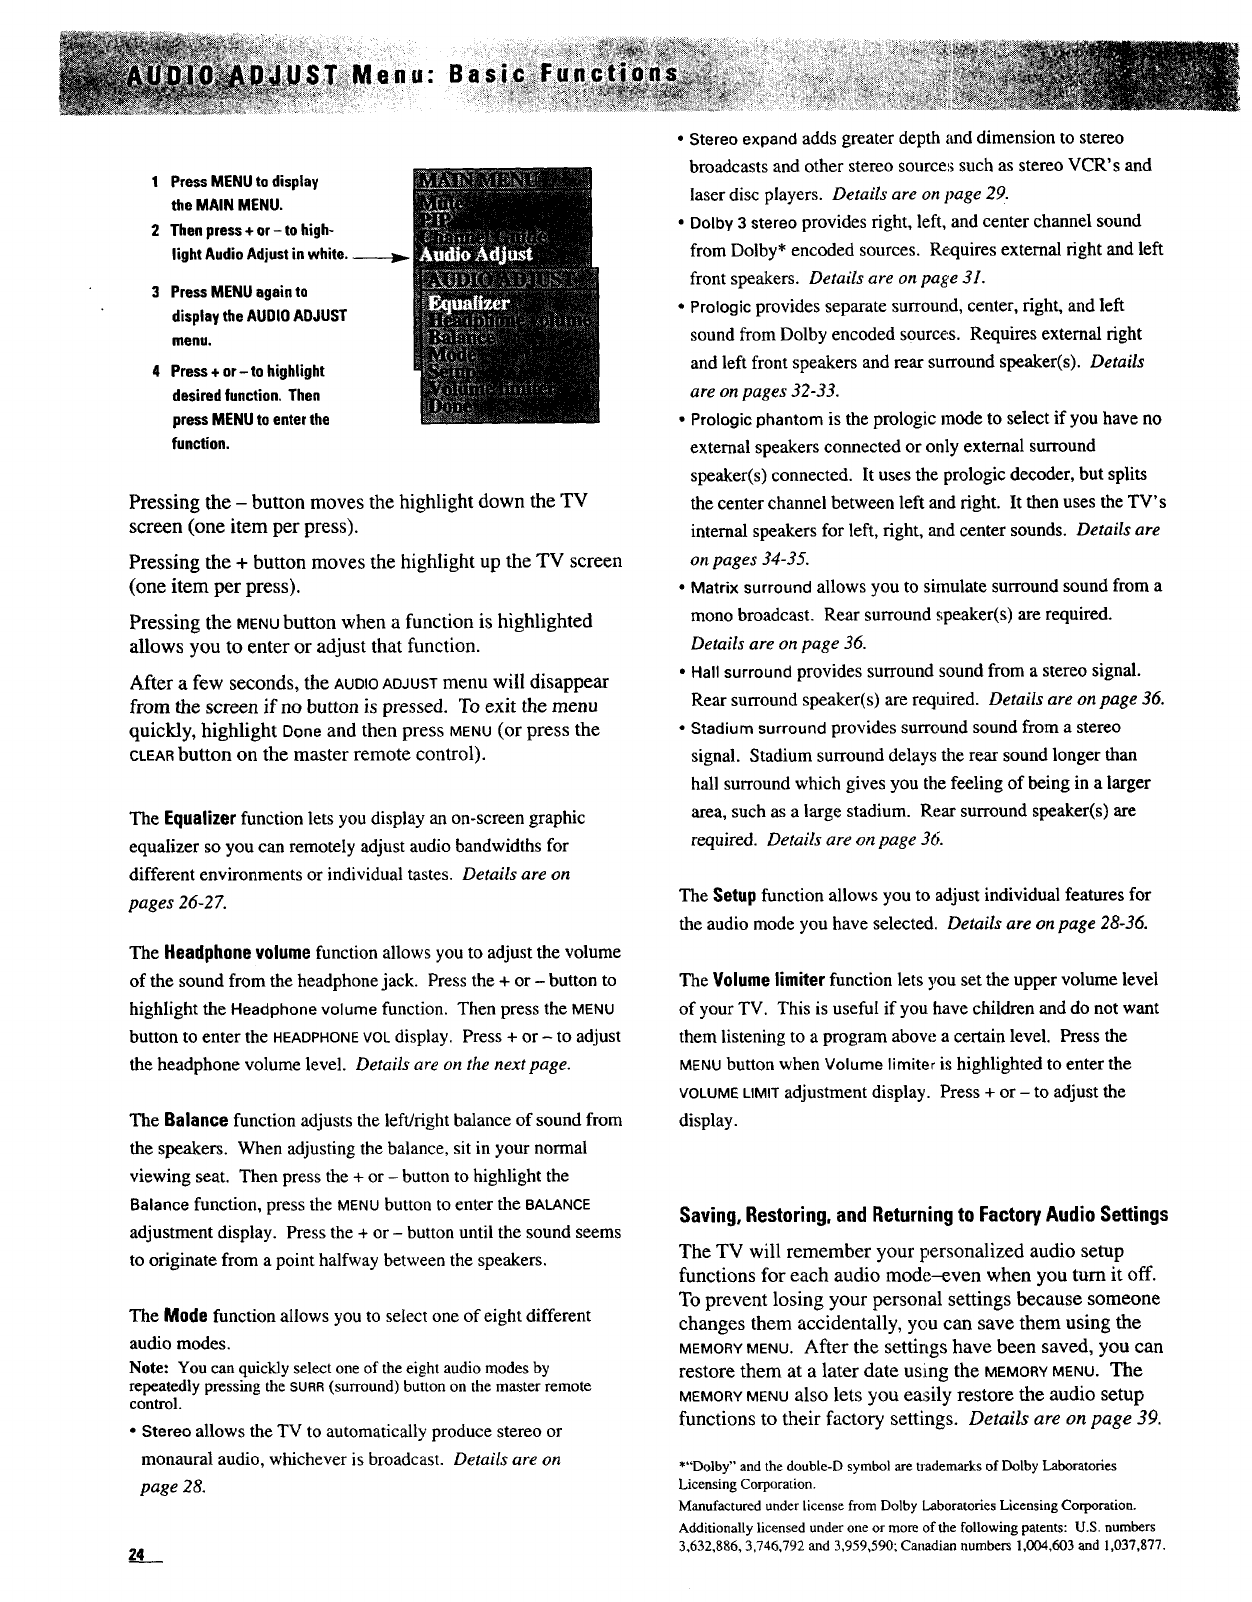
The Audio Adjust menu allows you to adjust the equalizer, adjust
the headphone's volume, adjust right and left balance, select one
of eight different audio modes (each with individual setup
features), and set the volume limit of your TV. Details are on
pages 23-36.
1 Pressthe MENU
buttonto displaythe
MAIN MENU.
2 Repeatedlypressthe
+ or- buttonto
highlight the desired
functionin white.
3 Pressthe MENU
buttonagain to enter
oradjust the function.
Pressing the - button moves the highlight down the screen
(one item per press).
Pressing the + button moves the highlight up the screen
(one item per press).
Pressing the MENUbutton when a function is highlighted
allows you to enter or change that function.
After a few seconds, the MAfNMENUwill disappear from the
screen if no button is pressed. To exit the menu quickly,
highlight Done and then press MENUor press the CLEAR
button on the master remote control.
Mute reduces the TV's sound to a minimum level. Press the
MENUbutton when Mute is highlighted to mute the sound.
The PIP (Picture-In-Picture) function displays one of two Pix-ln-
Pixmenus.
•The first Pix-ln-Pix menu lets you freeze, zoom, pan, and apply
special effects to the main picture. It also lets you turn on the
PIP feature. Details are on pages 14-16.
•The second Pix-ln-Pix menu allows you to swap, freeze, move,
adjust the size of the small inset picture and select which
picture's (PIP or main) audio the headphone jack will receive.
Details about operating PIP are on pages 18-21.
Channel Guide continually displays small pictures across the TV
screen. Only the channels (normal or priority) selected with the
Channels: normal/priority function in the MAINMENUwill appear.
Details are on page 17.
The Video Adjustmenu allows you to adjust the color, tint,
contrast, brightness, sharpness, color temperature, noise
reduction, and turn auto color on or off for the TV's picture.
Details are on page 37.
The Setup menu allows you to select [he antenna input, setup a
priority channel scan list, program the scheduler, edit the channel
memory, set the clock, AutoProgram the scan list, setup your
VCR and cable channels, set cable/air function, and turn on or
off the auto-help screens that appear at the bottom of the screen.
Details begin on page 40.
The Help function offers a variety of on-screen instructions and
diagrams to assist you in the operation and connection of your
TV. To enter the HELPMENUand display the help screens, follow
the instructions below.
1 Pressthe MENUbuttonwhen Help is
highlightedto displaythe HELP
MENU.
2 Repeatedlypressthe + or- buttonto
highlightthe desiredhelp function.
3 Pressthe MENU buttonagainto
entera help screen.
4 Then press +to continueor MENU to
exita help screen.
Notes: The HELPMENUand help screens will remain on the TV screen
until you exit the Help function.
Special functions allow you to activate the sleep timer, set the
time-reminder feature, and start TV demonstrations (auto, IDTV,
and sleep). You can also save your per,;onalized audio and video
settings to be recalled later or return audio and video to factory
settings.. You can select Closed Captioning to display the audio
portion of a program as text or show cmrent program
information. Details are on page 38-39.
The Channels: priority/normal function switches the channel
memory scan list between normal and priority channels. Details
are on page 42.
13
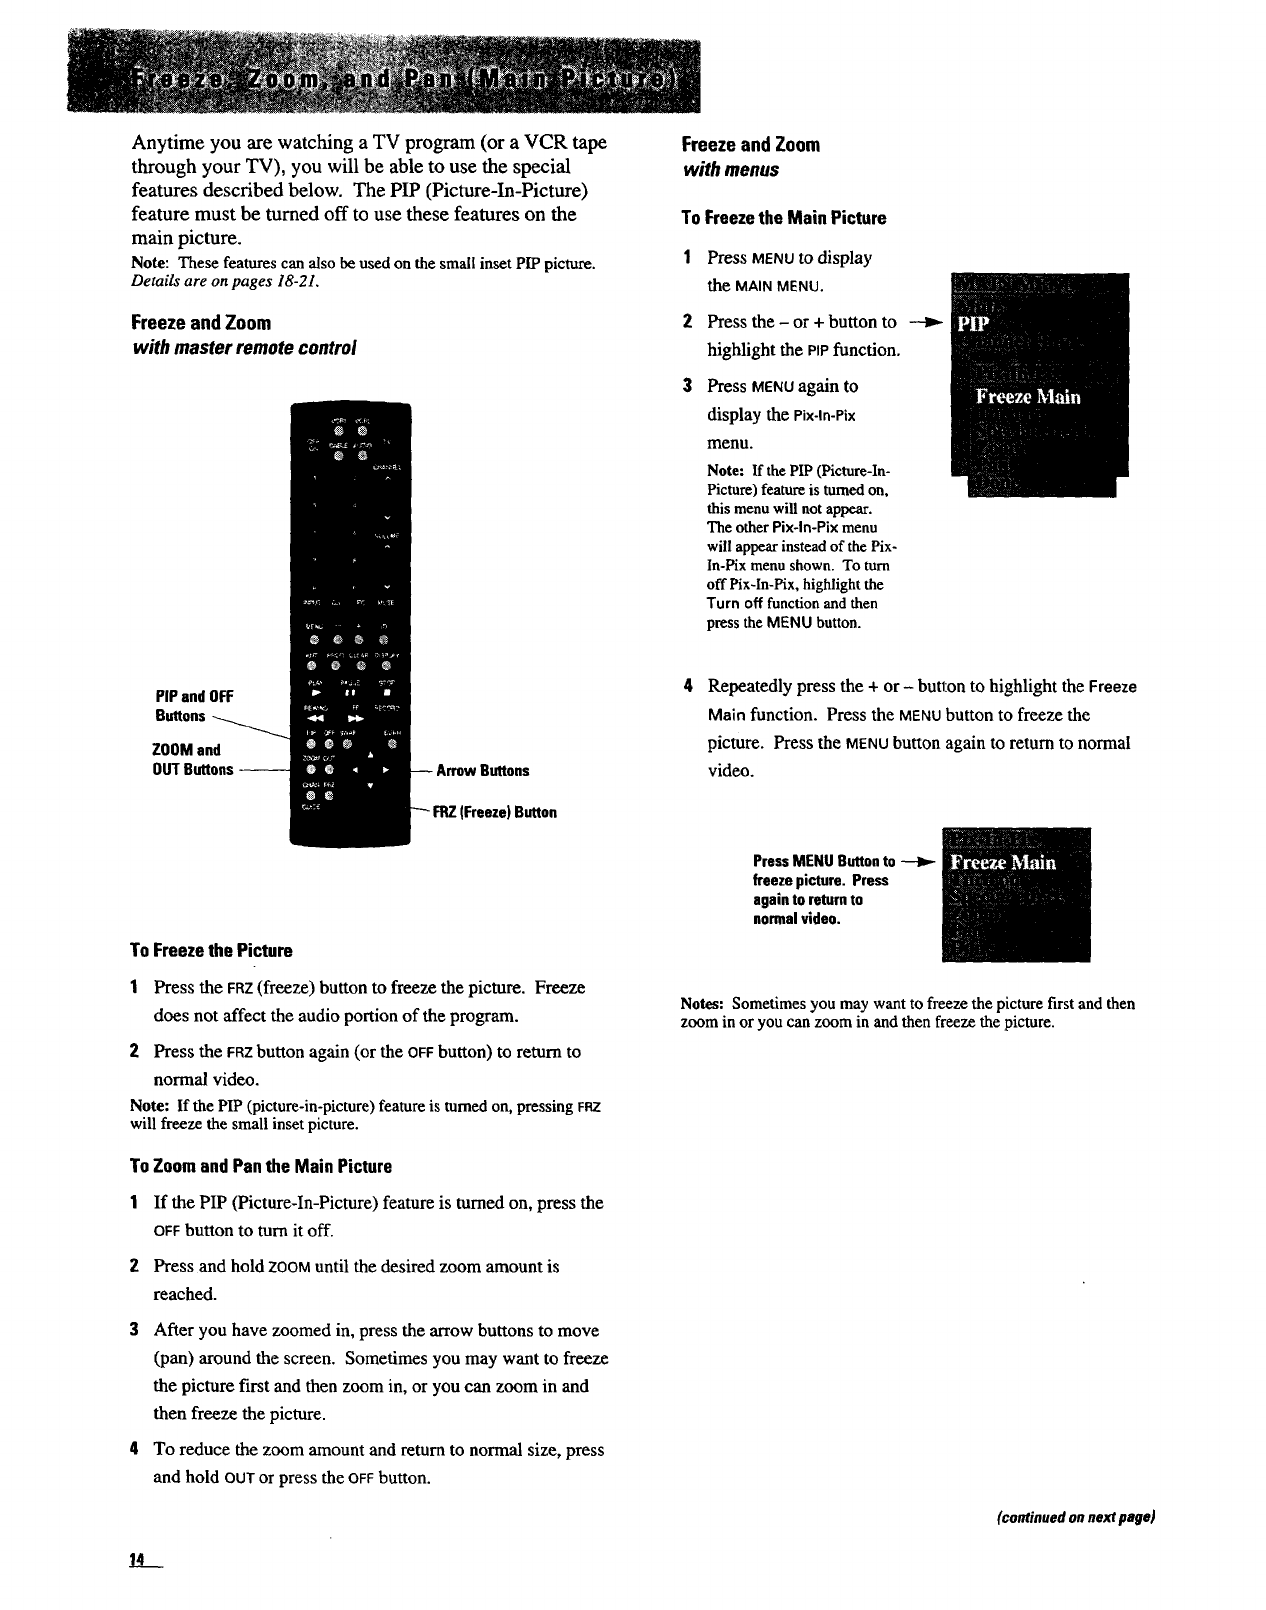
Anytime you are watching a TV program (or a VCR tape
through your TV), you will be able to use the special
features described below. The PIP (Picture-In-Picture)
feature must be turned off to use these features on the
main picture.
Note: These features can also be used on the small inset PIPpicture.
Details are on pages 18-21.
FreezeandZoom
with master remotecontrol
PiPand OFF
Buttons
ZOOMand
OUTButtons -- Buttons
Freeze)Button
To FreezethePicture
1Press the FRZ(freeze) button to freeze the picture. Freeze
does not affect the audio portion of the program.
2Press the FRZbutton again (or the OFFbutton) to return to
normal video.
Note: If the PIP (picture-in-picture) feature is turnedon, pressing FraY.
will freeze the small inset picture.
To Zoom and Pan the Main Picture
1If the PIP (Picture-In-Picture) feature is turned on, press the
OFFbutton to turn it off.
Press and hold ZOOMuntil the desired zoom amount is
reached.
3After you have zoomed in, press the arrow buttons to move
(pan) around the screen. Sometimes you may want to freeze
the picture first and then zoom in, or you can zoom in and
then freeze the picture.
4To reduce the zoom amount and return to normal size, press
and hold OUTor press the OFFbutton.
4!!____
Freezeand Zoem
with menus
To Freeze the Main Picture
3
Press MENUto display
the MAIN MENU.
Press the - or + button to
highlight the PP function.
Press MENU again to
display the Pix-ln-Pix
menu.
Note: If the PIP (Picture-In-
Picture) feature is turned on,
this menu will not appear.
The other Pix-ln-Pix menu
will appear instead of the Pix-
In-Pix menu shown. To turn
off Pix-In-Pix, highlight the
Turn off function and then
press the MENU button.
Repeatedly press the + or - button to highlight the Freeze
Main function. Press the MENU button to freeze the
picture. Press the MENUbutton again to return to normal
video.
PressMENU Buttonto
freeze picture. Press
againto returnto
normalvideo.
Notes: Sometimes you may want to freeze the picture first and then
zoom in or you can zoom in and then freeze the picture.
(continued on next page)
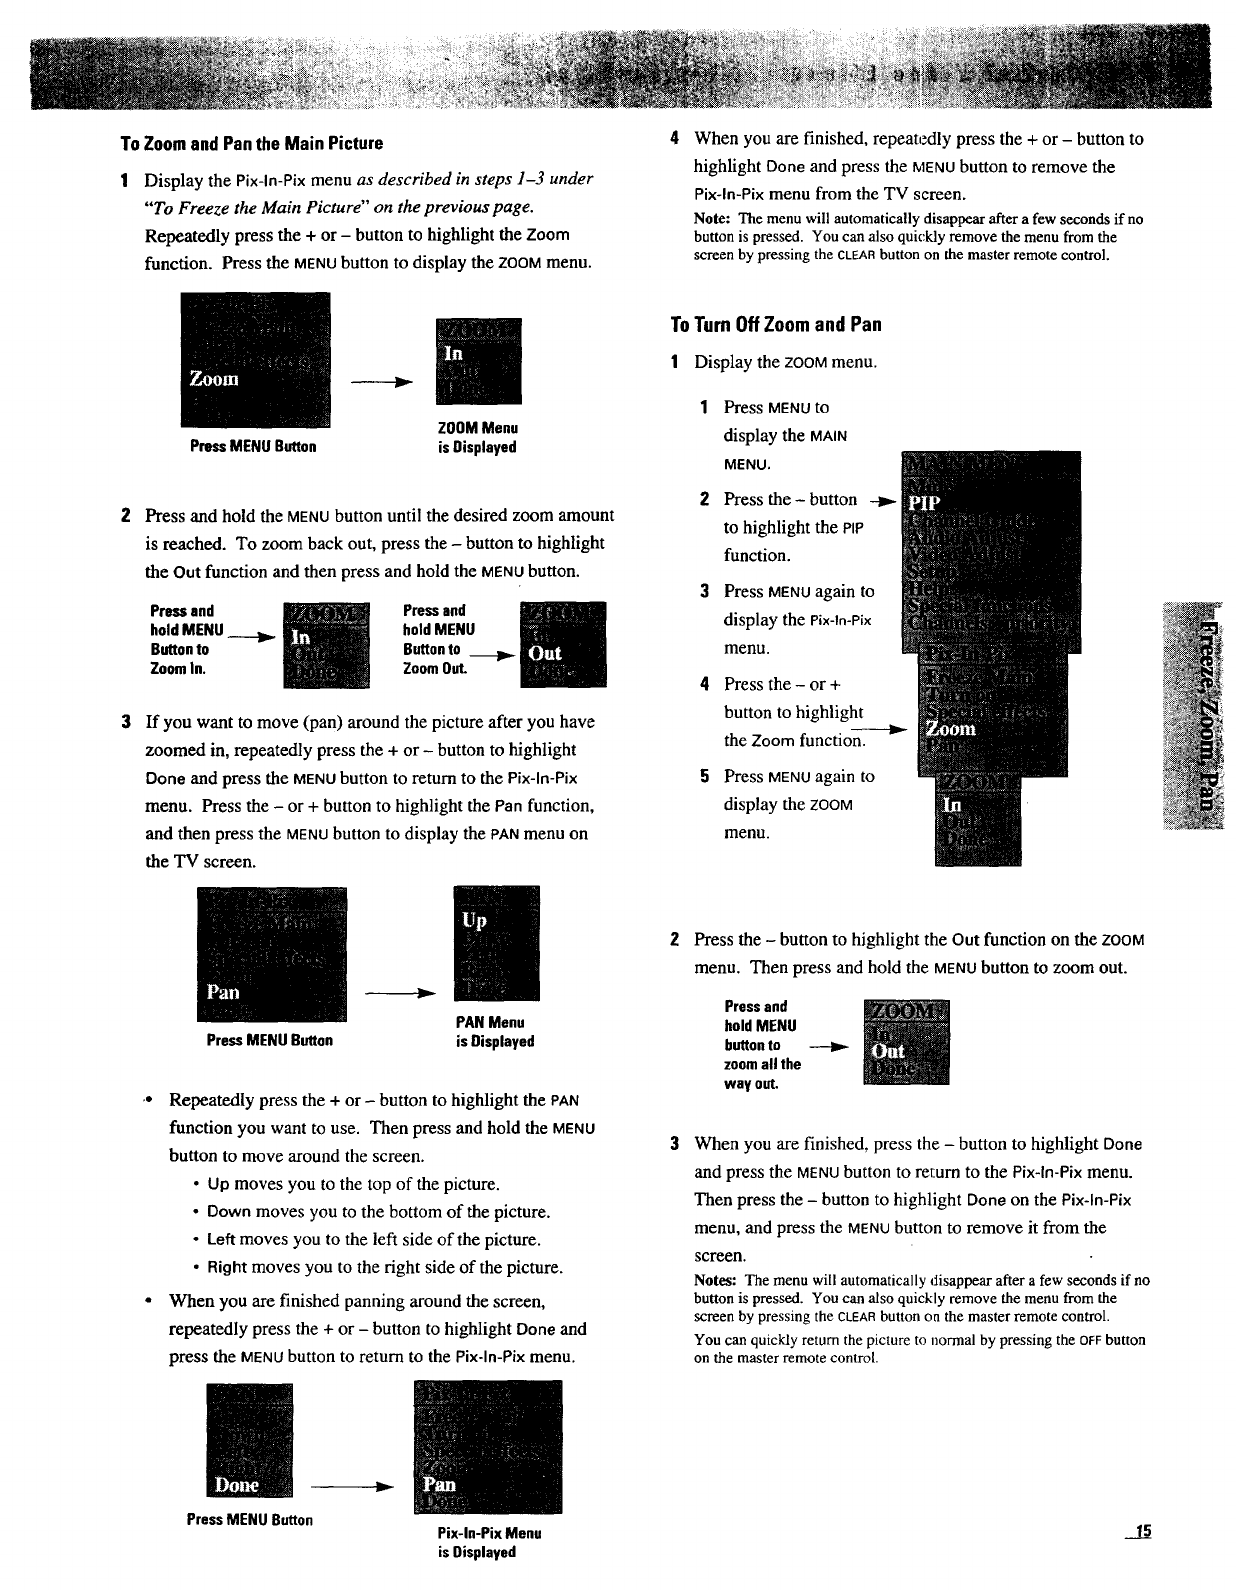
To Zoom and Pan the Main Picture
Display the Pix-ln-Pix menu as described in steps 1-3 under
"To Freeze the Main Picture" on the previous page.
Repeatedly press the + or - button to highlight the Zoom
function. Press the MENUbutton to display the ZOOMmenu.
PressMENU Button
When you are finished, repeatedly press the + or - button to
highlight Done and press the MENUbutton to remove the
Pix-ln-Pix menu from the TV screen.
Note: The menu will automatically disappear after a few seconds if no
button is pressed. You can alsoquickly remove the menu from the
screen by pressing the CLEARbutton on the master remote control.
ZOOMMenu
is Displayed
Press and hold the MENUbutton until the desired zoom amount
is reached. To zoom back out, press the - button to highlight
the Out function and then press and hold the MENUbutton.
Pressand
hold MENU
Buttonto
ZoomIn.
Pressand
hold MENU
Buttonto
ZoomOut
If you want to move (pan) around the picture after you have
zoomed in, repeatedly press the + or -button to highlight
Done and press the MENUbutton to return to the Pix-ln-Pix
menu. Press the - or + button to highlight the Pan function,
and then press the MENUbutton to display the PANmenu on
the TV screen.
PressMENU Button
ToTurnOffZoomand Pan
1Display the ZOOMmenu.
1Press MENU to
display the MAIN
MENU.
2Press the -button --_
to highlight the PIP
function.
Press MENUagain to
display the Pix-ln-Pix
menu.
4Press the -or +
button to highlight---I1_
the Zoom function.
Press MENU again to
display the ZOOM
menu.
PAN Menu
is Displayed
.. Repeatedly press the + or -button to highlight the PAN
function you want to use. Then press and hold the MENU
button to move around the screen.
• Up moves you to the top of the picture.
• Down moves you to the bottom of the picture.
• Left moves you to the left side of the picture.
•Right moves you to the right side of the picture.
• When you are finished panning around the screen,
repeatedly press the + or - button to highlight Done and
press the MENUbutton to return to the Pix-ln-Pix menu.
Press the -button to highlight the Out function on the ZOOM
menu. Then press and hold the MENUbutton to zoom out.
Pressand
hold MENU
buttonto
zoomall the
way out.
When you are finished, press the - button to highlight Done
and press the MENUbutton to return to the Pix-ln-Pix menu.
Then press the - button to highlight Done on the Pix-ln-Pix
menu, and press the MENUbutton to remove it from the
screen.
Notes: The menu will automatically disappear after a few seconds if no
button is pressed. You can alsoquickly remove the menufrom the
screen by pressing the CLEARbutton on the masterremote control.
You can quickly return the picture to normal by pressing the OFFbutton
onthe master remote control.
PressMENU Button
y
Pix-ln-PixMenu
is Displayed
__!5
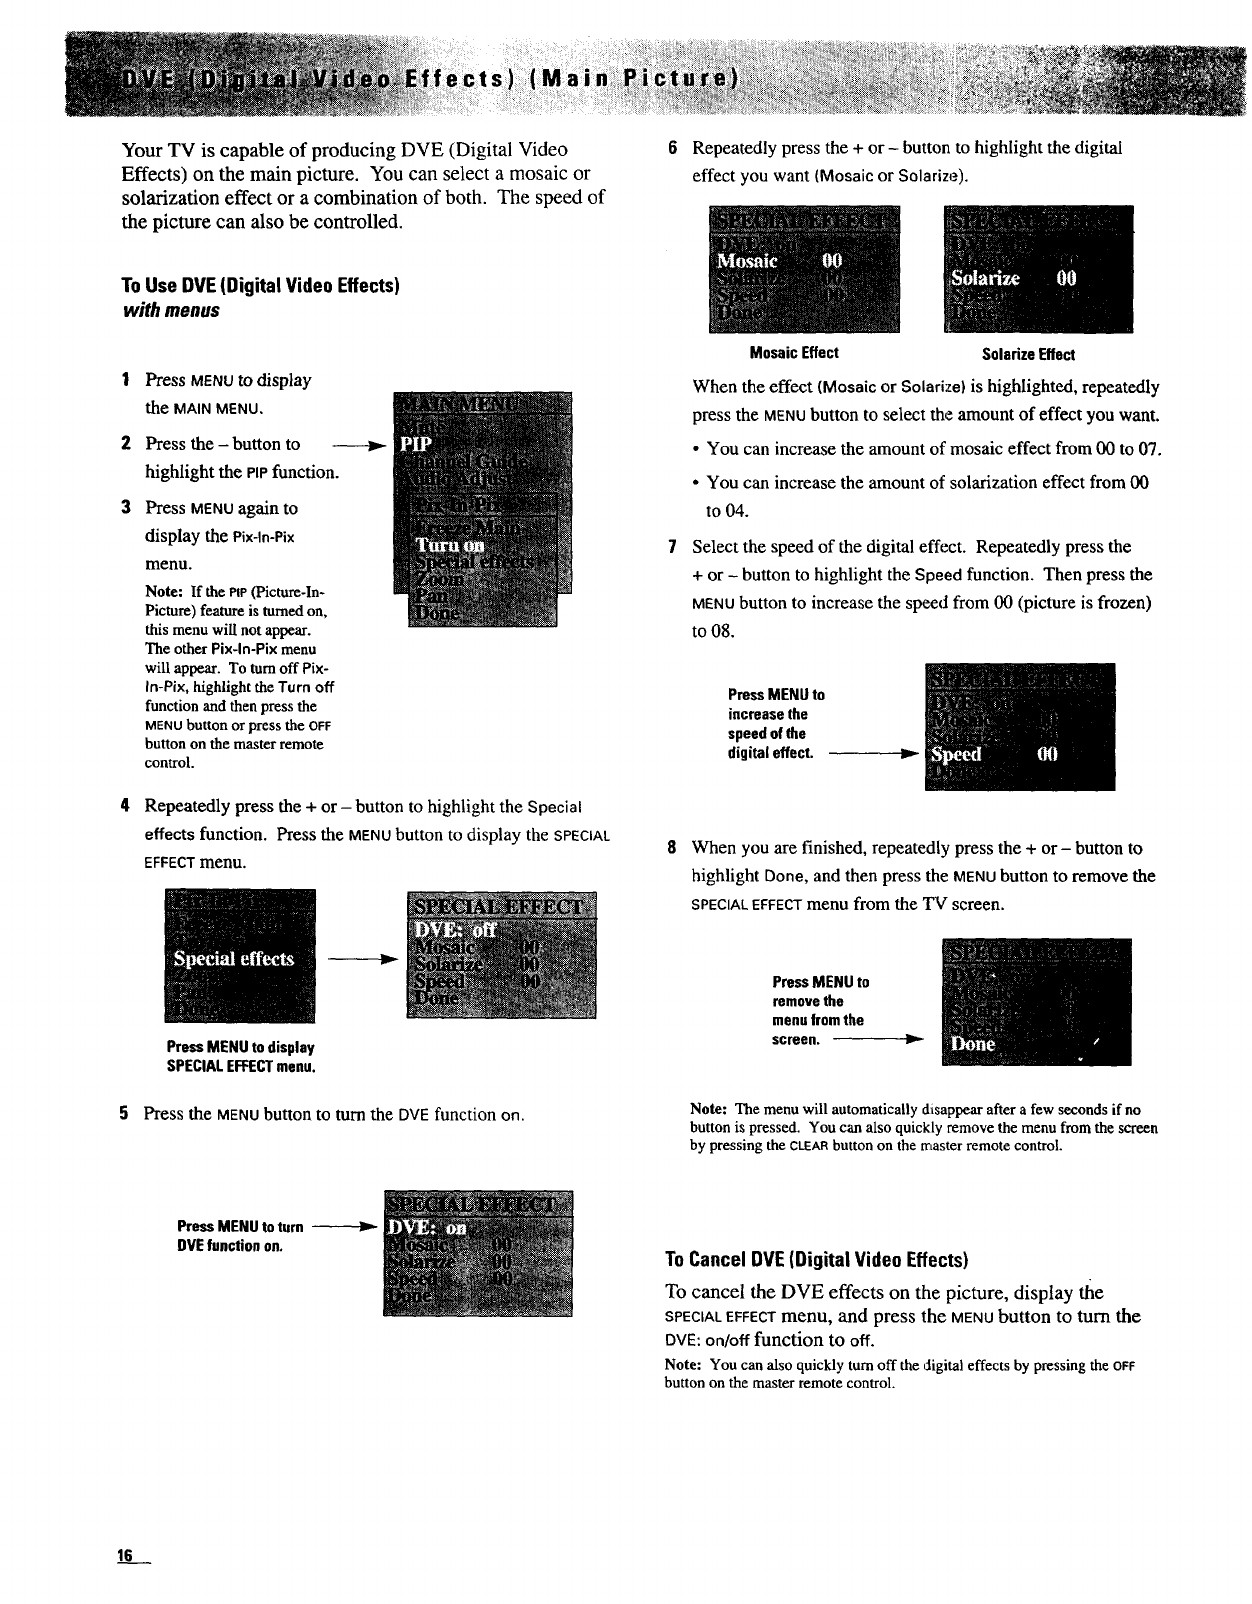
Your TV is capable of producing DVE (Digital Video
Effects) on the main picture. You can select a mosaic or
solarization effect or a combination of both. The speed of
the picture can also be controlled.
ToUse DVE(Digital Video Effects)
with menus
Press MENU to display
the MAIN MENU,
Press the - button to
highlight the PIPfunction.
Press MENU again to
display the Pix-ln-Pix
menu.
Note: If the PIP(Picture-In-
Picture) feature is turned on,
this menu will not appear.
The other Pix-ln-Pix menu
will appear. To turn off Pix-
In-Pix, highlight the Turn off
function and then press the
MENUbutton or press the OFF
button on the master remote
control.
Repeatedly press the + or - button to highlight the Special
effects function. Press the MENUbutton to display the SPECIAL
EFFECTmenu.
PressMENU to display
SPECIALEFFECTmenu.
5Press the MENU button to turn the DVEfunction on.
Repeatedly press the + or - button to highlight the digital
effect you want (Mosaic or Solarize).
MosaicEffect SolarizeEffect
When the effect (Mosaic or Solarize) is highlighted, repeatedly
press the MENUbutton to select the amount of effect you want.
•You can increase the amount of mosaic effect from 00 to 07.
• You can increase the amount of solarization effect from O0
to 04.
Select the speed of the digital effect. Repeatedly press the
+ or -button to highlight the Speed function. Then press the
MENUbutton to increase the speed from O0 (picture is frozen)
to 08.
PressMENU to
increasethe
speedof the
digital effect.
8When you are finished, repeatedly press the + or- button to
highlight Done, and then press the MENUbutton to remove the
SPECIAL EFFECT menu from the TV screen.
PressMENU to
removethe
menufromthe
screen. ._-
Note: The menuwill automaticallydisappear after a few seconds if no
buttonis pressed. You can also quickly remove the menu fromthe screen
by pressing the CLEARbuttonon the masterremote control.
PressMENU to turn
DVEfunction on. To Cancel DVE(Digital Video Effects)
To cancel the DVE effects on the picture, display tile
SPECIALEFFECTmenu, and press the MENUbutton to turn the
DYE:on/off function to off.
Note: You can also quicklyturn off the digital effects by pressing the OFF
button on the master remote control.
16
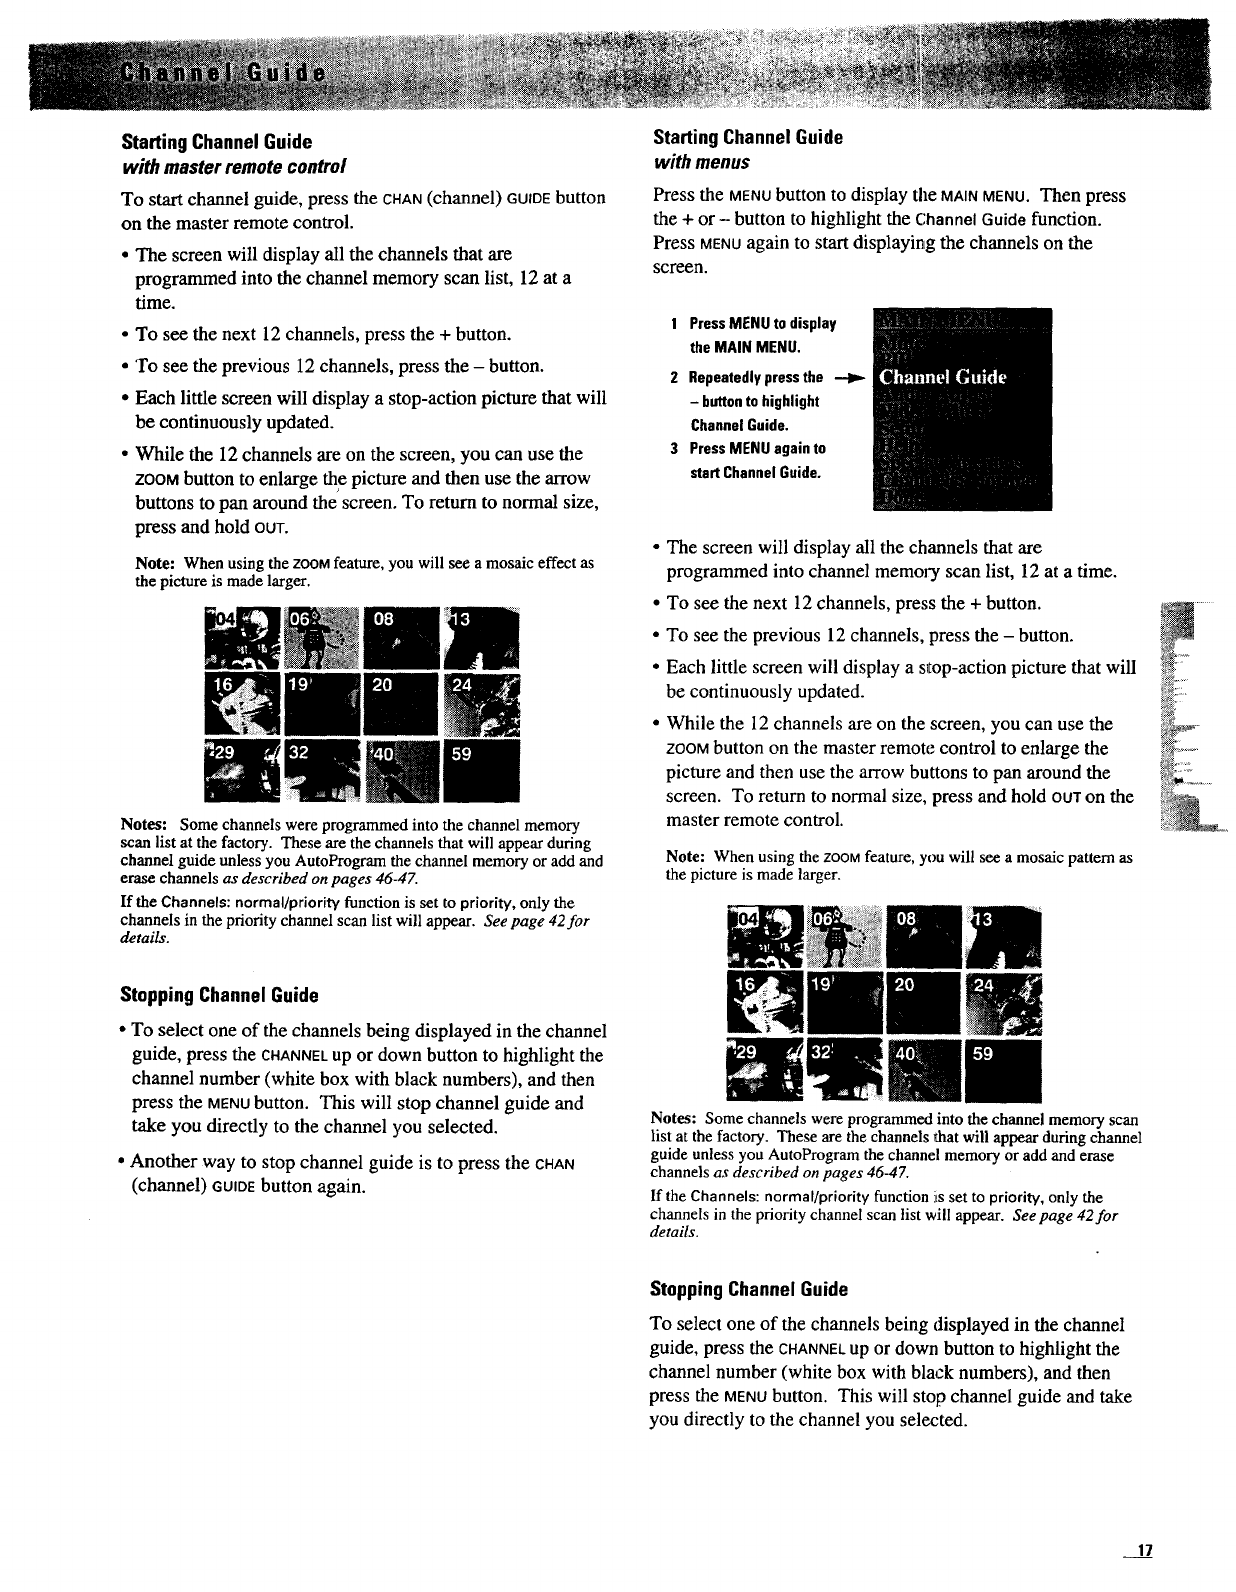
Starting ChannelGuide
with master remotecontrol
To start channel guide, press the CHAN(channel) GUIDEbutton
on the master remote control.
•The screen will display all the channels that are
programmed into the channel memory scan list, 12 at a
time.
• To see the next 12 channels, press the + button.
• To see the previous 12 channels, press the - button.
• Each little screen will display a stop-action picture that will
be continuously updated.
• While the 12 channels are on the screen, you can use the
ZOOMbutton to enlarge _e picture and then use the arrow
buttons to pan around the screen. To return to normal size,
press and hold OUT.
Note: When using the ZOOMfeature, you will see a mosaic effect as
the picture is made larger.
Notes: Some channels were programmed into the channel memory
scan list at the factory. These are the channels that will appear during
channel guide unless you AutoProgram the channel memory or add and
erase channels as described on pages 46-47.
If the Channels: norrnal/priori_ function is set to prioriW, only the
channels in the priority channel scan list will appear. See page 42for
details.
StartingChannelGuide
with menus
Press the MENUbutton to display the MAINMENU.Then press
the + or - button to highlight the Channel Guido function.
Press MENUagain to start displaying the channels on the
screen.
1 PressMENU to display
the MAIN MENU.
2 Repeatedlypressthe --Ira-
- buttonto highlight
ChannelGuide.
3 PressMENU againto
startChannel Guide.
• The screen will display all the channels that are
programmed into channel memol-y scan list, 12 at a time.
•To see the next 12 channels, press the + button.
• To see the previous 12 channels, press the - button.
• Each little screen will display a s_Iop-actionpicture that will
be continuously updated.
• While the 12 channels are on the screen, you can use the
ZOOMbutton on the master remote control to enlarge the
picture and then use the arrow buttons to pan around the
screen. To return to normal size, press and hold our on the
master remote control.
Note: When using the ZOOMfeature, you will see a mosaic pattern as
the picture is made larger.
StoppingChannelGuide
• To select one of the channels being displayed in the channel
guide, press the CHANNELup or down button to highlight the
channel number (white box with black numbers), and then
press the MENUbutton. This will stop channel guide and
take you directly to the channel you selected.
°Another way to stop channel guide is to press the CHAN
(channel) GUIDEbutton again.
Notes: Some channels were programmed into the channel memory scan
list at the factory. These are the channels that will appear during channel
guide unless you AutoProgram the channel memory or add and erase
channels as described on pages 46-47.
lfthe Channels: normal/priority function Jisset to priority, only the
channels in the priority channel scan list will appear. Seepage 42for
details.
StoppingChannelGuide
To select one of the channels being displayed in the channel
guide, press the CHANNELup or down button to highlight the
channel number (white box with black numbers), and then
press the MENUbutton. This will stop channel guide and take
you directly to the channel you selected.
17
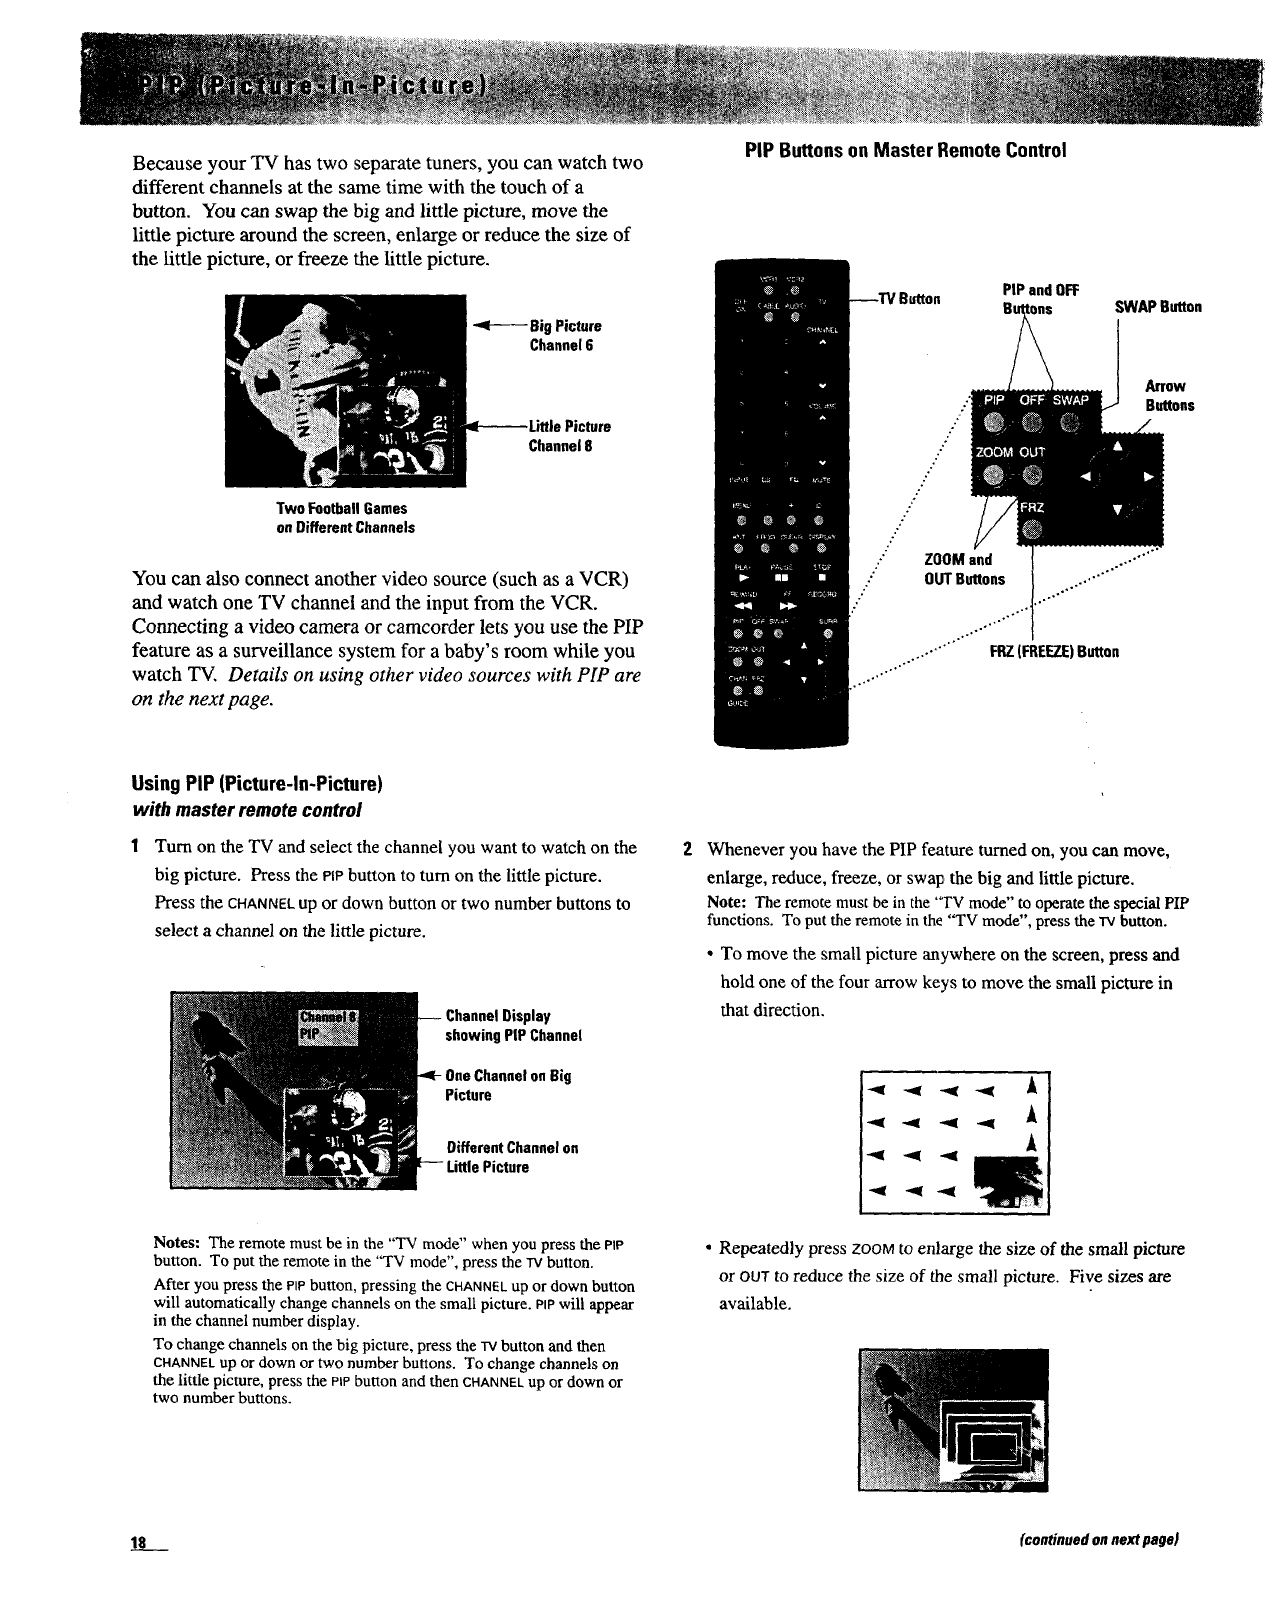
Because your TV has two separate tuners, you can watch two
different channels at the same time with the touch of a
button. You can swap the big and little picture, move the
little picture around the screen, enlarge or reduce the size of
the little picture, or freeze the little picture.
BigPicture
Channel6
_------- Little Picture
Channel6
Two FootballGames
on Different Channels
You can also connect another video source (such as a VCR)
and watch one TV channel and the input from the VCR.
Connecting a video camera or camcorder lets you use the PIP
feature as a surveillance system for a baby's room while you
watch TV. Details on using other video sources with PIP are
on the next page.
PIP Buttonson Master RemoteControl
PIP and OFF SWAPButton
..."
ZOOMand
OUT Buttons
Arrow
Buttons
Using PiP (Picture-In-Picture)
with master remote control
Turn on the TV and select the channel you want to watch on the
big picture. Press the PIPbutton to turn on the little picture.
Press the CHANNELup or down button or two number buttons to
select a channel on the little picture.
ChannelDisplay
showing PIP Channel
One Channelon Big
Picture
Different Channelon
Whenever you have the PIP feature turned on, you can move,
enlarge, reduce, freeze, or swap the big and little picture.
Note: The remote must be in the '°I_Vmode" to operate the special PIP
functions. To put the remote in the "TV mode", press the "Iv button.
•To move the small picture anywhere on the screen, press and
hold one of the four arrow keys to move the small picture in
that direction.
A
Notes: The remote must be in the "TV mode" when you press the PIP
button. To put the remote in the "TV mode", press the TVbutton.
After you press the PIP button, pressing the CHANNELup or down button
will automatically change channels on the small picture. PIPwill appear
in the channel number display.
To change channels on the big picture, press the "rv button and then
CHANNEL up or down or two number buttons. To change channels on
the little picture, press the PIPbutton and then CHANNELup or down or
two number buttons.
•Repeatedly press ZOOMto enlarge the size of the small picture
or OUTto reduce the size of the small picture. Five sizes are
available.
18 (continued onnext page)
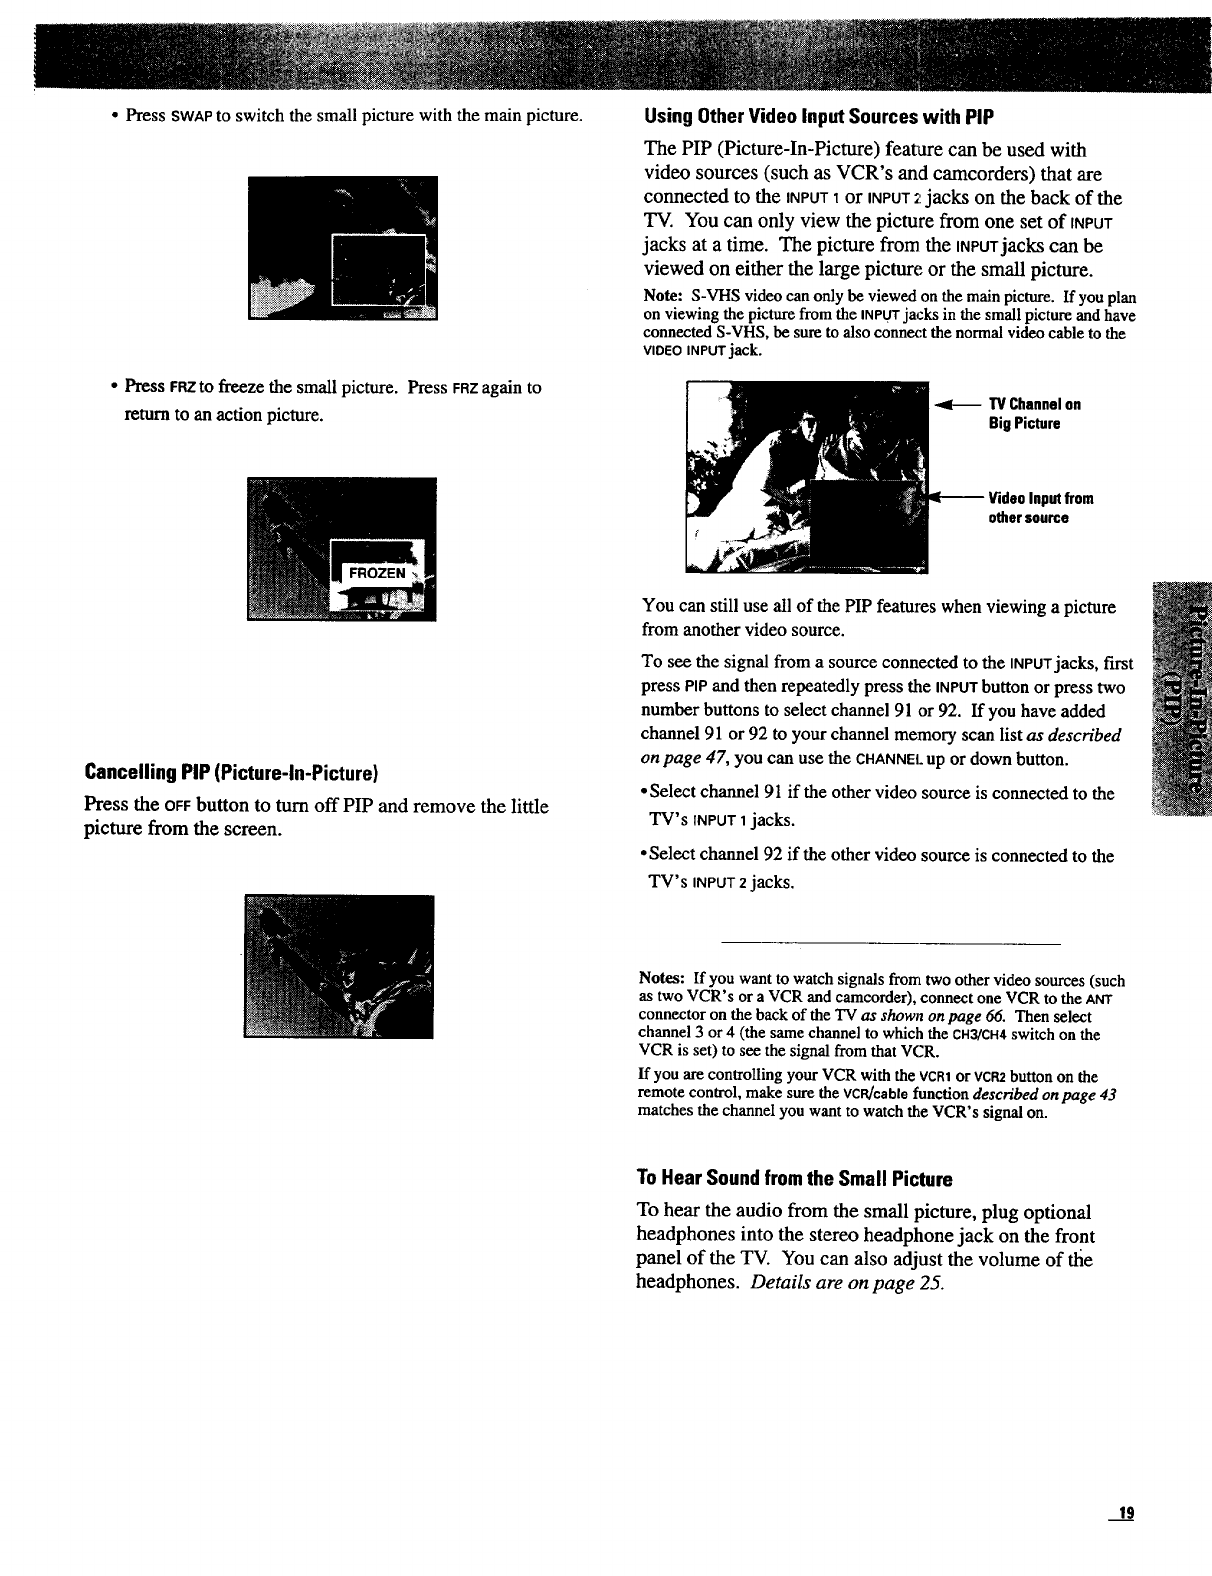
•Press SWAPto switch the small picture with the main picture.
•Press FP,Zto freeze the small picture. Press FRZagain to
return to an action picture.
Using OtherVideo Input Sourceswith PIP
The PIP (Picture-In-Picture) fea_are can be used with
video sources (such as VCR's and camcorders) that are
connected to the INPUT1or INPUT:'jacks on the back of the
TV. You can only view the picture from one set of INPUT
jacks at a time. The picture from the INPUTjacks can be
viewed on either the large picture or the small picture.
Note: S-VHS video can only be viewed on the main picture. If you plan
on viewing the picture from the INPUTja_-ksin the small picture and have
connected S-VHS, be sure to also connect the normal video cable to the
VIDEO INPUT jack.
-,4(--TVChannelon
BigPicture
Inputfrom
othersource
Cancelling PIP (Picture-In-Picture)
l_ess the OFFbutton to turn off PIP and remove the little
picture from the screen.
You can still use all of the PIP featureswhen viewing a picture
from another video source.
To see the signal from a source connected to the INPUTjacks, lust
press PIP and then repeatedly press the INPUT button or press two
number buttons to select channel 91 or 92. If you have added
channel 91 or 92 to your channel memory scan list as described
on page 47, you can use the CHANNEl.up or down button.
•Select channel 91 if the other video source is connected to the
TV's INPUT 1 jacks.
•Select channel 92 if the other video source is connected to the
TV's INPUT2jacks.
Notes: If you want to watch signals from two other video sources (such
as two VCR's or a VCR and camcorder), connect one VCR to the ANT
connector on the back of the TV as shown on page 66. Then select
channel 3 or 4 (the same channel to which the CH3/CH4switch on the
VCR is set) to see the signal from that VCR.
If you are controlling your VCR with the VCR1or VCRZbutton on the
remote control, make sure the VCR/cable function described on page 43
matches the channel you want to watch the VCR's signal on.
To Hear Soundfromthe Small Picture
To hear the audio from the small picture, plug optional
headphones into the stereo headphone jack on the front
panel of the TV. You can also adjust the volume of tile
headphones. Details are on page 25.
19
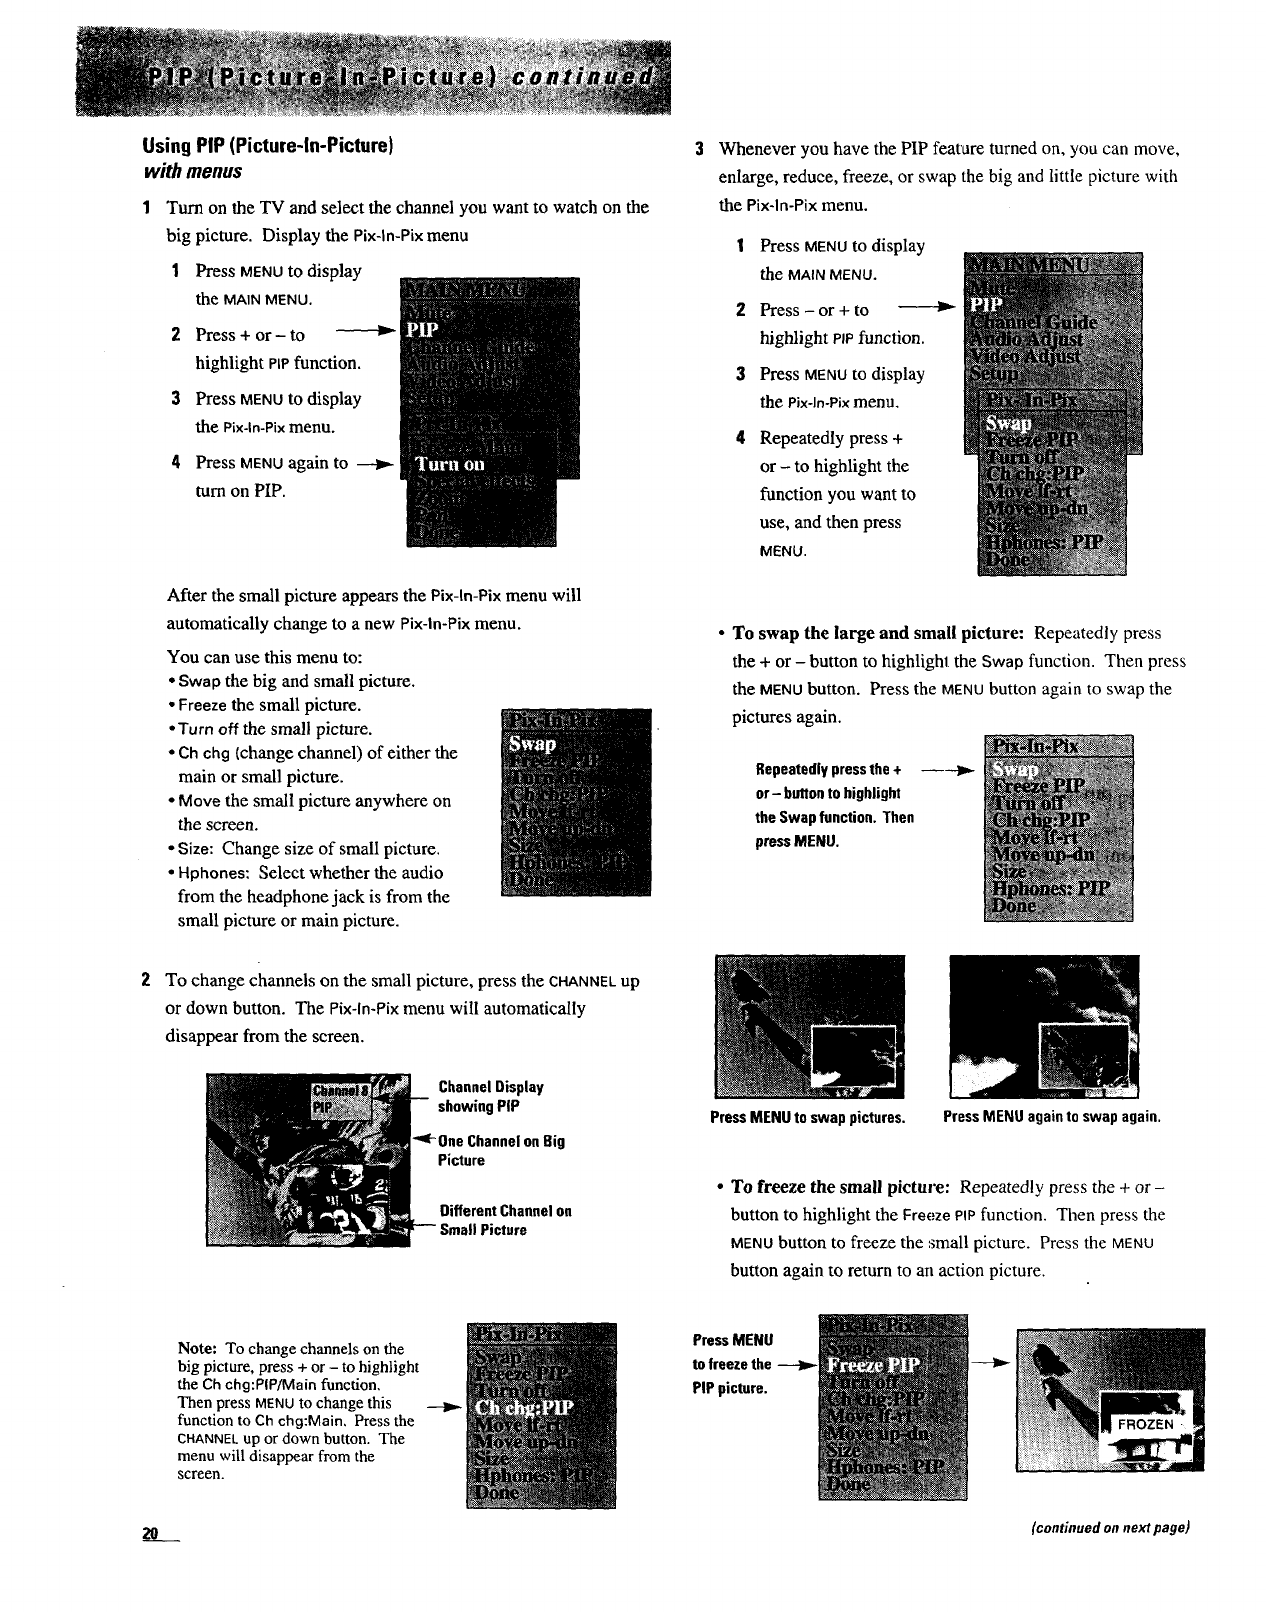
Using PIP (Picture-In-Picture)
with menus
Turn on the TV and select the channel you want to watch on the
big picture. Display the Pix-ln-Pix menu
1 Press MENUto display
the MAIN MENU.
ZPress + or- to
highlight PLPfunction.
3 Press MENUto display
the Pix-ln-Pix menu.
4Press MENUagain to
turn on PIP.
After the small picture appears the Pix-ln-Pix menu will
automatically change to a new Pix-ln-Pix menu.
You can use this menu to:
*Swap the big and small picture.
oFreeze the small picture.
•Turn off the small picture.
• Ch chg Ichange channel) of either the
main or small picture.
•Move the small picture anywhere on
the screen.
•Size: Change size of small picture.
• Hphones: Select whether the audio
from the headphone jack is from the
small picture or main picture.
Whenever you have the PIP feature turned on, you can move,
enlarge, reduce, freeze, or swap the big and little picture with
the Pix-ln-Pix menu.
Press MENUto display
the MAINMENU.
2Press -or + to
highlight Pip function.
3 Press MENUto display
the Pix-ln-Pix menu.
Repeatedly press +
or - to highlight the
function you want to
use, and then press
MENU.
•To swap the large and small picture: Repeatedly press
the + or - button to highlighl the Swap function. Then press
the MENUbutton. Press the MENU button again to swap the
pictures again.
Repeatedlypressthe +
or- buttonto highlight
the Swapfunction. Then
pressMENU.
2To change channels on the small picture, press the CHANNELup
or down button. The Pix-ln-Pix menu will automatically
disappear from the screen.
ChannelDisplay
showingPIP
"<F One ChannelonBig
Picture
Different Channelon
Picture
PressMENU to swap pictures. PressMENU againto swap again.
•To freeze the small picture: Repeatedly press the + or -
button to highlight the Freeze PIP function. Then press the
MENUbutton to freeze the :_mall picture. Press the MENU
button again to return to an action picture.
Note: To change channels on the
big picture, press + or - to highlight
the Ch chg:PIP/Main function.
Then press MENUto change this
function to Ch chg:Main, Press the
CHANNELup or down button. The
menu will disappear from the
screen.
PressMENU
to freezethe
PIP picture.
(continued on next page)

• To move the small picture left or right: Repeatedly press
the + or -button to highlight the Move If-rtfunction. Then
press the MENUbutton to display the PIP move If- rt+ display
on the TV screen. Press and hold the -button to move the
small picture to the left or the +button to move the small
picture to the right. Pressing the MENUbutton will return
you to the Pix-ln-Pix menu.
Repeatedly press the + or -
button to highlight the Move If-rt --
function. Then press MENU.
• To change the size of the small picture: Repeatedly press
the +or - button to highlight the Size function. Then press
the MENUbutton to display the PIPsize up+ dn-display on
the TV screen. Press the +button to increase the size of the
small picture or the - button to reduce the size of the small
picture. Pressing the MENUbutton will return you to the Pix-
In-Pix menu.
Repeatedly
pressthe + or-
buttonto
highlightthe
Sizefunction.
Then press
MENU.
Press and hold - button to move
small picture to the left.
Pressandhold + buttonto move
smallpicture to the right.
• To move the small picture up or down: Repeatedly press
the +or - button to highlight the Move up-dn function. Then
press the MENU button to display the PIP move up+ dn-display
on the TV screen. Press and hold the +button to move the
small picture up or the -button to move the small picture
down. Pressing the MENU button will return you to the
Pix-ln-Pix menu.
Repeatedly press the +
or -button to highlight
the Move up-dn function.
Then press MENU.
A
A
Pressandhold + buttonto
move smallpicture up.
Pressandhold - buttonto
movesmallpicturedown.
Press+ to increase,
the smallpicturesize.
Fivesizes are available.
Press-to decrease the
small picturesize.
When you are finished, press the +or -button to highlight Done.
Then press MENUto remove the menu from the screen.
Note: The menu will automatically disappear from the screen in a few
seconds if no button is pressed.
Toturn off PIP
with menus
1Press MENUtO display the MAIN
MENU.
2 Press - or + to highlight PIP --I_
function.
3Press MENUagain to display the
Pix-ln-Pix menu.
4Repeatedly press -or +to ----------Z_
highlight the Turn off function.
5Press MENUagain to turn off PIP.
The small picture will disappear.
The other Pix-ln-Pix menu will
appear on the TV.
Note: This menu will disappear
within a few seconds if no button is
pressed. To remove the menu,
repeatedly press + or - to highlight
Done. Then press the MENUbutton to
remove the menu.
21
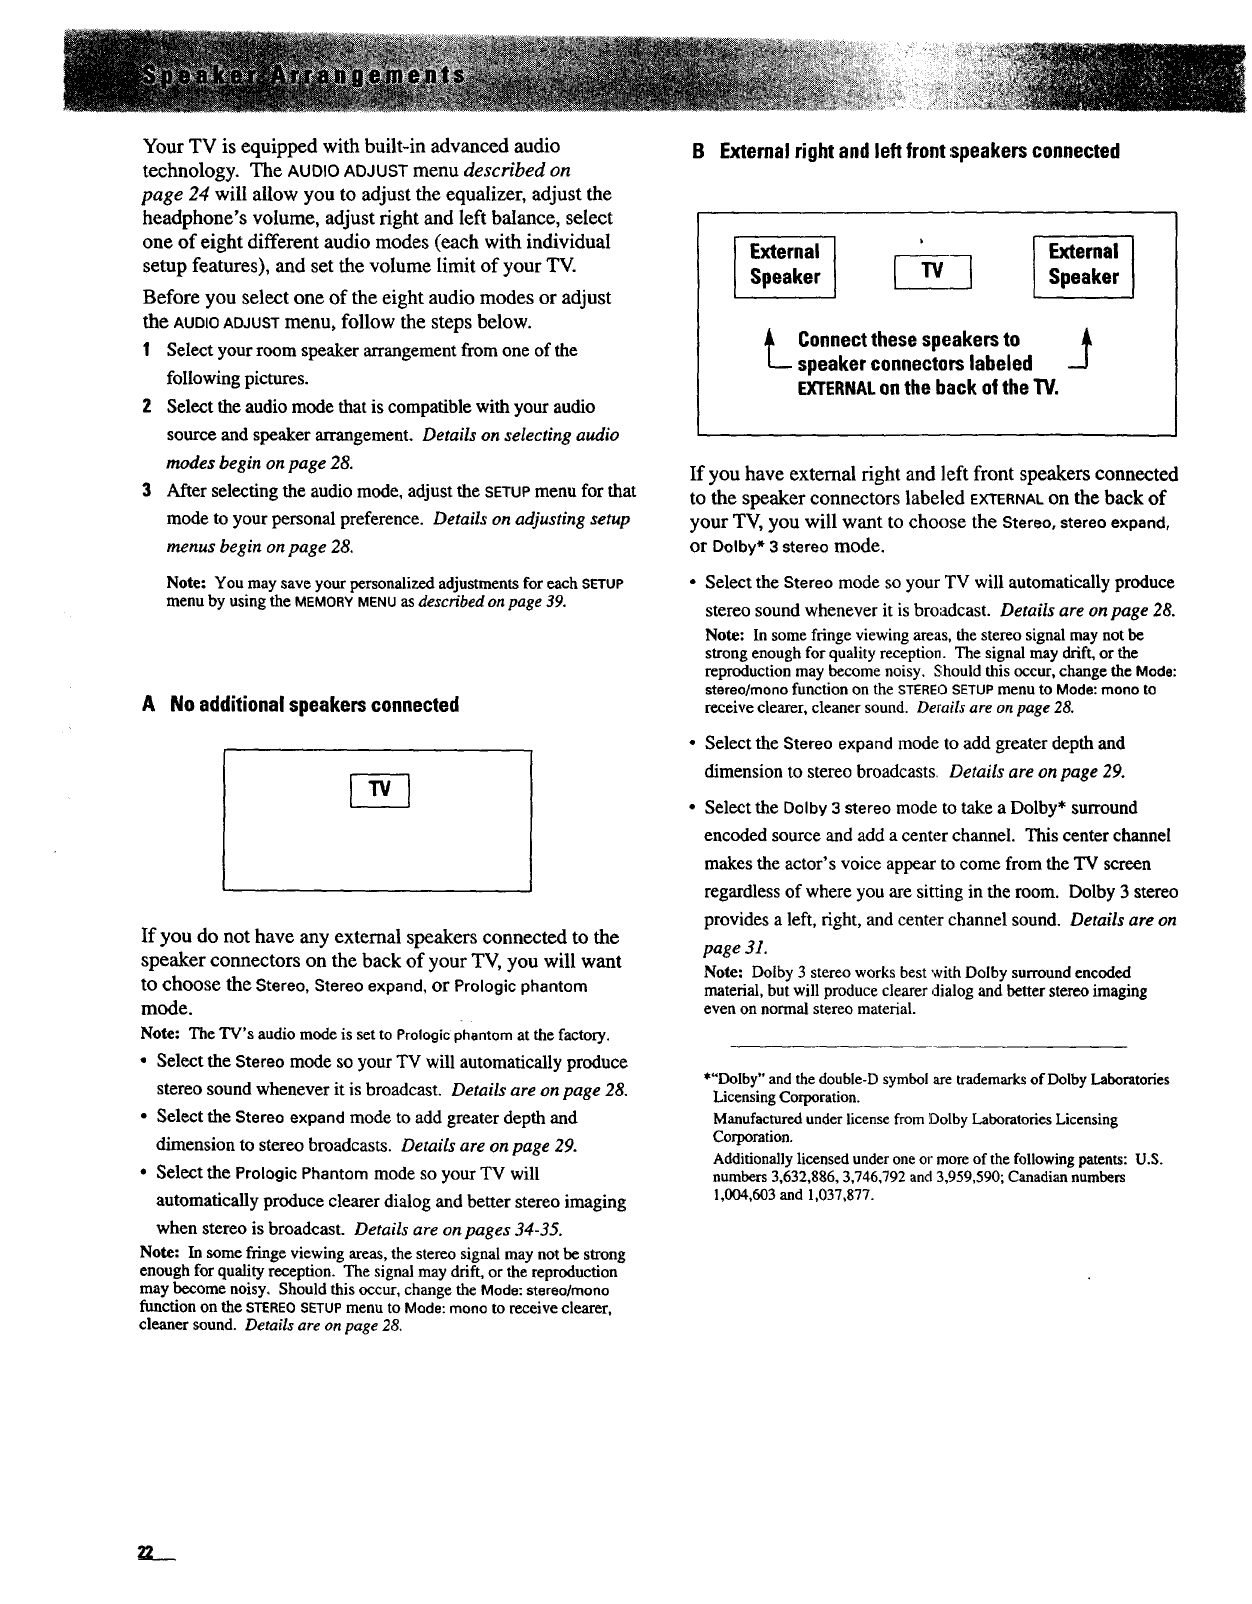
Your TV is equipped with built-in advanced audio
technology. The AUDIO ADJUST menu described on
page 24 will allow you to adjust the equalizer, adjust the
headphone's volume, adjust right and left balance, select
one of eight different audio modes (each with individual
setup features), and set the volume limit of your TV.
Before you select one of the eight audio modes or adjust
the AUDIOADJUSTmenu, follow the steps below.
1 Select your room speaker arrangement from one of the
following pictures.
2Select the audio mode that is compatible with your audio
source and speaker arrangement. Details on selecting audio
modes begin on page 28.
3 After selecting the audio mode, adjust the SETUPmenu for that
mode to your personal preference. Details on adjusting setup
menus begin on page 28.
Note: You may save your personalized adjustments for each SETUP
menu by using the MEMORY MENU asdescribed onpage 39.
A No additional speakers connected
If you do not have any external speakers connected to the
speaker connectors on the back of your TV, you will want
to choose the Stereo, Stereo expand, or Prologic phantom
mode.
Note: The TV's audio mode is set to Prologic phantom at the factory.
• Select the Stereo mode so your TV will automatically produce
stereo sound whenever it is broadcast. Details are on page 28.
•Select the Stereo expand mode to add greater depth and
dimension to stereo broadcasts. Details are on page 29.
• Select the Prologie Phantom mode so your TV will
automatically produce clearer dialog and better stereo imaging
when stereo is broadcast. Details are on pages 34-35.
Note: In some fringe viewing areas, the stereo signal may not be strong
enough for quality reception. The signal may drift, or the reproduction
may become noisy, Should this occur, change the Mode: stereo/menD
function on the STEREOSETUPmenu to Mode:mend to receive clearer.
cleaner sound. Details are on page 28,
B External right and left front speakers connected
,.r..,I
Speaker _Speaker
Lonnect these speakers to j
speaker connectorslabeled
EXTERNALonthe back of the TV.
If you have external right and left front speakers connected
to the speaker connectors labeled EXTERNALon the back of
your TV, you will want to choose the Stereo, stereo expand,
or Dolby* 3 stereo mode.
Select the Stereo mode so your TV will automatically produce
stereo sound whenever it is broadcast. Details are on page 28.
Note: In some fringe viewing areas, the stereo signal may not be
strong enough for quality reception. The signal may drift, or the
reproduction may become noisy. Should this occur, change the Mode:
stereo/menD function on the STEREO SETUP menu to Mode: mend to
receive clearer, cleaner sound. Derails are on page 28.
Select the Stereo expand mode to add greater depth and
dimension to stereo broadcasts. Details are on page 29.
Select the Dolby 3 stereo mode to take a Dolby* surround
encoded source and add a center channel. This center channel
makes the actor's voice appear to come from the TV screen
regardless of where you are sitting in the room. Dolby 3 stereo
provides a left, right, and center channel sound. Details are on
page 31.
Note: Dolby 3 stereo works best with Dolby surround encoded
material, but will produce clearer dialog and better stereo imaging
even on normal stereo material.
*"Dolby" and the double-D symbol are trademarks of Dolby Laboratories
Licensing Corporation.
Manufactured under license from Dolby Laboratories Licensing
Corporation.
Additionally licensed under one or more of the following patents: U.S.
numbers 3,632,886, 3,746,792 and 3,959,590; Canadian numbers
1,004,603 and 1,037,877.
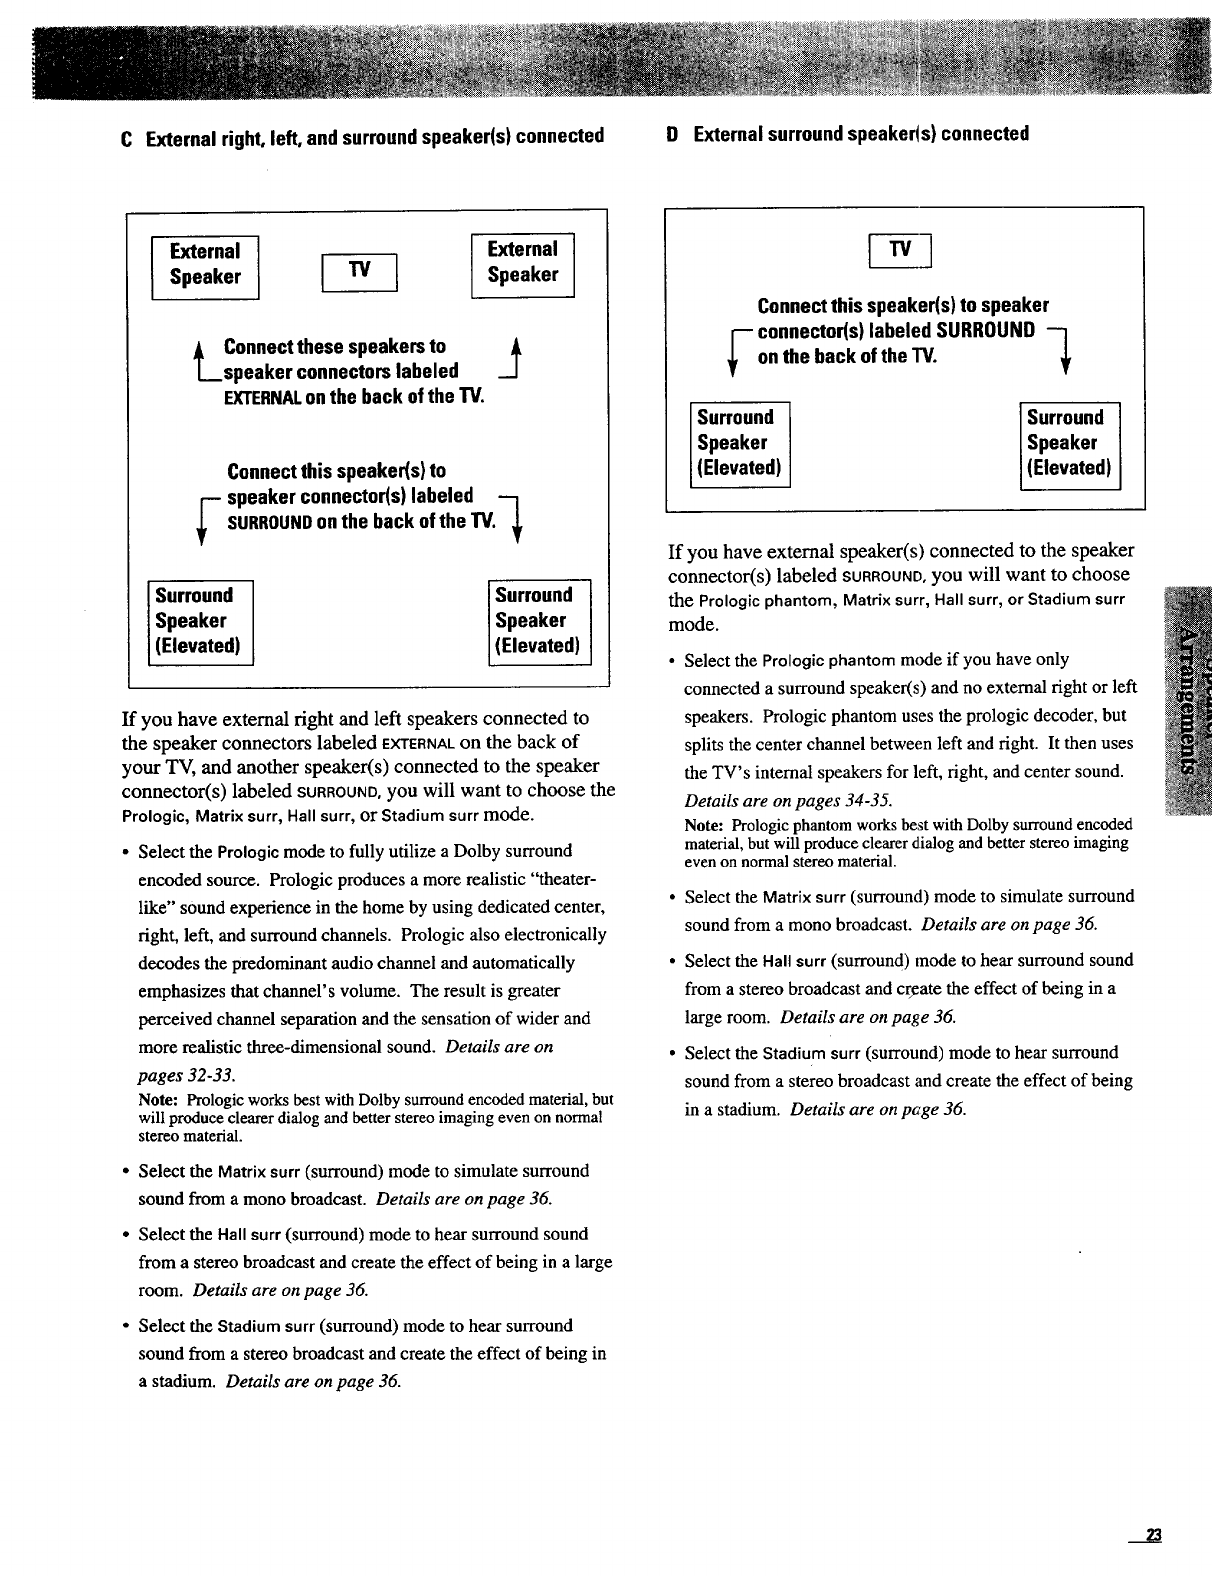
C External right,left, and surroundspeaker(s) connected D External surroundspeaker(s) connected
External
Speaker IExternalSpeaker
AL_Connect these speakersto ___
speaker connectors labeled
EXTERNALon the back of the TV.
Connect this speaker(s) to
speaker connector(s)labeled "-I
--SURROUND the backofthe
on TV._
Surround
Speaker
(Elevated)
Surround
Speaker
(Elevated)
If you have external right and left speakers connected to
the speaker connectors labeled EXTERNALon the back of
your TV, and another speaker(s) connected to the speaker
connector(s) labeled SURROUND,yOU will want to choose the
Prologic, Matrix surr, Hall surr, or Stadium surr mode.
•Select the Prologic mode to fully utilize a Dolby surround
encoded source. Prologic produces a more realistic "theater-
like" sound experience in the home by using dedicated center,
right, left, and surround channels. Prologic also electronically
decodes the predominant audio channel and automatically
emphasizes that channel's volume. The result is greater
perceived channel separation and the sensation of wider and
more realistic three-dimensional sound. Details are on
pages 32-33.
Note: Prologic works best with Dolby surround encoded material, but
will produce clearer dialog and better stereo imaging even on normal
stereo material.
•Select the Matrix surr (surround) mode to simulate surround
sound from a mono broadcast. Details are on page 36.
• Select the Hall surf (surround) mode to hear surround sound
from a stereo broadcast and create the effect of being in a large
room. Details are on page 36.
•Select the Stadium surf (surround) mode to hear surround
sound from a stereo broadcast and create the effect of being in
a stadium. Details are on page 36.
Connect this speaker(s) to speaker
_-- connector(s) labeled SURROUND -7
on the back of the TV.
Surround Surround
Speaker Speaker
(Elevated) (Elevated)
If you have external speaker(s) connected to the speaker
connector(s) labeled SURROUND,yOU will want to choose
the Prologic phantom, Matrix surr, Hall surr, or Stadium surr
mode.
Select the Prologic phantom mode if you have only
connected a surround speaker(s) and no external right or left
speakers. Prologic phantom uses the prologic decoder, but
splits the center channel between left and right. It then uses
the TV's internal speakers for left, right, and center sound.
Details are on pages 34-35.
Note: Prologic phantom works best with Dolby surround encoded
material, but will produce clearer dialog and better stereo imaging
even on normal stereo material.
•Select the Matrix surr (surround) mode to simulate surround
sound from a mono broadcast. Details are on page 36.
•Select the Hall surr (surround) mode to hear surround sound
from a stereo broadcast and create the effect of being in a
large room. Details are on page 36.
•Select the Stadium surr (surround) mode to hear surround
sound from a stereo broadcast and create the effect of being
in a stadium. Details are on page 36.
Z3
1 PressMENU to display
the MAIN MENU.
2 Then press+ or- to high-
light Audio Adjustin white.
3 PressMENU againto
displaythe AUDIOADJUST
menu.
4 Press+or-to highlight
desiredfunction, Then
press MENU to enterthe
function.
Pressing the - button moves the highlight down the TV
screen (one item per press).
Pressing the + button moves the highlight up the TV screen
(one item per press).
Pressing the MENUbutton when a function is highlighted
allows you to enter or adjust that function.
After a few seconds, the AUDIOADJUSTmenu will disappear
from the screen if no button is pressed. To exit the menu
quickly, highlight Done and then press MENU(or press the
CLEARbutton on the master remote control).
The Equalizer function lets you display an on-screen graphic
equalizer so you can remotely adjust audio bandwidths for
different environments or individual tastes. Details are on
pages 26-27.
The Headphone volume function allows you to adjust the volume
of the sound from the headphone jack. Press the + or - button to
highlight the Headphone volume function. Then press the MENU
button to enter the HEADPHONEVOLdisplay. Press + or- to adjust
the headphone volume level. Details are on the next page.
The Balance function adjusts the left/fight balance of sound from
the speakers. When adjusting the balance, sit in your normal
viewing seat. Then press the + or - button to highlight the
Balance function, press the MENUbutton to enter the eALANCE
adjustment display. Press the + or - button until the sound seems
to originate from a point halfway between the speakers.
The Mode function allows you to select one of eight different
audio modes.
Note: You can quickly select one of the eight audio modes by
repeatedly pressing the SURR(surround) button on the master remote
control.
• Stereo allows the TV to automatically produce stereo or
monaural audio, whichever is broadcast. Details are on
page 28.
24
°Stereo expand adds greater depth and dimension to stereo
broadcasts and other stereo source:; such as stereo VCR's and
laser disc players. Details are on page 29.
• Dolby 3 stereo provides fight, left, and center channel sound
from Dolby* encoded sources. Rexluires external fight and left
front speakers. Details are on page 31.
•Prolooic provides separate surround, center, right, and left
sound from Dolby encoded sources. Requires external fight
and left front speakers and rear surround speaker(s). Details
are on pages 32-33.
•Prologic phantom is the prologic mode to select if you have no
external speakers connected or only external surround
speaker(s) connected. It uses the prologic decoder, but splits
the center channel between left and fight. It then uses the TV's
internal speakers for left, right, and center sounds. Details are
on pages 34-35.
• Matrix surround allows you to simulate surround sound from a
mono broadcast. Rear surround speaker(s) are required.
Details are on page 36.
• Hall surround provides surround sound from a stereo signal.
Rear surround speaker(s) are required. Details are on page 36.
• Stadium surround provides surround sound from a stereo
signal. Stadium surround delays the rear sound longer than
hall surround which gives you the feeling of being in a larger
area, such as a large stadium. Rear surround speaker(s) are
required. Details are on page 36.
The Setup function allows you to adjust individual features for
the audio mode you have selected. Details are on page 28-36.
The Volume limiter function lets you set the upper volume level
of your TV. This is useful if you have children and do not want
them listening to a program abow." a certain level. Press the
MENUbutton when Volume limiter is highlighted to enter the
VOLUMEUMrt adjustment display. Press + or - to adjust the
display.
Saving,Restoring, and Returningto FactoryAudio Settings
The TV will remember your personalized audio setup
functions for each audio mode-even when you turn it off.
To prevent losing your personal settings because someone
changes them accidentally, you can save them using the
MEMORYMENU.After the settings have been saved, you can
restore them at a later date using the MEMORYMENU.The
MEMOaYMENUalso lets you ea:_ily restore the audio setup
functions to their factory settings. Details are on page 39.
*"Dolby" and the double-D symbol are trademarks of Dolby Laboratories
Licensing Corporation.
Manufactured under license from Dolby Laboratories Licensing Corporation.
Additionally licensed under one or more of the following patents: U.S. numbers
3,632,886, 3,746,792 and 3,959,590; Canadian numbers 1,004,603 and 1,037,877.
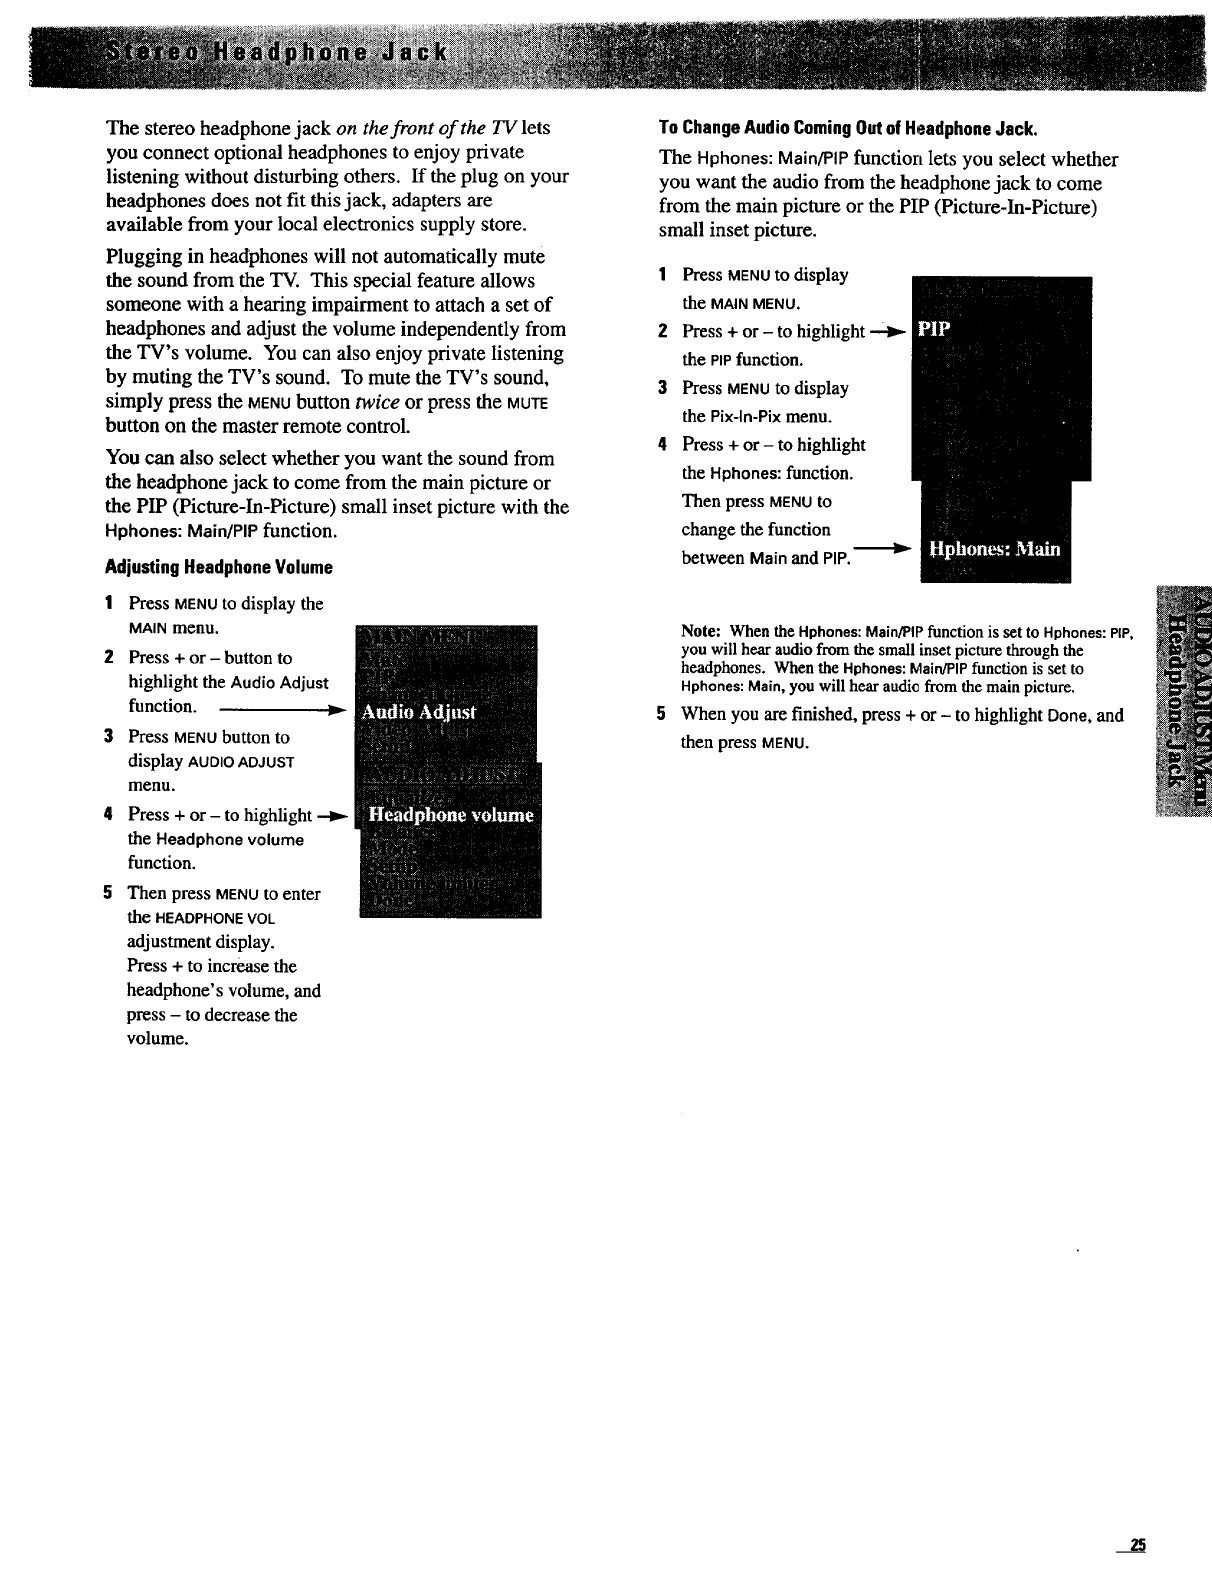
The stereo headphone jack on the front of the TV lets
you connect optional headphones to enjoy private
listening without disturbing others. If the plug on your
headphones does not fit this jack, adapters are
available from your local electronics supply store.
Plugging in headphones will not automatically mute
the sound from the TV. This special feature allows
someone with a hearing impairment to attach a set of
headphones and adjust the volume independently from
the TV's volume. You can also enjoy private listening
by muting the TV's sound. To mute the TV's sound,
simply press the MENUbutton twice or press the MUTE
button on the master remote control.
You can also select whether you want the sound from
the headphone jack to come from the main picture or
the PIP (Picture-In-Picture) small inset picture with the
Hphones: Main/PIP function.
Adjusting Headphone Volume
1Press MENUto display the
MAIN menu.
2 Press + or- button to
highlight the Audio Adjust
function.
3Press MENU button to
display AUDIO ADJUST
menu.
4Press + or- to highlight
the Headphone volume
function.
Then press MENU to enter
the HEADPHONE VOL
adjustment display.
Press + to increase the
headphone's volume, and
press - to decrease the
volume.
ToChangeAudioComingOutof HeadphoneJack.
The Hphones:Main/PIPfunction lets you select whether
you want the audio from the headphone jack to come
from the main picture or the PIP (Picture-In-Picture)
small inset picture.
1Press MENUto display
the MAIN MENU.
2Press + or - to highlight
the PIP function.
3Press MENU to display
the Pix-ln-Pix menu.
4 Press + or- to highlight
the Hphones: function.
Then press MENU to
change the function
between Main and PIP.-'''11_
Note: WhentheHphones: Main/PIPfunction is setto Hphones: PIP,
you will hearaudio from the small inset picture through the
headphones. When the Hphones:Main/PIPfunction is set to
Hphones: Main, you will hear audio from the main picture.
When you are finished, press + or - to highlight Done, and
then press MENU.
25
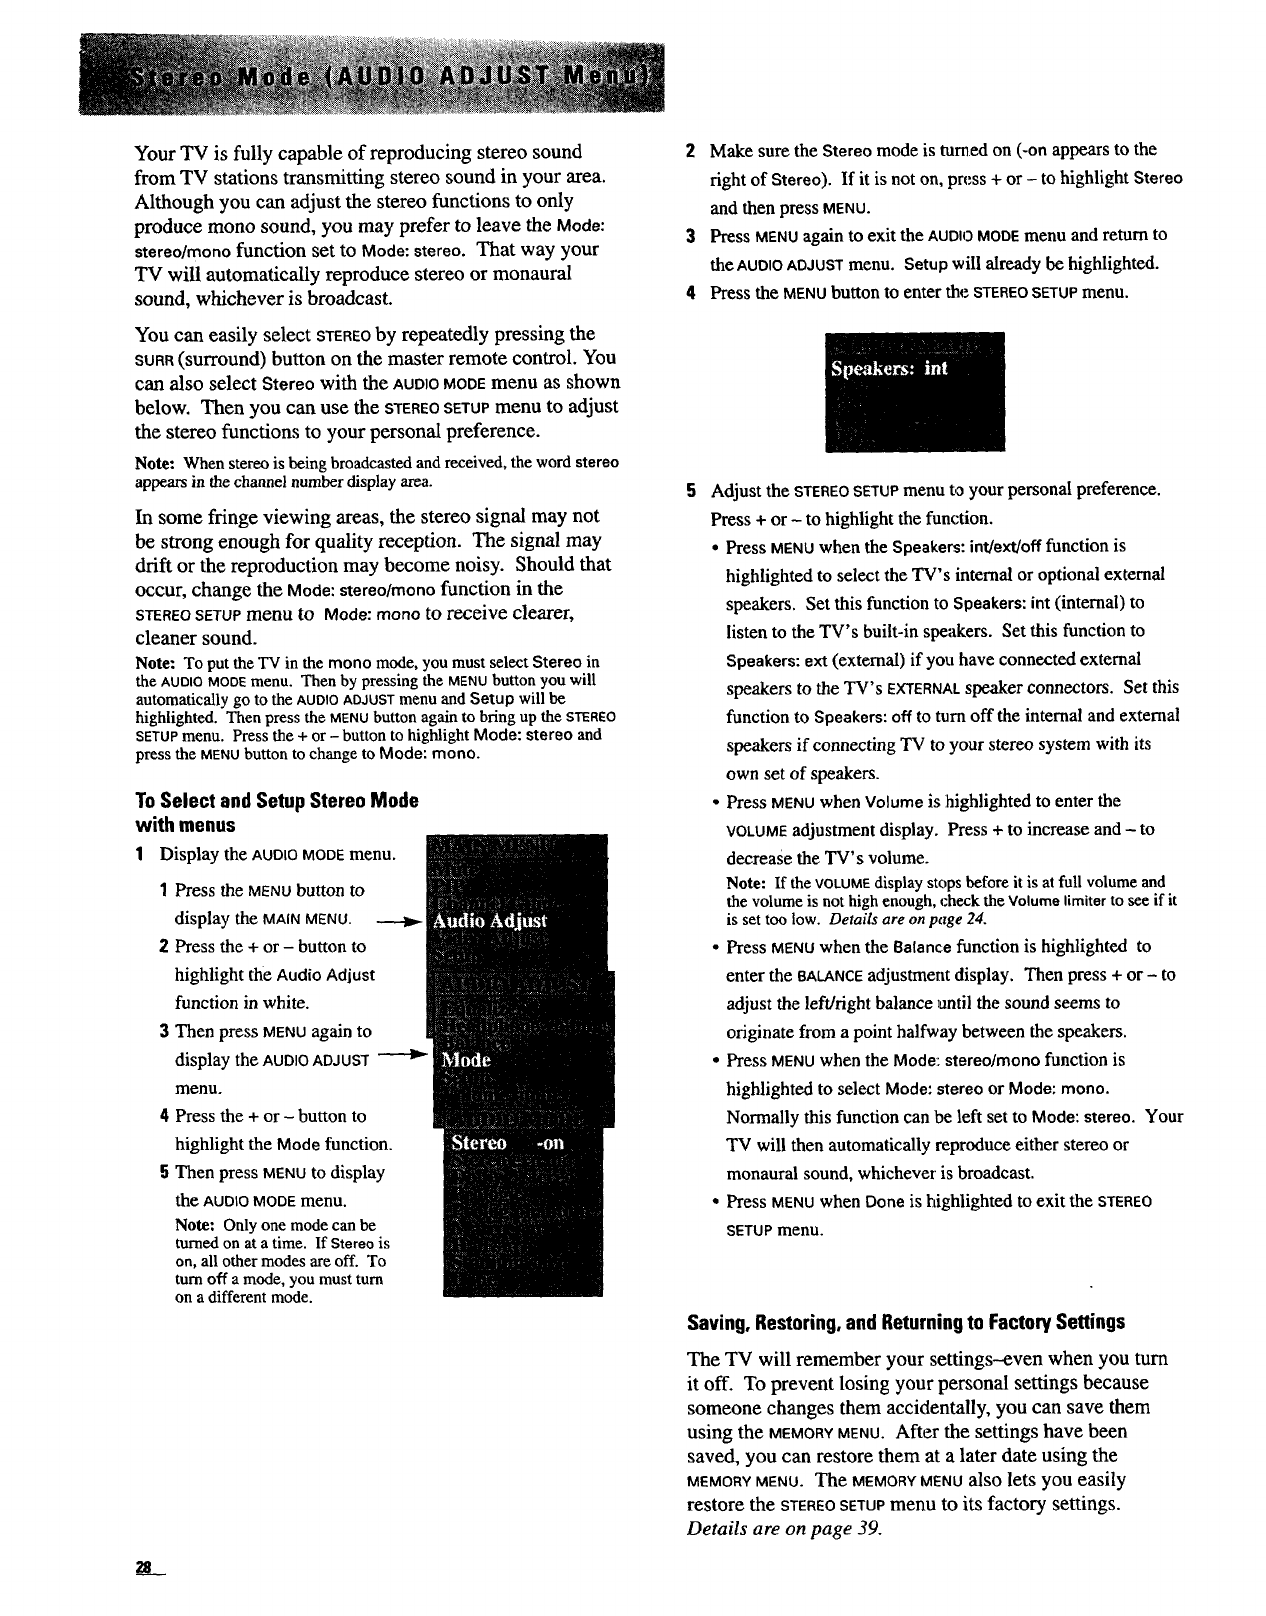
Your TV is fully capable of reproducing stereo sound
from TV stations transmitting stereo sound in your area.
Although you can adjust the stereo functions to only
produce menD sound, you may prefer to leave the Mode:
stereo/menD function set to Mode: stereo. That way your
TV will automatically reproduce stereo or monaural
sound, whichever is broadcast.
You can easily select STEREOby repeatedly pressing the
SURR(surround) button on the master remote control. You
can also select Stereo with the AUDIOMODEmenu as shown
below. Then you can use the STEREOSETUPmenu to adjust
the stereo functions to your personal preference.
Note: When stereo is being broadcasted and received, the word stereo
appears in the channel number display area.
In some fringe viewing areas, the stereo signal may not
be strong enough for quality reception. The signal may
drift or the reproduction may become noisy. Should that
occur, change the Mode: stereo/mono function in the
STEREO SETUP menu to Mode: menD to receive clearer,
cleaner sound.
Note: To put the TV in the menD mode, you must select Stereo in
the AUDIOMODEmenu. Then by pressing the MENUbutton you will
automatically go to the AUDIOADJUSTmenu and Setup will be
highlighted. Then press the MENUbutton again to bring up the STEREO
SETUPmenu. Press the + or-button to highlight Mode: stereo and
press the MENUbutton to change to Mode: menD.
To Select and Setup Stereo Mode
with menus
1Display the AUDIOMODEmenu.
1Press the MENUbutton to
display the MAINMENU.
Z Press the + or - button to
highlight the Audio Adjust
function in white.
3Then press MENU again to
display the AUDIOADJUST
menu.
4Press the + or - button to
highlight the Mode function.
5Then press MENUto display
the AUDIO MODE menu.
Note: Onlyonemodecanbe
turned on at atime. If Stereo is
on, all othermodes are off. To
turn off a mode, you must turn
on a different mode.
Z8
2Make sure the Stereo mode is turned on (-on appears to the
fight of Stereo). If it is not on, press + or - to highlight Stereo
and then press MENU.
3 Press MENU again to exit the AUDIO MODEmenu and return to
the AUDIOADJUSTmenu. Setup will already be highlighted.
4Press the MENU button to enter the STEREO SETUP menu.
Adjust the STEREOSETUPmenu to your personal preference.
Press + or - to highlight the function.
*Press MENUwhen the Speakers: int/ext/off function is
highlighted to select the TV's internal or optional external
speakers. Set this function to Speakers: int (internal) to
listen to the TV's built-in speakers. Set this function to
Speakers: ext (external) if you have connected external
speakers to the TV's EXTERNALspeaker connectors. Set this
function to Speakers: off to turn off the internal and external
speakers if connecting TV to your stereo system with its
own set of speakers.
•Press MENUwhen Volume is highlighted to enter the
VOLUMEadjustment display. Press + to increase and -to
decrease the TV's volume.
Note: If the VOLUMEdisplay stops before it is at full volume and
the volume is not high enough, check the Volume limiter to see if it
is set too low. Details are on page 24.
•Press MENUwhen the Balance function is highlighted to
enter the BALANCEadjustment display. Then press + or- to
adjust the left/right balance until the sound seems to
originate from a point halfway between the speakers.
•Press MENUwhen the Mode: stereo/menD function is
highlighted to select Mode: stereo or Mode: menD.
Normally this function can be left set to Mode: stereo. Your
TV will then automatically reproduce either stereo or
monaural sound, whichever is broadcast.
•Press MENUwhen Done is highlighted to exit the STEREO
SETUPmenu.
Saving, Restoring,and Returningto Factory Settings
The TV will remember your settings--even when you turn
it off. To prevent losing your personal settings because
someone changes them accidentally, you can save them
using the MEMORYMENU.After the settings have been
saved, you can restore them at a later date using the
MEMORY MENU. The MEMORY MENU alSO lets you easily
restore the STEREOSETUPmenu to its factory settings.
Details are on page 39.
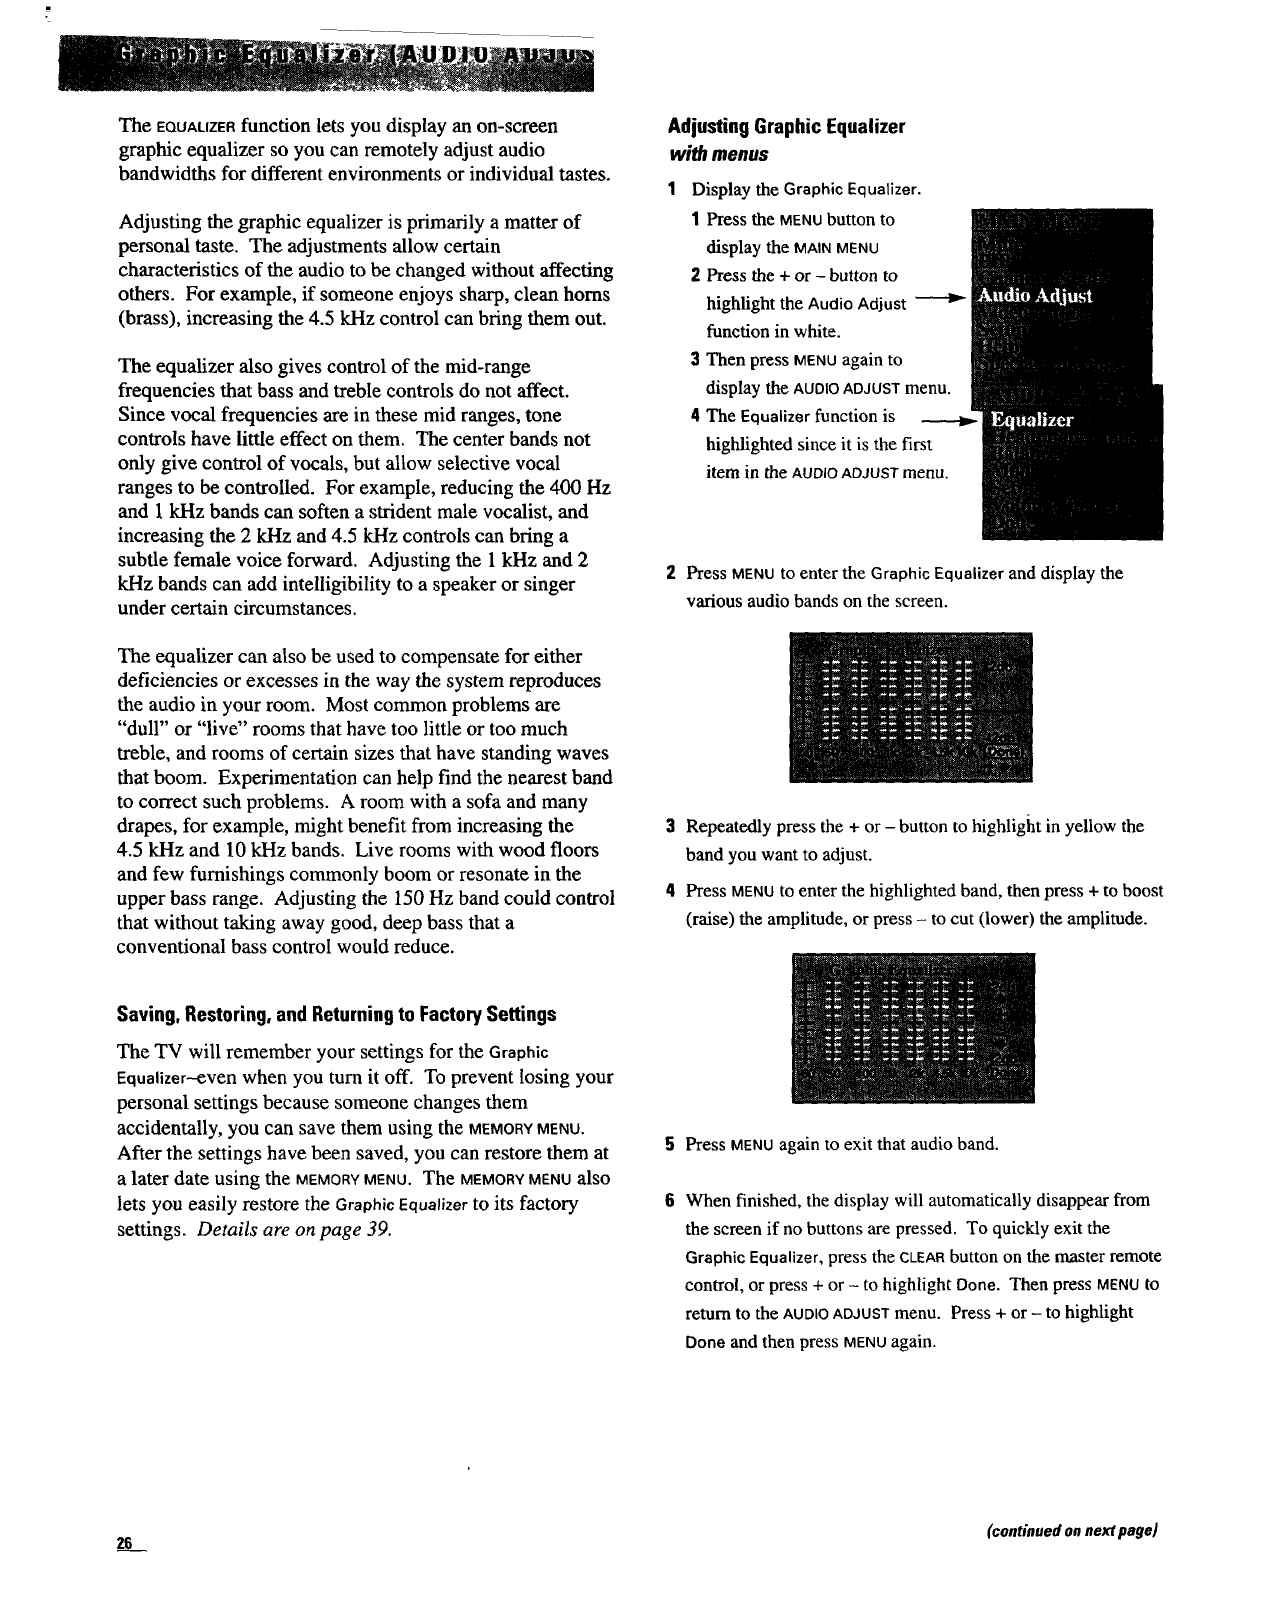
The EQUALIZERfunction lets you display an on-screen
graphic equalizer so you can remotely adjust audio
bandwidths for different environments or individual tastes.
Adjusting the graphic equalizer is primarily a matter of
personal taste. The adjustments allow certain
characteristics of the audio to be changed without affecting
others. For example, if someone enjoys sharp, clean horns
(brass), increasing the 4.5 kHz control can bring them out.
The equalizer also gives control of the mid-range
frequencies that bass and treble controls do not affect.
Since vocal frequencies are in these mid ranges, tone
controls have little effect on them. The center bands not
only give control of vocals, but allow selective vocal
ranges to be controlled. For example, reducing the 400 Hz
and 1 kHz bands can soften a strident male vocalist, and
increasing the 2 kHz and 4.5 kHz controls can bring a
subtle female voice forward. Adjusting the 1 kHz and 2
kHz bands can add intelligibility to a speaker or singer
under certain circumstances.
The equalizer can also be used to compensate for either
deficiencies or excesses in the way the system reproduces
the audio in your room. Most common problems are
"dull" or "live" rooms that have too little or too much
treble, and rooms of certain sizes that have standing waves
that boom. Experimentation can help find the nearest band
to correct such problems. A room with a sofa and many
drapes, for example, might benefit from increasing the
4.5 kHz and 10 kHz bands. Live rooms with wood floors
and few furnishings commonly boom or resonate in the
upper bass range. Adjusting the 150 Hz band could control
that without taking away good, deep bass that a
conventional bass control would reduce.
Saving, Restoring, and Returningto FactorySettings
The TV will remember your settings for the Graphic
Equalizer-even when you turn it off. To prevent losing your
personal settings because someone changes them
accidentally, you can save them using the MEMORYMENU.
After the settings have been saved, you can restore them at
a later date using the MEMORYMENU.The MEMORYMENUalso
lets you easily restore the Graphic Equalizerto its factory
settings. Details are on page 39.
Adjusting Graphic Equalizer
with menus
Display the Graphic Equalizer.
1Press the MENU button to
display the MAINMENU
2Press the + or - button to
highlight the Audio Adjust
function in white.
3Then press MENUagain to
display theAUDIOADJUSTmenu.
4The Equalizer function is
highlighted since it is the first
item in the AUDIOADJUSTmenu.
Press MENU to enter the Graphic Equalizer and display the
various audio bands on the screen.
3Repeatedly press the +or - button to highlight in yellow the
band you want to adjust.
4Press MENUto enter the highlighted band, then press + to boost
(raise) the amplitude, or press - to cut (lower) the amplitude.
5Press MENUagain to exit that audio band.
When finished, the display will automatically disappear from
the screen if no buttons are pressed. To quickly exit the
Graphic Equalizer, press the CLEARbutton on the master remote
control, or press + or - to highlight Done. Then press MENUto
return to the AUDIOADJUSTmenu. Press + or - to highlight
Done and then press MENUagain.
26 (continued on next page)
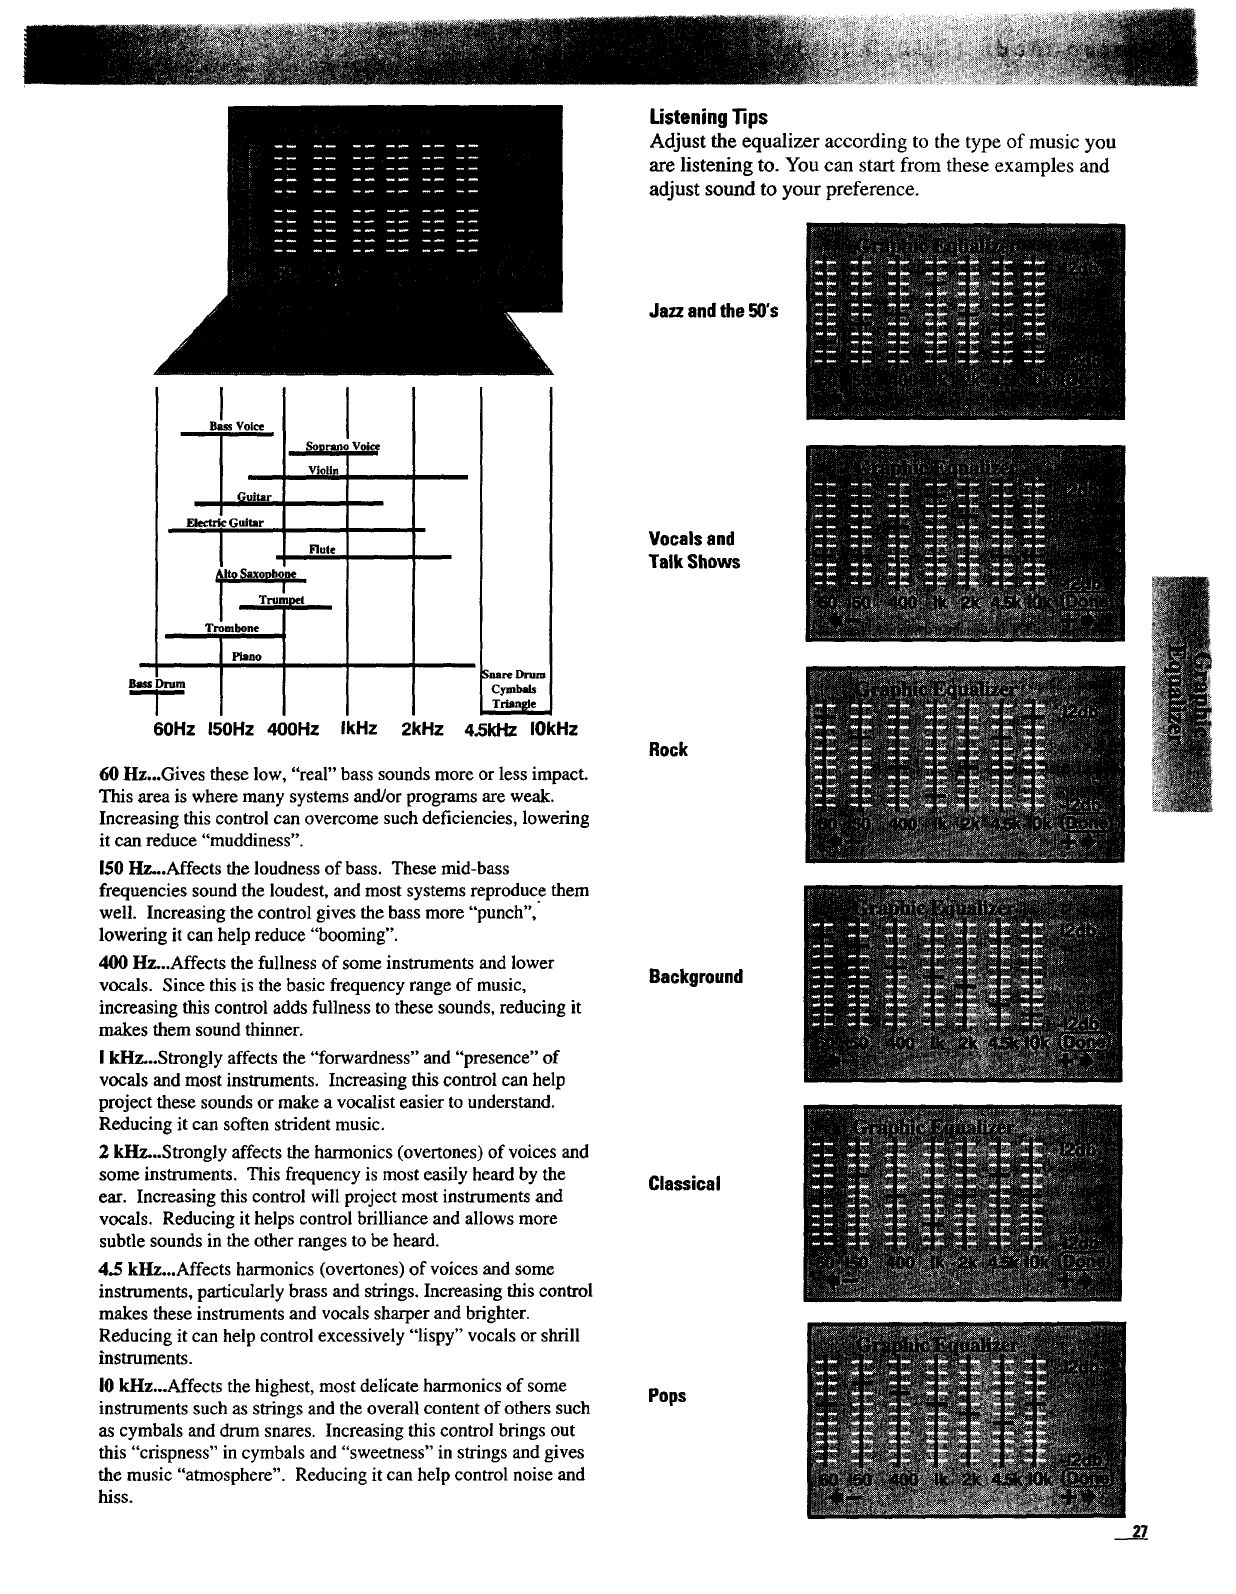
I
Bass Voice
ListeningTips
Adjust the equalizer according to the type of music you
are listening to. You can start from these examples and
adjust sound to your preference.
Jazz and the 50's
Guitar
Elect_ _-Guitar
Flute
I
Trumpet
Trombone
Piano
Bau Drum
60Hz 150Hz 400Hz IkHz 2kHz
Cymbals
4.SkHz IOkHz
60 Hz...Gives these low, "real" bass sounds more or less impact.
This area is where many systems and/or programs are weak.
Increasing this control can overcome such deficiencies, lowering
it can reduce "muddiness".
150 Hz...Affects the loudness of bass. These mid-bass
frequencies sound the loudest, and most systems reproduce them
well. Increasing the control gives the bass more "punch",
lowering it can help reduce "booming".
400 Hz...Affects the fullness of some instruments and lower
vocals. Since this is the basic frequency range of music,
increasing this control adds fullness to these sounds, reducing it
makes them sound thinner.
I kItz,..Strongly affects the "forwardness" and "presence" of
vocals and most instruments. Increasing this control can help
project these sounds or make a vocalist easier to understand.
Reducing it can soften strident music.
2 kHz...Strongly affects the harmonics (overtones) of voices and
some instruments. This frequency is most easily heard by the
ear. Increasing this control will project most instruments and
vocals. Reducing it helps control brilliance and allows more
subtle sounds in the other ranges to be heard.
4.5 kHz...Affects harmonics (overtones) of voices and some
instruments, particularly brass and strings. Increasing this control
makes these instruments and vocals sharper and brighter.
Reducing it can help control excessively "lispy" vocals or shrill
instruments.
l0 kHz...Affects the highest, most delicate harmonics of some
instruments such as strings and the overall content of others such
as cymbals and drum snares. Increasing this control brings out
this "crispness" in cymbals and "sweetness" in strings and gives
the music "atmosphere". Reducing it can help control noise and
hiss.
Vocalsand
TalkShows
Rock
Background
Classical
Pops
27

Your TV is fully capable of reproducing stereo sound
from TV stations transmitting stereo sound in your area.
Although you can adjust the stereo functions to only
produce menD sound, you may prefer to leave the Mode:
stereo/menD function set to Mode: stereo. That way your
TV will automatically reproduce stereo or monaural
sound, whichever is broadcast.
You can easily select STEREOby repeatedly pressing the
SURR(surround) button on the master remote control. You
can also select Stereo with the AUDIO MODEmenu as shown
below. Then you can use the STEREOSETUPmenu to adjust
the stereo functions to your personal preference.
Note: When stereo is being broadcasted and received, the word stereo
appears in the channel number display area.
In some fringe viewing areas, the stereo signal may not
be strong enough for quality reception. The signal may
drift or the reproduction may become noisy. Should that
occur, change the Mode: stereo/menD function in the
STEREOSETUPmenu to Mode:menD to receive clearer,
cleaner sound.
Nete: To put the TV in the menD mode, you must select Stereo in
the AUDIOMODEmenu. Then by pressing the MENUbutton you will
automatically go to the AUDIOADJUSTmenu and Setup will be
highlighted. Then press the MENUbutton again to bring up the STEREO
SETUPmenu. Press the + or - button to highlight Mode: stereo and
press the MENUbutton to change to Mode: menD.
To Select and Setup Stereo Mode
with menus
1Display the AUDIOMODEmenu.
1Press the MENU button to
display the MAINMENU.
2Press the + or - button to
highlight the Audio Adjust
function in white.
3Then press MENUagain to
display the AUDIO ADJUST
menu.
4Press the + or -button to
highlight the Mode function.
5Then press MENUto display
the AUDIO MODE menu.
Note: Only one mode can be
turned on at a time. If Stereo is
on, all other modes are off. To
turn off a mode, you must turn
on a different mode.
2Make sure the Stereo mode is turned on (-on appears to the
right of Stereo). If it is not on, press + or- to highlight Stereo
and then press MENU.
3Press MENUagain to exit the AUDIOMODEmenu and return to
the AUDIOADJUSTmenu. Setup will alreadybe highlighted.
4Press the MENUbutton to enter the STEREOSETUPmenu.
Adjust the STEREOSETUPmenu to your personal preference.
Press + or - to highlight the function.
• Press MENUwhen the Speakers: int/ext/off function is
highlighted to select the TV's internal or optional external
speakers. Set this function to Speakers: int (internal) to
listen to the TV's built-in speakers. Set this function to
Speakers: ext (external) if you have connected external
speakers to the TV's EXTERNALspeaker connectors. Set this
function to Speakers: off to turn offthe internal and external
speakers if connecting TV to your stereo system with its
own set of speakers.
•Press MENUwhen Volume is highlighted to enter the
VOLUMEadjustment display. Press + to increase and - to
decrease the TV's volume.
Note: If the VOLUMEdisplay stops before it is at full volume and
the volume is not high enough, check the Volume limiter to see if it
is set too low. Details are onpage 24.
•Press MENUwhen the Balance function is highlighted to
enter the BALANCEadjustment display. Then press + or - to
adjust the left/right balance until the sound seems to
originate from a point halfway between the speakers.
•Press MENUwhen the Mode: stereo/menD function is
highlighted to select Mode: stereo or Mode: menD.
Normally this function can be left set to Mode: stereo. Your
"IV will then automatically reproduce either stereo or
monaural sound, whichever is broadcast.
•Press MENUwhen Done is highlighted to exit the STEREO
SETUP menu.
Saving,Restoring, and Returningto Factory Settings
The TV will remember your settings--even when you turn
it off. To prevent losing your personal settings because
someone changes them accidentally, you can save them
using the MEMORYMENU.After the settings have been
saved, you can restore them at a later date using the
MEMORYMENU.The MEMORYMENUalso lets you easily
restore the STEREOSETUPmenu to its factory settings.
Details are on page 39.
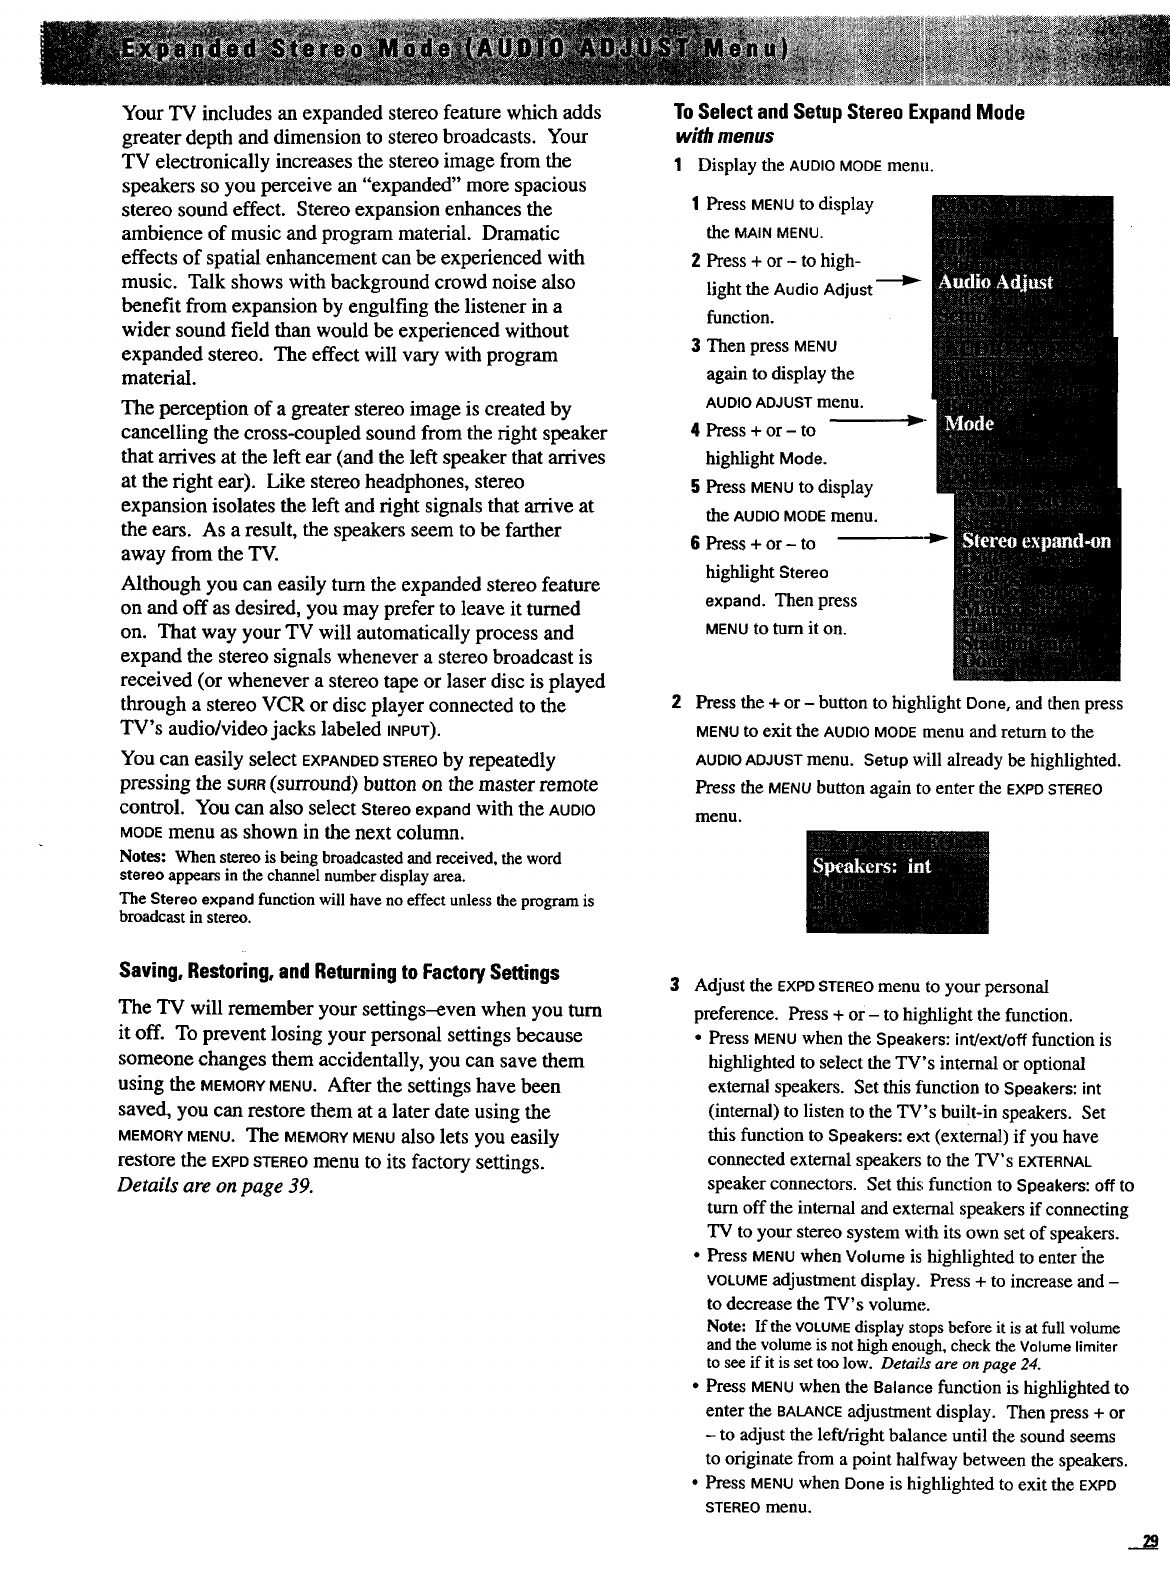
Your TV includes an expanded stereo feature which adds
greater depth and dimension to stereo broadcasts. Your
TV electronically increases the stereo image from the
speakers so you perceive an "expanded" more spacious
stereo sound effect. Stereo expansion enhances the
ambience of music and program material. Dramatic
effects of spatial enhancement can be experienced with
music. Talk shows with background crowd noise also
benefit from expansion by engulfing the listener in a
wider sound field than would be experienced without
expanded stereo. The effect will vary with program
material.
The perception of a greater stereo image is created by
cancelling the cross-coupled sound from the right speaker
that arrives at the left ear (and the left speaker that arrives
at the right ear). Like stereo headphones, stereo
expansion isolates the left and right signals that arrive at
the ears. As a result, the speakers seem to be farther
away from the TV.
Although you can easily turn the expanded stereo feature
on and off as desired, you may prefer to leave it turned
on. That way your TV will automatically process and
expand the stereo signals whenever a stereo broadcast is
received (or whenever a stereo tape or laser disc is played
through a stereo VCR or disc player connected to the
TV's audio/video jacks labeled INPUT).
You can easily select EXPANDEDSTEREOby repeatedly
pressing the sure (surround) button on the master remote
control. You can also select Stereo expand with the AUDIO
MODEmenu as shown in the next column.
Notes: Whenstereois beingbroadcastedandreceived, the word
stereo appearsinthe channelnumberdisplay area.
The Stereo expandfunctionwillhaveno effectunless theprogramis
broadcastin stereo.
Saving, Restoring,and Returningto Factory Settings
The TV will remember your settings-even when you turn
it off. To prevent losing your personal settings because
someone changes them accidentally, you can save them
using the MEMORYMENU.After the settings have been
saved, you can restore them at a later date using the
MEMORYMENU. The MEMORYMENU alSO lets you easily
restore the EXPDSTEREOmenu to its factory settings.
Details are on page 39.
ToSelect and Setup Stereo Expand Mode
with menus
1Display the AUDIOMODEmenu.
2
1Press MENU tO display
the MAIN MENU.
2Press+ or- to high-
light the Audio Adjust
function.
3ThenpressMENU
againto display the
AUDIO ADJUST menu.
4Press + or - to
highlight Mode.
5Press MENUto display
the AUDIO MODE menu.
6Press + or- to
highlight Stereo
expand. Then press
MENU to turn it on.
Press the + or- button tohighlight Done,and then press
MENUto exit the AUDIOMODE menu and return to the
AUDIOADJUSTmenu. Setup will already be highlighted.
Press the MENU button again to enter the EXPD STEREO
menu.
Adjust the EXPDSTEREOmenu to your persona]
preference. Press +or - to highlight the function.
* Press MENU when the Speakers: int!ext/off function is
highlighted to select the TV's internal or optional
external speakers. Set this function to Speakers: int
(internal) to listen to the TV's built-in speakers. Set
this function to Speakers: ext (external) if you have
connected external speakers to the TV's EXTERNAL
speaker connectors. Set this function to Speakers:off to
turn off the internal and external speakers if connecting
TV to your stereo system with its own set of speakers.
•Press MENUwhen Volume is highlighted to enter be
VOLUMEadjustment display. Press + to increase and -
to decrease the TV's volume.
Note: If the VOLUMEdisplay stops before it is at full volume
and the volume is not high enough, check the Volume limiter
to see if it is set too low. Details are on page 24.
• Press MENUwhen the Balance function is highlighted to
enter the BALANCEadjustment display. Then press + or
- to adjust the left/fight balance until the sound seems
to originate from a point halfway between the speakers.
• Press MENUwhen Done is highlighted to exit the EXPD
STEREO menu.
ze
Some TV stations that broadcast stereo also broadcast
another audio program called SAP. SAP stands for
Second Audio Program and is sometimes used to
broadcast a second audio track for a bilingual movie.
In order to receive SAP broadcasts you must first turn on
the SAP function for each channel you want to receive
SAP. To turn on SAP follow the steps below.
SelectingSAPAudio
1Display the CHANNELMEM(memory) menu.
1 Press the MENU button to
display the MAINMENU.
2Press the + or - button to
highlight the Setup
function in white. -_
3 Then press MENUagain to
display the SETUPmenu.
4Press the + or - button to
highlight the Channel memory
function.
Then press MENUtOdisplay the
CHANNEL MEM (memory) menu.
Select the channel you want to hear SAP on. Press the MENU
button to underline the Channel function. Then press + to
enter a higher channel or - to enter a lower channel. Press the
MENUbutton again to exit the Channel function by removing
the underline.
Note: The channel you are currently tuned to will automatically
appear in the Channel function.
Enterchannel
number13.
Turn SAP on or off for selected channel. Press the + or -
button to highlight the SAP: off/on function. Press the MENU
button to select SAP:on or SAP: off.
Turn SAP on to
hear SAP audio
for channel 13
shown above.
4Press the + or - button to highlight Done, and then press MENU
tO exit the CHANNELMEMmenu.
No(es: To hear SAP you must select each channel individually and turn
on SAP. Although SAP is transmitted with the stereo signal, it is not
broadcast in stereo. That means SAP audio will be monaural sound.
When SAP is turned on for a channel, you will only hear the SAP audio
for that channel whenever SAP is broadcast. If SAP is not
broadcast, you will hear normal audio.
Closed Captioning lets you display the audio portion of a
program as text on the TV screen. This is useful to the
hearing impaired or anyone who wants to watch a program
without the sound. Eight types of closed captioning are
available: CC1, CC2, CC3, CC4, Text1, Text2, Text3, and
Text4.
Selecting when Closed Captioning is displayed
1Display the SPECIAL ITEMSmenu.
1Press the MENUbutton to display
the MAIN MENU.
2Press the + or -button to highlight
Special functions in white.
3Then press MENUagain to _
display the SPECIAL ITEMS menu.
4 Press the + or - button to
highlight the Caption function.
5Then press MENUto cycle between
NEVER, ALWAYS, and ON MUTE.
2Select NEVERto keep captioning
turned off. Select ALWAYSto always
show captioning when available. Select ON MUTEto show
captioning only when the TV sound has been muted.
Selecting the Closed Captioning Mode
1Display the SPECIAL ITEMSmenu.
1Follow steps 1-3 above to display
the SPECIALITEMS menu.
2Press the + or - button to
highlight the Caption mode
function. _D,-
3 Then press MENUto display the
CAPTION MODE menu, _D,-
4 Press the + or - button to
highlight the Caption mode
you want to use.
5 Press the MENUbutton to select the
captioning mode you want to use.
Z Select CCI for complete text of the primary language in your
area. Select CC3 for secondary language translation or
simplified English, depending on which type is available in
your area. Select CC2 or CC4 for captioning not necessarily
in the same time frame as the sound from the program.
Several second delays are typical for CC2 and CC4. Text
modes; Textl, Text2, Text3 and Text4, display on-screen
boxes containing general information not related to the audio
portion of the program.
3 Press the + or - button to highlight Done, and then press MENU
to exit the CAPTION MODE menu.
Notes: Closed Captioning (CC) is nm available on all channels at all times.
The Text modes are also not available at all times on all channels.
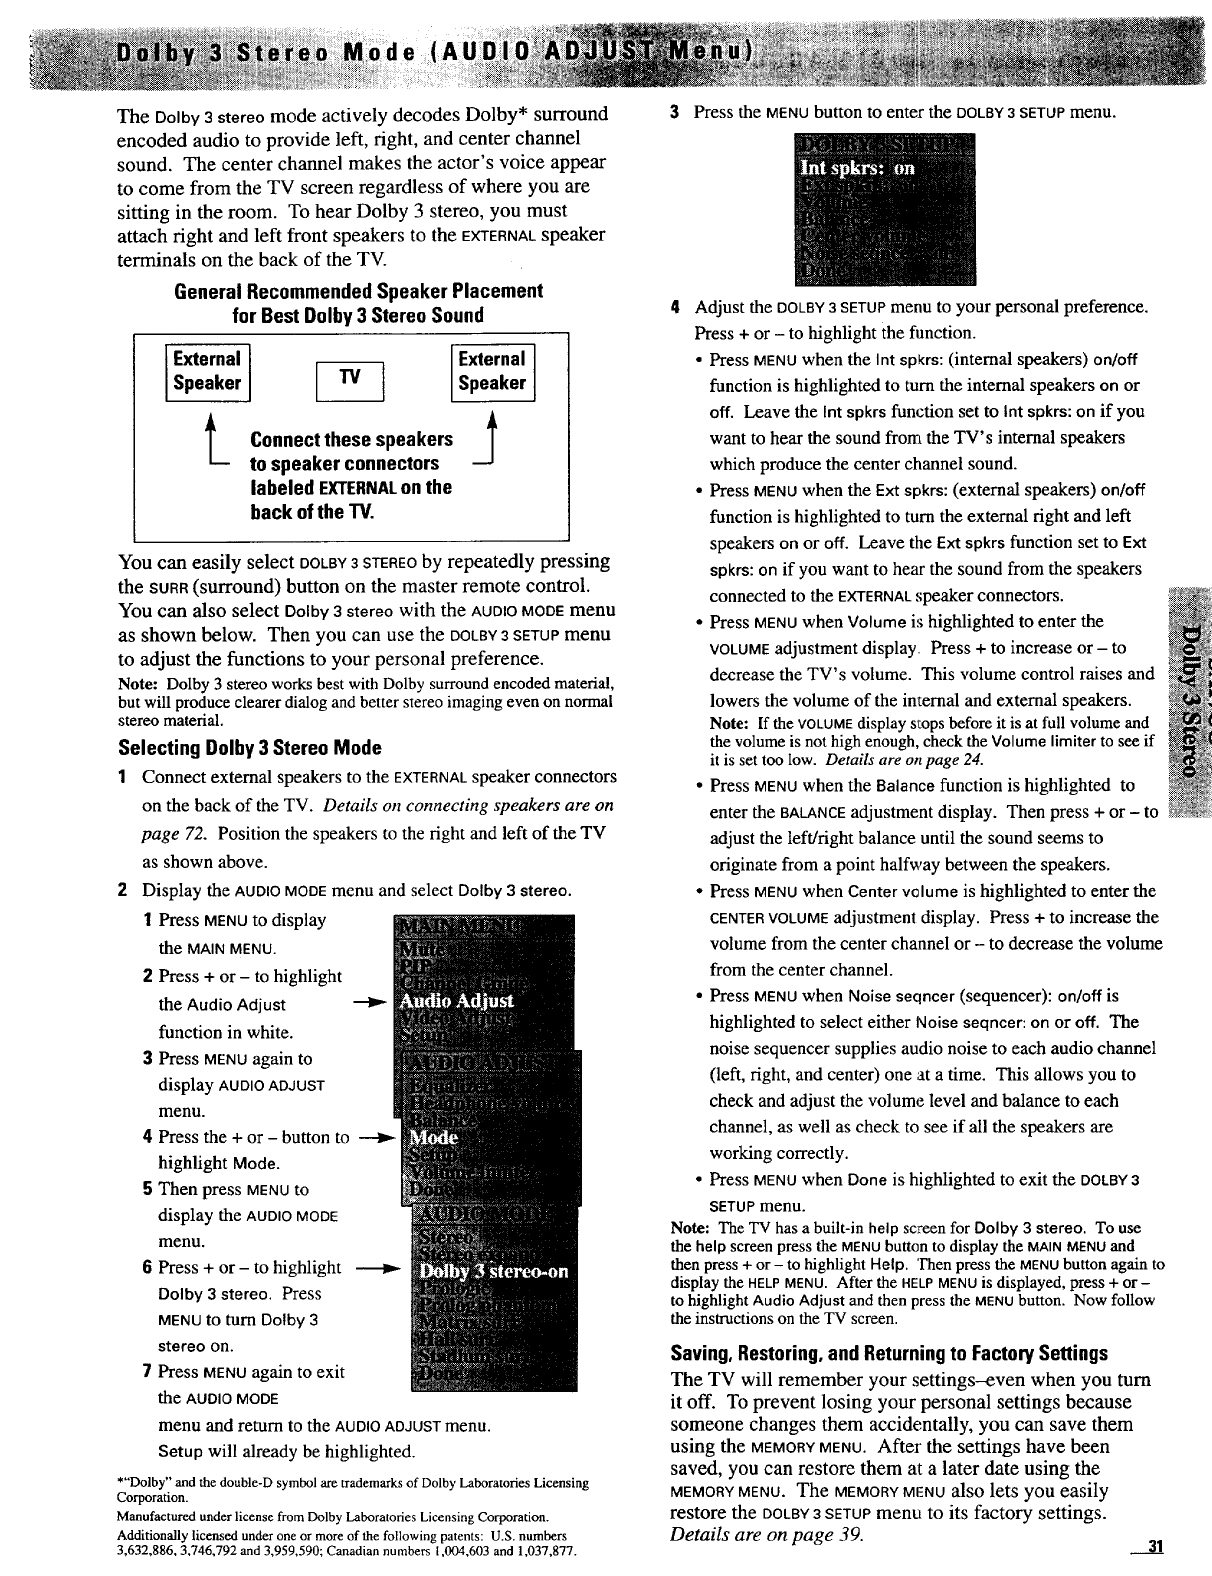
The Dolby3stereo mode actively decodes Dolby* surround
encoded audio to provide left, fight, and center channel
sound. The center channel makes the actor's voice appear
to come from the TV screen regardless of where you are
sitting in the room. To hear Dolby 3 stereo, you must
attach right and left front speakers to the EXTERNALspeaker
terminals on the back of the TV.
General RecommendedSpeaker Placement
for Best Dolby3 Stereo Sound
External
Speaker _-_
tonnect these speakers
to speaker connectors
labeled EXTERNALon the
back of the TV.
External
Speaker
J
You can easily select DOLBY3 STEREOby repeatedly pressing
the SURR(surround) button on the master remote control.
You can also select Dolby 3 stereo with the AUDIOMODEmenu
as shown below. Then you can use the OOLBY3 SETUP menu
to adjust the functions to your personal preference.
Note: Dolby 3 stereo works best with Dolby surround encoded material,
but will produce clearer dialog and better stereo imaging even on normal
stereo material.
Selecting Dolby 3 Stereo Mode
1Connect external speakers to the EXTERNALspeaker connectors
on the back of the TV. Details on connecting speakers are on
page 72. Position the speakers to the right and left of the TV
as shown above.
2Display the AUDIO MODE menu and select Dolby 3 stereo.
1Press MENUto display
the MAIN MENU.
2Press + or - to highlight
the Audio Adjust -----It-
function in white.
3Press MENU again to
display AUDIOADJUST
menu.
4Press the + or - button to
highlight Mode.
5Then press MENUtO
display the AUDIOMODE
menu.
6Press + or - to highlight
Dolby 3 stereo. Press
MENUto turn Dolby 3
stereo on.
7Press MENUagain to exit
the AUDIO MODE
menu and return to the AUDIO ADJUST menu.
Setup will already be highlighted.
*"Dolby" and the double-D symbol are trademarks of Dolby Laboratories Licensing
Corporation.
Manufactured under license from Dolby Laboratories Licensing Corporation.
Additionally licensed under one or more of the following patents: U.S. numbers
3,632,886, 3,746,792 and 3,959,590; Canadian numbers I,O04,603 and 1,037,877.
3Press the MENU button to enter the DOLBY 3SETUPmenu.
4Adjust the DOLBY3SETUPmenu to your personal preference.
Press + or - to highlight the function.
•Press MENUwhen the Int spkrs: (internal speakers) on/off
function is highlighted to turn the internal speakers on or
off. Leave the Int spkrs function set to Int spkrs: on if you
want to hear the sound frorrt the TV's internal speakers
which produce the center channel sound.
• Press MENUwhen the Ext spkrs: (external speakers) on/off
function is highlighted to turn the external right and left
speakers on or off. Leave the Ext spkrs function set to Ext
spkrs: on if you want to hear the sound from the speakers
connected to the EXTERNAL ,;peaker connectors.
•Press MENUwhen Volume is highlighted to enter the
VOLUMEadjustment display Press + to increase or - to
decrease the TV's volume. This volume control raises and
lowers the volume of the imernal and external speakers.
Note: If the VOLUMEdisplay stops before it is at full volume and
the volume is not high enough, check the Volume limiter to see if
it is set too low. Details are m,page 24.
•Press MENUwhen the Balance function is highlighted to
enter the BALANCEadjustment display. Then press + or - to
adjust the left/fight balance until the sound seems to
originate from a point halfway between the speakers.
• Press MENUwhen Center volume is highlighted to enter the
CENTERVOLUMEadjustment display. Press + to increase the
volume from the center channel or - to decrease the volume
from the center channel.
• Press MENUwhen Noise seqncer (sequencer): on/off is
highlighted to select either Noise seqncer: on or off. The
noise sequencer supplies audio noise to each audio channel
(left, right, and center) one at a time. This allows you to
check and adjust the volume level and balance to each
channel, as well as check to see if all the speakers are
working correctly.
• Press MENUwhen Done is highlighted to exit the DOLBY3
SETUPmenu.
Note: The TV has a built-in help screen for Dolby 3 stereo. To use
the help screen press the MENUbutton to display the MAINMENUand
then press + or - to highlight Help. Then press the MENUbutton again to
display the HELPMENU.After the HELPMENUis displayed, press + or -
to highlight Audio Adjust and then press the MENUbutton. Now follow
the instructions on the TV screen.
Saving, Restoring,and Returningto Factory Settings
The TV will remember your settings--even when you turn
it off. To prevent losing your personal settings because
someone changes them accidentally, you can save them
using the MEMORYMENU.After the settings have been
saved, you can restore them a_ta later date using the
MEMORYMENU.The MEMORYMrNOalso lets you easily
restore the DOLBY3SETUPmen_l to its factory settings.
Details are on page 39. 31
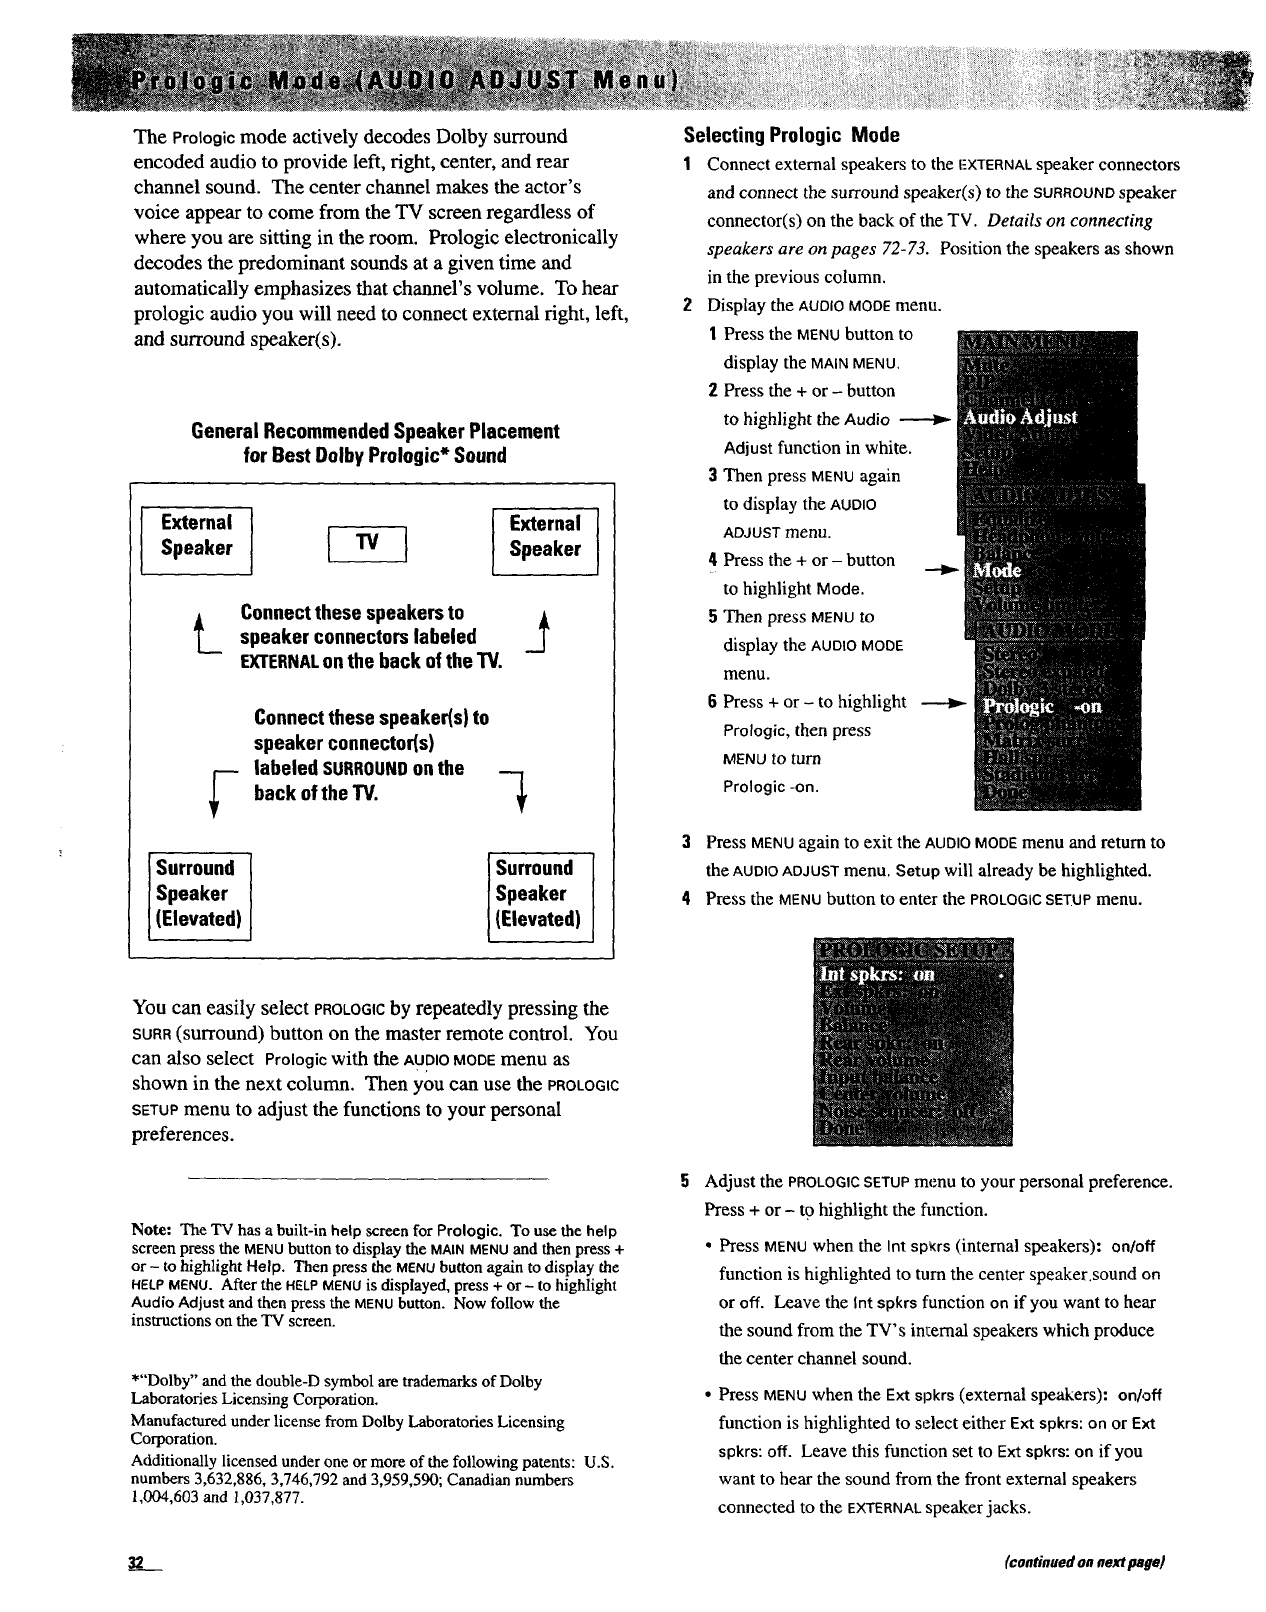
The Prologic mode actively decodes Dolby surround
encoded audio to provide left, right, center, and rear
channel sound. The center channel makes the actor's
voice appear to come from the TV screen regardless of
where you are sitting in the room. Prologic electronically
decodes the predominant sounds at a given time and
automatically emphasizes that channel's volume. To hear
prologic audio you will need to connect external right, left,
and surround speaker(s).
General RecommendedSpeaker Placement
for Best Dolby Prologic* Sound
IExternal
Speaker I vl External
Speaker
Connectthese speakersto
Lspeaker connectors labeled
EXTERNALonthe back ofthe TV.
Connectthese speaker(s) to
speaker connector(s)
labeled SURROUNDonthe
_--- back of the TV. "_
Surround
Speaker
(Elevated)
Surround
Speaker
(Elevated)
Selecting Prologic Mode
1Connect external speakers to the I-XTERNALspeaker connectors
and connect the surround speaker(s) to the SURROUNDspeaker
connector(s) on the back of the TV. Details on connecting
speakers are on pages 72-73. Position the speakers as shown
in the previous column.
2Display the AUDIOMODEmenu.
1Press the MENUbutton to
display the MAINMENU,
2 Press the + or - button
to highlight the Audio
Adjust function in white.
3 Then press MENUagain
to display the AUDIO
ADJUST menu.
4Press the + or - button
to highlight Mode.
5Then press MENUto
display the AUDIOMODE
menu.
6 Press + or - to highlight
Prologic, then press
MENU to turn
Prologic -on.
3Press MENUagain to exit the AUDIOMODEmenu and return to
the AUDIOADJUST menu. Setup will already be highlighted.
4Press the MENUbutton to enter the PROLOGICSETUPmenu.
You can easily select PROLOGICby repeatedly pressing the
SURf (surround) button on the master remote control. You
can also select Prologic with the AUDIOMODEmenu as
shown in the next column. Then you can use the PROLOGtC
SETUPmenu to adjust the functions to your personal
preferences.
Note: The TV has a built-in help screen for Prologic. To use the help
screen press the MENU button to display the MAIN MENUand then press +
or -to highlight Help. Then press the MENU button again to display the
HELPMENU. After the HELPMENUis displayed, press + or - to highlight
Audio Adjust and then press the MENUbutton. Now follow the
instructions on the TV screen.
*"Dolby" and the double-D symbol are trademarks of Dolby
Laboratories Licensing Corporation.
Manufactured under license from Dolby Laboratories Licensing
Corporation.
AdditionaUy licensed under one or more of the following patents: U.S.
numbers 3,632,886, 3,746,792 and 3,959,590; Canadian numbers
1,004,603 and 1,037,877.
Adjust the PROLOGIC SETUP menu to your personal preference.
Press + or - t9 highlight the fimction.
•Press MENUwhen the Int spl<rs (internal speakers): on/off
function is highlighted to turn the center speaker.sound on
or off. Leave the Int spkrs function on if you want to hear
the sound from the TV's in_ernal speakers which produce
the center channel sound.
Press MENUwhen the Ext spkrs (external speakers): on/off
function is highlighted to select either Ext spkrs:on or Ext
spkrs: off. Leave this function set to Ext spkrs:on if you
want to hear the sound from the front external speakers
connected to the EXTERNALspeaker jacks.
32 (continued onnext page]
• Press MENUwhen Volume is highlighted to enter the
VOLUMEadjustment display. Press +to increase or - to
decrease the TV's volume. This volume control raises and
lowers the volume of the internal, external, and surround
speakers.
Note: If the VOLUMEdisplay stops before it is at full volume and
the volume is not high enough, check the Volume limiter to see if it
is set too low. Details are on page 24.
• Press MENUwhen the Balance function is highlighted to
enter the BALANCEadjustment display. Then press + or - to
adjust the left/right balance until the sound seems to
originate from a point halfway between the speakers.
Note: The balance control will not affect the audio from the
surround speakem.
•Press MENUwhen Rearspkrs (speakers):on/off function is
highlighted to select Rear spkrs: on or Rear spkrs: off.
Leave this function set to Rear spkrs: on to hear sound from
the rear (surround) speakers.
•Press MENUwhen Rear volume is highlighted to enter the
REARVOLUMEadjustment display. Press + to increase the
volume from the rear surround speakers or- to decrease the
surround speaker volume.
• Press MENUwhen the Input balance function is highlighted
to enter the INPUTaALANCEdisplay. The INPUT8ALANCE
display is used to balance the left and fight audio signals
coming into the set for optimum surround sound
performance. Most of the time you will want to leave this at
mid scale. If the sound coming from your surround sound
speaker(s) has a lot of voices (instead of mostly background
ambience), you may want to adjust the INPUTBALANCE
display to minimize the voices. With the INPUTBALANCE
display on the TV screen, press the +and - buttons to move
to the right and to the left of the scale. Stop at the point
where voices are minimal in the surround speaker(s).
Note: When adjustingthe INPUTBALANCE,the front speakers will
automatically be muted. This allows you to hear only the sound
from the rear surround speakers. Adjust the sound to minimize
voices and to give mostly background ambience.
• Press MENUwhen Center volume is highlighted to enter the
CENTERVOLUMEadjustment display. Press + to increase the
volume from the center channel or - to decrease the volume
from the center channel.
•Press MENU when Noise seqncer (sequencer): on/off is
highlighted to select either Noise seqncer: on or off. The
noise sequencer supplies audio noise to each audio channel
(left, fight, center, and surround) one at a time. This allows
you to check and adjust the volume level and balance to
each channel as well as check to see if all the speakers are
working correctly.
•Press MENUwhen Done is highlighted to exit the PROLOGIC
SETUP menu.
Saving, Restoring,and Returningto Factory Settings
The TV will remember your settings-even when you turn
it off. To prevent losing your personal settings because
someone changes them accidentally, you can save them
using the MEMORYMENU.After the settings have been
saved, you can restore them at a later date using the
MEMORYMENU.The MEMORYMENUalso lets you easily
restore the PROLOGICSETUPmenu to its factory settings.
Details are on page 39.
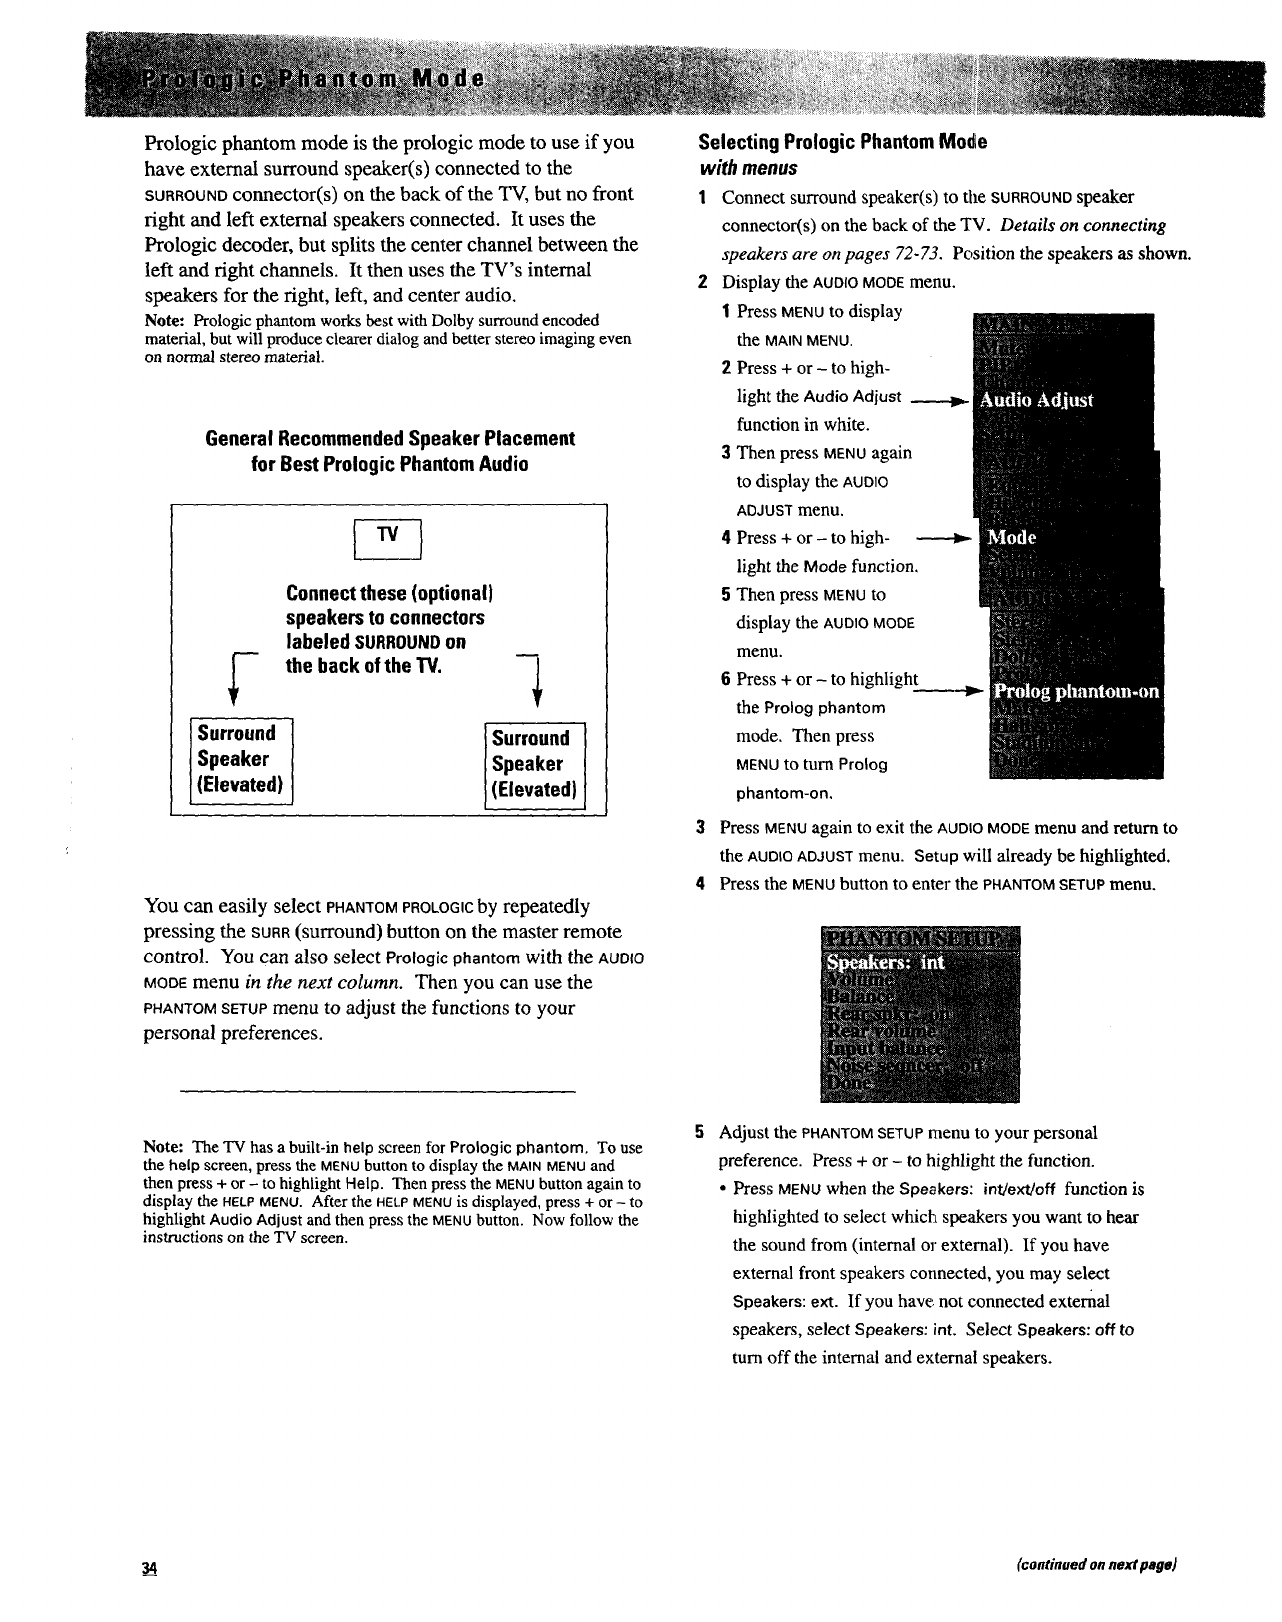
Prologic phantom mode is the prologic mode to use if you
have external surround speaker(s) connected to the
SURROUNDconnector(s) on the back of the TV, but no front
right and left external speakers connected. It uses the
Prologic decoder, but splits the center channel between the
left and right channels. It then uses the TV's internal
speakers for the right, left, and center audio.
Note: Prologic phantom works best with Dolby surround encoded
material, but will produce clearer dialog and better stereo imaging even
on normalstereo material.
General RecommendedSpeaker Placement
for Best Prologic PhantomAudio
Connectthese (optional)
speakers to connectors
labeled SURROUNDon
_- the back of the TV. -_
Surround
Speaker
(Elevated)
Surround
Speaker
(Elevated)
You can easily select PHANTOMPROLOGOCby repeatedly
pressing the SURR(surround) button on the master remote
control. You can also select Prologic phantom with the AUDIO
MODEmenu in the next column. Then you can use the
PHANTOMSETUPmenu to adjust the functions to your
personal preferences.
Note: The TV has a built-in help screen for Prologic phantom, To use
the help screen, press the MENU button to display the MAIN MENU and
then press + or - to highlight Help. Then press the MENU button again to
display the HELPMENU. After the HELPMENU is displayed, press + or -to
highlight Audio Adjust and then press the MENU button. Now follow the
instructions on the TV screen.
Selecting Prologic Phantom Mode
with menus
1Connect surround speaker(s) to the SURROUNDspeaker
connector(s) on the back of the TV. Details on connecting
speakers are on pages 72-73. Position the speakers as shown.
2Display the AUDIOMODEmenu.
1Press MENUto display
the MAIN MENU.
2Press + or -to high-
light the Audio Adjust
function in white.
3Then press MENUagain
to display the AUDIO
ADJUST menu.
4Press +or -to high-
light the Mode function.
5Then press MENUto
display the AUDIOMODE
menu.
6 Press + or - to highlight ]_-
the Prolog phantom
mode. Then press
MENU to turn Prolog
phantom-on,
3Press MENUagain to exit the AUDIOMODEmenu and return to
the AUDIOADJUST menu. Setup will already be highlighted.
4Press the MENUbutton to enter the PHANTOM SETUP menu.
Adjust the PHANTOM SETUPmenu to your personal
preference. Press + or -to highlight the function.
•Press MENUwhen the Speakers: int/ext/off function is
highlighted to select which speakers you want to hear
the sound from (internal or external). If you have
external front speakers connected, you may select
Speakers: ext. If you have not connected external
speakers, select Speakers: int. Select Speakers: off to
turn off the internal and external speakers.
(continued on next page)
•Press MENUwhen Volume is highlighted to enter the
VOLUMEadjustment display. Press +to increase or -to
decrease the TV's volume. This volume control raises
and lowers the volume of the internal, external, and
surround speakers.
Note: If the VOLUMEdisplay stops before it is at full volume and
the volume is not high enough, check the Volumelimiter to see if
it is set too low. Details are on page 24.
•Press MENUwhen the Balance function is highlighted to
enter the BALANCEadjustment display. Then press + or-
to adjust the left/fight balance until the sound seems to
originate from a point halfway between the speakers.
•Press MENUwhen Rear spkr (speaker): on/off function is
highlighted to select either Rear spkr. on or Rear spkr. off.
Leave this function set to Rear spkr: on to hear sound from
the rear (surround) speaker(s).
•Press MENUwhen Rear volume is highlighted to enter the
REARVOLUMEadjustment display. Press + to increase the
volume from the rear surround speaker(s) or - to decrease
the volume from the rear surround speaker(s).
°Press MENUwhen the Input balance function is highlighted
to enter the INPUT BALANCE display. The INPUTBALANCE
display is used to balance the left and fight audio signals
coming into the set for optimum surround sound
performance. Most of the time you will want to leave this
at mid scale. If the sound coming from your surround
sound speaker(s) has a lot of voices (instead of mostly
background ambience), you may want to adjust the INPUT
BALANCEdisplay to minimize the voices. With the INPUT
BALANCEdisplay on the TV screen, press the + and -
buttons to move to the fight and to the left of the scale.
Stop at the point where voices are minimal in the surround
speaker(s).
Note: When adjusting the INPUTBALANCE,the front speakers
will automatically be muted. This allows you to hear only the
sound from the rear surround speakers. Adjust the sound to
minimize voices and to give mostly background ambience.
• Press MENUwhen Noise seqncer (sequencer): on/off is
highlighted to select either Noise seqncer: on or off. The
noise sequencer supplies audio noise to each audio
channel (left, fight, center, and surround) one at a time.
This allows you to check and adjust the volume level and
balance to each channel as well as check to see if all the
speakers are working correctly.
• Press MENUwhen Done is highlighted to exit the PHANTOM
SETUP menu.
Saving, Restoring, and Returningto FactorySettings
The TV will remember your settings--even when you
turn it off. To prevent losing your personal settings
because someone changes them accidentally, you can
save them using the MEMORYMENU.After the settings
have been saved, you can restore them at a later date
using the MEMORYMENU.The MEMORYMENUalSO lets you
easily restore the PHANTOMSETUPmenu to its factory
settings. Details are on page 39.
35
These modes provide surround sound generation and require
rear speakers. There are three surround modes to choose
from. Matrix surround simulates surround sound from a
mono broadcast. Hall surround provides surround sound from
a stereo signal, and stadium surround delays the rear sound
longer than hall surround which gives you the feeling of being
in a larger area.
GeneralRecommendedSpeakerPlacement
forBestSurroundSoundAudio
Lspeakers to connectorslabeled
EXTERNALon the backof the "IV.
Connectthese speaker(s)to
speaker connector(s)labeled
SURROUNDon the back ofthe 13/. ---_
Surround {Surround I
I Speaker ISpeaker
I(Elevated)I(Elevated)
You can easily select MATRIXSURROUND,HALLSURROUND,or
STADIUMSURROUND by repeatedly pressingthe SURR(surround)
button on the master remote control. You can also select
Matrix, Hall, or Stadium surf with the AUDIO MODE menu as
shown below. Then you can use the SURROUNDSETUPmenu to
adjust the functions to your personal preferences.
SelectingMatrixSurr,HallSurr,orStadiumSurrModes
1 Connect (optional) external speakers to the EXTERNAL
speaker connectors and surround speaker(s) to the
SURROUNDconnector(s) on the back of the TV. Details on
connecting speakers are on pages 72-73.
2Display the AUDIOMODEmenu.
1Press MENUto display the
MAIN MENU,
2Press + or - to highlight the
Audio Adjust function in
white. .
3Then press MENUagain to
display the AUDIOADJUST
menu.
4Press the + or - button to
highlight the Modefunction. --_
5Then press MENUto display
the AUDIO MODE menu.
6Press + or - to highlight
Matrix surr, Hall surr, or
Stadium surf mode. Then
press MENU to turn on
whichever mode is
highlighted.
3Press MENUagain to exit the AUDIOMODEmenu and return
to the AUDIOADJUSTmenu. Setup will already be
highlighted.
4Press the MENUbutton to enter the setup menu for the
surround mode you have selected. If you have selected
matrix surround the setup menu is titled MATRIXSETUP.If
you have selected hall or stadium surround the setup menu
is titled SURROUND.
5Adjust the setup menu to your personal preference. Press
+ or - to highlight the function.
• Press MENUwhen the Speakers: int/ext/off function is
highlighted to change the setting between Speakers: int
(internal), ext (external), or off. Select Speakers: int to
hear sound from the TV's internal speakers. Select
Speakers: ext if you have external front speakers and you
want to hear the sound from them instead of the internal
speakers. Select Speakers: off if you do not want any
sound from the internal or external front speakers.
•Press MENUwhen Volume is highlighted to enter the
VOLUMEdisplay. Press + to increase or- to decrease the
TV's volume. This volume control raises and lowers the
volume of the internal, external, and surround speakers.
Note: If the VOLUMEdisplay stops before it is at full volume and
thevolumeisnot highenough,checkthe Volumelimiterto see if it
is settoo low. Derailsareonpage 24.
• Press MENUwhen the Balance function is highlighted to
enter the BALANCEadjustment display. Then press + or -
to adjust the left/fight balan_'e until the sound seems to
originate from a point halfway between the speakers.
• Press MENUwhen Rear spkr (speaker): on/off function is
highlighted to select either Rear spkr: on or Rear spkr: off.
Leave this function set to Rear spkr:on to hear surround
sound.
• Press MENUwhen Rear volume is highlighted to enter the
REARVOLUMEadjustment display. Press + to increase the
volume from the rear surround speakers or - to decrease
the volume from the rear surround speakers.
• Press MENUwhen the Input balance function is highlighted
to enter the INPUTBALANCEdisplay. The INPUTBALANCE
display is used to balance the left and right audio signals
coming into the set for optimum surround sound
performance. Most of the time you will want to leave
this at mid scale. If the sound coming from your
surround sound speaker(s) has a lot of voices (instead of
mostly background ambience), you may want to adjust
the INPUTRALANCEdisplay to minimize the voices. With
the INPUTBALANCEdisplay on the TV screen, press the +
and - buttons to move to the right and to the left of the
scale. Stop at the point where voices are minimal in the
surround speaker(s).
•Press MENUwhen Done is highlighted to exit the setup
menu.
Saving,Restoring,andReturningto FactorySettings
The TV will remember your settings--even when you turn it
off. To prevent losing your personal settings because
someone changes them accidentally, you can save them using
the MEMORYMENU.After the :settings have been saved, you
can restore them at a later date using the MEMORYMENU.The
MEMORY MENU also lets you easily restore the MATRIX SETUP or
SURROUNDsetup menu to its factory settings. Details are on
page 39.
1 PressMENU to display
the MAIN MENU.
3
4
Repeatedlypress + or -
to highligM the Video
Adjust function.
PressMENU to display
VIDEOADJUST menu.
Pressthe + or- buttonto
highlight the functionyou want
to adjust,then pressMENU to
enterthe adjustmentdisplay.
Press+ or-to adjust it. Press
MENU to returnto the VIDEO
ADJUSTmenu.
Pressing the - button moves the highlight down the TV
screen (one item per press).
Pressing the + button moves the highlight up the TV screen
(one item per press).
Pressing the MENUbutton when a function is highlighted
allows you to enter or adjust that function.
After a few seconds, the VIOEOADJUSTmenu will disappear
from the screen if no button is pressed. To exit the menu
quickly, highlight Done and then press MENU(or press the
CLEARbutton on the master remote control).
Color adjusts the amount of color in the picture. Press + to
increase color or press - to decrease color.
Tint adjusts the color of flesh tones. Press + to add more red tint
or press - to add more green tint.
Contrast adjusts the overall brightness and contrast of the picture.
Press + to increase contrast or press - to decrease contrast.
Brightness adjusts the brightness of the dark portions of the
picture. Press + to increase brightness or press - to decrease
brightness.
Sharpness adjusts picture sharpness. Press + to increase
sharpness or press -to decrease sharpness.
The Auto color: on/off function allows you to select either Auto
color: on or Auto color: off. When Auto color: on is selected, the
TV will minimize the differences in color and fleshtones that
normally occur due to program variations. Press + or- to select
either Auto color: on or Auto color: off.
The Colortemp (temperature): cool/med/warm function lets you
adjust the blue and red hues of the overall picture to your
personal preference. Press + or - to change.
The Noise reduce: low/reed/high function allows you to remove
some of the picture noise caused by a weak signal. You can
select how much noise reduction you need (low, medium, or
high). Try each one and select the one that gives you the cleanest
and clearest picture.
The Projection setup function allows you to adjust the TV's
CONVERGENCEmenu. For details see page 5.
Highlight Done and press MENUtOexit the VIDEOADJUSTmenu.
Adjustingfor a ColorPicture that Pleases You
1Decrease color to minimum. This will leave a black-and-white
image on the screen.
2Adjust contrast until the picture pleases you.
3Adjust brightness until the black parts of the picture appear _iii
black. You may need to wait until the picture shows i
something you are sure is black. Be careful not to lose the
details in darkly shaded areas.
4Increase color until you reach a pleasing level of intensity.
5Adjust tint until flesh tones or other color objects appear
natural.
6Adjust sharpness for a pleasing level of picture sharpness.
(For weak signals, the picture may be more pleasing with
sharpness decreased.)
7Set the Auto color, Color temp, and Noise reduce features to
your personal preference.
Saving, Restoring,and Returningto Factory Video Settings
The TV will remember your settings--even when you turn
it off. To prevent losing your personal settings because
someone changes them accidentally, you can save them
using the MEMORYMENU. The settings for color, tint,
contrast, brightness, and sharpness will be saved. After the
settings have been saved, you can restore them at a later
date by using the MEMORYMENU.The MEMORYMENUalso lets
you easily restore the video functions to their factory
settings. Details are on page 38.
37

After setting the video functions to your personal
preference as described on page 37, you can use the
MEMORYMENUtO save and restore them. This is helpful in
case someone changes them accidentally.
The MEMORYMENUalso lets you restore the color, tint,
contrast, brightness, and sharpness settings to their
factory settings.
To Restore Your Personalized Seltings: Press the +or -
button to highlight the Restore video function. Then press the
MENUbutton to restore color, tint. contrast, brightness, and
sharpness to the settings you previously saved with the Save
video setup function. The word RESTORED will appear on the
TV screen.
To Save and Restore Your Personalized Video Settings
with menus
1Display the MEMORYMENU.
1Press MENUtOdisplay
the MAIN MENU.
ZPress + or - to highlight
Specialfunctions in
white.
3Then press MENUagain
to display the SPECIAL
ITEMS menu.
4Press + or - to highlight
the Setup memory
function.
5Then press MENUto
display the MEMORY
MENU.
PressMENU to
restore videoto
the settings you
previously
saved.
To Restore FactoryVideo Settings
with menus
Display the MEMORYMENU. Press the + or - button to
highlight the Factory video function. Then press MENUtO
restore the color, tint, contrast, brightness, and sharpness
functions to their original factory settings. The word
RESTORED will appear on the TV screen.
PressMENU to
restorefacton/
videosettings.
To Save Your Personalized Settings: Press the + or -
button to highlight the Save video setup function. Then
press the MENUbutton to save your.settings for color, tint,
contrast, brightness, and sharpness. The word STORED
appears on the TV screen while the settings are being
stored in memory.
PressMENU to save
video settings.
38
After setting the audio functions on the STEREO,EXPD
(expanded) STEREO, DOLBY 3, PROLOGIC, PHANTOM, MATRIX, or
SURROUND SETUP menus to your personal preference as
described on pages 28-36, you can use the MEMORYMENUto
save them. This is helpful in case someone changes them
accidentally.
To save and restore your settings, use the MEMORYMENUas
shown below.
The MEMORYMENUalso lets you easily restore the settings to
their factory settings.
To Save and Restore YourAudio Settings
with menus
1Display the MEMORYMENU.
1Press MENUto display the
MAIN MENU.
2Press + or -to highlight
Special functions in
white.
3Then press MENUagain to
display the SPECIALITEMS
menu.
4 Press + or - to highlight
the Setup memory
function.
5Then press MENUto
display the MEMORY
MENU.
To RestoreYour Personalized Settings: Press the +or -
button to highlight the Restore audio function. Then press
the MENUbutton to restore the audio to the settings you
previously saved with the Save audio setup function. The
word RESTOREDwill appear on the TV screen.
PressMENU to
restore audioto the
settingsyou
previouslysaved.
To Restore FactoryAudio Settings
with menus
Display the MEMORYMENU. Press the + or - button to
highlight the Factory audio function. Then press MENUtO
restore the audio setup functions to their original factory
settings. The word RESTORED will appear on the TV screen.
PressMENU to
restoreaudio setup
functionsto factory
settings. _-
To Save Your Personalized Settings: Press the +or- button
to highlight the Save audio setup function. Then press the
MENUbutton to save your settings. The word STORED
appears on the TV screen while the settings are being stored
in memory.
audiosettings.
39

1 Pressthe MENU
buttonto displaythe
MAIN MENU.
2 Repeatedlypressthe
+or - buttonto
highlight Setupin
white.
3 Pressthe MENU
button again to
displaythe SETUP
menu.
Repeatedly press the -button to move the highlight down
(one item per press).
Repeatedly press the + button to move the highlight up (one
item per press).
Press the MENUbutton again to enter or adjust the highlighted
function.
After a few seconds, the SETUPmenu will disappear from the
screen if no button is pressed. To exit the menu quicker,
highlight Done and then press MENU(or press the CLEARbutton
on the master remote control).
Antenna: input A/B: Your TV has two separate antenna inputs on
the back labeled ANTA and ANTB. Two different signal sources,
such as a home antenna and cable-TV system, can both be
connected. To switch between the two antennas, press the MENU
button when Antenna: input A/B function is highlighted to switch
between the two antennas. Details are on the next page.
Priority channels allow you to create a separate channel memory
scan list consisting of up to six of your favorite channels. When the
Channels: normal/priority function in the MAINMENUis set to
priority, pressing the CHANNELup or down button will only scan
through the favorite channels you entered in the PRiORrrYCHAN
(channel) menu. Details are on page 42.
Scheduler allows you to program your TV with up to three separate
programs. It will turn on automatically, tune to a specified channel,
and turn off automatically. You can select once to run the
scheduler only one time or you can select rpt. (repeat) weekly to run
the scheduler every week at the same time. The program will play
only once or repeat every week at the same time. Press the MENU
button when Scheduler is highlighted to display the SCHEDULER
menu. Details are on pages 44-45.
The Channel memory function allows you to add or erase channels
from the channel memory scan lisL turn SAP on or off, turn
parental control on or off, and add or erase channel labels. Details
are on pages 30 and 47-50.
The Clock set function allows you to set the clock and day of the
week. The time and day-of-the-week display will then appear on
the TV screen whenever you turn on the TV, change channels, or
press the rv or DISPLAYbutton on the master remote control. Details
are on page 7.
Autoprogram commands the TV to automatically cycle through all
channels and place only active channels in the channel memory
scan list. The TV will then only stop on the channels in the scan
list when you press the CHANNEL_tpor down button. Details are on
page 46.
VCRJcablesetup lets you program which channel the TV will
automatically tune when you press the VCB1,VCR2,or CABLEbutton.
Details are on page 43.
The Cabin/air function tells your TV whether yod have a cable-TV
system or home antenna (air) connected to the antenna inputs.
Your TV is so automatic that you will probably never need to
change this function. When your TV autoprograms, it
automatically adjusts the Cable/air function for you. If you ever
need to override the automatic setting, press the MENUbutton while
the Cable/air function is highlighted to change it.
The Auto help: on/off function lets you turn on or turn off the help
messages that appear on the bottom of the screen whenever a menu
is displayed. Press the MENUbutton when the Auto help function is
highlighted to turn the help messages on or off. Details are on
page 4.
L
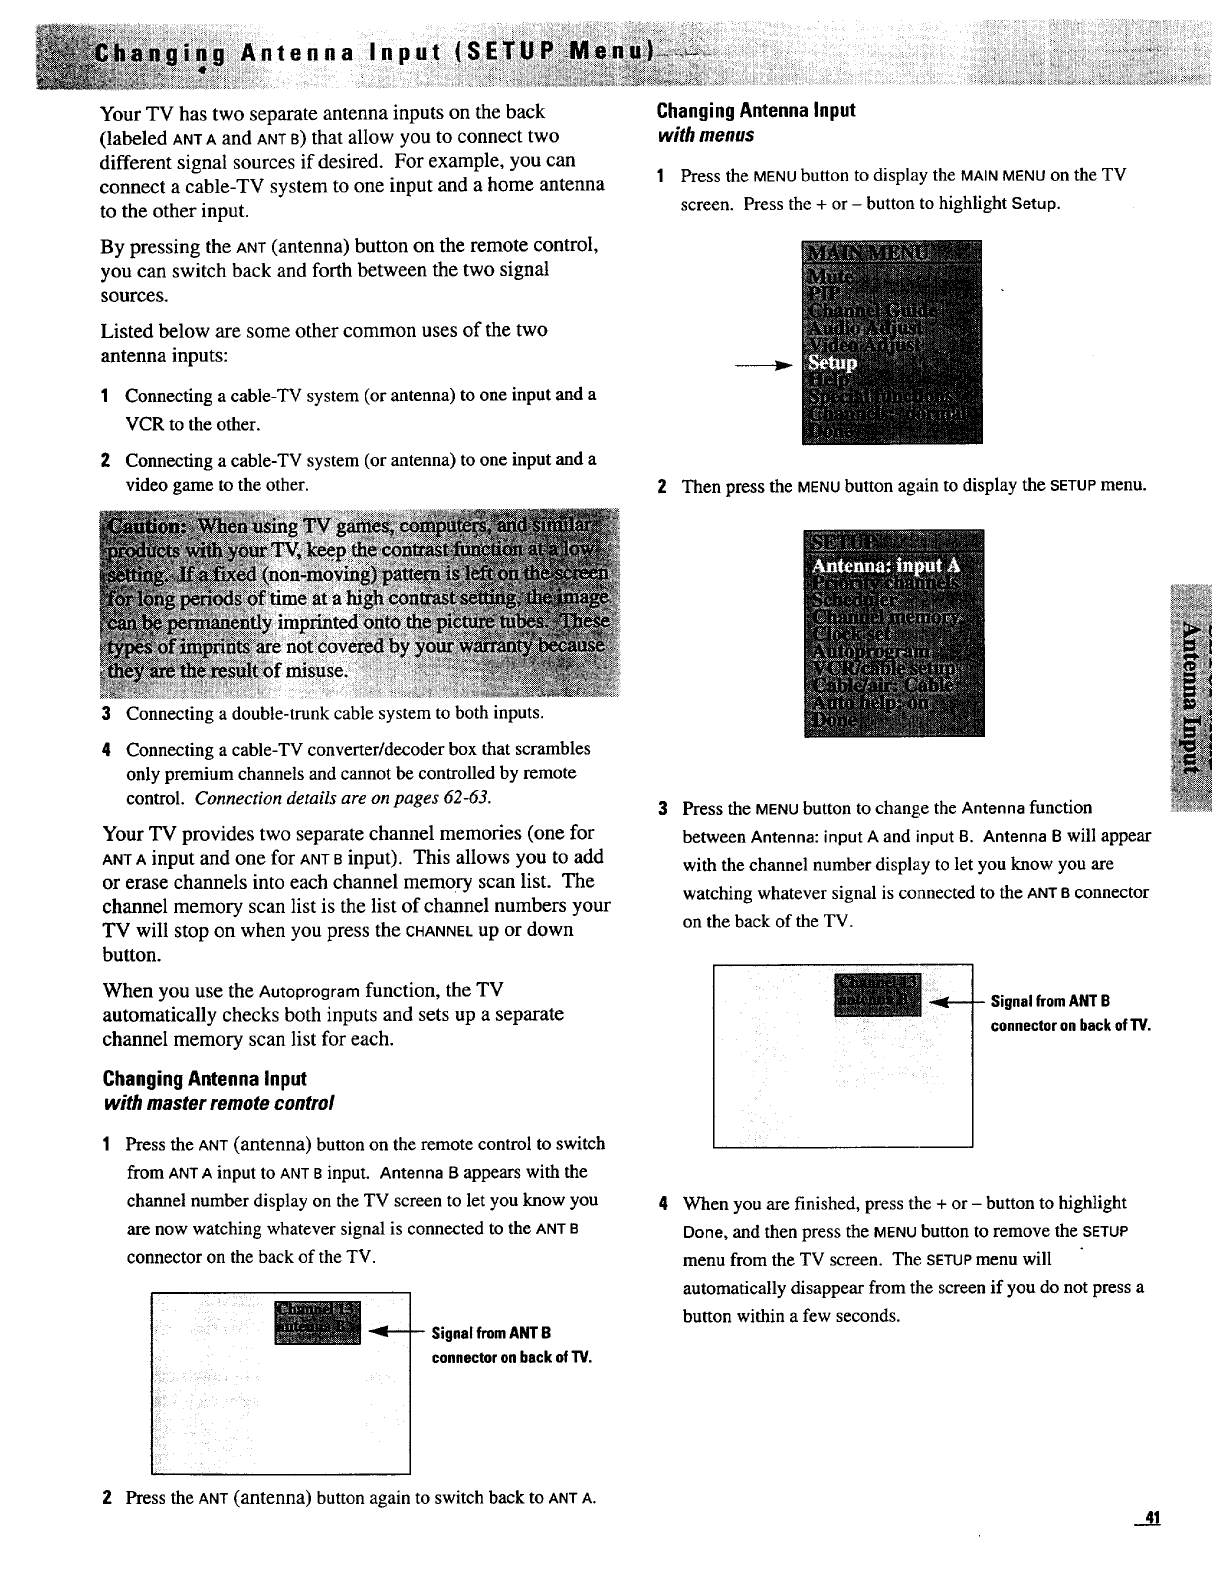
t e.. alnp
Your TV has two separate antenna inputs on the back
(labeled ANTA and ANTa) that allow you to connect two
different signal sources if desired. For example, you can
connect a cable-TV system to one input and a home antenna
to the other input.
By pressing the ANT (antenna) button on the remote control,
you can switch back and forth between the two signal
sources.
Listed below are some other common uses of the two
antenna inputs:
1 Connecting a cable-TV system (or antenna) to one input and a
VCR to the other.
2Connecting a cable-TV system (or antenna) to one input and a
video game to the other.
ChangingAntennaInput
with menus
1Press the MENUbutton to display the MAINMENUon the TV
screen. Press the + or - button to highlight Setup.
---11,.-
2Then press the MENU button again to display the SETUP menu.
3Connecting a double-trunk cable system to both inputs.
4Connecting a cable-TV converter/decoder box that scrambles
only premium channels and cannot be controlled by remote
control. Connection details are on pages 62-63.
Your TV provides two separate channel memories (one for
ANTA input and one for ANTSinput). This allows you to add
or erase channels into each channel memory scan list. The
channel memory scan list is the list of channel numbers your
TV will stop on when you press the CHANNELup or down
button.
When you use the Autoprogram function, the TV
automatically checks both inputs and sets up a separate
channel memory scan list for each.
Changing Antenna Input
with master remote control
Press the ANT(antenna) button on the remote control to switch
from ANTA input to ANTBinput. Antenna B appears with the
channel number display on the TV screen to let you know you
are now watching whatever signal is connected to the ANTB
connector on the back of the TV.
SignalfromANT B
connectoron back ofTV.
Press the MENUbutton to change the Antenna function
between Antenna: input A and input B. Antenna B will appear
with the channel number display to let you know you are
watching whatever signal is connected to the ANTa connector
on the back of the TV.
SignalfromANT B
connector on back ofTV.
When you are finished, press the + or - button to highlight
Done, and then press the MENUbutton to remove the SETUP
menu from the TV screen. The SETUPmenu will
automatically disappear from the screen if you do not press a
button within a few seconds.
Press the ANT(antenna) button again to switch back to ANTA. 4__1
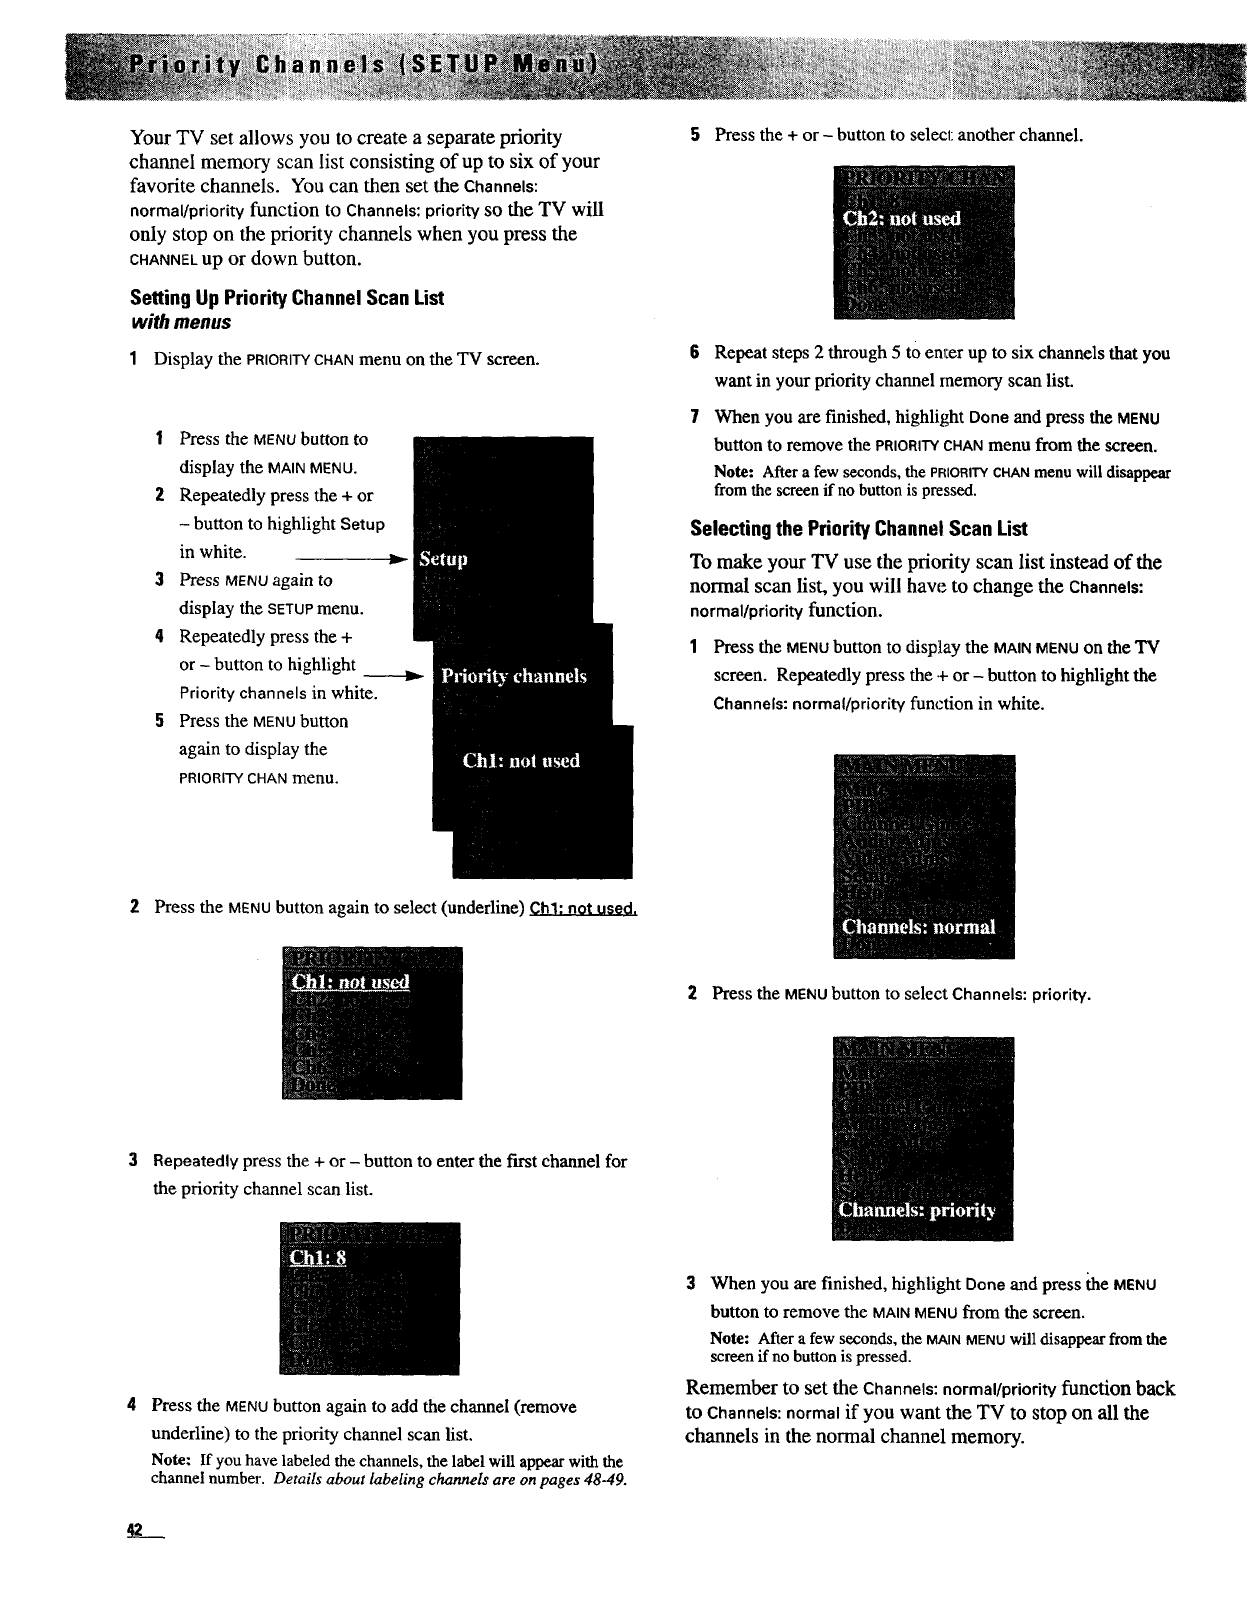
Your TV set allows you to create a separate priority
channel memory scan list consisting of up to six of your
favorite channels. You can then set the Channels:
normal/priority function to Channels: prioritySOthe TV will
only stop on the priority channels when you press the
CHANNELup or down button.
Setting Up Priority Channel Scan List
with menus
1Display the PRIORITY CHAN menu on the TV screen.
1Press the MENUbutton to
display the MAINMENU.
2Repeatedly press the + or
- button to highlight Setup
in white.
3Press MENUagain to
display the SETUPmenu.
4Repeatedly press the +
or -button to highlight
Priority channels in white.
5Press the MENUbutton
again to display the
PRIORITY CHAN menu.
5Press the + or- button to select another channel.
Repeat steps 2 through 5 tO enl:er up to six channels that you
want in your priority channel memory scan list.
When you are finished, highlight Done and press the MENU
button to remove the PRIORITYCHANmenu from the screen.
Note: After a few seconds, the PRIORITYCHANmenu will disappear
from the screen if no button is pressed.
Selecting the Priority Channel Scan List
To make your TV use the priority scan list instead of the
normal scan list, you will haw: to change the Channels:
normal/priority function.
1Pressthe MENU buttonto display the MAINMENUon the"IV"
screen. Repeatedly press the + or- button to highlight the
Channels: normal/priority function in white.
2Press the MENUbutton again to select (underline) Chl: not used.
2Press the MENUbutton to select Channels: priority.
3 Repeatedly press the + or -button to enter the first channel for
the priority channel scan list.
Press the MENUbutton again to add the channel (remove
underline) to the priority channel scan list.
Note: If you have labeled the channels, the label will appear with the
channel number. Details about labeling channels are on pages 48-49.
3When you are finished, highlight Done and press the MENU
button to remove the MAINMENU from the screen.
Note: After a few seconds, the MAINMENUwill disappear fromthe
screen if no button is pressed.
Remember to set the Channels: normal/priority function back
tO Channels: normal if you want the TV to stop on all the
channels in the normal channel memory.
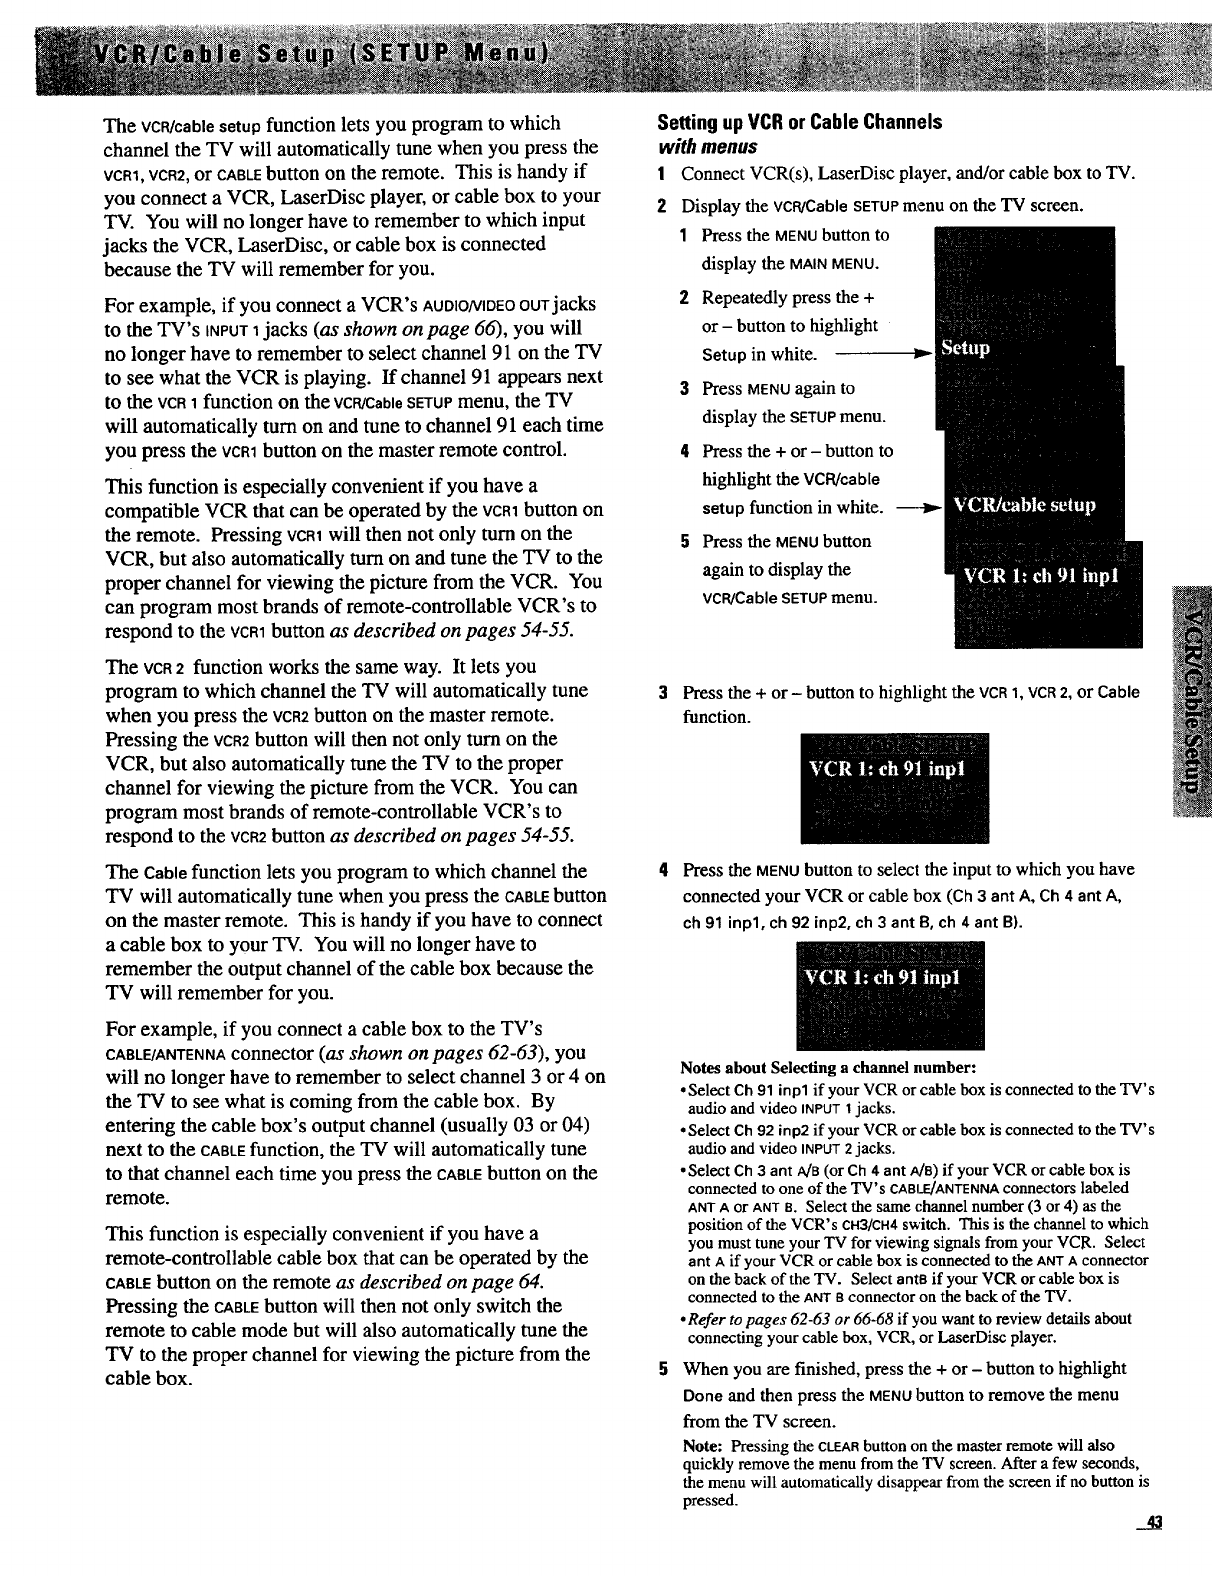
The VCR/cablesetupfunction lets you program to which
channel the TV will automatically tune when you press the
VCR1,VCR2,or CABLEbutton on the remote. This is handy if
you connect a VCR, LaserDisc player, or cable box to your
TV. You will no longer have to remember to which input
jacks the VCR, LaserDisc, or cable box is connected
because the TV will remember for you.
For example, if you connect a VCR's AUDIO/VIDEOOUTjacks
to the TV's iNPUT1jacks (as shown on page 66), you will
no longer have to remember to select channel 91 on the TV
to see what the VCR is playing. If channel 91 appears next
to the VCR1 function on the VCRiCable SETUPmenu, the TV
will automatically turn on and tune to channel 91 each time
you press the VCR1button on the master remote control.
This function is especially convenient if you have a
compatible VCR that can be operated by the VCR1button on
the remote. Pressing VCR1will then not only tum on the
VCR, but also automatically turn on and tune the TV to the
proper channel for viewing the picture from the VCR. You
can program most brands of remote-controllable VCR's to
respond to the VCR1button as described on pages 54-55.
The VCR2 function works the same way. It lets you
program to which channel the TV will automatically tune
when you press the VCR2button on the master remote.
Pressing the VCR2button will then not only turn on the
VCR, but also automatically tune the TV to the proper
channel for viewing the picture from the VCR. You can
program most brands of remote-controllable VCR's to
respond to the VCR2button as described on pages 54-55.
The Cablefunction lets you program to which channel the
TV will automatically tune when you press the CABLEbutton
on the master remote. This is handy if you have to connect
a cable box to your TV. You will no longer have to
remember the output channel of the cable box because the
TV will remember for you.
For example, if you connect a cable box to the TV's
CABLE/ANTENNAconnector (as shown on pages 62-63), you
will no longer have to remember to select channel 3 or 4 on
the TV to see what is coming from the cable box. By
entering the cable box's output channel (usually 03 or 04)
next to the CABLEfunction, the TV will automatically tune
to that channel each time you press the CABLEbutton on the
remote.
This function is especially convenient if you have a
remote-controllable cable box that can be operated by the
CABLEbutton on the remote as described on page 64.
Pressing the CABLEbutton will then not only switch the
remote to cable mode but will also automatically tune the
TV to the proper channel for viewing the picture from the
cable box.
Setting up VCR or Cable Channels
with menus
1Connect VCR(s), LaserDisc player, and/or cable box to TV.
2Display the VCR/CableSETUPmenu on the TV screen.
1Press the MENUbutton to
display the MAINMENU.
2Repeatedly press the +
or - button to highlight
Setup in white.
3Press MENUagain to
display the SETUPmenu.
4Press the + or- button to
highlight the VCR/eable
setup function in white. ---_-
Press the MENU button
again to display the
VCR/Cable SETUPmenu.
3Press the + or- button to highlight the VCR1, VCR2, or Cable
function.
4Press the MENUbutton to select the input to which you have
connected your VCR or cable box (Oh 3 ant A, Ch 4ant A,
ch 91 inpl, ch 92 inp2, ch 3 ant B,ch 4 ant B).
Notes about Selecting achannel number:
•Select Ch 91 inpl if your VCR or cable box is connected to the TV's
audio and video INPUT 1jacks.
• Select Ch 92 inp2 if your VCR or cable box is connected to the TV's
audio and video INPUT2 jacks.
•Select Ch 3 ant A/B (or Ch 4 ant A/a) if your VCR or cable box is
connected to one of the TV's CABLE/ANTENNA connectors labeled
ANT A or ANT B. Select the samechannel number (3 or 4) asthe
position of the VCR's CH3/CH4switch. Tiffs is the channel to which
you must tune your TV for viewing signals from your VCR. Select
ant A if your VCR or cable box is connected to the ANT A connector
on the back of the TV. Select ants if your VCR or cable box is
connected to the ANT S connector on the back of the TV.
•Refer to pages 62-63 or 66-68 if you want to review details about
connecting your cable box, VCR, or LaserDisc player.
When you are finished, press the + or - button to highlight
Done and then press the MENUbutton to remove the menu
from the TV screen.
Note: Pressing the CLEARbutton on the master remote will also
quicklyremovethe menufrom theTV screen.Aftera few seconds,
the menuwillautomatically disappear from thescreen if no buttonis
pressed.
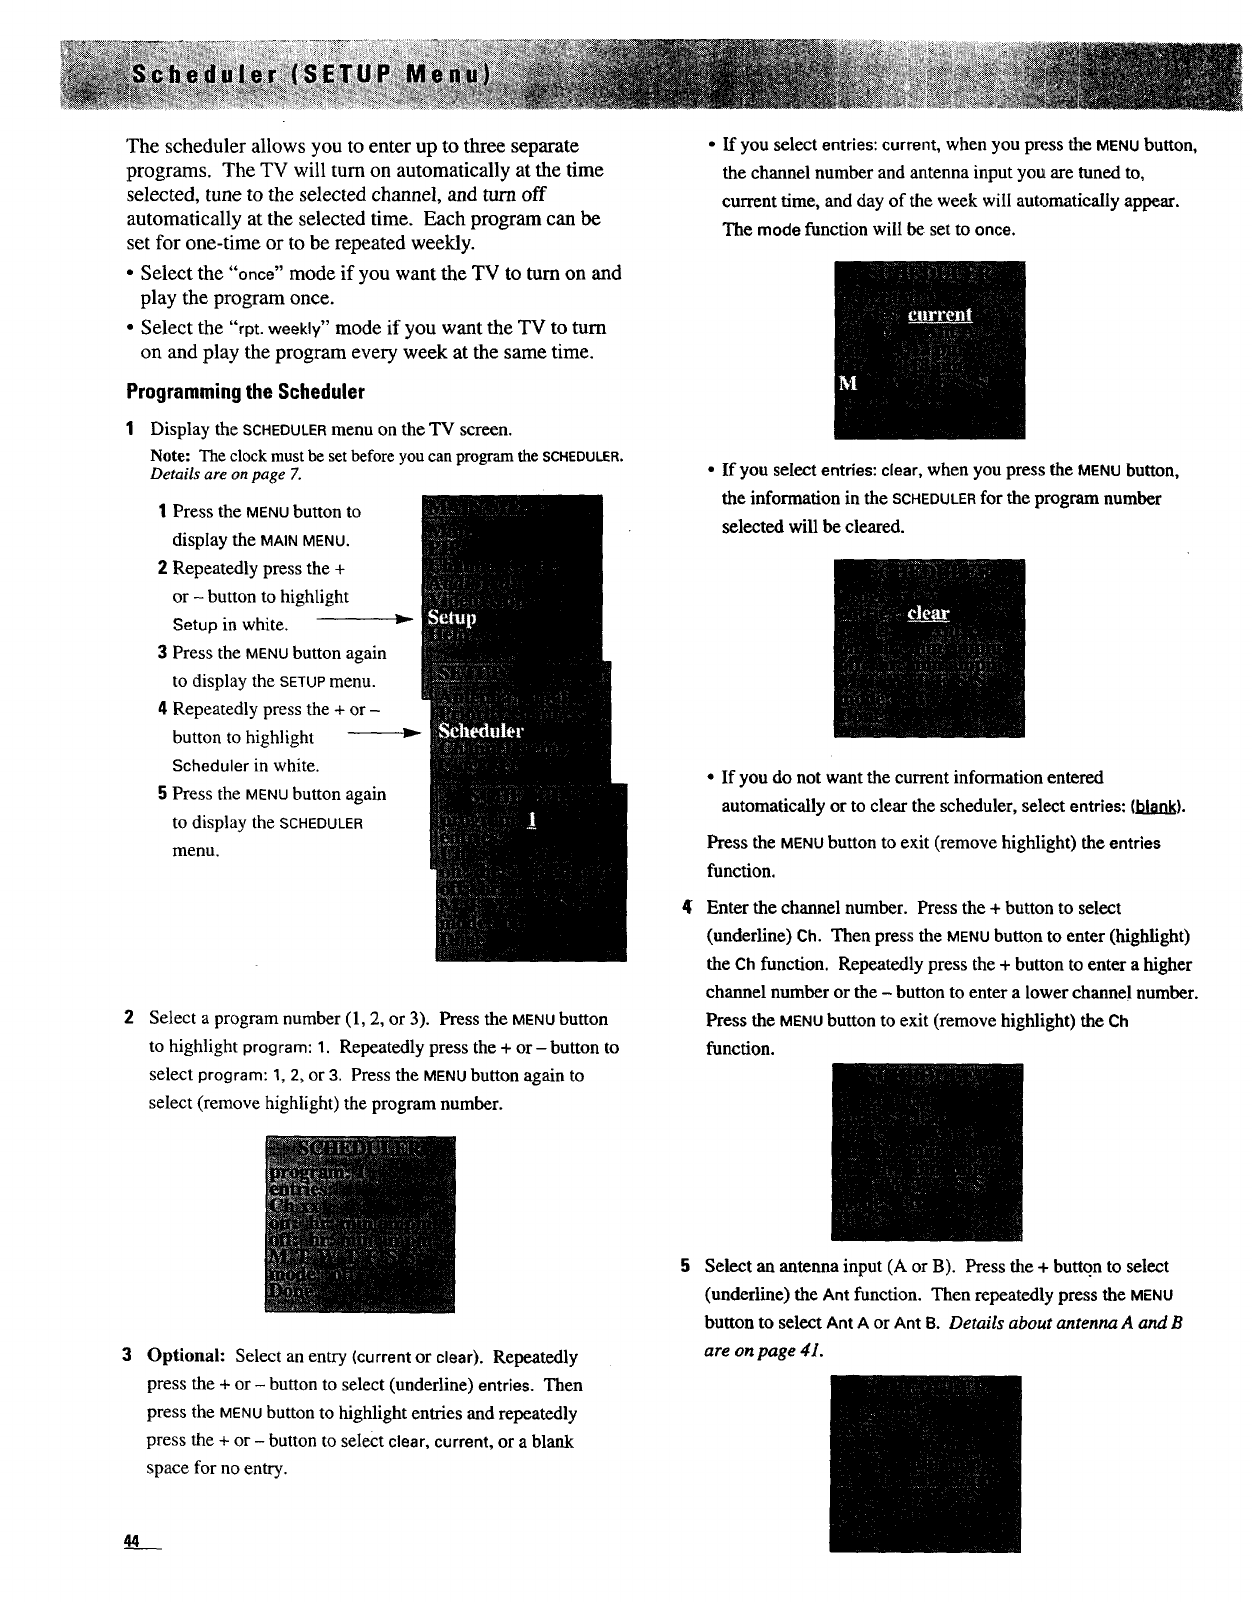
The scheduler allows you to enter up to three separate
programs. The TV will turn on automatically at the time
selected, tune to the selected channel, and turn off
automatically at the selected time. Each program can be
set for one-time or to be repeated weekly.
• Select the "once" mode if you want the TV to turn on and
play the program once.
• Select the "rpt. weekly" mode if you want the TV to turn
on and play the program every week at the same time.
Programming the Scheduler
1Display the SCHEDULER menu on the TV screen.
Note: The clock must be set before you can program the SCHEDULER.
Details are on page 7.
1Press the MENUbutton to
display the MAINMENU.
2Repeatedly press the +
or - button to highlight
Setup in white.
3 Press the MENUbutton again
to display the SETUPmenu.
4Repeatedly press the + or -
button to highlight
Scheduler in white.
5Press the MENUbutton again
to display the SCHEDULER
menu.
Select a program number (1, 2, or 3). Press the MENUbutton
to highlight program: 1. Repeatedly press the + or-button to
select program: 1, 2, or 3. Press the MENUbutton again to
select (remove highlight) the program number.
Optional: Select an entry (current or clear). Repeatedly
press the + or - button to select (underline) entries. Then
press the MENUbutton to highlight entries and repeatedly
press the + or - button to select clear, current, or a blank
space for no entry.
4
•If you select entries: current, when you press the MENUbutton,
the channel number and antenna input you are tuned to,
current time, and day of the week will automatically appear.
The mode function will be set to once.
•If you select entries:clear, when you press the MENUbutton,
the information in the SCHEDULERfor the program number
selected will be cleared.
•If you do not want the current information entered
automatically or to clear the scheduler, select entries: (blank).
Press the MENUbutton to exit (remove highlight) the entries
function.
Enter the channel number. Press the + button to select
(underline) Ch. Then press the MENUbutton to enter (highligh0
the Ch function. Repeatedly press the + button to enter a higher
channel number or the - button to enter a lower channe! number.
Press the MENUbutton to exit (remove highligh0 the Ch
function.
Select an antenna input (A or B). Press tim + button to select
(underline) the Ant function. Then repeatedly press the MENU
button to select Ant A or Ant B. Details about antenna A and B
are on page 41.
44
Set the time you want the TV to turn on.
1Press the + button to select (underline) the on: hr function.
Then press the MENUbutton to enter (highlight) the on: hr
function. Repeatedly press the + button to enter a higher
hour or the - button to enter a lower hour. Press the MENU
button to exit (remove highlight) the hr function.
2 Press the + button to select (underline) the on: rain function.
Then press the MENUbutton to enter (highlight) the on: rain
function. Repeatedly press the + button to enter higher
minutes or the - button to enter lower minutes. Press the
MENUbutton to exit (remove highlight) the rain function.
3 Press the + button to select (underline) the ampm function.
Then press the MENUbutton to select am or pro.
Set the time you want the TV to turn off. Repeat the steps
above to enter the off time.
Select the day or days of the week you want the TV to turn on.
Press the + button to select (underline) the day. Press the
MENUbutton to highlight the day. Then press the + button to
move to the next day. Do this for each day of the week that
you want the program to come on. For example, if you want a
program to come on Monday through Friday, highlight M, r,
W, T, and F.
Monday
Tuesday
Wednesday
Thursday
Friday
Saturday
I iunday
M T W T F S S
Program the TV to play your program one time or to repeat it
every week.
Press the + button to select (underline) the mode function.
Then repeatedly press the MENUbutton to select off, once, or
rpt. weekly.
• Select mode: once if you want your program to play one
time.
•Select mode: rpt. weekly if you want the program to play
every week at the same time.
• Select mode: off if you do not want the program to play.
This is useful if you have programmed the TV to come on at
the same time every week and you are going to be away.
When you return, you can set the mode function back to
rpt. weekly.
10 Follow steps 1 through 9 to enter two more programs in the
scheduler if desired. When you are finished, repeatedly press
the + or- button to select (underline) Done and press the
MENU button to remove the SCHEDULER from the screen.
Note: You can also press the CLEARbutton on the master remote to
quickly remove the SCHEDULERfrom the screen. After a few seconds,
the SCHEDULERwill disappear from the screen if no button is pressed.
4___5
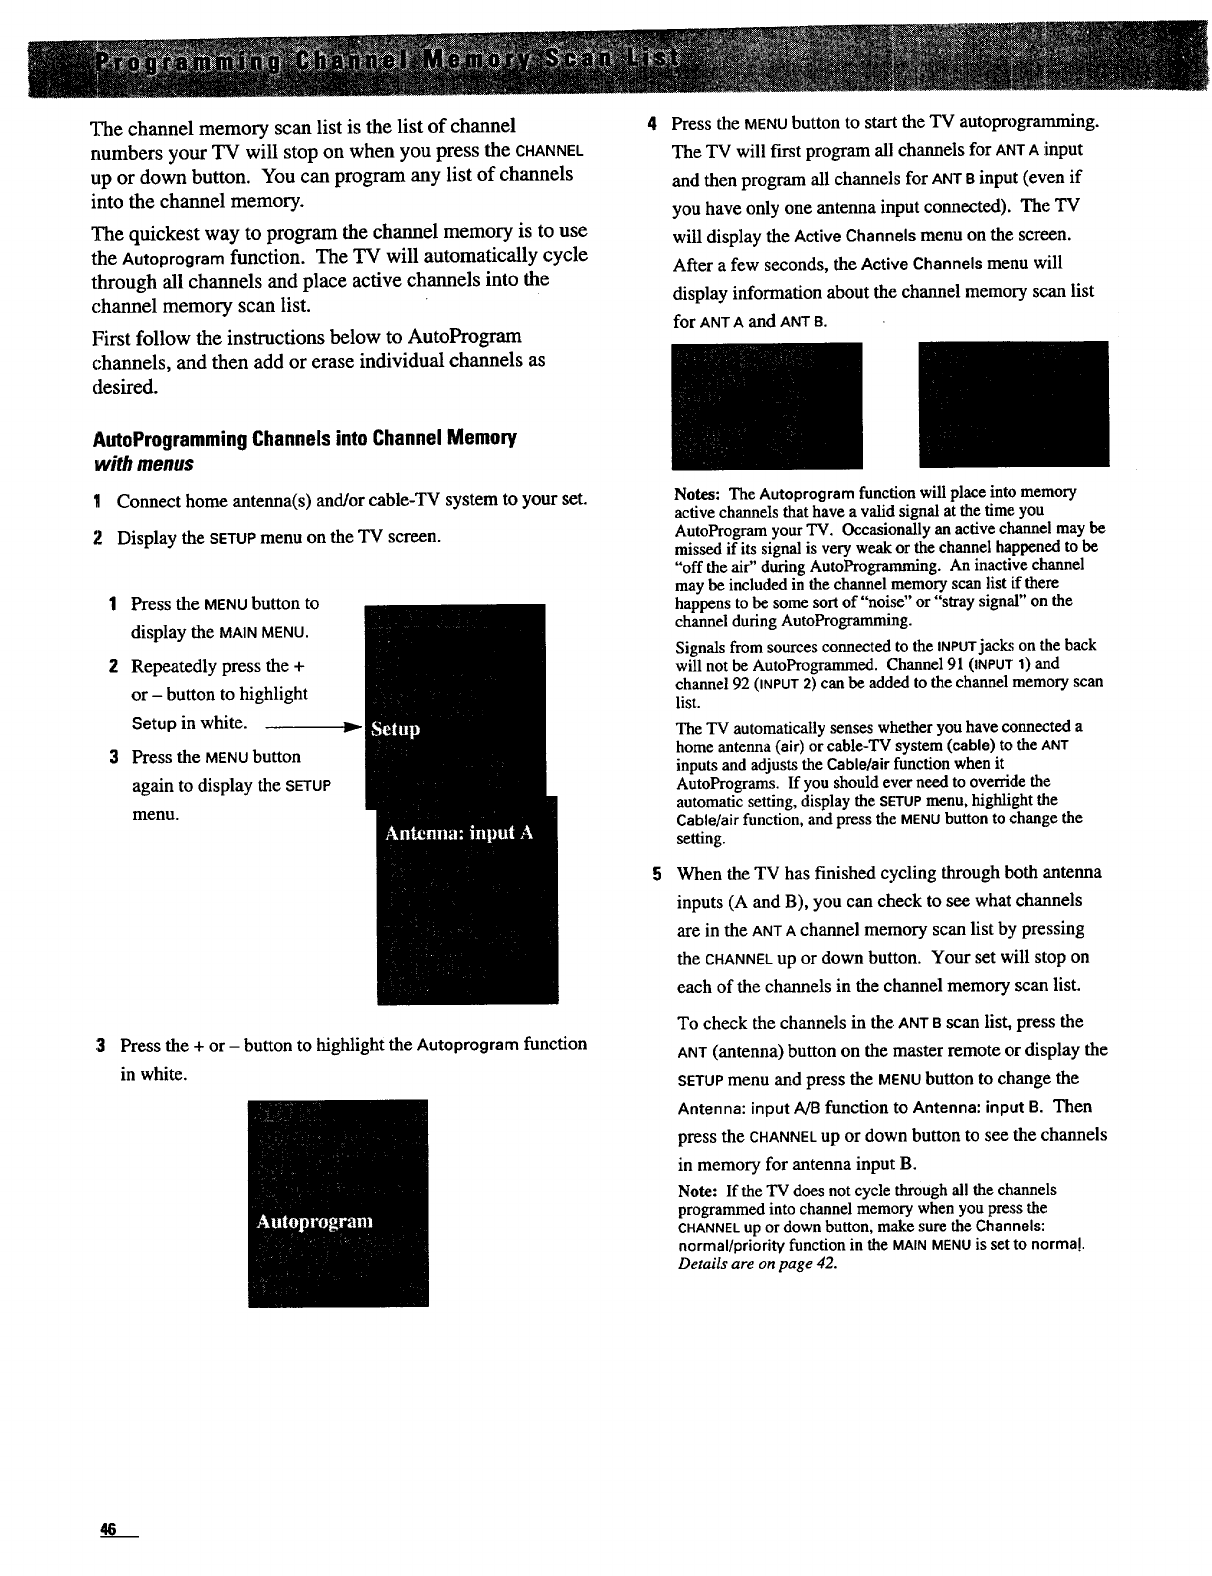
The channel memory scan list is the list of channel
numbers your TV will stop on when you press the CHANNEL
up or down button. You can program any list of channels
into the channel memory.
The quickest way to program the channel memory is to use
the Autoprogramfunction. The TV will automatically cycle
through all channels and place active channels into the
channel memory scan list.
First follow the instructions below to AutoProgram
channels, and then add or erase individual channels as
desired.
Press the MENU button to start the TV autoprogramming.
The TV will first program all channels for ANTA :input
and then program all channels for ANTB input (even if
you have only one antenna input connected). The TV
will display the Active Channels menu on the screen.
After a few seconds, the Active Channels menu will
display information about the channel memory scan list
for ANT Aand ANT B.
AutoProgrammingChannels into Channel Memory
with menus
IConnect home antenna(s) and/or cable-TV system to your set.
2Display the SETUPmenu on the TV screen.
1Press the MENUbutton to
display the MAINMENU.
2Repeatedly press the +
or - button to highlight
Setup in white.
3Press the MENU button
again to display the SETUP
menu.
3Press the + or -button to highlight the Autoprogram function
in white.
Notes: The Autoprogram function will place into memory
active channels that have avalid signal at the time you
AutoProgram your "IV. Occasionally an active channel may be
missed if its signal is very weak or the channel happened to be
"off the air" during AutoProgramming. An inactive channel
may be included in the channel memory scan list if there
happens to be some sort of "noise" or "stray signal" on the
channel during AutoProgramming.
Signals from sources connected to the INPUTjaclcs on the back
will not be AutoProgrammed. Channel 91 (INPUT 1) and
channel 92 (INPUT 2) can be added to the channel memory scan
list.
The TV automatically senses whether you have connected a
home antenna (air) or cable-TV system (cable) to the ANT
inputs and adjusts the Cable/air function when it
AutoPrograms. If you should ever need to override the
automatic setting, display the SETUP menu, highlight the
Cable/air function, and press the MENU button to change the
setting.
When the TV has finished cycling through both antenna
inputs (A and B), you can check to see what channels
are in the ANTA channel memory scan list by pressing
the CHANNELup or down button. Your set will stop on
each of the channels in the channel memory scan list.
To check the channels in the ANT BSCanlist, press the
ANT(antenna) button on the master remote or display the
SETUPmenu and press the MENUbutton to change the
Antenna: input A/B function to Antenna: input B. Then
press the CHANNELup or down button to see the channels
in memory for antenna input B.
Note: If the TV does not cycle through all the channels
programmed into channel memory when you press the
CHANNELup or down button, make sure the Channels:
normal/priorityfunction in the MAINMENUis set to normal
Details are on page 42.
46
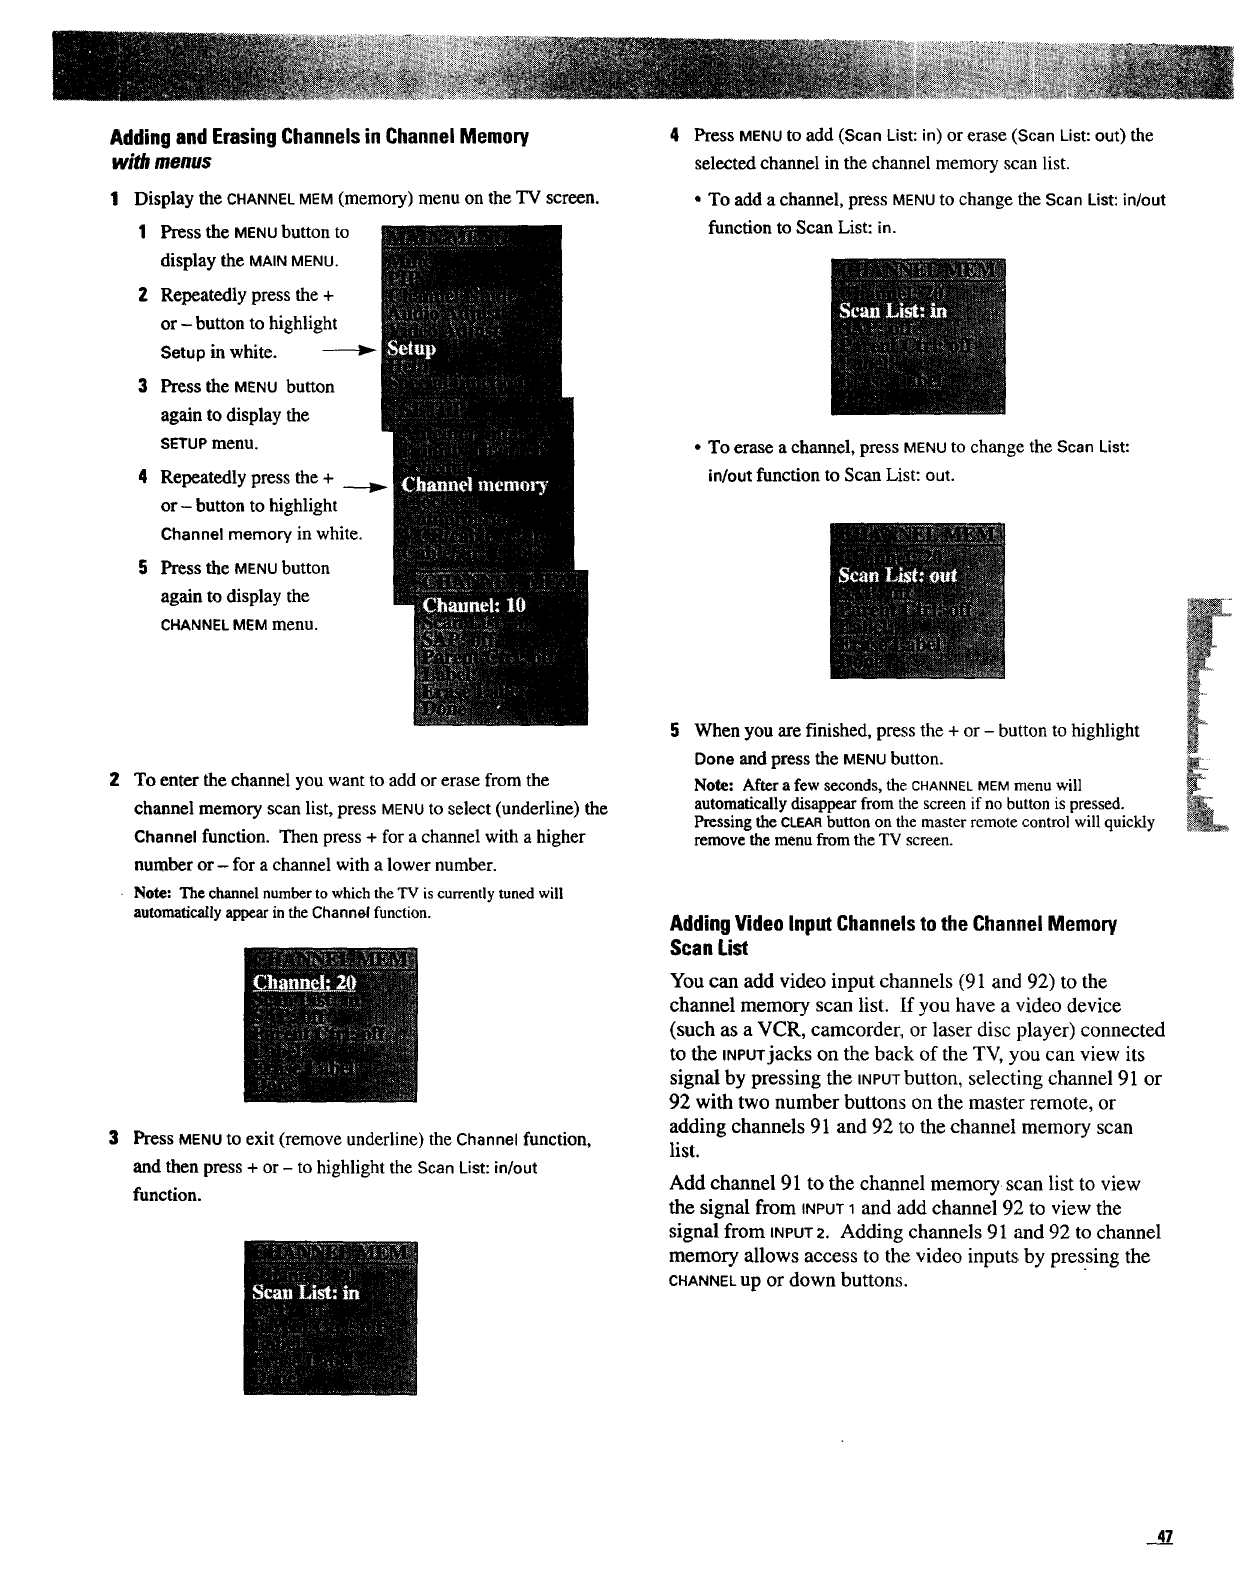
Adding and Erasing Channels in Channel Memory
with menus
1Display the CHANNELMEM(memory) menu on the TV screen.
1Press the MENUbutton to
display the MAINMENU.
ZRepeatedly press the +
or - button to highlight
Setup in white. --roD-
3 Press the MENU button
again to display the
SETUPmenu.
4 Repeatedly press the +
or -button to highlight
Channel memory in white.
5Press the MENUbutton
again to display the
CHANNEL MEM menu.
Press MENU to add (Scan List: in) or erase (Scan List: out) the
selected channel in the channel memory scan list.
•To add a channel, press MENUto change the Scan List:in/out
function to Scan List: in.
• To erase a channel, press MENUto change the Scan List:
in/out function to Scan List: out.
To enter the channel you want to add or erase from the
channel memory scan list, press MENUto select (underline) the
Channel function. Then press + for a channel with a higher
number or- for a channel with a lower number.
Note: The channel number to which the TV is currently tuned will
automatically appearin the Channelfunction.
Press MENUtOexit (remove underline) the Channel function,
and then press + or - to highlight the Scan List: in/out
function.
When you are finished, press the + or - button to highlight
Done and press the MENU button.
Note: After a few seconds, the CHANNELMEMmenu will
automatically disappear from the screen if no button is pressed.
Pressing the CLEARbutton on the master remote control will quickly
remove the menu from the TV screen.
Adding Video Input Channelsto the Channel Memory
Scan List
You can add video input channels (91 and 92) to the
channel memory scan list. If you have a video device
(such as a VCR, camcorder, or laser disc player) connected
to the =NPUTjackson the back of the TV, you can view its
signal by pressing the UNPUTbutton, selecting channel 91 or
92 with two number buttons on the master remote, or
adding channels 91 and 92 to the channel memory scan
list.
Add channel 91 to the channel memory scan list to view
the signal from INPUT1and add channel 92 to view the
signal from INPUT2. Adding channels 91 and 92 to channel
memory allows access to the video inputs by pressing the
CHANNELup or down buttons.
47
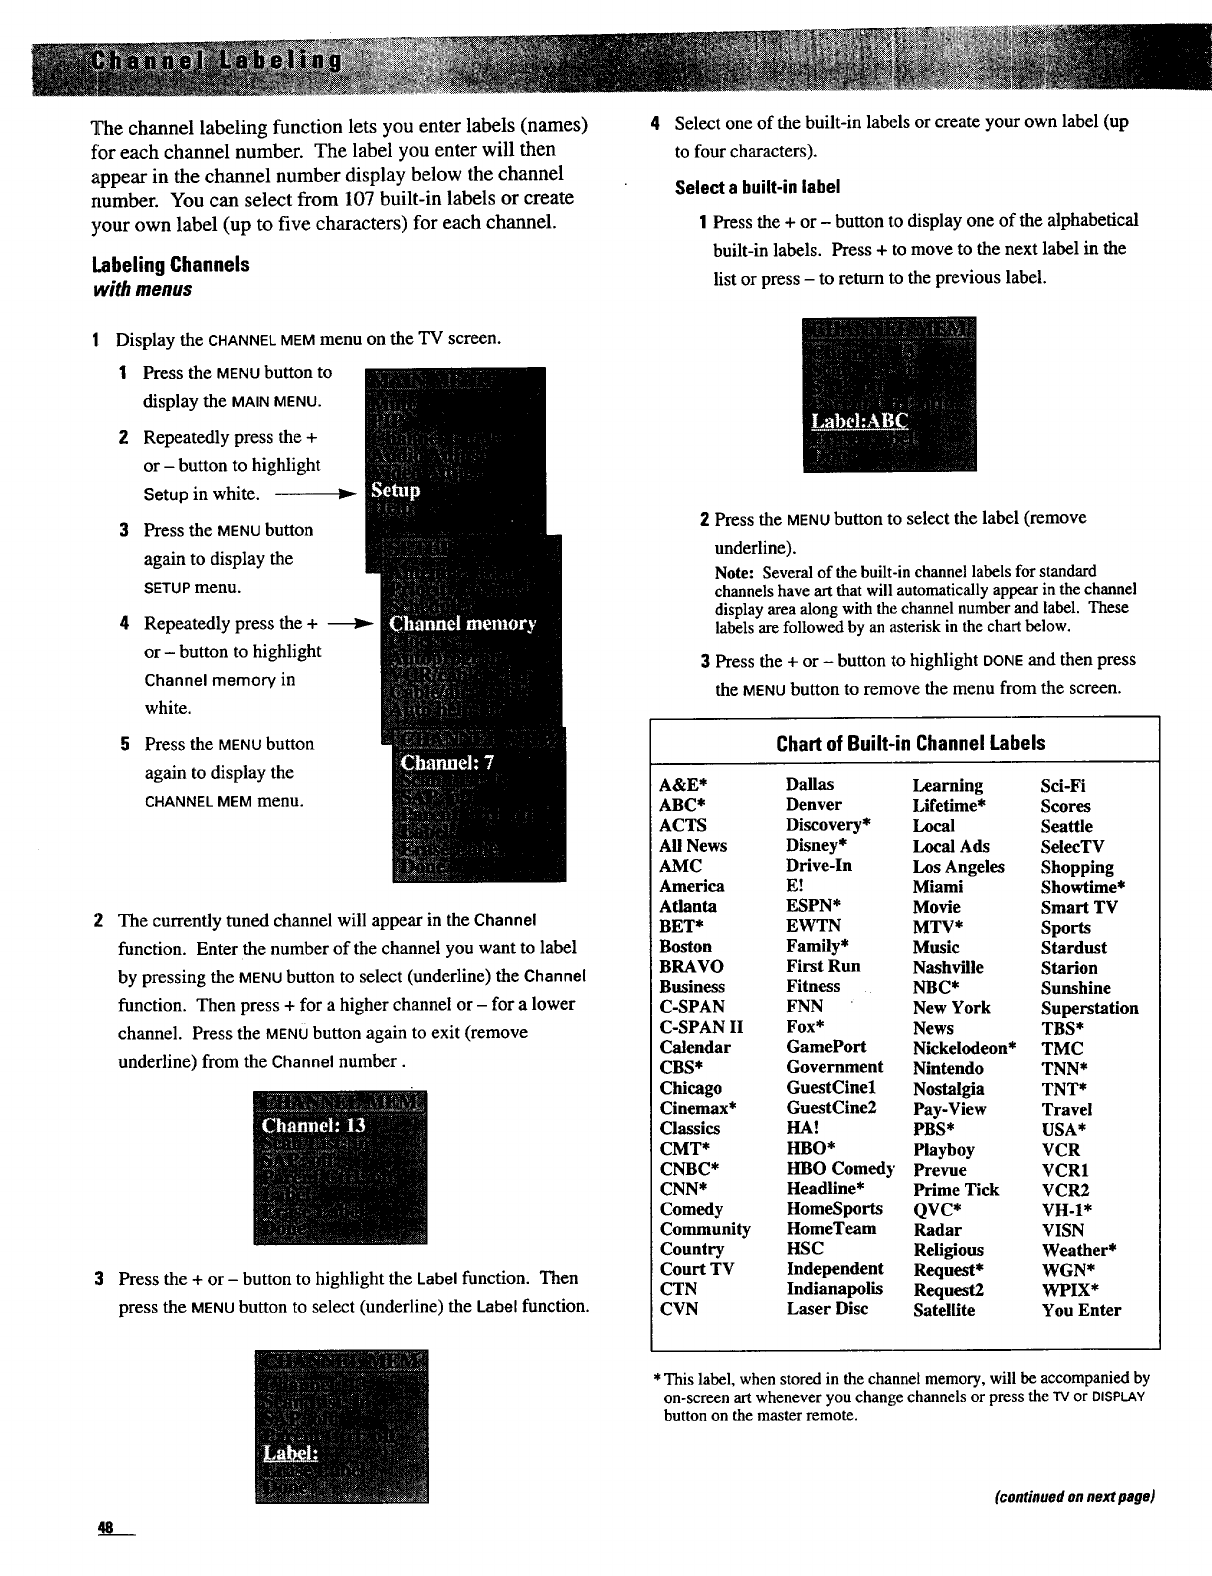
The channel labeling function lets you enter labels (names)
for each channel number. The label you enter will then
appear in the channel number display below the channel
rmmber. You can select from 107 built-in labels or create
your own label (up to five characters) for each channel.
Labeling Channels
with menus
Select one of the built-in labels or create your own label (up
to four characters).
Select a built-in label
1Press the + or - button to display one of the alphabetical
built-in labels. Press + to move to the next label in the
list or press - to return to the previous label.
48
Display the CHANNEL MEM menu on the TV screen.
1Press the MENUbutton to
display the MAINMENU.
2Repeatedly press the +
or - button to highlight
Setup in white.
Press the MENUbutton
again to display the
SETU e menu.
Repeatedly press the +
or - button to highlight
Channel memory in
white.
5Press the MENUbutton
again to display the
CHANNEL MEM menu.
The currently tuned channel will appear in the Channel
function. Enter the number of the channel you want to label
by pressing the MENUbutton to select (underline) the Channel
function. Then press + for a higher channel or - for a lower
channel. Press the MENUbutton again to exit (remove
underline) from the Channel number.
Press the + or - button to highlight the Label function. Then
press the MENUbutton to select (underline) the Label function.
ll
2Press the MENU button to select the label (remove
underline).
Note: Several of the built-in channel labels for standard
channels have art that will automatically appear in the channel
display area along with the channel number and label. These
labels are followed by an asterisk in the chart below.
3Press the + or - button to highlight DONEand then press
the MENU button to remove the menu from the screen.
Chart of Built-in Channel Labels
A&E* Dallas Learning Sci-Fi
ABC* Denver Lifetime* Scores
ACTS Discovery* Local Seattle
All News Disney* Local Ads SelecTV
AMC Drive-ln Los Angeles Shopping
America E! Miami Showtime*
Atlanta ESPN* Movie Smart TV
BET* EWTN MTV* Sports
Boston Family* Music Stardust
BRAVO First Run Nashville Starion
Business Fitness NBC* Sunshine
C-SPAN FNN New York Superstation
C-SPAN II Fox* News TBS*
Calendar GamePort Nickelodeon* TMC
CBS* Government Nintendo TNN*
Chicago GuestCinel Nostalgia TNT*
Cinemax* GuestCine2 Pay-View Travel
Classics HA! PBS* USA*
CMT* HBO* Playboy VCR
CNBC* HBO Comedy Prevue VCR1
CNN* Headline* Prime Tick VCR2
Comedy HomeSports QVC* VH-I*
Community HomeTeam Radar VISN
Country HSC Religious Weather*
Court TV Independent Request* WGN*
CTN Indianapolis Request2 WPIX*
CVN Laser Disc Satellite You Enter
* This label, when stored in the channel memory, will be accompanied by
on-screen art whenever you change channels or press the TV or DISPLAY
button on the master remote.
(continuedonnext page)
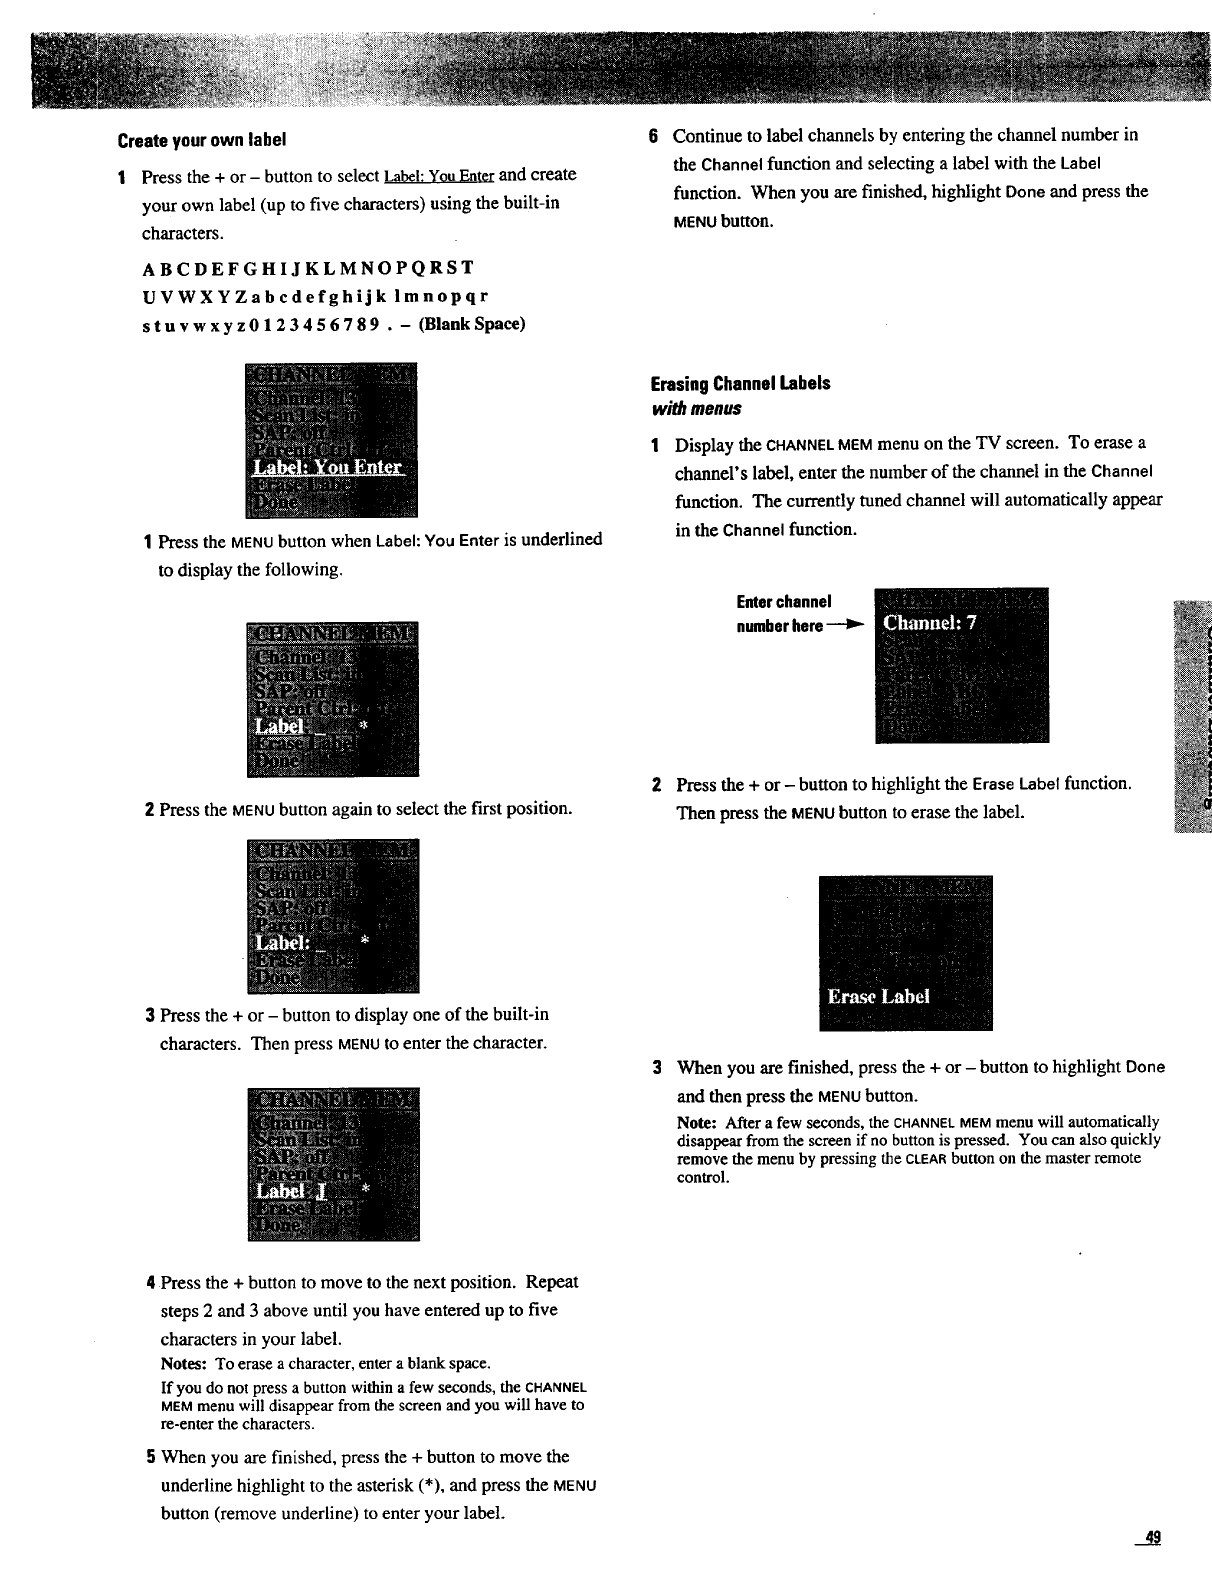
Create your own label
IPress the + or - button to select Label: You Enter and create
your own label (up to five characters) using the built-in
characters.
ABCDEFGHIJKLMNOPQRST
UVWXYZabcdefghijk lmnopqr
stuvwxyz0123456789 .- (Blank Space)
1Press the MENUbutton when Label: You Enter is underlined
to display the following.
Continue to label channels by entering the channel number in
the Channel function and selecting a label with the Label
function. "When you are finished, highlight Done and press the
MENUbutton.
ErasingChannelLabels
withmenus
Display the CHANNELMEMmenu on the TV screen. To erase a
channel's label, enter the number of the channel in the Channel
function. The currently tuned channel will automatically appear
in the Channelfunction.
Enter channel
number here
2Press the MENU button again to select the first position.
.m
3Press the + or - button to display one of the built-in
characters. Then press MENUtOenter the character.
4Press the + button to move to the next position. Repeat
steps 2 and 3 above until you have entered up to five
characters in your label.
Notes: To erase a character, enter a blank space.
If you do not press a button within a few seconds, the CHANNEL
MEMmenu will disappear from the screen and you will have to
re-enter the characters.
5When you are finished, press the +button to move the
underline highlight to the asterisk (*), and press the MENU
button (remove underline) to enter your label.
2Press the + or- button to highlight the EraseLabelfunction.
Then press the MENUbutton to erase the label.
When you are finished, press the +or - button to highlight Done
and then press the MENU button.
Note: After afew seconds, the CHANNELMEM menu will automatically
disappear from the screen if no button is pressed. You can also quickly
remove the menu by pressing the CLEARbutton on the master remote
control.
4____a
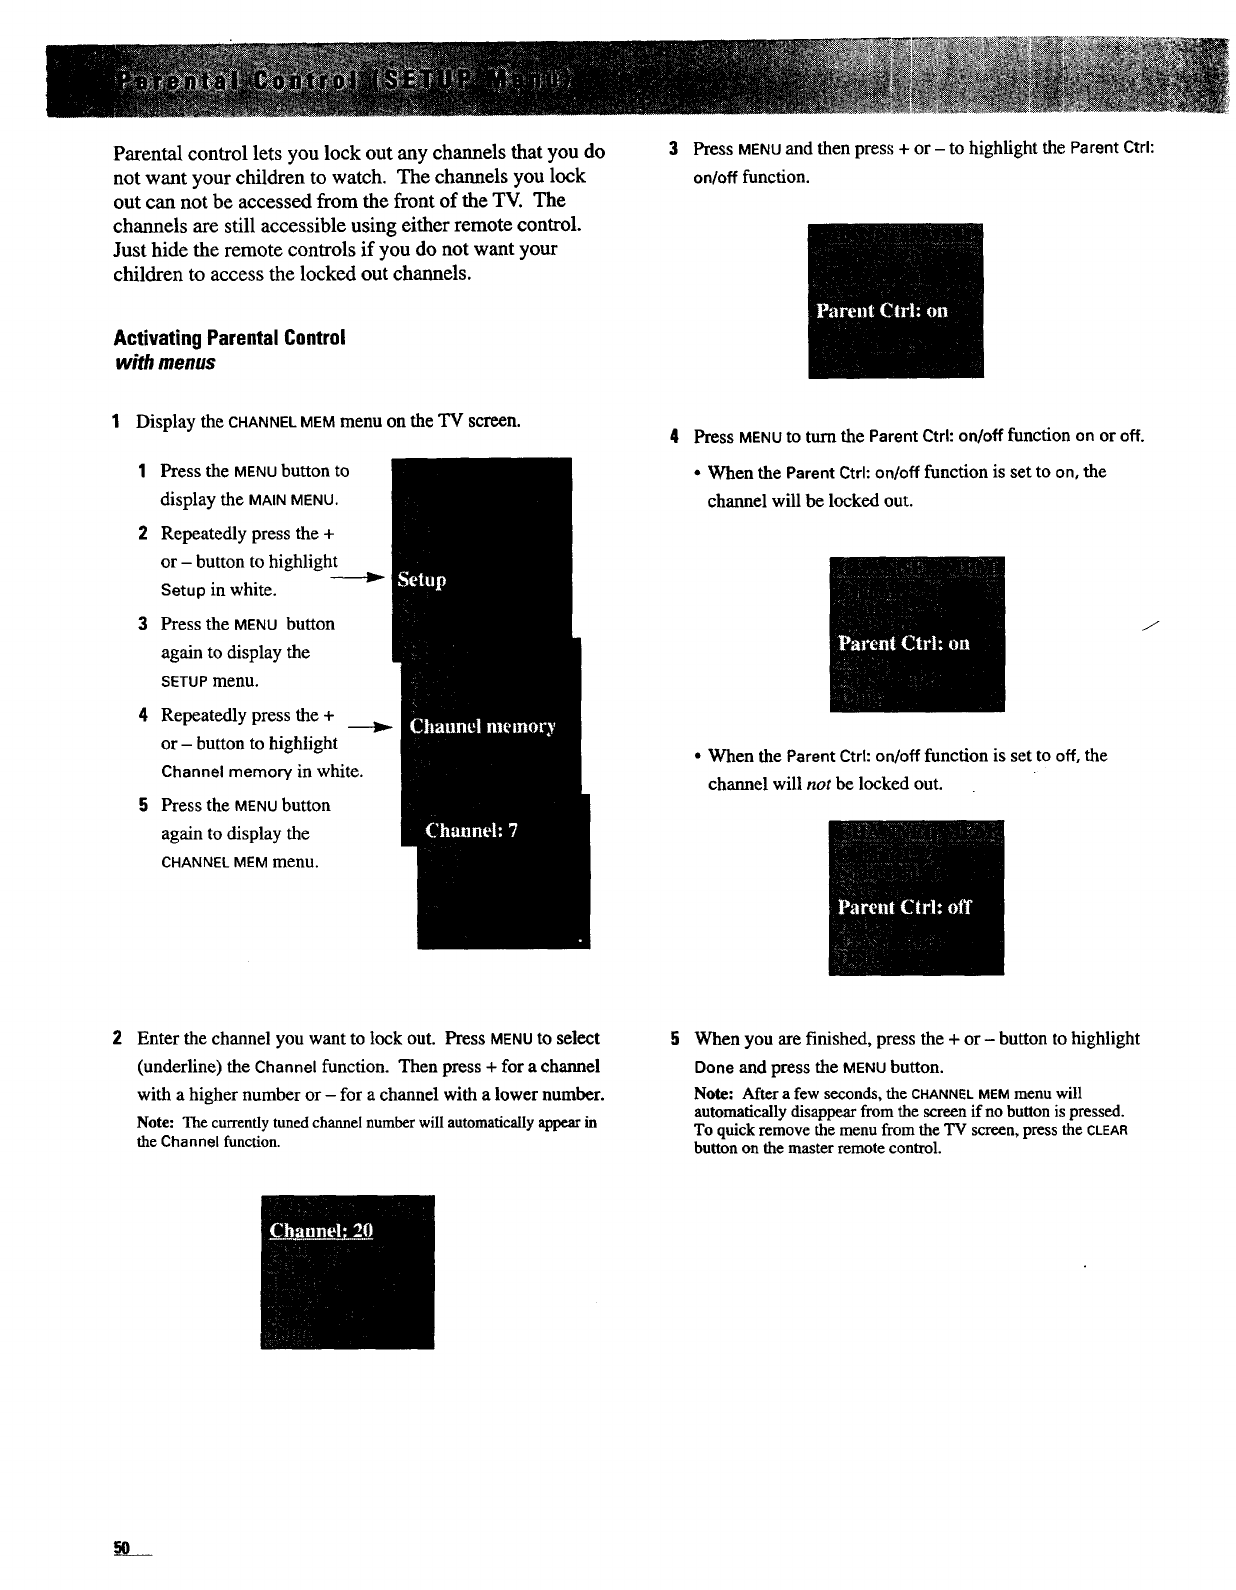
Parental control lets you lock out any channels that you do
not want your children to watch. The channels you lock
out can not be accessed from the front of the TV. The
channels are still accessible using either remote control.
Just hide the remote controls if you do not want your
children to access the locked out channels.
Press MENU and then press +or - to highlight the Parent Ctrl:
on/off function.
Activating Parental Control
with menus
1Display the CHANNEL MEM menu on the TV screen.
1Press the MENU button to
display the MAINMENU.
2Repeatedly press the +
or - button to highlight
Setup in white.
3Press the MENU button
again to display the
SETU Pmenu.
4Repeatedly press the +
or - button to highlight
Channel memory in white.
5Press the MENU button
again to display the
CHANNEL MEM menu.
Press MENU to turn the Parent Ctrl: on/off function on or off.
•'When the Parent Ctrl: on/off function is set to on, the
channel will be locked out.
•When the Parent Ctrl: on/off function is set to off, the
channel will not be locked out.
/
Enter the channel you want to lock out. Press MENUto select
(underline) the Channel function. Then press + for a channel
with a higher number or - for a channel with a lower number.
Note: The currently tuned channel number will automatically appear in
the Channel function.
When you are finished, press the + or -button to highlight
Done and press the MENUbutton.
Note: After afew seconds, the CHANNELMEMmenu will
automatically disappear from the screen if no button is pressed.
To quick remove the menu from the TV screen, press the CLEAR
button on the master remote control.
L
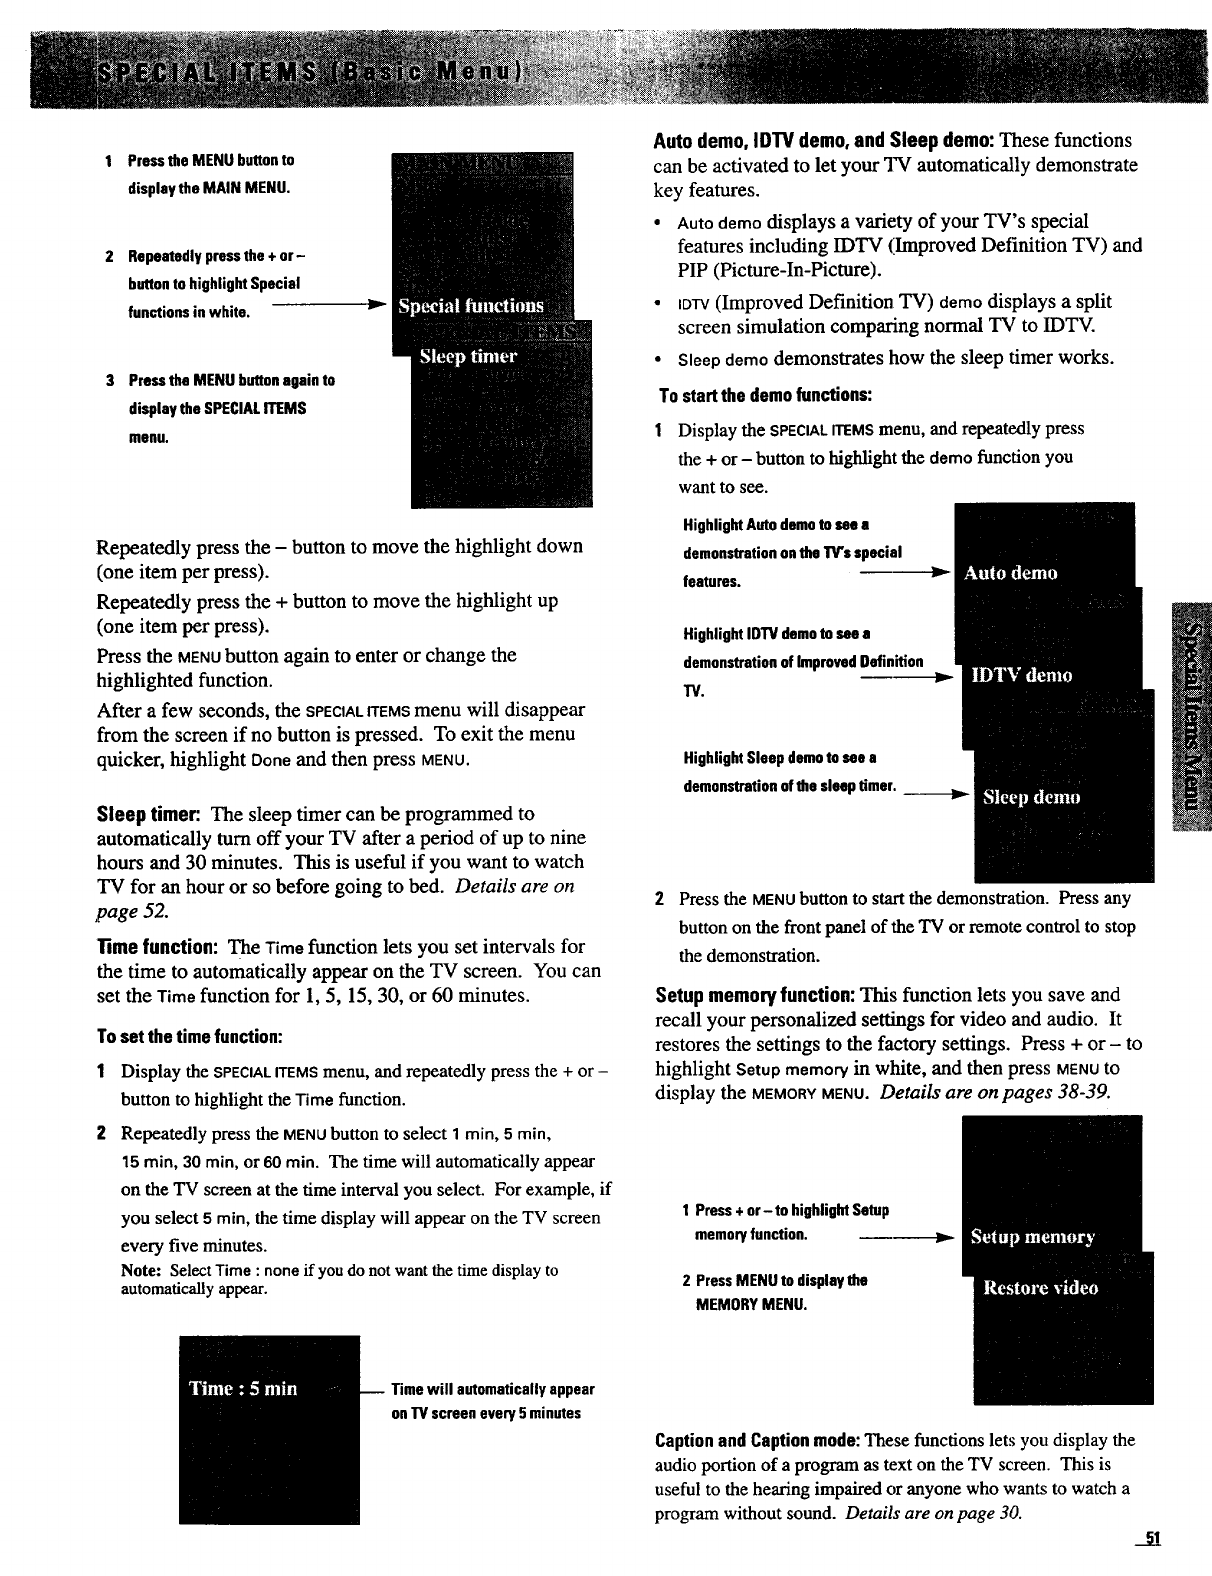
1 Pressthe MENU buttonto
displaythe MAIN MENU.
2 Repeatedlypressthe +or-
buttonto highlight Special
functionsin white.
3 Pressthe MENU buttonagain to
display the SPECIALITEMS
menu.
Repeatedly press the - button to move the highlight down
(one item per press).
Repeatedly press the + button to move the highlight up
(one item per press).
Press the MENUbutton again to enter or change the
highlighted function.
After a few seconds, the SPECIALffEMSmenu will disappear
from the screen if no button is pressed. To exit the menu
quicker, highlight Done and then press MENU.
Sleep timer: The sleep timer can be programmed to
automatically turn off your TV after a period of up to nine
hours and 30 minutes. This is useful if you want to watch
TV for an hour or so before going to bed. Details are on
,page 52.
Time function: The Time function lets you set intervals for
the time to automatically appear on the TV screen. You can
set the Time function for 1, 5, 15, 30, or 60 minutes.
To set the time function:
Display the SPECIALITEMSmenu, and repeatedly press the + or-
button to highlight the Time function.
Repeatedly press the MENUbutton to select 1rain, 5rain,
15 rain, 30 rain, or 60 rain. The time will automatically appear
on the TV screen at the time interval you select. For example, if
you select 5rain, the time display will appear on the TV screen
every five minutes.
Note: Select Time : none if you do not want the time display to
automatically appear.
Auto demo, IDTV demo, end Sleep demo:These functions
can be activated to let your TV automatically demonstrate
key features.
•Auto demo displays a variety of your TV's special
features including IDTV (Improved Definition TV) and
PIP (Picture-In-Picture).
• IDlY(Improved Definition TV) demo displays a split
screen simulation comparing normal TV to IDTV.
• Sleep demo demonstrates how the sleep timer works.
To start the demo functions:
1Display the SPECIALITEMSmenu, and repeatedly press
the + or - button to highlight the demo function you
want to see.
HighlightAutodemoto sea a
demonstrationonthe TV's special
features. --re-)w-
HighlightIDTV demoto see a
demonstrationof ImprovedDefinition
TV. m__._.
HighlightSleep damnto see a
demonstrationof the sleep timer.
2Press the MENUbutton to start the demonstration. Press any
button on the front panel of the TV or remote control to stop
the demonstration.
Setupmemoryfunction: This function lets you save and
recall your personalized settings for video and audio. It
restores the settings to the factory settings. Press + or - to
highlight Setup memory in white, and then press MENUto
display the MEMORYMENU.Details are on pages 38-39.
1 Press+or-to highlightSetup
memoryfunction.
2 PressMENU to displaythe
MEMORY MENU.
v
Time will automatically appear
on"IV screen every5 minutes
CaptionandCaptionmode:These functions lets you display the
audio portion of a program as text on the TV screen. This is
useful to the hearing impaired or anyone who wants to watch a
program without sound. Details are on page 30. 51
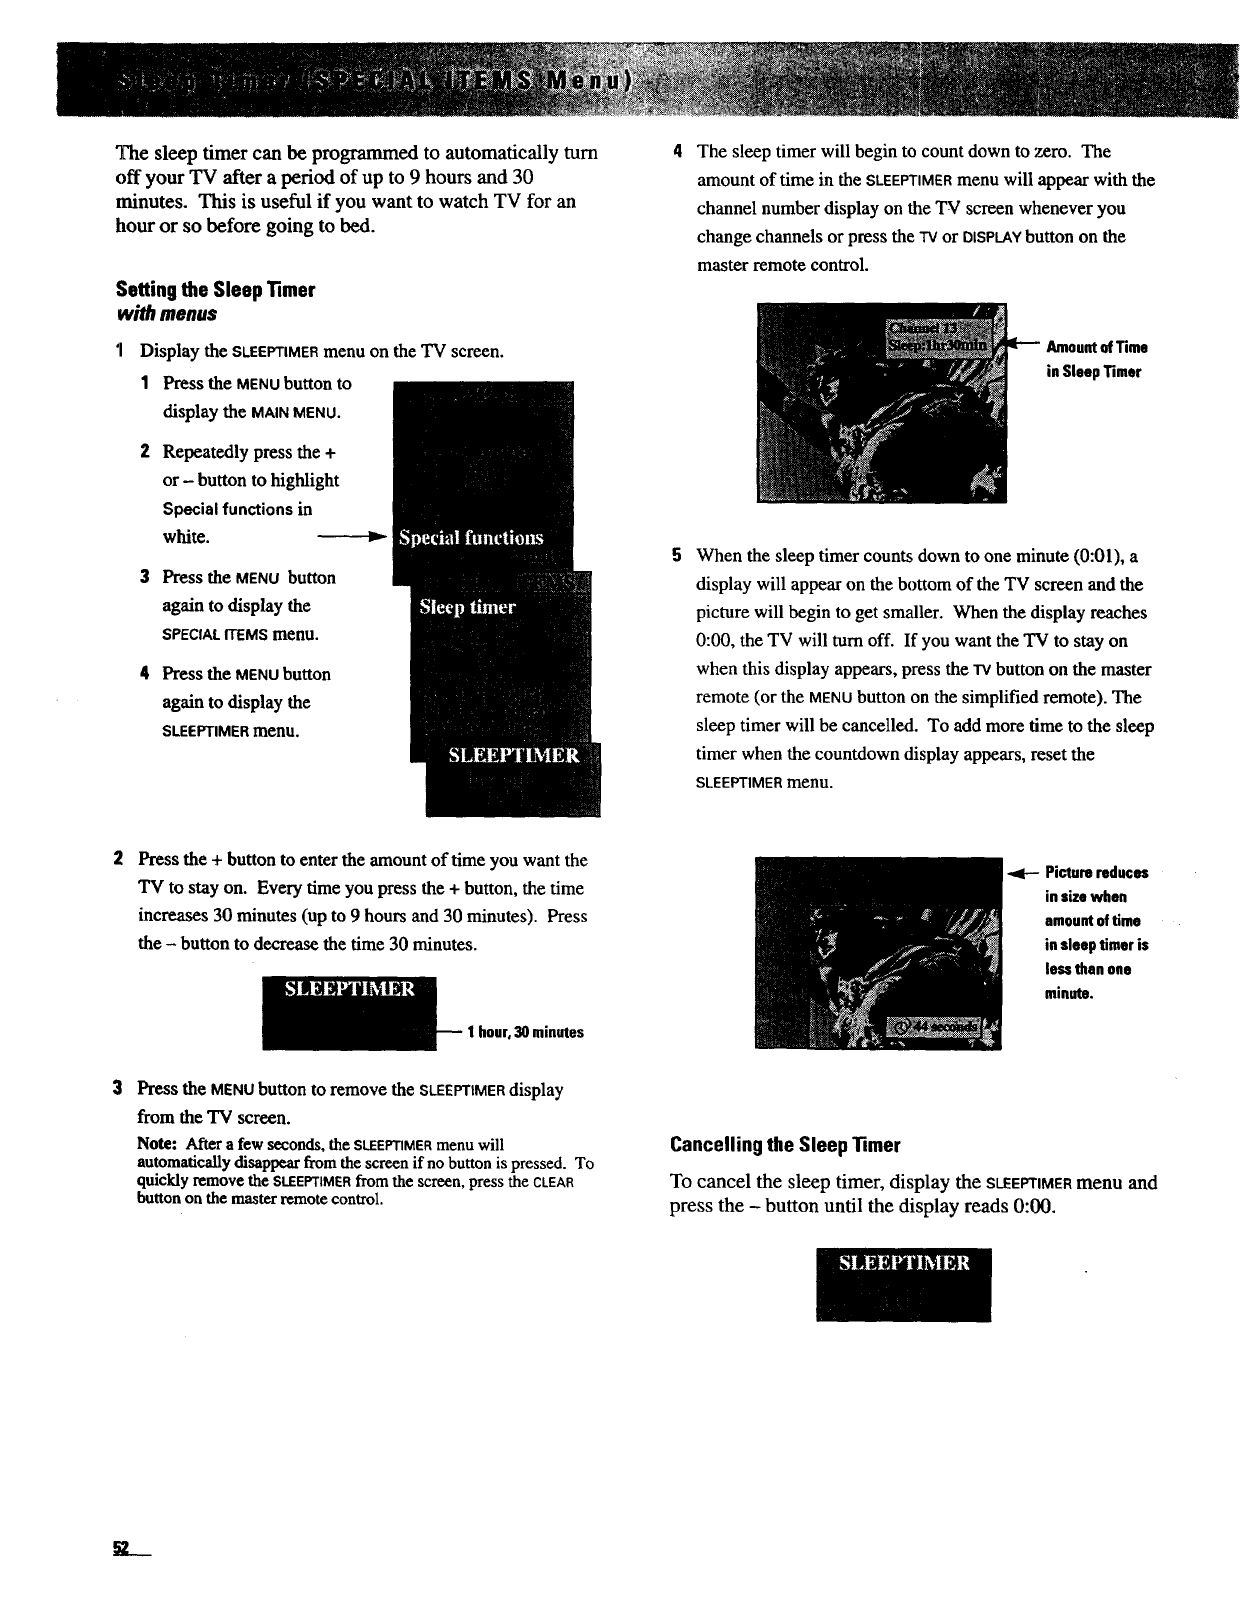
The sleep timer can be programmed to automatically turn
off your TV after aperiod of up to 9 hours and 30
minutes. This is useful if you want to watch TV for an
hour or so before going to bed.
Setting the Sleep _mer
with menus
'1 Display the SLEEPTIMERmenu on the TV screen.
1 Pressthe MENU button to
display the MAIN MENU.
2 Repeatedly press the +
or- button to highlight
Special functionsin
white. _-_
3Press the MENU button
again to display the
SPECIALITEMS menu.
4Press the MENU button
againtodisplaythe
SLEEPTIMER menu.
The sleep timer will begin to count down to zero. The
amount of time in the SLEEPTIMERmenu will appear with the
channel number display on the "IV screen whenever you
change channels or press the TVor DISPLAYbutton on the
master remote control.
Amountof Time
in Sleep Timer
When the sleep timer counts down to one minute (0:01), a
display will appear on the bottom of the TV screen and the
picture will begin to get smaller. When the display reaches
0:00, the TV will turn off. If you want the TV to stay on
when this display appears, press the TVbutton on the master
remote (or the MENUbutton on the simplified remote). The
sleep timer will be cancelled. To add more time to the sleep
timer when the countdown display appears, reset the
SLEEPTIMER menu.
Press the +button to enter the amount of time you want the
"IV to stay on. Every time you press the + button, the time
increases 30 minutes (up to 9 hours and 30 minutes). Press
the -button to decrease the time 30 minutes.
30 minutes
Picture reduces
in sizewhen
amountoftime
insleep timer is
less than one
minute.
Press the MENUbutton to remove the SLEEPTIMERdisplay
from the TV screen.
Note: After afew .seconds, the SLEEPTIMERmenu will
automatically disappear from the screen if no button is pressed. To
quickly remove the SLEEPTIMERfrom the screen, press the CLEAR
button on the master remote control.
Cancelling the Sleep 11mer
To cancel the sleep timer, display the SLEEPTIMERmenu and
press the - button until the display reads 0:00.
k
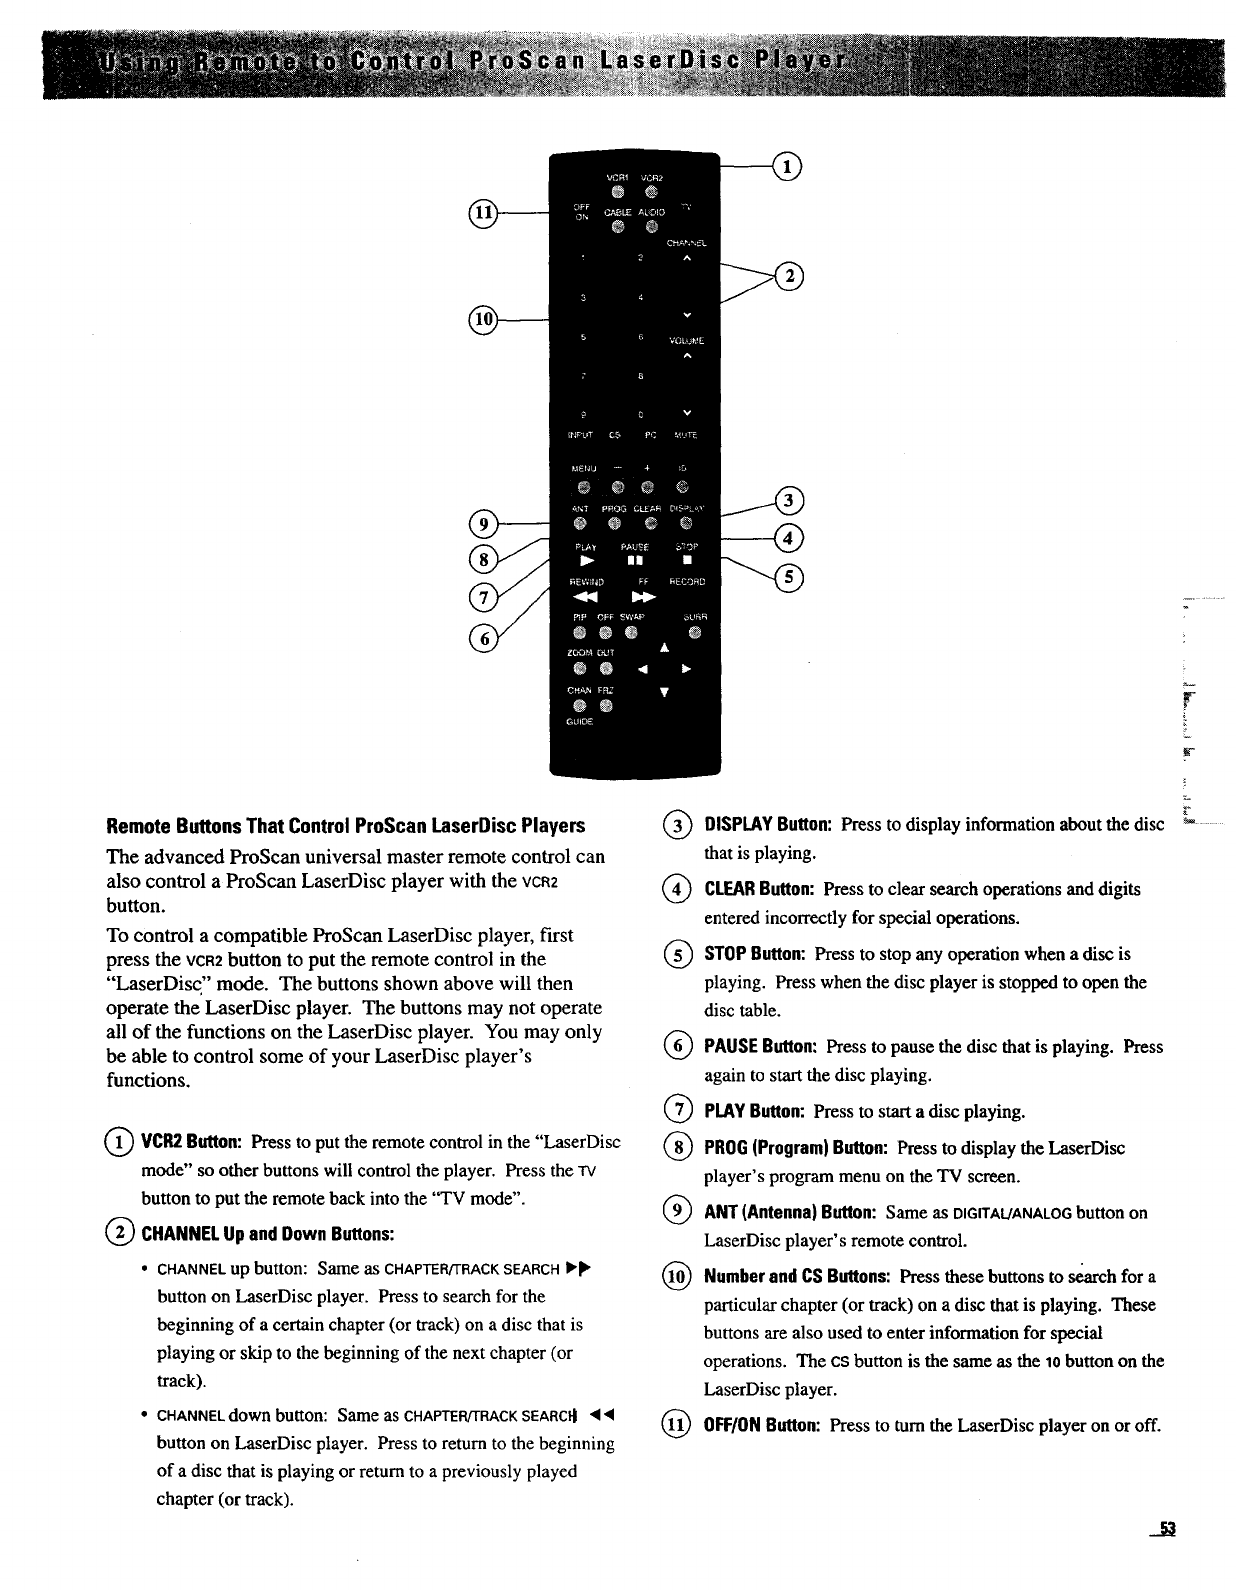
L
g,-
Remote ButtonsThat ControlProScan LaserDiscPlayers
The advanced ProScan universal master remote control can
also control a ProScan LaserDisc player with the vca2
button.
To control a compatible ProScan LaserDisc player, first
press the VCR2button to put the remote control in the
"LaserDisc" mode. The buttons shown above will then
operate the LaserDisc player. The buttons may not operate
all of the functions on the LaserDisc player. You may only
be able to control some of your LaserDisc player's
functions.
QVCR2 Press to put the remote control in the "LaserDisc
Button:
mode" so other buttons will control the player. Press the -rv
button to put the remote back into the '"I'V mode".
(_) CHANNEL Up and Down Buttons:
• CHANNEL up button: Same as CHAPTER/TRACK SEARCH I_1_
button on LaserDisc player. Press to search for the
beginning of a certain chapter (or track) on a disc that is
playing or skip to the beginning of the next chapter (or
track).
• CHANNEL down button: Same as CHAPTER/TRACK SEARCI_ • •
button on LaserDisc player. Press to return to the beginning
of a disc that is playing or return to a previously played
chapter (or track).
GDISPLAY Button: Press information about the disc
to display
that is playing.
(_ Press to clear search operations and digits
CLEARButton:
entered incorrectly for special operations.
(_) STOP to stop any operation a
Button: Press when disc is
playing. Press when the disc player is stopped to open the
disc table.
(_ PAUSE Button: Press to pause the disc that is playing. Press
again to start the disc playing.
(_ PLAYButton: Press to start a disc playing.
(_) PROG(Program) Button: Press to display the LaserDisc
player's program menu on the TV screen.
(_ANT (Antenna) Button: Same as DIGITAL!ANALOGbutton on
LaserDisc player's remote control.
Number and CSButtons: Pressthese buttons to s_ch for a
particular chapter (or track) on a disc that is playing. These
buttons are also used to enter information for special
operations. The cs button is the same as the 10 button on the
LaserDisc player.
(_) OFF/ON Button: Press to turn the LaserDisc player on or off.
53
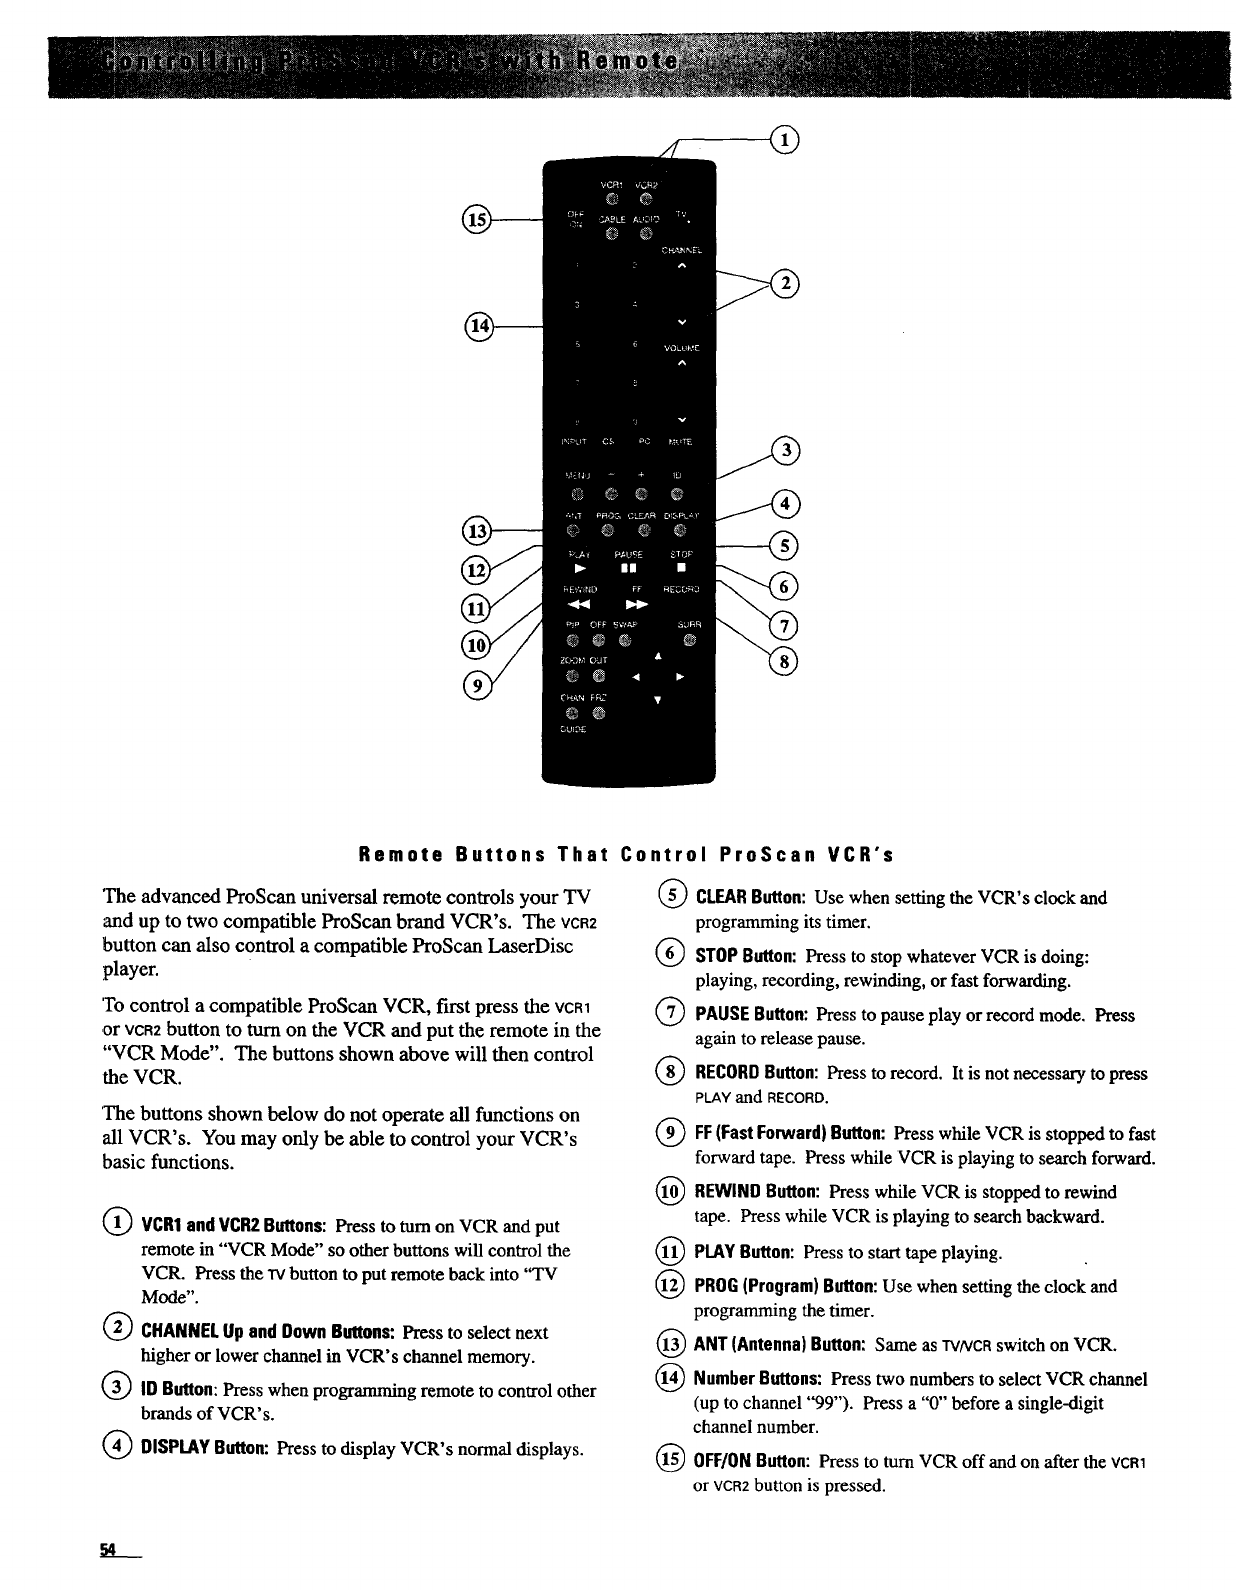
Remote Buttons That
The advanced ProScan universal remote controls your TV
and up to two compatible ProScan brand VCR's. The VCR2
button can also control a compatible ProScan LaserDisc
player.
'Tocontrol a compatible ProScan VCR, first press the VCR1
,orVCR2button to turn on the VCR and put the remote in the
"VCR Mode". The buttons shown above will then control
the VCR.
'The buttons shown below do not operate all functions on
all VCR's. You may only be able to control your VCR's
basic functions.
VCR1 and VCR2 Buttons: Press to turn on VCR and put
remote in "VCR Mode" so other buttons will control the
VCR. Press the TVbutton to put remote back into "TV
Mode".
CHANNEL Up and Down Buttons: Press to select next
higher or lower channel in VCR's channel memory.
lD Button: Press when programming remote to control other
brands of VCR's.
DISPLAY Button: Press to display VCR's normal displays.
Control ProScan VCR's
@
@
@
®
®
®
@
@
@
@
®
CLEARButton:Use when setting the VCR's clock and
programming its timer.
STOPButton:Press to stop whatever VCR is doing:
playing, recording, rewinding, or fast forwarding.
PAUSEButton: Press to pause play or recordmode. Press
again to release pause.
RECORDButton:Press to record. It is not necessary to press
PLAYand RECORD.
FF(FastForward)Button:Press while VCR is stopped to fast
forward tape. Press while VCR is playing to search forward.
REWINDButton: Press while VCR is stopped to rewind
tape. Press while VCR is playing to search backward.
PLAYButton: Press to start tape playing.
PROG(Program)Button:Use when setting the clock and
programming the timer.
ANT (Antenna)Button: Same as TV/VCRswitch on VCR.
Number Buttons: Press two numbers to select VCR channel
(up to channel '_)9"). Press a "0" before a single-digit
channel number.
0FF/0N Button: Press to turn VCR offand on after the VCR1
or VCR2button is pressed.
L
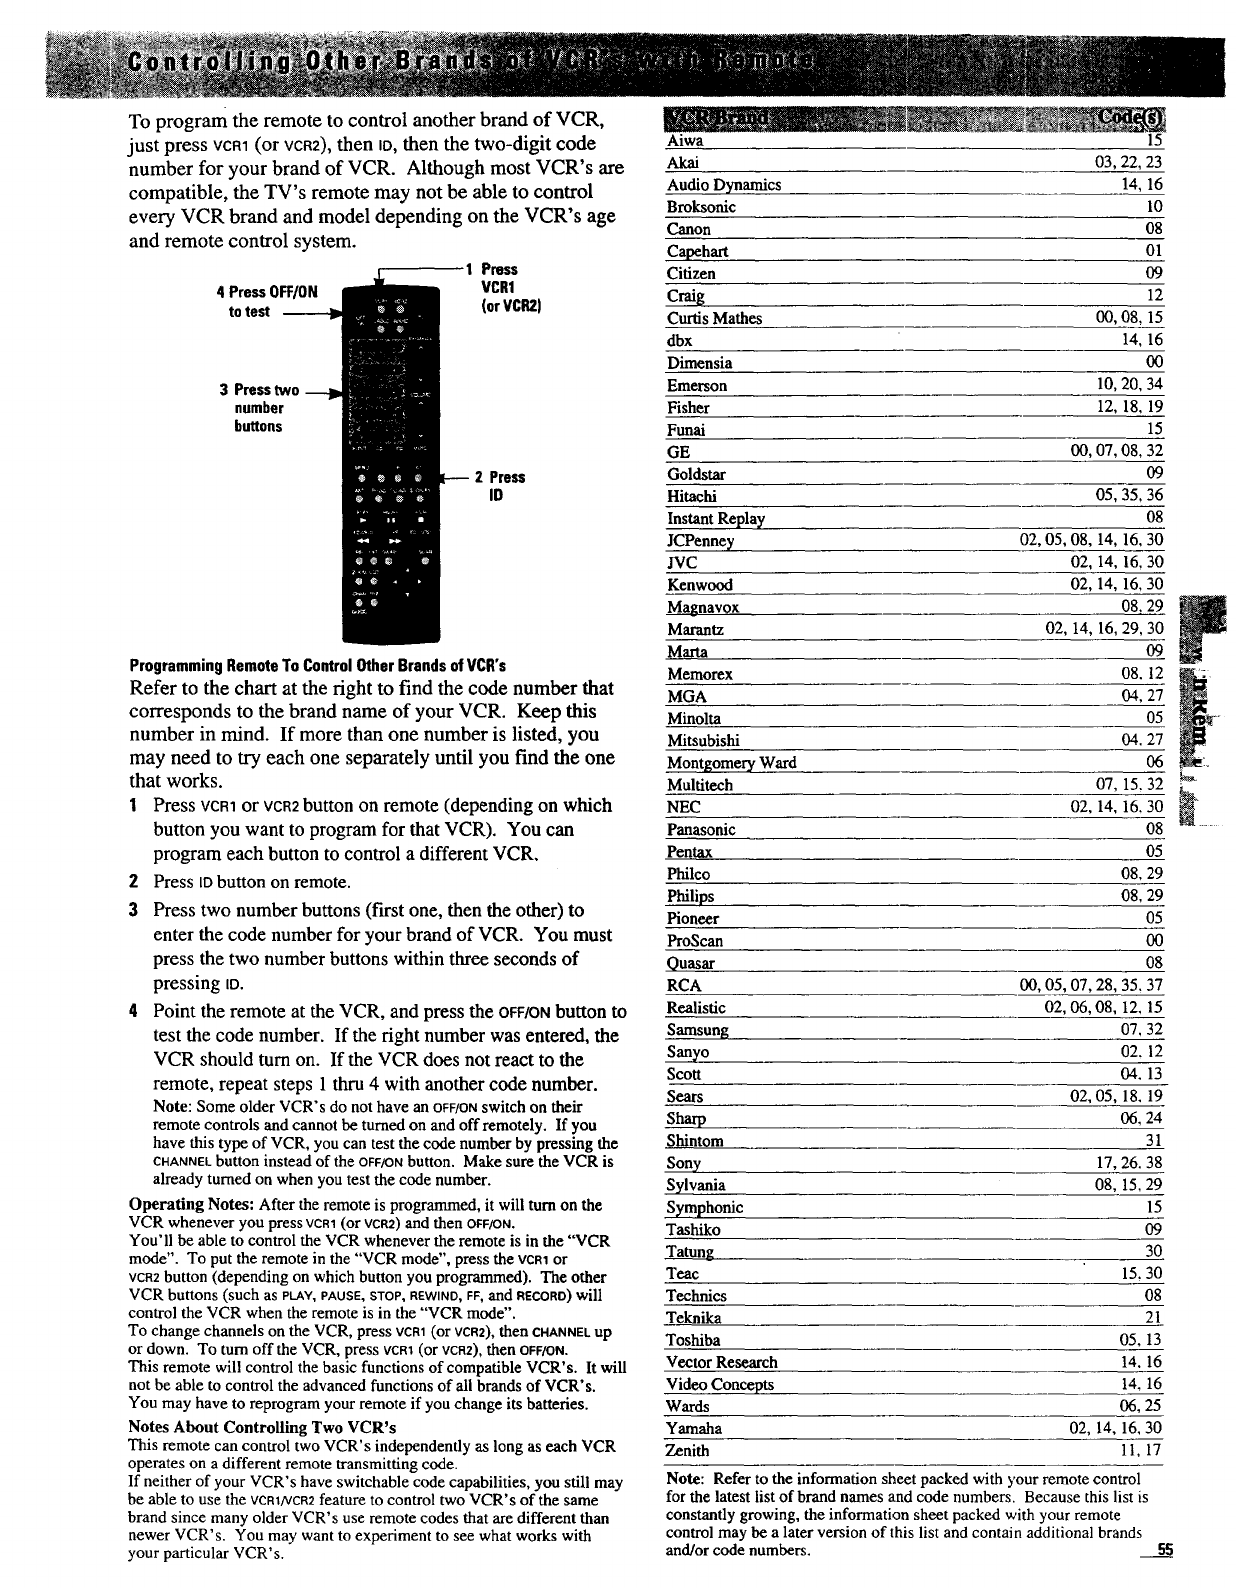
ToprogramtheremotetocontrolanotherbrandofVCR,
just press VCR1 (or VCR2), then Io, then the two-digit code
number for your brand of VCR. Although most VCR's are
compatible, the TV's remote may not be able to control
every VCR brand and model depending on the VCR's age
and remote control system.
1 Press
4 PressOFF/ON VCR1
to test (or VCR2)
3 Presstwo
number
buttons
Press
ID
Programming Remote To Control Other Brands of VCR's
Refer to the chart at the right to find the code number that
corresponds to the brand name of your VCR. Keep this
number in mind. If more than one number is listed, you
may need to try each one separately until you find the one
that works.
1Press VCR1or VCR2button on remote (depending on which
button you want to program for that VCR). You can
program each button to control a different VCR.
2Press ID button on remote.
3 Press two number buttons (first one, then the other) to
enter the code number for your brand of VCR. You must
press the two number buttons within three seconds of
pressing to.
4Point the remote at the VCR, and press the OFF/ONbutton to
test the code number. If the right number was entered, the
VCR should turn on. If the VCR does not react to the
remote, repeat steps 1 thru 4 with another code number.
Note: Some older VCR's do not have an OFF/ONswitch on their
remote controls and cannot be turned on and off remotely. If you
have this type of VCR, you can test the code number by pressing the
CHANNELbutton instead of the OFF/ONbutton. Make sure the VCR is
already turned on when you test the code number.
Operating Notes: After the remote is programmed, it will turn on the
VCR whenever you press VCR1(or vca2) and then OFF/ON.
You'll be able to control the VCR whenever the remote is in the "VCR
mode". To put the remote in the "VCR mode", press the VCR1or
VCR2button (depending on which button you programmed). The other
VCR buttons (such as PLAY,PAUSE,STOP,REWIND,FF,and RECORD) will
control the VCR when the remote is in the "VCR mode".
To change channels on the VCR, press VCR1(or VCR2), then CHANNELup
or down. To turn off the VCR, press VCR1(or VCR2),then OFF/ON.
This remote will control the basic functions of compatible VCR's. It will
not be able to control the advanced functions of all brands of VCR's.
You may have to reprogram your remote if you change its batteries.
Notes About Controlling Two VCR's
This remote can control two VCR's independently as long as each VCR
operates on a different remote transmitting code.
If neither of your VCR's have switchable code capabilities, you still may
be able to use the VCR1NCR2feature to control two VCR's of the same
brand since many older VCR's use remote codes that are different than
newer VCR's. You may want to experiment to see what works with
your particular VCR's.
Aiwa 15
Akai 03, 22, 23
Audio Dynamics 14, 16
Broksonic 10
Canon 08
Capehart Ol
Citizen 09
Craig 12
Curtis Mathes 00, 08, 15
dbx 14, 16
Dimensia 00
Emerson 10, 20, 34
Fisher 12, 18, 19
Funai 15
GE 00, 07, 08, 32
Goldstar 09
Hitachi 05, 35, 36
Instant Replay 08
JCPenne), 02, 05, 08, 14, 16, 30
JVC 02, 14, 16, 30
Kenwood 02, 14, 16, 30
Magnavox 08.29
Marantz 02, 14, 16, 29, 30
Marta 09
Memorex 08, 12
MGA 04, 27
Minolta 05
Mitsubishi 04. 27
Montgomery Ward 06
Multitech 07, 15, 32
NEC 02, 14, 16, 30
Panasonic 08
Pentax 05
Philco 08, 29
Philips 08, 29
Pioneer 05
ProScan 00
Quasar 08
RCA 00, 05, 07, 28, 35, 37
Realistic 02, 06, 08, 12, 15
Samsung 07, 32
San_€o 02. 12
Scott 04. 13
Sears 02, 05, 18. 19
Sharp 06, 24
Shintom 31
Sony 17, 26. 38
Sylvania 08, 15, 29
S_,mphonic 15
Tashiko 09
Tatung 30
Teac 15, 30
Technics 08
Teknika 21
Toshiba 05, 13
Vector Research 14. 16
Video Concepts 14. 16
Wards 06, 25
Yamaha 02, 14, 16, 30
Zenith l 1, 17
Note: Refer to the information sheet packed with 3'our remote control
for the latest list of brand names and code numbers. Because this list is
constantly growing, the information sheet packed with your remote
control may be a later version of this list and contain additional brands
and/or code numbers. 55
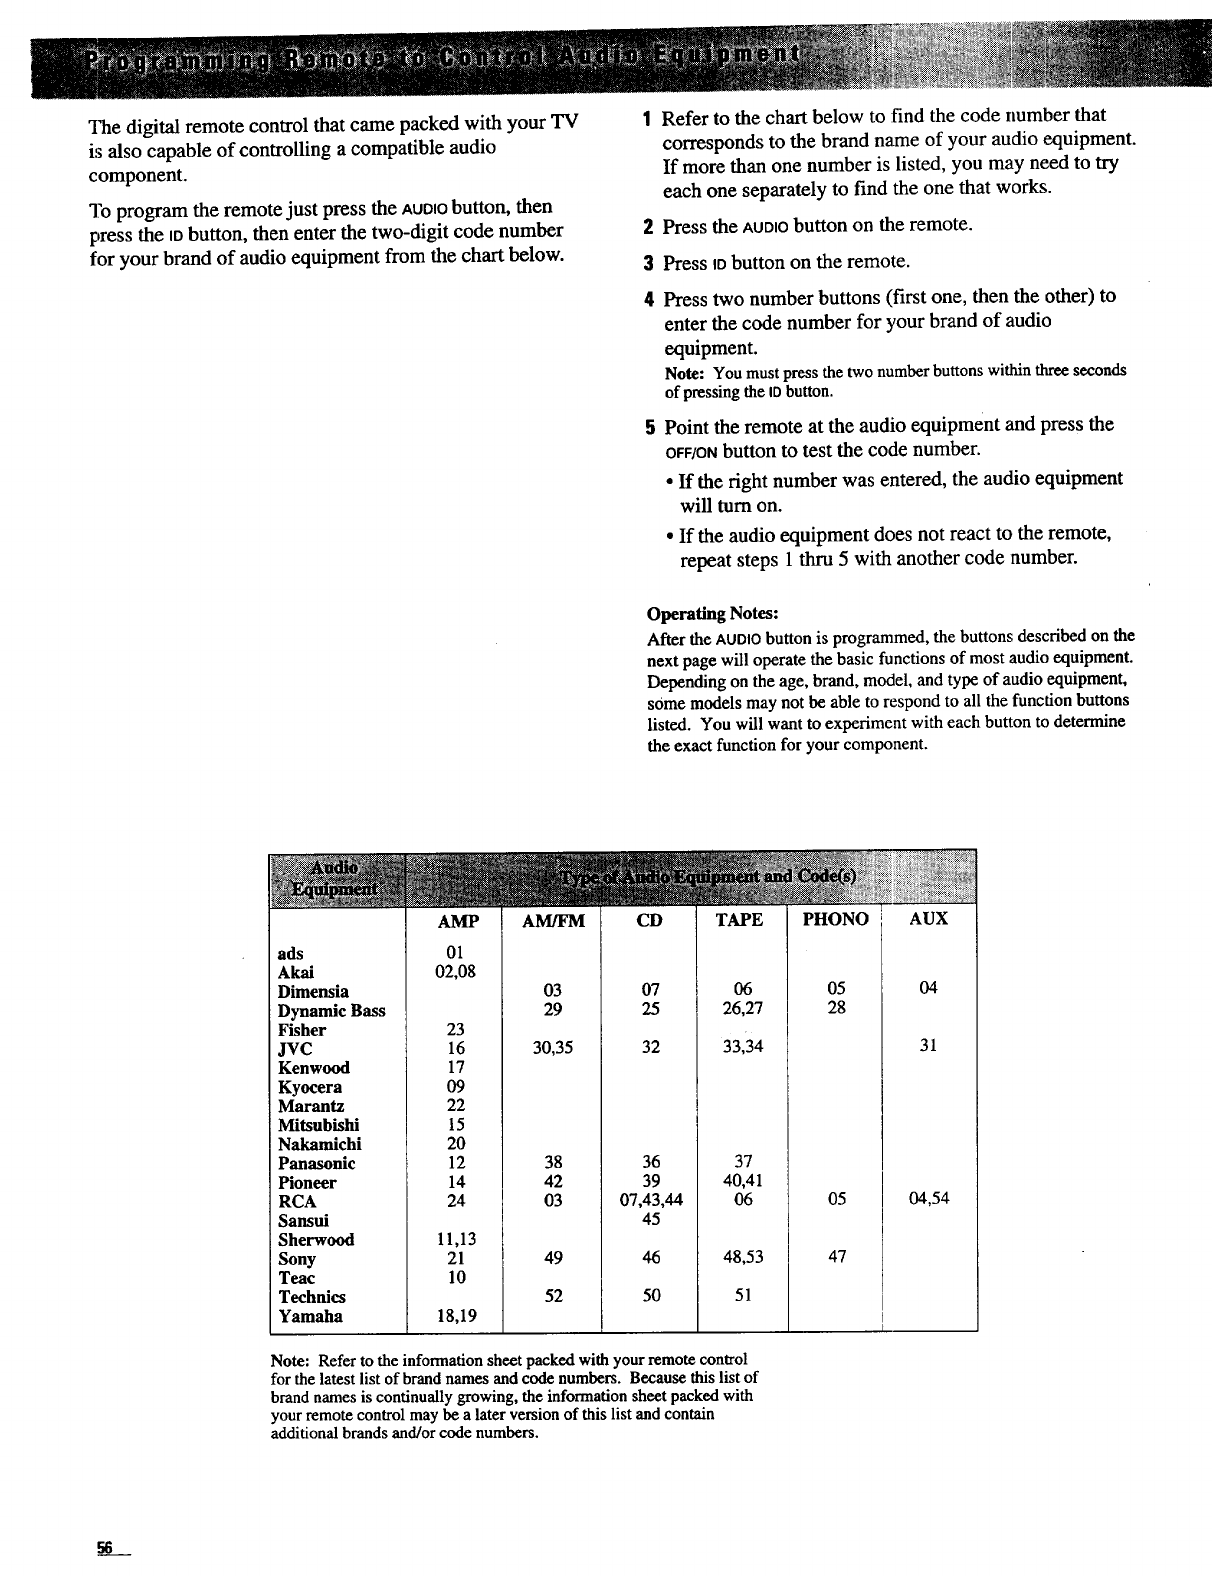
The digital remote control that came packed with your TV
is also capable of controlling a compatible audio
component.
"lb program the remote just press the AUDIObutton, then
press the IObutton, then enter the two-digit code number
for your brand of audio equipment from the chart below.
2
3
4
Refer to the chart below to :find the code [lumber that
corresponds to the brand name of your audio equipment.
If more than one number is listed, you may need to try
each one separately to find the one that works.
Press the AUDIObutton on the remote.
Press IDbutton on the remote.
Press two number buttons (first one, then the other) to
enter the code number for your brand of audio
equipment.
Note: You must press the two number buttons within three seconds
of pressing the IDbutton.
Point the remote at the audio equipment and press the
OFF/ONbutton to test the code number.
•If the right number was entered, the audio equipment
will turn on.
• If the audio equipment does not react to the remote,
repeat steps 1 thru 5 with another code number.
Operating Notes:
After the AUDIObutton is programmed, the buttons described on the
next page will operate the basic functions of most audio equipment.
Depending on the age, brand, model, and type of audio equipmenL
some models may not be able to respond to all the function buttons
listed. You will want to experiment with each button to determine
the exact function for your component.
ads
Akai
Dimensia
Dynamic Bass
Fisher
JVC
Kenwood
Kyocera
Marantz
Mitsubishi
Nakamichi
Panasonic
Pioneer
RCA
Sansui
Sherwood
Sony
Teac
Technics
Yamaha
AMP
01
02,08
23
16
17
09
22
15
20
12
14
24
11,13
21
10
18,19
AM/FM CD TAPE PHONO AUX
03
29
30,35
38
42
03
49
52
07
25
32
36
39
07,43,44
45
46
50
06
26,27
33,34
37
40,41
06
48,53
51
05
28
05
47
Note: Refer to the information sheet packed with your remote control
for the latest list of brand names and code numbers. Because this list of
brand names is continually growing, the information sheet packed with
your remote control may be a later version of this list and contain
additional brands and/or code numbers.
04
31
04,54
56
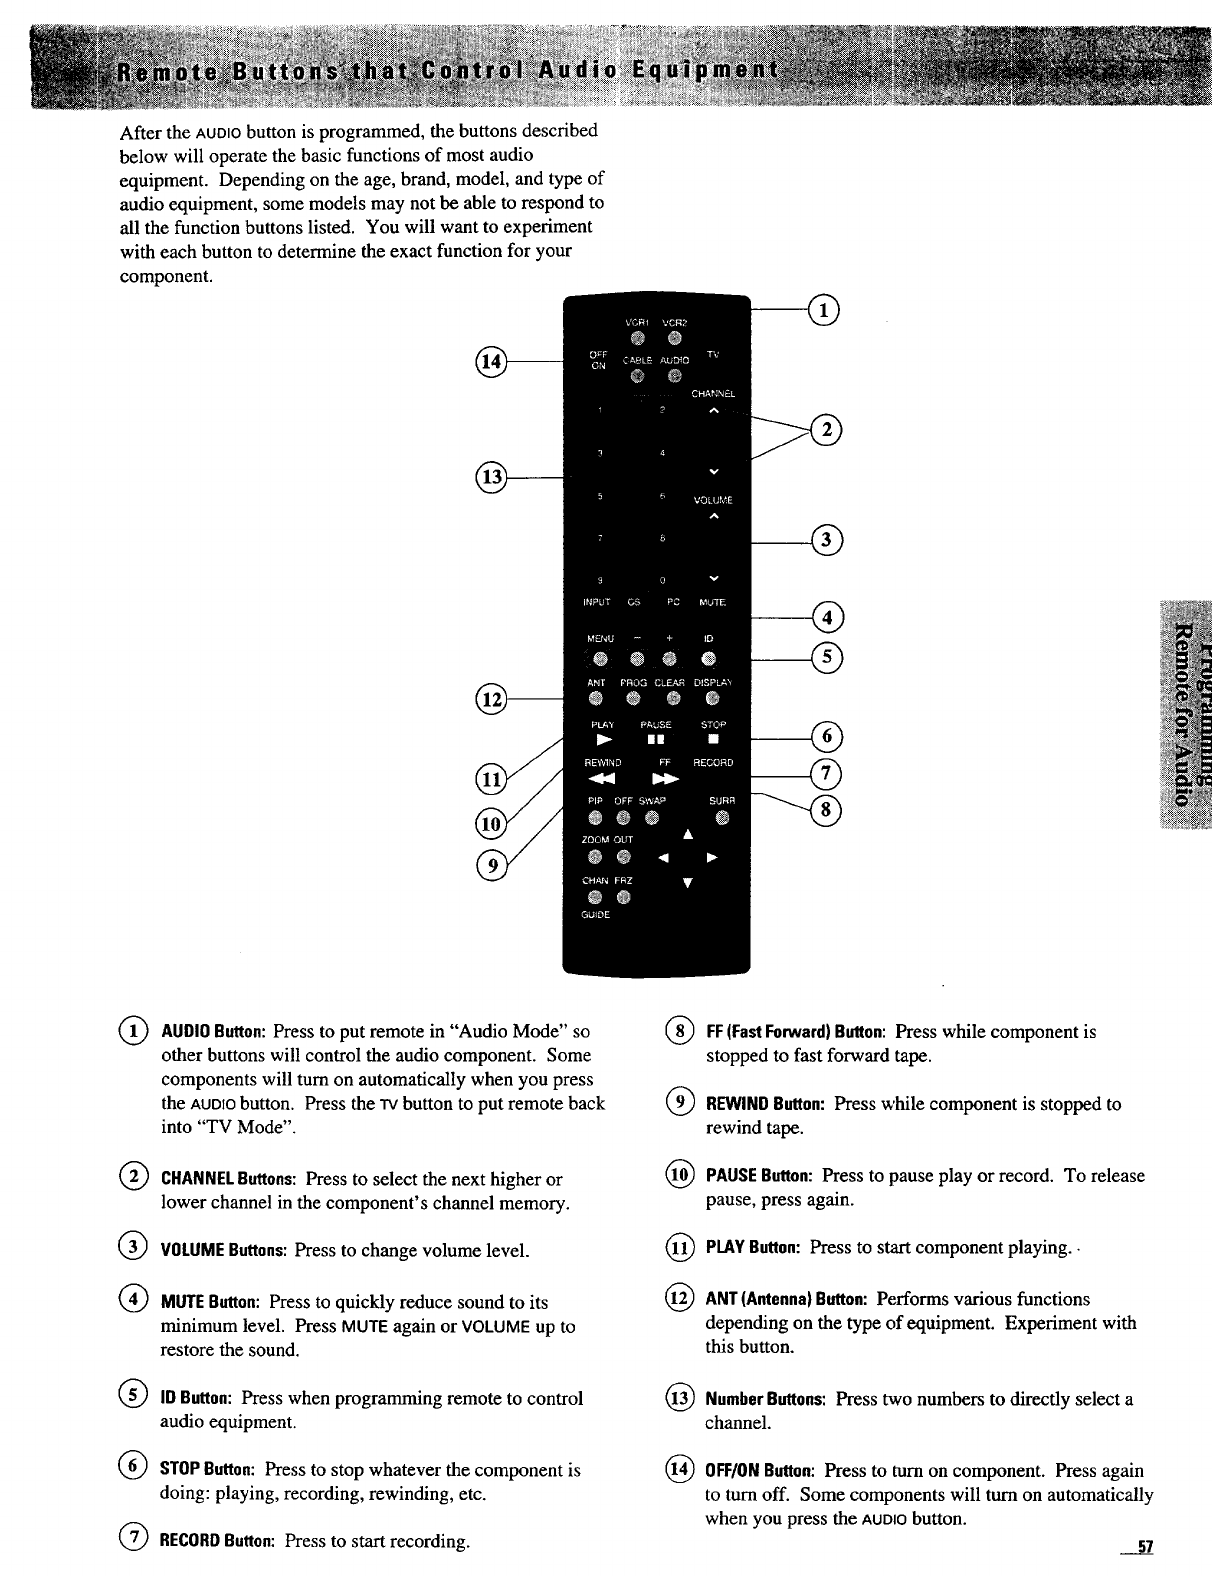
After the AUDIO button is programmed, the buttons described
below will operate the basic functions of most audio
equipment. Depending on the age, brand, model, and type of
audio equipment, some models may not be able to respond to
all the function buttons listed. You will want to experiment
with each button to determine the exact function for your
component.
O
@
@
®
(9
®
@
AUDIOButton: Press to put remote in "Audio Mode" so
other buttons will control the audio component. Some
components will turn on automatically when you press
the AUOtObutton. Press the rv button to put remote back
into "TV Mode".
CHANNELButtons:Press to select the next higher or
lower channel in the component's channel memory.
VOLUMEButtons: Press to change volume level.
MUTEButton: Press to quickly reduce sound to its
minimum level. Press MUTE again or VOLUME up to
restore the sound.
IDButton: Press when programming remote to control
audio equipment.
STOPButton: Press to stop whatever the component is
doing: playing, recording, rewinding, etc.
RECORDButton: Press to start recording.
®
®
®
@
@
@
@
FF(FastForward)Button: Press while component is
stopped to fast forward tape.
REWIND Button: Press while component is stopped to
rewind tape.
PAUSE Button: Press to pause play or record. To release
pause, press again.
PLAYButton: Press to start component playing. •
ANT(Antenna} Button: Performs various functions
depending on the type of equipment. Experiment with
this button.
NumberButtons:Press two numbers to directly select a
channel.
OFF/ONButton: Press to turn on component. Press again
to turn off. Some components will turn on automatically
when you press the AUDIObutton.
57
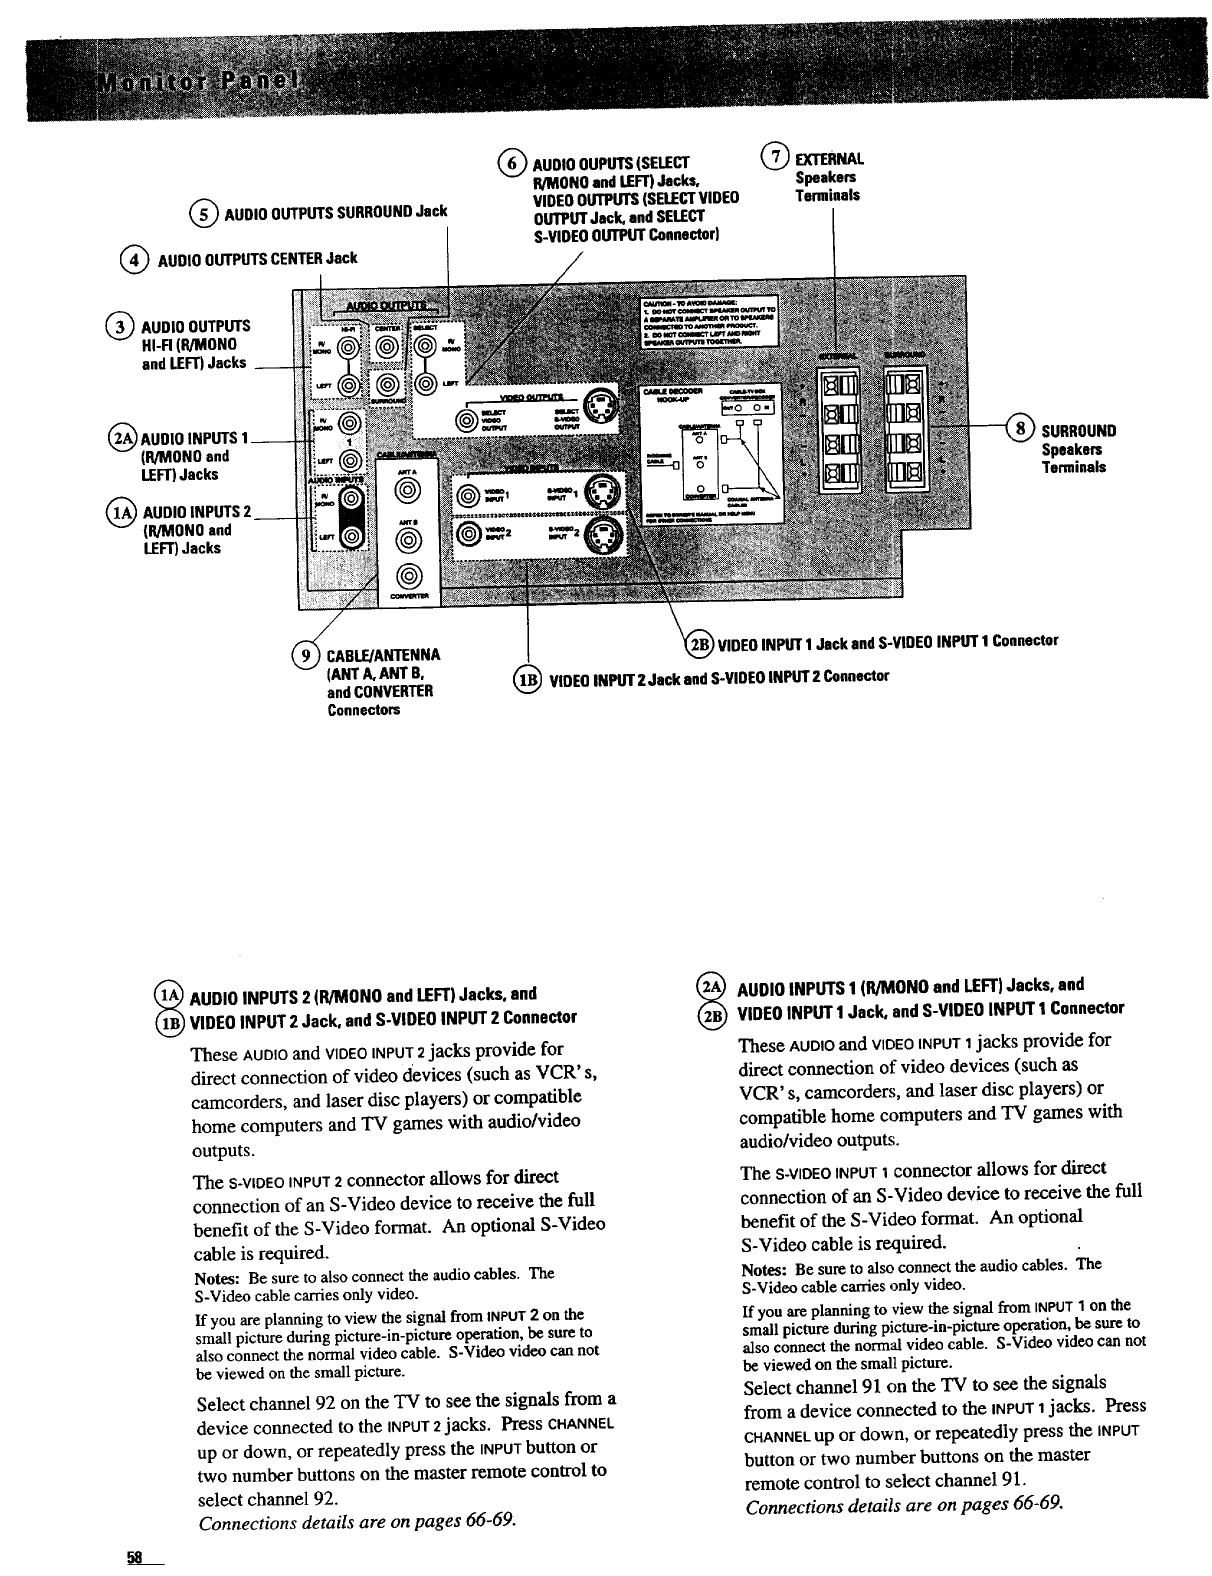
QAUDIOOUTPUTSSURROUNDJack
(_) AUDI0 OUTPUTSCENTERJack
(_ AUDIOOUPUTS(SELECT
R/MONOand LEFT)Jacks,
VIDEOOUTPUTS(SELECTVIDEO
OUTPUTJack, and SELECT
S-VIDEOOUTPUTConnector)
QEXTERNAL
Speakers
Terminals
QAUDIOOUTPUTS
HI-FI (R/MONO
and LEFT)Jacks __
(_ AUDIOINPUTS 1 __
(R/MON0 and
LEFT)Jacks
AUDIOINPUTS 2
IR/MON0 and
LEFT)Jacks
SURROUND
Speakers
Terminals
CABLE/ANTENNA
(ANT A,ANT B.
and CONVERTER
Connectors
'VIDEOINPUT 1 Jack andS-VIDE0 INPUT 1 Connector
VIDEOINPUT 2 Jack and S-VIDEOINPUT2 Connector
58
AUDIOINPUTS2 (R]MONOandLEFT)Jacks, and
VIDEOINPUT2 Jack, andS-VIDEOINPUT2 Connector
These AUDIOand vIDEo INPUT2jacks provide for
direct connection of video devices (such as VCR' s,
camcorders, and laser disc players) or compatible
home computers and TV games with audio/video
outputs.
The S-VIDEOINPUT2 connector allows for direct
connection of an S-Video device to receive the full
benefit of the S-Video format. An optional S-Video
cable is required.
Notes: Be sure to also connect the audio cables. The
S-Video cable carries only video.
If you are planning to view the signal from INPUT2 on the
small picture during picture-in-picture operation, be sure to
also connect the normal video cable. S-Video video can not
be viewed on the small picture.
Select channel 92 on the TV to see the signals from a
device connected to the INPUT2 jacks. Press CHANNEL
up or down, or repeatedly press the INPUTbutton or
two number buttons on the master remote control to
select channel 92.
Connections details are on pages 66-69.
AUDIOINPUTS1 (P,/MONOand LEFT)Jacks, and
VIDEOINPUT1Jack, andS-VIDEOINPUT1 Connector
These AUDIOand VIDEOINPUT1jacks provide for
direct connection of video devices (such as
VCR' s, camcorders, and laser disc players) or
compatible home computers and TV games with
audio/video outputs.
The S-VIDEOINPUTI connector allows for direct
connection of an S-Video device to receive the full
benefit of the S-Video format. An optional
S-Video cable is required.
Notes: Be sure to also connect the audio cables. The
S-Video cable carries only video.
Ifyou areplanningto view thesignalfrom iNPUT1on the
smallpicture during picture-in-picture operation, be sureto
alsoconnectthe normalvideocable. S-Videovideocannot
be viewedon the smallpicture.
Select channel 91 on the TV to see the signals
from a device connected to the INPUT1jacks. Press
CHANNELup or down, or repeatedly press the INPUT
button or two number buttons on the master
remote control to select channel 91.
Connections details are on pages 66-69.
QAUDIOOUTPUTSHI-FI(R/MONOandLEFT)Jacksfeed
volume-controlled stereo audio out from whatever is
displayed on the TV screen. Allows connection of an
external audio amplifier and still lets you adjust sound
level with the TV's remote. Optional speakers and
amplifier are required. Connection details are on
page 70.
(_) AUDIOOUTPUTSCENTERJack feeds volume-controlled
"center-sound" audio out from whatever is displayed on
the TV screen. Allows connection of audio amplifier in
case you want to drive "center-channel" sound louder
than the TV speakers will allow. Prologic or Dolby 3
stereo audio mode must be turned on to hear the
"center-channel" sound (optional speakers and amplifier
are required). Connection details are on page 71.
QAUDIOOUTPUTSSURROUNDJack feeds volume-
controlled surround-sound audio from whatever is
displayed on the TV screen. Allows connection of
audio amplifier in case you want to drive the surround
speakers louder than the SURROUNDspeaker terminals
will allow. Prologic, prologic phantom, matrix
surround, hall surround, or stadium surround audio
mode must be turned on to hear the "surround" sound.
Optional speakers and amplifier are required. Details
are on page 71.
QAUDIOOUTPUTS(SELECTR/MONOand LEFT)Jacks, and
VIDEOOUTPUTS(SELECTVIDEOOUTPUTJack and SELECT
S-VIDEOOUTPUTConnector)provide fixed level audio and
video output from whatever is displayed on the TV
screen (including the video signal from the SELECT
S-WDEOOUTPUTconnector). They provide audio and
video signals suitable for recording. These can be used
for several applications such as:
•VCR editing with two or three VCR' s (page 67).
•Recording TV programs onto a camcorder (page 69).
• Recording cable-TV programs onto a VCR that is not
cable ready (page 67).
•Recording audio onto an audio cassette tape recorder
(page 70).
Notes: Remember that the signal coming out of these jacks is
whatever you see (and/or hear) on the TV screen. So, whatever
you want to record must be displayed on the TV screen during
recording. The menus and displays (such as clock and channel
number) that are on the screen can not be recorded.
To record from an S-VHS component, you must also connect an
optional S-Video cable from the SELECTS-VIDEOOUTPUTconnector
onthe TV to the S-VHSINPUTconnectoron theVCR.
QEXTERNALSpeakers permit direct connection
Terminals
of optional external speakers. Connection details are
on pages 72-73.
Important: To hear sound from the external speakers, they
must be turned on using the Speakers: int/ext/off function on
the AUDIOADJUSTSETUPmenu for the audio mode you have
selected. Details are on pages 28-36.
®SURROUNDSpeakersTerminalspermit direct connection
of auxiliary speakers for surround-sound effects.
Prologic, prologic phantom, matrix surround, hall
surround, or stadium surround audio mode must be
selected, and the Rear spkr: on/off function on the
AUDIOADJUSTSETUPmenu for that mode must be set to
Rear spkr: on to hear the "surround" sound. Optional
speakers are required. Details on connecting speakers
are on pages 72-73.
Note: 8-ohm speakers should be used.
(_ CABLE/ANTENNA(ANTA,ANT B,and/or CONVERTER)
Connectorsare used when attaching either a home
antenna and/or a cable-TV system to your TV.
Connection details are on pages 61-65.
v
59
CompatibleComponents
A wide variety of compatible VCR's, camcorders, and
LaserDisc players are available. Check with your dealer
for details.
Other brands of components can also be connected to your
TV. Refer to the component owner's manual for the
manufacturer's recommended hookup instructions.
PositioningComponentsonShelvesin a Rack orStand
If you are connecting several components and plan to use a
stand or component rack, follow these general rules when
arranging your components.
If the components are arranged horizontally, allow at least
an inch or two of space between them so air can circulate
freely. This will also provide some space between the
devices to minimize interference.
If components are arranged vertically on shelves, place the
stereo amplifier at the top so that heated air rising from it
will not pass around the other components.
Do not block the ventilation holes in the components.
If components are placed on rugs or deep-pile mats, the
ventilation holes in the bottoms may be blocked and
overheating could result.
Turn OffPower Before ConnectingCOmponents
Always turn off power to all components before you
connect or disconnect any cables. This will protect your
components from possible electrical surges that could
damage your equipment.
This is a good practice for all your audio and video
components - TV's, VCR's, audio systems, computers, etc.
PositionSpeakersto AvoidInterference
Placing external speakers with unshielded magnets too
close to the TV may result in the speaker magnets affecting
the quality of the picture. Such speakers should be located
at least eight inches away.
If unshielded speakers are too close to the TV,
misconvergence may happen (colors along sides may
shift). If this happens move the speakers farther away
from the TV. If this does not correct the problem, you may
need to converge the TV as described on page 5.
Plugging in Power Cords
Do not plug your TV's power cord into another
component's outlet (switched or unswitched). Your TV
should only be plugged into a wall outlet or suitable power
strip outlet.
Do not plug any power cord into a wall outlet until you are
finished making connections.
Many components have "convenience outlets" on their
back panels so you can plug power cords from other
components into a "convenience outlet" instead of a wall
outlet. Usually these outlets will be labeled either
"switched" or "unswitched".
If the outlet is labeled "switched", that means power to the
outlet will be switched off when the component's power
button is switched off.
If the outlet is labeled "unswitched", that means power will
always be available at that outlet, even when the
component is turned off.
Depending on the size of your system, you may prefer to
use an extension cord or a "multiple adapter" to get enough
outlets for all your components.
The power cords on your ProScan components are
"polarized" (one blade is wider than the other). Be sure
the extension cord or multiple adapter is also polarized.
The plug should fit in the outlet only one way.
Position Cables to Avoid Hum
The possibility of picking up hum (interference noise) in
the audio/video cables will be reduced if you keep them
away from the back of the TV. Route the cables to the
sides of the TV's back panel instead of straight down the
middle.
All cable plugs should be firmly seated in the jacks where
they connect to the equipment. If a plug is not connected
firmly, audio hum or smeared video may result.
If your antenna cable is flat twin-lead cable, try to keep it
away from the audio/video cables as much as possible.
Excess flat, twin-lead cable should be cut off instead of
coiled behind the TV. Round, coaxial, antenna cable is
usually shielded and can be coiled or placed next to
audio/video cables without causing interference.
611
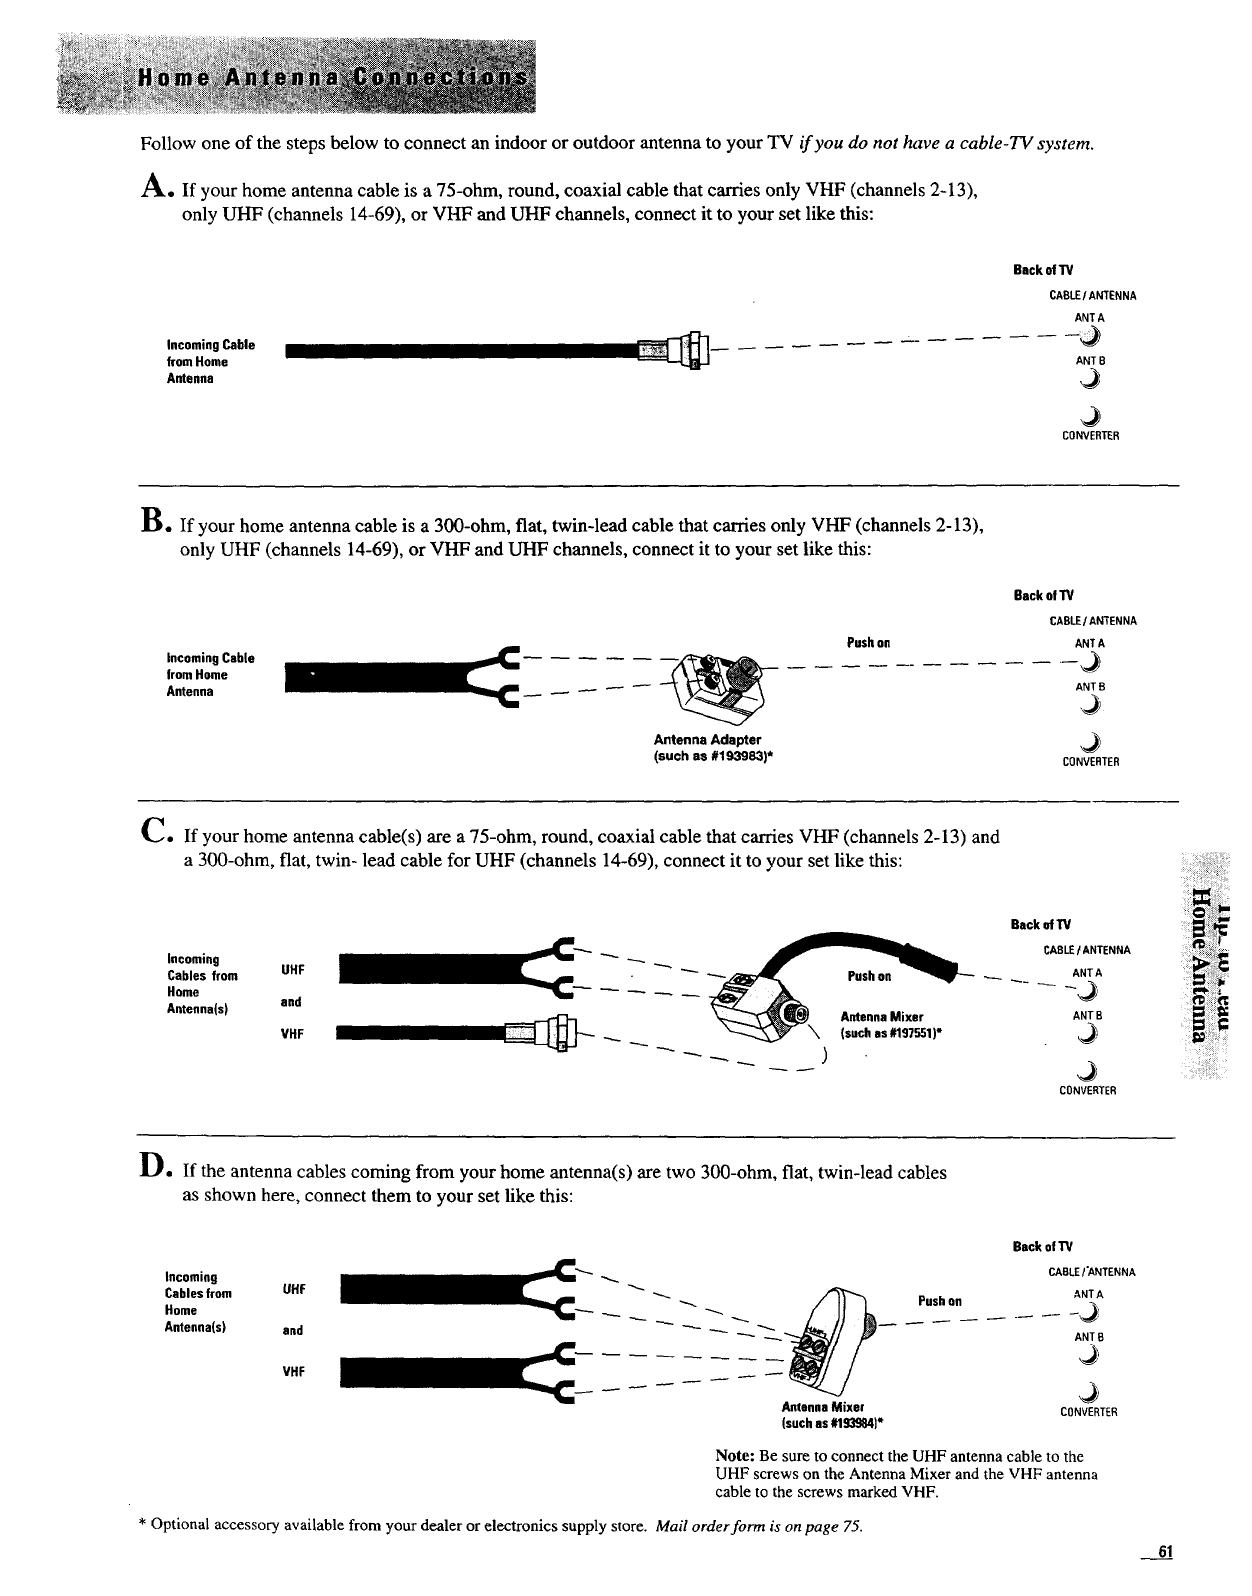
Follow one of the steps below to connect an indoor or outdoor antenna to your TV if you do not have a cable-TV system.
A. if your home antenna cable is a 75-ohm, round, coaxial cable that carries only VHF (channels 2-13),
only UHF (channels 14-69), or VHF and UHF channels, connect it to your set like this:
Incoming Cable
fromHome
Antenna
Back ofTV
CABLE!ANTENNA
ANT A
ANT B
CONVERTER
B° if your home antenna cable is a 300-ohm, fiat, twin-lead cable that carries only VHF (channels 2-13),
only UHF (channels 14-69), or VHF and UHF channels, connect it to your set like this:
Incoming Cable
fromHome
Antenna
Antenna Adapter
(such as #193983)*
Pushon
Back of TV
CABLE/ANTENNA
ANTA
.--_._
ANT R
J
CONVERTER
C° if your home antenna cable(s) are a 75-ohm, round, coaxial cable that carries VHF (channels 2-13) and
a 300-ohm, fiat, twin- lead cable for UHF (channels 14-69), connect it to your set like this:
incoming
Cables from
Home
Antenna(s)
U.F
end
VHF
Pushon
AntennnMixer
(such ns#197551)*
)
BackofTV
CABLEtANTENNA
ANTA
ANTB
CONVERTER
D. if the antenna cables coming from your home antenna(s) are two 300-ohm, flat, twin-lead cables
as shown here, connect them to your set like this:
Incoming
Cablesfrom
Home
Antenna(s)
UHF ""--
and _ _ _'_"
VHF
Antenna Mixer
(suchas_1S39841"
Back of1_/
CABLE/'ANTENNA
Push on ANTA
ANTR
CONVERTER
Note: Be sure to connect the UHF antenna cable to the
UHF screws on the Antenna Mixer and the VHF antenna
cable to the screws marked VHF.
* Optional accessory available from your dealer or electronics supply store. Mail order form is on page 75.
61
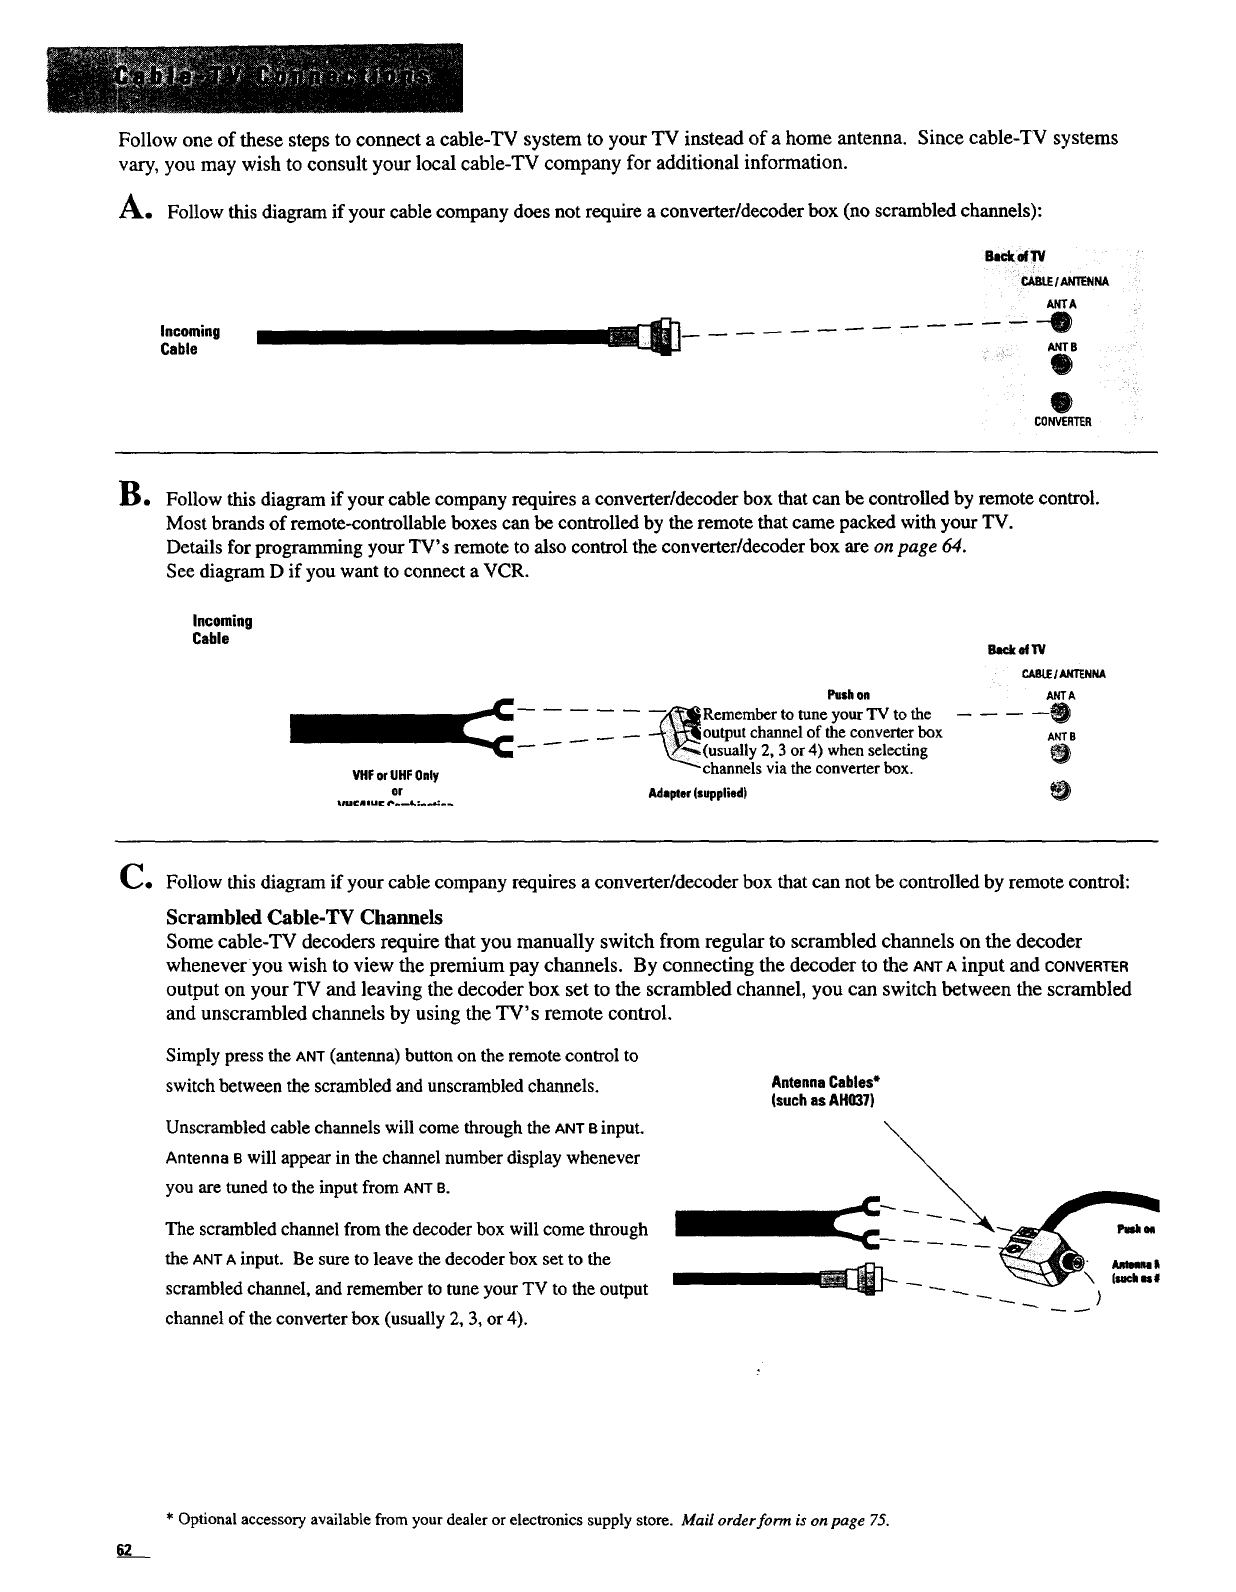
Follow one of these steps to connect a cable-TV system to your TV instead of a home antenna. Since cable-TV systems
vary, you may wish to consult your local cable-TV company for additional information.
A. Follow this diagram if your cable company does not require a converter/decoder box (no scrambled channels):
Incoming ___
Cable
g,ckd_V •
CABLEIANTENNA
ANTA i_
-0
ANT B
W
Q
CONVERTER
B* Follow this diagram if your cable company requires a converter/decoder box that can be controlled by remote control.
Most brands of remote-controllable boxes can be controlled by the remote that came packed with your TV.
Details for programming your TV's remote to also control the converter/decoder box are on page 64.
See diagram D if you want to connect a VCR.
Incoming
Cable Backer 1V
CAIKEIANTENNA
Push on ANTA
_Remember to tuneyourTVto the '_
-- -_ \_-_ output channelof the converterbox Ame
-- _ _(usually 2, 3or 4) when selecting
VIIForUHFOnly -"-channels viatheconverterbox.
or Adapter(supplied)
tlUCalUl: ___,
Co Follow this diagram if your cable company requires aconverter/decoder box that can not be controlled by remote control:
Scrambled C.able-TV Channels
Some cable-TV decoders require that you manually switch from regular to scrambled channels on the decoder
whenever you wish to view the premium pay channels. By connecting the decoder to the ANTAinput and CONVERrEa
output on your TV and leaving the decoder box set to the scrambled channel, you can switch between the scrambled
and unscrambled channels by using the TV's remote control.
Simply press the ANT (antenna) button on the remote control to
switch between the scrambled and unscrambled channels.
Unscrambled cable channels will come through the ANTainput.
Antenna B will appear in the channel number display whenever
you are tuned to the input from ANT8.
The scrambled channel from the decoder box will come through
the ANTA input. Be sure to leave the decoder box set to the
scrambled channel, and remember to tune your TV to the output
channel of the converter box (usually 2, 3, or 4).
AntennaCables*
(such as AHQ37)
62
* Optional accessory available from your dealer or electronics supply store. Mail order form is on page 75.
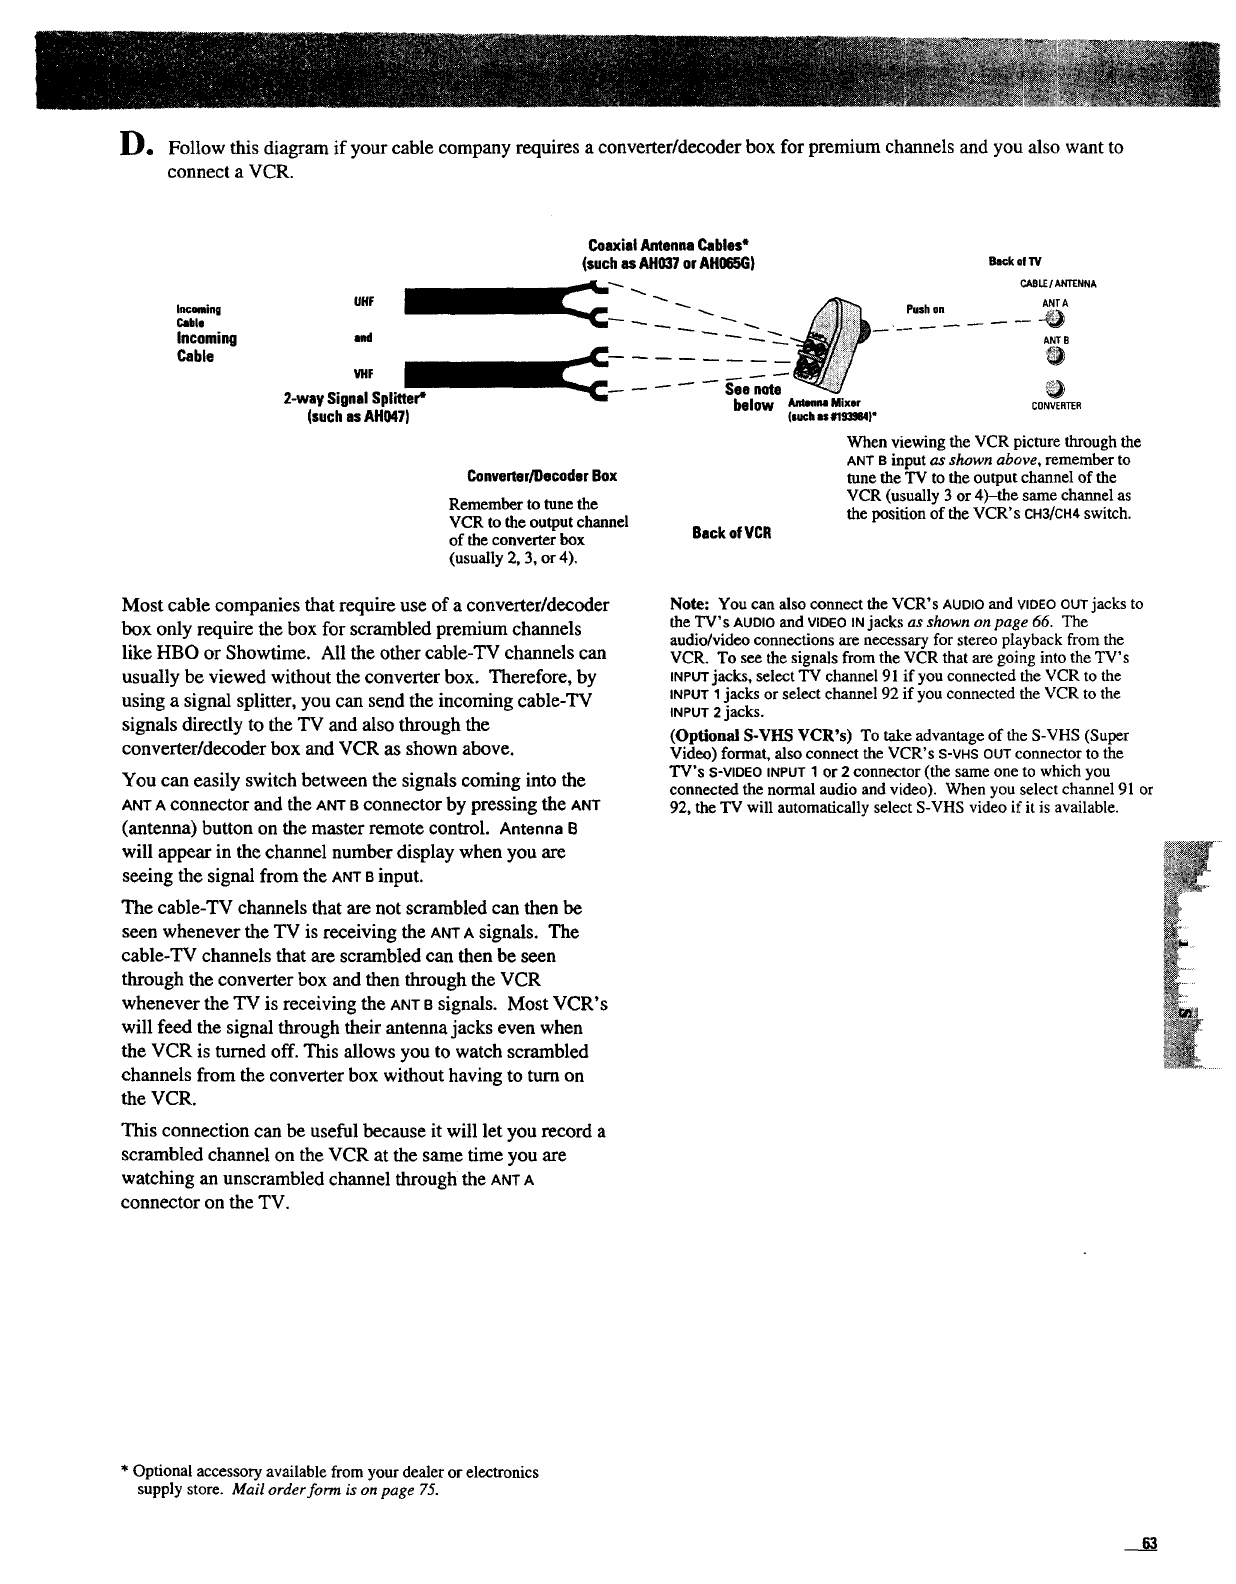
D° Follow this diagram if your cable company requires a converter/decoder box for premium channels and you also want to
connect a VCR.
Incoming
Cable
Incoming
Cable
UflF
and
VHF
2-way Signal Splitter*
(such usAHO471
CoaxialAntennaCables*
(suchas AHg37orAH065G) Back,tw
_: CAgLE/ANITNNA
"" _ _ _ Pushon ANTA
_ _ _ ANT B
below Antenna Mixer CONVERTER
(suchus#lS3N4)"
Converter/Decoder Box
Remember to tune the
VCR to the output channel
of the converter box
(usually 2, 3, or 4).
Beck of VCR
When viewing the VCR picture through the
ANT Binput as shown above, remember to
tune the TV to the output channel of the
VCR (usually 3 or 4)-the same channel as
the position of the VCR's ¢H3/CH4 switch.
Most cable companies that require use of a converter/decoder
box only require the box for scrambled premium channels
like HBO or Showtime. All the other cable-TV channels can
usually be viewed without the converter box. Therefore, by
using a signal splitter, you can send the incoming cable-TV
signals directly to the TV and also through the
converter/decoder box and VCR as shown above.
You can easily switch between the signals coming into the
ANTA connector and the ANTBconnector by pressing the ANT
(antenna) button on the master remote control. Antenna B
will appear in the channel number display when you are
seeing the signal from the ANTe input.
The cable-TV channels that are not scrambled can then be
seen whenever the TV is receiving the ANTa signals. The
cable-TV channels that are scrambled can then be seen
through the converter box and then through the VCR
whenever the TV is receiving the ANTBsignals. Most VCR's
will feed the signal through their antenna jacks even when
the VCR is turned off. This allows you to watch scrambled
channels from the converter box without having to turn on
the VCR.
This connection can be useful because it will let you record a
scrambled channel on the VCR at the same time you are
watching an unscrambled channel through the ANTa
connector on the TV.
Note: You can also connect the VCR's AUDIOand VIDEOOUTjacks to
the TV's AUDIOand VIDEOINjacks as shown on page 66. The
audio/video connections are necessary for stereo playback from the
VCR. To see the signals from the VCR that are going into the TV's
INrtrr jacks, select TV channel 91 if you connected the VCR to the
INPUT 1jacks or select channel 92 if you connected the VCR to the
INPUT2jacks.
(Optional S-VHS VCR's) To take advantage of the S-VHS (Super
Video) format, also connect the VCR's S-VHS OUT connector to the
TV's S-VIDEOINPUT 1 or 2 connector (the same one to which you
connected the normal audio and video). When you select channel 91 or
92, the TV will automatically select S-VHS video if it is available.
* Optional accessory available from your dealer or electronics
supply store. Mail order form is on page 75.

If your cable box has its own remote to change channels,
you will probably be able to program the TV's remote to
control both the TV and the cable box.
The TV's remote is designed to control several brands of
cable boxes. To program the remote, just press CABLE,then
in, then the two-digit code number for your brand of cable
box. Refer to the chart below to find the code number for
3,our cable box. Press the OFF/ONbutton next to confirm
operation. You may need to try each of the code numbers
listed until you find the one that works.Press
CABLE
4 PressOFFION
to test.
3 Presstwo number
buttons
(See list below.)
2 PressID
i;
Anvision 07, 08
Cablestar 07, 08
Eagle 08
Eastern International 02
General Instrument 04, 05, 15, 23, 24, 25, 30, 36
Hamlin 12, 13, 34
Hitachi 37, 43
Jerrold 04, 05, 15, 23, 24, 25, 30, 36
MACOM 37, 43
Magnavox 07, 08, 19, 26, 28, 29, 32, 33, 40, 41
NSC 09
Oak 01, 16, 38
Oak Sigma 16
Panasonic 27, 39
Philips 07, 08, 19, 26, 28, 29, 32, 33, 40, 41
Pioneer 18, 20
Randtek 07, 08
RCA 27
Regal 12, 13
Regency 02
Scientific Atlantic 03, 22
Sylvania 11
Teknika 06
Texscan 10, 11
Tocom 17, 21
Unika 31
Views t,t,_ 07, 08, 19, 26, 28, 29, 32, 33, 40, 41
Zenith 14, 42
Note: Refer to the information sheet packed with your remote control
for the latest list of brand names and code numbers. Because this list is
constantly growing, the information sheet packed with your remote
control may be a later version of this list and contain additional brands
and/or code numbers.
64
1
2
3
After the TV's remote is programmed, you will be able to
turn on the cable box by pressing CABLEthen OFF/ON.YOU
can change channels on the cable box by pressing the
CHANNELbuttons whenever the remote is in the "cable
mode". To put the remote in the "cable mode", press the
CABLEbutton. Press the rv button to put the remote back
into the "TV mode" so the remote buttons will control the
TV again.
ProgrammingRemoteTo ControlCable Box
with master remotecontrolonly
Refer to the chart at the left to find the code number that
corresponds to the brand name of your cable box. Keep
this number in mind. If more than one number is listed,
you may need to try each one separately until you find the
one that works.
Press CABLEbutton on remote.
Press ID button on remote.
Press two number buttons (first one, then the other) to enter
the code number for your brand of cable box.
Note: You must press the two number buttons within three seconds
of pressing the to button.
Point the remote at the cable box and press the OFF/ONbutton
to test the code number.
•If the right number was entered, the cable box should turn
on. Pressing the CHANNELbuttons should then also change
channels on the cable box.
•If the cable box does not react to the remote (or if the remote
turns on the cable box but does not change channels), repeat
steps 1 through 5 with another code number.
Operating Notes: After the remote control is programmed, it will
turn on the cable box whenever you press CAaLEand then OFF/ON.
To turn off the cable box, press CABLE,then OFF/ON.
To change channels on the cable box, press CABLEthen CHANNEL
up or down.
After you program the remote control, you can use the VCR/cable
Setup function on the SETUP menu to automatically turn on the cable
box and tune the TV to the correct channel for the cable box when
you press the CABLEbutton. Details are on page 43.
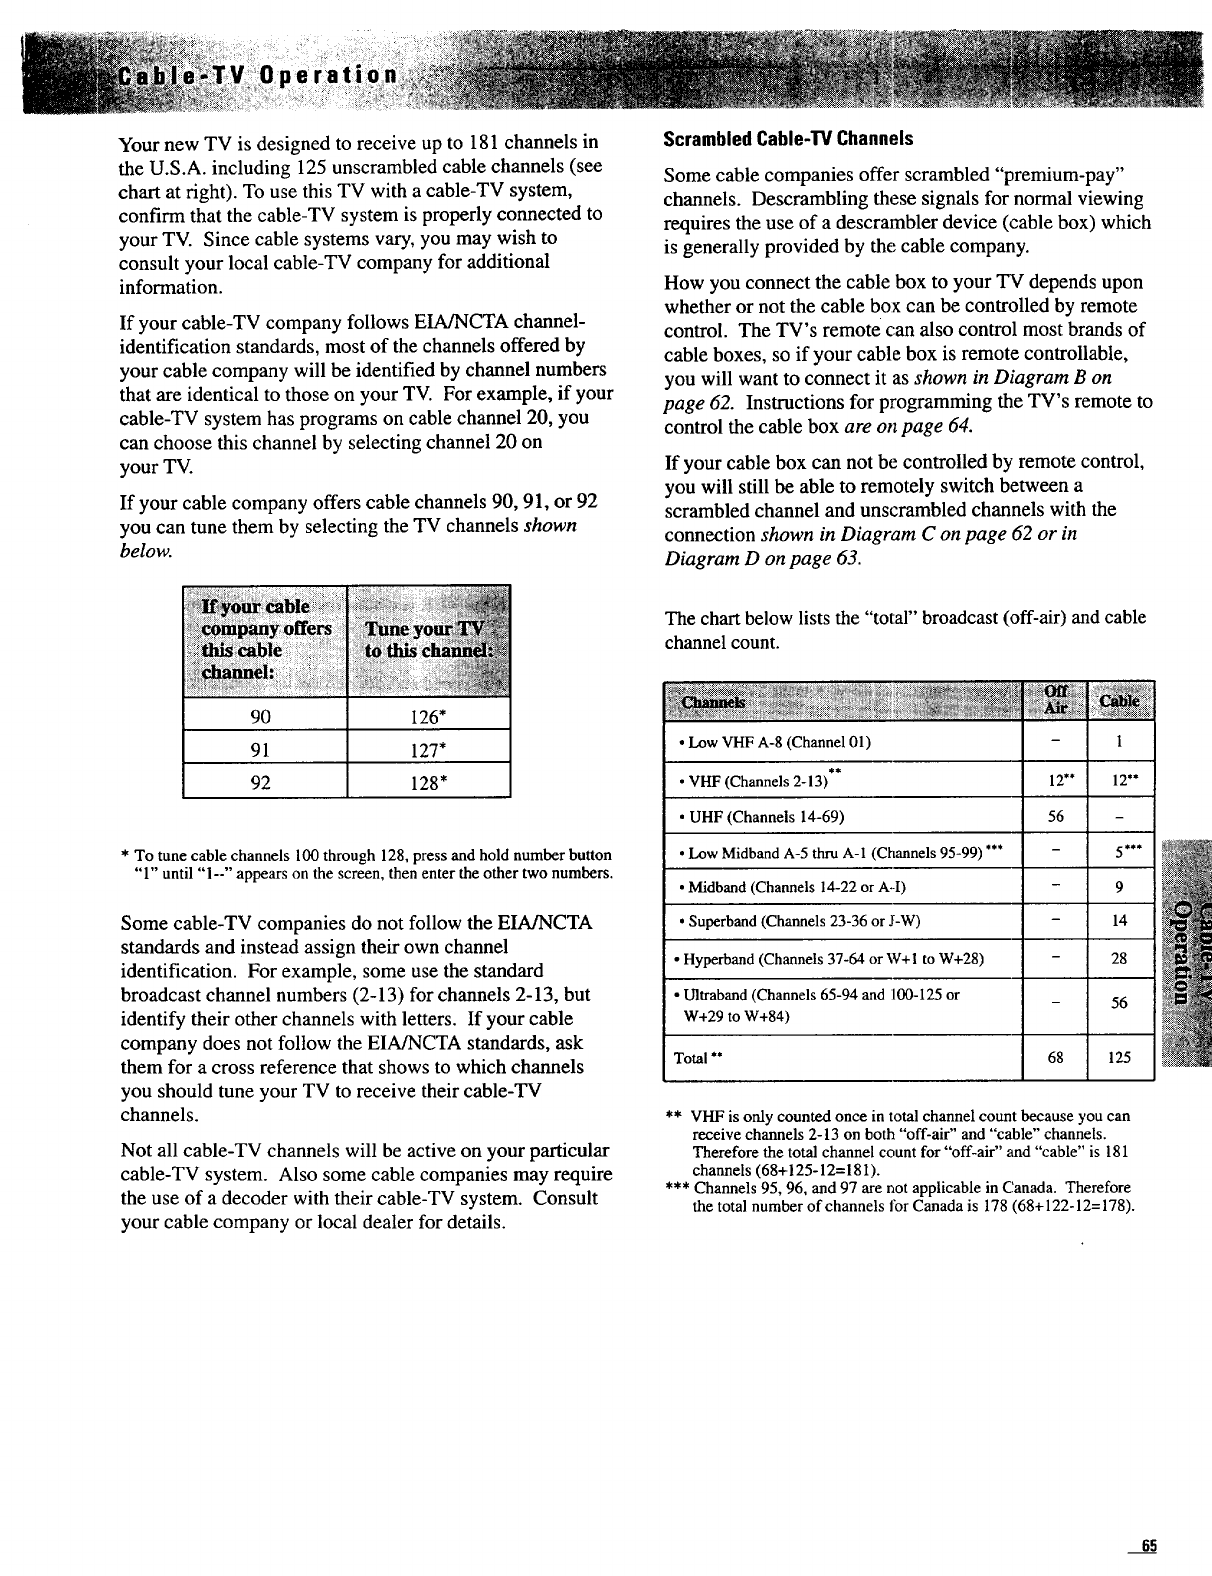
Your new TV is designed to receive up to 181 channels in
the U.S.A. including 125 unscrambled cable channels (see
chart at right). To use this TV with a cable-TV system,
confirm that the cable-TV system is properly connected to
your TV. Since cable systems vary, you may wish to
consult your local cable-TV company for additional
information.
If your cable-TV company follows EIA/NCTA channel-
identification standards, most of the channels offered by
your cable company will be identified by channel numbers
that are identical to those on your TV. For example, if your
cable-TV system has programs on cable channel 20, you
can choose this channel by selecting channel 20 on
your TV.
If your cable company offers cable channels 90, 91, or 92
you can tune them by selecting the TV channels shown
below.
ScrambledCable-TV Channels
Some cable companies offer scrambled "premium-pay"
channels. Descrambling these signals for normal viewing
requires the use of a descrambler device (cable box) which
is generally provided by the cable company.
How you connect the cable box to your TV depends upon
whether or not the cable box can be controlled by remote
control. The TV's remote can also control most brands of
cable boxes, so if your cable box is remote controllable,
you will want to connect it as shown in Diagram B on
page 62. Instructions for programming the TV's remote to
control the cable box are on page 64.
If your cable box can not be controlled by remote control,
you will still be able to remotely switch between a
scrambled channel and unscrambled channels with the
connection shown in Diagram C on page 62 or in
Diagram D on page 63.
90 126"
91 127"
92 128"
* To tune cable channels 100 through 128, press and hold number button
"1" until "1--" appears on the screen, then enter the other two numbers.
Some cable-TV companies do not follow the EIA/NCTA
standards and instead assign their own channel
identification. For example, some use the standard
broadcast channel numbers (2-13) for channels 2-13, but
identify their other channels with letters. If your cable
company does not follow the EIA/NCTA standards, ask
them for a cross reference that shows to which channels
you should tune your TV to receive their cable-TV
channels.
Not all cable-TV channels will be active on your particular
cable-TV system. Also some cable companies may require
the use of a decoder with their cable-TV system. Consult
your cable company or local dealer for details.
The chart below lists the "total" broadcast (off-air) and cable
channel count.
*Low VHF A-8 (Channel 01) - 1
•VHF (Channels 2-13)** 12"* 12"*
• UHF (Channels 14-69) 56 -
• Low Midband A-5 thru A-1 (Channels 95-99) .... 5"**
• Midband (Channels 14-22 or A-I) - 9
• Superband (Channels 23-36 or J-W) - 14
• Hyperband (Channels 37-64 or W+ 1 to W+28) - 28
• Ultraband (Channels 65-94 and 1100-125 or - 56
W+29 to W+84)
Total ** 68 125
** VHF is only counted once in total channel count because you can
receive channels 2-13 on both "off-air" and "cable" channels.
Therefore the total channel count for "off-air" and "cable" is 181
channels (68+ 125-12= 181 ).
*** Channels 95, 96, and 97 are not applicable in Canada. Therefore
the total number of channels lbr Canada is 178 (68+122-12=178).
65
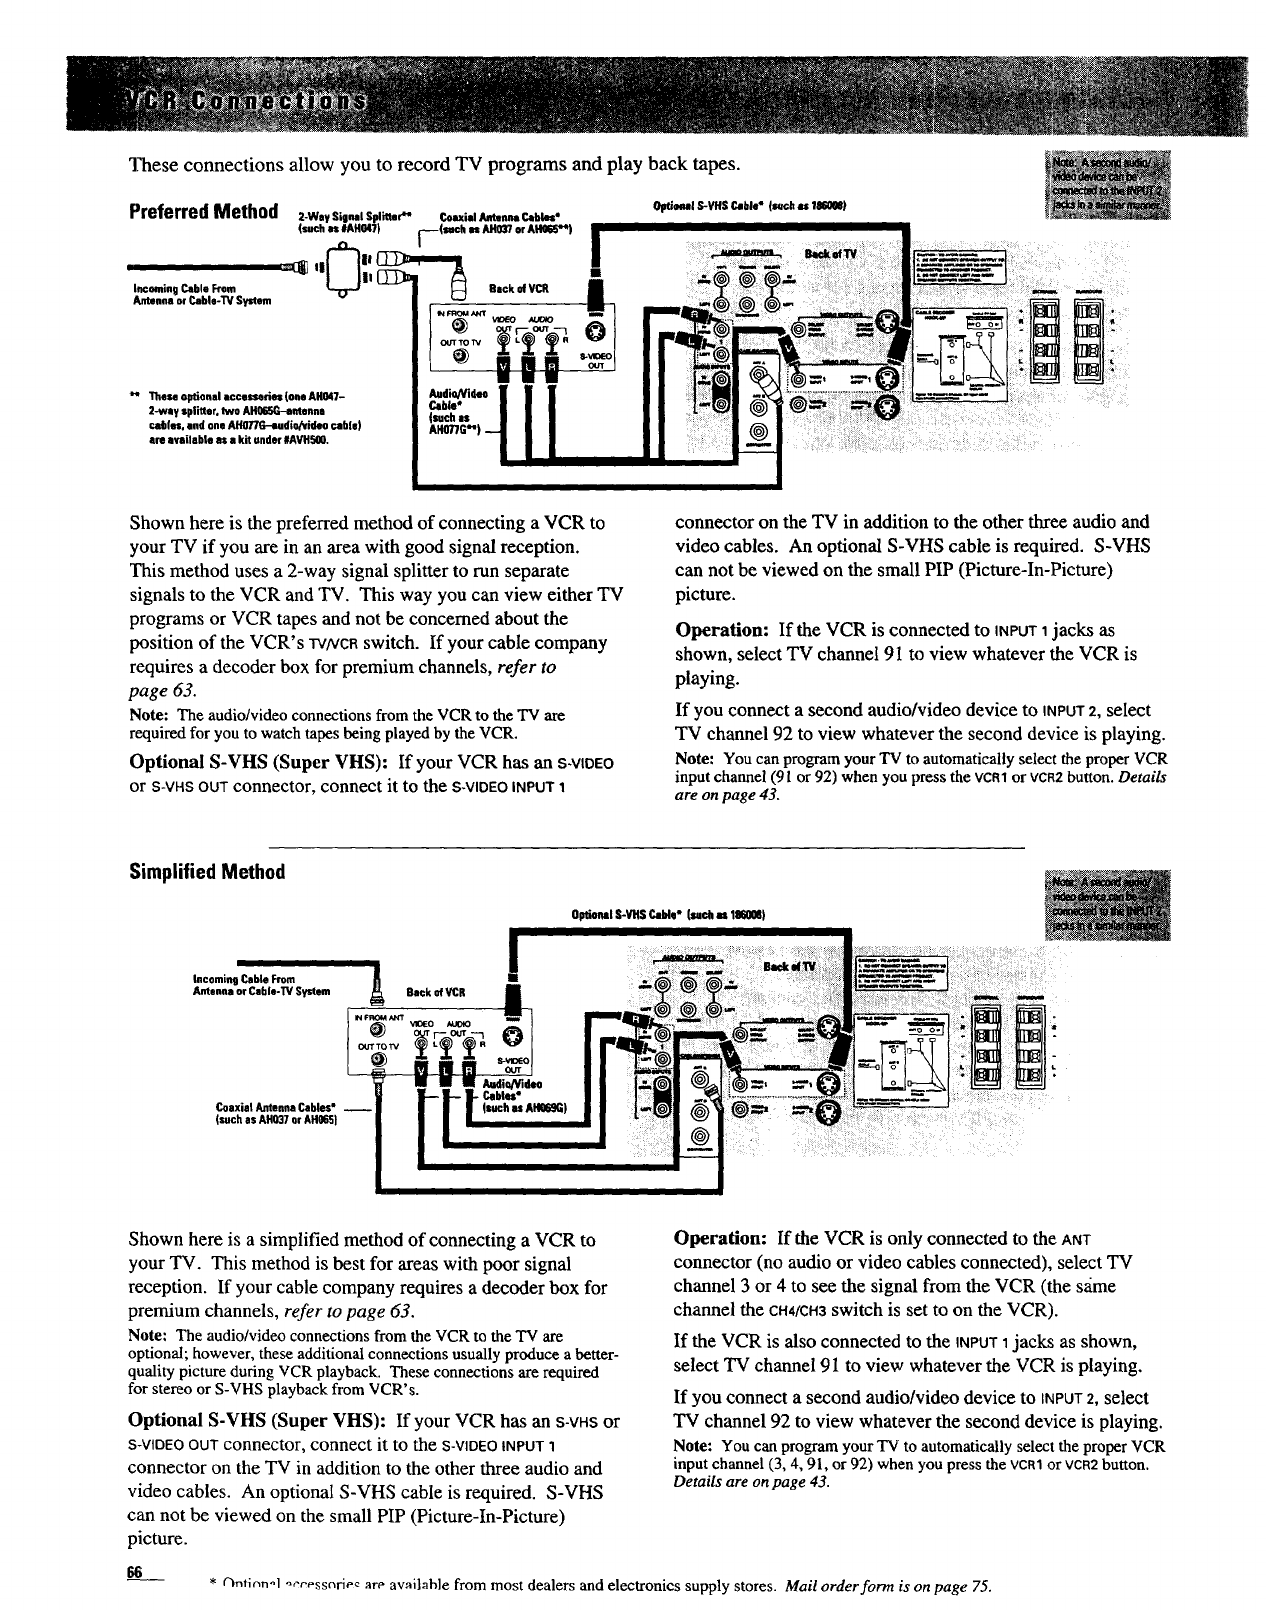
These connections allow you to record TV programs and play back tapes.
Shown here is the preferred method of connecting a VCR to
your TV if you are in an area with good signal reception.
This method uses a 2-way signal splitter to run separate
signals to the VCR and TV. This way you can view either TV
programs or VCR tapes and not be concerned about the
position of the VCR's rv/vcR switch. If your cable company
requires a decoder box for premium channels, refer to
page 63.
Note: The audio/video connections from the VCR to the TV are
required for you to watch tapes being played by the VCR.
Optional S-VHS (Super VHS): If your VCR has an S-VIDEO
or S-VHSOUTconnector, connect it to the S-VIBEOiNPUT1
connector on the TV in addition to the other three audio and
video cables. An optional S-VHS cable is required. S-VHS
can not be viewed on the small PIP (Picture-In-Picture)
picture.
Operation: If the VCR is connected to INPUTIjacks as
shown, select TV channel 91 to view whatever the VCR is
playing.
If you connect a second audio/video device to INPUT2, select
TV channel 92 to view whatever the second device is playing.
Note: You canprogramyour"IV toautomaticallyselectthe properVCR
input channel(91or92)whenyou pressthevc81 orvca2 button.Details
are onpage43.
Simplified Method
Optle_l S-VHS Call,," Inch u 1860H)
Incoming Cable From
Antenna or Cablo-TY Syntom
Coaxial Antenna Cables*
Isech as AHO37or AH065}
Back ofVCR
ANT "_O
Shown here is a simplified method of connecting a VCR to
your TV. This method is best for areas with poor signal
reception. If your cable company requires a decoder box for
premium channels, refer to page 63.
Note: The audio/video connections from the VCR to the TV are
optional; however, these additional connections usually produce a better-
quality picture during VCR playback. These connections are required
for stereo or S-VHS playback from VCR's.
Optional S-VHS (Super VHS): If your VCR has an s-v8s or
S-VIDEO OUT connector, connect it to the S-VIDEO INPUT1
connector on the TV in addition to the other three audio and
video cables. An optional S-VHS cable is required. S-VHS
can not be viewed on the small PIP (Picture-In-Picture)
picture.
Operation: ff the VCR is only connected to the ANT
connector (no audio or video cables connected), select TV
channel 3 or 4 to see the signal from the VCR (the s_ime
channel the C841CH3switch is set to on the VCR).
If the VCR is also connected to the INPUTI jacks as shown,
select TV channel 91 to view whatever the VCR is playing.
If you connect a second andio/video device to INPtJr2, select
TV channel 92 to view whatever the second device is playing.
Note: You can program your "IV to automatically select the proper VCR
input channel (3, 4, 91, or 92) when you press the VCR1or VCR2 button.
Details are on page 43.
66 *t)nticm-1 _'t'essnrie¢ are available from most dealers and electronics supply stores. Mail order form is on page 75.
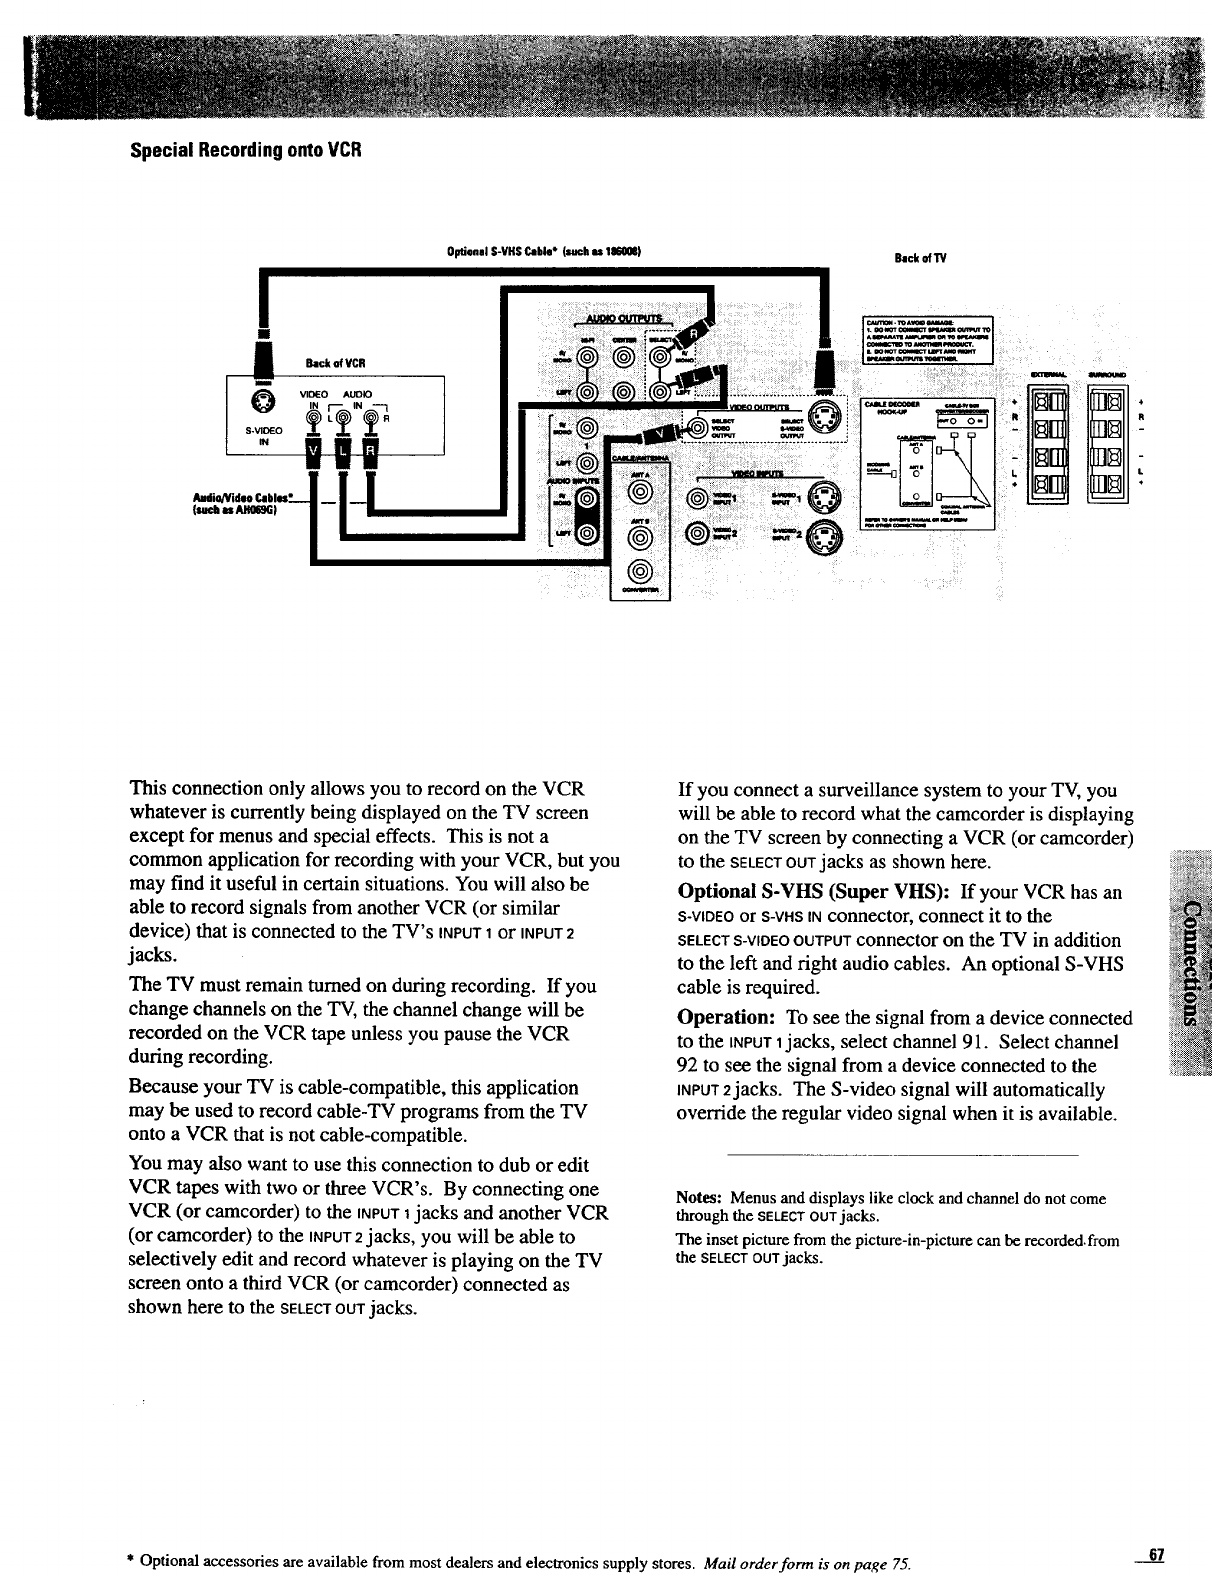
Special RecordingontoVCR
Back of VCR
_o_O AUDIO
Optional S-VHS Cable* (such as 186008) Back orrv
@
m B
R
L
This connection only allows you to record on the VCR
whatever is currently being displayed on the TV screen
except for menus and special effects. This is not a
common application for recording with your VCR, but you
may find it useful in certain situations. You will also be
able to record signals from another VCR (or similar
device) that is connected to the TV's INPUT1or INPUT2
jacks.
The TV must remain turned on during recording. If you
change channels on the TV, the channel change will be
recorded on the VCR tape unless you pause the VCR
during recording.
Because your TV is cable-compatible, this application
may be used to record cable-TV programs from the TV
onto a VCR that is not cable-compatible.
You may also want to use this connection to dub or edit
VCR tapes with two or three VCR's. By connecting one
VCR (or camcorder) to the INPUT1jacks and another VCR
(or camcorder) to the INPUT2jacks, you will be able to
selectively edit and record whatever is playing on the TV
screen onto a third VCR (or camcorder) connected as
shown here to the SELECTOUTjacks.
If you connect a surveillance system to your TV, you
will be able to record what the camcorder is displaying
on the TV screen by connecting a VCR (or camcorder)
to the SELECTOUTjacks as shown here.
Optional S-VI-IS (Super VItS): If your VCR has an
S-VIDEOor S-VHSINconnector, connect it to the
SELECTS-V_DEOOUTPUTconnector on the TV in addition
to the left and right audio cables. An optional S-VHS
cable is required.
Operation: To see the signal from a device connected
to the INPUTljacks, select channel 91. Select channel
92 to see the signal from a device connected to the
INPUT2jacks. The S-video signal will automatically
override the regular video signal when it is available.
Notes: Menus and displays like clock and channel do not come
through the SELECTOUTjacks.
The inset picture from the picture-in-picture can be recorded.from
the SELECTOUTjacks.
* Optional accessories are available from most dealers and electronics supply stores. Mail order form is on page 75. 67
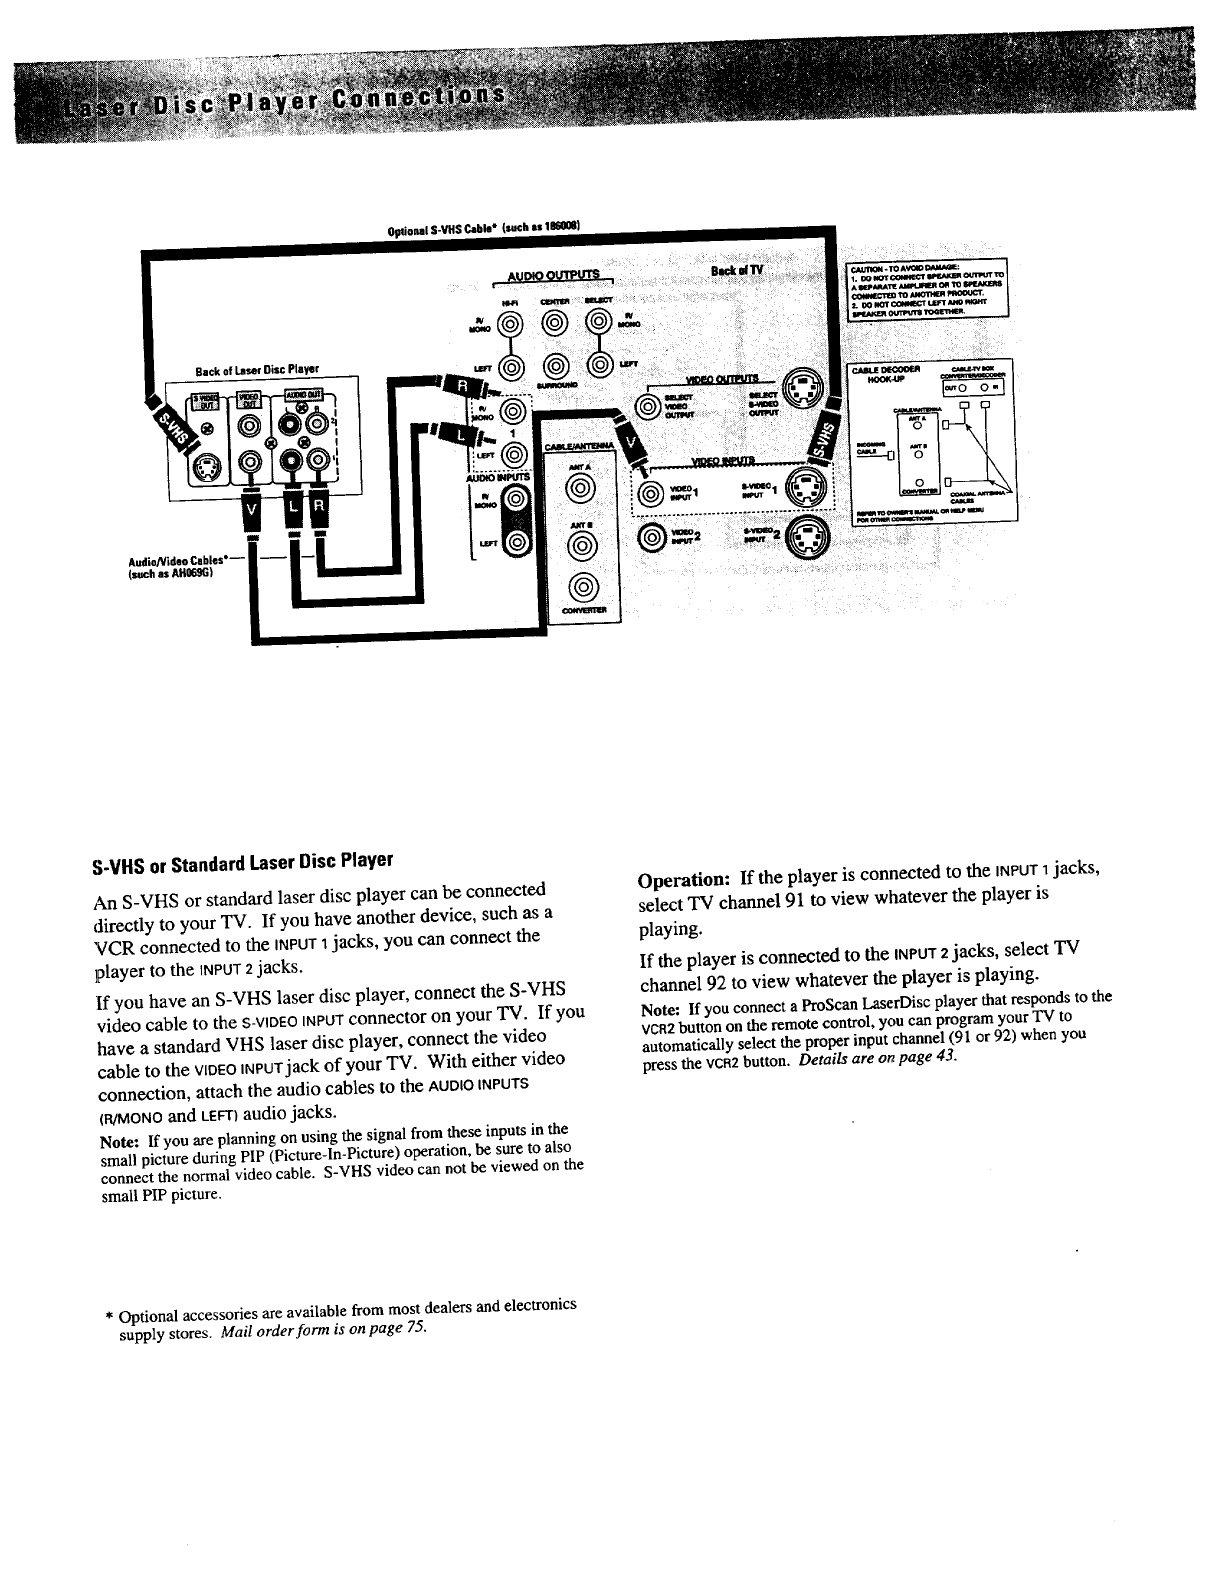
Back of LaserDisc Player
OptionalS-VHS Cable* (such is 1860gl1)
S-VHSor StandardLaserDisc Player
An S-VHS or standard laser disc player can be connected
directly to your TV. If you have another device, such as a
VCR connected to the INPUT1jacks, you can connect the
player to the INPU'r2jacks.
If you have an S-VHS laser disc player, connect the S-VHS
video cable to the S-V_DEOINPUTconnector on your TV. If you
have a standard VHS laser disc player, connect the video
cable to the Vtt)EOnNPUTjackof your TV. With either video
connection, attach the audio cables to the Auolo INPUTS
(WMONOand LEFT)audio jacks.
Note: If you are planning on using the signal from these inputs in the
small picture during PIP (Picture-ln-Picture) operation, be sure to also
connect the normal video cable. S-VHS video can not be viewed on the
small PIP picture,
Operation: If the player is connected to the iNPUT1jacks,
select TV channel 91 to view whatever the player is
playing.
If the player is connected to the INPUT2 jacks, select TV
channel 92 to view whatever the player is playing.
Note: If you connect a ProScan LaserDisc player that responds to the
vcn2 button on the remote control, you can program your TV to
automaticallyselecttheproper inputchannel(91 or 92)whenyou
press the VCR2 button. Details are on page 43.
* Optional accessories are available from most dealers and electronics
supply stores. Mail order form is on page 75.
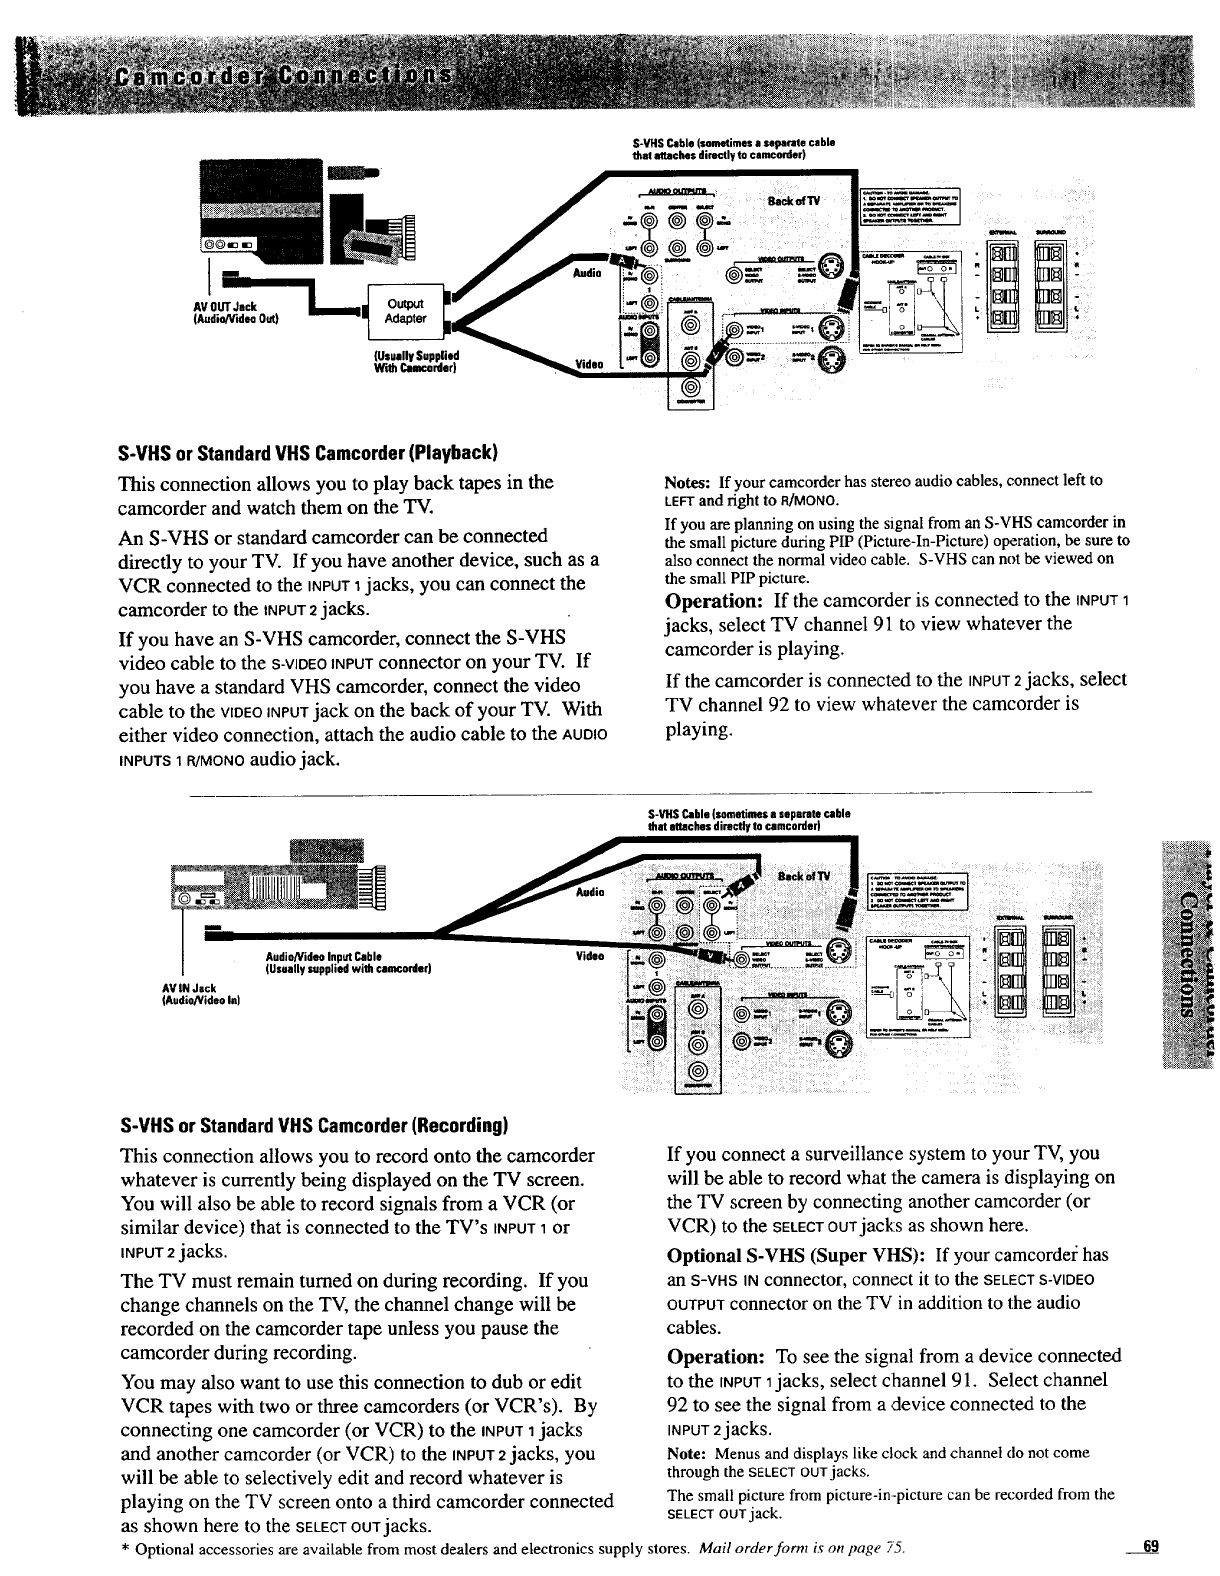
AV OUTJack
(Audio/Video Out)
S-VHS Cable (sometimes a separate cable
that attaches directly to cemcorder)
lilllle
(Usually Supplied
With Camcorder) Video
•_8ackofl"#
!1!
S-VHS orStandardVHS Camcorder(Playback)
This connection allows you to play back tapes in the
camcorder and watch them on the TV.
An S-VHS or standard camcorder can be connected
directly to your TV. If you have another device, such as a
VCR connected to the iNPUT1jacks, you can connect the
camcorder to the iNPUT2jacks.
If you have an S-VHS camcorder, connect the S-VHS
video cable to the S-ViDEO(NPUIconnector on your TV. If
you have a standard VHS camcorder, connect the video
cable to the VIDEOiNPUTjack on the back of your TV. With
e,ither video connection, attach the audio cable to the AOD(O
INPUTS 1 R/MONO audio jack.
Notes: If your camcorder has stereo audio cables, connect left to
LEFTand right to R/MONO.
If you are planning on using the signal from an S-VHS camcorder in
the small picture during PIP (Picture-In-Picture) operation, be sure to
also connect the normal video cable. S-VHS can not be viewed on
the small PIP picture.
Operation: If the camcorder is connected to the INPUT1
jacks, select TV channel 91 to view whatever the
camcorder is playing.
If the camcorder is connected to the INPUT2jacks, select
TV channel 92 to view whatever the camcorder is
playing.
S-VHS Cable (sometimes a separate cable
that attaches directly to camcordur)
AV IN Jack
(Audio/Vidse In)
Audio/Video Input Cable Video
(Usually supplied with camcordur)
m
t I
S-VHS or StandardVHS Camcorder(Recording)
This connection allows you to record onto the camcorder
whatever is currently being displayed on the TV screen.
You will also be able to record signals from a VCR (or
similar device) that is connected to the TV's INPUT1 or
INPUT 2jacks.
The TV must remain turned on during recording. If you
change channels on the TV, the channel change will be
recorded on the camcorder tape unless you pause the
camcorder during recording.
You may also want to use this connection to dub or edit
VCR tapes with two or three camcorders (or VCR's). By
connecting one camcorder (or VCR) to the iNPUT1jacks
and another camcorder (or VCR) to the iNPUT2jacks, you
will be able to selectively edit and record whatever is
playing on the TV screen onto a third camcorder connected
as shown here to the SELECTOUTjacks.
If you connect a surveillance system to your TV, you
will be able to record what the camera is displaying on
the TV screen by connecting another camcorder (or
VCR) to the SEtECTOUTjacks as shown here.
Optional S-VHS (Super VHS): If your camcorde_ has
an S-VHS INconnector, connect it to the SELECTS-VIDEO
OUTPUTconnector on the TV in addition to the audio
cables.
Operation: To see the signal from a device connected
to the INPUT1jacks, select Channel 91. Select channel
92 to see the signal from a device connected to the
INPUT2jacks.
Note: Menus and displays like clock and channel do not come
through the SELECTOUTjacks.
The small picture from picture-in-picture can be recorded from the
SELECTOUTjack.
* Optional accessories are available from most dealers and electronics supply stores. Mail order form is on page 75. 69
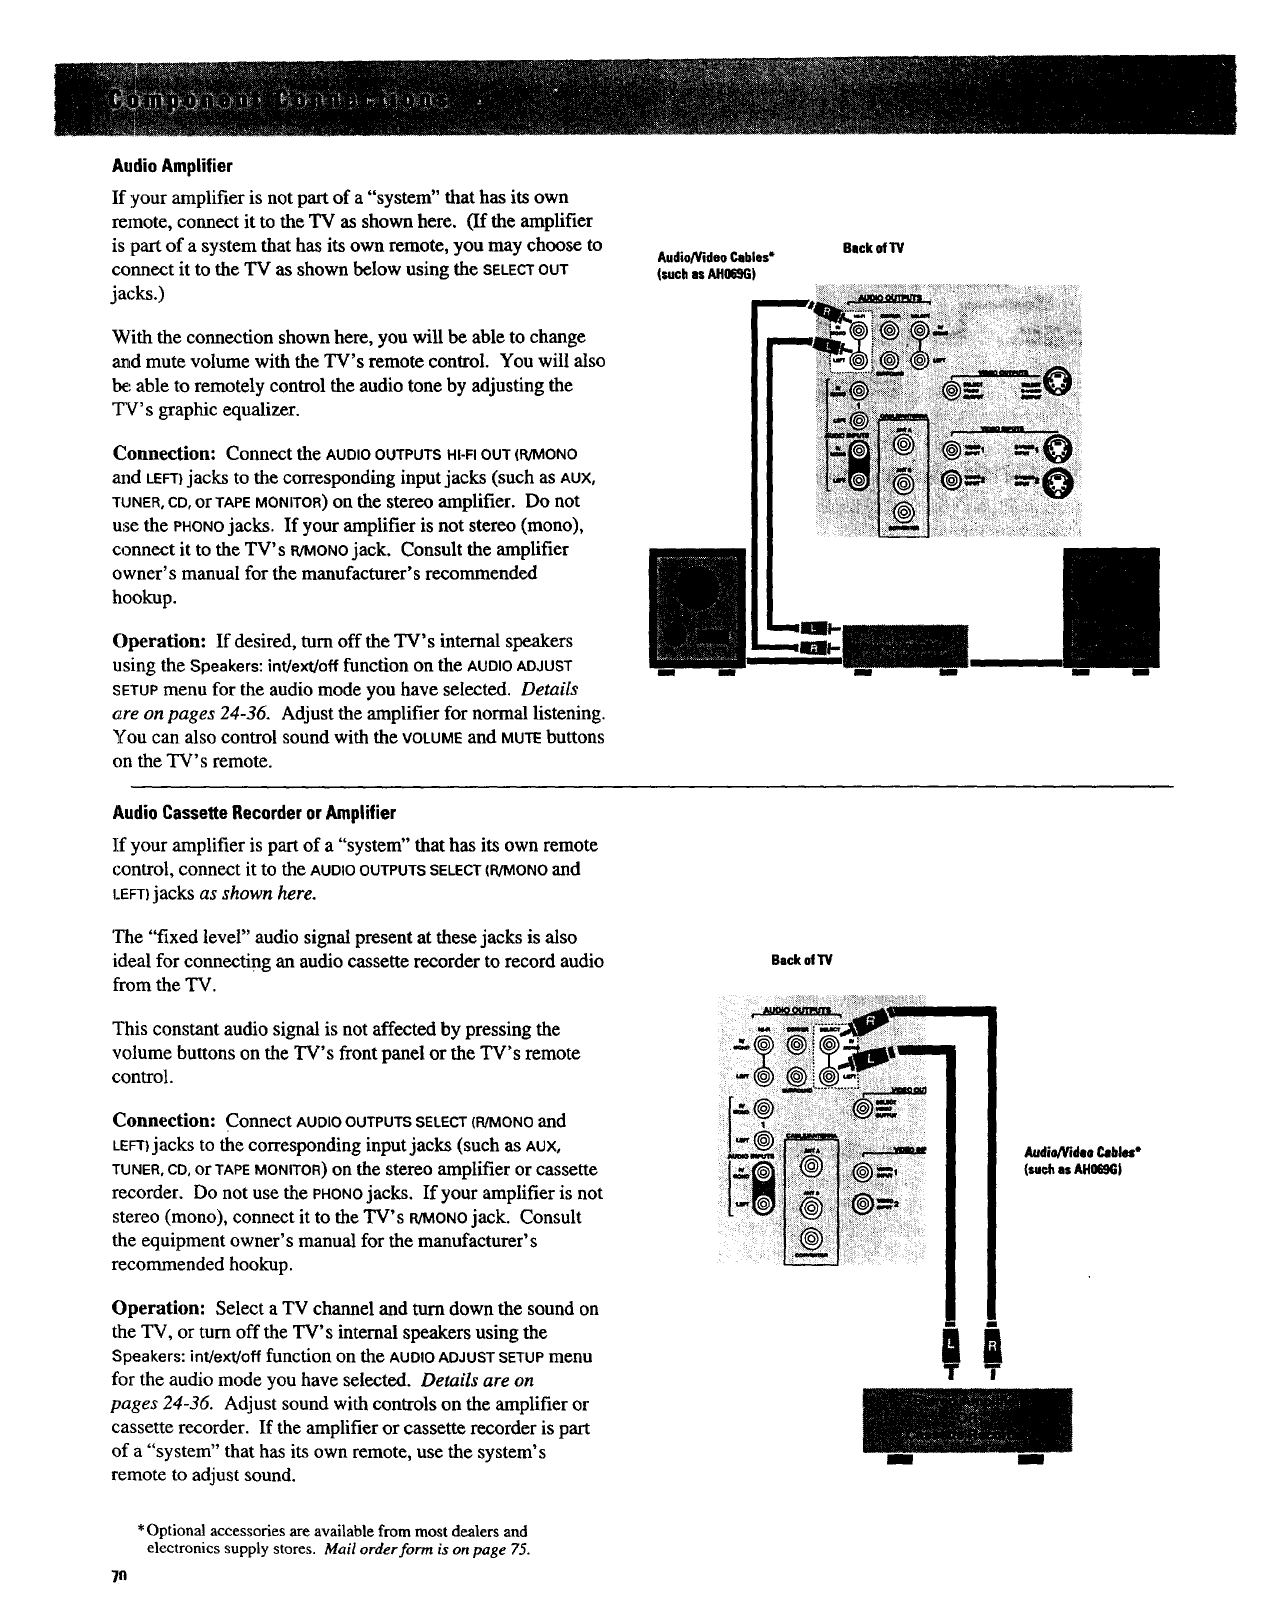
Audio Amplifier
If your amplifier is not part of a "system" that has its own
remote, connect it to the TV as shown here. (If the amplifier
is ;partof a system that has its own remote, you may choose to
connect it to the TV as shown below using the SELECTOUT
jacks.)
With the connection shown here, you will be able to change
and mute volume with the TV's remote control. You will also
Ix: able to remotely control the audio tone by adjusting the
TV's graphic equalizer.
Connection: Connect the AUDIOOUTPUTSHI-FIOUT(R/MeND
and LEFT} jacks to the correspondinginput jacks (suchasAUX,
TUNER, CD, or TAPE MONITOR) on the stereo amplifier. Do not
use the PHONOjacks. If your amplifier is not stereo (mono),
connect it to the TV's aroUNDjack. Consult the amplifier
owner's manual for the manufacturer's recommended
hookup.
Operation: If desired, turn off the TV's internal speakers
using the Speakers:int/ext/offfunction on the AUDIO ADJUST
SETUPmenu for the audio mode you have selected. Details
are on pages 24-36. Adjust the amplifier for normal listening.
You can also control sound with the VOLUMEand MUTEbuttons
on the TV's remote.
Back ofTV
Audio/Video Cables*
(suchasAH0_G)
_I_ I
Audio Cassette Recorder orAmplifier
]if your amplifier is part of a "system" that has its own remote
control, connect it to the AUDIOOUTPUTSSELECT(R/MONOand
LEFT)jacks as shown here.
'/'he "fixed level" audio signal present at these jacks is also
;ideal for connecting an audio cassette recorder to record audio
from the TV.
This constant audio signal is not affected by pressing the
volume buttons on the TV's front panel or the TV's remote
control.
Connection: Connect AUDIO OUTPUTS SELECT (R/MONO and
LEFT)jacksto the corresponding input jacks (such as AUX,
TUNER, CD, or TAPE MONITOR) on the stereo amplifier or cassette
recorder. Do not use the PHONOjacks. If your amplifier is not
stereo (mono), connect it to the TV's R/MONOjack. Consult
the equipment owner's manual for the manufacturer's
recommended hookup.
Operation: Select a TV channel and turn down the sound on
the TV, or turn off the TV's internal speakers using the
Speakers:intJext/offfunction on the AUDIO ADJUST SETUP menu
for the audio mode you have selected. Details are on
pages 24-36. Adjust sound with controls on the amplifier or
cassette recorder. If the amplifier or cassette recorder is part
of a "system" that has its own remote, use the system's
remote to adjust sound.
Back of W
I I
Audio/VideaCables"
(suchasAH069GI
* Optional accessories are available from most dealers and
electronics supply stores. Mail order form is on page 75.
7n
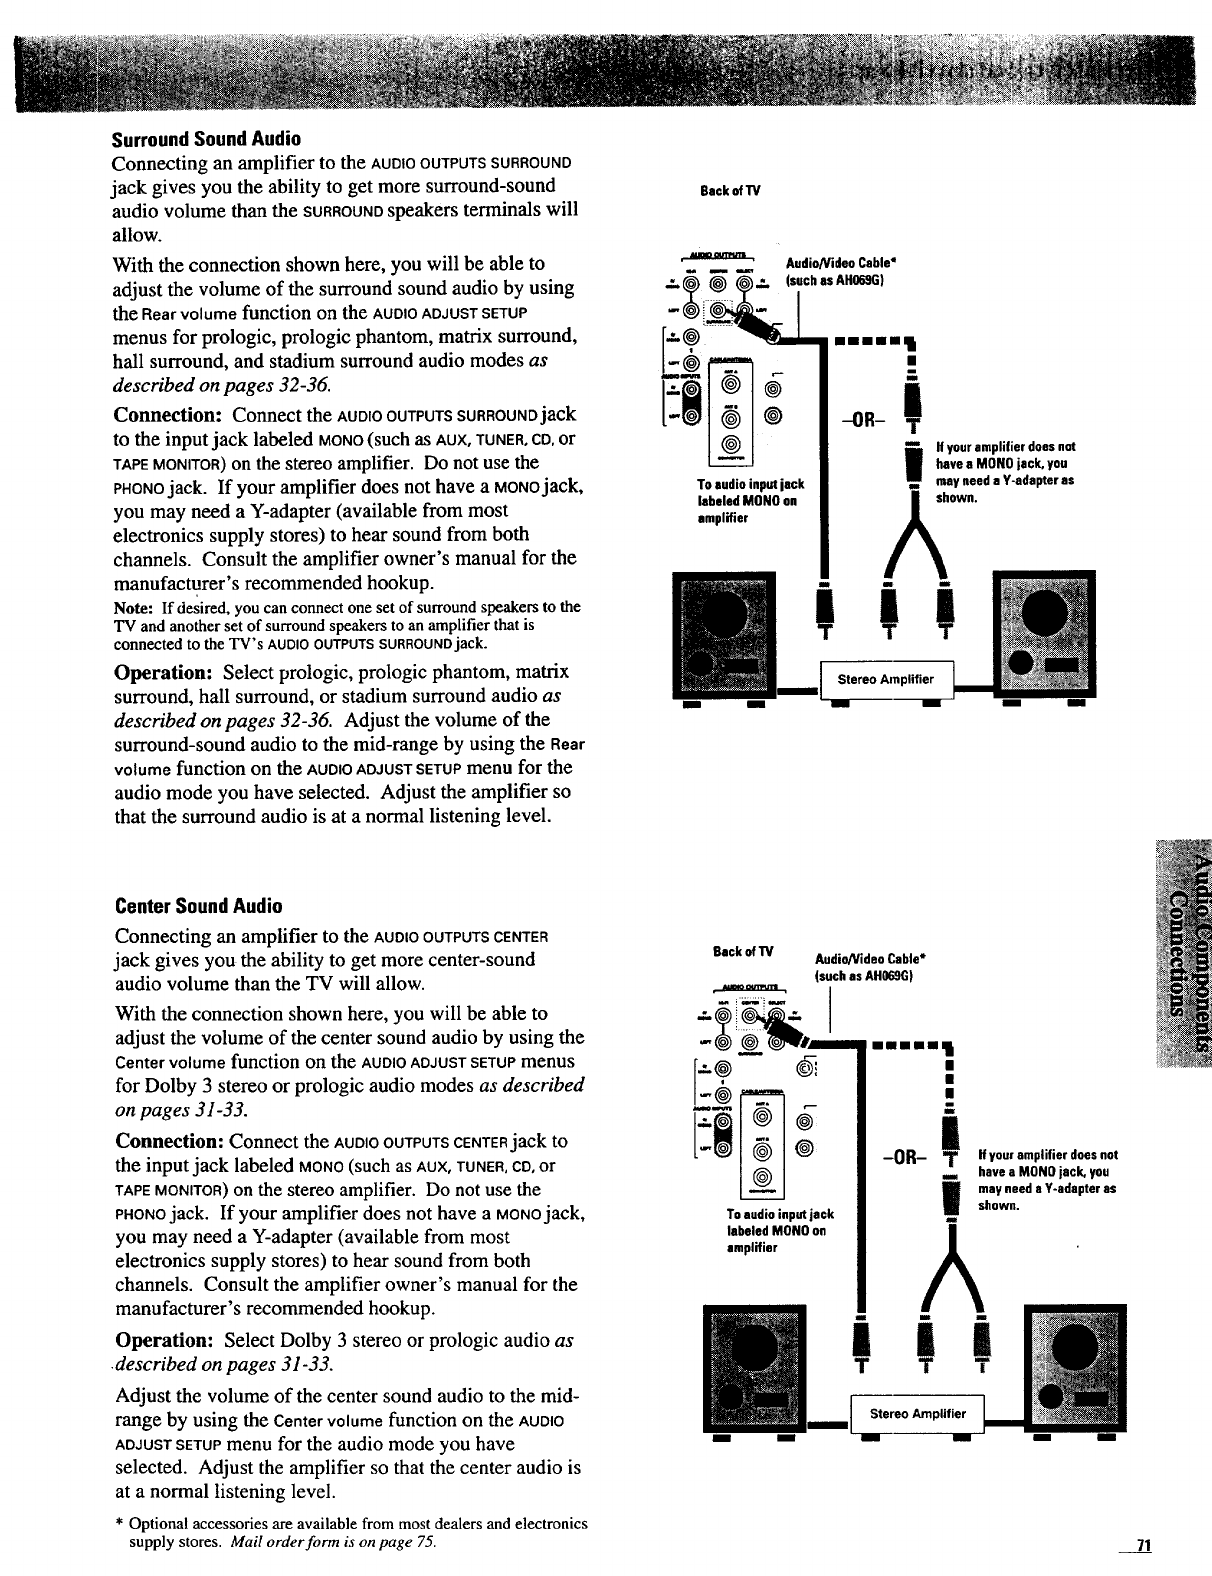
Surround SoundAudio
Connecting an amplifier to the AUDIOOUTPUTSSURROUND
jack gives you the ability to get more surround-sound
audio volume than the SURROUNDspeakers terminals will
allow.
With the connection shown here, you will be able to
adjust the volume of the surround sound audio by using
the Rear volume function on the AUDIO ADJUST SETUP
menus for prologic, prologic phantom, matrix surround,
hall surround, and stadium surround audio modes as
described on pages 32-36.
Connection: Connect the AUDIOOUTPUTSSURROUNDjack
to the input jack labeled MONO(such as AUX,TUNER,CO,or
TAPEMONITOR)on the stereo amplifier. Do not use the
PHONOjack. If your amplifier does not have a MONOjack,
yOU may need a Y-adapter (available from most
electronics supply stores) to hear sound from both
channels. Consult the amplifier owner's manual for the
manufacturer's recommended hookup.
Note: If desired, you can connect one set of surround speakers to the
TV and another set of surround speakers to an amplifier that is
connected to the TV's AUDIO OUTPUTSSURROUNDjack.
Operation: Select prologic, prologic phantom, matrix
surround, hall surround, or stadium surround audio as
described on pages 32-36. Adjust the volume of the
surround-sound audio to the mid-range by using the Rear
volumefunction on the AUDIOADJUSTSETUPmenu for the
audio mode you have selected. Adjust the amplifier so
that the surround audio is at a normal listening level.
Center SoundAudio
Connecting an amplifier to the AUDIOOUTPUTSCENTER
jack gives you the ability to get more center-sound
audio volume than the TV will allow.
With the connection shown here, you will be able to
adjust the volume of the center sound audio by using the
Centervolumefunction on the AUDIO ADJUST SETUP menus
for Dolby 3 stereo or prologic audio modes as described
on pages 31-33.
Connection: Connect the AUDIOOUTPUTS CENTERjack to
the input jack labeled MONO(such as AUX,TUNER,CO,or
TAPE MONITOR)on the stereo amplifier. Do not use the
PHONOjack. If your amplifier does not have a MONOjack,
yOU may need a Y-adapter (available from most
electronics supply stores) to hear sound from both
channels. Consult the amplifier owner's manual for the
manufacturer's recommended hookup.
Operation: Select Dolby 3 stereo or prologic audio as
•described on pages 31-33.
Adjust the volume of the center sound audio to the mid-
range by using the Centervolumefunction on the AUDIO
ADJUSTSETUPmenu for the audio mode you have
selected. Adjust the amplifier so that the center audio is
at a normal listening level.
• Optional accessories are available from most dealers and electronics
supply stores. Mail order form is on page 75.
Back ofTV
If your amplifier does nut
have a MON0 jack, you
To audio input iack may need a Y-adapter as
labeled MONO on sl Iown.
amplifier ^
Stereo Amplifier
Back of 13/ Audio/Video Cable*
(such asAH069G)
==glUm==
have a MON0 jack, you
may need s Y-adapter as
i ii
T T T
Stereo Amplifier
-IN--------------roll
71
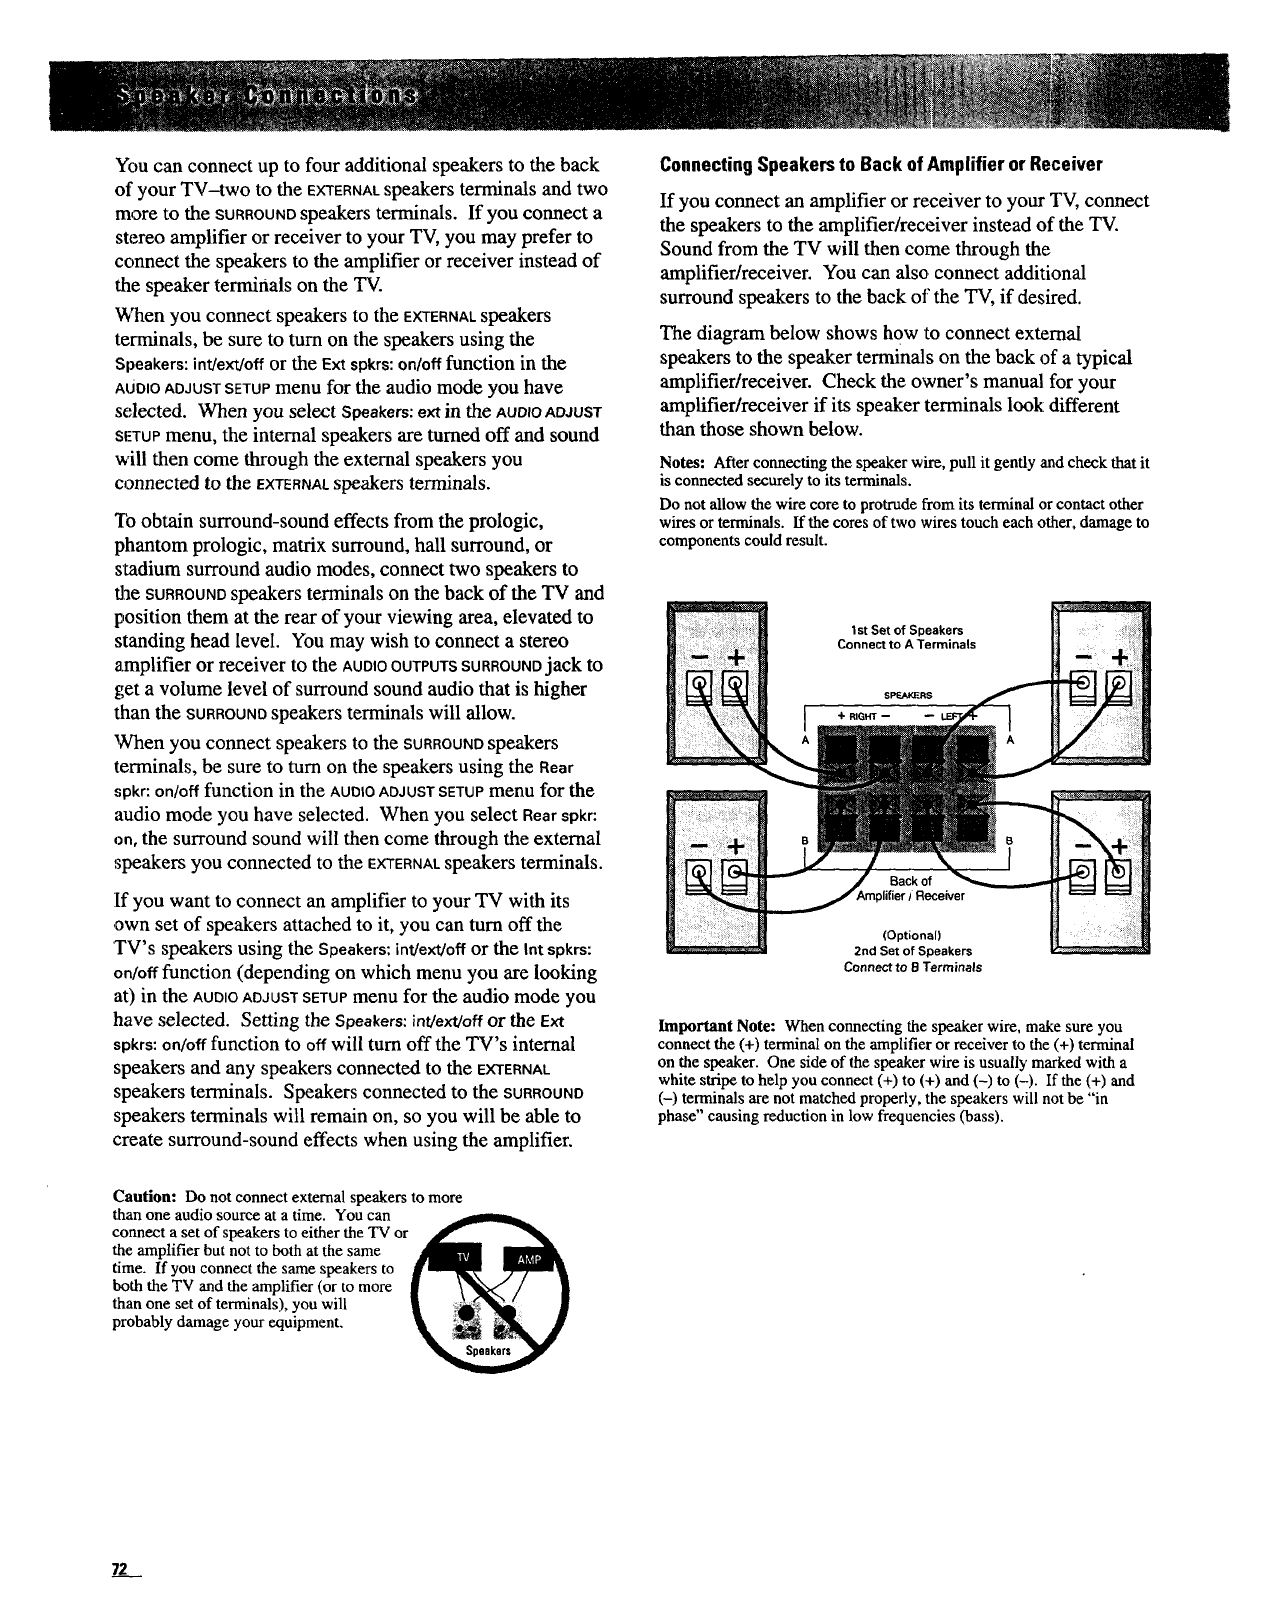
You can connect up to four additional speakers to the back
of your TV-two to the EXTERNALspeakers terminals and two
more to the SURROUNDspeakers terminals. If you connect a
stereo amplifier or receiver to your TV, you may prefer to
connect the speakers to the amplifier or receiver instead of
the speaker terminals on the TV.
Vvqaenyou connect speakers to the EXTERNALspeakers
terminals, be sure to turn on the speakers using the
Speakers: int/ext/off or the Ext spkrs: on/off function in the
AUDIOADJUSTSETUPmenu for the audio mode you have
selected. When you select Speakers: ext in the AUDIOADJUST
SETUPmenu, the internal speakers are turned off and sound
will then come through the external speakers you
connected to the EXTERNALspeakers terminals.
"[bobtain surround-sound effects from the prologic,
phantom prologic, matrix surround, hall surround, or
stadium surround audio modes, connect two speakers to
the SURROUNDSpeakers terminals on the back of the TV and
position them at the rear of your viewing area, elevated to
standing head level. You may wish to connect a stereo
amplifier or receiver to the AUDIOOUTPUTSSURROUNDjack to
get a volume level of surround sound audio that is higher
than the SURROUNOspeakers terminals will allow.
When you connect speakers to the SURROUNDspeakers
terminals, be sure to turn on the speakers using the Rear
spkr:on/offfunction in the AUD)OADJUST SETUP menu for the
audio mode you have selected. When you select Rearspkr:
on, the surround sound will then come through the external
speakers you connected to the EXTERNALspeakers terminals.
If you want to connect an amplifier to your TV with its
,own set of speakers attached to it, you can turn off the
TV's speakers using the Speakers:int/ext/offor the Intspkrs:
on/off function (depending on which menu you are looking
at) in the AUD=OADJUSTSETUPmenu for the audio mode you
have selected. Setting the Speakers:int/ext/offor the Ext
spkrs:on/off function to off will turn off the TV's internal
speakers and any speakers connected to the EXTERNAL
speakers terminals. Speakers connected to the SURROUND
speakers terminals will remain on, so you will be able to
create surround-sound effects when using the amplifier.
ConnectingSpeakersto Back of Amplifier or Receiver
If you connect an amplifier or receiver to your TV, connect
the speakers to the amplifier/receiver instead of the TV.
Sound from the TV will then come through the
amplifier/receiver. You can also connect additional
surround speakers to the back of the TV, if desired.
The diagram below shows how to connect external
speakers to the speaker terminals on the back of a typical
amplifier/receiver. Check the owner's manual for your
amplifier/receiver if its speaker terminals look different
than those shown below.
Notes: After connecting the speaker wire, pull it gently and check that it
is connected securely to its terminals.
Do not allow the wire core to protrude from its terminal or contact other
wires or terminals. If the cores of two wires touch each other, damage to
components could result.
1st Set of Speakers
Connect to A Terminals
Receiver
(Optional)
2nd Set of Speakers
Connect to B Terminals
Important Note: When connecting the speaker wire, make sure you
connect the (+) terminal on the amplifier or receiver to the (+) terminal
on the speaker. One side of the speaker wire is usually marked with a
white stripe to help you connect (+) to (+) and (-) to (-). If the (+) and
(-) terminals are not matched properly, the speakers will not be "in
phase" causing reduction in low frequencies (bass).
Caution: Do not connect external speakers to more
than one audio source at a time. You can
connect a set of speakers to either the TV or
the amplifier but not to both at the same
time. If you connect the same speakers to
both the TV and the amplifier (or to more
than one set of terminals), you will
probably damage your equipment.
72
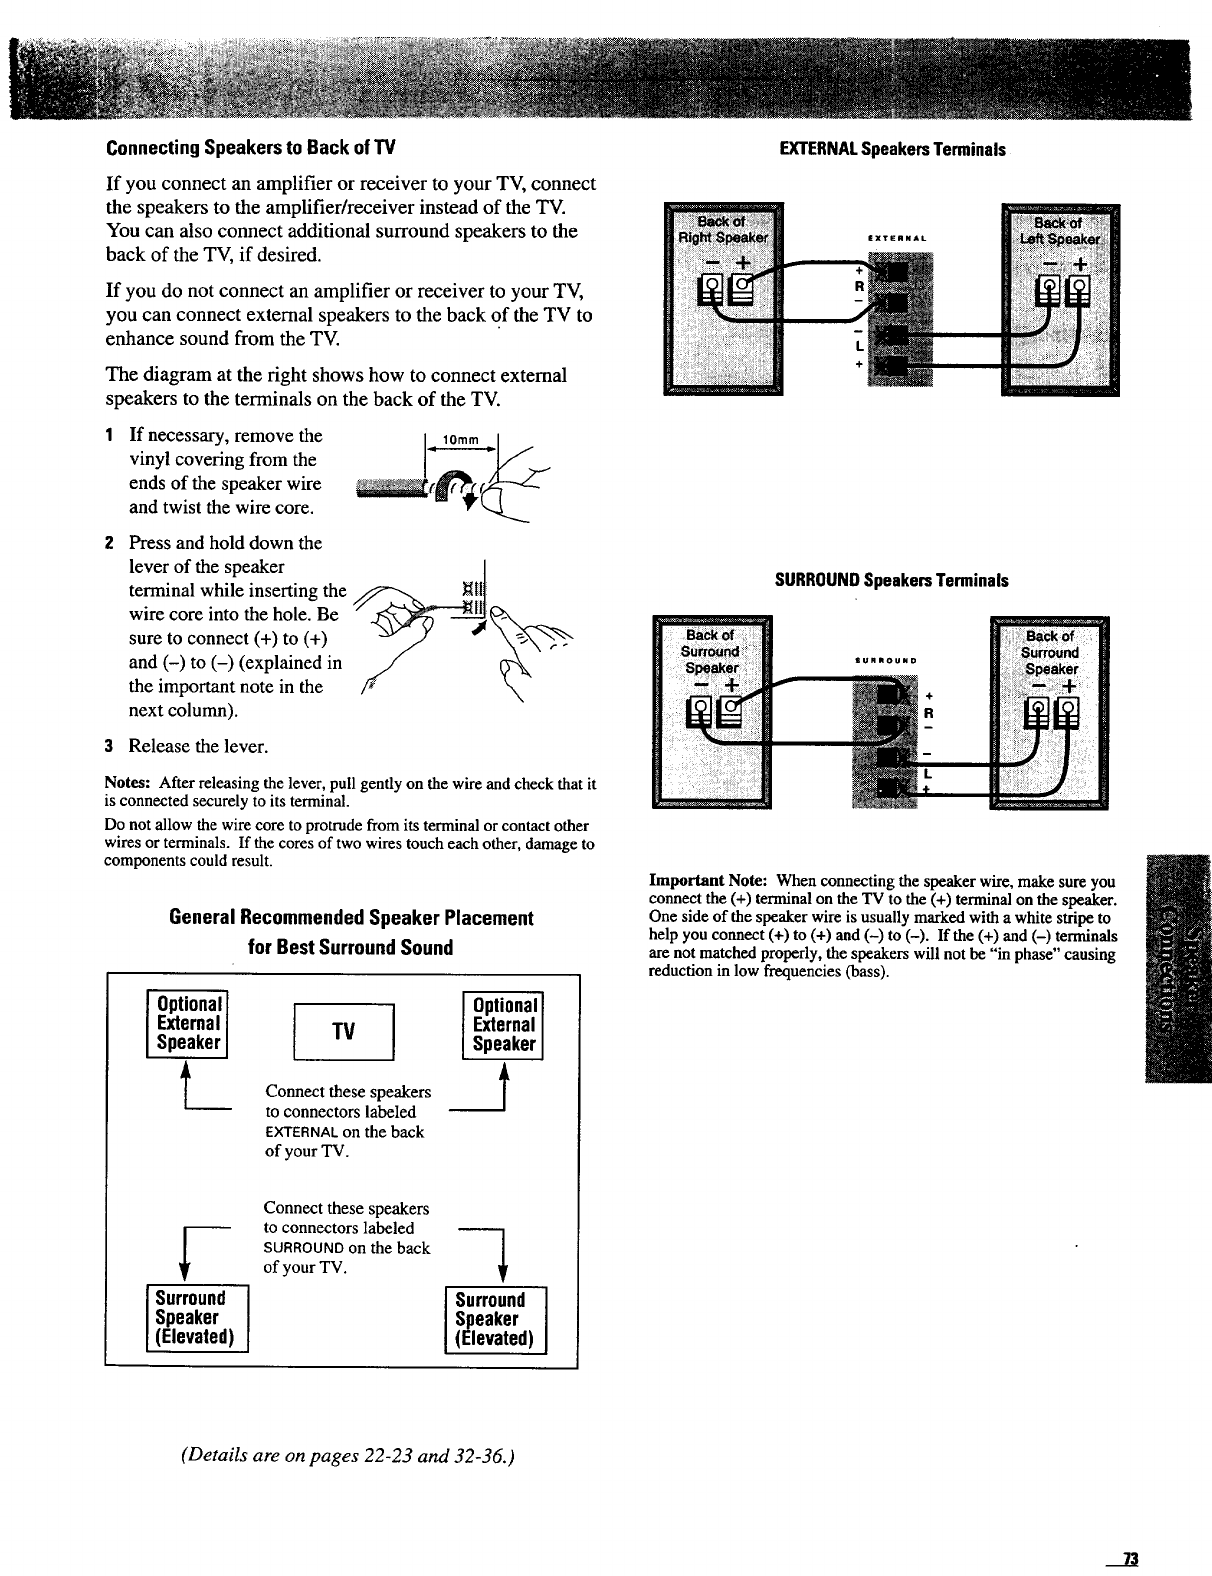
ConnectingSpeakersto Back ofTV
If you connect an amplifier or receiver to your TV, connect
the speakers to the amplifier/receiver instead of the TV.
You can also connect additional surround speakers to the
back of the TV, if desired.
If you do not connect an amplifier or receiver to your TV,
you can connect external speakers to the back of the TV to
enhance sound from the TV.
The diagram at the right shows how to connect external
speakers to the terminals on the back of the TV.
If necessary, remove the
vinyl covering from the
ends of the speaker wire
and twist the wire core.
Press and hold down the
lever of the speaker _
terminal while inserting the _ll
wire core into the hole. Be
sure to connect (+) to (+)
and (-) to (-) (explained in
the important note in the
next column).
3Release the lever.
Notes: After releasing the lever, pull gently on the wire and check that it
is connected securely to its terminal.
Do not allow the wire core to protrude from its terminal or contact other
wires or terminals. If the cores of two wires touch each other, damage to
components could result.
General RecommendedSpeaker Placement
for Best SurroundSound
Iptionall
External
Speaker
t_ TV
Connect these speakers
to connectors labeled
EXTERNALon the back
of your TV.
Optional
External
Speaker
_I
Surround
Speaker
(Elevated)
Connect these speakers
to connectors labeled
SURROUNDon the back
of your TV. I'rr°"'I
Speaker
(Elevated)
EXTERNALSpeakersTerminals
SURROUNDSpeakersTerminals
Important Note: When connecting the speaker wire, make sure you
connect the (+) terminal on the TV to the (+) terminal on the speaker.
One side of the speaker wire is usually marked with a white stripe to
help you connect (+) to (+) and (-) to (-). If the (+) and (-) terminals
are not matched properly, the speakers will not be "in phase" causing
reduction in low frequencies (bass).
(Details are on pages 22-23 and 32-36.)
__1!
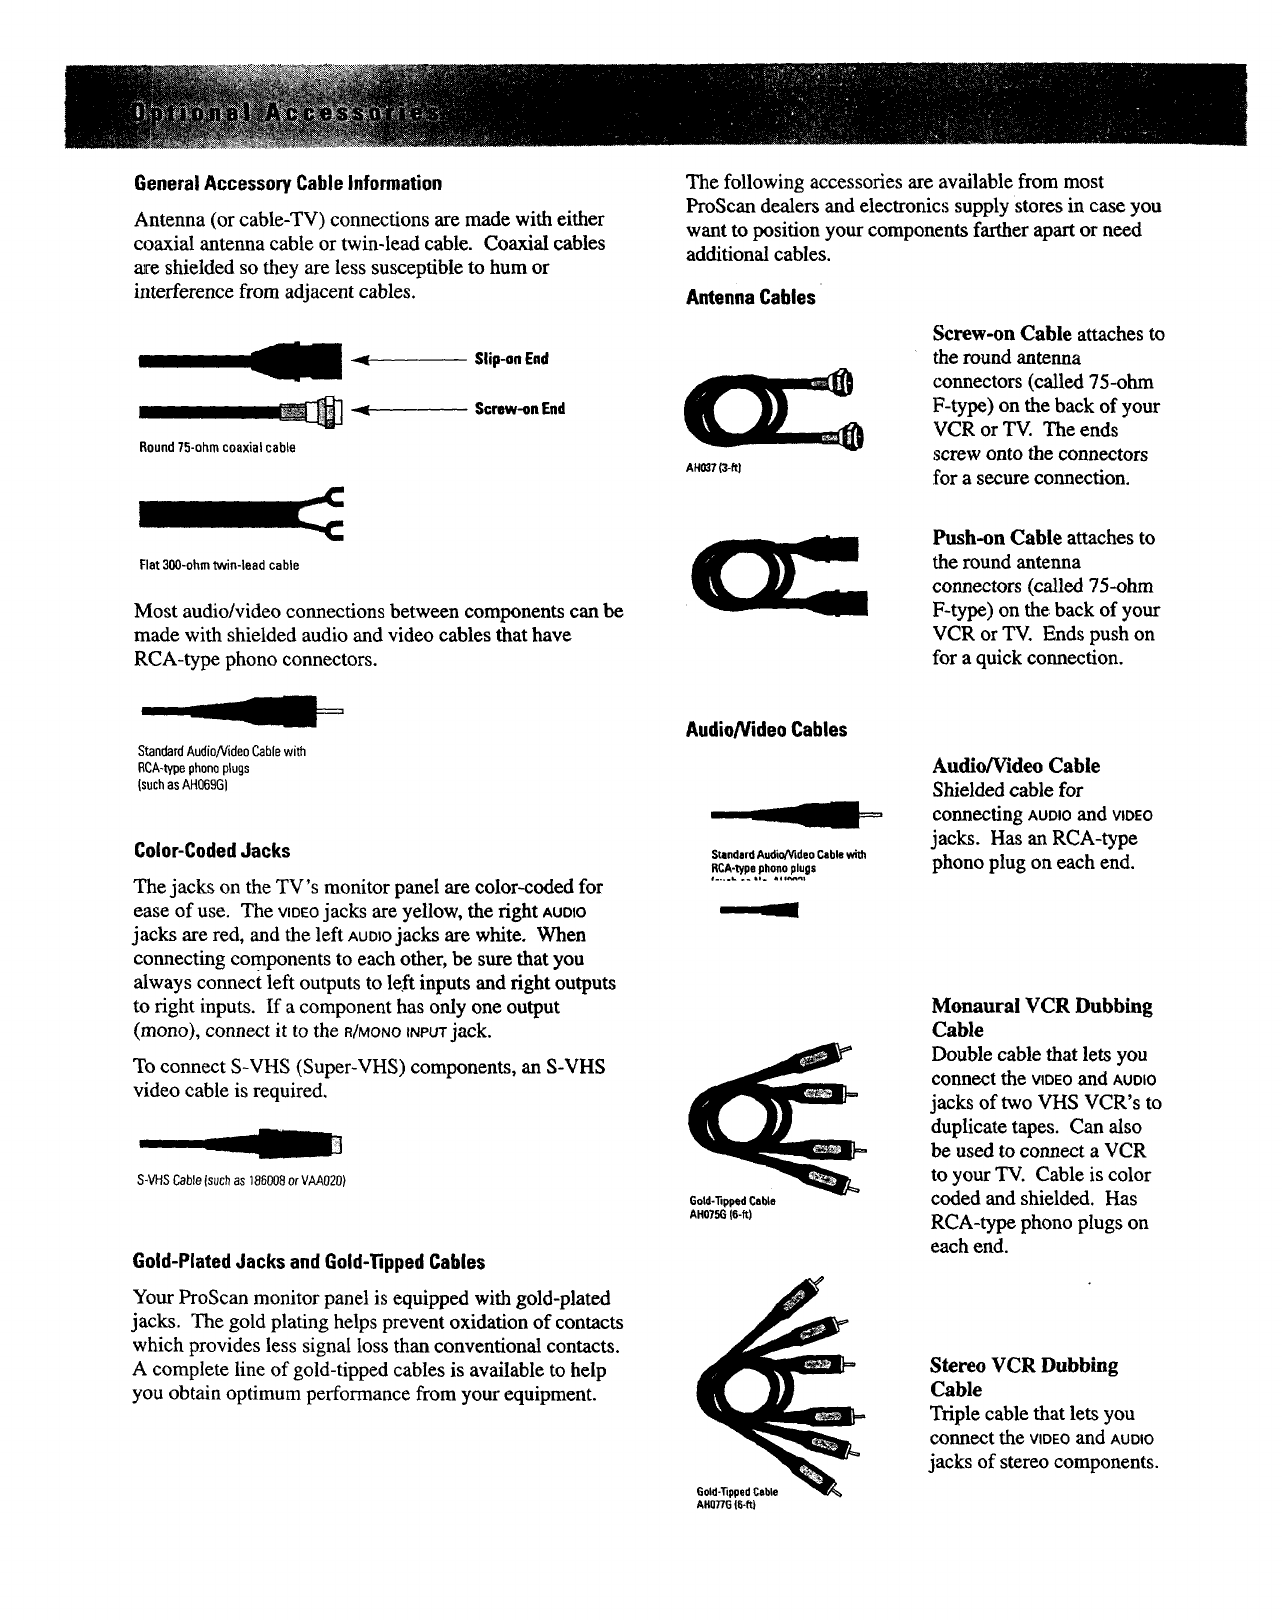
General AccessoryCable Information
Antenna (or cable-TV) connections are made with either
coaxial antenna cable or twin-lead cable. Coaxial cables
_ureshielded so they are less susceptible to hum or
interference from adjacent cables.
Slip-on End
_Screw-on End
Round75-ohmcoaxialcable
Flat 300-ohmtwin-lead cable
Most audio/video connectionsbetween componentscan be
made with shielded audio and video cables that have
RCA-type phono connectors.
StandardAudio/Video(;ablewith
RCA-typephon0plugs
(suchas AH06961
Color-CodedJacks
The jacks on the TV's monitor panel are color-coded for
ease of use. The VIDEOjacks are yellow, the right AUDIO
jacks are red, andthe left AUDIOjacks are white. When
connectingcomPonentsto each other,be surethat you
always connect left outputs to left inputs and right outputs
to right inputs. If a component has only one output
(mono), connect it to the R/MONOINPUTjack.
To connect S-VHS (Super-VHS) components, an S-VHS
video cable is required.
S-VHSCable(suchas 186008orVM020)
Gold-PlatedJacks andGold-'lippedCables
Your ProScan monitor panel is equipped with gold-plated
jacks. The gold plating helps prevent oxidation of contacts
which provides less signal loss than conventional contacts.
A complete line of gold-tipped cables is available to help
you obtain optimum performance from your equipment.
The following accessories are available from most
ProScan dealers and electronics supply stores in case you
want to position your components farther apart or need
additional cables.
AntennaCables
AHOY7(3-ftl
Screw-on Cable attaches to
the round antenna
connectors (called 75-ohm
F-type) on the back of your
VCR or TV. The ends
screw onto the connectors
for a secure connection.
Push-on Cable attaches to
the round antenna
connectors (called 75-ohm
F-type) on the back of your
VCR or TV. Ends push on
for a quick connection.
Audio/VideoCables
Standard Audio/_/ideoCable with
RCA-lype phonoplugs
Audio/Video Cable
Shielded cable for
connecting AOD,Oand Vlt_EO
jacks. Has an RCA-type
phono plug on each end.
_old "tippedCable
AH075G16-ft)
AH077G(_-fz)
Monaural VCR Dubbing
Cable
Double cable that lets you
connect the VIDEOand Auo=o
jacks of two VHS VCR's to
duplicate tapes. Can also
be used to connect a VCR
to your TV. Cable is color
coded and shielded. Has
RCA-type phono plugs on
each end.
Stereo VCR Dubbing
Cable
Triple cable that lets you
connect the VIDEOand AUDIO
jacks of stereo components.
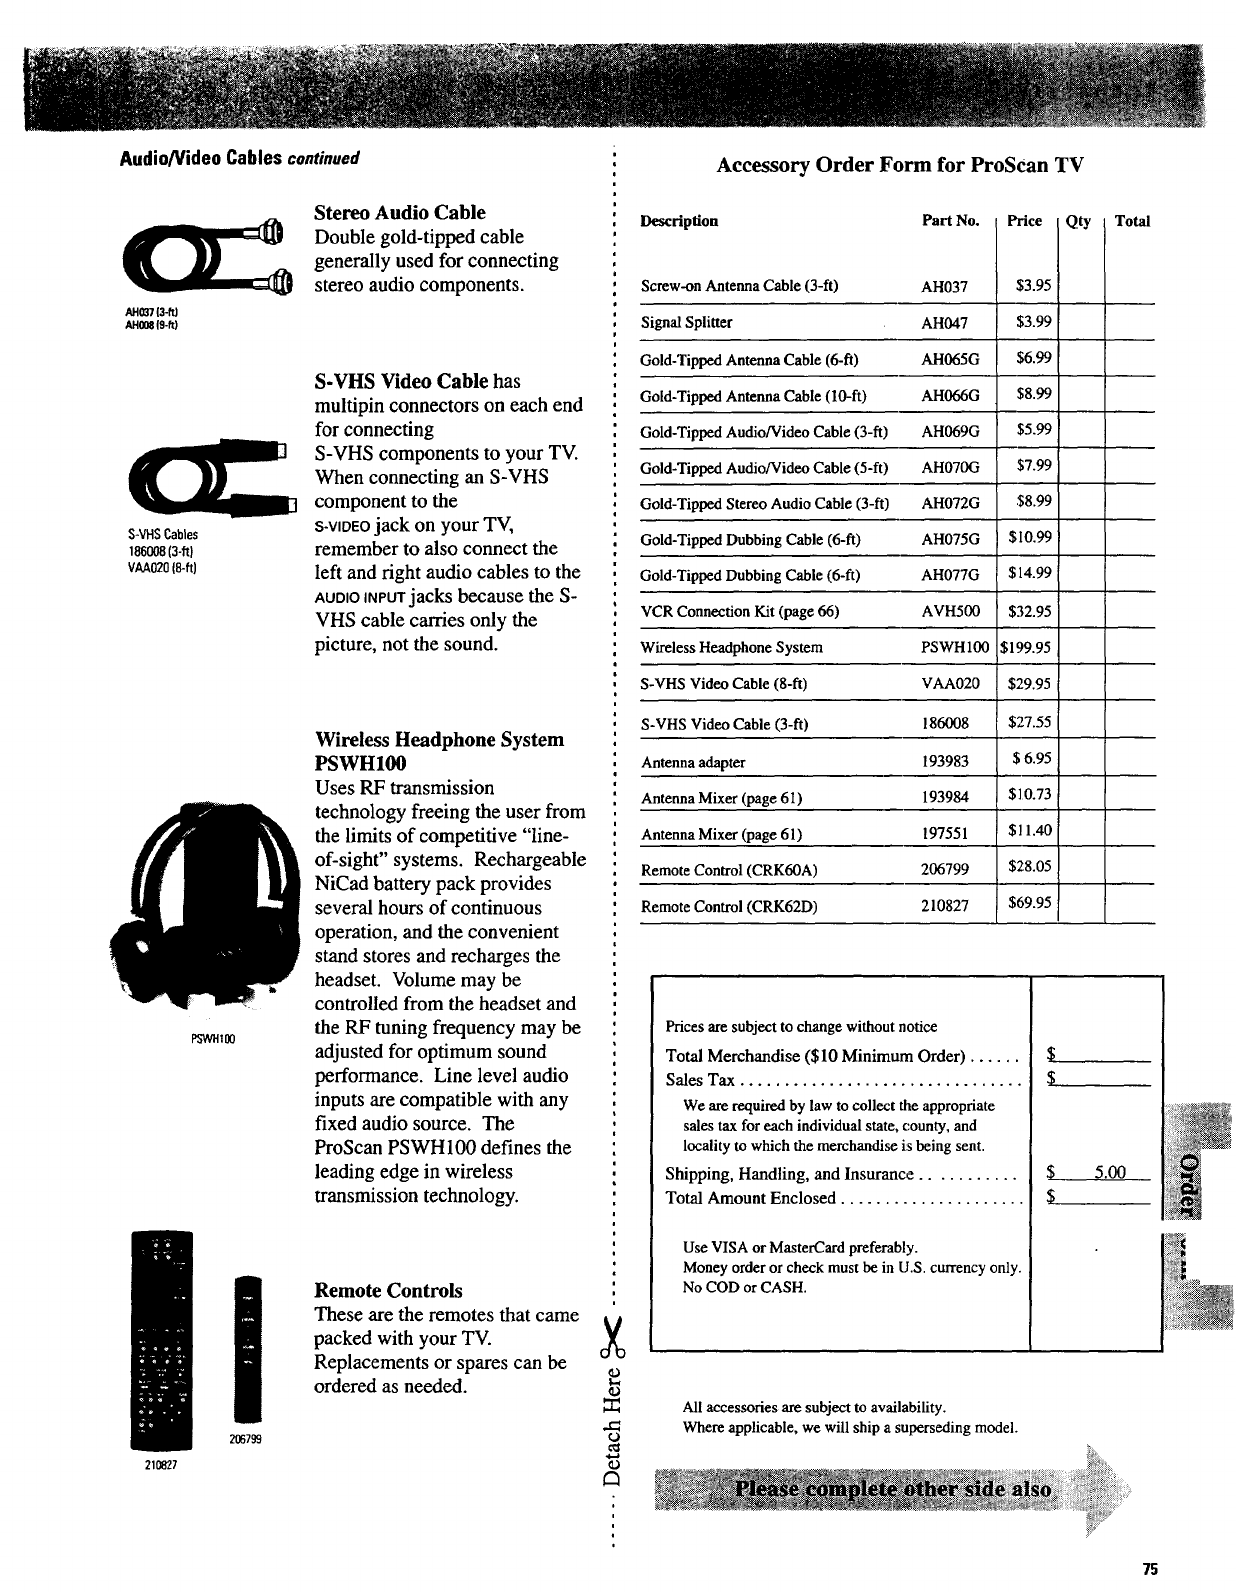
Audio/Video Cablescontinued
AH037 (34'0
AH00e 19-ft)
Stereo Audio Cable
Double gold-tipped cable
generally used for connecting
stereo audio components.
S-VHSCables
186008(3-ft)
VAA020(8-ft)
S-VHS Video Cable has
multipin connectors on each end
for connecting
S-VHS components to your TV.
When connecting an S-VHS
component to the
S-VIOEOjack on your TV,
remember to also connect the
left and right audio cables to the
AUDIOiNPUTjacks becausethe S-
VHS cable carries only the
picture, not the sound.
PSWHIfl0
Wireless Headphone System
PSWH100
Uses RF transmission
technology freeing the user from
the limits of competitive "line-
of-sight" systems. Rechargeable
NiCad battery pack provides
several hours of continuous
operation, and the convenient
stand stores and recharges the
headset. Volume may be
controlled from the headset and
the RF tuning frequency may be
adjusted for optimum sound
performance. Line level audio
inputs are compatible with any
fixed audio source. The
ProScan PSWH100 defines the
leading edge in wireless
transmission technology.
Remote Controls
These are the remotes that came
packed with your TV.
Replacements or spares can be
ordered as needed.
206799
210827
<1.)
m
cD
Accessory Order Form for ProSCan TV
Description Part No. Total
Screw-on Antenna Cable (3-ft)
Signal Splitter
Gold-Tipped AntennaCable (6-ft)
Gold-Tipped Antenna Cable (10-ft)
Gold-Tipped Audio/Video Cable (3-ft)
Gold-Tipped Audio/Video Cable (5-ft)
Gold-Tipped Stereo Audio Cable (3-ft)
Gold-Tipped Dubbing Cable (6-ft)
Gold-Tipped Dubbing Cable (6-fi)
VCR Connection Kit (page 66)
Wireless Headphone System
S-VHS Video Cable (8-ft)
S-VHS Video Cable (3-ft)
Antenna adapter
Antenna Mixer (page 61)
Antenna Mixer (page 61)
Remote Control (CRK60A)
Remote Control (CRK62D)
AH037
AH047 $3.99
AH065G $6.99
AH066G $8.99
AH069G $5.99
AH070G $7.99
AH072G $8.99
AH075G $10.99
AH077G $14.99
AVH500 $32.95
PSWH100 $199.95
VAA020 $29.95
186008 $27.55
193983 $ 6.95
193984 $10.73
197551 $11.40
206799 $28.05
210827 $69.95
Prices are subject to change without notice
Total Merchandise ($10 Minimum Order) ......
Sales Tax ................................
We are required by law to collect the appropriate
sales tax for each individual state, county, and
locality to which the merchandise is being sent.
Shipping, Handling, and Insurance ...........
Total Amount Enclosed .....................
Use VISA or MasterCard preferably.
Money order or check must be in U.S. currency only.
No COD or CASH.
$
$
$
$
5.00
All aec_ssodes axe subject to availability.
Where applicable, we will ship a superseding model.
75
Charge your order on your VISA
or MasterCard by
filling in below
USE YOUR CREDITCARD
IMPORTANT: Copy complete account number
from your VISA card
7T-T rTTq 7T-Y7 FT-Tq
My exp s:
IMPORTANT: Copy complete account number
from your MasterCard
FTTT7 FTT-I-] I I I I IFVT-N
Cop,Nomber Myo VIqV'r--1
above your expires:
flame on
MasterCard
AUTHORIZED SIGNATURE
Prices are subject to change without notice.
PLEASE Print or type your name and
address clearly. This will be your
mailing label.
Acomplete and correct order will
save you days of waiting.
Name:
Street:
City:
State:
Apt:
Zip:
Please make sure thatbothsides ofthisformhave
been fiUed out completely.
A
To order accessories, contact your local ProScan
Dealer.
If a dealer is not nearby, you can also follow the
instructions below to order by telephone.
United States Orders
To place your order by phone, have your Visa or
MasterCard ready and call the toll-free number listed
below between 8AM and 8PM Eastern Standard Time.
Use this number only to place an order for
accessory items listed on this order form.
1 - 800 - 338 - 0376
Most times your order will be shipped UPS within 72
hours of receipt. If ever it is not possible to ship
within 30 days, we will notify you with an update on
your order and an option to cancel.
To place your order by mail, detach and mail the
completed order form with credit card information,
money order, or check in U.S. currency (made payable
to Thomson Consumer Electronics, Inc.) to the
following address.
ProScan Video Accessories
P.O. Box 8419
Ronks, PA 17573
For more information on these accessories (or
current prices), write to the following address:
Video Accessories Customer Service
Thomson Consumer Electronics, Inc.
Distributor & Special Products
2000 Clements Bridge Rd
Depfford, NJ 08096-2088
Canadian Orders
To place your order by phone, have your Visa or
MasterCard ready and call the toll-free number listed
below. Use this number only to place an order for
accessory items listed on this order form.
1 - 800 -338 -0376 (English)
1 - 800 - 668 -5507 (French)
Allow 4-6 weeks for delivery. G.S.T. and P.S.T are
applicable on all orders.
For more information on these accessories, write to
the following address:
ProScan Video Accessories Canada
Thomson Consumer Electronics, Inc.
6540 Tomken Rd
Mississauga, Ontario Canada L5T 2E9
International Orders
This offer is valid only in the 50 United States and
_, Canada. For international orders, please send your
_ request for quotation (not an order) to:
"= International Customer Service
e..) Thomson Lonsumer Electronics, Inc.
4.a
€o Distributor & Special Products
2000 Clements Bridge Rd
I Deptford, NJ USA 08096-2088
I
General Specifications
Color Standard:
Chassis:
Power Requirements:
Power Consumption:
NTSC Color
CTC171 solid state IDTV
120VAC -+ 10%, 60Hz
300W maximum
Remote Control
Model:
Transmission system:
Batteries:
Battery Life:
CRK62D and CRK60A
Digitally encoded infrared light
CRK62D: 4 AAA Size
CRK60A: 2 AAA Size
One Year in Normal Use
RFSpecifications
Tuning System Type:
Band Coverage:
Frequency Coverage:
Tuner Type:
Channel Access:
Channel Indication:
Antenna Inputs:
Sensitivity:
Quartz-controlled
Multiband Frequency Synthesis
VHF channels 2-13
UHF Channels 14-69
EIA Cable Channels 1-125
Complete chart is on page 65.
54-806 MHz
Dual Solid State Tuners
Programmable Scan Up/Down
Direct Access With Master Remote
On-Screen
Two 75-ohm VHF/UHF combined inputs
151xVVHF, 30_tV UHF
Dust TV as required, using a soft cloth or the dusting
attachment of your vacuum cleaner. Occasionally
vacuum the ventilation slots in the cabinet to help assure
adequate ventilation. Take care not to scratch the plastic
surface.
If your TV's cabinet has atextured finish, do not use
furniture polish. Because textured finishes are porous,
using furniture polish will mar their appearance. They
can be easily cleaned with a damp, soft cloth.
To clean the screen, you can wipe it with adamp soft
cloth. (A very diluted, mild soap can be used on the
screen if it is extremely dirty.) Be careful not to let the
liquid run down into the bottom of the screen.
Do not use strong cleaners, polishes, or chemically-
treated cloths to clean the screen or cabinet.
Video Specifications
Horizontal Luminance
Resolution:
Black to White Rise Time
Luminance Bandwidth:
Video Input:
Video Output:
Up to 600 Lines (from S-VlOEOinput)
using wideband video source
50ns
13 MHz (from S-VtOEOinput)
1Vp-p; 75 ohms; negative sync
1Vp-p; 75 ohms; negative sync
Audio Specifications
Frequency Response: 50-20,000 Hz (at rated output)
Stereo System: Eight modes of operation: MTS Stereo,
Expanded Stereo, Dolby*, Dolby* Prologic,
Prologic Phantom, and Matrix, Hall, and
Stadium Surround.
Stereo/Mono Switching: Automatic
Audio Input: 450 mV RMS typical, 1 V RMS maximum
Audio Input Greater than 50 kOhms (Stereo);
Impedance: Greater than 25 kOhms (Mono)
Audio Power: 10 watts/channel RMS into 8 ohms -+3db
with less than 1% THD
Audio Output
Selected Outputs:
Outputs To Hi-Fi:
Output Impedance:
Output level tracks inputs within +l/-2dB
2 V RMS maximum, controlled by
volume, mute, equalizer, and balance
Surround and Hi-Fi outputs less
than 2,500 ohms
Speaker Type: Two 51 mm High Frequency
(3--way) Two 21/," x 5" Mid/Range
Two 170mm Enclosed Woofers
Speaker Impedance: Internal, 8 ohms (nominal)
External and surround, 8 ohms
*Dolby is a registered trademark of Dolby Laboratories Licensing Corp.
All features and specifications are subject to change
without notice.
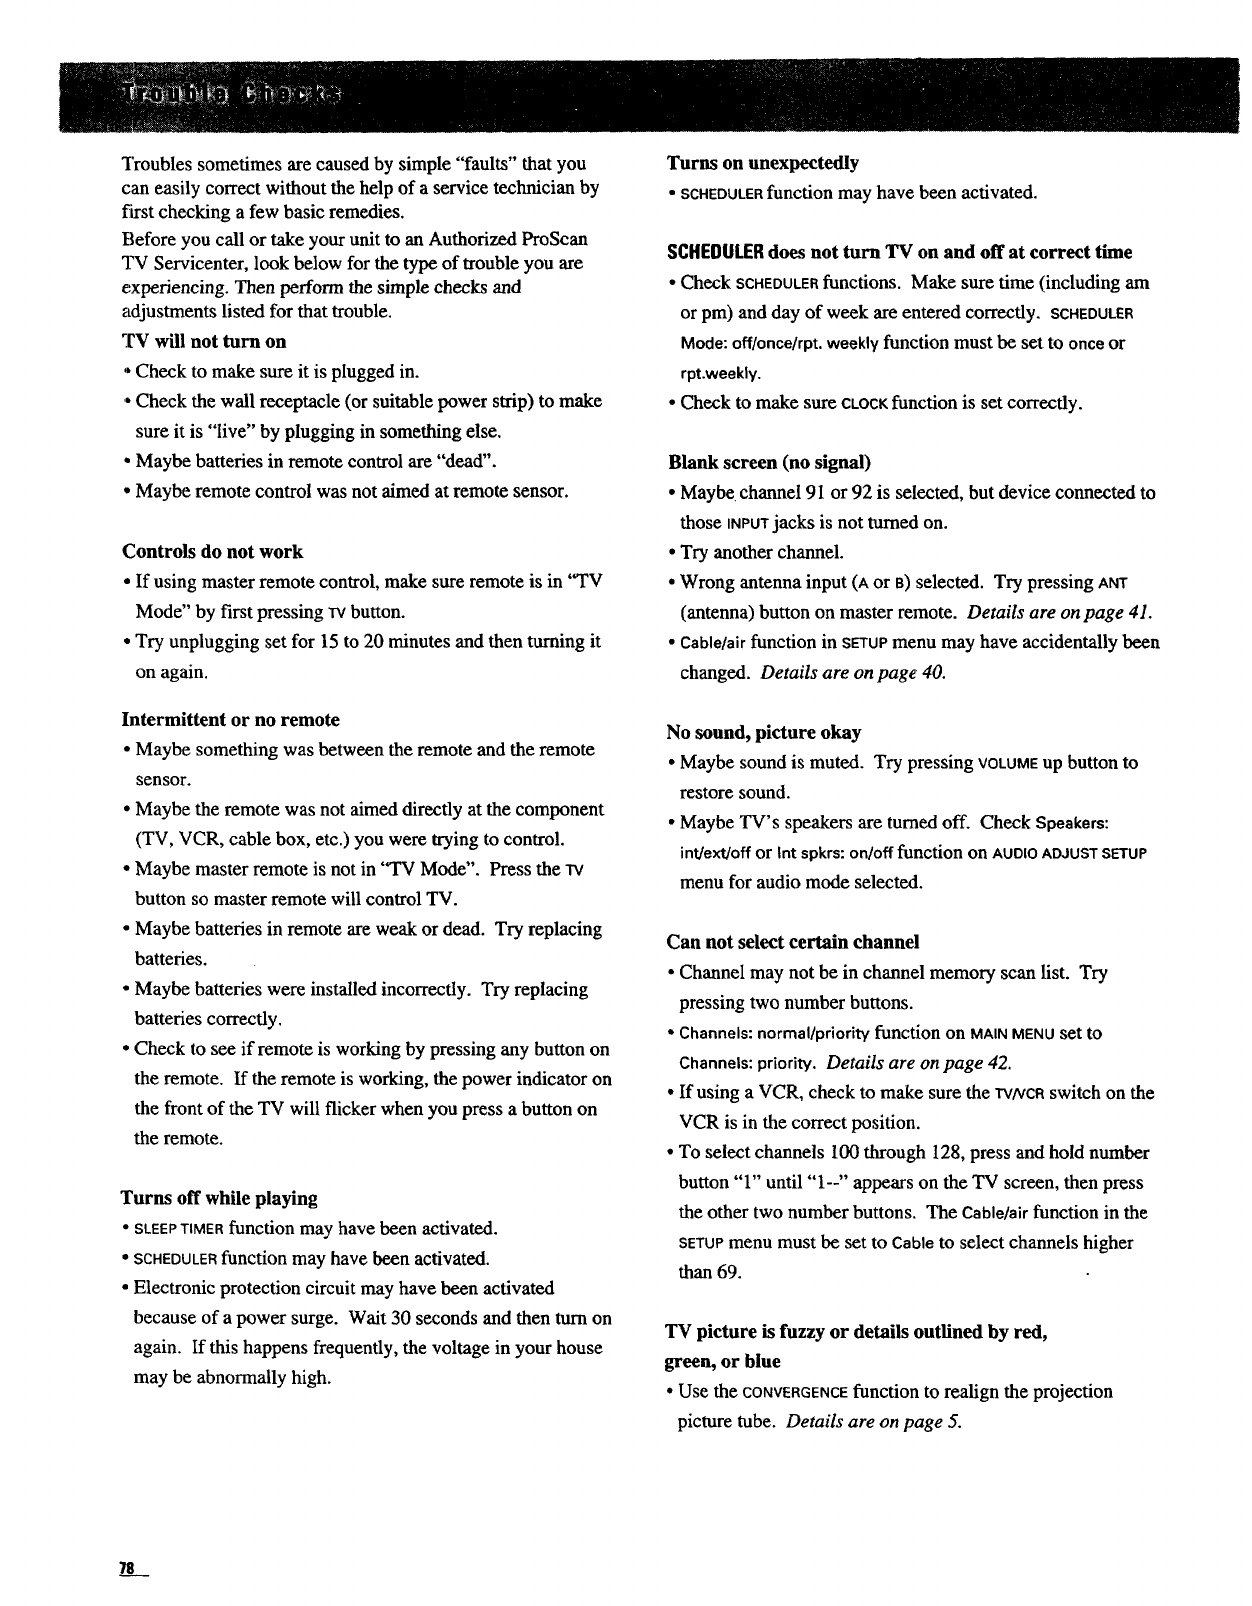
Troublessometimesarecausedbysimple"faults"that you
can easily correct without the help of a service technician by
first checking a few basic remedies.
Before you call or take your unit to an Authorized ProScan
TV Servicenter, look below for the type of trouble you are
experiencing. Then perform the simple checks and
adjustments listed for that trouble.
TV will not turn on
• Check to make sure it is plugged in.
,Check the wall receptacle (or suitable power strip) to make
sure it is "live" by plugging in something else.
•Maybe batteries in remote control are "dead".
•Maybe remote control was not aimed at remote sensor.
Controls do not work
•If using master remote control, make sure remote is in "TV
Mode" by first pressing IV button.
•Try unplugging set for 15 to 20 minutes and then turning it
on again.
Intermittent or no remote
•Maybe something was between the remote and the remote
sensor.
• Maybe the remote was not aimed directly at the component
(TV, VCR, cable box, etc.) you were trying to control.
• Maybe master remote is not in "TV Mode". Press the TV
button so master remote will control TV.
• Maybe batteries in remote are weak or dead. Try replacing
batteries.
•Maybe batteries were installed incorrectly. Try replacing
batteries correctly.
•Check to see if remote is working by pressing any button on
the remote. If the remote is working, the power indicator on
the front of the TV will flicker when you press a button on
the remote.
Turns off while playing
• SLEEPT_MERfunction may have been activated.
•SCHEDULERfunction may have been activated.
• Electronic protection circuit may have been activated
because of a power surge. Wait 30 seconds and then turn on
again. If this happens frequently, the voltage in your house
may be abnormally high.
Turns on unexpectedly
•SCHEDULERfunction may have been activated.
SCHEDULERdoes not turn TV on and off at correct time
• Check SCHEDULERfunctions. Make sure time (including am
or pro) and day of week are entered correctly. SCHEDULER
Mode:off/onee/rpt, weekly function must be set to once or
rpt.weekly.
• Check to make sure CLOCK function is set correctly.
Blank screen (no signal)
• Maybe channel 91 or 92 is selected, but device connected to
those iNPUTjacks is not turned on.
• Try another channel.
• Wrong antenna input (A or a) selected. Try pressing ANT
(antenna) button on master remote. Details are on page 41.
• Cable/air function in SETUPmenu may have accidentally been
changed. Details are on page 40.
No sound, picture okay
•Maybe sound is muted. Try pressing VOLUMEup button to
restore sound.
• Maybe TV's speakers are turnedoff. Check Speakers:
int/ext/off or Int spkrs: on/off function on AUDIO ADJUST SETUP
menufor audio mode selected.
Can not select certain channel
•Channel may not be in channel memory scan list. Try
pressing two number buttons.
•Channels: normal/priority function on MAIN MENU set to
Channels: priority. Details are on page 42.
• If using a VCR, check to make sure the TVNCRswitch on the
VCR is in the correct position.
•To select channels 100 through 128, press and hold number
button "1" until "1--" appears on the TV screen, then press
the other two number buttons, The Cable/airfunction in the
SETUPmenu must be set to Cable to select channels higher
than 69.
TV picture is fuzzy or details outlined by red,
green, or blue
•Use the CONVERGENCEfunction to realign the projection
picture tube. Details are on page 5.
78
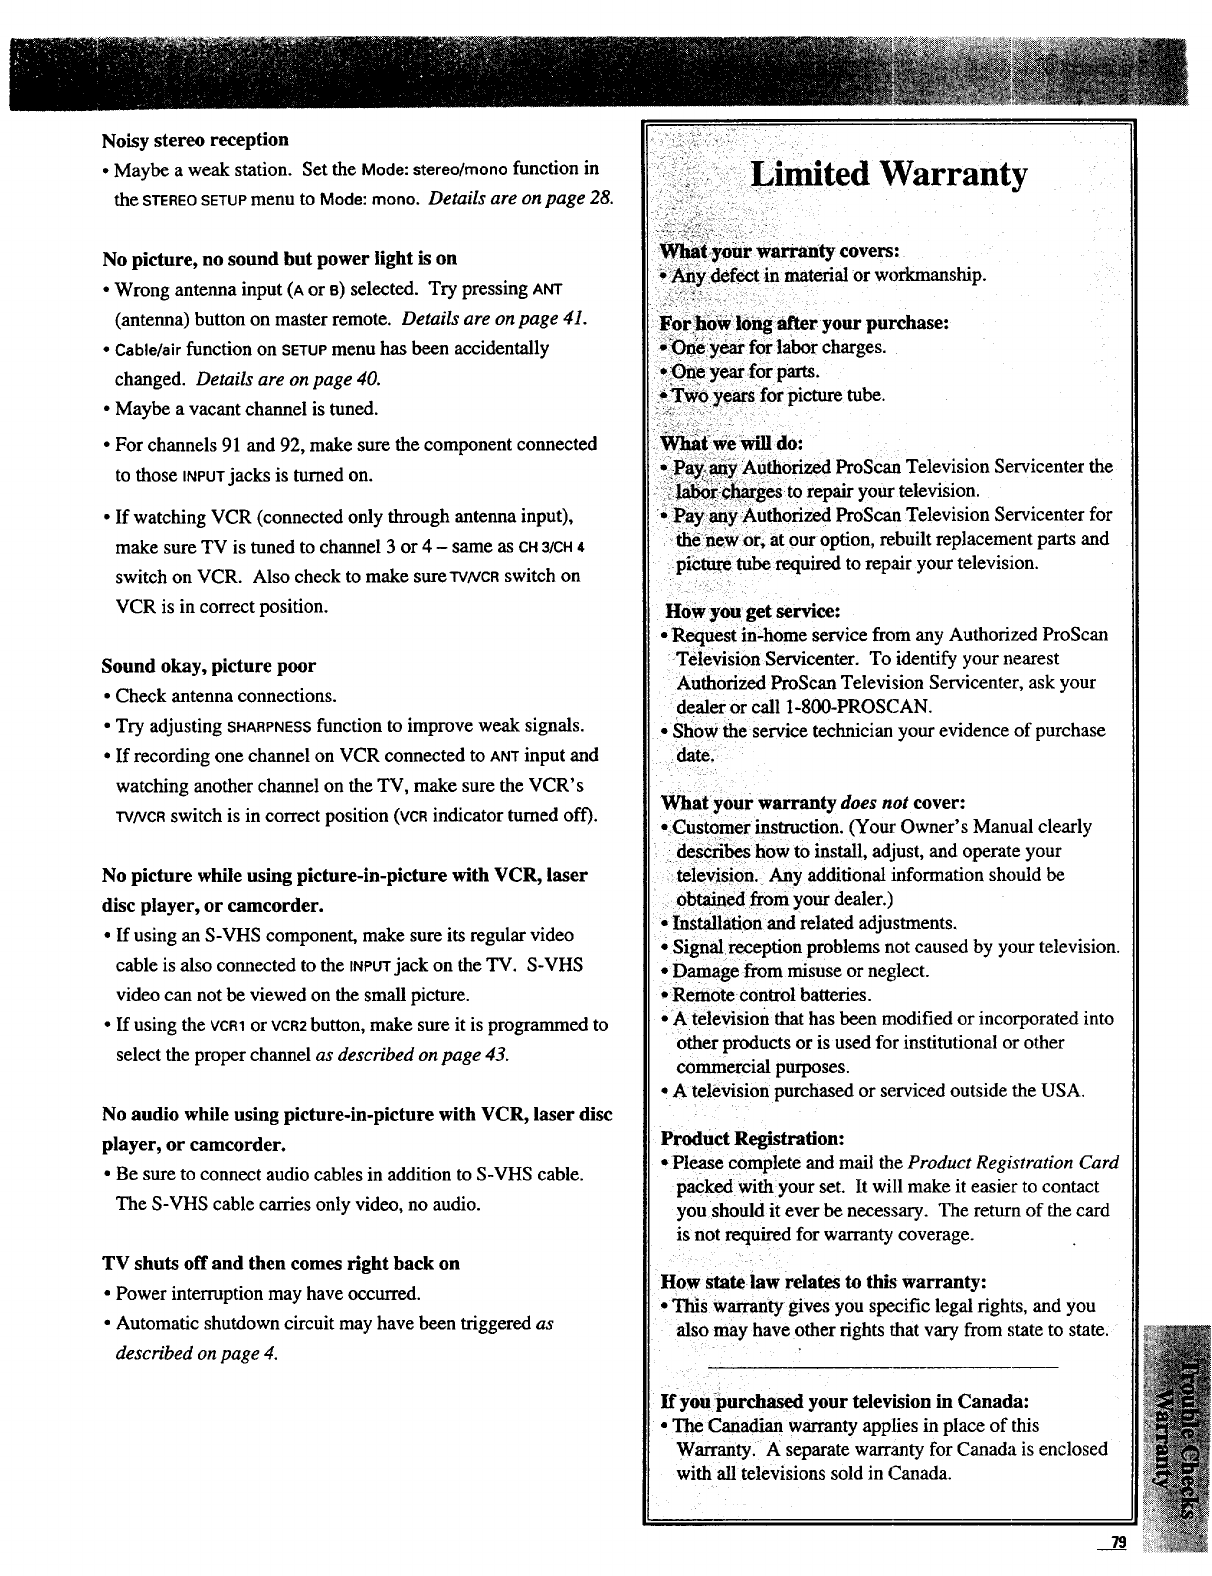
Noisy stereo reception
• Maybe a weak station. Set the Mode:stereo/mono function in
the STEREOSETUPmenu to Mode:mono. Details are on page 28.
No picture, no sound but power light is on
•Wrong antenna input (A or B)selected. Try pressing ANT
(antenna) button on master remote. Details are on page 41.
•Cable/airfunction on SETUPmenu has been accidentally
changed. Details are on page 40.
• Maybe a vacant channel is tuned.
• For channels 91 and 92, make sure the component connected
to those INPUT jacks is turned on.
• If watching VCR (connected only through antenna input),
make sure TV is tuned to channel 3 or 4 - same as CHa/CH4
switch on VCR. Also check to make sure'l'VNCRswitch on
VCR is in correct position.
Sound okay, picture poor
• Check antenna connections.
•Try adjusting SHARPNESSfunction to improve weak signals.
• If recording one channel on VCR connected to ANTinput and
watching another channel on the TV, make sure the VCR's
IVNCRswitch is in correct position (VCRindicator turned off).
No picture while using picture-in-picture with VCR, laser
disc player, or camcorder.
• If using an S-VHS component, make sure its regular video
cable is also connected to the tNPtYrjack on the TV. S-VHS
video can not be viewed on the small picture.
•If using the VCR1or VCR2button, make sure it is programmed to
select the proper channel as described on page 43.
No audio while using picture-in-picture with VCR, laser disc
player, or camcorder.
•Be sure to connect audio cables in addition to S-VHS cable.
The S-VHS cable carries only video, no audio.
TV shuts off and then comes right back on
•Power interruption may have occurred.
•Automatic shutdown circuit may have been triggered as
described on page 4.
picture tuberequired torepatr your television.
How you get service:
• Request in-home service from any Authorized ProScan
Television Servicenter. To identify your nearest
Authorized ProScan Television Servicenter, ask your
•dealer or call 1-800-PROSCAN.
Show the service technician your evidence of purchase
date.
What your warranty does not cover:
• Customer instruction. (Your Owner's Manual clearly
describes how to install, adjust, and operate your
television. Any additional information should be
• obtained from your dealer.)
Installation and related adjustments.
•Signalreception problems not caused by your television.
• Damage from misuse or neglect.
• Rem0te control batteries.
•A television that has been modified or incorporated into
other products or is used for institutional or other
commercial purposes.
•Atelevision purchased or serviced outside the USA.
Product Registration:
-Please complete and mail the Product Registration Card
packed with your set. It will make it easier to contact
you should it ever be necessary. The return of the card
is not required for warranty coverage.
How state law relates to this warranty:
• This warranty gives you specific legal rights, and you
also may have other rights that vary from state to state.
If you purchased your television in Canada:
• The Canadian warranty applies in place of this
Warranty. A separate warranty for Canada is enclosed
with all televisions sold in Canada.
79
+and - Buttons ................................................................ 6,10-12
Accessories, Included ................................................................. 3
Accessories, Optional ......................................................... 74-76
Accessory Cables, General ....................................................... 74
Accessory Order Form ........................................................ 75-76
Active Channel Displays ................................................... 6,46-47
Adding Channels to Channel Memory Scan List ..................... 47
Amplifier Connections ........................................................ 70-71
ANTAand ANTB Connectors ............................... .41,58-59,61-63
ANT(Antenna) Button .......................................... 10-11,41,54,57
Antenna Input, Changing ......................................................... 41
Antenna, Connecting ............................................................. 3,61
Arrow Buttons ........................................................... 10-11,14,18
AUDIOADJUSTMenu ............................................................ 22-36
AUDIOADJUSTMenu, Basic Functions ..................................... 24
AUDIOButton .................................................................... 9,56-57
AUDIO INPUTS 1 (WNIONO and LEFT) Jacks .................. 58,66,68-69
AUDIOINPUTS2 (R!MONOand LEFT)Jacks .................. 58,66,68-69
AUDIOOUTPUTSCENTERJack .......................................... 58-59,71
AUDIOOUTPUTSHI-FI(R/MONOand LEFT)Jacks ............... 58-59,70
AUDIOOUTPUTSSURROUNDJack ..................................... 58-59,71
Audio Equipment, Controlling With Remote ..................... 56-57
Audio from Headphone Jack, Changing .................................. 25
Audio Modes ....................................................................... 22-36
Audio Settings, Returning to Factory ....................................... 39
Audio Settings, Saving and Restoring Personalized ................ 39
Auto Demo Function (SPECIALrrEMS Menu) ............................ 51
Auto-Help Displays .................................................................... 4
Auto Help On/Off Function (SETUPMenu) ............................. 4,40
Auteprogram Function (SETUPMenu) ............................. 6,46-47
AutoProgramming Channel Memory Scan List ................. 46-47
Balance Function (AUDIOADJUSTMenu) .................................. 24
Batteries, Remote Controls ........................................................ 8
Cable/Air Function (SETUPMenu) ....................................... 40,46
CABLEButton .......................................................................... 9,64
Cable-TV Chart of Channels .................................................... 65
Cable-TV Connecting ...................................................... 4,62-63
Cable-TV Operation ................................................................. 65
CABLE/ANTENNAConnectors ...................................... 58-59,61-63
Cables, Accessory ............................................................... 74-75
Camcorder Connections ........................................................... 69
CAPTION:never,always,on mute .................................................. 30
Card, Product Registration ......................................................... I
Care and Cleaning .................................................................... 77
Cassette Recorder Connections ................................................ 70
CENTEROUTJack ............................................................. 58-59,71
CHAN(Channel) GUIDEButton ........................................ 10-11,17
Changing Antenna Input .......................................................... 41
Channel 91 ................................................................ 10-11,19,43
Channel 92 ................................................................ 10-11,19,43
CHANNELButtons ............................................... 4,10,12,53 -54,57
Channel Guide Function (MAINMENU) .................................... 17
Channel Labeling ................................................................ 48-49
Channel Labels, Chart of Built-in ............................................ 48
CHANNELMEM(Memory) Menu .................................. 6,30,48-51
Channel Memory (Adding/Erasing Channels) ...................... 6,47
Channel Memory Scan List ............................................. 6,46-47
Channel Number Display ......................................................... 12
Channels: Normal/Priority Function (MAINMENU).................... 42
Checks for Trouble ............................................................. 78-79
Cleaning and Care .................................................................... 77
CLEARButton ............................................................. 1O-11,53-54
L
CLOCKSETMenu ......................................................................... 7
Closed Captioning .................................................................... 30
Color Picture, Adjusting ........................................................... 37
Component Connection Tips ..................................................... 60
Components, Positioning ......................................................... 60
Connecting Amplifiers ......................................................... 70-71
Connecting Cable-TV System ......................................... 3,62-63
Connecting Camcorders ........................................................... 69
Connecting Cassette Recorders ................................................ 70
Connecting Components .......................................................... 70
Connecting Home Antenna .................................................... 3,61
Connecting Laser Disc Players ................................................ 68
Connecting VCR's .............................................................. 66-67
Contents .................................................................... Front Cover
Controlling Audio Equipment with Remote Control .......... 56-57
Controlling Cable Box with Remote Control ........................... 64
Controlling Other Brands of VCR's with Remote Control ...... 55
Controlling ProScan LaserDisc with Remote .......................... 53
Controlling ProScan VCR's with Remote ............................... 54
CONVERGENCEFunction .............................................................. 5
CONVERTERConnector ..................................................... 58-59,62
Cs (Commercial Skip) Button ........................................ 10-I 1,53
Day-of-Week Display .............................................................. 12
Design Specifications ............................................................... 77
Digital Video Effects (DVE) .................................................... 16
DISPLAYButton .......................................................... 10-11,53-54
Display, Channel Number ........................................................ 12
Display, Day-of-Week ............................................................. 12
Display, Time ........................................................................... 12
Displays, Auto-Help ................................................................... 4
DOLBY3 SETUP Menu ................................................................. 31
Dolby 3Stereo Mode (AUDIOADJUSTMenu) .............................
DVE (Digital Video Effects) .................................................... 16
Erasing Channel Labels ............................................................. 49
Erasing Channels from Channel Memory Scan List ................ 47
Expanded Stereo Mode (AUDIOADJUSTMenu) ........................ 29
EXPDSTEREOMenu ................................................................... 29
EXTERNALSpeakers Terminals ....................................... 58-59,73
External Speaker, Arranging ............................................... 22-23
Factory Settings, Returning To ........................................... 38-39
Features ...................................................................................... 2
FF(Fast Forward) Button ..................................................... 54,57
First-Time Operation .............................................................. 3-7
FRZ(Freeze) Button .............................................. 10-11,14,18-19
Freeze (Main Picture) ............................................................... 14
Front Panel Controls ................................................................ 12
Graphic Equalizer (AUDIOADJUSTMenu) ........................... 26-27
Guide, Menu Quick-Reference ...................... Inside Front Cover
Hall Surround Mode (AUDIO ADJUST Menu) ............................. 36
Headphone Jack .................................................................. 12,25
Headphone Volume Function (AUDIO ADJUSTMenu)...," ..........25
HELP MENU ................................................................................. 13
Home Antenna, Connecting .................................................. 3,61
Hum, Avoiding ......................................................................... 60
It:)Button ......................................................................... 54-56,64
IDTVDemo Function (SPECIAL ITEMSMenu) ............................. 51
Interference, Avoiding ............................................................. 60
INPUT1 Jacks ......................................................... 43,58,66,68,69
iNPUT2 Jacks ......................................................... 43,58,66,68,69
INPUTButton ........................................................................ 10-11
Interruptions, Power ................................................................... 4
Jack, Headphone ...................................................................... 12
LabelingChannels..............................................................48-49
LaserDiscPlayer,Connections...............................................68
LaserDiscPlayer,RemoteControlButtons.............................53
LimitedWarranty.....................................................................79
MAINMENU,BasicFunctions....................................................13
MATRIXSETUPMenu ................................................................. 36
Matrix Surround Mode (AUDIOADJUSTMenu) ......................... 36
MEMORYMenu ..................................................................... 38-39
MENUButton ..................................................................... 6,10-13
Menu (Quick-Reference Guide) ..................... Inside Front Cover
Modes, Audio ...................................................................... 22-36
Monitor Panel ................................ _.................................... 58-59
Mosaic Effect ........................................................................... 16
MUTEButton ............................................................................. 10
Mute Function (MAIN MENU) ..................................................... 13
Number Buttons............................................... 4,10-11,53-57, 64
OFF/ONButton ...................................................... 10-11,53-57,64
Operating Guide, Quick Reference ................ Inside Back Cover
Operation, First-Time ............................................................. 3-7
Optional Accessories .......................................................... 74-76
Order Form, Optional Accessories ........................................... 76
OUTButton ........................................................... 10-11,14,18-19
PANMenu ................................................................................. 14
Pan (Main Picture) .............................................................. 14-15
Parent Ctrl:On/Off Function (CHANNELMEM Menu)'. ............... 50
Parental Control .................................................................. 50-51
PAUSEButton.................................................................. 53-54,57
PC(Previous Channel) Button ............................................. 10- I I
PHANTOMSETUPMenu ........................................................ 34-35
Picture-In-Picture (PIP) ...................................................... 18-21
PIP (Picture-In-Picture) Control Buttons ................... I O-11,18-19
PIP (Using Menus) .............................................................. 20-21
PIP, Hearing Sound from Small Picture .................................. 19
Pix-ln-Pix Menus .................................................. 14-15,16,18-21
PLAYButton .................................................................... 53-54,57
Positioning Components .......................................................... 60
POWERButton ........................................................................ 4,12
Power Indicator ........................................................................ 12
Power Interruptions .................................................................... 4
Precautions, Safety ..................................................................... 1
Priority Channels Function (SETUP Menu) ................................ 42
Problem Solving ................................................................. 78-79
Product Features......................................................................... 2
Product Registration ................................................................... 1
PROG(Program) Button ....................................................... 53-54
Programming Remote to Control Audio Equipment ............... 56
Programming Remote to Control Cable Box ........................... 64
Programming Remote to Control Other VCR's ....................... 55
Programming the Scheduler ................................................ 44-45
ProjectionSetupfunction ......................................................... 5,37
PROLOGICSETUPMenu ......................................................... 32-33
Prologic Mode (AUDIO ADJUST Menu) ................................. 32-33
Prologic Phantom Mode ...................................................... 34-35
Quick-Reference Menu Guide ....................... Inside Front Cover
Quick-Reference Operating Guide ................. Inside Back Cover
RECORD Button ..................................................................... 54,57
Registration, Product .................................................................. 1
Remote Control Buttons (Audio Equipment) .......................... 57
Remote Control Buttons (LaserDisc Player) ............................ 53
Remote Control Buttons (TV) .............................................. 8-11
Remote Control Buttons (VCR) ............................................... 54
Remote Control Sensor ............................................................ 12
Replacing Batteries (Remote Controls) ...................................... 8
REWINDButton ..................................................................... 54,57
S-VIDEOINPUT1 Connector ......................................... 58,66,68,69
S-WDEOINPUT2Connector ......................................... 58,66,68,69
Safety Precautions ...................................................................... 1
SAP Audio ............................................................................... 30
Saving and Restoring Audio Settings ...................................... 39
Saving and Restoring Video Settings ....................................... 38
Scan List, Channel Memory ............................................. 6,46-47
Scheduler Function (SETUP. Menu) ...................................... 44-45
SELECTAUDIO(P,/MONOand LEFT)Jacks ................ 58-59,67,69,70
SELECTS-WDEOOUTPUTJack ...................................... 58-59,67,69
SELECTVIDEOOUTPUTJack ........................................ 58-59,67,69
Sensor, Remote Control ........................................................... 12
Setting the Clock ........................................................................ 7
SETUPMenu .................................................................. 6-7,40-50
SETUPMenu, Basic Functions ................................................... 40
Sleep Demo Function (SPECIAL.ITEMSMenu) ........................... 51
Sleep Timer Function (SPECIALITEMSMenu) ............................ 52
Solarize Effect ........................................................................... 16
Solving Problems ................................................................ 78-79
Speaker Connections ........................................................... 72-73
Speakers (EXTERNAL and SURROUND) Terminals ........... 58-59,73
Speakers (External), Arranging .......................................... 22-23
SPECIAL EFFECT Menu ................................................................ 16
SPECIALITEMSMenu .................................................. 38-39,51-52
Specifications ........................................................................... 77
Stacking Arrangements ............................................................ 60
Stadium Surround Mode (AUDIOADJUSTMenu) ..................... 36
STEREOSetup Menu .................................................................. 28
Stereo Mode (AUDIO ADJUST Menu) ......................................... 28
Stereo ExpandMode (AUDIOADJUSTMenu) ............................ 29
STOPButton.................................................................... 53-54,57
SURR(Surround) Button ................................. l 0-11,24-29,31-36
SURROUNDOUTJack ....................................................... 58-59,71
SURROUNDSetup Menu ............................................................ 36
SURROUNDSpeakersTerminals ...................................... 58-59,73
SWAPButton ........................................................................ 18-19
Table of Contents ....................................................... Front Cover
Time and Day-of-Week Display .............................................. 12
'Time Function (SPECIALITEMSMenu) ...................................... 51
Trouble Checks .................................................................... 78-79
Turning On TV ........................................................................... 4
"IVButton............................................................................. 4,9-10
Unpacking ................................................................................. 3
Using Video Input Sourceswith PIP ....................................... 19
VCR1Button ................................................................. 9,43,54-55
VCR2Button ................................................................. 9,43,53-55
VCR, Connecting ................................................................ 66-67
VCR, Remote Control Buttons ................................................ 54
VCR/CableSetup Function (SETUPMenu) .................................. 43
VIDEOADJUSTMenu ................................................................... 37
VDEOINPUT1Jack ..................................................... 58,66,68,69
VIDEOINPUT2Jack ..................................................... 58,66,68,69
Video Input, Adding to Channel Memory Scan List ............... 47
Video Settings, Returning to Factory ....................................... 38
Video Settings, Saving and Restoring ...................................... 38
VOLUMEButtons ........................................................... 4,10,12,57
Volume Limiter Function (AUDIO ADJUSTMenu) ...................... 24
Warranty ................................................................................... 79
ZOOMButton ........................................................ 10-11,14,18-19
ZOOMMenu .............................................................................. 15
Zoom (Main Picture) .......................................................... 14-15
81
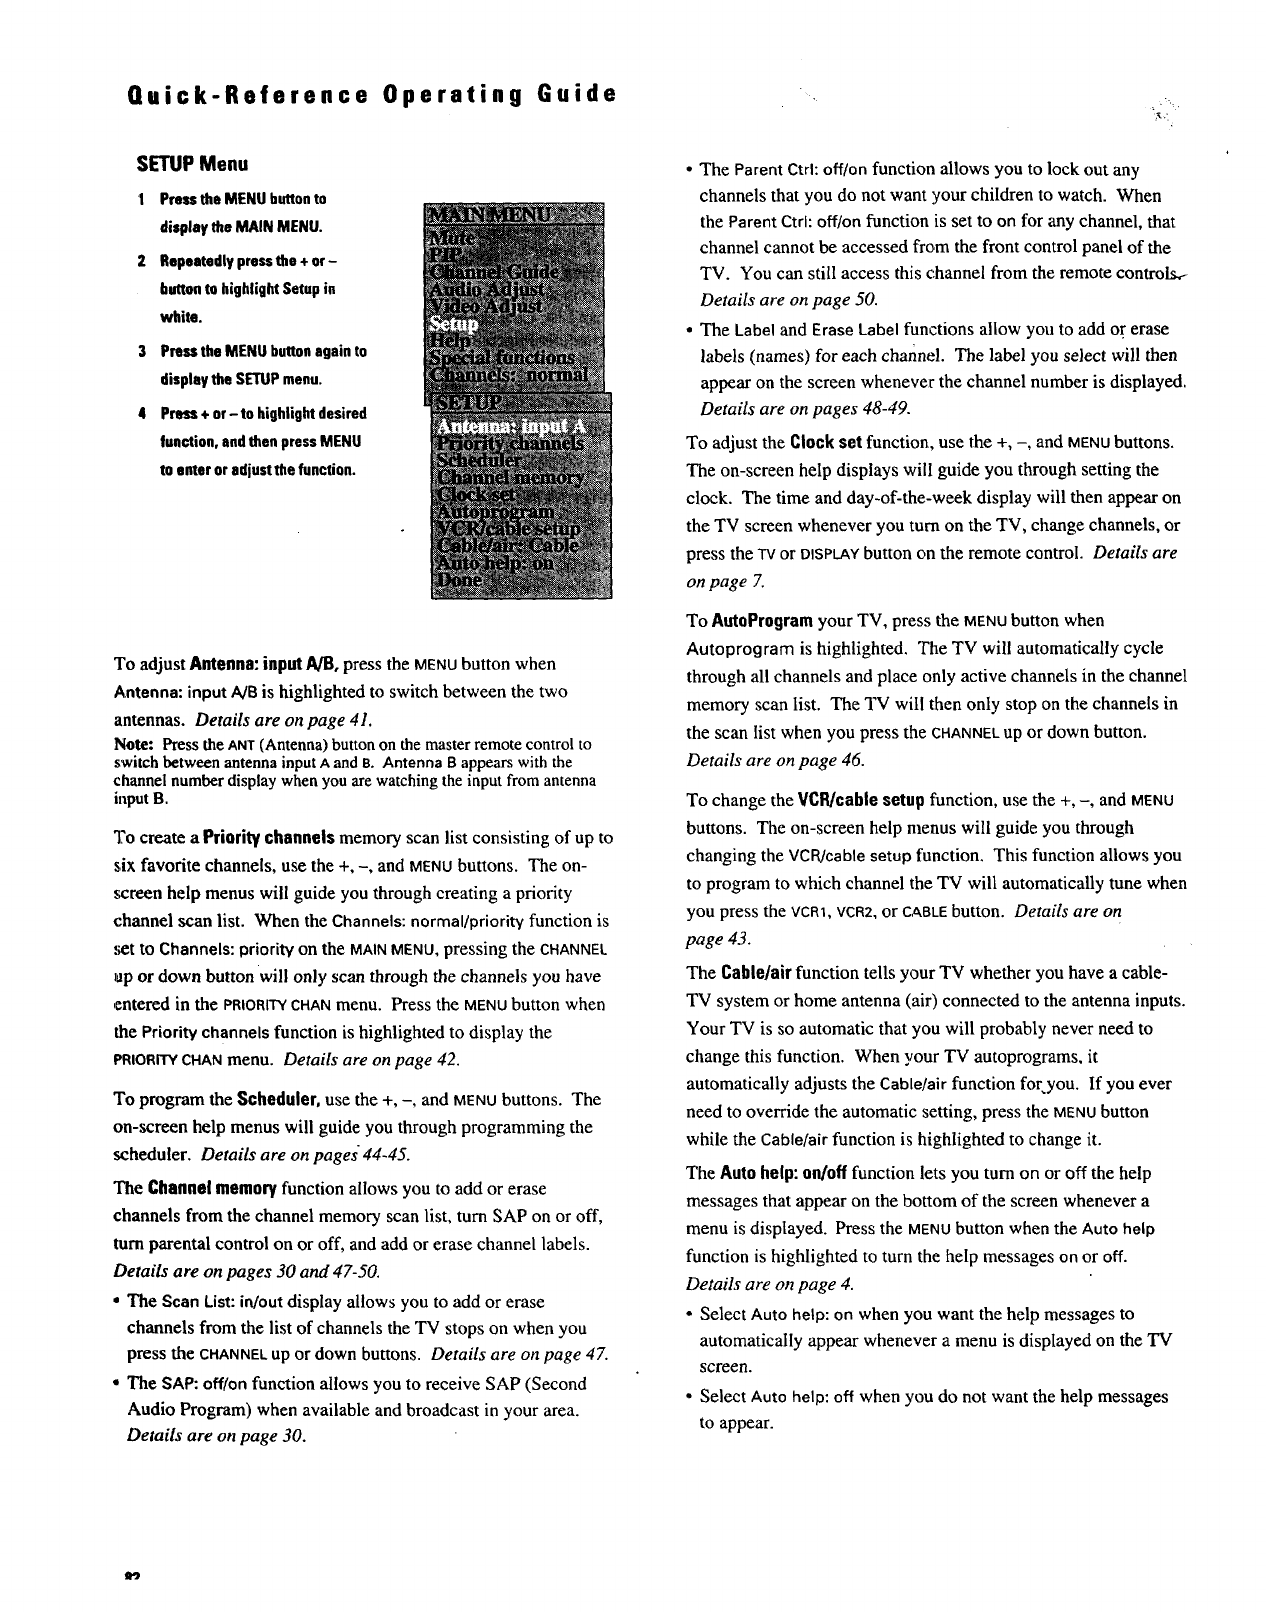
Quick-Reference Operating Guide ._
:.
SETUP Menu
I PresstheMENUbuttonto
displaytheMAINMENU.
2 Repeatedlypressthe + or-
buttonto highlightSetupin
white.
3 PresstheMENUbuttonagainto
displaythe SETUPmenu.
4 Press+ or-to highlightdesired
function,andthenpressMENU
to enteroradjustthefunction.
To adjust Antenna: inpnt A/B, press the MENUbutton when
Antenna: input NB is highlighted to switch between the two
antennas. Details are on page 41.
Note: Press the ANT(Antenna) button on the master remote control to
switch between antenna input Aand B. Antenna B appearswith the
channel number display when you are watching the input from antenna
input B.
To create a Priority channels memory scan list consisting of up to
six favorite channels, use the +, -, and MENUbuttons. The on-
screen help menus will guide you through creating a priority
t-hannel scan list. When the Channels: normal/priority function is
set to Channels: priority on the MAIN MENU,pressing the CHANNEL
up or down button will only scan through the channels you have
,entered in the PRIORITYCHANmenu. Press the MENU button when
the Priority channels function is highlighted to display the
PRIORITYCHANmenu. Details are on page 42.
To program the Scheduler, use the +, -, and MENUbuttons. The
on-screen help menus will guide you through programming the
scheduler. Details are on pages 44-45.
The Channel memory function allows you to add or erase
channels from the channel memory scan list, turn SAP on or off,
turn parental control on or off, and add or erase channel labels.
Details are on pages 30 and 47-50.
•The Scan List: in/out display allows you to add or erase
channels from the list of channels the TV stops on when you
press the CHANNELup or down buttons. Details are on page 47.
•The SAP: off/on function allows you to receive SAP (Second
Audio Program) when available and broadcast in your area.
Details are on page 30.
• The Parent Ctrl: off/on function allows you to lock out any
channels that you do not want your children to watch. When
the Parent Ctrl: off/on function is set to on for any channel, that
channel cannot be accessed from the front control panel of the
TV. You can still access this channel from the remote controls_
Details are on page 50.
•The Label and Erase Label functions allow you to add or erase
labels (names) for each channel. The label you select will then
appear on the screen whenever the channel number is displayed.
Details are on pages 48-49.
To adjust the Clock set function, use the +, -, and MENUbuttons.
The on-screen help displays will guide you through setting the
clock. The time and day-of-the-week display will then appear on
the TV screen whenever you turn on the TV, change channels, or
press the "IVor DISPLAYbutton on the remote control. Details are
on page Z
To AutoProgram your TV, press the MENUbutton when
Autoprogram is highlighted. The TV will automatically cycle
through all channels and place only active channels in the channel
memory scan list. The TV will then only stop on the channels in
the scan list when you press the CHANNELup or down button.
Details are on page 46.
To change the VCR/cable setup function, use the +, -, and MENU
buttons. The on-screen help menus will guide you through
changing the VCR/cable setup function. This function allows you
to program to which channel the TV will automatically tune when
you press the VCRt, VCR2,or CABLEbutton. Details are on
page 43.
The Cable/air function tells your TV whether you have a cable-
TV system or home antenna (air) connected to the antenna inputs.
Your TV is so automatic that you will probably never need to
change this function. When your TV autoprograms, it
automatically adjusts the Cable/air function foryou. If you ever
need to override the automatic setting, press the MENUbutton
while the Cable/air function is highlighted to change it.
The Auto help: on/off function lets you turn on or off the help
messages that appear on the bottom of the screen whenever a
menu is displayed. Press the MENUbutton when the Auto help
function is highlighted to turn the help messages on or off.
Details are on page 4.
*Select Auto help: on when you want the help messages to
automatically appear whenever a menu is displayed on the TV
screen.
,Select Auto help: off when you do not want the help messages
to appear.
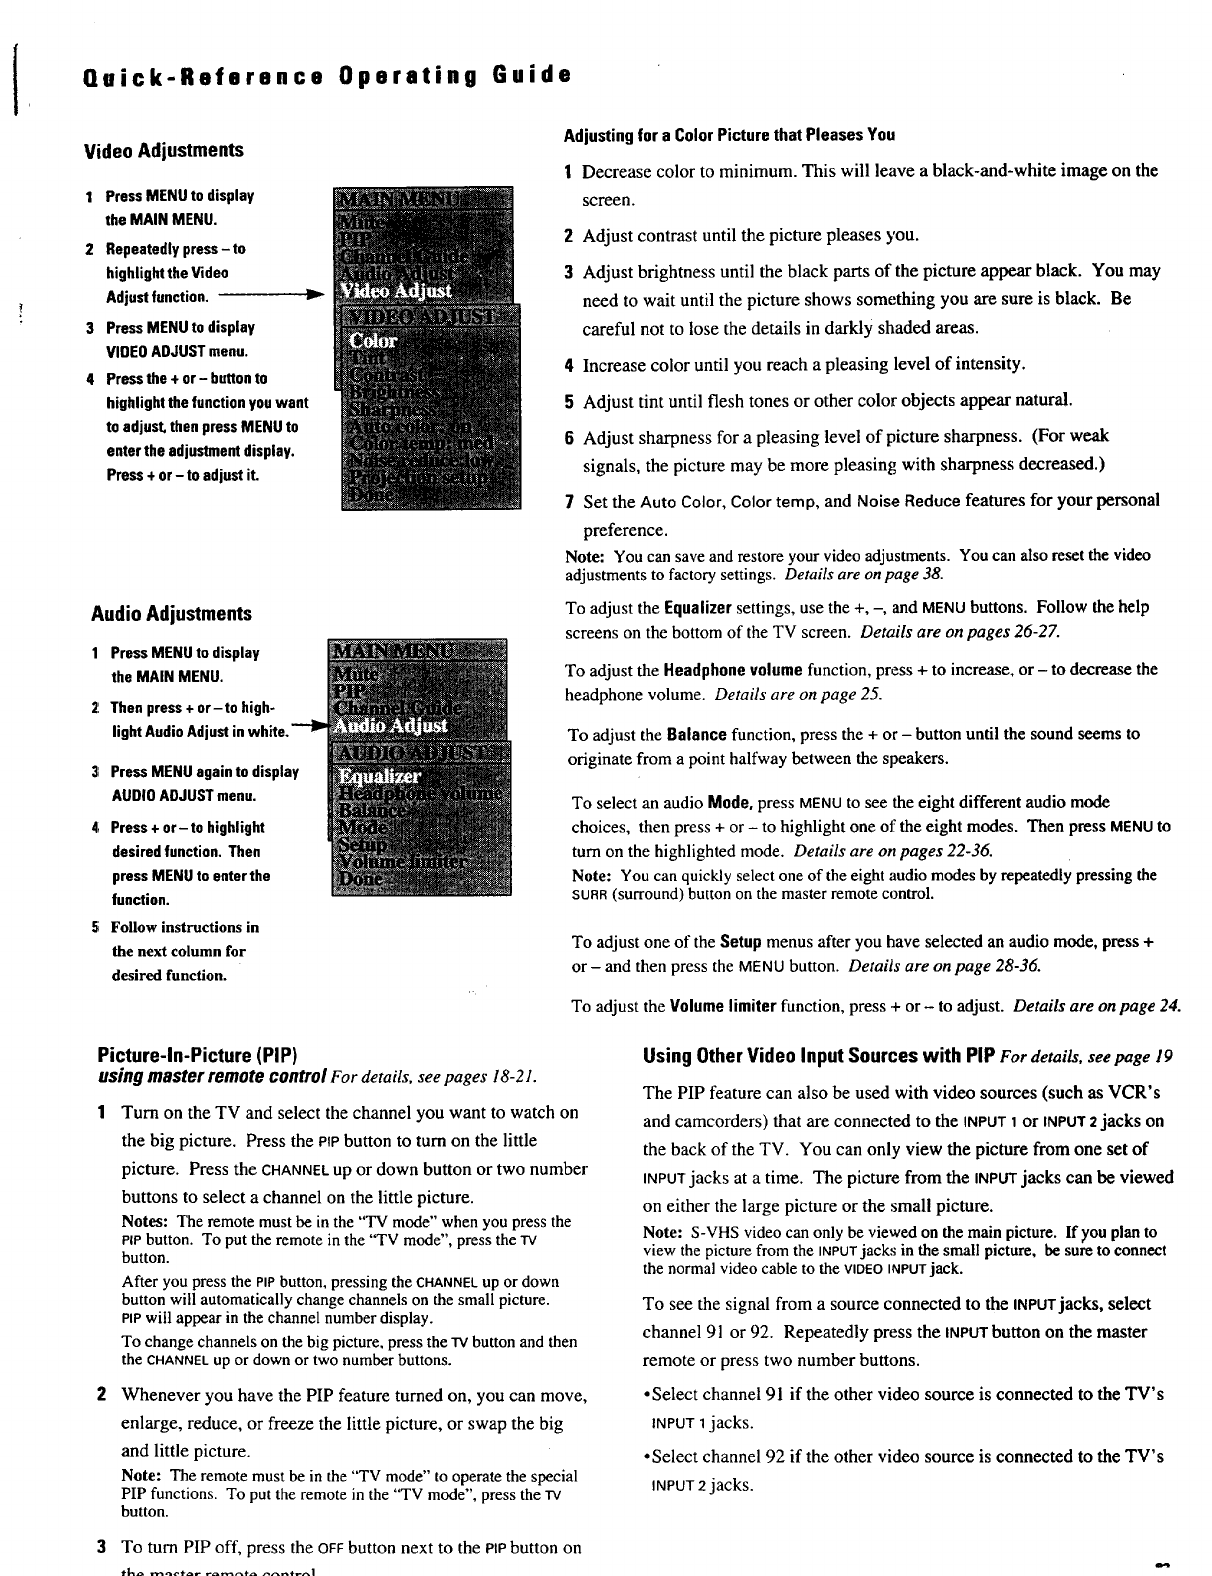
Quick-Reference Operating Guide
Video Adjustments
1 Press MENU to display
the MAIN MENU.
2 Repeatedlypress-to
highlightthe Video
Adjustfunction.
3 PressMENU to display
VIDEOADJUST menu.
4 Pressthe + or- buttonto
highlight the functionyouwant
to adjust, then pressMENU to
enter the adjustmentdisplay.
Press+ or-to adjust it.
Audio Adjustments
1 PressMENUtodisplay
theMAINMENU.
2 Thenpress+or-to high-
lightAudioAdjl
PressMENU againto display
AUDIO ADJUSTmenu.
4l Press + or- to highlight
desiredfunction. Then
press MENU to enterthe
function.
5 Follow instructions in
the next column for
desired function.
Adjustingfor a Color Picturethat PleasesYou
1Decrease color to minimum. This will leave a black-and-white image on the
screen.
2Adjust contrast until the picture pleases you.
3Adjust brightness until the black parts of the picture appear black. You may
need to wait until the picture shows something you are sure is black. Be
careful not to lose the details in darkly shaded areas.
4Increase color until you reach a pleasing level of intensity.
5Adjust tint until flesh tones or other color objects appear natural.
6Adjust sharpness for a pleasing level of picture sharpness. (For weak
signals, the picture may be more pleasing with sharpness decreased.)
7Set the Auto Color, Color temp, and Noise Reduce features for your personal
preference.
Note: You can save and restore your video adjustments. You can also reset the video
adjustments to factory settings. Details are on page 38.
To adjust the Equalizer settings, use the +, -, and MENUbuttons. Follow the help
screens on the bottom of the TV screen. Details are on pages 26-27.
To adjust the Headphone volume function, press + to increase, or - to decrease the
headphone volume. Details are on page 25.
To adjust the Balance function, press the + or - button until the sound seems to
originate from a point halfway between the speakers.
To select an audio Mode, press MENUto see the eight different audio mode
choices, then press + or - to highlight one of the eight modes. Then press MENUto
turn on the highlighted mode. Details are on pages 22-36.
Note: You can quickly select one of the eight audio modes by repeatedly pressing the
SORR (surround) button on the master remote control.
To adjust one of the Setup menus after you have selected an audio mode, press +
or - and then press the MENU button. Details are on page 28-36.
To adjust the Volumelimiter function, press + or - to adjust. Details are on page 24.
Picture-In-Picture (PIP)
usingmasterremotecontrolFordetails, see pages 18-21.
Turn on the TV and select the channel you want to watch on
the big picture. Press the PIP button to turn on the little
picture. Press the CHANNEL up or down button or two number
buttons to select a channel on the little picture.
Notes: The remote must be in the "TV mode" when you press the
PIPbutton. To put the remote in the "TV mode", press the "rv
button.
After you press the PiP button, pressing the CHANNELup or down
button will automatically change channels on the small picture.
PIPwill appear in the channel number display.
To change channels on the big picture, press the Iv button and then
the CHANNELup or down or two number buttons.
Whenever you have the PIP feature turned on, you can move,
enlarge, reduce, or freeze the little picture, or swap the big
and little picture.
Note: The remote must be in the "TV mode" to operate the special
PIP functions. To put the remote in the "TV mode", press the IV
button.
3To turn PIP off, press the OFFbutton next to the PIP button on
th_ m_¢t_r romr_to o_ntr_l
Using Other Video Input Sources with PIP For details, see page 19
The PIP feature can also be used with video sources (such as VCR's
and camcorders) that are connected to the INPUT1or INPUT2jacks on
the back of the TV. You can only view the picture from one set of
iNPUTjacks at a time. The picture from the iNPt.njacks can be viewed
on either the large picture or the small picture.
Note: S-VHS video can only be viewed on the main picture. If _,ou plan to
view the picture from the INPUTjacks in the small picture, be sure to connect
the normal video cable to the VIDEOINPUTjack.
To see the signal from a source connected to the INPUTjacks, select
channel 91 or 92. Repeatedly press the INPUTbutton on the master
remote or press two number buttons.
*Select channel 91 if the other video source is connecr_,xl to the TV's
INPUT 1jacks.
.Select channel 92 if the other video source is connected to the TV's
INPUT 2 jacks.

PROSCANo
We are committed to your complete satisfaction and viewing enjoyment.
Any time you have a question or want information about your ProScan product,
call our friendly toll-free number listed below. We're always ready to
help you Monday through Friday, 7 a.m. to 7 p.m. EST, year round.
1-800-ProScan
If you would like a copy of this manual in French, please follow the
instructions below:
Si un livret d'instructions en franqais n'est pas inclus avec votre appareil,
vous pouvez en obtenir un (indiquer le num_ro de module, votre nom, et
votre adresse) en vous adressant h:
Thomson l_lectronique Grand Public du Canada
Service des donn6es techniques
6540 Tomken Rd
Mississauga, Ontario L5T 2E9
An RCA
Entertainment
Product
Thomson Consumer Electronics
600 N Sherman Dr, PO Box 1976
Indianapolis, IN 46206-1976
©1993 Thomson Consumer Electronics, Inc.
Trademark(s)® Registered
Marca(s) Registrada(s)
Printed in U.S.A.
Part Number 1Q57 350-01A
