RCA TV/VCR Or DVD Combo Manual 98090083
User Manual: RCA RCA TV/VCR or DVD Combo Manual RCA TV/VCR or DVD Combo Owner's Manual, RCA TV/VCR or DVD Combo installation guides
Open the PDF directly: View PDF ![]() .
.
Page Count: 36
USER'S
GUIDE
TV/VCR COMBINATION
rfm
Important Information
RISKGF_SHOCK A
DO NOT OPEN
TO REDUCE THE RISK OF ELECTRIC SHOCK, DO
NOT REMOVE COVER (OR BACK). NO USER
SERVICEABLE PARTS INSIDE. REFER SERVICING
TO QUALIFIED SERVICE PERSONNEL.
This syml_l indicates "_%o_o.s
voltage" inside the product that
presents a risk of electricshock or
perso_ =jury.
A his symbolincb'catesimportant
instructions accompanying the
product.
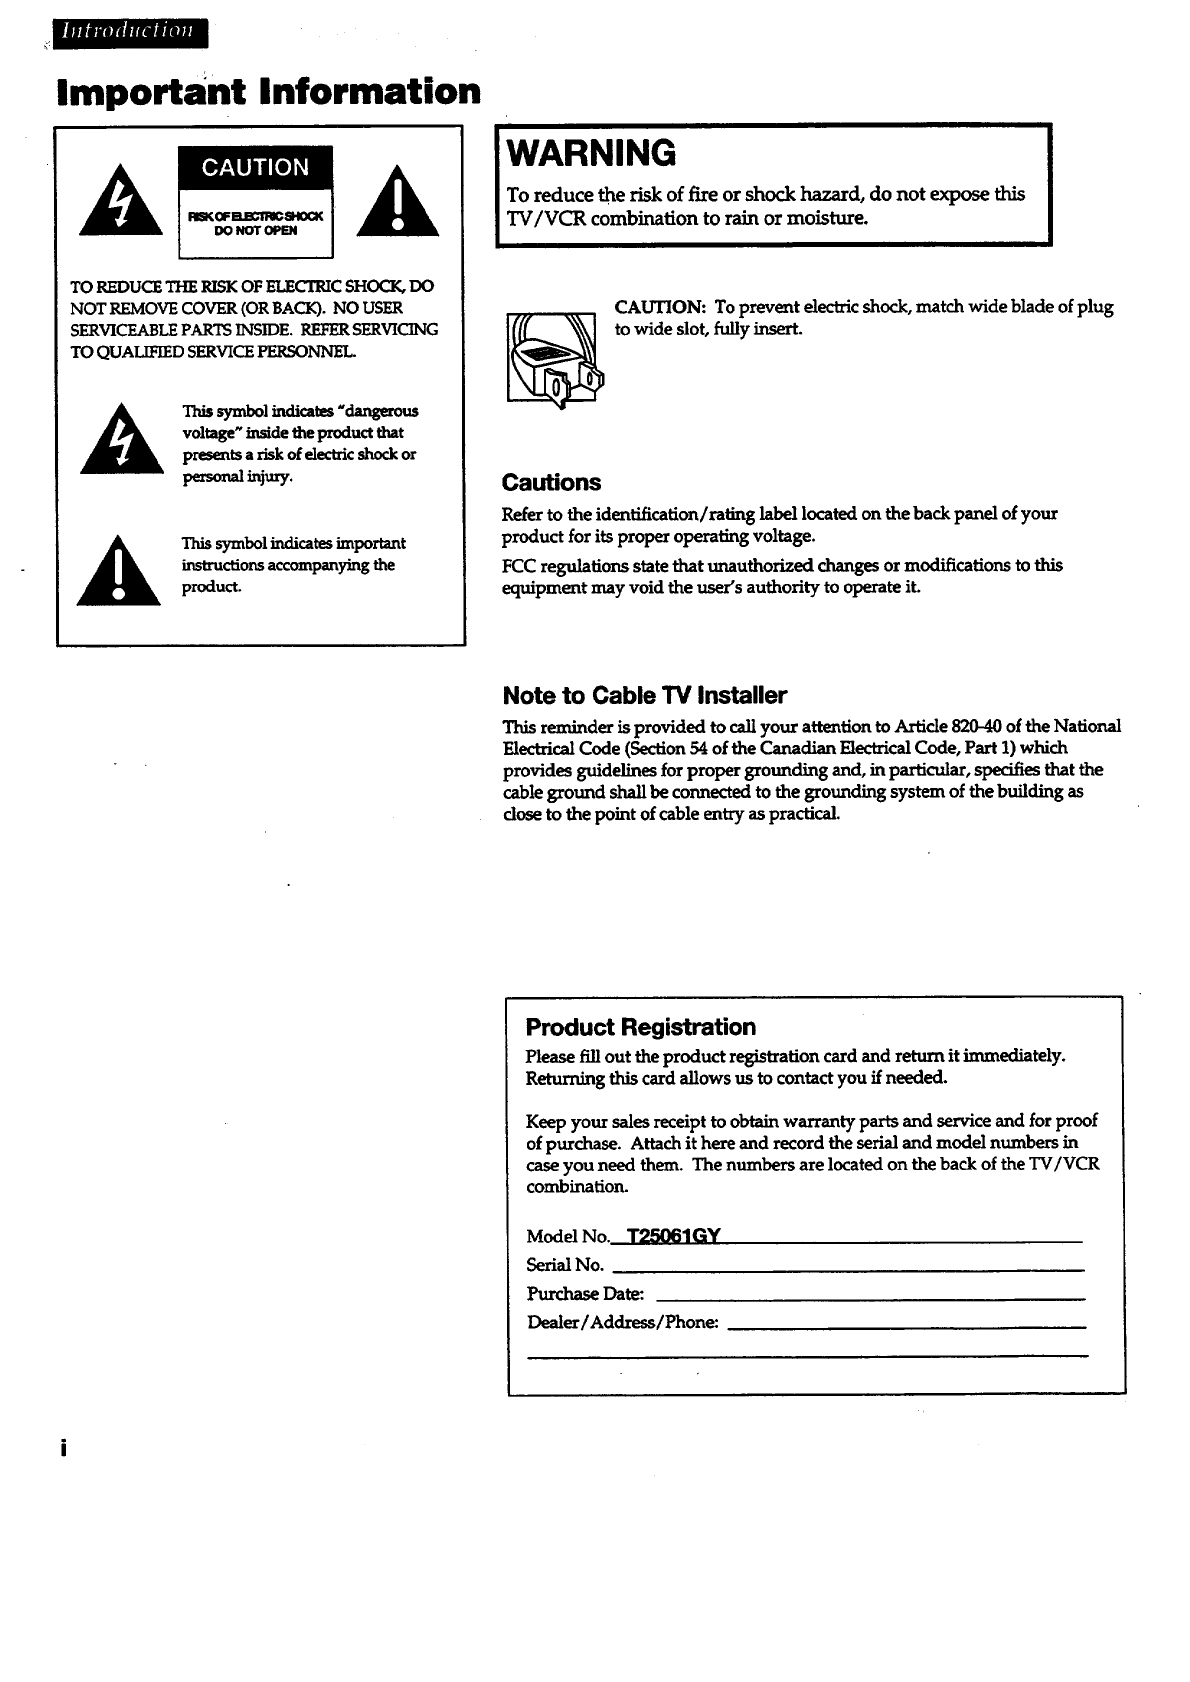
WARNING
To reduce the risk of fire or shock hazard, do not expose this
TV/VCR combination to rain or moisture.
CAUTION: To prevent electric shock, match wide blade of plug
to wide slot, fullyinsert.
Cautions
Refer to the identification/rating label located on the back panel of your
product for its proper operating voltage.
FCC regulations state that unauthorized changes or modifications to this
equipment may void the user's authority to operate it.
Note to Cable TV Installer
This reminder is provided to call your attention to Article 820-40 of the National
Electrical Cede (Section 54 of the Canadian Electrical Code, Part 1) which
provides guidelines for proper grounding and, in particular, specifies that the
cable ground shall be connected to the grounding system of the building as
closeto the point of cable entry as practical.
Product Registration
Please fill out the product registration card and return it immediately.
Returning this card allows us to contact you if needed.
Keep your sales receipt to obtain warranty parts and service and for proof
of purchase. Attach it here and record the serial and model numbers in
case you need them. The numbers are located on the back of the TV/VCR
combination.
Model No. T25061GY
Serial No.
Purchase Date:
Dealer/Address/Phone:
|mmm
-Table of Contents
Important Information
Waming
Cautions
Note to Cable TV Installer
Product Registration
i
i
i
i
Setting Up the TV/VCR
S_p Check Accessories With
TV/VCR Combination 2
Insert Batteries m Rmnote 2
Connect Antenna or Cable-TV
System 3
Place the TV/VCR Where You
Want to Operate It 3
Plug in the TV/VCR ....3
Turn On theTV/VCR 3
Set the Clock and Auto Channel
Search Automaticany 4
Set theClockManually 4
Add or Remove Channels from
TV/VCR's Memory 5
Select the Language.
(F_cojatm Idioma,/Choisissez
une l..ar_gue.) 5
Selecta Channel and Adjust
the Volume 5
Using the Remote Control
Buttons 6-7
Using the TV/VCR Features
On-ScreenDisplays 8
AdjusttheVideo 8-9
Channel Labeling 9
Commercial Skip 9
Closed Captions ,10
Alert Sound ,10
Program Guard 10
Wake-Up Timer 11
Sleep Timer 11
Playing a Tape
Operating Instructions 12
Using the Playback Features
Pause 13
Frame Advance 13
_ct_-e Search 13
Slow Motion ,.13
Automatic Tracking 14
Manual Tracking 14
Time Counter. 14
Auto Play Feature 15
Auto RepeatFeature. 15
Commercial Scan .15
Index Search 16
Zero Search 17
BlankSearch 17
Recording a Program
_ording Feat_es
RecordingSpeeds 18
Recording Pause 18
Types of Recordings •19
Basic Recording
Operating Instructions 19
Express Recording 20
Recording While You're Away
Timer Recording 21
Checking or Clearing
Timer Recordings 22
Stopping a Timer Recording _ 22
Copying and Editing Tapes 23
Location of Controls
Front Panel ,24
Back Panel 25
Hooking Up the TV/VCR
Choosing aHookup 25
Connect Antenna or
Cable System Without Cable Box_ 26
Connect Cable System With Cable Box to
Unscramble All Channels 27
Connect Cable System With
Cable Box to Unscramble Only Premium
Channels 27
Connect VCR or Camcorder
for Copying Tapes •28
References
Cleaning the TV/VCR 29
Trouble Checks 30-31
Limited Warranty 32
Index 33
bl'Ujmnn-'_m _ol_iWAauin_
Startup
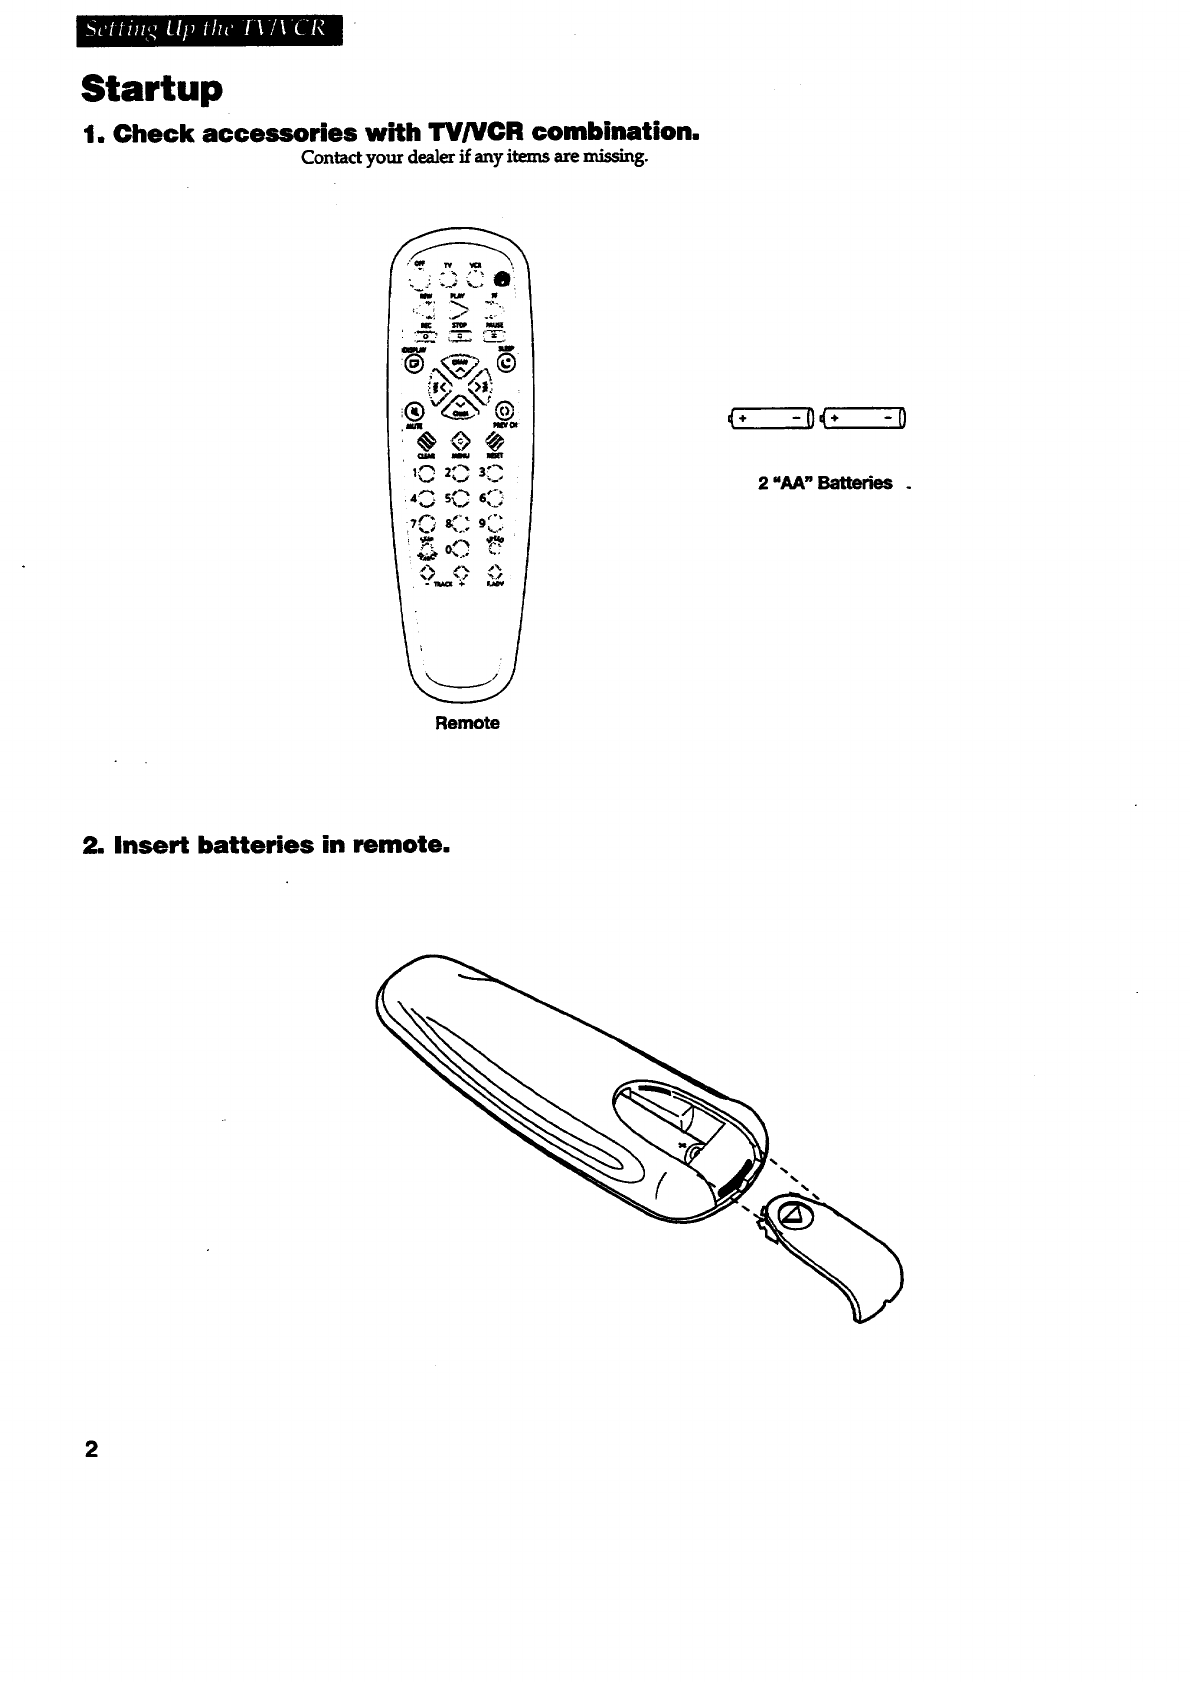
1. Check accessories with TV/VCR combination.
Contact your dealer if any items are n_ssmg.
Remo_
,€÷-0<÷-0
2 "AA" Batteries .
2. insert batteries in remote,
%%
%%
2
_uJ..tuJDl.,nlllllud_
Startup
3. Connect antenna or cable-TV system.
Connect a home antenna or a cable-TV systenL Detai/s on pages 2527.
4. Place the TV/VCR where you want to operate it.
Place the TV/VCR in a location where it is safe to operate.
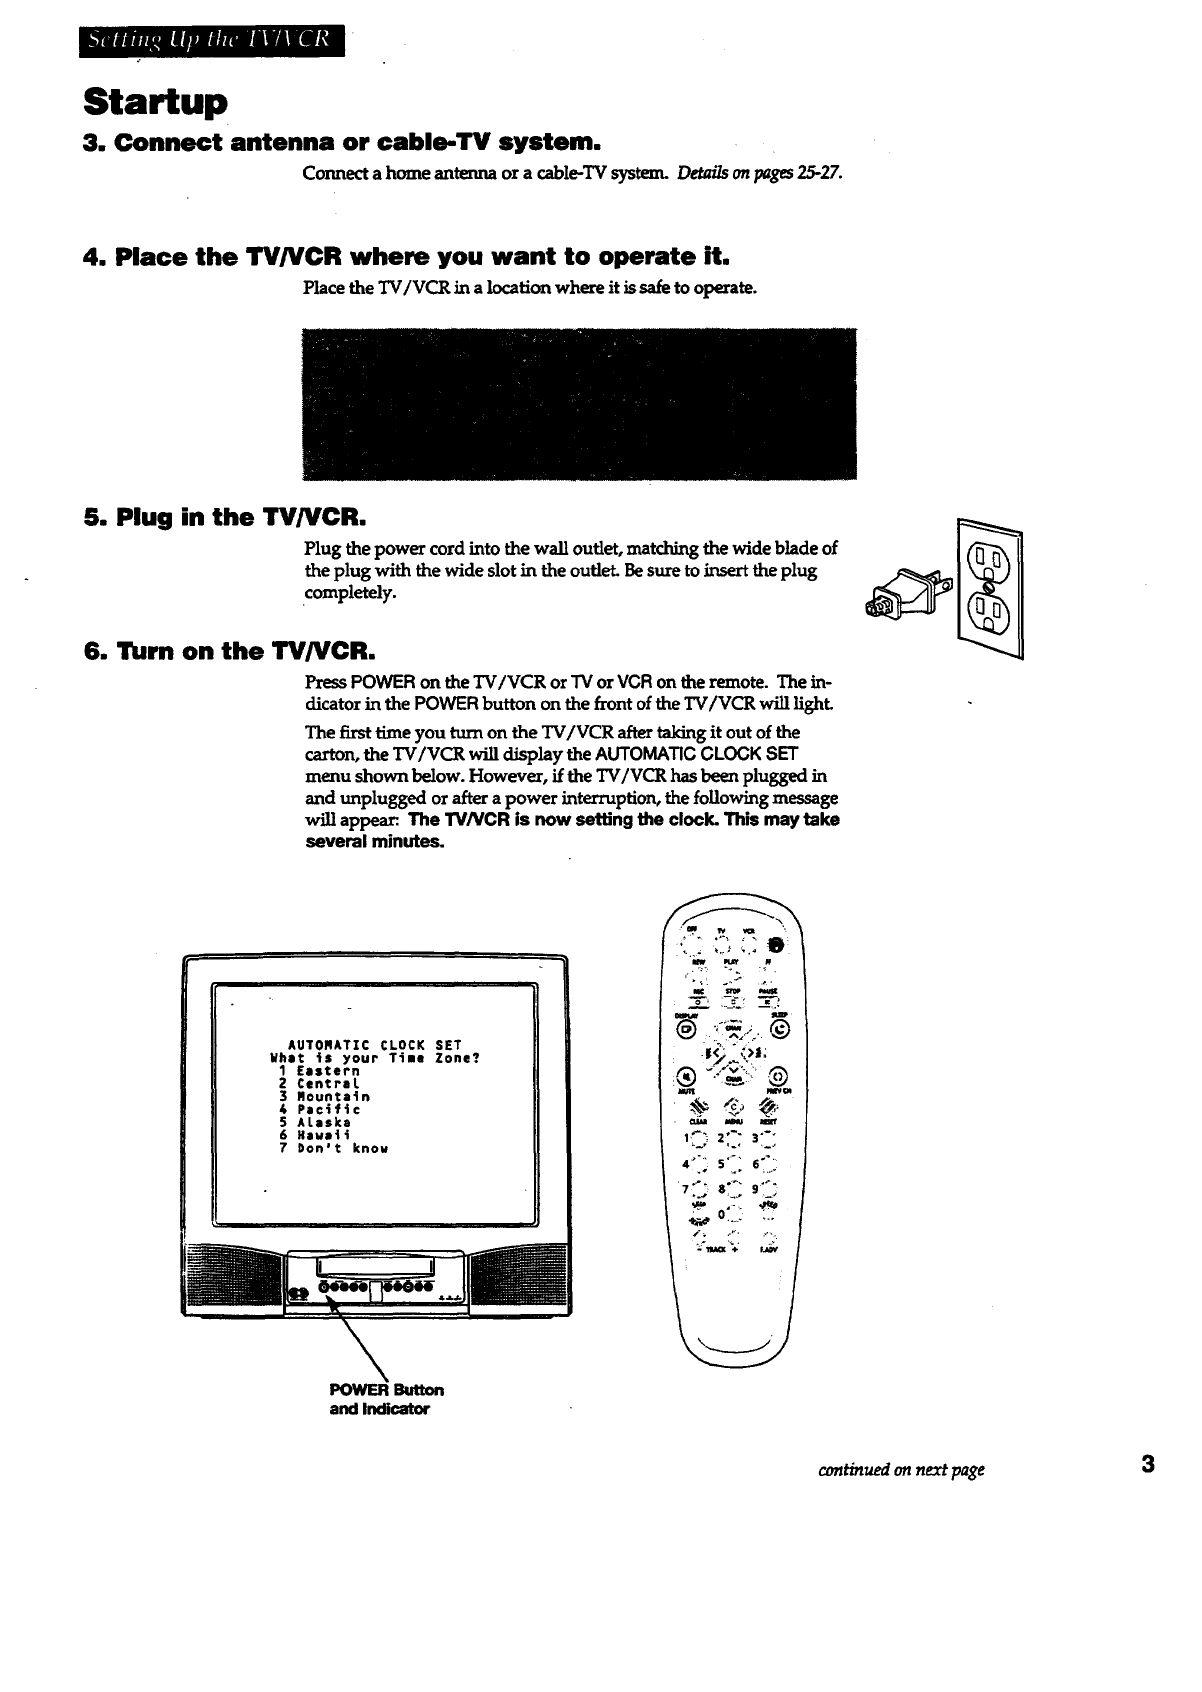
5. Plug in the TV/VCR.
Plug the powe_ cord into the wall outlet, matching the wide blade of
theplug withthewide slotintheoutlet.Be suretoinserttheplug
.completely.
6. Turn on the TV/VCR.
PressPOWER on theTV/VCR or"IVorVCR on theremote.The in-
dicatorinthePOWER buttonon thefrontoftheTV/VCR willlight.
The firsttimeyou turnon theTV/VCR aftertakingitoutofthe
carton, the _/V(_ will display the AUTOMATIC CLOCK SET
menu shown below.However, iftheTV/VCR hasbeen pluggedin
and unplugged or aftera power interruption,thefollowingmessage
will appear. The TV/VCR is now setting the clock. This may take
several minutes.
AUTORATZC CLOCK SET
Whet 4s your Time Zone?
1Eastern
Z Central
3 Rountotn
4Pacific
S ALaska
6 Heue_
7 Don't knou
POWER _
and Indicator
itw K_. w
=
1_'" 2" 3"-"
7 _'' 81" 9"_;
continuedonnext page 3
Startup
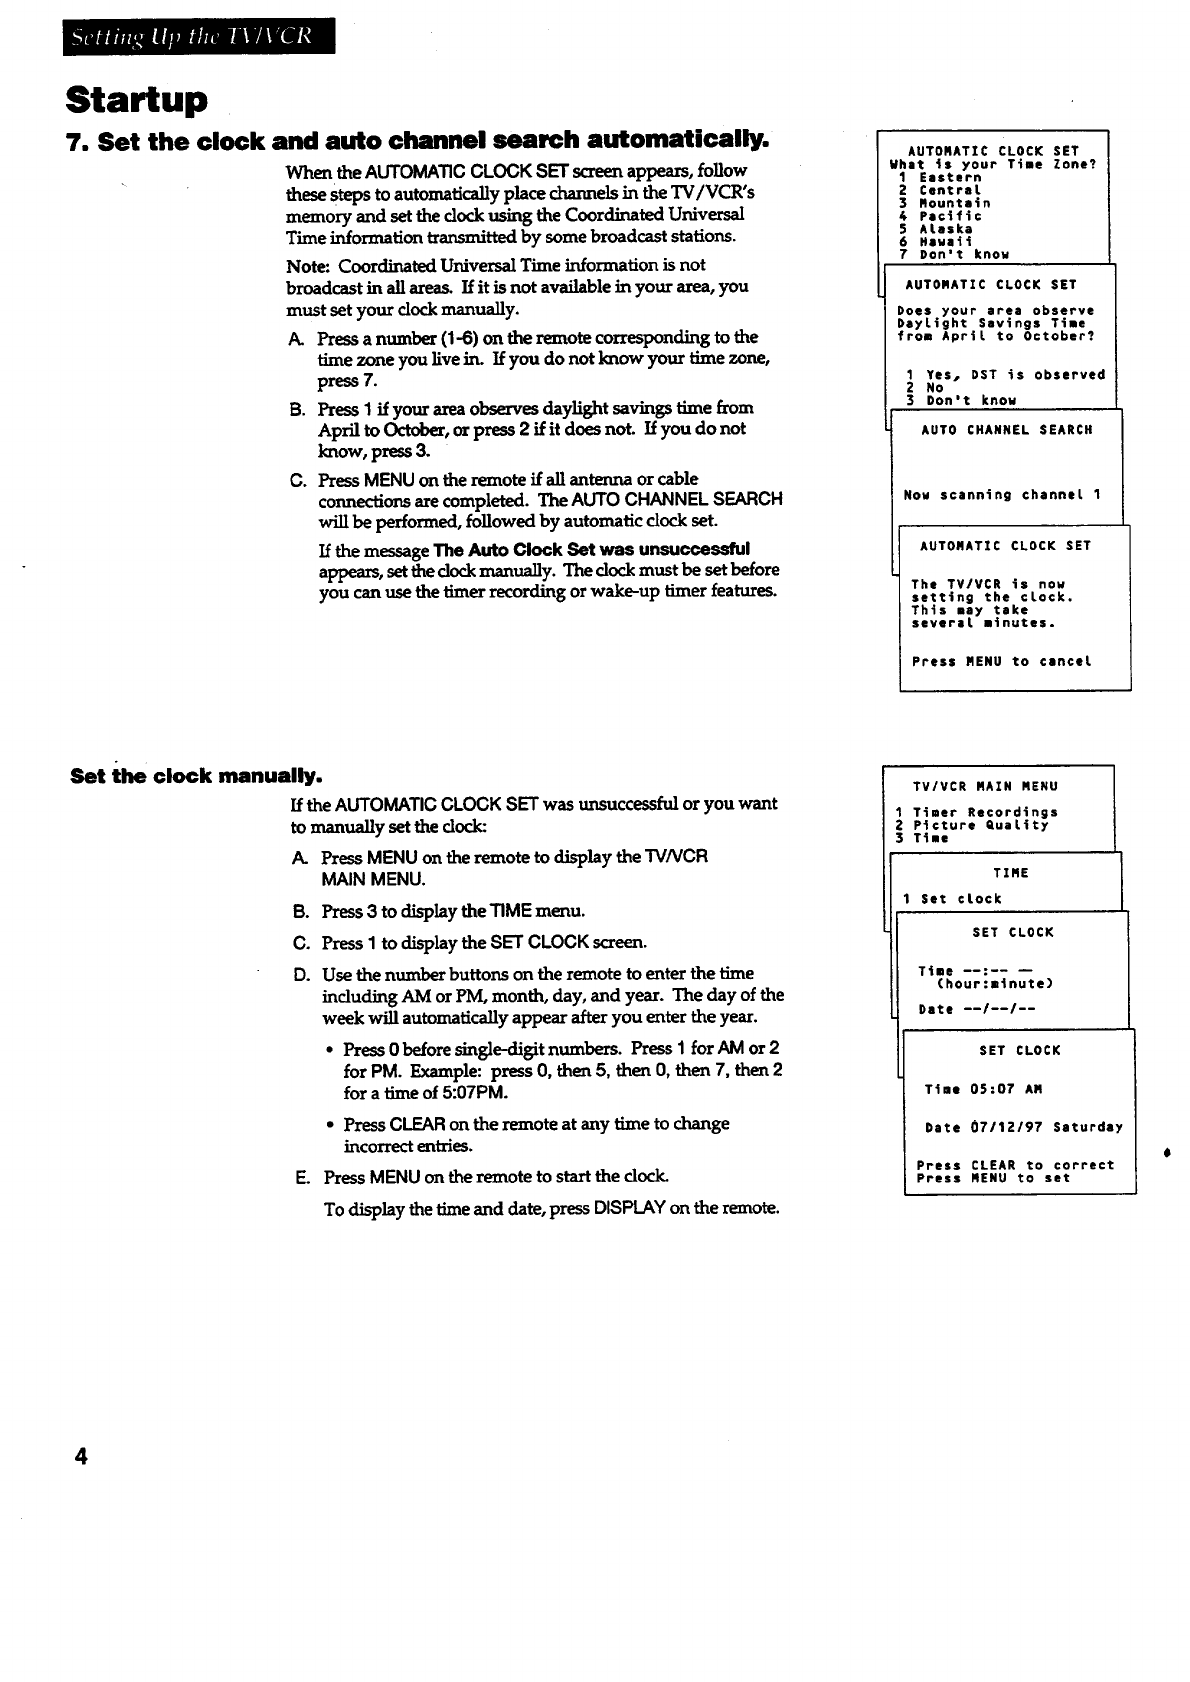
7. Set the clock and auto channel search automatically.
When the AUTOMA33C CLOCK SET screen appears, follow
these Stepsto automatically place channels in the TV/VCR's
memory and set the clock using the Coordinated Universal
Time information transmitted by some broadcast stations.
Note: Coordinated Universal Time information is not
broadcast in all areas. If it is not available in your area, you
must set your clock manually.
/_ Press a number (1-6) on the remote corresponding to the
time zone you live in. If you do not know your time zone,
press 7.
B. Press 1 if your area observes daylight savings time from
April to October, or press 2 if it does not. If you do not
know, press 3.
C. Press MENU on the remote if all antenna or cable
connections are completed. The AUTO CHNqNEL SEARCH
will be performed, followed by automatic clock set.
If the message The Auto Clock Set was unsuccessful
appears, set the clock manually. The clock must be set before
you can use the timer recording or wake-up timer features.
AUTONATIC CLOCK SET
What is your Time Zone?
1 Eastern
Z Central
3 Rountein
6 Pacific
5ALaska
6 Havsii
7 Don't know
AUTORATZC CLOCK SET
Does your area observe
DayLight Savings Time
from April to October?
1 Yes, DST is observed
Z No
3Don't know
AUTO CHANNEL SEARCH
Now scanning channel 1
AUTONATZC CLOCK SET
The TV/VCR is now
setting the clock.
This may take
several minutes.
Press NENU to cancel
Set the clock manually.
If the AUTOMATIC CLOCK SET was umuccessful or you want
to manually set the dock:
P_ PressMENU on the remote to display the TV/VCR
MAIN MENU.
B. Press3 to display the'RME menu.
C. Press 1 to display the SET CLOCK screen.
D. Use the number buttons on the remote to enter the time
including AM or PM, month, day, and year. The day of the
week will automatically appear after you enter the year.
•Press 0 before sing]e-digit numbers. Press I for AM or 2
for PM. Example: press 0, then 5, then 0, then 7, then 2
for a time of 5:07PM.
• Press CLEAR on the remote at any time to change
incorrect entries.
E. Press MENU on the remote to start the dock.
To display the time and date, press DISPLAY on the remote.
TV/VCR NAZN NENU
1 Timer Recordings
2 P_cture euaLtty
3 Time
TZRE
1 Set clock
SET CLOCK
Time --:-- --
(hour:minute)
Date --/--/--
SET CLOCK
Time 05:07 AR
Date 07/1Z/97 Saturday
Press CLEAR to correct
Press NENU to set
4
_lmRnWm_milVA_
Startup
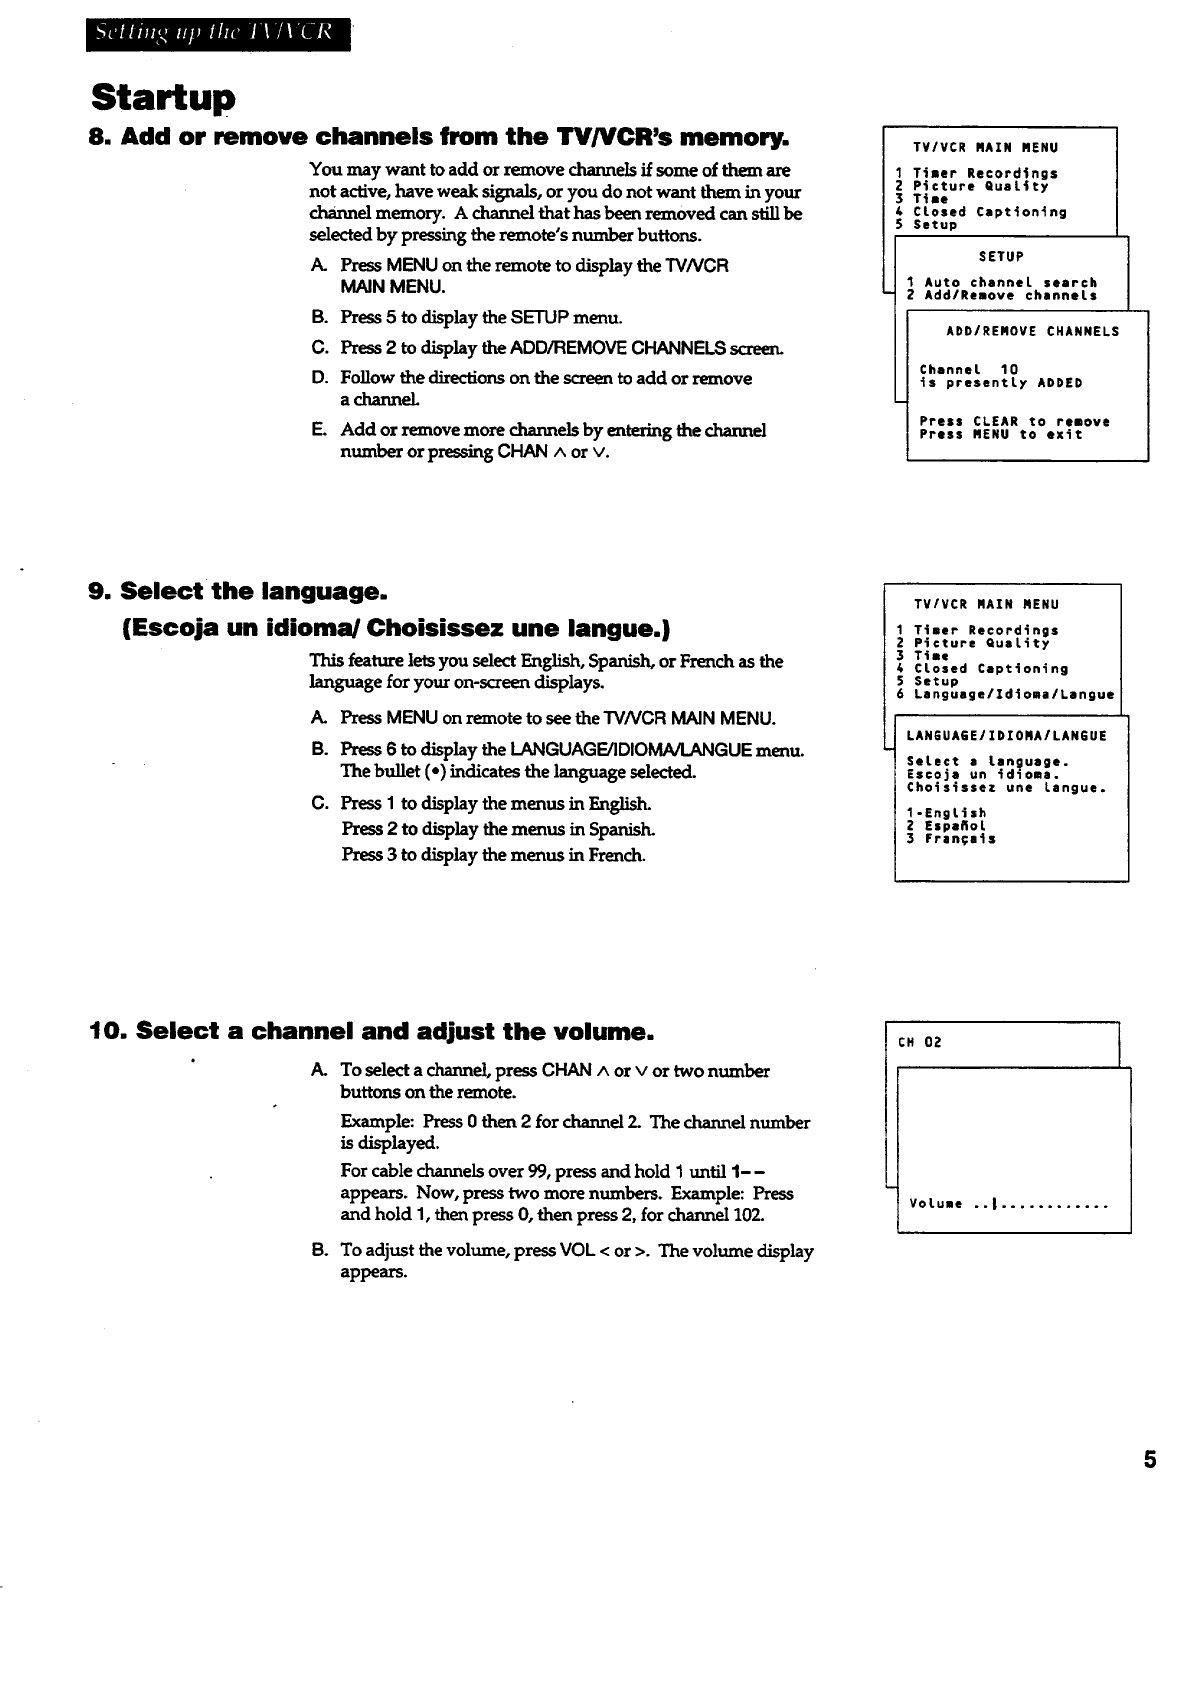
8. Add or remove channels from the TV/VCR's memory.
You may want to add or remove channels if some of them are
not active, have weak signals, or you do not want them in your
channel memory. A channel that has been removed can still be
selected by pressing the remote's number buttons.
PressMENU on the remote to display the "rVNCR
MAIN MENU.
B. Press5 to display the SETUP menu.
C. Press2 to display the ADD/REMOVE CHANNELS screen.
D. Follow the directions on the screen to add or remove
a channeL
E. Add or remove more channels by entering the channel
number or pres_g CHAN^ or v.
TVIVCR RAIN MENU
Timer Recordings
Picture QuaLity
Time
CLosed Captioning
Setup
SETUP
Auto channeL search
Add/Remove channels
ADD/REMOVE CHANNELS
Channel 10
is presently ADDED
Press CLEAR to remove
Press MENU to exit
9. Select the language.
(Escoja un idioma/Choisissez une langue.)
This feature lets you select English, Spanish, or French as the
language for your on-screen displays.
A. PressMENU on remote to see the TV/VCR MAIN MENU.
B. Press6 to display the LANGUAGE/IDIOMA/LANGUE menu.
The bullet (-) indicates the language selected.
C. Press I to display the menus in English.
Press 2 to display the menus in Spanish.
Press 3 to display the menus in French.
TVIVCR RAIN MENU
1 Timer Recordings
Z Picture quality
3 Tile
4CLosed Captioning
5 Setup
6Lenguage/Zdtoma/Langue
LAN6UA6E/ZDIOMA/LANEUE
SeLect s Language.
Escoje un idlome.
Choisissez une Langue.
1-EngLish
2EspeRoL
3 Fran;sts
10. Select a channel and adjust the volume.
A. To select a channel, press CHAN^ or vor two number
buttons on the remote.
Example: Press 0 then 2for channel 2_ The channel number
is displayed.
For cable channels over 99, press and hold 1until 1--
appears. Now, press two more numbers. Example: Press
and hold 1, then press (3, then press 2, for channel 102.
B. To adjust the volume, press VOL <or >. The volume display
appears.
CH OZ
VoLume .-I ............
5
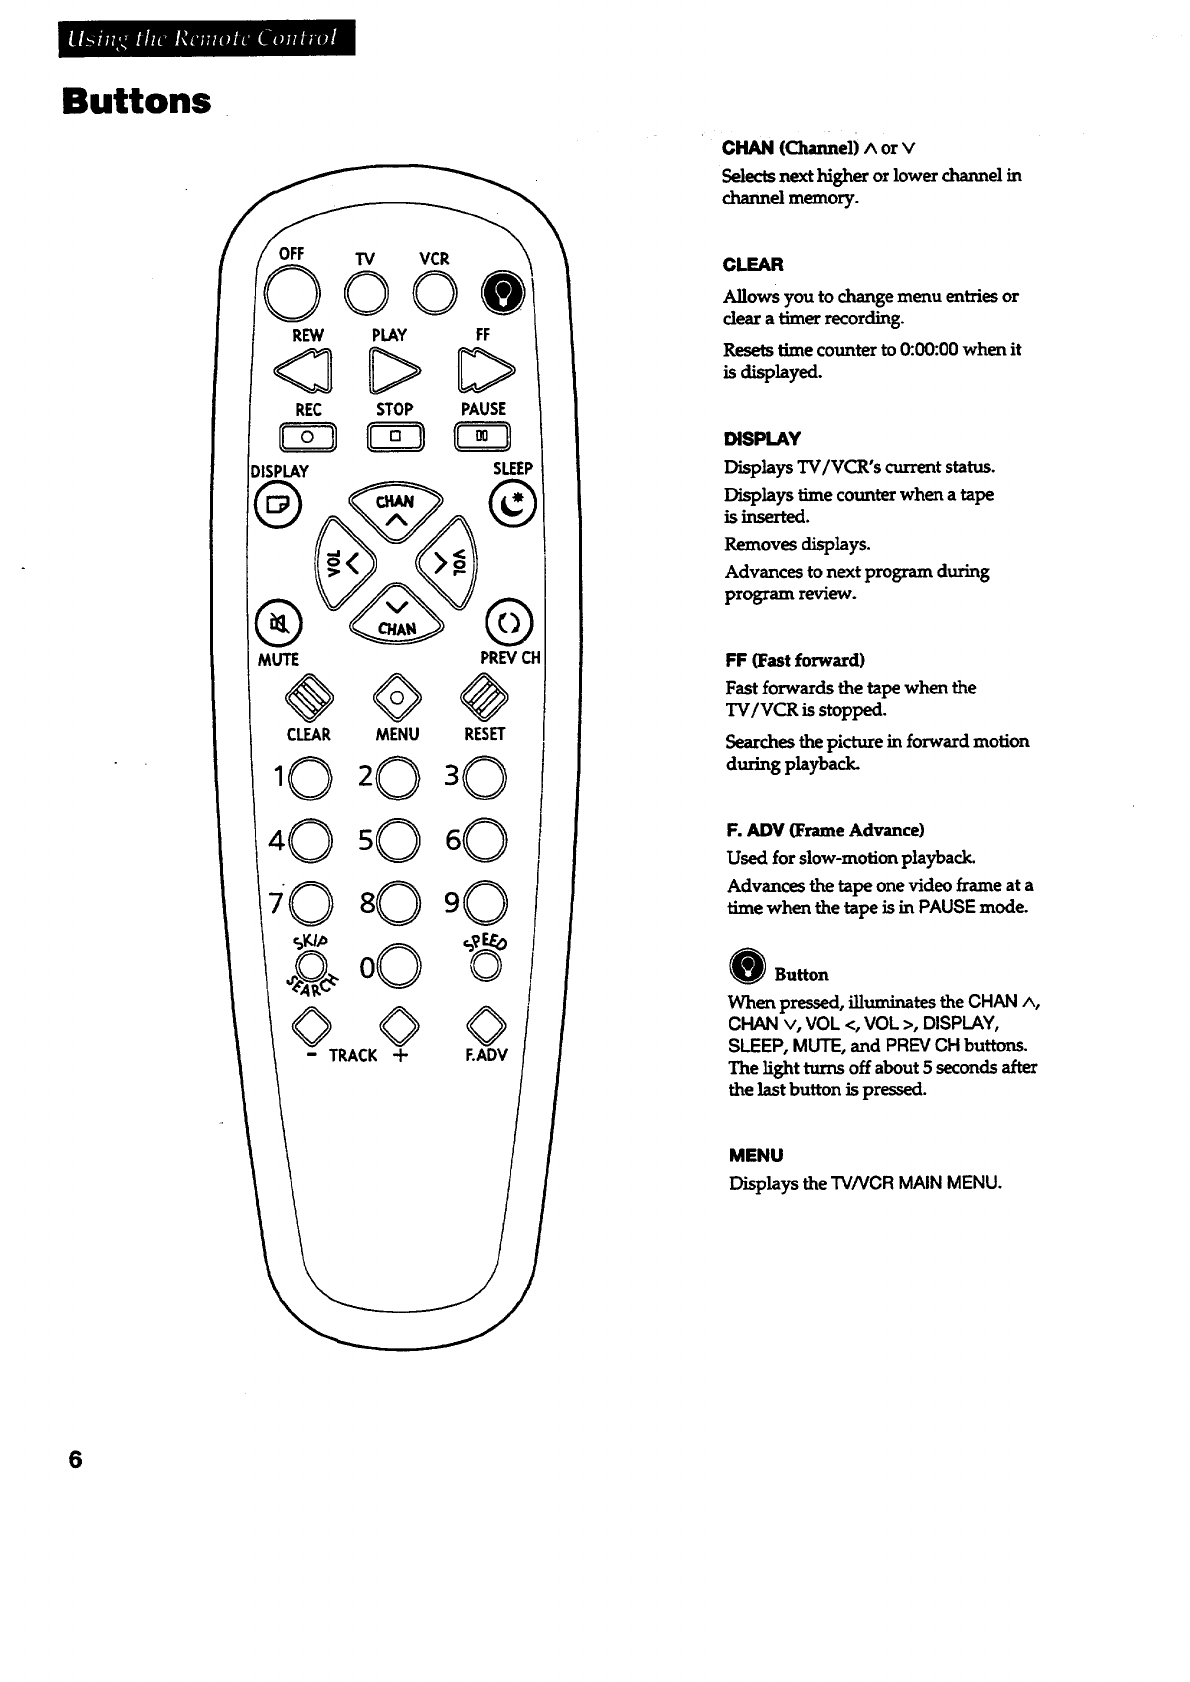
Buttons
TV VCR
ooe
REW PLAY FF
<3C>D
REC STOP PAUSE
_ISPLAY SLEEP
MUTE PREVCH
@©@
CLEAR MENU RESET
CHAN (Channel)Aor v
Selects next higher or lower channel in
channel memory.
CLEAR
Allows you to change menu entries or
dear a timer recording.
Resets time counter to 0:00:00 when it
is d_layed.
DISPLAY
Displays TV/VCR's current status.
Displays time counter when a tape
is inserted.
Removes displays.
Advances to next program during
program review.
b'F (Fast forward)
Fast forwardsthetapewhen the
TV/VCR is stopped.
Searches the picture in forward motion
during playback.
F. ADV (Frame Advance)
Used for slow-motion playback.
Advances the tape one video frame at a
timewhen thetapeisinPAUSE mode.
e Button
When pressed,illuminates theCHAN ^,
CHAN v, VOL <, VOL >, DISPLAY,
SLEEP, MUTE, and PREV CH buttons.
The light turns off about 5 seconds after
the last button is pressed.
MENU
Displays the TV/VCR MAIN MENU.
6
l|_nMl:M_nluImmnlumm
Buttons
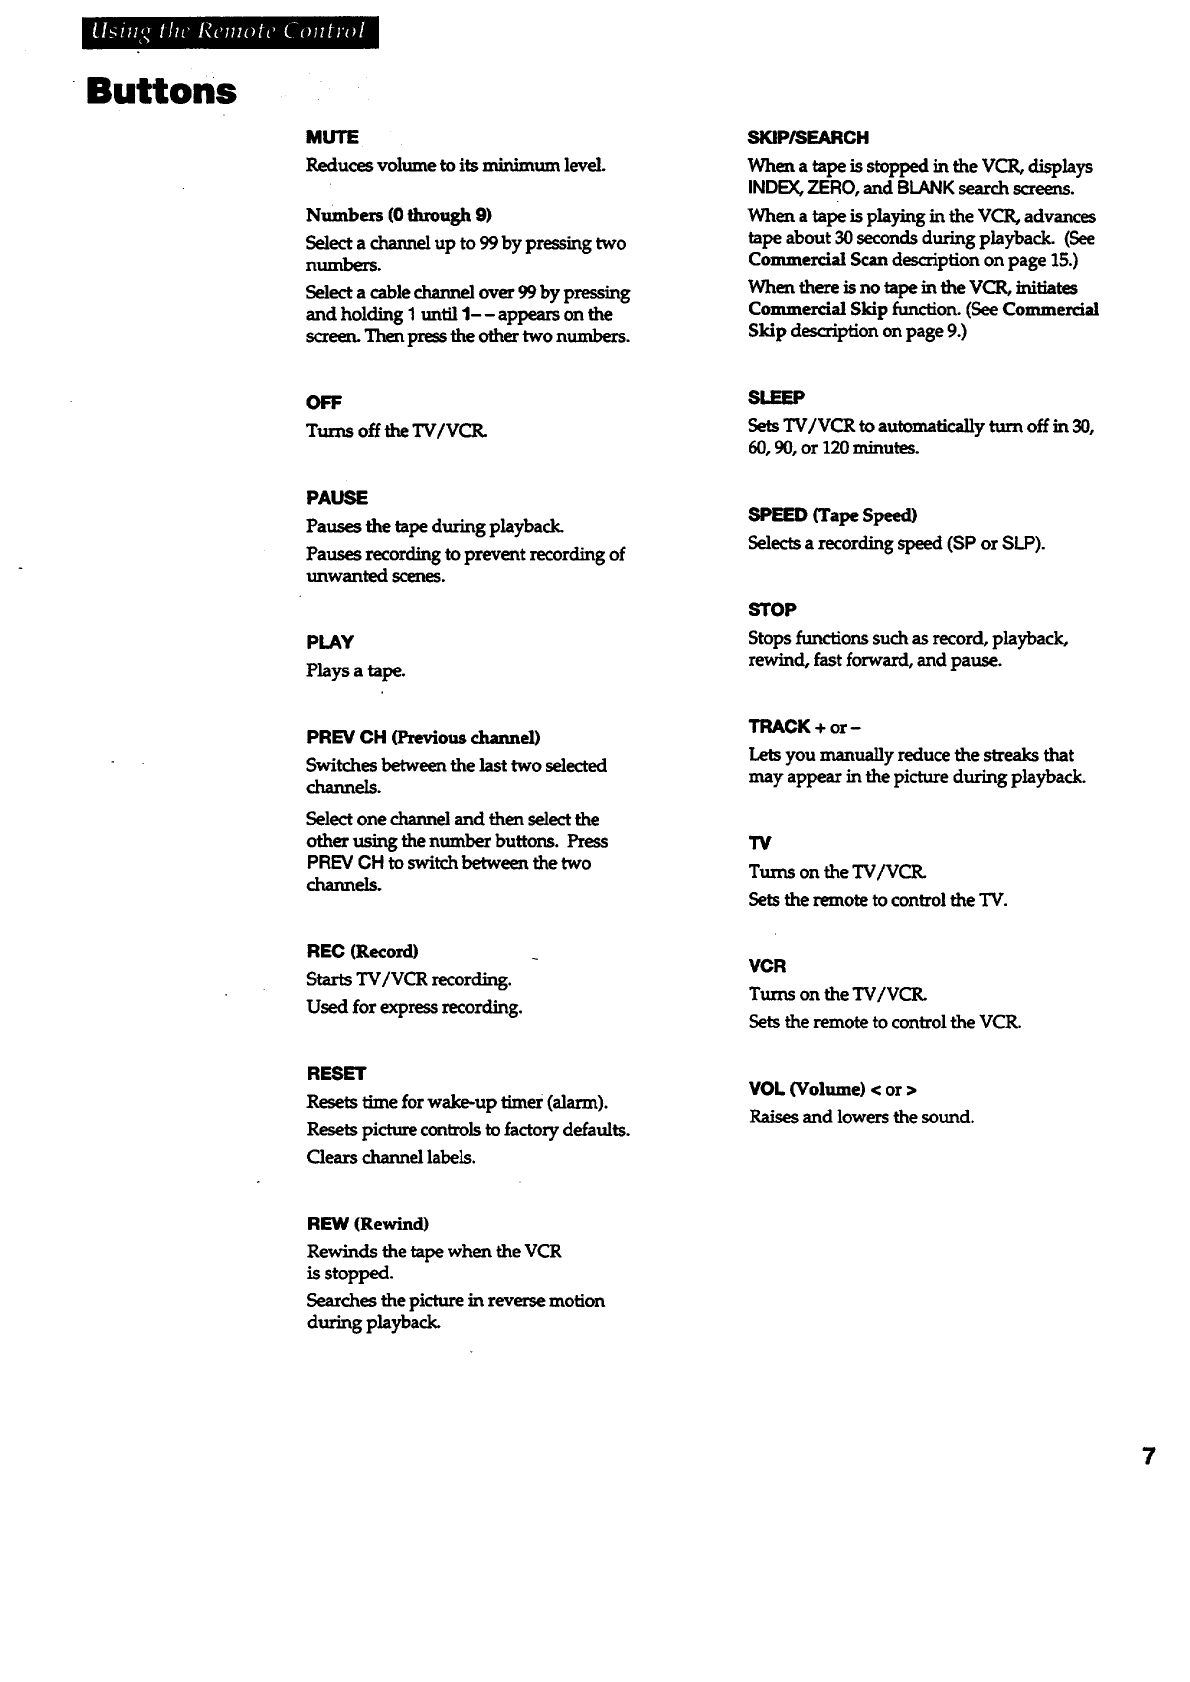
MUTE
Reduces volume to its minimum level.
Numbers (0 through 9)
Select a channel up to 99 by pressing two
numbers.
Select a cablechannel over 99 by pressing
and holding 1until 1-- appears on the
screen. Thenpress the other two numbers.
OFF
Turns off theTV/VCIL
PAUSE
Pauses the tape during playback.
Pauses recording to prevent recording of
unwanted scenes.
PLAY
Plays a tape.
PREV CH (Previous channel)
Switches between the last two selected
channels.
Select one channel and then select the
other using the number buttons. Press
PREV CH to switch between thetwo
channels.
REC (Record)
Starts TV/VCR recording.
Used for express recording.
RESET
Resets time for wake-up timer (alarm).
Resets picture controlsto factory defaults.
Gears channel labels.
REW (Rewind)
Rewinds the tape when the VCR
is stopped.
Searches the picture in reverse motion
during playback.
SKIP/SEARCH
When a tape is stopped in the VCILdisplays
INDEX, ZERO, and BLANKsearchscreens.
When atape is playing in the VCR,advances
tape about 30 seconds during playback. (See
Commercial Scan description on page 15.)
When there is no tape in the VCILinitiates
Commercial Skip function. (See Commercial
Skip description on page 9.)
Sets TVIVCR toautomatically turn off in 30,
60, 90, or120 minutes.
SPEEDCrapeSpeed)
Selectsarecordingspeed (SP or SI.P).
STOP
Stopsfunctions suchas record,playback,
rewind, fastforward,and pause.
TRACK + or-
Lets you manually reduce the streaks that
may appear in the picture during playback.
13/
Turns on the TV/VCIL
Sets the remote to control the "IV.
VCR
Turns on the TV/VC1L
Sets the remote to control the VCR.
VOL (Volume) <or >
Raises and lowers the sound.
7
Using the TV/VCR Features
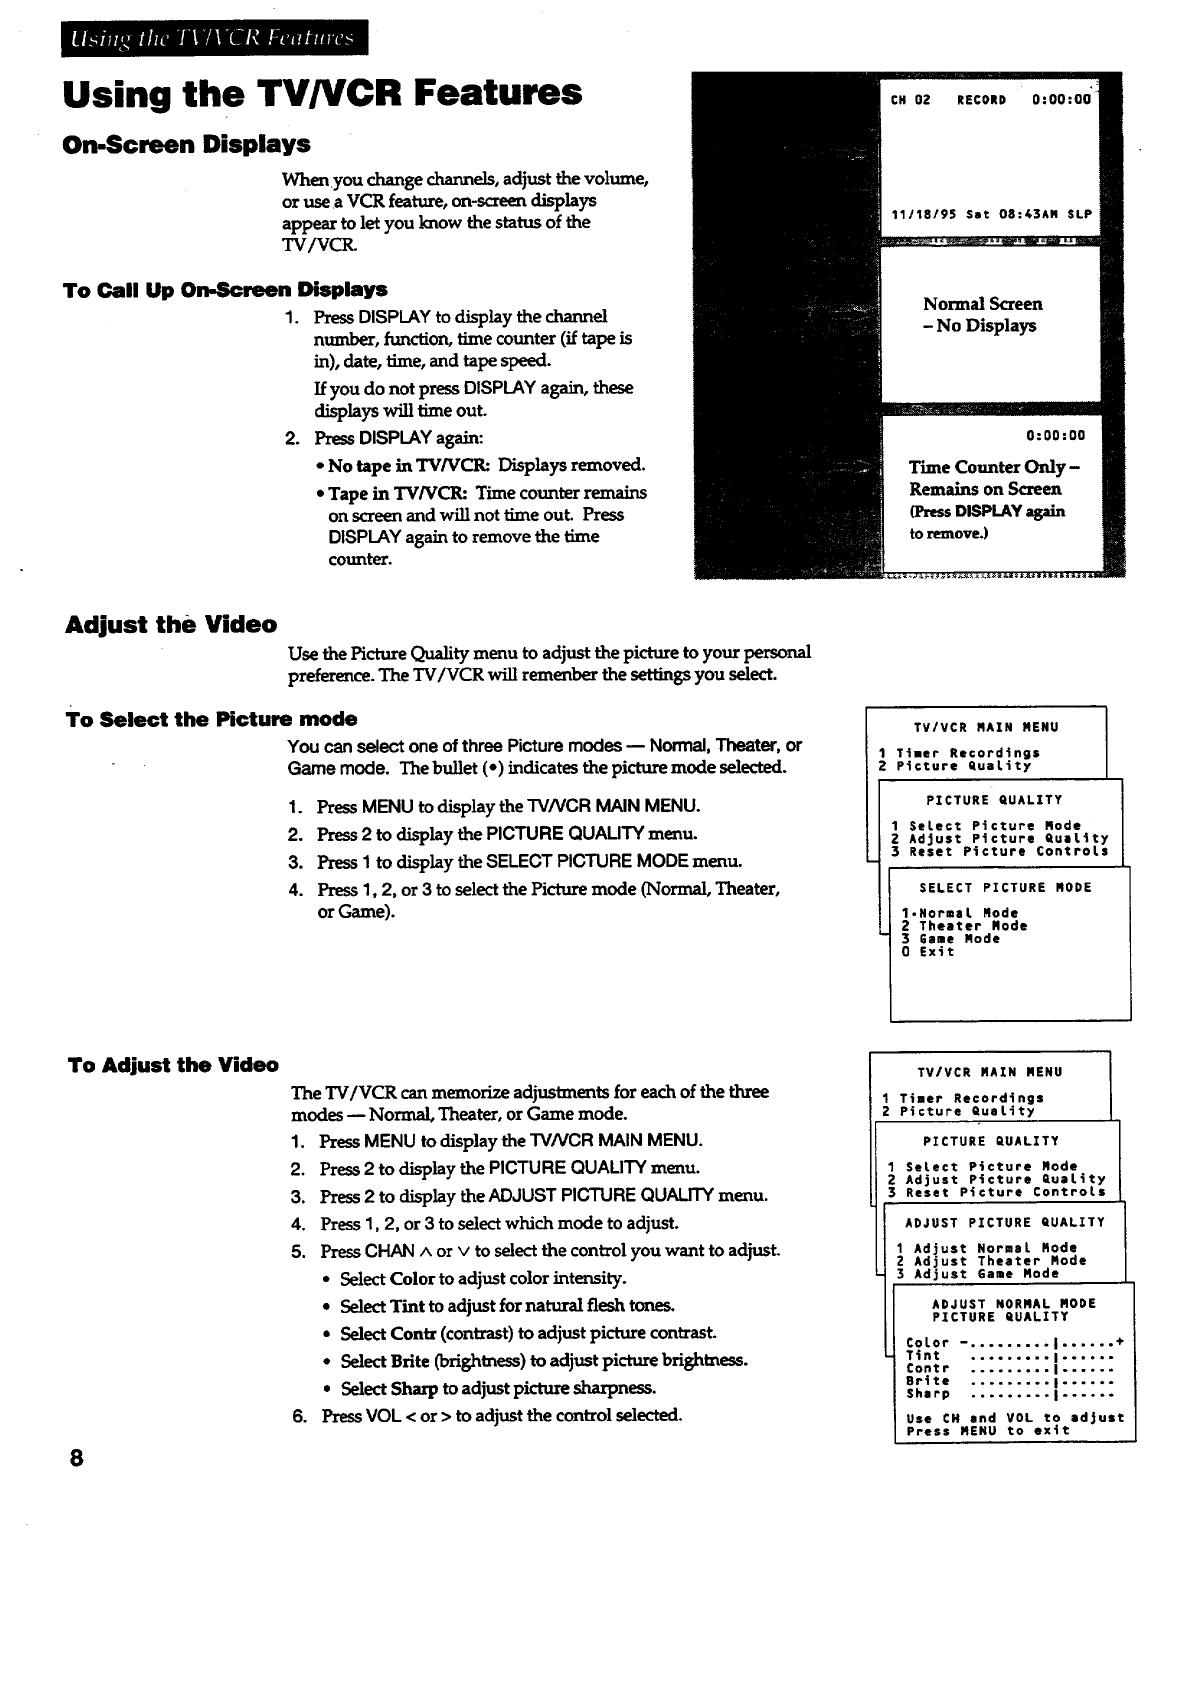
On.Screen Displays
Whenyou change channels, adjust the volume,
or use aVCR feature, on-screen displays
appear to let you know the status of the
TV/VCIL
To Call Up On-Screen Displays
1. PressDISPLAY to display the channel
number, function, time counter (if tape is
in), date, time, and tape speed.
If you do not press DISPLAY again, these
displays will time out.
2. Press DISPLAY again:
•No tape in TV/VCR: Displays removed.
• Tape in TV/VCR: Time counter remains
on screen and will not time out. Press
DISPLAYagain to remove the time
counter.
Adjust the Video
Use the Picture Quality menu to adjust the picture to your personal
preference. The TV/VCR will remenber the settings you select.
To Select the Picture mode
You canselectoneofthreePicturemodes-- Normal,Theater,or
Game mode. Thebullet(*) indicates the picture mode selected.
1. Press MENU to display the TV/VCR MAIN MENU.
2. Press2 to display the PICTURE QUALITY menu.
3. Press1 to display the SELECT PICTURE MODE menu.
4. Press1, 2, or 3 to select the Picture mode (Normal, Theater,
or Game).
TV/VCR RAIN MENU
1 Timer Recordings
2 Picture QuaLity
PICTURE QUALITY
1 SeLect Picture Rode
Adjust Picture QuaLity
Reset Picture ControLs
SELECT PICTURE RODE
1.NormaL Rode
2 Theater Rode
3 Game Rode
0 Exit
To Adjust the Video
8
The TV/VCR can memorize adjustments for each of the three
modes -- Normal, Theater, or Game mode.
1. PressMENU to display the TV/VCR MAIN MENU.
2. Press2 to display the PICTURE QUALITY menu.
3. Press 2 to display the ADJUST PICTURE QUALITY menu.
4. Press 1, 2, or 3 to select which mode to adjust.
5. Press CHAN ^or vto select the control you want to adjust.
* Select Color to adjust color intensity.
• Select Tint to adjust for natural flesh tones.
•Select Contz (contrast) to adjust picture contrast.
- Select Brite (brightness) to adjust picture brightness.
. Select Sharp to adjust picture sharpness.
6. Press VOL < or > to adjust the control selected.
TV/VCR RAIN MENU
1 Timer Recordings
2 Plcture QuaLity
PICTURE QUALITY
SeLect Picture Mode
Adjust Picture QuaLity
Reset Picture ControLs
ADJUST PICTURE QUALITY
1 Adjust NormaL Rode
ZAdjust Theater Mode
3Adjust Game Rode
ADJUST NORMAL MODE
PICTURE QUALITY
CoLor -. ........ I...... +
Tint ......... I......
Contr ......... I......
BrUte ......... I......
Sharp ......... |......
Use CH end VOL to adjust
Press MENU to exit
II; m. ...- . .mli i s = t41m. . .mi_m
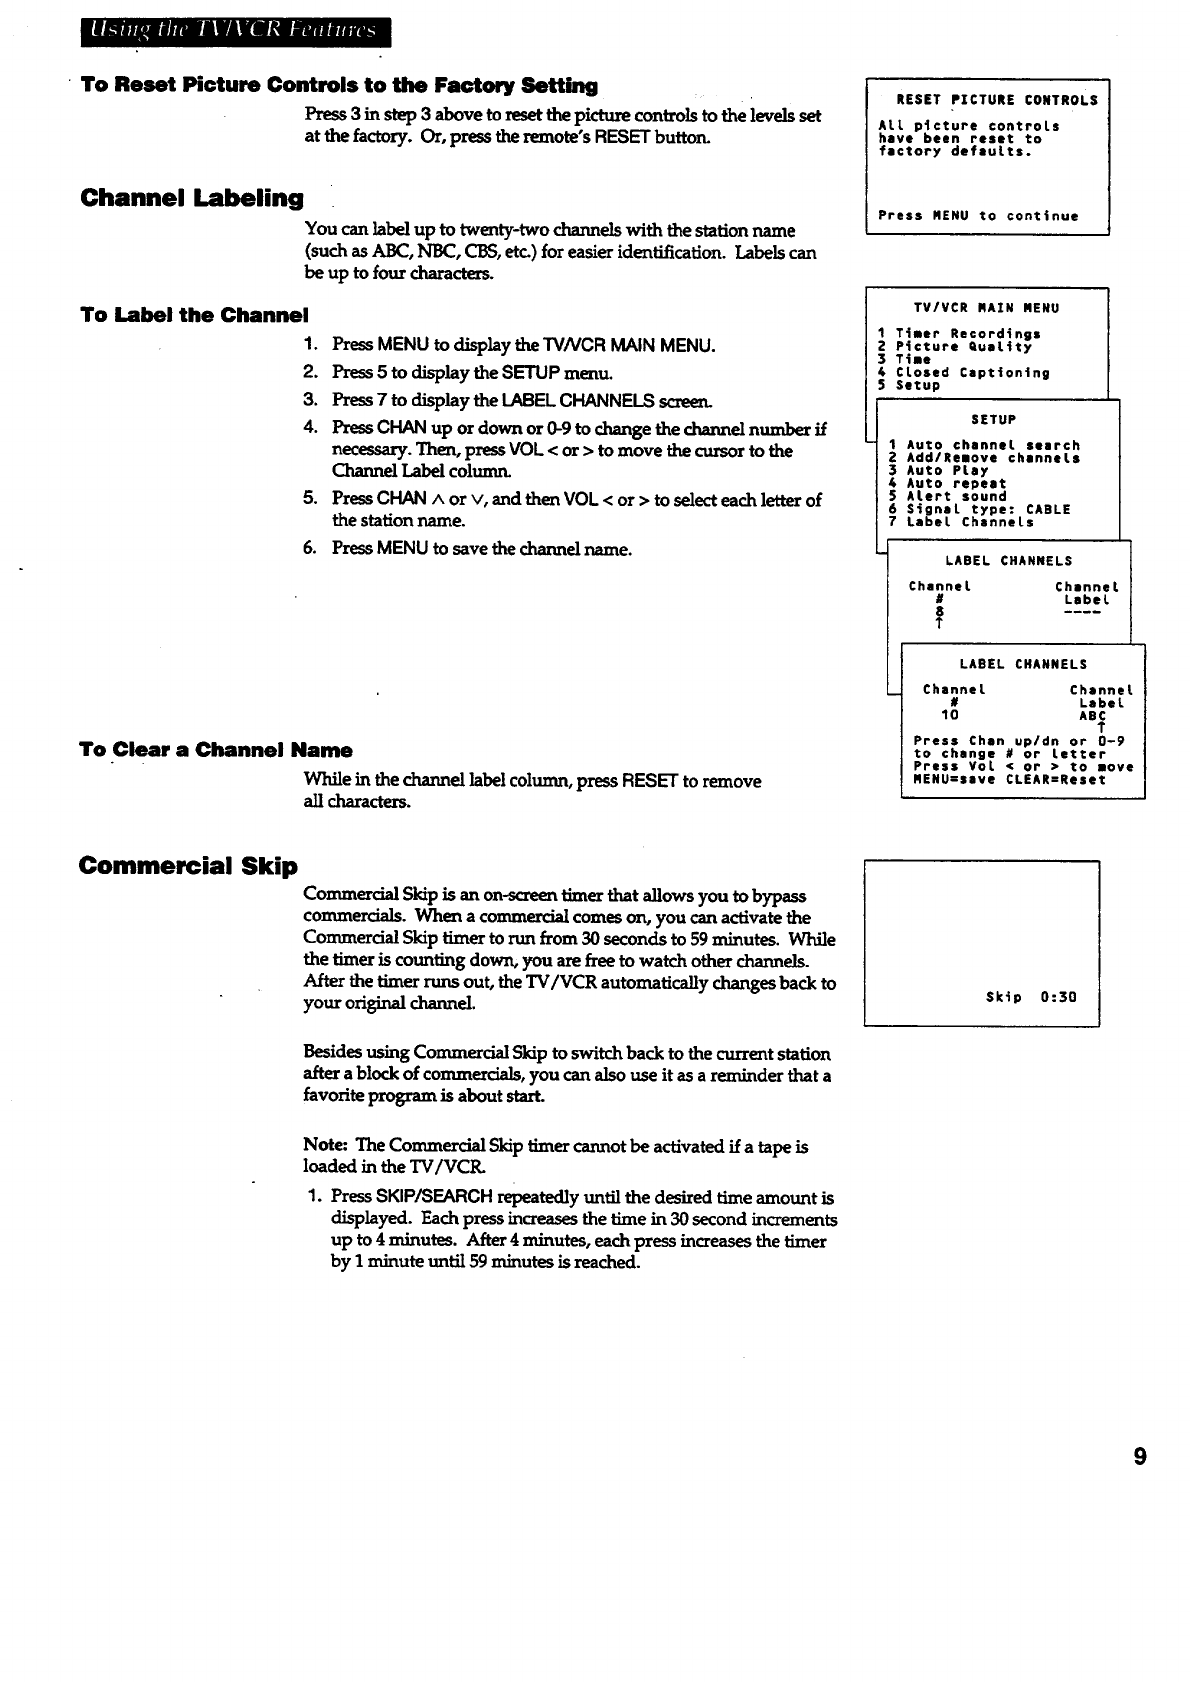
• To Reset Picture Controls to the Factory Setting
Press 3 in step 3 above to reset the picture controls to the levels set
at the factory. Or, press the remote's RESET buttorL
Channel Labeling
You can label up to twenty-two channels with the station name
(such as ABC, NBC, CBS, etc.) for easier identification. Labels can
be up to four characters.
To Label the Channel
1.
2.
3.
4.
o
6.
PressMENU to display the TVNCR MAIN MENU.
Press5 to display the SETUP menu.
Press7 to display the LABEL CHANNELS screen.
Press CHAN up or down or 0-9 to change the channel number if
necessary. Then, press VOL <or > to move the cursor to the
Channel Label colunu_
Press CHAN ^or v, and then VOL <or > to select each letter of
the station name.
Press MENU to save the channel name.
To Clear a Channel Name
While in the channel label column, press RESETto remove
all characters.
RESET PICTURE CONTROLS
ALL ptcture controls
have been reset to
factory defaults.
Press MENU to continue
TV/VCR RAIN MENU
1Ttaer Recordings
2 P4cture Quattty
3 Tiae
4CLosed Captton4ng
5 Setup
SETUP
1 Auto channel search
2Add/Reeove channels
3Auto PLay
4Auto repeat
$ALert sound
6 S_gnaL type: CABLE
7 Label ChanneLs
LABEL CHANNELS
Channel
#
8
T
Channel
Label
LABEL CHANNELS
Channel Channel
# Label
10 ABC
T
Press Chln up/dn or 0-9
to change # or Letter
Press VoL < or > to move
MENU=save CLEAR=Reset
Commercial Skip
Commercial Skip is an on-screen timer that allows you to bypass
commercials. When a commercial comes on, you can activate the
Commercial Skip timer to run from 30 seconds to 59minutes. While
the timer is counting down, you are free to watch other channels.
After the timer runs out, the TV/VCR automatically changes back to
your original channel.
Besides using Commercial Skip to switch back to the current station
after a block of commercials, you can also use it as a reminder that a
favorite program is about start.
Note: The Commercial Skip timer cannot be activated if a tape is
loaded in the TV/VCI_
1. Press SKIP/SEARCH repeatedly until the desired time amount is
displayed. Each press increases the time in 30 second increments
up to 4 minutes. After 4 minutes, each press increases the timer
by I minute until 59 minutes is reached.
Skip 0:30
9
Using the TV/VCR Features
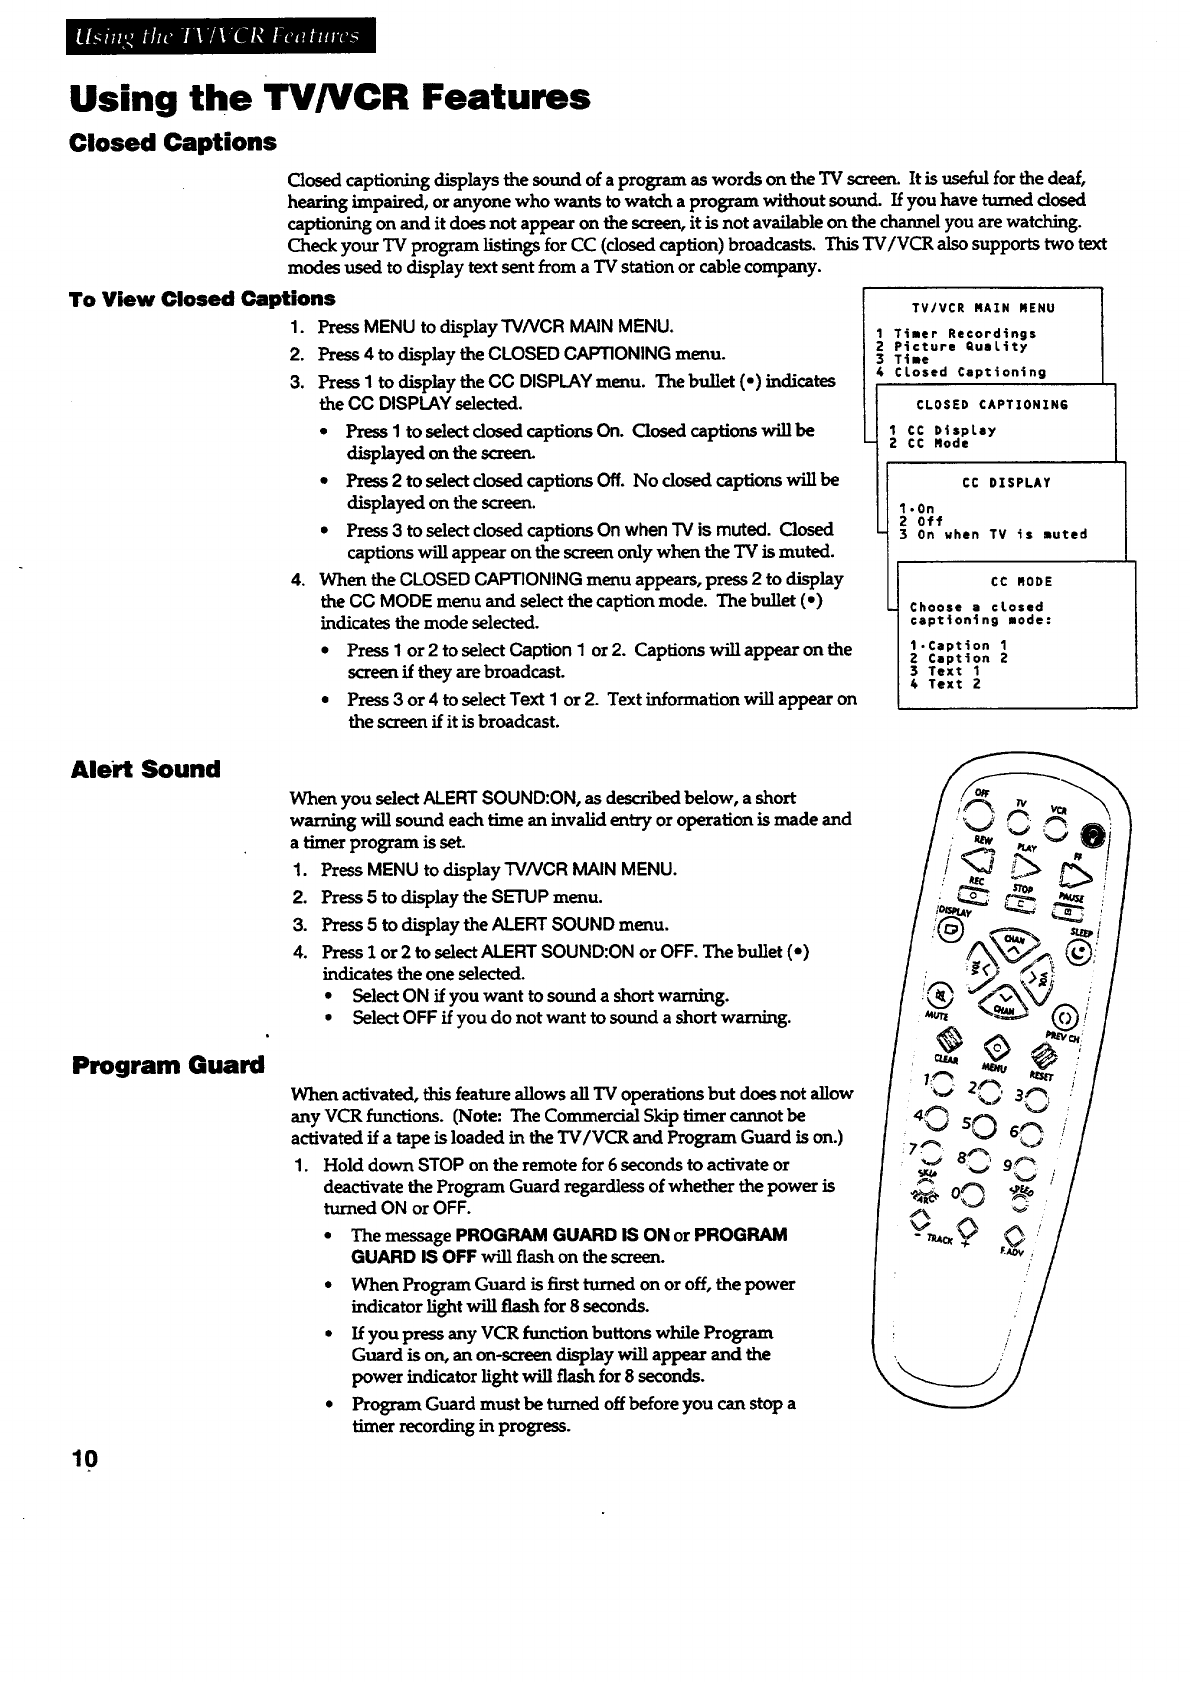
Closed Captions
Closed captioning displays the sound of a program as words on the TV screen. It is useful for the deaf,
hearing impaired, or anyone who wants to watch a program without sound. If you have turned dosed
captioning on and it does not appear on the screen, it is not available on the channel you are watching.
Check your TV program listings for CC (dosed caption) broadcasts. This "IV/VCR also supports two text
modes used to display text sent from a TV station or cable company.
To View Closed Captions
1. PressMENU to displayTVNCR MAIN MENU.
2. Press 4 to display the CLOSED CAPTIONING menu.
3. Press Ito display the CC DISPLAY menu. The bullet (•) indicates
the CC DISPLAY selected.
4.
• Press Ito select dosed captions On. Closed captions will be
displayed on the screen.
*Press 2to select dosed captions Off. No dosed captions will be
displayed on the screen.
•Press 3to select dosed captions On when TV is muted. Closed
captions will appear on the screen only when the TV is muted.
When the CLOSED CAPTIONING menu appears, press 2 to display
the CC MODE menu and select the caption mode. The bullet (e)
indicates the mode selected.
•Press Ior 2to select Caption I or 2. Captions will appear on the
screen if they are broadcast.
•Press 3or 4to select Text Ior 2. Text information will appear on
the screen if it is broadcast.
TV/VCR RAIN MENU
1 Timer Recordings
Z Picture QuaLity
3 Time
4 CLosed Captioning
CLOSED CAPTIONIN6
1 CC DispLay
2 CC Rode
CC DXSPLAY
1.0n
2 off
3on when TV is muted
CC BODE
Choose a closed
captioning mode:
1.Caption 1
2 Caption 2
3 Text 1
4 Text 2
Alert Sound
Program Guard
10
When you select ALERT SOUND:ON, as described below, a short
warring will sound each time an invalid entry or operation is made and
a timer program is set.
1. PressMENU to display TVNCR MAIN MENU.
2. Press 5 to display the SETUP menu.
3. Press5 to display the ALERT SOUND menu.
4. Press 1 or 2 to selectALERT SOUND:ON or OFF. The bullet (-)
indicates the one selected.
• Select ON if you want to sound ashort warning.
*Select OFF if you do not want to sound ashort warning.
When activated, this feature allows all TV operations but does not allow
any VCR functions. (Note: The Commercial Skip timer cannot be
activated if a tape is loaded in the TV/VCR and Program Guard is on.)
1. Hold down STOP on the remote for 6 seconds to activate or
deactivate the Program Guard regardless of whether the power is
turned ON or OFF.
• The message PROGRAM GUARD IS ON or PROGRAM
GUARD IS OFF will flash on the _n.
•When Program Guard is first turned on or off, the power
indicator light will flash for 8 seconds.
• Ifyou pressany VCR function buttons whileProgram
Guard is on, an on-screen display will appear and the
power indicator light will flash for 8 seconds.
• Program Guard must be turned off before you can stop a
timer recording in progress.
Using the TV/VCR Features
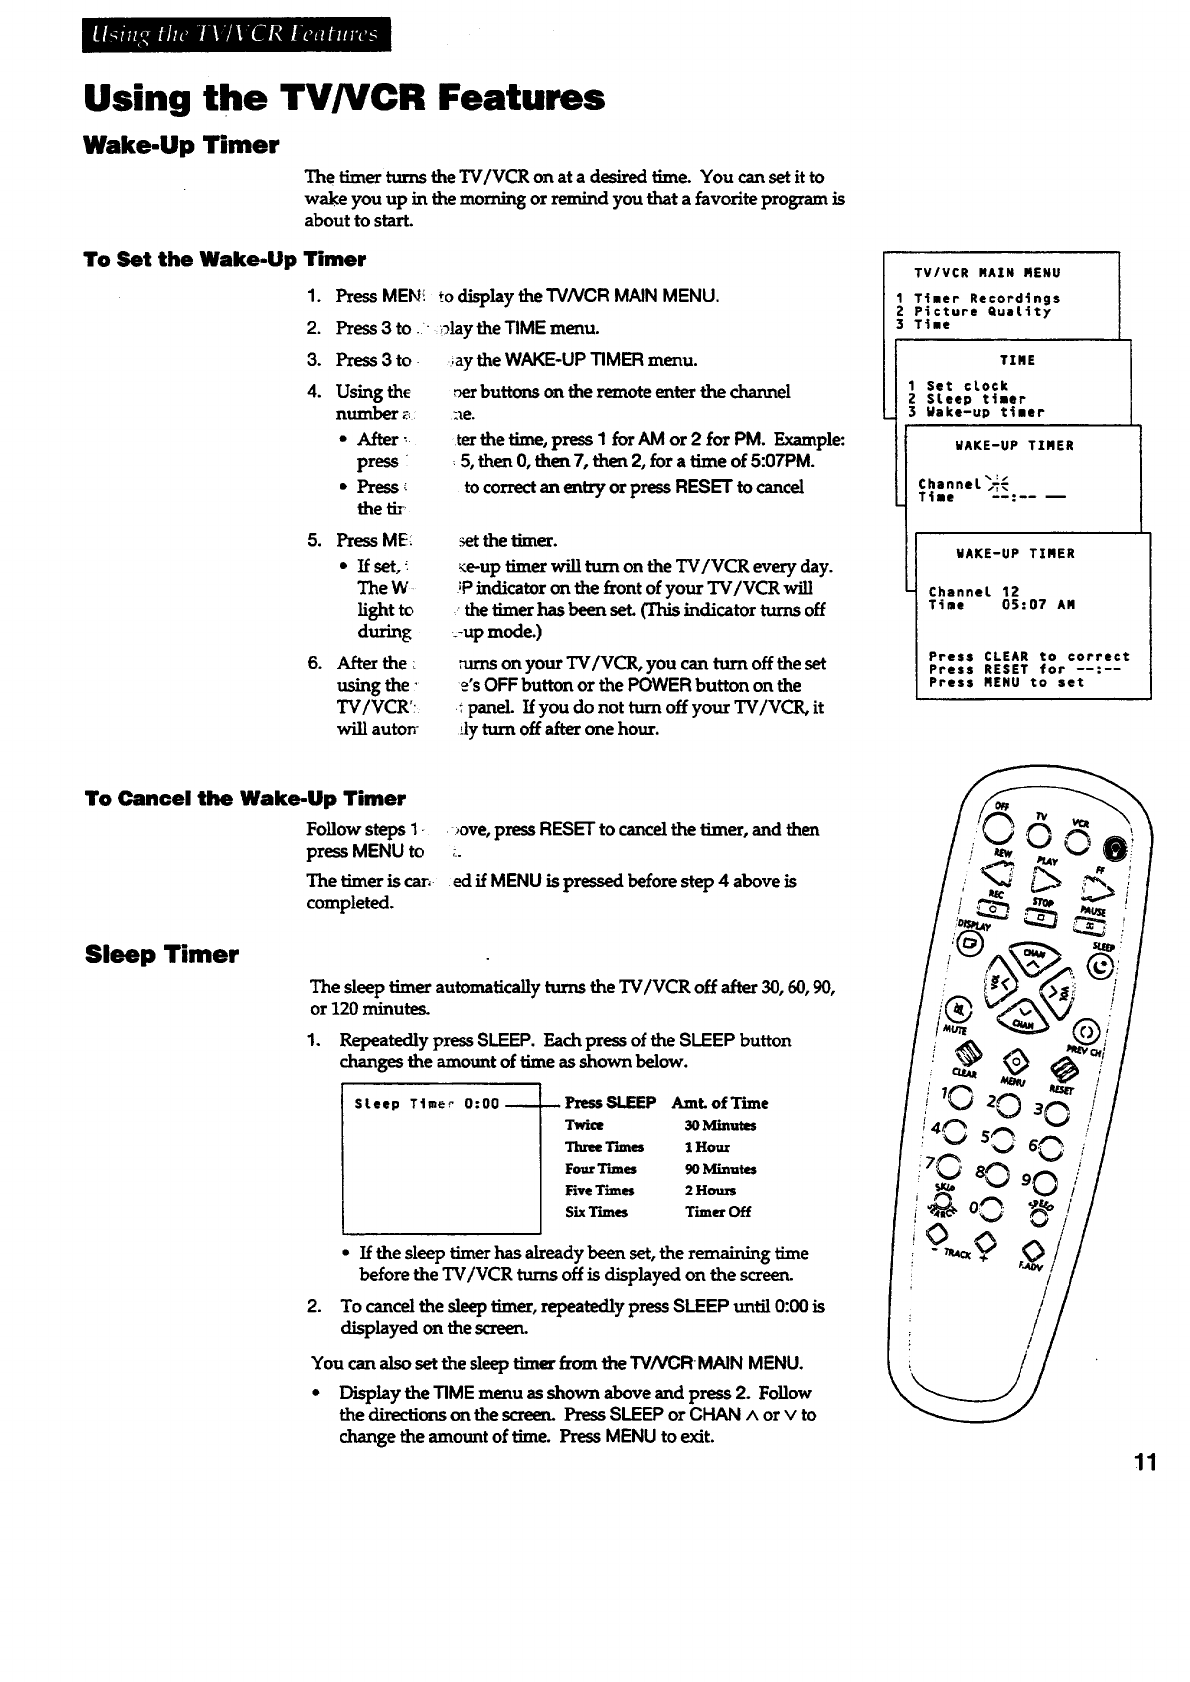
Wake-Up Timer
The timerturnstheTV/VCR on ata desiredtime.You can setitto
wake you up in the morning or remind you that a favorite program is
about to start.
To Set the Wake-Up Timer
1°
2.
3.
4.
PressMEN! to display theTVNCR MAINMENU.
Press3to. ,;)lay theTIMEmenu.
Press 3to
Using the
number _._
•After _.
press i
•Press _
the tit
;aytheWAKE-UP TIMER menu.
,_rbuttonson theremoteenterthechannel
tetthetime,pressI forAM or 2 forPM. Example:
5,then0,then7,then2,fora time of5:07PM.
tocorrectan e_tryorpressRESET tocancel
5. Press ME:
•If set, :.
The W
]i_t to
during
6. After the _
using the "
TV/VCR';
willautorr
thetimer.
_e-uptimerwillturnon theTV/VCR everyday.
;Pindicatoron thefrontofyour TV/VCR will
.the timer hasbeen set (This indicator turns off
_-upmode.)
on your TV/VCR, you can turn off the set
e's OFFbutton or the POWERbutton on the
tpanel. If you do not turn off your TV/VCR, it
,_lyturn off after one hour.
TV/VCR MAIN MENU
Timer Rerord4ngs
Picture QuaLity
Time
TIRE
1 Set clock
2 SLeep timer
3Wake-up timer
WAKE-UP TIMER
%:/
Channel _
Time
WAKE-UP TIMER
Channel 12
Time 05:07 AM
Press CLEAR to correct
Press RESET for --:--
Press MENU to set
To Cancel the Wake-Up Timer
FoLlowsteps 1- _ve, press RESET to cancelthe timer, and then
press MENU to _.
The timer is car,- ed ff MENU is pressed before step 4 above is
completed.
Sleep Timer
The sleep timer automatically turns the TV/VCR off after 30, 60, 90,
or 120 minutes.
1. Repeatedly pressSLEEP. Each press of the SLEEP button
changes the amount of lime as shown below.
SLeep Timer 0:00-- Press SLEEP AmL of Tzzne
Twioe 30 Minwms
T'_m_ 1Hour
Four Times 90 Minutes
Five T'mtes 2 H_
Six T'umes Timer Off
2.
•If the sleep timerhas already been set, the remaining time
before the TV/VCR turns off is displayed on the screen.
To cancelthesleep_er, repeatedlypressSLEEP until 0:00is
displayedon thescreen.
You canalsosetthesleeptimerfz_n theTV/VCR MAIN MENU.
•Display the TIME menu as shown above and press 2. Follow
thedirectionson thescreen.PressSLEEP or CHAN ^ orv to
change the amount of time. Press MENU to exit. 11
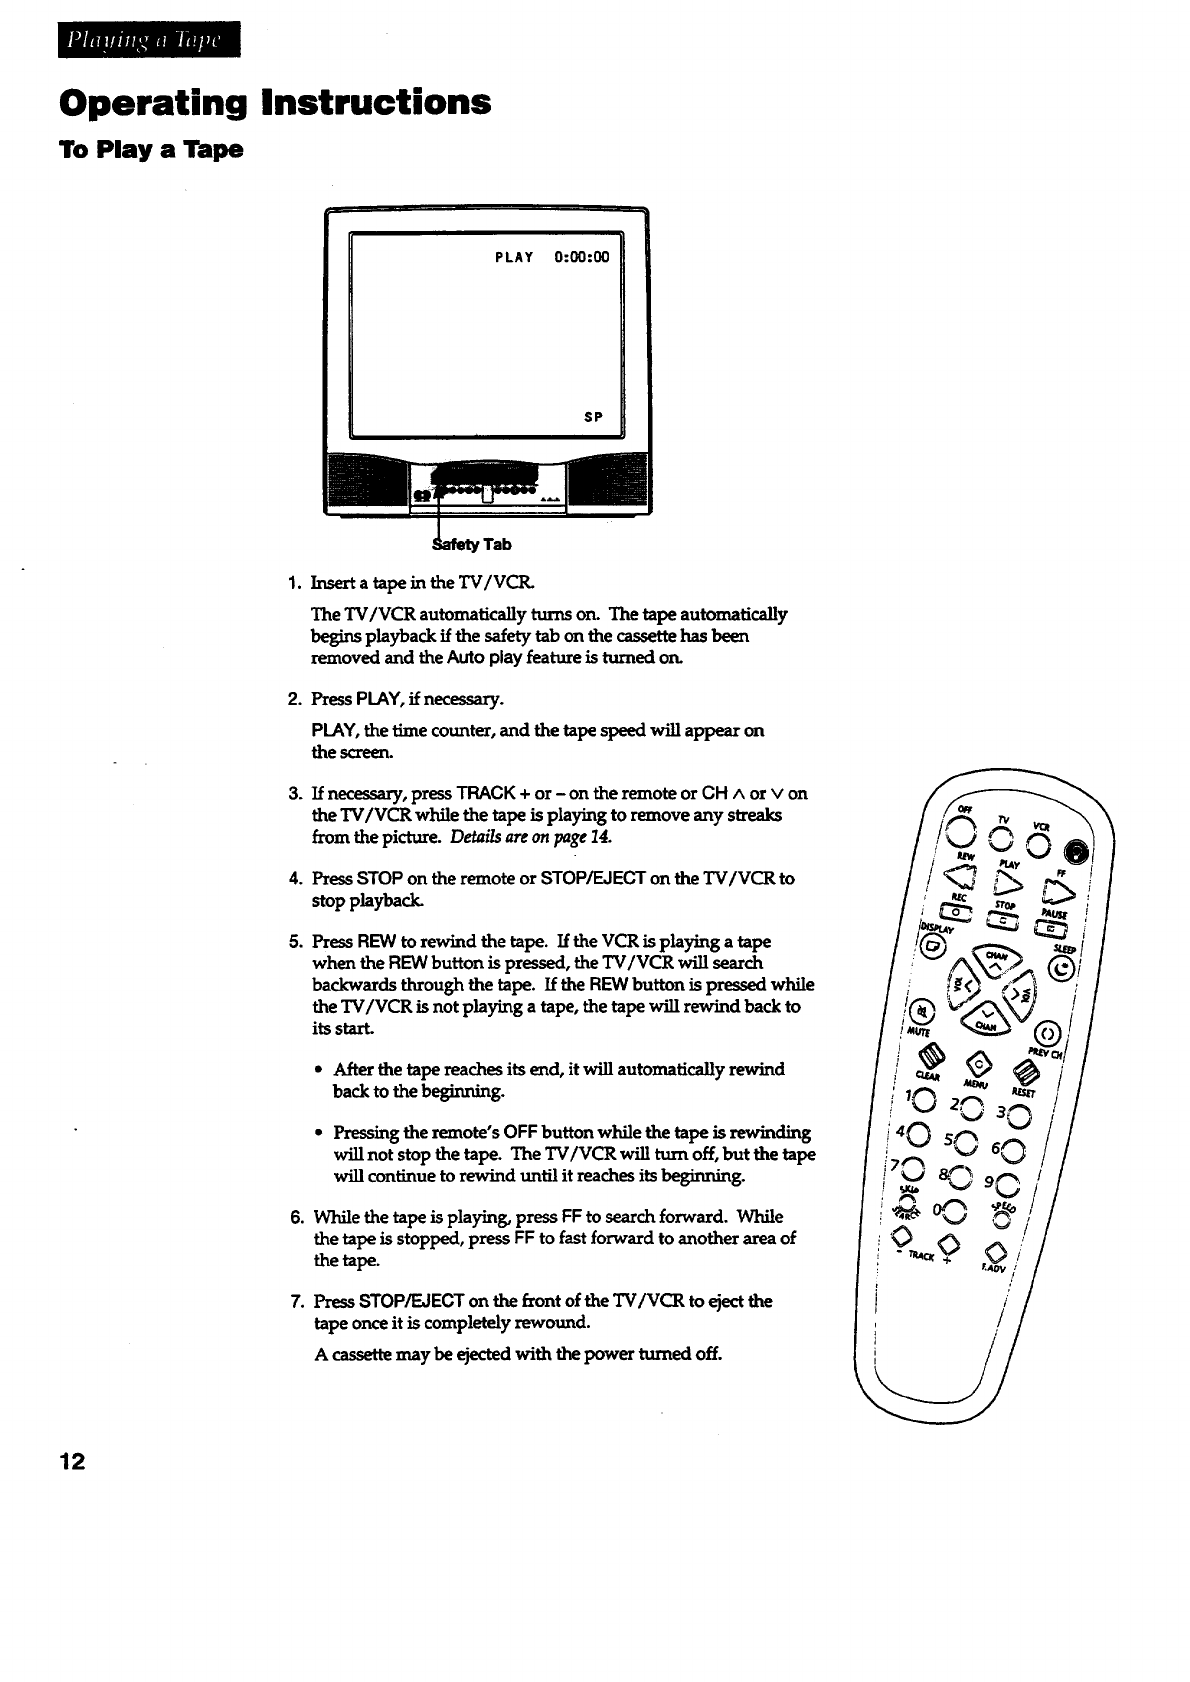
Operating Instructions
To Play a Tape
PLAY 0:00:00
SP
[
rTab
1. Inserta tapein theTV/VCIL
The TV/VCR automatically turns on. The tape automatically
begins playback if the safety tab on the cassette has been
removed and theAuto play featureisturnedon.
2. Press PLAY, if necessary.
PLAY, the time counter, and the tape speedwig appear on
thescreen.
3.
4°
°
Ifnecessary,pressTRACK + or-on theremote orCH ^or v on
theTV/VCR whilethetapeisplayingtoremove any streaks
from thepicture.Detailsareon page14.
PressSTOPon theremoteorSTOP/EJECTontheTV/VCR to
stopplayback.
PressREW to rewind the tape.IftheVCR isplayingatape
when theREW buttonispressed,theTV/VCR willsearch
backwards throughthetape.IftheREW buttonispressedwhile
the TV/VCR is not playing a tape, the tape will rewind back to
its start.
•After the tape reaches its end, it will automatically rewind
back to the beginning.
•Pressing the remote's OFF button while the tape is rewinding
will not stop the tape. The TV/VCR will turn off, but the tape
will continue to rewind until it reaches its beginning.
6. While the tape is playing, press FFto search forward. While
the tape is stopped, press FF to fast forward to another area of
the tape.
7. PressSTOP/EJECT on the fzont of the TV/VCR to ejectthe
tape once it is completely rewound.
Acassette may be ejected with the power turned off.
%°?
/
/
12
_wmmumemmm_
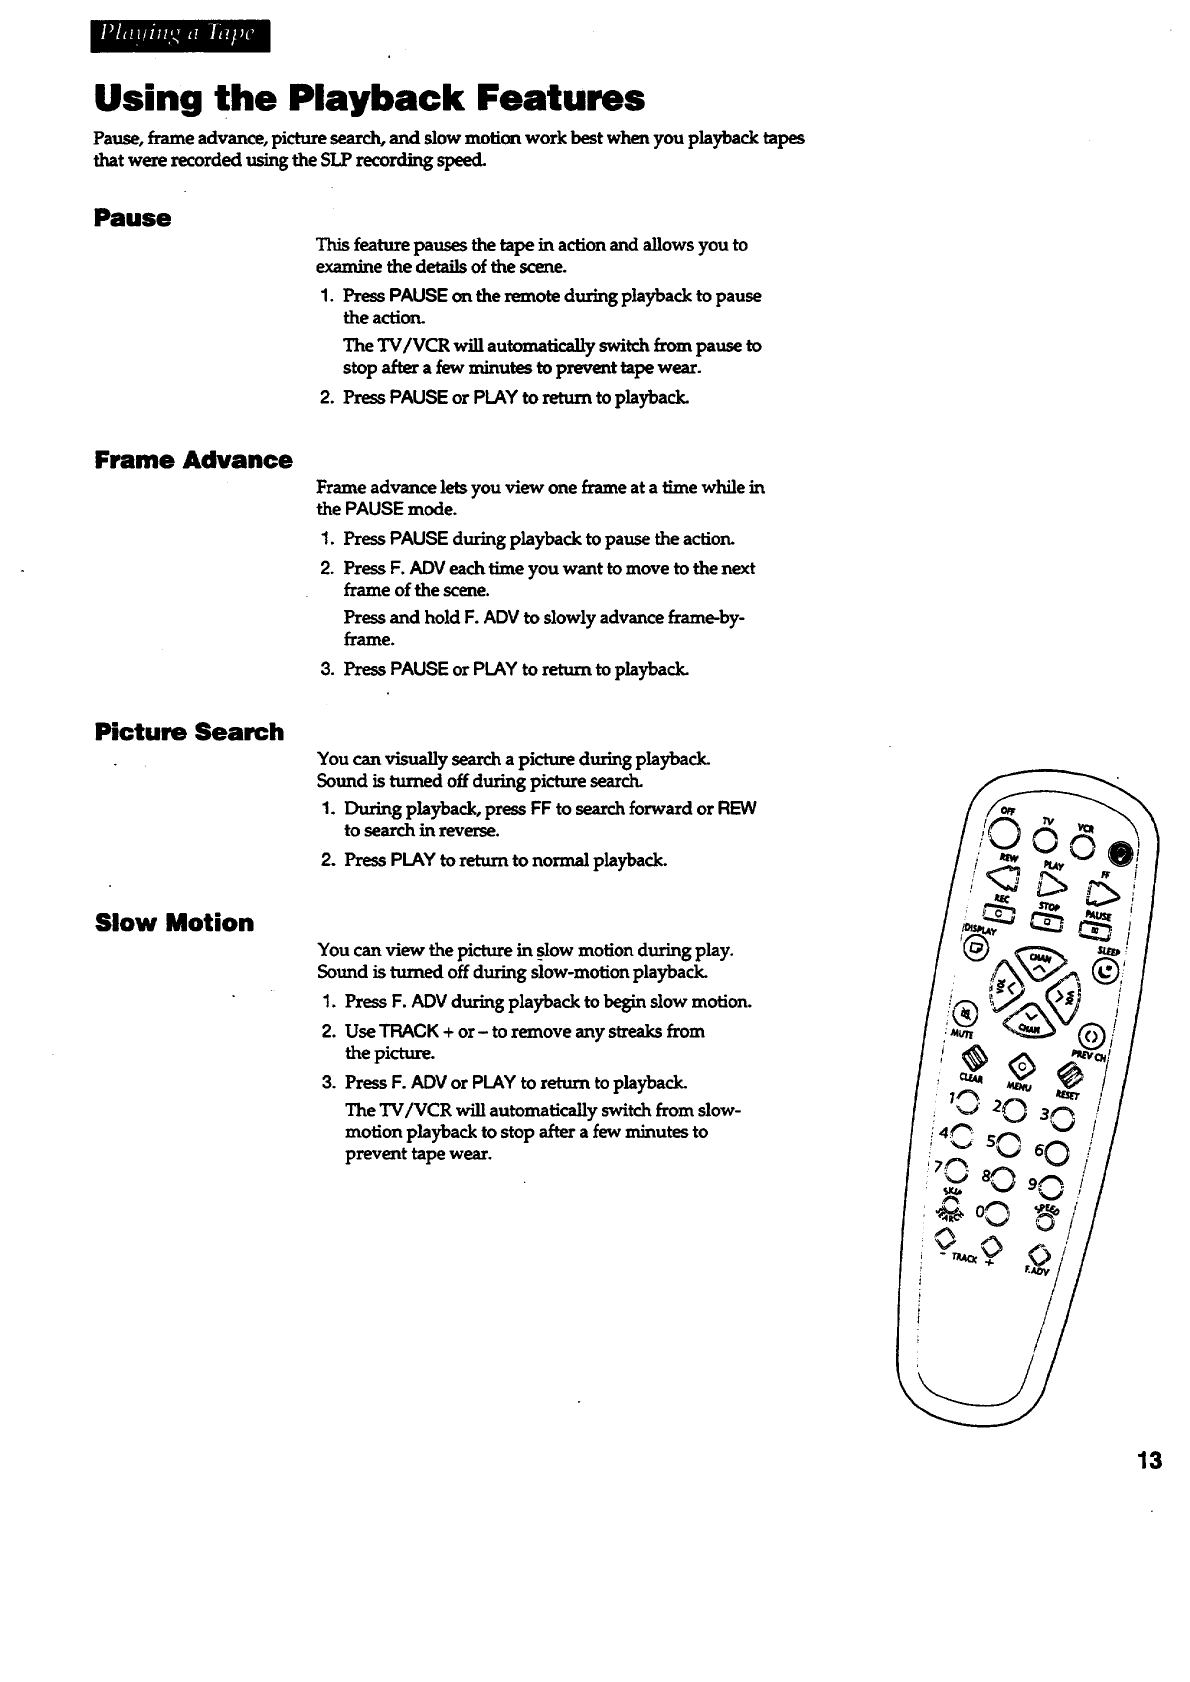
Using the Playback Features
Pause, frame advance, picture search, and slow motion work best when you playback tapes
that were recorded using the SLP recording speed.
Pause
This feature pauses the tape in action and allows you to
examine the details of the scene.
1. Press PAUSE on the remote during playback to pause
the action.
The TV/VCR will automatically switch from pause to
stop after a few minutes to prevent tape wear.
2. Press PAUSE or PLAY to return to playback.
Frame Advance
Frame advance lets you view one frame at a time while in
the PAUSE mode.
1. Press PAUSE during playback to pause the actiorL
2. Press F. ADV each time you want to move to the next
frame of the scene.
Press and hold F.ADVto slowly advance frame-by-
frame.
3. Press PAUSE or PLAY to return to playback.
Picture Search
You can visually search a picture during playback.
Sound is turned off during picture search.
1. During playback, press FF to search forward or REW
to search in reverse.
2. Press PLAY to return to normal playback.
Slow Motion
You can view the picture in slow motion during play.
Sound is turned off during slow-motion playback.
1. Press F. ADV during playback to begin slow motion.
2. Use TRACK + or- to remove any streaks from
the picture.
3. Press F. ADV or PLAY to return to playback.
The TV/VCR will automatically switch from slow-
motion playback to stop after a few minutes to
prevent tape wear.
13
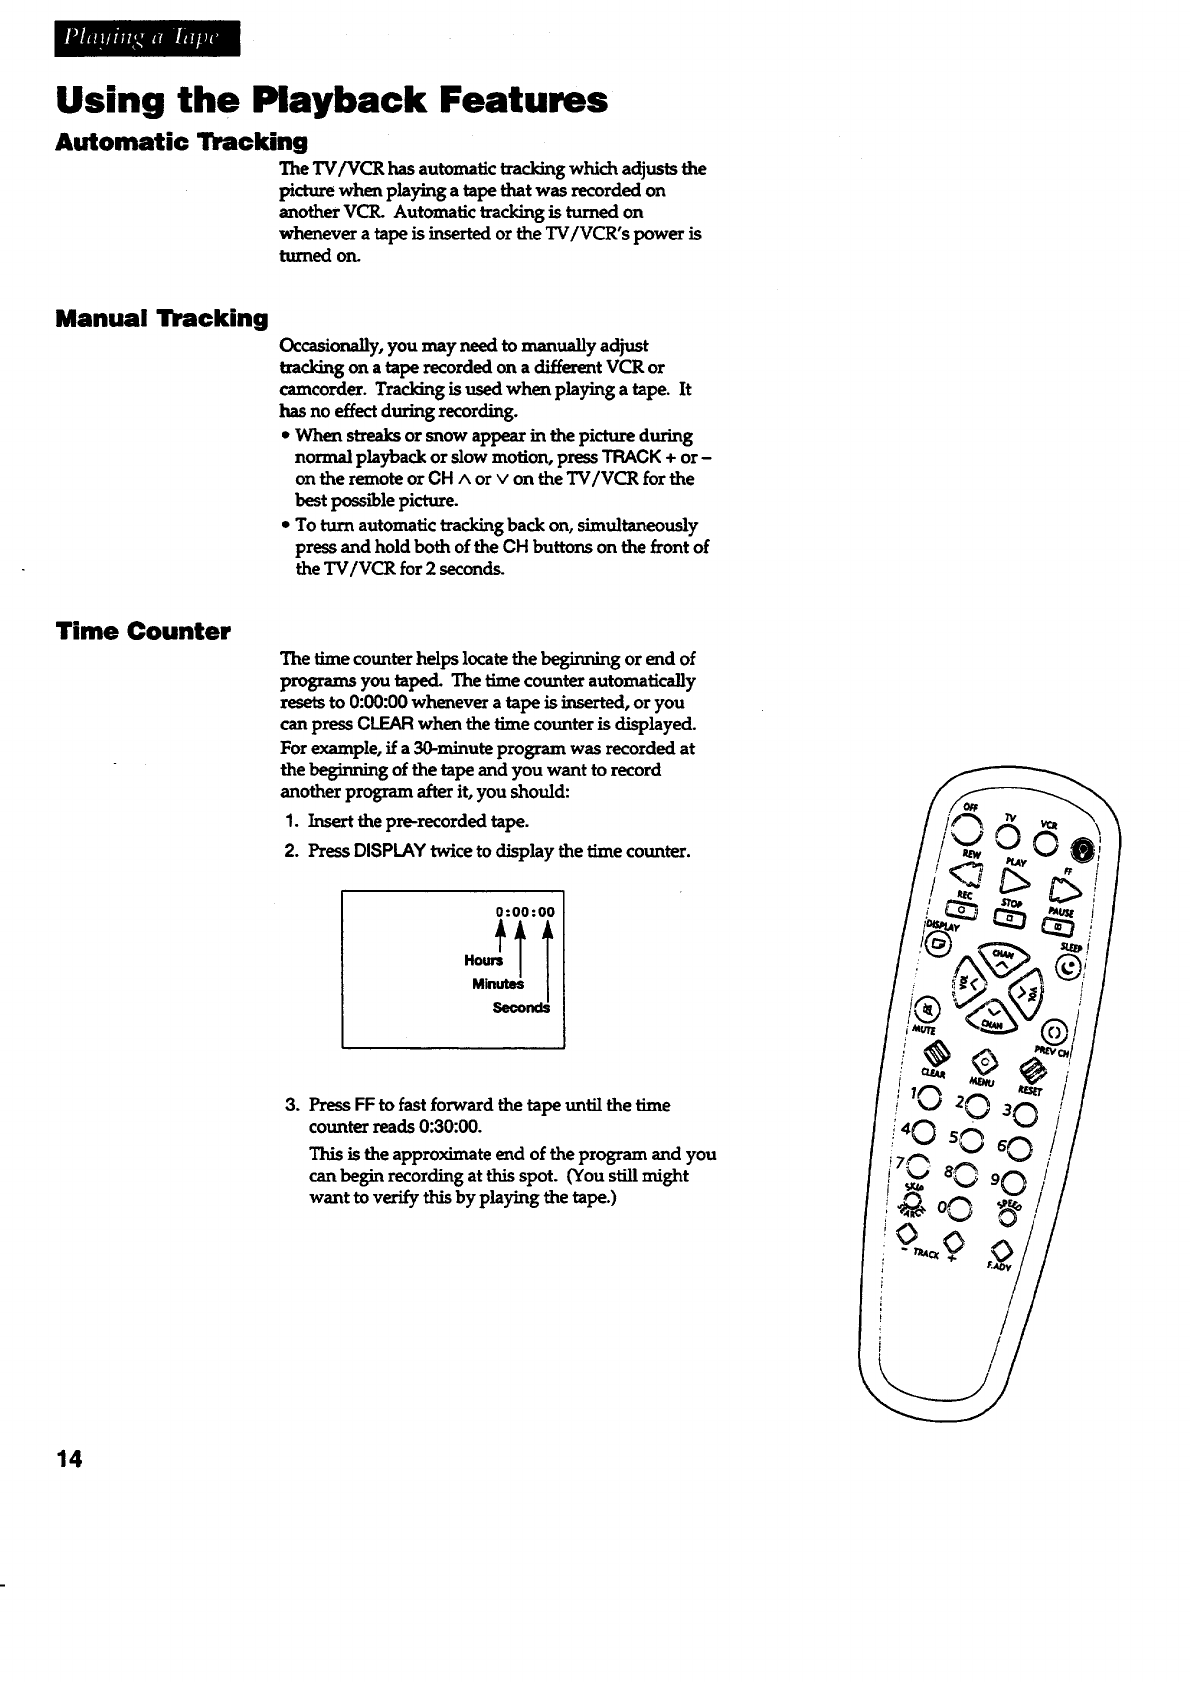
Using the Playback Features
Automatic Tracking
The TV/VCR has automatic tracking which adjusts the
picture when playing a tape that was recorded on
another VCIL Automatic tracking is turned on
whenever a tape is inserted or the TV/VCR's power is
turned on.
Manual Tracking
Occasionany, you may need to manually adjust
tracking on a tape recorded on a different VCR or
camcorder. Tracking is used when playing a tape. It
has no effect during recording.
* When streaks or snow appear in the picture during
normal playback or slow motion, press TRACK + or-
on the remote or CH Aor Von the TV/VCR for the
best possible picture.
•To turn automatic tracking back on, simultaneously
press and hold both of the CH buttons on the front of
the TV/VCR for 2 seconds.
Time Counter
The time counter helps locate the beginning or end of
programs you taped. The time counter automatically
resets to 0:00:00 whenever a tape is inserted, or you
can press CLEAR when the time counter is displayed.
For example, if a 30-minute program was recorded at
the beginning of the tape and you want to record
another program after it, you should:
1. Insert the pre-recorded tape.
2. Press DISPLAYtwice to display the time counter.
0:00:00
Minutes
3. Press FF to fast forward the tape until the time
counter reads 0:30:00.
This is the approximate end of the program and you
can begin recording at this spot. (You still might
want to verify this by playing the tape.)
/
/
/
14
I_RSMIIMmWEERIHM
Using the Playback Features
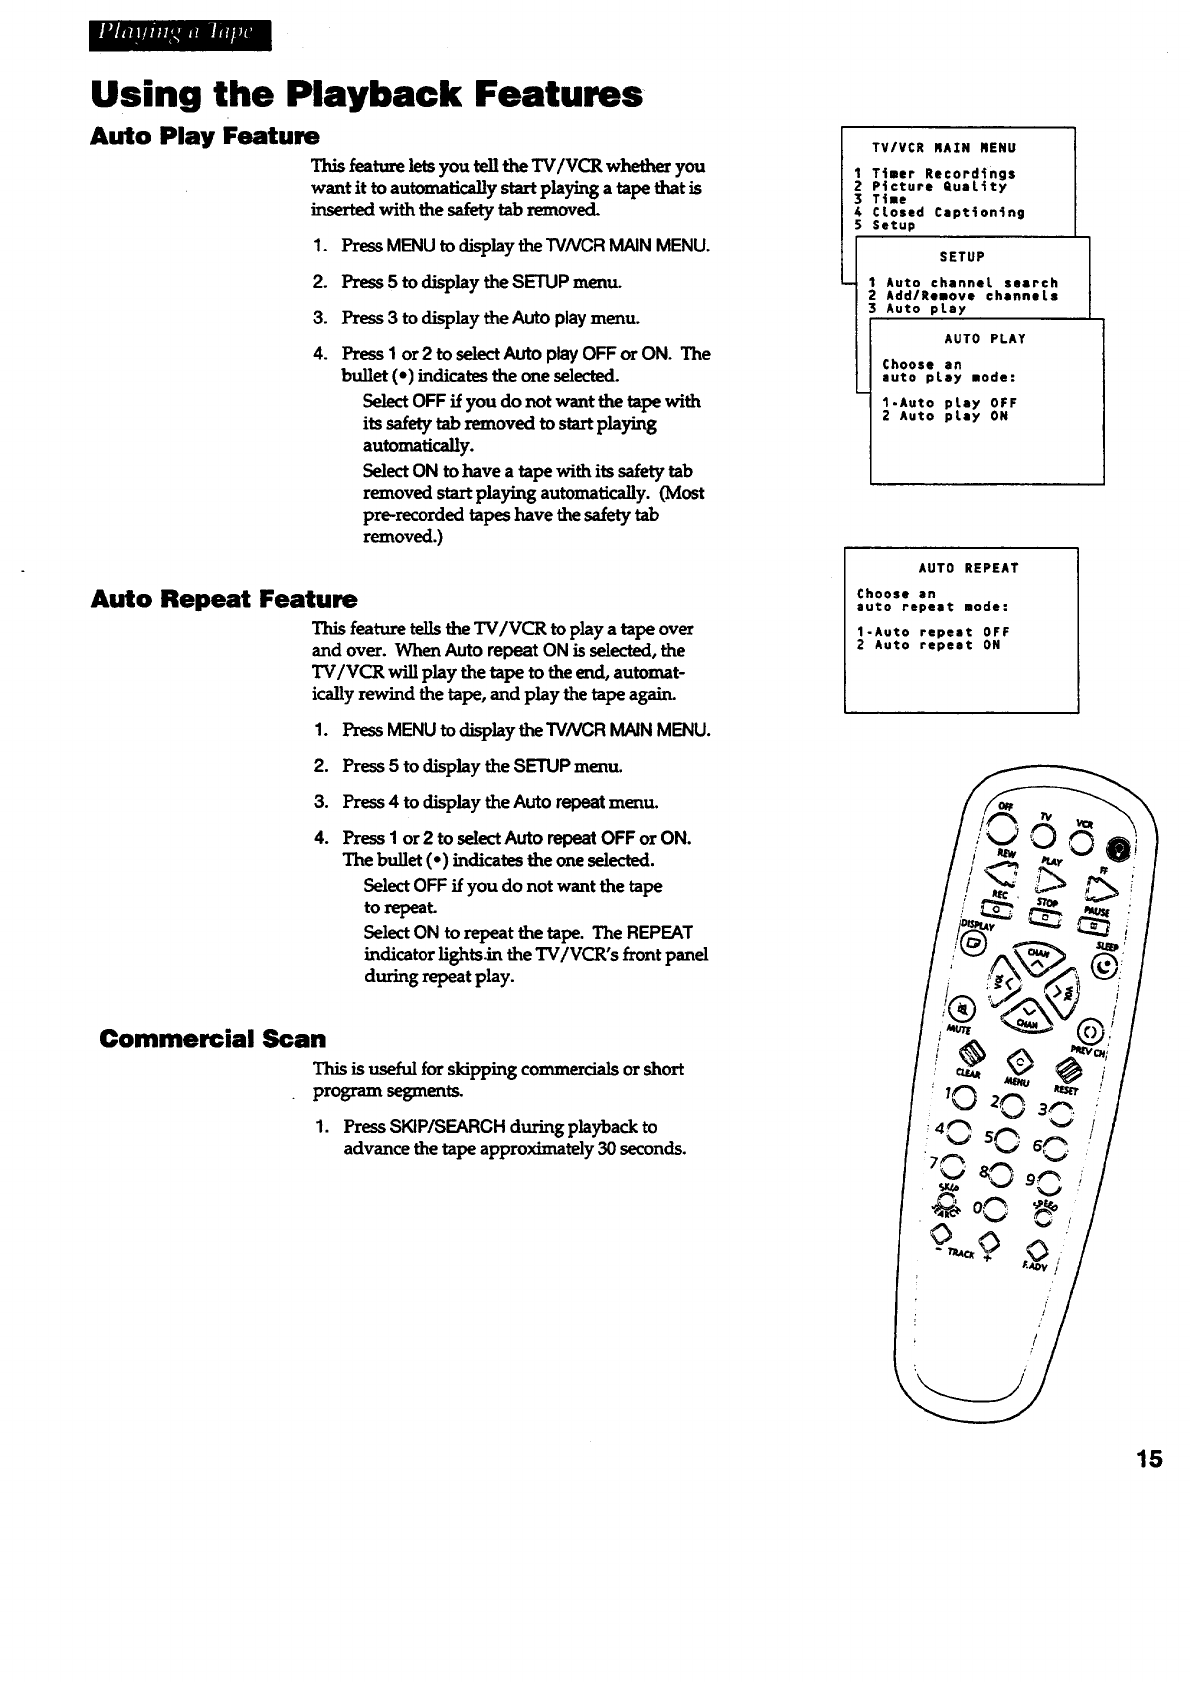
Auto Play Feature
This feature lets you tell the TV/VCR whether you
want it to automatically start playing a tape that is
with the safety tab removed.
1. Press MENU to display the TVNCR MAIN MENU.
2. Press5 to displaythe SETUPmeztu.
3. Press 3to display the Auto playmenu.
4. Press I or 2 to selectAuto play OFF or ON. The
bu]let ( • ) indicates the one selected.
Select OFF if you do not want the tape with
its safety tab removed to start playing
automatically.
Select ON to have atape with its safety tab
removed start playing automatically. (Most
prerecorded tapes have the safety tab
removed.)
Auto Repeat Feature
This feature tells the TV/VCR to play a tape over
and over. When Auto repeat ON is selected, the
TV/VCR will play the tape to the end, automat-
ically rewind the tape, and play the tape agairL
1. PressMENU to display the TVNCR MAIN MENU.
2. Press 5 to display the SETUP menu.
3. Press 4to display the Auto repeat menu.
4. l_ess I or 2 to select Auto repeat OFF or ON.
The bullet (• ) indicates the one selected.
Select OFF if you do not want the tape
to repeat.
Select ON to repeat the tape. The REPEAT
indicator lightsAn the TV/VCR's front panel
during repeat play.
Commercial Scan
This is useful for skipping co_ or short
program segmen_
1. PressSKIP/SEARCH during playback to
advance the tape approximately 30 seconds.
TV/VCR MAZN RENU
1Timer Recordings
2P4cture QuaLity
3 T|me
4CLosed Captioning
5 Setup
SETUP
Auto channel search
AddlRemove channels
Auto pLay
AUTO PLAY
Choose an
auto play mode:
1.Auto play OFF
2 Auto play ON
I
AUTO REPEAT
Choose an
auto repeat mode:
1-Auto repeat OFF
2Auto repeat ON
/
/
/
15
rS/iff/ff/IM/IYam
Using the Playback Features
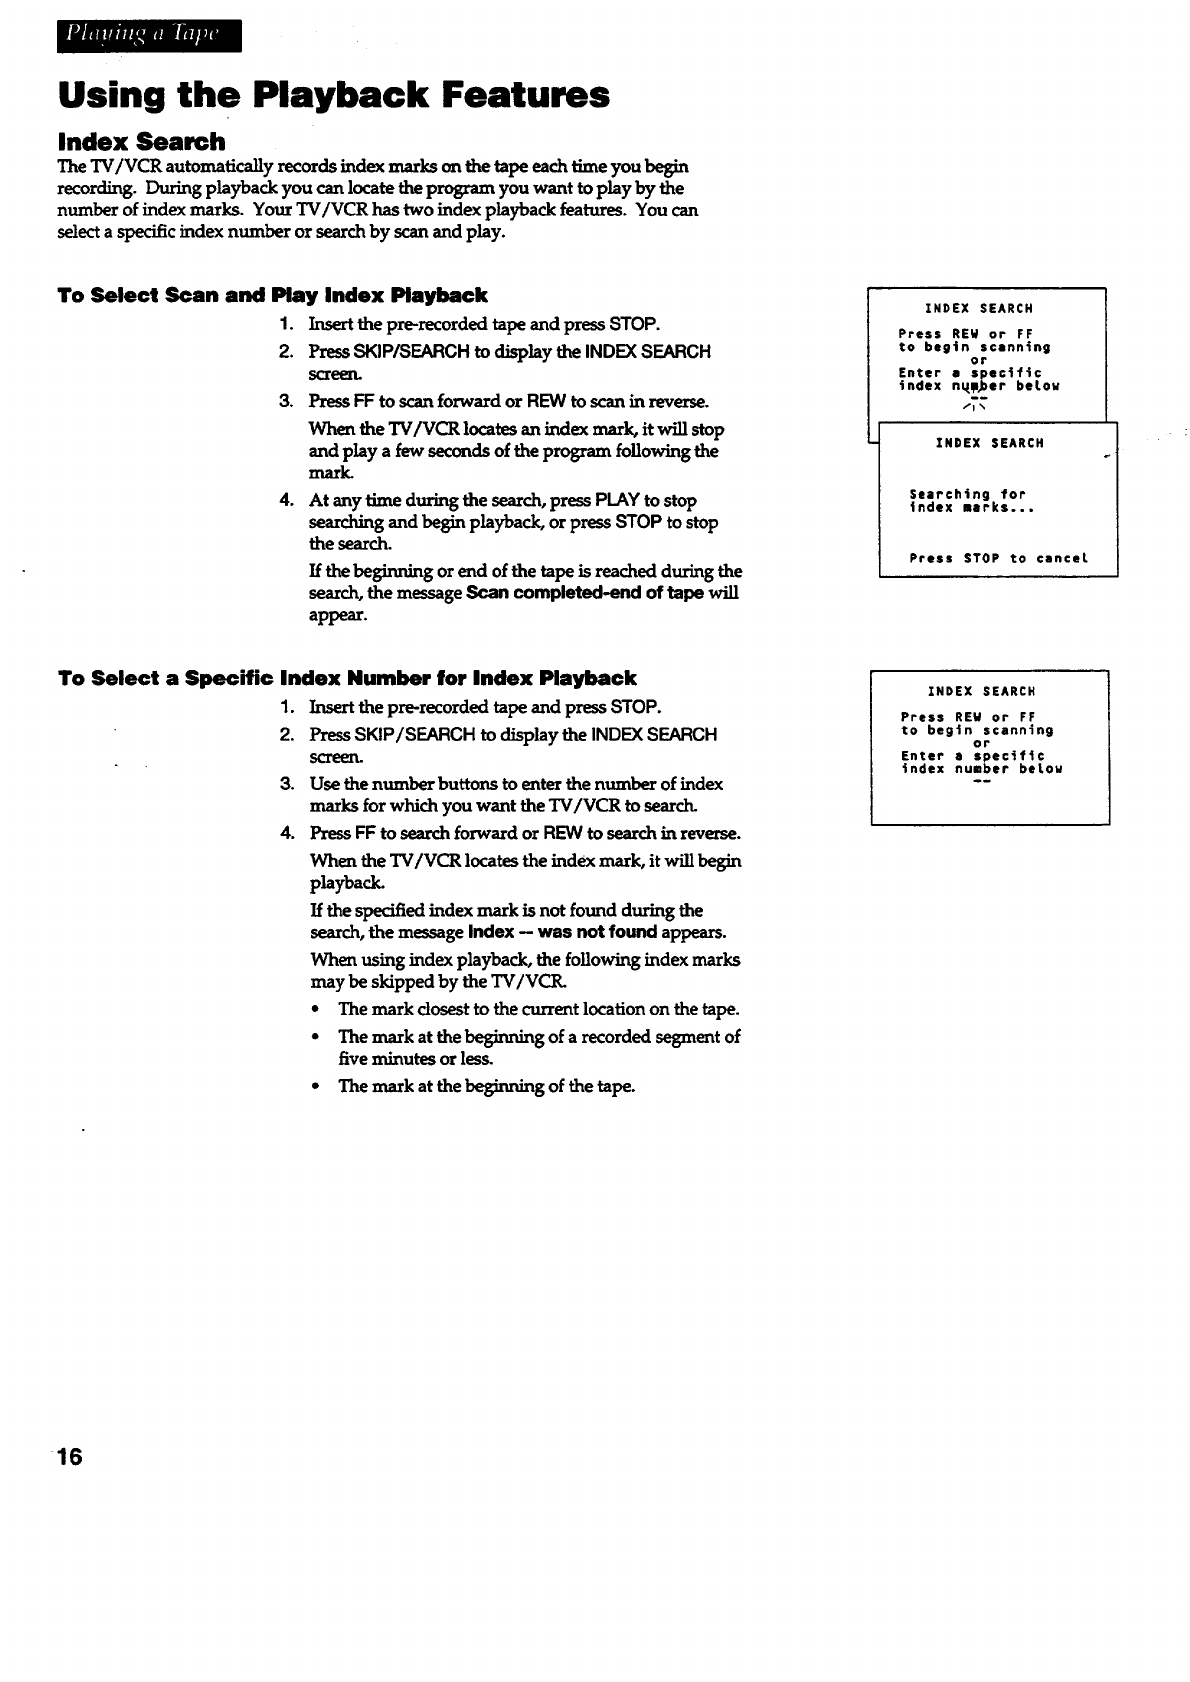
Index Search
The TV/VCR automatically records index marks o_t the tape each time you begin
recording. During playback you can locate the program you want to play by the
number of index marks. Your TV/VCR has two index playback features. You can
select a specific index number or search by scan and play.
To Select Scan and Play Index Playback
1. Insert the pre-recorded tape and press STOP.
2. PressSKIP/SEARCH to display the INDEX SEARCH
_3re_t.
3. Press FF to scanforward or REW to scan in revezse.
When theTV/VCR locates an index mark, itwillstop
andplaya fewsecondsoftheprogramfollowingthe
mark.
4. At any time during the search, press PLAYto stop
searching and begin playback, or press STOP to stop
the search.
If thebeginning orend ofthe tapeis reachedduring the
search,the messageScan completed-end of tape
appear.
INDEX SEARCH
Press REW or FF
to begin scanning
or
Enter aspect/ic
index n_i_er betou
/i %
INDEX SEARCH
Searching for
tndex marks...
Press STOP to canceL
To Select a Specific Index Number for Index Playback
1. Insert the prerecorded tape and press STOP.
2. PressSKIP/SEARCH to display the INDEX SEARCH
screen.
3. Use the number buttons to enteT the number of index
marks for which you want the TV/VCR to search.
4. Press FF to search forward or REW to search in reverse.
When the TV/VCR locates the indexmark, it will begin
playback.
If the specified index mark is not found during the
search, the message Index -- was not found appears.
When using index playback, the following index marks
may be skipped by the TV/VCR.
• The mark closest to the current location on the tape.
• The mark at the beginning of a recorded segment of
five minutes or les_
•The mark at the beginning of the tape.
INDEX SEARCH
Press REW or FF
to begin scanning
or
Enter aspecific
index number below
16
_J_lT|lmn=_Brl_ RIJUr_
Using the Playback Features
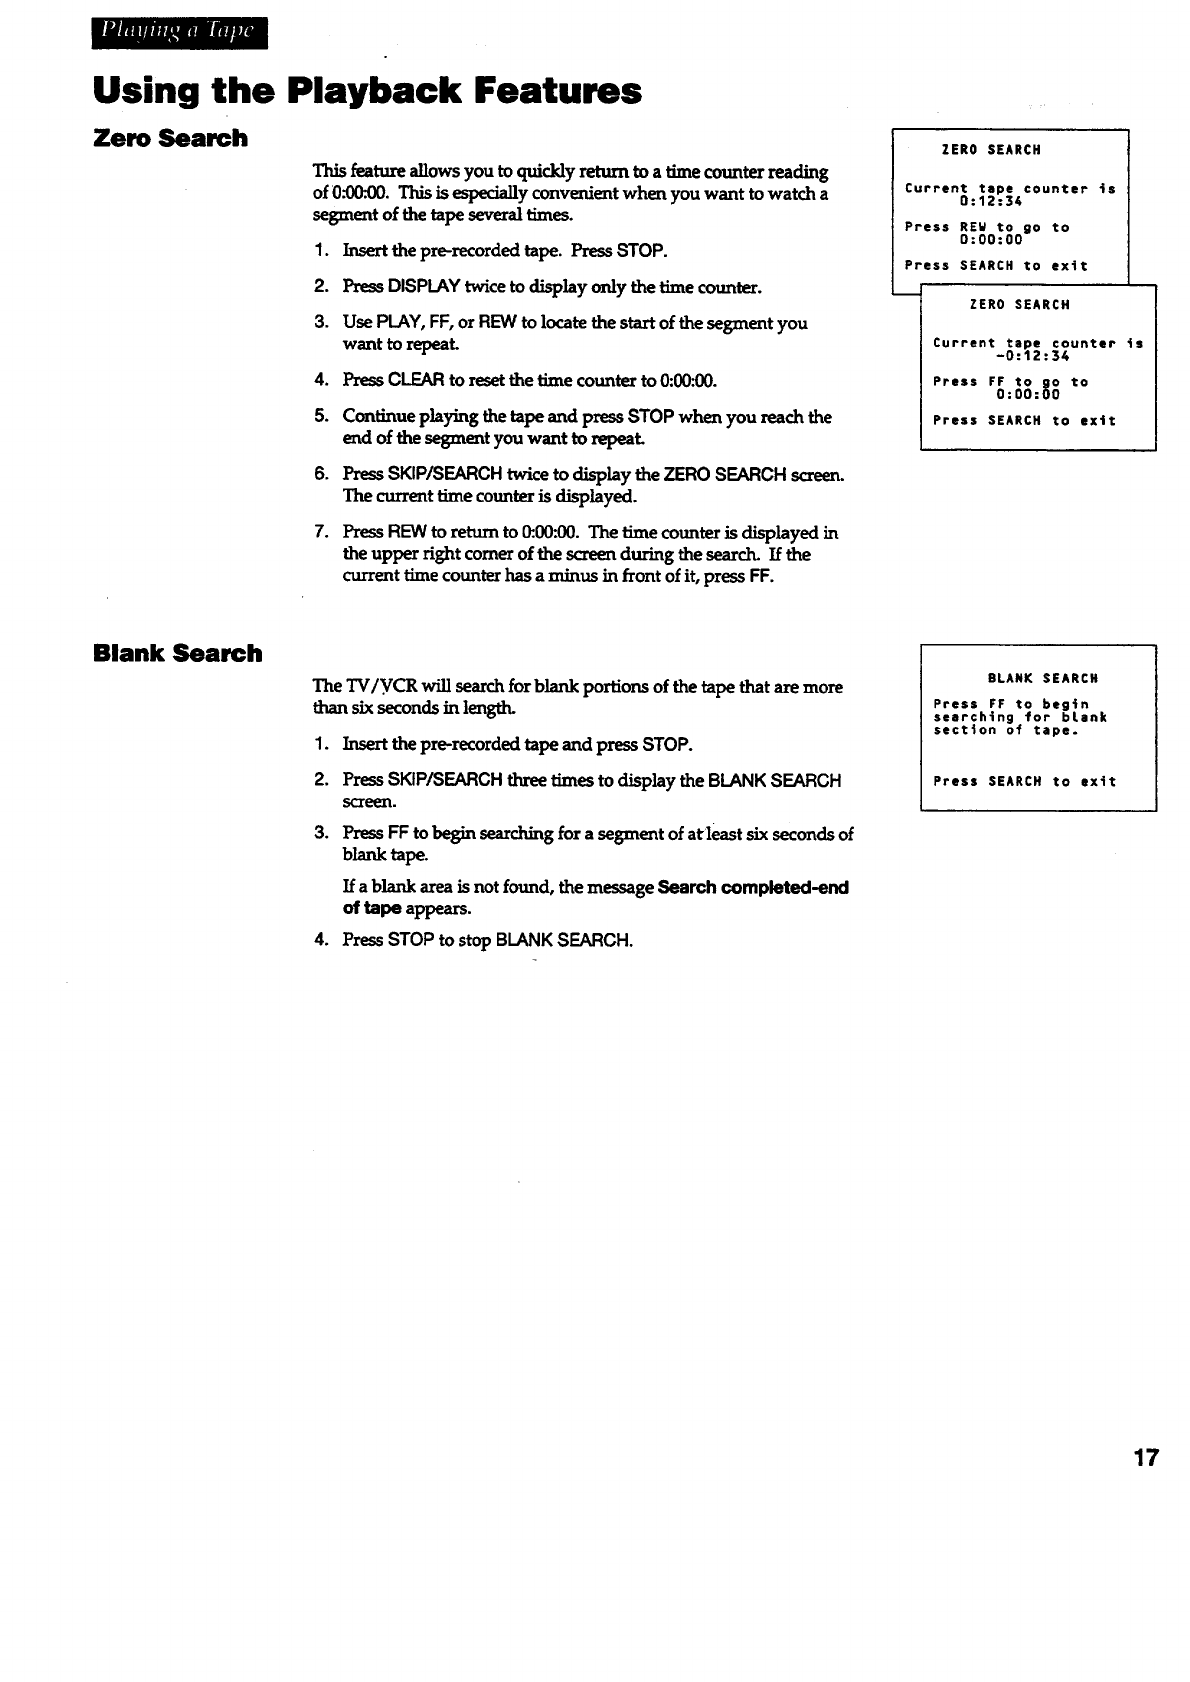
Zero Search
This feature allows you to quickly return to a time counter reading
of 0._0:00. This is especially convenient when you want to watch a
segment of the tape several times.
I. Insert the prerecorded tape. Press STOP.
2. Press DISPLAY twice to display only the time counter.
3. Use PLAY, FF,or REW to locate the start of the segment you
want to repeat.
4. Press CLEAR to reset the lime counter to 0:00:00.
5. Continue playing the tape and press STOP when you reach the
end of the segnumt you want to repeat.
6. Press SKIP/SEARCH twice to display the ZERO SEARCH screen.
The current time counter is displayed.
7. Press REW to return to 0:.00:00. The time counter is displayed in
the upper right comer of the screen during the search. If the
current time counter hasa minus in front of it, press FF.
ZERO SEARCH
Current tape counter _s
0:1Z:34
Press REW to go to
0:00:00
Press SEARCH to exit
mZERO SEARCH
Current tape counter 4s
-0:12:34
Press FF to 9o to
0:00:00
Press SEARCH to exit
Blank Search
The TV/VCR will search for blank portions of the tape that are more
than six seconds in length.
1. Insert the prerecorded tape and press STOP.
2. Press SKIP/SEARCH three times to display the BLANK SEARCH
screen.
3. Press FF to begin searching for asegment of atleast six secondsof
blank tape.
If a blank area is not found, the messageSearch completed-end
of tape appears.
4. PressSTOP to stop BLANK SEARCH.
BLANK SEARCH
Press FF to begin
searching for blank
sect4on of tape.
Press SEARCH to exit
17

Recording Features
Recording Speeds
Press SPEED to select a recording speed.
Cassette
T-120
1"-160
Recording
2H 6I-Ir
2Hr 40Min 8Hr
* SP (Standard Play) gives the best quality recording.
That is why most prerecorded, rental tapes are
recorded in SP. Fewer programs, however, can be
recorded on the tape.
* SLP (Super Long Play) gives three times the
recording time of tapes recorded in SP.
Special Effects During Playback
• Pause, _rame advance, picture search, and slow
motion work best for tapes recorded in SLP speed.
SLP
t
Tape Speed Indicator
Recording Pause
This feature allows you to prevent recording short
passages of unwanted material.
Press PAUSE during recording to stop and start
recording.
The TV/VCR will automatically switch from pause
to stop after a few minutes to prevent tape wear.
'18
#
Types of Recordings
YourTVIVCR providesdifferent types ofrecording. These types are explained in the
following sections:
Basic R_cozding- Operating Instructions
Express Recording
Recording While You're Away
Timer Recording
Copying and Editing Tapes
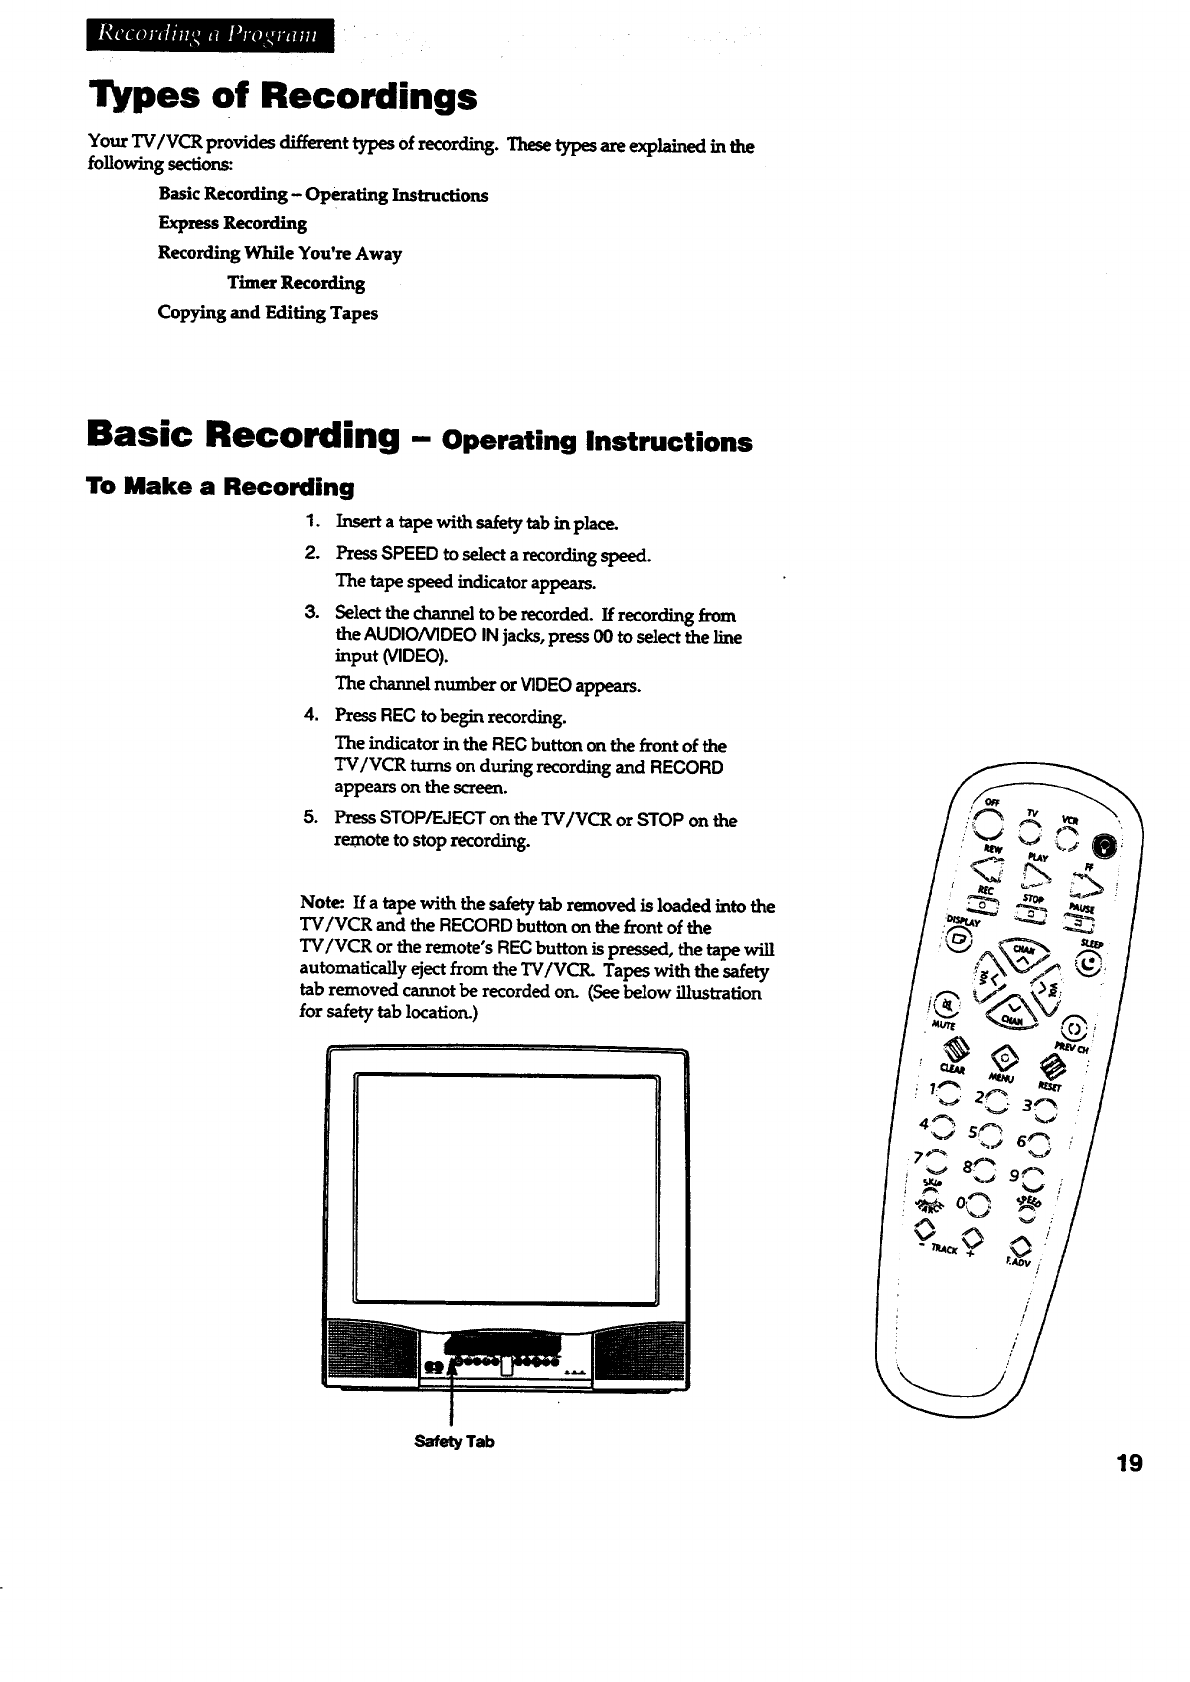
Basic Recording - operatinginstructions
To Make a Recording
I. Inserta ropewithsafetytabinplace.
2. PressSPEED toselectarecordingspeed.
The tapespeedindicatorappears.
3. Select the channel to be recorded. If recording _,om
the AUDIO/VIDEO IN jacks,press 00 to select the line
input (VIDEO).
The channelnumber orVIDEO appears.
4. PressREC tobeginrecording.
The indicator in the REC button on the front of the
TV/VCR turns on during recording and RECORD
appears on the screen.
5. Press STOP/EJECT on the TV/VCR or STOP on the
remote to stoprecording.
Note.- If a tape with the safety tabremoved isloadedintothe
"IV/VCR and theRECORD button on the frontofthe
"IV/VCR or the remote's REC button is pressed, the tape will
automatically eject from the TV/VCIL Tapes with the safety
tabremoved cannotbe recordedon. (Seebelow illustration
forsafetytablocation.)
I
/
/
/
Safety Tab 19
Express Recording
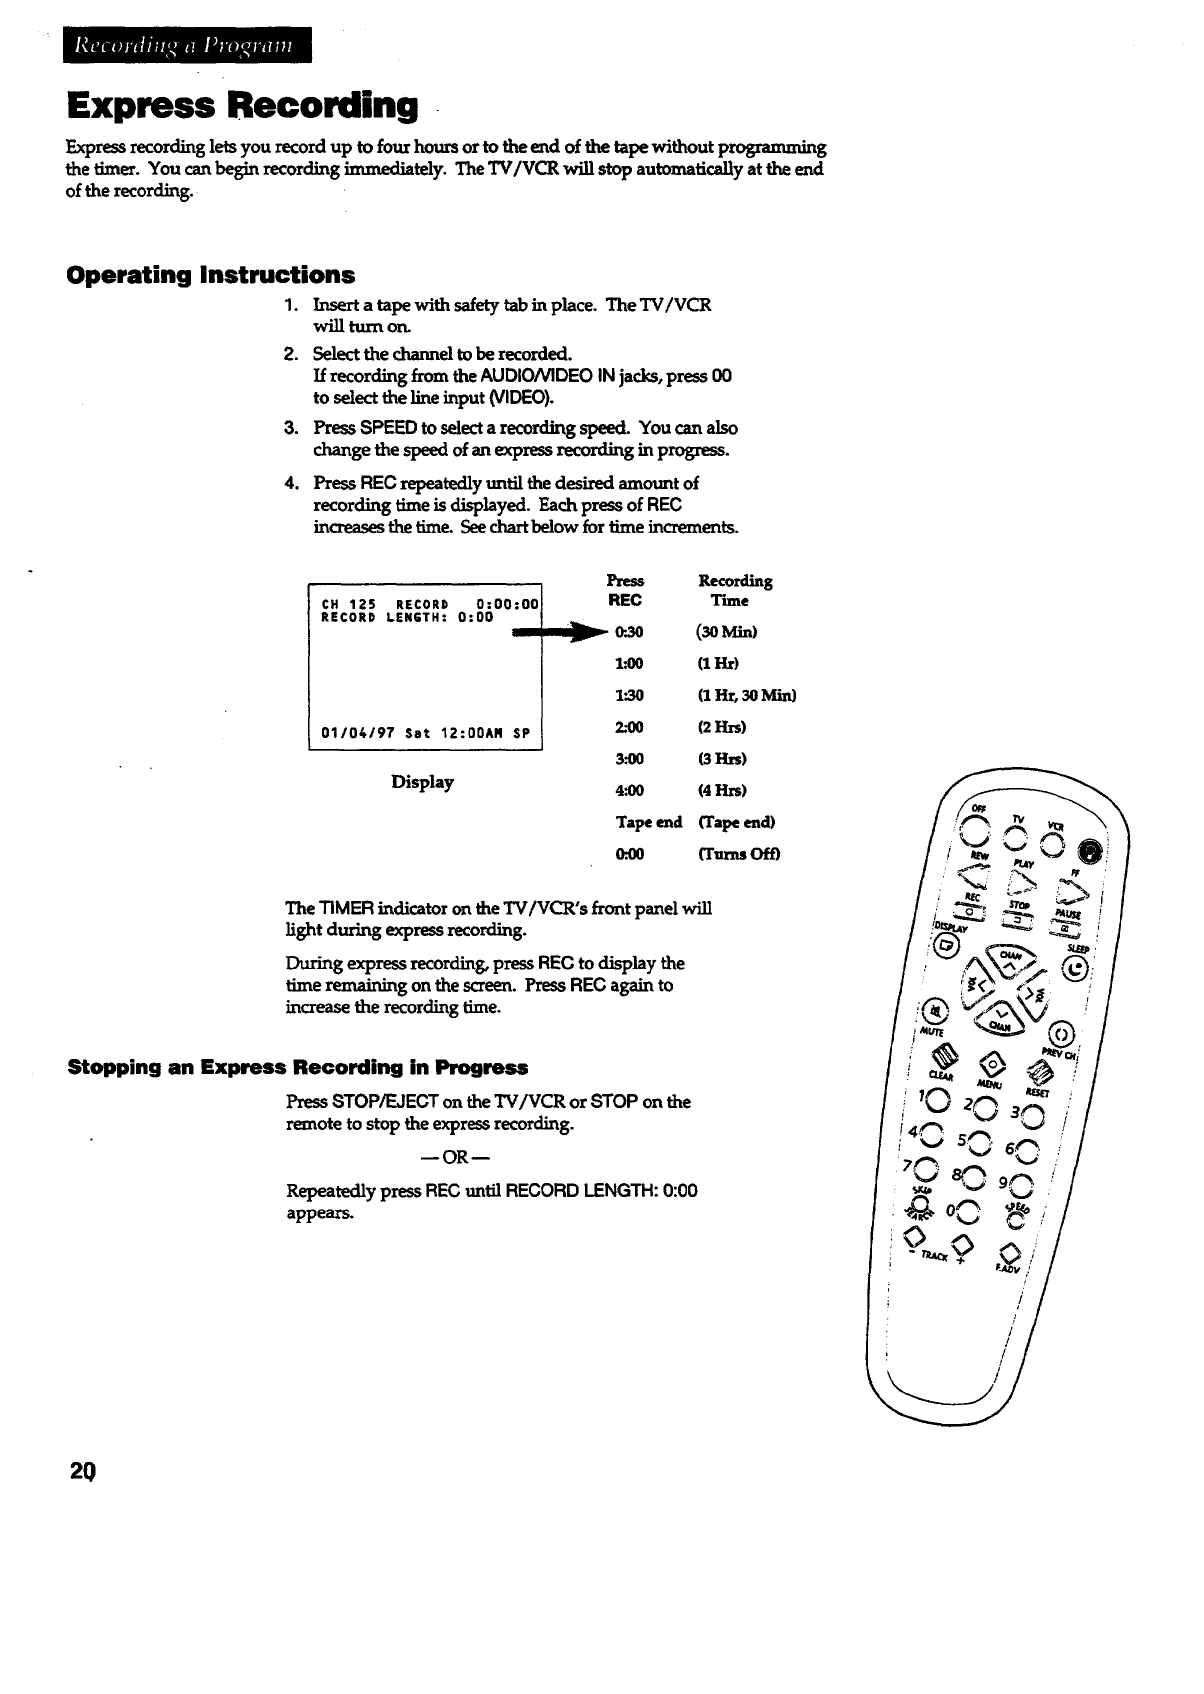
Express recording lets you record up to four hours or to the end of the tape without programming
the timer. You can begin recording immediately. TheTV/VCR will stop automatically at the end
of the recording.
Operating Instructions
1. Insert a tape with safety tab in place. TheTV/VCR
will turn on.
2. Select the channel to be recorded.
If recording from the AUDIO/VIDEO IN jacks, press 00
to select the line input (VIDEO).
3. Press SPEED to selecta recording speed. Youcanalso
change the speed of an express recording in progress.
4. Press REC repeatedly until the desired amount of
recording t_ne is displayed. Each press of REC
increasesthetime. Seechart below for time increments.
CH 125 RECORD 0:00:00
RECORD LENGTH: 0:00
01/04/97 Sat 12:00AN SP
Display
.lb._
V
Recording
REC Time
o-.3o (3oML,O
l:00 (1 Hr)
1".30 (1Hr, 3OMin)
2._0 (21_s)
3.'OO (3H_,,s)
4.'0O (41_s)
Tape e_d (Tape end)
(k00 (Turns Oft)
The TIMERindicator on the TV/VCR's front panel will
light during express recording.
During expressrecording,pressRECto display the
time remainingonthesczeen.PressRECagainto
increasetherecordingtime.
Stopping an Express Recording in Progress
Press STOP/F.JECT on the TV/VCR or STOP on the
remote to stop the express recording.
--OR--
Repeatedly press REC until RECORD LENGTH: 0:00
appears.
2O
RecordingWhile You're Away (Timer Recording)
Tin_e_recording lets you program theTV/VCR to record up to eight _t pl_'ams
within a one year period. This is useful if you plan on being away from home for a long
period of time. Before setting the timer,make sure that the clock is set correctly.
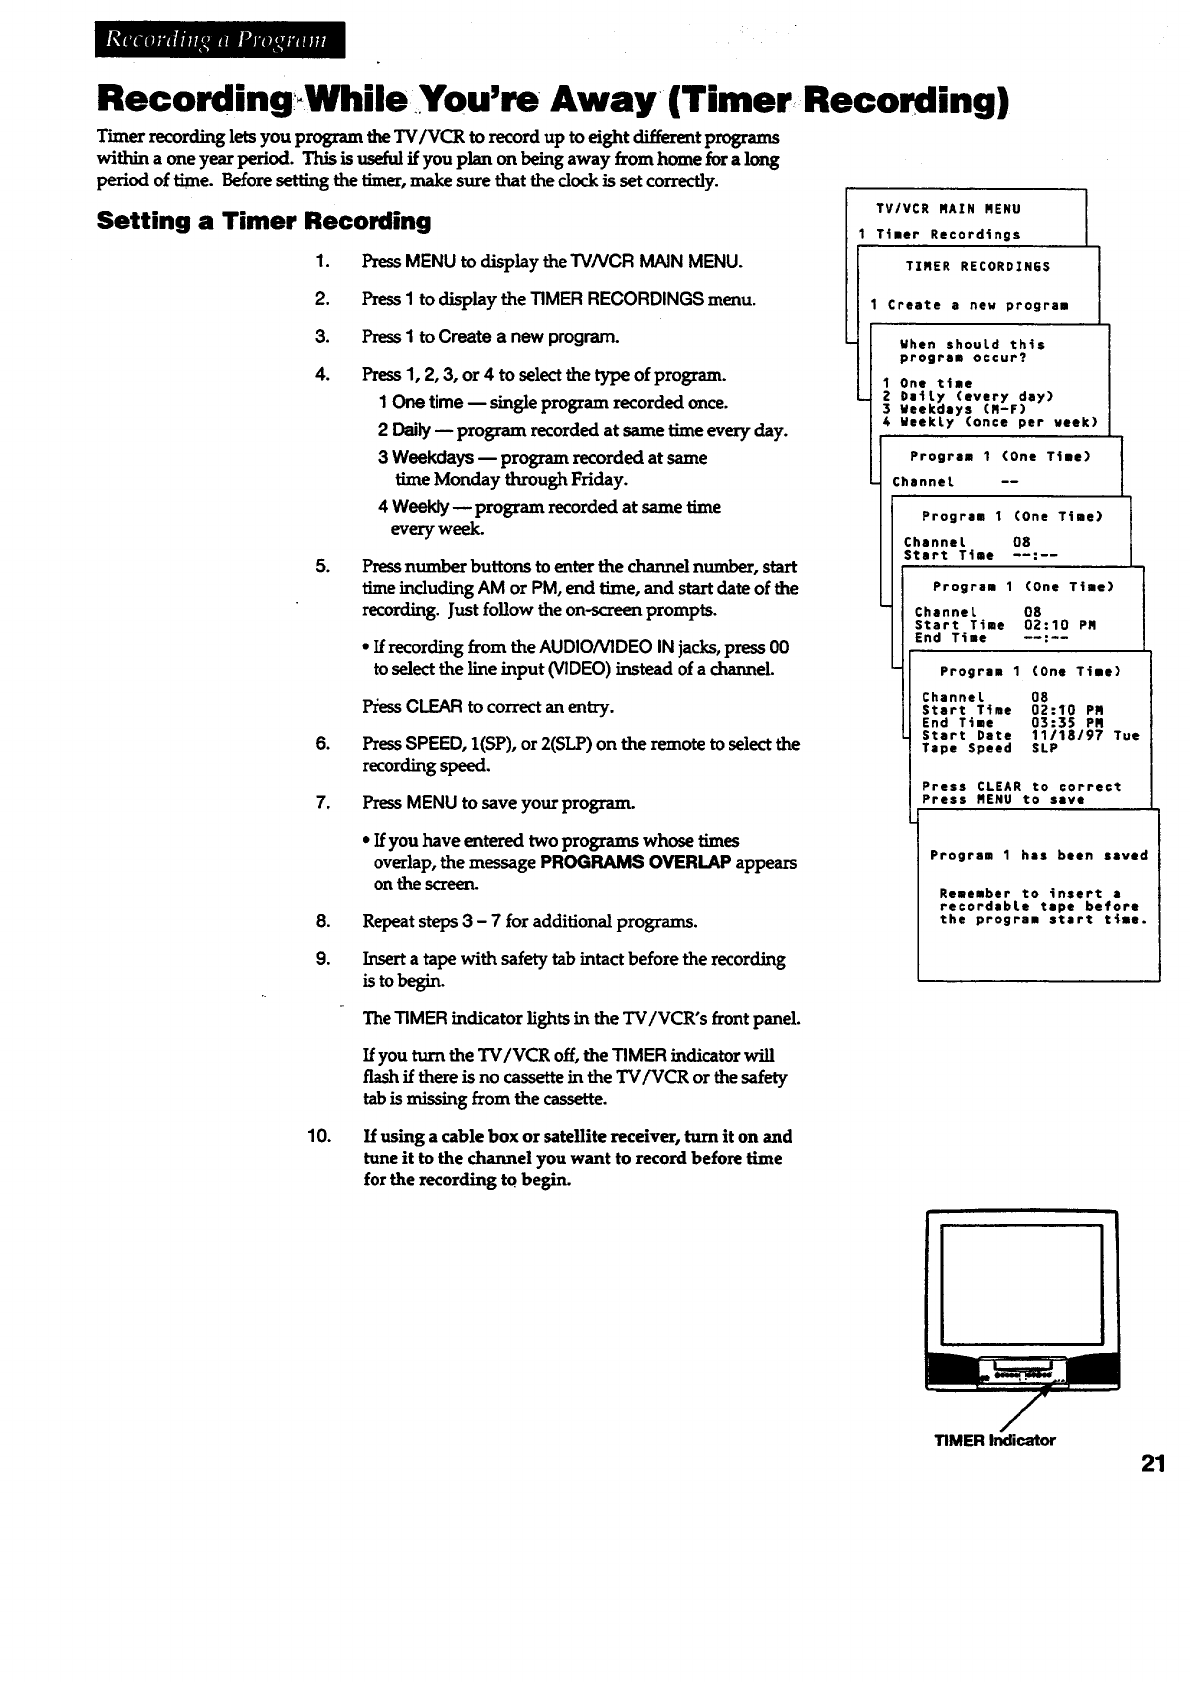
Setting a Timer Recording
1. PressMENU to display the TVNCR MAIN MENU.
2. PressIto display the TIMER RECORDINGS menu.
3. PressI to Create a new program.
.Press1, 2, 3, or 4 to sele_ the type of program.
1 One time -- single program recorded once.
2 Daily -- program recorded at same time every day.
3 Weekdays -- program recorded at same
time Monday through Friday.
4 Weakly-- program recorded at same time
every week.
.Press number buttons to enter the channel number, start
time including AM or PM, end time, and start date of the
recording. Just follow the on-screen prompts.
• If recording from the AUDIO/VIDEO INjacks, press 00
to select the line input (VIDEO) instead of a channel.
.
7,
l_ess CLEAR to co=ect an entz7.
PressSPEED, I(SP), or 2(ST._) on the remote to selectthe
recording speed.
PressMENU to save your program.
*If you have entered two programs whose times
overlap, the message PROGRAMS OVERLAP appears
on the s_eerL
8.
9.
Repeat steps3 - 7 for additional programs.
Insert a tape with safety tab intact before the recording
isto -=sm.
The TIMER indicator lights in the TV/VCR's front panel.
If you turn the TV/VCR off, the TIMER indicator will
flash if there is no cassette in the TV/VCR or the safety
tab is missing from the cassette.
TV/VCR RAZN MENU
Timer Recordings
TIRER RECORDINES
Create a new program
When shouLd this
program occur?
1 One time
DaiLy (every day)
Meekdeys (R-F)
4 MeekLy (once per veek)
I
i
Program 1 (One Ttme)
ChanneL --
Program 1 (One Time)
Channel 08
Start T4me --:--
Program 1(One T4me)
Channet 08
Start Time 02:10 PR
End Time --:--
11
Program 1(One Time)
Channel 08
Start Time 02:10 PR
End Time 03:35 PR
Start Date 11118/97 Tue
Tape Speed SLP
Press CLEAR to correct
Press RENU to save
Program 1 has been saved
Remember to insert •
recordebLe tape before
the program start t_me.
10. If using a cable box or satellite receiver, turn it on and
tune it to the channel you want to record before lime
for the recording to begin.
TIMER Indioator
21
Recording While You'm Away(Timer ReCording)
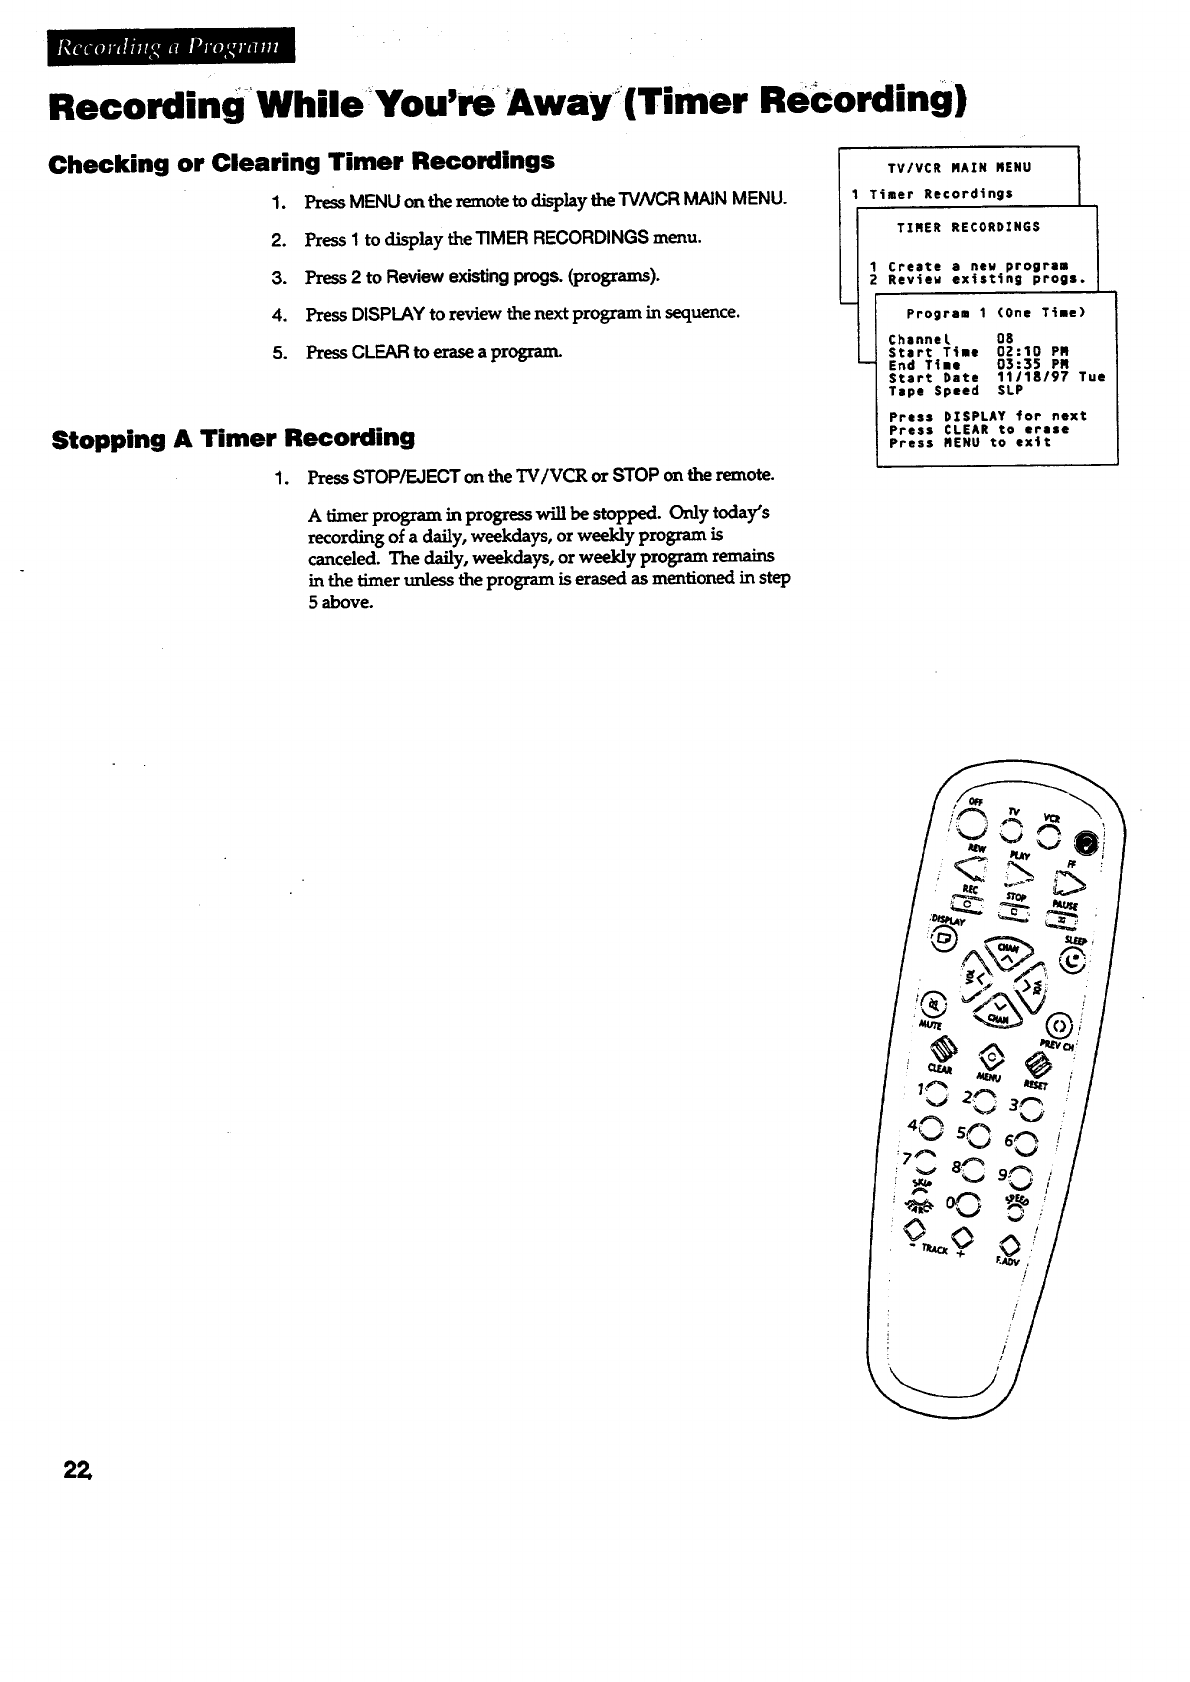
Checking or Clearing Timer Recordings
1. PRss MENU on the remote to ctisp]aythe "rVNCR MAIN MENU.
2. Press I to dLsp]ay theT1MER RECORDINGS menu.
3. Press 2 to Review existing progs. (programs).
4. Press DISPLAY to review the next program in sequence.
5. Press CLEAR to erase a progran_
Stopping A Timer Recording
1. PressSTOP/EJECTonthe"IV/VCR or STOPo_ the remote.
Atimer program in progress will be stopped. Only today's
recording of a daily, weekdays, or weekly program is
canceled. The daily, weekdays, or weekly program remains
in the timer unless the program is erased as mentioned in step
5above.
I
TV/VCR MAIN MENU i
I
Timer Recordings
TIMER RECORDINGS
1 Create a new program
2Review ex_sttng progs.
Program 1 (One T_|e)
Channel OS
Start T4me 02:10 PM
End T4ma 03:35 PM
Start Date 11/18/97 Tue
Tape Speed SLP
Press DISPLAY for next
Press CLEAR to erase
Press mENU to exit
22
Copying and Editing Tapes
Operating Instructions IRe_r to hookup oo page :S.)
_: The _ub_xJz_
_and od_ _t_Is
mayinfringeuixm_ fights
o!others.
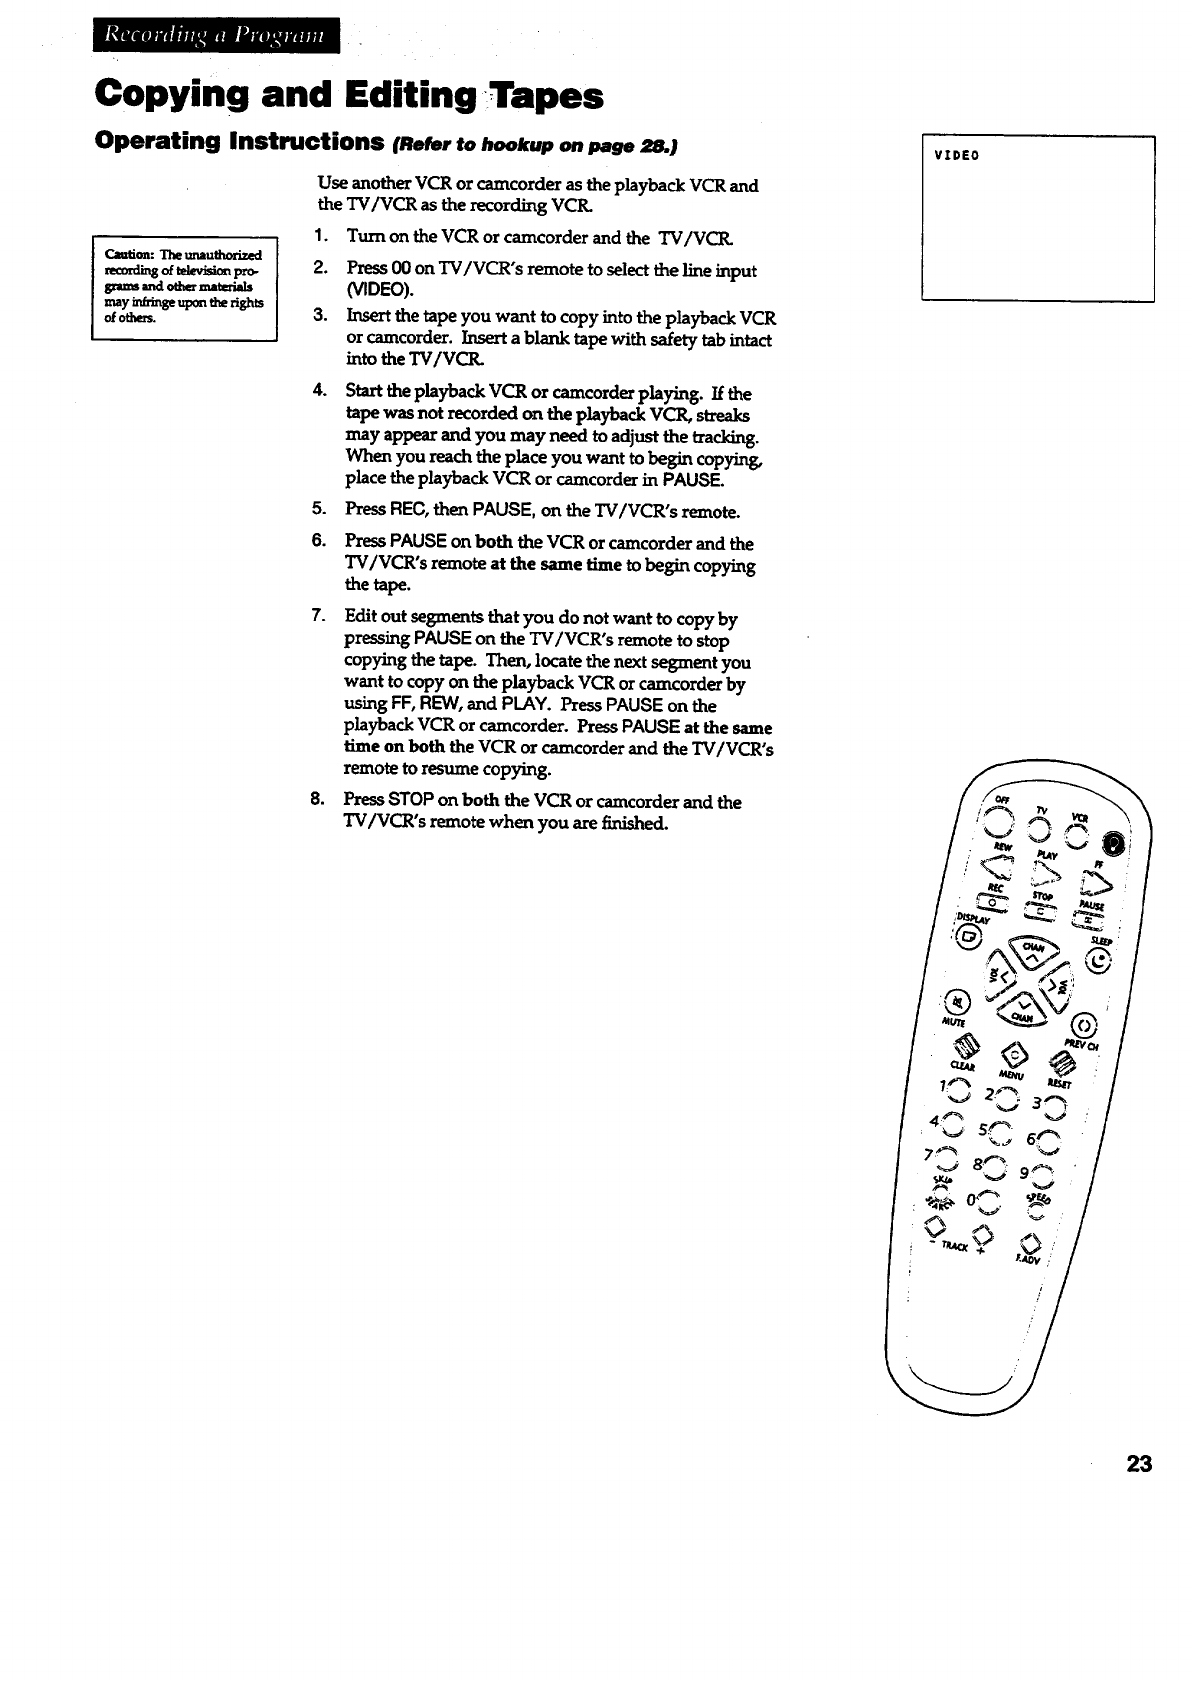
Use another VCR or camcorder asthe playback VCR and
the TV/VCR as the recording VCIL
1. Turnon the VCR or camcorder and the TVIVCIL
2. Press00 on TV/VCR's remote toselectthelineinput
(VIDEO).
3. Insertthetapeyou want tocopy intotheplaybackVCR
orcamcorder.Insertablanktapewithsafetytabintact
intotheTV/VCIL
4. StarttheplaybackVCR orcamcorderplaying.Ifthe
tapewasnotrecordedontheplaybackVCR, streaks
may appearandyou may needtoadjustthetracking.
When youreachtheplaceyouwanttobegincopyin_
placetheplaybackVCR orcamcorderinPAUSE.
5. Press REC, then PAUSE, on the TV/VCR's remote.
6.
7.
8,
PzessPAUSE on both theVCR or camcorderand the
TV/VCR's remote atthe same timetobegincopying
thetape.
Editoutsegmentsthatyou do notwant tocopy by
pressingPAUSE on theTV/VCR's remotetostop
copyingthetape.Then,locatethenextsegment you
want tocopyon theplaybackVCR orcamcorde_by
usingFF,REIN,and PLAY. PressPAUSE on the
playbackVCR orcamcorder. PressPAUSE atthesame
timeon both theVCR orcamcorderand theTVIVCR's
remote to resume copying.
PressSTOP on both theVCR or camcorderand the
TV/VCR's remotewhen you arefinished.
VIDEO
i
/
23
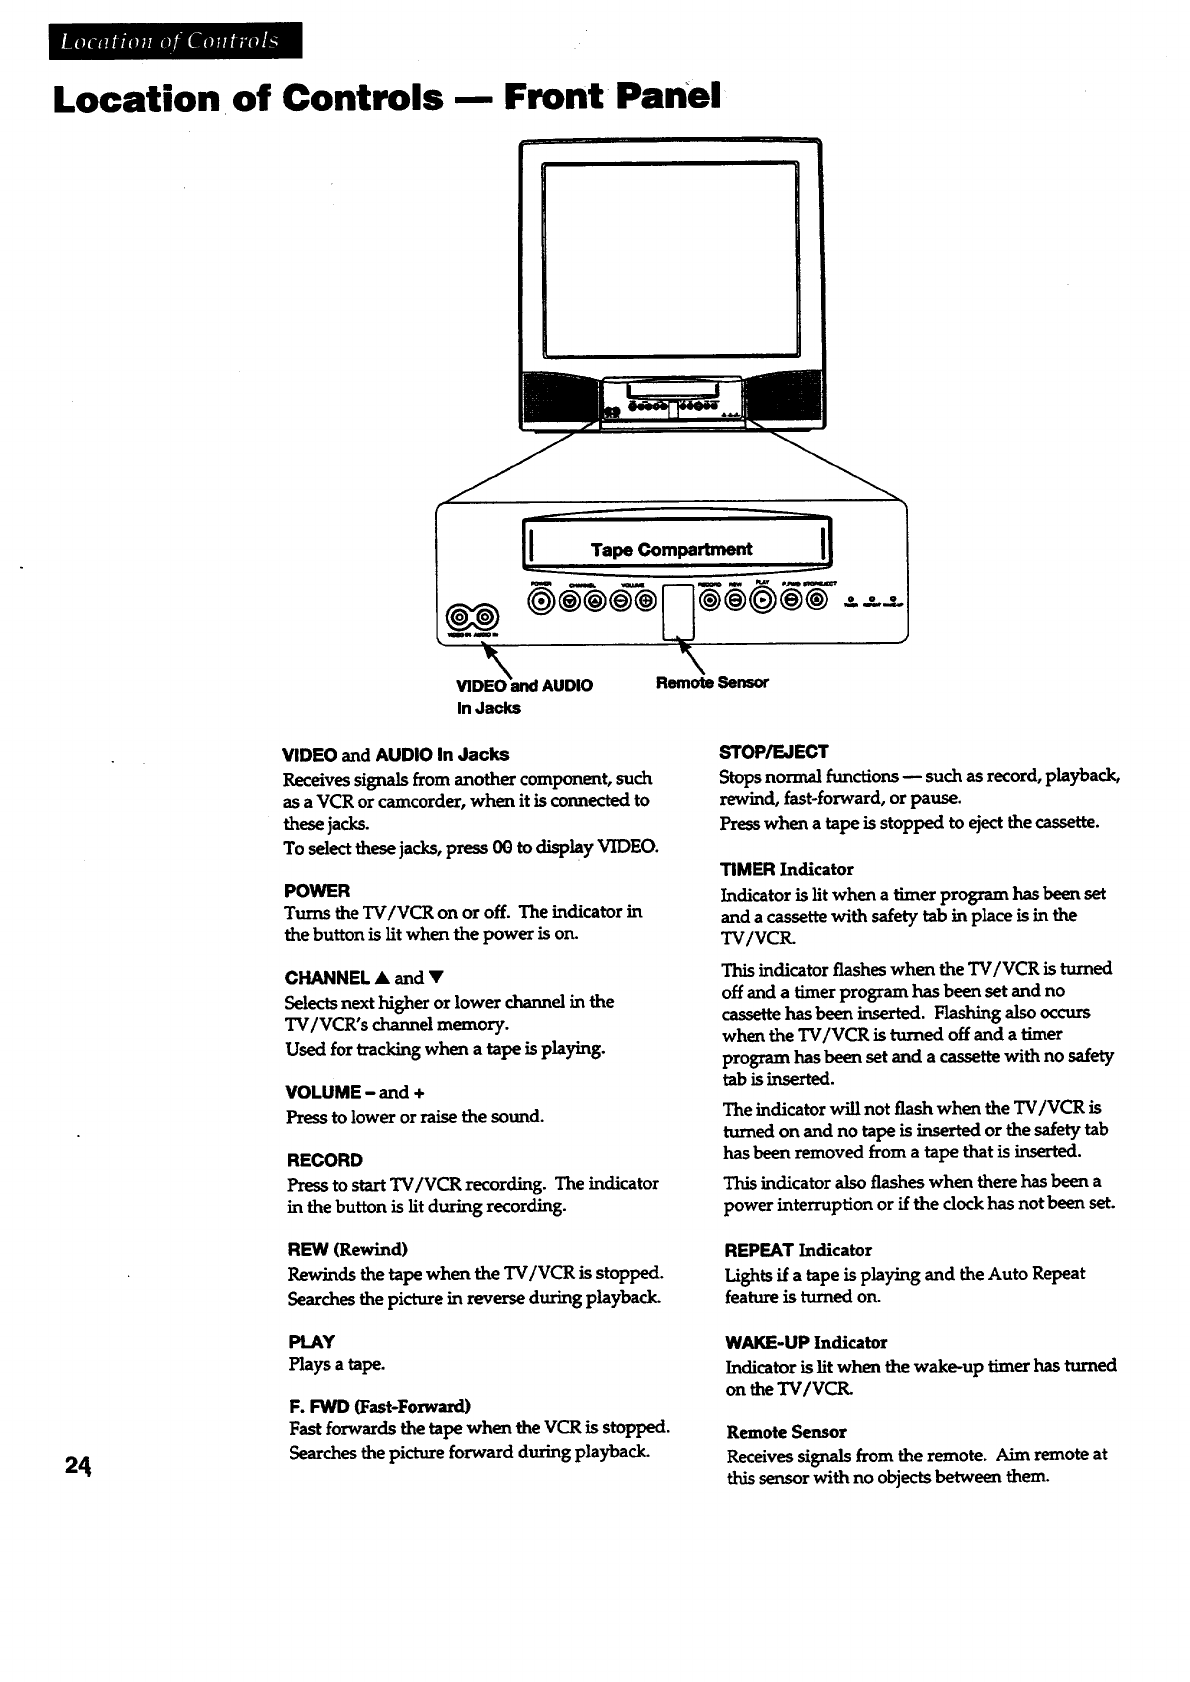
Location of Controls-- Front Panel
24
Tape Compartment ______l
In Jacks
VIDEO and AUDIO In Jacks
Receives signals from another component, such
as a VCR or camcorder, when it is connected to
these jacks.
To select these jacks, press 00 to display VIDEO.
POWER
Turns the TV/VCR on or off. The indicator in
the button is lit when the power is on.
CHANNEL •and •
Selects next higher or lower channel in the
TV/VCR's channel memory.
Used for tracking when a tape is playing.
VOLUME - and +
Pressto lower or raise the sound.
RECORD
Press to start TV/VCR recording. The indicator
in the button is lit during recording.
REW (Rewind)
Rewinds the tape when the TV/VCR is stopped.
Searches the picture in reverse during playback.
PlAY
Plays a tape.
F. FWD (Fast-Foxward)
Fast forwards the tapewhen the VCR is stopped.
Searches the picture forward during playback.
STOP/EJECT
Stops normal functions -- such as record, playback,
rewind, fast-forward, or pause.
Press when a tape is stopped to eject the cassette.
TIMER Indicator
Indicator is lit when a timer program has been set
and a cassette with safety tab in place is in the
TV/VCtL
This indicator flashes when the TV/VCR is turned
off and a timer program has been set and no
cassette has been inserted. Hashing also occurs
when the TV/VCR is turned off and a timer
program has been set and a cassette with no safety
tab is inserted.
The indicator will not flash when the TV/VCR is
turned on end no tape is inserted or the safety tab
has been removed from a tapethatisinserted.
This indicator also flashes when there has been a
power interruption or if the clockhas not been set.
REPEAT Indicator
Lights if a tapeisplaying and the Auto Repeat
feature is turned on.
WAKE-UP Indicator
Indicator is lit when the wake-up timer has turned
on the TV/VCR.
Remote Sensor
Receives signals from the remote. Aim remote at
this sensor with no objects between them.
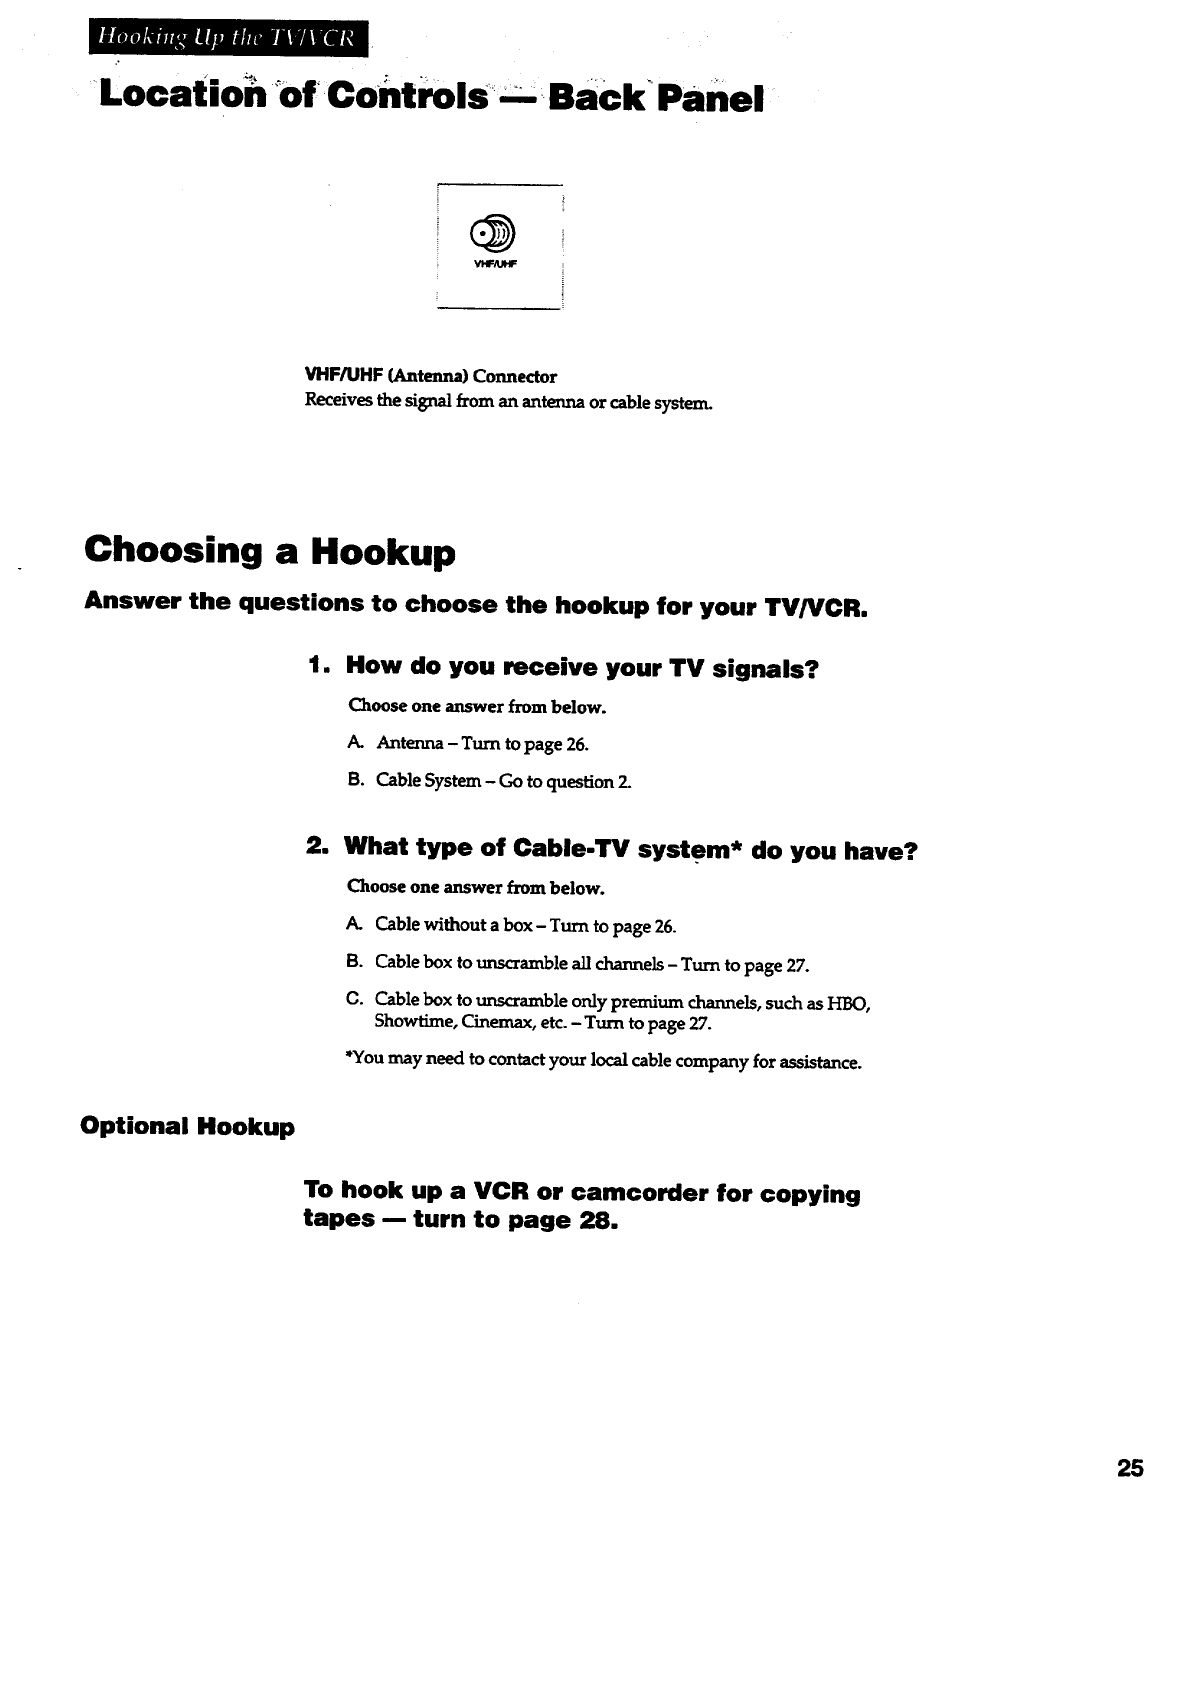
Locatio_ Of controls "_m Back Panel
VHF/UHF (Antenna) Connector
Receives the signal from an antenna or cable system.
i HookupChoos ng a
Answer the questions to choose the hookup for your TV/VCR,
tm How do you receive your TV signals?
Choose one answer from below.
A. Antenna - Turn to page 26.
B. Cable System- Go to question 3-
2. What type of Cable-TV system* do you have?
Choose one answer from below.
A. Cable without a box- Turn to page 26.
B. Cable box to unscramble all channels- Turn to page 27.
G. Cablebox tounscrambleonlypremium channels,suchas HBO,
Showtime,Cinemax,etc.- Turn topage27.
*You may need to contact your local cable company for assistance.
Optional Hookup
To hook up a VCR or camcorder for copying
tapes -- turn to page 28.
25
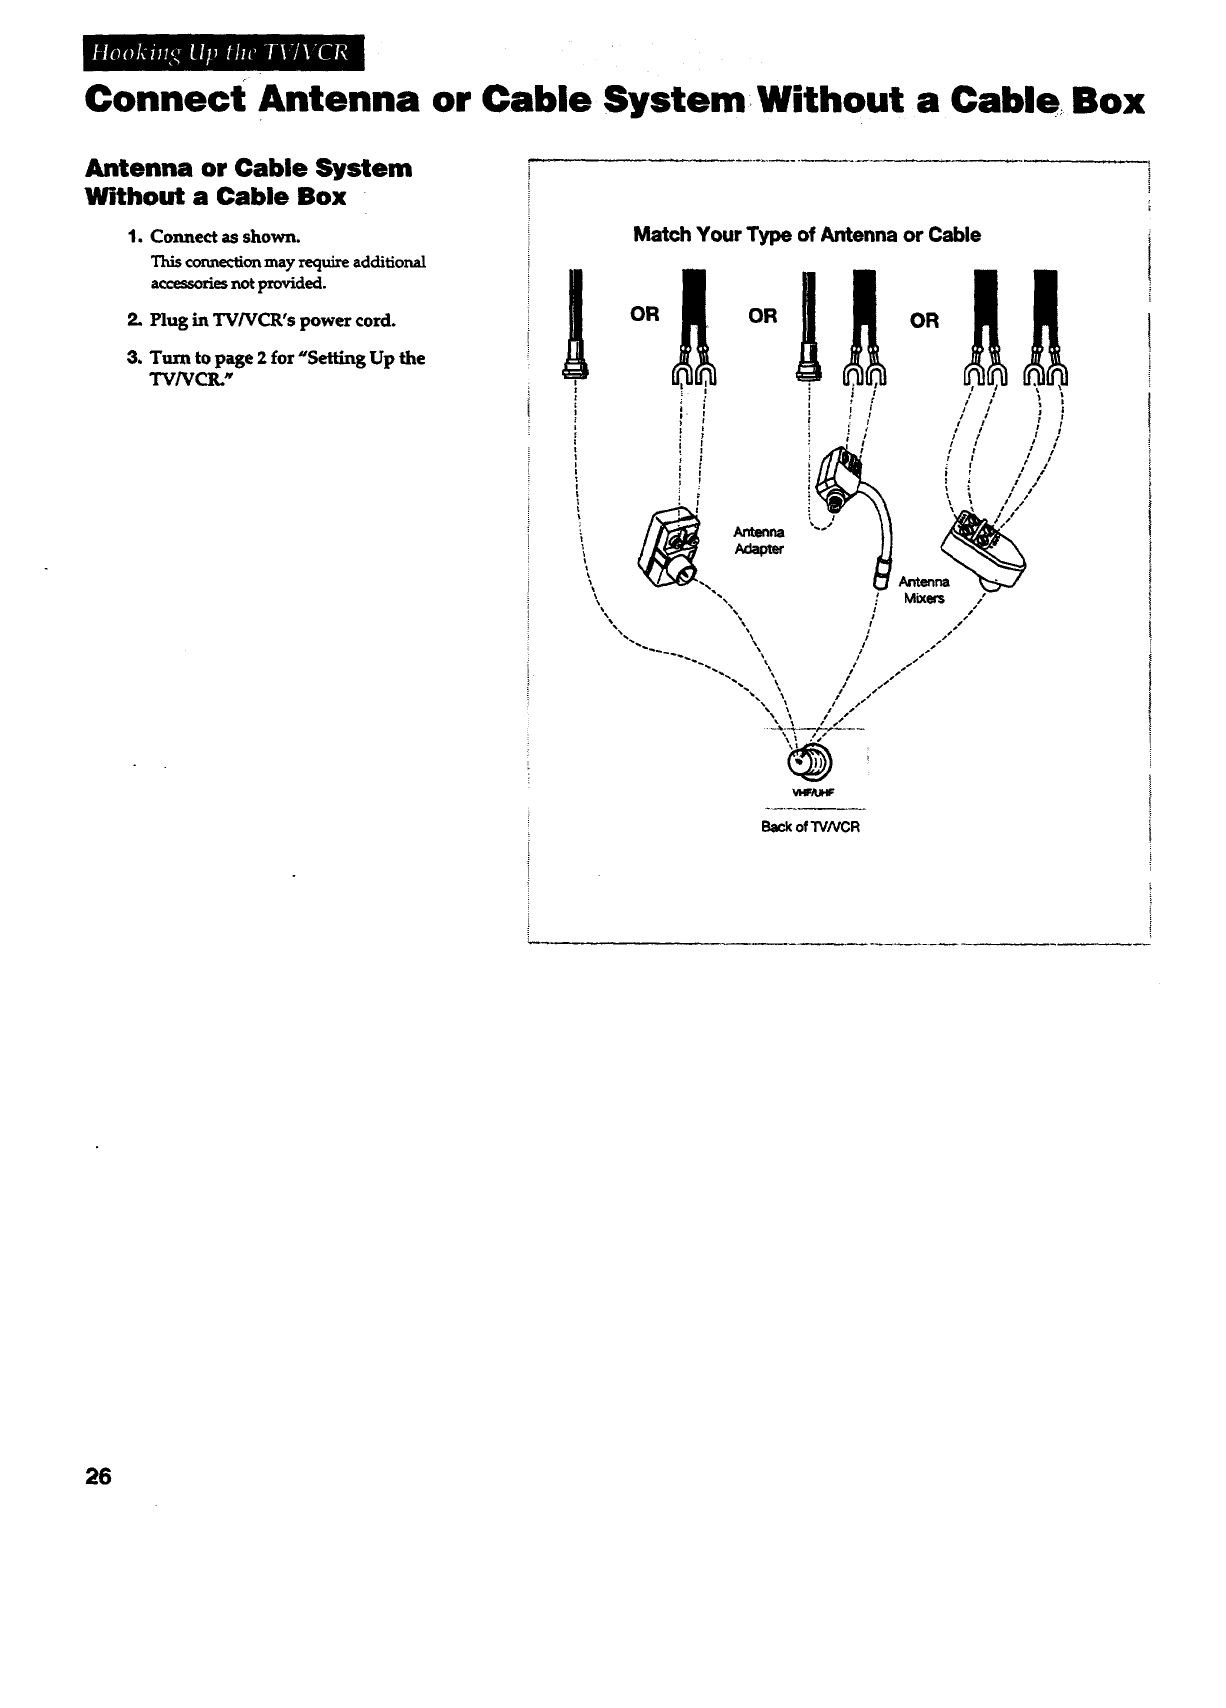
Connect Antenna or Cable System,Without a Cable Box
Antenna or Cable System
Without a Cable Box
I. Connect as shown.
This connection may require additional
accessoriesnotprovided.
2. Plug in TV/VCR's power cord.
3. Turn to page 2 for "Setting Up the
TV/VCR._
Match Your Type of Antenna or Cable
Back of TVNCR
26
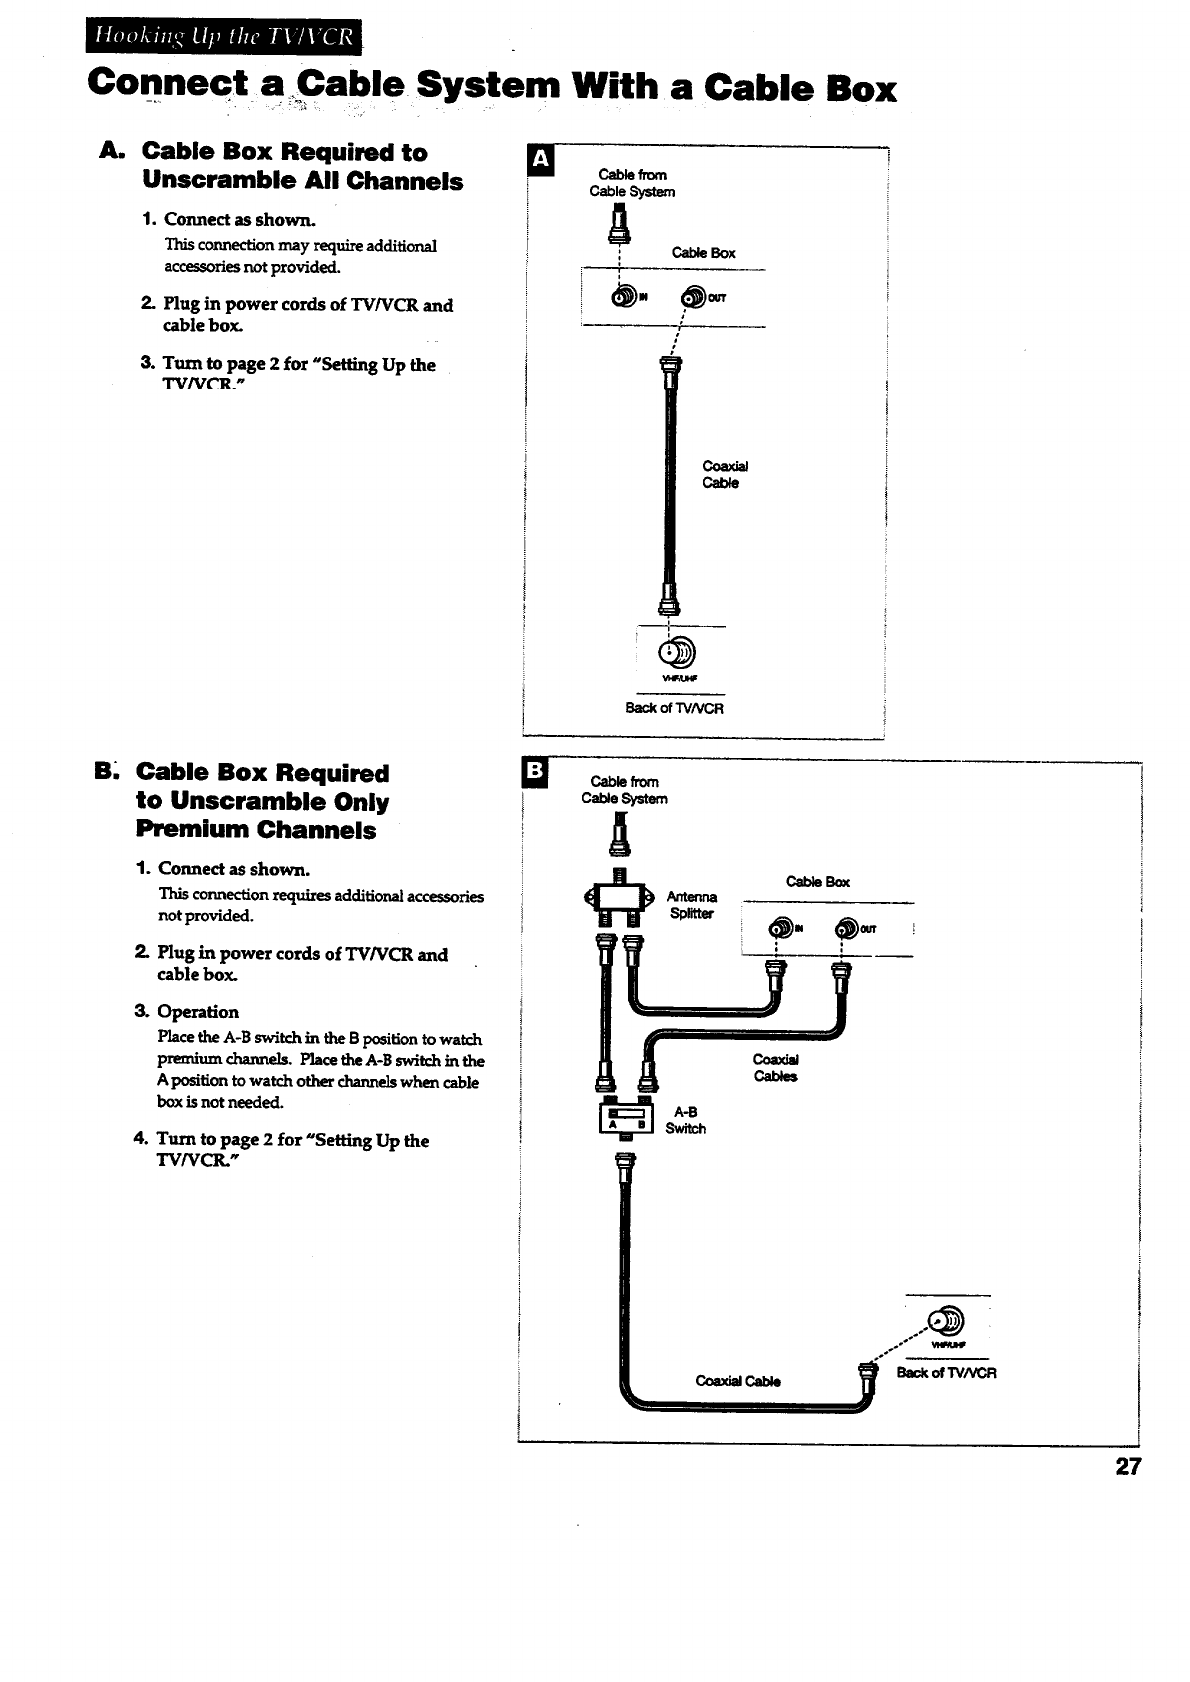
Connect aCable System With a Cable Box
Am Cable Box Required to []
Unscramble All Channels m
1. Connect as shown.
This connection may require additional
accessories not provided.
2. Plug in power cords of TV/VCR and
cable box.
3. Turn to page 2 for "Setting Up the
TV/VCR_"
Cab__om
Cab,e
: CableBox
s
/
Coax_
Ca_e
Back of "rv/vcR
B- Cable Box Required
to Unscramble Only
Premium Channels
1.
2.
Connect as shown.
This connection requizes additional accessories
not provided.
Plug in power cords of TV/VCR and
cable box.
3. Operation
Place the A-B switch in the Bposition to watch
premium channels. Place the A-B switch in the
Aposi_on to watch other channelswhen cable
box is not needed.
4. Turn to page 2 for "Setting Up the
TVNCR."
ta Cablefrom
CabJeSystem
A
r
!
Coa.,_ e.,al_
'so._
°_.°°
27
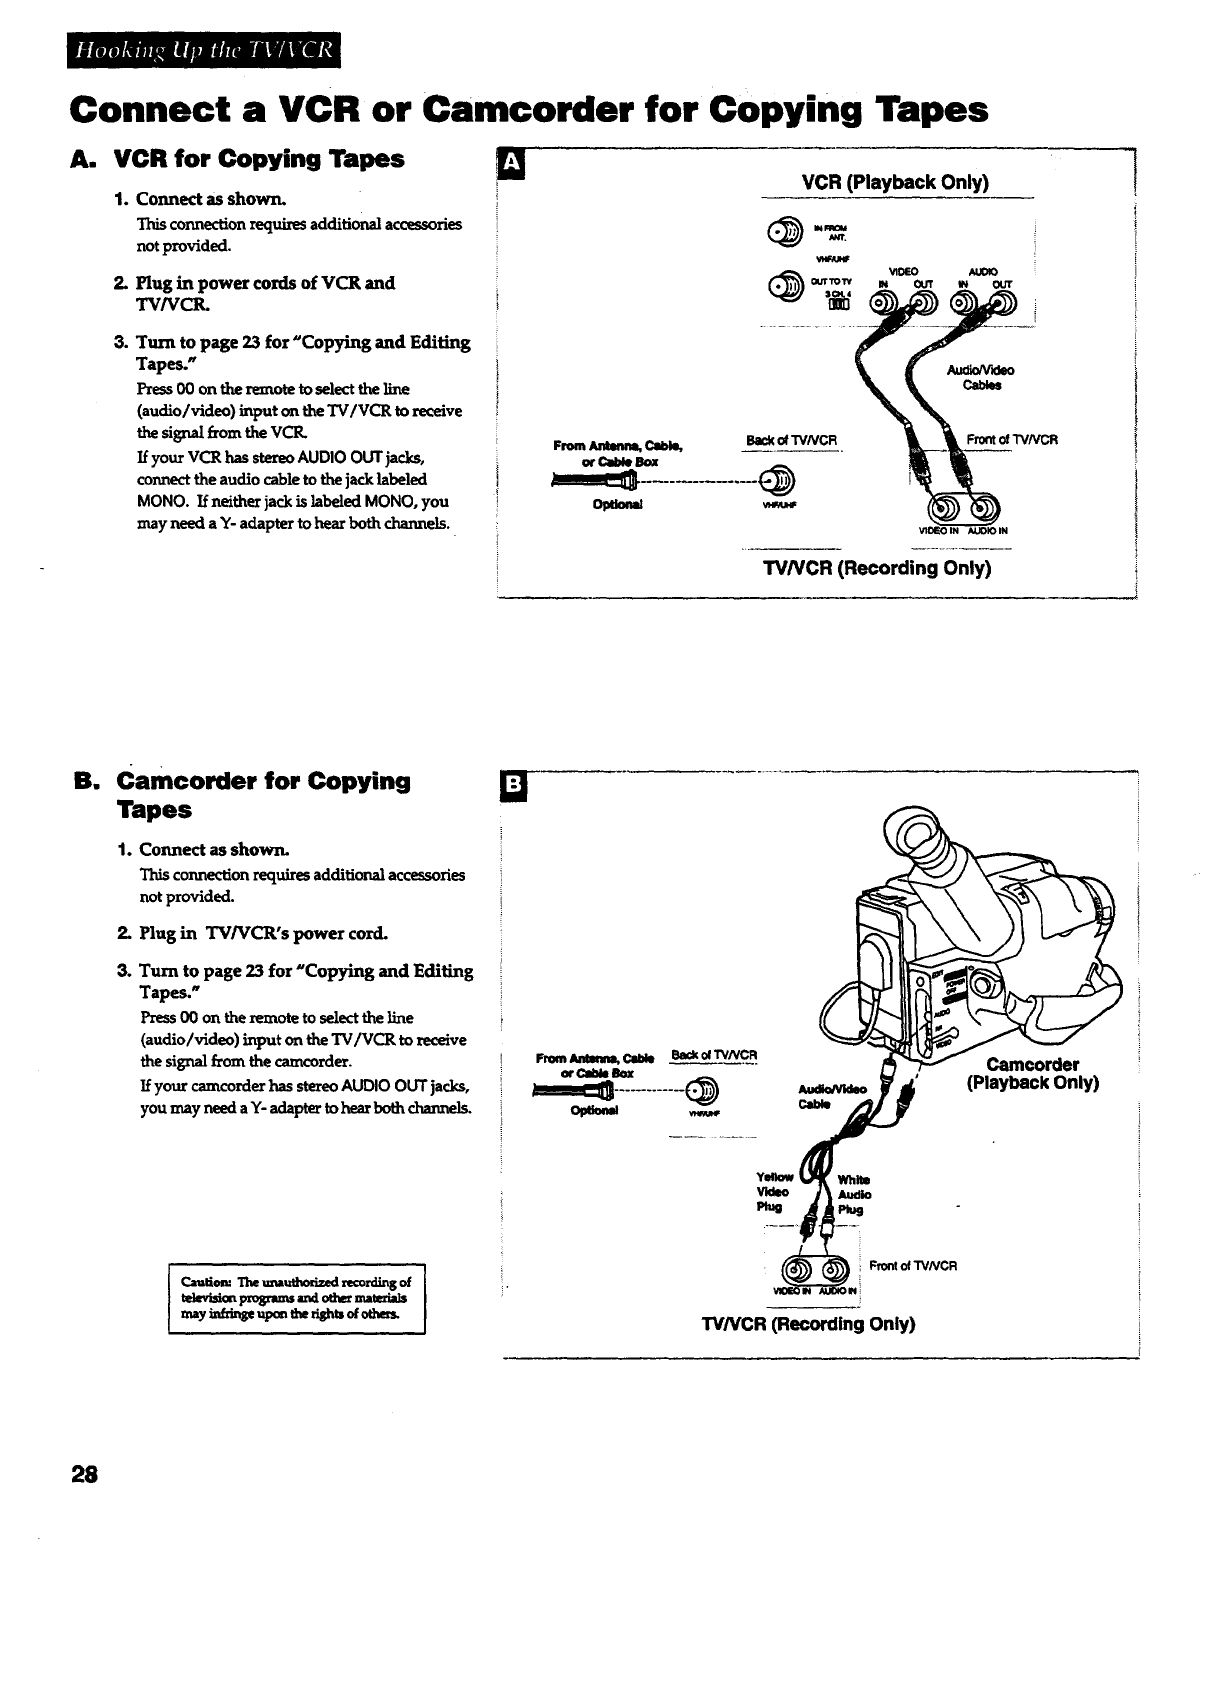
Connect a VCR or Camcorder for Copying Tapes
A. VCR for Copying Tapes E]
1.
2.
Connect as shown.
This connection requixes additional accessories
not provided.
Plug in power cords of VCR and
TV/VCI_
3. Turn to page 23 for "Copying and Editing
Tapes."
Press00 on theremote toselecttheline
(audiolvideo)inputon theTVIVCR toreceive
thesignalfrom theVCR.
If your VCR has stereo AUDIO OUT p.cks,
connect the audio cable to the jack labeled
MONO. If neither jack is labeled MONO, you
may need aY- adaptertohearboth chazmels.
Fmm Ammm, Cm_,
orCaldeB==
Opao_
VCR (Playback Only)
J_rt.
oyy
Backof'rVNCR FrontofTVNCR
_,tX-O IN _IOIN
TVNCR (Recording Only)
11 Camcorder for Copying
Tapes
1. Connect as shown.
Thisconnectionrequiresadditionalaccessories
notprovided.
2. Plug in TV/VCR's power cord.
3. Turn to page 23 for "Copying and Editing
Tapes."
Press O0 on the remote to select the line
(audio/video) input on the TV/VCR to receive
thesignalfrom thecamcorder.
If your camcorder has stereo AUDIO OUT jacks,
you may need a Y-adaptertohearbothcharmels.
Ia==iomTheumuezzizedrecordingof
televisi_pxogrm=m_loemrm=tedads
nmy i=ffdng=upontl_right=of_
Q
From Antmma, Cable Back Of'rVNCR
orCa_ llox
Y_
Front of "rVNCR
(Playback Only)
"I'VNCR (Recording Only)
28
Cleaning the TV/VCR
You can dean the TV/VCR as required, using a soft cloth or the dusting
attachment for your vacuum cleaner. Be sure to occasionaUy vacuum the
ventilation slots in the cabinet to help assure adequate ven_lation.
To clean the TV/VCR screen, use a soft cloth dampened with a diluted soap and
water mixture. Do not use furniture polish on the TV/VCR cabinet or screen.
While cleaning,do not sprayliquiddirectlyon thescreen,orallowliquidtorun
down thescreenand insidetheTV/VCR. Also,avoidplacingdrinksorvases
withwater on topoftheTV/VCR. Thiscouldincreasetheriskoffireorshock
hazard ordamage totheTV/VCR.
29
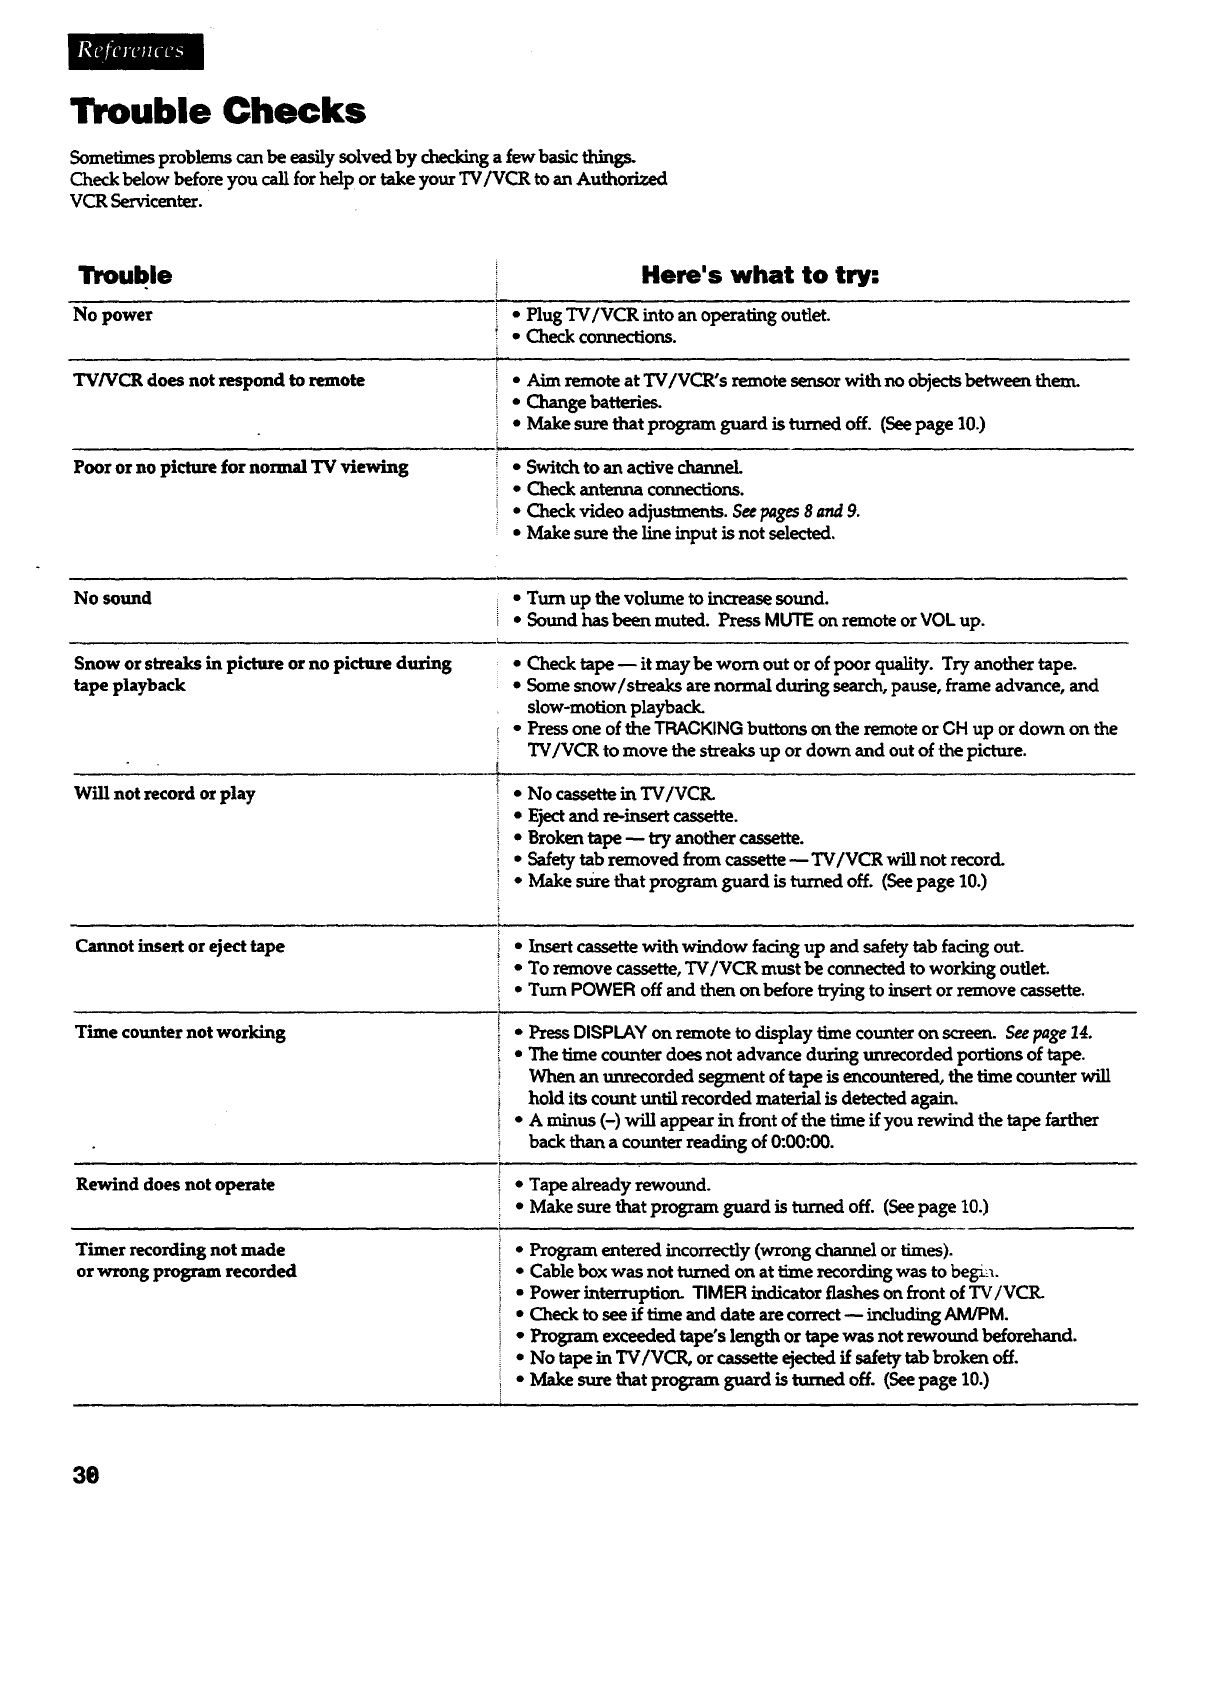
Trouble Checks
Sometimes problems can be easily solved by checking a few basic things.
Check below before you call for help or take your TV/VCR to an Authorized
VCR Servicenter.
Trouble
No power
TV/VCR does not respond to remote
Poor or no picture for normal TV viewing
Here's what to try:
• Plug TV/VCR into an operating outlet.
• Check connections.
•Aim remote at TV/VCR's remote sensor with no objects between them.
•Change batterie_
•Make sure that program guard is turned off. (See page 10.)
•Switch to an active channel.
• Check antenna connections.
• Check video adjustments. Seepages 8 and9.
•Make sure the line input is not selected.
No sound * Turn up the volume to increase sound.
•Sound has been muted. Press MUTE on remote or VOL up.
Snow or streaks in picture or no picture during
tape playback
Will not record or play
Cannot insert or eject tape
• Check tape-- itmay be worn outor ofpoor quality.Try anothertape.
• Some snow/streaksarenormal duringsearch,pause,frame advance,and
slow-motionplayback
•Press one of the TRACKING buttons on the remote or CH up or down on the
TV/VCR to move the streaks up or down and out of the picture.
•No cassetteinTVIVCIL
•Ejectand re-insertcassette.
•Brokentape-- tryanothercassette.
• Safetytabremoved from cassette-- TV/VCR willnotrecord.
•Make surethatprogram guard isturnedoff.(Seepage 10.)
• Insert cassette with window facing up and safety tab facing out.
• To remove cassette, TV/VCR must be connected to working outlet
•Turn POWER offand then on beforetryingtoinsertorremove cassette.
Time counter not working •Press DISPLAY on remote to display time counter on scre_ See page 14.
•The time counter does not advance during unrecorded portions of tape.
When an unrecorded segment of tape is encountered, the time counter wiU
holditscount untilrecordedmaterialisdetectedagain.
•A minus (-) will appear in front of the time if you rewind the tape farther
back than a counter reading of 0:00:00.
Rewind does not operate * Tape already rewound.
•Make sure that program guard is turned off. (See page 10.)
Timer recording not made
or wrong program recorded
•Program entered incorrectly (wrong channel or times).
• Cable box was not turned on at time recording was to beg-_.
•Power interruptiomTIMER indicator flashes on front of TV/VCR.
• Check toseeiftimeand datearecorrect--indudingAM/PM.
• Program exceededtape'slength ortapewas not rewound beforehand.
•No tapeinTV/VCR, orcassetteejectedifsafetytabbroken off.
•Make surethatprogram guard isturnedoff.(Seepage 10.)
36
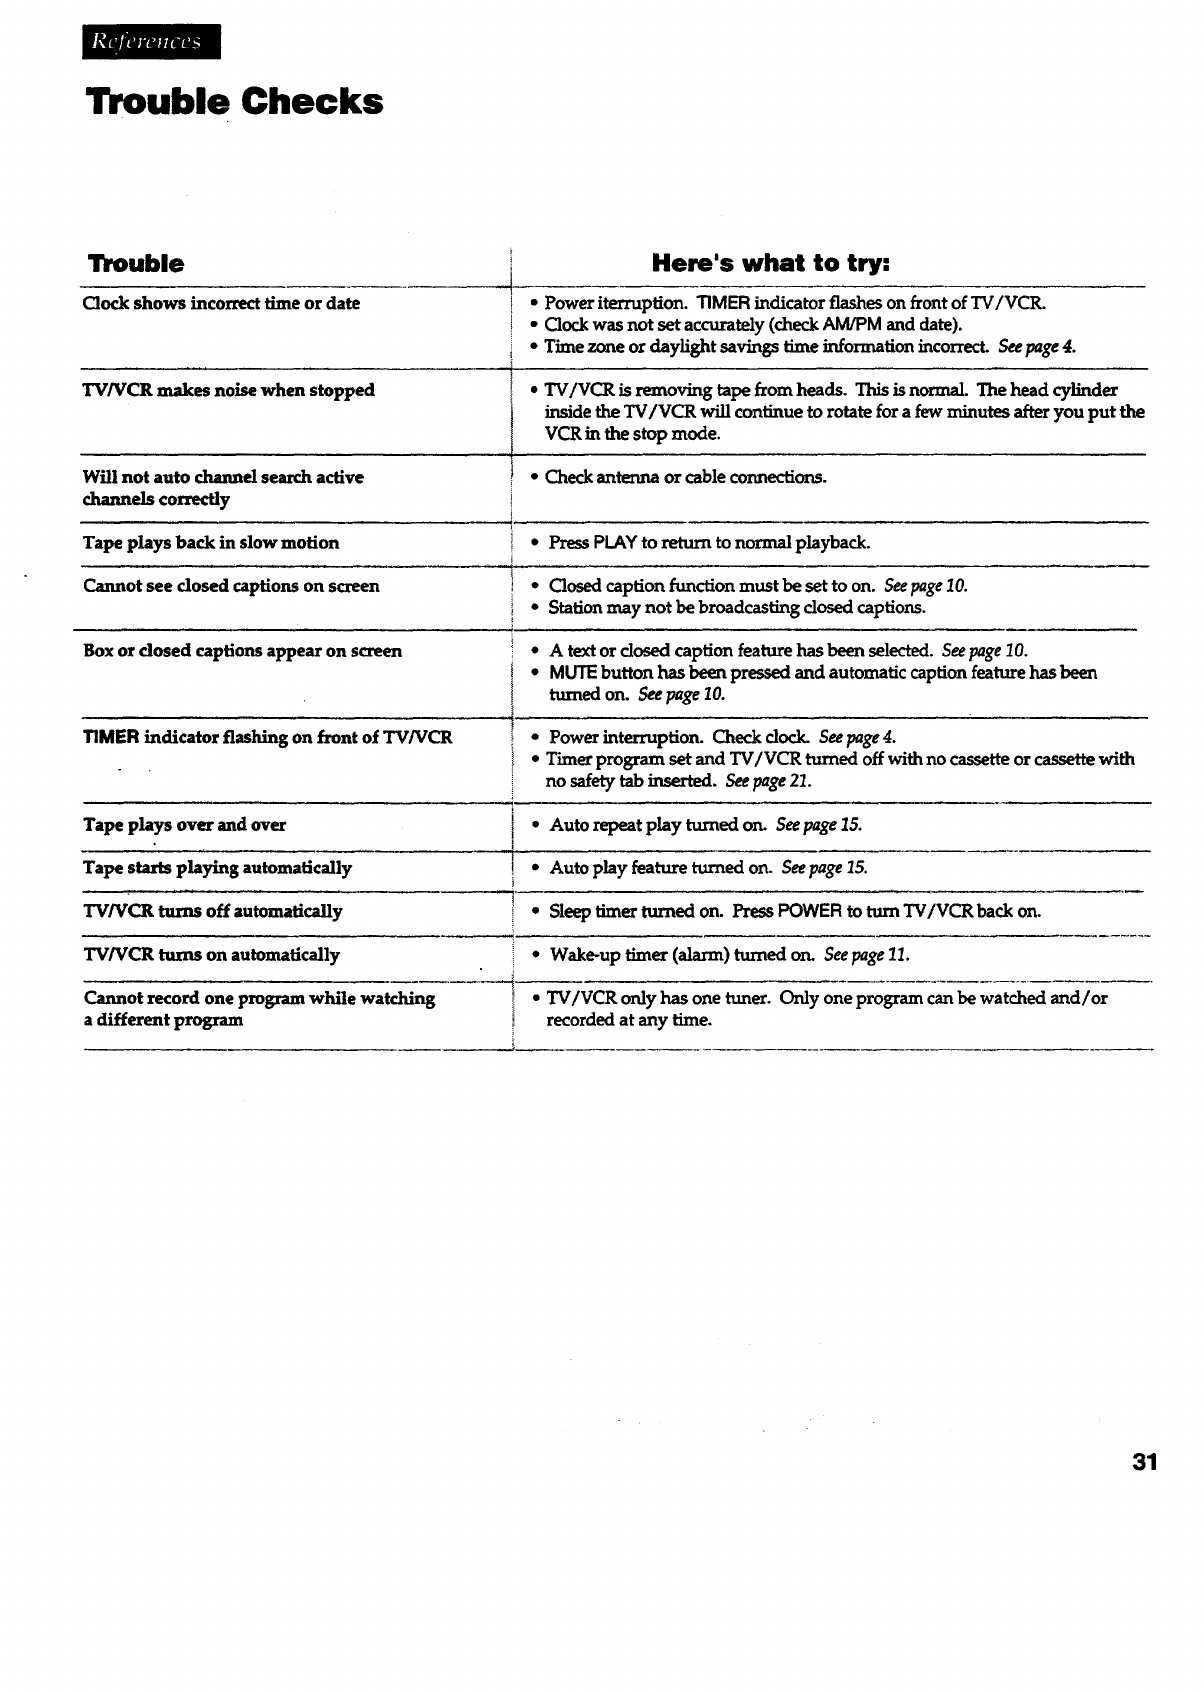
Trouble Checks
Trouble
Clock shows incorrect time or date !•
I •
i*
Here's what to try:
Power iterruption.TIMER indicatorflasheson frontofTV/VCR.
Clockwas notsetaccurately(checkAM/PM and date).
Time zone ordaylightsavingstimeinformationincorrect.Seepage4.
TV/VCR m__akesnoisewhen stopped
Will not auto channel search active
channels correctly
Tape plays back in slow motion
Cannot see dosed captions on screen
•TV/VCR isremoving tapefromheads. Thisis normal.The head cylinder
insidetheTV/VCR willcontinuetorotatefora few minutesafteryou putthe
VCR in the stopmode.
Tape plays over and over
Tape starts playing automatically
TV/VCR turns off automatically
TV/VCR turns on automatically
Cannot record one program while watching
a different program
•Check antenna or cableconnections.
•Press PLAY to return to normal playback.
i • Closedcaption function must be set to on. Seepage 10.
Station may not be broadcasting dosed captions.
Box or dosed captionsappearon screen * A textor dosed captionfeaturehas been selected.Seepage10.
•MUTE buttonhas been pressedand automaticcaptionfeaturehasbeen
turnedon. Seepage70.
TIMER indicator flashing on front of TV/VCR • Power interruption. Check dock. See page 4.
• Timer program set and TV/VCR turned off with no cassette or cassette with
no safety tab inserted. See page 21.
I•Auto repeat play turned on. See page 15.
!*Auto play feature turned on. See page 15.
•Sleep timer turned on. Press POWER to turn TV/VCR back on.
• Wake-up timer (alarm) turned on. Seepage 11.
TV/VCR only has one tuner. Only one program can be watched and/or
recorded at any time.
31
Limited Warranty
What your warranty covers:
• Any defect in material or workmanship.
For how long after your purchase:
• Ninety days for labor charges.
* Two years for picture tube.
• One year for parts.
(The warranty period for rental units begins with the first rental or 45 days from date
of shipment to the rental firm, whichever comes first.)
What we will do:
•Pay any Authorized RCA VCR Serviceni_r the labor charges to repair your TV/VCtL
•Pay any Authorized RCA VCR Servicenter for the new or, at our option, refurbished
replacement parts and picture required to repair your TV/VCtL
How you get service:
•For screen sizes of 20" and smaller:.
Take your RCA TV/VCR to any Authorized RCA VCR Servicenter and pickup when
repairs are complete.
•For screen sizes larger than 20":
Request home service from any Authorized RCA VCR Servicenter.
• To identify your nearest Authorized RCA VCR Servicenter, ask your dealer, look in
the Yellow Pages, or call 1-800-336-1900.
•Show the Authorized Servicenter Representative your sales receipt or othe evidence
of purchase date.
What your warranty does not cover:
•Customer instruction. (Your owner's manual dearly describes how to instan, adjust,
and operate your TV/VCR. Any additional information should be obtained from
your dealer.)
• Installation and related adjustments.
• Signal reception problems not caused by your TV/VCR.
•Damage from misuse or neglect.
• Cleaning of video/audio heads.
•Customer Replacable fuses.
• Images burnt onto the screen.
•Batteries.
•A TV/VCR that has been modified or incorporated into other products or is used for
institutional or other commercial purposes.
• A TV/VCR purchased or serviced outside the USA.
• Acts of God, such as but not limited to lightning charge.
Product Registration:
• Please complete and mail the Product Registration Card packed with your TV/VCR.
It will make it easier to contact you should it ever be necessary. The return of the
card is not required for warranty coverage.
How state law relates to this warranty:
•Thiswarrantygivesyou specificlegalrights,and you alsomay have otherrightsthat
vary from state to state.
If you purchased your TV/VCR outside the United States:
•This warranty does not apply. Contact your dealer for warranty information.
32
Index
Accessories, Included ................................... .2
ADD/REMOVE CHANNELS Menu ............... .5
Adding Channels toMemory .........................5
AdjustingtheVideo ...........:.............................8
.A.d'L_g"Volume............................................5
ALERT SOUND ............................................. 10
Antenna System, Connecting ....................... _6
AUDIO/VIDEO IN Jacks ...................19,21,24,28
AUTO CHANNEL SEARCH Menu ..................4
Auto Play Feature ........................................... 15
AUTO PLAY Screen ........................................ 15
Auto Repeat Feature ...................................... 15
AUTO REPEAT Menu ..................................... 15
AUTOMATIC CLOCK SET Menu ................ 3,4
Automatic Tracking....................................... 14
Back Panel Controls ...................................... .25
Basic Recording ............................................... 19
Batteries, Installing in Remote ...................... .2
Blank Search Feature ...................................... 17
BLANK SEARCH Screen ................................ 17
Bdte (Brightness) Function ............................. 9
Buttons, Remote Control ............................. 6-7
Cable System (No Cable Box), Cormecting.27
Cable System with Cable Box, Connecting .29
Camcorder, Connecting to TV/VCR .......... "28
Captions, Closed ............................................. 10
Cautions .............................................................. i
CC DISPLAY Menu ........................................ 10
CC MODE Menu ............................................. 10
CHAN and CH Buttons ..................... 5,6,9,11,24
Channel Memory, Programming ................. .5
Channel, Solecting ............................................ 5
Chart, Express Recording Tunes .................. 20
Chart, Recording S._ds ............................... 18
Checking a Timer Recording ....................... 22
Checking for Trouble ................................ 30-31
Choosing aH ool_. _ ...................................... .25
CIeanin_theTV/VCR .................................. .29
CLEAR button ....................... 4,6,11,14,17,21,22
Clearing a Timer Recording .......................... 22
Clock Se_ng, Automatic or Manual ............. 4
CLOSED CAPTIONING Menu ..................... I0
ClosedCaptions..............................................10
Color Function ................................................... 9
Commercial Scan ............................................ 15
Commerdal Skip .............................................. 9
Connections
Antenna ................................................. .26
Cable System With Cable Box for
All Channels ....................................... 27
Cable System With Cable BOx for
Premium Channels ........................... 27
Cable System With No Cable Box ......26
Camcorder to Copy Tapes .................. .28
VCR to Copy Tapes ............................ .28
Contents ........................................................... 1
Contr (Contrast) Function ............................... 9
Controls, Back Panel ..................................... .25
Controls, Front Panel .................................... .24
Contzols, Remote ........................................... 6-7
Copying Tapes ............................................... .23
Daily Programs, Recording ........................... 21
Date, Setting ...................................................... 4
S cations....................................29
DISPLAY Button ............................. 6,8,14,17,22
D_plays,On-Saeen.........................................8
Editing Tapes ................................................. 23
Electronic Program Indexing ........................ 16
Escoja un idioma .............................................. .5
FExpress Recording ......................................... .20
a, y ....................................8
Features, Playback ..................................... 12-17
Features, Recording ................................. 18-23
Features, TV/VCR ................................... .8-11
FF (Fast Forward) BuRon .......6,13,14,16,17,24
First-T'mne Operation ................................... .2-5
Frame Advance ............................................... 13
Front Panel Controls ..................................... .24
Home Antenna System, Connecting ........... .26
Hookups
Ant_ ................................................ .26
Cable System With Cable BOx for
All Channels .................................... .27
Cable System With Cable Box for
Premium Channels ........................... .27
Cable System With No Cable Box.....26
Camcorder toCopy Tapes ................... 28
VCR toCopy Tapes ..............................28
important Information ..................................... j
Included Accessories ....................................... .2
Index Feature ................................................... 16
Index Number Feature ................................. 16
INDEX SEARCH Menu .................................. 16
Information, Important .................................... .i
Labeling Channel ..............................................9
Language for Displays ................................... .5
Limited Warranty ...................................... -32
Location of Controls .......................... 6-7,24-25
Manual Tracking .......................................... 14
MENU Button .................... 3A,5,6,8,10,15,21,22
MUTE Button ..................................................... 7
Note to Cable TV Installer ............................... 2
Number Buttons ............ .4,6-7,8,10,11,15,21,22
On-ScreanDisplays..........................................8
One-Time Program, Recording .................... 21
Operation
Express Record ..................................... .20
Play a Tape ........................................... 12
Record a Program ................................. 19
Program Channel Memory ................... 4
Timer Record ......................................... 21
Video, Adjust. .......................................... 8
Set the Clock ............................................ 4
Setthe SleepTimer...............................11
Setthe Wake-upTimer........................11
PAUSE Button ................................... 7,13,18,23
Pause During Playback .................................. 13
Pause DuringRecording............................... 18
PICTURE QUALITY Menu ............................... 8
Picture Search ................................................. 13
PLAY Button ........................... 7,12,13,16,17,24
Playback
Auto Play...............................................15
Blank Tape ............................................17
Commercial Scan ................................. 15
Commercial Skip .................................. 17
Features ............................................. 11-17
Index ....................................................... 16
Pause ....................................................... 13
Playa Tape............................................ 12
Repeat....................................................lS
Slow Motion .......................................... 13
Zero ....................................................... 17
POWER Button and Indicator ........ 3,7,12,24
PREV CH (Previous Channel) Button ........6-7
Problem Solving ...................................... .30-31
Product Registration Card .............................. .i
Programming Channel Memory .................... 5
PROGRAM GUARD ........................................ 10
PROGRAMMING Menu ............................21,22
REC (Record) Button and Indicator ...................
......................................................... 7,19,20,23,24
Recording
Basic ........................................................ 19
Express ................................................. 20
Features .................................................. 18
Pause ....................................................... 18
Speedsand Chart .................................. 18
TImer .................................................. .21
Registration Card ............................................ i
Remote Batteries, Imtalling ......................... -2
Remote Control Buttons ............................. 6-7
Remote Sensor............................................ .24
Removing Channels from Memory ............... 5
REPEAT Indicator ................................... 15,24
RESET Button ......................................... 7,9,11
Resetting Video to Factory Settings .............. 9
REW (Rewind) Button ................. 7,12,13,17,24
S_andTab................................. 12,19-21,23,24
Play Index Feature........................ 16
Scan,Commercial ..........................................15
Search, Index ...................................................16
Search, Tune Counter....................................17
Searching ..........................................................13
Selecting a Channel....................................... .5
Selecting a Language for Displays .................5
Semor, Remote..............................................."24
Setting a T_merRecording ...........................2.1
Setting an ExpressRecording ......................20
Setting the Clock ...............................................4
Setting the Date ...............................................4
Setting the T_me...............................................4
Setting Up the TV/VCR .............................2-5
SETUPMenu .............................................4,9,15
SharpFunction................................................9
SEARCH/SKIPButton............................7,16,17
SkipCommercial........................................17
SLEEPButton...........................................6-7,11
Sleep Timer......................................................11
Slow Motion ....................................................13
SLP Speed ........................................................18
Solving Problems.......................................30-31
SPSpeed .........................................................18
SPEED (Tape Speed) Button....... 7,18,19,20,21
Speeds,Recording.........................................18
Stands, PlacingTV/VCR On ........................3
Start Up ......................................................... .2-5
STOP Button ....................... 7,12,16,17,19,20,23
STOP/_JEGT Button .................. 12,19,20,22,24
Stopping a Timer Recording ........................ .22
Stopping an Express Recording .................. 20
Tab, Safety ................................... 12,19-21,23,24
Table of Contents .............................................. 1
Tape, How to Play ......................................... 12
Tapes, Copying .............................................. .23
Tapes, Editing ............................................... 23
TextMode, Closed Captioning.....................10
Time Counter ............................................. 14,17
TIME Menu ................................................... 4,11
Time, Setting ...................................................... 4
TIMER Indicator ................................... .20,21,24
Timer Recording
Checking ............................................... .22
Clearing.................................................22
Setting .................................................... .21
Stopping...............................................22
"13ntFunction. ..................................................... 9
TRACKING Buttons ................................ 7,12,14
Tracking, Automatic ...................................... 14
Tracking, Manual ............................................ 14
Trouble Checks ........................................ 20-31
Turn on TV/VCR ........................................... 3
TVNCR MAIN MENU.....4,5,8,9,10,11,15,21,22
TV/VCR Setup ........................................... .2.-5
Types of Recordings ....................................... 19
VClL Connecting to TV/VCIL ..................... .28
VHF/UHF Azttenna Connector .........25,26-27
Video, Adjusting ............................................ 8,9 0
VIDEO/AUDIO IN Jacks ................... 19,21,24,28
Video, Reset to Factory Settings ..................... 9
Video Settings ................................................ 8,9
VOL (Volume) Buttons .......................... 5,7,9,24
Volume, Adjusting ........................................... 5
WAKE-UP Indicator .................................. 11,24
Warnings ........................................................... i
Warranty, Limited ......................................... .32
Weekdays (M-F), Recording ......................... .21
Weekly Program, Recording ..................... .21
ZERO SEARCH Screen .................................. 17
33
Foryour nearest Authorized Servicenter
call toll-free in the U.S.A.
1-800-336-1900
Ifyour TV/VCR needs service, please contact your dealer or
thenearest servicenter from the yellow pages. Please do not
send any products to the Indianapolis address listed in this
m_anualor on the carton. This will only add delays in service
foryour product.
_11HIOMSONCONSUMERELECTRONICS
10330 N Meridian Street
Indianapolis, IN 46290
©1997 Thomson Consum_ Electronics, Inc.
Trademark(s)@ Registen_d
Printed in U.S.A.
Part Number 15252590 VQTS3315
