RCA B27TF680 User Manual TV/VCR/DVD Manuals And Guides L0311131
RCA TV/VCR or DVD Combo Manual L0311131 RCA TV/VCR or DVD Combo Owner's Manual, RCA TV/VCR or DVD Combo installation guides
User Manual: RCA B27TF680 B27TF680 RCA TV/VCR/DVD - Manuals and Guides View the owners manual for your RCA TV/VCR/DVD #B27TF680. Home:Electronics Parts:Rca Parts:Rca TV/VCR/DVD Manual
Open the PDF directly: View PDF ![]() .
.
Page Count: 84
TV/VCR/DVD
User's G ude
Changing Entertainment. _in.

I p@tr an' I n'f@r a i@n
WARNING
TO REDUCE THE RISK OF FiRE OR
ELECTRICSHOCK, DO NOT EXPOSE
THIS PRODUCT TO RAIN OR
MOISTURE.
CAUTION
THiS PRODUCT UTILIZES A LASER.
USE OF CONTROLS OR
ADJUSTMENTS OR PERFORMANCE
OF PROCEDURES OTHER THAN
THOSE SPECIFIED HEREIN MAY
RESULT IN HAZARDOUS RADIATION
EXPOSURE. DO NOT OPEN COVERS
AND DO NOT REPAIR YOURSELF.
REFERSERVICING TO QUALIFIED
PERSONNEL.
Note:
This DVD player is designed and
manufactured to respond to the
Region Management Information. If
the Region number of a DVD disc does
not correspond to the Region number
of this DVD player, this DVD player
cannot play the disc. The Region
number for this DVD player is Region
No I.
CLASS 1
LASER
PRODUCT
Information
CAUTION
CAUTION: TO REDUCE THE RISK OF
ELECTRIC SHOCK,
DO NOT REMOVE COVER (OR BACK).
NO USER SERVICEABLE PARTS INSIDE.
REFER SERVICING TO QUALIFIED SERVICE
PERSONNEL.
AThis symbol indicates
"dangerous voltage" inside
the product that presents a
risk of electric shock or
personal injury.
AThis symbol indicates
important instructions
accompanying the product.
Caution: To prevent electric shock, match wide blade
of plug to wide slot, fully insert.
Attention: Pour _viter les chocs _lectriques, introduire
la lame la plus large de la fiche dans la borne
correspondante de la prise et pousser jusq_ au fond.
Refer to the identificationlrating label located on the back panel of your
product for its proper operating voltage.
FCCRegulations state that unauthorized changes or modifications to this
equipment may void the user's authority to operate it.
Caution: Using video games or any external accessory with fixed
images for extended periods of time can cause them to be
permanently imprinted on the picture tube (or projection TV picture
tubes). ALSO, some network/program Iogos, phone numbers, etc.
may cause similar damage. This damage is not covered by your
warranty.
Cable TV Installer: This reminder is provided to call your attention to
Article 820-40 of the National Electrical Code (Section 54 of the Canadian
Electrical Code, Part 1) which provides guidelines for proper grounding and,
in particular, specifies that the cable ground shall be connected to the
grounding system of the building as close to the point of cable entry as
practical.
This equipment has been tested and found to comply with the limits for a Class B digital device, pursuant to Part 15 of the FCC Rules. These
limits are designed to provide reasonable protection against harmful interference in a residential installation. This equipment generates, uses
and can radiate radio frequency energy and, if not installed and used in accordance with the instructions, may cause harmful interference to
radio communications. However, there is no guarantee that interference will not occur in a particular installation. If this equipment does cause
harmful interference to radio or television reception, which can be determined by turning the equipment off and on, the user is encouraged to
try to correct the interference by one or more of the following measures:
• Reorient or relocate the receiving antenna.
• Increase the separation between the equipment and receiver,
• Connect the equipment into an outlet on a circuit different from that to which the receiver is connected.
• Consult the dealer or an experienced radio/IV technician for help.
Product Registration
Please fill out the product registration card (packed separately) and return it immediately. Returning the card
allows us to contact you if needed.
Product Information
Keep your sales receipt to obtain warranty parts and service and for proof of purchase. Attach it here and record
the serial and model numbers in case you need them. These numbers are located on the product.
Model No. Serial No.
Purchase Date:
DealerlAdd resslPhone:
Key Features Overview
Your TV/VC1UDVD is equipped with features that will add to your TV/VCR/DVD viewing experience. "II_e
following intk)n=qadon summarizes these features. See Chapter 3 for more information about llle features and
how to use them.
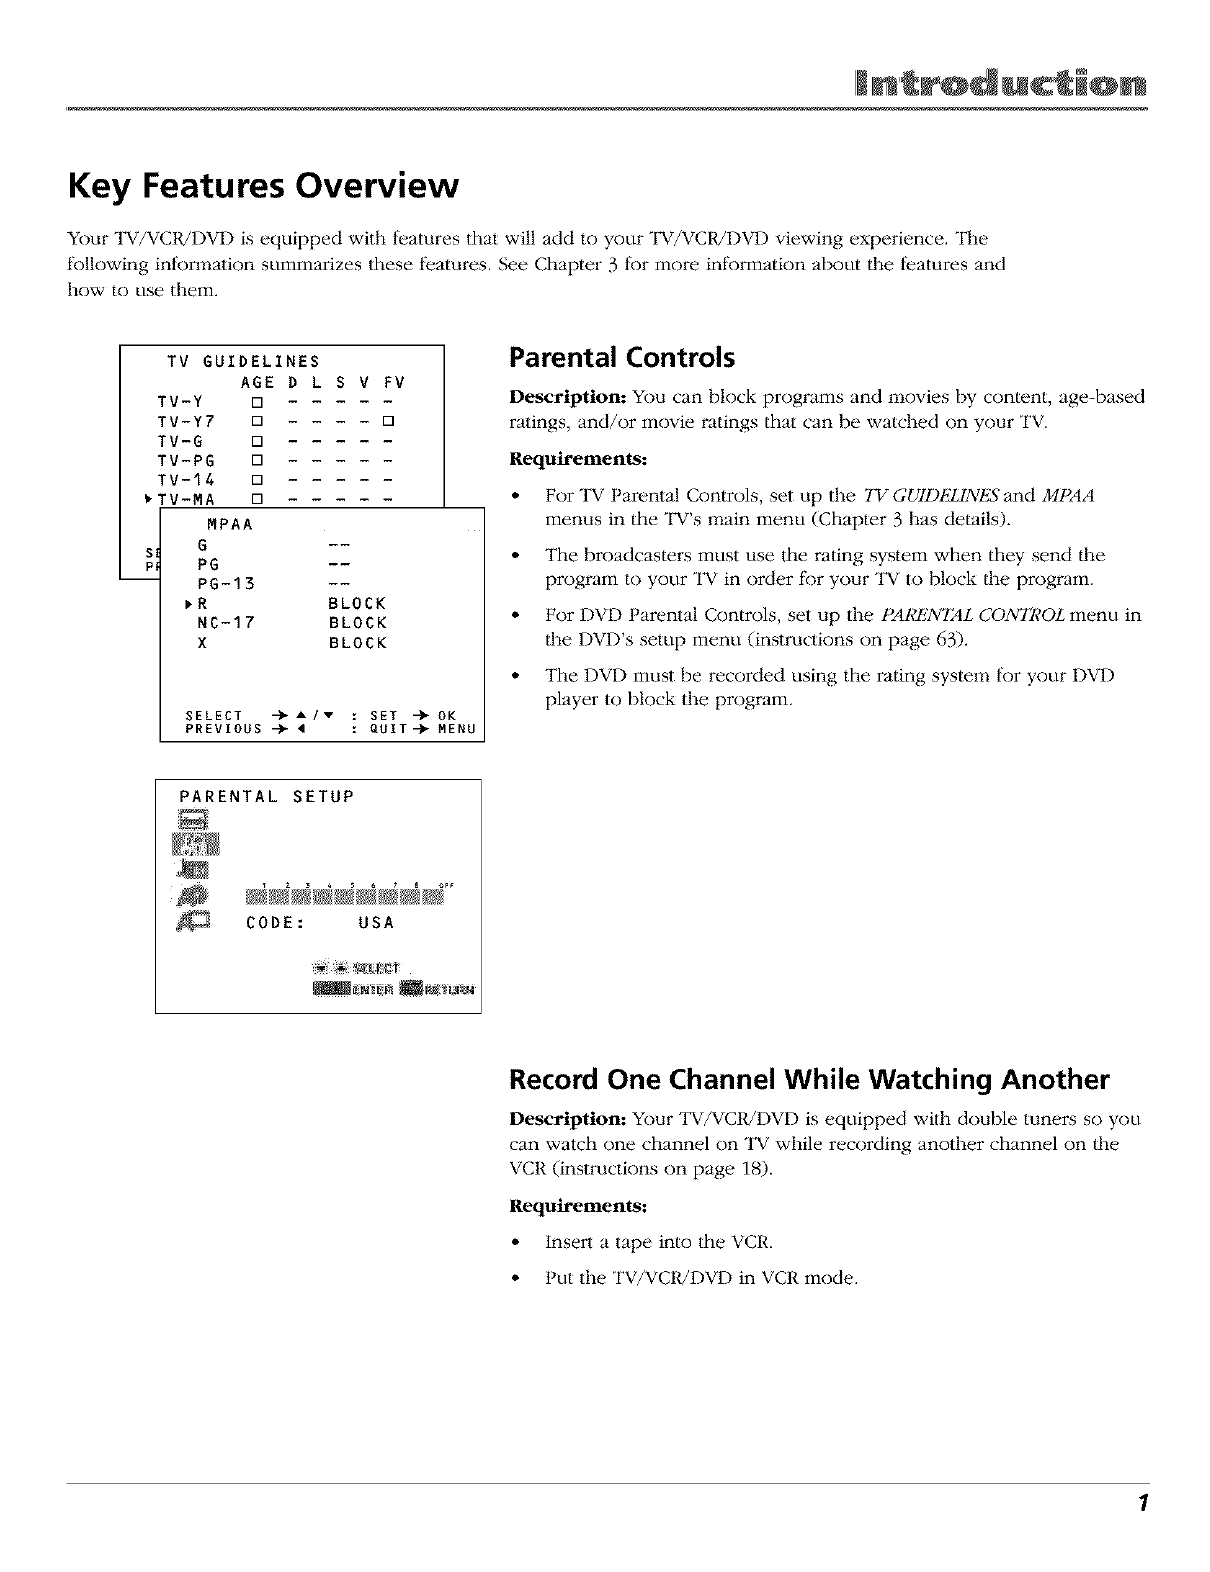
TV GUIDELINES
AGE D LS V FV
TV-Y []
TV-Y7 [] []
TV-G []
TV-PG []
TV-14 []
TV-MA []
MPAA
G --
S PG --
PG-13 --
_R BLOCK
NC-17 BLOCK
X BLOCK
SELECT -_ A /v : SET -_ OK
PREVIOUS -_ 4: QUIT-_ MEN
Parental Controls
Description: You can block programs and movies by content, age-based
radngs, and/or movie ratings that can be watched on your TV.
Requirements:
• For TV Parental Controls, set up the TV GUIDELINt,fS and MPAA
menus in the TV's 1=qainmenu (Chapter 3 has details).
• The broadcastei:s must use the rating system when they send llie
program to your "IV in order for your TV to block llie program.
• For DVD Parental Controls, set up the PARENTAL CONTROL menu in
llie DVD's setup menu (instructions on page 63).
• The DVD must be recorded using the rating syste_=qfor your DVD
player to block the program.
PARENTAL SETUP
CODE: USA
Record One Channel While Watching Another
Description: Your TV/VC1V1-)VD is equipped widi double tuners so you
can watch one channel on TV while recording another channel on the
VCR (instructions on page 18).
Requirements:
• Insert a tape into the VCR.
• Put the TV/VCR/DVD in VCR mode.
1
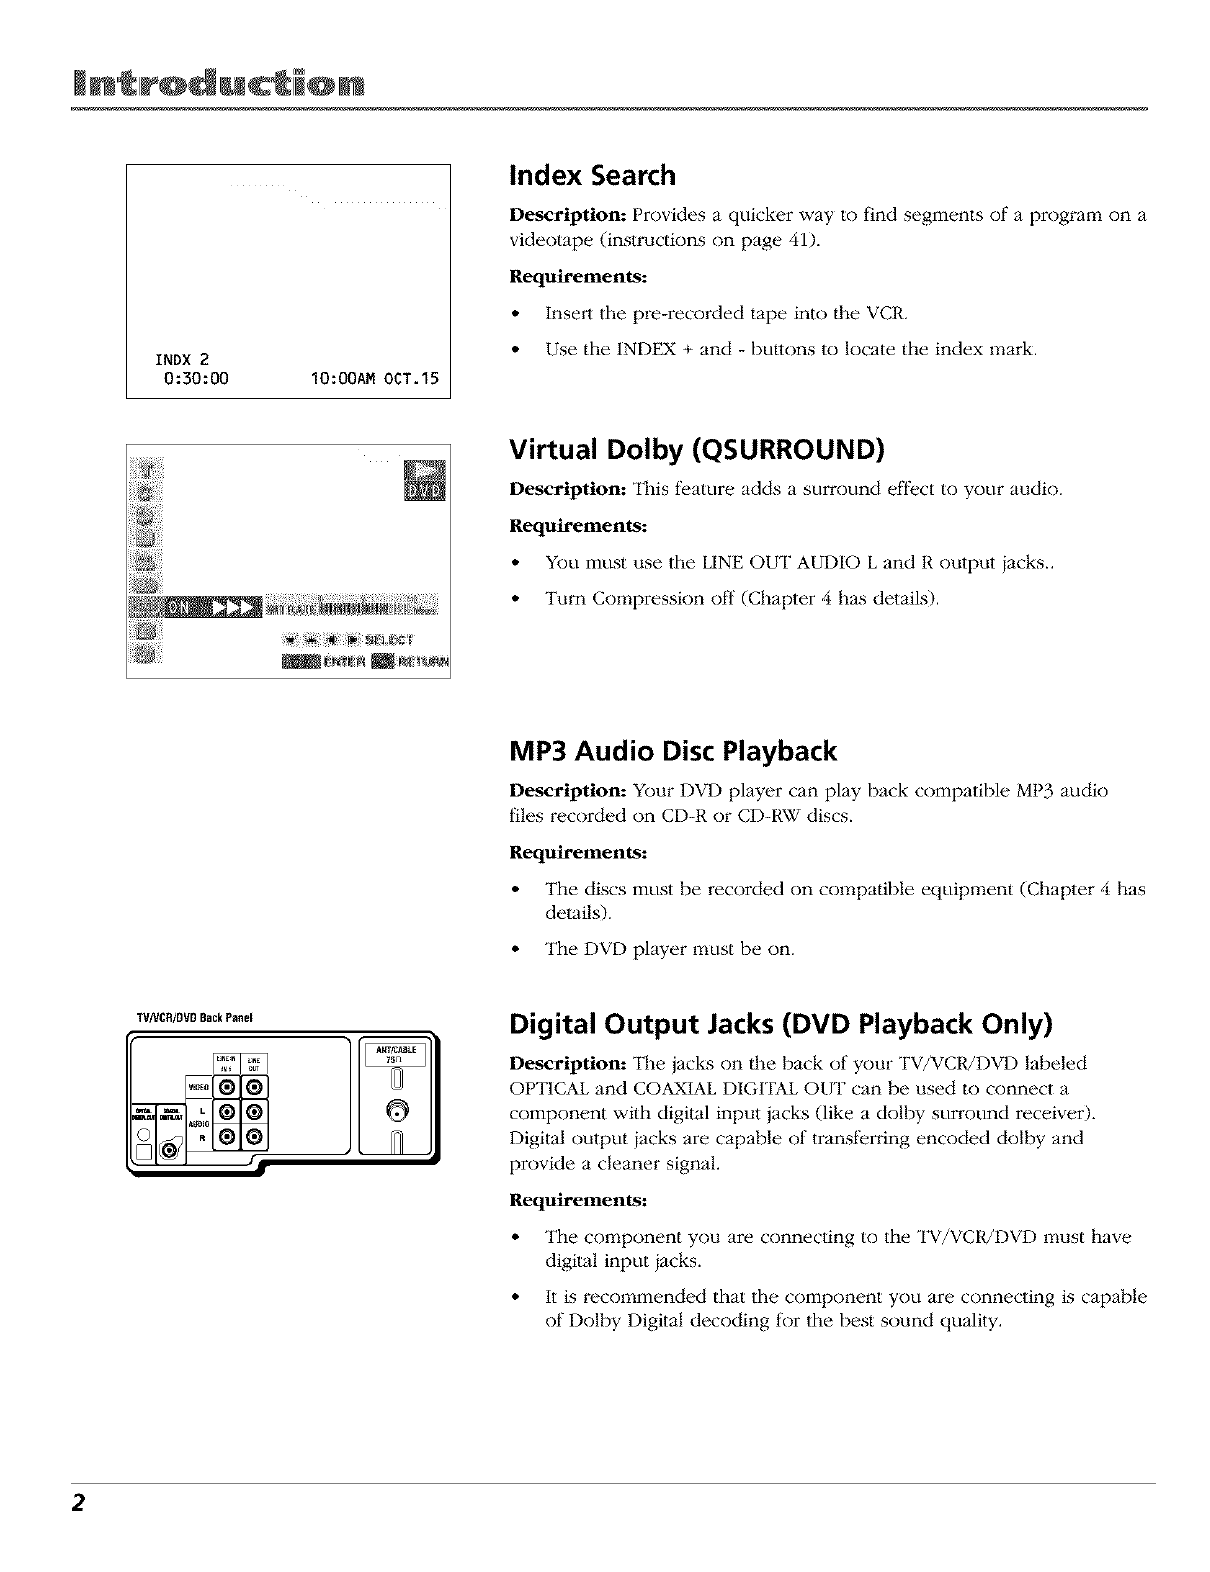
INDX 2
0:30:00 10:00AM 0CT.15
Index Search
Description: Provides a quicker way to find segments of a program on a
videotape (instructions on page 41).
Requirements:
• Insert the pre-recorded tape into the VCR.
• Use the INDEX + and - buttons to locate the index mark.
Virtual Dolby (QSURROUND)
Description: "I]sis feature adds a surround effect to your audio.
Requirements:
• You must use the LINE OUT AUDIO L and R output jacks..
• Turn Compression off (Chapter 4 has details).
MP3 Audio Disc Playback
Description: Your DVD player can play back cornpatible MP3 atMio
files recorded on CD-R or CD-RW discs.
Requirements:
• The discs must be recorded on compatible equipment (Chapter 4 has
details).
• The DVD player must be on.
TV]VCH/DVD BackPane[
®
Digital Output Jacks (DVD Playback Only)
Description: The jacks on the back of your TV/VCR/DVD labeled
OPTICAL and COAXIAL DIGITAL OUT can be used to connect a
component wilh digital input jacks (like a dolby surround receiver).
Digital output jacks are capable of transferring encoded dolby and
provide a cleaner signal.
Requirements:
• The component you are connecting to the TV/VCR/DVD must have
digilal input jacks.
• It is recommended that the component you are connecting is capable
of Dolby Digital decoding tk)r the best sound quality.
2
TalblM Qf Con't n' s
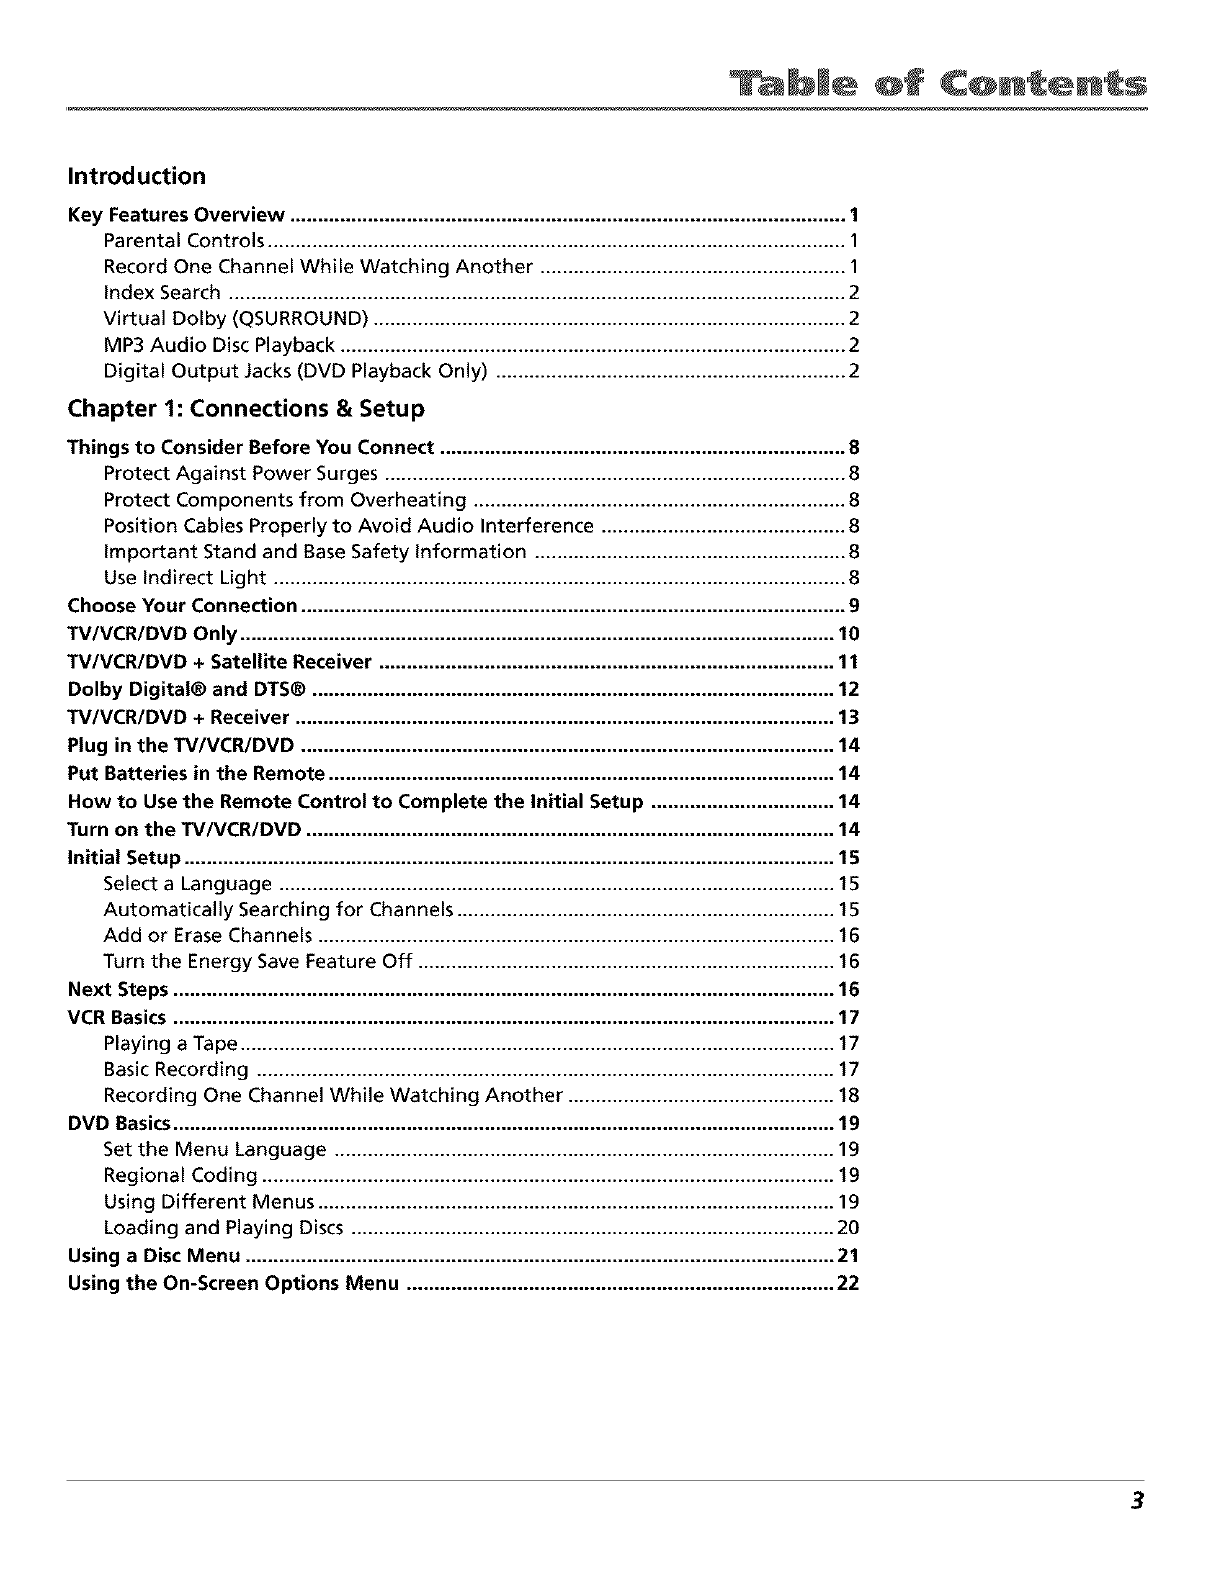
Introduction
Key Features Overview .................................................................................................... 1
Parental Controls ........................................................................................................ 1
Record One Channel While Watching Another ....................................................... 1
Index Search ............................................................................................................... 2
Virtual Dolby (QSURROUND) ..................................................................................... 2
MP3 Audio Disc Playback ........................................................................................... 2
Digital Output Jacks(DVD Playback Only) ............................................................... 2
Chapter 1: Connections & Setup
Things to Consider Before You Connect .........................................................................
Protect Against Power Surges ...................................................................................
Protect Components from Overheating ...................................................................
Position Cables Properly to Avoid Audio Interference ............................................
Important Stand and Base Safety Information ........................................................
Use Indirect Light .......................................................................................................
Choose Your Connection ..................................................................................................
TV/VCR/DVD Only ........................................................................................................... 1(
TV/VCR/DVD + Satellite Receiver .................................................................................. 11
Dolby Digital® and DTS® .............................................................................................. 12
TV/VCR/DVD + Receiver ................................................................................................. 13
Plug in the TV/VCR/DVD ................................................................................................ 14
Put Batteries in the Remote ........................................................................................... 14
How to Use the Remote Control to Complete the Initial Setup ................................. 14
Turn on the TV/VCR/DVD ............................................................................................... 14
Initial Setup ..................................................................................................................... 15
Select a Language .................................................................................................... 15
Automatically Searching for Channels .................................................................... 15
Add or Erase Channels ............................................................................................. 16
Turn the Energy Save Feature Off ........................................................................... 16
Next Steps ....................................................................................................................... 16
VCR Basics ....................................................................................................................... 17
Playing a Tape ........................................................................................................... 17
BasicRecording ........................................................................................................ 17
Recording One Channel While Watching Another ................................................ 18
DVD Basics....................................................................................................................... 19
Set the Menu Language .......................................................................................... 19
Regional Coding ....................................................................................................... 19
Using Different Menus ............................................................................................. 19
Loading and Playing Discs ....................................................................................... 20
Using a Disc Menu .......................................................................................................... 21
Using the On-Screen Options Menu ............................................................................. 22
3
lblM Qf Con't n' s
Chapter 2: Using the Remote Control
The Buttons on the Remote Control ............................................................................. 24
Programming the Remote to Operate Other Components ......................................... 27
Find Out If You Need to Program the Remote ....................................................... 27
How to Program the Remote .................................................................................. 27
How to Use the Remote After You've Programmed It .......................................... 28
How to Order A New Remote Control .......................................................................... 28
Code List .......................................................................................................................... 29
Chapter 3: Using the TV/VCR/DVD's Features
Parental Controls and V-Chip ......................................................................................... 32
How V-Chip Works ................................................................................................... 32
New Rating Systems................................................................................................. 32
TV Guidelines Rating Limit ...................................................................................... 33
MPAA Rating Limit ................................................................................................... 35
Download New Rating System ................................................................................ 36
Turning V-Chip Block On and Off ............................................................................ 36
Recording Features ......................................................................................................... 37
Recording Speeds ..................................................................................................... 37
Recording Pause ....................................................................................................... 37
Types of Recording ................................................................................................... 37
One-Touch Recording ............................................................................................... 38
Timer Recording ....................................................................................................... 38
Check, Change, or Delete Timer Recordings .......................................................... 39
Copying and Editing Tapes ...................................................................................... 40
Recording from the DVD Player .............................................................................. 40
Picture Search Options ................................................................................................... 41
Frame Advance ......................................................................................................... 41
Slow Motion ............................................................................................................. 41
Index Search ............................................................................................................. 41
Tracking ..................................................................................................................... 42
Time Counter ............................................................................................................ 42
Audio Features ................................................................................................................ 42
Reception .................................................................................................................. 43
Tape Playback ........................................................................................................... 43
Disc Playback Features Using the Remote .................................................................... 44
Fast Motion Playback (Picture Scan) ....................................................................... 44
Freeze Frame ............................................................................................................ 44
Slow-Motion Playback ............................................................................................. 44
Select a Title .............................................................................................................. 44
Zoom ......................................................................................................................... 45
Using the Repeat Feature ........................................................................................ 45
Chapter 4: Playing Discs
Playing DVDs ................................................................................................................... 48
Selecting a Title ............................................................................................. 48
4
Qf
Selecting a Chapter ....................................................................................... 48
_ Selecting a Time Location ............................................................................. 49
Se,ecting Subtit,es ......................................................................................... 49
Changing the Camera Angle ........................................................................ 49
Changing the Audio ...................................................................................... 50
Changing the Virtual Dolby (QSURROUND) Setting .................................. 50
Changing the Digital Gamma Setting .......................................................... 51
Changing the Digital Super Picture Setting ................................................ 51
Playing Audio CDs ............................................................................. 52
Disc Playback Features Using the Remote .............................................................. 52
Scan Playback ........................................................................................................... 52
Pause ......................................................................................................................... 52
Track Advance ........................................................................................................... 52
Using the Repeat Feature ........................................................................................ 52
Playing MP3 Discs ............................................................................. 53
To Play an MP3 Disc .................................................................................................. 53
Playback Features Using the Remote ...................................................................... 54
Pause ......................................................................................................................... 54
Track (File) Advance ................................................................................................. 54
Using the Repeat Feature ........................................................................................ 54
Chapter 5: Using the Menu System
How to Use Your Menu System ............................................................ 56
Time Menu ................................................................................. 56
Video Adjust Menu .................................................................................................. 57
Audio Adjust Menu .................................................................................................. 58
Language Menu ....................................................................................................... 58
Setting Closed-Caption Modes ................................................................................ 58
Additional Setup Features ....................................................................................... 59
The DVD Menu System ......................................................... 59
_TV MODE 60
_Set ................................................................. 61
Parental Limits
_ Select Audio Settings .............................................................. 62
_ Select the Disc Language .............................................................................. 63
_Select Display Language ........................................................
the On-Screen 63
Disc Language Codes ............................................................................................... 64

_lblM_ Qf Con't_n'_s
Chapter 6: Other Information
Troubleshooting .............................................................................................................. 66
The Front of Your TV/VCR/DVD ..................................................................................... 70
Back Panel Jacks.............................................................................................................. 71
Care and Cleaning .......................................................................................................... 72
Limited Warranty ............................................................................................................ 74
Finding the TV/VCR's Video Line Input Channel .......................................................... 76
Accessories ...................................................................................................................... 77
Index ................................................................................................................................ 79
6
1
Connections & Setup
Chapter Overview:
• Things to Consider Before You Connect
•Choose Your Connection
•Connections
•Plug in the TV/VCR/DVD
•Put Batteries in the Remote
•How to Use the Remote Control to Complete the
Initial Setup
•Turn on theTV/VCR/DVD
•Initial Setup
•VCR Basics
•DVD Basics
Changing
Graphics used u ithin this publication are fi)r representation only. 7
Connections S ' up
Things to Consider Before You Connect
Protect Against Power Surges
•Connect all co1:r_ponents bel_re you plug any of their power cords into the wall outlet.
•Turn ol]"the TV/VCR/DVD and/or component before you connect or disconnect any cables.
• Make sure all antennas and cables are properly grounded. ReR..r to the ImporUant Safeguards sheet
packed with your TV/VCR!DVD.
Protect Components from Overheating
• Don't block ventilation holes on any of lhe components. Arrange the components so that air can
circulate freely.
• Don't stack components.
• When you place components in a stand, make sure you allow adequate ventilation.
• If you connect an audio receiver or amplifier, place it on the top shelf so the heated air from it won't
tlow around other components.
Position Cables Properly to Avoid Audio Interference
•Insert each cable firmly into the designated jack.
• If you place components above lhe TV/VC1UDVD, route all cables down the side of the back of lhe
TV/VCR/DVD instead of straight down lhe middle.
• If your antenna uses 300-ohm twin lead cables, do not coil the cables. Also, keep lhe twin lead cables
away fro1:qattdio/video cables.
Important Stand and Base Safety Information
Choose the location for your TV/VCR/DVD carefully. Place the TV/VCR!1-)VD on a stand or base that is of
adequate size and strength to prevent the TV/VCR/DVD from being accidentally tipped over, pushed off, or
pulled off. This could cause personal injury and/or damage to the TV/VCR/DVD. Refer to the Important
SaR..guards sheet packed with your TV/VCR/DVD.
Use Indirect Light
Don't place the TV/VC1U1-)VD where sunlight or room lighting will be directed toward the screen. Use sot't
or indirect lighting.
8C&apter 1
Connections S ' up
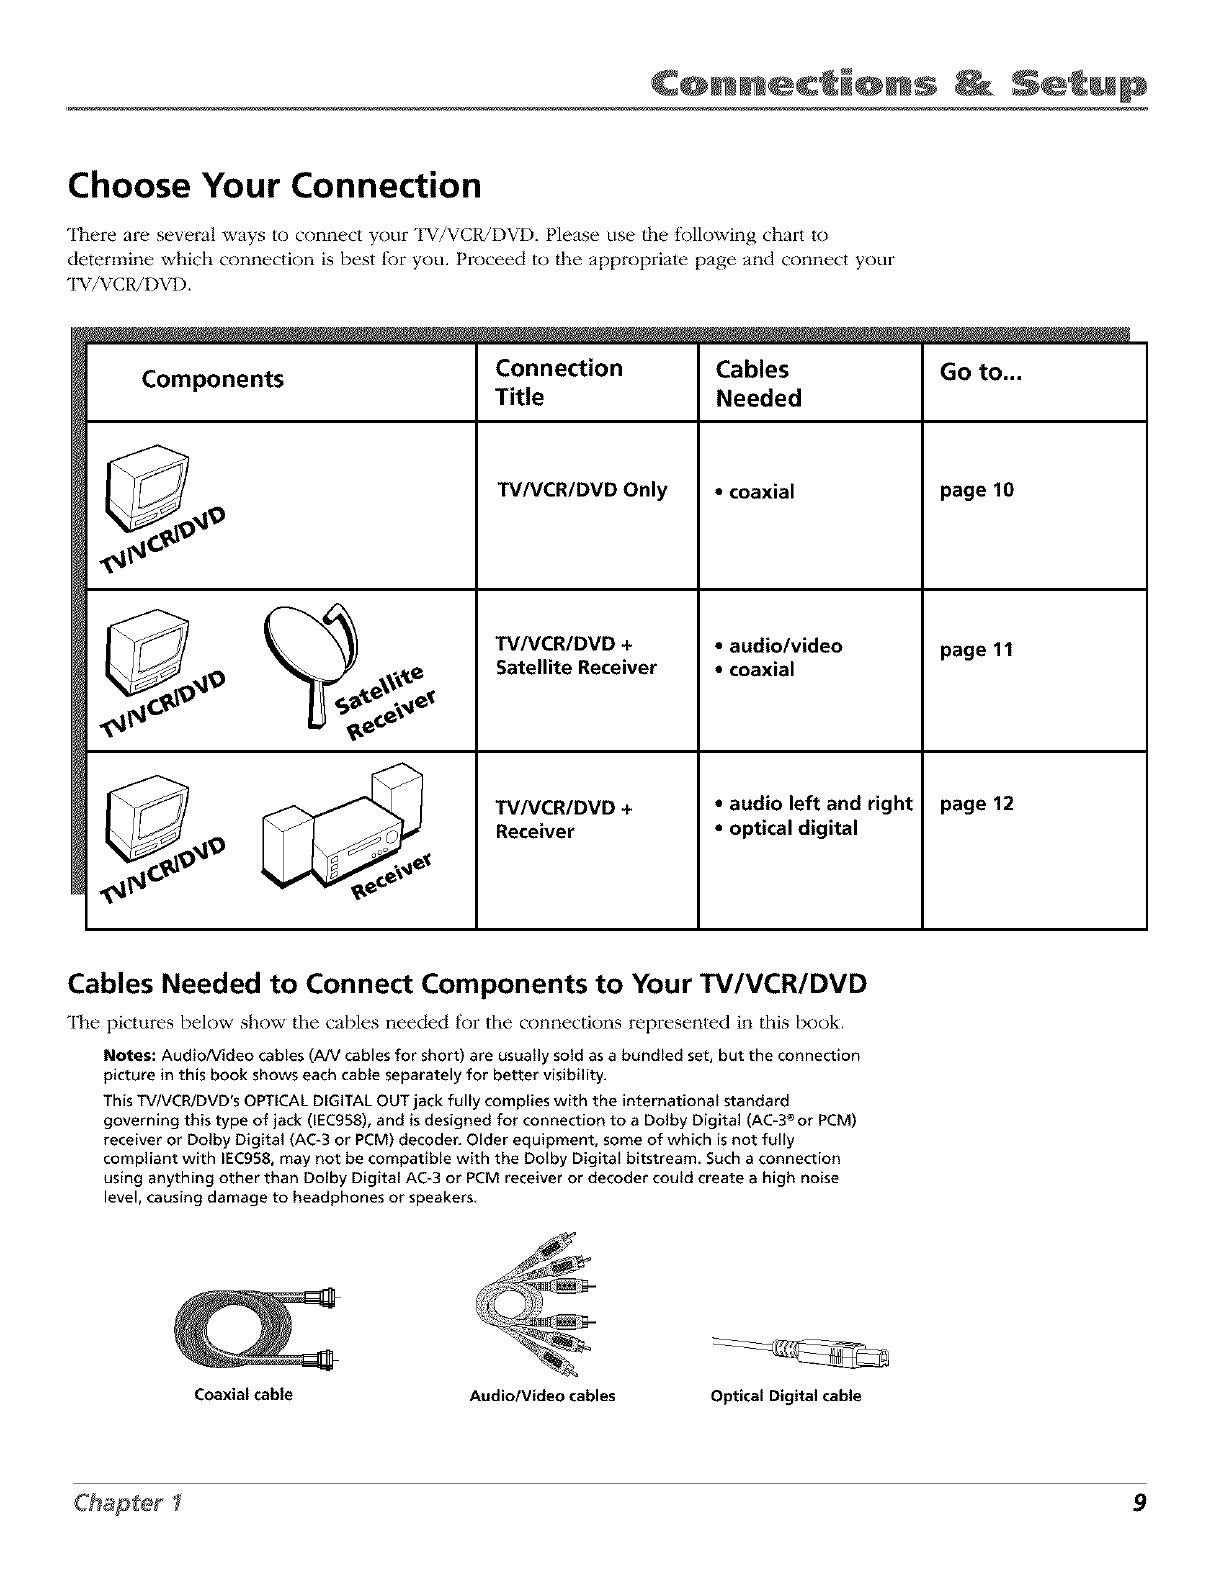
Choose Your Connection
"[l_ere are sevei_Jl ways to connect your TV/VCR/DVD. Please use |he following chart Io
determine which connection is best lk_r you. Proceed to tlle appropriate page and connect your
TV/VCR/DVD.
Components
_J
Connection
Title
TV/VCR/DVD Only
TV/VCR/DVD +
Satellite Receiver
TV/VCR/DVD +
Receiver
Cables
Needed
• coaxial
• audio/video
• coaxial
• audio left and right
• optical digital
Go to...
page 10
page 11
page 12
Cables Needed to Connect Components to Your TV/VCR/DVD
_[l_e pictures below show the cables needed for the connections represented in this book.
Notes: Audio/Video cables (A!V cables for short) are usually sold as a bundled set, but the connection
picture in this book shows each cable separately for better visibility.
This TV/VCR/DVD's OPTICAL DIGITAL OUT jack fully complies with the international standard
governing this type of jack (IEC958), and is designed for connection to a Dolby Digital (AC-3 ®or PCM)
receiver or Dolby Digital (AC-3 or PCM) decoder, Older equipment, some of which is not fully
compliant with IEC958, may not be compatible with the Do[by Digital bitstream. Such a connection
using anything other than Do[by Digital AC-3 or PCM receiver or decoder couM create a high noise
level, causing damage to headphones or speakers
Coaxial cable Audio/Video cables Optical Digital cable
9
Connections _ S_'_up
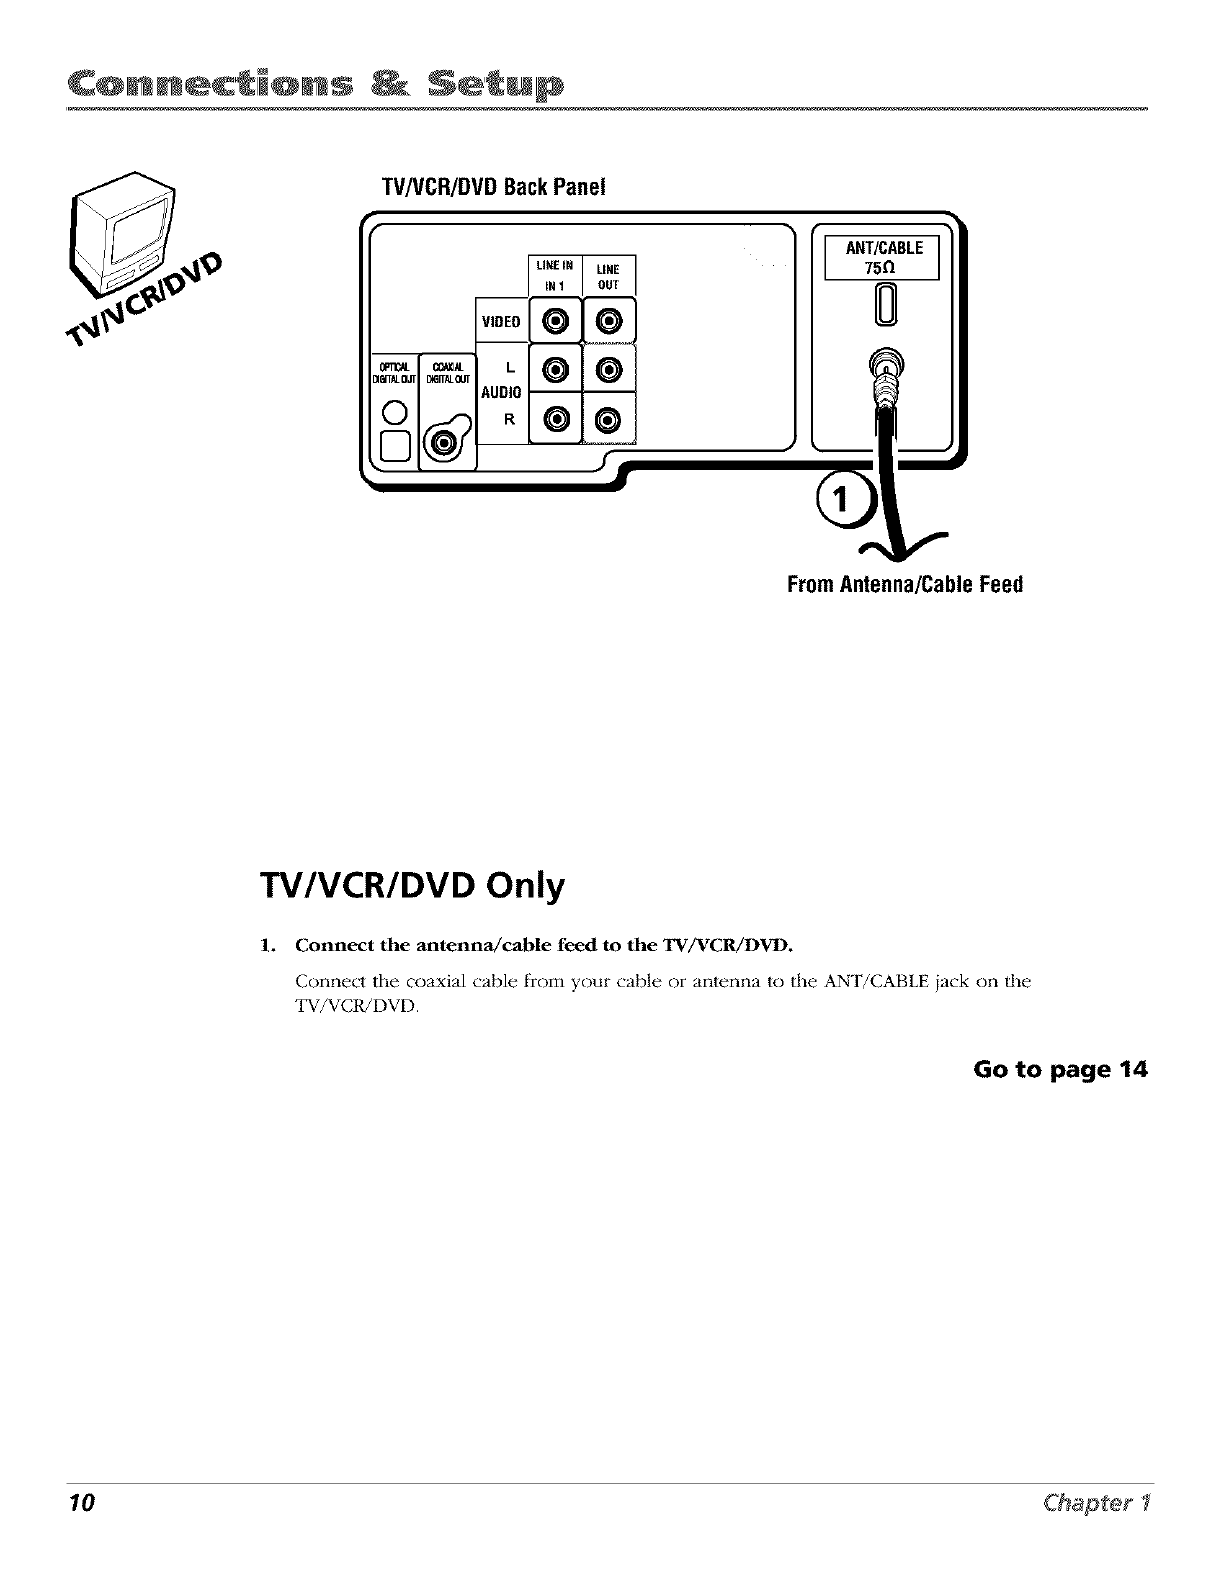
TV/VCR/DVDBackPanel
ANT/CABLE
75D.
0
FromAntenna/CableFeed
TV/VCR/DVD Only
1. Connect the antenna/cable feed to the TV/VCR/DVD.
Connect the coaxial cable from your cable or antenna to the ANT/CABLE jack on fl_e
"IW/VC1UDVD.
Go to page 14
10 C&apter 1
Connections S ' up
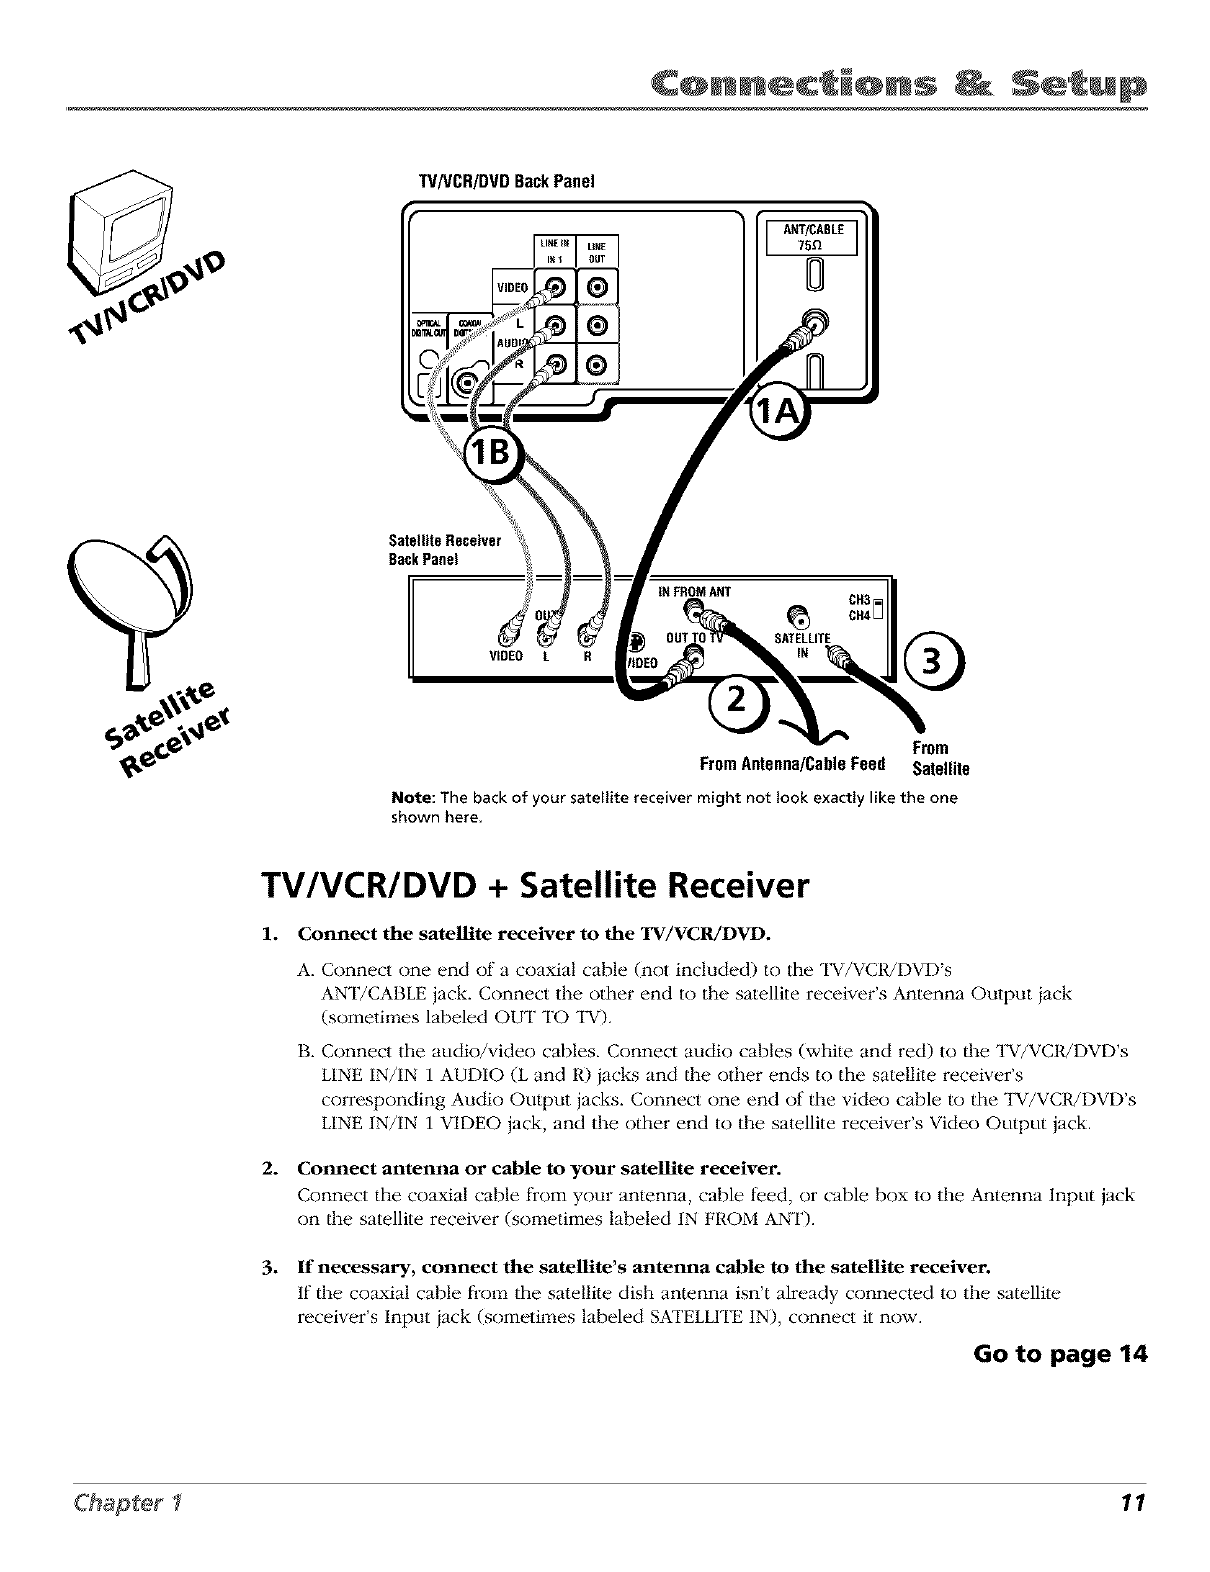
TV/VCR/DVDBackPanel
ANT/CABLE
75_z
Satellite Receiver
SackPanel
From
FromAntenna/CableFeed Satellite
Note: The back of your satetJite receiver might not Jook exactly like the one
shown here,
TV/VCR/DVD +Satellite Receiver
1. Connect the satellite receiver to the TV/VCR/DVD.
A. Connect one end of a coaxial cable (not included) to the TV/VCR/DVD's
ANT/CABLE jack. Connect the other end to the satellite receiver's Antenna Output iack
(sometimes labeled OUT TO TV).
B. Connect tile audio/video cables. Connect audio cables (white and red) to lhe 1N/VCR/DVD's
LINE IN/IN 1 AUDIO (L and R) iacks and lhe other ends to the satellile receiver's
corresponding Audio Output jacks. Connect one end of the video cable to the "IN/VCR/DVD's
LINE IN/IN 1 VIDEO jack, and the other end to the satellite receiver's Video Output jack.
2. Connect antenna or cable to your satellite receiver.
Connect the coaxial cable from your antenna, cable t_:ed, or cable box to the Antenna Input jack
on lhe satellite receiver (sometimes labeled 1N FROM ANT).
3. If necessary, connect the satellite's antenna cable to the satellite receiver.
If the coaxial cable from the satellite dish antenna isn't already connected to the satellite
receiver s Input iack (someti :aes labeled SATELLITE IN), connect it now.
Go to page 14
11
Connections S ' up
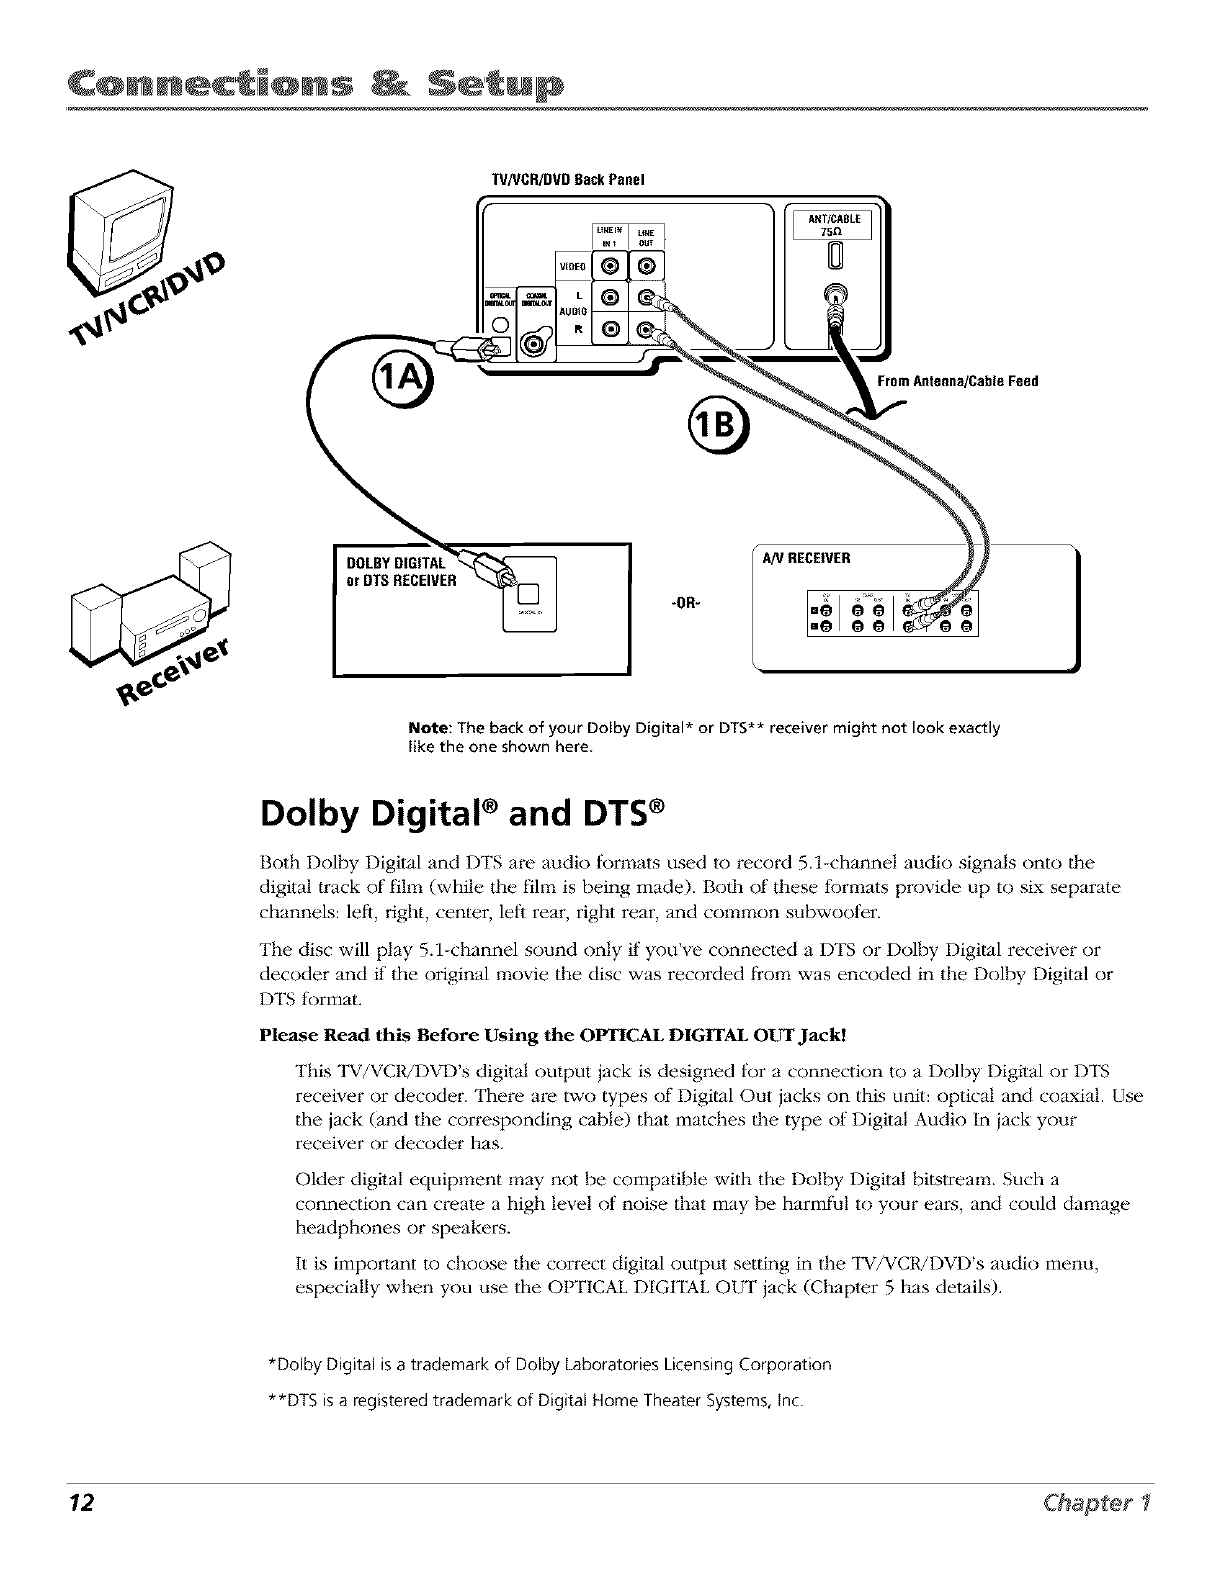
TV/VCR/DVDSackPanel
From Antenna/Cable Feed
DOLBYDIGITAL
orDTSRECEIVER
Note: The back of your Dolby Digital* or DTS** receiver might not look exactly
like the one shown here.
Dolby Digital ®and DTS®
Both Dolby Digital and DTS are audio formats used to record 5.1-channel audio signals onto fl_e
digital Irack of fihn (while the fihn is being made). Bolh of these formats provide up to six separate
channels: left, right, center, left rear, right rear, and common subwoofer.
The disc will play 5.l-channel sound only if you've connected a DTS or Dolby Digital receiver or
decoder and if the original movie the disc was recorded from was encoded in the Dolby Digital or
DTS format.
Please Read this Before Using the OPTICAL DIGITAL OUT Jack!
This "lW/VCR/DVD's digital output jack is designed l_)r a connection to a Dolby Digilal or DTS
receiver or decoder. There are two types of Digilal Out jacks on this unil: optical and coaxial. Use
the jack (and the corresponding cable) that matches lhe lype of Digital Audio In iack your
receiver or decoder has.
Older digital equipment may not be compatible with the Dolby Digital bitstream. Such a
connection can create a high level of noise that may be harmful to your ears, and could damage
headphones or speakers.
It is important to choose fl_e correct digital output setting in the TV/VCR/DVD's audio menu,
especially when you use the OPTICAL DIGFIAL OUT jack (Chapter 5 has details).
*Dolby Digital is a trademark of Dolby Laboratories Licensing Corporation
**DTS is a registered trademark of Digital Home Theater Systems, Inc.
12 Chapter 1
Connections S ' up
TV/VCR/DVD + Receiver
1A. Connect the Dolby Digital or DTS receiver to the TV/VCR/DVD
If you have a Dolby Digital or DTS receiver will] a Digital Input iack, connect an optical
digital cable (not provided) into the OPTICAL DIGITAL OUT iack on the TV/VCR/DVD
player and to the Digital Input iack on the back of the receivei: You must also set the
digilal output setting in the DVD setup menu (Chapter 5 has details). Also, check the
audio within the DVD Options menu to make sure it is set up correctly (Chapter 4 has
details).
Note: The illustration on the left shows a digital optical cable connection, If your receiver has a
coaxial Audio in jack, use a shielded (coaxial) video or audio cable with RCA plugs at both ends to
connect the coaxial digital jacks on the TV/VCR/DVD and the AN receiver,
or
lB. Connect the A/V receiver to the TV/VCR/DVD
Connect the A/V cables to an A/V (audio/video) receivei: Connect audio cables to the
TV/VCR/DVD's LINE OUT AUDIO (L and R) jacks and the other ends to the receiver's
corresponding Audio Input jacks.
Go to page 14
13
Connections _ S_'_up
Plug in the TV/VCR/DVD
Plug the end of |he power cord into the wall outlet. Match the wide blade of the plug wi|h the
wide slot in II]e outlet. Insert the plug completely into the outlet.
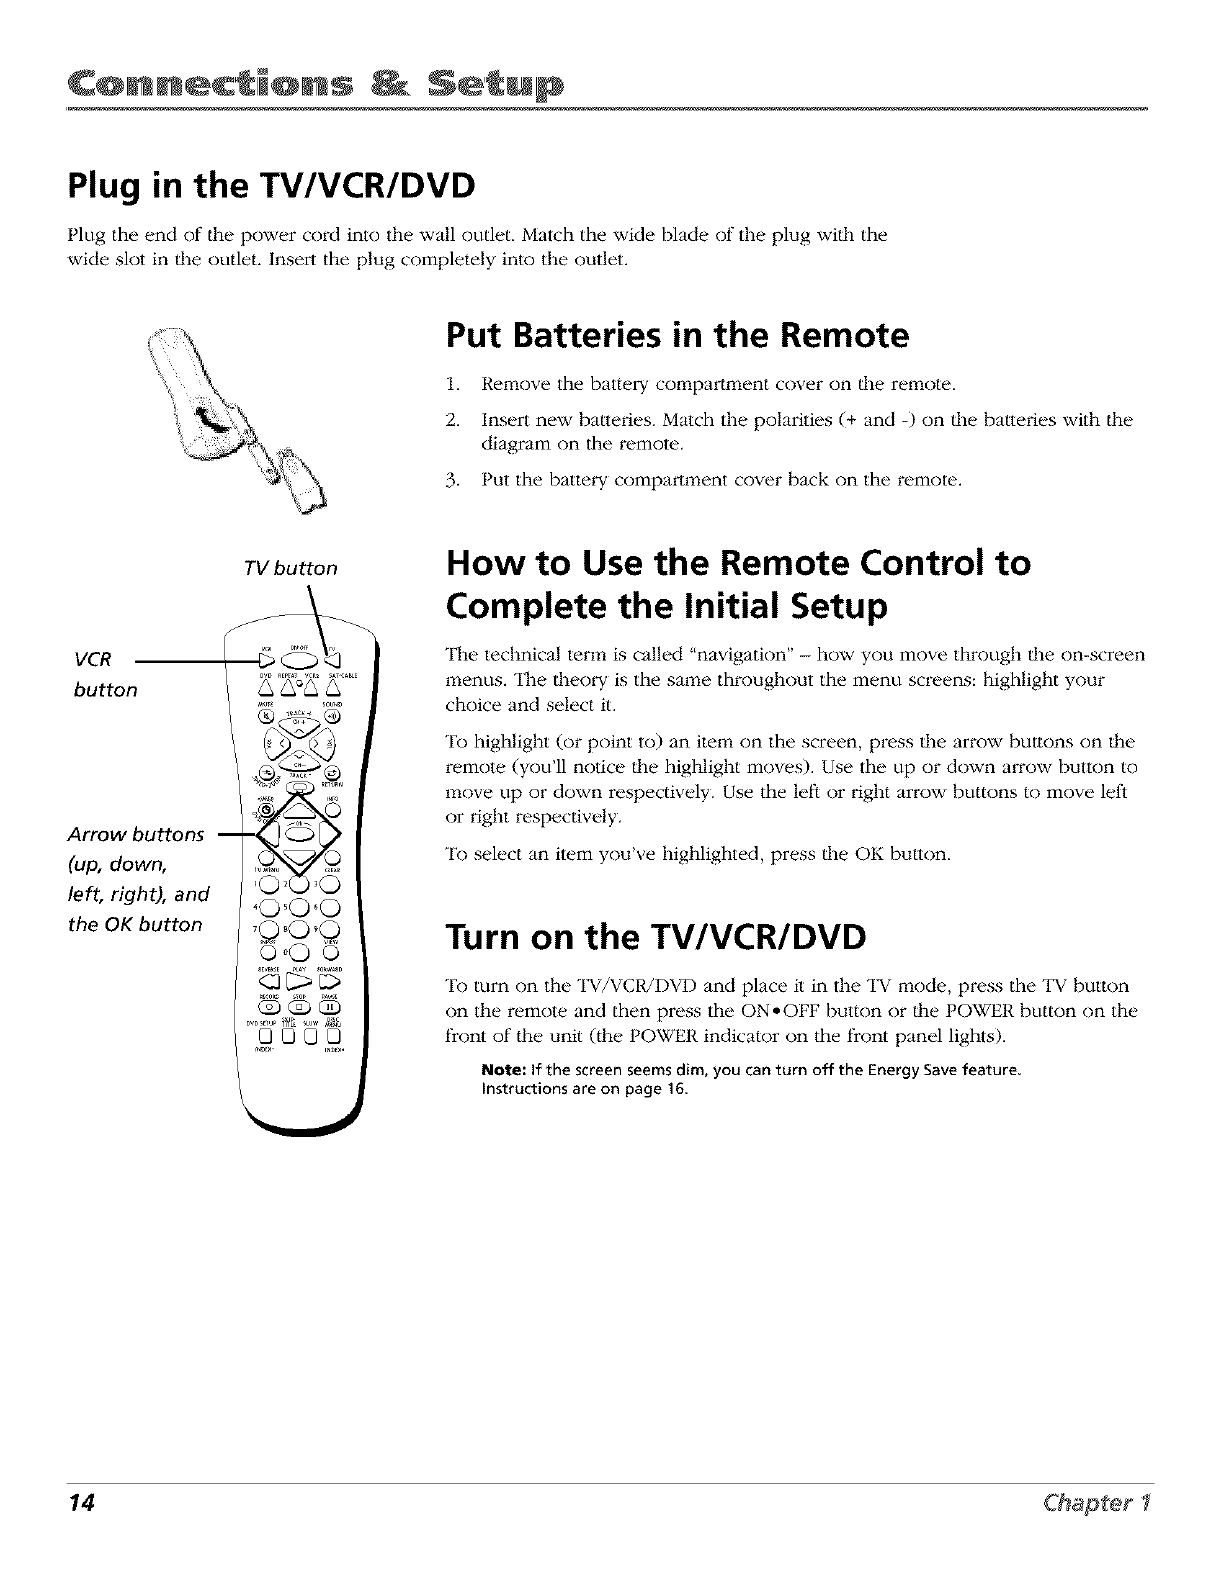
Put Batteries in the Remote
1. Remove the battery compartment cover on |he remote.
2. Insert new baltefies. Match the polarities (+ and -) on lhe baltefies with lhe
diagram on the remote.
3. Put the battery compartment cover back on the remote.
VCR
button
Arrow buttons
(up, down,
left, right), and
the OK button
TV button How to Use the Remote Control to
Complete the Initial Setup
The technical term is called "navigation" - how you move through the on-screen
menus. The ll_eory is the same throughout the menu screens: highlight your
choice and select it.
To highlight (or point to) an item on the screen, press the arrow bmlons on file
remole (you'll notice llle highlight moves). Use dc_eup or down arrow bulton to
move up or down respectively. Use the left or right arrow buttons to move left
or right respectively.
To select an item you've highlighted, press the OK button.
Turn on the TV/VCR/DVD
To turn on the TV/VCR/DVD and place il in II_e "IV mode, press the TV button
on II]e remole and then press the ON*OFF button or fl_e POWER button on the
front of llle unil (tim POWER indicator on the front panel lights).
Note: If the screen seems dim, you can turn off the Energy Savefeature,
Instructions are on page 16
14 Chapter 1
Connections S ' up
Initial Setup
"II_e first time you turn on your TV/VC1UDVD, you'll be asked to set a few screens so that your
TV/VCR/DVD will be set up correctly. Complete the following steps to set up your TV/VCR/DVD.
LANGUAGE
ENGLISH
ESPA_OL
FRANCAIS
SELECT -_" A/v : SET -_OK
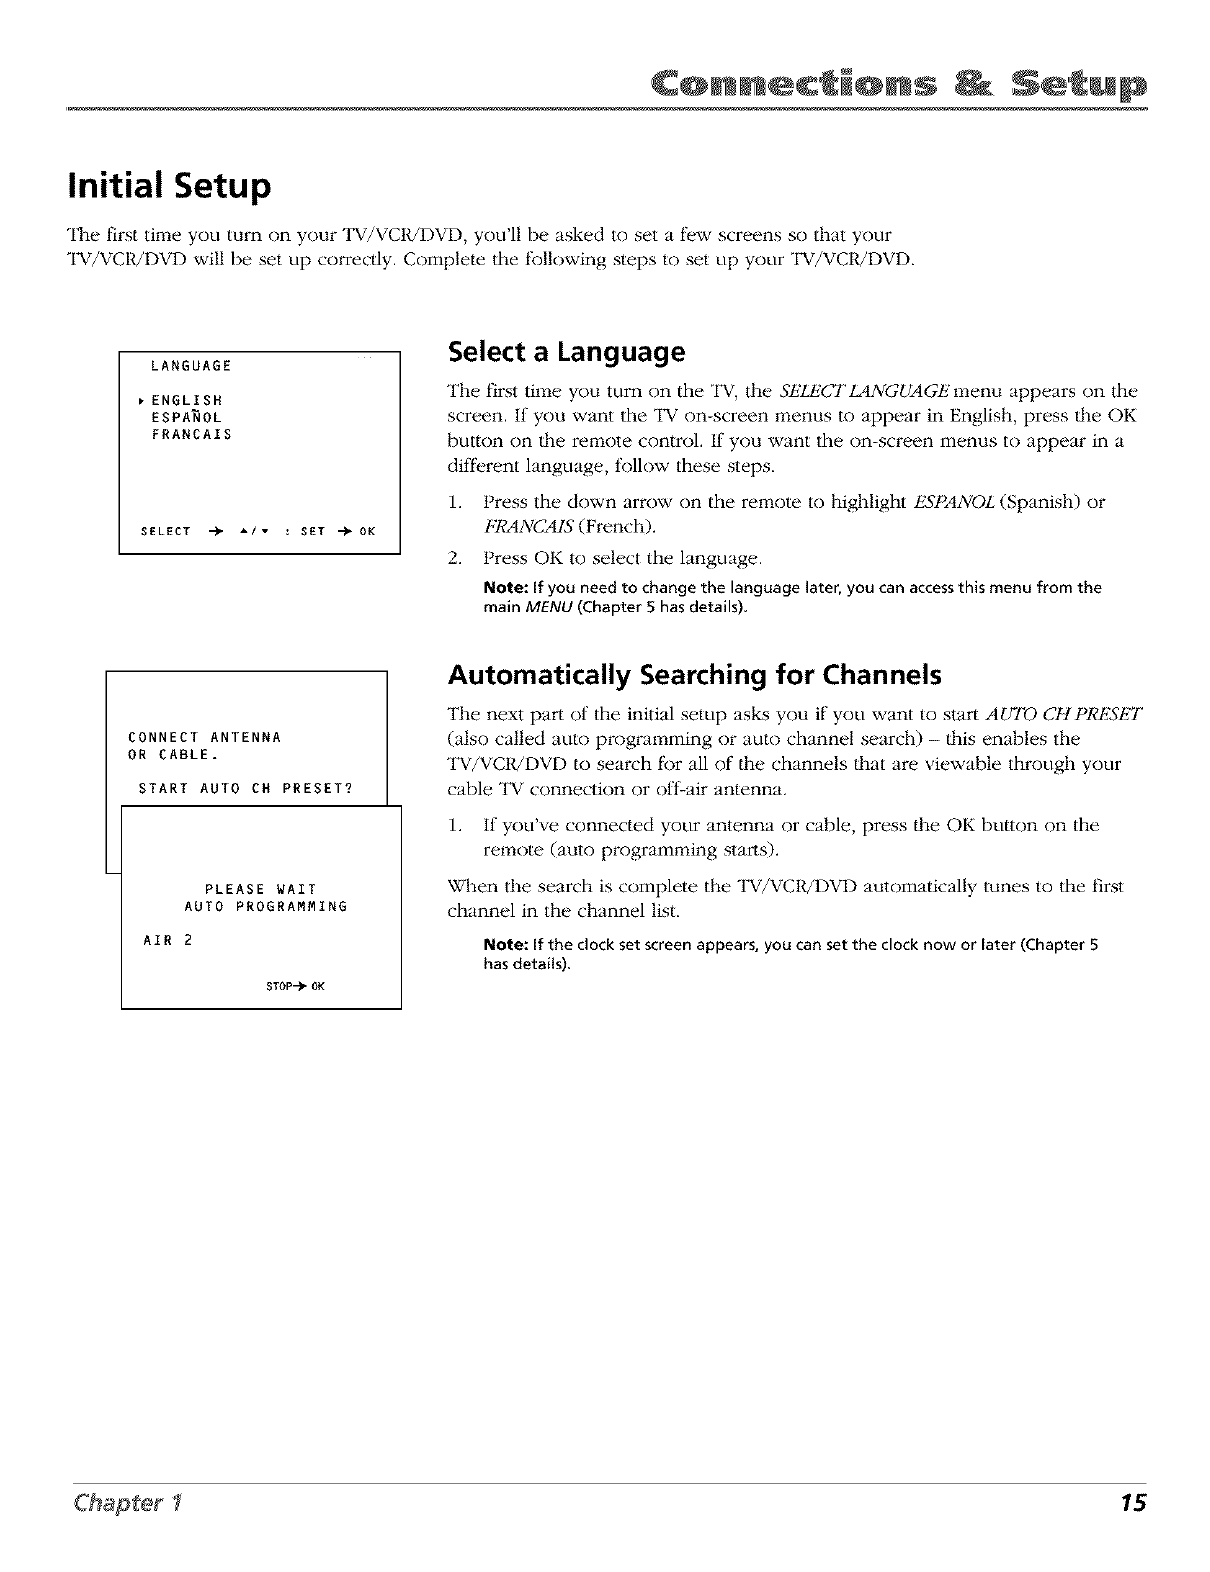
Select aLanguage
The first time you turn on the TV, the SELECTIMA_UAGt]" menu appears on the
screen. If you want the TV on-screen menus to appear in English, press the OK
button on the remote control. If you want the on-screen menus to appear in a
different language, follow these steps.
1. Press the down arrow on the remote to highlight ESPANOL (Spanish) or
F1,'ANCA1S (French).
2. Press OK to select the language.
Note: If you need to change the language later, you can accessthis menu from the
main MENU (Chapter 5 hasdetails)
CONNECT ANTENNA
OR CABLE.
START AUTO CH PRESET?
PLEASE WAIT
AUTO PROGRAMMING
AIR 2
STOP-_ OK
Automatically Searching for Channels
The next part of the initial setup asks you if you want to start AUTO CHPRt]_'T
(also called auto programming or auto channel search) - this enables the
TV/VCR/DVD to search for all of the channels that are viewable through your
cable TV connection or off-air antenna.
1. If you've connected your antenna or cable, press the OK button on the
remote (auto programming starts).
When the search is complete the TV/VCR/DVD automatically tunes to the first
channel in the channel list.
Note: If the clock set screen appears, you can set the clock now or later (Chapter 5
has details),
15

Connections S ' up
MENU
TIME
VIDEO ADJUST
AUDIO ADJUST
CLOSED CAPTION
TIMER RECORDINGS
LANGUAGE
,SETTING
SETTING
FUNCTION
AUTO CH PRESET
AIR/CABLE
CH SEARCH
,CH MEMORY
CN MEMORY
AIR 54
ADD
SELECT -)-AI. : SET -_OK
PREVIOUS -_ _ : QUIT-)'MENU
MENU
TIME
VIDEO ADJUST
AUDIO ADJUST
CLOSED CAPTION
TIMER RECORDINGS
LANGUAGE
,SETTING
SETTING
FUNCTION
FUNCTION
Add or Erase Channels
You might want to add or erase some channels if II]ey're inactive, have weak
signals, or you don't want lhem in your channel list. The channel list is dc_elist
of channels the TV tunes to when you press the channel up and/or channel
down buttons.
Note: Even if you erase a channel, you can still tune to it by pressing the number
buttons on the remote control
1. Press "IV MENU on the re_:qote 0he main MENUappears).
2. Press the down arrow button to highlight SEYFING.
3. Press OK (Ihe SE_NG menu appears).
4. Press the down arrow button to highlight CHM_O1,'K
5. Press OK (Ihe CHMEMORYmenu appears). Follow the on-screen directions
to ADD or ERASt]'a channel.
6. You can add or erase _:qore channels by entering the channel number or
pressing CH + or CH -.
_ENERGY SAVE ON
BLUE SCREEN OFF
REPEAT PLAY OFF
SELECT -)-A /v : SET -_OK
PREVIOUS -_ _ : QUIT-)'MENU
Turn the Energy Save Feature Off
This feature reduces the brightness of the picture, lowering _he power
consumption of your "lW/VC1UDVD by approximately 20 percent. To turn oil" the
ENI_]_GY SAVE feature:
1. Press TV MENU (the main MENU appears).
2. Press the up arrow button to highlight SETFING and press OK. The
SETFING menu appears with FUNCTION highlighted. Press OK.
3. The FUNCTION menu appears with ENERGY SAVE highlighted. Press OK
(ON tlashes).
4. Press the down arrow to change to OFE then press OK.
5. Press TV MENU to exit.
Next Steps
Now that you've finished dc_einitial selup tor your product, you have several
options- watch "1_, play a disc, play a lape, or record a program. The rest of this
chapter provides basic information for recording, playing tapes, and playing
discs. For more delailed intBrmation about lhe "lW/VC1UDVD's fealures, go to
Chapter 3. To learn more about the remote control that came with this product,
go to Chapter 2.
16 Chapter 1
Connections S ' up
VCR Basics
Now that you've finished the initial setup, you can watch TV or start using the VCR part of your
product.
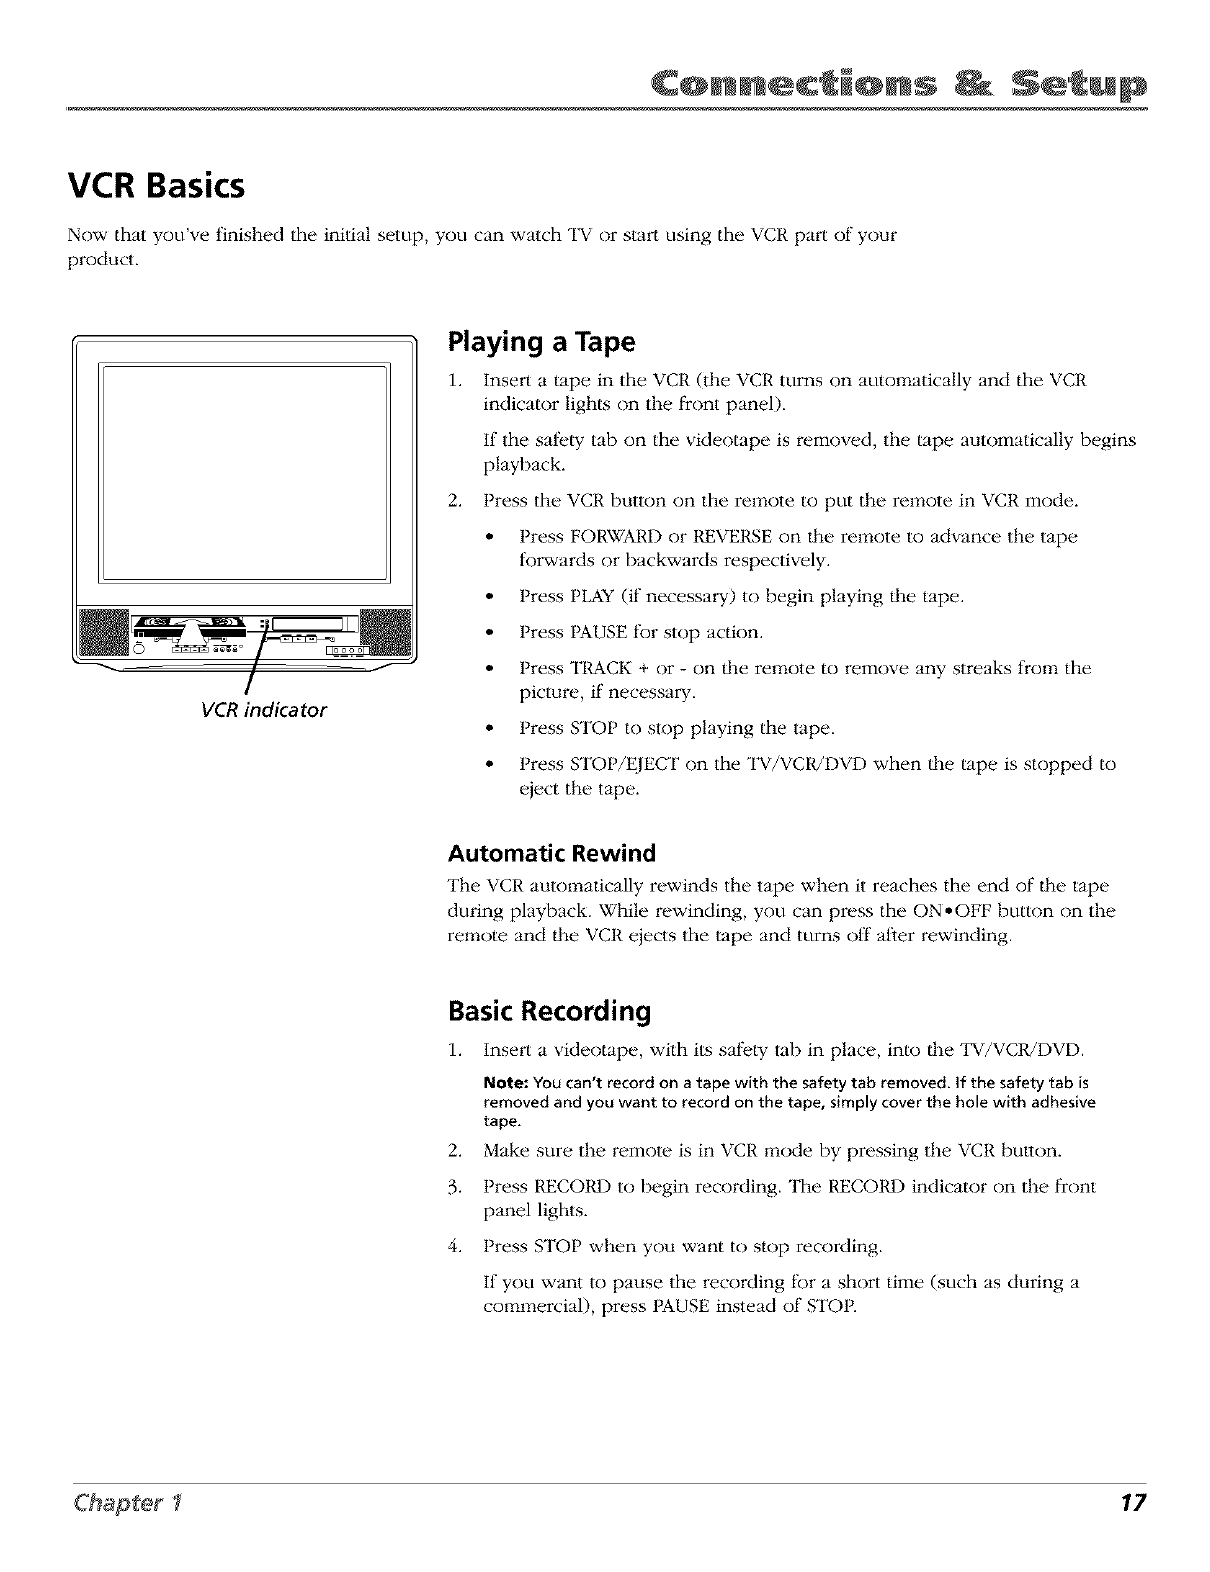
VCR indica tor
Playing a Tape
1. Insert a tape in the VCR (the V('R turns on automatically and the VCR
indicator lights on the front panel).
If the sal_,.ty tab on the videotape is removed, the tape automatically begins
playback.
2. Press the VCR button on the remote to put the remote in VCR mode.
•Press FORWARD or REVERSE on lhe remote to advance the tape
forwards or backwards respectively.
• Press PLAY (if necessary) to begin playing lhe tape.
• Press PAUSE for stop action.
• Press TRACK + or - on lhe remote to remove any streaks from the
picture, if necessary.
• Press STOP to stop playing the tape.
• Press STOP/EJECT on the TV/VCR/DVD when lhe tape is stopped to
eject the tape.
Automatic Rewind
The VCR automatically rewinds the tape when it reaches the end of _e tape
during playback. While rewinding, you can press the ON*OFF button on the
remote and lhe VCR ejects the "tape and turns o1_"after rewinding.
Basic Recording
1. Insert a videotape, with its safety tab in place, into the "I_/VCR/1-)VI-).
Note: YOUcan't record on a tape with the safety tab removed. If the safety tab is
removed and you want to record on the tape, simply cover the hole with adhesive
tape.
2. Make sure the remote is in VCR mode by pressing the VCR button.
3. Press RECOI_) to begin recording. The RECOI_) indicator on the front
panel lights.
4. Press STOP when you want to stop recording.
If you want to pause the recording tbr a short time (such as during a
commercial), press PAUSE instead of STOP.
17
Connections S ' up
VCR
button
CH +/-
buttons
TV button
'O'O o0
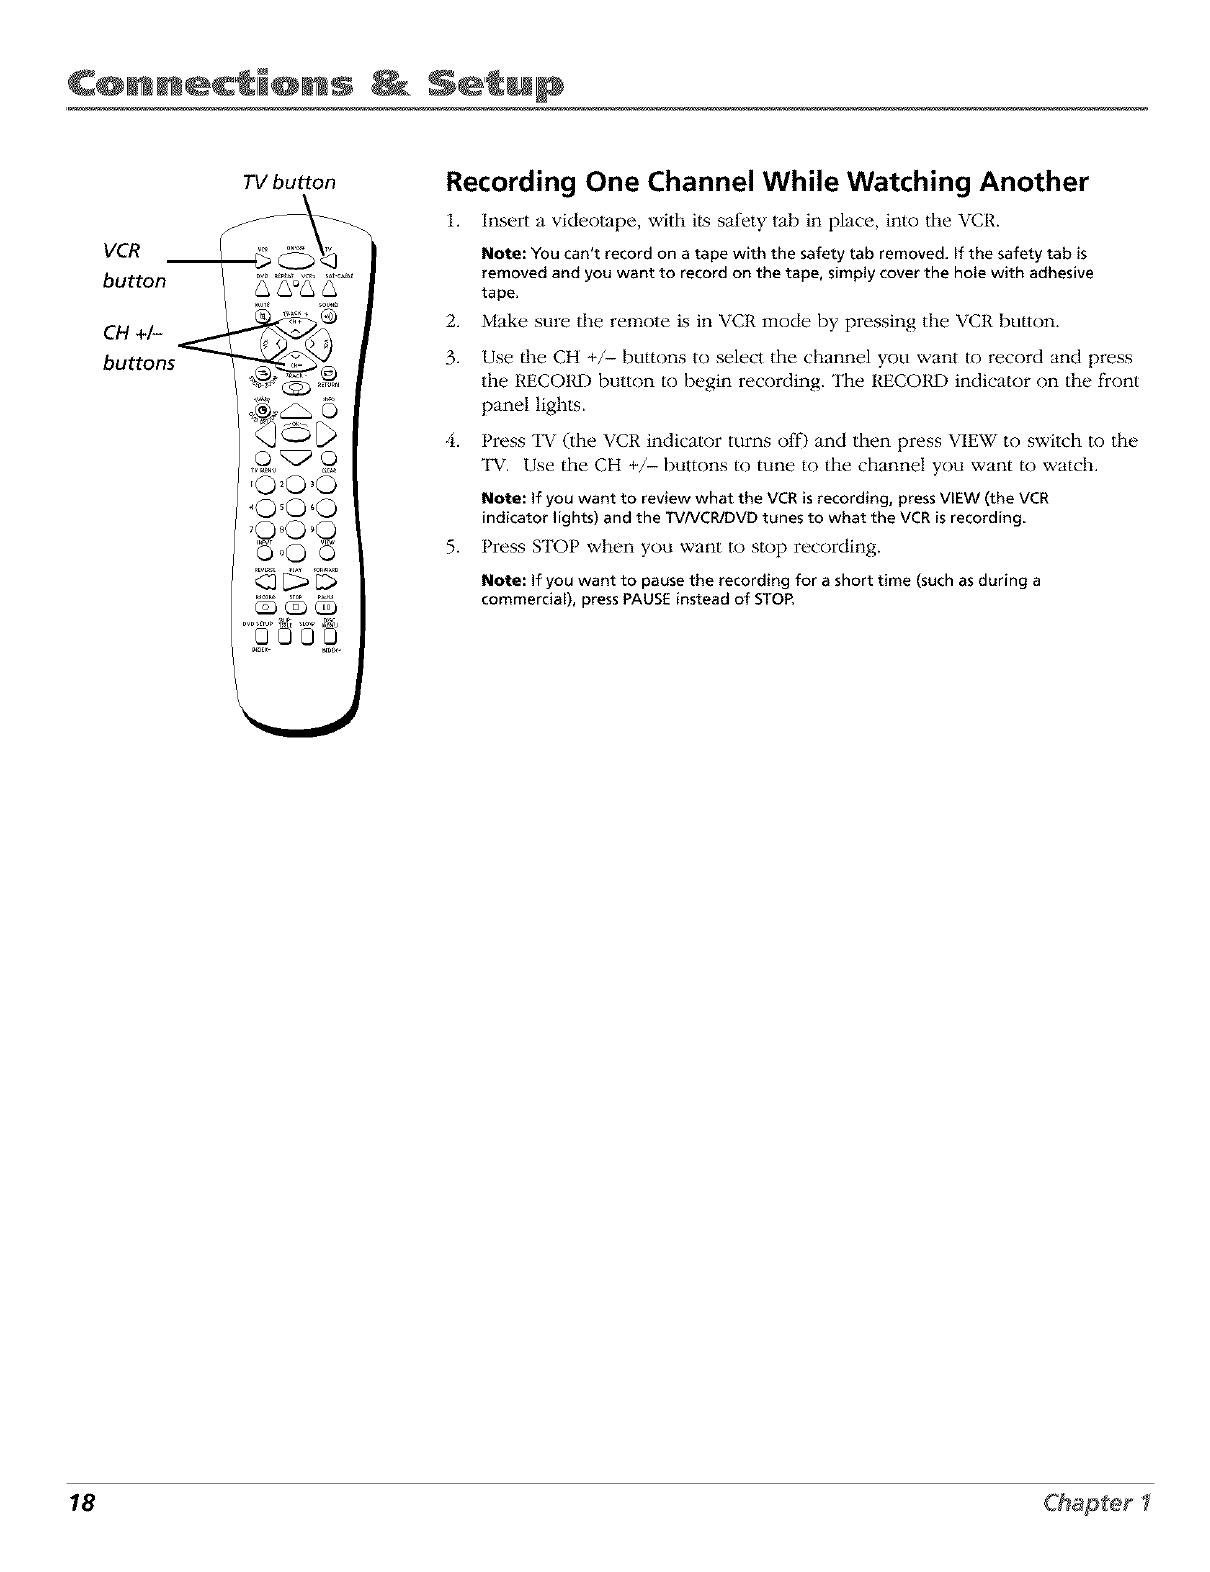
Recording One Channel While Watching Another
1. Insert a videotape, with its safety tab in place, into the VCR.
Note: You can't record on atape with the safety tab removed. If the safety tab is
removed and you want to record on the tape, simply cover the hole with adhesive
tape.
2. Make sure the remote is in VCR mode by pressing the VCR button.
3. Use the CH +/- buttons to select the channel you want to record and press
the RECOI_) button to begin recording. The RECOI_) indicator on the front
panel lights.
4. Press TV (the VCR indicator turns off) and then press VIEW to switch to the
TV. Use the CH +/- buttons to tune to the channel you want to watch.
Note: If you want to review what the VCR isrecording, press ViEW (the VCR
indicator lights) and the TVNCPJDVDtunes to what the VCRis recording
5. Press STOP when you want to stop recording.
Note: If you want to pause the recording for a short time (such asduring a
commercial), press PAUSEinstead of STOP,
18 Chapter 1
Connections S ' up
DVD Basics
"II_e first time you turn on the I-)VD player, press the I-)VD SETUP button while the player is
stopped. The OSD LANGUAGk" SETUP screen appears on the TV screen.
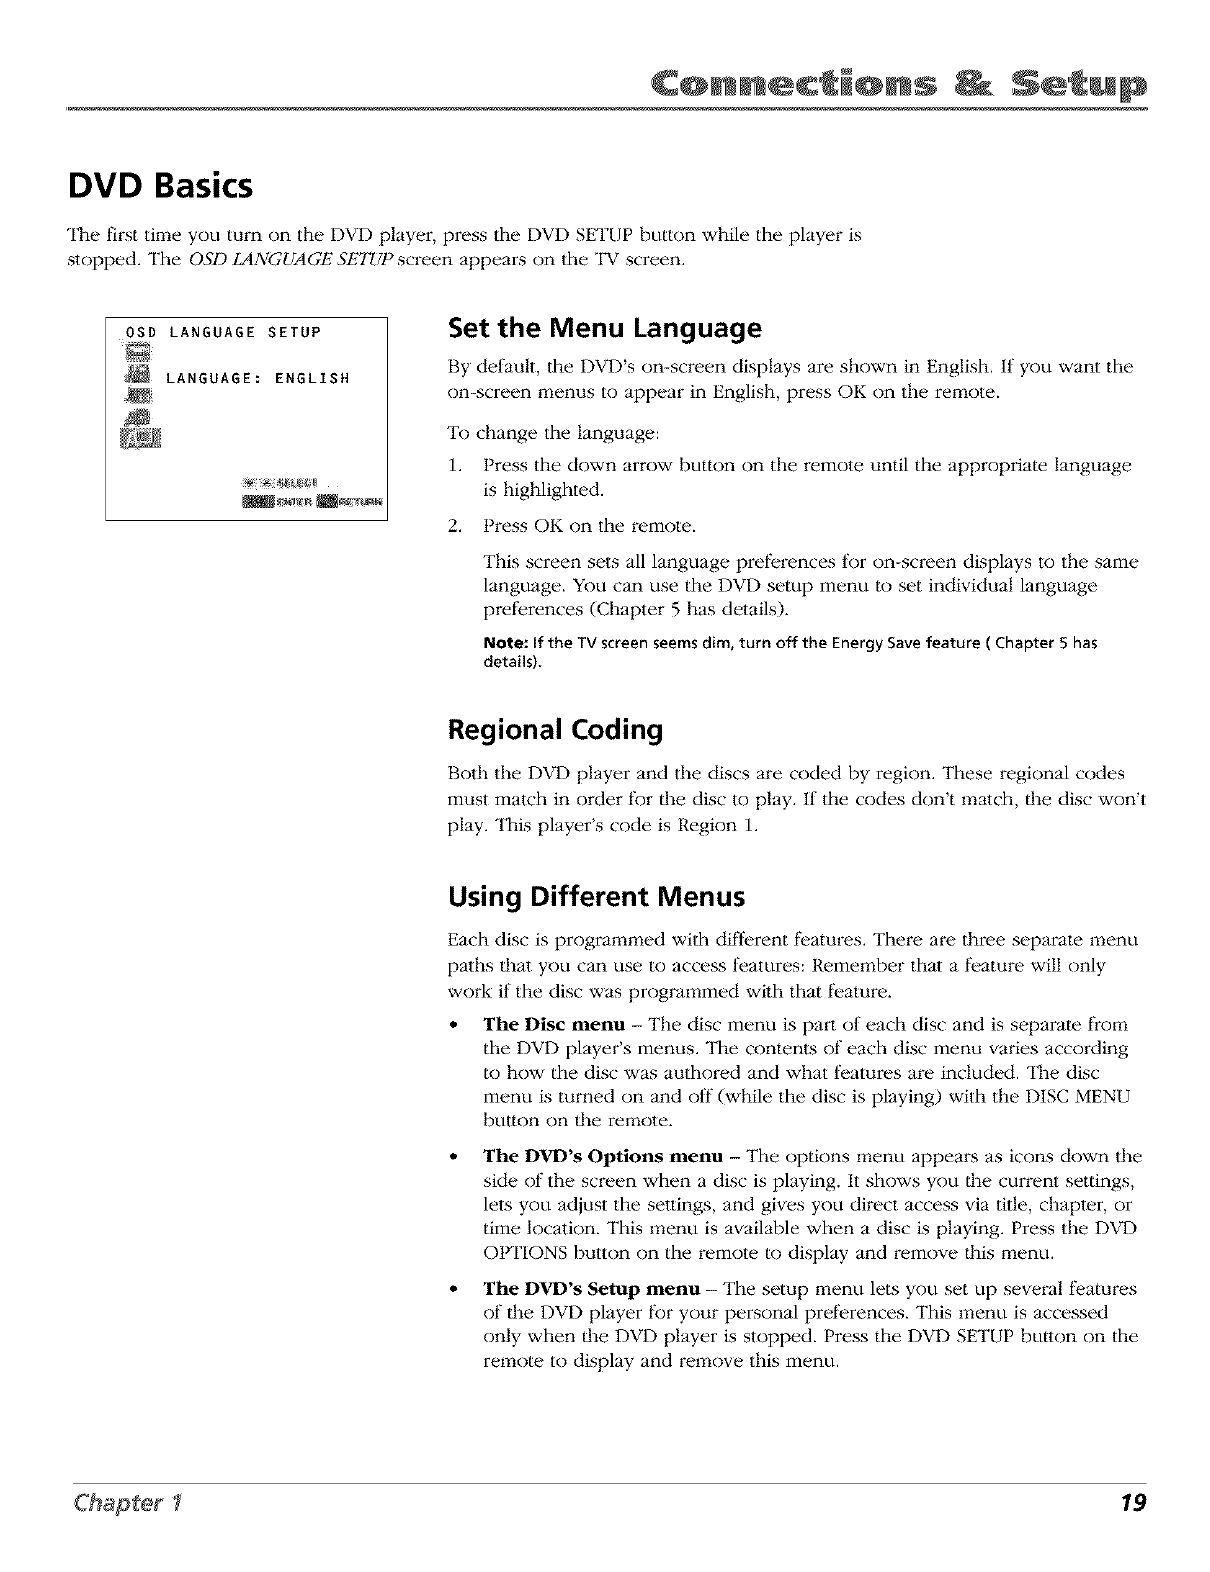
OSD LANGUAGE SETUP
LANGUAGE: ENGLISH
Set the Menu Language
By default, the DVD's on-screen displays are shown in English. If you want the
on-screen menus to appear in English, press OK on the remote.
To change the language:
1. Press the down arrow button on the remote until the appropriate language
is highlighted.
2. Press OK on the remote.
This screen sets all language preferences for on-screen displays to the same
language. You can use the DVD setup menu to set individual language
preferences (Chapter 5 has details).
Note: If the TV screen seems dim, turn off the Energy Save feature ( Chapter S has
details).
Regional Coding
Both the DVD player and the discs are coded by region. These regional codes
must match in order for lhe disc to play. If the codes don't match, lhe disc won't
play. This players code is Region 1.
Using Different Menus
Each disc is programmed with different features. There are three separate menu
paths lhat you can use to access l_atures: Remember that a feature will only
work if the disc was programmed wilh that feature.
•The Disc menu - The disc menu is part of each disc and is separate from
the DVD player's menus. The contents of each disc menu varies according
to how the disc was authored and what l_amres are included. The disc
menu is turned on and off (while the disc is playing) with the DISC MENU
bulton on the remote.
The DVD's Options menu - The options menu appeai:s as icons down the
side of the screen when a disc is playing. It shows you the current settings,
lets you adjust the settings, and gives you direct access via title, chapter, or
time location. This menu is available when a disc is playing. Press the DVD
OPTIONS button on the remote to display and remove this menu.
The DVD's Setup menu - The setup menu lets you set up several features
of lhe DVD player for your personal preferences. This menu is accessed
only when lhe DVD player is stopped. Press the DVD SETUP bulton on the
remote to display and remove this menu.
19
Connections S ' up
Loading and Playing Discs
Your DVD player plays DV1-) discs (3" and 5" discs), audio CD discs (3" and 5" discs), and CD-
R/CD-RW discs recorded in MP3 format or audio format (3" and 5" discs). On CD-G and CD-
EXTRA discs, only the sound can be played (no images). Before you load a disc, make sure that
it is compatible with the player. "I1]efollowing discs CANNOT be used wilh lhis player:
• Laserdiscs
• Photo CD, CD-1, DVD-ROM, DVD-R, DVD-RW, DVD-Audio, SACD and CD-ROM
• Discs recorded using other broadcast standards (i.e. PAL or SECAM)
• Discs with unusual shapes (heart or hexagonal)
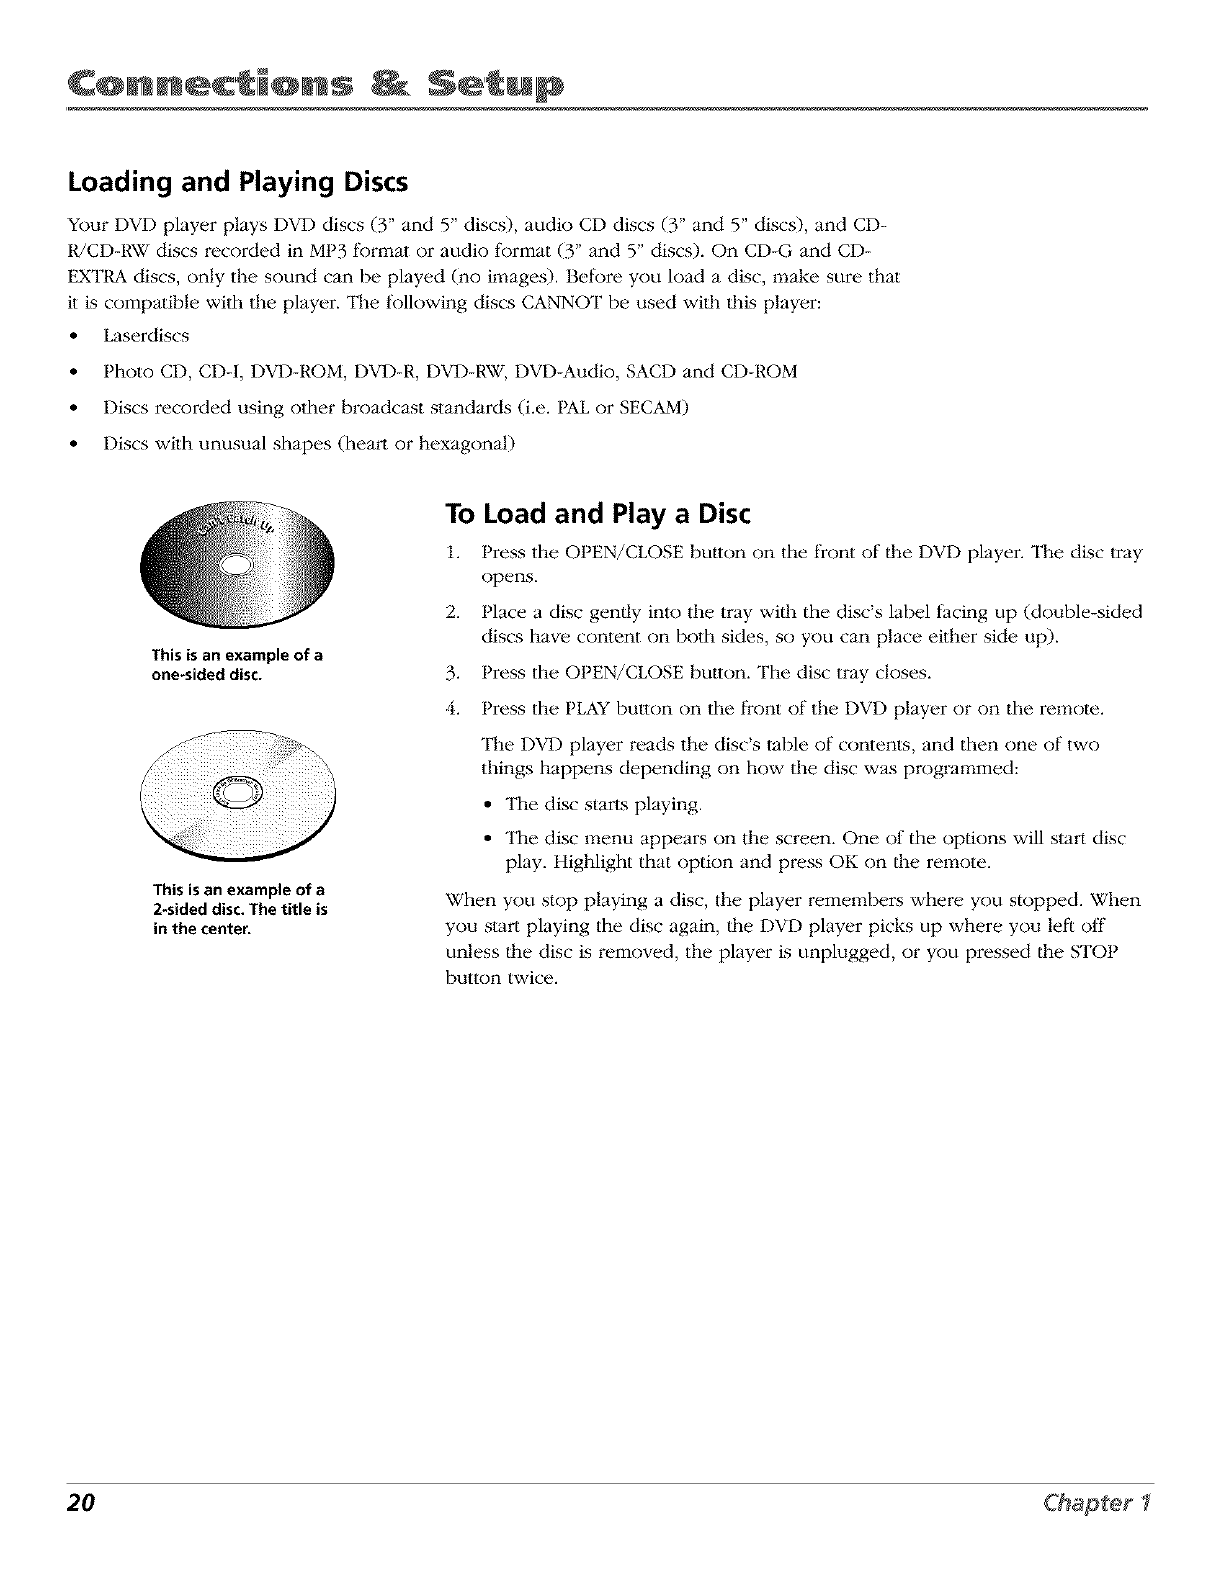
This is an example of a
one-sided disc.
This is an example of a
2-sided disc. The title is
in the center.
To Load and Play a Disc
1. Press the OPEN/CLOSE button on the front of the DVD player. The disc tray
opens.
2. Place a disc genlly into the tray wilh the disc's label facing up (double-sided
discs have content on both sides, so you can place either side up).
3. Press the OPEN/CLOSE button. The disc tray closes.
4. Press the PLAY button on the front of the DVD player or on the remote.
The DVD player reads the disc's table of contents, and then one of two
things happens depending on how the disc was progrm:qmed:
• The disc star_s playing.
• The disc _:qenu appears on the screen. One of the options will start disc
play. Highlight that option and press OK on lhe remote.
When you stop playing a disc, the player remembers where you stopped. When
you start playing the disc again, lhe DVD player picks up where you let't oil"
unless lhe disc is removed, the player is unplugged, or you pressed lhe STOP
button twice.
20 Chapter 1
Connections S ' up
Using aDisc Menu
Some discs have an on-screen 1:qenu thal is separale frcmq the DVD player's menus. The disc
_:qenu might only contain a list of the titles and chapters or it may allow you to change features
such as language and playback settings. Although the content and operation of disc _:qenus vary
from disc-to-disc, lhe following example gives you an idea of what to expect.
Many discsskip the disc menu
and start playing automatically,
Toaccessthe disc menu when
you're playing a disc, press DISC
MENU on the remote.
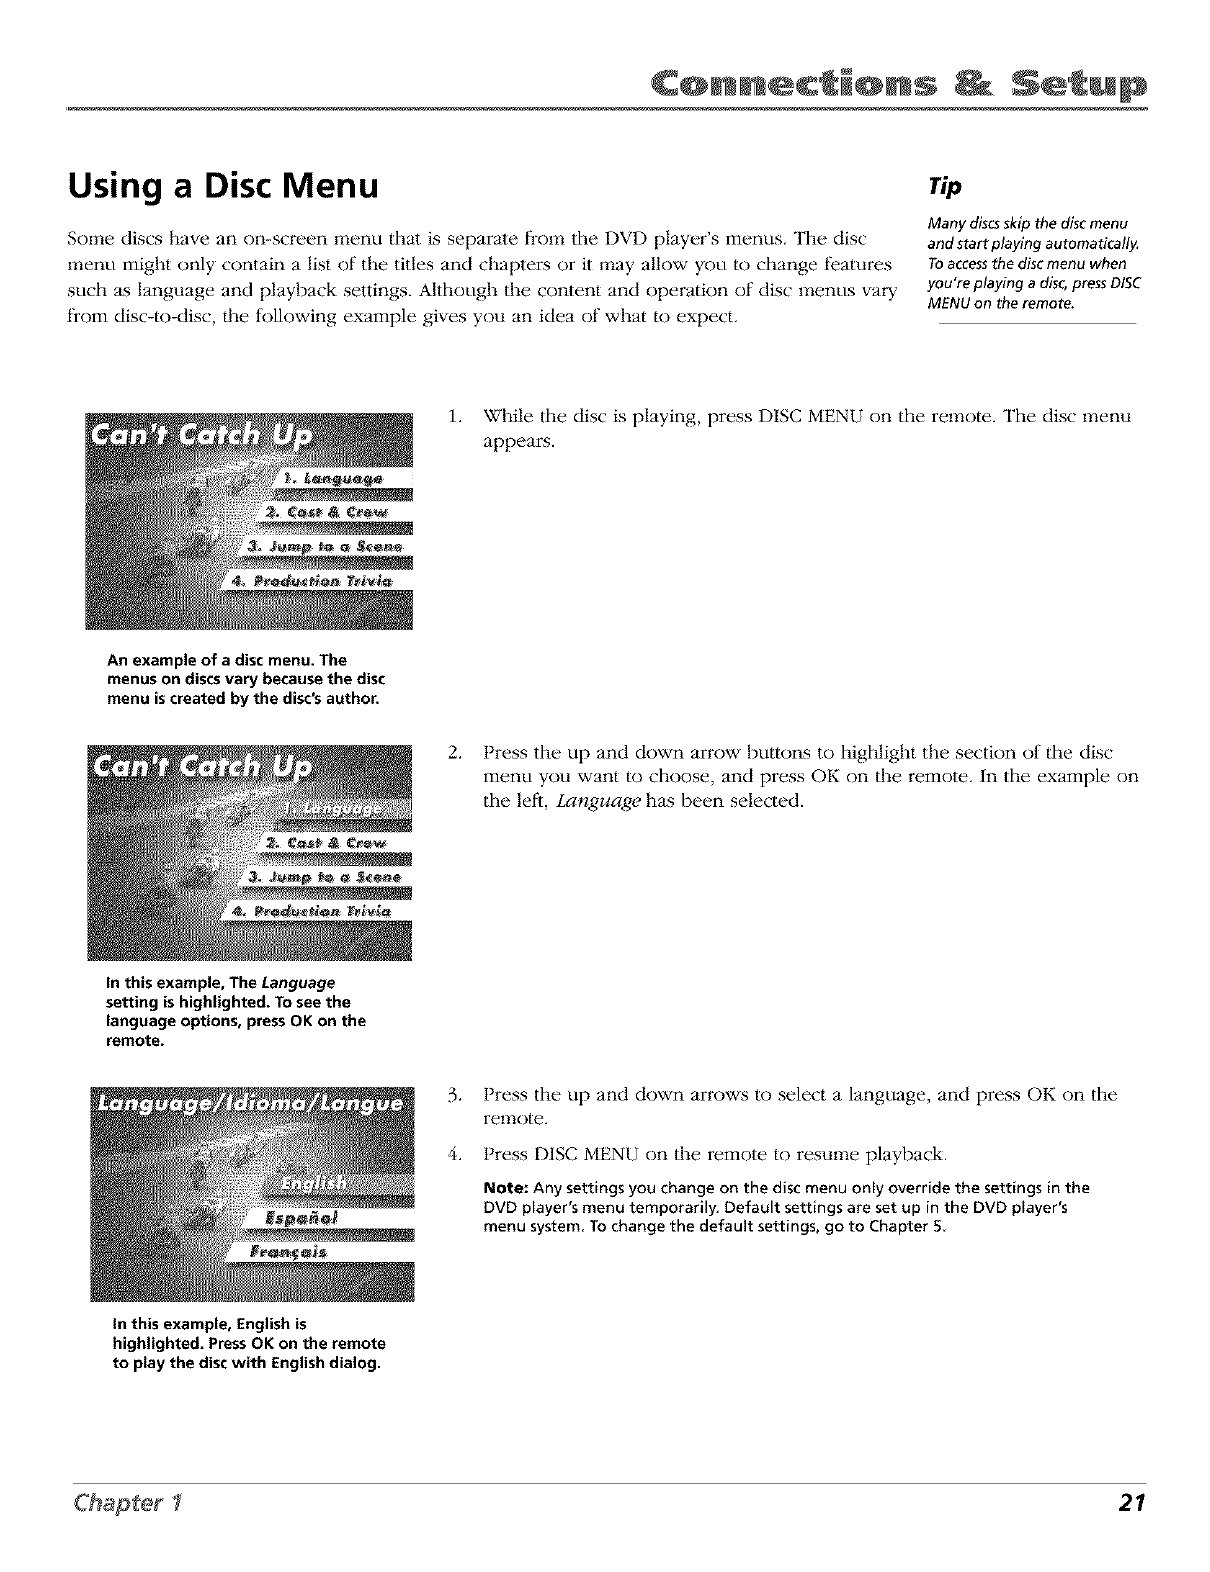
1. While the disc is playing, press DISC MENU on the re1:qote. The disc 1:qenu
appears.
An example of a disc menu. The
menus on discs vary because the disc
menu is created by the disc's author.
2. Press the up and down arrow buttons to highlight the section of the disc
menu you want to choose, and press OK on the remote. In the example on
the left, Language has been selected.
In this example, The Language
setting is highlighted. To see the
language options, press OK on the
remote.
.
4.
Press the up and down arrows to select a language, and press OK on the
remote.
Press DISC MENU on the remote to resume playback.
Note: Any settings you change on the disc menu onty override the settings in the
DVD player's menu temporarily_ Default settings are set up in the DVD player's
menu system To change the default settings, go to Chapter 5
in this example, English is
highlighted. Press OK on the remote
to play the disc with English dialog.
21
Connections _ S_'_up
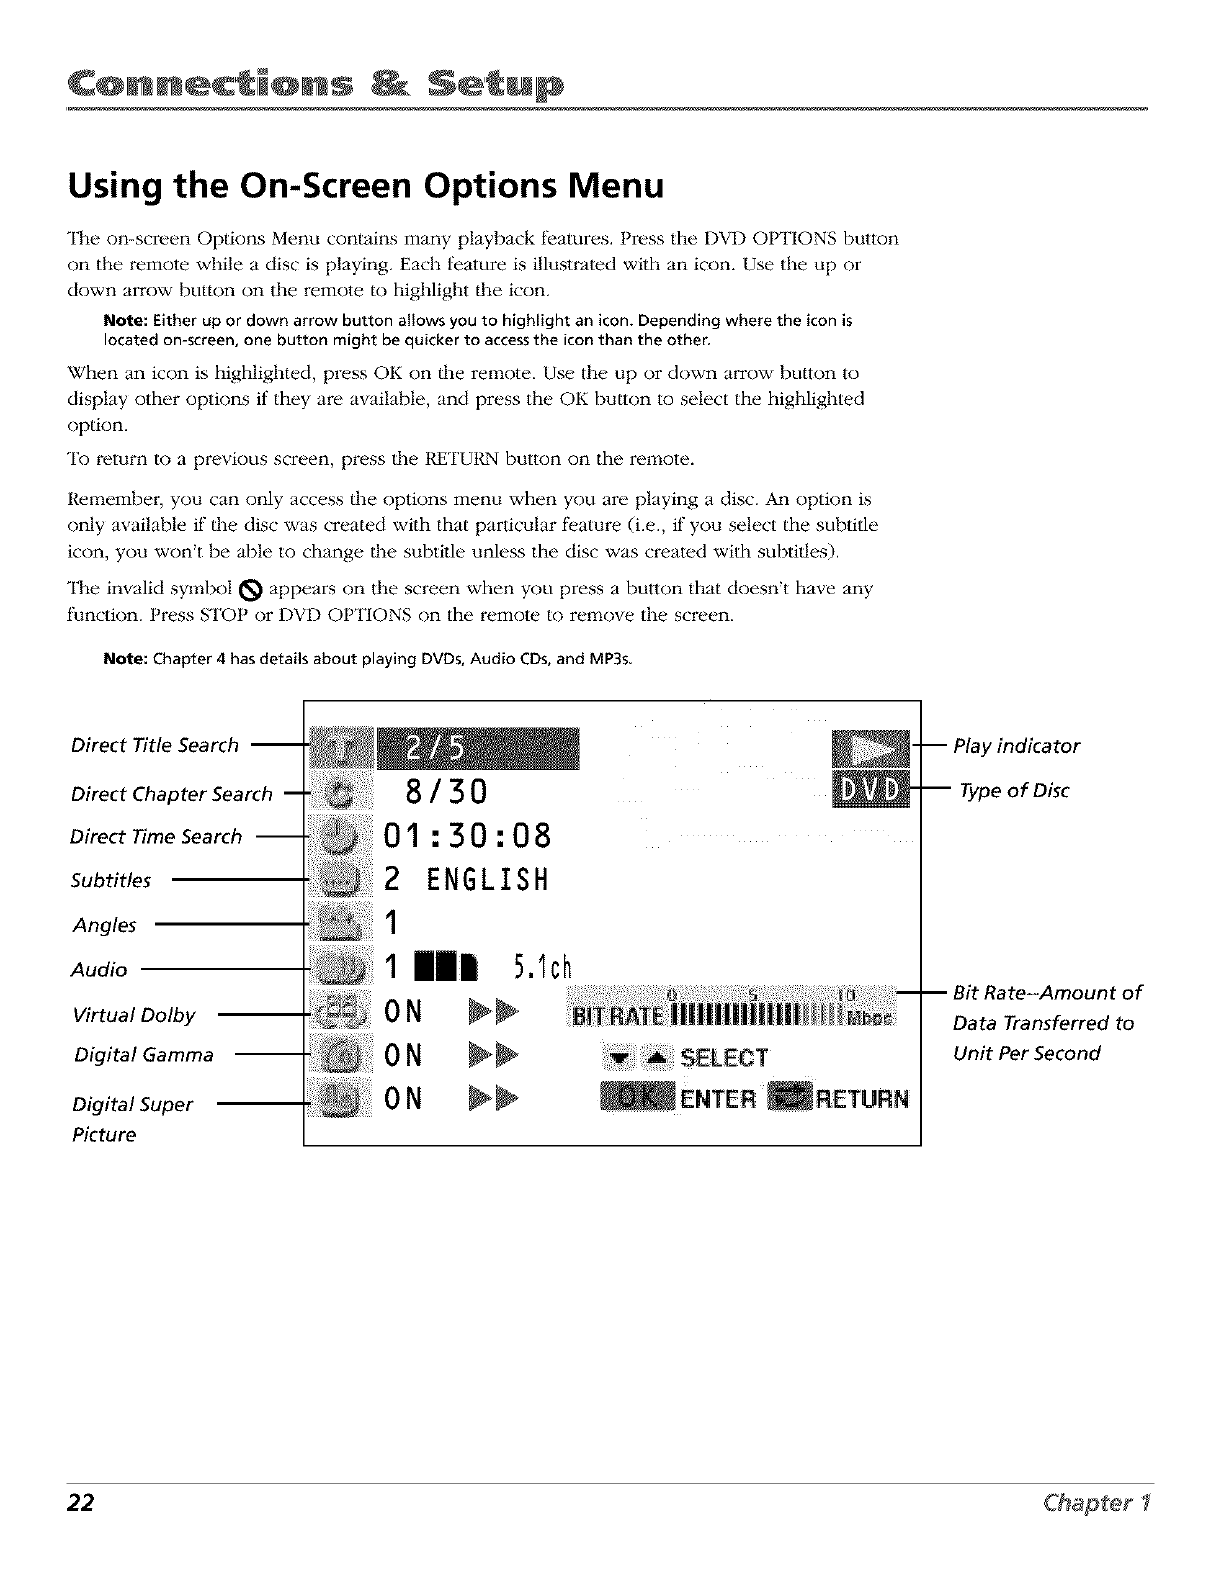
Using the On-Screen Options Menu
"II_e on-screen Options Menu contains many playback features. Press the DVD OPTIONS button
on the remote while a disc is playing. Each l_ature is illustrated wilh an icon. Use the up or
down arrow button on lhe remote to highlight lhe icon.
Note: Either upor down arrow button allowsyou to highlight an icon.Depending where the iconis
locatedon-screen,onebutton might be quickerto accessthe iconthan the other,
When an icon is highlighted, press OK on lhe remote. Use lhe up or down arrow bullon Io
display other options if they are available, and press the OK bulton to select the highlighted
option.
To return to a previous screen, press lhe RETUt_N button on the remote.
Remember, you can only access lhe options menu when you are playing a disc. An option is
only available if lhe disc was created with that particular feature (i.e., if you select the subtitle
icon, you won't be able to change lhe subtitle unless the disc was created with subtilles).
"II_e invalid symbol _ appears on the screen when you press a button that doesn't have any
function. Press STOP or DVD OPTIONS on the remote to remove the screen.
Note: Chapter 4 has details about playing DVDs, Audio CDs, and MP3s,
Direct Title Search --
Direct Chapter Search
Direct Time Search --
Subtitles
Angles
Audio
Virtual Dolby
Digital Gamma
Digital Super
Picture
8/30
01:30:08
2 ENGLISH
I
_ili_:¸%1:¸¸i¸¸
IliI 5.1ch
ON
ON
ON
_LEGT
ENTER !RETURN
-- Play indicator
Type of Disc
-- Bit Rate--Amount of
Data Transferred to
Unit Per Second
22 Chapter 1
Using the Remote
Control
Chapter Overview:
• The Buttons on the Remote Control
•Programming the Remote to Operate Other Components
•How to Use the Remote After You've Programmed It
•How to Order a New Remote Control
•Code List
Changing Entertainment. .n.
Graphics used within this publication are fi_r repre.;entation only. 23
Using _h_ R_@_ C@n_lr@!
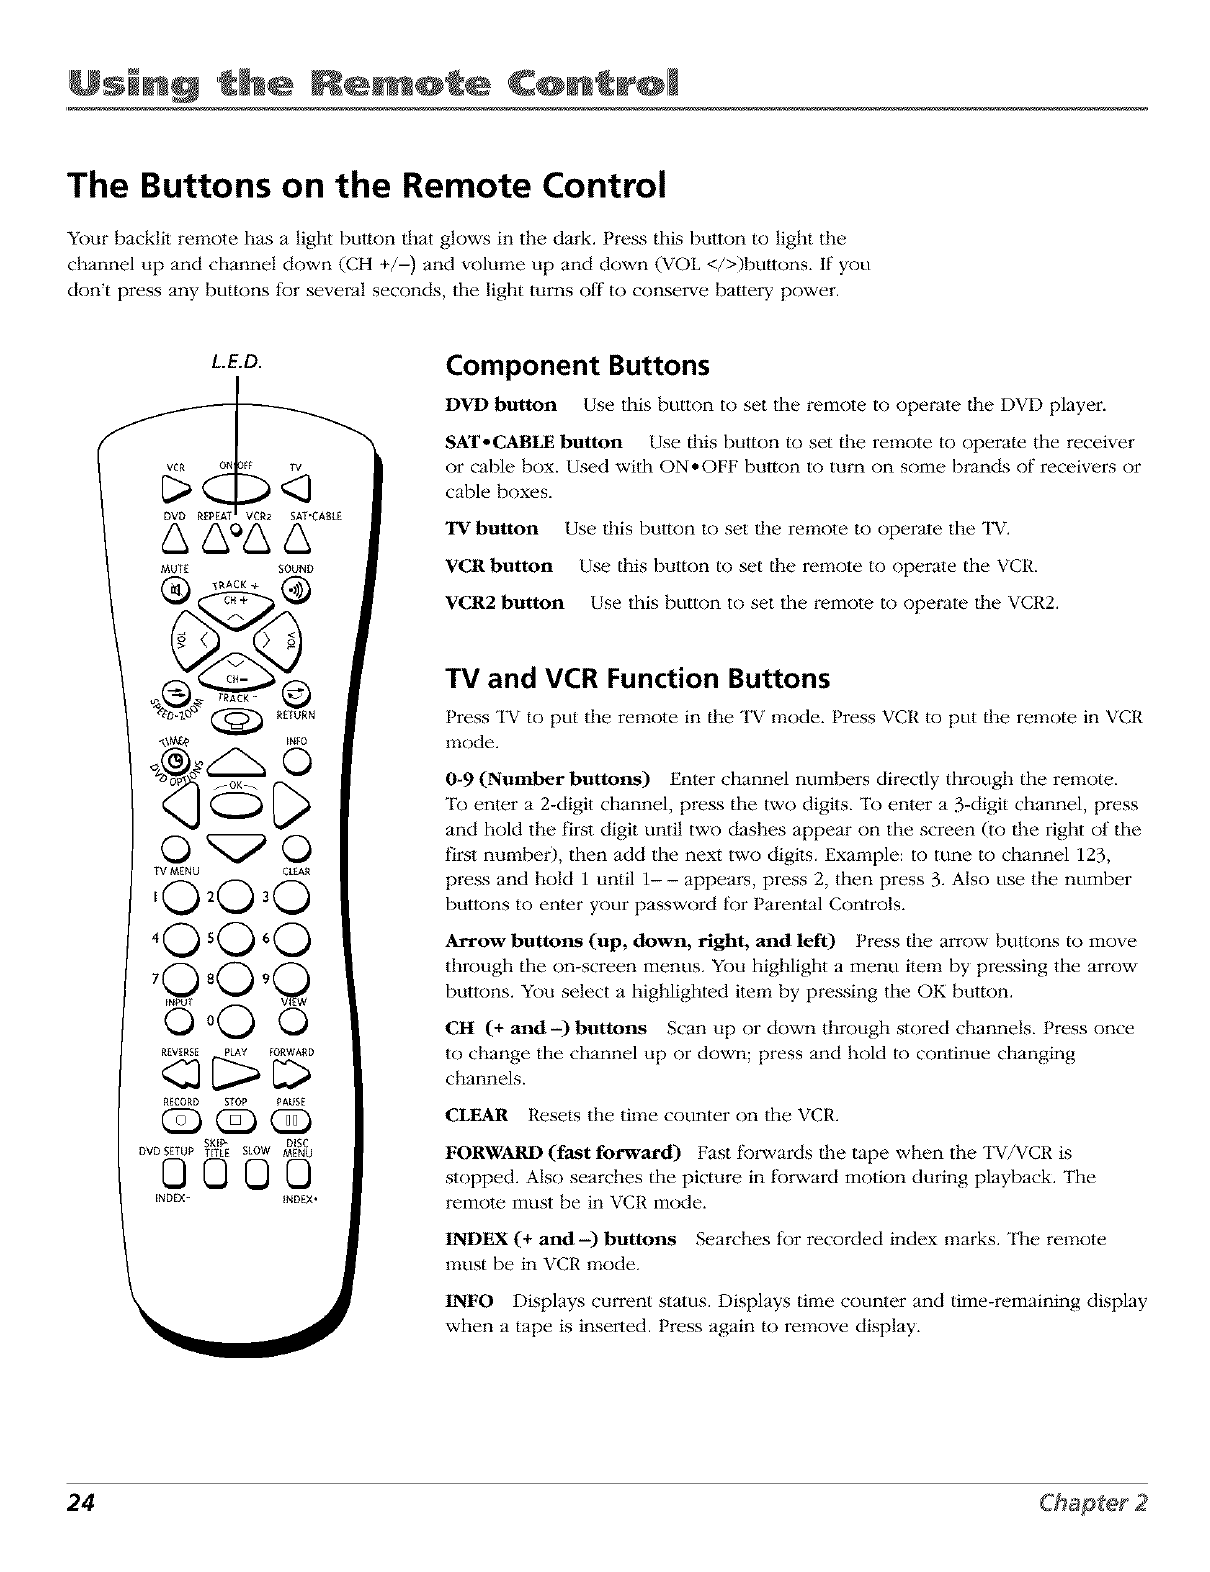
The Buttons on the Remote Control
Your backlit remote has a light button that glows in the dark. Press this button to light the
channel up and channel down (CH +/-) and volume up and down (VOL </>)buttons. If you
don't press any buttons for several seconds, the light turns off to conserve battery power.
L.E.D.
SAT'CABLE
& &°&&
MUTE SOUND
_-_ _ RETURN
TV MENU CLEAR
,O O,O
'O
,@ Q
o0O o
R_VERSE PLAY FORWARD
RECORD STOP PAUSE
(223(E) (_D
SKI_ DISC
DVDSETUP lilLE SLOW MEN U
000©
iNDEX- iNDEX*
Component Buttons
DVD button Use this button to set the remote to operate lhe DVD player.
SAT-CABLE button Use this button to set ll_e remote to operate the receiver
or cable box. Used with ON,OFF button to turn on some brands of receivers or
cable boxes.
IW button Use lhis button to set lhe remote to operate the TV.
¥CR button Use finis button to set the remote to operate the VCR.
¥CR2 button Use this button to set the remote to operate the VCR2.
TV and VCR Function Buttons
Press TV to put the remote in the TV mode. Press VCR to put the remote in VCR
mode.
0-9 (Number buttons) Enter channel numbers directly through the remote.
To enler a 2-digit channel, press the two digits. To enler a 3-digit channel, press
and hold the first digit until two dashes appear on the screen (to tile right of the
first number), then add the next two digils. Exmnple: to tune to channel 123,
press and hold 1 until 1- -appears, press 2, then press 3. Also use the number
buttons to enter your password for Parental Controls.
Arrow buttons (up, down, right, and left) Press d_e arrow buttons to move
through the on-screen menus. You highlight a menu item by pressing the arrow
buttons. You select a highlighted item by pressing the OK button.
CH (+ and-) buttons Scan up or down through stored channels. Press once
to change the channel up or down; press and hold to continue changing
channels.
CLEAR Resets the time counter on the VCR.
FORWARD (fast forward) Fast forwards the tape when the TV/VCR is
stopped. Also searches the picture in forward motion during playback. The
remote must be in VCR mode.
INDEX (+ and-) buttons Searches fi)r recorded index marks. The remote
must be in VCR mode.
INFO Displays current status. Displays time counter and time-remaining display
when a tape is inserted. Press again to remove display.
24

Using Coheir@!
Repeatedly press to select tuner or line inputs (LINk'I lbr the rear LINE IN/IN1 jacks,
LINt_221k)rthe front VIDEO, L/MONO, R jacks, or DVD). If you are watching "IV, press INPUT to
tune to the VCR and play a "tape.
LoE.D. (light-emit|ing diode) "II_e little light on lhe remote that lights when you are
programming the remote. It also lights when you press a valid button on the remote.
MUTE Lowers the volume to its minimum level and aulomalically turns on closed-captioning.
Press again to restore volume and turn off closed-captioning.
OK Selects a highlighted menu feature.
ON-OFF Turns the "lW/VC1UDVD on and off.
PAUSE Pauses lhe tape during playback. Press again to advance tape one frame. Also pauses
the tape during recording to prevent recording of unwanted scenes. "II_e remote must be in VCR
mode.
PLAY Plays a tape. Starts normal playback from pause, frame advance, or slow motion. The
remote must be in VCR mode.
RECORD Starts VCR recording.
REIlJRN Returns you to the previous channel. Removes on-screen menus.
REVERSE Rewinds lhe tape when the TV/VCR is stopped. Also searches the picture in reverse
during playback. The remote must be in VCR mode.
SKIP-TITLE Press once belk)re changing channels and the "IV will wait 30 seconds belk)re
returning you to lhe original channel. Press repeatedly to add more time.
SLOW Press to start slow-motion during playback. The remote must be in VCR mode.
SOUND Press to select stereo, SAP, or mono audio.
SPEED-ZOOM Use to select tape speed. The remote must be in VCR mode.
STOP When the remote is in VCR mode, stops the following: record, play, rewind, fast
forward, and pause.
TIMER Press to set timer recording. Press to operate, TV/VCR when timer recording is set (the
PROGRAM EVENT indicator on lhe front panel lights). Press again to reset timer recording.
TRACK + /- buttons Reduces streaks which may appear on lhe picture during regular or
slow-motion playback. Reduces picture "iilter" during stop-action (paused) playback. The
remole must be in VCR mode.
TV MENU Displays lhe "lW's main Mt_2VU.
¥OL < and > buttons Decrease or increase the volume.
25
Using C@n lr@!
L.E.D.
f
DVD REPEA VCR2 SAPCABLE
& &°& &
MUTE SOUND
_4 _ R£TURN
_INFO
TV NENU CLEAR
,©2©,0
O'O'O
,©0o
o0O o
REVERSE PLAY _ORWARD
RECORD STOP RAUS[
(2D(23 (g)
SKI_ DISC
DVDSETUP TITLE SLOW MENU
0000
iNDEX- [NDEX÷
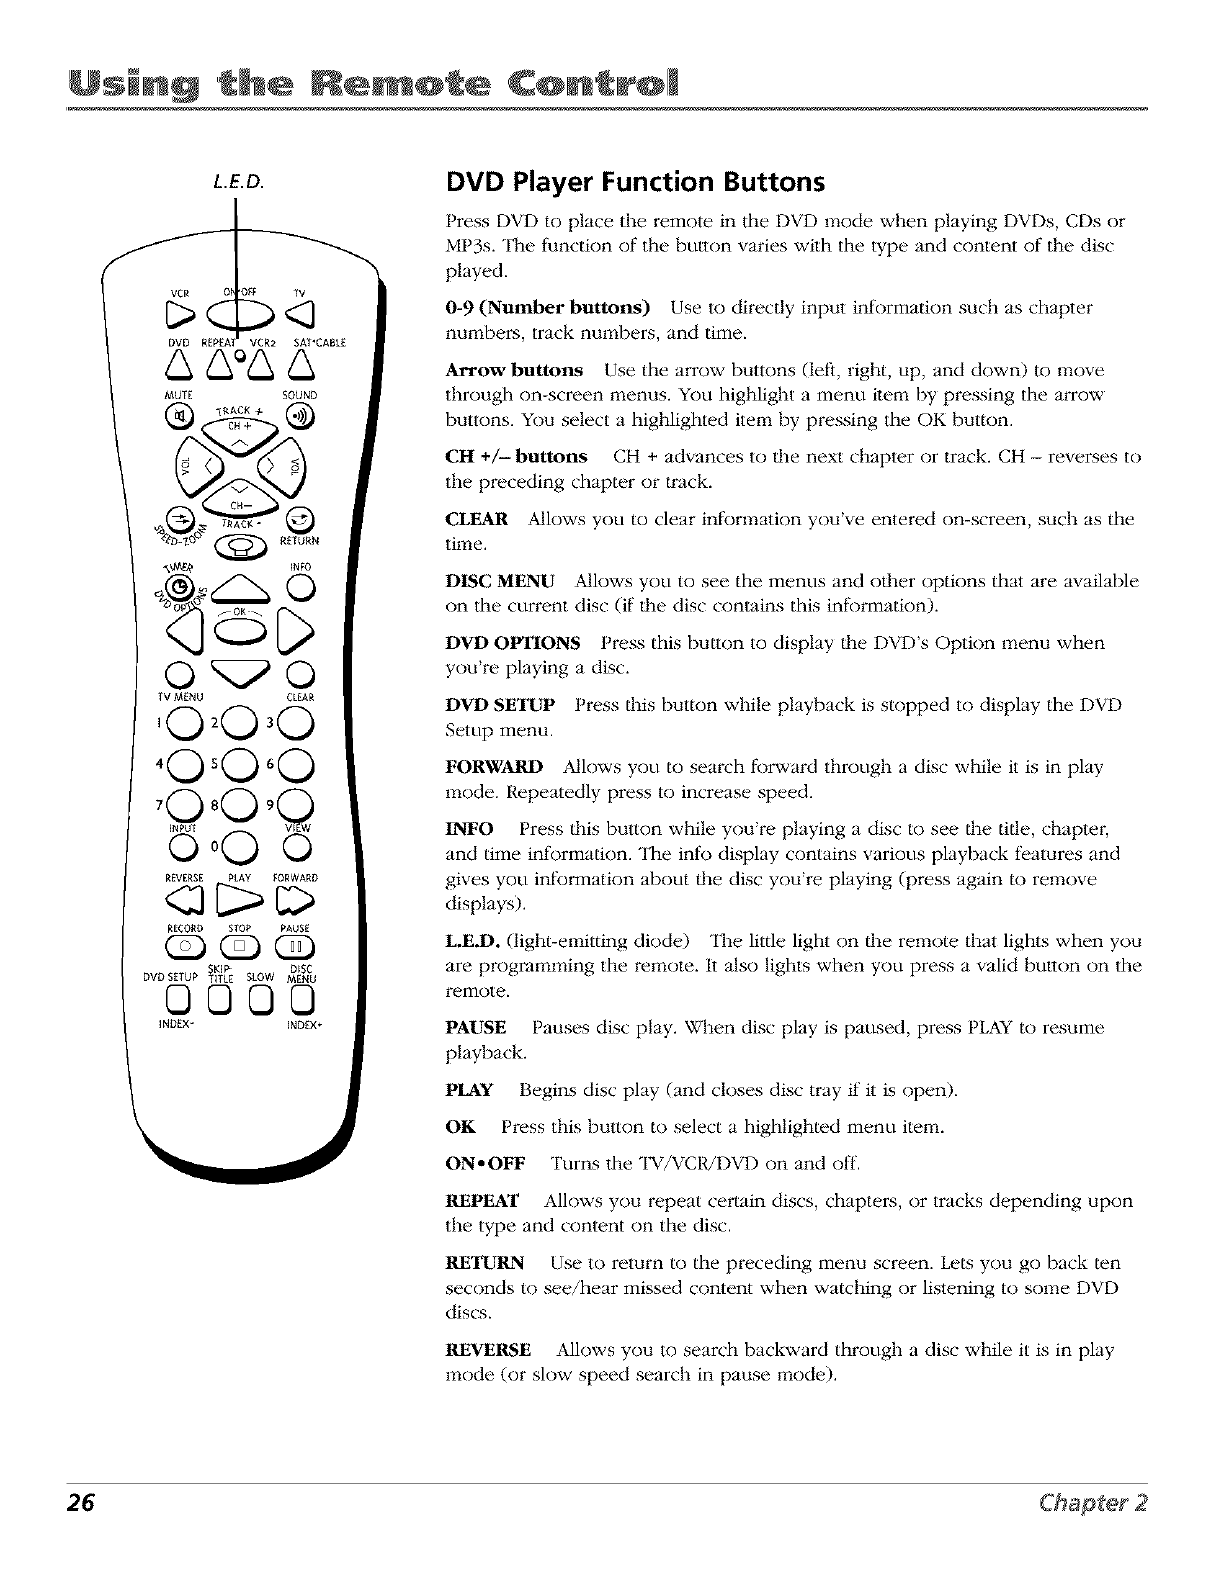
DVD Player Function Buttons
Press I-)VD to place the remote in the I-)VD mode when playing DVI-)s, Cl-)s or
MP3s. "I]_e function of the button varies with the type and content of the disc
played.
0-9 (Number buttons) Use to directly input information such as chapter
numbers, track numbers, and time.
Arrow buttons Use the arrow buttons (left, right, up, and down) to move
through on-screen menus. You highlight a menu item by pressing the arrow
buttons. You select a highlighted item by pressing the OK button.
CH +/-- buttons CH + advances to tl_e next chapter or track. CH -reverses to
the preceding chapter or Ira&.
CLEAR Allows you to clear information you've entered on-screen, such as the
time.
DISC MENU Allows you to see the menus and offer options that are available
on the current disc (if lhe disc contains this information).
DVD OPTIONS Press this button to display tl_e DVD's Option menu when
you're playing a disc.
DVD SETUP Press tl_is button while playback is stopped to display the DVD
Setup menu.
FORWARD Mlows you to search forward through a disc while it is in play
mode. Repeatedly press to increase speed.
INFO Press lhis [)ullon while you're playing a disc to see lhe title, chap<
and time inbrmation. The inb display contains various playback features and
gives you information about lhe disc you're playing (press again to remove
displays).
LE.D. (light-emitting diode) "II_e little light on fie remote tl_at lights when you
are programming the remote. It also lights when you press a valid button on the
remote.
PAUSE Pauses disc play. When disc play is paused, press PLAY to resume
playback.
PLAY Begins disc play (and closes disc tray if it is open).
OK Press this button to select a highlighted menu item.
ON.OFF Turns the TV/VCR/DVD on and off.
REPEAT Allows you repeat certain discs, chapters, or tracks depending upon
the type and content on the disc.
RETURN Use to return to the preceding menu screen. Lets you go back ten
seconds to see/hear missed content when watching or listening to some DVD
discs.
REVERSE Allows you to search backward through a disc while it is in play
mode (or slow speed search in pause mode).
26
Using Coheir@!
SOUND Use this button to display available audio for lhe type of disc that is playing.
SPEED-ZOOM Use to zoom in on the picture when playing DVD discs.
STOP Stops disc play.
SKIP-TITLE Allows you to see the title and other options available on the current disc (if the
disc contains the options).
VIEW Allows you to switch to a TV program or a recording channel, if you are recording.
C5_
You'll use mese DU_lOnS when
you program the remote to
operate another component.
Important: The remote might
not operate all models of all
brands. The remote buttons
also might operate differently
for other components,
especially when you're using
their menu system.
Programming the Remote to Operate
Other Components
"[l_e universal remote control can be programmed to operale most brands of
remole controllable VCRs, salellite receivei:s and cable boxes. "iI_e remote is
already programmed to operate most RCA, GE and Proscan VCRs and satellite
receivers.
Note: The TV, VCR, and DVD buttons cannot be programmed.
Find Out If You Need to Program the Remote
To determine whether lhe uniw:rsal remote needs to be programmed, turn a
component ON, such as a VCR, point the remote at the VCR, and press the
VCR2 button. Then press ON*OFF or channel up or channel down to see if the
VCR responds to lhe remote commands. If not, lhe remote needs to be
programmed.
How to Program the Remote
There are two ways to program the remote con|rol: automatic code search and
direct entry. Instructions for both ways follow.
rip
Tostop the automatic code search without
programming any components,press and hold
CLEARuntil the light on the remote turns off.
Using Automatic Code Search
1. Turn on the component you want the remote to operate (VCR or satellite
receiver).
2. Press and hold lhe component button on lhe remote I/nat corresponds to lhe
component you want the remote to operate (VCR2 or SKI'* CABLE). While
you hold down the component butlon, press and hold ON*OFF (when the
light below the ON* OFF button on the remote turns on, release bolh
buttons).
(Steps continued on next page)
27
Using Coheir@!
3. Press PLAY (lhe light on |he remote starts flashing).
"II_e remote is searching lhe first set of component codes (there are 20 sets of codes). If the
component you want to operate doesn't/urn off"automalically alter 5 seconds, press PLAY
again (the light starts flashing again as the remote searches through lhe next set of codes).
Continue pressing PLAY until lhe component/urns off.
Note: If the componentdoesn'tturn off after you've pressed the PLAYbutton 20times,the
component can't beprogrammed.
4. Press REVERSE, wait 2 seconds. Repeat this step until the compone, nt turns back on.
5. To finish, press and hold lhe STOP button until the light on the remote turns oft"
Using Direct Entry
1. Turn on the component you want lhe remote to operate.
2. Look up the brand and code number(s) for the component on lhe code list on the next
page.
3. Press and hold lhe component bullon that corresponds to the component you want the
remole, to operate (VCR2 or SAT*CABLE).
4. Enter the code from the code list on the next page.
5. Release lhe component button.
6. Press ON-OFF to see if lhe component responds to the remote commands. If it doesn't, fry
pressing the component buuon and then ON* OFF again.
• If you get no response, repeat these steps using the next code listed for your brand, until
the component responds to _he remote commands.
• If you fry all the codes for your component brand and none work, try lhe automatic
code search method. If automatic code search doesn't find the code, the remote is not
compatible with your component.
How to Use the Remote After You've Programmed It
Once the remote has been programmed successfully, you are, ready to use it to control your
components. To operate the component:
1. Press the component button (VCR2 or SAT*CABLE) to set the remote to con_ol lhe
component.
2. Press ON*OFF to turn the component ON or OFF.
3. Use lhe remote buttons lhat apply to lhat component.
Notes: If you keep pressing buttons and nothing happens, the remote is probably in the wrong
mode You must press the component button that matches the component you want to operate (Le,
if you want to operate the satellite receiver, press SAT, CABLE on the remote to put it in the satellite
receiver mode).
The other remote buttons may operate differently for other components, especially when you're
using their menu systems.
Important
You must continue pressing the
component button while you
enter the code,
How to Order A New Remote Control
To order a new remote control or other accessories to use with your "lW/VCR/DVD, go to
Accessories in Chapter 6.
28
Using Coheir@!
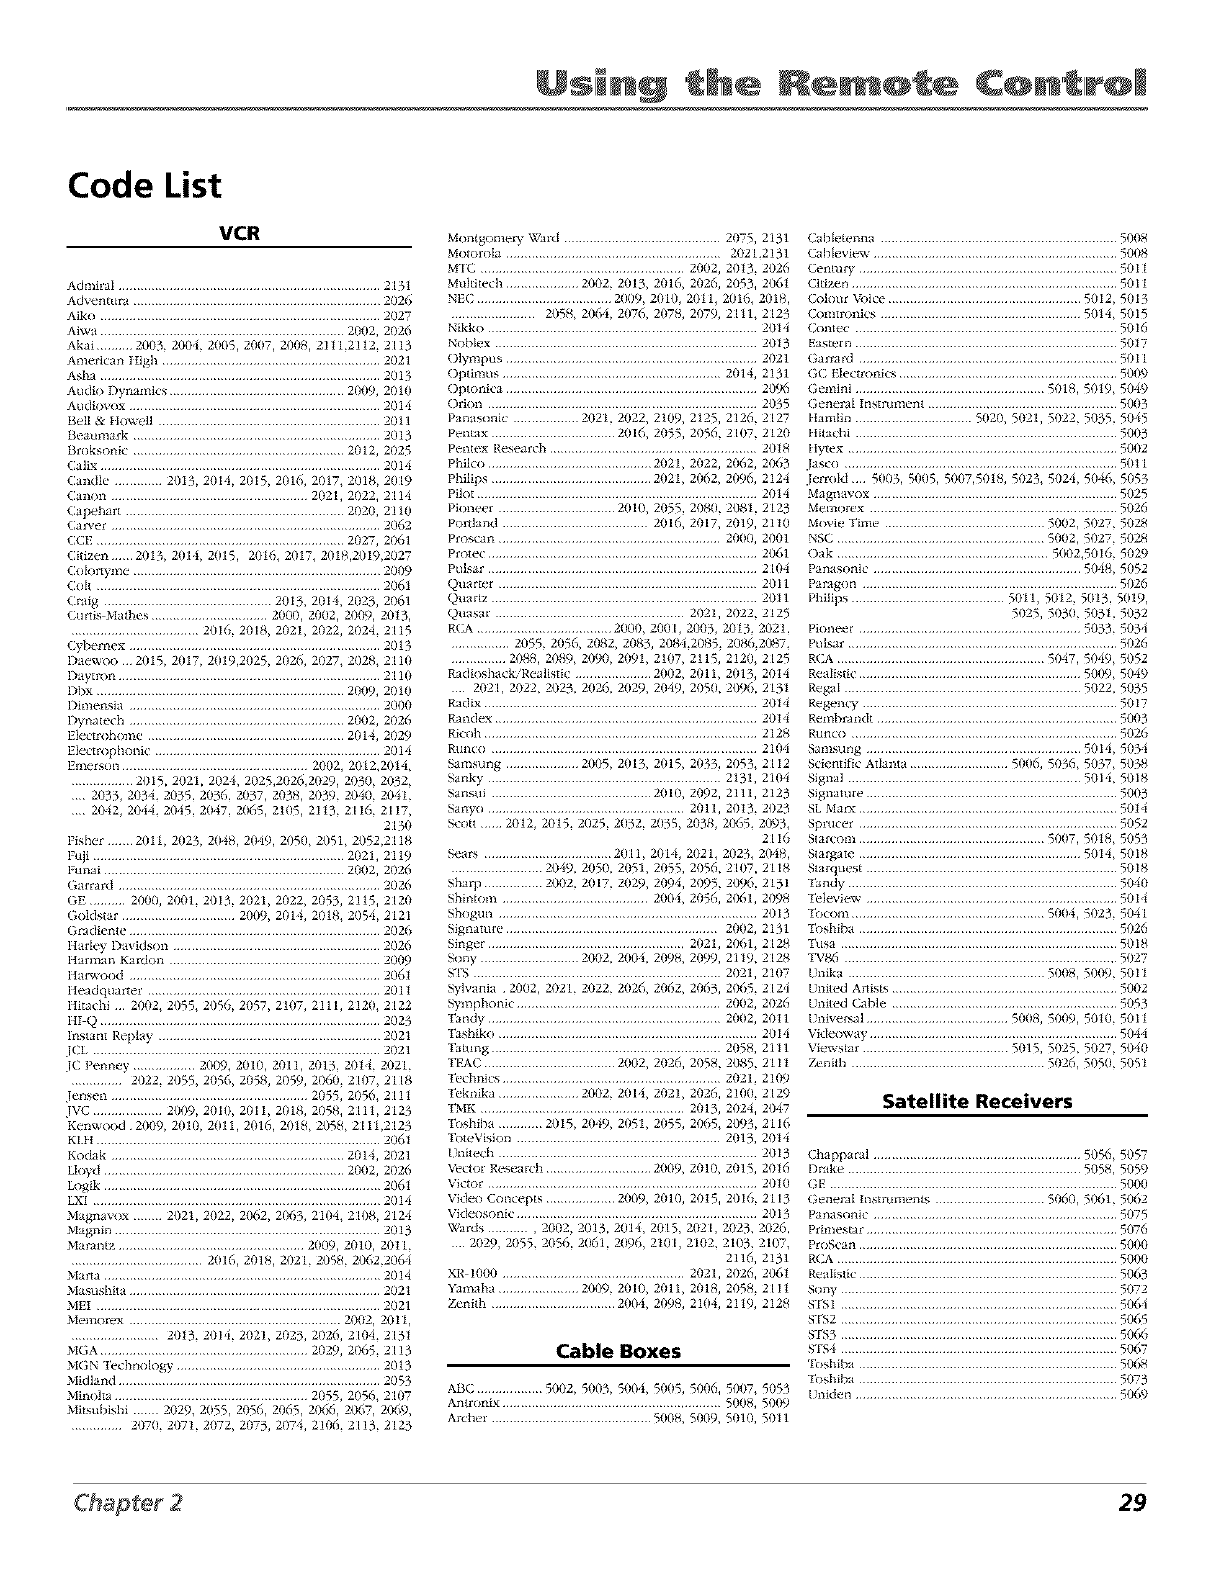
Code List
VCR
AdmiraI ........................................................................ 2131
Adventure .................................................................... 2026
Aiko ............................................................................. 2027
Aiwa ................................................................... 20(}2, 2026
Akai .......... 2003, 2004, 2(}05, 20(}7, 2008, 2111,2112, 2¸[13
American High ............................................................ 2021
Asha ............................................................................. 2013
Audio Dynamics ................................................ 20(}9, 2010
Audiovox ..................................................................... 2014
BeII& ttowell ............................................................. 2011
Beaumark .................................................................... 2013
Broksonlc .......................................................... 2012, 2025
Calix ............................................................................. 2014
CandIe ............. 2013, 2(}[4, 20[5, 2016, 2017, 2018, 20¸[9
Canon ...................................................... 202[, 2022, 2¸[14
Capehart ............................................................ 2020, 2110
Carver .......................................................................... 2062
CCE .................................................................... 2027, 2061
(:itizen 2013, 2(}[4, 2(}[5, 2016, 2017, 2018,2019,2027
(:oh_rt_ne .................................................................... 2009
Colt .............................................................................. 2061
Cmlg .............................................. 2013, 2014, 2023, 2(}61
Curtis Mathes ................................ 2000, 2002, 2009, 2013,
................................... 2016. 20[8, 2021, 2022, 2024, 2115
C_bemex ..................................................................... 2013
Daewoo 2015, 2(}17, 2(}[9,2(}25, 2026, 2027, 2028, 2[ 10
Daytron ........................................................................ 2l 10
Dbx .................................................................... 2089, 2010
Dimensia ..................................................................... 2000
Dynalech ........................................................... 2002, 2026
Elecmlhome ...................................................... 2014, 2029
Elect rophonic .............................................................. 2014
Emers/in ................................................... 2002, 2012,2014,
................. 2015, 2021, 2024, 2025,2026,2029, 2030, 2032,
.... 2033, 2034, 2035, 2036, 2037, 2038, 2039, 20{0, 2041,
.... 2(542, 204,1, 2045, 2047, 2065, 2105, 2113, 2116, 2117,
2130
Fisher 2011, 2023, 2048, 2049, 2050, 2051, 2052,2l 18
Fuji ..................................................................... 2021, 2119
Funai .................................................................. 2082, 2026
OarraM ........................................................................ 2020
GE .......... 2000, 2001, 2013, 2021, 2022, 2053, 2115, 2120
GoIdstar ............................... 2009, 2014, 2018, 2054, 2121
Gradiente ..................................................................... 2026
Hark T Davldson ......................................................... 2026
Harman KaMon .......................................................... 20(_)
It _rwood ..................................................................... 2061
Headqtlarter ................................................................ 2011
Hitachi 2002, 2055, 2056, 2057, 2107, 211l, 2120, 2122
HI Q ............................................................................. 2023
Instant Replay ............................................................. 2021
JCI ................................................................................ 2021
JC penney ................. 2009, 2010, 20H, 2013, 2014, 2021,
.............. 2022, 2055, 2056, 2058, 2059, 2(}60, 2107, 2118
Jensen ...................................................... 2055, 2056, 2l 11
JVC ................... 2009, 2010, 20H, 2018, 2058, 2H1, 2123
Kenwood 2009, 2010, 2011, 2016, 2018, 2058, 2111,2123
KLH .............................................................................. 2061
Kodak ................................................................ 2014, 2021
LI(&d .................................................................. 2082, 2026
Logik ............................................................................ 2061
LX[ ............................................................................... 2014
Magnavox ........ 2021. 2022. 2062, 2063, 2104, 2[08. 2124
Magnln ......................................................................... 2013
Marantz ................................................... 2009, 2010_ 2011
.................................... 2016, 2018, 2021, 2058, 2062.2064
Marta ............................................................................ 2014
Masnshita ..................................................................... 2021
MEI .............................................................................. 2021
Memorex .......................................................... 2002, 2011,
........................ 2013, 2014, 2(}21, 2023, 2026, 2[04, 2131
MGA ......................................................... 2029, 2(}65, 2113
MGN Technology ........................................................ 2013
Midland ........................................................................ 2053
Minoha ..................................................... 2055, 2056, 2107
Mitsnbishi 2029, 2(}55, 2056, 2065, 2066, 20(,7, 2069,
.............. 2070, 2071. 2072, 2073, 2074, 2106, 2113, 2123
Montgome W Ward ........................................... 20=5, 2131
MotoroIa ........................................................... 2021,2131
M'I_ ........................................................ 2002, 2013, 2026
M_fltitech .................... 2002, 2013, 2016, 2026, 2053, 2061
NEC ..................................... 2(}09, 2010, 2011, 2016, 2018,
....................... 2058, 2064. 2076, 20=8, 2079, 2111, 2123
Nikko .......................................................................... 2014
Noblex ........................................................................ 2013
Ol_npus ..................................................................... 2021
Optimus ............................................................ 2014, 2131
Optonica ..................................................................... 20_
Orion .......................................................................... 2035
Panasonic .................. 2021. 2022, 2109, 2125_ 2126, 2[27
Pentax .................................. 20[6, 2055, 2056, 2107, 2120
Penl('x Research ......................................................... 2018
Philco ............................................. 2021, 2022, 2062, 2(}63
Philips ............................................ 2021, 2062, 2ff96, 2124
Pilot ............................................................................. 2014
Pioneer ................................ 20[0, 2055, 208(L 2081. 2123
Pordand ........................................ 2016, 2017, 2019, 2110
Proscan ............................................................. 2080, 2001
Protec .......................................................................... 2061
Pulsar .......................................................................... 2104
Quarter ....................................................................... 2011
Quartz ......................................................................... 2011
Quasar .................................................... 2021, 2022, 2125
RCA ..................................... 2000, 208l, 2003, 2013, 2021.
................ 2055, 2056, 2082, 2083, 208d,2085, 2086,208 =,
............... 2088, 2089, 2090, 2091, 2107, 2115, 2120, 2[25
Radioshack/Realistlc ..................... 2002, 2011, 2013_ 2014
.... 202[, 2022, 2023, 2026, 2029, 2049, 2050, 2096, 2131
Radix ........................................................................... 2014
Randex ........................................................................ 2014
Ricoh ........................................................................... 2128
Rtlnco ......................................................................... 2104
Samsung .................... 2005, 20[3, 2015, 2033, 2053, 2[ 12
Sanky ................................................................ 2131, 2104
Sansul ............................................ 2010, 2(_)2, 211l, 2123
Sanyo ...................................................... 201l, 2013, 2023
Scott 2012, 2015, 2025, 2032, 2035, 2038, 2(}65, 2093,
2116
Sears ................................... 20ll, 2014, 2021, 2023, 2048.
......................... 2049, 2050, 2051, 2055, 2056, 2ll)7, 2118
Sharp ................ 2002. 2017. 2029, 2(g)4, 2095, 2096, 2131
Shlntom ........................................ 2004, 2056, 2(X_I, 2098
Shogun ....................................................................... 2013
Signature .......................................................... 2002, 2131
Singer ...................................................... 2021, 2(}61 2128
Sony ........................... 2002. 2004. 2(g)8, 209_), 2119, 2128
STS .................................................................... 2021, 2107
Sylvania 2002, 2021, 2022. 2026, 2062, 2063, 2(}65, 2124
S}anphonic ........................................................ 2002, 2026
Tandy ................................................................ 2082, 2011
Tashiko ....................................................................... 2014
Tatung ............................................................... 2058, 2111
TEAC .................................... 2002, 2026, 2058, 2085, 2111
Technics ............................................................ 2021 2109
Teknika ...................... 2002. 2014, 2021, 2026_ 2108, 2129
TMK ........................................................ 2013, 2024, 2047
Toshiba ............ 2015, 2049, 2051, 2055, 2(}65, 2093. 2116
ToteVision ........................................................ 2013, 2014
Unitech ....................................................................... 2013
Vector Researdi ............................. 2009, 2010, 2015, 2016
Victor .......................................................................... 2010
Video Concepts ................... 2009, 2010, 2015, 2016, 2113
Videosonlc .................................................................. 2013
Wards ........... ,2002, 2013, 2014, 2015, 202l, 2023, 2026,
.... 2029, 2055, 2056, 2061, 2()96, 210l, 2102, 2103, 2107,
2116, 213t
XR 1000 .................................................. 202l, 2026, 2061
Yamaha ...................... 2009, 2010, 2011, 2018, 2058, 2111
Zenith .................................. 2004, 2098, 2104, 2119, 2128
Cable Boxes
ABC .................. 5002, 5003, 5004, 5085, 5006, 501)7, 5053
Antronlx ............................................................ 5008, 50if')
Archer ............................................ 5008, 5009, 5010, 5011
Cabletenna ................................................................. 50(}8
Cablevlew •.................................................................. 5008
Cenm W ....................................................................... 501¸1
Citizen ......................................................................... 5011
Colour _)ice ..................................................... 5012, 5013
Comt tonics ....................................................... 5(114, 5015
Contec ........................................................................ 5016
Eastern ........................................................................ 5017
Garmrd ....................................................................... 5011
GC EIectr(mi_ ............................................................ 5009
Gemini .................................................... 5018, 5019, 5049
GeneraI Instmment .................................................... 5003
HamIin ................................ 5(}20, 502[, 5022, 5(135, 5045
Hitachi ........................................................................ 5003
Hytex .......................................................................... 5002
.las_ ........................................................................... 5011
.lem0d 5(}03, 50(}5, 5007,5018, 5023, 5(124, 5(}46, 5053
Magnavox ................................................................... 5025
Memorex .................................................................... 5026
Movie Time ............................................ 5002, 5027, 5028
NSC ......................................................... 5002, 5027, 5028
Oak .......................................................... 5(102,5016, 5029
Panasonic ......................................................... 5(148, 5052
Pamgon ...................................................................... 5026
Phillps .......................................... 5011, 5012, 5(113, 5(}[9,
5025, 503(}, 5031, 5032
Pioneer ............................................................. 5(133, 5034
Pulsar .......................................................................... 5026
RCA ......................................................... 5_7, 5049, 5052
Reallstic ............................................................. 5009, 5049
Re_l ................................................................. 5022, 5035
Regency ...................................................................... 5017
Rembrandt .................................................................. 5003
Runco ......................................................................... 5026
Samsung ........................................................... 5014, 5034
Sclentil_c Atlanta ........................... 50(}6, 5036, 50.37, 5038
Signal ................................................................ 5(114, 5018
Signamre ..................................................................... 5003
SL Marx ....................................................................... 5014
Sprucer ....................................................................... 5052
SIarcom ................................................... 50(}7, 5018, 5053
SIa_ate ............................................................. 5(114, 5018
Starq_est ..................................................................... 5018
_ndy .......................................................................... 5040
Televlew •.................................................................... 5014
_com ..................................................... 50(}4, 5023, 5041
_bshlba ....................................................................... 5026
Tusa ............................................................................ 5018
TV86 ........................................................................... 5027
Unika ...................................................... 5008, 5009, 5011
United Artists .............................................................. 5002
United Cable .............................................................. 5053
Universal ....................................... 50(}8, 5009, 5(110, 5011
Videoway .................................................................... 5044
Viewstar ........................................ 5015, 5025, 5027, 5040
Zenith ..................................................... 5026, 505(}, 5(151
Satellite Receivers
Chapparal ......................................................... 5056, 5057
Drake ................................................................ 5(158, 5059
GE ............................................................................... 5000
GeneraI Instruments .............................. 5060, 5061, 5062
Panasonic ................................................................... 5075
Primestar ..................................................................... 5076
ProScan ....................................................................... 5000
R(;A ............................................................................. 5000
Reallstic ....................................................................... 5063
Sony ............................................................................ 5072
STS 1 ............................................................................ 5064
S_2 ............................................................................ 5065
STS3 ............................................................................ 5066
ST54 ............................................................................ 5067
_shlba ....................................................................... 5068
_bshlba ....................................................................... 5073
Uniden ........................................................................ 5069
29

(This page intentionally left blank)
Using the TV/VCR/DVD's
Features
Chapter Overview:
• Parental Controls and V-Chip
•Recording Features
•Picture Search Options
•Audio Features
•Disc Playback Features Using the Remote
Changing
Graphics used within this publication are fiJr rq>resentation only. 31

Using C DVID s F a' ufr@s
MENU
TIME
VIDEO ADJUST
AUDIO ADJUST
CLOSED CAPTION
TIMER RECORDINGS
LANGUAGE
SETTING
_V-CNIP BLOCK
V-CHIP BLOCK
_MPAA
TV GUIDELINES
MPAA
G --
PG --
PG-13 --
,R BLOCK
NC-17 BLOCK
X BLOCK
TV GUIDELINES
AGE D L S V FV
TV-Y []
bTV-Y7 [] []
TV-G []
TV-PG [] [] [] [] [] []
TV-14 [] [] [] [] [] []
TV-MA [] - [] [] [] []
D:VIEW
[]:BLOCK
SELECT _A/v : SET _OK
PREVIOUS -_- 4 : QUIT-_" MENU
Parental Controls and V-Chip
The V-CHIPBLOCKfeamre allows you to program your TV so that children
can't see certain progra1:qs or channels. By del_ult, this feature is turned off
•TV GUIDELINES 1:qenu allows you to block "IV programs based on age,
violence, sex, or other content you don't want your children to view.
• MPAA menu allows you to block movies and "IV programs according to the
MPAA (Motion Pictures Association of America) ratings syste_:q.
You block and unblock programs by turning the V-Chip l_:ature on or off in the
V-CHIPBLOCKraenu, and using the password you create. Be sure to re1:qe1:qber
your password.
How V-Chip Works
When the V-Chip sot_ware is activated (or turned on), it reads a code that most
broadcasters send with programs. That code tells the software the program's
age-based rating (TV-MA, "1W-14,etc.) and content themes [(Violence (V), Adult
Language (L), etc.)[ If you have blocked the rating and/or content themes that
the program contains, a message appears and the channel won't be available for
viewing.
Broadcasters aren't required to provide content themes, so programs that aren't
tagged with a content theme can only be blocked if you block their age-based
rating.
The TV age-based ratings and content themes and MPAA ratings are listed on
the following pages.
New Rating Systems
The TV allows you to download additional new rating syste_:r_s.If you watch a
program wilh lhe new system, you can download lhe new V-Chip data for that
program.
32
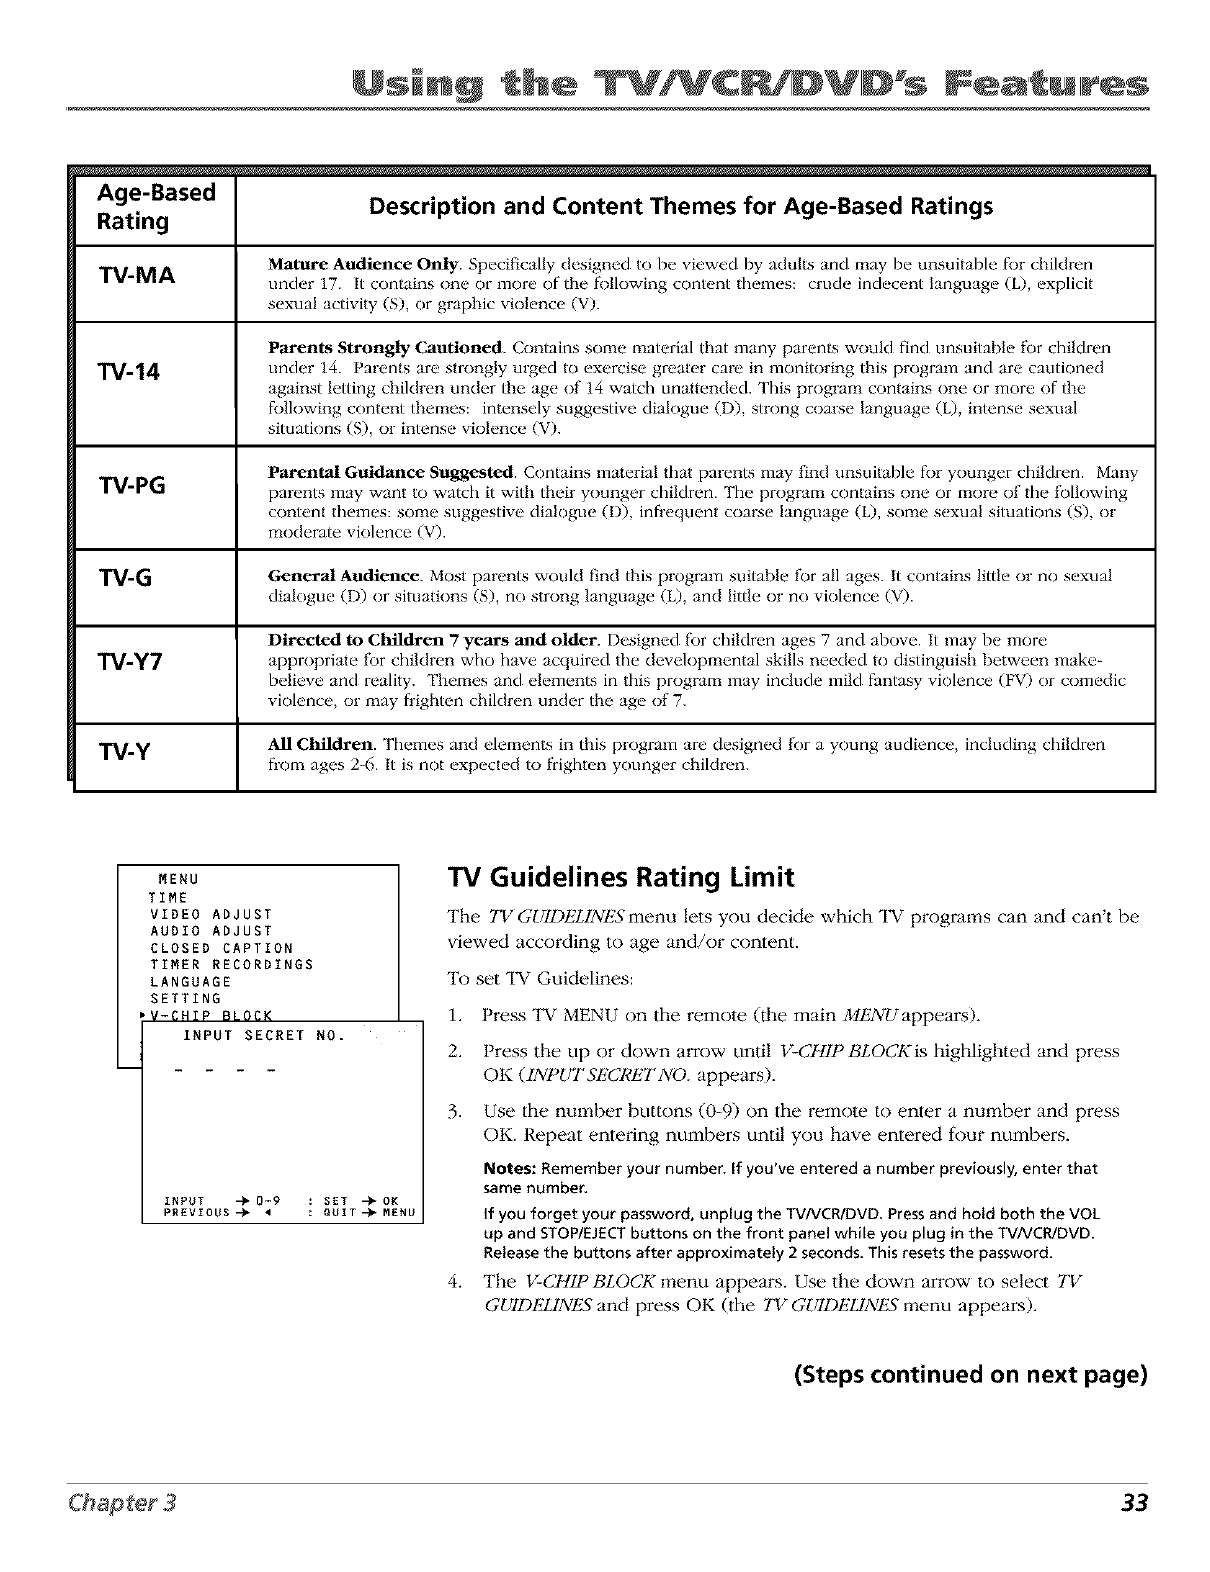
Using C DVID s
Age-Based Description and Content Themes for Age-Based Ratings
Rating
Mature Audience Only. Specifically designed to bc viewed by adults and may bc unsuitable for children
TV-MA under 17. It contains one or more of the following content themes: crude indecent language (L), explicit
sexual activity (S), or graphic violence (V).
Parents Strongly Cautioned. Contains some material that many parents would find unsuitable fbr children
TV-14 under 14. Parents are strongly urged to exercise greater care in monitoring this program and are cautioned
against letting children under the age of 14 watch unattended. This program contains one or more of the
following content themes: intensely suggestive dialogue (D), strong coarse language (L), intense sexual
situations (S), or intense violence (V).
Parental Guidance Suggested. Contains material that parents may f_ncl unsuitable for younger children. Many
TV-PG parents may want to watch it with their younger children. The program contains one or more of the fbllowing
content themes: some suggestive dialogue (D), infrequent coarse language (L), some sexual situations (S), or
moderate violence (V).
TV-G General Audience. Most parents would f_nd this program suitable fbr all ages. It contains little or no sexual
dialogue (D) or situations (S), no strong language (L), and little or no violence (V).
Directed to children T years and older. Designed fur children ages 7 and above. It may be more
TV-Y7 appropriate fbr children who have acquired the developmental skills needed to distinguish between make_
believe and reality. Themes and elements in this program may include mild fantasy violence (IW) or comedic
violence, or may frighten children under the age of 7.
TV-Y All children. Themes and elements in this program are designed f_)r a young audience, including children
from ages 2-6. It is not expected to fiighten younger children.
MENU
TIME
VIDEO ADJUST
AUDIO ADJUST
CLOSED CAPTION
TIMER RECORDINGS
LANGUAGE
SETTING
V-CHIP BLOCK
INPUT SECRET NO.
INPUT -_'0-9
PREVIOUS-_" •
TV Guidelines Rating Limit
The TV GI. 7DkZINP;S menu lets you dec_de which I'V proglams can and can't be
viewed according to age and/or content.
: SET -_OK
: QUIT-_MENU
To set TV Guidelines:
1. Press TV MENU on the remote (fl_e main MENUappears).
2. Press the up or down arrow Emtil V-CHIP BLOCKis highlighted and press
OK (INPUF57_'CRETNO. appears).
,
4,
Use the nmnber buttons (0-9) on the remote to enter a number and press
OK. Repeat entering numbers until you have entered four numbers.
Notes: Remember your number, if you've entered a number previously, enter that
same number.
If you forget your password, unplug the TV/VCR/DVD. Press and hold both the VOL
up and STOP/EJECT buttons on the front panel while you plug in the TVNCR/DVD.
Release the buttons after approximately 2 seconds. This resets the password.
The V-CHIPBLOCK menu appears. Use the down arrow to select TV
GUIDELINES and press OK (the TV GUIDELINES menu appears).
(Steps continued on next page)
33

Using C DVID s F a' ufr@s
V-CHIP BLOCK
MPAA
wTV GUIDELINES
TV-Y7
wAGE BLOCK
D --
L --
S --
V --
FV BLOCK
SELECT -_A /v : SET -),OK
PREVIOUS -_, : QUIT-)-MENU
5. Press the up or down aITOWbul|ons to select the age-based rating or its
contents that you want to block, and press the OK bulton.
Note: All higher ratings andcontentsare automatically blocked.
6. When _lle desired rating screen appears, press the up or down arrow
butlons and OK button to BLOCKor unblock (--) the age raling and any
content rating you are allowed to set.
7, Press the let't arrow button to return to the TV GUIDELINES menu or press
MENU to exit.
Note: The illustration below shows the TV GUIDELINES menu with the various fields
described
When you change the status of a rating to Block,
the system automatically blocks higher ratings and
all corresponding content themes.
Rating Field
Lets you sde_ from a
list of age-based ratings
you can block or view.
Rating Status Field
Shows you whether the status of the age-based rating limit to the
lef_ is Wk'W(no check) or t3LOCK (checked)..
TV GUIDEI
I TV-Y IA!
TV-Y7
TV-G
TV-PG i
TV-14
TV-MA
INES
DLSVFV
[]
[][][][][]
[][][][][]
[][][][]
_:VJ
J
EW
[]:BLOCK
SELECT -q_ _, /v : SET -_- OK
PREVIOUS --)"4: QUIT-_- MENU
fContent Themes
Lists the content themes you
cat1 btock or view.
Shows distinction between
content ratings that can be
set (square) and content
ratings that cannot be set (-)
because they are not
broadcast.
Lets you view whether the
status of the content theme is
currently VIEW(no check) or
BLOCK (checked).
34
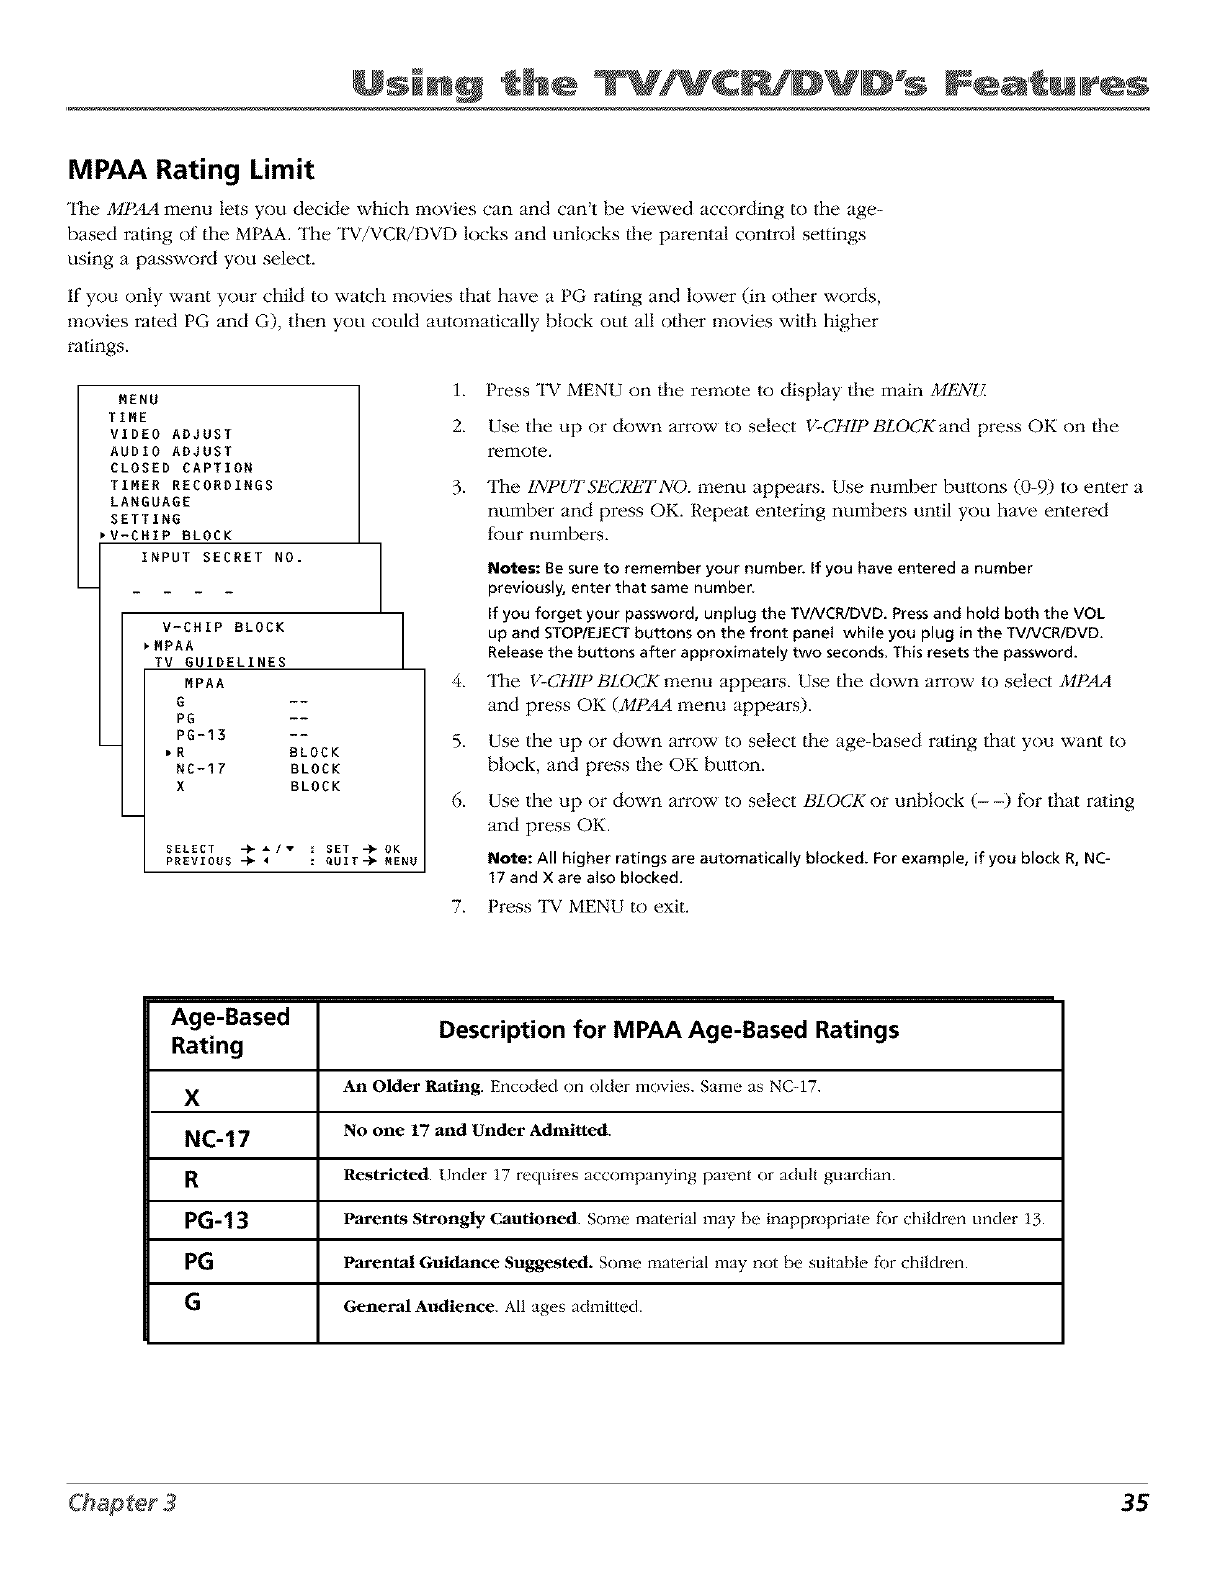
Using C DVID%
MPAA Rating Limit
"II_e MP_ menu lets you decide which movies can and can't be viewed according to the age-
based rating of the MPAA. The TV/VCR/DVD locks and unlocks the parental control settings
using a password you select.
If you only want your child to watch movies that have a PG rating and lower (in other words,
movies rated PG and G), then you could automatically block out all oilier movies with higher
ratings.
MENU
TIME
VIDEO ADJUST
AUDIO ADJUST
CLOSED CAPTION
TIMER RECORDINGS
LANGUAGE
SETTING
_V-CNIP BLOCK
INPUT SECRET NO.
V-CHIP BLOCK
_MPAA
TV GUIDELINES
MPAA
G --
PG --
PG-13 --
,R BLOCK
NC-17 BLOCK
X BLOCK
SELECT -_-A 1T : SET -_OK
PREVIOUS -_ 4 : QUIT-_MENU
i.
2.
.
4.
5.
6.
Press TV MENU on ll_e remote to display ll_e main M/_2VU.
Use the up or down arrow to select V-CHIPBLOCKand press OK on ll_e
remote.
The INPUT,52_'CI,'ETNO. menu appears. Use number buttons (0-9) to enter a
number and press OK. Repeat entering numbers until you have entered
four numbers.
Notes: Be sure to remember your number. If you have entered a number
previously, enter that same number.
If you forget your password, unplug the TV/VCPJDVD. Press and hold both the VOL
up and STOP/EJECT buttons on the front panel while you plug in the TV/VCR/DVD.
Release the buttons after approximately two seconds. This resets the password.
The V-CHIP BLOCK menu appears. Use the down am)w to select MPAA
and press OK (MPAA menu appears).
Use the up or down arrow to select the age-based rating that you want to
block, and press ll_e OK button.
Use the up or down arrow to select BLOCK or unblock (--) for that raling
and press OK,
Note: All higher ratings are automatically blocked. For example, if you block R, NC-
17and X are also blocked,
7. Press TV MENU to exit.
Age-Based
Rating
X
NC-17
R
PG-13
PG
G
Description for MPAA Age-Based Ratings
An Older Rating. Encoded on older movies. Same as NC-17.
No one 17 and Under Admitted.
Restricted. Under 17 requires accompanying parent or adult guardian.
Parents Strongly Cautioned. Some material may be inappropriate fbr children under 13.
Parental Guidance Suggested. Some material may not be suitable fbr children.
General Audience. All ages admitted.
35
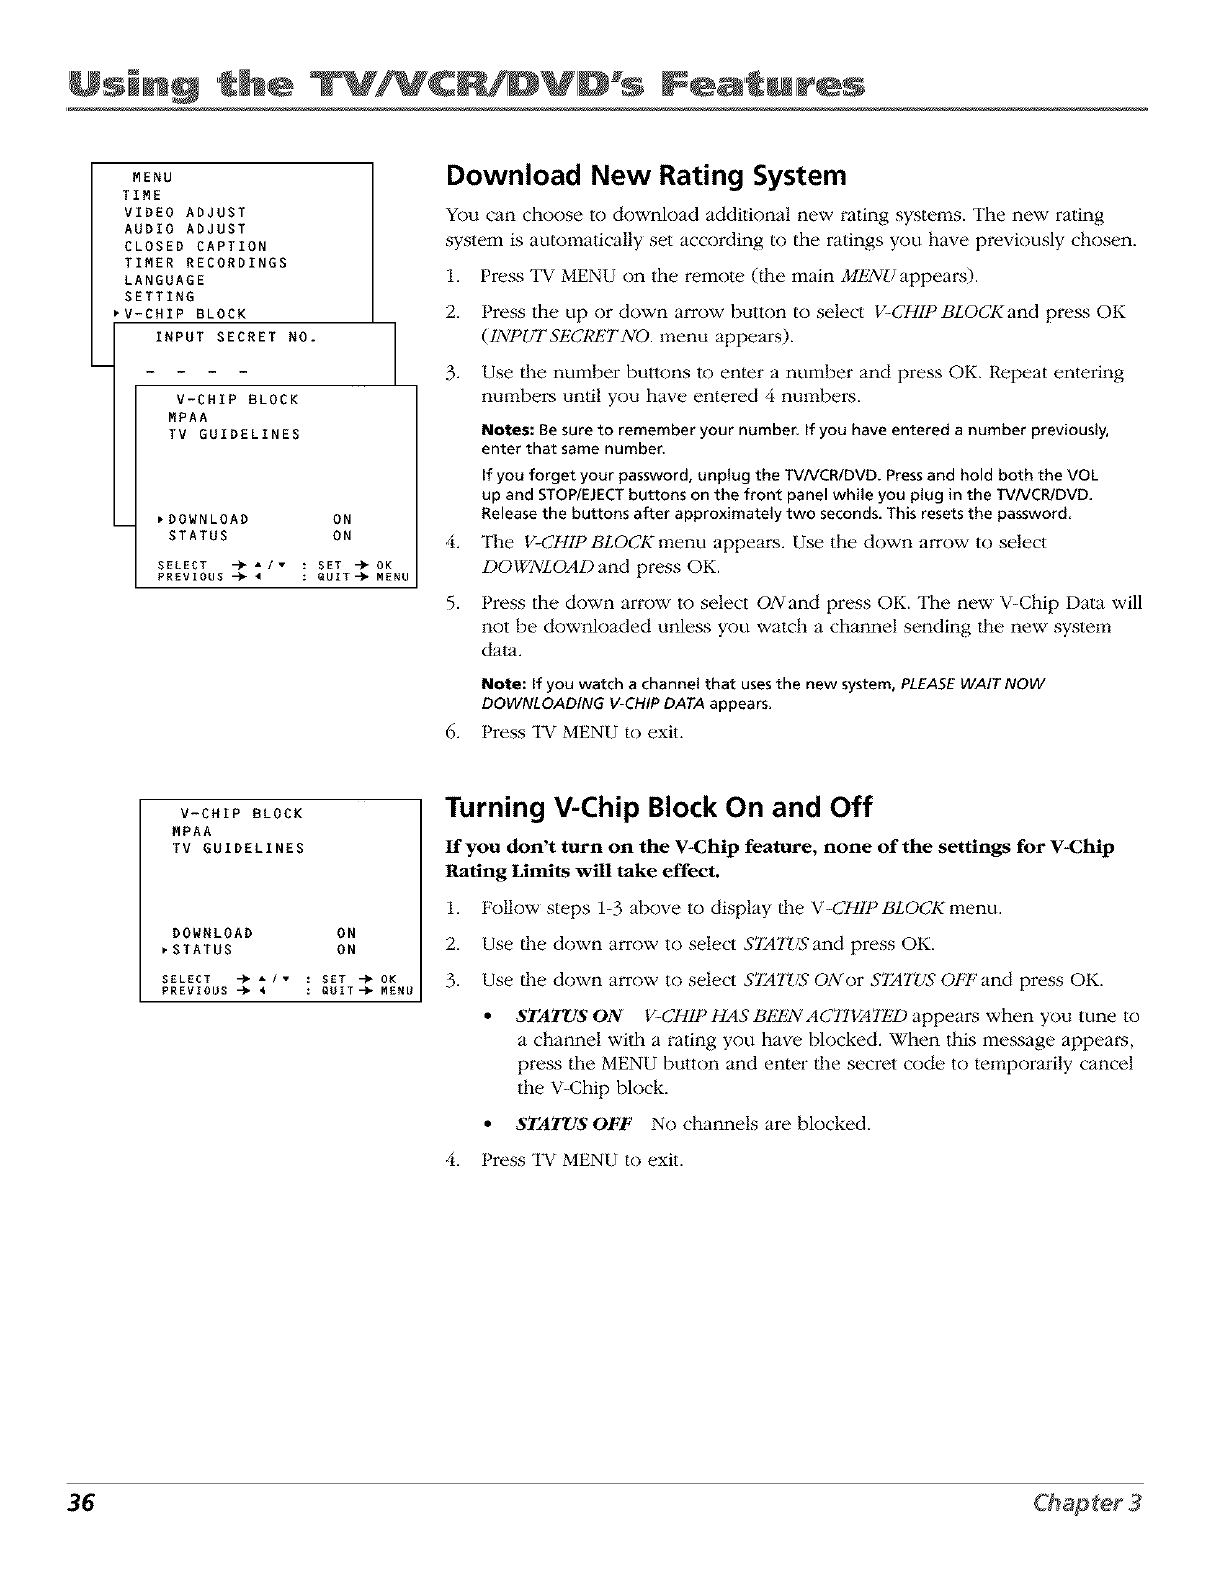
Using C DVID s F a' ufr@s
MENU
TIME
VIDEO ADJUST
AUDIO ADJUST
CLOSED CAPTION
TIMER RECORDINGS
LANGUAGE
SETTING
,V-CHIP BLOCK
INPUT SECRET NO.
V-CHIP BLOCK
MPAA
TV GUIDELINES
,DOWNLOAD ON
STATUS ON
SELECT -_ A /. : SET -)" OK
PREVIOUS -)_4 : QUIT-_MENU
Download New Rating System
You can choose to download additional new rating systems. The new rating
system is automatically set according to the ratings you have previously chosen.
1. Press TV MENU on the remote (lhe main M/_2VUappears).
2. Fress the up or down arrow button to select V-CHIPBLOCKandpressOK
(1NPUTSECRt_;'TNO. menu appears).
3. Use the number buttons to enter a number and press OK. Repeat entering
numbers until you have entered 4 numbers.
Notes: Be sure to remember your number, if you have entered a number previously,
enter that same number.
if you forget your password, unplug the TV/VCR/DVD. Press and hold both the VOL
up and STOP/EJECT buttons on the front panel while you plug in the TV/VCR/DVD.
Release the buttons after approximately two seconds. This resets the password
4. The V-CHIP BLOCK menu appears. Use the down an'ow to select
DOWNLOAD and press OK,
5. Press the down arrow to select ONand press OK. The new V-Chip Data will
not be downloaded unless you watch a channel sending the new system
dam.
Note: if you watch a channel that uses the new system, PLEASE WAIT NOW
DOWNLOADING V-CHIP DATA appears.
6. Press TV MENU to exit.
V-CHIP BLOCK
MPAA
TV GUIDELINES
DOWNLOAD ON
_STATUS ON
SELECT -)-A /v : SET -_OK
PREVIOUS -_ _ : QUIT-_*MENU
Turning V-Chip Block On and Off
If you don't turn on the V-Chip feature, none of the settings for V-Chip
Rating Limits will take effect.
1. Follow steps 1-3 above to display d_e V-CHIP BLOCK menu.
2. Use the down arrow to select STA2I _' and press OK.
3. Use the down arrow to select $72t2US ON or S72tTUS OFF and press OK.
•STATUS ON V-CHIP HAS B_2NACTIVATED appears when you tune to
a channel with a rating you have blocked. When this message appears,
press the MENU button and enter the secret code to temporarily cancel
the V-Chip block.
• STATUS OFF No channels are blocked.
4. Press TV MENU to exit.
36
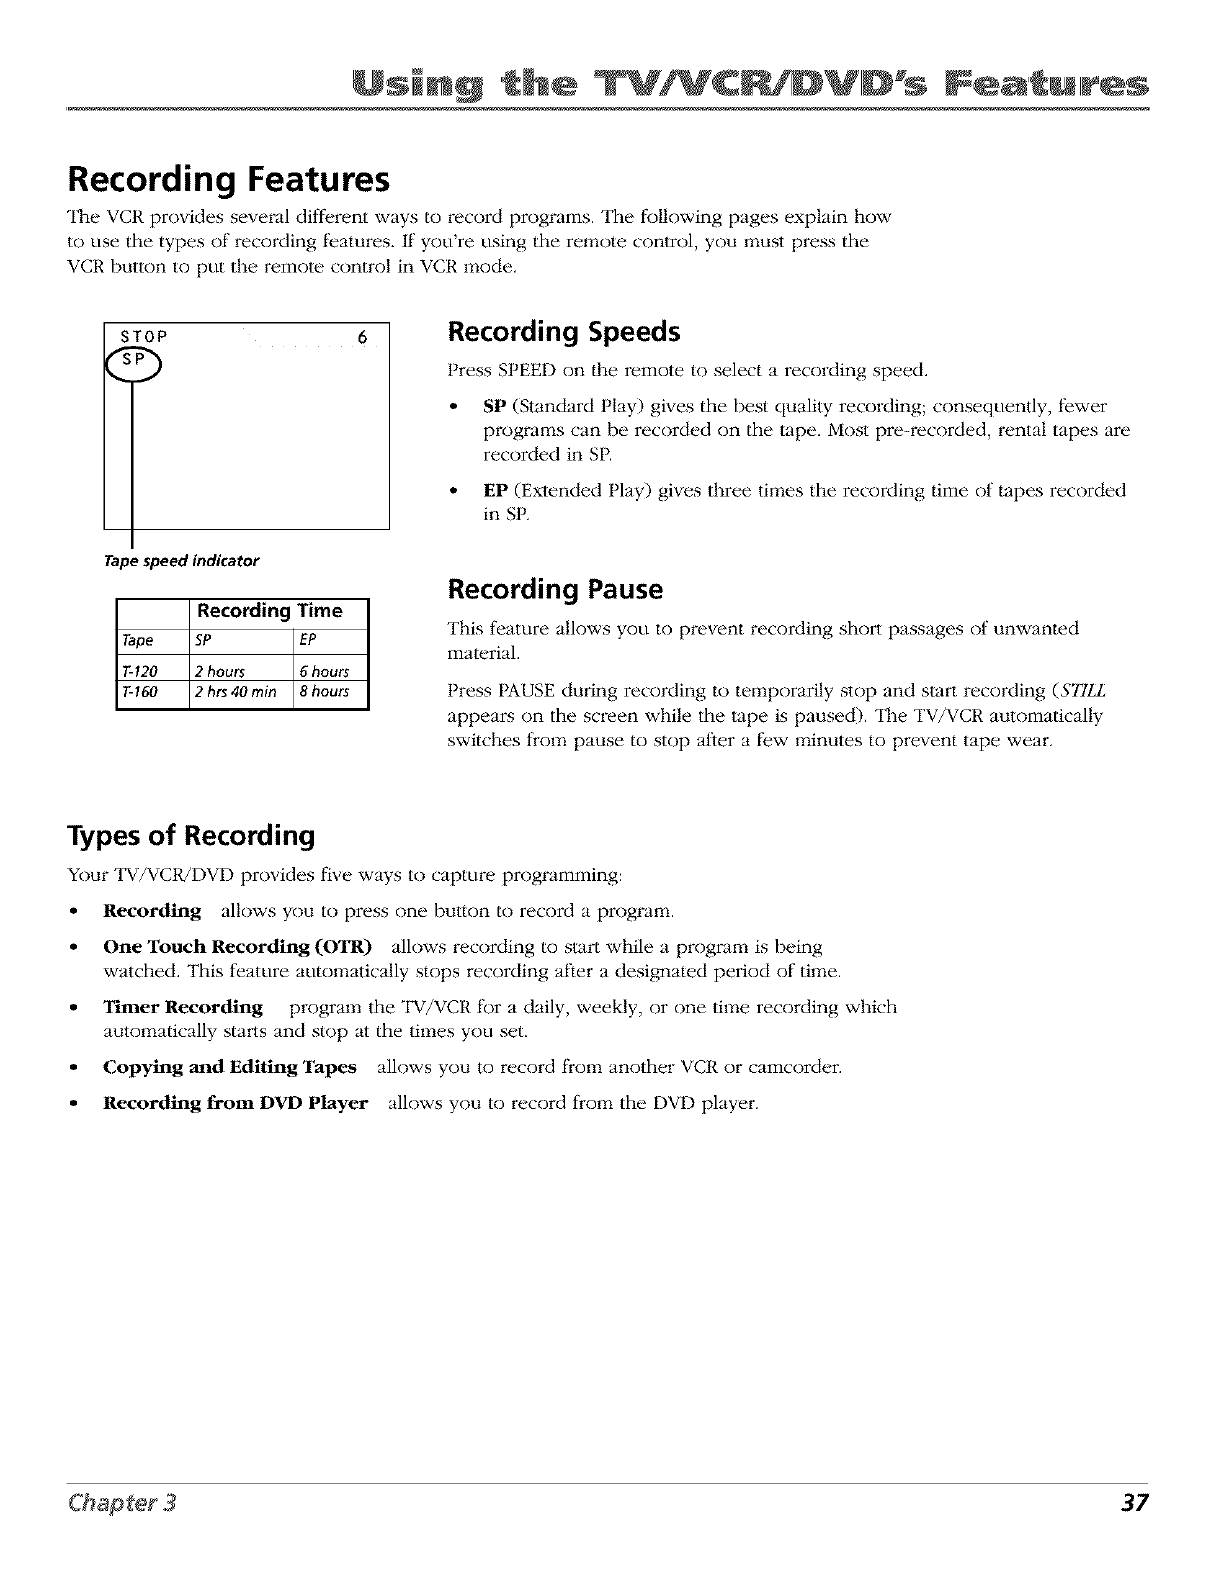
Using C DVID s
Recording Features
"II_e VCR provides several different ways to record programs. The following pages explain how
to use the types of recording features. If you're using the remote control, you must press the
VCR button to put the remote control in VCR mode.
STOP
Tape speed indicator
Recording Time
Tape SP EP
T-120 2hours 6 hours
T-160 2hrs4Ornin 8hours
Recording Speeds
Press SPEED on lhe remote to select a recording speed.
• SP (Standard Play) gives the best quality recording; consequently, fewer
progrmns can be recorded on the "tape. Most pre-recorded, rental tapes are
recorded in SP.
• EP (Extended Play) gives three times the recording time of tapes recorded
in SP.
Recording Pause
This feature allows you to prevent recording short passages of unwanted
material.
Press PAUSE during recording to temporarily stop and start recording (STILL
appears on the screen while the "tape is paused). The TV/VCR automatically
switches from pause to stop after a few minutes to prevent tape wear.
Types of Recording
Your "lW/VC1U1-)VI-)provides live. ways to capture programming:
• Recording allows you to press one button to record a program.
• One Touch Recording (OTR) allows recording to start while a program is being
watched. This feature automatically stops recording alter a designated period of time.
• Timer Recording program the TV/VCR tBr a daily, weekly, or one time recording which
automatically starts and stop at the times you set.
• Copying and Editing Tapes allows you to record from another VCR or camcorder.
• Recording from DVD Player allows you to record from the DVD player.
37
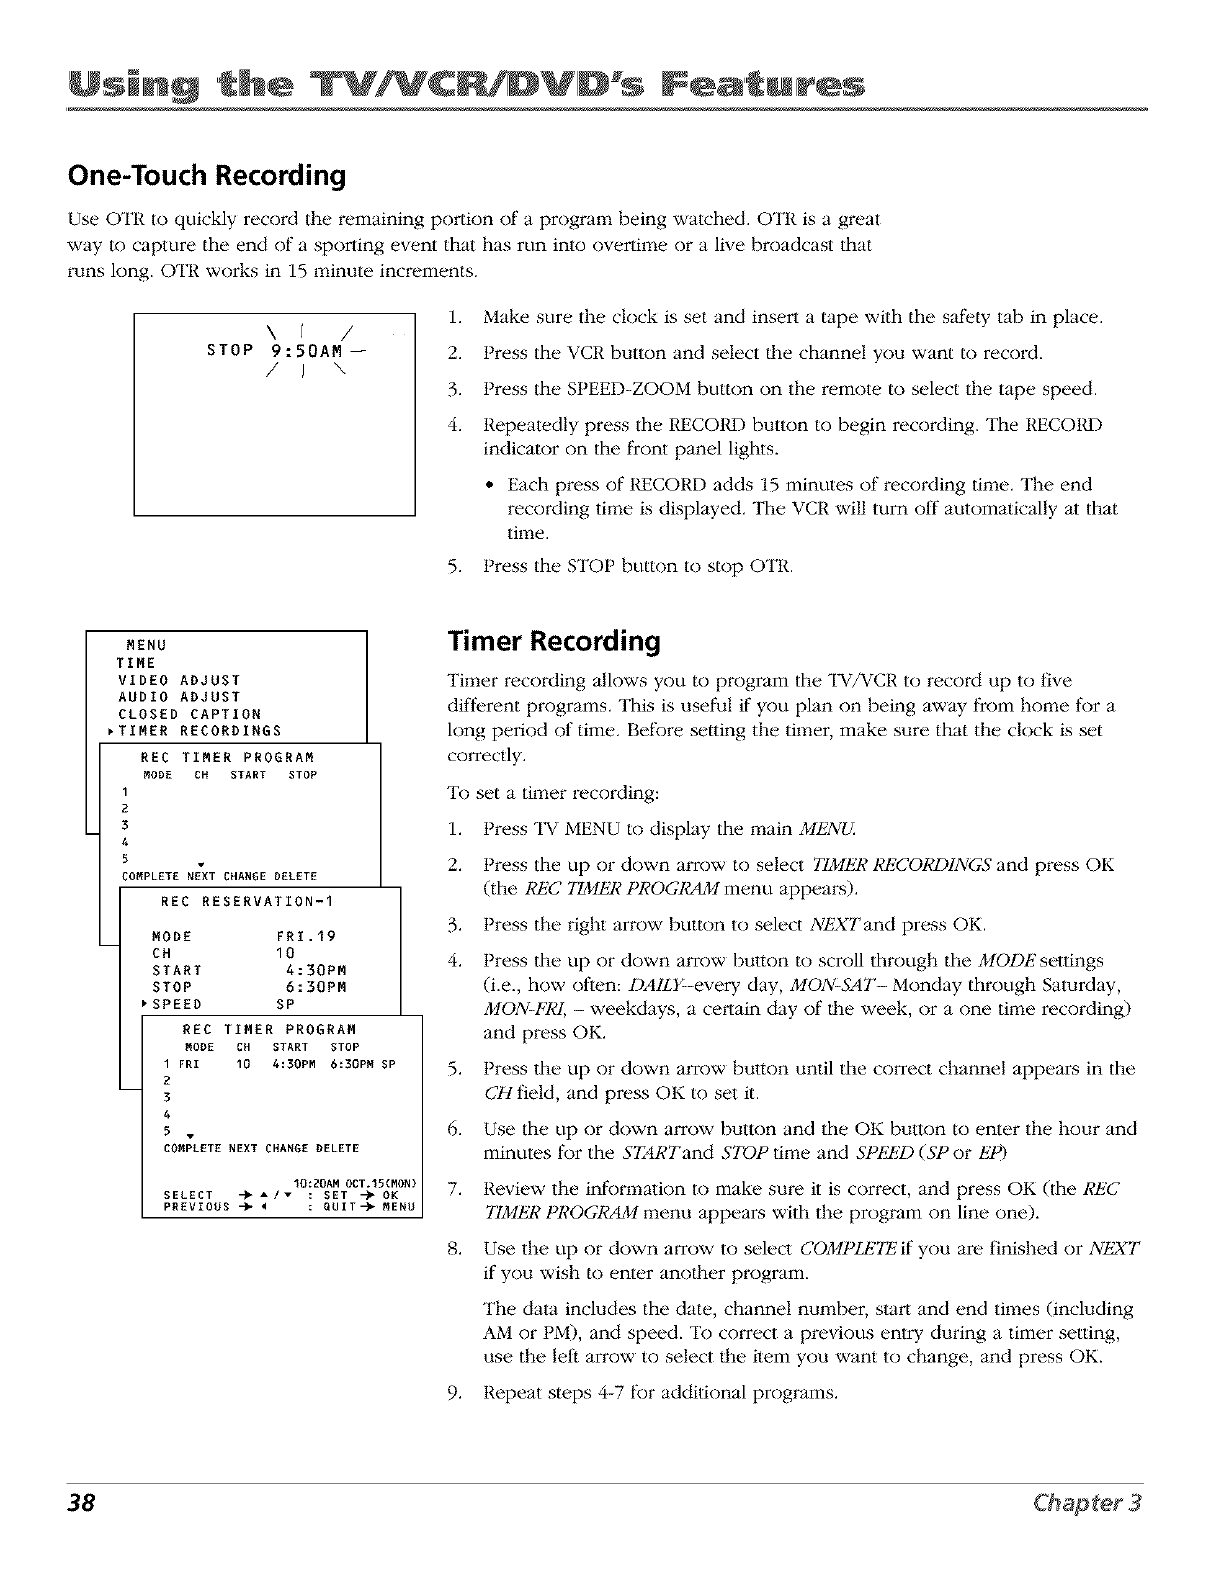
Using C DVID s F a' ufr@s
One-Touch Recording
Use OTR to quickly record the remaining portion of a program being watched. OTR is a great
way to capture the end of a sporting event that has run into overtime or a live broadcast that
runs long. OTR works in 15 minute increments.
\f /
STOP 9:50AM --
/j \
1. Make sure the clock is set and insert a tape wilh the safely tab in place.
2. Press the VCR button and select the channel you want to record.
3. Press the SPEED-ZOOM button on the remote to select the tape speed.
4. Repeatedly press the RECORD button to begin recording. The RECORD
indicator on the front panel lights.
• Each press of RECORD adds 15 minutes of recording time. The end
recording time is displayed. The VCR will turn off automatically at that
time.
5. Press the STOP button to stop OTR.
MENU
TIME
VIDEO ADJUST
AUDIO ADJUST
CLOSED CAPTION
_TIMER RECORDINGS
REC TIMER PROGRAM
MODE CH START STOP
OMPLETE NEXT CHANGE DELETE
REC RESERVATION-I
MODE FRI.19
CH 10
START 4:30PM
STOP 6:30PM
SPEED SP
REC TIMER PROGRAM
MODE CH START STOP
1 FRI 10 4:30PM 6:30PR SP
2
3
4
5v
COMPLETE NEXT CHANGE DELETE
I0:20AM OCT*I5(MON)
SELECT -_ A /.:SET -)" OK
PREVIOUS -_ <:QUIT-_MENU
Timer Recording
Timer reco_ing allows you to program the TV/VCR to reco_ up to five
difli:rent programs. This is useful if you plan on being away from home for a
long period of time. Before setHng the timer, make sure that the clock is set
correctly.
To set a timer recording:
1. Press "IV MENU to display the main MENU.
2. Press the up or down arrow to select TIMER Rt'2CO1,'D1NGSand press OK
(the I,'EC TIMER PROGI_M menu appears).
3. Press the right arrow button to select NEXTand press OK.
4. Press tile up or down arrow button to scroll through the MODE settings
(i.e., how ofien: DAILY--every day, MON-SAT- Monday through Saturday,
MON-F1,'I, - weekdays, a certain day of lhe week, or a one time recording)
and press OK.
5. Press lhe up or down aITOWbutton until the correct channel appears in the
CH field, and press OK to set il.
6. Use the up or down arrow button and the OK butlon to enter the hour and
minutes l_r the STARTand STOP time and SPEED (SP or EP)
7. Review the information to make sum it is correct, and press OK (tile REC
TIMER PROGRAM menu appears with the program on line one).
8. Use the up or down arrow to selecl COMPLETEif you are finished or N_T
if you wish to enter anolher program.
The data includes the date, channel number, start and end times (including
AM or PM), and speed. To correct a previous entry during a timer setting,
use the leli arrow to select lhe ilem you want to change, and press OK.
9. Repeat steps 4-7 for additional programs.
38
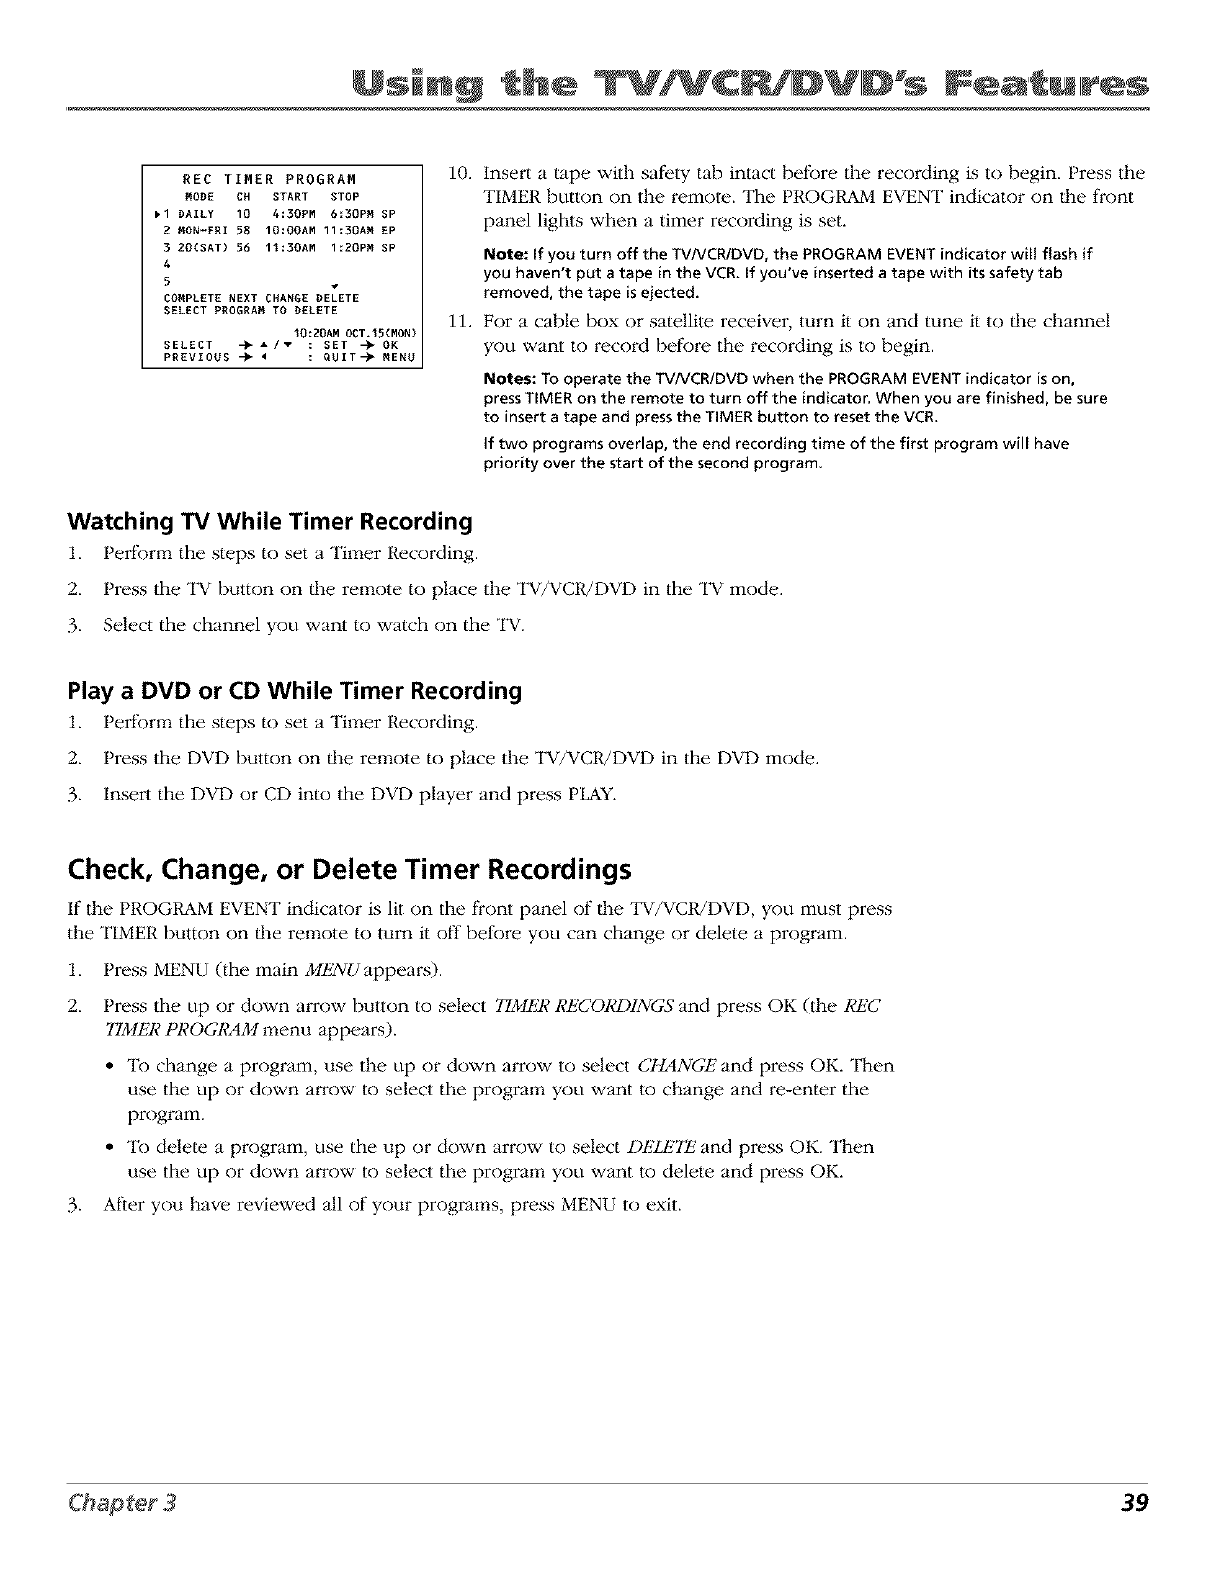
Using C DVID s
REC TIMER PROGRAM
nODE CH START STOP
,1 DAILY 10 4:30PM 6:30PM SP
2 MON-FRI 58 IO:OOAM 11:30AR EP
3 20(SAT) 56 11:30AM I:20PM SP
4
5v
COMPLETE NEXT CHANGE DELETE
SELECT PROGRAM TO DELETE
10:20AM OCT*I5(MON)
SELECT -_- A /v : SET -_" OK
PREVIOUS -_- 4 : QUIT-_'MENU
10.
11.
Insert a tape with safety tab intact bet5re the recording is to begin. Press the
TIMER button on the remote. The PROGRAM EVENT indicator on the front
panel lights when a timer recording is set.
Note: If you turn off the TV/VCR/DVD, the PROGRAM EVENT indicator will flash if
you haven't put a tape in the VCR. If you've inserted a tape with its safety tab
removed, the tape is ejected.
For a cable box or satellite receiver, turn it on and tune it to the channel
you want to record before the recording is to begin.
Notes: To operate the TV/VCR/DVD when the PROGRAM EVENT indicator is on,
press TIMER on the remote to turn off the indicator. When you are finished, be sure
to insert a tape and press the TIMER button to reset the VCR.
If two programs overlap, the end recording time of the first program will have
priority over the start of the second program.
Watching TV While Timer Recording
1. Perform the steps to set a Timer Recording.
2. Press the "IV button on the remote to place the TV/VCR/DVD in the "IV mode.
3. Select the channel you want to watch on the "IV.
Play aDVD or CD While Timer Recording
1. Perform the steps to set a Timer Recording.
2. Press the DVD button on the remote to place the TV/VCR/DVD in the DVD mode.
3. Insert the DVD or CD into the DVD player and press PLAY.
Check, Change, or Delete Timer Recordings
If the PROGRAM EVENT indicator is lit on the front panel of |he TV/VC1U1-)VI-), you must press
the TIMER button on the remote to turn it off belk_re you can change or delete a program.
1. Press MENU (the main M/;2VUappears).
2. Press the up or down arrow button to select TIMER RECOI,'DINGS and press OK (the I,'k'C
TIMER PROGRAM menu appears).
.
• To change a program, use the up or down arrow to select C_NGk" and press OK. Then
use the up or down arrow to select the program you want to change and re-enter the
program.
• To delete a program, use the up or down arrow to select Dt_2LETk"and press OK. Then
use the up or down arrow to select the program you want to delete and press OK.
After you have reviewed all of your programs, press MENU to exit.
39
Using C DVID s F a' ufr@s
Copying and Editing Tapes
Use another VCR or camco_er as the playback VCR and the TV/VCR/DVD as _e recording
VCR.
Note: The unauthorized recording of television programs and other materials may infringe upon the
rights of others.
1. Turn on the VCR or camcorder and lhe "I_/VCR/1-)VD.
2. Press INPUT on the TV/VCR/DVD's remote to select lhe con'ect line input for the device
you have connected (LINE 1--back LINE 1N 1 jacks, L1NE2--front iacks).
3. Insert the tape you want to copy into the playback VCR or camcorder. Insert a blank tape
with the sal)ty tab intact into the VCR.
4. Start the playback VCR or camcorder playing. If the tape was not recorded on the playback
VCR, streaks may appear and you may need to adjust the tracking. When you reach the
place you want to begin copying, place the playback VCR or camcorder in play pause.
5. Press RECORD, then PAUSE on the TV/VCR/DVD's remote.
6. Press PAUSE on bolh the VCR or camcorder and the TV/VCR/DVD's remote at the same
time to begin copying the tape.
7. Edit out segments that you do not want to copy by pressing PAUSE on the TV/VCR/DVD's
remote to pause lhe tape. Then, locate the next segment you want to copy on the playback
VCR or camcorder by using FORWARD, REVERSE, or PLAY. Press PAUSE on lhe playback
VCR or camcorder. Press PAUSE at the same time on bolh the VCR or camcorder and the
TV/VCR/DVD's remote to resume copying.
8. Press STOP on both the VCR or camcorder and lhe "lW/VCR/DVD's remote when you are
finished.
Recording from the DVD Player
You can record audio and vMeo from the DVI-) player to tape.
Note: The unauthorized recording of movies and other materials may infringe upon the rights of
others.
1. Press lhe VCR bulton on the remote to turn on the TV/VCR/DVD.
2. Press the INPUT button to select the DVD input.
3. Insert the DVD you want to copy into the DVD player and a blank tape with the safety tab
intact into the VCR.
4. Press the DVD button to turn on the DVD player and place the remote in the DVD mode.
5. Press the 1NFO button repeatedly to turn off on-screen displays (any intk)rmation displayed
from the DVD player will be recorded on tape).
6. Press the PLAY button to start DVD playback.
7. Press the RECORD button to begin copying.
8. Press the STOP button when finished.
Notes: The shared DVD/VCR output jacks become VCR fixed during DVD recording.
Copy protected DVDs cannot be recorded (the image becomes distorted after pressing
RECORD),
4O
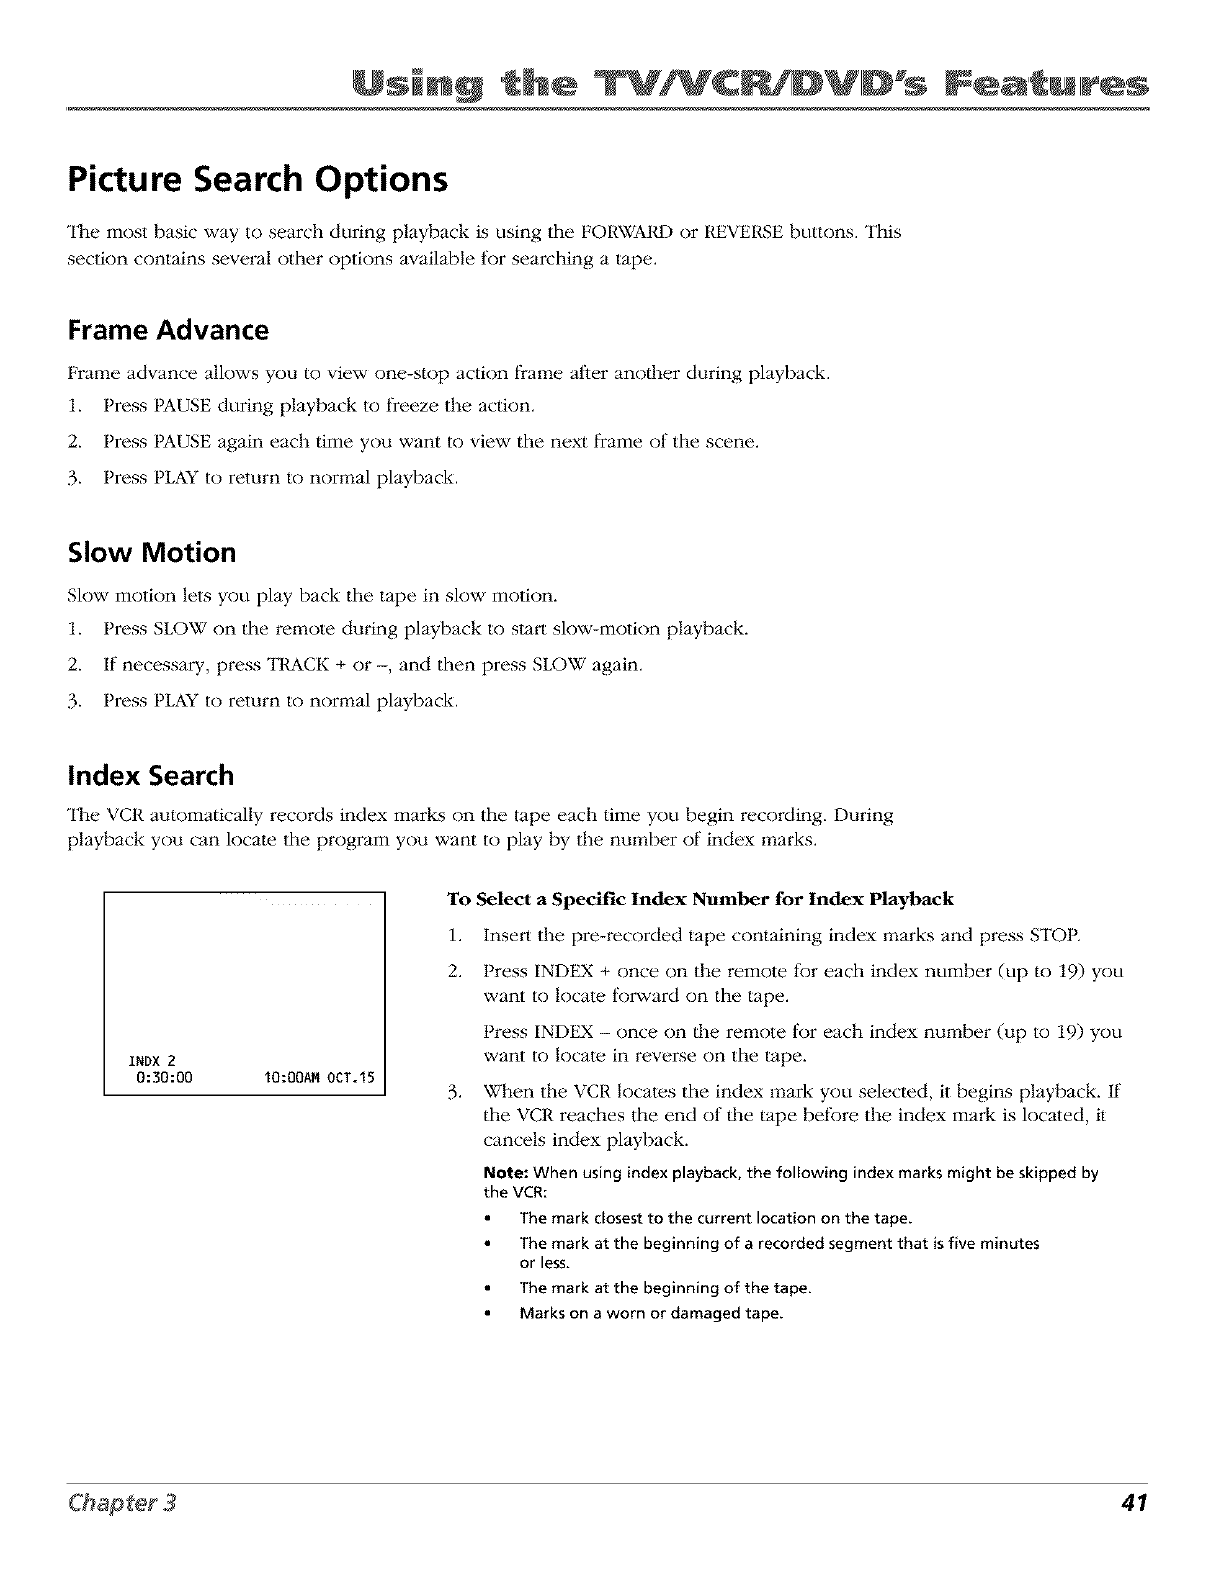
Using C DVID s
Picture Search Options
"II_e most basic way to search during playback is using the FORWARD or REVERSE buttons. This
section contains several other options available for searching a tape.
Frame Advance
Prame advance allows you to view one-stop action t)'ame after another during playback.
1. Press PAUSE during playback to freeze the action.
2. Press PAUSE again each time you want to view the next frame of the scene.
3. Press PLAY to return to normal playback.
Slow Motion
Slow motion lets you play back the tape in slow motion.
1. Press SLOW on the remote during playback to start slow-motion playback.
2. If necessary, press TRACK + or -, and then press SLOW again.
3. Press PLAY to return to normal playback.
Index Search
"II_e VCR automatically records index marks on the tape each time you begin recording. During
playback you can locate the program you want to play by the number of index marks.
INDX 2
0:30:00 10:00AM 0CT.15
To Select aSpecific Index Number for Index Playback
1. Insert the pre-recorded tape containing index marks and press STOP.
2. Press INDEX + once on the remote for each index number (up to 19) you
want to locate forward on the tape.
Press INDEX -once on the remote IBr each index number (up to 19) you
want to locate, in reverse on the tape.
3. When the VCR locates the index mark you selected, it begins playback. If
the VCR reaches the end of the tape before the index mark is located, il
cancels index playback.
Note: When using index playback, the following index marks might be skipped by
the VCR:
The mark closestto the current location on the tape.
The mark at the beginning of a recorded segment that isfive minutes
or less.
The mark at the beginning of the tape.
Marks on a worn or damaged tape.
41
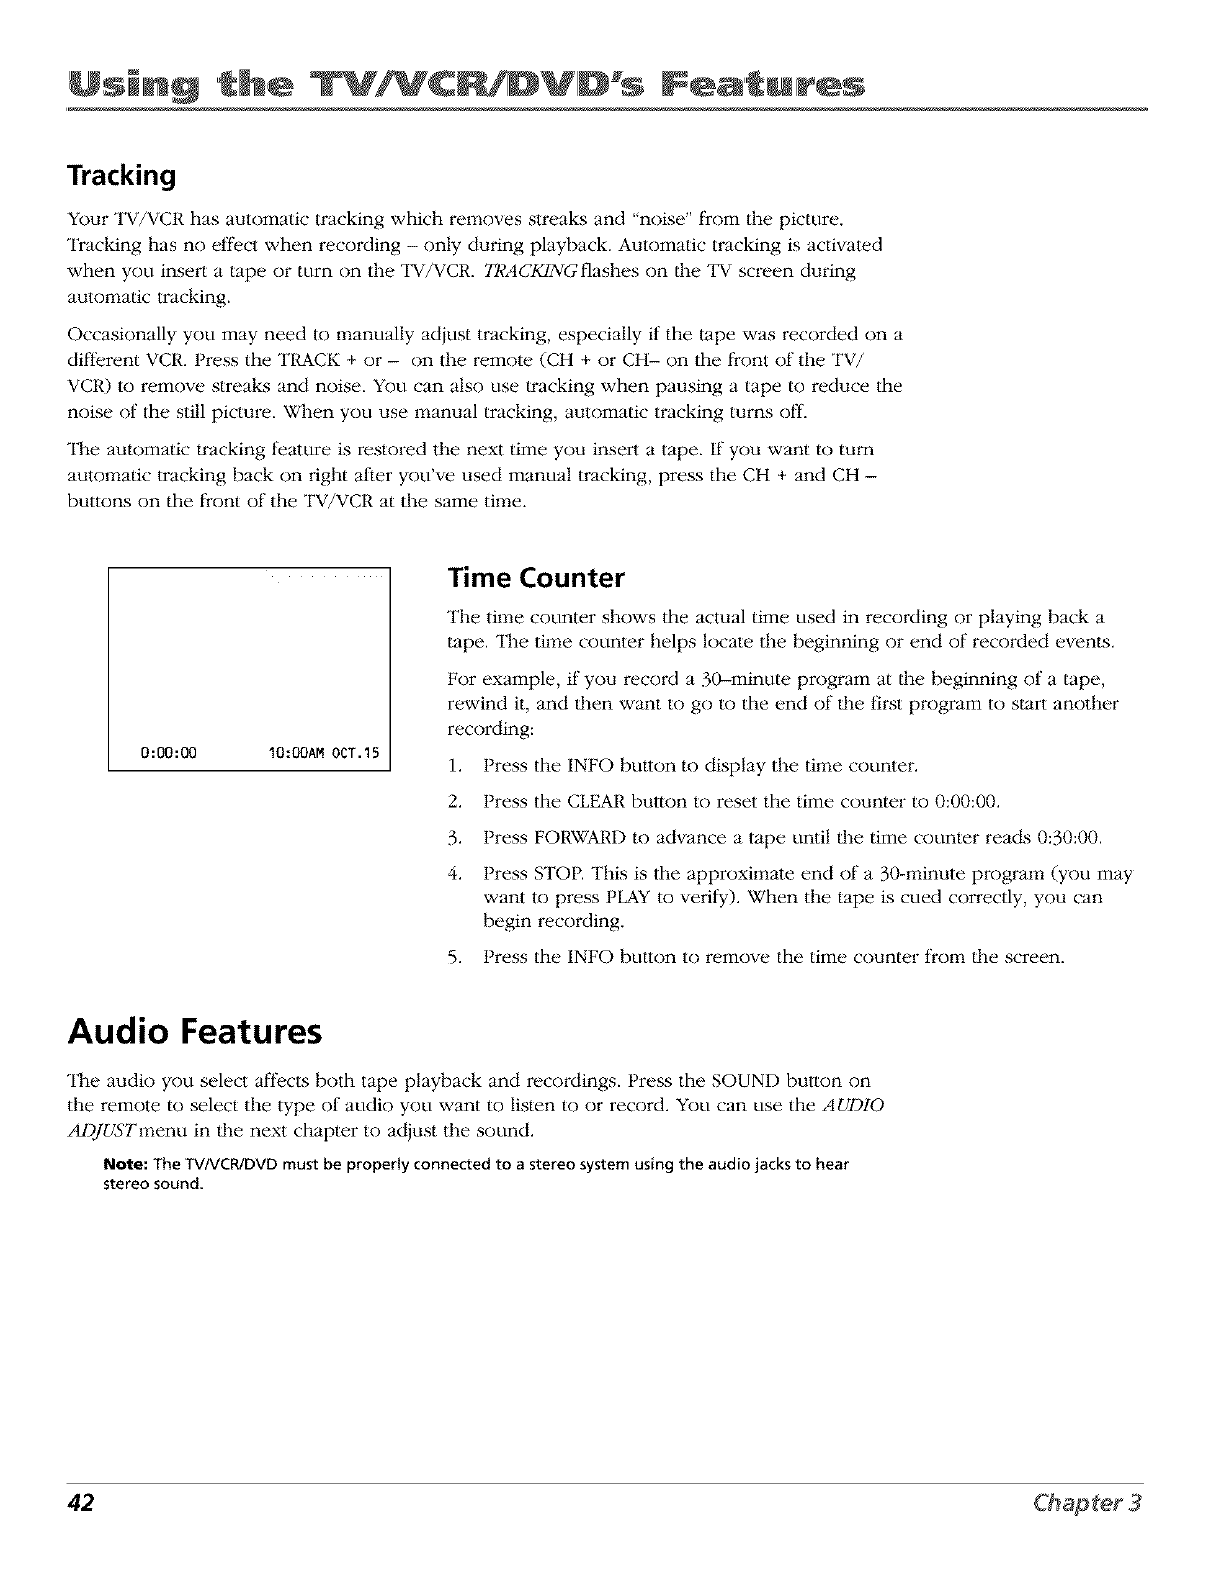
Using C DVID s F a' ufr@s
Tracking
Your "lW/VCR has automatic tracking which removes streaks and "noise" from the picture.
"IYacking has no effect when recording - only during playback. Automatic tracking is activated
when you insert a tape or turn on the TV/VCR. TRACKING flashes on lhe "1_ screen during
automatic {racking.
Occasionally you may need to manually adiust tracking, especially if the tape was recorded on a
different VCR. Press the TRACK + or - on the remote (CH + or CH- on the front of the TV/
VCR) to remove streaks and noise. You can also use tracking when pausing a tape to reduce the
noise of the still picture. When you use manual tracking, automatic tracking turns off.
"II_e automatic tracking t_ature is restored the next time you insert a tape. If you want to turn
automatic tracking back on right alier you've used manual tracking, press the CH + and CH -
buttons on the front of the TV/VCR at the same time.
0:00:00 lO:00AM 0CT.15
Time Counter
The time counter shows the actual time used in reco_ing or playing back a
tape. The time counter helps locate the beginning or end of recorded events.
For example, if you record a 30-minute program at the beginning of a tape,
rewind it, and then want to go to the end of the first program to start another
recording:
1. Press the INFO button to display the time counter.
2. Press the CLEAR button to reset the time counter to 0:00:00.
3. Press FORWARD to advance a tape until the time counter reads 0:30:00.
4. Press STOR This is the approximate end of a 30-minute program (you may
want to press PLAY to verify). When the tape is cued correctly, you can
begin recording.
5. Press the INFO button to remove the time counter from the screen.
Audio Features
The audio you select affects both tape playback and recordings. Press the SOUND butlon on
the remote to select the type of audio you want to listen to or record. You can use the AUDIO
ADJUSTmenu in lhe next chapter to adjust the sound.
Note: The TV/VCR/DVDmust be properly connected to a stereo system using the audio jacks to hear
stereo sound
42
Using C DVID s
Reception
Some TV programs are broadcast with stereo audio or a Second Audio Program (SAP) which
offers a second language. "II_e SOUND button on the remote lets you select the type of audio
you want to listen to or record. Press the SOUND button on the remote repeatedly to switch
between STEREO or SA,r_
•STEREO Used to hear/record normal or stere() broadcast "IV. STappears on the TV screen
when stereo is being broadcast.
SAP Used to heaffrecord a Second Audio Program. SAP appears on the "IV screen when
stereo is being broadcast. Both lhe SAP and main audio are recorded on the tape.
Note: The TV/VCR/DVDdefaults to mono if the stereo signal is weak, too noisy, or the program
isn't being broadcast in stereo (no indicatorappears on the screen)
Tape Playback
"II_e VCR records audio on both the Hi-lq stereo and linear tracks on the tape. Hi-Fi sound is
recorded on separate left and right stereo channels. Monaural sound is recorded on the linear
track. SAP is recorded on the linear track and the main audio is recorded on lhe Hi-Fi track. To
enjoy Hi-Fi sound, connect your "IV/VC1UDVD to a stere() system using the attdio jacks.
Press the SOUND button repeatedly to switch between LR, L, R, or mono (no display).
Note: Tapesrecorded on a mono VCRautomatically play back in linear audio.
• Ill (Hi-Fi) Used for normal playback. Both the left and right channels play from the audio
track.
• L (Hi-Fi) Used to hear the left channel of the Hi-Fi track played through bofl_ speakers.
• R (Hi-Fi) Used to hear the right channel of d_e Hi-Fi track played through both speakers.
•LINEAR (No Display) Used to play back the sound recorded on the linear monaural
track, such as a Second Audio Program, or a dubbed voice-over.
43
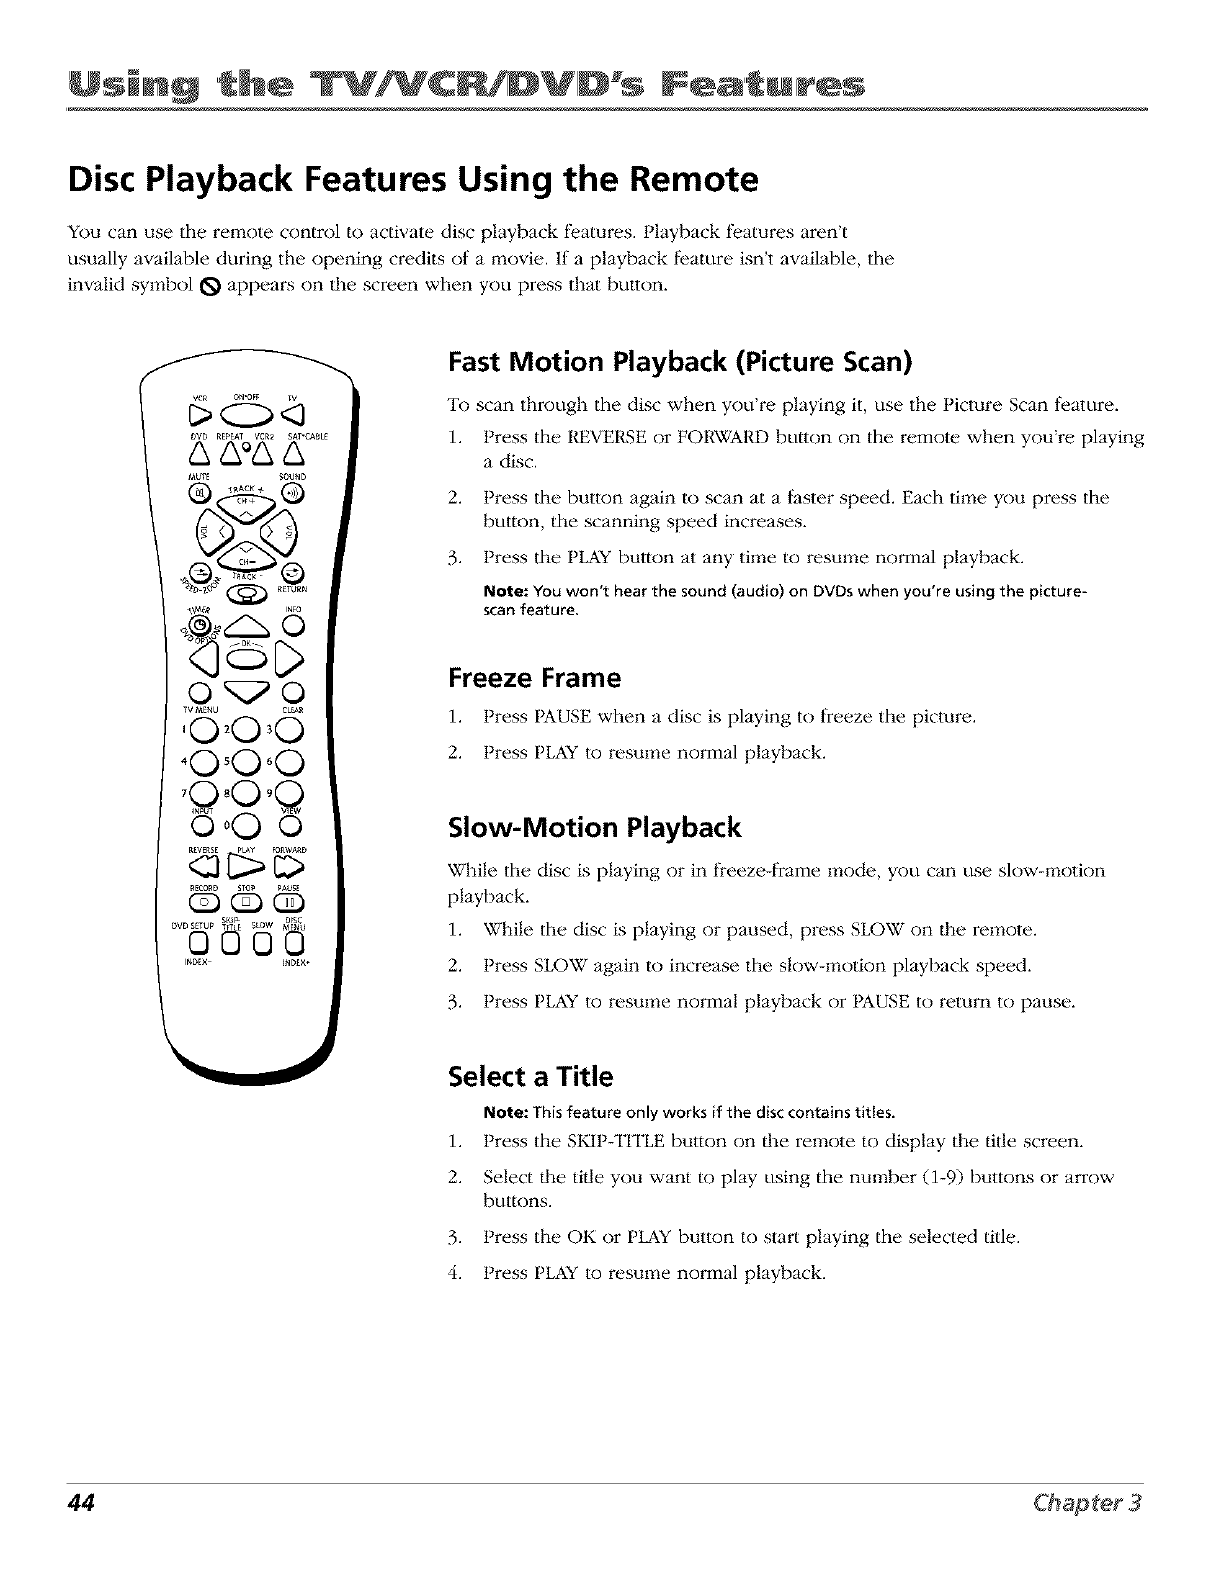
Ms ng C DVID s F a' ufr@s
Disc Playback Features Using the Remote
You can use the re1:qote control to activate disc playback features. Playback features aren't
usually available during the opening credits of a _:qovie. If a playback feature isn't available, the
invalid symbol _ appears on ll_e screen when you press that button.
Fast Motion Playback (Picture Scan)
To scan through the disc when you're playing it, use the Picture Scan feature.
1. Press the REVERSE or FORWARD button on the remote when you're playing
a disc.
2. Press the button again to scan at a faster speed. Each time you press the
button, the scanning speed increases.
3. Press the PLAY button at any time to resume normal playback.
Note: You won't hear the sound (audio) on DVDs when you're using the picture-
scan feature,
Freeze Frame
1. Press PAUSE when a disc is playing to freeze the picture.
2. Press PLAY to resume normal playback.
Slow-Motion Playback
While the disc is playing or in freeze-frame mode, you can use slow-motion
playback.
1. While the disc is playing or paused, press SLOW on d_e remote.
2. Press SLOW again to increase the slow-motion playback speed.
3. Press PLAY to resume normal playback or PAUSE to return to pause.
Select a Title
Note: This feature only works if the disc contains titles.
1. Press the SFJP-TITLE button on dm re_:qote to display the tide screen.
2. Select lhe tille you want to play using the nm:qber (1-9) buttons or arrow
buttons.
3. Press the OK or PLAY button to slart playing the selected tide.
4. Press PLAY to resm:qe normal playback.
44
Using C DVID s
Zoom
You can zoom in on the picture.
1. Press SPEED-ZOOM to zoom in on the picture. "II_e ZOOM indicator appears on the TV
screen.
2. Press SPEED-ZOOM again to increase the zoom. You can use the arrow buttons to 1:qove
the zoo1:qed area up, down, leli, or right.
Notes: The zoom indicator turns red when you cannot perform the selected zoom operation.
When playing a pan and scandisc, only two zoom levels are available
The zoom image may become distorted.
3. Press SPEED-ZOOM repeatedly or press STOP to re.turn to a normal picture.
Using the Repeat Feature
Press the REPEAT button to use the repeat feature,. There are three type,s of repeat available on
DVDs.
• Chapter - repeats lhe chapter that is playing
• Title - repeats the tille that is playing
• A*B - Set the beginning (point A) and the end (point B) to make this part of the disc play
repeatedly.
To Use Repeat:
.... )
1. While a disc _splaying, press tIE1 EAT on the re, :r_ote. The _ (repeat icon) appears
on-screen.
2.
• Press llle t{EPEAT bulton once and press the PLAY button to repeat the chapter that is
playing.
• Press llle t{EPEAT bulton twice and press llle PLAY bulton to repeat the tille lllat is
playing.
• Press llle t{EPEAT button three times and press the PLAY bulton when you reach the start
of the section you want to repeat. Press the PLAY button again when you reach the end
of the section you want to repeat. The section is repeated.
To cancel repeat, press lhe STOP button or press lhe REPEAT button until the _ turns off.
Notes:A,B repeat only operateson the sametitle or chapter of somediscs.
A-B doesnot operate on sceneswhere different camera anglesarerecorded.
45

(This page intentionally left blank)
Playing Discs
Chapter Overview:
• Playing DVDs
•Playing Audio CDs
•Playing MP3 CDs
Changing
Graphics used u ithin this publication are fi_r representation only. 47
IPIMay ng ID scs
Playing DVDs
For basic information about loading and playing discs, go to page 20 in Chapter 1. "II_ischapter
gives you the details about the on-screen DVD Options, how to play audio CDs and MP3 discs.
Selecting a Title
Some discs contain more than one title. For example, there might be four movies on one disc
(each movie might be considered a title). Each title is divided into chapters. To select a title:
1. While the disc is playing, press DVD OH'IONS.
2. If isn't highlighted, use the up or down an'ow button to highlight it, and press OK.
3. Press the up or down arrow button to select the title number to which you want to skip. You
can also enter the title number with the number (0-9) buttons.
4. Press OK on lhe remote to start playing the title you have selected.
Notes: Some discs only have one title.
You can also select a title number by pressing SKIP-TITLE on the remote and using the arrow or number
buttons (0-9) to select the title you want Press OK to start playing that title,
iiiill Selecting a Chapter
Because DVD discs use digital technology, a title can be divided into individual chapters (similar
to tracks on a CD). You can skip to a specific chapter by using the Chapter feature.
1. While the disc is playing, press DVD OH'IONS.
2. If lsn t alghhghted, press the up or down arrow button to highlight it, and press OK.
3. Press the up or down arrow button to select the chapter number to which you want to skip.
You can also enter the chapter number with the number (0-9) I)uttons.
4. Press OK on lhe remote to start playing the chapter you have selected.
Notes: The Chapter feature only works on discs formatted with separate chapters.
You can also advance to the next chapter by pressing SKIP-TITLE on the remote and go to the beginning
of the chapter by pressing SKIP-TITLE twice within three seconds,
48
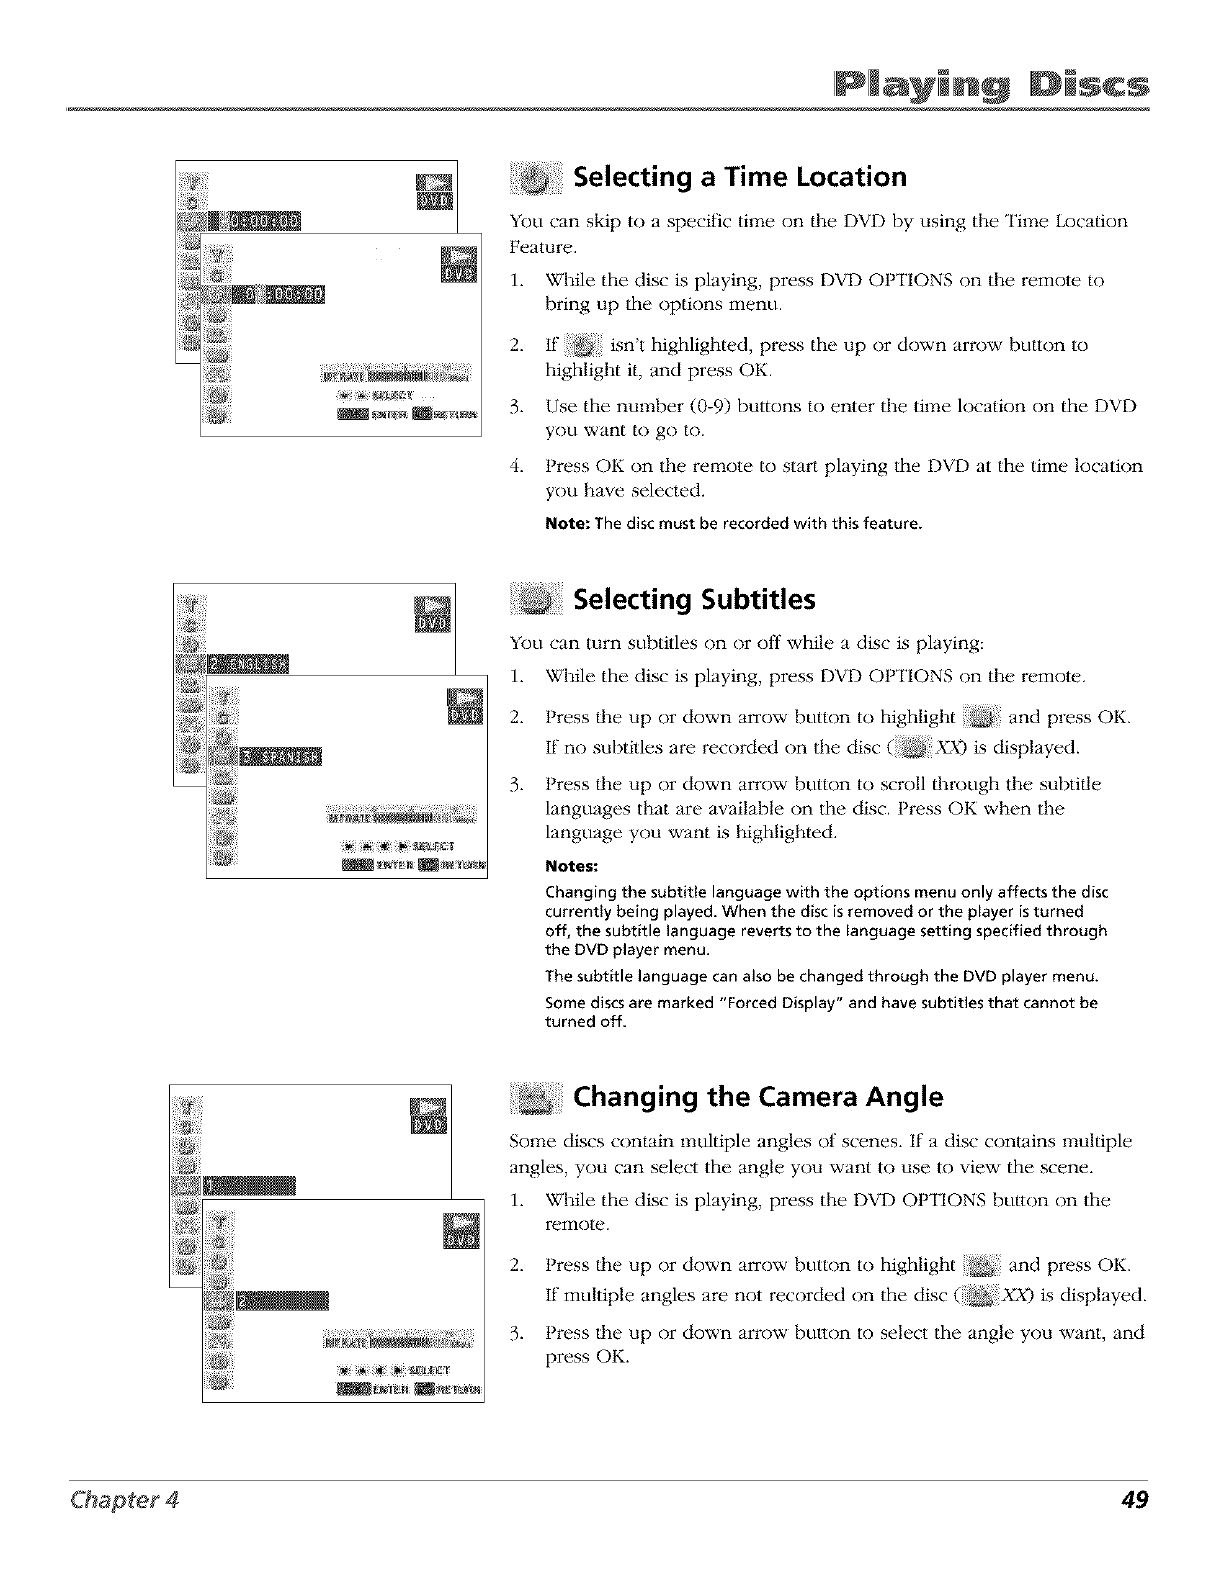
IPIMay n9 ID scs
iiiiiii_
....... Selecting a Time Location
You can skip to a specific time on the DVD by using the Time Location
Feature.
1. While the disc is playing, press DVD OH'IONS on the remote to
bring up the options menu.
2. If isn't highlighted, press the up or down arrow button to
highlight it, and press OK.
3. Use the number (0-9) buttons to enter the time location on the DVD
you want to go to.
4. Press OK on the remote to start playing the DVD at the time location
you have selected.
Note: The disc must be recorded with this feature.
Selecting Subtitles
You can turn subtitles on or off while a disc is playing:
1. While the disc is playing, press DVD OH'IONS on the remote.
2. Press the up or down arrow button to highlight : and press OK.
If no subtitles are recorded on the disc (XX) is displayed.
3. Press the up or down arrow button to scroll through the subtitle
languages that are available on the disc. Press OK when the
language you want is highlighted.
Notes:
Changing the subtitle language with the options menu only affects the disc
currently being played. When the disc is removed or the player is turned
off, the subtitle language reverts to the language setting specified through
the DVD player menu.
The subtitle language can also be changed through the DVD player menu.
Some discs are marked "Forced Display" and have subtitles that cannot be
turned off
Changing the Camera Angle
Some discs contain multiple angles of scenes. If a disc conlains multiple
angles, you can select the angle you want to use Io view the scene.
1. While the disc is playing, press the DVD OPTIONS button on the
remote.
2.
.
i_i i!_i¸i_i ii_!_ _!_
m_ ¸M_3_
Press the up or down arrow button to highlight :: and press OK.
If multiple angles are not recorded on the disc ( !_ XX) is displayed.
Press the up or down arrow button to select the angle you want, and
press OK.
49
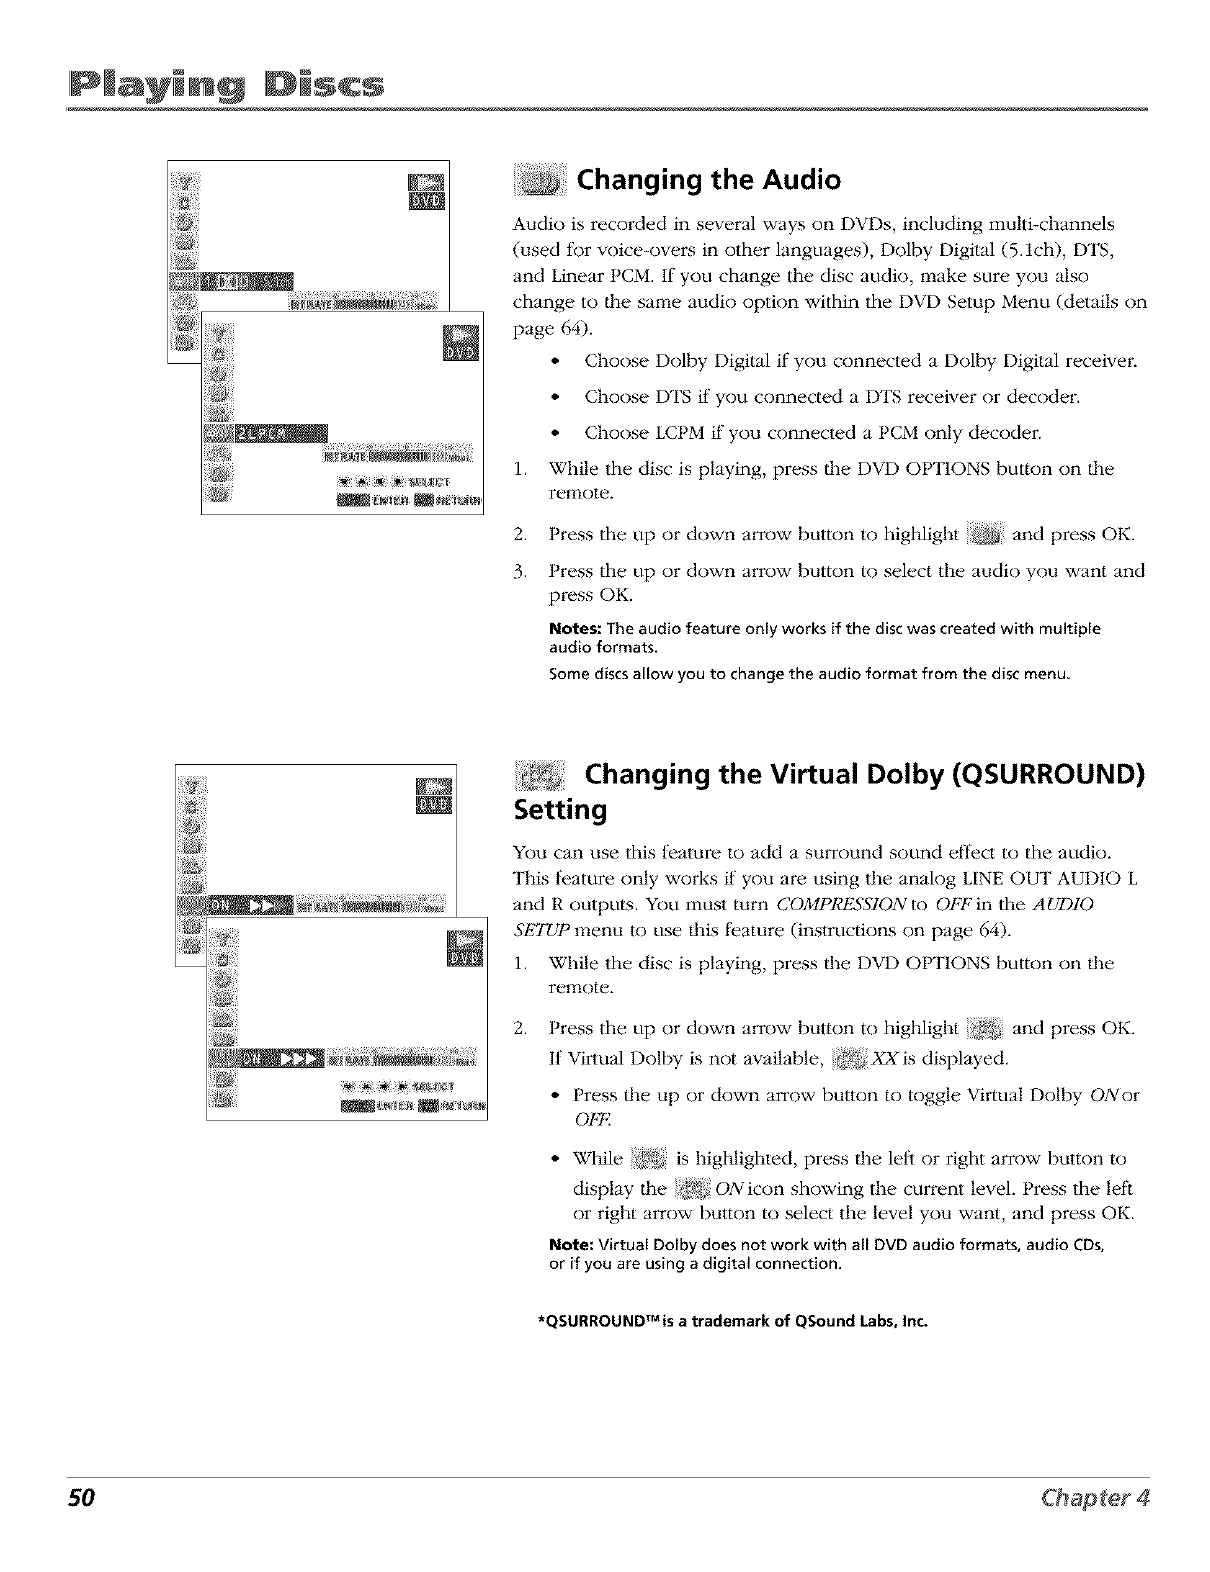
IPIMay ng ID scs
.... Changing the Audio
Audio is recoMed in several ways on DVDs, including multi-channels
(used for w)ice-overs in other languages), Dolby Digilal (5.1ch), DTS,
and Linear PCM. If you change the disc audio, make sure you also
change to llle same audio option within the DVD Setup Menu (details on
page 64).
• Choose Dolby Digital if you connected a Dolby Digital receivei:
• Choose DTS if you connected a DTS receiver or decoder.
• Choose LCPM if you connected a PCM only decoder.
1. While the disc is playing, press ll_e DVD OPTIONS button on ll_e
remote.
2.
3.
Press the up or down arrow button to highlight _ and press OK.
Press the up or down arrow button to select the audio you want and
press OK.
Notes: The audio feature only works if the disc was created with multiple
audio formats,
Some discsallow you to change the audio format from the disc menu,
Changing the Virtual Dolby (QSURROUND)
Setting
You can use this l)ature to add a smxound sound effect to the audio.
This feature only works if you are using the analog LINE OUT AUDIO L
and R outputs. You must turn COMPRESSION to OFFin the AUDIO
Sk'TUP menu to use lllis feature (instructions on page 64).
1. While lhe disc is playing, press llle DVD OPTIONS button on llle
remote.
2. Press the up or down arrow button t ) h_ghhght {_:j and press OK.
If Virtual Dolby is not available, XX is displayed.
• Press the up or down arrow button to toggle Virtual Dolby ONor
OFK
• While _ is highlighted, press llle left or right arrow button to
display lhe #;2_g_ON icon showing the current level. Press the let't
or right arrow button to select the level you want, and press OK.
Note: Virtual Dolby does not work with all DVD audio formats, audio CDs,
or if you are using a digitaJ connection,
*QSURROUND TM is atrademark of QSound Labs, Inc.
50
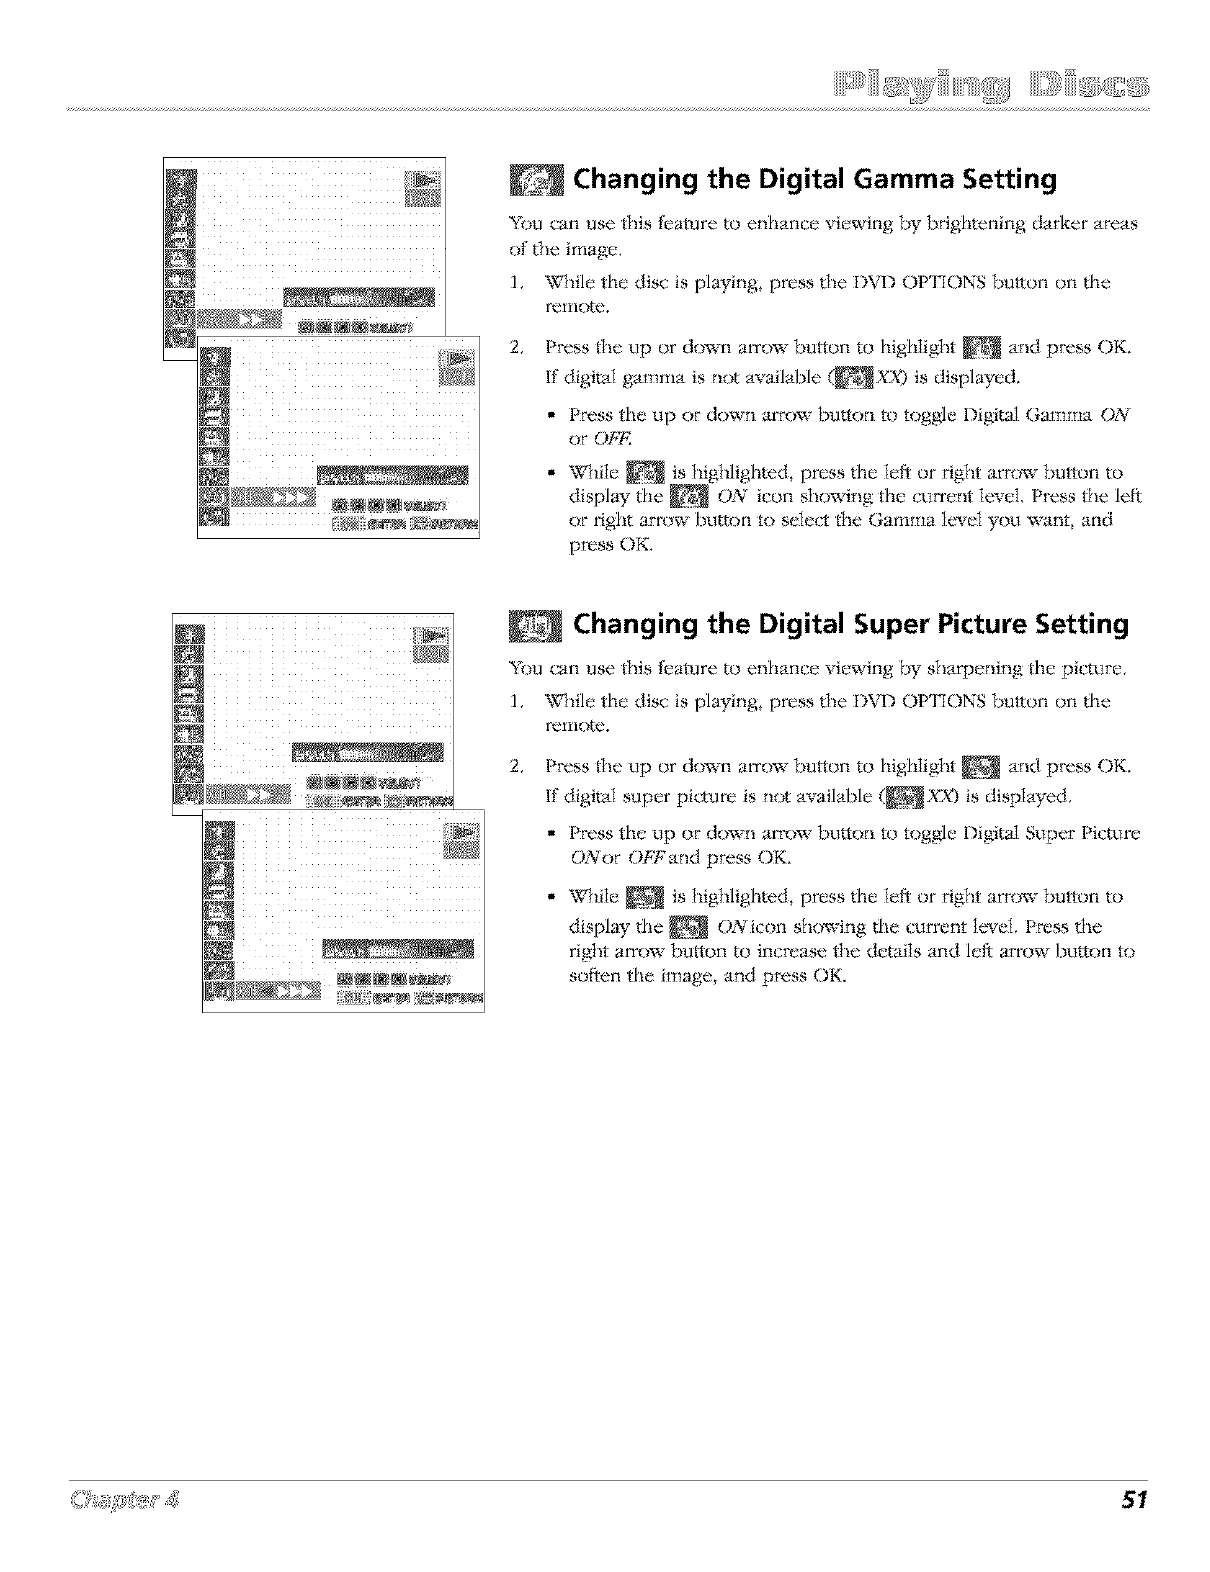
i_ ¸ _ _:_ _ , cz; _ _ _ -_ _, -
Changing the Digital Gamma Setting
"_%ucan use this i'_ature to enhance viewing by brightening darker areas
of the image.
1, While the disc is pla_qng, press the I_VD OVIIONS button on the
remote,
2, Press the up or down arrow button to higl_Iight _ and press OK.
If digital gamma is not available (_XX) is displayed.
• Press the up or down arrow button to toggle Digital Gamma ON
or OF/_I
• While _ is highlighted, press the Ieft or right arrow t:m_ton to
displa}" the _ ON icon showing the current level, Press the left
or right arrow I:mtton to select the Gamma level you want, and
press OK,
Changing the Digital Super Picture Setting
h%u can use this l_ature to enhance vit.'wing by sharpening the picture,
], While the disc is pla)qng, press the DVD OP'I_ONS button on the
remote.
2, Press the up or down arrow button to highIight _ and press OK.
If digital super pi(*ure is not availal)le (_XX) is displayed,
• Press the up or down arrow button to toggle Digital Super Picture
O,Nor O,FFand press OK.
• WhiIe _ is higlflighted, press the 1eft or right arrow bu_ton to
disph Wthe _ ONicon showing the current level, Press the
right arrow burton to increase the detaiIs and left arrow button to
soften the image, and press OK.
51
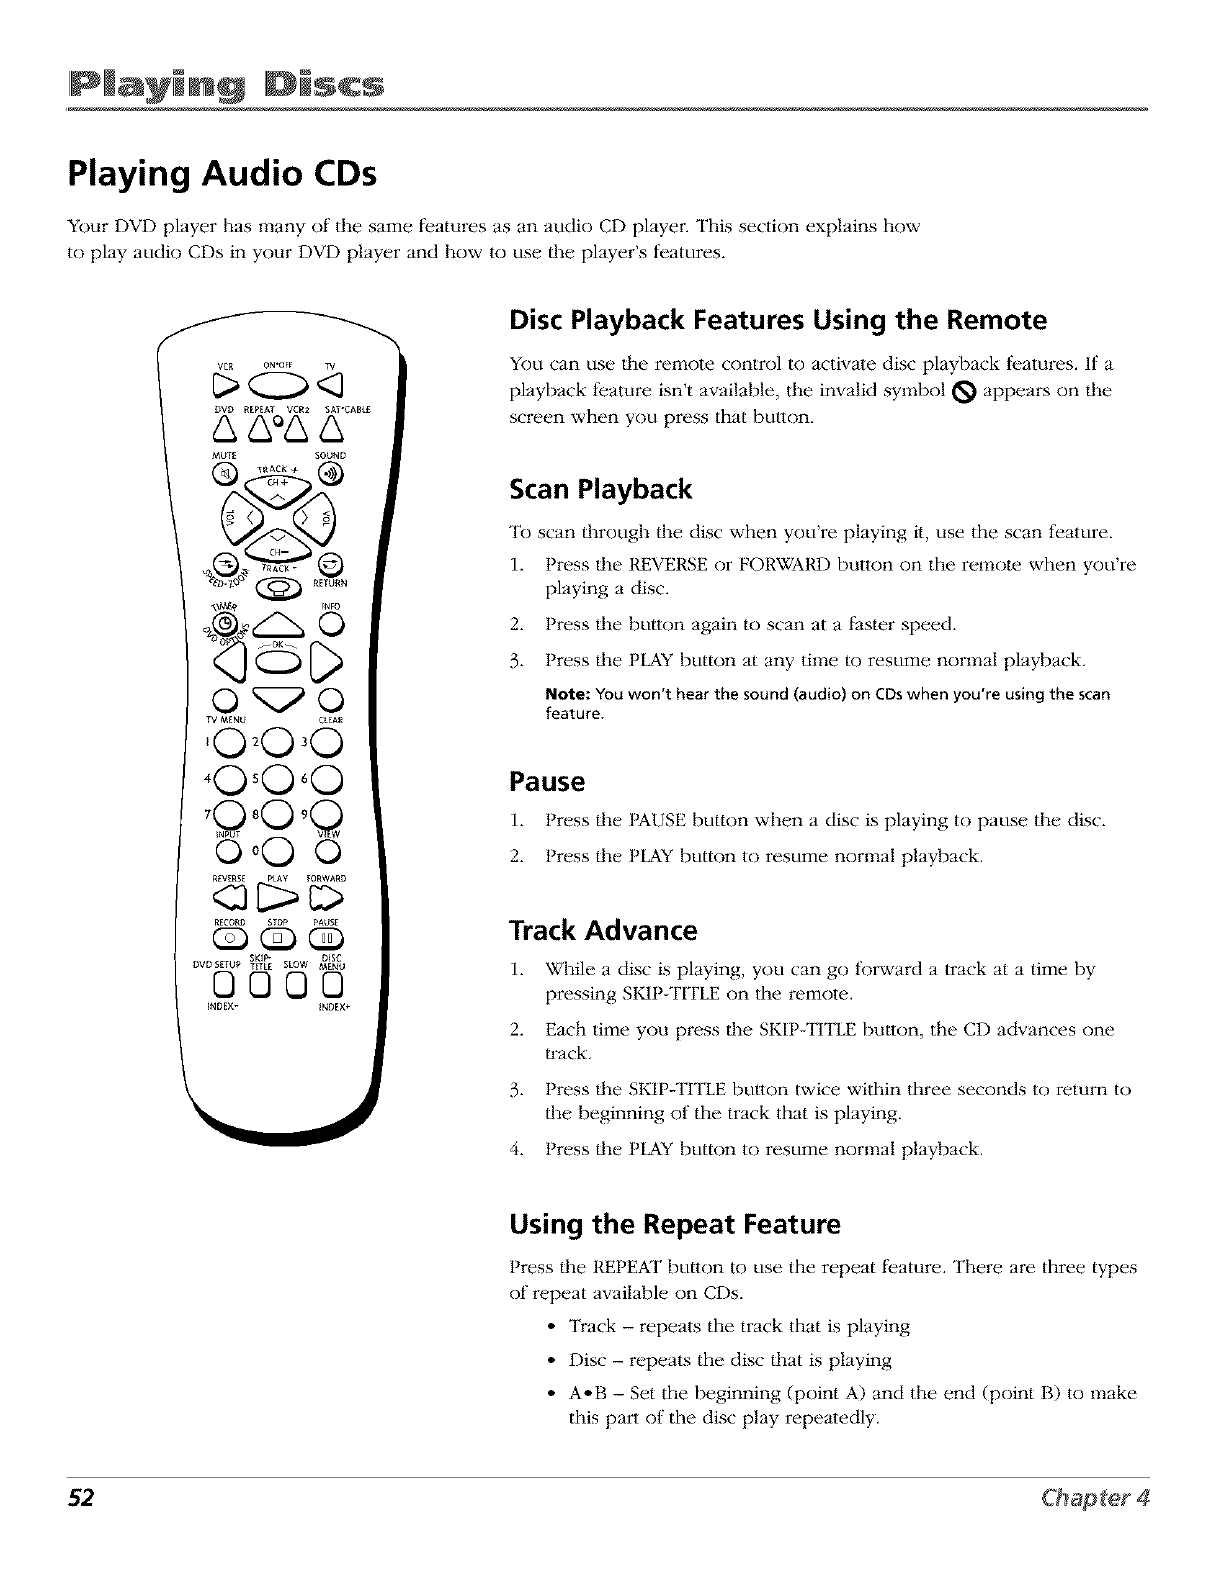
IPIMay ng ID scs
Playing Audio CDs
Your DVD player has many of the same features as an audio CD player. This section explains how
to play audio CDs in your DVD player and how to use lhe player's features.
Disc Playback Features Using the Remote
You can use |he remote control to activate disc playback features. If a
playback feature isn't available, the invalid symbol _ appears on the
screen when you press that button.
Scan Playback
To scan through the disc when you're playing it, use the scan feature.
1. Press lhe REVERSE or FORWAI_) button on the remote when you're
playing a disc.
2. Press |he button again to scan at a faster speed.
3. Press lhe PLAY button at any time to resume normal playback.
Note: You won't hear the sound (audio) on CDs when you're using the scan
feature.
Pause
1. Press the PAUSE button when a disc is playing to pause the disc.
2. Press |he PLAY button to resume normal playback.
Track Advance
1. While a disc is playing, you can go forward a track at a time by
pressing SFJP-TITLE on the remote.
2. Each time you press lhe SKIP-TITLE buuon, the CD advances one
_ack.
3. Press lhe SKIP-TI'I_E buuon twice within three seconds to return to
lhe beginning of the track that is playing.
4. Press lhe PLAY button to resume normal playback.
Using the Repeat Feature
Press the REPEAT button to use the repeat feature. There are three types
of repeat available on CDs.
•Track - repeats the track that is playing
• Disc - repeats the disc that is playing
• A•B - Set the beginning (point A) and the end (point B) to make
this part of the disc play repeatedly.
52
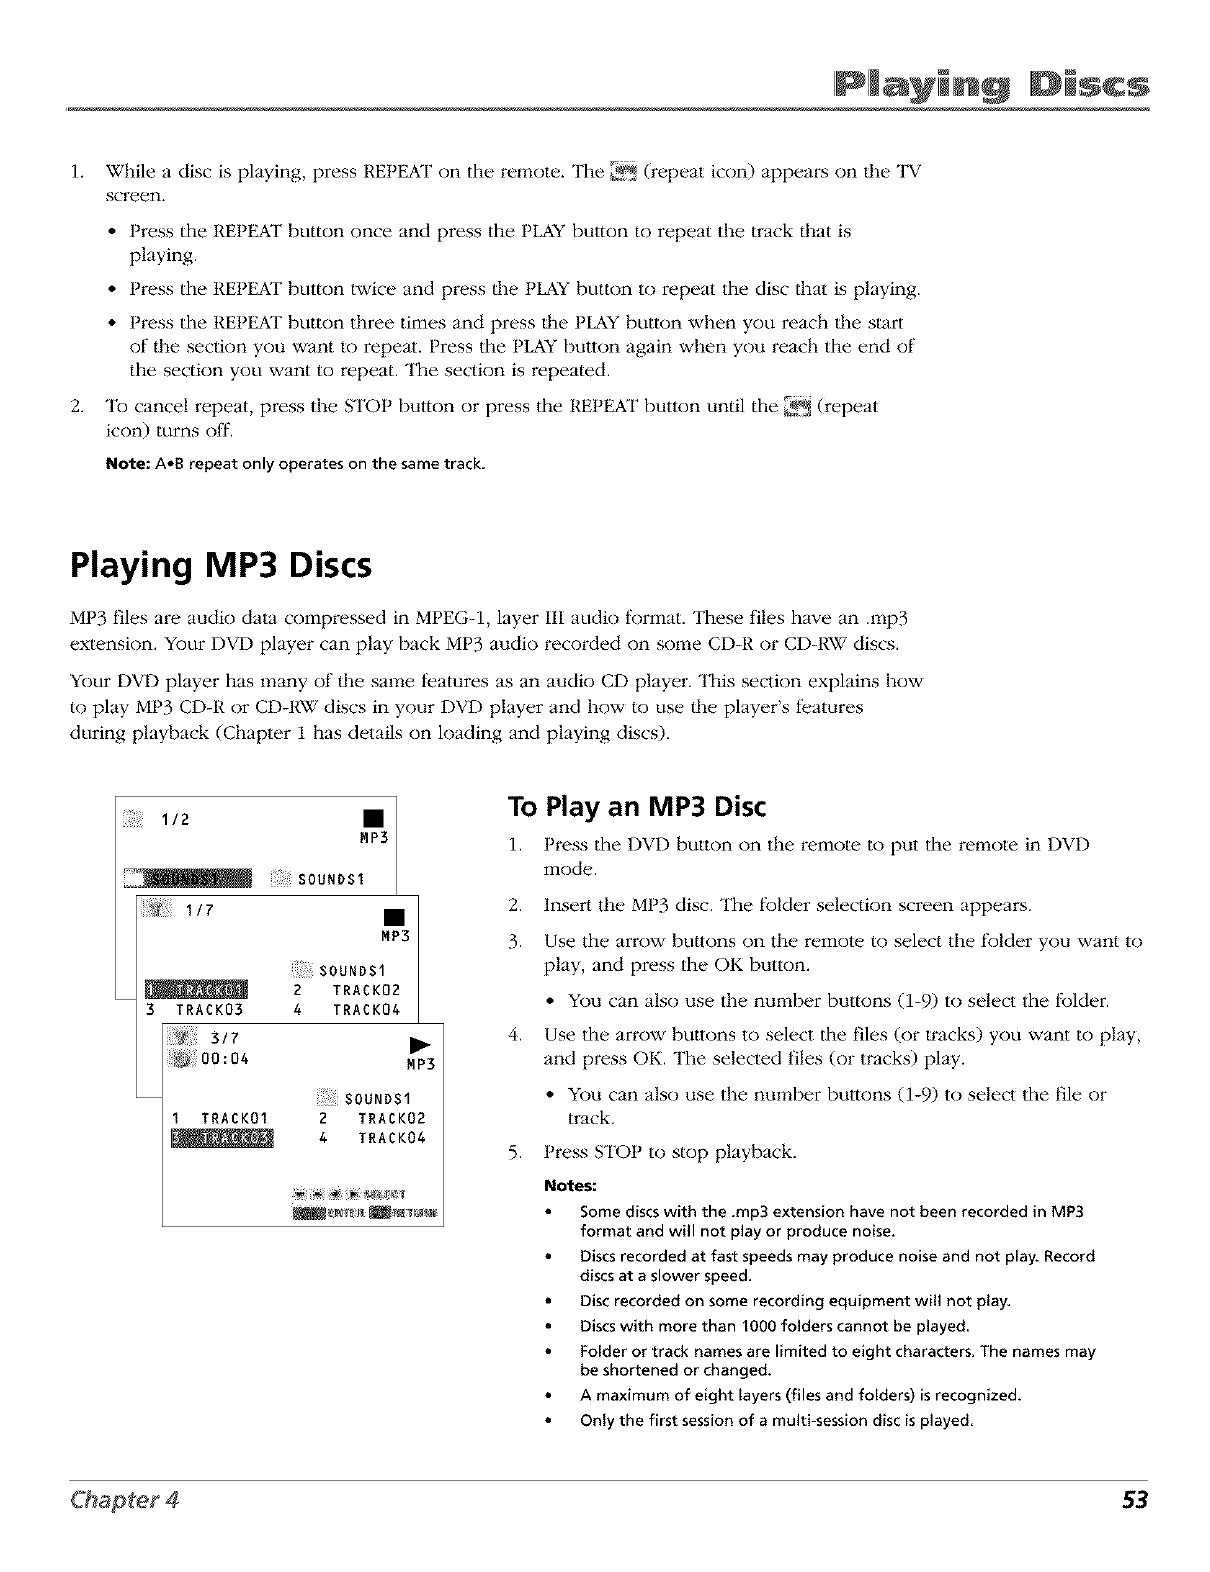
IPIMay n9 ID scs
1. While a disc is playing, press REPEAT on the remote. The _ (repeat icon) appears on the TV
screen.
• Press the REPEAT button once and press the PLAY button to repeat the track lllat is
playing.
• Press the REPEAT button twice and press llle PLAY button to repeat the disc lllat is playing.
• Press the REPEAT button dlree times and press lhe PLAY button when you reach lhe start
of llle section you want to repeat. Press the PLAY bulton again when you reach the end of
the section you want to repeat. The section is repeated.
2. To cancel repeat, press the STOP button or press the REPEAT button until the _ (repeat
icon) turns off.
Note: AoB repeat only operates on the same track,
Playing MP3 Discs
MP3 files are audio data compressed in MPEG-1, layer III audio format. These files have an .rap3
extension. Your DVD player can play back MP3 audio recorded on some CD-R or CD-RW discs.
Your DVD player has many of the same features as an audio CD player. This seclion explains how
to play MP3 CD-R or CD-RW discs in your DVD player and how to use tlle player's features
during playback (Chapter 1 has details on loading and playing discs).
112
"rs 1/7
3 TRACK03
SOUNDSl /
MP3
S 0 UN DS 1
2 TRACK02
4 TRACK04
p,.
MP3
iiSOU"DSl
I TRACK01 2 TRACK02
4 TRACK04
To Play an MP3 Disc
1. Press the DVD button on the remote to put the remote in DVD
mode.
2. Insert {lle MP3 disc. The folder selection screen appears.
3. Use dne arrow buttons on tim remote to select the folder you want to
play, and press the OK button.
• You can also use llle number buttons (1-9) to select the tblder.
4. Use the arrow bullons to select dne files (or tracks) you want to play,
and press OK. The selected files (or tracks) play.
• You can also use the number buttons (1-9) to select the file or
track.
5. Press STOP to stop playback.
Notes:
Some discs with the .mp3 extension have not been recorded in MP3
format and will not play or produce noise.
Discs recorded at fast speeds may produce noise and not play. Record
discs at a slower speed,
Disc recorded on some recording equipment will not play,
Discs with more than 1000 folders cannot be played
Folder or track names are limited to eight characters, The names may
be shortened or changed.
A maximum of eight layers (files and folders) is recognized.
Only the first session of a multi-session disc is played
53
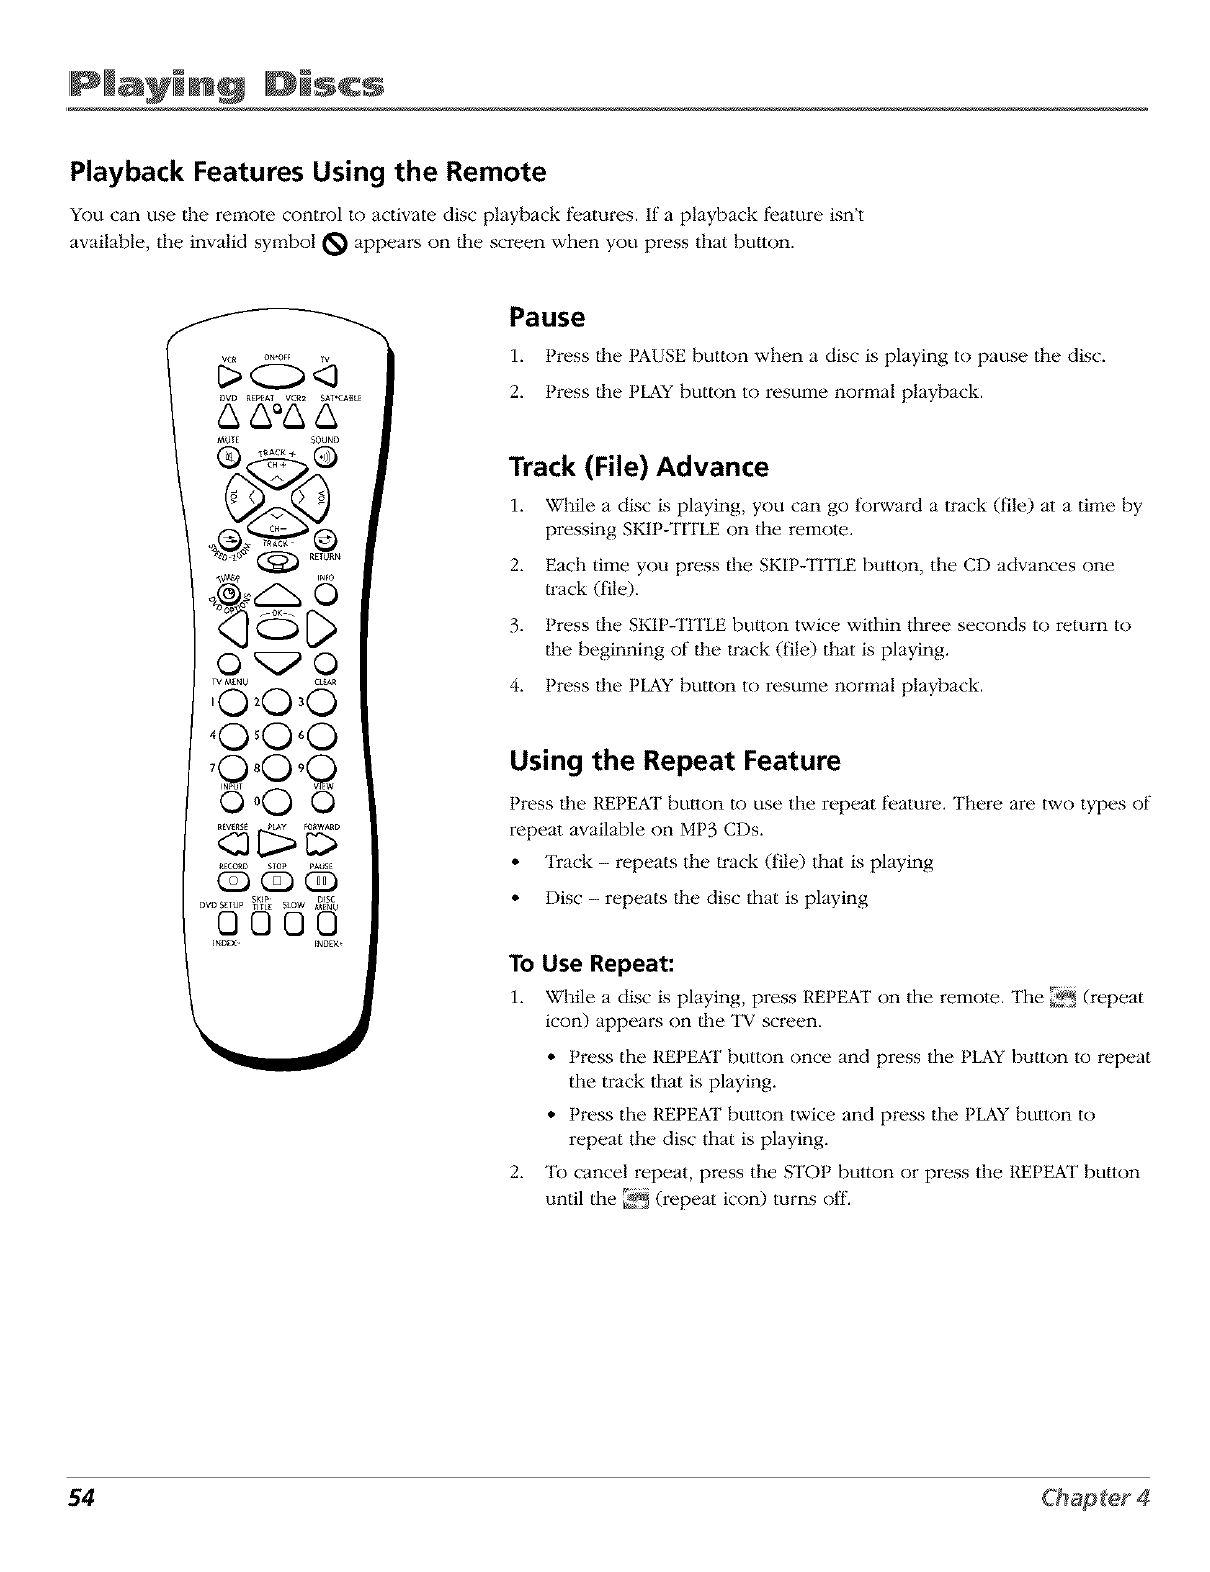
IPIMay ng ID scs
Playback Features Using the Remote
You can use the remote control to activate disc" playback features. If a playback feature isn't
available, the invalid symbol _ appears on lhe screen when you press that button.
Pause
1. Press the PAUSE button when a disc is playing to pause the disc'.
2. Press |he PLAY button to resume normal playback.
Track (File) Advance
1. While a disc is playing, you can go forward a track (t_le) at a time by
pressing SFJP-TH'LE on the remote.
2. Each time you press lhe SKIP-TITLE button, the CD advances one
Irack (file).
3. Press lhe SKIP-TITLE button twice within three seconds to return to
lhe beginning of lhe Irack (file) that is playing.
4. Press lhe PLAY button to resume normal playback.
Using the Repeat Feature
Press the REPEAT button to use the repeat feature. There are two types of
repeat available on MP3 CDs.
• "lYack - repeats the Irack (file) that is playing
• Disc - repeats lhe disc that is playing
To Use Repeat:
1. While a disc is playing, press REPEAT on the remote. The _.,_ (repeat
icon) appears on lhe "1_ screen.
2.
• Press the REPEAT button once and press the PLAY button to repeat
the track that is playing.
• Press the REPEAT button twice and press the PLAY button to
repeat the disc that is playing.
To cancel repeat, press the STOP button or press the t{EPEAT bulton
until the _ (repeat icon) turns olT.
54
Using the Menu System
Chapter Overview:
• How to Use Your Menu System
•Time Menu
•Video Adjust Menu
•Audio Adjust Menu
•Language Menu
•Setting Closed Caption Modes
•Additional Setup Features
•DVD Menu System
Changing Entertainment. .n.
Graphics contained within this publication are fiar representational pu*poses. 55
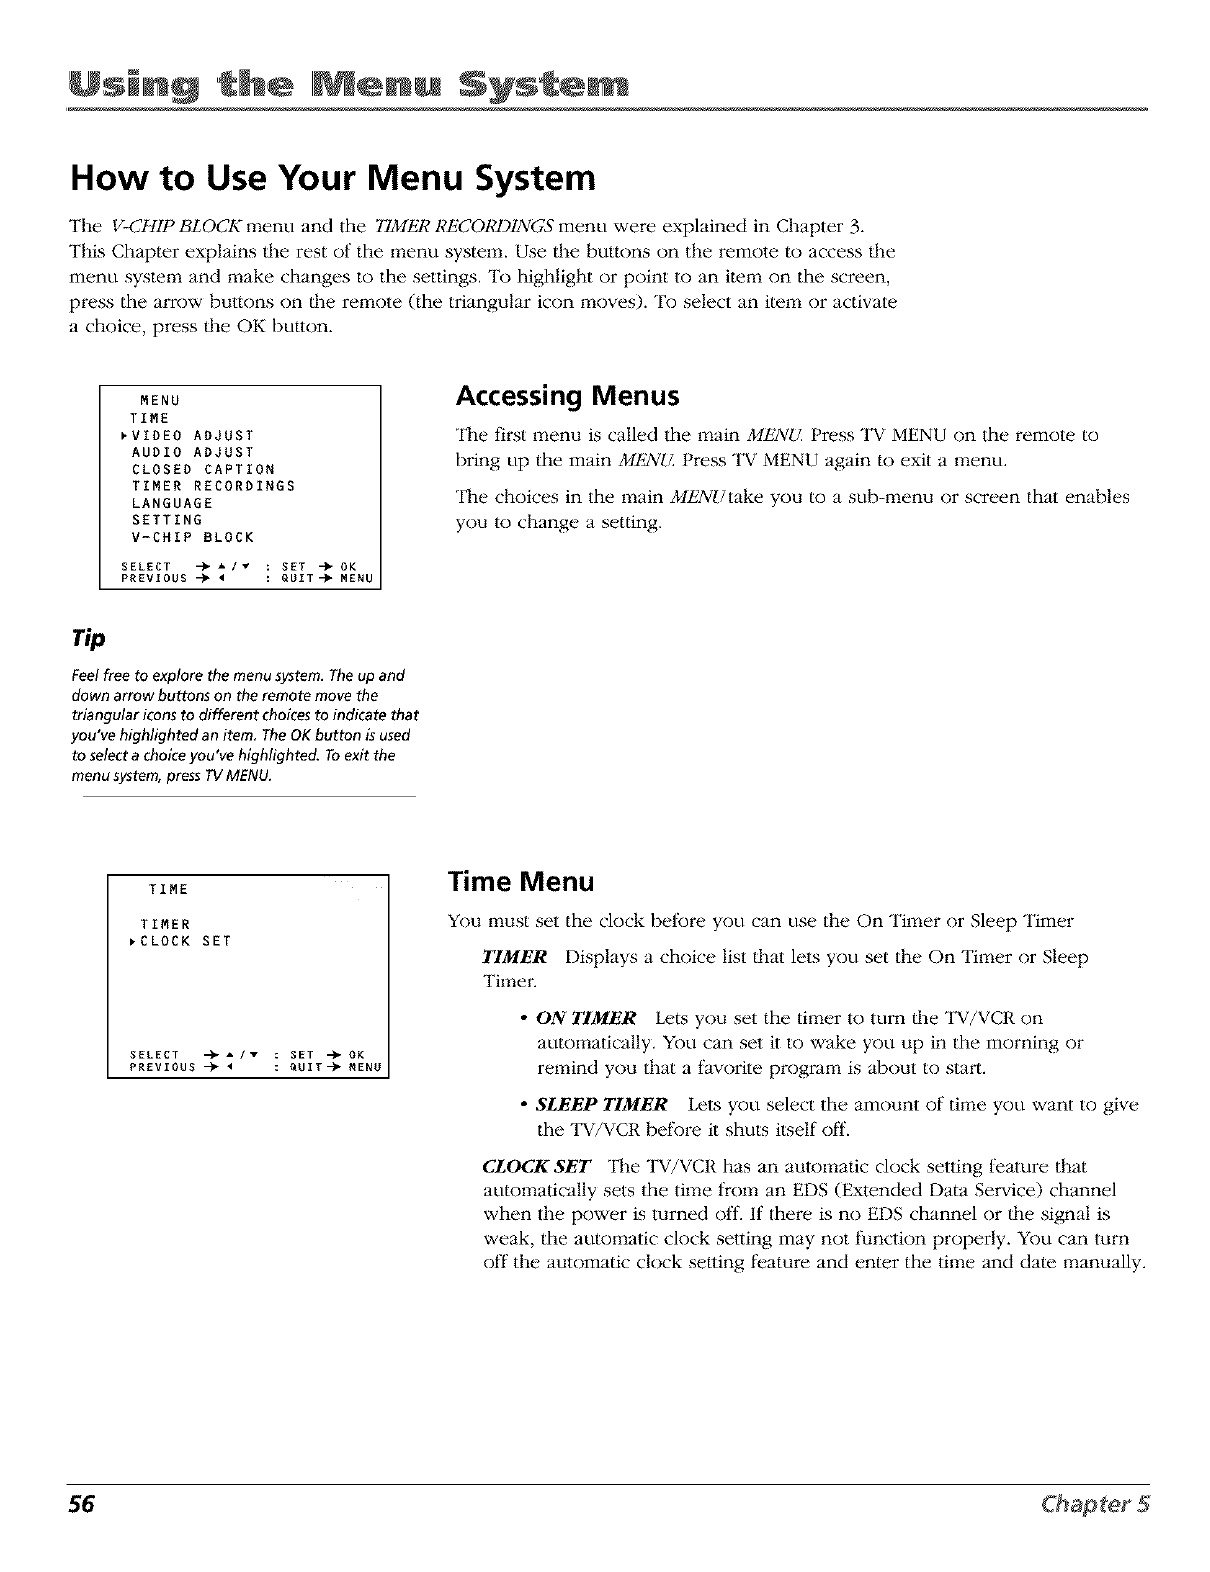
Using Syst@
How to Use Your Menu System
The V-CHIP BLOCK 1:qenu and the TIMER I¢ECOR1)INGS menu were explained in Chapter 3.
This Chapter explains lhe rest of the menu system. Use lhe buttons on the remote to access lhe
menu system and make changes to the settings. To highlight or point to an item on the screen,
press the aITOWbuttons on lhe re1:qote (the triangular icon *:qoves). To select an ite*:qor activate
a choice, press lhe OK bulton.
MENU
TIME
_VIDEO ADJUST
AUDIO ADJUST
CLOSED CAPTION
TIMER RECORDINGS
LANGUAGE
SETTING
V-CHIP @LOCK
SELECT -_A /. : SET -_OK
PREVIOUS -_" <: QUIT-_'MENU
Accessing Menus
"II_e first menu is called the _:qain MENU Press TV MENU on the remote to
bring up the main MENE_ Press "lW MENU again to exit a menu.
The choices in the main MENUtake you to a sub-menu or screen that enables
you to change a setting.
np
Feel free to explore the menu system. The up and
down arrow buttons on the remote move the
triangular icons to different choices to indicate that
you've highlighted an item, The OK button is used
to select a choice you've highlighted. To exit the
menu system, press TV MENU.
TIME
TIMER
_CLOCK SET
SELECT -_AI_" : SET -_OK
PREVIOUS -)_ • : QUIT-_" MEN
Time Menu
You must set the clock belk)re you can use the On Timer or Sleep Timer
TIMER Displays a choice list that lets you set the On Ti1:qer or Sleep
Ti1:qer.
•ON TIMER Lets you set the timer to turn lhe "lW/VCR on
automatically. You can set it to wake you up in the morning or
remind you that a law)rite program is about to start.
•SLEEP TIMER Lets you select the amount of time you want to give
the TV/VCR before it shuts itself off.
CLOCK SET The TV/VCR has an automatic clock setting l)ature that
automatically sets the time from an EDS (Extended Data Service) channel
when die power is turned off. If there is no EDS channel or the signal is
weak, the automatic clock setting may not function properly. You can turn
off the automatic clock selling feature and enter the time and date manually.
56
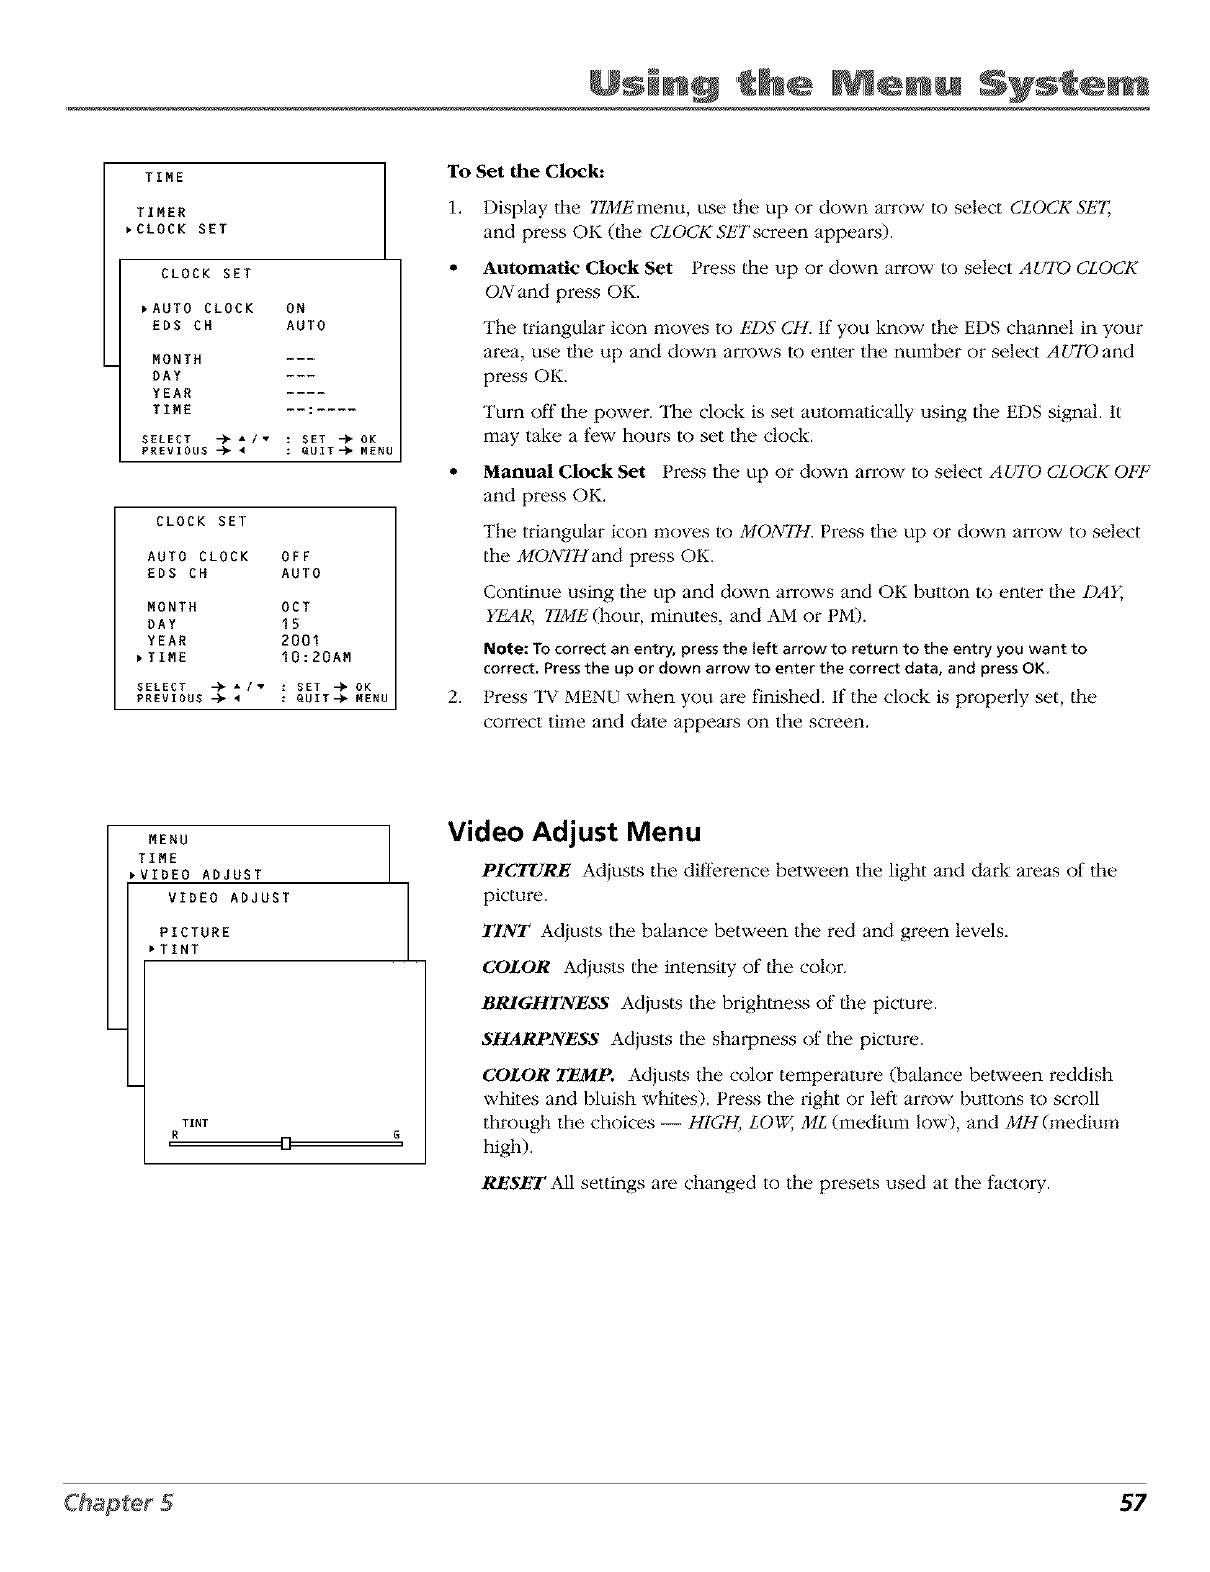
Using
TIME
TIMER
_CLOCK SET
CLOCK SET
_AUTO CLOCK ON
EDS CH AUTO
MONTH ---
DAY ---
YEAR ....
TIME
SELECT -_ A /. : SET -)" OK
PREVIOUS -_4 : GUIT-_MENU
CLOCK SET
AUTO CLOCK OFF
EDS CH AUTO
MONTH OCT
DAY 15
YEAR 2001
_TIME 10:20AM
SELECT -_ A /v : SET -)"OK
PREVIOUS -_-< : QUIT-_'MENU
MENU
TIME
_VIDEO ADJUST
VIDEO ADJUST
PICTURE
*TINT
To Set the Clock:
l. Display the TIME menu, use llie tip or down arrow to select CLOCK Sk"I_
and press OK (flie CLOCKSETscreen appeai:s).
• Automatic Clock Set Press the up or down arrow to select AUTO CLOCK
ON and press OK.
The triangular icon moves to EDS CH. If you know the EDS channel in your
area, use flie up and down arrows to enter the number or select AUYOand
press OK.
Turn off the power. The clock is set automalically using the EDS signal. It
may take a few hours to set the clock.
• Manual Clock Set Press the up or down arrow to select AUTO CLOCK OFF
and press OK.
The triangular icon moves to MON_. Press the up or down arrow to select
the MONTHand press OK.
Continue using the up and down arrows and OK button to enter flie DAY,
Y_R, TIME (hour, minutes, and AM or PM).
Note: TOcorrectanentry, pressthe left arrow to return to the entryyou want to
correct,Pressthe upor down arrow to enter the correctdata, and pressOK,
2. Press "IV MENU when you are finished. If the clock is properly set, flie
correct time and date appears on the screen.
TINT
RG
,D==========
Video Adjust Menu
P1C'I_RE Adjusts the difference between the light and dark areas of the
picture.
TINT Adjusts the balance between the red and green levels.
COLOR Adjusts the intensity of d_e color.
BRIGHTNESS Adjusts the brighmess of d_e picture.
SHARPNESS Adjusts the sharpness of the picture.
COLOR TEMP. Adjusts the color temperature (balance between reddish
whites and bluish whites). Press the right or left arrow buttons to scroll
through the choices -- HIG_ LOW, ML (medium low), and MH (medium
high).
RESET All settings are changed to the presets used at the factory.
57
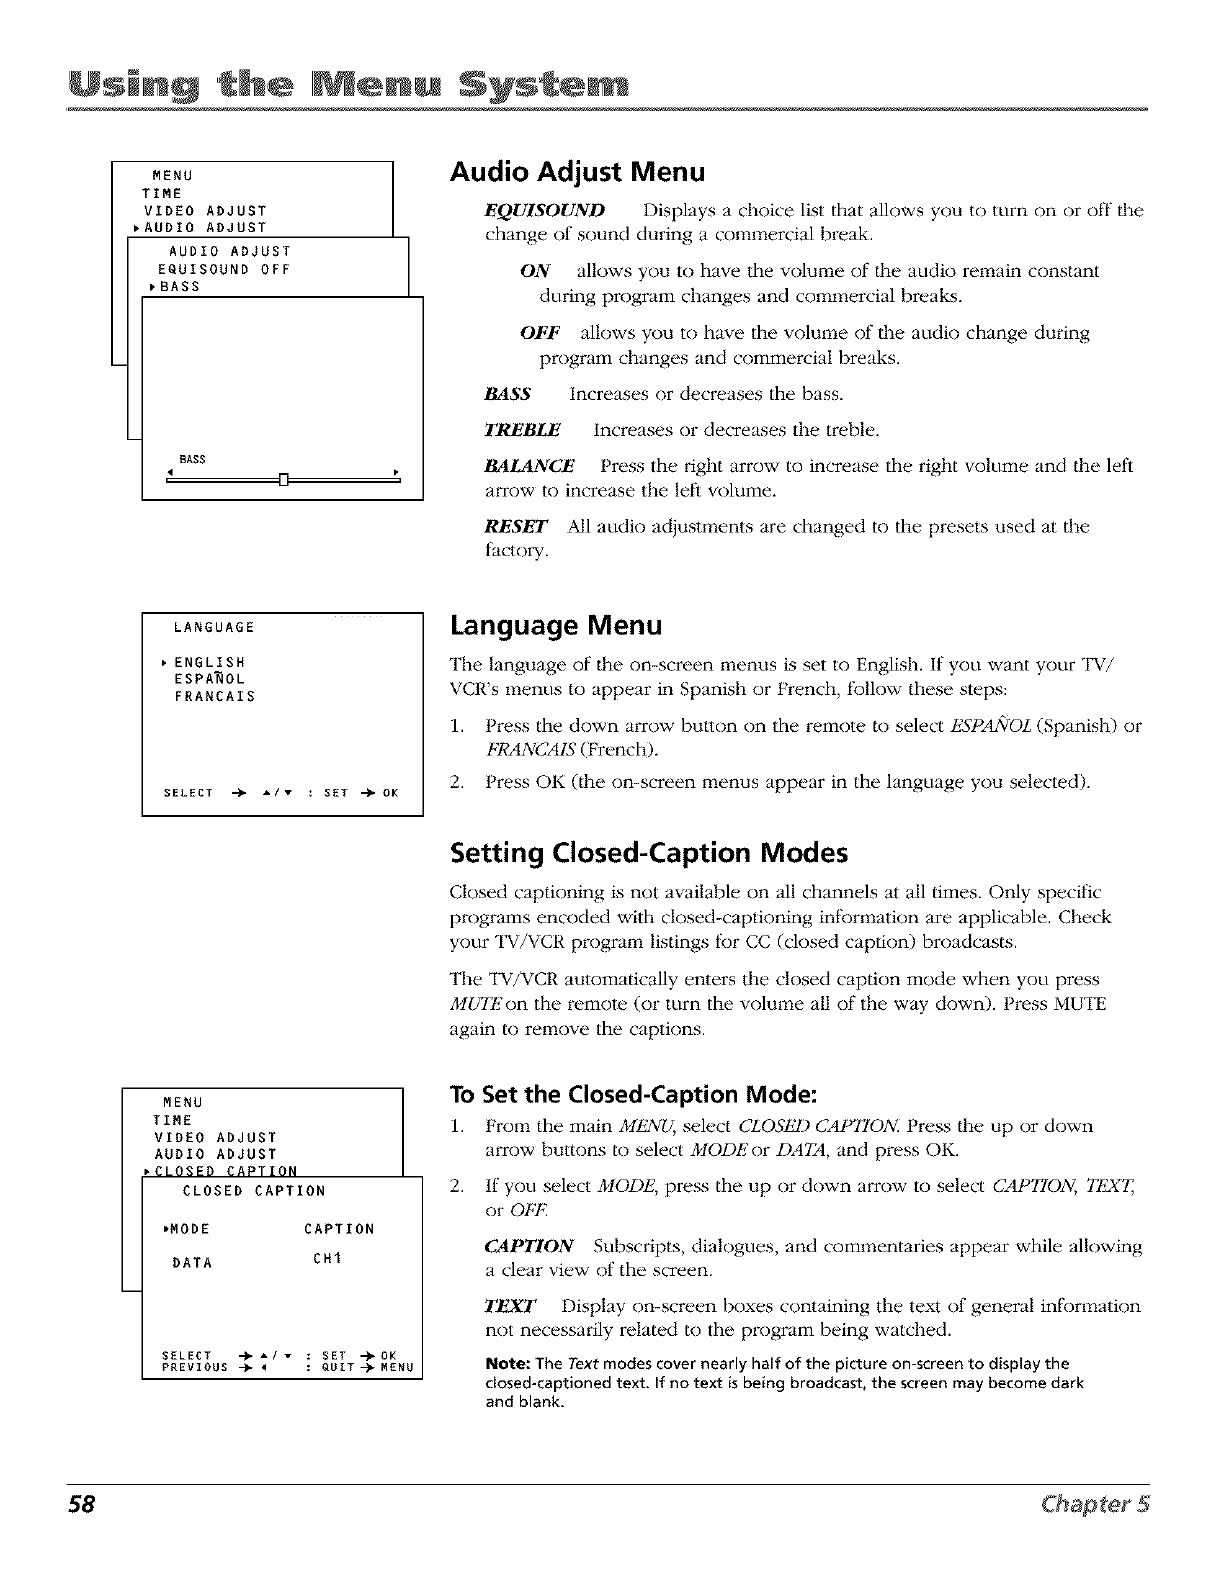
Using Syst@
MENU
TIME
VIDEO ADJUST
AUDIO ADJUST
AUDIO ADJUST
EQUISOUND OFF
,BASS
BASS
,9 n _,
LANGUAGE
Audio Adjust Menu
EQUISOUND Displays a choice list that allows you to turn on or off the
change of sound during a commercial break.
ON allows you to have the volume of the audio remain constant
during program changes and commercial breaks.
OFF allows you to have the volmne of lhe audio change during
program changes and commercial breaks.
BASS Increases or decreases the bass.
TREBLE Increases or decreases the treble.
BALANCE Press the right arrow to increase the right volume and lhe left
arrow to increase the let't volume.
RESVLT All audio adjustments are changed to the presets used at the
factory.
ENGLISH
ESPA_OL
FRANCAES
SELECT ->" */" : SET -)" OK
Language Menu
The language of the on-screen menus is set to English. If you want your "IV/
VCR's menus to appear in Spanish or French, follow these steps:
1. Press the down arrow buuon on the remote to select ESPANOL (Spanish) or
Fh'ANCA1S (French).
2. Press OK (the on-screen menus appear in the language you selected).
Setting Closed-Caption Modes
Closed captioning is not available on all channels at all times. Only specific
programs encoded with closed-captioning information are applicable. Check
your TV/VCR program listings for CC (closed caption) broadcasts.
The TV/VCR automatically enters the closed caption mode when you press
MUTE on the remote (or turn the w)lume all of the way down). Press MUTE
again to remove the captions.
MENU
TIME
VIDEO ADJUST
AUDIO ADJUST
,CLOSED CAPTION
CLOSED CAPTION
,MODE CAPTION
DATA CH1
SELECT -_ A/ . : SET -)'OK
PREVIOUS -)* <: QUIT-_MENU
To Set the Closed-Caption Mode:
1. From the main MEN_ select CLOSED CAP770A_ Press |he up or down
arrow buttons to select MODEor DA72t, and press OK.
2. If you select MODk', press the up or down arrow to select CAPTION, TEXT;
or OFE
CAPTION Subscripts, dialogues, and commentaries appear while allowing
a clear view of the screen.
TEXT Display on-screen boxes containing the text of general information
not necessarily related to the program being watched.
Note: The Text modes cover nearly half of the picture on-screen to display the
dosed-captioned text. If no text is being broadcast, the screen may become dark
and blank,
58
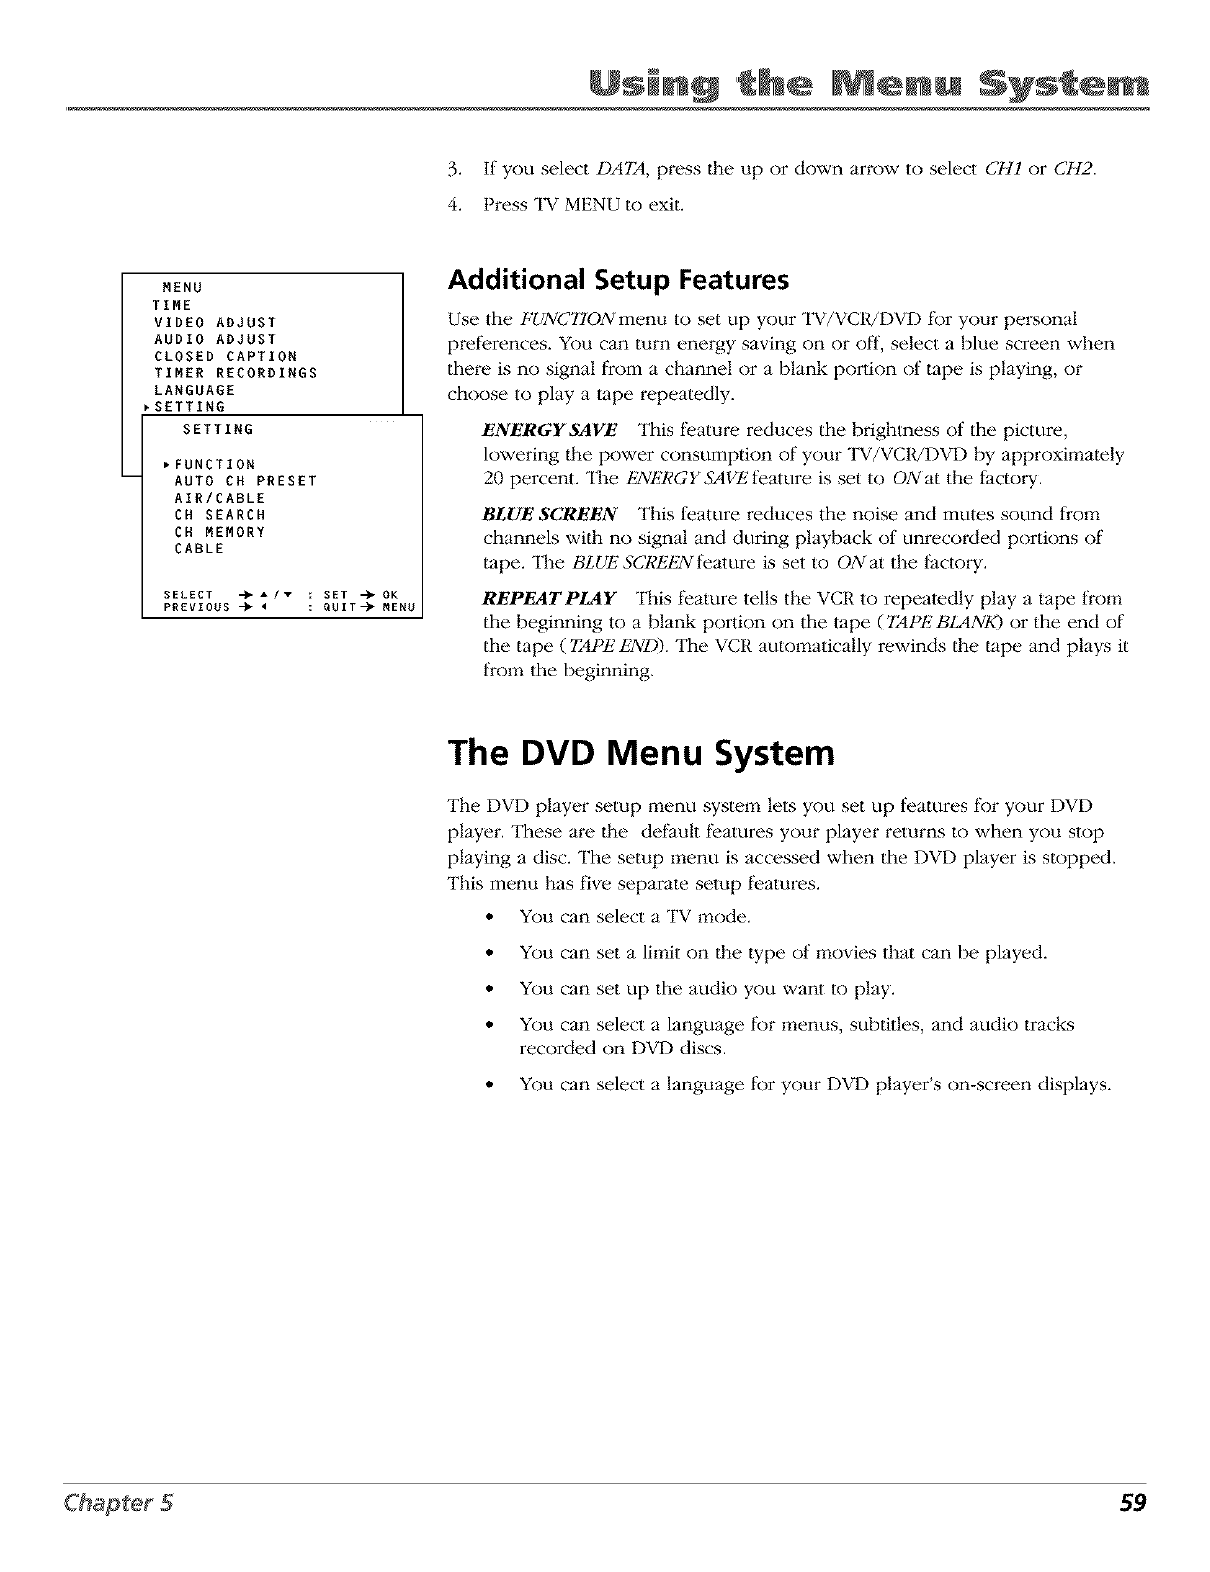
Using
3. If you select DA72t, press the up or down arrow to select CH1 or CH2.
4. Press TV MENU to exit.
MENU
TIME
VIDEO ADJUST
AUDIO ADJUST
CLOSED CAPTION
TIMER RECORDINGS
LANGUAGE
_SETTING
SETTING
,FUNCTION
AUTO CH PRESET
AIR/CABLE
CH SEARCH
CH MEMORY
CABLE
SELECT -_-_ /v: SET -_OK
PREVIOUS -_ 4 : QUIT-_MENU
Additional Setup Features
Use the FUNCTION menu to set up your TV/VCR/I-)VD t_r your personal
preferences. You can turn energy saving on or off, select a blue screen when
there is no signal from a channel or a blank portion of tape is playing, or
choose to play a tape repeatedly.
ENERGYSAVE This feature reduces the brightness of the picture,
lowering the power consumption of your "IW/VC1UDVD by approximately
20 percent. The t;2VPLT,'GYSAVEfeature is set to ONat the factory.
BLUE SCREEN This feature reduces the noise and mutes sound from
channels with no signal and during playback of unrecorded portions of
tape. The BLUE SCREEN feature is set to OA 1at the factory.
REPEATPLAY This feature tells the VCR to repeatedly play a tape from
the beginning to a blank portion on the tape (TAPE BLANK) or the end of
the tape (TAPE END). The VCR automatically rewinds the tape and plays it
from the beginning.
The DVD Menu System
The DVD player setup menu system lets you set up features for your DVD
player. These are lhe default features your player returns to when you stop
playing a disc. The setup menu is accessed when the DVD player is stopped.
This menu has five separate setup features.
•You can select a TV mode.
• You can set a limit on lhe lype of movies that can be played.
• You can set up the audio you want to play.
• You can select a language for menus, subtitles, and audio tracks
recorded on DVD discs.
• You can select a language for your DVD player's on-screen displays.
59
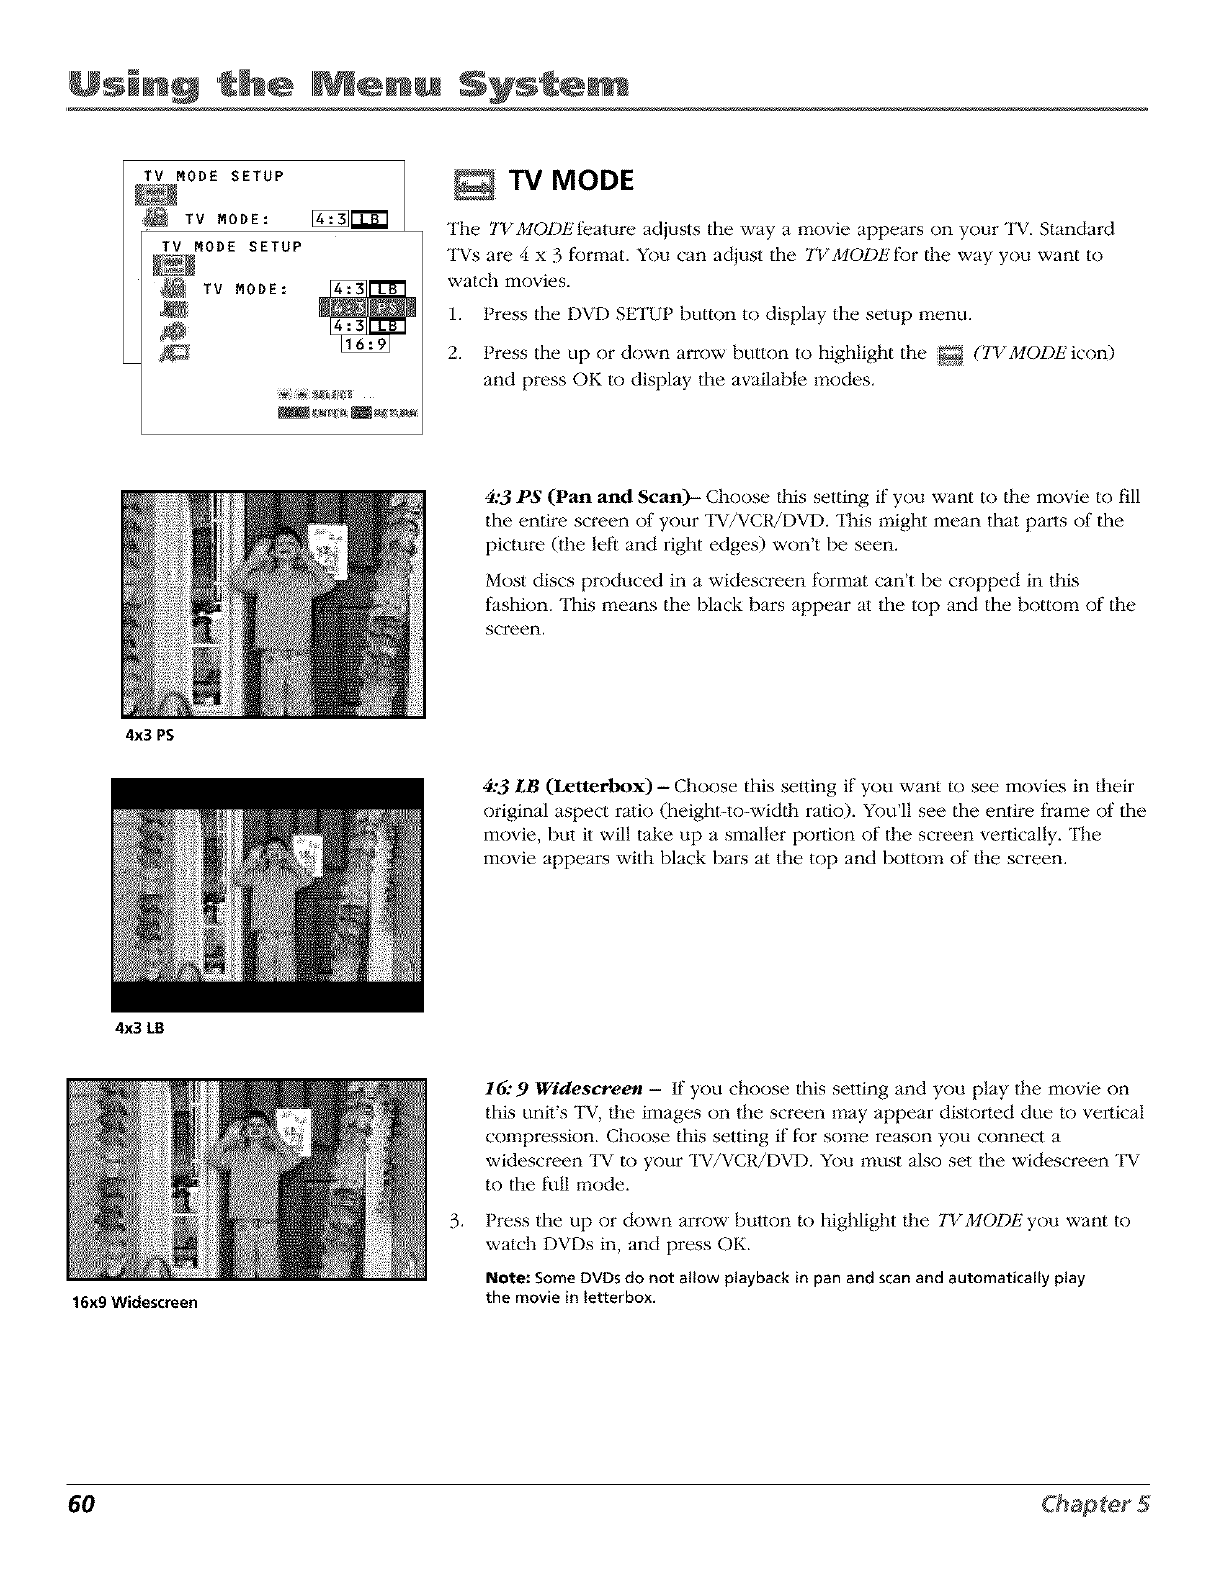
Using Syst@
TV MODE SETUP
TV MODE:
TV MODE SETUP
TV MODE:
4x3 PS
4x3 LB
TV MODE
The TVMODEI_:amre adjusts the way a movie appears on your "IV. Standard
TVs are 4 x 3 format. You can adjust the 2_MODEt'or lhe way you want to
watch movies.
1. Press the DVD SETUP button to display the setup menu.
2. Press the up or down arrow button to highlight the _ (TVMODE icon)
and press OK to display the available modes.
4:3 PS (Pan and &can)-- Choose lhis selling if you want to lhe movie to fill
the entire screen of your TV/VCR/DVD. "Ilais might mean that parts of the
picture (the let) and right edges) won't be seen.
Most discs produced in a widescreen tBrmat can't be cropped in this
fashion. This means the [)lack bars appear at the top and the bottom of the
screen.
4:3 LB (Letterbox) -Choose this selling if you want to see movies in lheir
original aspect ralio (height-to-widlh ratio). You'll see the entire frame of the
movie, but it will take up a smaller po_lion of the screen vertically. The
movie appears with [)lack bars at the top and bottom of lhe screen.
16x9 Widescreen
.
16.'9 Widescreen - If you choose this selling and you play the movie on
this unit's "IV, lhe images on the screen may appear distorted due to vertical
compression. Choose this setting if for some reason you connecl a
widescreen "IV to your TV/VCWDVD. You must also set the widescreen "IV
to the full mode.
Press the up or down arrow button to highlight lhe TVMODEyou want to
watch DVDs in, and press OK.
Note: Some DVDs do not allow playback in pan and scan and automatically play
the movie in letterbox.
6O

Using
Set Parental Limits
The PARENTAL SETUt_menu lets you set viewing limils according to a movie's ruling or
contents. Some discs are equipped wilh a ruling feature that rates the disc according to the
content. So1:qe discs let you edil out scenes and replace them with scenes suitable for children.
You can also set the locking feature so any discs beyond the rating you select cannot be played.
PARENTAL SETUP
CODE: USA
PARENTAL SETUP
_!_ PASSWORD:
CODE: USA
PARENTAL SETUP
PASSWORD:
CODE: USA
PARENTAL SETUP
SELECT LEVEL
CODE: USA
1. Press the DVD SETUP bulton to display lhe setup menu.
2. Press the up or down arrow button to highlight lhe :_ (PARt]'NTAL 5k'I'TUP
icon), and press OK to display the PA£5'WORD screen.
3. Use the number butlons (0-9) to enter a 4-digit password, and press OK.
The password verification screen appears. Enter your password again, and
press OK.
Important Note: Besure to remember your password. The next time you try to
accessthis menu, you will have to enter the same password.
If you forget your password, you can erase the current one by pressing the STOP
button on the remote four times.
4. The ratings t_r the USA are listed. Press the up or down arrow button to
highlight the highest level you want DVDs played.
• Select 1 (G rating) for the 1:qost reslricted viewing.
• Select 3 for PG rating.
• Select 4 for PG13 raling.
• Select 6 for R rating.
• Select 7 for NC-17 rating.
• Select 8 for adult viewing.
5. Press the OK button on the remote to set the viewing level.
Notes: if this feature isset to OFF,the selected rating does not apply. All discscan
be viewed.
The discs must be encoded with the rating feature.
Somediscslet you temporarily change the level setting to view original scenes,and
some discs have a set level and cannot be modified.
61
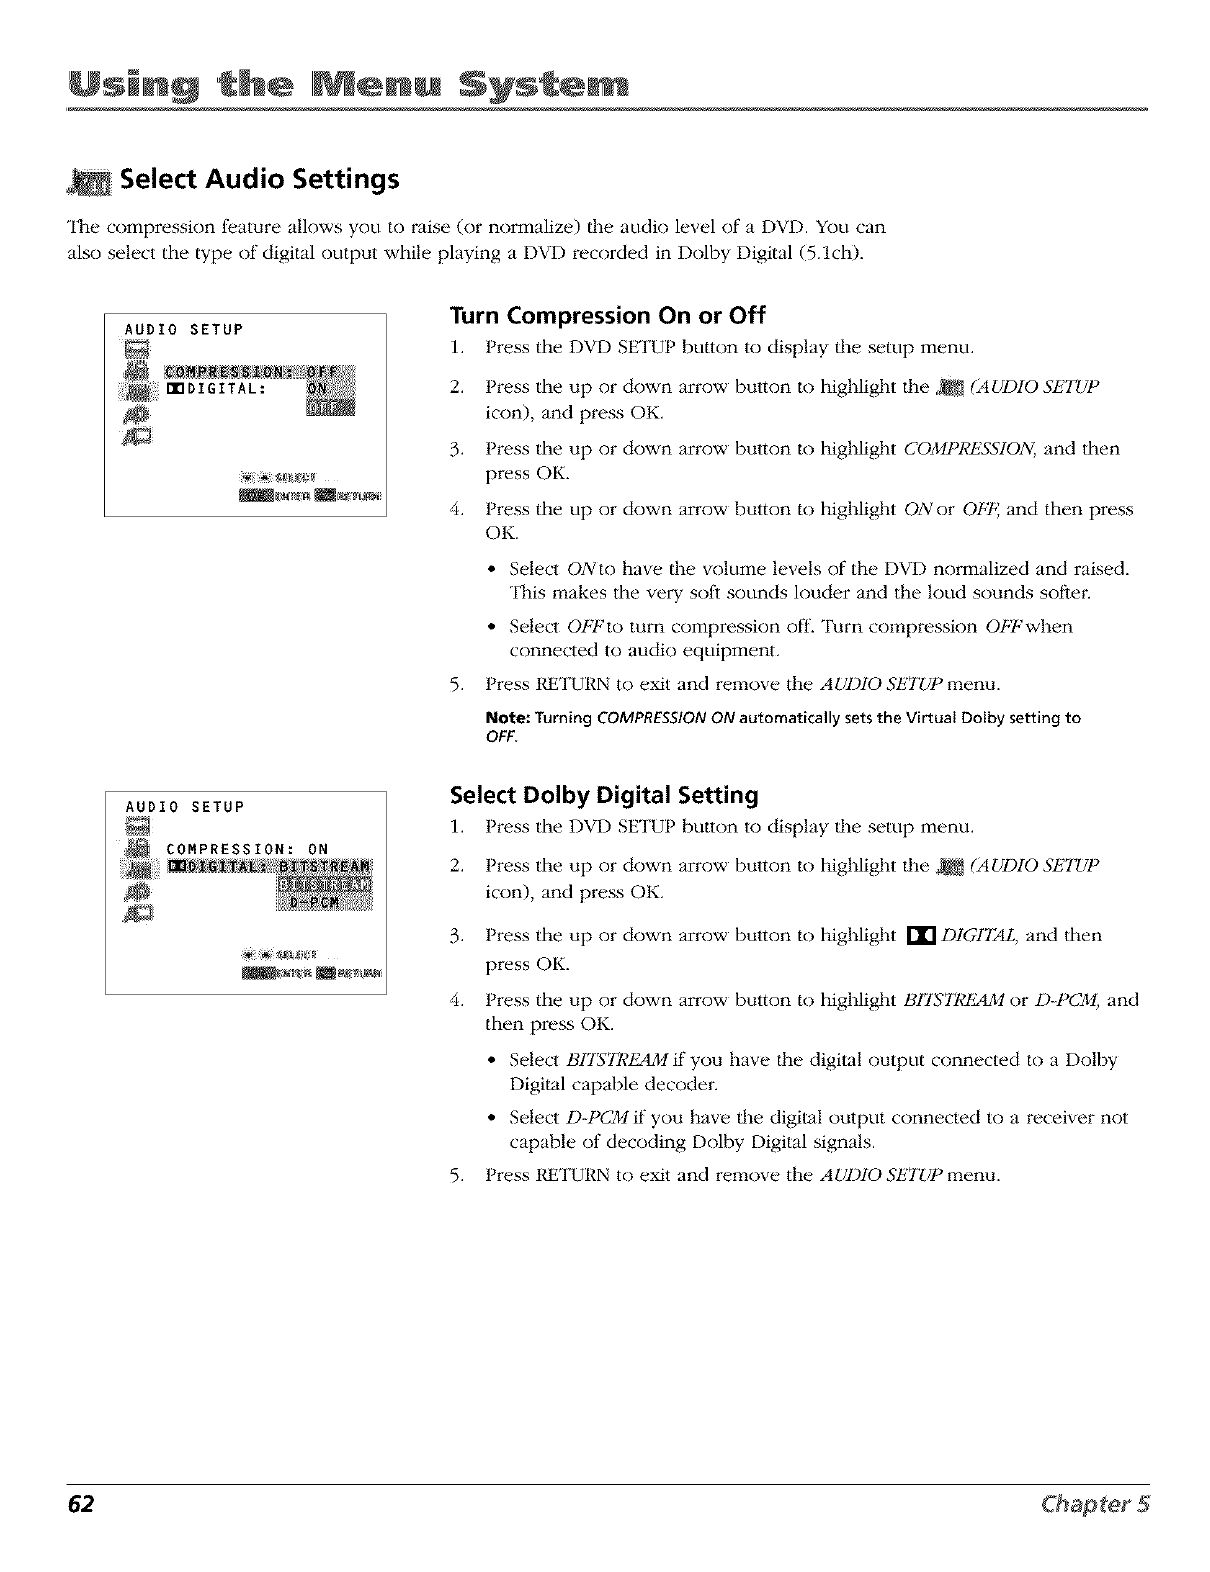
Using Syst@
"II_e compression l_:ature allows you to raise (or normalize) lhe audio level of a DVD. You can
also select the type of digital output while playing a DVD recorded in Dolby Digilal (5.1ch).
AUDIO SETUP Turn Compression On or Off
1. Press the DVD SETUP button to display the setup menu.
2. Press the up or down arrow button to highlight lhe ._ (AUDIO SETUP
icon), and press OK.
3. Press the up or down arrow button to highlight COMPRESSION, and then
press OK.
4. Press the up or down arrow button to highlight ONor OFE and then press
OK.
5.
•Selecl ONto have lhe volume levels of the DVD normalized and raised.
This makes the very soft sounds louder and the loud sounds soflei:
•Selecl OFFto turn compression off. Turn compression OFFwhen
connected to audio equipment.
Press KETURN to exit and remove the AUDIO St]'TUP menu.
Note: Turning COMPRESSION ON automatically sets the Virtual Dolby setting to
OFF.
AUDIO SETUP
COMPRESSION: ON
Select Dolby Digital Setting
1. Press the DVD SETUP btmon to display the setup menu.
2. Press the up or down arrow button to highlight lhe _ (AUDIO SETUP
icon), and press OK.
.
4.
5.
Press the up or down arrow button to highlight [I] DIGITAL, and then
press OK.
Press the up or down arrow button to highlight BIT_'TR_M or D-PCM, and
then press OK.
•Selecl B17STR_ if you have the digital output connected to a Dolby
Digital capable decodei:
• Select D-PCM if you have the digital output connected to a receiver not
capable of decoding Dolby Digital signals.
Press RETURN to exit and remove the AUDIO SETUP menu.
62
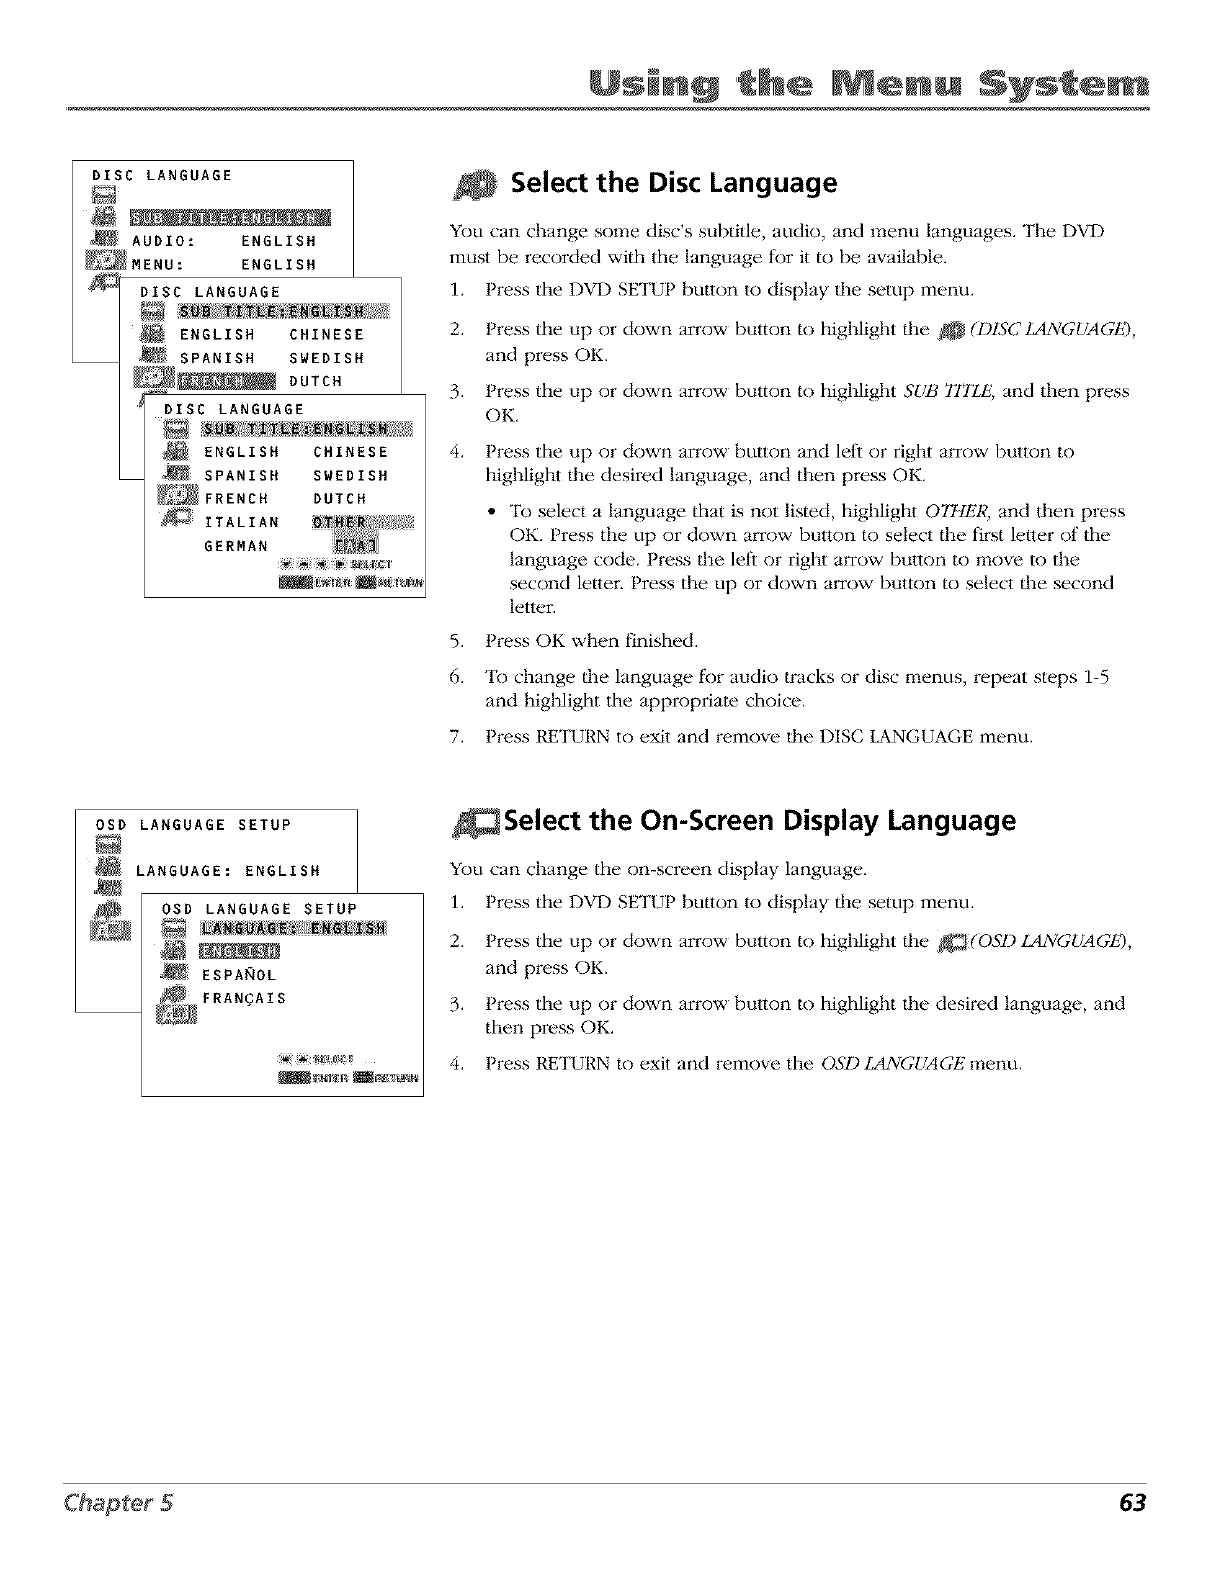
Using
DISC LANGUAGE
AUDIO: ENGLISH
ENGLISH
DISC LANGUAGE
ENGLISH CHINESE
SPANISH SWEDISH
__ DUTCH
DISC LANGUAGE
i_ ENGLISH CHINESE
SPANISH SWEDISH
DUTCH
_i ITALIAN
GERMAN
Select the Disc Language
You can change so_:qe disc's subtide, audio, and menu languages. The DVD
must be recorded wilh dc_elanguage for it to be available.
1. Press the DVD SETUP bulton to display lhe setup menu.
2. Press the up or down arrow button to highlight lhe _ (DISC IANGUAGk),
and press OK.
3. Press the up or down arrow button to highlight SUI3 _IITLE,and then press
OK.
4. Press the up or down arrow button and left or right arrow button to
highlight lhe desired language, and then press OK.
•To select a language that is not listed, highlight O_ER, and then press
OK. Press the up or down arrow button to select the fi_:stletler of the
language code. Press lhe left or right arrow bulton to move to the
second lette_: Press the up or down arrow button to select the second
letter.
5. Press OK when fnished.
6. To change the language for audio tracks or disc menus, repeat steps 1-5
and highlight doleappropriate choice.
7. Press t{ETURN to exit and remove lhe DISC LANGUAGE menu.
OSD LANGUAGE SETUP
LANGUAGE: ENGLISH
OSD LANGUAGE SETUP
ESPANOL
FRANGAIS
Select the On-Screen Display Language
You can change the on-screen display language.
1. Press the DVD SETUP bulton to display lhe setup menu.
2. Press the up or down arrow button to highlight lhe _(OSI) IMNGUAGk),
and press OK.
3. Press the up or down arrow button to highlight lhe desired language, and
then press OK.
4. Press t{ETURN to exit and remove the OSD LANGUAGE menu.
63
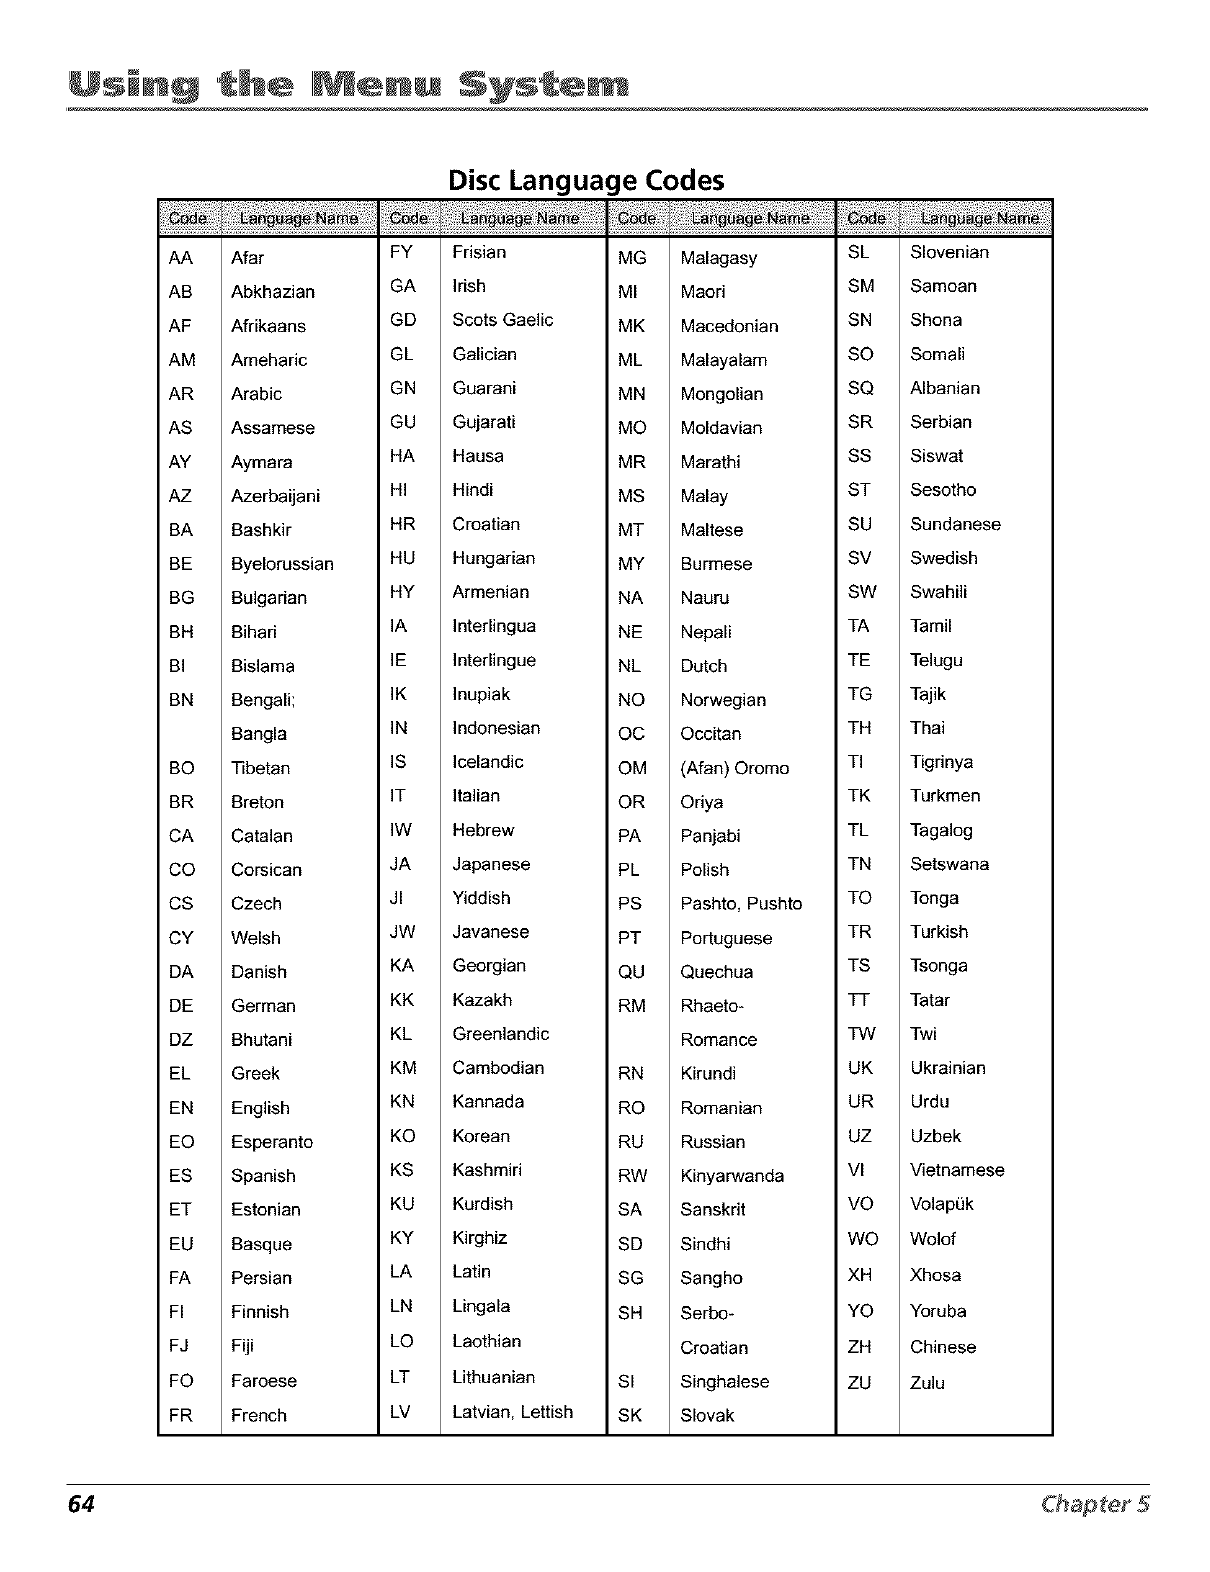
Using Syst@
AA
AB
AF
AM
AR
AS
AY
AZ
BA
BE
BG
BH
BI
BN
BO
BR
CA
CO
CS
CY
DA
DE
DZ
EL
EN
EO
ES
ET
EU
FA
FI
FJ
FO
FR
Afar
Abkhazian
Afrikaans
Ameharic
Arabic
Assamese
Aymara
Azerbaijani
Bashkir
Byelorussian
Bulgarian
Bihari
Bislama
Bengali;
Bangla
Tibetan
Breton
Catalan
Corsican
Czech
Welsh
Danish
German
Bhutani
Greek
English
Esperanto
Spanish
Estonian
Basque
Persian
Finnish
Fiji
Faroese
French
FY Frisian
GA Irish
GD Scots Gaelic
GL Galician
GN Guarani
GU Gujarati
HA Hausa
HI Hindi
HR Croatian
HU Hungarian
HY Armenian
IA Interlingua
IE Interlingue
]K ]nupiak
IN Indonesian
IS Icelandic
IT Italian
IW Hebrew
JA Japanese
JI Yiddish
JW Javanese
KA Georgian
KK Kazakh
KL Greenlandic
KM Cambodian
KN Kannada
KO Korean
KS Kashmiri
KU Kurdish
KY Kirghiz
LA Latin
LN Lingala
LO Laothian
LT Lithuanian
LV Latvian, Lettish
Disc Language Codes
MG
MI
MK
ML
MN
MO
MR
MS
MT
MY
NA
NE
NL
NO
OC
OM
OR
PA
PL
PS
PT
QU
RM
RN
RO
RU
RW
SA
SD
SG
SH
SI
SK
Malagasy SL
Maori SM
Macedonian SN
Malayalam SO
Mongolian SQ
Moldavian SR
Marathi SS
Malay ST
Maltese SU
Burmese SV
Nauru SW
Nepali TA
Dutch TE
Norwegian TG
Occitan TH
(Afan) Oromo TI
Oriya TK
Panjabi TL
Polish TN
Pashto, Pushto TO
Portuguese TR
Quechua TS
Rhaeto- TT
Romance TW
Kirundi UK
Romanian UR
Russian UZ
Kinyarwanda Vl
Sanskrit VO
Sindhi WO
Sangho XH
Serbo- YO
Croatian ZH
Singhalese ZU
Slovak
SIovenian
Samoan
Shona
Somali
Albanian
Serbian
Siswat
Sesotho
Sundanese
Swedish
Swahili
Tamil
Telugu
Tajik
Thai
Tigrinya
Turkmen
Tagalog
Setswana
Tonga
Turkish
Tsonga
Tatar
Twi
Ukrainian
Urdu
Uzbek
Vietnamese
Volap0k
Wolof
Xhosa
Yoruba
Chinese
Zulu
64
Other Information
Chapter Overview:
• Troubleshooting
•The Front of Your TV/VCR/DVD
•Back Panel Jacks
•Care and Cleaning
•Limited Warranty
•Finding the TV/VCR/DVD's Video Line Input Channel
•Accessories
•Index
Changing
Graphics used within this publication are fi_r repre.;entation only. 65
Troubleshooting
Most problems you encounter wilh your TV/VCR/DVD can be corrected by consulting the Troubleshooting list that lk)llows.
General TV/VCR/DVD Problems
TV/VCR/DVD won't turn on
Make sure you tW the following buttons on the remote: TV, VCR DVD, and ON-OPE
Something might be wrong with your remote control. Press the POWER button on the front of the TV/VCR/DVD. if the TV/VCR/DVD
turns on, check the remote control solutions on page 67.
Make sure the TV/VCR/DVD is plugged in.
Check the wall receptacle (or extension cord) to make sure it is "live" by plugging in something else.
Controls don't work
if you're using the remote" control for TV f_mctions (such as changing channels), press the TV button first to make sure the remote" is
in TV mode.
Unplug the TV/VCR/DVI) fbr 2 minutes and then plug it back in. Turn the TV on and tW again.
PROGRAM EVENT indicator lit on the fi-ont panel of the TV/VCR/DVD. Timer recording set. Press TIMER on the remote to turn off
the indicator. Remember to press TIMER to reset the timer recording when you are finished.
TV/VCR/DVD turns off unexpectedly
Sleep timer may have been activated. Go to page 56 for instructions.
TV/VCR/DVD turned on with On Timer. Automatically turns off after two hours if no other control is used.
Electronic protection circuit may have been activated because of a power surge. _lait 30 seconds and then turn the TV/VCR/DVI) on
again, if" this happens frequently, the voltage in yore house may be abnormally high or low.
TV/VCR/DVD turns on unexpectedly
On timer (alarm) may have been activated. Go to page 56 f_:)rinsti_actions.
Blank screen
TW another channel.
Check vide() adjustments. Go to page 57 for infb about the l/_li)gO ADJHS7menu.
Make sure the line input isn't selected. Repeatedly press INPUT on the remote to switch between audio/video input jacks and the
tuner.
Make sure blank portion of tape is not playing.
No sound, picture okay
Press the VOL up button to increase the sound.
Maybe sound is muted. Press the MUTE button to restore sound.
Digital Audio Output is available dming DVI) playback only.
Check audio settings f_:)rTV/VCR and DVD.
Check audio connections. Make sure the audio cables are firmly connected to the jacks.
No picture, no sound but TV is on
Press '['V on relqOOtc' to put remote in TV mode.
The channe] might be empty -- change channe]s.
66
Sound okay, picture poor
TW adjusting sharpness fi.mction to improve, weak signals. Go to page 57 for instructions.
The energy-save fbature might be on. Go to page 59 for more inf_)rmation.
Check antenna connections. Make sure all of the cables are firmly connected to the jacks.
Can't select certain channel
Channel may be blocked or not approved in the V-CHll)BLOCK menu.
Clock is wrong
Power interruption. Need to reset the clock. Go to page 57 f_0imore information.
Clock was not set accuratvly (check AM/PM and datv). Go to pagv 57 f_:)rmorv information.
Black box appears on the screen
Closed-captioned tvxt mode might be selected. Check the CLOSE ('AP77ONmenu. Go to pagv 58 f_:)i-more instructions.
Closed captions not appearing on screen
Closed caption might not be, turnc, d on. Go to page 58 f_:)i-more inf_)rmation.
Station might not be broadcasting closed caption.
The Remote Control Doesn't Work
You have to make sure file remote control is in the right mode -- if you're using VCR fbatures, you need to press the VCR button on
the remote to put it in VCR mode. If you're using TV functions, you need to press file TV button to put the remote in TV mode.
Something might be between the remote and the remote sensor on the component. Make sure there is a clear path.
Maybe the remote isn't aimed directly at the TV/VCR/DVD.
Maybe batteries in remote are weak, dead or installed incorrectly. Put new batteries in the remote.
You might need to drain the remote's microprocessor: remove batteries and press the number 1 button for at least 60 seconds.
Release the 1 button, replace the batteries, and (if necessa W) program the remote again.
VCR Playback Problems
Tape plays continuously
Repeat Play might be turned on. Go to page 59 _:)rinstructions.
Tape plays automatically
Tape with safi.ty tab removed starts playing automatically.
Tape won't insert or eject
Make sme you insert the cassette with the window facing up and safety tab facing (:)tit.
When removing a tape, make sure the TV/VCR/DVD is connected to a working outlet.
Turn off the TV/VCR/DVD, then turn it back on befk)re twing to insert or remove tape.
Tape won't play or record
If"youre using the remote control, prvss VCR to put the rvmotv in VCR mode bvf_:)re you press PLaY or RECORD.
Make sun, a videotape has bven inserted.
Eject and reinsert tapv.
The tape might be broken -- tl T another tape.
Check to soy if the safety tab ires bern removed. If" it has, the TV/VC_I)VD will not record.
The TV/VCR/I)VD might by in pause mode. Press PLAY on the remote to return the tape to play mode.
Time counter not working
The time counter will not advance during unrecorded portions of tape.
You have rewound the tape farther back than a counter reading of 0:00:00. A minus (-) will appear if this has occurred.
OTR recording is set.
Snow or streaks in picture or no picture during tape playback
Some snow/streaks arv normal during search pause, frame advancv, and slow-motion playback.
Check tape. it may by worn out or of poor quality.
Might need to adjust the tracking. Go to page 42 for instructions.
TV/VCR/DVD makes noise when VCR stopped
VCR is removing tape from beads, which is normal. '['l_e head cylinder inside the VCR continues to rotate for a few minutes after you
put the VCR in stop mode.
DVD Playback Problems
DVD won't play
Make sun, disc is for Region 1 for this player.
Make sure the correct type of disc is inserted. Go to page 20 for more information.
Disc may be dirty. Clean disc. Go to page 73 for morn infk)rmation.
DVD's Disc Language different than players menu's
Some DVDs menus may not by available in your languagv.
DVD playback volume lower or higher than expected
Check compression and digital audio settings. Go to pagv 62 f_:)rmore inf_:)rmation.
DVD playback image is boxed in or distorted
Verify the correct TVMOI)L; setting. Go to pagv 60 f_:)rmore inf_:)rmation.
No Virtual Dolby (QSURROUND) effect output to the receiver
Virtual Dolby (QSI.JRROI.JND) is not available while listvning to the audio through the digital output jacks.
Disc will not play
Parvntal Control set. Go to page 61 for morv information.
68
VCR Recording Problems
PROGRAM EVENT indicator on front of TV/VCR is flashing
There might have been a power interruption. Check the clock for time and date setting. Go to page 36 for more information.
A timer program has been set and you turned off the TV/VCR but you haven't inscrl_,d a tape or the tape you inserted has had its
safi, ty tab removed. Go to page 38 for instructions.
Cannot record one program while watching a different program
Make sure to press the TV button on the remote and press VIEW to switch to TV mock'. Go to page, 18 f_)r details.
Timer recording didn't work
Program cnt_,red incorrectly. Go to page, 38 fbr instructions.
If" tbc TV/VCR/I)VD is connected to a cable box or sat_,llit_, receiver, the cabh, box or receiver was not turned on anti tuned to
correct channel at time recording was to begin.
There might have been a power interruptk:m. If so, the PROGRAM EVENT indicator will flash on front of the TV/VCR/DVD.
Check to see if the TV/VCR/DVI)'s time and date was set correctly. Go to 57 fbr more infbrmation.
Program exceeded tape's length or tape was not rewound beforehand.
No tape in TV/VCR/DVD or tape inserted without a safety tab.
OTR recording takes precedence over timer recording. Go to page 38 for details.
Image distorted during DVD recording
Some DVI) s are copyright protected and cannot bc recorded.
Problems with V-Chip/Parental Controls for TV/VCR
The rating limits don't work
You must turn V_Chip on. Go to the main MkWU (press TV MENU on your remote) select V_UH1PBLOCK, and set ST_iTZL';to (Z%!Go
to page 30 fk)r instructions.
I don't remember my password and I want to unlock the TV/VCR
If'you fbrget your password, unplug the TV/VCR/I)VD simultaneously press and hold VOL up and STOP/EJECF buttons on the fiont
of the TV/VCR/DVD while you plug the TV/VCR/DVD in. Hold for two seconds and release. This resets the password so you can
enter a new one.
Problems with Parental Controls for DVD Player
The rating limits don't work
You must turn Parental Control on. Go to page 61 for details.
Some discs do not have ratings encoded.
Forgot Parental Control Password for DVD player
If"you f_)rgct your password, you can erase the current password by pressing the STOP button on the remote four times.

The Front of Your TV/VCR/DVD
TV/VCR Controls
I
© .... ;-=I
I-I--I--I-I @@@
Remote control sensor DVD Player Controls
POWER Button Turns the TV/VCWDVD on or off.
Power Indicator Lights when the power is on.
PHONES (Headphone Jack) Connect headphones (not supplied) to this jack.
Remote Sensor Receives signals from the remote. Aim remote at this sensor wilh no objects between them.
VIDEO, L/MONO, and R Input Jacks Receives audio and video signals from another component, like a video gaming
device or camcorder when the component is connected to these jacks. To select these front panel jacks, press INPUT on
the remote until LINE2 appears.
VOL - or + Decreases and increases the volume.
DVD Controls
DVD Indicator Lights when the TV/VCR/1-)VD is in the DVD rrlode.
OPEN/CLOSE Press to open and close the DVD tray.
PLAY Press once to begin playback of disc. Press to resume playback when disc is paused or in slow motion.
SKIP/REV and SKIP/FWD Press SKIP/I_EV to search the picture backwards or SKIP/FWD to search the picture forwards
during DVD playback.
STOP Stops normal DVD functions such as play, rewind, fast-forward, or pause.
TV/VCR Controls
CH + and- Scans down through the current channel list. Used for manual u'acking when a tape is playing.
FWD (Forward) Fast forwards the "tape when the VCR is stopped. Searches the picture forward during playback.
7O
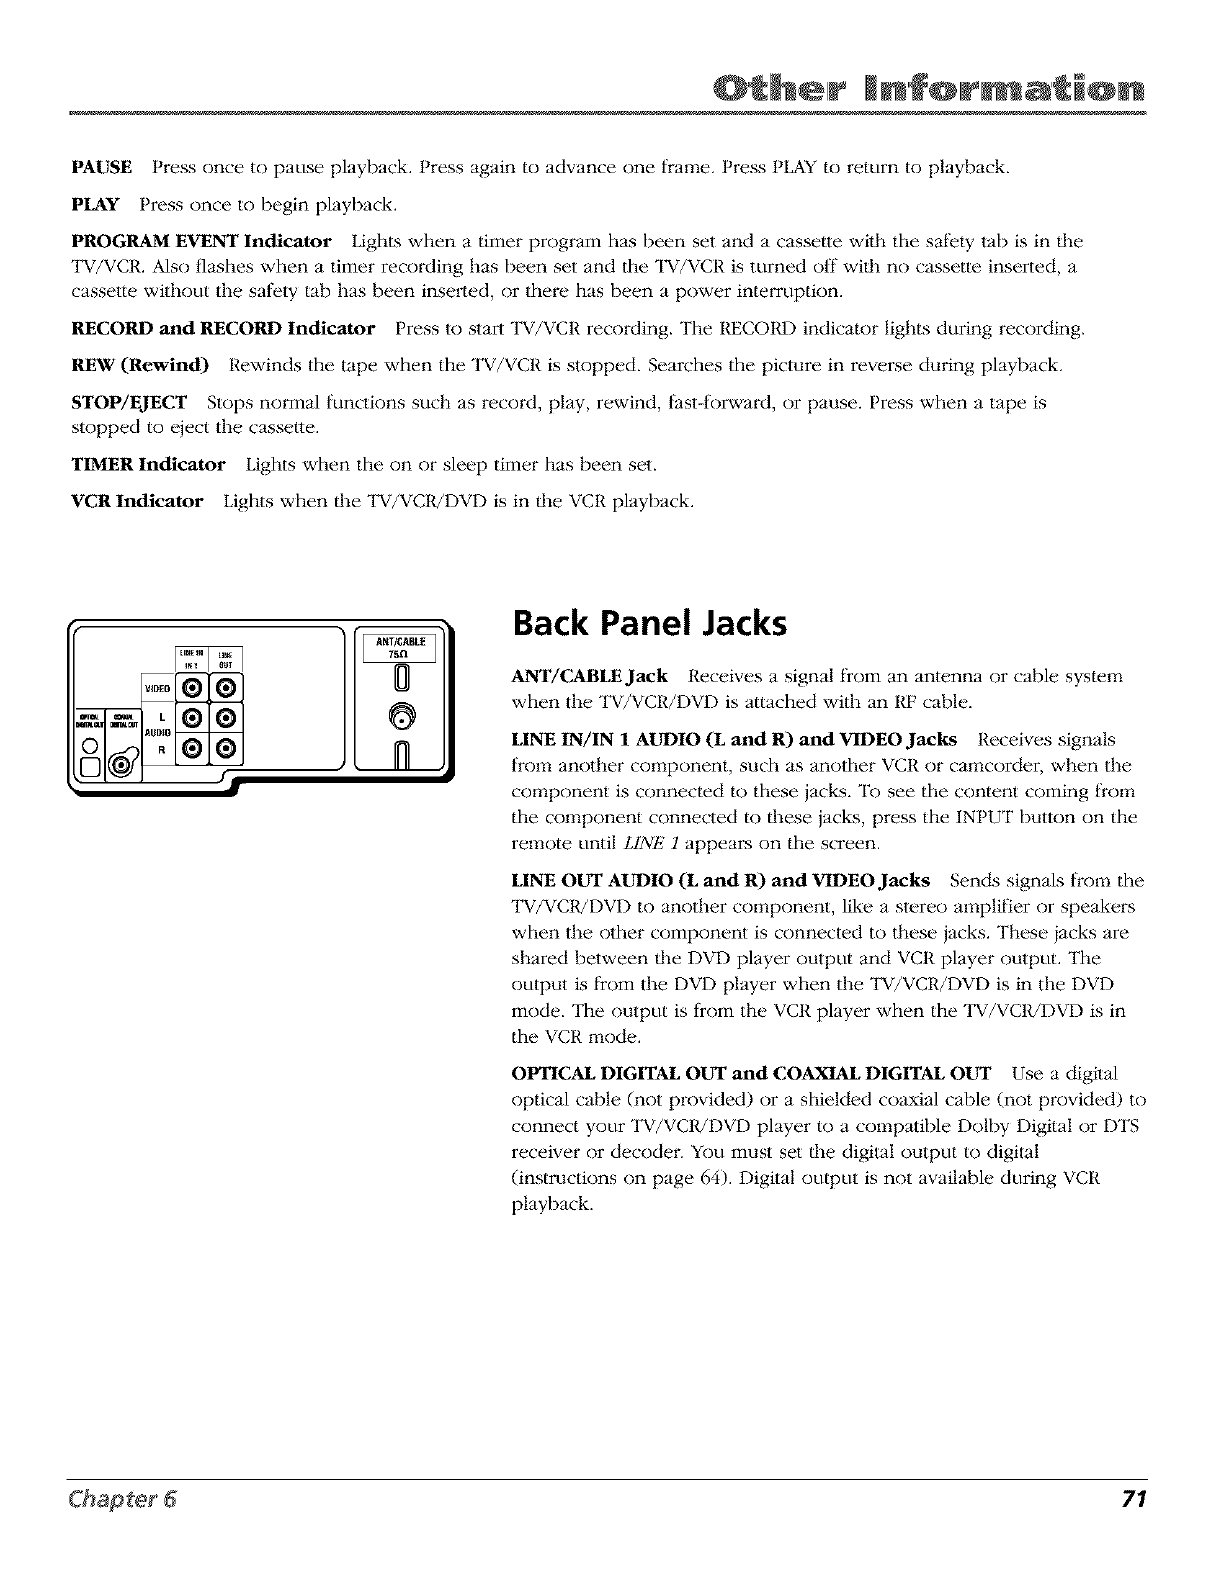
PAUSE Press once to pause playback. Press again to advance one frame. Press PLAY to return to playback.
PLAY Press once to begin playback.
PROGRAM EVENT Indicator Lighl_swhen a timer program has been set and a casselte wilh the safely lab is in lhe
TV/VCR. Also flashes when a timer recording has been set and the TV/VCR is turned off wilh no cassette inserted, a
cassette without the sal)ty tab has been inselled, or there has been a power interruption.
RECORD and RECORD Indicator Press to start "lW/VCR recording. The RECORD indicator lights during recording.
REW (Rewind) Rewinds the tape when the "lW/VCR is stopped. Searches the picture in reverse during playback.
STOP/EJECT Stops normal functions such as record, play, rewind, fast-forward, or pause. Press when a tape is
stopped to eject the casselte.
TIMER Indicator Lights when the on or sleep timer has been set.
VCR Indicator Lights when lhe "lW/VC1UDVD is in lhe VCR playback.
VIDEO @
I
Back Panel Jacks
ANT/CABLEJamk Receives a signal from an antenna or cable system
when the "lW/VCR/DVD is attached with an RF cable.
LINE IN/IN 1 AUDIO (L and R) and VIDEO Jacks Receives signals
from anoflmr component, such as another VCR or camcorder, when the
component is connected to these jacks. To see the content coming from
the component connected to these jacks, press the INPUT button on the
remote until LINE 1 appears on the screen.
LINE OUT AUDIO (L and R) and VIDEO Jacks Sends signals from the
TV/VCR/DVD to another component, like a slereo amplifier or speakers
when the other component is connected to these jacks. These jacks are
shared between the DVD player output and VCR player output. The
output is from the DVD player when the TV/VCR/DVD is in the DVD
mode. The output is from the VCR player when the TV/VCR/DVD is in
the VCR mode.
OPTICAL DIGITAL OUT and COAXIAL DIGITAL OUT Use a digilal
optical cable (not provided) or a shielded coaxial cable (not provided) to
connect your TV/VC1UDVD player to a compatible Dolby Digital or DTS
receiver or decoder. You must set the digital output to digital
(instructions on page 64). Digital output is not available during VCR
playback.
71
Care and Cleaning
Maintenance of TV/VCR/DVD Cabinet
CAUTION: Turn OFF your TV/VCR/DVD before cleaning.
You can clean the TV/VCR/DVD as required, using a soft lint-fi'ee cloth. Be sure to occasionally dust the
ventilation slots in the cabinet to help assure adequate ventilation.
The "lW/VC1UDVD screen may be cleaned with a soft, lint-flee clolh as well. Take care not to scratch or mar
the screen. If necessary, you may use a cloth dampened wilh warm water. Never use s_ong cleaning agents,
such as ammonia-based cleaners or abrasive powder. These types of cleanei:s will damage the TV/VCR/DVD.
While cleaning, do not spray liquid direcdy on the screen or allow liquid to run down lhe screen and inside
the TV/VCR/DVD. Also, aw)id placing drinks or vases wilh water on top of the TV/VCR/DVD. "II_is could
increase the risk of fire or shock hazard or damage to the TV/VCR/DVD.
Caution: Using video games or any external accessory widl fixed images for exmnded periods of time can
cause them to be permanently imprinted on the picture tube (or projection "1_ picture tubes). ALSO, some
network/program logos, phone numbers, etc. may cause similar damage. "II_is damage is not covered by your
wmxanty.
Formation of Condensation
• Due to sharp changes in temperature and humidity, condensation may _rm if warm air comes in contact
with any toM parts inside the DVD player.
• When condensation forms inside the DVD playeL dm player may not operate, correctly. If this occurs, leave
the player at room temperature until the inside of the player becomes dry and operational.
• If condensation forms on a disc, wipe the disc with a soft, dry cloth by moving the cloth from the center
hole toward the outer edge.
Disc Cautions
• Don't move the player while a disc is being played. The disc may get scratched or broken,
internal parts may be damaged.
• Don't put any container filled with liquid or any small metal objects on the player.
• Be careful not to put your hand into the disc tray.
• Don't place anylhing olher than the disc in the disc tray.
• Be sure to remove the disc and turn off the player after use.
and the player's
72
Handling Discs
• Don't touch the disc's signal surfaces. HoM by the edges or by one edge and the hole in the center.
• Don't affix labels or adhesive tape to label surfaces. Don't scratch or damage the label.
• Do not use damaged (cracked or warped) discs.
Cleaning Discs
• Dirty discs can cause reduced vMeo and audio performance. Always keep discs clean by wiping them gently
with a soft cloth from the inner edge toward the outer perimeter.
• If a disc becomes very dirty, wet a soft clolh in water, wring it out well. Wipe the dirt away gently, and
remove any water drops with a dry cloth.
• Do not use record-cleaning sprays or anti-static agents on discs. Also, never clean the discs with benzene,
thinner, or other volatile solvents which may cause damage to the disc surface.
73
Limited Warranty
What your warranty covers:
• Defects in material or workmanship.
For how long after your purchase:
• One year from date of purchase for labor charges.
• One year from date of purchase tbr parts.
• Two years from date of purchase for picture tube.
The warranty period for rental units begins with the first rental or 45 days from date of shipment to the rental firm,
whichever comes first.
What we will do:
• Pay any Authorized RCA "Pelevision Service Center the labor charges to repair your "I_/VCR/DVD.
• Pay any Authorized RCA Television Service Center for the new or, at our option, refurbished replacement parts and
picture tubes required to repair your TV/VCWDVD.
How you get service:
• For 20" screen size: "Fake your RCA "I_/VCR/DVD to any Authorized RCA Television Service Center and pickup when
repairs are complete.
• For screen sizes larger than 20": Request home or pick up, repair and return service from any Authorized RCA
Television Service CenteL provided that your TV/VCR!DVD is located within the geographic teiTimly covered by an
Authorized RCA Television Service Centei: If not, you must take your TV/VCR/DVD to the Service Center location at
your own expense, or pay for the cost the Service Center may charge to transport your unil to and from your home.
• To identify your nearest Authorized RCA Service Center, ask your dealeL look in the Yellow Pages, or call
1-800-336-1900.
• Proof of purchase in the form of a bill of sale or receipted invoice which is evidence that the product is within the
warranty period must be presented to obtain warranty service. For rental firms, proof of first rental is also required.
What your warranty does not cover:
• Customer instruelion. (Your Owner's Manual clearly describes how to install, adjust, and operate your TV/VCR/DVD.
Any additional intk)rmation should be obtained from your dealer).
• Installation and related adjustments.
• Signal reception problems not caused by your TV/VCR/DVD.
• Damage from misuse or neglect.
• Cleaning of audio/video heads.
• Batteries.
• Customer replacement fuses.
• Images burned onto the screen.
• A TV/VCR/DVD that has been modified or incoi_orated into other products or is used for institutional or other
commercial pm_oses.
• Acts of nature, such as but not limited to lightning damage.
• A TV/VCR/DVD purchased or serviced outside the U.S.A.
74
Product registration:
• Please complete and mail the Product Registration Card packed wilh your TV/VCR/DVD. It will make it easier to
contact you should i_ ever be necessary. The return of the card is not required for warranty coverage.
Limitation of Warranty:
• THE WARRANTY STATED ABOVE IS THE ONLY WARRANTY APPLICABLE TO THIS PRODUCT. ALL OTHER
WARRANTIES, EXPRESS OR IMPLIED (INCLUDING ALL IMPLIED WARRANTIES OF MERCHANTABILITY OR
FITNESS FOR A PARTICULAR PURPOSE) ARE HEREBY DISCLAIMED. NO VERBAL OR WRITTEN
INFORMATION GIVEN BY THOMSON MULTIMEDIA INC., ITS AGENTS OR EMPLOYEES SHALL CREATE A
GUARANTY OR IN ANY WAY INCREASE THE SCOPE OF THIS WARRANTY.
REPAIR OR REPLACEMENT AS PROVIDED UNDER THIS WARRANTY IS THE EXCLUSIVE REMEDY OF THE
CONSUMER. THOMSON MULTIMEDIA INC. SHALL NOT BE LIABLE FOR INCIDENTAL OR CONSEQUENTIAL
DAMAGES RESULTING FROM THE USE OF THIS PRODUCT OR ARISING OUT OF ANY BREACH OF ANY
EXPRESS OR IMPLIED WARRANTY ON THIS PRODUCT. THIS DISCLAIMER OF WARRANTIES AND LIMITED
WARRANTY ARE GOVERNED BY THE LAWS OF THE STATE OF INDIANA. EXCEPT TO THE EXTENT
PROHIBITED BY APPLICABLE LAW, ANY IMPLIED WARRANTY OF MERCHANTABILITY OR FFFNESS FOR A
PARTICULAR PURPOSE ON THIS PRODUCT IS LIMITED TO THE APPLICABLE WARRANTY PERIOD SET
FORTH ABOVE.
How state law relates to this warranty:
• Some states do not allow the exclusion nor limilation of incidental or consequential damages, or limilations on how
long an implied wamanty lasts, so the above limitations or exclusions may not apply to you.
• This warranty gives you specific legal rights, and you also may have other rights that vary from state to state.
If you purchased your product outside the United States:
• This warranty does not apply. Contact your dealer for warranty information.
Service calls which do not involve defective materials or workmanship are not covered by this warranty.
Costs of such service calls are the sole responsibility of the purchaser.
75
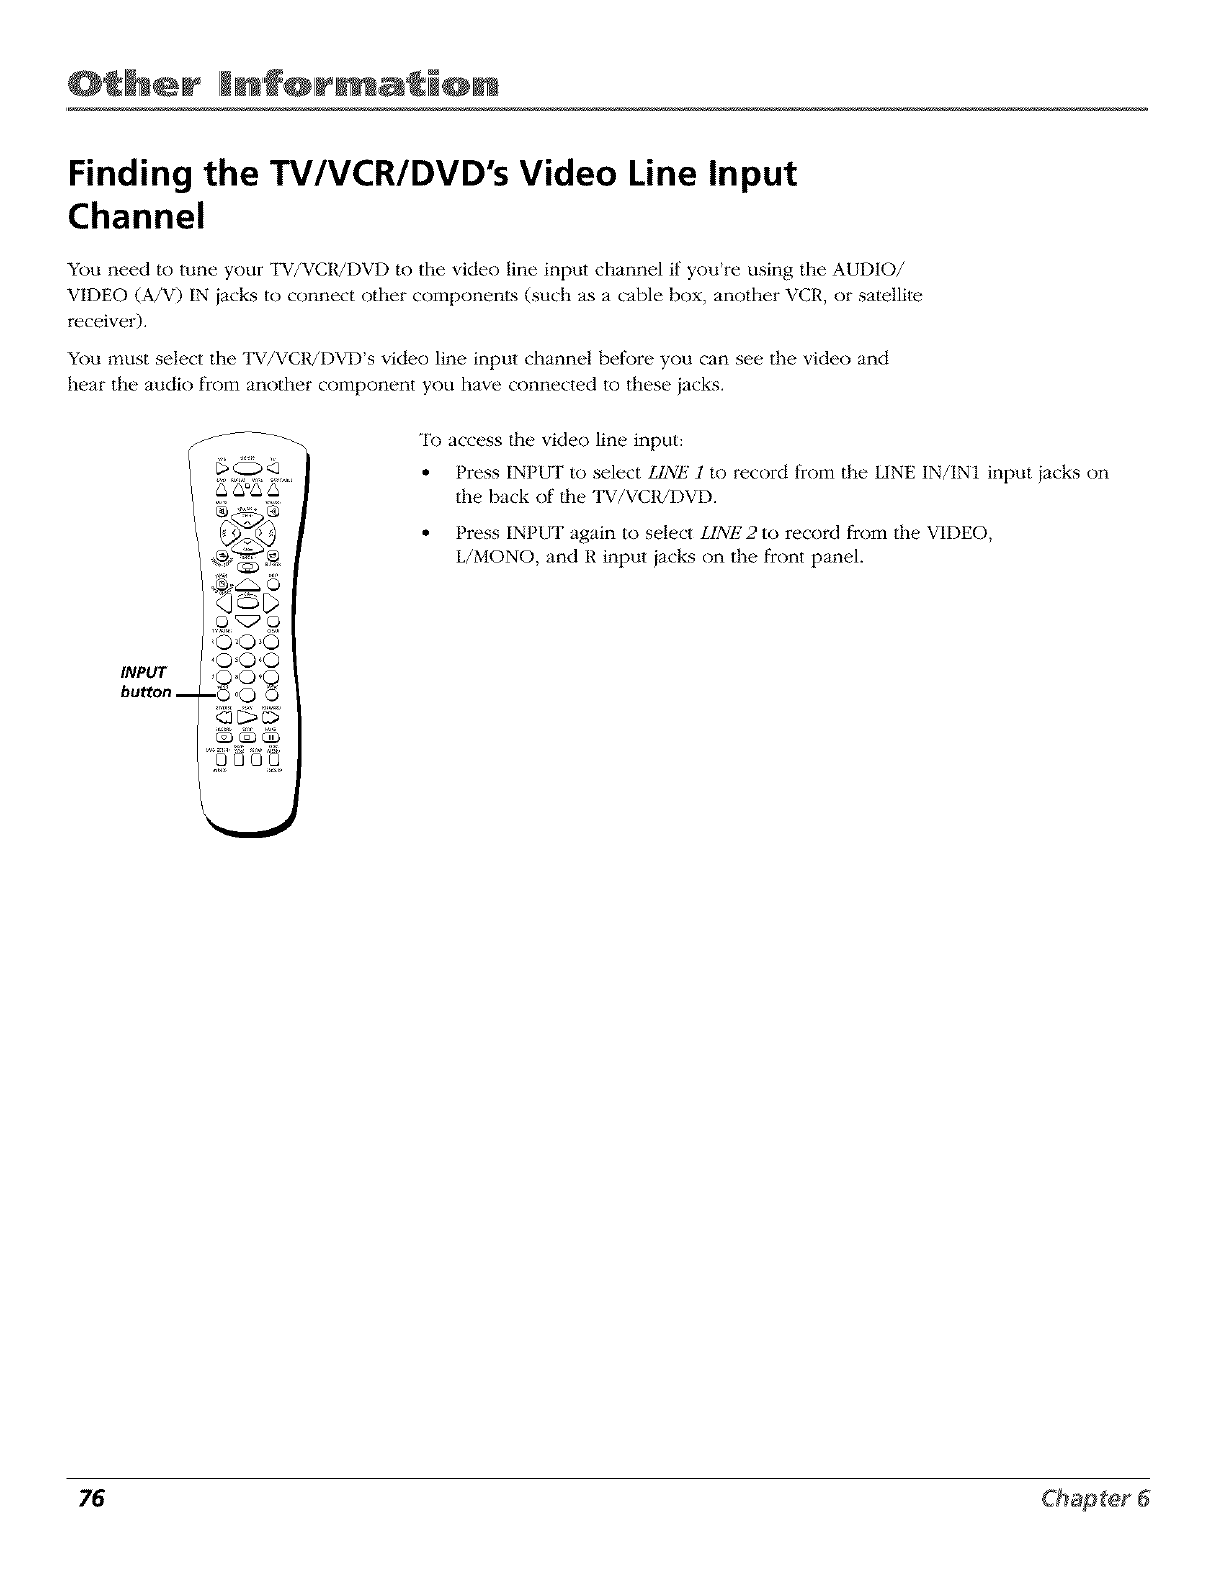
Finding the TV/VCR/DVD's Video Line Input
Channel
You need to tune your TV/VCR/DVD to the video line input channel if you're using the AUDIO/
VIDEO (A/V) IN jacks to connect other components (such as a cable box, another VCR, or satellite
receiver).
You must select the "lW/VCR/DVD's video line input channel before you can see the vide() and
hear the audio from another component you have connected to these jacks.
INPUT
button __
& &°&/_
\1_1/
_0'0 _0
To access lhe video line input:
• Press INPUT to select LINk" 1 to record from the LINE 1N/IN1 input jacks on
the back of lhe "lW/VC1UDVD.
• Press INPUT again to select LINk" 2 to record from the VIDEO,
L/MONO, and R input jacks on the front panel.
76
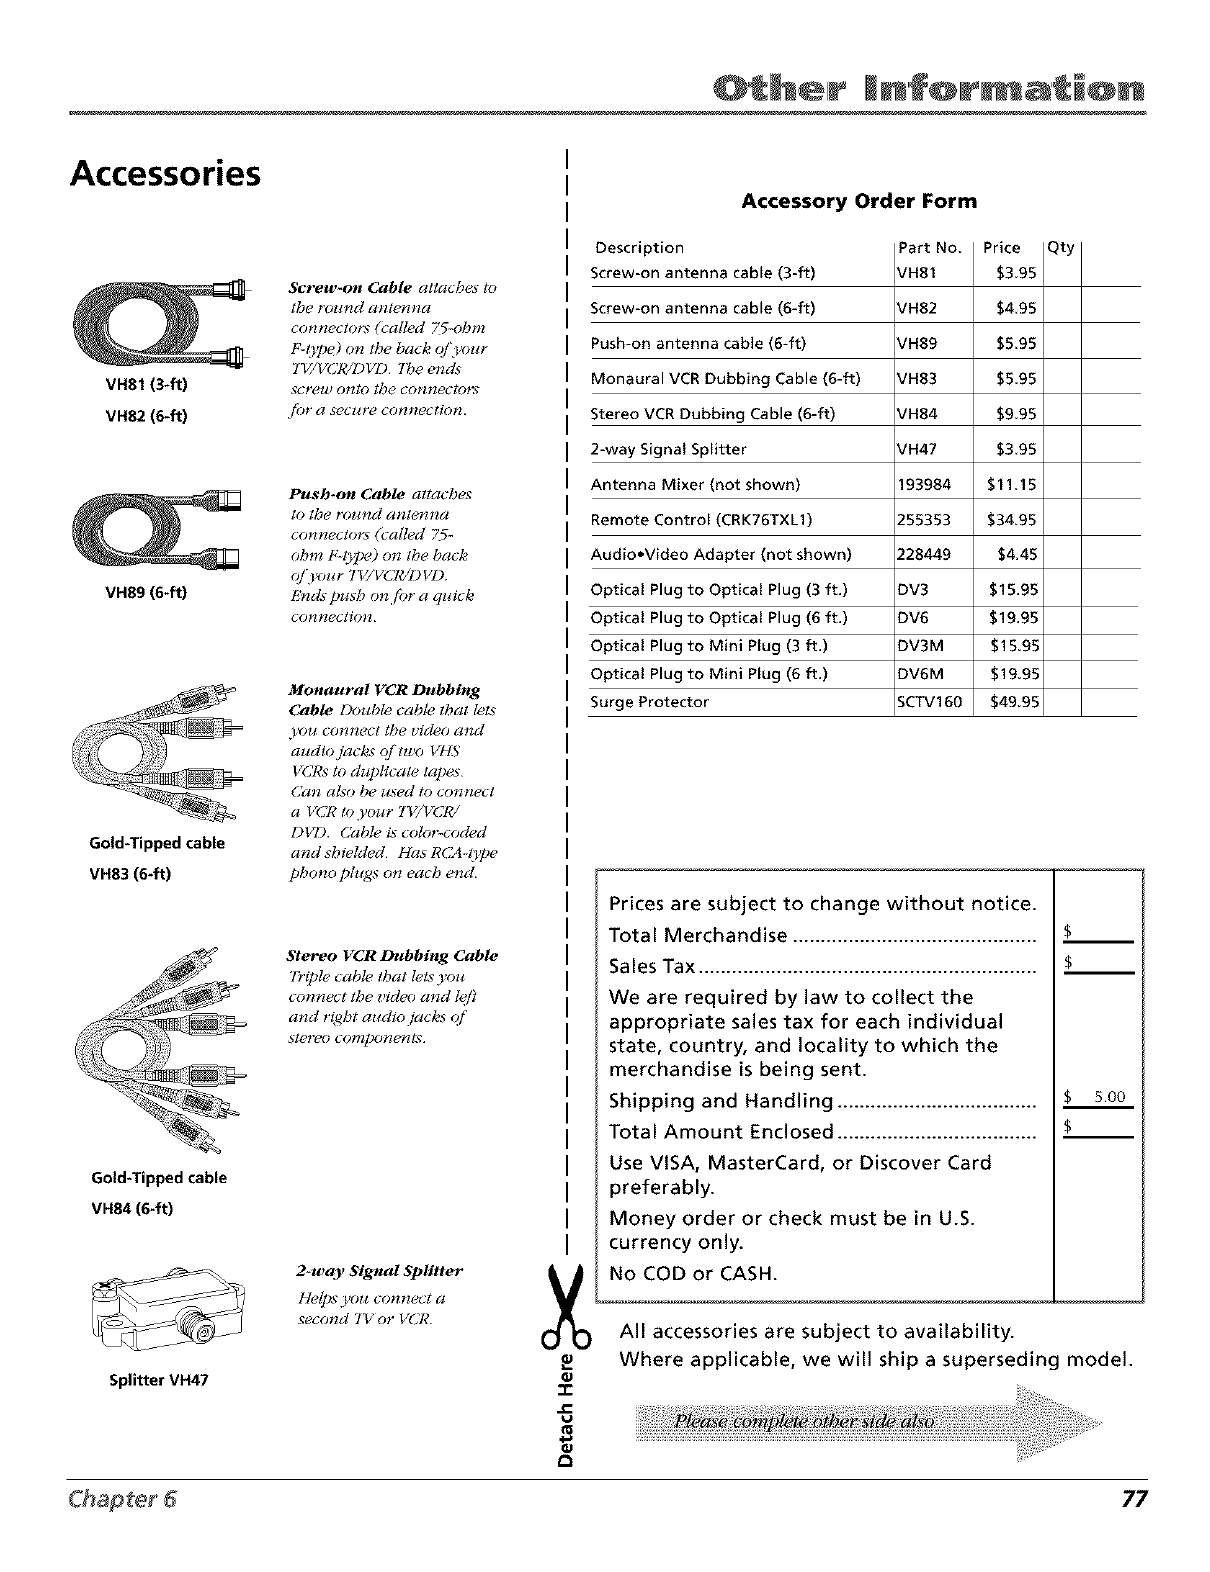
Accessories
VH81 (3-ft)
VH82 (640
VH89 (6-ft)
Gold+Tipped cable
VH83 (640
Gold+Tipped cable
VH84 (640
Splitter VH47
Screw-on CaOle attache* to
the rot_d antenna
connecto_ (called 75-ohm
F-thpe) on the hack of your
7V/VCR/I) VD. 7be cmd+
SCrg_Wonto the connectors
j_)r a Seclgrg¢ COt_lnectio!_.
Push-on Cable attaches
to the rou_d antem_a
co!_nector5 (called 75-
ohm F-tyl)e) on the bac_
of h,mr TV/VCR/DVI).
tZ_cIs push on fi)r a quick
Co!_nect_0!_
Monaural VCR Dubbing
Cable Double cable that lets
you cormect the video a_d
audio jack_ o/'tzcw VHS
VCRs to duplicate tapes
(]a_ also be t_sed to connect
aVCR toyour 7]7/VCR/
DVD. Cable is color-coded
and shielded Has R(]A-l)pe
phono plugs on each e_d.
Stereo VCR Dubbing Cablo
7)qple cable that lets you
connect the zideo and lgfi
and r_ht audio jacks
stereo componen_
2-way Signal Splitter
Helps you connect a
second TV or VCR.
Accessory Order Form
Description
Screw-on antenna cabte (3-ft)
Screw-on antenna cabte (6-ft) ¢H82
Push-on antenna cable (6-ft) ¢H89
Monaural VCR Dubbing Cable (6-ft) VH83
Stereo VCR Dubbing Cable (6-ft) ¢H84
2-way Signal Sptitter ¢H47
Antenna Mixer (not shown) 193984
Remote Contro[ (CRK76TXL1) 255353
Audio*Video Adapter (not shown) 228449
Optical Plug to Optical Plug (3 ft,) DV3
Optical Plug to Optical Plug (6 ft,) DV6
Optical Plug to Mini Ptug (3 ft,) DV3M
Optical Plug to Mini Ptug (6 ft,) DV6M
Surge Protector _CTV160
$4,95
$5,95
$5,95
$9,95
$3,95
$11.15
$34.95
$4,45
$15,95
$19,95
$15,95
$19,95
$4995
_0
:C
Prices are subject to change without notice.
Total Merchandise ............................................. $__
Sales Tax .............................................................. $__
We are required by law to collect the
appropriate sales tax for each individual
state, country, and locality to which the
merchandise is being sent.
Shipping and Handling ..................................... $ .5.0o
Total Amount Enclosed ..................................... $-_
Use VISA, MasterCard, or Discover Card
preferably.
Money order or check must be in U.S.
currency only.
No COD or CASH.
All accessories are subject to availability.
Where applicable, we will ship a superseding model.
77
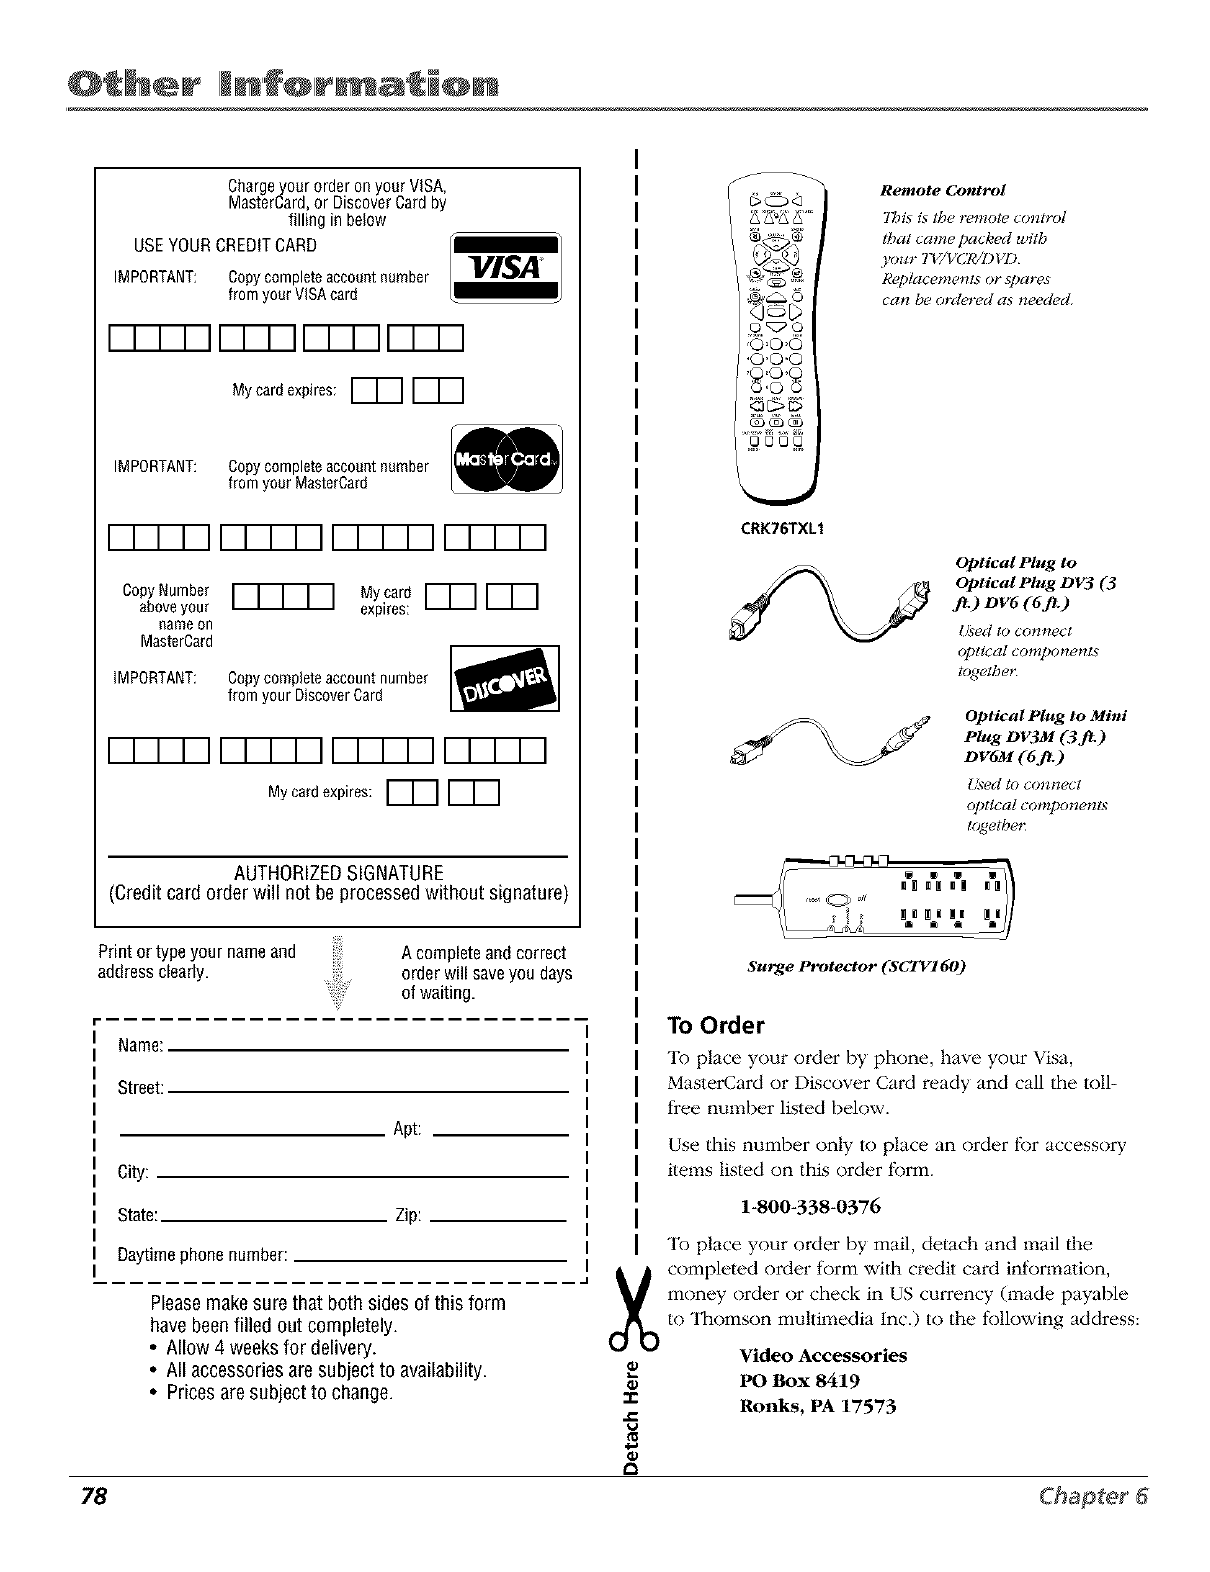
Chargeyourorder onyour VISA,
MasterCard,or DiscoverCardby
filling in below
USEYOURCREDITCARD
IMPORTANT: Copy complete account number
from your VISAcard
VISA °
My card expires: _
IMPORTANT: Copy complete account number
from your MasterCard
r-N-
Copy Number
above your
name on
MaeterCard
My ardI--I--1I--I--1
expires:
IMPORTANT: Copycomplete account number
from your Discover Card
r-N-
Mycardexpires: _
AUTHORIZED SIGNATURE
(Credit card order will not be processed without signature)
Print or type your name and A complete and correct
address clearly, order will saveyou days
of waiting,
Name:
Street:
City:
Apt:
State: Zip:
Daytime phone number:
Pleasemakesure that both sides of this form
have beenfilled out completely.
• Allow 4 weeks for delivery.
• All accessories are subject to availability.
• Prices aresubject to change.
&&_&&
_5
w
CRK76TXL1
Remote Control
This is the remote control
ri_al came packed wilh
your TV/VCR/I)VD
Replacemen_ or._pares
can be ordered as needed.
Optical Plug to
Optical Plug DV3 (3
jr) hv6 (6j_.)
Used to con_zecl
oj)tical components
r{4gelber
Optical Plug to Mini
Plug DV3M (3ft.)
DV6M (6 _.)
I,_ed to connect
optical components
lc4getbc;<
m
Surge Protector(SCTV160)
To Order
To place your oMer I_ phone, have your Visa,
MasterCard or Discover CaM ready and ca]] the toll-
free number listed below.
Use this number only to place an order for accessory
items listed on this order form.
1-800-338-0376
To place your order by mail, detach and mail flae
X completed order form with credit card information,
money order or check in US cmTency (made payable
to Thomson multimedia Inc.) to the following address:
Video Accessories
o
€0 PO Box 8419
-e Ronks, PA 17573
=c
t_
4_
t_
78 Chapter 6
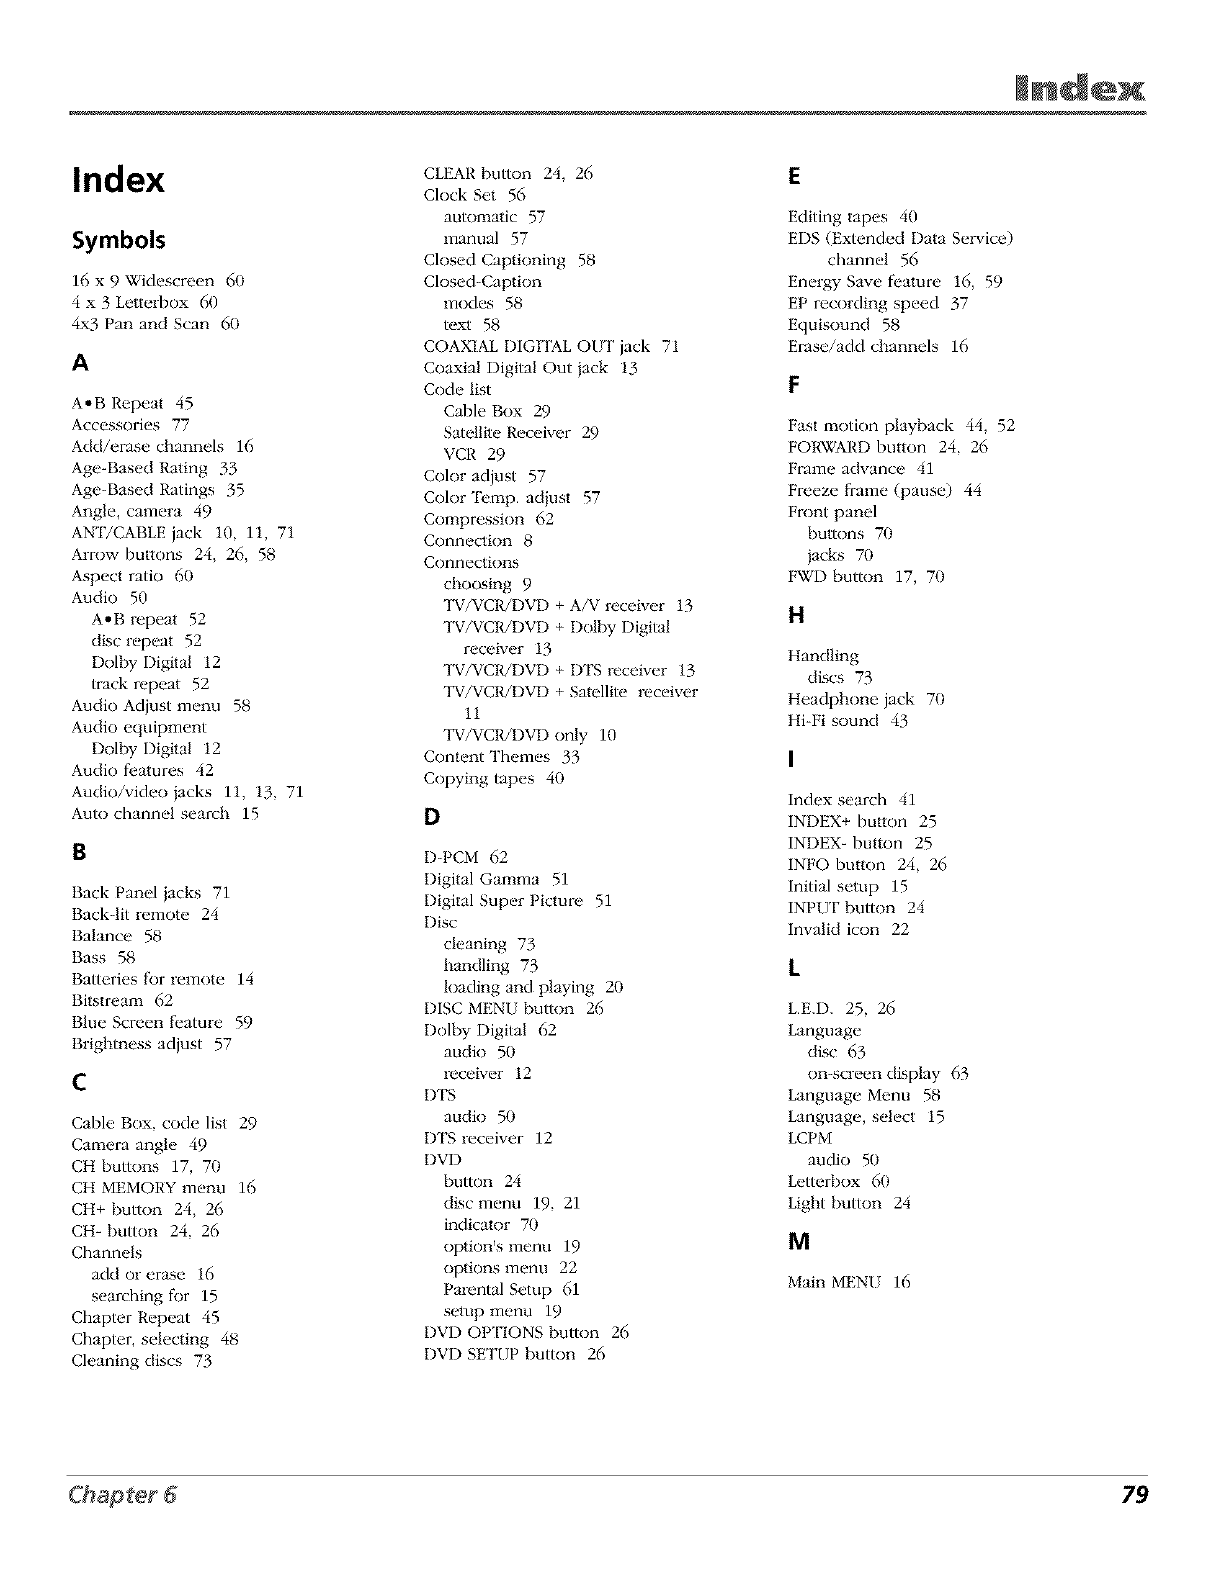
Index
Symbols
16 x 9 Widcscreen 60
4 x 3 Lenerbox 60
4x3 Pan and Scan 60
A
A-B Repeat 45
Accessories 77
Add/erase channels 16
Age-Based Ra_ing 33
Age-Based Ratings 35
Angle, camera 49
AN'ITCABLE jack 10, 11, 71
Arrow buttons 24, 26, 58
Aspect ratio 60
Audio 50
A-B repeat 52
disc repeat 52
Dolby Digital 12
track repeat 52
Audio Adjust menu 58
Audio equipment
Dolby Digital 12
Audio features 42
Audio/video jacks 11, 13, 71
Auto channel search 15
B
Back Panel jacks 71
Back-lit remote 24
Balance 58
Bass 58
Batteries fbr remote 14
Bitstream 62
Blue Screen fi:ature 59
Brightness adjust 57
c
Cable Box, code list 29
Camera angle 49
CH buttons 17, 70
CH MEMORY menu 16
CH+ button 24, 26
CH- button 24, 26
Channels
add or erase 16
searching for 15
Chapter Repeat 45
Chapter, selecting 48
Cleaning discs 73
CLEAR button 24, 26
Clock Set 56
automatic 57
manual 57
Closed Captioning 58
Closed-Caption
rood c_s 58
text 58
COAXIAL DIGITAL OI/T jack 71
Coaxial Digital Out jack 13
Code list
Cable Box 29
Satellite Receiver 29
VCR 29
Color adjust 57
Color 'lk'mp. acliust 57
Compression 62
Connection 8
Connections
choosing 9
_/VCR/DVD + A/V receiver 13
_/VCR/DVD + Dolby Digital
receiver 13
_/VCR/DVD + D'I\S receiver 13
_/VCIUDVD + Satellite receiver
i1
_/VCR/DVD only 10
Content Themes 33
Copying tapes 40
D
D-PCM 62
Digital Gamma 51
Digital Super Picture 51
Disc
cleaning 73
handling 73
loading and playing 20
DISC MENU button 26
Dolby Digital 62
audio 50
receiver 12
DTS
audio 50
DTS receiver 12
DVD
button 24
disc menu 19, 21
indicator 70
option's menu 19
options menu 22
Parental Setup 61
setup menu 19
DVD OPTIONS button 26
DVD SETUP button 26
E
Editing tapes 40
EDS (Extended Data Service)
channel 56
Energy Save feature 16, 59
EP recording speed 37
Equisound 58
Erase/add channels 16
F
Fast motion playback 44, 52
FORWARD button 24, 26
Frame advance 41
Freeze fiame (pause) 44
Front panel
bultons 70
jacks 70
1-_7I) button 17, 70
tt
Handling
discs 73
Headphone jack 70
Hi-Fi sound 43
index search 41
INDEX+ button 25
INDEX- button 25
INFO button 24, 26
initial setup 15
INPUT button 24
invalid icon 22
L
L.E.D. 25, 26
Language
disc 63
on-screen display 63
Language Menu 58
Language, select 15
LCPM
audio 50
Letter/)ox 60
Light button 24
M
Main MENU 16
79
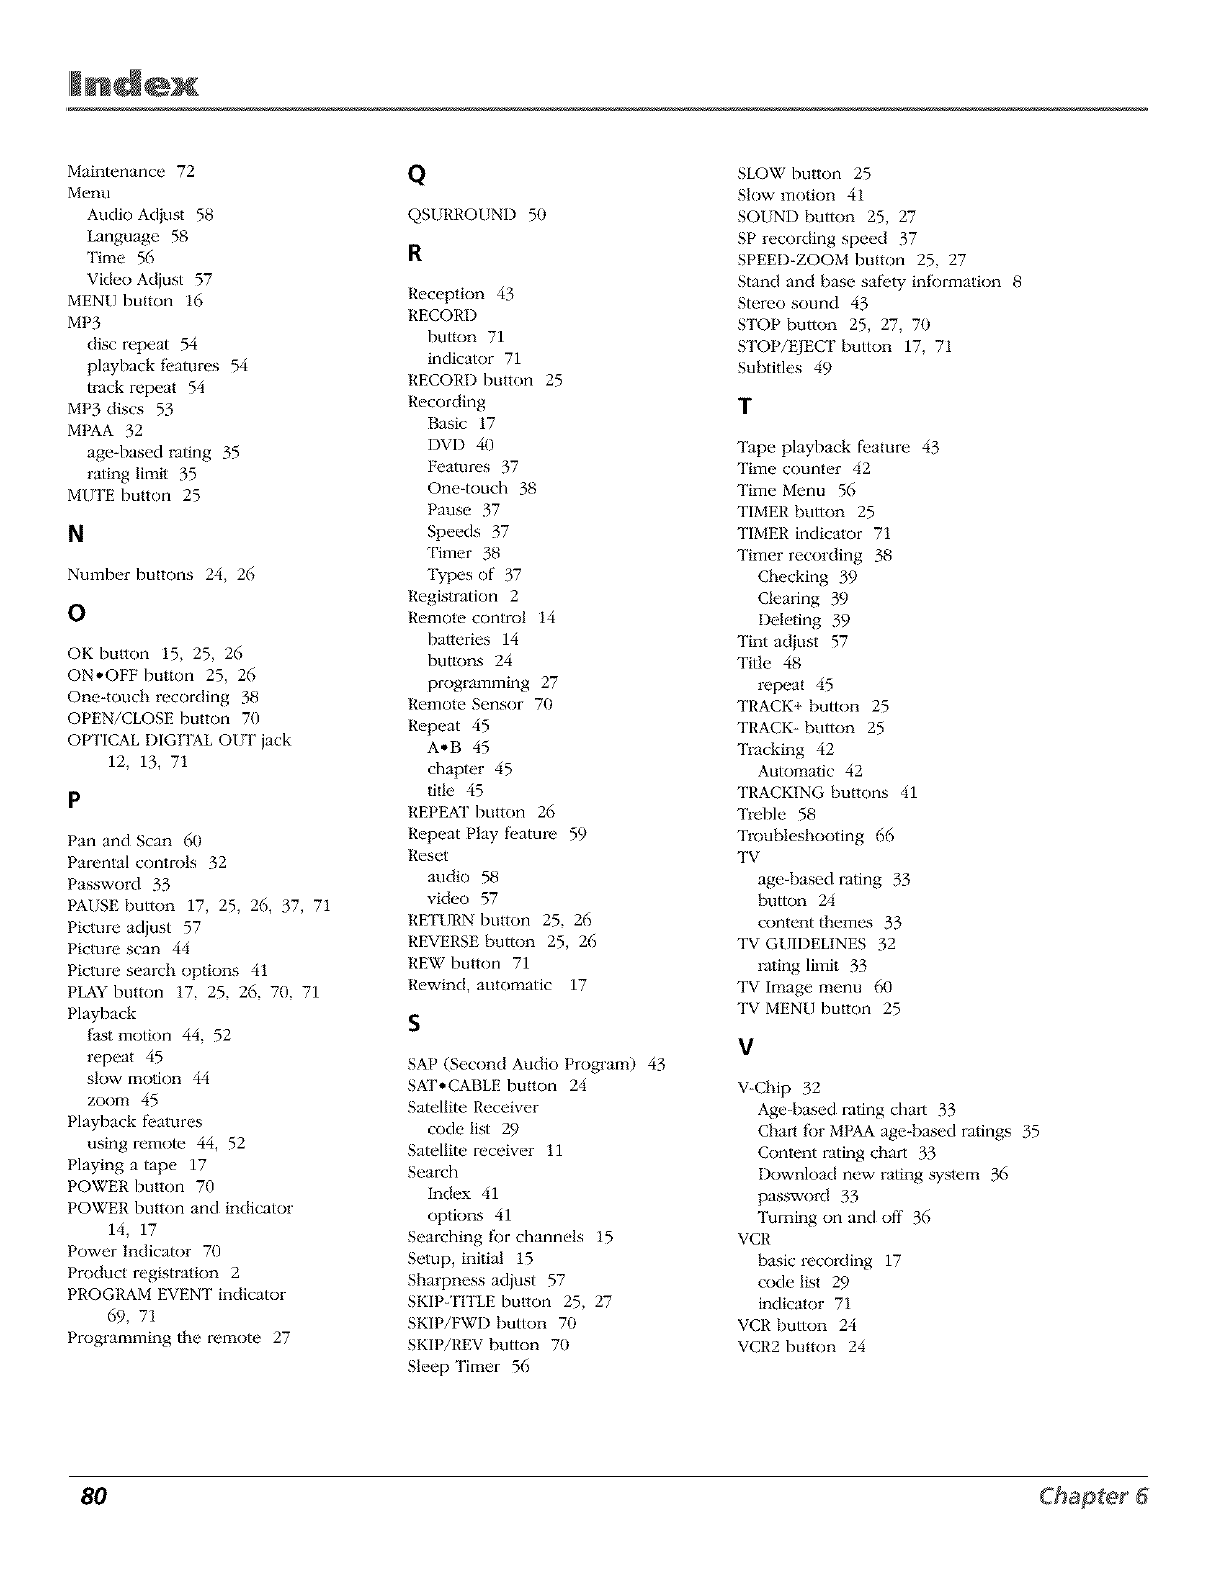
Maintenance 72
Menu
Audio Adiust 58
Language 58
Time 56
Video Adjust 57
MENU button 16
MP3
disc repeat 54
playback fL'atures 54
track repeat 54
MP3 discs 53
MPAA 32
age-based rating 35
rating limi_ 35
MUTE button 25
N
Number buttons 24, 26
o
OK button 15, 25, 26
ON*OFF button 25, 26
One-touch recording 38
OPEN/CLOSE button 70
OPllCAL DIGITAL OUT jack
12, 13, 71
P
Pan and Scan 60
Parental controls 32
Password 33
PAUSE button 17, 25, 26, 37, 71
Picture adjust 57
Picture scan 44
Picture search options 41
PLAY button 17, 25, 26, 70, 71
Playback
fast motion 44, 52
repeat 45
slow motion 44
zoom 45
Playback features
using remote 44, 52
Playing a tape 17
POWER button 70
POWER button and indicator
14, 17
Power Indicator 70
Product registration 2
PROGRAM EVENT indicator
69, 71
Programming the remote 27
Q
QSURROI JND 50
R
Reception 43
RECORD
button 71
indicator 71
RECORD button 25
Recording
Basic 17
DVD 40
Featu rc_s 37
One-touch 38
Pause 37
Speeds 37
l'imer 38
Types of 37
Registration 2
Remote control 14
batteries 14
butu)ns 24
programming 27
Remote Sensor 70
Repeat 45
A.B 45
dmpter 45
title 45
REPEAl' button 26
Repeat Play fi.ature 59
Reset
audio 58
video 57
RETIJRN button 25, 26
REVERSE button 25, 26
REW button 71
Rewind, automatic 17
S
SAP (Second Audio Program) 43
SAT*CABLE button 24
Satellite Receiver
code list 29
Satellite receiver 11
Search
index 41
options 41
Searching fbr channels 15
Setup, initial 15
Sharpness adjust 57
SKIP-TITLE button 25, 27
SKIP/FWD button 70
SKIP/REV button 70
Sleep Timer 56
SLOW button 25
Slow motion 41
SOUNI) button 25, 27
SP recording speed 37
SPEED-ZOOM button 25, 27
Stand and base safety infk)rmation 8
Stereo sound 43
Sl'OP button 25, 27, 70
STOP/EJECT button 17, 71
Subtitles 49
T
Tape playback feature 43
Time counter 42
Time Menu 56
TIMER button 25
TIMER indicator 71
Timer recording 38
Checking 39
Clearing 39
Deleting 39
Tint adiust 57
Title 48
repeat 45
TRACK+ button 25
TRACK- button 25
%acking 42
Automatic 42
TRACKING buttons 41
Treble 58
Troubleshooting 66
TV
age-based rating 33
button 24
content themes 33
TV GUIDELINES 32
rating limit 33
TV image menu 60
TV MENU button 25
V
V-Chip 32
Age-based rating chart 33
Chart fbr MPAA age-based ratings 35
Content rating chart 33
Download new rating system 36
password 33
Turning on and off 36
VCR
basic recording 17
code list 29
indicator 71
VCR button 24
VCR2 button 24
80 Chapter 6
Video Adjust menu 57
Vide() input channel 76
VIEW button 27
Virtual I)olby 50
VOL buttons 70
VOL+ button 25
VOL- button 25
W
Warranty 74
Widescreen 60
Z
Zoom 45
81
Visit the RCA web site at www.rca.com
Please do not send any products to the Indianapolis address listed in this manual or on the carton. This will only
add delays in service for your product.
Thomson multimedia Inc.
10330 North Meridian Street
Indianapolis, IN 46290
©2001 Thomson multimedia Inc.
Trademark(s)® Registered
Marca(s) Registrada(s)
Printed in Malaysia
TOCOM 15775960
"n.IOMSON
THOMSON _!'_1,
