RCA CC9390 User Manual CAMCORDER Manuals And Guides L0202037
RCA Digital Camcorder Manual L0202037 RCA Digital Camcorder Owner's Manual, RCA Digital Camcorder installation guides
User Manual: RCA CC9390 CC9390 RCA CAMCORDER - Manuals and Guides View the owners manual for your RCA CAMCORDER #CC9390. Home:Electronics Parts:Rca Parts:Rca CAMCORDER Manual
Open the PDF directly: View PDF ![]() .
.
Page Count: 180 [warning: Documents this large are best viewed by clicking the View PDF Link!]

Digital
Camcorder
User's G ide
Changing Entertainment.
Jmp@ ant Enf@rmat @n
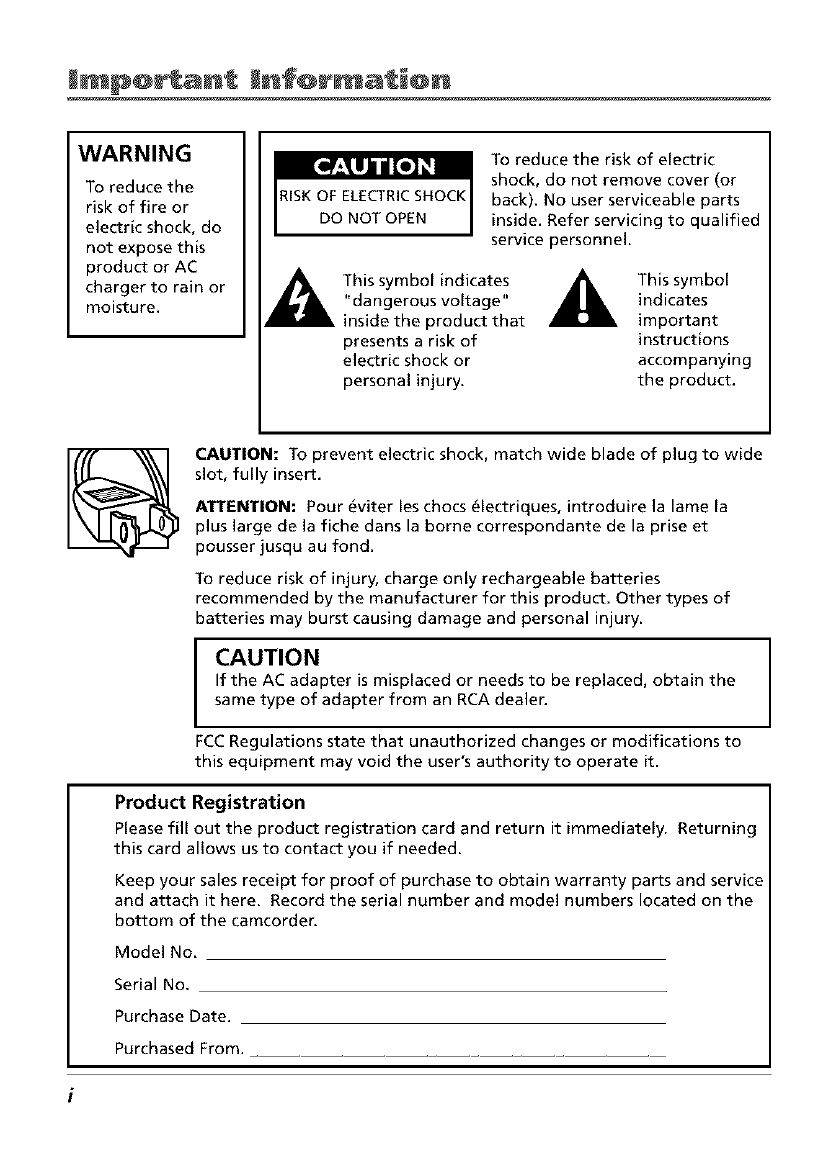
WARNING
To reduce the
risk of fire or
electric shock, do
not expose this
product or AC
charger to rain or
moisture.
RISK OF ELECTRICSHOCK
DO NOT OPEN
To reduce the risk of electric
shock, do not remove cover (or
back). No user serviceable parts
inside. Refer servicing to qualified
service personnel.
This symbol indicates _1_
"dangerous voltage"
inside the product that
presents a risk of
electric shock or
personal injury.
This symbol
indicates
important
instructions
accompanying
the product.
CAUTION: To prevent electric shock, match wide blade of plug to wide
slot, fully insert.
ATTENTION: Pour _viter les chocs _lectriques, introduire la lame la
plus large de la fiche dans la borne correspondante de la prise et
pousser jusqu au fond.
To reduce risk of injury, charge only rechargeable batteries
recommended by the manufacturer for this product. Other types of
batteries may burst causing damage and personal injury.
I AUTION
If the AC adapter is misplaced or needs to be replaced, obtain the
same type of adapter from an RCA dealer.
FCC Regulations state that unauthorized changes or modifications to
this equipment may void the user's authority to operate it.
Product Registration
Please fill out the product registration card and return it immediately. Returning
this card allows us to contact you if needed.
Keep your sales receipt for proof of purchase to obtain warranty parts and service
and attach it here. Record the serial number and model numbers located on the
bottom of the camcorden
Model No.
Serial No.
Purchase Date.
Purchased From.
ble @f ¢@n ents
Chapter 1: Connections & Setup
Parts Checklist ...................................................................................................... 6
Buttons and Controls .......................................................................................... 7
Using Some Basic Controls .................................................................................. 9
POWER CAMERA-OFF-PLAY switch ............................................................. 9
Selecting the Camcorder Mode ................................................................... 9
DISPLAY ON/OFF Button ............................................................................. 10
CONTROL Dial ............................................................................................. 10
Using Optional Stereo Earphones ............................................................. 10
Getting Started .................................................................................................. 11
Unpack the Camcorder and Accessories .................................................... 11
Adjust the Hand Strap ................................................................................ 11
Attach the Lens Cap to the Camcorder ..................................................... 12
Attach a Power Supply ............................................................................... 12
Insert and Remove a Memory Card ........................................................... 13
Turn on Camcorder and Set to Full-Auto Mode ....................................... 14
Set the DSC MODE (DUALITAPEICARD) Switch to DUAL .......................... 14
Insert a Cassette Tape ................................................................................. 15
Use the LCD Monitor or Viewfinder to See What's Recording ................ 16
Start Recording ........................................................................................... 17
Play Your Taped Recording ........................................................................ 18
View Your Still Pictures ............................................................................... 18
Turn off the Camcorder .............................................................................. 18
Powering the Camcorder .................................................................................. 19
Attaching the Battery to the Camcorder .................................................. 19
Removing the Battery from the Camcorder ............................................. 19
Charging the Battery .................................................................................. 20
Battery Level Icon ....................................................................................... 21
Using the Power Supply ............................................................................. 22
Battery Care and Storage ........................................................................... 22
Using the Shoulder Strap .................................................................................. 24
Attaching the Lens Hood .................................................................................. 24
Install the Clock Lithium Cell ............................................................................ 2S
Set the Area, Date and Time ............................................................................. 26
Changing to the 24-hour Time Mode ....................................................... 27
Set Daylight Saving Time ........................................................................... 28
Displaying the Date and Time of Recording ............................................. 29
Set the Tape Recording Speed .......................................................................... 30
Chapter 2: Using the Monitors
Seeing What You Are Recording......................................................................32
(continued on the? nuxt paqu) 1
bJe @f ¢@ntents
Using the LCD Monitor ............................................................................... 32
Using the Viewfinder ................................................................................. 34
On-Screen Icons ................................................................................................. 35
Using the Mode Screens ................................................................................... 42
Using the Menu Screen ..................................................................................... 43
Chapter 3: Recording
Recording Details ............................................................................................... 46
TAPE-CAMERA Mode-Recording on Tape ................................................ 46
DUAL-CAMERA Mode-Tape and Card Recording .................................... 47
CARD-CAMERA Mode-Recording on a Memory Card ............................. 48
Full-Auto Mode .................................................................................................. 49
Journalistic Shooting ......................................................................................... 49
Self-Recording .................................................................................................... 49
Quick Return ...................................................................................................... 50
Edit Search ......................................................................................................... 51
Gamma Brightness ............................................................................................ 52
Select the Audio Mode ...................................................................................... 53
Zooming ............................................................................................................. 54
Using the Zoom Buttons (W and T) ........................................................... 54
Optical Zooming ......................................................................................... 54
Digital Zoom ............................................................................................... 55
Macro Zooming .......................................................................................... 55
Digital Image Stabilization (DIS) ...................................................................... 56
Fading Scenes .................................................................................................... 57
Video Light ......................................................................................................... 58
Multiple-Strobe Recording ................................................................................ 60
Still Recording on Tape ...................................................................................... 62
Select Still-Recording Mode ....................................................................... 62
Time Code Display ............................................................................................. 64
Recording From an External Source ................................................................. 65
Turn ON the S-Video Input ......................................................................... 65
Connections ................................................................................................ 65
To Record From an External Source ........................................................... 66
Recording Tips ................................................................................................... 66
Chapter 4: Playback
Playback Options ............................................................................................... 68
Tape Playback Using the LCD Monitor ...................................................... 68
Playback Using the Viewfinder .................................................................. 69
2
ble @f ¢@n ents
Playback Features .............................................................................................. 69
Still Playback ............................................................................................... 69
Shuttle Search ............................................................................................. 70
Gamma Playback ........................................................................................ 70
Multiple-Strobe Playback ........................................................................... 71
Playback Zoom ............................................................................................ 72
Digital Effect Playback ............................................................................... 73
Tape Playback Using Index Images ............................................................ 74
Dubbing Images from a Tape to a Card ........................................................... 78
Auto Capture Still Images ................................................................................. 79
To Capture Still Images ............................................................................... 79
Audio Dubbing Feature ..................................................................................... 80
............................................................................................................................ 81
Audio Playback Mode ....................................................................................... 82
Dubbing to Another Digital Video Camcorder ................................................ 83
Connecting to a TV (or VCR) with Audio/Video
(and/or S-VIDEO) Input Jacks............................................................................ 84
Playback on a TV (or VCR) with Audio/Video/S-Video
Input Jacks ........................................................................................... 85
Dubbing to a VCR ....................................................................................... 85
Chapter 5: Advanced Features
Using Mode and Menu Screens For Advanced Adjustments ......................... 88
Mode and Menu Screen Definitions ................................................................ 89
Advanced Features ............................................................................................ 97
Night Mode ................................................................................................. 97
Program AE ................................................................................................. 98
White Balance Adjustment ...................................................................... 100
Exposure Control ...................................................................................... 102
Gain Control .............................................................................................. 103
Shutter Speed Control .............................................................................. 104
Auto and Manual Focus ........................................................................... 106
Digital Picture Effects ............................................................................... 108
Wide Mode (16:9) ..................................................................................... 109
Using the Zoom Microphone ................................................................... 110
Dialog Recording ...................................................................................... 112
Wind Cut ................................................................................................... 113
World Clock ............................................................................................... 114
Setting the Confirmation Sound ............................................................. 116
Demonstration Mode ............................................................................... 117
Using the LCD Monitor as a Remote Control ................................................ 118
(conti_wd on the? _ext /)age) 3
bJe @f ¢@ntents
Chapter 6: Digital Still Camera
Card Recording ................................................................................................ 122
Select Picture Quality and Image Size ..................................................... 123
Select Image Size ...................................................................................... 124
Recording with a Guide Frame ................................................................ 125
Recording with the Self Timer ................................................................. 126
Formatting a Card .................................................................................... 127
Card Playback ................................................................................................... 128
Delete Protection ...................................................................................... 129
Deleting Stored Images ............................................................................ 130
Slide Show Playback ................................................................................. 132
Dubbing Images from a Card to a Tape .................................................. 134
Chapter 7: Viewing and Downloading
System Requirements for PhotoStudio 2000® .............................................. 136
Loading PhotoStudio 2000 .............................................................................. 137
How to Handle a CD-ROM ....................................................................... 137
Attaching the External Card Reader to Your Computer ........................ 138
Downloading Still Images to Your Computer ......................................... 140
Changing the JPEG Default ...................................................................... 142
Connecting to a Computer Using an Optional DV Cable ....................... 143
Chapter 8: Other Information
Troubleshooting ............................................................................................... 146
Final Notes ....................................................................................................... 150
Care and Cleaning ........................................................................................... 156
After Using the Camcorder ...................................................................... 156
Cleaning The Camcorder .......................................................................... 156
Dirty Video Heads ..................................................................................... 157
Proper Care and Storage .......................................................................... 158
Tape Care and Storage ............................................................................. 158
Things to Avoid ......................................................................................... 159
Traveling Tips ............................................................................................ 159
Specifications ................................................................................................... 160
RCA Digital Camcorder Limited Warranty ..................................................... 162
FCC Declaration of Conformity and Industry Canada Information .............. 166
Optional Accessories ....................................................................................... 167
Accessories Order Form ............................................................................ 169
Index ................................................................................................................. 173
4
Chapter 1
Connections & Setup
Chapter Overview:
• Parts Checklist
• Buttons and Controls
• Getting Started
• Powering the Camcorder
• Using the Shoulder Strap
• Attaching the Lens Hood
• Setting the Date and Time
• Setting the Tape Recording Speed
Changing Entertainment. Again.
5
¢@nnec @ns Setup
Parts Checklist
M_Lk__ sure the box includes the items shown here:
Camcorder
Battery pack AC adapter/ Power cord for
Part #252762 battery charger adapter/charger
Part #252767 Part #254598
CR2025 type Power connector Audio/Video/ Detachable LCD cable
lithium cell Part #254335 S-video cable Part #254337
Part #254336
Lens hood Lens Cap Shoulder strap Video light
Part #254415 Part #254233 Part #254338 Part #253402
Zoom microphone 16MB
Part #254414 MultiMediaCard
Part #254416
Card Reader/Writer
Part #254417 Imaging software and
driver CD-ROMs (2)
<3
Ferrite Cores Cleaning Cloth
Caution: Only use the power supply provided with this unit. Using other power
supplies may damage the unit.
6Chapte_
¢@nnec_@ns _ Setup
Buttons and Controls
STILL
button
NIGHT MODE
"OFF/ON switch
Terminal
UNLOCK
buHon
REC START/STOP
bu_on
Hand
strap
Audio/Video and
DV terminals
DSC MODE
DUAL/TAPE/CARD
switch
POWER
CAMERA/OFF/PLAY
switch
Zoom (W/T) and Volume
buttons (VOL +/-)
shoe
Manual focus ring
Microphone PHONES jack
CONTROL dial
FOCUS switch
AUTO/MANU/PUSH AUTO
Chapter _7
¢@nnec @ns Setup
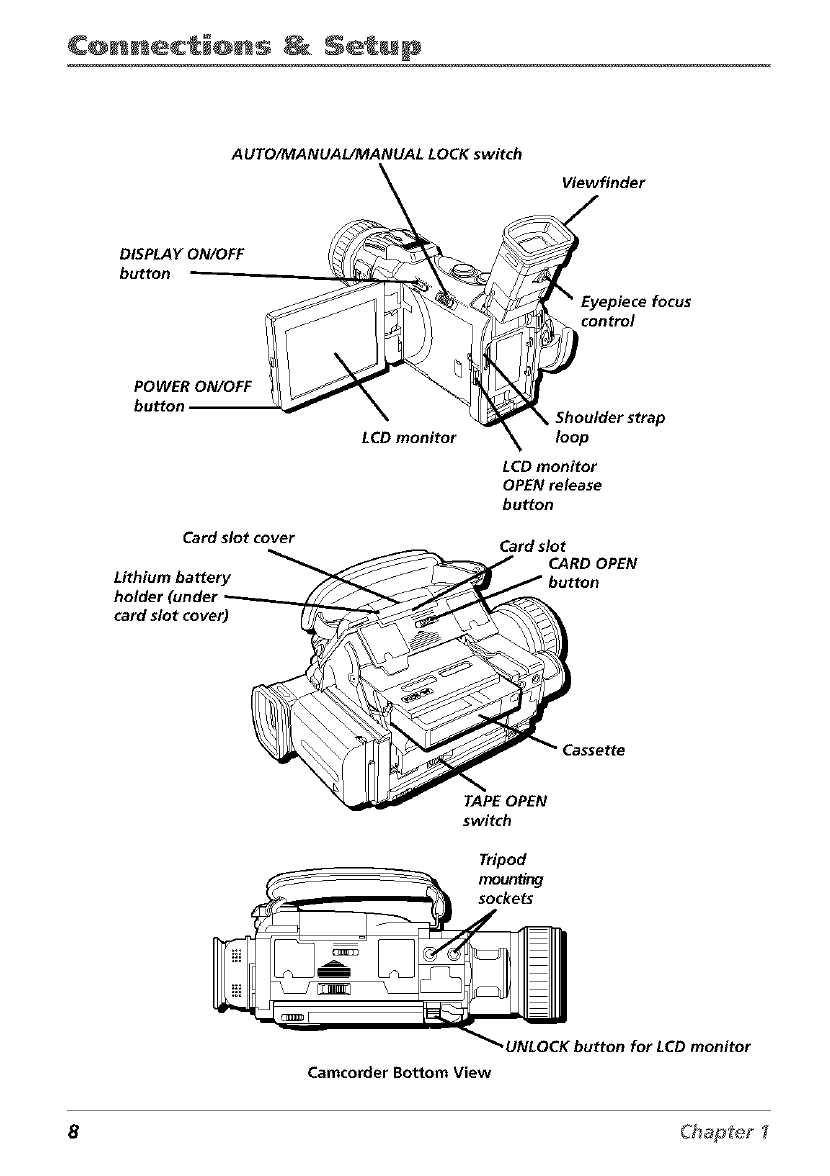
AUTO/MANUAUMANUAL LOCK switch
Viewfinder
DISPLAY ON/OFF
button
control
focus
POWER ON/OFF
button
Card slot cover
Lithium battery
holder
card slot cover)
LCD monitor
Shoulder strap
loop
LCD monitor
OPEN release
button
Card slot
CARD OPEN
button
TAPE OPEN
switch
Tripod
Camcorder Bottom View
8Chap[e_
¢@nnec @ns Setup
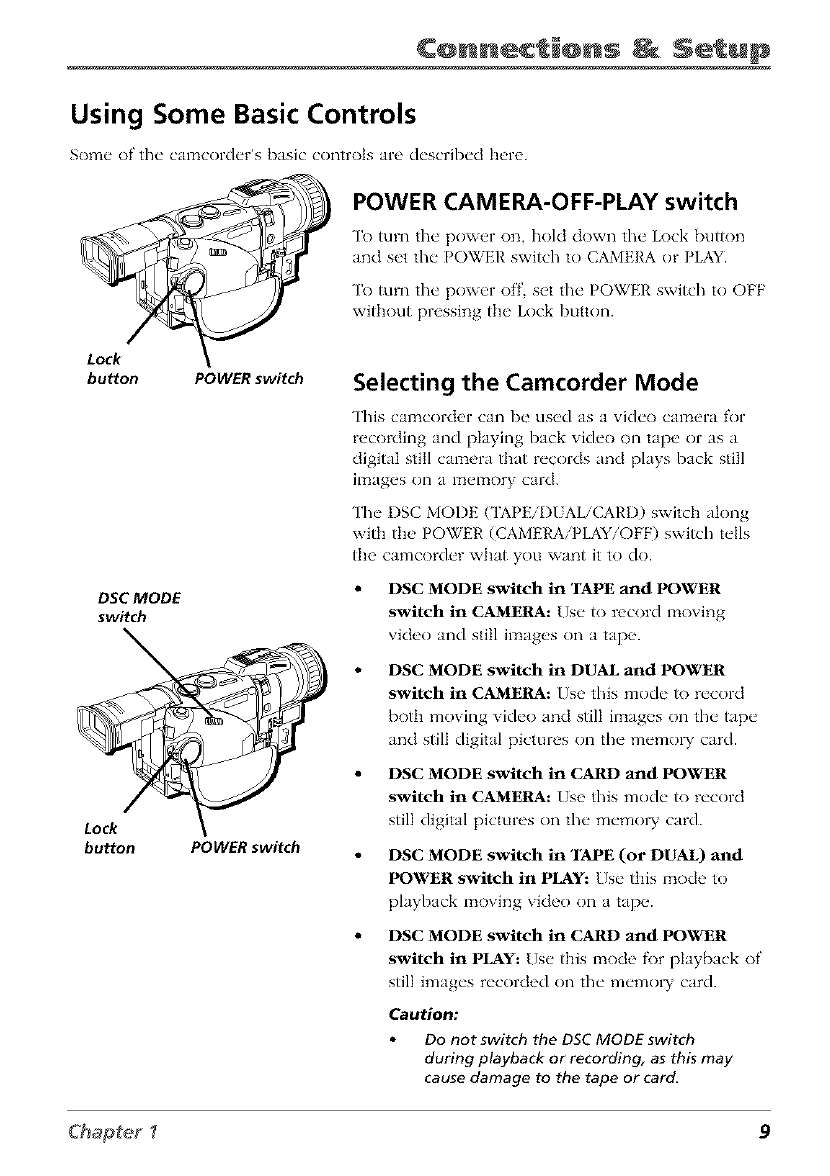
Using Some Basic Controls
Some of the camco1"der's basic controls are described h_'1"_'.
POWER CAMERA-OFF-PLAY switch
To turn the power on, hold down the Lock button
and set the POWER switch to CAMERA or PLAY_
To turn the power off set the POWER switch to OFF
without pressing the Lock button.
Lock
bu_on
DSCMODE
switch
Lock
button
POWER switch
POWER switch
Selecting the Camcorder Mode
This camcorder can be used as a vide{) CalTtera for
recoiling and playing back vide{) on tape or as a
digitaI stitl camera that records and plays back still
ilTtages on a ITtelTtOry card.
The DSC MODE ('IAPEiI)UALiCARD) switch along
with the POWER (CAMERA/PLAY/OFF) switch tells
the camcorder what you want it to do.
DSC MODE switch in "rAPE and POWER
switch in CAMERA: Use to record moving
video and still images on a tape.
DSC MODE switch in DUAL and POWER
switch in CAMERA: Use this mode to record
both moving video and still images on the tape
and still digital pictures on the memo W card.
DSC MODE switch in CARD and POWER
switch in CAMERA: Use this mode to record
still digital pictures on the memo W card.
DSC MODE switch in "rAPE (or DUAL) mid
POWER switch in PLAY: Use this mode to
playback moving video on a tap(,.
DSC MODE switch in CARD and POWER
switch in PLAY: Use this mode fi)r playback of
still images recorded on the memo W card.
Caution:
Do not switch the DSC MODE switch
during playback or recording, as this may
cause damage to the tape or card.
Chapter _9
¢@nnec i@ns Setup
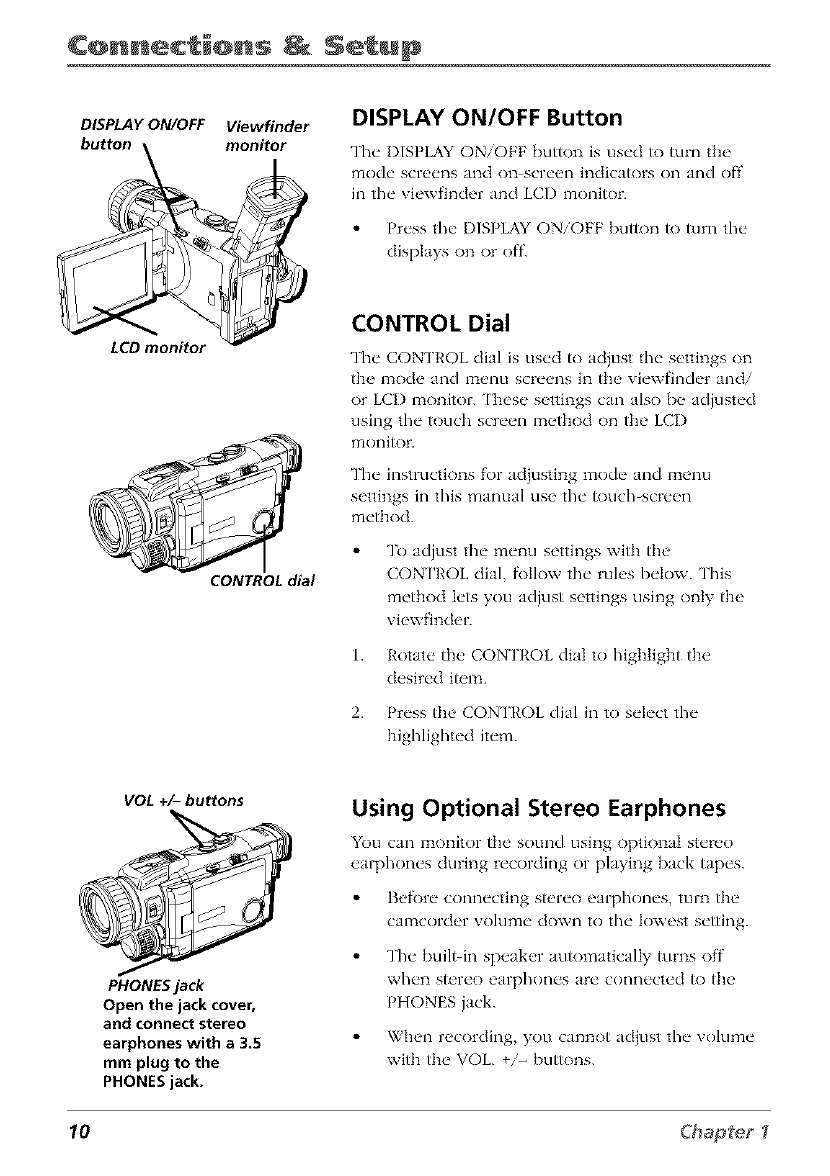
DISPLAY ON/OFF Viewfinder DISPLAY ON/OFF Button
The DISPLAY ON/OFF button is used to turn tile
mode screens and on screen indicators on and off
in the viewfinder and LCD monitor.
Press the DISPLAY ON/OFF button to turn the
clisplays on or off.
CONTROL dial
CONTROL Dial
The CONTROL dial is used to adjust the settings on
the mode and menu screens in the viewfinder and/
or LCI) monitor. ['hese settings can also be adjusted
using the touch screen method on the LCI)
monitor.
The instructions for adjusting mode and menu
settings in this manual use the _)uch_screen
method.
To adjust the menu settings with the
CON ['ROL dial, f\)Ilow the rules below. This
method lets you adjust settings using only the
viewfinder.
1. Rotate tile CONTROL dial to highlight the
desired item.
2. Press the CONTROL dial in to select the
highlighted item.
VOL +/- buttons
PHONES jack
Open the jack cover,
and connect stereo
earphones with a3.5
mm plug to the
PHONES jack.
Using Optional Stereo Earphones
You can ITIonitor tile sound using optional stere()
earphones during recording or playing back tapes.
Befi)re connecting stereo earphones, turn the
camcorder volume down to the lowest setting.
The built in speaker automatically turns off
xvhc_n s[_rcx) _arphonc_s arc _ connc_ctc_d It) the
PHONES jack.
When recording, you cannot adjust the volume
with the VOL. +/- bu_)ns.
10 Chapte_
¢@nnec @ns Setup
Getting Started
This s_,ction c]_'scrib_'s the' basics on how to s_,t up your camcord_'r to r_'cord f_)r the"
first tim_'. Ref_,r to the olh_'r s_'ctions for cletai]_'d opt'ration and f'_'atul-_" options.
Unpack the Camcorder and Accessories
•The' it,'ms shown in l)arta _Chc,_ldL_t ;u_" pack_'d with the' camcorch'r. If"any pi_'c_'s
are missing or app_'ar damaged contact your ch'a]_'r immediately.
•R_'mov_" the' plastic f'ih_a that cov_'rs the' f)'ont and sich" Iogos on the" camcorch'r.
Us_" your f'ing_,rnai], not anything sharp to r_'move.
•Say+" all packing mat+'ria]s and box in cas+" th<' camcord+'r +'v+'r n+'_,ds to b+"
shipp_'d or stor_'d.
Adjust the Hand Strap
1. Lif_ the flap on the" hand strap and s_'parate the" X/elcro strip.
2. Insert your hand so your fingers can comf\)rtably reach the buttons.
3. Adjust the strap to fit snugly.
4. Refasten the strap, and R)ld the flap back down.
Chapter _11
¢@nnec_i@ns _ Setup
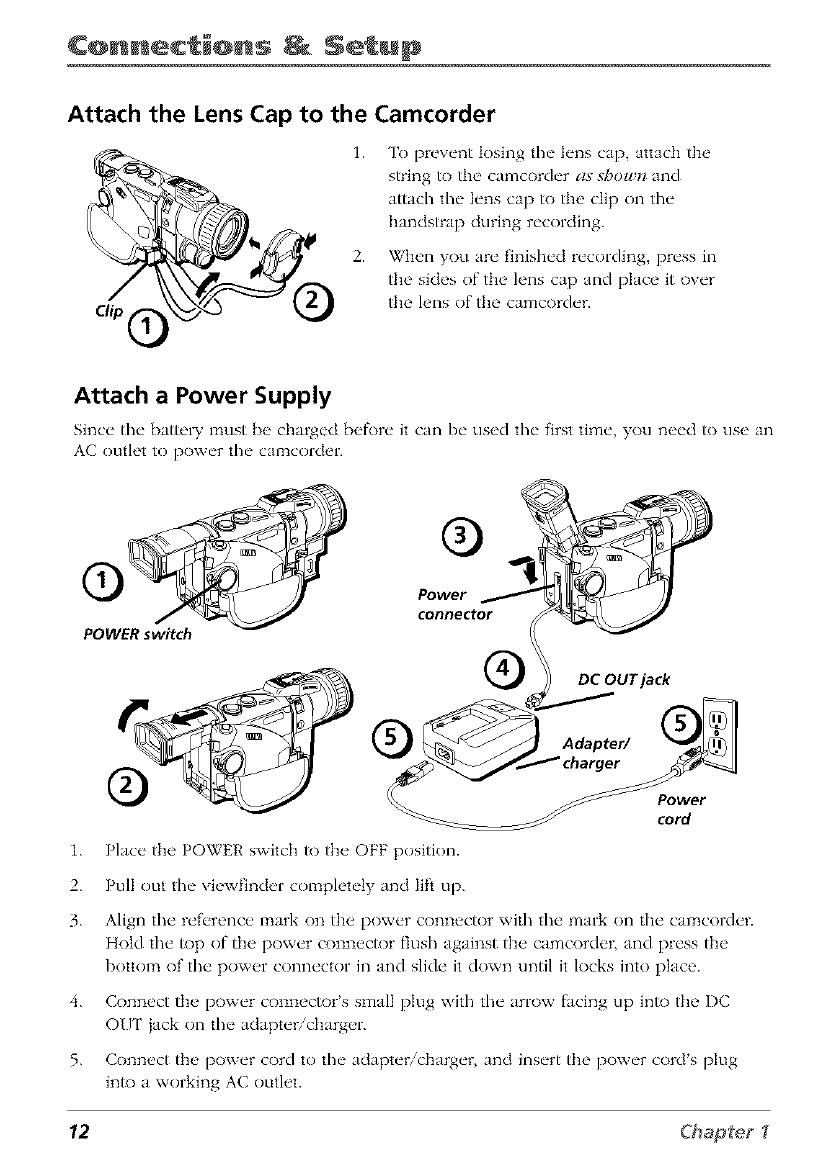
Attach the Lens Cap to the Camcorder
1.
2.
To prevent losing the lens cap, attach the
string to the camcorder as".%t?olgt?and
attach the lens cap to the clip on the
handstrap during recording.
When you are finished recording, press in
the sides of the lens cap and place it over
the lens of the camcorder.
Attach a Power Supply
Since" the" battci T must [)_, charged b_,f\)r_" it can I)_" clsed the" first tim_', you n_,_'d to else an
AC outh't to pow_'r the" camcordor.
POWER switch
®
Power
connector
DC OUT jack
Power
cord
1. Place the POWER switch to the OFF position.
2. Pull out the viewfinder completely and lift up.
3. Align the refi'rence mark on the power connector with the mark on the camcorder.
Hold the top of the power connector flush against the camcorder, and press the
bottom of the power connector in and slide it down until it locks into place.
4. Connect the power connector's small plug with the arrow facing up into the DC
O[]T jack on the adapter/charger.
5. Connect the power cord to the adapter/charger, and insert the power cord's plug
into a working AC outlet.
12 Cl'_ap_eg
¢@nnec @ns Setup
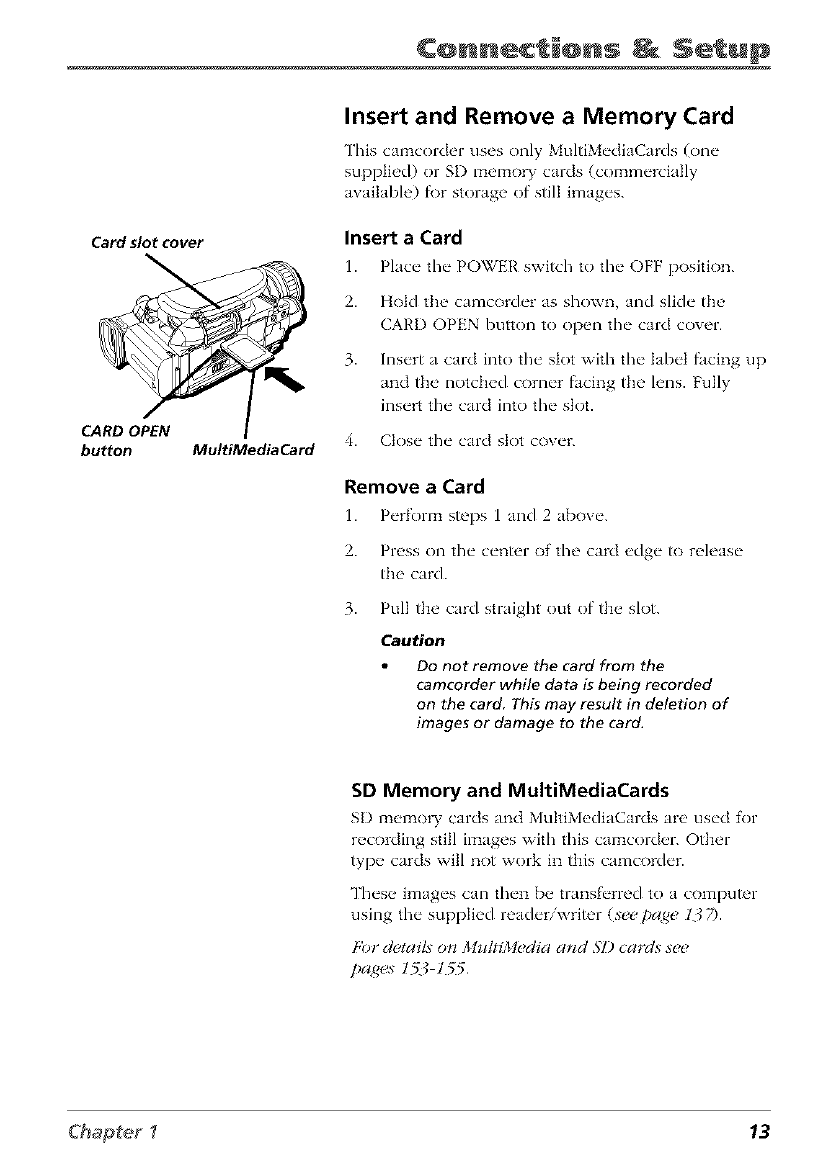
Card slot cover
CARD OPEN
button MultiMediaCard
Insert and Remove a Memory Card
This camcorder uses only MultiMediaCards (one
supplied) or SD memory cards (commercially
available) fi)r storage of still images.
Insert a Card
Place" the" POWER switch to the" OFF position.
1.
2.
3.
Hold the camcorder as shown, and slide the
CARD OPEN button to open the card cover.
Insert a card into the slot with the label facing up
and the notched corner facing the lens. Fully
insert the card into the slot.
4. Close the card slot cover.
Remove a Card
1. P_'rform steps 1 and 2 ab()v_'.
2. Press on the center of the card edge to release
the card.
3. Pull the card straight out of the slot.
Caution
Do not remove the card from the
camcorder while data is being recorded
on the card This may result in deletion of
images or damage to the card.
SD Memory and MultiMediaCards
SD memo W cards and MultiMediaCards are used for
recording still images with this camcorder. Other
type cards will not work in this camcorder.
These images can then be transf_'rred to a computer
using the supplied readeriwrimr (see page 13 7).
[,i)*"&¢tai£ on MultiM_¢diaand M) cards st¢t¢
pages 1_1_5
Chapter _ 13
¢@nnec @ns Setup
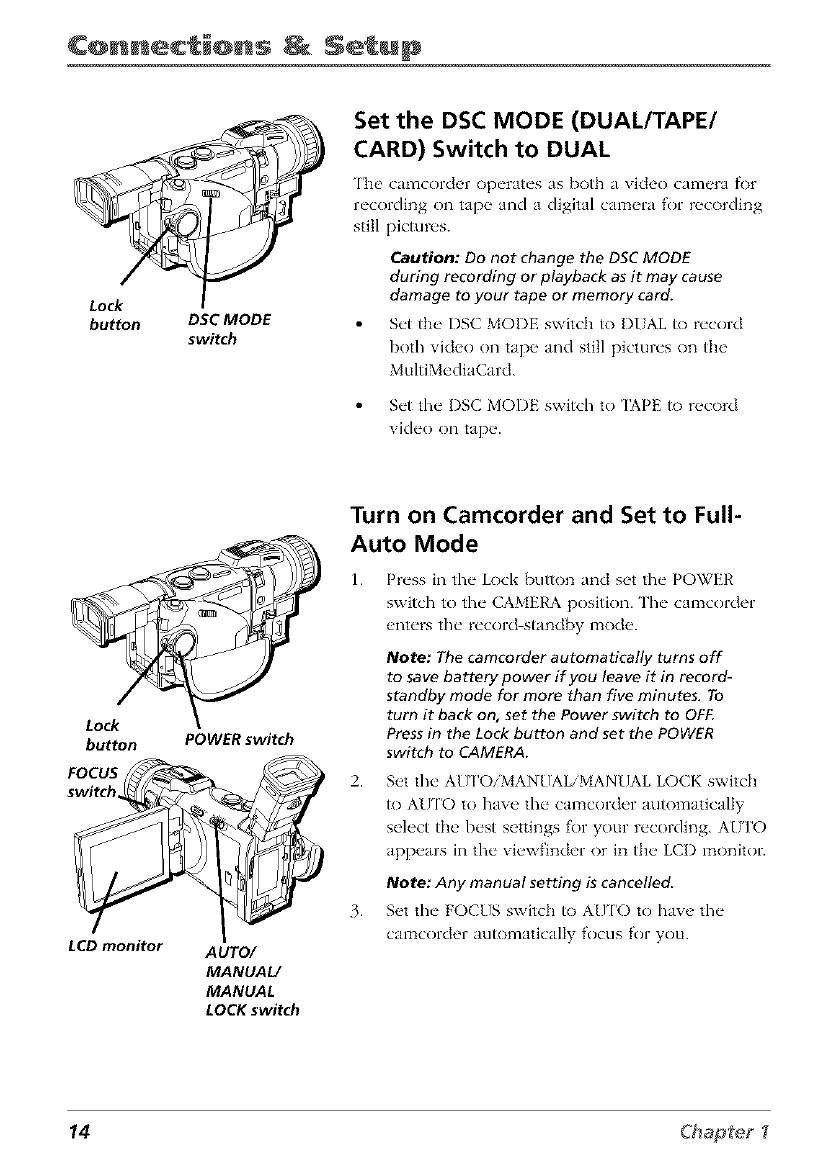
Lock
button DSC MODE
switch
Set the DSC MODE (DUAL/TAPE/
CARD) Switch to DUAL
The' cmqnc'order operates as both n \qdeo c'mqncra f_)r
recording on tap_" and a digital cam_,ra for recording
still pictures.
Caution: Do not change the DSC MODE
during recording or playback as it may cause
damage to your tape or memory card.
Set the, DSC MODE switch to DUAL to record
both video on tap_, and still pictures on the
MultiMediaCard.
Set the DSC MODE switch to 'IAPE to record
vide() on tape.
Lock
button POWER switch
FOCUS
switch
LCD monitor AUTO/
MANUAL/
MANUAL
LOCK switch
Turn on Camcorder and Set to Full-
Auto Mode
1. Press in the Lock button and set the POWER
switch to the CAMERA position. The camcorder
enters the record stand,by mode.
Note: The camcorder automatically turns off
to save battery power if you leave it in record-
standby mode for more than five minutes. To
turn it back on, set the Power switch to OFF.
Press in fhe Lock button and set fhe POWER
switch to CAMERA.
2. Set the AU ['O/MANUAL/MANUAL LOCK switch
to AUTO to have the camcorder automatically
select the best settings for your recording. AITFO
appears in the viewfinder or in the LCI) monitor.
Note: Any manual setting is cancelled,
3. S_,t the FOCUS switch to AU['O to have the
camcorder automatically focus for you.
14 Chapte_
¢@nnec @ns Setup
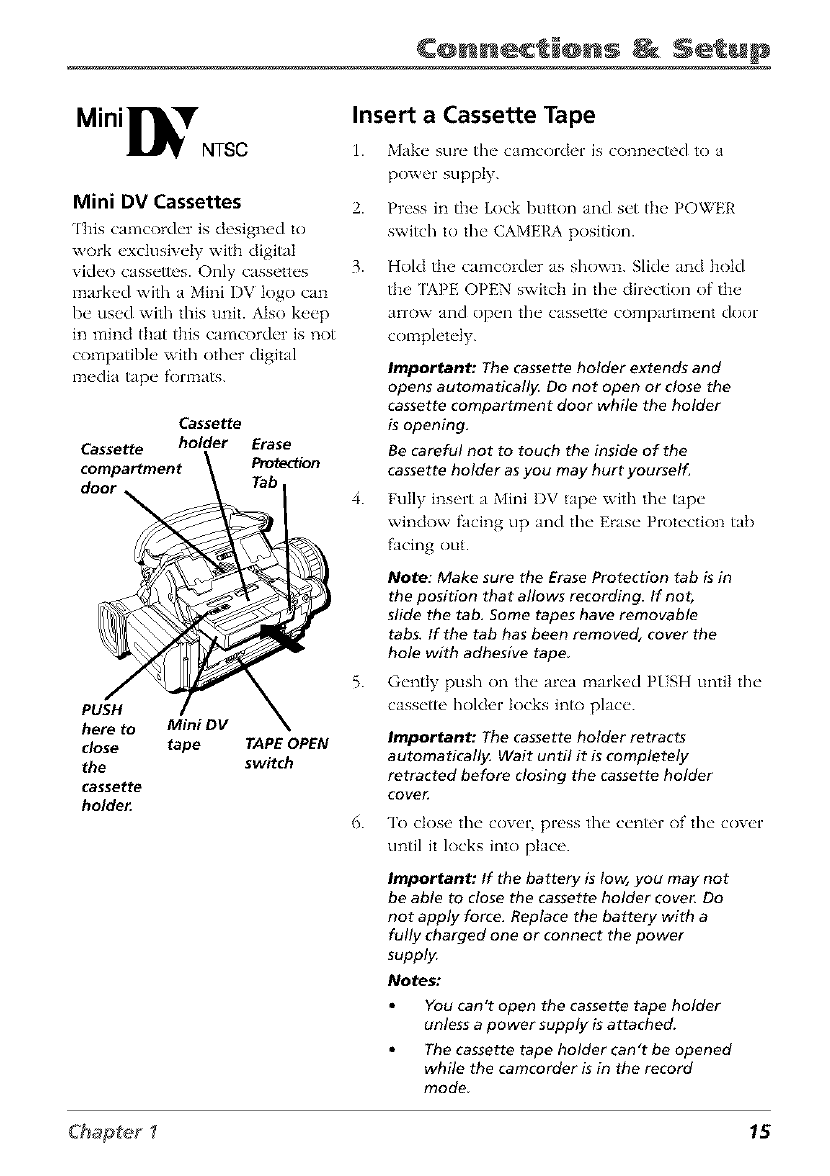
Mini_'NTSC
Mini DV Cassettes
This camcorder is designed to
work exclusively with digital
video cassettes. Only cassettes
marked with a Mini DV logo can
be used with this unit. Also keep
in mind that this camcorder is not
compatible with ()tiler digital
media tape formats.
Cassette
Cassette holder Erase
compartment Protection
door_
PUSH
here to Mini DV
close tape TAPE OPEN
the switch
cassette
holder.
Insert a Cassette Tape
1. Make sure the camcorder is conn_,cted to a
power supply.
2. Press in the Lock button and set the POWER
switch to tile CAMERA positkm.
3. Hold the camcorder as shown. Slide and hold
the [APE OPEN switch in tile directkm of the
arrow and open tile cassette compartlTtent door
completely.
Important: The cassette holder extends and
opens automatically. Do not open or close the
cassette compartment door while the holder
is opening.
Be careful not to touch the inside of the
cassette holder as you may hurt yourself.
4. Fully insert a Mini I)V tape with the tape
window facing up and the Erase Protection tab
facing out.
Note: Make sure the Erase Protection tab is in
the position that allows recording. If not,
slide the tab. Some tapes have removable
tabs. If the tab has been removed, cover the
hole with adhesive tape
5. Gently push on the area mark_,d PISH until the
cassette holder locks into place.
Important: The cassette holder retracts
automatically. Wait until it is completely
retracted before closing the cassette holder
COVet;
6. To dose the cow, r press the center of the cow'r
until it locks into place.
Important: If the battery is low, you may not
be able to close the cassette holder cove_ Do
not apply force. Replace the battery with a
fully charged one or connect the power
supply.
Notes:
You can't open the cassette tape holder
unless a power supply is attached.
The cassette tape holder can't be opened
while the camcorder is in the record
mode
Chapter _ 15
¢@nnec_i@ns _ Setup
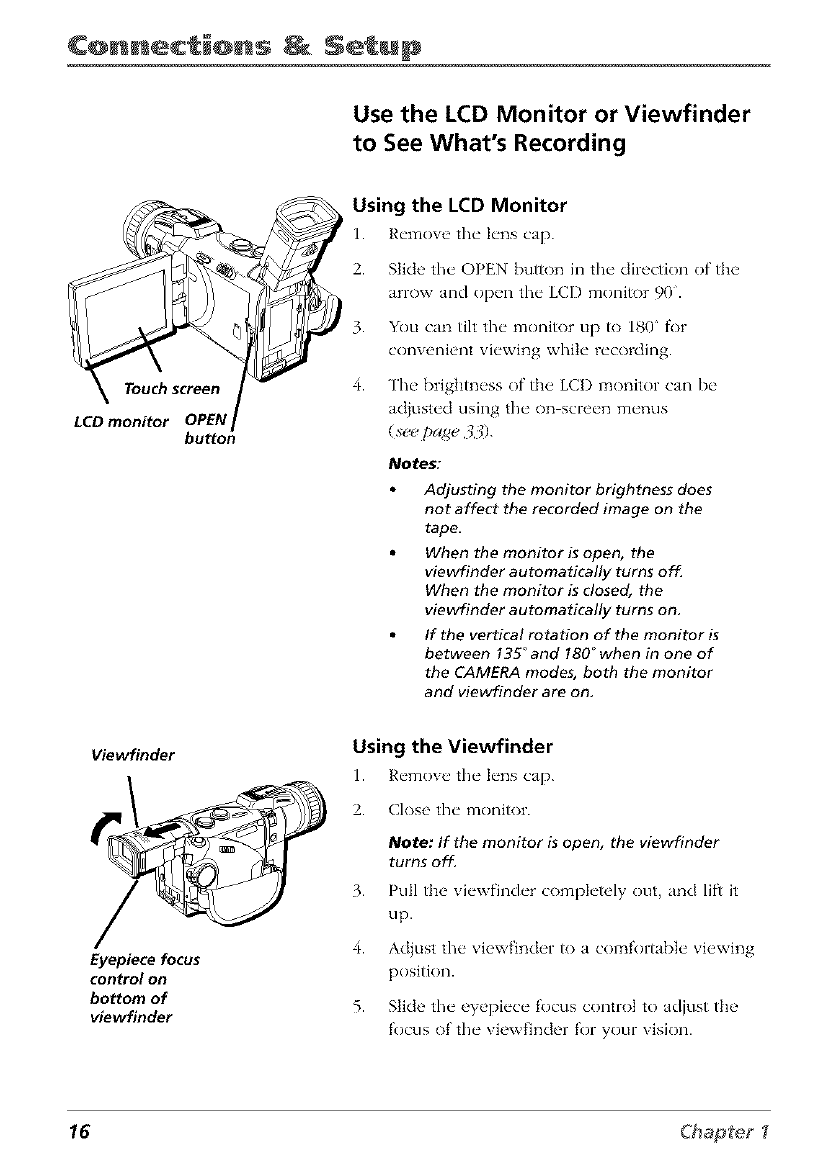
Use the LCD Monitor or Viewfinder
to See What's Recording
LCD monitor OPEN
button
Using the LCD Monitor
1. Remove the h'ns cap.
2. Slide the OPEN button in the direction of the
arrow and open the LCD monitor 90.
3. You can tilt the monitor up to 180 fi)r
convenient viewing while recording.
4. The brightness of the LCI) monitor can be
adiusted clsing the on screen menus
(see page 33).
Notes:
Adjusting the monitor brightness does
not affect the recorded image on the
tape.
When the monitor is open, the
viewfinder automatically turns of_
When the monitor is closed, the
viewfinder automatically turns on,
If the vertical rotation of the monitor is
between 135_and 180°when in one of
the CAMERA modes, both the monitor
and viewfinder are on.
Viewfinder
Eyepiece focus
control on
bottom of
viewfinder
Using the Viewfinder
1. Remove the h'ns cap.
2. Close the moniR)r.
Note: If the monitor is open, the viewfinder
turns off.
3. Pull the viewfinder completely out and lift it
tip.
4. Ad}ust the viewfinder to a comR)rtable viewing
position.
5. Slide the eyepiece R_cus control to adjust the
focus of the viewfinder for your vision.
16 Chap[e_

¢@nnec @ns Setup
DSC MODE
STILL switch
button
REC START/
STOP button p_
Lock WER
button switch
LCD monitor AUTO/
MANUAL/
MANUAL
LOCK switch
Start Recording
1. R_'move the" k'ns cap, and ()p_ql the" LCD
monitor.
2.
3.
4.
5.
6.
7.
Make sure you have ilasertd a cassette for video
recording and/or a memo W card f\)r recording
still pictures.
Place tim AU ['OiMANUAL/MAN/JAL LOCK
switch to the A/Yl'O position.
Place the FOCUS switch to the AUI'O position.
Place tim I)SC MODE switch to the I)UAL
position.
Press in the Lock button and set the POWER
switch to the CAMERA position.
Record video on tape or a still picture on the
memol T card.
Record Video on the Tape
• Press and release the REC STAR'IVSTOP button
to start and stop recording on the tape.
•RE(2appears in tim viewfinder or LCI) monitor
while the camcorder is recording (but wont be
recorded on the tape).
• When you are not recording, the camcorder
enters the record pause mode and I)AUSP2
appears in the viewfinder or on the LCD
monitor.
Record aStill Picture on the Memory Card
• Place the camcorder in record pause mode
(IMUSP2appears in the viewfinder or on the
LCD monitor).
• Use the power Zoom WYI"buttons to f)ame
your subject.
• Press the S ['ILL button to record a still picture
on the memo W card. RE(]OI¢I)I3i(; '/()
MEMORY (2AA'Dappears in the viewfinder or
on the LCI) monitor.
Chapter _ 17
¢@nnec_i@ns _ Setup
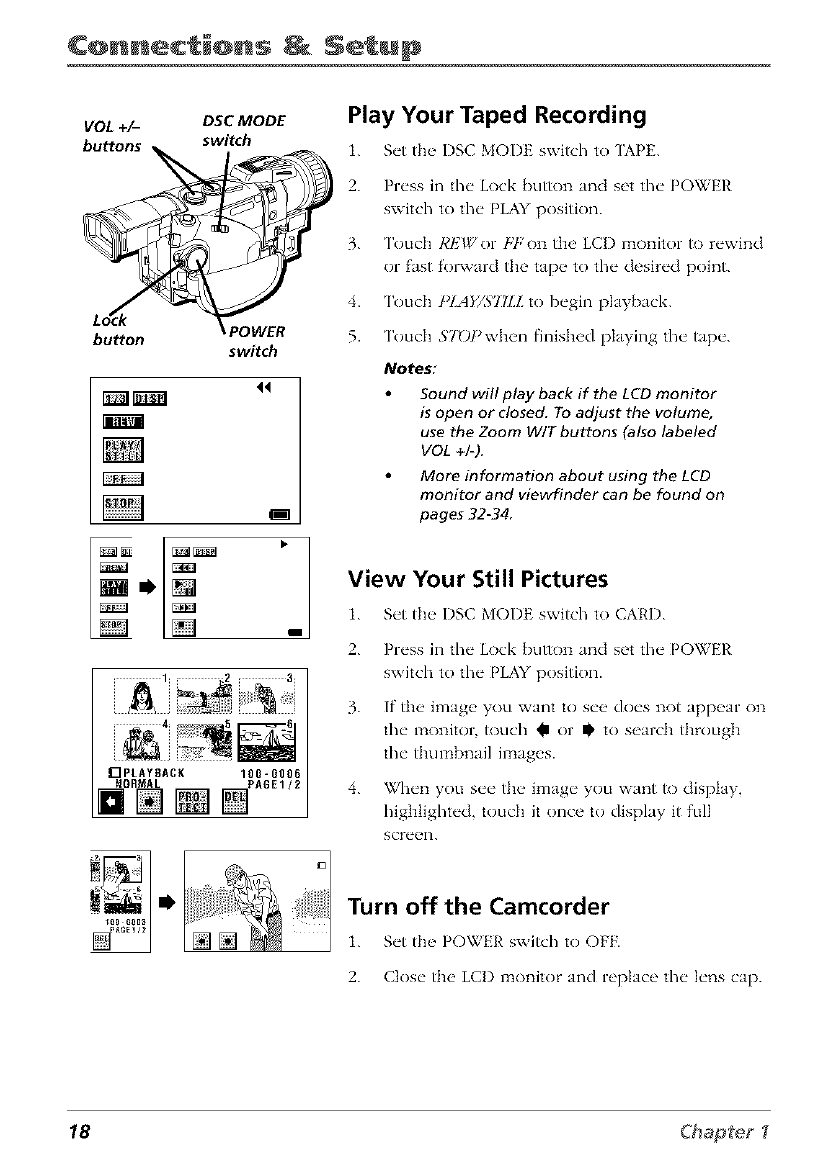
VOL +/- DSC MODE
buttons switch
t_
button POWER
switch
44
]_
i
fIpLAYSACK 100-0000
fin [] []'A°E'2
Play Your Taped Recording
1. S_'t tJ]__ I)SC MOI)E switch to [APE.
2. Pr_'ss in the" Lock button and set tl]_" POWER
switch to the" PLAY position.
3. ToucIl REWor H,'on d_ >LCD monffor/o r_'wind
or fast fol_vard the tap_ to the, desir_'d point.
4. Touch IqAY/S77LL to bvgin playback.
5. Touch 57Dl_when finished playing fl/v tapv.
Notes:
Sound will play back if the LCD monitor
is open or closed. To adjust the volume,
use the Zoom WtT buttons (also labeled
VOL +1-).
More information about using the LCD
monitor and viewfinder can be found on
pages 32-34
View Your Still Pictures
i. S_'t the, I)SC MOI)E switch to CAI,'I).
2.
3.
4.
Press in the Lock button and set the PO_TER
switch to the ¸PLAY position.
If the image you want to see does not appear on
the monitor, touch _ or Ib to search through
the thumbnail images.
When you see the image yotl want tO display,
highlighted, touch it once to display it full
SCr_2(2n.
Turn off the Camcorder
• s
i. S_'t th_ _ ] O_ER swffd/ to OFF.
2. C}os_" the LCD monitor and replace t]/_" k'ns cap.
18 Chapfeg

¢@nnec_@ns _ Setup
Powering the Camcorder
You can power your camcorder with a battel T or the AC adapter/charger. The battel T must
be charged as d_scrih_,d oH the _xtpa<_ebefore ii can be used _) power the camcorder.
2.
3.
Attaching the Battery to the
Camcorder
Make" sur_" the POWER switch is set to OFR
Pull th__ vi_'wfinch'r all the" way out and lift it up.
Align the _ mark on the side of the batte W to
the _ on the camcorder.
4. Press the battery in and slide it down until it
locks into place.
UNLOCK
button
Cautions:
Always stop recording or playback and
place POWER switch in OFF before
attaching or removing the batter_
Removing the battery while the
camcorder is recording or playing back
may cause damage to the tape or card.
Remove the battery if the camcorder will
not be used for a long period of time.
Use only the recommended batteries for
this camcorde_ Use of other batteries
may present a risk of fire or explosion
Removing the Battery from the
Camcorder
1. Make sure the POWER switch is set to OFR
2.
3.
Pull the viewfinder all the way out and lift it up.
Press and hold the I NLOCK button in the
direction of the arrow and slide the batte W up
and relTtOVe it.
Chapter _ 19
¢@nnec @ns Setup
CHARGE POWER
•" " "tor
Tip
Before extended use, it is
recommended that you prepare
enough battery packs to cover 3
times the planned shooting time.
Charging the Battery
I. Remove the pow_'r connectors cane from the
AC adapter/charger if attached.
2. Connect tim supplied power cord to the AC
power socket on the AC adapter/charger and
insert the AC plug into a working AC outlet. The
POWER indicator lights.
3. Align the ref_'rence mark on the battery with the
mark on the adapter/charger. Slide the batte W
into the groove until it locks into place. The
CHARGE indicator lights.
4. The CHARGE indicator will turn off wimn the
battery is fully charged. Unplug the power
supply from the AC outlet.
5. Slide tim battery pack out of the adapter charger
and remow' it.
Notes:
If a protective cap is on the battery, remove
it before use or charging.
When charging a battery for the first time or
after a long storage period, the CHARGE
indicator may not come on. Remove the
battery and try again.
Charge the battery in temperatures between
50° and 90° Fahrenheit (10-35° Celsius).
Charging times are based on afully
discharged battery and vary depending on
temperature and battery conditions.
If you store a partially charged battery for a
long period of time, its performance is
reduced.
Charging and discharging isn't possible if the
wrong type of battery is used.
If the battery operation time remains
extremely short even after having been fully
charged, the battery may be worn out and
needs to be replaced.
20 Chap_e_
¢@nnec @ns Setup
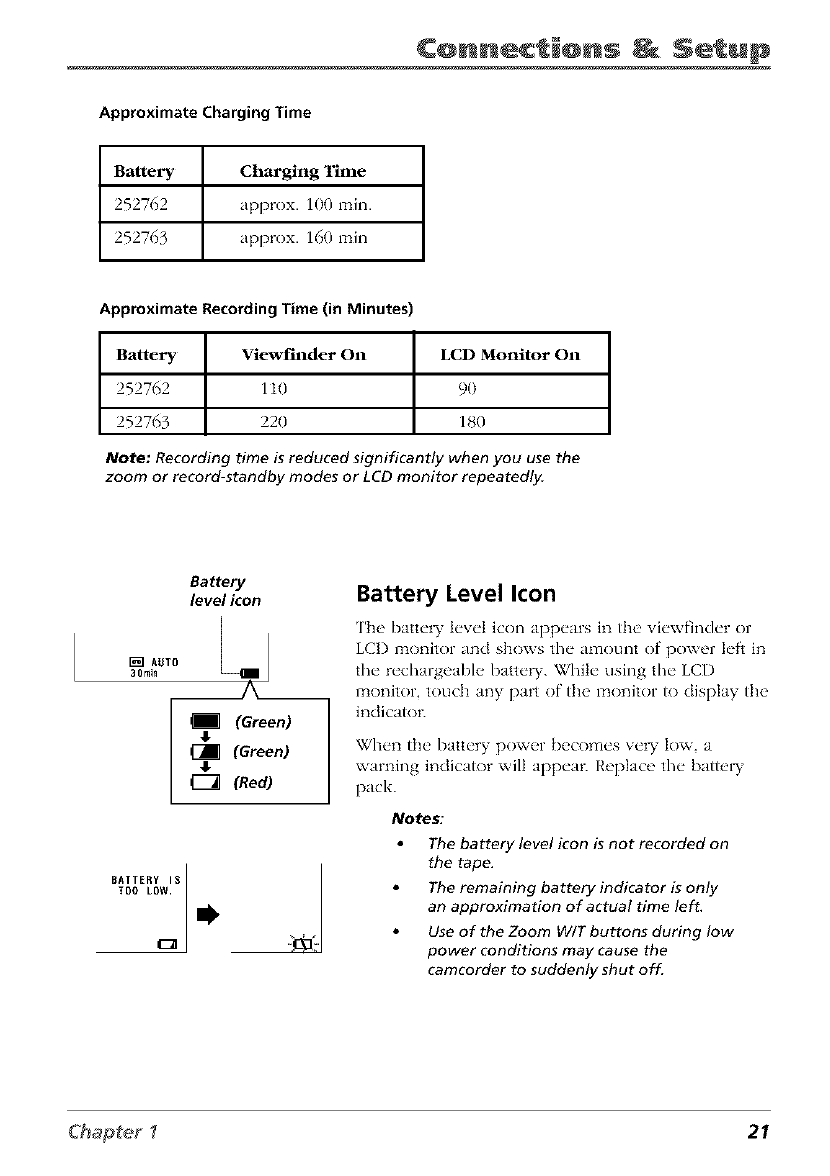
Approximate Charging Time
Battery Charging Time
252762 approx. 100 rain.
252763 approx. 160 min
Approximate Recording Time (in Minutes)
Battery Viewf_lderOn
252762 110
252763 220
LCD Monitor On
90
180
Note: Recording time is reduced significantly when you use the
zoom or record-standby modes or LCD monitor repeatedl_
Battery
level icon
[_] AUTO
3lit,in
4" (Green) ]
(_ (Green)
#(Red)
Battery Level Icon
The batte W level icon appears in the viewfinder or
LCI) monitor and shows the amount of power left in
the recbargeable batte W. While using the LCI)
monitor, touch any part of the monitor to display the
indicator.
When the battery power becomes ve W low, a
warning indicator will appear. Replace the batte D'
pack.
Notes:
The battery level icon is not recorded on
the tape.
The remaining battery indicator is only
an approximation of actual time left.
Use of the Zoom WiT buttons during low
power conditions may cause the
camcorder to suddenly shut off.
Chapter _ 21
¢@nnec_@ns _ Setup
Battery Care and Storage
After repeated charging and use, battel T life gradually decreases. Wh_'n opt, ration
time is too short to be useful, the battel T should be replaced.
If the batte W pack becomes too hot, remove it from the camcorder and let it coot
down.
Do not short the battel)"s terminals.
Do not attempt to disassembh" or modif_y ' the barrel)'. ']'here are no user_serviceable
parts inside.
/se the batte_ T only with specified adapter/chargers and camcorders.
Throwing the battel T into a fire or exposing it to excessive heat over 149F (65C)
could be hazardous.
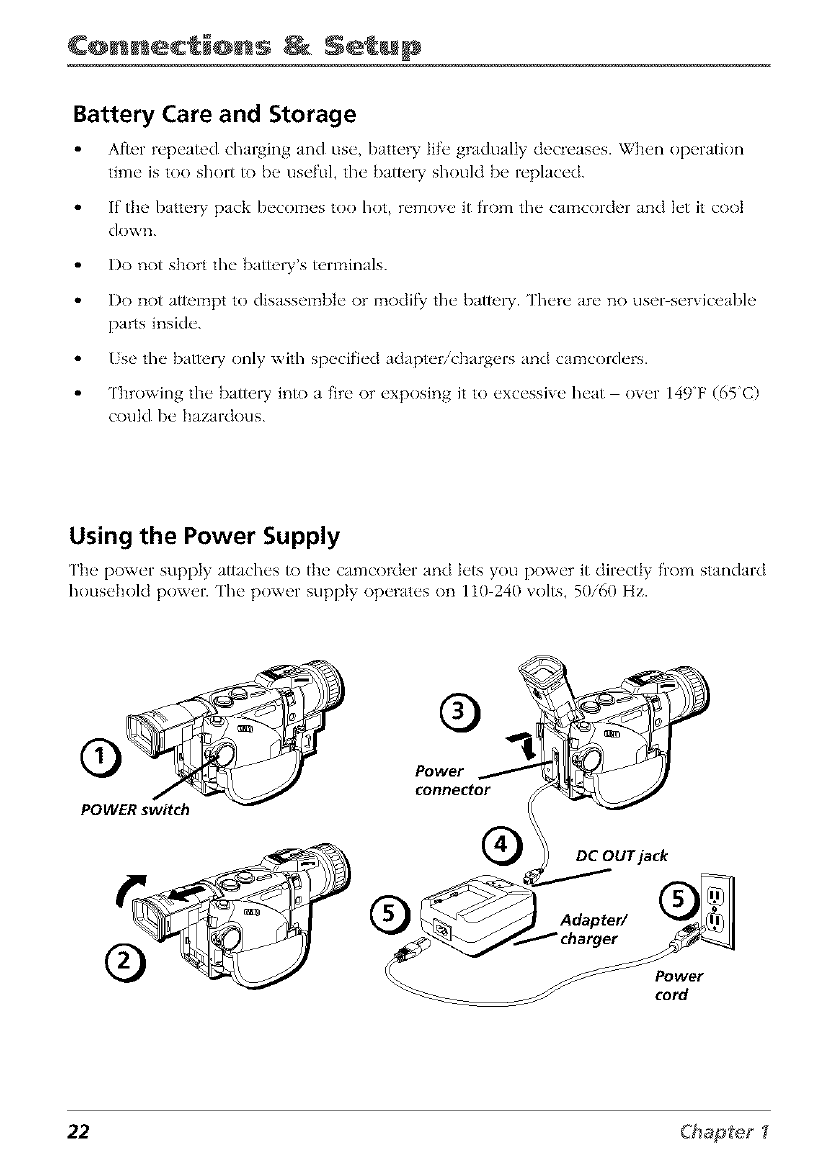
Using the Power Supply
['h_" power supply attaches to the' c tmcorder and h'ts you power it directly from standard
household power. The power supply operates on 110 240 xolts, 50/60 Hz.
POWER switch
Power
connector
DC OUT jack
Power
cord
22 Chap_e_
¢@nnec @ns Setup
1. Place the POWER switch to the OFF position.
2. Pull out the viewfinder completely and liR up.
3. Align the refl'rence mark on tim power connector with tim mark on tim camcorder.
Hold the top of tim power connector flush against tim camcorder, and press the
bottom of the power connector in and slide it down until it locks into place.
4. Connect tim power connector's small plug with the arrow facing up into the DC OUP
jack on tim adapter/charger.
5. Connect tim power cord to the adapter/charger, and insert the power cord's plug
into a working AC outlet.
Caution: Only use the power supply provided with this unit. Using other power
supplies may damage the unit.
Removing the Power Supply
1. Mal<__ sure the" POWER switch is set to OFF.
2. Pull tt_ _ vit'wfindt'r all tht" way out and lift it up.
3. Pwss and hold tt_' I NLOCK button in the" ciirection of the arrow and wmow" the
po_,ver conn/_ctor.
Caution: Always stop recording or playback and place POWER switch in OFF before
attaching or removing the battery. Removing the battery while the camcorder is
recording or playing back may cause damage to the tape or card.
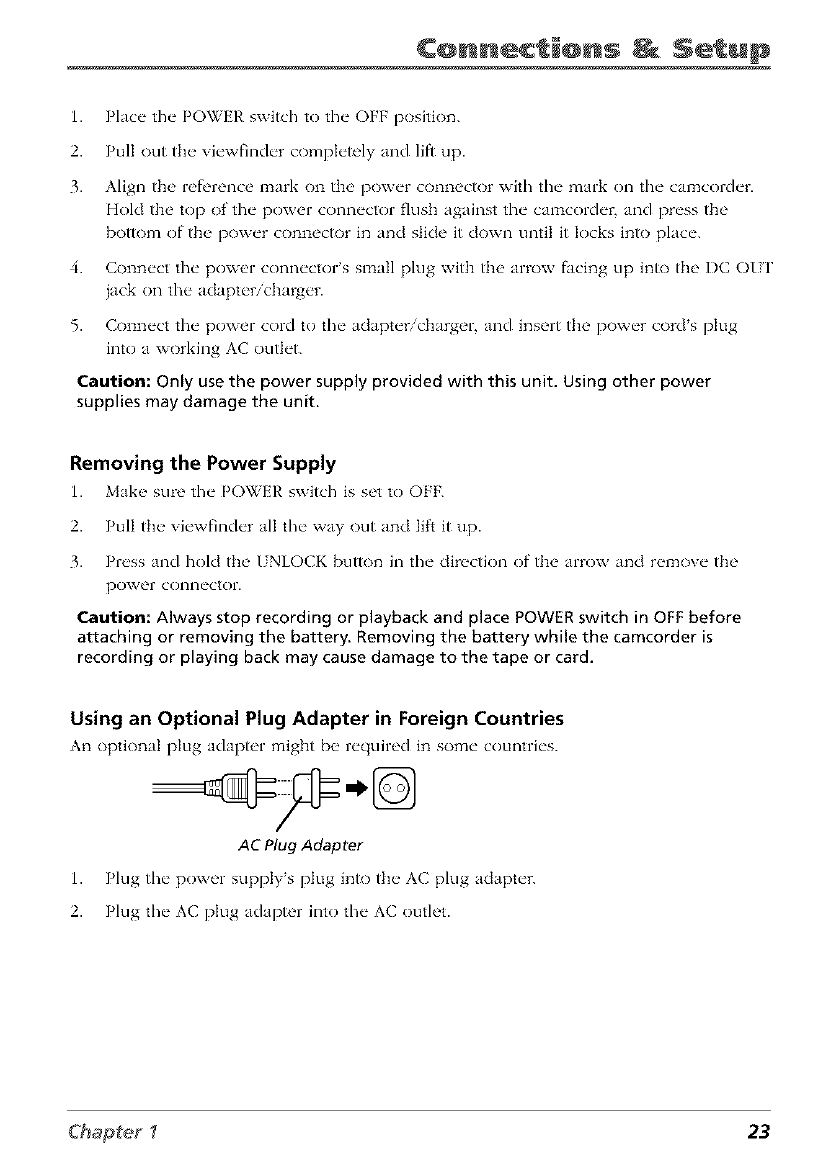
Using an Optional Plug Adapter in Foreign Countries
An optional plug adaptor might I)__ r('quirod in sore(" countri('s.
AC Plug Adapter
1. Plug tim power supply's plug into the AC plug aclapter.
2. Plug the AC plug adapter into the AC outlet.
Chapter _ 23

¢@nnec @ns Setup
Using the Shoulder Strap
['h_' camcorder's shoulder strap is design_,d to let you carl T the camcorder from your
shoulder and when ready bring the camcorder to shooting position in one quick
1. Following the illustration, thread the strap through the eyelet.
2. Fold tile strap back and thread it througll the buckle.
3. Repeat the procedure to attach the other end of the strap to the other eyelet located
under the hand strap. Make sure the strap is not twisted.
Caution: When carrying the camcorder with the shoulder strap, you should close the
LCD monitor and rotate the viewfinder down and slide it in. This helps prevent
possible damage to the monitor or viewfinder from bumping against your body as you
move. Make sure the shoulder strap is firmly attached before using it to carry the
camcorder.
Attaching the Lens Hood
When recording outdoors on a sunny day or in a location with bright lighting attach the
supplied h'ns hood to the camcorder.
Turn the lens hood in the direction of the
arrow to attach it.
To remove the lens hood, turn it in the
opposite directkm
Notes:
The lens cap can still be attached on top
of the lens hood
Filters and other accessories cannot be
attached on fop of the lens hood,
24 Chapfef

¢@nnec @ns Setup
Install the Clock Lithium Cell
Card slot cover
The supplied lithium cell must be installed f\)r the camcorder to remember the date and
time settings.
1. Slide the CARD OPEN button in the direction of
the arro\v to open the card SlOt cover.
2. Pull out the cell bolder using the tip of a
ballpoint pen or other pointed object.
3. Insert the lithium ceil into the cell holder with
the + side of the ceil facing the + side of the
holder.
CARD OPEN Lithium cell 4. Insert the cell holder back into the compartment.
button holder 5. Close the card slot cover.
To Remove the Clock Lithium Cell
Peribrm steps 1 and 2 above, and Iili out the lithium
cell fiom the cell holder.
Notes."
Set the date and time after inserting a
lithium cell Not setting the date and
time causes extra wear on the lithium
cell
Replace the cell with a new CR2025
lithium cell when the time display starts
to fall behind the correct time.
Important: Lithium cell battery. Replace only with 3-volt lithium cell-such as
CR2025, Use of other cell presents a risk of fire or explosion, Must be disposed of
properly, Never handle punctured or leaking cell May cause burns or personal
injury.
Keep out of the hands of children. Can cause death or injury if swallowed, If
swallowed, consult a physician immediately for emergency treatment.
The Lithium cell used in this device may explode resulting in a fire or chemical burn
if mistreated Do not recharge, disassemble, heat above 212W (100"C), or
incinerate.
Never use metallic tweezers to hold the cell, and never short circuit the +and -
sides of the cell
Chapter _ 25
¢@nnec @ns Setup
Lock
button POWERswitch
OPEN button
[_ AUTO
i,
0ISPLAY
_21t NEW YORK
ii DYLT SAVE
SETI ING
12H/24H
IIETURH
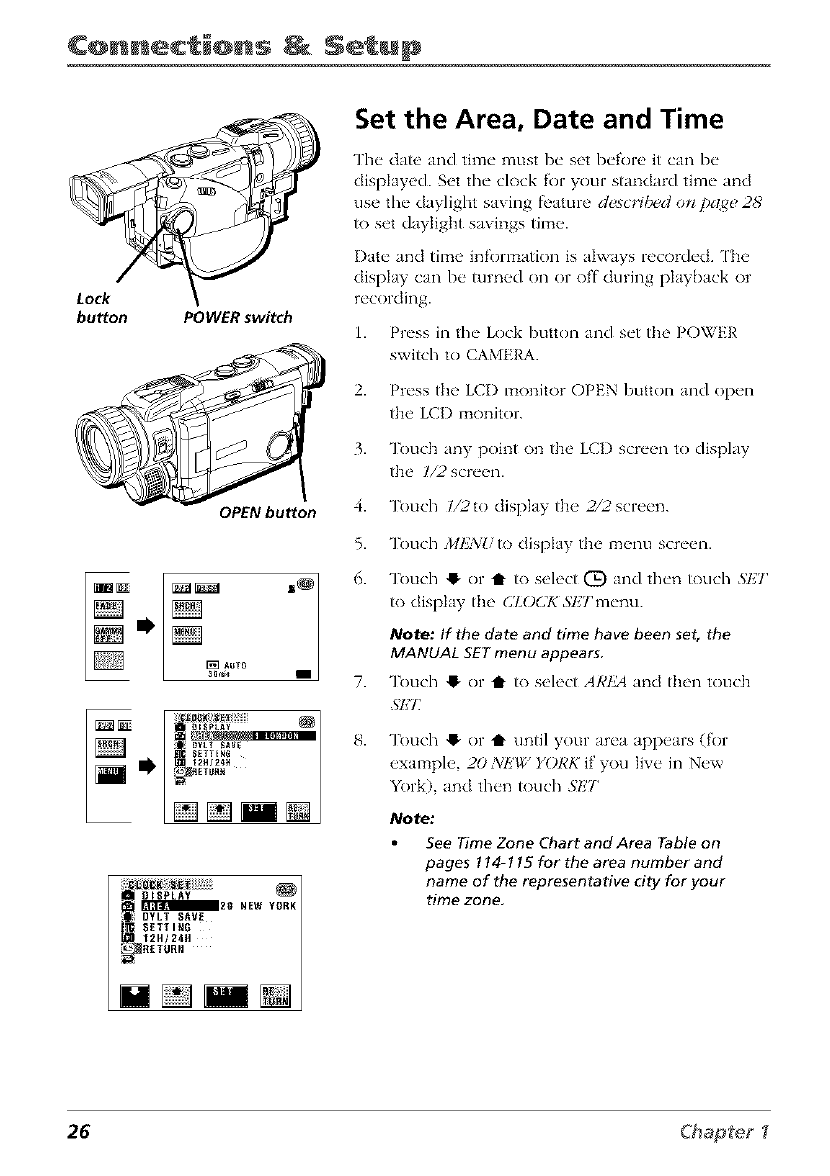
Set the Area, Date and Time
The date and time must be set before it can be
displayed. Set the clock for your standard time and
use the daylight saving f_'amre desc,'_i&_don pa_e 2,8'
to set daylight savings time.
Date and time information is ahvays recorded. ['he
display can be _lrned on or off during playback or
recording.
1. Press in the Lock button and set the POWER
switch to CAMERA.
2. Press the LCI) monitor OPEN button and open
the LCI) monitor.
3. Touch any point on the LCI) screen to display
the l/2 screen.
4. Touch l/2to display the 2/2screen.
5. Touch J/llZ3iUto display the menu screen.
6. Touch ,I or t to select (D and then touch SHT
to display the (_ZOCK SHTmenu.
Note: If the date and time have been set, the
MANUAL SET menu appears
7. Touch ,I or t to select AI,'t_ and then touch
51"]7:
Touch ,I or i until your area appears (for
example, 20 XI!'W YORK if you live in New
York), and then touch .flY/'
Note:
See Time Zone Chart and Area Table on
pages ! 14-1 15 for the area number and
name of the representative city for your
time zone,
26 Chap{eg
¢@nnec_@ns _ Setup
AREA
12N/24H 12:0SAM
RETURN
NN N
9. ]linch 0 or t to select $1,7771NG and then
_)uch .';I_'T
10. T_)uch O or t until the desired number
appears for the month, and then touch S]_7_
Repeat _) set the day, yea_ hour, and minute.
3buch RET_/R/V to select and change a numben
11. T_uch RETUR/vrepeatedly to turn offthe menu
screens.
[OtSPLAY
AREA
DYLT SAVE
ETTINR
RETURN 24ff
Changing to the 24-hour Time
Mode
1. Afker step i0 aboxe, touch O or t1" to select
12H/24H and then touch ,'_k'T
2. 3_)uch @ or t1" to select 2411_ and then touch
3. 3_xlch RI_'7_sRN repeatedly to turn off the menu
screen.
Notes:
The date and time are recorded on the
tape or card, press DISPLAY ON!OFF to
turn the time display on or of_
The menu screen automatically turns off
if no settings are made within five
minutes.
Chapter _27
¢@nne¢ i@ns Setup
Lock
button POWER switch
JUH. 2.2002
[_]AUTO IO:30AM
3Bmin
DISPLAY
tAREA
:SETTING ON
:12H124H
_RETURH
[]
Daylight Savings
indicator
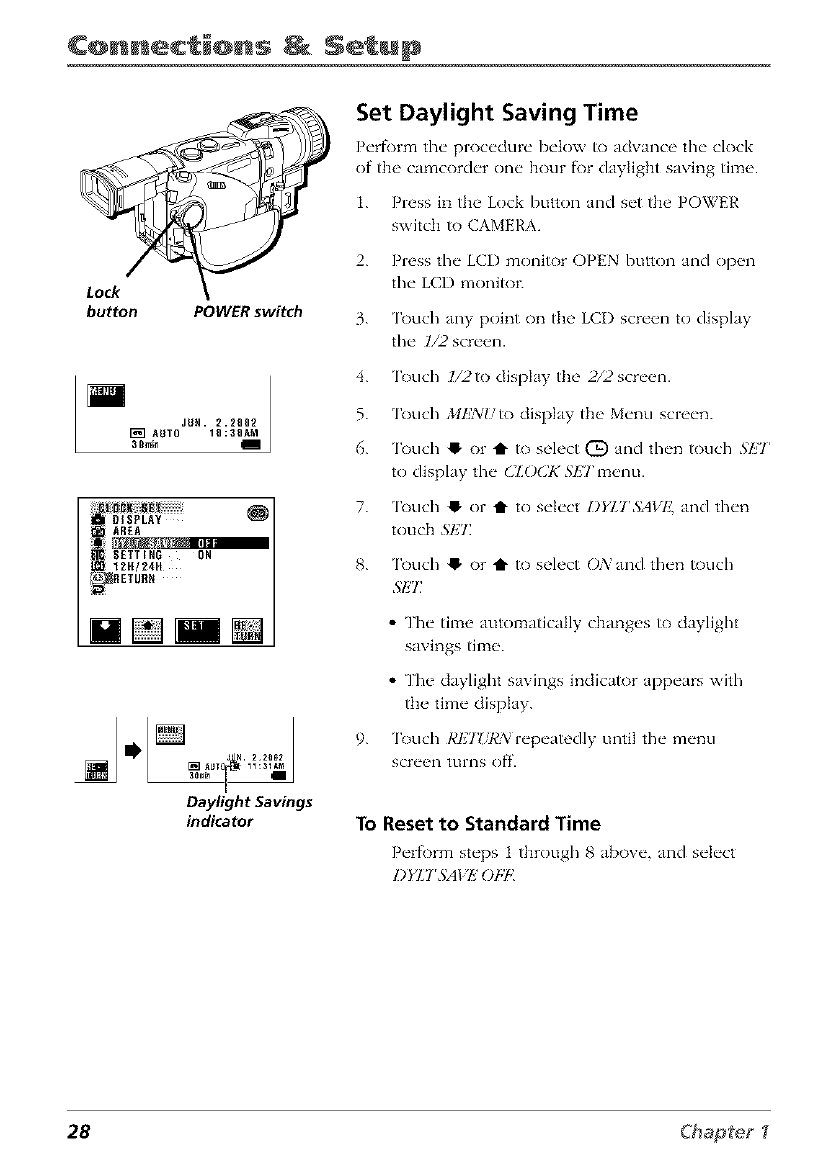
Set Daylight Saving Time
P_'rfi)rm t];_" proc_'dml_" I)_'|ow to advance the" clock
of the camcord_'r one" hour fi)r daylight saving tim__.
1. Press in the Lock button and s_'t the POWER
switch to CAMERA.
2. Press the LCI) monitor OPEN button and open
the LCI) monitor.
3. ['ouch any point on the LCI) screen to display
the l/2 screen.
4. 'lkxlch l/2to display the 2/2 screen.
5. 'lkxlch MkWUto display the Menu screen.
6. 'lk)uch !1. or tl- to select (_) and then touch SET
to display the CZO(2KSETmenu.
7. 'lk)uch !1. or tl- to select DFLTSAVk'. and then
touch 3'1£T.
8. ['ouch !1. or tl- to select O2vand then touch
S/HJ
9.
•The time automatically changes to daylight
sax ings time.
•The daylight saxings indicator appears with
the time display.
['ouch I,'I'22URA_repeatedly until the menu
screen tLII'I3S off.
To Reset to Standard Time
P_'rf_)rm st_'ps t through 8 abo_ _', and s_'k'ct
28 Ck_apte_
¢@nnec @ns Setup
JUN 2.2_Q2
10:30AM
I
Displaying the Date and Time of
Recording
Follow the procedure below to display the date
or dat_, and time. You can display the date and
time during both recording and playback. ['he
dock cell must be installed and the time and
date set bel"ore you can display and record
them (see pa_es 252(5).
1. Follow steps 1 through 6 under ,',_,t
l)aFl{ght 5az DTg7Dne.
2. 'lk)uch 41- or t1" to select l)lSYlAYand
touch SI,_'I:
3. 'lk)uch !_ or t1" to select I)A'II,_
IrATE+TIME, or OET:and touch SET.
• Select Z)ATt,:to display and record the
date.
4.
• Select I)A7E'+TIMI!to display and record
the date and time.
• Select OETqo turn ()If'the date and time
display. It will not be recorded.
'lk)uch Rl,_T!/RNuntil the menu screen turns
off. The da_ or da_ and time are
displayed.
Notes."
Before recording, make sure that
the date and time have been
correctly set (see pages 26 and 27).
If they have not been set, the
display will be left blank when
playing back the recording. The
display will also be left blank for
unrecorded or damaged portions
of the tape.
In TAPE-PLAY mode, the current
date and time are displayed when
the tape is not being played back.
Chapter _ 29
¢@nnec @ns Setup
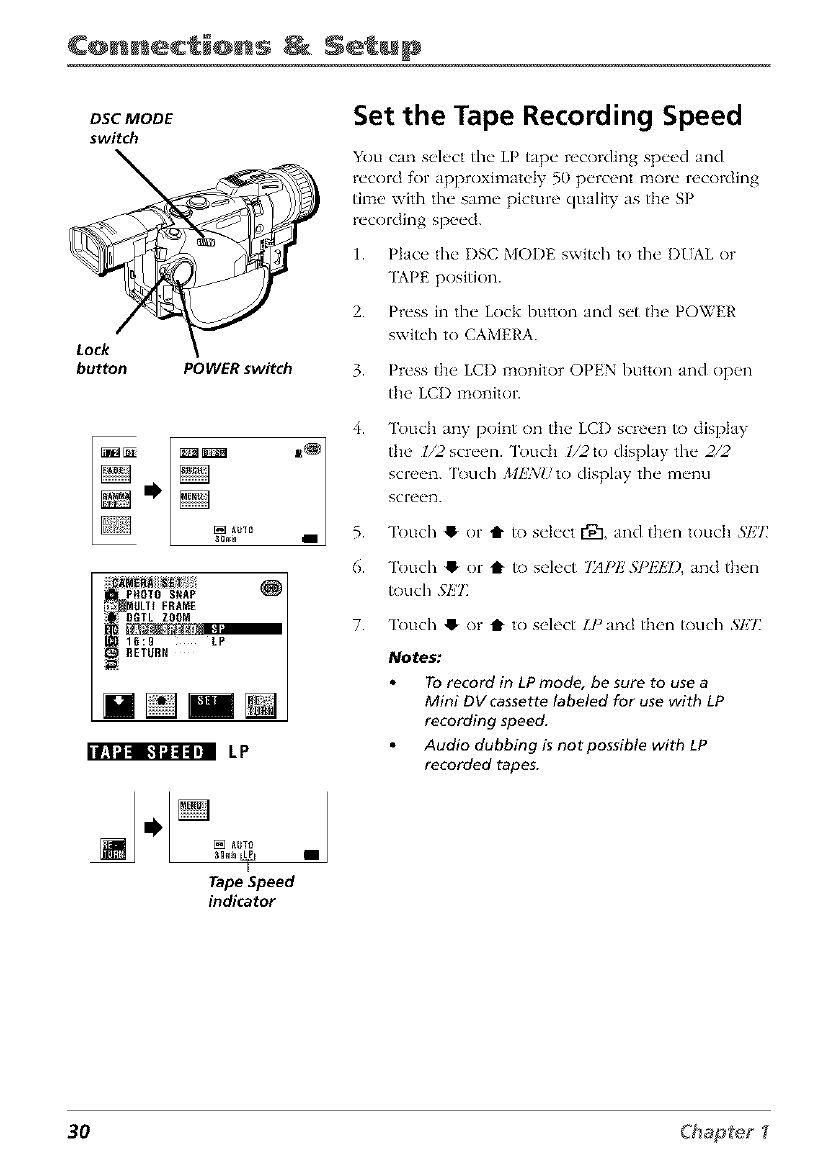
DSC MODE
switch
Lock
button POWER switch
iPHOTO SNAP
!_ _ ULT[ FRAME
m16:9 LP
_RETURN
] [] AUT_
Tape Speed
indicator
Set the Tape Recording Speed
You can select the LP tape recording speed and
record for approximately 50 percent more recording
time with the same picture quality as the SP
recording speed.
1. Place the I)SC MODE switch to the DIAL or
TAPE position.
2. Press in the Lock button and set the POWER
switch to CAMERA.
3. Press the LCI) monitor OPEN button and open
the LCI) monitor.
4.
5.
6.
Touch any point on the LCI) screen to display
the l/2 screen. Toudl l/2to display the 2/2
screen. 'lk)uch MkWl/to display the menu
screen.
Touch ,I or t1"to select [_1, and then touch SHT]
Touch ,I or t to select "IAPI_'.ST_l,]k7),and then
touch Sl!7]
7. Touch O or t to select IJ _and then touch SET
Notes:
To record in LP mode, be sure to use a
Mini DV cassette labeled for use with LP
recording speed.
Audio dubbing is not possible with LP
recorded tapes.
30 Chapteg
Cha@t÷r 2
Using the Monitors
Chapter Overview:
•Seeing What You Are Recording
•Using the Mode Screens
• Using the Menu Screens
•On-Screen Icons
Changing Entertain
31
Usin@ the @nit@rs
Seeing What You Are Recording
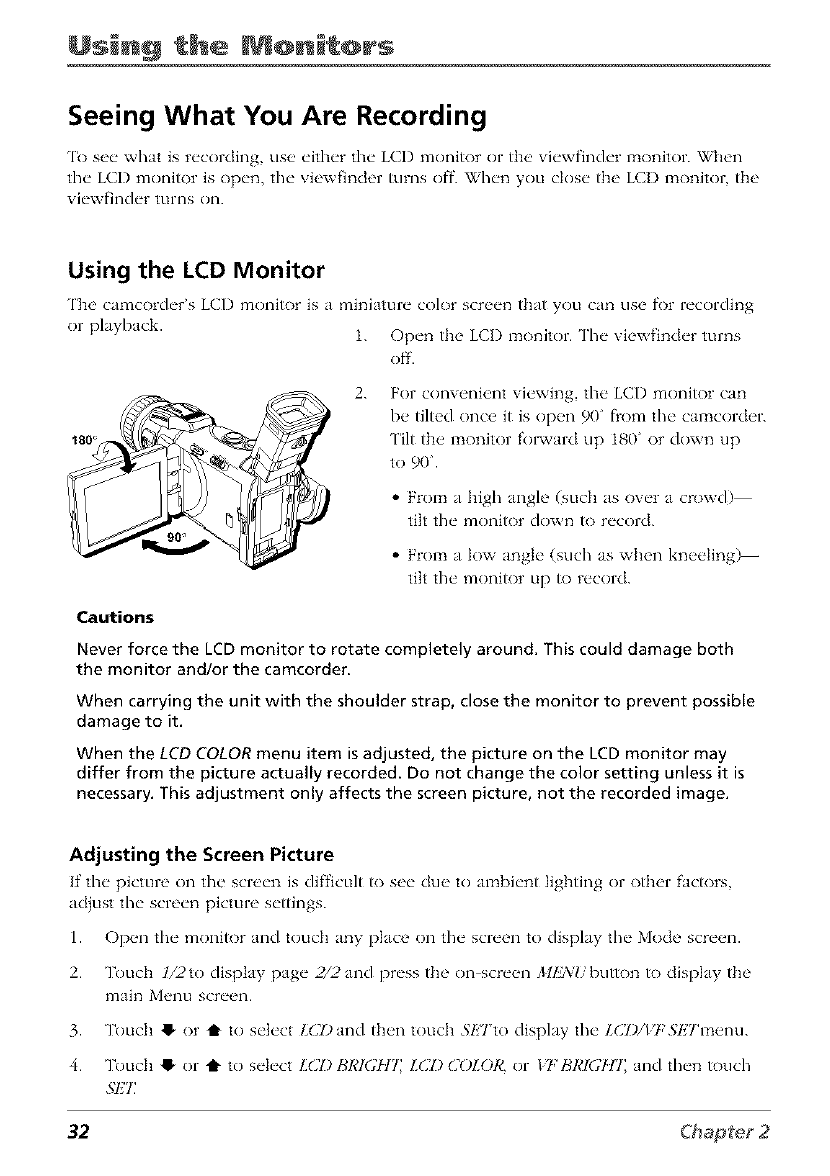
1'o set, what is recording, use eitlwr the LCI) monitor or tI_e _iewfinder monitor. When
tile LCD monitor is open, tile viewfinder turns off. _il/en you close the LCI) monitor, the
viewfinder turns on.
Using the LCD Monitor
['h_' ctmcorder's LCI) monitor is a miniature color scn, en that you can use fi)r recording
or playback. L Open the LCI) molqitor. Tlw xicwfinder turns
Ofl'.
2. For convenient viewh_g the LCI) monitor can
be tilted once it is open 90" from the camcorder.
Tilt the monitor fol_vard up 180 ¸¸or down up
to 90.
•From t high angle (such as over a crowd)
tilt the monitor down to record.
•From t low angle (such as when kneeling)--
tilt the monitor up to record.
Cautions
Never force the LCD monitor to rotate completely around. This could damage both
the monitor and/or the camcorder.
When carrying the unit with the shoulder strap, close the monitor to prevent possible
damage to it.
When the LCD COLOR menu item is adjusted, the picture on the LCD monitor may
differ from the picture actually recorded. Do not change the color setting unless it is
necessary. This adjustment only affects the screen picture, not the recorded image.
Adjusting the Screen Picture
If the picture on the scn'en is difficLflt to see ClU_"to mnbient lighting or other factors
acljust the screen picture settings.
1. Op_ql the monitor Jnd touch any place on the screen to dispk_y the Mode scre_ql.
2. Touch ]/2to display p'4ge 2/2 "and press the on_screml ,_11£'_J//button to clispIay the
3. Touch !_ or t to select LC'I)Jnd th_'n touch 5h'Tto dispk_y the l.C'l)/l?_Sl£Tm_,nu.
4. Touch e" or t to select LC'I) BRI(YH7 LC'I) C'OI.OR, or 17; BRI(YIIT, Jnd then touch
5"E7_
32
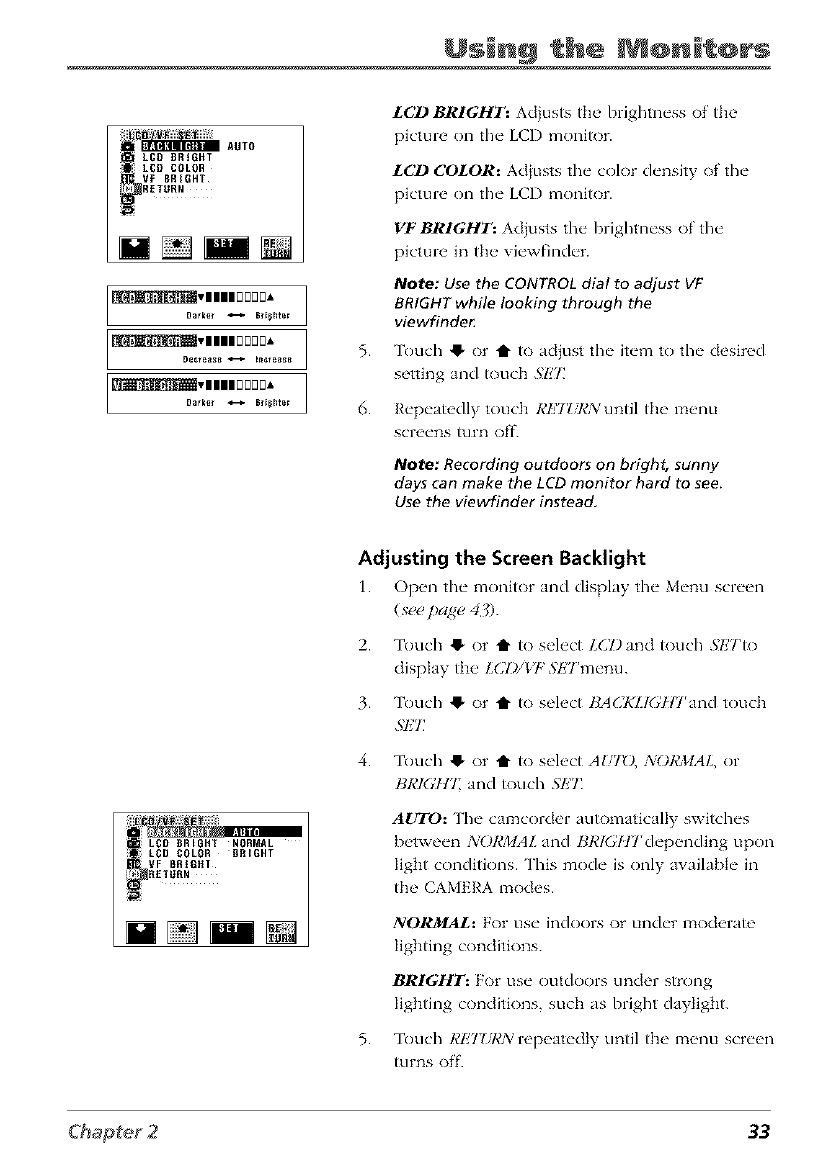
Usin@ the @nit@rs
LCD BRtGHT AUTO
LCD COLOR
VF BRIGHT
RETtJRN
5.
6.
LCD BRIGHT: Adiusts the brightness of tile
picture on the LCD moniR)r.
LCD COLOR: Adiusts the color density of tile
picture on the LCI) monitor.
VFBRIGHT: Adiusts the brighmess of tile
picture in tile viewfinder.
Note: Use the CONTROL dial to adjust VF
BRIGHT while looking through the
viev_inde_
Touch @ or t to acl}ust tile item to tile desired
setting and touch .gl;'7:
Repeatedly touch RETZTRNuntil tile menu
screens tufi1 off.
Note: Recording outdoors on bright, sunny
days can make the LCD monitor hard to see.
Use the viewfinder instead,
LCD BRIGHT NORMAL
ii i LCD COLOR BRIGHT
VF BRIGHT
RETURN
Adjusting the Screen Backlight
1. Op_ql the"monitor and display the"M_'nuscw_ql
(see pagu 43).
2.
3.
Touch @ or i" to select LCT)and touch .gETto
display tile LCI)/Vt: SETmenu.
Touch 41, or t1" to select BA(]KLl(_l'lrand touch
SET
4. Touch 41, or I" to select AUTD, :_iORMAL, or
BR_HT_ and _)uch ,_I;7_
AUTO: The camcorder automatically switches
between _'_()RMAL and BR_/17rdepending upon
light conditions. This mode is only awdlabIe in
tile CAMERA modes.
5.
NORJlAL: For use indoors or under moderate
lighting conditions.
BRIGHT: For use outdoors under strong
lighting conditions, such as bright daylight.
Touch RI;'7ZiI,'N repeatedly until tile menu screen
_]rns off.
33
Usin@ the @nit@rs
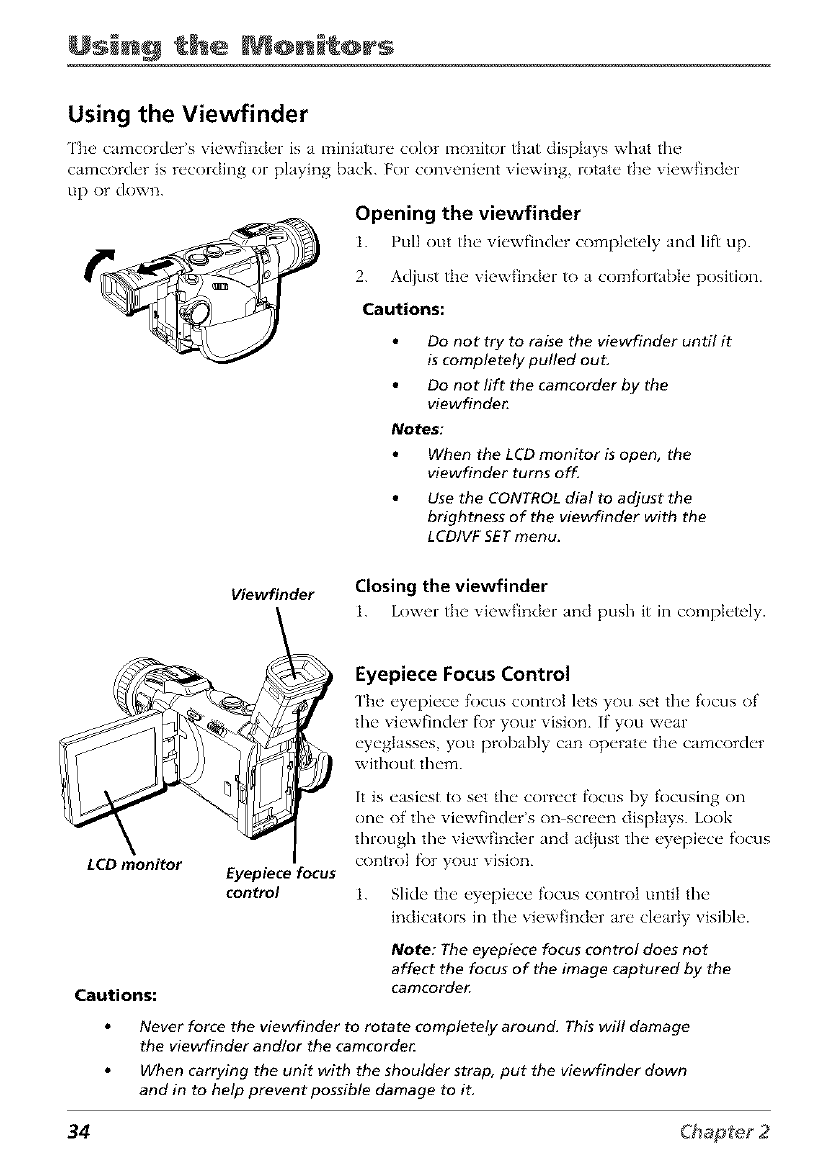
Using the Viewfinder
The camcorder's viewfinder is a miniature color monitor that displays wlmt the
camcorder is recording or playing back. For convenient viewing, rotate the viewfinder
up or down.
Opening the viewfinder
1. Pull out tlw viewfinder completely and lift up.
2. Adiust the viewfinder to a comfortabIe position.
Cautions:
Do not try to raise the viewfinder until it
is completely pulled ouL
Do not lift the camcorder by the
viewfinde_
Notes:
When the LCD monitor is open, the
viewfinder turns off.
Use the CONTROL dial to adjust the
brightness of the viewfinder with the
LCD/VF SET menu_
Viewfinder Closing the viewfinder
1. Lower tlw vJewfJnder and push it in comph'tely.
Eyepiece Focus Control
The' eyepiece focus control lets you set the focus of
the viewfinder f\)r your vision. If" you wear
eyeglasses you probably can operate the camcorder
without them.
LCD monitor
Cautions:
Eyepiece focus
control
It is easiest to set the correct fl)cus by focusing on
one of the viewfinder's on screen displays. Look
through the viewfinder and adjust the eyepiece focus
control f\)r your vision.
1. Slide the eyepiece focus control until the
indicators in the viewfinder are clearly visible.
Note: The eyepiece focus control does not
affect the focus of the image captured by the
camcorde_
Never force the viewfinder to rotate completely arouncL This will damage
the viewfinder andlor the camcorde_
When carrying the unit with the shoulder strap, put the viewfinder down
and in to help prevent possible damage to it.
34
Usin@ the @n t@rs
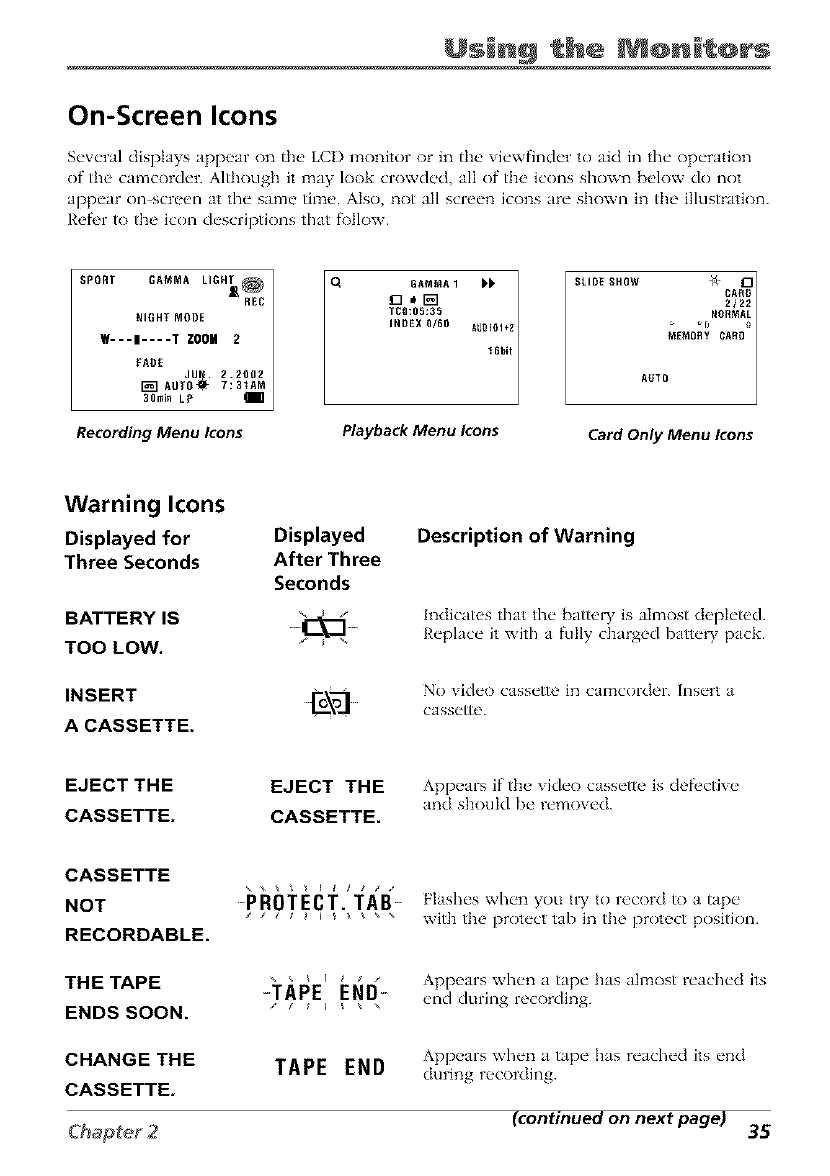
On-Screen Icons
Several displays appear on the LCI) monitor or in tile viewfinder to aid in the operation
of tim camcorder. Although it may look crowded, all of the icons shown below do not
appear on-screen at the same time. Also, not all screen icons are shown in the illustration.
Refi'r to the icon descriptions that follow.
NIGHT MODE
w---i----'r zoom 2
FADE JU_. 2.2002
I_ AUTO'S. 7: 31AM
30rain LP
Recording Menu Icons
GAMNA 1
TCg:05:35
INDEX 0/60
Playback Menu Icons
SLIDE SHOW _, CA_nu
2122
_DNOBMA_
MEMORY CARD
AUTO
Card Only Menu Icons
Warning Icons
Displayed for
Three Seconds
BATTERY IS
TOO LOW.
INSERT
A CASSETTE.
Displayed
After Three
Seconds
Description of Warning
hadicatcs that the" battel T is almost d_,pl_'tcd.
R_'plac_" it wifl/ a fully charged barn, W pack.
No vid('o cass_'tte in camcordor. Ins('rt a
cass_ttc.
EJECT THE
CASSETTE.
EJECT THE
CASSETTE.
Appears if the xideo cassette is defl'ctixe
and should be remox ed.
CASSETTE
NOT
RECORDABLE.
-PROTECT[TAB-'".i.._ Flashes when you UT to record to a tape
; ; ; a _ _ _ _ , with the protect tab in the protect position.
THETAPE
ENDSSOON.
TAI_E'E[_[i- Appears when a tape has almost reached its
"*" /_ I end dtll'illg recording.
CHANGETHE
CASSETTE. TAPE END Appears when a tape has reached its end
during recording.
(continued on next page) 35
Usin@ the @nit@rs
Displayed for Displayed
Three Seconds After Three
Seconds
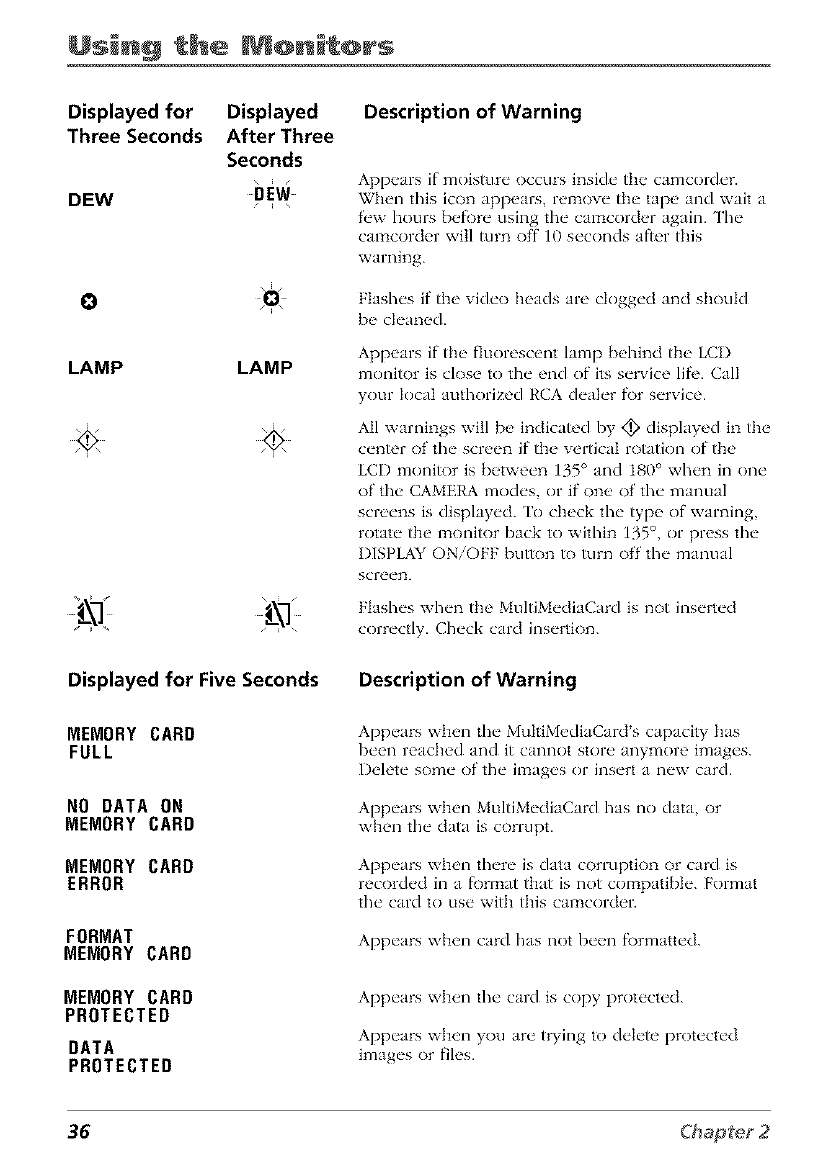
DEW
DEW
o
LAMP LAMP
Displayed for Five Seconds
Description of Warning
Appears if moisture occurs inside tile camcorder.
When this icon appears, remove the tape and wait a
fl'w hours befl)re using tim camcorder again. The
camcorder will turn off 10 seconds after this
warning.
Flashes if the vide() heads are clogged and should
be cleaned.
Appears if the fluorescent lamp behind the LCI)
monitor is close to tim end of its service lift'. Call
your local authorized RCA dealer fbr service.
All warnings will be indicated by <_ displayed in the
center of tim screen if the vertical rotation of the
LCD monitor is between 135 ° and 180 ° when in one
of the CAMERA modes, or if one of tim manual
screens is displayed. ['o check the type of warning,
rotate the monitor back to within 135 °, or press the
DISPLAY ON/OFF button to turn off the manual
Flashes when the MultiMediaCard is not inserted
correctly. Check card insertion.
Description of Warning
MEMORY CARD
FULL
NO DATA ON
MEMORY CARD
MEMORY CARD
ERROR
FORMAT
MEMORY CARD
MEMORY CARD
PROTECTED
DATA
PROTECTED
Appears when the MultiMediaCard's capacity has
been reached and it cannot store anymore images.
Delete some of the images or insert a new card.
Appears when MultiMediaCard has no data, or
when the data is corrupt.
Appears when there is data corruption or card is
recorded in a fl)rmat that is not compatible. Format
the card to use with this camcorder.
Appears when card has not been f\)rmatted.
Appears when the card is copy protected.
Appears when you are trying to delete protected
images or files.
36
Usin@ the @n t@rs
Displayed for Five Seconds
MEMORY CARD
READ ERROR
CANNOT
STORE DATA
DATA NOT
FOUND
Description of Warning
Appears when the selected image cannot be read by
the eameorder.
Appears when the camcorder cannot read any data.
Replace the card.
The ID of the card and the tape do not match fk)r
Index Playback, or no index is reco_led on the
card. Insert a card with the indexes _)r the tape in
question or record indexes and then perf'orm Index
Playback.
Card Playback Status Displays
CARD Indicates a card is inserted.
617 Current image number/total number of images.
NORMAL Picture quality indicator.
1280 o • •
lma_,e size indicator (resolutkm width).
100-0006 Image file name.
Appears when camcorder is copying still picture
from card to tape.
Appears when camcorder is copying a still picture
from the tape to the card.
(continued on next page) 37
Usin@ the @nit@rs
Recording and Playback Icons
Date, Time, or Date and Time Icons
JUN. 2. 2002 lndicmcs the current date mad time and is recorded when it is
10:30AM dispktyed
Program AE with Special Effects Icons
SHU_
SPEED
EXPOSURE
Appears when you manually select the shutter speed.
Appears when you m_mmflly select the exposure setting.
SPORT Appenrs when you select .S7_01¢75 to record fast moving action,
such as sporting events.
SUNLIGHT Appears when you select SI[_iLI(;HTto record fast moving
subjects with little blur.
PARTY Appears when you select ]_ARTYto record scenes in direct
lighting such as spotlights.
DUSK Appears when you select DUSKto record scenes at twilight,
fireworks, etc.
SOLARI Appears when you select SOLARIto give your recordings a
enbm_ccd Jrtistic quality.
NEGA Appears when you select NI!'(;A to give your black and white
recordings an inverse color effi'ct.
SEPIA Appears when you select SI!7)IA to give your recordings a brown
tone like old photographs.
BLUE Appears when you select BLI@2 to give your recordings a blue
filter appearance.
38
B/W
Usin@ the @n t@rs
Appears when you select B/_f, to record scenes in
classic black and white.
Status Icons
REC
PAUSE
II
44
Appears when the camcorder is recording.
Appears during record stand[_y or record pause.
Appears when the camcorder plays a tape.
Appears during play pause.
Appears during fast f\)rward.
Appears during rewind.
tq
Appears when timer is set.
Appears during self timer.
Indicates a MultiMediaCard is inserted or camcorder is
in Card Mode.
Appears when Automatic Daylight Savings fi'ature is on.
Time-Remaining Icon
120MIN
Fade Icon
FADE IN
FADE OUT
Focus Icons
AUTO
MF
Indicates the approximate time remaining on the
tape.
Appears during afade in or fade out transition.
AUIO appears while the camera is in full auto mode. J/IF is
displayed when focus is set to manual.
(continued on next page) 39
Usin@ the @nit@rs
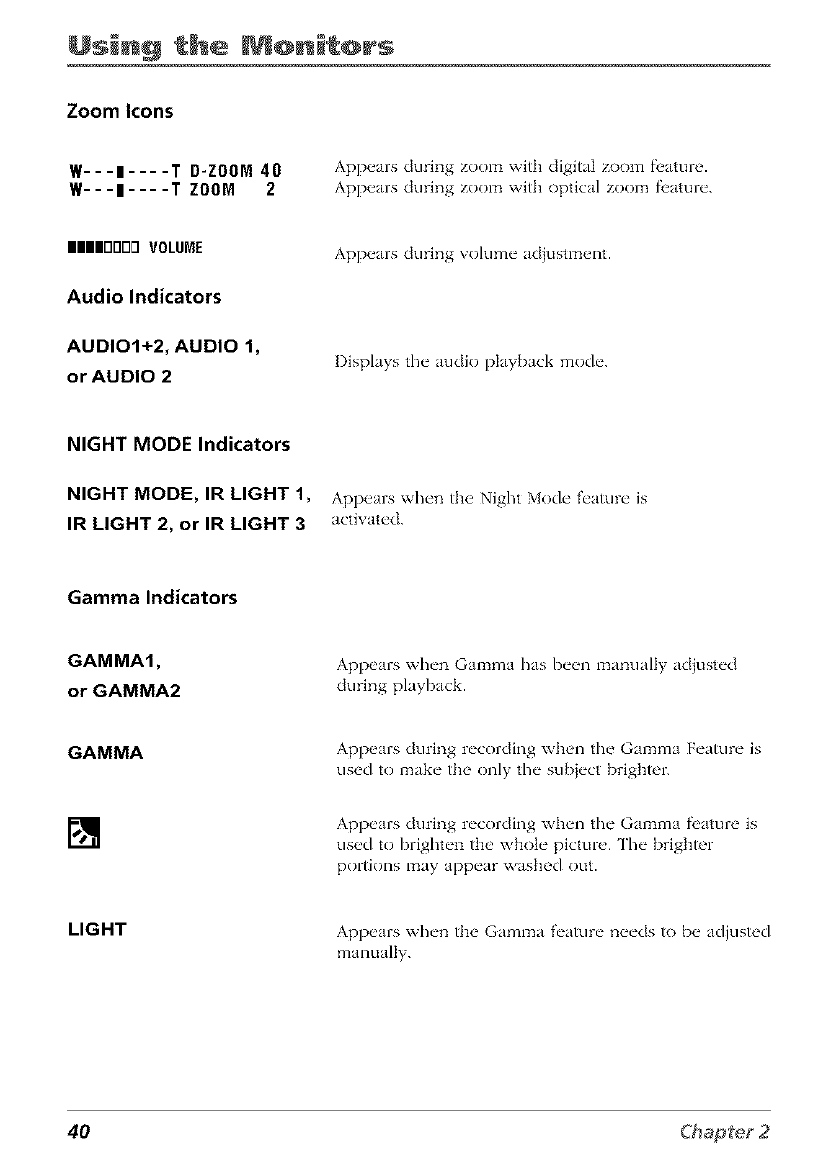
Zoom Icons
W---I .... T D-ZOOM 40
W---I .... T ZOOM 2
Appears during zoom with digital zoom f_'ature.
Appears during zoom with optical zoom f_'ature.
IIIIIIIIOrlorl VOLUME
Audio Indicators
Appears during w)lume adiustment.
AUDIO1+2, AUDIO 1,
or AUDIO 2 Displays the audio playback mode.
NIGHT MODE Indicators
NIGHT MODE, IR LIGHT 1, Appears when the Night Mode feature is
IR LIGHT 2, or IR LIGHT 3 acti'_ated.
Gamma Indicators
GAMMA1,
or GAMMA2
Appears when Gamma has been manually adjusted
during playback.
GAMMA Appears during recording when the Gamma Feature is
used to make the only the sub}ect brighter.
[] Appears during recording when the Gamma fi'ature is
used to brighten the whole picture. The brighter
portions may appear washed out.
LIGHT Appears when the Gamma f'_'ature needs to be adjusted
manually.
40
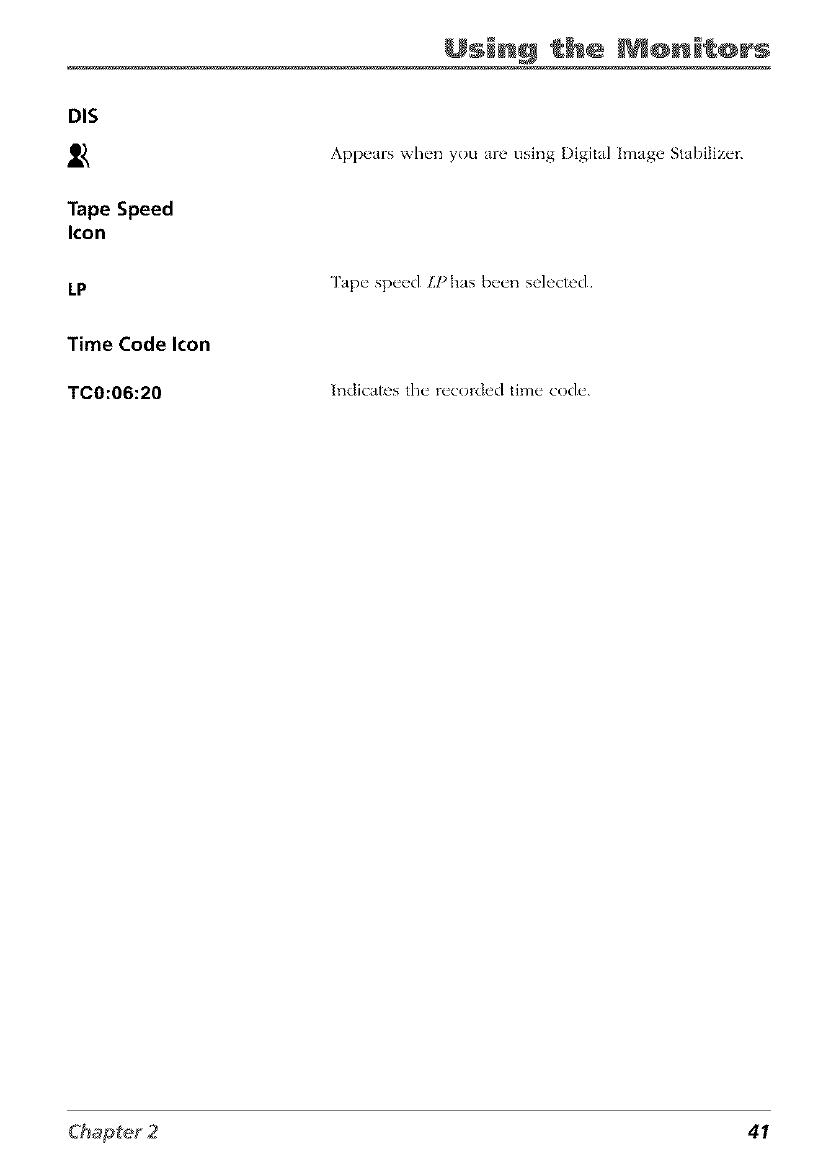
DIS
Tape Speed
Icon
LP
Time Code Icon
TC0:06:20
Usin@ the _@n_t@rs
Appears when you are using l)igital Image Stabilizer.
Tape speed LPhas been selected
Indicates the recorded time code.
41
Usin@ the @nit@rs
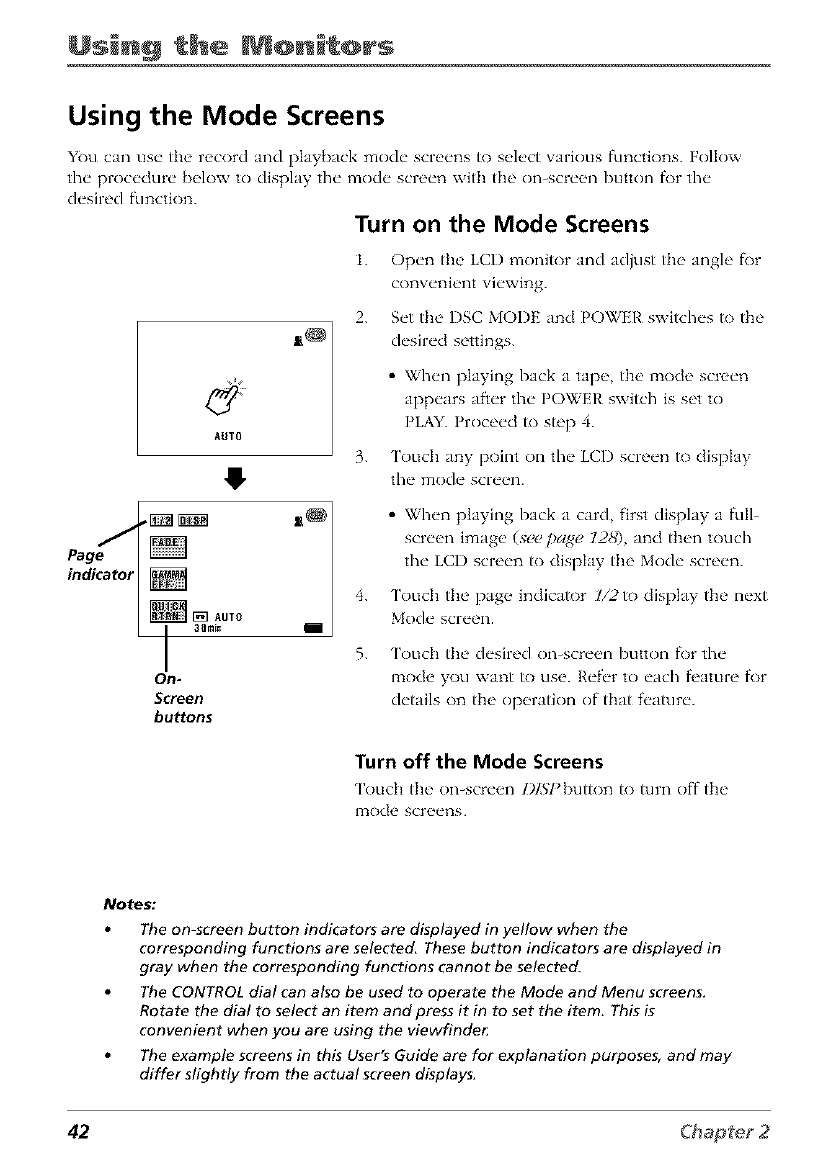
Using the Mode Screens
You can use the record and playback mode screens to select various functions. Follow
the procedure b_qow to display tilt"mode screen with the on-scre_qabutton f\)r tilt"
&,sired function.
Turn on the Mode Screens
1. Open the LCI) monitor and adjust the angle f\_r
convenient viewing.
AUTO
_[_] AUTO
a{Imi_
On-
Sc/'een
buttons
2.
3.
4.
5.
Set the DSC MODE and POWER switches to the
desired settings.
• When playing back a tape, the mode screen
appears after the POWER switch is set to
PLAY. Proceed to step 4.
Touch any point on tile LCD screen to display
tile mode screen.
•When playing back a card, first display a frill
screen image (sc_)page 12,8'), and then touch
the LCD screen to display the Mode screen.
Touch the page indicator l/2to display the next
Mode screen.
Touch the desired on-screen button fi)r the
mode you want/o use. Retbr to each fi'ature f\)r
details on the operation of that t't,ature.
Turn off the Mode Screens
Touch the" on-scrt,_,n l)lSlqx]tton /o turn off the
ITtode screens
Notes,"
The on-screen button indicators are displayed in yellow when the
corresponding functions are selected. These button indicators are displayed in
gray when the corresponding functions cannot be selected.
The CONTROL dial can also be used to operate the Mode and Menu screens.
Rotate the dial to select an item and press it in to set the item. This is
convenient when you are using the viewfinder
The example screens in this User's Guide are for explanation purposes, and may
differ slightly from the actual screen displays.
42
Usin@ the @n t@rs
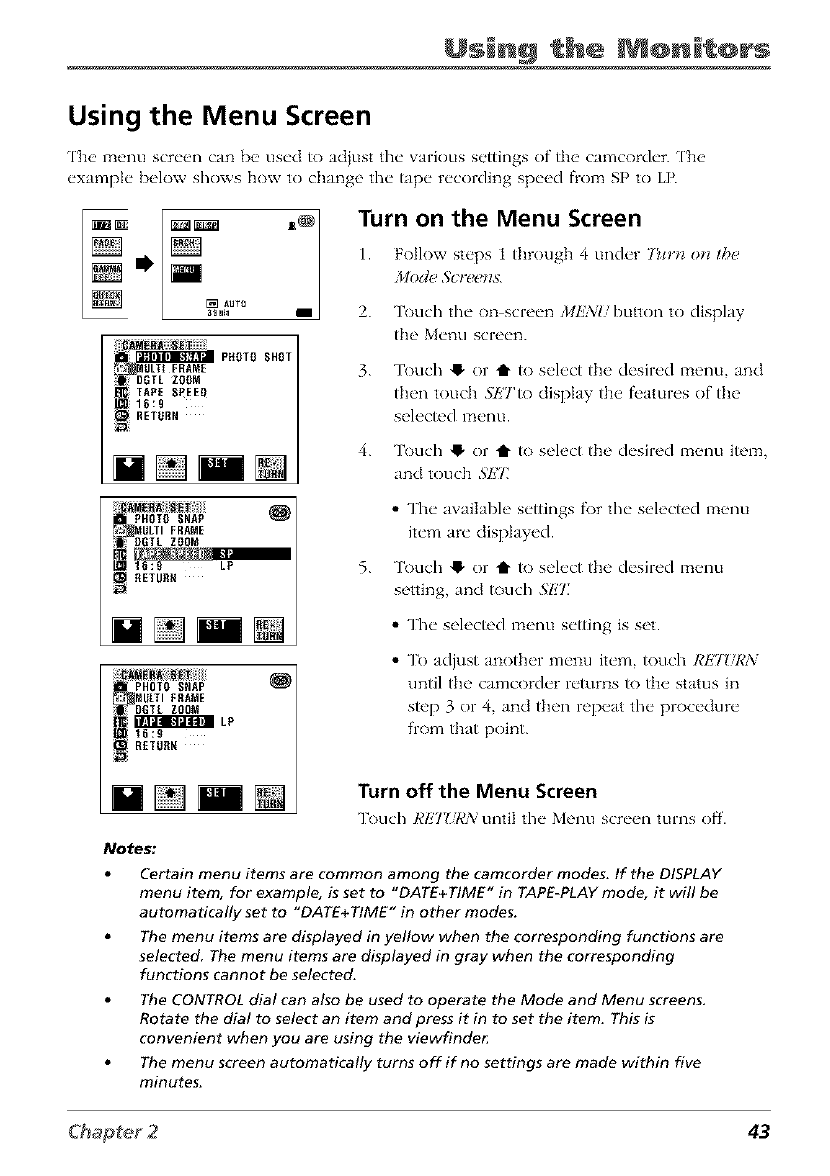
Using the Menu Screen
['he menu screen can be used to ad}ust the various settings of the camcorder. ['he
example below shows how to change the tape recording speed flom SP to LP.
D
[] AUT_
aQm_
_PHOTOSHOT
_DOTL ZOOM
iTAPE SOEEO
_1U:9
MULTI FRAME
OGTL ZOOM
10:9 LP
_ RETURt{
PHOTO SHAP
_MULTI FSAME
DGTL ZOOM
O?Fa":m_I_'.Z'_BLP
16:9
RETORR
Notes:
iTurn on the Menu Screen
1. Follow steps 1 through 4 under 7_r_l o_l the
_/odc __cr_!_?Ils.
2. Touch the on screen Mk'NI/button to display
the Menu screen.
3.
4.
Touch e. or t to select the desired mentl, and
then touch _'Tto display the features of the
selected menu.
Touch 4_ or t to select the desired menu item,
and touch L_7_
5.
••o• • •
The available settin_,s f\)r the selected merit1
item are displayed.
Touch _ or _ to select the desired menu
setting, and touch SET_
• The selected menu setting is set.
• To adjust another menu item, touch I@]T!,7¢_Y
until the camcorder returns to the status in
step 3 or 4, and then repeat the procedure
from that point.
Turn off the Menu Screen
Touch Rl_'7_:l,'_'vuntil the Menu scre_q_ turns off'.
Certain menu items are common among the camcorder modes. If the DISPLAY
menu item, for example, is set to "DATE+TIME" in TAPE-PLAY mode, it will be
automatically set to "DATE+TIME" in other modes.
The menu items are displayed in yellow when the corresponding functions are
selected The menu items are displayed in gray when the corresponding
functions cannot be selected.
The CONTROL dial can also be used to operate the Mode and Menu screens,
Rotate the dial to select an item and press it in to set the item, This is
convenient when you are using the viewfinde_
The menu screen automatically turns off if no settings are made within five
minutes,
43

This page left intentionally blank.
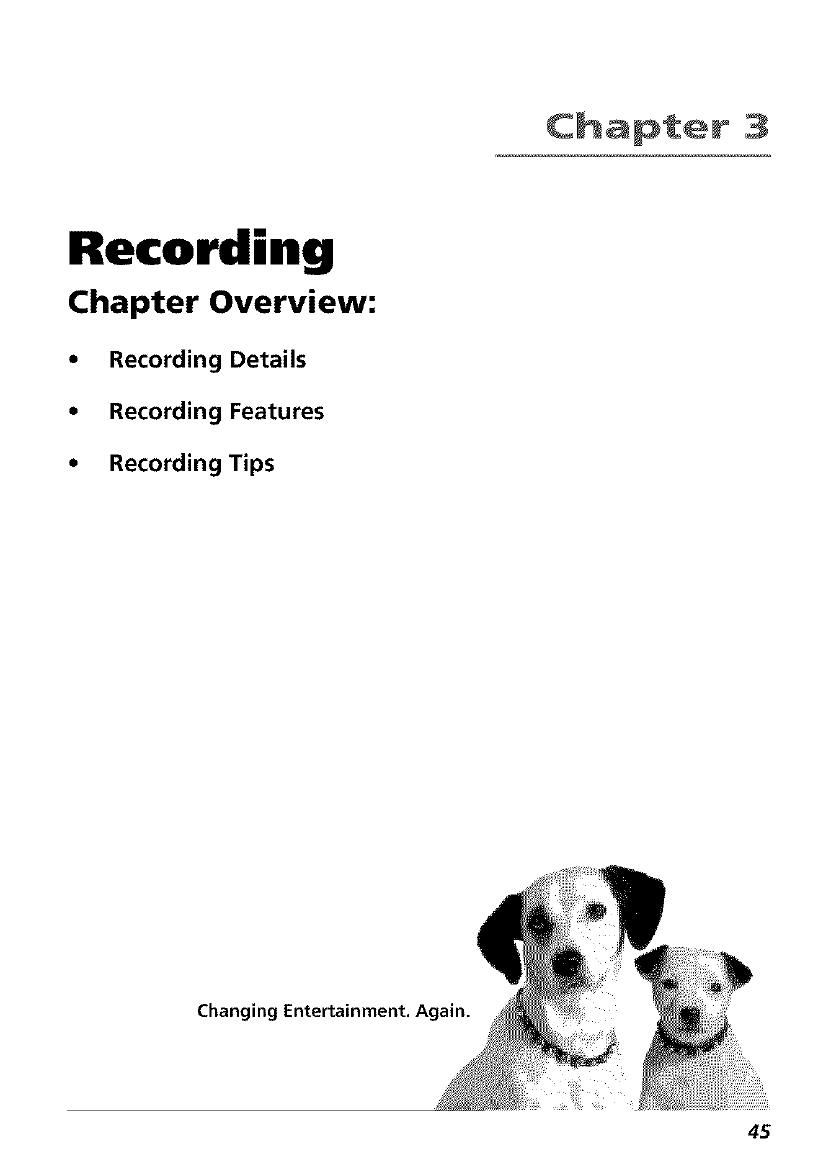
Chapter 3
Recording
Chapter Overview:
•Recording Details
•Recording Features
• Recording Tips
Changing Entertainment. Again.
45
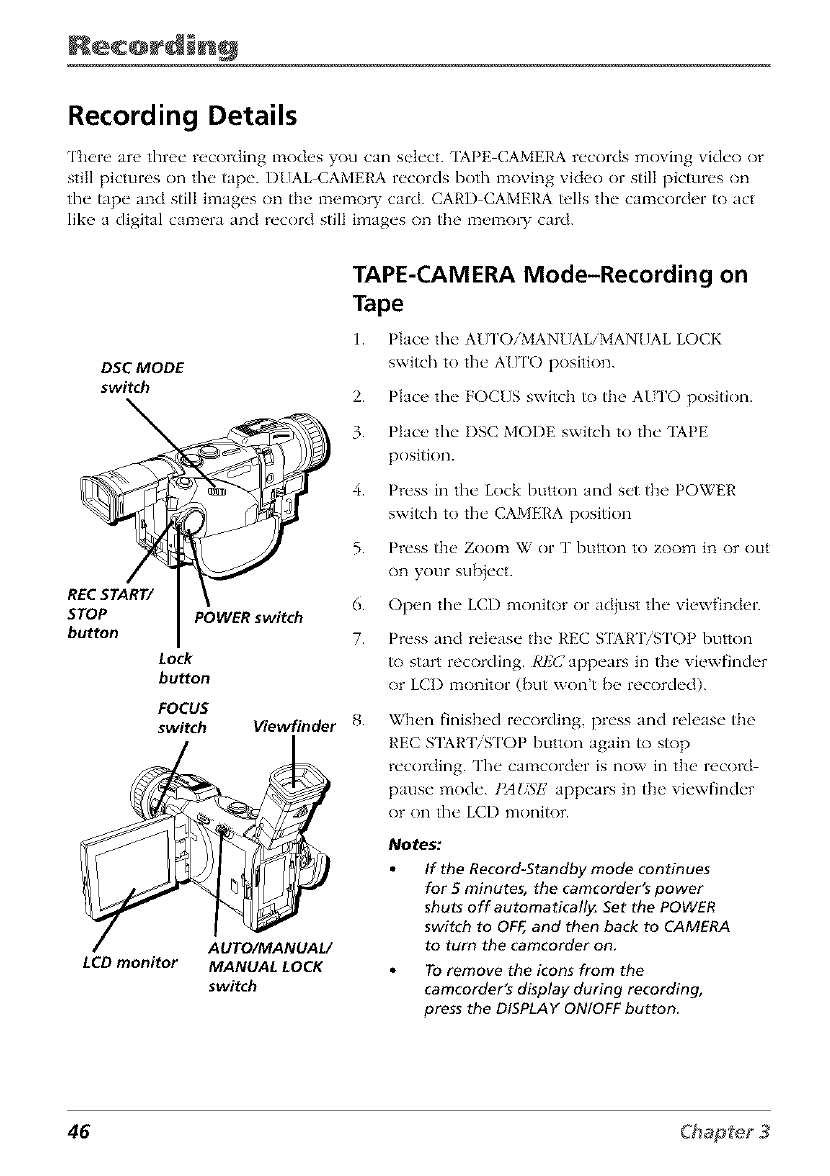
Recording Details
There are three recording modes you can select. TAPE CAMERA records moving video or
still pictures on the tape. I)UAL-CAMERA records both moving video or still pictures on
the tape and still images on the memory card. CARD CAMERA Ells the camcorder _) act
like a digital camera and record still images on the memo1T card.
DSC MODE
switch
REC START/
STOP
button
LCD monitor
TAPE-CAMERA Mode-Recording on
Tape
1. Place the AU ['OiMANUAL'MANUAL LOCK
switch to tile A[ FI'O position.
2. Place the FOCUS switch to the AUTO position.
3. Place the DSC MODE switch to tile "IAPE
position.
4. Press in the Lock button and set the POWER
switch to the CAMERA position
5.
6.
POWER switch
7.
Lock
button
FOCUS
switch Viewfinder 8.
Press the Zoom W or T button to zoom in or out
on your sub}ect.
Open the LCD monitor or adiust tile viewfinder.
Press and release the REC S [AR'IVS['OP button
to start recording. I@]Cappears in the viewfinder
or LCI) monitor (but won't be recorded).
When finished recording, press and release the
REC S_IART/S ['OP button again to stop
recording. The camcorder is now in the record
pause mode. tM!TSE appears in the viewfinder
or on tile LCD monitor.
AUTO/MANUAL/
MANUAL LOCK
switch
Notes:
If the Record-Standby mode continues
for 5 minutes, the camcorder's power
shuts off automaticall_ Set the POWER
switch to OFF,and then back to CAMERA
to turn the camcorder on.
To remove the icons from the
camcorder's display during recording,
press the DISPLAY ON/OFF button
46
STILLbutton
\
REC START/
STOP
button
LCD monitor
DSC MODE
switch
DUAL-CAMERA Mode-Tape and Card
Recording
1. Make" sun' a MultiM_'diaCard and DV cassette" arc
insvrtvd propt'1"ly.
2. Place tht. AU ['O/MANUAL/MANUAL LOCK
switch to the A{ TI'O position.
3. Place the FOCUS switch to the AUTO position.
4. Place the I)SC MODE switch to the DIAL
position.
5. Press in the Lock button and set the POWER
switch to tile CAMERA position.
Open the LCD monitor or adjust the viewfinder.
Press the Zoom W or T button to zoom in or out
on your subject.
Record video on tape or a still picture on the
memo W card.
Record Video on the Tape
• Press and release the REC STAR']TSTOP button
to start and stop recording on the tape.
REC appears in the viewfinder or LCI) l:_onitor
while the camcorder is recording (but wont be
recorded on tile tape).
When you arc not recording, the camcorder
enters the record pause mode and I)AUSE
appears in the viewfinder or on the LCD
moniR)r.
Record aStill Picture on the Memory Card
• lqacc tilt. ca_zacordcr in n,cord pause mode'.
PAUSE app_,ars in tilt, viewfindcr or on tilt"
LCD monitor.
POWERswitch 6.
Lock 7.
bu_on
FOCUS
switch Viewfinder 8.
AUTO/MANUAL/
MANUAL LOCK
switch
Press the S ['ILL button to record a still picture
on the _aemo W card. RtZ(]()RI)I3i(.: 70
MI;.M()RY CAR1)appears in tile viewfinder or
on the LCI) monitor.
47
9. When finished recording, set the POWER switch
to OFF.
Notes:
If the Record-Standby mode continues
for 5 minutes, the camcorder's power
shuts off automaticall_ Set the POWER
switch to OFF,and then back to CAMERA
to turn the camcorder on.
To remove the icons from the
camcorder's display during recording,
press the DISPLAY ON/OFF button
DSC MODE
switch
STILL button
\
POWER switch
Lock button
FOCUS Viewfinder
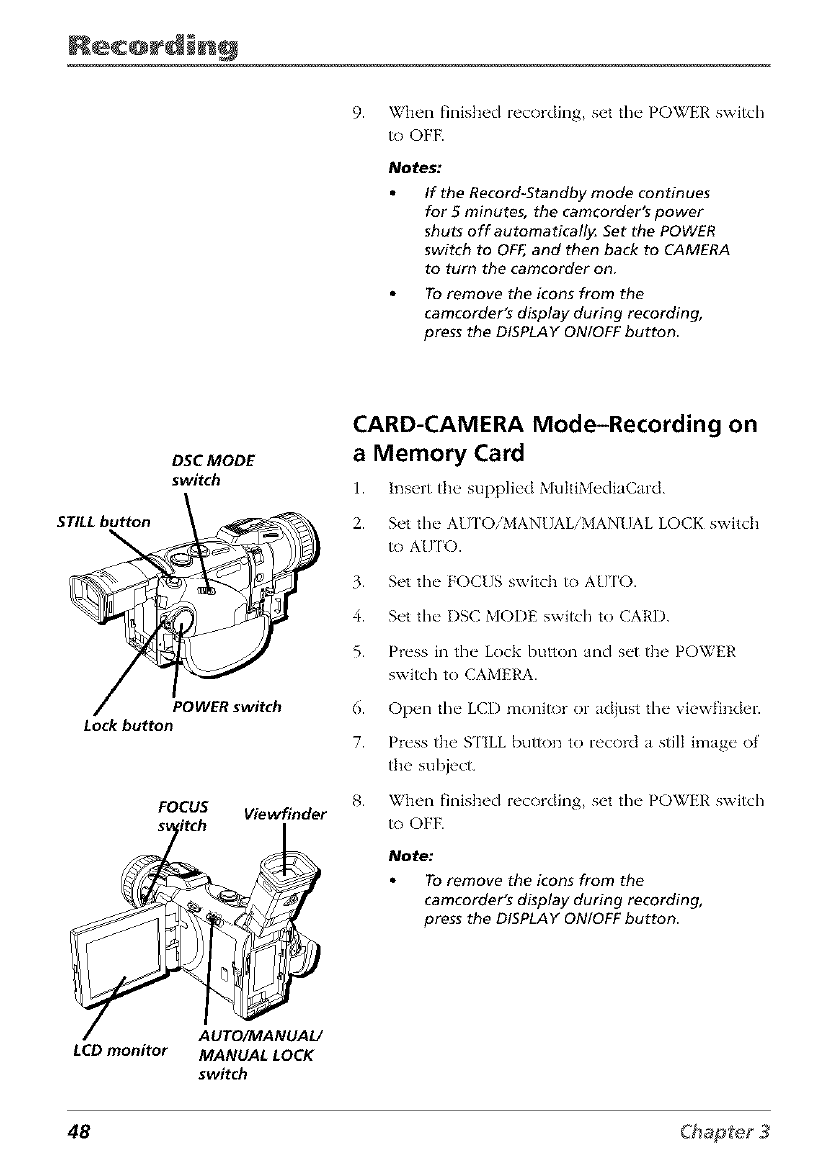
CARD-CAMERA Mode-Recording on
a Memory Card
1. Insert the" suppli_'d MultiMediaC'ard.
2. Set the AUTO/MANUAL/MANUAL LOCK switch
/o AU 1'0.
3. Set the FOCUS switch to AU 1'O.
4. Set the I)SC MODE switch to CARD.
5. Press in the Lock button and set the POWER
switch to CAMERA.
6. Open the LCD monitor or ad}ust the viewfinder.
7. Press the STILL button to record a still image of
the subject.
8. When finished recording, set the POWER switch
to OFF.
Note:
To remove the icons from the
camcorder's display during recording,
press the DISPLAY ON/OFF button
AUTO/MANUAL/
LCD monitor MANUAL LOCK
switch
48
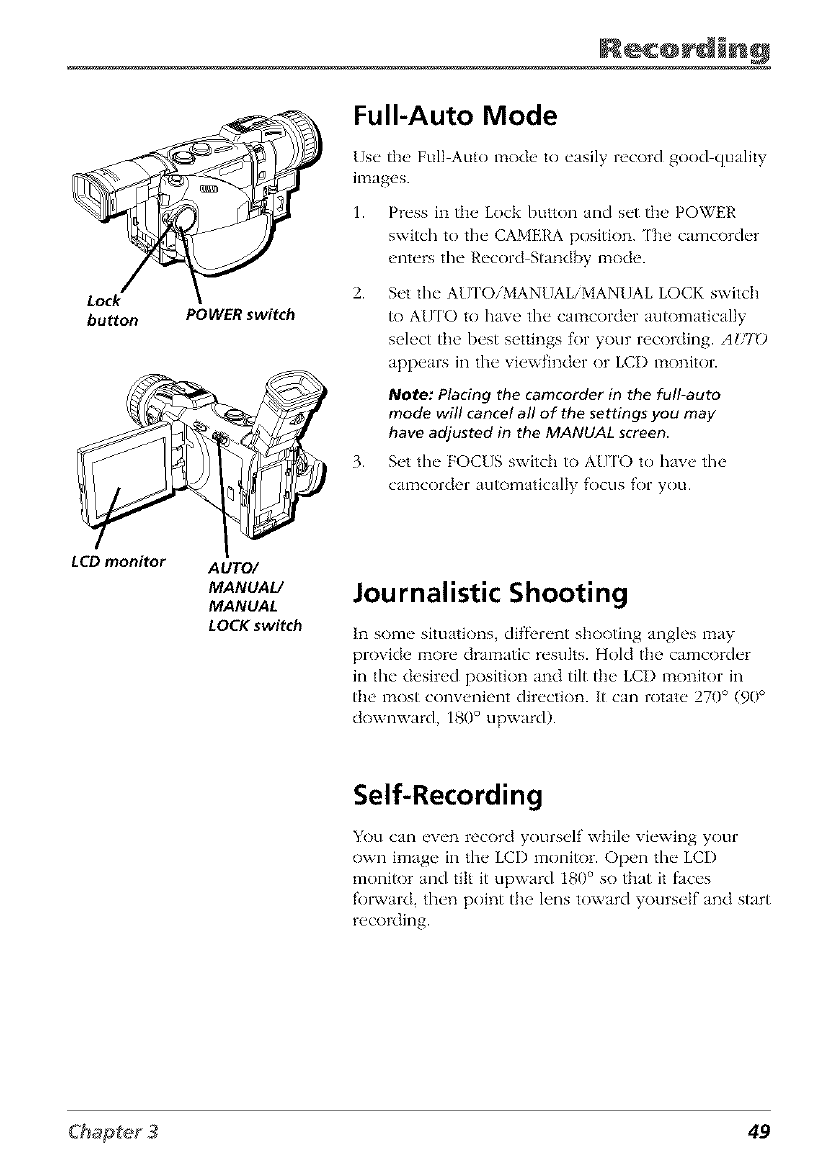
Lock
button POWER switch
Full-Auto Mode
Use the Full Auto 1node to easily record good quality
ilnages.
1. Press in the Lock button and set the POWER
switch to the CAMERA position. ['be camcorder
enters the Record Standl_w 1node.
2. Set the AUI'OiMANUAL/MANUAL LOCK switch
to AUTO to have the camcorder automatically
select the best settings for your recording. AUfO
appears in the viewfinder or LCI) monitor.
Note: Placing the camcorder in the full-auto
mode will cancel all of the settings you may
have adjusted in the MANUAL screen
3. S_,t the" FOCUS switch to AU['O to have the
camcorder automatically focus for you.
LCD monitor AUTO/
MANUAL/
MANUAL
LOCK switch
Journalistic Shooting
In some situations, diffl'rent shooting angles may
provide more dramatic results. Hold the camcorder
in tim desired position and tilt the LCI) monitor in
the most convenient direction. It can rotate 270° (90 °
downward, 180° upward).
Self-Recording
You can even record yourself while viewing your
own image in the LCI) monitor. Open the LCD
monitor and tilt it upward 180° so that it faces
t'ol_,vard, then point the lens toward yourself and start
recording.
49
DSC MODE
switch
REC START/
STOP POWER switch
bu_on
Lock
bu_on
AUTO I
Quick Return Screen
Quick Return
After playing back tim tape you recorded, you can
quickly return to tim end of the last recording by
using the Quick Return f_'ature on the Mode
screen.
1. Set the I)SC MODE switch to qAPE or DIAL,
and press in tile Lock button to set tile
POWER switch to CAMERA.
2. In the recording standby mode, touch any
point on the LCI) screen to display the 1/2
Mode screen.
3. Touch QtTCK R777_
•The tape begins fast fi)rwarding or rewinding
to the end of the last recorded scene.
• When the tape reaches the end of the last
recorded scene, QDTCK/,"/7,'s_i changes to
[qN]SHk7), and the camcorder enters the
Record Standby mode.
Notes:
To cancel Quick Return, touch QUICK
RTRN again.
Quick Return cannot be used if the
cassette has been removed since the
last recording or if no recording has
been made since the cassette was
loaded.
50
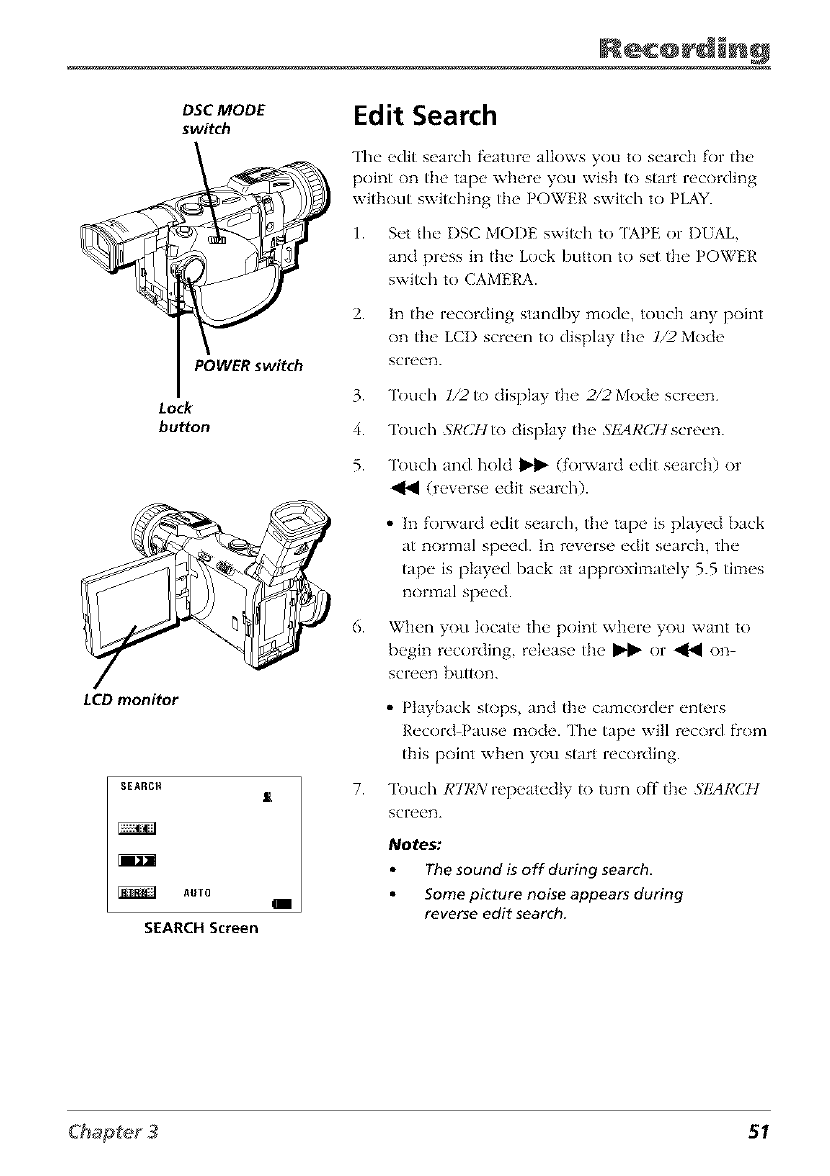
DSC MODE
switch
POWER switch
Lock
button
LCD monitor
SEARCH J_
AUTO I
SEARCHScreen
Edit Search
The edit search fl,ature allows you to search for the
point on the tape where you wish to start recording
without switching the POWER switch to PLAYI
1. Set the I)SC MODE switch to [APE or I)UAL,
and press in the Lock button to set the POWER
switch to CAMERA.
2. In the recording standby mode, touch any point
on tim LCI) screen to display the 1/2 Mode
screen.
3.
4.
5.
6.
7.
Touch 1/2 to clisplay the 2/2 Mode screen.
Touch .qR(2Hto display the ,qlgAR(21t screen.
Touch and hold _ (fol',vard edit search) or
(reverse edit search).
• In fol",vard edit search, the tape is played back
at normal speed. In reverse edit search, the
tape is played back at approximately 5.5 times
normal speed.
When you locate the point where you want to
begin recording, release the _ or _ on
screen button.
• Playback stops, and the camcorder enters
Record Pause mode. The tape will record fiom
this point when you start recording.
Touch RT]¢A: repeatedly/o turn off the .';IMRCH
screen.
Notes:
The sound is off during search,
Some picture noise appears during
reverse edit search.
51
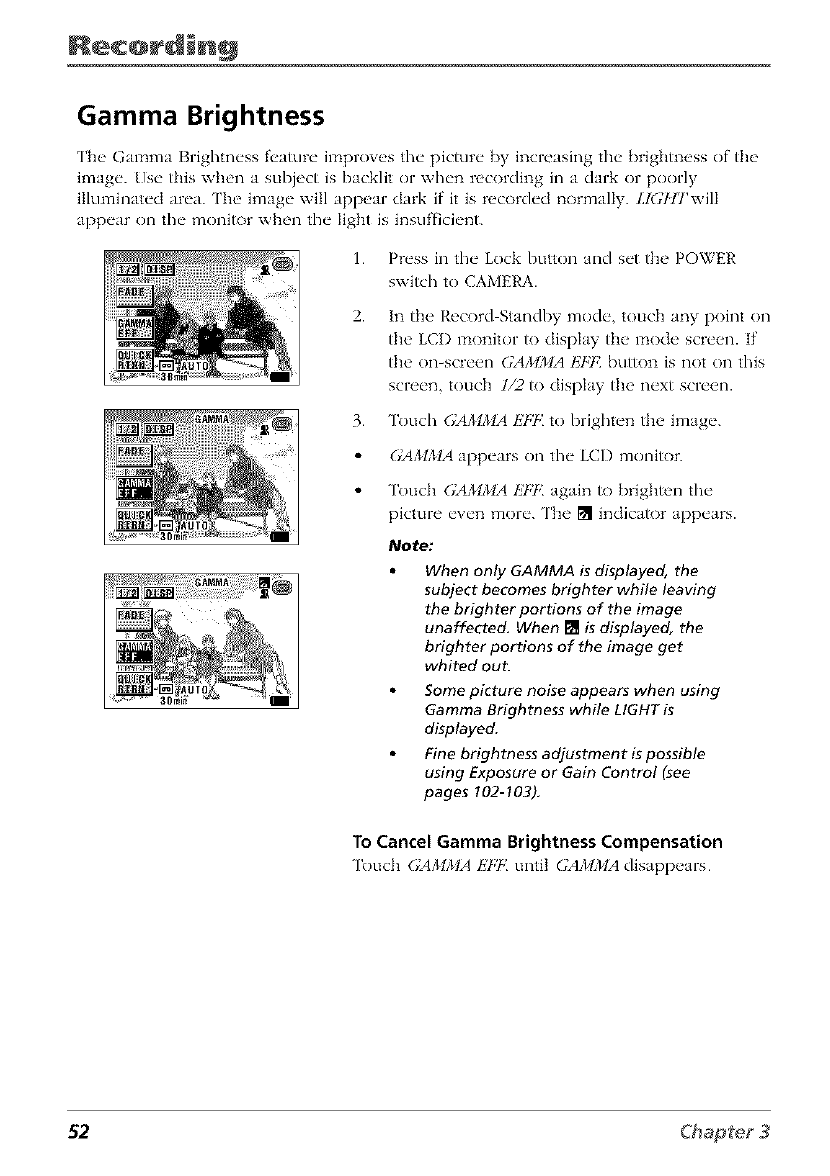
Gamma Brightness
['he Gamma Brightness fea/ure improves the picture [_y increasing the brightness of the
image. Use this when a subject is backlit or when recording in a dark or poorly
illuminated area. ['he image will appear dark if it is recorded normally. LIGflTwill
appear on the moni/or when the Iight is insufficient.
1. Press in the Lock button and set the POWER
switch to CAMERA.
2. In the Record Standby mode, touch any point on
th{' LCI) monitor/o dispIay th{, mode scre{,n. If
the on-screen GA}dMA I']FI{ buUon is not on this
screen, touch 1/2/o dispIay the next screen.
3. Touch (;AMMA Is7,7<to brighten the image.
(YA,*:IMA appears on the LCD moni/or.
Touch (;AMMA 1;7:1{again /o briglm'n tim
picture even more. The [] indica/or appears.
Note:
When only GAMMA is displayed, the
subject becomes brighter while leaving
the brighter portions of the image
unaffected. When [] is displayed, the
brighter portions of the image get
whited out.
Some picture noise appears when using
Gamma Brightness while LIGHT is
displayed.
Fine brightness adjustment is possible
using Exposure or Gain Control (see
pages !02-103).
To Cancel Gamma Brightness Compensation
Touch (.:A,_d}clA1s7.7.'until GAMMA disapp_ars
52.
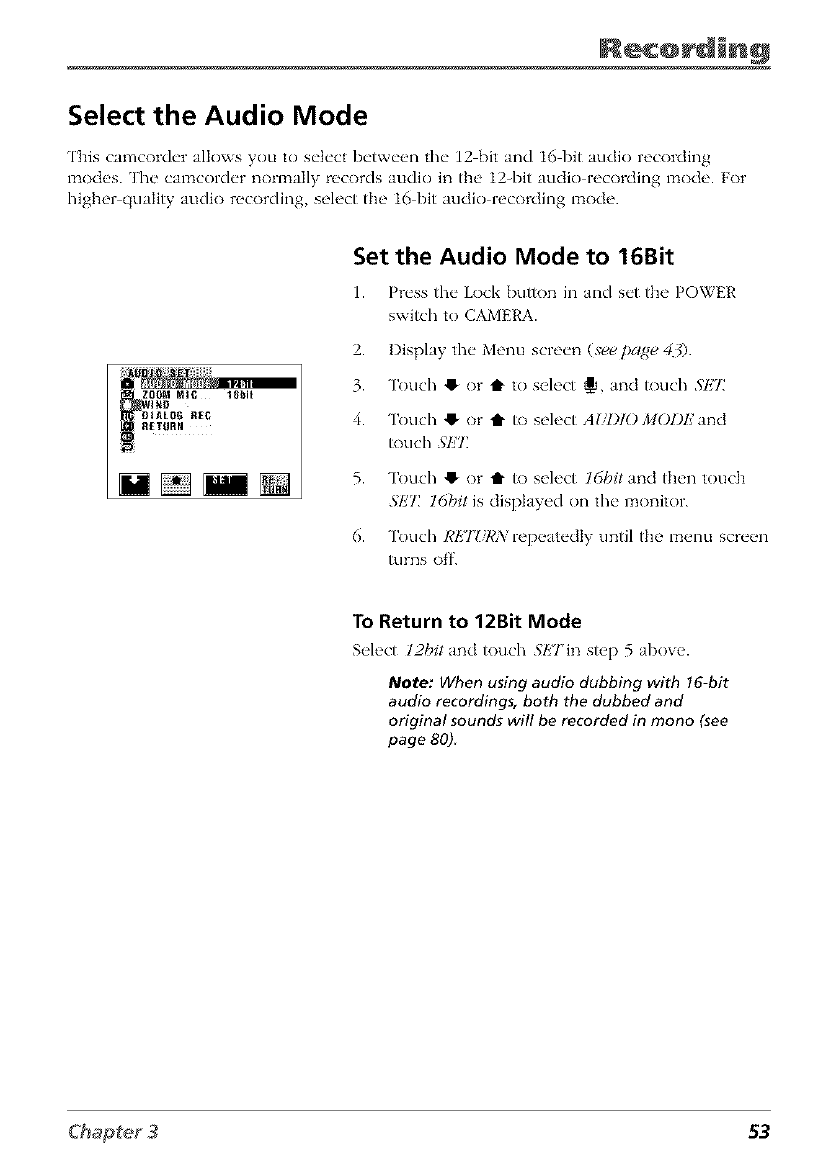
Select the Audio Mode
This camcorder allows you to select between the 12 bit and 16 bit audio recording
_aodes. The camcorder normally records audio in the 12-bit audio recording mode. For
higher quality audio recording, select the 16 bit audio recording mode.
Set the Audio Mode to 16Bit
1. Pr_'ssthe"Lock button in and s_'t the POWER
switch to CAMERA.
2. I)isplay the" Menu scre_'n (,v_ page, 43).
3. Touch @ or t to select _, and touch SI_T
4. Touch @ or i" to select Ag/l)lOMOl)k'and
R)uch .','l_'7Z
5. Touch @ or t R) select ldbit and then touch
.qk"l: 16bit is displayed on the monitor.
6. Touch REJZ/RXrepeatedly until the menu screen
turns of'f.
To Return to 12Bit Mode
Select 12bit and touch .q/!'TJn Slt'p 5 above.
Note: When using audio dubbing with 16-bit
audio recordings, both the dubbed and
original sounds will be recorded in mono (see
page 80)
53
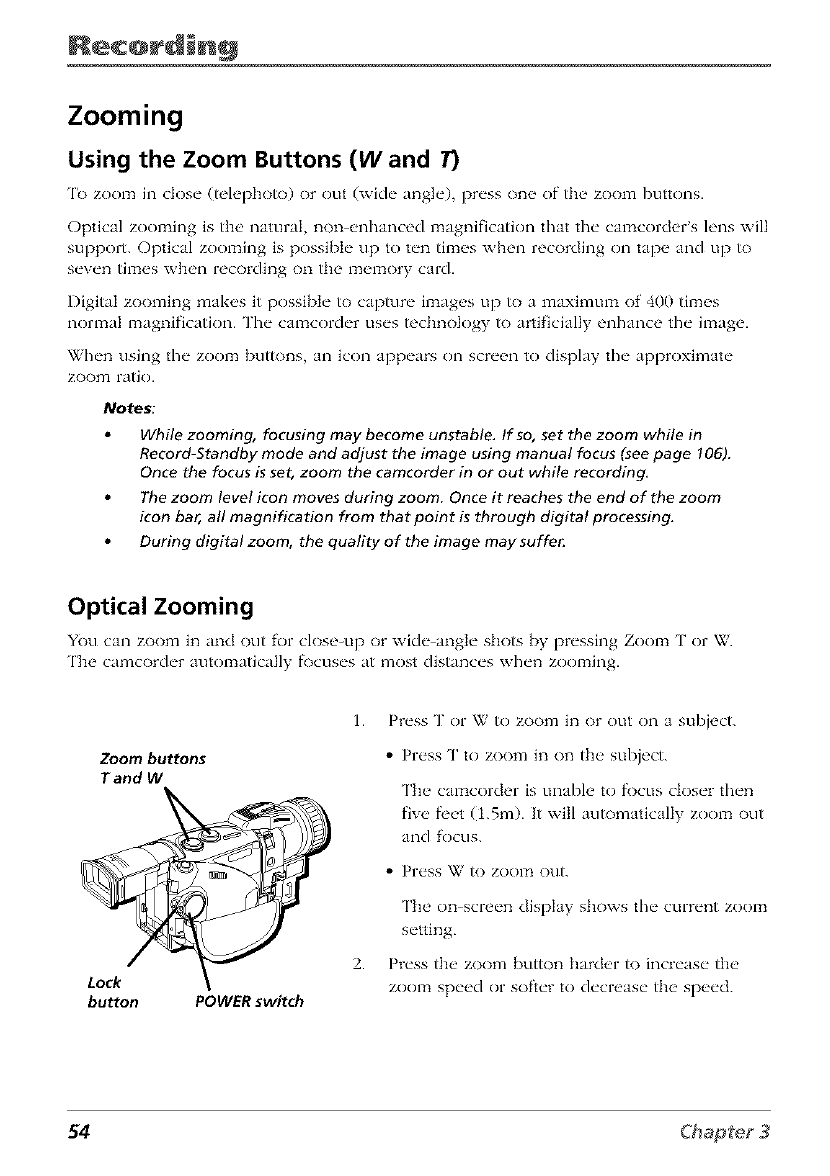
Zooming
Using the Zoom Buttons (W and 7)
'lb zoom in close" (teh, photo) or out (wkh" ang]_'), pr_'ss on_ _ of th_ _ zoom buttons.
Optical zooming is the' namraI non _,nhanced magnification that the" ctmacord_,r s h'ns will
support. Optical zooming is possibI_" up to t_'n tim_s when recording on tap_ _ and up to
s_'v_'n tim_s wh_'n rocording on the m_q_ory card.
Digital zooming mak_,s it possibt_" to capture" il_aag_,s up to a maximtma of 400 tim_,s
normal magnification. The camcorder uses technology to artificially enhance the image.
When using the zoom buttons an icon appears on screen to display the approximate
zoom ratio.
Notes:
While zooming, focusing may become unstable. If so, set the zoom while in
Record-Standby mode and adjust the image using manual focus (see page 106).
Once the focus is set, zoom the camcorder in or out while recording,
The zoom level icon moves during zoom. Once it reaches the end of the zoom
icon bar, all magnification from that point is through digital processing.
During digital zoom, the quality of the image may suffe_
Optical Zooming
You can zoom in and out for close_up or with" :mgl_" shot_ by pr_'ssing Zoom 3" or W.
'lIbe camcorch'r automatically f\)cus_'s at most distanc_'s wh_'n zooming.
Zoom buttons
T and W
Lock
button POWER switch
1.
2.
Press T or W to zoom in or out on a subject.
•Press T to zoom in on the subject.
The ca_acorder is unable to fi)cus closer then
five f_'et (1.5m). It will automatically zoom out
and R)cus.
•Pr_'ss W tO ZOOITt ()Lit.
The on screen display shows the current zoom
setting.
Press the zoom button harder to increase the
zoom speed or softer to decrease the speed.
54
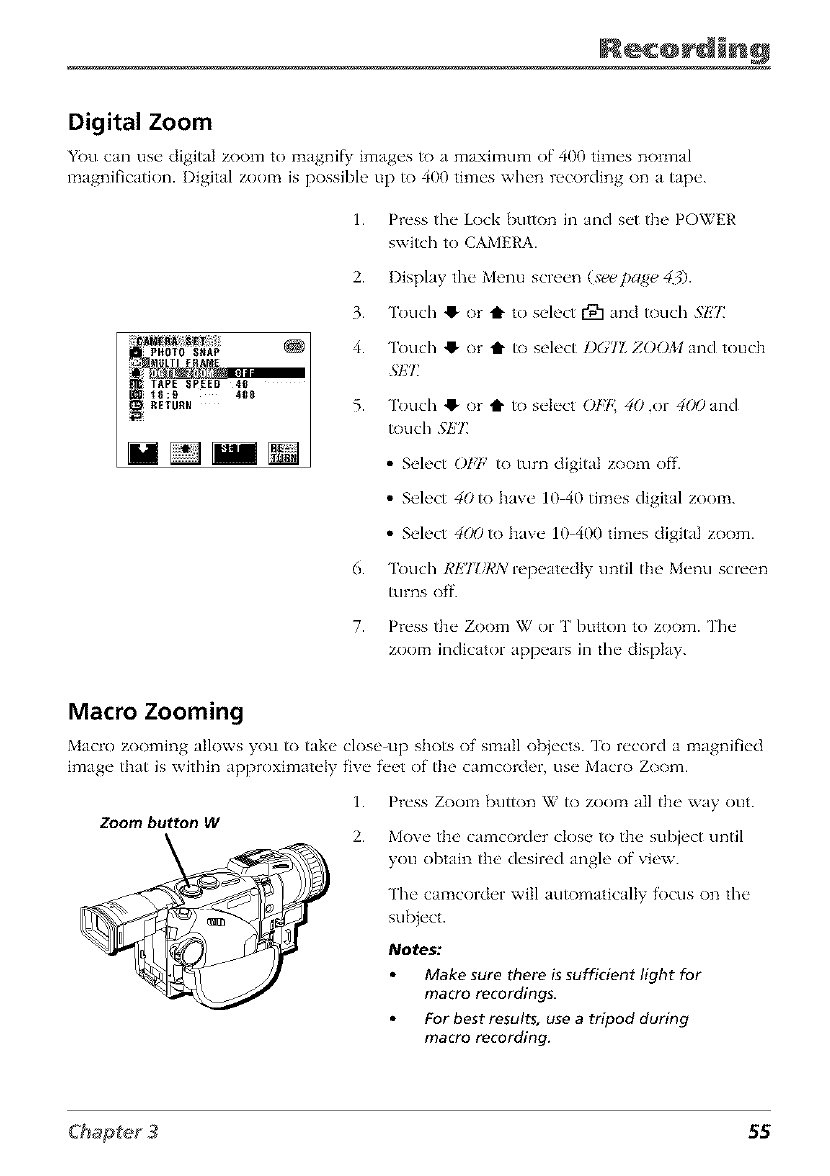
Digital Zoom
You can us_" digital zoom to magnify: image's to a maximum of 400 time's normal
magnification. I)igital zoom is l_ossibh ' up to 400 time's wh_'n recording on a tap_'.
1. Press the Lock button in and set the POWER
switch to CAMERA.
PHOTO SNAP
=_ MULTI FRAME
TAPE SPEED 40
15:£t 400
2. Display the Menu screen (s_page 40.
3. Touch 41-or t to select r91 and touch .qE2_
4. Touch 41-or t to select I)GTZ ZOOM and touch
.@IT
5. Touch 41-or t to select OFt 40 ,or 4(*9 and
touch 5k'2_
• Select ObT,' to turn digital zoom off.
• Select 40to have 10 40 times digital zoom.
• Select 4(X)to have 10 400 times digital zoom.
6. Touch RET?/RA/repeatedly until the Menu screen
turns off.
7. Press the Zoom W or T button to zoom. The
zoom indicator appears in the display.
Macro Zooming
Macro zooming allows you to take close-up shots of small obj_'cts. To r_'cord a magnifi_'d
imag_" that is within apl_roximat_'Iy f'iv_" f'_'_t of the camcorder, us_" Macro Zoom.
Zoom but_nW
1. Press Zoom button W to zoom all the way out.
2. Move the camcorder close to the subject until
you obtain the desired angle of view.
The camcorder will automatically focus on the
sub}ect.
Notes:
Make sure there is sufficient light for
macro recordings.
For best results, use a tripod during
macro recording.
55
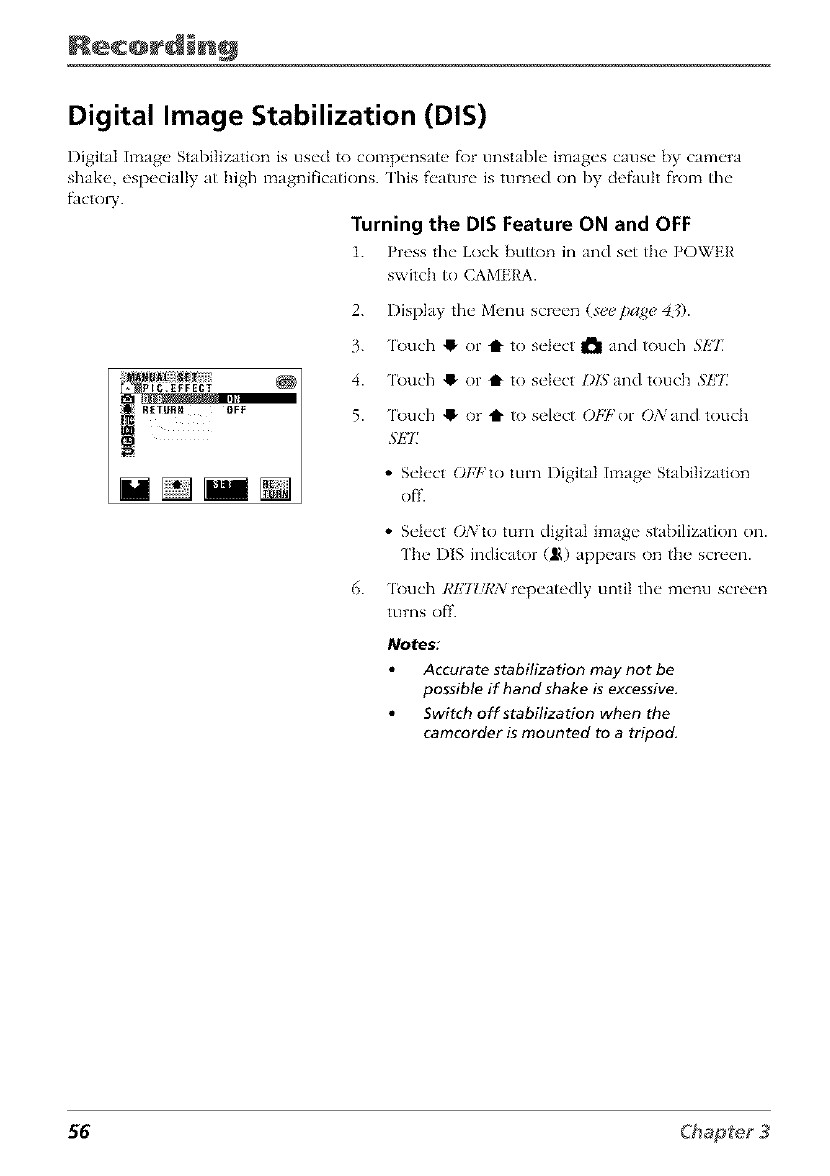
Digital Image Stabilization (DIS)
Digital Image Stabilization is used to compensnte fk)r unstable images cause by camera
shake, especially at high magnifications. This feature is turned <)i1 by defauh flom the
facto W.
Turning the DIS Feature ON and OFF
1. Press the Lock button in and set the POWER
switch to CAMERA.
2. Display the Menu screen (see page 4_).
3. 'lbuch !_ or t1" to select I_1 and touch SET
4. 'lbuch !_ or t to select l)lSand touch SET
5. 'lbuch !_ or t1" to select OPl,'or ONand touch
SI_E
•Select OFFto turn Digital Image Stabilization
off.
•Select ONto turn digital image stabilization on.
['he I)lS indicator (ILl,)appears on the screen.
'lbuch 1@27Zff¢N repeatedly until the menu screen
turns off.
Notes:
Accurate stabilization may not be
possible if hand shake is excessive,
Switch off stabilization when the
camcorder is mounted to a tripod.
56
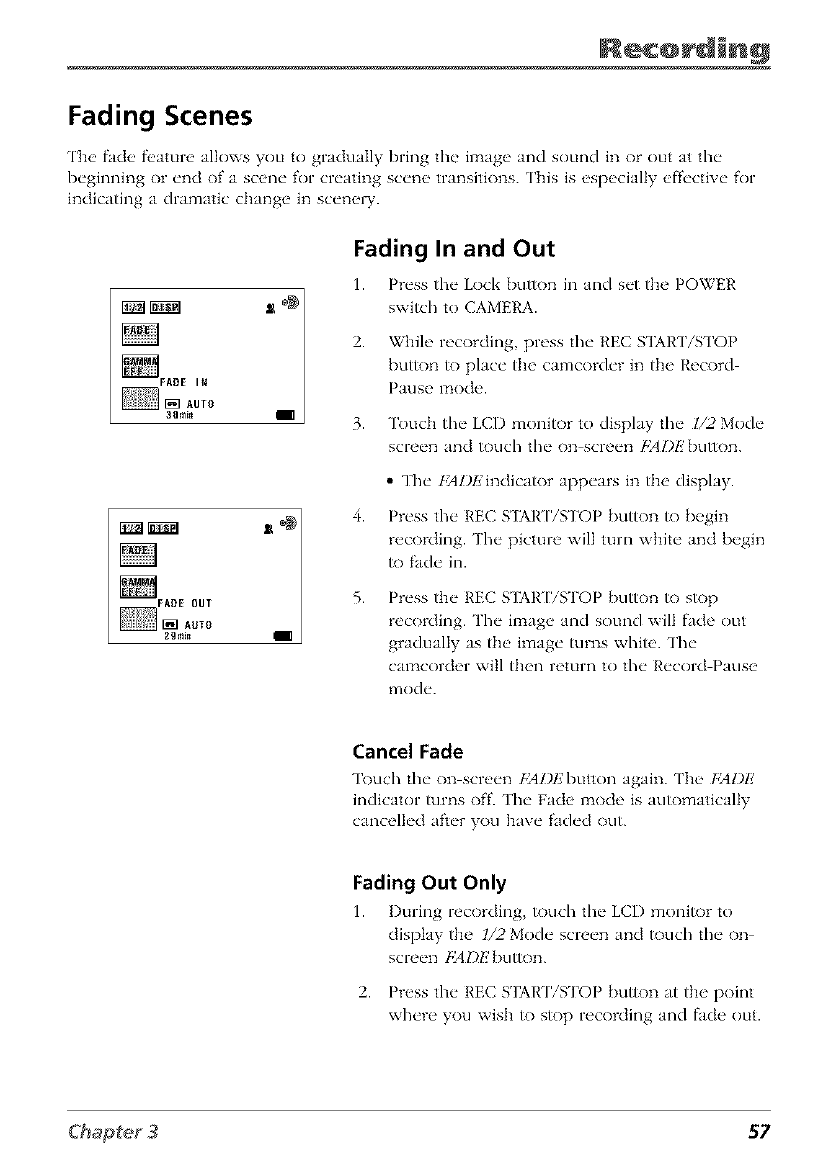
Fading Scenes
The fade fl, ature allows you to gradually bring the image and sound in or out at the
beginning or end of a scene _r creating scene transitions. This is especially effective _)r
indicating a dramatic change in scene_.
FADE I_
3groin
Fading In and Out
1. Press the Loci< button in and set the POWER
switch to CAMERA.
2. While recording, press the REC S3AR ['/STOP
butR)n to place the camcorder in the Record
Pause mode.
3. Touch the LCD monitor to display the l/2 Mode
screen and touch the on screen b_4Dl_'button.
4.
5.
• The [,'AZ)l_'indicator appears in the display.
Press the REC S_l?kR ['iKFOP button to begin
recording. The picture will turn white and begin
_) _Lde in.
Press the REC S3AR ['/STOP button to stop
recording. The image and sound will _de out
gradually as the image turns white. The
camcorder will then return to the Record Pause
ITlode.
Cancel Fade
Touch the on screen ,_IZ)L,'button again. The FADE
indicator turns off. The Fade mode is automatically
cancelled after you have faded out.
Fading Out Only
1. During recording touch the LCD monitor to
display the l/2 Mode screen and _)uch the on
screen /_4DE button.
2. Press the REC S'IARTiSTOP button at the point
where you wish _) s_)p recording and _de out.
57
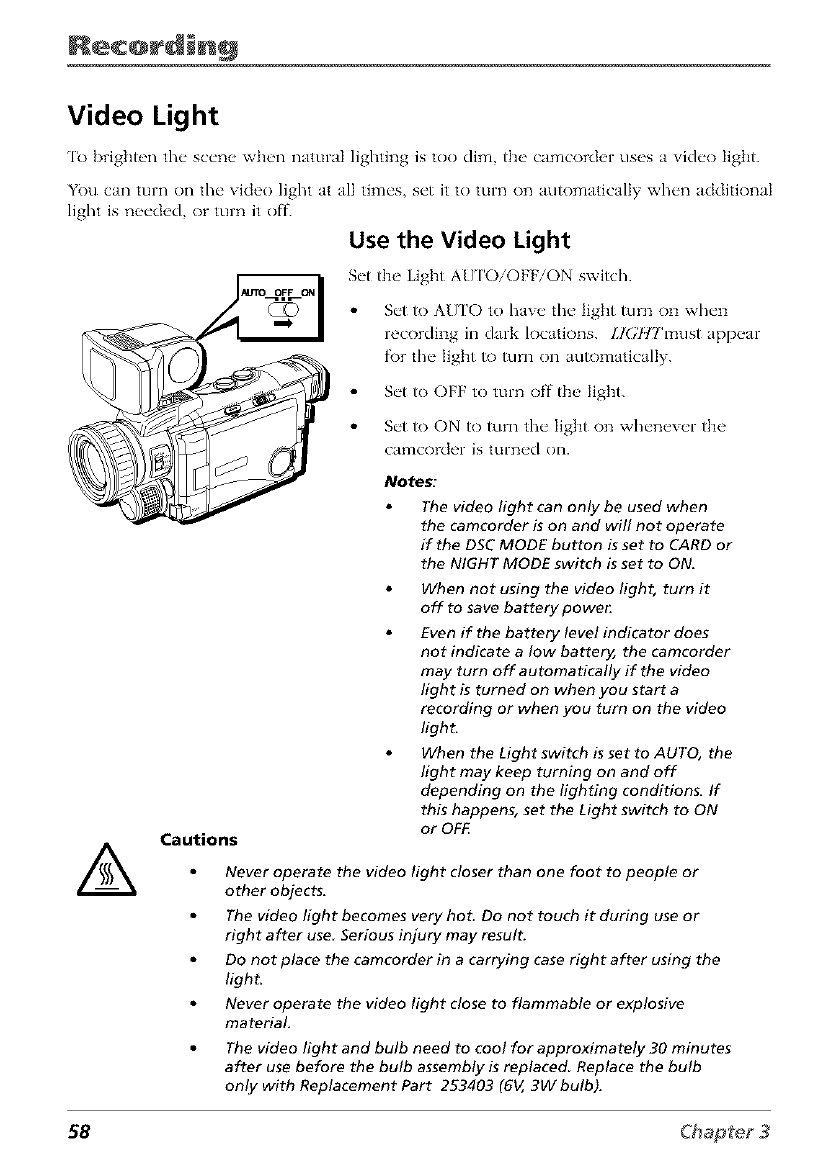
Video Light
'It) brigi_ten the scene when natural lighting is too dim, the camcorder uses a video light.
You can turn on the video light at all times, set it to turn on automatically when additional
light is needed, or turn it o_
Use the Video Light
let the Light AU ['O/OFF/ON switch.
Set to AUTO to have the light turn on when
recording in dark locations. LIGitt2'l_lst appear
_)r the light to turn on automatically.
Set to OFF to turn off the light.
Set to ON to turn the Iig]_t on whenever the
c_{mc()lCiel- IS turned on.
Notes:
The video light can only be used when
the camcorder is on and will not operate
if the DSC MODE button is set to CARD or
the NIGHT MODE switch is set to ON,
ACautions
When not using the video light, turn it
off to save baftery powe_
Even if the battery level indicator does
not indicate a low battery, the camcorder
may turn off automatically if the video
light is turned on when you start a
recording or when you turn on the video
light.
When the Light switch is set to AUTO, the
light may keep turning on and off
depending on the lighting conditions. If
this happens, set the Light switch to ON
or OFF.
Never operate the video light closer than one foot to people or
other objects,
The video light becomes very hot. Do not touch it during use or
right after use Serious injury may result.
Do not place the camcorder in a carrying case right after using the
light.
Never operate the video light close to flammable or explosive
material.
The video light and bulb need to cool for approximately 30 minutes
after use before the bulb assembly is replaced Replace the bulb
only with Replacement Part 253403 (6V, 3W bulb).
58
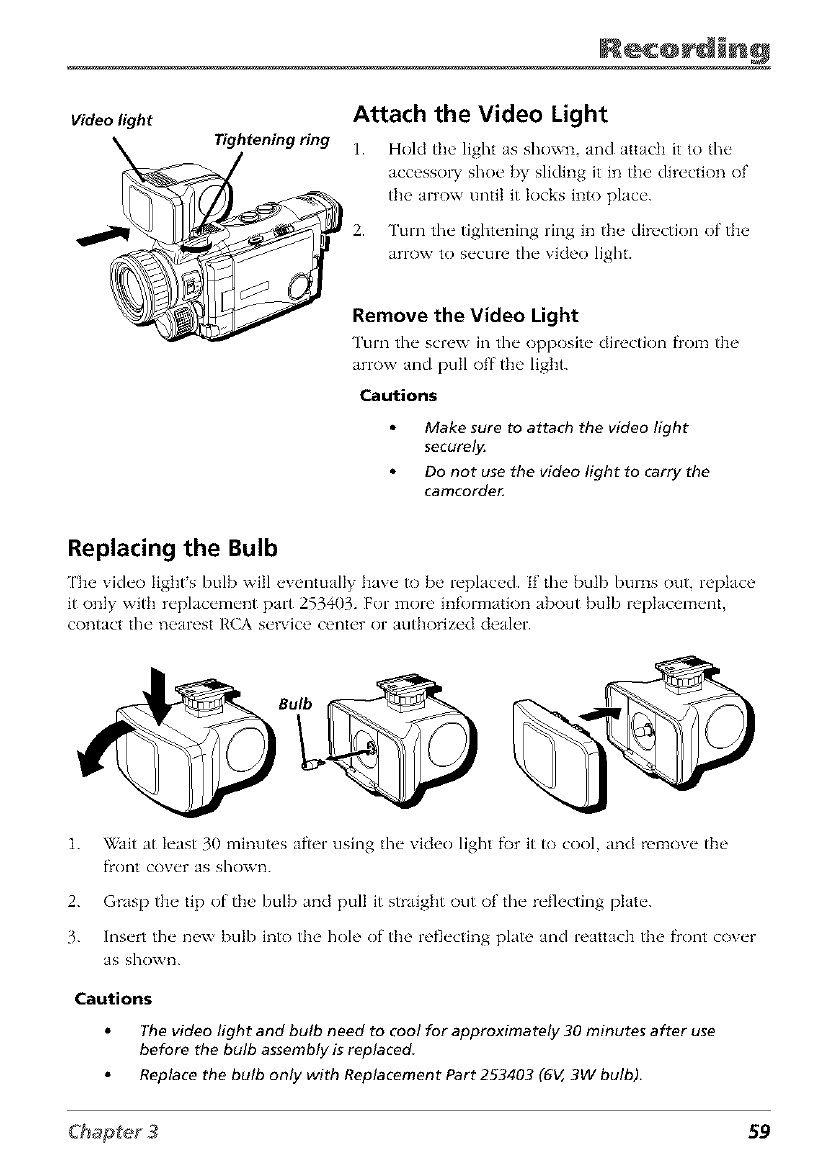
Video light
Tightening ring
/
Attach the Video Light
1. Hold the' light as shown and attach it to file
accessol T shoc [_y sliding it in the' direction of
the arrow until it locks into place.
2. Turn tile tightening ring in the direction of the
arrow to secure the video light.
Remove the Video Light
Turn tile screw in the opposite direction fl'om the
arrow and pull off the light.
Cautions
Make sure to attach the video light
securel_
Do not use the video light to carry the
camcorde_
Replacing the Bulb
['be vide<) light's bulb will eventually have to be replaced. If tile bulb burns out, replace
it only with replacement part 253403. For more information about bulb replacement,
contact the nearest RCA service center or authorized dealer.
1.
2.
3.
_Zait at least 30 minutes after using the video light f\)r it to cool, and remove the
fI'()n_t cover as sho_vn.
Grasp the tip of the bulb and pull it straight out of the reflecting plate.
Insert the new bulb into the hole of the reflecting plate and reattach the flont cover
as shown.
Cautions
The video light and bulb need to cool for approximately 30 minutes after use
before the bulb assembly is replaced
Replace the bulb only with Replacement Part 253403 (6V, 3W bulb).
59
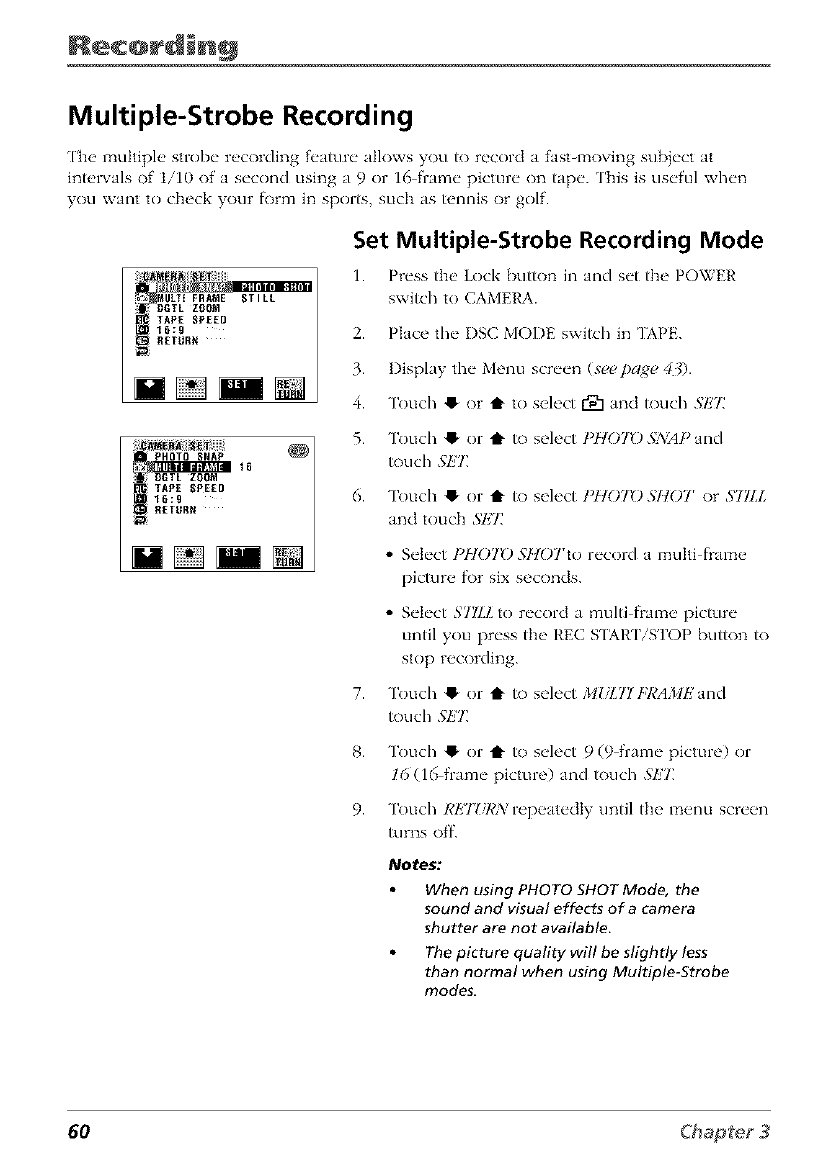
Multiple-Strobe Recording
['he multiple strobe recording f_'amre allows you /o record a fasHnoving subject at
inWrvals of 1/10 of a second using a 9 or 16 frame picture on tape. This is useful when
you want to check your form in sports, such as/ennis or golf.
i_ MULTI FR_E STILL
TAPE SPEED
_6_g
i_ RETURN
:;iliN_Ni_ii!JJiiiii16 £
=_ PHOTO SNAP
ii _ DGTL ZOOM
ITAPE SPEED
16:9
Set Multiple-Strobe Recording Mode
1. Pwss the' Lock bu//on in and s_'t the POWER
switch to CAMERA.
2. Place the" I)SC ivlO/)E switch in 'DMq_L
3. I)isplay th{" Menu scr{'{'n (seepage 43).
4. "lk)uch !_ or t to select r'D1 and/ouch .SI!"£
5.
6.
Touch !_ or t /o select t'HOTO .Sz_/APand
/ouch .SET]
Touch !_ or t /o select I'HOTO .SHOT or STILl.
and touch 3'ET
• Select/'I/OTD S/lOTto record a multi frame
pit.ire for six seconds.
• Select STILL to record a multi fiame picture
until you press the REC SqARTiSTOP bu//on /o
stop recording.
7. Touch !_ or t /o select MDL71 t?I,'AJ/IEand
/ouch .SI!7_
8.
9.
Touch !_ or t to select 9 (9 frame picture) or
16 (16 fram{" picture) and /ouch .S1!7_
Touch REJZ/RA: repeatedly until the menu screen
turns off.
Notes:
When using PHOTO SHOT Mode, the
sound and visual effects of a camera
shutter are not available.
The picture quality will be slightly less
than normal when using Multiple-Strobe
modes.
60
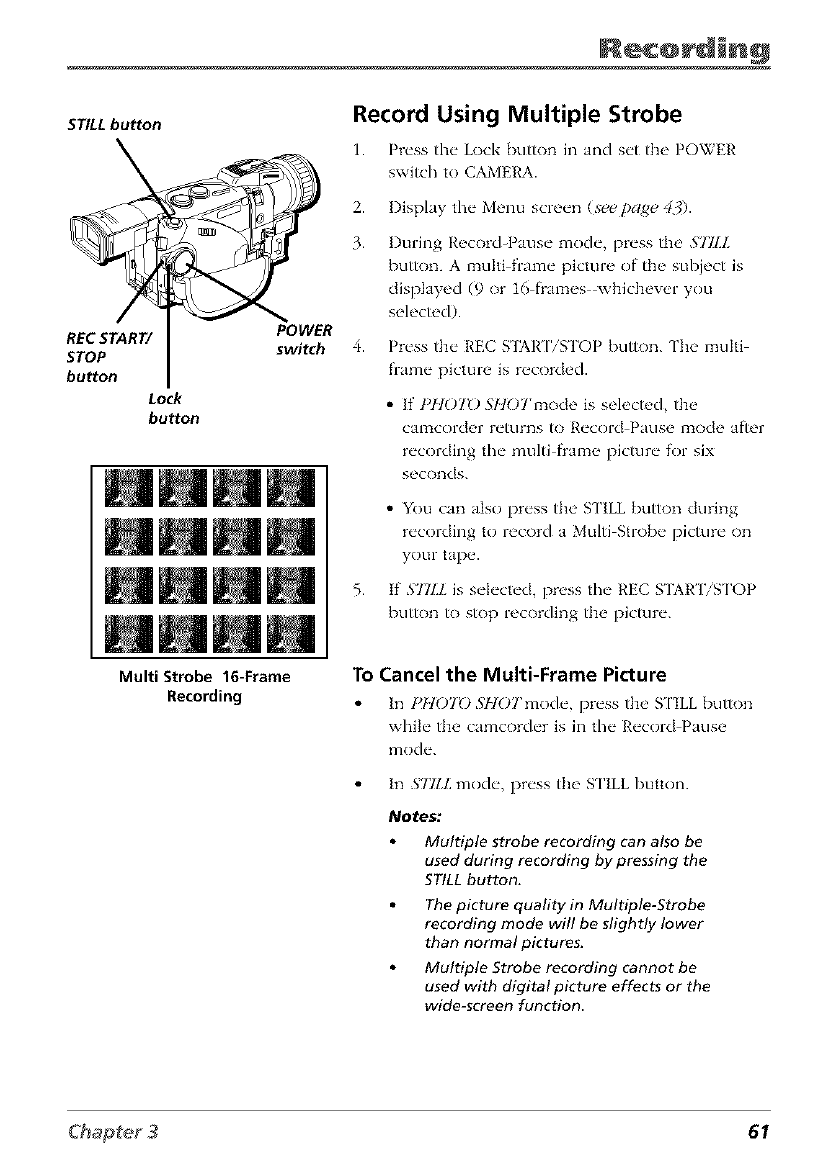
STILL button
RECSTART/
STOP
bu_on
Lock
bu_on
Record Using Multiple Strobe
1. Pn'ss the" Lock button in and s_'t the POWER
switch to CAMERA.
2. Display the Menu screen (se_e_page 43).
3.
POWER
switch 4.
5.
I)uring Record_Pause mode, press the STILL
button. A multi t'rame picture of the subject is
displayed (9 or 16 frames whichever you
selecmd).
Press the REC S1AR ['/STOP button. The multi
_ame picture is recorded.
• If t'tlOTO 571OTmode is selects, d, the
CalT1corder returns /o Record Panse iTIode after
recording the multi frame picture for six
seconds.
• You can also press the STILL button during
recording to record a Multi Strobe picture on
your tape.
If S2ILL is selected, press the REC SI2,R'ITSTOP
button to stop recording the picture.
Multi Strobe 16-Frame
Recording
To Cancel the Multi-Frame Picture
In PILOT0 3klOTmod_', pr_'ss tl](>S ['ILL button
while the camcorder is in the Record Pause
mode.
In STllL mode, press the STILL button.
Notes:
Multiple strobe recording can also be
used during recording by pressing the
STILL button,
The picture quality in Multiple-Strobe
recording mode will be slightly lower
than normal pictures.
Multiple Strobe recording cannot be
used with digital picture effects or the
wide-screen function
61
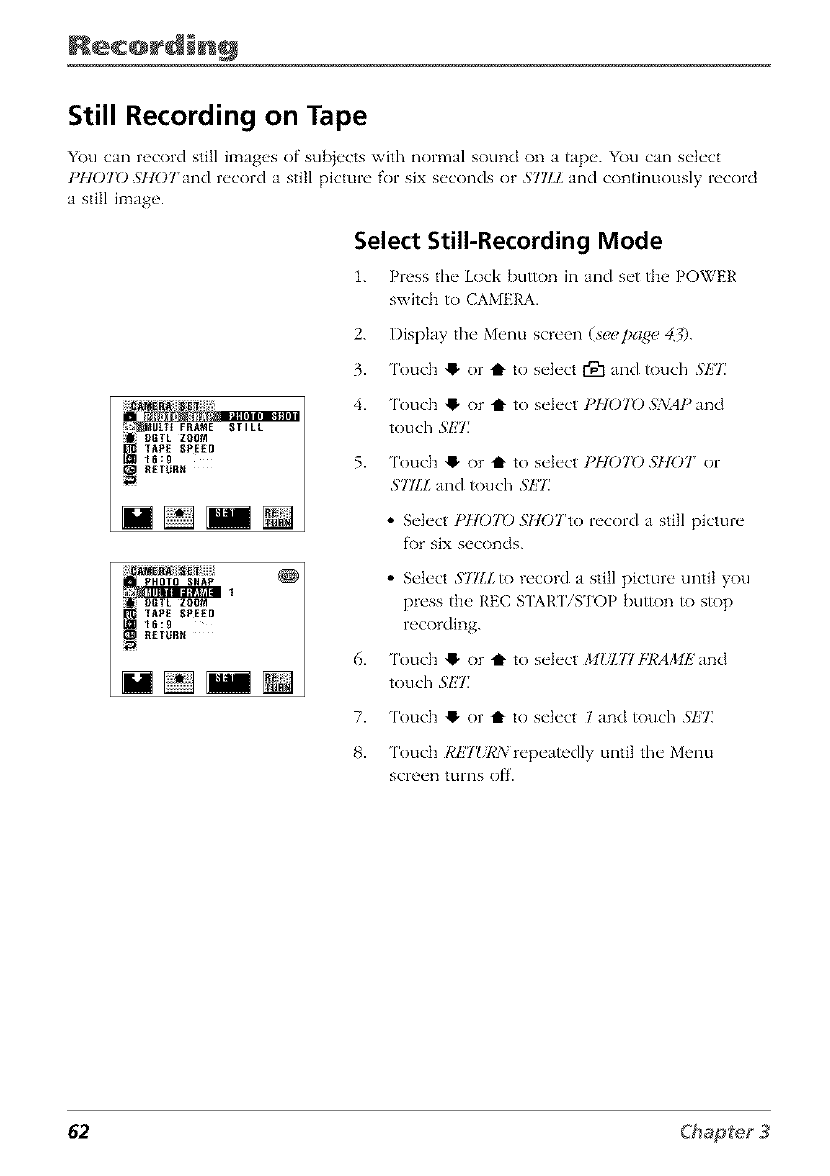
Still Recording on Tape
YOu can record still im tges of subjects with normal sound on a tape. YOu can select
]_t07}0 SHOTand record a still picture for six seconds or STILL and continuously record
a still image.
:;;_N 1'
iljii DGTL Z0IlN
' TAI_E IIPE£[I
RETUR_I
="_ii:;ii_i_•;_:gTAI_EDGTLPHOTO_l_i_!ii]iii_l{l_E[0Z00_lSNAPI _
Select Still-Recording Mode
1. Press the Lock button in Jnd set the POWER
switch to CAMERA.
2. I)ispkly the Menu screen (see !)age 43).
3. Touch !_ or t to select rgl and touch SEZ
4. Touch !_ or t to select P1107()SNAP and
touch SEZ
5. l'ouch !_ or t to select PHOTD SHOT or
STILL and touch SEZ
•Select PHO?}O SHOTto record a still picture
f\)r six seconds.
6.
• Select STZ/Z to record a still picture until you
press the REC S_IART/STOP button to stop
recording.
l'ouch !_ or t to select MI&Tlt;JCAMH and
touch SET_
7. l'ouch !_ or t to select land touch 5"H?]
8. l'oudl RHT?7¢N repeatedly until the Menu
screen turns o_'.
62

LCD monitor
Record Still Images
1. Pr_'ss the" Lock button in and s_'t the POWER
switch to CAMERA.
2.
3.
4.
I)uring Record Pause mode, press the S ['ILL
bu//on. A still picture of the subject is displayed.
Press the REC S'IARTiSTOP bu//on. The still
picture is recorded.
• If PHOTO .ST]OTmode is selec/_.d, the
CalT1corder returns It) Record Pause 12_ode aflor
recording the still pic/ure for six seconds.
• You can also press the STILL bu//on during
recording to record a still picture on your tape.
If PHOTO S/tOTis selec/ed, the sound and
visual eff_>ctof' the camera shutter is turned
of'f. ['be camcorder returns to record pause
mode aiker recording the still picture f\_r six
seconds.
If S77LLmode is selec/_,d, press the REC SI_\R'I7
STOP bu//on/o slop recording the pic/ure.
Note: To turn off the shutter sound, (see
page 116).
To Cancel the Still Picture
In lq107_),'_klOTmod_', pr_'ss tl](>S ['ILL button
while the camcorder is in the Record Pause
mode.
In S77LL mode, press the STILL button.
63
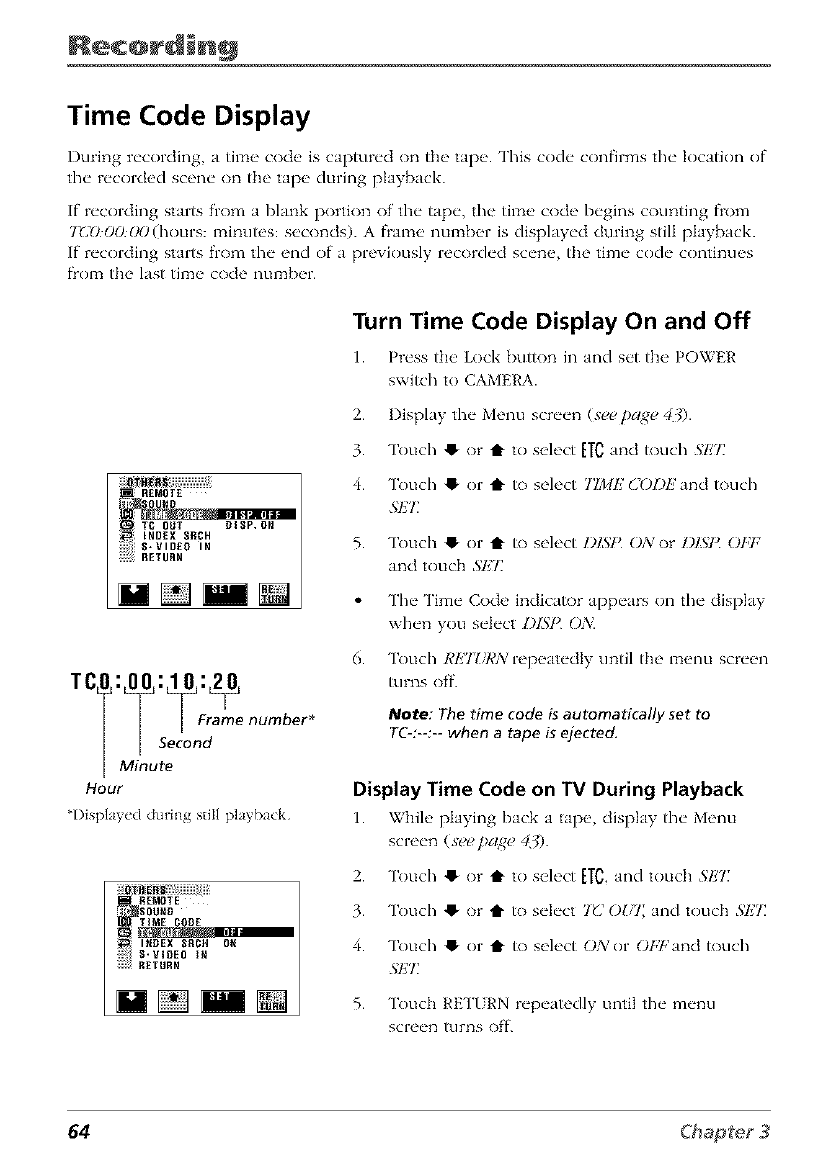
Time Code Display
During recording, a time code is captured on the tape. This code confirms the location of
the recorded scene on the tape during playback.
If recording starts from a blank portion of the tape, the time code begins counting from
7UO:OO(.g)(hours: minutes: seconds). A flame number is displayed during still playback.
If recording starts from the end of a previously recorded scene, the time code continues
from the last time code number.
Turn Time Code Display On and Off
1. Pwss the' Lock button in and s_'t the POWER
switch to CAMERA.
TCO: 00 : 10 :_2_
||Second
|Minute
Hour
*l)isplayed during still playback
..._.j RENOTE
i'SOUR8
"i RETUR_I
2. Display the Menu screen (see page 40.
3. Touch !_ or tl" to select [TC and touch .S'l_'7:
4. Touch !_ or t to select TIME (lODE and touch
.@IT
5. Touch !_ or tl" /o select I)ISI_ OA: or I)lSI_ OFt:
and touch 5'E7_
The Time Code indicator appears on the display
when you select I)ISI{ ()_
6. "lkmch RET?iI,'Xrepeatedly until the menu screen
turns off.
Note: The time code is automatically set to
TC-:--:-- when a tape is ejected.
Display Time Code on TV During Playback
1. Whih, playing back a tap__ display t[w Menu
screen (see pa£(_ 43).
2. Touch !_ or t to select [TO,and touch SET
3. Touch !_ or t1" /o s_'h'ct 7U Oh7 and touch SET.
4. Touch !_ or tl" /o select ON or Ot,7,'and touch
.@IT
5. Touch I_ETI RN repeatedly until the menu
screen [urns off.
64
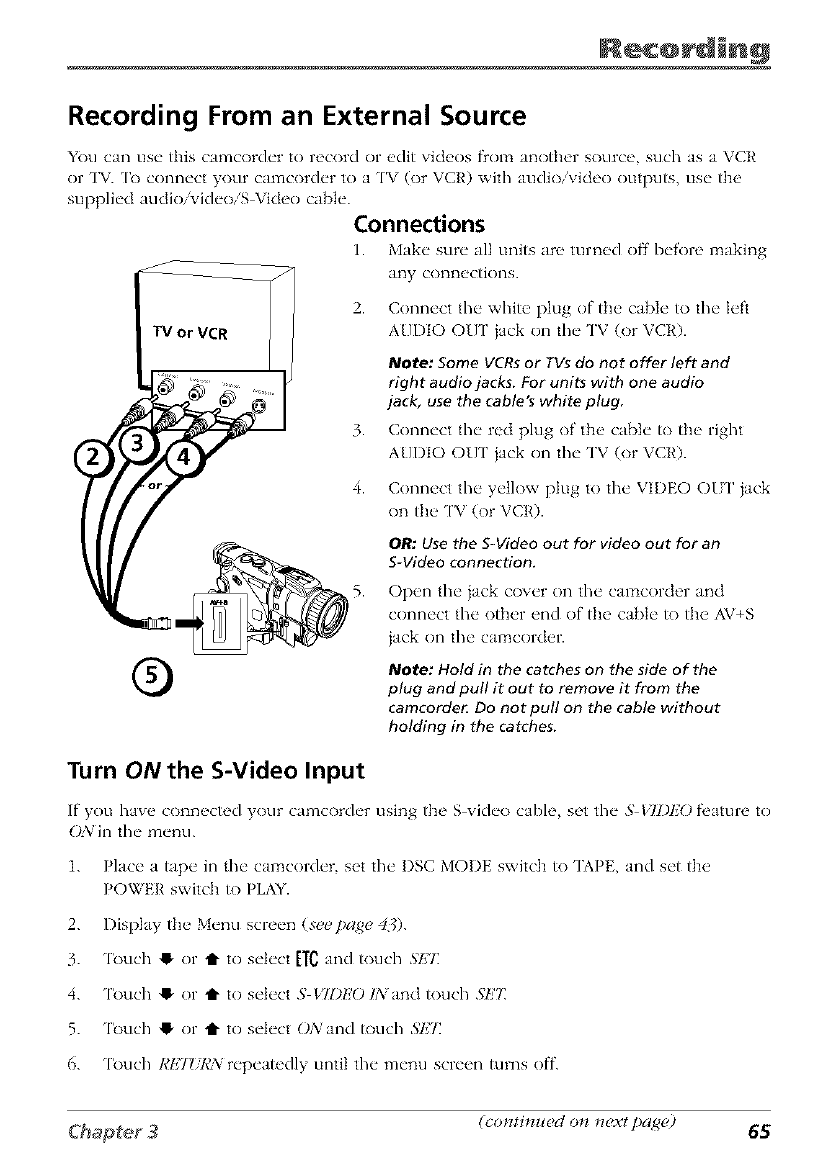
Recording From an External Source
You can use this camcorder to record or edit videos f]om another source, such as a VCR
or TV. [b connect your camcorder to a TV (or VCR) with audio/video outputs, use the
supplied audio/videoiSVldeo cable.
Connections
1. Makt" stm" all units are tuln_.d off bt.fol-e making
any connections.
®
2. Connect the white plug of the cable to the left
AUDIO OUt' jack on the TV (or VCR).
Note: Some VCRsor TVsdo not offer left and
right audio jacks. For units with one audio
jack, use the cable's white plug
3. Conn_'ct the" red plug of th(, cabh" to th(, right
AUI)IO OUt' jack on the TV (or VCR).
4. Connect the yellow plug to the VIDEO OIT jack
on the ['V (or VCR).
OR: Use the S-Video out for video out for an
S-Video connection.
5. Open the jack cover on the camcorder and
connect the other end of the cable _) the AV+S
iack on the camcorder.
Note: Hold in the catches on the side of the
plug and pull it out to remove it from the
camcorde_ Do not pull on the cable without
holding in the catches.
Turn ON the S-Video Input
If" you haw _ conn_cted your camcorch'r using the S vich'o cabh' set the" .SVII)I£O f_,atul'e to
ON in the" m_'nu.
1. Place a tape in the camcorder, set the I)SC MODE switch to TAPE, and set the
POWER switch to PLAYL
2. Display the Menu screen (see page 4_).
3. 'lkmch !_ or t to select [Tgand touch SI£T
4. q_)uch !_ or t to select SVII)EO INand touch .SkT_
5. 'l_mch !_ or t to select ONand touch SET.
6. 'l_xlch RtHURN repeatedly until the metal screen turns off.
(co_iti_lu_d o_1 _1{.vtpa2_ ) 65

To Record From an External Source
1. Place" a tap_" in the" camcold_'r set the" I)SC MODE switch to 'IAPE and set the"
POWER switch _) PLAY_
2. Start playback flom the TV or VCR making sure you can see the picture on the
camcorder.
Note: If NO SIGNAL is displayed on the camcorder screen, make sure the audio/
video/S-Video cable is properly connected.
3. Press REC SIAR ['/STOP on the camcorder. The camcorder will enter the Record
Pause mode.
4. 'lbuch the on screen I_IAY/ST]LL button to begin recording.
•"lbuch bill to start and stop recording.
• Touch •to stop recording
Recording Tips
'lb improve" picturo quality and color roproduction, tlT to make" sure indoor scon_,s
are well lit.
Don't move the camcorder rapidly from side to side while recording. A steady,
gradual pan" avoids blurring and 'jitter".
Use the viewfinder or LCI) monitor to make sure the camcorder is level while
recording so that your scene isn't 'tilted."
Do not bump or tap the camcorder's microphone while recording as this sound will
be recorded.
Include close ups of individuals when taping family outings or group functions.
Fading in and out of scenes makes your videos appear more profi'ssk)nal.
Learn to use the special effi'cts to add variety to your recordings.
Be aware of video and audio backgrounds. Background details barely noticed while
recording may show up as visual clutter" on your recording. Background noises
(especially ['V sets, radk)s, household appliances, traffic sounds, etc.) might detract
flom the sound you want to record.
Avoid long "still" shots of landmarks and scenic attractions. Recordings are more
interesting if they include people and details. Local color" gives travel videos
lasting appeal. 'lb add interest, consider recording a familiar or landmark scene
f]'oman unfamiliar vantage point.
66
Chapt÷r 4
Playback
Chapter Overview:
•Playback Options
•Playback Features
•Dubbing
•Connection to a TV (or VCR)
Changing Entertainment. Again.
67
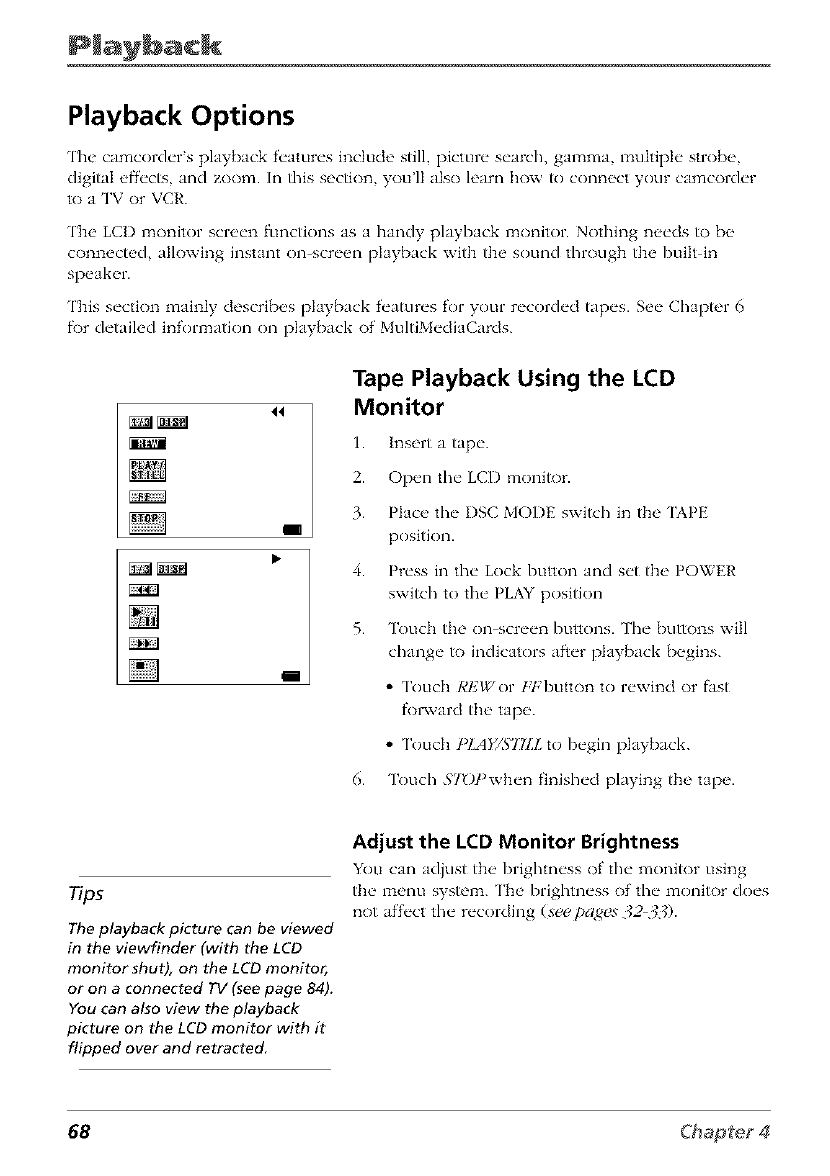
Playback Options
The camcorder's playback f'('atures include still, picture search, gamma, multiple slrobe,
digital ef}'('cts, and zoom. In fl/is section, you'll also learn how to connect your camcorder
to a TV or VCR.
The LCI) monitor screen functions as a bandy playback monitor. Nothing needs to be
connected, allowing instant on-screen playback with the sound through the built in
speaker.
Tiffs section mainly describes playback f('atures for your recorded tapes. See Chapter 6
f\)r detailed information on playback of' MultiMediaCards.
44
I
i
Tape Playback Using the LCD
Monitor
1. Insert a tap('.
2. Op(ql tl_(" LCI) monitor.
3. Plat'(, th(" I)SC MODE switch in the 'IAPE
position.
4. Press in the Lock button and set the POWER
switch to the PLAY position
5. Touch the on-screen buttons. The buttons will
change to indicators af_er playback begins.
•Touch REWor 1,2:button to rewind or fast
fk)l_vard tlm tape.
• Touch t_IAE/SJTLL to begin playback.
6. Touch STOYwhen finished playing the tape.
Tip5
The playback picture can be viewed
in the viewfinder (with the LCD
monitor shut), on the LCD monitor,
or on a connected TV (see page 84).
You can also view the playback
picture on the LCD monitor with it
flipped over and retracted
Adjust the LCD Monitor Brightness
You can adjust tb( _brightn('ss of th(" monitor using
tb(_m_'nu system. ['h(' brightn('ss of' th(" monitor do('s
not af'f('ct th(" r('cording (s_ pag_s 323._).
68
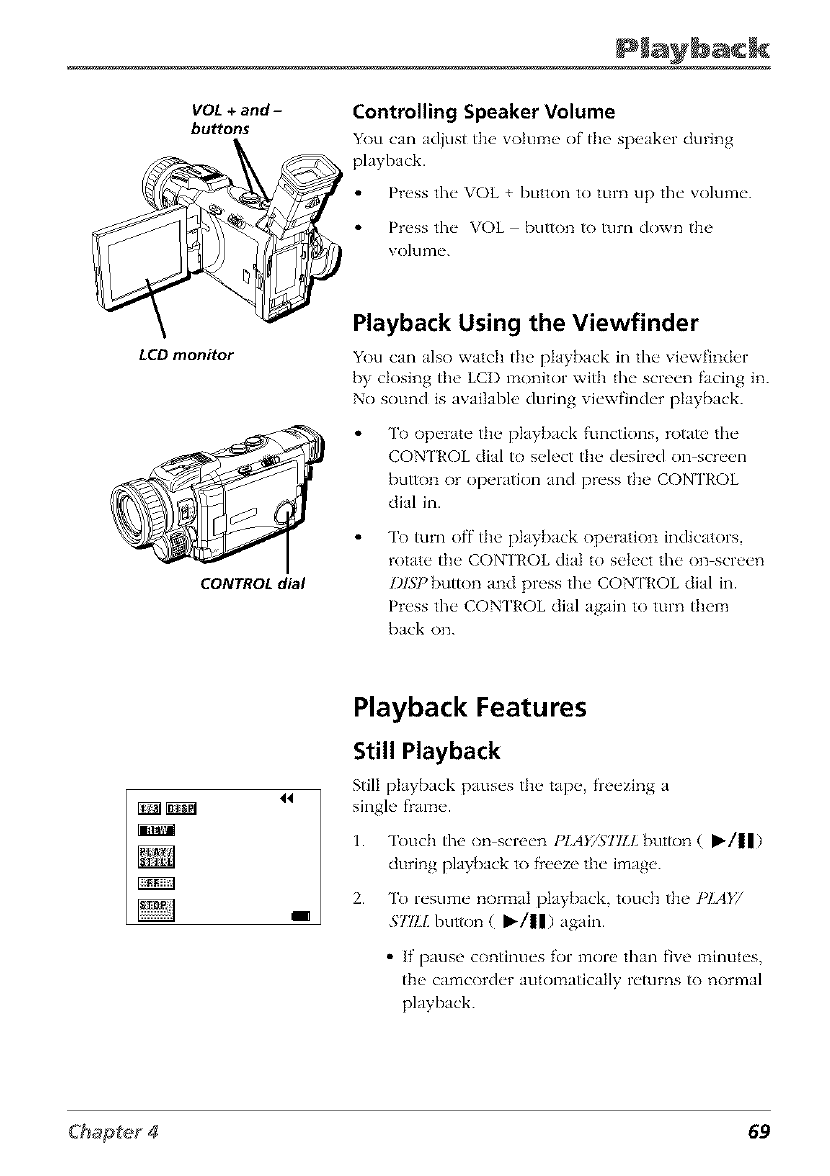
VOL +and-
buttons
LCD monitor
CONTROL dial
Controlling Speaker Volume
You can adjust the _otum(, of the sp(,al_(,r during
_ playback.
• Press the VOL + button to turn up the _ olume.
Pr(,ss the VOL - button to turn down the
b \ olul]le.
Playback Using the Viewfinder
You can also watch tile l)Iaybacl,: in tile viewfinder
by dosing the LCI) l_aonitor with tile screen facing in.
No sound is available during viewfinder playback.
To operate the playback functions, rotate tile
CONTROL dial to select the desired on-screen
bu_)la or operatk)n and press the CONTROL
dial in.
To turn off tile playback operation indicators,
rotate the CONTROL dial to select the on screen
I)ISI >button and press the CONTROL dial in.
Press the CONTROL dial again to turn them
back on.
44
I
Playback Features
Still Playback
Still playback pauses th(" tap(" freezing a
single flame.
1. Touch tile on screen PIA_TS']7II_ button (I_/ll)
during playback to fieeze the image.
2. To resume normal l)Iayback, touch the PLAY/
$77!.Lbutton (i'/ll) again.
• If I3 ttlSe COlltintles fOl" naol'e than five 17_intltes,
the camcorder automatically returns to normal
playback.
69
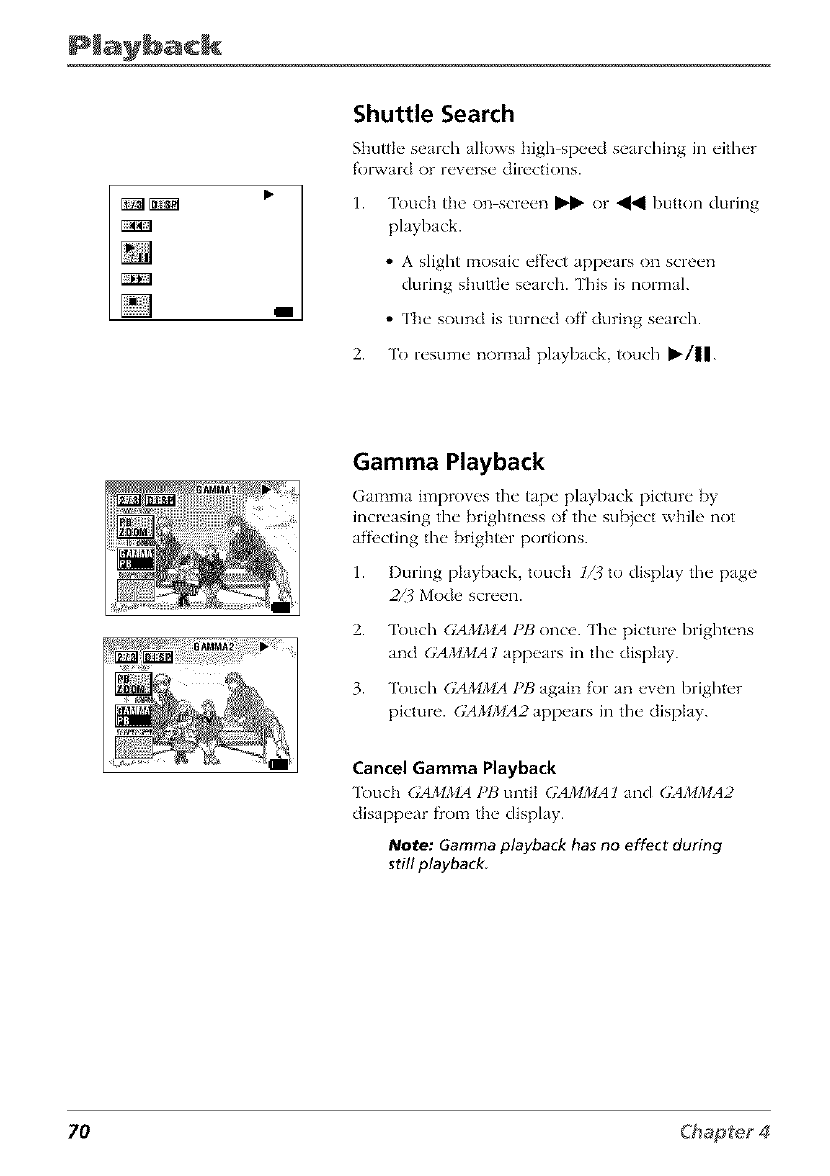
I
Shuttle Search
Shuttle" search allows high-sp_'_'d searching in _'ith_'r
f'ol",vard or reverse directions.
1. "]kmch the on screen _ or _1 button during
playback.
• A slight mosaic effl, ct appears on screen
during shuttle search. This is normal.
• The sound is turned off during search.
2. To resume normal playback, touch _/||.
Gamma Playback
Gamma improves the" tap_" playback picture" by
increasing the brighmess of the subject while not
affi'cting the brighter portions.
1. I)uring playback, touch 1Z{ to display the page
2_? Mode screen.
2. "lkmch GAMMA PB once. The picture brightens
and GAMMA l appears in the display.
3. "lkmch (;AMMA PB again for an even brighter
picture. GAMMA2 appears in the display.
Cancel Gamma Playback
Touch GAMMA PB until GAMMA l and GAMMA2
clisappear fiom the display.
Note: Gamma playback has no effect during
still playback
70
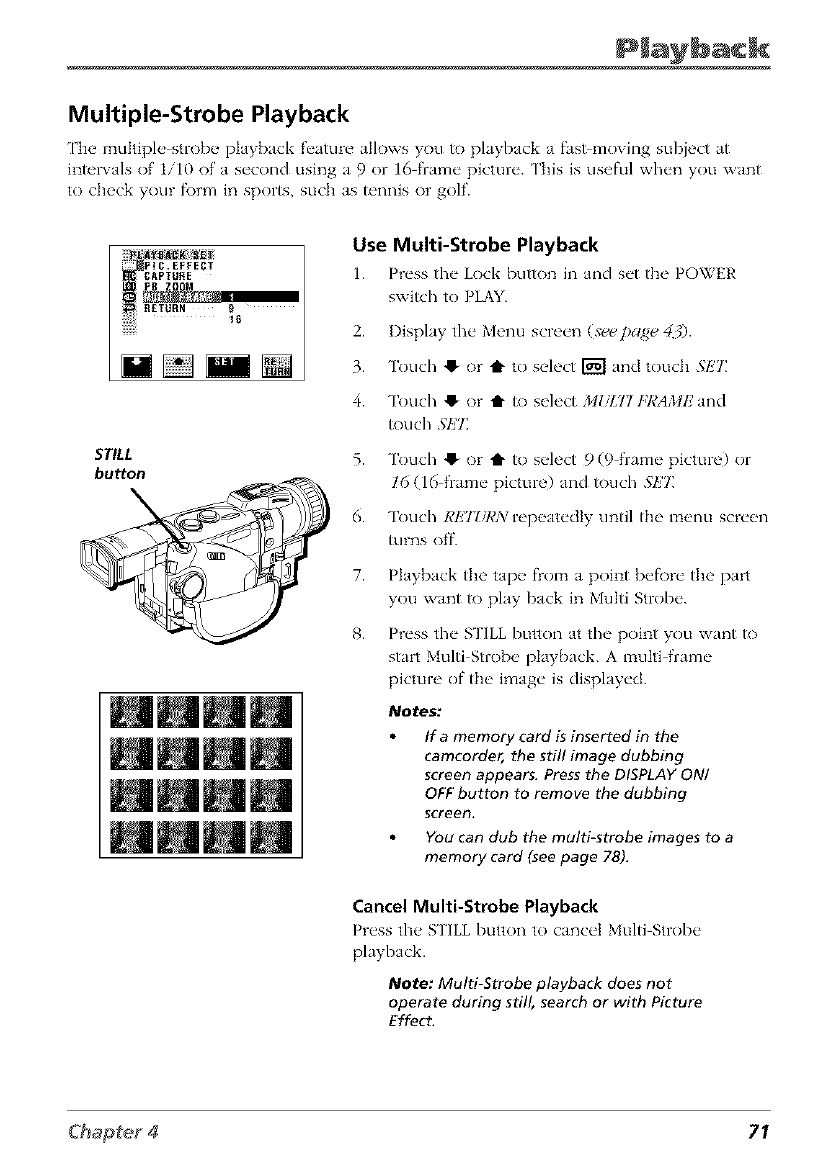
Multiple-Strobe Playback
Fbe multiple-strobe playback feature allows you to playback a fas>moving subject at
intervals of 1/10 of a second using a 9 or 16 frame picture. This is useful when you want
to check your f\_rm in sports, such as tennis or golf.
iiiii___!ii_ _i
[!:_:: I_lG. EFFECT
__CAPTUftE
STILL
button
Use Multi-Strobe Playback
1. Press the Lock button in and set the POWER
switch to PLAY.
2. Display the Menu screen (seepage 40.
3. Touch O or t to select _ and touc]] S/ZT]
4. Touch O or t1" to select MI&77 HCAMIZand
touch Sk'TZ
5.
6.
Touch O or t1" to select 9 (9 frame picture) or
16 (16 frame picture) and touch S/ZT:
Touch RET_/RN repeatedly until the menu screen
_]rns off.
7.
8.
Playback the tape flom a point befl)re the part
you want to play back in Multi Strobe.
Press the STILL button atthe point you want to
start Multi Strobe playback. A multi frame
picture of tlm image is displayed.
Notes:
If amemory card is inserted in the
camcorder, the still image dubbing
screen appears. Press the DISPLAY ON/
OFF button to remove the dubbing
screen.
You can dub the multi-strobe images to a
memory card (see page 78).
Cancel Multi-Strobe Playback
Pn_ss the _FILL button to cancel Multi Strobe
playback.
Note: Multi-Strobe playback does not
operate during still, search or with Picture
Effect.
71
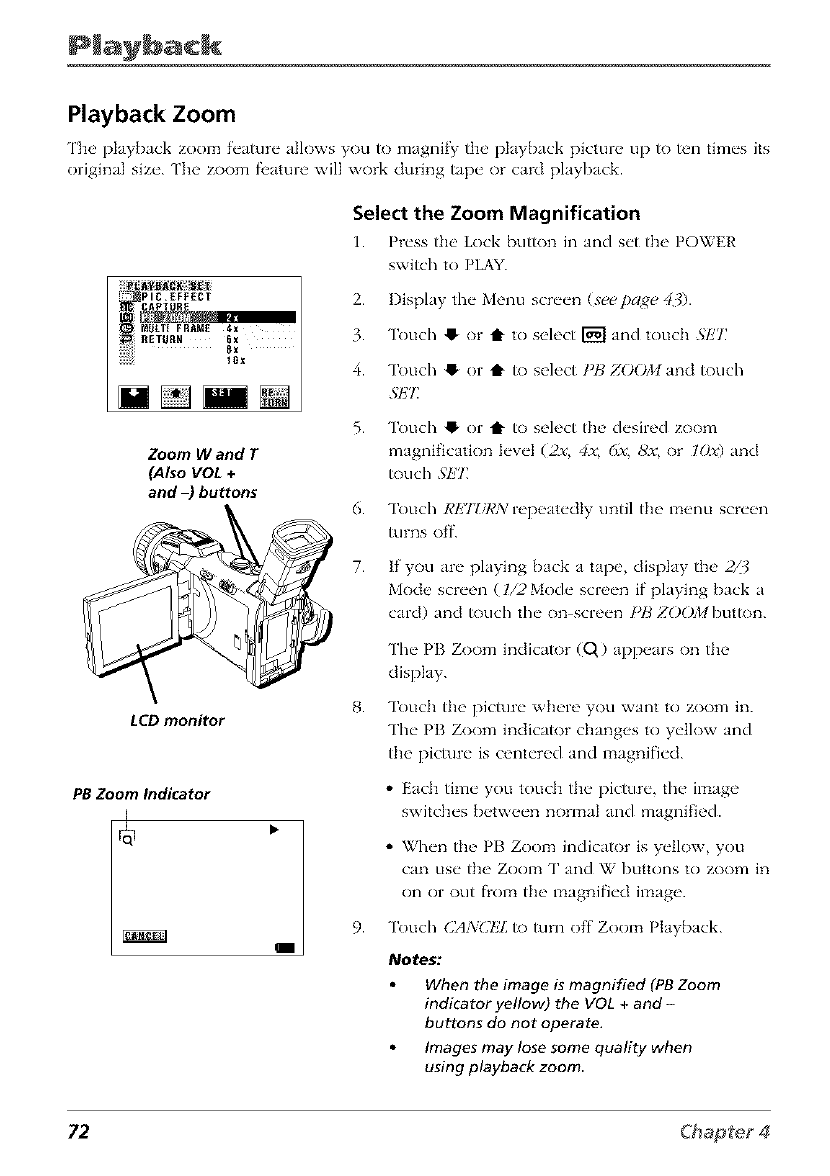
Playback Zoom
Tlw playback zoom feature allows you to magnify ttw playback picmn, up to ten times its
original size. The zoom fi'ature will work during tape or card playback.
__ii_:ipIC.EFFECT
_Itlt.T{ FRAME 4x
_{ RETOnX 6x
Zoom Wand T
(Also VOL +
and -) buttons
LCD monitor
PB Zoom Indicator
I
Select the Zoom Magnification
1. Press the' Lock button in and set the POWER
switch to PLAY.
2. Display the Menu screen (seepage 40.
3. Touch O or t to select _ and touch SIZ7_
4. Touch Q or t to select 1"t3ZOOM and touch
SET_
5.
6.
7.
Touch ,! or Q to select the desired zoom
magnification level (2_v, 4_v,6x, 8'x, or lOx) and
touch SIZT_
Touch RET_/RN repeatedly until the menu screen
_lrns off.
If you are playing back a tape, display the 2/3
Mode screen (l/2 Mode screen if playing back a
card) and touch the on screen PB ZOOMbutton.
The PB Zoom indicator (Q) appears on the
display.
Touch the picture where you want to zoom in.
The PB Zoom indicator changes to yellow and
the picture is centered and magnified.
• Each time you touch the picture, the image
switches between normal and magnified.
• When tim PB Zoom indicator is yellow, you
can use the Zoom T and W buttons to zoom in
on or out flom the magnified image.
9. Touch CA3/CIZLto turn off Zoom Playback.
Notes:
When the image is magnified (PB Zoom
indicator yellow) the VOL +and-
buttons do not operate.
Images may lose some quality when
using playback zoom
72
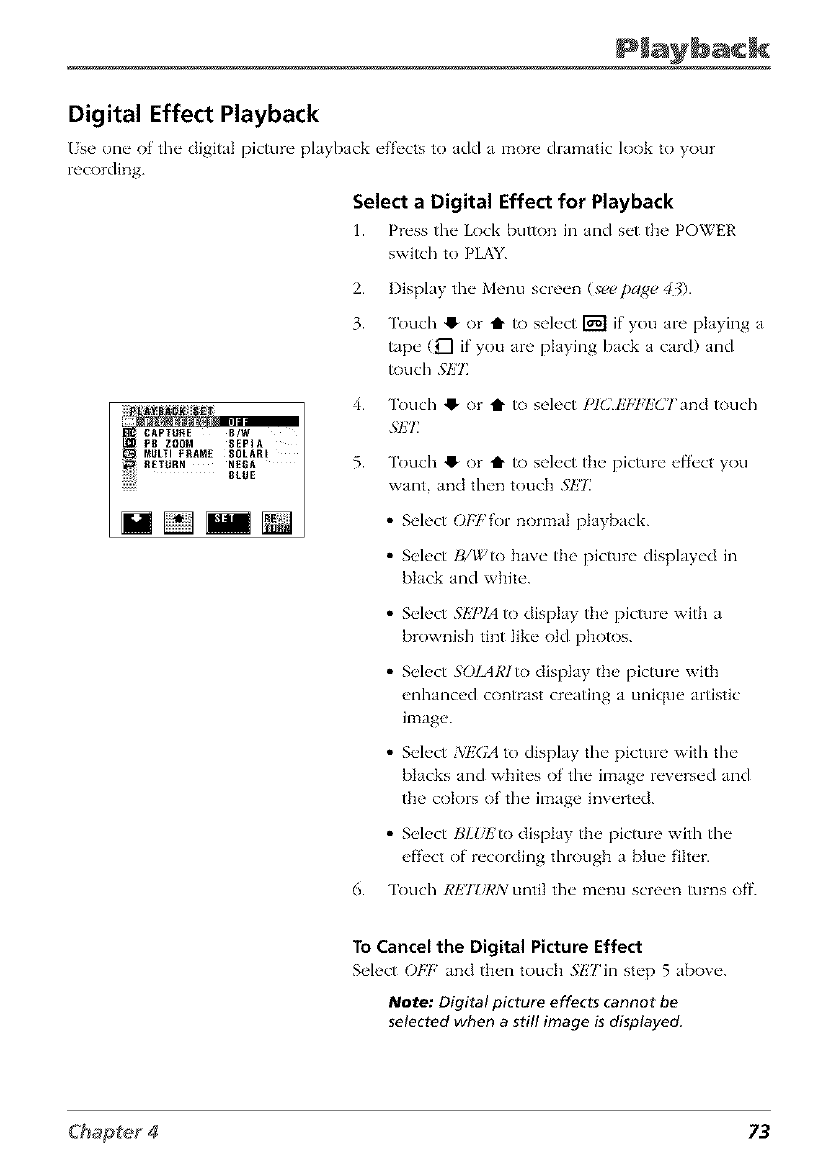
Digital Effect Playback
/se one of the digital picture playback effects to add a more dramatic look to your
recording.
Select aDigital Effect for Playback
1. Press the Lock button in and set the POWER
switch to PLAY.
2.
3.
Display the Menu screen (see t_age 40.
Touch 41-or t1" to select _ if you are playing a
tape (g"l if you are playing back a card) and
touch SET:
4.
.... B/W
MULTI FRAME SOLARt
RETURX NEBA 5.
BLUE
Touch @ or t1" to select l'lClz'bT:lz'CTand touch
.gET
Touch @ or t1" R) select the picture effect you
want, and then touch .gE77
• Select O/:Fh)r normal playback.
• Select H/Wto have the picture displayed in
black and white.
6.
• Select SkY_IA to display the picture with a
brownish tint like old photos.
• Select SOIARIto display the picture with
enhanced contrast creating a unique artistic
image.
• Select NEGA to display the picture with tile
blacks and whites of the image reversed and
the colors of the image inverted.
• Select IJMd_'to display the picture with tile
effect of recording through a blue filter.
Touch REJ?/I,'N until tile menu screen turns off.
To Cancel the Digital Picture Effect
Select 0t,'t: and tb_,n touch .';ETin step 5 above.
Note: Digital picture effects cannot be
selected when a still image is displayed.
73
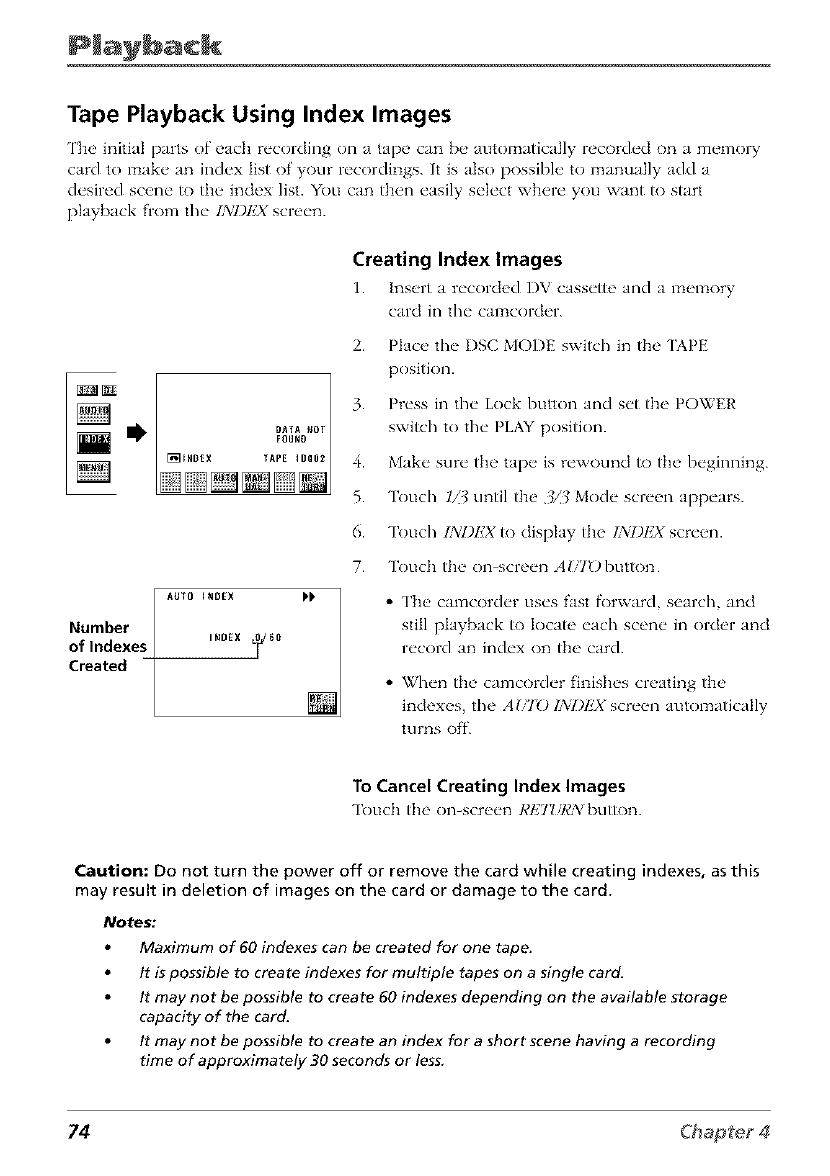
Tape Playback Using Index Images
The initial parts of each recording on a tape can be automatically recorded on a memol T
card to make an index list of your recordings. It is also possible to manually add a
desired scene to the index list. You can then easily select where you want to start
playback from the IXIJI']X screen.
Creating Index Images
1. lns_,rt a r_'COld_'d DV cass_'tte and a m_q_ory
card in tl_" cal_COl'del'.
AUTO INDEX
Number
oflndexes _OEX _0
Created
2. Place the I)SC MODE switch in the 'IAPE
position.
3. Press in the Lock button and set the POWER
switch to tile PLAY position.
4. Make sure the tape is rewound to the beginning.
5. Touch IZJ until the 3/3 Mode screen appears.
6. Touch INI)I']X to display the IXI)I']X screen.
7. Touch the on-screen AU'/E) button
•The camcorder uses fast fl)rward, search, and
still playback to locate each scene in order and
record an index on the card.
• When the camcorder finishes creating the
indexes, tile A171_)IXI)EX screen automatically
turns off.
To Cancel Creating Index Images
Touc]] the on_sc-r_,n ],'tZ7_/R:_/button.
Caution: Do not turn the power off or remove the card while creating indexes, as this
may result in deletion of images on the card or damage to the card.
Notes."
Maximum of 60 indexes can be created for one tape.
It is possible to create indexes for multiple tapes on a single card.
It may not be possible to create 60 indexes depending on the available storage
capacity of the card.
It may not be possible to create an index for a short scene having a recording
time of approximately 30 seconds or less.
74

gB
Manually Add an Index for a Scene
1. lns_,rt a r('corck'd I)V cass('tte and a m_qnory
card in the" camcorder.
2. Plac_' thv I)SC MODE switch in the 'IAPE
position.
3. Press in the Lock button and set the POWER
switch to the PLAY position.
4. Make sure the tape is rewound to the beginning.
5. Touch IZ3 until the 3/3 Mode screen appears.
6. Touch IA:I)lzXto display the IA:l)lzXscreen.
7. Touch the on screen MANLIdL button to display
the MANUAL 13iI)P]X screen.
8. Use Ft ICEg,_ and PIAY/577LL to locate the
beginning of the scene you want to index.
9. "lbuch IqAY/STILL to begin playback and touch
.ql!Tat the point you want to index. The image is
recorded on the card as an index.
10. If you want to add another index, touch $7_)]"
and repeat steps g and 9.
11. "lk)uch STOl'anci then touch RETI/RNto Wrn off
tl_e MANI ML ]NI)P]X screen.
DELETE ALL ?
To
1.
2.
Delete Indexes
Perf\)rm st_'ps 1 6 above.
Touch DP]L to display the INI)EX Dl!TETI,2 screen.
Note: If the index you want to delete does
not appear, touch 0or 0to scroll through
the indexes.
• Delete aParticu "lar Index
Touch the' Jnd_'x you want to d('l('/o and touch
the' on-scr_'_qa l)1_7,button. Pr_'ss YES to deh, tv
the index. Pr_'ss NO to cancel.
• Delete all the indexes on the card
Touch the on-screen DlzZ ALL button. When
the confirmation screen appears, press YESto
delete all indexes. Press NO to cancel.
75
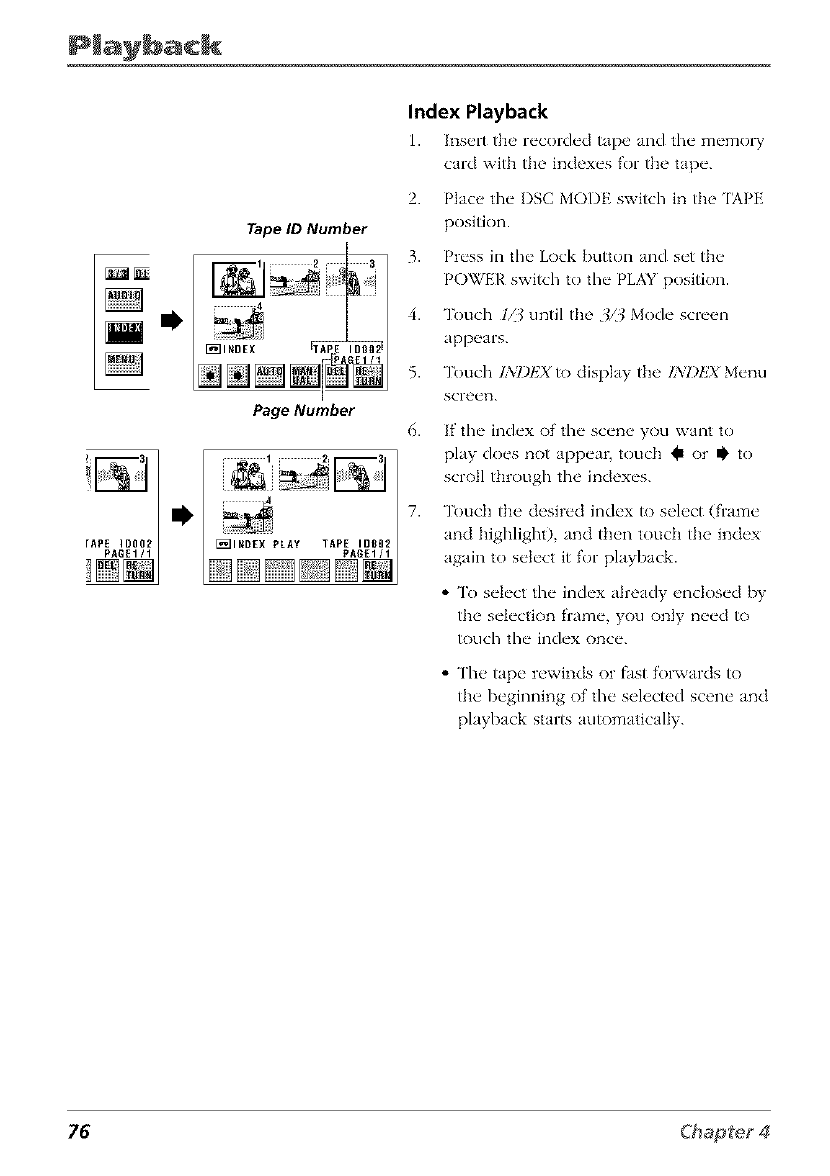
Tape ID Number
Page Number
Index Playback
1. lns_,lt flw recorded tape and the memo1 T
card wRb the h_dexes for the tape.
2. Place tim I)SC MODE switch in the 'IAPE
position.
3. Press in the Lock button and set the
POWER switch to the PLAY position.
4. Touch 1_7_until the 3/3 Mode screen
appears.
5. Touch INI)I,2X to display the INDEX Menu
screen.
6. If the index of the scene you want to
play does not appear, touch @ or Ii' to
scroll through tim indexes.
7. Touch the desired index to select (frame
and lfiglfiight), and then touch the index
again to select it for playback.
• To select tim index already enclosed by
the selection frame, you only n_,ed to
touch the index once.
• The tape rewinds or fast folxvards to
the beginning of the selected scene and
playback star_ au_)matically.
76

Looking Up the Indexes on a Card
You can use, this f_,ature to find out wh_thc'r indexes for file tap_ _ that you want to play
back are recorded on the card in the camcorde_
1. Insert the recorded tape and the memory card
2.
3.
4.
5.
6.
7.
9.
with tile indexes for tile tape.
Place tile I)SC MODE switch in the '[APE
position.
Press in tile Lock button and set tile POWER
switch to the PLAY position.
Touch //_ until tile 3/3 Mode screen appears.
Touch tile on screen J/ll_li!)utton.
Touch !_ or t to select [TC and touch 3'1{/:
Touch !_ or t1" to select INDI']X 3'RdT! and touch
.';l_7: Touch Sl_7'again to 1,2XI,X]I_ The first
index for each tape recorded on the card in the
camcorder is displayed.
If tile index for the tape you are searching for
does not appear and muhiple index list pages
are recorded, touch @ or z!' to switch tile page.
Touch the correct index fi)r the tape in the
camcorder. ['he rest of tile indexes for that tape
will appear. [buch the index where you want
playback to begin to highlight it. Touch again to
start playback.
• To select tile index already enclosed [_y tim
selection f]ame, you only need to touch the
index once.
10.
• The tape rewinds or fast folxvards to tile
beginning of the selected scene and playback
starts automatically.
Touch REJZ/RN repeatedly until the menu screen
_]rns off.
Note: To return to a previous screen touch
RETURN.
77
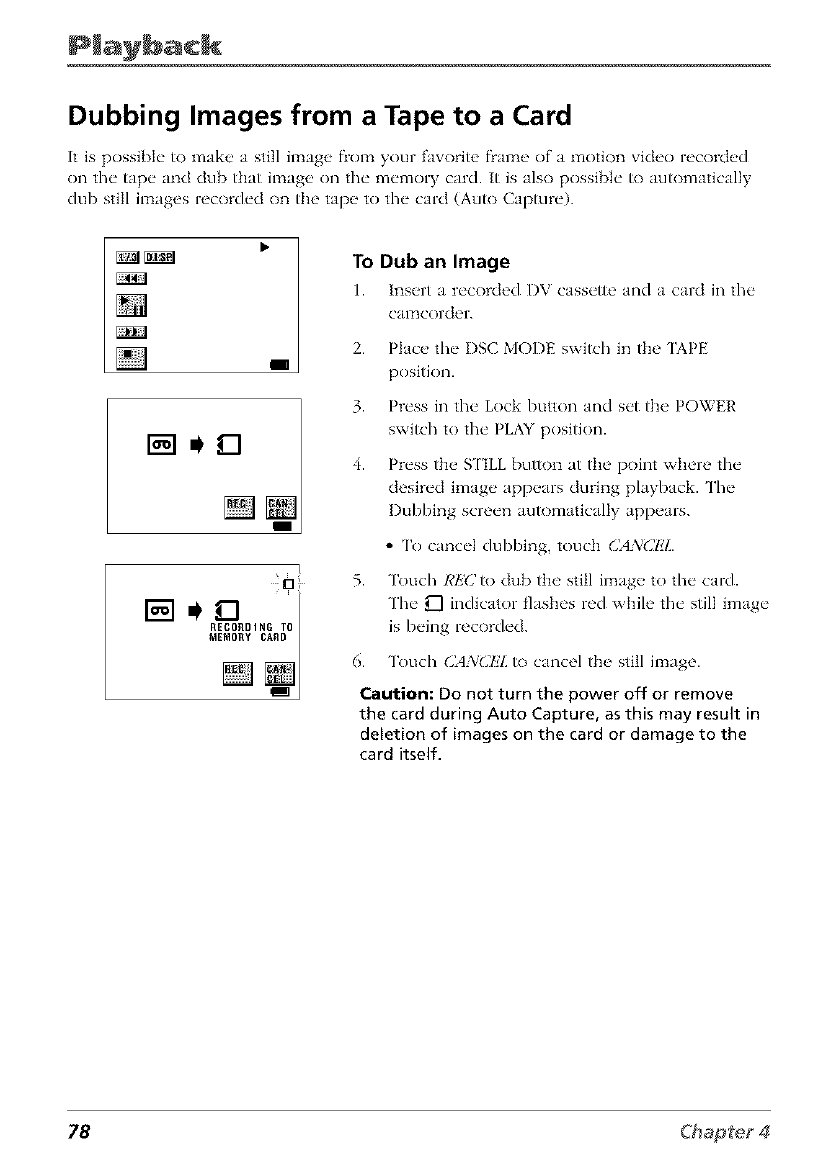
Dubbing Images from a Tape to a Card
It is possible to make a still image fiom your favorite f)ame of a motion video recorded
on the tape and dub that image on the memory card. It is also possible _) au_)matically
dub still images recorded on the tape to the card (Au_) Cap.ire).
I
0
To Dub an Image
1. lns_,rt a r_'corded I)V cass_'tte and a card in the"
CalTtCol-d_r.
2. Place the I)SC MODE switch in the 'IAPE
position.
3. Press in the Lock button and set the POWER
switch to the PLAY position.
4. Press the S ['ILL button at the point where the
desired image appears during playback. The
Dubbing screen automatically appears.
•To cancel dubbing, touch CANCI!Z.
5. Touch RIiC to dub the still image to the card.
The U"I indicator flashes red while the still image
is being recorded.
6. Touch CANCEL to cancel the still image.
Caution: Do not turn the power off or remove
the card during Auto Capture, as this may result in
deletion of images on the card or damage to the
card itself.
78
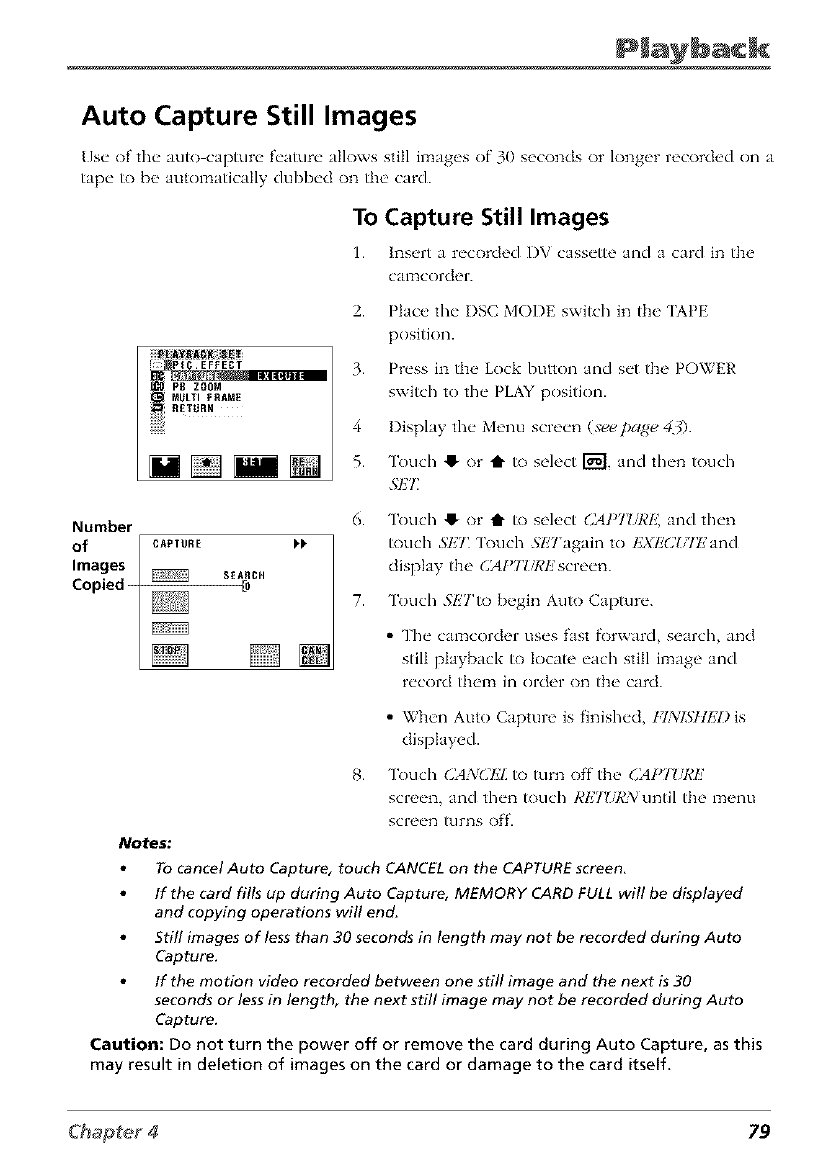
Auto Capture Still Images
[]s(" of the auto capture f('atur(" allows still images of 30 seconds or longer recorded on a
tap(" to b(" automatically dubb('d on th( > card.
To Capture Still Images
1. h_s_,rt a r('corch'd I)V cass('tte and a card in the
CalTtCOI'd('I'.
2.
:=: pI .EFFECT 3.
P8 ZOOM
RETURN 4
Number 6.
of [[ CA,TU.E ))
Images
Copied _ SEARCH 7.
[]
Place the I)SC MODE switch in the 'IAPE
position.
Press in tim Lock button and set the POWER
swflch to the PLAY positkm.
Display the Menu screen (seepage 4_).
Touch 41-or i" to select i"_----I,and then touch
.qIH_
Touch 41"or t to select ()APT_7¢E, and then
touch ,';1,71'[_)uch .';ETagain to I']Xk'CUIT':and
display the CAl>TlTeEscreen.
Touch .';ETto begin Auto Capture.
• The calz_corder uses fast f_)rward, search, and
still playback to locate each still il:_age and
record them in order on the card.
•When Auto Capture is finished, FINISIIIH) is
displayed.
8. Touch (]ANCI']I_ to turn off the CAPT_JCE
screen, and then touch I_ETURN until the menu
screen tHFns Off.
Notes:
To cancel Auto Capture, touch CANCEL on the CAPTURE screen.
/f the card fills up during Auto Capture, MEMORY CARD FULL will be displayed
and copying operations will end,
5till images of less than 30 seconds in length may not be recorded during Auto
Capture.
/f the motion video recorded between one still image and the next is 30
seconds or less in length, the next still image may not be recorded during Auto
Capture.
Caution: Do not turn the power off or remove the card during Auto Capture, as this
may result in deletion of images on the card or damage to the card itself.
79
Audio Dubbing Feature
You can add narration to a tape recorded with this camcorder by using the buil>in stere<)
microphone, while preserving the original audio and vide<) recording. Select your
recording mode.
Note: Audio dubbing cannot be performed via the DV terminal
Audio Recorded in the Audio Dubbing Mode
Audio can be recorded and dubbed in 12 or 16 bit. To change tl_e recording mode s_
pag_ _. The chart below shows how audio is recorded ill the normal and dubbing
modes.
In Normal Recording Mode
12-Bit Audio Recording
The audio is rocord_,d in st_'r_'o on
Audio L
•Audio 1: Stereo (left and right)
sound
•Audio 2: No audio
16-Bit Audio Recording
'l'b_' audio is rocord_,d in st_'r_'o with
the" l_'ft and right sound on two
s_'parate chann_qs.
•Audio 1: Left sound
•Audio 2: Right sound
In Audio Dubbing Mode
12-Bit Audio Recording
'llb{ ` dubbd audio is r_'corded on
Audio 2.
•Audio 1: Original stere<) (left and
right) sound
•Audio 2: Dubbed stereo (left and
right) sound
16-Bit Audio Recording
'lIbe dubb_,d audio is r_'c'ord_,d on
Audio 2 ov_'r the" original right sound.
Both the dubbed and original sounds
are in ITtOnO.
•Audio 1: Original left sound
•Audio 2: Dubbed sound
80
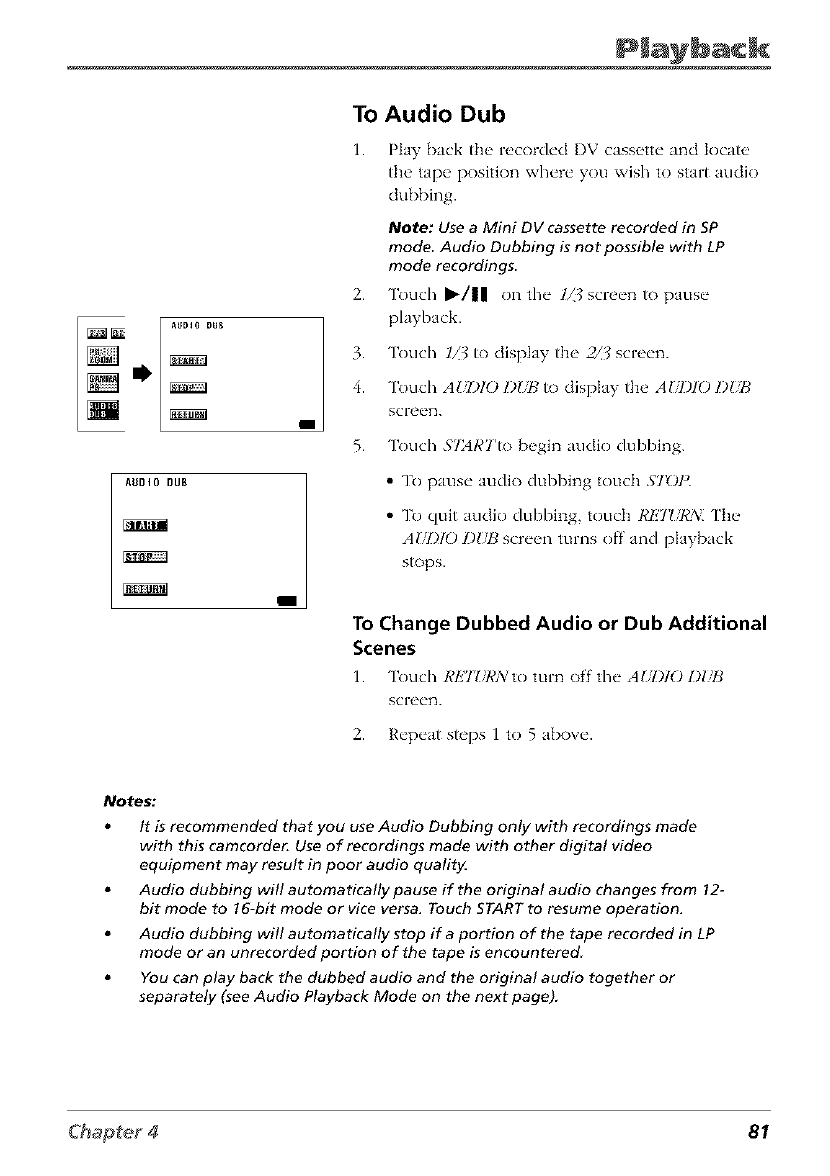
To Audio Dub
AUDIO DUB
3.
4.
5.
1. Play back the recorded I)V cassette and Iocat_,
the tape position where you wish to start audio
dubbing.
Note: Use a Mini DV cassette recorded in SP
mode Audio Dubbing is not possible with LP
mode recordings
2. Touch I_/ll on the 1_? screen io pause
playback.
Touch 1_? to display the 2//7 screen.
Touch AUDIO l)l sB to display the AI/I)IO I)UB
screen.
Touch STARTto begin audio dubbing.
AUDIO DUB
,'11I[;| fill
I
• To pause audio dubbing touch $7_)1 ).
• To quit audio dubbing, touch RI!TIiRN. Fhe
AI/I)IO l)lJH screen turns off and playback
stops.
To Change Dubbed Audio or Dub Additional
Scenes
1. Touch RIZT_iRA:to turn off the AUI)IO L)DB
screen.
2. Repeat steps 1 to 5 above.
Notes."
It is recommended that you use Audio Dubbing only with recordings made
with this camcorde_ Use of recordings made with other digital video
equipment may result in poor audio quality.
Audio dubbing will automatically pause if the original audio changes from 12-
bit mode to !6-bit mode or vice versa. Touch START to resume operation.
Audio dubbing will automatically stop if a portion of the tape recorded in LP
mode or an unrecorded portion of the tape is encountered
You can play back the dubbed audio and the original audio together or
separately (see Audio Playback Mode on the next page).
81
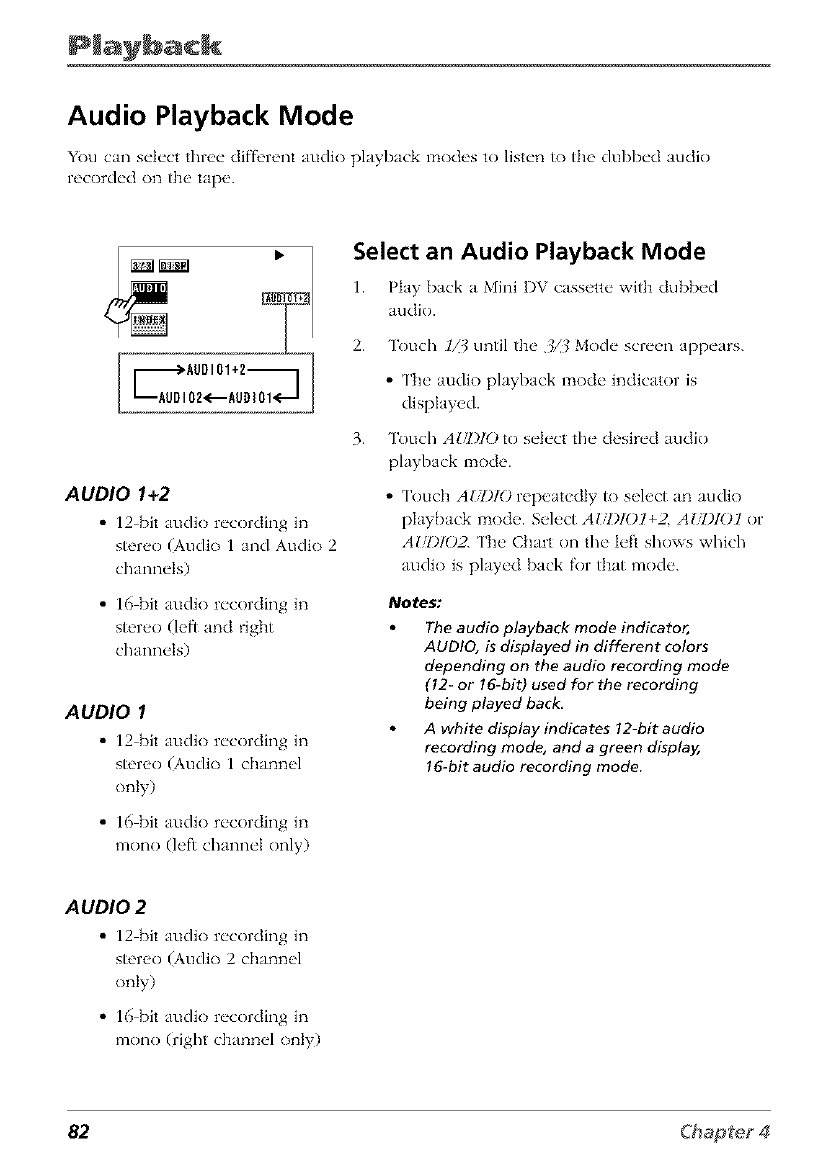
Audio Playback Mode
You can select three diff',rent audk) playback modes to listen to the dubbed audio
recorded on the tap_<
Select an Audio Playback Mode
1. Play back a Mini DV cassette with dubb_'d
audio.
AUDIO 1+2
• 12 bit audio recording in
stereo (Audio 1 and Audio 2
channels)
• 16 bit audio recording in
stereo (left and right
channels)
AUDIO 1
• 12 bit audio recording in
stereo (Audio 1 channel
only)
• 16 bit audio recording in
mono (left channel only)
2. Touch //.3 until the 3/3 Mode screen appears.
3.
•The audio playback l:_ode indicator is
displayed.
Touch AIJl)K)to select the desired audio
playback l:_ode.
•Touch A_Jl210 repeatedly to select an audio
playback lzaode. Select A_)10 l+_ A Iil)lO l or
AI_)I02. The Cimrt on the left shows which
audio is played back _)r flint mode.
Notes:
The audio playback mode indicator,
AUDIO, is displayed in different colors
depending on fhe audio recording mode
(12- or 16-bit) used for the recording
being played back,
A white display indicates 12-bit audio
recording mode, and a green display,
16-bit audio recording mode,
A UDIO 2
• 12 [)it audio recording in
stereo (Audio 2 channel
only)
•16 [)it audio recording in
mono (right channel only)
82
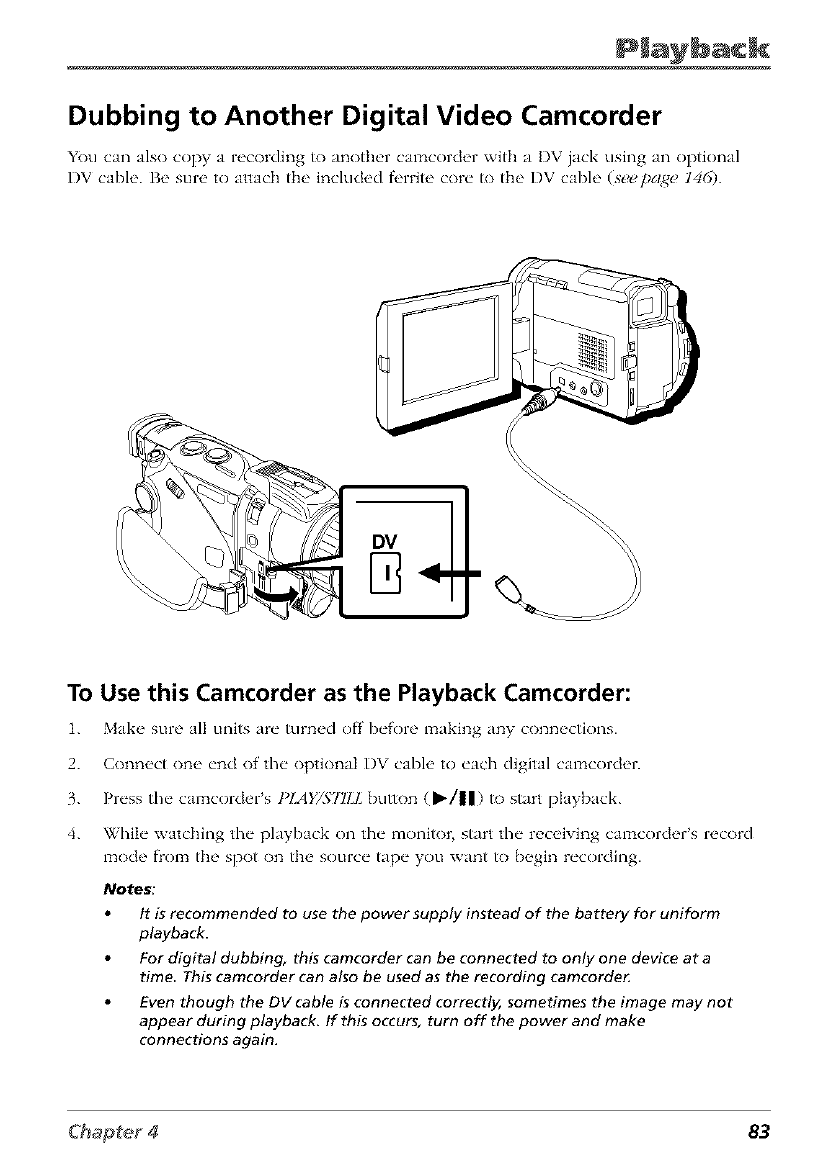
Dubbing to Another Digital Video Camcorder
You can also copy a recording to anotb_'r camcol'der wRh a DV jack using an optional
I)V cable. Be sure to attach fl_e included f_q'rite core to fl_e I)V cable (seepaNe 146).
To Use this Camcorder as the Playback Camcorder:
1. Make, sure all units are turn_'d off before making any conn_,ctions.
2. Connect one end of the optional I)V cable to each digital camcorder.
3. Press the camcorder's t_IAY/STILL bu_)n (b_/||) _) start playback.
4. While watching the playback on the monitor, start file receiving camcorder's record
mode flom the spot on the source tape you want to begin recording.
Notes:
It is recommended to use the power supply instead of the battery for uniform
playback.
For digital dubbing, this camcorder can be connected to only one device at a
time This camcorder can also be used as the recording camcorder
Even though the DV cable is connected correctly, sometimes the image may not
appear during playback. If this occurs, turn off the power and make
connections again.
83
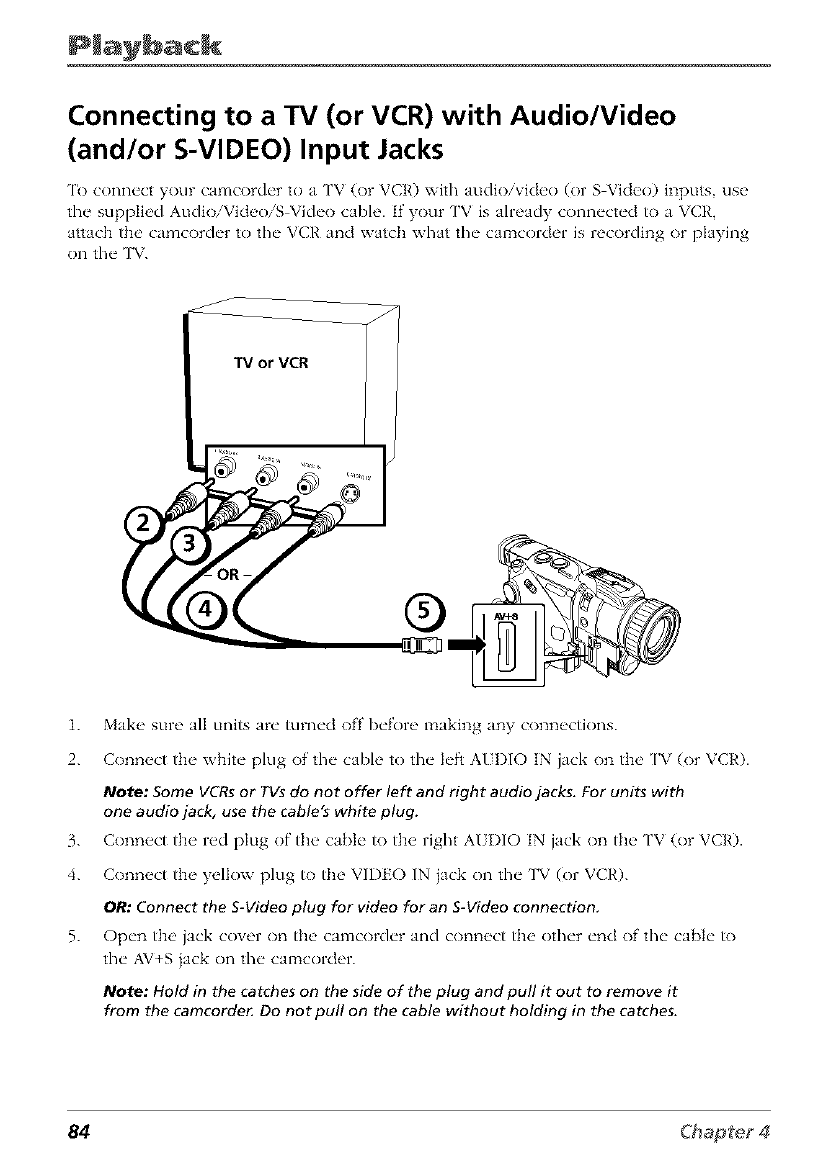
Connecting to a TV (or VCR) with Audio/Video
(and/or S-VIDEO) Input Jacks
'It) connect your camcorder to a ['V (or VCR) with audio/video (or S Video) inputs, use
the supplied AudioiVideoiS Video cable. If your rv is already connected to a VCR,
attach the camcorder to the VCR and watch what the camcorder is recording or playing
on the TV.
TV or VCR
®
1. Make sure all units are turned off before making any connections.
2. Connect the white plug of the cable to the left AUI)IO IN jack on the TV (or VCR).
/Vote: Some VCRs or YVs do not offer left and right audio jacks. For units with
one audio jack, use the cable's white plug.
3. Connect the red plug of the cable to the right AUI)IO IN jack on the TV (or VCR).
4. Connect the yellow plug to the VIDEO IN iack on the TV (or VCR).
OR: Connect the S-Video plug for video for an S-Video connection,
5. Open the jack cover on the camcorder and connect the other end of the cable to
the AV+S iack on the camcorder.
Note: Hold in the catches on the side of the plug and pull it out to remove it
from the camcorde_ Do not pull on the cable without holding in the catches.
84
Playback on a TV (or VCR) with Audio/Video/S-Video
Input Jacks
1. Turn on th__ ['V and tune it to the' vich'o input chann_'t or turn on the' VCR and place
it in the' 'lin_" or 'cam_'ra mode". (If"your VCR do_s not have a lin_" or cam_qa
mode,', consult the" VCR users guide.) Opt, rate the" TV as you normally do to s_'_, the"
signal coming fiom the" VCR.
2. Op_'n the LCD monitor.
3. Pn'ss in th__ Lock button and s_'t the POWRR switch to the PLAY position.
4. 'l_xlch the" on scre_'n I_[AY/5"77LI. button to b_'gin playback.
I)uring playback, use tile playback f_'atures.
5. Press S70P when you are finished.
Notes:
It is recommended to use the power supply instead of the battery for power to
achieve uniform playback.
Adjust the TV sound volume to its minimum level to avoid a sudden burst of
sound when the camcorder is turned on,
If you have a TV or speakers that are not specially shielded, do not place the
speakers next to the TV as interference will occur in the camcorder playback
picture
Dubbing to a VCR
1. Following the" illustration conn_'ct the" camcorder and the VCR.
2. Pn'ss in the" Lock button and s_'t the' POWER switch to the" PLAY position. Turn on
the" VCRs pow_'r, and insert the' appropriate" tape's in the" camcorder and VCR.
3. Mak_ _ sure the" VCR is in th_ _ appropriate, AUX (IANR or VH)EO IN) mo&" and in the"
Record Pause" mode'.
4. ls_' the' camcordors on-scr_'_,n FF, RtZIX,_and I)LAY/S77Ll. buttons to find a spot just
before tile edi>in point. Once it is reached, press PlAY/STILL on the camcorder.
5. When you're ready to start recording, press PlAY/STILL on the camcorder and press
tile appropriate record button on the VCR.
6. When you want to stop recording, press the VCR's pause button and press PIA}7
STlLL on the camcorder.
7. Repeat steps 4 through 6 for aclditional editing. Then stop the VCR and camcorder
when finished.
85

This page left intentionally blank.
Chapter 5
Advanced Features
Chapter Overview:
* Using the Menus for Advanced Adjustment
,, Menu Definitions
•Using the Advanced Features
Changing Entertainment. Again.
87
Advanced Features
Using Mode and Menu Screens For Advanced
Adjustments
This camcorder is equipped wifll an on-screen menu system that simplifies many of tile
more detailed camcorder settings. Simply touch tile screen to make your selection.
4y
AUTO
0
_[_ AUTO
88mi_
On-Screen button
[_] AUTO
3DmiN
On-Screen MENU
button
Notes,"
1.
2.
3.
4.
5.
6.
Open tile LCD monitor and adjust.
Press in tile Lock button and set tile POWER
switch to CAMERA or PLAY_
Note: When playing a tape, the Mode screen
appears after the POWER switch is set to PLAY
(go to step 4)
Set the" AU ['O/MAN[]AL/MAN[]AL LOCK switch
/o AUTO.
Touch any point on the LCI) screen to display
tile Mode screen.
Note: When playing a card, first display a
full-screen still image (see page !28), and
then touch the LCD monitor to display the
Mode screen.
Toud] tile f_'ature you want to select. Touch the
page indicator (1Z{, 2/3, or 3ZJ) to display tile
next Mode screen. If you want a Menu screen,
press the ME3iUbutton when it appears.
Touch !_ or t to select the desired fl, ature or
menu, and then touch 5ETto set the selected
fl,aR]re or menu. Continue using !_ or tl" /o
select the item, and then touch SI£'E
Note: To adjust another menu item, touch
RETURN until the camcorder returns to the
item you want to set.
7. Touch RETZ/RX until tile menu screens turn off.
Certain menu items are common among the camcorder modes. If the DISPLAY
menu item, for example, is set to "DATE+TIME" in TAPE-PLAY mode, it will be
automatically set to "DATE+TIME" in other modes
The menu items are displayed in yellow when the corresponding functions are
selected The menu items are displayed in gray when the corresponding
functions cannot be selected.
The CONTROL dial can also be used to operate the Mode and Menu screens.
Rotate the dial to select an item and press it in to set the item.
The menu screen automatically turns off if no settings are made within five
minutes.
88
Advanced Fea_u_s
Mode and Menu Screen Definitions
The fk)Ilowing charts contain brief definitions of tim fi'atures of the Mode and Menu
screens. These screens o_r different features _r each recording and playback mode.
For a more detailed explanation on how _) use each feature, refer to the corresponding
section.
DSC MODE Switch Set to DUAL or TAPE-- POWER Switch in
CAMERA.
Mode Screens
FADE Fades in and out of scen_s (s_pa_ 57).
GAMMA EFF. Adds brightness to dark image (s_ pa£_ 52).
QUICK RTRN Returns you to beginning of recorded segment (s_pa£_, 50).
SRCH Lets you visually search the tape in CAMERA mode (s_pa_e 5l).
MENU Screens
MANUAL SET Screens
The f\)tlowing menus are available when I_1 is selecmd.
PIC. | l)igitaI picture effects alk)w you to record with a more dramatic
EFFECt ON_ effec ( sec page 108)
DIS Factory Preset: ltefer to l)igital In ge S ) ze- (seep_£e 56)
CAMERA SET Menus
The folk)wing menus ar__awfilaMe when r91 is selected.
PHOTC
SNAP
MULTI
FRAME
PHOTO SHOT
STILL
1
9
16
Alk)ws you to record still images of subiects with normal
sound on a tape. Only awtilable in 'IAPE mode
(see pages 62 @D
Used with the PHOTO SHOT tl, ature to make multiple
strobe recordings of fasbmoving subjects at intervals of 1/10
of a second using a 9 or 16 flame picture. Only available in
'IAPE mode (see pagt_s 60 6 i)
89

Advanced Features
DGTL OFF The optical zoom limit is 10X. When OFF is set, digital zoom is
ZOOM not used.
Factory Preset: Allows you /o rise the Digital Zoom. By digitally
40 processing and magnifying images, zooming is possible from
10X (the optical zoom Iimi0 to a maximum of 40X digital
magnification.
400 Allows you to use the i)igitaI Zoom. By digitally processing and
magnif_'ing images zooming is possible from lOX (the optical
zoom limit) to a maximum of 400X digital magnification.
"TAPE Select the recording tape speed (seo pa_ge 301.
SPEED
SP
LP
OFF
ON
16:9 ])oes not display black bars. []se for normal recording.
Allows you to record black bars at the top and bo_)m of the
screen to produce a wide screen effect.
AUDIO SET Menus
The f\)tlowing menus are aw_ilabh' when _ is selected.
AUDIO 12 bit Factol T Preset: Enables vide() recording of stereo sound on f\)ur
MODE separate channels.
16 bit Enables video recording of stere() sound on two separate
channels.
ZOOM
M1C
Allows you to use the zoom microphone to record audio
according _) the magni_cation of the zoom lens. You can also
use the zool]l iTnicrophone _) record sounds ill the distance
(,veo page 110).
WIND Mild wind noise is reduced automatically.
AUTO
TELE
OFF
NORMAL
STRONG
OFF
OFF
ON
DIALOG
REC
Strong wind noise is largely eliminated.
Lets you record sounds without changes in wind intensity
changing tonal qualities.
Set to ON to record from a distance at a lecture, workshop or
other occasion when the speaker's voice may blend with ambient
sounds, lse this to record the speaker's voice more distinctly.
9O
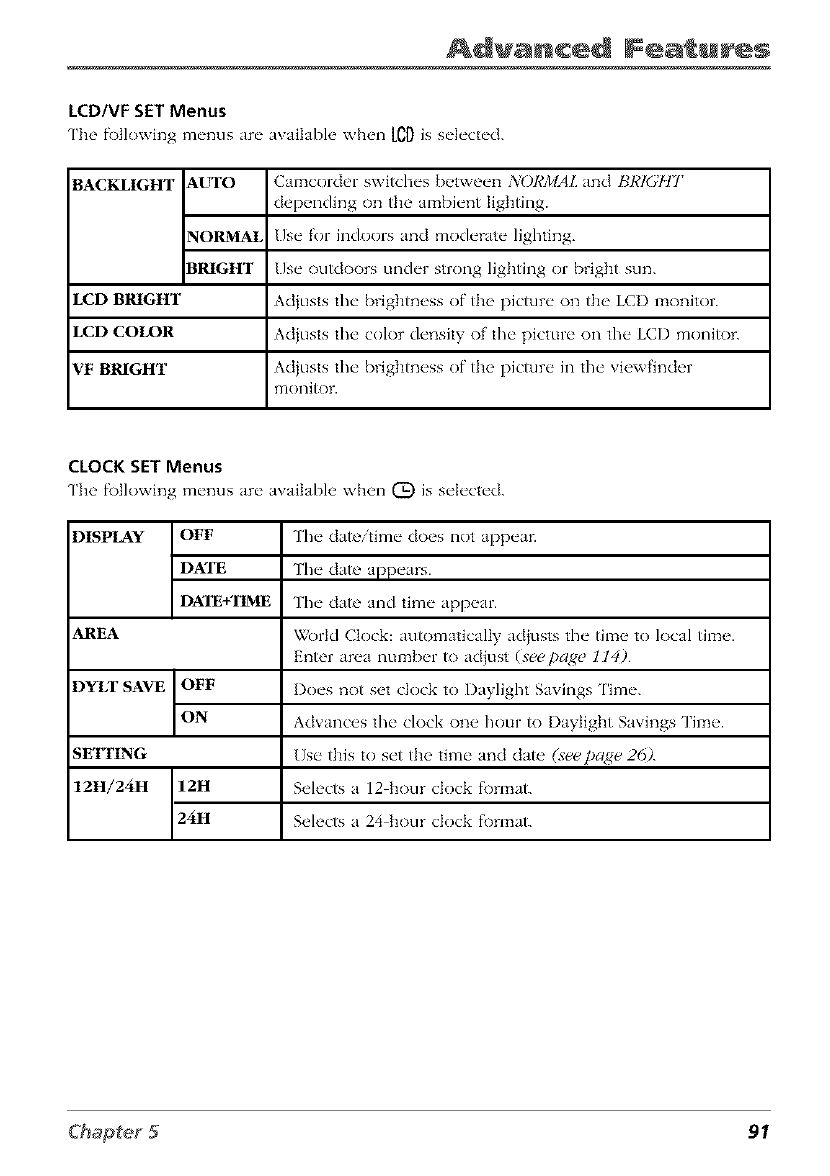
Advanced Fea u s
LCD/VF SET Menus
The f\)tlowing menus are awfilable when ED is selected.
BACKLIGHT AUTO
NORMAL
BRIGHT
LCD BRIGHT
LCD COLOR
VF BRIGHT
Camcorder switches between NORMAL and Bikini'[{7 r
depending on the ambient lighting.
Jse _r indoors and moderate lighting.
Jse outdoors under strong lighting or bright sun.
Adiusts the brightness of the pic_]re on the LCI) monitor.
Adiusts the cok_r density of the picture on the LCD moni_
Adiusts the brightness of the picture in the viewfinder
moni_)r.
CLOCK SET Menus
The f\)tlowing menus are availabh' when (_) is selected.
DISPLAY OFF
DATE
DXIE+'IIME
AREA
DYLT SAVE OFF
ON
SE1TING
12H/24H 12H
24H
The date/time does not appear.
The date appears.
The date and time appear.
World Clock: automatically adiusts the time to local time.
Enter area number to adiust (see [)aRe 114)
I)oes not set clock to Daylight Savings Time.
Advances the clock one hour/o I)aytight Savings Time.
[Jse this to set the time and date (see])aNe 26Z
Selects a 12 hour dock f\)rmat.
Selects a 24 hour dock f\)rmat.
91
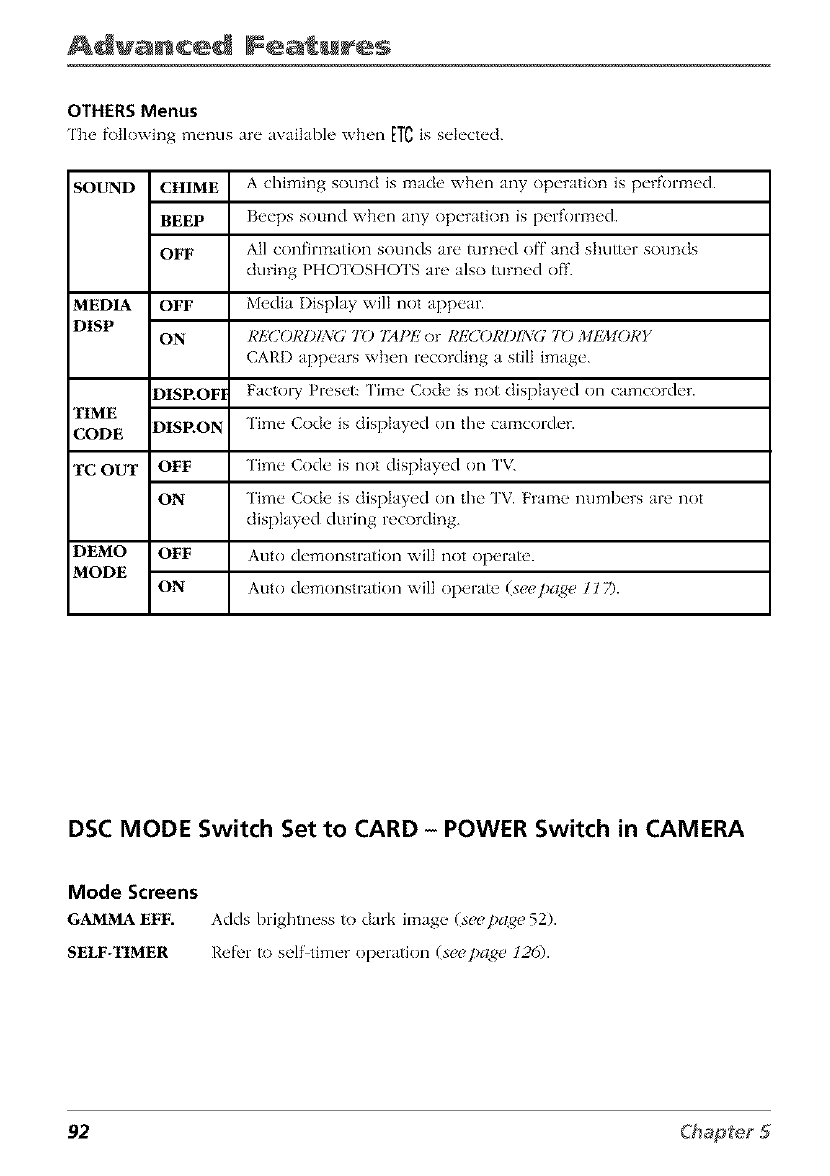
Advanced Features
OTHERS Menus
The f\)tlowing menus are awlilable when ETCis selected.
SOUND CHIME A chiming sound is mxlde when any operation is performed.
BEEP Beeps sound when any operation is performed.
OFF All confirmation sounds are turned off and shutter sounds
during PHOTOSHOTS are also turned off.
MEDIA OFF Media Display will not appear.
DISP ON I¢IiCOI¢I)ING _7_) 724PE or I_EC'(_I¢I)IN(_ "ID MEMORY
CARD appears when recording a still image.
DISP.OF] Factol T Preset: Time Code is not displayed on camcorder.
"lIME
CODE DISP.O_ Time Code is displayed on the Cal_Col"der.
TC OUT OFF Time Code is not displayed on 'I'V_
ON Time Code is displayed on the TV. Frame numbers are not
displayed during recording.
DEMO OFF Auto demonstratkm will not operate.
MODE
ON Auto demonstratkm will operate (see pare 1 l 7).
DSC MODE Switch Set to CARD - POWER Switch in CAMERA
Mode Screens
GAMMA EFF. Adds brightness to clxn'k im:lg_, (see pare 52).
SELF-TIMER Ref_,r to self timer operation (seepage 126).
92
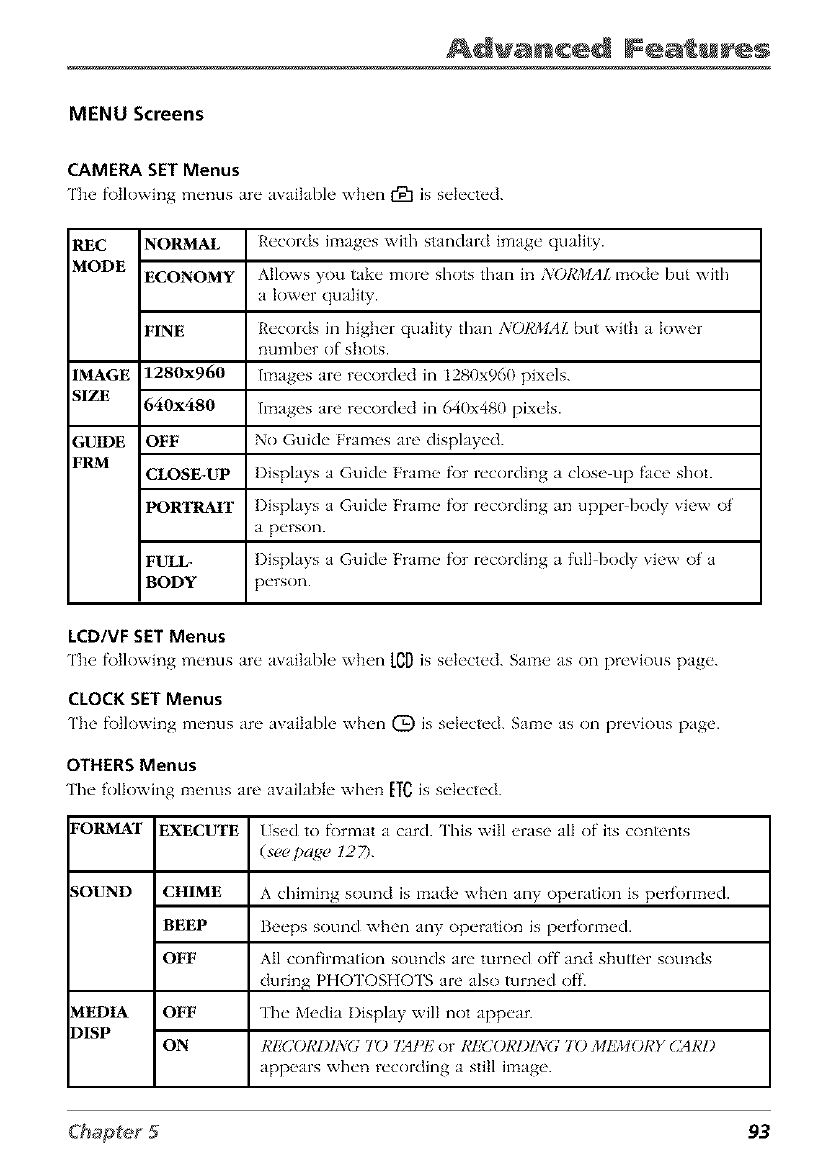
Advanced Fea u s
MENU Screens
CAMERA SET Menus
The f\)tlowing menus are avai]abh' when r91 is selected.
REC NOPLMAL Records images with standard image quality.
MODE ECONOMY Allows you take more shots than in NORMALInocle but with
a lower quality.
FINE Records in higher quality than NORMAL but with a lower
number of shots.
IMAGE 1280x960 hnages are recorded in 1280x960 pixels.
SIZE 640x480 Images are recorded in 640x480 pixels.
GUIDE OFF No Guide Frmnes are displayed.
FRM CLOSE_UP Displays a Guide Frame f\)r recording a close up face shot.
PORTRAIT Displays a Guide Fralne f\)r recording an upper body view of
a person.
FULL- Displays a Guide Frame f\)r recording a full body view of a
BODY person.
LCD/VF SET Menus
The f\)tlowing menus are availal)h' when leD is selected. Saln_ as on previous page.
CLOCK SET Menus
The f\)tlowing menus are available when (D is selected. Sam__ as on previous page.
OTHERSMenus
The folk)wing lnenus are awdlable when [T_ is selected.
FORMAT
SOUND
MEDIA
D1SP
EXECUTE
CHIME
BEEP
OFF
OFF
ON
Used to fi)rmat a card. This will erase all of its contents
(see pa,_e 12 7).
Achiming sound is made when any operation is performed.
Beeps sound when any operation is performed.
All confirmation sounds are turned off and shutter sounds
during PHOTOSHOTS are also turned off.
The Media Display will not appear.
RE(]ORI)ING 7_) 7ZIPI,2or RI!'(]ORI)ING 7_) MEMORY CMRD
appears when recording a still image.
93
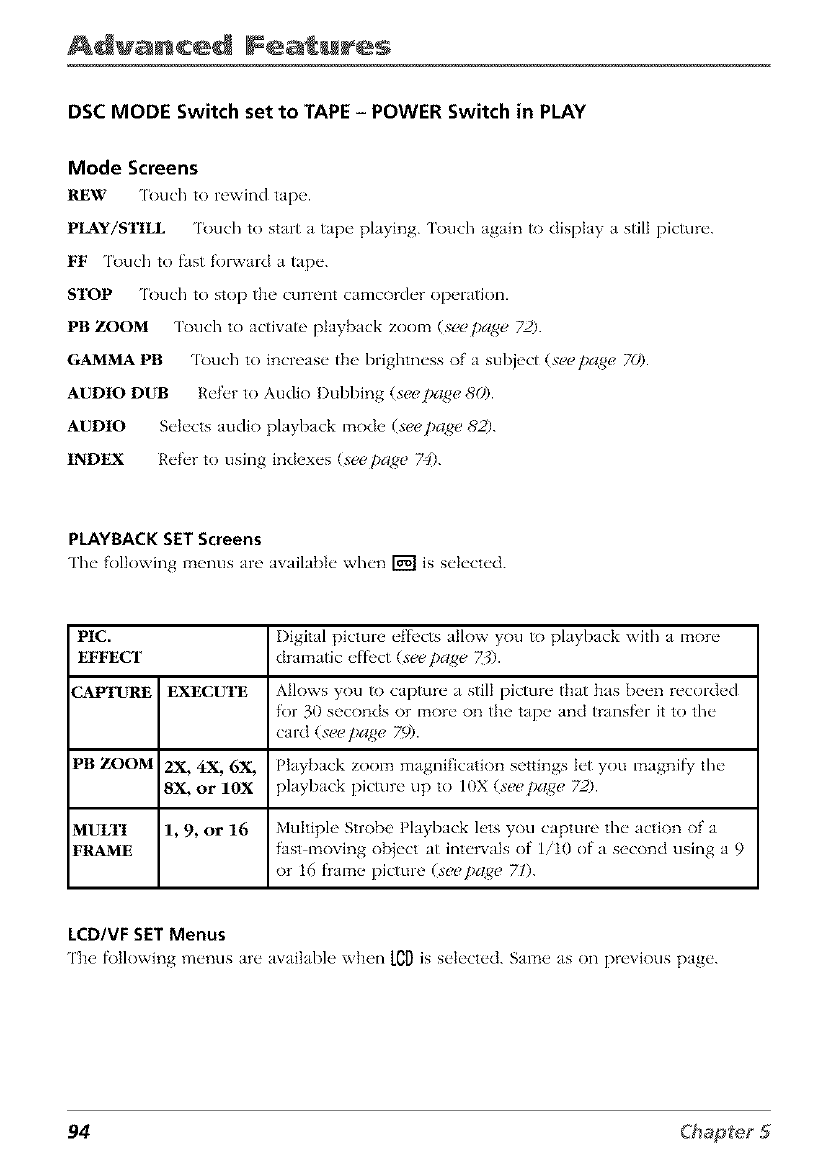
Advanced Features
DSC MODE Switch set to TAPE - POWER Switch in PLAY
Mode Screens
REW [_uch to rewind tap_ _.
PLAY/STILL 'l_)uch to start a tap(" playing. 'l_)uch again to display a still pictur('.
FF 'l_uch to fast f'ol_vard a tape.
STOP 'l_)uch to stop the current camcord_'r operation.
PB ZOOM 'lt_uch to activate playback zool_a (see page 72).
GAMMA PB 'lt_uch to increase the brightness of' a subject (see page 70).
AUDIO DUB Ref_'r to Audio Dubbing (see page 80).
AUDIO Selects audio playback mode (seepage 8'2).
INDEX Ref'_'r to using indexes (see pa,_e 74).
PLAYBACK SET Screens
The following menus are awdlabIe when _ is selected.
PIC. Digital picture effl'cts allow you to playback with a more
EFFECT dramatic effl'ct (seepa,qe Z$).
CAI_'URE EXECUTE Allows you to capture a still picture that has been recorded
for 30 seconds or mor_" on the tap_" and transfl'r it to the"
card (see page 79).
PB ZOOM 2X, 4X, 6X, Playback zoom magnification settings let you magnifiy' the
8X, or IOX playback picture up to 10X (seepa,_e 72).
MULTI 1, 9, or 16 Multiple Strobe' Playback lets you capture the action of' a
FRAME fast moving object at intervals of 1/10 of a second using a9
or 16 flame picture (seepa,_e 7l).
LCD/VF SET Menus
The f\>tlowing m_'nus ar_"available when [_D is s_'h'ct_'d. Sam__as on pr_'vious page'.
94

Advanced Fea u s
OTHERS Menus
The f\)tlowing menus are awfilable when ETCis selected.
REMOTE ON There is a buil_in remote sensor f_)r an optional remote control.
Set this fl, amre to ON to use an optional remote.
OFF Remote sensor is turned off.
SOUND CHIME Achiming sound is made when any operation is perf\)rmed.
BEEP Beeps sound when any operation is perf\)rmed.
OFF All confirmation sounds are turned off and shutter sounds
during PHOTOSHOTS are also turned off.
"rIME DISP. OFF Factory Preset: Time Code is not displayed on camcorder.
CODE
DISP. ON 'I'hTt_* Code is displayed on the camcordcr.
TC OUT DFF Time Code is not displayed on TV_
DN Time Code is displayed on the TV. Frame numbers are not
displayed during recording.
INDEX EXECUTE []se to find out if indexes f\)r the tape you want to playback arc
SRCH recorded on the card.
S-VIDEO OFF This is factoiT preset to OFE S VIDEO IN is turned off.
-IN ON Set to ON to use the camcorder's S VIDEO IN jack.
CLOCK SET Menus
The f\)t]owing menus arc available when (_) is sch'ctcd.
DISPLAY OFF The date/time does not appear.
DATE The date appears.
DXIE+'nME The date and time appear.
DSC MODE Switch Set to CARD - POWER Switch in PLAY
Mode Screens
MUL'n SCRN Touch to dispkty a thumbnail of the images (,v_ t_ag_,12,'_>).
PB ZOOM Touch to activate playback zoom.
PROTECr Touch to protect an image flom being deleted (,v_page 129).
DEL 'lk)uch to delete an image (see page 130).
95
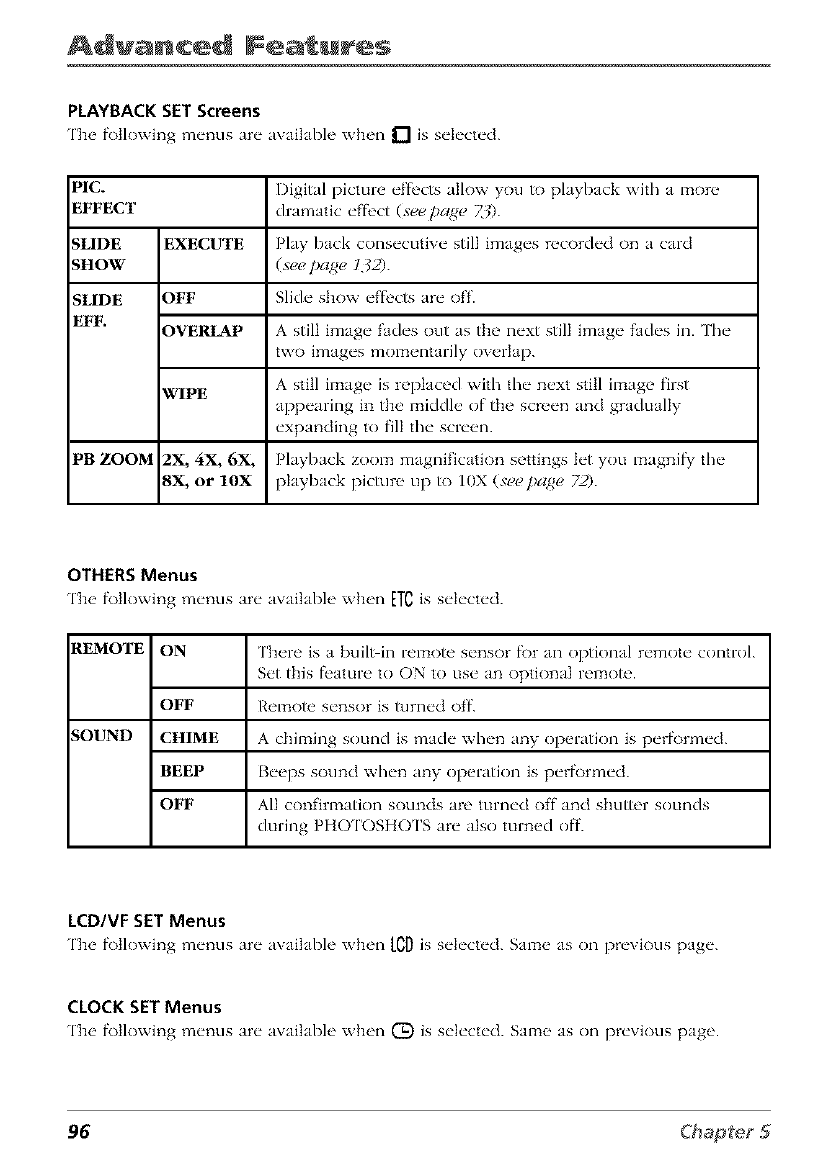
Advanced Features
PLAYBACK SET Screens
The f\)tlowing menus are awfilable when D is selected.
P1C. Digital picture eff_'cts allow you to playback with a more
EFFECT dramatic eff_'ct (s_/)a_ Z:/).
SLIDE EXECUTE Play back consecutive still images recorded on a card
SHOW (s_!_!page 132).
SLIDE OFF Slide show ef'f_'ctsare off.
EFF. OVERLAP A still image fades out as the next still image fades in. The
two images momentarily overlap.
WIPE A still image is replaced with the next still image first
appearing in the middle of the screen and gradually
expanding to fill the screen.
PB ZOOM 2X, 4X. 6X, Playback zoom magnification settings let you magnif}' the
8X, or 10X playback picture up to 10X (see page 72).
OTHERS Menus
The f\)tlowing menus are awlilable when E/¢is s.>ct.d.
REMOTE ON There is a bull>in remote sensor fk)r an optional remote control.
Set this f_'ature to ON to use an optional remote.
OFF Remote sensor is turned off.
SOUND CHIME A chiming sound is made when any operation is perf\)rmed.
BEEP Beeps sound when any operatkm is perf\_rmed.
OFF All confirmation sounds are turned off and shutter sounds
during PHOTOSHOTS are also turned off.
LCD/VF SET Menus
The f\)tlowing menus are awfilable when LCDis selected. Sam_, as on previous page.
CLOCK SET Menus
The f\)llowing menus are availabh' when (D is selected. Sam__as on previous page.
96
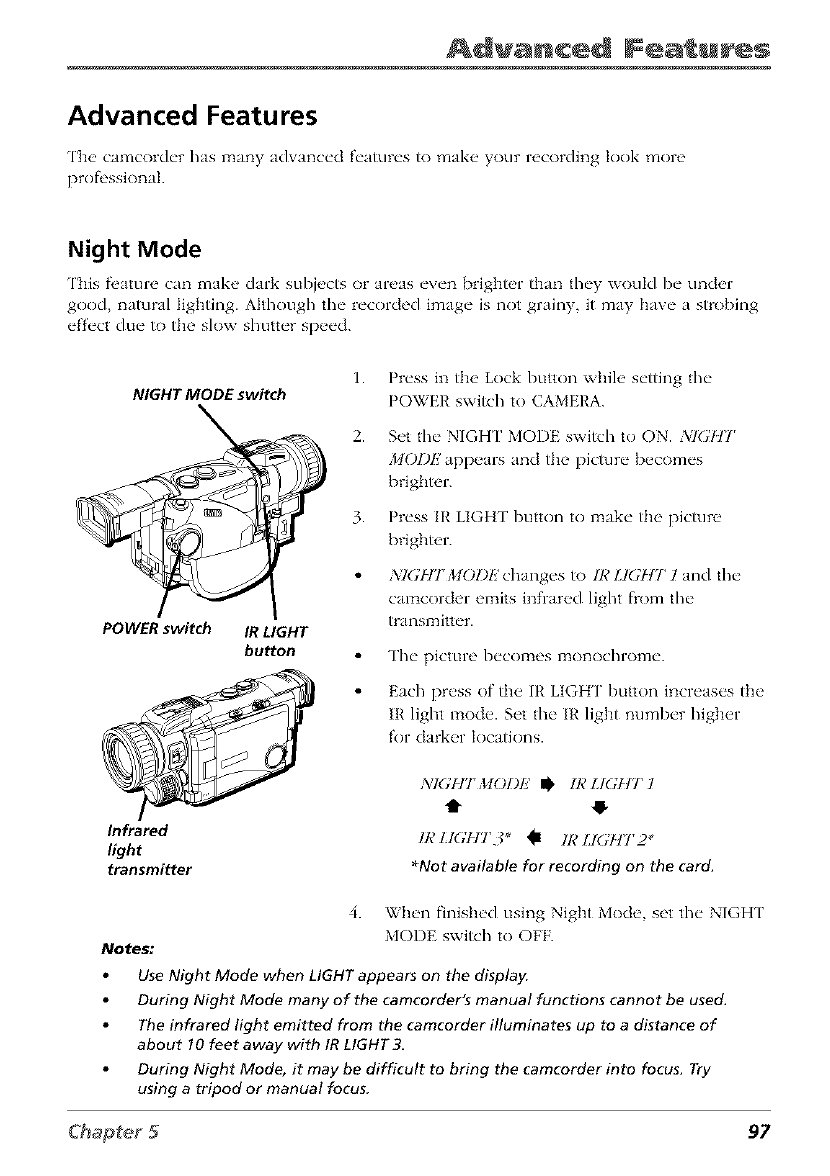
Advanced Fea u s
Advanced Features
The' camcorder has many advanced features to mak_ _your recording look more
prof_'ssiona].
Night Mode
This fi'ature can make dark subjects or areas even brighter than they would be under
good, natural lighting. Although the recorded image is not grainy, it may have a strobing
effect due/o the slow shutter speed.
NIGHT MODE switch
POWER switch IR LIGHT
button
1.
2.
3.
Press in the Lock button while setting the
POWER switch to CAMERA.
Set tim NIGH[' MODE switch to ON. ,_41(J'[tT
MOI)I,2 appears and the picture becomes
brighter.
Press IR LIGHT button to make the picture
brighter.
_;I(;[[']rMODE changes to IR LIGHT l and the
camcorder emits infrared light flom the
translTtitter.
The picture becomes monochrome.
Each press of the IR LIGHT button increases the
IR light mode. Set tim IR light number higher
for darker Iocatkms.
Infrared
light
transmitter
]VI(._F.IrMOI)I/ I_ IR LIGHT 1
t1" tP"
IR LI(;HT3" _1 IR LIGl_tTr2*
•Not available for recording on the card.
4. When finished using Night Mode, set the NIGHT
MODE switch to OFR
Notes:
Use Night Mode when LIGHT appears on the display.
During Night Mode many of the camcorder's manual functions cannot be used.
The infrared light emitted from the camcorder illuminates up to a distance of
about 10 feet away with IR LIGHT3.
During Night Mode, it may be difficult to bring the camcorder into focus. Try
using a tripod or manual focus,
97
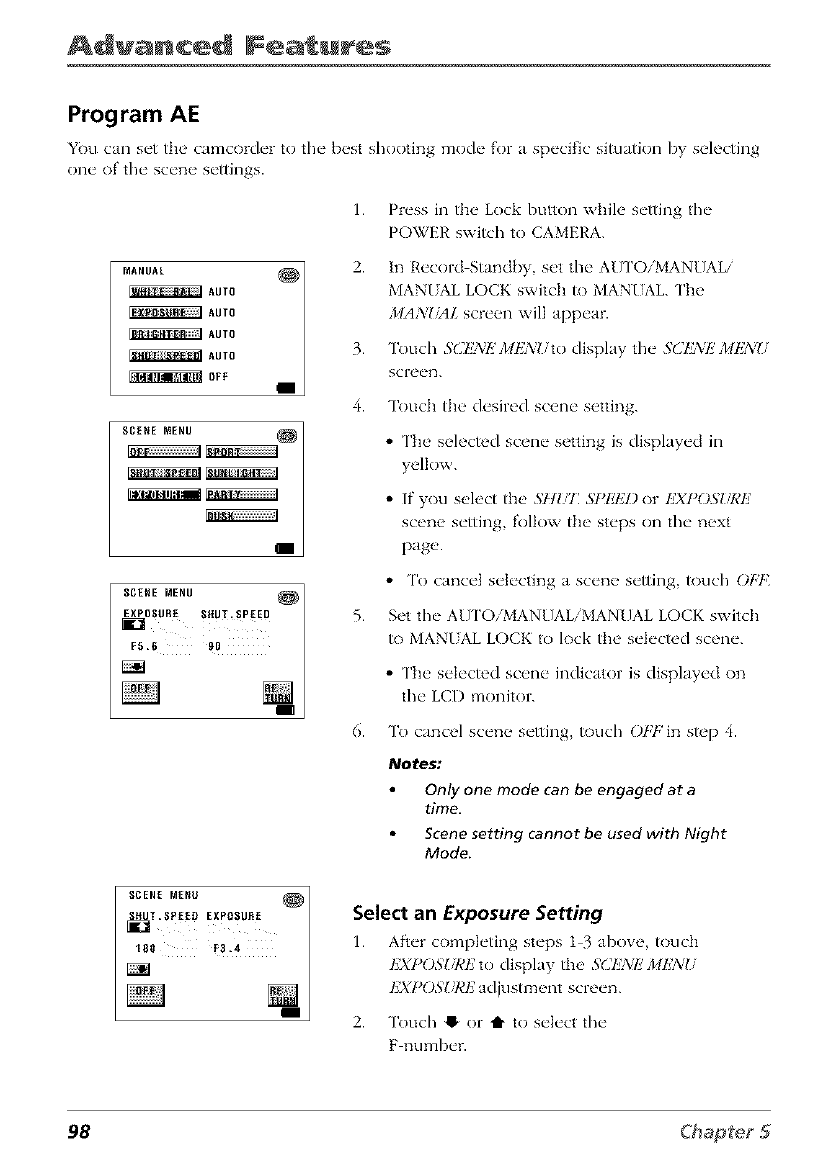
Advanced Features
Program AE
You can set th(' camcorder to the b(_st shooting mode for a specific situation by selecting
one of the scen(, settings.
1.
MANUAL _ 2.
_AUTO
_AUTO
_AUTO
_AUT0 3.
_0FF
4.
i
"°,00,,, E0÷1 5.
6.
Press in the Lock button while setting the
POWER swish to CAMERA.
In Record Standby, set the AU ['O/MANUAL/
MANUAL LOCK switch to MANUAL. ['he
J/IANIM1. screen will appear.
Touch S(2I!)_/I!'2/ItZNI/to display the S(]IL'_:E2/ItZNU
screen.
Touch the desired scene setting.
• The selected scene setting is displayed in
yellow.
•If you select the 5Hill' SPI!TZI) or lYl)OS_JeE
scene setting, follow the steps on the next
page.
• To cancel selecting a scene setting, touch O[gt(
Set the AU ['O/MANUAL/MANUAL LOCK switch
to MAN/AL LOCK to lock the selected scene.
• Tile selected scene indicator is displayed on
the LCD monitor.
To cancel scene setting, touch Ot,7,'in step 4.
Notes:
Only one mode can be engaged at a
time,
Scene setting cannot be used with Night
Mode.
';2°$2 ÷1,
/Select an Exposure Setting
1. After comph'ting steps 1 3 above touch
IZXPOSURtZto display th(' SCI;7_k'2/IEXg/
I']XPOSURI']adjustm(qlt SCl'(_(_n.
2. Touch !) or t1" to select the
F number.
98
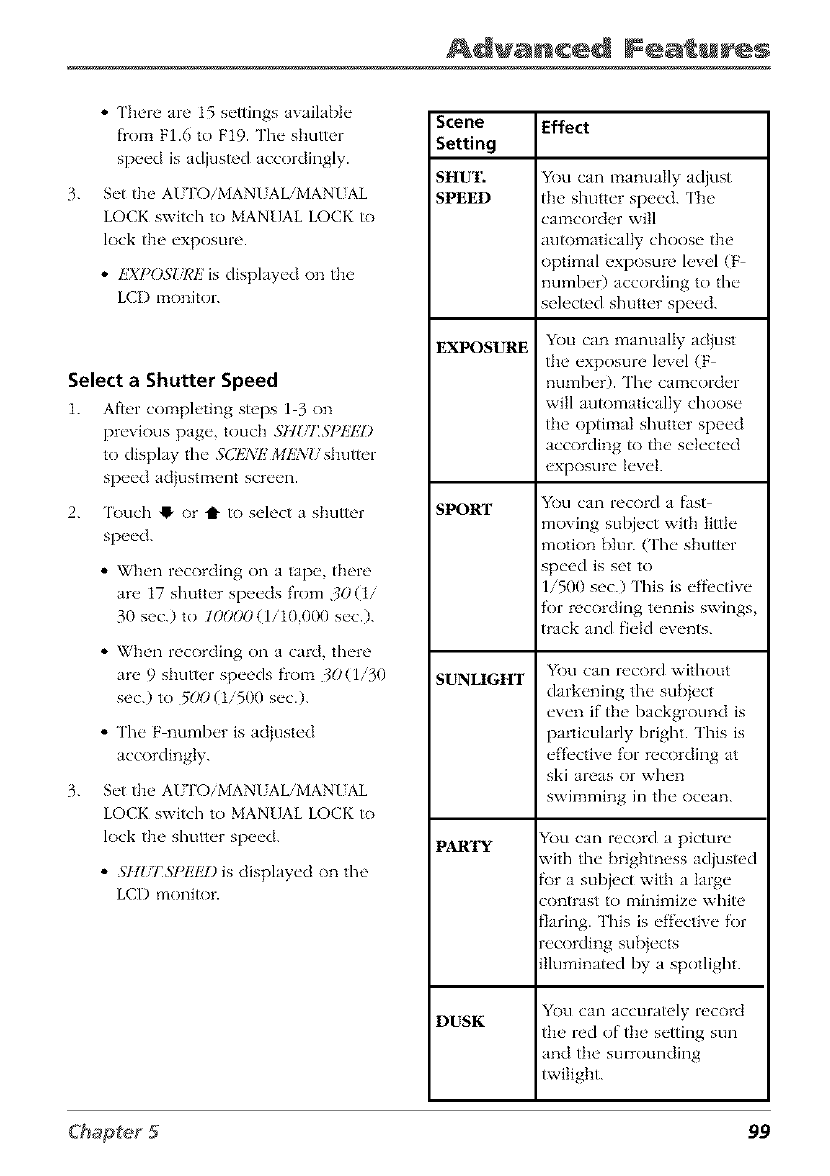
Advanced Feagu s
3.
• There are 15 settings availaMe
ffoca FI.6 to F19. Tim shutter
speed is adjusted accordingly.
Set the AUTOiMANUALiMANUAL
LOCK switch to MANUAL LOCK to
lock the exposure.
•EXPOS_J¢E is displayed on the
LCI) monitor.
Select a Shutter Speed
1. Afl_,r completing steps 1 3 on
previous page, touch SH_/I'_?IffgZI)
to display tim SCTZNI'2MliA'I/shutter
speed acljustment screen.
2. 'lbuch !_ or t to select a shutter
speed.
• When recording on a tape, there
are 17 slmtter speeds from 30 (1/
30 sec.) to 100(X)(1/10,000 see.).
• When recording on a card, there
are 9 shutter speeds fiom 30 (1/30
sec.) to 5iX) (1/500 sec.).
• Tim F number is adjusted
accordingly.
3. Set the AUTOiMANUALiMANUAL
LOCK switch to MANUAL LOCK to
lock the shutter speed.
•Sltl/I'SI)lilg) is displayed on the
LCD monitor.
Scene Effect
Setting
SHUT. You can mmmally adjust
SPEED tlm shutter speed. The
camcorder will
auR)matically choose the
optimal exposure level (F
numbeO according to the
selected shutter speed.
EXPOSURE
SPORT
SUNLIGHT
PARTY
DUSK
You can manually adjust
tlm exposure level (F
number). The camcorder
will automatically choose
the optimal slmtter speed
according to the selected
exposure level.
You can record a fast
moving subject with little
motion blur. CFhe shutter
speed is set to
1/500 see.) This is effi'ctive
for recording tennis swings,
track and field events.
You can record without
darkening tim subject
even if the background is
particularly bright. Tiffs is
effective for recording at
ski areas or when
swimming in the ocean.
gou can record a picture
aith the brightness adjusted
br a subject with a large
:ontrast to minimize white
"laring. This is ef*bctive for
ecording subjects
lluminated by a spotlight.
You can accurately record
the red of the setting sun
and the surrounding
twilight.
99
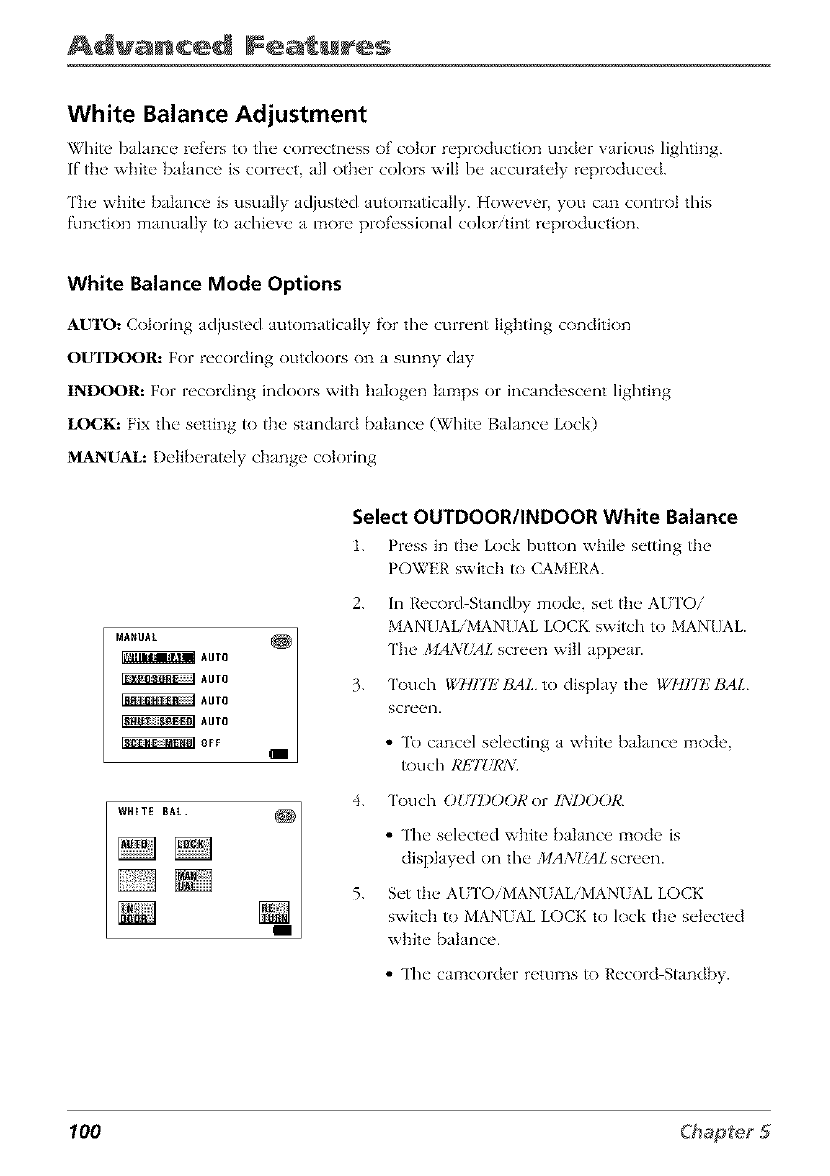
Advanced Features
White Balance Adjustment
White balance refers to the correctness of color reproductk)n under various lighting.
ff the' white bakmce is correct a]] oilier co]ors wi]] be accurately reproduced.
q'h_" white balance is usua]]y adjusted automafica]]y. How_,ver you can control this
function manually to achieve a more professional color/tint reproduction.
White Balance Mode Options
AUTO: Cok)ring adjusted automatically f_)r the current lighting condition
OUTDOOR: For recorciing outdoors on a sunny day
INDOOR: For recording indoors with halogen lamps or incandescent lighting
LOCK: Fix the setting to the standard balance (White Balance Lock)
_NUAL: Deliberately change coloring
MAUAL
AUTO
AUTO
AUTO
AUTO
OFF
WHZTE BAt.
Select OUTDOORIINDOOR White Balance
1. Press in the" Lock button whih' setting the
POWER switch to CAMERA.
2.
3.
In Record Standby mode, set the AUI'Oi
MANUAL/MANUAL LOCK switch to MAN[]AL.
The MANliAL screen will appear.
'lk)uch Ig@ll7F BAL to display the WIII7I'_' BAL
screen.
• To cancel selecting a white balance mode,
_)uch RI£TUR_Yl
4. 'l_)uch OUIDOOR or INDOOR.
• The selected w]fite balance lzaode is
displayed on the MANgsAL screen.
5. Set the AITI'OiMANIAL/MANIAL LOCK
switch to MAN/AL LOCK to lock the selected
white balance.
• The calz_corder returns to Record Stand,by.
100
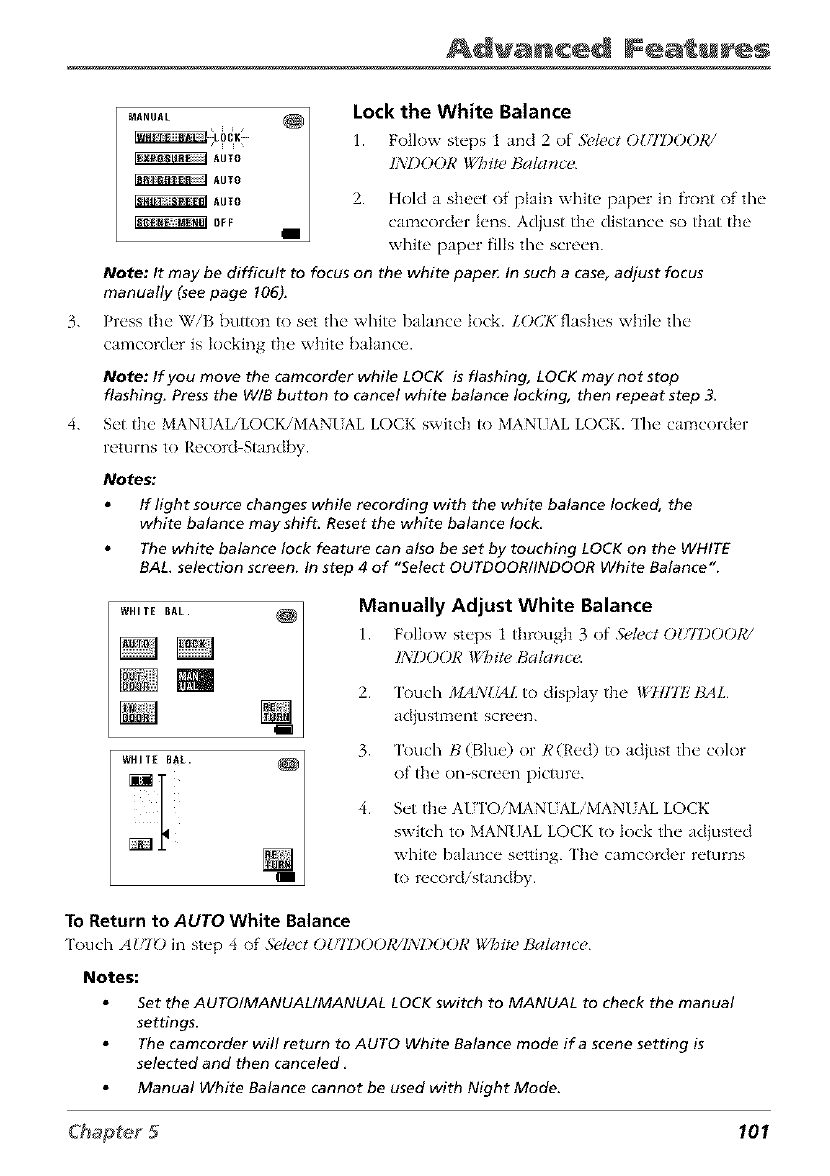
Advanced Fea u s
3.
LOCK _
AUTO
AUTO
AUTO
OFF
Lock the White Balance
1. Follov,: steps : and 2 of ,Sde_t OUIDOOR!
INDOOR White Balance.
2. Hold a sheet of plain white paper in fiont of the
camcorder lens. Adjust the distance so that the
white paper fills the screen.
Note: It may be difficult to focus on the white paper In such a case, adjust focus
manually (see page !06).
Press the WiB button to set the white balance lock. LO(J_ flashes while the
camcorder is locking the white balance.
Note: If you move the camcorder while LOCK is flashing, LOCK may not stop
flashing. Press the W/B button to cancel white balance locking, then repeat step 3.
4. Set the MANUAL/LOCK/MANUAL LOCK switch to MANUAL LOCK. The camcorder
returns to Record Stand[:y.
Notes."
If light source changes while recording with the white balance locked, the
white balance may shift. Reset the white balance lock.
The white balance lock feature can also be set by touching LOCK on the WHITE
BAL selection screen. In step 4 of "Select OUTDOOR/INDOOR White Balance ".
WHITE BAL.
WHITE BAL. N.
Manually Adjust White Balance
L Follow steps 1 flmx@: 3 of .Sde_tOULOO01¢/
INDOOR White<Bala_ce.
2.
3.
4.
'lk)uch MAN!,I4Lto display the *g@H7FBAL
adjustment screen.
'lkx]ch B(Blue) or R(Red) to adiust the color
of the on-scre(q] picture.
Set the AIZI'OiMANUALiMANUAL LOCK
switch to MANUAL LOCK to lock the ad}usted
white balance setting. The camcorder returns
to recordistand[:y.
To Return to AUTO White Balance
'lkx]ch AUI_) in step 4 of .Sdect OUIDOOIC/IA:I)OORWhite Balance,
Notes:
Set the AUTOIMANUALIMANUAL LOCK switch to MANUAL to check the manual
settings.
The camcorder will return to AUTO White Balance mode if a scene setting is
selected and then canceled.
Manual White Balance cannot be used with Night Mode.
101
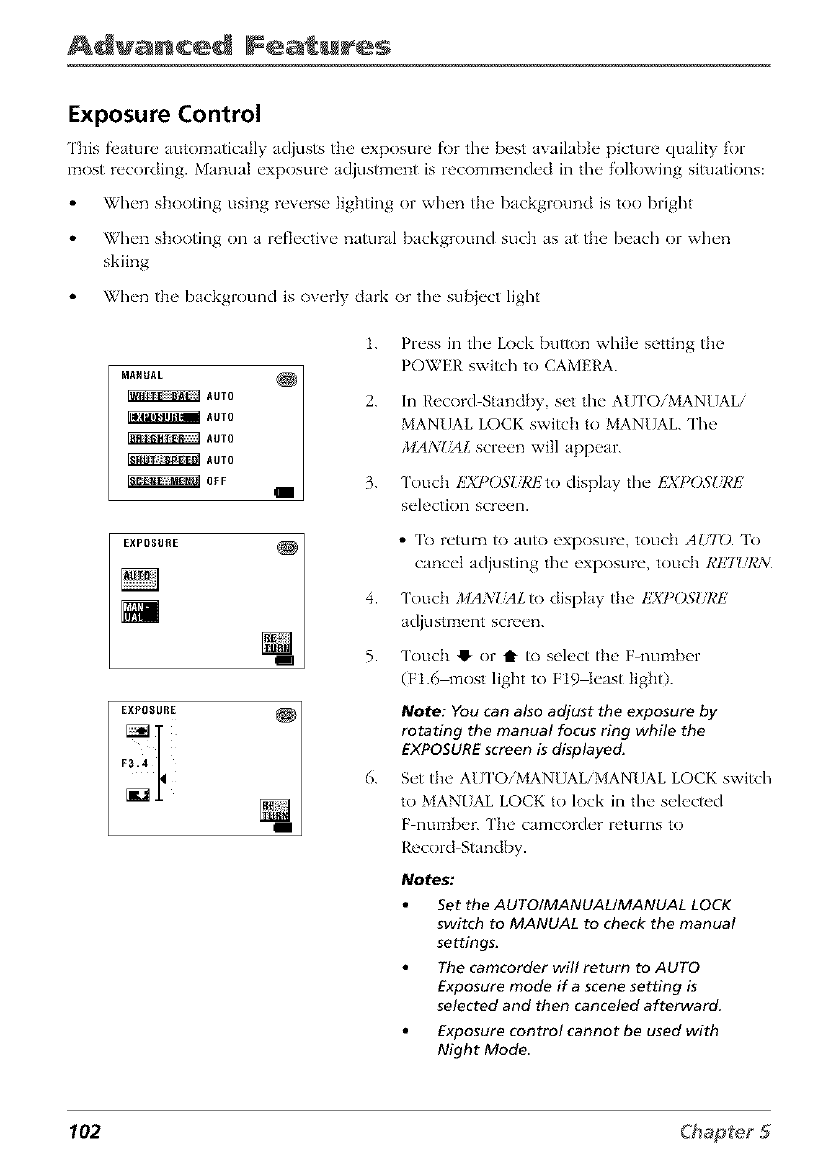
Advanced Features
Exposure Control
This fl'amre automatically adjusts the exposure fi)r the b_'st availabk" picture quality for
most recording. Mam]al exposure adjustment is recommended in the f()llowing situations:
When shooting using reverse lighting or when the background is too bright
When shooting on a reflective natural background such as at the beach or when
skiing
When the background is overly dark or the sub}ect light
1.
MARUAL
_AUTO 2.
_AUTO
_AUTO
_AUTO
_O_F 3.
EXPOSURE _ _ 4.5.
Fa.4EXPOSURE_I
6.
Press in tile Lock button while setting the
POWER swish to CAMERA.
In Record Standby, set the AU ['O/MANUAL/
MANUAL LOCK switch to MAN[JAL. The
MANUAL screen will appear.
Touch I!7£I)O,SURI']to display tile I']XI_OSURE
selection screen.
• 'lk) return to auto exposure, touch AU70. To
cancel adjusting tile exposure, touch RET_/RN
Touch MANUAL to display the EXI)OSI/I,'E
adjustment screen.
Touch 0 or t to select the F_number
(F1.6 most light to F19qeast lighO.
Note: YOu can also adjust the exposure by
rotating the manual focus ring while the
EXPOSURE screen is displayed.
Set the, A[] ['O/MANUAL/MANUAL LOCK switch
to MANUAL LOCK to lock in tile selected
F number. ['he camcorder returns to
Record Standby.
Notes:
Set the AUTOIMANUAL/MANUAL LOCK
switch to MANUAL to check the manual
settings.
The camcorder will return to AUTO
Exposure mode if a scene setting is
selected and then canceled afterward,
Exposure control cannot be used with
Night Mode
102
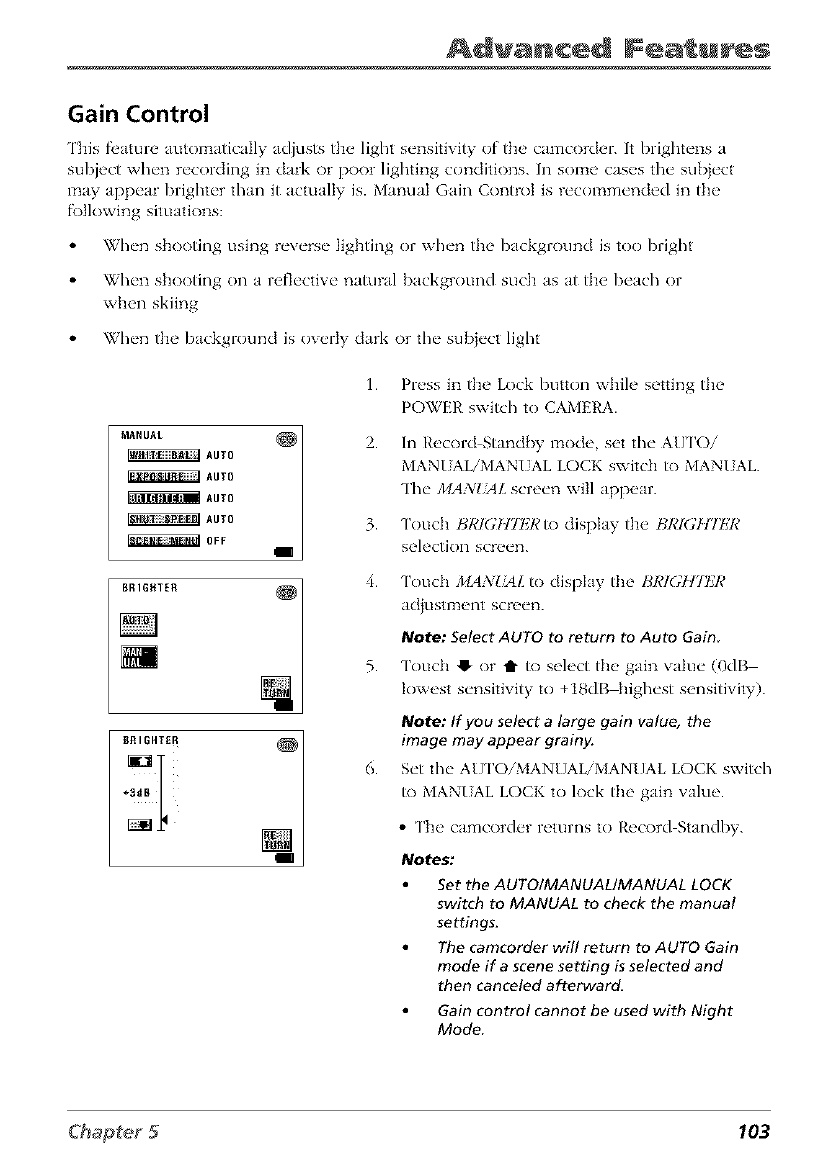
Advanced Fea u s
Gain Control
This fl, amre automatically adjusts tht, light sensitivity of tbt' camcorder. It briglm'ns a
subject when recording in dark or poor lighting conditions. In some cases the subject
may appear brighter than it actually is. Manual Gain Control is recommended in the
following situations:
When shooting using reverse lighting or when the background is too bright
When shooting on a reflective natural background such as at the beach or
when skiing
When the background is overly dark or the sub}ect light
1.
2.
3.
4.
Press in the Lock button while setting the
POWER switch to CAMERA.
In Record Stand[>y mode, set tim A[J['Oi
MANIdALiMANUAL LOCK switch to MANUAL.
Tim MANUAL screen will appear.
Touch BKK;H72,gRto display the t_I,'IGH7IZR
selection screen.
Touch 2/IAN!,24L to display the BRI(;HgtZR
adjustment screen.
Note: Select AUrO to return to Auto Gain
5. Touch 41, or tt to select the' gain willie (0dB
lowest sensitivity to +18dgq_ighest sensitivity).
Note: If you select alarge gain value, the
image may appear grainy.
6. Set the AU ['O/MANUAL/MANUAL LOCK switch
to MANI AL LOCK to lock the gain value.
•The camcorder returns to Record Standby.
Notes:
Set the AUTOIMANUAL/MANUAL LOCK
switch to MANUAL to check the manual
settings.
The camcorder will return to AUTO Gain
mode if a scene setting is selected and
then canceled afterward.
Gain control cannot be used with Night
Mode
103
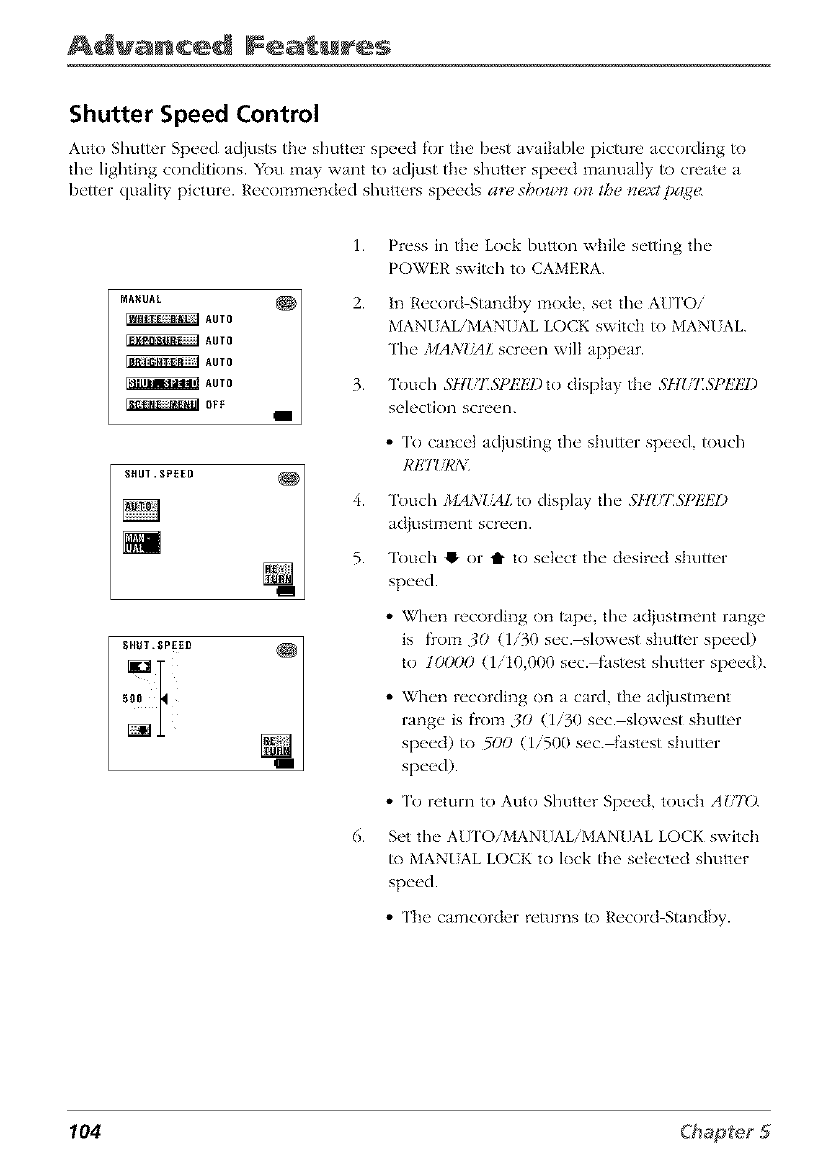
Advanced Features
Shutter Speed Control
Auto Shutter Speed adjusts tile shutter speed for tile best available pictm-e according to
tim lighting conditions. You may want to adjust the shutter speed manually to create a
better quality picture. Recommended shutters speeds a,z! shown on the t_xtpa_<
1.
MANUAL _ 2"
_AUTO
_AUTO
_AUTO
_AUTO 3.
_OFF
6.
Press in the Lock button while setting the
POWER swish to CAMERA.
In Record Stand{_y mode, set tim A[]['Oi
MANI ALiMANI AL LOCK switch to MANI AL.
The MANIsAL screen will appear.
Touch 5HUI:SPI!I_J)to display the 5HIH:SI_IZIff)
selection screen.
• To cancel adjusting the shutter speed, touch
RE7 _/R:_iI
Touch ,I/IAN{ML to display the SltZ/I]SI_IffZI)
adiustment screen.
Touch t! or t1" to select the desired shutter
speed.
• When recording on tape, the acijustment range
is flom 30 (1/30 sec. slowest shutter speed)
to lrXX)O (1/10,000 sec. fastest shutter speed).
• When recording on a card, the adjustment
range is flom 30 (1/30 sec. slowest shutter
speed) to 5t;O (1/500 sec. fastest shutter
speed).
• To return to Auto Shutter Speed, touch AUTO.
Set the All ['O/MANUAL/MANUAL LOCK switch
to MANUAL LOCK to lock the selected shutter
speed.
• The camcorder returns to Record Standby.
104
Advanced Fea u s
Notes;
Fast shutter speeds can be used with the still recording functions to record
higher quality still images of fast-moving objects.
If the on-screen picture flickers when recording under fluorescent lighting, you
may be able to compensate by setting the shutter speed to I/!00 second.
Recording with shutter speeds faster than !/60 sec may darken the picture
Make sure to record in brightly lit areas if using higher shutter speeds
Using higher shutter speeds under fluorescent lighting will cause flickering in
the picture and possibly color shifts.
Set the AUTO/MANUAL/MANUAL LOCK switch to MANUAL to check the
manual settings,
The camcorder will return to AUTO Shutter Speed mode if a scene setting is
selected and then canceled afterward
Manual Shutter Speed cannot be used with Night Mode
Recommended Shutter Speeds
1/30 Second
Use to record in a poorly
illuminated location.
[]se when you want R) create
artistic trailing images of fast
moving subjects.
1/100 Second
[)se when you want to reduce
the light by half.
Use as a substitute for an NI)2
filter.
11250-111,000 Second
Use to record outdoor spor_
on a partially cloudy day.
I. se to record an outside scene
through a car window (when
you want to minimize blur
caused by the camera shaking).
111,000-1110,000 Second
I. se to record sports action in
bright daylight.
Use to record in bright daylight
at some locations, such as a ski
resort.
105
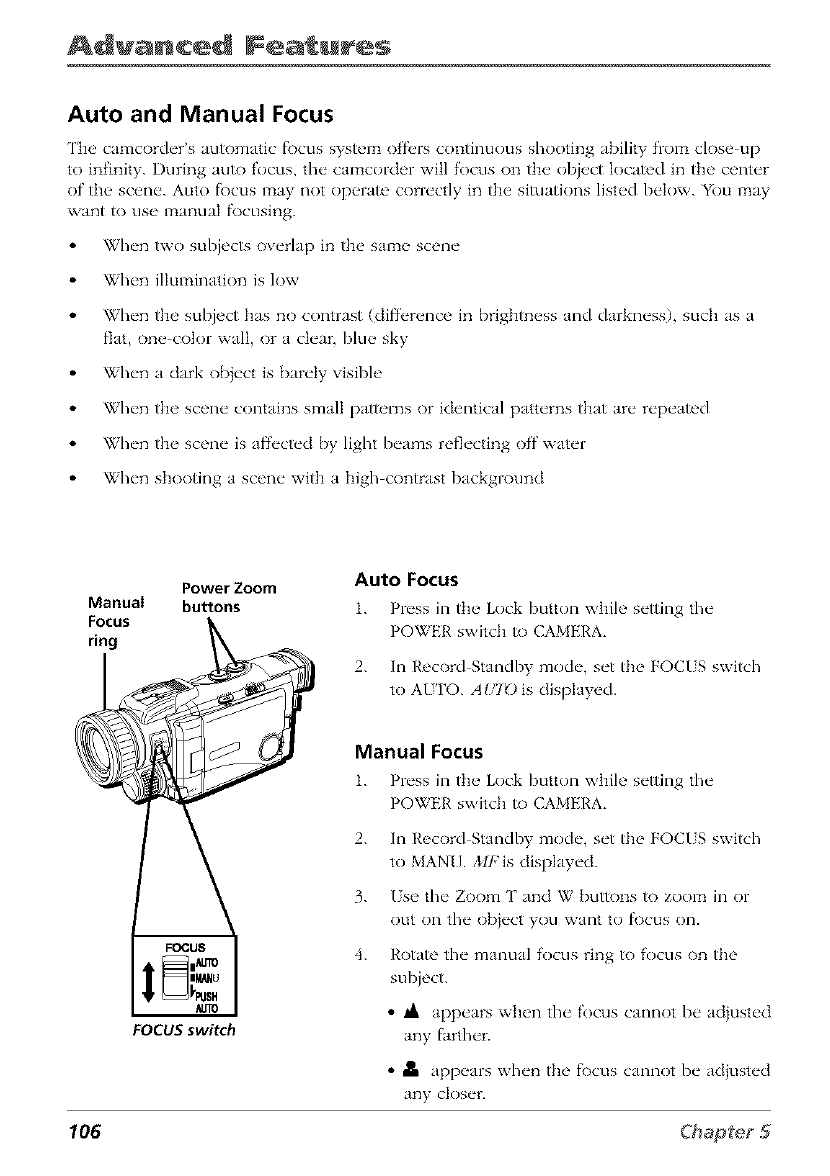
Advanced Features
Auto and Manual Focus
'l'h_' camcorder's automatic fi)cus syst_'m offi'rs continuous shooting ability from close up
to infinity. During auto focus, the camcorder will focus on the" obj_'ct Iocated in the center
of tb__ scene. Auto fi)cus may not op_q'ate correctly in fl_e situations ]ist_d below. You may
want to use manual f\)cusing.
When two subjects overlap in the saln_ _ scene
When i]]umhlation is ]ow
When the subject has no contrast (differs, rice in brigbtn_'ss and darkness), such as a
fiat on_ _ color wa]] or a clear, b]u_ _ sky
When a dark obiect is barely visible
When fl_e scene contains small patterns or identical patterns fl_at are repeated
When the" scene is affected by light beams reflecting off water
When shooting a scene with a high contrast background
Power Zoom Auto Focus
Manuai buttons L Press in d_ _ Lock button while setting the
FOCUS POWER switch to CAMERA.
ring
106
2. In Record Standby mode, set the FOCUS switch
to AIYI'O. A I#ID is displayed.
Manual Focus
1. Press in the, Lock button wbih' setting the
POWRR switch to CAMERA.
2.
3.
4.
In Record Standby mode, set the FOCUS switch
to MANU. Ml"is displayed.
Use the Zoom [' and W buttons to zoom in or
out on the ob}ect you want to fi)cus on.
Rotate the manual focus ring to focus on the
subject.
• IA appears when the focus cannot be adiusted
any farther.
• It appears when the f\)cus cannot be adiusted
any closer.
Advanced Fea u s
Use Auto Focus Temporarily
While the" camcorder is in manual focus you can use
the, auto f\)cus fi,ature t_'mporarily. This h_'lps cry'ate,
a smooth imag_" wh_'n you move" from one"subi_'ct to
another using manual fi)cus.
1. Push and hold the FOCUS switch in PUSH
A[/['O AIZID appears in the display.
2. Release the switch to return to manual f\)cus.
FOCUS switch in MANU.
Cancel Manual Focus
1. Place the" FOCUS switch in AUTO AI_TO
appears in the display.
Notes:
If the lens is smeared or blurred, accurate
focusing isn't possible. Keep the lens
clean, wiping it with a piece of soft cloth
if it gets dirty. If condensation occurs,
wipe the lens with a soft cloth or wait for
it to dry naturally.
When shooting a subject closer than 5 ft.
to the lens, zoom out first. When
zooming in the auto-focus mode, the
camcorder may automatically zoom out
depending on the distance between the
camcorder and the subject.
107
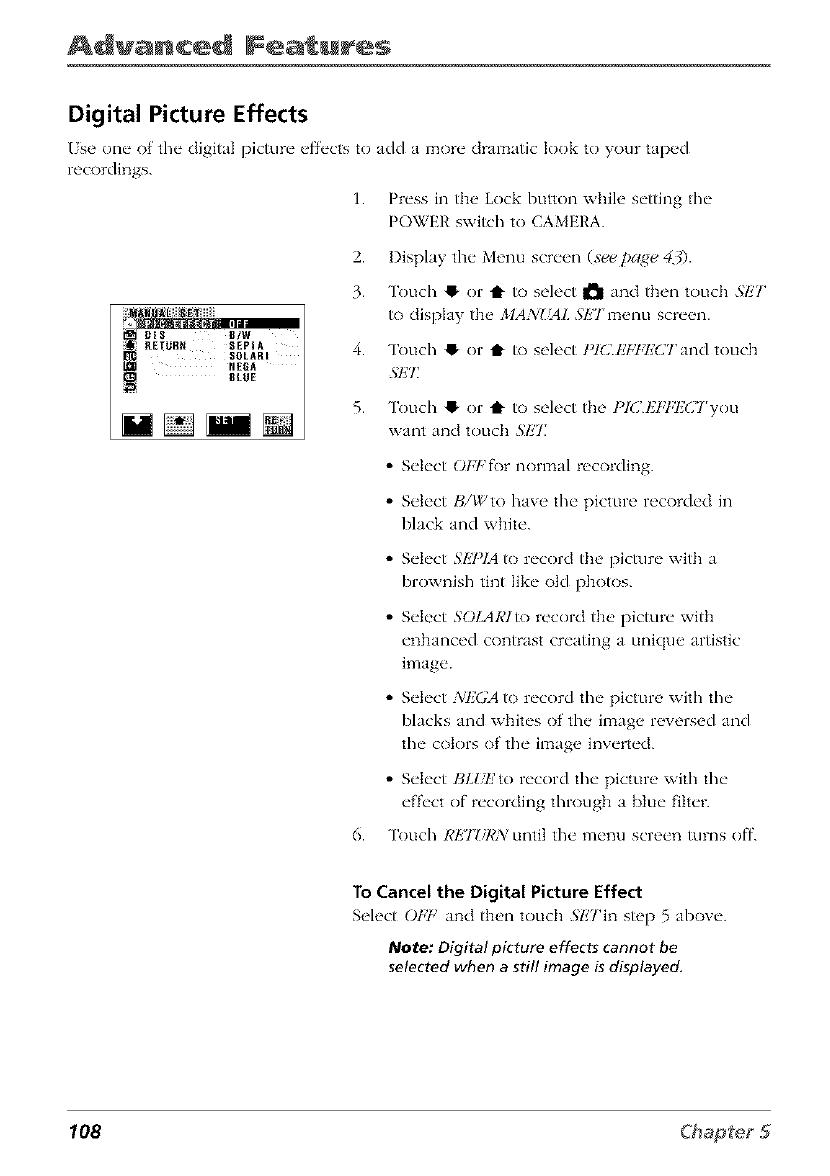
Advanced Features
Digital Picture Effects
[se one of the digital picture effects to add a more dramatic look to your tapped
recordings.
1. Press in tl]__ Lock button whih' setting the
POWER switch to CAMEh'A.
i_¸_li_i_i_i]iil__iiiiiiiiil
DIS B/@
8tOE
2. Display the Menu screen (see pa_e 43).
3. Touch ,I or t to select d'_ and then touch SliT
to display the MANlgtL S/iTmenu screen.
4. Touch 41"or t to select t'ICIiFFI,X]Tand touch
.gET:
5. Touch 41"or t to select the t'lCl_7,7:l,]CTyou
want and touc]] SET
•Select ()Ft:f_)r normal recording.
•Select B/Wto have the picture recorded in
black and white.
6.
•Select bkY_/A to record tlm picture with a
brownish tintlikeold p]]o_)s.
• Select SOLARIto record tlm picture with
enhanced contrast creating a unique artistic
image.
•Select :'¢EGA to record the picture with the
blacks and whites of the image reversed and
the colors of the image inverted.
•Select BL_,li to record the picture with the
effect of recording through a blue filter.
"lbuch REJZiRN until the menu screen turns off.
To Cancel the Digital Picture Effect
Select OFF and th_'n touc]] SET'in step 5 above.
Note: Digital picture effects cannot be
selected when a still image is displayed.
108
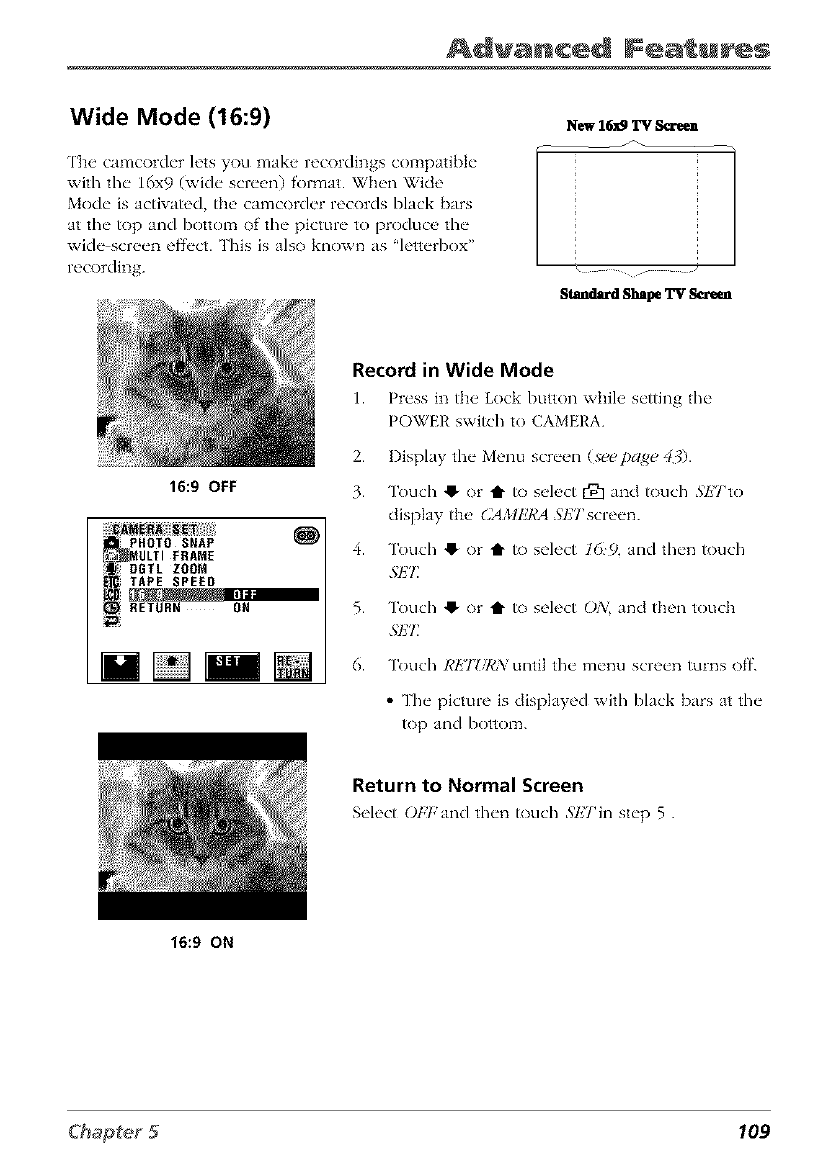
Advanced Fea u s
Wide Mode (16:9)
Tl]e camcorder lets you make recordings compatible
with the 16x9 (wide screen) format. When Wide
Mode is activated, the camcorder records black bars
at the top and bottom of the picture to produce the
wide screen eff_'ct. This is also known as 'letterbox"
recording.
New 16._ TV Sc_en I
Standard Shape TV Scr_n
Record in Wide Mode
1. Pr_'ss in tl]__Lock button wbih' s_'tting the"
POWER switch to CAMERA.
2.
16:9 OFF 3.
!PHOTO SNAP _4.
MOLTIFRAME
DGTL ZOOM
_TAPE SPEED
RETURN OH 5.
Display the Menu screen (st¢t¢/)age 40.
Touch 4_ or t to select r91 and touch SETto
dispk Wthe (2AMkJCA .ql£Tscreen.
Touch 41, or tin- to select 165), and then touch
5"1£7_
7k)uch 4_ or t to select O,_, and tl]en touch
$1£7_
Touch RETZ/RA: until the menu screen turns off.
•The picture is dispkwed with black bars at the
top and bottom.
Return to Normal Screen
Select Ot,'t"and th_'n touch 37£Tin st_'p 5 .
16:9 ON
109
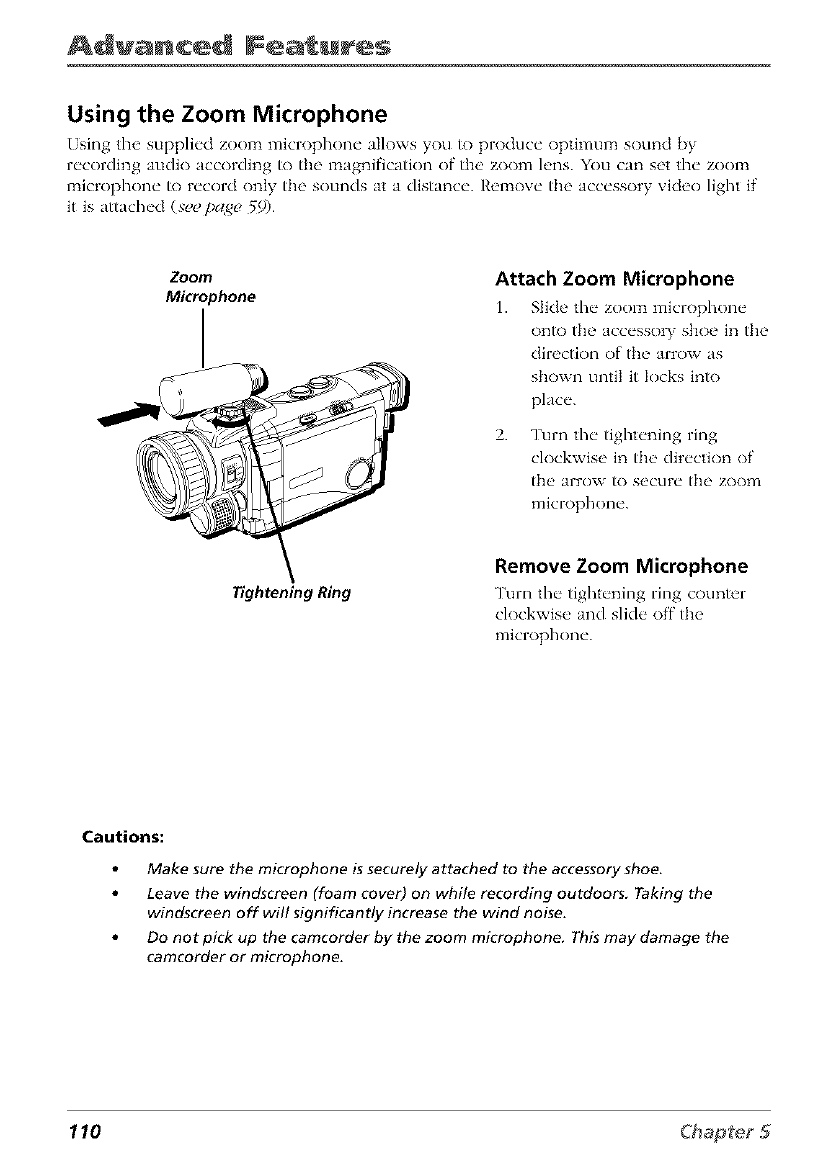
Advanced Features
Using the Zoom Microphone
[sing the suppli_'d zoom microphone" a]lows you to produc_" optimum sound by
r_'cording audio according to the magnification of the' zoom h, ns. You can set the" zoom
microphone" to r_'cord only the sounds at a distance'. I,'emov_" the ac'c_'sso W video light if
it is attached (,ve_/;_ag_, _9).
Zoom
Microphone
Tightening Ring
Attach Zoom Microphone
1. Slide the" zoom microphone"
one) the accesso_ shop in the
direction of the arrow as
shown until it JoJ_s in_)
place'.
2. Turn the tightening ring
clockwise in the direction of
the arrow to secure the zoonl
microphone.
Remove Zoom Microphone
Turn the" tight_'ning ring counter
dockwis_, and s]kh" off the
microphone'.
Cautions:
Make sure the microphone is securely attached to the accessory shoe.
Leave the windscreen (foam cover) on while recording outdoors. Taking the
windscreen off will significantly increase the wind noise.
Do not pick up the camcorder by the zoom microphone. This may damage the
camcorder or microphone.
110
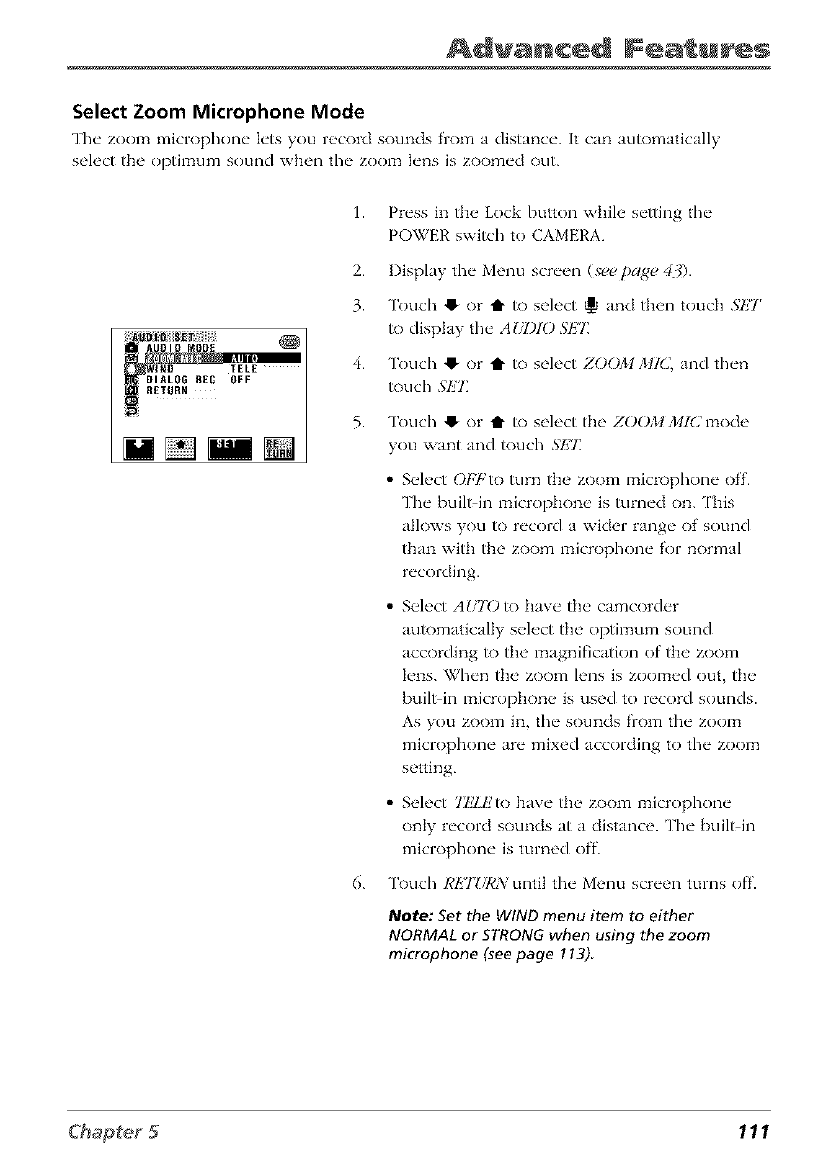
Advanced Fea u s
Select Zoom Microphone Mode
The zoom microphone lets you r_'cord sounds from a distance. It can automatically
seh, ct the optimum sound when the" zoom I_'ns is zoom_'d out.
IELE
!DIALOG REC OFF
1.
2.
3.
4.
5.
Press in the Lock button wifile setting the
POWER switch to CAMERA.
Display the Menu screen (seepage 43).
Touch @ or t to select _ and then touch SET
to display the AUDIO SET
Touch ,_ or t to select ZOOM MIC, and then
touch .fEZ
Touch ,_ or t to select the ZOOM MIC mode
you want and _)uch SI{/_
• Select OFFto turn the zoom microphone off.
The built in microphone is turned on. ['his
allows you to record a wider range of sound
than with the zoom microphone for normal
recording.
• Select AUTO to have the camcorder
automatically select the optimum sound
according to the magnification of the zoom
lens. When the zoom lens is zoomed out, the
built in microphone is used to record sounds.
As you zoom in, the sounds from the zoom
microphone are mixed according to the zoom
setting.
• Select 77:ZEro have the zoom microphone
only record sounds at a distance. The buil_in
microphone is turned off.
6. Touch RETZ/RN until the Menu screen turns off.
Note: Set the WIND menu item to either
NORMAL or STRONG when using the zoom
microphone (see page ! 13)
111
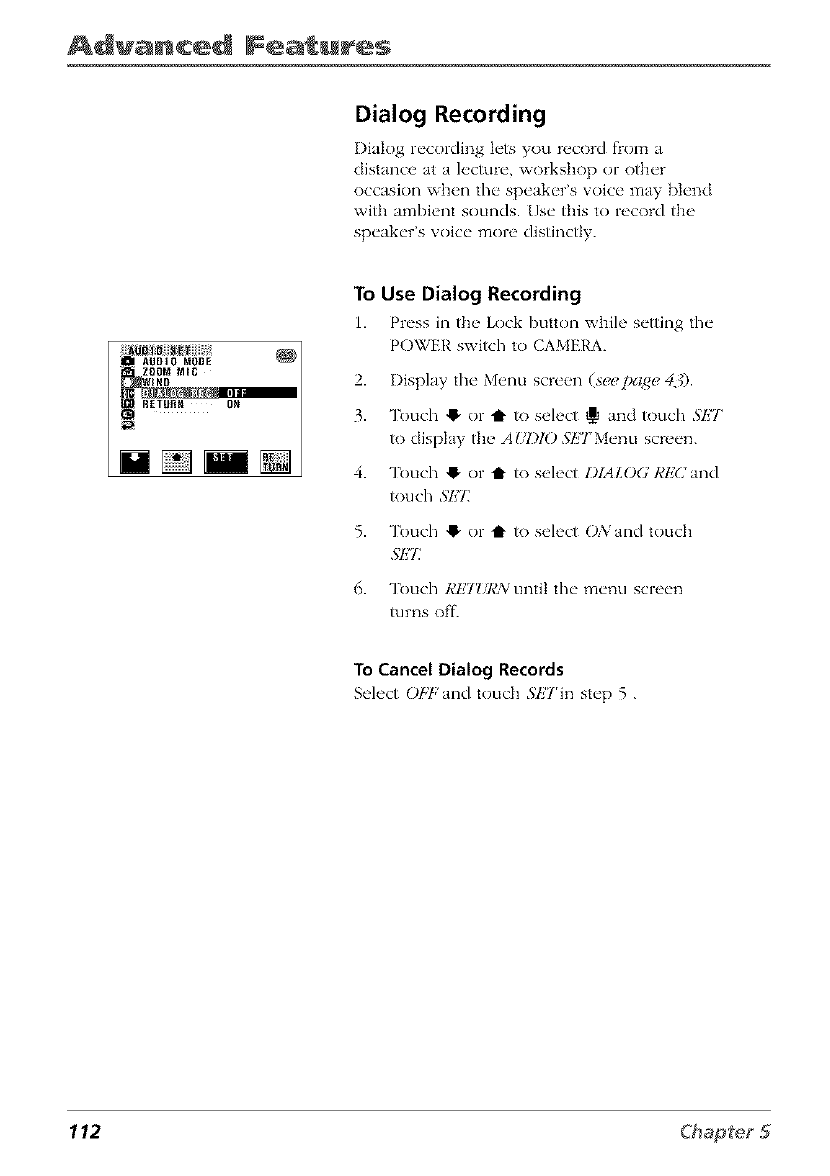
Advanced Features
Dialog Recording
I)ialog recording lets you record flom a
distance at a lecture, workshop or other
occasion when the speaker's voice may blend
with ambient sounds. Use this to record the
speaker's w)ice more distinctly.
To
1.
2.
3.
4.
5.
6.
Use Dialog Recording
Press in th__ Lock button while setting the
POWER switch to CAMERA.
I)isplay the Menu scre_,n (s_pa_, 43).
Touch "I or t to select _ and touch SPIT
to display the AIiI)IO S/iTMenu screen.
Touch ,I or tto select I)IALOG RF_Cand
touch SET
Touch ,I or t to select ()A/and touch
SET:
Touch REIZ/RN until file menu screen
turns off.
To Cancel Dialog Records
Select Ot,'F and touch M/Tin step 5 .
112
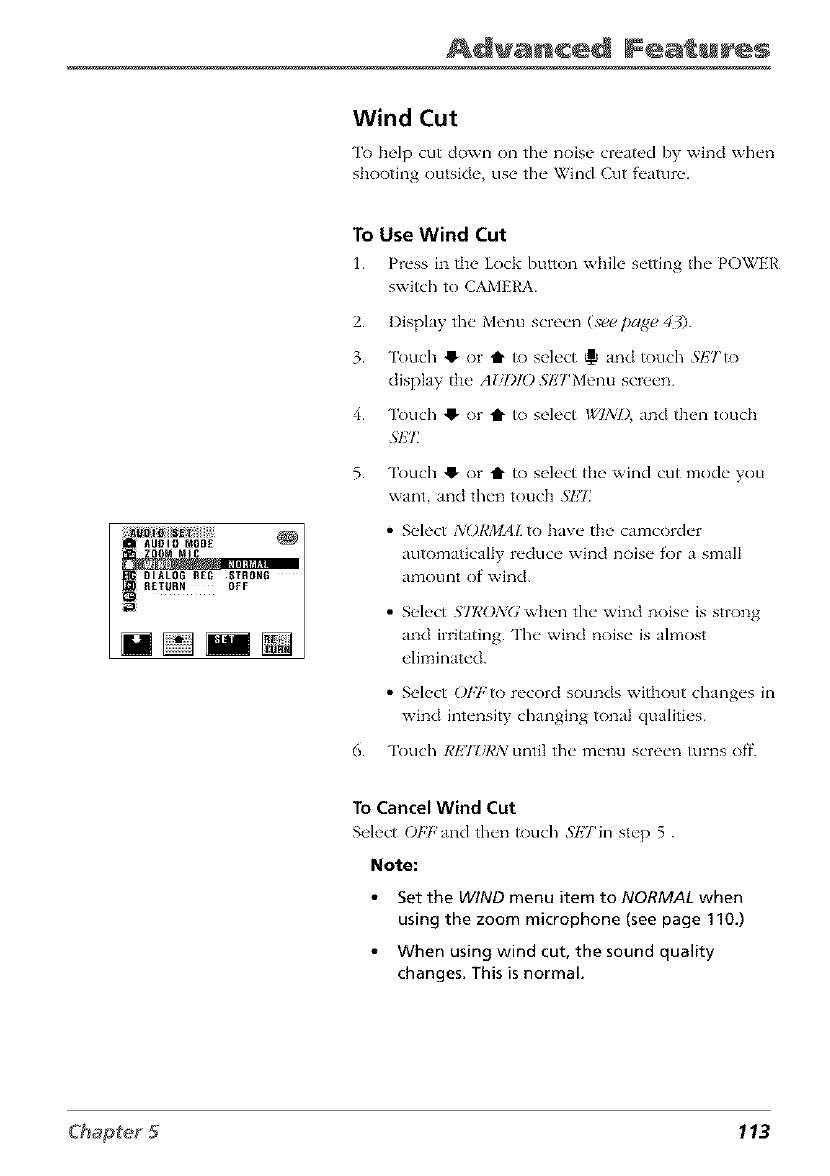
Advanced Fea u s
Wind Cut
To help cut down on the noise created by wind when
shooting outside use the Wind Cut feature.
_]{_ DIALOG REC STRONG
To Use Wind Cut
1. Press in the Lock button w]fi]e setting the POWER
switch to CAMERA.
2. Display the Menu screen (see page 40.
3. Touch ,_ or t to select _ and touch Sl']Tto
display the AI/DIO SI/TMenu screen.
4. Touch @ or t to select WIND, and then touch
.ql']7_
5. Touch O or t to select tt_e wind cut mode you
want, and then touch .';l_'7_
• Select NORMAL to have the camcorder
automatically reduce wind noise for a small
amotlnt of wiled.
• Select S'II?O:_/(.;when the wind noise is strong
and irritating. The wind noise is almost
eliminated.
• Select OFFto record sounds without changes ill
wind intensity changing tonal qualities.
6. Touch RETZ/RN until the menu screen turns off.
To Cancel Wind Cut
Select OFF and then touch _';P]Till Step 5 .
Note:
Set the WIND menu item to NORMAL when
using the zoom microphone (see page 110.)
• When using wind cut, the sound quality
changes. This is normal.
113
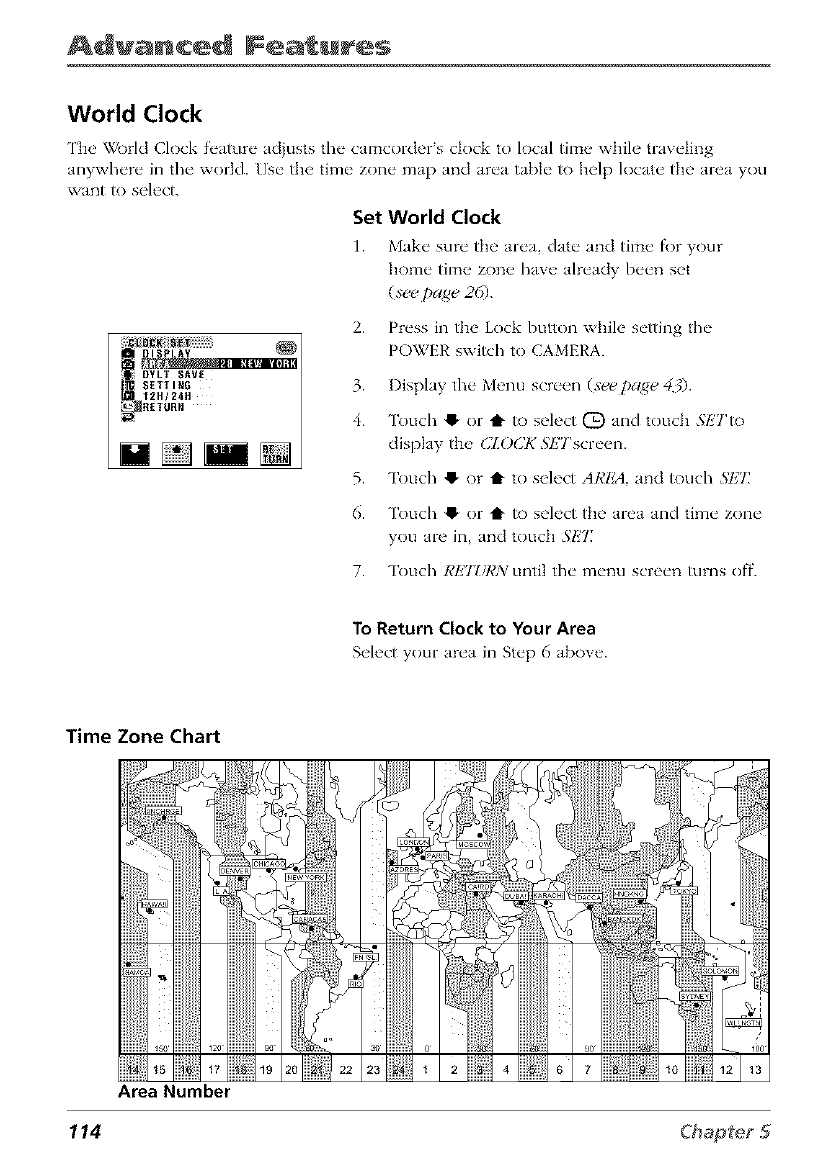
Advanced Features
World Clock
The World Clock feature adjusts the camcorder's clock to local time while traveling
anywhere in the world. Use the time zone map and area table to help locate the area you
want/o select.
Set World Clock
1. Make sure the area, date and time fl)r your
home time zone have already been set
(xee page 26).
; SETI IR6
12H/241t
_RETURH
2. Press in the Lock button while setting the
POWER switch to CAMERA.
3. Display the Menu screen (see page 43).
4. "lkmch !_ or t to select (_) and touch SIiTto
display the CZOCK SETscreen.
5. "lkmch !_ or t to select AREA, and touch SI,2Z
6. Touch !_ or t to select the area and time zone
you are in, and touch SET
7. Touch REJZ/RN until the menu screen turns off.
To Return Clock to Your Area
Select your area in Step 6 above.
Time Zone Chart
114
Area Number
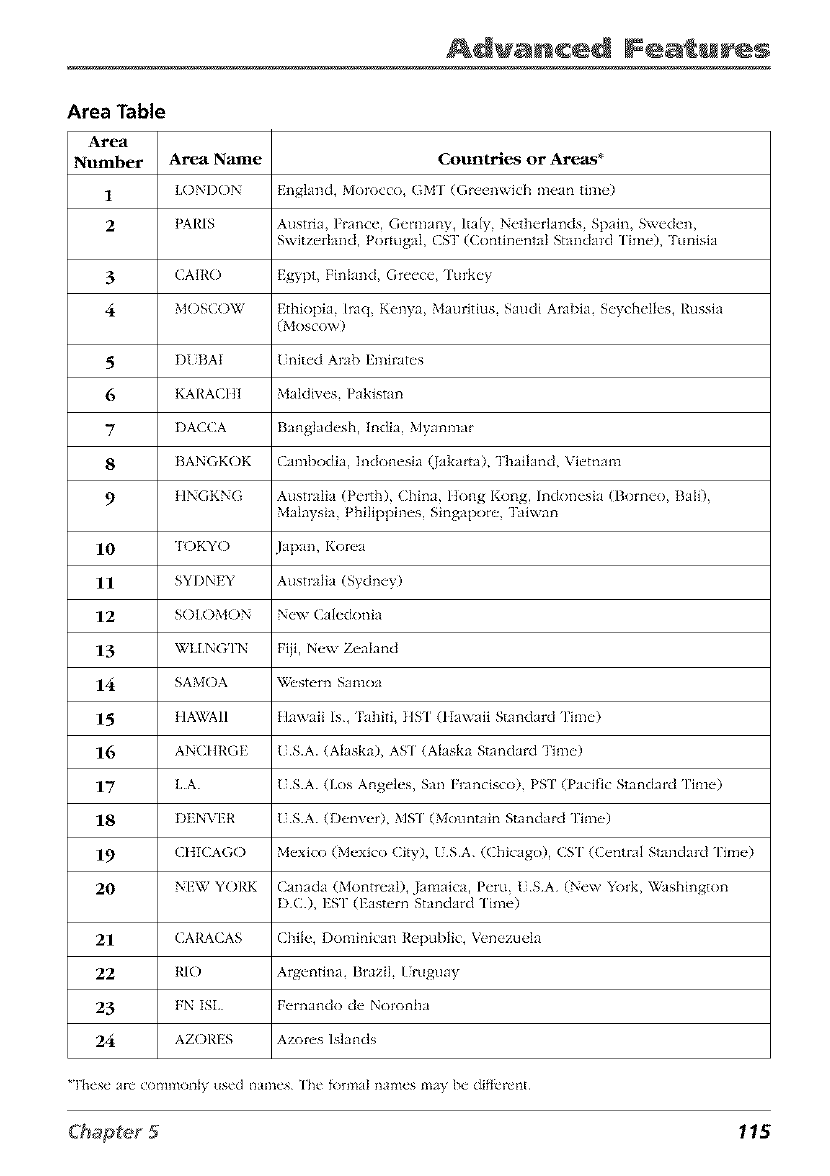
Advanced Fea u s
Area Table
Area
Number Area Nanle Countries or Areas*
1 LONI)ON Engkmd, Morocco, GM'I (Greenwich mean tim(')
2 PARIS AustIia, France, Germany, Italy, Ncth_q'kmds, Spain, Sw_den,
Switzerland, Portugal, CST (Continental Standard "lime), Tuniskl
3 CAIRO Egypt, Finland, Gtee_e, Turkey
4 MOSCOW Ethiopia, haq, Kenya, Mauritius, Saudi Aml)ia, S_'y_hellos, Russia
(Moscow)
5 DI. BAt ( nit,'d Arab l!mimtes
6 KARACItI Malclives, Pakistan
7DA((A Banglaclesh, Inclia, Myanmar
8 BANGKOK Cambodia, Indonesia (Jaka*ta), Thailand, Viemam
9 HNGKNG Australia (Perth), China, ltong Kong, lnckmesia (Borneo, Bali),
Malaysia, Philippines, Singapore, Taiwan
10 TOKYO lapan, Korea
11 SYDNEY Australia (Sydney)
12 SOLOMON New Caleckmia
13 WLLNG'IN Fiji, New Zealand
14 SAMOA Western Samoa
15 HAWAII Hawaii Is, Tahiti, HST (Hawaii Standard Time)
16 ANCI{RGE (S.A. (Alaska), AS'I (Alaska Standard Time)
17 LA. (S.A. (Los Angeles, San Francisco), PKI' (Pacific Standard Time)
18 DENVER (S.A. (Denver), MS'I (Mountain Standard Time)
19 CItlCAGO Mexico (Mexico City), /SA. ((hicago), CS'I (Central Standard Time)
20 NEW YORK Canada (Montreal), Jamaica, Peru, tSA (New York, V,_ishington
DC.), ES'I (Eastern Standard Time)
21 CARACAS Chile, Dominican Republic, Venezuela
22 RIO Argentina, Brazil / rug(my
23 FN ISL Fernando de Noronha
24 AZORES Azores Islands
_These ale ComlnOll_y used llames The _llrma} names lllt_y De di_lL'lc*n[
115
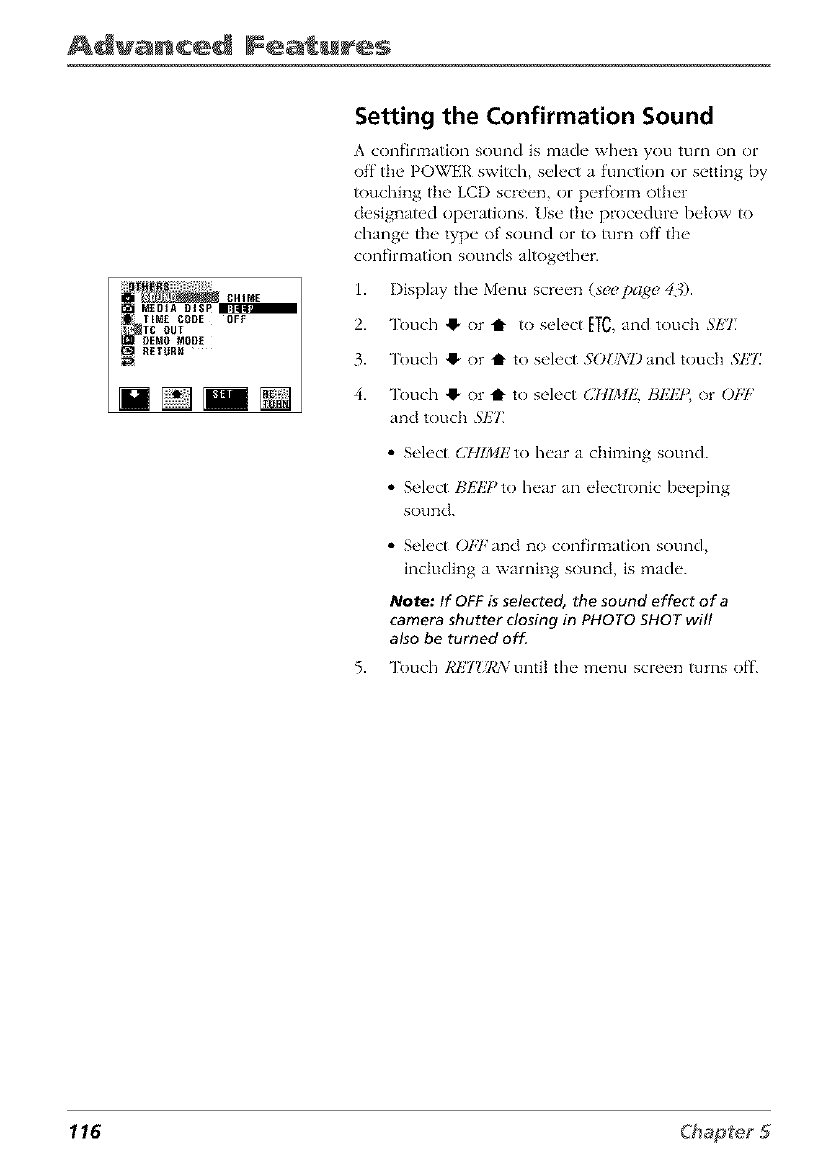
Advanced Features
MEDIA OISP_
TIME CODE OFF
RETURN
Setting the Confirmation Sound
A confirlTtation sound is made when you turn on or
off tim POWER switch, select a function or setting by
touching tt_e LCD screen, or perfk)n:_ other
designated operations. Use tt_e procedure below to
change tim type of sound or to turn off the
confirmation sounds altogether.
1. Display the Menu screen (s_page 401
2. Touch O or Q to select _T_, and touch SET
3. Touch ,1_or t toselect .';OUNI) and touch bET
4. Touch @ or Q to select (_711MP2,HI_HF,or Ot,7,'
and touchSHT
• Select CHIMI/to hear a chil_aing sound.
• Select HEIZPto hear an electronic beeping
sound.
• Select OFFand no confimaation sound,
including a warning sound, is made.
Note: If OFF is selected, the sound effect of a
camera shutter closing in PHOTO SHOT will
also be turned off.
5. Touch RET_iI,'N until the menu screen turns off.
116
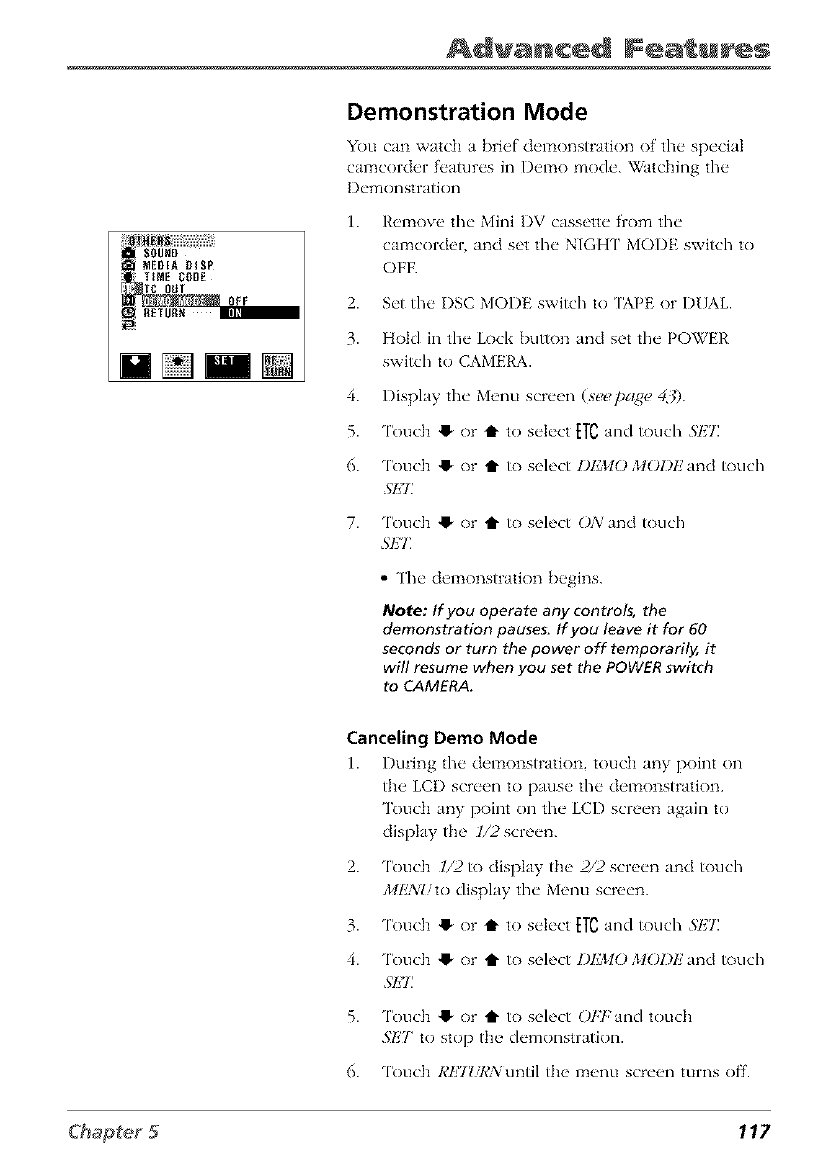
Advanced Fea u s
SOUND
MEDIADISP
TIMECODE
M[]imN
Demonstration Mode
You can watch a brief demonstration of the special
camcorch, r features in I)emo mode. _atching the
I)emonstration
1. I{_,mov_, the Mini I)V cassette from the
camcorder and see the NIGHT MODE switch to
OFF.
2. Set the I)SC MODE switch to [APE or DUAL
3. Hok] in the Lock button and see the POWEh'
switch to CAMERA.
4. Display the Menu screen (see page 43).
5. Touch @ or t to select ETCand touch SKT.
6. Touch !_ or tl" to select I)I']MO MOI)E and touch
.';El7
7. Touch !_ or tl" to select ONand touch
5'IZT.
• The demonstratk)n begins.
Note: If you operate any contro/s, the
demonstration pauses, If you leave it for 60
seconds or turn the power off temporarily, it
will resume when you set the POWER switch
to CAMERA.
Canceling Demo Mode
1. l)ming the del]lonstrationtouch any point on
th__ LCD screen to pnus_, the demonstration.
Touch any point on the LCI) screen again to
display the l/2screen.
2.
3.
4.
5.
6.
Touch 1/2 to display the 2/2 screen and touch
MlkVI/to display the Menu screen.
Touch !_ or t to select ETCand touch SI,2T.
Touch !_ or tl" to select DEMO MOI)E and touch
SEI_
Touch !_ or t1" to select Ot;Fand touch
.qlx7" to stop the demonstration.
Touch RETZiRsYuntil the menu screen turns off.
117
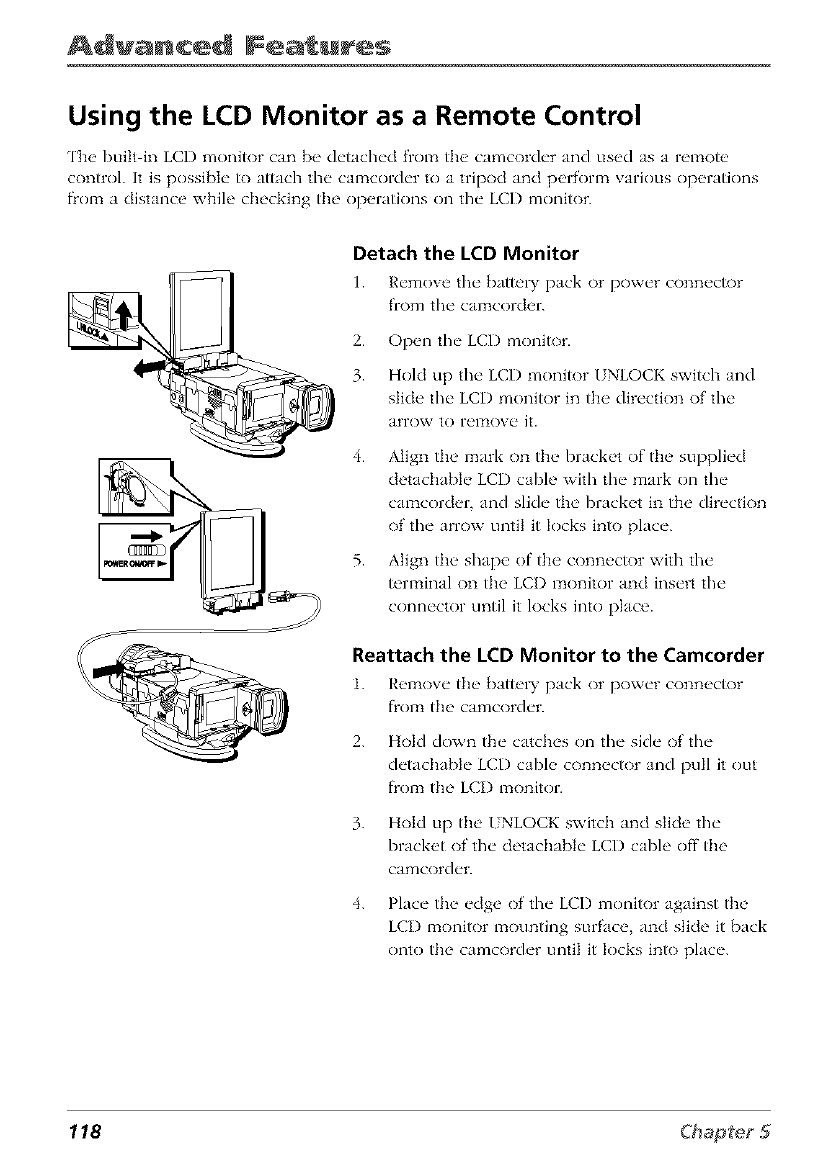
Advanced Features
Using the LCD Monitor as a Remote Control
The built in LCD monitor can b__ detached from the" camcorder and used as a remote'
control. It is possible to attach the camcorder to a tripod and perform various opt, rations
flom a distance while checking the op_q'ations on the LCI) monitor.
Detach the LCD Monitor
I. Remove the bnth, ry pack or power conn_ctor
from the camcorder.
2. Open the LCD monitor.
3. Hold up the LCD moni_)r UNLOCK swish and
slide the LCI) monitor in the direction of the
aFro\v to relTiOVe Jr.
4.
5.
Align the mark on the bracket of tile supplied
detachable LCD cable with the mark on the
camcorder, and slide the bracket in the direction
of the arrow until it locks into place.
Align the shape of the connector with the
terminal on the LCI) monitor and insert the
connector until it locks into place.
Reattach the LCD Monitor to the Camcorder
1. I{_qnove tb__ batte D, pack or power conn_ctor
flom the camcorder.
2. Hokl down the catches on the side of the
detachab]e LCD cabh' conn_,ctor and pull it out
flom the LCI) monitor.
3.
4.
Hold up the UNLOCK switch and slide the
bracket of the detachable LCD cable off the
camcorder.
Place the edge of the LCI) monitor against the
LCI) monitor mounting surface, and slide it back
onto the camcorder until it locks into place.
118
Advanced Fea u s
Operating the LCD Monitor as a Remote Control
1. Supply pow_'r to tl/_" camcorder.
2. S_'t th_ _ POWER switch on the camcord_'r to CAMERA or PLAY.
3. Op_'rat_" the, ch'sir_'d controls on the LCI) monitor.
•The" POWER ()N/OFF switch on the monitor can b_" used to turn the" camcorch'r's
power on or off.
• The" CON ['ROL alia] on the side of the monitor can b_" used to p_qf'orm the
following op_qafions:
• Zoom control wh_'n in CAMERA modes
• Volume control when playing back a tape
• Zoom control in Playback Zoom too&" (playback zoom indicator disp]ay_'d
in yellow).
• AdiLlSt the" s_'ttings on the" m_'nu scr_'_'ns by rotating the dial to s_'h'ct and
pr_'ssing the" dial in to st't.
To change the Camcorder Mode
1. Pr_'ss in the, CONTI,'OL dial f_)r l:_or_" than two s_'conds.
• The MOI)E Sl!7l!'CTscreen is displayed.
Note: It is not possible to display the MODE SELECTscreen when the menu screen
is displayed.
2. 'I_)uch the" ch'sir_'d camcorch'r moth'.
• 7LdlqiRIiC:'IAPE CAMEI'_A l:_oc|e (record on tap_')
•I)_JAL REC! DUAL CAMERA mode (record on tape or the card)
•CARl) RIiC: CARD CAMERA mode (record on the card)
•TAIqiI_B:'ITXPE PLAY l:_ode (playback the tape)
•CARl) PB: CARD PLAY l:_ode (playback the card)
119

This page left intentionally blank.
Chapter 6
Digital Still Camera
Chapter Overview:
*Recording
- Playback
Changing Entertainment. Again.
121
Still Camera
Card Recording
You can use the camcorder just like a digital camera and take a still picture and
record it to the card.
1. Make sure a MultJMedJaCard is inserted
(see page 13).
Number of shots taken
XORi
11280
AUTO
Number of shots remalninc
D{
AUTO C_RD_
2122
NORMAL
RECORDING TO
NEMORY CARD
2.
3.
4.
5.
6.
7.
Set the FOCUS switch to AUTO and DSC
MODE switch to CARD.
Press in the Lock button and set the POWER
switch to CAMERA. A still image is displayed.
Open the LCI) monitor or adjust the
viewfinder.
Use the Zoom buttons to frame the subject
(from 1 to 7 times zoom).
Press the S ['ILLbutton to record a still image
of the sub}ect. The U'l indicator flashes red
while data is being recorded on the card and
returns to white when recording is finished.
When finished recording, place the POWER
switch in OFK
Caution:
Do not turn the power off or remove the card while the Dindicator is flashing
in step 6. This may delete or damage images on the card or damage the card.
Notes:
To remove the icons from the camcorder's display during recording, press the
DISPLAY ON/OFF button.
In CARD-CAMERA mode, the angle of fieM is slightly wider than in TAPE-
CAMERA or DUAL-CAMERA mode.
Recording under insufficient light may result in blurred images. Try using a
tripod.
RECORDING TO MEMORY CARD or RECORDING TO TAPE is displayed during
the recording of still images. If you do not want this displayed, set the MEDIA
DISP. menu item in the OTHERS menu to OFF in one of the CAMERA modes.
122
Digital S ili Camera
Select Picture Quality and Image Size
['he picture quality of still images recorded on a card and the number of recordable
images depend on the combination of the picture quality and image size settings. Select
tim appropriate settings fi)r your recording. ['be camcorder compresses each image with
tile picture quali Wsetting to save memoi T on a card.
To Select a Picture Quality
1. S_t the" DSC MOI)E switch to DUAL or CAI,'I)
and th__POWER switch to CAMERA.
2. Display the Menu screen (see t)age 40.
3. Touch '_ or t to select fgl and touch 57£Tto
display the CAMkT?A ._ETscreen.
4. Touch !_ or tt to select RIZ(JMODE and touch
57£7_
CARD
NORMAL
12881
Picture Quality indicator
5. Touch !_ or t1" to select NOI,'MAL, IZCO3/OM}_
or FINE, and then touch 5"E?_The selected
picture quality is displayed.
• Select NORMAL to record approximately 48
images in 1280 X 960 or 200 images in 640 X
480.
• Select F_CONOMYto record approximately 92
images in 1280 X 960 or 360 images in 640 X
480.
• Select Fl:X/l'2torecord approximately 22 images
in 1280 X 960 or 120 images in 640 X 480.
6. Touch RET_/I,'A:until tile menu screen turns off.
Notes:
The number of recordable images differs depending on the combination of
picture quality and image size settings being used and the images being
shot.
The picture quality indicator displayed in the CARD-PLAY mode may differ
from the quality selected for recording depending on factors, such as image
details.
123
Still Camera
Select Image Size
Still images recorded on a card are made up of pixels. YOu cm select tile number of
pixets you want to record. Larger number of pixels provide greater image detail, but use
iT_ore card memoir.
CARD
3/21
NORMAl.
Image Size indicator
To Select an Image Size
1. s_t the DSC MODE switch to DUAL or CARD
and th_ _ POWER switch to CAMERA.
2. Display the Menu screen (st¢t¢page 40.
3. Touch Q or t to select r'_ and touch _')ETto
display the CMMkJ_A SETscreen.
4. Touch Q or t to select IMAGE SIZE and touch
5"E7_
5. Touch O or t to select 128YJX960or 6_40X48'0
and touch M,IE
• Select 128DX960to record images in 1280 X
960 pixels. Better quality but requires more
17te17tOl)' on the card.
• Select 6_OX480to record images in 640 X 480
pixels.
6. Touch RETZq,'_'v until the menu screen turns off.
•['he selected image size indicator is displayed.
Note: When the DSC MODE switch is set to
DUAL, the image size is fixed at 640x480
pixels.
Picture Quality
NORMAL
ECONOMY
FiNE
Image Size
1280 x 960 640 x 480
48 200
92 360
22 120
This chart is approximate and
applies to a 16MB memory card.
124
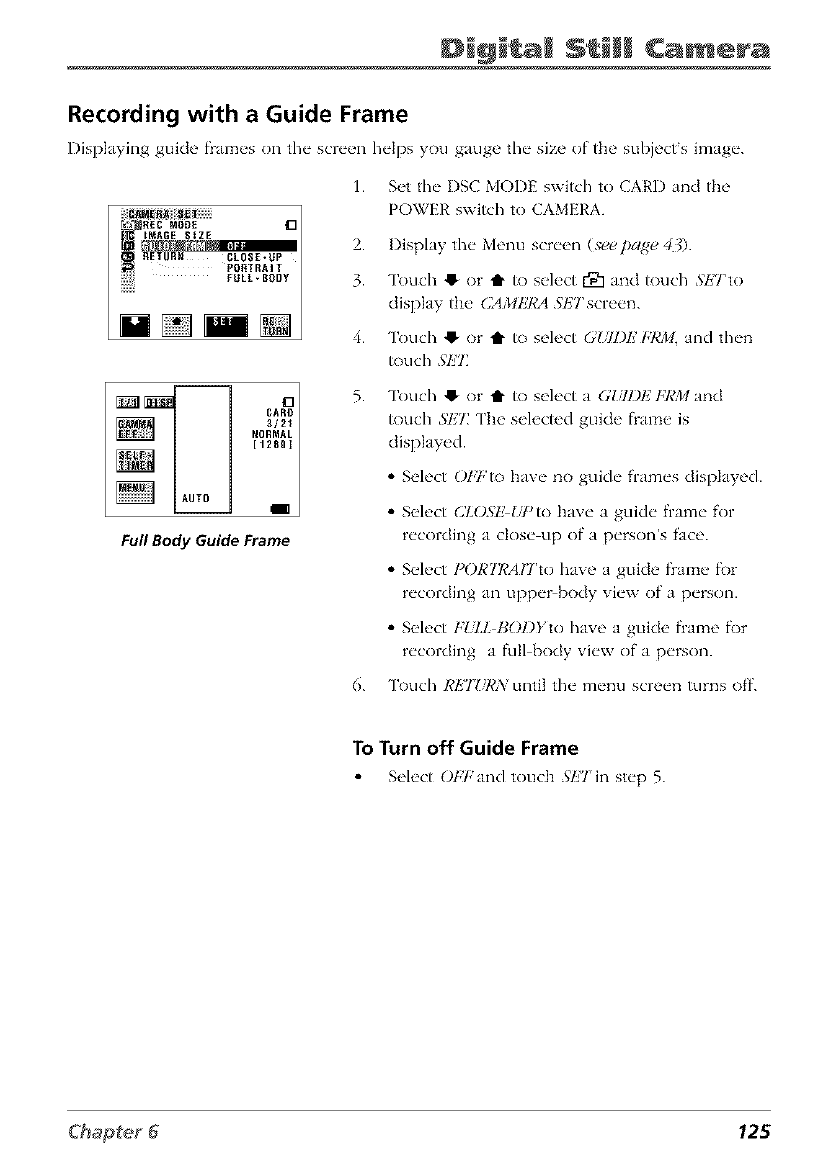
Di@i a Camera
Recording with a Guide Frame
Displaying guide fi'am_s on the scre_ql helps you gauge the size of the subjects image.
1.
NAGE tZE 2.
RETURN CLOSE-Up
PONTRAIT
iii_ii_ FULL- BODY 3.
__ 4.
BARD
3/21
FuflBodyGuideFrame
Set the I)SC MODE switch to CARD and the
POWER swish to CAMERA.
Display the Menu screen (,v_t_tt)c/ge 40.
Touch !_ or t1" to select r91 and touch SETto
display the CAMkT¢A SETscreen.
Touch !_ or t1" to select GIiII)P] FRM, and then
touch Sl;'7:
Touch !_ or t1" to select a G_71)1,2FI,'Mand
touch 5'E7: The selected guide fiame is
displayed.
• Select O/,7,'to have no guide frames displayed.
• Select (2LOSE _;*)to have a guide frame for
recording a dose up of a person's face.
• Select PORTICAHrtO have a guide fiame fi)r
recording an uppe>body view of a person.
• Select F!.J£ BOl)Yto have a guide fiame f\)r
recording a full body view of a person.
6. Touch RETZ/RA: until the menu screen turns off.
To Turn off Guide Frame
Se]ect OYFand touch ._/ZTin step 5.
125
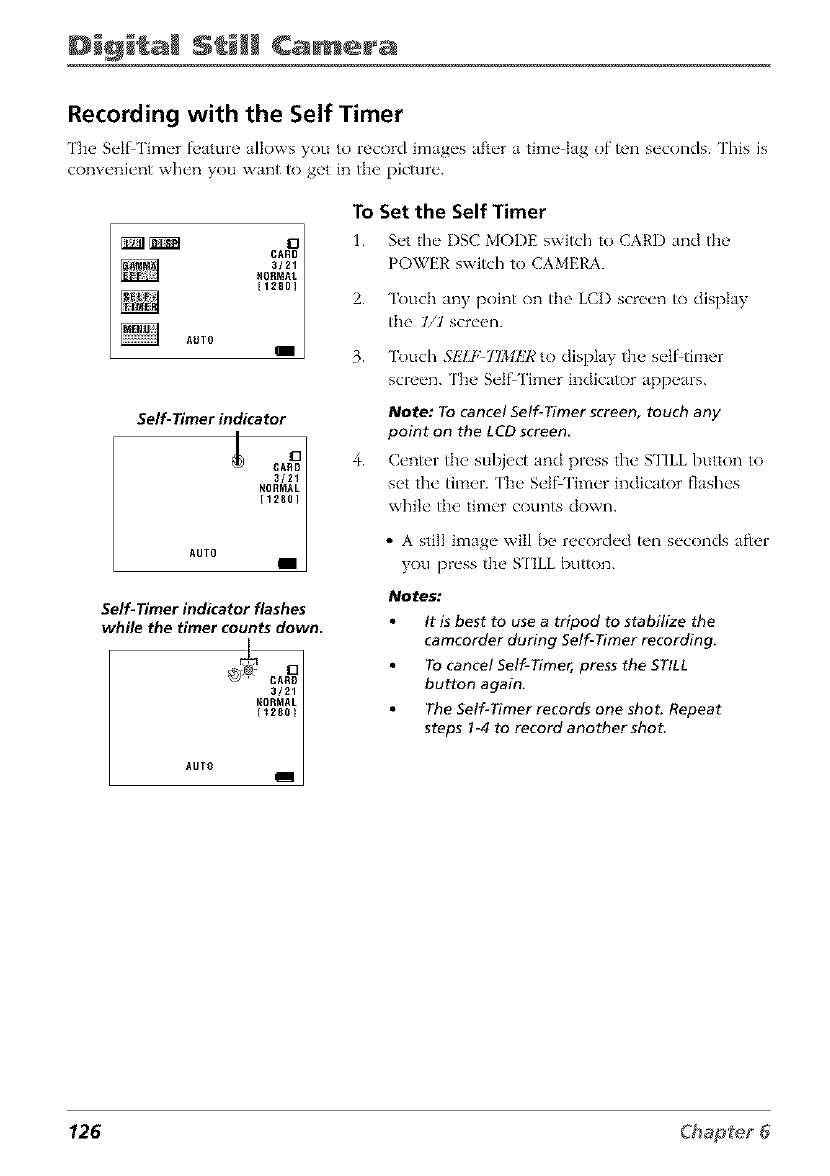
Still Camera
Recording with the Self Timer
The S_'tf Tim_'r f_,ature allows you to record image's af_'r a tim_" lag of ten s_'conds. This is
conv_'ni_'nt wh_'n you want to get in the picture'.
CARD
3]21
2.
AUTO
3.
Self- Timer indicator
CARD
3/21
AUTO
Self-Timer indicator flashes
while the timer counts down.
AUTO __
To Set the Self Timer
1. S_.t th(" I)SC MODE switch to CARl) and the
POWER switch to CAMERA.
4.
Touch any point on the LCI) screen to display
the l/1 screen.
Touch ,SI!'LFJIIMI!7¢ to display the setS timer
screen. The Self Timer indicator appears.
Note: To cancel Self-Timer screen, touch any
point on the LCD screen
C_'nter the subject and press the" _FILL button to
set the" tim_,r. ['h__ S_'lf Tim_'r indicator f]ash_'s
while" thu tim_'r counts down.
•A still image will be recorded ten seconds after
you press the STILL button.
Notes:
It is best to use a tripod to stabilize the
camcorder during Self-Timer recording.
To cancel Self-Timer, press the STILL
button again,
The Self-Timer records one shot. Repeat
steps 1-4 to record another shot.
126
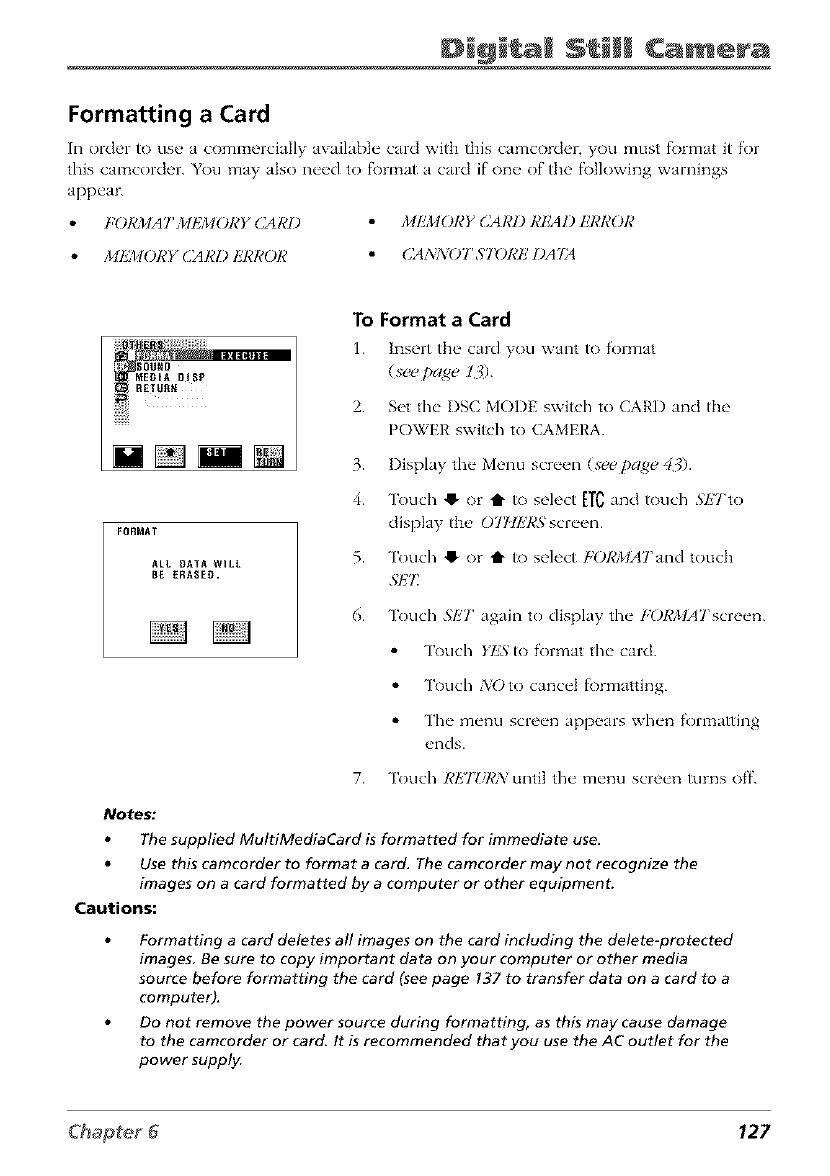
Di@i a Camera
Formatting a Card
In ord_'r to us_, a commercially available" card wRh this camcord_'r, you must f_)maat it for
this camcorder. You may also n_'_'d to f\)rmat a card if"one, of the f\)Jlowing warnings
appea_
FORMATMtZMORY CAR1) MIL_IORY CAR1) RliAD I!RROR
MIL_[ORY (lARD I_7¢ROR CANNOT STORE L)A'IS_
FORMAT
ALL DATA WiLL
BE ERAgEO.
To Format a Card
1. Insert th_, card you w'ant to form'at
(see [>age 13).
2. Set the I)SC MODE switch to CARD and the
POWER switch to CAMERA.
3. Display the Menu screen (see page 43).
4. Touch 41- or t1" to select ETC_na touch SETto
display tire 07HliRS;screen.
5. Touch 41- or t1" to select FORMAJand touch
.qI_T
6. Touch SliT again to display the FORMAT screen.
Touch Yk'Sto format the card.
Touch NOto cancel f_)rmatting.
The menu screen appears when fom_atting
ends.
7. Touch RETZiI,'N until the menu screen turns off.
Notes."
The supplied MultiMedia_rd is formatted for immediate use_
Use this camcorder to format a card, The camcorder may not recognize the
images on a card formatted by a computer or other equipmenL
Cautions:
Formatting a card deletes all images on the card including the delete-protected
images, Be sure to copy important da_ on your computer or other media
source before formatting the card (see page 137 to transfer data on a card to a
computer),
Do not remove the power source during formatting, as this may cause damage
to the camcorder or card. It is recommended that you use the AC outlet for the
power supply.
127
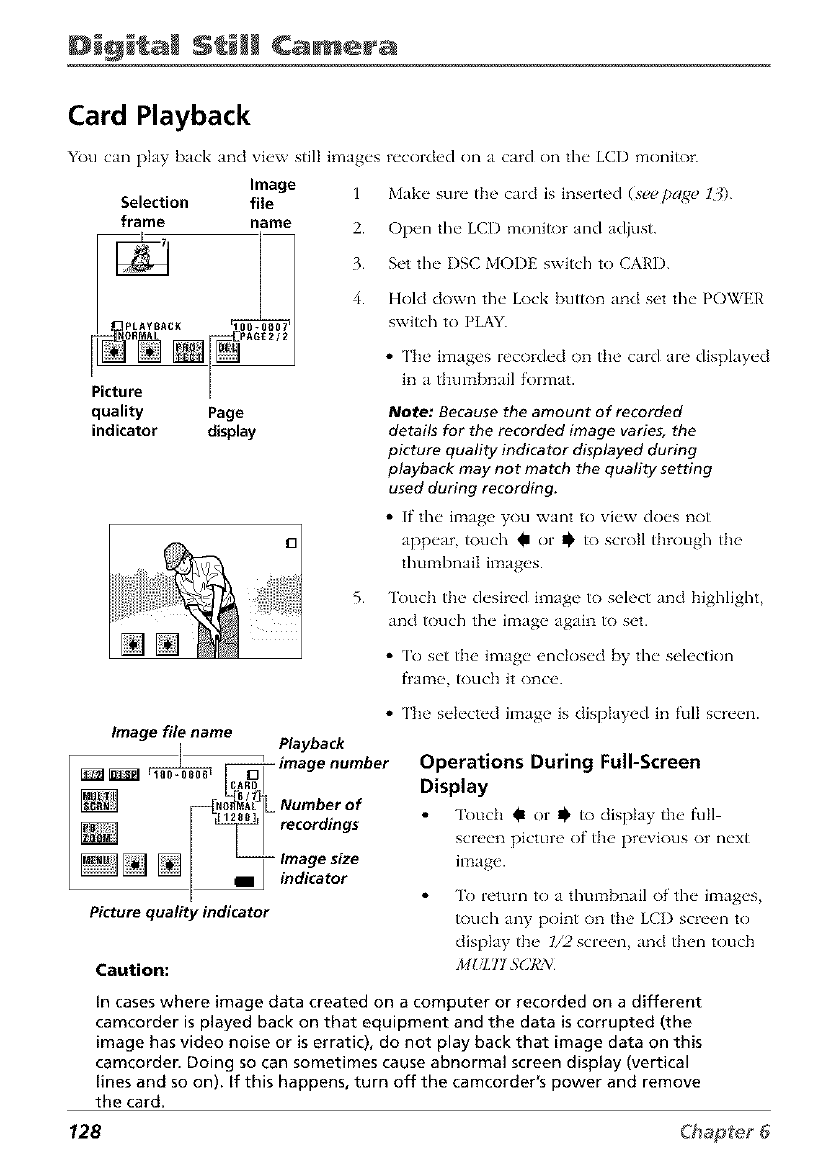
Still Camera
Card Playback
You can play back and view still images
Image 1
Selection file
frame name 2.
quality Page
indicator display
recorded on a card on the LCD monitor.
Make sure the card is inserted (seepa,_e 13).
Open the LCD monitor and adjust.
Set the I)SC MODE switch to CARD.
Hold down the Lock button and set the POWER
switch to PLAY.
•The images recorded on the card are displayed
in a thumbnail format.
Note: Because the amount of recorded
details for the recorded image varies, the
picture quality indicator displayed during
playback may not match the quality setting
used during recording.
• If the image you want to view does not
appear touch _ or _, io scroll through the
thulnbnaiI ilnages.
5. Touch the desired image to select and highlight,
and touch tim image again to set.
• To set the image enclosed by the selection
flame, touch it once.
• The selected image is displayed in full screen.
Image file name
IPlayback
_ _ ICAFDD__ image number
I
r---_N__ Number of
I128_1_ recordings
I_ indicator
Picture quality indicator
Caution:
Operations During Full-Screen
Display
Touch Im or _' to display the" full
screen picture of the previous or next
image.
To return to a thumbnail of the images,
touch any point on the LCI) screen to
display the l/2screen, and then touch
MIJl/I'I /¢(]RzYl
In cases where image data created on a computer or recorded on a different
camcorder is played back on that equipment and the data is corrupted (the
image has video noise or is erratic), do not play back that image data on this
camcorder. Doing so can sometimes cause abnormal screen display (vertical
lines and so on). if this happens, turn off the camcorder's power and remove
the card.
128
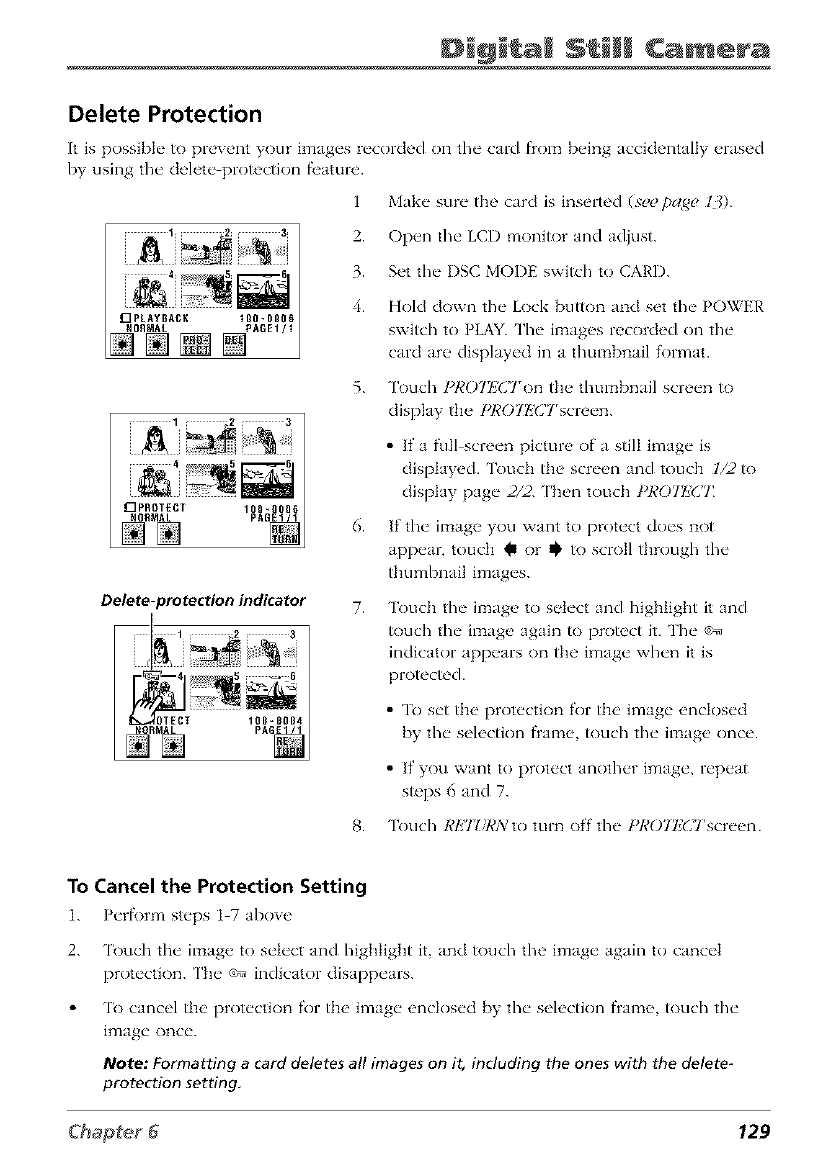
Di@i a Camera
Delete Protection
It is possible to prevent your h_ages recorded on the card flom being acckiemally erased
by using the delete pro_ctk)n feature.
1 Make sure the card is inserted (see page l{).
[][][]
2. Open the LCD monitor and adjust.
3. Set the I)SC MODE switch to CARD.
4. Hold down the Lock button and set the POWER
switch to PLAY. The images recorded on the
card are displayed in a thumbnail ff)rmat.
5. 3k)uch I_ROTIZCTon the thumbnail screen to
display the I_ROTI_'CTscreen.
• If a full screen picture of a still image is
displayed. Touch the screen and touch 1/2 to
display page 2/2. ['hen touch PRO72ZCT
Delete-protection indicator
6.
7.
If the image you want to protect does not
appear, touch @ or @ to scroll through the
thumbnail images.
Touch the image to select and highlight it and
_)uch the ilTlage again to protect it. The ¢_
indicator appears on the image when it is
proceed.
• To set the protection for the image enclosed
by the selection flame, touch the image once.
• If you want to protect another image, repeat
steps 6 and 7.
8. Touch RETZiI,'Nto turn off the IWO7_l']C'lrscreen
To Cancel the Protection Setting
1. Perf_)rm steps 1 7 above
2. 'lk)uch the image to select and higllligllt it, and touch the image again to cancel
protection. The _ indicator disappears.
'lk) cancel the protection for the image enclosed by the selection frame, touch the
image once.
Note: Formatting a card deletes all images on it, including the ones with the delete-
protection setting,
129
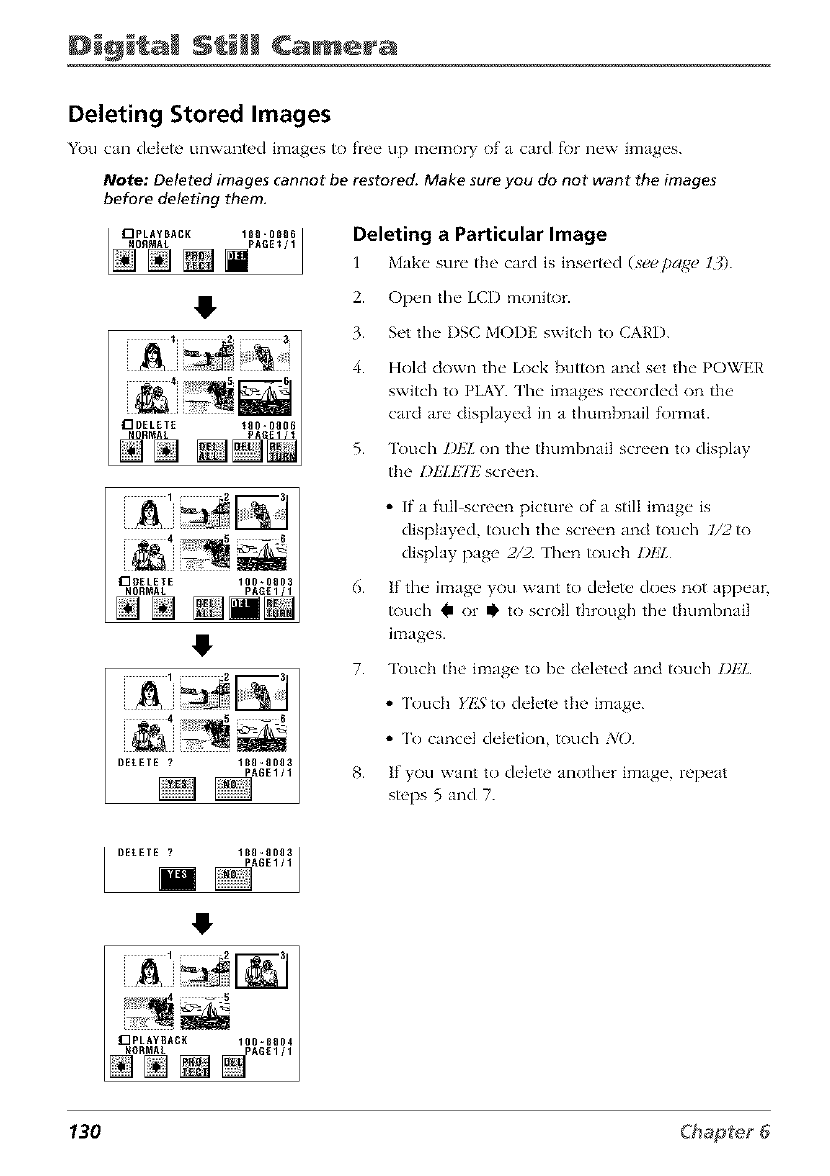
Still Camera
Deleting Stored Images
YOu can d_,J_,teunwanted hnag_'s to fre_"up m_'mo_T of a card fi)r n_'w hnag_'s.
Note: Deleted images cannot be restored. Make sure you do not want the images
before deleting them.
Deleting a Particular Image
l Make sure the card is inserted (seepage 13).
2. Op_,n the"LCI) monitor.
3. Set the" I)SC MOIIR switch to CARI).
4. Hold down the Lock button and set the POWER
switch to PLAY. The images recorded on the
card are displayed in a thumbnail R)rmat.
5. Touch Z)E2I,on the thumbnail screen to display
the I)EI_E7E:screen.
• If a full screen picture of a still image is
displayed, touch the screen and touch l/2to
display page 2/2. Then touch DlzZ
6. If the image you want to delete, does not appear,
touch I' or I!' to scroll through the thumbnail
images.
7. Touch the image to be deleted and touch Z)E2L.
•Touch Yl!B'to delete the image.
• To cancel deletion, touch NO
8. If you want to delete another image, repeat
steps 5 and 7.
130
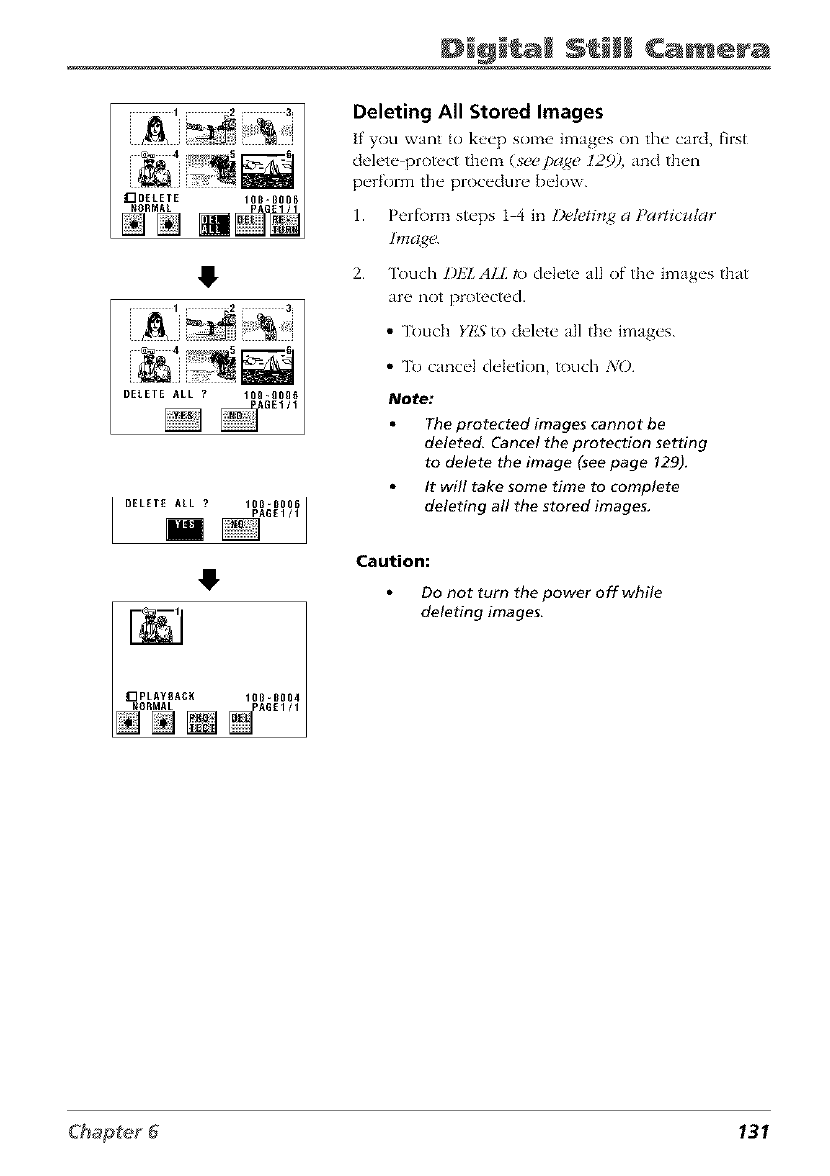
Di@i a Camera
1 2 3_
_DELETE 10_=_001
_ORMAL
NN
DELETE ALL ? 10B-B006
PAGE1/1
im
Deleting All Stored Images
If you want to ]<_,_'p some image's on fll_" card, first
cleh.t_" prot_'ct th('m (seepage 129). and th(ql
perR)rm the procedure below.
1. Peril)tin steps 1 4 in l)eletir*,_ a Pa,.ticzdar
2. Touch DI.JI. ALL to delete all of the images that
are not protectd.
• Touch YkB'to delete all the images.
•To cancel deletion, touch NO
Note:
The protected images cannot be
deleted. Cancel the protection setting
to delete the image (see page 129).
It will take some time to complete
deleting all the stored images,
Caution:
Do not turn the power off while
deleting images.
131
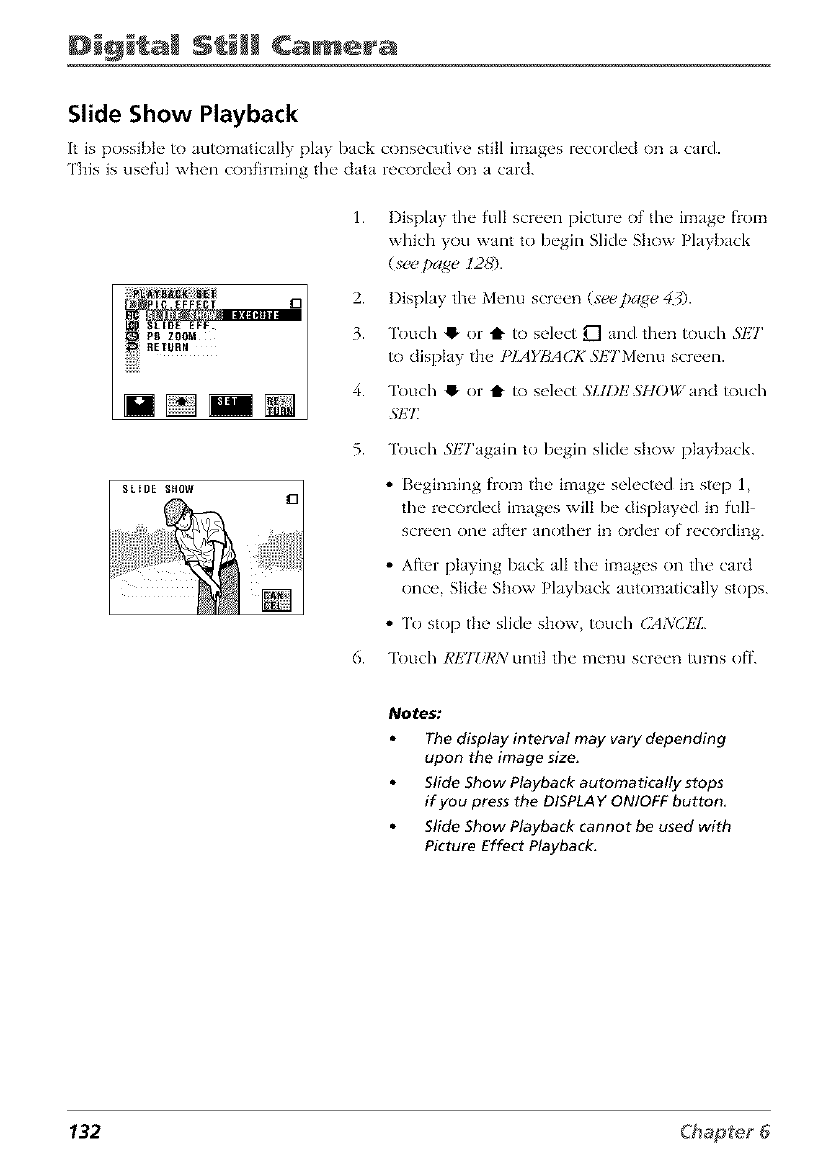
Still Camera
Slide Show Playback
It is possibl_" to automatically play back consecutive still images r_'corch'd on a card.
This is useful when confirming the" data recorch'd on a card.
RETURN
1. Display the full screen picture of the image f)om
which you want to begin Slide Show Playback
(,vcepage 128).
2. Display the Menu screen (star,page 43).
3. Touch !1. or t to select U"Iand then touch SI,2T
to display the PIAYBA(]K 3'ETMenu screen.
4. Touch !1. or t to select SLIDES"FIOWand touch
.ST_T
5. Touch 3'l£Tagain to begin slide show playback.
•Beginning f)om the image selected in st_,p 1,
the recorded images will be displayed in full
screen one af_er another in order of recording.
• Afier playing back all the images on the card
once, Slide Show Playback automatically stops.
• To stop the slide show, touch CANCtZL
6. Touch REJZiI,'A:until the menu screen turns off.
Notes:
The display interval may vary depending
upon the image size.
Slide Show Playback automatically stops
if you press the DISPLAY ON/OFF button,
Slide Show Playback cannot be used with
Picture Effect Playback.
132
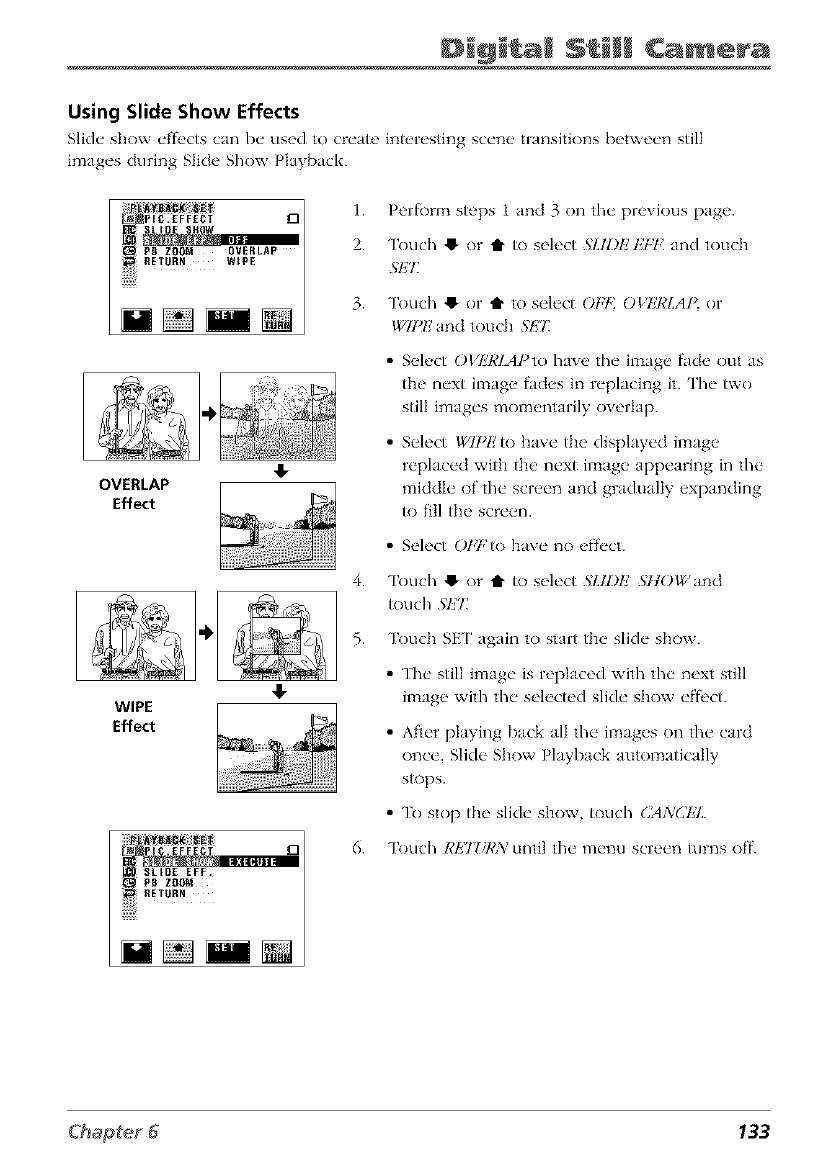
Di@i a Camera
Using Slide Show Effects
Slid(" show ('ffi'cts can b(" used to cr('at{' intorosting sc(,n_ _transitions b_txvo('n still
image's during Slide Show Playback.
i!iii_ii_>_[{_ 1 1.
_PIC.EFFECI D /
SLIDE SNOW
, PB Z_OM OVERLA_ •
RETURN wipe
iiiiiii_
4,
OVERLAP
Effect
4.
4-
WIPE
Effect
$1.IDE EFF.
PB ZOON
iiiiii!
Perf\)rm steps 1 and 3 on the previous page.
Touch !_ or t1" to select ._;IJl;£ £7,7,' and touch
SET_
Touch !_ or t1" to select ()Ft OVkT¢LA](or
WIPE and touch S1"2"£
• Select OVkT¢lAPto have the image fade out as
tile next image fades in replacing it. The two
still images momentarily overlap.
• Select WIPk' to have tile displayed image
replaced witil tile next image appearing in the
middle of the screen and gradually expanding
to fill tile screen.
• Select Ot,7,'to have no eff{'ct.
Touch !_ or 'It to select SLID£ SItOWand
touch Sl_"£
Touch SE[' again to start tile slide show.
• The still image is replaced with the next still
image with the selected slide show el"fi,ct.
• After playing back all the images on the card
once, Slide Show Playback automatically
stops.
• To stop tile slide show, touch CANCt_L
Touch REJZiRN until the menu screen turns off.
133
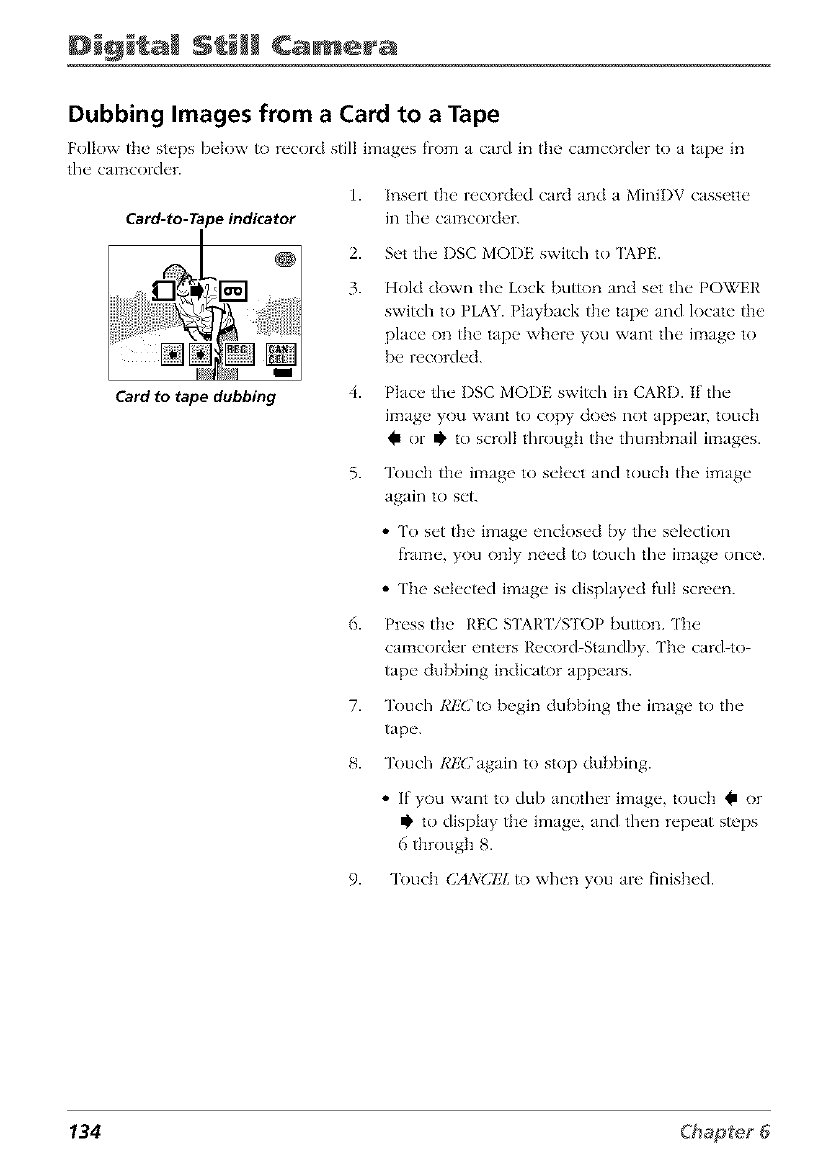
Still Camera
Dubbing Images from a Card to a Tape
Follow the' st_'ps b_'low to n'cord still image's from a card in the camcord_'r to a tap_ _ in
t]/_ _ CalTtCOI'd _q'.
1. Insert the' r_'cord_'d card and a MiniI)V cassette"
Card-to-T_ _e indicator in the" camcorder.
2.
3.
Set the I)SC MODE switch to 'IAPE.
Hold down the Lock button and set the POWER
switch to PLAY. Playback the tape and locate the
place on the tape where you want the image to
be recorded.
Card to tape dubbing 4.
5.
6.
7.
8.
Place the I)SC MODE switch in CARD. If the
image you want to copy does not appear, touch
Im or Ii' to scroll through the thumbnail images.
Touch the image to select and touch the image
again to set.
• To set the image enclosed by the selection
frame, you only need to touch the image once.
• The selected image is displayed full screen.
Press the REC SIAR['iSTOP bum)n. ['be
camcorder enters Record Standby. ['be card-to
tape dubbing indicator appears.
Touch RIZ(2to begin dubbing the image to the
tape.
Touch Rk'() again to stop dubbing.
• If you want to dub another image, touch Q or
Ii' to display the image, and then repeat steps
6 through 8.
9. Touch (2A3iCEL to when you are finished.
134
Chapter 7
Viewing and Downloading
Chapter Overview:
•System Requirements for PhotoStudio 2000 ®
•Loading PhotoStudio 2000 ®
•Connecting to a Computer Using an Optional DV Cable
ging
Vie in% anl @@ nl@alin@
System Requirements for PhotoStudio 2000 ®
Windows _PC Requirements
• Windows95 PC with available" serial port
•Windows 98 PC with available ISB or serial port (/SB port recommended)
• Windows 2000 PC with available USB or serial port (USB port recommended)
• Windows Me" PC with available USB or serial port (USB port recommended)
• Pentium based or faster microprocessor
• 32 MB RAM
• 50 MB avatable hard disk space
• CI) ROM drive
• Color VGA display
Macintosh _Requirements
• Mac OS 8.5 or later
• Pov,'er Mac" or iMac' (USB compatible)
• 32 MB RAM
• 50 MB available hard disk space
• Available USB port
• CI) ROM drive
• Color VGA display
PhotoStudio 2000 is a registered trademark of ArcSofl, Inc.
Windows is a trademark of Microsoft Corporation, registered in the U.S.A. and other
countri_'s.
Macintosh, Mac OS, PowerMac, and iMac are registered trademarks of Apple Computer,
Inc.
136
Vie in@ anl @@ nl@alin%
Loading PhotoStudio 2000
To transfer your stl] image's to your PC or Macintosh you will need the suppli_'d ISB
card read_,r a suitably equipped computer with a I. SB connectk)n, and the image
transl',r/editing software PhotoStudio 2000.
1. Turn on your colzaputer and insert the PhotoStudio 2000 CI) ROM into your drive.
2. Double click the installer icon and follow the on-screen instructions to install the
software. DO NO[' install the USB DRIVER CD ROM at this time.
3. Follow the instructk)ns in the next section to install the USB drivers for your
COITtpHtor.
How to Handle a CD-ROM
Take care not to soil or scratch the surface.
Do not write on or place stickers on the front or back.
If the CI) ROM gets dirty, gently wipe it with a soft cloth outward fl'om the center
hok" using a circular motion.
Do not use conventional disc ck'an_q's or ck'aning spray.
Do not bend the CI) I,'OM or touch its mirror surface.
Do not stor_" your CI) I,'OM in a dusty hot, or humid environment. K_,ep it away
fiom direct sunlight.
137
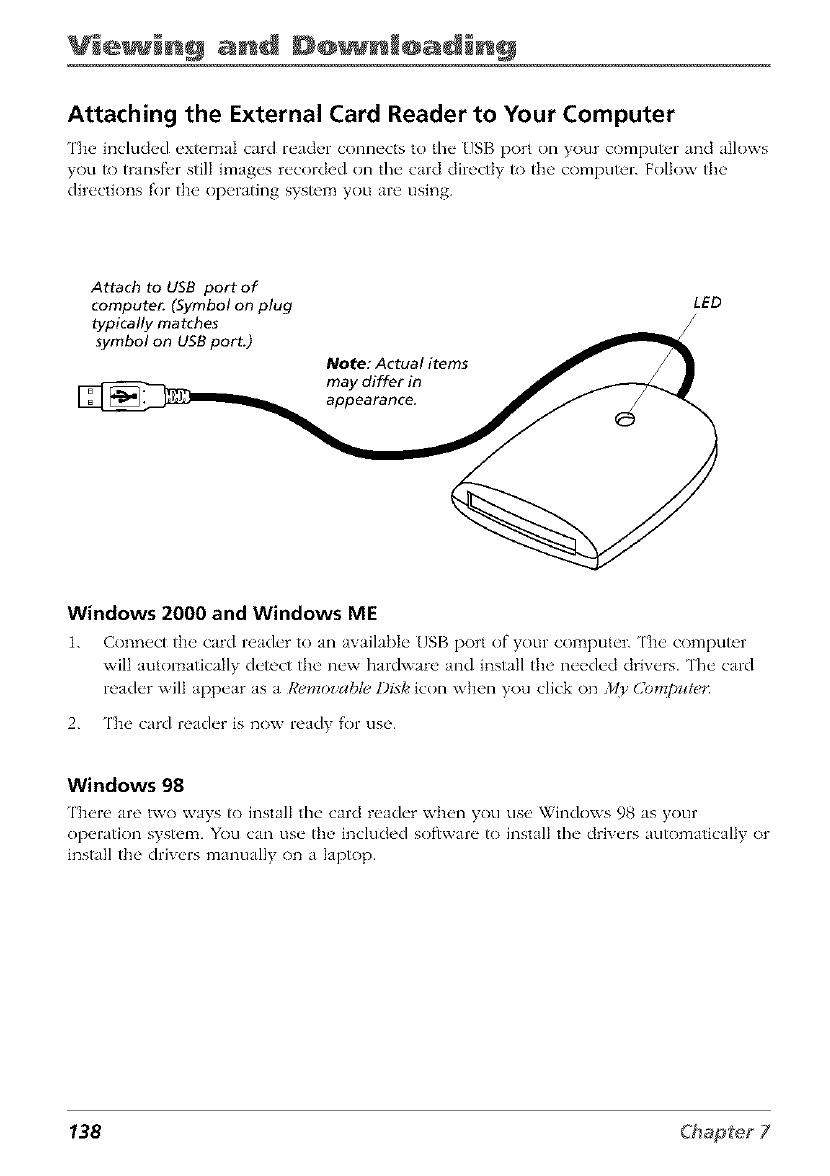
Vi+ in@ anl @@ nl@alin@
Attaching the External Card Reader to Your Computer
The included ext_'rnaI card reader connects to the USB port on your computer and allows
you _ transfer still images recorded on the card directly _) the compu_r. Follow the
directions for the operating sys_m you are using.
Attach to USB port of
compute_ (Symbol on plug
typically matches
symbol on USB port.)
Note: Actual items
may differ in
appearance.
LED
Windows 2000 and Windows ME
1. Conn_ct the' card r_'ad_'r to an avail_bI_" [/SB port of your comput_'r. ['h_' comput_'r
will autom_tic_lly d_'t_'ct the' n_'w hm'dwnr_, and inst_ll the' n_'_'d_'d driv_'rs. 'l'h_" card
r_'ad_'r will Jpp_'ar Js a I¢_mToz'ahleDixie icon wh+'n you click on _l)' (JomI>ztt_?,_
2. The card reader is now read'i for use.
Windows 98
There are two ways to install the card reader when you use Windows 98 as your
operation sys_m. You can use the included software _) install the drivers au_)matically or
install the drivers manually on a Iap_)p.
138
Vie in@ anl @@ nl@alin%
Install Drivers Automatically
1. '1_) instal the nec_,ssal T drivers automatical]y insert the inck]ded software CD into
the CD drive and double click on the Setup exe icon.
2. Follow the directions on the screen and click Finish to restart the computer.
3. Afl_,r the machine is restarted, connect the card reader to an available USB port of
your computer. Tim computer will automatically detect tile new hardware and the
card reader will appear as a Remoz'able Dixie icon when you click on _/{)' C?)nTp_ften
Install Drivers Manually
1. 'I_) install the n_cessmT drivers manually, insert the included software CI) into the
CD drive.
2. Connect the card reader to an awdlable /]SB port of your computer. ['he computer
will automatically detect the new hardware and ask you fi)r a driver.
3. Select &)arcb jbr the best driz,_r fi)r your dez ice and click Next
4. When the next screen appears asking where to search for the driver, select (2/) ROM
driz'e and Spec{[_' a location ['ype in !):\driz'er (I) being the Iocatkm of your CD
ROM drive). Click on Next.
5. Windows will search fi)r tile driver and display the screen showing
D\])RIVER\SI)MM(]OZII;'_:FaI_er it locates tile driver. Click _\extto have Windows
install the driver.
6. The computer will now automatically detect the new hardware and the card reader
will appear as a Remoz'ab_ Disla icon when you click on _ (_m[_ute_
Macintosh
1. Conn_,ct the card reader to an available US[3 port of your computc'r.
2. 'l'b_' comput_'r will automatically detect the n_'w hardware and the card reader will
3ppc_ar 3s 3n icon on yoLlr conlpLlt_r.
Notes:
If your card reader does not appear when you turn on or reboot your computer, try
replugging in the USB cable
Consult your computer or device's owner manual for USB port specifications and
troubleshooting
139
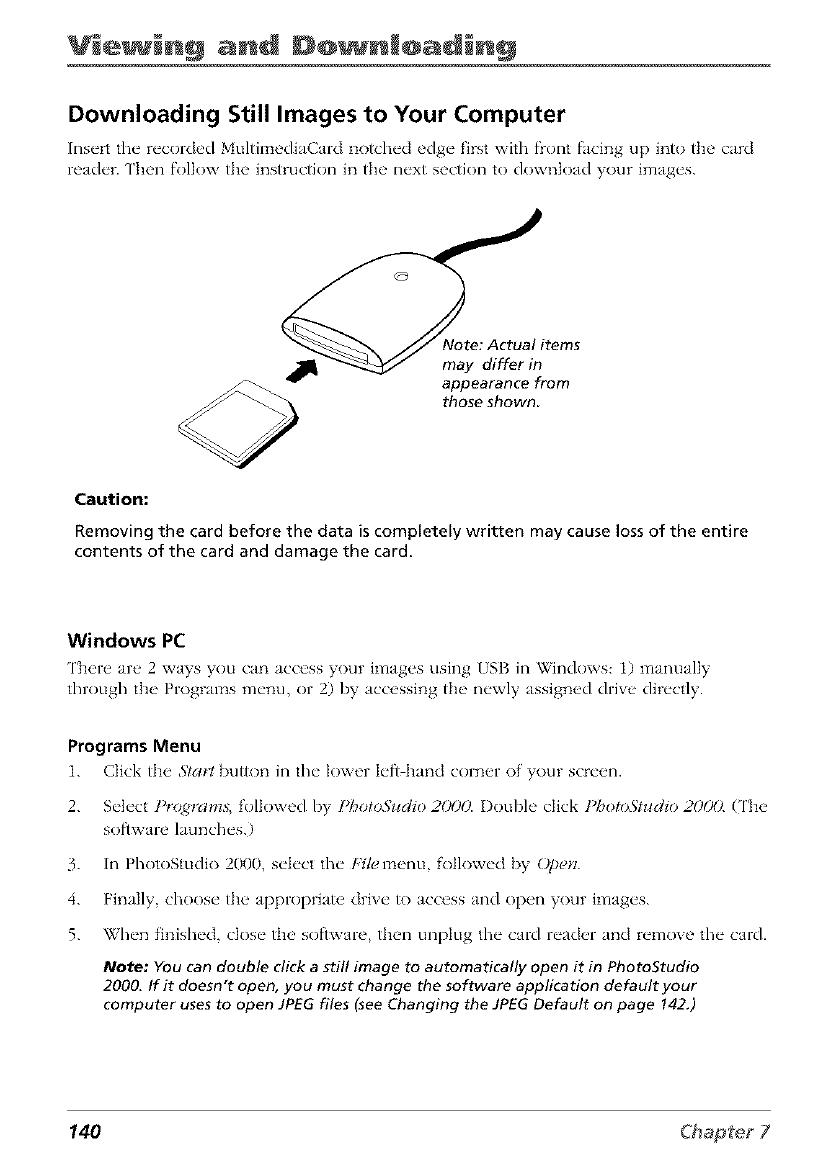
Vie in@ anl @@ nl@alin@
Downloading Still Images to Your Computer
Insert the recorded Multimedi_Cm'd notched edge first with front facing up into the card
reader. Then fo]Iow d_e instruction in d_e ne×t section to download your images.
_-:Actual items
may differ in
appearance from
those shown
Caution:
Removing the card before the data is completely written may cause loss of the entire
contents of the card and damage the card.
Windows PC
The,re m'_'2 ways you can _lcc'ess your images using USB in \Vindows: 1) manLmlly
through the Programs metal or 2) by accessing the newly assign_d drive directly.
Programs Menu
1. C]ick tl]__ Sta_ button in the lower left h_md cornier of your scre_n.
2. Select Programs, followed by PbotoSudio 2(X)O. I)ouble click t)hotoStudio 20(X). (The
software launches.)
3. In PhotoStudio 2000, select the [qle menu followed by O[)en.
4. FinMly choose the approprk_te drive to access and open your images.
5. When finished, dose the software then unplug the card rexlder xmd remove the card.
Note: YOu can double click a still image to automatically open it in PhotoStudio
2000. If it doesn't open, you must change the software application default your
computer uses to open JPEG files (see Changing the JPEG Default on page !42.)
140
Vie in@ anl @@ nl@alin%
Direct Drive Access
1. I)oubk, dick _0, Computer (The MT' C?mTp_fter window opens_ showing you all fl_e
Jvaiklble drives.)
2. Double click the approprinte drive to Jccess and open your images.
3. When finished close the soflwJre_ then unplug the card reader and remove the c'ard.
Note: YOu can double crick a still image to automatically open it in PhotoStudio 2000 If it
doesn't open, you must change the software application default your computer uses to
open JPEG files (see Changing the JPEG Default on page 142.)
Macintosh
1. I)ouNe click on the zo_Htle_ldrive icon on your desktop, f\)tlowed by the D(]IM folder,
Jnd the IOIR(]A fk)lder.
2. Dr_LgJlI the still imJges you want to move to your desktop. (['he files Jre copied.)
3. When finished, drag the ztntitled drive icon to the trash, unplug the c_nd reader, Jnd
remove the card.
141
Vie in@ anl @@ nl@alin@
Changing the JPEG Default
Depending on your system configuratk)n, your still images l_aight not automatically open
in PhotoStudk_ 2000. This is because you probably already have another software
program set as the default R) {)pen your images, which are saved in JPEG format. If you
want to set PhotoStudio 2000 as the default application for your images, use the following
instructions to change your computer's JPEG default.
Windows PC
1. Click t]]__ 3'ta_'tbutton in the" lower h'fl ]land corn_q" of' you]- scr_'_ql.
2. S_'h'ct Programs. f'ollow_*d by .g_ttir*gs
3. Next select Foldcr ()ptior*s and click the Fih, ?])7_s tab. Then select,IPl_G
4. Click l_dit, then click PhotoMudio 2000.
Note: There are several variations of JPEG files (JPG,JPEG, etc.), so you might have
to set PhotoStudio for each of them,
Macintosh
1. In the" Apl)h" m_'nu, highlight (_?)_t,'ol Parz#ls. followed by t,'&. lg.x_harz_e.
2. Click the t'C 12vchatTge tab (if it isn't already selected) and seIect,!l_l;G.
3. Click Cba.g< then select l'hotoStudio 2(XX).
Note: Thereare several variations of JPEGfiles (JPG,JPEG,etc.), soyou might have
to set PhotoStudio for each of them
142
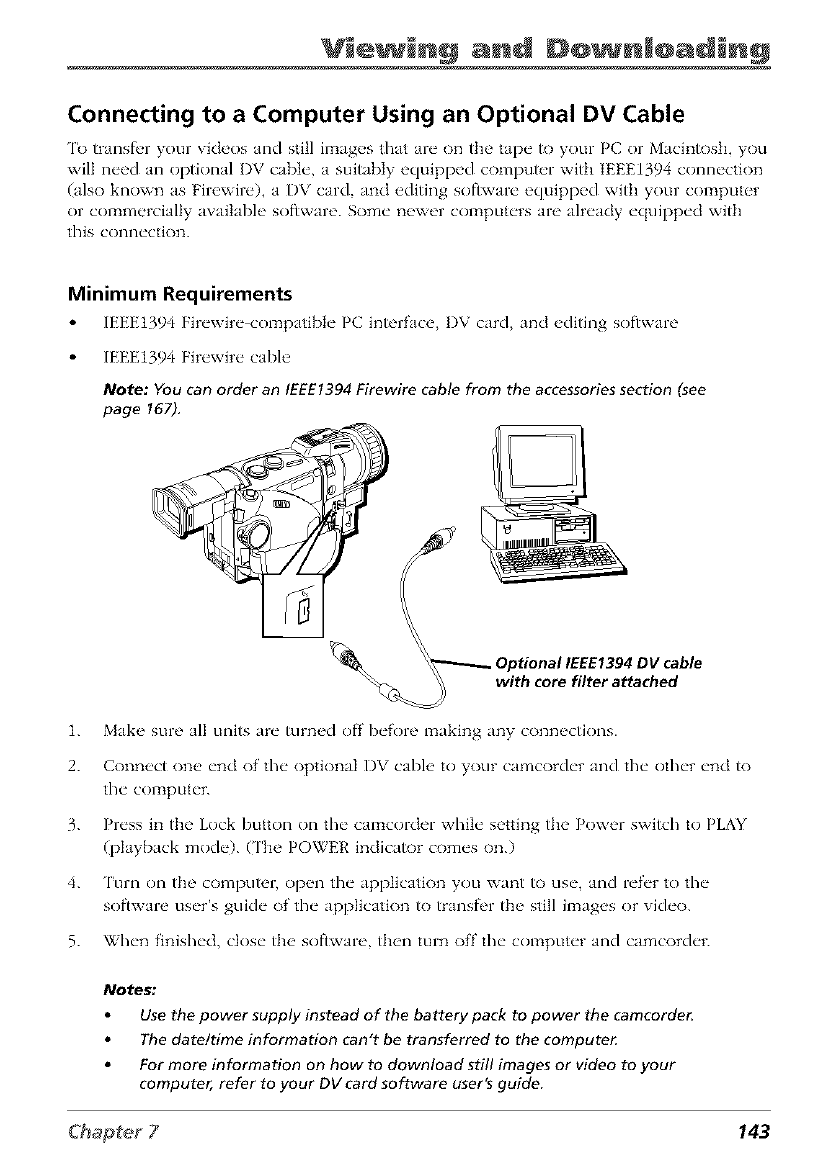
Vie in@ anl @@ nl@alin%
Connecting to a Computer Using an Optional DV Cable
'1_ transfbr your videos and still images flint are on the tape to your PC or Macintosh, you
will need an optional I)V cable, a suitably equipped comput_,r with IEEEI394 connection
(also known as Firewire), a DV card, and editing software equipped witt_ your computer
or commercially available software. Some newer computers are already equipped with
this connection.
Minimum Requirements
IEEEt394 Firewire compatible PC in_r_tce, DV card, and editing software
IEEE1394 Fir_'wir_" cabh'
Note: YOucan order an IEEE1394Firewire cable from the accessoriessection (see
page 167).
_ptional IEEE1394 DV cable
with core filter attached
1. Mak_ _ sure all units ar_" turn_d off b_'fore making any conn_ctions.
2. Col_n_,c't one' _'nd of the" optional I)V cabh' to your camcord_'r and the" oth_'r _'nd to
the" comput_'r.
3. Pr_'ss in the Lock button on the" camcorder whiI_" setting the Power switch to PLAY
(playback mode). (The POWER indicator comes on.)
4. Turn on the computer, op_ql the" application you want to us_', and r_'f_'r to the"
software us_'r's gulch" of fl/_" application to transfbr fl_, still imag_,s or vich'o.
5. Wh_'n f'inish_'d, close" the software then turn off the" comput_'r and camcord_'r.
Notes."
Use the power supply instead of the battery pack to power the camcorde_
The date/time information can't be transferred to the compute_
For more information on how to download still images or video to your
computer, refer to your DV card software user's guide
143

This page left intentionally blank.

Chapter 8
Other Information
Chapter Overview:
• Troubleshooting
• Final Notes
• Care and Cleaning
• Traveling Tips
•Specifications
• Limited Warranty
• FCC and Industry Canada Information
•Optional Accessories
• Index
Changing Entertainment. Again.
145
@ her Inf@rm i@n
Troubleshooting
If you're having problems with your camcorder, try the solutions in this section. If the
problem still exists, please consult your nearest authorized RCA service center.
External noise and intcrfi, rence (from a ['V a radio, etc.) might prevent your camcorder
fiom functioning properly. In such cases, first disconnect the power supply unit (battew,
AC power supply, etc.); and then reconnect it and proceed as usual from the beginning.
Power Problems
No power is supplied.
The batt_'ry pack has not I)_'_'n attach_'d correctly (see page l f)).
The battery pack is not charged (see page 20).
The power supply has not been correctly connected (see page 22).
There is dew in camcorder. Wait until camcorder dries out.
The power suddenly goes off and does not come back on by itself.
Camcorch'r h, fl in Ih,cord Standby moth" for five" minutes. Turn the POWER switch
OFF and then on again.
The battery pack has completely discharged.
Remove the tape and disconnect the power source. Then after a f_>w minutes, try
reconnecting and turning the power back on. If it still does not come on, consult your
nearest authorized RCA service center.
Feature and Function Problems
Some menus or features are not available.
The AUI'OiMANUALiMANUAL LOCK switch is set to AUTO. Set to MANUAL and try again.
Vertical white lines appear when shooting a very bright object.
This somotim_'s occurs wh_>n th_'t"_" is a lot of contrast b_'tw_'en the" background and the"
object. It is not a dcfi'ct of the" camcorch'r. Try shooting fiom a clif}'_'r_'ntangt_" or adjusting
the lighting conditions.
Bright, crystal-shaped spots appear in the LCD monitor and the viewfinder.
Sunlight is directly cnt_,ring the lens. This is not a d_'fi'ct of the camcordcr.
146
@ her Enf@rmat @n
The back of the LCD monitor is hot.
'l'h_, light us_'d to illuminate" the, LCI) monitor cause's it to b_" hot. Ctos_"the' LCI) monitor
to turn it off or s_'t th(_POWER switch to OFF, and let the" unit cool down.
Colored bright spots appear all over the LCD monitor or the viewfinder.
'l'h_' LCI) monitor and the' vi_'wfind_'r al_"made with high precision technology. How_'v_'r,
black spots or bright spots of light (r_'d gl{'{,n oi blu_') ln_ly app.'at constantly on the LCI)
monitor or in tim viewfinder. These spots are not recorded on the tape. This is not due to
any dell'or of the unit.
The icons and the picture color on the LCD monitor are not clear.
This may occur wh_'n the surface or the" _'dge of the LCI) monitor is pr_'ssed.
The LCD monitor, the viewfinder, and the lens are dirty.
Wipe th_'m gcntty with a cleaning cloth. Wipe the" LCI) monitor g_'ntty in a s_'micirch"
because wiping strongly spreads the stain and it wont come out easily.
The image is out of focus.
If"using vi_'wfinch'r, the" _,yepi_,c_, focus control l:_ay n_'_d to b_"adiust_'d
C_eepa_e ¢_.
The scene being shot is adversely af}'t'cting the operation of Auto Focus
(see page 106).
Manual settings are canceled.
AU'FOiMANI ALiMANI AL LOCI<.switch or FOCIS switch has b_'_*ns_'t to AUTO. Manual
settings are canceled.
147

@ her Enf@rm @n
Recording Problems
Recording on tape cannot be performed.
Mak_ _ sure the Erase Protection tab is in th_ _ position that allows recording. If" not slide
the tab. Som_" tapes have removable tabs. If' the tab has b_,en removed cover the hoh'
with adhesive tap_ _.
Recording does not start.
'l'h_, camcordcr POWER switch has not b_'en set to CAMERA or the I)SC MODE switch is
not set to th_" con'ect positkm (see])a_e 4G).
Cannot Record from S-Video Connector
Make, sure the S VII)EO IN f_,ature on the ETC Menu is set to ON (seepage 65).
Playback Problems
The tape is running, but there is no playback picture on the TV.
The TV has not b_,en set to its VIDEO input channel.
Playback picture is blurred or interrupted.
'I'h_' video h_'ads are dirty or worn out. Consult your n_,arest authorized RCA service
center f\_r head ch'aning or replacem_,nt (see pa,_e 157).
Rewinding or fast-forwarding can't be performed.
The tap_, is already fully wound on one re_q or the other.
The date and time displays disappear.
Press the I)ISPLAY ON/OFF button to turn them back on.
If you rel_aove the power source from the camcorder while the power is on, all
settings and selections are erased. Make sure to turn the camcorder's power off
before disconnecting the power source.
The wrong date and time are displayed/recorded.
If you have not per_maed Da_['ime Se_ing (see page 26), the date and time are not
displayed/recorded correctly. Check setting of I)aytight Savings time (seepa,_e 2,'_').
The tape won't eject.
The batte W pack is running k)w.
148
@ her Enf@rmat @n
No playback audio or audio is distorted.
Check audk) settings (see page _arid _2).
If using zoom mic, check the settings (seepa,_e 110).
Digital Still Camera Problems
Cannot record or playback a still picture.
Ch('ck to make" sur_" a compatibl_" m_'mol T card with space" availabh' is ins_'rt_'d in
the" C_HTtCoI'd_'r (S(2(2 /)(//g_' ,/_).
Make, sure write prot_'ct tab is in correct positkm.
Make sure I)SC MODE switch is set to CARD or DIAL
Cannot record images in 1280 X 960.
Make, sure I)SC MODE switch is s_'t to CARI).
Cannot delete an image from the card.
Image is protected (seepa, ge 125)). Canc<'I prot<'ctk)n (,reel)age 13()).
Cannot format the card.
Make" sure it is compatibh' with this camcorder (,veepa_ge 13). Contact your dealer for
advice.
Cannot record very many images on the card.
Ch_'ck the" picture" quality and image size selected (seepa, ges 12:_ 1240. High_'r s_'ttings
require more space on the memory card.
CARD WARNINGS appear on the screen.
Warnings app_'ar to warn you of card probI_'ms such as a full card etc. (seepa,_es 3637).
149
@ her Enf@rm @n
Final Notes
Power
Pvrfi)rm charging ",vh_,re thv tempvrature is betwevn 10°C and 35°C (50°F and 95°F).
20°C to 25°C (68°F to 77°F) is the ideal temperature range for charging. If the
environment is too cold, charging may be incomplete.
Charging times are R_r a fully discharged batte W pack.
Charging time varies according to the ambient temperature and the status of the
battery pack.
'It) aw)id interfi'rence with reception, do not use the AC power supply near a radio.
Since the AC power supply processes electricity internally, it becomes warm during
use. Be sure to use it only in well ventilated areas.
The f\)tlowing stops charging or discharging:
I nplugging the AC power supply's cord from the AC outlet.
Detaching the batte W from the AC adapter/charger.
Date/Time Settings
'l'h_' dat_'itime cannot [)_,stored in m_'mol T if the" clock c_'ll has not I)_'n install_'d or
nv_ds replacing. Rvplacv clock evil.
Video Recording
Wh_,n the' POWER switch is s_'t to CAMERA or PLAY and the' LCI) monitor is
op_ql_'d at an angl_" of 25 or mort', the" LCD monitor switch_'s on and the
vi_'wfind_'r switch_'s off automaticaJ]y to save pow_'r.
The cassette tape holder can't be opened unless a power supply is attached.
There may be a delay after you slide 'IAPE OPEN until the cassette tape holder
opens, l)o not use force.
The time required to calculate the remaining tape length, and the accuracy of the
calculation, may wtry according to the type of tape used.
While recording, sound is not heard from the speaker.
150
@ her Inf@rmati@n
Tapes
Apow_'r supply must b__attached to load or _'i_'cta tap__.
When loading a tape, it takes a f'w seconds f)r the cassette tape holder/o {)pen.
Never apply f)rce _) the holder or door cover as this might result in damage to the
camcorder and void the warranty.
If the cassette tape holder does not {)pen after a f_'w seconds, close tlm holder door
and try again. If it still does not open, turn the camcorder off, then on again.
If tim tape does not load properly, open the cassette tape holder door and frilly
remove tim cassette. Wait a f'w minutes and reinsert it.
Closing the cassette tape holder door bef)re the holder comes out may damage the
camcorder.
Even when the camcorder is turned off. a tape can still be loaded or unloaded. After
the cassette tape holder is closed witt_ the camcorder switched off, tt_ough, it may
not recede. Turn the power on before loading or unloadiaig ta_s.
When recording, once tim cassette tape holder door is open, a blank portion will be
recorded on the tape or a prevkmsly recorded scene will be taped over regardless of
whether the tape holder came out or not.
Dew Formation
If"your camcorder is brougilt directly from a cold place to a warm place dew may
condense inside your camcorden on fl_e sur_ce of the head dram, and on the surfice
of th_>vich'o taD'. If"this happ_'ns, the" video tape may stick to the vich'o h_>ad and b_"
damaged or your camcorder may not operate correctly. Remove the tape, and wait a
f_'w hours before using the camcorder.
Dew may f'orm in any of the f)Ilowing situations:
When bringing the camcorder from a cold location to a warm location.
When placing the camcorder in a cold room which is then heated rapidly.
When bringing the camcorder outdoors f_om an air conditioned room or car.
When placing the camcorder in the direct path of air blowing from an air
conditioner.
When placing the camcorder in a humid room.
151
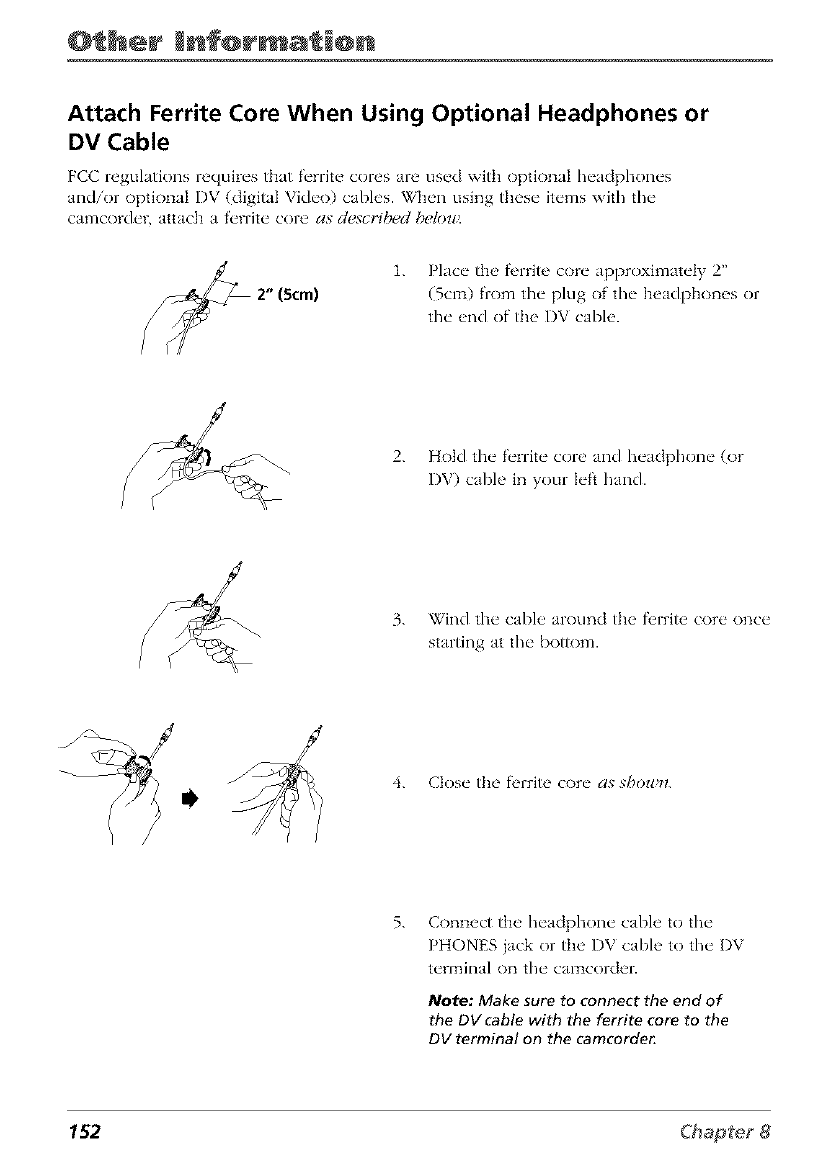
@_her Enf@rma_@n
Attach Ferrite Core When Using Optional Headphones or
DV Cable
FCC regulations requires that ft'rrite cores are used wRb optional headphones
and/or optional DV (digital Vide()) cables. When using these items with the
camcorder, attach a t'_'rrite core as _.t_scyiht:c _.ht:lol_'.
1. Place the fl,rritc core approximately 2"
(Scm) from the plug of the headphones or
the end of the DV cable.
2. Hold the f('rrite core and headphone (or
DV) cable in your left hand.
3. Wind the cable around the f_,rritc core once
starting at the bottom.
4. Close the f_,rritc core as shou_l.
5. Connect the headphone cable to the
PHONES jack or the DV cable to the I)V
terlTtJnal on the calT1corder.
Note: Make sure to connect the end of
the DV cable with the ferrite core to the
DV terminal on the camcorde_
152
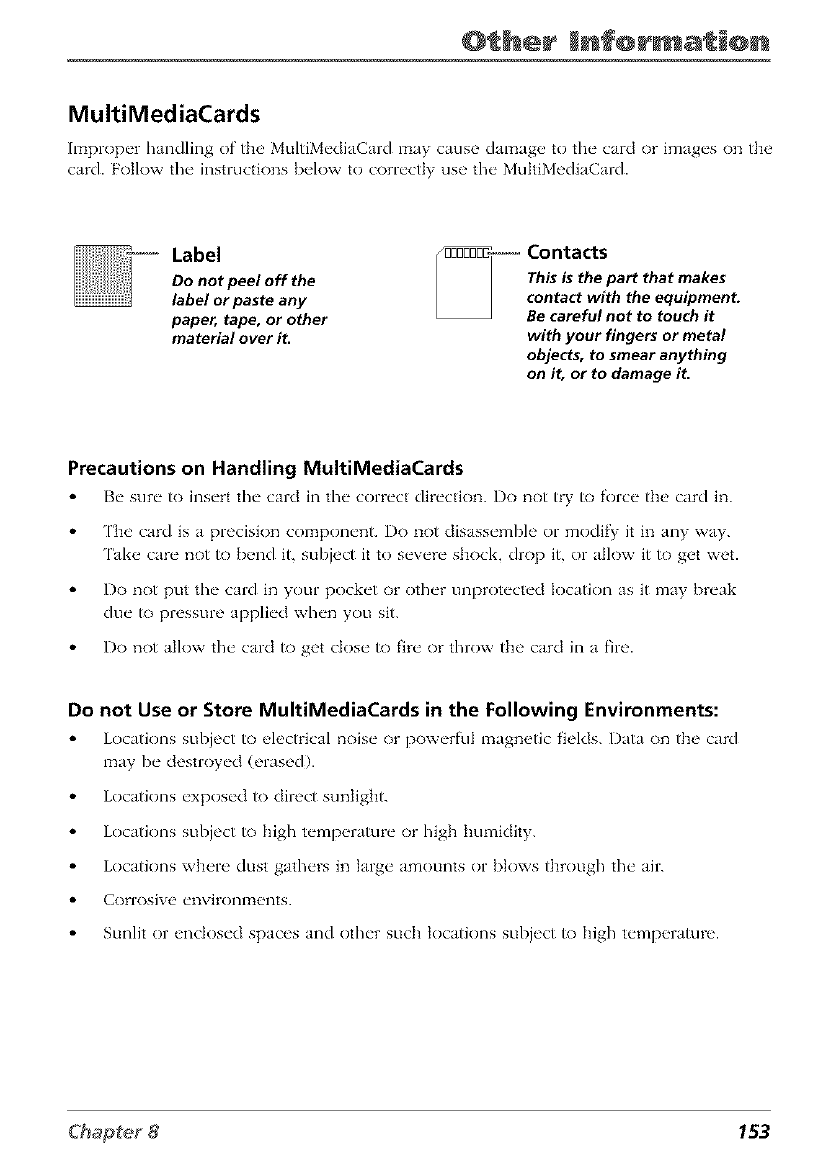
@ her Enf@rmat @n
MultiMediaCards
Improper handling of the' MultiMediaCard may cause dama D, to the card or images on the
card. Follow the instructions b_qow to correctly use the MulthMediaCard.
Label
Do not peel off the
label or paste any
paper, tape, or other
material over iL
_-- Contacts
....... This is the part that makes
;Z:2f:/tLtth,;;Z:£St
with your fingers or metal
objects, to smear anything
on it, or to damage iL
Precautions on Handling MultiMediaCards
Be sure /o insert the card in tile correct direction. Do not try/o force the' card in.
['be card is a precision component, i)o not disassemble or modify it in any way.
Take care not to bend it, subject it to severe shock, drop it, or allow it to get wet.
Do not put tile card in your pocket or <)tiler unprotected location as it may break
due to pressure applied when you sit.
Do not allow tile card to get dose to fire or throw the card in a fire.
Do not Use or Store MultiMediaCards in the Following Environments:
Locations subject to _,lectrical noise or powerful magn_,tic fields. Data on the card
may be destroyed (erased).
Locations exposed to direct sunlight.
Locations subject to high temp_,rature or high bmnidity.
Locations where dust gathers in large amounts or blows through the air.
Corrosive et]virolqlTtelqts.
Sunlit or enclosed spaces and other such tocatkms subject to high temperature.
@ her Enf@rm @n
Watch Out for Static Electricity.
Do not k't dirt or other fl)reign matter nccumulate on the card contacts, or touch
them with your fingers or rub or scrape them. Static ch, ctricity may damage (erase)
data on flw card. Ck'an tJw card by wiping it gently with a soft d W c]ofl_.
When carwing or storing the card, place it in the plastic (polyethylene) bag it was
originally packed in to keep dirt and dust off the contacts and protect it from static
electricity. (This polyethylene bag has been given anti-static treatment.)
Watch Out For Condensation.
Moisture (condensation) may _)rm inside and outside the card ff it is carried in_) an
area subject to sudden large changes of temp_q'ature. _atch out for condensation
b_caus_ _ it carl caus_ _ I_lglfLlnctk)I]S.
When moisture condenses on the card, leave the card at the prevailing temperature
until the drops of moisture evaporate on their own.
Protect Your Image Data.
It is best to copy your valuable imag_' data fl'om the' card onto some otlwr m_'dium
(p_q'sonal computer floppy disk MO disk, etc.) and to backup the contents.
Malfunction, repair, and so on can cause the recorded images to disappear from the
card.
Make absolutely sure not to remove the card or turn the camcorder power off while
the card is recording data, erasing data, or formatting (initializing). This can cause
loss of data and damage to the card.
Initializing the card will erase the data on it. Make sure no important image data is
recorded on the card before you initialize it.
Please be aware that Thomson multimedia Inc. will not be liable for any damages
resulting flom loss of data caused by incorrect handling of the card by you or a third
party, or caused by exposure to static electricity or electrical noise or by malfunctkm.
154
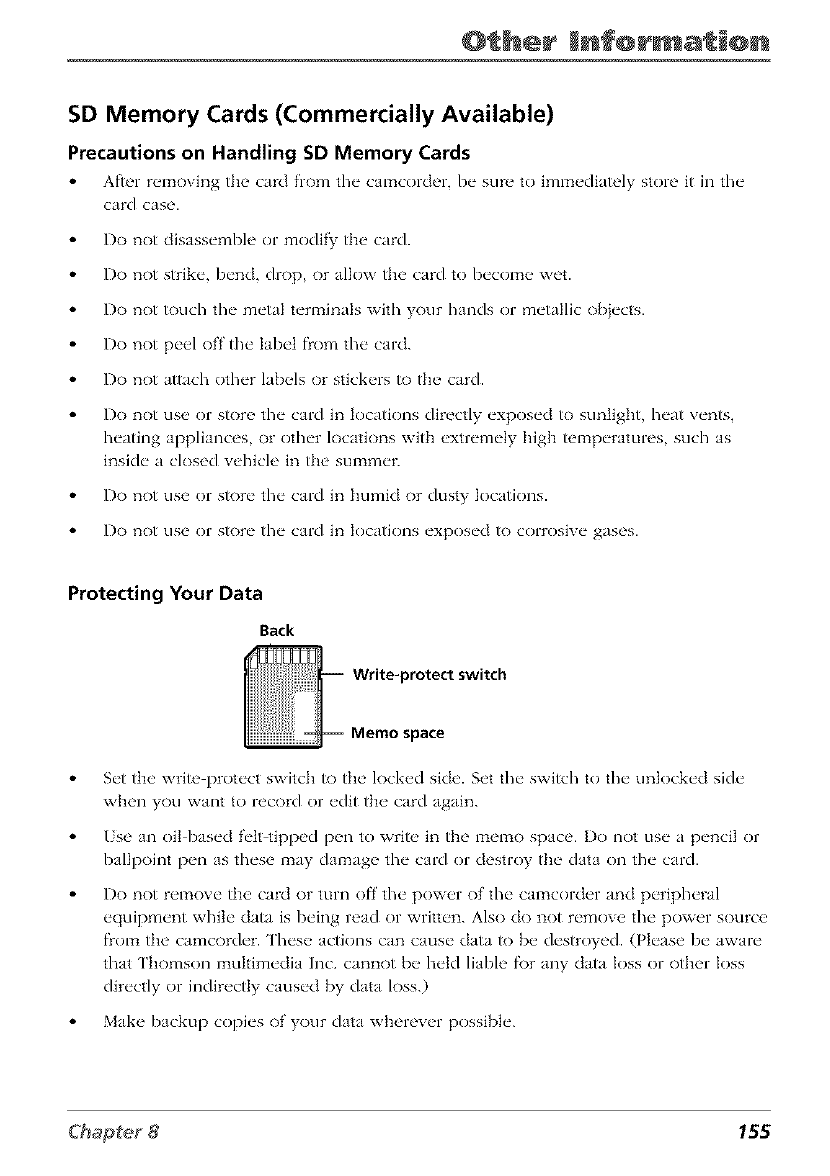
@ her Enf@rmat @n
SD Memory Cards (Commercially Available)
Precautions on Handling SD Memory Cards
After removing the card flona the calncordel", be sure to immcdi_]tely store it in the
c_Ird c_Is{ _.
Do not disassemble or modif_ the card.
I)o not strike, bend, drop or _fllow the card to become wet.
I)o not touch the metal] tcrmin_]]s with your hJnds or mct_]]lic objects.
Do not peel off the label fl'om the card.
I)o not aH;]cb other ];]bcls or stickers to the card.
I)o not us{, or store the card in loc_]tions directly exposed to sunlight, bc_]t vents
bc_]ting JppliJnces or other locations with cxtrcmcIy high temperatures such Js
inside a dosed vehicle in the' summer.
I)o not use or store the card in humid or dusty locations.
I)o not use or store the card in Iocations exposed to corrosive g;]ses.
Protecting Your Data
Back
Write=protect switch
Memo space
Set the write protect switch to the locked side. Set the switch to the unlocked side
when you wJnt to record or edit the card Jgain.
Use an oit based felt-tipped pen to write in the memo space. Do not use a pencil or
ballpoint pen as these may damage tim card or destroy the data on the card.
Do not remove the card or turn off the power of the camcorder and peripheral
equipment while data is being read or written. Also do not remove tim power source
flom the camcorder. These actions can cause data to be destroyed. (Please be aware
that ['homson multimedia Inc. cannot be held liable f\)r any data Ioss or other Ioss
directly or indirectly caused by data loss.)
Make backup copies of your data wherever possible.
155
@ her Enf@rm @n
Care and Cleaning
After Using the Camcorder
1. S_'t th__ POWER switch to OFF.
2. Close and lock the LCD monitor.
3. Slide and hold the qAPE OPEN switch in tlm direction of the arrow and open the
cassette holder cover. Remove the tape. Be careful not to touch the inside of the
cassette holder as you may hurt yourselE
4. Push on the area marked PUSH. ['he cassette holder locks into place.
• Once the cassette holder is dosed, it recedes automatically. Wait until it recedes
completely bef\)re closing the cassette holder cover.
5. Close the cover until it firmly locks into place.
6. Slide the I NLOCK switch, and remove the batte W pack.
7. Roattach the lens cap.
Cleaning The Camcorder
1.
2.
Clean tim exterior, wiping gently with a soft clott_. For heavy dirt, use diluted, mild
soap and wring the cloth well. ['hen wipe again with a dW cloth.
Open the LCI) monitor and wipe it gently with a sofi, d W cloth. Close it when
finished.
3. 'lk) clean the lens, blow it with air using a blower brush. Wipe gently with tens
cleaning paper.
Notes:
Avoid using strong cleaning agents such as alcohol.
Cleaning should be done only after the power supply has been disconnected.
Mold may form if the lens is left dirty.
When using a cleaner or chemically treated cloth, refer to the cautions of each
product.
156
@ her Enf@rmat @n
Dirty Video Heads
/sing the camcorder when the vide{) tape is dirty may cause the heads to clog, producing
noise on the recorded image or prevent the image from being recorded at all. Other
things that may cause clogging include recording in high temperature and higll humidity
environments, a lot of dust in the air, damaged tape, worn tape, long time use or dew
fi)rmation. Vide<) heads becoming dogged soon after deaning may be caused by a
damaged tape. In this case, stop using the tape immediately.
If the vide<) heads arc' clogged, the O indicator appears on the screen during recording.
Signs of clogged heads during playback include: mosaic like noise on the pictures,
picWres that do not move, or the entire screen Wrning blue.
If using a cleaning tape does not clear the vide<) heads, contact an authorized RCA
service center or your dealer for further advice.
Using a Cleaning Tape (Commercially Available)
Vich'o head clt'aning can b_. don{" by using a commt'rcially available clt'aning tap_..
Notes:
Excessive use of a cleaning tape may cause damage to the video heads. Please
read the instructions accompanying the cleaning tape carefully before using it.
The fast forward and rewind functions cannot be used when the cleaning tape
is in the camcorde_
To Use aCleaning Tape
1. lns_,rt a ch, aning tap_" into the"
CalTtCol-d_l -.
CLEANING
I,
CLEANING
i//,
I
2.
3.
Open the LCD monitor and adjust
the angle.
Set the I)SC MODE switch to [APE,
and hold in the Lock button and set
the POWER switch /o PLAY_
• The video head cleaning scr_.en
appears.
Touch .gTARTto begin vide<) head
cleaning. NO _;, CZtMNING flast_es
during cleaning.
• After about 20 seconds, vide<) head
cleaning automatically finishes, and
I_]I,2CT 7Hls' CASSI,277k' is displayed.
• To cancel cleaning, touch STOI{
5. Remove the cleaning tape.
157
@ her Enf@rma @n
Proper Care and Storage
Ke_,p dirt fiom entering the camcorder s cassette tap_" door. Dust and grit are abrasive
and cause, excessive wear to both the"recording/playback h_'ads and tape's.
Always cap the lens when the camcorder is not in use.
BH_)re handling thu camcordcr make sure your hands and face arc fi'ee fi'om any
chemical products such as suntan lotion as it might damage the' finish.
The camcorder might Ix' damaged by improper storage, or handling, l)o not subicct the
camcorder to swinging, shaking, or dropping.
Do not store the carncorder in temperatures below 22F (30C) or ab{)ve 149F (65 C).
When the carncorder is not in use, always remove ttae tape and power supply.
Retain the original carton f\_r furore storage or shipping purposes.
Tape Care and Storage
When finished with a tape, rewind it, remove, it fi'om the' camcorder, and ]ab_q it.
Protect th__tap__using the erase protection tab if' necessary.
Store tapes vertically in their protective cases at nonTnal room temperatures. Never
leave the camcorder or tapes in a car or outdoors for an extended period of time.
Excessive heat or cold might damage tapes.
Keep tapes away fiom strong magnetic fields such as electric motors, speakers, and
other devices.
Keep dust fiom entering the cassette tape compartment. All dust is abrasive and
causes excessive wear on the tape and the camcorder's recording and playback
heads.
Never use tapes with damaged or spliced tape.
Do not use a tape if it has been damaged or exposed to moisture. The tape might
jam and/or damage the camcorder.
158
@ her Enf@rmat @n
Things to Avoid
Do not aR_'mpt to disassembh" tho camcordcr. Th_,ro aro no user s_'_dcoabh, parts
inside.
Avoid operating the camcorder immediately after moving it fi.om a cold location to a
warin location. Give the camcorder 1 1/2 to 2 hours to reach a stable te_nperamre
befi)re inserting a tape.
In cold to warm conditions, condensation might occur causing the tape to stick to the
recording heads and damage the camcorder or tapes.
Never aim the camcorder at tim sun or oflmr bright objects.
Do not leave the camcorder in direct sunlight for exh,nded periods of time. ['he
resuhing heat buildup 1night permanently dmnage the cmncorder's internal parts or
reduce the lifi" of the clock batte W.
Do not operate the camcorder in exffemely humid environments.
Do not operate the camcorder near tim ocean as salt water or spray might damage the
internal par_ of fl_e camcorde_
Do not operate the camcorder for extended periods in temperatures below 40F (4C)
or above 95F (35 C).
Do not expose tim camcorder or power supply/charger to rain or moisture. If any
component becomes wet, turn off the power and take the unit to an authoriT_d RCA
cmncorder service provider.
Do not use any power supply or batteries oflmr titan the ones specified fi)r the
cmncorder. /]sing the wrong accessories 1night cause damage to tim cmncorder.
Traveling Tips
_%ite down your camcord_'r s s_'rial numb_q and k_'_,p it s_'parate fi'om the" camcorder
when trav_Jing. If" your camcorder is lost or stoh'n you will I)_" abk" to ich'ntif_' it.
Use extra care to avoid damage to your camcorder and accessories when operating
them at a beach or pool. Spray, sand, and dust should be aw_ided, ff your lens has
been exposed to the elements, clean it only with proper lens cleaning supplies.
Make sure you have any plug adapters that you might need befi)re taking your
camcorder to other countries. Consult your dealer for advice.
Can T your camcorder in a carwing case when traveling. See the accessories section
(page 167) for a case designed especially fi)r this camcorder. An ordina Wsuitcase or
carl T bag does not offi'r the protectk)n your camcorder needs. %eat your camcorder
as car W on luggage to protect it from rough handling.
159
@ her Enf@rm @n
Specifications
Camcorder
Format
DV N['SC standard
Power source
DC 7.3 VZ (1 sing AC power
supply)
DC 7.4 VZ (1 sing batte W pack)
Power consumption
Viewfinder on:
4.3 W (8.3W wifl/ video light on)
LCI) monitor on:
5.1 W (9.1W with video light on)
Signal system
NTSC type
Recording/Playback Format
Video: digital component recording
Audio: PCM digital recording, 32 kHz
4 channel (12 biD, 48 kHz 2 channel
(16 bid
Cassette tape
Mini I)V cassette rope
Tape speed
SP: 18.8 mmisec.
LP: 12.5 ml2aisec.
Recording time (max.)
SP: 80 minutes
LP: 120 minutes (with 80 rain cassette)
Operating temperature
0°C to 40°C (32°F to 104°F)
Operating humidity
35% to 80%
Storage temperature
20°C to 50°C _4°F to 122°F)
Weight
Approx. 705 g (1.58 Ibs)
Dimensions (W x H x D)
72 mm x 90 mmx 200 mm (3 11/16 '_x 4 21/
32" x 7 11/32 '') (with th{' LCD 12_onitor closed
and xvifl] the view_:inder fully tilted
downward)
Pickup
i/_.6 '_fol"ma*.CCI)
Lens
10X optica]i400X digital power zoom lens
(fl.6, f-4.2 42m12_ in [APE CAMERA mode,
f-5.7-4212am in CARD CAMERA 12_ode), full
range auto f\_cus
Viewfinder
Electronic LCI) color viewfinder
White balmlce adjustment
Auto/Manual adjustm{,nt
LCD monitor system
3.5" diagonally 12_easured, LCD paneI/l'FT
active matrix
Speaker
Monaural
160
@ her Enf@rmat @n
Audio/Video Jacks
S-Video
Y: 1 V(p-p), 75 gl, analog
C: 0.29 V(p p), 75 gl, analog
Video
1 V (p-p), 75 £2 analog output (via Video output
connect)r)
Audio
300 mV (rms) 1 k_2 analog stereo output (via Audio
output connector)
DF
4 pin, IEEE 1394 compliant
Earphone Jack
3.5mm Diameter plug
AC Power Supply
Power requirement
I .S.A. and Canada: AC 120 V, 60 Hz
Other coun'_ries: AC 110 V '_o 240 V_ 50 Hz/60 Hz
Output
DC 7.3V
Dimensions (W x H x D)
80mmx45mmx98mm
(3 5/32 '_ x 1 25/32 '_x 3 27/32 '_)
Weight
Approx. 18t g (0.40 Ibs)
161
@ her Enf@rma @n
RCA Digital Camcorder Limited Warranty
What your warranty covers:
Defi'cts in materials or workmanship.
For how long after your purchase:
90 days from date of purchase fi)r labor charg_'s.
One year from date of purclmse fi)r parts.
Tim warranty period fi)r rental units begins with the first rental or 45 days fiom date of
shipment tothe rental firm, whichever comes first.
What we will do:
During the initial 90 days
Exchange your camcorder with a new or refurbished unit or repair your camcorder. The
option will be ours. There will I)__ no cost to you.
After the 90 days and within one year
Exchange your camcorder with a new or refurbished unit or repair your camcorder. The
option will be ours. Parts will be provided at no charge, but you will b_" responsibh' f\)r
the cost of labor required f\)r the repair.
How you get service:
Call 1_800 283_6503 and have your units date of purchase and model/serial number
ready. ['he model/serial number inf'ormation is on the bottom of your camcorder.
A representative will troubleshoot your problem over the phone. If the
representative determines that you should receive a replacement unit you will be
provided with a Service Request (SR) number and the location of a near[_y exchange
point if one exists. No returns will be accepted without the SR number.
Proof of purchase in the form of a bill of sale or receipted invoice which is evidence
that the product is within the warranty period must be presented/o obtain warranty
service. For rental firms, proof of first rental is also required.
162
@ her Enf@rmat @n
To receive a replacement Camcorder before you return yours:
O l_tion I
1. Provide your Discover, MasterCard, or Visa account number and expiration dat_, to
our phone representative. This is _)r security purposes. If we receive your unit,
excluding all accessories, within 14 days ffolia the date you were provided the SR
number, only i_ms not covered by warramy will be charged _) your account. IF
YOUR UNIT 1S NOr RECEIVED WITHIN 14 DAYS, THE SUGGESTED RETAIL
VALUE OF THE CAMCORDER WILL BE CHARGED TO YOUR CREDIT CARD.
This amount, less $10.00 handling, will be credited if the unit is subsequently
received.
2. _e will send you a replacement unit.
3. Slfip the unit back to us, excluding all accessories, using the replacement unit's
carton. Shipping instructions will be included in the carton along with your SR
number which will allow you to easily ship the unit back to us. Make sure you
insure your shipment in case of d_age or loss. Include with tile shipment:
• Evidence of purchase date, such as a bill of sah' to w'rif_' your unit's warranty
eligibility.
• A brief note describing your camcorder's problem.
• Your name, address and phone number.
Return transportation, storage, handling, and insurance costs are your sole responsibility.
We accept no liability in case of damage or loss.
O_tion II
1. For a fee of $10.00, we will send a replacement unit to file exchange point.
2. The exchange location will notil_ you of its arrival.
3. Take your unit, excluding all accessories, and your evidence of purchase date, such
as a bill of sale, to the exchange location and you will be provicled tile new or
refurbished unit.
4. If the repairs were covered by your warramy, you will not be billed.
183

@ her Enf@rma @n
To receive a replacement unit after we have received your unit:
L Write the SR number on the outside of the carton used to return the unit.
Make sure VOlt insure vour shipment in case of d_age or loss.
2. Carvfully pack thv unit, _'xcluding all acc_,ssorivs, using tlm original box Jnd pJcking
mat_'rial if possible.
3. Include with the shipment:
Evidence of purchase date, such as a bill of sale to veriI_ your unit's warranty
eligibility.
A brief note describing your camcorder's problem.
Your name, address and phone number.
Return transportatkm, storage, handling, and insurance costs are your sole responsibility.
_ze accept no liability in case of damage or loss.
4. The representative will advise the address to mail a cashier's check or money order
fi_r payment if there are any out of warranty labor or parts charges and you elect not
to use your credit card.
5. Upon receipt of your product, a new or refurbished unit will be shipped to you.
What your warranty does not cover:
Adjustment of customer controls.
Damage from misuse or neglect.
A unit timt has been modified or incorporated into other products or is used f\_r
institutional or other commercial purposes.
Batteries fi)r remote' control and clock.
Cleaning of video/audio heads.
Camcorders purchased or serviced outside the U.S.A.
Return transportatkm, storage and handling costs of your unit, including insurance
f\_r loss or damage.
Acts of nature, such as but not limited to Iightning damage.
164
@ her Enf@rmat @n
Product Registration:
Please complete and mail the Product Registration Card packed with your
Camcorder. It will make it easier to contact you should it cvcr be n_,cessaD'. The
return of the card is not required f\)r warranty coverage.
Limitation of Warranty:
THE WARRAN'Pg STATED ABOVE IS THE ONLY WARRANI_ APPLICABLE TO
THIS PRODUCT. ALL OTHER WARRANTIES, EXPRESS OR IMPLIED
(INCLUDING ALL IMPLIED WARRANTIES OF MERCHANTAB1LN_( OR FFI2_ESS
FOR A PARTICULAR PURPOSE) ARE HEREBY DISCLAIMED. NO VERBAL OR
WRITTEN INFORMATION GIVEN BY THOMSON MULTIMEDIA INC., ITS AGENTS
OR EMPLOYEES SHALL CREATE A GUARANI_( OR IN ANY WAY INCREASE THE
SCOPE OF THIS _rARRAN1_(.
REPAIR OR REPLACEMENT AS PROVIDED UNDER "I]flS WARRANTY IS "lifE
EXCLUSIVE REMEDY OF THE CONSUMER. "I]fOMSON MULTIMEDIA INC.
SHALL NOT BE LIABLE FOR INCIDENTAL OR CONSEQUEN'lqAL DAMAGES
RESULTING FROM THE USE OF THIS PRODUCT OR ARISING OUT OF ANY
BREACH OF ANY EXPRESS OR IMPLIED WARRANa_( ON THIS PRODUCT. "l]fIS
DISCLAIMER OF WARRAN'nES AND LIMITED WARRANa_( ARE GOVERNED BY
THE LAWS OF THE STATE OF INDIANA. EXCEtrF TO "lifE EX'I_NT PROHIBFFED
BY APPLICABLE LAW, ANY IMPLIED WARRAN'FY OF MERCHANTABILFFY OR
FITNESS FOR A PARTICULAR P_SE ON THIS PRODUCT IS LIMFFED TO "lifE
APPLICABLE WARRAN'FY PERIOD SEa" FORa_ ABOVE.
How State Law relates to warranty:
Some states do not nllow the _xclusion nor limitation of incidental or consequential
damages or limitations on how long an implied warranty lasts so the above
limitations or exclusions may not apply to you.
This warranty gives you specific legal rights, and you also may have other rights that
wtry from state to state.
If you purchased your camcorder outside the United States:
This warranty does not apply. Contact your dealer f\)r warranty information.
165

@ her Inf@rma i@n
FCC Declaration of Conformity and Industry
Canada Information
FCC Regulations state that unauthorized changes or modifications to this equipment may
void the user's authority _) operate it.
Tiffs device c<maplies with part 15 of FCC Rules. Operation is subject to the fk)Ilowing two
conditions: (1) This device l_aay not cause harmful interf_'rence, and (2) This device must
accept any interf_'rence received, including interf_,rence that may cause undesired
operatkm.
This Class Bdigital apparatus complies with the Canadian ICES 003.
Cet appareil num{>rique de la Classe Best confk)rme _ la norme NMB 003 du Canada.
This equipment has been type tested and fk)und to col_aply with the limits for a Class B
Digital Device in accordance with the specifications in Part 15 of the FCC rules. These
rules are designed to provide reasonable protections against radio and television
interference in a residential installation. Fhis equipment generates, uses and can radiate
radio flequency energy and, if not installed and used in accordance with the instructions,
may cause han_aful interf_>rence to radio com_aunications. However, there is no guarantee
that interference will not occur in a particular installation.
If this equipment does cause interference to radio or television reception (which you can
determine by turning the equipl_aent off' and on), try to correct tile interference by one or
more of tile following l_aeasures:
Reorient or relocate the receiving antenna (that is, tile antenna f\)r tile radio or television
that is "receiving' the interf_'rence).
Change the position of the Camcorder with respect to the radio or television equipment
that is receiving interf_,rence.
Move the Camcorder away from tile equipment that is receiving interference.
Plug the Camcorder into a difl'erent wall outlet so that the Camcorder and the equipment
receiving interf_'rence are on difl'erent branch circuits.
If these measures do not eli_ainate the interference, please consult your dealer or an
experienced radio/teteviskm technician for additional suggestions. Also, the Federal
Coml_aunications Commission has prepared a helpful booklet, "How To Identif}' and
Resolve Radio/'FV Interfl>rence Probletias. ['his booklet is aw_ilable from the U.S.
Governl_aent Printing Office, _ashington D.C. 20402. Please speci}_ stock number 004
000 003454 when ordering copies.
For more inforl_aation of FCC confk)maity: Thomson l_aultimedia Inc.,
10330 N. Meridian Street, Indianapolis, IN 46290; 1-800 587 5850.
166
@_her Enf@rmat_@n
Optional Accessories
_{' invite you to take t look at some great ideas fi)r sparking creativity and adding to the
fun of using your camcorder. The _)tlowing pages have a selection of accessories to help
make your memorable moments look and sound even better.
l'hese accessories are designed to make the process of recording and watching your
xideos more enioyable.
To order accessories, contact your local Dealer.
If t dealer is not nearby, all accessories are available through toll fiee ordering or by
using the order form ff)und on page 169.
AC201A Soft Carrying Case
Custom compact soft case designed especially to
provide protection and utility for your camcorder and
most accessories. Rugged fabric lined with soft
nonabrasive material and generous padding. Has
three outside pockets with storage for lens filters,
adapters, batteries, and tapes.
254338 Shoulder Strap
Designed to r{,place the shoulder strap that came
with your camcorder.
254336 Audio/Video/S-Video Cable
Replacement for the included A/V cable. Used to
attach the camcorder to an external component like a
TV or VCII.
__ H2011 DVCable
[]sed to connect the camcorder to a compatibh' PC
with a IEEE1394 DV interface.
All specifications and descriptions of accessories are subject to change without notice
167
@ her Enf@rm @n
Using the Optional AC088 Tripod
Mounting the, camcorder on a tripod, such as AC088, k_,eps the camcorder steady and
produces exce]h, nt video results.
This uipod s fluid _,f'fect head provides slzaootb calzaera pan and tilt. The quick rel(,ase
mount makes it easy to affach or remow >the camcorder. The grooved, tubular 3 section
leg design f\)tds down to 26" when not in use. Rubber f_'et allow f\)r sure footing.
Cautions:
Before using a tripod, make sure it is
stable enough to hold the camcorder
without falling ove_ Do not transport
the camcorder attached to the tripod
When attaching your camcorder to a
tripod, be careful not to force the tripod
screw into the camcorder's tripod
mounting hole
The tripod screw should not protrude
into the camcorder more than
approximately three-eighths (3/8) of an
inch Forcing the screw could damage
the mounting hole on the bottom of the
camcorde_
168
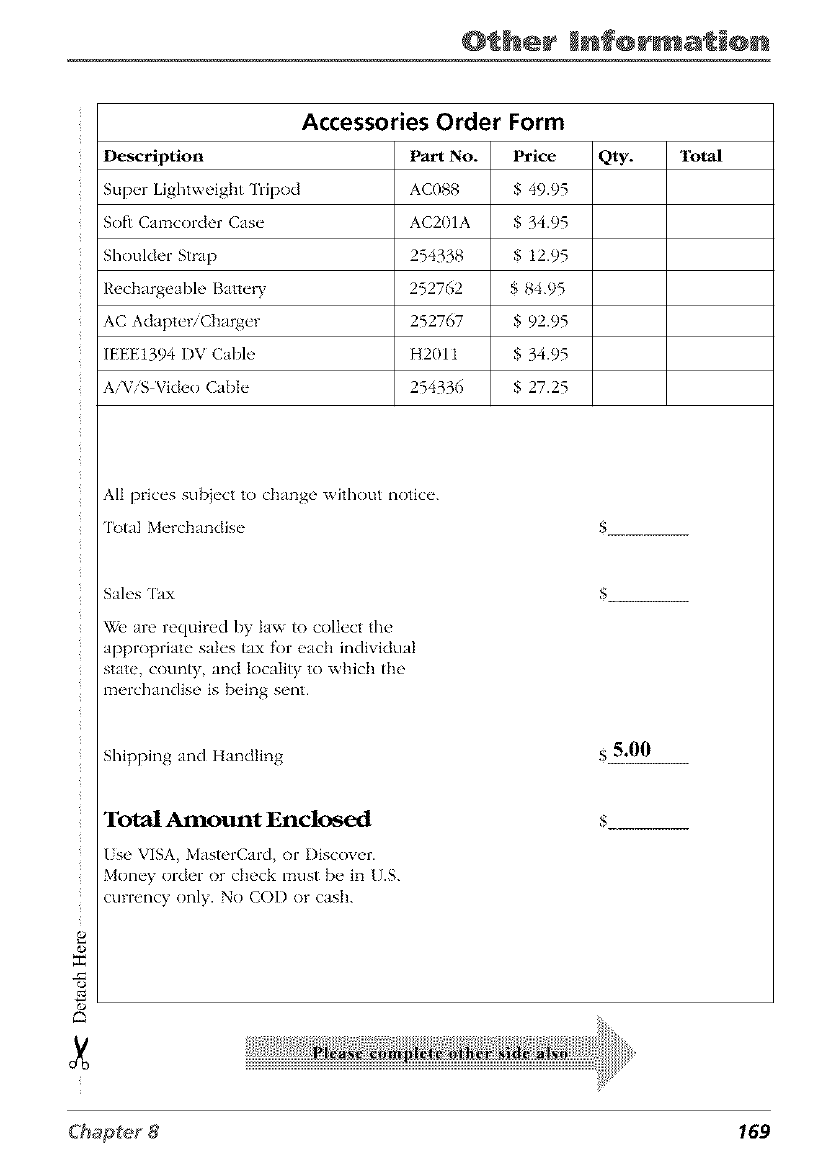
@ her Enf@rmat @n
Accessories Order Form
Description
Supper Lightweight Tripod
Soft Camcorder Casv
Shoulder Strap
Rechargeabh, Batty"W
AC Adaptvr/Cbargvr
IEEE1394 DV Cable
AiViS Video Cable
Part No. Price
AC088 $ 49.95
AC201A $ 34.95
254338 $ 12.95
252762 $ 84.95
252767 $ 92.95
H2011 $ 34.95
254336 $ 27.25
Qty. Total
All prices subiect to change without notice.
'lk_tal Merchandise $
e
o
"r"
_O
r,
Sales h]x
_Ze are required by law to collect the
appropriate sales tax for eadl individual
state, county, and locality to which the
merchandise is being sent.
Shipping and Handling s5.00
Total Amount Enclosed
Use VISA, MasterCard, or I)iscover.
Money order or check must be in U.S.
currency only. No COD or cash.
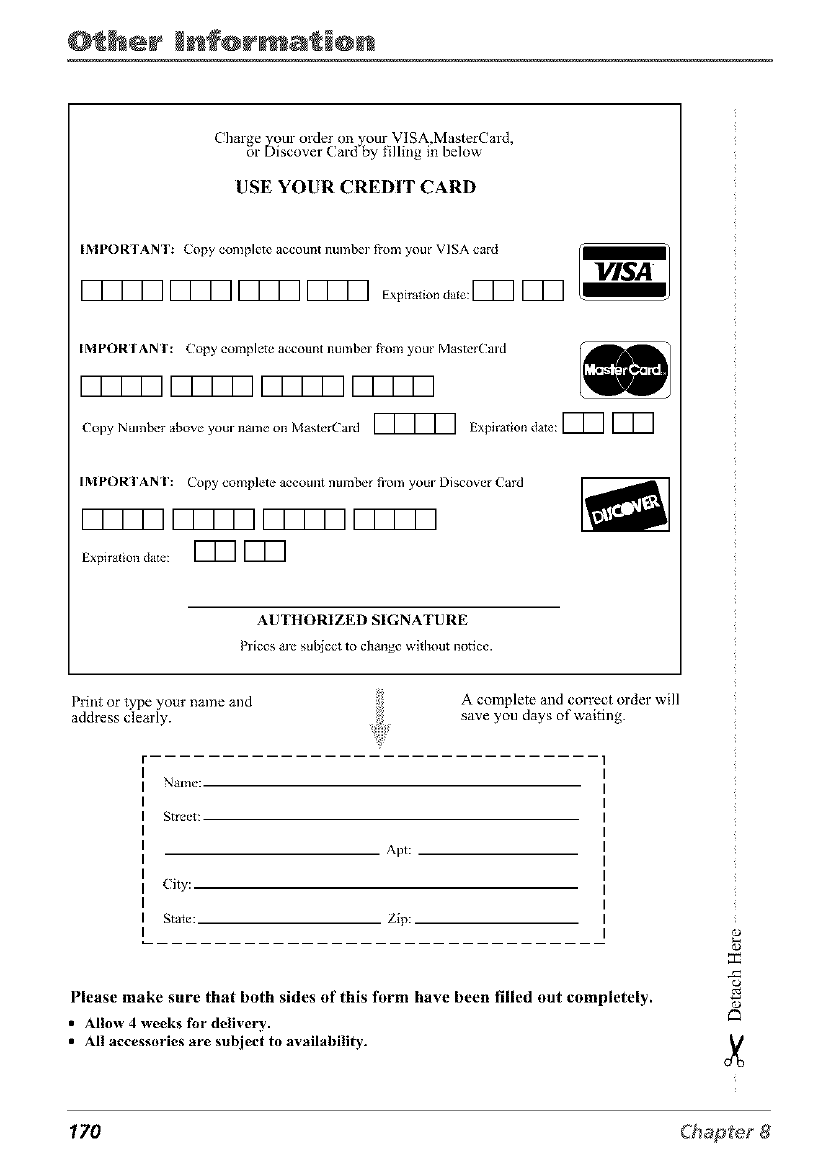
@_her Enf@rm_@n
Charge your order on _our VISA MasterCard
or D scover Card by filling n below'
USE YOUR CREDIT CARD
IMPORTANT: Copy complete account numbm i_om your VISA card _"
17777177717771777 E_,_,t,o_d_o:r77 lED
IMPORTANT: Copy complete account numbm i?om your Master(aid
r7777 VTTT7 r7777 r7777
Copy Nmnber above your na ...... Master(aid _ Expiration date: [77 [77
IMPORTANT: Copy complete account number fi'om you," Discover Card
1777717777 VT777177T1
Expiration date: [77 [77
AUTHORIZED SIGNATURE
Plices are subject to change without notice.
Print or type your name and A complete and correct order will
address clearly, save you days of waiting.
Name:
Street:
Apt:
City:
Stam: Zip:
Please make sure that both sides of this form have been filled out completely.
•Allow 4 weeks for delivery.
•All accessories are subject to availability.
170
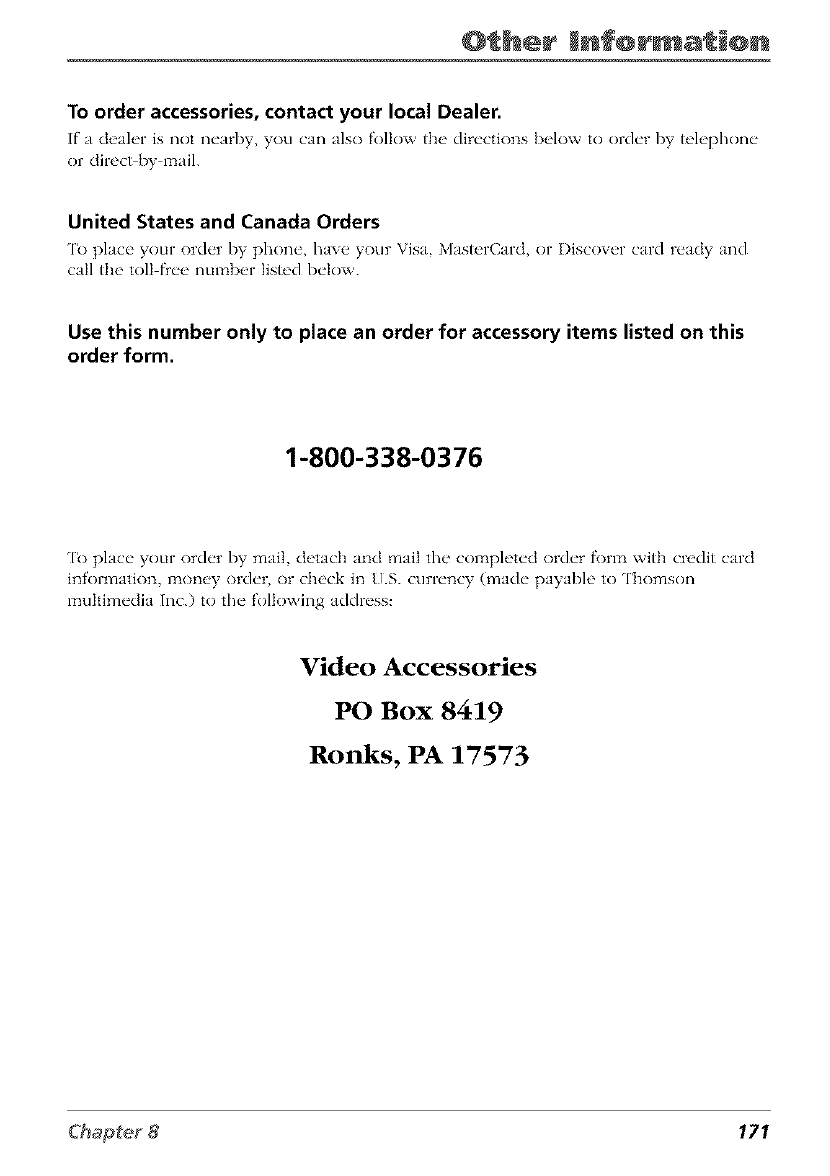
@_her Enf@rmat_@n
To order accessories, contact your local Dealer.
If" n d_'ah'r is not n_'arby, you can Jlso follow the' dir_'ctions b_dow to old_'r by t_'h'phon_"
or dil'_'ct by ITt:]il.
United States and Canada Orders
'1_)plnce your order I)7- phone, haw, your Visa M_st_'rCm'd, or I)iscoxa'r card ready Jnd
call the toll free number Iist_'d below.
Use this number only to place an order for accessory items listed on this
order form.
1-800-338-0376
[k) place your order by mail, detach and mail the col_apleted order fk)n_a with credit card
information, _zaoney order, or check in [/.S. currency (made payable to Thomson
multimedia Inc.) to the following address:
Video Accessor_s
POBox 8419
Ronks, PA 17573
171

This page left intentionally blank.
Symbols
12-bit audio 80
16-bit audio 80
24 hour time mode 27
A
Accessories 6, 167
included 6
optional 167
order k)rm 169
unpack 11
Adapter/charger 12, 20, 23
Advanced f('atures 97
Area, setting 26
AI I)IO button 82
AI I)IO I)IB button 81
Audio dubbing 80
Audio indicators 40
Audio modes 53
Audio playback 82
AII)IOSETmenu 111, 112, 113
Audio/video input jacks 65, 84
Auto f_)cus 106
AV+S }ack 65
Basic playback 68
BatteW, care and storage 22
Battew, charging 20
Battery level icon 21
BRIGHTER screen 103
Buttons and controls 7
C
Camcorder cleaning 156
Camcorder mode 9
CAMERA SE[' screen
109, 123, 124, 125
Capture still images 79
Card, formatting 127
CARl) OPEN button 13, 25
Card playback 128
Card playback status displays 37
Card reader, attach 138
Card recording 122
Card slot 25
CARD-CAMERA mode 48
Care and cleaning 156
Cassette holder 15
Cassette tapes 15
Cassettes, care and storage 151
CD rom, how to handle 137
Changing the JPEG default 142
Charging the batte W 19
Choose your connection 65
Cleaning 156
Cleaning tapes 157
Clock lithium ceil, installing 25
CLOCK SET menu 26, 28, 114
Confirmation sound f_'ature 116
Connecting
anofl/er I)V camcorder 83
qW (_)r VCI,') with jacks 84
Connecting to a computer
I)V 11394 Firewire) 143
CONFROL dial 10, 33, 42, 69, 119
Controls and buttons 7
D
Date and time, display 29
Date and time, setting 26
I)aylight saving time, set 28
I)efinitions, mode and menu screens 89
I)EL ALL button 131
I)EL button 130
Delete protection 129
I)eteting all stored images 131
I)eteting stored images 130
Demonstration mode 117
I)ew f_)rmation 151
DIALOG REC f_'ature 112
Digital efl'ect playback 73
Digital image stabilization 56
Digital picture efl_'cts 108
Digital still camera 122
Digital zoom 55
Dirty video beads 157
DISPLAY ON/OFF button 10, 48, 71
Displaytilzaecodeon['V 64 G
Downloadingstillimagestoyour
computer140
Driversfl)rcardreader,install139
DSCMODEswitch9,14,17,18,30,46,
47,48,50,51,65,66,68,74,77,78,
79,89,117
DUAL-CAMERAmode47
Dubbing
anotherdigitalcamcorder83
audio80
audiorecorded80
tapetocard78 H
R)aVCR79,85
toanotherdigitalxideo camcorder 83 Handstrap 1i
l)ubbing images [
card to tape 134
DV cable 143
DV cable, optional 83
Edit search 51
Erase protection tab 15
E['C lzaenu 64, 65, 77, 117, 127
Exposure control 102
EXPOSURE screen 102
Eyepiece R)cus control 16, 34
FADE button 57
Fade icon 39
Fading 57
FCC information 166
Ferrite cores, attaching 152
FF button 18, 68, 85
Final notes 150
Firewire connection 143
Focus, auto and lzaanual 106
Focus icons 39, 41
FOCIS switch
14, 46, 47, 48, 49, 106, 122
Fonzaatting a card 127
FulI_auto lzaode 14, 49
Full-screen display 128
Gain control 103
Gamma brightness 52
GAMMA EFE button 52
Gamma indicators 40
GAMMA PB button 70
Gamlzaa playback 70
Getting started 11
Guide frame, recording with 125
GUIDE FRM fl'ature 125
Icons 35
Icons, on-screen 35
Icons, warning 35
IEEE1394 connection 143
Image size, select 123, 124
Important infl)rmation 2
Index, add and delete 75
INDEX button 74
Index, card 77
INDEX screen 74
INDEX SEARCH f_'ature 77
Industry Canada infi)rmation 166
Infrared light transmitter 97
IR LIGHT button 97
Journalistic shooting 49
JPEG defimlt 142
LCI) BRIGHT fi'ature 33
LCI) cable 118
LCI) COLOR fi'ature 33
LCI) monitor, use as remote control 118
LCI) lzaonitor, use f\)r recording 32
Lens cap 12, 18
Lens hood 24
174
Light A/]['OiOFFiON switch 58
Light, vide() 58
Limitd warranty 162
Lithium cell holder 25
Lithium cell, installing 25
Loading PbotoStudk) 2000 137
Lock button 9, 17, 18, 26, 30, 46, 47, 48,
49, 52, 53, 55, 56, 57, 60, 62, 64, 68,
73, 74, 77, 78, 79, 100, 106, 108, 109,
112, 113, 114, 117
LP speed 30
M
Macro zooming 55
Manual focus 106
MANUAL SE[' menu 26, 108
MANUAL SE[' menu, definitions 89
Manual white balance 101
Memory cards 17
insert and remove 13
MENU button 26, 28, 43, 77
Menu screen definitions 89
Mini DV cassettes 15
Mode screen definitkms 89
Mode screens 42, 88
MODE SELECT screen 119
MILTI FRAME f_'ature 71
MultiMediaCard 122, 127
MultilnediaCard 140
MultiMediaCards 13, 47, 153
Multiple strobe playback 71
Multiple strobe recording 60
N
Night 1node fi'ature 97
NIGHT MODE indicators 40
NIGHT MODE switch 97, 117
O
On screen icons 35
OPEN button 16, 26, 28, 30
Optical zooming 54
Optional accessories 167
Order form 169
OTHERSscreen 127
P
Parts checklist 6
PB ZOOM button 72
PHOTO SNAP fi'ature 60, 62
PIC.EFFEC[' f_'ature 73, 108
Picture quality, select 123
PLAY button 65
PLAY/grILL button 18, 66, 68, 69, 78, 83, 85
Playback, basic 68
Playback icons 38
Playback on a TV (or VCR) with AiV inputs 85
Playback options 68
PLAYBACK SET lnenu 132
Playback zooln 72
Plug adapt_,r 23
Power connecR)r 12, 23
Power. final notes on 150
POWER ON/OFF switch 119
Power supply 22
attaching 12
removing 23
using 22
Probleln solving 146
Product registration 2
Program AE f_,ature 98
Program AE icons 38
Program AE with special eff_'cts 98
PROTECF button 129
Q
Quick return 50
QIICK RTRN button 50
R
RCA digital camcorder lilnited warranty 162
REC button 134
REC STAR'IYS ['OP button
17, 46, 57, 63, 66, 134
Record still picture on card 47
Record video on tape 47
(conti*_m,d on _*extpage) 175
Recording and playback icons 38
Recording, basic 17
Recording from an external source 65
Recording icons 38
Recording modes 46
Recording speed 30
Recording tips 66
Removing the power supply 23
RETI ItN button
27, 55, 71, 72, 74, 77, 100
REW bum)n 18, 68, 85
S
S VIDEO fbature 65
S vide<) input menu feature 65
SCENE MENU 98
Screen backlight 33
SD memory cards 13, 155
Self timer recording 126
Self recording 49
SELF ['[MER button 126
SE[" button 26
Shoulder strap 24
SHU ['.SPEED screen 104
Shutter speed control 104
Shutter speeds 99, 105
Shuttle search 70
SLIDE EFE button 133
SLIDE SHOW button 132
Slide show effl, cts 133
Slide show playback 132
Solving problems 146
SOUND fbature 116
SP speed 30
Speaker w_lume, adiusting 69
Special effects icons 38
Specificatkms 160
SRCH button 51
Start recording 17
Status icons 39
Stere<) earphones, optkmal 10
STILL button
17, 47, 48, 61, 63, 71, 122, 126
Still image playback 69
Still image recording on tape 62
Still images 18
STOP button 18, 68
Storage, proper 158
System requirements for PbotoStudk)Q_)2000
136
1"
[ape care and storage 158
[APE OPEN switch 15
[ape playback using index images 74
[ape speed icon 41
[APE-CAMERA mode 46
[apes, final notes on 151
['C OU[' button 64
['hings to avoid 159
['humbnait images 128, 130
['ime and date, display 29
["ime and date, setting 26
['ime code display 64
['ime code icon 41
['ime counter icon 41
['line-remaining icon 39
'l)ansf]'rring still images and video to a
computer 143
[raveling tips 159
%oubleshooting 146
U
UNLOCK button 23, 118
USB port 138
V
VF BRIGHT fbature 33
Vide<) light 58
Vide<) light bulb, replacing 59
Vide<) recording, final notes on 150
Viewfinder 12, 16, 23, 46, 47, 48, 122
Viewfinder playback 69
Viewfinder, using 34
VOL buttons 18, 69
176
W
Warning icons 35
WHITE BAL. screen 100
White balance h'ature 100
Wide mode (16:9) 109
Wind cut f_'ature 113
World clock 114
Z
Zoom buttons 17
Zoom buttons 21, 46, 47, 54, 55, 106, 122
Zoom icons 40
Zoom microphone 110
Zoom microphone mode 111
Zooming 54
177

Visit the RCA website at www.rca.com
Please do not send any products to the Indianapolis address listed in this manual or
on the carton. This will only add delays in service for your product.
Thomson multimedia Inc.
10330 North Meridian Street
Indianapolis, IN 46290
©2001 Thomson multimedia Inc.
Trademark(s)® Registered
Marca(s) Registrada(s)
Printed in Japan
TOCOM 15804080
Part No. TINSE0427TAZZ
O
'n.IOMSON
THOMSON
