RCA DVD Systems Manual L0011229
User Manual: RCA RCA DVD Systems Manual RCA DVD Systems Owner's Manual, RCA DVD Systems installation guides
Open the PDF directly: View PDF ![]() .
.
Page Count: 96
DVD Player
User's a ual
Changing a,n.
Important Information
This symbol indicates that this product
incorporates double insulation between
hazardous mains voltage and user
accessible parts. When servicing use only
identical replacement parts.
This symbol indicates
"dangerous voltage" inside the
product that presents a risk of
electric shock or personal injun/.
,_ This symbol indicates
important instructions
accompanying the product.
FCC NOTE (for U.S.A.):
This equipment has been tested and found to comply with the limits for a
Class B digital device, pursuant to Part 15 of the FCC rules. These limits are
designed to provide reasonable protection against harmful interference in a
residential installation. This equipment generates, uses and can radiate radio
frequency energy and, if not installed and used in accordance with the
instructions, may cause harmful interference to radio communications.
However, there is no guarantee that interference will not occur in a particular
installation. If this equipment does cause harmful interference to radio or
television reception, which can be determined by turning the equipment off
and on, the user is encouraged to try to correct the interference by one or
more of the following measures.
•Reorient or relocate the receiving antenna.
• increase the separation between the equipment and receiver.
• Connect this equipment into an outlet on a circuit different from that to which
the receiver is connected.
•Consult the dealer or an experienced radio/TV technician for help.
This class Bdigital apparatus meets all requirements of the Canadian
Interference--Causing Equipment Regulations.
Product Registration
Please fill out the product registration card and return it immediately. Returning
this card allows us to contact you if needed.
Keep your sales receipt to obtain warranty parts and service and for proof of
purchase. Attach it here and record the serial and model numbers in case you
need them. The numbers are located on the back of the player.
Model No. RC5225P
Serial No.
Purchase Date:
Dealer/Address/Phone:
WARNING
To reduce the risk of fire or shock hazard, do
not expose this DVD player to rain or moisture.
No objects filled with liquids, such as vases,
shall be placed on the apparatus.
CAUTION
THIS PRODUCT UTILIZES A LASER. USE OF
CONTROLS OR ADJUSTMENTS OR
PERFORMANCE OF PROCEDURES OTHER
THAN THOSE SPECIFIED HEREIN MAY
RESULT IN HAZARDOUS RADIATION
EXPOSURE. DO NOT OPEN COVERS AND
DO NOT REPAIR YOURSELF. REFER
SERVICING TO QUALIFIED PERSONNEL.
CAUTION
FCC Regulations state that unauthorized
changes or modifications to this equipment may
void the user's authority to operate it.
Note:
This DVD player is designed and manufactured
to respond to the Region Management
Information. If the Region number of a DVD
disc does not correspond to the Region
number of this DVD player, this DVD player
cannot play the disc. The Region number for
this DVD player is Region No 1,
No_:
This device is protected by U.S. patent numbers
4,631,603 and 4,577,216 and 4,819,098 and
other intellectual property rights. The use of
Macrovision's copy protection technology in the
device must be authorized by Macrovision and is
intended for home and other limited pay-per-
view uses only, unless otherwise authorized in
writing by Maerovision. Reverse engineering or
disassembly is prohibited.
II
! I
LASER
PRODUCT
Introduction
Introduction
Your DVD player is equipped with some special features. The following information summarizes
some of these features.
The On-Screen Information Display
The Info Display is a menu bar that you can bring up to access certain features while discs are
playing. Icons represent the different features supported by your DVD player. By selecting
different Info Display icons, you can access features including Scene Snip, Repeat, Audio, Subtitles,
Bookmarks and Camera Angle.
Time Search
The Time Search feature lets you go to a point on a disc by entering the elapsed time in the ot"l-
screen time display. For example, if your favorite scene in a movie is one hour and twelve minutes
after the beginning of the movie, you can enter 01:12:00 into the time display and go right to that
point in the movie.
The Bookmarks Feature
You can bookmark a point on a disc that you can go to quickly with the bookmark feature. You
can store up to six bookmarks. For example, if you have a favorite scene in a movie, you can
bookmark it so you can return to it without having to fast forward or reverse to find the exact
scene.
Ratings Limits and Scene Snip
Your DVD player allows you to set ratings limits and passwords. For example, you can set the
DVD player so that any movie with a PG-13 rating or above requires a password to be entered.
You can use Scene Snip to edit out sections of a disc. When this disc is played, you must have the
password to view the original version.
Since not all discs contain ratings, you can also decide if you want to allow free access or require
a password to view unrated discs.
Scene Again TM
When you are watching a DVD disc, by pressing the GO BACK-AGAIN button on the remote'you
can replay ascene instantly. The Scene Again TM feature goes back approximately ten seconds and
replays both video and audio while turning on the subtitles.
(e)lPruSurround
The TmSurround ®option can be used to simulate a six-speaker listening experience through two
speakers.
SRS/TruSurround and the (@) symbol are trademarks of SRSLabs, Inc. in the United States and selected
foreign countries. TruSurround technology is incorporated under license from SRSLabs, Inc.
Table of Contents
Introduction .............................................................................................. 1
Chapter 1: Connections & Setup
Things to Consider Before You Connect ......................................................................... 6
Protect Against Power Surges ................................................................................... 6
Protect Components from Overheating ................................................................... 6
Position Cables Properly to Avoid Audio Interference ............................................ 6
Connection Pictures ................................................................................................... 6
Types of DiscsYour DVD Player will Play .................................................................. 6
Choose Your Connection .................................................................................................. 7
Cables Needed to Connect Components to Your TV ............................................... 7
DVD Player + TV with AudioNideo Input Jacks ....................................................... 8
DVD Player + TV + VCR .............................................................................................. 9
DVD Player + TV + Dolby Pro Logic, Dolby Digital ®or DTS®Receiver ...... i............ 10
DVD Player + TV + 5.1-Channel Audio/Video Receiver .......................................... 12
DVD Player + TV + VCR + Satellite Receiver ............................................................ 14
The Jacks onthe Back of the DVD Player ..................................................................... 16
Install Batteries in the Remote ...................................................................................... 17
Turn on the TV and DVD Player ..................................................................................... 17
How to Find Your TV's Video Input Channel ................................................................ 18
How to Move Around the DVD Player's Menu System ............................................... 19
Set the Menu Language ................................................................................................. 19
Setting Other Options .................................................................................................... 19
A Quick Tour of the Remote .......................................................................................... 20
Component Buttons ................................................................................................. 20
DVD Buttons ............................................................................................................. 20
Chapter 2: Playing DVDs
Regional Coding ............................................................................................................. 24
Using Different Menus ................................................................................................... 24
Loading and Playing Discs ............................................................................................. 24
Using a Disc Menu .......................................................................................................... 25
Using the On-Screen Info Display ................................................................................. 27
Time Display .............................................................................................................. 28
Selecting a Title ........................................................................................................ 28
Selecting a Chapter .................................................................................................. 28
Using Scene Snip Editing ....................................... t................................................. 29
Selecting Subtitles .................................................................................................... 31
Changing the Audio Language ............................................................................... 32
Using the Repeat Feature ........................................................................................ 33
Using Bookmarks ...................................................................................................... 34
Changing the Camera Angle ................................................................................... 35
Manufactured under licensefrom Dolby Laboratories. "Dolby" and the double-D symbol are trademarks of Dolby Laboratories.
Confidential unpubLished works. ©1992-1997 Dolby Laboratories, Inc. All rights reserved.
DTSis a registered trademark of Digital Home Theater Systems, Inc.
•2
Table of Contents
Disc Playback Features Using the Remote ........................................................ _........... 36
Fast Motion Playback (Picture Scan) ....................................................................... 36
Freeze Frame and Frame Advance .......................................................................... 36
Slow Motion Playback .............................................................................................. 36
Chapter Advance ...................................................................................................... 36
Scene Again TM ........................................................................................................... 37
Subtitles .................................................................................................................... 37
Audio Language ....................................................................................................... 37
Camera Angle. .......................................................................................................... 37
Scene Snip Edit ......................................................................................................... 37
Zoom ......................................................................................................................... 38
Chapter 3: Playing Audio CDs
Using the Info Display .................................................................................................... 40
Using the Time Display ............................................................................................. 40
Selecting aSpecific Track ......................................................................................... 40
Selecting a Play Mode .............................................................................................. 41
Using the Program Play Feature .............................................................................. 41
Editing a Playlist ................................................................................................. 42
Using the Repeat Feature ....................................................... ................................. 42
Using IntroScan ........................................................................................................ 43
Using Bookmarks ...................................................................................................... 44
Dub Assist ................................................................................................................. 45
Chapter 4: Playing Video CDs
What is a Video CD? ................................................................................................. 48
The Video CD Disc Menu .......................................................................................... 48
Video CD Information Display ................................................................................. 49
Selecting a Specific Track ................................................................................... 50
Selecting a Specific Index .................................................................................. 50
Using the Repeat Feature .................................................................................. 50
Changing the Audio Channel Output .............................................................. 51
Skipping Tracks ......................................................................................................... 51
Chapter 5: The DVD Player's Menu System
The DVD PLayerMenu System ................................................................................. 54
Two Types of Menu Items: Path and Action ........................................................... 54
The Play/Resume Play Option .................................................................................. 54
The Play Mode menu ............................................................................................... 55
Selecting a Play Mode ....................................................................................... 55
How to Create a Program ................................................................................. 56
Creating a Program List for an Audio CD ......................................................... 56
Creating a Program List for a DVD Disc............................................................ 57
Editing a Program ........... ................................................................................... 57
Autoplay ............................................................................................................. 58
Dub Assist........................................................................................................... 58
3
Table of Contents
The Lock Menu ......................................................................................................... 59
Locking Your DVD Player ................. :................................................................. 59
Unlocking Your DVD Player ............................................................................... 59
Changing Your Password ................................................................................... 59
Editing Your Scene Snip Disc Library ................................................................ 60
Setting the Ratings Limit ................................................................................... 60
How to Set DVD Limits .................................................................................. 60
Changing to a Different Country's Rating System ....................................... 61
Rated Titles ......................................................................................................... 61
Unrated Titles ..................................................................................................... 62
Front Tray Lock ................................................................................................... 62
System Test ......................................................................................................... 62
The Display Menu ..................................................................................................... 63
TV Image ............................................................................................................ 63
Front Display ...................................................................................................... 64
On-Screen Displays ............................................................................................. 64
The Sound Menu ...................................................................................................... 65
Digital Output .................................................................................................... 65
Analog Output ................................................................................................... 66
2-Channel Stereo ........................................................................................... 66
5.1-Channel Out ............................................................................................. 67
Sound Logic ........................................................................................................ 68
The Languages Menu ............................................................................................... 69
Changing the Player Menus Language Preference ......................................... 69
Changing the Disc Menus Language Preference ............................................. 69
Changing the Audio Language Preference ...................................................... 70
Changing the Subtitle Language Preference ................................................... 70
Glossary ..................................................................................................................... 71
Language Code List .................................................................................................. 72
Chapter 6: Other Information
Troubleshooting ....................................................................................................... 74
Handling Cautions ................ :................................................................................... 77
Maintenance of Cabinet .......................................................................................... 77
Formation of Condensation .................................................................................... 77
Handling Discs .......................................................................................................... 77
Cleaning Discs ................................................................................................ ;.......... 77
Universal Remote ..................................................................................................... 78
Program the Remote ......................................................................................... 78
Operate Components after Programming the Remote .................................. 79
Codes .................................................................................................................. 80
Front Panel Controls .......................................................................................... 81
Front Panel Display .................................................................................... _....... 82
Limited Warranty RCA Digital Video Disc (DVD) Player ......................................... 85
Accessories and Order Form .................................................................................... 87
Index .................................. ....................................................................................... 90
4
Chapter 1
Connections & Setup
Chapter Overview:
• Things to Consider Before You Connect
• Choose Your Connection
•The Jacks on the Back of the DVD Player
• Inserting Batteries in the Remote
•How to Find Your TV's Video Input Channel
•How to Move Around the DVD Player's Menu System
•Set the Menu Language
•The Remote Control
Changing Entertainme ,in.
5
Connections &Setup
Things to Consider Before You Connect
Protect Against Power Surges
• Connect all components before you plug any of their power cords into the wall outlet.
• Turn off the TV and/or components before you connect or disconnect any cables.
• Make sure all antennas and cables are properly grounded. Refer to the Important Safeguards
sheet packed with your DVD player.
Protect Components from Overheating
• Don't block ventilation holes on any of the components. Arrange the components so that air
can circulate freely.
• Don't stack components.
• When you place components in a stand, make sure you allow adequate ventilation.
• If you connect an audio receiver or amplifier, place it on the top shelf so the heated air from
it won't flow around other components.
Position Cables Properly to Avoid Audio Interference
• Insert each cable firmly into the designated jack.
• If you place components above the TV, route all cables down the side of the back of the TV
instead of straight down the middle of the back of the TV.
• If your antenna uses 300-ohm twin lead cables, do not coil the cables. Also, keep the twin
lead cables away from audio/video cables.
Connection Pictures
Audio/video cables are usually bundled together. For better visibility, the connection pictures in
this book show each cable separately (audio left, audio right, and video).
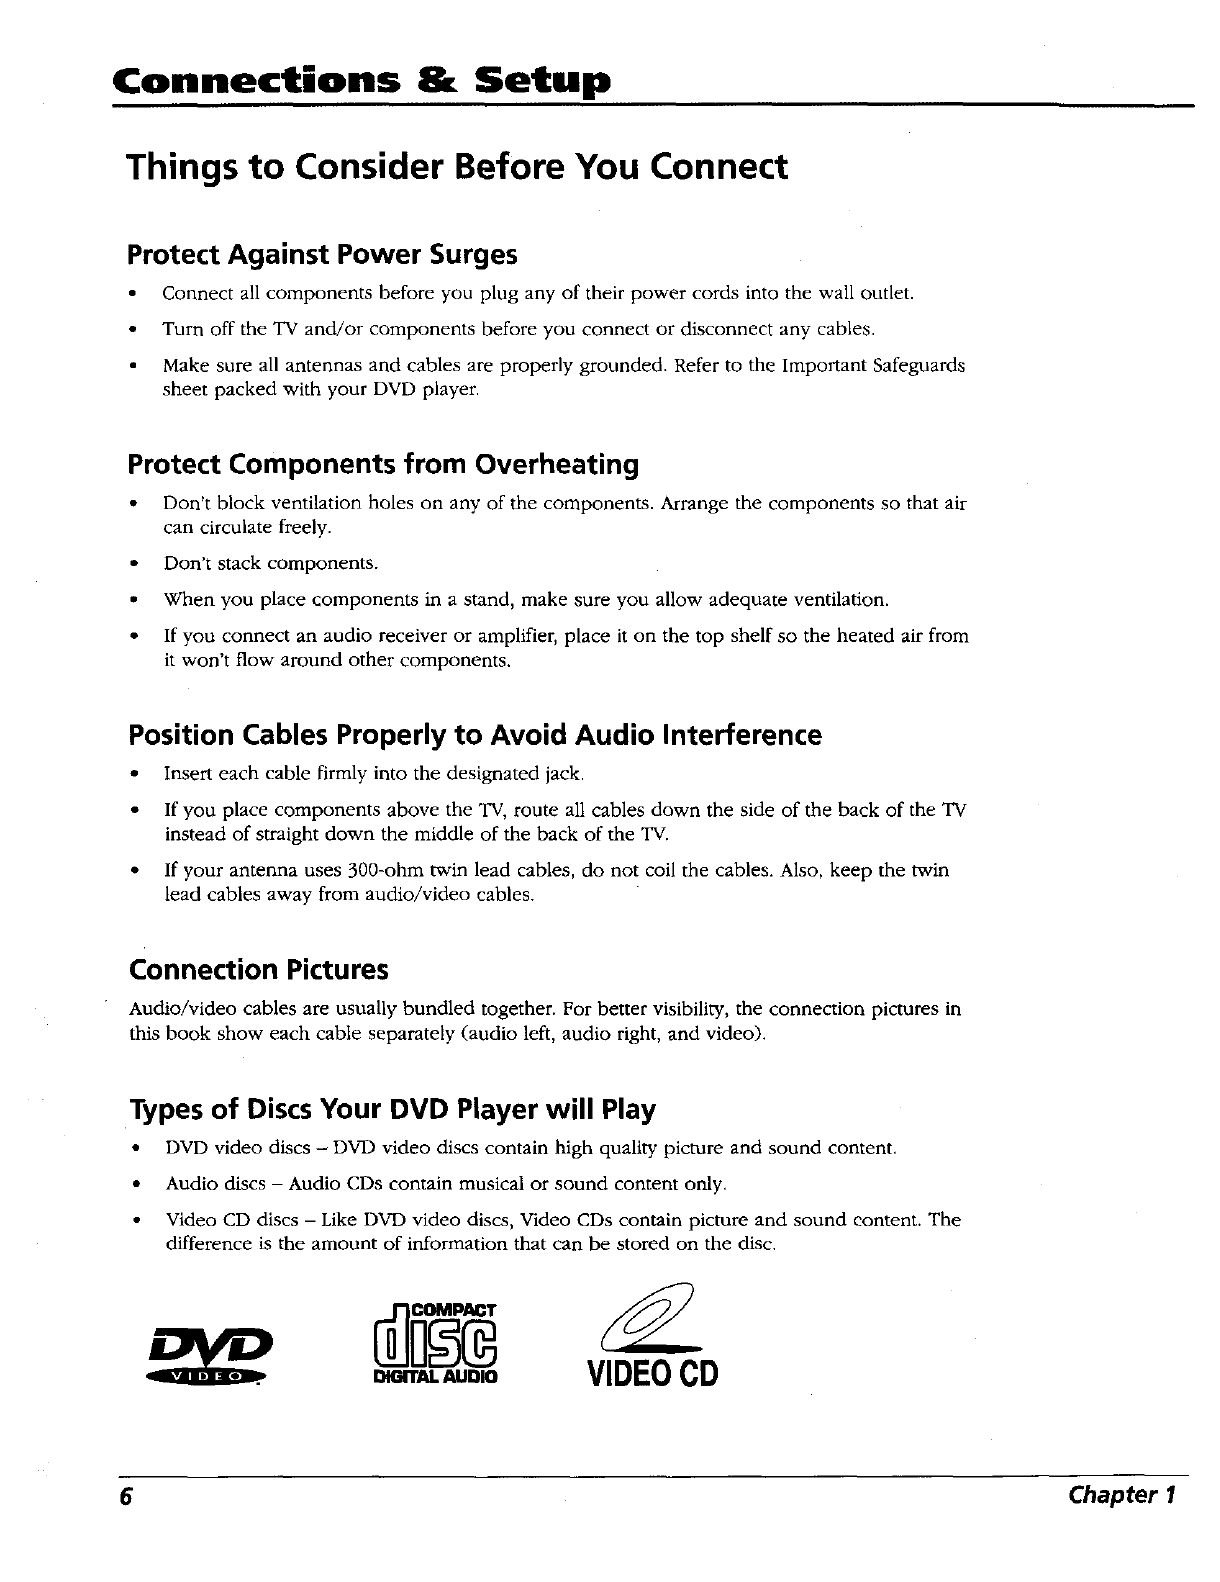
Types of Discs Your DVD Player will Play
• DVD video discs - DVD video discs contain high quality picture and sound content.
• Audio discs - Audio CDs contain musical or sound content only.
Video CD discs - Like DVD video discs, Video CDs contain picture and sound content. The
difference is the amount of information that can be stored on the disc.
I_MI'AI. AUDIO VIDEOCD
6Chapter 1

Connections Setup
Choose Your Connection
There are several ways to connect your DVD player. Please use the following chart to determine
which connection is best for you. Turn to the appropriate page and connect your DVD player.
Components Cables Needed
• Coaxial
•Audio/video
• S-Video (optional)
•Component video
(optional)
•Coaxial
•Audio/video
•S-Video (optional)
• Component video
(optional)
•Coaxial
•Audio/video
•S-Video (optional)
•Component video
(optional)
•Audio/video
•S-Video (optional)
•Component video
(optional)
_! • Coaxial
•Audio/video
•S-Video (optional)
• Component video
_s_.e__e (optional)
Connection
Title
TV + DVD
TV + DVD + VCR
TV + DVD +
Dolby Digital
TV + DVD +
5,1-Channel
Analog
TV + DVD +
VCR + Satellite
Go to...
page 8
page 9
pages
10-11
pages
12-13
pages
14-15
Cables Needed to Connect Components to Your TV
The pictures below show the cables needed for the connections represented in this book.
Note: Audio/Video cables (A/V cables for short) are usually soM us a bundled set, but the connection pictures in this
book sbow each cable separately for better visibility.
Audio/Video cables
Component Video cables
Coaxial cable S-Video cable
Chapter I 7

Connections & Setup
CABLE
OR
OFF-AIR SIGNAL
TV
AUDIO OUT
6'
AUDIO IN
S-VIDEO VIDEO IN
, o
o'o-\K_(
ANT IN
O
I
DVD Player + TV with Audio/Video Input Jacks
1. Connect the audio cables to the AUDIO OUT FRONT L (left - white) and R (right -red) jacks
on the back of your DVD Player, and to the corresponding Audio Input jacks on your TV.
2. Connect the video cable.
• Basic video cormection - Connect the video cable (yellow) to the VIDEO OUT jack on
the back of your DVD Player, and to the Video Input jack on your TV.
OR
• S-Video (optional) - If your TV has an S-Video Input jack, connect the S-Video cable to the
S-VIDEO OUT jack on the back of your DVD Player and to the S-Video jack on your TV. If
your TV doesn't have S-Video, use the basic video connection listed above.
OR
•Component video (optional) - If your TV has component video (Y, P., and P, jacks) use
video-grade cables for the Y, Pu, and PRconnections. Note that it is essential to match the
color-coded connectors with a compatible "IV. If your TV doesn't have component video,
use the basic video connection listed above.
3. Connect the AC power cord to the AC IN jack on the back of your DVD Player, and plug the
other end into an AC outlet.
Note: Your cable or off-air connection to the television should not he affected by this
connection. Connect your cable or off-air antenna to your television as you normally
would. You may need to consult your television manual for details.
Go to page 17
8Chapter I
Connections Setup
TV
AUDIO _T
S-VNoo cable
Is optional
DVD
PLAYER
VCR
®
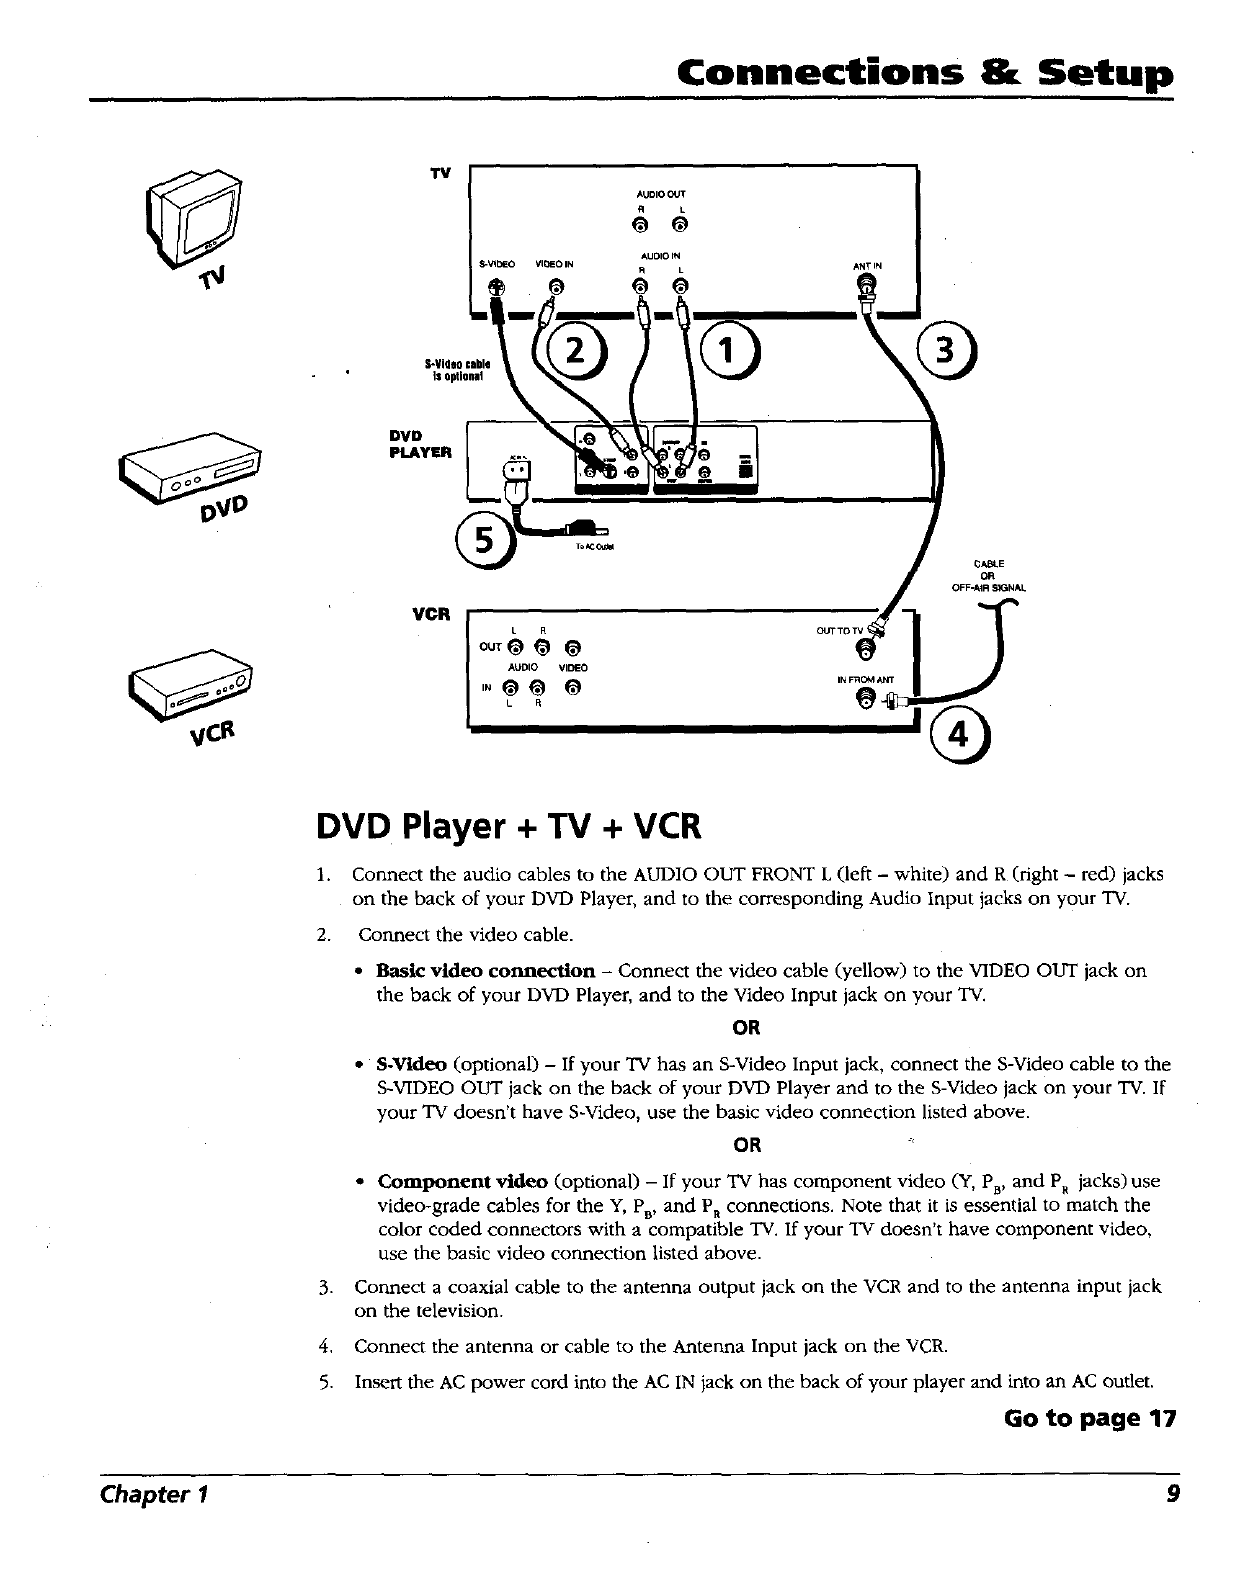
DVD Player + TV + VCR
1. Connect the audio cables to the AUDIO OUT FRONT L (left -white) and R (right -red) jacks
on the back of your DVD Player, and to the corresponding Audio Input jacks on your TV.
2. Connect the video cable.
• Basic video connection - Connect the video cable (yellow) to the VIDEO OUT jack on
the back of your DVD Player, and to the Video Input jack on your TV.
OR
•S-Video (optional) - If your TV has an S-Video Input jack, connect the S-Video cable to the
S-VIDEO OUT jack on the back of your DVD Player and to the S-Video jack on your TV. If
your TV doesn't have S-Video, use the basic video connection listed above.
OR
•Component video (optional) - If your TV has component video (Y, PB, and PR jacks) use
video-grade cables for the Y, Pm and PR connections. Note that it is essential to match the
color coded connectors with a compatible "IV. If your TV doesn't have componem video,
use the basic video connection listed above.
3. Connect a coaxial cable to the antenna output jack on the VCR and to the antenna input jack
on the television.
4. Connect the antenna or cable to the Antenna Input jack on the VCR.
5. Insert the AC power cord into the AC IN jack on the back of your player and into an AC outlet.
Go to page 17
Chapter I 9
Connections & Setup
TV
AUDIO OUT
R L
AUDIO IN
S-VIDEO VIDI_O IN L
-!
CABLE OR OFF-AIR SIGNAL
7"-
ANTIN
e
S-Videocable
Is oplional
DVD
PLAYER
®
DOLBY DIGITAL or
DTS RECEIVER
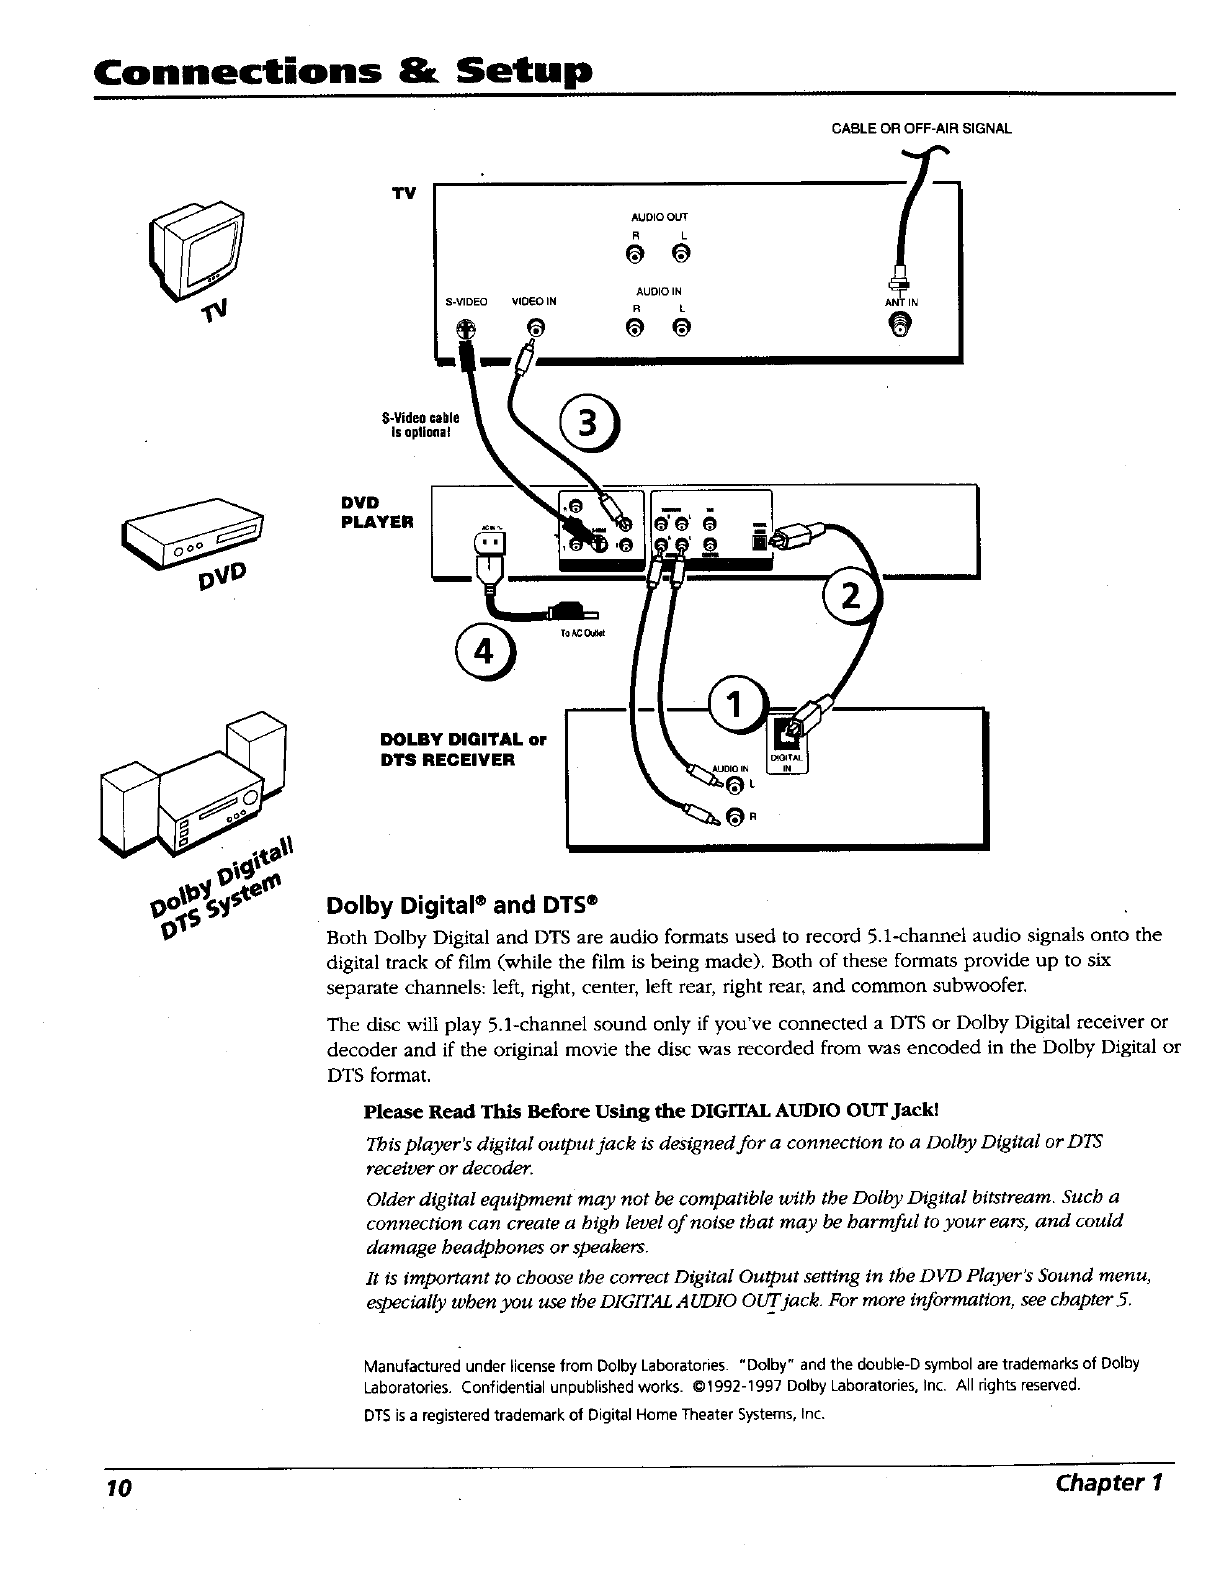
Dolby Digital ®and DTS ®
Both Dolby Digital and DTS are audio formats used to record 5.1-channel audio signals onto the
digital track of film (while the film is being made). Both of these formats provide up to six
separate channels: left, right, center, left rear, right rear, and common subwoofer.
The disc will play 5.1-channel sound only if you've connected a DTS or Dolby Digital receiver or
decoder and if the original movie the disc was recorded from was encoded in the Dolby Digital or
DTS format.
Please Read This Before Using the DIG1TAL AUDIO OUT Jackl
This player's digital output jack is designed for a connection to a Dolby Digital or DTS
receiver or decoder.
Older digital equipment may not be compatible with the Dolby Digital bitstream. Such a
connection can create a high level of noise that may be harmful to your ears, and could
damage headphones or speakers.
It is important to choose the correct Digital Output setting in the DUE) Player's Sound menu,
eapecially when you use the DIGITAL AUDIO OUTjack. For more information, see chapter 5.
Manufactured under license from Dolby Laboratories. "Dolby" and the double-D symbol are trademarks of Dolby
Laboratories. Confidential unpublished works. ©1992-1997 Dolby Laboratories, Inc. All rights reserved.
DTS isa registered trademark of Digital Home Theater Systems,Inc.
10 Chapter I
Connections & Setup
DVD Player + TV + Dolby Pro Logic, Dolby Digital
or DTS Receiver
To Connect the DVD Player
1. Connect the left and right audio cables to your audio/video receWer and to the AUDIO OUT
FRONT L (left - white) and R (right - red) jacks on the back of your DVD Player.
2. If you have a Dolby Digital or DTS receiver, insert an optical digital cable (not provided) to the
DIGITAL AUDIO OUT jack on the DVD player to the Digital Input jack on the back of the
receiver. You must also set the Digital Output setting in the Sound menu (see chapter 5).
3. Connect the video cable.
• Basic video connection - Connect the video cable (yellow) to the VIDEO OUT jack on the
back of your DVD Player, and to the Video Input jack on your TV.
OR
•S-Video (optional) _ If your TV has an S-Video Input jack, connect the S-Video cable to the
S-VIDEO OUT jack on the back of your DVD Player and to the S-Video jack on your TV. If
your 'IV doesn't have S-Video, use the basic video connection listed above.
OR
• Component video (optional) - If your "IV has component video (Y, PB, and PR jacks) use
video-grade cables for the Y, Pw and P_ connections. Note that it is essential to match the
color coded connectors with a compatible TV. If your TV doesn't have component video,
use the basic video connection listed above.
4. Connect the AC power cord to the AC IN jack on the back of your DVD Player, and plug the
other end into an AC outlet.
Go to page 17
Chapter I 11
Connections & Setup
TV
AUDIO OUT
RL
AUDIO IN
S-VIDEO VIDEO IN ANT IN
RL
i
mI
S-Videocable
isoptional
DVD
PLAYER
CABLE
OR
OFF-AIR SIGNAL
AUDIO/VIDEO
RECEIVER
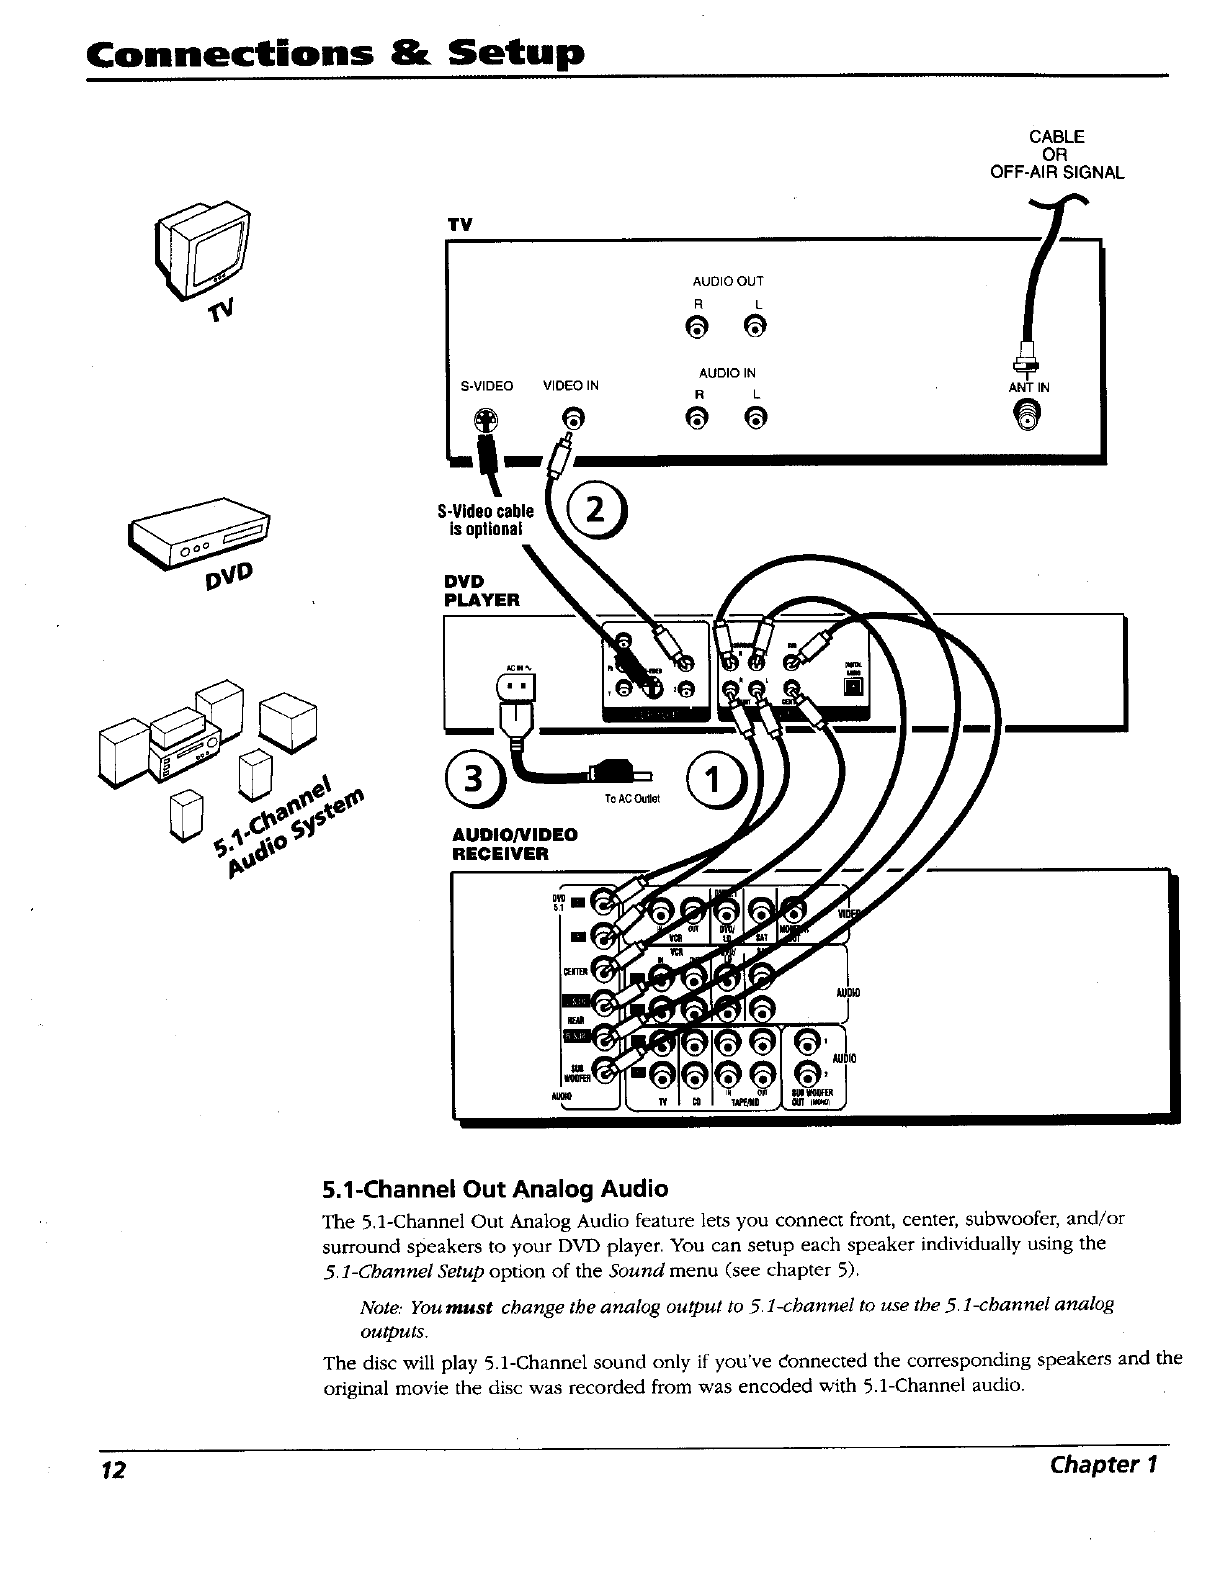
5.1-Channel Out Analog Audio
The 5,1-Channel Out Analog Audio feature lets you connect front, center, subwoofer, and/or
surround speakers to your DVD player. You can setup each speaker individually using the
5.1-Channel Setup option of the Sound menu (see chapter 5),
Note: You must change the analog ouq)ut to 5.1-channel to use the 5.1-channel analog
ou_uts.
The disc will play 5.1-Channel sound only if you've Connected the corresponding speakers and the
original movie the disc was recorded from was encoded with 5.1-Channel audio.
12 Chapter I
Connections & Setup
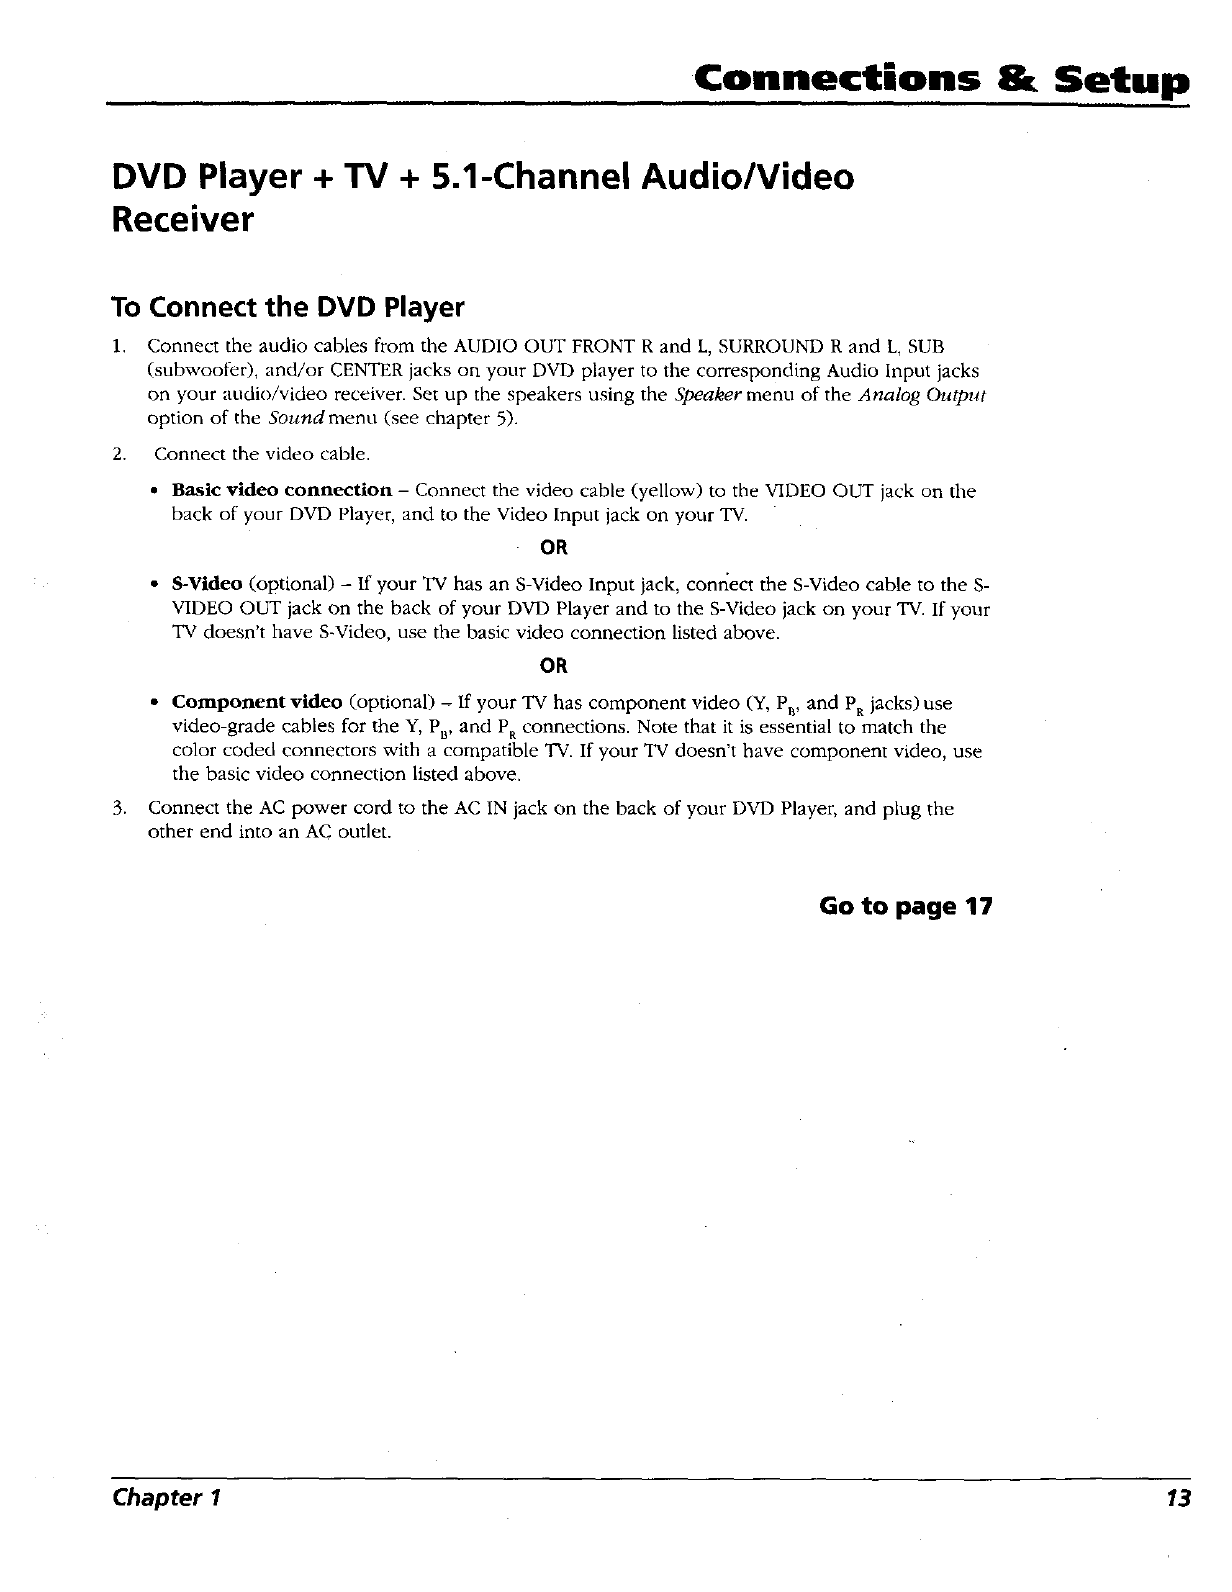
DVD Player + TV + 5.1-Channel Audio/Video
Receiver
To Connect the DVD Player
1, Connect the audio cables from the AUDIO OUT FRONT Rand L, SURROUND Rand L, SUB
(subwoof;er), and/or CENTER jacks on your DVD player to the corresponding Audio Input jacks
on your audio/video receiver. Set up the speakers using the Speaker menu of the Analog Output
option of the Sound menu (see chapter 5).
2. Connect the video cable.
•Basic video connection - Connect the video cable (yellow) to the VIDEO OUT jack on the
back of your DVD Player, and to the Video Input jack on your TV.
OR
• S-Video (optional) -If your TV has an S-Video Input jack, connect the S-Video cable to the S-
VIDEO OUT jack on the back of your DVD Player and to the S-Video jack on your TV. If your
TV doesn't have S-Video, use the basic video connection listed above.
OR
•Component video (optional) -If your TV has component video (Y, Pu, and PR jacks) use
video-grade cables for the Y, Pu, and PRconnections. Note that it is essential to match the
color coded connectors with a compatible TV. If your TV doesn't have component video, use
the basic video connection listed above.
3. Connect the AC power cord to the AC IN jack on the back of your DVD Player, and plug the
other end into an AC outlet
Go to page 17
Chapter I 13

Connections &Setup
TV
AUDIO OUT
RL
ANT IN
@
S-Videocable
is optional
DVD
PLAYER
@ O
AUDIO IN
S-VIDEO VIDEO IN R L
-1o
To AC OuIJet
VCR
@
VIDEO
@
OUT TO TV
IN FROM ANT
SATELLITE
RECEIVER
OUT
S-VIDEO VIDEO R L
OUT TO TV
SATELLITE
SIGNAL
II CABLE
OR
OFF-AIR
SIGNAL
14 Chapter I
Connections & Setup
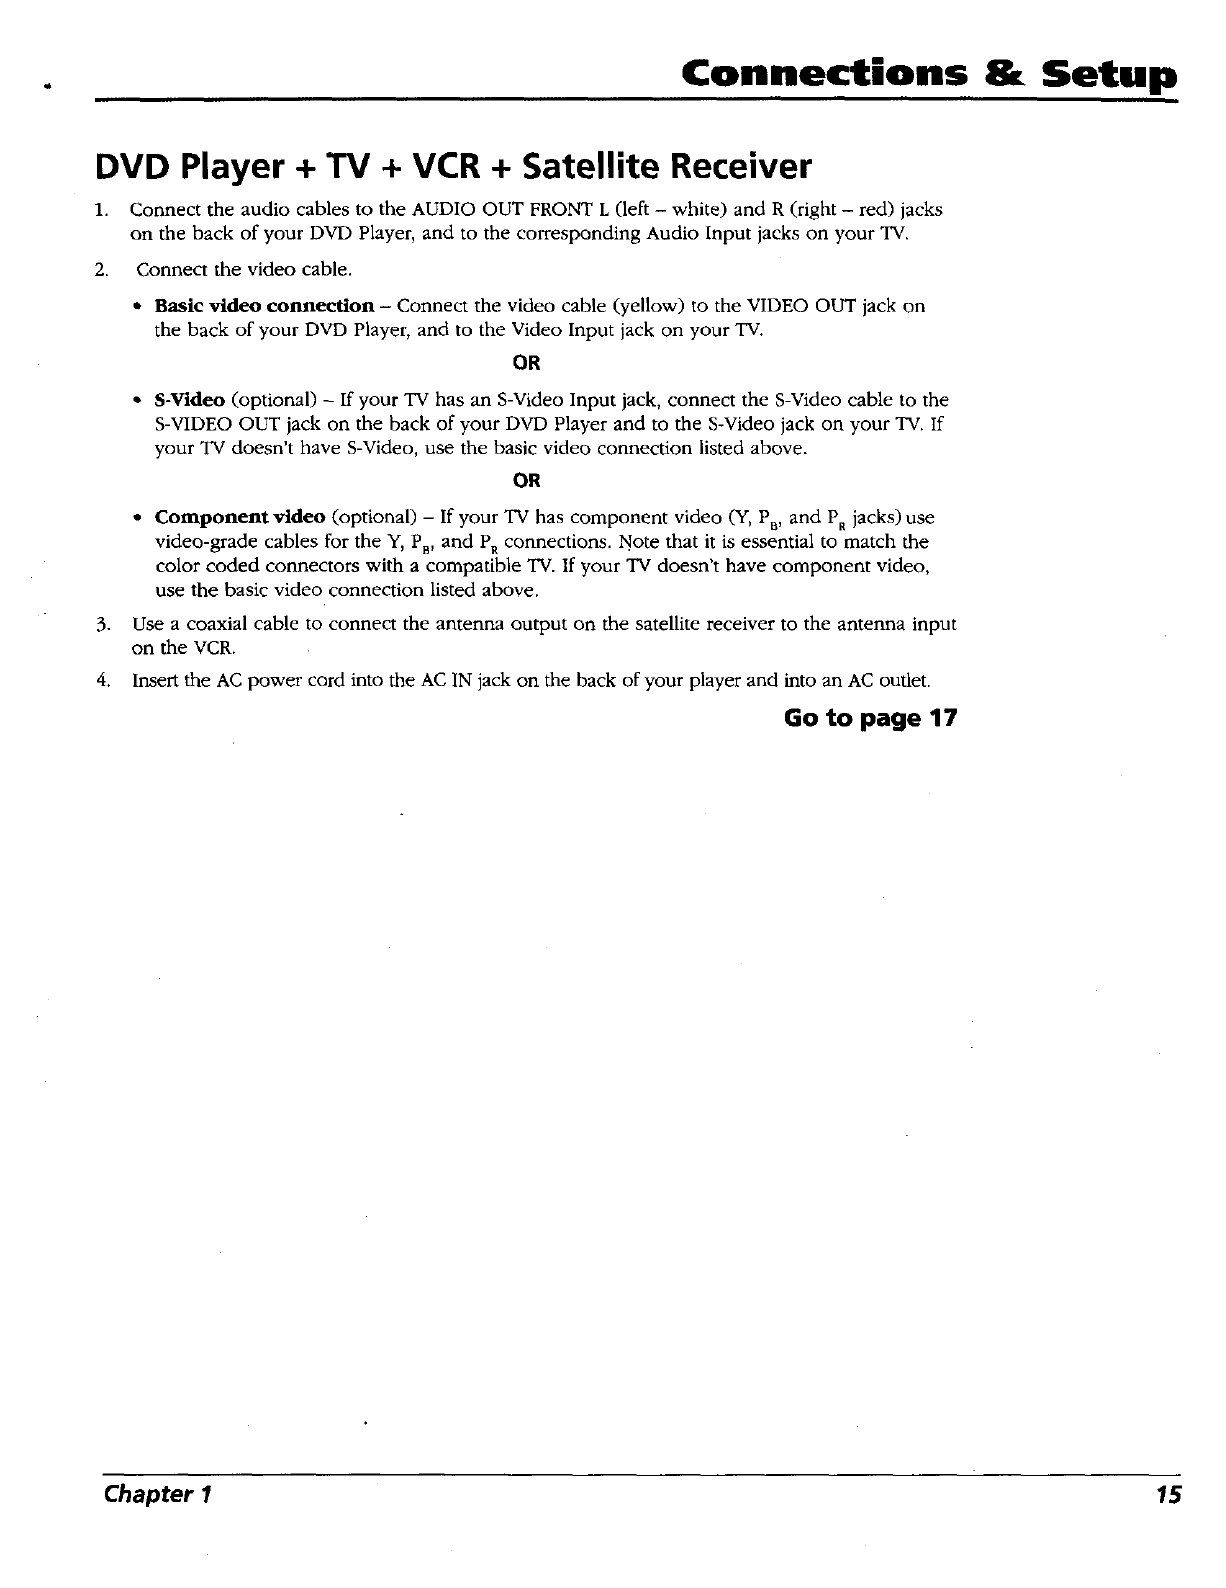
DVD Player + TV + VCR +Satellite Receiver
1. Connect the audio cables to the AUDIO OUT FRONT L(left - white) and R (right - red) jacks
on the back of your DVD Player, and to the corresponding Audio Input jacks on your TV.
2. Connect the video cable.
*Basic video connection - Connect the video cable (yellow) to the VIDEO OUT jack on
the back of your DVD Player, and to the Video Input jack on your TV.
OR
•S-Video (optional) - If your TV has an S-Video Input jack, connect the S-Video cable to the
S-VIDEO OUT jack on the back of your DVD Player and to the S-Video jack on your TV. If
your "IV doesn't have S-Video, use the basic video connection listed above.
OR
• Component video (optional) - If your TV has component video (Y, Pu, and PR jacks) use
video-grade cables for the Y, PB, and PRconnections. Note that it is essential to match the
color coded connectors with a compatible "IV.If your TV doesn't have component video,
use the basic video connection listed above.
3. Use a coaxial cable to connect the antenna output on the satellite receiver to the antenna input
on the VCR.
4. Insert the AC power cord into the AC IN jack on the back of your player and into an AC outlet.
Go to page 17
Chapter I 15
Connections & Setup
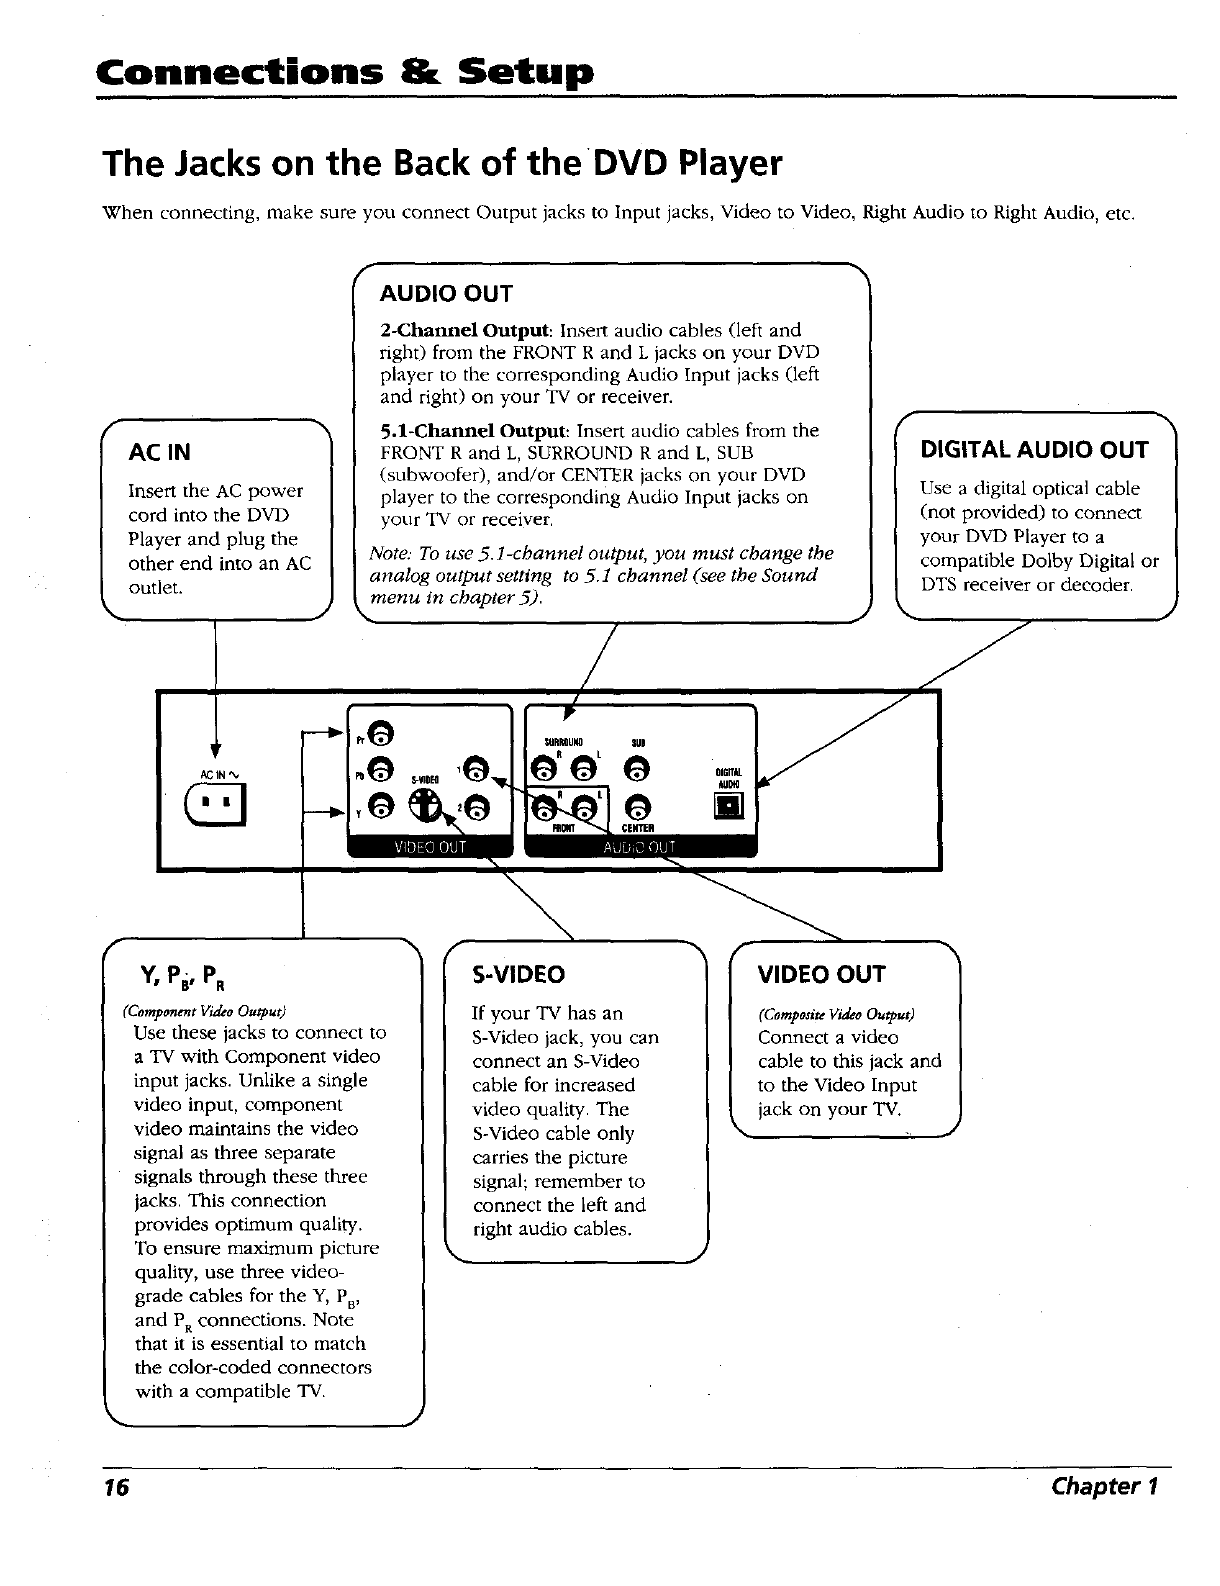
The Jacks on the Back of theDVD Player
When connecting, make sure you connect Output jacks to Input jacks, Video to Video, Right Audio to Right Audio, etc.
fAC IN
Insert the AC power
cord into the DVD
Player and plug the
other end into an AC
outlet.
fAUDIO OUT
2-Channel Output: Insert audio cables (left and
right) from the FRONT R and L jacks on your DVD
player to the corresponding Audio Input jacks (left
and right) on your TV or receiver.
5.1-Channel Output: Insert audio cables from the
FRONT R and L, SURROUND R and L, SUB
(subwoofer), and/or CENTER jacks on your DVD
player to the corresponding Audio Input jacks on
your TV or receiver.
Note.. To use 5.1-channel output, you must change the
analog output setttng to 5.1 channel (see the Sound
menu in chapter 5).
o'oLo
'O O []
f
DIGITAL AUDIO OUT
Use a digital optical cable
(not provided) to connect
your DVD Player to a
compatible Dolby Digital or
DTS receiver or decoder.
V.
f
Y' PB' PR
(Component Video Ou_out)
Use these jacks to connect to
aTV with Component video
input jacks. Unlike asingle
video input, component
video maintains the video
signal as three separate
signals through these three
jacks. This connection
provides optimum quali W.
To ensure maximum picture
qualiw, use three video-
grade cables for the Y, Pw
and PR connections. Note
that it is essential to match
the color-coded connectors
with a compatible TV.
S-VIDEO
If your TV has an
S-Video jack, you can
connect an S-Video
cable for increased
video quail W. The
S-Video cable only
carries the picture
signal; remember to
connect the left and
right audio cables.
/
r
VIDEO OUT
(Composite Video Output)
Connect avideo
cable to this jack and
to the Video Input
jack on your TV.
16 Chapter 1
Connections & Setup
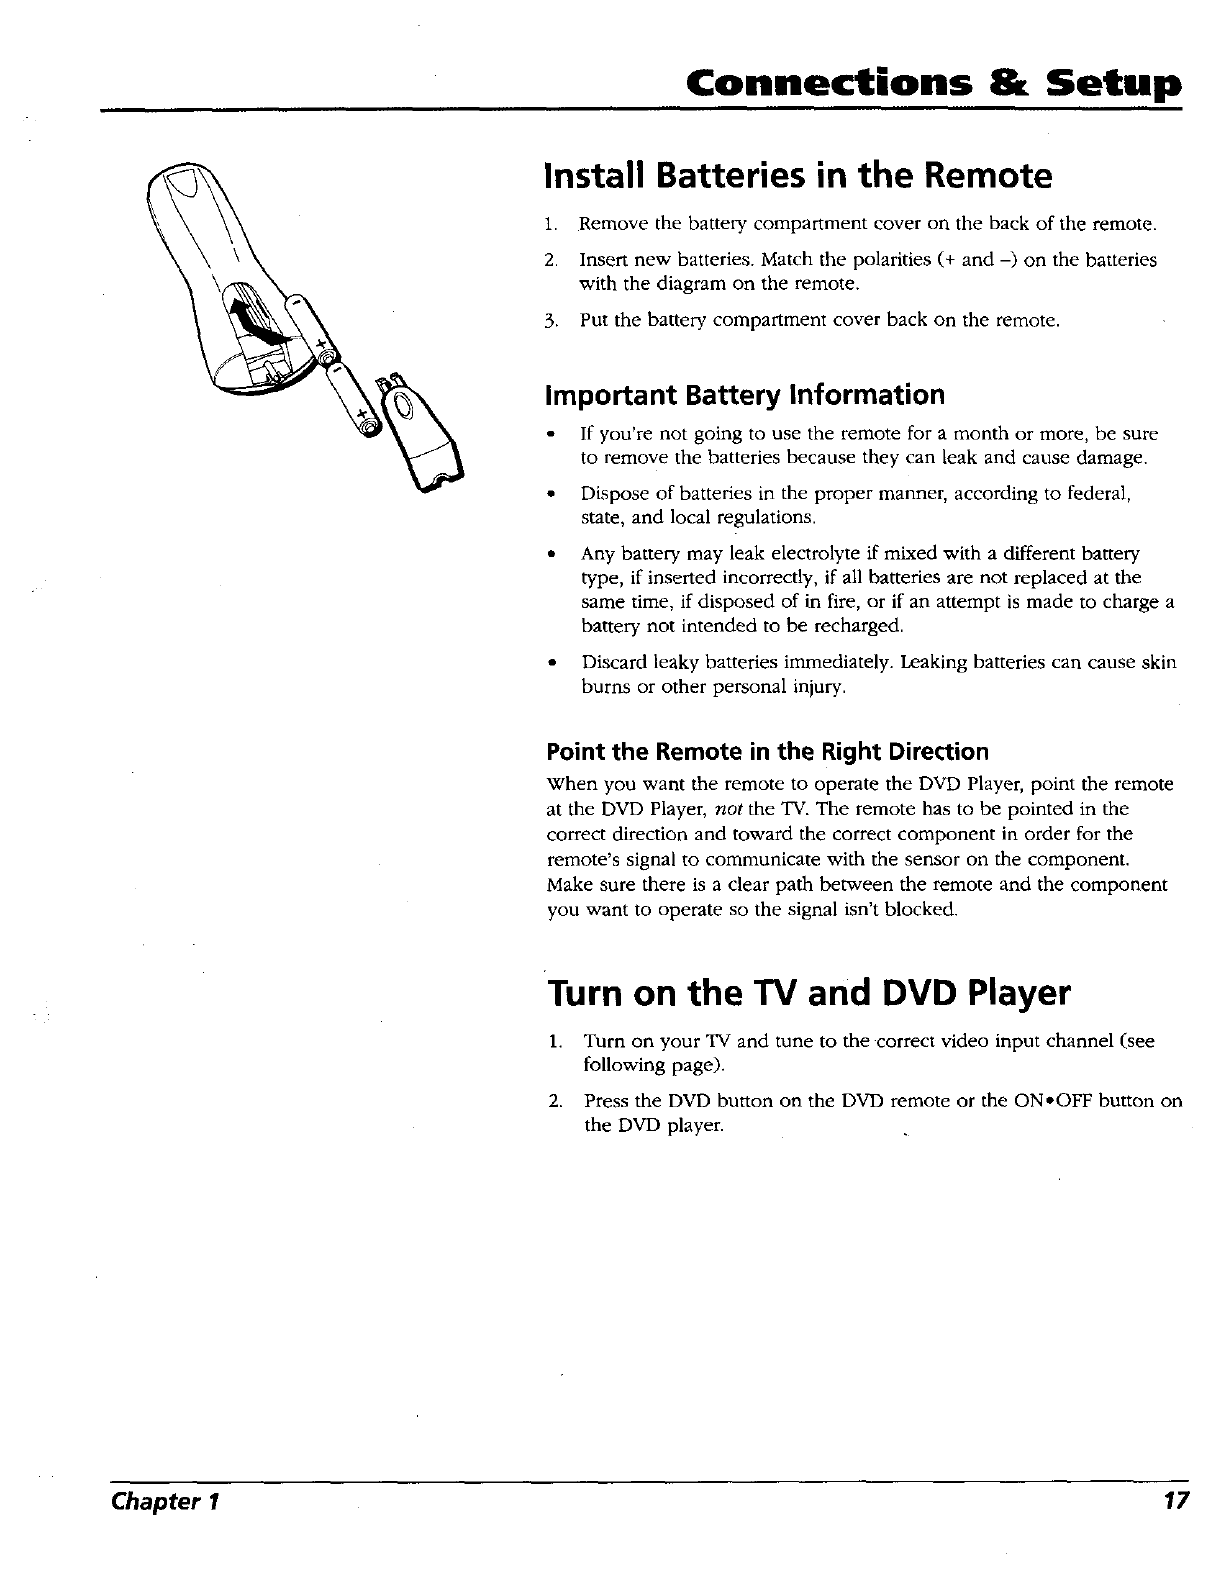
Install Batteries in the Remote
1. Remove the battery compartment cover on the back of the remote.
2. Insert new batteries. Match the polarities (+ and -) on the batteries
with the diagram on the remote.
3. Put the battery compartment cover back on the remote.
Important Battery Information
If you're not going to use the remote for a month or more, be sure
to remove the batteries because they can leak and cause damage.
• Dispose of batteries in the proper manner, according to federal,
state, and local regulations.
Any battery may leak electrolyte if mixed with a different battery
type, if inserted incorrectly, if all batteries are not replaced at the
same time, if disposed of in fire, or if an attempt is made to charge a
battery not intended to be recharged.
• Discard leaky batteries immediately. Leaking batteries can cause skin
burns or other personal injury.
Point the Remote in the Right Direction
When you want the remote to operate the DVD Player, point the remote
at the DVD Player, not the TV. The remote has to be pointed in the
correct direction and toward the correct component in order for the
remote's signal to communicate with the sensor on the component.
Make sure there is a clear path between the remote and the component
you want to operate so the signal isn't blocked.
Turn on the TV and DVD Player
1. Turn on your TV and tune to the correct video input channel (see
following page).
2. Press the DVD button on the DVD remote or the ON,OFF button on
the DVD player.
Chapter I 17
Connections &Setup
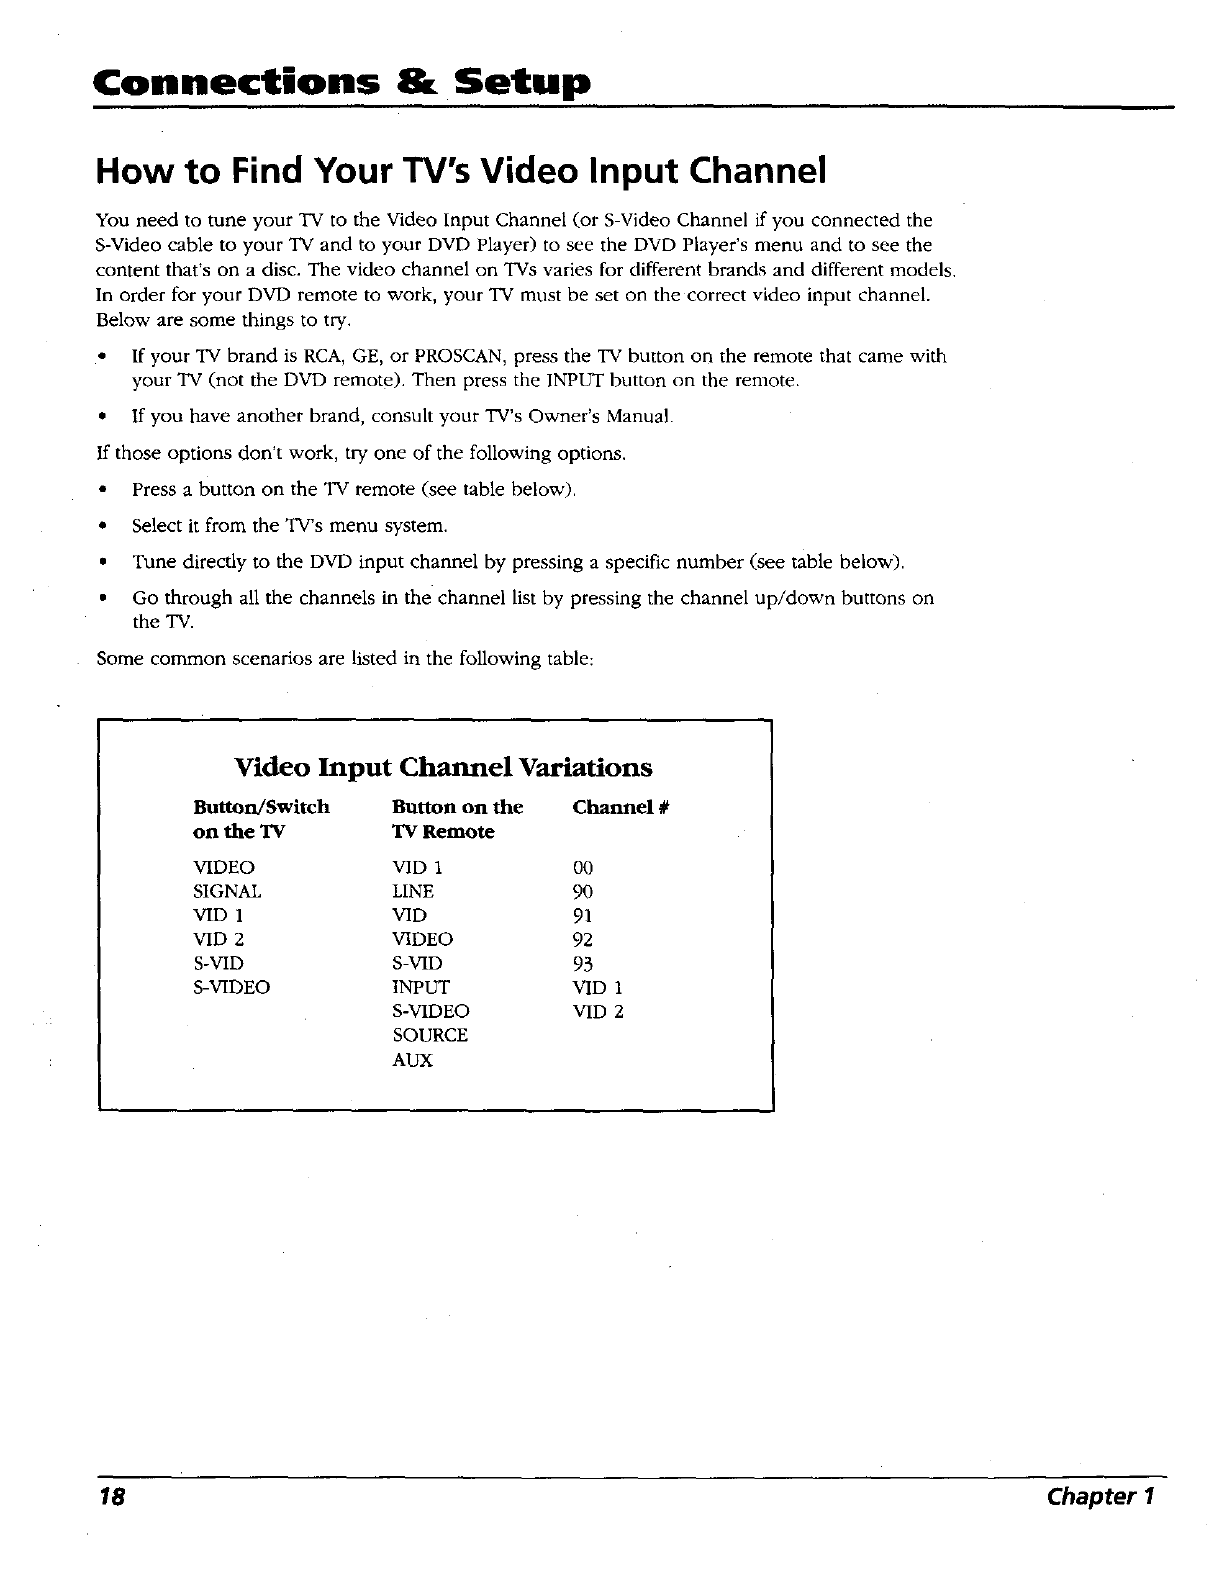
How to Find Your TV's Video Input Channel
You need to tune your TV to the Video Input Channel (or S-Video Channel if you connected the
S-Video cable to your TV and to your DVD Player) to see the DVD Player's menu and to see the
content that's on a disc. The video channel on TVs varies for different brands and different models.
In order for your DVD remote to work, your TV must be set on the correct video input channel.
Below are some things to try.
• If your TV brand is RCA, GE, or PROSCAN, press the TV button on the remote that came with
your TV (not the DVD remote). Then press the INPUT button on the remote.
* If you have another brand, consult your TV's Owner's Manual.
If those options don't work, try one of the following options.
• Press a button on the TV remote (see table below).
• Select it from the TV's menu system.
• Tune directly to the DVD input channel by pressing a specific number (see table below).
• Go through all the channels in the channel list by pressing the channel up/down buttons on
the "IV.
Some common scenarios are listed in the following table:
Video Input Channel Variations
Button/Switch Button on the Channel #
on the TV TV Remote
VIDEO VID 1 00
SIGNAL LINE 90
VID 1 VID 91
VID 2 VIDEO 92
S-VID S-VID 93
S-VIDEO INPUT VID 1
S-VIDEO VID 2
SOURCE
AUX
18 Chapter 1
Connections &Setup
,J_J,D
, J,,J,_
joj 0
JJJJ
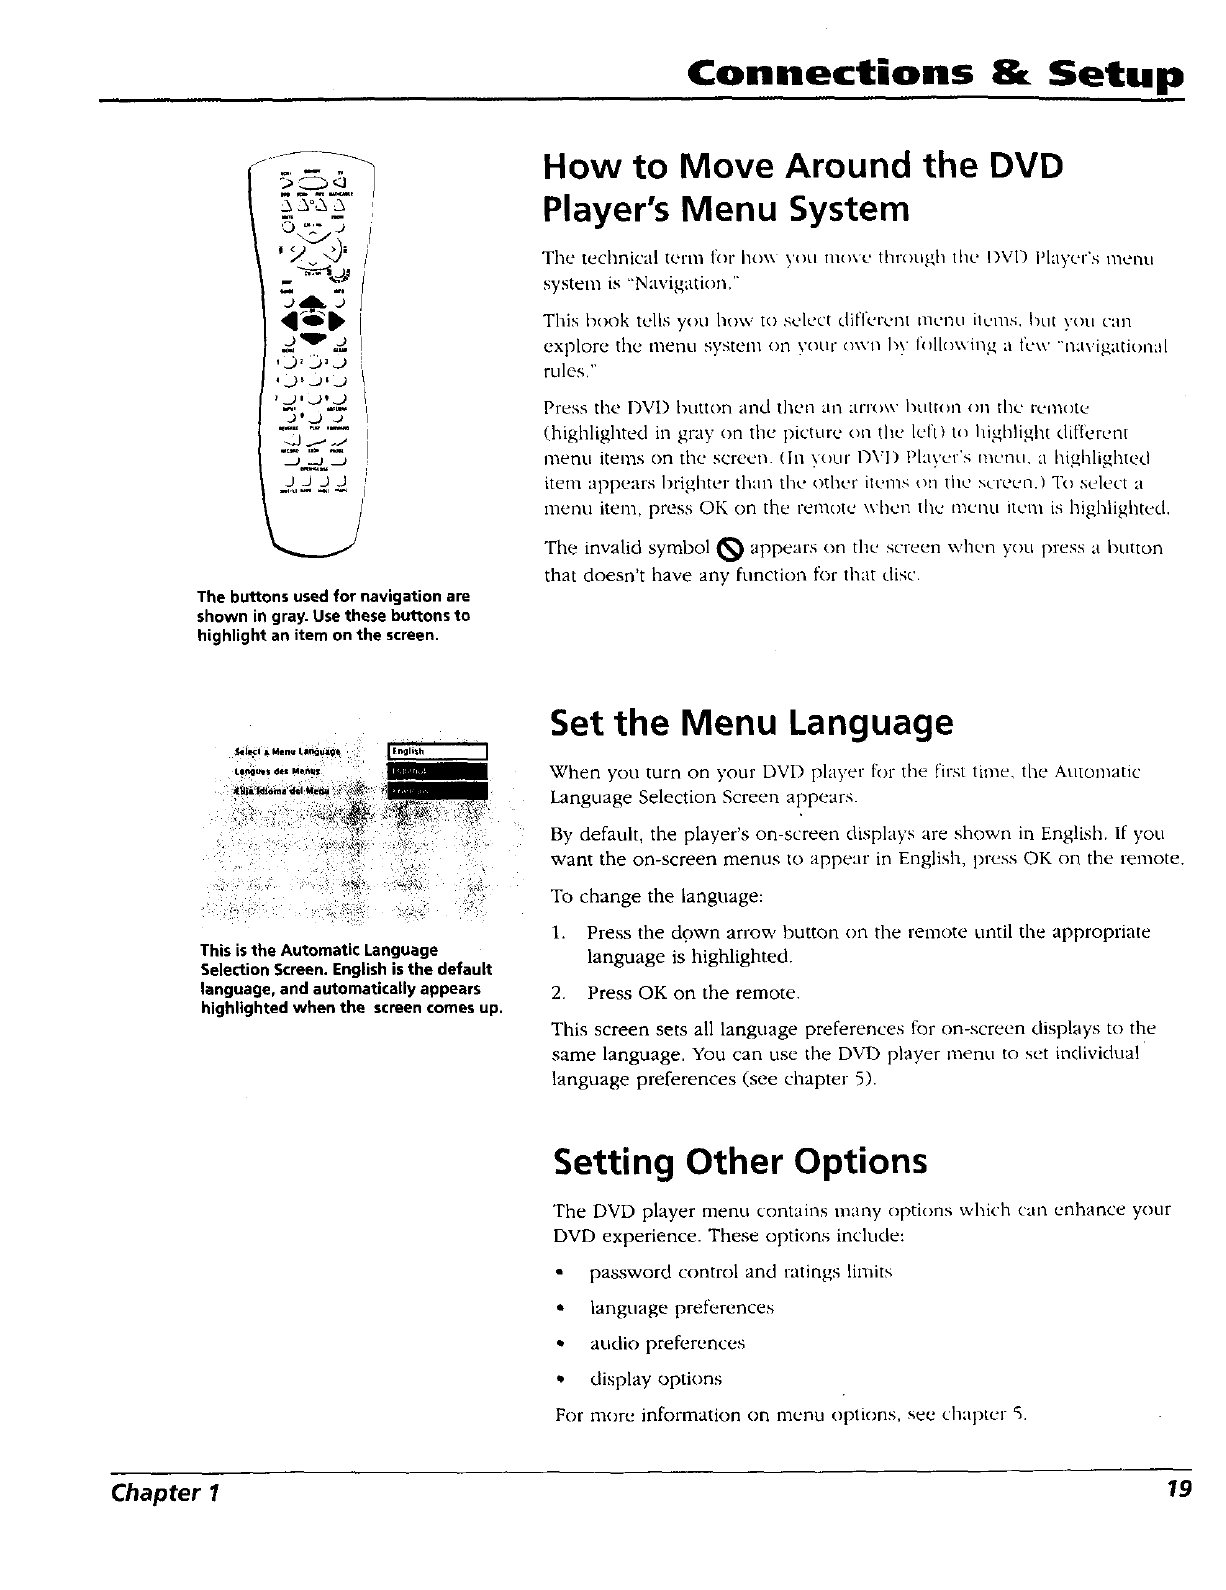
The buttons used for navigation are
shown in gray. Use these buttons to
highlight an item on the screen•
How to Move Around the DVD
Player's Menu System
The teclmical terln for hot\ yl)u nlo\e through lilt' I)VD Player's nlellU
system is "Navigation,"
This book tells you how to select different inenu ilL,ins, lint you t•an
explore tile nlenu systeln on VOtll o\vn Isy 1ollo_ ing a few '•ua\'ilZ t it ]
rules,"
Press the DV1) button and then an atlOt\ button oil the remote
(highlighted in gray on tile picture on the left) to highlight diflerent
n;enu items on the screen. (In)our DVI) Pktycr's mcncl, a highlighted
item appears brigllter thall the othel •iteins on the Xcleei].) To selet't a
menu item, press OK on the remote \\ hell the mC'ilU ileill is highlighted,
The invalid symbol _ appears on the screen when yol.i press a button
that doesn't have any function for that disc.
Ll_ue sdel Men_c _1
t_
This is the Automatic Language
Selection Screen. English is the default
language, and automatically appears
highlighted when the screen comes up.
Set the Menu Language
When you turn on ),our DVD player for tile first time, tire Automatic
Language Selection Screen appears.
By default, the player's on-screen displays are shown in English. If you
want the on-screen menus to appear in English, pn'ss OK on the remote.
To change the language:
1. Press the dpwn arrow button on the renrote until the appropriate
language is highlighted.
2. Press OK on the remote.
This screen sets all language preferences for on-screen displays to the
same language. You can use the DVD player menu to set individual
language preferences (see chapter 5).
Setting Other Options
The DVD player menu contains many options which can enhance your
DVD experience. These options include:
password control and ratings limits
• language preferences
• audio preferences
,, display optkms
For more information on menu options, see chapter _,
Chapter I 19
Connections 8. Setup
VCRI ON*OFF TV
OVD VCR2 AUX SAT*CABLE
&&°&&
MUTE ZOOM
0o..- 0
o 0N--
SNiP _CR*_
GUIDE INFO
MENU CLEAN
,0,0 0
,0
,0,0,0
INPUToO0 ANTENNAo
REVERSE PLAY FORWARD
RECORD STOP PAUSE
OPEN.CLOSE
0000
SLiB'i_'LEAUDIO ANGLE FRAME-
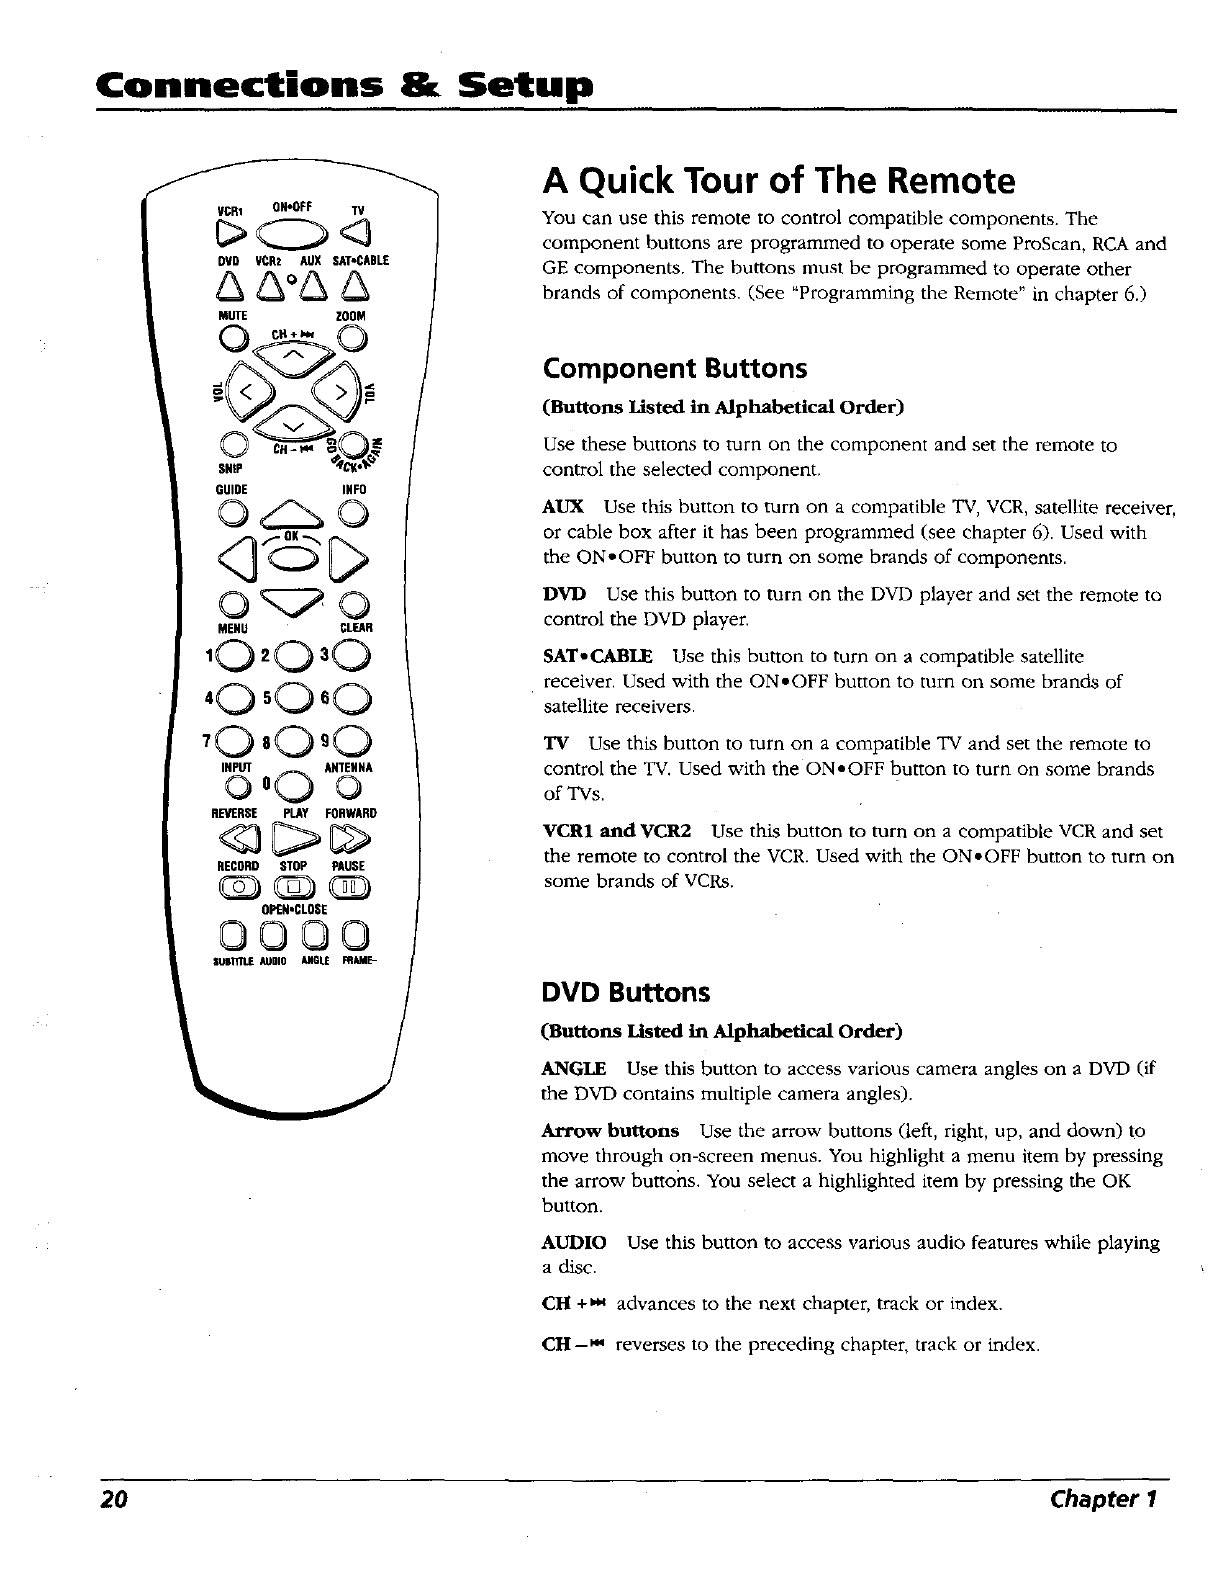
A Quick Tour of The Remote
You can use this remote to control compatible components. The
component buttons are programmed to operate some ProScan, RCA and
GE components. The buttons must be programmed to operate other
brands of components. (See "Programming the Remote" in chapter 6.)
Component Buttons
(Buttons Listed in Alphabetical Order)
Use these buttons to turn on the component and set the remote to
control the selected component.
AUX Use this button to turn on a compatible TV, VCR, satellite receiver,
or cable box after it has been programmed (see chapter 6). Used with
the ON-OFF button to turn on some brands of components.
DVD Use this button to turn on the DVD player and set the remote to
control the DVD player.
SAT-CABLE Use this button to turn on a compatible satellite
receiver. Used with the ON-OFF button to turn on some brands of
satellite receivers.
TV Use this button to turn on a compatible TV and set the remote to
control the TV. Used with the ON-OFF button to turn on some brands
of TVs,
VCR1 and VCR2 Use this button to turn on a compatible VCR and set
the remote to control the VCR. Used with the ON-OFF button to turn on
some brands of VCRs.
DVD Buttons
(Buttons Listed in Alphabetical Order)
ANGLE Use this button to access various camera angles on a DVD (if
the DVD contains multiple camera angles).
Arrow buttons Use the arrow buttons (left, right, up, and down) to
move through on-screen menus. You highlight a menu item by pressing
the arrow buttons. You select a highlighted item by pressing the OK
button.
AUDIO Use this button to access various audio features while playing
a disc.
CH +m advances to the next chapter, track or index.
CH-m reverses to the preceding chapter, track or index.
20 Chapter I
Connections & Setup
CLEAR Allows you to clear information, such as remove the Info display from the screen.
FORWARD Allows you to search forward through a disc while it is in play mode (or slow speed
search in pause mode). Press repeatedly to increase speed.
FRAME-- Press this button during playback to reverse the disc one frame at a time.
GO BACK-AGAIN When you're using the DVD Player's menu system, press this button to return
to the preceding menu screen. When you're watching or listening to a DVD disc, press this button
to go back 10 seconds to see/hear missed content.
Note: AGAIN may not be available for some DVD titles.
GUIDE Allows you to see the titles that are available on the current disc (if the disc contains a
guide menu).
INTO Press this button while you're playing a disc to see the on-screen Info Display. The lnfo
Display contains various playback features and gives you information about the disc you're
playing (press again to remove the Info Display from the screen).
MENU Press this button to see the disc's menu when you're playing a disc (press it again to
resume playback).
Nmnber buttons (0-9) Use the number buttons to input information such as chapter numbers,
track numbers, or to make selections on some menu screens.
OK Press this button to select a highlighted menu item.
ON.OFF Turns on the player when it is in standby mode or puts the player in standby mode
when power is on.
OPEN*CLOSE When the STOP button is held down, opens and closes the disc tray.
PAUSE Pauses disc play. When disc play is paused, press PAUSE again to advance a frame or
FRAME - to go back a frame.
PLAY Begins disc play (and closes disc tray if it is open).
REVERSE Allows you to search backward through a disc while it is in play mode (or slow speed
search in pause mode).
SNIP Displays the Scene Snip Info Display so you can edit out selected scenes from the
DVD disc.
STOP Stops disc play. You can also press STOP to remove the screen saver from the screen to
see the DVD Player's main menu. When you hold the STOP button down, it acts as the
OPEN,CLOSE button to open and close disc tray.
SUBTITLE Use this feature to turn the subtitles off and on. While the subtitle info area is
displayed press the arrow up and down buttons on the remote to change subtitle languages
(if available).
ZOOM Use this button to zoom in on certain areas of the screen.
Chapter I 21

This page left intentionally blank.

Chapter 2
Playing DVDs
Chapter Overview:
• Regional Coding
• • Using Different Menus
• Loading and Playing a Disc
• Using a Disc Menu
• Using the On-Screen Info Display
•Disc Playback Features
Changing Entertainment. ain.
23
Playing DVDs
Regional Coding
Both the DVD player and the discs are coded by region. These regional codes must match in
order for the disc to play. If the codes don't match, the disc won't play. This player's code is
region 1.
Using Different Menus
Each disc is programmed with different features. There are three separate menu paths that you
can use to access features:
The Disc menu - The Disc menu is part of each dis_5and is separate from the DVD player's
menu. The contents of each Disc menu varies according to how the disc was authored and
what features are included. The Disc menu is turned on and off while the disc is playing)
with the MENU button on the remote.
•The DVD player's lnfo Display -The Info Display appears as icons across the top of the
screen when a disc is playing. It can only be accessed while you are playing a disc. It's turned
on and off with the INFO button on the remote.
• The DVD player menu -The DVD player's menu system is accessed only when a disc isn't
playing. It appears automatically when the STOP button is pressed.
Remember that a feature will only work if the disc was programmed with that feature. For
example, if you choose subtitles on the Info Display, the subtitles will only appear if the disc was
created with subtitles. If a menu item is "grayed out" it means that item isn't available.
Loading and Playing Discs
Your DVD player plays DVD discs, Video CD discs and Audio CD discs. Before you load a disc,
make sure that it is compatible with the player. The following discs CANNOT be used with this
player:
• Laserdiscs
• CD-1, CD-ROM (computer-only discs), CD-R, CD-RW, DVD-ROM
• Discs recorded using other broadcast standards (i.e. PAL or SECAM)
Notes:
If the message "Tray Locked" appears on the screen, the retail lock feature has been
accidentally engaged. To unlock the disc tray you mustpress and hold a combination of
keys simultaneously:
On the front panel of the D VD Player, at the same time press and hold the SKIP FWD,
OPEN. CLOSE, and TS SURROUND buttons for at least 3 seconds.
24 Chapter 2
Playing DVDs
To Load and Play a Disc
Turn on the TV and your DVD PkLver (pruss ON.OFF on the player or press the DVD button on
the remote control).
1. Press tile Olq_N,,CI.OSP buttor_ ot'l the front of the DVD Player or
on the l)\q) remote. The disc tray opens.
This is an example of
a one-sided disc,
This is an example of
a 2-sided disc. The
title is in the center.
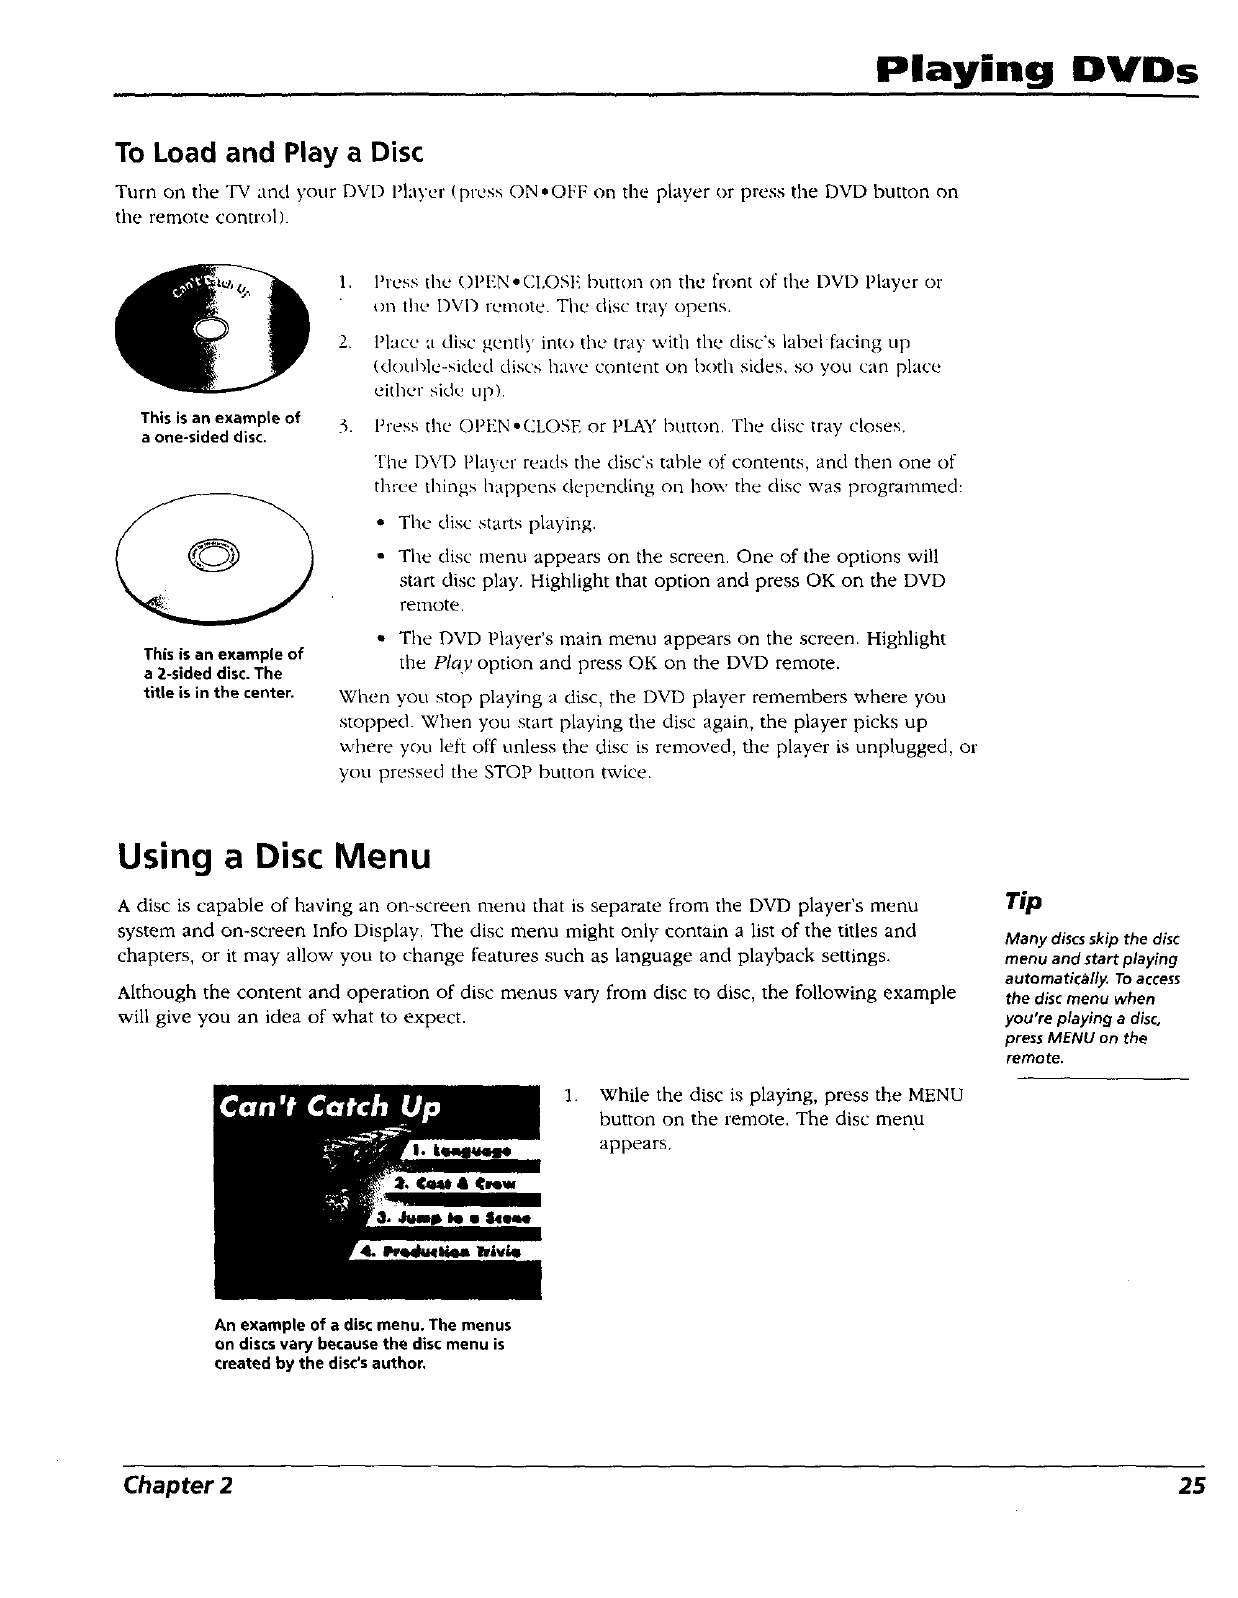
2. Place a disc gently into the m_y with the disc's label facing up
(double-sided discs have content on both sides, so you can place
either side up).
3. Press the OPEN*CLOSE or PLAY button. The disc tray closes.
The I)V1) Player reads the disc's table of contertts, and ther_ one of
three things happens depending on how the disc was programmed:
• The disc starts playing.
•The disc menu appears on the screen. One of the options will
start disc play. Highlight that option and press OK on the DVD
remote.
• The DVD Player's main menu appears on the screen. Highlight
the Play option and press OK on the DVD remote.
When you stop playing a disc, the DVD player remembers where you
stopped. When you start playing the disc again, the player picks up
where you left off unless the disc is removed, the player is unplugged, or
you pressed the STOP button twice.
Using a Disc Menu
A disc is capable of having an on-screen menu that is separate from tbe DVD player's menu
system and on-screen Info Display. The disc menu might only contain a list of the titles and
chapters, or it may allow you to change features such as language and playback settings.
Although the content and operation of disc menus vary from disc to disc, the following example
will give you an idea of what to expect.
1. While the disc is playing, press the MENU
button on the remote. The disc menu
appears.
Tip
Many discsskip the disc
menu and start playing
automatically. To access
the disc menu when
you're playing a disc,
press MENU on the
remote.
An example of a disc menu. The menus
on discs vary because the disc menu is
created by the disc's author,
Chapter 2 25
Playing DVDs
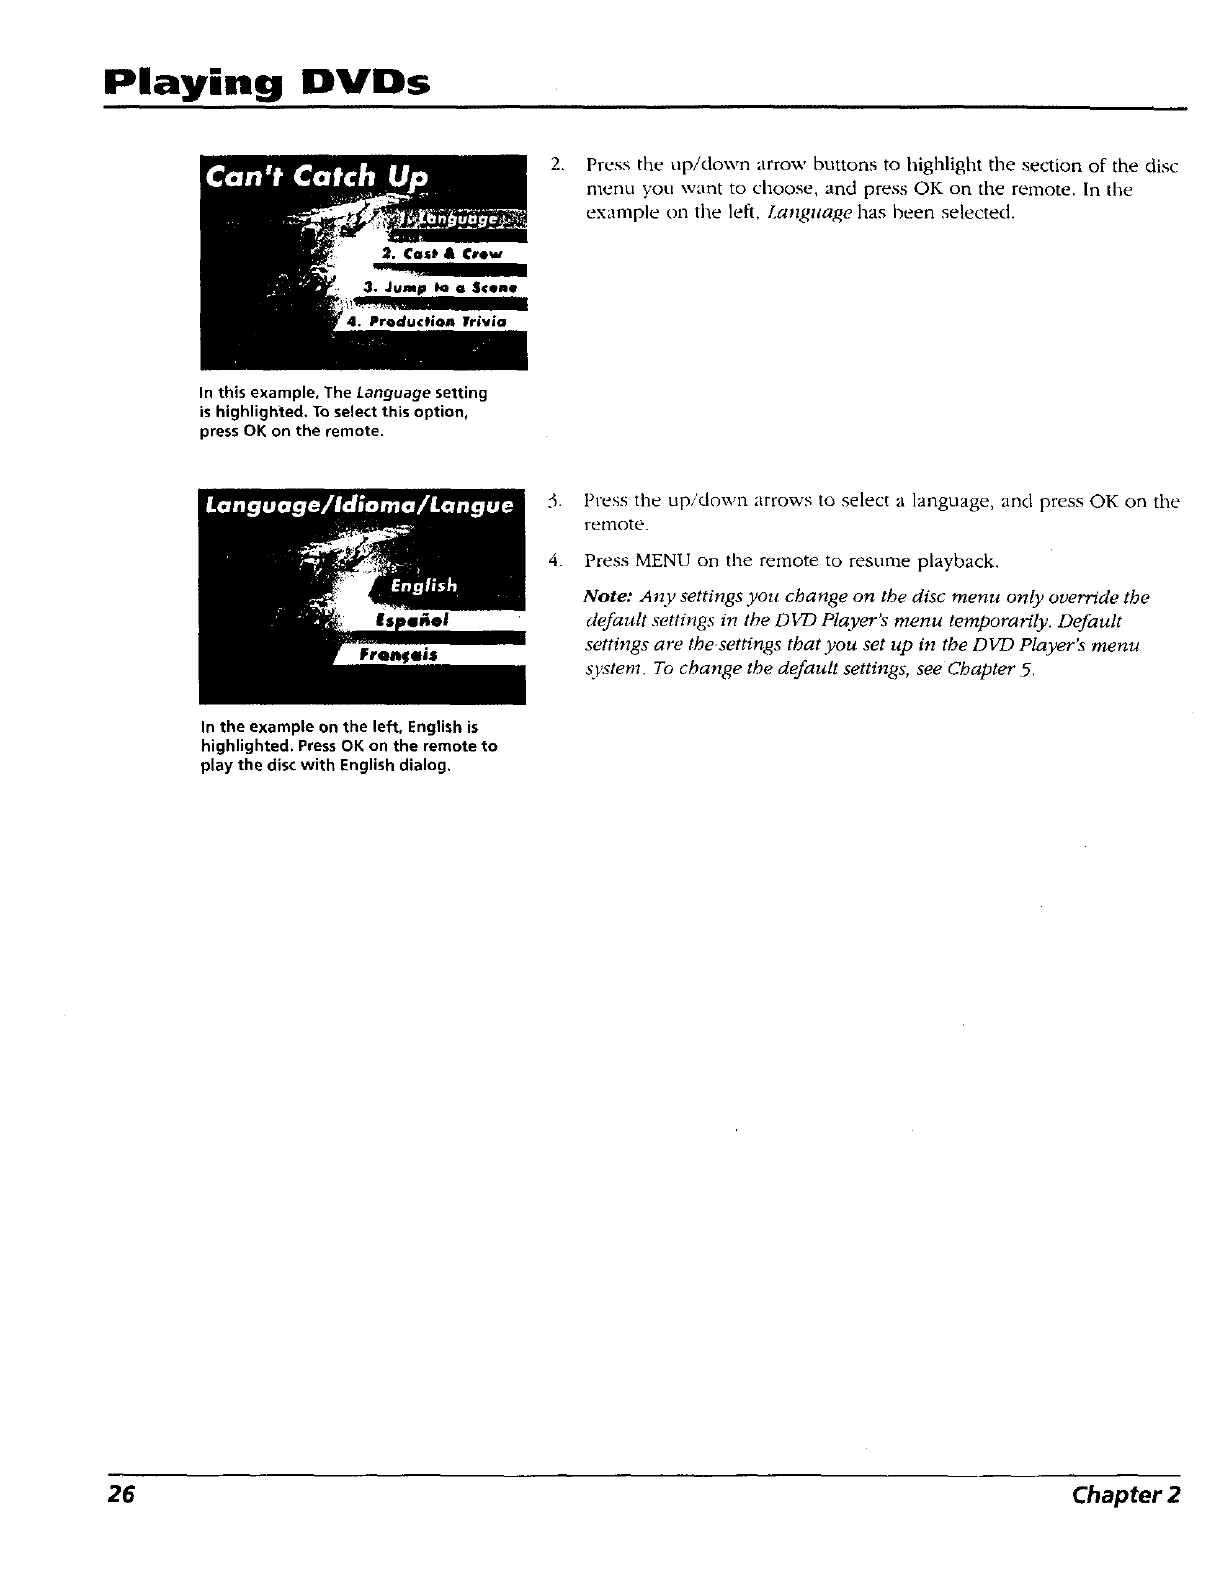
2. Press the up/down arrow buttons to highlight the section of the disc
menu you want to choose, and press OK on the remote. In the
example on the left, Language has been selected.
In this example, The Language setting
is highlighted. To select this option,
press OK on the remote.
3. Press the up/down arrows to select a language, and press OK on the
renlote.
4. Press MENU on the remote to resume playback.
Note: Any settings you change on the disc menu only ove*'ride the
default settings in the DFD Player's menu temporarily. Default
settings are the settings that you set up in the DVD Player's menu
si,stem. To change the default settings, see Chapter 5.
In the example on the left, English is
highlighted. Press OK on the remote to
play the disc with English dialog,
26 Chapter 2
Playing DVDs
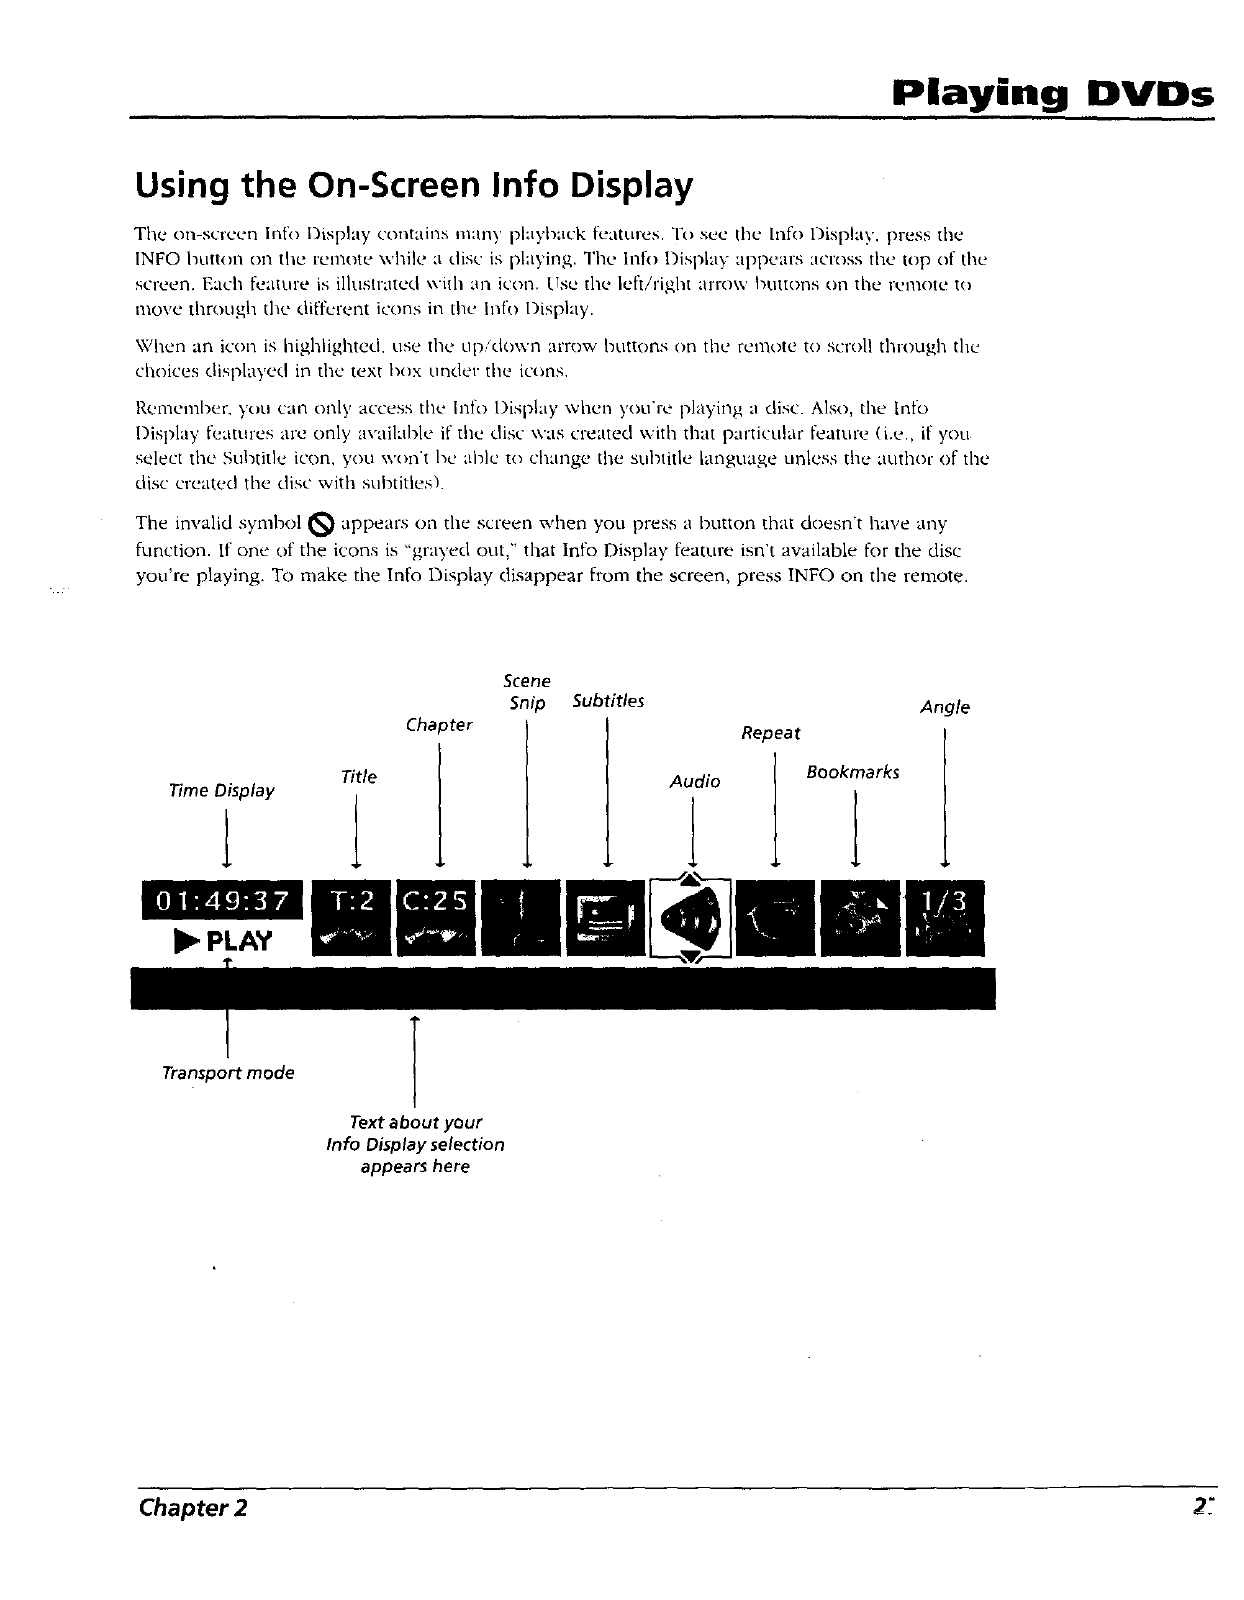
Using the On-Screen Info Display
The on-screen lnfo Display contains many phwback features. To see the lnfo l)isplay, plleSS the
INFO buttol'_ ot'_tile remote while a disc is playing. The Infl) l)isplay appears across the top of the
screen. Each feattire is illustrated wilh an icon. Use the le{t/right arrow buttons on the remote to
move through the different icons in the Info l)isplay.
When an icon is highlighted, use tile up'down arrow buttons on the remote to scroll through the
choices displayed in the text box under the icons.
Remember. you can only access the |nlk) l)isph Wwhen you're playing a disc. Also, the Info
Display [:eatures are only available if the disc was created vdth that particular feature (i.e., if you
select the Sul_title icon, you won't be able to change the subtitle language unless the author of the
disc created the disc with subtitles).
The invalid symbol _ appears on the screen when you press a button that doesn't have any
fl.mction. If one of the icons is "grayed out," that Info Display feature isn't available for the disc
you're playing. To make the Info Display disappear from the screen, press INFO on the remote.
Time Display
1
Title
Cha 3ter
Scene
Snip Subtitles Angle
Audio
Repeat
1
Bookmarks
Transport mode
Text about your
Info Displayselection
appears here
Chapter 22"
Playing DVDs
Time Display
This fi-ature displays tile audio,video time For DVI) discs, die time displayed refers to the current
title time. For Audio CDs. it relk:rs t,) the current track tin'le.
For I)VD vMeo discs, the Time l)isplay also acts as a Time Search feature. This lets you go to a
particular scene in a movie by entering the time that scene is played. For example, if you like the
dogfight scene in Top Gon, you can enter the elapsed time the scene plays and skip right to it. To
use Time Searc]l:
Press INFO on the remote to bring up the Info DBplay. HigMight the Time Display and enter the
elapsed time of the scene you wish to go to. For example, enter 01:12:00 to go to the scene that
plays at I hoklr and twelve minutes into the movie.
When yOtl'Ve entered the time, l)ress OK on the renlote.
Selecting a Title
Some discs contain more than one title. For example, there might be four movies on one disc
(each movie might be considered a title). Each title is divided into chapters. To select a title:
1. While the disc is playing, press INFO on the remote to bring up the Info Display.
2. If the Title icon on the Info Display isn't highlighted, use the left/right arrow buttons to
highlight it.
3. Use the number Imtton(s) on the remote to enter the title number or press the up/down arrow
buttons to go to the next/previous title.
4. Press OK on the remote when the title you want to play appears in the text window.
Note." Some discs only have one title.
C:12 Selecting a Chapter
Because DVD discs use digital technology, a title can be divided into individual chapters (similar
to tracks on a CD). You can skip to a specific chapter by using the C,hapter feature in the Info
Display.
1. While a disc is playing, press INFO on the remote to bring up the Info Display.
2. Press the arrow buttons to highlight the Chapter icon.
3. Use the number buttons on the remote to enter the number of the chapter you want to play or
press the up/down arrow buttons to go to the next/previous title.
4. Press OK on the remote.
Notes:
The Chapter feature won't work if the disc isn't formatted with separate chapters.
You can also advance to the next chapter bFpressing CH + _ on the remote (SKIP FWD on
the front of the plc(yer) and go to the preceding chapter by pressing CH- _on the remote
(SKIP BACK on the front of the plcd_e_9
28 Chapter 2

Playing DVDs
Using Scene Snip Editing
The Scene Snip feature lets you edit out select scenes on a disc. Once you have made edits, the
disc's title is stored in the Scene Snip Library so you can play either the edited or unedited version
of that disc.
Editing a Disc
1. While the disc is playing, press SNIP on the remote to bring up the Scene Snip Info Display.
Note: You can also press INFO on the remote, select the Scene Snip icon (scissors) and
press OK.
2. The Scene Snip display appears. An available icon will be highlighted (a scissors icon with the
word Uncut next to it).
,
4,
.
When you reach the beginning of the scene you want to edit out, press OK on the remote.
The number of the cut and a time display appear next to the icon. For example, in the
illustration above, the first cut is indicated by the number 1 followed by the time the cut
begins - 00:06:18.
When you reach the end of the scene you want to edit out, press the OK button on the
remote. The icon changes to a trash can with the cut number and beginning time displayed
next to it. The edited version of the disc is added to the Scene Snip library.
Press the INFO or CLEAR button on the remote to remove the Scene Snip display from the
screen.
Chapter 2 29
Playing DVDs
Using Scene Snip
The DVD Player must be locked to play the edited version of a disc. If yon play the disc in an
unlocked state, it will play as if there are no edits. The player is locked and unlocked from the
DVD player Lock menu (see chapter 5).
When the DVD Player is locked, you must enter the password to edit the disc. To play the edited
version of a disc:
1. Make sure the DVD Player is locked.
2. When a disc including Scene Snips is inserted, a message box with two options appears:
Play Unedited
Play Edited
3. Highlight and select Play Edited. The edited version of the disc is played.
If you want to play an unedited version of a disc that has been assigned Scene Snips, you must
enter a password.
Each side of a 2-sided disc must be edited separately.
Note: Random and Program play are not available when Scene Snip is on.
Clearing Scene Snips
To clear an edit while the disc is playing:
1, Press SNIP on the remote to bring up the Scene Snip Display.
2, Highlight the trash can icon next to the edit you want to clear. Press OK.
3, The edit is cleared and the trash can icon changes back to the scissors icon.
If all 6 edits are in use, you can only add a new edit by clearing an existing one.
30 Chapter 2
Playing DVDs
Selecting Subtitles
By default, subtitles are off. To turn subtitles on:
1. While the disc is playing, press INFO on the remote.
2. Highlight the Subtitles icon. The Subtitle icon acts as a toggle to turn subtitles on and off.
When subtitles are on, the text box below the icons will display the current subtitle language.
You can also turn on subtitles by pressing the SUBTITLE button on the remote control. When the
subtitle info display comes up, press the up/down arrow buttons to change the subtitle language
(if available on that disc).
Selecting the Subtitle Language
You can change the Subtitle language while you're watching a DVD disc, but only if the disc was
created wRh subtitles.
1. While the disc is playing, press INFO on the remote.
2. Press the arrow buttons to highlight the Subtitle icon and if subtitles are off, press OK to turn
them on.
,Use the up/down arrow buttons to scroll through the subtitle languages that are available on
the disc. If subtitles aren't available, the text in the text box will read Subtitles: Not Available. If
subtitles are available, the language currently showing in the text box is the active selection.
The subtitles will be shown in that language.
4. To make the Info Display disappear, press the INFO button on the remote.
Notes:
Changing the subtitle language with the Info Display will only affect the disc currently
being played. When the disc is removed or the player is turned off, the subtitle language will
revert to the language setting specified through the DVDplayer main menu.
The subtitle language can also be changed through the DVDplayer menu.
You can also display the subtitle lnfo Display bypressing SUBTITLE on the remote. Press
SUBTITLE again to toggle subtitles on or off Use the up/down arrow buttons to select a
different subtitle language (if available). Press 1NFO to remove the Info Display from the
screen.
Chapter2 31
Playing DVDs
Changing the Audio Language
If the disc was created with different language tracks (recorded in different languages), you can
use the Info Display to temporarily change the DVD Player's Audio Language setting.
1. While a disc is playing, press INFO on the remote to bring up the Info Display.
Note: You can also bring up the info display by pressing the AUDlO button on the remote.
2. Highlight the Audio icon. The current audio language appears in the text box below the row
of icons.
3. Press the up/down arrow buttons to scroll through the attdio languages that are available on
the disc until the audio language you want to use appears in the text box. Audio will be
played in that language.
4. To make the Info Display disappear, press the INFO button on the remote.
Notes:
The language feature only works if the disc was created with multiple audio tracks.
When you choose an audio language from the Info Display, you only override the audio
language setting in the DVD Player's main menu temporarily.
The audio language can also be changed through the DVD player menu.
32 Chapter 2
Playing DVDs
Using the Repeat Feature
The default mode for the Repeat feature is Off. There are four Repeat options:
• Disc - repeats the disc that is playing
• Title - repeats the title that is playing
• Chapter - repeats the chapter that is playing
• A•B - Set the beginning (point A) and the end (point B) to make this part of the movie play
repeatedly.
To Use Repeat:
1. While a disc is playing, press INFO on the remote.to bring up the Info Display.
2. Highlight the Repeat icon. The text in the text box below the icons will read Repeat Mode: OfF
3. Press the up/down arrow buttons to scroll through the Repeat options until the Repeat option
you want is displayed in the text box.
, 4. Press OK. The selected repeat option will loop repeatedly until you turn Repeat off. Repeat is
turned off by completing steps 1 through 3 above, and selecting the Off option.
A*B Repeat
A•B Repeat lets you define a specific segment on the disc that you want to repeat. For example,
you might like to watch the dogfight in the movie Top Gun. To watch this scene over and over:
1. Find the spot on the disc that is a few seconds before the beginning of the scene you want to
repeat (this gives you time to access the Info Display and the Repeat feature).
2. Press INFO on the remote and select the Repeat icon from the Info Display.
3. Press the up/down arrow buttons until the A•B Repeat option is shown in the text box
underneath the icons. The text box reads Repeat Mode: A-B Press OK to Set A Point.
4. At the beginning of the scene you want to repeat, press OK to set the A point.
5. When you get to the part of the disc that you want to be the end of the repeated segment (the
B point), press OK. The segment will repeat until you turn Repeat off.
6. To make the Info Display disappear from the screen, press the INFO button on the remote.
How to Cancel Repeat
There are three ways to cancel Repeat:
• Press STOP twice.
• Go to the Repeat icon in the Info Display and select Off
• Eject the disc.
Chapter 2
Playing DVDs
Using Bookmarks
The bookmark feature lets you mark a point on the disc that you can go to quickly. You can store
up to 6 bookmarks per disc. When you turn the player off or remove the disc, bookmarks are
cleared.
Storing a Bookmark
1. While a disc is playing, press INFO on the remote.
2. Highlight the Bookmark icon and press OK.
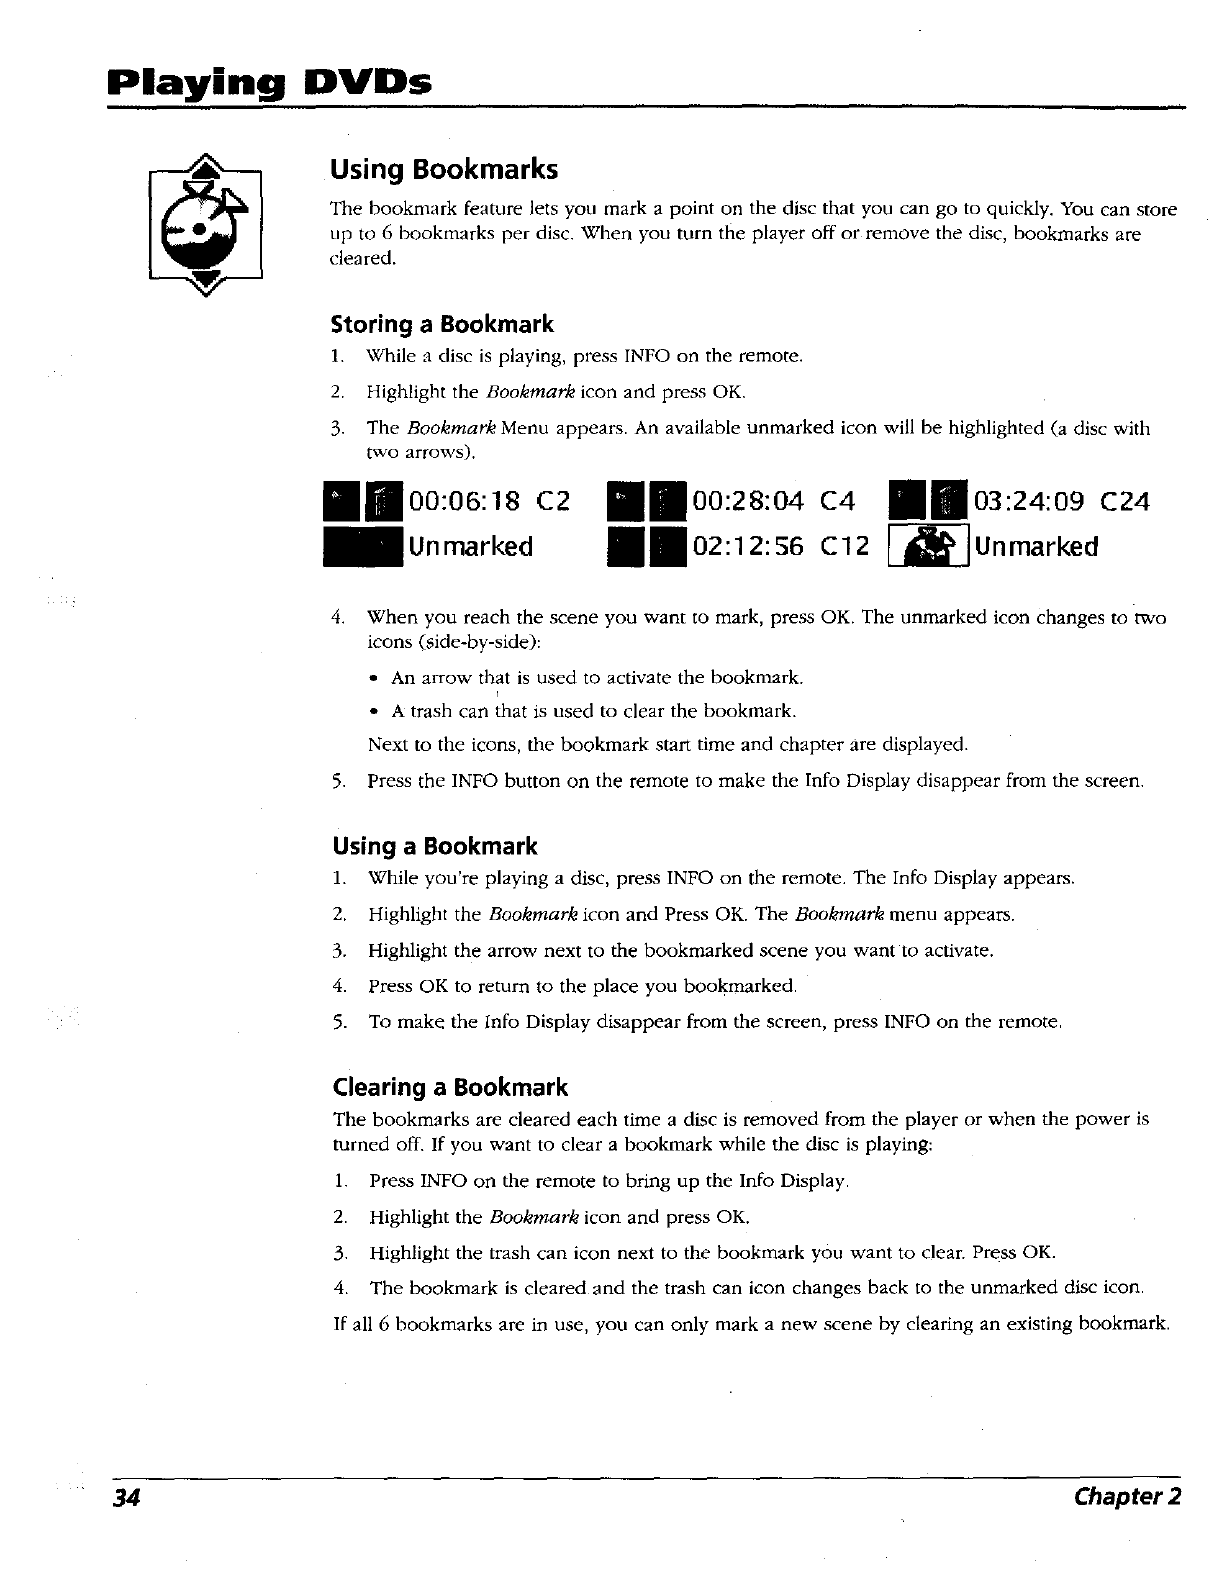
3. The Bookmark Menu appears. An available unmarked icon will be highlighted (a disc with
two arrows).
mmoo:oo:, mnoo:, :o mm,
4. When you reach the scene you want to mark, press OK. The unmarked icon changes to two
icons (side-by-side):
• An arrow that is used to activate the bookmark.
• A trash can 'that is used to clear the bookmark•
Next to the icons, the bookmark start time and chapter are displayed.
5. Press the INFO button on the remote to make the Info Display disappear from the screen.
Using a Bookmark
1. While you're playing a disc, press INFO on the remote. The Info Display appears•
2. Highlight the Bookmark icon and Press OK. The Bookmark menu appears.
3. Highlight the arrow next to the bookmarked scene you want to activate.
4. Press OK to return to the place you bookmarked.
5. To make the lnfo Display disappear from the screen, press INFO on the remote.
Clearing a Bookmark
The bookmarks are cleared each time a disc is removed from the player or when the power is
turned off. If you want to clear a bookmark while the disc is playing:
1. Press INFO on the remote to bring up the Info Display.
2. Highlight the Bookmark icon and press OK.
3. Highlight the trash can icon next to the bookmark you want to clear. Press OK.
4. The bookmark is cleared and the trash can icon changes back to the unmarked disc icon.
If all 6 bookmarks are in use, you can only mark a new scene by clearing an existing bookmark.
•34 Chapter 2
Playing DVDs
Changing the Camera Angle
Some discs contain multiple angles of a particular scene or sequence. If the disc only has one
angle, this feature won't work. When multiple angles are available, the Camera Angle icon
appears in the upper right corner of the screen. To change the camera angle:
1. While a disc is playing, press INFO on the remote. The [nfo Display appears.
2. The Camera Angle icon will display the number of angles available. For example, if there
are 3 different angles, the icon will read 1 of 3. This means angle 1 is currently being
played.
.The text box beneath the icons displays Camera Angle: 1. Use the up/down arrow buttons
to scroll through the camera angle choices. The camera angle number displayed in the text
window is automatically shown.
4. To make the Info Display disappear, press the INFO button on the remote.
Note:
You can also display the camera angle Info Display bypressing ANGLE on the remote. Use
the up/down arrow buttons to switch between different camera angles. Press INFO to
remove the Info Display from the screen.
Chapter 2
Playing DVDs
&_oA &
,0,0,0
,0,0,
,0,0,_ _lretN_
0°(.)
_ _o
OOOO
Disc Playback Features Using the Remote
You can use the remote control to activate disc playback features.
Playback features aren't usually available during the opening credits of a movie. If a playback
feature isn't available, the invalid symbol _ appears on the screen when you press that button.
Fast Motion Playback (Picture Scan)
To scan quickly through the disc when you're playing it, use the Picture Scan feature.
1. Press the REVERSE or FORWARD button on the remote when you're playing a disc.
2. Press the button again to scan at a faster speed. Each time you press the button, the scanning
speed increases.
3. Press the PLAY button at any time to resume normal playback.
You can also use the Picture Scan feature by rotating the shuttle on the front of the DVD player.
Rotate the shuttle clockwise (forward search) or counterclockwise (backward search). The farther
you rotate the shuttle, the faster the speed.
Note: You won't hear the sound (audio) on DVD discs when you're using thepicture scan
feature.
Freeze Frame and Frame Advance
1. Press PAUSE when a disc is playing to freeze the picture.
2. Each time you press the PAUSE button, the picture advances one frame.
• Press FRAME - on the remote to advance one frame backwards.
3. Press PLAY to resume normal playback.
Slow Motion Playback (in Freeze Frame Mode)
While the disc is in freeze frame mode, you can use slow motion playback.
1. While the disc is playing, press PAUSE on the remote.
2. Press the REVERSE or the FORWARD button.
3. Press the button again to increase the slow motion playback speed.
4. Press PLAY to resume normal playback.
Chapter Advance
While a disc is playing, you can go forward or backward a chapter or track at a time by pressing
CH +_ or CH - _ on the remote.
36 Chapter 2

Playing DVDs
Scene Again TM
When you're watching or listening to a DVD disc, press the GO BACK-AGAIN button on the remote to go back
approximately 10 seconds to see and hear missed content. Subtitles will automatically be displayed until the end of the
replayed scene (to select the subtitle options, see chapter 5). This feature only works if the disc is encoded with navigation
control.
Multiple presses of the GO BACK-AGMN button will go back further. For example, if you press the GO BACK button three
times in rapid succession, play will go back 30 seconds.
Subtitles
When a DVD is recorded with subtitles, you can use the Subtitle feature to view the subtitles on-screen.
1. Press the SUBTITLE button on the remote when you're playing a disc to bring up the Info Display.
2. Press the button again to toggle the subtitle feature on or off.
3. Use the up/down arrows buttons on the remote to switch between different languages (if available).
4. Press INFO to remove the Info Display from the screen.
Audio Language '
You can temporarily change the default audio language (if different audio languages are available on that disc).
1. Press AUDIO to bring up the Info Display.
2. Use the up/down arrows buttons to switch between different languages (if available on that disc).
3. Press INFO to remove the Info Display from the screen.
Camera Angle
Some DVDs are recorded using multiple camera angles (if available on that disc).
1. Press ANGLE to display the Angle icon.
2. Use the up/down arrows buttons to switch between different camera angles (if available on that disc).
3. Press INFO to remove the Angle icon from the screen.
Scene Snip Edit
You can edit out sections of a disc.
1. Press SNIP to bring up the Scene Snip display.
2. Select the time you want the first edit to start and press OK. Press OK again where you want the edit to end.
• You can edit out up to 6 sections of a disc.
Press INFO or CLEAR to remove the Info Display from the screen.
Chapter 2
Playing DVD$
Zoom
When playing DVD discs and Video CDs, you can magnify the screen during normal playback.
For DVD discs, Zoom has 3 levels (1.5x, 2x, 4x). For video CDs, Zoom has 2 levels (Ix, 2x). Zoom
magnifies from the center of the screen. Once in Zoom mode, you can pan right, left, up or down
by using the arrow buttons.
1. Press ZOOM on the remote control to magnify. (The zoom level will be displayed in the
corner of the screen. Press CLEAR to clear the zoom info display from the screen.)
2. Press the ZOOM button again to go to the next level of magnification.
3. To turn Zoom off, press the ZOOM button until you cycle through all the levels and return to
normal playback.
Note: You can use tbe 1.5x zoom mode to alter a 16x9 letterbox movie (black bars top and
bottom) to a 4x3 format. This will eliminate the black bars at the top and bottom and allow
you to use left/right arrow keys to pan and scan.
'38 Chapter2
Chapter 3
Playing Audio CDs
Chapter Overview:
• Using the Info Display
•Using the Time Display
•Selecting a Specific Track
•Selecting a Play Mode
•Using the Repeat Feature
•Using IntroScan
•Using Bookmarks
•Dub Assist
mGrrAL AUDIO
Changing
39
Playing Audio CDs
Using the Info Display
Your I)VI) player has nlany _)f the same t_:atures as an au,.lio C1) player. The pla_er's on-screen
lnlk/ I)isplay I,..'ts you choose \arious pktyback features. "Ellis scclion explains how to play audi,./
Cl)s in your I)V'I) player alld IIO\V to usc" lh_-' player's f_'alLLres. Fc)r instructions on loading and
playing your ('l)s. sec Chapter 2.
To access the Info Display v, hilt tile CI) is playing, press INFO on tile ierllc_tc. Tile Into Display
appe:ns aClC*ss [hu top of the screen. Each of the p]ayl_ack [__,atures is reprcsentecl by an icon. 'Eo
access af_'atLIz'C. LlSe the :nlOW btltn)ns Oll tile remote to higLlJight the icon l'ach |_+attlrc that can
be a,.'ccsscd flom the On-Screen Itlfo l)ispkty is ¢lcscrihcd on tile foliowirtg pages. T_) clear the
Info Display lrom the screen, press INFO ,:_ll the icnlote control.
Note." 7b sec Ib_, D{/b l)i._l)lt O' tt'bileplc(l't'Hg audio C1)s. you I*ulsl letrll o_t I'ozcr TI "atzd tuttc
it to ItS Uzdc,o l]qaltt Challlz_,l. t:or more tlz/_)rmatt'on about Ibc, 71 "_ I"t'cl_,{)IHl_ltt C']_a_zttel.
se_, C_apter 1
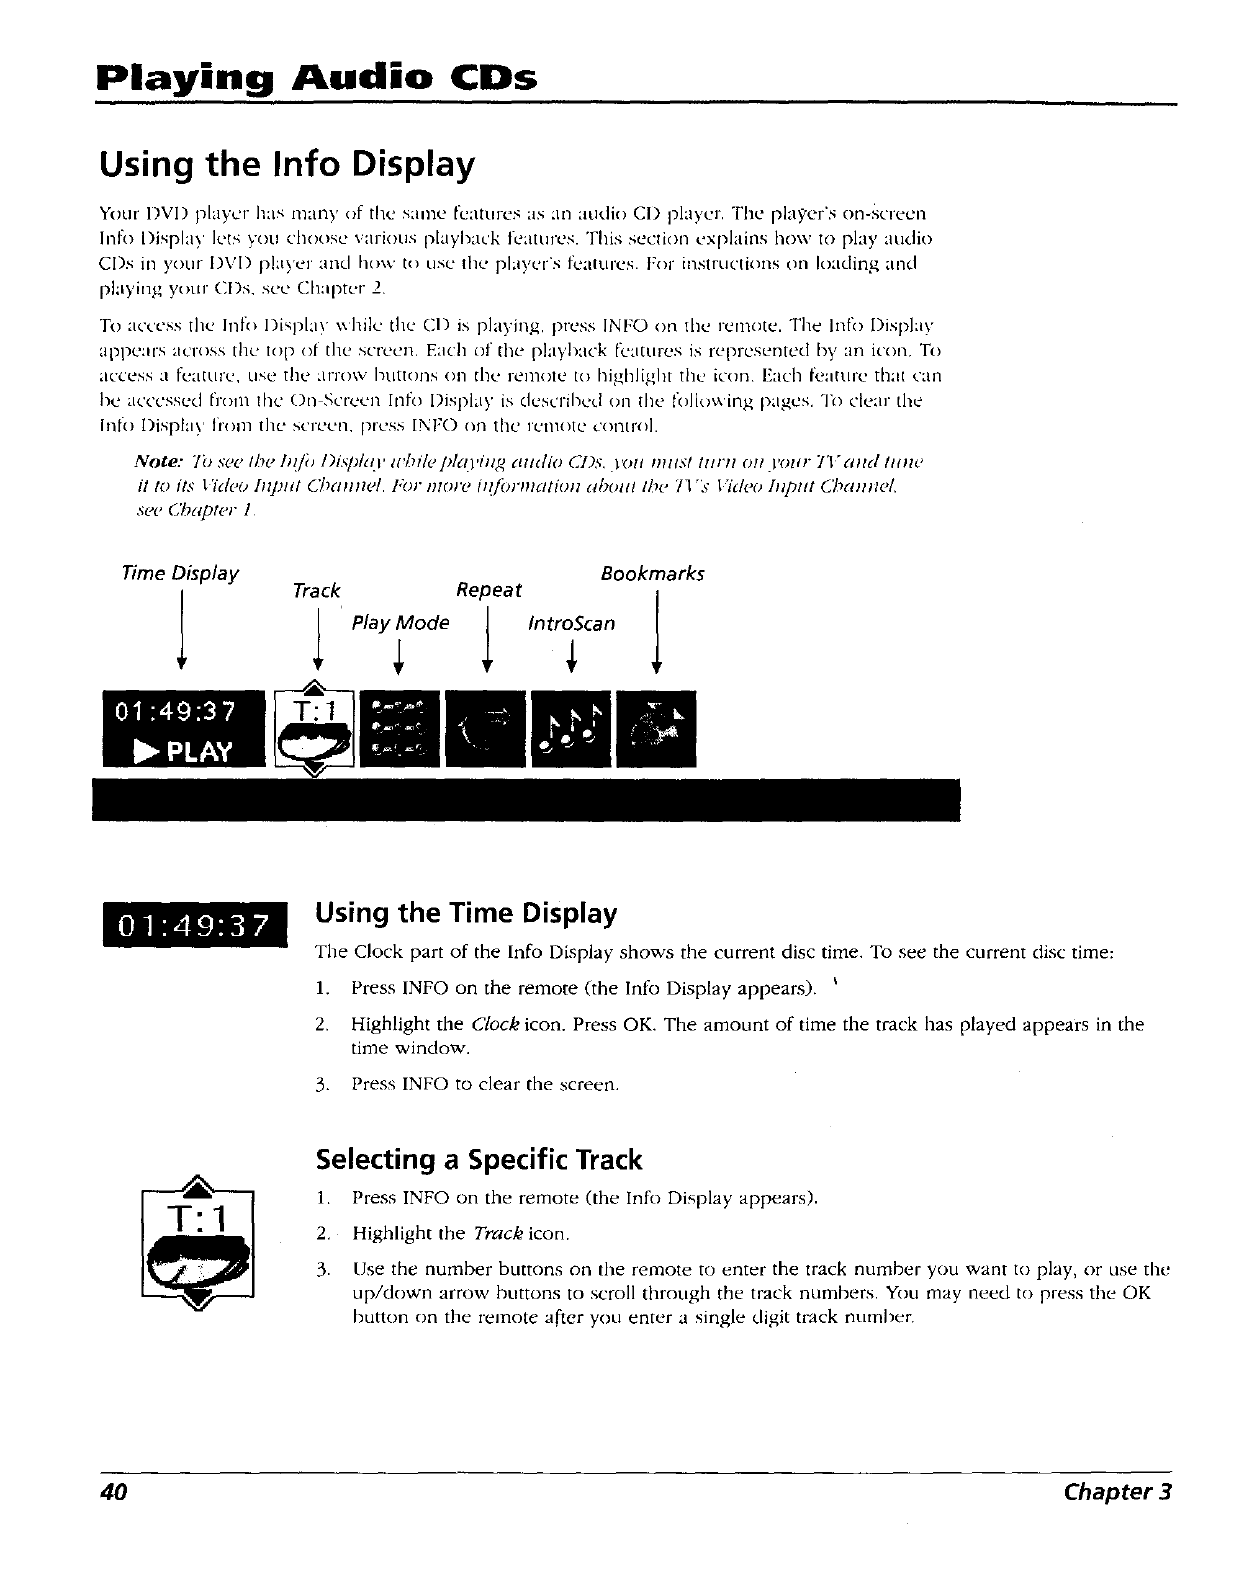
Time Display Bookmarks
Track Repeat; l
Play Mode IIntroScan
÷maama
Using the Time Display
Tile Clock part of the Info Display shows the current disc time. To see the current disc time:
1. Press INFO on the remote (the Info Display appears).
2. Highlight the Clock icon. Press OK. The amount of time the track has played appears in the
time window.
3. Press INFO to clear the screen.
Selecting aSpecific Track
1. Press INFO on the remote (the Info Display appears).
2. Highlight the Track icon.
3. Use the number buttons on the remote to enter the track number you want to play, or use tile
up/down arrow buttons to scroll through the track numbers. Yon may need to press the OK
button on the remote after you enter a single digit track number.
40 Chapter 3
Playing Audio CDs
Selecting a Play Mode
The Play Mode feature lets you set up tile order in which you want the tracks on the CD to phty.
There are three options:
Standard: the tracks play in tile order listed on the CI) (starting with track 1).
Random: the tracks on the CI) play in randow* order.
Program: the tracks on the CI) play in the order you've programmed. You must first create a
program list in the PI*O' menu of the DVD Player's main menu.
Switching between Standard and Random Play
Standard (the order listed on the CD) is the default setting for your player. To change the default
setting:
1. Press INFO on the remote while a disc is playing. The lnfo Display appears•
2. Highlight the Play Mode icon• The current play mode appears in the text box underneath the
icons. Press the up/down arrow buttons to scroll through the play mode choices until Random
appears in the text box. The tracks on the CD will now play in random order.
Note: 77_eplayer dqfilults mStandard playback whenever.you put a new CD 07to3_)ur player
Using the Program Play Feature
To use the Program Playback feature, yon must enter the order in which you want the tracks on
the CD to play by creating a program. This is done from the DVD player's menu.
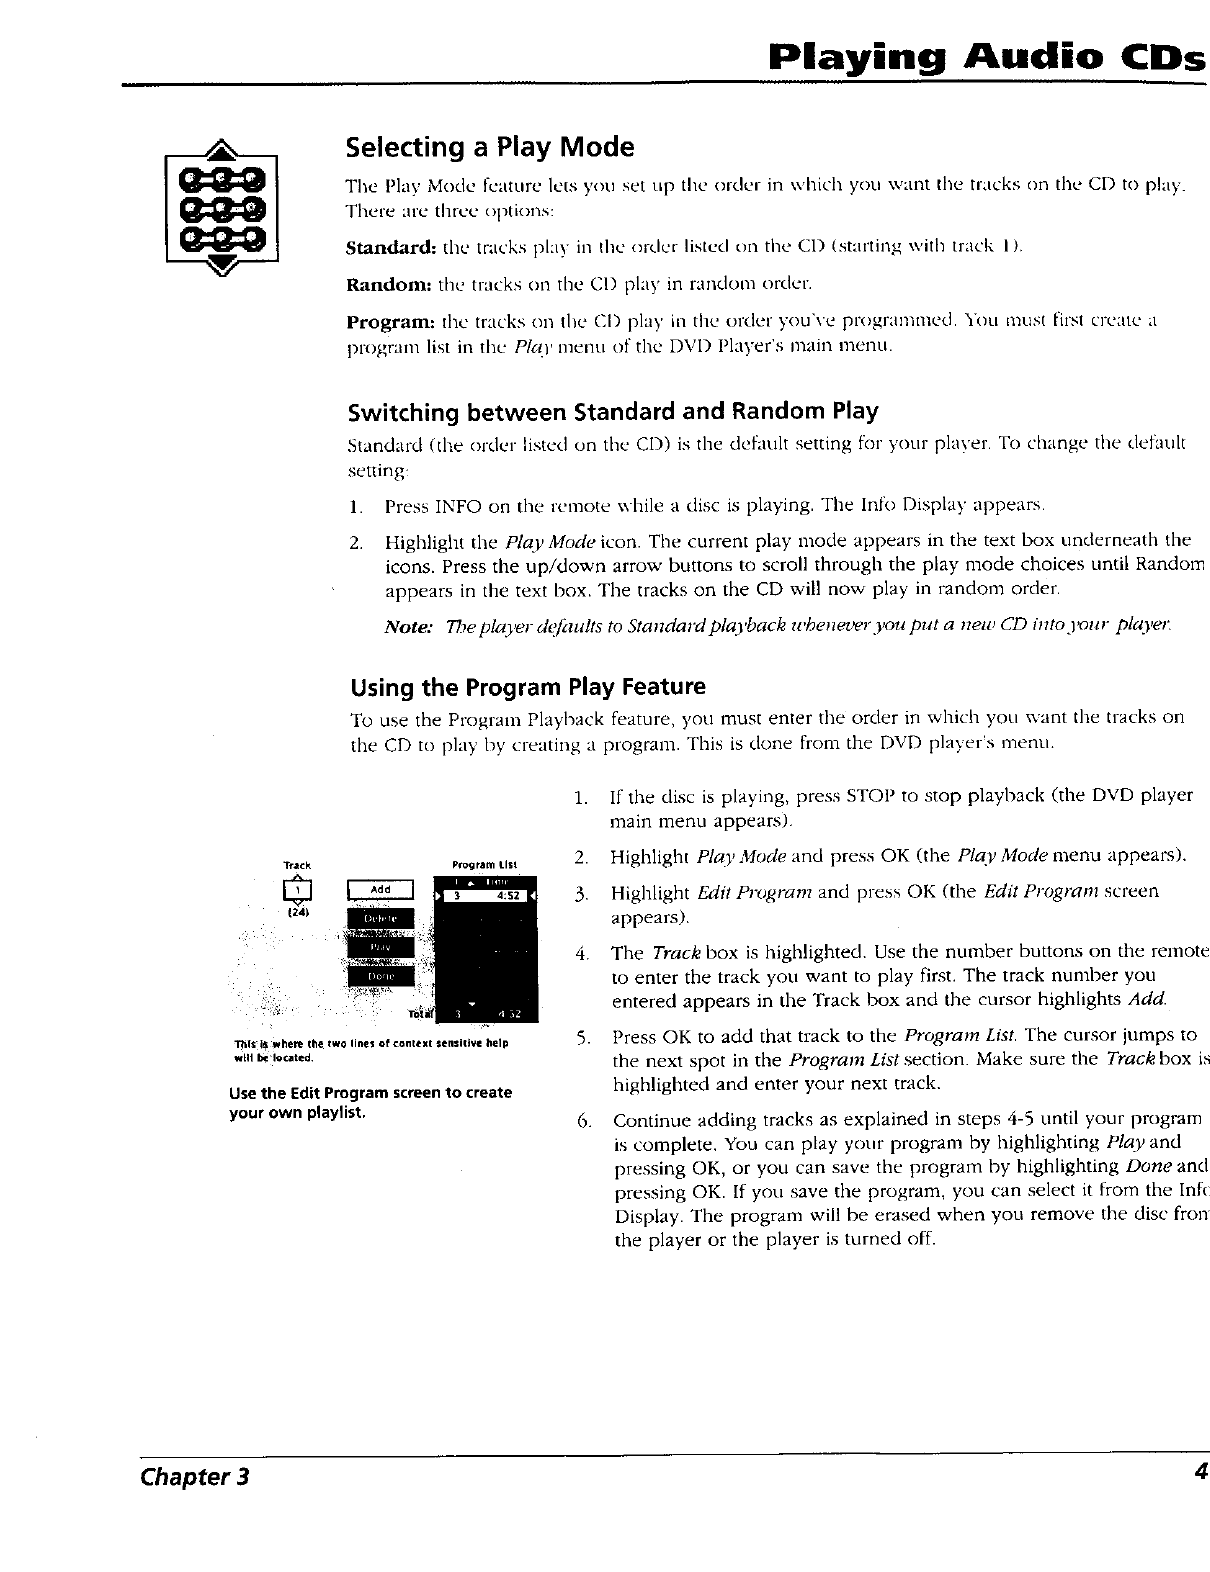
TI_ l_ _her,_ th e two lines of context Sensit _¥e I_elp
wRI _iocated
Use the Edit Program screen to create
your own playlist.
1.
2.
3.
4.
5.
.
If the disc is playing, press STOP to stop playback (the DVD player
main menu appears).
Highlight PlcO,Mode and press OK (the Play Mode menu appears).
Highlight Edit Program and press OK (the Edit Program screen
appears).
The Track box is highlighted. Use the number buttons on the remote
to enter the track you want to play first. The track number yon
entered appears in the Track box and the cursor highlights Add.
Press OK to add that track to the Program List. The cursor jumps to
the next spot in the Program List section• Make sure the Track box is
highlighted and enter your next track.
Continue adding tracks as explained in steps 4-5 until your program
is complete. You can play your prograrn by highlighting Play and
pressing OK, or you can save the program by highlighting Done and
pressing OK. If you save the program, you can select it from the Inh)
Display• The program will be erased when you remove the disc from
the player or the player is turned off.
Chapter 3
Playing Audio Cns
Editing a Playlist
1. If the disc is playing, press STOP to stop playback. The DVD player main menu appears.
2. Highlight Play Mode and press OK (the Play Mode menu appears).
3. Highlight Edit Program and press OK (the Edit Program screen appears).
4. Highlight the item in the playlist you want to delete.
5. Highlight Delete, and press OK.
6. When you've rearranged the playlist and/or deleted all the tracks necessary, press OK.
Using the Repeat Feature
The default mode for the Repeat feature is Off. There are three Repeat options for Audio CDs:
• Disc - repeats the disc that is playing
• Track - repeats the track that is playing
• A•B - Set the beginning (point A) and the end (point B) to make this part of the CD play
' repeatedly.
To Use Repeat:
1. While a disc is playing, press INFO on the remote to bring up the Info. Display.
2. Highlight the Repeat icon. The text in the text box below the icons will read Repeat Mode: Off
.
4.
Press the up/down arrow buttons to scroll through the Repeat options until the Repeat option
you want is displayed in the text box.
Press OK. The selected repeat option will loop repeatedly until you turn Repeat off. Repeat is
turned off by completing steps 1 through 3 above, and selecting the Off option.
A,B Repeat
AoB Repeat lets you define a specific segment on the disc that you want to repeat:
1,
2.
3.
Find the spot on the disc that is a few seconds before the beginning of the part you want to
repeat (this gives you time to access the Info Display and the Repeat feature).
Press INFO on the remote and select the Repeat icon from the Info Display.
Press the up/down arrow buttons until the A,,B Repeat option is shown in the text box
underneath the icons. The text box reads Repeat Mode: A-B Press OKto SetA Point.
4. At the beginning of the part you want to repeat, press OK to set the A point.
5. When you get to the part of the disc that you want to be the end of the repeated segment (the
B point), press OK. The segment will repeat until you turn Repeat off.
6. To make the Info Display disappear from the screen, press the INFO button on the remote.
42 Chapter 3
Playing Audio CDs
How to Cancel Repeat
There are three ways to cancel Repeat:
• Press STOP twice.
• Go to the Repeat icon in the Info Display and select Off
• Eject the disc.
Using IntroScan
IntroScan plays the first ten seconds of each track on the CD (similar to the scan feature that's on
many car radios). To use IntroScan:
1. Press INFO on the remote (the lnfo Display appears).
2. Highlight the lntroScan icon, Press OK. The first ten seconds of each track will play.
• After IntroScan goes through all of the tracks, it stops.
• If you want to stop IntroScan while it's in progress, press PLAY on the remote. The current
track starts playing in its entirety.
• You can also access IntroScan from the Play Mode menu in the DVD Player's main menu.
Chapter 3 4"
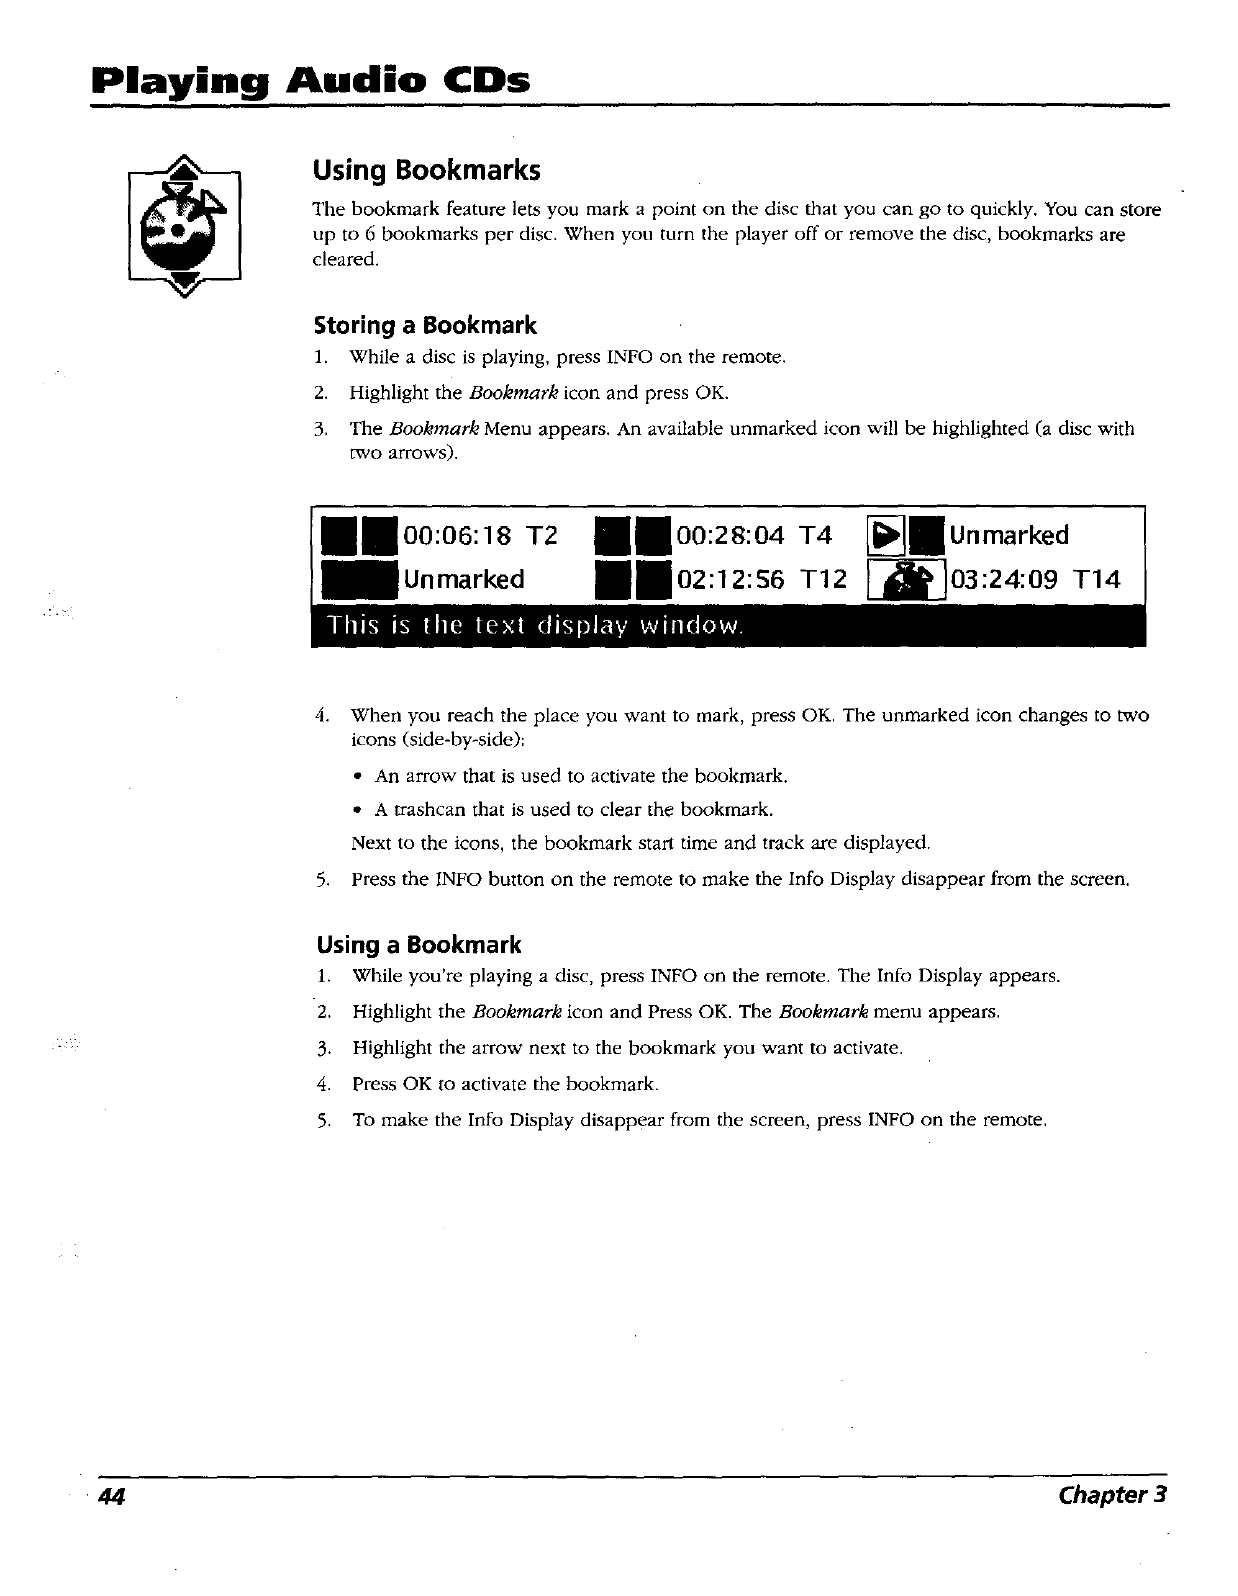
Playing Audio CDs
Using Bookmarks
The bookmark feature lets you mark a point on the disc that you can go to quickly. You can store
up to 6 bookmarks per disc. When you turn the player off or remove the disc, bookmarks are
cleared.
Storing a Bookmark
1. While a disc is playing, press INFO on the remote.
2. Highlight the Bookmark icon and press OK.
3. The Bookmark Menu appears. An available unmarked icon will be highlighted (a disc with
two arrows).
00:06:18 T2
4. When you reach the place you want to mark, press OK. The unmarked icon changes to two
icons (side-by-side):
• An arrow that is used to activate the bookmark.
• A trashcan that is used to clear the bookmark.
Next to the icons, the bookmark start time and track are displayed.
5. Press the INFO button on the remote to make the Info Display disappear from the screen.
Using a Bookmark
1. While you're playing a disc, press INFO on the remote. The Info Display appears.
2. Highlight the Bookmark icon and Press OK. The Bookmark menu appears.
3. Highlight the arrow next to the bookmark you want to activate.
4. Press OK to activate the bookmark.
5. To make the Info Display disappear from the screen, press INFO on the remote.
44 Chapter 3
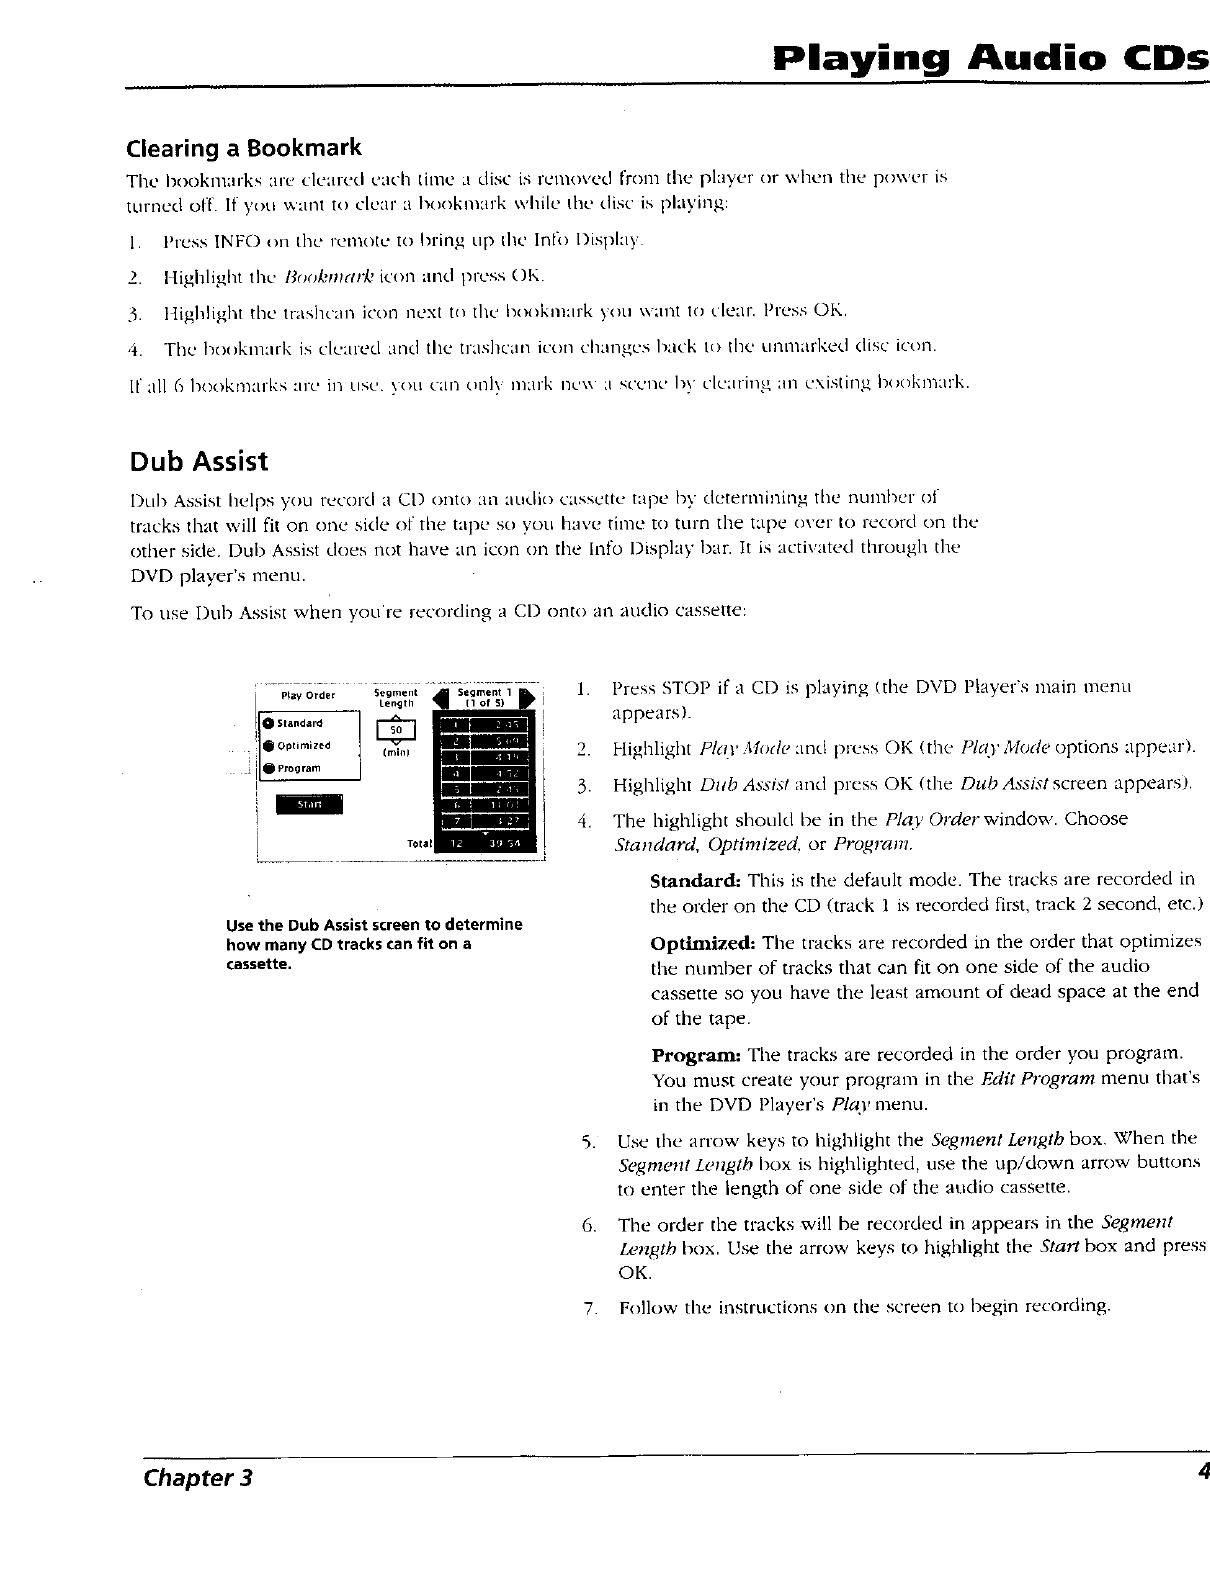
Playing Audio CDs
Clearing a Bookmark
The bookmarks ar_' cleared each time a disc is removed from the player or when the pow_'r is
turned off. If you v.'ant to clear a bookmark v,.hile d'._' disc is playing:
1. Press INFO on tilt.' remote to blling Up [hL' Inl_) l)ispla)
2. t g alight the l_ookmark icon and press OK.
3. Highlig]ll die trashcan icon next to the bookmark you want Io clear, F'ress OK.
4. The bookmark is clearecl and th_ trashcan icon changes back to the unmarl<ed disc icon.
If all 6 I+ooktmuks are in use. ,,on can onl) mark ncxx ;t scq'llu by clcating an existing bookmark.
Dub Assist
I)ub Assist helps you record a CD onto an audio cassette tape by deternail'dng file nuiYlbur ol
tracks that will fit on one side of the tape so you have time to turn the tape over to record on the
other side. Dub Assist does not have an icon on tile lnfo Display I)ar. It is activated through the
DVD player's menu.
To use Dub Assist when you're recording a CD onto an audio cassette:
Use the Dub Assist screen to determine
how many CD tracks can fit on a
cassette.
1. Press STOP if a CD is playing (the DVD Player's main menu
appears).
2. Highlight Pk(l' Mode and press OK (the Pla.)' Mode options appear).
3. Highlight Dub Assist and press OK (the Dub Assist screen appears).
4. The highlight should be in the Pla_, Order window. Choose
Standard, Optimized, or Program.
Standard: This is the default mode. The tracks are recorded in
the order on the CD (track 1 is recorded first, track 2 second, etc.)
,
Optimized: The tracks are recorded in the order that optimizes
the number of tracks that can fit on one side of the audio
cassette so you have the least amount of dead space at the end
of the tape.
Program: The tracks are recorded in the order you program.
You must create your program in the Edit Program n-tenu that's
in the DVD Player's Play menu.
Use the arrow keys to highlight the Segment Length box, When the
Segment Length box is highlighted, use the up/down arrow buttons
to enter the length of one side of the audio cassette.
The order the tracks will be recorded in appears in the Segment
Length box. Use the arrow keys to highlight the Start box and press
OK.
7. Follow the instructions on the screen to begin recording.
Chapter 3

This page left intentionally blank.

Chapter 4
Playing Video CDs
Chapter Overview:
•What is Video CD?
• The Video CD Disc menu
•The Video CD Info Display
VIDEOCD
Changing Entertainment. Again.
47
Playing Video CDs
What is a Video CD?
Like DVD video discs, Video CDs contain picture and sound content. Video CDs (VCDs) are
encoded in a different format. VCDs don't hold as much information as DVD discs and the
picture quality is not as high.
VCDs are divided into tracks, and each track is divided into indexes. A track is similar to a title
and an index is similar to a chapter.
The Video CD Disc Menu
A Video CD disc is capable of having an on-screen menu that is separate from the DVD player's
menu system and on-screen Info Display. If the disc has a menu, the menu will appear after the
disc is loaded into the player.
The content and operation of disc menus varies from disc to disc. Check the instructions that
accompany the Video CD for more information on how to use the playback control function for
that specific disc.
If a disc menu appears:
1. Use the number buttons on the remote to select a track (similar to a title).
2. Press OK or PLAY on the remote to begin playback of the selected track.
3. Press CH + _ or CH - _ on the remote (SKIP FWD or SKIP BACK on the player) to scroll
through the tracks.
4. Press MENU to 'stop playback and return to the disc menu or press STOP to stop playback
and return to the DVD player menu.
To bring up the disc menu during disc play, press the MENU button on the remote.
48 Chapter 4
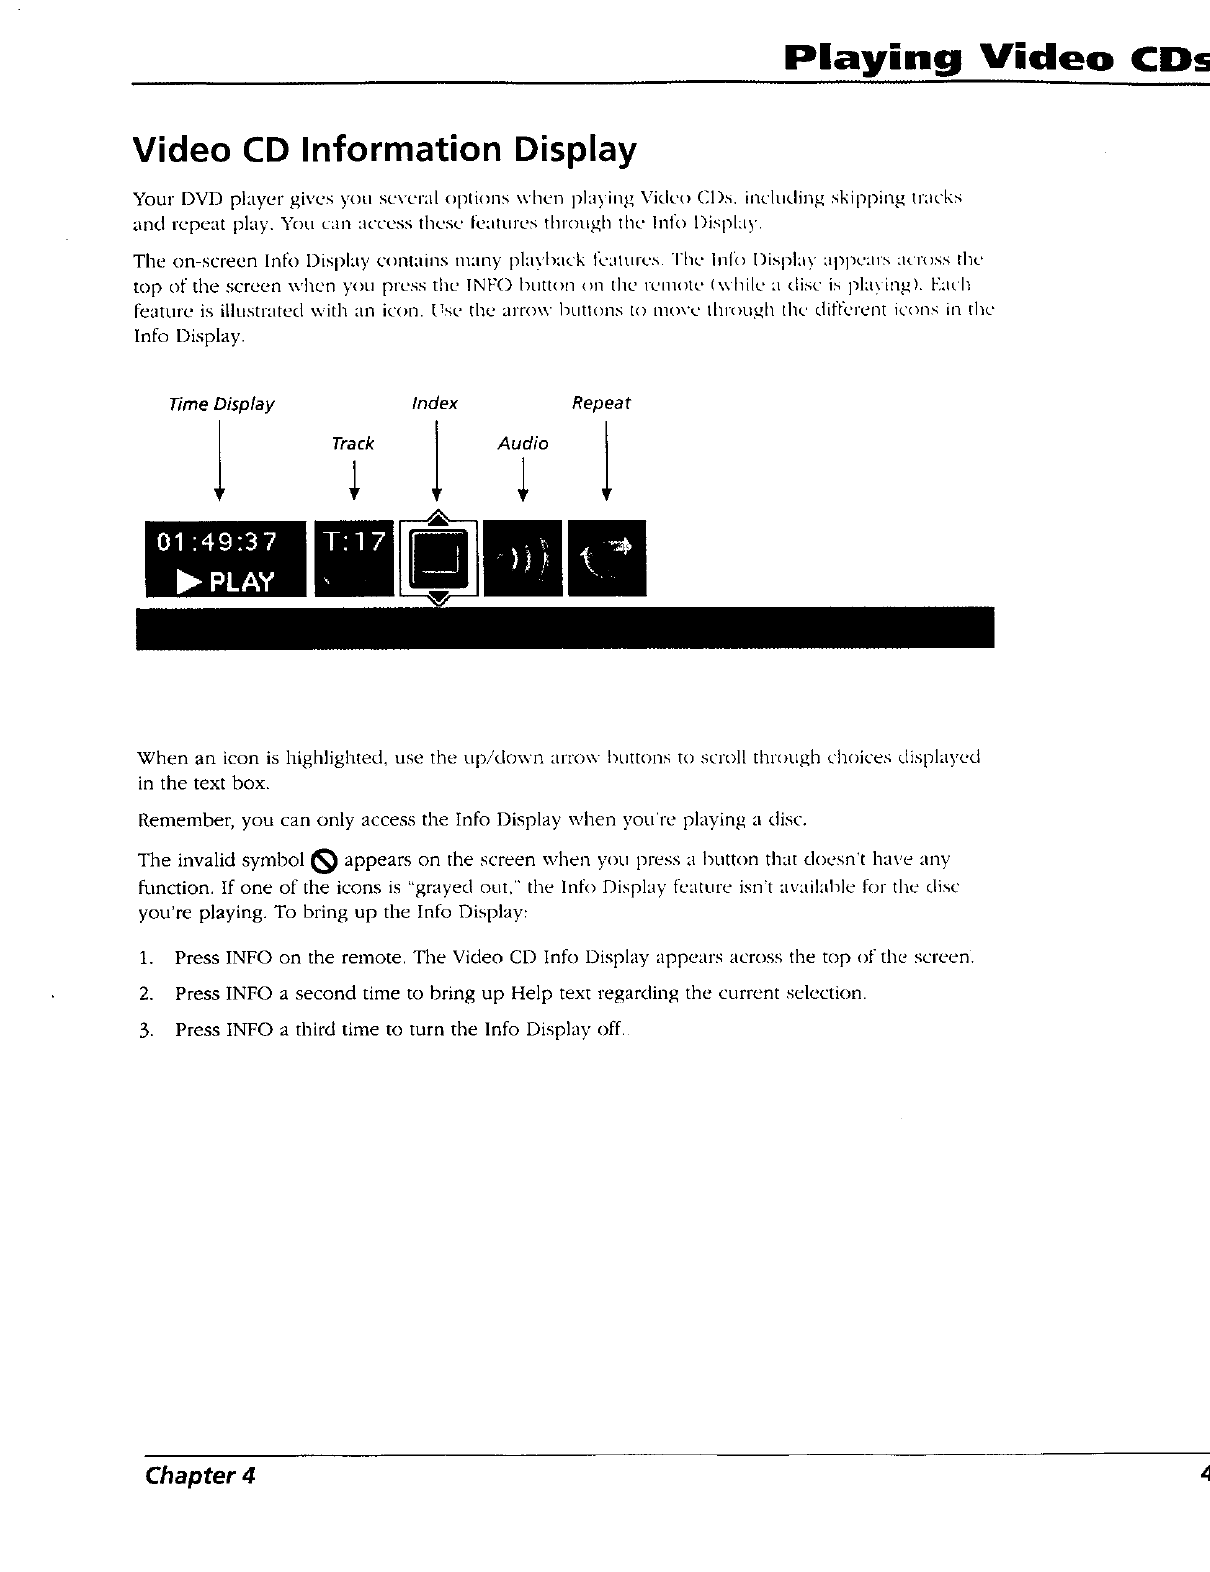
Playing Video CDs
Video CD Information Display
Your DVD player gives you several options when playing Video Cl)s, inchiding skipping tracks
and repeat play. You can access these li_'aturesthrough the hlfo l)isp[:ty.
The on-screen II1R) l)ispkty contains many playback l;_'alnres. "l'h_.' lift<>l)isplay appe_lrN ;l_.'r/)ss the
top of the screen when you press the INFO button on the remote (while a disc is pla} ing) Each
feature is ilhlstrated with an icon. Use the arrow btltlolls to IllO\'e I[lri)tigh t]l_.' dif[+.>]ent icons in the
lnfo Display.
Time Disp/ay
Track
Index Repeat
Audio
When an icon is highlighted, use the up/down :in'o\\ buttons to scroll through <.'hoices displayed
in the text box.
Remember, you can only access the Info Display when you're playing a disc.
The invalid symbol _ appears on the screen when you press a button that doesn't have any
function. If one of the icons is "grayed out," the lnfo Display feature isn't avaihlhle tT_]tile disc
you're playing. To bring up the Info Display:
1. Press INFO on the remote. The Video CD Info l)isphiy appears across the top of tile screen.
2. Press INFO a second time to bring up Help text regarding tile cun+ent selection.
3. Press INFO a third time to turn the lnfo Display off.
Chapter 4
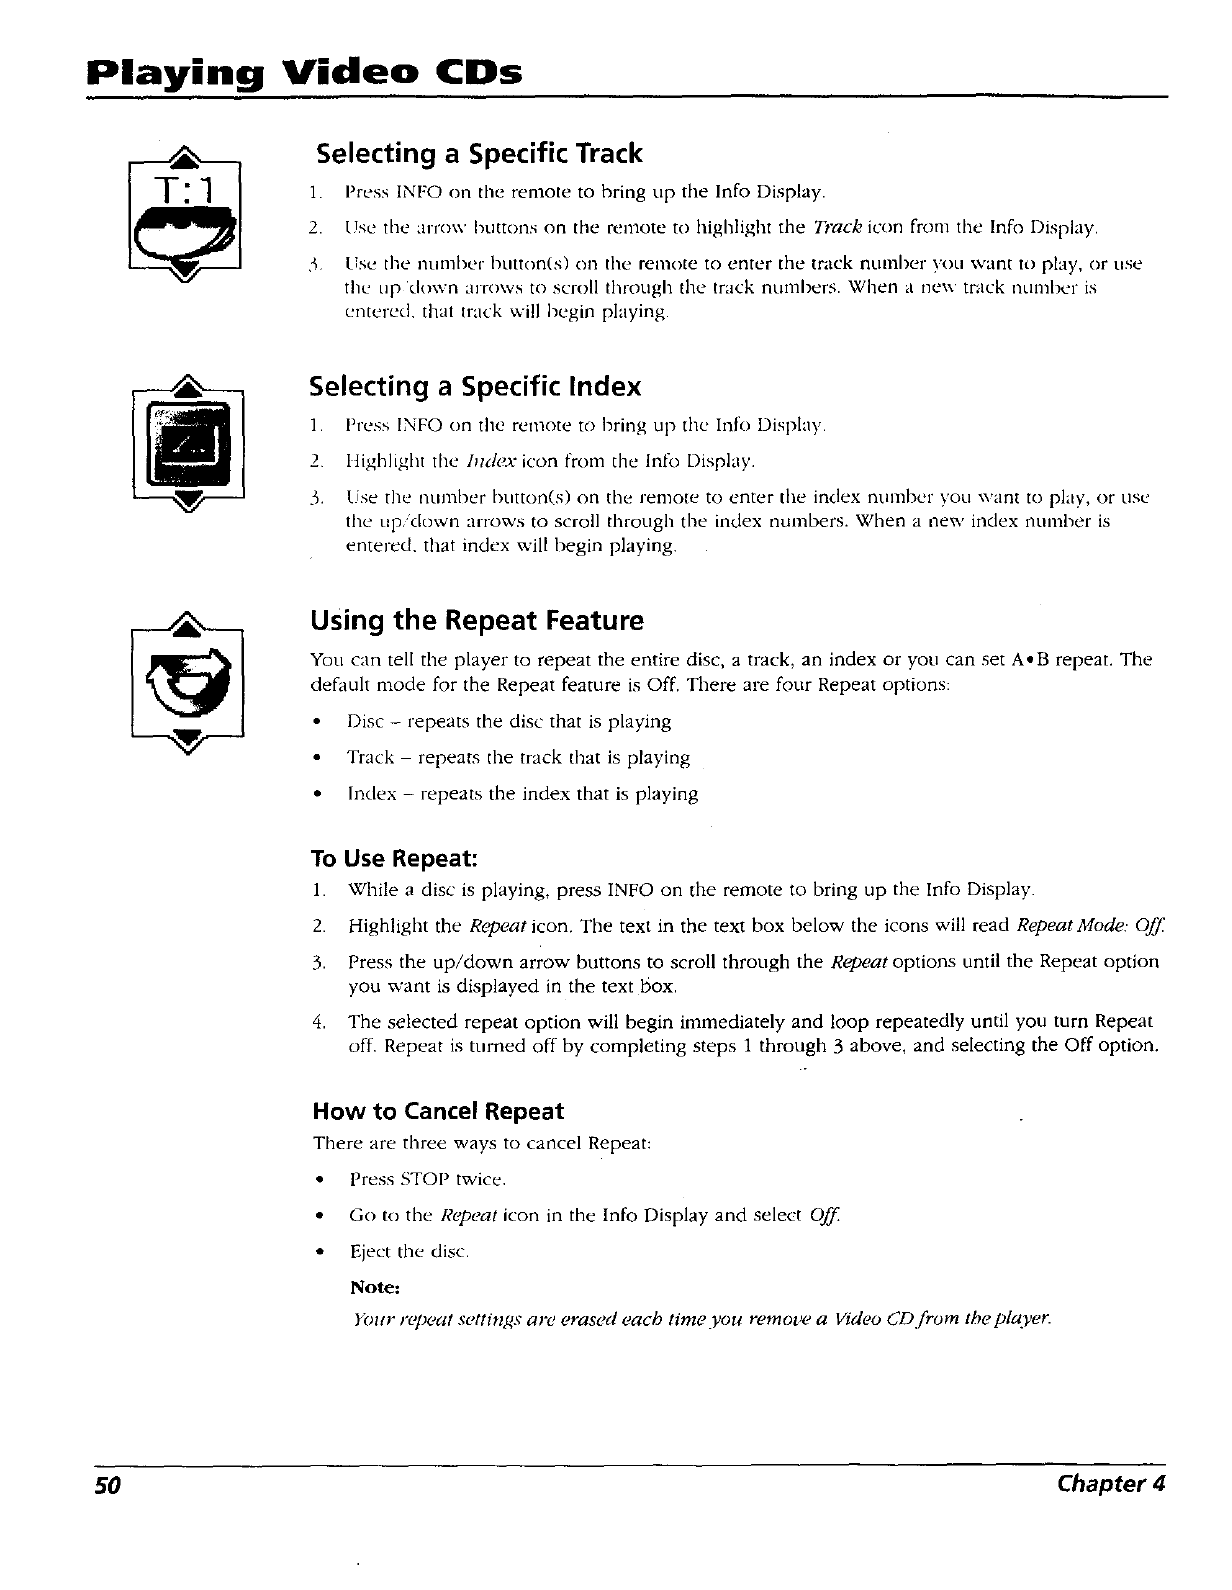
Playing Video CDs
Selecting a Specific Track
1. F'ress INFO on the remote to bring up tile Info Display.
2. Use the arrow buttons on the remote to highlight the Track icon from the Info I)isplay.
3 Use the number button(s) on the remote to enter the track nLunher you v,,ant to play, or use
the tip down arrows to scroll through the track nulnbers. When a new track number is
entered, that track will begin playing
Selecting a Specific Index
1. Press INFO on the remote to bring up the h_fo Display.
2 Highlight the lmtex icon from the lnt_._Display.
3. Use the number button(s) on the remote to enter the index number you want to play, or use
the up/down arrows to scroll through the index numbers. When a new index number is
entered, that index will begin playing.
Using the Repeat Feature
You can tell the player to repeat the entire disc, a track, an index or yon can set A.B repeat. The
default mode for the Repeat feature is Off. There are four Repeat options:
Disc - repeats the disc that is playing
Track - repeats the track that is playing
• Index - repeats the index that is playing
To Use Repeat:
1. While a disc is playing, press INFO on the remote to bring up the Info Display.
2. Highlight the Repeat icon. The text in the text box below the icons will read Repeat Mode: Off
3. Press the up/down arrow buttons to scroll through the Repeat options until the Repeat option
you want is displayed in the text box.
4. The selected repeat option will begin immediately and loop repeatedly until you turn Repeat
off. Repeat is turned off by completing steps 1 through 3 above, and selecting the Off option.
How to Cancel Repeat
There are three ways to cancel Repeat:
• Press STOP twice.
• Go to the Repeat icon in the Info Display and select Off
• Eject the disc.
Note:
Your rr'peal settings are erased each time you remove a Video CD,/rom the player.
50 Chapter 4
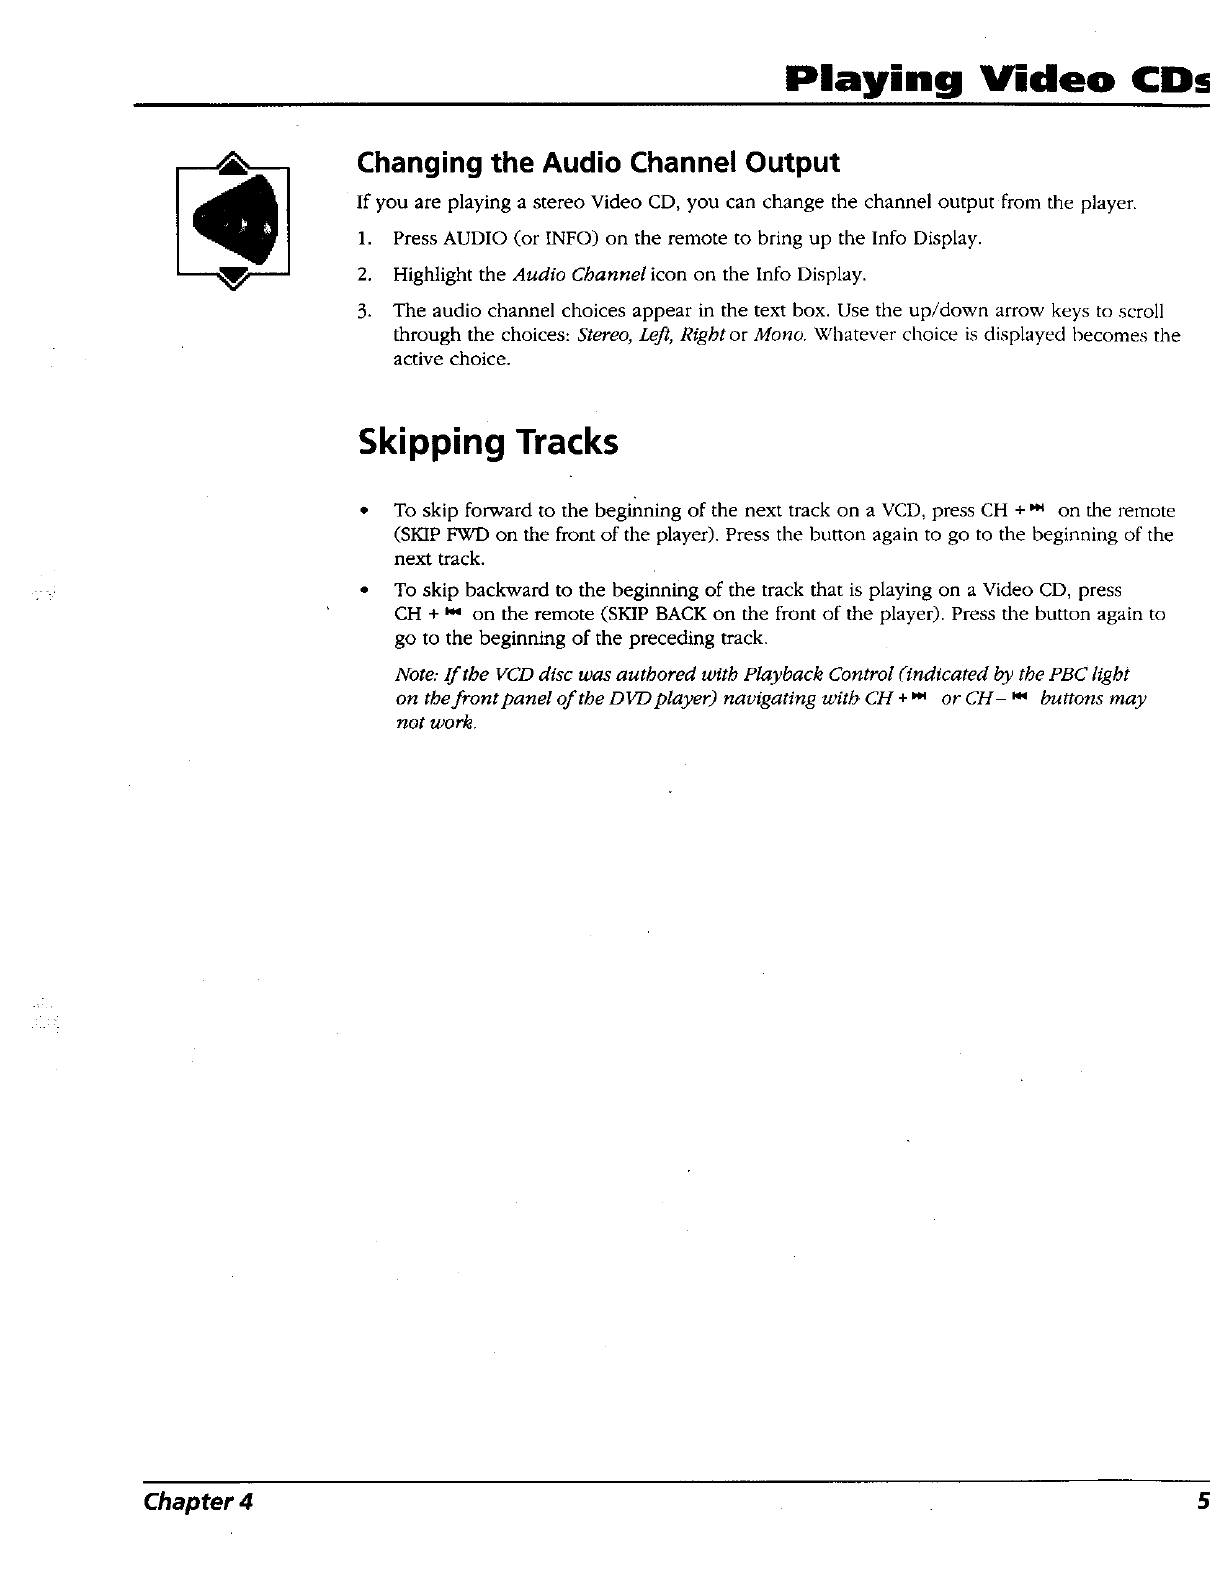
Playing Video CDs
Changing the Audio Channel Output
If you are playing a stereo Video CD, you can change the channel output from the player.
1. Press AUDIO (or INFO) on the remote to bring up the Info Display.
2. Highlight the Audio Channel icon on the Info Display.
3. The audio channel choices appear in the text box. Use the up/down arrow keys to scroll
through the choices: Stereo, Left, Rightor Mono. Whatever choice is displayed becomes the
active choice.
Skipping Tracks
• To skip forward to the beginning of the next track on a VCD, press CH + '_ on the remote
(SKIP FWD on the front of the player). Press the button again to go to the beginning of the
next track.
• To skip backward to the beginning of the track that is playing on a Video CD, press
CH + _" on the remote (SKIP BACK on the front of the player). Press the button again to
go to the beginning of the preceding track.
Note: If the VCD disc was authored with Playback Control (indicated by the PBC light
on the frontpanel of the DVDplayer) navigating with CH + _ or CH- _buttons may
not work.
Chapter 4

This page intentionally left blank.
Chapter 5
Using the DVD Player's
Menu System
Chapter Overview:
•The DVD Player Menu
•The Play Menu
•The Lock Menu
•The Display Menu
•The Sound Menu
•The Languages Menu
•The Glossary
Changing aln.
53
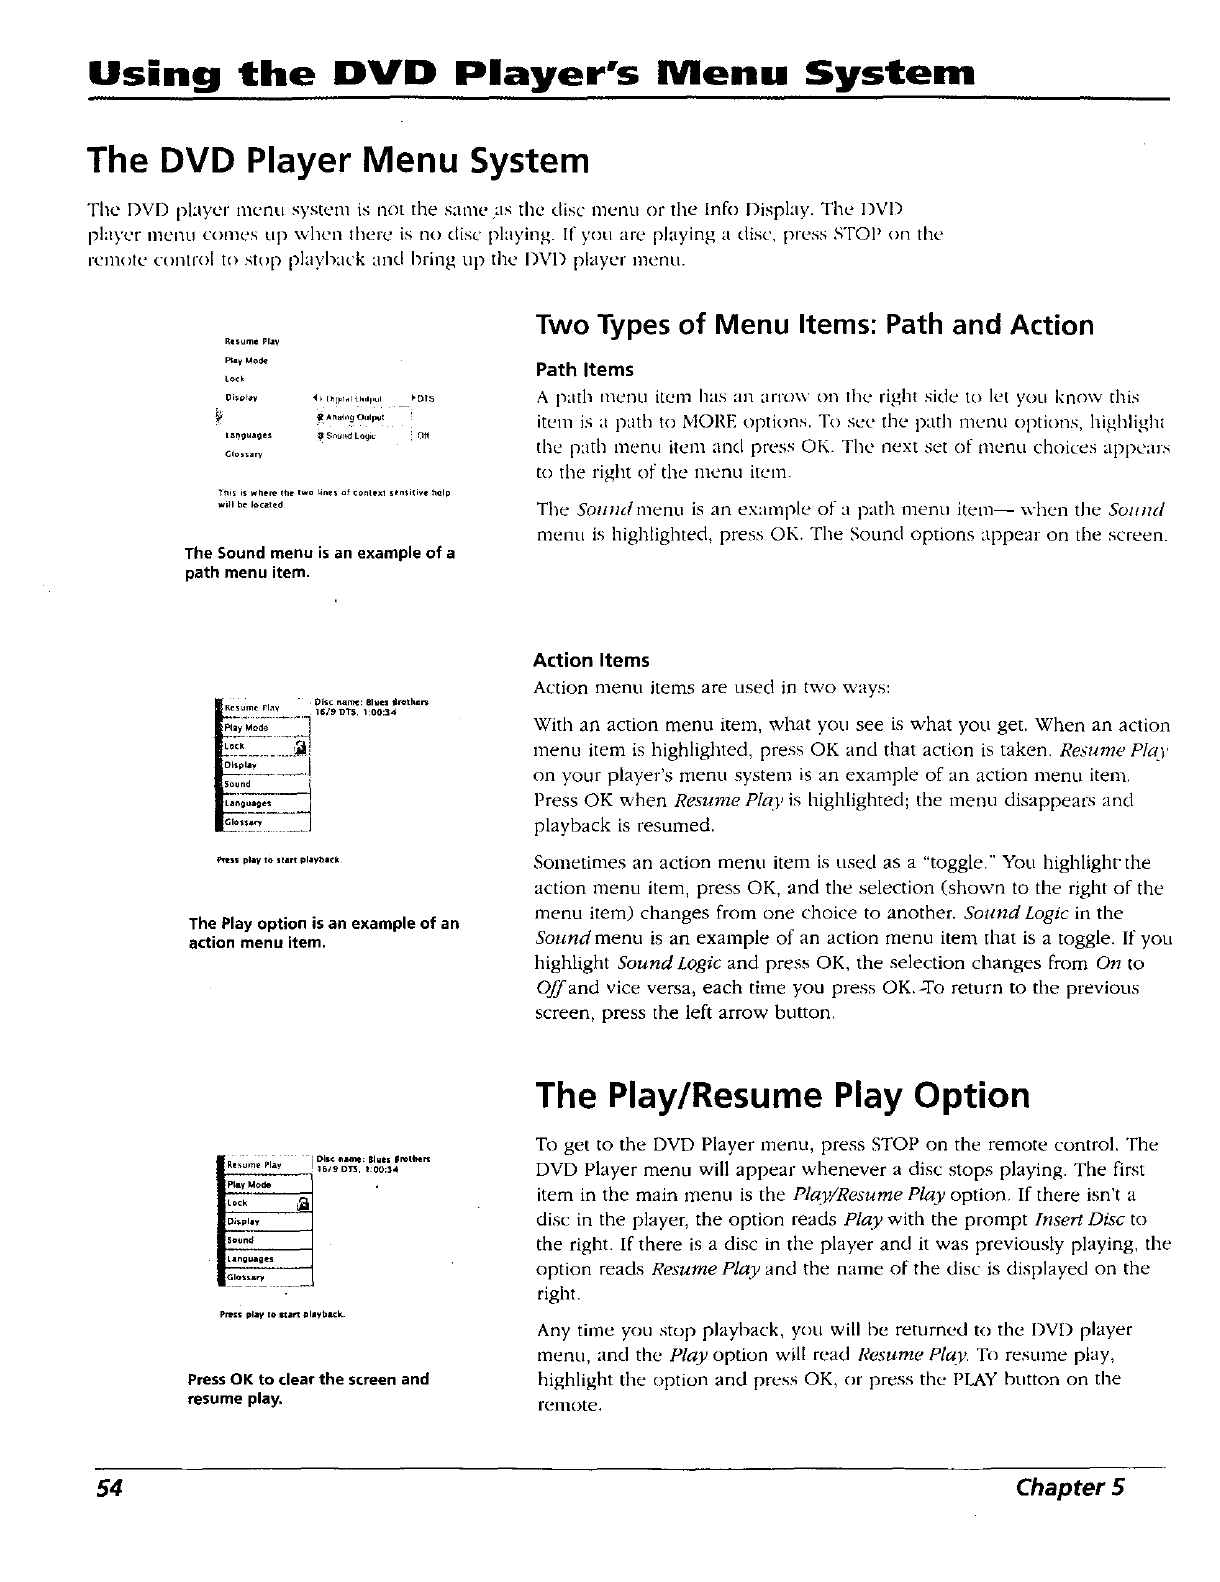
Using the DVD Player's Menu System
The DVD Player Menu System
Tile DVD player menu system is not the same as the disc menu or the lnfo Display. Tile I)VI)
player menu comes up when there is no disc playing. If you are playing a disc. press STOP on the
remote control to stop i'Jlayback and bring up the I)VD player menu.
R_s_me flay
F_ay M0de
rock
Di_o_,_y _ _ [_r.I _,,i I, i _DI5
t _9uages _ Sca*l_l L09_ i Ot_
_lossarv
T_4S is where t_ two _nes o_ c0ntexl _en$1_ive h,alp
The Sound menu is an example of a
path menu item.
Two Types of Menu Items: Path and Action
Path Items
A path tnenu item has an arrow on the right side to let you know this
item is a path to MORE options. To see the path menu options, highligh_
the path menu item and press OK. The next set of menu choices appears
to the right of the menu item.
The Soundmenu is an examl'_le of a path menu item-- when the Sound
menu is highlighted, press OK. The Sound options appear on the screen.
_re_s pla_,I**slam _layb_¢k
The Play option is an example of an
action menu item.
Action Items
Action menu items are used in two ways:
With an action menu item, what you see is what you get. When an action
menu item is highlighted, press OK and that action is taken. Resume PI_O,
on your player's menu system is an example of an action menu item.
Press OK when Resume PlcO,is highlighted; the menu disappears and
playback is resumed.
Sometimes an action menu item is used as a "toggle." You highlight'the
action menu item, press OK, and the selection (shown to the right of the
menu item) changes from one choice to another. Sound Logic in the
Soundmenu is an example of an action menu item that is a toggle. If you
highlight Sound Logic and press OK, the selection changes from On to
Off and vice versa, each time you press OK.-To return to the previous
screen, press the left arrow button.
press play I_ $_,_r, Mlybl¢k
Press OK to clear the screen and
resume play.
The Play/Resume Play Option
To get to the DVD Player menu, press STOP on the remote control. The
DVD Player menu will appear whenever a disc stops playing. The first
item in the main menu is the Play/Resume Play option. If there isn't a
disc in the player, the option reads Play with the prompt Insert Disc to
the right. If there is a disc in the player and it was previously playing, the
option reads Resume Play and the name of the disc is displayed on the
right.
Any tirne you stop playback, you will be returned to the DVD player
menu, and the Play option wil[ read Resume Play. To resume play,
highlight the option and press OK, or press the PLAYbutton on the
relnote.
54 Chapter 5
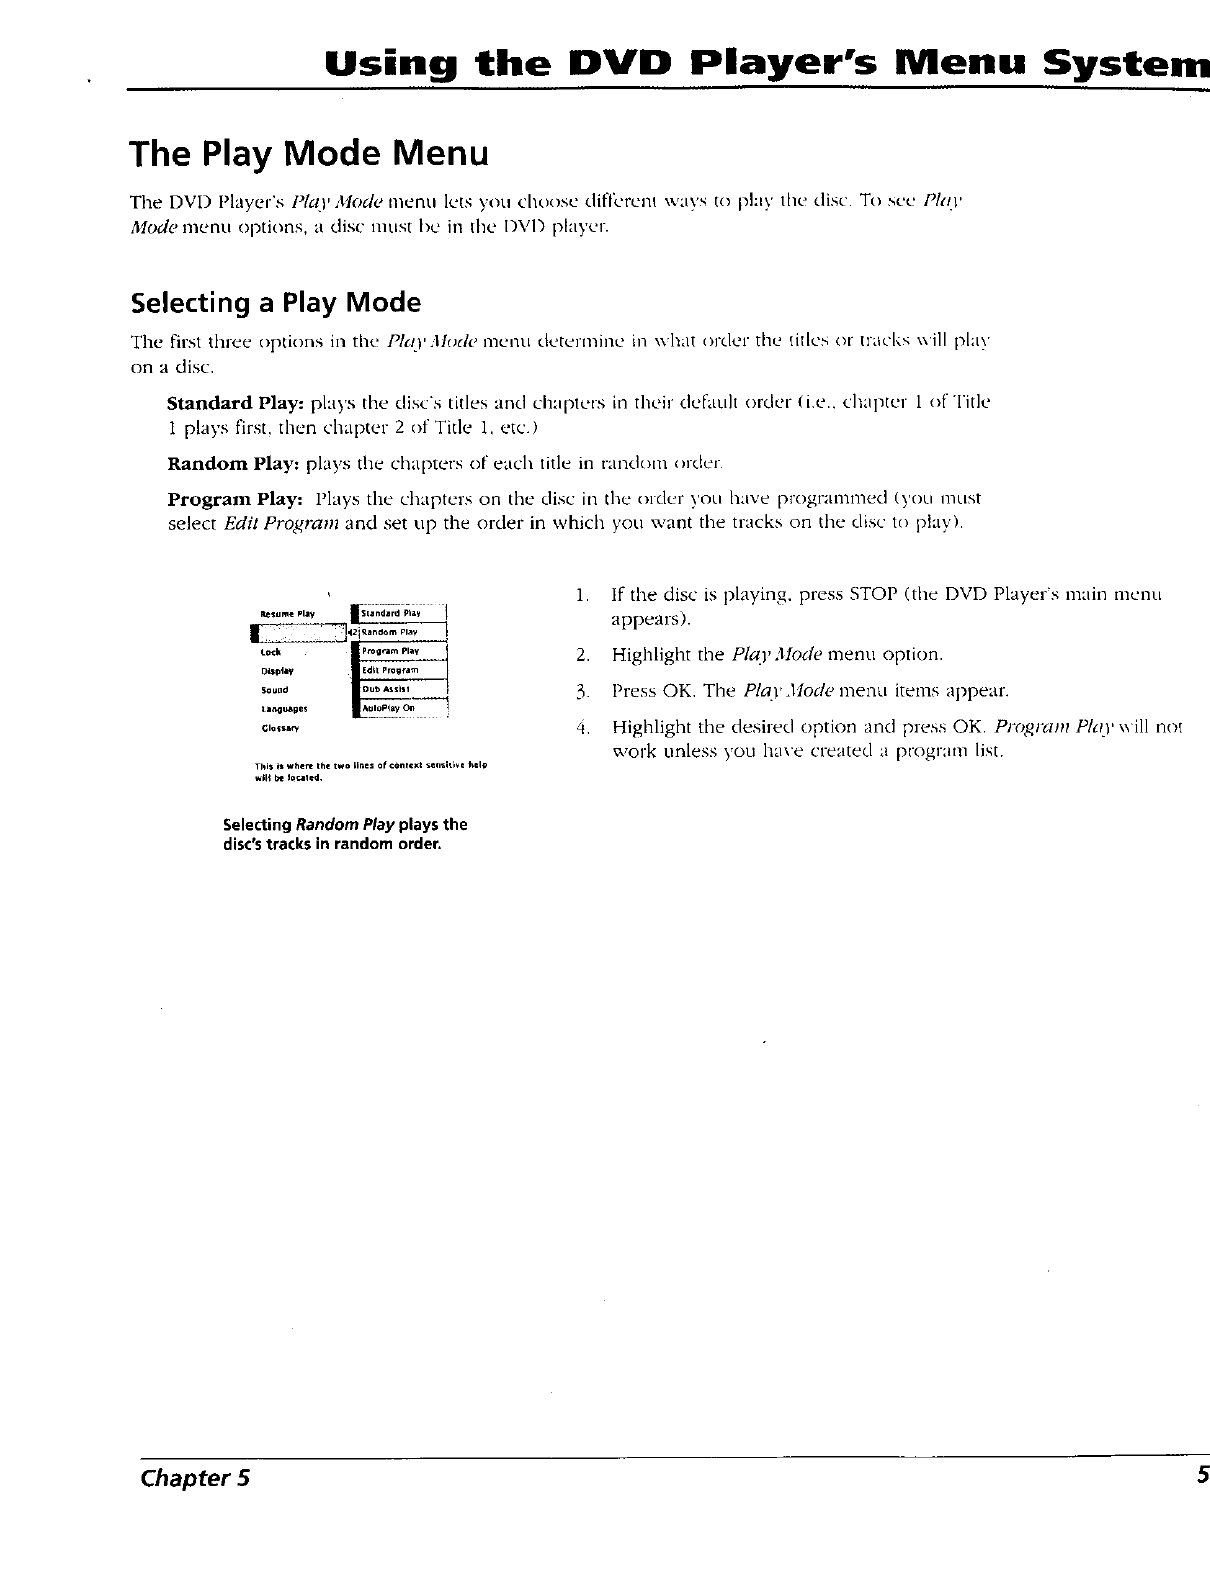
Using the DVD Player's Menu System
The Play Mode Menu
The DVD F'layer's P[_O'Mode menu lets you choose difl_'renl ways to play the disc. To sec Ph O'
Mode menu opti,:ms, a disc must be in tile I)VD pktyer.
Selecting a Play Mode
The first three oI, ti,:ms in the PlcO,Mode menu dete]mine in what order the titles or tracks ,.,,ill pet 3
on a disc,
Standard Play: plays the discs titles and chapters in their default order (ie.. chapter 1 of Title
1 plays first, then chapter 2 of Title 1. etc.)
Random Play: plays the chapters of each title in random order
Program Play: I:'lays the chapters on the disc it'Lthe order you have programnaed (you must
select Edit Program and set up the order in which you want the tracks on the disc to play).
I_sume I'l,q"/
t-Z-Z _-__,2i..........
LC,_k Program pI,_V I
Dt_pI_
"*autld e
tae, g,_ge$
Thl_ h_ where the two ,r_es r,t ¢,_,1)d. x_ sensitive ;_elp
1. If the disc is playing, press STOP (the DVD Player's main menu
appears).
2. Highlight the Plal'Mode menu option.
3. Press OK. The Pl_o'Mode menu items appear.
4. Highlight the desired option and press OK. Prr{wam PItO' ,,',ill not
work unless you have created a program list.
Selecting Random Play plays the
disc's tracks in random order.
Chapter 5
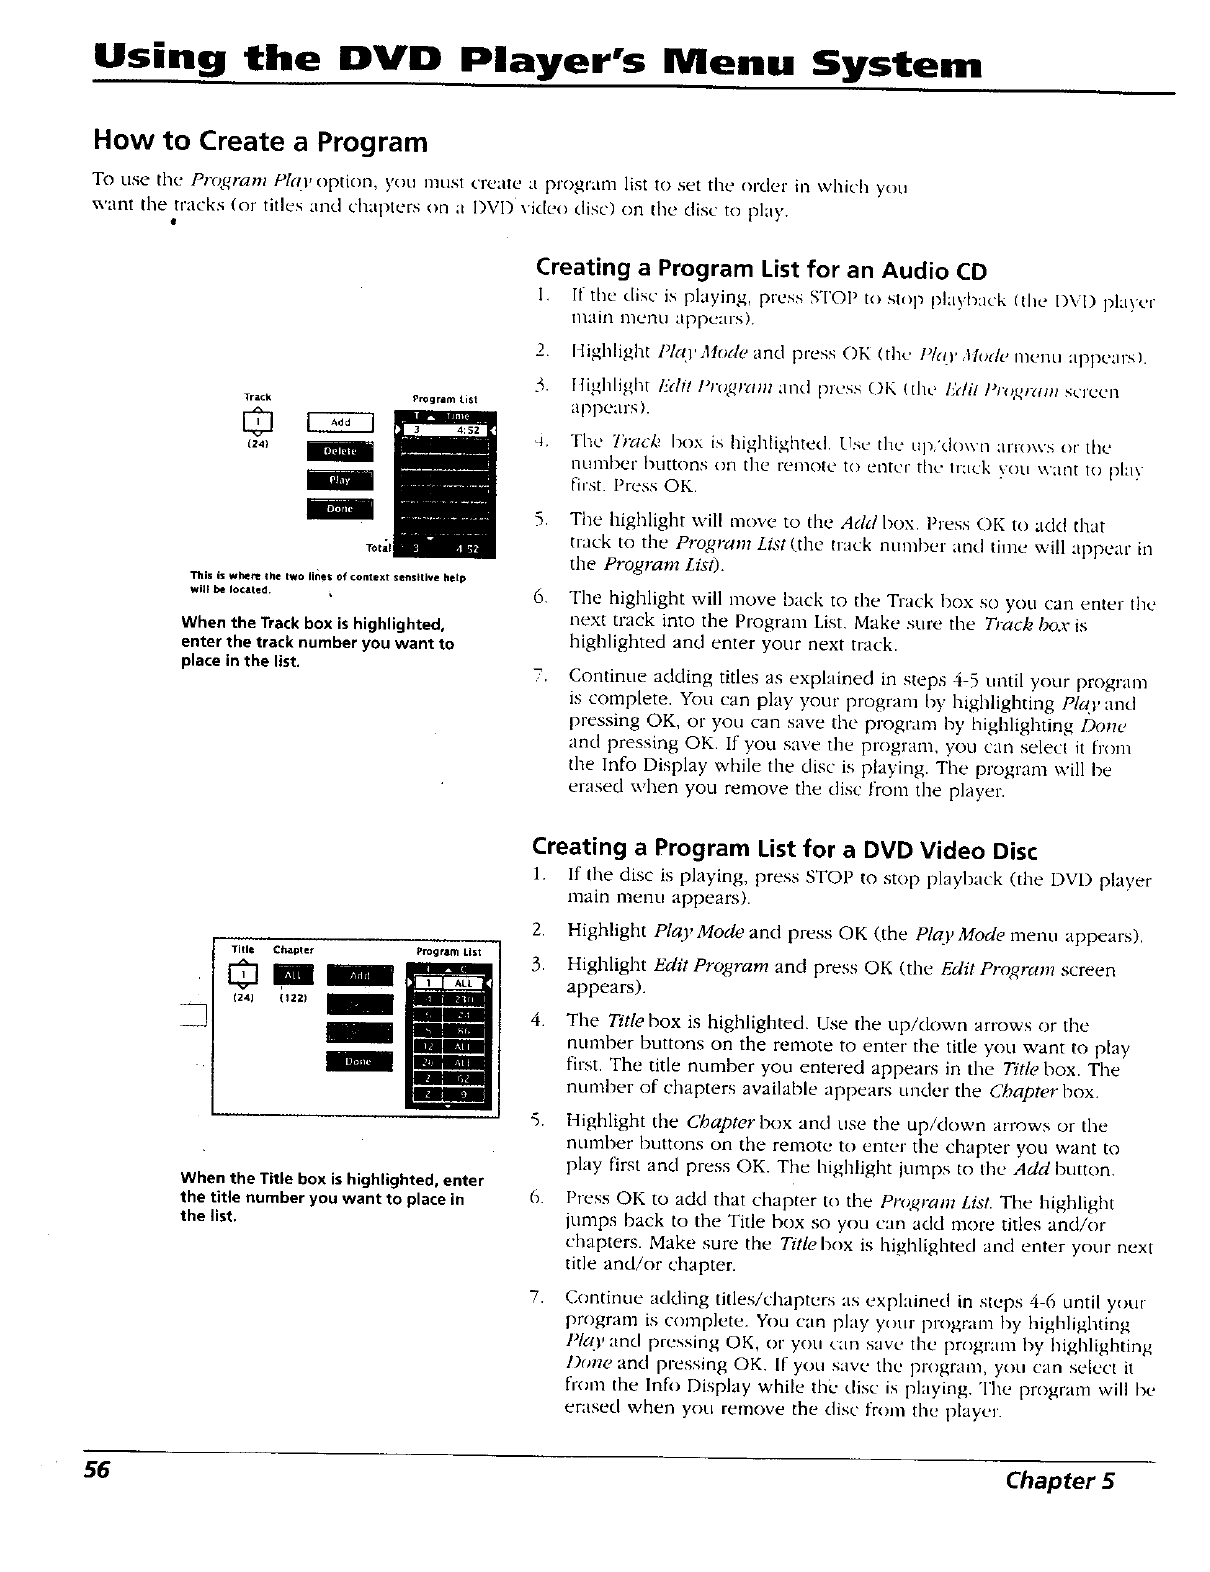
Using the DVD Player's Menu System
How to Create a Program
To use the Program PIe(t, option, you must c'e lie a p'ogranl list to set tile order in whicil you
want the tracks (or tit_es and chapters on a I_,VD "_qdeo disc) on the disc to pkly.
Track Pr0gram List
Q
(24)
This is whe_l_ the two lilies of context serlsltlYe hetp
will be Iocated
When the Track box is highlighted,
enter the track number you want to
place in the list.
Creating a Program List for an Audio CD
I. If the disc is playing, press STOP to stop playback (the DVD player
lniiin nlenu appears).
2.
3.
Li.
Highlight Pla 'Mode and press OK (the lqr O, ,llodt, nlenu appearsL
Iligl/light k'di! l_;c{{{ram and press OK (tile I:'di! /'r _g "_ screen
appearsL
The 7)'ack box is highlighted. /1so tile up,'do_x n anows or the
i1ktn)l)er buttons on the remote to enter till' lntck VOll \vant tO pI:ly
first Press OK.
5,
6.
7,
The highlight will move to the Add box. Press OK to add that
tiack to the Program List {.the track numbel and time ,,',ill appear in
the Program List).
The highlight will move back to the Track box so you can enter tile
next track into the Program List. Make sure the Track box is
highlighted and enter your next track,
Continue adding titles as explained in steps 4-5 unti_,your program
is complete. You can play your program by highlighting Pla.y and
pressing OK, or you can save the program by highlighting Done
and pressing OK. If you save the program, you can select it from
the Info Display while the disc is playing. The program will be
erased when you remove the disc from the player.
m
Title Chaplet Program List
Qmm
(24) 1122)
When the Title box is highlighted, enter
the title number you want to place in
the list.
Creating a Program List for a DVD Video Disc
1. If the disc is playing, press STOP to stop playback (the DVD player
main menu appears).
2. Highlight P!ay Mode and press OK (the Pla, Mode., menu appears).
3. Highlight Edit Program and press OK (the Edit Program screen
appears).
4. The Title box is highlighted. Use the up/down anows or the
number buttons on the remote to enter the title you want to play
first. The title number you entered appears in the Title box. The
number of chapters available appears under the Chapter hox.
5. Highlight the Chapter box and use the up/down arrows or the
number buttons on the remote to entre the chapter you want to
play first and press OK. The highlight jumps to Ihe Add button.
Press OK to add that chapter to the Pro,gram List. The highlight
jumps back to the Title box st) you can add more titles and/or
chapters. Make sure the Title box is highlighted and enter your next
title and/or chapter.
7. Continue adding titles/chapters its explained in steps 4-6 until your
program is complete. You can play your program by highlighting
PigO,and pressing OK_ or you can save the progr;un by higl)lighting
Done and pressing OK. If you save the program, you can select it
from the Infi) Disphly while thL' disc is playing. The program will be
erased when you remove the disc fronl file player.
56 Chapter 5
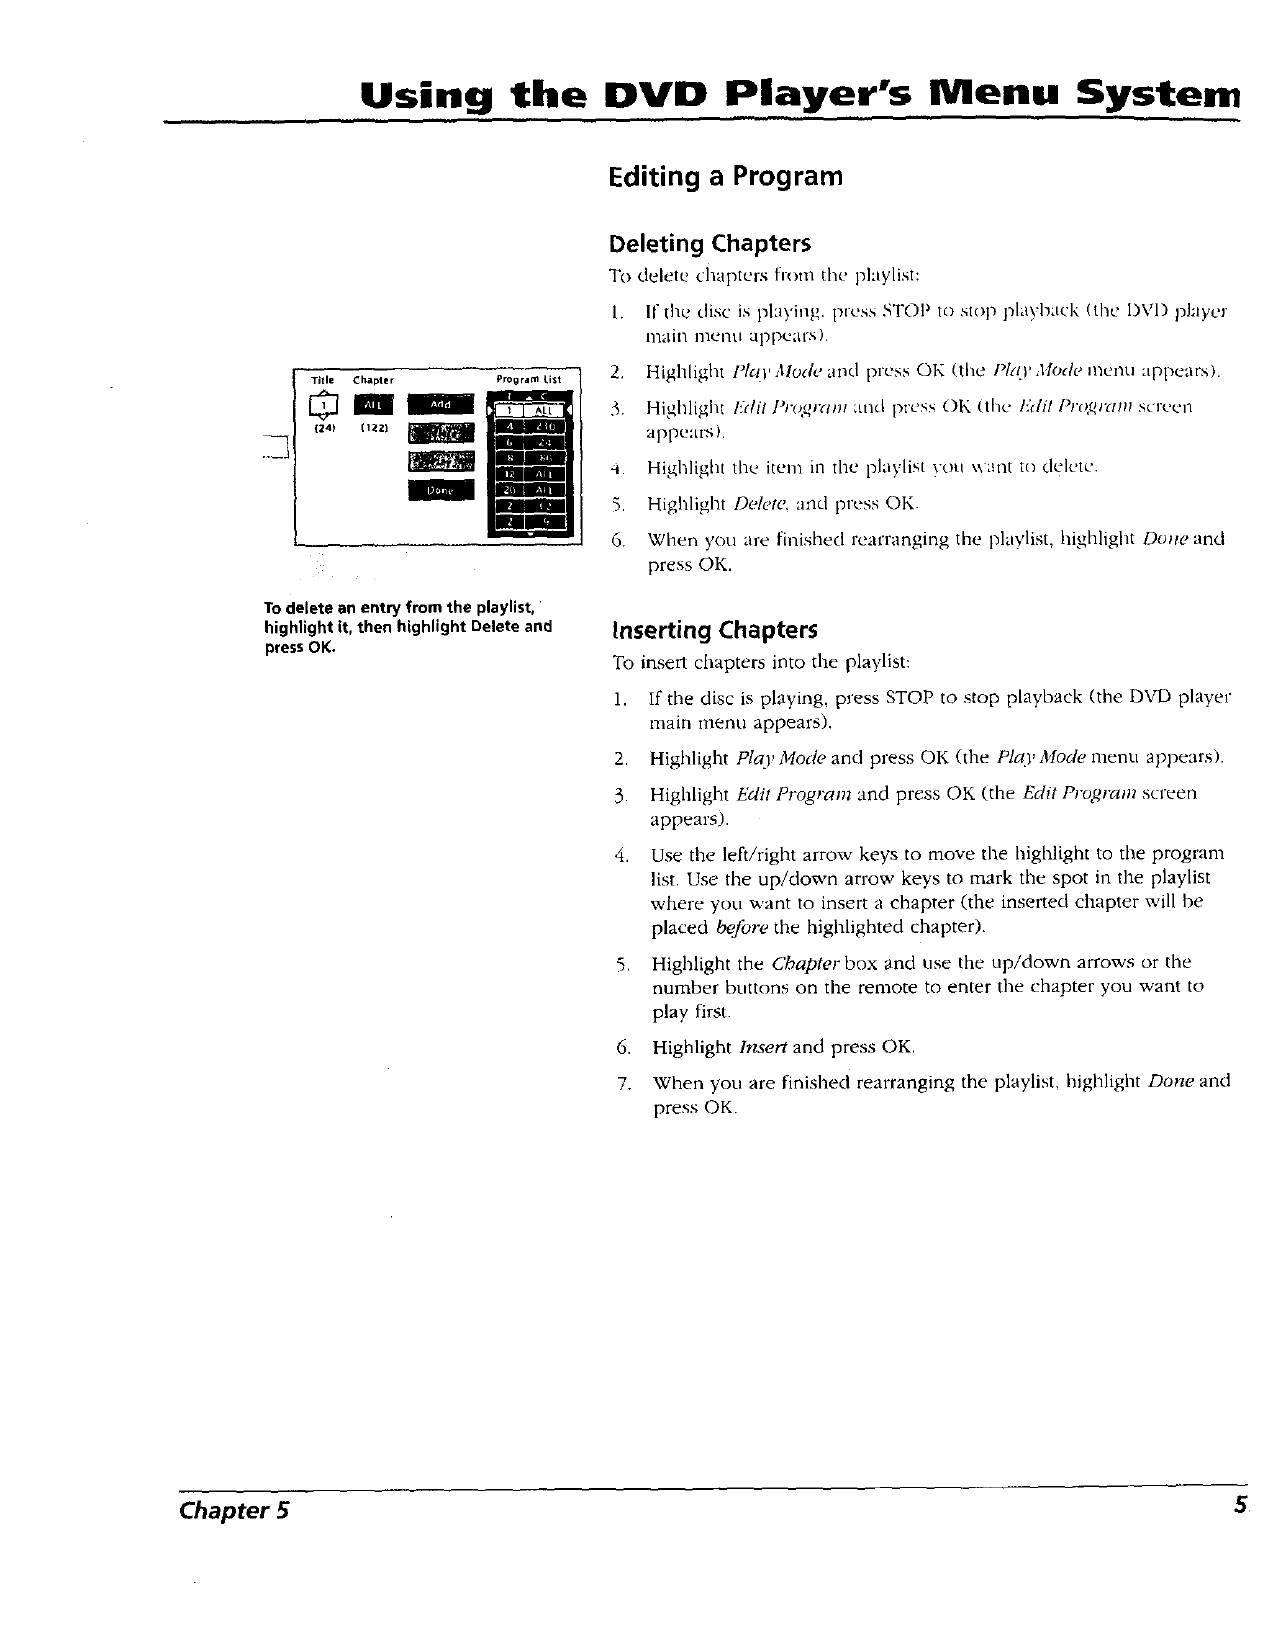
....Using the DVD Player,s Menu System
Editing a Program
Deleting Chapters
To delete chapters from the pkiylist:
1. If the' disc is playing, pre_,s STOP tostop playl'mck (the, D\q) player
main mentt appears).
"_-1 2., I,_z, _.
5.
6.
Highlight Pit41' Mode and press OK (the Pl:(l' Mode menu appears).
Highlight l'_dl'l ])ro,Rrelnl and press OK (the Edil Pro,_ralll sc'reel't
appears),
Highlight the item in the playlist you \',ant to delete
Highlight Delete, and press OK.
When you are finished rearranging the playlist, highlight Done and
press OK.
To delete an entry from the playlist,
highlight it, then highlight Delete and
press OK, Inserting Chapters
To insert chapters into the playlist:
1. If the disc is playing, press STOP to stop playback (the DvD player
main nrenu appears).
2. Highlight PIco, Mode and press OK (the Plco' Mode menu appears).
3. Highlight Edit Program and press OK (the Edit Prop,ram screen
appears).
4. Use the left/right arrow keys to move the highlight to the program
list. Use the up/down arrow keys to mark the spot in the playlist
where you want to insert a chapter (the inserted chapter will be
placed beJbre tile highlighted chapter).
5. Highlight the Chapter box and use the up/down arrows or the
number buttons on the remote to enter the chapter you want to
play first.
6. Highlight Insert and press OK.
7. When you are finished rearranging the playlist, highlight Done and
press OK.
Chapter 5 5
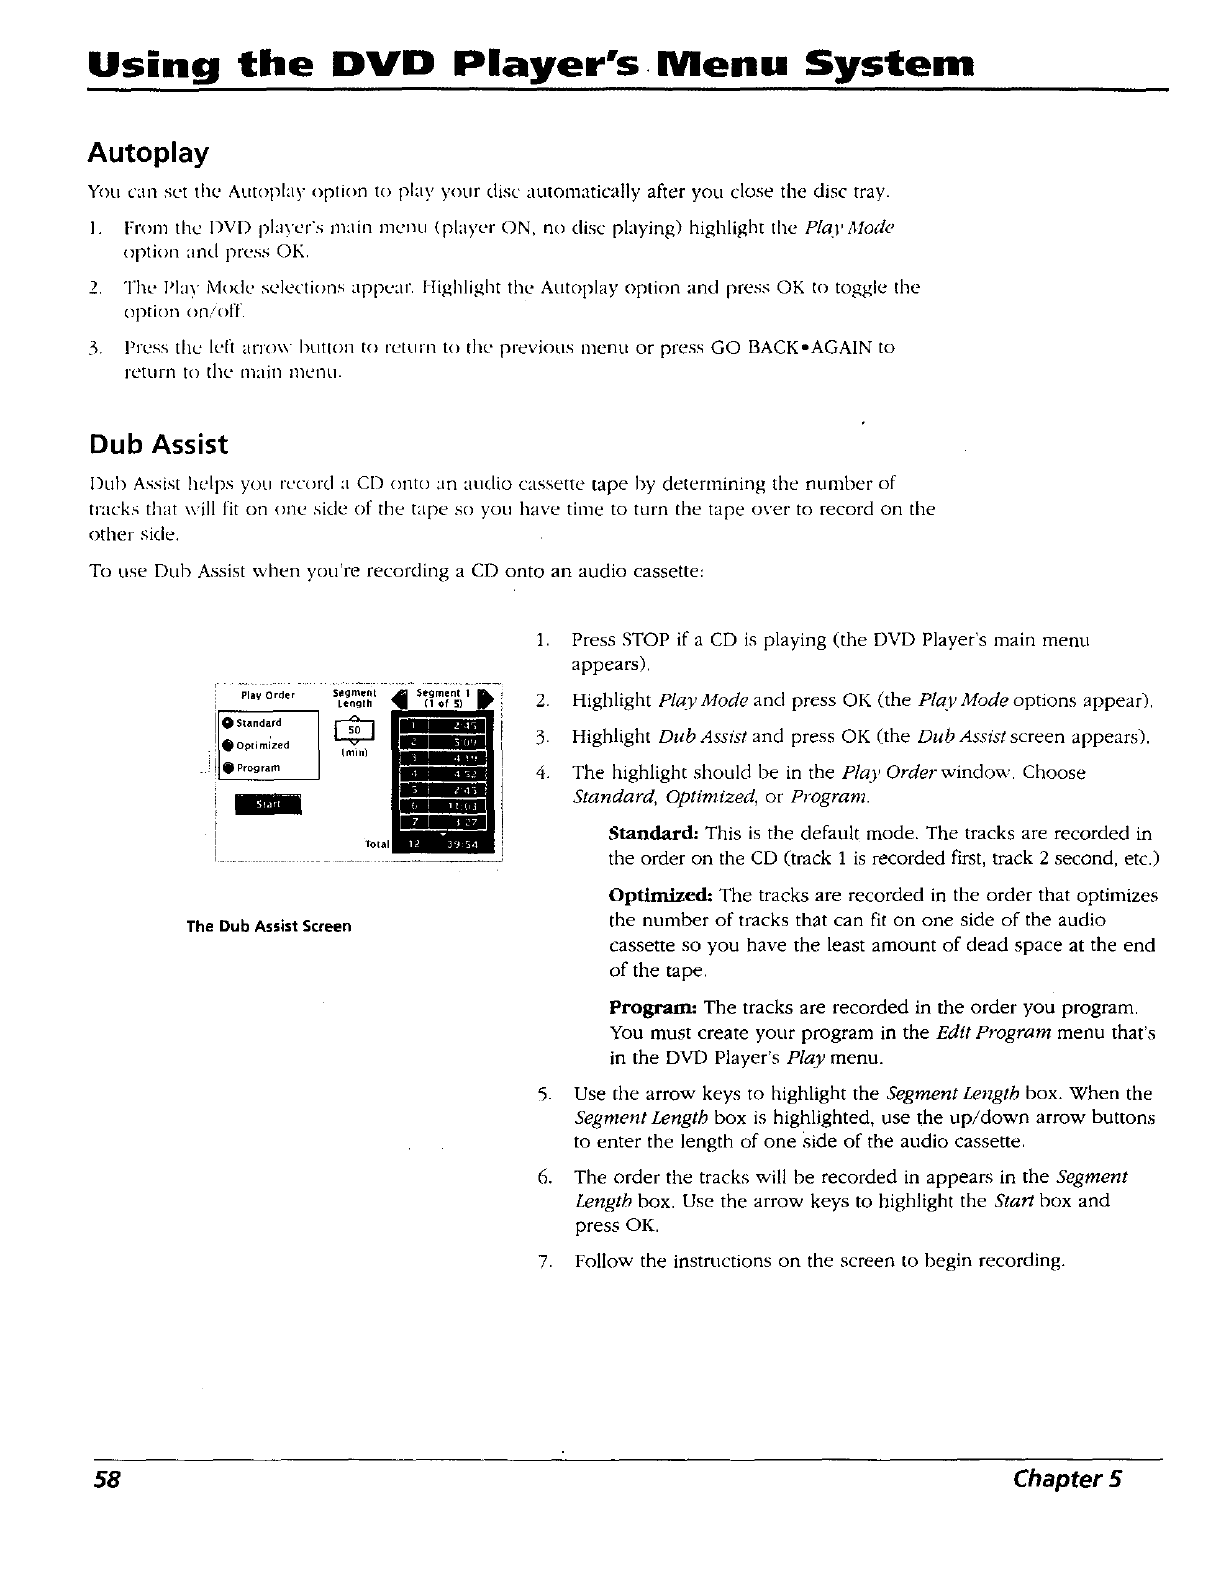
Using the DVD Player's+Menu System
Autoplay
You can set the Autoplay option to play your disc automatically after you close the disc tray.
I. Froln thc DVI) player's illahl nlelltl (player ON, no disc playing) highlight tile Plal' Diode
option clnd press OK.
2. The Play Mode selections appear, lIig Rht the Autoplay option and press OK to toggle the
option ol],./off.
3. F'ress the lcl] arroxx button to rctcirn to die previous menu or press GO BACK,AGAIN to
return to the main menu.
Dub Assist
Dub Assist he[ps yocl record a CD onto an audio cassette tape hy determining the number of
tracks that will fit on one side of the tape so you have time to turn the tape over to record on the
other side,
To use Dub Assist when you're recording a CD onto an audio cassette:
The Dub Assist Screen
1,
2.
3.
4+
5.
,
Press STOP if a CD is playing (the DVD Player's main menu
appears).
Highlight Pla_:Mode and press OK (the Play Mode options appear).
Highlight Dub Assist and press OK (the Dub Assz_t screen appears).
The highlight should he in the Play Orderwindow. Choose
Standard, optimized, or Program.
Standard: This is the default mode. The tracks are recorded in
the order on the CD (track 1 is recorded first, track 2 second, etc.)
Optimized: The tracks are recorded in the order that optimizes
the number of tracks that can fit on one side of the audio
cassette so you have the least amount of dead space at the end
of the tape.
Program: The tracks are recorded in the order you program.
You must create your program in the Edit Program menu that's
in the DVD Player's Play menu.
Use the arrow keys to highlight the Segment Length box. When the
Segment Length box is highlighted, use the up/down arrow buttons
to enter the length of one Side of the audio cassette.
The order the tracks will be recorded in appears in the Segment
Length box. Use the arrow keys to highlight the Start box and
press OK.
7. Follow the instructions on the screen to begin recording.
58 Chapter 5
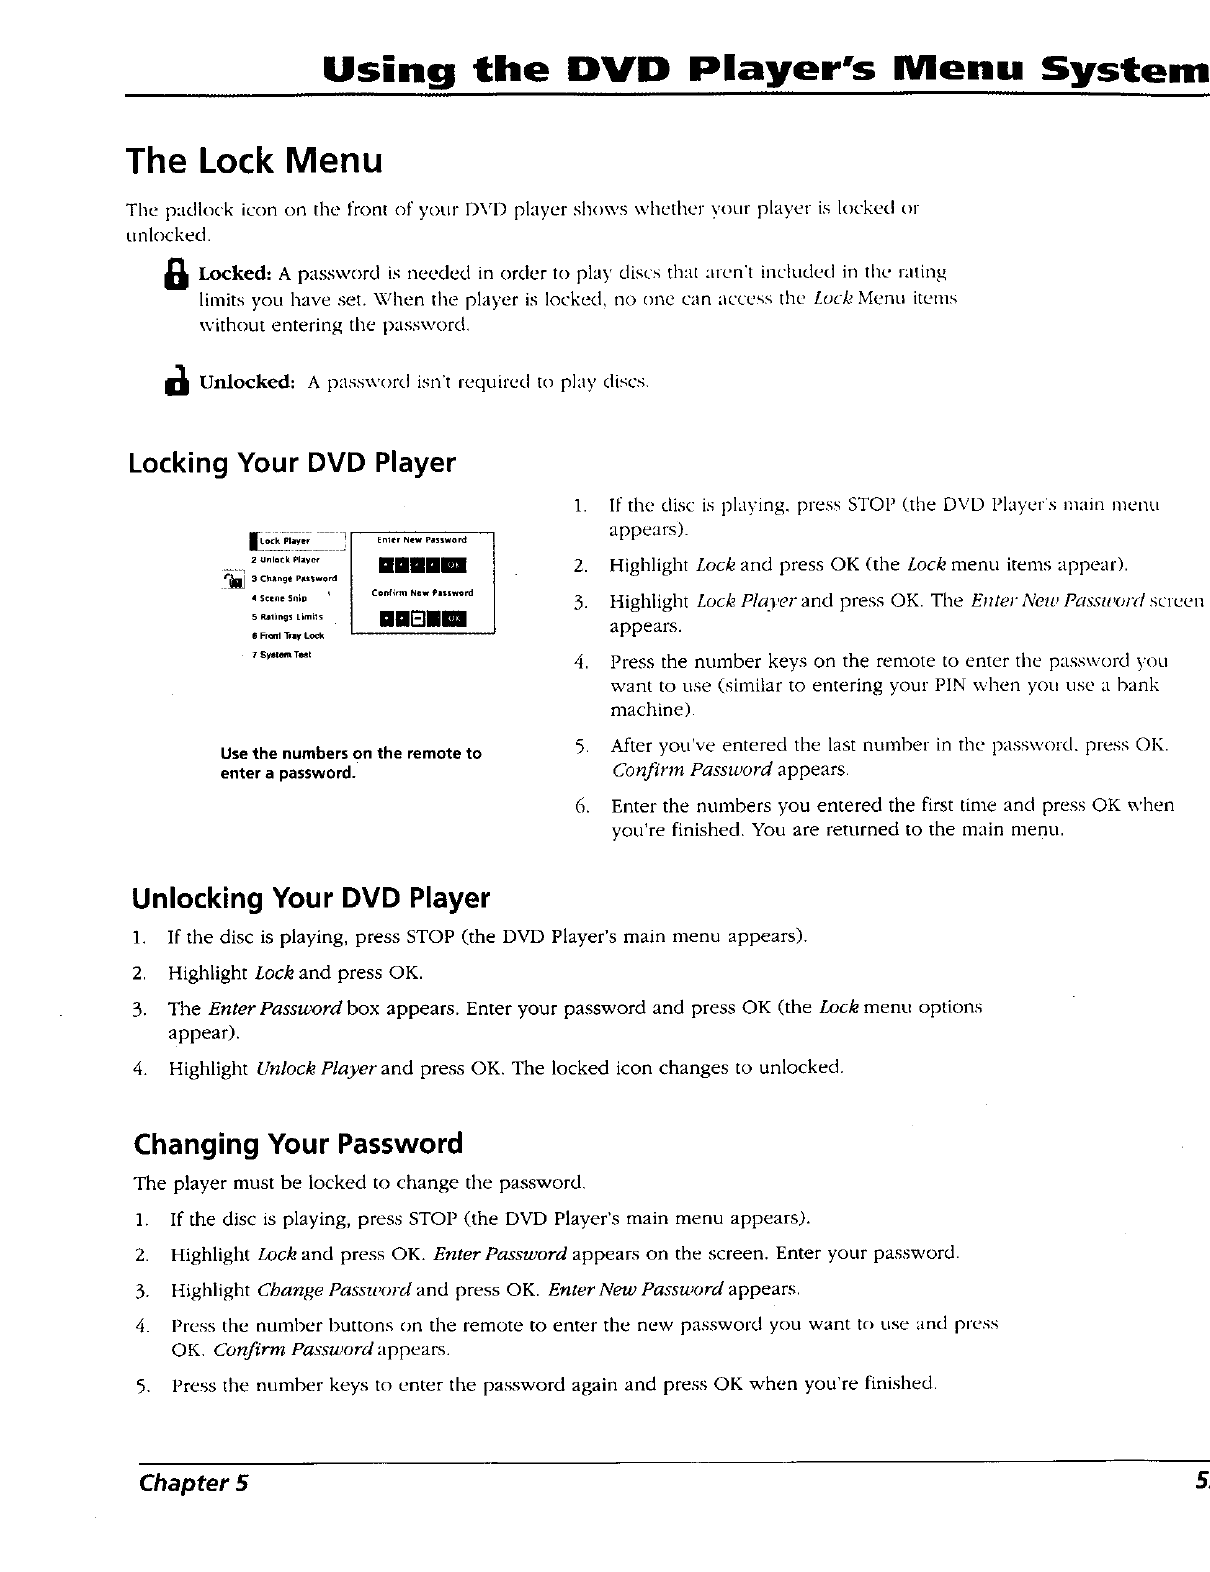
Using the DVD Player's Menu System
The Lock Menu
The padlock icon on tile front of your DVD player shows whether your pktyer is locked or
unlocked.
1_ Locked: Ais needed in order discs that aren't included in the rating
password to play
limits you have set. When the player is locked, no one can access the Lock Menu items
without entering the password.
_1_ Unlocked: A password isn't required to play discs
Locking Your DVD Player
-, ............. nnnnu
_3 ¢_l*mg¢, PA.,_word
•Scene Snip _ I Ct"*_ _,ew pHtwO_
o..,,o,,..... unsut
7$_ttn_t Tc_lt
Use the numbers on the remote to
enter a password.
1. If the disc is playing, press STOP (the DVD Player's main metal
appears).
2. Highlight Lock and press OK (the Lock menu items appear).
3. Highlight Lock Player and press OK. The Enter New Password screen
appears.
4. Press the number keys on the remote to enter the password you
want to use (similar to entering your PIN when you use a bank
machine).
5. After you've entered the last number in the password, press OK.
Confirm Password appears.
6. Enter the numbers you entered the first tin're and press OK when
you're finished. You are returned to the main menu.
Unlocking Your DVD Player
1. If the disc is playing, press STOP (the DVD Player's main menu appears).
2. Highlight Lock and press OK.
3. The Enter Password box appears. Enter your password and press OK (the Lock menu options
appear).
4. Highlight Unlock Player and press OK. The locked icon changes to unlocked.
Changing Your Password
The player must be locked to change the password.
1. If the disc is playing, press STOP (the DVD Player's main menu appears).
2. Highlight Lock and press OK. Enter Password appears on the screen. Enter your password.
3. Highlight Change Password and press OK. Enter New Password appears.
4. Press the number buttons on the remote to enter the new password you want to use and press
OK. dbnfirm Password appears.
5. Press the number keys to enter the password again and press OK when you're finished.
Chapter 5
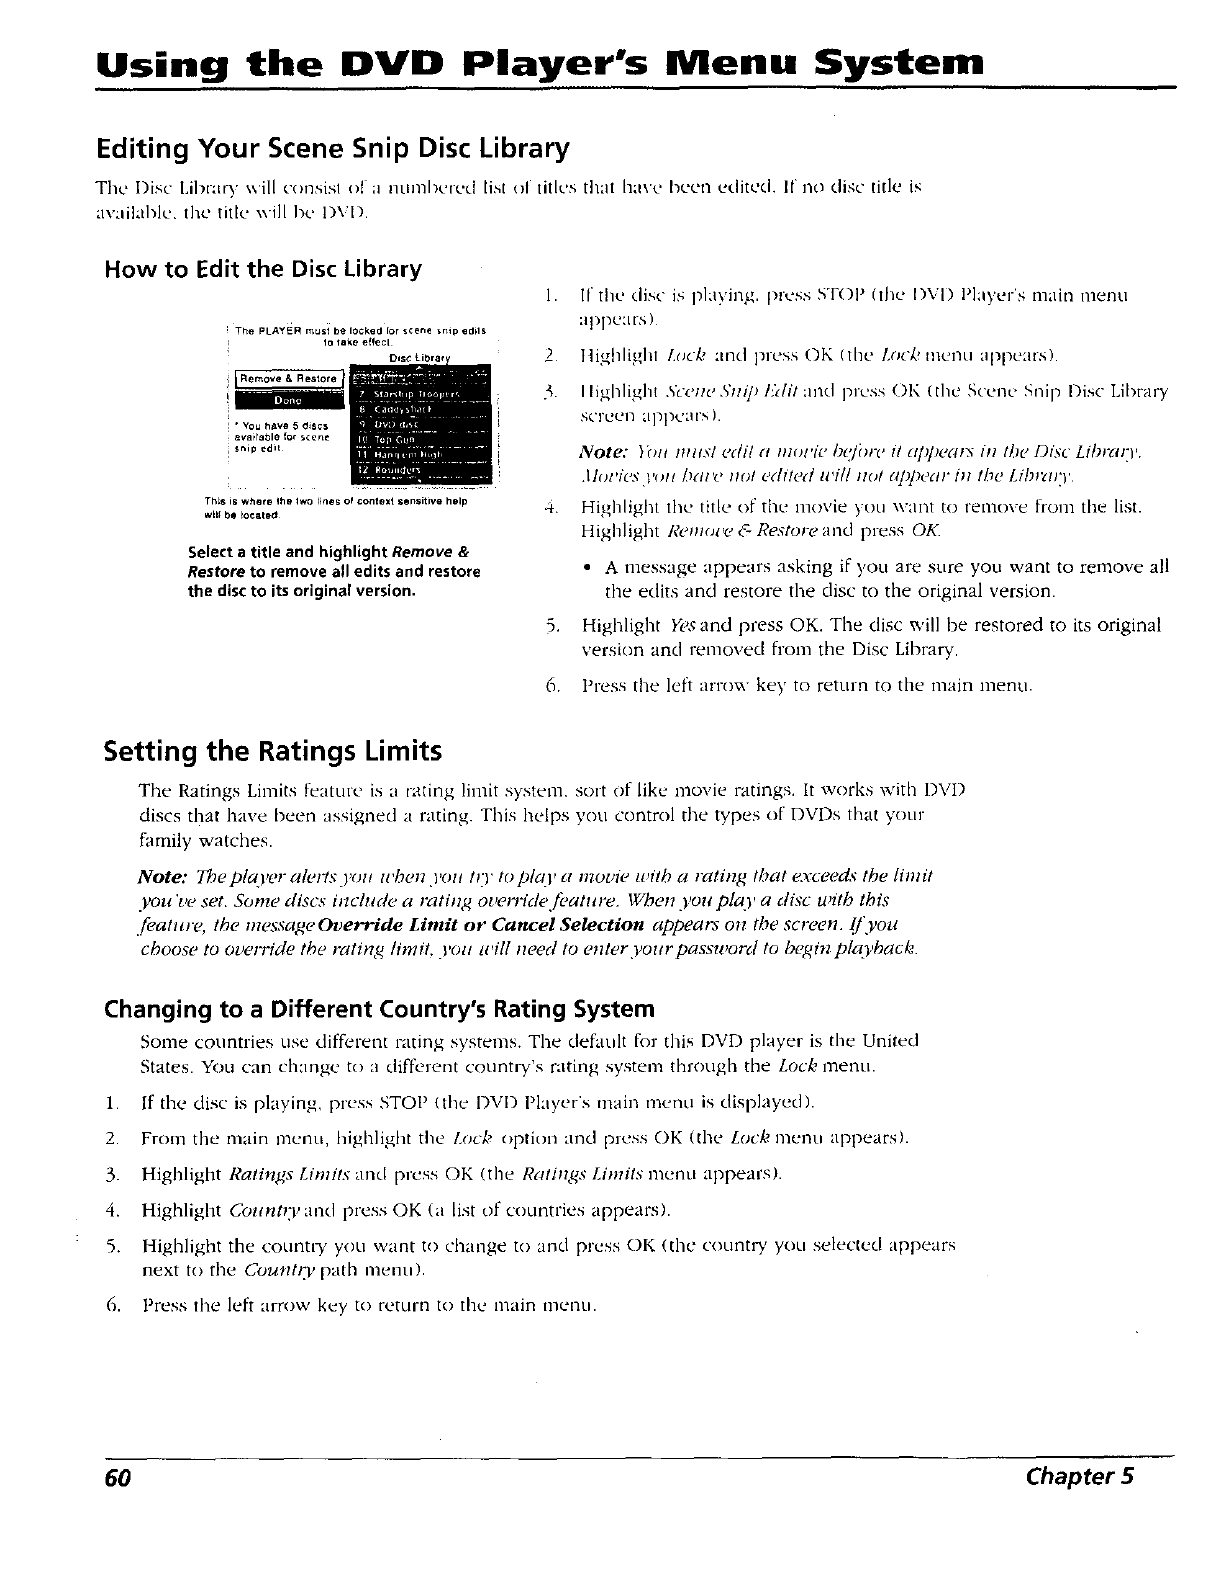
Using the DVD Player's Menu System
Editing Your Scene Snip Disc Library
The l)isc Library ',;'ill consisl of a nmnbcred list of titles that have been edited, ff no disc title is
a\'aiktl+]c, the title will be I)VI).
How to Edit the Disc Library
The PLAYER must be locked lot scene stop edilS
]1° tare efCe¢l
This is where the two _ines ol context sensitive help
will be _ocat e(_
Select a title and highlight Remove &
Restore to remove all edits and restore
the disc to its original version.
1. 11'tile disc is playing, press STOP (the I)VI) Player's nlain menu
appea rs )
2 ttighlighl Lock and press OK (the Lock menu appears).
3. Ilighligh{ AZeHe A'tlip l:klit and press OK (the Scene Snip Disc Library
screen appcars).
Note: }bH truest ccitt a mom'e hqfinx, it appears ttt the Dt_c Librat_l'.
,Ih)l'ies l,olt hgtt'e I/ol edited tt'il[ rio/appear itt the Lthrtt O'
4. Highlight tile title of the movie you want to renrove flom the list.
Highlight Remove & Restore and press OK.
• A message appears asking if you are sure you want to remove all
the edits and restore the disc to the original version.
5. Highlight Yes and press OK. The disc will be restored to its original
verskm and removed from the Disc Library.
6, Press the left arrow key to return to the nlain menu.
Setting the Ratings Limits
The Ratings Limits feature is a rating limit system, sort of like movie ratings. It works with I)VI)
discs that have been assigned arating. This helps you control the types of DVDs that yotlr
family watches.
Note: The player alerts ),ott tt'hen you tO' topic O,a movw with a rating that exceeds the limit
Fou 're set. Some discs include a rating ovem_'defi, atttre. Whet* .you play a disc with this
featttre, the messageOverride Limit or Cancel Selection appears on the screen. If you
choose to overlqde the rating limit, you zt'ill twed to enter yom'password to begin plavback.
Changing to a Different Country's Rating System
Some countries use different rating systems. The default for this DVD player is the United
States. You can change to a different country's rating system through tire Lock menu.
1. If the disc is playing, press STOP (the DVI) Player's main menu is displayed).
2. From the main menu, highlight the Lock option and [)russ OK (the Lock menu appears).
3. Highlight Ratings Limits and press OK (the Ratings Limits menu appears).
4. Highlight Countw and press OK (a list of countries appears).
5. Highlight the country you want to dlange to and press OK (the country you selected appears
next to the Couflt/Tp path menu).
6. Press the left arrow key to return 1o the nlain tnenLi.
60 Chapter 5
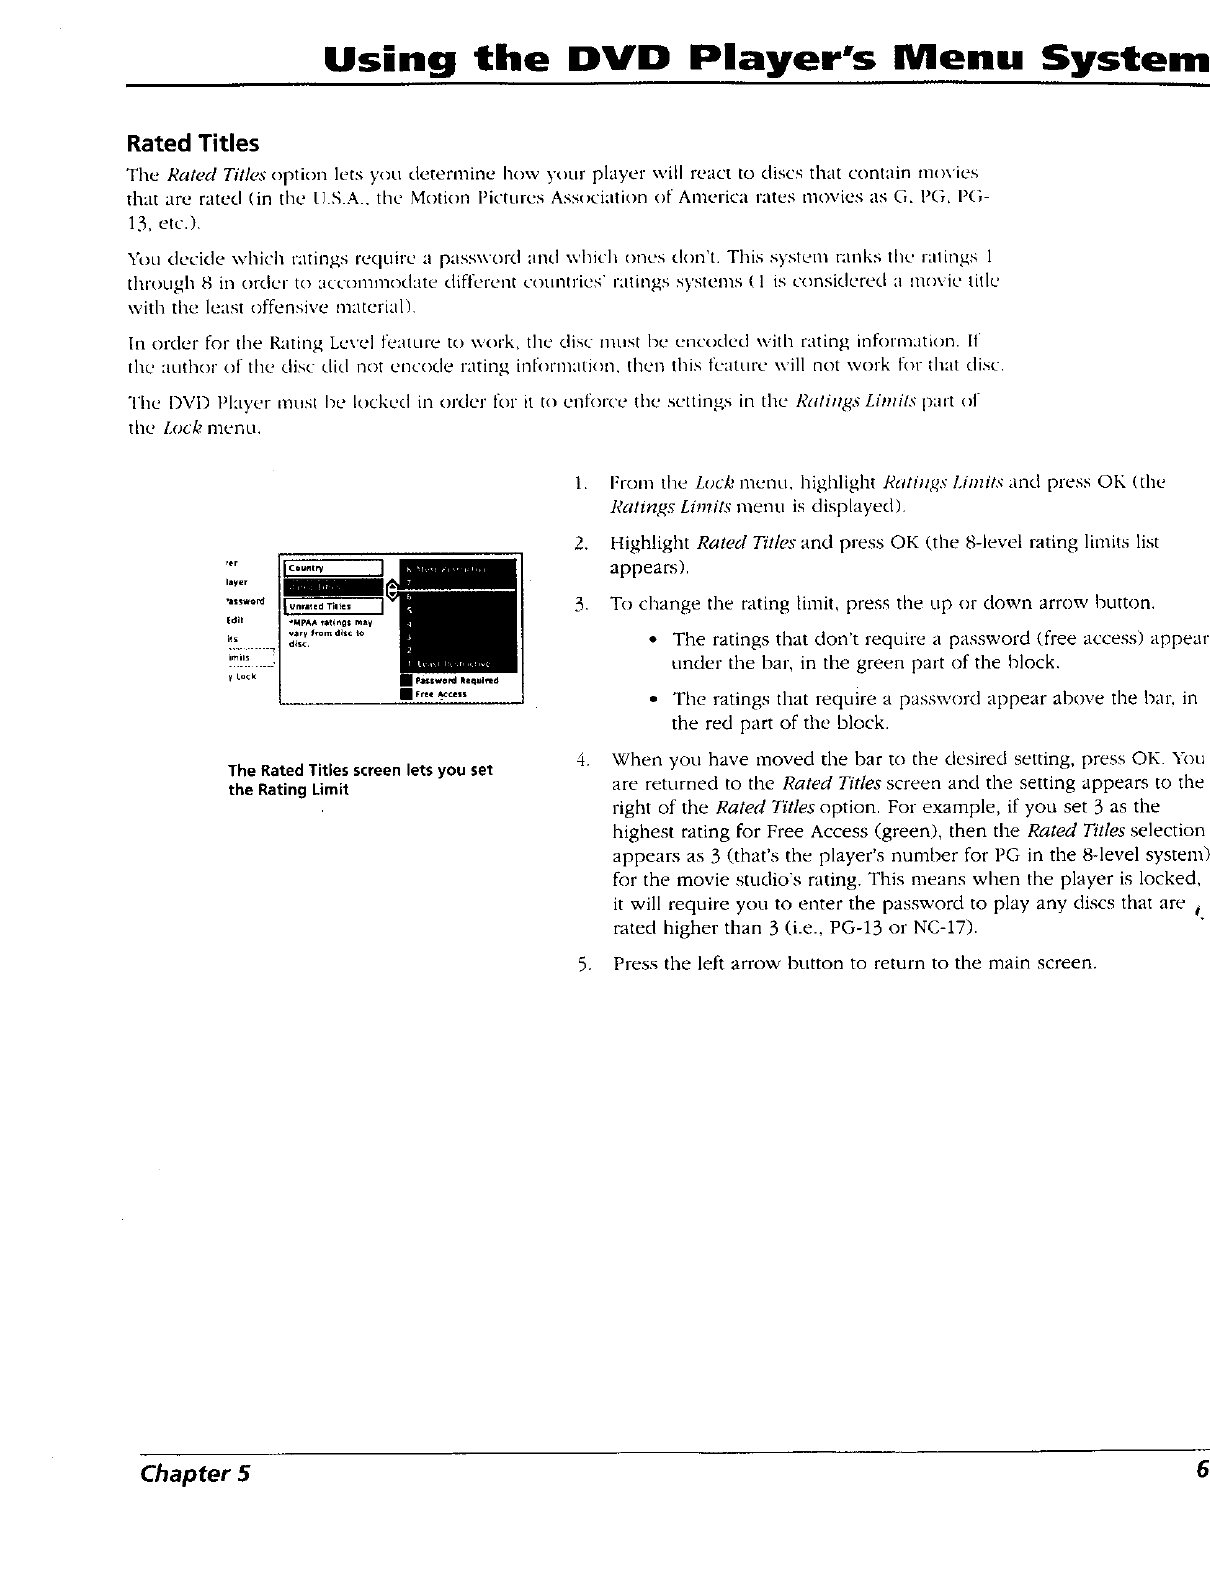
Using the DVD Player's Menu System
Rated Titles
The Rated Titles option lets you detenvdne how your player ",,.,illreact to discs that contain movies
that are rated (in the U.S.A.. the Motion Pictures Association of America rates movies as G, F'G. PG-
13, etc.).
You decide which ratings require a password and which ones don't. This systut+L++ranks the ratings 1
through 8 in order to accomn'Jodate differerLt cotmtries' ratings systems ( 1 is considered a movie title
vvitb the least offensive material).
In order for the Rating Lc\'e] feature to v_rork, the disc InLIst be encoded with rating information. II
the author of the disc did not encode rating in[ormation, then this feature ,,,.'illnot work for that disc.
The DVI) Player must be locked in order for it to enforce he settings in the Ralitlgs Limits part of
the Lock menu.
The Rated Titles screen lets you set
the Rating Limit
l.
2.
3.
4,
From the Lock menu. highlight Ratlugs Limits and press OK (the
Ratings Limits menu is displayed).
Highlight Rated Titles and press OK (the 8-level rating limits list
appears).
To change the rating limit, press the up or clown arrow button.
• The ratings that don't require a password (free access) appear
under the bar, in the green part of the block.
• The ratings that require a password appear above the bar. in
the red part of tD.e block.
When you have moved the bar to the desired setting, press OK. 5kx_
are returned to the Rated Titles screen and the setting appears to the
right of the Rated Titles option. For example, if you set 3 as the
highest rating for Free Access (green), then the Rated Titles selection
appears as 3 (that's the player's number for PG in the &level system)
for the movie studio's rating. This means when the player is locked,
it will require you to crater the password to play any discs that are (
rated higher than 3 (i.e., PG-13 or NC-17).
5. Press the left arrow button to return to the main screen.
Chapter 5
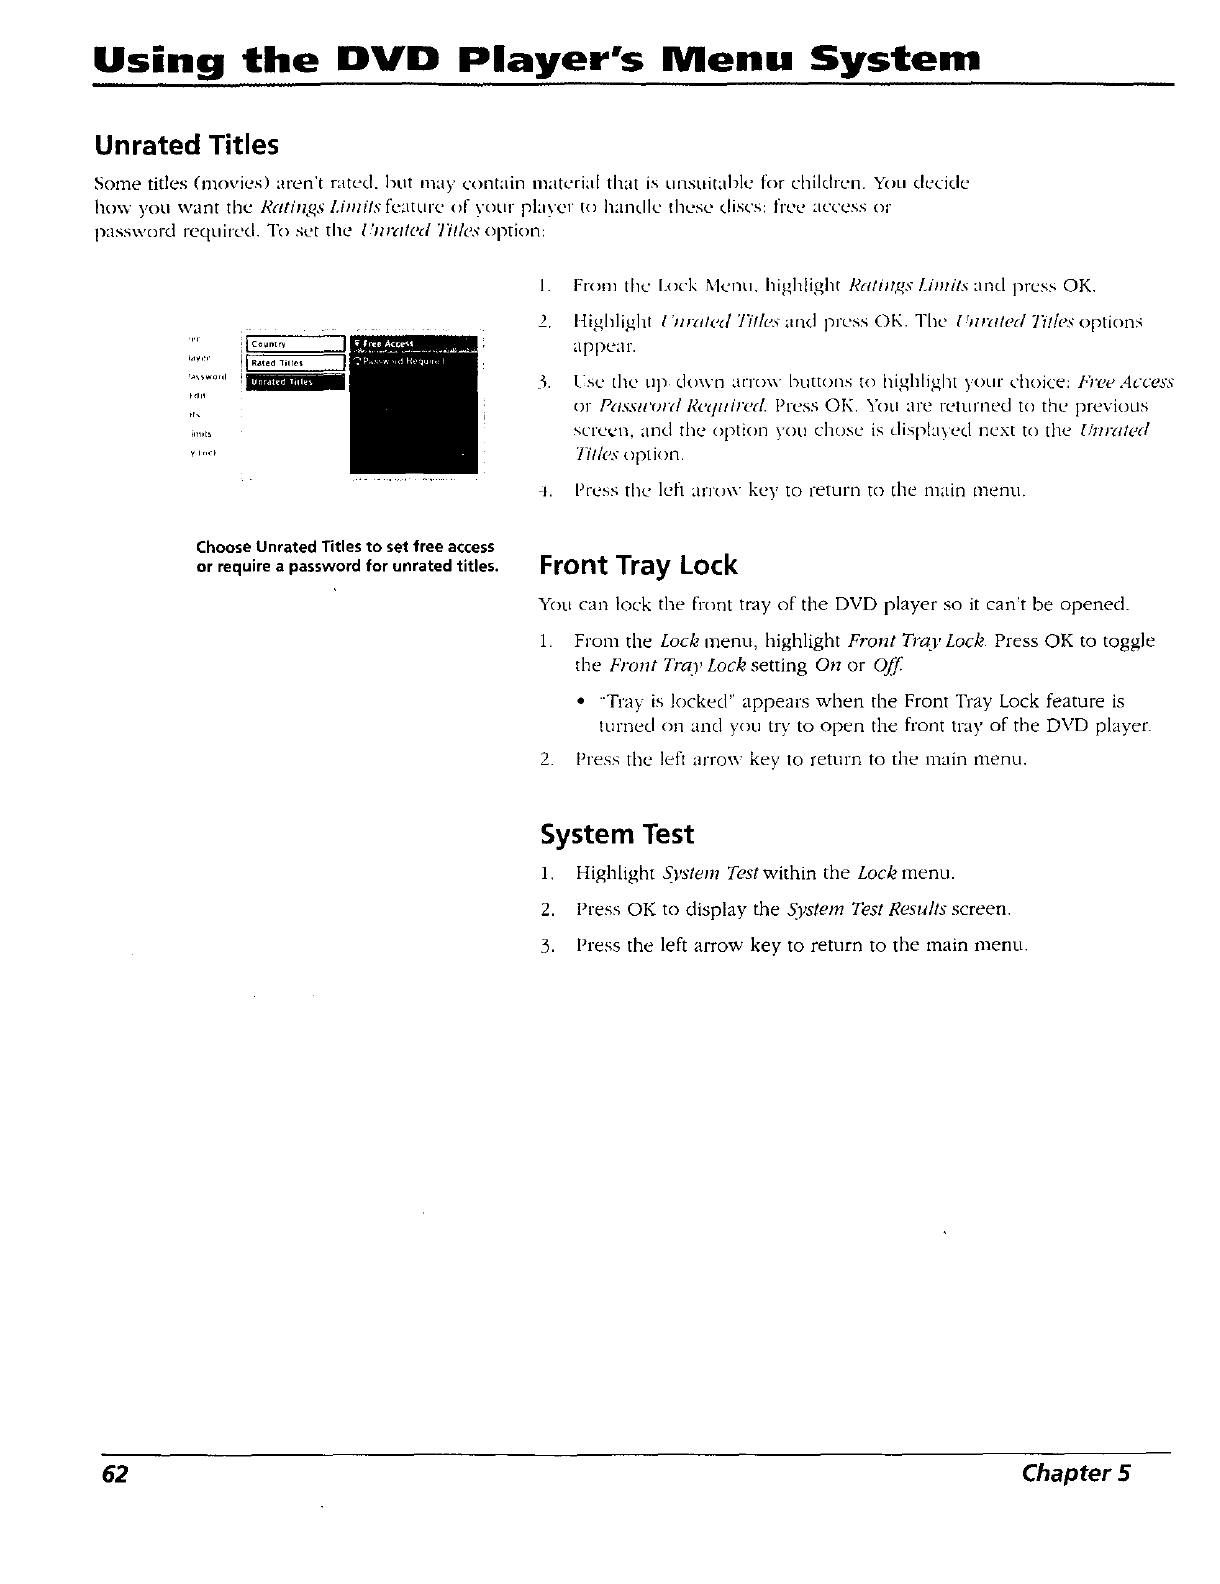
Using the DVD Player's Menu System
Unrated Titles
Some titles (movies) aren't rated, bttt may contain material that is unsuital_le for chiMren. You decide
how yotl want the Rat/'/lgs Li//tlls t'eatur(_, of yotlr player to halldlc these discs: free access or
password required To set the l'nrated 77lies oration:
q'l ]
lawn_ ]
.........!mmm_i
_,Jll
.n_ts
y Ir,, _
1.
2.
From the Loci,: Menu. hightighl Rati,,gs LImtts and press OK.
liighlighl /'uraled 77/h,sand press Ob:. The [',zraled 7_t/es options
appear.
[s_. the up dov..n ano,.\ buttons to highlight y,:)ur choice: Free Access
or P(ISSII'O/Y/l_eql/i/'e([ Press OK. _'Otl arc relurned to the previous
SCl'e_n. and The (_l_ti()i1 yotl chose is displayed next to the [_l_tc(I
77lies option.
q. Press the l{'ft alr()\\ key to retLlri) to the nlaJn menu.
Choose Unrated Titles to set free access
or require a password for unrated titles. Front Tray Lock
YOLIc'al_ lock the front tray of the DVD player so it can't be opened.
1. From the Lock memt, highlight Front Tray Lock. Press OK to toggle
the Front Tra_,Lock setting On or Q.ff
• 'Tray is k)cked" appears when the Front Tray Lock feature is
turned on :.rod you try to open the front tray of the DVD player.
2. Press the left arl-oxv key to l'etnrn to tile main menu,
System Test
1. Highlight System Testwithin the Lock menu.
2. Press OK to display the System Test Results screen.
3. Press the left arrow key to return to the main menu.
62 Chapter 5
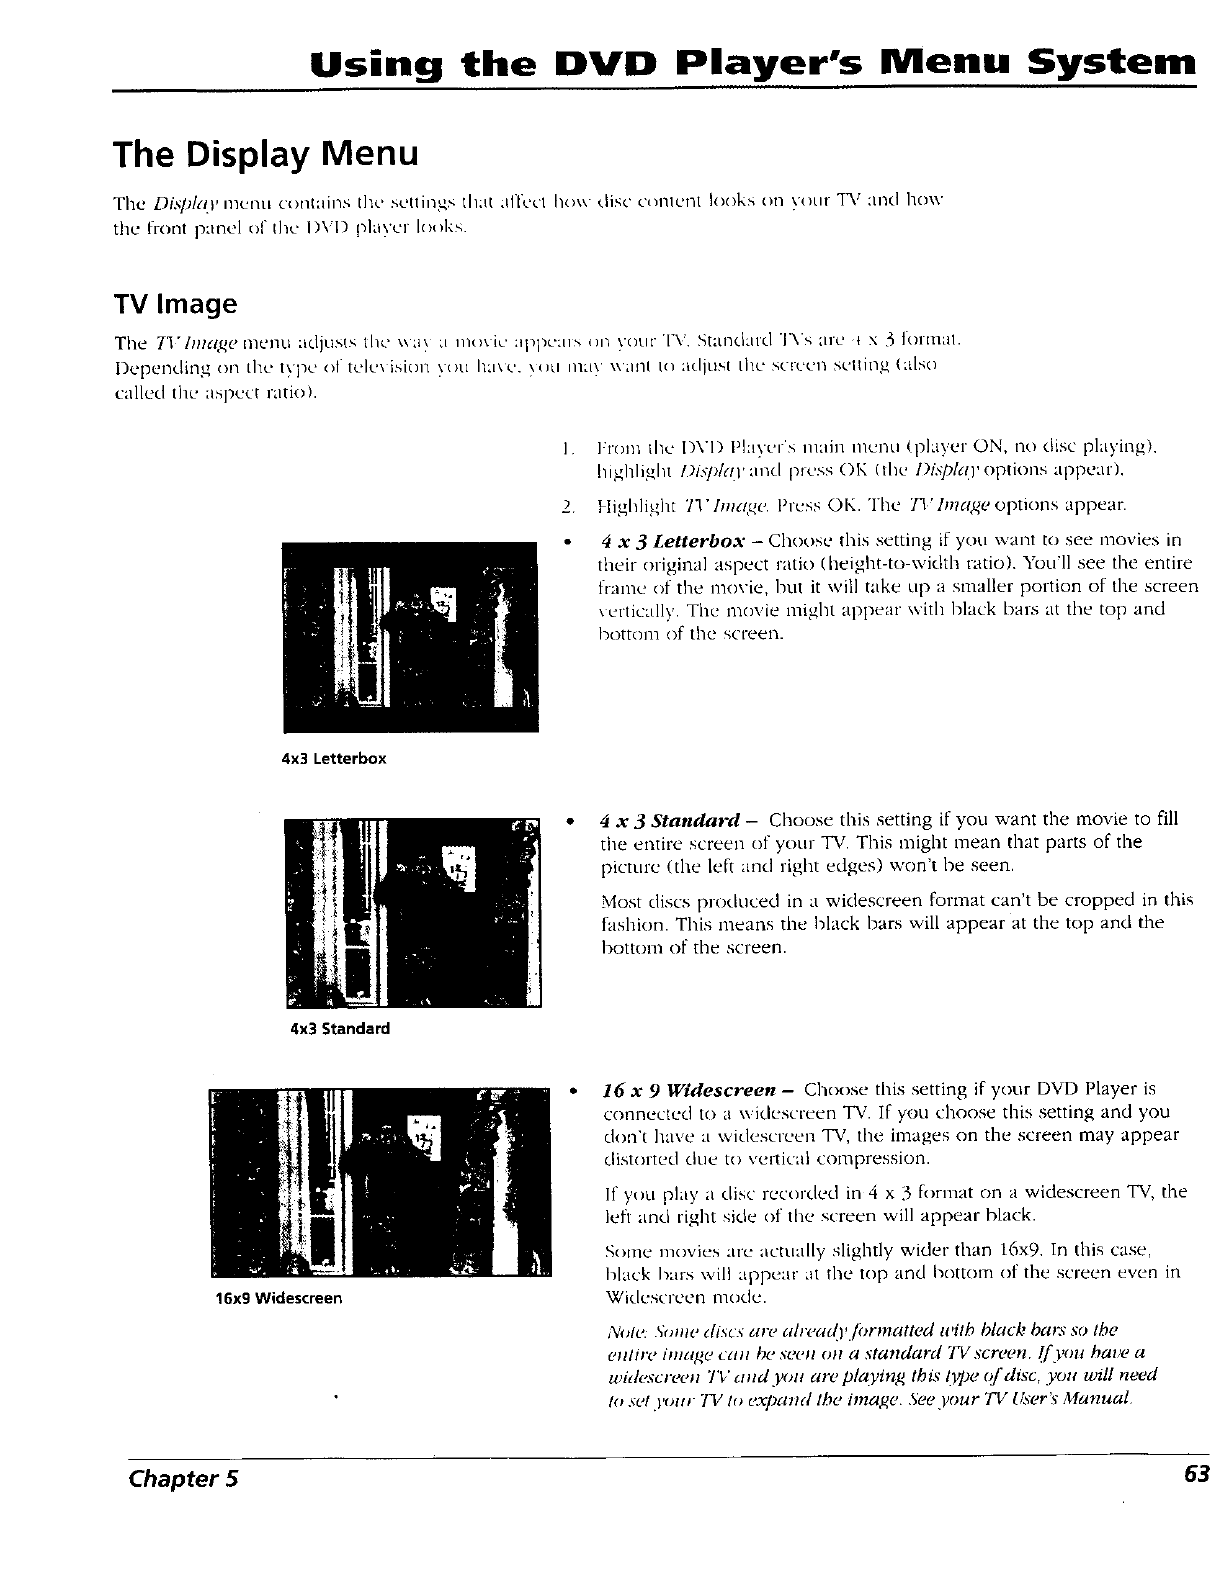
Using the DVD Player's Menu System
The Display Menu
the front panel of the I)VI) playc] lot)ks
TV Image
The 71"/m_emenu adjusts the \\a_ a i//o\i,';ippcals Ol_ your TV Standald TVs are t x 3 formal.
)epeDdiil_ on the typ_.t of telc\ ision you hu\_.'. )t)_i nm\ \\atlt to adjust the scrt.'el++ stating (also
called thu aspect ratio).
]
2
From the DVI) Pktyurs main i'ncnu (player ON, no disc playing),
highlight l)l,_[_l( O' anti press ()I'4 (the 1)i,_plc O' options appear),
F ghlight 71"Imaqe. Press OFt. The Tl'Image options appear.
4x 3 Letterbox - Choose this setting if you want to see movies in
their original aspect ratio (height-to width ratio). You'll see the entire
flame of the movie, hut it will take up a smaller portion of the screen
xcrtical b . The moxie might appear with black bars at the top and
Notion1 of the screen.
4x3 Letterbox
4x 3 Standard - Choose this setting if you want the movie to fill
tile emire screen of your TV. This might mean that parts of tile
picture (the Left and right edges) won't be seen.
Most discs produced in a widescreen format can't be cropped in this
fashion. This means the black hats will appear at the top and the
bottonl of the screen.
4x3 Standard
16x9 Widescreen
16 x 9 Widescreen -Choose this setting if your DVD Player is
connected to a widescreen TV. If you choose this setting and you
don'{ ]lave a widescreen TV, the images on the screen may appear
clistorted dtle tovertical compression.
If you play a disc recorded in 4 x 3 format on a widescreen TV, the
left and right side of the screen "+viiiappear black.
Sotne movies arc actually slightly wider than 16x9. In this case,
black bars \',,ill appear at tire top and bottom of the screen even in
Widcscreen mode.
,¥ole. Skmwdiscs are ah'ea_O,./ormatted with black bars so the
(,lllil'e inla_e Call be seen Oil a standard _l_screen, Ill,(lit bal)e a
widescreen TV and.poll are playing this O]per?/'disc, you will need
to set ,our TV to expa*ul lbe image See your +IVUser's Manual
Chapter 5
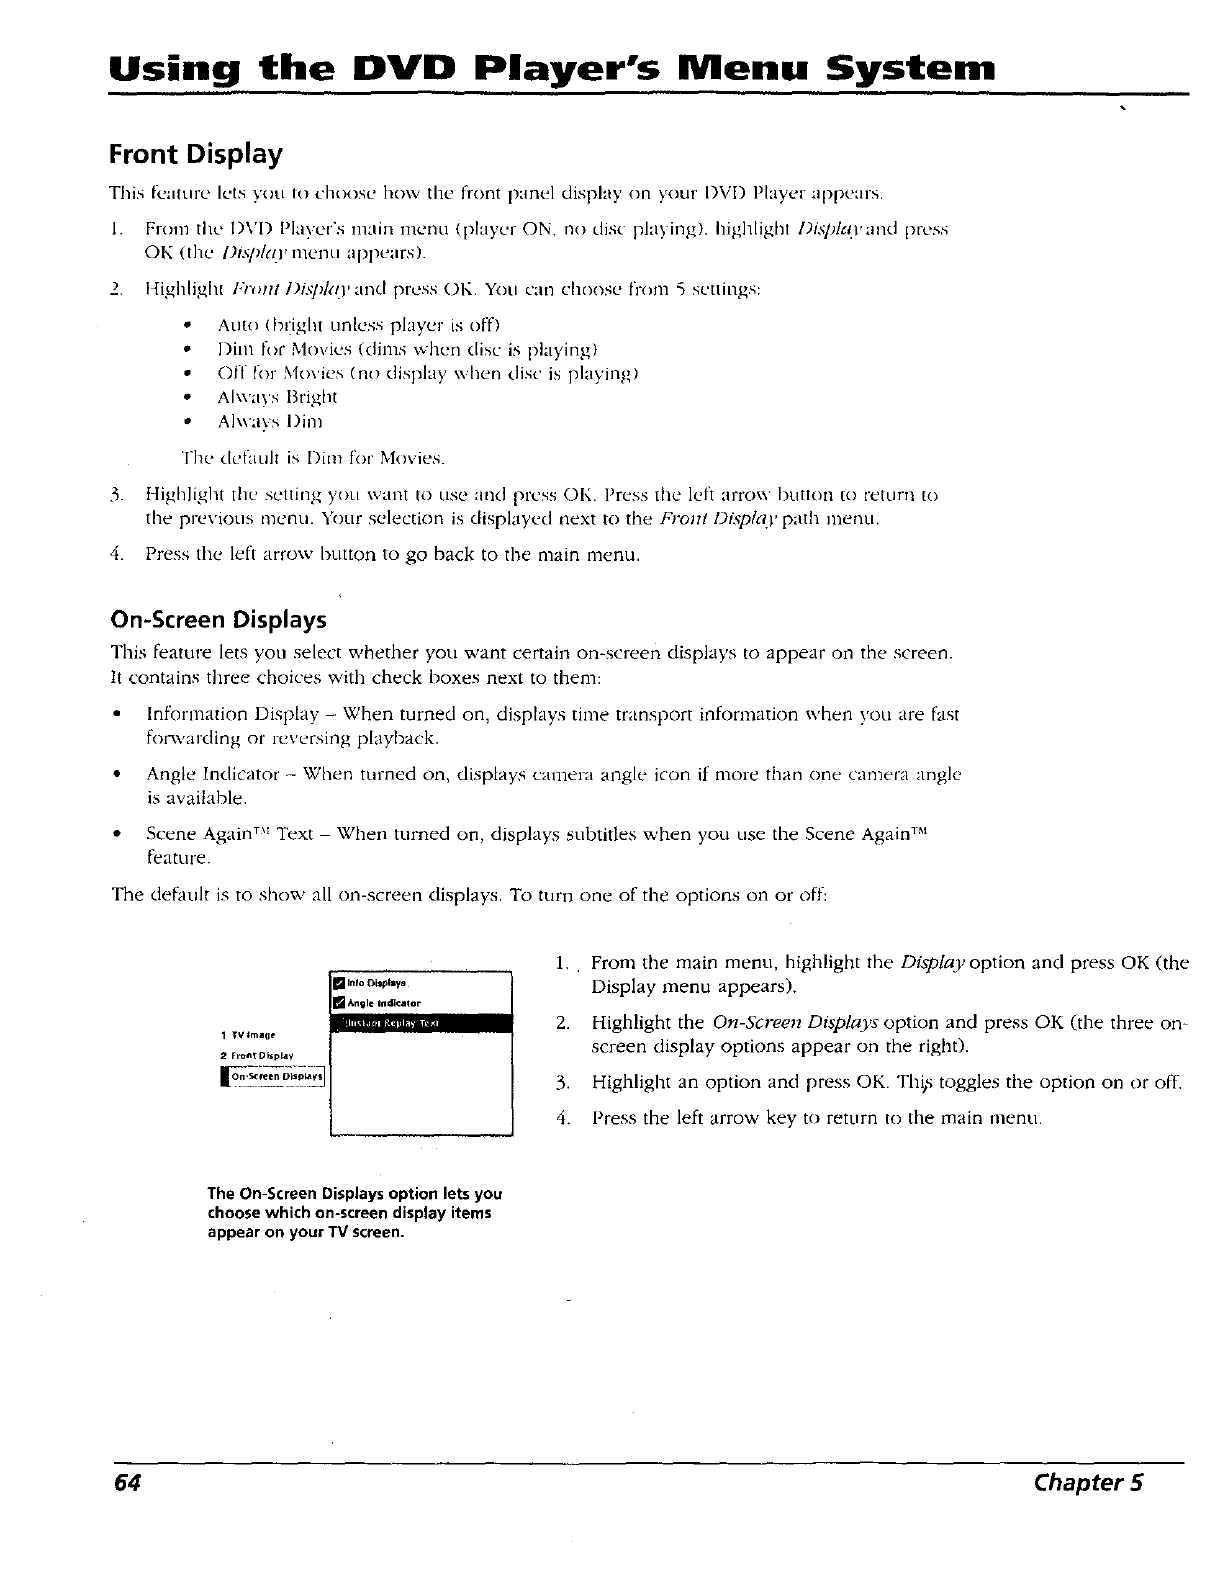
Using the DVD Player's Menu System
Front Display
This f_:aturc h_.tsyou to choose how the front panel display on your I)VD Player appears.
1.
2.
From the l)VI) Player's main ntcnu (player ON, no disc playirlg), hig 1limb l)i._7)lt(t'and press
OK (the l)is])lcO, inei_u appears).
Highlight I.'rcuztDi._7_kO,and press O1,[. You can choose fr,')ln 5settings:
• Atlt<)(bllight unless player is off)
• Dim for Movies (dims when disc is playing)
• Off lkn Movies (nl) (lisplay when disc is playing)
• Ahvays Bright
• A]x\'avs l)im
The clcfault is Dim for Movies.
3. tligh ight the setting you want to use aud press ()I,L Press the left an'ow button to return to
the previous menu. Your selection is displayed next to the FroJzt Dispkz ' path menu.
4. Press the left arrow button to go back to the main menu.
On-Screen Displays
This feature lets you select whether you want certain on-screen displays to appear on the screen.
It contains three choices with check boxes next to them:
• Information Display -When turned on, displays time transport information when you are fast
forwarcling or reversing playback.
• Angle Indicator - When turned on, displays camera angle icon if more than one camera angle
is available.
• Scene Again TM Text When turned on, displays subtitles when you use the Scene Again TM
feature.
The default is to show all on-screen displays. To turn one of the options on or off:
1T¥ Image
2Fr_,_ Db_pl,l?
1.
|Inlo Oi_pllys
Angle Indicator
2.
3.
4.
. From the main menn, highlight the Display option and press OK (the
Display menu appears).
Highlight the On-Screen Displays option and press OK (the three on-
screen display options appear on the right).
Highlight an option and press OK. Thi,s toggles the option on or off.
Press the left arrow key to return to the main menu.
The On-Screen Displays option lets you
choose which on-screen display items
appear on your TV Screen.
64 Chapter5
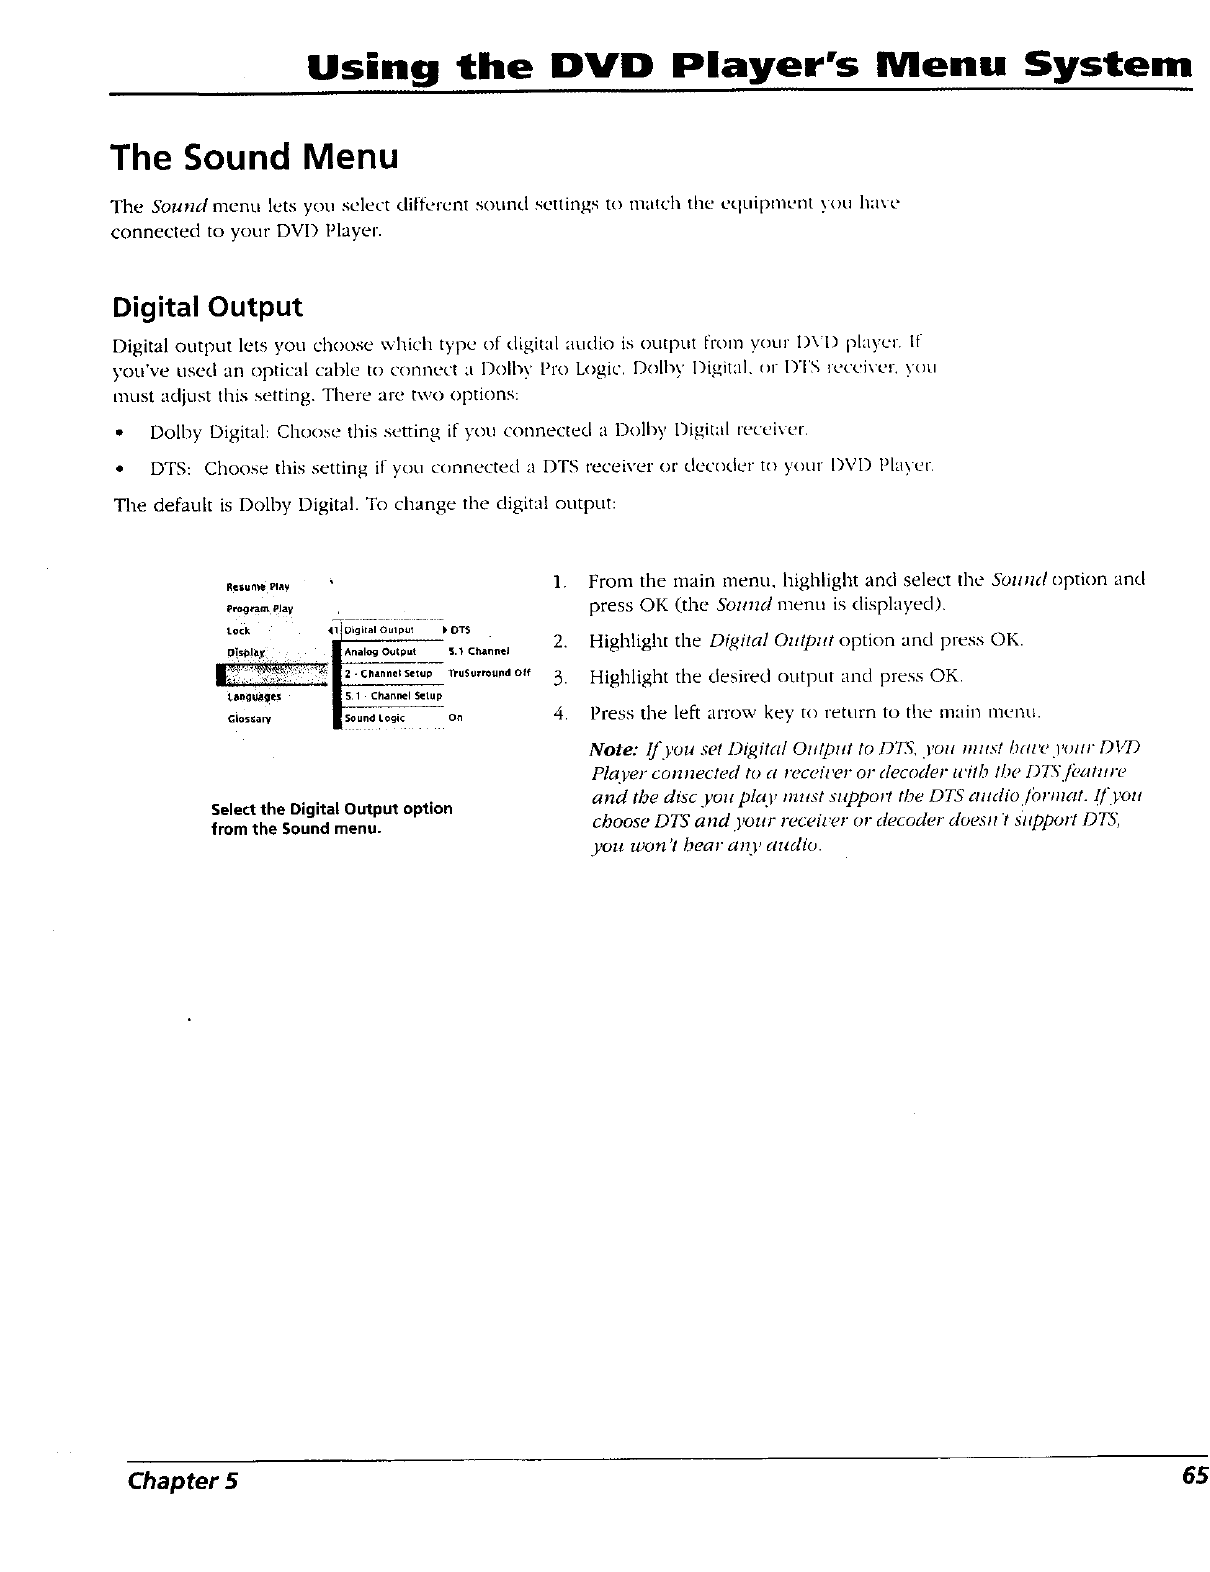
Using the DVD Player's Menu System
The Sound Menu
The So1_*ld menu lets you select different sound settings to nl;.itch the equipment }ou ]1axe
connected to your DVD Player.
Digital Output
Digital output lets you choose which type of digital audio is output fr(ml your I)VD player. If
you've used an optical cable to connect a l)olby Pro Logic, l)(_[by l)igita], or I)TS receiver, you
must adjust this setting. There are two options:
• Dolby Digital: Choose this setting if you connected a 1)olby Digital receiver.
• DTS: Choose this setting if yon connected a DTS receiver or decoder to your I)VD Player.
The default is Dolby Digital. To change the digital output:
R,el;t_n_ePlay 1.
progcam Play _ ...........
Lock 41JOigital Oulplal bOT$
Displ_ AnalOg Output S. _Ci_nmeJ 2.
_IUP TruS_Jrr°und off 3.
tar_g_ges _5A •ChanneSl• Chanr_l Setup
Select the Digital Output option
from the Sound menu.
From the main menu. highlight and select the Sound option an([
press OK (the Sotmd menu is displayed).
Highlight the Digital Output option and press OK.
Highlight the desired OUtl_Utand press OK.
Press the left arrow 7key to return to the nlain l'l_lenu.
Note: If you set Digital OHtpl_t tO D_, you trot!! baz'e ),our DVD
Player con_wcted to areceit'er or decodc, r with the DZS"fi, atttr_,
and the disc you play must support the DTS a,diojbrmat, ifyou
choose DTS and your receil'er or decoder doesll 7sltpport DTS;
you won't bear a* O, audio.
Chapter 5
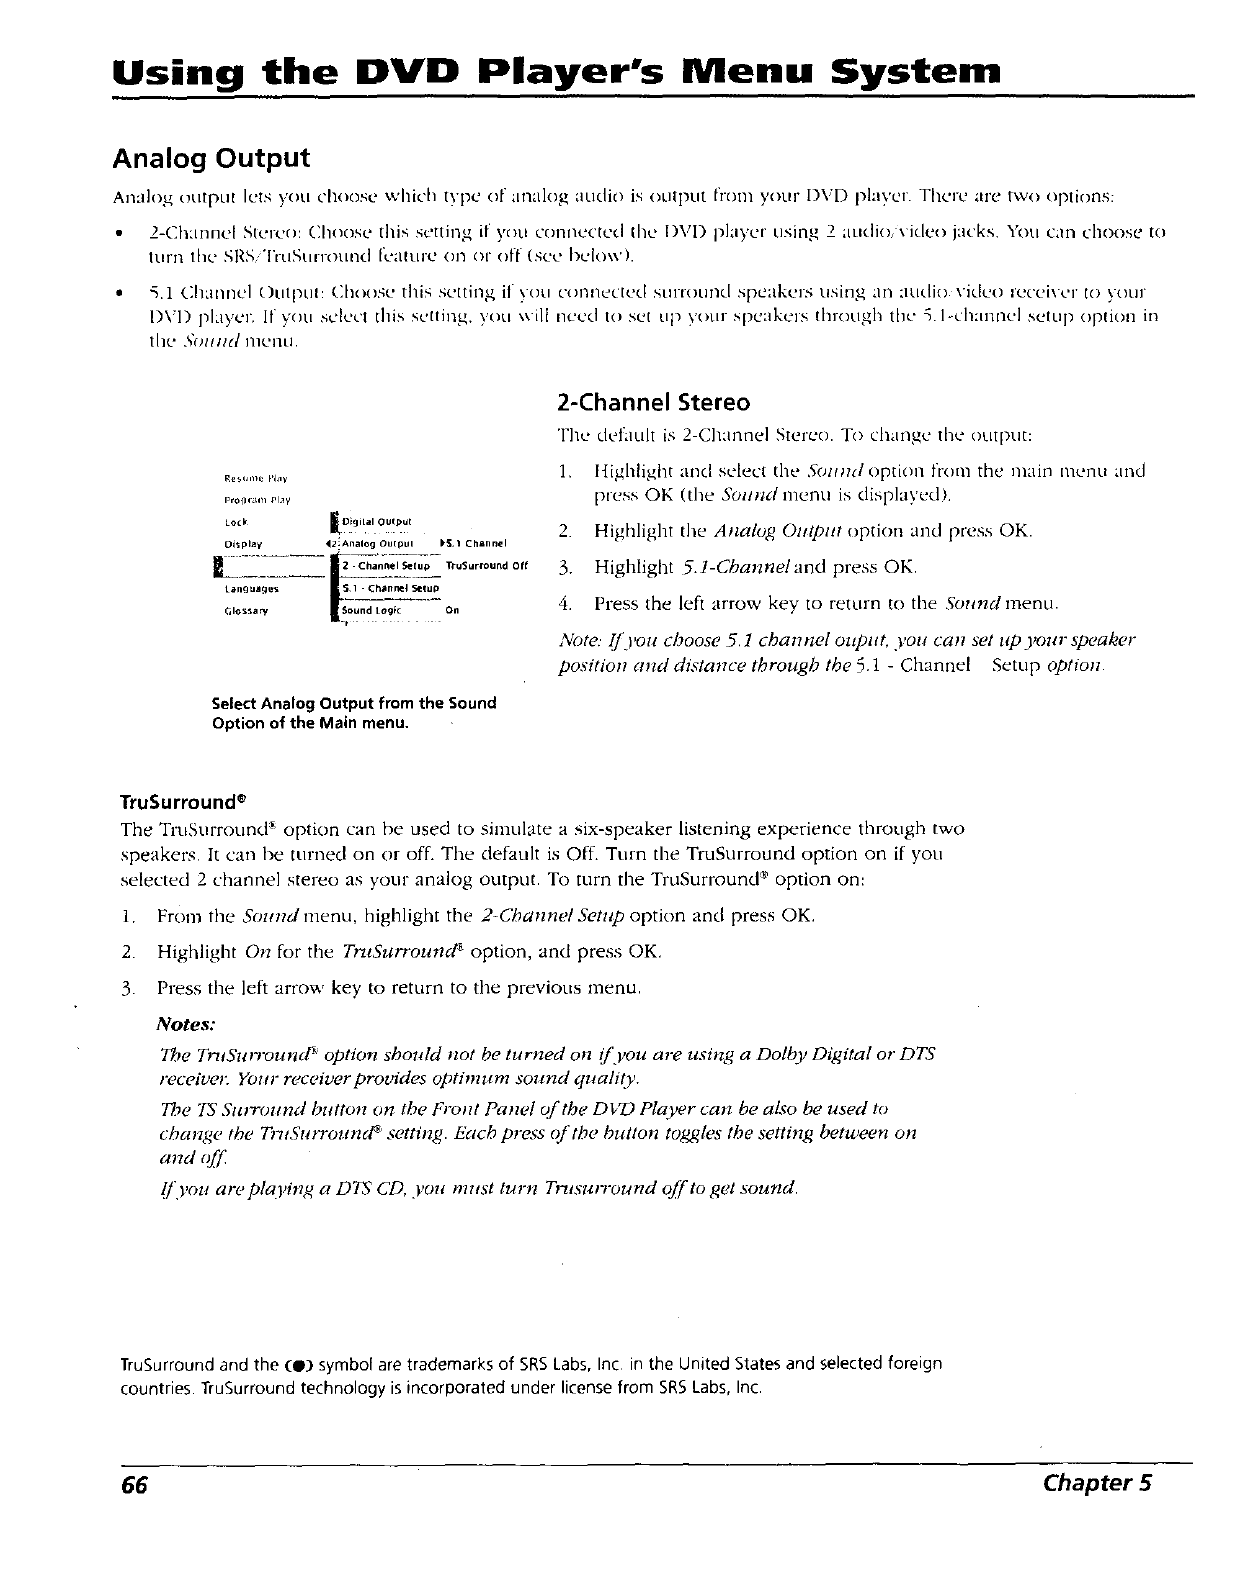
Using the DVD Player's Menu System
Analog Output
Aua]o,_ output lets you choose which type of analog audio is output froul your DVD player. There are two options:
2-Channel Stel,:o: Choose this setting ifI you connected tile |)VD player us ng 2aLidio, _ icleo jacks, You can choose to
turn the SRS "['ruStulound fe_itun_' on or off (see be[ow).
• 5.1 (]hannel Otflpul: Choose this setting if \ou connected surround speakers using an audio video receiver to your
I)1'I) player. I1 you select tills seltin_4 you will need to set tip VOtlr speakers through the -_.l-channel setup oplion in
the 3"ouud nleuu.
Re _ Ull_ F'lay
Proglam Play
LoO I_>!g..,ou!Dy,
Di_plal" _2 Anllog Oulplll I+_, I Chilnlllll
_.2L2y---- _<n_l'l _u-_ - 1R-uSurruund Off
:,:::7
Select Analog Output from the Sound
Option of the Main menu.
2-Channel Stereo
The default is 2-Channel Stereo. To change the ol.ltput:
1. I{ighligtlt and select tilt" ,fOHlul optIou b'oul the ulaiil inenu and
press OK (tile Solllld llleOt! is displayed),
2. Highlight the Analog Output,:)ption and press OK.
3. Highlight 5.1-Channeland press OK.
4. Press the left arrow key to return to file Sound menu.
Note: I/you choose 5.1 channel oupnt, you can set up your speaker
position and distance through the 5.1 - Channel Setup option.
TruSurround ®
The TruSurround a' option can tie used to simulate a six-speaker listening experience through two
speakers. It can be turned on or off. The default is Off. Turn the TruSurround option on if you
selected 2 channel stereo as your analog output. To turn the TruSurround _ option on:
1. From the Sound menu, highlight the 2-Channel Setup option and press OK.
2. Highlight On for the TruSurround _ option, and press OK.
3. Press the left arrow key to return to the previous menu.
Notes:
The TruSun'ound _option should not he turned on i/'you are using a Dolby Digital or DTS
receiw,*: Your receiverprovides optimum sound quality.
The TS Surround button on the Front Panel of the DVD Player can be also be used to
change the T*vtSun'ound _ st,tting. Each preqs o['the button tobies the setting between on
and (7/5/:
/,/you atvplaFing a DTS CD, you must turn Trusurround off to get sound.
TruSurroundand the (B) symbol are trademarks of SRSLabs, Inc in the United States and selected foreign
countries. TruSurround technology is incorporated under licensefrom SRSLabs, Inc.
66 Chapter 5
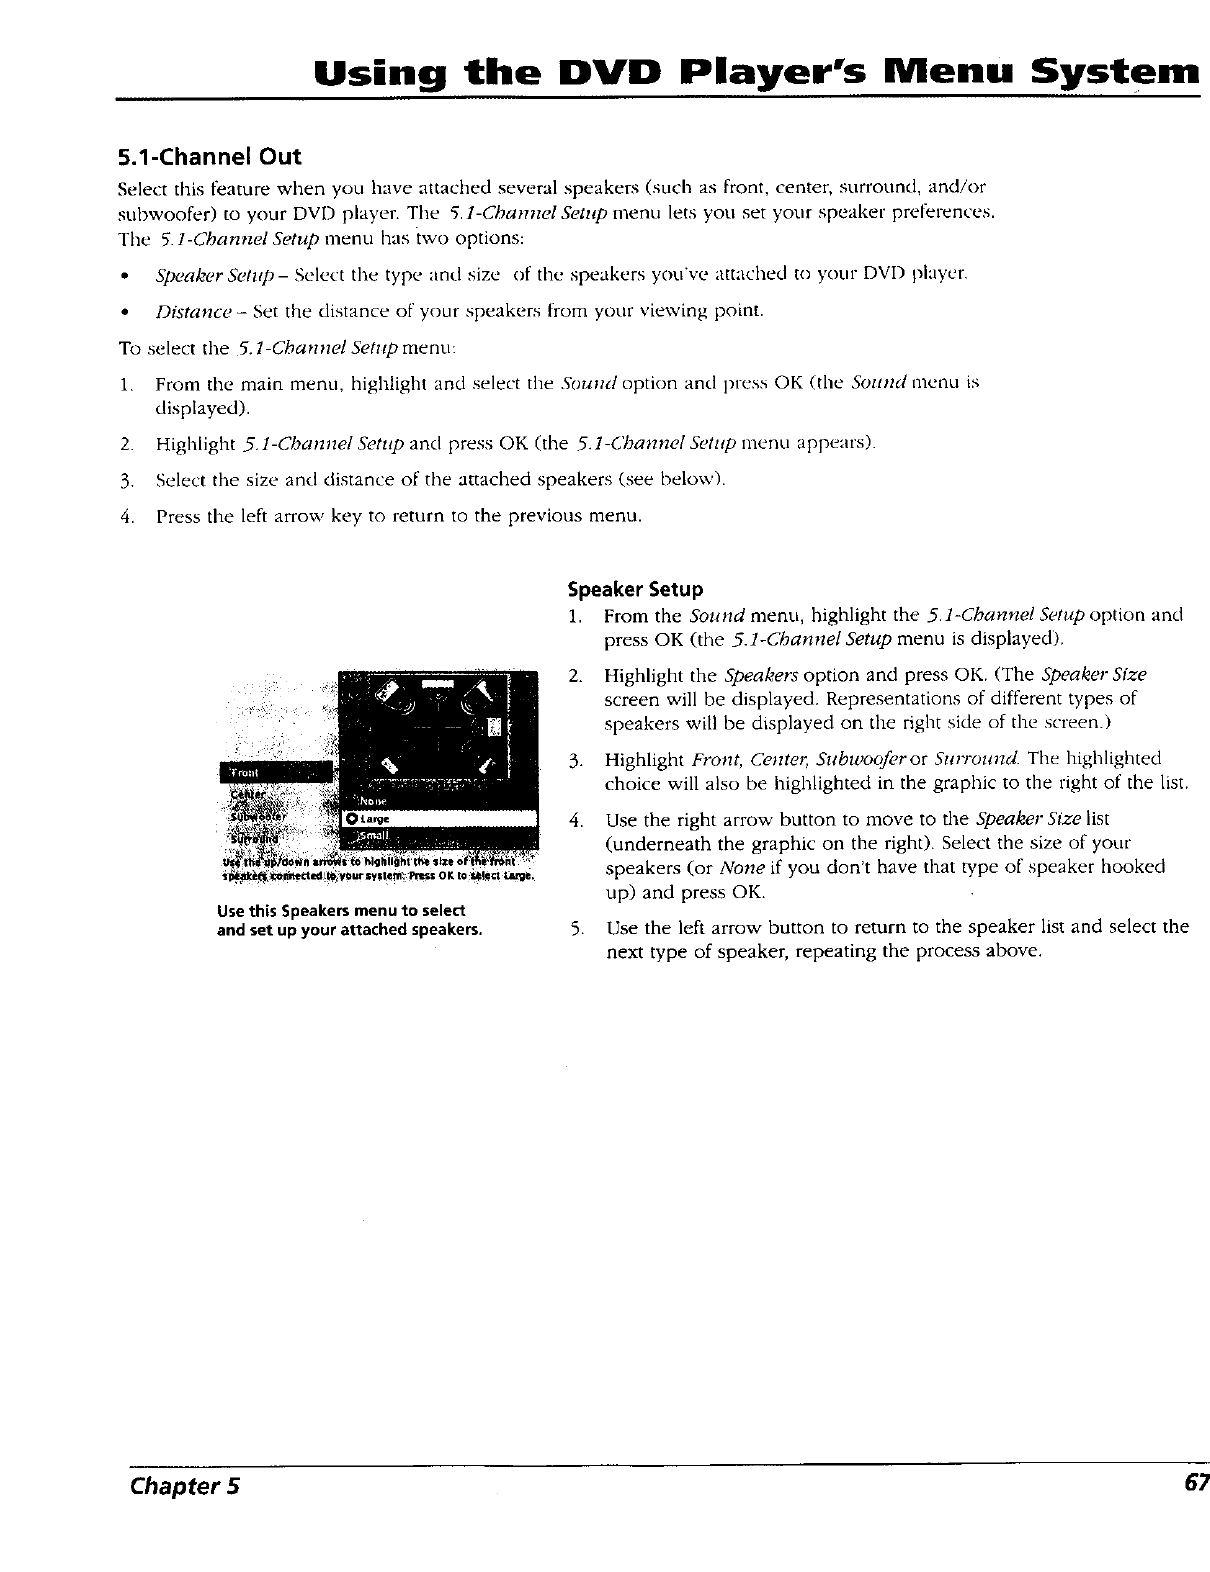
Using the DVD Player's Menu System
5.1-Channel Out
Select this feature when you have attached several speakers (such as front, center, surround, and/or
snbwoofer) to your DVD player. The 5.1-Cha_znel Setup meno lets you set your speaker prel_'rences.
The 5.1-Channel Setup menu has two options:
•Speaker Setup- Select the type and size of tire speakers you've attached to yOl.lr DVD player.
• Distance- Set the distance of your speakers from your viewing point.
To select the 5. l-ChannelSetupmenu:
1. From the main menu, highlight and select the Soutzd option and press OK (the Sozmd nrenu is
displayed).
2. Highlight 5.I-ChannelSetnp and press OK (the 5.1-CDannelSet*lp menu appears).
3. Select the size and distance of the attached speakers (see below).
4. Press the left arrow key to return to the previous menu.
Use 'this Speakers menu to select
and set up your attached speakers.
Speaker Setup
1. From the Sound menu, highlight the 5.1-Channel Setup option and
press OK (the 5.1-Channel Setup menu is displayed).
2,
.
Highlight the Speakers option and press OK. (The Speaker Size
screen will be displayed. Representations of different types of
speakers will be displayed on tire right side of the screen.)
Highlight Front, Cente*, Subwooferor Snrrou_zd. Tire highlighted
choice will also be highlighted in the graphic to the right of the list.
,
5.
Use the right arrow button to move to the Speaker Size list
(underneath the graphic on the right). Select the size of your
speakers (or None if you don't have that Wpe of speaker hooked
up) and press OK.
Use the left arrow button to return to the speaker list and select the
next type of speaker, repeating the process above.
Chapter 5
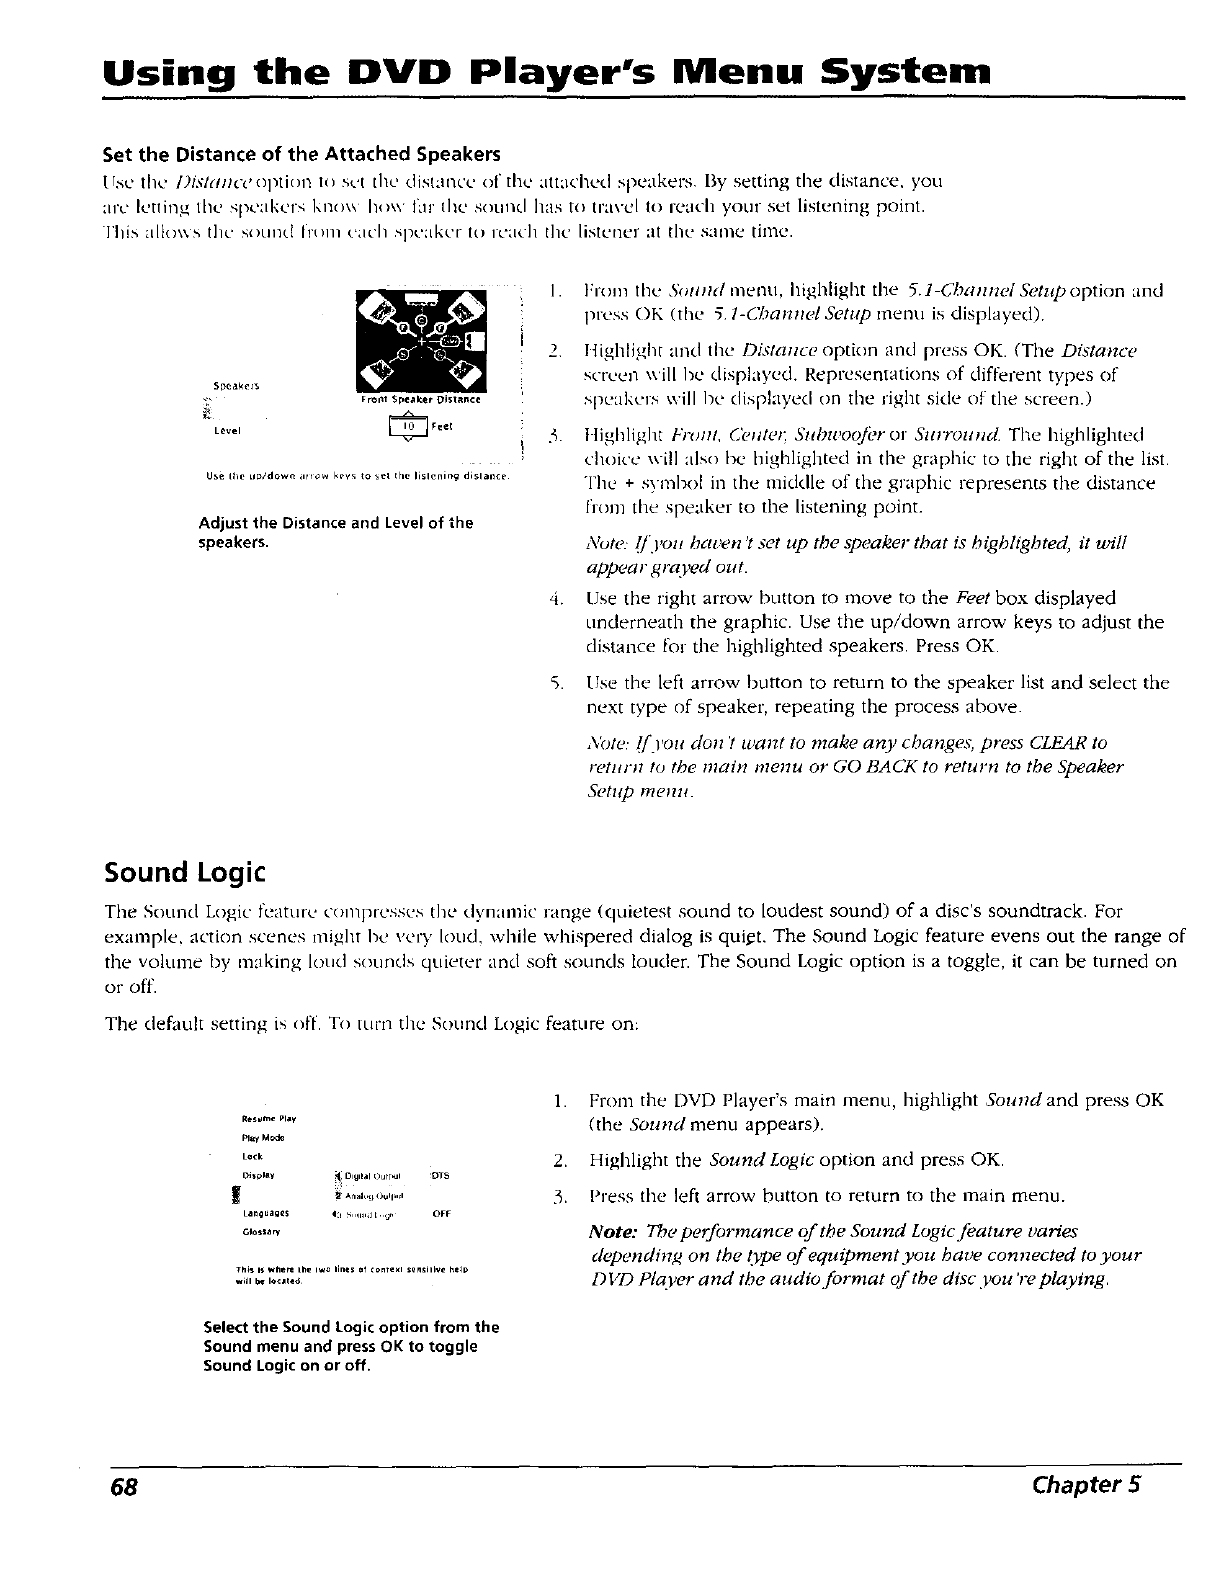
Using the DVD Player's Menu System
Set the Distance of the Attached Speakers
llse the l)islaJlcvoption losc, t the distance of the attached speakers, P,y setting tile distance, you
are letting tile speakers kno_\ ho\\ flu the sound has to travel to reach your set listening point.
This alto\\s lilt sound Irom u,ac'[I speaker to reac]l the listener at tile same tinle.
SOcakc_
Level
i
Fro_t Speaker DisTance
Fee(
Use the up/dow_ arrow kew _o set Ehe llstening dist.,nee
Adjust the Distance and Level of the
speakers.
1.
2.
4.
Froln tile" SoHnd mel'Ul, highlight the 5.I-Channel Setup option and
press OK (the 5 1-Channel Setup menu is displayed).
ltighlight and the Distance optkm and press OK. (The Distance
screen will be dispkiyed. Representations of different types of
speakers will he displayed on the right side of the screen.)
l lighlight l@{u_l,Ceute*; &thwoofi.r or Surrouud. The highlighted
choice wi!l also be highlighted in the graphic to the right of the list.
The + symbol in the middle of the graphic represents the distance
from the speaker to the listening point.
Notc: _q'.l'ouhaven't set up the speaker that is highlighted, it will
appear graved out.
Use the right arrow button to move to the Feet box displayed
underneath the graphic. Use the up/down arrow keys to adjust the
distance f:k_rthe highlighted speakers. Press OK.
Use tile left arrow button to return to the speaker list and Select the
next type of speaker, repeating the process above.
Abte.. lf.rou don't want to make any changes, press CLEAR to
return to the main menu or GO BACK to return to the Speaker
Setup menu.
Sound Logic
The Sound Logic f{'ature COml_resses the d.vnamk' range (qciietes/sound to loudest sound) of a disc's soundtrack. For
example, action scenes might I',e very loud, while whispered dialog is qui_t. The Sound Logic feature evens out the range of
the volume by making loud sounds quieter and soft sounds louder. The Sound Logic option is a toggle, it can be turned on
or off.
The defacflt setting is off. To turfi the Sound Logic feature on:
R_me l_lav
lilly 14_
Llack
DIsplaY .5
Lantluatles 4a S,..,_J t _<a,_ OI-F
G#r,s_a,-/
Th_s i_ '_herl Itle ,w_ iin_s _f _omex, se nslilve hell,
Select the Sound Logic option from the
Sound menu and press OK to toggle
Sound Logic on or off.
1. From the DVD Player's main menu, highlight Sound and press OK
(the Sound menu appears).
2. Highlight the Sound Logic option and press OK.
3. Press the left arrow button to return to the main menu.
Note: Tbeperformance of the Sound Logic feature varies
dependin,_ on the type of equipment you have connected to your
DVD Plc_ver and the audio format of the disc you 'replaying.
68 Chapter 5
Using the DVD Player's Menu System
The Languages Menu
The Languages menu enables you to choose different language options for audio, subtitles, Disc
Menu items and DVD player menu items. The default for all Language menu items is English.
Changing the Player Menus Language Preferences
You can choose one of three languages for the text that appears within the on-screen menu
system. The default is English. If you change the Player Menu Language, the entire player menu
system will be displayed in the selected language.
1. From the main menu, highlight and select the Languages option (the Languages menu is
displayed).
2. Highlight Player Menus and press OK (the language choices for the DVD Player's menu are
displayed).
3. Highlight the language you want to use for the menu items and press OK. The menu appears
with your selection shown next to Player Menus.
4. Press the left arrow button or press GO BACK°AGAIN to return to the previous menu.
Changing the Disc Menus Language Preference
The Disc Menus option enables you to choose which language you want to use to display the disc
menus.
1.
2.
3.
From the main menu, highlight and select the Languages option (the Languages menu is
displayed).
Highlight Disc Menus and press OK (the LYiscMenus language options are displayed).
Highlight the language you want to use for the disc menus and press OK. Press the left arrow
to return to the previous screen. The menu appears with your selection shown next to Disc
Menus.
4. Press the left arrow button or press GO BACK°AGAIN to return to the previous menu screen.
How to Set Other as an Disc Menus Language Option
W " .
If the language you ant to use lsn t 1sted, you can use the Other option to select the language of
your choice.
1. From the main menu, highlight and select the Languages option (the Languages menu is
displayed).
2.
3.
4.
5,
Highlight Disc Menus and press OK (the Disc Menus language options are displayed).
Highlight Other and press OK.
Enter the code from the Language Codes list at the end of this chapter and press OK (the
previous menu appears with your selection shown next to the Disc Menus path menu).
Press the left arrow button or press GO BACK,,AGAIN to return m the previous menu screen.
NOTE: Remember, yourplayer can 'tplay the disc in the language you have chosen if the
disc wasn't created with that language option.
Chapter 5 69
Using the DVD Player's Menu System
Changing the Audio Language Preference
The Audio Language menu enables you to choose which language you want to listen to the movie
in.
1. From the main menu, highlight and select the Languages option (the Languages menu is
displayed).
2. Highlight Audio and press OK (the audio language options are displayed).
3. Highlight the language you want to use for the audio portion of the titles and press OK. Press
the left arrow button. The menu appears with your selection shown next to Audio.
4. Press the left arrow button or press GO BACK,,AGAIN to return to the previous menu screen.
How to Set Other as an Audio Language Option
If the language you want to use isn't listed, you can use the Other option to select the language of
your choice.
1. From the Languages menu, highlight and select the Audio option (the Audio menu
is displayed).
2. From the Audio menu, highlight Other and press OK.
3. Enter the code from the Language Codes list at the end of this chapter and press OK. The
menu appears with your selection shown next to Audio.
4. Press the left arrow button or press GO BACK°AGAIN to return to the previous menu.
NOTE: Remember, yourplayer can 'tplay the disc in the language you have chosen if the
disc wasn't created with that language option.
Changing the Subtitle Language Preference
The Subtitles menu lets you choose a preferred language for the subtitles. The default is Auto. The
Auto preference defaults to the same language that has been set as the audio language preference.
To change the subtitle language preference:
1. From the main menu, highlight and select the Languages option (the Languages menu is
displayed).
2. From the Languages menu, highlight Subtitles and press OK (the Subtitle menu is displayed).
3. Highlight the language you want to use for subtitles and press OK. Press the left arrow button.
The menu appears with your selection shown next to Subtitles.
4. Press the left arrow button or press GO BACK,,AGAIN to return to the previous menu.
Note: Remember, yourplayer can '_play the disc in the language you have chosen if the disc
wasn't created with that language option.
70 Chapter 5
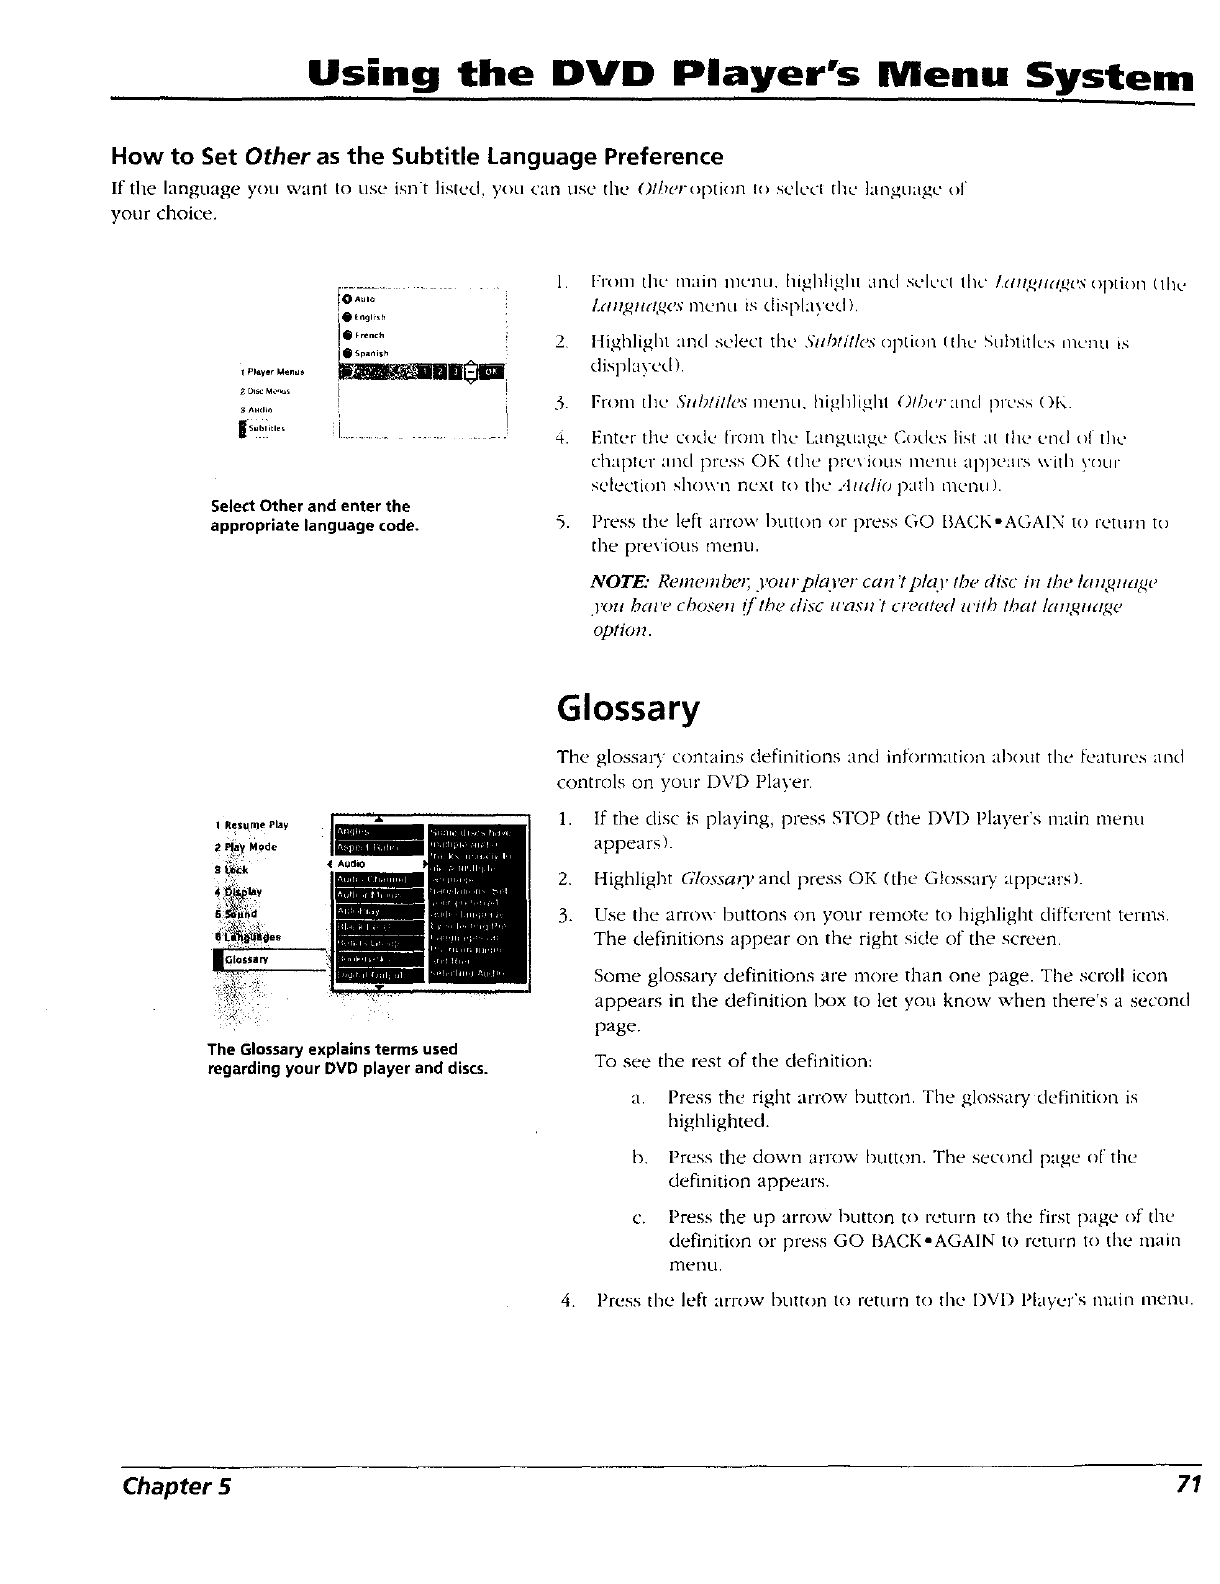
Using the DVD Player's Menu System
How to Set Other as the Subtitle Language Preference
If the language you want to use isnt ]isted, you can use the Olhe/o )tion to se[ecl the ]an_t]agc ol
your choice.
I.
!oA.,-;..... •
O Et'gl_sh i
0 Spanish
T_)ayerMe.us __
I
lb.,,...... i............. 4.
Select Other and enter the
appropriate language code. 5.
1:1"O111 t]lt2 tna]n nit'riLl, highlight and select the LaH<_aa_esoption (Ih(.+
Langlta,_+,smenu is displayed).
Highlight and select the 5al_titles option (dlu_;ul+)tillt:smetal is
displayed).
From the Szd_/it&,s nlent.i, highlighl ()lhc,r and press ()l\.
Enter the code h-on1 the [4mgt.lage Codes list at (he end o{ t]lt.'
chaptt:r and press OK (the pr(.", ions nlent_ apl+)ears ,,x ilh youlr
selection sl+Lo\vn next to 111cAadin path n/el+ltl).
Press the left arrow button or press GO BACK-AGAIN to return to
the previous D_(enLI.
NOTE: Remembe*; .l'oarplg(l'cr can ?pI_{v the disc ill the Irnlgllage
.you hal'e chose1_ (/'the disc u'as*l t cfeated i_+/lhthat laHglldge
option.
The Glossaryexplainsterms used
regardingyour DVD player and discs.
Glossary
The glossary contains definitions and infk)r]+nation about the features and
controls on your DVD Player.
1. If the disc is playing, press STOP (the DVD Player's l+nainment.i
appears)•
2. Highlight Glossary and press OK (the Gk)ssaw appears).
3. Use the arrow buttons on your remote to highlight cliff;crest terms.
The definitions appear on the right side of the screen•
Some glossaw definitions are more than one page. The scroll icon
appears in the definition box to let you know when there's a second
page.
To see the rest of the definition:
a. Press the right arrow button. The glossary definition is
highlighted.
b. Press the down arrow bt.ltton. The second page of the
definition appears.
c. Press the up arrow bumm to return to the first page of the
definition or press GO BACK-AGAIN to return to the mare
menLl,
4. l+'ress the left arrow I)ntton to rettlrn to the l)Vl) Player's nlain menu.
Chapter 5 71
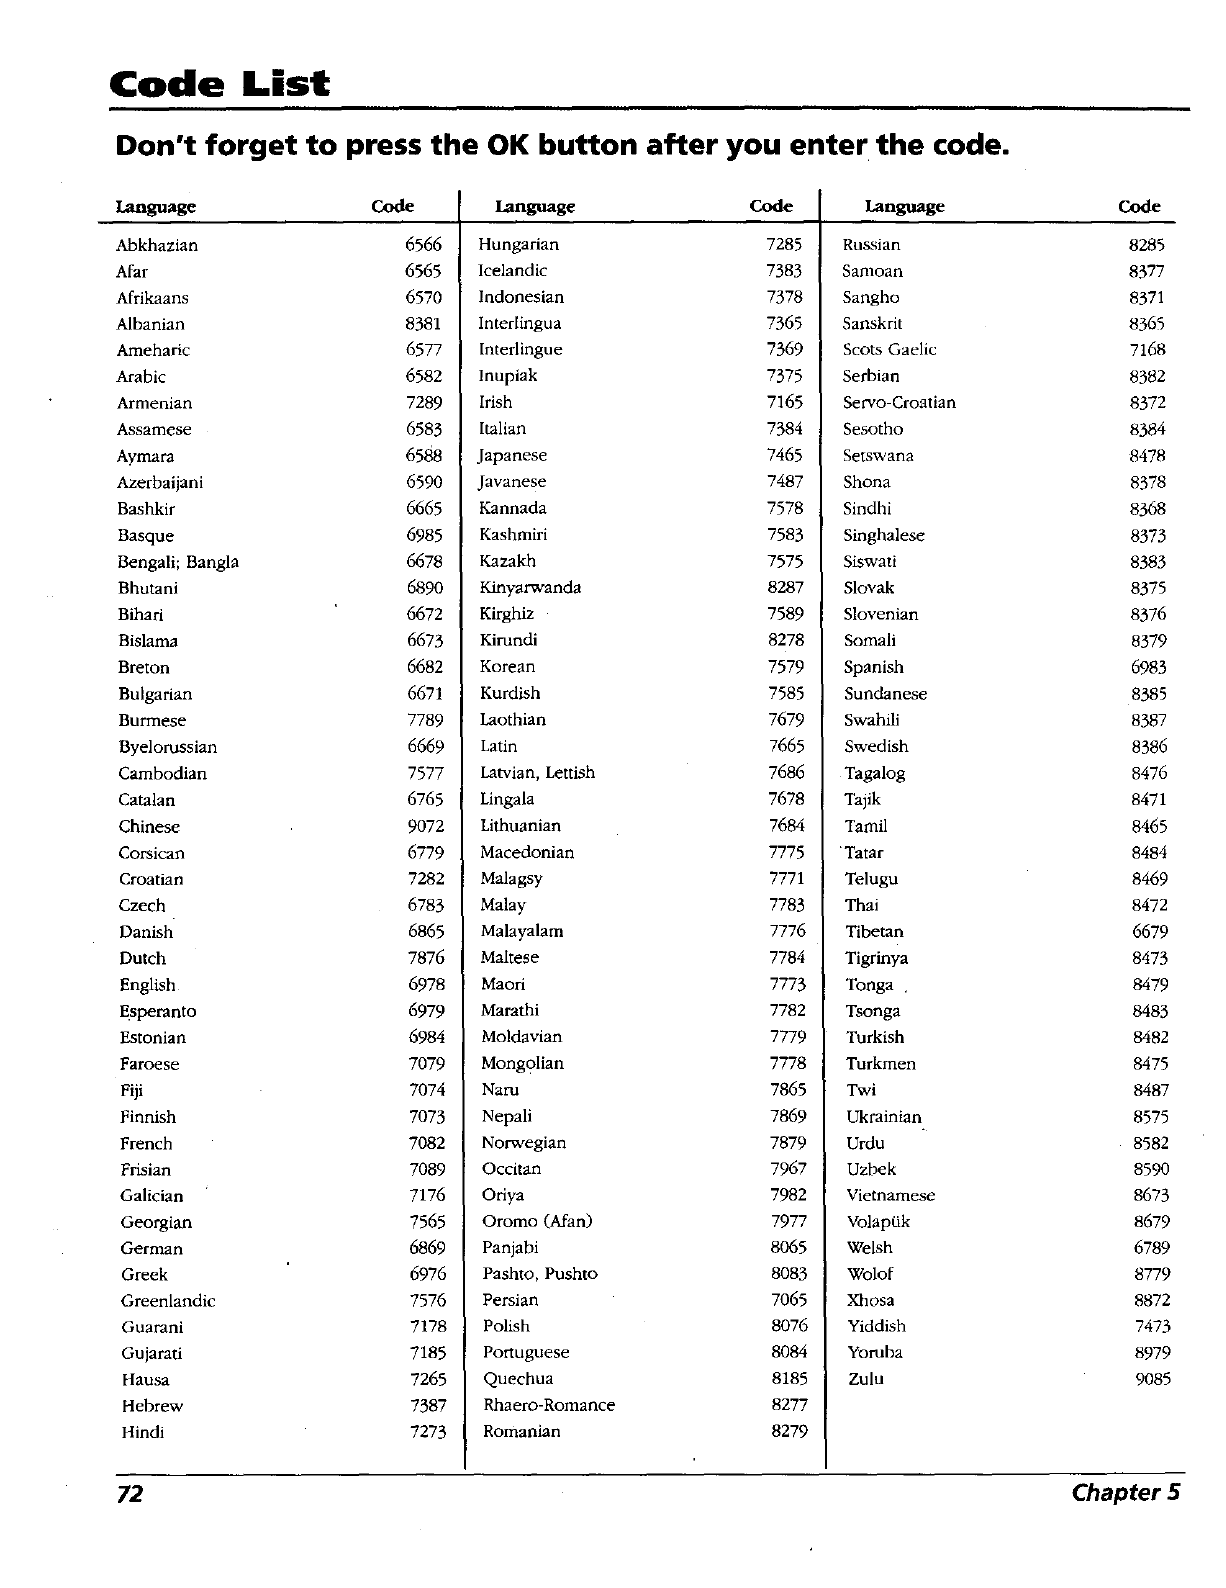
Code List
Don't forget to press the OK button after you enter the code.
Language
Abkhazian
Afar
Afrikaans
Albanian
Ameharic
Arabic
Armenian
Assamese
Aymara
Azerbaijani
Bashkir
Basque
Bengali; Bangla
Bhutani
Bihari
Bislama
Breton
Bulgarian
Burmese
Byelorussian
Cambodian
Catalan
Chinese
Corsican
Croatian
Czech
Danish
Dutch
English
Esperanto
Estonian
Faroese
Fiji
Finnish
French
Frisian
Galician
Georgian
German
Greek
Greenlandic
Guarani
Gujarati
Hausa
Hebrew
Hindi
Code
6566
6565
657O
8381
6577
6582
7289
6583
6588
659O
6665
6985
6678
689O
6672
6673
6682
6671
7789
6669
7577
6765
9O72
6779
7282
6783
6865
7876
6978
6979
6984
7079
7074
7073
7082
7089
7176
7565
6869
6976
7576
7178
7185
7265
7387
7273
Language Code
Hungarian 7285
Icelandic 7383
Indonesian 7378
Interlingua 7365
lnterlingue 7369
lnupiak 7375
Irish 7165
Italian 7384
Japanese 7465
Javanese 7487
Kannada 7578
Kashmiri 7583
Kazakh 7575
Kinyarwanda 8287
Kirghiz 7589
Kirundi 8278
Korean 7579
Kurdish 7585
Laothiao 7679
Latin 7665
Latvian, Lettish 7686
Lingala 7678
Lithuanian 7684
Macedonian 7775
Malagsy 7771
Malay 7783
Malayalam 7776
Maltese 7784
Maori 7773
Maratbi 7782
Moldavian 7779
Mongolian 7778
Naru 7865
Nepali 7869
Norwegian 7879
Occitan 7967
Oriya 7982
Oromo (Alan) 7977
Panjabi 8065
Pashto, Pushto 8083
Persian 7065
Polish 8076
Portuguese 8084
Quechua 8185
Rhaero-Romance 8277
Romanian 8279
Language
Russian
Samoan
Sangho
Sanskrit
Scots Gaelic
Serbian
Servo-Croatian
Sesotho
Setswana
Shona
Sindhi
Singhalese
Siswati
Slovak
Slovenian
Somali
Spanish
Sundanese
Swahili
Swedish
Tagalog
Tajik
Tamil
Tatar
Telugu
Thai
Tibetan
Tigrinya
Tonga .
Tsonga
Turkish
Turkmen
Twi
Ukrainian
Urdu
Uzbek
Vietnamese
Volap6k
Welsh
Wolof
Xhosa
Yiddish
Yoruba
Zulu
Code
8285
8377
8371
8365
7168
8382
8372
8384
8478
8378
8368
8373
8383
8375
8376
8379
6983
8385
8387
8386
8476
8471
8465
8484
8469
8472
6679
8473
8479
8483
8482
8475
8487
8575
8582
8590
8673
8679
6789
8779
8872
7473
8979
9085
72 Chapter 5
Chapter 6
Other Information
Chapter Overview:
• Troubleshooting
•Care and Maintenance
•The Universal Remote
•Front Panel Controls
• Front Panel Display
•Limited Warranty
•Accessory Ordering Information
Changing Entertainment. Again.
73
Other Information
Troubleshooting
lf you are experiencing product operation problems, please review the troubleshooting section before you call for service. Refer
to the Limited Warranty for information on how to obtain repair service.
Player won't work
• Reset the DVD Player by unplugging the AC power cord and plugging it back in.
No Power
• Plug in the DVD Player. Make sure both ends of the AC power cord are securely plugged into the player and into an AC
outlet.
Disc won't play
• Insert a disc with the label side facing up.
• Check the type of disc you put into the player. This player only plays DVD video discs, Video CDs and audio CDs.
• If the disc is a DTS music CD, it requires a DTS decoder. If you have a DTS receiver hooked up to your DVD player
and you are still not getting sound, make sure the Trusurround ® option is turned off.
• Both the player and the disc are coded by region. If the regional codes don't match, the disc can't be played. This
player is Region No. 1.
Play starts, but then stops immediately
• The disc is dirty. Clean it.
• Condensation has formed. Mlow player to dry out,
No picture
• Turn your TV to its Video Input Channel (see chapter 1).
• Turn on the "IV.
• Make sure your player is connected properly. Make sure all cables are securely inserted into the appropriate jacks.
No sound or distorted sound
• Make sure your player is connected properly. Make sure all cables are securely inserted into the appropriate jacks.
• You may need to readjust the Digital Output or Analog Ouqmt settings from the Sound menu (see chapter 5).
• Turn your TV to its Video Input Channel (see chapter 1),
• Sound is muted during still, frame advance, or slow-motion play.
•If you connected an audio or audio/video receiver to your DVD Player, make sure you chose the correct input setting
on the receiver.
• If you are NOT using a stereo TV for your sound source, turn off the TruSurround* option (from the Analog Ou_ut
menu or TS SURROUND button on front of DVD player).
74 Chapter 6
Other Information
Troubleshooting
Remote control won't work
•If you are using a universal remote, you might be in the wrong mode. To operate your DVD Player, press DVD on the
remote before you press any other buttons. If you're operating the TV, press the TV button first, etc.
• Insert new batteries in the remote.
• Operate the remote control at a distance of no more than 20 feet.
• Remove any obstacles between the remote and the DVD Player or other component. If your DVD Player is in an
entertainment cabinet, the glass doors may be obstructing the remote control from operating the unit. Open the doors.
• Reset the remote. Remove batteries and hold down one or more buttons for about one minute to drain the
microprocessor inside the remote to reset it. Reinstall batteries and try the remote again.
Can't advance through a movie
• You can't advance through the opening credits and warning information that appear at the beginning of movies
because the disc is programmed to prohibit that action.
The @icon appears on screen
• The feature or action cannot be completed at this time because:
1. The disc's software restricts it.
2. The disc's software doesn't support that feature (e.g., angles).
3. The feature is not available at the moment.
4. You've requested a title or chapter number that is out of range.
The picture is distorted
• Did you connect your VCR to the DVD Player? Disconnect it. See chapter 1 for the correct setup and connection.
• The disc might be damaged. Try another disc.
Picture is distorted during forward and reverse scan
• It is normal for some distortion to appear while scanning.
A screen saver appears on the TV
•Your player is equipped with a screen saver that appears on the TV after your player has been idle for several minutes.
Press STOP or GO BACK•AGAIN on the remote to make the screen saver disappear from the screen and return to the
player's main menu.
Subtitle and/or audio language is not the one selected from the initial setting
• If the subtitle and/or audio language does not exist on the disc, the initial settings will not be seen/heard. The disc's
priority language is selected instead. Set the subtitle and/or audio language manually through the Info Display or the
player menu.
The menu is displayed in a foreign language
• The Menu Language preference is set to that language. From the DVD player's main menu, selelct the Languages option
(In Spanish, shown as Idioma_, in French, as Langues). From the Languages menu, select the Player Menus option (In
Spanish, shown as Men_s del Lector,, in French, as Menus Lecteur). Highlight the language you prefer and press OK.
Chapter 6 75
Other Information
Troubleshooting
Play doesn't begin
• The rating of the title on the disc exceeds the rating limit set in the Ratings Limits when you press PLAY. Unlock the
player or change the rating limit in those menus.
No forward or reverse scan
• Some discs have sections that prohibit rapid scanning, or title and chapter skip.
• If you're trying to skip through the warning information and credits at the beginning of a movie, you won't be able to.
This part of the movie is often programmed to prohibit skipping through it.
Camera angle cannot be changed
• Some discs don't have the multi-camera angle system, and some discs only have it in certain parts of the movie.
Picture is too tall and thin
• Change the aspect ratio using the TVImage setting in the Display menu (see chapter 5).
Picture is too short and wide
• Change the aspect ratio using the TVImage setting in the Display menu (see chapter 5).
Cannot copy discs to video tape
• You can't record DVD discs onto videocassettes because the discs are encoded with anti-copy protection.
Disc tray won't open
• Disengage the retail lock feature. Press and hold a combination of buttons on the front panel at the same time. Press
and hold SKIP FWD, OPEN-CLOSE, and TS SURROUND for at least three seconds.
• Front Tray Lock feature of Lock menu is turned on. Unlock the player or turn Tray Lock feature off (see chapter 5).
Full Version of Disc Does Not Play
• If the DVD player is locked, the disc may have been edited using the Scene Snip feature. Unlock the player (see
chapter 5).
Forgot password
• Point the remote at the DVD player. Press and hold the STOP button on the front of the DVD Player and the STOP
button on the remote control at the same time (hold both buttons down at the same time for at least 3 seconds). The
player will unlock. Follow the instructions for locking your player and changing the password in Chapter 5.
Disc won't eject
• When you put a disc into the player, the player may take up to 15 seconds to read the disc. You won't be able to eject
the disc during this time. Wait 15 seconds and try again.
76 Chapter 6
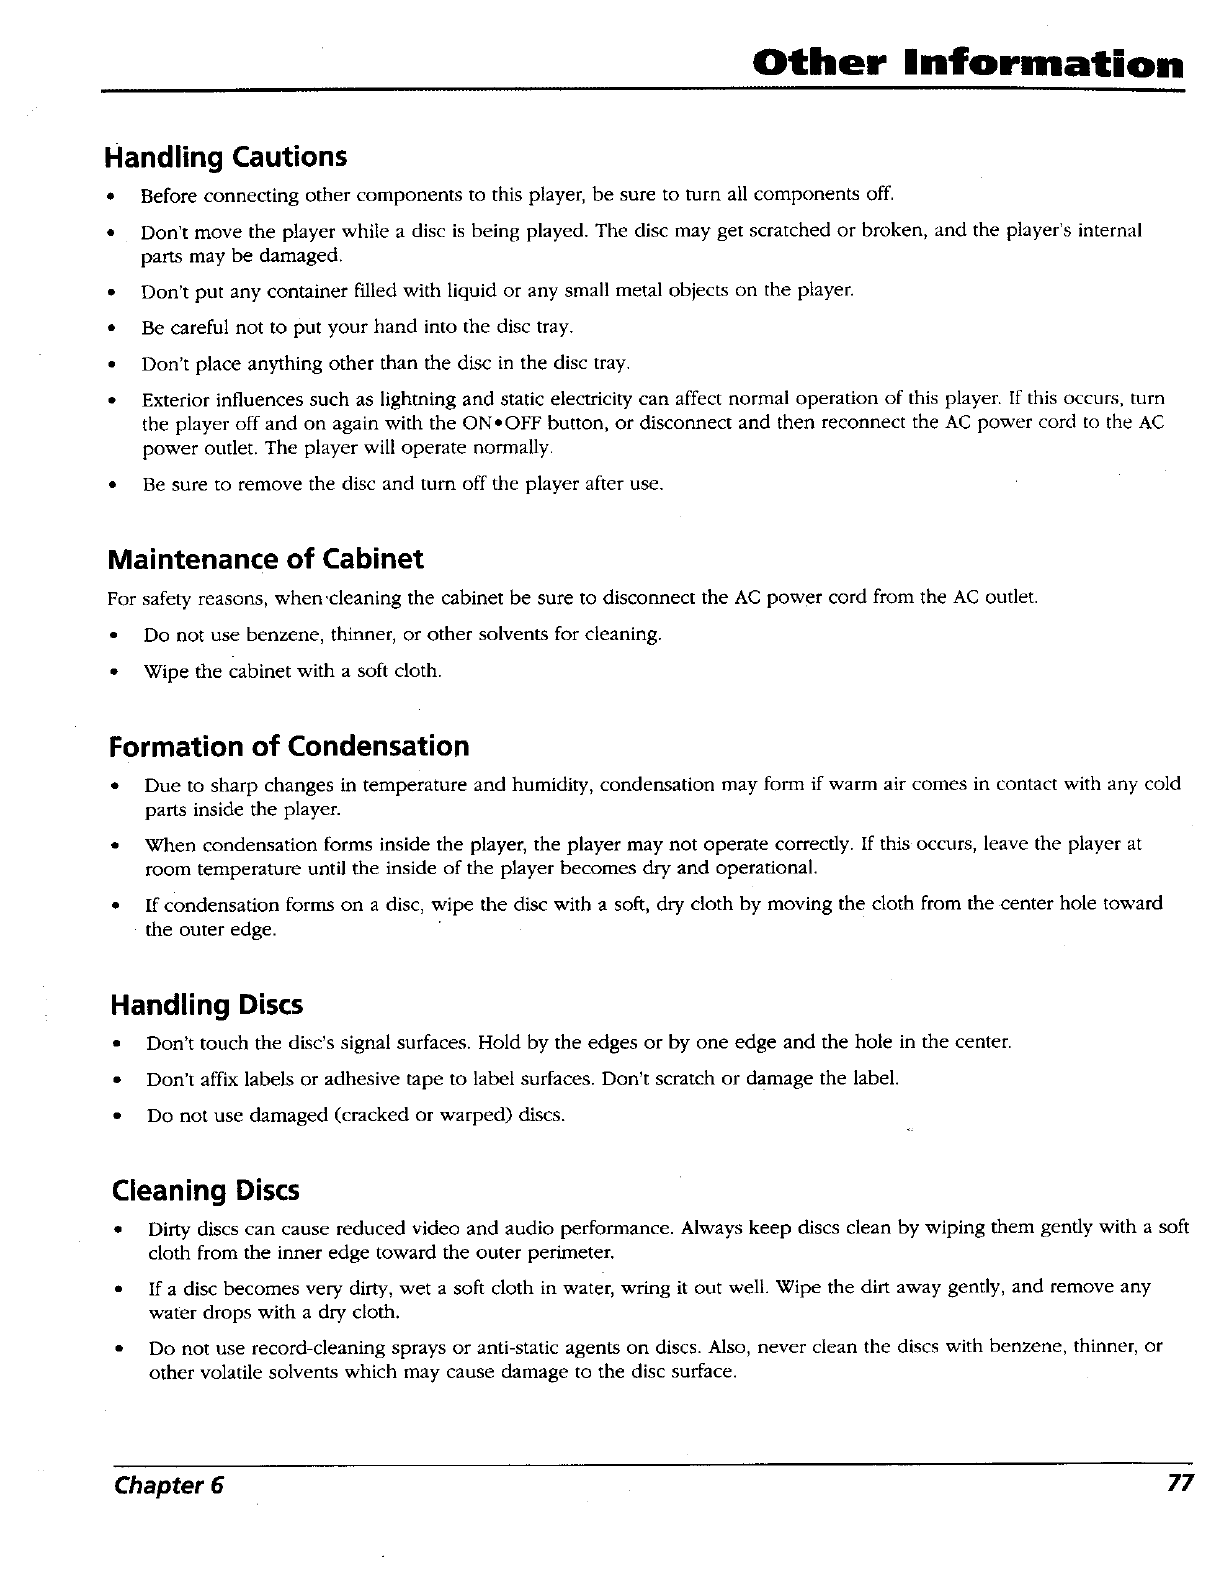
Other Information
Handling Cautions
• Before connecting other components to this player, be sure to turn all components off.
• Don't move the player while a disc is being played. The disc may get scratched or broken, and the player's internal
parts may be damaged.
• Don't put any container filled with liquid or any small metal objects on the player.
• Be careful not to put your hand into the disc tray.
• Don't place anything other than the disc in the disc tray.
• Exterior influences such as lightning and static electricity can affect normal operation of this player. If this occurs, turn
the player off and on again with the ON.OFF button, or disconnect and then reconnect the AC power cord to the AC
power outlet. The player will operate normally.
• Be sure to remove the disc and turn off the player after use.
Maintenance of Cabinet
For safety reasons, when'cleaning the cabinet be sure to disconnect the AC power cord from the AC outlet.
• Do not use benzene, thinner, or other solvents for cleaning.
• Wipe the cabinet with a soft cloth.
Formation of Condensation
Due to sharp changes in temperature and humidity, condensation may form if warm air comes in contact with any cold
parts inside the player.
When condensation forms inside the player, the player may not operate correctly. If this occurs, leave the player at
room temperature until the inside of the player becomes dry and operational.
If condensation forms on a disc, wipe the disc with a soft, dry cloth by moving the cloth from the center hole toward
the outer edge.
Handling Discs
• Don't touch the disc's signal surfaces. Hold by the edges or by one edge and the hole in the center.
• Don't affix labels or adhesive tape to label surfaces. Don't scratch or damage the label.
• Do not use damaged (cracked or warped) discs.
Cleaning Discs
• Dirty discs can cause reduced video and audio performance. Always keep discs clean by wiping them gently with a soft
cloth from the inner edge toward the outer perimeter.
• If a disc becomes very dirty, wet a soft doth in water, wring it out well. Wipe the dirt away gently, and remove any
water drops with a dry cloth.
• Do not use record-cleaning sprays or anti-static agents on discs. Also, never clean the discs with benzene, thinner, or
other volatile solvents which may cause damage to the disc surface.
Chapter 6 77
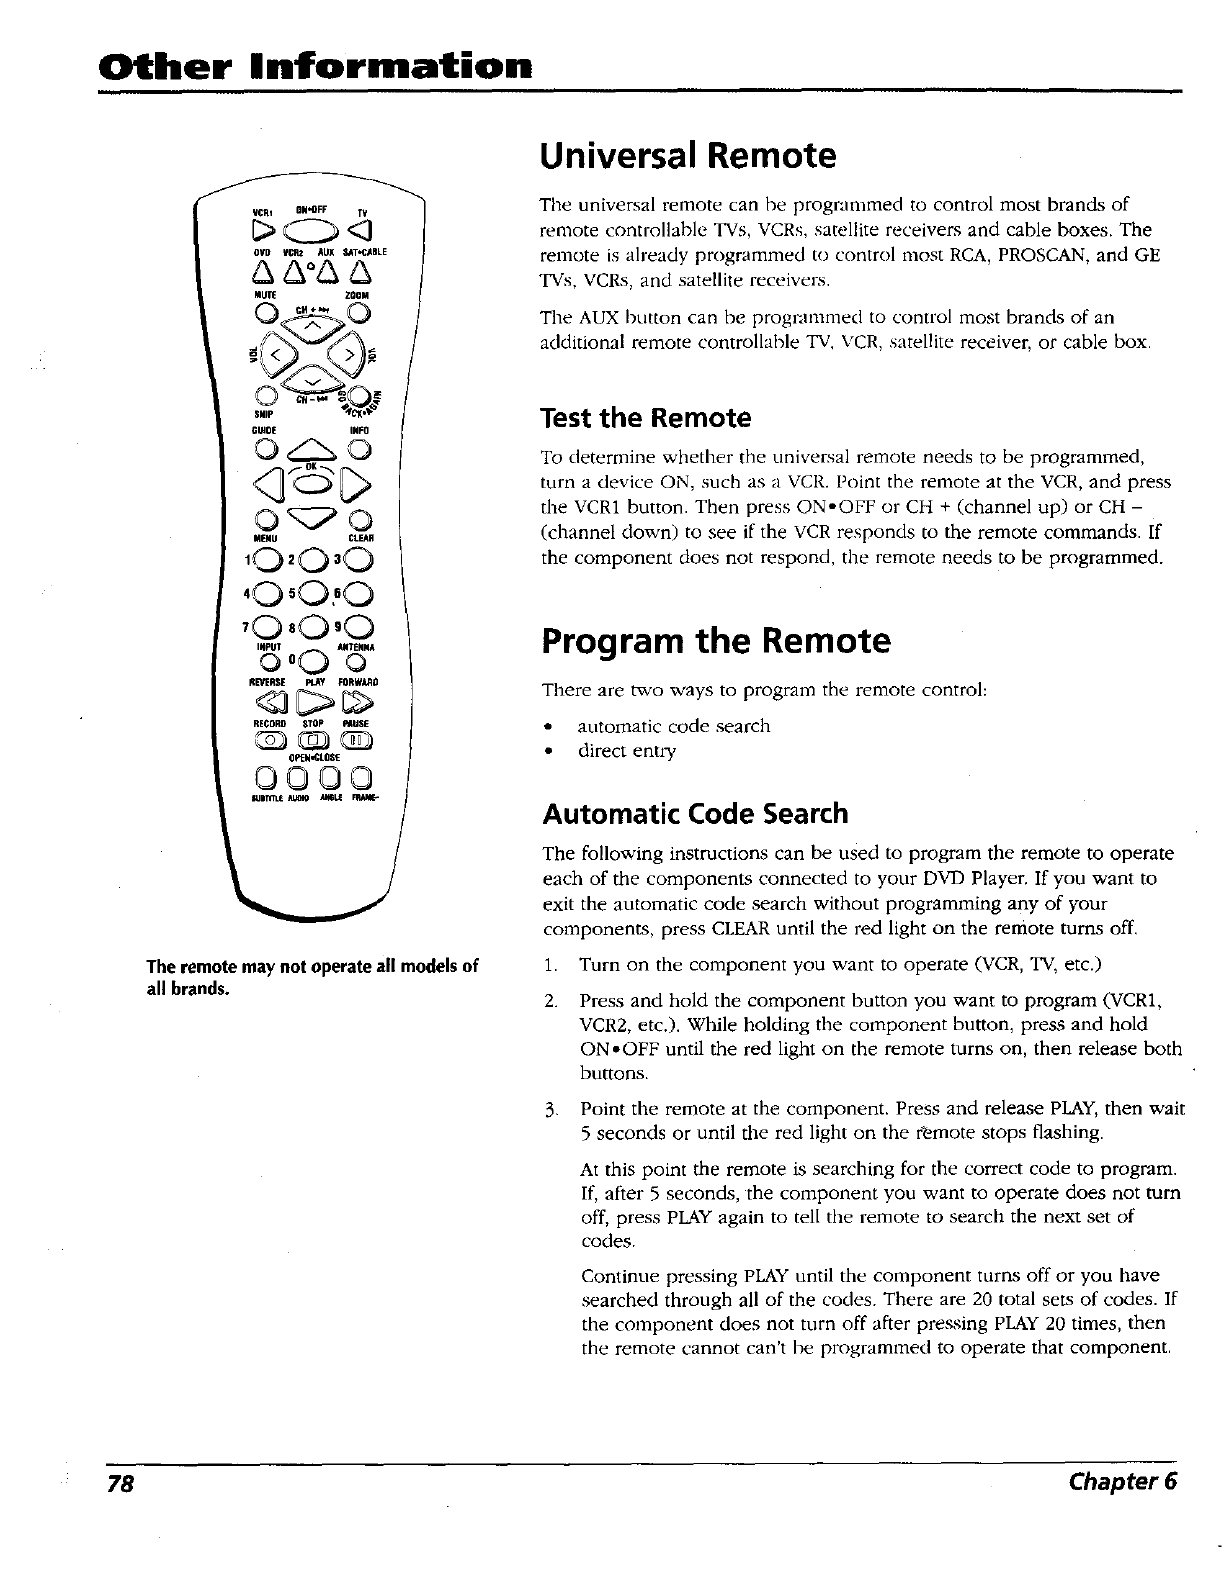
Other Information
GL_OE INl'O
MENU CLEAH
tO,O,O
,O O,°O
,0,0,0
RECDRD STOp FAUSE
OPEN.CLOSE
OOO©
WOT_tE _ _
Theremotemay notoperateall modelsof
all brands.
Universal Remote
The universal remote can he programmed to control most brands of
remote controllable TVs, VCRs, satellite receivers and cable boxes. The
remote is aheady programmed to control most RCA, PROSCAN, and GE
TVs, VCRs, and satellite receivers.
The AUX button can be programnled to control most brands of an
additional remote controllable TV. VCR, satellite receiver, or cable box.
Test the Remote
To determine whether the universal remote needs to be programmed,
turn a device ON, such as a VCR. Point the remote at the VCR, and press
the VCR1 button. Then press ON-OFF or CH + (channel up) or CH -
(channel down) to see if the VCR responds to the remote commands. If
the component does not respond, the remote needs to be programmed.
Program the Remote
There are two ways to program the remote control:
•automatic code search
• direct entry
Automatic Code Search
The following instmctions can be used to program the remote to operate
each of the components connected to your DVD Player. If you want to
exit the automatic code search without programming any of your
components, press CLEAR until the red light on the remote turns off.
1. Turn on the component you want to operate (VCR, TV, etc.)
2. Press and hold the component button you want to program (VCR1,
VCR2, etc.). While holding the component button, press and hold
ON-OFF until the red light on the remote turns on, then release both
buttons.
3. Point the remote at the component. Press and release PLAY, then wait
5 seconds or until the red light on the remote stops flashing.
At this point the remote is searching for the correct code to program.
If, after 5 seconds, the component you want to operate does not turn
off, press PLAY again to tell the remote to search the next set of
codes.
Continue pressing PLAY until the component turns off or you have
searched through all of the codes. There are 20 total sets of codes. If
the component does not turn off after pressing PLAY 20 times, then
the remote cannot can't be programmed to operate that component.
78 Chapter 6
Other Information
If the component you want to control does turn off:
1. Press and release REVERSE, then wait 2 seconds. Repeat this step until the device turns
back ON.
2. To finish, press and hold STOP until the red light on the remote turns off.
Direct Entry
1. Turn on the component to be programmed.
2. Look up the brand and code number(s) for the component on the code list in this
section.
3. Point the DVD Player's remote at the component.
4. Press and hold the component button on the remote you want to program.
5. Enter the code from the Remote Control code list on the following pages.
6. Release the component button, and then press ON-OFF to see if the component
responds to the command. If it doesn't, try pressing the component button and then
ON • OFF again.
7. If you get no response, repeat these steps using the next code listed for your brand,
until the component responds to the remote commands.
Important Tips!
You must continue pressing
the component button while
you enter the code.
Let's say you have a Zenith
T_ To program the universal
remote to operate the TV
you would:
Press and hold the TV button
while you enter the first
code listed for Zenith in the
TV Codes column.
Release the TV button. Press
ON, OFF to see if the 71/
responds. If it doesn't, follow
the same steps, but enter the
second code instead of the
first.
Operate Components after Programming the
Remote
Because this universal remote can control several different components (TV, DVD, VCR,
satellite receiver, etc.) it uses operational modes triggered by the component buttons. For
example if you want the remote to control the TV, you would press the TV button to put
the remote into TV mode before you could control the TV.
1. Press the appropriate component button (DVD, TV, VCR1, VCR2, SAT-CABLE, or AUX)
to set the remote to control the component.
2.
3.
Press ON-OFF to turn the component ON or OFF.
Use the remote buttons that apply to that component.
Note: This remote may not be compatible with all brands and models of
components.
Chapter 6 79
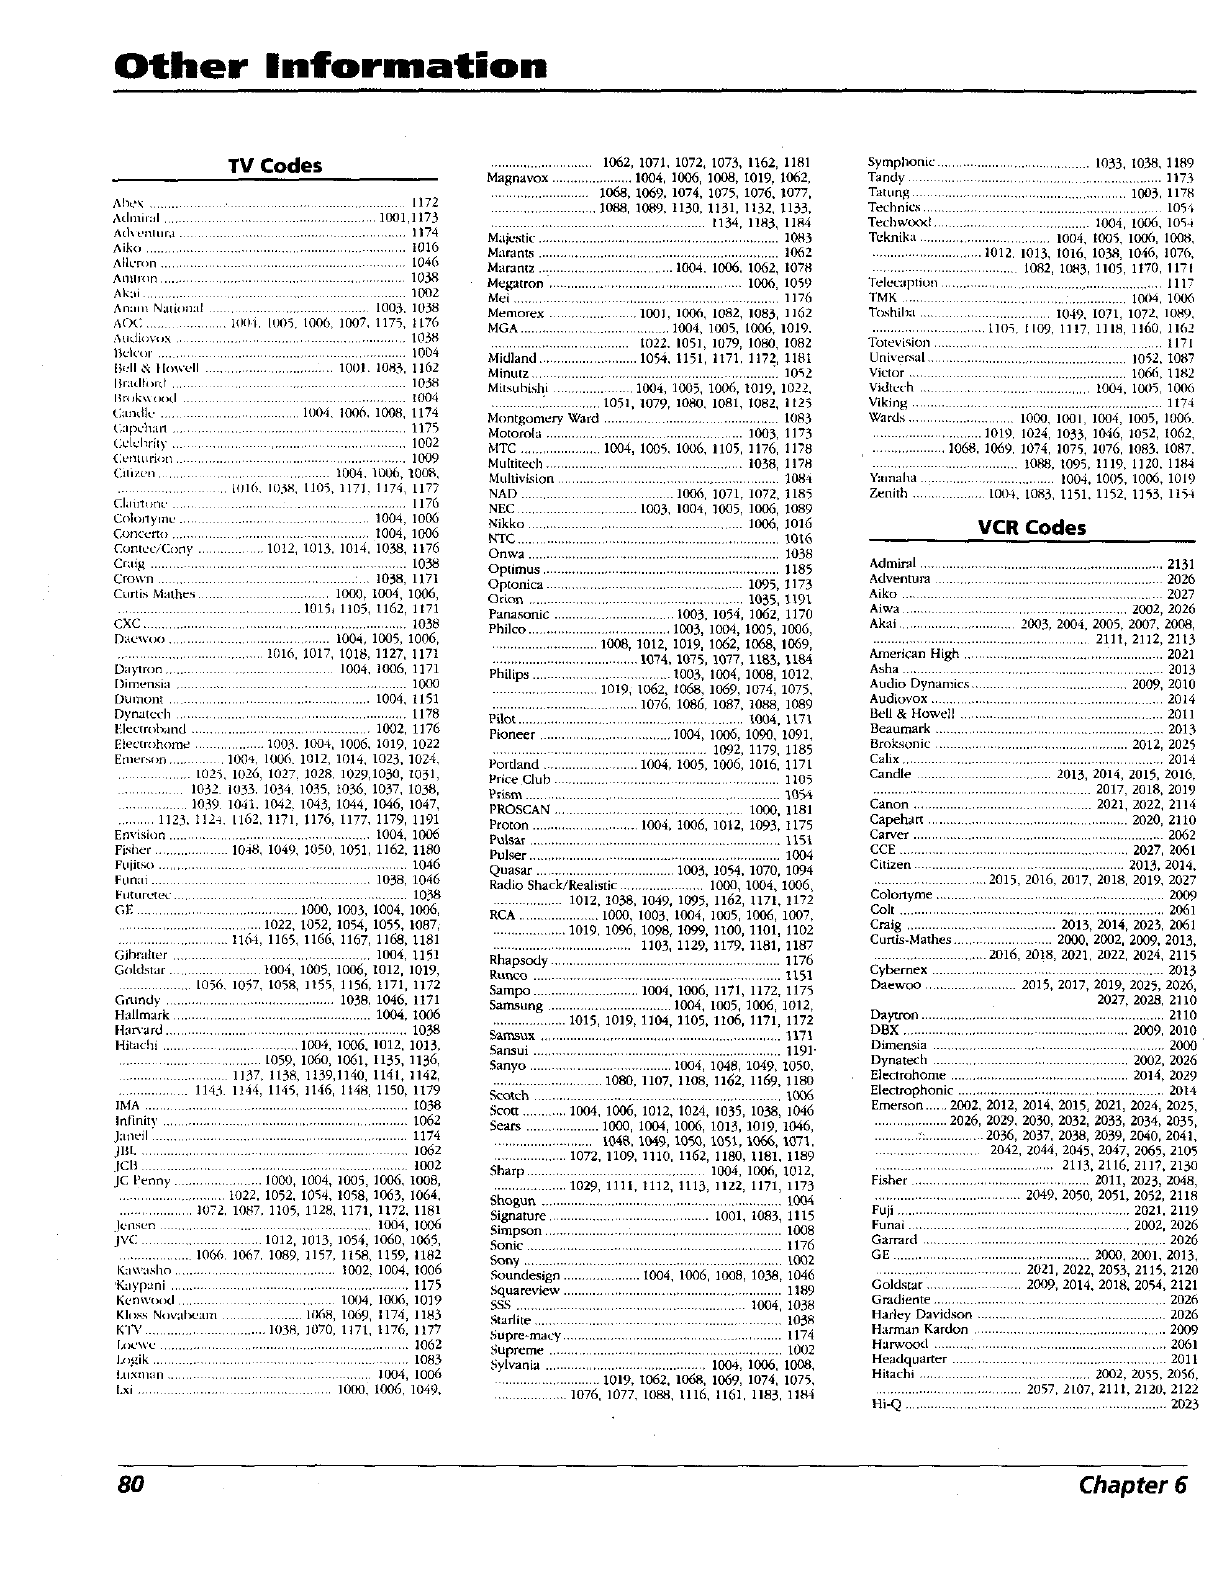
Other Information
TV Codes
Ahex ....................................................................... 1172
Admiral ....................................................... 1001,1173
Ad\ enlura ...................................................... 1174
Aiko ......................................................... 1016
Atlcron .......................................................... 1046
Amhxm .................................................... 1038
Akai .......................................................... 1002
Anam Na0onal ................................... 1003. 1038
AOC .............. I00i, 1005, 1006, 1007, 1175, 1176
Atldiow,x .......................................... 1038
Ilek'or ....................................................... 1004
Bell & Hnwell ............................. 1001 1083, 1162
IlradtoId ............................................ 1038
I_k_\ood ................................................ 1004
Candle ........................... 1004. 1006, 1008, 1174
Capcball ............................................ 1175
Cc/chrily ........................................ 1002
Centurion ................................................... 1009
Citizen .............................. 1004, 101X_,100P,,
................... i016, 1038, 1105, 1171, 1174, 1177
Claim>no ........................................... 1176
Cokmymc .................................... 1004, 1006
Concerto ............................................. 1004, 1006
Conmc/Cony ............. 1012, 1013, 1014, 1038, 1176
Craig .................................................................. 1038
Cro_ n ....................................................... 1038, 1171
Curtis Mathes ............................... 1000, 1004, 1006,
.......................................... 1015, 1105, 1162, 1171
CXC ................................................................. 1038
llaewoo ....................................... 1004, 1005, 1006,
.................................. !016, 1017, 1018, 1127, 1171
Datqron ..................................... 1004, 1006, 1171
I)imensia ......................................................... 1000
Dumont ........................................... 1004, 1151
Dynatcch ........................................................... 1178
Electroband ............................................. 1002, 1176
Etec0ohome ............... 1003. 1004, 1006, 1019, 1022
Emerson ........... 100_+, 1006 1012, 1014, 1023, 1024,
................. 1025. 1026, 1027. 1028, 1029,1030, 1031,
.............. 1032 1033. 1034. 1035, I036, 1037, 1038,
................. 1039 1041. 1042, 1043, 1044, 1046, 1047,
.......... 1123, 112_ 1162,1171, 1176, 1177, 1179, 1191
Er_vision ................................................. 1004, 1006
Fisher ............... 1048, 1049, 1050, 1051, 1162, 1180
Fuiitso ........................................................... 1046
F0nat ................................................... 1038, 1046
Fotttretec .......................................................... 10._5
GE ................................... 1000, 1003, 1004, 1006,
................................ 1022, 1052, 1054, 1055, 1087;
........................... 1164, 1165, 1166, 1167, 1168, 1181
GJbra0er ................................................... 1004, 1151
Go[dstar .................... 1004, 1005, 1006, 1012, 1019,
.................. 1056, 1057, 1058, 1155, 1156, 1171, 1172
Grundy .............................................. 1038, 1046, 1171
Hallmark ...................................................... 1004, 1006
Harvard ................................................................. 1038
HOachi .................................. 1004, 1006, 1012, 1013,
.................................. 1059, 1060, 1061, 1135, 1136,
........................... 1137, 1138, 1139,1140, 1141, 1142,
................... 1143 1144, 1145, 1146, 1148, 1150, 1179
IMA ............................................................... 1038
Infinity .............................................................. 1062
Janeil ............................................................. 1174
JBL .................................................................. 1062
.ICB ................................................................. 1002
JC penny ...................... 1000, 1004, 1005, 1006, 1008,
.......................... 1022, 1052, 1054, 1058, 1063, 1064.
................... 1072. 1087, 1105, 1128, 1171, 1172, 1181
Jcnsen ............................................ 1004, 1006
JVC .............................. 1012, 1013, 1054, 1060, 1065,
.................. 1066 1067. 1089, 1157, 1158, 1159, 1182
Kawasho ...................................... 1002, 1004, 1006
'Kaypani ....................................................... 1175
Kenwood ................................... 10114, 1006, 1019
Kloss Novalmam .............. 1¢K',8,1069, 1174, 1183
K'fV ....................... 1038, 1070, 1171, 1176, 1177
I,(x'\_ e .......................................................... 1062
la_Rik ................................................. 1083
LU XlUal] ............................................... 1004, 1006
Lxi ........................................ 1000, 1006, 1049,
............................ 1062, 1071, 1072, 1073, 1162, 1181
Magnavox ...................... 1004, 1006, 1008, I019, 1062,
........................... 1068, 1069. 1074, 1075, 1076. 1077,
............................. 10&8, 1089. 1130, 1131, 1132, 1133,
........................................................... 1134, 1183, 1184
Majestic .................................................................. 1083
Marants .................................................................. lob2
Marantz ..: ................................ 1004. 1006, 1062, 1078
Megatron .................................................... 1006 1059
Mei ..................................................................... 1176
Memorex ........................ 1001, 1006, 1082, 1083, 1162
MGA ....................................... 1004, 1005, 1006, 1019,
...................................... 1022. 1051, 1079, 1080. I082
Midland ........................... 1054. 1151, 1171. 1172, 118I
Minutz ................................................................... 1052
M0suhisbi ..................... 1004, 1005, 1006, 1019, 1022.
.............................. 1051, 1079, 1080. 1081, 1082, 1125
Montgomery Ward ................................................ 1083
Motorota ...................................................... 1003, 1173
MTC ...................... 1004, 1005, 10116. 1105, 1176, 1178
Muhitech .................................................. 1038, 1178
Muhivision ...................................................... 1084
NAD ..................................... 1006, 1071, 1072, 1185
NEC .............................. 1003. 100q, 1005, 1006, 1089
Nikko ........................................................... 1006, 1016
NTC ........................................................................ 1016
Onwa ..................................................................... 1038
Op0mus ................................................................. 1185
Optonica ...................................................... 1095, 1173
Orion ........................................................... 1035, 119l
Panasonic ................................. 1003. 1054, 1062, 1170
Philco ....................................... 1003, 1004, 1005, 1006,
............................. 1008, 1012, 1019, 1062, 1068, 1069,
........................................ 1074, 1075, 1077, 1183, 1184
Philips ...................................... 1003, 1004, 1008, 1012.
............................. 1019, 1062, 1068. 1069, 1074, 1075.
........................................ 1076, 1086. 1087, 1088, 1089
PilOt ............................................................ 1004, 1171
Pioneer ................................... 1004, 1006, 1090. 1091.
........................................................ 1092, 1179, 1185
Portland ......................... 1004, 1005, 1006, 1016, 1171
Price Club .............................................................. 1105
Prism ...................................................................... 1054,
PROSCAN .................................................... 1000, 1181
Proton ............................ 1004, 1006, 1012, 1093, 1175
Pulsar ..................................................................... 1151
PulSer ..................................................................... 1004
Quasar ...................................... 1003, 1054, 1070, 1094
Radio Shack/Realistic ....................... 1000, 1004, 1006,
................... 1012, 1038, 1049, 1095, 1162, 1171, 1172
RCA ...................... 10OO, 1003, 1004, 1005, 1006, 1007,
.................... 1019, 1096, 1098, 1099, 1100, 1101, 1102
...................................... 1103, 1129, 1179, 1181, 1187
Rhapsody ............................................................... 1176
Rul_co .................................................................... 1151
Sampo ............................. 1004, 1006, 1171, 1172, 1175
Samsung .................................. 1004, 1005, 1006, 1012,
.................... 1015, 1019, 1104, 1105, 1106, 1171, 1172
Samsux .................................................................. 1171
Sansui .................................................................... 1191.
Sanyo ...................................... 1004, 1048, 1049, 1050,
.............................. 1080, 1107, 1108, 1162, 1169, 1180
8cotcb ................................................................... 1006
Scott ............ 1004, 1006, 1012, 1024, 1035, 1038, 1046
Sears .................... 1000, 1004, 1006, 1013, 1019, 1046,
........................... 1048, 1049, 1050, 1051, 1066, 1071,
.................... 1072, 1109, 1110, 1162, 1180, 1181, 1189
Sharp .............................................. 1004, 1006, 1012,
.................... 1029, 1111. 1112, 1113, 1122, 1171, 1173
Shogun ............................................................... 1004
Signature ........................................... 1001, 1083, 1115
Simpson ....................... :........................................ 1008
8onic ...................................................................... 1176
Sc_y ....................................................................... 1002
Soundesign ..................... 1004. 1006, 1008, 1038, 1046
Squareview ............................................................ 1189
SSS .............................................................. 1004, 1038
Stadke ................................................................. 1038
Supre-macy ....................................................... 1174
Supreme ................................................................ 1002
Sylvania ............................................ 1004, 1006, 1008,
........................... 1019, I062, 1068, 1069, 1074, 1075.
................... 1076, 1077. 1088, 1116, 1161, 1183, 1184
Symphonic ....................................... 1033, 1038, 1189
Tandy .................................................................. 1173
Tatung ........................................................ 1003, 1178
Technics ............................................................. 1054
Techwo_×l ....................................... 1004, 1006, 105_
Teknika ................................. 1004, 1005, 1006, 1008,
.............................. 1012. 1013, 1016, 1038, 1046, 1076,
...................................... 1082, 1083, 1105, 1170, 1171
"Felt'caption .......................................................... 1117
TMK ...................................................... 10¢M, 100{i
Toshiha ................................ I049, 1071, 1072, 1089,
.......................... 110-5. 1109, 1117, 1118, 1160, 1162
Totevision ............................................................ 1171
Universal ...................................................... 1052, 1087
Victor ..................................................... 1066, 1182
Vidtcch ......................................... 1004, 1005, 10(R_
Viking ................................................................... 1174
Wards ............................ 1000, 1001, 1004, 1005, 1006.
........................... 1019. 1024, 1033, 1046, 1052, 1062,
, .................... 1068, 1069. 1074, 1075, 1076, 1083, 1087.
....................................... !088, 1095, 1119, 1120, 1184
Yamaba : ................................ 1004, 10115. 1006, 1019
Zenith .................... 1004, 1083, 1151, 1152, 1153, 1154
VCR Codes
Admiral ................................................................... 2131
Adventum ............................................................ 2026
Aiko ..................................................................... 2027
Aiwa ............................................................ 2002, 2026
Akai ................................ 2003, 2004, 2005, 2007, 2008,
......................................................... 2111,2112,2113
American High ...................................................... 2021
Asha ..................................................................... 2013
Audio Dynamics ........................................... 2009, 2010
Audiovox ............................................................. 2014
Bell & Howell ....................................................... 2011
Beaumark .............................................................. 2013
Broksonic .................................................. 2012, 2025
Calix ....................................................................... 2014
Candle ................................ 2013, 2014, 2015, 2016,
.......................................................... 2017, 2018, 2019
Canon ................................................ 2021, 2022, 2114
Capehart ..................................................... 2020, 2110
Carver ................................................................ 2062
CCE .............................................................. 2027, 2061
Citizen ......................................................... 2013, 2014,
............................... 2015, 2016, 2017, 2018, 2019, 2027
Colortyme ............................................................... 2009
Colt ....................................................................... 2061
Craig ......................................... 2013, 2014, 2023, 2061
CurOs-Mathes ........................... 2000, 2002, 2009, 2013,
............................... 2016, 20!8, 2021, 2022, 2024, 2115
Cybemex ................................................................ 2013
Daewoo ......................... 2015, 2017, 2019, 2025, 2026,
2027, 2028, 2110
Dayrron ................................................................... 2110
DBX ............................................................. 2009, 2010
Dimensia ................................................................ 2000
Dynatech ...................................................... 2002, 2026
Electrohome ................................................. 2014, 2029
ElecLrophonic ......................................................... 2014
Emerson.... 2002, 2012, 2014, 2015, 2021, 2024, 2025,
.................... 2026, 2029, 2030, 2032, 2033, 2034, 2035,
........... : ................ 2036, 2037, 2038, 2039, 2040, 2041,
............................ 2042, 2044, 2045, 2047, 2065, 2105
................................................ 2113,2116.2117,2130
Fisher ................................................ 201I, 2023, 2048,
....................................... 2049, 2050, 2051, 2052, 2118
Fuji .............................................................. 2021, 2119
Funai ............................................................. 2002, 2026
Garrard .................................................................. 2026
GE .................................................... 2000, 2001, 2013,
....................................... 2021, 2022, 2053, 2115, 2120
Gold.star .......................... 2009, 2014. 2018, 2054, 2121
Gradiente ............................................................. 2026
Harley Davidson ................................................. 2026
Harman Kardon ................................................. 2009
Harwood .............................................................. 2061
Headquarter ......................................................... 2011
Hitachi ............................................... 2002, 2055, 2056,
........................................ 2057, 2107, 2111, 2120. 2122
Hi-Q .................................................................... 2023
80 Chapter 6
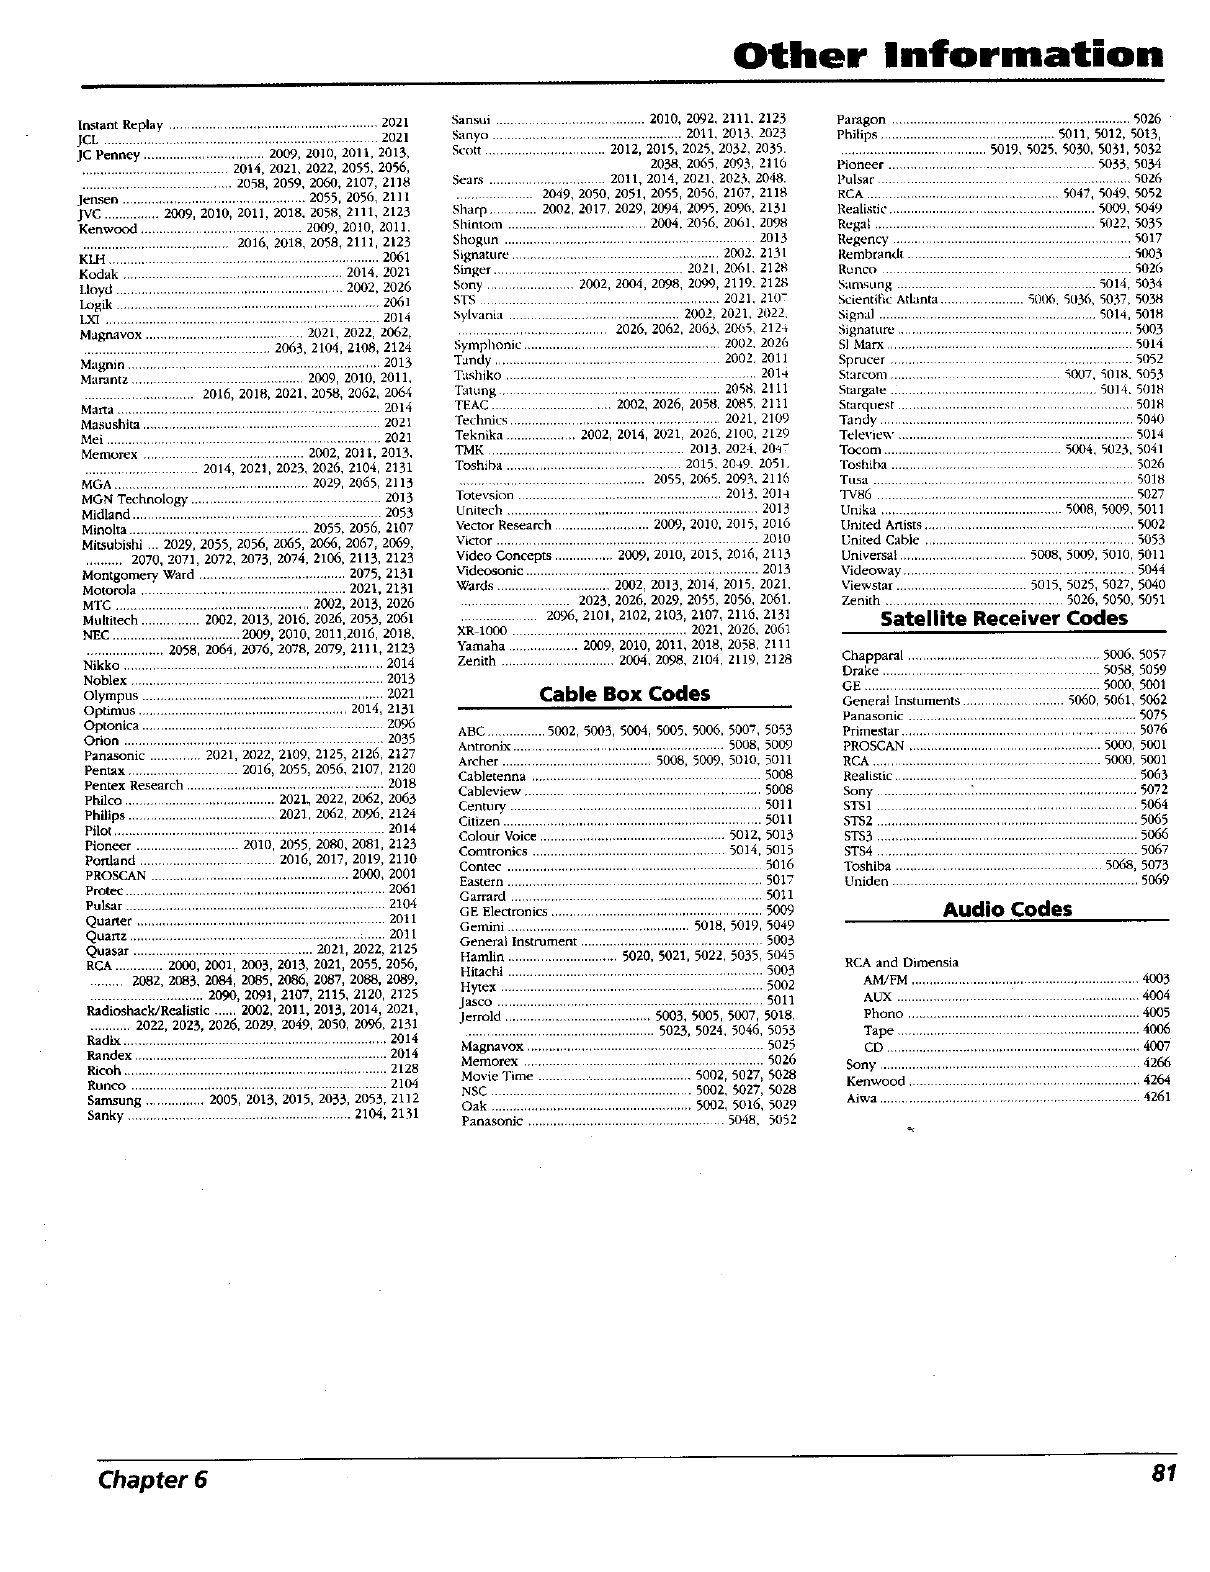
Other Information
Instant Replay ......................................................... 2021
JCL ........................................................................... 2021
JC Penney ................................. 2009, 2010, 2011, 2013,
........................................ 2014, 2021, 2022, 2055, 2056,
......................................... 2058, 2059, 2060, 2107, 2118
Jensen ................................................. 2055, 2056, 2111
JVC ............... 2009, 2010, 2011, 2018. 2058, 2111, 2123
Kenwood ............................................ 2009, 2010, 2011.
........................................ 2016, 2018, 2058, 2111, 2123
KLH ........................................................................ 2061
Kodak ......................................................... 2014. 2021
Lloyd ............................................................. 2002, 2026
Logik ....................................................................... 2061
LXI ...................................................................... 2014
Magnavox ........................................... 2021, 2022, 2062,
................................................... 2063, 2104, 2108, 2124
Magmn ..................................................................... 2013
Marantz ............................................... 2009, 2010, 2011,
.............................. 2016, 2018, 2021, 2058, 2062, 2064
Maria .................................................................... 2014
Masushita ................................................................. 2021
Mei ........................................................................ 2021
Memorex ............................................ 2002, 2011, 2013,
............................. 2014, 2021, 2023, 2026, 2104, 2131
MGA .................................................... 2029, 2065, 2113
MGN Technology .................................................... 2013
Midland .................................................................... 2053
Minolta ................................................. 2055, 2056, 2107
Mitsubishi ... 2029, 2055, 2056, 2065, 2066, 2067, 2069,
.......... 2070, 2071, 2072, 2073, 2074, 2106, 2113, 2123
Montgomery Ward ....................................... 2075, 2131
Motorola ........................................................ 2021, 2131
MTC ..................................................... 2002, 2013, 2026
MuhOech ................ 2002, 2013, 2016, 2026, 2053, 2061
NRC ................................... 2009, 2010, 2011,2016, 2018,
..................... 2058, 2064, 2076,2078, 2079, 2111, 2123
Nikko ..................................................................... 2014
Noblex ..................................................................... 2013
Olympus .................................................................. 2021
Optimus ......................................................... 2014, 2131
Optonica .................................................................. 2096
Orion ....................................................................... 2035
Panasonic .............. 2021, 2022, 2109, 2125, 2126, 2127
Pentax .............................. 2016, 2055, 2056. 2107, 2120
Pentex Research ..................................................... 2018
Philco ......................................... 2021. 2022, 2062, 2063
Philips ........................................ 2021, 2062, 2096. 2124
Pilot .......................................................................... 2014
Pioneer ............................ 2010, 2055, 2080, 2081, 2123
Portland ..................................... 2016, 2017, 2019, 2110
PROSCAN ...................................................... 20(RJ+2001
Prote¢. ....................................................................... 2061
Pulsar ....................................................................... 2104
Quarter .................................................................... 2011
Quartz ............................................................... : ..... 2011
Quasar ................................................. 2021, 2022, 2125
RCA ............. 2000, 2001, 2003, 2013, 2021, 2055, 2056,
......... 2082, 2083, 2084, 2085, 20_6, 2087, 2088, 2089,
............................... 2090, 2091, 2107, 2115, 2120, 2125
Radioshack/Realistie ...... 2002, 2011, 2013, 2014, 2021,
........... 2022, 2023, 2026, 2029, 2049, 2050, 2096. 2131
Radix ........................................................................ 2014
Randex ..................................................................... 2014
Ricoh ........................................................................ 2128
Runco ...................................................................... 2104
Samsung ................ 2005, 2013, 2015, 2033, 2053. 2112
Sanky ............................................................. 2104, 2131
Sansui ........................................ 2010, 2092, 2111. 2123
Sanyo .................................................. 2011, 2013. 2023
Scott ................................ 2012, 2015, 2025. 2032. 2035.
2038, 2065, 2093, 2116
Sears ............................... 2011, 2014. 2021, 2023, 2048.
................. 2049, 2050. 2051, 2055, 2056, 2107, 2118
Sbarp ............. 2002, 2017, 2029, 2094, 2095. 2090. 2131
Shintom ..................................... 2004. 2056. 2001. 2098
Shogun ..................................................................... 2013
Signature ........................................................ 2002, 2131
Singer .................................................... 2021, 2001. 2128
Sony ........................ 2002, 2004, 2098, 2099, 2110. 2128
STS .................................................................. 2021, 210-
Sylvania .............................................. 2002. 2021, 2022
................................. 2026, 2062, 2003, 2065, 2124
Symphonic ...................................................... 2002. 2026
Tandy ............................................................. 2002. 2011
Tashiko ............................................................ 2014
Tatung .......................................................... 2058, 2111
TEAC ................................ 2002, 2026, 2058. 2085. 2111
Technics ...................................................... 2021, 2109
Teknika ................... 2002, 2014, 2021, 2026, 2100, 2129
TMK ...................................................... 2013, 2024, 20q7
Toshiba ................................................ 2015, 20-,9. 2051,
................................................ 2055, 2005, 2093. 21!6
Totevsion ....................................................... 2013. 201-I
Unitech ..................................................................... 2013
Vector Research .......................... 2009, 2010, 2015, 2016
Victor ...................................................................... 2010
Video Concepts ................ 2009, 2010, 2015, 2016, 2113
Videosonic ............................................................... 2013
Wards ............................... 2002, 2013, 2014, 2015. 2021.
.............................. 2023, 2026, 2029, 2055, 2056, 2061.
..................... 2096, 2101, 2102, 2103, 2107, 2116. 2131
XR 1000 ................................................ 2021, 2026. 2061
Yamaha ................... 2009, 2010, 2011, 2018, 2058. 2111
Zenith ............................. 2004, 2098, 2104, 2119, 2128
Cable Box Codes
ABC ................ 5002, 5003, 5004, 5005. 5006, 5007, 5053
Antronix ...................................................... 5008, 5009
Archer ......................................... 5008, 5009, 50t0. 5011
Cabletenna ............................................................... 5008
Cableview ............................................................. 5008
Century ..................................................................... 5011
Citizen ....................................................................... 5011
Colour Voice .................................................. 5012, 5013
Comtronics ..................................................... 5014, 5015
Contec ...................................................................... 5016
Eastern ...................................................................... 5017
Garrard ..................................................................... 5011
GE Electronics .......................................................... 5009
Gemini .................................................. 5018, 5019, 5049
General Instr0ment .................................................. 5003
Hamlin .............................. 5020, 5021, 5022, 5035, 5045
Hitachi ...................................................................... 5003
Hytex ....................................................................... 5002
Jasco ......................................................................... 5011
Jerrold ........................................ 5003, 5005, 5007, 5018,
................................................... 5023, 5024, 5046, 5053
Magnavox ................................................................. 5025
Memorex .................................................................. 5026
Movie Time .............. ............................ 5002, 5027, 502g
NSC ....................................................... 5002, 5027, 5028
Oak ....................................................... 5002, 5016, 5029
Panasonic ...................................................... 5048. 5052
Paragon .................................................................. 5026
Philips ................................................ 5011, 5012, 5013,
..................................... 5019, 5025, 5030, 5031, 5032
Pioneer ........................................................ 5033, 5034
Pulsar ..................................................................... 5026
RCA .................................................. 5047, 5049, 5052
Realistic ...................................................... 5009. 5049
Regal ........................................................... 5022, 5035
Regency ................................................................. 5017
Rembrandt .............................................................. 5003
Runco .................................................................... 5026
Samsung ................................................... 5014. 5034
Scien0hc Adanta ....................... 50(R'l, 5036, 5037, 5038
Signal .......................................................... 5014, 5018
Signature ..................................................... 5003
SI Marx ............................................................ 5014
Sprucer ......................................................... 5052
Starcom ......................................... 5007, 501g. 5053
Stargate ......................................................... 5(114, 5010
Starquest ................................................................. 5018
Tandy .............................................................. 5040
Televie_ ................................................... 5014
Toeom ................................................ 5004, 5023, 5041
Toshiba ............................................................. 5026
Tusa ................................................................... 5018
TV86 ................................................................... 5027
Unika .............................................. 5008, 5009. 5011
United Artists ....................................................... 5002
United Cable ......................................................... 5053
Universal ................................... 5008, 5009, 5010, 5011
Videoway ............................................................. 5044
Viewstar .................................... 5015. 5025, 5027, 5040
Zenith ................................................ 5026, 5050, 5051
Satellite Receiver Codes
Chappaml .................................................. 5006, 5057
Drake .......................................................... 5058, 5059
GE ................................................................. 50(30, 5001
General Instuments ........................... 5060, 5061. 5062
Panasonic ............................................................... 5075
Primestar ................................................................. 5076
PROSCAN ..................................................... 5000, 5001
RCA ........................................................ 5000. 5001
Realistic ............................................................... 5063
Sony .......................... _............................................. 5072
STSl .................................................................... 5064
STS2 ........................................................................ 5065
STS3 .................................................................... 5O66
STS4 ...................................................................... 5067
Toshiba ......................................................... 5068, 5073
Uniden .................................................................... 5069
Audio Codes
RCA and Dimensia
AM!FM ............................................................. 4003
ALTX ................................................................... 4004
Phono ................................................................ 4005
Tape .............................................................. 4006
CD ...................................................................... 4007
Sony ........................................................................ 4266
Kenwood ................................................................ 4264
Aiwa ....................................................................... 4261
Chapter 6 81
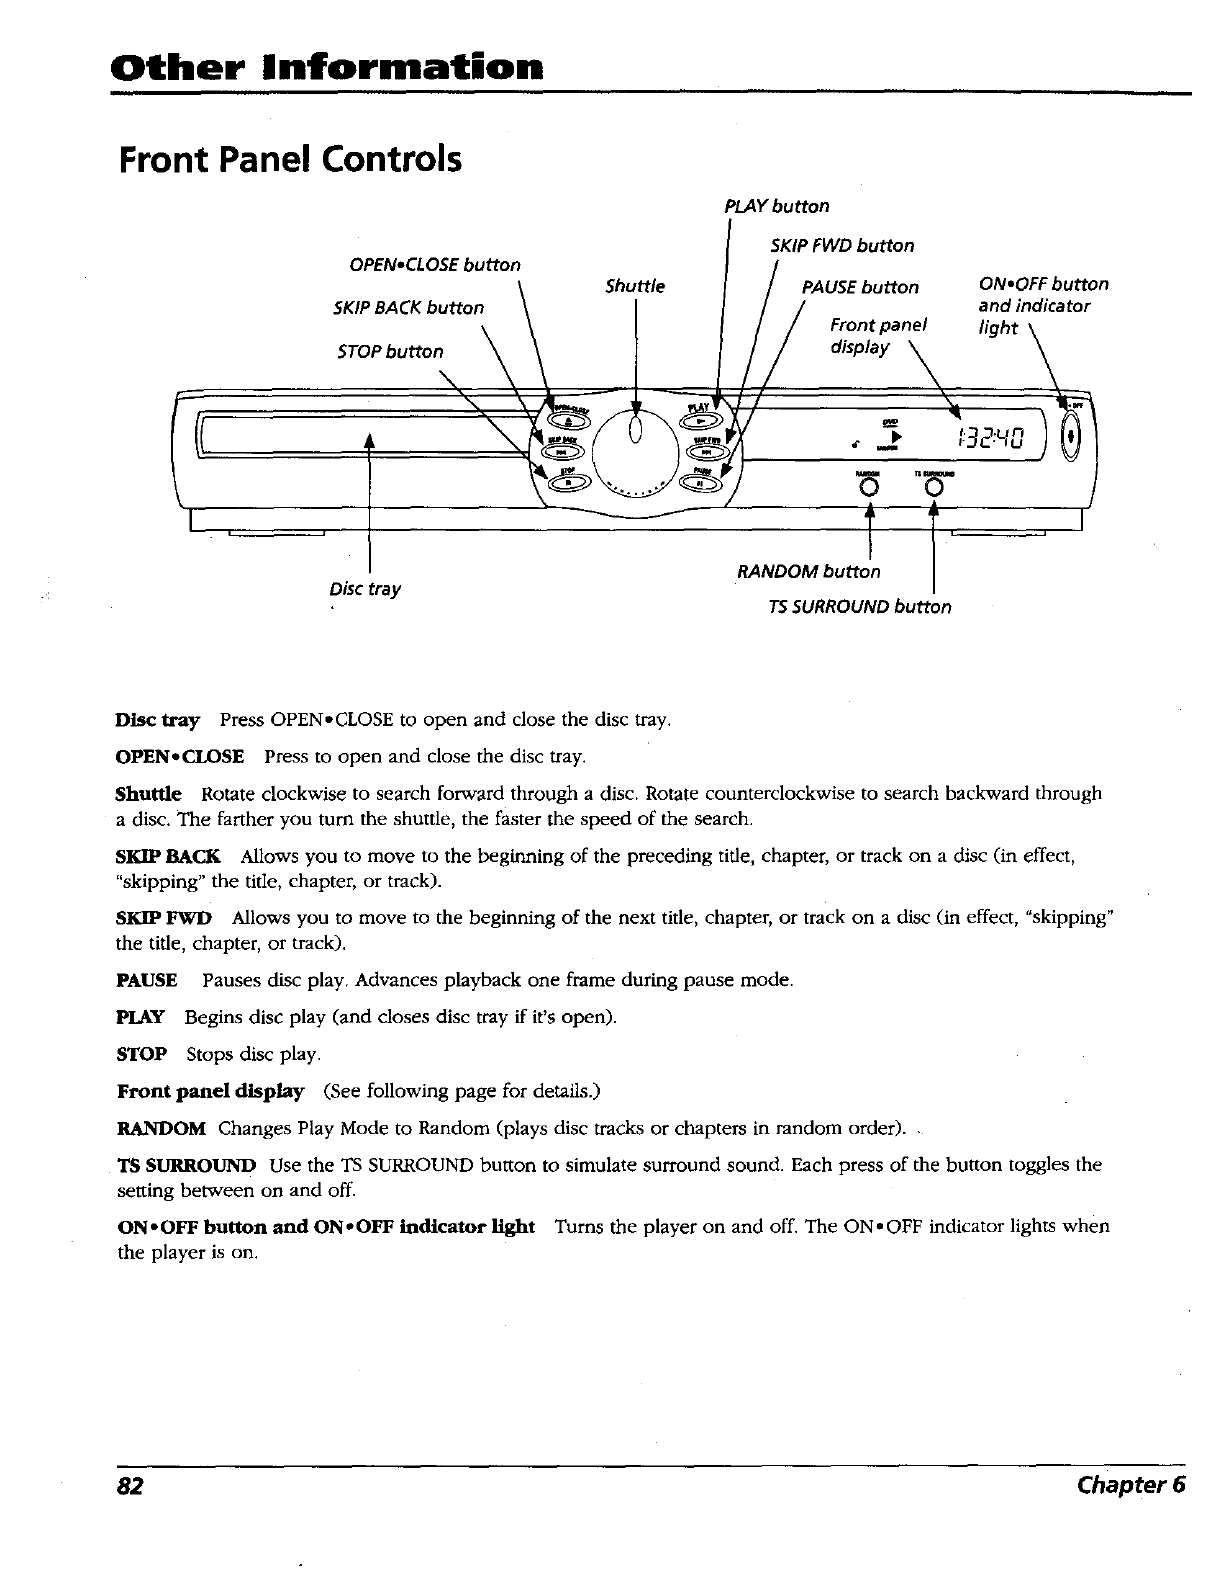
Other Information
Front Panel Controls
PLAY button
Dbc tray
OPEN*CLOSEbutton / jKIP FWD button
Shuttle PAUSEbutton ON*OFFbutton
SKIPBACKbutton _/ / and indicator
\[} // Frontpanel light \
JOT---
RANDOMbu
"ISSURROUNDbutton
DI_ tray Press OPEN*CLOSE to open and close the disc tray.
OPEN*CLOSE Press to open and close the disc tray.
Shuttle Rotate clockwise to search forward through a disc. Rotate counterclockwise to search backward through
a disc. The farther you turn the shuttle, the faster the speed of the search.
SKIP BACK Allows you to move to the beginning of the preceding title, chapter, or track on a disc (in effect,
"skipping" the title, chapter, or track).
SKIP FWD Allows you to move to the beginning of the next title, chapter, or track on a disc (in effect, "skipping"
the title, chapter, or track).
PAUSE Pauses disc play. Advances playback one frame during pause mode.
PLAY Begins disc play (and closes disc tray ff it's open).
STOP Stops disc play.
Front panel display (See following page for details.)
RANDOM Changes Play Mode to Random (plays disc tracks or chapters in random order)..
'IS SURROUND Use the 'IS SURROUND button to simulate surround sound. Each press of the button toggles the
setting between on and off.
ON-OFF button and ON*OFF Indicator light Turns the player on and off. The ON.OFF indicator lights when
the player is on.
82 Chapter 6
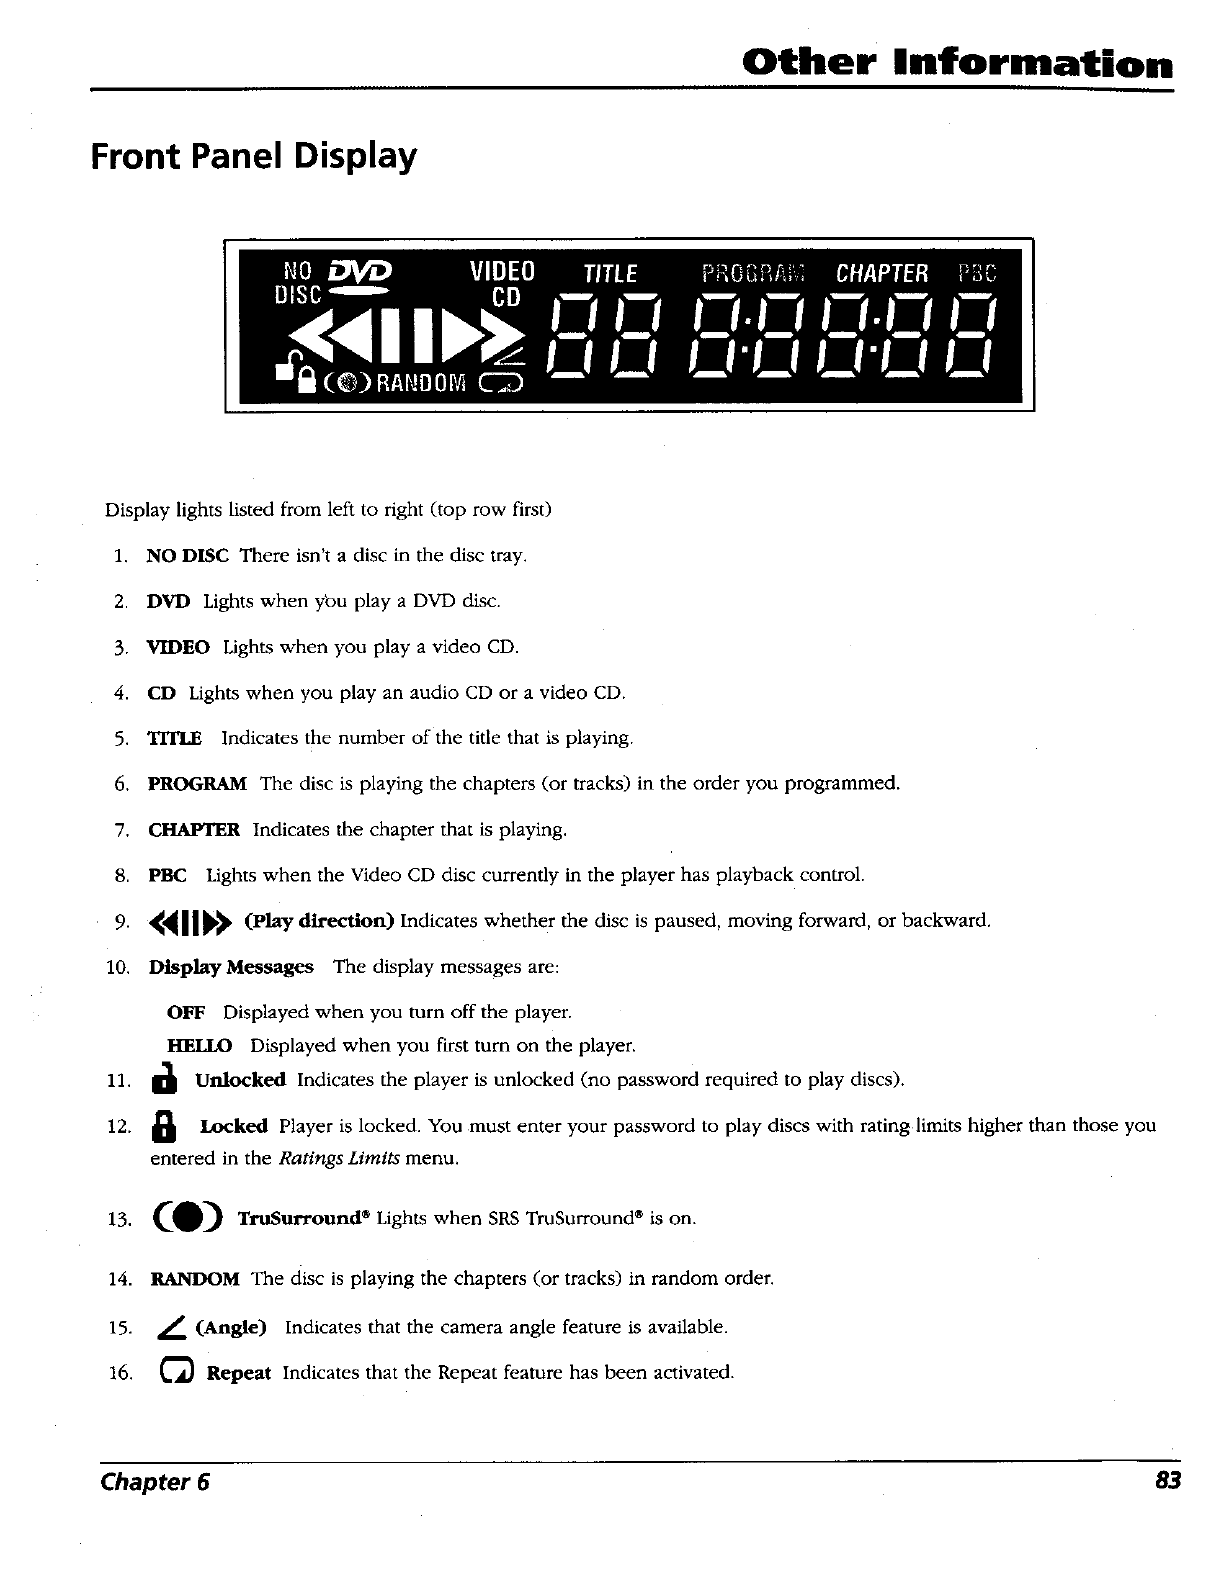
Other Information
Front Panel Display
Display lights listed from left to right (top row first)
1. NO DISC There isn't a disc in the disc tray.
2. DVD Lights when you play a DVD disc.
3. VIDEO Lights when you play a video CD.
4. CD Lights when you play an audio CD or a video CD.
5. TITLE Indicates the number of the title that is playing.
6. PROGRAM The disc is playing the chapters (or tracks) in the order you programmed.
7. CHAPTER Indicates the chapter that is playing.
8. PBC Lights when the Video CD disc currently in the player has playback control.
9. _'_]]_ (Play direction) Indicates whether the disc is paused, moving forward, or backward.
10. Display Messages The display messages are:
OFF Displayed when you turn off the player.
HELLO Displayed when you first turn on the player.
11. dUnlocked Indicates the player is unlocked (no password required to play discs).
12. _ Locked Player is locked. You must enter your password to play discs with rating limits higher than those you
entered in the Ratings Limits menu.
13. (O) TruSurr°und® Lights when SRS TmSurround ®is on.
14. RANDOM The disc is playing the chapters (or tracks) in random order.
15. L (Angle) Indicates that the camera angle feature is available.
16. _ Repeat Indicates that the Repeat feature has been activated.
Chapter 6 83
Other Information
Limited Warranty RCA Digital Video Disc (DVD) Player
What your warranty covers:
• Any defect in materials or workmanship.
For how long after your purchase:
• 90 days - Unit exchange, which includes parts and labor.
• 91 days to 1 year - Unit exchange, which includes parts only; you pay the labor.
• The warranty for rental units begins with the first rental or 45 days from date of shipment to the rental firm,
whichever comes first.
What we will do:
During the initial 90 days:
Exchange the DVD unit with a new or, at our option, refurbished unit.
After the 90 days and within one year:
Exchange the DVD unit with a new or, at our option, refurbished unit. We will bill you a flat exchange
charge to replace a defective unit. This charge covers the labor cost for its repair.
How you get service:
• Call 1-800-311-9263 and have your unit's date of purchase and model/serial number ready. The model/serial
number information is on the back of your unit.
• A representative will troubleshoot your problem over the phone.
• If the representative determines that you should receive a replacement unit you will be provided with a
Return Authorization (RA) number and the location of a nearby exchange point if one exists. No returns will
be accepted without the RA number.
To receive a replacement unit before you return yours:
Option h
1. Provide your Discover, Mastercard or Visa account number and expiration date to your phone representative.
This is for security purposes only and your account will not be charged at this time.
2. We will send you a replacement unit.
3. If you return the unit to us within 14 days from the date you were provided a RA number, only items not
covered by warranty will be charged to your account. If your unit is not received within 14 days, the
suggested retail value of the receiver will be charged to your credit card. This amount will be credited, less a
$10 handling fee, if the unit is subsequently received.
4. Ship your defective unit back to us using the replacement unit's carton. Shipping instmclions will be
included on the carton along with your RA number which will allow you to easily ship the unit back to us.
Make sure you insure your shipment in case of damage or loss. Include with the shipment:
• Evidence of purchase date such as a bill of sale.
• A brief note describing your unit's problem.
• Your name, address and phone number.
84 Chapter 6
Other Information
Option Ih
1. We will send a replacement unit to our exchange point.
2. The exchange location will notify you of its arrival.
3. Take your unit and evidence of purchase date, such as a bill of sale, to the exchange location and you will be
provided the new or refurbished unit. Please retain all accessories such as the remote control hand unit.
4. If the repairs are covered by your warranty, you will not be billed.
Thomson assumes no responsibility for warranty shipments from the customer to the factory if not
shipped in the manner prescribed by Thomson.
Return transportation, storage, handling and insurance costs are your responsibility. We accept no
responsibility in case of damage or loss.
To receive a replacement unit after we have received your unit:
• Write the RA number on the outside of the carton used to return the unit. Make sure you insure your shipnmnt
in case of damage or loss.
• Carefully pack the unit using the original box and packing material if possible. Please retain all accessories that
were included with your unit such as the remote control hand unit.
,, Include with the shipment:
1. Evidence of purchase date, such as a bill of sale, to verify your unit's warranty eligibility.
2. A brief note describing your unit's problem.
3. Your name, address and phone number.
• The representative will advise the address to mail a cashier's check or money order for payment if there are
any out of warranty labor or parts charges, and you elect not to use your credit card.
• After we receive your product, a new or refurbished unit will be shipped to you.
What your warranty does not cover:
• Acts of God, such as but not limited to lightning damage.
• Adjustment of customer controls.
• Damage from misuse or neglect.
• A unit that has been modified or incorporated into other products or is used for institutional or other
commercial purposes.
• Batteries.
• Units purchased or serviced outside the U.S.A.
• Shipping damage if the unit was not packed and shipped in the manner prescribed by Thomson.
• Storage fees may be charged by the exchange point if you fail to pickup the replacement unit in a timely
manner.
Product Registration:
• Please complete and mail the Product Registration Card packed with your DVD product. It will make it easier
to contact you should it ever be necessary. The return of the card is not required for warranty coverage.
How state law relates to warranty:
• This warranty gives you specific legal rights and you may have other rights that vary from state to state.
If you purchased your product outside the United States:
• This warranty does not apply. See your dealer for warranty information.
Chapter 6 85

This page left intentionally blank.
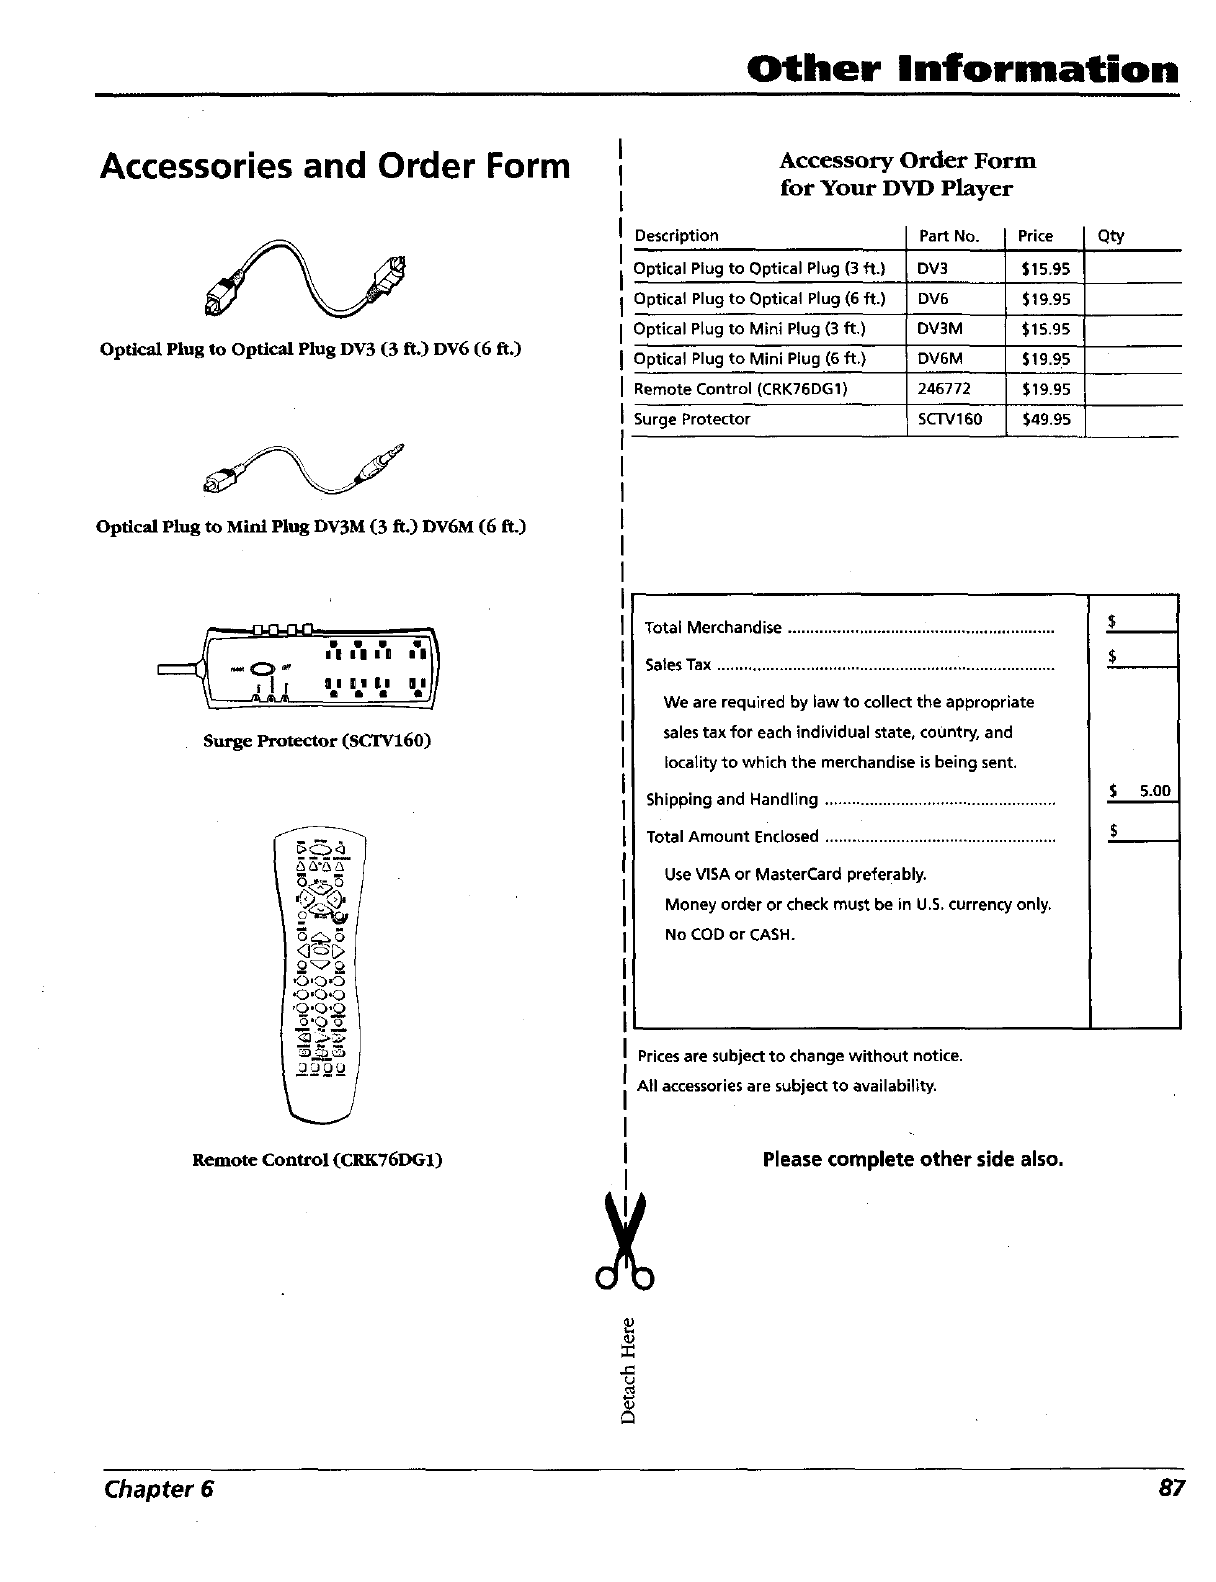
Other Information
Accessories and Order Form
Optical Plug to Optical Plug DV3 (3 ft.) DV6 (6 ft.)
Optical Plug to Mini Plug DV3M (3 ft.) DV6M (6 ft.)
|1 |1 |l Ill_
Surge Protector (SCTV160)
&&o_&
;'C)"
_210
Remote Control (CRK76DG1)
Accessory Order Form
for Your DVD Player
Description
Optical Plug to Optical Plug (3 ft.)
Optical Plug to Optical Plug (6 ft.)
Optical Plug to Mini Plug (3 ft.)
Optical Plug to Mini Plug (6 ft.)
Remote Control (CRK76DG1)
Surge Protector
Part No.
DV3 $15.95
DV6 $19.95
DV3M $15.95
DV6M $19.95
246772 $19.95
SCTV160 $49.95
Total Merchandise ............................................................
SaMsTax ............................................................................
We are required by law to collect the appropriate
sales tax for each individual state, country, and
locality to which the merchandise is being sent.
Shipping and Handling ....................................................
Total Amount Enclosed ....................................................
Use VISA or MasterCard preferably.
Money order or check must be in U.S. currency only.
No COD or CASH.
Prices are subject to change without notice.
All accessories are subject to availability.
v
_J
Please complete other side also.
Qty
$
$
$5.00
$
Chapter 6 87
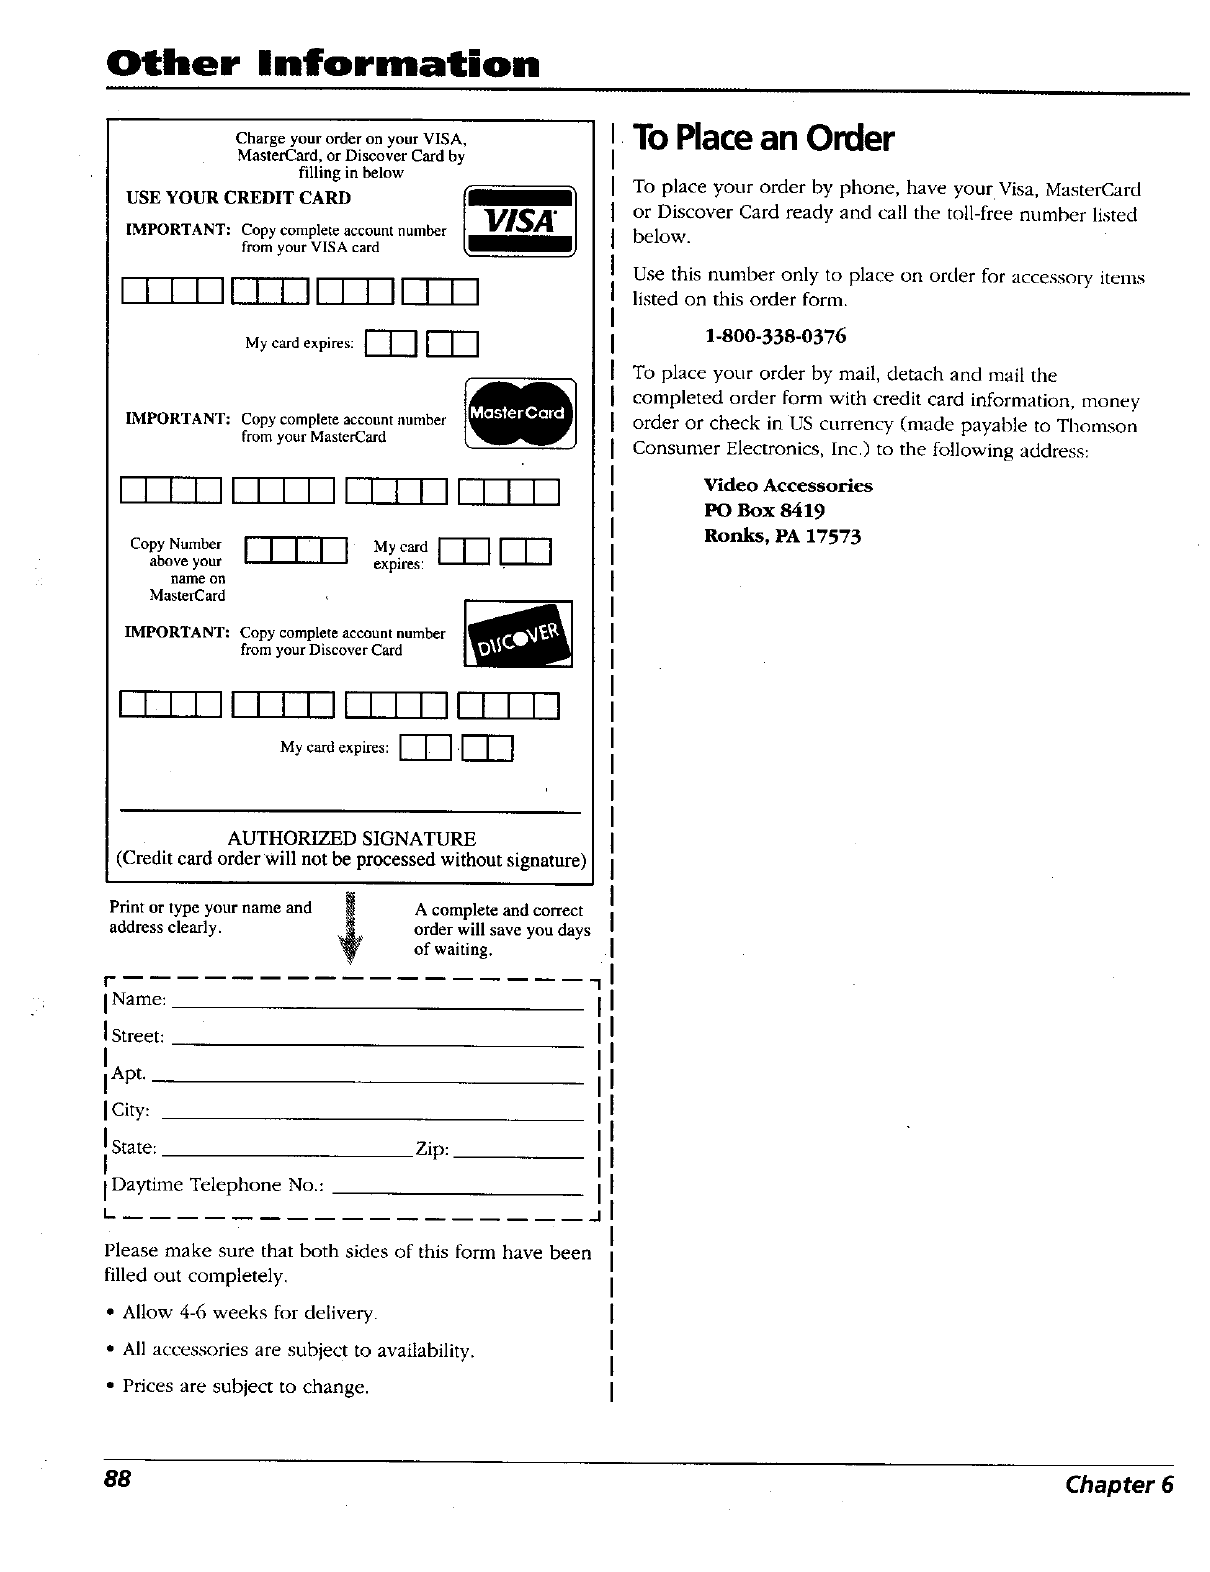
Other Information
Charge your order on your VISA,
MasterCard, or Discover Card by
filling in below
USE YOUR CREDIT CARD
IMPORTANT: Copy complete account number VISA"
from your VISA card
FTT-rqFTT-1F-T-r-1FT-_
My card expires: [--'l""]
IMPORTANT: Copy complete account number
from your MasterCard
VT7-_ FT7 rq FFTTOrrTTG
Copy Number
above your
name on
MasterCard
Myc_d
l-TIT] expires: F-"V'] l--T-]
IMPORTANT: Copy complete account number
from your Discover Card
FTTS-qFTT-N F-V-rTGF-r-rTq
Mycardexpires: _ [--["]
AUTHORIZED SIGNATURE
(Credit card order will not be processed without signature)
Print or type your name and _ A complete and correct
address clearly. ¢ order will save you daysof waiting. [
-11
I I
I I
I I
I I
Zip: ii
I I
,I
I-
[Name:
[Street:
Apt.
[City:
IState:
I
IDaytime Telephone No.:
I_
Please make sure that both sides of this form have been
filled out completely.
• Allow 4-6 weeks for delivery.
• All accessories are subject to availability.
• Prices are subject to change.
ToPlacean Order
To place your order by phone, have your Visa MasterCard
or Discover Card ready and call the toll-free number listed
below.
Use this number only to place on order for accessory itetns
listed on this order form.
1-800-338-0376
To place your order by mail, detach and mail the
completed order form with credit card information, money
order or check in US currency (made payable to Thomson
Consumer Electronics, Inc.) to the following address:
Video Accessories
PO Box 8419
Ronks, PA 17573
88 Chapter 6

This page left intentionally blank.
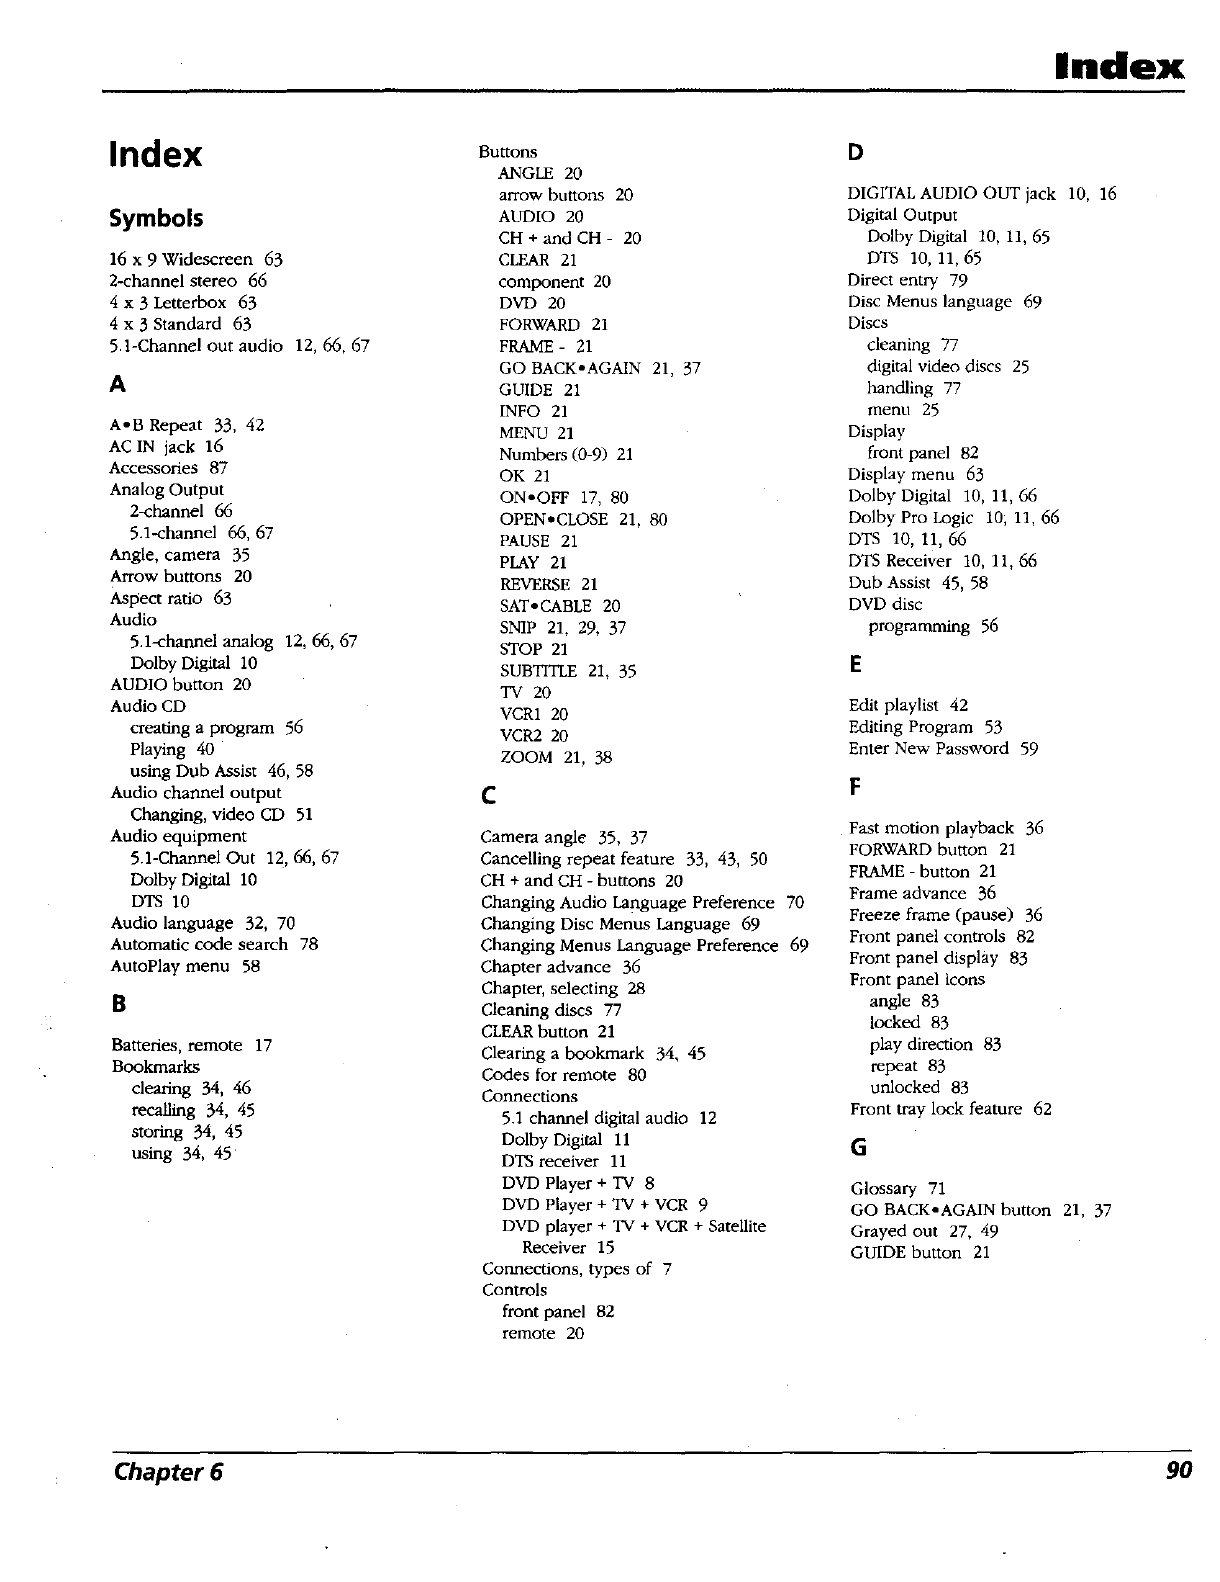
Index
Index
Symbols
16 x 9 Widescreen 63
2-channel stereo 66
4x3Letterbox 63
4x 3 Standard 63
5.1-Channel out audio 12, 66, 67
A
A-B Repeat 33, 42
AC IN jack 16
Accessories 87
Analog Output
2-channel 66
5.1-channel 66, 67
Angle, camera 35
Arrow buttons 20
Aspect ratio 63
Audio
5.1-channel analog 12, 66, 67
Dolby Digital 10
AUDIO button 20
Audio CD
creating a program 56
Playing 40
using Dub Assist 46, 58
Audio channel output
Changing, video CD 51
Audio equipment
5.1-Channel Out 12, 66, 67
Dolby Digital 10
DTS 10
Audio language 32, 70
Automatic code search 78
AutoPlay menu 58
B
Batteries, remote 17
Bookmarks
clearing 34, 46
recalling 34, 45
storing 34, 45
using 34, 45
Buttons
ANGLE 20
arrow buttons 20
AUDIO 20
CH+andCH- 20
CLEAR 21
component 20
DVI) 20
FORWARD 21
FRAME- 21
GO BACK-AGAIN 21, 37
GUIDE 21
INFO 21
MENU 21
Numbers (0-9) 21
OK 21
ON-OFF 17, 80
OPEN*CLOSE 21, 80
PAUSE 21
PLAY 21
REVERSE 21
SAT- CABLE 20
SNIP 21, 29, 37
STOP 21
SUBTITLE 2I, 35
TV 20
VCR1 20
VCR2 20
ZOOM 21, 38
C
Camera angle 35, 37
Cancelling repeat feature 33, 43, 50
CH + and CH - buttons 20
Changing Audio Language Preference 70
Changing Disc Menus language 69
Changing Menus language Preference 69
Chapter advance 36
Chapter, selecting 28
Cleaning discs 77
CLEARbutton 21
Clearing a bookmark 34, 45
Codes for remote 80
Connections
5.1 channel digital audio 12
Dolby Digital 11
DTS receiver 11
DVD Player + TV 8
DVD Player + TV + VCR 9
DVD player + TV + VCR + Satellite
Receiver 15
Connections, types of 7
Controls
front panel 82
remote 20
D
DIGITAL AUDIO OUT jack 10, 16
Digital Output
Dolby Digital 10, 11, 65
DTS 10, 11, 65
Direct entry 79
Disc Menus language 69
Discs
cleaning 77
digital video discs 25
handling 77
menu 25
Display
front panel 82
Display menu 63
Dolby Digital 10, 11, 66
Dolby Pro Logic 10; 11, 66
DTS 10, 11, 66
DTS Receiver 10, 11, 66
Dub Assist 45, 58
DVD disc
programming 56
t
Edit playlist 42
Editing Program 53
Enter New Password 59
F
Fast motion playback 36
FORWARDbutton 21
FRAME- button 21
Frame advance 36
Freeze frame (pause) 36
Front panel controls 82
Front panel display 83
Front panel icons
angle 83
locked 83
play direction 83
repeat 83
unlocked 83
Front tray lock feature 62
G
Glossary 71
GO BACK,,AGAIN button 21, 37
Grayed out 27, 49
GUIDE button 21
Chapter 6 90
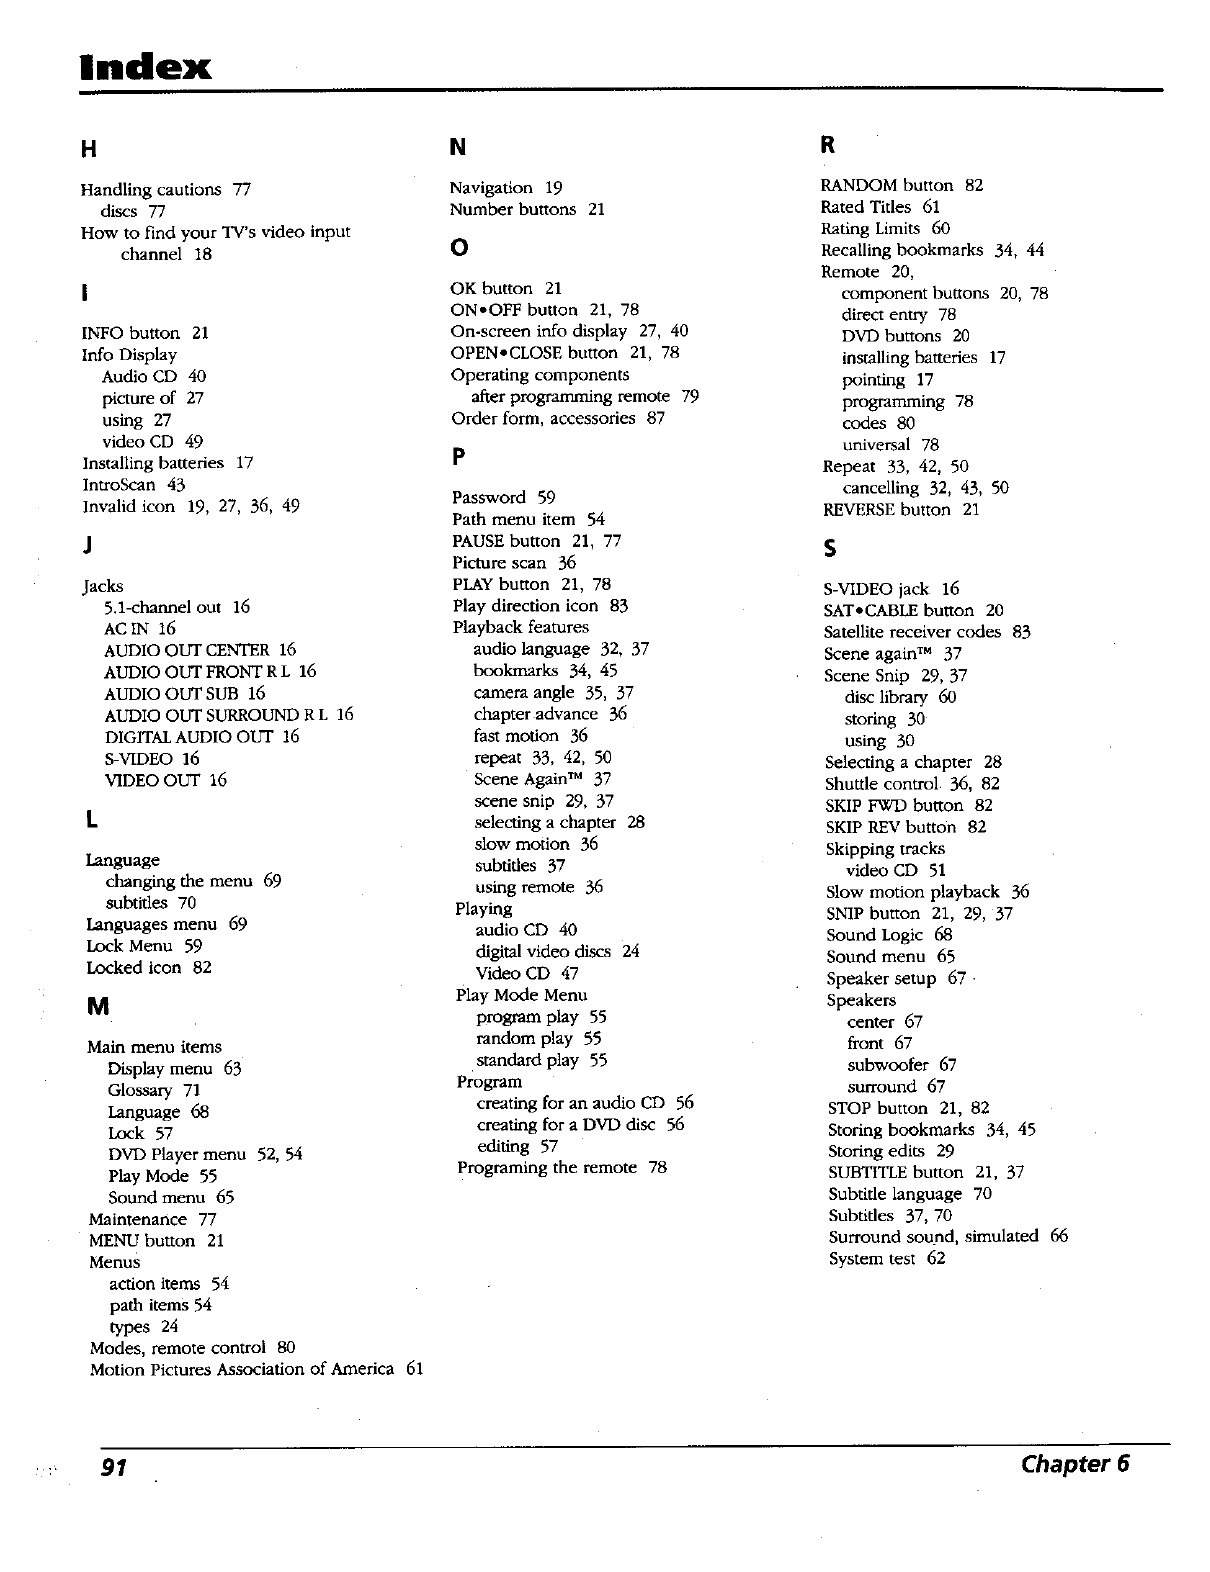
Index
H
Handling cautions 77
discs 77
How to find your TV's video input
channel 18
INFO button 21
Info Display
Audio CD 40
picture of 27
using 27
video CD 49
Installing batteries 17
IntroScan 43
Invalid icon 19, 27, 36, 49
Jacks
5.1-channel out 16
AC IN 16
AUDIO OUT CENTER 16
AUDIO OUT FRONT R L 16
AUDIO OUT SUB 16
AUDIO OUT SURROUND R L 16
DIGITAL AUDIO OUT 16
S-VIDEO 16
VIDEO OUT 16
Language
changing the menu 69
subtitles 70
Languages menu 69
Lock Menu 59
Locked icon 82
M
Main menu items
Display menu 63
Glossary 71
Language 68
Lock 57
DVD Player menu 52, 54
Play Mode 55
Sound menu 65
Maintenance 77
MENU button 21
Menus
action items 54
path items 54
types 24
Modes, remote control 80
Motion Pictures Association of America 61
N
Navigation 19
Number buttons 21
O
OK button 21
ON-OFF button 21, 78
On-screen info display 27, 40
OPENoCLOSE button 21, 78
Operating components
after programming remote 79
Order form, accessories 87
P
Password 59
Path menu item 54
PAUSE button 21, 77
Picture scan 36
PLAY button 21, 78
Play direction icon 83
Playback features
audio language 32, 37
bookmarks 34, 45
camera angle 35, 37
chapter advance 36
fast motion 36
repeat 33, 42, 50
Scene Again TM 37
scene snip 29, 37
selecting a chapter 28
slow motion 36
subtides 37
using remote 36
Playing
audio CD 40
digital video discs 24
Video CD 47
Play Mode Menu
program play 55
random play 55
standard play 55
Program
creating for an audio CD 56
creating for a DVD disc 56
editing 57
Programing the remote 78
R
RANDOM button 82
Rated Titles 61
Rating Limits 60
Recalling bookmarks 34, 44
Remote 20,
component buttons 20, 78
direct entry 78
DVD buttons 20
installing batteries 17
pointing 17
programming 78
codes 80
universal 78
Repeat 33, 42, 50
cancelling 32, 43, 50
REVERSE button 21
S-VIDEO jack 16
SAT.CABLE button 20
Satellite receiver codes 83
Scene again TM 37
Scene Snip 29, 37
disc library 60
storing 30
using 30
Selecting a chapter 28
Shuttle control 36, 82
SKIP FWD but*on 82
SKIP REV button 82
Skipping tracks
video CD 51
Slow motion playback 36
SNIP button 21, 29, 37
Sound Logic 68
Sound menu 65
Speaker setup 67 •
Speakers
center 67
front 67
subwoofer 67
surround 67
STOP button 21, 82
Storing bookmarks 34, 45
Storing edits 29
SUBTITLE button 21, 37
Subtitle language 70
Subtitles 37, 70
Surround sound, simulated 66
System test 62
.... 91 Chapter 6
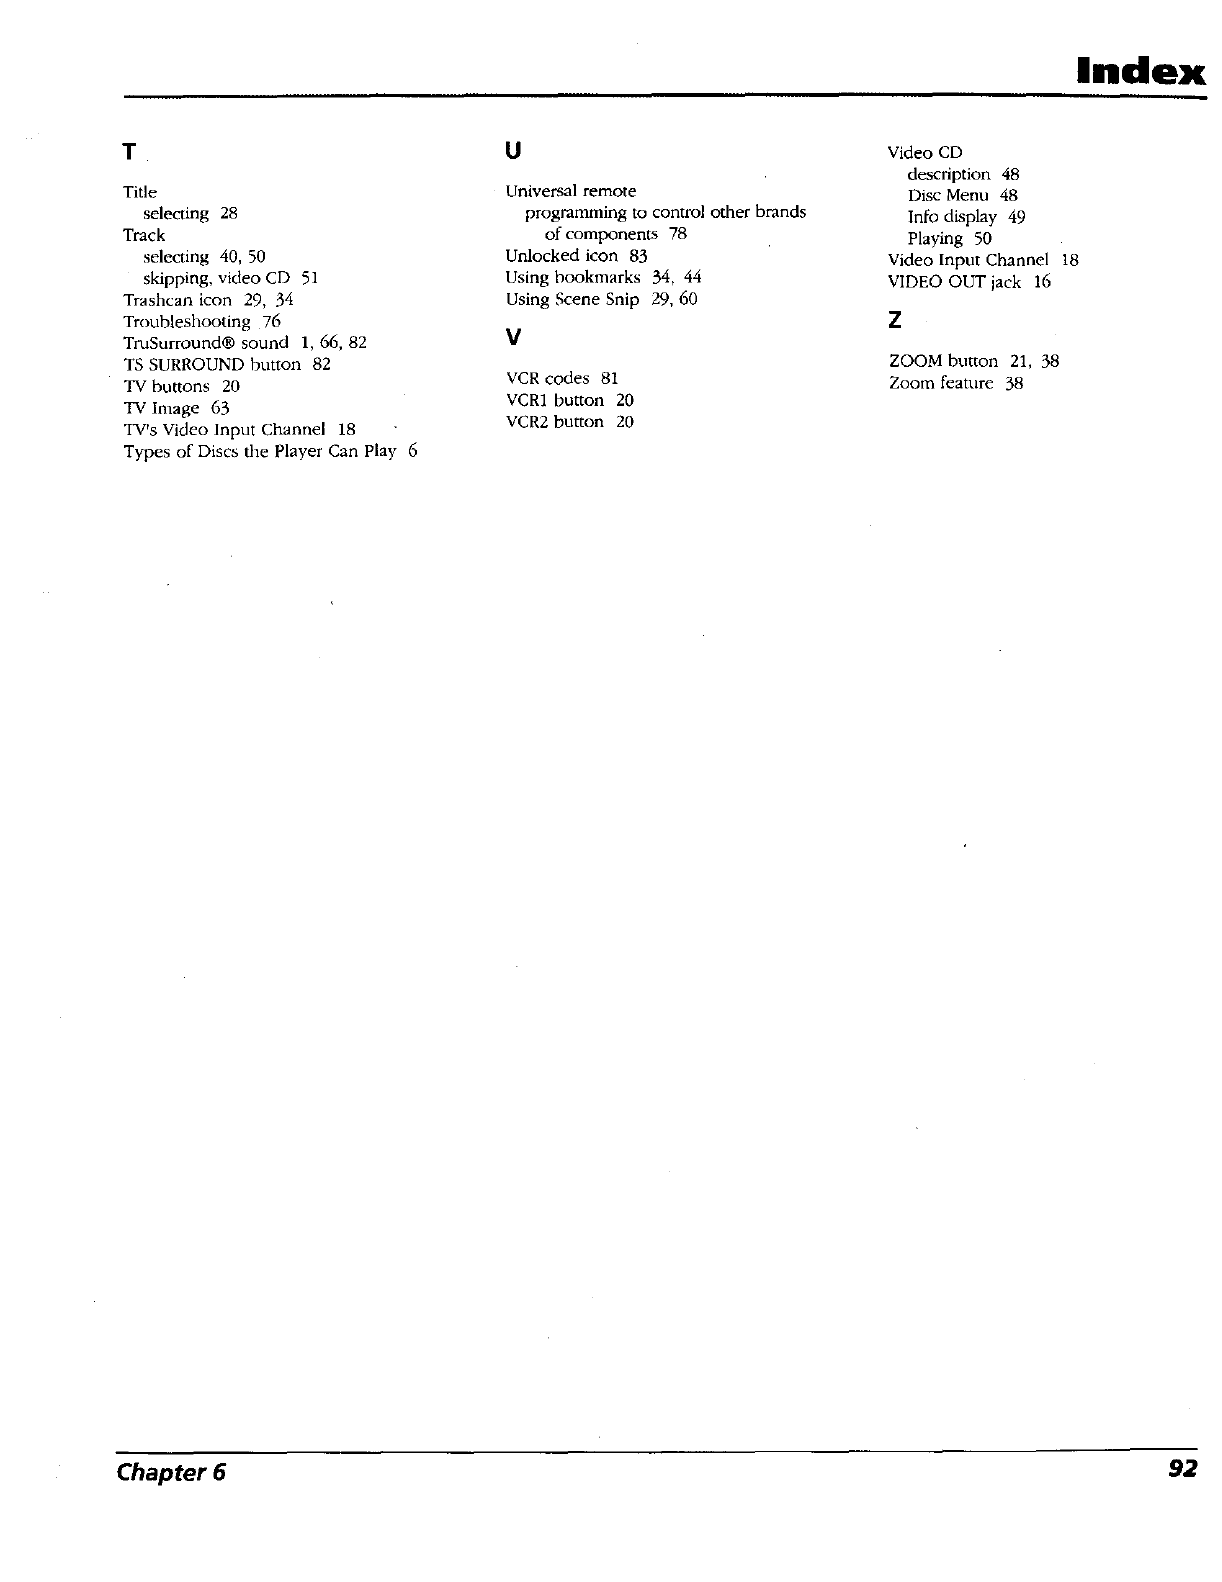
Index
T
Title
selecting 28
Track
selecting 40, 50
skipping, video CD 51
Trashcan icon 29, 34
Troubleshooting 76
TruSurround® sound 1, 66, 82
TS SURROUND button 82
TV buttons 20
TV Image 63
TV's Video Input Channel 18
Types of Discs the Player Can Play 6
U
Universal remote
programming to control other brands
of components 78
Unlocked icon 83
Using bookmarks 34, 44
Using Scene Snip 29, 60
V
VCR codes 81
VCR1 button 20
VCR2 button 20
Video CD
description 48
Disc Menu 48
Info display 49
Playing 50
Video Input Channel 18
VIDEO OUT jack 16
Z
ZOOM button 21, 38
Zoom feature 38
Chapter 6 92

This page left intentionally blank.
Please do not send any products to the Indianapolis address listed in this manual or on the carton. This will only
add delays in service for your product.
f,_ THOMSON CONSUMER ELECTRONICS
10330 North Meridian Street
Indianapolis, IN 46290
©2000 Thomson Consumer Electronics, Inc.
Trademark(s)® Registered
Marca(s) Registrada(s)
Printed in USA
TOCOM 1543630A
